UNIT 6 Word Processing Basics II
Key Competencies
By the end of this chapter, you should be able to:
(i) Manipulate text.
(ii) Use advanced formatting methods.
(iii) Add simple objects in a document.
Learning Objectives
Knowledge and understanding
By the end of this chapter, you should be able to:
(i) Explain the technique for manipulating a document.
(ii) Recognise the proofing features for editing a document including using track changes.
(iii) State when to use columns and breaks in a document.
Skills
By the end of this chapter, you should be able to:
(i) Manipulate a document by managing the layout of the page and the entire document.
(ii) Apply different methods to format text in a document.
(iii) Use proofing features for editing a document including track changes.
(iv) Use columns and breaks to organise the document.
Attitudes and Values
By the end of this chapter, you should be able to:
(i) Show interest in formatting and manipulating a document.
(ii) Appreciate advanced formatting and proofing features of word processing for editing a document including using track changes.
Key words in the chapter
• Page setup • Margins • Orientation • Watermark • Track Changes • Comments • Word count • Column
126
• Breaks • Styles • Drop cap • Nested list • Headers • Footers • Page numbers • Borders
Manipulating a document
A document can be formatted and edited in order to make it error free and appealing. One way through which this can be achieved is through changing the page setup of a document. The other ways are proofreading, adding breaks, styles, columns, and nested lists among others.
Page Setup group
It is found on the ribbon when the Page Layout tab is clicked. It is used to specify the margins and the orientation of a page among other specifications.
(i) Setting Margins
Page margins are the blank spaces around the edges of a page. Text and graphics are normally inserted in the printable area between the margins. However, some items can be positioned in the margins such as headers, footers, and page numbers among others
To set the margins do the following:
• Click Page Layout tab, from the Page Setup group and click Margins command.
• Click the margin type desired from the pull-down menu that appears. The margins are automatically adjusted.
• To set a customized margin, either click Margins, then select Custom Margins command or click on the dialog box launcher at the bottom of Page Setup group. A dialog box is displayed.
• Click on Margins tab on the dialog box that appears.
• Specify all the desired options and click OK to apply

127
Orientation
(i) Page Orientation
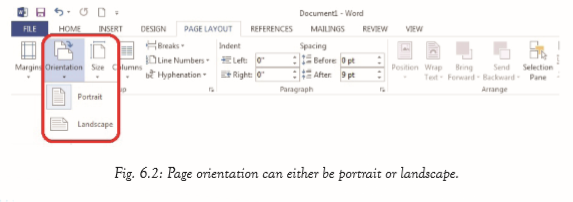
This refers to the positioning of the page in relation to the text or graphics. There are two types of page orientation.
• Portrait: This is where text and graphics are printed with the longest side placed vertically and the shortest placed horizontally.
• Landscape: This is where text and graphics are printed with the longest side placed horizontally and the shortest placed vertically.
Change the page orientation of an entire document
To change the page orientation of an entire document, proceed as follows:
(i) Click on the Page Layout tab, in the Page Setup group, click Orientation.
(ii) Select either Portrait or Landscape.
Using both portrait and landscape orientation in the same document
(i) Select the content on the pages or paragraph(s) whose orientation is to be changed to portrait or landscape.
(ii) Note: If some but not all of the text on a page is selected to change to portrait or landscape orientation, Word places the selected text on its own page, and the surrounding text on a separate page. (iii) Click on the Page Layout tab, in the Page Setup group, click Margins, then select Custom Margins command or click on the dialog box launcher in the Page Setup group.
(iv) Click on the Margins tab on the dialog box that appears.
(v) Under the Orientation section, select the desired orientation. (vi) Under the Apply to section, choose Selected text option. Click OK to apply.
128
Page borders
To create page borders do the following:
• Click anywhere within the page. Click the Design tab, in the Page Background group, click on Page Borders.
• Specify the settings, style, colour, art, and width.
• In the Apply to section, specify the area where the border will be effected
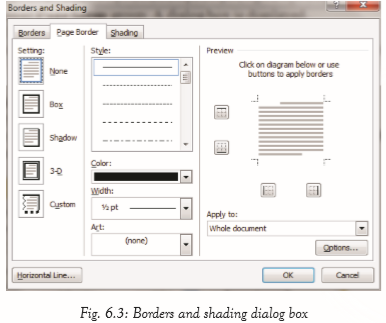
• To customize the margin, click on Option button.
• A dialog box is displayed as shown in figure 6.4.
• Click OK to close the dialog

129
Background
A background is also known as the page colour. It is used to create a more appealing background for online viewing. Backgrounds are visible in all the views except Draft and Outline view. Gradients, patterns, pictures, solid colours, or textures can be used for backgrounds.
If a document is saved as a Web page, the pictures, textures, and gradients are saved as JPEG (Joint Photographic Experts Group) files and the patterns are saved as GIF (Graphics Interchange Format) files.
A JPEG is a graphics file format with .jpg extension in Microsoft Windows. The JPEG format is supported by many Web browsers. It is used for compressing and storing photographic images. It is best used for graphics with many colours such as scanned photos. A GIF is a graphics file format with .gif extension in Windows.
The GIF format is used to display indexed-colour graphics on the World Wide Web. It supports up to 256 colours and uses lossless compression, meaning that no image data is lost when the file is compressed.
Adding a background to a document
Do the following to add a background in a document:
1. Click on the Design tab, in the Page Background group, click Page Color icon.
2. Do one of the following:
• Click the desired colour under Theme Colours or Standard Colours
. • Click More Colours and then select a desired colour.
• Click Fill Effects to add special effects, such as gradients, patterns, or textures. Select the desired colour before applying a gradient or pattern.
To remove a background, do the following:
1. Click on the Design tab, in the Page Background group; then click Page Colour.
2. Select No Colour
Watermarks
Watermarks are text or pictures that appear behind text in a document. They can be viewed in Print Layout view or in a printed document. If a picture is used as a watermark, it can be lightened or washed out, so that it does not interfere with the legibility of the text in the document.
Adding a watermark to a document
Do the following to add watermark:
130
1. On the Design tab, in the Page Background group, click Watermark icon.
2. Do one of the following:
• Select one of the predesigned watermarks, such as Confidential, Urgent or Disclaimer in the pull down menu displayed.
• Click Custom Watermark command. A dialog box is displayed as shown in figure 6.5.
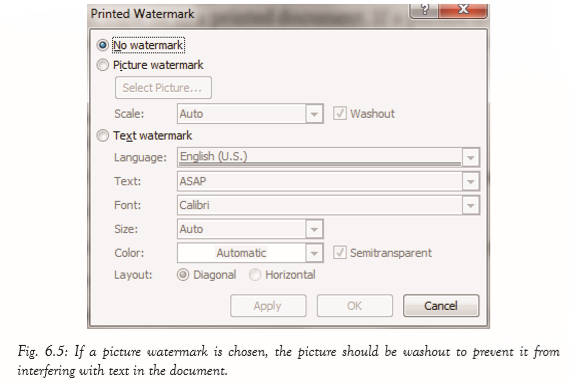
• Select either Picture watermark or Text watermark options. If the picture watermark is chosen, click on Select Picture button and insert the appropriate picture.
• If Text watermark option is selected, type the appropriate text in the Text box. Make all the other ne
1. Click on the Design tab in the Page Background group, click Watermark.2. Click on Remove Watermark command.131Learning Activity 6A 1. Create a new document.2. Add a watermark “No Pain, No Gain” diagonally on the page.3. Include a background colour of your choice on the document.4. Add a border and change its measurement to be 0.7 inches from text.5. Change the page margin to have the following measurements. Left margin 1.2 inch, right margin 0.9 inch, top margin 0.7 inch and bottom margin 0.9 inch.6. Save the document as My Page.Proofing features(a) Track changesIf this feature is activated, it enables the user to view all the changes that have been done on a document.To turn on track changes do the following:• Click on the Review tab in the menu bar, in the Tracking group, click the Track Changes icon. Click on track changes again. The Track Changes option will be automatically be turned on. Any changes done to the document will always be highlighted in red.• To add a track changes indicator to the status bar, right-click the status bar and click Track Changes. Then click the Track Changes indicator on the status bar to turn Track Changes on or off instead of using the menu option.(b) CommentsA comment can be inserted A comment is a note that an author or reviewer adds to a document. Microsoft Word displays the comment in a balloon in the margin of the document or in the Reviewing Pane. Comments can also be cleared or hidden to ensure that they do not appear in the document.Adding a commentTo add a comment do the following:(i) Select the text or item or click at the end of the text.(ii) Click on the Review tab, in the Comments group, click New Comment. A comment line is added with a comment balloon as shown in Figure 6.6. Type the comment text in the comment balloon.132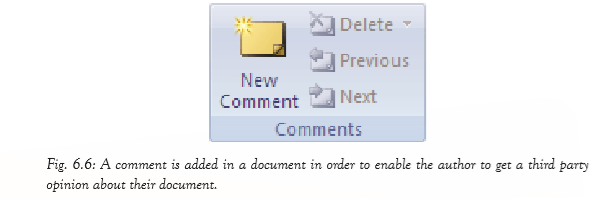
 Note: To respond to a comment, click its balloon, and then click New Comment in the Comments group on the Review tab. Type the desired response in the new comment balloon.Deleting a comment• To delete a single comment, right-click the comment, and then click Delete Comment or click on it then select Delete command in the Comments Group from the Review tab. • To quickly delete all comments in a document, click a comment in the document. On the Review tab, in the Comments group, click the arrow below Delete icon, and then click Delete All Comments in Document.(c) Word countWhen a document is being typed,
 Microsoft Word automatically counts the numberof pages and words in the document and displaysthem on the status bar at the bottom of the WorkspaceIf the word count is not displayed in the status bar, right-click the status bar, then and click Word Count option.Counting the Words in a SelectionIt is possible to count the number of words in a selected paragraph or sentence. To do this, simply select the text to be counted. Microsoft Word will automatically display the number of words in the selection at the status bar. For example, 11/2036 means133that the selection accounts for 11 words of the total numberof words in the document which is 2036Counting the number of pages, characters,paragraphs and linesThe Word Count dialog box displays the number
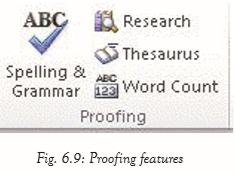 of pages, paragraphs and lines in a document.It also displays the number of characters, either including or excluding spaces.To view the word count, do the following:Click on the Review tab, in the Proofing group, click Word Count.A dialog box is displayed with all the possible word counts.
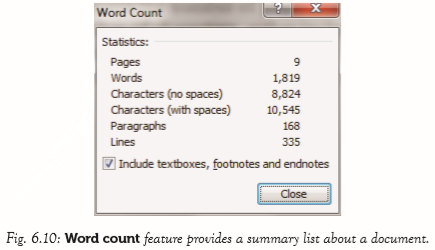 134Assignment 6.11. How are watermarks used?2. Explain the importance of washout feature used when a picture watermark is to be added.3. State the importance of adding breaks in a document.4. State the function of the Word Count feature.5. Mention the importance of adding a comment in a document.Learning Activity 6B Open My Page document created in Learning Activity 6A and do the following: 1. Type the National Anthem or your School Anthem.2. Add the track changes feature.3. Add a comment line.4. Write an explanation of each stanza of the anthem in the comment line.5. Spell check the document. 6. Save the document as AnthemColumnsThese are created to enhance the look of a document. The flow of the content from the bottom of one column to the top of the next one in the same page should be consistent. Columns can either be created using predefined or user-defined options.PredefinedTo create a column, do the following:
 • Select the text.• Click Page Layout tab from the menu bar;then click on the Columns command under Page Setup group• Click on the number of columns desired fromthe drop-down menu displayed.User Defined• Select the text.•Click Page Layout tab from the menu bar then click on the Columns command under Page Setup group. • Select More Column option from the resulting pull down menu.• Specify the column width and spacing, line between columns, number of columns, and where the column is to be applied. Click OK to apply once all the desired options have been selected.135
 BreaksA break is inserted in order to demarcate the end of a part and beginning of another. There are four types of breaks, namely the page break, column break, section break, and text wrapping break.(a) Page Break: It demarcates the end of one page and the beginning of the next. It is automatically inserted when the bottom margin is reached and a new page createdTo insert a page break, do the following:• Place the cursor where the page break is to be inserted.• Click Insert tab, then click the Page Break under Pages group.(b) Section Break: The section breaks include the Next page, Continuous, Even, and the Odd page section break.Use sections breaks to make (or fence in) other formatting changes on different pages in a document, in• Paper size or orientation• Headers and footers (remember to unlink the header or footer from its previous section).• Page numbering (remember to unlink the header or footer from its previous section).cluding:136• Line numbering. • Footnote and endnote numbering.User Defined• Select the text.• Click Page Layout tab from the menu bar then click on the Columns command under Page Setup group. • Select More Column option from the resulting pull down menu.• Specify the column width and spacing, line between columns, number of columns, and where the column is to be applied. Click OK to apply once all the desired options have been selected.135
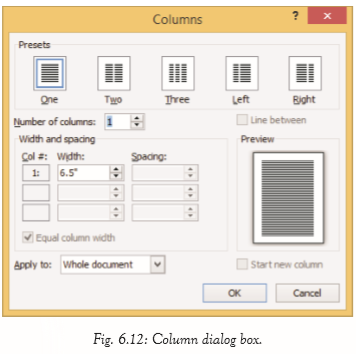 BreaksA break is inserted in order to demarcate the end of a part and beginning of another. There are four types of breaks, namely the page break, column break, section break, and text wrapping breakA break is inserted in order to demarcate the end of a part and beginning of another. There are four types of breaks, namely the page break, column break, section break, and text wrapping break.(a) Page Break: It demarcates the end of one page and the beginning of the next. It is automatically inserted when the bottom margin is reached and a new page created.To insert a page break, do the following:• Place the cursor where the page break is to be inserted.• Click Insert tab, then click the Page Break under Pages group.(b) Section Break: The section breaks include the Next page, Continuous, Even, and the Odd page section break. Use sections breaks to make (or fence in) other formatting changes on different pages in a document, including:• Paper size or orientation• Headers and footers (remember to unlink the header or footer from its previous section).• Page numbering (remember to unlink the header or footer from its previous section).136• Line numbering.• Footnote and endnote numbering
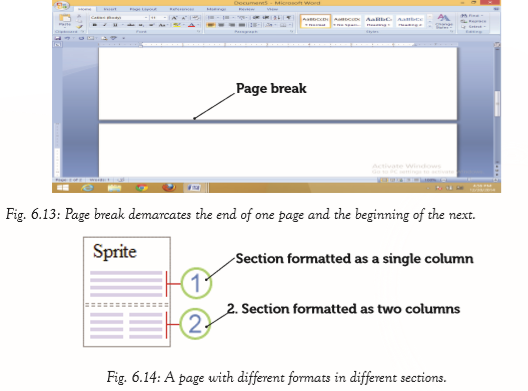 To insert a section break: Click Page Layout tab, in the Page Setup group, click Breaks. Select the desired type of section break. The following are some examples of section breaks:(i) Next Page section break: This inserts a section break and begins a new section on the next page.
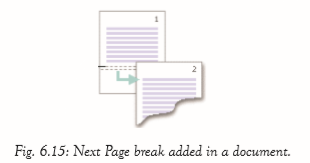 (ii) Continuous section break: This inserts a section break and begins a new section on the same page.137
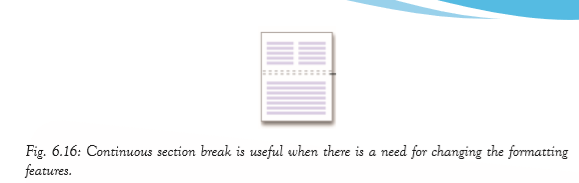 A continuous section break is useful
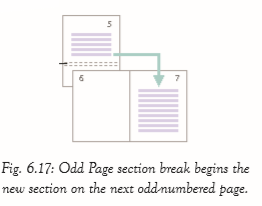 when the user would want to changethe formatting, such as changing the number of columns,without starting a new page.(iii) Even Page section break: This inserts a new sectionand begins the new section on the next even-numbered page.(iv) Odd Page section break: This inserts a section breakand begins the new section on the next odd-numbered page.(a) Column breaksIt is used to indicate that the text following the column break will begin in the next column• Click at the position where the column break is to be inserted.• Click on the Page Layout tab, select Breaks in the Page Setup group and then click Column.(d) Text wrapping BreakText wrapping breaks are used to separate the text around objects on a page. For example, it can be used to separate caption text from body text.• Click on the page where the wrapped text is to end.• Click on the Page Layout tab, select Breaks in the Page Setup group and then click Text Wrapping. Note: Text wrapping breaks are formatting marks that aren’t usually visible in a documentTo view these breaks, turn on the formatting marks by clicking Show/Hide in the Paragraph group on the Home tab. The text wrapping break character .will be shown indicating a text wrapping break.138StylesA user can create a style of their own using Word 2010 or they can make use of Quick Styles, which make it easy to create a professional and well-designed document faster. Formatting styles such as Bold, Italics, indent and font size could be applied directly through the Font group or paragraph group in the Home tab. However, if the same formatting is to be used for another heading or even for another document, then it becomes easier to define a style that can be re-used. Styles are specially packaged sets that apply many formats at once. They are there to be used over and over again. For example, one set of Quick Styles may include styles for several heading levels, body text, Font size, quotes, and title. All of the style colours and formats in a single style set are designed to be used together to create an attractive and readable document.(a) HeadingsThese are styles that have been defined in word processing application. Every heading comes along with its font size, colour, font and indentation among others. There are four main heading styles that the user can choose from namely: Heading 1, Heading 2, Heading 3 and Heading 4. The heading styles are necessary when the user want to create a table of contents. They are defined in a heading/subheading. Main heading is given heading 1 style, sub heading, heading 2 style and so on.FOR EXAMPLE
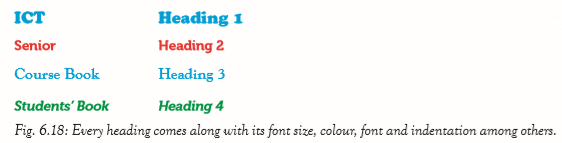 (b) Apply a StyleClick on the Home tab, in the Styles group, select a set of styles desired. Apply the styles from the convenient Quick Styles gallery as the document is being created.(c) Create a styleIt creates a style based on the formatting of the selected text.139To create a new style and add it to the Quick Styles gallery do the following:1. Select the text to be used to create the new style. For example, if the words “Business Information” is to be formatted so that it always appear as a red Heading 1 in a document.2. On the Mini toolbar that appears above the selection, select Styles then Heading 1 and finally click on Red color to format the text as shown in figure 6.19.
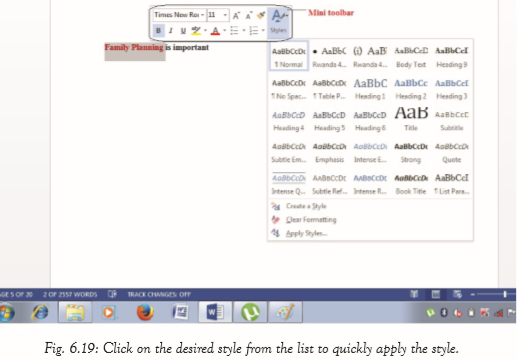 3. Right-click the selection, click on Styles then click Create a style command. A dialog box appears as shown in figure 6.20.
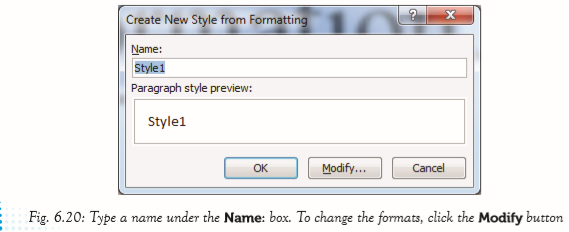 1404. Give the style a name, for example, Business Info, and then click OK or Modify to make other changes. The style created appears in the Quick Styles gallery with the given name, ready for application whenever the user desire to apply it.
 Clear Formatting1. Select the text whose style is to be erased. 2. Right-click the selection, click on Styles, and select Clear Formatting command. The formatting style will be changed back to the default style automatically.Nested listsBullets and numbers are used for the purposes of easier identification of items in the list. Nested lists refer to lists at different levels (sub-lists) that is a list within another list. To create a nested list, do the following:(i) Create the list with each item on its own line as shown below:VegetablesFruitsCereals(ii) Select the list then, click on the Numbering or Bullets icons from the Home tab in the Paragraph group.(iii) From the resulting menu, select the desired type of bullet or numbers. The selected text will have the selected bullets or numbers. For example:• Vegetables• Fruits• CerealsTo create a nested list under vegetables, do the following:(iv) Click at the end of the word vegetables.(v) Press the Enter key and then press on the Tab key. A new bullet is automatically inserted type the sublists.
• Vegetables • Fruits • Carrots • Cereals • Cabbage141To create another nested list for carrots which was under vegetables, repeat steps (iv) and (v).• Vegetables• Carrots• Contain carotene which is rich in vitamin A.• Carrots can be eaten raw or cooked. • Cabbage• Fruits• Cereals(vi) To close the current list level, either press the Enter key twice or press shift + tab.Drop caps t is a large capital letter usually at the beginning of a block of text that has the depth of more than one line of regular text. The letter “I” at the beginning of this sentence is a drop cap. To set a drop cap proceed as follows: • Highlight any character within the line
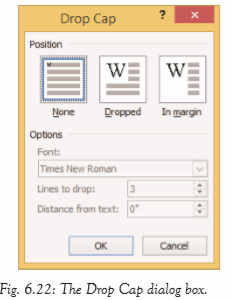 of text where the drop cap is to be inserted.• Click on the Insert tab, selectDrop Cap icon under text group• A drop down menu is displayed.• Select either the Dropped or In marginoption. However, to customize the options,click on the Drop Cap Options.A dialog box will appear, specify the position of the text,the number of lines to drop, font and distance from text. Click OK to apply.Headers and footersHeaders are lines of text or graphics that appear above the top margin of a page or selected pages. Footers are lines of text or graphics that appear below the bottom margin of a page or selected pages. To insert a header and footer do the following:• Click Insert tab from the menu bar; then click on Header or footer command from the ribbon. Under Header & Footer group, type the desired content to insert a header or footer respectively. Then press Enter.142A drop down menu appears. Click on the desired option.
 Assignment 6.21. Define the term drop cap.2. Explain how a header can be inserted in a document.3. List three types of heading styles that can be applied in a document.4. State the importance of using columns in a document.5. Differentiate between portrait and landscape orientation.Learning Activity 6CType the following text and save it as INTERNET DEVELOPMENTDevelopment of the InternetThe Advanced Research Projects Agency (ARPA) was the first research centre to set up a computer net work in 1969. It connected computers in four different universities and this was called an Arpanet. The use of electronic mail for communication by the researchers enabled data and information to be shared between these computers.This net allowed multiple users to work at the same time. Data and information was sent in packets with the address of the recipient, error detection control system and packet sequence information. This was called the packet switching technique. This net offered e-mail services only until 1973 and by 1979, media companies started getting connected to the net as new hosts.The American military used this net to tap intelligence resources and hence the American government increased the traffic by using it for commercial purposes.143By 1987, nearly 10,000 new hosts had been incorporated into the net with the United States of America and the nations in Europe getting the lion’s share of the net. With the increase in need of the net and its Internetworking importance, soft and hard ware companies raised in technology to meet the need, hence its dear advancement. The message transmission capacity (bandwidth) increased and the Internet services became cheaper. Close to 3 million computers had been hosted to the net by 1984. Rwanda has a number of Internet Service Providers (ISP).They include: Rwandatel, Tigo, LPSA and MTN Rwanda among others. Today, the net serves the Government and private organizations, individuals and groups, the military and the church, the media bodies and the public medics and patients, businesses and customers etc, in different spheres of life clustering the whole world in as very small open sphere called a village.Required(a) Create a heading one style of colour green, font size16, bold and underlined. It should have centre alignment. Save the style as net.(b) Apply the net style in the heading.(c) Drop cap the first letter of the second paragraph.(d) Put the second paragraph into three columns.(e) Put the last paragraph into two columns and a line in between. (f) Set the top margins to 2 inches and the bottom to 1.5 inches.(g) Double space the paragraph starting with “By 1987”.
Bullet the ISPs provided in the text.
(i) Include a nested list on the ISPs and add the countries where each one of them operates in.(j) Insert a page number in the document in the format of page x of y.Page NumberingThis is a formatting feature that organises a large document for ease of reference and makes it easy to track by inserting numbers beginning with the first page. To insert page numbers, do the following:• Click Insert tab on the ribbon that appears, click on Page Number from Header and Footer group.• Click the preferred option.144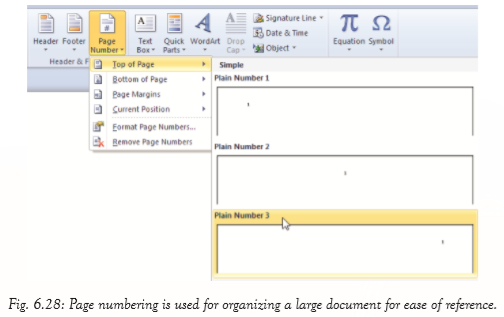 Revision Exercise 61. Differentiate between a header and a footer.2. Differentiate between an odd page break and an even page break.3. Explain how column breaks are inserted.4. Use diagrams to differentiate between the two types of page orientation. 5. Define the term styles. 6. Mention the importance of tracking changes in a document.7. List three features used for formatting text.8. Define the term watermark.9. List two types of proofing features.10. List two types of drop caps that can be used in a document.145