Topic outline
Introduction
Labels: 2File: 1UNIT 3 Computer Navigation
Key Unit Competencies
By the end of this chapter, you should be able to:(i) Navigate the Windows environment.
(ii) Work with Windows Explorer to introduce the techniques of folder and file management.
Learning Objectives
Knowledge and understanding
By the end of this chapter, you should be able to:
(i) Recognise the desktop and taskbar elements.
(ii) Explain the role of saving files in a folder.
(iii) Identify the process of managing files and folders.
(iv) State the purpose of the recycle bin and explain why deleted files are kept in recycle bin.
Skills
By the end of this chapter, you should be able to:
(i) Explore and customise the desktop, taskbar and start menu.
(ii) Restore deleted files and folders.
(iii) Use the control panel to customise the working environment.
(iv) Navigate window and manage files and folders hierarchically correctly.
(v) Use computer storage devices to move data between computers.
(vi) Use search techniques to find files and folders.
(vii) Analyse storage devices so that decisions can be made on what storage device should be used based on its characteristics.
Attitudes and values
By the end of this chapter, you should be able to:
(i) Adjust the computer working environment properly.
(ii) Delete files and folders.
(iii) Appreciate the importance of correctly managing files and folders so that files can be located.
70
Keywords in the chapter
• Customise • Screen • Programs • Suites • Toolbar • CPU • Graphics tablet • Clipboard • Accessories • Applications • BITMAP • Desktop
Desktop
Desktop is the first screen that is displayed when a computer boots up. It consists of icons, the task bar, and other features.
Desktop Icons: Icons are images that represent application programs, folders, and files. Icons are usually manipulated using pointing devices. Icons on the desktop include Computer, Documents and the Recycle Bin among others.
File: A file is a collection of data that are stored together. Files can be stored on the hard drive, in a flash memory, or a Compact Disk (CD) among others. Everything that a computer does is based on data stored in files.
Folder: A folder is a specific storage location in a storage media. Folders are used to organize and store related files. A folder may also contain other folders within it which are called subfolders.

71
Task bar It is a bar usually at the bottom of a computer screen showing running programs. These programs can be clicked to start software applications or switch between open applications or active windows.
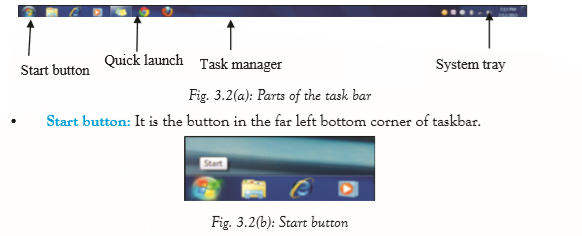
• Task manager: It is used to provide information about the processes and programs running on a computer, as well as the general status of the computer. Some implementations can also be used to terminate processes and programs, as well as change the processes priority.
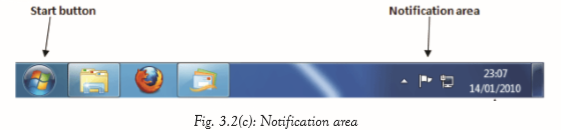
• System tray/Notification area: This is a part of the taskbar in the desktop interface that displays small icons on the opposite side of the Start Menu such as the clock, date and time, antivirus, and the icons of certain programs so that a user is reminded that they are running in the background
• Quick launch: It is a part of the taskbar near the Start menu where shortcuts to programs are added. This toolbar stays visible for shortcuts to be easily accessed, even when a window is open.
72
Customising the desktop
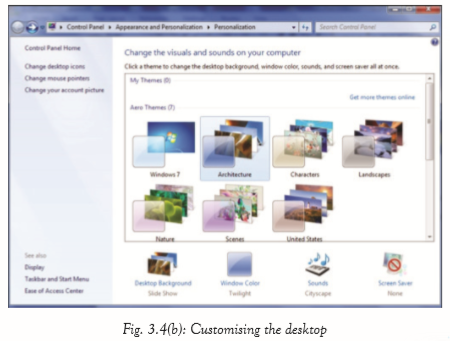
Customising refers to personalising the desktop to suit the user’s needs and tastes. The changes that the user can make to customise include new themes, mouse pointers, backgrounds, user images, and gadgets among others.
(i) To customize, right-click on the desktop. The following dialog box appears:

(ii) Click Personalize.
(iii) Select the desired theme from the dialog box displayed.
73
Customising the taskbar To customise the task bar:
(ii) Click on the properties option as shown in the figure below:
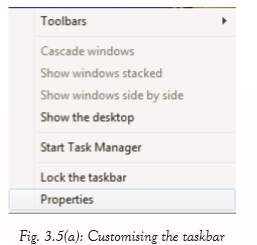
(iii) The dialog box below appears and can be used to customise the taskbar as desired.
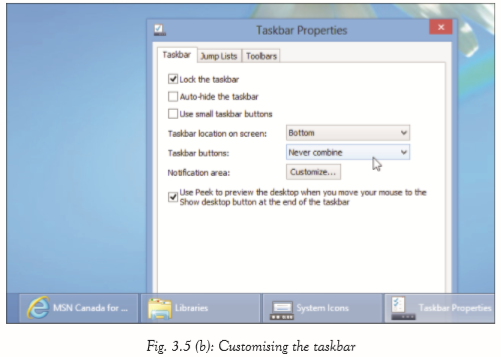
The following are some of the taskbar customisation options:• Lock the taskbar: Check marking this option ensures that the taskbar cannot be moved or changed in size. Any changes can only be made by un-checking.
74
• Auto-hide the taskbar: Check marking this option hides the taskbar until the mouse pointer moves over the area where it is hidden and it pops up. It hides again when the mouse pointer is moved away from it.
• Use small icons: This changes the size of the icons on the taskbar and the width of the taskbar.
• Taskbar location on screen: It helps position the taskbar at the left, top or right of the screen instead of the default location at the bottom.
• Taskbar buttons: Helps select how application icons behave, that is, always combine, hide labels, combine when taskbar is full, and never combine.
• NExplore and customise the start menu
(i) Right click the Start Menu then click on Properties. The shown in figure 3.6 dialog box appears:

(ii) Clicking the customise button helps modify items such as the control panel and pictures among others. (iii) Make the desired changes and click Apply.
(iv) Click OK to finish.
To customise the power button:
(i) Click Power button action.
(ii) Select the option to appear when turning off the computer.
(iii) Click Apply then OK to finish.
75

Recycle bin
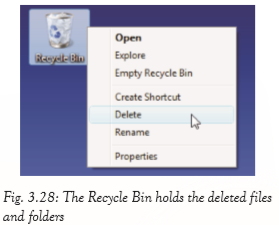
It is a container that temporarily stores deleted files and folders before they are permanently deleted. It allows restoring of files and folders that have been deleted accidentally.
Deleting and Restoring files from the Recycle Bin
Deleting is the act of erasing files or folder. Restoring is the act of retrieving the deleted files and folders from the Recycle Bin. The deleted files remain in the Recycle Bin until it is emptied. If files have been deleted by mistake, they can be recovered by clicking the Restore button in the Recycle Bin. However, pressing Shift + Delete permanently erases the file without sending it to the Recycle Bin. To delete a file or a folder, do one of the following:
(i) Click on the file or folder to be deleted. Press Delete.
(ii) Click on the file or folder to be deleted. Right click and then select Delete option from the pop-up menu.
.The operating system will prompt the confirmation of the deletion by displaying a dialogue box as shown below.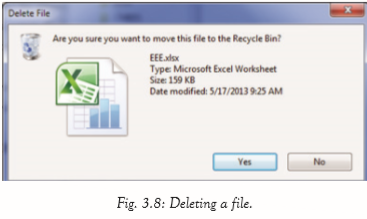
76
(iii) Click Yes to confirm deletion and No to cancel. To restore a file or folder from the Recycle Bin, do the following:
(i) Right click and select Open from the pop-up menu or double-click the Recycle Bin icon on the Desktop. (ii) Select the file(s) or folder(s) to be restored. (iii) Right-click then select Restore from the pop-up menu, or click the Restore this item option in the recycle bin window.
This action will put the file or folder back to its original location.
To empty the recycle bin, do the following:
(i) Right-click and select Open from the pop-up menu or double-click the Recycle Bin icon on the Desktop. (ii) Select the file(s) or folder(s) to be permanently deleted.
(iii) Select Delete. (iv) You will be prompted to confirm the deletion.
(v) If you are sure of the action, click Yes to conform the deletion.

Alternatively, click on Empty the Recycle Bin in the recycle bin window to permanently delete all items in the Recycle Bin.

Warning: Once items have been deleted from the Recycle Bin, they cannot be restored. Always keep a backup of the work. Do not attempt to delete program files. If you are unsure about an action, seek guidance from your teacher.The Control panel
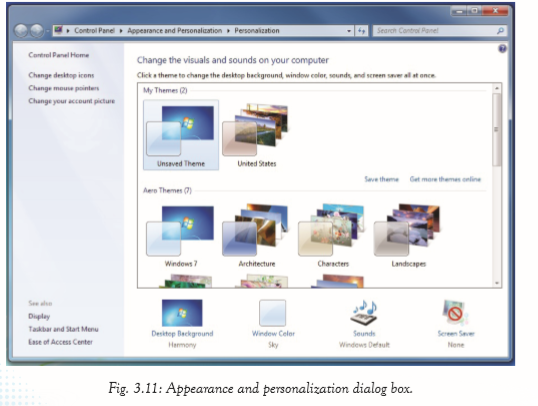
It a graphical user interface found on the Start Menu which allows users to view and manipulate basic system settings and controls.
Desktop Background and theme, Window color and Screen saver.
A background also known as wallpaper is an image used to decorate the graphical user interface on the screen. A theme is a preset package used to customise the look and feel of graphical appearance details. It replaces a computer’s ordinary icons, sounds, pointers, background, or screen saver with a designed pattern to reflect the interests of the user.
To customise the desktop background and theme, do as follows:
(i) Click the Start menu. Click on the Control Panel. Click on Appearance and Personalization.
(ii) Click on Change the theme or Personalization. Make the desired changes.
(iii) Click Save changes or OK where applicable.
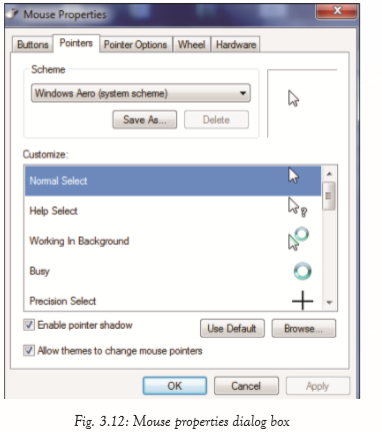
Mouse pointer
To customise the mouse pointer, do the following:
(i) Click on the Start menu. Click on the Control Panel. Click on Hardware and Sound. (ii) Click the Mouse tab. Click Pointers. (iii) Select the desired pointer option under Customize. Click Apply then OK.
Desktop icons and gadgetsIcons
The following procedure is used to customise desktop icons:
(i) Click the Start menu. Click on the Control Panel.
(ii) Click on Personalization.
(iii) Click on Change desktop icons on the left pane.
(iv) Select the icons to appear on the desktop, for example, Computer and Network.
(v) To change the way an icon appears, click on Change Icon button.
(vi) Clicking on Restore Default reverts the setting to Windows settings.
79

Gadgets
A gadget is a small application that is designed to sit on a user’s desktop screen and is capable of performing different tasks. Examples include the clock, CPU meter, and calendar among others. To customise desktop gadgets, do as follows:
(i) Right click on the desktop. Click on Gadgets.
(ii) Double-click on the gadget to insert on the desktop.

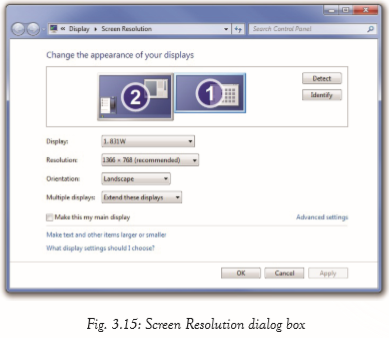
80Screen Resolution
This refers to the clarity of the text and images displayed on the screen. To change the screen resolution:
(i) Click the Start menu. Click on the Control Panel. Click on Personalization.
(ii) Click on Display. Click on Adjust resolution on the left pane.
(iii) Select the preferred resolution using the slide bar.
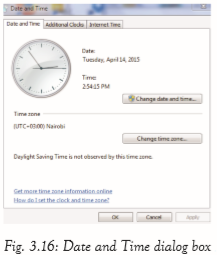
Changing Date and Time
To change date and time, do either of the following:(i) Click the Start menu. Click on the Control Panel.
(ii) Click on Clock, Language and Region.
(iii) Click on Date and Time.
(iv) Click Change date and time to set time and date;
or click Change time zone to adjust time zone settings.
(v) Click Apply and then OK to save the changes.
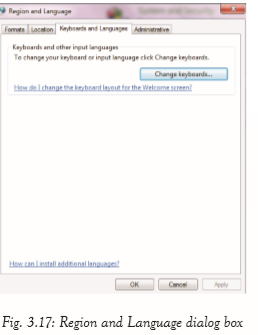
81Keyboard Layout
This refers to the arrangement of keys. To change keyboard layout:(i) Click the Start menu.
(ii) Click on the Control Panel.
(iii) Under Clock, Language and Region, click on Change keyboards or other input methods.
(iv) Click Change keyboards and make the preferred changes.
(v) Click Apply and then OK to save the changes.
Windows
A window is an open application on a computer’s display screen. A window shows the program currently running
Types of windows
There are two types of windows, namely application and document windows.
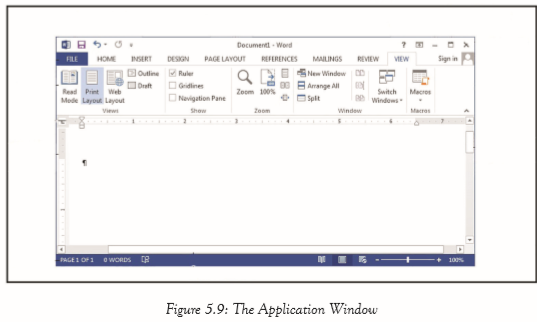
(i) Application window: It is the larger window that is displayed when an application is opened, for example, MS Word and MS Excel among others. It helps the user to communicate with the application program.
(ii) Document window:
It is the smaller window inside the application window. It is used for typing, editing, draWindow control buttons wing and formatting the text and graphics.
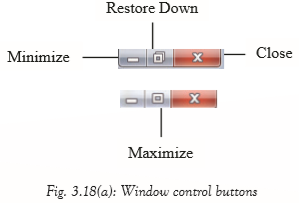
Window control buttons
There are four window control buttons, namely Minimize, Restore Down, Maximize and Close.
• Minimize: It removes a window from a view to an icon on the taskbar.
• Restore Down: It reduces the size of a window.
• Maximize: It enlarges the window to occupy the entire screen.
• Close: It exits the active program.
82
Common Windows Accessories
The following are some of the common windows accessories:
(i) Windows Explorer:
It is also known as File Explorer. It refers to the graphical file management utility that displays the drives and contents of folders and files in the computer.

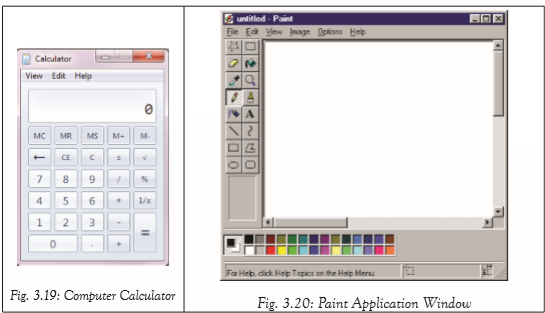
(ii) Calculator: It is a program similar to a hand-held calculator for performing mathematical operations. It is found in the accessories folder at the Start Menu.
(iii) Games: It is a program that enables the user to interact with objects displayed on the screen for the purpose of entertainment and learning skills.
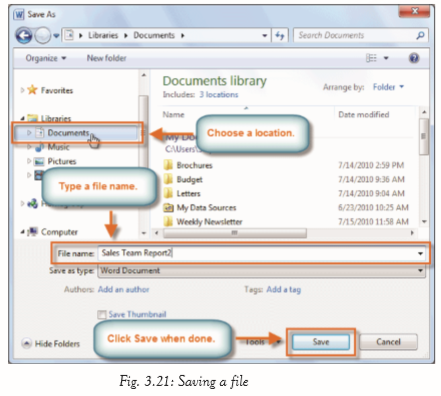
(iv) Paint: It is an application program designed to draw pictures or images on the display screen using a mouse or graphics tablet. The images are generated as bitmaps. It is incorporated in all Microsoft Office suites and is found in the accessories folder at the Start Menu.
83
Creating a folder
It is important to understand the organisational plan of the folders in the computer system when creating folders. This helps in knowing where the work has been saved. To create a new folder for example in the Local Disk C: in Windows 7:
(i) Click on the New Folder tab.
(ii) A new folder appears with the name New Folder highlighted.
(iii) Type the desired name to replace the name New Folder then press Enter. A new folder can also be created on an empty space in a storage location.
To do this,
(i) Right click on an empty space.
(ii) Select New from the drop down menu that appears then click on Folder.
(iii) Type the desired name to replace the name New Folder then press Enter.
Creating a file
(i) To create a new file, click the File menu in the active program and then click New. A dialog box appears. (ii) On the right pane, click Create button and select Blank Document under the available templates.
Saving
Saving is the process of storing a document in a storage medium or device for future reference or later use. There are two ways of saving a document:
(i) Save: It updates an active or existing document in a given location. If it is a new document, clicking on Save displays the Save As dialog box.
84
(ii)Save As: It allows one to enter a new file name and specify the location where to store the document. If there is an existing file with the same name, the file is overwritten. The file can also be renamed by typing a different file name or specifying a different location.
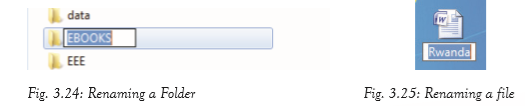
When saving a file for the first time, do the following:
(i) Click on File tab and select Save As command. A dialogue box appears.
(ii) Select the location to save the file from the left pane, for example, in a folder in Local Disk (C
.
(iii) Type the file name in the File name box.
(iv) Click the Save button. The document is saved in the selected location.
Opening a fileTo open a file, do either of the following:
(i) Double-click on the file.
Right-click and then click Open from the pop-up menu.
85

Renaming a folder
Renaming refers to changing the name of a file. To rename a folder, do the following:
(i) Click on the file or folder to be renamed.
(ii) From the Organize tab, select the Rename option from the drop down menu.
(iii) The original name will be highlighted and surrounded with a box.
(iv) Type the new name and press Enter. Alternatively, do the following:
(v) Right click on the file or folder to be renamed.
(vi) Select and click Rename option from the pop-up menu.
(vii) Type the new name over the old name and press Enter.
86
Cutting and pasting files and folders
Cutting is also known as moving. It is the transfer of the selected file or folder to a new location without leaving a copy at the source location. It is implemented using the Cut command. Once the file(s) or folder(s) to be moved are selected, they can be cut and pasted at any location by use of menu, keyboard shortcuts or by dragging and dropping.
The operating system automatically stores the cut data in a clipboard from where it will be pasted to the new location. Pasting refers to placing cut file or folder to a new location.
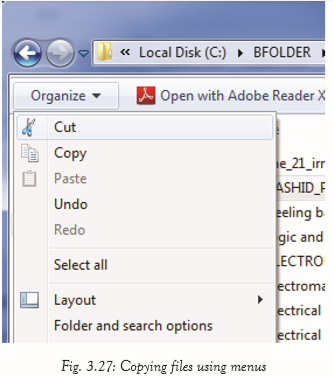
(a) Using the Menu

(b) Using Keyboard
To move selected file(s) or folder(s) using the keyboard commands, do the following;
(i) Press Ctrl + X to cut.
(ii) Press Ctrl + V to paste.
Copying and Pasting files and folders
Copying is duplication of text which means that a copy remains at the source location.
87
(c) Using Menu
To copy selected file (s) or folder (s) to another location using menus, do the following:
(i) Click on the Organize tab and select Copy.
(ii) Go to the new location where file(s) or folder(s) are to be copied.
(iii) Click on the Organise tab and select the Paste command.
(d) Using the Keyboard
To copy selected file (s) or folder (s) using the keyboard commands, do the following:
(i) Press Ctrl + C to copy.
(ii) Press Ctrl + V to paste.
(e) Using Dragging and Dropping
To move selected file(s) or folders(s) by dragging and dropping method, do the following:
(i) Click the file or the folder.
(ii) Hold down the left mouse button. Drag the selected file or folder to the preferred destination. Release the mouse button.
Note: Dragging and dropping file or folder in the same drive moves the file or folder to the new location. Dragging and dropping the file or the folder on different drives creates a duplicate
88Deleting files or folders
Most Windows Operating Systems usually protect files and folders deleted from the hard disk by placing them in a Recycle Bin.
Files or folders deleted accidentally or prematurely can be retrieved from the recycle bin. The deleted files and folders remain in the Recycle Bin until it is emptied.
Once the Recycle Bin has been emptied, its contents are permanently deleted from the computer and cannot be recovered.To delete a file, do either of the following:
(i) Click on the file or folder to be deleted. Press Delete
(ii) Click on the file or folder to be deleted. Right-click and then select Delete option from the pop-up menu. You will be prompted to confirm the deletion.
(iii) Click Yes to confirm deletion and No to cancel.

89Assignment 3.1
1. Define the term task manager.
2. Define these terms: desktop icons and control panel.
3. State and explain three parts of a task bar.
4. Outline the procedure followed to rename a folder.
5. State any two Window control buttons
6.List three accessories found in Microsoft Window.
Learning Activity 3A
1. Using the taskbar shortcut set the date and time of the computer.
2. In pairs, change the background of the computer.
3. Create a file called Senior1 on the Desktop, delete the file and restore it.
Revision Exercise 3
1. Describe each of the following: Save and Save As.
2. Differentiate between a file and a folder as used in computing.
3. Explain how to customise the taskbar.
4. Explain the role of the Recycle Bin.
5. Explain how gadgets are inserted on the computer desktop.
90
UNIT 4 Safe, Secure and Ethical Use of computers
Key Unit Competency
By the end of this chapter, you should be able to maintain a computer in good working condition and use it safely, securely and ethically.
Learning Objectives
Knowledge and understanding
By the end of this chapter, you should be able to identify and follow the basic safety guidelines to prevent cuts, burns, electrical shocks, and damage to eyesight, when using computers.
Skills
By the end of this chapter, you should be able to observe and apply the correct safety and security procedures when using ICT.
Attitudes and values
By the end of this chapter, you should be able to:
(i) Appreciate and follow the basic safety guidelines to prevent cuts, burns, electrical shock, and damage to eyesight when using computers.
(ii) Show concern about computer vulnerability
Keywords in the chapter
• Ergonomics • Brushes and swabs • Fire extinguisher • Cleaning agent • Blower • UPS • Computer laboratory • Vacuum cleaner
Safe Lab Procedure
A computer laboratory, simply known as a computer lab, is a special room set aside for safe installation and use of computer equipment. It is used in learning institutions to enable efficient teaching and learning activities.
Safety Precautions and Practices in a Computer Laboratory
Computers are expensive to acquire. They are also delicate and must, therefore, be handled with utmost care. It is for this reason that certain rules, precautions, and
91
practices MUST be observed when handling the computer and its components. This would help to avoid damage to the computers, injury to the user, as well as provide a conducive environment for teaching and learning.
Some safety precautions and practices are discussed below:
General safety
(i) DO NOT run in and out of the computer lab. This may cause one to knock down computer equipment hence causing damage.
(ii) Always cover the computers with dust covers after use to avoid dust accumulation on the machines.
(iii) DO NOT carry food or drinks to the computer lab. This is because spilling food or drinks on computer parts can cause damage.
(iv) Reinforce the entry points to the computer lab by use of padlocks, burglar proof doors, and metallic grills to ensure proper security of computer resources.
(v) Ensure that the computer lab is well ventilated to ensure the right amount of temperature and humidity.
(vi) Always shut down the computer using the correct procedure. This is because improper shutting down of a computer can lead to either data loss or crashing of the hard disk. Crashing of the hard disk refers to the permanent damage of the read and write head of the hard disk.
The following is the correct procedure for shutting down a computer. e following are some of the general safety precautions and practices:
(a) Close all open files and folders.
(b) Select the Start button and select Shut down.
(c) The shut down procedure automatically starts.
(d) Switch off the monitor.
(vii) Always consult the teacher or the technician before performing technical operations.
(viii) Ensure that all the cables in the computer laboratory are laid along the walls. They should not hang loosely since one may stumble, fall, and get hurt. If the cables are hanging loosely report to the teacher or the technician.
92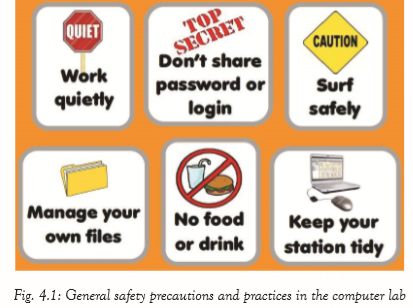
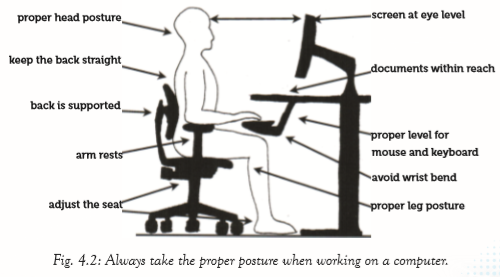
Health safety
The following are some of the health safety precautions to be observed:
(i) The screen resolution should be properly adjusted and where necessary use antiglare screens to prevent eye strain.
(ii) Use ergonomics chairs, tables, keyboards and mice among others to ensure good posture.
(iii) Ensure there is proper ventilation in the computer lab to ensure good health of the user. (iv) Always take a break to prevent fatigue or repetitive strain injury.
93
Electrical safety
The following are some of the electrical safety precautions to be observed:
(i) Follow proper guidelines when dealing with power supplies and Cathode Ray Tube (CRT) monitors. They contain high voltage that can lead to injuries and electrical fires.
(ii) Do not attempt to repair power supplies or CRT monitors. Always alert the teacher or the laboratory technician.
(iii) Always connect computers using Uninterruptible Power Supply (UPS). This protects them against damage by power instability.
Fire safety
The following are some of the fire safety precautions to be observed:(i) Ensure that the computer lab is equipped with fire extinguishers that are regularly serviced.
(ii) Ensure that the computer lab has an exit door for use in case of emergency or fire outbreak.
(iii) Ensure that the computer lab has fire or smoke detectors and alarms for warning in case of fire outbreak.
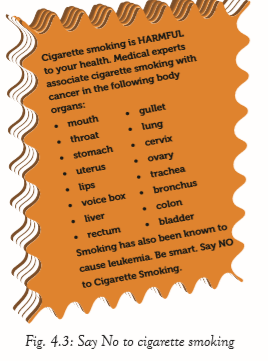
(iv) Do not smoke in the computer laboratory. Remember that cigarette smoking is harmful to your health. It causes cancer to various body organs. It also causes ailments of the circulatory and respiratory systems. It may also lead to unnecessary fire accidents.
Proper use of cleaning tools and fire extinguishers
Cleaning Cloth: A lint-free cloth is used to clean components such as the case drives, mouse, and keyboard because they do not leave residue and will not scratch plastic surfaces. Do not use a cloth to clean any circuitry such as the motherboard and RAM.
Brushes and Swabs: Soft-bristled brushes and swabs that are lint-free are used to dust off the hard-to-reach areas and to wipe stains from electrical contacts.
94
Blower: It is a portable electric device used to remove dust and dirt from computers. Blowing is done by forcing compressed air through various internal parts of the computer. Always ensure that all doors and windows are open to avoid dust accumulation.
Portable vacuum cleaner: It is a device used for sucking dust, dirt, hair, and other particles when cleaning the computer lab floor and other surfaces as well. There are wet and dry vacuum cleaners that can be used to clean up wet or liquid spills.
Non-static vacuum cleaner: This is a small, hand-held vacuum cleaner that is designed specifically for use on computers to suck up dirt and dust loosened by brush or canned air. It is advisable not to use the household vacuum cleaner. It creates static electricity that can damage the computer
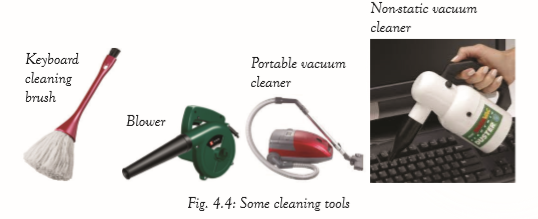
.Canned Air: Canned air is also known as gas duster or compressed air. It is used to loosen dirt and dust from delicate computer components.
The following are some of the safety precautions when using canned air:
(i) Do not shake the container because it can explode.
(ii) Always keep the liquid canned air upright. Turning the can upside down or tilting causes the liquid to spill and this can cause irreparable damage to the computer components that it touches.
(iii) Avoid inhaling canned air because it can lead to death.

95
Fire Extinguisher
It is a metallic cylinder usually red in colour. It contains a substance that puts out a small fire. The agent is represented by a colour band, for example, black for carbon (IV) oxide, red for water, and blue for dry powder among others.
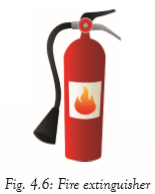
The computer laboratory MUST be fitted with gaseous fire extinguishers filled with carbon (IV) oxide to be used in case of fire outbreak. Water-based or powder extinguishers should be avoided because water contains ions which complete an electrical circuit resulting in electric shock. Powder extinguishers, on the other hand, can clog the computer parts thus causing malfunctioning.
Note: It is advisable to refer to instructions that come with each fire extinguisher before use.
To use a fire extingusher, do the following.
(a) Pull the pin. This will allow one to discharge the extinguisher.
(b) Aim at the base of the fire.
(c) Squeeze the top handle or lever to release the pressurised extinguishing agent in the extinguisher. (d) Sweep from side to side until the fire is completely extinguished.
Maintaining your Computer
(i) General precautions
• Computers should be connected to the UPS or plugged into a quality surge protector.
• Ensure the anti-virus software is updated regularly. Always scan the computer and the external storage devices before use.
• Always shut down the computer using the correct procedure.
• Avoid placing computers and related components at the edge of the table where they are likely to fall
. • Laptops should be carried in a bag with padding for protection.
• Engage the services of a reputable insurance company to cover the risk in case of loss or damage.
96
(ii) Power connectivity
• Ensure there are enough sockets in the computer lab to prevent overloading.
• Connect the power cable from the main power source to the UPS and to the power supply unit on the computer.
• Correctly turn off the computer when not in use. Always remember to switch off the main power source
. • Install a standby generator that can automatically be used incase of power failure.
(iii) Precautions for connecting the mouse, keyboard and other external peripherals
• Connect the peripheral devices to the correct ports, for example, the USB or PS/2 ports for the keyboard and the mouse.
• Do not force peripheral devices into the ports to avoid bending the pins as this can lead to malfunctioning.
• Ensure that monitors are correctly connected.
Maintenance precautions
(i) System unit
• Switch off the computer system and unplug the power cable before removing the system unit cover.
• Use a damp lint-free cloth to clean the outer part of the system unit.
• Avoid using water to clean the internal components to prevent rusting. It is advisable to use a blower or a non-static vacuum cleaner.
(ii) Monitor
• Never spray cleaners directly onto the screen. Instead, use a lint-free cloth dampened with a recommended cleaner to wipe the screen. Use a clean cloth to dry off the screen
. • Clean the outside of the monitor with a recommended cleaning solution.
• Avoid pressing too hard on the screen when cleaning an LCD screen.
• Avoid cleaning the inside of the monitor. Always consult an experienced technician.
(iii) Keyboard
• Do not punch down keys with excessive force since this may damage the components underneath.
• Wipe the outside parts with a dampened lint-free cloth. Be careful to avoid dripping cleaning liquids onto or into the keyboard. If necessary, use a recommended cleaning solution to remove tough dirt. Always make sure that the keyboard is disconnected from the computer.
• Do not remove the keys but instead use canned air and a soft-bristled brush to clean hard-to-reach areas.
97
(iv) Mouse
• Use a damp lint-free cloth to clean the extenal part of the mouse.
Assignment 4.1
1. List three general precautions applied on a keyboard.
2. State two health safety practices applied in a computer laboratory.
3. Give three fire safety measures practiced in a computer laboratory.
4. State any three cleaning tools used in a computer laboratory.
5. What are some of the electrical safety measures taken when working in a computer laboratory.
Learning Activity 4A
(i) In pairs, practise how to clean a computer monitor using a recommended cleaning solution.
(ii) In groups, discuss the general precautions carried out in the school computer lab.
(iii) In pairs, demonstrate the general safety measures taken in the computer laboratory.
(iv) Compare safety precautions observed in the chemistry laboratory with those observed in the computer laboratory.
(v) In groups, practise power connectivity precautions taken when connecting computers.
Revision Exercise 4
1. Describe the correct posture to take when working on a computer
. 2. State five general safety precautions practised in a computer lab.
3. Explain the reason for the use of lint-free swabs to clean the computer keyboard.
4. Explain three ways of maintaining a computer monitor
. 5. Explain why non-static vacuum cleaners are recommended to be used in a computer lab.
98
UNIT 5 Word Processing Basics I
Key Unit Competecy:
By the end of this unit, you should be able to create and manipulate a document using basic word processing features.
Learning Objectives
Knowledge and understanding
By the end of this unit, you should be able to:
(i) Identify the basic features of a word processing environment.
(ii) Explain the role of word processing applications.
(iii) State the steps used to create, rename, save and open a document.
(iv) Explain how written text should be organised.
(v) Recognise errors in a document and identify the appropriate proofing features to correct the errors. (vi) Identify different methods to move through the written text.
Skills
By the end of this unit, you should be able to:
(i) Explore the environment of word processing applications.
(ii) Use the basic features of word processing (create, rename, save and open a new document).
(iii) Organise written text.
(iv) Apply different methods to move text and move through the text (use of shortcuts)
(v) Use formatting tools to improve the presentation of a document.
(vi) Use proofing features of spelling and grammar checks and the thesaurus to correct errors in a document.
Attitudes and Values
By the end of this unit, you should be able to:
(i) Appreciate the basic features of a word processing environment.
(ii) Show confidence in improving presentation by replacing hand written documents with printed ones.
(iii) Show interest in organizing text.
(iv) Appreciate the formatting and proofing features of word processing to produce error-free and well-presented documents.
99
Word Processing
Key words in the chapter
• Scrolling • Thesaurus • Bullets • Selection • Tabs • Spell checker • Formatting • Editing • Numbering • Ribbon • Thesaurus • Toggle case
Introduction
Word processors were created in order to solve the problems encountered while using a typewriter. They ensure that if there is a typographical error, it can be corrected without compromising the neatness of the document and its structure.
Definition of word processing application
A word processing application is a software that enables the user to create, save, edit, format, and print text documents. It is used to create documents such as letters, memos, reports, and minutes among others. Examples of word processing applications are: Word Perfect, Word Star, Lotus Word Pro, AmiPro and Microsoft Word among others.
Role of word processing applications
(i) Create and manipulate text-based documents.
(ii) Create and manipulate pictures and objects.
(iii) Create a document to be uploaded to the Internet.
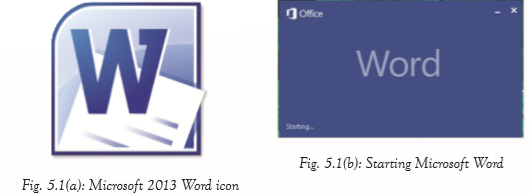
Microsoft Word (Ms Word)
Microsoft Word is an example of a word processing application. It is available in various versions incorporated in an integrated package called Microsoft Office Suite.
Examples of Ms Word versions include Ms Word 2000, Ms Word 2003, Ms Word 2007, Ms Word 2010 and Ms Word 2013 among others. Ms Word 2013 has been used in this unit to illustrate the use of a Word Processing application.
Starting Ms Word 2013
To launch Ms Word 2013, do one of the following:
(i) Click on Start Button, go to All Programs and select Microsoft Office; then click on Microsoft Word 2013.
(ii) If the Microsoft Word icon is on the Desktop, do one of the following:
Right-click on the icon then select Open from the pop-up menu that appears.
Double-click on the icon.
Click on the icon then press Enter key.
(iii) Click on Start button then select Microsoft Word 2013 if it was pinned to the Start Menu.
100
(iv) Click Microsoft Word 2013 if is pinned to the Task Bar.
(v) Click on the Start button go to Search programs and files, type Run then press Enter key. On the dialog box that appears, type the word WINWORD. Click OK
Word Processing Environment
In the environment of a word processor, the following basic tools or features can be used: title bar, tabs, menus, toolbars, scroll bar, ruler, and status bar.
• Title bar: This is the topmost bar on the window. It contains minimize, restore/ maximize, and close buttons as well as the name of the program and document. Any time a new word document is opened, Ms-Word gives it a temporary or a default name which could be Document1, Document2, and so on. When the document is saved, the default name is automatically changed to the new name.
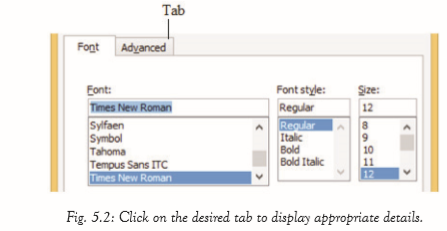
• Tabs: This term refers to the part of a window or a dialog box which when clicked, displays different parts of a menu, program window, or webpage.
101
• Menu Bar:
This bar displays a series of tabs namely File, Home, Insert, Page Layout, References, Mailings, Review and View. Other tabs appear if an image is inserted. Clicking on each tab displays a different ribbon.

Figure 5.3: Click on the desired tab to reveal the ribbon under it.
• File tab: It is the first item on the menu bar. When clicked it produces a pulldown menu which contains a list of options to choose from such as New, Open, Save, Save As, Print, and Close.
• Home tab: It contains icons used for text formatting, paragraph formatting, and editing among others.
• Insert tab: It contains icons that allow the user to add graphics and images in a document. It can be used to add pictures, tables and word art among others.
• Design tab: It consists of document formatting features, themes and features for formatting page background such as watermark
. • Page Layout tab: It contains icons that are used for formatting an entire page and paragraph formatting icons among others
. • References tab: It contains icons that are used for creating and manipulating Tables of Contents, Footnotes, Captions, Citation, and Bibliography among others.
• Mailings tab: It contains icons that are used during mail merging.
• Review tab: It contains icons used for proofreading, adding comments, tracking, and protection among others.
• View tab: It contains icons that are used to show the document views, add macros, zoom, and change the window appearance.
• Ribbon: It consists of icons of commands which are organized into groups and given a group name. For example, clicking on the Home tab displays a ribbon with five groups namely Clipboard, Font, Paragraph, Styles, and Editing.
102

• The Quick Access Toolbar: This is a small selection of the most commonly used commands. In most cases, it is located at the top left corner of the Title Bar but it can be placed above or below the Ribbon.
It can be customized by adding more commands on it or removing commands from it. By default, this bar contains Save, Undo and Redo commands. To customize it:
(i) Right click within the quick access toolbar, select Customize Quick Access Toolbar option. A dialog box is displayed.
(ii) Select the commands to add from the left pane then click Add>> button.
(iii) To remove the commands from the quick access toolbar, click on the command from the right pane of the window then select <<Remove button.

• Toolbars: This was a popular feature in the lower versions of MS Word. It refers to stripes that contain icons used for formatting, editing or inserting data. Examples of toolbars are drawing toolbar, formatting toolbar, standard toolbar, and picture toolbar among others. In MS Word 2013, the toolbar icons are incorporated in different ribbons in the window.
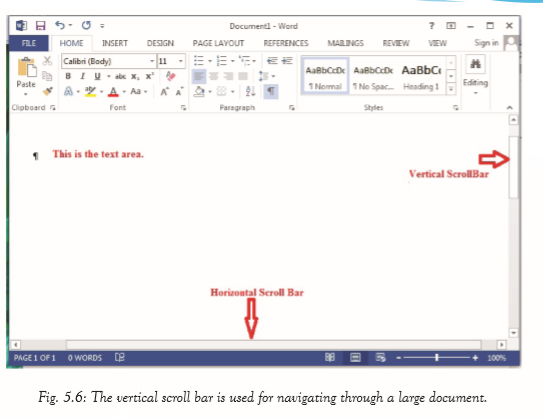
• The Scroll bars: They allow one to move or navigate through a large document. There are two types of scroll bars. The vertical scroll bar allows the content of a document to be moved from top to bottom. The horizontal scroll bar allows the content of the document to be moved from left to right and vice versa.
103
• Rulers: The ruler is used to set the layout of the text across the page such as margins, tab positions, and indents. There are two rulers namely the horizontal ruler on top of the document and the vertical ruler on the left side of the document. Figure 5.7 shows a horizontal ruler.

Fig. 5.7: Rulers are used for setting layout of text within the page.
• Status bar: This bar is usually located at the bottom of the window. It displays information about the activities being carried out in the current document and certain general information about the document such as the current page, word count, view buttons and zoom level tools.

104
• Working area/zone:
This is the largest part of a Word Processing window. It is the area where text and objects are displayed. It is enclosed with the top, bottom, left, and right margin. Any changes done on the typed text and inserted objects are reflected in this part of the window.
Assignment 5.1
1. Define the term word processing.
2. Give three examples of word processing applications.
3. State two roles of word processing applications.
4. Explain the use of any five tabs on the menu bar.
5. State the function of a title bar.
Learning Activity 5A
Label the diagram of the screen layout of Microsoft Word application window shown below.
Working with Documents
A document can be created, saved, opened, and renamed within the work area.
Creating a Document
It is the process of starting a new blank page from scratch or from an existing document.
105
When the Microsoft Word program is launched, a new document is automatically created. However, to create another new document do one of the following:
(i) Click the File tab. Select New on the window that appears; then select Blank document.
(ii) Press Ctrl + N on the keyboard.
(iii) Click the New icon if it is on the Quick Access Toolbar.
Typing Text
Typing is the process of inputting text on a document. By default, typing begins from the left margin towards the right margin at the cursor position.
Saving a Document
Saving is the process of copying a document from primary memory to a secondary memory for future reference or later use. There are two main commands used when saving a document which are: Save and Save As.
1. Save: It is used when updating an existing document. Clicking on Save if it is a new document results in the display of the Save As dialog box. To update a document do one of the following:
• Click File tab then select Save command.
• Press Ctrl + S on the keyboard.
• Click Save icon on the Quick Access Toolbar.
2. Save As: It is used when:
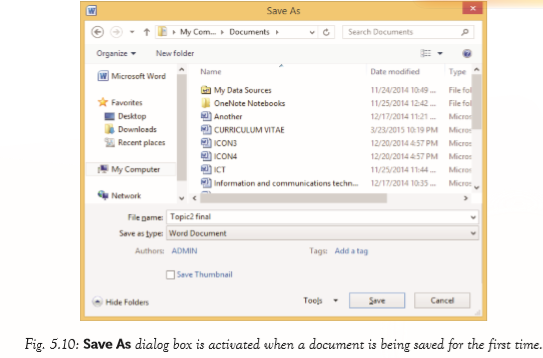
(i) Saving a document for the first time in the computer.
(ii) Saving the document using a new file name.
(iii) Changing the storage location of a document.
To use Save as command do the following:
(i) Click File tab select Save As command. Click on computer to display the Save As dialog box.
(ii) In the File name box, type the name of the file.
(iii) Specify the location where the file is to be stored on the first text box in the first row. For example My documents. Click the Save button or press the Enter key.
106
Open an existing document
It is also known as retrieving a document. This is the process of viewing the content of an existing document. To open a document, do one of the following:
(i) Click on the File tab on the menu bar. A pull-down menu appears. Select Open command. Click computer from the left pane then select Browse if the document was not among the recent ones. A dialog box is displayed. Specify the location where the document was previously stored and the file name. Click the Open command.
(ii) Click on the File tab on the menu bar. A pull-down menu appears. Select Recent Documents command. All recent documents are displayed on the right pane. Click on the desired file name to open it.
(iii) Open the location where the document was stored then open the document.
Renaming a document
To rename a document, right-click on the document name then select rename. Type the new name at the cursor position then press enter.
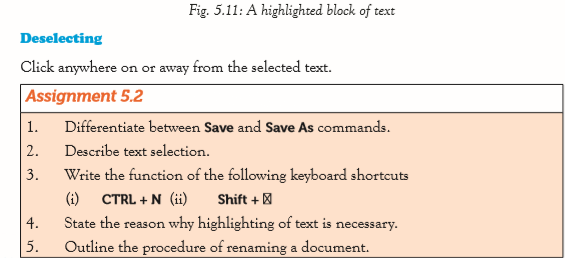
Selecting (highlighting) text or a block of text
It is done every time text or a block of text has to be formatted or edited.
107
To highlight any block of text, take the cursor to the beginning of the block of text then do one of the following:
(i) Click and drag the mouse over the text. (ii) Press Shift + arrow keys, depending on the direction of the desired text.
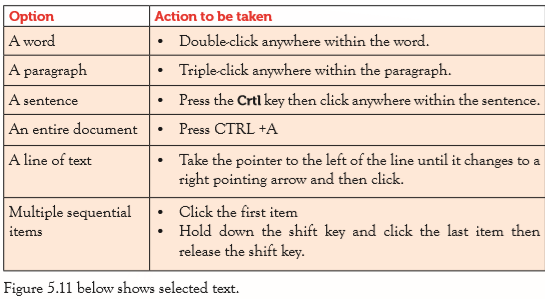
However, to quickly select the specified text, the following options can be chosen:

108
Learning Activity 5B
Type the following text and save it as INTERNETThe Internet is a global network of computers. It provides a variety of resources and data to the people who use it. It is a large set of computer networks that communicate with each other often over telephone lines.
The term Internet can be broken down into two words, Inter and net which implies that there is an interconnection of networks. Computers can be connected together using data transmission media such as cables, to communicate with one another.In most cases computer networks are unique to an organization. For example, the computers in your computer laboratory may be networked. Such a network is local in nature hence it is usually called a local area Network (LAN).
Internet is therefore a large network of computers that covers the whole world and enables millions of them from different organizations and people to communicate globally.
Because of its large size and great volume of information that passes through the Internet, it is sometimes called the information superhighway. Other names used to refer to the Internet are the net or the cyberspace.
Communication in this case will be an exchange between computers to achieve message transfer. This is because the computers are linked to form a network.Basic Text Formatting
Formatting is the process of enhancing the appearance of a document, making it attractive or stand out from the rest. Formatting features are divided into two broad categories namely: text and paragraph formatting.
Text formatting
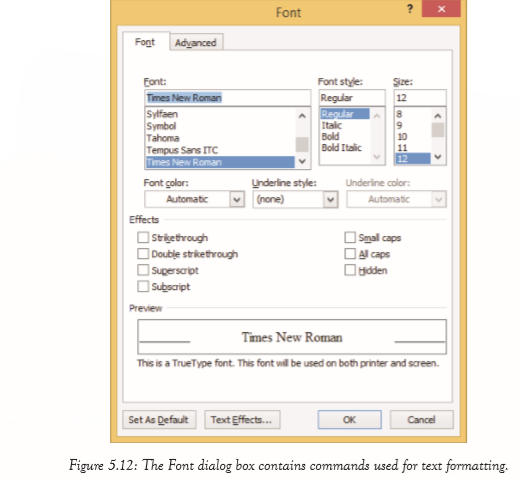
This involves enhancement of the appearance of the text. Some of the common text formatting features includes font, font style, font size, font colour, underline, styles, change case, and font effects among others.
(a) Font: Examples include; Times, Times New Roman, Calibri, Arial Black and Arial Narrow among others.
(b) Font style: There are four types of styles namely; bold, italic, regular and bold italics.
(i) Bold: makes the selected text appear thicker or darker than the rest of the text in a document. (This text is typed in bold.)
(ii) Italic: makes the selected text to slant forward. (This text is typed in italics.)
109
(iii) Regular: It takes up the style defined by the font type used. It is the default style. (This text is typed in regular font.)
(c) Font size: It refers to how small or large the characters are set. The standard size is 12.
(d) Font colour: The default font colour is black. The user can, however, change this colour to a desired one, by selecting options from Font Color box
(e) Underline: It is a line placed under the letter, word, or sentence. There are various underline styles that the user can choose from. Example include words only, double underline and dotted lines.
(f) Font Effects: There are various font effects that can be applied on a document in order to enhance the text appearance. These includes superscript, subscript, strikethrough, double strikethrough, all caps, small caps, and hidden. Superscript: It is where text is formatted to appear slightly above the normal typing line. For example in cm3, the text 3 is a superscript
110
Subscript: It is where text is formatted to appear slightly below the normal typing line. For example in “H20”, the text 2 is a subscript.
Strike through: It is used to cancel already typed text. It draws a line over the text.
To use any of the text formatting features, do the following:
• Select the desired text.
• From the Home tab, either select the desired text formatting icon on the ribbon under the Font group or click on the dialog box launcher (arrow) besides the Font group label. From the dialog box that appears, select the font tab then select the desired formats and click OK.
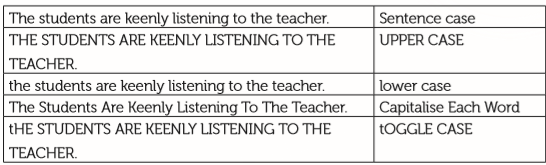
(g) Change case: Refers to the process of switching between the available cases. The following are the various types of cases available:
(i) Sentence case: Only the first character of a sentence is capitalized. In this sentence the first letter of the first word in the sentence is in capital letters.
(ii) UPPER CASE: All the characters in a word or sentence are capitalized. (iii) lower case: All the characters in a word or sentence are displayed in small letters.
(iv) Capitalize Each Word: The first character of each word in a sentence is in capital letters. It is also known as title case in the lower versions of MS Word.
(v) tOGGLE CASE: All characters in upper case are changed to lower case and vice versa.
To change case, do the following:
• Select the text to be formatted.
• From the Home tab, click on the arrow in the Change case icon under the Font group.
• Select the desired option. Figure 5.13 shows a change case icon
111

Paragraph formatting
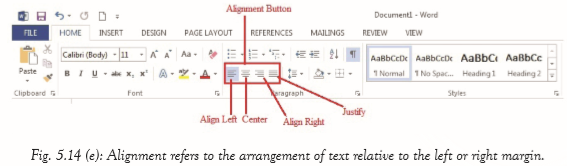
They are features used to improve the appearance of an entire paragraph. They include alignment,
indentation, spacing, tabs, Bullets and Numbering.
(a) Alignment: It refers to the arrangement of text relative to the left or right margin of a page. There are four types of alignments namely: left, right, centre, and justified alignments.
(i) Left alignment: This is where text is evenly positioned along the left margin but uneven at the right margin. Typing begins at the left margin and does not have to end at the right margin.
We need to save Mother Earth! It is high time we did something! The planet we live on is suffering. We are extracting all it has including oil, minerals, and water. We are cutting down trees.
Fig. 5.14(a): Left alignment
(ii) Right alignment: This is where text is evenly positioned along the right margin but uneven at the left margin. Typing begins at the right margin and does not have to end at the left margin.
We are killing animals. We are exploiting nature. The resources on this Planet are getting depleted. This poses great threat to our existence
Fig. 5.14(b): Right alignment
(iii) Center Alignment: This is where text is evenly arranged at the center of the page but uneven both at the left and right margins. Typing begins at the centre of the page.
112
Let us do something to save the planet. Let us start by planting more trees! Let’s take care of our water sources. Let’s take care of the soil. Let’s conserve the environment. Our survival is dependent on it.
Fig. 5.14(c): Centred text
(iv) Justification: This is where text is evenly arranged both at the right and left margins.
Let us prevent the occurrence of soil erosion. Let’s plant cover crops. Let’s practise contour farming in slopy areas. Let’s keep the right number of animals on a piece of land. We must do something to save the planet. Our survival is dependent on it.
Fig. 5.14(d): Justified text
(b) Indentation: It is the process of moving text away from the right or left margins by a given interval. They include right, left, and special indents.
(i) Left indent: The lines of text in an entire paragraph are pushed away from the left margin by several units of measurements. The first paragraph in the following text is left indented.

113
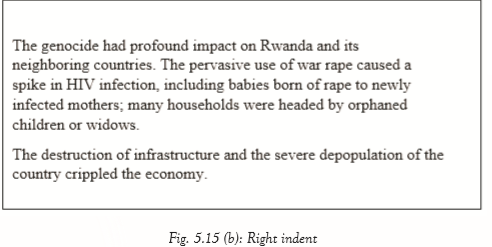
(ii) Right indent: The lines of text in an entire paragraph are pushed away from the right margin by several units of measurements. The first paragraph in the following text is right indented.
(iii) Special Indents: There are two types of special indents, namely first line and hanging indents.
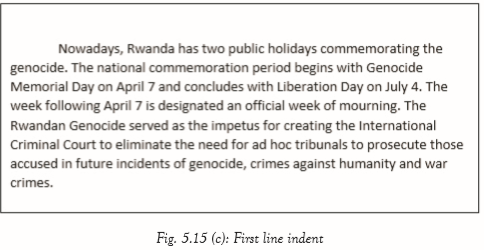
• First line indent: The first line in a paragraph is pushed away from the left margin by several units of measurements. The other lines in the paragraph remain on the left margin. The first line in the paragraph is indented.
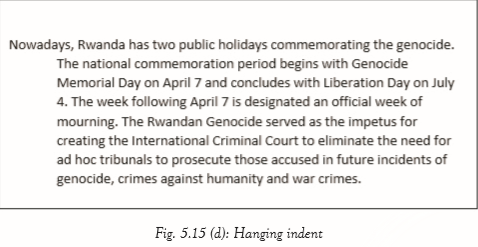
• Hanging indent: The first line of a paragraph remains at the left margin. The rest of the lines in the paragraph are pushed several units of measurements away from the left margin. Hanging indent is applied in this paragraph.
114
(c) Line spacing: It refers to the distance between lines of the text in a paragraph or a document. The default line spacing is Single. Other options are 1.5 lines, Double, At least, Exactly, and Multiple line spacing.
(d) Bullets and Numbering: Bullets and numbering allow text to be organized in lists.
(i) Bullets: They are small solid shapes used just before a line of text such as an item in a list. They are used to mark the beginning of a point.
(ii) Numbering: This is the use of numbers to list different points. They may be set in Arabic (1, 2,3, ...) or Roman (i, ii, iii, ...).
To apply line spacing, indentation, bullets and numbering, and alignment do the following:
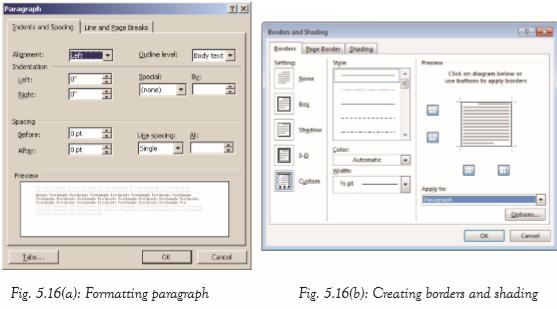
• Highlight the text. From the Home tab, either select the desired paragraph formatting icon on the ribbon under the Paragraph group; or click on the dialog box launcher besides the Paragraph group label. A dialog box appears as shown in figure 5.16(a).
• From the dialog box that appears, select the Indents and Spacing tab then select the desired formats and click OK.
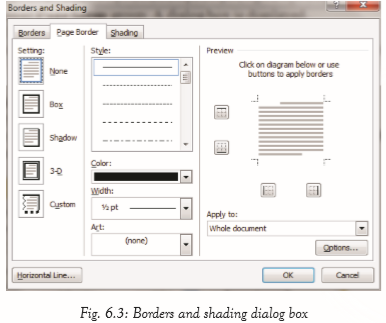
(e) Borders and Shading: The term border refers to a line separating two parts in a document. For example, to separate two cells in a table, a border can be used. Shading refers to the process of making an area in a document to have a relatively dark tone that produces a shade. Shading can be applied to a drawing, a table, or a picture. To create borders and shading on a table, do the following:
• Click anywhere within the text. Click the Page Layout Tab, in the Page Setup Group, click on the dialog box launcher. A dialog box is displayed. Select the Layout tab from the Page Setup dialog box.
115
• Click on the Borders command. The Borders and Shading dialog box is displayed as shown in figure 5.16(b).
• Select the Borders tab and specify the settings, style, colour, and width.
• In the Apply to section, specify the area where the border will be effected.
• Click OK to close the dialog box and effect the changes.
(f) Sorting: This is the process of arranging data in a particular order; that is, either in ascending or descending order. Data can be sorted when it is in a paragraph
. Sorting a paragraph of data: A paragraph can be sorted using the first letter in each line. For example, when the following data is sorted in ascending order it will appear as follows:
Unsorted
I am a patriot.
I am a law abiding citizen.
I will always defend my country.
Let us work as a team.
We must protect our country.
Sorted
I am a law abiding citizen.
I am a patriot.
I love my country.
I will always defend my country.
Let us work as a team.
We must protect our country.
I love my country.
To sort data in a paragraph do the following: • Select the paragraph. Click on Sort from the Paragraph group in the Home tab.
116
A dialog box appears as shown in figure 5.17.
Ensure that the words to be sorted are separated by a comma or by tab stops.
• Under Sort by select Paragraphs.
• Under Type select Text
• Choose either ascending or descending sort orders.
.Click ok to apply

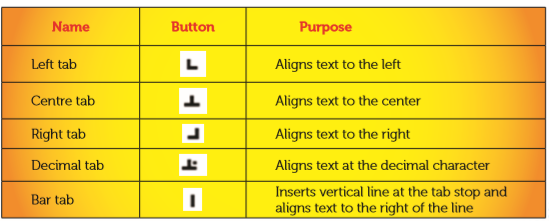
(g) Tabs: Tabs are special buttons on the horizontal ruler. They are used to indicate how far to indent text or where to begin a column of text in a paragraph. By default, the tab stop position is 0.5 inches. Table 5.1: Tabs are used to move the cursor to a preset position on a document.
117
Assignment 5.3
1. Differentiate between subscripts and superscripts.
2. How can the paragraph indention measurements be changed from inches to centimeters?
3. Differentiate between bullets and numbers.
4. Define the term sorting.
5. Describe three types of indentations that can be applied in a document.
Learning Activity 5C
Open the Internet document you created in Learning Activity 5B and do the following formatting
(a) Create a space at the top of the document and type the heading THE INTERNET, font size 20 points, italicized, bold, centred, and underlined.
(b) Change the line spacing of the second paragraph to 1.5 spacing.
(c) Italicize the word “information superhighway”.
(d) Change the case of the word “Internet” in paragraph 1, 2 and 4 to upper case.
(e) Save the changes as INTERNET1
Proofing Features
(a) Proofreading: The features that are used for proofing include spelling and grammar checker, Thesaurus, Autocomplete, and Autocorrect.
(i) Spelling and grammar checker: It is a feature that contains an inbuilt dictionary for checking spelling and grammatical mistakes. It notifies the user of the mistakes found on an active document by either using a red wavy line for spelling mistakes or a green wavy line for grammatical errors. It also allows the user to add words in the dictionary. To make use of this feature do the following:
• Click Review Tab from the menu bar. Select Spelling and Grammar command from the ribbon under Proofing group. A window appears in the right pane.
• To make the correction, select the right word in the Suggestions box and click Change command button. • To leave the word or phrase as it is, click Ignore button.
• If the word occurs several times in the document, click Ignore All to leave all the occurrence of the word as it is.
• To add the word in the dictionary, click Add button.
Note: Ignore All only appears when there is a spelling error.
118
• Once the spelling and grammar checking process is complete, a dialog box will be displayed notifying the user that the spelling and grammar check is complete. Click the OK button to close the dialog box.
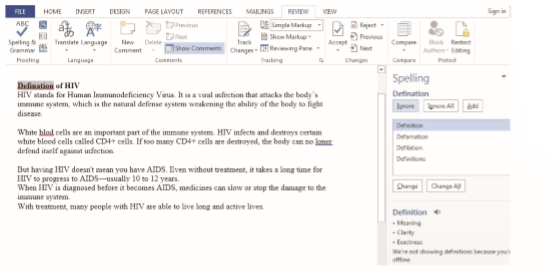
Fig. 5.18: Spelling and Grammar dialog box.
To spell-check a document simply press F7 key on the keyboard. Figure 5.19 shows the Spelling and Grammar Complete dialog box.

Fig. 5.19: A dialog box showing that spelling and grammar check has been completed.
(ii) Thesaurus: This feature displays synonyms and antonyms of a selected word.
Synonyms are words with similar meaning while antonyms are words with opposite meaning to the selected word. To make use of thesaurus do the following:
• Highlight the word whose synonym or antonym is required.
• Click Review Tab from the menu bar. Select Thesaurus command from the ribbon under Proofing group. A list of words is displayed on the right pane of the window.
• Point to the desired word from the resulting list and click on the arrow besides it; then select Insert to automatically replace the highlighted word with the selected one.
119

Moving and copying a section of text MS Word contains commands that can be used for moving and copying text from one part of a document to another. These commands are cut, copy, and paste.
(a) Moving a text
Moving refers to changing the position of text to a new location. The original text is moved to a clipboard awaiting to be pasted to the new location. A clipboard is a temporary space where all items to be moved or copied are stored before they are pasted to the desired location.
To move text, do the following:
(i) Select or highlight the text. Use one of the following options:
• From Home tab, click Cut icon.
• Right-click on the selected text and click Cut command from the resulting pop-up menu.
• Press Ctrl + X on the keyboard. (ii) Position the cursor where the text is to be moved. (iii) To paste, use one of the following options:
• Click Home tab, under the Clipboard group, click Paste icon.
• Right-click and select Paste Command from the pop-up menu.
• Press Ctrl + V on the keyboard.
120
(b) Copying text
Copying refers to creating a duplicate of text. To copy, do the following:
(i) Select or highlight the text or document to be copied.
(ii) Use one of the following options:
• From Home tab, click Copy icon under the Clipboard group.
• Right-click on the selected text and click Copy command from the pop-up menu.
• Press Ctrl + C on the keyboard
. (iii) Position the cursor where the item is to be copied.
(iv) To paste, use one of the following options:
• From Home tab, click Paste icon under the Clipboard group.
• Right-click and click Paste command.
• Press Ctrl + V on the keyboard.
Another copy is created in the new location while the original remains in the previous location
Moving through the text
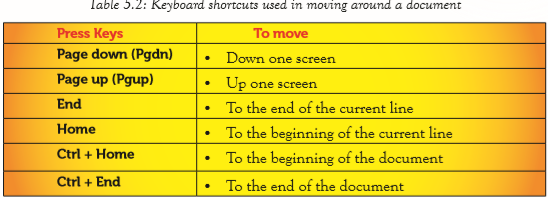
(a) Moving through a document using keyboard shortcutsThe keyboard shortcuts can be used for moving through a document. When they are used, the position of the cursor is automatically changed. The following are some keyboard shortcuts that can be used:
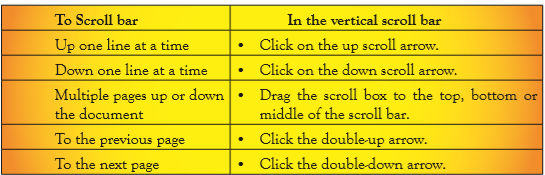
(b) Scrolling through the text
Scrolling is the process of moving around a document without changing the position of the cursor. The vertical scroll bar is used to move up or down the pages. The horizontal scroll bar is used to scroll from side to side.
Table 5.3: Use of vertical Scroll Bar
121
Deleting Text or image in a Document
To delete text or image refers to remove or erase content such as words and pictures from a document. Deleting can be done using the Backspace key and the Delete key.
(i) Backspace key: Erases character by character from the left side of the cursor position to the right.
(ii) Delete key: Erases character by character from the right side of the cursor position to the left.
Typing Modes
There are two typing modes used to edit documents. These are the Insert and the Typeover modes:
(i) Insert mode: It is a typing mode that adds text between words at the insertion point without replacing them as the user types. The existing words are pushed forward towards the right margin and to the next line when the cursor reaches the right margin. It is the default typing mode.
(ii) Typeover mode: It is also referred to as Overtype mode. When in this mode, characters are overwritten at the cursor position towards the right margin. Text added at the cursor position automatically deletes and replaces the existing text. To activate overtype mode, do one of the following:
• Press the Insert key on the keyboard. To switch back to insert mode press the insert key again.
• From File tab, click Options. From the Word Options dialog box, click the Advanced tab then click on the box next to use overtype mode.
Undo and Redo commands
(i) The Undo command is used to cancel or negate a series of the last commands executed starting with the most recent in order to restore the status of the document. Assuming that the following command have been executed in the following order: delete, copy, and paste. When the undo command is executed,
122
the “paste” command will be negated first. The next execution of undo command will negate “copy” and another execution of the same command will negate “delete”. The undo command is executed using one of the following options:
• Press CTRL + Z on the keyboard.
• Click on the Undo command icon on the Quick Access Toolbar.
(ii) The Redo command is activated only when the undo command had been used earlier. It nullifies a series of the negated actions. The redo command is executed using one of the following options:
• Press CTRL + Y on the keyboard.
• Click on the Redo command icon on the Quick Access Toolbar.
Find and Replace
The Find command is used to locate a word or phrase within a document. This makes it easy to identify a word or words to be formatted or changed with another. Assuming that a document has many occurrences of the article “the” and needs to be replaced by the word “an”, the find and replace command facilitates this change. The Replace command is used to automatically substitute the located word with a new word.
(i) The Find command: The following are the steps followed to locate words:
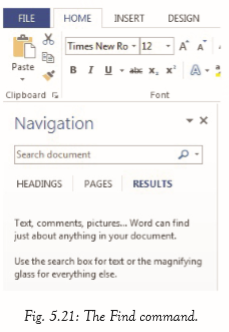
Click on Home tab on the menu bar, in the Editing group click on the Find command.
• The Navigation task pane appears as shown in Figure 5.21.
• This task pane can also be shown by pressing CTRL + F on the keyboard.
• Type the word to search in the Search Document box.
• All the occurrence of the word will be automatically highlighted on the document and a summary displayed as shown in Figure 5.22.
• Click on the close button in the navigation pane to exit the search as shown in Figure 5.23
123

(ii) The Replace command
To replace an existing word or phrase with a new one do the following.
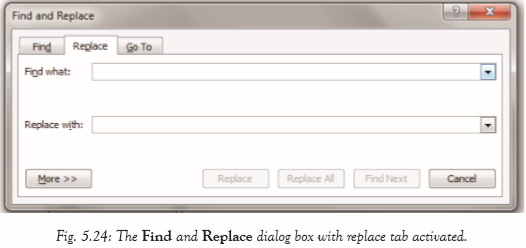
• Click on Home tab on the menu bar, in the Editing group, click on the Replace command. A dialog box is displayed as shown in figure 5.24. The box can also be displayed automatically by pressing CTRL + H on the keyboard.
• Type the word to be replaced on the Find what box, and the word to substitute it in the Replace with box. • Click on the Find Next button to locate the word in the document.
• Either click on Replace button to substitute one occurrence of the word at a time or click on the Replace All button to substitute all the occurrence of the word in the document at once
. • Click Cancel button to stop the procedure and close the dialog box.
124
Assignment 5.4
1. State the function of thesaurus.
2. Define the term proof reading.
3. Differentiate between find command and replace command.
4. Write the keyboard shortcut used to do the following:
(i) Move to the end of the document.
(ii) Move to the beginning of the document.
(iii) Open the Find navigation pane.
5. Describe how the vertical scroll bar could be used to move up or down one screen.
Learning Activity 5D
(a) Open a new document then copy INTERNET2 document created in Learning Activity 2 and do the following:
(b) Copy the first paragraph to the bottom of the document.
(c) Move the second paragraph to the paragraph after the words “information superhighway”
(d) Delete the third paragraph
. (e) Spell check the document.
(f) Find all occurrence of the word “large” in the document and replace it with the word “huge”.
(g) Save the changes as INTERNET3
Revision Exercise 5
1. Differentiate between the following:
(a) Moving
(b) Copying
(c) Deleting
2. Distinguish between spell checking and thesaurus.
3. Differentiate between the delete key and the backspace key.
4. Define the term selecting of text.
5. Outline the procedure used for sorting data in a paragraph.
6. Differentiate between End Key and Home Key functions.
7. Name the keys represented by the following symbols:
(i) Pgdn
(ii) Pgup
(iii) Ctrl
8. Define the term scrolling through text.
9. Differentiate between undo and redo commands.
10. Describe two types of typing modes that can be used in a word processing application.
125
UNIT 6 Word Processing Basics II
Key Competencies
By the end of this chapter, you should be able to:
(i) Manipulate text.
(ii) Use advanced formatting methods.
(iii) Add simple objects in a document.
Learning Objectives
Knowledge and understanding
By the end of this chapter, you should be able to:
(i) Explain the technique for manipulating a document.
(ii) Recognise the proofing features for editing a document including using track changes.
(iii) State when to use columns and breaks in a document.
Skills
By the end of this chapter, you should be able to:
(i) Manipulate a document by managing the layout of the page and the entire document.
(ii) Apply different methods to format text in a document.
(iii) Use proofing features for editing a document including track changes.
(iv) Use columns and breaks to organise the document.
Attitudes and Values
By the end of this chapter, you should be able to:
(i) Show interest in formatting and manipulating a document.
(ii) Appreciate advanced formatting and proofing features of word processing for editing a document including using track changes.
Key words in the chapter
• Page setup • Margins • Orientation • Watermark • Track Changes • Comments • Word count • Column
126
• Breaks • Styles • Drop cap • Nested list • Headers • Footers • Page numbers • Borders
Manipulating a document
A document can be formatted and edited in order to make it error free and appealing. One way through which this can be achieved is through changing the page setup of a document. The other ways are proofreading, adding breaks, styles, columns, and nested lists among others.
Page Setup group
It is found on the ribbon when the Page Layout tab is clicked. It is used to specify the margins and the orientation of a page among other specifications.
(i) Setting Margins
Page margins are the blank spaces around the edges of a page. Text and graphics are normally inserted in the printable area between the margins. However, some items can be positioned in the margins such as headers, footers, and page numbers among others
To set the margins do the following:
• Click Page Layout tab, from the Page Setup group and click Margins command.
• Click the margin type desired from the pull-down menu that appears. The margins are automatically adjusted.
• To set a customized margin, either click Margins, then select Custom Margins command or click on the dialog box launcher at the bottom of Page Setup group. A dialog box is displayed.
• Click on Margins tab on the dialog box that appears.
• Specify all the desired options and click OK to apply

127
Orientation
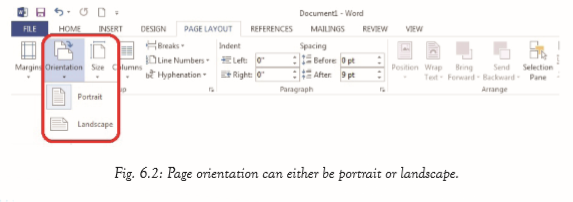
(i) Page Orientation
This refers to the positioning of the page in relation to the text or graphics. There are two types of page orientation.
• Portrait: This is where text and graphics are printed with the longest side placed vertically and the shortest placed horizontally.
• Landscape: This is where text and graphics are printed with the longest side placed horizontally and the shortest placed vertically.
Change the page orientation of an entire document
To change the page orientation of an entire document, proceed as follows:
(i) Click on the Page Layout tab, in the Page Setup group, click Orientation.
(ii) Select either Portrait or Landscape.
Using both portrait and landscape orientation in the same document
(i) Select the content on the pages or paragraph(s) whose orientation is to be changed to portrait or landscape.
(ii) Note: If some but not all of the text on a page is selected to change to portrait or landscape orientation, Word places the selected text on its own page, and the surrounding text on a separate page. (iii) Click on the Page Layout tab, in the Page Setup group, click Margins, then select Custom Margins command or click on the dialog box launcher in the Page Setup group.
(iv) Click on the Margins tab on the dialog box that appears.
(v) Under the Orientation section, select the desired orientation. (vi) Under the Apply to section, choose Selected text option. Click OK to apply.
128
Page borders
To create page borders do the following:
• Click anywhere within the page. Click the Design tab, in the Page Background group, click on Page Borders.
• Specify the settings, style, colour, art, and width.
• In the Apply to section, specify the area where the border will be effected
• To customize the margin, click on Option button.
• A dialog box is displayed as shown in figure 6.4.
• Click OK to close the dialog

129
Background
A background is also known as the page colour. It is used to create a more appealing background for online viewing. Backgrounds are visible in all the views except Draft and Outline view. Gradients, patterns, pictures, solid colours, or textures can be used for backgrounds.
If a document is saved as a Web page, the pictures, textures, and gradients are saved as JPEG (Joint Photographic Experts Group) files and the patterns are saved as GIF (Graphics Interchange Format) files.
A JPEG is a graphics file format with .jpg extension in Microsoft Windows. The JPEG format is supported by many Web browsers. It is used for compressing and storing photographic images. It is best used for graphics with many colours such as scanned photos. A GIF is a graphics file format with .gif extension in Windows.
The GIF format is used to display indexed-colour graphics on the World Wide Web. It supports up to 256 colours and uses lossless compression, meaning that no image data is lost when the file is compressed.
Adding a background to a document
Do the following to add a background in a document:
1. Click on the Design tab, in the Page Background group, click Page Color icon.
2. Do one of the following:
• Click the desired colour under Theme Colours or Standard Colours
. • Click More Colours and then select a desired colour.
• Click Fill Effects to add special effects, such as gradients, patterns, or textures. Select the desired colour before applying a gradient or pattern.
To remove a background, do the following:
1. Click on the Design tab, in the Page Background group; then click Page Colour.
2. Select No Colour
Watermarks
Watermarks are text or pictures that appear behind text in a document. They can be viewed in Print Layout view or in a printed document. If a picture is used as a watermark, it can be lightened or washed out, so that it does not interfere with the legibility of the text in the document.
Adding a watermark to a document
Do the following to add watermark:
130
1. On the Design tab, in the Page Background group, click Watermark icon.
2. Do one of the following:
• Select one of the predesigned watermarks, such as Confidential, Urgent or Disclaimer in the pull down menu displayed.
• Click Custom Watermark command. A dialog box is displayed as shown in figure 6.5.
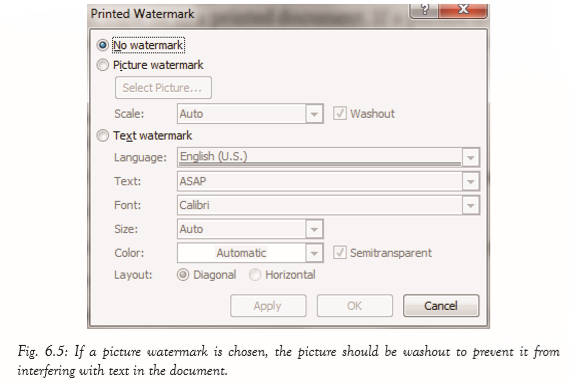
• Select either Picture watermark or Text watermark options. If the picture watermark is chosen, click on Select Picture button and insert the appropriate picture.
• If Text watermark option is selected, type the appropriate text in the Text box. Make all the other ne
1. Click on the Design tab in the Page Background group, click Watermark.2. Click on Remove Watermark command.131Learning Activity 6A 1. Create a new document.2. Add a watermark “No Pain, No Gain” diagonally on the page.3. Include a background colour of your choice on the document.4. Add a border and change its measurement to be 0.7 inches from text.5. Change the page margin to have the following measurements. Left margin 1.2 inch, right margin 0.9 inch, top margin 0.7 inch and bottom margin 0.9 inch.6. Save the document as My Page.Proofing features(a) Track changesIf this feature is activated, it enables the user to view all the changes that have been done on a document.To turn on track changes do the following:• Click on the Review tab in the menu bar, in the Tracking group, click the Track Changes icon. Click on track changes again. The Track Changes option will be automatically be turned on. Any changes done to the document will always be highlighted in red.• To add a track changes indicator to the status bar, right-click the status bar and click Track Changes. Then click the Track Changes indicator on the status bar to turn Track Changes on or off instead of using the menu option.(b) CommentsA comment can be inserted A comment is a note that an author or reviewer adds to a document. Microsoft Word displays the comment in a balloon in the margin of the document or in the Reviewing Pane. Comments can also be cleared or hidden to ensure that they do not appear in the document.Adding a commentTo add a comment do the following:(i) Select the text or item or click at the end of the text.(ii) Click on the Review tab, in the Comments group, click New Comment. A comment line is added with a comment balloon as shown in Figure 6.6. Type the comment text in the comment balloon.132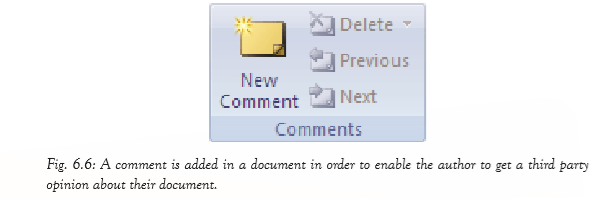
 Note: To respond to a comment, click its balloon, and then click New Comment in the Comments group on the Review tab. Type the desired response in the new comment balloon.Deleting a comment• To delete a single comment, right-click the comment, and then click Delete Comment or click on it then select Delete command in the Comments Group from the Review tab. • To quickly delete all comments in a document, click a comment in the document. On the Review tab, in the Comments group, click the arrow below Delete icon, and then click Delete All Comments in Document.(c) Word countWhen a document is being typed,
 Microsoft Word automatically counts the numberof pages and words in the document and displaysthem on the status bar at the bottom of the WorkspaceIf the word count is not displayed in the status bar, right-click the status bar, then and click Word Count option.Counting the Words in a SelectionIt is possible to count the number of words in a selected paragraph or sentence. To do this, simply select the text to be counted. Microsoft Word will automatically display the number of words in the selection at the status bar. For example, 11/2036 means133that the selection accounts for 11 words of the total numberof words in the document which is 2036Counting the number of pages, characters,paragraphs and linesThe Word Count dialog box displays the number
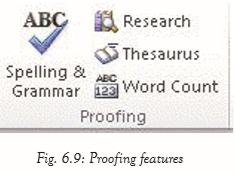 of pages, paragraphs and lines in a document.It also displays the number of characters, either including or excluding spaces.To view the word count, do the following:Click on the Review tab, in the Proofing group, click Word Count.A dialog box is displayed with all the possible word counts.
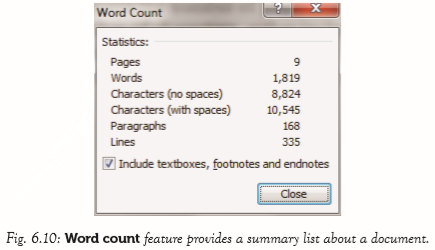 134Assignment 6.11. How are watermarks used?2. Explain the importance of washout feature used when a picture watermark is to be added.3. State the importance of adding breaks in a document.4. State the function of the Word Count feature.5. Mention the importance of adding a comment in a document.Learning Activity 6B Open My Page document created in Learning Activity 6A and do the following: 1. Type the National Anthem or your School Anthem.2. Add the track changes feature.3. Add a comment line.4. Write an explanation of each stanza of the anthem in the comment line.5. Spell check the document. 6. Save the document as AnthemColumnsThese are created to enhance the look of a document. The flow of the content from the bottom of one column to the top of the next one in the same page should be consistent. Columns can either be created using predefined or user-defined options.PredefinedTo create a column, do the following:
 • Select the text.• Click Page Layout tab from the menu bar;then click on the Columns command under Page Setup group• Click on the number of columns desired fromthe drop-down menu displayed.User Defined• Select the text.•Click Page Layout tab from the menu bar then click on the Columns command under Page Setup group. • Select More Column option from the resulting pull down menu.• Specify the column width and spacing, line between columns, number of columns, and where the column is to be applied. Click OK to apply once all the desired options have been selected.135
 BreaksA break is inserted in order to demarcate the end of a part and beginning of another. There are four types of breaks, namely the page break, column break, section break, and text wrapping break.(a) Page Break: It demarcates the end of one page and the beginning of the next. It is automatically inserted when the bottom margin is reached and a new page createdTo insert a page break, do the following:• Place the cursor where the page break is to be inserted.• Click Insert tab, then click the Page Break under Pages group.(b) Section Break: The section breaks include the Next page, Continuous, Even, and the Odd page section break.Use sections breaks to make (or fence in) other formatting changes on different pages in a document, in• Paper size or orientation• Headers and footers (remember to unlink the header or footer from its previous section).• Page numbering (remember to unlink the header or footer from its previous section).cluding:136• Line numbering. • Footnote and endnote numbering.User Defined• Select the text.• Click Page Layout tab from the menu bar then click on the Columns command under Page Setup group. • Select More Column option from the resulting pull down menu.• Specify the column width and spacing, line between columns, number of columns, and where the column is to be applied. Click OK to apply once all the desired options have been selected.135
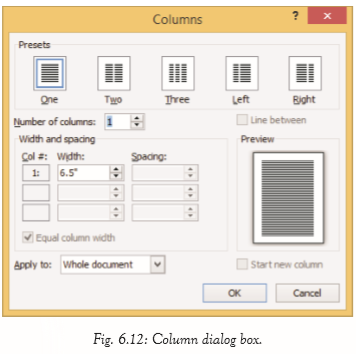 BreaksA break is inserted in order to demarcate the end of a part and beginning of another. There are four types of breaks, namely the page break, column break, section break, and text wrapping breakA break is inserted in order to demarcate the end of a part and beginning of another. There are four types of breaks, namely the page break, column break, section break, and text wrapping break.(a) Page Break: It demarcates the end of one page and the beginning of the next. It is automatically inserted when the bottom margin is reached and a new page created.To insert a page break, do the following:• Place the cursor where the page break is to be inserted.• Click Insert tab, then click the Page Break under Pages group.(b) Section Break: The section breaks include the Next page, Continuous, Even, and the Odd page section break. Use sections breaks to make (or fence in) other formatting changes on different pages in a document, including:• Paper size or orientation• Headers and footers (remember to unlink the header or footer from its previous section).• Page numbering (remember to unlink the header or footer from its previous section).136• Line numbering.• Footnote and endnote numbering
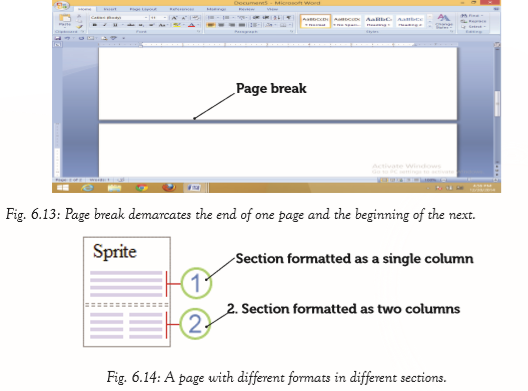 To insert a section break: Click Page Layout tab, in the Page Setup group, click Breaks. Select the desired type of section break. The following are some examples of section breaks:(i) Next Page section break: This inserts a section break and begins a new section on the next page.
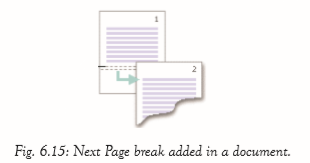 (ii) Continuous section break: This inserts a section break and begins a new section on the same page.137
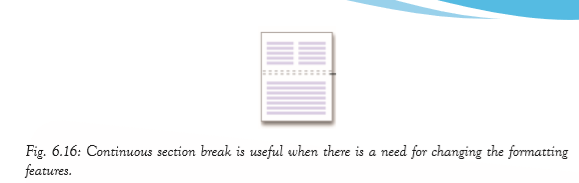 A continuous section break is useful
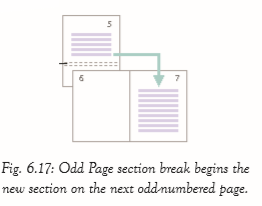 when the user would want to changethe formatting, such as changing the number of columns,without starting a new page.(iii) Even Page section break: This inserts a new sectionand begins the new section on the next even-numbered page.(iv) Odd Page section break: This inserts a section breakand begins the new section on the next odd-numbered page.(a) Column breaksIt is used to indicate that the text following the column break will begin in the next column• Click at the position where the column break is to be inserted.• Click on the Page Layout tab, select Breaks in the Page Setup group and then click Column.(d) Text wrapping BreakText wrapping breaks are used to separate the text around objects on a page. For example, it can be used to separate caption text from body text.• Click on the page where the wrapped text is to end.• Click on the Page Layout tab, select Breaks in the Page Setup group and then click Text Wrapping. Note: Text wrapping breaks are formatting marks that aren’t usually visible in a documentTo view these breaks, turn on the formatting marks by clicking Show/Hide in the Paragraph group on the Home tab. The text wrapping break character .will be shown indicating a text wrapping break.138StylesA user can create a style of their own using Word 2010 or they can make use of Quick Styles, which make it easy to create a professional and well-designed document faster. Formatting styles such as Bold, Italics, indent and font size could be applied directly through the Font group or paragraph group in the Home tab. However, if the same formatting is to be used for another heading or even for another document, then it becomes easier to define a style that can be re-used. Styles are specially packaged sets that apply many formats at once. They are there to be used over and over again. For example, one set of Quick Styles may include styles for several heading levels, body text, Font size, quotes, and title. All of the style colours and formats in a single style set are designed to be used together to create an attractive and readable document.(a) HeadingsThese are styles that have been defined in word processing application. Every heading comes along with its font size, colour, font and indentation among others. There are four main heading styles that the user can choose from namely: Heading 1, Heading 2, Heading 3 and Heading 4. The heading styles are necessary when the user want to create a table of contents. They are defined in a heading/subheading. Main heading is given heading 1 style, sub heading, heading 2 style and so on.FOR EXAMPLE
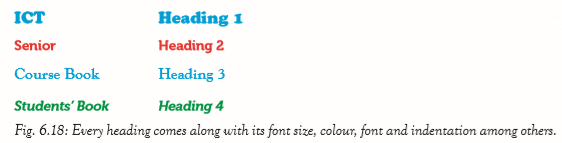 (b) Apply a StyleClick on the Home tab, in the Styles group, select a set of styles desired. Apply the styles from the convenient Quick Styles gallery as the document is being created.(c) Create a styleIt creates a style based on the formatting of the selected text.139To create a new style and add it to the Quick Styles gallery do the following:1. Select the text to be used to create the new style. For example, if the words “Business Information” is to be formatted so that it always appear as a red Heading 1 in a document.2. On the Mini toolbar that appears above the selection, select Styles then Heading 1 and finally click on Red color to format the text as shown in figure 6.19.
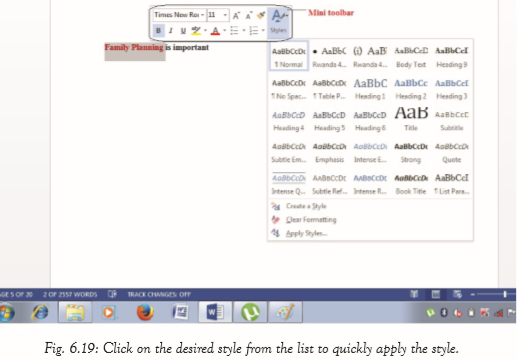 3. Right-click the selection, click on Styles then click Create a style command. A dialog box appears as shown in figure 6.20.
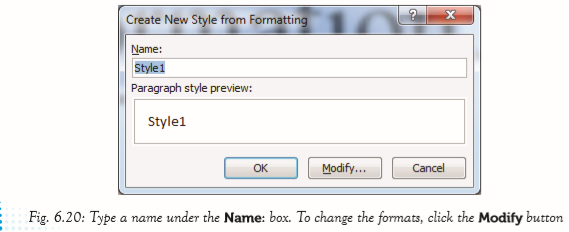 1404. Give the style a name, for example, Business Info, and then click OK or Modify to make other changes. The style created appears in the Quick Styles gallery with the given name, ready for application whenever the user desire to apply it.
 Clear Formatting1. Select the text whose style is to be erased. 2. Right-click the selection, click on Styles, and select Clear Formatting command. The formatting style will be changed back to the default style automatically.Nested listsBullets and numbers are used for the purposes of easier identification of items in the list. Nested lists refer to lists at different levels (sub-lists) that is a list within another list. To create a nested list, do the following:(i) Create the list with each item on its own line as shown below:VegetablesFruitsCereals(ii) Select the list then, click on the Numbering or Bullets icons from the Home tab in the Paragraph group.(iii) From the resulting menu, select the desired type of bullet or numbers. The selected text will have the selected bullets or numbers. For example:• Vegetables• Fruits• CerealsTo create a nested list under vegetables, do the following:(iv) Click at the end of the word vegetables.(v) Press the Enter key and then press on the Tab key. A new bullet is automatically inserted type the sublists.
• Vegetables • Fruits • Carrots • Cereals • Cabbage141To create another nested list for carrots which was under vegetables, repeat steps (iv) and (v).• Vegetables• Carrots• Contain carotene which is rich in vitamin A.• Carrots can be eaten raw or cooked. • Cabbage• Fruits• Cereals(vi) To close the current list level, either press the Enter key twice or press shift + tab.Drop caps t is a large capital letter usually at the beginning of a block of text that has the depth of more than one line of regular text. The letter “I” at the beginning of this sentence is a drop cap. To set a drop cap proceed as follows: • Highlight any character within the line
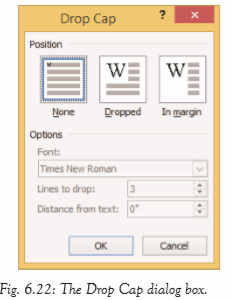 of text where the drop cap is to be inserted.• Click on the Insert tab, selectDrop Cap icon under text group• A drop down menu is displayed.• Select either the Dropped or In marginoption. However, to customize the options,click on the Drop Cap Options.A dialog box will appear, specify the position of the text,the number of lines to drop, font and distance from text. Click OK to apply.Headers and footersHeaders are lines of text or graphics that appear above the top margin of a page or selected pages. Footers are lines of text or graphics that appear below the bottom margin of a page or selected pages. To insert a header and footer do the following:• Click Insert tab from the menu bar; then click on Header or footer command from the ribbon. Under Header & Footer group, type the desired content to insert a header or footer respectively. Then press Enter.142A drop down menu appears. Click on the desired option.
 Assignment 6.21. Define the term drop cap.2. Explain how a header can be inserted in a document.3. List three types of heading styles that can be applied in a document.4. State the importance of using columns in a document.5. Differentiate between portrait and landscape orientation.Learning Activity 6CType the following text and save it as INTERNET DEVELOPMENTDevelopment of the InternetThe Advanced Research Projects Agency (ARPA) was the first research centre to set up a computer net work in 1969. It connected computers in four different universities and this was called an Arpanet. The use of electronic mail for communication by the researchers enabled data and information to be shared between these computers.This net allowed multiple users to work at the same time. Data and information was sent in packets with the address of the recipient, error detection control system and packet sequence information. This was called the packet switching technique. This net offered e-mail services only until 1973 and by 1979, media companies started getting connected to the net as new hosts.The American military used this net to tap intelligence resources and hence the American government increased the traffic by using it for commercial purposes.143By 1987, nearly 10,000 new hosts had been incorporated into the net with the United States of America and the nations in Europe getting the lion’s share of the net. With the increase in need of the net and its Internetworking importance, soft and hard ware companies raised in technology to meet the need, hence its dear advancement. The message transmission capacity (bandwidth) increased and the Internet services became cheaper. Close to 3 million computers had been hosted to the net by 1984. Rwanda has a number of Internet Service Providers (ISP).They include: Rwandatel, Tigo, LPSA and MTN Rwanda among others. Today, the net serves the Government and private organizations, individuals and groups, the military and the church, the media bodies and the public medics and patients, businesses and customers etc, in different spheres of life clustering the whole world in as very small open sphere called a village.Required(a) Create a heading one style of colour green, font size16, bold and underlined. It should have centre alignment. Save the style as net.(b) Apply the net style in the heading.(c) Drop cap the first letter of the second paragraph.(d) Put the second paragraph into three columns.(e) Put the last paragraph into two columns and a line in between. (f) Set the top margins to 2 inches and the bottom to 1.5 inches.(g) Double space the paragraph starting with “By 1987”.
Bullet the ISPs provided in the text.
(i) Include a nested list on the ISPs and add the countries where each one of them operates in.(j) Insert a page number in the document in the format of page x of y.Page NumberingThis is a formatting feature that organises a large document for ease of reference and makes it easy to track by inserting numbers beginning with the first page. To insert page numbers, do the following:• Click Insert tab on the ribbon that appears, click on Page Number from Header and Footer group.• Click the preferred option.144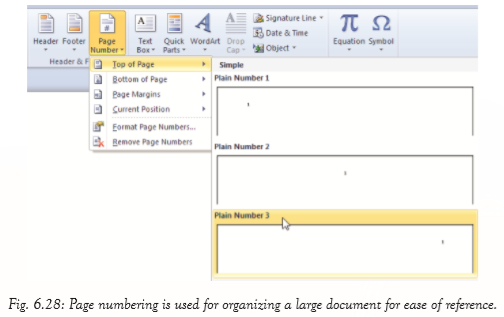 Revision Exercise 61. Differentiate between a header and a footer.2. Differentiate between an odd page break and an even page break.3. Explain how column breaks are inserted.4. Use diagrams to differentiate between the two types of page orientation. 5. Define the term styles. 6. Mention the importance of tracking changes in a document.7. List three features used for formatting text.8. Define the term watermark.9. List two types of proofing features.10. List two types of drop caps that can be used in a document.145
UNIT 7 Geographic Information Systems (GIS) and Maps
Key Unit Competencies
By the end of this unit, you should be able to:
(i) Define and recognise basic features of GIS.
(ii) Differentiate the elements or components of the interface of the GIS application.
(iii) Query a map and organise map layers.
Learning Objectives
Knowledge and Understanding
By the end of this unit, you should be able to:
(i) Understand the basic concepts of GIS.
(ii) Identify different elements of the interface of an ArcMap.
(iii) Know how to work with maps in a GIS environment.
(iv) Know and understand how to use different navigation tools.
(v) Know how to identify a location using a query on a map.
Skills
By the end of this unit, you should be able to:
(i) Explain GIS related terms appropriately.
(ii) Explore the ArcMap environment.
(iii) Navigate a map and show a certain section of a map in different scales.
(iv) Query a map and organize map layers.
Attitudes and Values
By the end of this unit, you should be able to appreciate the importance and function of GIS
Keywords in the Chapter


Introduction
GIS is a system designed to capture, store, manipulate, analyze, manage, and present all types of geographically referenced data; that is, data identified according to their location. GIS applications are tools that allow users to create interactive queries (usercreated searches), analyze spatial information, edit data in maps, and present the results of all these operations. It is a computer-based system that stores geographically referenced data.
It links it with non-graphic attributes (data in tables) allowing for a wide range of information processing including manipulation, analysis, and modelling. A GIS also provides for map display and production. The GIS software is used to take descriptive words of places on earth stored in databases and spreadsheets and display them as map layers.
The data is geospatial, that is, for every point to be mapped there is a unique set of numbers, latitudes and longitudes that describe the place.
Geographic Information Systems cover the following areas among others:
• Natural Resources: This includes forestry management, habitat identification, and evaluation
. • Community services: Examples include fire, ambulance, police, crime investigations, and utility management.
• Health: Mapping the spread of infectious agents.
• Water resources: Planning water needs, and mapping aquifers among other services.
• Minerals: Mapping oil, coal, natural gas deposits, and copper among others.
• Education: Mapping population demographics and school distribution.
• Mapping natural phenomena: Examples are the occurrence of volcanoes, hurricanes, floods, and earthquakes.
Components of ArcGIS
ArcGIS Desktop contains a set of integrated applications. There are three ArcGIS desktop applications namely the ArcCatalog, ArcMap, and ArcToolbox.
(i) ArcCatalog: This application is used for managing spatial data contained in the computer and other locations, managing database designs, recording and viewing metadata. ArcCatalog allows previewing of documents, and organization of geographic data and creation of sophisticated geodatabases to store the data.
147
(ii) ArcMap: This is the main mapping application that allows the creation of maps and query attributes and analyzes spatial relationships and layout of the final projects. It helps in mapping and editing tasks, as well as for map-based analysis.
(iii) ArcToolbox: This application is used for data conversion and geoprocessing. These three applications can perform any GIS task, including mapping, data management, geographic analysis, data editing, and geoprocessing
Definition of Terms
Definition of Terms
• Java edition (AEJEE): AEJEE is an abbreviation for ArcExplorer–Java edition for Education. It allows viewing and querying local data as well as ArcIMS services from the geodata.gov or other hosted sites. AEJEE comes with several pre-packaged project files, as well as sample data to get one started. It is no longer supported by Esri (ArcGIS developer) but it still serves a valuable need for schools using computers with limited capacity.
• PostGIS: It is a free open source extension for PostgreSQL databases. It is used for storing, manipulating, and retrieving spatial data. It adds spatial functions such as distance, area, and intersection to the database.
• ArcExplorer: It is a lightweight data viewer. It performs a variety of basic GIS functions including display, query and data retrieval applications.
• Layers: A layer is a method used to display geographic data sets in ArcGIS. Each layer points to a data set and specifies how that data set is represented using symbols and text labels. The features in layers are related to one another. Data set is represented using symbols and text labels.
• Raster Data: These are items, usually images that are composed of pixels. The images may be extracts of satellite images, scanned maps, aerial photographs, or any object that shows pixels when enlarged. Figure 7.1 shows Raster Data.
• Vector Data: These are images such as streets, rivers, railway lines, lakes, city blocks, and any other features that can be drawn on a map. An example of vector data is shown in figure 7.2.
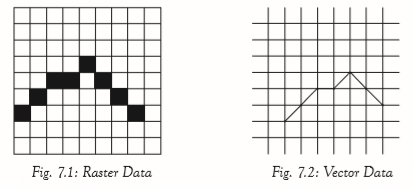
148
Assignment 7.1
1. Give five different areas where GIS can be applied.
2. Differentiate between:
(i) ArcMap and ArcGlobe
(ii) ArcCatalog and ArcScene
3. Define the following terms as used in GIS:
(i) Raster Data
(ii) Vector Data
(iii) Attribute
Learning Activity 7A
Do research on the Internet. Find out the type of institutions in Rwanda that are likely to be using GIS and maps. Find out the basic features of GIS they could be using.
The Interface of ArcMap
ArcMap can be opened from multiple locations. It can be opened from the Start menu or by use of an icon on the desktop.
To launch ArcMap, Click on the ArcMap icon pinned
 on the status bar.The startup window in figure 7.3 below appears.
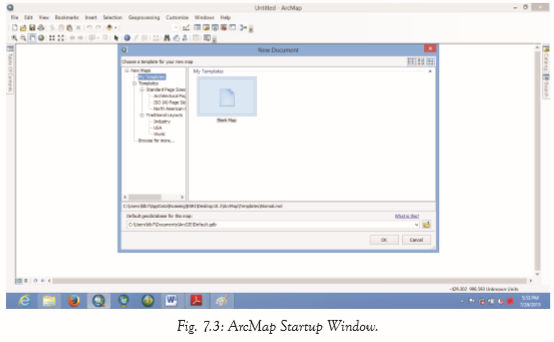
149
Click OK. The screen in figure 7.4 appears. The interface of ArcMap normally consists of Table of Contents (TOC), menu bar, status bar, main window, and toolbars.
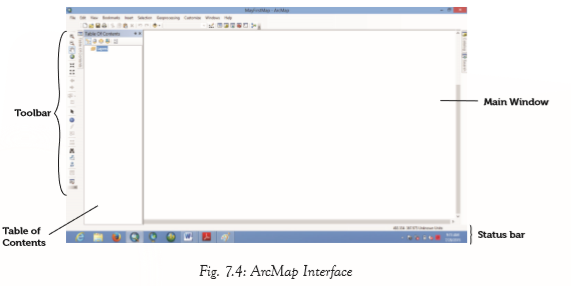
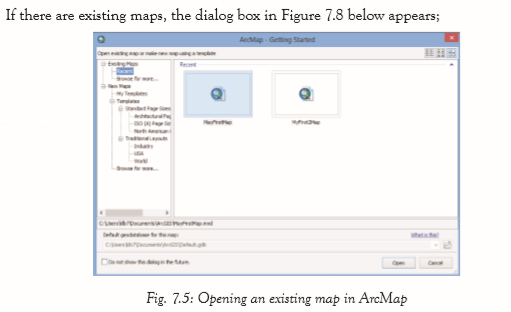
To open an existing map, select the map then click Open or double-click on the map. Clicking Cancel displays a blank window as shown in figure 7.6.
The following steps describe how one can open a new map using a template in an ArcMap:
(i) Start ArcMap by opening the Catalog window. The dialogue box in figure 7.6 appears
150

(ii) To open a new map, a template has to be chosen. Expand Templates and choose either from the Standard page sizes, from the Traditional layouts or Browse for more choices.
(iii) Clicking on World, displays the templates of the continents. Select the desired template, for example, Africa.

Click OK. The window shown in Figure 7.8 appears in the map display area of the ArcMap.
151
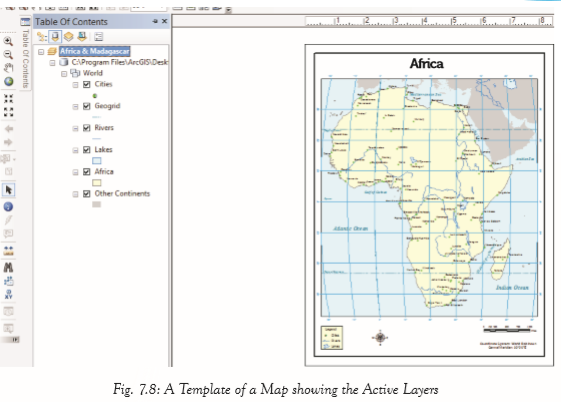
Table of Contents (TOC) The table of contents is used to manage the contents of the map display. it lists all the layers on the map. It also shows the features that each layer represents. The table of contents has the following command buttons:
(i) List By Drawing Order: The layers are listed by drawing order. Drag and drop to change the drawing order. When the layers tab is right-clicked, the commands are displayed.
152

• Add Data: The command is used to add new data to the maps in active data frame. Data can also be dragged into the map from the catalog window.
• New Group Layer: The command is used to add a new, empty group layer to the active data frame.
• New Basemap Layer: Adds a new, empty Basemap layer to the data frame. Abasemap layer is used to draw continously.
• Copy: Copies a dataframe(s) to the clipboard.
The menu bar
The Menu bar has options such as File, Edit, View, Bookmarks, Selection Geoprocessing, Customise, Windows and Help.
153

(a) The File Tab
The file tab enables the user to open a New window, open an existing file document, Save a document, save a document in a different location using Save As option, Save A Copy.., share a map package using Share as option, Add Data, Print, Print Preview, and Export Maps among other commands as shown in figure 7.10.
(b) The Edit Tab
The edit tab allows the user to Undo an operation, Redo an operation, Cut, Copy, Paste, Paste Special, Delete, and Copy map to clipboard among other operations as shown in figure 7.15.
(c) View Tab
The view tab contains the Data View, Layout View, Graph and Scroll Bar, Status Bar, Reports and Data Frame properties among other options.
Data and Layout View
ArcMap provides two ways of viewing a map; data view and layout view. Each view allows one to view and interact with the map in different ways.
• Data View provides a geographic window for exploring, displaying, and querying the data on the map. The view allows one to work using real-world coordinates and measurements. If the map contains more than one data frame, the contents of the active data frame will be displayed.
• Layout View allows working with the map layout elements such as titles, north arrows, scale bars, and data frame among others.
154
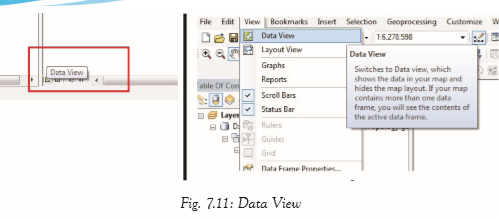
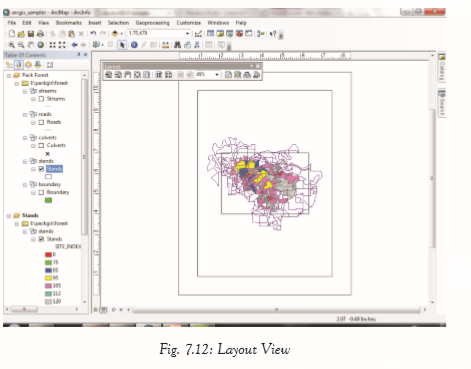
(d) Bookmarks
Abookmark is an item you save to a map.
Bookmarks provide shortcuts to place on a map. When one clicks a bookmark the map zooms to that location.
155
Assignment 7.2
1. State the different ways of launching ArcMap.
2. Explain the function of the three command buttons in the Table of Contents for ArcMap.
3. What is the function of the Add Data button?
4. Explain how one can switch between Data View and Layout Vew in ArcMaps.
5. What is a bookmark.
Learning Activity 7B
Define the basic features of GIS.
File Handling with ArcMap
ArcCatalog organizes spatial data contained on the computer and various other locations. It also allows search, preview, and addition of data to ArcMap, as well as managing metadata and setting up address locator services (geocoding).
ArcCatalog: Data Management
To open the ArcCatalog, double-click on the ArcCatalog icon on the desktop, or from the Windows Start menu, select the ArcCatalog. Figure 7.25 shows the ArcCatalog Icon. After opening the software, the screen in figure 7.26 appears.
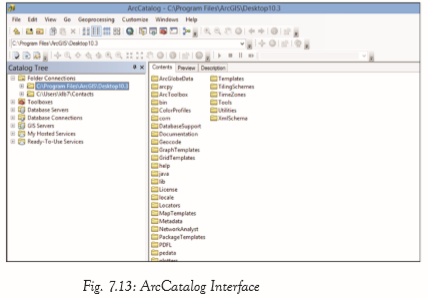
The screen lists a set of possible locations for data in the Catalog Tree. The screens may not look exactly the same. It is however easy to add directories for data by clicking on the ‘Connect to folder’ icon
 on the top left toolbar.
 156
Previewing Data
From the catalog tree on the left side, navigate to C:\Program Files\ArcGIS\Desktop 10.3\. A list of files will be displayed with various extensions. For example, the .shp extension of the file means that these files are in shapefile format and thus can be read by ArcGIS.
To be able to view file extensions, navigate to Customize, then select ArcCatalog Options and under the General tab unclick Hide file extensions and hit OK. Figure 7.27 shows Shapefiles as viewed in GIS data ArcCatalog. A combination of 3 to 7 individual files makes up a shapefile.

Description Tab
This tab provides an explanation of the files, spatial information, and a list of all of the attributes associated with a file.
Properties of Geographic Information Systems
(a) Location – Coordinates are used to give the exact location of an object.
(b) Attributes – Provides information about the location, for example, the population and the number of homes in a locality.
157
(c) Spatial Relationships – These are properties associating an object with other objects. These include the shape of the object and the relationship of an object with other objects.
Assignment 7.3
1. What is an ArcCatalog? Explain how it is different from an ArcMap.
2. Name and explain the different types of GIS files
3. Explain different properties of GIS.
Navigation Tools
The Basic Toolbar
Navigation is usually done using tools found in the basic toolbar. They are discussed as follows.
(a) Zoom In/Out: Zoom in is a tool used to enlarge the maps for a better view. To zoom in, click once on the Zoom In tool and then click anywhere on the map to be enlarged. Each click enlarges the map by a certain percentage. Zoom out is a tool used to reduce the size of the image
• To zoom out, click once on the Zoom Out tool and then click anywhere on the map. Each click on the map reduces the map by a certain percentage.
• Zoom in and zoom out can also be done by rolling the mouse scroll wheel in either direction.
(b) Fixed Zoom In/Out: Fixed Zoom in enlarges the image from the center of the page. To zoom, open the image and click on the Fixed Zoom In tool

• Fixed Zoom out reduces the image from the centre of the page. To zoom out, open the image and click on the Fixed Zoom Out tool .
• Fixed zoom in and zoom out functions can also be performed by rolling the mouse scroll wheel.
(c) Zoom to Full Extent: The tool zooms the image of the map to its full limit. After opening the map, click on the Full Extent tool

(d) Zoom to Previous/ Next: Zoom to previous tool takes the image back to the previous extent after navigating

• Zoom to the next extent takes the navigator go forward again through the sequence of extents one had viewed.
• The operations can also be performed using the < and > keys on the keyboard.
158
(e) Pan: Pan is to move an image horizontally or vertically from a stationary point in order to view from different angles. The map is panned by dragging on the screen.
• The pan tool
 can be clicked to re-centre the image or double-clicked to re-centre and zoom in. Holding down the C – key changes the cursor to the pan tool, then use the mouse to move the map.
• The map can also be moved by holding down the scrolling wheel of the mouse.
• To roam around the map, hold down the Q key or hold down the scrolling wheel of the mouse until the shape of the cursor changes, then roam as desired.
Query Methods
Query Using Find Tool
Find
 is a navigation tool used to search for locations using address or name of a place to find features that match particular attribute values and to find locations using linear referencing.
 Finding Features
To find Kigali from the map of Rwanda, do as follows:
(i) Click on the Find tool on the Tools toolbar. The find dialogue box shown in figure 7.15 below appears
 .
.
159Once the results of find are displayed, each feature can be navigated. Click an entry in the results list to flash it in the map (if it is within the map extent), double-click to Pan it (center the map on its location), or right-click to access a shortcut menu of the many operations that can be applied to the Find results.
Note: If one is using the default locator service from ArcGIS Online or another locator service on the web,
an Internet connection is required to use the Find tool.
Finding Locations
To find locations: (i) Click the Find tool to open the Find dialogue box and click the Locations tab. (ii) Identity the locator to be used. The window in figure 7.16 appears.
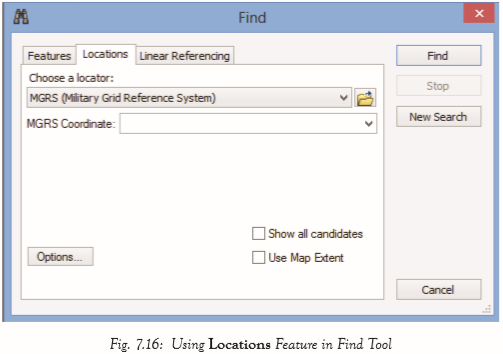
(iii) Enter the place name or address to be searched.
(iv) Click the Find button to search for and work with the results.
Linear Referencing
The Find tool can be used to locate events and observations with linear referencing onto line features. Linear referencing is the method of storing geographic locations by using relative positions along measured linear features.
One can find locations expressed as measures along routes. For example, one can find measures like the following;
160
• Find the point location of measure 20 along a certain route.
• An observation that starts at a measurement 36 and ends at 45.
Query Using Identify Tool
To view attribute values for a certain feature, use the Identify tool
 that can be accessed from the Tools toolbar. To use the Identify tool, follow the following steps;
 (i) Click the Identify tool on the Tools toolbar.
(ii) Click on a location in the data frame to identify the features at the location. The attributes are presented in the identify window as shown in figure 7.17.

(iii) Alternately, one can create a box to identify a group of features. Click on a location in the data frame, then drag to create a box. A window showing all the features within the selected box appears as shown in figure 7.31.
The attributes for the highlighted features are displayed at the bottom panel. Right – clicking a feature gives a drop-down menu shown in figure 7.32, that enables more operations such as zoom to, Flash, Pan to, Create bookmark Remove from Tree, Sort Ascending among other features to be performed.
161
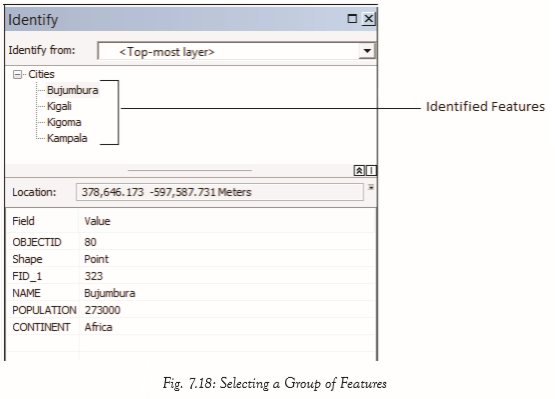

162
Feature geometry is needed to use the Flash, Zoom To, Pan To, and Create Bookmark commands. In some cases, feature geometry is not available, so these commands are unavailable. These cases include the identification of features from any WMS layer and features from an ArcIMS image service that does not include geometry in any query results.
Assignment 7.4
1. Explain the function of the following tools as used in GIS:
(i) Fixed Zoom In
(ii) Pan 2. What is linear referencing?
3. Explain how the attribute values for Lake Victoria can be determined in GIS.
Choosing the Layers to Identify
By targeting layers to identify, one can focus on what is relevant when exploring a map. The Identify Tool can be customized to narrow down the amount of data to be seen by either filtering the layers one is interested in or customizing the field properties of those layers.
The Identify Tool identifies the topmost layer in your map by default. Use the Identify From list at the top of the Identify window to choose the specific layer(s) to identify. The following options can be used:
• Topmost layer: Identifies the attributes of the feature(s) from the layer that is highest in the table of contents drawing order and currently visible. The option does not identify features in a layer that is turned off in the table of contents or currently not being drawn because of the scale of the map. With this setting, one can get the attributes of the feature clicked on without getting the attributes of features in other layers that are drawn underneath that feature.
• Visible layers: It identifies the attributes of the features that are currently visible in your map.
• Selectable layers: It identifies the attributes of the features belonging to selectable layers. One can manage the list of selectable layers in the table of contents List by Selection view.
• All layers: It displays feature attributes for all map layers in the data frame regardless of whether they are in the display or not.
• A layer: Select a specific layer in your map. If you choose a particular layer, its features are identifiable even if the layer is currently turned off in the table of contents or currently not being drawn because of the scale of the map.
163
Revision Exercise 7
1. Define GIS.
2. Give some of the areas covered by GIS layers.
3. Explain at least three components of ArcGIS.
4. With reference to GIS, define the following terms:
(i) PostGIS
(ii) ArcExplorer
(iii) Layers
5. Explain the different kinds of vector data.
6. Give the steps for opening a new map using a template in ArcMap.
7. Discuss some of the command buttons found in the Table of Contents (TOC).
8. Differentiate the two methods of viewing of data under the view tab.
9. What is a bookmark? Explain how it can be created.
10. ArcMaps have some basic requirements for handling data frames, explain them.
168
UNIT 8 Network and Internet Fundamentals
Key Unit Competency
By the end of this unit, you should be able to understand the rationale of a computer network and use the Internet efficiently and effectively.
Learning Objectives
Knowledge and understandingBy the end of this unit, you should be able to:
(i) Explain network and computer network terms.
(ii) Explain the role, advantages and disadvantages of a computer network.
(iii) Identify the common types of computer networks according to geographical areas.
(iv) Define the Internet and World Wide Web (www).
(v) Identify a webpage, web site, web browser, URL, and ISP.
(vi) Explain the importance of using the Internet in daily life.
(vii) Identify different methods used to connect to the Internet.
(viii) Explain the different types of search engines.
(ix) Identify and decipher search results on information from the Internet.
(x) Define and identify the advantages and disadvantages of using email.
Skills
By the end of this unit, you should be able to:
(i) Describe a computer network, the characteristics of a network, the role, and the advantages and disadvantages of a computer network. (ii) Classify a computer network according to geographical areas. (iii) Research Internet terms: Internet, World Wide Web (www), webpage, web site, web browser, URL, and ISP.
(iv) Apply different methods to connect to the Internet.
(v) Explore different search engines to perform searches on the Internet.
(vi) Apply and decipher search results using techniques to filter information from the Internet.
(vii) Create and manage an email account.
165
Attitudes and values
By the end of this unit, you should be able to:
(i) Appreciate the importance and power of a computer network and the Internet on daily life.
(ii) Enjoy improved communication and research by using the Internet efficiently.
Keywords in the Chapter
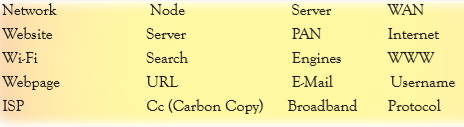
Computer Network Concepts
Definition of Network
A network is generally described as a system or group of interconnected objects or people.
Definition of Computer Network
A computer network is a set of interconnected computing nodes which communicate with one another through a transmission medium using a set of rules. The nodes share resources and services. A computer network must have sharable resources, transmission medium and set of rules (protocols).
Node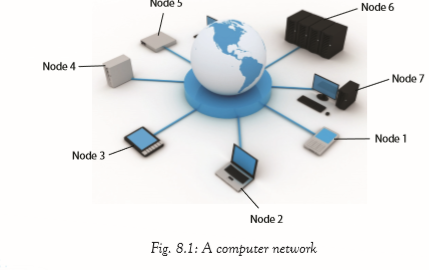
166
Characteristics of a Computer Network
The following are some characteristics of a computer network:
(i) Security: A network must provide protection data from unauthorised access, manipulation and implement policies for recovery from data loss.
(ii) Reliability: A computer network should work consistently to perform according to its requirement.
(iii) Transmission capacity: It must have two or more computing nodes connected using a transmission medium.
Role of a Computer Network
A computer network can be used to do the following:
(i) Store data centrally for ease of access and backup
. (ii) Communicate with other network users
. (iii) Share resources.
Advantages of a Computer Network
(i) Resource sharing: A computer network allows sharing of resources such as printers among the users in a network thus eliminating the need to have individual printers for each computer. This reduces the cost of purchasing and maintaining the resources.
(ii) Speed: A computer network provides a very fast means of sharing and transferring files thus saving time while maintaining file integrity.
(iii) Communication: A computer network provides the hardware necessary for exchanging information between the users in the network, for example, use of e-mail.
(iv) Work group computing: Many users in different geographical locations can work on a document or a project at the same time using workgroup software and hardware, thus saving time and traveling expenses.
(v) Security: A computer network allows administrators to manage critical data by regularly backing up and implementing security measures to control access to critical information.
(vi) Increased storage capacity: Many computers in a network provide a lot of memory that can be shared among the computers to increase the overall storage capacity.
(vii) Entertainment: A computer network supports multi-player computer games and entertainment.
167
Disadvantages of a computer network
(i) Expensive to install and maintain: High costs are involved in installing and maintaining the network, for example, the cost of cables, file servers, software and technical support services among others.
(ii) Failure of the server and other hardware: The whole network breaks down if the server fails and in some configurations, one broken cable or a malfunction of a node may terminate the functioning of the entire network.
(iii) Insecurity of information: Shared information in a network is exposed to hacking, cracking and eavesdropping among others.
(iv) Spread of computer viruses: Viruses can easily spread to other computers within a computer network.
Classification of computer network according to geographical areas
Types of Networks
There are four main types of computer networks classified according to geographical areas. They are Personal Area Network (PAN), Local Area Network (LAN), Metropolitan Area Network (MAN) and Wide Area Network (WAN).
Personal Area Network (PAN)
It is also known as Wireless Personal Area Network (WPAN). It is the smallest network used for data transmission among devices within the environment of an individual user. These devices may include Bluetooth-enabled devices or infra-red enabled devices such as a wireless printer, a telephone, a TV remote control, a wireless computer keyboard and a mouse among others.
• Bluetooth: This is a wireless protocol that connects electronic devices over a short distance of upto about 10 meters creating a PAN with a high level of security.
• Infra-red: This is a wireless electromagnetic energy technology with a wavelength longer than those of red visible light. It is use in conveying data from one device to another.
168
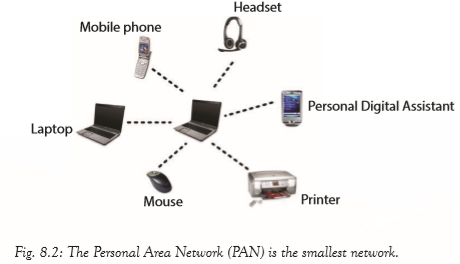
(a) Local Area Network (LAN
This is a network that covers a small geographical area for example, an office, a building, an institution, or an organization.
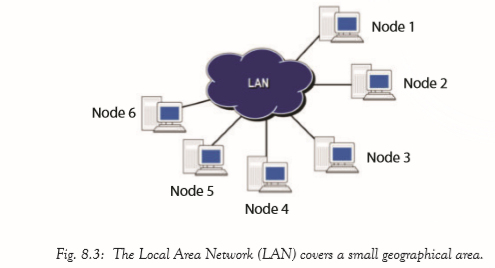
(b) Metropolitan Area Network (MAN)
A metropolitan area network covers a city or town. It can be made up of many LANs and can provide Internet connectivity in a Metropolitan region.
169

Differences between LAN and WAN

170Assignment 8.1
1. Define the following terms:(a) Network
(b) Computer Network
2. State three characteristics of a computer network
3. Explain two advantages of a computer network.
4. State two disadvantages of a computer network.
5. Classify computer networks according to geographical area.
Learning Activity 8A
Find out the type of network in your school and the neighbouring institutions.
Internet Concepts
Definition of the Internet
Internet stands for International Network. It is a worldwide network of computers connecting millions of computer networks via communication media such as telephone lines, wireless connections, and fiber optic.
Definition of Terms
• World Wide Web (WWW): It is commonly referred to as the Web. WWW refers to a large virtual space in the Internet where information pages called web pages are installed. The web pages can be accessed using a web browser.
• Webpage: This is Hypertext and hypermedia documents containing information about an individual or organization.
• Website: A collection of related web pages stored as a single file in a web server.
• Web browser: It is commonly referred to as a browser. These are programs used for displaying and viewing web pages on the World Wide Web (WWW), for example, Mosaic, Netscape Navigator, Internet Explorer, Mozilla Firefox, Opera and Google Chrome among others
. • URL: It is an abbreviation for Uniform Resource Locator. A website address is commonly known as URL. It is a unique address of each web page in a websites which identifies the location of a specific web page on the Internet.
• The URL consists of three parts namely; protocol, server name and resource ID.
171
• An example of URL is http://www.techrwanda.com
• ISP: This is the abbreviation for Internet Service Provider (ISP) is a licensed organization or company that provides access to the Internet usually at a fee. Examples of ISPs include Rwandatel, Tigo, ISPA, and MTN Rwanda among others.

Assignment 8.2
1. Define the term Internet as used in computer.
2. Write the following abbreviations in full:
(a) ISP(b) WWW (c) URL
3. Differentiate between a web page and website as used in the Internet.
4. Briefly explain the term web browser.
Learning Activity 8B Explore the Internet.
Find out the URL of:
(i) Your school
(ii) The Rwanda Education Board
(iii) other institutions of your choice
History of the Internet
Development of the Internet
The root of today’s Internet came from visionary people in the 1960’s for the purpose of information and research sharing. In 1962 packet switching was developed and it formed the basis of Internet connection. The Advanced Research Projects Agency (ARPANET) which was a branch of the department of defense was the first known fully operational packet-switching network.
172
In 1969, ARPANET began working on an experiment to determine whether computers at different universities could communicate with each other without a central system.

The corporation Bolt Baranet and Newman developed Interface Message Processor (IMP), the basis of the new communications system. IMPs were small machines which were dedicated to forming the network between computers. They used a technology which split large sections of data into small parts called packets, each labelled with its destination address, and later re-assembled at the destination computer. In 1970, Vinton Cerf and others, published a proposal for protocols and later ARPANET began operating Network Control Protocol (NCP) to enable computers to communicate. In 1974, Vinton Cerf together with Bob Kahn presented their protocol for packet network interconnection, which became the basis of the modern Internet. In 1978, TCP was split into two protocols TCP/IP (Internet Protocol). In 1982, TCP/IP was established as the protocol for ARPANET and by January 1983, all of the ARPANET was switched over from NCP to TCP/IP.
By the end of the 1980’s, a young British Scientist, Tim Berners-Lee assigned a common system of written addresses and hypertext links to all information. Hypertext is the organization of information units into connections that a user can make. In 1990, Lee started working on a hypertext graphical user interface browser and editor. By 1991 the first World Wide Web (WWW) files were made available on the net for downloading using File Transfer Protocol (FTP).
The mid 1990’s saw the introduction of search engines and by late 1990’s Independent Internet Service Providers (ISPs) such as Sprint and AT&T had so many subscribers. In 1993, the world started waking up to the WWW and at least 200 known HTTP
173
servers were connected. In 1994, Netscape Communications was born and Microsoft created a Web browser for Windows 95. Later in 1998 Google search engine was born changing how users engaged with the Internet.
Today the Internet is everywhere, enabling people to communicate and share interests in many ways more faster using sites such as Facebook, Twitter, Linked-In, YouTube, blogs, wikis, and many more.
Internet Uses in Daily life
Internet can be used in the following ways in daily life;
(a) Communication: Through electronic mails (e-mails), social sites, chat rooms and newsgroups, Rwandese can easily exchange information within and outside the country.
(b) Research: People use the Internet to get information on various topics. For example, university students in Rwanda can use the internet to research on topics of study.
(c) Business: Customers can buy and sell goods and services through the Internet. They can pay for the goods and services through Electronic Funds Transfer (EFT), cheques and credit cards among others. In Rwanda, people are able to buy goods from other countries in the comfort of their homes.
(d) Education: The Internet is used in various ways such as distant education or online education, Internet or Web-based training. It can also be used to take up short term courses with the course materials available online, attend virtual classes, learn and take examinations.
(e) Medicine: Medical practitioners are using the Internet to update themselves on specific areas of interest and even take refresher courses to enhance their medical knowledge for better services. This has enhanced delivery of services in Rwanda hospitals.
(f) Internet banking: Bank customers access their accounts and carry out transactions through the Internet. Rwanda people are able to tranfer money online from one account to another without necessarily having to physically visit their respective banks.
(g) Entertainment: Internet provides various forms of entertainment, for example, one can play games, watch online movies, upload and download entertainment materials such as music.
174
Methods /Ways of connecting to the Internet
Connecting to the Internet can be done using the following ways:
(i) Dial up
It involves connecting a computer to an Internet Service Provider (ISP) by use of a modem and telephone line such as a Subscriber Identity/ Identification Module (SIM) card, only when accessing the Internet. The connection is terminated once the user logs out from the Internet. Dial-up Internet connection is mostly used in rural or remote areas where broadband Internet access is not available. However, dial up Internet is potentially approaching extinction because of the advancements in wireless technology.
(ii) Broadband
This is a high capacity transmission technique that uses a wide range of frequencies to enable a large number of messages to be communicated simultaneously. Some examples of broadband are Wi-Fi , 4G and satellite among others.
(iii) Wi-Fi
Wi-fi stands for Wireless Fidelity. This is a wireless networking technology that uses radio waves to provide high-speed Internet and networking connections. Examples of Wi-Fi enabled devices includes laptops, cell phones, tablets, iPads, and peripheral devices such as the mouse, printers and keyboards among others. They communicate with a single computer which is fitted with a Wi-Fi adapter.
Getting online
Web browser
These are programs used for displaying and viewing web pages on the World Wide Web (WWW), for example, Mosaic, Netscape Navigator, Internet Explorer, Mozilla Firefox, Opera Mini and Google Chrome among others.

175
Basic parts of a web browser
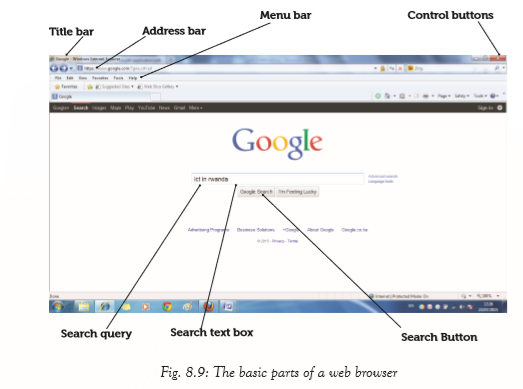
The following are basic parts of a browser window:
(a) Menu bar – It consist of a list of menus to choose from, for example, File, Edit, View, Tools, and Help.
(b) Control buttons – These buttons are found on the far right-side of the title bar of the search engine and include the following:
• Minimize: It removes a web page window from a view to an icon on the taskbar.
• Restore Down: It reduces the size of a web page window.
• Maximize: It enlarges the web page window and fills up the screen.
• Close: It exits the active window.
(c) Address bar: This is where an address (or name) is typed so as to go to a given web site page. An example of a web site address is www.techrwanda.com.
(d) Search Text box: This is where keywords are typed to describe the information that one wants to find. (e) Search button: It is the command button clicked in order to initiate the search.
(f) Search Query: It is the information typed by the user to help the search engine decipher the required information.
176
Web Address
A website address is commonly known as Uniform Resource Locator (URL). It is a unique address of each web page in a websites which identifies the location of a specific web page on the Internet.
The URL consists of three parts namely; protocol, server name and resource ID. An example of URL is http://www.techrwanda.com
Assignment 8.3
1. Give a brief description of the Internet history.2. Explain the application of the Internet in the following areas:
(a) Communication
(b) Research
(c) Education
3. Explain two ways in which one can get connected to the Internet.
4. Explain three basic parts of a web browser.
5. State the three main parts of a website address.
Learning Activity 8C
Explore the Internet connection in your school. Identify the method of connection.
(i) Find out the web address of your school
(ii) Write the domain of your school.
Search Engines
Search Engines are programs that help a user to look for and identify items that corresponds to keywords or phrases specified from the World Wide Web. Examples include; Yahoo, Google, Bing and Ask.com among others.
Advantages of search engines
• They provide precise results.
• They have indexes representing important parts of the Internet which offer a wide range of information resources.
• They enable users to describe the information being searched.
• They enable users to locate and access information in different websites.
• They reduce the time taken to locate desired information.
• They provide a wealth of information for professional and personal use.
Disadvantages of search engines
• Tiresome and complex to search if the keyword typed is ambiguous. Many users get discouraged and frustrated because of the many links they have to search
177
before getting the correct information.
• A lot of irrelevant information gets displayed after typing a keyword.
• A lot of distractions from advertisements that keep on popping up.
• A link to sites containing viruses could be displayed as a search result.
List of search engines
The following are some examples of search engines.
a) Google (b) Google scholar (c) Yahoo! (d) Bing (e) Ask.com (f) Wikipedia (g) WiseGeek.com
Deciphering search results
Deciphering is the conversion of text written in code form into natural language. A search engine results page displays a lot of different information. In fact, one may not be aware of all the different types that appear. From vertical search engine results to related new stories, to suggested spellings, the results page offers all sorts of ways for one to dig dipper into a subject.

178
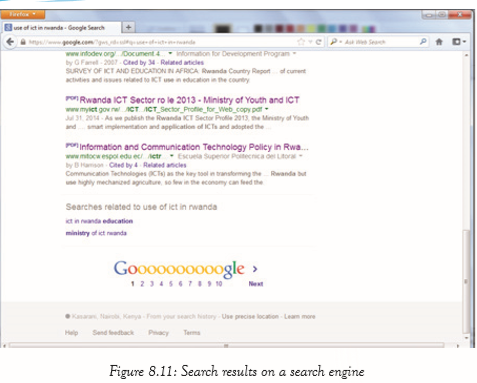
Procedure for deciphering search results
(i) Type your search query in the Search Box.
(ii) Click on the Search Button. The result is displayed with the following sections:
Search Box: The box where you type your search query. In this case it is “Use of ICT in Rwanda.”
Search Verticals: Links to the vertical search engines, the specialized ones that narrow your search into a specific type of result, such as news or images. Clicking one of these links takes you to a results page with only news or only images.
Page Count: The number of Web pages the search engine finds that match your search query in some way.
Time the Search took: How long the search engine took to retrieve your results.
Related Searches: Other topics that contain your query or other searches the search engine thinks might be relevant.
Images: Picture files that match your query. This comes from Images vertical engine. Clicking the link would take you to the vertical search results.
News Results: Any news results pertaining to your query or containing a keyword. These come from the vertical news engine. Clicking the link would take you to the news page.
179
Sponsored Links: These are paid advertisements (ads). Note how some of them relate to a specific geographical location near you. This is thanks to the local vertical search engine.
Organic Results: The listing results from a general search of Google’s index, with algorithms applied to determine relevance. Pagination: Links to the additional pages of results.
Disambiguation: The “Did you mean . . . ?” suggestions that usually display after a misspelled search query or search queries that turned up very few results. It is the search engine’s way of trying to guess what you actually wanted. When the search query is spelt correctly, no disambiguation appears. You can test this feature for yourself by typing a mispelt query in Google.
(iii) Click on one of the options within the sections to access the web page.
Assignment 8.4
1. Define the term search engine.
2. State two advantages of using a search engine.
3. Outline two disadvantages of search engines.
4. List three examples of search engines.
Learning Activity 8D
Search for information on the following topics and do brief write-ups:
(i) The harmful effects of drug and substance abuse
(ii) The importance of conserving the environment
(iii) The dangers of engaging in premarital sex
(iv) The importance of maintaining peace in a country
Electronic Mail (E-Mail)
E-Mail refers to a system of exchanging messages electronically over a computer network. The user must have an e-mail address in order to use e-mailing services.
E-mail address
The following is a sample format of an e-mail address:
username@hostcomputer.domainname
Explanation
• username: It identifies the owner of the e-mail address.
• @ (“at” sign): Separates the username from the rest of the address parts.
180
• hostcomputer: The name of the remote server on which the e-mail account is hosted. For example gmail, yahoo, and hotmail among others.
• .(dot): Separates the domain from the other part of the e-mail address.
• domain name: It identifies the type of institution offering the services. This has been discussed earlier in this book.
• For example, nkwanga@gmail.com, nkwanga is the username, gmail is the host computer and .com is the domain name for a commercial organization.
Advantages of E-Mail
(i) It allows sending of one mail to many recipients at the same time.
(ii) It is cheaper compared to traditional mails.
(iii) It is convenient since it allows sending and receiving mails from anywhere in the world.
(iv) E-mails can be saved for future retrieval.
(v) It is easier to reply and forward mails.
(vi) Allows sending and receiving of any form of information.
Disadvantages of E-Mails
(i) Requires some computer literacy to use.
(ii) E-mails are not accessible to everyone due to Internet connectivity problems.
(iii) Expensive to set up. (iv) Allows spread of viruses such as hoax.
Creating an e-mail account
Follow steps:
(i) Open the e-mail application software. Then select Check Mail option. The Sign in dialog box is displayed.
(ii) Click Sign Up and follow the procedure provided in the application.
Note: When creating a password for the account ensure that the password is strong enough. A strong password should have a minimum of 8 characters and should be a mixture of both letters, numbers and if possible symbols.
• Passwords are case sensitive.
• Always use a combination of characters that you can easily remember.
• Avoid using characters that can be guessed.
• Passwords are always encrypted for security purposes.
181
For example: To create a mail account in Gmail, the steps are as follows:
(i) Open Gmail application software.
(ii) Click Create an account link in the Sign in dialog box. This will open the sign up page.
(iii) Type the required information on the sign up page.
A sample of the page is shown in Figure 8.12.

(iv) Finish by clicking on the check box “ I agree to the Google’s Terms of Service and Privacy Policy”.
(v) Click Next Step button.
Sending and Reading messages
Before sending and reading a message, the user must open their account. The procedure of opening an account is referred to as Signing in.
Sign In
To sign in to an existing account do the following:
(i) Open the web browser software installed in the computer.
(ii) Open the e-mail application program to display the sign in window.
A sample is shown in figure 8.13.
(iii) Type the e-mail address under User Name box and password under the Password box.
(iv) Click Sign in button to open the e-mail.
182
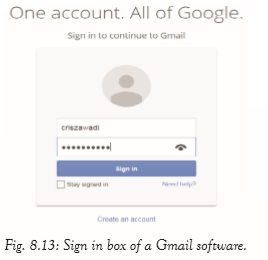
Receiving a message
Upon signing in, the user’s inbox is automatically opened. The messages are displayed in three columns showing the name of the sender, the subject and the Date/Time when the mail was sent. To read a message, click on the Subject. Once the message is read the user can decide to select one of the following options available on the message window: Reply, Reply to All, Forward, Move and Delete among others.
• Reply: This option is selected if the user desires to respond to the read mail.
•Reply to All: This option is selected if the user desires to respond to all the addresses listed in the CC, BCC and To box. Both CC and BCC forward a copy of the message to everyone listed as a recipient. The difference between CC or Carbon Copy and BCC (Blind Carbon Copy) is that, with the latter, the recipients do not get to know each other.
• Forward: This option is selected if the user desires to send the same message to other e-mail addresses.
• Delete: This option is selected if the user desires to erase the mail. Note that deleting the message only sends it to the Trash folder. The user can retrieve the message from this folder if so desired.
• Move: This option is selected if the user wishes to remove the message from the Inbox folder and transfer it to another folder.
Sending messages
The user can either compose a new message or send one that already exists in their inbox. Composing is the process of creating a new mail.
183
To compose a message do the following:
• Click on the Compose button in the e-mail account window. A dialog box appears.
• Click at To text box and type the e-mail address of the recipient. Note: To send the same message to a number of people the following options can be used. X Cc (Carbon Copy): When this option is used, the list of all the recipients appears in each recipient’s mail. X Bcc (Blind Carbon Copy): When this option is used, the list of all the recipients is hidden from the other recipients of the mail.
• Click at Subject text box to type the title that describes what the e-mail is about.
• Type the message in the body section. Note: E-mail text can be formatted the same way as in a Microsoft Word document using the formatting bar.
• Click Send button once the message is completed.
• To permanently delete the message, empty the trash folder.
 Organise email messageThe following are some of the ways of organising an Email.184MoveAn email in the inbox can be transferred from the inbox to another folder. The following is the procedure for moving an email.1. Select the emails to be stored in a folder by checking the box to the left of the email’s name or thumbnail. Note: Multiple emails can be selected to be moved at once.2. Move the emails into the folder by clicking the Move to button at the top of the email list and select the name of the folder from the drop-down menu.Note: If multiple emails have been selected, they will move together.
 DeleteAn email can be erased from the account using either of the following procedures: Click on the email and then click the Delete button.OR Right-click on the Email message and click Delete from the pop-up menu.185
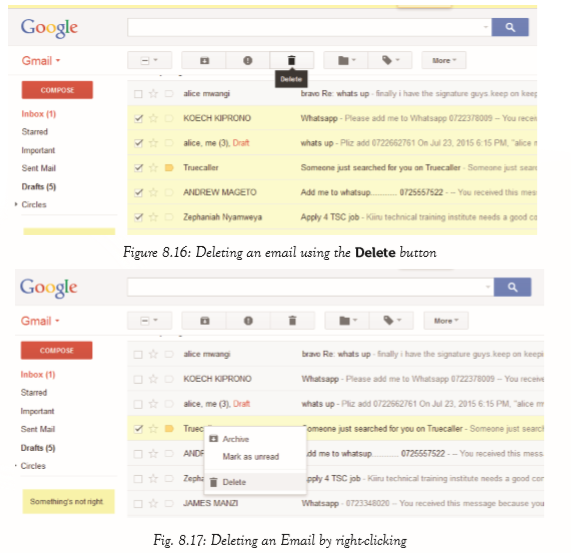 Add or switch folders1. On the left side of the page, click More at the bottom of the labels list.2. Click Create New Label.3. Type the name of the new label and click Create.4. Gmail does not use folders. Instead, it uses labels to help the user organize the mails more effectively.186
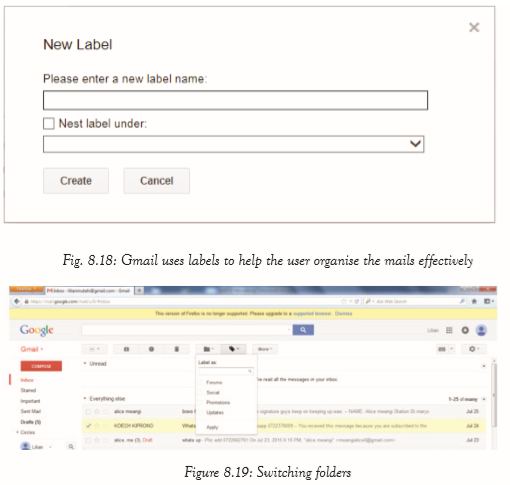 Comparison between labels and folders
 Address BookIt is an online contact manager used to store all contact information and it makes it easy to keep track of names, e-mail addresses, phone numbers, fax numbers and a lot more. It is possible to add a contact to the address book from an e-mail message.187To add names to the address book:(i) Click on Add contact option. A dialog box is displayed.(ii) Type the details of the contact requested.(iii) Click Add on the dialog box. The window is automatically closed.Using the address book(i) Once a contact exists in the address book, when the user starts typing the e-mail address, a list of all the possible contacts that match it are displayed.(ii) Select the desired contact.(iii) Press the Enter key.Uploading/Attaching a document to an e-mailIt is possible to attach one or more files to an e-mail address. The attachment could be a Microsoft Word document file, a spreadsheet, a sound file, a video file, or a picture file among others.To attach a file do the following:(i) Click on the Attach command button. A dialog box appears(ii) Select the file to be attached then click Open button. The attachment procedure begins.(iii) Once the procedure is complete, click the Send button.Note: Once a message is sent, a copy is stored in the Sent folder.Downloading Information from NetDownloading is the process of getting information from the Internet. This information can be viewed, backed up (saved) or printed. Any attachment sent in an e-mail needs to be downloadedTo download a file, do the following:(i) Click File on the page to be downloaded.(ii) Select Save As option and follow the procedure for saving a document.To print the page without saving, do the following(i) Click File on the page to be downloaded.(ii) Select the Print option and follow the procedure for printing a document.Assignment 8.5
1. Define the following terms:(a) E-mail(b) Hyperlink(c) Password2. State three advantages of using an e-mail.3. Define the term downloading.4. What is the role of an address book in an e-mail.5. State three characteristics of a strong password.188Learning Activity 8E Work in groups1. Create email accounts with assistance from the teacher.2. Exchange emails among yourselves.3. Search the Internet for information on the effects of the Internet on Rwanda’s economy. Do a brief write-up.Revision Exercise 81. Differentiate between LAN and WAN as used in computer.2. Explain WI-FI as an Internet connectivity method.3. Differentiate between BCC and CC.4. State three disadvantages of using an email.5. Explain the different parts of an email address.189UNIT 9: Music Sprite Programming
Keywords in the chapter
Introduction
Scratch is a free programming language that allows creation of interactive games, animations, music and stories that can be shared around the world.
A sprite is an object that performs actions in a project. Most projects contain at least one sprite. Sprites can be created by the user in the paint editor that is part of the Scratch program or can be imported from external sources. Scratch program was developed and is maintained by the Lifelong Kindergarten group at the Massachusetts Institute of Technology.
Opening a Scratch program
To open the Scratch program, do either of the following:
1. Click the Start button.
2. Select
 from the resulting menu.
 OR
Double-click on the Scratch shortcut icon from the computer desktop as shown in figure 9.1.
190
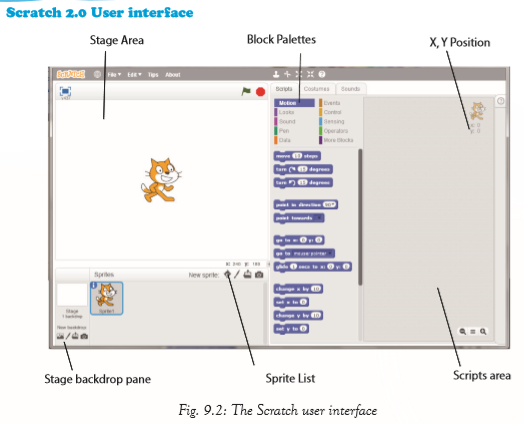
By default, the Scratch user interface divides the screen into four main areas:
1. Stage area: It displays the sprite(s) and the results. It contains the View full screen button, project title and two script control buttons, that is, Green Flag and Stop buttons.
• View full screen: Clicking on the button shown in figure 9.3 makes the stage area to cover the whole screen. The button changes and appears as shown in figure 9.4 (b).

To restore to the previous view, click on the button again.
• Project title: This is the name of the project. It only appears after the project has been saved.
191
• Green Flag: This button is used for starting all scripts in a project that are hatted with the ‘when Green Flag clicked’ block.
• Stop button: Stops all scripts in all sprites.
2. Sprite list: It is located at the bottom left area of the Scratch window and displays sprites as thumbnails. Each thumbnail contains information about the selected sprite and tools for manipulating the sprite. Sprite information is accessed by clicking the blue button which displays the information and manipulation tools as shown in figure 9.5 below:
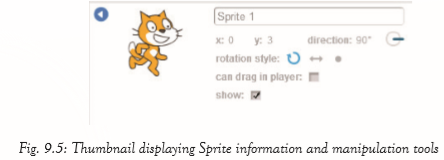
To change the sprite’s name, simply click in the box labelled Sprite1 and type the preferred name.
3. Scripts Tab: This tab contains the block palettes that are activated by clicking. It is located in the middle of the Scratch window and contains blocks that can be dragged onto the scripts area to make a project. Dragging a block from the Block Palettes makes a copy to follow the mouse until it is dropped where desired in the scripts area.
It is organized into 10 groups of block palettes, that is, Motion, Looks, Sound, Pen, Data, Events, Control, Sensing, Operators and More Blocks as shown in figure 9.6.

192
Learning Activity 9A
The teacher to instruct the learners to point at each block palette from the scripts tab and click on to navigate.
• Motion blocks: They are used to control how sprites move and change angles or direction.
• Looks blocks: They are used to control how sprites appear, for example, displaying thought bubbles or speech, changing sprite colour and making the sprite larger or smaller among others. • Sound blocks: They are used to control sound and play audio files.
• Pen blocks: They are used to draw by controlling pen width, colour, and shade.
• Data blocks: They contain variable blocks and list blocks. The variable blocks are used to hold values and strings in variables as well as displaying them using stage monitors or watchers while list blocks are used to manipulate lists.
• Events blocks: They contain event handlers which are placed on top of each group of blocks to activate scripts to run.
• Control blocks: They are used to direct scripts, for example, forever, if then, wait until and repeat until among other conditions.
• Sensing: They are used to interact with the surrounding of a project.
• Operators: They contain mathematical operators and strings that compare sprite positions.
• More Blocks: They contain custom procedures (blocks) and extensions for the selected sprite. It includes Make a Block and Add an Extension buttons that allow the user to create more blocks.
4. Scripts area: It is located at the right side of the Scratch window and it is where blocks are combined to form scripts which in turn form a project. Other tabs in Scratch user interface window include Costumes, Sounds, and Help.
(a) Costumes tab: This tab contains a list of costumes for the selected sprite
A costume is a frame or other appearance of the sprite. Sprites can change their appearance to any of their costumes. They can be created, named and edited and are commonly used in making animations for games or projects. Clicking on frame switches the sprite to the selected costume. It contains the name of the selected costume, costume as a thumbnail and tools to manipulate the costume as shown in figure 9.7.
193
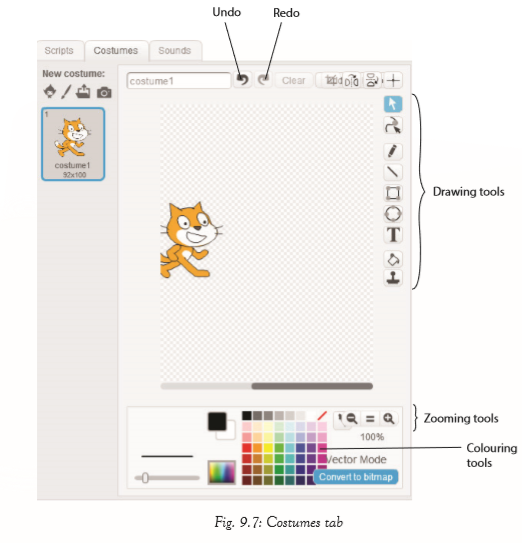
194
To add new costumes, click one of the following:
(i) Giga button
 . It opens the built-in costume library on sprites from which a costume can be chosen. Figure 9.8 shows Costume Library.
(ii) Paintbrush button .
It opens the paint editor and is used to paint new costumes. Figure 9.9 shows Paint editor window.

195
(iii) Import/ Folder button : It opens a file browser and is used to upload sprite or image from a file.
(iv) Camera button : It opens a camera and is used to create new costume from camera.
Learning Activity 9B
1. Insert bear 1-a from the costume library from the animal category and apply different colours on it.
2. Draw different shapes and fill them with colours of your choice.
3. Zoom the figure to 200%.
Three options are displayed when a costume thumbnail is Right-clicked, that is, Duplicate, Delete and Save to Local File.
• Duplicate: Creates a copy of the costume.
• Delete: Erases the costume.
• Save to Local File: Saves the costume in any location as desired.
(b) Sounds tab:
This tab contains a list of audio clips and is used to insert sounds and music to a sprite. It contains the name of the selected sound and a speaker as a thumbnail. For example, the sound name in Figure 9.10 is bird.
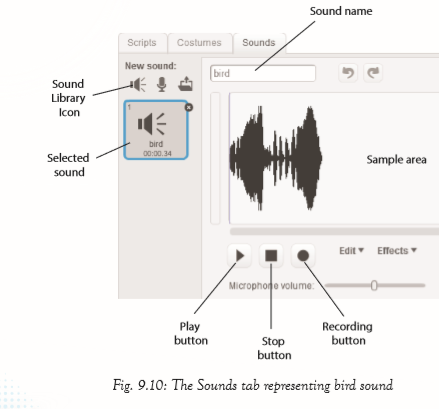
196

(ii) Record button
 : It opens the sound recorder that enables sound to be recorded from an external device.
(iii) Folder/ Import button
 : It opens a file browser and is used to upload sound from file.
 (c) Help: This is an expandable bar at the right side of the Scratch user interface window that contains tips on Scratch 2.0. It also displays Help information about a particular block. To get information about a particular block, right click on it and click on the Help command that pops up. Click on Help button to expand and Close button to minimize. Figure 9.12 shows the Help bar.
(d) Stage backdrop pane: The term backdrop refers to a frame or background of the stage. The backdrops pane is located at the bottom left, next to sprite list area. It is used to choose a backdrop from the library, paint new backdrop, upload backdrop from file and add new backdrop from camera.
The Scratch Toolbar
The toolbar appears at the top of the Scratch program window and is used to carry out very important functions. The word “Scratch” appears on the left upper part of the window followed by an image of globe or sphere. Clicking on the globe displays a dropdown list with all the languages in Scratch, for example, English. The toolbar also contains menu options, that is, File, Edit, Tips and About as shown in figure 9.13:
197
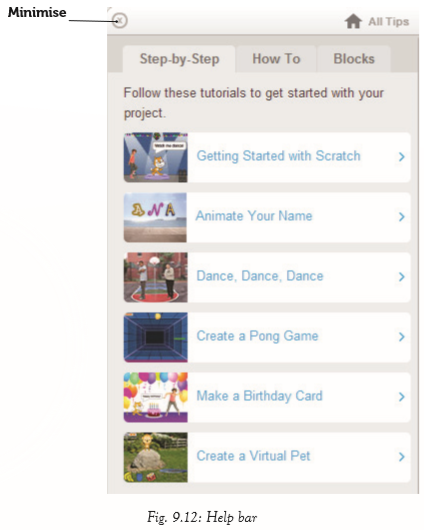

(a) File menu option: Clicking on the drop-down arrow next to “File” displays the following menu options:
• New: Creates a new project.
• Open: Displays a dialog box that allows opening a project from file.
• Save As and Save: Discussed earlier in other programs.
• Share to Website: It is an online feature that allows sharing of a project onto the Scratch website.
198
• Check for Updates: It is an online feature that allows checking for updates for the offline editor.
• Quit: Exits the Scratch application.
(b) Edit menu option: Clicking on the drop-down arrow next to “Edit” displays the following menu options:
• Undelete: Cancels any deletion that had been recently performed.
• Small stage layout: Reduces the size of the stage area.
(c) Tips: Opens help area.
(d) About: It is an online feature that connects the user to the Scratch website.
Other cursor tools on the toolbar include:
• Stamp Tool/ Duplicate button
 : It creates a copy of the selected sprite, script or any other selected project resource. To create a copy, click on the button and then click on the sprite, script or any other project resource.
 • Delete button
 - It erases the selected sprite, script or any other selected project resource. To delete, click on the button and then click on the sprite, script or any other project resource.
• Grow button
 : It increases the size of a sprite.
• Shrink button
 : It decreases the size of a sprite.
• Block help button
 : Clicking this button and then clicking any scratch block opens a Help window that provides assistance focused on that block’s usage.
 • Turbo Mode: Makes the code execution very fast.
Learning Activity 9C
Practise to use the cursor tools listed above
Learning Activity 9C
Practise to use the cursor tools listed above
Create/ Import a sprite
Importing refers to the processes of transferring an existing image into a program. The user can import sprites, backdrops, sounds, projects, costumes, scripts, and lists among others.
Create a new sprite or import the existing image
There are four buttons used to create a new sprite or import an existing image, namely Giga button, paintbrush button, folder button and camera button. The buttons appear just above the Sprites area as shown in figure 9.14.
199

(a) The Giga button opens the built-in sprites and enables the user to choose a sprite from the library. To create a sprite using the Giga option, do the following: (i) Click on the Giga button. A sprite library window appears as shown in figure 9.15.
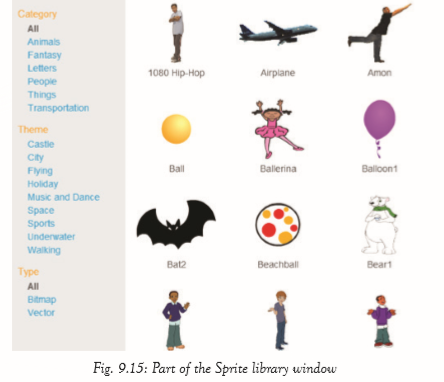
(ii) Double-click on the desired sprite or select the desired sprite and click OK.
The selected sprite appears on the stage area.200
Learning Activity 9D
Practise to create a new sprite using the button
(b) The Paintbrush button opens the paint editor and is used to manually draw the sprite with colour tools provided by Scratch. Figure 9.16 shows a paint editor in a Scratch window.

Learning Activity 9E
Practise to create a new sprite using the paint brush button.
(c) The Folder button opens a file browser and is used to upload a sprite or image. Figure 9.17 shows a file browser. Select the location from where to upload the sprite, select the file name then click OK.
201
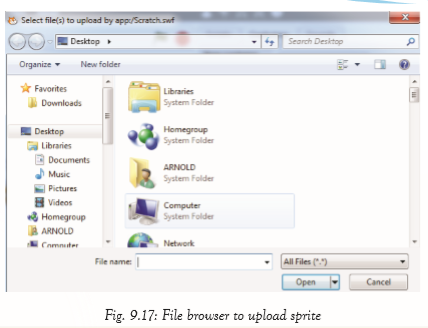
Learning Activity 9F
Practise to create a new sprite using the Folder button.

(d) Camera button opens a camera which would be used
to create a new sprite.
For example, a computer with a Web camera can be used.
When the camera button in the Scratch program is clicked
the web camera is activated ready to capture a photograph.
Figure 9.18 shows a dialog box of a web camera.
Clicking on save command displays the sprite in the stage area.
Learning Activity 9G
Practise to create a new sprite using the camera button.
Use combo blocks to play sounds
Combo sprite blocks are formed by combining single sprite blocks. The default sound in the play sound… until done block is meow. To play sounds using combo blocks, do the following:
202
(i) Click on Sounds tab and select the preferred sound from the library or any other source. The selected sound appears as a thumbnail under Sounds tab.
(ii) To select a sound, click the drop-down arrow in the play sound block as shown in figure 9.20.
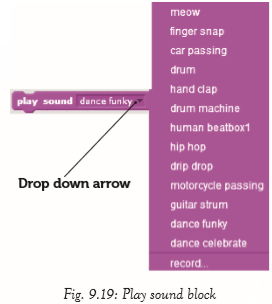
Figure 9.21 shows a sound combo block for playing the sounds as reflected in each block.

Note: To play a script, the user can click on the Green flag button or on the script.
Practical Assignment: Create a project named combosound1 on the desktop that plays the following sounds forever when the Green Flag button is clicked.
203
(i) Singer2; (ii) Singer1; (iii) Horse gallop (iv) Ya.
Choose the sprite especially from the Things folder. To choose a sprite from the things folder, click on the Giga button to open the sprite library. Click on the Things folder to open as shown in Figure 9.22.
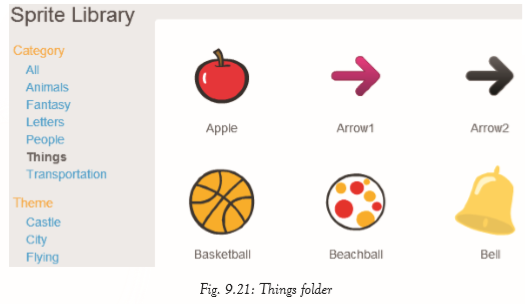
Manipulation of variables to program switch on and switch off
A variable is a changeable value that can only hold one value at a time. The value can be either a number or string (text). Variables enable one to see and manipulate numbers and text in the program.
It is created from the Data blocks on the Script Tab using the button. Clicking on this button displays the New Variable dialog box that enables the user to name the variable and specify its scope as shown in figure 9.23.

Types (Scope) of Variables
There are three types of variables in Scratch 2.0 ,namely local (private), global (public) and cloud.
204
(i) Local Variable This is a variable that can only be changed by the sprite that owns it. It can be read by other sprites using the Change () by () block but they cannot change it.
For example:
 block.
 A local variable is created by selecting For this sprite only option button in the New Variable dialog box
.

(ii) Global Variable
This is a variable that can be read and changed by any sprite in the project. By default, For all sprites option button is selected meaning that it is a global variable.
(iii) Cloud Variable
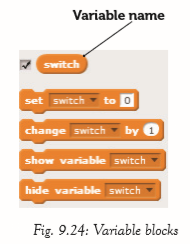
Practical 1
Example 1: Two sprites can be programmed such that clicking on one sprite turns the switch ON and clicking on the other switches it OFF and vice versa. For example, when205
listening to music, the switch is on when the music is playing and the switch is off when the music is off. To create a virtual switch, the following tool kits can be used:
• Data tool kit
• Operators tool kit
• Control tool kit

Practice Sound toolkit is displayed by clicking on the Sound block under the Scripts tab. This tool kit is used to add a music script to a sprite. Figure 9.28 shows the Sound Tool Kit.
To add a music script to a sprite, do the following:
(i) Select the Sprite. Click Sound block under Scripts tab.
(ii) Add a music script as desired using the blocks under the Sound block as shown in figure 9.28 (a). For example, to play a sol-fa notation, drag the block shown in figrue 9.28 (b) to the scripts area. Click the drop-down arrow on the block to display the keyboard. Figure 9.29 shows a keyboard with Sol-fa notation Do.
206
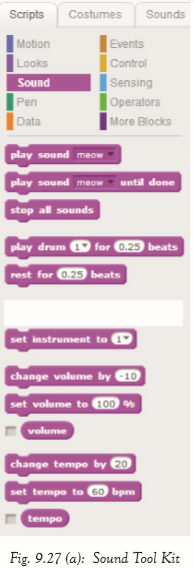
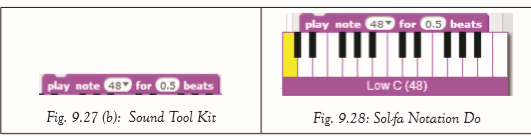
Practice
Example 2: The following example creates a tune using the Sound tool kit. The tune is de, re, mi, fa, so, la, ti, do and pauses for 0.25 seconds between the notations. Click on the blocks to play the sounds.
207
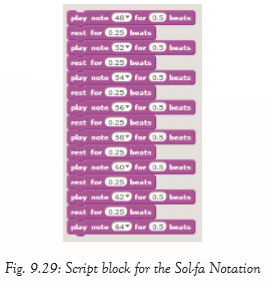
Practice
Example 3: The following example plays the birthday bells sound in a sprite. The tune plays 3 times, rests for 1 beat between them, and reduces volume by -20% until it stops then resets volume to 100%.
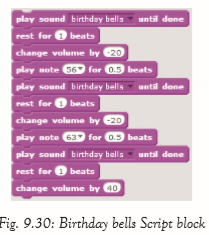
Create a Sound Clip using Audacity (Practice)
Audacity is a free, open source software that is used for recording and editing sounds. In Scratch, creating a sound clip or song using Sound Tool Kit can be time-consuming. The Audacity software provides the Scratch user with several features that can be used to create Scratch sound clips or songs. To use the Audacity program, do the following: (i) Open the Audacity program. Figure 9.32 shows Audacity application window.
208
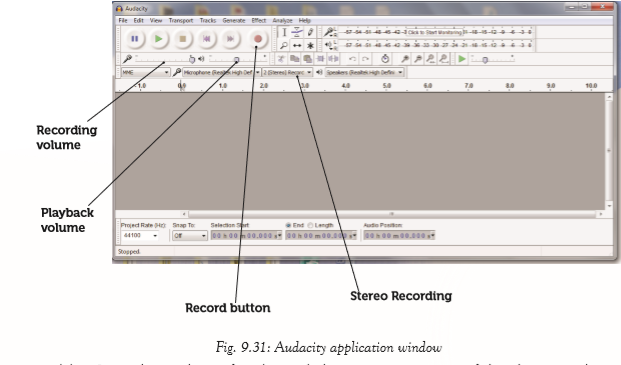
(ii) Start playing the preferred sound clip or song using any of the players on the computer
. (iii) Select Stereo Recording.
(iv) Click the Record button to start recording.
 This displays sound waves as shown in figure 9.33.
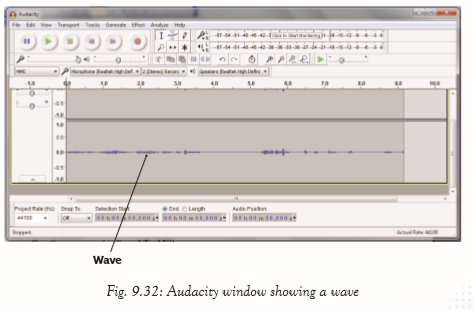
209
(v) Click the Stop button
 to stop recording.
(vi) To save the recorded sound clip or song, click File then select Export Audio. Save the file as type WAV, for example, Clip.wav.
(vii) To import the recorded sound clip or song to a sprite, select the Sounds tab and click Import button to upload sound from file. The following block shows a sound clip created using Audacity.

Creating a song using Sound Tool Kit (Practice)
To create a song, do the following:
(i) Click Sounds tab.
(ii) Create a new sound (s) as discussed under Sounds tab above.
(iii) The created sound is added to the play sound and play sound……..until done blocks.
(iv) Click on Scripts tab and select Sound. (v) Drag play sound or play sound……..until done blocks into the scripts area.
(vi) Click the drop-down arrow on the block and select the preferred song.
Learning Activity 9H
1. Use photographs of yourself to create characters that are dancing
. 2. Include music in your project that plays while the characters are dancing.
Projects
Projects in Scratch and Music SpriteProject 1: Happy Birthday Card Animation
Use Sprite to create a birthday card for your friend. Add animations to the card
Project 2: Emotion Faces
1. Use Sprites to create a face that can show different emotions such as happy, sad, surprised, or other emotions you choose
. 2. Use different sprites for the eyes, nose, eyebrows, and mouth.
3. Change movement and shape to convey emotion.
210
Project 3: The Goal Keeper
Create a sprite with the following requirements:
1. A soccer ball that falls down from the left side of the screen to the right side of the screen
. 2. When Ball touches the edge of stage, a goal keeper catches it. Ensure that the ball moves at a realistic speed in relation to gravity.
Project 4: Growing Plants
Create a sprite with the following requirements:
1. A Sprite that creates a stem, leaves and flowers when clicked.
2. Use Pen and colour change to create coloured flowers
Project 5: Quiz
Create a Sprite with the following requirements:
1. Choose a quiz topic (Examples: parts of a plant, Parts of the digestive system, vocabulary words , or any other topic that interests you)
2. Create a list of possible answers
3. Create a Sprite to “ask the question.
” 4. Allow user to type in an answer.
5. Compare the user’s answer to question.
6. Provide user feedback to tell the user if they are correct or incorrect.
Your Sprite must:
1. Keep score of correct answers.
2. Give a final percentage of correct answers.
3. Use movement and sounds to make game entertaining.
Project 6: Animation of a short story Create a Sprite with the following Requirements:
1. Select a short story.
2. Design Sprites that represent the characters in your story.
3. Use costume changes to simulate animation and movement.
4. Select musical sound clips for each characters. Record speaking parts for each character.
5. Use movement, hide, direction, and broadcast commands to animate a scene from the story
211
Glossary
Alignment: It refers to the arrangement of text relative to the left or right margin of a page.
Animations: Animation is the process of displaying motionless images in a rapid sequence to create the appearance of movement. Examples of animations are cartoons on Televisions.
Applications: These are programs that are designed to perform specific task for the user.
Application software: They are programs that are designed to enable the user accomplish a given task.
ArcCatalog: This component organizes spatial data contained on the computer and various other locations and allows search, preview and addition of data to ArcMap as well as managing metadata and set up address locator services (geocoding)
. ArcGIS: This is a geographic system designed to capture, store, manipulate, analyze, manage and present all types of geographically referenced data, that is, data identified according to their location.
ArcMap: This is the main mapping application that allows the creation of maps and query attributes. It also analyzes spatial relationships and layout of the final projects.
ArcToolbox: This is a Geographic Information System (GIS) component. It contains tools for Geoprocessing, data conversion, coordinate systems and projections among other functions.
Artificial Intelligence: It is the science of developing machines that mimic human behaviour such as reasoning, learning, hearing, seeing and communicating
. Attribute: This is a defined characteristic of a theme.
Autocomplete: It is a feature that enables phrases to be automatically completed on pressing the enter key, after they have been written midway
. AutoFormat: Refers to a range of predefined formatting templates.
Basemap: This is a map portraying background orientated information such as landforms, landmarks, roads and political boundaries, onto which other thematic information is placed.
Bitmap: A graphic image made up of many tiny dots.
Blocks: These are shapes that connect to each other and are used to create code.
They determine how sprites interact with each other.
212
Blower: It is a portable electric device used to remove dust and dirt from computers. Bookmark: This is an electronic marker in a map identifying the geography of the map for future reference or retrieval
. Break: It is inserted in order to demarcate the end of a part and beginning of another.
Broadband: This is a high capacity transmission technique that uses a wide range of frequencies to enable a large number of messages to be communicated simultaneously.
Bullets: They are small solid shapes used just before a line of text such as an item in a list. They are used to mark the beginning of a point.
Cache memory: This is a high speed storage location that enables the CPU to perform its functions faster.
Case: This is the representation of text in a document, lower or upper case. Other cases available are Capitalize Each Word, tOGGLE and Sentence cases
. Cc (Carbon Copy): This is used to send the same message to a number of people. When Cc is used, the list of all the recipients appears in each recipient’s mail.
Central Processing Unit: It is also known as a processor. It is commonly referred to as the “brain” of a computer system. The processor is a programmable device that controls the retrieval, interpretation and execution of instructions in a computer.
Clipboard: It is a temporary location for storing copied or cut data waiting to be pasted.
Columns: It is a feature that is used to divide content in a page into two or more columns
. Command: It is an instruction given for action to be taken. It represents an authorizing rule, power, or reason for some actions to be performed.
Computer Buses: These are a group of electronic wires that provide a path way through which bits of data are transmitted between the various computer components.
Computer laboratory: It is a special room set aside for safe installation and use of computer equipment.
Computer system: It is a collection of components that work together to process data and manage
information in a computer in order to achieve a desired goal.
Connector: It is a part of a cable that plugs into a port or interface to connect two devices.
Costume: An image or visual representation that affects the appearance of a sprite. A sprite can be programmed to switch to a different costume to change its appearance.
213
CPU: Abbreviation for the Central Processing Unit. Also called the processor, and makes up the brain of a computer.
Customise: It refers to personalizing or modifying something to suit the user’s needs and tastes.
Customised software: They are tailor-made to solve a specific problem at hand or to meet a specific needof the user.
Data gathering: It is the systematic collection of data for a specific purpose from various sources.
Desktop computers: These are computers designed to be used while placed on top of a desk or a table.
Dialog box: This is a graphic interface which displays a section of the screen to be viewed. It gives the user several options to be choose from.
Distance Learning: It is also known as distance education. It is a mode of study where students do not physically attend learning centres.
Document: This is a written text, manuscript, paper, essay or article organized and saved as a file.
Drop cap: It is a large capital letter usually at the beginning of a block of text that has the depth of more than one line of regular text.
E- Business: Conducting business through the Internet. E-Mail: This refers to a system of exchanging messages electronically over a computer network.
Edit: This is changing the content of a file. File: It consists of a group of related records and is used for storing data in a secondary storage media. It is also called tables.
Fire extinguisher: It is a metallic cylinder usually red in colour containing a substance or agent that put out a small fire.
Firmware: These are software programs that are stored in computers Read Only Memory (ROM) where they are available for immediate use.
Font: It refers to the way text appear on the screen and when printed. It includes font type, style and size.
Footers: They are lines of text or graphics that appear below the bottom margin of a page or selected pages.
Formatting: It is the process of improving the appearance of a document to make it attractive and appealing to look at.
214
Geocoding: This is a GIS procedure for converting street addresses into spatial data that can be displayed as features on a map, usually by referencing address information from a street segment data layer.
Geodatabase: This is a collection of geographic datasets of various types held in a common file or folder such as Microsoft Access database, or a multiuser relational DBMS (such as Oracle, Microsoft SQL Server, PostgreSQL, Informix, or IBM DB2).
GIS: This is a system designed to capture, store, manipulate, analyze, manage and present all types of geographically referenced data, that is, data identified according to their location.
Hard disk: It consists of one or several inflexible circular disks called platters which are coated with a magnetic material normally Iron II Oxide.
Hardware: It is defined as any physical and tangible component of a computer which could either be mechanical, electrical or electronic.
Headers: They are lines of text or graphics that appear above the top margin of a page or selected pages.
Highlight: This is selecting text or object for the purposes of formatting and editing. Indent: It is pushing text away from the margin.
Input: This is data entered in a computer for processing.
Input Devices: These are hardware components that are used to enter data and instructions into a computer.
Integrated software: These are software that combines several standard software into a package.
Internet: It stands for International Network. It is a worldwide network of computers connecting millions of computer networks through a combination of public and private communication lines such as telephone lines, wireless connection and fiber optic.
ISP: This is the abbreviation for Internet Service Provider. It is a licensed organization or company that provides access to the Internet usually at a fee.
Label: It is a heading which describes the content of a row or column.
LAN: This stands for Local Area Network.
It covers a small geographical area for example, an office, a building, an institution, or an organization.
Landscape: This is where text and graphics are printed with the longest side placed horizontally and the shortest placed vertically.
215
Laptop computers: This is a portable computer that looks like a briefcase and has all input/output, processing and memory devices inside the system unit.
Layer: This is a method used to display geographic data sets in ArcMap with each layer pointing to a data set and specifying how the data set is represented using symbols and text labels.
Layout: This is a presentation or an outline which designates a design, or arrangement of data or information.
Lists: It is also known as an array in other programming languages. It refers to a variable that stores multiple pieces of information at once.
MAN: This stands for Metropolitan Area Network covers a city or town. It can be made up of many LANs and can provide Internet connectivity in a Metropolitan region.
Menu: It is a list of options or commands presented to the user of an application to help find information or execute a program function.
Metadata: This is part of an ArcGIS item. Whenever an item is copied in ArcGIS, its metadata also gets copied and when the item is imported into a geodatabase, its metadata is also imported
. Metadata is stored in the same location as the item’s data in a manner that is appropriate for its data type.
Microcomputers: They are popularly known as Personal Computers (PCs) since they are designed to be used by one person at a time.
Network: is a set of interconnected computing nodes which communicate with one another through a transmission medium using a set of rules.
Networking software: It is system software that is used for configuration and enhancement of interactions in a computer network.
Numbering: This is the use of numbers to list different points. They may be set in Arabic or Roman. Offline: Does not require Internet connection.
Off-the-Shelf software: They are software written by a software engineer or programmer, packaged and then made available through a vendor, distributor or the developer Online: Requires Internet connection
. OpenGL: It is the computer industry standard Application Program Interface (API) that is used to define 2D and 3D graphic images. API interacts with a Graphics Processing Unit (GPU) to achieve hardware accelerated rendering.
216
Operating System: This is a group of programs that provide a platform for loading other programs known as application programs and act as an interface between the hardware and the application programs
. Orientation: This refers to the positioning of the page in relation to the text or graphics. There are two types of page orientation, namely landscape and portrait.
Output: It is the information produced after processing is complete.
Output devices: These are devices used for displaying data and information.
Page margins: They are the blank spaces around the edges of a page.
Page numbering: This is a formatting feature that organises a large document for ease of reference and makes it easy to track by inserting numbers beginning with the first page.
Palmtop computers: They are designed to fit in the palm of the user and easily fit in pockets.
PAN: It is also known as Wireless Personal Area Network (WPAN). It is the smallest network used for data transmission among devices within the environment of an individual user.
Pan: This is to move an image horizontally or vertically from a stationary point in order to view from different angles.
Password: is a string of characters entered to log- in or sign- in so as to allow one get authentication.
Peripheral devices: They are computer components that are connected to the ports in the system unit through cables or wireless media.
Port: It is an interface on a computer on which a device can be connected.
Portrait: This is where text and graphics are printed with the longest side placed vertically and the shortest placed horizontally
. Processing: This is the conversion of data into information.
Programs: Also known as software. It is a collection of instructions that enable the computer to perform specific tasks or help the user to interact with a computer.
Project: This is a creation made in the Scratch Program. A project can be about anything, from music to animations, art, games, and simulations among others. Python: This is the free, open-source scripting language that has been integrated with ArcGIS 10.
217
Query: This is a request that examines features or tabular attributes based on userselected criteria and displays only those features or records that satisfy the given criteria.
Raster Data: These are items, usually images that are composed of pixels.
Register: They are temporary storage location found inside the processor that is used to hold data, instructions or information awaiting processing or output.
Screen: It is also known as the monitor or Visual Display Unit. It is an output device that displays information from the computer.
Script: A collection of connected blocks that perform a task
. Scrolling: It is the processes of moving around a document without changing the position of the cursor.
Search Engines: These are programs that help a user to look for and identify items that corresponds to keywords or phrases specified from the World Wide Web.
Examples include; Yahoo, Google, WiseGeek, and Inforseek
. Server: Is a computer or device on a network that manages network resources.
Shapefiles: This is an Esri vector data storage format for storing the location, shape, and attributes of geographic features and it stores a set of related files.
Signals: It is an electrical impulse transmitted or received.
Software: It is a collection of instructions (programs) that enable the computer to perform specific tasks or help the user to interact with a computer.
Software: It is a set of instructions that either enable the computer hardware to perform their assigned tasks or help the user to accomplish specific tasks.
Sorting: Arranging data alphabetically or numerically in a descending or ascending order.
Spatial: These are features related to or existing within space.
Sprite: A sprite is an object that can be manipulated through a script to perform actions in a project.
A project can contain multiple sprites that interact with one another. The default Sprite is a cat but it can be changed to a different sprite.
Storage: A computer can store a large amount of data within it. It has primary and secondary storage devices that are used for this purpose.
Storage Devices: These are devices that are used for storage of data, information and instructions.
Styles: They are specially packaged sets that apply many formats at once. They are available to the user for formatting the document.
128
Suite: A collection of programs with related functionality sold together as a package.
Surf/Browse: To surf or to browse is to view or access data from the Internet.
Telecommuting: Telecommuting is working from a remote location, usually one’s home by electronically linking to the workplace.
Thesaurus: This feature displays synonyms and antonyms of a selected word.
Thumbnail: An image of a large document or graphic that is reduced in size to allow multiple documents or images to be viewed on the screen at the same time.
TINs: This is a vector data structure that partitions graphic space into connecting nonoverlapping triangles. They are used to store and display service models.
Toolbar: A strip with buttons and options used to carry out commands.
Toolbars: This is a graphical user interface (GUI) with buttons that allow users to execute software commands.
Track Changes: It is a feature that enables the user to view all the changes that have been made on a document.
URL: is an abbreviation for Uniform Resource Locator. It is a unique address of each web page in a websites which identifies the location of a specific web page on the Internet.
Username: : It is a name that identifies the owner of the e-mail address. It also refers to the identity one uses to log in to a computer network.
Utility software: They are system software that is used to perform routine functions aimed at optimizing, analysing and maintaining the operations of a computer.
Vector Data: These are drawings that represent features such as streets, rivers, railway lines, lakes, city blocks and any other feature that can be drawn on a map Virtual memory: It is the use of part of the hard disk as main memory for storing tasks from or to the processor.
WAN: This stands for a Wide Area Network. It interconnects LANs and MANs within a very large geographical area and may span across regions, country, continents or even the whole world
. Watermarks: They are text or pictures that appear behind text in a document.
Web browse: These are programs used for displaying and viewing web pages on the World Wide Web (WWW), for example, Mosaic, Netscape Navigator, Internet Explorer, Mozilla Firefox, Opera and Google Chrome amongst others. The web pages can be accessed using a web browser.
219
Webpage: It is Hypertext and hypermedia documents containing information about an individual or organisation
. Wi-Fi: is a wireless networking technology that uses radio waves to provide high-speed Internet and networking connections
. Windows Accessories: These are built-in programs found in Windows operating system, for example, calculator, notepad and pain among others.
Word Count: It is a feature that is used to count all characters, words, paragraphs and pages including textboxes, footnotes and endnotes. WWW: It is commonly referred to as the Web. WWW refers to a large virtual space of the Internet where information pages called web pages are installed.
220
Detailed Index
Adding a background, 128
Add or switch folders, 200
Advantages of a Computer, 60
Advantages of a Computer Network, 180
Advantages of EMail, 195
Advantages of search engines, 191
Analog data, 2
ArcCatalog: Data Management, 164
Areas Where Computers are used, 61
Assistive Technology , 5
Attaching a document to an e-mail, 202
Background, 128
Basic parts of a web browser, 189
Basic Text Formatting, 107
Breaks, 134
Broadband, 188
Central Processing Unit (CPU), 19
Changing Date and Time, 80
Characteristics of a Computer, 18
Characteristics of a Computer Network, 180
Choosing the Layers to Identify, 173
Classification of computer networks, 181
Classification of Computer Software, 46
Clear Formatting, 139 Columns, 133
Common GIS File Types, 166
Common Windows Accessories, 82
Communication, 4
Components of ArcGIS, 145
Computer Buses, 21
Computer Components, 19
Computer Family, 50
Computer Network Concepts, 179
Computer Peripherals, 22
Computers for Storage, 67
Computers in Office Work, 66
Computers in Security Systems, 64
Computers in the Business Industry, 62
Computers in the Communication Industry, 61
Computers in the Education Sector, 63
Computers in the Entertainment Industry, 63
Computers in the Manufacturing Sector, 67
Computers in the Media Sector, 62
Computers in the Medical Field, 63
Computers in Traffic Control, 65
Computers in Weather Forecasting, 65
Copying and Pasting files and folders, 85
Count the Words in a Selection, 132
Create/ Import a sprite, 214
Create a Sound Clip using Audacity, 224
Create a tune using the Sound Tool Kit, 222
Creating a Document, 104 Creating a folder, 83
Creating an e-mail account, 195
Creating a song using Sound Tool Kit, 225
Creating a strong password, 195
Cutting and pasting files and folders, 85
Data and Layout View, 155
Data Frames, 157
Data gathering, 2
Deciphering search results, 192
Definition of a Computer, 18
Definition of Computer Network, 179
Definition of Data, 2
221
Definition of Internet, 184
Definition of Network, 179
Definition of software, 46
Definition of Terms, 146
Definition of Terms, 184
Delete emails, 199
Deleting files or folders, 87
Deleting Text or image, 119
Description Tab, 167
Deselecting, 106
Desktop, 70
Desktop Icons, 70
Desktop icons and gadgets, 78
Development of the Internet, 141
Development of the Internet, 186
Dial up, 188
Different Kinds of Vector Data, 148
Digital data, 2
Disadvantages of a Computer, 61
Disadvantages of a computer network, 181
Disadvantages of Email, 195
Disadvantages of search engines, 192
Downloading Information from Net, 202
Drop caps, 140
E-mail address, 194
Electrical safety, 92
Electronic Mail (E-Mail), 194
Ergonomic keyboards., 22
Evolution of Computers, 53
Explanation of the address, 190
File, 87
File Handling with ArcMap, 164
Find and Replace, 120
Finding Locations, 170
Fire Extinguisher, 94
Fire safety, 93
First Generation Computers (1940’s to mid1950’s), 56
Folder, 83
Fourth Generation Computers (early 1970’s to late 1980’s), 59
Functions of Computers, 18
Gadgets, 79
General safety, 91
Generation of Computers, 56
Getting online, 189
Hardcopy output devices, 30
Hardware, 19
Headers and footers, 140
Health safety , 92
History of computers, 53
History of the Internet, 186
ICT Equipment, 6
ICT in Banking, 12
ICT in Business, 11
ICT in Communication, 12
ICT in Education, 10
ICT in Health, 11
ICT in Manufacturing and Production, 12
ICT in Rwanda, 13
Importance of ICT, 10
Information, 3
Information Technology (IT), 6
Input devices, 22
Internet Concepts, 184
Internet Uses in Daily life, 187
Keyboard Layout, 81
Learning Activity 5A, 104
List of search engines, 192
Local Area Network (LAN), 182
222
Mainframe computers, 52
Maintaining your Computer, 95
Maintenance precautions, 96
Manipulating a document, 125
Mass Memory, 42
Medical Technology , 6
Methods /Ways of connecting to the Internet, 188
Metropolitan Area Network (MAN), 182
Microcomputers, 50
Microsoft Word (Ms Word), 99
Minicomputers, 51
Monitors, 34
Move emails, 199
Moving and copying text, 118
Moving through the text, 119
Navigation Tools, 167
Nested lists, 139
Open an existing document, 105
Opening a file, 89
Opening a Scratch program, 205
Organise email message, 199
Orientation, 126
Output devices, 30
Page borders, 127
Page Numbering, 142
Page Setup group, 125
Paragraph formatting, 110
Parts of Microsoft Application Window, 103
Personal Area Network (PAN), 181
Plotters, 33 Ports and Connector, 37
Previewing Data, 165
Primary Memory, 41
Printers, 30
Procedure for deciphering search results, 193
Proofing Features, 115
Proofing features, 130
Query Methods, 169
Receiving a message, 197
Recycle bin, 75
Renaming a document, 106
Renaming a folder, 84
Role of a Computer Network, 180
Safe Lab Procedure, 90
Safety Precautions in a Computer Lab, 90
Saving, 88 Saving a Document, 104
Scratch 2.0 User interface, 206
Screen Resolution, 80
Search Engines, 191
Secondary Memory, 42
Second Generation Computers (mid 1950’s to early 1960’s), 57
Selecting text, 106
Sending and reading messages, 196
Sending messages, 198
Sign In, 196
Softcopy Output Devices, 34
Software, 46
Starting Ms Word 2010, 99 Storage, 41
Storage Devices and Media, 41
Styles, 137
Supercomputers, 52
Table of Contents (TOC), 152
Task bar, 70 Technology, 5
Technology of Teaching , 5
Tertiary Storage, 45
Text formatting, 107
223
The Basic Toolbar, 167
The Control panel, 77
The Fifth Generation Computers (Early 1990’s to present), 60
The Interface of ArcMap, 148
The menu bar, 153
The Scratch Toolbar, 212
Third Generation Computers (early 1960’s to early 1970’s), 58
Toolbars, 161
Traditional keyboards, 22
Types of data,
2 Types of Networks, 181
Types of ports, 37
Types of windows, 81
Typing Modes, 120
Typing Text, 104
Undo and Redo commands, 120
Uploading a document to an e-mail, 202
Use combo blocks to play sounds, 217
Using an email address book, 202
Voice Output devices, 36
Watermarks, 128
Web Address, 190
Web browser, 189
Wi-Fi, 188
Wide Area Network (WAN), 183
Window control buttons, 81
Windows, 81
Word Processing, 99
Word Processing Environment, 100
Working with Documents, 104
224