UNIT 5 Word Processing Basics I
Key Unit Competecy:
By the end of this unit, you should be able to create and manipulate a document using basic word processing features.
Learning Objectives
Knowledge and understanding
By the end of this unit, you should be able to:
(i) Identify the basic features of a word processing environment.
(ii) Explain the role of word processing applications.
(iii) State the steps used to create, rename, save and open a document.
(iv) Explain how written text should be organised.
(v) Recognise errors in a document and identify the appropriate proofing features to correct the errors. (vi) Identify different methods to move through the written text.
Skills
By the end of this unit, you should be able to:
(i) Explore the environment of word processing applications.
(ii) Use the basic features of word processing (create, rename, save and open a new document).
(iii) Organise written text.
(iv) Apply different methods to move text and move through the text (use of shortcuts)
(v) Use formatting tools to improve the presentation of a document.
(vi) Use proofing features of spelling and grammar checks and the thesaurus to correct errors in a document.
Attitudes and Values
By the end of this unit, you should be able to:
(i) Appreciate the basic features of a word processing environment.
(ii) Show confidence in improving presentation by replacing hand written documents with printed ones.
(iii) Show interest in organizing text.
(iv) Appreciate the formatting and proofing features of word processing to produce error-free and well-presented documents.
99
Word Processing
Key words in the chapter
• Scrolling • Thesaurus • Bullets • Selection • Tabs • Spell checker • Formatting • Editing • Numbering • Ribbon • Thesaurus • Toggle case
Introduction
Word processors were created in order to solve the problems encountered while using a typewriter. They ensure that if there is a typographical error, it can be corrected without compromising the neatness of the document and its structure.
Definition of word processing application
A word processing application is a software that enables the user to create, save, edit, format, and print text documents. It is used to create documents such as letters, memos, reports, and minutes among others. Examples of word processing applications are: Word Perfect, Word Star, Lotus Word Pro, AmiPro and Microsoft Word among others.
Role of word processing applications
(i) Create and manipulate text-based documents.
(ii) Create and manipulate pictures and objects.
(iii) Create a document to be uploaded to the Internet.
Microsoft Word (Ms Word)
Microsoft Word is an example of a word processing application. It is available in various versions incorporated in an integrated package called Microsoft Office Suite.
Examples of Ms Word versions include Ms Word 2000, Ms Word 2003, Ms Word 2007, Ms Word 2010 and Ms Word 2013 among others. Ms Word 2013 has been used in this unit to illustrate the use of a Word Processing application.
Starting Ms Word 2013
To launch Ms Word 2013, do one of the following:
(i) Click on Start Button, go to All Programs and select Microsoft Office; then click on Microsoft Word 2013.
(ii) If the Microsoft Word icon is on the Desktop, do one of the following:
Right-click on the icon then select Open from the pop-up menu that appears.
Double-click on the icon.
Click on the icon then press Enter key.
(iii) Click on Start button then select Microsoft Word 2013 if it was pinned to the Start Menu.
100
(iv) Click Microsoft Word 2013 if is pinned to the Task Bar.
(v) Click on the Start button go to Search programs and files, type Run then press Enter key. On the dialog box that appears, type the word WINWORD. Click OK
Word Processing Environment
In the environment of a word processor, the following basic tools or features can be used: title bar, tabs, menus, toolbars, scroll bar, ruler, and status bar.
• Title bar: This is the topmost bar on the window. It contains minimize, restore/ maximize, and close buttons as well as the name of the program and document. Any time a new word document is opened, Ms-Word gives it a temporary or a default name which could be Document1, Document2, and so on. When the document is saved, the default name is automatically changed to the new name.
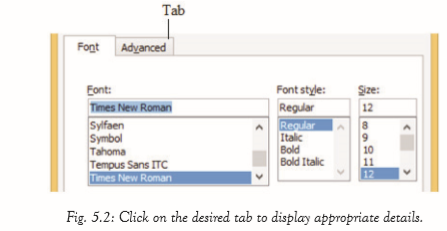
• Tabs: This term refers to the part of a window or a dialog box which when clicked, displays different parts of a menu, program window, or webpage.
101
• Menu Bar:
This bar displays a series of tabs namely File, Home, Insert, Page Layout, References, Mailings, Review and View. Other tabs appear if an image is inserted. Clicking on each tab displays a different ribbon.

Figure 5.3: Click on the desired tab to reveal the ribbon under it.
• File tab: It is the first item on the menu bar. When clicked it produces a pulldown menu which contains a list of options to choose from such as New, Open, Save, Save As, Print, and Close.
• Home tab: It contains icons used for text formatting, paragraph formatting, and editing among others.
• Insert tab: It contains icons that allow the user to add graphics and images in a document. It can be used to add pictures, tables and word art among others.
• Design tab: It consists of document formatting features, themes and features for formatting page background such as watermark
. • Page Layout tab: It contains icons that are used for formatting an entire page and paragraph formatting icons among others
. • References tab: It contains icons that are used for creating and manipulating Tables of Contents, Footnotes, Captions, Citation, and Bibliography among others.
• Mailings tab: It contains icons that are used during mail merging.
• Review tab: It contains icons used for proofreading, adding comments, tracking, and protection among others.
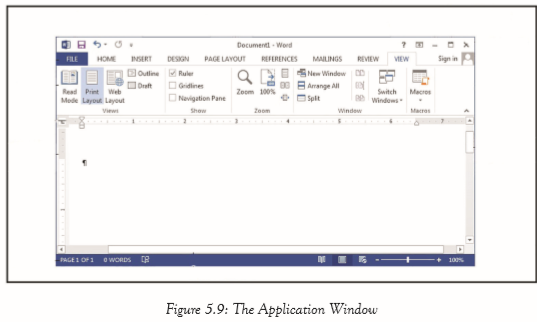
• View tab: It contains icons that are used to show the document views, add macros, zoom, and change the window appearance.
• Ribbon: It consists of icons of commands which are organized into groups and given a group name. For example, clicking on the Home tab displays a ribbon with five groups namely Clipboard, Font, Paragraph, Styles, and Editing.
102

• The Quick Access Toolbar: This is a small selection of the most commonly used commands. In most cases, it is located at the top left corner of the Title Bar but it can be placed above or below the Ribbon.
It can be customized by adding more commands on it or removing commands from it. By default, this bar contains Save, Undo and Redo commands. To customize it:
(i) Right click within the quick access toolbar, select Customize Quick Access Toolbar option. A dialog box is displayed.
(ii) Select the commands to add from the left pane then click Add>> button.
(iii) To remove the commands from the quick access toolbar, click on the command from the right pane of the window then select <<Remove button.

• Toolbars: This was a popular feature in the lower versions of MS Word. It refers to stripes that contain icons used for formatting, editing or inserting data. Examples of toolbars are drawing toolbar, formatting toolbar, standard toolbar, and picture toolbar among others. In MS Word 2013, the toolbar icons are incorporated in different ribbons in the window.
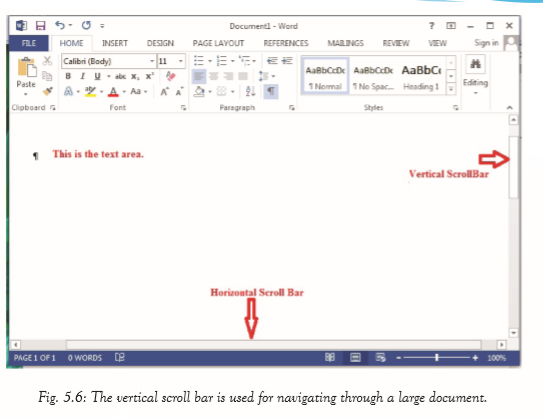
• The Scroll bars: They allow one to move or navigate through a large document. There are two types of scroll bars. The vertical scroll bar allows the content of a document to be moved from top to bottom. The horizontal scroll bar allows the content of the document to be moved from left to right and vice versa.
103
• Rulers: The ruler is used to set the layout of the text across the page such as margins, tab positions, and indents. There are two rulers namely the horizontal ruler on top of the document and the vertical ruler on the left side of the document. Figure 5.7 shows a horizontal ruler.

Fig. 5.7: Rulers are used for setting layout of text within the page.
• Status bar: This bar is usually located at the bottom of the window. It displays information about the activities being carried out in the current document and certain general information about the document such as the current page, word count, view buttons and zoom level tools.

104
• Working area/zone:
This is the largest part of a Word Processing window. It is the area where text and objects are displayed. It is enclosed with the top, bottom, left, and right margin. Any changes done on the typed text and inserted objects are reflected in this part of the window.
Assignment 5.1
1. Define the term word processing.
2. Give three examples of word processing applications.
3. State two roles of word processing applications.
4. Explain the use of any five tabs on the menu bar.
5. State the function of a title bar.
Learning Activity 5A
Label the diagram of the screen layout of Microsoft Word application window shown below.
Working with Documents
A document can be created, saved, opened, and renamed within the work area.
Creating a Document
It is the process of starting a new blank page from scratch or from an existing document.
105
When the Microsoft Word program is launched, a new document is automatically created. However, to create another new document do one of the following:
(i) Click the File tab. Select New on the window that appears; then select Blank document.
(ii) Press Ctrl + N on the keyboard.
(iii) Click the New icon if it is on the Quick Access Toolbar.
Typing Text
Typing is the process of inputting text on a document. By default, typing begins from the left margin towards the right margin at the cursor position.
Saving a Document
Saving is the process of copying a document from primary memory to a secondary memory for future reference or later use. There are two main commands used when saving a document which are: Save and Save As.
1. Save: It is used when updating an existing document. Clicking on Save if it is a new document results in the display of the Save As dialog box. To update a document do one of the following:
• Click File tab then select Save command.
• Press Ctrl + S on the keyboard.
• Click Save icon on the Quick Access Toolbar.
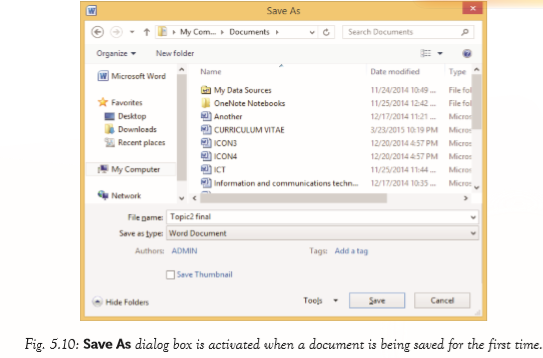
2. Save As: It is used when:
(i) Saving a document for the first time in the computer.
(ii) Saving the document using a new file name.
(iii) Changing the storage location of a document.
To use Save as command do the following:
(i) Click File tab select Save As command. Click on computer to display the Save As dialog box.
(ii) In the File name box, type the name of the file.
(iii) Specify the location where the file is to be stored on the first text box in the first row. For example My documents. Click the Save button or press the Enter key.
106
Open an existing document
It is also known as retrieving a document. This is the process of viewing the content of an existing document. To open a document, do one of the following:
(i) Click on the File tab on the menu bar. A pull-down menu appears. Select Open command. Click computer from the left pane then select Browse if the document was not among the recent ones. A dialog box is displayed. Specify the location where the document was previously stored and the file name. Click the Open command.
(ii) Click on the File tab on the menu bar. A pull-down menu appears. Select Recent Documents command. All recent documents are displayed on the right pane. Click on the desired file name to open it.
(iii) Open the location where the document was stored then open the document.
Renaming a document
To rename a document, right-click on the document name then select rename. Type the new name at the cursor position then press enter.
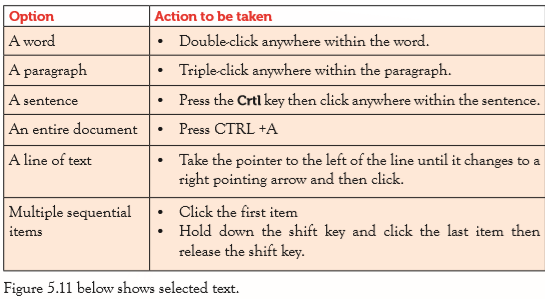
Selecting (highlighting) text or a block of text
It is done every time text or a block of text has to be formatted or edited.
107
To highlight any block of text, take the cursor to the beginning of the block of text then do one of the following:
(i) Click and drag the mouse over the text. (ii) Press Shift + arrow keys, depending on the direction of the desired text.
However, to quickly select the specified text, the following options can be chosen:

108
Learning Activity 5B
Type the following text and save it as INTERNETThe Internet is a global network of computers. It provides a variety of resources and data to the people who use it. It is a large set of computer networks that communicate with each other often over telephone lines.
The term Internet can be broken down into two words, Inter and net which implies that there is an interconnection of networks. Computers can be connected together using data transmission media such as cables, to communicate with one another.In most cases computer networks are unique to an organization. For example, the computers in your computer laboratory may be networked. Such a network is local in nature hence it is usually called a local area Network (LAN).
Internet is therefore a large network of computers that covers the whole world and enables millions of them from different organizations and people to communicate globally.
Because of its large size and great volume of information that passes through the Internet, it is sometimes called the information superhighway. Other names used to refer to the Internet are the net or the cyberspace.
Communication in this case will be an exchange between computers to achieve message transfer. This is because the computers are linked to form a network.Basic Text Formatting
Formatting is the process of enhancing the appearance of a document, making it attractive or stand out from the rest. Formatting features are divided into two broad categories namely: text and paragraph formatting.
Text formatting
This involves enhancement of the appearance of the text. Some of the common text formatting features includes font, font style, font size, font colour, underline, styles, change case, and font effects among others.
(a) Font: Examples include; Times, Times New Roman, Calibri, Arial Black and Arial Narrow among others.
(b) Font style: There are four types of styles namely; bold, italic, regular and bold italics.
(i) Bold: makes the selected text appear thicker or darker than the rest of the text in a document. (This text is typed in bold.)
(ii) Italic: makes the selected text to slant forward. (This text is typed in italics.)
109
(iii) Regular: It takes up the style defined by the font type used. It is the default style. (This text is typed in regular font.)
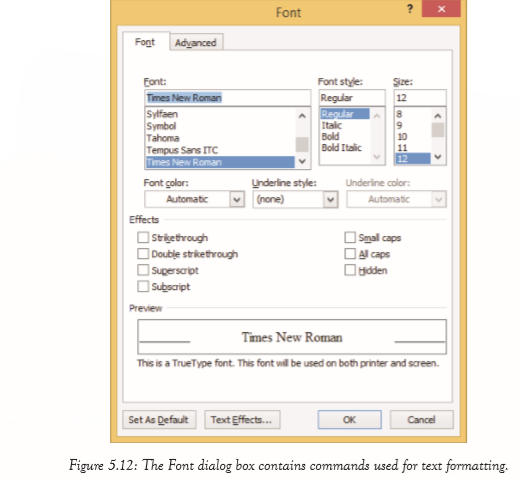
(c) Font size: It refers to how small or large the characters are set. The standard size is 12.
(d) Font colour: The default font colour is black. The user can, however, change this colour to a desired one, by selecting options from Font Color box
(e) Underline: It is a line placed under the letter, word, or sentence. There are various underline styles that the user can choose from. Example include words only, double underline and dotted lines.
(f) Font Effects: There are various font effects that can be applied on a document in order to enhance the text appearance. These includes superscript, subscript, strikethrough, double strikethrough, all caps, small caps, and hidden. Superscript: It is where text is formatted to appear slightly above the normal typing line. For example in cm3, the text 3 is a superscript
110
Subscript: It is where text is formatted to appear slightly below the normal typing line. For example in “H20”, the text 2 is a subscript.
Strike through: It is used to cancel already typed text. It draws a line over the text.
To use any of the text formatting features, do the following:
• Select the desired text.
• From the Home tab, either select the desired text formatting icon on the ribbon under the Font group or click on the dialog box launcher (arrow) besides the Font group label. From the dialog box that appears, select the font tab then select the desired formats and click OK.
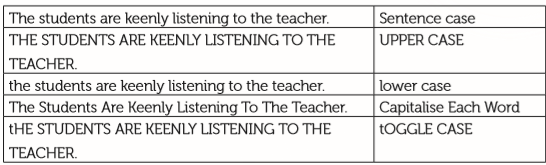
(g) Change case: Refers to the process of switching between the available cases. The following are the various types of cases available:
(i) Sentence case: Only the first character of a sentence is capitalized. In this sentence the first letter of the first word in the sentence is in capital letters.
(ii) UPPER CASE: All the characters in a word or sentence are capitalized. (iii) lower case: All the characters in a word or sentence are displayed in small letters.
(iv) Capitalize Each Word: The first character of each word in a sentence is in capital letters. It is also known as title case in the lower versions of MS Word.
(v) tOGGLE CASE: All characters in upper case are changed to lower case and vice versa.
To change case, do the following:
• Select the text to be formatted.
• From the Home tab, click on the arrow in the Change case icon under the Font group.
• Select the desired option. Figure 5.13 shows a change case icon
111

Paragraph formatting
They are features used to improve the appearance of an entire paragraph. They include alignment,
indentation, spacing, tabs, Bullets and Numbering.
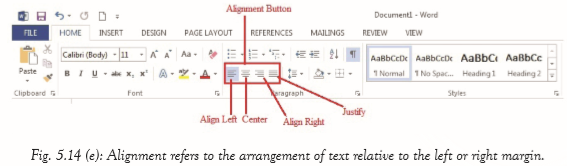
(a) Alignment: It refers to the arrangement of text relative to the left or right margin of a page. There are four types of alignments namely: left, right, centre, and justified alignments.
(i) Left alignment: This is where text is evenly positioned along the left margin but uneven at the right margin. Typing begins at the left margin and does not have to end at the right margin.
We need to save Mother Earth! It is high time we did something! The planet we live on is suffering. We are extracting all it has including oil, minerals, and water. We are cutting down trees.
Fig. 5.14(a): Left alignment
(ii) Right alignment: This is where text is evenly positioned along the right margin but uneven at the left margin. Typing begins at the right margin and does not have to end at the left margin.
We are killing animals. We are exploiting nature. The resources on this Planet are getting depleted. This poses great threat to our existence
Fig. 5.14(b): Right alignment
(iii) Center Alignment: This is where text is evenly arranged at the center of the page but uneven both at the left and right margins. Typing begins at the centre of the page.
112
Let us do something to save the planet. Let us start by planting more trees! Let’s take care of our water sources. Let’s take care of the soil. Let’s conserve the environment. Our survival is dependent on it.
Fig. 5.14(c): Centred text
(iv) Justification: This is where text is evenly arranged both at the right and left margins.
Let us prevent the occurrence of soil erosion. Let’s plant cover crops. Let’s practise contour farming in slopy areas. Let’s keep the right number of animals on a piece of land. We must do something to save the planet. Our survival is dependent on it.
Fig. 5.14(d): Justified text
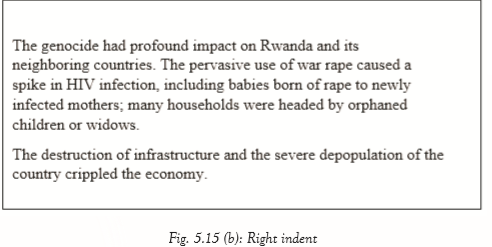
(b) Indentation: It is the process of moving text away from the right or left margins by a given interval. They include right, left, and special indents.
(i) Left indent: The lines of text in an entire paragraph are pushed away from the left margin by several units of measurements. The first paragraph in the following text is left indented.

113
(ii) Right indent: The lines of text in an entire paragraph are pushed away from the right margin by several units of measurements. The first paragraph in the following text is right indented.
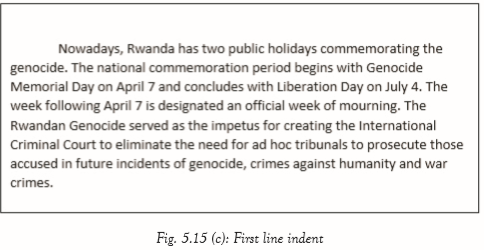
(iii) Special Indents: There are two types of special indents, namely first line and hanging indents.
• First line indent: The first line in a paragraph is pushed away from the left margin by several units of measurements. The other lines in the paragraph remain on the left margin. The first line in the paragraph is indented.
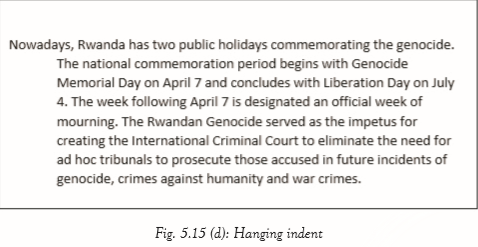
• Hanging indent: The first line of a paragraph remains at the left margin. The rest of the lines in the paragraph are pushed several units of measurements away from the left margin. Hanging indent is applied in this paragraph.
114
(c) Line spacing: It refers to the distance between lines of the text in a paragraph or a document. The default line spacing is Single. Other options are 1.5 lines, Double, At least, Exactly, and Multiple line spacing.
(d) Bullets and Numbering: Bullets and numbering allow text to be organized in lists.
(i) Bullets: They are small solid shapes used just before a line of text such as an item in a list. They are used to mark the beginning of a point.
(ii) Numbering: This is the use of numbers to list different points. They may be set in Arabic (1, 2,3, ...) or Roman (i, ii, iii, ...).
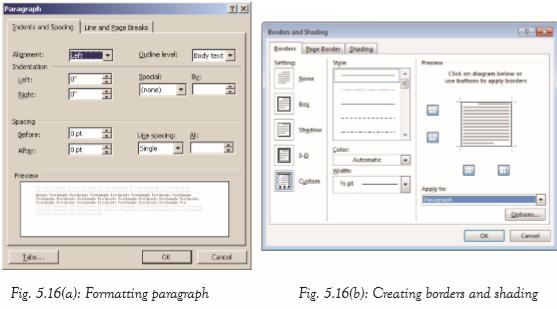
To apply line spacing, indentation, bullets and numbering, and alignment do the following:
• Highlight the text. From the Home tab, either select the desired paragraph formatting icon on the ribbon under the Paragraph group; or click on the dialog box launcher besides the Paragraph group label. A dialog box appears as shown in figure 5.16(a).
• From the dialog box that appears, select the Indents and Spacing tab then select the desired formats and click OK.
(e) Borders and Shading: The term border refers to a line separating two parts in a document. For example, to separate two cells in a table, a border can be used. Shading refers to the process of making an area in a document to have a relatively dark tone that produces a shade. Shading can be applied to a drawing, a table, or a picture. To create borders and shading on a table, do the following:
• Click anywhere within the text. Click the Page Layout Tab, in the Page Setup Group, click on the dialog box launcher. A dialog box is displayed. Select the Layout tab from the Page Setup dialog box.
115
• Click on the Borders command. The Borders and Shading dialog box is displayed as shown in figure 5.16(b).
• Select the Borders tab and specify the settings, style, colour, and width.
• In the Apply to section, specify the area where the border will be effected.
• Click OK to close the dialog box and effect the changes.
(f) Sorting: This is the process of arranging data in a particular order; that is, either in ascending or descending order. Data can be sorted when it is in a paragraph
. Sorting a paragraph of data: A paragraph can be sorted using the first letter in each line. For example, when the following data is sorted in ascending order it will appear as follows:
Unsorted
I am a patriot.
I am a law abiding citizen.
I will always defend my country.
Let us work as a team.
We must protect our country.
Sorted
I am a law abiding citizen.
I am a patriot.
I love my country.
I will always defend my country.
Let us work as a team.
We must protect our country.
I love my country.
To sort data in a paragraph do the following: • Select the paragraph. Click on Sort from the Paragraph group in the Home tab.
116
A dialog box appears as shown in figure 5.17.
Ensure that the words to be sorted are separated by a comma or by tab stops.
• Under Sort by select Paragraphs.
• Under Type select Text
• Choose either ascending or descending sort orders.
.Click ok to apply

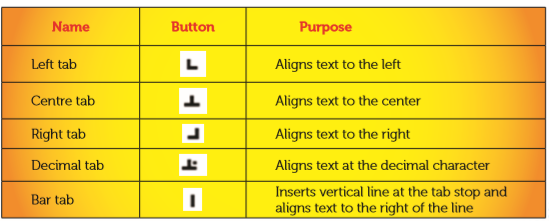
(g) Tabs: Tabs are special buttons on the horizontal ruler. They are used to indicate how far to indent text or where to begin a column of text in a paragraph. By default, the tab stop position is 0.5 inches. Table 5.1: Tabs are used to move the cursor to a preset position on a document.
117
Assignment 5.3
1. Differentiate between subscripts and superscripts.
2. How can the paragraph indention measurements be changed from inches to centimeters?
3. Differentiate between bullets and numbers.
4. Define the term sorting.
5. Describe three types of indentations that can be applied in a document.
Learning Activity 5C
Open the Internet document you created in Learning Activity 5B and do the following formatting
(a) Create a space at the top of the document and type the heading THE INTERNET, font size 20 points, italicized, bold, centred, and underlined.
(b) Change the line spacing of the second paragraph to 1.5 spacing.
(c) Italicize the word “information superhighway”.
(d) Change the case of the word “Internet” in paragraph 1, 2 and 4 to upper case.
(e) Save the changes as INTERNET1
Proofing Features
(a) Proofreading: The features that are used for proofing include spelling and grammar checker, Thesaurus, Autocomplete, and Autocorrect.
(i) Spelling and grammar checker: It is a feature that contains an inbuilt dictionary for checking spelling and grammatical mistakes. It notifies the user of the mistakes found on an active document by either using a red wavy line for spelling mistakes or a green wavy line for grammatical errors. It also allows the user to add words in the dictionary. To make use of this feature do the following:
• Click Review Tab from the menu bar. Select Spelling and Grammar command from the ribbon under Proofing group. A window appears in the right pane.
• To make the correction, select the right word in the Suggestions box and click Change command button. • To leave the word or phrase as it is, click Ignore button.
• If the word occurs several times in the document, click Ignore All to leave all the occurrence of the word as it is.
• To add the word in the dictionary, click Add button.
Note: Ignore All only appears when there is a spelling error.
118
• Once the spelling and grammar checking process is complete, a dialog box will be displayed notifying the user that the spelling and grammar check is complete. Click the OK button to close the dialog box.
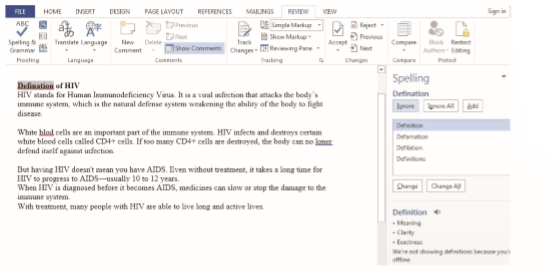
Fig. 5.18: Spelling and Grammar dialog box.
To spell-check a document simply press F7 key on the keyboard. Figure 5.19 shows the Spelling and Grammar Complete dialog box.

Fig. 5.19: A dialog box showing that spelling and grammar check has been completed.
(ii) Thesaurus: This feature displays synonyms and antonyms of a selected word.
Synonyms are words with similar meaning while antonyms are words with opposite meaning to the selected word. To make use of thesaurus do the following:
• Highlight the word whose synonym or antonym is required.
• Click Review Tab from the menu bar. Select Thesaurus command from the ribbon under Proofing group. A list of words is displayed on the right pane of the window.
• Point to the desired word from the resulting list and click on the arrow besides it; then select Insert to automatically replace the highlighted word with the selected one.
119

Moving and copying a section of text MS Word contains commands that can be used for moving and copying text from one part of a document to another. These commands are cut, copy, and paste.
(a) Moving a text
Moving refers to changing the position of text to a new location. The original text is moved to a clipboard awaiting to be pasted to the new location. A clipboard is a temporary space where all items to be moved or copied are stored before they are pasted to the desired location.
To move text, do the following:
(i) Select or highlight the text. Use one of the following options:
• From Home tab, click Cut icon.
• Right-click on the selected text and click Cut command from the resulting pop-up menu.
• Press Ctrl + X on the keyboard. (ii) Position the cursor where the text is to be moved. (iii) To paste, use one of the following options:
• Click Home tab, under the Clipboard group, click Paste icon.
• Right-click and select Paste Command from the pop-up menu.
• Press Ctrl + V on the keyboard.
120
(b) Copying text
Copying refers to creating a duplicate of text. To copy, do the following:
(i) Select or highlight the text or document to be copied.
(ii) Use one of the following options:
• From Home tab, click Copy icon under the Clipboard group.
• Right-click on the selected text and click Copy command from the pop-up menu.
• Press Ctrl + C on the keyboard
. (iii) Position the cursor where the item is to be copied.
(iv) To paste, use one of the following options:
• From Home tab, click Paste icon under the Clipboard group.
• Right-click and click Paste command.
• Press Ctrl + V on the keyboard.
Another copy is created in the new location while the original remains in the previous location
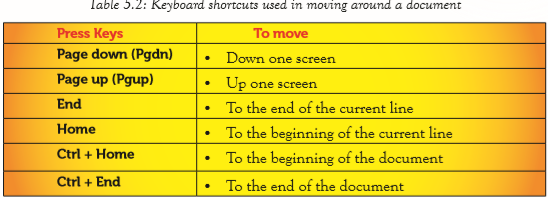
Moving through the text
(a) Moving through a document using keyboard shortcutsThe keyboard shortcuts can be used for moving through a document. When they are used, the position of the cursor is automatically changed. The following are some keyboard shortcuts that can be used:
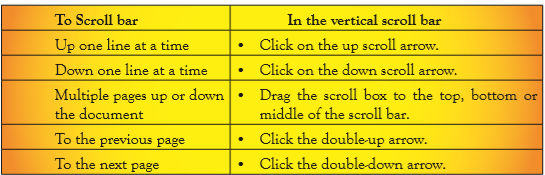
(b) Scrolling through the text
Scrolling is the process of moving around a document without changing the position of the cursor. The vertical scroll bar is used to move up or down the pages. The horizontal scroll bar is used to scroll from side to side.
Table 5.3: Use of vertical Scroll Bar
121
Deleting Text or image in a Document
To delete text or image refers to remove or erase content such as words and pictures from a document. Deleting can be done using the Backspace key and the Delete key.
(i) Backspace key: Erases character by character from the left side of the cursor position to the right.
(ii) Delete key: Erases character by character from the right side of the cursor position to the left.
Typing Modes
There are two typing modes used to edit documents. These are the Insert and the Typeover modes:
(i) Insert mode: It is a typing mode that adds text between words at the insertion point without replacing them as the user types. The existing words are pushed forward towards the right margin and to the next line when the cursor reaches the right margin. It is the default typing mode.
(ii) Typeover mode: It is also referred to as Overtype mode. When in this mode, characters are overwritten at the cursor position towards the right margin. Text added at the cursor position automatically deletes and replaces the existing text. To activate overtype mode, do one of the following:
• Press the Insert key on the keyboard. To switch back to insert mode press the insert key again.
• From File tab, click Options. From the Word Options dialog box, click the Advanced tab then click on the box next to use overtype mode.
Undo and Redo commands
(i) The Undo command is used to cancel or negate a series of the last commands executed starting with the most recent in order to restore the status of the document. Assuming that the following command have been executed in the following order: delete, copy, and paste. When the undo command is executed,
122
the “paste” command will be negated first. The next execution of undo command will negate “copy” and another execution of the same command will negate “delete”. The undo command is executed using one of the following options:
• Press CTRL + Z on the keyboard.
• Click on the Undo command icon on the Quick Access Toolbar.
(ii) The Redo command is activated only when the undo command had been used earlier. It nullifies a series of the negated actions. The redo command is executed using one of the following options:
• Press CTRL + Y on the keyboard.
• Click on the Redo command icon on the Quick Access Toolbar.
Find and Replace
The Find command is used to locate a word or phrase within a document. This makes it easy to identify a word or words to be formatted or changed with another. Assuming that a document has many occurrences of the article “the” and needs to be replaced by the word “an”, the find and replace command facilitates this change. The Replace command is used to automatically substitute the located word with a new word.
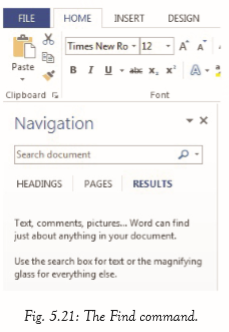
(i) The Find command: The following are the steps followed to locate words:
Click on Home tab on the menu bar, in the Editing group click on the Find command.
• The Navigation task pane appears as shown in Figure 5.21.
• This task pane can also be shown by pressing CTRL + F on the keyboard.
• Type the word to search in the Search Document box.
• All the occurrence of the word will be automatically highlighted on the document and a summary displayed as shown in Figure 5.22.
• Click on the close button in the navigation pane to exit the search as shown in Figure 5.23
123

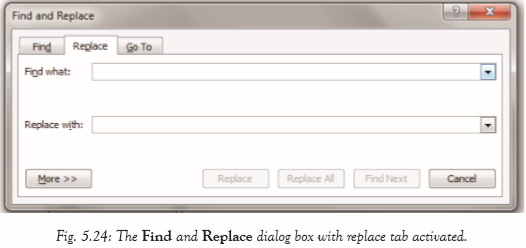
(ii) The Replace command
To replace an existing word or phrase with a new one do the following.
• Click on Home tab on the menu bar, in the Editing group, click on the Replace command. A dialog box is displayed as shown in figure 5.24. The box can also be displayed automatically by pressing CTRL + H on the keyboard.
• Type the word to be replaced on the Find what box, and the word to substitute it in the Replace with box. • Click on the Find Next button to locate the word in the document.
• Either click on Replace button to substitute one occurrence of the word at a time or click on the Replace All button to substitute all the occurrence of the word in the document at once
. • Click Cancel button to stop the procedure and close the dialog box.
124
Assignment 5.4
1. State the function of thesaurus.
2. Define the term proof reading.
3. Differentiate between find command and replace command.
4. Write the keyboard shortcut used to do the following:
(i) Move to the end of the document.
(ii) Move to the beginning of the document.
(iii) Open the Find navigation pane.
5. Describe how the vertical scroll bar could be used to move up or down one screen.
Learning Activity 5D
(a) Open a new document then copy INTERNET2 document created in Learning Activity 2 and do the following:
(b) Copy the first paragraph to the bottom of the document.
(c) Move the second paragraph to the paragraph after the words “information superhighway”
(d) Delete the third paragraph
. (e) Spell check the document.
(f) Find all occurrence of the word “large” in the document and replace it with the word “huge”.
(g) Save the changes as INTERNET3
Revision Exercise 5
1. Differentiate between the following:
(a) Moving
(b) Copying
(c) Deleting
2. Distinguish between spell checking and thesaurus.
3. Differentiate between the delete key and the backspace key.
4. Define the term selecting of text.
5. Outline the procedure used for sorting data in a paragraph.
6. Differentiate between End Key and Home Key functions.
7. Name the keys represented by the following symbols:
(i) Pgdn
(ii) Pgup
(iii) Ctrl
8. Define the term scrolling through text.
9. Differentiate between undo and redo commands.
10. Describe two types of typing modes that can be used in a word processing application.
125