UNIT 6 : VISUAL BASICPROJECT
Key Unit Competency
To be able to connect Visual Basic Interface to Database and create a simple Visual
Basic standard desktop applications for a real life situation.
Introductory activity
GS Gisakura is a Twelve- Years- Basic- Education School that has a big number of students. The school is facing the problem of students’ information management and is
looking for an application to manage its students’ registration.
After elucidating the requirement specifications of the GS Gisakura's students’ registration system do the following:
1. Using Visual basic, create a front end interface for the GS Gisakura
students’ registration system.
2. Using MS access, create the database for the GS Gisakura’s students
registration system.
3. Using Open Database Connectivity (ODBC), link the front and back end
interfaces for the GS Gisakura students’ registration system.
4. Using Data Access Objects (DAO), Data controls and properties;
manipulate data of the GS Gisakura students’ registration system.
5. Design the front end interface basing on ergonomics rules
6.1. PROJECT 1: REQUIREMENT ANALYSIS AND PROJECT
PLANNING
In every software project, you need to collect and analyze the information about
what you are going to do. This phase in Software Development Life Cycle (SDLC) is
called requirement’ analysis.
To develop a Visual Basic Project, all requirements specifications must be gathered
so that the planning of the project can be realized.
6.1.1. VB Project Planning
The project planning is an important phase of a software development. It works
on the breakdown of activities, the scheduling, the human force distribution, its
recruitment and capacity development. The cost of the project is also done by
considering the size of work and manpower needed for its realization.
As each project should have its objectives, for example, the student registration
system should manage student registration information where every student
information in the system has to be recorded, stored and should be modifiable (edit,
add new, delete and update) by the authorized users.
6.1.2. Software requirement analysis
The software requirement or specification requirement phase allows both the
developers and their clients to have a common understanding of the project and
avoids mistakes that should cause failures. The requirements can be functional and
nonfunctional. Functional requirements are those requirements concerning actions
to be performed by the new system while nonfunctional requirements concern the
constraints, performance, safety, security, timing and the quality of the new system.
In case of the software that manages a school, the Software requirement should help
to understand the status of the school in terms of computerization, the intended
software and how it will work with the users in this phase. So, there is a need to
take sufficient time by conducting extensive interviews with all the people who are
going to use the software. In this case, the school administrators, teachers, students
and the school secretary have to give their views.
After, it is better to structure all collected data and analyze them for the development
of the program. All technical limitations that may arise on the client’s side must be
considered before the development of a list of specifications that meet the user’s
needs.
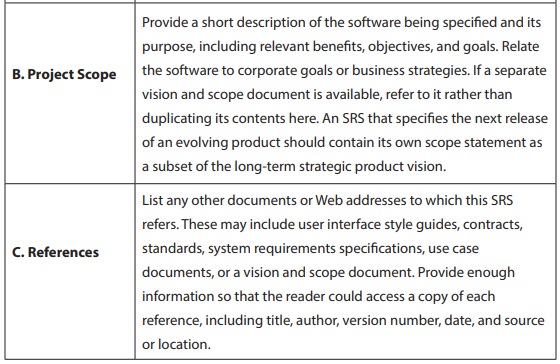
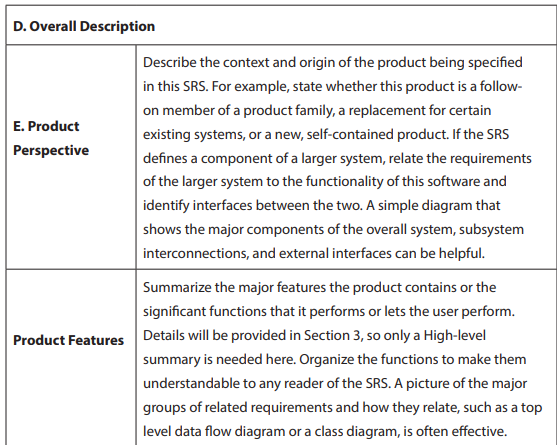
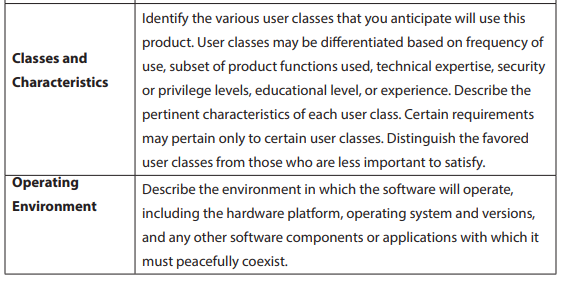
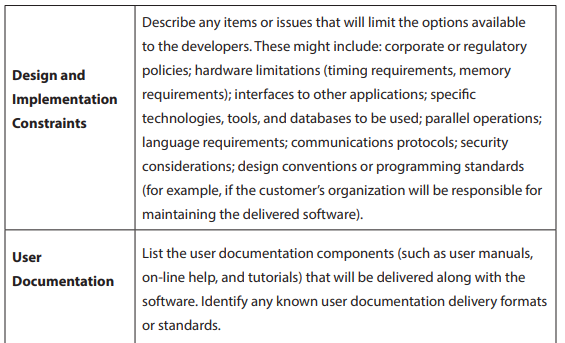
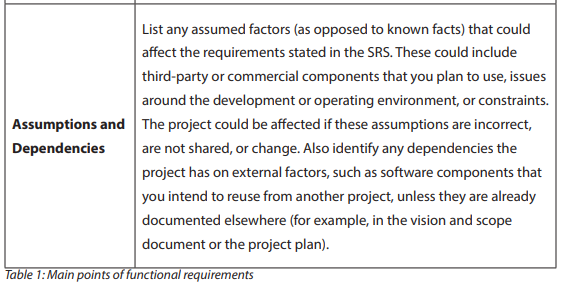
The template to be followed for the software functional requirements is described
hereafter. The main template is follows the points in the tablebelow.

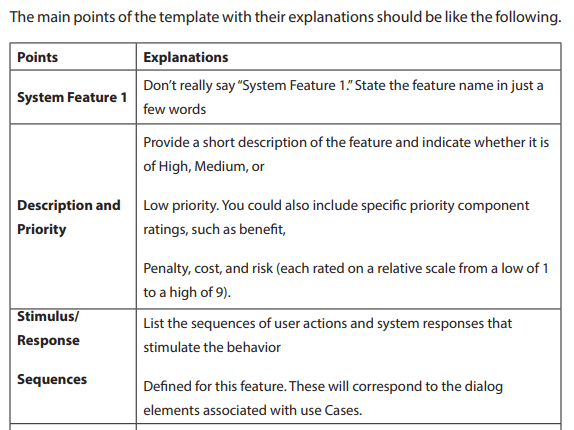
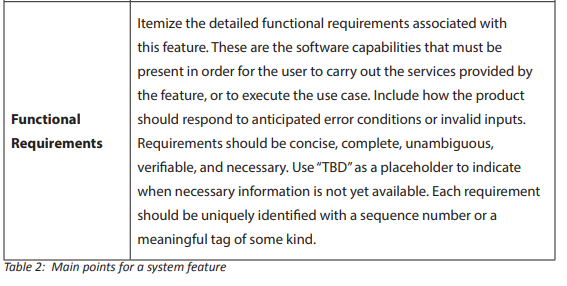
3. System Features
This template illustrates how to organize the functional requirements for the product
by system features and the major services provided by the product. This section can
be organized bymode of operation, user class, object class, functional hierarchy, or
combinations of these, whatever makes the most logical sense for your product.
4. External Interface Requirements
a. User Interfaces
Describe the logical characteristics of each interface between the software product
and the users. This may include sample screen images, any GUI standards or product
family style guides that are to be followed, screen layout constraints, standard buttons
and functions (e.g., help) that will appear on every screen, keyboard shortcuts, error
message display standards, and so on. Define the software components for which a
user interface is needed. Details of the user interface design should be documented
in a separate user interface specification.
b. Hardware Interfaces
Describe the logical and physical characteristics of each interface between the
software product and the hardware components of the system. This may include
the supported device types, the nature of the data and control interactions between
the software and the hardware, and communication protocols to be used.
c. Software Interfaces
Describe the connections between this product and other specific software
components (name and version), including databases, operating systems, tools,
libraries, and integrated commercial components. Identify the data items or
messages coming into the system and going out and describe the purpose of each.
Describe the services needed and the nature of communications. Refer to documents
that describe detailed application programming interface protocols. Identify data
that will be shared across software components. If the data sharing mechanism
must be implemented in a specific way (for example, use of a global data area in a
multitasking operating system), specify this as an implementation constraint.
d. Communications Interfaces
Describe the requirements associated with any communications functions required
by this product, including e-mail, web browser, network server communications
protocols, electronic forms, and so on. Define any pertinent message formatting.
Identify any communication standards that will be used, such as FTP or HTTP.
Specify any communication security or encryption issues, data transfer rates, and
synchronization mechanisms.
5. Other Nonfunctional Requirements
a. Performance Requirements
If there are performance requirements for the product under various circumstances,
state them here and explain their rationale, to help the developers understand the
intent and make suitable design choices. Specify the timing relationships for real
time systems. Make such requirements as specific as possible. You may need to state
performance requirements for individual functional requirements or features.
b. Safety Requirements
Specify those requirements that are concerned with possible loss, damage, or harm
that could result from the use of the product. Define any safeguards or actions that
must be taken, as well as actions that must be prevented. Refer to any external
policies or regulations that state safety issues that affect the product’s design or use.
Define any safety certifications that must be satisfied.
c. Security Requirements
Specify any requirements regarding security or privacy issues surrounding use of the
product or protection of the data used or created by the product. Define any user
identity authentication requirements. Refer to any external policies or regulations
containing security issues that affect the product. Define any security or privacy
certifications that must be satisfied.
d. Software Quality Attributes
Specify any additional quality characteristics for the product that will be important
to either the customers or the developers. Some to consider are: adaptability,
availability, correctness, flexibility, interoperability, maintainability, portability,
reliability, reusability, robustness, testability, and usability. Write these to be specific,
quantitative, and verifiable when possible. At the least, clarify the relative preferences
for various attributes, such as ease of use over ease of learning.
e. Other Requirements
Define any other requirements not covered elsewhere in the SRS. This might include
database requirements, internationalization requirements, legal requirements,
reuse objectives for the project, and so on. Add any new sections that are pertinent
to the project
6.1.3 Project1
Based on the request of your school to have a student registration system and by
following the software requirement specifications template given above, develop
the Requirements Document.
6.2. PROJECT2: FRONT END USER INTERFACE IN VISUAL BASIC
6.2.1. Understanding front end
In visual basic, the term Front End refers to the user interface, where the user
interacts with the program through the use of the screen forms and reports. The
Front End graphical user interface use buttons, text field and different icons to make
easy navigation of the application software.
6.2.2. Design the forms constituting a front end interface
Front-end interface for the GS Gisakura students’ registration layout are given below
and you are going to design the same layout and your own basing on SRS you have
elucidated in your school as case study.


6.3. PROJECT 3: BACK END DATABASE
(In Ms-Access, MySQL or any suitable RDBMS)
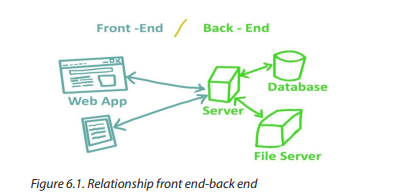
Database systems are comprised of a Front End and Back End. The Back End has the
tables that store data, including the relationships between the tables, data queries
and other behind the scenes technology that accepts information from and displays
information to the user via the Front End.
For example, when you are requesting for a birth certificate through Irembo there is
a number of information you provide through different forms and that information
is kept in the Irembo database tables.
Back ends can be built using different Relational Database Management Systems
such as Microsoft Access, SQL Server, Oracle etc. User at the front end of a system
does not need to know how data is stored and how it is modified or retrieved.
Note: If you create a program that access a database:
• Programming language are used as Front End. Example: Visual Basic, HTML.
etc.
• Database management systems are used as Back End. Example: Microsoft
Access, My SQL, SQL Server, Oracle, etc.
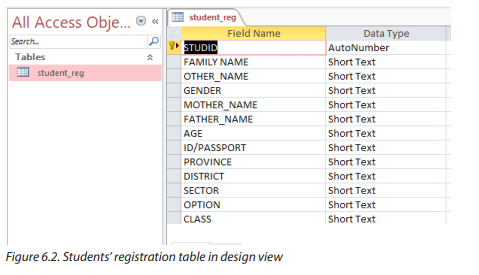
Below is layout of created table in design view. Create a database and name it
“school” and create a table whose “student_reg” as a name, using your suitable
Database management system (in this book we have used MS access 2016) with
the same field names as below. After, you are going to design and create your own
database basing on SRS you found in your school as case study.
6.4. PROJECT 4: CONNECTING A VISUAL BASIC 6.0 PROJECT
TO A DATABASE (ODBC configuration)
A visual basic database application has three main parts: user interface, the database
engine and the data storage.
• The user interface: Is the Media through which the user interacts with
the application. It may be form or group of forms, a window or an ActiveX
document form.
• The database engine: Connects the application program with the physical
database files. This gives you modularity and independence from the
particular database you are accessing. For all types of database, the same
data access object and programming techniques can be used in visual basic.
• The data storage: Is the source of the data. It may be a database or a
text file. Database processing has become an integral part of all types of
complex applications. A database is a system that contains different objects,
which can be used together to store data. Using visual basic, you can create
applications easily and make them have efficient access to data.
6.4.1. ODBC (Object Database Connectivity) configuration
a. ODBC overview
ODBC strands for Open Database Connectivity, a standard database access method
developed by the SQL Access group in 1992. The goal of ODBC is to make it possible
to access any data from any application, regardless of which database management
system (DBMS) is handling the data. ODBC manages this by inserting a middle
layer, called a database driver, between application and DBMS. The purpose of this
layer is to translate the application’s data queries into commands that the DBMS
understands. For this to work, both application and DBMS must be ODBC compliant.
b. Create an ODBC connection for the Database
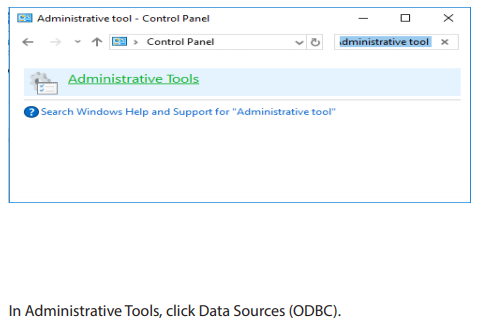
Step 1. Click Start button, and select Control Panel. Once the control panel gets
opened, click on Administrative Tools or tape it in search control panel if you do not
locate the Administrative Tools or just tape ODBC in start button search and click
ODBC data sources(32bit)
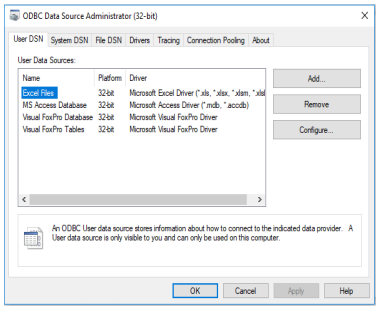

Step 2. Now we are going to add new database, click Add button and new window
will appear “Create New Data Source”, select the Driver do Microsoft Access (*.mdb)
for MS Access, click Finish Button.
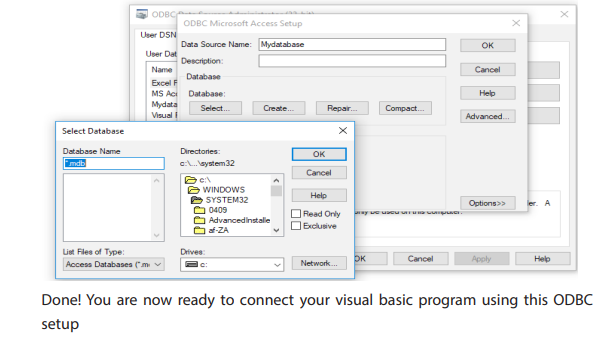
Step 3: We’re almost done, let’s configure the ODBC for MS Access, under Data
Source Name, type the MyDatabase, please leave blank the description it’s optional.
Now, let’s select the path of your database .mdb once you found it select OK button.
The image shown below means that the Database .mdb is successfully located. Click
OK button to Finish the configuration. (MS Access Database Configuration done).
6.5. PROJECT 5: DAO, RDO AND ADO OBJECTS IN VISUAL
BASIC
Using all steps and guidance below, create connectivity between your backend and
frontend
a. Introduction
You may build VB database applications using data control, however, data control is
not a very flexible tool as it could only work with limited kinds of data and must work
strictly in the Visual Basic environment. To overcome these limitations, we can use a
much more powerful data control in Visual Basic, known as ADO control.
Data control is a control that allows connecting a VB program to a text database such
as (Sql Server, MS Access, MySQL, Dbase, FoxPro…). That control allows moving in
data base records, display, and manipulating data in a list of the available data base
records. It is adjusted on the form of other objects and you can define its properties.
There are many types of data controls; in Visual Basic, there are three data access
interfaces:Dao (Data Access Object), RDO (Remote Data Object), Ado (ActiveX Data
Object). Thelatest among the three is ADO, which features a simpler yet more flexible
object model than either RDO or DAO.
1. Data access object (DAO) is an object that provides an
abstract interface to some type of database or other persistence
mechanism. By mapping application calls to the persistence layer, DAOs
provide some specific data operations without exposing details of the
database. This isolation supports the Single responsibility principle. It
separates what data accesses the application needs, in terms of domainspecific objects and data types (the public interface of the DAO), from how
these needs can be satisfied with a specific , database schema, etc. (the
implementation of the DAO).
2. Remote Data Objects (abbreviated RDO) is the name of an
obsolete data access application programming interface primarily used
in Microsoft Visual Basic applications on Windows 95 and later operating
systems. This includes database connection, queries, stored procedures,
result manipulation, and change commits. It allowed developers
to create interfaces that can directly interact with Open Database
Connectivity (ODBC) data sources on remote machines, without having
to deal with the comparatively complex ODBC API (Open Database
Connectivity- Application Programming Interface). Remote Data Objects
was included with versions 4, 5, and 6 of Visual Basic; the final version of
RDO is version 2.0.
3. ActiveX data Object (ADO)
This control helps us to access a database data offering the possibility of
working on different data sources such as text files, relational data base etc.
i.Add ADO control
ADO controls contain multitudes of objects having properties, methods and events.
Access-connection: It allows your program to access a data source using a connection.
Its environment deals with transferring data.
ii. Recordset:
this property work with the records which can be accessed by an ADO control. Most
of methods are associated to this property. You can use this property to count the
number of records.
For example using the command: CmdRecordCount()
Private Sub CmdRecordCount_click()
Adodc1.Recordset.Movelast
MsgBox Adodc1.RecordSet.RecordCount ‘to count the number of records
End Sub
• Field: correspond to the fields of a database which are connected to the
program.
• Error: Errors may occur when a program fails to connect t, execute a
command or perform a given operation.
• Event: ADO uses the concept of events as other VB interfaces do, you can
use also event procedures.
• Recordsource: Recordsource property specifies the source of the records
accessible through bound controls on your form. If you set the recordsource
property to the name of an existing table in the database, all of the fields
in that table are visible to the bound controls attached to the Data control.
• Datasource: The datasource property specifies an object containing data
to be represented as a recordset object. It is used to create data-bound
controls with the data environment in visual basics.
Eg: a datasource can be a spreadsheet, text file.
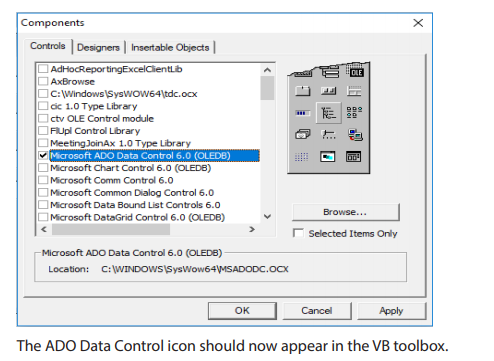
To add the ADO control on the form perform the following steps:
1. Select the command Component in the project menu
2. Click on Controls in the dialog box which opens
3. Select Microsoft Ado Data Controls 6.0 (OLEDB)
4. Click ok button
5. This control will be added to the toolbox.
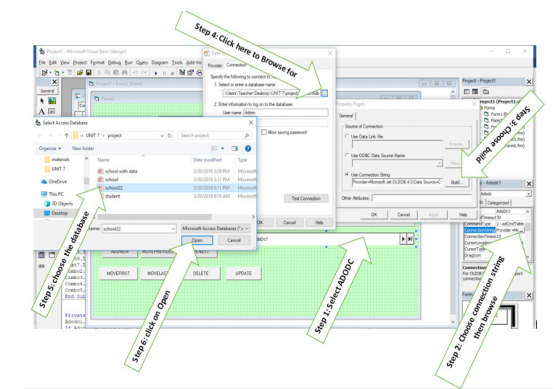
6. To connect ADO objects on the data source use a « ConnectionString »
and specify the datasource (the database name you want to connect)
7. Then you have to specify the access path after clicking the connection
property.
Let us go a bit details and do practice
Select components in Project Menu or use keyboard shortcuts CTRL+T In
components check in check boxes for:
• Microsoft ADO Data Control 6.0 (OLEDB) &Microsoft DataGrid Control 6.0
(OLEDB) By right click in tool box, we obtain also components
• Double click on the form and write the following codes:
Private Sub Form_Load()
Adodc1.ConnectionString = “”
Adodc1.RecordSource = “select * from student”
Set DataGrid1.DataSource = Adodc1
End Sub
• Create a connection string by making right click on adodc control which is
on the form, then select properties.
• On the properties page which opens, choose build and select the path
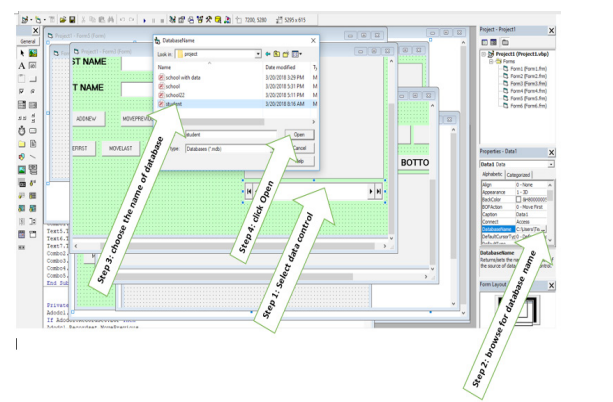
b. Method of the data control
Data control properties
• Name: you can keep data1 or put the one of your choice
• Caption=put your own message or leave it blank
• Connect=access
• Database name= browse and get the Employee database.
• Recordset type= table
• Record source=name of the table
• Visible= choose false so that when you run your application, the data
control will not appear
Data control has many methods like move first, move last, move next, and move
previous which are used to move through the records.
MoveFirst: will move the record pointer to the first record in the recordset.
MoveNext: will move the record pointer to the next record in the recordset
MovePrevious: will move the record pointer to the previous record in the recordset
MoveLast: will move the record pointer to the last record in the recordset
6.6. PROJECT 6 DATA CONTROLS, PROPERTIES AND DATA
MANIPULATION AND CODING
(adodc, recordset, addnew, delete, update, movenext, movelast, movefirst,
moveprevious code in vb for data manipulation)
To create an ADO Data Control that exposes a Recordset in your application, at the
minimum you need to do the following:
• Specify a Connection by filling in the ConnectionString property.
• Specify how to derive a Recordset by setting the RecordSource property
(which is a complex property requiring its own dialog box to set up).
The detailed steps are as follows:
6.6.1. Setting up ADO Data Control in Visual Basic 6.0
a. Adding ADODC (ADO Data Control) on toolbox
To add ADO Data control, make right click on toolbox dialog box and choose
component, then you will have a dialog box and tick Microsoft ADO Data Control
6.0(OLEDB) and click OK as shown below:

b. RECORDSET
Recordset property:
A recordset object provides a logical representation of a record in a table, or in the
results of a query. There are three types of recordset object:
1. Table: this type of recordset provides access to all of the record and field
in a specified table. The contents of records can be updated using the
table type, but only one table can be referenced by this type of recordset.
Data access is faster, since it has a direct reference to the table.
2. Dynaset: the dynaset type represents a selected (by SQL) set of records
from one or more tables. The records and fields contained in a dynaset
type are specified by a query. The data can be modified in the case of
dynaset type recordset.
3. Snapshot: the snapshot type recordset is similar to a dynaset but it is a
read only. The data cannot be updated. So you cannot use snapshot type
to modify records in a table. Snapshot type can be used if you want only to
view data or fill drop down from a table.
In a recordset, two special positions of record pointer are BOF and EOF.
• BOF is the beginning of the file before the first record
• EOF is the end of the record after the last record. The record pointer is to the
first record when BOF is reached and the last record when EOF is reached
Use of ADO control to connect database fields to different VB objects
Ho to connect database fields to textbox?
1. Select a textbox to connect
2. Press f4 key to display the property window.
3. In data source property, select the name of the connection control (here it
is Adodc1)
4. To display a given field, put the field name in « DataField »
Use of methods
Add record into a database
b. To add a record into a database we use the method AddNew.
Syntax: Controlname.RecordSet.AddNew
Ex. Adodc1.RecordSet.AddNew
c. Delete a record
To delete a record we use delete method:
Private Sub CmdDelete_Click()
Adodc1.RecordSet.Delete
End Sub
To prevent the display of blank record, we move the record:
Private Sub CmdDelete_Click()
Adodc1.Recordset.Delete
Adodc1.Recordset.MoveNext’ prevent the error in case a record is not available
End sub
d. Refresh method
Refresh method is used to refresh database data; it allows to update the controls
according to the new values of the fields of a table.
Ex. Adodc1.Refresh
e. Update database fields
To modifying a database fields, you have to use the update method
Private Sub CmdUpdate_click()
Adodc1.UpDateRecord or
Adodc1.Update
End Sub
f.MoveNext method
Put the record pointer to the next record
Private Sub CmdNext_Click()
Adodc1.Recordset.MoveNext
End sub
g. MovePrevious method
Put the pointer on the previous method
Private Sub CmdPrevious_Click()
Adodc1.Recordset.MovePrevious
End Sub
h. MoveFirst method
Put the pointer on the first record of the database
Private sub CmdFirst_Click()
Adodc1.Recrdset.MoveFirst
End sub
i.MoveLast method
Put the pointer on the last record
Private Sub CmdLast_Click()
Adodc1.Recordset.MoveLast
End sub
Counting the records number
We use the method RecordCount:
Private Sub CmdCount_Click()
Adodc1.Recordset.MoveLast
MsgBox adodc1.Recordset.RecordCount
End sub
6.6.2. Building the interface and accessing the database • Interface is required to access a related database in order a user can add,
modify, retrieve data and so many other interactions.
• Drawing the interface, you have to set properties and then coding
• You have to add the data control to connect your database.
• Now let us add data control to be used to connect database with the
following steps below:
• Create a database in Microsoft access and an interface in visual basic6.0
then try to access it from VB form interface.
• Name your database created in Microsoft access for example name it
“school”
• Create three tables named for example Table1, Table2 and Table. Fill your
database in Table1 with the fields: RegNo, First name, Last name, Gender,
Mother’s name, Father’s name, ID/Passport, Province, District, Sector, Option
and class respectively.
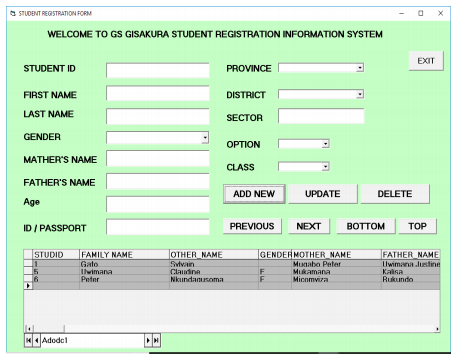
• Using visual basic 6.0, draw the interface for your tables with the following
controls:
• 12 labels (RegNo, First name, Last name, Gender, Mother’s name, Father’s
name, ID/Passport, Province, District, Sector, Option and class)
• 12text boxes RegNo, First name, Last name, Gender, Mother’s name, Father’s
name, ID/Passport, Province, District, Sector, Option and class)
• Eight command buttons for Add, Delete, Next, Previous, Top, Bottom,
Update, and Exit.
Below is VB form that contains all above command buttons. Connect it with your
created database and access all information from school database and do the same for your own basing on created database through SRS. Below are codes that will guide you.
a. Set properties for the text box
• Data field=name of the field (for this example it is Table2)
• Setting properties for the combo box
• Data source=data control name (for the example above, data control name
is Adodc1)
• Data field=name of the field (depending on the name of field in you want
to be displayed in database)
1. Codes for combo box (Gender)
Double click the form and write the following codes:
Private Sub Form_Load ()
Combo1.AddItem “Male”
Combo1.AddItem “Female”
End Sub
Note: You may edit the name combo1.AddItem to “cmbgender” or other name you
want.
1. Codes for command buttons
• Command “Add”
Private Sub cmdadd_Click()
Data1.Recordset.AddNew
End Sub
Command “Update”
Private Sub cmdupdate_Click()
Data1.Recordset.Update
End Sub
• Command “Bottom”
Private Sub cmdbottom_Click()
Data1.Recordset.MoveLast
End Sub
• Command “Top”
Private Sub cmdtop_Click()
Data1.Recordset.MoveFirst
End Sub
• Command “Exit”
Private Sub cmdexit_Click()
Unload Form1
End Sub
Private Sub cmdexit_Click()
Unload me
End Sub
or
Private Sub cmdexit_Click()
end
End Su
• Command “Next” (using Data1)
Private Sub cmdnext_Click()
Data1.Recordset.MoveNext
If Data1.Recordset.EOF Then
Data1.Recordset.MovePrevious
End If End Sub
• Command “Next” (using Adodc1)
Private Sub Command2_Click()
Adodc1.Recordset.MoveNext
If Adodc1.Recordset.EOF Then
Adodc1.Recordset.MovePrevious
MsgBox “you are at the end”
End If
End Sub
• Command “Previous” (using Data1)
Private Sub cmdprevious_Click()
Data1.Recordset.MovePrevious
If Data1.Recordset.BOF Then
Data1.Recordset.MoveNext
End If End Sub
• Command “Previous” (using Adodc1)
Private Sub Command3_Click()
Adodc1.Recordset.MovePrevious
If Adodc1.Recordset.BOF Then
Adodc1.Recordset.MoveNext
MsgBox “you are at the end”
End If
End Sub
• Command “Delete”
Private Sub cmddelete_Click()
If MsgBox(“Are you sure?”, vbQuestion + vbYesNo,
“Deleting”) = vbYes Then
Data1.Recordset.Delete
Data1.Recordset.MoveNext
End If
End Sub
• Command “Find”
Private Sub cmdfind_Click()
find = InputBox(“Enter parent_id”)
.With Data1.Recordset
.Index = “primarykey” .Seek “=”, find
End With
End Sub
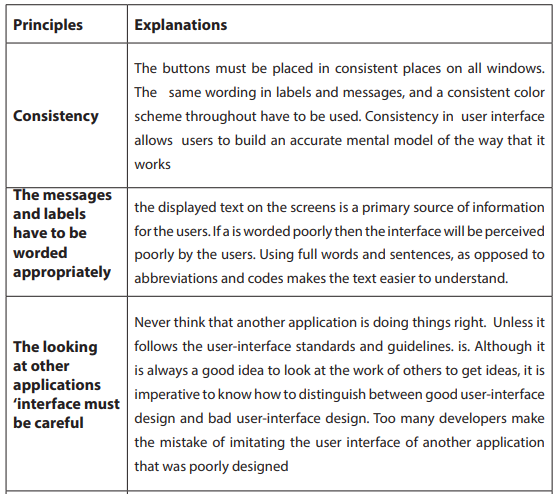
6.7. PROJECT 7: PRINCIPLES FOR DESIGNING A FRIENDLY AND
ERGONOMIC USER INTERFACE
Designing a good user interface is an iterative process. There are appropriate
techniques to use during the designing and implementation of a user interface. For
good looking and being attractive, the user interface should be SMART so that every
designed screen should support single action of real value to the users. This should
make it easier to learn, use, add, delete and other interactions for users.
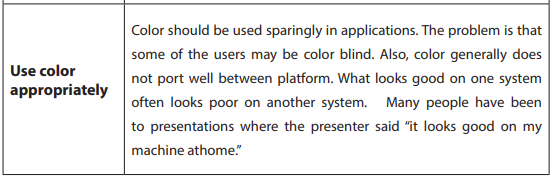
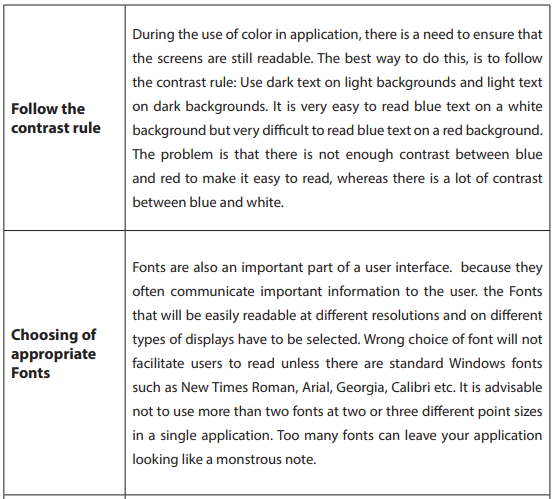
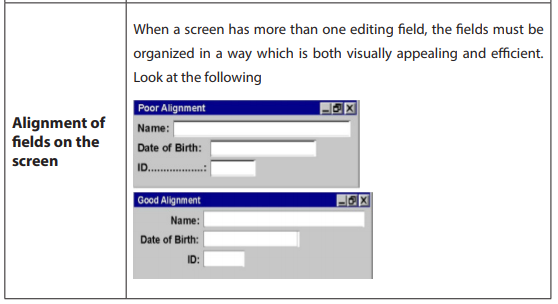
a. Principles of a friendly user interface.
The following table is showing the main principles of a friendly user interface.
Each programmer should keep it as a bible to consult during the development of
applications in different Programming Languages.

b. Principles for an ergonomic user interface
Ergonomics derives from two Greek words: ergon, meaning work, and nomoi, meaning natural
laws, to create a word that means the science of work and a person’s relationship to that work.
Ergonomics is a field of study that attempts to reduce strain, fatigue, and injuries by improving
product design and workspace arrangement. It makes things comfortable and efficient.
It is intended to maximize productivity by reducing operator fatigue and discomfort. Human
characteristics, such as height, weight, and proportions are considered, as well as information
about human hearing, sight, temperature preferences, and so on, in order to reduce or
eliminate factors that cause pain or discomfort
There are five aspects of ergonomics: safety, comfort, ease of use, productivity/performance,
and aesthetics. Based on these aspects of ergonomics, examples are given of how products
or systems could benefit from redesign based on ergonomic principles.
i. Safety: This has to do with the ability to use a device or work with a device
without short or long term damage to parts of the body.
ii. Comfort: Comfort in the human-machine interface is usually noticed first.
Physical comfort in how an item feels is pleasing to the user.
iii. Ease of use: This has to do with the ability to use a device with no stress
iv. Productivity/performance: Ergonomics addresses the performance of user
interface by providing more options to the users, enabling them to easily
and quickly skip some instructions as users’ choice.
v. Aesthetics: Signs in the workplace should be made consistent throughout
the workplace to not only be aesthetically pleasing, but also so that
information is easily accessible.
Project 6 activity
Improve your project by taking into consideration the principles of a friendly user
interface and an ergonomic user interface above.