UNIT 13: MULTIMEDIA
Key unit competency
To be able to explain the different use of multimedia and interactive multimedia
applications and to use multimedia software to create video.
Introductory Activity
Observe the figure below and answer the following questions.

1. Describe what you see.
2. What materials or tools are used?
3. Explain the method used to achieve their objectives?
4. What is the importance of multimedia in meetings organization?
5. What else technologies can be used to share information between
individuals and institutions?
13.1. INTRODUCTION TO MULTIMEDIA
Activity 13.1.
1. What do you understand by Multimedia?
2. Discuss the role of multimedia in daily life.
3. Discuss the software used in multimedia.
13.1.0 Definition
Multimedia is the content that uses a combination of different forms of content
such as text, audio, images, animations, video and interactive content. Multimedia
contrasts with media that uses only rudimentary computer displays such as textonly
or traditional forms of printed or hand-produced material.
Multimedia can be recorded and played, displayed, interacted with or accessed
by information content processing devices, such as electronic devices, but can also
be part of a live performance. Multimedia devices are electronic media devices
used to store and experience multimedia content.
13.1.1 Different types of media
Media are the collective communication outlets or tools used to store and deliver
information or data. Modern media come in many different formats, including
print media (books, magazines, newspapers), television, movies, video games,
music, cell phones, various kinds of software, and the internet.
1. Print Media
The term ‘print media’ is used to describe the traditional or “old-fashioned” printbased
media, including newspapers, magazines, books, and comics or graphic
novels.
2. Television
Television (TV) is a telecommunication medium used for transmitting moving
images in monochrome (black and white), or in colour, and in two or three
dimensions and sound. The term can refer to a television set, a television
program (“TV show”), or the medium of television transmission. Television is a mass
medium for advertising, entertainment and news.
3. Movies
Movies, also known as films, are a type of visual communication which
uses moving pictures and sound to tell stories or inform (help people to learn).
People in every part of the world watch movies as a type of entertainment, a way
to have fun.
4. Video Games
A video game is an electronic game that involves interaction with a user
interface to generate visual feedback on a video device such as a TV
screen or computer monitor.
13.1.2 Media applications
Multimedia finds its application in various areas including, but not limited to,
advertisements, art, education, entertainment, engineering, medicine, mathematics,
business, scientific research, spatial temporal applications, etc.. Several examples
are as follows:
1. Creative industries
Creative industries use multimedia for a variety of purposes ranging from fine arts,
to entertainment, to commercial art, to journalism, to media and software services.
2. Commercial uses
Much of the electronic used by commercial artists and graphic designers is multimedia.
Exciting presentations are used to grab and keep attention in advertising. Business
to business, and interoffice communications are often developed by creative
services firms for advanced multimedia presentations beyond simple slide shows to
sell ideas or liven up training.
3. Entertainment and fine arts
Multimedia is heavily used in the entertainment industry, especially to develop special
effects in movies and animations (VFX, 3D animation, etc.). Multimedia games
are a popular pastime and are software programs available either as CD-ROMs or
online. Some video games also use multimedia features. Multimedia applications
that allow users to actively participate instead of just sitting by as passive recipients
of information are called interactive multimedia. In the arts, there are multimedia
artists, whose minds are able to blend techniques using different media that in some
way incorporates interaction with the viewer.
4. Education
In education, multimedia is used to produce computer-based training courses
(popularly called CBTs) and reference books like encyclopedia and almanacs. A
CBT lets the user go through a series of presentations, text about a particular topic,
and associated illustrations in various information formats. Edutainment is the
combination of education with entertainment, especially multimedia entertainment.
5. Journalism
Newspaper companies all over the world are trying to embrace the new phenomenon
by implementing its practices in their work.
6. Engineering
Software engineers may use multimedia in computer simulations for anything
from entertainment to training such as military or industrial training. Multimedia
for software interfaces are often done as collaboration between creative
professionals and software engineers.
7. Mathematical and scientific research
In mathematical and scientific research, multimedia is mainly used for modeling and
simulation. For example, a scientist can look at a molecular model of a particular
substance and manipulate it to arrive at a new substance.
8. Medicine
In medicine, doctors can get trained by looking at a virtual surgery or they can simulate
how the human body is affected by diseases spread by viruses and bacteria and
then develop techniques to prevent them. Multimedia applications such as virtual
surgeries also help doctors to get practical training.
13.1.3. Hardware and software requirements
Multimedia is the one industry which requires different equipments to be used. It
requires Hardware and Software equipment as listed below.
a. Hardware
27” standalone iMac
• 15” monitor with multiple video inputs
• scanner
• DV/DVD recording :is an optical disc recorder that uses optical
disc recording technologies to digitally record analog or digital signals
onto blank writable DVD media
• DVD/VCR recording deck: is an electromechanical device that records
analog audio and analog video from broadcast television or other source
on a removable, magnetic tape videocassette, and can play back the
recording.
• DV/VCR recording deck
• DV recording deck
• Whiteboard
b. Software used in multimedia

Application Activity 13.1.
1. Explain how multimedia can be applied in education
2. State different software and hardware required for multimedia applied
in education.
3. What kind of headphone can you use to protect your ears from the
noise
13.2. Interactive multimedia
Activity 13.2.
4. What do you understand by Hyperlink?
5. In PowerPoint presentation, discuss different steps followed to create
hyperlinks.
13.2.1 PowerPoint presentation
a. Creating Hypertext in the same document
Whenever the internet is used in Microsoft office 2013, hyperlinks are used to
navigate from one webpage to another. Web addresses or email addresses are
included in PowerPoint presentation through hyperlinks.
Hyperlinks have two basic parts: the address of the webpage, email address,
or other location they are linking to, and the display text (which can also be a
picture or shape). For example, the address could be https://www.youtube.com,
and YouTube could be the display text. In some cases, the display text might be
the same as the address. When creating a hyperlink in PowerPoint, choose both the
address and the display text or image.
1. Steps Creating Hyperlink
Step1: Select the image or text you want to make a hyperlink.
Step2: Right-click the selected text or image, then click Hyperlink.
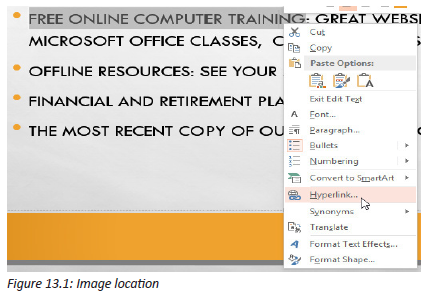
Step3: The Insert Hyperlink dialog box will open. You can also get to this dialog
box from the Insert tab by clicking Hyperlink.
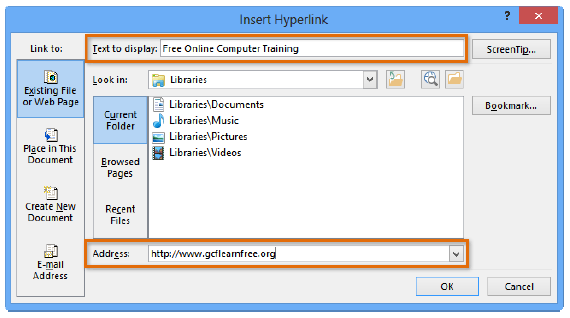
Figure 13.2: Dialog box for inserting Hyperlink
Step4: If you selected text, the words will appear in the Text to display field at the
top. You can change this text if you want.
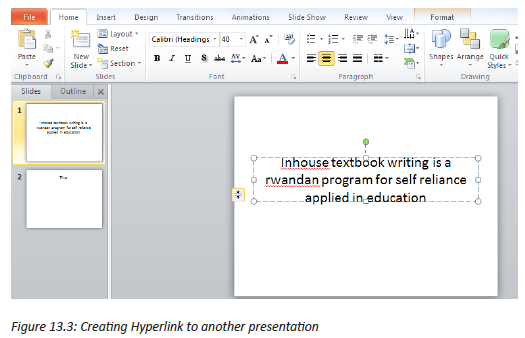
b. Creating Hyperlink to another presentation
You can easily link to a specific slide in another presentation. Follow these steps:
Step1: Select the object on the slide that you want to use for the hyperlink.
Step3: In the insert Hyperlink dialog box, choose Existing File or Web Page from
the Link to bar at the left.

Step4: Click the Bookmark button.
The Select a Place in Document dialog box opens, listing all the slides in the
presentation to which you’re linking.
Step5: Select a Place in Document dialog box
Choose the slide you want and click OK.
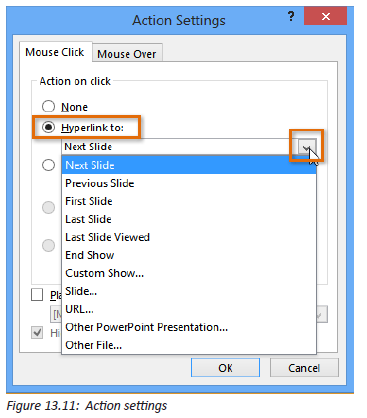
Note: If your object is an Action Button, the Action Settings dialog box opens.
Choose the Hyperlink To option. From the drop-down list, choose Other PowerPoint
Presentation. Navigate to the presentation and click OK. The Hyperlink to Slide
dialog box opens, which is just like the Select Place in Document dialog box, listing
the slides. Choose the one you want and click OK twice.
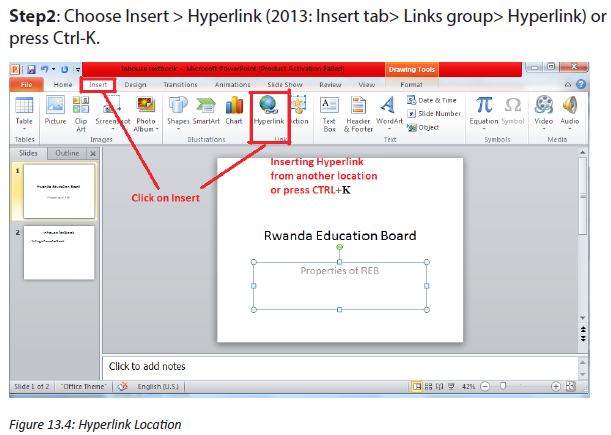
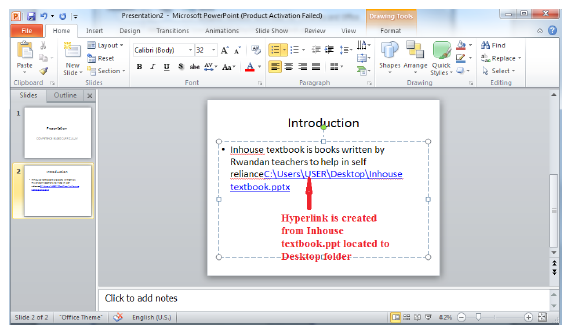
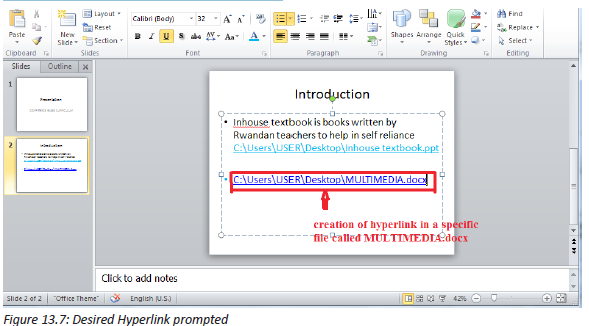
c. Creating Hyperlink to a file
Step1: Press CTRL+K
Step2: Right-click the selected text or image, then click Hyperlink. The Insert
Hyperlink dialog box will appear.
Step3: On the left side of the dialog box, click Existing File or Webpage.
Click the drop-down arrow to browse for your file.
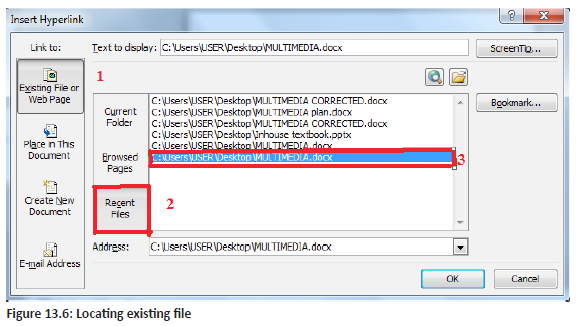
After selecting the desired file, Click OK button
Step4: Desired Hyperlinks prompted
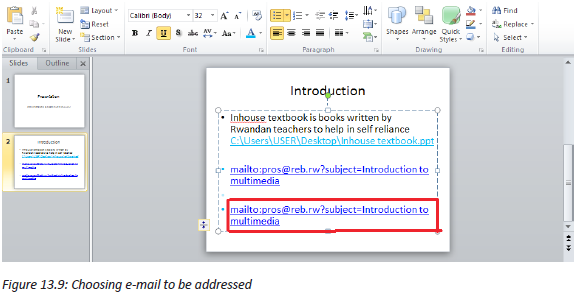
d. Creating a hyperlink to an email address
Step1: Right-click the selected text or image, then click Hyperlink.
Step2: The Insert Hyperlink dialog box will open.
Step3: On the left side of the dialog box, click Email Address.
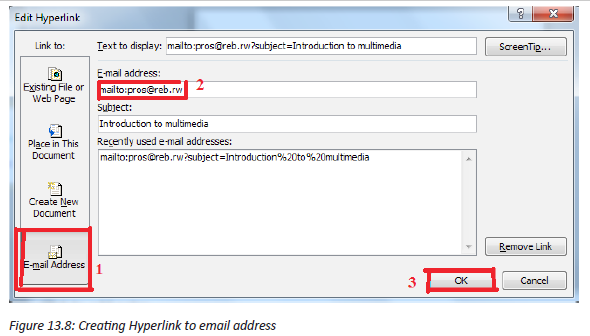
Step4: Type the email address you want to connect to in the Email Address box,
then click OK.
PowerPoint often recognizes email and web addresses as you type and will format
them as hyperlinks automatically after you press the Enter key or spacebar.
If you plan to display your presentation on a different computer, your hyperlink
to another file may not work. You have to make sure that you have a copy of the
linked file on the new computer and always it is good to test hyperlinks before
giving a presentation.
Application Activity 13.2.
1. In Computer lab, create PowerPoint presentation
2. Create hyperlink in the same document,Create hyperlink to another
presentation,
3. Create hyperlink to another file and
4. Create Hyperlink to email address
5. How can you protect your hyperlink created to an email address for not
being hacked?
13.3. Creating action buttons
Activity 13.3.
1. What do you understand by Action button in PowerPoint presentation?
2. Discuss different types of action buttons and their roles.
3. In an opened PowerPoint presentation, create an action button.
a. Action Buttons play or stop
Another tool used to connect to a webpage, file, email address, or slide is called
an action button. Action buttons are built-in button shapes added to a
presentation and set to link to another slide, play a sound, or perform a similar
action.
Action buttons can be inserted on one slide at a time, or an action button can be
inserted to show up on every slide. The second option can be useful if every slide
has to be linked back to a specific slide, like the title page or table of contents.
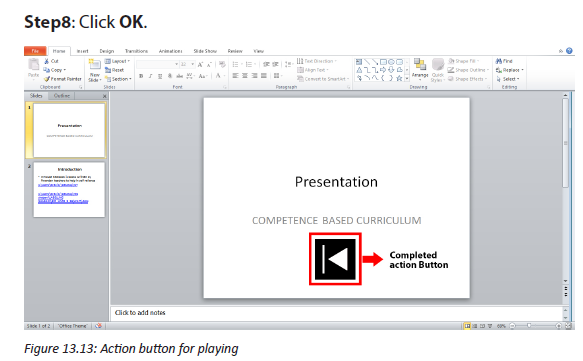
To insert an action button on one slide:
Step1: Click the Insert tab.
Step2: Click the Shapes command in the Illustrations group. A drop-down menu
will appear with the action buttons located at the very bottom.

Step3: Select the desired action button.
Step4: Insert the button onto the slide by clicking the desired location. The Action
Settings dialog box will appear.
Step5: Select the Mouse Click or Mouse Over tab. Selecting the Mouse Click tab
means the action button will perform its action only when clicked. Selecting
the Mouse Over tab will make the action button perform its action when the
mouse is moved over it.
Step6: in the Action on click section, select Hyperlink to: then click the dropdown
arrow and choose an option from the menu.
Step7: Check the Play Sound box if you want a sound to play when the action
button is clicked. Select a sound from the drop-down menu, or select other
sound to use a sound file on your computer.

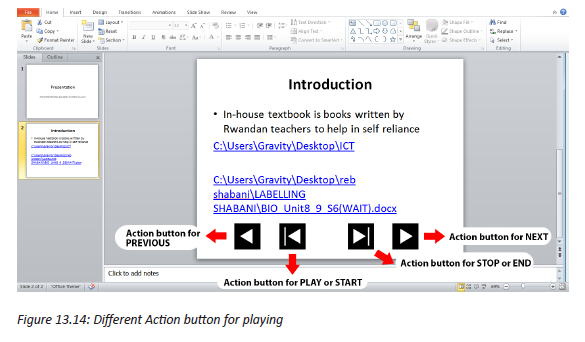
b. Action Button for playing a CD
When you want to play a CD, the following action buttons must take effect, and
you need to follow the same process for creating action buttons to create them.
1. Action button for previous media
2. Action button for next media
3. Action button for start or begin or play
4. Action button for end or stop
Application Activity 13.3.
1. In a created PowerPoint presentation
a. Create action button for playing an audio song
b. Create action button for next and previous song
2. Create action button for stopping song Tom who is a friend of Antoine
is working in video and audio editing. Antoine has a birthday party of
his son and he wants to take an audio sound of each event. Tom told
him that he will do it as an expert and a friend for free, what are the
advantages for Antoine.
3. In a slide, create an action button to play a movie that you selected.
13.4. Digital Audio recording and Editing
Activity 13.4.
1. What is an audio sound?
2. Discuss the format of an audio sound that you may know.
3. What do you thing about audio sound recording?
4. Discuss which software can edit an audio sound and how?
An audio file format is a file format for storing audio. There are various audio file
formats and they all encode audio data in different ways. There are two different
approaches; compressed or non-compressed formats.
1. Uncompressed formats
Uncompressed audio formats are always lossless, meaning that all original audio
information is retained. If there is unlimited storage space, an uncompressed - or
lossless file format is the way to go. While working with audio (ie making music),
also stick with uncompressed formats.
There are two main format options here, AIFF and WAV. Neither of these requires a
license to use.
WAV is the most recommended as it is more widely used and supported.
Uncompressed audio in CD-quality (sample rate of 44.1 kHz and a bit depth of 16
bits) takes about 10MB for one minute of stereo audio.
1. Compressed formats
Compressed audio formats are primarily lossy formats, meaning that audio
information is reduced. If an audio needs to be distributed over the internet, a
compressed format is the best option.
Although MP3 is very popular but it does require a license, even for audio
distribution. The existing and most used audio formats are:
a. 3GP and 3G2, (3GPP file format) is a multimedia container
format defined by the Third Generation Partnership Project (3GPP) which
is multimedia services. It is used on 3G mobile phones but can also be
played on some 2G and 4G phones.
b. MP3 (MPEG-1 Audio Layer-3) is a standard technology and format for
compressing a sound sequence into a very small file (about one-twelth the
size of the original file) while preserving the original level of sound quality
when it is played. MP3 provides near CD quality audio.
c. WAVE or WAV format is the short form of the Wave Audio File Format
(rarely referred to as the audio for Windows). WAV format is compatible
with Windows, Macintosh or Linux. Despite the fact that the WAV file can
hold compressed audio, the most common use is to store it just as an
uncompressed audio in linear PCM (LPCM).
13.4.1 Use of different tools to record sound
a. Microphone
A microphone is a device that captures audio by converting sound waves into
an electrical signal. A microphone placement technique is how microphones are
positioned in relation to the instrument or voice. Technique is the general strategy
used in microphone placement. The location of the microphones while recording
will make a big difference in the got sound. Microphones can just be plunked
down and recorded, but a little experimentation can go a long way in getting a
better sound.
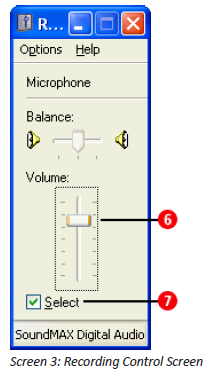
Process to record sound using Microphone
The process to record sound depends on the version of MS Windows used. Up to
the MS Windows 7, follow the next steps. The steps will be almost similar if you use
new versions of MS Windows.
Step1: Click on the Start button, and then click All Programs > Accessories >
Entertainment > Volume Control to display the Volume Control box.


Application Activity 13.4.
1. What is the best audio format recommended? Explain why.
2. A part from the musical instruments described above, explain other five
musical instruments used to deal with sound.
3. In Rwandan culture, describe the elements which can be linked by this
topic to manage sounds?
13.4.2 Editing Audio Sound
Activity 13.5.
1. What do you think about audio editing?
2. Discuss software used when editing audio sound.
3. Explain what are the processes to edit audio sound?
Audio editing is the process of manipulating audio to alter length, speed, and
volume or to create additional versions such as loops. Audio editing is almost
always done using a computer and audio editing software but used to be done
with analogue tape and razor blades by splicing and taping in a pre-digital world.
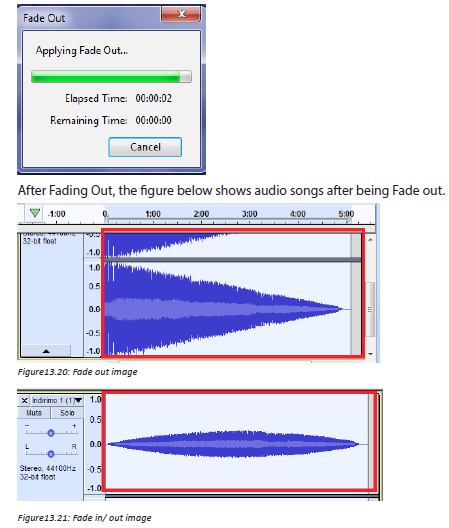
a. Fade-In and Fade-Out
In audio engineering, a fade is a gradual increase or decrease in the level of
an audio signal. The term can also be used for film cinematography or theatre
lighting in much the same way (see fade- filmmaking and fade- lighting).
A recorded song may be gradually reduced to silence at its end (fade-out), or may
gradually increase from silence at the beginning (fade-in).
As there are many software applications used in multimedia for sound editing
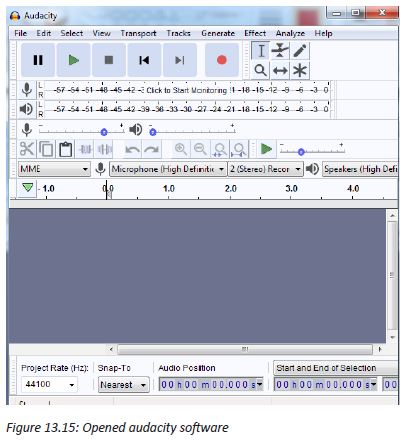
and management, in this section, let us use Audacity. Audacity is a free and
open-sourcedigital audio editor and recording application software, available for
Windows, macOS/OS X and Unix-like operating systems. Audacity was started in
the fall of 1999 by Dominic Mazzoni and Roger Dannenberg at Carnegie Mellon
University and was released on May 28, 2000 as version 0.8.
As of October 10, 2011, it was the 11th most popular download from SourceForge,
with 76.5 million downloads.Audacity won the SourceForge 2007 and 2009
Community Choice Award for Best Project for Multimedia. In March 2015, hosting
was moved to FossHub and by February 21, 2017 it had exceeded 51.8 million
downloads there. It is under the terms of the GNU General Public License.
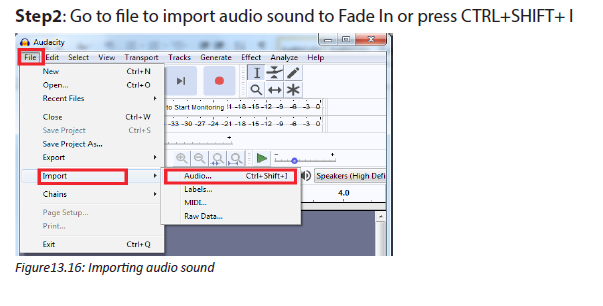
Steps to Fade In/Out
Step1: Open Audacity software


Step5: After selecting effect, you can Fade In/Out depending on what you want
to do. The below figure shows the process of sound fade in when using audacity
software.

The figure below shows the process of FADE Out, when an audio song is being
Faded out
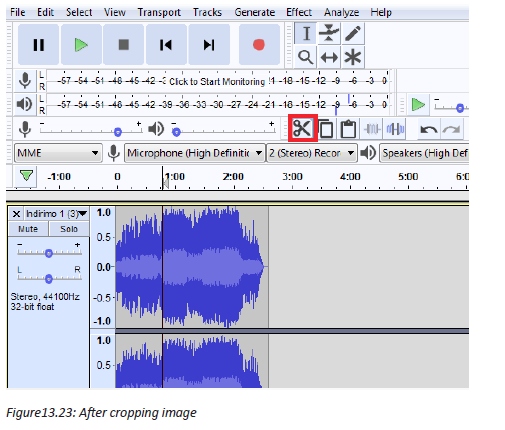
b. Crop
To crop audio is to make it start where you want to be started and end at the point
you wish to be ended. The following are the steps in adobe flash player to crop an
audio sound.
Step1: Importing audio in audacity software, and select the area to crop from to
where you don’t want to be played.
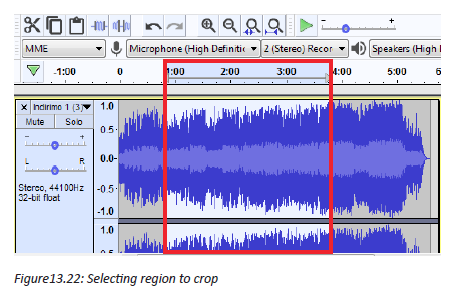
Step2: Click on cut sign, the unwanted area will be removed and you remain with
the wanted part.
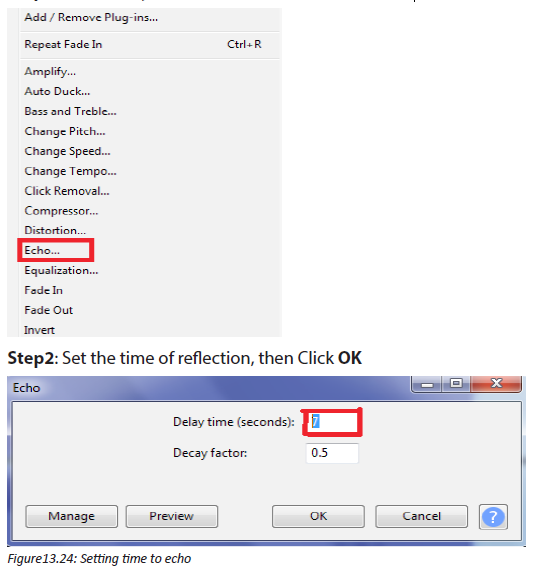
c. Echo
Echo is a reflection of sound that arrives at the listener with a delay after the
direct sound. The delay is proportional to the distance of the reflecting surface
from the source and the listener.
Here is how you can have echo in your audio sound:
Step 1: In audacity software, click on Echo from Effect
d. Increasing or decreasing volume,
Open the audio file in Audacity. Remember, do not make trim changes
in Audacity. On the left side of the screen is the gain (in dB), which can be adjusted
to increase or decrease the volume of the recording.

Once you have adjusted the volume of the recording to your liking, save the audio
file in its original location. When you reopen the file in Proclaim the audio level
changes will be reflected.
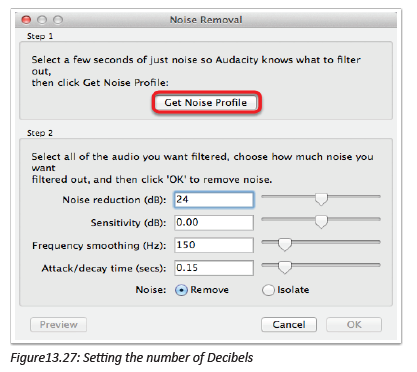
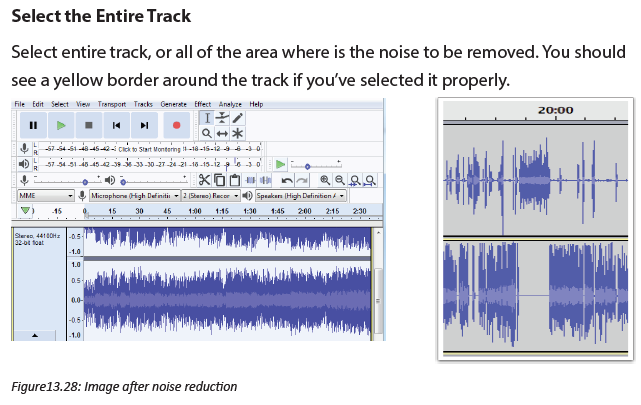
e. Reducing noise
Step1: In imported sound Audacity Software, Select a Region of Pure Noise
Hopefully you have a good sample area, but Audacity can do amazing things even
if only with a few seconds of data. You can see in the bottom track a grey area that
is selected as our noise profile.
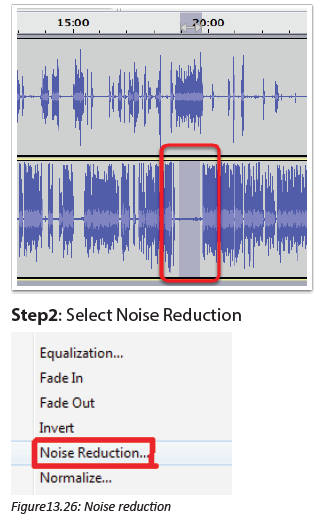
Step3: Click Get Noise Profile
When you click this, the window will go away and it won’t look like Audacity did
anything at all, but in fact you’ve just told it, “This is what noise looks like”.
f. Humming
After removing noise vocals, you need to select all region of sound to remove
again noise; in that case you will find the sound is humming.
Step1: Select the region where is the hum, Go to effect and select Noise reduction
then click on Get Noise Profile, the image below will be produced
Step2: Select the region of the whole song, go to effect and Select Noise
Reduction the click OK, the figure above will be produced which is different from
the above figure.
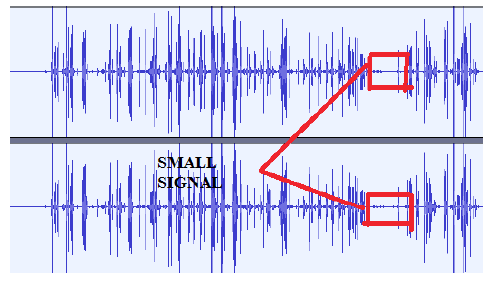
Figure13.30: Image after humming
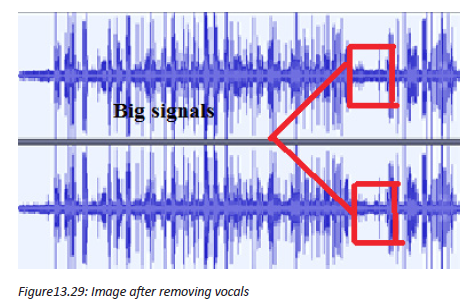
g. Remove vocal
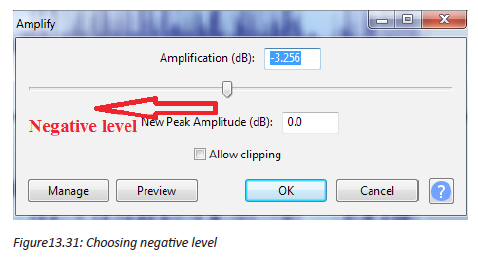
Go to Effect, Amplify and choose a negative level value, then click OK. You want
to play around with the exact values until you find one that works best for your
specific track.
h. Equalizer
Equalization is the process of adjusting the balance
between frequency components within an electronic signal. The most well-known
use of equalization is in sound recording and reproduction but there are many
other applications in electronics and telecommunications. The circuit or equipment
used to achieve equalization is called an equalizer. To do this, follow these steps.
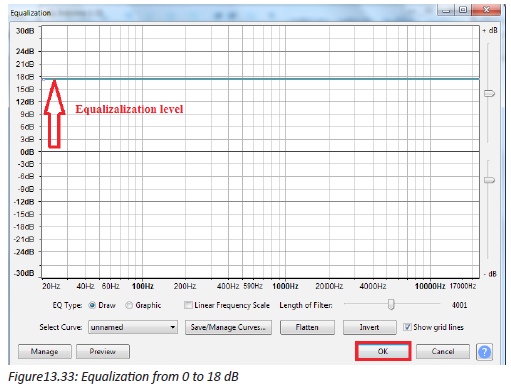
Step1: With imported sound, select Effect and Click on Equalization
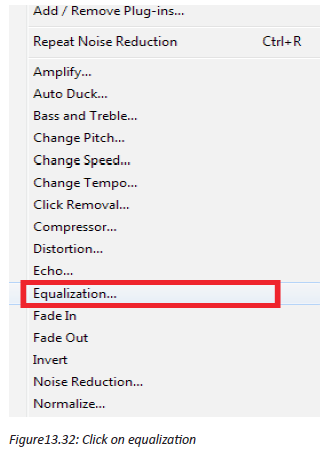
Step2: Set Equalizer to the needed Decibel
After clicking on Equalization, equalization table will appear, measured in decibel,
the line in green was located at the level of 0dB, then you drag to the appropriate
equalization you want to be, here it is dragged from 0dB to 15dB
Application Activity 13.5.
1. Using audacity software that you have installed on your computer, do
the following:
a. Use a smartphone/ digital camera, etc and record a sound
b. Import the recorded sound and do all necessary operation to be an
audible or quality sound such as crop Fade In/out, remove vocals,
remove noise
c. Create sound humming
d. Set different Decibels to create equalization.
13.4. Digital Video recording and editing
Activity 13.6.
1. In group of five students, discuss different video formats and software
to edit videos
2. What is the preparation required to take a video that may be displayed
in your classroom?
13.4.1 Various Video format
A video file format is a type of file format for storing digital video data on
a computer system. Video is almost always stored in compressed form to reduce
the file size.
a. Audio Video Interleave (.avi)
Audio Video Interleave known by its initials AVI, is a multimedia container format
introduced by Microsoft in November 1992 as part of its Video for Windows
software. AVI files can contain both audio and video data in a file container that
allows synchronous audio with video playback Flash Video (.flv, .swf )
b. .M4V and .MP4
.m4v and .mp4 are very similar and are both part of MPEG-4 which was based on
the Quicktime file format. .m4v was created by Apple as an extension of MPEG-4
with the option of proprietary Apple DRM to keep their files from playing on nonapple
devices.
13.4.2 Digital video Recording
A digital video recorder (DVR) is a consumer electronics device designed for
recording video in a digital format within a mass storage device such as USB
flash drive, hard disk drive or any other storage device. There are many software
to manage and edit a digital video. Some are proprietary while others are Open
Source software.
Set up your recording environment
With Snagit (Snagit is a screenshot program that captures video display and audio
output. Originally for the Microsoft Windows operating systems, recent versions
have also been available for macOS, but with fewer features.), it doesn’t take long
to create great videos of any computer-related process. To begin, close or minimize
any programs not involved in the process, especially ones that might trigger alerts
or popups. Then, open the programs you want to record and arrange them on your
screen. The steps to record an audio are the Following.
a. Launch Snagit
Open Snagit and select the video tab. Start with your webcam on if you want to
explain what your video will demonstrate or give it a personal touch.
b. Prepare to record
Write down a list of the key talking points or things you want to be sure to include
in your video. It won’t take long, and will be helpful to reference when you’re
recording. With your talking points in hand, click the capture button in Snagit, and
select part of the screen to record.
c. Make a test recording
Check that microphone audio recording is on, and system audio (the noises that
come from your computer) is on if you need it in your video. Click record to do a
quick test. While recording, go through a couple of the steps of your process. Then,
stop the test recording and play it back to make sure everything worked the way it
should.
d. Record your video
Once your test recording looks and sounds the way you want it, you’re ready to
record your video. Click the Capture button, select the recording area, and click
record. The countdown will play and then you can talk through your entire process.
If you make a mistake or stumble over a portion, instead of restarting the
recording, reset to a point in the process just before the mistake and go from there.
You can remove mistakes later.
e. Reviewyour video
When you are finished, stop your recording. The video is brought into the software
editor, where you can watch it and cut out any mistakes.
f. Share your video
Use the share menu to save your final video to your computer, or send it to
Screencast.com, Youtube, or Google Drive for immediate sharing.
13.4.3 Digital video editing
a. Video editing
Video editing is the process of manipulating and rearranging video shots to create
a new work. Editing is usually considered being one part of the post production
process.
Video clips are short clips of video, usually part of a longer recording. The term
is also more loosely used to mean any short video less than the length of a
traditional television program. The steps are as follow:
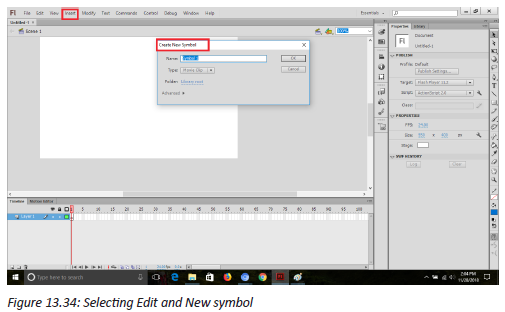
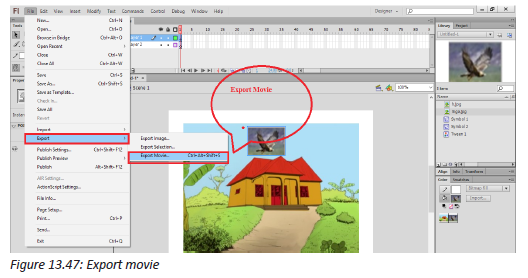
Step1: Select Edit, New Symbol then press OK
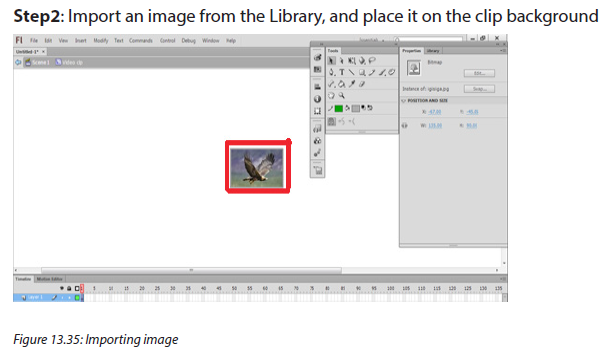
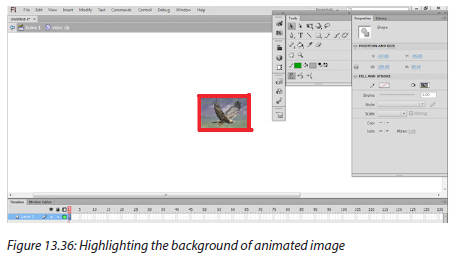
Step3: Press CTRL +B, to highlight the background of animated image for being
edited using different tools.
Step4: Use different tools to do animation of the imported image in the
background in different frames chosen.

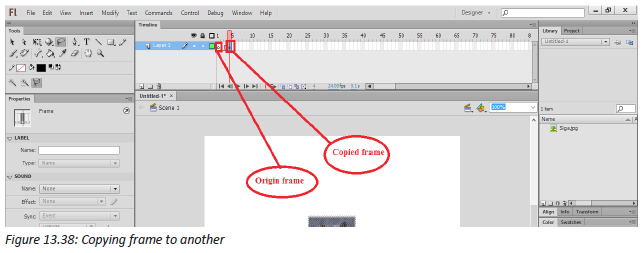
Step5: Select all Frames and right click to Copy them to the next frames
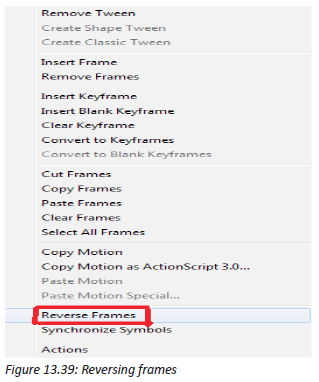
Step6: Select all frames and right click then press to Reverse frames for reversing
the created frames.
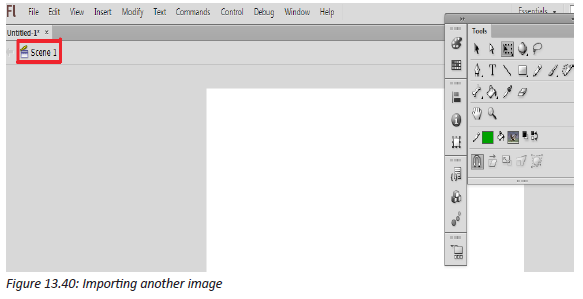
Step7: Click Scene1 to come back to scene one and import another image
Step8: Resizing the image using free transform tool and zoom in and out
depending on the desired motion.

Step 11: Create new Layer, and go to windows then click on Library
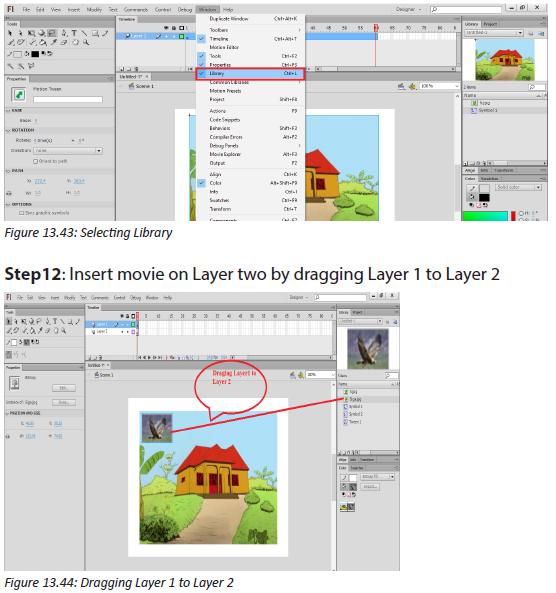
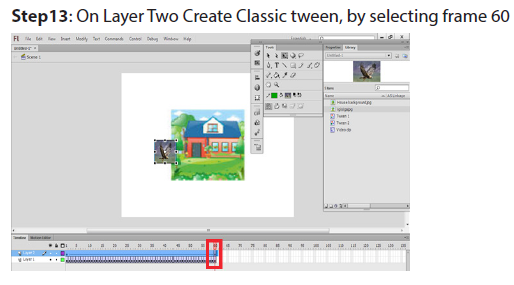
Figure 13.45: Classic tween creation
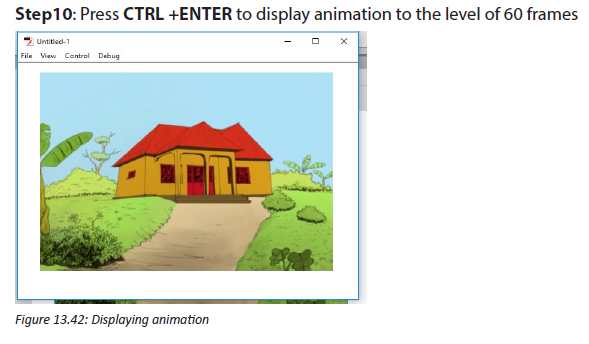
Step14: Change moving position and Press CTRL+ ENTER to review the clip

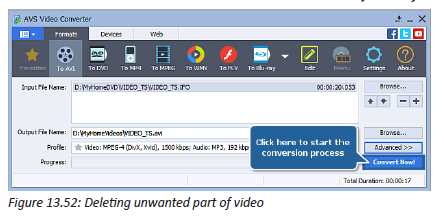
b. Deleting unwanted clip video
The universal character of AVS Video Converter is probably the main secret of its
popularity. This compact tool is ideal not only for converting files, it can also be
used for simple video editing and burning the resulting videos to discs.
The Edit function is the one that causes most of the problems as it implies working
with the timeline. The following guides will give some tips on editing video
with AVS Video Converter, in particular, on how to delete unnecessary parts from
files.
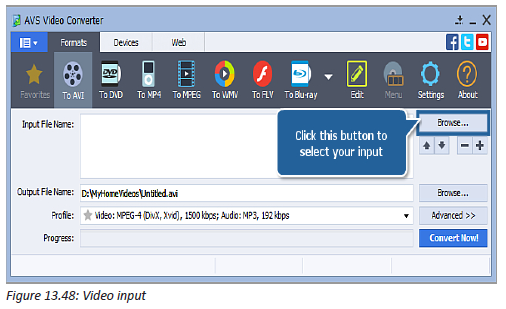
Step 1: Run AVS Video Converter and select your input video file
To select a video you would like to convert hit the Browse... button next to
the Input File Name field. In the opened Windows Explorer window browse for the
necessary video file:
Step 2: Switch to the Edit area
Once the input video is loaded, press the Edit button on the Main Toolbar to open
the Edit Input File(s) window.
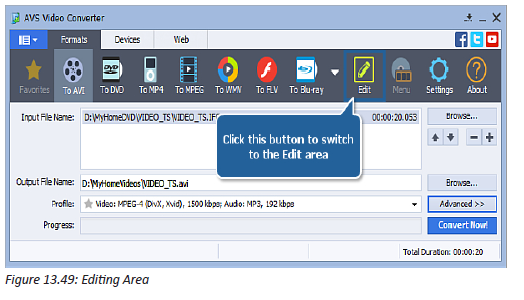
The video file(s) you loaded into the software will be represented on the Timeline.
The following components will help navigate the video:
1. The Timeline Scale in the upper part of the Timeline shows the file in its
chronological sequence – in hh.mm.ss format. Use the Zoom slider on the
right to zoom in or zoom out the scale.
2. The Preview Area located in the right part of the Edit Input File(s) screen
allows you to visually control the editing process. The current position of
the cursor is always displayed in this area. By default it displays the very
first frame of the video you imported into the program.
Step 3: Delete a part of the video file: set start/end of the deletion area
Navigate the file (use the tips provided at Step 3) to find the initial moment
of the episode you wish to cut out. Left-click on the timeline to place a cursor,
Use playback controls located in the Preview Area, hotkeys or simply drag the
cursor to adjust its position. When ready, press Trim Start right above the timeline
to set the initial point of the area you wish to delete. Perform the same actions to
find the final point of the area you wish to delete. Press the Trim End button to set
a marker.
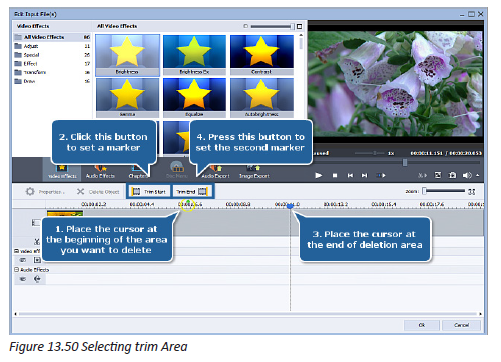
As soon as you set the second marker, a blue-colored area will appear in
the Deletions area highlighting the deleted part on the timeline.
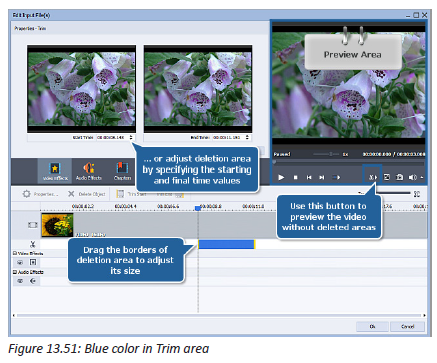
Note: you can add more than one area of deleting to your video just by going
through the same procedure once again. The active area of deletion is marked by
yellow stripes at the limits of the area.
Step 4: Delete a part of the video file: adjust the size of the selected area
You can change the size of the selected area for deletion by adjusting its borders.
To adjust the borders:
• Drag the borders of the area of deletion with the mouse.
• Adjust the borders in the Properties - Trim window. Double-click an area of
deletion to access this window. It will be displayed in the left part of the Edit
Input File(s) screen. The Properties - Trim screen contains 2 windows
which display the initial and final points of the area of deletion. Use the
arrows or enter the hh.mm.ss manually to adjust the borders of the area.
Wait while the software converts your video. It might take up to several hours
depending on your computer capabilities. The edited video of a new format is now
ready to be watched.
c. Add text with ms windows movie maker
MS Windows Movie Maker has always been one of the most popular software for
simple video editing. It can join video files, lets you add audio and music to your
video, apply video transitions, create slideshows and many more. The software is
pretty easy to use. Here is how to add captions to video in Movie Maker:
Step 1: Open Movie Maker and add the video clips;
Step 2: Then click on Home tab and choose Caption;
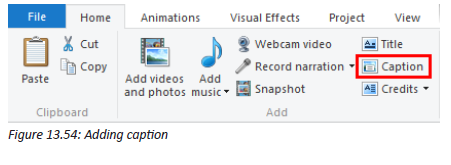
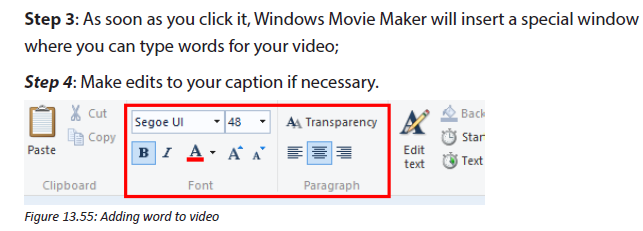
Step 5: Save your video track to apply changes.
It is a convenient and simple software that provides a multi-functional message
editor. You can change position, font and size. Moreover, you can choose the
transition effect to your wording and make it appear in an unusual way.
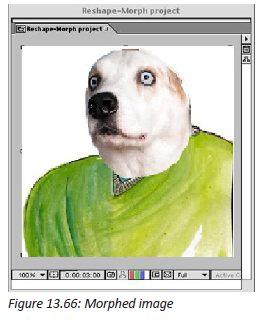
d. Morphing
Morphing is a special effect in motion pictures and animations that changes
(or morphs) one image or shape into another through a seamless transition. Most
often it is used to depict one person turning into another through technological
means or as part of a fantasy or surreal sequence.
In this practice, JockSource movie and Sheep source movie is going to be used
Begin by opening After Effects Software and importing the two Quicktime files:
Jock-Source.mov and Sheep-Source.mov.
Step1: In the project window, drag one of the footage items onto the composition
icon at the bottom of the window, so it creates a new composition at the same
size and frame rate as the source file. The composition should be 320 x 320, square
pixels at 25 fps.
Change the composition settings to have duration of six seconds, and then drag
the other footage file into the composition. Call it “Reshape-Morph project”
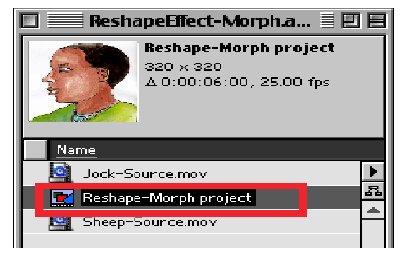
Figure 13.56: Importing image to be morphed
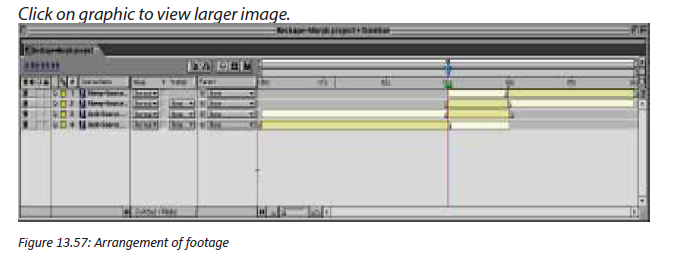
Step2: Arrange the footage items so that the bottom layer is Jock, beginning at
frame 0, and the top layer is the Sheep, starting at the three-second mark. There
should be a one-second overlap, which is where the effect will take place. To make
things simpler, split the Jock layer at the 3:00 point, then go to the four second
mark (4:00) and split the Sheep layer, so our effect can be applied to layers only
as long as it’s used. From this point on, when referred to the “Jock layer” and the
“Sheep layer” the one-second layers is referenced, and not the other, longer clips.
Step3: The first step in creating morph effect is to create a mask around the object.
Turn off the Sheep layer and go to the 3-second mark where the Jock layer begins.
If Jock layer is selected in the timeline, pressing “i” will take to the in-point. Using
the pen tool, draw a mask around Jock and make sure it is closed. It is easier to
draw a mask when the image is greyscale, so click on the green button at the
bottom of the composition window so the green channel will be appeared. It may
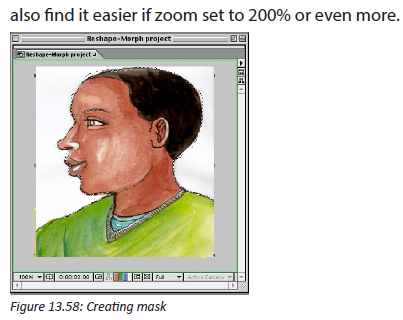
Step4: Because Jock moves during the one second, the shape is needed to be
animated to match the mask in his movement. Press “m” to reveal the mask
properties in the timeline window, and click on the stopwatch. This will add a
keyframe which records the shape of the mask at the 3:00 point.
It is important to note that only masks is needed to define the shapes which are
going to be morphed, there is no need masks which act as masks cut out the
background. So where it says “add”, select “none” from the mask menu to turn off
the mask, otherwise clip fine detail from the edge of Jock’s face. Clicking on the
name of the mask, which by default is “Mask 1” and then pressing “enter” will allow
to rename the mask to avoid confusion later, so call it “Jock shape”.

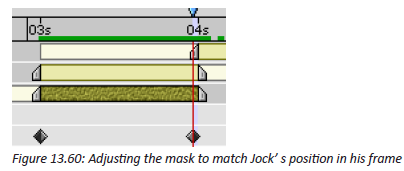
Step5: Press the “o” key to go to the out-point of the Jock layer, which is 3:24. Using
the selection tool, adjust the mask to match Jock’s position in this frame. He hasn’t
moved very much and it’s really only the profile of his face which needs to be
changed. After Effects will automatically add another keyframe for the new mask
shape, and it will animate the shape over time.
If the timeline is scrubbed, the mask animates over the one-second period, it
matches Jock pretty well. It is not necessary to adjust the mask any further.
Step6: The next step is to do the same thing for the Sheep layer. Draw a closed
mask around the Sheep, enable mask animation with a keyframe at 3:00 and then
move to 3:24 and adjust the mask to match.
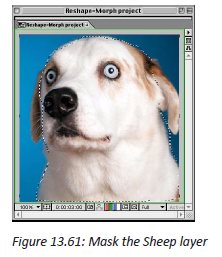
Unlike Jock, the mask with only two keyframes doesn’t fit the Sheep that accurately
as it animates, so at 3:10 and 3:20, tweak the shape of the mask to match the
Sheep’s movement. Rename the mask to “Sheep Shape” and ensure the mask mode
is “none” and not “add”.

Once masks are outline two subjects and animate over time to match their
movement, begin on the actual morph effect.
Step7: Copy and paste each mask onto the other layer, so that both layers have
both masks. Rename the layers once pasted them (they default back to “Mask 2”)
and turn them off by selecting “none” from the mask menu.
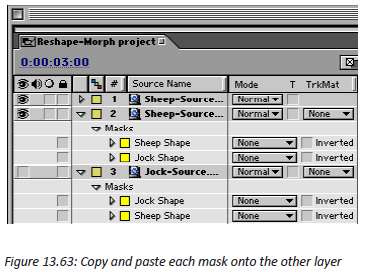
In the composition window, you should now see the shapes of the two masks
overlapping the footage items.

Turn off the visibility of the Sheep layer, select the Jock layer and apply the Reshape
effect from the “Distort menu”.
Step8: Change the defaults. Change the “source mask” to “Jock Shape”. This is the
starting point which is defining the parts of the image to be morphed.

Step9: Change the “destination mask” to “Sheep Shape” everything that is inside
the “Jock Shape” masks namely Jock to be wrapped into the shape defined by
the Sheep Shape mask. Change the boundary mask to “none” this can be used to
confine the area which is effected by the Reshape effect, but because the footage
is on a keyed unused background. If the Reshape effect is used on images which
are not keyed, add boundary mask to prevent the background from becoming
distorted by the Reshape effect.
Application Activity 13.6.
1. In computer lab, download adobe flash software, movie maker and
install it in your computer and do the following:
a. Use a smartphone/ digital camera to record a simple video
b. Import the recorded video and do all necessary operation to be an
audible or quality video.
c. Create animation from static object
d. Set different frames for creating Video clips
e. Delete unwanted clips
f. Create morphing
2. Make a movie where you show the life of students at your school
End unit assessment
Question 1:What are advantages and disadvantages of Multimedia?
Question 2: How many production teams are needed in Multimedia Production?
State them
Question 3: Download an image of a Sheep. Using multimedia editing software,
animate from frame o to 80 by drawing the line where it will pass through.
Question 4: How 2–D animations are classified?
Question 5: What are the uses of hyperlinks?
Question 6: What are the uses of Morphing and Warping?