UNIT 11: JAVA ENTERPRISE WEB APPLICATIONS
Key unit competency
To be able to design and run a java enterprise web application
Introductory Activity
Observe the figure below and answer questions:
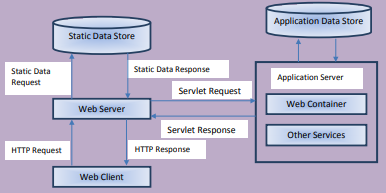
1. Describe what you see.
2. Give a meaning of each arrow in the figure.
3. Explain the whole process illustrated in the figure above.
4. Describe a web server.
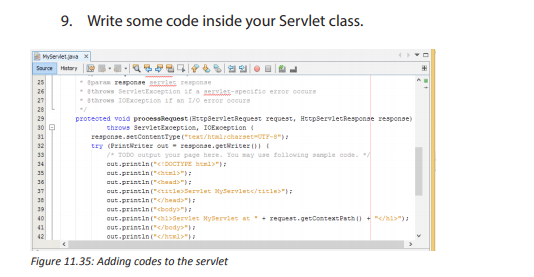
5. Describe a web container.
11.1 Tomcat
Activity 11.1.
Describe and illustrate the difference between web server and application server?
11.1.1. Definition of Apache Tomcat:
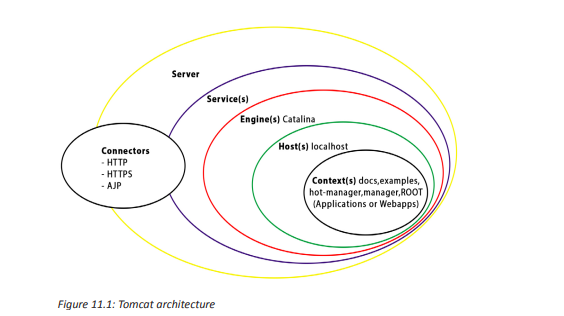
Apache Tomcat is a web server and application server that is used to serve Java
applications. Tomcat employs a hierarchical and modular architecture as shown
below:
11.1.2. Terms
a. Server
In the Tomcat world, a Server represents the whole container. Tomcat provides a
default implementation of the Server interface, and this is rarely customized by
users.
b. Service
A Service is an intermediate component which lives inside a Server and ties one or
more Connectors to exactly one Engine.
c. Engine
An Engine represents request processing channel for a specific Service. As a Service
may have multiple Connectors, the Engine received and processes all requests from
these connectors, handing the response back to the appropriate connector for
transmission to the client.
d. Host
A Host is an association of a network name, e.g. www.yourcompany.com, to the
Tomcat server. An Engine may contain multiple hosts, and the Host element also
supports network aliases such as yourcompany.com and abc.yourcompany.com.
e. Connector
A Connector handles communications with the client. Connectors provide
instructions for the ports an application server listens to for incoming requests with
incoming requests being directed to configured web application.
f. Context
A Context represents a web application. A Host may contain multiple contexts,
each with a unique path. The Context interface may be implemented to create
custom Contexts, but this is rarely the case because the Standard Context provides
significant additional functionality.
11.1.3. The components of Tomcat are:
Tomcat itself is comprised of three main components: Jasper, Catalina, and Coyote.
These components combined allow for the parsing and compilation of Java Server
Pages into java servlet code, the delivery of these servlets, and request processing.
a. Jasper
Jasper is Apache Tomcat’s Java Server Pages Engine. Jasper describes JSP files
compiling them into Java code as servlets to be handled by Catalina. At runtime,
Jasper detects changes to JSP files and recompiles them.
b. Catalina
Catalina is Apache Tomcat’s servlet container. Catalina implements the specifications
for servlet and Java Server Pages (JSP).
c. Coyote
Coyote is Apache Tomcat’s HTTP Connector component supporting the HTTP 1.1
protocol. Coyote listens for incoming connections on configured TCP ports on the
server and forwards requests to the Tomcat Engine for processing and returning a
response to the requesting client.
Application Activity 11.1.
1. Describe what Tomcat is?
2. Explain the architecture of Tomcat.
3. Explain the role of each one the main components of Tomcat.
11.2. Installation and configuration of tomcat configuration
directory
Activity 11.2.
Switch on computers in your school computer lab and answer the following
questions:
1. Examine the type and version of operating system running on your
computer.
2. Observe the web server software installed on your computer.
11.2.1. Installing Tomcat
a. Requirements for Installing
To install and configure Tomcat, first download the Latest version of Tomcat and
Netbeans with Java Development Kit (JDK). You should choose the appropriate
downloads based on your operating system.
b. Installing Tomcat Using Windows Service Installer
• The first thing you need to do is install the NetBeans with Java Development
Kit (JDK)
• Download the Apache Tomcat Windows service installer from the Tomcat
download page.
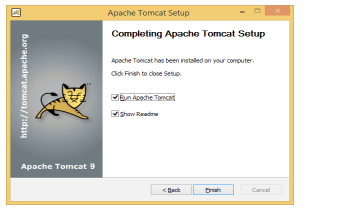
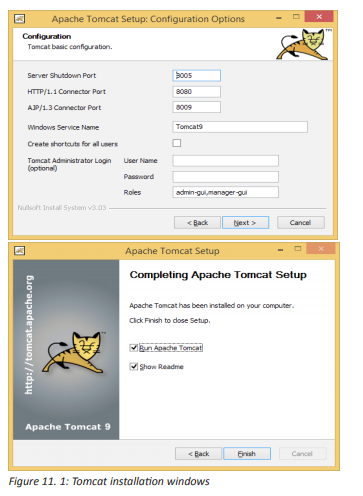
In our case we are going to install Tomcat version 9.0.6. Follow the steps, choose the
installation location, and the installer will take care of extracting and copying files
to correct directory, and configuring Environment variables and service properties.
Figures below show the running Tomcat installer for Windows.
c. Testing Your Tomcat Installation
To test the Tomcat installation, you need to first start the Tomcat server using a folder
which is placed in your Windows Start menu with shortcuts that allow you to start
and stop your Tomcat server from there.
Once Tomcat has started, open your browser to the following URL: http://
localhost:8080/
You should see a page similar to that shown in Figure 11-3.

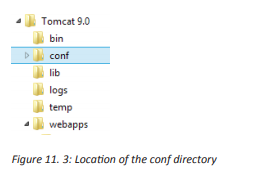
11.2.2. Configuration of tomcat configuration directory
This directory contains all the configuration files for the Tomcat server. The most
important ones are:
• Server.xml
• Tomcat-user.xml[add user]
• Web.xml
• Contex.xml
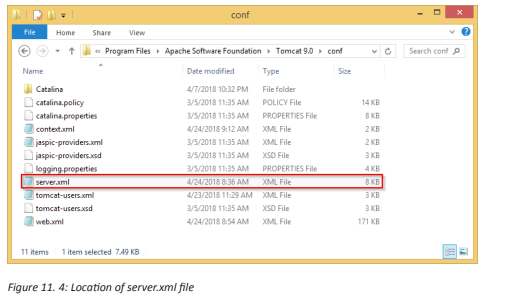
a. Server.xml
The main Tomcat configuration file is server.xml, located in conf directory.
The main Tomcat elements like engines, hosts, and contexts are configured here. This
file is located in the CATALINA_HOME/conf directory and can be considered the heart
of Tomcat. It allows you to completely configure Tomcat using XML configuration
elements. Tomcat loads the configuration from server.xml file at startup, and any
changes to this file require server restart.
CATALINA_HOME: This represents the root of your Tomcat installation. When we
say, “This information can be found in your $CATALINA_HOME/README.txt file” we
mean to look at the README.txt file at the root of your Tomcat install.
The default server.xml is reproduced as follows (after removing the comments and
minor touch-ups):
<?xml version=”1.0” encoding=”UTF-8”?>
<Server port=”8005” shutdown=”SHUTDOWN”>
<Listener className=”org.apache.catalina.startup.VersionLoggerListener” />
<Listener className=”org.apache.catalina.core.AprLifecycleListener” SSLEngine=”on” />
<Listener className=”org.apache.catalina.core.JreMemoryLeakPreventionListener” />
<Listener className=”org.apache.catalina.mbeans.GlobalResourcesLifecycleListener” />
<Listener className=”org.apache.catalina.core.ThreadLocalLeakPreventionListener” />
<GlobalNamingResources>
<Resource name=”UserDatabase” auth=”Container”
type=”org.apache.catalina.UserDatabase”
description=”User database that can be updated and saved”
factory=”org.apache.catalina.users.MemoryUserDatabaseFactory”
pathname=”conf/tomcat-users.xml” />
</GlobalNamingResources>
<Service name=”Catalina”>
<Connector port=”8080” protocol=”HTTP/1.1”
connectionTimeout=”20000”
redirectPort=”8443” />
<Connector port=”8009” protocol=”AJP/1.3” redirectPort=”8443” />
<Engine name=”Catalina” defaultHost=”localhost”>
<Realm className=”org.apache.catalina.realm.LockOutRealm”>
<Realm className=”org.apache.catalina.realm.UserDatabaseRealm”
resourceName=”UserDatabase”/>
</Realm>
<Host name=”localhost” appBase=”webapps”
unpackWARs=”true” autoDeploy=”true”>
<Valve className=”org.apache.catalina.valves.AccessLogValve” directory=”logs”
prefix=”localhost_access_log” suffix=”.txt”
pattern=”%h %l %u %t "%r" %s %b” />
</Host>
</Engine>
</Service>
</Server>
Understanding codes
• Server
Server (Line 2) is top component, representing an instance of Tomcat. It can contains
one or more services, each with its own engines and connectors.
<Server port=”8005” shutdown=”SHUTDOWN”>
• Common Attributes
• className - Java class name of the implementation to use. This class
must implement the org.apache.catalina.Server interface.
If no class name is specified, the standard implementation will be used.
• Address - The TCP/IP address on which this server waits for a shutdown
command. If no address is specified, localhost is used.
• Port - The TCP/IP port number on which this server waits for a shutdown
command. Set to -1 to disable the shutdown port.
• Shutdown - The command string that must be received via a TCP/IP
connection to the specified port number, in order to shut down Tomcat.
• Listeners
The Server contains several Listeners (Lines 3-7). A Listener element defines a
component that performs actions when specific events occur, usually Tomcat
starting or Tomcat stopping.
For example the Version Logging Lifecycle Listener logs Tomcat, Java and
operating system information when Tomcat starts.
• Global Naming Resources
The element (Line 9-15) defines the JNDI (Java Naming and Directory Interface)
resources, that allows Java software clients to discover and look up data and objects
via a name. The default configuration defines a JNDI name called UserDatabase via
the element (Line 10-14), which is a memory-based database for user authentication
loaded from conf/tomcat-users.xml.
<GlobalNamingResources>
<Resource name=”UserDatabase” auth=”Container”
type=”org.apache.catalina.UserDatabase”
description=”User database that can be updated and saved”
factory=”org.apache.catalina.users.MemoryUserDatabaseFactory”
pathname=”conf/tomcat-users.xml” />
</GlobalNamingResources>
You can define other global resource JNDI such as MySQL database to implement
connection pooling.
• Services
A Service associates one or more Connectors to an Engine. The default configuration
defines a Service called “Catalina”, and associates two Connectors: HTTP and AJP to
the Engine.
<Service name=”Catalina”>
• Connectors
A Connector is associated with a TCP port to handle communications between the
Service and the clients. The default configuration defines two Connectors: HTTP/1.1:
Handle HTTP communication and enable Tomcat to be an HTTP server. Clients can
issue HTTP requests to the server via this Connector, and receive the HTTP response
messages.
<Connector port=”8080” protocol=”HTTP/1.1”
connectionTimeout=”20000”
redirectPort=”8443” />
The default chooses TCP port 8080 to run the Tomcat HTTP server, which is different
from the default port number of 80 for HTTP production server. You can choose any
number between 1024 to 65535, which is not used by any application to run your
Tomcat server.
The connection Timeout attribute define the number of milliseconds this connector
will wait, after accepting a connection, for the request URI line (request message) to
be presented. The default is 20 seconds.
The redirect attribute re-directs the Secure Sockets Layer (SSL) requests to TCP port
8443. AJP/1.3: Apache JServ Protocol connector to handle communication between
Tomcat server and Apache HTTP server.
<Connector port=”8009” protocol=”AJP/1.3” redirectPort=”8443” />
You could run Tomcat and Apache HTTP servers together, and let the Apache HTTP
server handles static requests and PHP; while Tomcat server handles the Java Servlet/
JSP.
• Containers
Tomcat refers to Engine, Host, Context, and Cluster, as container. The highest-level
is Engine; while the lowest-level is Context. Certain components, such as Realm and
Valve, can be placed in a container.
• Engine
A Engine is the highest-level of a container. It can contains one or more Hosts. You
could configure a Tomcat server to run on several hostnames, known as virtual host.
<Engine name=”Catalina” defaultHost=”localhost”>
The Catalina Engine receives HTTP requests from the HTTP connector, and direct
them to the correct host based on the hostname/IP address in the request header.
• Realm
A Realm is a database of user, password, and role for authentication (i.e., access
control). You can define Realm for any container, such as Engine, Host, and Context,
and Cluster.
<Realm className=”org.apache.catalina.realm.LockOutRealm”>
<Realm className=”org.apache.catalina.realm.UserDatabaseRealm”
resourceName=”UserDatabase”/>
</Realm>
The default configuration defines a Realm (UserDatabaseRealm) for the Catalina
Engine, to perform user authentication for accessing this engine. It uses the
JNDI name UserDatabase defined in the GlobalNamingResources. Besides the
UserDatabaseRealm, there are: JDBCRealm (for authenticating users to connect to a
relational database via the JDBC driver); DataSourceRealm (to connect to a DataSource
via JNDI; JNDIRealm (to connect to an LDAP directory); and MemoryRealm (to load
an XML file in memory).
• Hosts
A Host defines a virtual host under the Engine, which can in turn support many
Contexts (webapps).
<Host name=”localhost” appBase=”webapps”
unpackWARs=”true” autoDeploy=”true”>
The default configuration define one host called localhost. The appBase attribute
defines the base directory of all the webapps, in this case, webapps. By default, each
webapp’s URL is the same as its directory name. For example, the default Tomcat
installation provides four webapps: docs, examples, host-manager and manager
under the webapps directory. The only exception is ROOT, which is identified by an
empty string. That is, its URL is https://localhost:8080/. The unpackWARs specifies
whether WAR-file dropped into the webapps directory shall be unzipped. For
unpackWARs=”false”, Tomcat will run the application from the WAR-file directly,
without unpacking, which could mean slower execution. The autoDeploy attribute
specifies whether to deploy application dropped into the webapps directory
automatically.
• Valve
A Valve can intercept HTTP requests before forwarding them to the applications, for
pre-processing the requests. A Valve can be defined for any container, such as Engine,
Host, and Context, and Cluster. In the default configuration, the AccessLogValve
intercepts an HTTP request and creates a log entry in the log file, as follows:
<Valve className=”org.apache.catalina.valves.AccessLogValve” directory=”logs”
prefix=”localhost_access_log” suffix=”.txt”
pattern=”%h %l %u %t "%r" %s %b” />
b. Tomcat-user.xml[add user]
Tomcat-users.xml is one of the Tomcat configuration files. An example of the tomcatusers.xml file is shown below:
<?xml version=’1.0’ encoding=’cp1252’?>
<tomcat-users xmlns=”http://tomcat.apache.org/xml”
xmlns:xsi=”http://www.w3.org/2001/XMLSchema-instance”
xsi:schemaLocation=”http://tomcat.apache.org/xml tomcat-users.xsd”
version=”1.0”>
<role rolename=”manager-gui”/>
<user username=”tomcat” password=”tomcat” roles=”manager-gui, manager-script, managerjmx”/>
</tomcat-users>
By default, access to the manager application is disabled; this can be accessed only
by an authenticated user. The default realm for the manager application is tomcatusers.xml.
To set up the manager application, add a user with the manager role to this file. You
can find the role names in the web.xml file of the Manager web application. The
available roles are:
• manager-gui — Access to the HTML interface.
• manager-status — Access to the “Server Status” page only.
• manager-script — Access to the tools-friendly plain text interface that is
described in this document, and to the “Server Status” page.
• manager-jmx — Access to JMX proxy interface and to the “Server Status”
page.
• Using Tomcat Server Management App
Add a user and a role elements in the TOMCAT_ROOT_DIR\config\tomcat-users.xml
configuration file as shown below:
<tomcat-users xmlns=”http://tomcat.apache.org/xml”
xmlns:xsi=”http://www.w3.org/2001/XMLSchema-instance”
xsi:schemaLocation=”http://tomcat.apache.org/xml tomcat-users.xsd”
version=”1.0”>
<role rolename=”manager-gui”/>
<user username=”tomcat” password=”tomcat” roles=”manager-gui”/>
</tomcat-users>
The above entry in the tomcat-users.xml allows access to the manager web app
provided by default with each Tomcat instance. The user name and the password
in the example could be any legal value. Once you have added above entry in the
tomcat-users.xml configuration file, save changes and restart the Tomcat server.
Notice: In case you fail to save changes, run the editor as Administrator.
You should be able to login to tomcat by one of the ways:
• http://localhost:8080/ and click the “Manager App” button
• http://localhost:8080/manager/html
This will prompt for the user name and password. Enter the values from the tomcatusers.xml.
In the codes provided above, the user name is “tomcat” and the password is “tomcat”

c. Tomcat web.xml
It is one of the main configuration files for the Tomcat server. It is located in the
TOMCAT_ROOT_DIR\conf folder. This configuration file is used for basic web
application’s configuration shared by all web applications that will be deployed on
the Tomcat server instance.
Below is the web.xml with no options:
<?xml version=”1.0” encoding=”ISO-8859-1”?>
<web-app xmlns=”http://xmlns.jcp.org/xml/ns/javaee”
xmlns:xsi=”http://www.w3.org/2001/XMLSchema-instance”
xsi:schemaLocation=”http://xmlns.jcp.org/xml/ns/javaee
http://xmlns.jcp.org/xml/ns/javaee/web-app_4_0.xsd”
version=”4.0”>
...
</web-app>
The above simplified web.xml contains <web-app> element which will contain
options for operating all web applications deployed in this Tomcat instance. The
<web-app> element represents the configuration options for a web application.
It is required that all deployment descriptors must confirm to XML schema for the
Servlet 4.0. Web-app is the root element for the deployment descriptor, web.xml file.
d. Tomcat context.xml
In Tomcat, the Context Container represents a single web application running within
a given instance of Tomcat. A web site is made up of one or more Contexts. For each
explicitly configured web application, there should be one context element either in
server.xml or in a separate context XML fragment file.
Here is an example of context.xml
<?xml version=”1.0” encoding=”UTF-8”?>
<!-- The contents of this file will be loaded for each web application -->
<Context>
<!-- Default set of monitored resources. If one of these changes, the -->
<!-- web application will be reloaded. -->
<WatchedResource>WEB-INF/web.xml</WatchedResource>
<WatchedResource>WEB-INF/tomcat-web.xml</WatchedResource>
<WatchedResource>${catalina.base}/conf/web.xml</WatchedResource>
<!-- Uncomment this to disable session persistence across Tomcat restarts -->
<!--
<Manager pathname=”” />
-->
</Context>
Application Activity 11.2.
Having Apache Tomcat server installed on your computer, do the following:
1. Change its connector port and set it to: 9999
2. Add a user with the following credentials:
a. Username: tomcat
b. Password: secret
c. Permission: Access to the "Server Status" page only
3. Put http://locatlhost:9999 in your browser and run it to make sure that it
is working.
4. What happens when you open the “Manage App” using the “tomcat”
and “secret” for username and password?
5. Where should you use the username and password indicated in
question 4?
11.3 Hypertext Transfer Protocol (HTTP) request / response
11.3.1. Http
Activity 11.3
Describe how web servers handle requests from different clients?
HTTP is an asymmetric request-response client-server protocol. An HTTP client
sends a request message to an HTTP server. The server, in turn, returns a response
message. In other words, HTTP is a pull protocol, the client pulls information from
the server (instead of server pushes information down to the client).
a. Key element of HTTP request
Below are the components of an http request:
• URL
• Form data
• HTTP method( if present)
• Cookies
• Uniform Resource Locator (URL)
It is a reference to a web resource that specifies its location on a computer network
and a mechanism for retrieving it.
Example: https://irembo.gov.rw/rolportal/web/rol/aboutus
• Form data
Data collected using HTML form is called form data and in HTTP request it is optional
information. If it is present then it will be present in header or body part of the HTTP
request depending on the HTTP method present in the request.
• HTTP method
It indicates desired action to be performed on dynamic web resources. HTTP has a
different method and in Servlet we implement that method based on action to be
performed.

b. Key element of HTTP response
An HTTP response consist of the following:
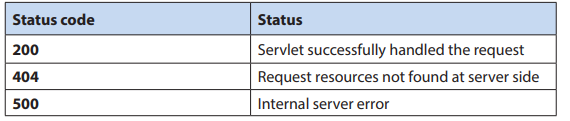
* Status code
* Content type
* Actual content
* Cookies( if present)
• Status code
Status code represent status of HTTP request. It is a mandatory information and it
will be present in Header part of HTTP response.
• Content Type
Content type tells the browser what type of content it is going to receive so that it
can prepare itself to handle response data. It is a mandatory information and it is
present in header part of HTTP request.
List of Content Type
Text/html
application/pdf
video/quicktime
image/jpeg
application/x-zip
11.3.2. Request-Response Process
This sections provides the logical breakdown of the HTTP request-response process.
After the client sends its request to a server, it is helpful to define a set of logical
steps which the server must perform before a response is sent.
The following steps are performed in the normal response process:
• Authorization translation
• Name translation
• Path checks
• Object type
• Respond to request
• Log the transaction
If at any time one of these steps fail, another step must be performed to handle the error and inform the client about what happened.
Application Activity 11.3
1. Explain the process of http request.
2. Explain the process of http response.
11.4 Web application
Activity 11.4
Explain the difference between a website and web application.
11.4.1. The definition of web application
A web application is a collection of servlets, html pages, classes, and other resources
that can be bundled and run on multiple containers from multiple vendors. Briefly,
a web application is a container that can hold any combination of the following list
of objects:
• Servlets
• Java Server Pages (JSPs)
• Utility classes - is a static class that perform small and repetitive operations
on a kind of instance (example of utils classes ArrayUtils or IOUtils from
Apache)
• Static documents, including HTML, images, JavaScript libraries, cascading
style sheets (CSS), and so on
• Client-side classes
• Meta-information describing the web application (Metadata is data that
describes other data.)
11.4.2. Servlet
A Java servlet is a platform-independent web application component that is hosted
in a servlet container. Servlets communicate with web clients using a request/
response model managed by a servlet container, such as Apache Tomcat.
11.4.3. Servlet context
The servlet context is an object that is created when the web-application is started
in a servlet container and destroyed when the web-application is undeployed or
stopped. The servlet context object usually contains initialization parameters in the
form of a web.xml document.
11.4.4. Servlet container
It is the component of a web server that interacts with Java servlets. The container
is responsible to manage the life-cycle of servlet. Web server hands the request to
web container in which servlet is deployed and not to Servlet itself. Then container
provides request and response to servlet. Tomcat is the example of Servlet container.
Servlet Container provides the following services:
• It manages the servlet life cycle.
• The resources like servlets, JSP pages and HTML files are managed by servlet
container.
• It appends session ID to the URL path to maintain session (Session means
a particular interval of time. The container uses session ID to identify the
particular user.)
• Provides security service.
• It loads a servlet class from network services, file systems like remote file
system and local file system.
Life Cycle of a Servlet
The life cycle of the servlet is as follows:
1. Servlet class is loaded.
2. Servlet instance is created.
3. init method is invoked.
4. service method is invoked.
5. destroy method is invoked.
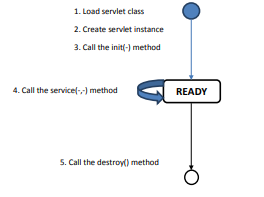
Figure 11. 7: Servlet life cycle
As displayed in the above diagram, there are three states of a servlet: new, ready
and end. The servlet is in new state if servlet instance is created. After invoking the
init() method, Servlet comes in the ready state. In the ready state, servlet performs
all the tasks. When the web container invokes the destroy() method, it shifts to the
end state.
11.4.5. Java server pages (JSP) files
Java Server Pages (JSP) is a technology for developing Webpages that supports
dynamic content. This helps developers insert java code in HTML pages by making
use of special JSP tags, most of which start with <% and end with %>. Using JSP,
you can collect input from users through Webpage forms, present records from a
database or another source, and create Webpages dynamically.
JSP tags can be used for a variety of purposes, such as retrieving information from a
database or registering user preferences, accessing JavaBeans components, passing
control between pages, and sharing information between requests, pages etc. A JSP
document must end with a .jsp extension.
The following code contains a simple example of a JSP file:
<HTML>
<BODY>
<% out.println(“MURAKAZA NEZA!”); %>
</BODY>
</HTML>
A JSP file is a server-generated web page. It contains Java code. The code is parsed
by the web server, which generates HTML that is sent to the user’s computer.
11.4.6. Configuration file
It is a file that contains configuration information for a particular web application.
When the application is executed, it consults the configuration file to see what
parameters are in effect
a. Deployment descriptor
A web application’s deployment descriptor describes the classes, resources and
configuration of the application and how the web server uses them to serve web
requests. When the web server receives a request for the application, it uses the
deployment descriptor to map the URL of the request to the code that ought to
handle the request.
The deployment descriptor is a file named web.xml. It resides in the app’s Web
application Archive (WAR) under the WEB-INF/ directory. The file is an XML file
whose root element is <web-app>.
The location of WEB-INF Directory

The root directory of you web application can have any name. In the above example
the root directory name is webapps.
The WEB-INF directory is located just below the web app root directory. This
directory is a meta information directory.
Here is a simple web.xml example that maps all URL paths (/*) to the servlet
class mysite.server.ComingSoonServlet:
<web-app xmlns=”http://java.sun.com/xml/ns/javaee” version=”2.5”>
<servlet>
<servlet-name>comingsoon</servlet-name>
<servlet-class>mysite.server.ComingSoonServlet</servlet-class>
</servlet>
<servlet-mapping>
<servlet-name>comingsoon</servlet-name>
<url-pattern>/*</url-pattern>
</servlet-mapping>
</web-app>
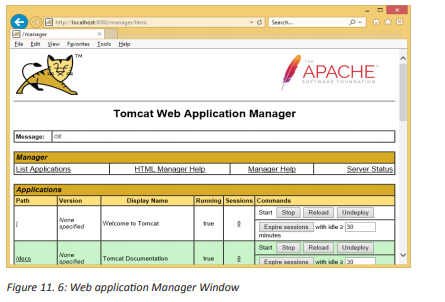
11.4.7. Manage Web Applications
In many production environments it is very useful to have the capability to manage
your web applications without having to shut down and restart Tomcat. The interface
is divided into six sections:
• Message - Displays success and failure messages.
• Manager - General manager operations like list and help.
• Applications - List of web applications and commands.
• Deploy - Deploying web applications.
• Diagnostics - Identifying potential problems.
• Server Information - Information about the Tomcat server.
a. Message
Displays information about the success or failure of the last web application manager
command you performed. If it succeeded OK is displayed and may be followed by a
success message. If it failed FAIL is displayed followed by an error message.

b. Manager
The Manager section has three links:
• List Applications - Redisplay a list of web applications.
• HTML Manager Help - A link to this document.
• Manager Help - A link to the comprehensive Manager App HOW TO.
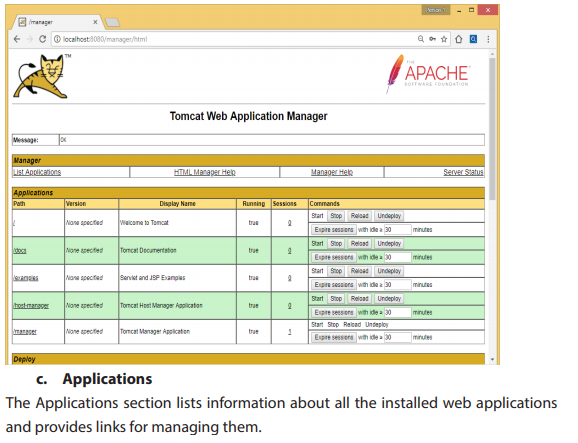
For each web application the following is displayed:
• Path - The web application context path.
• Display Name - The display name for the web application if it has one
configured in its “web.xml” file.
• Running - Whether the web application is running and available (true), or
not running and unavailable (false).
• Sessions - The number of active sessions for remote users of this web
application. The number of sessions is a link which when submitted displays
more details about session usage by the web application in the Message
box.
• Commands - Lists all commands which can be performed on the web
application. Only those commands which can be performed will be listed
as a link which can be submitted. No commands can be performed on the
manager web application itself. The following commands can be performed:
• Start - Start a web application which had been stopped.
• Stop - Stop a web application which is currently running and make it
unavailable.
• Reload - Reload the web application so that new “.jar” files in /WEB-INF/
lib/ or new classes in /WEB-INF/classes/ can be used.
• Undeploy - Stop and then remove this web application from the server.
Steps to open the Servlet and JSP examples
Step1: Click on /Examples in the path column
Step2: Click on Servlet examples


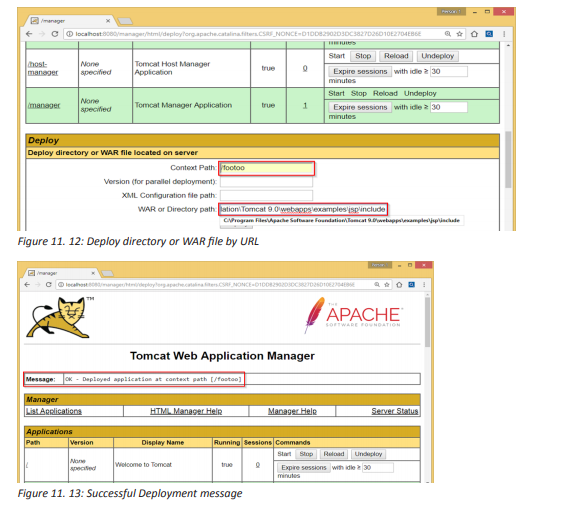
a. Deploy directory or WAR file located on server
Deploy and start a new web application, attached to the specified Context
Path: (which must not be in use by any other web application). This command is the
logical opposite of the Undeploy command.
• Deploy a Directory or WAR by URL
Install a web application directory or “.war” file located on the Tomcat server. If
no Context Path is specified, the directory name or the war file name without
the “.war” extension is used as the path. The WAR or Directory URL specifies a URL
(including the file: scheme) for either a directory or a web application archive (WAR)
file.
In this example the web application located in the directory C:\path\to\foo on the
Tomcat server (running on Windows) is deployed as the web application context
named /footoo.
Context Path: /footoo
WAR or Directory URL: file:C:/path/to/foo in our example it is C:\Program Files\
Apache Software Foundation\Tomcat 9.0\webapps\examples\jsp\include
11.4.8. Using the documentation
Apache Tomcat has its built in documentation which will assist you in downloading
and installing Apache Tomcat, and using many of the Apache Tomcat features.
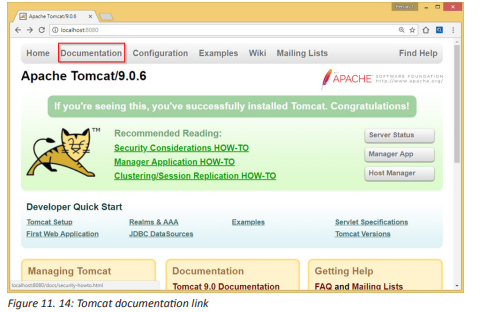
To explore this documentation, go to the Apache Tomcat home page and click on
documentation as shown in the figure below:
Application Activity 11.4
1. Why would you prefer to develop a web application?
2. Explain the functional difference between JSP and servlet?
3. Explain the servlet life cycle.
4. Write a JSP to display a message of welcome to your school.
11.5. A Uniform Resource Locator (URL)
Activity 11.5
Open your browser and enter the following website addresses:
http://www.reb.rw/index.php?id=270
Question: Compare the outputs and indicate the differences and resemblances.
11.5.1. Definition of URL
URL is the global address of documents and other resources on the World Wide Web.
Its main purpose is to identify the location of a document and other web resources
available on the Internet, and specify the mechanism for accessing it through a web
browser.
For instance, if you look at the address bar of your browser you will see:
http://www.reb.rw/index.php?id=270
11.5.2. The URL Syntax
The general syntax of URLs is the following: scheme://host:port/path?querystring#fragment-id
A URL has a linear structure and normally consists of some of the following:
• Scheme name — The scheme identifies the protocol to be used to access
the resource on the Internet. The scheme names followed by the three
characters :// (a colon and two slashes). The most commonly used protocols
are http://, https://, ftp://, and mailto://.
• Host name — The host name identifies the server where resource is located.
A hostname is a domain name assigned to a server computer. This is usually
a combination of the host’s local name with its parent domain’s name. For
example, http://www.reb.rw consists of host’s machine name www and the
domain name .reb.rw
• Port Number — Servers often deliver more than one type of service, so you
must also tell the server what service is being requested. These requests are
made by port number. Well-known port numbers for a service are normally
omitted from the URL. For example, web service HTTP is commonly
delivered on port 80.
• Path — The path identifies the specific resource within the host that the
user wants to access. For example, /html/html-url.php
• Query String — The query string contains data to be passed to server-side
scripts, running on the web server. For example, parameters for a search. The
query string preceded by a question mark, is usually a string of name and
value pairs separated by ampersands, for example, ?first_name=John&last_
name=Corner.
• Fragment identifier — The fragment identifier, if present, specifies a part or
a position within the overall resource or document. The fragment identifier
introduced by a hash mark “#” is the optional last part of a URL for a document.
When fragment identifier used with HTTP, it usually specifies a section or
location within the page, and the browser may scroll to display that part of
the page.
11.5.3. Static and dynamic web pages
a. Static
A static page is one that is usually designed in plain HTML and the content is always
same. A static website contains Web pages with fixed content. Each page is coded
in HTML and displays the same information to every visitor. Static sites are the most
basic type of website and are the easiest to create. A static site can be built by simply
creating a few HTML pages and publishing them to a Web server.
Advantages of static websites and web pages
• Easy to develop
• Cheap to develop
• Cheap to host
b. Dynamic
Dynamic webpages can show the different content or information based on the
results of a search or some other request. It is designed by server side scripting
language like PHP, ASP, JSP with HTML, CSS.
Advantages of dynamic websites and web pages
• Much more functional website
• Much easier to update
• Can connect with database
• New content brings people back to the site and helps in the search engines
• Can work as a system to allow staff or users to collaborate
Application Activity 11.5
1. Describe what you see on the URL given below: http://primature.gov.
rw/home.html?no_cache=1&tx_drblob_pi1%5BdownloadUid%5 D=484
2. Discuss the advantages of dynamic websites and web pages.
3. What are the barriers of static websites and webpages?
11.6. Project creation
Activity 11.6
You are requested to make a proposal of the website for your school,
1. Explain the process to create that website and test it on your computer.
2. Show the director of the school the cost of the website.
11.6.1. Project creation using Tomcat
Once you get Tomcat up and running on your server, the next step is configuring
its basic settings. If you plan to create a Web service that uses Apache Tomcat as its
server, it must be configured before you begin creating your Web service. Following
are the steps to configure the Tomcat Server:
Step 1:Configure Tomcat Server
The Tomcat configuration files are located in the “conf” sub-directory of your Tomcat
installed directory, e.g. “C:\Program Files\Apache Software Foundation\Tomcat 9.0\
conf”. There are 4 configuration XML files:
1. server.xml
2. web.xml
3. context.xml
4. tomcat-users.xml
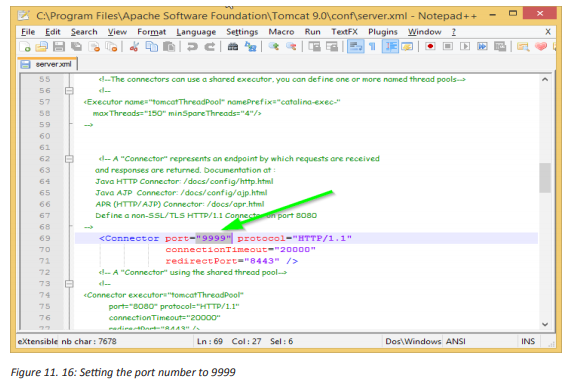
Step 1(a) “conf\server.xml” - Set the TCP Port Number
1. Use a programming text editor (e.g., NotePad++, TextPad) to open the
configuration file “server.xml”, under the “conf” sub-directory of Tomcat
installed directory.

2. The default TCP port number configured in Tomcat is 8080, you may
choose any number between 1024 and 65535, which is not used by an
existing application. We shall choose 9999 in this example.
3. Locate the following lines (around Line 69) that define the HTTP
connector, and change port=”8080” to port=”9999”.
Notice: Remember to save changes
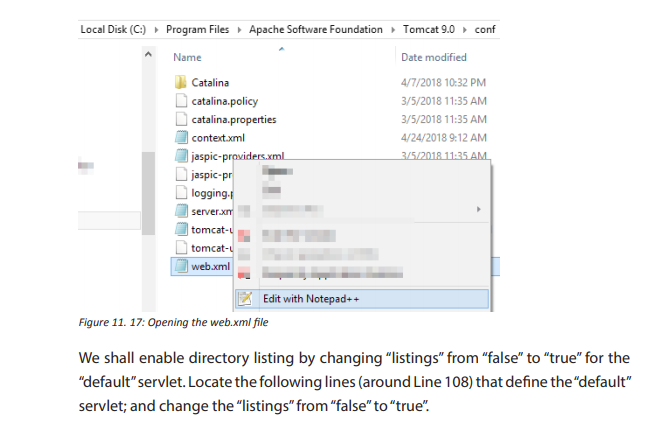
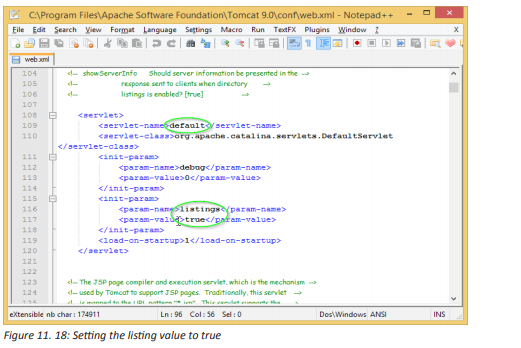
Step 1(b) “conf\web.xml” - Enabling Directory Listing
Directory listing is a web server function that displays a list of all the files when there
is not an index file, such as index.php and default.asp in a specific website directory.
Again, use a programming text editor to open the configuration file “web.xml”, under
the “conf” sub-directory of Tomcat installed directory.
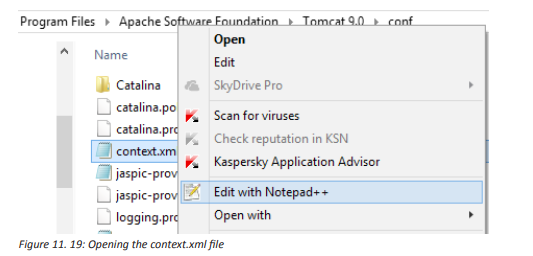
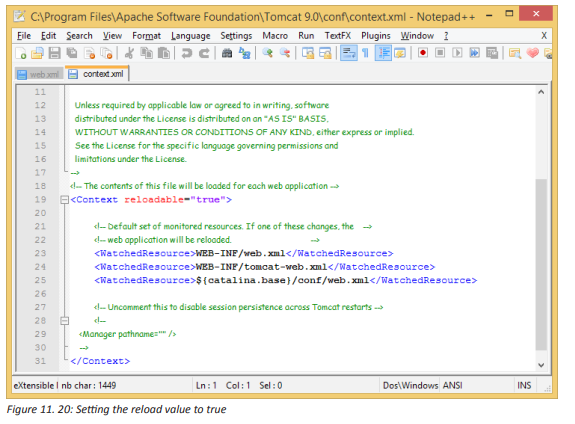
Step 1(c) “conf\context.xml” - Enabling Automatic Reload
We shall add the attribute reloadable=”true” to the <Context> element to enable
automatic reload after code changes. Again, this is handy for test system but not for
production, due to the overhead of detecting changes.
Locate the <Context> start element (around Line 19), and change it to <Context
reloadable=”true”>.
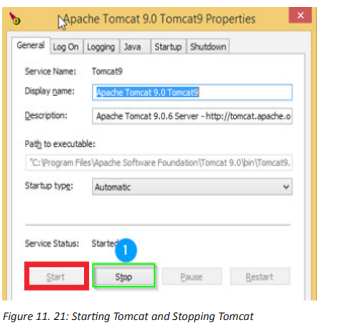
Step 2(a) Start Server
By default, Tomcat is set to start automatically when windows starts. But after
configuring Tomcat basic settings, the next step is to restart the server in order to
ensure that all configurations take effect. To do so, open the Tomcat configuration
properties, stop and start it as follows:
Step 2(b) Start a Client to Access the Server
Start a browser (Firefox, Chrome) as an HTTP client. Issue URL “http://localhost:9999”
to access the Tomcat server’s welcome page. The hostname “localhost” (with IP
address of 127.0.0.1) is meant for local loop-back testing inside the same machine.
Step 3: Develop and Deploy a WebApp
The container that holds the components of a web application is the directory
structure in which it exists. The first step in creating a web application is creating this
directory structure.
Step 3(a) Create the Directory Structure for your WebApp
The root directory of our web application should be placed under /webapps as
indicated in the figure below:
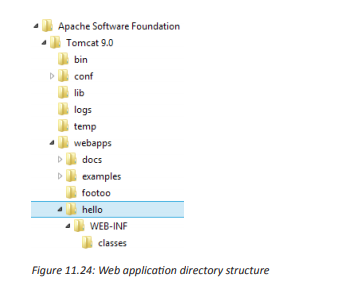
Let us call our first webapp “hello”. Go to Tomcat’s “webapps” sub-directory and
create the following directory structure for your webapp “hello” (as illustrated):
Under Tomcat’s “webapps”, create your webapp’s root directory “hello”
1. (i.e., “<TOMCAT_HOME>\webapps\hello”).
Under “hello”, create a sub-directory “WEB-INF”
2. (i.e., “<TOMCAT_HOME>\webapps\hello\WEB-INF”).
Under “WEB-INF”, create a sub-sub-directory “classes”
3. (i.e., “<TOMCAT_HOME>\webapps\hello\WEB-INF\classes”).
You need to keep your web resources (e.g., HTMLs, CSSs, images, scripts, servlets,
JSPs) in the proper directories:
• “hello”: This is called the context root (or document base directory) of your
webapp. You should keep all your HTML files and resources visible to the
web users (e.g., HTMLs, CSSs, images, scripts, JSPs) under this context root.
• “hello/WEB-INF”: This directory, although under the context root, is not
visible to the web users. This is where you keep your application’s web
descriptor file “web.xml”.
• “hello/WEB-INF/classes”: This is where you keep all the Java classes such as
servlet class-files.
You can issue the following URL to access the web application “hello”:
http://localhost:9999/hello
You should see the directory listing of the directory “<TOMCAT_HOME>\webapps\
hello”, which shall be empty at this point of time. (Take note that we have earlier
enabled directory listing in “web.xml”. Otherwise, you will get an error “404 Not
Found”).

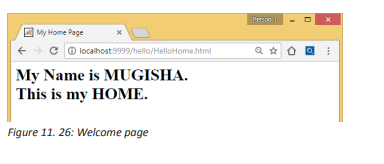
Step 3(b) Write a Welcome Page
Create the following HTML page and save as “HelloHome.html” in your application’s
root directory “hello”.
1. <html>
2. <head><title>My Home Page</title></head>
3. <body>
4. <h1>My Name is MUGISHA. <br> This is my HOME.</h1>
5. </body>
6. </html>
You can browse this page by issuing this URL:
http://localhost:9999/hello/HelloHome.html
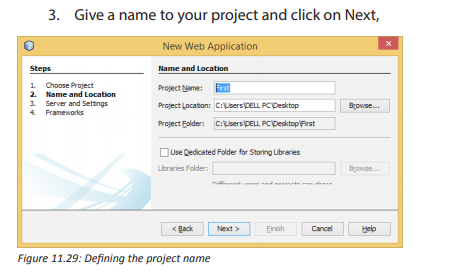
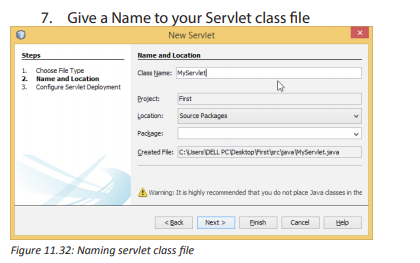
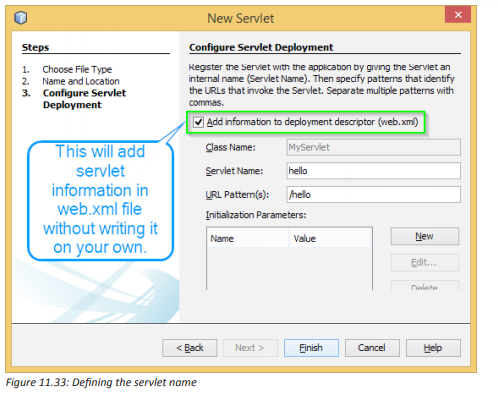
11.6.2. Steps to create web application project in Netbeans IDE
To create a servlet application in Netbeans IDE, you will need to follow the following
(simple) steps:
1. Open Netbeans IDE, Select File -> New Project

4. Click Finish
5. The complete directory structure required for the Servlet Application will
be created automatically by the IDE.


11.6.3. Http Session
Session is a conversional state between client and server and it can consists of
multiple request and response between client and server. This is how a HttpSession
object is created.
protected void doPost(HttpServletRequest req,
HttpServletResponse res)
throws ServletException, IOException {
HttpSession session = req.getSession();
}
a. .setAttribute()
You can store the user information into the session object by using setAttribute()
method and later when needed this information can be fetched from the session.
This is how you store info in session. Here we are storing username, emailid and
userage in session with the attribute name uName, uemailId and uAge respectively.
session.setAttribute(“uName”, “Mukamana”);
session.setAttribute(“uemailId”, “mukamana@gmail.com”);
session.setAttribute(“uAge”, “30”);
This First parameter is the attribute name and second is the attribute value. For e.g.
uName is the attribute name and Mukamana is the attribute value in the code above.
b. .getAttribute
To get the value from session we use the getAttribute() method of HttpSession
interface. Here we are fetching the attribute values using attribute names.
String userName = (String) session.getAttribute(“uName”);
String userEmailId = (String) session.getAttribute(“uemailId”);
String userAge = (String) session.getAttribute(“uAge”);
Session Example
index.html
<form action=”login”>
User Name:<input type=”text” name=”userName”/><br/>
Password:<input type=”password” name=”userPassword”/><br/>
<input type=”submit” value=”submit”/>
</form>
MyServlet1.java
import java.io.*;
import javax.servlet.*;
import javax.servlet.http.*;
public class MyServlet1 extends HttpServlet {
public void doGet(HttpServletRequest request, HttpServletResponse response){
try{
response.setContentType(“text/html”);
PrintWriter pwriter = response.getWriter();
String name = request.getParameter(“userName”);
String password = request.getParameter(“userPassword”);
pwriter.print(“Hello “+name);
pwriter.print(“Your Password is: “+password);
HttpSession session=request.getSession();
session.setAttribute(“uname”,name);
session.setAttribute(“upass”,password);
pwriter.print(“<a href=’welcome’>view details</a>”);
pwriter.close();
}catch(Exception exp){
System.out.println(exp);
}
}
}
MyServlet2.java
import java.io.*;
import javax.servlet.*;
import javax.servlet.http.*;
public class MyServlet2 extends HttpServlet {
public void doGet(HttpServletRequest request, HttpServletResponse response){
try{
response.setContentType(“text/html”);
PrintWriter pwriter = response.getWriter();
HttpSession session=request.getSession(false);
String myName=(String)session.getAttribute(“uname”);
String myPass=(String)session.getAttribute(“upass”);
pwriter.print(“Name: “+myName+” Pass: “+myPass);
pwriter.close();
}catch(Exception exp){
System.out.println(exp);
}
}
}
web.xml
<web-app>
<servlet>
<servlet-name>Servlet1</servlet-name>
<servlet-class>MyServlet1</servlet-class>
</servlet>
<servlet-mapping>
<servlet-name>Servlet1</servlet-name>
<url-pattern>/login</url-pattern>
</servlet-mapping>
<servlet>
<servlet-name>Servlet2</servlet-name>
<servlet-class>MyServlet2</servlet-class>
</servlet>
<servlet-mapping>
<servlet-name>Servlet2</servlet-name>
<url-pattern>/welcome</url-pattern>
</servlet-mapping>
</web-app>
The ouput will be as follows:

Application Activity 11.6
1. Create a web application project as follows:
• Location: Desktop/Senior6
• Title of the index page: Library
• Message: Welcome to the school library.
• Class Name: LibraryServlet
• Servlet Name: LibraryServlet
• Your servlet page should list some of the books
11. 7 Java Server Pages
Activity 11.7
Look at the codes indicated below and explain the difference between them.
11.7.1 Introduction
Java Server Pages (JSP) is a standard Java extension that is defined on top of the
servlet Extensions. The goal of JSPs is the simplified creation and management of
dynamic Web pages. JSPs allow you to combine the HTML of a Web page with pieces
of Java code in the same document. The Java code is surrounded by special tags that
tell the JSP container that it should use the code to generate a servlet, or part of one.
The benefit of JSPs is that you can maintain a single document that represents both
the page and the Java code that enables it. The JSP tags begin and end with angle
brackets, just like HTML tags, but the tags also include percent signs, so all JSP tags
are denoted by <% JSP code here %>
11.7.1 Creating a new JSP page in netbeans
To create a JSP page, the following steps are necessary:
1. Right click on your project’s name ->New -> JSP(in this example, the
project is “Senior6”)
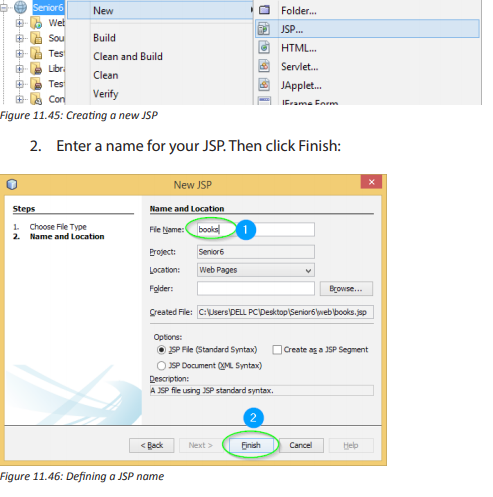
3. Netbeans creates a skeleton JSP page comprising of little more than the
<head> and <body> tags and a couple of commented-out sample bean
directives.
4. Add codes as follows:

11.7.3. JSP directives
Directives are messages to the JSP container and are denoted by the “@”:
<%@ directive {attr=”value”}* %>
Directives do not send anything to the out stream, but they are important in setting
up your JSP page’s attributes and dependencies with the JSP container. For example,
the line:
<%@ page language=”java” %> says that the scripting language being used within
the JSP page is Java.
The most important directive is the page directive. It defines a number of page
dependent attributes and communicates these attributes to the JSP container.
These attributes include: language, extends, import, session, buffer, autoFlush,
isThreadSafe, info and errorPage. For example:
<%@ page session=”true” import=”java.util.*” %>
This line first indicates that the page requires participation in an HTTP session. The
import attribute describes the types that are available to the scripting environment.
11.7.4. JSP scripting elements
Once the directives have been used to set up the scripting environment you can
utilize the scripting language elements. JSP has three scripting language elements—
declarations, scriptlets, and expressions. A declaration will declare elements,
a scriptlet is a statement fragment, and an expression is a complete language
expression. In JSP each scripting element begins with a “<%”. The syntax for each is:
<%! declaration %>
<% scriptlet %>
<%= expression %>
White space is optional after “<%!”, “<%”, “<%=”, and before “%>.”
All these tags are based upon XML; you could even say that a JSP page can be
mapped to a XML document. The XML equivalent syntax for the scripting elements
above would be:
<jsp:declaration> declaration </jsp:declaration>
<jsp:scriptlet> scriptlet </jsp:scriptlet>
<jsp:expression> expression </jsp:expression>
In addition, there are two types of comments:
<%-- jsp comment --%>
<!-- html comment -->
The first form allows you to add comments to JSP source pages that will not appear
in any form in the HTML that is sent to the client. Of course, the second form of
comment is not specific to JSPs, it’s just an ordinary HTML comment.
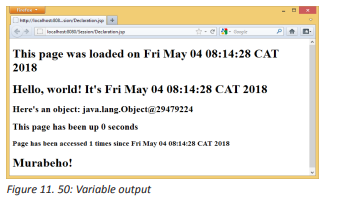
a. Declaration
Declarations are used to declare variables and methods in the scripting language
used in a JSP page. The declaration must be a complete Java statement and
cannot produce any output in the out stream. In the Hello.jsp example below, the
declarations for the variables loadTime, loadDate and hitCount are all complete
Java statements that declare and initialize new variables.
<%@page contentType=”text/html” pageEncoding=”UTF-8”%>
<!DOCTYPE html>
<%-- This JSP comment will not appear in the
generated html --%>
<%-- This is a JSP directive: --%>
<%@ page import=”java.util.*” %>
<%-- These are declarations: --%>
<%!
long loadTime= System.currentTimeMillis();
Date loadDate = new Date();
int hitCount = 0;
%>
<html><body>
<%-- The next several lines are the result of a
JSP expression inserted in the generated html;
the ‘=’ indicates a JSP expression --%>
<H1>This page was loaded on <%= loadDate %></H1>
<H1>Hello, world! It’s <%= new Date() %></H1>
<H2>Here’s an object: <%= new Object() %></H2>
<H2>This page has been up
<%= (System.currentTimeMillis()-loadTime)/1000 %>
seconds</H2>
<H3>Page has been accessed <%= ++hitCount %>
times since <%= loadDate %></H3>
<%-- A “scriptlet” that writes to the server
console and to the client page.
Note that the ‘;’ is required: --%>
<%
System.out.println(“Goodbye”);
out.println(“<h1>Murabeho!</h1>”);
%>
</body></html>
When you run this program you will see that the variables loadTime, loadDate and
hitCount hold their values between hits to the page, so they are clearly fields and
not local variables. At the end of the example is a scriptlet that writes “Goodbye” to
the Web server console and “Murabeho” to the implicit JspWriter object out.
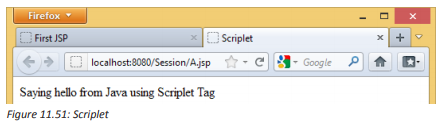
b. Scriptlets
Scriplets are used to insert Java code in your JSP page. The Java code is enclosed
within tags <% %>, which are known as Scriplet Tags. A JSP Scriplet tag may hold
the Java code comprising java expressions, statements or variable. JSP comes with a
built-in Java object named out which allows us to write a text to the JSP web page,
below is an example of how we can use the in-built out object within the scriplet tag
to display a message on a web page.
<%@page contentType=”text/html” pageEncoding=”UTF-8”%>
<!DOCTYPE html>
<html>
<head>
<meta http-equiv=”Content-Type” content=”text/html; charset=UTF-8”>
<title>First JSP</title>
</head>
<body>
<% out.println(“Saying hello from Java using Scriplet Tag”); %>
</body>
</html>
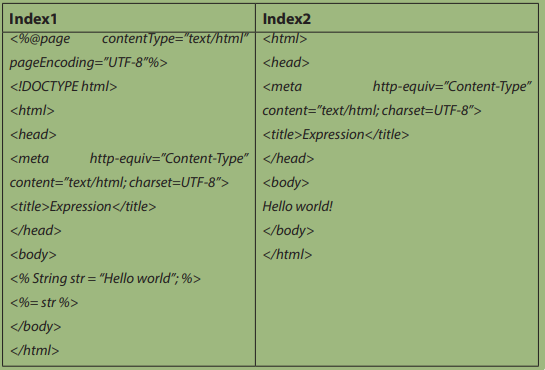
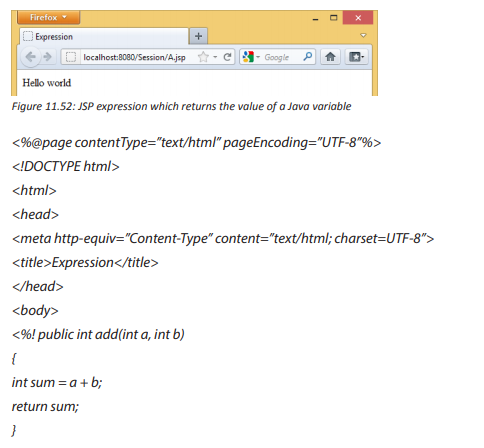
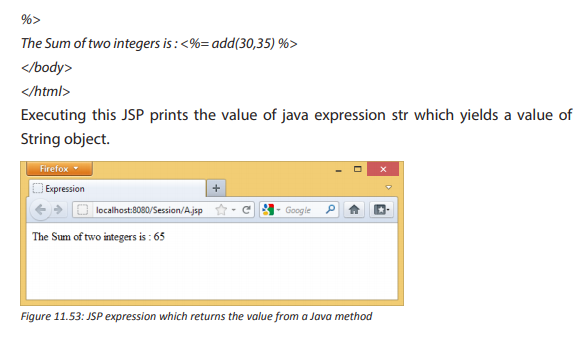
c. Expressions
Expression tag evaluates the expression placed in it, converts the result into String
and send the result back to the client through response object. Java expressions
result in a value, hence JSP Expression tags are used to enclose java expressions that
yield a value to be printed on a JSP web page. The Java expressions are enclosed in
within <%= %> tags.
JSP expression tag Examples
<%@page contentType=”text/html” pageEncoding=”UTF-8”%>
<!DOCTYPE html>
<html>
<head>
<meta http-equiv=”Content-Type” content=”text/html; charset=UTF-8”>
<title>Expression</title>
</head>
<body>
<% String str = “Hello world”; %>
<%= str %>
</body>
</html>
Executing this JSP prints the value of java expression str which yields a value of
String object.
11.7.5. JSP page attributes and scope
By poking around in the HTML documentation for servlets and JSPs, you will find
features that report information about the servlet or JSP that is currently running.
The following example displays a few of these pieces of data.
//:! c15:jsp:PageContext.jsp
<%--Viewing the attributes in the pageContext--%>
<%-- Note that you can include any amount of code
inside the scriptlet tags --%>
<%@ page import=”java.util.*” %>
<html><body>
Servlet Name: <%= config.getServletName() %><br>
Servlet container supports servlet version:
<% out.print(application.getMajorVersion() + “.”
+ application.getMinorVersion()); %><br>
<%
session.setAttribute(“My country”, “Rwanda”);
for(int scope = 1; scope <= 4; scope++) { %>
<H3>Scope: <%= scope %></H3>
<% Enumeration e =
pageContext.getAttributeNamesInScope(scope);
while(e.hasMoreElements()) {
out.println(“\t<li>” +
e.nextElement() + “</li>”);
}
}
%>
</body></html>
///:~
This example also shows the use of both embedded HTML and writing to out in
order to output to the resulting HTML page.
The first piece of information produced is the name of the servlet, which will probably
just be “JSP” but it depends on your implementation. You can also discover the
current version of the servlet container by using the application object. Finally, after
setting a session attribute, the “attribute names” in a particular scope are displayed.
You don’t use the scopes very much in most JSP programming; they were just shown
here to add interest to the example. There are four attribute scopes, as follows: The
page scope (scope 1), the request scope (scope 2), the session scope (scope 3). Here, the
only element available in session scope is “My country,” added right before the for
loop), and the application scope (scope 4), based upon the Servlet Context object.
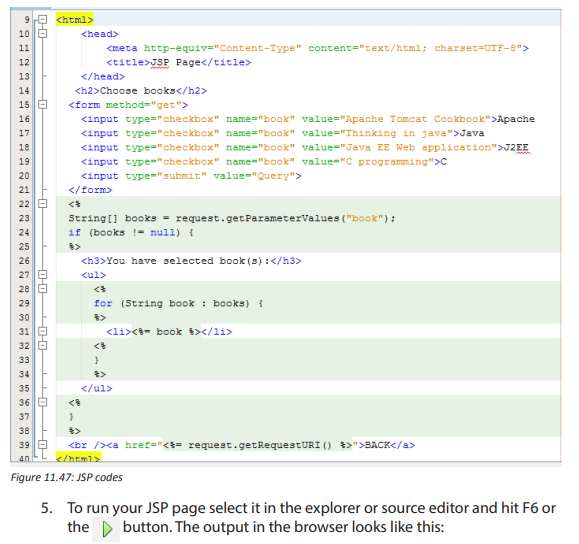
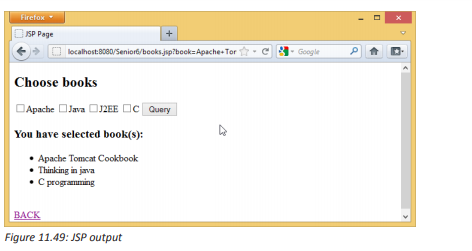
Application Activity 11.7
1. Why could you use JSP instead of Servlets?
2. How is JSP combined with HTML?
3. Create a JSP web form with the following characteristics:
a. The form should contain input boxes to receive student’s names and
the year of study.
b. A command button to submit recorded information
c. When the “submit” button is clicked, the form will display a message
as follows: Hello “student’s names”, you study in “year of study”
11.8 tandard Tag Library (JSTL)
Activity 11.7
1. Explain how paired and unpaired tags are used?
2. Provide an example for each one of the following types of tags:
a. Formatting tags
b. Page Structure tags
c. Control tags
11.8.1. Introduction
The JavaServer Pages Standard Tag Library (JSTL) is a collection of useful JSP tags
which encapsulates the core functionality common to many JSP applications.
JSTL has support for common, structural tasks such as iteration and conditionals,
tags for manipulating XML documents, internationalization tags, and SQL tags. It
also provides a framework for integrating the existing custom tags with the JSTL
tags.
To use any of the libraries, you must include a <taglib> directive at the top of each
JSP that uses the library.
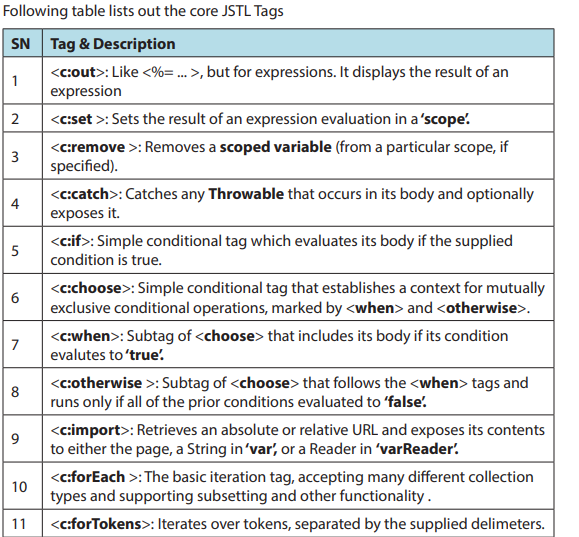
11.8.2. Classification of the JSTL Tags
The JSTL tags can be classified, according to their functions, into the following JSTL
tag library groups that can be used when creating a JSP page:
• Core Tags
• Formatting tags
• SQL tags
• XML tags
• JSTL Functions
a. Core Tags
The core group of tags are the most commonly used JSTL tags. Following is the
syntax to include the JSTL Core library in your JSP −
<%@ taglib prefix = “c” uri = “http://java.sun.com/jsp/jstl/core” %>
Below is a simple example of tag:
<%@ taglib uri=”http://java.sun.com/jsp/jstl/core” prefix=”c” %>
<html>
<head>
<title>Core Tag Example</title>
</head>
<body>
<c:forEach var=”j” begin=”1” end=”3”>
Item <c:out value=”${j}”/><p>
</c:forEach>
</body>
</html>
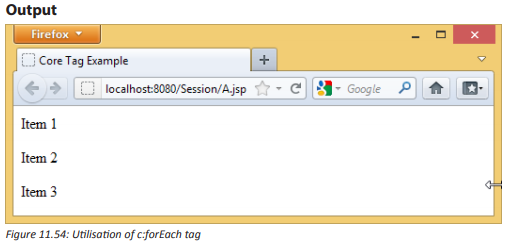
b. Formatting Tags
The JSTL formatting tags are used to format and display text, the date, the time,
and numbers for internationalized Websites. Following is the syntax to include
formatting library in your JSP.
<%@ taglib prefix = “fmt” uri = “http://java.sun.com/jsp/jstl/fmt” %>


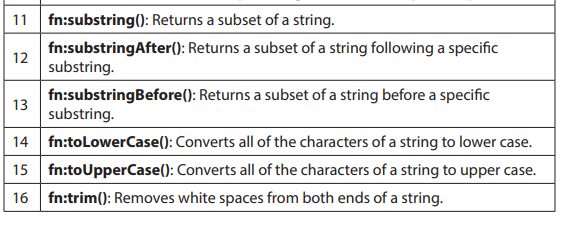
e. JSTL Functions
JSTL includes a number of standard functions, most of which are common string
manipulation functions. Following is the syntax to include JSTL Functions library in your JSP −


Application Activity 11.7
Identify and explain different tags found in the codes below:
<%@ page language="java" contentType="text/html; charset=US-ASCII"
pageEncoding="US-ASCII"%>
<!DOCTYPE html PUBLIC "-//W3C//DTD HTML 4.01 Transitional//EN" "http://www.w3.org/TR/
html4/loose.dtd">
<html>
<head>
<meta http-equiv="Content-Type" content="text/html; charset=US-ASCII">
<title>Home Page</title>
<%@ taglib uri="http://java.sun.com/jsp/jstl/core" prefix="c" %>
<style>
table,th,td
{
border:1px solid black;
}
</style>
</head>
<body>
<%-- Using JSTL forEach and out to loop a list and display items in table --%>
<table>
<tbody>
<tr><th>ID</th><th>Name</th><th>Role</th></tr>
<c:forEach items="${requestScope.empList}" var="emp">
<tr><td><c:out value="${emp.id}"></c:out></td>
<td><c:out value="${emp.name}"></c:out></td>
<td><c:out value="${emp.role}"></c:out></td></tr>
</c:forEach>
</tbody>
</table>
<br><br>
<%-- simple c:if and c:out example with HTML escaping --%>
<c:if test="${requestScope.htmlTagData ne null }">
<c:out value="${requestScope.htmlTagData}" escapeXml="true"></c:out>
</c:if>
<br><br>
<%-- c:set example to set variable value --%>
<c:set var="id" value="5" scope="request"></c:set>
<c:out value="${requestScope.id }" ></c:out>
<br><br>
<%-- c:catch example --%>
<c:catch var ="exception">
<% int x = 5/0;%>
</c:catch>
<c:if test = "${exception ne null}">
<p>Exception is : ${exception} <br>
Exception Message: ${exception.message}</p>
</c:if>
<br><br>
<%-- c:url example --%>
<a href="<c:url value="${requestScope.url }"></c:url>">JournalDev</a>
</body>
</html>
11.9 Java Database Connectivity (JDBC) connection
Activity 11.7
1. Illustrate how websites communicate with databases?
2. What are the benefits of having a website which is connected to a
database?
JDBC is a standard Java application programming interfaces (APIs) for databaseindependent connectivity between the Java programming language and a wide
range of databases.
The JDBC library includes APIs for each of the tasks mentioned below that are
commonly associated with database usage.
• Making a connection to a database.
• Creating SQL or MySQL statements.
• Executing SQL or MySQL queries in the database.
• Viewing & Modifying the resulting records.
Fundamentally, JDBC is a specification that provides a complete set of interfaces
that allows for portable access to an underlying database.
11.9.1. Common JDBC Components
The JDBC API provides the following interfaces and classes:
• Driver Manager: This class manages a list of database drivers. Matches
connection requests from the java application with the proper database
driver using communication sub protocol. The first driver that recognizes
a certain subprotocol under JDBC will be used to establish a database
Connection.
• Driver: This interface handles the communications with the database server.
You will interact directly with Driver objects very rarely. Instead, you use
DriverManager objects, which manages objects of this type. It also abstracts
the details associated with working with Driver objects.
• Connection: This interface with all methods for contacting a database.
The connection object represents communication context, i.e., all
communication with database is through connection object only.
• Statement: You use objects created from this interface to submit the SQL
statements to the database. Some derived interfaces accept parameters in
addition to executing stored procedures.
• ResultSet: These objects hold data retrieved from a database after you
execute an SQL query using Statement objects. It acts as an iterator to allow
you to move through its data.
• SQLException: This class handles any errors that occur in a database
application.
11.9.2. Load Driver
1. Download MySQL Connector/J, name ‘mysql-connector-java-5.1.46.zip’
from the Official Site at https://dev.mysql.com/downloads/connector/j
Extract the zip file to a folder, you will see file ‘mysql-connector-java-5.1.46-
bin.jar’ which is the library file that we want. Just copy the file to the library
folder, for example to “C:\Program Files\Java\jdk1.6.0_02\lib” directory.
2. Start Netbeans and create a new project (File->New Project; a window
will appear. Select Java from the Categories list and Java Application from
the Projects list. Click Next. In the New Java Application window, enter the
name and location of the project.)
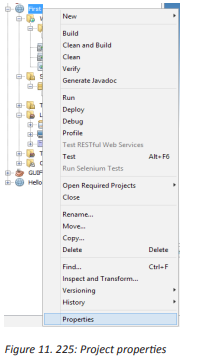
3. Add JDBC Driver to the “First” project on NetBeans (Add a library).
a. In Projects window, right click the project name and select Properties.

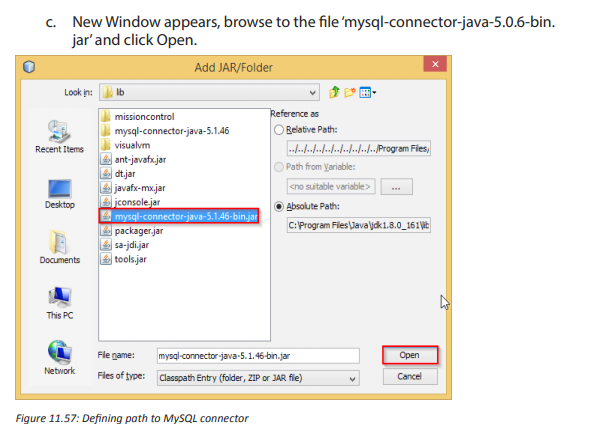

Note: You should keep mysql-connector-java-5.1.46-bin.jar in the directory that
you won’t delete it (ex. not in temp folder). May be in the same directory that keep
common library files. If you delete the file without delete a link from the project, the
project will show error about missing library.
11.9.3. Connecting to the database
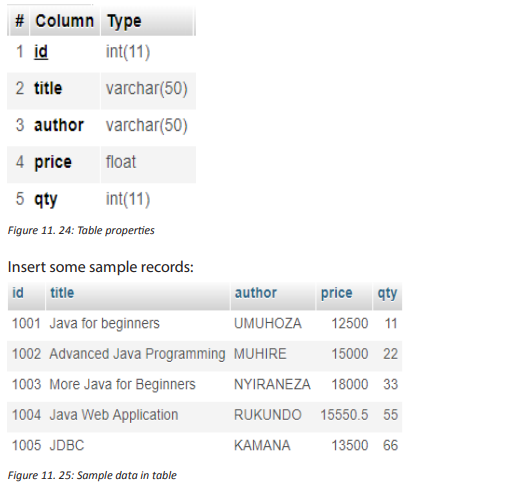
Supposing we have a table named books in a MySQL database called ebooks with
the following fields:
a. Writing code to connect to the database
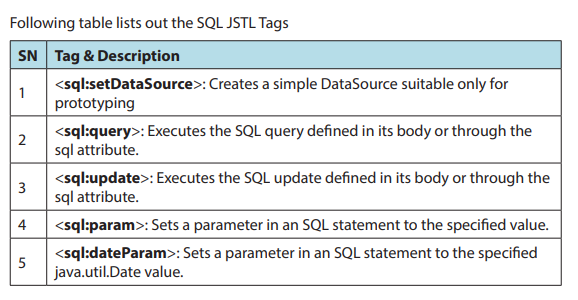
Use the <sql:setDataSource> tag to create a data source to our database like this:
<sql:setDataSource
var=”myDB”
driver=”com.mysql.jdbc.Driver”
url=”jdbc:mysql://localhost:3306/ebooks”
user=”root”password=”secret”
/>
Remember to change the user and password attributes according to your MySQL
settings. Note that the data source is assigned to a variable called my DB for reference
later.
b. Writing code to query the records
Use the <sql:query> tag to create a query to the database as follows:
<sql:queryvar=”list_users”dataSource=”${myDB}”>
SELECT * FROM books;
</sql:query>
Note that the dataSource attribute refers to the data source myDB created in the
previous step, and result of this query is assigned to a variable called listUsers for
reference later.
c. Writing code to display the records
Use the <c:forEach> tag to iterate over the records returned by the <sql:query> tag.
And for each record, use the <c:out> tag to print value of a column in the table, like
this:
<c:forEach var=”books” items=”${books.rows}”>
<td><c:out value=”${books.id}” /></td>
<td><c:out value=”${books.title}” /></td>
<td><c:out value=”${books.author}” /></td>
<td><c:out value=”${books.price}” /></td>
<td><c:out value=”${books.qty}” /></td>
</c:forEach>
Note that the items attribute of the <c:forEach> tag refers to the listUsers variable
assigned by the <sql:query> tag.
d. The complete JSP code
Now we wire the above pieces together to form a complete JSP page with taglib
directives to import JSTL tags and HTML code to display the books list in tabular
format. Code of the complete JSP page is as follows (books.jsp):
<%@ taglib uri=”http://java.sun.com/jsp/jstl/core” prefix=”c” %>
<%@ taglib uri=”http://java.sun.com/jsp/jstl/sql” prefix=”sql” %>
<%@page contentType=”text/html” pageEncoding=”UTF-8”%>
<!DOCTYPE html>
<html>
<head>
<meta http-equiv=”Content-Type” content=”text/html; charset=UTF-8”>
<title>JSP List books</title>
</head>
<body>
<sql:setDataSource
var=”myDB”
driver=”com.mysql.jdbc.Driver”
url=”jdbc:mysql://localhost:3306/ebooks”
user=”root” password=””
/>
<sql:query var=”books” dataSource=”${myDB}”>
SELECT * FROM books;
</sql:query>
<div align=”center”>
<table border=”1” cellpadding=”5”>
<caption><h2>List of books</h2></caption>
<tr>
<th>ID</th>
<th>Title</th>
<th>Author</th>
<th>Price</th>
<th>Quantity</th>
</tr>
<c:forEach var=”books” items=”${books.rows}”>
<tr>
<td><c:out value=”${books.id}” /></td>
<td><c:out value=”${books.title}” /></td>
<td><c:out value=”${books.author}” /></td>
<td><c:out value=”${books.price}” /></td>
<td><c:out value=”${books.qty}” /></td>
</tr>
</c:forEach>
</table>
</div>
</body>
</html>
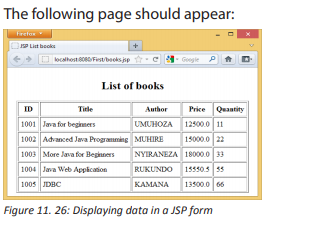
e. Testing the application
Supposing we put the books.jsp file inside the web application called First on
localhost Tomcat, type the following URL to run the list books JSP page:
http://localhost:8080/First/books.jsp
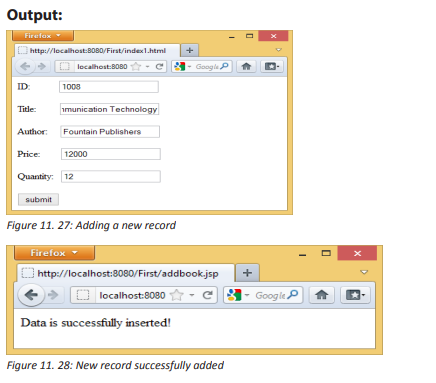
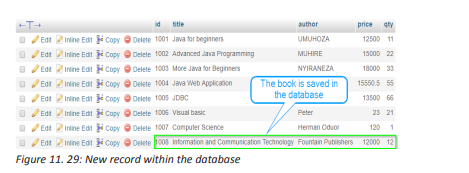
11.9.4. Inserting data into tables
We need 2 files to insert a new book record in the books table created in the previous
section in MySQL:
• index.html: for getting the values from the user
• addbooks.jsp: A JSP file that process the request
Codes for index.html are as follows:
<!DOCTYPE html>
<html>
<body>
<form method=”post” action=”addbook.jsp”>
ID:
<input type=”text” name=”id”>
<br><br>
Title:
<input type=”text” name=”title”>
<br><br>
Author:
<input type=”text” name=”author”>
<br><br>
Price: <input type=”text” name=”price”>
<br><br>
Quantity:
<input type=”text” name=”qty”>
<br><br>
<input type=”submit” value=”submit”>
</form>
</body>
</html>
Codes for addbooks.jsp are as follows:
<%@ page language=”java” contentType=”text/html; charset=ISO-8859-1”
pageEncoding=”ISO-8859-1”%>
<%@page import=”java.sql.*,java.util.*”%>
<%@ taglib uri=”http://java.sun.com/jsp/jstl/core” prefix=”c” %>
<%@ taglib uri=”http://java.sun.com/jsp/jstl/sql” prefix=”sql” %>
<%
String id=request.getParameter(“id”);
String title=request.getParameter(“title”);
String author=request.getParameter(“author”);
String price=request.getParameter(“price”);
String qty=request.getParameter(“qty”);
try
{
Class.forName(“com.mysql.jdbc.Driver”);
Connection conn = DriverManager.getConnection(“jdbc:mysql://localhost:3306/ebooks”, “root”,
“”);
Statement st=conn.createStatement();
int i=st.executeUpdate(“insert into books(id,title,author,price, qty)
values(‘”+id+”’,’”+title+”’,’”+author+”’,’”+price+”’,’”+qty+”’)”);
out.println(“Data is successfully inserted!”);
}
catch(Exception e)
{
System.out.print(e);
e.printStackTrace();
}
%>
11.9.5. Updating tables
To update data into books table created in the previous section, we need 3 files:
• index.jsp: To retrieve data from database with an update option.
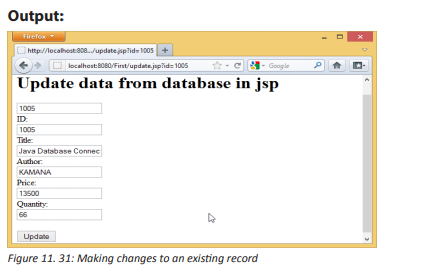
• update.jsp: Show the book data as per the selected id of book (Suppose
you select book id 1001, then it show only the information of id 1001).
• update-process.jsp: Process the user data after edit.
index.jsp:
<%@page contentType=”text/html” pageEncoding=”UTF-8”%>
<!DOCTYPE html>
<%@ page import=”java.sql.*” %>
<%@ page import=”java.io.*” %>
<%@page import=”java.sql.DriverManager”%>
<%@page import=”java.sql.ResultSet”%>
<%@page import=”java.sql.Statement”%>
<%@page import=”java.sql.Connection”%>
<%
String id = request.getParameter(“id”);
String driver = “com.mysql.jdbc.Driver”;
String connectionUrl = “jdbc:mysql://localhost:3306/”;
String database = “ebooks”;
String userid = “root”;
String password = “”;
try {
Class.forName(driver);
} catch (ClassNotFoundException e) {
e.printStackTrace();
}
Connection connection = null;
Statement statement = null;
ResultSet resultSet = null;
%>
<html>
<body>
<h1>Retrieve data from database in jsp</h1>
<table border=”1”>
<tr>
<td>id</td>
<td>Title</td>
<td>Author</td>
<td>Price</td>
<td>Quantity</td>
<td>update</td>
</tr>
<%
try{
connection = DriverManager.getConnection(connectionUrl+database, userid, password);
statement=connection.createStatement();
String sql =”select * from books”;
resultSet = statement.executeQuery(sql);
while(resultSet.next()){
%>
<tr>
<td><%=resultSet.getString(“id”) %></td>
<td><%=resultSet.getString(“title”) %></td>
<td><%=resultSet.getString(“author”) %></td>
<td><%=resultSet.getString(“price”) %></td>
<td><%=resultSet.getString(“qty”) %></td>
<td><a href=”update.jsp?id=<%=resultSet.getString(“id”)%>”>update</a></td>
</tr>
<%
}
connection.close();
} catch (Exception e) {
e.printStackTrace();
}
%>
</table>
</body>
</html>

update.jsp:
<%@page contentType=”text/html” pageEncoding=”UTF-8”%>
<!DOCTYPE html>
<%@page import=”java.sql.DriverManager”%>
<%@page import=”java.sql.ResultSet”%>
<%@page import=”java.sql.Statement”%>
<%@page import=”java.sql.Connection”%>
<%
String id = request.getParameter(“id”);
String driver = “com.mysql.jdbc.Driver”;
String connectionUrl = “jdbc:mysql://localhost:3306/”;
String database = “ebooks”;
String userid = “root”;
String password = “”;
try {
Class.forName(driver);
} catch (ClassNotFoundException e) {
e.printStackTrace();
}
Connection connection = null;
Statement statement = null;
ResultSet resultSet = null;
%>
<%
try{
connection = DriverManager.getConnection(connectionUrl+database, userid, password);
statement=connection.createStatement();
String sql =”select * from books where id=”+id;
resultSet = statement.executeQuery(sql);
while(resultSet.next()){
%>
<!DOCTYPE html>
<html>
<body>
<h1>Update data from database in jsp</h1>
<form method=”post” action=”update-process.jsp”>
<input type=”hidden” name=”id” value=”<%=resultSet.getString(“id”) %>”>
<input type=”text” name=”id” value=”<%=resultSet.getString(“id”) %>”>
<br>
ID:<br>
<input type=”text” name=”id” value=”<%=resultSet.getString(“id”) %>”>
<br>
Title:<br>
<input type=”text” name=”title” value=”<%=resultSet.getString(“title”) %>”>
<br>
Author:<br>
<input type=”text” name=”author” value=”<%=resultSet.getString(“author”) %>”>
<br>
Price:<br>
<input type=”text” name=”price” value=”<%=resultSet.getString(“price”) %>”>
<br>
Quantity:<br>
<input type=”text” name=”qty” value=”<%=resultSet.getString(“qty”) %>”>
<br><br>
<input type=”submit” value=”Update”>
</form>
<%
}
connection.close();
} catch (Exception e) {
e.printStackTrace();
}
%>
</body>
</html>
update-process.jsp
<%@page contentType=”text/html” pageEncoding=”UTF-8”%>
<!DOCTYPE html>
<%@ page import=”java.sql.*” %>
<%! String driverName = “com.mysql.jdbc.Driver”;%>
<%!String url = “jdbc:mysql://localhost:3306/ebooks”;%>
<%!String user = “root”;%>
<%!String psw = “”;%>
<%
String id = request.getParameter(“id”);
String title=request.getParameter(“title”);
String author=request.getParameter(“author”);
String price=request.getParameter(“price”);
String qty=request.getParameter(“qty”);
if(id != null)
{
Connection con = null;
PreparedStatement ps = null;
int personID = Integer.parseInt(id);
try
{
Class.forName(driverName);
con = DriverManager.getConnection(url,user,psw);
String sql=”Update books set id=?,title=?,author=?,price=?,qty=? where id=”+id;
ps = con.prepareStatement(sql);
ps.setString(1,id);
ps.setString(2, title);
ps.setString(3, author);
ps.setString(4, price);
ps.setString(5, qty);
int i = ps.executeUpdate();
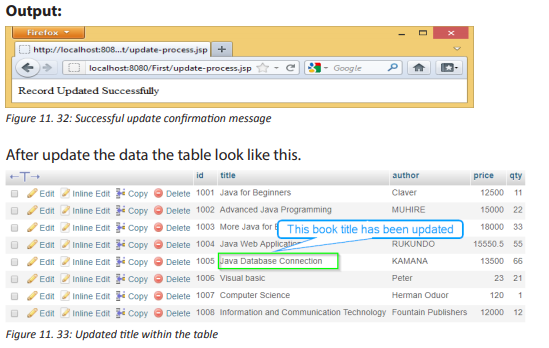
if(i > 0)
{
out.print(“Record Updated Successfully”);
}
else
{
out.print(“There is a problem in updating Record.”);
}
}
catch(SQLException sql)
{
request.setAttribute(“error”, sql);
out.println(sql);
}}
%>
Application Activity 11.9
Develop a web application that connects to a database. You could use MySql
database. The program could collect data from the user (via a form) and store it
in a database table.
End unit assessment
1. How can you change the connector port while configuring Apache
Tomcat?
2. How does the servlet container interact with java servlet?
3. How could you access and run Tomcat Servlet and JSP examples?
4. Develop a web application so that it stores information in a session
variable. Use the session variable in the JSP output page.