General
- P6: Science and Elementary Technology File Uploaded 31/07/22, 12:21
- P6: Science and Elementary Technology TG File Uploaded 2/08/22, 09:20
- P6 SET TG ( Adapted ) File Uploaded 2/11/22, 08:34
UNIT 4: Writing Skills
1. Study the picture below.
2. Summarize what is going on in the picture in one paragraph in
your notebook.
3. Type your summary using your XO laptop. Are you happy with
your typed work? How can you make it look better?
4.1 Gnome Environment
In Primary 4, you learnt about the two interfaces used in the XO laptop.
Can you name them? How do you switch from Sugar to Gnomeinterface?
Activity 4.1 Switching from Sugar to Gnome interface
1. Go to my Settings by placing the cursor at ‘X’
2. Click on switch desktop.

3. Click on switch to GNOME.
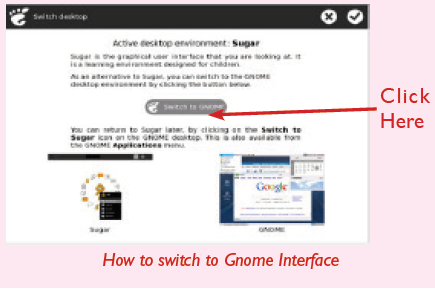
4. Lastly, click on restart now button.
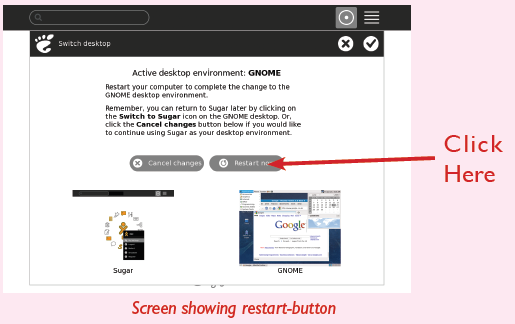
Your screen should look like this.
Identification of elements of Gnome environment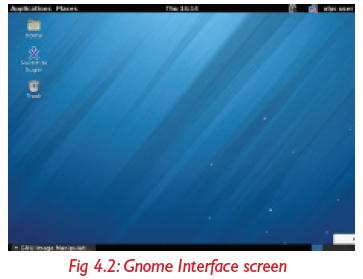
Activity 4.2 Gnome environment1. Look at the screen below. Does it look familiar?
2. Identify the parts shown on the screen.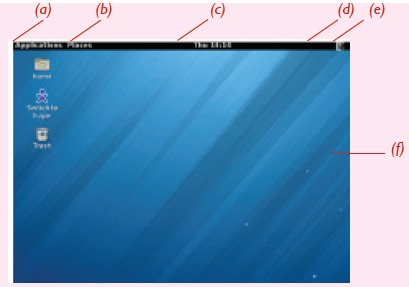
There are top and bottom panels in a Gnome window. On the top left
there are: applications and places. On the top right, we find network,
date and olpc user.
(i) The Top Menu Panel
This panel stretches across the top of the screen. The left side contains:
• Applications
• Places
The right side of the panel is home to:
• A clock and Calendar
• Network connection
• Battery status
• The User Switch area
Note: If you hold the mouse pointer over the menu text or an icon, a
brief description of its function appears. If you click one of these icons,that application starts.
Activity 4.3 Launching an application menu
To launch an application, perform the following:
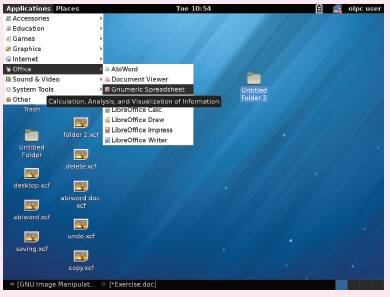
1. Open the Applications menu by clicking on it.
2. Move the mouse down the menu to the Sound and Video. (Each
sub menu opens as your mouse passes over the category).
3. Click the menu item for the application.4. Locate where you can record sound.
This Menu displays a list of installed applications. When you click on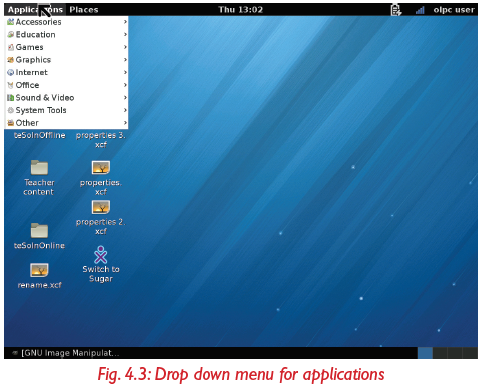
Applications, a drop-down list appears as shown above. Each of these
sub-menus corresponds to a category. For example, in the Sound & Videosub-menu, you will find applications for playing CDs and recording sound.
ii) Places menu
Activity 4.4 Explaining places menu1. Click on places icon as shown below.
2. Select recent documents.
3. Write down names of the documents/ folders which are there.
The ‘Places’ menu is a quick way to go to various locations on your
computer and your local network.
It allows you to open the following items:
• Home folder- where your personal files are kept by default.
• The Desktop folder - which is the main work area on your
computer.
• Documents - list several of the last folders opened.
• The computer window allows you to browse the computer’s files
and all data storage attached to the computer.• Network allows you to manipulate your networks.
iii) Network menu
Activity 4.5 Network Menu
1. Click on network icon to see which network connections are
available for use in accessing the internet.
2. To connect a network you click on it. For example: click on onelaptop per child to connect on it or to disconnect it
It displays available networks including WI-FI networks that are available.
Setting date and time
Activity 4.6 Setting date and time
To set date:
1. Place the cursor on the date icon at the top right panel. A dropdown window with the calendar appears.

2. Click on the back and front arrows to select month and year.
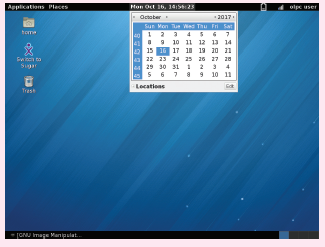
3. Place the cursor on the date then click on it to set the date.
To set time:
4. Place the cursor on the time icon at the top right panel. Click onedit. This will allow you to input the correct time.
Sometimes, the date and time on the XO-laptop may not be right. When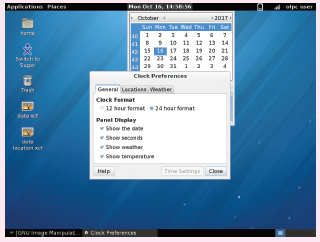
this happens, you may need to re-set the date and time.
Activity 4.7 Opening Abiword program
You will open an Abiword program in this activity.
1. Go to applications. A drop down menu like the one shown belowappears.
2. Place the cursor on office, then click on it.
3. Select Abiword then click on it. A window like the one belowappears.
Did your screen look like this?
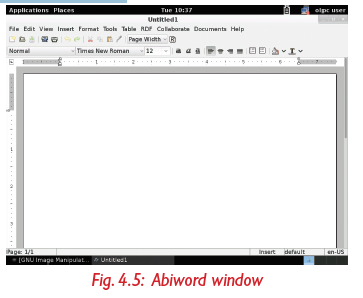
This is the Abi word that can be used to type a word document
Activity 4.8 Text typing in Abiword
Follow the steps above to open a new abiword document using yourXO - laptop. Type in the words ‘Hello children’.
Working with a document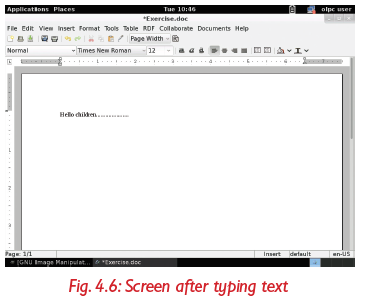
Activity 4.9 Creating a new document
1. Follow the steps as highlighted in Activity 4.8 to open a new
Abiword window.2. Click the File tab and click New, or just click on the new document
 icon.
icon.
3. Start typing your text. Once you are done with typing in your
new AbiWord document, it is time to save your document to
avoid losing the work.
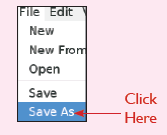
4. Click the File tab and select ‘Save As’ option.
5. Select where you would like to save your file (can be documents,
desktop or any other earlier created folder on the desktop).
Enter file name which you want to give (for example, my test)
and Select ‘Save file as’ type file. By default, it is AbiWord. Abw.
6. Finally, click on save button and your document will be saved
with the entered name in the selected folder.
A new blank document always opens when you start Abiword. But you
can start another new document by clicking on File + New or just clickon the new document icon
Remember!
In order for your document to be read using other computers, selectmicrosoft word.doc as file type.
Activity 4.10 Saving new changes
1. Open the Abiword document you created in Activity 7.7 then
make some corrections in the document. You may delete or add
information
2. Now go to file Tab and click on save option or just click on save
icon on the Menu Bar.
3. Re-open the document from its folder and confirm that the
corrections were saved.
To save the new changes to the document you can do one of the following:
• Press CTRL +S to save the new changes.
• Click on save icon below the file tab.
• Click on file then click on save.
Activity 4.11 Opening a document
1. Click the ‘File tab’ and select ‘Open’ option.
(The window below will displayed (an open dialog box), which lets you
move through different file folders and also lets you select a file, whichyou want to open).
2. Finally locate and select the file which you want to open and
click on open. In the above screen the file to be opened is named
‘exercise.doc’.
When you want to open an existing document go to File Tab, select
Open option , locate your file and click on Open button.
Activity 4.12 Closing a document
1. Click the File tab and click ‘Close’ option.
(When you select close option and if the document is not saved before
closing, it will display a Warning box asking whether the document
should be saved or not).
2. It is up to you; If you want to save the changes, then click ‘Save’,
otherwise click ‘Close without saving’ button.
(To go back to the document click ‘Cancel’ button. This will close the
Dialog Box
3. Or click on ‘(x)’ at the top right side of the screen.
Once you have opened an existing document, you work on it. This may
include making some changes, saving then closing it.
To close an open document, you can do one of the following:
• Click the File Tab and click close option.• Or click on ‘X’ at the top right of the screen.
Activity 4.13 Renaming an existing document
1. Locate the folder where the document is (this may be in my
documents, desktop or any other folder you created earlier).
2. Right-click on the document, a drop down menu like the one
below appears.
3. Click on rename, and write the name you want. Then after, pressthe ‘Enter key’
When you want to rename an existing file in your XO laptop,
• Right click on the file you want to rename option.
• Press the erase botton to delete the existing name.• Then type the name of your choice and press enter key.
Folder management
Activity 4.14 Creating a folder1. ‘Right click’ where you want to create a folder.

2. Click on ‘new folder’.
3. ‘Right click’ on the untitled folder, then click on ‘rename’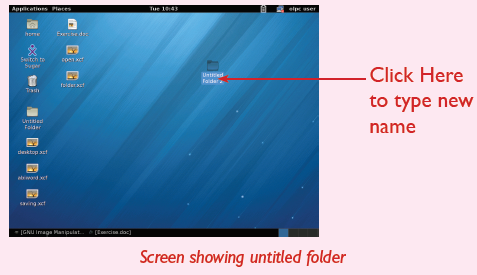
option or simply, erase ‘untitled folder’ by pressing on delete
button on the keyboard then type the new name.
Folders are used to store documents in a computer. They are named
depending on what content is stored there.
To create a new folder, you can do one of the following.
• Right click where you want to create the folder. It can be either onthe desktop or elsewhere.
• Then click a ‘new folder’ and save the folder with a name. You canname the documents you want in there.
Activity 4.15 Create a folder
1. Follow the steps above to create a folder named ‘ MY SCHOOL’.
2. Save the folder on the desktop then shut down the XO-laptop.
3. Switch the XO-laptop on. Switch to Gnome interface then try to
locate the folder on the desktop. Did you find it?4. Rename the folder ‘MY CLASS’ and save. What happens?
Moving and deleting a folder
Activity 4.16 To move and delete a folder1. Right click on the folder you want to move.
2. Click on ‘Move” option.
3. Select where you want to put your folder.
4. Locate the folder in the new location where you moved it to and
right click on it to delete. Where is the file finally?
It is possible to move a folder from one location to another. This can bedone by choosing ‘move to’ command then clicking on the new location.
How to delete a folder
To delete a folder, follow these steps:
1. Right-click’ on the folder.
2. Click on ‘move to Trash’. This deletes the folder from its currentlocation and move it to the trash or bin.
Talking Point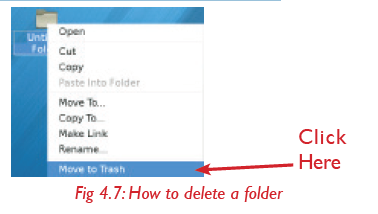
1. Create two folders on the desktop.
2. Name them as EXERCISE 1 and EXERCISE 2.
3. Move the folder “EXERCISE 1” to folder “Documents”.
4. Copy the folder “EXERCISE 2” and paste it in Documents folder.5. Delete the folder “EXERCISE 2” from the desktop.
Saving a file into a folder
Activity 4.17 Saving a file into a folder
1. Create an, AbiWord document as shown in Activity 4.7.
2. Type the following text then save the document on the Desktop.
Name it “My Residence”.
My residence address
Southern Province
Nyanza District
Mukingo Sector
Nkomero Cell
P. O. BOX 240 Nyanza
3. Save this file in the folder you renamed ‘MY CLASS’ in Activity
4.15.
4. Access the file in the folder, then copy and paste it in the folder
named “EXERCISE 1” that you created in Activity 4.17 above.
As mentioned earlier, folders are used to store files. After you have
created a file, for example in AbiWord, you can then save it in the
appropriate folder by doing the following:
• Right click on the file, right click on cut then click on the
folder, then click paste into folder.• Place the cursor on the file and drag it to the folder.
Activity 4.18 Accessing properties of a folder1. Right click on any folder on the desktop.
2. Select the ‘Properties’ in the display menu and click on it. What
can you see?
To access the properties of a file or folder, right-click on it and select
‘Properties’
Elements of AbiWord window
You have already interacted with AbiWord window several times. Howdoes the screen of AbiWord look like?
Talking Point1. Study the window below with a friend.
2. The main features of the window are shown using letters. Write
them down in your notebook.
3. Compare your labelled window with other pupil’s. Did you get itright?
AbiWord is a free word processing program. It has a number of differentcomponents as described below.
(a) Title bar
Activity 4.19 To name a document
1. Go to application office and click on AbiWord.
2. What is the title of the opened Abiword document?
3. Click on File save as and type the name of your choice and
click on save.
4. Now what is the new name of the document?5. Click on X to close the document.
The title bar normally displays the name of the program, and the documentthat is currently open. Title bar shows the document titles.
Table 4.1 Uses of the buttons in the title bar
(b) The Menu Bar
Activity 4.20 Inserting a table
1. Open a new AbiWord document.
2. Type “Class test.”
3. Go to menu bar and click on Insert option.
4. Click on table and select number of columns of your choice,
then click on insert.5. Type in the marks you got in the class test.
The menu bar is shown below.
Fig 4.9: Menu bar features
The menu bar allows you to choose commands that AbiWord is capable
of performing. The menu bar has a series of words on it as shown in Fig
4.9. The most common one is the file tab.
(c) Toolbar
Toolbar buttons are typically used to quickly access commonly used menu
commands. The two types of tool bars are
i) Standard toolbar
This toolbar provides access to the most commonly used operations,
including creating a new file, saving the current document and printingthe current document, along with cut, copy and paste functions.
ii) Formatting toolbar
Activity 4. 21 Formatting Text
1. Open AbiWord on your XO - Desktop.
2. Write the following sentence:
Hallo friend. My name is Andy and this is my first experience with AbiWord.
3. Make bold the name “Andy”.
4. Make italics the phrase “Hallo friend”.
5. Underline the word “AbiWord”.
6. Now, use the Erase button of your keyboard and try to delete
the phrase “with AbiWord”.
7. Use the text cursor and move to “Andy”. Again use the Erase
button and delete it in order to type your name.
This toolbar provides access to various formatting options such as
Italicizing text, making text bold, underlining text and changing font
type and font size and so on.
(d) The Scroll bars
The scroll bars allow you to view other parts of your document and to
see what part of the document you are currently viewing relative to theentire document.
i) The Vertical scrollbar
Activity 4.22 Scroll bar
1. Open a new AbiWord document.
2. Type number 1 then press Enter key.
3. Continue typing numbers up to 25.
4. Practice to scroll so that you can see the first number, and also
scroll down to see the last number.
The vertical scrollbar shows where, between the top and bottom of the
document, the part of the document currently visible is located. It scrolls
upwards or downwards.
ii) The horizontal scroll bar
This allows you to see what part of the width of the document is currentlyvisible. It scrolls the document horizontally. That is either towards the left of right.
(e) The status bar
Activity 4.23 Using status bar
1. Open a document done in Activity 4.2.
2. Click on minimize button.
3. Go to status bar.
4. How many pages are there?
5. What is the name/title of the document on the status bar?
This displays document information as well as the insertion point
location. From left to right, this bar contains the total number of pagesand words in the document, language among others.
(f) Document area!
This is the area where you type the text. The flashing vertical bar that
appears when you click inside this area is called the insertion point and itrepresents the location where text will appear when you type.
Selecting a Text
Activity 4.24 Formatting a text
1. Type the following text:
“The computer has greatly changed how we do things today. For
example, with the development in technology, we are able to send mails
and receive messages without using the postal services. Further, we are
also able to communicate using other means such as mobile phones. We
can also send money electronically. Because of all these, it is said we are
living in the computer age!”
2. Drag the mouse over the words “Computer age” and click on
B to make it bold.
3. Double click on the word technology and change its colour.
4. Use the shortcut Ctrl+A to select the whole text and make its
font Italic.
5. Which part of text did you highlight?
In order to highlight the text, click and drag the mouse over the desired
text while pressing onto its left button.
You can also use the following shortcuts to select text.
• To select a whole word, double click within the word.
• To select the whole paragraph, triple click within the paragraph.
• To select several words or lines, drag the mouse over the words.• To select the entire document, press ‘ctrl+A’.
Remember!
In order to de-select text, click anywhere outside the selection onthe page.
Text formatting
a) Font Color
Activity 4.25 Using font color
1. Open AbiWord document.
2. Type the following: Kigali is the capital city of Rwanda.
3. Select the sentence you wrote.
4. Go to formating tools and click on font colour icon.
5. Or click on format tab, then click on font, choose text colorand choose the color you want and click on ok.
b) Font Style
Activity 4.26 Using font style
1. Open AbiWord document.
2. Write the following sentence “Computer My friend”.
3. Select the sentence you wrote.
4. Go to formatting tool and click on font style and choose the
style of your choice.
5. Or click on format tab then click on font, then select the fontyou want and click on ok.
c) Font Size
Activity 4.27 Using font size
1. Type the following sentence “Computer My friend”.
2. Select the sentence you wrote.3. Go to formatting tool and change the size to 12.
d) Underline
Activity 4.28 Using underline
1. Select the sentence “Computer My friend”
2. Go to formatting tools and click on an underline “a”to underline
your sentence.
When formatting text, you can change font size, font type and font
colour. You can also underline, italicize or bold text. Additionally, you
can align text to the left or to the right.
Self –Test 4.1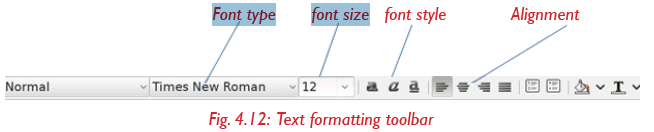
1. Type text, “Hello Children” in your AbiWord new document.
Create a folder on the desktop. Rename it as “exercise” Once
you are done, save your document in that folder to avoid the
document getting lost.
2. Open AbiWord and individually create a front page of your school
newsletter. Use possible AbiWord tools and functions to make a
good presentation.
3. Individually do an interview at your local community about
fighting malaria in your village, type the findings in AbiWord and
use formatting tools to make your presentation attractive.
4. Practice copying, cutting, pasting and moving parts of text in thedocument you created in 3 above.
4.2 Gnumeric Spreadsheet
Activity 4.29 Introduction to gnumeric spreadsheet
1. Study the following table carefully. Create a table in AbiWord and
input the data in the table.2. Calculate the total amounts and fill in the last column.
Home weekly shopping
3. Do you think there is a program that can display this table more
clearly and calculate the total cost for shopping easily? Discusswith your friends.
Definition and role of spreadsheet application
Gnumeric is a spreadsheet computer program used to manipulate and
analyze numeric data. It can help you keep track of information in
lists, organize numeric values in columns and rows, perform and update
complex calculations.
Spreadsheet environment
Spreadsheet is another example of a program used in XO- laptop just likeAbiWord. How do you open a spreadsheet application in your computer?
Activity 4.30 Opening spreadsheet environment
1. Switch from Sugar to Gnome interface in your XO-laptop.
2. Click the ‘Applications’ icon on the top right corner. Didyour screen look like this?
3. Click on “Gnumeric spreadsheet.”
Features of the spreadsheet window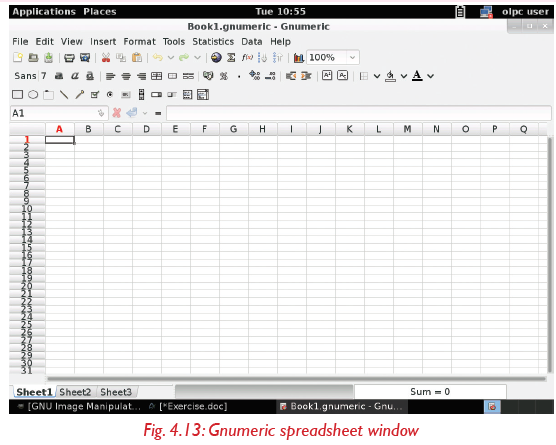
Talking Point
1. Go through the screen in Activity 4.30 with a friend. Try to identify
the various features on the screen.
2. What are the features used for?3. Label the key features in the screen.
When you open a spreadsheet, you begin using a workbook that contains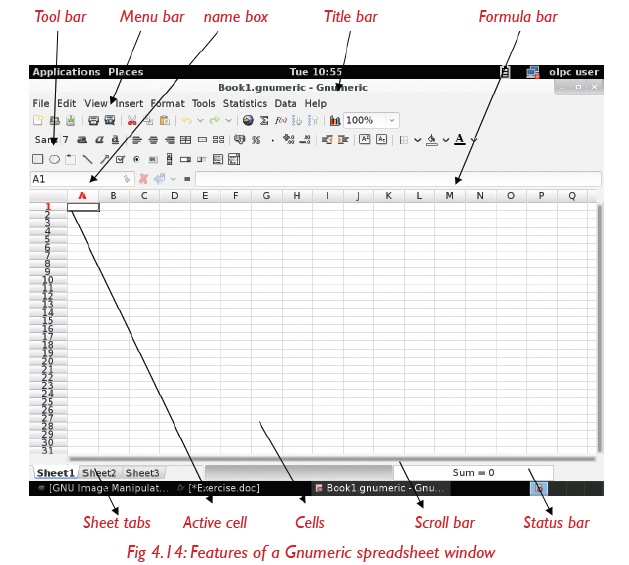
screens called worksheets. They are identified as sheet 1, sheet 2,
sheet 3 and so on. The spreadsheet uses rows and columns. The keyfeatures of a Gnumeric spreadsheet window are shown below.
Remember!
Each of the features in the spreadsheet window have special use asyou shall learn next.
a) Title Bars
Activity 4.31 Using title bar
1. Open a new spreadsheet, window. Check the name on the title
bar.
2. Go to File, Save as, and name this workbook as P6A Class list.
3. Go to title bar and see whether the name has changed.
The Title Bar is located at the very top of the screen. On the Title bar,
spreadsheet displays the name of the workbook you are currently using.
At the top of your screen, you should see “Book1.gnumeric-Gnumeric” asshown below or a similar name
b) Tool bar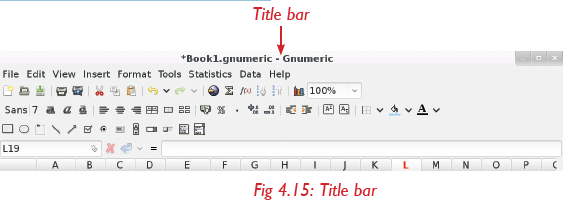
Activity 4.32 Formatting text
1. Open the workbook named P6A Class lists.
2. Type “P6A Class lists” in capital letters.
3. Underline this sentence by clicking on the underlined “a”
4. Make the sentence bold by clicking on this icon.
5. Change the size to 14.6. Go to standard toolbar and click on save to save your work.
The Toolbars provide shortcuts to menu commands. Toolbars are generallylocated just below the Menu bar.
The basic toolbars that is, Standard and Formatting toolbars are available
as the gnumeric spreadsheet is opened.

c) Formula bar
Excel’s Formula bar is located directly above the worksheet document
window (see Fig. 4.28 below).
It displays the current content of cells and allows you to add in formulas,labels or values into a cell.
d) Status bar
The status bar is located across the bottom of the spreadsheet workspace.The Status Bar provides information about the current work environment.
e) Cell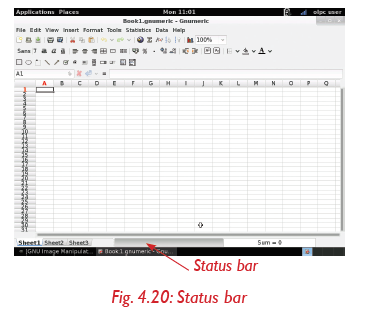
Activity 4.33 Using cell
1. Click on Cell A1 and type the word “No”.
2. Click on cell A2 and type the word “Names”.3. Continue typing “Age” and “Sex” in cells A3 and A4.
A cell is an individual data box, which is intersection of rows and columns.For instance, the first cell is A1 (meaning Column A, Row 1).
f) Name box
Activity 4.34 Using name box
1. Click on cell C8 then go to the name box and check whether
we have the same reference name.
The Name Box is located next to the formula bar above the worksheet
area to the left of the formula bar. The name box displays a reference to acell that is currently active.
g) Column heading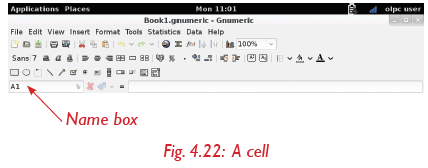
In Spreadsheets, the column heading or column header is the grey-coloured
row containing the letters (A, B, C among others) used to identify each
column in the worksheet. The column header is located above row 1 inthe worksheet.
h) Row heading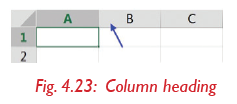
The row heading or row header is the grey-coloured column located to
the left of column 1 in the worksheet containing the numbers (1, 2, 3,among others) used to identify each row in the worksheet.
i) Menu bar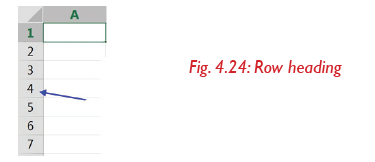
This is a horizontal menu that appears on top of a window. Usually, eachoption in a menu bar is associated with a pull-down menu.
j) Scroll bar
This is the bar that appears on the side or bottom of a window to control
which part of a list or document is currently in the window’s frame. Thescrollbar makes it easy to move to any part of a file or document
k) Creating a workbook
A workbook is a spreadsheet file that contains one or more worksheets.
Activity 4.35 Opening new workbook
1. From the Gnumeric spreadsheet window opened in Activity 4.30,
Choose File2. Click on new from the menu bar. What happens?

The New Workbook task pane opens as shown below.
A blank workbook is displayed when Gnumeric spreadsheet is first opened.
You can also create a new spreadsheet workbook by clicking on File thenselect New.
Saving a workbook
Activity 4.36 Saving a workbook
1. From the Gnumeric spreadsheet window opened in Activity 4.20,
Choose ‘File’.2. Go to ‘save as’ option on the drop down menu.
The ‘Save As’ dialog box appears as shown below.
3. Select where to save your file, write the file name and click on save.
Every workbook created in Excel must be saved and assigned a name to
distinguish it from other workbooks.
The first time you save a workbook, spreadsheet will prompt you to assign
a name through the ‘Save As’ option.
Once the name is assigned any additional changes made to the text,numbers, or formulas must be saved using the ‘Save’ option.
Opening a workbook
Activity 4.37 Opening a workbook
1. Open a new Gnumeric spreadsheet window.
2. Choose File.3. Go to Open option on the drop down menu.
4. In the Look in list, click the drive, or folder that contains the file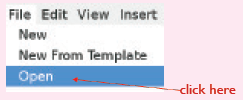
you want to open.
5. In the folder list, open the folder that contains the file. Once
the file is displayed, click the file you want to open.6. Click the Open button.
You can open any workbook that has previously been saved and given aname.
Worksheets
Activity 4.38 Using worksheets
1. Open a new spreadsheet window.
2. Double Click on sheet 1 then type first term, sheet 2 as second
term and sheet 3 as third term.
3. Click on insert option and add another sheet.
4. Double click on it and name it as annual report.
5. Right click on sheet 4 and select remove to delete that sheet(In this example you are going to be deleting Annual report).

6. Or click on Edit select sheet and then click on remove.
A worksheet is a collection of cells where data are typed, stored or
manipulated. By default, each spreadsheet workbook contains threeworksheets.
Selecting a worksheet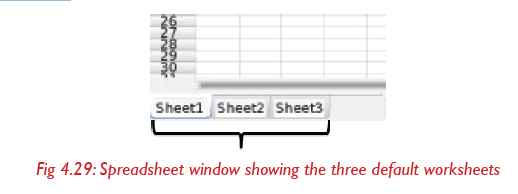
When you open a spreadsheet, it automatically selects sheet 1 for you.
The name of the worksheet appears on its sheet tab at the bottom of thedocument window as shown below.
To select one of the other two worksheets, simply click on the sheet tab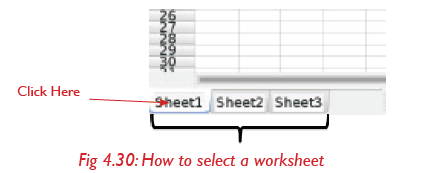
of Sheet 2 or Sheet 3.
Inserting a worksheet
You can insert as many worksheets as you want. To quickly insert a newworksheet, click the ‘Insert’ option at the top of the document window.
Deleting (or removing) a worksheet
To delete a worksheet, right-click on the sheet tab and select ‘Remove’
Renaming a worksheet
Activity 4.39 Renaming a worksheet
To give a worksheet a more specific name, do the following:
1. Right-click on the sheet tab of Sheet 1.
2. Choose ‘Rename’.
3. Rename it as you want.By default, the worksheets are named Sheet 1, Sheet 2 and Sheet 3.
Columns, rows and cells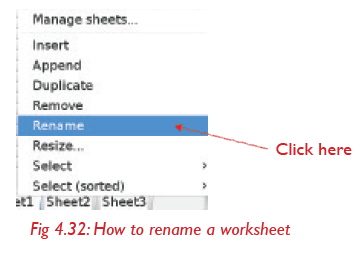
Entering text or data in a cell
Activity 4.40 Entering text or data in a cell
1. Open a new spreadsheet document.
2. On the worksheet, click a cell.
3. Type the numbers or text that you want to enter, then press
ENTER or TAB keys.
4. Look at the Figure below. The position of the active cell is A1.
Can you identify cells whose positions are:a) A5 b) C3 c) B7
5. Practise entering data in a created worksheet.
A cell is the intersection between a row and a column on a spreadsheet.
They are numbered A, B, C, D and so on horizontally and 1,2,3,4 and
so on vertically. Therefore, each cell can be given a unique identification
number such as A1, A2, B1, B2 and so on, depending on its position. To
select a cell, click on the desired cell, the cell will have a black border,which indicates that it is the active cell.
Remember!
If a cell is active, any typing will replace what is already in that cell.
Double-click on the cell to make the cursor appear in the cell forsmaller edits
Modifying columns and rows
It is possible to change column width and row height.
2. Activity 4.41 Modifying columns and rows
To change row height or column width:
1. Open spreadsheet window.
2. Select a row or column to resize.
3. ‘Right-click’ the row number or column letter, then select‘Resize row’ or ‘Resize column’.
You can also click and drag the edge of a row or column to resize it.Inserting rows and columns
Activity 4.42 Adding columns or rows
1. On your spreadsheet, select a row or column. You can also
highlight multiple rows or columns.
2. Click on ‘Insert’ on the menu bar, or right-click on the row or
column you want to add.3. From the menu that appears, select row or column.
Deleting columns and rows
2. Activity 4.43 Deleting columns or rows
1. On your spreadsheet, ‘right-click’ a row or column.
2. From the menu that appears, select ‘Delete row’ or ‘Deletecolumn.
Talking Point
1. Open a new spreadsheet document. Practice doing the following:
2. Increasing the height of a row and the width of a column.
3. Deleting a column.4. Inserting a row.
Formatting cells
2. Activity 4.44 Formating Cells
1. Open a new spreadsheet window.
2. Type the following titles from cells A1 to E1(Maths, Science,
English, SST, Kinyarwanda)
3. Resize all the columns to make all subject titles visible.
4. Change the font size to 10 and apply ‘sans’ as font style.
5. Select the cells from A1 to E1 and go down from A20 to E20.
6. Put borders to the selected area by clicking on the toolbars
and select ‘all borders’.
7. Put the Maths and Science titles in blue and the rest in green
color.
8. Select all titles and make them center by clicking on the correct
icon.
9. From the menu that appears, select row or column.
We can manipulate cell content in a variety of ways to make our document
look attractive or more appealing. Some of them include:
• Changing font type or font size.
• Inserting or removing cell borders.
• Applying colour.
• Aligning text.
a) Changing font type or font size in a worksheet
To change font type or font size, follow these steps:
1. Select the cell, range of cells, text or characters that you want to
format.
On the toolbar (Fig 4.30) in the Font group, do the following:
• To change the font type, click the font type that you want in
the Font box.• To change the font size, click the font size that you want in the Font box.
b) Inserting or removing cell borders on a worksheet
Here is how you can add borders by selecting different line styles and
colours:
1. Select the cell or range of cells.
2. On the Tool Bar, click the arrow next to Borders, and then choosethe border options that you want.
To remove a border, select the cells with the border and click the arrow
next to Borders.
c) Applying a fill colour
To choose a new fill colour for a cell selection, follow these steps:
1. On the Tool Bar, in the Font group, click the ‘Fill Colour’ button in the
drop down menu.2. The ‘Fill Colour’ palette appears as shown below.
3. Select the colour you want to use in the drop-down palette.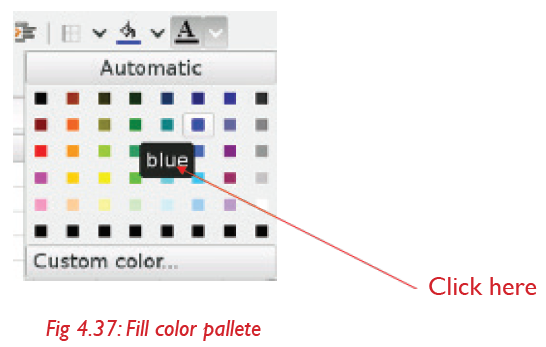
Text alignment and orientation
Texts and numbers may be aligned using the left-align, center and rightalignbuttons on the Formatting toolbar.
To align text or numbers in a cell:
1. Select a cell or range of cells.
2. Click either the Left-Align, Center, or Right-Align buttons on the
Standard toolbar.
3. The text or numbers in the cell(s) take on the selected alignmenttreatment.
Remember!
You can get more orientation styles in Format Cells dialog box by
clicking the ‘Format Cells’ alignment item in the list. See the figurebelow.
You could also ‘right-click’ and choose Format Cells from the shortcut menu.
• The Format Cells dialog box opens.• Click the Alignment tab.
Basic mathematical operators in spreadsheet
1. Activity 4.45 Basic Mathematical operations
1. Beginning in cell D4 (See the screen below), and going down,
enter the numbers 1, 2, 3, up to 10.
(Hint: Enter the first 2 numbers, drag over both cells to select,
then drag the “fill” handle down until the numbers up to 10 are
entered).
2. In a cell under the last number put an equal sign (=).
3. Click on the fist number then type a plus sign (+).
4. Click on last number you want to add and press enter or ablue icon near the formular bar.
It is possible to manipulate data using Gnumeric spreadsheet. It uses standard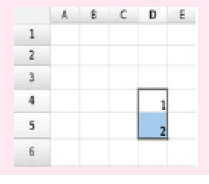
operators for formulas, such as a plus (+) sign for addition, minus (-) signfor subtraction , asterisk (*) for multiplication, forward (/) slash for division.
Remember!
All formulas in numeric spreadsheets must begin with an equal sign
(=). This is because the cell contains, or is equal to the formula andthe value it calculates.
• After the equal symbol, you enter either a calculation or function.For example, look at the following spreadsheet screen:
Type the entire equation: =A1+A2+A3+A4+A5
Add up values in cells B1 through B5, you can use the SUM function:
= SUM(B1:B5)
Using the colon (in Excel formulas allows you to supply a range of cells
for the formula. In the above formula example, range B1:B5 includes five
cells, that is, B1 through B5. Try these out in your XO-laptop and see thesum.
While you can create simple formulas in Excel manually
(for example, =2+2 or =5*5), most of the time you will use cell addresses
to create a formula. This is known as making a ‘cell reference’.
Therefore, by combining a mathematical operator with cell references,
you can create a variety of simple formulas in spreadsheet.
Formulae can also include a combination of cell references and numbers,as in the examples below:
Activity 4.46 Total calculation
1. Enter the following information into a blank worksheet incolumns A, B and C, and in rows 1 through 6.
2. Calculate the total cost using a formula in spreadsheet.
The sum function
You can use the auto sum icon (Ʃ) on the standard tool bar, whichautomatically adds numbers in a cell. Follow these steps:
Activity 4.47 Total calculation
1. Select the cell that the sum will appear in, that is, outside the
cluster of cells whose value will be added.
2. Click the auto sum button.
3. Highlight the group of cells that will be summed.
4. Press the ‘Enter key’ on the keyboard, or click the green checkmark on the formula bar.
Further Activity Calculations
1. In the costs for the first term and second term in activity
4.46, calculate the total cost for the second term using
auto sum.
2. Create your home weekly shopping list in spreadsheet,
indicate what have been purchased and how much itcosts. Work out the total costs.
Self –Test 4.2
1. Open a new Gnumeric Spreadsheet document. Enter the following
information:
a) Type “January” in Cell A1, press TAB.
b) Type “February” in Cell B1, press TAB.
c) Type “March” in Cell C1, press TAB.
d) Practice using holding your left mouse button to select a
range (block) of cells. Select A1 through C1.
2. Open a new Gnumeric spreadsheet document. Do the following:
a) Format the labels in Cell A1 through C1: Bold
b) In Cell D1 type: TOTAL
c) Format the text in Cell D1: Bold, Centered and Blue
3. Save your practice spreadsheet and name it: “Beginning ExcelPractice 1”.
UNIT TEST 4
1. Do an interview about fighting malaria at your village. Write
down your findings in your notebook.
(a) Type the findings in AbiWord.
(b) Use required formatting tools to make your text look good.
(c) Create a folder on the desktop and re-name it “Malaria”.
(d) Save your file as “interview” and save in the folder you
created.
2. Write in AbiWord your class timetable and make all necessary
formatting.
3. Talk to your friend about your favourite subjects, type them in
AbiWord.
4. Save your file as “my favoUrite subject” in ‘My Documents’.
5. Enter the information below in a spreadsheet. Be sure that the
information is entered in the same cells as given, or the formulas
below will not work.
(a) Click on the Column Header D to highlight the entire
column.
(b) Click on the drop down arrow by Insert.
(c) Click on Insert Sheet Column.
(d) Click on Cell D2 and type Email Address.
6. Type the following text in AbiWord document:”Be good friends.
Do not quarrel any more”.
(a) Make your text italics.
(b) Change the font size to 14.
(c) Use Calibri body as a font style.
(d) Save in my document.
7. Open a new workbook and save it with the file name “Months”.
(a) Activate cell location A2 on the worksheet.
(b) Type the word “Names”
(c) Press the right arrow key, this will enter the word into cell
A2 and activate the cell to the right.
(d) Type Math and press the right arrow key.(e) Repeat the step 4 for the words Science and Total.