Topic outline
UNIT 1: Mechanical and blacksmith tools
1. Look at the picture below carefully.Some ways of maintaining mechanics tools are:
2. Describe the situation shown in the picture.
3. Who is the right person recommended to help in such situation?
4. What kind of tools are required in such situation?
1.1 Mechanics tools
Find out
1. Who a mechanic is.
2. How to use and maintain mechanical tools.
3. Where does a mechanic store his or her tools.
4. What will happen if mechanics were not in our society today?
a) Identification of mechanic tools
Activity 1.1 Identifying mechanics tools
1. Visit a nearby mechanics garage. Look at the people working in
the garage. What tools are they using? Which of these tools do
you know?
2. List down the tools the mechanics are using. What are the tools
being used for?
3. Come up with a table like this.
A mechanic is a person who enable our machines to work properly.
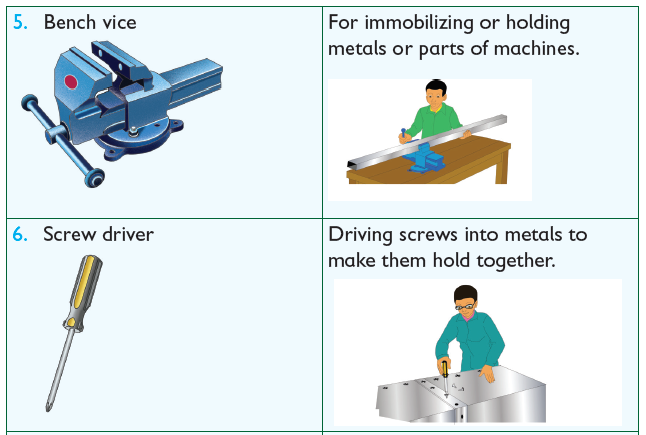
Table 1.1 Common mechanics tools and their uses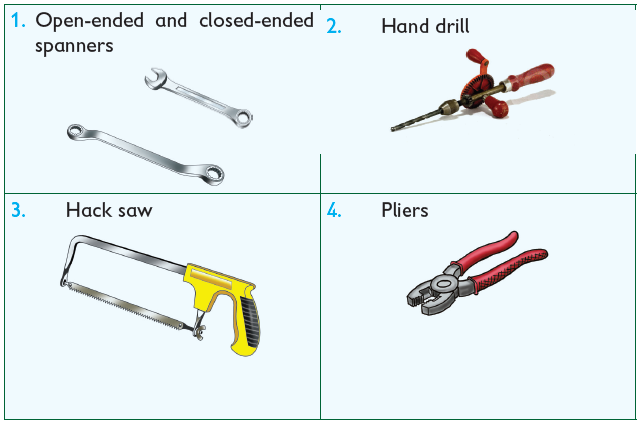

b) Uses of mechanics tools
Activity 1.2 Practicing use of mechanics tools
1. Visit a garage while it is operating.
2. Observe the tools being used and how the mechanic uses them.
Come up with a table like this.
3. Use the tools yourself (You will be guided by the mechanic).
What challenges did you encounter?
Table 1.2 Common mechanics tools and their uses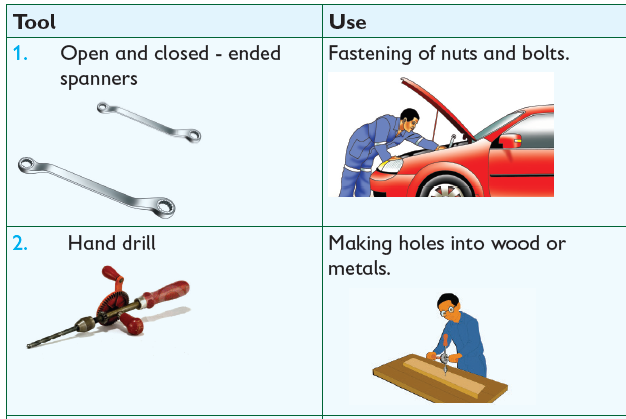


Remember!
Tools can harm us. Be very careful while at the workshop. Do not hurt
yourself or others while using tools.
c) Maintenance of mechanics tools
Find out
How to maintain mechanics tools.
Activity 1.3 Repairing and maintaining mechanics tools
1. Look at the following pictures.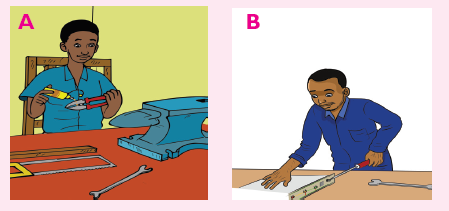
2. Discuss what is taking place in the above pictures.
• Cleaning
• Oiling /Greasing
• Repairing
• Keeping the tools in a clean, dry and safe
place.
• Keeping tools in toolbox after use.
• Using tools for the purpose they are made
for.
Work to do
The maintenance practices mentioned above do not apply to all
mechanics tools. Come up with a table on which maintenance practice
applies to which tool.
d) Storage of mechanics tools
Find out
How to store mechanics tools correctly. Write short notes and
compare with your friend’s findings.
Activity 1.4 Storing of mechanics tools
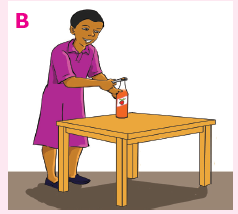
1. Look at the following picture.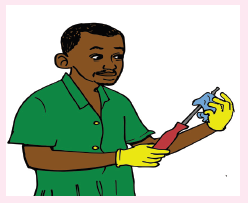
2. Discuss what is being done in the picture above.
Before storage, mechanics tools should first be thoroughly cleaned, dried
using a clean piece of cloth then stored either in a cool and dry place or
in a toolbox as shown below.
e) Dangers when using mechanics tools
Find out
The dangers when using mechanics tools.
Activity 1. 5 Identifying dangers when using mechanical
tools
1. Look at the following picture
2. Describe the danger shown above in the picture.
Some dangers that we face while working in a mechanics workshop
include:
• Being hit by moving objects.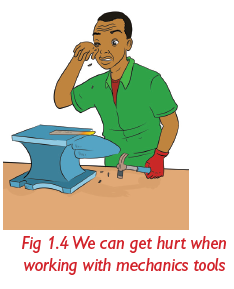
working with mechanics tools
• Cutting or hurting ourselves as
we use the tools.
• Getting cuts or bruises by objects
lying in the garage.
• Dangerous chemicals getting
into our eyes, nose or mouth
f) Precautions to take when using mechanics tools
Activity 1.6 Precautions to take when using mechanics
tools
1. Look at the following picture.
2. Describe how you can dress appropriately when working in a garage
to avoid accidents.
To avoid the dangers associated with use of mechanics tools, we should
always:
• Keep mechanics tools safely and properly after use.
• Wear protective clothing such as overall, mouth masks, gloves,
gumboots among others to protect us as we work.
• Use tools carefully and for the right purpose to avoid injury.
• Avoid directing chemicals to other workshop users.
Work to do
Find out other dangers related to working in a mechanics workshop
apart from the ones above. How can we avoid them? Come up with
a table like this.
Remember!
Always buy original tools. Counterfeits may be cheap but break down
very quickly. In the long run, they are more expensive!
Self –Test 1.1
1. What do you think would happen if there were no mechanics to repair or fix broken down machines?
2. Which mechanic tools is used for:
a) Replacing a car Tyre?
b) Unscrewing nuts?
3. Name the mechanics tools below.
(a) (b) (c)
4. What are some of the dangers that we face in a mechanics
workshop?
5. Name three protective clothing that a mechanic should put on?
1.2 Blacksmith tools
Find out
1. Who a blacksmith is.
2. What tools a blacksmith uses.
3. Where a blacksmith works.
4. What will happen if we did not have blacksmiths in our society.
5. How to use blacksmith tools.
a) Common blacksmith tools
Activity 1. 7 Identifying blacksmith tools
1. Visit a nearby blacksmith workshop. Look at the people working
in the workshop. What tools are they using? Which of these tools do you know?
Blacksmiths are people who make or repair tools made of iron by hand.
They heat metals until red-hot then they beat them with a blacksmith hammer into desired shapes.
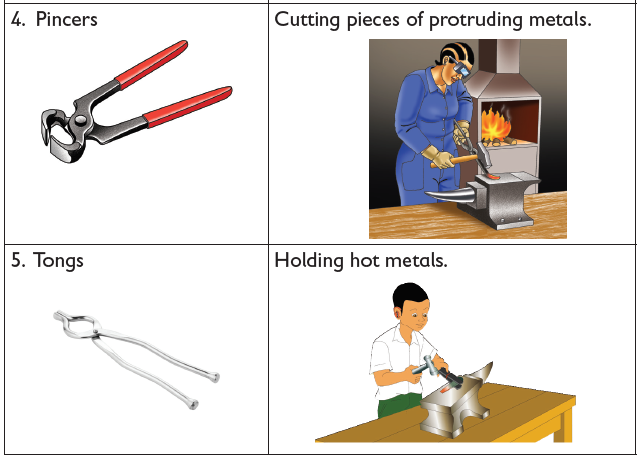
Table 1.3: Common black smith tools

N.B Some tools that we use at home that are made by blacksmiths
include knives, axes, machetes, saucepans among others.
b) Uses of blacksmith tools
Find out
The specific uses of blacksmith tools.
Activity 1. 8 Practicing the use of blacksmith tools
1. Visit a blacksmith workshop.
2. Observe the tools being used and how the blacksmith uses them.
3. Try using the blacksmith tools yourself.
Table 1.4 Common blacksmith tools and their uses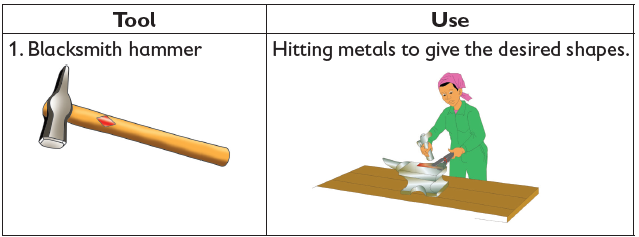

c) Maintenance of blacksmith tools
Activity 1.9 Practicing maintenance of blacksmith tools
1. Apply oil on the anvil and blacksmith hammer. What is the
importance of this practice?
2. Leave a blacksmith hammer outside the house over night. Do
you notice anything on the blacksmith hammer after two days?
Some ways of maintaining blacksmith tools are: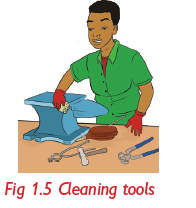
• Cleaning thoroughly after use.
• Tools with metallic parts such as anvil, hammer
and tong should be oiled or greased.
• Keeping in a dry place to avoid rusting.
d) Storage of blacksmith tools
Find out
1. Correct practice on storage of blacksmith tools.
2. Conditions needed for proper storage of blacksmith tools.
Activity 1.10 Storage of blacksmith tools1. Look at the following picture.
2. Describe how blacksmith tools are stored in the picture above.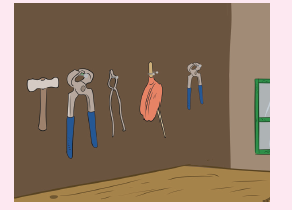
Before storage blacksmith tools should be cleaned, wiped dry and storedin a toolbox or hanged on a wall.
e) Identifying dangers when using blacksmith tools
Activity 1.11 Identifying dangers of blacksmith tools
1. Look at the following illustration.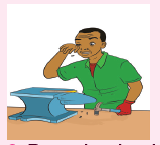
2. Describe the danger shown in the picture above.
Some dangers that we face while working in a blacksmith workshop
include:
• Being hit by moving objects.
• Cutting or hurting ourselves as we use the tools.
• Getting bruises by objects lying in the workshop.
• Dangerous metal particles getting into our eyes, nose or mouth
as we work.• Getting burnt by fire or hot metals.
f) Precautions to take when using blacksmith tools
Activity 1.12 Protecting the body when using
blacksmith blacksmith tools
1. Look at the following picture.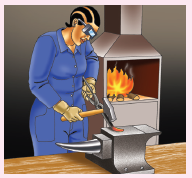
2. Describe how you can dress appropriately in a blacksmith workshop
to avoid accidents.
To avoid dangers associated with use of blacksmith tools, we should
always:
• Keep blacksmith tools safely and properly after use.
• Wear protective clothing such as overall, mouth masks, gloves,
and gumboots to protect us as we work.
• Use tools carefully to avoid injury.
In general, blacksmiths need to protect themselves against fire orhot metals which may cause burns or scalds to their skins as they work.
Work to do
Find out other dangers related to working in a blacksmith workshop
apart from the ones above. How can we avoid them? Come up witha table like this.
Self –Test 1.2
1. Mention five main tools used by blacksmiths.
2. Which tools do you use at home that are made by blacksmiths?
3. Why should we wear googles when dealing with blacksmithstools?
UNIT TEST 1
1. Why are these people important in our society?
a) Mechanic
b) Blacksmith
2. Match the tool with its use in the table below using a line.
3. Mutoni was heard by a friend complaining how dirty a blacksmith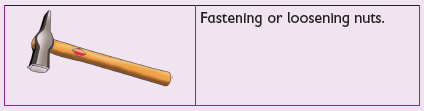
job is. What advice can you give Mutoni?
4. Why do you think it is necessary for mechanics and blacksmiths to
put on protective clothes?5. What is wrong with the picture below?
6. Give at least 3 important tools that we use in our homes that are
produced by blacksmiths.
7. Bring some blacksmith tools such as anvil, tong and pincers toschool. Practice maintaining them. What did you do to each tool?
URLs: 14Folder: 1Label: 1File: 1UNIT 2:Simple machines
1. Look at the picture below showing people working in a constructionsite.
2. Is it easier to move materials as shown in the picture?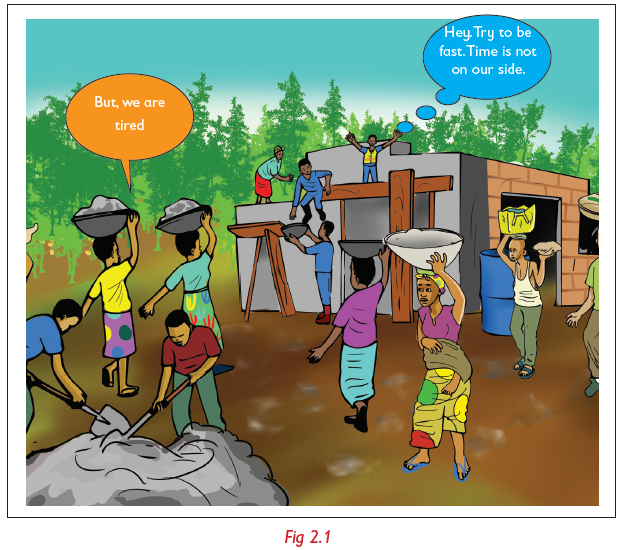
3. Suggest what you can use to move the materials shown in the picture faster.
2.1 Definition of simple machine
Find out
1. What a simple machine is.
2. The difference between working with and without a simplemachine.
Activity 2.1 Carrying heavy weight
1. Look at the following pictures.
2. Which one above finds it easier to carry the load? Explain why?
Simple machines are simple devices that make work easier. Examplesinclude wheelbarrow, hammer, screwdriver, spade among others.
2.2 Types of simple machines
Find outHow different simple machines are used to do work.
Activity 2.2 Identifying simple machines1. Look at the following pictures

2. Name the types of simple machines shown above.
Simple machines are of different types. The various categories of
simple machines are:
• Levers e.g wheelbarrow,crow bar
• Wheel and axle e.g windlass
• Pulleys e.g elevator, cargo lift
• Inclined planes e.g ladder
• Wedges e.g metallic saw• Screws e.g screwdriver
a) Levers
Activity 2.3 Uses of simple machines
1. Discuss how each group of levers is used. Write a report andpresent the report to the rest of the class.
Activity 2.4 Practicing the use of levers
1. Practice playing on a see-saw as shown below with a friend.
a) Why did you go down and your friend up?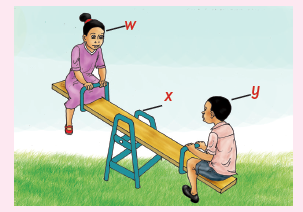
b) Change positions along the wooden plank. What happens?2. Now, try moving a stone using a crowbar as shown below.
Were you able to move the stone? Now try moving the stone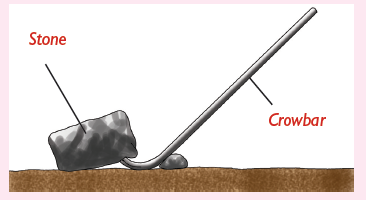
without the crowbar? Was it easier? Why?
3. Which point on the see-saw is:
a) Effort?
b) Load?
c) Pivot or fulcrum?
How about on the crowbar?4. What does your findings tell you about levers?
Definition
A lever is a stiff bar with a fixed turning point called a fulcrum or pivot.A lever was one of the first simple machines to be discovered in life.
Parts of the lever
A lever is made up of effort, fulcrum and load. These parts are shown inthe diagram below.
Depending on the position of these parts, levers are put into different
categories.
Classes of levers
Activity 2.5 Identifying classes of levers based on
the position of the effort, fulcrum or load
1. Do the following:a) Try removing a piece of nail from wood as shown below.

b) Open a bottle of soda using a bottle opener as shown below.
c) Scoop sand using a spade as shown below.
Study questions
In the three cases above,
i) Where did you apply energy to lift the load?
ii) Where was the turning point?
iii) What was the position of the load?
2. Draw a diagram to show the parts of the lever in the positions
above.
3. Find out more about the types of levers based on the positions
of the three parts above. Come up with a table on classes oflevers as shown below.
• The turning point of a lever is called pivot or (fulcrum).
• The force applied to the lever is called effort.
• The resistance against which the force is applied is called load.
Levers are put into three classes depending on the position of the fulcrum,
effort or load.
i) First class levers
In first class levers, the fulcrum is between the load and the effort.The pictures below are examples of first class levers.
Work to do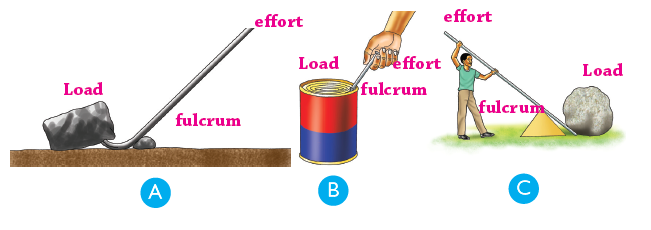
Find out other machines which belong to this category. Write the list
down in your notebook.
ii) Second class leversIn this class of levers, the load is between the effort and the fulcrum.
Examples of levers in this class include paper cutter, nut-cracker,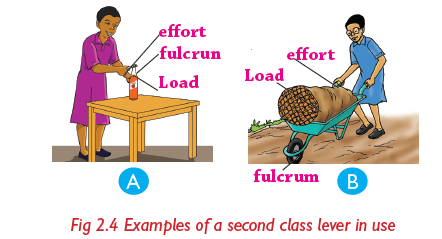
wheelbarrow and bottle opener in use.
Work to do
Find out other machines which belong to this category. Write down
the list in your notebook.
iii) Third-class levers
In this class, the effort is between the load and the fulcrum.The pictures below are examples of third-class levers.
Examples of levers in this class include a tennis racket, fishing rod, baseball
bat, the human arm, a broom, tweezers and a spade in use.
Work to do
Find out other machines which belong to this category. Write downthe list in your notebook.
b) Wheel and axle
• The wheel and axle is a simple machine that has two wheels,
one large and smaller one fixed together. Examples include a doorhandle, a steering wheel and a windlass.
c) Pulleys
• Pulleys - a pulley is a wheel that rotates around an axle which has
a groove where a rope or a string fits.
• Types of pulleys include: A single fixed pulley, movable pulleyand the block and tackle pulley system.
d) Inclined plane
• Inclined plane - this is any device with a sloping surface. Examples
of inclined planes are: staircase, a ladder, a meandering road on asteep hill, a ramp among others.
e) Wedges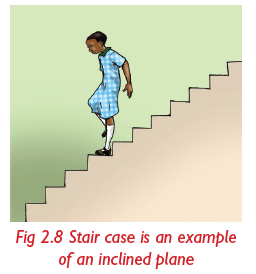
• Wedges - a wedge is an object with one sharp cutting edge.Examples of wedges are knife, razorblade, axe and chisel.

f) Screw
• Screws – A screw is a metal rod with a raised thread running
round it.
• Screws are used to hold and join pieces of metals or wood together.• Screws are also used in jacks to raise heavy objects like cars.
2.3 Dangers when using simple machines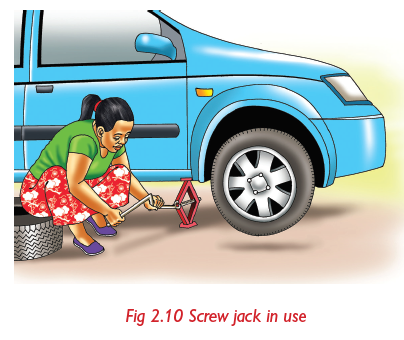
Find outThe dangers of using simple machines.
Activity 2.6 Dangers when using simple machines
1. Which dangers do you face when using simple machines? Discuss
in groups and write a report. Choose one group member to
present the report in class
Some dangers that we face when using simple machines include:• We can get pricked by pointed parts of the machines.

• Machines with sharp edges can cut our skin.
• We can fall when using inclined planes such as ladder

• We can get hurt while using machines like bicycle.
Remember!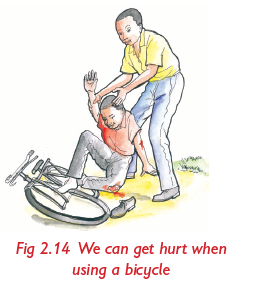
We should always buy quality machines and tools. Cheap tools or
machines may cause accidents. They may also get spoils quickly , thismakes it expensive in the long run.
2.4 Safety in using simple machines
Find out
How to use simple machine safely without any danger?
Activity 2.7 Identifying protective methods when using
simple machines
1. How can we avoid the dangers associated with the use of simple
machine?
2. Discuss in your group and write short notes.3. Compare your report with that of other classmates.
• We should always be careful when using simple machines to avoid
accidents.
• We should always wear protective clothing when using simple
machines.
• Protective clothing include overalls, goggles, gumboots, gloves,mouth and nose masks among others.
Self –Test 2.1
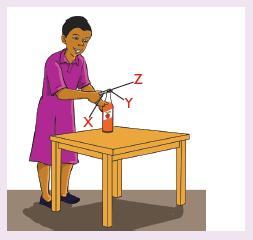
1. What is a lever?
2. Look at the diagram below. Can you label the parts named X,Yand Z?
3. How would you know whether a given machine is: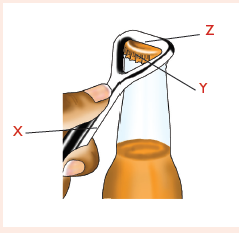
a) First class lever? b) Second class lever?
c) Third class lever?4. A ladder is an example of ___________. (lever, inclined plane)
UNIT TEST 2
1. What is the importance of the invention of simple machines by
early human beings?
2. Where do we apply simple machines in our daily lives.
3. Give three examples of simple machines where wheel and axle is
applied.
4. In which category of simple machines does the one shown belowbelong to?
5. Given the following list of simple machines: wheelbarrow, nut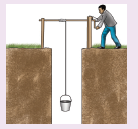
cracker, tweezers, tong, pliers and a pair of scissors. Put theminto three groups as shown in the following table.
6. Name parts of your body that act as levers.
7. Go for a tour around your school. Observe how the roads are
constructed on steep slopes. Why do you think the roads are
constructed like that?
8. What is the use of screws and bolts? What type of simple machines
are they?
9. How would you advise primary 6 pupils using simple machines
with sharp edges?
10. The diagram below shows a claw hammer being used toremove a nail from a piece of wood.
Based on the diagram, the hammer is _________ class of lever.
11. Write true or false:
a) A simple machine uses a single applied force to do work
against a single load. _________
b) A simple machine enables people to do work with less effort
and at greater speed. ____________
c) Life became very safe when early human beings discovered
the use of simple machines. _________
d) The force applied on a simple machine is always greater
than the work done. _____________
e) Most levers are examples of simple machines.12. Which type of simple machine is shown below?
A. Lever B. Wedge
C. Screw D. Single fixed pulley
13. Mugabo sweeps the class floor every morning using a broom asshown below. To which class of lever is the broom?
A. Fist class Lever
B. Third class Lever
C. Second class Lever
14. What is a simple machine and how does it help to make work
easier?
15. Visit a construction site and list the simple machines used there.16. Why do roads on a steep slope meander as shown below?
17. What is a lever? _____________________
18. Look at the diagram below. Can you label the parts named X,Yand Z?
19. A ladder is an example of ___________ (lever, inclined plane)
UNIT 3:Objects production
1. Look at the picture below.
2. What is happening in the picture?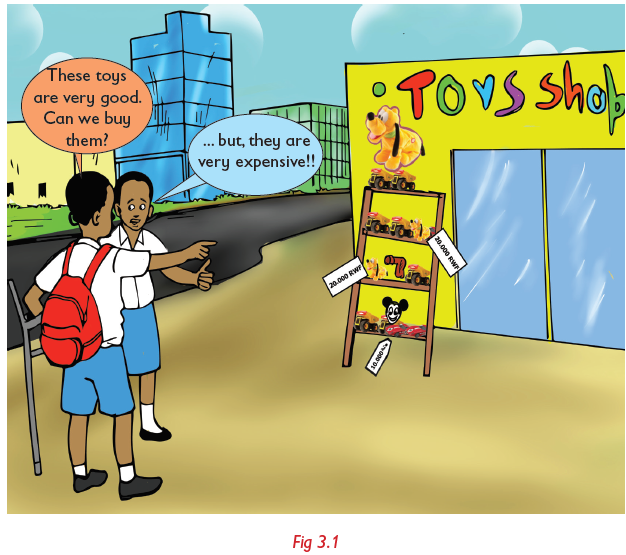
3. What can you advise the pupils to do?
3.1 Making toys using clay
Find out
1. How you can make a doll using clay.2. How you can make a toy motorcycle using wires.
Activity 3.1 Modelling a doll using clay
What you need
• Clay • Water in a container • Model of the doll
What to do
1. Collect clay and water.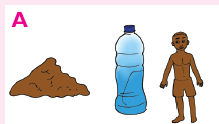
2. Mix the clay with water and knead it to obtain dough for modelling.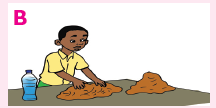
3. Model the trunk of the doll.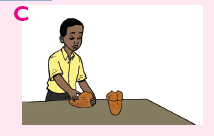
4. Model the head with ears, eyes, nose and mouth.
5. Model the limbs and join the trunks.
6. Make the final touches and compare your doll to show/drawn on the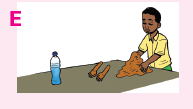
chalkboard. Allow you a model to dry under shade.
Remember!
We should not dry our toys under direct sunlight as this will makethem crack!
Activity 3.2 Modelling animals using clay
What you need
• Clay • Water in a container • Model of the doll
What to do
1. Collect materials needed.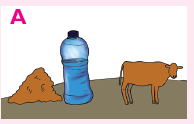
2. Mix the clay with water and knead it to obtain dough for of modelling.

3. Model the trunk of the cow.

4. Model the head with ears, eyes, nose,mouth.

5. Model the limbs and join the trunks.
6. Model the tail and join it the trunk.
7. Fix the head onto the trunk. Make the final touches and compare yourmodel drawn on the chalkboard.

8. Allow you a model to dry under shade.
Remember!
Our environment is our life. When collecting clay, avoid destroying avegetation and polluting the water
Work to do
Use the steps above to make a model of a sheep or a dog. Smooth enyour model and make it as attractive as possible.
3.2 Making toys using wires
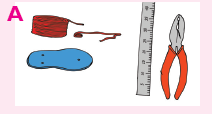
Activity 3.3 Making a motorcycle using wires
What you need
• Wires • Pliers • Ruler • Rubber bands
• Old slippers( for making a wheel) • Pencils • Drawing paper
What to do1. Collect materials you need.
2. Make a sketch of toy motorcycle.
3. Prepare appropriate pieces of wires with the right measurements.
4. Bend the wires according to the motorcycle shape to be made. The
frame of main parts are: body of motorcycle, handlebars, footrestor foot peg.
5. Connect the different frames with rubber bands.
6. Fix two wheels on the frame made of body and handlebars.7. Display the complete the motor cycle.
Remember!
When making toys from wires, care should be taken. Wires are sharpobjects that can pierce and harm the skin.
3.3 Making utility objects in threads
Find out
How you can make utility objects ( socks, scarfs, hats) using threads.
Activity 3.4 Making socks
What you need
• Threads • Sewing needle
• Pair of scissors • Razor blade or lance let
What to do1. Collect the materials needed.

2. Choose your favorite yarn

3. Cast-on-loop using the left hand needle.
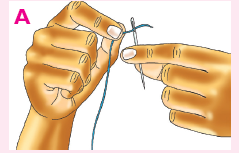
4. Use two needles to begin knitting the socks as shown below.
5. Knit the socks until you reach full sock as shown below.
6. Wrap the end of socks using a piece of cloth to make them strong.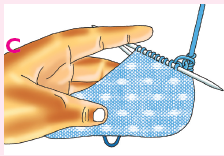
This is called hemming.

7. Repeat steps 1-4 to make another sock.
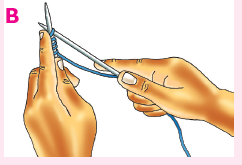
Activity 3.5 Making scarf
What you need
• Threads or yarn • Sewing needles
• Hand cream • Pair of scissors
• Razor blades
What to do1. Collect materials required.
2. Choose your favorite yarn

3. Cast on as shown below.
4. How to knit cast on 24 stitches.
• Hold the needle with the 24 cast on stitches in your left hand.
• Insert the point of the right needle into the first stitch from front to
back under your left needle.
• With your index finger bring the loose yarn under and over the
point of the right needle.
• Draw the yarn through the stitch with your right needle point.
• Skip the first loop on he left needle off , so you now have the newstitch on the right needle.

5. Knit until the scarf is complete.

6 . Wrap the scarf on your neck .
Watch video using internet link http://www.youtube.com/
watc?v=IwRwJUgt_Tg on how to knit a scarf.
3.4 Making learning materials using a paper
Find out
How to make learning aids from paper.
Can you name some learning aids you made in Primary 4 and 5? How
did you make them? In this class, you will make:
• Regular polygons, for example a pentagon and hexagon.• Various solids, for example cuboid and cylinder
3.5 Making regular polygons
Find out
How to make regular polygons from manila paper. Which tools andmaterials are used when making polygons from a paper.
Activity 3.6 Making regular polygons from manila paper
What you need
• Manila paper • Pencil
• Pair of scissors
What to do
1. Collect the materials required.
2 . Draw a hexagon using a pencil,compass on the manila paper.
3. Cut the paper along the lines as shown below.
Remember!
To make a regular polygon, you first draw the polygon on a manila
paper. Cut the manila paper into the polygon using a pair of scissors.
3.6 Making solids
Activity 3.7 Making solids from papers
What you need
• Pencil • Ruler • A pair of compass
• Manila paper • Lancelet, razor blade or pair of scissors
What to do1. Collect materials needed.

2. Draw a hexagon using a pencil on the manila paper.

3. Cut the paper along the lines as shown below.
4. Fold the shape into the cube or solid as shown below
3.7 Maintenance of utility and learning objects
Find out
How to maintain utility and learning objects.
Activity 3.8 Maintaining utility and learning
objects1. Look the picture below.
2. Discuss how to maintain utility and learning objects.
Ways of maintaining utility and learning objects include:
• Storing utility objects in a clean and dry place.They should be
covered to avoid dust.• The learning materials should be placed on the wall of the classroom.
Remember!Our utility objects require maintenance otherwise they will be spoilt.
UNIT TEST 3
1. Name two materials that can be used to make toys.
2. How can you make a toy made of clay strong?
3. Apart from toys, name other utility objects found at home that
are made of clay.
4. Describe how you can make a motorcycle from wires. How can
you make it look beautiful?
5. Look at the picture below.
a) What is the girl doing?
b) What materials is she using?
c) How can she make the mat more durable?
6. a) Give the importance of knitting in our society.
b) Apart from knitting, which other methods can be used to
make utility objects?
7. Describe how we can maintain our utility and learning materials.
8. Below is a boy playing with a toy.
a) What is the toy made of?
b) How should the boy maintainthe toy?
9. Make a cylinder using a Manila
paper. Which tools did you use?
What method did you use?
10. Hitayezu does not like modelling
using clay. He says it makes him
dirty and that when he goes home,
his parents quarrel him. What advice can you give Hitayezu andhis parents?
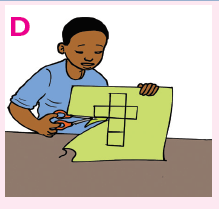
UNIT 4: Writing Skills
1. Study the picture below.
2. Summarize what is going on in the picture in one paragraph in
your notebook.
3. Type your summary using your XO laptop. Are you happy with
your typed work? How can you make it look better?
4.1 Gnome Environment
In Primary 4, you learnt about the two interfaces used in the XO laptop.
Can you name them? How do you switch from Sugar to Gnomeinterface?
Activity 4.1 Switching from Sugar to Gnome interface
1. Go to my Settings by placing the cursor at ‘X’
2. Click on switch desktop.

3. Click on switch to GNOME.

4. Lastly, click on restart now button.
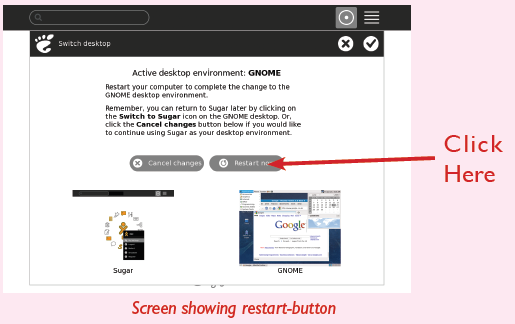
Your screen should look like this.
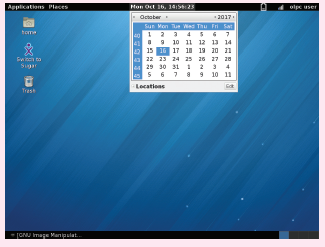
Identification of elements of Gnome environment
Activity 4.2 Gnome environment1. Look at the screen below. Does it look familiar?
2. Identify the parts shown on the screen.
There are top and bottom panels in a Gnome window. On the top left
there are: applications and places. On the top right, we find network,
date and olpc user.
(i) The Top Menu Panel
This panel stretches across the top of the screen. The left side contains:
• Applications
• Places
The right side of the panel is home to:
• A clock and Calendar
• Network connection
• Battery status
• The User Switch area
Note: If you hold the mouse pointer over the menu text or an icon, a
brief description of its function appears. If you click one of these icons,that application starts.
Activity 4.3 Launching an application menu
To launch an application, perform the following:
1. Open the Applications menu by clicking on it.
2. Move the mouse down the menu to the Sound and Video. (Each
sub menu opens as your mouse passes over the category).
3. Click the menu item for the application.4. Locate where you can record sound.
This Menu displays a list of installed applications. When you click on
Applications, a drop-down list appears as shown above. Each of these
sub-menus corresponds to a category. For example, in the Sound & Videosub-menu, you will find applications for playing CDs and recording sound.
ii) Places menu
Activity 4.4 Explaining places menu1. Click on places icon as shown below.
2. Select recent documents.
3. Write down names of the documents/ folders which are there.
The ‘Places’ menu is a quick way to go to various locations on your
computer and your local network.
It allows you to open the following items:
• Home folder- where your personal files are kept by default.
• The Desktop folder - which is the main work area on your
computer.
• Documents - list several of the last folders opened.
• The computer window allows you to browse the computer’s files
and all data storage attached to the computer.• Network allows you to manipulate your networks.
iii) Network menu
Activity 4.5 Network Menu
1. Click on network icon to see which network connections are
available for use in accessing the internet.
2. To connect a network you click on it. For example: click on onelaptop per child to connect on it or to disconnect it
It displays available networks including WI-FI networks that are available.
Setting date and time
Activity 4.6 Setting date and time
To set date:
1. Place the cursor on the date icon at the top right panel. A dropdown window with the calendar appears.

2. Click on the back and front arrows to select month and year.
3. Place the cursor on the date then click on it to set the date.
To set time:
4. Place the cursor on the time icon at the top right panel. Click onedit. This will allow you to input the correct time.
Sometimes, the date and time on the XO-laptop may not be right. When
this happens, you may need to re-set the date and time.
Activity 4.7 Opening Abiword program
You will open an Abiword program in this activity.
1. Go to applications. A drop down menu like the one shown belowappears.
2. Place the cursor on office, then click on it.
3. Select Abiword then click on it. A window like the one belowappears.
Did your screen look like this?
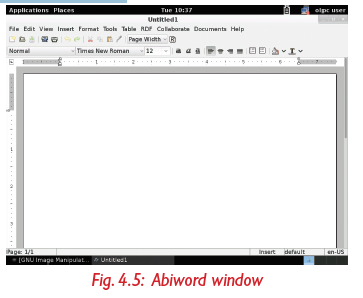
This is the Abi word that can be used to type a word document
Activity 4.8 Text typing in Abiword
Follow the steps above to open a new abiword document using yourXO - laptop. Type in the words ‘Hello children’.
Working with a document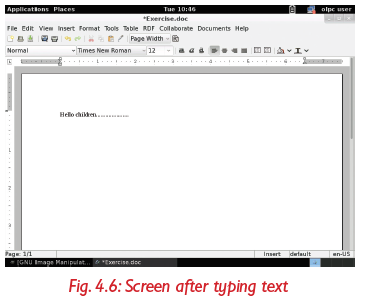
Activity 4.9 Creating a new document
1. Follow the steps as highlighted in Activity 4.8 to open a new
Abiword window.2. Click the File tab and click New, or just click on the new document
 icon.
icon.
3. Start typing your text. Once you are done with typing in your
new AbiWord document, it is time to save your document to
avoid losing the work.
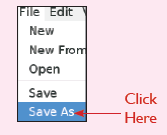
4. Click the File tab and select ‘Save As’ option.
5. Select where you would like to save your file (can be documents,
desktop or any other earlier created folder on the desktop).
Enter file name which you want to give (for example, my test)
and Select ‘Save file as’ type file. By default, it is AbiWord. Abw.
6. Finally, click on save button and your document will be saved
with the entered name in the selected folder.
A new blank document always opens when you start Abiword. But you
can start another new document by clicking on File + New or just clickon the new document icon
Remember!
In order for your document to be read using other computers, selectmicrosoft word.doc as file type.
Activity 4.10 Saving new changes
1. Open the Abiword document you created in Activity 7.7 then
make some corrections in the document. You may delete or add
information
2. Now go to file Tab and click on save option or just click on save
icon on the Menu Bar.
3. Re-open the document from its folder and confirm that the
corrections were saved.
To save the new changes to the document you can do one of the following:
• Press CTRL +S to save the new changes.
• Click on save icon below the file tab.
• Click on file then click on save.
Activity 4.11 Opening a document
1. Click the ‘File tab’ and select ‘Open’ option.
(The window below will displayed (an open dialog box), which lets you
move through different file folders and also lets you select a file, whichyou want to open).
2. Finally locate and select the file which you want to open and
click on open. In the above screen the file to be opened is named
‘exercise.doc’.
When you want to open an existing document go to File Tab, select
Open option , locate your file and click on Open button.
Activity 4.12 Closing a document
1. Click the File tab and click ‘Close’ option.
(When you select close option and if the document is not saved before
closing, it will display a Warning box asking whether the document
should be saved or not).
2. It is up to you; If you want to save the changes, then click ‘Save’,
otherwise click ‘Close without saving’ button.
(To go back to the document click ‘Cancel’ button. This will close the
Dialog Box
3. Or click on ‘(x)’ at the top right side of the screen.
Once you have opened an existing document, you work on it. This may
include making some changes, saving then closing it.
To close an open document, you can do one of the following:
• Click the File Tab and click close option.• Or click on ‘X’ at the top right of the screen.
Activity 4.13 Renaming an existing document
1. Locate the folder where the document is (this may be in my
documents, desktop or any other folder you created earlier).
2. Right-click on the document, a drop down menu like the one
below appears.
3. Click on rename, and write the name you want. Then after, pressthe ‘Enter key’
When you want to rename an existing file in your XO laptop,
• Right click on the file you want to rename option.
• Press the erase botton to delete the existing name.• Then type the name of your choice and press enter key.
Folder management
Activity 4.14 Creating a folder1. ‘Right click’ where you want to create a folder.

2. Click on ‘new folder’.
3. ‘Right click’ on the untitled folder, then click on ‘rename’
option or simply, erase ‘untitled folder’ by pressing on delete
button on the keyboard then type the new name.
Folders are used to store documents in a computer. They are named
depending on what content is stored there.
To create a new folder, you can do one of the following.
• Right click where you want to create the folder. It can be either onthe desktop or elsewhere.
• Then click a ‘new folder’ and save the folder with a name. You canname the documents you want in there.
Activity 4.15 Create a folder
1. Follow the steps above to create a folder named ‘ MY SCHOOL’.
2. Save the folder on the desktop then shut down the XO-laptop.
3. Switch the XO-laptop on. Switch to Gnome interface then try to
locate the folder on the desktop. Did you find it?4. Rename the folder ‘MY CLASS’ and save. What happens?
Moving and deleting a folder
Activity 4.16 To move and delete a folder1. Right click on the folder you want to move.
2. Click on ‘Move” option.
3. Select where you want to put your folder.
4. Locate the folder in the new location where you moved it to and
right click on it to delete. Where is the file finally?
It is possible to move a folder from one location to another. This can bedone by choosing ‘move to’ command then clicking on the new location.
How to delete a folder
To delete a folder, follow these steps:
1. Right-click’ on the folder.
2. Click on ‘move to Trash’. This deletes the folder from its currentlocation and move it to the trash or bin.
Talking Point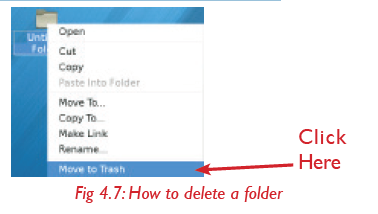
1. Create two folders on the desktop.
2. Name them as EXERCISE 1 and EXERCISE 2.
3. Move the folder “EXERCISE 1” to folder “Documents”.
4. Copy the folder “EXERCISE 2” and paste it in Documents folder.5. Delete the folder “EXERCISE 2” from the desktop.
Saving a file into a folder
Activity 4.17 Saving a file into a folder
1. Create an, AbiWord document as shown in Activity 4.7.
2. Type the following text then save the document on the Desktop.
Name it “My Residence”.
My residence address
Southern Province
Nyanza District
Mukingo Sector
Nkomero Cell
P. O. BOX 240 Nyanza
3. Save this file in the folder you renamed ‘MY CLASS’ in Activity
4.15.
4. Access the file in the folder, then copy and paste it in the folder
named “EXERCISE 1” that you created in Activity 4.17 above.
As mentioned earlier, folders are used to store files. After you have
created a file, for example in AbiWord, you can then save it in the
appropriate folder by doing the following:
• Right click on the file, right click on cut then click on the
folder, then click paste into folder.• Place the cursor on the file and drag it to the folder.
Activity 4.18 Accessing properties of a folder1. Right click on any folder on the desktop.
2. Select the ‘Properties’ in the display menu and click on it. What
can you see?
To access the properties of a file or folder, right-click on it and select
‘Properties’
Elements of AbiWord window
You have already interacted with AbiWord window several times. Howdoes the screen of AbiWord look like?
Talking Point1. Study the window below with a friend.
2. The main features of the window are shown using letters. Write
them down in your notebook.
3. Compare your labelled window with other pupil’s. Did you get itright?
AbiWord is a free word processing program. It has a number of differentcomponents as described below.
(a) Title bar
Activity 4.19 To name a document
1. Go to application office and click on AbiWord.
2. What is the title of the opened Abiword document?
3. Click on File save as and type the name of your choice and
click on save.
4. Now what is the new name of the document?5. Click on X to close the document.
The title bar normally displays the name of the program, and the documentthat is currently open. Title bar shows the document titles.
Table 4.1 Uses of the buttons in the title bar
(b) The Menu Bar
Activity 4.20 Inserting a table
1. Open a new AbiWord document.
2. Type “Class test.”
3. Go to menu bar and click on Insert option.
4. Click on table and select number of columns of your choice,
then click on insert.5. Type in the marks you got in the class test.
The menu bar is shown below.
Fig 4.9: Menu bar features
The menu bar allows you to choose commands that AbiWord is capable
of performing. The menu bar has a series of words on it as shown in Fig
4.9. The most common one is the file tab.
(c) Toolbar
Toolbar buttons are typically used to quickly access commonly used menu
commands. The two types of tool bars are
i) Standard toolbar
This toolbar provides access to the most commonly used operations,
including creating a new file, saving the current document and printingthe current document, along with cut, copy and paste functions.
ii) Formatting toolbar
Activity 4. 21 Formatting Text
1. Open AbiWord on your XO - Desktop.
2. Write the following sentence:
Hallo friend. My name is Andy and this is my first experience with AbiWord.
3. Make bold the name “Andy”.
4. Make italics the phrase “Hallo friend”.
5. Underline the word “AbiWord”.
6. Now, use the Erase button of your keyboard and try to delete
the phrase “with AbiWord”.
7. Use the text cursor and move to “Andy”. Again use the Erase
button and delete it in order to type your name.
This toolbar provides access to various formatting options such as
Italicizing text, making text bold, underlining text and changing font
type and font size and so on.
(d) The Scroll bars
The scroll bars allow you to view other parts of your document and to
see what part of the document you are currently viewing relative to theentire document.
i) The Vertical scrollbar
Activity 4.22 Scroll bar
1. Open a new AbiWord document.
2. Type number 1 then press Enter key.
3. Continue typing numbers up to 25.
4. Practice to scroll so that you can see the first number, and also
scroll down to see the last number.
The vertical scrollbar shows where, between the top and bottom of the
document, the part of the document currently visible is located. It scrolls
upwards or downwards.
ii) The horizontal scroll bar
This allows you to see what part of the width of the document is currentlyvisible. It scrolls the document horizontally. That is either towards the left of right.
(e) The status bar
Activity 4.23 Using status bar
1. Open a document done in Activity 4.2.
2. Click on minimize button.
3. Go to status bar.
4. How many pages are there?
5. What is the name/title of the document on the status bar?
This displays document information as well as the insertion point
location. From left to right, this bar contains the total number of pagesand words in the document, language among others.
(f) Document area!
This is the area where you type the text. The flashing vertical bar that
appears when you click inside this area is called the insertion point and itrepresents the location where text will appear when you type.
Selecting a Text
Activity 4.24 Formatting a text
1. Type the following text:
“The computer has greatly changed how we do things today. For
example, with the development in technology, we are able to send mails
and receive messages without using the postal services. Further, we are
also able to communicate using other means such as mobile phones. We
can also send money electronically. Because of all these, it is said we are
living in the computer age!”
2. Drag the mouse over the words “Computer age” and click on
B to make it bold.
3. Double click on the word technology and change its colour.
4. Use the shortcut Ctrl+A to select the whole text and make its
font Italic.
5. Which part of text did you highlight?
In order to highlight the text, click and drag the mouse over the desired
text while pressing onto its left button.
You can also use the following shortcuts to select text.
• To select a whole word, double click within the word.
• To select the whole paragraph, triple click within the paragraph.
• To select several words or lines, drag the mouse over the words.• To select the entire document, press ‘ctrl+A’.
Remember!
In order to de-select text, click anywhere outside the selection onthe page.
Text formatting
a) Font Color
Activity 4.25 Using font color
1. Open AbiWord document.
2. Type the following: Kigali is the capital city of Rwanda.
3. Select the sentence you wrote.
4. Go to formating tools and click on font colour icon.
5. Or click on format tab, then click on font, choose text colorand choose the color you want and click on ok.
b) Font Style
Activity 4.26 Using font style
1. Open AbiWord document.
2. Write the following sentence “Computer My friend”.
3. Select the sentence you wrote.
4. Go to formatting tool and click on font style and choose the
style of your choice.
5. Or click on format tab then click on font, then select the fontyou want and click on ok.
c) Font Size
Activity 4.27 Using font size
1. Type the following sentence “Computer My friend”.
2. Select the sentence you wrote.3. Go to formatting tool and change the size to 12.
d) Underline
Activity 4.28 Using underline
1. Select the sentence “Computer My friend”
2. Go to formatting tools and click on an underline “a”to underline
your sentence.
When formatting text, you can change font size, font type and font
colour. You can also underline, italicize or bold text. Additionally, you
can align text to the left or to the right.
Self –Test 4.1
1. Type text, “Hello Children” in your AbiWord new document.
Create a folder on the desktop. Rename it as “exercise” Once
you are done, save your document in that folder to avoid the
document getting lost.
2. Open AbiWord and individually create a front page of your school
newsletter. Use possible AbiWord tools and functions to make a
good presentation.
3. Individually do an interview at your local community about
fighting malaria in your village, type the findings in AbiWord and
use formatting tools to make your presentation attractive.
4. Practice copying, cutting, pasting and moving parts of text in thedocument you created in 3 above.
4.2 Gnumeric Spreadsheet
Activity 4.29 Introduction to gnumeric spreadsheet
1. Study the following table carefully. Create a table in AbiWord and
input the data in the table.2. Calculate the total amounts and fill in the last column.
Home weekly shopping
3. Do you think there is a program that can display this table more
clearly and calculate the total cost for shopping easily? Discusswith your friends.
Definition and role of spreadsheet application
Gnumeric is a spreadsheet computer program used to manipulate and
analyze numeric data. It can help you keep track of information in
lists, organize numeric values in columns and rows, perform and update
complex calculations.
Spreadsheet environment
Spreadsheet is another example of a program used in XO- laptop just likeAbiWord. How do you open a spreadsheet application in your computer?
Activity 4.30 Opening spreadsheet environment
1. Switch from Sugar to Gnome interface in your XO-laptop.
2. Click the ‘Applications’ icon on the top right corner. Didyour screen look like this?

3. Click on “Gnumeric spreadsheet.”
Features of the spreadsheet window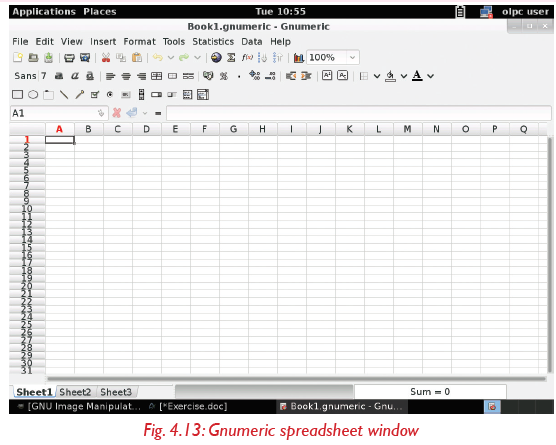
Talking Point
1. Go through the screen in Activity 4.30 with a friend. Try to identify
the various features on the screen.
2. What are the features used for?3. Label the key features in the screen.
When you open a spreadsheet, you begin using a workbook that contains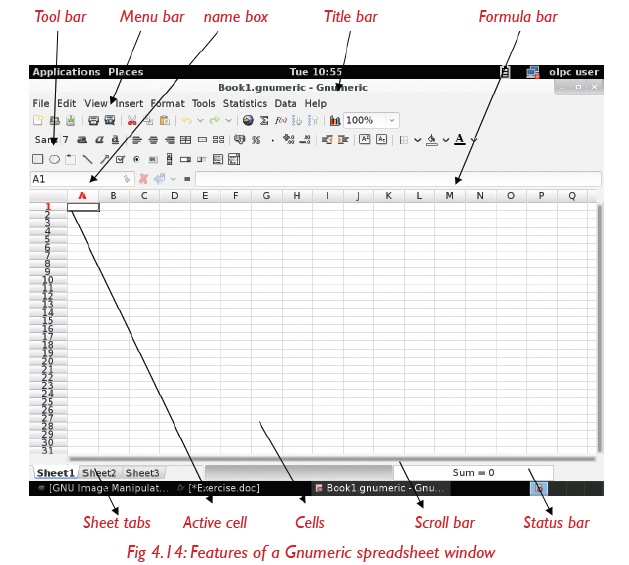
screens called worksheets. They are identified as sheet 1, sheet 2,
sheet 3 and so on. The spreadsheet uses rows and columns. The keyfeatures of a Gnumeric spreadsheet window are shown below.
Remember!
Each of the features in the spreadsheet window have special use asyou shall learn next.
a) Title Bars
Activity 4.31 Using title bar
1. Open a new spreadsheet, window. Check the name on the title
bar.
2. Go to File, Save as, and name this workbook as P6A Class list.
3. Go to title bar and see whether the name has changed.
The Title Bar is located at the very top of the screen. On the Title bar,
spreadsheet displays the name of the workbook you are currently using.
At the top of your screen, you should see “Book1.gnumeric-Gnumeric” asshown below or a similar name
b) Tool bar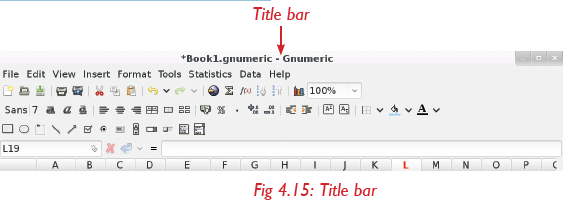
Activity 4.32 Formatting text
1. Open the workbook named P6A Class lists.
2. Type “P6A Class lists” in capital letters.
3. Underline this sentence by clicking on the underlined “a”
4. Make the sentence bold by clicking on this icon.
5. Change the size to 14.6. Go to standard toolbar and click on save to save your work.
The Toolbars provide shortcuts to menu commands. Toolbars are generallylocated just below the Menu bar.
The basic toolbars that is, Standard and Formatting toolbars are available
as the gnumeric spreadsheet is opened.

c) Formula bar
Excel’s Formula bar is located directly above the worksheet document
window (see Fig. 4.28 below).
It displays the current content of cells and allows you to add in formulas,labels or values into a cell.
d) Status bar
The status bar is located across the bottom of the spreadsheet workspace.The Status Bar provides information about the current work environment.
e) Cell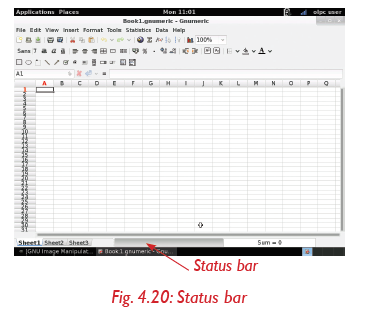
Activity 4.33 Using cell
1. Click on Cell A1 and type the word “No”.
2. Click on cell A2 and type the word “Names”.3. Continue typing “Age” and “Sex” in cells A3 and A4.
A cell is an individual data box, which is intersection of rows and columns.For instance, the first cell is A1 (meaning Column A, Row 1).
f) Name box
Activity 4.34 Using name box
1. Click on cell C8 then go to the name box and check whether
we have the same reference name.
The Name Box is located next to the formula bar above the worksheet
area to the left of the formula bar. The name box displays a reference to acell that is currently active.
g) Column heading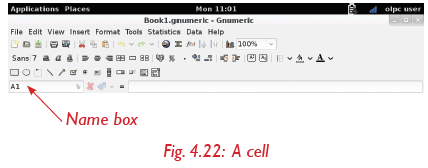
In Spreadsheets, the column heading or column header is the grey-coloured
row containing the letters (A, B, C among others) used to identify each
column in the worksheet. The column header is located above row 1 inthe worksheet.
h) Row heading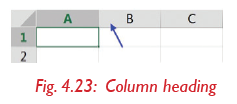
The row heading or row header is the grey-coloured column located to
the left of column 1 in the worksheet containing the numbers (1, 2, 3,among others) used to identify each row in the worksheet.
i) Menu bar
This is a horizontal menu that appears on top of a window. Usually, eachoption in a menu bar is associated with a pull-down menu.
j) Scroll bar
This is the bar that appears on the side or bottom of a window to control
which part of a list or document is currently in the window’s frame. Thescrollbar makes it easy to move to any part of a file or document
k) Creating a workbook
A workbook is a spreadsheet file that contains one or more worksheets.
Activity 4.35 Opening new workbook
1. From the Gnumeric spreadsheet window opened in Activity 4.30,
Choose File2. Click on new from the menu bar. What happens?

The New Workbook task pane opens as shown below.
A blank workbook is displayed when Gnumeric spreadsheet is first opened.
You can also create a new spreadsheet workbook by clicking on File thenselect New.
Saving a workbook
Activity 4.36 Saving a workbook
1. From the Gnumeric spreadsheet window opened in Activity 4.20,
Choose ‘File’.2. Go to ‘save as’ option on the drop down menu.
The ‘Save As’ dialog box appears as shown below.
3. Select where to save your file, write the file name and click on save.
Every workbook created in Excel must be saved and assigned a name to
distinguish it from other workbooks.
The first time you save a workbook, spreadsheet will prompt you to assign
a name through the ‘Save As’ option.
Once the name is assigned any additional changes made to the text,numbers, or formulas must be saved using the ‘Save’ option.
Opening a workbook
Activity 4.37 Opening a workbook
1. Open a new Gnumeric spreadsheet window.
2. Choose File.3. Go to Open option on the drop down menu.
4. In the Look in list, click the drive, or folder that contains the file
you want to open.
5. In the folder list, open the folder that contains the file. Once
the file is displayed, click the file you want to open.6. Click the Open button.
You can open any workbook that has previously been saved and given aname.
Worksheets
Activity 4.38 Using worksheets
1. Open a new spreadsheet window.
2. Double Click on sheet 1 then type first term, sheet 2 as second
term and sheet 3 as third term.
3. Click on insert option and add another sheet.
4. Double click on it and name it as annual report.
5. Right click on sheet 4 and select remove to delete that sheet(In this example you are going to be deleting Annual report).

6. Or click on Edit select sheet and then click on remove.
A worksheet is a collection of cells where data are typed, stored or
manipulated. By default, each spreadsheet workbook contains threeworksheets.
Selecting a worksheet
When you open a spreadsheet, it automatically selects sheet 1 for you.
The name of the worksheet appears on its sheet tab at the bottom of thedocument window as shown below.
To select one of the other two worksheets, simply click on the sheet tab
of Sheet 2 or Sheet 3.
Inserting a worksheet
You can insert as many worksheets as you want. To quickly insert a newworksheet, click the ‘Insert’ option at the top of the document window.
Deleting (or removing) a worksheet
To delete a worksheet, right-click on the sheet tab and select ‘Remove’
Renaming a worksheet
Activity 4.39 Renaming a worksheet
To give a worksheet a more specific name, do the following:
1. Right-click on the sheet tab of Sheet 1.
2. Choose ‘Rename’.
3. Rename it as you want.By default, the worksheets are named Sheet 1, Sheet 2 and Sheet 3.
Columns, rows and cells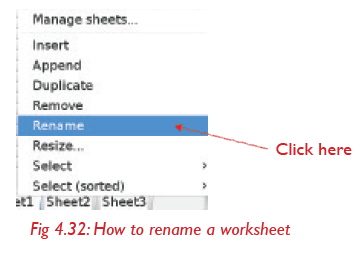
Entering text or data in a cell
Activity 4.40 Entering text or data in a cell
1. Open a new spreadsheet document.
2. On the worksheet, click a cell.
3. Type the numbers or text that you want to enter, then press
ENTER or TAB keys.
4. Look at the Figure below. The position of the active cell is A1.
Can you identify cells whose positions are:a) A5 b) C3 c) B7
5. Practise entering data in a created worksheet.
A cell is the intersection between a row and a column on a spreadsheet.
They are numbered A, B, C, D and so on horizontally and 1,2,3,4 and
so on vertically. Therefore, each cell can be given a unique identification
number such as A1, A2, B1, B2 and so on, depending on its position. To
select a cell, click on the desired cell, the cell will have a black border,which indicates that it is the active cell.
Remember!
If a cell is active, any typing will replace what is already in that cell.
Double-click on the cell to make the cursor appear in the cell forsmaller edits
Modifying columns and rows
It is possible to change column width and row height.
2. Activity 4.41 Modifying columns and rows
To change row height or column width:
1. Open spreadsheet window.
2. Select a row or column to resize.
3. ‘Right-click’ the row number or column letter, then select‘Resize row’ or ‘Resize column’.
You can also click and drag the edge of a row or column to resize it.Inserting rows and columns
Activity 4.42 Adding columns or rows
1. On your spreadsheet, select a row or column. You can also
highlight multiple rows or columns.
2. Click on ‘Insert’ on the menu bar, or right-click on the row or
column you want to add.3. From the menu that appears, select row or column.
Deleting columns and rows
2. Activity 4.43 Deleting columns or rows
1. On your spreadsheet, ‘right-click’ a row or column.
2. From the menu that appears, select ‘Delete row’ or ‘Deletecolumn.
Talking Point
1. Open a new spreadsheet document. Practice doing the following:
2. Increasing the height of a row and the width of a column.
3. Deleting a column.4. Inserting a row.
Formatting cells
2. Activity 4.44 Formating Cells
1. Open a new spreadsheet window.
2. Type the following titles from cells A1 to E1(Maths, Science,
English, SST, Kinyarwanda)
3. Resize all the columns to make all subject titles visible.
4. Change the font size to 10 and apply ‘sans’ as font style.
5. Select the cells from A1 to E1 and go down from A20 to E20.
6. Put borders to the selected area by clicking on the toolbars
and select ‘all borders’.
7. Put the Maths and Science titles in blue and the rest in green
color.
8. Select all titles and make them center by clicking on the correct
icon.
9. From the menu that appears, select row or column.
We can manipulate cell content in a variety of ways to make our document
look attractive or more appealing. Some of them include:
• Changing font type or font size.
• Inserting or removing cell borders.
• Applying colour.
• Aligning text.
a) Changing font type or font size in a worksheet
To change font type or font size, follow these steps:
1. Select the cell, range of cells, text or characters that you want to
format.
On the toolbar (Fig 4.30) in the Font group, do the following:
• To change the font type, click the font type that you want in
the Font box.• To change the font size, click the font size that you want in the Font box.
b) Inserting or removing cell borders on a worksheet
Here is how you can add borders by selecting different line styles and
colours:
1. Select the cell or range of cells.
2. On the Tool Bar, click the arrow next to Borders, and then choosethe border options that you want.
To remove a border, select the cells with the border and click the arrow
next to Borders.
c) Applying a fill colour
To choose a new fill colour for a cell selection, follow these steps:
1. On the Tool Bar, in the Font group, click the ‘Fill Colour’ button in the
drop down menu.2. The ‘Fill Colour’ palette appears as shown below.
3. Select the colour you want to use in the drop-down palette.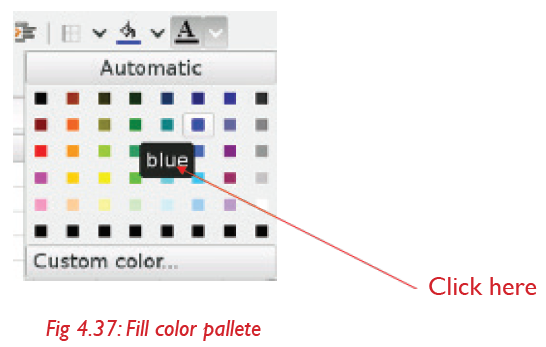
Text alignment and orientation
Texts and numbers may be aligned using the left-align, center and rightalignbuttons on the Formatting toolbar.
To align text or numbers in a cell:
1. Select a cell or range of cells.
2. Click either the Left-Align, Center, or Right-Align buttons on the
Standard toolbar.
3. The text or numbers in the cell(s) take on the selected alignmenttreatment.
Remember!
You can get more orientation styles in Format Cells dialog box by
clicking the ‘Format Cells’ alignment item in the list. See the figurebelow.
You could also ‘right-click’ and choose Format Cells from the shortcut menu.
• The Format Cells dialog box opens.• Click the Alignment tab.
Basic mathematical operators in spreadsheet
1. Activity 4.45 Basic Mathematical operations
1. Beginning in cell D4 (See the screen below), and going down,
enter the numbers 1, 2, 3, up to 10.
(Hint: Enter the first 2 numbers, drag over both cells to select,
then drag the “fill” handle down until the numbers up to 10 are
entered).
2. In a cell under the last number put an equal sign (=).
3. Click on the fist number then type a plus sign (+).
4. Click on last number you want to add and press enter or ablue icon near the formular bar.
It is possible to manipulate data using Gnumeric spreadsheet. It uses standard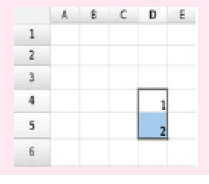
operators for formulas, such as a plus (+) sign for addition, minus (-) signfor subtraction , asterisk (*) for multiplication, forward (/) slash for division.
Remember!
All formulas in numeric spreadsheets must begin with an equal sign
(=). This is because the cell contains, or is equal to the formula andthe value it calculates.
• After the equal symbol, you enter either a calculation or function.For example, look at the following spreadsheet screen:
Type the entire equation: =A1+A2+A3+A4+A5
Add up values in cells B1 through B5, you can use the SUM function:
= SUM(B1:B5)
Using the colon (in Excel formulas allows you to supply a range of cells
for the formula. In the above formula example, range B1:B5 includes five
cells, that is, B1 through B5. Try these out in your XO-laptop and see thesum.
While you can create simple formulas in Excel manually
(for example, =2+2 or =5*5), most of the time you will use cell addresses
to create a formula. This is known as making a ‘cell reference’.
Therefore, by combining a mathematical operator with cell references,
you can create a variety of simple formulas in spreadsheet.
Formulae can also include a combination of cell references and numbers,as in the examples below:
Activity 4.46 Total calculation
1. Enter the following information into a blank worksheet incolumns A, B and C, and in rows 1 through 6.
2. Calculate the total cost using a formula in spreadsheet.
The sum function
You can use the auto sum icon (Ʃ) on the standard tool bar, whichautomatically adds numbers in a cell. Follow these steps:
Activity 4.47 Total calculation
1. Select the cell that the sum will appear in, that is, outside the
cluster of cells whose value will be added.
2. Click the auto sum button.
3. Highlight the group of cells that will be summed.
4. Press the ‘Enter key’ on the keyboard, or click the green checkmark on the formula bar.
Further Activity Calculations
1. In the costs for the first term and second term in activity
4.46, calculate the total cost for the second term using
auto sum.
2. Create your home weekly shopping list in spreadsheet,
indicate what have been purchased and how much itcosts. Work out the total costs.
Self –Test 4.2
1. Open a new Gnumeric Spreadsheet document. Enter the following
information:
a) Type “January” in Cell A1, press TAB.
b) Type “February” in Cell B1, press TAB.
c) Type “March” in Cell C1, press TAB.
d) Practice using holding your left mouse button to select a
range (block) of cells. Select A1 through C1.
2. Open a new Gnumeric spreadsheet document. Do the following:
a) Format the labels in Cell A1 through C1: Bold
b) In Cell D1 type: TOTAL
c) Format the text in Cell D1: Bold, Centered and Blue
3. Save your practice spreadsheet and name it: “Beginning ExcelPractice 1”.
UNIT TEST 4
1. Do an interview about fighting malaria at your village. Write
down your findings in your notebook.
(a) Type the findings in AbiWord.
(b) Use required formatting tools to make your text look good.
(c) Create a folder on the desktop and re-name it “Malaria”.
(d) Save your file as “interview” and save in the folder you
created.
2. Write in AbiWord your class timetable and make all necessary
formatting.
3. Talk to your friend about your favourite subjects, type them in
AbiWord.
4. Save your file as “my favoUrite subject” in ‘My Documents’.
5. Enter the information below in a spreadsheet. Be sure that the
information is entered in the same cells as given, or the formulas
below will not work.
(a) Click on the Column Header D to highlight the entire
column.
(b) Click on the drop down arrow by Insert.
(c) Click on Insert Sheet Column.
(d) Click on Cell D2 and type Email Address.
6. Type the following text in AbiWord document:”Be good friends.
Do not quarrel any more”.
(a) Make your text italics.
(b) Change the font size to 14.
(c) Use Calibri body as a font style.
(d) Save in my document.
7. Open a new workbook and save it with the file name “Months”.
(a) Activate cell location A2 on the worksheet.
(b) Type the word “Names”
(c) Press the right arrow key, this will enter the word into cell
A2 and activate the cell to the right.
(d) Type Math and press the right arrow key.(e) Repeat the step 4 for the words Science and Total.
UNIT 5:Computer Research
1. Study the picture below. What is happening in the picture?

2. How can you help the learners in the picture?
5.1 Introduction to Search engine
Activity 5.1 Introduction to Search engine
1. Open google search engine using your XO-laptop.
REMEMBER – The XO-laptop should be connected to the
internet first.
2. Type these words ‘ Rwanda Education Board’.
3. Click on search. What can you see?
We can use the Internet to search for information. To do this, we use
a web search engine. A web search engine is a software system that isdesigned to search for information on the World Wide Web (www).
Talking Point1. Look at the images below. Do you know the images?
2. What are the images used for?
3. Research about them. Give their uses
Examples of search engines are:
• Google • Bing • MSN
• Ask • Yahoo • Wikipedia• Netscape
Role of search engines
Search engines allows internet users to find specific information from the
web, based on keyword criteria that is entered by the user.
5.2 Search engine techniques
The two main techniques of conducting internet search are:
• Keyword searching• Phrase searching
a) Keyword Searching
Case Study
1. Search your own mind and come up with the most unique
keyword you can think of.
2. Log on to Google web browser.
3. Type the keyword and search its meaning. Write the meaning
down.
4. Use the other web browsers to search the same keyword. Write
the meaning in your notebook.
5. Compare the definitions from the different browsers. Are theythe same?
A keyword search is a basic search technique that involves searching
for one or more words within a collection of documents. The documentsreturned by the search engine are called the search results.
You can also make your search for images, videos, maps, books or
news by just clicking on the options you want to search for as shown in the image above.
Remember!
Keyword searches are usually punctuation-sensitive. Therefore, omit apostrophes, parentheses, hyphens, among others when typing the keywords. For example, type ‘dont’ instead of don’t, CD ROM instead of ‘CD-ROM’ and so on.
b) Phrase Searching
Phrase search is a type of search that allows users to search for documents
containing an exact sentence or phrase, rather than single keywords.
Note: Anytime you have more than one key word, you have a phrase.
Although each search engine is different, know when you should use this
method.
Examples of Phrase searches include:
• “Rwandan President” • “Spirit of St. Louis”• “Ozone layer depletion” • “Gulf of Mexico”
Work to do
Repeat the case study under Keyword search to search for the phrasesabove. Compare your search from the different browsers.
Activity 5.2 Assessing the search results
1. After you complete a search, glance over the first page of
search results.
2. Did it return what you are looking for, or is it just a lot of
unnecessary information?
3. If your search results do not seem to be very good, you mayneed to try different search keyword or phrase.
Remember!
The search engine cannot read your mind, it just looks for matching
words. For example, if you just search for the word ‘polish’, the search engine does not know whether you are looking for ‘shoe polish’ or ‘history of the Polish language’!
You could improve your search results by searching for ‘shoe polish’.
However, this still may return a variety of websites, including:
• Stores that sell shoe polish
• Guides on how to polish shoes
• The history of shoe polish
To get the best results, ask yourself, “What exactly am I looking for?”Specific terms usually return better results.
Activity 5.3 Conducting a basic search
1. Go to www.google.com
2. On the Basic Search screen, type in the following keywords
exactly as they are written below and take note of the results.
Chocolate health food or health risk
NOTE: You do not need to link keywords with AND. Google does this automatically.
3. Click on Search. How many results are retrieved?
4. Go back to the Basic Search box and type the following:
(chocolate OR cocoa OR “dark chocolate”) AND (diet OR
nutrition).5. Click on ‘Search’. How many results are retrieved?
Successful Search Skills
Case Study
1. Search for the phrase “river boats” using google search.
2. Now, search for ‘river’ AND ‘boats’ then ‘river + boats’ separately.
3. Compare your results in the cases above. Which results are more relevant?
Searching for ‘river boats’ will give you more relevant results than searching for, ‘river and boats’ or ‘river + boats’.
Activity 5.4 Use of keyword and phrase search
Think about the appropriate keywords or phrase to use, to search for
the various cultural practices in Rwanda. Using google or any other
search engine, type the keywords or phrase then search. List down the
cultural practices in your notebook. Compare your work with those of
your other class members.
Before you even open your Internet browser, prepare a list of keywords.
This will help to eliminate being overwhelmed with millions of irrelevant
results. Follow these guidelines to create your list of keywords:
• Identify the main concepts of your topic.
• List keywords for each concept.
• Include synonyms and alternate spellings.• Determine the logical relationships between your keywords.
Self –Test 5.1
1. What does www stand for?
2. In pairs discuss the benefits and risks of using Internet.
3. Explain the role of search engines in our lives.
4. Name and compare different search engines using keyword and phrase search techniques.
5.3 Types of search engines
Most search engines give general information. They are examples of
general search engines. The general search engines can be put into
three categories namely:
• Primary
• Secondary
• Targeted
Other examples of search engines include:
• Meta search engines
• Science-specific search engines
• Social sciences-specific search engines
• Art and humanities-specific search engines
• Format-specific search engines
a) Primary Search Engines
Activity 5.5 Using primary search engine
1. Go to www.google.com
2. Search for the phrase ‘ One laptop per child Rwanda’.
3. Repeat the search above using “Yahoo” and “Bing”.
4. Compare your search results.
The most popular search engines used nowadays are known as primarysearch engines. Examples include Google, Yahoo! and Bing.
• Google – This is the most widely used search engine.
• Yahoo - This search engine has been around for many years and is
one of the most widely used as well.
• Bing – This is relatively new. It is Microsoft’s latest attempt atdeveloping a search engine
b) Secondary Search Engines
Activity 5.6 Secondary search engine
1. Go to www.ask.com
2. Search for the question: ‘Who is the president of Rwanda?’
3. Write down the results of your search.
Secondary Search Engines are targeted at smaller, more specific audiences
although the content itself is still general. Examples of secondary search
engines include Lycos, LookSmart, Miva, Ask.com and Espotting.
Of the search engines in this category, Ask.com is the most common:
ASK.com is based on a question and answer format where most questionsare answered by other users or are in the form of polls.
c) Targeted Search Engines
Activity 5.7 Using targeted Search Engine
1. Go to city search and search for ‘the first astronaut to visit the
moon’.
2. Go to Yahoo Travel and search for ‘the most amazing park in
Rwanda’.
3. Go to Music Search and search for ‘ Rwanda Musicians’.4. Write down the search results in your notebook.
Targeted Search Engines are sometimes called topical search engines.
These search engines are narrowly focused usually to a general topic like medicine or branches of science, travel, sports or some other topic.
Examples of targeted search engines include City Search, Yahoo Travel and Music Search
d) Meta search engines
Case Study
1. Go to www.metacrawler.com and search for the process of
digestion.
2. Go to www.dogpile.com and search for ‘ the process of digestion.
3. Compare your results in the two cases. Which site gives more
accurate information?
Meta search engines take the results from all the other search engines
and combines them into one large listing. Examples of Meta search
engines include:
• Metacrawler (www.metacrawler.com)
• Dogpile (www.dogpile.com)
e) Science-Specific search engines
Case Study
1. Go to http://scholar.google.com and search for “cause of
climate change” and “how we can slow it down”.
2. Repeat the search above using:
a) http://www.sciencedirect.com
b) http://www.getcited.org/.
3. Compare your search results above. Which is more accurate?
These are academic search engines used for finding and accessing
articles in academic journals, repositories, archives or other collections
of scientific information and other articles. Examples include:
• Google Scholar - http://scholar.google.com
• Science Direct - http://www.sciencedirect.com• GetCITED - http://www.getcited.org
f) Social science specific search engines
Case Study
1. Go to behavioral brain science archive and search for
‘populations of sub-saharan African countries’.
2. Repeat the search above using:
a) Social Science Research Network:
b) SocioSite
c) SocioWeb
3. Compare your search results above. Which is more accurate?
Several Internet search engines are available to assist in locating abstracts
and other information about the social sciences. Examples include:
• Behavioral Brain Science Archive.
• Social Science Research Network.
• SocioSite.
• The SocioWeb.
g) Art and humanities specific search engines
Activity 5.8 Using art and humanities specific
search engines
1. Use the search engines:
a) http://www.vads.ac.uk/search.php
b) http://wwar.com/
To find out about the origin of Kinyarwanda language. Write
short notes on your research findings in both cases. Compare the two search two results.
2. Back at home, ask your parent or guardian about the origin of
Kinyarwanda language.
3. Compare your findings in (2) above with your search results.
Humanities are academic disciplines that study human culture. These include ancient and modern languages, literature, philosophy, religion,and musicology. Examples of search engines used to extract informationin these areas are:
• VADS visual art images
http://www.vads.ac.uk/search.php
• Arts Search (World Wide Arts Resources)
h) Format-specific search engines
Activity 5.9 Format-specific search engines
1. Use the internet to search for information on:
a) the game parks in Rwanda
b) Rwanda athletes
2. Use different search engines i.e Google, Bing, Yahoo, Ask.com,
MSN, Wikipedia and Netscape and compare the results of the
search.
A format-specific web search engine focuses on searching for web pages in a certain area. This area could be format, subject area, geographic region or domain. There may be overlaps between one or more of these areas.
5.4 How to search for information using different
search engines
In this section, you will learn how to search for information using differentsearch engines.
a) Google
Google search engine is the most popular search engine and the most
popular product from Google.
To do a search in Google, type the key word or the phrase in the spacein a window similar to Fig. 5.4 below.
b) Bing
Bing is an equivalent to Google but from Microsoft company. It is the
default search engine in Microsoft’s web browser. It provides different
services including image, web and video search along with maps.
To search using bing, type the keywood or phrase in the space shown ina window similar to Fig. 5.5 below.
c) Yahoo
Yahoo apart from being the most popular free email provider, it is also
a search engine. However, it is not much popular in search engine area.
To search using yahoo, type the keyword or phrase in the space shownin Fig. 5.6.
d) Ask
Ask.com is a question and answer search engine. Using ask.com, you
can get the answers to your questions. It integrates a large amount of
archive data to answer your questions.
To search using ask.com, type the question in the space shown in Fig. 5.7below.
e) MSN
MSN is a web portal and related collection of Internet services and apps
for Windows and mobile devices provided by Microsoft.
It is the best in news, sports, entertainment, money, weather, travel, health,
and lifestyle searches.
To search using MSN, type the keyword or phrase in the space shown ina window similar to Fig. 5.8 below.
f) Wikipedia
Wikipedia is an online encyclopaedia that allows anyone to search and
edit articles. It is the largest and most popular general reference work
search engine on the Internet and is ranked among the ten most popular
websites.
To search using Wikipedia, type the keyword or phrase in the spaceshown in a window similar to Fig. 5.9 below.
g) Netscape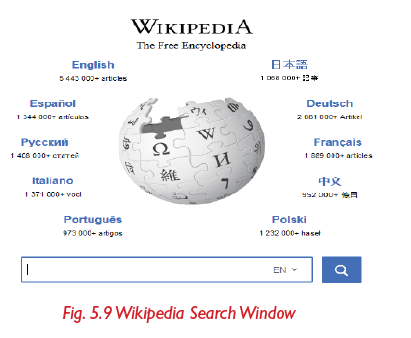
Netscape is an Internet browser first introduced as Mosaic Netscape 0.9
in 1994. Netscape is no longer supported or used, but old versions canstill be downloaded
Self –Test 5.2
1. Name and classify the different types of search engines.
2. Click on the ‘MAPS’ link:
a) Type in the search box: ‘Rwanda Population’.
b) Write down the search results.
c) Compare the results from different search engines.
3. Using different search engines, find out the population of East
African countries. Compare the results from different search
engines.
4. Make a research on how we should keep our environment clean.
Compare your results using different search engines.
5. Find out the cause of climate change. How can we slow downthe process? Compare the results from different search engines.
UNIT TEST 5
1. Find a website that sells books. What is the website address?
2. Find a website with news in your first language. What is the
website address?
3. On google.com, find a Weather Website.
a) Find out what the weather is going to be like on Friday,
Saturday and Sunday in Rwanda.
b) Write it down in your notebook. How will you dress on
these days?
4. On google, find information on the cause of climate change.
a) What is the name of the website you found the information
from?
b) Find out how we can slow down this process.
c) Write down the information you get.
5. In the address bar of google.com, type the following:
www.reb.rw
a) Find the school calendar.
b) What information did you get?
c) Write down the calendar for the second and third term.
6. Open google, search for the ‘Population of Sub Saharan Africa”.Write your findings in AbiWord.
UNIT 6:Programming for children
The picture below shows a family watching a cartoon programme in a
Television at their home.1. Study the chat among the family members carefully.

2. How would you help Nganji reach his dream as advised by her brother?
6.1 Turtle Art for displaying thingsActivity 6.1 Displaying text
1. Open turtle art.
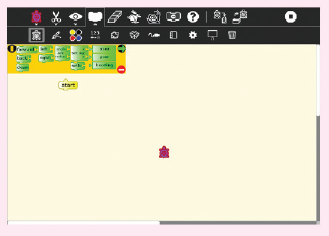
2. Click on pallete of media objects.
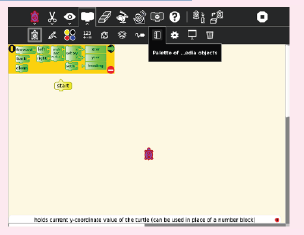
3. Click on show command.
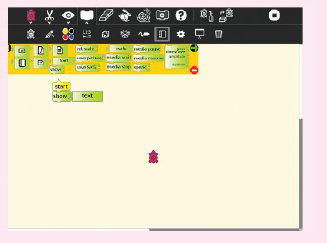
4. Replace the word text by typing “This is a green apple”.

5. Click on show to display this word.
To display text and numbers use the command block show then type the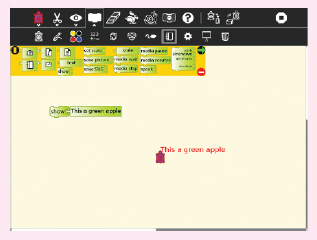
intended text. When you run the command, turtle prints values in thestatus block and displays it in the window.
Activity 6.2 Displaying numbers
1. Open turtle art.2. Go to palette of media objects drag & drop show command.

3. Replace the word “text” with a number, example here type “8”.
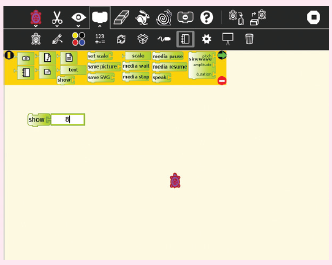
4. Click on show to display the number.
Activity 6.3 Displaying images
1. Click on palette of media objects.
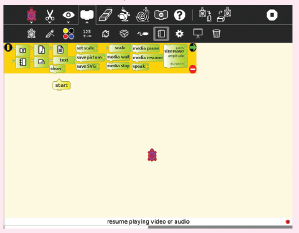
2. Drag and drop the show command.
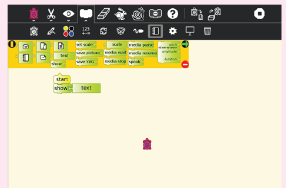
3. Drag and drop the journal icon over the word “text”.

4. Click on the image icon to choose the image in the journal.
5. Select the image by clicking on it.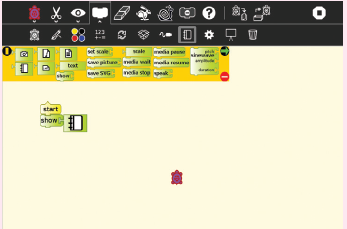
6. Click on show block to display the image
Activity 6.4 Displaying audio
1. Go to palette of media objects, click on media icon (sugar journal
audio object).
2. Drag and drop the command “show”
3. Drag and drop the audio icon over the word text.
4. Click on audio icon to choose the audio from journal, select and
click on the audio you want.5. Click on show to listen to the audio.
We can also use show block to play sound from our music or sound files.
Drawing regular polygons
1. Open turtle art2. Put the following blocks together (screenshot)
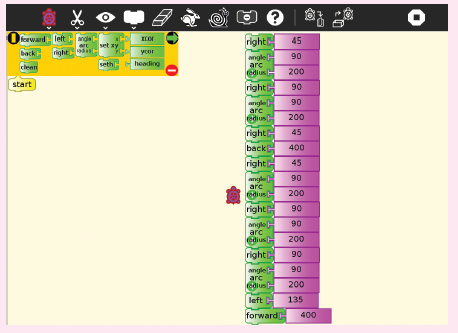
3. Test your programs by clicking on the commands
Activity 6.6 Drawing cuboid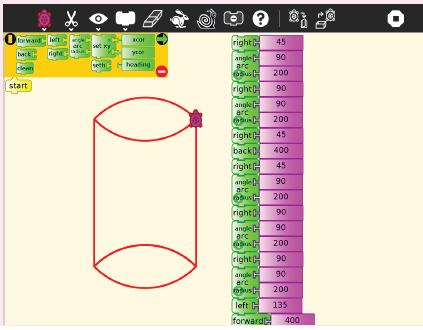
1. What is the name of this shape? What are its characteristics?
2. Discuss in pairs and draw it using turtle art. Which set of
instructions did you follow? Write them down in your notebook.3. What shape will this set of commands make? Try and see.
Activity 6.7 Drawing a cube
1. Open turtle art.2. Put the following blocks together.

3. Test your program by clicking on the commands.
Activity 6.8: Drawing a circle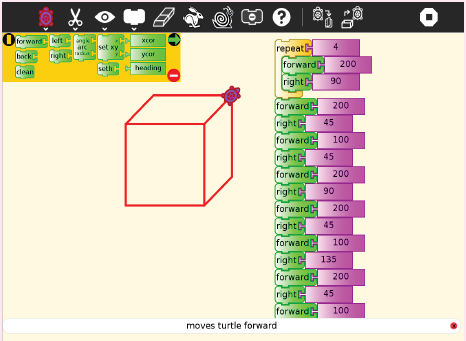
1. Open turtle art.2. Put the following blocks together (screenshot).

3. Test your programs by clicking on the commands.
Self –Test 6.1
1. We can use show blocks to display four things. Name them.
2. Distinguish between a regular and an irregular polygon.
3. Which of these shapes are regular polygons?
Cube, cuboid, circle, oval, triangle, rectangle, square,
parallelogram, rhombus
4. Draw vertical, horizontal and oblique lines using turtle art
commands.
5. Display some sound from your XO – laptop.
6. Construct and produce different geometric shapes (rectangle,triangle, cube, circle) using turtle instructions.
6.2 Programming animations and computing inscratch
Activity 6.9 Animation
Take time and familiarise yourself with the main features of the
scratch screen or the scratch Home Page. Recall what you learnt
in Primary 4 and 5 under Scratch. Do the following individually in your
XO-laptop:
1. Open scratch activity, click on the cat in the Sprite List.
2. Drag out “move 10 steps” block.
3. Double click on the block to see the cat move.
4. Add a control block, for example “When space key pressed”
In Scratch, Sprites can move around, can be activated or they can beobjects that stay still.
Scratch project
In this project, you will create a dancing Sprite. What stepswill you follow? To have an idea, try out the activity 6.10.
Activity 6.10 A dancing sprite
1. Open scratch program in your XO-laptop.
2. Select ‘New’ from the Menu to start a new project.
3. Delete the cat sprite.
4. Select the suitable background by clicking on the “stage icon” located
under the display window in the third column of the scratch screen.
5. Click on background in the second column and click on import.
6. Choose an appropriate background for the dancing sequence youare about to make by clicking on indoors and select spotlight stage.
Remember!
A Sprite cannot do anything by itself. You have to give instructionsfor it to follow.
Activity 6.11 Choosing a sprite
1. Click on “choose new sprite from file”.
2. Click on people folder then click ok.
3. Click on the 1st sprite of cassy-dancing then click ok.
4. Click on costume tab in the second column then click on
import.
5. Click on the second sprite of cassy dancing, then click ok.
6. Go back to costume tab click on import and choose the
third sprite called cassy dancing.
7. Repeat step 6 until you finish all sprites of cassy dancing asshown.
Activity 6.12 Animating
1. Go to script box and select ‘when clicked’ drag and drop it to thescript area.
2. Again from the control folder drag the command ‘forever’.
This command will let the dance program run continuously until
the user selects the red circle (Stop icon) located at the top rightside of the Stage screen.
3. Next, select the ‘Wait command’, which the user should reduce
in duration from 1 second to 0.5 seconds - otherwise the Sprite
will be dancing slowly.
4. Go to Looks folder, select ‘Next Costume’ and place it withinthe Forever command block as shown below.
5. In order to add sound, go to Sound tab and click on “Sounds
box” and click on import.
6. Click on music loops then click ok.
7. Select hip hop music then click ok.
8. Go to script box, click on sound and drag the command playsound hip hop until done to the script area and drop.

9. Run the program by clicking on the commands.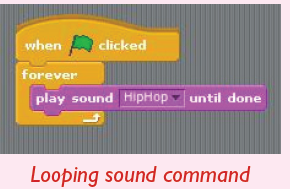
10. Finally, add the following command to introduce a disco lighteffect to the stage.
Your screen after inputting all the instructions should look like
this
Activity 6.13 Scratch projects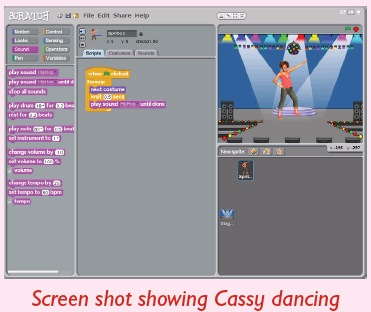
In this activity, you will follow the steps in activity. 6.12 to come up
with your own animation.
1. Start a new program with a different background, different music
and three dancing sprites.
2. Draw a few Rwandan traditional dancers in different poses using
paint editor, stagger their appearances on stage.
3. Locate some appropriate music and make your very own Riverdance scene using the above
Activity 6.14 Understanding X and Y co-ordinates
Familiarise yourself with xy co-ordinates as follows:
1. Switch on your XO laptop. Open scratch Activity.
2. Go to the stage, followed by background then select ‘Import’
icon.
3. Choose the xy-grid - the last of the screen options in the
background library.
4. Move the sprite around in order to come to an appreciation of
coordinates.
5. Put the cursor on the sprite, then check the horizontal bar at the
bottom right corner. Write down the ‘x’ and ‘y’ coordinates.
6. Repeat step 5 several times. Which ‘x’ and ‘y’ coordinates did youcome up with?
X and y coordinates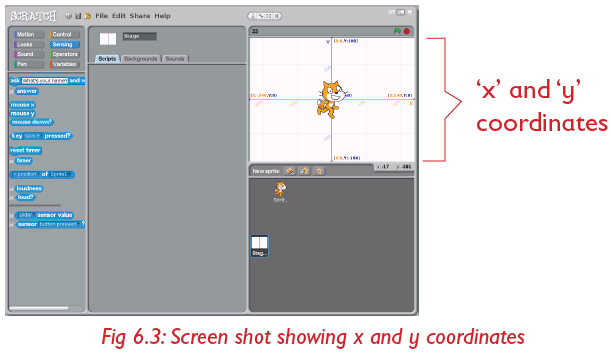
‘X’ and ‘Y’ coordinates are respectively the horizontal (x) and verticaladdresses of any pixel or addressable point on a computer display
screen.
With motion commands, inserting co-ordinate values can control the
magnitude and direction of the sprite’s movement. For example,
• A negative ‘x’ value will move the sprite horizontally left.
• A positive‘x’ value will move the sprite horizontally right.
• A negative ‘y’ value will move the sprite vertically down.• A positive‘y’ value will move the sprite vertically up.
Working with a stage
Activity 6.15 Selecting a background
1. Open scratch activity.2. Click on Stage.

3. Go to the “background” option and select “import” option
4. Go to the folder labelled ‘Indoors’ and select ‘bedroom1’. Does
your screen look like this?
You will notice that we have a problem - the cat looks as if it is walking on
air! Next is to come up with a solution of how to code the Script in order to
make the cat move across the floor of the room.
We therefore have to put in some extra command code that will ensure thatthe cat walks along the floor.
5. First step is to make the Sprite (cat) become the active element
instead of the Background, so ‘double Click’ on the sprite (cat) to
move back to the Script of the Sprite.
6. Move the Sprite to the bottom left-hand corner of the stage screenas shown below.
7. Return to the “bedroom 1” background by clicking on the stage
icon.
8. Move the cat to the top right hand corner of the stage.
The ‘x’ and ‘y’ coordinates for the cat will appear under the faded spriteicon located at the top right hand side of the script area.
9. Go to the ‘Motion’ folder of the ‘Command’ panel.
Find the ‘Go to X: Y: block’
10. Move this block into the Script area block. Fill in the ‘x’ and ‘y’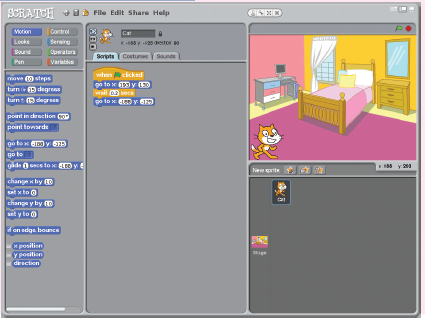
coordinates shown when you point the arrow head on the cat.
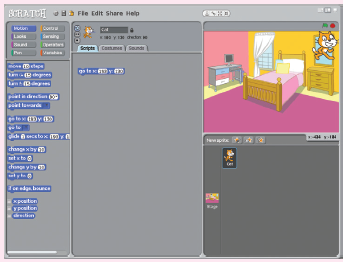
11. Go to command panel, click on control, pick the ‘when flag is clicked
block . Drag it into the script area and
place it on top of the block in step 10.
12. Return the sprite to the bottom left of the stage panel and double
click on it.
13. Click the Green Flag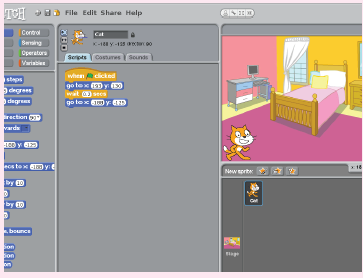
 icon to start the program. What happens?
How to make the cat jump up and down
Activity 6.16 Moving a sprite
1. Move the cat onto the bed. Place the cursor on the cat then notethe ‘x’ and ‘y’ co-ordinates of this position.
2. Now, move the cat to the highest position of jumping. Place the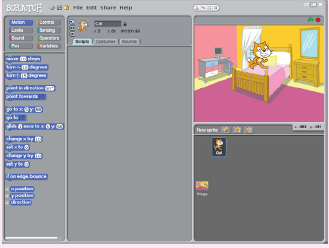
cursor onto the cat and record the ‘x’ and ‘y’ co-ordinates of thisposition.
3. Go to the Motion folder of the Command panel and find the ‘Glide
1 secs to X: Y block’.
4. Move this block into the Script area and input the ‘x’ and ‘y’co-ordinates of the position of the cat at the bed level.
5. Repeat steps 4 for the top position of the cat when it jumps.
6. Now, go to control panel and drag ‘when clicked’, ‘wait for 1 sec’
and ‘repeat 10 times’ blocks to the script area.
7. Go to sound panel choose ‘meow’ sound from import option and
bring the block to the script area.
8. Click the Green Flag icon to start the program. Does your
screen look like this?
9. Save your program file with the name ‘Cat Jumps’ by selecting
‘Save As’ in the File pull-down menu located at the top of the
Scratch screen, that is:
Your file will be saved in the scratch default folder located in yourXO-laptop.
Further Activity
1. Place some further blocks of code in the program that will allow
the cat to jump off the bed and walk a few steps.
2. Make the cat change colour for each step of the remainder of his
walk in question 1 above.
3. Replace the background with a new image from the BackgroundLibrary.
Activity 6.17 Creating an animation from a story
Step 1: Create a story line
The first step to create an animation is to have an idea. It could be
from a joke you’ve heard or a story you recently read. Or better yet, it
could be entirely your own. An example of a simple story line has been
created for you as shown below:
“Mr. Meow was hungry and needed to find the Donut Man, who is known
to carry numerous donuts. Fortunately, Mr. Meow found the Donut Man
immediately and got what he wanted. He ate and ate and ate! When Mr.Meow was full, he let out a happy sigh and returned home.”
Step 2: Create Sprites
In the story above, we can see that there are “three sprites” we need
to have. Can you name them? They are:
• Mr. Meow
• The Donut Man
• The Donut
The SPRITES are things or characters shown in the animation. It is very
easy and fun to create your own sprite. Let’s start by making them.First, let’s create the Donut Man.
Click the (“Create new sprite”) button to open the Paint Editor.
The paint editor allows you to create the default costume of the new Sprite.
Create the Donut Man who proudly wears three donuts round his waist
as a belt. Do this using lines, circles, rectangles, colours and other toolsfound in the paint editor.

In the same way, create a Donut Sprite. Click
 to open the Paint
Editor again. Use the circle drawing tool and make sure that you
select the hallow circle instead of solid circle to create the donut shape.Then use paint bucket to fill the inside of the donut.
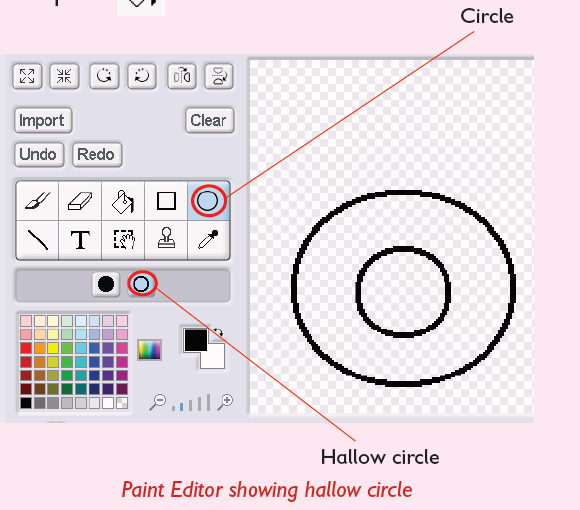
When you have created both new Sprites, that is, Donut Man and Donut,your Scratch Screen should look something like this:
When you have created both
new Sprites, that is, Donut Man
and a Donut, your Scratch
Screen should look something
like this:
You will then do the followingwith the sprites:
Scratch screen after creating Donut andDonut man
Table 6.1 The various sprites and their roles
Step 3: Creating Scripts from the Story Line Sprites
Now that we have all sprites we need, the next step is to get them to
work. To make them do anything meaningful, we need to give them their
scripts. To design scripts for each sprite, we need to review our simple
story line:
“Mr. Meow was hungry and needed to find the Donut Man, who is known to
carry many donuts. Fortunately, Mr. Meow found the Donut Man immediately
and got what he wanted. Mr. Meow ate, ate and ate. When Mr. Meow was full,he let out a happy sign and returned home.”
NOTE: Do not worry if the Scripts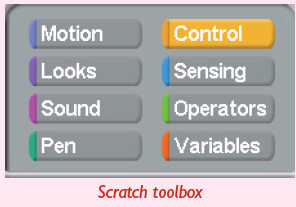
in Scratch Language do not make
sense to you; we will explain them
very shortly while we build Mr.
Meow’s scripts. Let’s do it!
Now we need to use the Scratch
“Tool Box”. There are eight
categories of tools but we will only
look at five categories that is, Motion, Looks, Sound, Control, andSensing.
Remember!
Most of the tools are very self-explanatory and you can RIGHT CLICK
a tool and click on help to see a brief description about thattool as shown below
Step 4: Create a Simple Scene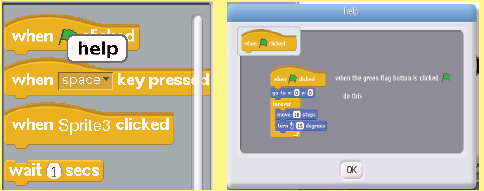
To create a scene, we change the costume of “Stage”. We will add two
houses and a plate to the “Stage”. To do so, double-click the Stage
icon to select. This will take you to “background 1”, hit “Edit” button.The paint editor window appears as shown below.
Change the costume by adding the two houses and a plate. When done,
hit “OK” button. Does your screen look like this?
Step 5: Adding Simple Movement Scripts to Sprites
We are going to show you how these tools work by first building Mr.
Meow’s scripts. “Double Click” Mr. Meow from the Sprites area, thenclick “Scripts” tab. Do you see a screen like this?
From the Tool Box, click the “Control” button. From the Control Script
Snippets, click and drag ‘when clicked’ to the “Scripts tab area”. Yourscreen should look like this.
Then, build a really simple script so that Mr. Meow follow go to his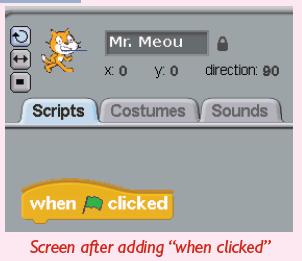
house when the green flag is clicked. Here are the steps to build this;
Activity 6.18 Moving the sprite around the stage
1. Move the three sprites as shown below. The x-axis and y-axis
values will be updated accordingly. Note them down for eachsprite.
2. Click “Motion” button in Tool Box Selection

3. From Motion Script Snippets, you would notice that the ‘x’-axis
and ‘y’-axis values are already filled in. See the figure below.
4. Click “Looks” button in Tool Box Selection, then ‘switch tocostume’ as shown below.
5. You are now ready to test this simple scripts. Drag Mr. Meow to
anywhere in the Stage and then click the Green Start Flag. You
would see Mr. Meow gliding back to his house.
6. In the same way, create the following scripts for the Donut Manand the Donut itself.
7. Click the green
 flag and see what happens.
Step 6: Saving the Project
To save your completed work: Click on ‘File’, and then ‘Save as’. Give the
project a title. In the “About this Project” section, fill in details about
the project such as what it does, what buttons activate the controls and
any other information you wish to include.
Step 7: Testing the project
Now you can test this very simple animation by first moving the sprites
around in the Stage and clicking the Green Start Flag button.
Describe what happens.
Further Activity
1. Make a Playground scene complete with see-saw and swing.
2. Draw in two children (boy and girl) and position them at the end
of the see-saw.3. Give the impression of the see-saw moving.
Scratch with Mathematics (Simple Computing using scratch)
As mentioned earlier, it is possible to use scratch to do some mathematical
computations. In this section, you will learn how to use scratch in:
• Determining angles and shapes
• Determining areas.
• Working out averages.
a) Shapes and angles
What shapes do you know? Draw some of these shapes in your notebook.
What angles do the corners make? For each shape you drew, write down
the value of the angles at its corners.
Activity 6.19 Drawing shapes using sprites
1. Try these out with a friend:
(a) Walk forward 2 steps, let your friend draw a line of your
path using a stick.
(b) Turn 90 degrees to the right. Walk forward 2 steps. Again,
let your friend draw a line of your path.
(c) Turn 90 degrees to the right. Walk forward 2 steps. Let
your friend draw a line of your path .
(d) Turn 90 degrees to the right, walk forward 2 steps. Let
your friend draw a line of your path.
• What shape did your friend come out with?
It is possible to draw shapes like this using sprites. It is as if your sprite
is holding a pencil. Whenever the sprite moves, it leaves a line behind it.
To draw a shape we must “walk” that shape.
2. Now, open a scratch activity and input the commands.In the
following picture.
3. Run the program by clicking on the green flag. What shape
did you come up with?
Did you notice that the code in step 3 above is repetitive? (Because the
movements and turns are all equal?)
In Scratch, we can use a repeat loop to create a shorter piece of
code. For example, the code above can be summarised as follows: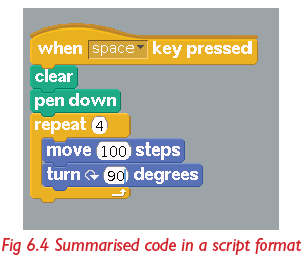
Try this out in your computer and run it. What shape did you end up
with? Compare it with the Fig. 6.4. Use the same basic commands to
draw a rectangle, triangle, pentagon and other shapes of your choice.
b) Using scratch in calculations
We can add, subtract, multiply or divide numbers in Scratch. Look at the
figure below and do different calculations by entering the numbers and
check for the answers.
You can also use scratch to calculate areas and perimeters. Further,
you can use scratch to determine perimeters of figures and to compute
averages.
Example: Using Scratch to calculate the area of a rectangle
To do this, create two (2) variables, one called Length (L), and the other
called Width (W). By clicking on “ Variable”then“ Make Variable” You
can enter the length and width values and the program will calculate thearea using the formula:
Activity 6.20 Calculating the area of a rectangle
1. Follow the steps shown in the screens below to calculate the areaof a rectangle in scratch.
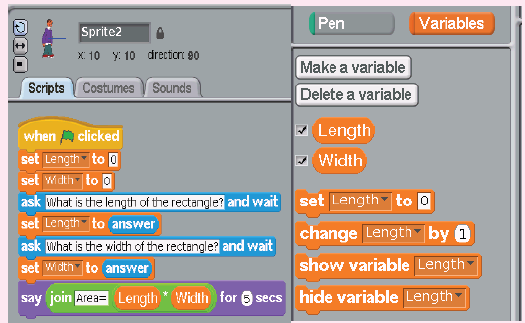
2. Set ‘Length’ and ‘Width’ in variables as shown below.
3. Calculate the area of a rectangle with length and width of your
choice in Scratch by running the program. What value did you get?
4. Use the dimensions above to draw the rectangle in your notebook.
Calculate its area using the formula: Area = Length x Width.
Compare your value in step 4 above to what you obtained using
scratch. Are they the same?
5. Try to calculate the perimeter of the rectangle:
• Ask the user for length (L)
• Ask the user for width (W)
• Compute (P) = (L + W) × 2
• Report P to the user.
Program to compute average in scratch
You may begin by an exercise first:
• Average 5 numbers for example { 12, 14, 15, 10, 10 }
Variable ‘sum’ will be used to add them. After you add all the
numbers, divide by 5.
• In the example sum = 12 + 14 + 15 + 10 + 10 = 61
• The average = 61/5= 12.2
Doing it using a Scratch program
In order to make a script in Scratch program, you need:
• To set variables, that is N-SUM and NEXT.
• A repeat loop (N-times).
• To ask the user for a number ‘NEXT’ inside the repeat loop
• To add NEXT to SUM each time in the loop.
• To say the answer eventually.
a) Creating the variables
The variables include:
N - which refers to how many numbers to average.
NEXT - the next number.
SUM - the sum of the numbers.
AVERAGE - the average of the numbers.
Remember!
A variable is a changeable value recorded in Scratch’s memory.Variables can only hold one value at a time.
To create the variables, click on variables tab on the commands panelfollowed by ‘make a variable’. A window like this appears.
Type in the variable name and create the next variable until you finish
the four. Your screen should eventually look like the one shown on figurebelow.
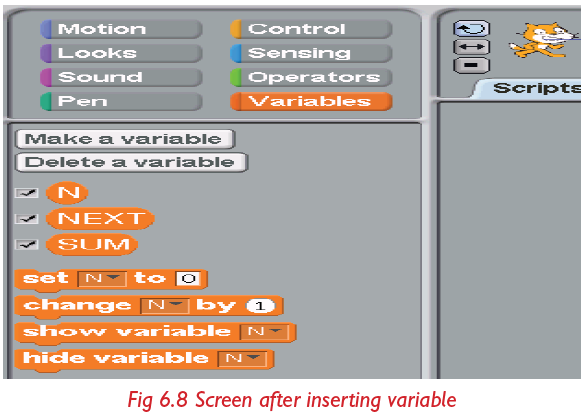
b) Creating the program
The program has three parts:
• Part 1: Allows you to insert the value of ‘N’.
• Part 2: Prompts you to insert the ‘N’ numbers to be averaged and
adds them up.• Part 3: Computes and says the average.
Can you identify these parts in the screen below?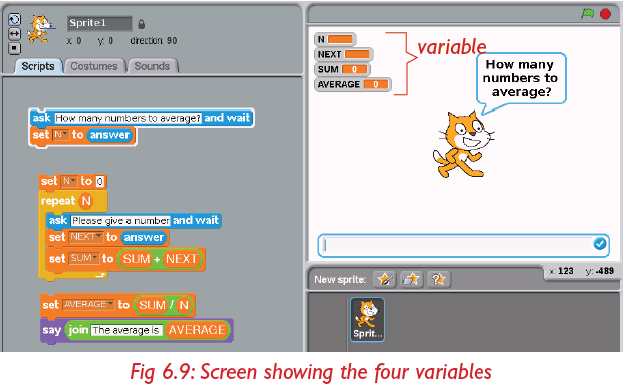
Open a scratch activity, input the above instructions to determine the
average of this set of data 14,15 and 16. Click on each part of the programand see it run! Did your screen finally look like this?
Save your average program in your scratch projects folder. You can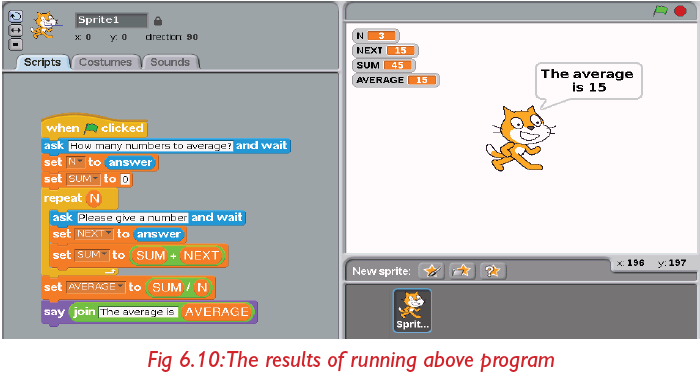
always use it again in the future.
Further Activity
Follow the steps above to determine the average of this range of data:23, 5, 8, 13, 17 and 11.
Self –Test 6.2
1. What is a sprite?
2. A sprite cannot do anything on its own. Why is this the case?
3. Practice changing the following:
a) Background.
b) Costumes of a sprite in your XO-laptop.
4. a) What is the importance of ‘x’ and ‘y’ co-ordinates in a
scratch project?
b) What does;
i. negative x-coordinate values mean in sprite movement?
ii. positive y – coordinate values mean in sprite movement?
5. When creating animation stories, which steps will you follow?6. We can use scratch in calculating _________, _________ and
6.3 Etoys
Identification of elements of Etoys environment
Activity 6.21 Identifying elements in Etoys environment
1. Look at the screen below. Is the screen familiar?Try to identify the things in the screen.
2. Draw and label the window in your notebook.
Etoys is a software environment that allows you to learn real
programming.
We use Etoys to make our own games, multimedia presentations,
computer art, animated storybooks, computer simulations and many
other things.
The screen in Activity 6.21 is an Etoys screen. It is called ‘the World’.
Everything you do from etoys will happen in this World!
To start Etoys, simply double-click on the Etoys icon which is
located on the desktop of sugar. The Etoys opening screen displays:
• Navigator bar
• Three coloured clouds
• An automobile that travels around the window, bouncing
off the clouds and the edges of the screen.
• The script - that controls the car’s movement.
Can you identify these in the screen above?
In the next section you will learn about some important features in
Etoy environment which you will use more oftenly. They include:
• Navigator bar
• Supplies• Etoys book
a) Navigator Bar
The Navigator Bar has many buttons:
All these buttons will allow you to navigate across different Etoys
projects. For now, note the ‘Publish It’, the ‘Find’
 and the
‘Quit’ buttons.
To save a project you will use the ‘Publish it’ button. To find a project that
you have saved, you will use the ‘Find’ button. To leave Etoys, you will use
‘Quit’ button.
b) Supplies
When you click on the ‘Supplies box’ a drop down screen like this
appears:
It contains various tools used to manipulate etoys program. The book in
the drop-down menu is very important.
c) Etoys book
The BOOK is one of the most useful objects in Etoys. You can use it to
do Slideshows, class diaries and albums; register observations and
even create your own animated book.
The most interesting part is that you can insert any kind of element
(OBJECT) inside a BOOK. For example, you can add text, drawings
and even animations in order to bring your book to live. So, let’s seesome tips before you create your first BOOK.
Activity 6.22 Creating a new book1. Once Etoys is open, you can find the BOOK in the SUPPLIES box.

2. When the SUPPLIES box opens, you will see the BOOK icon.
3. Now, just drag the BOOK icon over the WORLD to create a
new book. Did your screen look like this?
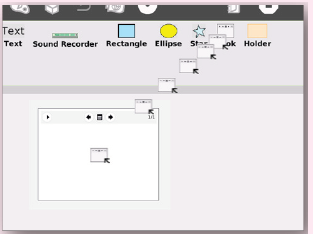
Etoys book screen
With this, a new book is now ready to be created!
Adding Text to the Book
To add text to the book, you need to open the SUPPLIES box again andlook for the TEXT object.
Just drag the TEXT over the book again and drop it. To start writing, just
select the text and start typing.
Now, you might have noticed that the size of the text is not right, or you
want to change the font or the size of your text. So, what you need to dois to call the halo, by clicking the TEXT with the circles buttons.
Activity 6.23 Adding text to an Etoy book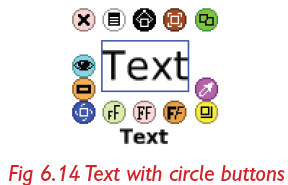
1. Follow the steps above to open an etoys book. Add text to the
book stating your name, your class and your school.
Adding drawings to the Book
There are two ways of adding a drawing to the BOOK. If you already
have a drawing outside the book, just drag it and drop over the book.
The drawing will be automatically added to the current page. The
second way is to create a new drawing, by clicking the PAINT icon
icon
located at the top menu. Clicking the paint palette in the toolbar brings
up the painting tool. It has two components: a translucent rectangle calleda SketchEditor where the user can paint an image and a PaintBox toolbar.
The SketchEditor is smaller than the screen. Therefore, everything drawn
on one page will be one object. To draw several objects, exit the painting
tool by clicking “keep” when one object is done and open it again to
get a new sheet to draw on. To draw the background of the world, click
the world’s grey pencil ‘halo’ icon.You can then use the toolbar to make a drawing of your choice.
Activity 6.24 Drawing in an Etoy book
1. Open a new Etoys book and draw a house in a valley. Do not
paint the diagram at this stage.
Painting a background
The BOOK is often used to create stories with animated characters. But,
in order to do animations in Etoys, it is necessary to draw the scenario
(BACKGROUND) separated from the characters (OBJECTS). Whatshould you do?
Activity 6.25 Painting a background
1. Right-click the circle button one time over the book. You will seethe halo, with the word “book” under it.
2. Now, click again over the book, You will see that the word ‘book’
changes to ‘page’. See Fig 6.40 above.
(If you look closer at the image, you might also notice some other
details. The PEN ICON , should have showed up. Well, it is exactly in this
icon that you should click in order to paint your scenario. Clicking on itgives you the paintbox toolbar below).
3. Use the various tools in the paintbox toolbar to paint your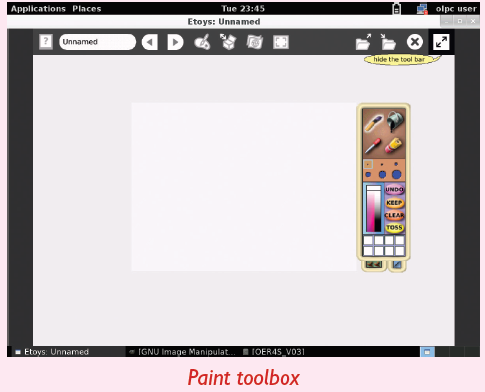
drawing in Activity 6.22 above. After painting, you will have adrawing such as this.
4. Finally, you can add the title of your storyline to come up with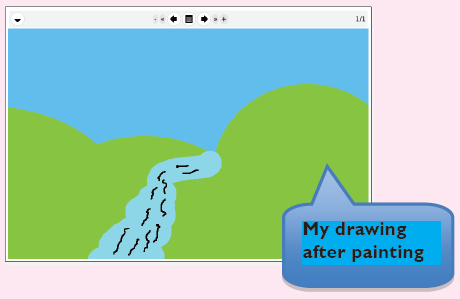
the cover of your book as shown below. The first page of yourstorybook should then look like this.
Etoys projects and Animations
In this section, you will learn how to create Etoys projects, how to save
new projects and how to open, rename and delete existing projects. You
will begin by making an Etoys animated car. To do this, go through thefollowing steps:
Step 1: Drawing and painting the car
Activity 6.26 Drawing and painting the car
1. Switch on your XO-laptop then click on the ‘Etoys’ icon in sugar
interface to open a new Etoys activity.
2. Click on ‘Make a Project’, or the ‘page icon’ to open up a new
project.
3. Choose the paintbrush to open up Etoys’ paint palette.
4. Draw a blob – which looks like the shape of a car as seen fromabove. See the diagram below.
NOTE: If you do not like what you drew, click on ‘Undo’ on the paint palette.
5. Choose different colours for the wheels, windows and so on.
6. When you are happy with what you have drawn, click on keep tosave your drawing. Did your screen look like this?
Congratulations! You have just finished the first step in your Etoys
project.
Right now, your car object is just a drawing. But every object in Etoys
has characteristics (properties) and behaviour, just like real world
things. You can manipulate the properties and behaviour of the objects
to make them do different things.
If you ‘right-click’ your mouse over the car object, you will see little
ovals surrounding the car. These are called ‘Handles’. Through these
handles, you can access the properties of your object and also modifyits behaviour.
Activity 6.27 Accessing the properties of a viewer handle
1. Click on the viewer handle to reveal the viewer. Did you seeimages like these?
The viewer contains property tiles (Fig.B) that shows what your car is
and what it can do.
2. You can “collapse” the viewer against the right edge by clicking
on the small tab with the picture of your car on it. To make the
viewer re-appear, simply click on the tab again.
Step 2: Changing the name property of the car
First, you will change the name of the object from ‘Sketch’ to ‘Car’.
Find the word ‘Sketch’ at the top of the viewer. Click on it to highlight it
and type in the word ‘Car’. Press enter to save the new name. Confirm
that your object is now known as ‘car’ and not ‘sketch’.
Step 3: Getting into more action!
Look at the tiles in the basic category pane. You will see two types of
tiles: some are preceded by a yellow exclamation point and others
are not. The tiles following the exclamation point are action
tiles. Clicking on them will fire the action once. Holding down on them
will run the action repeatedly. Try driving the car around the worldusing the exclamation points.
Step 4: Changing the behaviour of the car manually
Numeric values of the tiles can be changed by either clicking on the up
or down arrow on the left of the value or by selecting the value andtyping in a new number and hitting enter once.
After changing the value, click on the
 again. What happens?
Activity 6.28 Changing the value of the car
1. Practice changing the value as explained above.
2. Try different numbers, what do you think will happen if you typein negative numbers? Try this out as well!
Step 5: Changing the properties of the car
Tiles which are not followed by an exclamation point are value tiles.
(See Fig 6.17 below). Each of these is followed by a green and white
arrow that assigns or sets that value as the current value for a particularattribute or property of the car.
In the real world, objects have properties such as size, colour, location,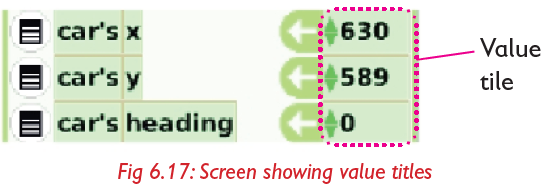
direction and so on. Every object that you draw or pull out of the
supplies bin in Etoys automatically has many standard properties that
tell us about the object, where it is and what it looks like and so on. Type
different numbers in the tiles then press enter, what happens?
Step 6: Changing the behaviour of the car – automatically
Manually pressing down on the yellow exclamation point as you did
in above activity to make the car move seems very inefficient and not
interesting! However, to make the car move on its own, until some
condition is reached (i.e. for one minute, until the car reaches an obstacle
and so on) we can use scripts just like in scratch.
a) Creating a script
Scripts are created for objects by assembling tiles in a scriptor. There are
two ways to get a scriptor:
i) Drag out the tile “car forward by 5” from the viewer and drop it
on the world. A scriptor will sprout around it. You can do this with
any action tile.
ii) If you would like to start with an empty scriptor, go to the scripts
pane of the viewer and drag out “car emptyscript”. (You can
scroll between panes by clicking on “basic” and “additional
panes” choices will appear).
Remember!
For now, use the first option only.
b) Naming the scriptYou now probably have something like this:
Click on “script1” to highlight it, and then change it by typing “drive”.
NOTE: When we program, we want our scripts and objects to be namedthings that tell us what their purpose is.
c) Running the scripts
Clicking on the yellow exclamation mark fires the action once.
This means that from the program above, the car will go forward 5
pixels. However, to make the car keep moving, click on the clock symbol (or ticker) on the scriptor. Notice that in the title of the script,
the word has changed to say “ticking”. If you click it again, the scriptwill stop and it will show “paused”.
Activity 6.29 Running the scripts
1. Open a new Etoys project. Experiment with different values and
different scripts.
2. How can you make your car go faster? Go Slower? Go backwards?
Go round in a circle? What tiles do you need to add for these?
d) Changing the “ticking” rate
Another way to change a script is to modify its “ticking rate”. Every
script is born with the default rate of 8 ticks per second. You can speed
things up, or slow them down by holding down the mouse button over
the clock icon until the following menu appears, after which, you can
make your selection.
Step 7: Creating the steering wheel object Activity 6.32
Activity 6.30 Creating a steering wheel object
1. Open a paint activity, paint a steering wheel.
2. Bring up the handles of the steering wheel by pressing ‘alt-’.
3. Open the viewer for the steering wheel by clicking on the ‘eyeball’
handle. Did your screen look like this?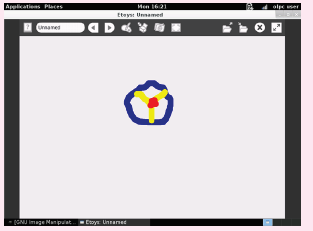
4. Change the name of the object to ‘Wheel’.
5. Bring up the handles of ‘Wheel’ again. Click on the blue ‘Rotate’handle. What happens?
By clicking and dragging the blue rotation handle, you can rotate the steering
wheel.
6. If you look at the wheel’s heading in the viewer, you will see how
the values change as you rotate the wheel. Try this out. Whichvalues did you see?
Step 8: Controlling the car through the steering wheel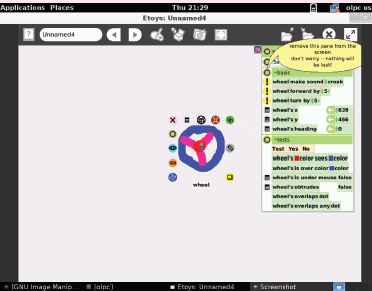
In the car’s scriptor, make sure you have the following tiles: To control
the car through the steering wheel, the car and the steering wheel have
to be connected. Specifically, the turn of the car has to be connected
to the heading of the steering wheel. Heading indicates at what angle
the object is rotating. As the car moves forward, if the heading of the
steering wheel is negative, it will turn left. If the heading is positive, it willturn right and if the heading is 0, then the car will move straight ahead.
Activity 6.31 Connecting the head of a steering
wheel to the car
To connect the heading of the steering wheel to the turn of the car,”
drag the heading tile of the steering wheel from the viewer and
position it over the “5” in the “turn by tile” of the car on its scriptor.You should end up with this:

Step 9: Driving the car using the steering wheel
You are now ready to drive the car using the steering wheel. In wheel’s
basic pane, set the value of heading to 0. Then start the car’s script by
clicking on the ticker in the car scriptor. Quickly bring up the handles of
the wheel. Scroll the mouse down on the blue rotation angle and start
driving the car! Is it fun?
Step 10: Using maths to scale the effect of the wheel on the car
You may have realised that the car in step 9 above is too sensitive to
the wheel. With every “tick”, the car turns by the wheel’s heading. So, if
the wheel is heading slightly to the right, say 5 degrees, then, assuming 8
ticks per second, the car is spinning 40 degrees every second. Dizzying!
Activity 6.32 Using maths to scale the effects of
the wheel on the car
1. Click on the small green arrow just next to the word “heading”,
and it will change to say “car turn by heading + 1”. You can
change the “+” to a variety of other math operations and you
can change the “1” to any number. Try these out and see what
happens.
2. Try the following and determine what they do, and which effect
you want in order to get the car to be less sensitive to the wheel”
a) “car turn by wheel’s heading –5”
b) “car turn by wheel’s heading * 5”c) “car turn by wheel’s heading * -5”
Step 11: Publish the car (save the car project)
We do not “save” Etoys projects, we “publish” them. In the Navigator
tab, click on the “Publish” icon A form like the one shown below will
appear.
Using the form, name the project. Follow the guidelines given by your
teacher. Include descriptive information in the name. Do not use any
special symbols in the name other than dashes. You need not to fill out
the other information. You can come back to that later.
After you click “ok” on the form, a new window like the one shown
below will appear.
Click once on “Etoys” (or wherever else your teacher tells you to publish
to) which is a special folder on your computer, and then click “Save” at
the bottom of the window. Wait for Etoys to finish publishing.
Congratulations!
You have just completed your very first Etoys project. Now go ahead
and play with the different options that we explored!! When you are
done, go back to the Navigator tab and click on “Quit”. At the end of thistutorial, you should have this:
Recovering your work (Open)
Open Etoys, and find your project by clicking on the “Find” button on
the Navigator Bar. Click on “Etoys” in the left pane, select your project
in the right pane and click “OK”. Follow this procedure to recover yoursaved work
Remember!
When you are drawing multiple sketches, it is very important to draw
them in layers. To do this, you must open the sketching tool every time
you want to draw a new sketch. For example, what we have done in the
project above is one sketch. If I want to draw a hat that moves, I have toopen the paint tool again and draw a separate hat sketch.
Self –Test 6.3
1. How do we call the window that appears when we open an
Etoys activity?_____________
2. Name the main features in an Etoys window.
3. What is a “halo” of an object?
4. How do you open a “viewer” for objects in Etoys?
5. Give five properties of any object in Etoys.
6. What is a “scriptor”?
7. What is the “heading” of an object? What does it mean if a
ticking program changes the heading so that it increases by 90?
If you were riding on the object, what would you say happened?
UNIT TEST 6
1. Using record activity, record a song of your choice and save
it in Journal. Open turtle art and use correctly the blocks of
commands to display your song.
2. Take different photos of yourself. Use turtle art to display them
by arranging appropriate blocks.
3. How can you make an object move backwards in Etoys?
4. a) Habineza wants to program a “hot air balloon” to go up
and down as she drags a picture of a sandbag up and
down. Can you describe how she can do this in Etoys? Be
real and specific, because she hasn’t seen Etoys before.
b) How would you make the balloon go up and down much
further than the sandbag?
5. a) Create scratch programs to do the following: (save each
project in your computer).
i) Calculate the area of a rectangle.
ii) Calculate the perimeter of a rectangle.
iii) Calculate the sum of three numbers.
iv) Calculate the average of three numbers.
b) Practice the following: Create three sprites. First sprite 1
starts at the upper left corner of the screen and glides to
the middle. Then sprite 2 starts in the upper right and
glides to the middle of the screen. They are followed by
sprite from bottom left and finally sprite 4 from bottom
right to the middle.
6. Practice and create a shark attack game in scratch. Change to a
suitable background and animate a shark to make it interactive.
7. Calculate the answer to the following problems; write the
answers in your exercise book. Enter the calculations into
scratch and confirm your answers.
a) 5 + 4 b) 5 × 4 c) 5 + 4 – 3
d) 34 + 3 × 6 e) (34 + 3) × 6 f)40/5+ 4
g) 4 +40/5UNIT 7:Air pollution
1. Look at the following pictures.
2. Think about the responsibilities of human beings in the situations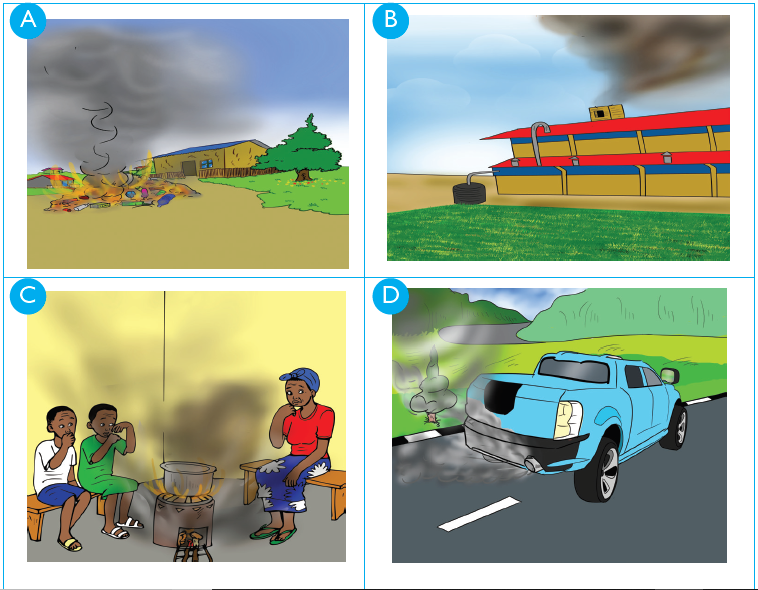
above and predict what you are going to learn in this unit.
7.1 Definition of pollution
Find out
1. What pollution is.
2. How polluted air affects us.
3. Causes of air pollution.4. How to advocate against air pollution.
Activity 7.1 Field visit
1. Describe the harmful effects of motor vehicles to the environment.
2. Visit an industry near your school.
3. Ask questions on several activities going on in the industry
including how the environment is managed.
4. Write short notes in your notebook.
Pollution is the presence or introduction into the environment of asubstance which has harmful poisonous effects.
7.2 Sources of common air pollutants
Activity 7.2 Identifying the sources of air pollution1. Look at these pictures.
2. What is going on in the pictures? Is it good or bad to the
environment?
3. Visit a polluted environment and observe it carefully. Write down
short notes that include:
a) Causes of air pollutionb) Effects of air pollution
Air pollutants are substances that cause air pollution. e.g smoke, dust
particles, fumes, gases such as carbon monoxide, sulphur dioxide and
nitrogen dioxide.They come from burning of garbage and tyres, vehicle
exhaust systems, industries, smoking, deforestation, woodfires. Dust
created by wind and other activities like quarrying also pollute the air.Air pollutants contaminate the air making it unsafe for use.
7.3 Consequences of air pollution
Activity 7.3 Identifying effects of air pollution
Carry out the following experiments:
1. Burn some fresh leaves in a closed room. How do you feel after
some time? Why is this the case?
2. Burn some plastics such as tyres then place a shiny lid or pan on
top of the burning fire. Observe the lid or pan after sometime.What do you see?

3. What do these experiments tell you about how air pollution affects us?
Activity 7.4 Research Activity
1. Go to the library and read articles, textbooks, magazines and
pamphlets on consequences of air pollution.
2. Visit a local environment management authority office. While
there, ask the officers about the causes and effects of air
pollution and how to control it.
3. Write short notes on your findings on consequences of airpollution.
Consequences of air pollution can be grouped into two:
• Health effects
• Environmental effects
a) Health effects
These include:
• Irritation of the eyes, nose and throat.
• Respiratory diseases such as asthma, pneumonia and cancer of
the lungs.
• Damage to other living organisms.
b) Environmental effects
These include:
• Air pollutant gases such as carbon monoxide which can cause
death when inhaled. This happens especially when in limited supply
of air. This explains why we should not stay in a closed room with
burning charcoal.
• Acid rain which contaminates water, putting the lives of human
beings and other animals at risk.
• Destruction of the ozone layer leading the green house effectwhich causes global warming.
7.4 Advocating against air pollution
Find out
Ways of avoiding air pollution.Activity 7.5 Ways of Preventing air pollution
1. Look at the following picture.
2. How are the activities above important regarding environment
protection?
Ways of controlling air pollution include:
• Planting plenty of trees to create forest covers in order to absorb
carbon dioxide. Forests act as both water catchment areas and
recycling points of gases.
• Fitting vehicle exhausts with catalytic converters to help convert
poisonous gases into less poisonous ones before being released to
the atmosphere.
• Setting up industries far away from residential areas and fitting
factories with chimneys that filter air.• Avoiding/reducing cooking using firewood and charcoal.
UNIT TEST 7
1. What is pollution?
2. Apart from carbon dioxide, give other pollutants that are gaseous
in nature.
3. Give any three reasons why air pollution is a threat to animal lives
and the environment.
4. Why is it not advisable to stay in a room with burning charcoal?
5. Explain the term “go green” as a solution to air pollution in our
environment.
6. Explain why the government of Rwanda stopped people from
smoking cigarettes in public places.
7. Look at the pictures below. Say whether what is going on is rightor wrong. Give reasons for your answer.
a) __________________

b) __________________
c) __________________
8. a) What is global warming?
b) What environmental activities can we practice to avoid global
warming?
9. How does air pollution affect drivers?
10. What advice would you give to people who use fuel as a source of
energy?
11. Air pollution is severe in ____________. (cities, rural areas) Why?
12. Which of these gases is responsible for global warming?
A. Hydrogen peroxide
B. Carbon dioxide
C. Sulfur dioxideD. Nitrogen dioxide
UNIT 8:Animals
1. Study the picture below.
2. What is happening in the picture?
3. Is it good to graze many cows in a small piece of land?
8.1 Characteristics of a good cowshed or goat shelter
Find out1. How a cowshed or goat shelter should look like.
Activity 8.1 Investigating the characteristics of a
good cowshed
1. Observe and write the characteristics of good cowshed/goat shelter to a farmer during school trip.
a) Where is the location of the shelter or cowshed?
b) What is it made of?
c) Do young ones share the same shelter as the older ones?
Why?d) How does the floor of the shelter look like? Why?
A good cowshed should have the following characteristics:
• It should be fenced to avoid predators.
• The floor should be made in an inclined manner for easy
flowing of water during runoff in order to drain easily.
• It should be roofed.
• It should have proper ventilation.
• It should have concrete rough floors that are easy to clean
and to prevent the cows from slipping.
• It should have both clean feeding and watering troughs at
designated points.
• There should be another part reserved for calves.
• It should have an isolation box to accommodate animals that
are on treatment.
• There should also be a crush to be used for spraying the cowsand a milking shed.
8.2 Types of cattle and goat breeds
Find out
The different types of cattle and goat breeds.
Activity 8.2 Identifying breeds of cattle/goats to rear
1. Make a trip to a cattle farm to observe the various types ofcattle kept. Write down their characteristics.
Types of cattle/goat breeds
The term ‘breed’ means a group of animals with similar characteristics.
There are two main types of cattle breeds namely.
• Local (indigenous) breeds
• Foreign (exotic) breeds
a) Local (indigenous) cattle breeds
These are cattle breeds that are found locally in Rwanda. They are
native cattle that can withstand hostile climatic conditions and are also
resistant to tropical diseases. They have long legs and they can walk
over long distances looking for food and pasture. Their productivity is
generally low and they are small in size. Examples of indigenous cattle
breeds include:
i. Zebu cattle – They are small in size and have short humps. Dairycattle of this breed have the ability to resist tick-borne diseases.
ii. The long – horned cattle (Inyambo) -These are fairly large in size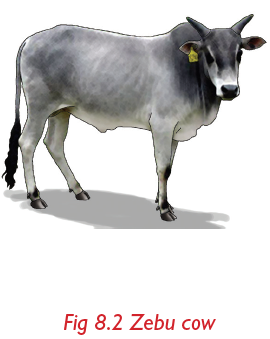
and have well developed horns
iii. The boran cattle – They are large in size than the zebu, have short
horns and big humps. They produce good quality beef.
b) Foreign (exotic) cattle breeds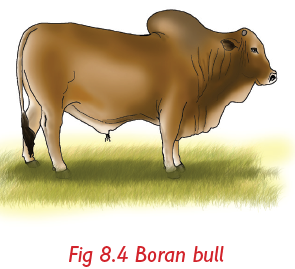
They were introduced in Rwanda from foreign countries and can be
beef or dairy cattle.
Dairy cattle breeds
These are mainly kept for production
of milk. They include: Friesian, Jersey,
Guernsey and Ayrshire.
i) Friesian
• Originated from Holland.
• Produces the largest amount of milk.
ii) Ayrshire
• Originated from Scotland.• Produces 20 litres of milk per day.
iii) Guernsey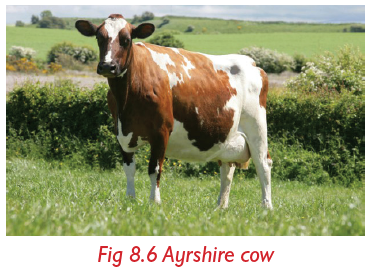
• Its origin is Guernsey island
(coast of France).
• Produces about 17 litres of milk
per day.
iv) Jersey
• Originated from England.
• Produces about 14 litres of milk perday.
Beef cattle breeds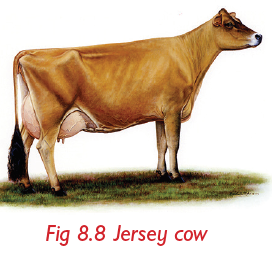
These are purposely kept for meat production.
They include:Aberdeen angus, Hereford, Charolais, Shorthorns and Galloway.
i) Aberdeen Angus
• Originated from the counties
of Aberdeenshire and Angus
in North-Eastern Scotland.• Best in quality beef.
ii) Hereford
• Originated from England.
• Bulls weigh 1000 kg and areexcellent grazers.
iii) Charolais
• Its origin is France.
• Bulls weigh 1200 kg withhigh quality meat.
iv) Short horns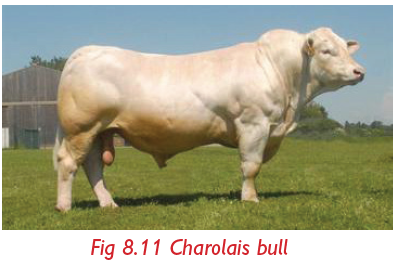
• Originated from England.• Bulls weigh 800 kg.
v) Galloway
• Originated from Scotland.
• Are black with brownish tinge.
• Bulls weigh 1000 kg.
• They have long earlaps which
droop.
• They weigh between 60-75 kg.• They lack horns (are hornless).
Remember!
Some cattle are kept for both milk and meat. They are called dual purposecattle. Examples are Sahiwal, Red poll and Simmental.
Breeds of goats
Goats can be kept either for milk or meat.
Main types of goat breeds.
a) Local (indigenous) breeds of goats
• They are the native goats of Rwanda.
They are kept mainly for meat and
are more resistant to diseases. e.g:
East African small goats and Nubiangoat.
b) Foreign (exotic) breeds of goats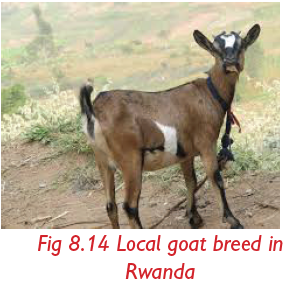
They can be dual propose e.g Boer goat and Galla goat.
Goat breeds for mutton/ meat production
i) Boer
• Originated from South Africa.
• They are fast maturing.
• Are ideal for cross-breeding withlocal breeds.
ii) Galla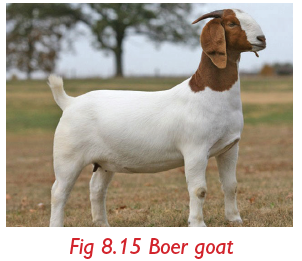
• Its origin is Northern Kenya.
iii) Nubian goat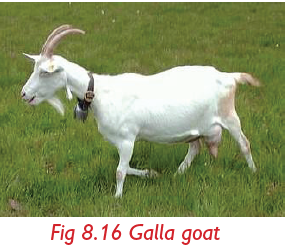
• Its origin is Sudan.
• It is white in colour with brown patchesor vice verse.
Dairy goat breeds
Examples toggenburg, saanen and
alpine goat.
i) Toggenburg
• Originated from Switzerland.• Produce 3-4 litres of milk per day.
ii) Saanen goat
• Originated from Switzerland.• It Produces 2-3 litres of milk per day.
iii) Alpine goat
• Its origin is France.
• It produces between 3-4 litres of milkper day.
Remember!
Goats can also be kept for fibre /mohair production. e.g Angora goat.
Characteristics of cattle and goat breeds to rear
Goats and cattle to rear should have the following characteristics.
• Growth rate – they should grow fast.
• Resistance – they should resist against common diseases found inthe area such as anthrax and foot and mouth disease.
• They should be good producers of milk and meat.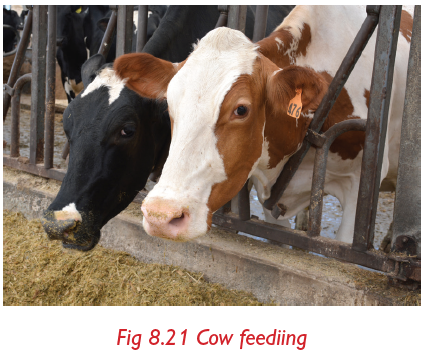
• They should be able to survive a range of climatic conditionsavailable.
8.3 Feeding of cows and goats
Find outHow farm animals especially cows and goats are fed.
Activity 8.3 Visit to a goat and cattle farm
1. Make a trip to a goat and/or cattle farm and describe:
• Observe and describe what goats and cattle are feeding on.
• Identify nutrients of good animal diet and their sources.
Cattle / Goat should be fed on a balanced diet. A balanced diet contain
animal feeds with appropriate nutrients in their right amounts.
A balanced diet contains:
• carbohydrates e.g pastures, fodder crops, vegetables e.t.c
• proteins
• fat and oils
• minerals and vitamins
• roughages
Below is a summary of elements of good cattle/goat diet and their
sources.
• Carbohydrates e.g potato vines, maize grains, sorghum stalks,
cereals and molasses.
• Poteins e.g legumes, commercial seeds (concentrated).
• Minerals and vitamins e.g saltlicks and bone meal.
• Fats and oils e.g plant leaves and cotton seeds.• Roughages e.g green fodder, green pasture and vegetables.
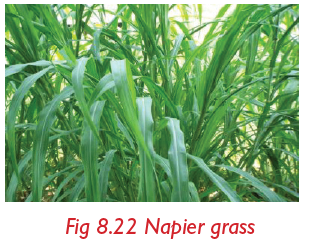
Remember!
In addition to feed stuffs, farm animals should be provided with plentyof clean drinking water.
8.4 Cattle or goats health sanitation conditions
Find outWhich sanitation conditions are necessary in cattle or goat farms.
Activity 8.4 Field visit
• Visit a nearest farm of cattle / goat.
• Observe and discuss sanitation conditions on the farm.
• Compare sanitation of farm animals and have one at home.
Things that should be done to maintain proper sanitation in a goat or
cattle farm include:
• Keeping animals houses clean.
• Keeping feeding and drinking troughs clean.
• Clearing the bushes around the animals’ sheds.
• Keeping water sources clean.
• Cutting over growths from the feet of animals such as the goats.• Disposing off dead animals by burying them deep into the soil.
8.5 Common diseases of cattle and goats
Find out
What to do when animals become affected
Activity 8.5 Identifying common diseases of cattle
and goats and their prevention measures
1. Visit a cattle or goat farm/ google engine/ library.
2. Describe diseases, signs and symptoms that are observable
through the sick animals.
3. Make a summary of your findings (Diseases, animals affected
with signs and symptoms.
a) Identification of common disease of cattle and goat
Diseases that affect cattle and goats are grouped into two:
• Parasitic diseases - these are diseases that are caused by
parasites. Examples are East Coast Fever (ECF), anaplasmosis and
trypanosomiasis, pneumonia, Nagana.
• Infections - these are diseases that are caused by micro-organisms
such as viruses and bacteria. Examples are pneumonia, mastitis and
anthrax.
b) Prevention and control measures of cattle and goat diseases
General ways of controlling or preventing livestock diseases include:
• Vaccination
• Quarantine
• Isolation
• Use of drugs such as antibiotics to treat the disease
• Dipping or spraying to control external parasites that may cause
diseases among others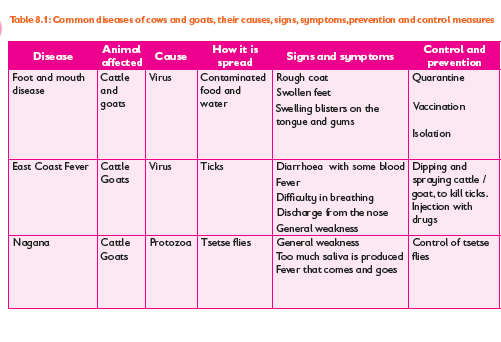

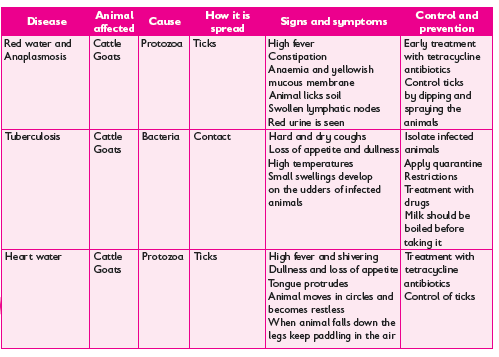
8.7 Importance of cattle or goat farming
Find out
1. How animals are helping families in Rwanda.2. The animal product we sell to get income.
Activity 8.6 Identifying various cow/ goat products
and their importance
Discuss the following questions:
1. Which are some of the products we get from goats or cows and
their importance? Fill the table below.
2. Think about other ways in which we benefit from cattle and goats.List them down in your notebook.
The following are some reasons why we keep cattle and goats:
a) Nutritional benefits
• Meat and milk that enriches our diet with proteins and fats.
b) Economic benefits
• Milk from cows and goats enriches man’s diet with vitamins, proteins,
carbohydrates and fats.
• Hides or skins provide leather which is used to make bags, wallets,
belts, shoes, jackets and sofa sets.
• Provides employment to various groups of people example include:
farmers, veterinary doctors, slaughterhouse workers, butcher men
and women, workers in dairies among others.• Source of income (selling milk and meat).
c) Social benefits
• Cattle and goats are used in social functions such as dowry.
d) Agricultural benefits
• Manure to be used in farms to grow crops.
Remember!
Animals are our heritage. We should avoid mistreating them. Instead,ensure that they are well taken care of.
UNIT TEST 8
1. Assume you want to start a project of keeping goats or cows
at home. Describe how you would construct the cowshed or the
goat shelter.
2. a) What is a breed?
b) Distinguish between indigenous breeds and the exotic breeds
of animals.
3. Give two reasons why an animal house should be fenced.
4. Akaliza is a primary 6 pupil. Everytime they go for field visit to
observe animals, she complains of bad smell. One day, she said
that she cannot become a farmer. In fact, she added that farming
is meant for boys alone. What advice can you give to Akaliza?
5. Which characteristics will you look for when selecting a cow for
a) Beef production? b) Milk production?
6. Fill the gaps in the table below.
7. What is the importance of keeping proper sanitation in animal
farms?
8. Which breed of cattle are those in the next page? Which aredairy cattle and which are beef cattle?
9. Why do you think it is an advantage to grow crops when you are
a cattle or goat farmer?
10. Why is the government of Rwanda emphasizing that there should
be at least a cow per family in Rwanda?
11. Why do you think people are advised NOT to drink milk that is
not boiled?
12. Write TRUE or FALSE for each statement.
a) Ayrshire, Holstein and brown Swiss are all dairy cattle breeds.
_________
b) The most important products of cattle are draft power and
milk and not meat. __________
c) Taking goat milk by human beings is NOT healthy.
___________
d) When animals die of diseases, they are supposed to be
slaughtered immediately and eaten. __________
13. Give a reason why the government of Rwanda is encouraging
Rwandans to practice ‘Gira inka munyarwanda’!UNIT 9:Plant reproduction
1. Look at the pictures below. What is going on in the pictures?
2. How can you help the family in picture B?
9.1 Definition and types of plant reproduction
Find out
1. What is plant reproduction ?
2. Two types of plant reproduction.
Activity 9.1 Investigating definition and types of
plant reproduction
1. Research in a library textbook or search engine what plant
reproduction is.
2. Obtain some healthy sugarcane cuttings.
3. Bury the sugarcane cuttings into the soil then observe for two
weeks.
Reproduction is the production of new plants from the parent plants
e.g cassava cuttings.
Reproduction occurs in two ways:
Asexual reproduction e.g sugar cane
Sexual production e.g beans
9.2 Identification of parts of a complete flower
Find out
1. Go out of the classroom and collect as many flowers as you can.
2. Observe the external parts carefully. What parts do you see?
3. Dissect the flowers and identify the internal parts.
4. Did all types of plants have the same type of flowers?
A Complete flower is made up of three main parts:
• The external flower parts
• The male reproductive parts
• The female reproductive parts
a) External parts of the flower
These include the stalk, calyx and corolla.
The flower stalk
The stalk joins the flower to the plant.
The calyx
This consists of small parts that look like leaves. They are called sepals.
Sepals protect the develping flower.
The corolla
Corolla consists of brightly coloured parts called petals. They attract
insects and birds thereby assisting during the pollination process.
b) Male reproductive parts
The male reproductive parts put together are know as stamen.
The stamen is made up of:
• Anthers - which contain pollen grains. Pollen grains are the
male reproductive cells.
• Filament - a long stalk that holds the anther.
c) Female reproductive parts
The female reproductive parts put together form the pistil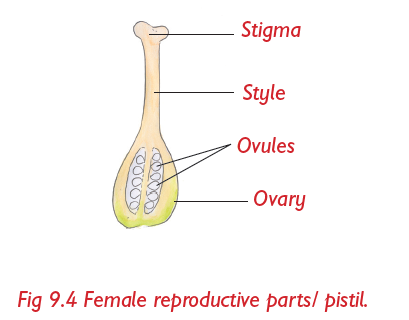
The pistil is made up of:
• Stigma - which receives pollen grains from the anthers during
pollination.
• Style - is a long and narrow tube that joins the stigma to the
ovary.
• Ovary - is the swollen part at the bottom of the style. It
contains ovules. Ovules are the female reproductive cells.
9.3 Process of sexual reproduction in flowering plants
Find out
1. Various agents of pollination.
2. How the agents cause pollination to occur.
Activity 9.3 I Investigating ways in which plant
reproduce
1. Research in search engine or library textbook on ways of plant
reproduction
2. Write down notes on various ways on which plants reproduces
Sexual Reproduction in flowering plants involves the following
processes : pollination, fertilisation, seed dispersal and seed germination.
a) Pollination
Pollination is the transfer of pollen grains from the anthers to stigma of
a flower.
There are two types of pollination:
• Self pollination - involves transfer of pollen grains from the
anthers to the stigma within the same flower or to the stigma of
another flower on the same plant.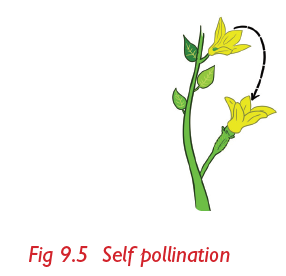
• Cross pollination - This is the transfer of pollen grains from
the anther of one flower to the stigma of another flower on a
different plant but of the same type.
Agents of pollination
These refer to things that help to transfer pollen grains from the anther
to the stigma of another flower. They include:
Insects: example bees and butterflies
Birds: example: sunbird; wind, water.
• Birds and insects are attracted by bright colours and the sweet
scent of flowers. They help in the transfer of pollen grains. The
wind blows the pollen grains from flowers of one plant to the stigma
of flowers on another plant or within the same plant.
• Water flows downstream carrying pollen grains with it.
b)Fertilisation
• After pollination, fertilisation follows.
• When pollen grains reach the stigma, it germinates and grows
down through the style to the ovary and meets the ovules. This
process of joining together of the nuclei of pollen grains with that
of ovules is called fertilisation.
After fertilisation, the ovules become seeds and the ovary develops intoa fruit.
c) Seed dispersal
Seed dispersal is the scattering away of seeds in order to germinate and
grow into new plants.
Agents of seed dispersal
a) Self-dispersal
This is whereby fruits split open with a lot of force (explode) and
throw out the seeds.
b) Wind –Wind flows and spread the plant seeds at long distance
c) Animals
• Animals eat juicy and fleshy parts of fruits and scatter away
the seeds. Examples of such fruits are mangoes and oranges.
• Some fruits and seeds have hooks or spikes which stick to the
hair, fur or clothing of passing animals and human beings. They
later drop at distant places from where they grow into new
plants. An example is the black jack seed.
d) WaterFruits and seeds are dispersed by water.
d)Germination
Activity 9.4 Investigating germination of seeds
1. Plant some bean or maize seeds in a tin or box.
2. Water the planted seeds for one week as you observe what
happens
3. Discuss your findings.
Germination is the process by which a seed develops into a young plant
known as seedling. During germination, the following take place:
• The seed absorbs water through a tiny hole on the seed.
• The seed coat (testa) bursts and splits open.
• The radical comes out to form a tiny root.
• The plumule forms a shoot with tiny leaves and grows upwards.• The seedling grows to become a mature plant.
Self –Test 9.1
1. What is the function of a flower in a plant?
2. Draw and label the different parts of a flower.
3. _________ and __________ make up the stamen of a flower.
4. Name two seeds dispersed through wind and through water.
5. Many petals together form______while sepals form_______
6. What is pollination?7. Name two types of pollination
9.4 Asexual reproduction methods
Find out
Different types of asexual reproduction.
Activity 9.5 Investigating of types of plant asexualreproduction
1. Put the potato tuber into the soil and leave them for one week.
2. Observe the potato tubers such as the one alongside.
What can you see?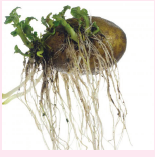
In asexual reproduction, there is no need of male or female sex cells
to come together. Here, a certain plant part may separate from the
parent plant and grow into a new plant. Asexual reproduction methods
include the following:
• Use of cuttings
• Grafting
• Layering• Use of suckers
a) Use of cuttings
Activity 9.6 Vegetative reproduction using
stem cuttings
1. Cut stems of sugarcane or cassava plant.
2. Plant the stems in the kitchen garden at home.3. Water them for five days then make your observations
We can use leaves, stem or root cuttings to come up with new plants.
e.g sweet potatoes, cassava, yams and sugarcane.
b) Grafting
Activity 9.7 Grafting1. Look at the picture below.
2. What is going on in the picture above?
The picture above shows the process of grafting.
In grafting, scion is added to the stem of another plant of same type
called the root. The two unite and come to grow together as one plant.
Examples of plants that can be grafted: oranges, lemons, mangoes,
avocados.Note: Grafting helps to improve the quality of a produce of certain plant.
Project work
1. Practise grafting using an orange plant (scion) with a lemon plant
(root stock) at home.
2. Take care of the plant until it produces fruits.
3. Taste the fruits produced. Are they different from the originalorange fruits?
c) Layering or marcotting
Activity 9.8 Layering
1. Bend one of the branches of a passion tree down as shown
below. Peg the branch into the soil and pile a heap of soil on the
branch.2. Leave it for one week and check if the roots have developed.
3. Cut off the branch from the main plant then plant it in a different
garden. Monitor the growth of the plant until fruiting.
4. Monitor the growth of the plant until fruiting.
Layering also known as marcotting. It is a form of asexual reproductionwhereby rooting is induced in part of a tree branch as shown above.
d) Suckers
Activity 9.9 Vegetative reproduction using suckers
1. Visit a banana or a sisal plantation.
2. Separate the plant lets from the main plant carefully. Plant it ina different place.
3. Water the plant let for a few days. Do they grow into mature
plants?
The small plants (plant lets) growing besides the mature banana or sisal
plants are called suckers. The suckers can be separated from their
parents and be planted at another location. The new plant continues togrow to become a healthy mature plant. eg: Pineapple, Ginger, Aloe Vera.
9.5. Reasons for plant reproduction
Find outThe reasons for plant reproduction.
Activity 9.10 Investigating the importance of plant
reproduction
1. Search in library textbook or search engine on plant reproduction.
2. Write down the reason for plant reproduction.
Reproduction in plants is important because it:
• Improves the quality of produce of crop plants.
• Prevent the plant species from becoming extinct.
• Helps to control plant diseases through mixing of genes.• Increases food production through research.
UNIT TEST 9
1. What is the difference between pollination and fertilisation?
2. The three agents of pollination are ___________, __________
and __________.
3. The ovules in a flower are produced in the _______________
while the pollen grains are produced in the ____________.
4. Distinguish between male and female parts of a flower using
diagrams.
5. Potato tuber is an underground __________. (stem, root)
6. After fertilisation __________ becomes seeds while __________
develops into a fruit.
7. Which method of reproduction would you recommend for the
following plants?
a) Banana ___________
b) Sugarcane ___________
8. Hagimana came across the following seeds during a field trip.The seeds are likely to be dispersed by ______________.
9. Distinguish between grafting and layering. Use diagrams.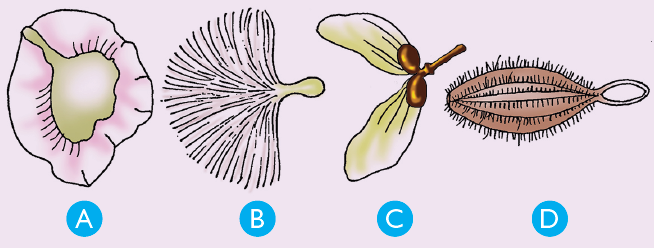
10. Which conditions must be present for germination to occur?
11. Explain why bee-keeping is important near a sunflower farm.
12. Draw and label the parts of a flower.
13. Match each part of the flower in the table that follows with itsfunction using a line.
14. Give a reason why some plants have brightly coloured petals.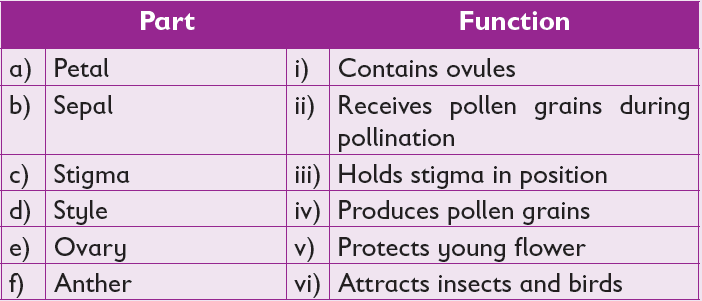
15. Why do most flowers have scent?
UNIT 10: Sustainable waste management
1. Look at the picture below.

Fig 10.1
2. Is there a better way in which we can manage the wastes in the
picture?
10.1 Classification of wastes
Find out
1. How wastes are classified.2. What should happen to the wastes.
Activity 10.1 Classifying wastes
1. Take a walk around the school compound.
2. Look out for any types of wastes.3. Group the wastes as shown in the table below.
4. Discuss the advantages and disadvantages of each category of
wastes.
5. How should we dispose of each type of waste?
The two main categories of wastes are biodegradable and non-biodegradable
wastes.
a) Biodegradable wastes – these are wastes that can be
decomposed by microorganisms to form organic manure.
They include kitchen garbage, animal dung, vegetable remains
among others.
b) Non-biodegradable wastes – wastes that cannot be decomposed
by microorgarnism. They are recycleable. They remain in theenvironment forever.
Examples: plastics, polythene bags and
glass.
Waste can also be grouped as follows:
a) Hazardous wastes – wastes that can
harm or cause diseases, fire etc. Examplesare biomedical wastes.

b) Toxic wastes – wastes that can cause death. Examples: chemicals
and gases such as carbon monoxide.
c) Flammable wastes – wastes that can easily catch fire and reactexplosively with air. Examples : waste fuels and gas cylinders.
Remember!
We should form a habit of separating wastes into their various categories.
For example, hazardous, biodegradable and non-biogradable recyclablewastes.
10.2 Sources of wastes
Find outDifferent sources of wastes.
Activity 10.2 Discussion
1. Think about the activities that take place in the following places:
• Farms
• During general cleaning at home
• Industries
• Medical centres
(i) Which ones create wastes?
2. For each category, discuss some wastes that come about as aresult of the activities.
Sources of wastes in our environment include:
• Urban or municipal wastes
- these are wastes collected
from residential areas, markets,
streets and other places mostly
in town. Examples: plastics, old
clothes, pieces of glass, organic
matter and food remains from
households and wastes from
business premises establishments.
• Industrial wastes - these
originates from cement factories,
power stations, textile factories,
food processing industries andmany others.
Remember!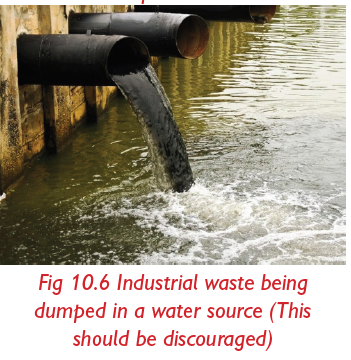
Some of these wastes especially those from chemical industries canbe hazardous, so we need to be careful when handling them.
• Agricultural wastes - Bio-degradable wastes, are associated
with agricultural activities.Examples: crops remains, animal remains,e.t.c
• Construction wastes - these are wastes from construction sites.
Examples: unwanted materials produced at the construction sites,empty cement bags, broken bricks, soil and packaging boxes .
• Biomedical wastes - generated from hospitals, clinics and other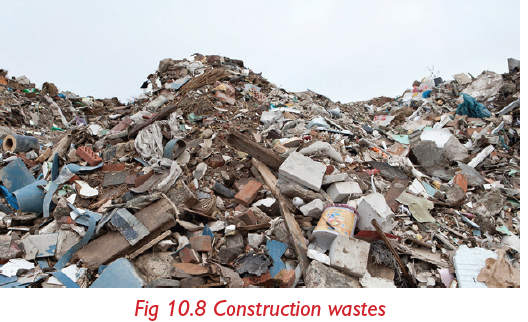
medical institutions. Examples: expired drugs, surgical dressings,plastic syringes and used gloves.
• Electronic sources of wastes - e-waste or e-scrap are old
electronic and electrical devices. Examples : old DVD, televisionsets, telephones, computers, vacuum cleaners and their parts.
• Wastes from automobiles - are wastes that come from cars or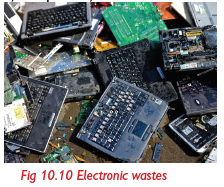
old vehicles. Also, oil and grease.
10.3 Waste management techniques
Find out
1. How garbage is collected.
2. How garbage is safely transported to a landfill.
3. How recycling, up cycling and re-using of waste is done.
Activity 10.3 Applying waste management techniques
1. Collect the garbage around the school surroundings.
2. Apply waste sorting techniques
3. Search in library, text book or search engine on waste
management.
4. Write a report on compositing of waste,up cycling and
recycling of waste and waste processing .
Wastes should be handled depending on their types:
• Hazardous wastes - These can cause harm. They should either be
buried or burnt in an incinerator. For example, hospital waste.
Note :The golden rule of environmental stewardship
Always remember the 3Rs - Recycle, Reuse and Reduce!
Waste management refers to the process of handling wastes after itsproduction. Some ways of handling wastes include:
• Collection of the wastes.
• Safe transportation of wastes.
• Waste processing to identify what wastes are to be re-used, recycled
or decomposed.
a) Professional garbage collection
Garbage or wastes can be collected in
two ways:
• The garbage is thrown into dust
bin.
• By depositing the wastes in acompost pit.
b) Safe waste transportation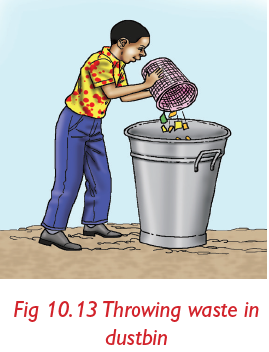
Collect and safe transport the garbage to dumpsites or landfills.
c) Proper waste processing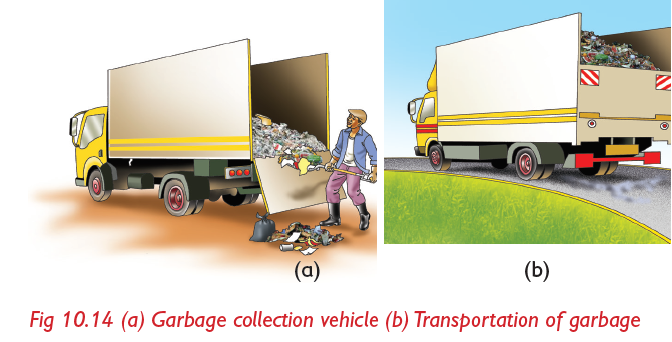
Biological , chemical and mechanical methods used are:
1. Changing chemical composition of waste.
2. Removing environmental pollutant from industries and municipal
wastes.
3. Treating sewage before discharging.
(d) Recycling and re-using
Recycling is the process of converting waste materials into same new
materials. Old plastic bottles can used to make new ones.
Re-using is making use of the waste product for another purpose from
the original one.
For example: old plastic tins can be used as flower pots.
e) Up cycling
Up cycling is changing the wastes into different utility items. For
example, plastic bottles can be used to make chairs, toys amongothers things.
f) Compositing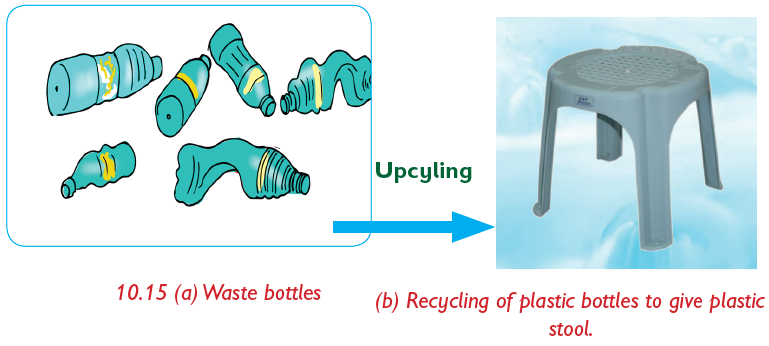
This is making use of natural processes to decompose. These
wastes materials ( biodegradable)are dumped in a compost pit and
left to rot or decay. The manure formed is used in agriculture toimprove crop production.
UNIT TEST 10
1. What is waste management?
2. With examples, give the difference between biodegradable and
non-biodegradable wastes.
3. a) What are hazardous wastes?
b) Write down different types of hazardous wastes and their
potential danger.
4. Distinguish between recycling and re-using wastes?
5. Recently, Kigali was ranked as the cleanest city in Africa. How do
you think the government of Rwanda has managed to do this?
6. The golden rule of waste management is 3Rs. What does it stand
for?7. Give the missing information in the table below.
8. What do you understand by the term ‘professional garbage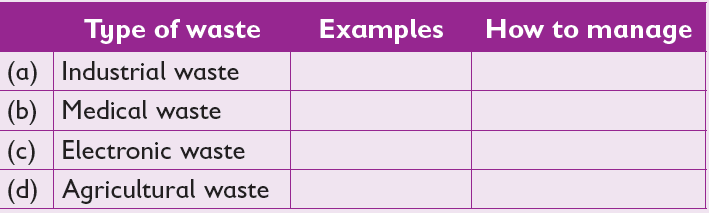
collection’?
9. Mungwana’s computer got spoil. He took it and dumped it in a
compost pit nearby his home. Comment on this.
10. What can you advise Gamka who doesn’t like collecting garbage
in her home compound?
11. Explain what landfill is and its importance in the society.
12. What should be done to hazardous wastes?13. Wastes are a must! Discuss this statement.
UNIT 11:Circulatory System
2.What is happening in picture A? How about picture B?
3. Discuss the consequences of poor health care shown on picture A and B
11.1 Main function of human circulatory system
Find out
1. The main function of circulatory system.
Activity 11.1 Investigating the function of human
circulatory system
1. Research in library text book or search engine on human
circulatory system
2. Write down your findings
The main functions of the human circulatory system include
• Transport oxygen to blood cells.
• Transport digested food nutrients to the cells of the body.
• Transport carbon dioxide from cells to excretory organs.
• Transport hormones to the glands.
11.2 Organs of the human circulatory system
Find out
1. The main organs of the human circulatory system.
Identifying organs of the human
circulatory system
1. Use a chart of blood circulation and name main organs of
circulatory system.
2. Watch the video on human blood circulation using the link:The circulatory system in human beings is made up of three main organs:
• The heart - This is a muscular organ that pumps blood to all
parts of the body.
• Blood vessels -These are tubes that carry blood around the
body. They are of different types depending on what they do.• Blood - This is the transport fluid in the body.
Structure of the human heart
Activity 11.3 Drawing the structure of the human
heart
1. Research from library text book about the heart structure.
2. Draw the diagram of the human heart in your notebook.
3. Label the various parts of the human heart.The human heart is a muscular organ that pumps blood to all parts of
the body. It is divided into four chambers:
• Two chambers are on the upper side of the human heart. They are
called Auricles or atria (singular-atrium).
• Two other chambers are located on the lower side of the human
heart. They are called ventricles.
• The heart also has blood vessels. Example, vena cava, pulmonary
artery,aorta and pulmonary vein.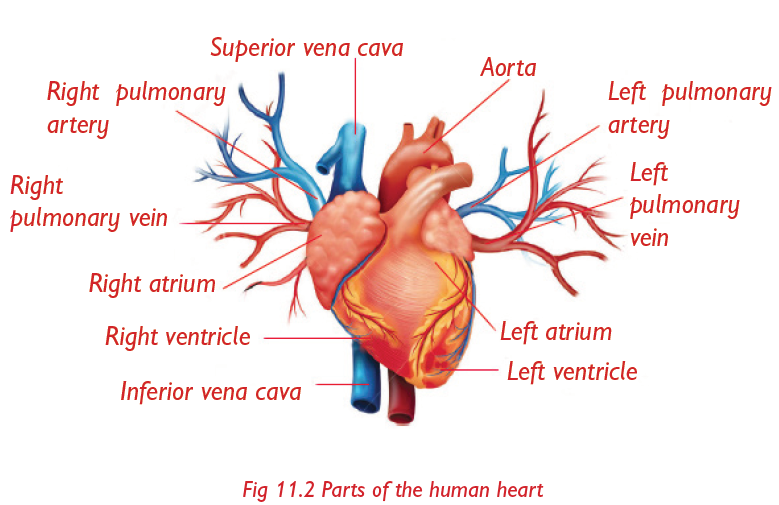
Note : Further, the human heart chambers are separated by valves
on both the left and right sides. Valves prevent the blood from flowing
backwards.
Separating the left side of the heart from the right side is a muscular wall
called septum.
Remember!
The division of the heart into four chambers is important as it
ensures that oxygenated and deoxygenated blood do not mix.
11.3 The process of human blood circulation
a ) Blood vessels
Activity 11.4 Identifying different types of blood
vessels in human beings
1. Observe the picture below of human blood circulation. Name theparts labelled a, b and c.
2. Trace the path of blood from the heart to the lungs and to all
parts of the body and back using the picture above.
3. Watch the video on human blood circulation using the link:
4. Try to trace the path of blood from the heart or other body parts.
• How does blood flow from the heart to other body parts?
Which vessels are involved in the process?
• How does blood flow from the other body parts back to the
heart? Which vessels are involved in the process?
5. Draw a diagram to represent the path of blood from the heart
to the lungs and to all parts of the body and back. Compare your
diagram to the one in the picture in (1) above. Are they similar?
The blood vessels are interconnected to allow transportation of blood
to all parts of the body. There are three major blood vessels:
• Arteries - carry blood from the heart to all parts of the body.
The main artery is the aorta.They lack valves , have thick
elastic wall and narrow lumen and carry blood at highpressure.
• Veins - carry blood from all parts of the body to the heart.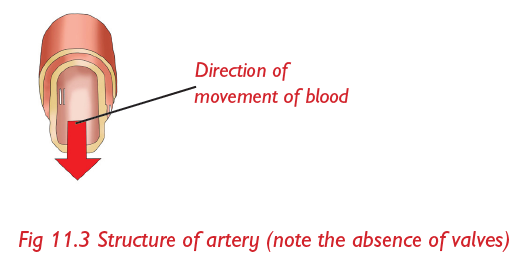
The main vein is the vena cava. They have thinner walls
than the arteries but with wider lumen. They have valves
which prevent blood from flowing backwards. Blood in thevein flow at much low pressure than in arteries.
• Capillaries - act as a link between arteries and veins. They
form a network within tissues. They are very thin -They have
tiny holes called pores which allow movement of materials inand out. Further, they connect arteries and veins.

b) Blood circulation
The heart pumps blood to all parts of the body.
• The blood leaves the heart and flows to the body parts through
arteries. The blood returns to the heart from the body parts through
veins.• The steps involved in blood circulation are as follows:
• Deoxygenated blood from all parts of the body flows through
the vena cava into the right auricle (RA) and finally into the right
ventricle.
• The walls of the right ventricle then pumps the blood into the lungs
through the pulmonary artery for oxygenation.
• In the lungs, oxygen is added to the blood and carbon dioxide is
removed. The blood is now said to be oxygenated.
• The oxygenated blood then flows to the left auricle through
pulmonary vein and finally into the left ventricle.
• The walls of the left ventricle (which are thicker and more muscular)
then pump the blood to all parts of the body through the aorta.
• Once the blood circulates to all parts of the body, it flows back tothe heart through vena cava and the cycle repeats itself.
11.4 Components of human blood
Find out
1. The various components of human blood.2. The importance of the various components of human blood.
Activity 11.5 Investigating the components of humanblood.
1. Research in library text book or search engine on
components of human blood.
2. Write your findings in exercise note book.Blood is the red fluid found in our bodies. It has four main components:
a) Plasma - This is the main component of blood. This part is mainly liquid.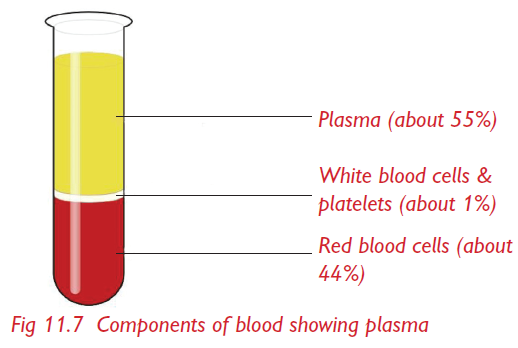
b) Red blood cells - Red blood cells help to carry oxygen from the lungs to all body organs. They contain a red colouring matter calledhaemoglobin.
Remember!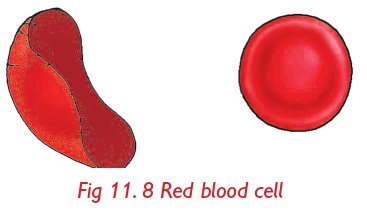
Blood that contains oxygen is called oxygenated blood. It is scarlet
or bright red in colour. Blood that has lost oxygen and has morecarbon dioxide is called deoxygenated blood. It is dark-red in colour.
c) White blood cells
White blood cells help to fight and kill disease - causing germs. They are therefore responsible for body immunity.
d) Platelets
Blood platelets are responsible for clotting of blood, they therefore
help to stop bleeding in case of injury. They also help during healingof wounds.
Self –Test 11.1
1. What makes up the circulatory system?
2. Describe the process of blood circulation using a flow diagram.
3. What is the significance of the organisation of the heart into
four chambers and further left and right sides?4. Complete the table below.
5. Differentiate between arteries and veins.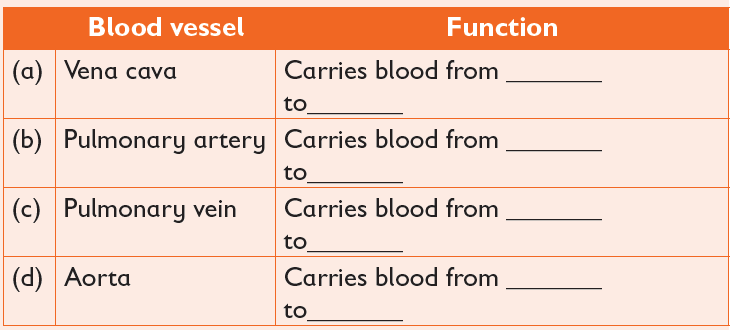
6. What is blood made of? What are their functions?
11.5 Caring for and health of circulation system
Find out
1. What to do in order to keep our blood circulatory system healthy.
2. How to take care of the human heart.
Activity 11.6 Researching how to keep the blood
circulation system healthy
1. Visit the library. Find out from textbooks about practices that help
to keep the human heart healthy. You can also use the Internet.
2. Write your findings in a exercise book.
3. Do the same with the rest of the parts that make up the humancirculatory system (blood vessels and blood).
Table 11.1 below shows some ways of observing hygiene of the humanheart, blood and blood vessels:
Table 11.1: Hygiene of the human heart, blood and blood vessels
Remember!
We should avoid all activities that may lead us into getting infectedwith HIV and AIDS.
11.6 Diseases or conditions of the circulatory system
Find out
1. The diseases that affect the circulatory system.
2. The causes, signs and symptoms of diseases that affect the
circulatory system.3. How to avoid diseases of circulatory system.
Activity 11.7 Investigating common diseases of
circulatory system
1. Research in library textbook or search engine on disease that
affect circulatory system.
2. Write your findings in a exercise book.
The diseases that affect the circulatory system include: high blood
pressure, heart attack, stroke, atherosclerosis and deep-veinthrombosis (DVT)
Table 11.2 Diseases of the circulatory system, their signs and symptomsand prevention and control measures
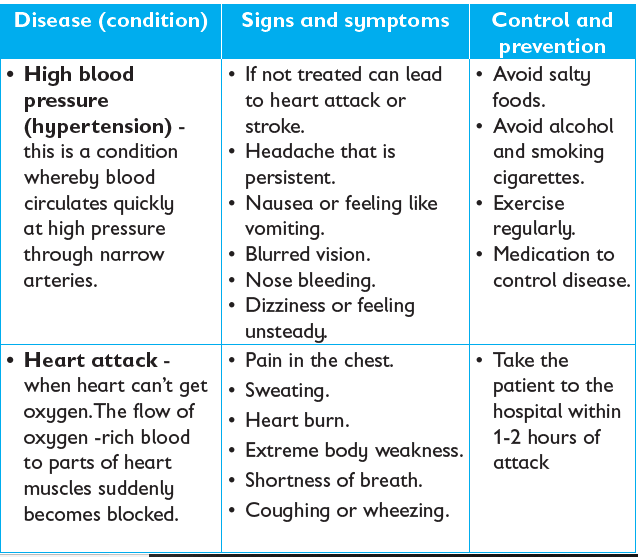
11.7 Blood pressure measurement
Find outNormal measurement of blood pressure
Activity 11.8 A visit to health centre
1. Go to a nearby health centre .2. Observe how the nurse measures your blood pressure.
3. Ask the nurse what normal blood pressure is.
4. Discuss and interpret your blood pressure.
• Blood pressure is the amount of force exerted against the walls of
arteries as blood flows through them.
• It is measured using an instrument called sphygmomanometer/
blood pressure meter.
• The normal blood pressure is 120/80mmHg.
Note: Any value lower than 120/80mmHg is considered low bloodpressure. Any value higher than 120/80mmHg is high blood pressure.
UNIT TEST 11
1. Name the organs that make up the human circulatory system.
2. Blood leaves the heart to the rest of the body through ______
and returns to the heart through the _____________.
3. The __________ prevents blood from flowing backwards in
veins.
4. The main artery is the _________ while the main vein is the
________.
5. Draw and label the parts of the circulatory system. Using arrows,
show how blood circulates in the body.
6. Name the three types of blood vessels in human circulatory
system.
7. Arteries do not have valves. Why?
8. Compare and contrast heart rate during rest and during
exercise.
9. How would you ensure that your blood is functioning properly?
10. Why is it important to check our blood pressure regularly?
11. Blood carried by the arteries are under____________ pressure
while that carried by veins is under _________________ pressure.
(high, low)
12. The main function of white blood cells is__________________
while platelets help during ________________ process.
13. Oxygen is carried in blood in form of________________Use the diagram below to answer questions 14-17
14. Which of the following statements is correct? The blood vessel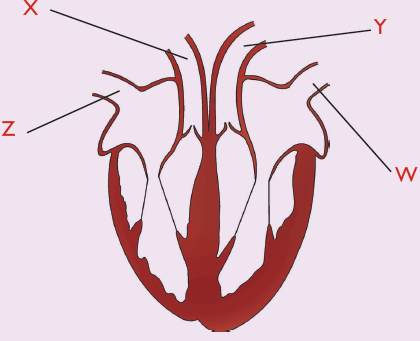
mark W carries:
A. Blood from the lungs
B. Blood to the lungs
C. Blood to the body organs
D. De-oxygenated blood
15. The blood vessel marked X is the __________
16. Which one of the following statements is not correct about the
blood vessel marked Y?
A. Carries deoxygenated blood
B. Is the major artery in the circulatory system
C. Carries blood from the heart to the body organs
D. Is the aorta
17. The blood vessel marked Z is _____________. It is the largestvein in the body.
UNIT 12 :Respiratory System
1. Look at the picture below.
2. Is it right or wrong to smoke inside the house where people are?
3. How does smoke affect the health of people?
4. What would you advise people who smoke in public places?5. Predict what you are going to learn in this unit.
12.1 The human respiratory system and its function
Find out
1. The main function of human respiratory system .2. The various organs of the human respiratory system.
Activity 12.1 Investigating the main function of the
respiratory system
1. Take a deep breathe and note the time on the clock or wrist
watch.
2. Close your mouth and nose tightly and hold onto your breathe.
How long can you stay without breathing? What does this tell
you about breathing?
The main function of respiratory system is to transport fresh air(
oxygen) into the lungs and remove waste air (carbondioxide) out of the lungs.
Identification of organs of the respiratory system
Activity 12.2 Identifying organs of the respiratory system
1. Look at the picture below.
2. Draw and label the human respiratory system in your notebook.
The main parts of the human respiratory system are the nose,trachea lungs (windpipe), bronchi and the diaphragm.

Table 12.1: Parts of respiratory system and their functions

12.2 Mechanism of respiration (Breathing in and out)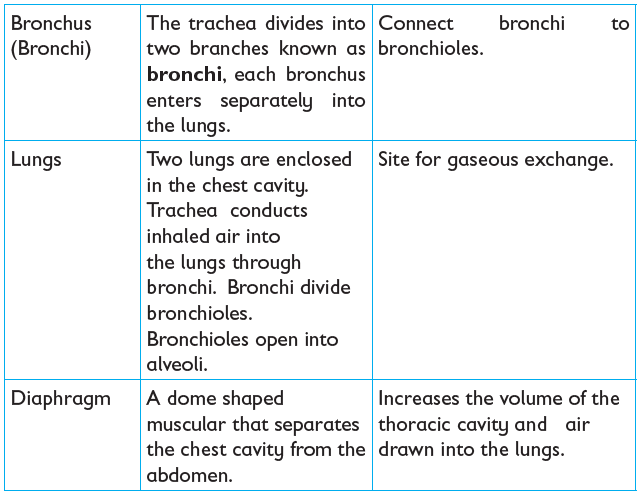
Find out
1. How the human respiratory system operates.2. The process of breathing in and breathing out in human beings.
Activity 12.3 Investigating the mechanism of the
respiratory system
1. Place your hands on both sides of your chest. Take a deep breath.
What happens to your chest?
2. Repeat this several times and note what happens.3. Interpret your findings about breathing process.
Activity 12.4 Experiment to demonstrate how
respiratory system works
What you will need
Bell jar, two balloons, rubber stopper, Y-shaped glass tube, rubber sheet,
string.1. Set up the things above as shown in the picture below.
2. What do you think the following parts represent in the respiratory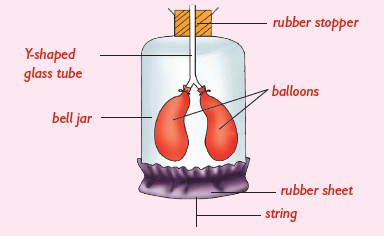
system?
a) Bell jar
b) Balloons
c) Rubber sheet
d) Y-shaped tube
3. Pull down the string tied on the rubber sheet. What happens to
the balloons?
4. Release the string. What happens to the balloons?
5. Repeat steps 3 and 4 several times as you note what happens.
6. How do you think the findings in this experiment relate to theworking of the breathing system?
Mechanisms of breathing
Respiration refers to the act of breathing in / inhalation / inspirationand breathing out/ exhalation / expression.
• The bell jar represents chest cavity, Y-shaped tube represents the
trachea and bronchi, the balloons represents the lungs and the rubber
sheet represents the diaphragm.
Breathing in ( inhalation/ inspiration)
• When the rubber sheet is pulled downwards, the volume inside the
bell jar increases.
• The balloons become inflated( air rushes into the ballons). This issimilar to what happens during breathing in.
• When the sheet is released, the volume inside the bell jar reduces.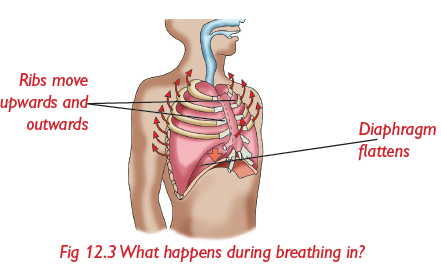
Air is pushed out of the balloons and they become deflated. This is similar to what happens during breathing out.
Table 12.2: What happens during (inhalation) and breathing out
(exhalation)
12.3 Good health practices and behaviours for a
healthy respiratory system
Find out1. Care of the respiratory system.
Activity 12.5 Experiment to demonstrate the
danger of smoking cigarette
What you will need
• Transparent plastic bottle with cap
• Tissue paper • Rubber band
• Cigarette • Match box
• Nail • Biro-pen casing with cap
• Water
1. Make a hole at the bottom of the plastic bottle. Insert the biropen casing as shown below. Ensure that the bottle top is on.
2. Fill the bottle almost three-quarter way with water.
3. Take the cap off the bottle, make a hole then insert the piece ofcigarette.
4. Screw the bottle cap into the bottle with the cigarette filter inside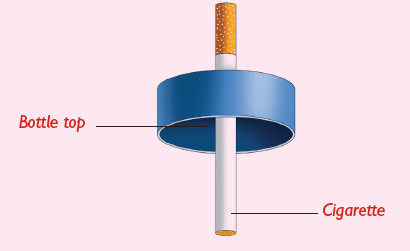
the bottle.
5. Light the cigarette using the match stick and match box.
6. Remove the cap of the biro pen casing to let the water out asshown below and observe what happens.
7. Once all the water is drained out of the bottle, remove the bottle
cap and wrap the tissue paper round the mouth of the bottle. Tie
it using the rubber band.
8. Blow air through the biro pen using the bottom of the bottle asshown below.
Why do you think this is important?
9. Unwrap the tissue paper and observe it carefully. What can you
see?
10. Discuss the results of this experiment with your friends. Relate
your findings here to what happens to the lungs when you smoke.
11. Based on the results of this experiment, do you think smoking is good or bad for our health?
Ways of taking care of the respiratory system include:
• Avoiding smoking or excessive driving of alcohol to
ensure healthy lungs.
• Eating a vitamin- rich diet
• Seeking immediate medical care in case of a respiratory problem.
• Exercising regularly to strengthen respiratory muscles.
• Drinking plenty of water.
• Avoid refined sugar, pasta or dairy products.
• Avoiding inhaling unknown or dangerous substances or
chemicals.
• When spraying chemicals in the house or any other place,
always wear protective clothing, for example, a gas mask.• Developing good eating habits
12.4 Diseases of the respiratory system
Find out
1. The various diseases that affect the respiratory system.2. What are their signs and symptoms?
Activity 12.6 Investigating the diseases of the
respiratory system
1. Using search engine, find out about diseases of the respiratory
system.
2. Write down your findings in your exercise book.
Common diseases of the respiratory system include:
• Tuberculosis (TB)
• Whooping cough
• Asthma
• Bronchitis• Pneumonia
Table 12.3 Signs and symptoms of the respiratory diseases and theircontrol measures

12.5 Suffocation
Find out
1. What suffocation is.
2. The cause of suffocation.3. First aid for suffocation.
Activity 12.7 Investigating the causes and
first aid suffocation1. Look at the picture below.
2. Discuss what happened to the people in the picture above.
If a person does not get enough air into the lungs, he/she suffocates.
Note: Suffocation may lead to death.
a) Causes of suffocation
• Choking - this is the blocking of the windpipe by food or other
materials. It prevents smooth flow of air into the lungs.
• Drowning – when we drown, the water prevents air from
reaching our lungs. We therefore suffocate.
• Carbondioxide inhalation.
• When a place is so hot that you cannot breathe easily you maysuffocate.
b) First aid for suffocation
In case of suffocation, you should do the following:
• For all the victims, loosen the clothing surrounding the neck, move
the victim to an open place with plenty of fresh air.
• Gently slap between the shoulder blades in case of chocking.• Perform abdominal thrusts.
• If the person is unconscious, lie them on a flat floor, clear the airways
and perform chest compressions.
• In case of drowning, tilt the victim towards one side with the head
down.
• If breathing has stopped, mouth to mouth resuscitation should begiven.
Self –Test 12.1
1. Which four practices would help to prevent respiratory problems
in human beings?
2. Name four respiratory diseases.
3. What causes suffocation?4. Describe the procedure you will use to help a suffocated person.
UNIT TEST 12
1. A human being without a respiratory system is as good as a car
without fuel. Explain this statement.
2. Explain the following observations:
a) Your heart rate increases when you do exercise such as running.
b) You cannot hold your breathe for more than five minutes.
3. Describe what happens to the chest and lungs during:
a) breathing in.
b) breathing out.
4. Dust particles and germs are trapped by the _______ and
___________ in the nostrils. Why is this important?
5. The _______________ is a sheet of muscles that separates the
chest cavity from the abdomen.
6. What do the parts shown in the breathing model below representin human respiratory system?
7. During breathing out, the waste gas called _____________
moves from the blood into the air sacs, after which it is breathed
out. On the other hand ______________ gas moves from the air
inside the air sacs into the blood.
8. Inspiration is to _________ as expiration is to __________
9. Which one of the following organs is not involved in breathing?
A. Diaphragm B. Bronchioles
C. Oesophagus D. Wind pipe
10. Describe an experiment you would use to show dangers of
smoking to members of your class.
11. How would you ensure that your respiratory system remainshealthy.
Unit 13 Reproduction system
1. Study the chat among family members in the picture below.
2. Do you think all is well in this family?
3. Predict what you are going to learn in this unit.
13.1. Main function of the reproductive system in
human being
Find outThe function of the reproductive system?
Activity 13.1 Investigating main function of the
reproductive system
1. Using search engines, find out about main function of the human reproductive system.
2. Write down your findings in your exercise note book.
The main function of reproductive system in human being is to
produce male and female sex cells and to insure the growth and
development of off springs. Reproduction is the process of givingrise to new ones of own kind.
13.2 Male reproductive organs
Find outWhat makes the male reproductive systems
Activity 13.2 Identifying external parts of male genitalia
1. Observe the picture chart
2. Draw and label diagrams of male
external reproductive organs.
3. What are the functions of each part?
Major external male genitalia
From the outside, the male reproductive system is made up of:
• The scrotum -This is a bag-like skin that contains the testis
and protects them.
• Penis - This is a tube- like muscular organ that deposits sperms
to female vagina
during sexual intercourse.
• The testicles (or testis
plural testes) - Two oval
organs that contain sex
glands which produce sperms
Major internal male genitala sperms.
The male reproductive system is made up of:
• The sperm duct also known as vas deferens is a tube that allows passage of sperms from the testis to the urethra.
• Prostate gland and seminal vesicles: Gland that produce fluid
in which sperms swim. A mixture of sperms and these fluids is called semen.
• Urethra - This is the tube inside the penis that lets out sperms and urine.
13.3 Female reproductive organs
The female reproductive system is made up of external and internal parts.
Activity 13.3 Identifying external parts of a femalegenitalia
1. Observe the chart below.
2. Can you identify parts of the female reproductive system above?
3. Draw the diagrams in your notebook and label the various parts
shown in the chart above.
Major external female genitalia
The major external organs of the female genitalia are shown below.
The vulva consists of the following external female organs:
The labia major and labia minor - protect female sexual organ.
The Bartholin’s gland - secretes mucus which lubricates the vagina.
• Clitoris –A small electile female organ.
• Mon pubis
• Urinary meatus• Vaginary opening
Major internal female reproductive organs

Table 13.1 The functions of female internal gentialia
Remember!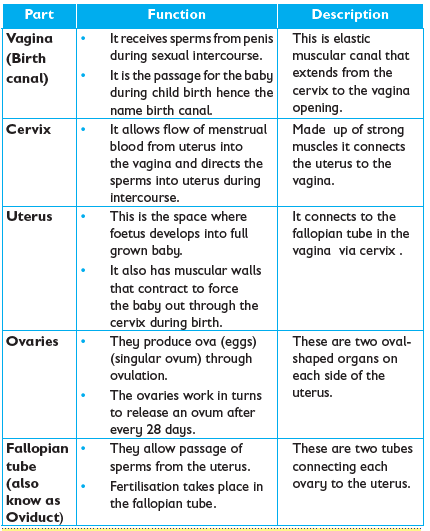
Both boys and girls should clean their genitals regularly to avoid
infections. Girls should particularly do this thoroughly during
menstruations this helps to remove the blood stains and germs
which may cause genital diseases.
Self –Test 13.1
1. Draw and label the male reproductive organs. Name both
internal and external parts.
2. State the functions of every part that you labelled in question (1)
above.
3. Name the parts of external genital organs in females.
4. Draw and label the female internal genital organs.
5. Come up with a table on the functions of internal parts of female
genitalia.
13.4 Prevention of unplanned pregnancy
Find out
1. Consequences of early or teenage pregnancy.2. How teenage pregnancy can be avoided.
Activity 13.4 Preventing unplanned pregnancy1. Study the pictures below carefully.

2. Discuss what is going on in the pictures.
3. Discuss how the pregnancy will affect the future life of the girl and
the boy.
4. Identify ways through which one can avoid unplanned pregnancy.
Pregnancy occurs when a male and a female engage in sexual
intercourse.
A teenage pregnancy/ early pregnancy is pregnancy in the females under age.
a) How to prevent unwanted pregnancy
Unwanted pregnancy/unplanned pregnancy it is involuntary or un
expected pregnancy. When a woman gets pregnant against her wish, the pregnancy is not planned.
Unwanted pregnancy/unplanned pregnancy can be prevented by
• Abstinence ( Not engaging in sexual intercourse).
• Avoid sexual exploitation.
• Using contraceptives diaphragms, pills, condoms, coils / IUD, Norplant,
Depo - provera, spermicides)
Activity 13.5 Demonstrating of safe use of male condom
What you need
• A packet of condom
• A penis model or a ripe banana
What to do
1. Wash the penis model or the banana (without peeling) to ensure
that it is clean.
2. Check on the expiry date on the condom. If expired, do NOT use.
3. Remove the condom from its packet carefully.
4. Determine which way the condom is rolled.
5. Ensure that the reservoir at the tip of the condom is facing away
from you.
6. Roll the condom down the length of the penis model or thebanana.
7. As for penis, make sure that it is erect and roll the condom down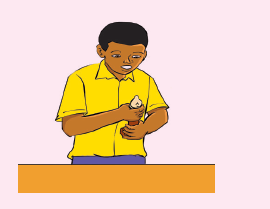
the shaft as shown below then use. Continue rolling until it reaches
the end of the banana or model.
A condom is a thin rubber tube, closed at one end used to prevent the
sperms from reaching the uterus. It is used during sexual intercourse.
Condoms are about 98% effective. This means that in every 100 users
only two get pregnant.
b) Consequences of early pregnancy
The consequences of early or teenage pregnancy include:
• Dropping out of school or college.
• Emotional stress especially for the girls.
• Girls may die during pregnancy or at birth because their bodies are not yet prepared to handle giving birth.
• Teenage pregnancy is associated with a stigmatization and rejection by families.
• Illegal abortion.
d) Dangers of abortion
When a pregnant woman attempts to do away with the pregnancy. This is known as abortion. Abortion is very dangerous and is illegal in many countries including Rwanda.
Dangers of abortion include:
• Abortion leads to loss of life of the foetus.
• Abortion may cause injury or damage to reproductive organs and
other internal organs.e.g cervix, uterus, bladder, rectum.
• Abortion may cause infection due to incomplete abortion or use of contaminated equipment.
• Abortion may cause complete infertility.
• Abortion may cause spontaneous abortion in the future.• It can lead to death of the mother.
Remember!AVOID abortion always! It can lead to death!
13.5 Sexually transmitted infections (STIs)
Find out
1. Sexually transmitted infections.
2. Signs and symptoms of sexually transmitted infections.
Activity 13.6 Research about STIS
1. Use search engine or library to research on examples of sexually
transmitted diseases. What causes them? How can they be
prevented?
2. Watch the video using the link: http://www.youtube.com/
Sexually transmitted infections are diseases that can be transmitted from
one person to another through sexual contact. Examples: syphilis,
herpes, gonorrhea, chancroid, genital candidiasis and HIV and
AIDS.
Table 13.2: The cause, transmission for the various Sexually Transmitted
Diseases.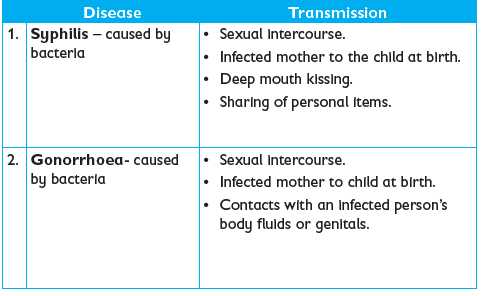
13.6 Prevention of Sexually Transmitted Infections
(STIs)
Activity 13.7 Investigating ways of preventing
sexually transmitted infection
1. Discuss how STIs can be prevented or controlled. Write short
notes and share with the rest of the class.
Ways of preventing sexually transmitted infections include:
1. Abstaining from sexual intercourse.
2. Married people should be faithful to their spouses.
3. Seeking medical help immediately on suspicious of infection.
4. Use of condom during sexual intercourse.
5. An expectant mother who feels she has STI should seek medical
assistance to ensure the baby is protected from contracting theinfection.
13.7 HIV and AIDS
Find out
1. Mode of transmission of HIV and AIDS.
2. How to prevent HIV and AIDS.3. How to live positively with HIV and AIDS.
Activity 13.8 Research about HIV/AIDS1. Write down what each letter in the table below stands for.
2. Discuss what causes , HIV and AIDS. How is it transmitted?
3. Write short notes on these.
HIV stands for human immuno defieciency virus is the virus that lead a
acquired immune deficiency syndrome or AIDS for not treated.
Transmission of HIV and AIDS
AIDS is transmitted when we come into contact with various body
fluids. Examples: blood, breast milk, semen, vagina fluids and others.
The fluids get into our body during sexual intercourse, blood transfusion,
sharing body, piercing and cutting objects, and mother to child during
pregnancy or during breast feeding.
Prevention and treatment of HIV and AIDS
Ways of preventing the spread of HIV and AIDS include:
1. Abstinence from sexual intercourse.
2. Not sharing body piercing and cutting tools such as razor blades,
nail cutters, scissors, syringes and ear piercing, circumcision andtattooing tools.

Fig 13.16 These tools can spread HIV when shared
3. Seeking medical help from trained doctors or officers. They use
sterilised instruments and have equipment for screening donated
blood for presence of HIV.
4. Using protective clothing such as gloves when handling bleeding
patients.
5. Avoiding abuse of drugs. Drug addicts make poor decisions.
They may engage in sexual activities This can lead to HIV infection.
NOTE : Like many viral diseases, HIV and AIDS has no cure. However,
the severity of the disease may be reduced using drugs called ARVs
(Anti-Retro-Viral).
Fig 13.17 Sample of ARVs
Remember!
Stop HIV and AIDS spread! Insist on abstinence until you get married
Living positively with HIV and AIDS
Activity13.9 Chatting,reading and searchingabout living positively with HIV
1. Talk to a person living positively with HIV and AIDS. Write down
main points.
2. Read textbooks, brochures, handouts and pamphlets on HIV and AIDS.
Look out for:
a) The ways of living positively with HIV and AIDS patients.
b) Challenges that HIV and AIDS patients come across and
how to manage them.
c) How to live positively with other family members and the
community.
Ways of living positively with HIV and AIDS patients include:
• The patients should be given love and affection.
• They should not be isolated, but should be given good care.
• They should be given a balanced diet at all times.
• The infected persons should be counselled so that they may accept their conditions and not live in denial.
UNIT TEST 13
1. What is the role of reproductive system in human beings?
2. Draw and label
a) Internal parts of male genitalia.
b) Internal parts of female genitalia.
3. In males, sperms are produced in the ___________ while in females
ova are produced in _____________.
4. __________ as well as _________ pass through the urethra in males.
5. Give other names for
a) Uterus b) Oviduct c) Vagina
6. You have been invited to your local church to talk to your
friends about:
a) How HIV and AIDS is spread.
b) How the spread of HIV and AIDS can be prevented.
c) How HIV and AIDS can be controlled.
List down the points you will talk about.7. Label the external parts of male genitalia shown below.
8. The most effective way of preventing HIV and AIDS, especially for
adolescents is by:
A. Abstinence B. Using condoms
C. Having one partner D. Being faithful.
9. Which one of the following statements about STIs is incorrect?
A. STIs are spread through sexual contact.
B. STIs can be passed from mother to the unborn baby.
C. STIs cannot be transmitted through kissing.
D. The most effective way to avoid contracting STIs is
abstinence.
10. Assume that your close relative is suffering from HIV and AIDS.
How would you take care of him or her?
11. Which signs will you look out for to know if your sister is pregnant?
What should you do there after?
12. What are the consequences of early or teenage pregnancy?
13. Abortion is illegal in Rwanda. Why is this the case?
14. What causes and how can these diseases be prevented?
a) Candidiasis
b) Syphilis
c) Chancroid15. Match the contraceptive with its use using a line.
16. Which one of the following cultural practices cannot lead to
spread of HIV and AIDS?
A. Wife inheritance
B. Circumcision
C. Teeth removal
D. Sharing meat from a common pot.
17. Which one of the following is not a mass communication medium
through which HIV and AIDS education can be carried out?
A. Television B. News papers
C. Radio D. Mobile phone18. Role-play how to avoid early pregnancy with a friend.
Unit 14 Energy management
1. Look at the picture1. Study the picture below.
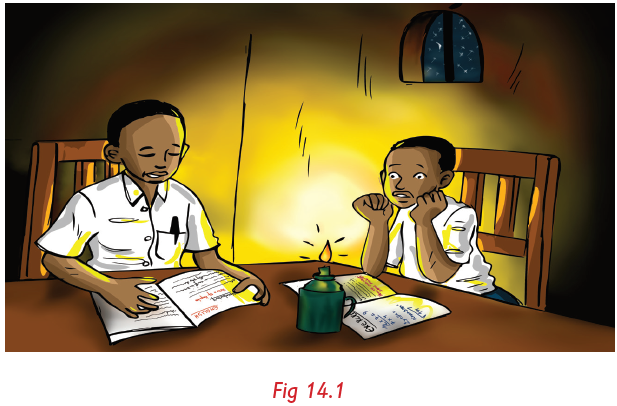
2. What is going on in the picture?
3. What would you advise the parents of the children to do to help them out of their problem?
14.1. Definition of energy and forms of energy
Find outWhat is energy
Activity 14.1 Investigating the means of energy.
1. Look at the picture below.
2. What are the people doing in the picture above?3. Discuss which ability is needed for work in the picture above
When you do work of any kind, you apply effort to do it.
Also, when you dig, you apply effort. The source of this effort is the energy
stored in your body muscles. So, what is energy?
Energy is defined as ‘the ability to do work’.
The various forms of energy include:
• Mechanical energy
• Chemical energy
• Thermal (heat) energy
• Electrical energy
• Electromagnetic energy• Elastic energy
a) Chemical energy
Activity 14.2 Investigating chemical energy
Materials needed
• Fuel (charcoal, firewood or kerosene)
• A gas lighter or matches and matchbox
• A kerosene stove or charcoal burner
• Irish potatoes
What to do
1. Peel the potatoes before cooking. Are they soft or hard?
2. Put the kerosene in the stove or charcoal in the charcoal burner.
3. Light the stove or charcoal burner using a lighter or matchbox.
4. Use the stove or charcoal burner to cook the Irish potatoes.
Observe the potatoes after cooking.
5. Which is softer? Before or after cooking? Why?
• We cook potatoes (food) by using energy. The energy stored in
charcoal, kerosene or fire wood is called Chemical energy.
• Car batteries and dry cells also have stored chemical energywhich is used to run vehicles and produce electricity respectively.
b) Heat (thermal) energy
Activity 14.3 Investigating heat energy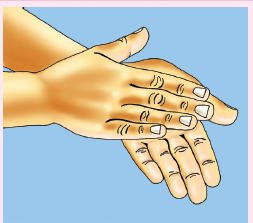
Carry out these activities:
1. Rub your hands against one
another for some time. How do
you feel?
2. Rub two rough surfaces against one
another and then feel the surfaces.
What can you conclude from the resultsof the activities above
• When we rub our hands against each other, heat is produced. We
feel warm as a result.
• When we rub rough surfaces together, heat is produced.
Note: Common sources of heat energy are the sun, electricity andfuels such as charcoal, gas, biogas and firewood.
c) Electrical energy
Activity 14.4 Investigating of electrical energy
1. Look at the pictures below.
2. Can you identify the things in the pictures?3. What do they require in order to work?
Electrical energy is also known as electricity. It is produced when
electrical currents flow in a conductor.
Uses of electricity
Electricity can be used to do the following things:
• Lighting bulbs.
• Driving machines in factories and industries.
• Operating electrical appliances such as radios, televisions and
computers.
• Drying things for example, harvested crops.• For cooking.
d) Electromagnetic energy
Activity 14.5 Investigating electromagnetic energy1. Look at the picture below
2. Try to identify the pictures shown.
Electromagnetic energy is a form of energy that is in form of magnetic
and electrical waves (also known as magnetism).Example: Radio waves.
e) Mechanical energy
Activity 14.6 Investigating mechanical energy
1. Rub top of a table with sand paper.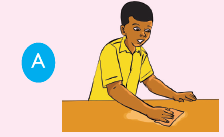
2. Use a file to rub an iron bar.

3. Rub a matchstick on the side of a match box.
4. Discuss the results of your experiments above.
Energy can be stored or can be in motion. Energy of objects due to theircurrent position and ability to move is called mechancial energy.
f) Elastic energy
Activity 14.7 Investigating elastic energy
1. Look at the diagram below.2. What is the person using?
3. Make your own catapult using pieces of old Tyre tubes and a Y shaped
stick. Ask your parent or your guardian to help you.
4. Play with the catapult by throwing stones.
5. How effective was the catapult at throwing stones? Compare itto when you use your bare hands to throw stones.
• Elastic energy is a type of energy that is found in elastic materials.
Self –Test 14.1
1. What is energy?
2. Give any five forms of energy that you know.
3. Give three examples of devices that use electric current.4. Explain briefly how you can generate static electricity.
14.2 Energy transformation (Energy conversions)
Find out
How energy is transformed from one form to another ?
Activity 14.8 Investigating energy transformation
1. Put some dry cells in a torch.
2. Put on the switch. What happens?3. Strike a matchbox using a matchstick. What happens?
4. Blow a whistle or flute. What happens?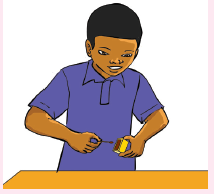
5. What does the experiments above tell you about energy?
Energy can be changed from one form to another. We say that the energyhas been transformed.
Remember!
Energy is transformed from one form into another but it is never
destroyed.
a) Conversion from mechanical energy to heat (thermal)
energy
Activity 14.9 Converting mechanical energy to
heat energy
1. Rub top of a table with sand paper. What happens?
2. Use a file to rub an iron bar. What do you see or feel?
3. Rub a matchstick on the side of a match box. What happens?
4. Explain the results of your experiments above.
• When person is using sand paper to rub a wooden table, the heat
is produced due to mechanical energy which in converted into heat
energy.
• The file produces heat energy. Mechanical energy is converted to
produce heat when using a file.
• The matchstick bursts into flames because of heat produced duringrubbing. Mechanical energy stored in the matchstick is converted into heat energy,
Mechanical energy------------------------- Heat (thermal) energy
b) Conversion from mechanical energy to electrical energy
Activity 14.10 Converting mechanical energy to
electrical energy
Rub a comb against your hair. Try to attract pieces of paper using thecomb. What happens?
When a comb is rubbed on hair, electrical energy is produced. Thiselectrical energy is called static electricity.
Mechanical energy------------------------ ` Electrical energy(Comb rubbed on hair) (Static electricity produced)
Other common examples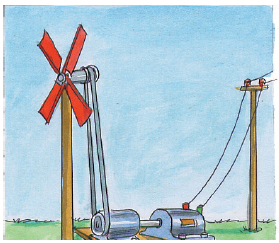
Fig 14.3 Windwill converts mechanical energy to electrical energy
• In windmills – electricity is generated by using wind energy.
• In hydroelectric power stations – water flowing under the
influence of force of gravity is used to turn huge turbines to produceelectricity.
c) Conversion from chemical energy to heat (thermal)
energy
Activity 14.11 Converting chemical energy to
heat ( thermal ) energy
1. Use the stove or charcoal burner to cook Irish potatoes.
2. Observe the potatoes after cooking.
3. Where did the heat that was used to cook the potatoes come from?4. What does this tell you about energy conversions?
Charcoal store chemical energy. During burning, this chemical energy
is transformed into heat (thermal) energy that is used to cook the food.
Chemical energy `-------------------- Heat (thermal) energy(In fuel/ charcoal ) (Cooks food)
d) Conversion from chemical energy to electrical energy
Activity 14.12 Converting chemical energy toelectrical energy
What you need
• Dry cell • Switch •Connecting wire • Bulb
What to do1. Set up an experiment as shown below.
2. Put on the switch. What happens to the bulb?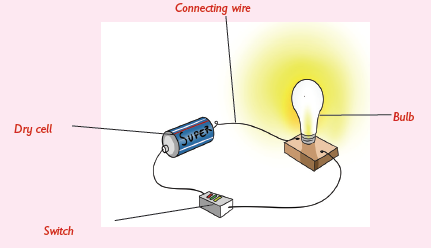
3. Now, put off the switch. What happens?
4. Write a report about your findings and present to the rest of theclass.
When the switch is put on, the bulb lights. This is because chemical
energy stored in the dry cell is converted into electrical energy
Chemical energy------------------- Electrical energy
(In dry cell) (In bulb)
Note: When switched off, the chemical energy is not converted hencethe bulb does not light.
e) Conversion from solar energy to electrical energy
Activity 14.13 Converting Solar energy toelectrical energy

alongside. Have
you ever seen such
an installation in
the community
where you stay?
2. What are the
benefits of what
is going on in the
picture?
In the figure above, solar energy is used to produce electrical energythat is used to light the house.
Solar energy --------------------Chemical energy------------------- electrical(In solar panel) (In battery) (In bulb)
Remember!
Solar energy can also be transformed into heat energy that can beused to heat water for domestic use, that is:
Solar energy ----------------------Heat energy(In solar panel) (In water heater)
f) Conversion from electrical energy to thermal (heat)
energy
Activity 14.14 Converting electrical energy tothermal energy
1. Assemble the apparatus as shown below.
2. Switch on the electric kettle.
3. Summarize the energy transformations that are involved in thisexperiment.
When the switch is turned on, the electrical energy is converted to
heat energy in the kettle. The heat energy is used to boil the waterinside the kettle.
Electrical energy-------------------------------- Heat(thermal) energy
An electric iron also works in a similar
way.
Electricity possessed in electric iron
produces thermal (heat) energy which isused to straighten the piece of cloth.
Electrical---------------------------------- thermal energy
(Electric iron) (Heat in iron)
g) Conversion from electrical energy to mechanical energy
Activity 14.15 Converting electrical energy to
mechanical energy1. Assemble the apparatus as shown below.
2. Switch on the electric fan.
3. What energy transformation occurs when an electrical fan isturned on ?
Some electrical appliances transform electrical into mechanicalenergy e.g electrical blender, electric fan and motors among others.
Electrical energy----------------------------- Mechanical energy
14.3 Importance of energy
Find out
1. Why do we eat food?
2. What would happen if a vehicle ran out of fuel?3. Suppose the Sun did not exist, what will happen to plants?
Activity 14.16 Investigating the importance of energy1. Look at the picture below.
2. Observe the pictures above and discuss the importance of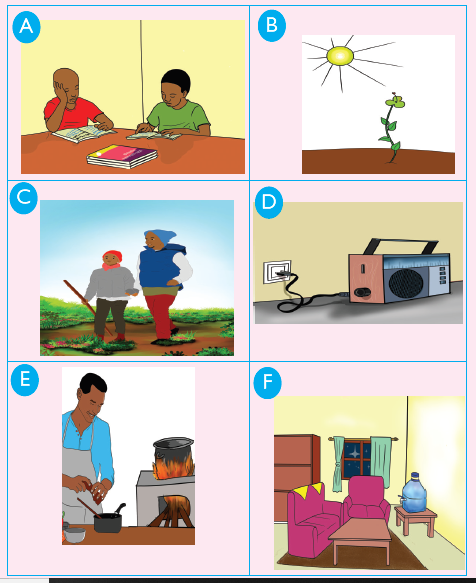
using energy
We can not live without energy, for example, energy helps in movement,
in growth, as a source of light, heat, and electricity among other
uses.
• We get heat from different sources example, the Sun, from burning
fuels, electricity among others.
• Energy helps to grow .
• Many objects around us work using electrical energy and heat energy.
• Energy helps to improve the quality of lives.
• Energy support economic competitiveness.
Self –Test 14.2
1. Name any three forms of energy that you know.
2. Which form of energy is produced when we:
a) burn charcoal?b) connect a bulb across a lemon using wires as shown below?
c) rub a file on an iron metal?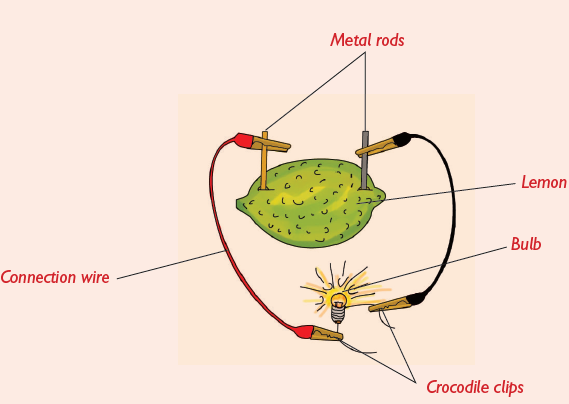
3. Describe the energy transformations that occur in a
a) Radio
b) Hydro-electric power generation station
c) When throwing a stone using catapult.
4. Distinguish between elastic and thermal energies.
5. Which energy transformations are involved in the diagram in
question (2) above?
14.4. Sources of energy
Find out
How energy is transformed from one form to another ?
Activity 14.17 Investigating sources of energy.1. Look the pictures below.
2. Analyse the pictures above and discuss the main sources of
energy.
The common sources of energy are:
• The Sun - which is the main source of energy.
• Fuels – we burn fuel (solids, liquids and gases) to produce heat.
Examples
- Gas (or LPG)
- Diesel - Petrol
- Kerosene - Biogas
• Hydro-electric power – this is power produced from generators
driven by water. An example is Rusizi hydroelectric powergeneration station.
Wind – wind power is produced from windmills. Windmills are wind driven
turbines which rotate the machines that produce electricity.
14.5. Renewable energy
Find out
1. Different sources of renewable energy.
2. The most common source of renewable energy.3. The advantages and uses of renewable energy
Energy sources can be renewable or non-renewable. Renewable
energy sources are those that cannot get finished. They can actually be
recycled or reused. Examples include:
• Sunlight
• Wind
• Water or hydroelectric power
• Energy from ocean waves
• Geothermal power
• Solar power• Bio-fuels (trees which can be planted to replace cut ones)
a) Solar energy
Activity 14.18 Visit to a solar power generation plant
Make a visit to a nearby solar energy installation.
1. Find out how solar power works.
2. Find out about the components of a solar power installation.
3. Enquirer about the importance of solar power.
4. Draw a sketch of what you observe in your notebook.
The Sun is the main source of energy. This is what is called solar energy.It is a renewable source of energy. Look at the diagram below.
The various components of a solar power installation are:
• Solar panels – These trap solar energy from the Sun.
• Solar battery – stores charge in form of chemical energy following
conversion of light energy from the Sun.
• Inverter – converts direct current (D.C) - which is the form inwhich chemical energy is stored in the battery to alternating current
(A.C) - which is the form that can be utilised by the bulbs and other
electrical equipments.
• Bulb – the load. It converts electrical energy into light energy which
enables us to see.
Uses of solar energy
1. All crops and plants depend on energy from the Sun to make their
food.
2. Solar energy is a source of warmth and light.
3. Heat energy from the sun is used to dry clothes and grains.4 Solar panels are used to heat water in solar heaters.
5. Heat energy from the Sun is used to dry harvested food crops using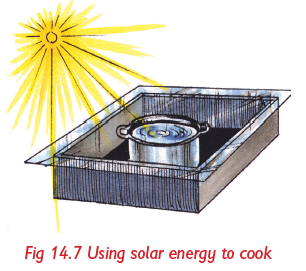
solar drier. They can also be dried by placing them directly under
sunlight.
6. Heat energy from the Sun causes evaporation in the water cycle.
This eventually provides us with rain.
Maintenance of solar installation
• Solar panel is held every time firmly in a safe position.
• Solar panel is exposed to maximum sunlight by removing all litter
that may fall it.• Solar repair and replace the faulty parts of solar plant.
b) Biogas
Activity 14.19 Visit to a biogas plant
Visit to a nearby biogas generation facility.
1. What are the components of a biogas digester.
2. Explain the process of producing biogas and the challenges faced
in operating digester.
Biogas is produced in a special unit called biogas digester. Water and
cow dung or other materials used to produced biogas are mixed in the
digester. From the digester, a pipe is connected to the bulb or the cookerwhere the biogas is intended for use.
Activity 14.20 Making a biogas plant
You will build your own biogas digester in this activity.
Materials
• 3 containers.
• Enough cow dung and water mixed in the ratio of 4:5:1.
• A long wire and a pipe .
• A delivery tube (rubber) of about 60 m long.• Candle wax, plasticine or clay.
What to do
1. Set the biggest drum of the three with open end facing up.
2. Add the cow dung-water mixture.
3. Cut open end of the second drum to make three stands. These
stands should be about 7 cm long.
4. Make a hole on the extreme right of the closed end (bottom).
5. Make another hole (pipe-size) on the extreme left.
6. Place the small drum upside down into the large drum. Tie it withwires to keep it in central position.
7. Insert the pipe with bigger diameter through the bigger hole.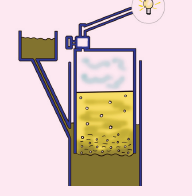
8. Insert the delivery tube through the hole on the small drum.
9. Make a hole the size of delivery tube at the top right side of the
third tin. Seal round it with wax to close all the spaces. Connect
the delivery tube from the first tin to this tin.
10. Connect this tube to a tap (regulation of gas).
11 After one week, connect the tube to the gas cooker open the tapand light the matchbox.
The gas produced from animal dung mixed with water is called methane
The bacteria present in the mixture breaks down the organic materials
to produce the gas. The gas is burnt to produce flame. The gas burns witha blue flame.
Domestic uses of biogas
1. Biogas can be collected and
stored in gas cylinders for
domestic use. The remaining
waste is used as manure.
2. At home the biogas is used
in cooking and as a source
of light. It can also be used
to warm the room when it iscold.
Advantages of installing a biogas plant
1. Biogas unlike petroleum products such as kerosene, firewood
and charcoal is a cleaner source of energy hence good for our
environment.
2. It is less cheaper unlike other sources of energy such as fuels. It
will only cost more money during installation but once you have
installed, no costs are incurred,
3. It is more convenient to use than other energy sources.
4. Biogas can be produced by anybody with minimum training.
Advantages of using renewable energy
1. They are cheap hence can be afforded by many families.
2. They do not pollute the environment that is, they are environmental
friendly.
3. They help us to conserve non-renewable sources of energy.
4. They are readily available and in abundance.
5. They, help to conserve trees, thereby conserving the environment.6. Renewable energy sources are convenient to use.
Remember!• Conserving energy by using renewable sources
Self –Test 14.3
1. Name five sources of energy.
2. Distinguish between renewable and non-renewable sources of
energy.
3. Many solar types of equipment are painted black. Give a reason
for this.
4. Name four components of a solar power installation and give
their uses.
5. Suggest three ways in which cow dung can be used as a source
of fuel.
6. What name is given to the gas that burns in biogas as a source
of fuel?
7. Give some advantages of using renewable sources of energy asopposed to non-renewable sources.
UNIT TEST 14
1. What is energy?
2. When we eat, we get energy to work and to do other things.
What form of energy is contained in food?
3. Why would a vehicle without fuel stop moving?
4. Describe the energy transformations involved in the followingdiagram.
5. You have been employed in an organisation dealing with
environmental conservation in your home area. Assume you have
been asked to explain to the people the importance of planting
trees, what are some of the points you would give?
6. Solar panels change Sunlight into ________ form of energy.
A. Heat B. Sound C. Chemical D. Electrical
7. Which of the following is not a use of animal dung?
A. Production of biogas B. Making charcoal balls
C. Fuelling improved jikos D. Making of solar panels
8. Energy stored in fuels is ________________ energy.
9. Describe a simple experiment you would use to demonstrate the
existence of thermal energy.
10. a) What is the difference between static and current electricity?
b) Describe how you would produce static electricity using a
comb.
11. When a bulb is lit using dry cells, the energy changes that take
place are:
A. Chemical----------- electric--------- light ------------heat
B. Chemical----------- electric--------- kinetic--------- heat
C. Chemical----------- heat -------------light -----------electric
D. Chemical----------- electric--------- heat----------- light12. Find out and circle eight forms of energy in the puzzle below.
13. When food is digested, chemical energy is changed to _______.
A. Light and heat B. Heat and motion
C. Electric and motion D. Electric and heat
14. Which one of the following correctly describes the energy
transformations in a simple electromagnet?
A. Electromagnetic electric chemical attraction
B. Chemical electric electromagnetic attraction
C. Chemical electrical electromagnet
D. Electrical chemical attraction electromagnetic
15. Write true or false.
a) A magnet gives electromagnetic energy. _______________
b) Ocean waves is an example of a renewable source of energy.
__________
c) An inverter stores charge in solar panel installations.
___________
d) A biogas digester does not require a slurry pit. __________
16. Plan and execute a project on biogas digester at home. Use the
biogas to cook a variety of foods?17. Mention ways you can use to conserve energy in your community.
Unit 15 Magnetism
1. Study the pictures below
2. What is going on in the pictures?
3. What can you advise the mother of the child to do to help herseparate the iron fillings with ease? Why is this possible?
15.1 Types of Magnets
Find out
1. The definition of a magnet.
2. The various types of magnet.
Activity 15.1 Investigating the meaning of the term
“ Magnet”
1. Research from library books or search engine on meaning of
the term “ magnet”.
2. Discuss on different types of magnet
3. Write down a short note and do a presentation to other classmembers.
• A magnet is an object that attracts materials usually made of iron
or steel.
There are two main type of magnets:
• Natural magnets
• Artificial magnets
a) Natural magnets
These are magnets that are found naturally in the earth’s crust. Examplemagnetite/Lodestone.
b) Artificial magnets
These are magnets made by human beings from magnetic materials.
Remember!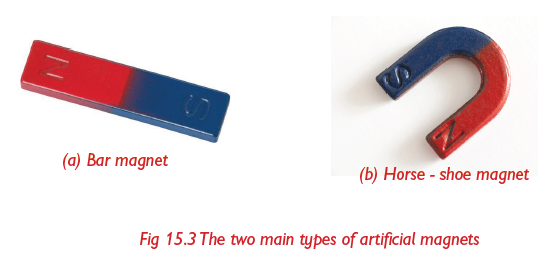
Magnets are used in various electrical appliances e.g Radio, Televisionfreezer e.t.c
15.2 Composition of magnets
Activity 15.2 Making a temporary magnet
What you need
• Nail, piece of copper wire, a dry cell, pins or paper clips, masking
tape and switch.
What to do
1. Wrap the copper wire to the nail several times as shown below.
2. Connect the wire ends to the two terminals of the dry cell usingmasking tape.
3. Bring the paper clips or pins close to the nail. What happens?
4. Now, remove the wire ends from the dry cell terminals and
connect through the switch. Connect to the dry cell as explained
in procedure 2 above.
5. Switch on the switch and bring the pins close to set up. Whathappens?
6. Now, switch off the switch and bring the set up close to the pins
or paper clip close to the set up again. What happens?
7. What does the findings in this experiment tell you about the
nature of the magnet that you have just made? How is it differentfrom the normal bar or horse-shoe magnet?
Activity 15.3 Making a temporary magnet
What you need
• Permanent magnet, nail or paper clip, needle or pin.
What to do
1. Rub a paper clip or a nail along the length of a permanent magnet
as shown below.
Note: Move the paper clip or nail in only one direction. Do not rub back
and forth!
2. Continue rubbing the paper clip and the magnet about 50 times or
more.
3. Use the nail or paper clip to touch the needle or pins. What do you
observe? What do you think happened? The nail on paper clip picks
up the needle or pins. This is because it became magnetized.
Rubbing a magnet a few times over an unmagnetized piece such as an iron
nail as in the activity above, you can convert the nail into a temporary
magnet. This is because the nail becomes magnetized.
The magnet made in Activity 15.3 above is temporary magnet called an
electromagnet.
• Temporary magnets loose their magnetic properties after
sometime. Iron which is magnetically soft is used to make temporary
magnet.
• A permanent magnet on the other hand retain their magnetism
over a long period of time. Steel/ferromagnetic material is used to
make permanent magnet. Example: Horse-shoe magnet.
Natural magnet is composed of substances created by nature, which
have the property of attraction.They have properties of iron fillings e.giron ore, magnetite e.t.c
15.3 Characteristic of magnets
Activity 15.4 Investigating the characteristics of
magnets
What you will need
• Two bar magnets
• Items such as pins, paper clips, nails, rubber, pencil, pieces of wood,
coin.
• String
What to do
1. Put the items above on a table.Move a magnet over them asshown below. What happens?

2. Suspend one bar magnet using a string as shown below
3. Bring the north pole of the second magnet near the south pole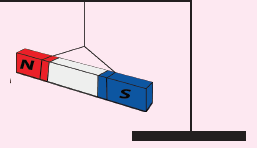
of the suspended magnet. What happens?
4. Bring the north pole of the second magnet close to the north
pole of the first magnet. What happens?
Give reasons for your observations in this activity.
5. Write short notes about what you think magnets are, what they
are made of and their characteristics.
Magnets have the following characteristics:
1. They have two poles - North pole and South pole.
2. Unlike poles of magnet attract while like poles repel.
3. When a bar magnet is suspended, it rests with its South pole pointing
North of the earth’s magnetic pole.
4. Magnets attract magnetic materials but do not attract nonmagnetic
materials.
5. Magnetic force can pass through non-magnetic materials.
Magnetic forces and magnetic materials
Find outThe difference between magnetic and non-magnetic materials.
Activity 15.5 Investigating magnetic force
What you need
• Magnets of various sizes,
• White sheet of paper,
• Sewing needle or safety pins,
• Pieces of glass, a coin-sized cross section of cork,
• Iron fillings,
• Paper clips or small nails of different metallic objects,
• Biro-pen casing
• Staples.
What to do
1. Explore what happens if you place the materials listed above close
to a magnet. Come up with a table like this.
• A magnet attracts certain things but not others:
• A magnet attracts iron fillings, iron nails, office pins, staples, sewing
needles, safety pins. These are magnetic materials.A magnet
attract objects made up of iron, steel,nickel e.t.c
• On the other hand, a magnet does not attract things like plastic,
wood, paper, glass, copper and aluminum foil. They are non-magnetic
materials.
Table 15.1: Magnetic and non-magnetic materials
Self –Test 15.1
1. Name some magnetic materials found in your home.
2. Suppose you have dropped iron fillings in some salt or sugar,
explain how you can separate the two.
3. Give any four uses of magnets.
4. Explain how you can create magnetism using biropen case orcomb using your hair.
15.4 Magnetic field
Find out
The definition of a magnetic field.
Patterns or field lines at a magnet.
Activity 15.6 Investigating force of attraction of a magnet
What you need
• Permanent magnets of different types (horse-shoe and bar
magnets)
• White sheet of paper
• Iron fillings
What to do
1. Place the bar magnet and the horse-shoe magnet one at a time
below a white sheet of paper.
2. Sprinkle the iron fillings on the white paper. What do you
observe? Draw the pattern formed by the iron- fillings.
3. Now, bring two bar magnets with their north poles close to one
another below the piece of paper. Sprinkle the iron fillings. What
happens to the iron fillings?
4. Repeat step 4 above but this time with the north and south poles
of the two magnets facing one another.
Draw the pattern made by the iron fillings in each case above. Is there
any difference between the patterns? Why is this the case?
Magnetic field is the area around a magnet or materials that aremagnetic where magnetic force is experienced.
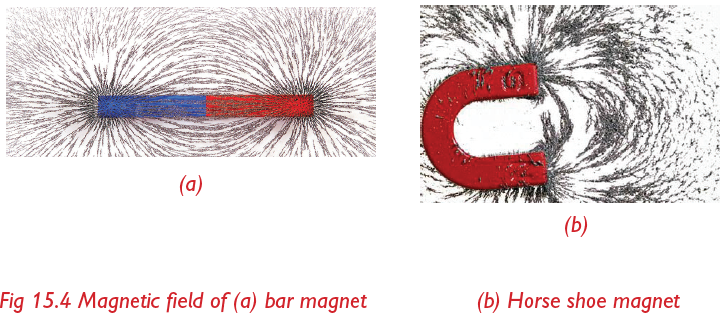
When two North poles of two bar magnets are brought together; their
magnetic fields interact with one another to form a pattern like the oneshown below.
However, when the North Pole and the South pole of two bar magnets
are brought together, the field lines formed are shown below.
15.5 Magnetic compass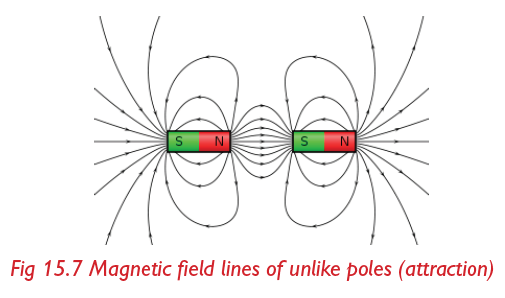
Find out
The function of a magnetic compass and its uses.
Activity 15.7 Making a simple magnetic compass
What you need
A magnet, clear jar with some water, three needles, thread, pencil,
piece of Manila paper, tape clay or Plasticine.
What to do
1. Magnetize the needles by rubbing them against the magnet as
explained in Activity 15.5.
2. Tape the needles onto a piece of paper. Mark the paper with theend with needle eye ‘N’ and the pointed part ‘S’.
3. Insert the third needle into clay or Plasticine. Balance the paper
with needles on top of the third needle as shown below.
4. Tap one end of the paper. Does the paper turn to its original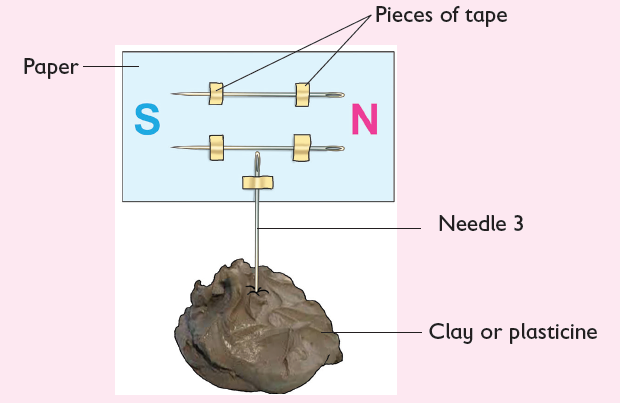
position? Why is this the case?
5. Remove the needle and fasten the magnet using a string onto the
pencil.
6. Put the pencil across the mouth of the clear jar with water asshown below.
Watch as the magnet spin inside the clear bottle. Where does it
settle?
7. Disturb the jar by turning it. Note what happens to the magnet.
8. Look at the picture below. What is shown in the picture? How isit useful in our lives?
9. Discuss the results of this experiment. Write short notes and do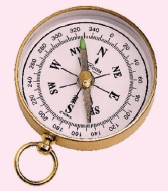
a presentation to the rest of the class.
• The picture in Activity 15.6 above shows a magnetic compass.
• Magnetic compass is an instrument that uses magnetised steel bar
to indicate direction relative to the Earth’s magnetic poles.
• You earlier learnt that the Earth’s core is made up of magnetic
materials. This makes the Earth a huge magnet.
• Therefore, being a magnet, it has poles.
• When the magnetic compass is
placed at any point on the surface
of the earth, the steel bar rests with
its head pointing in the magnetic
north direction of the earth. Thus
the compass can be used to find or
locate direction of a place while onthe surface of the Earth.
15.6 Uses of magnets
Find outThe devices that we use in our daily life that use magnets.
Activity 15.8 Use of magnet1. Look at the pictures below. What can you see in the pictures?
2. Discuss how magnets are used above objects.
Magnets are used almost everywhere in our lives. The things in the
pictures above show where magnets are used. Other uses include:
• Electric trains and roller coasters use electromagnets.
• Electromagnets are also useful in carrying heavy loads at the
port.
• Used in refrigerators to keep doors closed.
• They are used in TV screens, computers, telephones, tape recorders
and as magnetic strips in electronic cards.
• Used in speakers of radios to help in sound production.
• Used in constructing electric motors and generators.
• Used in making of electric bells.
• Used in separating mixtures involving magnetic and nonmagnetic
substances, for example iron fillings and flour.
• Used in making telegraph machines.• Magnetic compass is used in showing or finding directions.
Self –Test 15.2
1. What is magnetic field?
2. State one important use of a magnetic compass.
3. Draw a diagram to show how iron fillings will be distributed
when placed on a paper covering a horse-shoe magnet.4. Name four areas where magnets are used at home.
UNIT TEST 15
1. What is magnetism and how is it important in our lives?
2. Many materials found where we live are either magnetic or nonmagnetic.Based on that information, fill the table below.
3. Draw a diagram to show magnetic field when unlike poles of two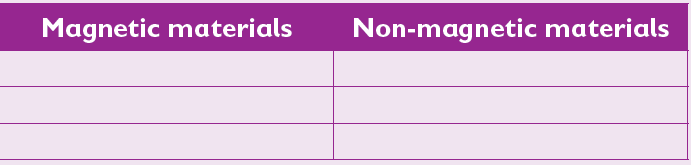
bar magnets are brought close together.
4. Magnets can be temporary or permanent. What is the difference
between the temporary and permanent magnet?
5. What are magnets made of?______________________
6. In which of the following mixtures can the solids be separated by
use of a magnet?
A. Rice and husk.
B. Iron fillings and flour.
C. Flour and copper turnings.
D. Zinc and copper turnings.
7. Which of the following pairs of materials consists only of nonmagnetic
materials?
A. Steel spoon, iron nail.
B. Aluminum foil, a glass rod.
C. Nickel, cobalt.
D. Chromium, cobalt.
8. Make a simple temporary magnet at home and use it to separate
a mixture of iron fillings and flour.
9. What are some of the characteristics of magnets?
10. Give an example of a natural material that is magnetic.
11. Suggest ways in which you can make use of magnets in yourlocal environment.