Topic outline
UNIT 1 COMPUTER MAINTENANCE
Introductory activity 1.0
1. Observe the image below and answer related questions:
a. What is the task being accomplished by the person in the image above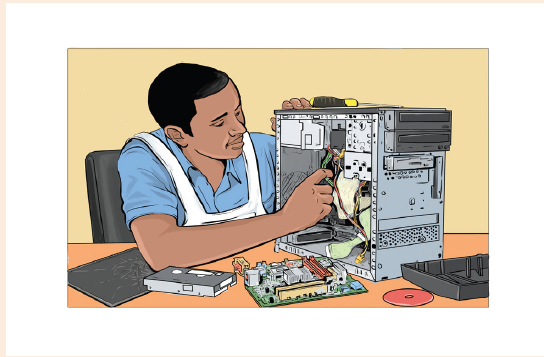
b. List out any five names of devices found on the figure above
1.1. HARDWARE:
Hardware refers to any physical or tangible part of a computer. The computer
hardware consist of internal and external parts.
A.Internal computer components
Those are all components that are found inside the system unit such as disk drives,
motherboard, processor, power supply, memory, etc.
B.External computer components
External components of a computer also known as peripherals refer to all externals
devices connected to central housing known as the system unit. They can be input
devices, output devices such as the monitor or storage devices such as a hard
drive or flash drive, memory card. Peripherals devices are connected to the systemunit through different ports found on the computer.
1.1.1. Elements of the computer system unit and their roles:
Activity 1.1
1. Open the system unit cover to expose the internal components as shownin Figure below.
a. Identify various components inside the system unit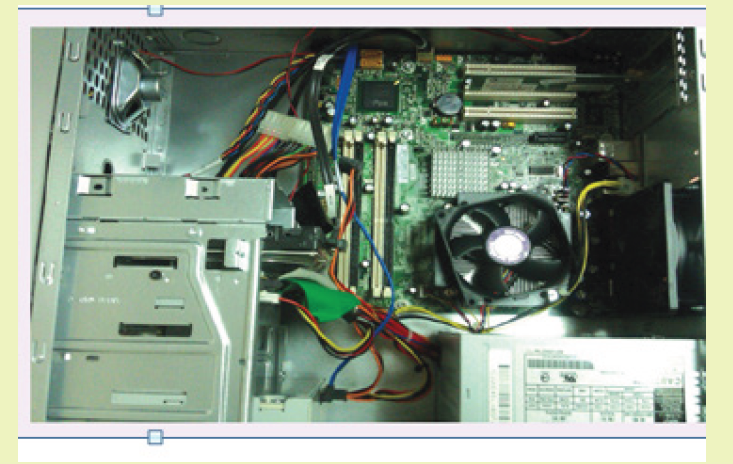
b. Briefly state the role of each component identified in a)
Activity 1.1
The system unit, which houses all the internal components of a computer, has a
number of components inside it such as the power supply and the motherboard on
which are connected other parts like microprocessor (or CPU) disk drives, adapter
cards and memory.
Different components of the computer case and their roles are elaborated in the
content to follow.
A. Power supply
The power supply is unit is the one which is directly connected to the power outlet
through the power cable. The Power Supply Unit (PSU) converts alternating current
(AC) from the power outlet to direct current (DC) required by internal computercomponents.
B. Motherboard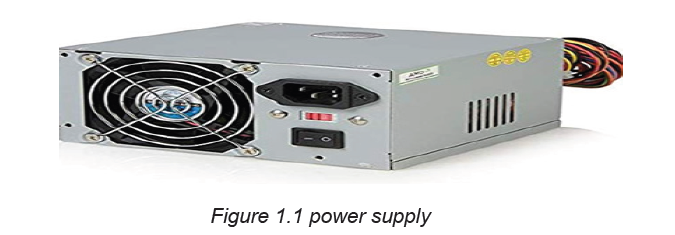
A motherboard also known as circuit board is the main printed circuit board onto
which all components of the computer interconnect into one another. It also allows
communication of those different parts as it has routes from/to those parts.
Motherboard size varies depending on whether a computer is a desktop or a laptop
and the size also varies depending on manufacturers but the devices found on
each and their functions don’t vary. A particular desktop computer looks like in theimage below:
On the motherboard are connected different devices which are CPU, hard disk,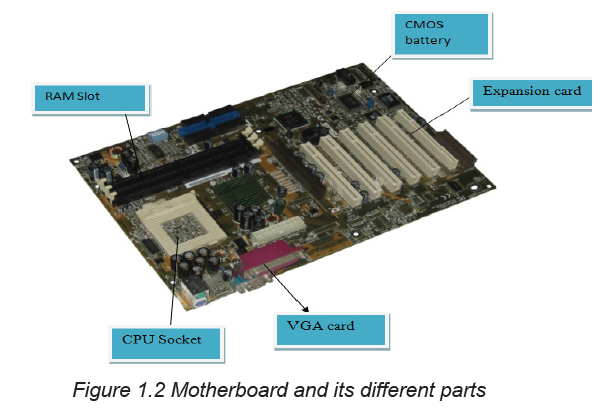
video card, RAM, ROM, expansion slots, data buses, etc.
B.1. Central processing unit (CPU)
The Central Processing Unit (CPU), also known as the processor or microprocessor,
is the most important part of the computer which is considered as the “brain” of the
computer because all processing activities are carried out inside it.
The processor controls the retrieval, interpretation, and execution of instructions in
a computer. It consists of three components namely the Arithmetic and Logic Unit
(ALU), the Control Unit (CU) and the memory units, known as registers.
i. The Arithmetic and Logic Unit (ALU)
It is the part of the CPU that performs two main functions, namely arithmetic
operations such as addition, subtraction, division, and multiplication and logical
operations such as OR, AND, and NOT among others. These two functions are
necessary in the execution of different instructions by the CPU.
ii. The control unit (CU)
The control unit coordinates all processing activities in the CPU as well as input,
storage and output operations. It also performs tasks like controlling, supervising,
and overseeing all the activities of the computer. It oversees fetching instructions
from the main memory, decoding the instructions in a format the computer can
understand, executes the instructions by issuing commands to respective
components where action is supposed to be taken and controlling the transfer of
data and information within the available storage space.
iii. Registers
Registers are temporary storage locations located inside the processor that are
used to hold data, instructions or information waiting processing or output. There
are four types of registers namely: instruction register, accumulator register, address
register, and storage register. All the four types of registers store information that
is temporarily needed for program execution. The Instruction register holds an
instruction before it is converted to machine readable format, the Address register
stores the address of the next instruction to be processed, the Accumulator
register holds the last processing step of the Arithmetic Logic Unit and the Storage
register holds information waiting to be outputted.
B.2. Hard disk
A hard disk also known as hard disk drive (HDD) is a non-volatile computer storage
device containing magnetic disks or platters with high speed. It is a secondary
storage device used to store data and program permanently, the term Non-volatilemeans data and program are retained even when the computer is turned off.
B.3. Video card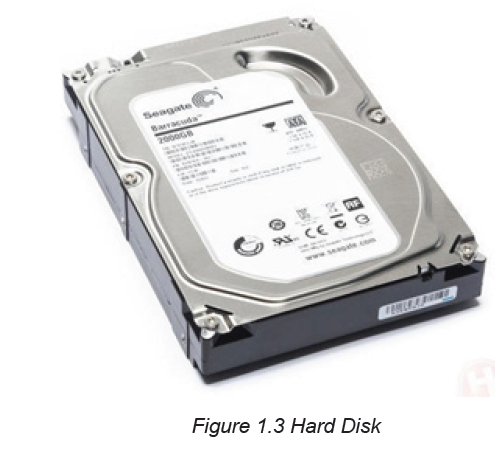
Video cards also referred to as graphic cards are components that are connected
to the motherboard of a computer system and generates the quality of images
on output devices such as screen. Graphic cards have processors or a graphic
processing unit and are directly connected to the motherboard which allows it toaccept information from the CPU and send output to the monitor.
B.4. Random Access Memory (RAM)
Random access memory (RAM) also known as working storage is used to hold
instructions and data needed by the currently running programs. It is referred to as
random access because its content can be read directly regardless of the sequence
in which it was stored.
RAM is a temporary or volatile storage because its content disappears when the
computer is switched off. Therefore, before switching off the computer, it is importantto save the work in a device that offers relatively permanent storage facility.
B.5. ROM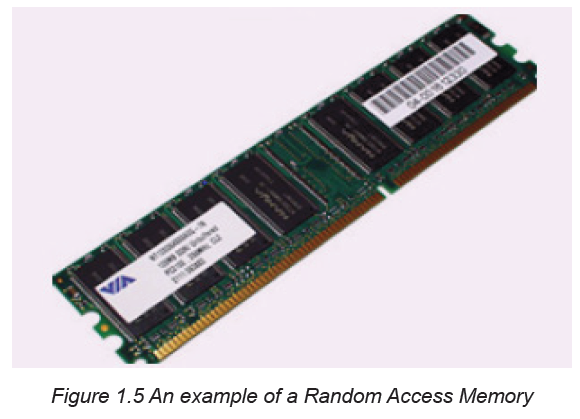
Read-Only Memory (ROM) is a type of non-volatile memory used in computers and
other electronic devices. As the name indicates; data stored in ROM may only be
read and cannot be electronically modified after the manufacturer of the memory
device. Unlike RAM (Random Access Memory), ROM is non-volatile, which meansit keeps its contents regardless of whether or not it has power.
B.6. Expansion slot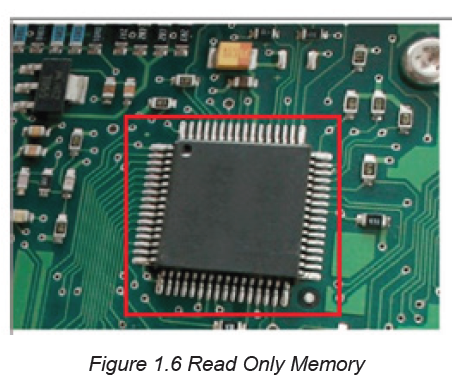
Expansion slot alternatively referred to as bus slot or port is a connection on the
motherboard to which an expansion card can be plugged in order to expand thefunctionalities of a computer.
B.7. Data buses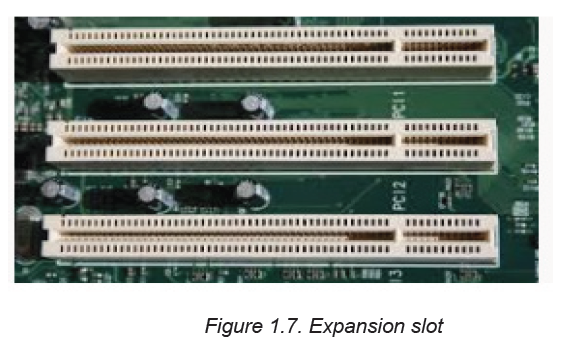
Data buses are those used to transfer data and instructions between componentsinside the computer.
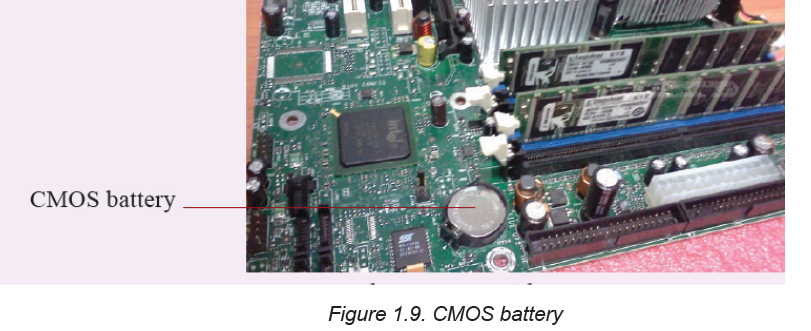
B.8 Complementary Metal- Oxide Semi-Conductor (CMOS) Battery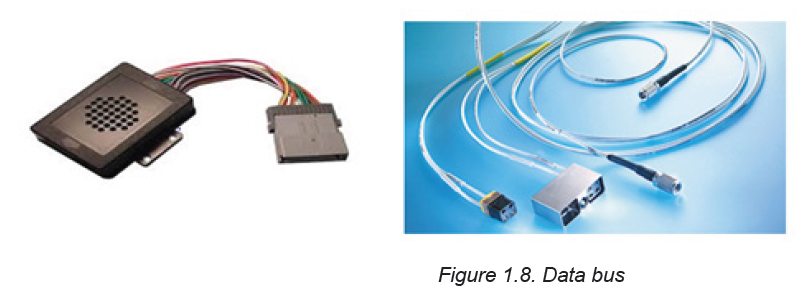
Complementary Metal- Oxide Semi-Conductor (CMOS) is the term usually used to
describe the small amount of memory on a computer motherboard that stores the
BIOS settings. The basic activities carried out by CMOS is to test the availability
of computer basic input and output devices (POST) and make sure no errors existbefore loading the operating system.
APPLICATION ACTIVITY 1.1
1. Explain three types of ports available on a desktop or laptop computer.
2. Research on the internet about primary, secondary and tertiary memory
and answer the questions below:
a. Which devices are referred to as primary,secondary or tertiary storage
devices?b. Why are some of these devices referred to as mass storage devices?
1.1.2. Computer maintenance principles
Activity 1.2
1. Identify five factors that need to be considered in order to minimize health
risks such as RSI (Repetitive Strain Injuries) and eye strain while using
computer.
2. Explain why it is not advisable to take food substances and drinks in the
computer lab.Computers are expensive to acquire. They are also useful to human being because
they carry out tasks that are sometimes so difficult. As an important tool in the life
of a human, a computer needs to be in good working conditions. Some computer
components can easily get damaged hence need to be handled with care. To
protect computers, certain rules, precautions and practices must be obeyed while
using computers and their components. This would help to avoid damage to the
computers.
Computer maintenance is the practice of keeping computers in a good state.
Computer maintenance can be carried out on the hardware or software. The
principles of software maintenance can be updates firmware, operating system,
application and data security such as encryption, cache clearing, and secure
deletion. On the hardware side of maintenance there can be cleaning and properly
connecting hardware components, monitoring peripherals, maintaining cooling and
testing individual components for integrity such as power supplies, RAM modules
and the hard disk. On the software side there is running different tools and software
aimed at optimizing the working of a computer.
Below are principles to be followed for computer maintenance:
A. Hardware:
1. Clean dust from the computer.
Computers are some of the most efficient dust collectors. Apart from looking gross
and possibly being an allergy hazard, a dusty computer will trap heat, which can
reduce its performance and lifespan.
2. Clean up the cabling and everything else
Cables may collect a lot of dust as they are sometimes on the floor. If there are
many peripherals consider cleaning them regularly.
3. Organize the installation disks
Keep memories for different software organized. Don’t mix CDs with memory
sticks or external memories and separate each memory depending on the type of
software stored. Installation software can be Operating systems, application and
utility software.
4. Properly interconnects components
Electronic device components are designed to fit into one another without using
mechanical force, when interconnecting a component into another requires force
this may be an indication of connecting it wrongly and it can result in the breaking
of pins making the whole device unusable.
B. Software
1. Properly switch on/off the computer
To properly switch off the computer gives time for the whole process required to
unload running programs. Switch off the computer when all programs are closed
and use the available computer menu (click on Start then on Shut down). Never
press the power button for switching off the computer. When programs fail to close
use the combination key Ctlr + Alt + Delete to open the task manager which will
help in closing those stubborn programs.
2. Delete unused files and programs
Unused Files and empty folders occupy space and make the computer run slowly.
Delete temporary files, old audios and videos as these occupy bigger space. Delete
also programs that are not used and don’t keep two versions of the same program
if they are not both needed.
3. Back up the data.
A data backup is the result of copying or archiving files and folders for the purpose
of being able to restore them in case of data loss. Data backup should be done
regularly in order to avoid total catastrophe in case there is a problem with the
computer.
4. Run antivirus and scans regularly
Antivirus software is a type of utility software used for scanning and removing
viruses from a computer. Scan so as to avoid computer being infested.
5. Clean up the OS
Disk cleanup is a maintenance utility used to free up space on a hard disk by
deleting unnecessary files and Windows components that are no longer in use.
This includes temporary internet files, downloaded program files and files in the
recycle bin. The disk cleans up procedure will be discussed later.
6. Clean up the software.
Every few months, look through the ‘Add or Remove Programs’ interface that is
found in the control panel. If there’s a software that is no longer needed, it must be
deleted.
7. Update everything
Check for updates for the hardware and software. This includes running Windows
Updates, checking for updated drivers, and checking for software patches.
8. Defragment
Defragmentation is the process of moving file fragments to contiguous clusters tooptimize the storage space and performance.
APPLICATION ACTIVITY 1.2
1. Explain the importance of computer maintenance
2. Highlighting some routine maintenance practices that need to be carriedout in a computer laboratory.
1.1.3. Computer capacityActivity 1.3
One day, Josiane wanted to borrow films from Paul who had many but when she
went to Paul’s home with her flash disk to borrow, the flash was able to keep
only two.
a. What should Josiane do so as to get all the films?
b. The two films stored on the flash were of equal size and the flash dish’ssize is 1GB. What is the size of each film?
A. Storage size
In digital computers, data is represented using a sequence of bits, bytes and words.
A bit is a short form for binary digit referring to a single digit which can be either
0 or 1 used to represent any data in digital computers. In other words, a bit is the
smallest unit used to represent data in digital computers.
A byte is a storage unit capable of representing a single character, such as a
letter, number or symbol. Technically, computers represent any type of data using a
sequence of 8 bits. A byte can store 28 or 256 different values, which is sufficient to
represent standard ASCII characters (letters, numbers and symbols)
A word is a unit of data used by a particular processor
Storage capacity also known as storage size refers to the amount of data a storage
device can hold. It is measured in kilobytes (KB), megabytes (MB), gigabytes
(GB) and terabytes (TB). Since most files contain thousands of bytes, file sizes
are often measured in kilobytes. Larger files, such as images, videos, and audio
files, contain millions of bytes and therefore are measured in megabytes. Modern
storage devices can store thousands of these files, that is why storage capacity is
typically measured in gigabytes or even terabytes for larger memories.Standard units of measurement used for data storage are in the table below:
A.1. Reading memory/storage size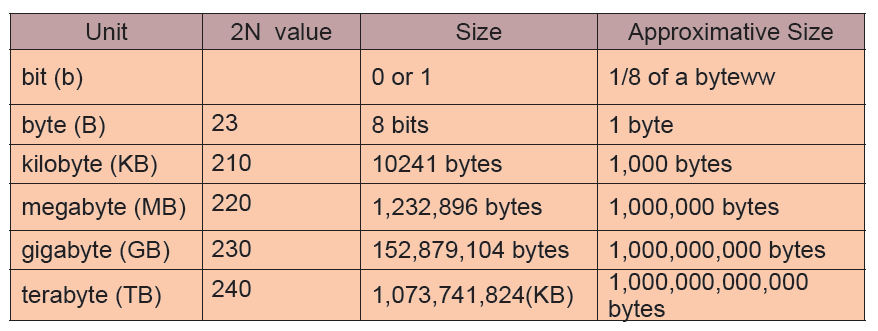
It is possible to know the size of the memory plugged in a computer or found inside
it.
I. Hard disk size
The hard disk size and its different disks can be viewed by going to the Computer
or This PC icon depending on the operating system. These icons can be found onthe desktop or on the startup menu. The window below will appear:
The window above shows that the computer has three disks each disk having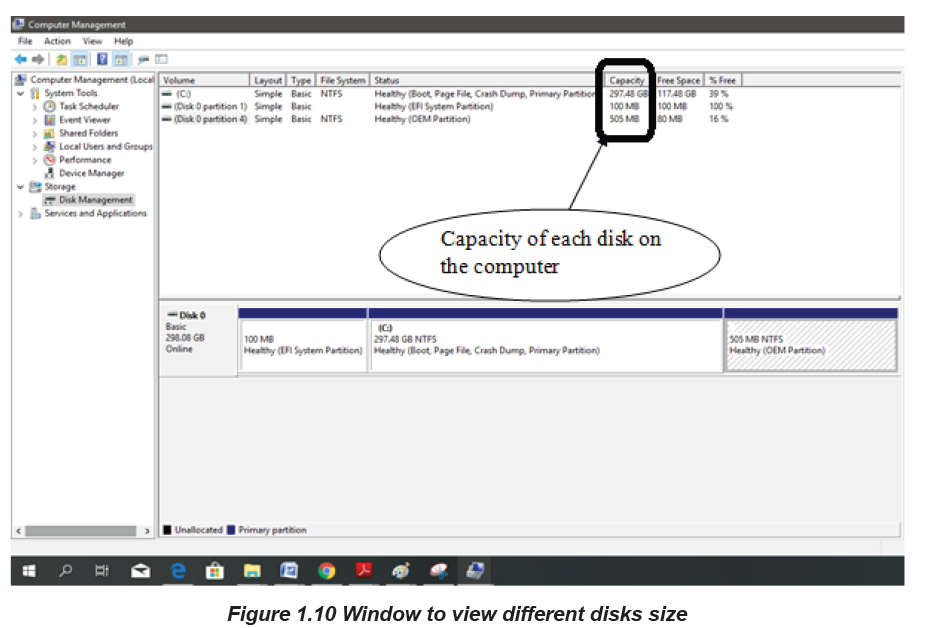
respectively 297.48GB, 100 MB and 500 MB of size. The size of the hard disk is
obtained by summing up the size of all the individual disks.
NB: When there is an external memory mounted on the computer, the name of that
memory will be displayed in the window used to view the hard disk’s size and the
size of that memory can also be viewed in the same window.
ii. RAM size
Proceed through the following steps to obtain basic information regarding the
capacity of primary memory (RAM) installed in the computer
Press control panel icon
Through all Control Panel Items select System.
A shortcut can also be used by using Right click on this PC icon and select properties.The figure below showing information of installed RAM will appear.
B. Processing speed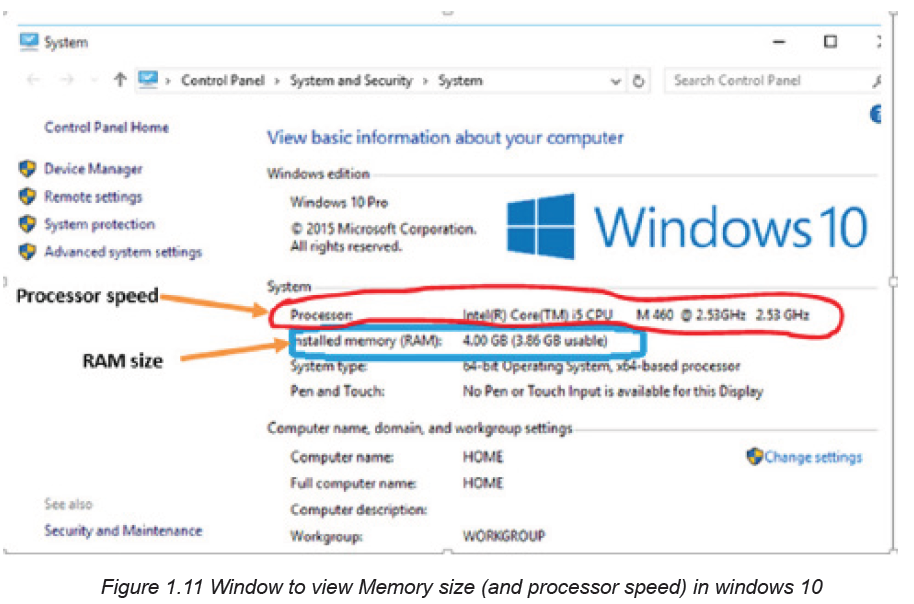
Processing speed is defined as the number of cycles per second at which the central
processing unit (CPU) of a computer operates and is able to process information.
It is measured in megahertz and is essential to the ability of a computer to run
applications.
The processing speed is measured in terms of Clock Speed which is measured in
gigahertz (GHz), with a higher number equating to a higher clock speed. Faster
clock speeds mean that tasks ordered from CPU are completed quicker, making
the computer user experience seamless. The processor speed can be viewed usingthe same window as the one used to view the RAM size.
APPLICATION ACTIVITY 1.3
1. If a CD contains 700 MB, how many number of CDs a DVD of 4,7 GB can
contain ?
2. If a 4MB document is downloaded within 6 seconds, what time (in hours)is required to download a 4GB movie?
1.1.4. Identifying and addressing hardware issuesActivity 1.4
a. Explain how you would connect both projector and monitor to a single
computer.
Computers are built with all security to protect sensitive components and hardware
housed inside a casing against any form of dust and other harsh elements. However,
some common computer hardware problems occur despite the protection. It’s very
crucial to identify and recognize such problems. The following are some of the
commonly found hardware related problems on computers.
1.1.4.1. Common hardware related problems
A. The Check POST test fails
POST stands for “Power on Self-Test”. This is part of a computer’s startup program
used to diagnose the keyboard, random access memory (RAM), disk drives and
other hardware to make sure they are working properly. If the POST detects any
errors in the hardware, it will either display a text error message on the screen or a
series of short and long beeps.
If an error message appears as the computer is booted, read careful the error
message and correct it or type the exact error message into a search engine to find
more information about it.
B. Blank monitors
A blank monitor is the most common computer problem. Most people who work
with computers might have dealt with such non-working blank monitor at least
once. In such cases, first and foremost check the supply cord and power systems.
Sometimes, the video cable might be loosened. Just push the video cable and
place it again.
C. Mouse Problems
The mouse is used for a variety of purposes, such as playing games or opening files
and moreover, it facilitates easy navigation. The most common problems related to
the mouse include failure to move, connection problems, freezing on the screen or
damage to the mouse. Mouse with PS/2 connection are prone to damages in its
pins, once such a mouse is not functioning its pins must be checked for blockage
or bending.
D. Jumpy Mouse
A jumpy mouse is just a muted mouse that cannot be scrolled. In case of a track
and ball mouse the problem can be solved by opening the ball container, removing
the excess debris and cleaning the dirt that lines the rollers. For an optical mouse,
eliminate the dust that has collected around the optical sensor.
E. Computer does not recognize USB
In this case, even when the USB is connected, the computer might not be able to
recognize it and hence displaying errors like “Device not recognized” This might
be due to the USB connector problems or the software malfunctions.
F. Keyboard Problems
Keyboard is a vital part of any computer. It not only allows typing, but also gives
commands. Common potential problems with the keyboard include keyboards that
will not connect to the computer, stuck keys, broken keyboards or keyboards where
the letters end up jumbled.
G. Power Cord Problems
Whether it is a laptop or a desktop, power cords are a vital part of any computer. A
laptop can run on batteries for a limited amount of time but then needs the power
cord for recharging. The most common problem with the power cord is an improper
connection.
H. Motherboard Problems
The motherboard has several parts of the computer including the RAM, BIOS system,
mass storage and CPU. The computer motherboard contains several devices,
which can create numerous potential problems. Problems with the motherboard
range from too little RAM to BIOS problems. Fixing the problems will depend on
the specific problem and, in the worst case scenario will require purchasing a new
motherboard to fix the problems.
I. Insufficient Memory
Processor-intensive programs also demand a lot of memory. Random access
memory (RAM) aides the central processing unit (CPU) by storing instructions linked
to common operations. Without enough RAM, software crashes and slowdowns
can occur.
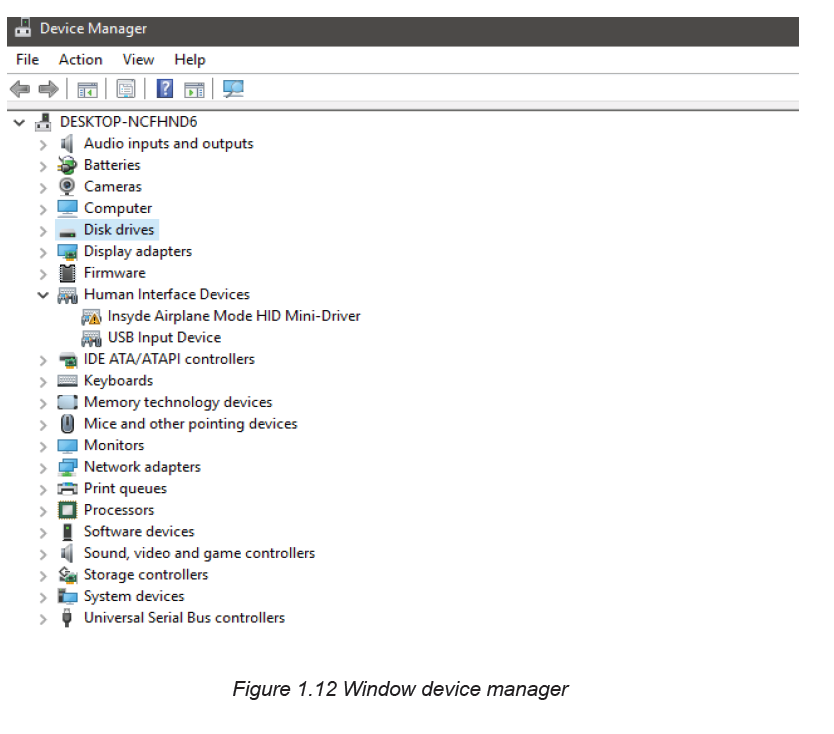
1.1.4.2. Checking for hardware problems
Many computer problems are caused by hardware failures or problems with
hardware drivers. Windows will usually notify about devices that have problems.
Device Manager can be used to check the status of different hardware devices. The
Device Manager which is the Control Panel extension of Microsoft Management
Console, provides users an organized, central view of the Windows-recognized
hardware attached to a computer. This includes devices like keyboards, hard disk
drives, USB devices etc. It sorts out all hardware, listing them on the basis of various
criteria and when a device malfunctions or stops working altogether, it immediately
notifies the user. Thus, it can be used to control devices, enable or disable them,
configure them, identify conflicts between devices, and so forth.
To check for window hardware problem using device manager go through
this process:
Open Control Panel
Click on the Hardware and Sound link for Windows 8 or 10 or Click System and
Security for Windows 7.
Check under Devices and Printers in Windows 8 and 10, and under System in
Windows 7, to find Device Manager.
Once Device Manager is open, user can view device status, update device drivers,
enable or disable devices or do hardware management as shown in the figurebelow:
APPLICATION ACTIVITY 1.4
1. a. Identify the common hardware problems that you used to
face with while using computerb. How can you proceed to solve the problem above?
Note: Depending on version of Windows, Control Panel is usually available from
the Start Menu or the Apps screen.1.1.5. Assembling a computer & disassembling a computer
Activity 1.5
1. By searching the internet identify tools used in assembling and
disassembling a computer
2. Explain the reasons that may prompt a technician to remove any internalpart of a computer
A. Assembling a computer
Assembling a computer is putting together the computer components mainly the
internal ones so that they get interconnected and work together. Assembling acomputer can take 20 to 40 minutes provided all parts to assemble are available.
Steps to assemble a computer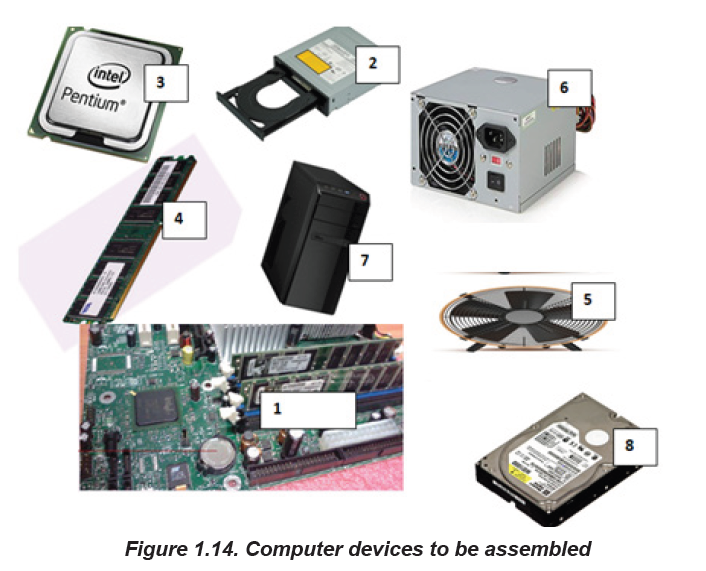
Step 1: Gather Tools and Supplies
Some tools such as Screwdriver, Wire cutters and strippers, Needle-nosed pliers,
Small flashlight, Small container to hold screws, Grounding Strap are helpful to
open or fix the screw and need to be made ready before. Also make sure all parts
are available and are organized in a way to facilitate identification of which part to
fit in the computer case first.
Step 2: Prepare the Case for Assembly
There are three things that need to be considered before assembly
Before assembling consider removing the cover for the optical drive and make note
of the cables pre-installed in the case. These should be front panel connections for
features such as the power switch, audio jacks and USB ports.
Step 3: Install the Motherboard
During motherboard mounting all standoffs need to be installed in the case. After
installation of standoffs it is necessary to check for screw hole locations on the
motherboard for exact placement. The next stage requires lowering the motherboard
into the case and aligning with the I/O bezel and installing the screws. The standoffs
and screws are installed in order to prevent damage to the motherboard.
Step 4: Install Hard Drive
Hard disk drives are usually connected to the motherboard through Enhanced
Integrated Drive Electronics (EIDE), Small Computer System Interface (SCSI) or
Serial Advanced Technology Attachment (SATA) cable interface. Because with the
SATA technology a drive can be detached or attached to the motherboard while the
computer is switched on
The following steps are used to mount the drive into its hole:
1. Find drive bay to install the drive in. If there is a trouble finding a place to
mount the drive consult the case documentation for suggestions.
2. Slide the drive into place until the screw holes on the sides are lined up with
the holes in the case and put/tighten the screws in place.3. Connect wires that need to be connected
Step 5: Install Optical Drive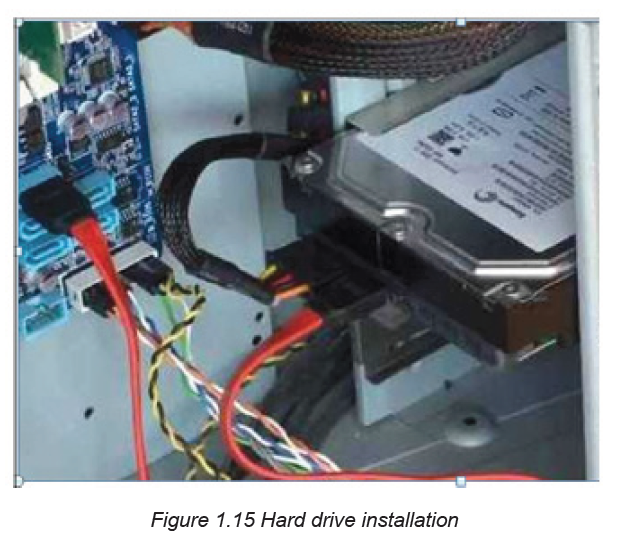
The optical drive is installed in the drive bay. The following steps are used to mount
the optical drive into its hole:
1. Slide the drive into the drive bay until the screw holes are lined up and the
front of the drive is flush with the front of the case. Make sure that it is
orientated correctly.
2. Install the screws and install wires to the right places
Step 6: Install the CPU
The CPU is the brain of the computer. It is installed on the motherboard’s appropriatesocket.
To install the CPU, first locate the corner marking that designates pins of the CPU.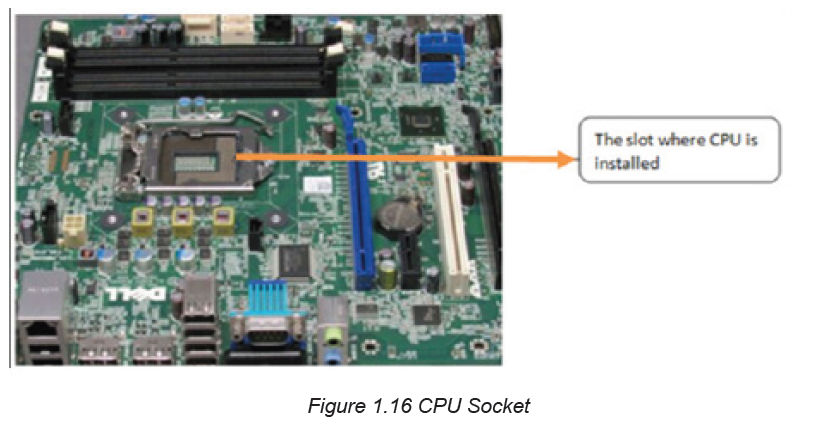
The second stage require to lift the small metal rod next to the socket and then
find the corresponding marking on the CPU socket to insert the CPU so that the
markings are lined up. Last push the rod down to lock the processor in place.
Step 7: Install RAM
The RAM is the temporary memory location that the processor works from.
Permanently stored data is pulled from disks and stored in RAM while the processor
works with it
The following steps are gone through to mount RAM into its exact position:
Set the RAM board in the socket. Check to see that the notch in the board is in the
correct location
Press firmly on both ends of the board to set it into the socket. Make sure the tabs
lock into place and press the board only when the tab is aligned as not doing so candamage the RAM or even the motherboard.
Step 8: Install the CPU Fan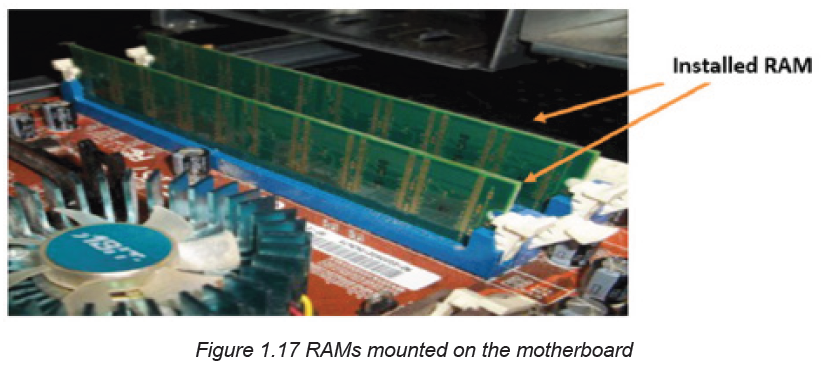
The CPU fan is a combination of a heat sink and fan together. The unit draws heat
away from the CPU. To install the fan the following steps are followed:
Firstly, Place thermal compound to the CPU following the instructions provided with
the compound,
Secondly, set the fan assembly on the CPU with mounting tabs aligned,
Pull the locking rod down on the fan assembly to lock into place,
Connect the fan assembly’s power connector to the motherboard.
Note: Failure to apply thermal compound results in insufficient cooling and cancause damage to the CPU or motherboard.
Step 9: Install Case Fan
The case fan is usually installed on the back panel of the case. To mount the fan
do the following:
1. Align the mounting holes by holding the fan to the mounting pad on the
inside of the case. The fan needs to be mounted so that it blows air out of
the case.
2. Insert the screws from the outside of the case and tighten them
Step 10: Install Power Supply
The following steps are followed to install power supply:
1. Align the mounting holes in the case and power supply.
2. Insert screws and tighten.Step 11: Connect Cables
When all of the components installed in the case, it may be possible that there are
some parts which may not be supplied with the power. It is important to consult the
motherboard manual in order to make sure proper connections are made. There
are two kinds of connections, power and data.
About power connectors, every device installed needs power. The motherboard
has two power connections, connectors specifically for SATA devices (drives) other
connectors for running fans and or non-SATA devices. While data cables connect
drives and front panel devices to the motherboard. Incorrect connections can
damage components.
Step 12: Wrap-up
Now that the components are completely installed, the last thing to do is to
reinstall the side panels on the case. The computer is now ready to be turned
on. If the computer has problems starting up, check all component connections
and mounting to make sure that everything has been attached correctly. Otherwise
consult individual component manuals for specific troubleshooting information if
problems persist.
B. Disassembling a desktop computer
Disassembling a computer means disconnecting external and internal components
from the system unit. This process involves unplugging,
unscrewing and sliding out components depending on the mechanism used
to connect to the system unit or mount it onto motherboard. To disassemble a
computer, the following process is followed:
1. Disconnect the computer from the power source by unplugging the power
cable from power supply unit.
2. Unplug peripheral devices attached to the system unit such as monitor,
keyboard, mouse and printer.
3. Open the outer cover of the system unit by unscrewing or sliding it out.
4. Remove the adapter cards by first unscrewing them and gently unplug them
off the motherboard
5. Remove the fixed drives such as hard disk and optical (CD/DVD) drives by
unscrewing and disconnecting them from power supply unit. Next, disconnect
the IDE or SATA interface cable that connects the drive to the motherboard.
6. Remove memory (RAM) modules by pressing the tabs located on both ends
down away from the memory slot. Carefully hold the slightly lifted module by
the edges and remove it from the motherboard.
7. Remove the power supply unit starting with the power connector to the
motherboard, CPU fan, cabinet fan, power buttons and drives if any. Next,
unscrew the unit to disconnect it from the system casing
8. Remove the CPU and its fan by first unscrewing the cooler fan from the
motherboard.
9. Finally, unscrew the motherboard to unplug it from the system unit casing soas to have an empty shell of the casing
APPLICATION ACTIVITY 1.5
1. Demonstrate how to mount a motherboard using the following guidelines:
• Line it up properly on the chassis, screw and fit it into place.
• Mount the processor, RAM modules and any expansion cards separately.
• Plug in the power cable connector from the power supply unit.
• Connect other internal components onto the board, and then connect the
monitor, keyboard and mouse to the system unit.
• Test for power and ensure that internal and external components are
initializing correctly during POST (Power-On Self-Test).
2. Do a research and explain five types of expansion cards used on desktopcomputers.
1.2. SOFTWARE1.2.1. Software installation principles
Activity 1.6
1. Explain the importance of reading the user manual before installing new
software.
2. State three factors you would consider before purchasing application
software.
3. State three hardware requirements to be considered when installing
application software.
Software is another part of a computer. It is the invisible part which consists of
instructions which operates a computer and executes specific tasks. Software can
be classified into two main categories namely system software and application
software.
System software is the one that performs a variety of fundamental operations that
helps to make computer resources available to the user. It can be divided into
Operating systems, Utility software, Firmware and Networking software.
Application software is the one used in a computer in order to perform tasks,
functions for the benefits to the user. Application software available in a specific
computer depends on the needs of the computer user. For example
one may have VLC to play videos while another may not have it depending on the
needs.
The number of computer software or programs installed on a computer is only limited
to hardware specifications such as processor type, memory and storage capacity.
Once a computer meets recommended specifications, software installations is
automatically carried out.
A.System requirement
Before installing computer program whether operating system or application
software, there are minimum system specifications that have to be considered in
terms of: Memory (RAM) capacity, Free hard disk space, Processor type with
speed and Graphics display.
For example, the following are the minimum and recommended system requirements
for the installation of Windows 10 operating system:
• Memory capacity: 1 Gigabyte (GB) of RAM on a 32-bit or 2 GB on 64-bit
machine
• Storage space: 16 GB free-disk space on 32-bit or 20 GB on 64-bit machine
• Processor type and speed: 1 Gigahertz (GHz) of CPU Speed
• Graphics card: Microsoft DirectX 9 graphics controller with WDDM driver
(Windows Display Driver Model)
B. Application software goes with specific operating system
An operating system has specific application software that it is designed to accept,
that is due to the fact that an application software needs a working environment
that is made ready by an operating system and while developing a program, the
developer considers the environment provided by that specific operating system.
For example, Windows operating system cannot accept application programsdeveloped for Linux.
APPLICATION ACTIVITY 1.6
1. Discuss various categories of software installed in the computers found in
the computer lab of your school.
2. Research on the internet minimum and recommended specification for
installing the following software:
a. Latest version of Microsoft Office
b. Latest release of Kaspersky Antivirusc. latest Ubuntu Linux
1.2.2. Computer software issues:Activity 1.7
At the end of the school term when students were using computers in the school
computer lab, every computer worked well but at the beginning of next term they
brought from outside different storage devices such as flash disks and other
external disks used to copy various documents to the computers. One day when
their teacher switched on the computers so as to install some software most of
the computers displayed suspected messages.
a. Discuss what may be the cause of such behaviors.
b. How the problem can be addressed in the laboratory?
A. Operating System issues
Being the one that directly interacts with the computer hardware through the
Operating system kernel, an operating system issue is a serious problem that may
make even accessing the computer’s different applications impossible. The various
operating system issues are elaborated in the subsequent content.
i. The computer won’t start
Operating system has the function of managing hardware and other application
software resources. A complete damage of an operating system leads a computer
to do not start even not function.
ii. Abnormally Functioning Operating System
If the operating system or other software is misbehaving, close it forcefully and
reopen it. A virus scan can also help if a reliable anti-virus software is installed.
iii. Operating system is not booting up
When the operating system is not loading, it is a serious problem that requires a
fresh reinstall of an OS.
iv. Operating system blue screen of death
A blue screen of death pops up when Windows encounter a critical error and
indicates a serious error with a computer device. Incase this occurs, users are
prone to losing important data since regular apps don’t normally have a right to
save their open data. The main reasons for this issue are:
• Crashing of a low-level software or drivers
• Drivers updates going wrong
• A faulty hardware
• A virus attack on a system
How to fix the blue screen of death issue:
• Do a system restore which will help undo any recent installed driver.
• Update device drivers since as time goes by some drivers become incompatible
with the regular OS updates which could cause the computer drivers to crash
more frequently.
• Start PC in Safe Mode and troubleshoot any problem from the blue screen
details and scan it for viruses since some viruses are known to cause the
Blue Screen of death.
• Reinstall the Windows OS if none of the above works.
v. Windows freezes or stops responding
The operating system may sometimes stop responding and freeze. In this case
a cursor may not move, an application may not respond or just a computer
user gets stuck on a certain action. Potential causes of the random freeze and
unresponsiveness on a PC may include:
• Software related issue including malicious software, virus attack and driver
related issues,
• Running too many programs at the same time,
• Memory issues and general hardware failure
• Solutions to windows freezing or stopping to respond
• The best solution is to give the computer some time to process, since it might
be handling a complex task that could be taking most of its CPU and RAM
If giving it more time does not work, then force end the task or program that is not
responding by pressing Ctrl + Alt + Del to open the Task Manager. After the Task
Manager opens highlight the non-responding program or process and choose “End
Task”.
• Reboot the PC by pressing down on the power button until the computer turns
off and restart it after a few seconds
• If after rebooting the computer still freezes then reboot the PC in Safe Mode
and uninstall any recent driver that might be causing the computer to freeze.
• Determine if there is a defective piece of hardware that might be causing the
device to freeze and replace it immediately. Also check on the computer’s
memory such as RAM to know if it needs upgrading.
• When none of the above solutions work a clean install of the Windows
Operating System can be considered.
vi. Less free storage than before after an operating system upgrade
This happens because files from the previous operating system are still left in the
system in a folder known as “Windows Old “the “Disk Clean-up” tool can be used
to prevent the computer from running slowly.
Steps to delete unnecessary files after an operating system upgrade
• Irrespective of the operating system used, either Windows 7, 8, 8.1, or 10 go
to the start then search and type Disk Cleanup
• The disk cleanup app shows, click on it to launch
• From the Apps interface, select the drive on which the OS is installed which
is usually C by default in many PCs.
• After selecting the drive click Ok and the disk cleanup app will scan for theunnecessary files that can be deleted and present them as a list.
• The disk cleanup then does another search and gives another list now with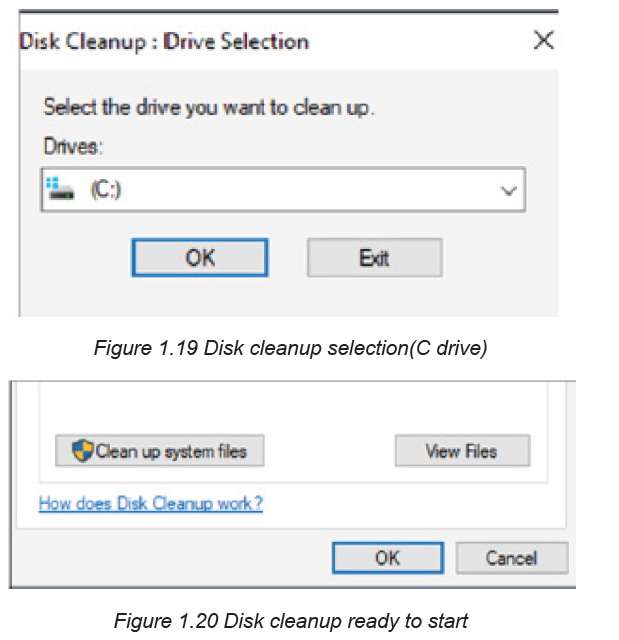
all the necessary files to delete. From the list select all the unnecessary files
taking up on the space including “Previous Windows installations”
• Click OK and a box asking whether to permanently delete these files will pop
up. Click Delete Files.
There are thousands of problems an operating system might encounter. However
most of those problems are rare and the existing few have been documented.
The various common issue and how they can be solved has been looked at in theabove content.
B. Applications issues
Common computer software issues or fault can include the following:
Inadequate software performance: This refers to slow system response time and
transaction throughput rates.
1. Obsolete software: Software that no longer works due to new hardware or
support software changes
2. Inconsistent processing: Software that only works correctly in one
environment. This refers to software that has been designed for only
one environment and cannot be easily transported and used in another
environment.
3. Unreliable results or performance: This means that the software does not
deliver consistently correct results and cannot work correctly each time it is
used.
4. Incorrect software version being installed on a computer
5. Virus and malware infection on a computer, etc.
The most common way to rectify software issues include uninstalling and reinstalling
a software, upgrading the software, running a virus and malware scan. It is also a
good practice to check for the manufacturers’ website for patches
C. Malware
Malware are harmful programs or malicious software that are specifically designed
to gain access or damage a computer without the user’s knowledge. They affect
the smooth running of a computer system or carry out illegal activities such ascollecting information from the infected user’s computer.
The categories of harmful programs include viruses, worms, Trojan horses, rootkits,spyware, crimeware, and adware. In this section we will discuss on viruses.
a) Virus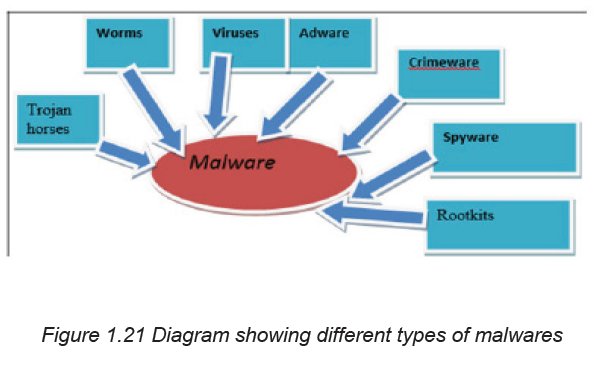
A virus is a self-duplicating computer program or piece of code that is loaded into
a computer without the user’s knowledge. Viruses can spread themselves from
computer to computer, interfering with data and software.
The source of computer viruses is the internet and storage devices or media.
To Prevent Harmful Programs the following measures can be taken:
i. Install an antivirus program
An antivirus will check for suspicious files and disinfect them or delete them. Make
sure the antivirus is up to date so that it can detect even newly created viruses.
ii. Avoid non-secure sites
Avoid visiting unfamiliar suspicion sites and block special sites that should not be
accessed using the computer browser.
iii. Scan emails for viruses
Do not open email attachments unless they are from legitimate known source.
iv. Install anti-spyware software
This is a type of program designed to prevent and detect unwanted spyware
program installations.
b) Trojan
Trojan or Trojan Horse is a malicious software that is disguised as legitimate. Trojan
misrepresents itself as useful, routine, or interesting in order to persuade a victim to
install it on a computer. Trojans do not replicate themselves and appear harmless
but in fact malicious.
c) Worms
A worm is a computer program that sits in the computer memory, duplicates itself
continuously until the system runs out of memory and crashes. Worms infect
networks by replicating themselves and transmitting their multiple copies to all the
nodes connected on the network
d) Rootkit
A rootkit is software used by a hacker to gain constant administrator-level access
to a computer or network. It is installed through a stolen password or by exploiting
system vulnerabilities without the victim’s consent or knowledge.
Rootkits primarily aim at user-mode applications. Rootkits can completely deactivateor destroy the anti-malware software installed in an infected computer, thus making
a rootkit attack difficult to track and eliminate. When done well, the intrusion can be
carefully hidden so that even system administrators are unaware of it.
e) Spyware
Spyware is a software code installed on a computer without user’s knowledge to
monitor or supervise user activities.
Spyware can do the following:
• Gather personal information and can transmit it without user’s knowledge,
• Change computer settings,
• Corrupt windows Registry files,
• Slow down internet connection speeds and the computer itself by taking up
memory and space on the computer,
• Can make a computer to malfunction or totally crash.
f) Adware
The term adware is used to describe a form of malicious software which presents
unwanted advertisements to the user of a computer. The advertisements produced
by adware are sometimes in the form of a pop-ups or in a window that cannot be
closed.
Adware is considered a dangerous program, its main objective is to collect information
about the user, to remove the browser ‘s restrictions, settings and default search
engine. When data collection is complete, the current opened program starts to be
active, and user gets low-quality sites in response to any request.
g) Crimeware
Crimeware is distinct from spyware and adware. It is designed to commit identity
theft through social engineering in order to access a computer user’s financial and
retail accounts for the purpose of taking funds from those accounts or completing
unauthorized transactions.
Crimeware can have the following impact:
• Install keystroke loggers to collect sensitive data login and password
information for online bank accounts.
• Redirect a user’s web browser to a counterfeit website controlled by the thief
even when the user types the website’s proper domain name in the address bar.
• Steal passwords cached on a user’s system.
• Enable remote access into applications, thus allowing a break into networksfor malicious purposes
• Encrypt all data on a computer and require the user to pay a ransom to decrypt it
APPLICATION ACTIVITY 1.7
1. Using internet and brainstorming, search any other common sources of
computer virus infection
2. Discuss the various ways a user can acquire a software to use.3. Demonstrate how to start disk cleanup utility.
1.2.3. Computer software installation
1.2.3.1. Installation of an OS
Activity 1.8
Suppose your school receives 30 new computers with no installed programs.
a. What is the first program the school ICT teacher or lab technician should
firstly install?
b. Explain why?
The term Software Installation means the process of copying installation files of
a given program onto the hard disk in a format that allows the computer to run the
program. It means putting a computer program on a computer and make it ready
to use. Before installing any software read the manufacturer’s installation manual
to correctly install programs. This manual describes all the procedures and the
necessary system requirements for successful installation.
Most programs are installed by downloading the program from online sources.
Programs can be installed from an external storage medium such as a DVD or USB
stick. If a program is being installed from the disk, the installer will automatically start
when a memory is inserted in the DVD drive. What the one doing the installation will
have to do is just follow the instructions.
Installation of an Operating System is a fundamental process that starts with
identifying minimum or recommended system specifications.
Installation of Windows 10
Like other versions of Microsoft Windows, installation of Window 10 is a threephase
process consisting of: copying files from either bootable USB or CD/
DVD, installing features and drivers and configuring settings.
a. Copying files,
At this first stage of installation the all files are moved from either bootable USB or
CD/DVD to computer which require installation
b. Installing features and drivers,
At this stage the copied files with respect to their features start to be installed
together with the drivers, recall that the role of drivers is to provide a software
interface to hardware devices, enabling operating systems and other computer
programs to access hardware functions without needing to know precise details
about the hardware being used.
c. Configuring settings
This is where installer is asked to choose from available options. This stage of
configuration requires to be taken carefully as some of the settings once disabled
may lead to the malfunctioning of the computer
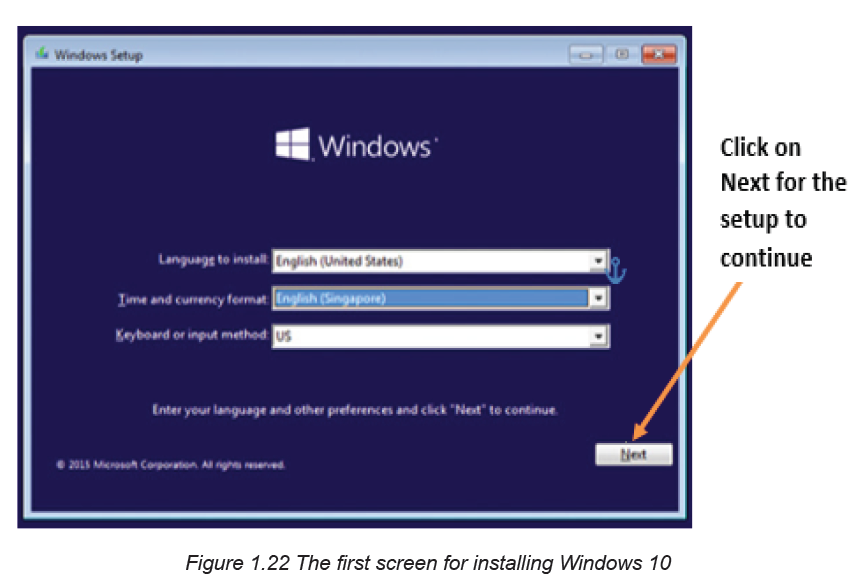
Step 1: This is the first screen to see while installing Windows 10 using a bootable
USB flash drive or DVD. Here’s where to choose the Operating System’s language,
time and currency format, and input method. Once everything is chosen appropriatelychoose Next to continue
Step 2: In the new window that appears click on Install now
Note: If the repair option is chosen, the Troubleshoot screen where to choose to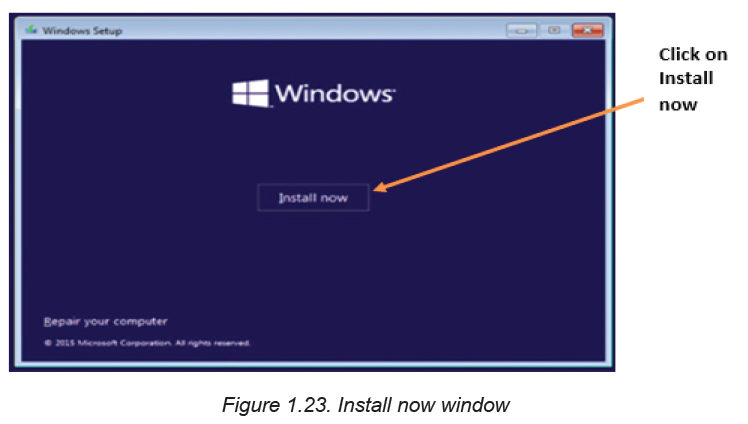
reset the PC and re-install windows will appear. Therefore, keep or remove the files
Step 3: In the window that appear next enter the Windows product key. This can
be found online, in the confirmation email so that they can be purchased, or on theDVD packaging.
Step 4: Accept the license terms. This stage deals with reading software license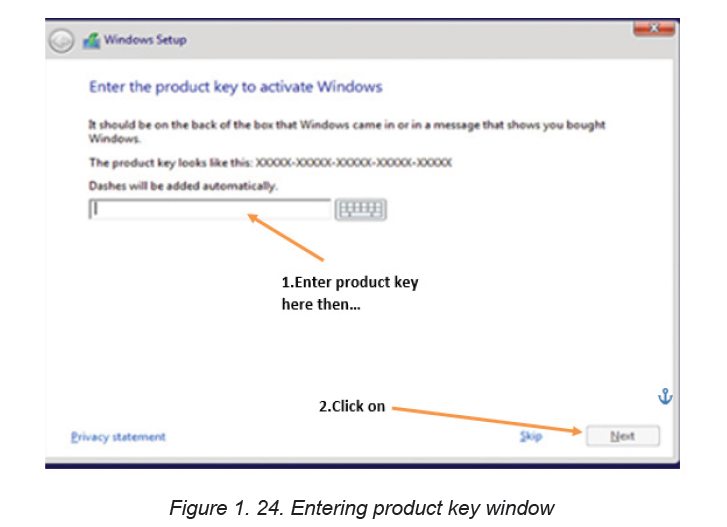
terms and condition to install window 10.
Step 5: In the next image, one can choose to upgrade or custom install windows.
In the upgrade option, files, settings and apps are moved to Windows while in
custom option these are not moved. The choice to make will depend on the oneinstalling Windows and what is the needed outcome at the end of the installation.
Step 6: Select the drive to install Windows 10 on. At this step an existing drive can
be formatted and used for installation like a new drive can be used for that purpose.Partition is also done.
Step 7: Once the partition in which Windows will resides specified, clicking the Next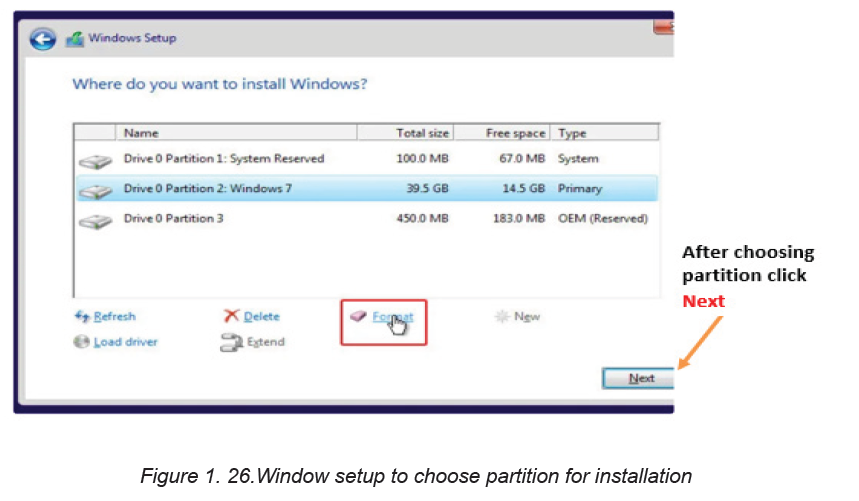
button moves the installation to the next phase of copying Windows 10 files ontothe partition as shown in Figure below:
At this stage after files have been copied configuration is started. During drivers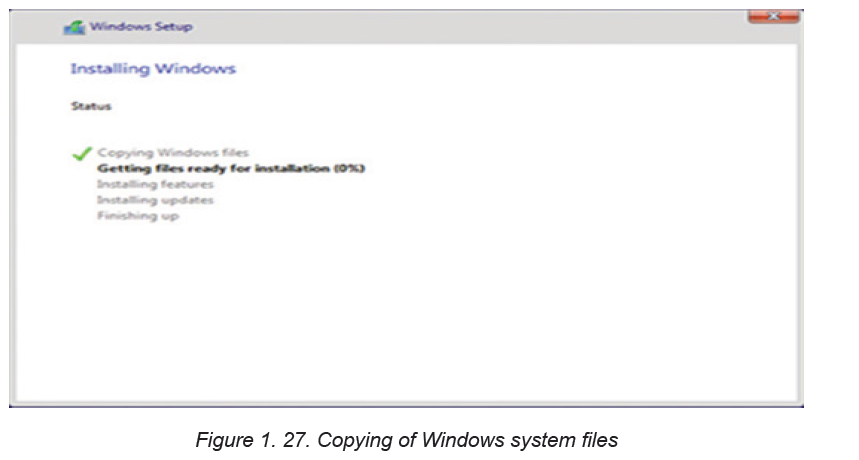
and features configuration stage, the PC restarts several times.Step 8: Do personalization of installed Windows
Read the settings to customize carefully before turning them on or off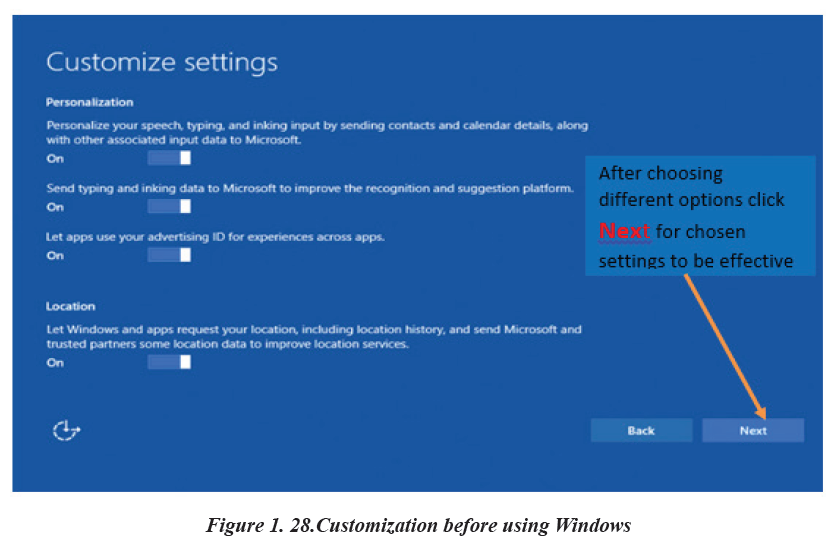
Step 9: Sign in or create a Microsoft account when prompted to do so as shown inthe figure below.
Microsoft account is important as it allows the user to access Windows 10 resources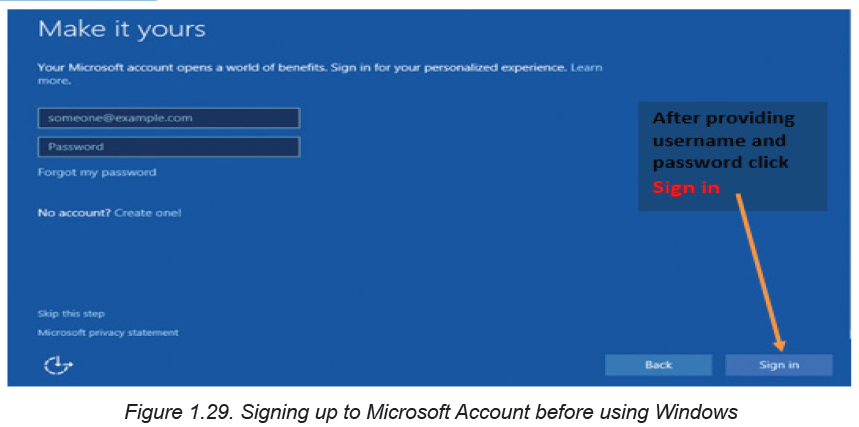
like online emails, cloud and Apps.
Step 10: Let the installer configure Apps before the desktop shown in the figurebelow is displayed.
Now Windows 10 is ready to be used. The newly installed window will have on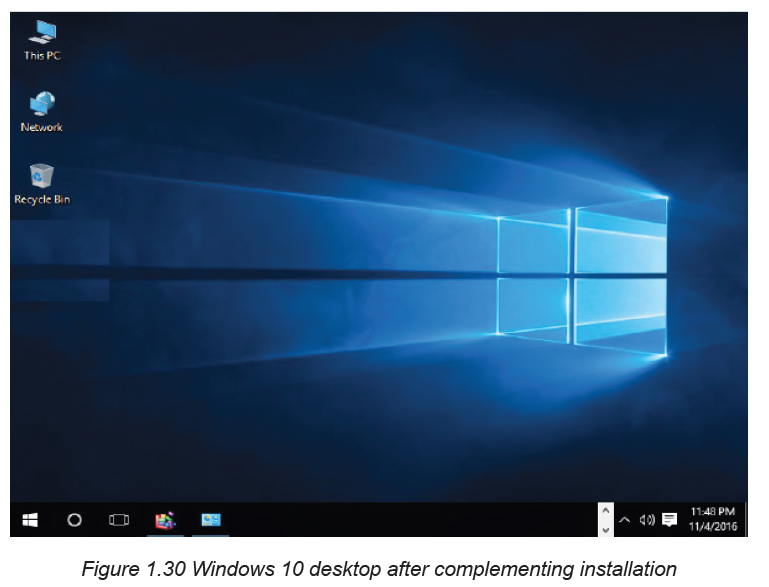
desktop three main items: This PC, Network and Recycle bin
APPLICATION ACTIVITY 1.8
Demonstrate and outline steps on how to install various versions of Microsoft
Window operating systems such as window 7,8, etc..
1.2.3.2. Installation of Application software
Activity 1.9
John bought a computer and connected a flash disk on it to play some music,
unfortunately the computer refused to either play the music or open some
documents stored on the flash disk but once the flash was connected to the
friend’s computer it played and opened the document. After reading this scenario:
a. Suggest what should be the problem with John’s computer
b. How to handle the issue seen in a?
In order to have a computer accomplish a specific task that the computer user want,
instead of having only the operating system, a specific software to accomplish a
specific task is installed. That software to install is an application software.
A. General guidelines procedure to install application software on the
Computer
The first most important step in software installation is to check whether the
target system meets the general hardware requirements of the application. It is
also necessary to make sure that the version of the application to be installed
corresponds to the Operating System platform running on the computer.
Some computer programs also have software requirements prior to installation.
Once all the initial requirements have been met, make sure that there are no
unnecessary programs running before beginning the installation procedure.
Software installation can be done directly from the Internet or from an installation
media
A.1. Installation from media
To install from the disk, insert the CD/DVD drive. Once A setup wizard is running
simply follow the prompts until the installation process is completed. In case there
is no setup wizard window, open the Explorer and navigate to the optical drive.
Double click on either the Autorun or Setup file. For novice users, accept the defaultvalues to minimize potential problems during the procedure.
A.2. For installation from the Web
Launch the browser application and download the setup file to the hard drive.
After completion of the downloading process, run the setup program which is found
in the Downloads folder to execute the setup wizard that will handle the automatic
installation of the software.
After the installation procedure has been completed and the setup wizard has
terminated, reboot the computer before launching the newly installed software.
A.3. Installation of Microsoft office 2013
Most software developers package several programs into a suite with good example
being Microsoft Office 2013. Go through the following steps:
Step4: Insert Microsoft Office 2013 DVD or USB installation media into the
computer. In the license agreement screen that appears, click the check box withthe text “I accept the terms of this agreement”.
Step 2: Once the Microsoft terms of agreement are accepted, choose whether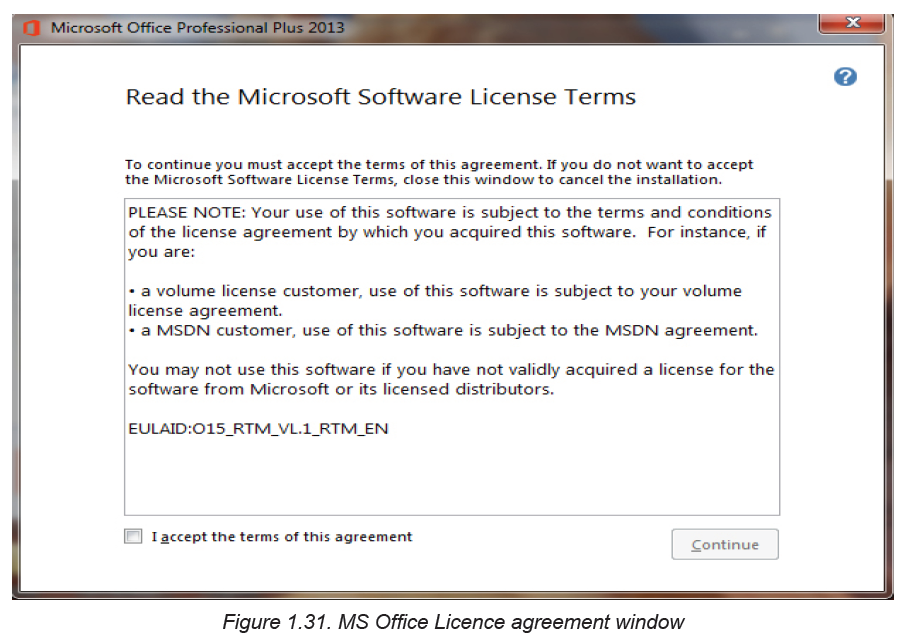
to upgrade an existing version or custom install a new copy. install new copy asshown in Figure below:
If an old version of office is already installed there is an option to upgrade
it to a newer version but both the new and the old versions can be kept
depending on the user’s choice.
Step 3: To upgrade an existing version of Microsoft Office, click Upgrade. Make
sure the radio button “Remove all previous versions” is selected, and then clickNext. The installation progress screen shown in the figure fellow.
Step 4: Once the installation process is complete, sign in for Microsoft account to
get online access to the Microsoft resources like the screen shown in the figurebelow is displayed to confirm that Office 2013 has successfully been installed.
Step 5: Open Office 2013 by clicking on the Start button then All apps. The list of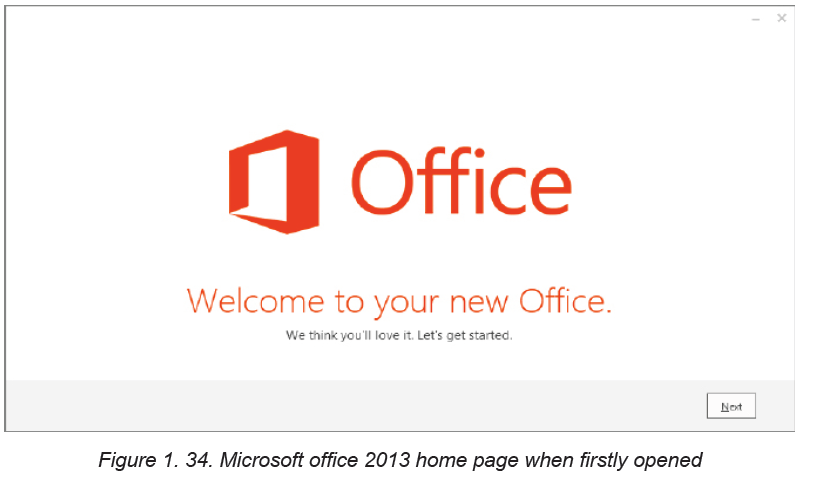
installed Microsoft Office 2013 apps is displayed.
Note:
To install application software successfully there is a need to use an administrator
login because with other types of accounts with limited privileges such an installation
is not possible.
Sometime once a program is installed into a computer there may be a need for
removing them from the computer for different reasons. The process or removing
installed application software from computer is known as uninstallation. Here below
are the procedures followed to uninstall some programs in window 10:
• Open the Start menu
• Select control panel
• Click on uninstall program
• Select the program to remove
• Click Uninstall• Click on the program to uninstall
APPLICATION ACTIVITY 1.9
You are provided with Microsoft Office 2019 Installation on DVD or on flash disk.
Uninstall the current running Microsoft office and Install this provided application
on your computer.End unit assessment
1. Compare safety precautions applied in scientific laboratories such as
chemistry, physics and those observed in computer laboratory
2. Study the motherboard of a computer and perform the following:
a. Identify the CMOS cell battery and RAM mounted on the motherboard
b. Detach and re-attach a CMOS battery and RAM
3. a. Explain briefly the meaning of operating system in the computer system.
b. Explain three phases taken by operating system during its installation
c. Discuss any five functions performed by the operating system residing
on a computer.
4. State four factors to consider before purchasing application software.
5. Explain why motherboard is the first element to be installed in the process
of assembling but the last one to be removed during the process ofdisassembling?
UNIT 2 ADVANCED WORD PROCESSING
Using Ms Word type text about the use of ICT in Health Sector and do the
following tasks:
1. Insert page header text “ICT tools in education”
2. Insert page footer text “Enhancing students’ learning”
3. Insert 2 footnotes to the text “My First Footnote” and “Second footnoteIntroductory activity 2.0
Muhire an associate nurse student was asked to prepare a document presenting
the features of his/her reference hospital. The document to prepare must contain
at least five images which present the most aspects of the hospital. Those
images can be Emergency, Intensive care unit, administrative blocks, Pharmacy,
Radiology and Laboratory. The document must contain titles and have highlights
of words to which more attention is needed. The highlighted words can be made
bold, italic, underlined or can have any other color depending on the preferences.
a. Prepare such a document with at least 4 pages and give it the title
“My beautiful Hospital”
b. Insert page numbers in the created document
c. Create a table of content for that document
d. Create a cover page that is going to be the first page in the
document but with no page number
2.1. Formatting a document
Activity 2.1
Instruction:
Open a blank document in Ms Word and save it as”Inzu”; then type in the
document “Hano hari inzu ikodeshwa “
Do the following:
1. Change the font size to 36
2. Change the font – type to Book Antiqua.
3. Change the textfont color to red.
4. Change text to Bold Italic and Underline it.
5. Change text to the UPPERCASE.
Formatting a document refers to the appearance or presentation of a document
which is done in order to make that document look more beautiful by looking like areadable document rather than a letter or note to a friend.
2.1.1. Change the font
Text formatting allows the changing of the appearance and layout of text and other
characters within a document. The font determines the way the text appears on the
screen and when the document is printed. The more common font types are Times
New Roman, Verdana and etc. there are also different font colors and size which are
used depending on the user’s choice.
It is possible to apply a font to either an entire document or to certain portions of a
document. To apply a font:
• Click on the Home tab
• Go to the Font group• Select/click on the font to apply
Note: When the font is to be applied on a text already written the steps to apply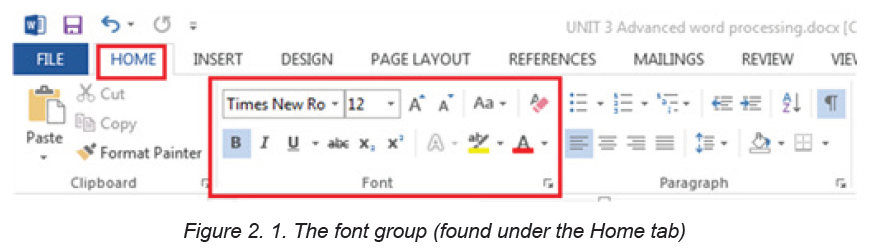
a font will be preceded by selecting that text
A. Changing font size
The most used size of word characters is 12, however character size in word varies
from 1 to 72 but can increased even up to 1638 for Microsoft Office word 2013.To change the font–size go through the following steps:
1. Select the text for which the size is going to be changed
2. On the Home tab, click the Font size drop-down arrow. Select a font size from the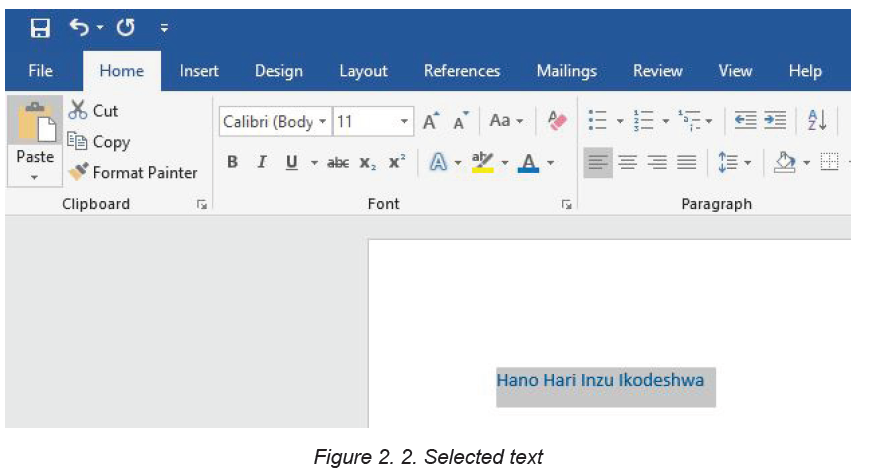
menu. If the font size needed is not available in the menu, click the Font size box
and type the desired font size, then presses Enter.In the image below the font size of the text is now changed to 36.
Note: It is possible to change font size using the Increase Font Size and Decrease
Font Size commands
B. Changing font type
By default, the font type of each new document is set to Calibri. However, Ms Word
provides many other fonts to use in customizing the text. It is advisable to use thefont type “Times New Roman” and the font size 12.
To change text’s font type go through these steps:
1. Select the text to modify.
2. On the Home tab, click the drop-down arrow next to the Font box. A menu of font
styles will appear.3. Select and click on the font type to apply. Immediately the font types changes.
C. Changing the font color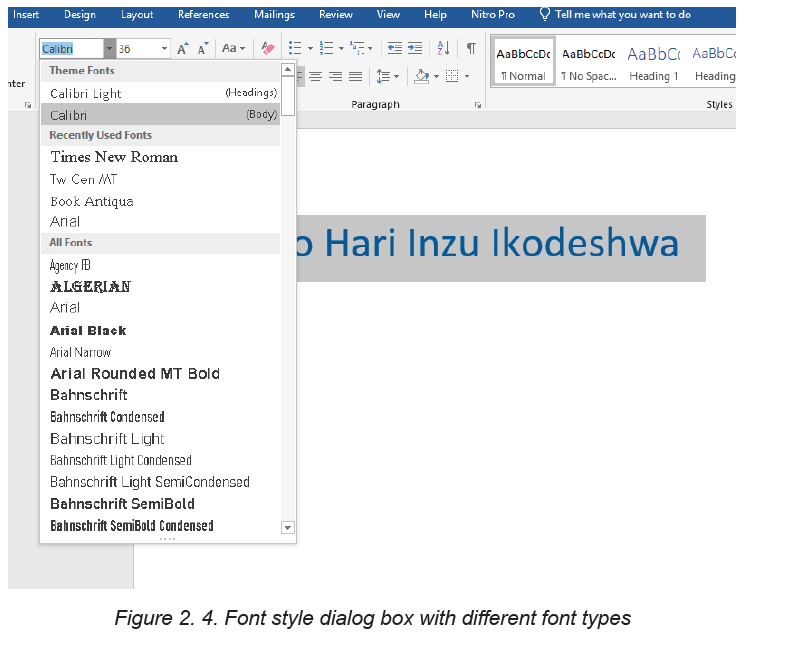
The most common font color for word text is automatic (near black) but there are
other fonts available. To change the font color:
1. Select the text to modify.
2. On the Home tab, click the Font Color drop-down arrow. The Font Color menu
appears.3. Select the font color to use. The font color will change in the document.
The Color to choose from are not limited to the drop-down menu that appears. Select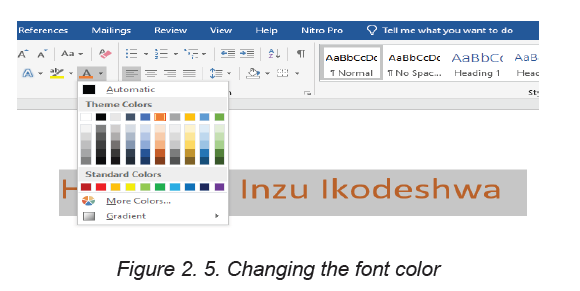
More Colors at the bottom of the menu to access the Colors dialog box and chooseone of the colors.
D. Making text Bold, Italic, and Underlined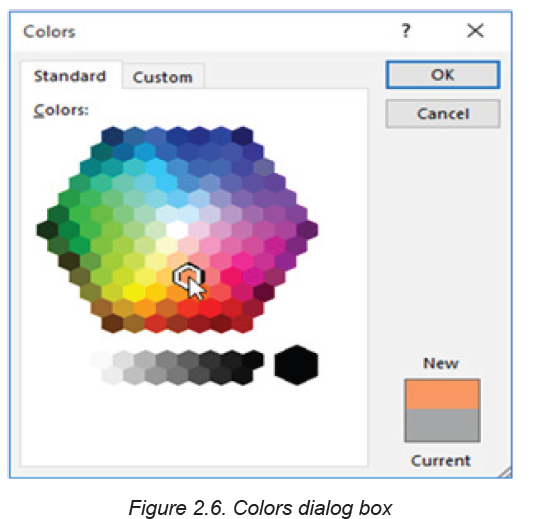
The Bold, Italic, and Underline commands are used to help draw attention to
important words or phrases. To make text have these attributes do the following:
1. Select the text to modify.
2. On the Home tab, click the Bold (B), Italic (I), or Underline (U) commands
in the Font group
3. The selected text will be modified and made bold, italic and underlinedas in the next image if all the corresponding icons were clicked on.
D. Changing text case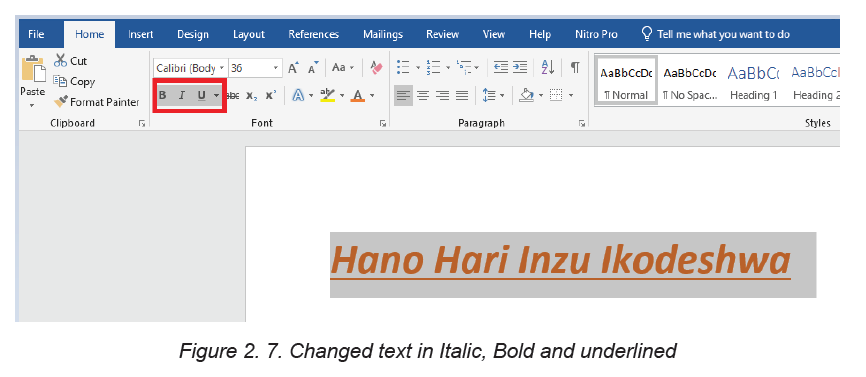
The text case is about the presentation of characters in words. A character can
be in capital or small letter. The available cases are: Sentence case, Lower case,
Upper case, Toggle case and Capitalize each Word. When changing the text case
is needed, use the Change Case command instead of deleting and retyping the
text.
To change the case:
1. Select the text for which to change the case.
2. On the Home tab, click the Change Case command in the Font group.3. A drop-down menu will appear. Select the desired case option from the menu.
The text case will be changed in the document like in the next image whose text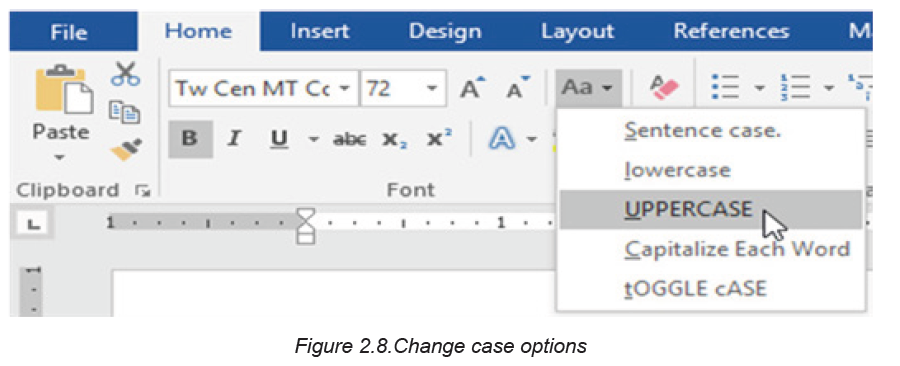
was in small letter before changing to upper case.
APPLICATION ACTIVITY 2.1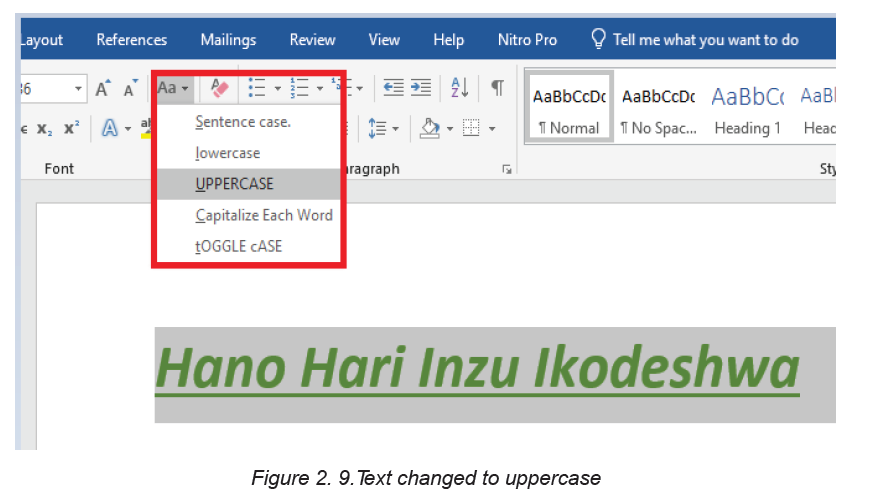
Write at least four lines of text which describes “peace of mind “and do the
following:
1. Change font type of the first and second sentences to “Poor Richard” ,font
size to “14”, font color to “Blue” and make the sentences italic.
2. Change the third and fourth sentence to the font type ”Tahoma”,
font size “12”, font color “Red” and underline those sentences.2.2. Paragraph group
Activity 2.2
1. Type text in word processing software which describe your last holidays.
The first paragraph talk about your daily activities, the second about what
made you happy and sad during the holidays. Save it as “my activities” and do
the following:
a. Apply on the text a line spacing of 1.0
b. Using the numbering option number your paragraphs as 1 and 2
c. Apply an indentation of 2.1 to the left on your paragraphs
A paragraph is a distinct section that describes a special idea.
Paragraph format contains one or more lines with a combination of words, numbers
and other characters. Various commands are used to format a paragraph such as:
Text Alignments, Bullets, Numbering, Multi-Level list, Paragraph Indents, Sorting
Text, Line Spacing and many others.
2.2.1. Indent
Indent means how far to move the paragraph away from the left or from the right
margin.
A. Method 1 of changing indent: the Tab key
The quickest way to indent is to use the Tab key which creates a first-line indent of
1/2 inch. That is done in this way:
1. Place the insertion point at the very beginning of the paragraph to indent.
2. Press the Tab key and the paragraph will be moved to the right by
1/2 inch.
3. The first line of the paragraph will be indented.
B. Method 2: Indent markers
In some cases, there is a need to have more control over indents. Word providesindent markers that allow to indent paragraphs to the needed location.
The indent markers are located to the left of the horizontal ruler, and they provide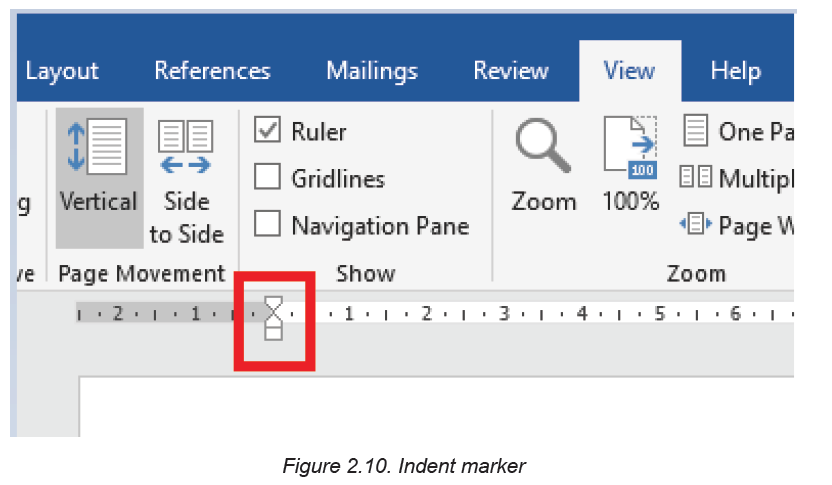
several indenting options:
• First-line indent marker adjusts the first-line indent
• Hanging indent marker adjusts the hanging indent
• Left indent marker moves both the first-line indent and hanging
indent markers at the same time (this will indent all lines in a paragraph)
Indent using the indent markers goes through the following steps:
1. Place the insertion point anywhere in the paragraph to indent, or select one or
more paragraphs.2. Click and drag the desired indent marker.
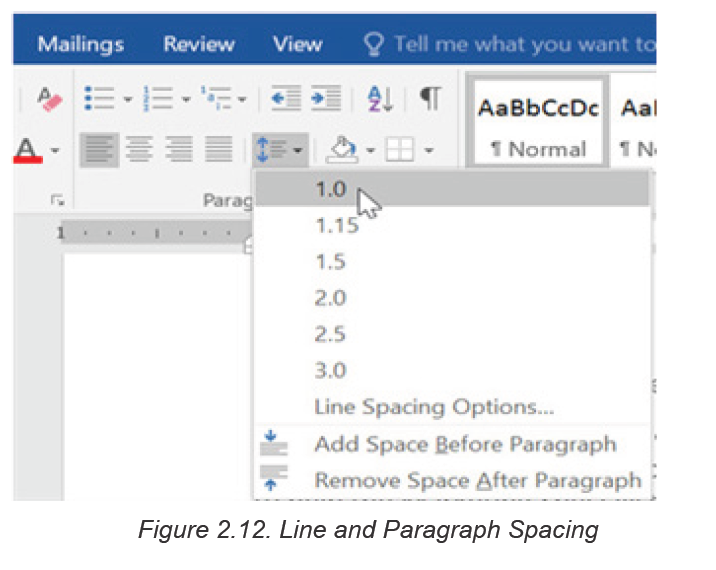
2.2.2. Line Spacing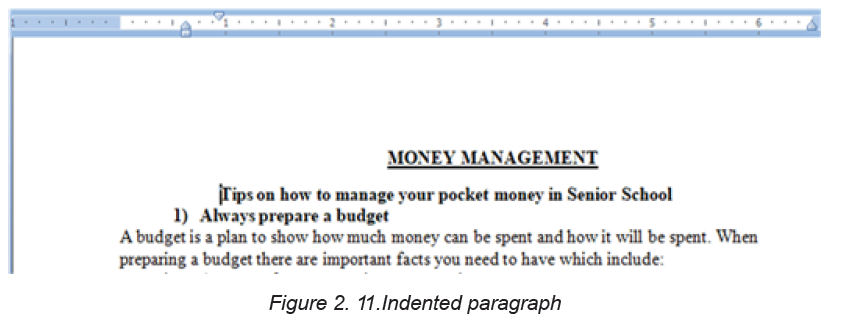
Line spacing is the space between each line in a paragraph. Word processing
program allows to customize the line spacing to be single spaced (one line high),
double spaced (two lines high), or any other space size.
Steps to format line spacing:
1. Select the text for which to change the line spacing.
2. On the Home tab, click the Line and Paragraph Spacing command, then selectthe desired line spacing.
The line spacing will change. In the the image below the line spacing is 1.0
2.2.3 Bullets and Numbering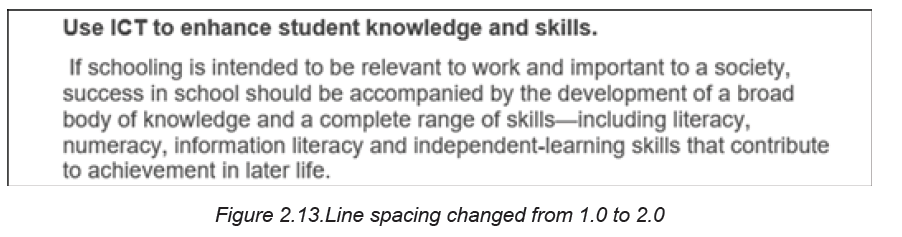
Bullets or numbering are used for a list. It is possible to apply automatically simple
bullets and numbering to lists in the document as it is being written.
Method 1: Custom made bullets and numbering
1. Start a bulleted list in Word by typing a character to use as a bullet at the
beginning of the first item in the list and pressing the “63” key.
2. After pressing the “Spacebar” on the keyboard, the asterisk will turn into a bullet point.
3. Type the first line of the list and press the “Enter” key to move to the next line.
The bulleted list will continue to be created.
4. To discontinue the bulleting, press “Enter” two times when finished with the list
Note: The character to use as a bullet can be a number or a letter. It can also be
followed by a dot or a closing parenthesis.
Method 2. Bullets and Numbering found in the paragraph group
The paragraph group has bullets and numbering that can be chosen from. To apply
them Go to the Home tab, in the Paragraph group, choose the Numbering buttonand then the style of bullets and numbering to use.
2.2.4 Alignment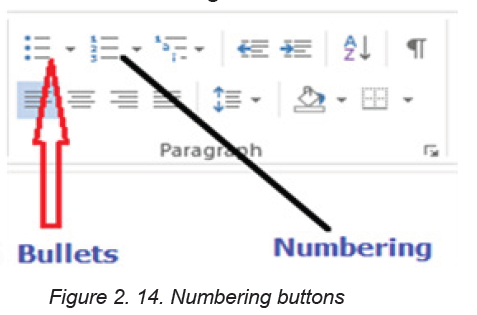
It refers to the arrangement of text relative to the left or right margin of a page. Thereare four types of alignments namely: Left, Right, Centre, and Justified Alignments.
Left alignment: Text is evenly positioned along the left margin but uneven at the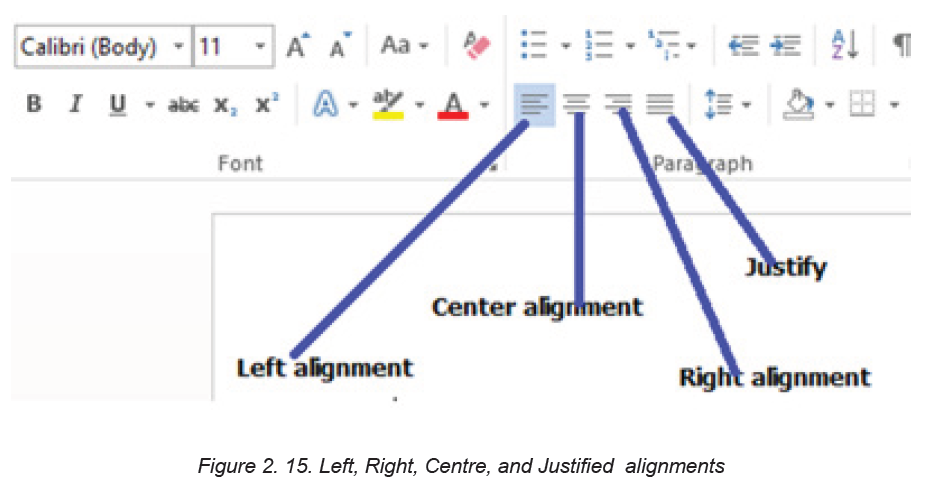
right margin. Typing begins at the left margin and does not have to end at the rightmargin.
Right alignment: Text is evenly positioned along the right margin but uneven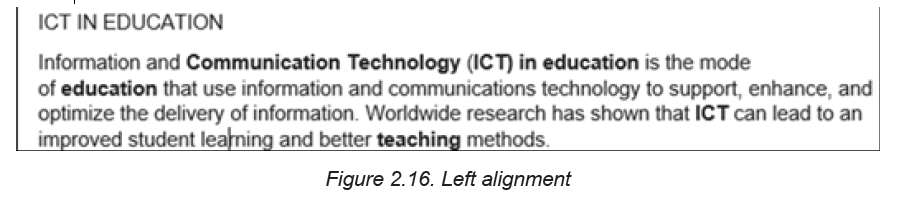
at the left margin. Typing begins at the right margin and does not have to endat the left margin.
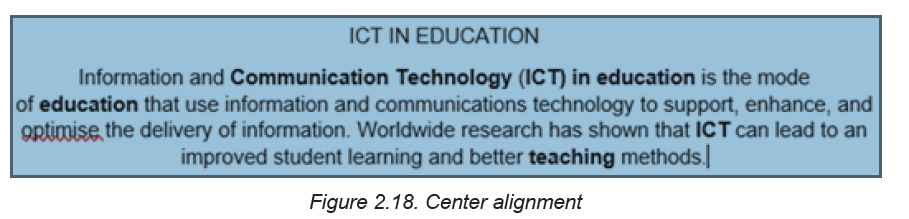
Center Alignment: Text is evenly arranged at the center of the page but uneven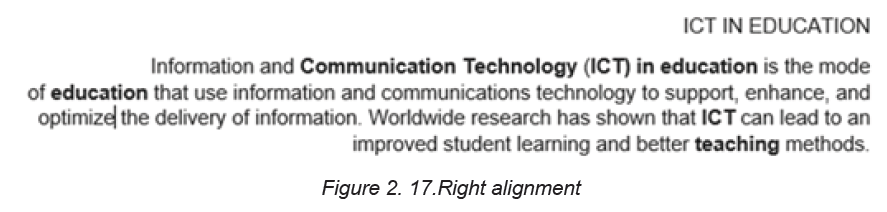
both at the left and right margins. Typing begins at the center of the page.
Justification: Text is evenly arranged both at the right and left margins.
APPLICATION ACTIVITY 2.2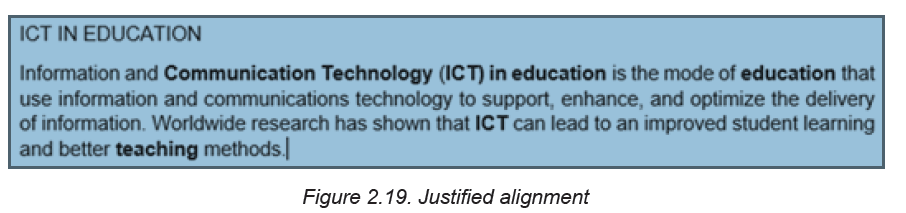
Instruction:
Using MS Word type a text from an English book, then do the following:
1. Indent the first sentence,
2. Change the font type to “Time New Roman “ , size =”12” , line spacing=”2.0
3. Change alignment from Left to Justified alignment
2.3. Referencing a word document
Activity 2.3
Using Ms Word type text about the use of ICT in Health Sector and do the
following tasks:
1. Insert page header text “ICT tools in education”
2. Insert page footer text “Enhancing students’ learning”
3. Insert 2 footnotes to the text “My First Footnote” and “Second footnote
2.3.1. Header and Footer
Headers are lines of text or graphics that appear above the top margin of a page
or selected pages while Footers are lines of text or graphics that appear below the
bottom margin of a page or selected pages.
To insert a header and footer do the following:
Step 1:Click Insert Tab from the menu bar; then click on Header or footercommand from the ribbon.
Step 2: A drop down menu appears showing the different styles of footer or header.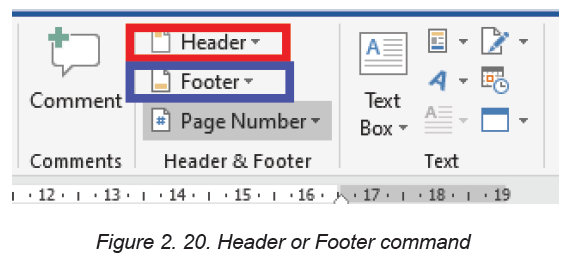
Click on the desired option.
Step 3: In the Header & Footer regions type the desired content to use as header
or footer respectively. Then press Enter.
After entering the text to use the respective header and footer will look like in thefollowing images:
2.3.2. Insert Footnotes and Endnotes in Word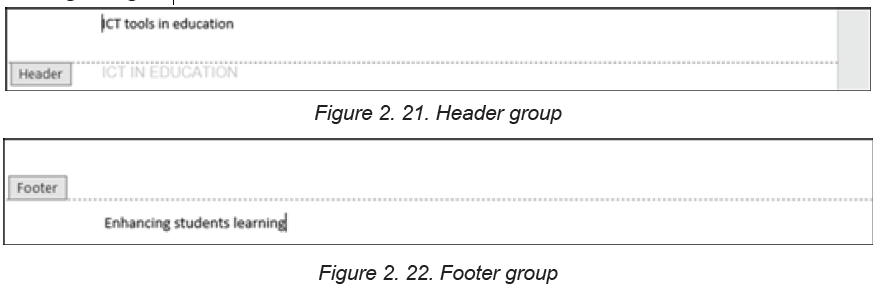
Footnote is the note citing a particular source or making a brief explanatory
comment placed at the bottom of a page corresponding to the item cited in the
corresponding text while endnote is a note citing a particular source or making a
brief explanatory comment placed at the end of a research paper and arranged
sequentially in relation to where the reference appears in the paper.
To insert footnotes and endnotes do the following:
Step 1: Place the cursor where the superscript number for the first note
should appear.
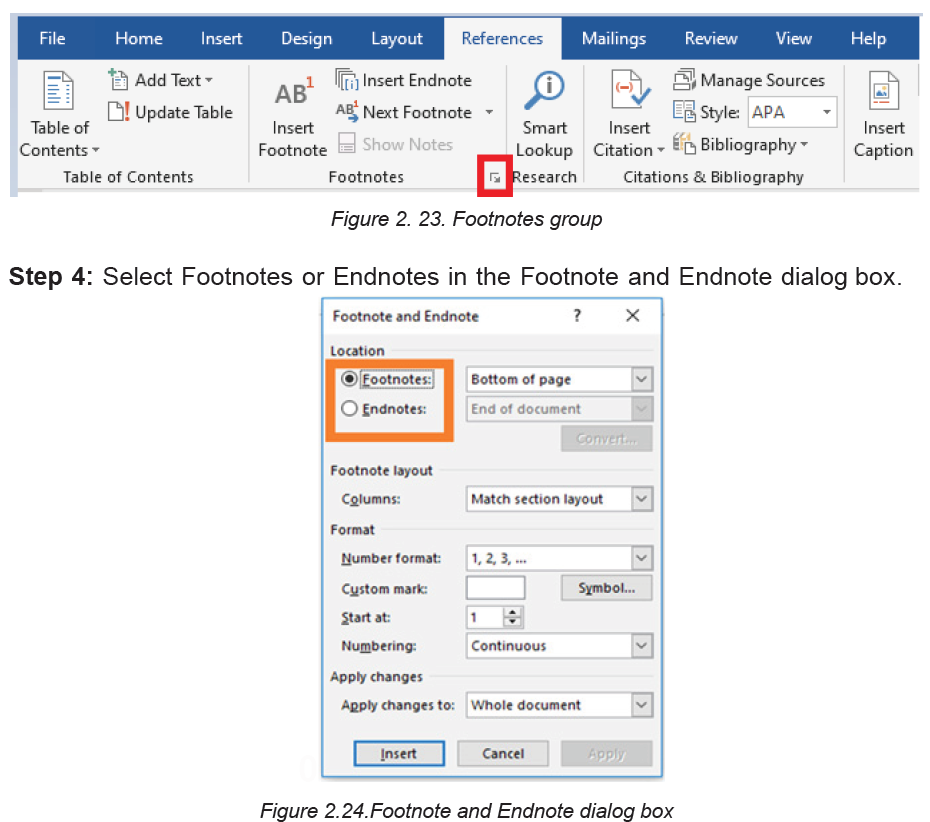
Step 2: Select the References tab in the ribbon.Step 3: Select the dialog box launcher in the Footnotes group.
Step 4: Select the note’s location from the drop-down menu.
Note: It is also possible to choose additional options in the Footnote and Endnote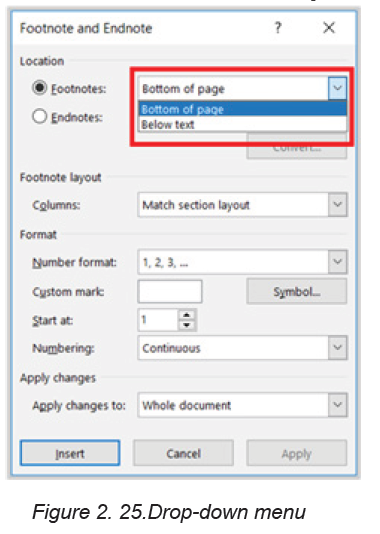
dialog box such as number formatting and whether the numbering applies to the
whole document or to a specific section.Step 6: Select the Insert button to create the first note.
After Word has created the superscript number, the cursor will automatically move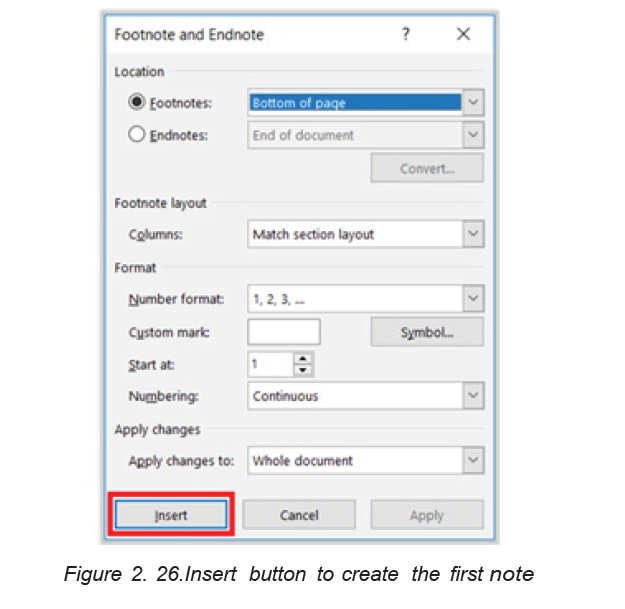
to the note location selected in the Footnote and Endnote dialog box.
Place the cursor where the superscript number for the next note should appear in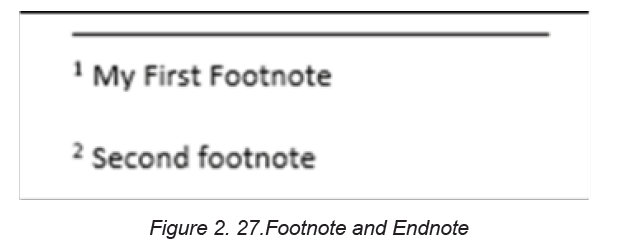
the text and then select Insert Footnote or Insert Endnote in the Footnotes groupin the ribbon to insert the next note.
2.3.3. Converting Footnotes to Endnotes
Step 1:Open the document and select the References tab. In the Footnotesgroup, click Show Notes.
Step 2: Select the notes to convert, and then right-click and Select Convert to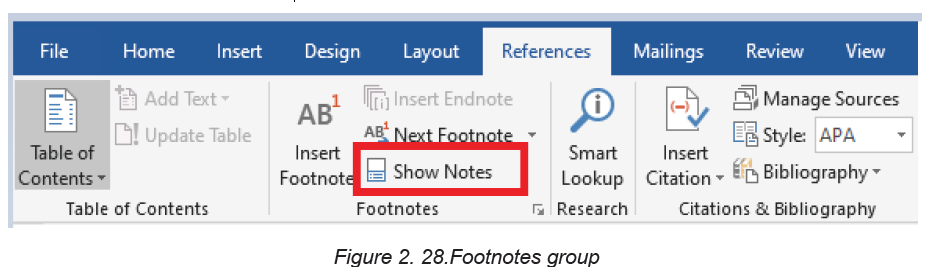
Footnote or Convert to Endnote.
APPLICATION ACTIVITY 2.3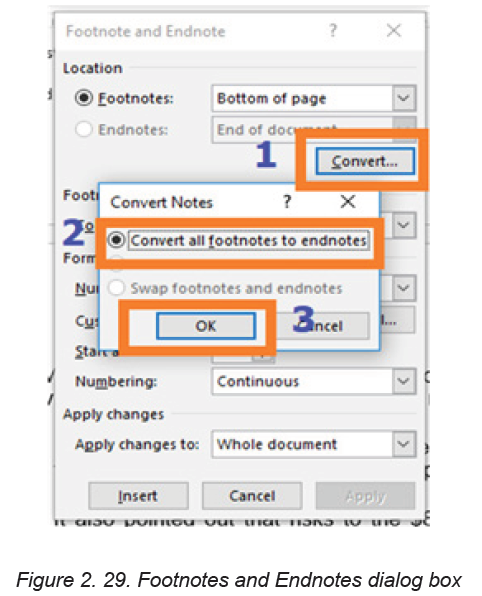
1. Differentiate footnotes and endnotes?
2. Open “use of ICT in Health Sector ” file created in the activity 3.3 and
create 5 endnotes of your choice in that document:
3. Convert all the above Endnotes to Footnotes?
2.4. Creating and updating a table of contents
2.4.1 Creating table of content
Activity 2.4
Using MS Word, write text which describe computer hardware and software and
save it as “Information and Communication Technology”. The text to write should
contain titles and in order to do it quickly you can copy text from the softcopy
books available on the REB website. Make sure the document has at least 3
pages. Do the following with the created document:
1. Change the Font-Type to “Book Antiqua”
2. Change the Font Size to 12 and Line Spacing =”2.0”3. Change Heading 1 to “Arial Black ” and Font-size =”14”
A Table of Contents (TOC) is an organized listing of chapters and major sections of
a document. The role of Table of content is to help readers immediately see how
the document is organized. A clear, concise, and well formatted Table of Content is
the first indicator of a good document.
Below are steps to create a table of content:
Step 1: Set different titles to different headings depending on their importance.
Heading 1 is the biggest title in the document if it is a unit for example the heading
1 may be the unit name. The other headings are those under the Heading 1. In
Heading 1 there are many Heading 2 and in Heading 2 there are many Heading 3
and so forth. The font properties of the headings can be set by the computer user.
To set a title’s heading select the title and while in Home click on the desiredheading
Note: Ms Word will create a table of contents based the headings created in the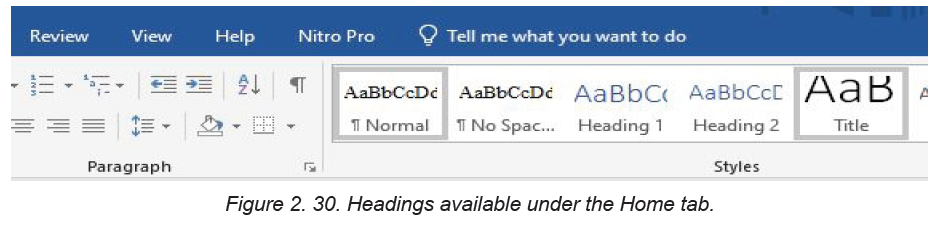
whole document so do this for all of the text that will appear in the table of contents.
Step 2: Place the cursor where the table of contents will appear usually at the
beginning of the documentStep 3: Go to References and Choose Table of Contents
Step 4: Choose the style to apply as the table of content. Immediately the table of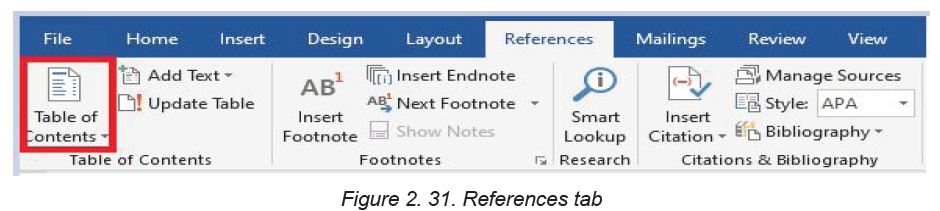
content will be inserted where the cursor is.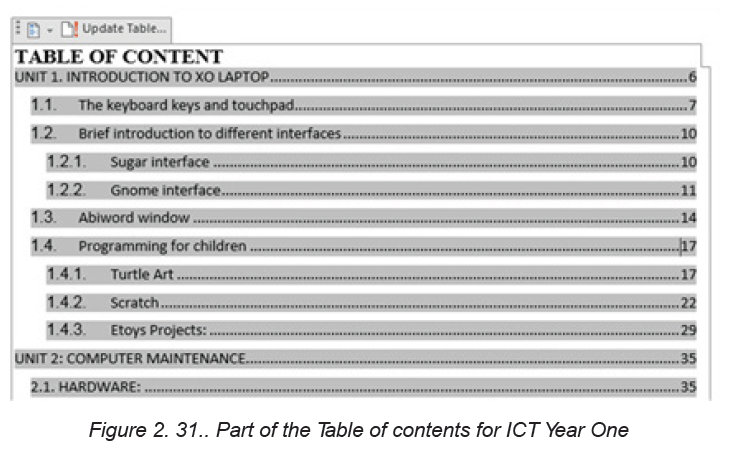
The table of content above is that of one part of the Student Book of ICT Year One in
TTC schools. To create a table of content like the one above, the titles have been set
to the following headings: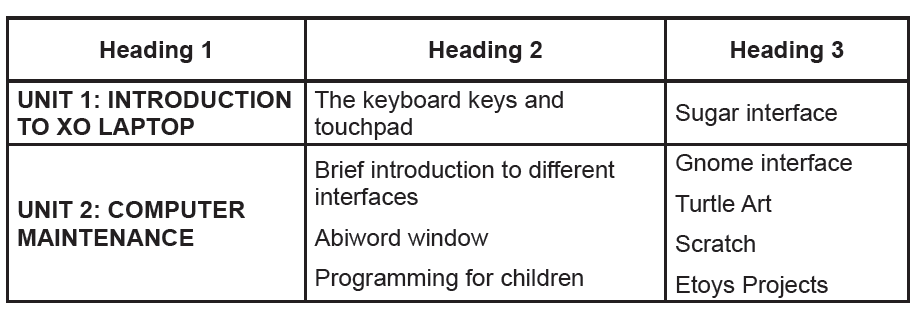
Note: If the Custom Table of Contents option is chosen, it is possible to format the
way the table of contents will look: Choose a different style, hide page numbers,
include more heading levels than the default three levels, and more.
2.4.2. Updating the table of Content
As more titles are added and some removed, page numbers changed, the table of
content needs to be changed to reflect the actual document. To update
the table of content go through the following steps:
Step 1: Click on the Table of Contents to highlight the whole area (the whole area
becomes grayed-out)
Step 2: Right-click to bring up the Table of Contents menuStep 3: Click on Update Field
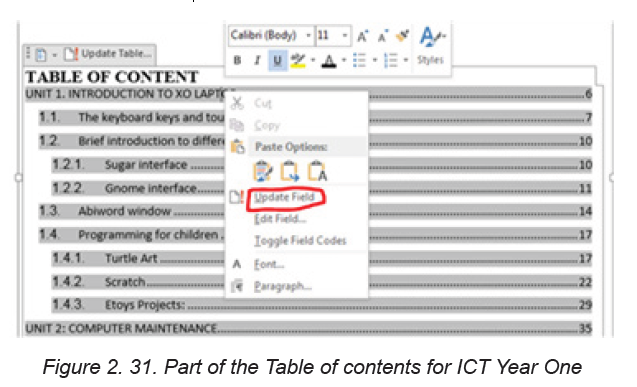
Step 4: Click on Update page numbers only or Update entire table
Note: Use ‘update page numbers only’ to keep the table exactly as it is and just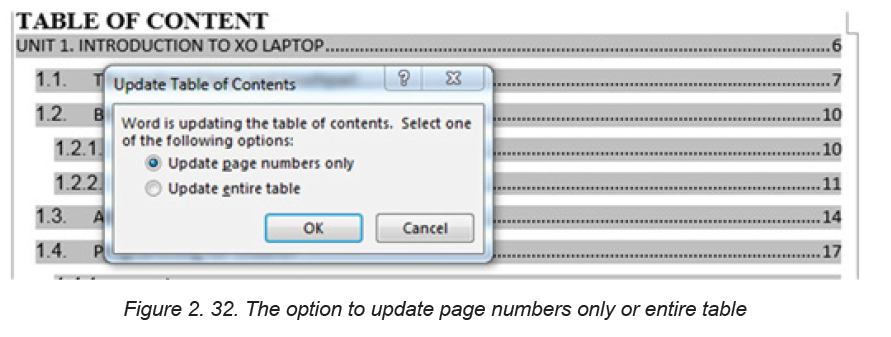
update the numbering or ‘update entire table’ if Ms Word will regenerate the Tableof contents.
APPLICATION ACTIVITY 2.4
1. Create a document on ICT which has the following headings:
Computer Hardware (Heading 1)
Generate a list of computer hardware available in the school’s computer
Laboratory on the following categories which will be Heading 2
• Input Hardware
• Output hardware
• Processing hardware
• Storage hardware
Create additional headings in Heading 2 where possible. Those headings will be
Heading 3 and Heading 4
2. Add a new title “SOFTWARE” in the document. Make that title a heading
appropriately and in it create other headings. Update your table of content
2.5. Page layout tab command
Activity 2.5
Using Ms Word, write a document which has a title Benefit of Learning ICT as
Future Nurse and apply on it the following:
1. Change page orientation from Portrait to Landscape
2. Organize the text into 3 separate columns
3. Change page margin from 1.0 to 1.5 points
2.5.1. Page Setup Group
It is found on the ribbon when the Page Layout tab is clicked. It is used to specify
the margins and the orientation of a page, size, number of columns among other
specifications.
2.5.2. Setting Margins
Page margins are the blank spaces around the edges of a page. Text and graphics
are normally inserted in the printable area between the margins. However, some
items can be positioned in the margins such as headers, footers, and page numbersamong others.
To set the margins do the following:
Step 1: Click Page Layout tab, from the Page Setup group and click
Margins command.
Step 2: Click the margin type desired from the pull-down menu that appears. The
margins are automatically adjusted.
Step 3: To set a customized margin, either click Margins, then select Custom Margins
command or click on the dialog box launcher at the bottom of Page Setup group. A
dialog box is displayed.
Step 4: Click on Margins tab on the dialog box that appears.Step 5: Specify all the desired options and click OK to apply.
2.5.3. Page Orientation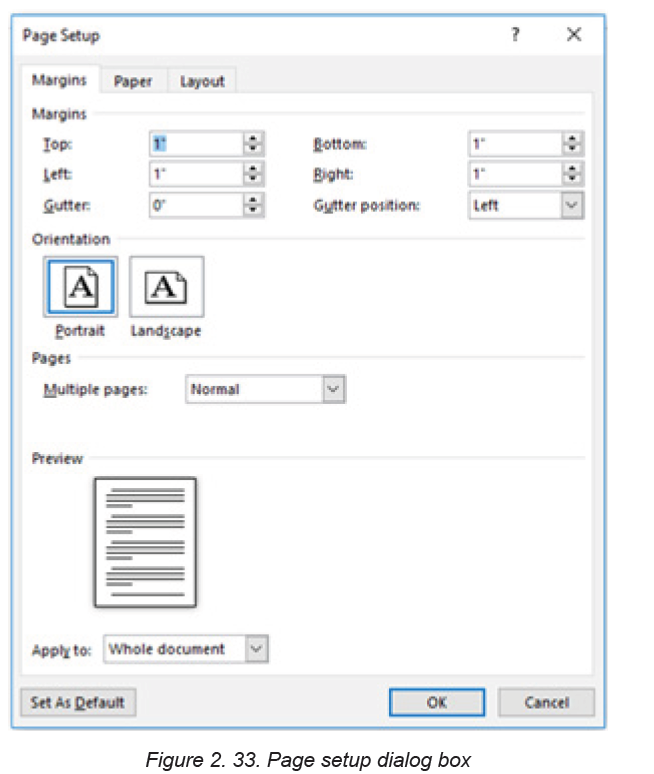
This refers to the positioning of the page in relation to the text or graphics. Thereare two types of page orientation.
• Portrait: This is where text and graphics are printed with the longest side
placed vertically and the shortest placed horizontally.
• Landscape: This is where text and graphics are printed with the longest side
placed horizontally and the shortest placed vertically.
A. Changing the page orientation of an entire document
To change the page orientation of an entire document, proceed as follows:
Step 1: Click on the Page Layout tab, in the Page Setup group, clickOrientation
Step 2: Select either Portrait or Landscape.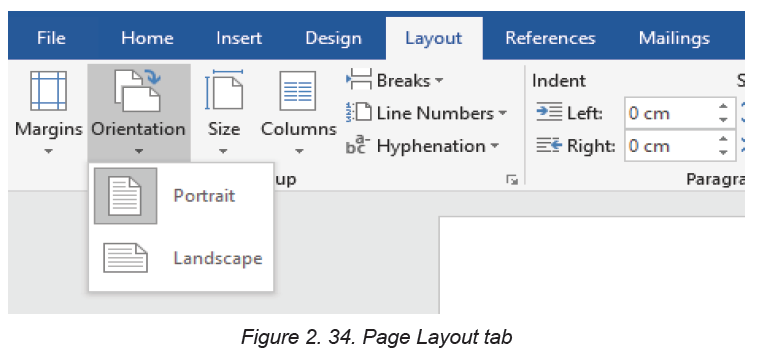
B. Using both portrait and landscape orientation in the same document
There can be a need to have both landscape and portrait pages in the same
document. Such a need can arise for example when the document is in a portrait
format and that there is a big table that cannot fit in the document if the page is
not made landscape. Go through these steps:
Step 1: Select the content on the pages or paragraph(s) whose orientation is to be
changed to portrait or landscape.
Step 2: Click on the Page Layout tab, in the Page Setup group.
Step 3: Click Margins, then select Custom Margins command or click on the
dialog box launcher in the Page Setup group.
Step 4: Click on the Margins tab on the dialog box that appears.
Step 5: Under the Orientation section, select the desired orientation (Portrait orLandscape).
Step 6: Under the Apply to section, choose selected text option and click OK toapply.
Note: If some but not all of the text on a page is selected to change to portrait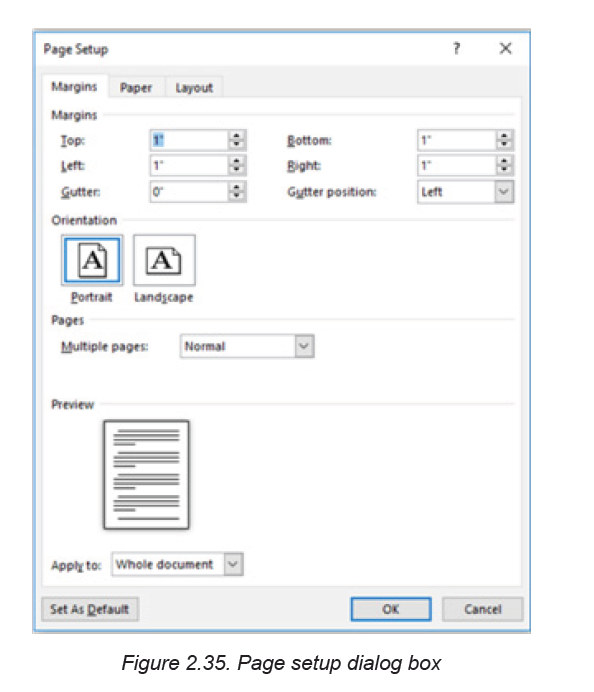
or landscape orientation, Word places the selected text on its own page, and the
surrounding text on a separate page.
2.5.4 Columns
Columns are created to enhance the look of a document. The flow of the
content from the bottom of one column to the top of the next one in the same page
should be consistent. Columns can either be created using predefined or
user-defined options.
i. Predefined
To create a predefined column, do the following:
Step 1: Select the text.
Step 2: Click Page Layout tab from the menu bar; then click on the Columnscommand under Page Setup group.
Step 3: Click on the number of columns desired from the drop-down menu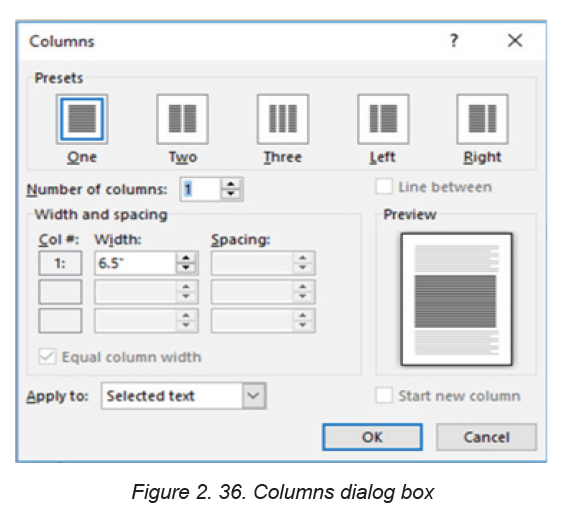
displayed.
ii. User Defined columns
Step 1: Select the text.
Step 2: Click Page Layout tab from the menu bar then click on the Columns
command under Page Setup group.
Step 3: Select More Column option from the resulting pull down menu.
Step 4: Specify the column width and spacing, line between columns, numberof columns, and where the column is to be applied.
Step 5: Click OK to apply once all the desired options have been selected.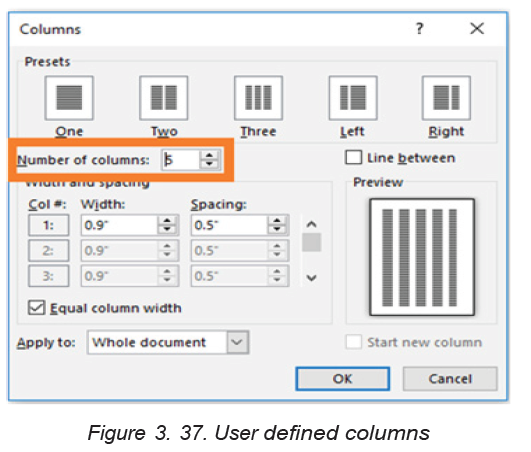
APPLICATION ACTIVITY 2.5
1. Type Microsoft word document which describes “your school environment”
and then do the following:
a. Split the paragraph into 2 columns.
b. Make the page Landscape
2.6. Protecting a document from unauthorized access
and changes
Activity 2.6
Write a word document which describes the benefit of studying in TTC especially
in your Option and protect it with a password.
A word document can be protected from unauthorized access. This protection is done
when the document contain sensitive and private information to which the owner
does not want anyone to have access to.
2.6.1 Protecting Word files with a password
The followings are steps to follow when protecting a word file with a password.
Step 1: Select File then Info
Step 2: Select the Protect Document optionStep 3: Choose “Encrypt Document with Password”
Step 4: Type the password to use, and then select OK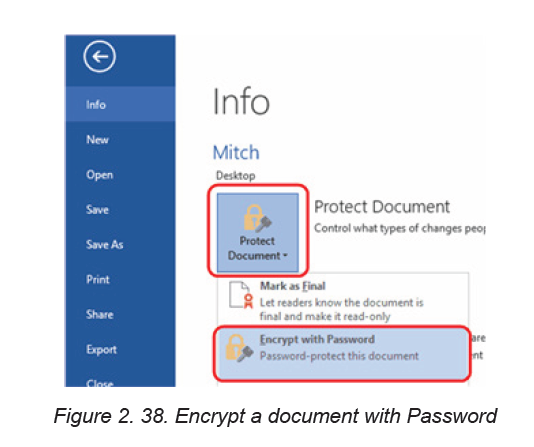
Step 5: Type the password again to confirm and then select OK
2.6.2 Protect a document and mark the parts that can be changedStep 1: On the Review tab, in the Protect group, click Restrict Editing.
Step 2: In the Editing restrictions area, select the Allow only this type of editing in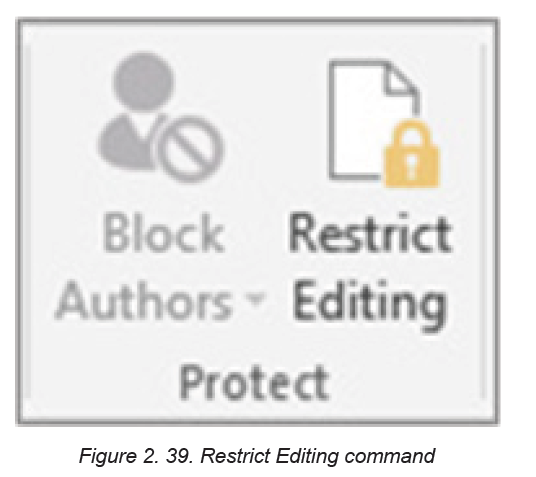
the document check box.Step 3: In the list of editing restrictions, click No changes (Read only).
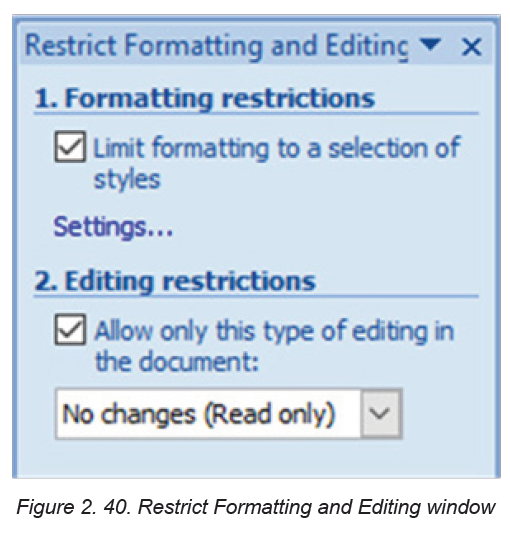
Step 4: Select the part of the document where to allow changes.
The selected words in bracket, show where the other user can make change only. To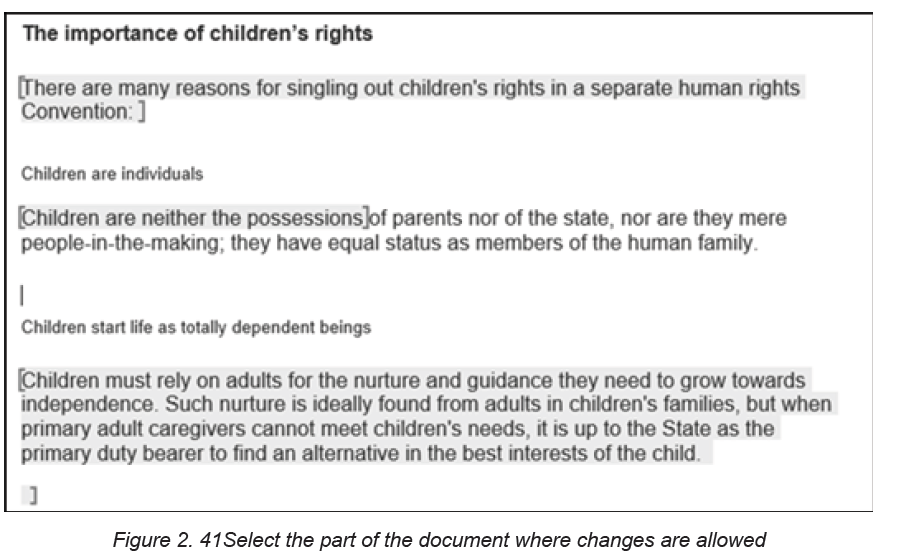
select more than one part of the document at the same time, select one part then
press CTRL and select more parts while holding down the CTRL key.
Step 5: Under Exceptions, do one of the following:
• To allow anyone who opens the document to edit the part that was
selected, select the Everyone check box in the Groups list.
• To allow only particular individuals to edit the part that was selected, clickmore users, and then type the user names.
Step 6: Click OK and select the check boxes next to the names of the
individuals that are to be allowed to edit the selected part.
Note: If more than one individual are selected, those individuals are added as an
item to the Groups box, so that you can quickly select them again.
Step 7: Continue to select parts of the document and assign users permission to edit them.Step 8: Under Start enforcement, click Yes, Start Enforcing Protection.
Step 9: Do the following: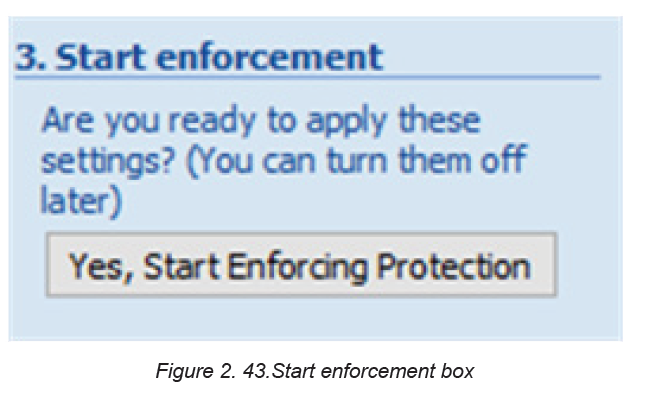
To assign a password to the document so that users who know the password can
remove the protection and work on the document, type a password in the Enternew password (optional) box, and then confirm the password.
Use the above option if other people are going to work on the document at the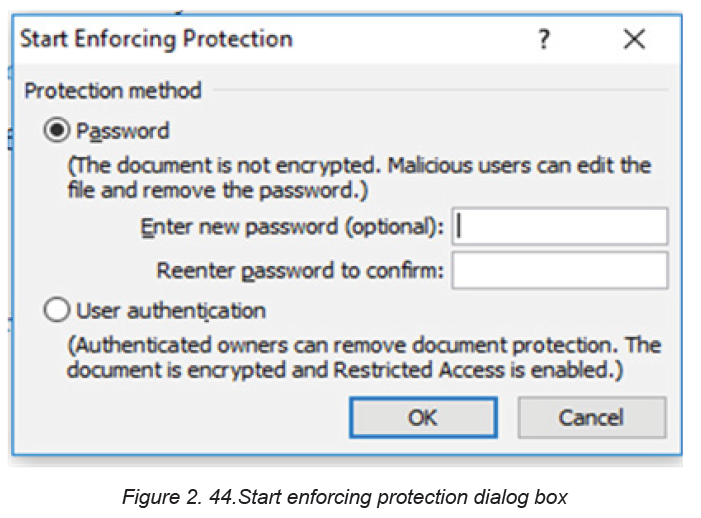
same time and make sure to use strong passwords that combine uppercase and
lowercase letters, numbers, and symbols.
Step 10: To encrypt the document so that only authenticated owners of the document
can remove the protection, click User authentication. Encrypting the document
prevents others from working on the document at the same time.
2.6.3 Unlock a protected document
To remove all protections from a document, use the password that was applied
to the document or there is a need to be listed as an authenticated owner of the
document.
For an authenticated owner of the document or if you know the password for
removing the document protection, do the following:
Step 1: On the Review tab, in the Protect group, click Restrict Editing.Step 2: In the Restrict Editing task pane, click Stop Protection
Step 3: If prompted to provide a password, type the password.
2.6.4 Make changes in a restricted document
When opening a protected document, Word restricts what can be changed based
on whether the document owner granted the permission to make changes to a
specific part of the document.
The Restrict Editing task pane displays buttons for moving to the regions of the
document for which there is permission to change.
If no permission is granted to edit any parts of the document, Word restricts editing
and displays the message, “Word has finished searching the document” whenthe buttons in the Restrict Editing task pane is clicked
2.6.5 Finding word document parts to edit
If the Restrict Editing task pane is closed and there is a need to make changes
where the user has not been granted permission, Word displays the following
message in the status bar: “This modification is not allowed because the selection
is locked”.
To return to the task pane and find a region where there is permission
to edit,
do the following:
Step 1: On the Review tab, in the Protect group, click Restrict Editing.Step 2: Click Find Next Region I Can Edit or Show All Regions I CanEdit.
APPLICATION ACTIVITY 2.6
Using Ms Word,
1. Open a document which describe the benefit of learning in your option
that you protected and remove password
2. Type any text related to your career, Protect it and mark the parts that can
be changed
End unit assessment
1. Explain the following concept
a. Formatting
b. Paragraph
2. Write at least one page on XO laptop hardware and do the following :
a. Change line spacing to 1.5
b. Change font-type =”Book Antiqua” , size=” 14” color =”Blue” ,and
alignment=”Justified ”
c. Insert header =” ICT for children” and footer=” XO laptop for fun ”d. Protect the document
UNIT 3:ADVANCED SPREADSHEET I
Introductory activity 3
At the end of the year Teacher Peace was overloaded with work as she was
required to prepare the end of the year report for pupils. The marks given to her
are word softcopies for which total are manually. She has the task to write the
marks in the word sheets, calculate the totals for the whole year, the average per
subject for the whole year and the overall average for the whole year for each
pupil. For this reason she is planning to buy a calculator and is considering hiring
someone to help her which is against the ethics.
a. Advise Teacher Peace on how to handle this situation using
the word files she has
b. Advise this same teacher on how excel program can helpher
c. Comp are the easiness of the task when Teacher Peace
adopts the advice in a) and when she chooses the optionpresented in b
3.1. Conditional formatting
Activity 3.1
Open Spreadsheet program and enter data in the table below. Save thefile as “Burera Ltd Sales data”
Do the followings: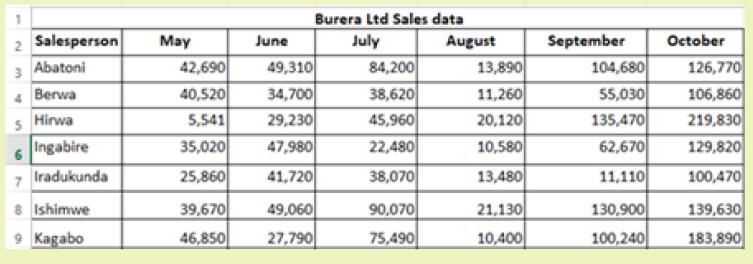
1. Using Burera Ltd Sales data, show salespersons who are meeting
their monthly sales goals. The sales goal is 50,000 items per month
2. Highlight all salesperson whose sales are below the average
3. Highlight with blue color ,all salesperson whose sales are above80,000
Conditional formatting is a spreadsheet functionality which allows Excel(spreadsheet)
users to specify conditions allowing to get specific answers on data in the worksheet
that was otherwise not easy to analyze.
It can be applied to a range of cells or an entire worksheet and makes cells meeting
specified criteria have relative formatting (font). If the formatting condition is true,
the range of cells is formatted according to the preset criteria, else that range is not
formatted.
Conditional formatting is a feature in many spreadsheet applications that allows
users to apply specific formatting to cells that meet certain criteria. It is most often
used as color-based formatting to highlight, emphasize or differentiate among data
and information stored in a spreadsheet.
Conditional formatting enables spreadsheet users to do a number of things. It calls
attention to important data points such as deadlines and at-risk tasks. It can also
make large data sets more digestible by breaking up the wall of numbers with
a visual organizational component. Among the options provided by conditional
formatting are: highlight cell rules, top bottom rules, customized rules, etc
3.1.1. Highlight cell rule
Conditional formatting can be used to enhance the reports and dashboards
in Excel. The conditional formatting statement under the Highlight Cells Rules
category allow to highlight the cells whose values meet a specific condition.
The benefit of a conditional formatting rule is that Excel automatically reevaluates
the rule each time a cell is changed provided that cell has a conditional formatting
rule applied to it. Those rules include: greater than, less than, equal to, between,
text that contain, A Date occurring, duplicate values, …Here are the steps to apply the highlight cell rule:
Step 1: Select the desired cells on which to apply the conditional formatting rule
Step 2: From the Home tab, click the Conditional Formatting command. A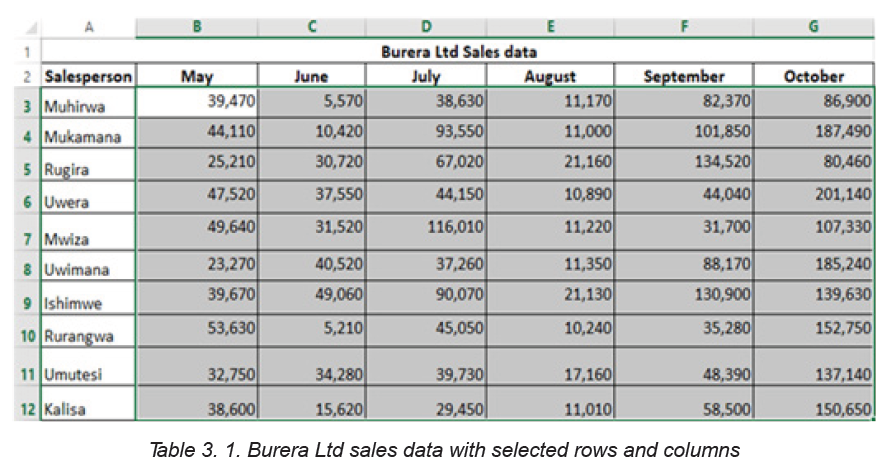
drop-down menu will appear.
Step 3: Hover the mouse over the desired conditional formatting type, and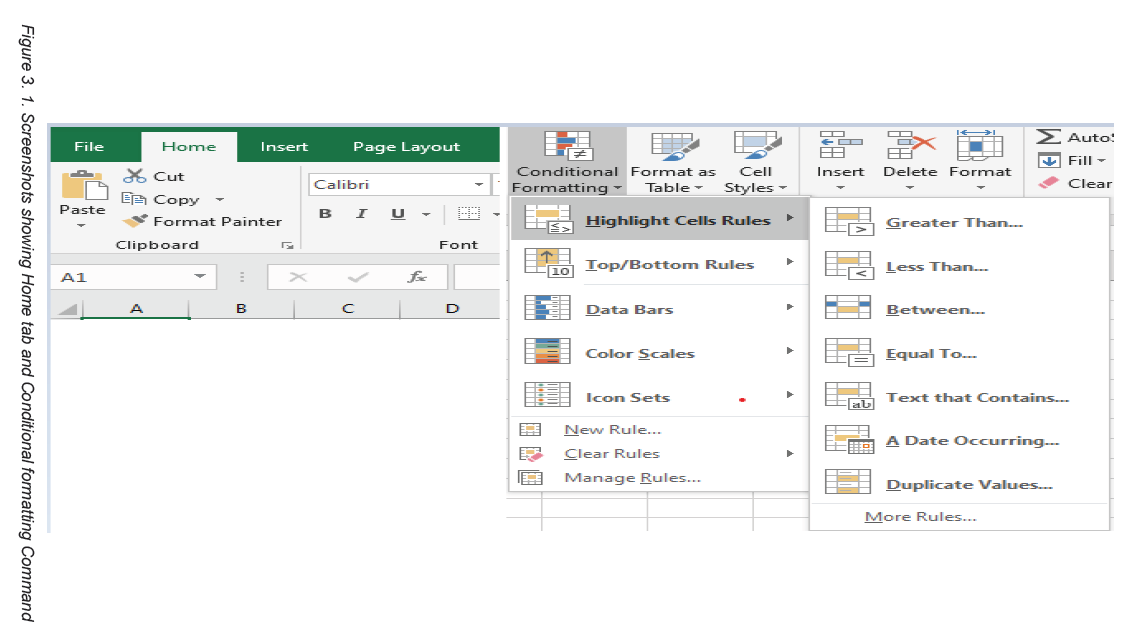
then select the desired rule from the menu that appears. In the Activity 4.1, cells
that are greater than 50, 000 are to be highlighted.
Step 4: A dialog box will appear. Enter the desired value(s)into the blank field.
In the case of the activity 4.1.the taken value is 50, 000.
Step 5: Select a formatting style from the drop-down menu. In the Activity3.1, the color to choose is Green Fill with Dark Green Text, then click OK.
Step 6: The conditional formatting will be applied to the selected cells. In this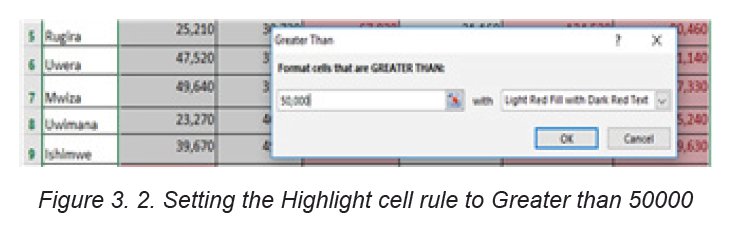
case, it’s easy to see which salesperson reached the 50, 000 sales goalsfor each month.
Note: It is possible to apply multiple conditional formatting rules to a cell range
or worksheet. This allows to visualize different trends and patterns in data.
3.1.2. Clear rule
Rules that have been used to highlight cells that meet certain conditions can be
removed and have text with no highlight when the rules are no longer needed
or when there is a need to set new rules.
To clear rules, do the following:
Step 1: Select the desired cells for clearing the conditional formatting rule Step 2:
On the Home tab, in the Styles group, click Conditional Formatting Step 3: ClickClear Rules then click Clear Rules from Selected Cells
After clearing rules for selected cells, cells are no longer colored, there is no
more formatting in cells.
3.1.3. Create Top/Bottom Rules
Top/Bottom rules are another useful Conditional Formatting in Excel. These rules
allow users to call attention to the top or bottom range of cells, which can be specified
by number, percentage, or average. The steps to create Top/Bottom rules are:
Step 1: Select the desired cells for the conditional formatting rule
Step 2: From the Home tab, Select Conditional Formatting then Top/BottomRules then click Above Average
Step 3: A dialog box will appear. Choose color format to use like “Light Red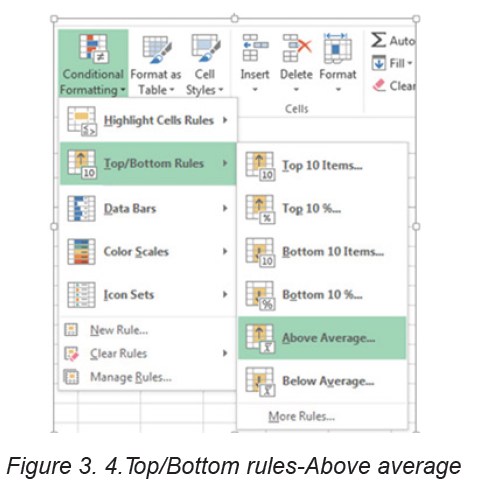
Fill with Dark Red text”.After choosing cells format, Press “OK”
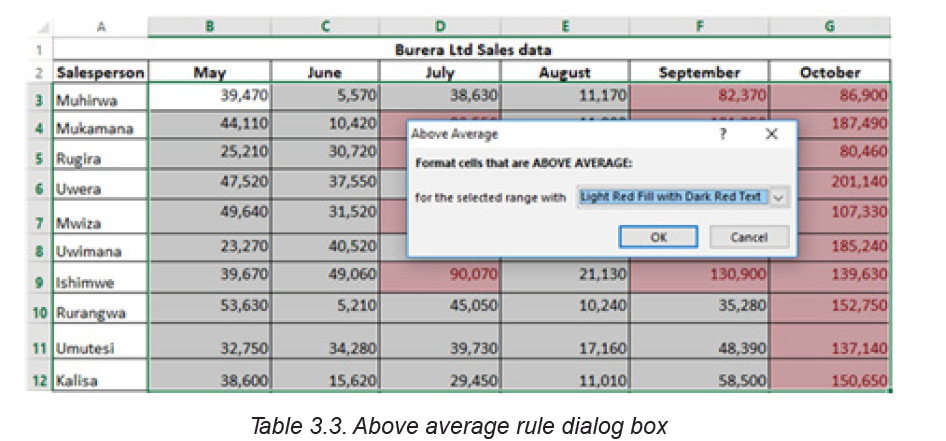
Step 4: The sheet will now highlight the values above the average
3.1.4. Create new rule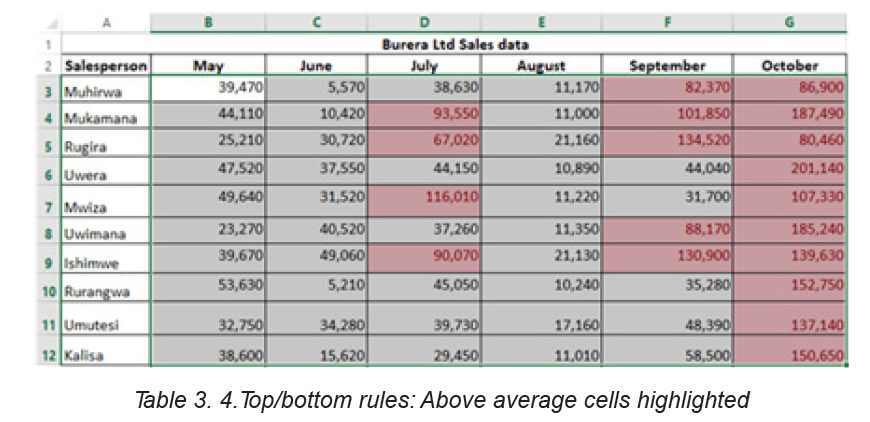
Excel allows to create a formula-based conditional formatting rule. The available
options are:
• Formatting cells based on their values,
• Formatting cells that contain certain values,
• Formatting only top or bottom ranked values,
• Formatting only values that are below or above average,
• Formatting only unique or duplicate values and using a formula to determinewhich values to format.
All those options are presented in the window below:
Step 1: Select the cells to be formatted. In the Home tab click on Conditional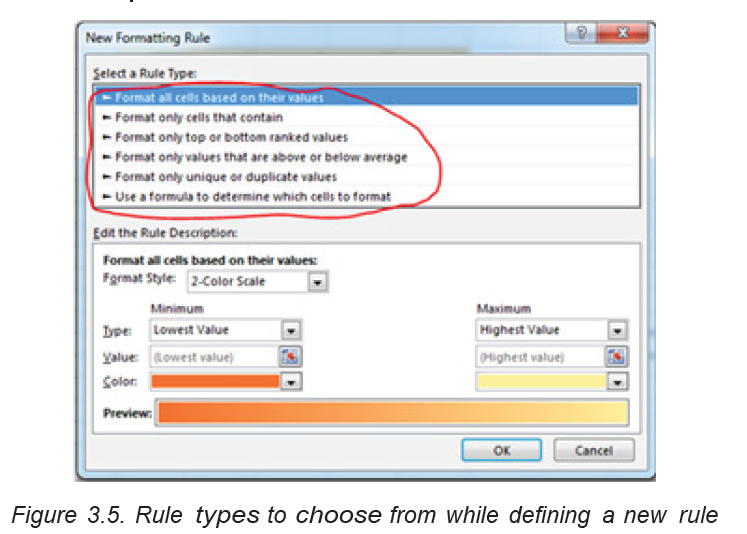
Formatting command and click New rule.
Step 2: Create a conditional formatting rule, and select the Formula option then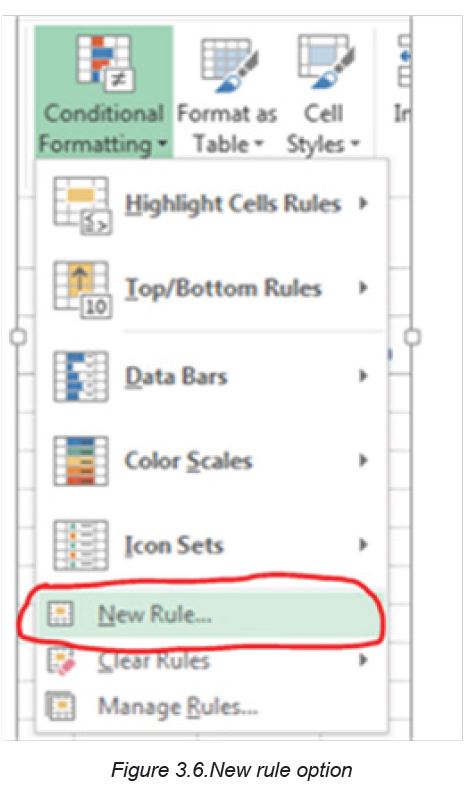
click OK. In the window below the option “Use a formula to determine which
cells to format” has been chosen
1. Format all cells based on their values
Step 1: New formatting rule window will be opened.
Step 2: Select Format all cells based on their values option, however this isby default selected.
There are at least four format styles that can be applied while applying conditional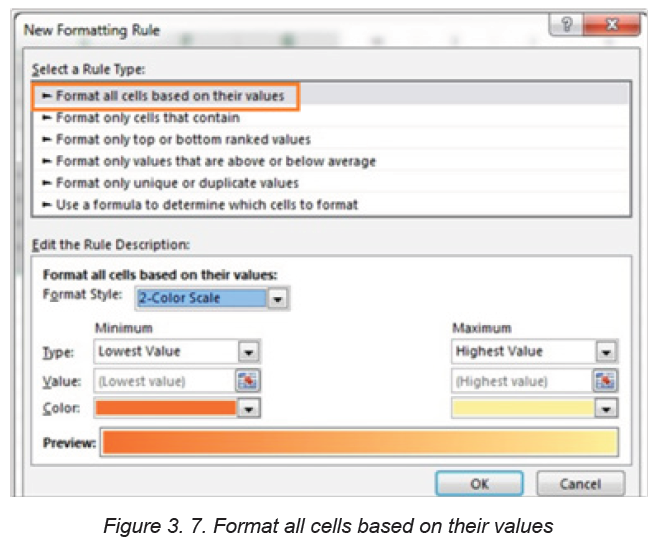
formatting on Excel data. Those formats are: Data Bar, Icon Set,
2-Color Scale and 3-Color Scale
a. 2-color scale
Step 1: Choose minimum and maximum valuesStep 2: Click Ok button to apply this conditional formatting
Step 3: Data set with this condition formatting will look like below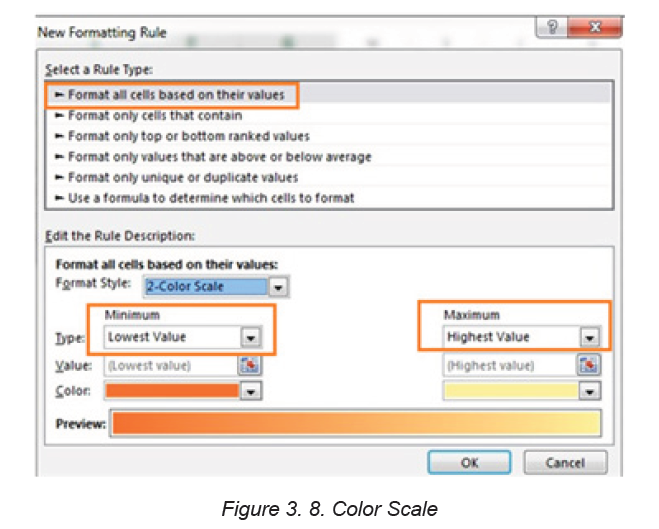
Note: we have chosen minimum number to 50,000 and the maximum to80,000, then selected a colors to separate both values.
b. 3-color scale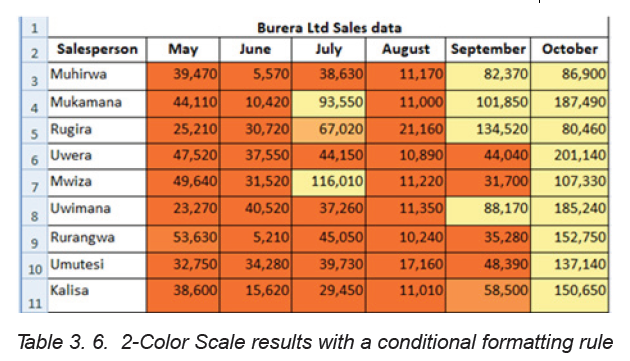
Step 1: New formatting rule window will be opened.
Step 2: Select Format all cells based on their values option, however this isby default selected.
Below are steps to apply 3 -color formatting style: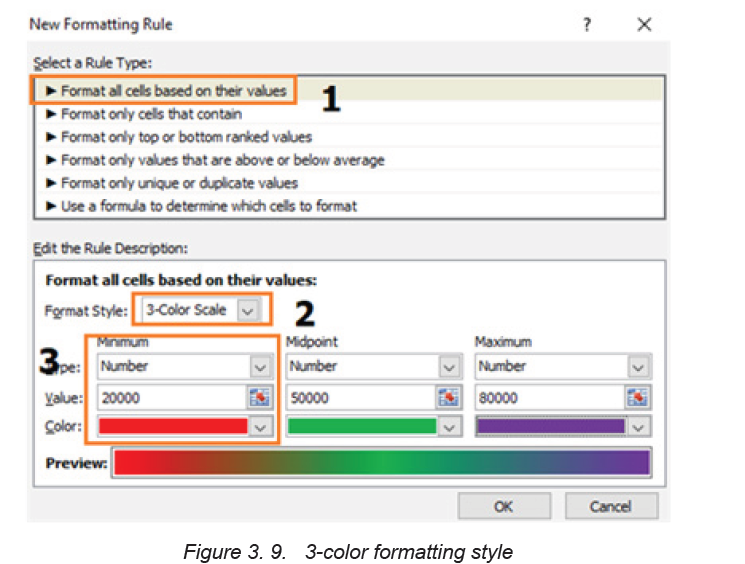
Step 3: Select 3 color scale option in format style
Step 4: Choose the type; here we are taking as Minimum, Midpoint and
Maximum
Step 5: Put values for number for Minimum, Midpoint and Maximum then,results are displayed as follows:
2. Use a formula to determine which cells to format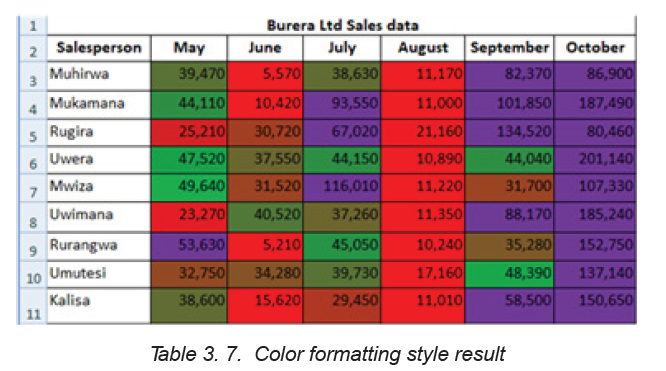
New rules can be created by customizing own formulas. By using custom
made formula, a custom condition that triggers a rule is created and can be
applied as the user needs it to be applied. In the data that is going to be used
the formula = B3>80000 has been applied for formatting.
To specify the formatting formula click on Conditional Formatting tab then New
Rule and choose Use Formula to determine which cells to format as in thewindow below:
Step 3: In the window that will appear, enter a formula that returns TRUE or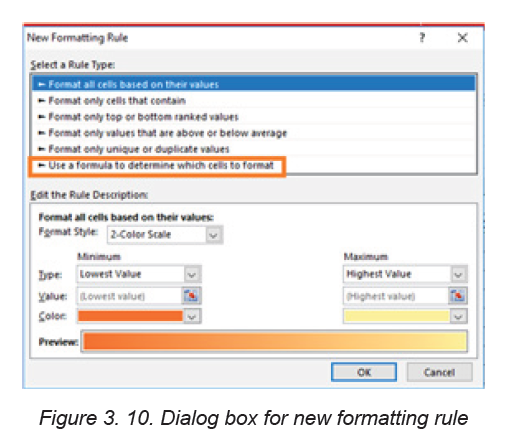
FALSE then set formatting options, save the rule and press OK
After clicking OK cells that meet the formatting rule are highlighted as specified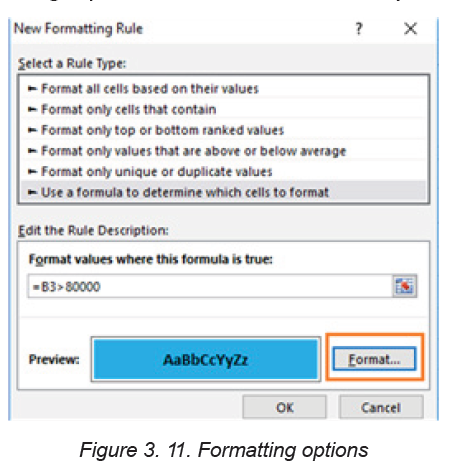
in the new rule. In the window below cells meeting the criteria are blue coloredas it has been specified in the preceding window.
Note: Always write the formula for the upper-left cell in the selected range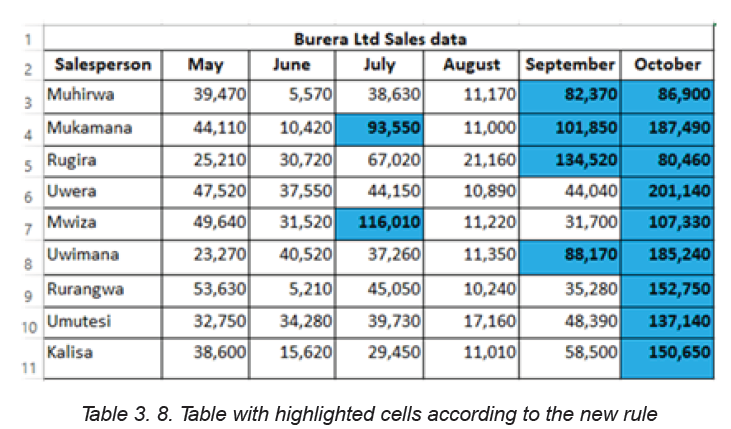
and Excel will automatically copy the formula to the other cells in the selected
range.
Below are some formulas that apply conditional formatting and return TRUE or
FALSE, or numeric equivalents that can be used in setting formatting cell rules
based on formula:
1. =ISODD (A1): This function is used to check if a numeric value is an odd
number. ISODD returns TRUE when a numeric value is odd and FALSE when
a numeric value is even. If value is not numeric, ISODD will return the #VALUE
error.
2. =ISNUMBER (A1): The function is used to check if a value is a number.
ISNUMBER will return TRUE when value is numeric and FALSE when not.
3. AND (A1>100, B1<500): The AND function is used to apply more than
one condition at the same time, up to 255 conditions. Each logical condition
(logical1, logical2, etc.) must return TRUE ExamplesAND (A1>100, B1<500) tests if the value in A1 is greater than100 and B1 less than 500
APPLICATION ACTIVITY 3.1
Open the file “Burera Ltd. Sales Data”
1. Using Burera Ltd Sales data, show salespersons who are not meeting
their monthly sales goals. The sales goal is 50,000 item per month
2. Highlight all salesperson whose sales are above the average
3. Highlight with green color all salesperson whose sales are below
80,000
3.2 Charts
Activity 3.2
1.Open Spreadsheet program, en- ter data in the table below and saveit as “Production”
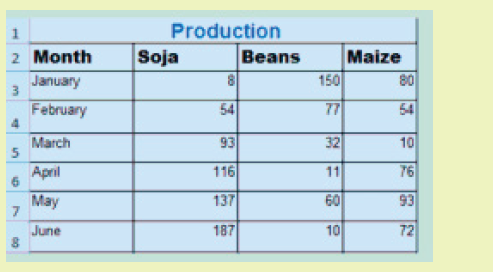
2.Using Production data make the graph below:
3.2.1 Create a Chart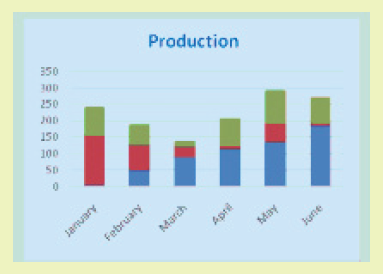
In spreadsheet, a chart is often called a graph. It is a visual representation of data
from a worksheet that can bring more understanding to the data than just looking
at the numbers.
A chart is a powerful tool that allows to visually display data in a variety of
different chart formats such as: Bar, Column, Pie, Line, Area, and many.
In order to create a chart, the following steps are followed:
Step 1: Select the desired cells in the chart creation
1.Open Spreadsheet program, en- ter data in the table below and save it as“Production”
Step 2: On the Insert tab, in the Charts group, choose the type of chart to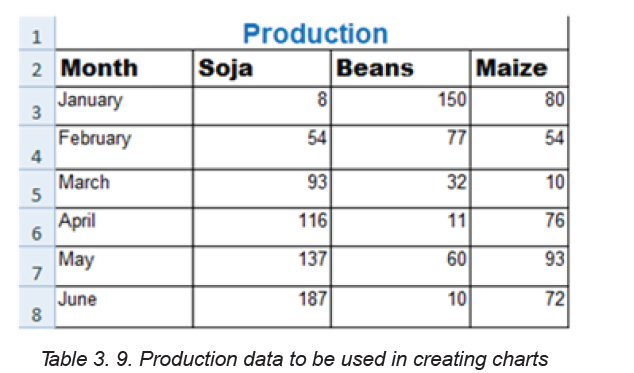
use. In this case the type chosen is the column chart. Click the column chartsymbol

Step 3: Choose the appropriate style. Here a Column Chart has been
chosen. The chart looks like in the image below:
3.2.2. Change Legend Position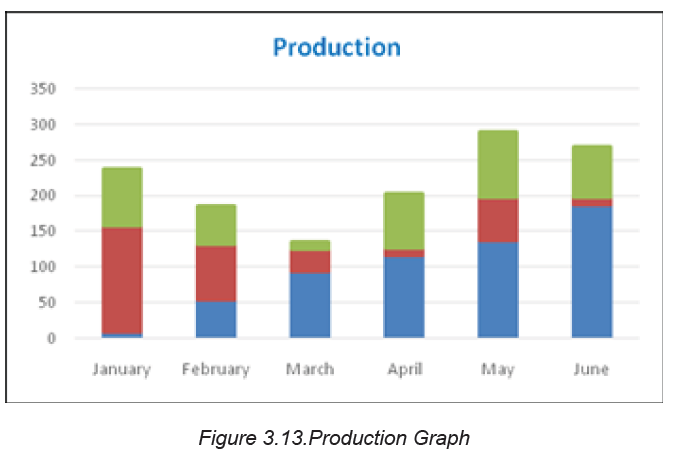
To move the legend to the right side of the chart, go through the following steps.
Step 1: Select the chart.
Step 2: Click the button on the right side of the chart, choose Legend and
click on the arrow next to it. Click on any option to apply in this case Rightwas chosen.
After changing the Legend style, the Legend will be located on the right side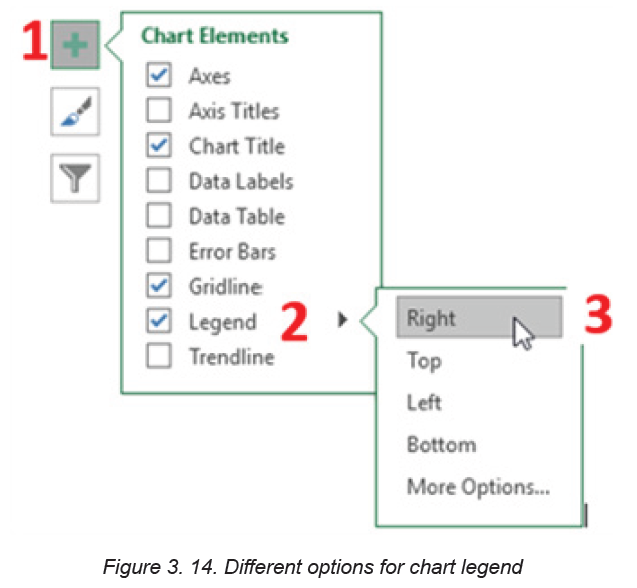
of the chart as it was specified in the steps. The chart looks like in the imagebelow:
3.2.3. Data Labels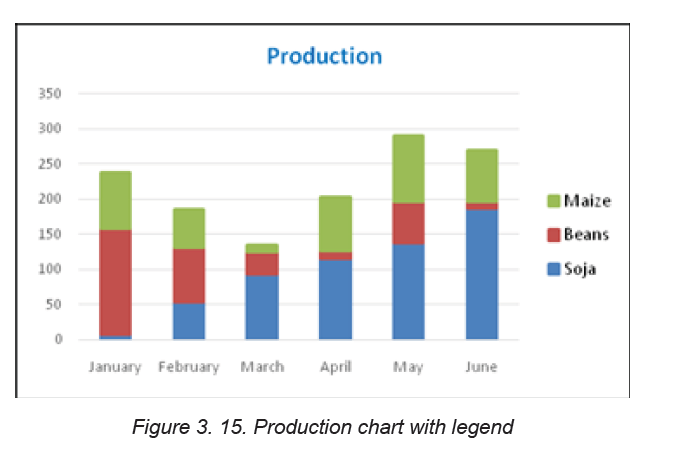
Data labels focus the readers’ attention on a single data series or data point.
These labels can be arranged in the center of the bar, outside end or any
other fashion that the reader wants. Data labels positions are set in this way:
Step 1: After selecting the chart click a green bar to select the Data Labels.
Step 2: Choose the position where data is going to appear, in this caseCenter has been chosen

The graph below with data labels in centers is the result:
3.2.4 Change Chart Type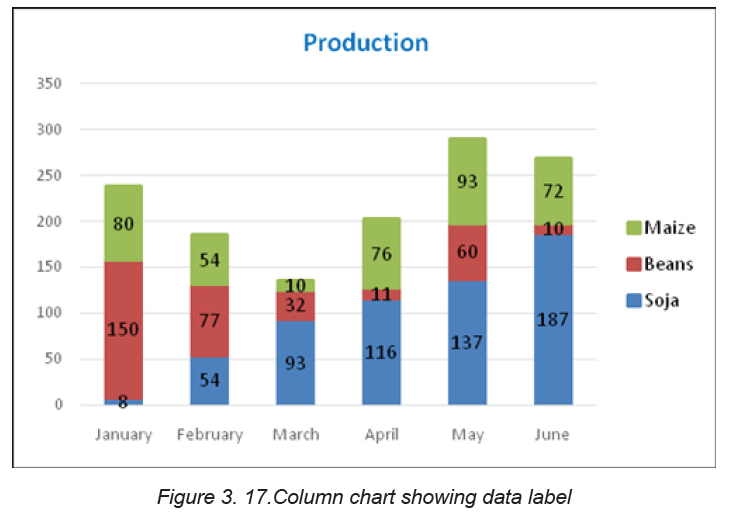
There are different types of chart which can be used depending on the data
to display. Switching from one chart type to another is done in this way:
Step 1: Select the chart for which the type is to be changed
Step 2: Click on the Design tab found under the Chart Tools and in theType group, click Change Chart Type.
Step 3: In the new window that will appear click on either“Recommended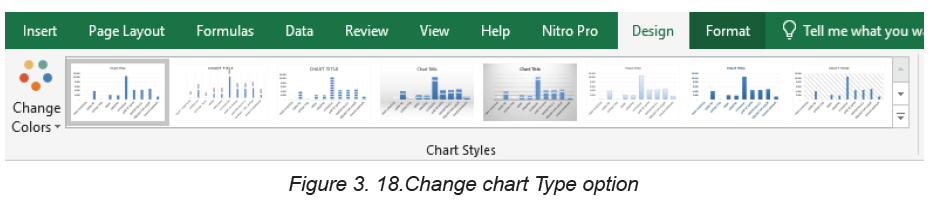
Charts”or “All Charts”. Choosing all charts will display all the charts from
which user can choose. In the image below the line chart was chosen. Selectthe type and click OK
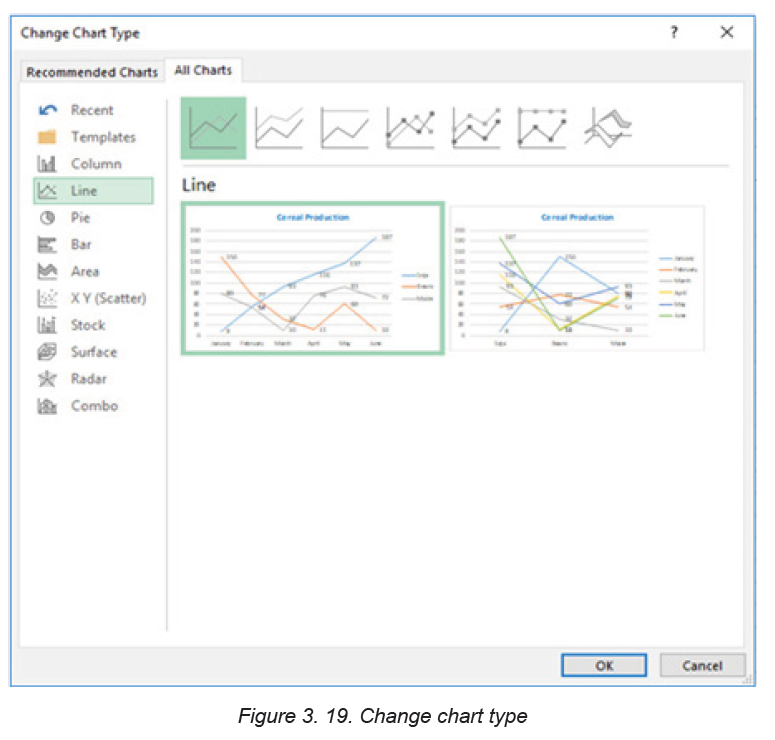
The resulting graph will look like in the image below:
APPLICATION ACTIVITY 3.2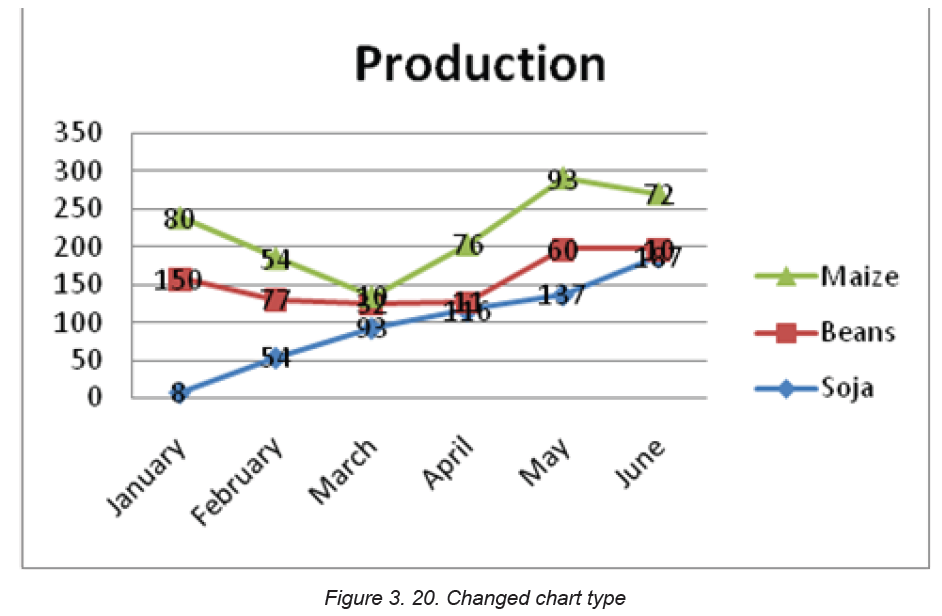
Open the file “Burera Ltd. sales data and do the following:
1. Create a bar column using Burera Ltd. Sales Data2. You have the graph below. Change it to another type (Column chart)
3.3. Data organization
Activity 3.31. Open Burera Ltd Sales data file and update the table as follow:
a. Show salesperson whose region is “Northern”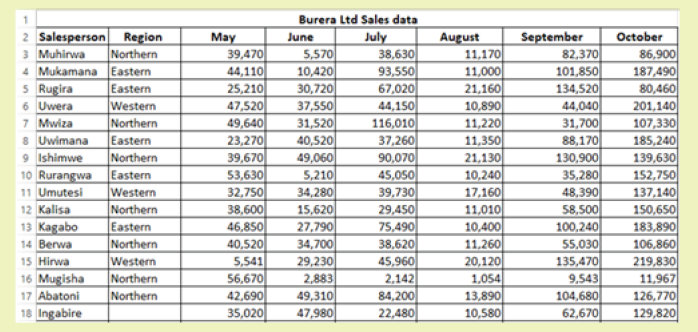
b. Show all salesperson whose sales are below the average
After data has been entered into an Excel worksheet and even after it has
been organized into a table, it can still be manipulated and reorganized. One
of the easiest options is to sort data in a particular order for example, sorting
data in alphabetical order.
On the other hand, Filtering data allows to analyze data easily. When data is
filtered, only rows that meet the filter criteria is going to be displayed and other
rows will be hidden. Filters narrow down the data in a worksheet, allowing to view
only needed information.
3.3.1 Filtering data
After entering data in Excel, it is also possible to filter, or hide some parts of the
data, based on user-indicated categories. When using the Filter option, no
data is lost; it is just hidden from view.
In order for filtering to work correctly, the worksheet should include a header row
which is used to identify the name of each column and is used for filtering.
Follow these steps for filtering data in an excel table:
Step 1: Select the Data tab, and then click the Filter command. Immediately a dropdown
arrow will appear in the header cell for each column. The filter command can
also be accessed by clicking the Home tab and finding it at the far right side of themenu in the Editing Group.
Step 2: Click the drop-down arrow for the column to filter. In this activity column B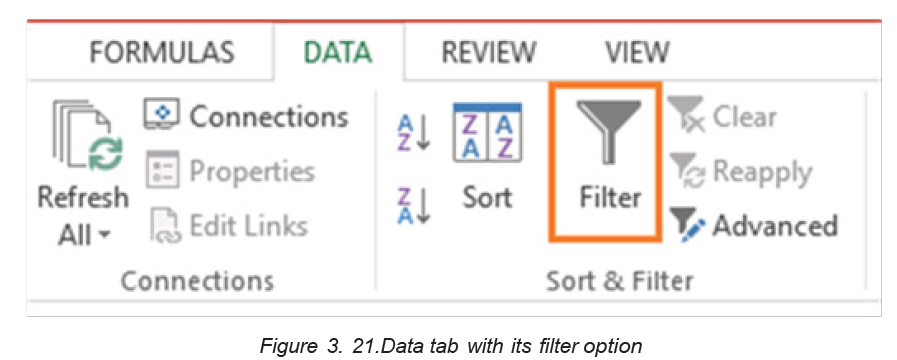
(Region) is filtered to view only certain region.
Step 3: In the Filter menu that will appear uncheck the box next to Select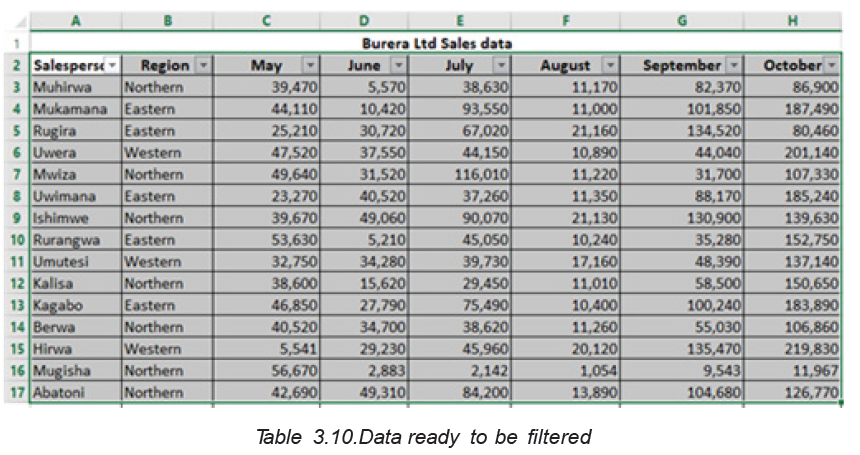
All to quickly deselect all data.
Step 4: Check the boxes next to the data to filter, and then click OK.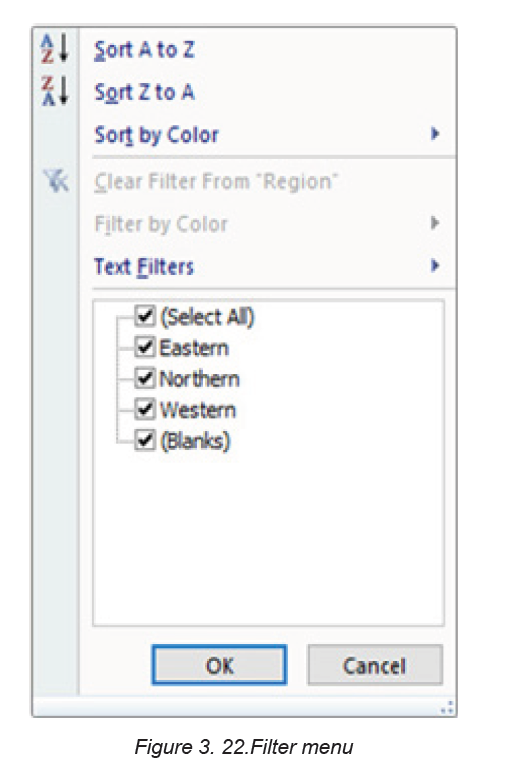
In this example, Northern is checked to view only those types of equipment.
The data will be filtered, temporarily hiding any content that doesn’t match the
criteria.
3.3.2 Clear a filter
After applying a filter, it can be removed or cleared from the worksheet. That
can be in this way:
Step 1: Click the drop-down arrow for the filter that is going to be cleared the
Filter options will appear. In the case of the activity4.3, the column B filter is
going to be cleared.
Step 2: Choose Clear Filter from [COLUMN NAME] from the Filter menu. In
this activity, select Clear Filter from “Checked Out”. This can also be done by
selecting all the items (Northern, Eastern, Western) available in the filter
Step 3: The filter will be cleared from the column. The previously hidden datawill be displayed.
3.3.3. Sorting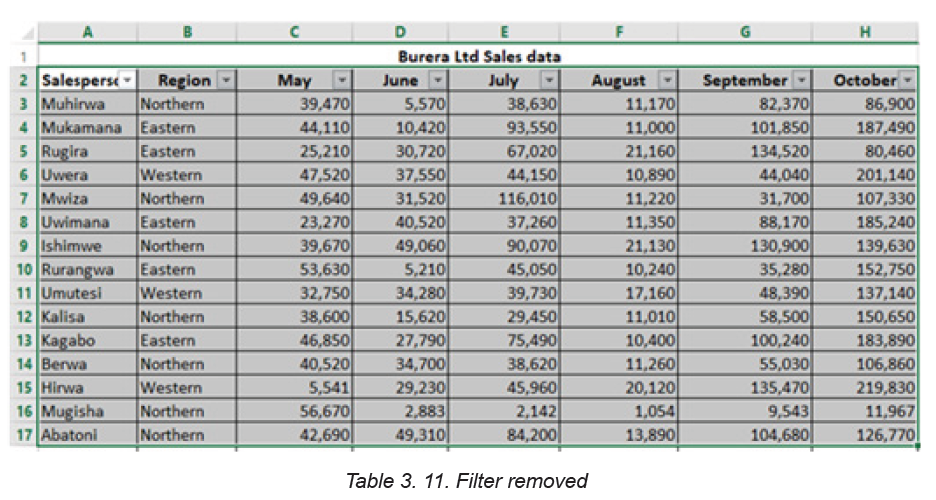
Sorting refers to ordering data in an ascending or descending order according to
some linear relationship among the data items. Sorting can be done on names,
numbers and records.
Below are steps to sort data:
Step 1: Select the entire table to sort. In most cases, select just one cell
and Excel will pick the rest of the data automatically, but this is an error-prone
approach, especially when there are some gaps (blank cells) within the data
to sort.Step 2: On the Data tab, in the Sort & Filter group, click Sort

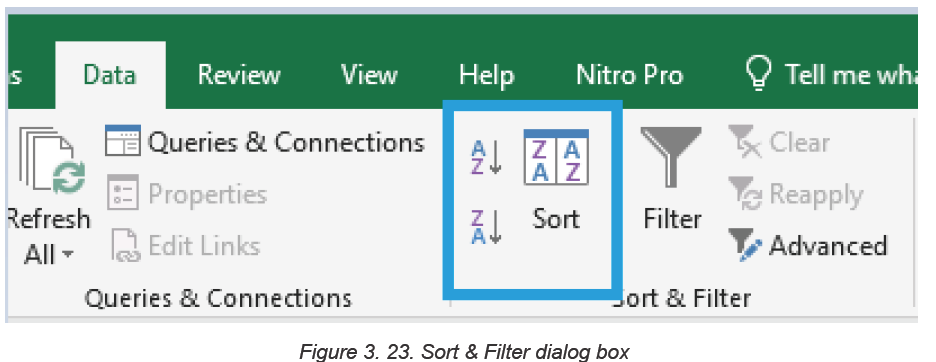
Step 3: The Sort dialog box will show up with the first sorting level created
automatically
Note: If the first dropdown is showing column letters instead of headings, tick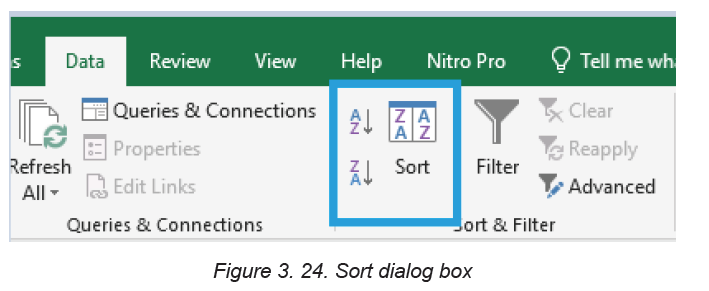
off the “My data has headers” box.
Step 4: Click the Add Level button to add the next level and select the options
for another column then click Ok if all needed levels are added. For sorting
by multiple columns with the same criteria, click Copy Level instead of AddLevel. In this case choose a different column in the first box.
After the sorting criteria are applied data will be sorted by Region then by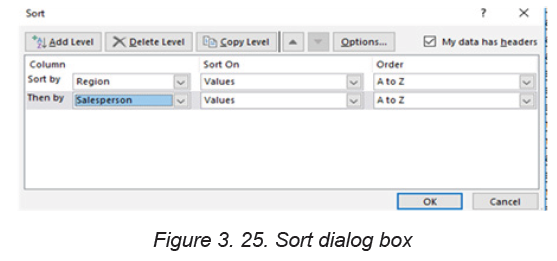
Salesperson as it is clear in the image below:
APPLICATION ACTIVITY 3.3
1. Open Burera Ltd Sales data file and update it to make it look likethe table below:
a. Show salespersons whose region is “Western” and sale “Battery”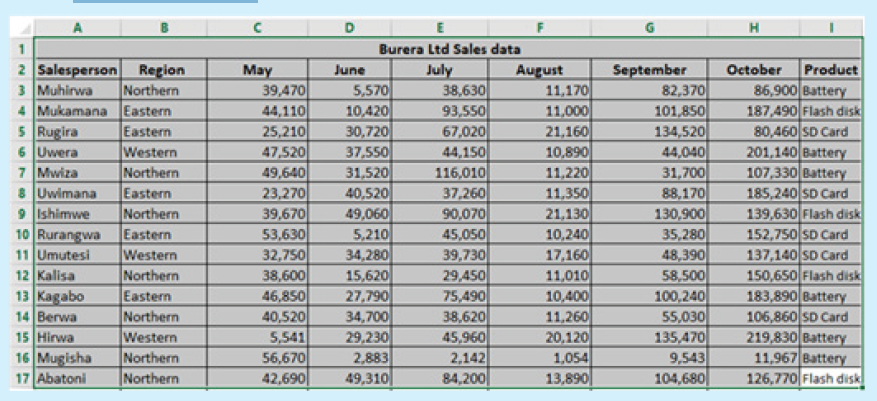
b. as product
c. Sort Product in ascending order by showing the region wherethe product is sold
3.4. Exporting Excel files to PDF or other file types
Activity 3.4
1. Open Burera Ltd Sales data file and export it to a PDF file format
3.4.1 Export Excel Files to PDF
By default, Excel workbooks are saved in the .xlsx file type. However, there may be
times when there is a need to use another file type such as a PDF. Follow the steps
below to export an Excel file to PDF
Step 1:Click on the File menu then Export on bottom of File Menu. A Panel will
appear on right side to Export file in .PDF format. Click on Create PDF/ XPS
Document then on Create PDF/XPS
APPLICATION ACTIVITY 3.3
Open Burera Ltd Sales that you have created in previous activities and do the
following:
1. Export Burera Ltd Sales data File to web page file
2 . Export this same file to PDF. What are the benefits of saving anexcel worksheet to PDF?
Step 2: A Save As window will appear. Select the location where to save the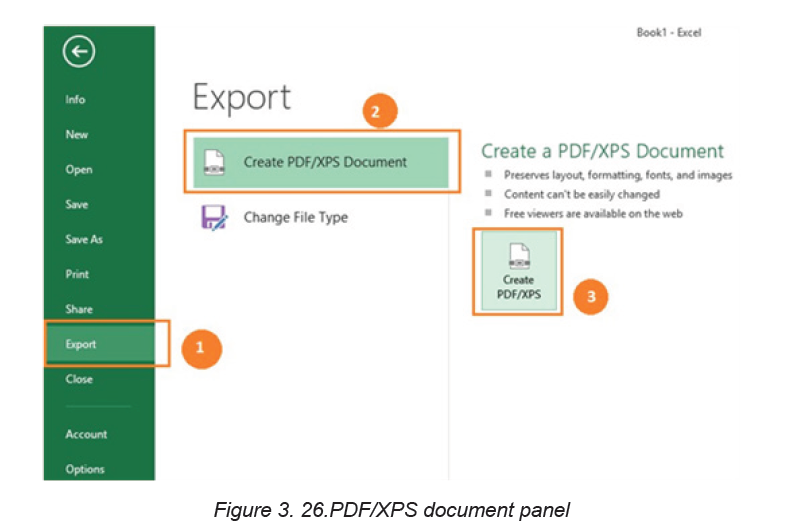
PDF file, give it a name and click Publish.
Excel will Export only the worksheet that is currently active. For exporting to PDF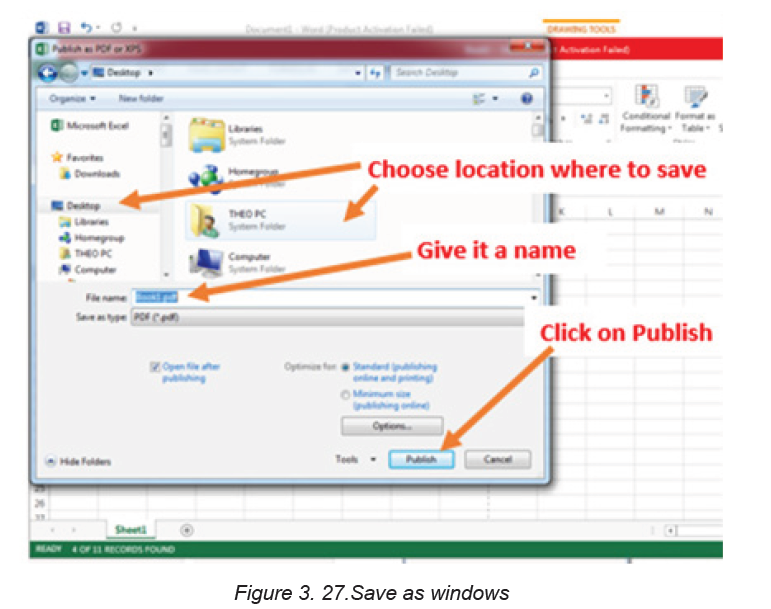
a workbook that has more than one worksheet click on the Option tab available onthe save as window then tick “Entire workbook” and click on OK then on Publish
3.4.2 Exporting in another File Type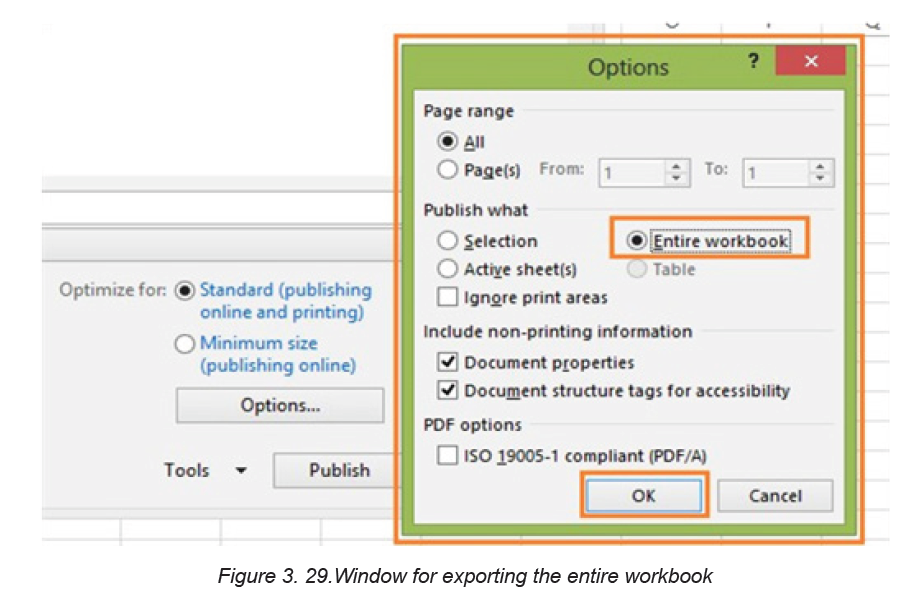
Apart from PDF and other file formats that can be used to save Excel, it is
possible to export an Excel file in other formats like csv, binary workbook and
many others.
To Export Excel files to other formats go through the following steps:.
Step 1:Go to File, then Export. Click on Change File Type and the window belowwith different file types will appear:
Step 2: In the window that will appear choose the new file type to apply and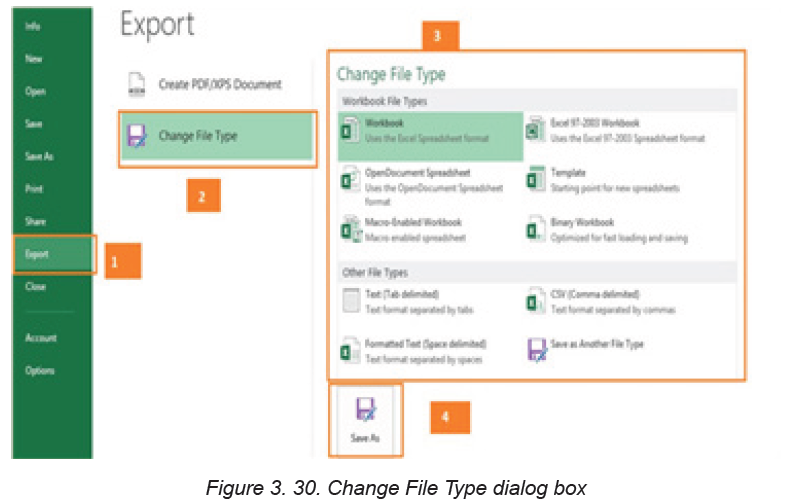
click on Save As in order to provide the name and the location of the file. File
types can be csv, OpenDocument spreadsheet, Macro-Enabled workbook,Text or any other available option.
APPLICATION ACTIVITY 3.4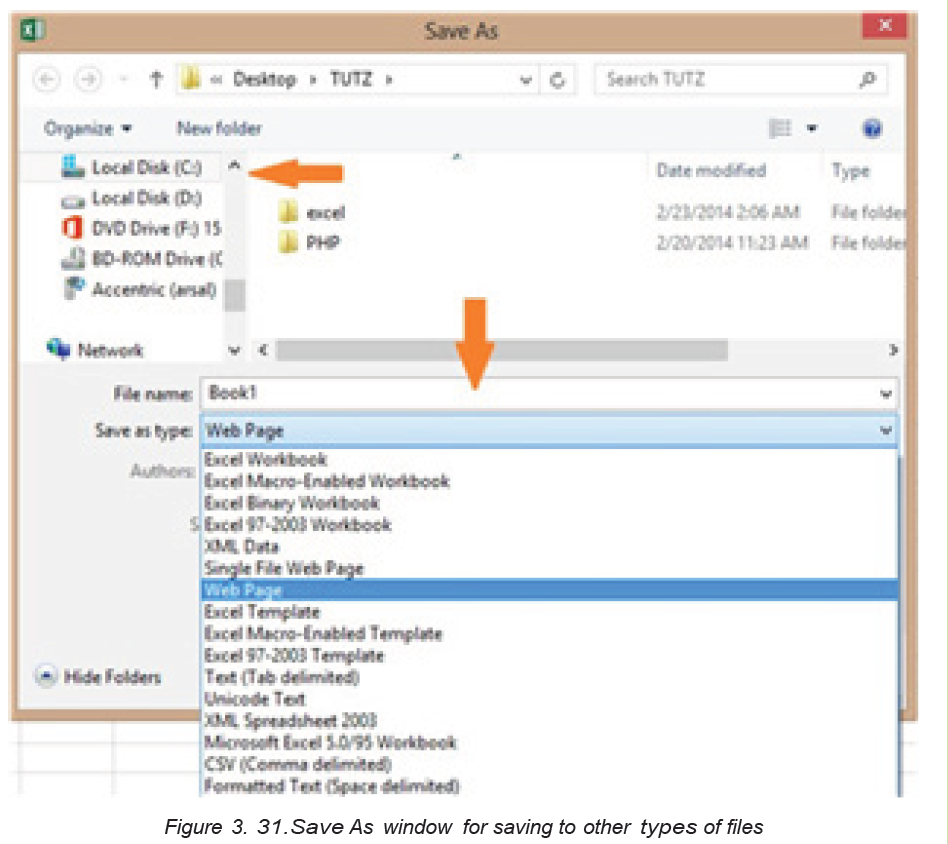
1. Open Burera Ltd Sales that you have created in previous activities and
do the following:
2. Export Burera Ltd Sales data File to web page file
3. Export this same file to PDF. What are the benefits of saving an excel
worksheet to PDF?
End unit assessment
Enter the data below in Excel and save the file under the name “Senior 4 MPCMark Sheet”
1. Calculate the total and the grand total for each student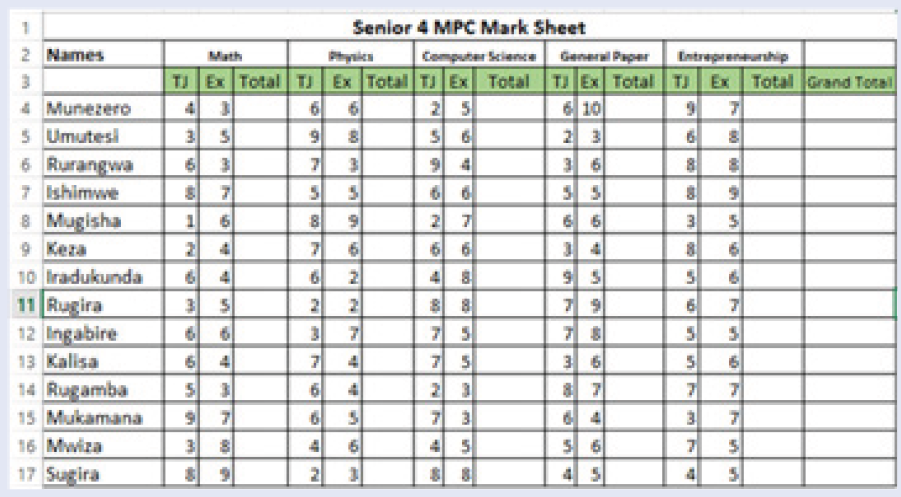
2. Highlight in red and bold students who scored less than 5 points in each
subject
3. Use Green fill with dark green text to Highlight students who have total
above 12 in any subject
4. Using blue highlight show all students who scored 55 and above5. Sort Grand Total in descending order
UNIT 4 SEARCHING THE INTERNET
Introductory activity 4.0
During the end of the year holiday, Jean Claude, a student in Senior Four in one
of the schools with Associate Nursing Program in Rwanda received a message
from someone claiming to be a girl who studies in Senior Four at the same
school. The girl claimed to have feelings for Jean Claude. They chatted as much
as they could even confidentially and sent to each other pictures.
At the beginning of the new school year Jean Claude met the girl as they entered
the school gate and tried to hug her but the girl seemed not to know him. Later
he learned from her that they never chatted. Some weeks later Jean Claude
received a message that if he does not pay 100000 Frw his nude pictures will be
published on social networks.
a. “The girl seemed not to know him” Explain why while they introduced
themselves to one another and have been sending pictures to one another
b. Discuss how Jean Claude would have prevented the threat of having his
nude pictures shared
c. Have you encountered a problem like this while using the internet and
social media? Discuss.
4.1 Internet ethics
Activity 4.1
During the end of the year holiday, Jean Claude, a student in Senior Four in one
of the schools with Associate Nursing Program in Rwanda received a message
from someone claiming to be a girl who studies in Senior Four at the same
school. The girl claimed to have feelings for Jean Claude. They chatted as much
as they could even confidentially and sent to each other pictures.
At the beginning of the new school year Jean Claude met the girl as they entered
the school gate and tried to hug her but the girl seemed not to know him. Later
he learned from her that they never chatted. Some weeks later Jean Claude
received a message that if he does not pay 100000 Frw his nude pictures will be
published on social networks.
a. “The girl seemed not to know him” Explain why while they introduced
themselves to one another and have been sending pictures to one
another
b. Discuss how Jean Claude would have prevented the threat of having
his nude pictures shared
c. Have you encountered a problem like this while using the internetand social media? Discuss.
Internet is an interconnection of computer networks worldwide providing a series of
information and communication facilities and thus being a big tool for carrying out
researches.
Internet ethics refers to set of moral principles that regulate the use of internet.
Thus the internet users must be honest, respect the right and property of others on
internet.
The following are ethical issues that should be addressed at individual, social, and
political level:
a. Flaming
Flaming refers to messages that contain offensive, obscene or immoral words
spread via social media applications such as WhatsApp, Facebook and Instagram.
b. Forgery
Availability of computers and high-resolution imaging devices has made it possible
for criminals to forge certificates, money and identity cards.
c. Piracy
Piracy is a form of theft of intellectual property on copyrighted software products
without proper authorization. To avoid violation of copyright laws, everyone needs
to understand various software licences.
d. Terrorism
High penetration of internet and mobile phones has exposed most countries to evil
plans of terrorists across the globe.
e. Pornography
Availability of pornographic material in form of pictures and video has affected
moral values of young children leading to immoral behavior such as homosexuality
and premature sex.
f. Fraud
Computers and mobile phones are being used to steal other people’s account details
or money through fraudulent means such as fake websites and SMS messages.
g. Corruption
Corruption has become social evil in private and public institution because it is
seen as the easiest means to gaining social, economic or political favors. In some
countries, mobile and internet-based money transfer has opened doors to corrupt
behavior that goes unnoticed by law enforcement agents.
h. Blackmail
Is an action of asking money or any other benefits in exchange to not revealing
private information on someone. That information can be nude pictures or videos
and other compromising information about someone.
As internet ethics mean acceptable behavior of using internet below are ten rules
that anyone using the internet should follow:
1. Do not use the Internet to harm other people.
2. Do not interfere with other people’s internet work.
3. Do not snoop around in other people’s internet files.
4. Do not use the Internet to steal.
5. Do not use the Internet to bear false witness.
6. Do not copy or use proprietary software for which you have not paid without
permission.
7. Do not use other people’s Internet resources without authorization or proper
compensation.
8. You shall not appropriate other people’s intellectual output.
9. Think about the social consequences of the program you are writing or the
system you are designing if it is to be used over the internet
10. Always use the Internet in ways that ensure consideration and respect for
your fellow humans
Apart from the rules some of the ethics to be followed while using internet are here
below:
• While using email and chatting, internet must be used for communication or
for research purpose. Be on guard while chatting with stranger and avoid
forwarding e-mail from unknown people or stranger
• Do not be rude and do not use bad language while using email, chatting,
blogging and social network, be respectful to others’ views.
• It is not advisable to use internet to fool others or pretending to be someone
else, hiding one’s identity to fool other on internet is a crime.
• It is not advisable to download and share the copyrighted material without
permission.
APPLICATION ACTIVITY 4.1
1. Brainstorm on how technology use has influenced our morals in terms of
communication, privacy and intellectual property rights.
2. What are ethical challenges arising from the use of computers and mobile
devices used to access the internet?
4.2. Web security spyware, hacking and firewall
Activity 4.2
1. Discuss the measures taken by your school to protect computers against
different security threats If they are not secured suggest solutions that can
be used to safeguard them
2. By doing a research write down some cases of internet security break thathave happened in Rwanda and in the world?
Computers are indispensable tools in the life of human beings. Computers are
used in different area such as banking, shopping, communicating between people
through emails and chats, etc. However, some intruders join the conversations
and try to read emails and other information for which they don’t have the rights.
Most of the time, they misuse their computers by attacking other systems, sending
forged emails from computers, or examining personal information stored in others’
computers.
Web security, spyware, hacking and firewall are among the terms that are
common in the world of internet specifically when it comes to using the internet.
The common attributes for all these terms are that they refer to the need to use the
internet securely.
4.2.1. Web security
Web security refers to the techniques of protecting computers, networks, programs
and data from unauthorized access or attacks. Major areas covered in web security
are: Application Security, Information Security, Disaster recovery and Network
Security.
The key Web services security requirements are authentication, authorization,
data protection, and no repudiation. These are implemented in order to have
more security while on the web.
a. Authentication
It is a process in which the credentials provided are compared to those in the
database of authorized users’ information on a local operating system or within
an authentication server. If the credentials match, the process is completed and
the user is granted authorization for access. Therefore, authentication verifies the
identity and enables authorization.
b. Authorization
The term authorization is the process of giving someone permission to do or have
something. In the field of computer an authorized user gains access to the system
and is allowed to get the available resources depending on the access level attached
to his/her credentials.
c. Data protection
It is the process of safeguarding important information from corruption, compromise
or loss.
4.2.2. Spyware
Like virus, Spyware also comes under the category of malware attacks. Although
the working of spyware is different from the other types of malware mentioned
earlier in unit 2, Spyware as the name suggests is used to spy into a system. The
job of the spyware is to silently sit inside the host system and observe the activities
of that system.
i. How spyware work
Suppose a user is logging on to any bank. Once the website of the bank opens, the
user id and login password are input. After that if the user wants to do a financial
transaction, the transaction password has to be entered. All this information is quietly
registered by the spyware then the spyware sends all the information recorded from
the user’s computer to probably a hacker who is somewhere else on the Internet.
ii. How spyware is spread
Devices which use windows operating systems are more susceptible to attacks;
here below are the most common ways, a computer can become infected with
spyware:
• Accepting a prompt or pop-up without reading it first
• Downloading software from an unknown source
• Opening email attachments from unknown senders, etc.
iii. How to recognize spyware on the device
Spyware can be difficult to recognize in an infected device. But there are clues
that can help one to know that a computer has been infected. The symptoms
of a computer attacked by a spyware are that the device is so slow or crashes
unexpectedly, it runs out of hard drive space and there are pop-ups when online or
offline.
iv. How to remove spyware
If the device is infected with spyware, it is necessary to run a scan with current
security software to make sure it has cleaned up everything it can. The best fight
against a spyware is to install reputable anti-spyware removal tools.
v. How to help prevent spyware
Here are four main ways to help prevent spyware.
Do not open emails from unknown senders.
• Do not download files from untrustworthy sources.
• Do not click on pop-up advertisements.
• Use reputable antivirus software.
4.2.3. Hacking
Hacking is a term used to describe actions taken by someone to gain unauthorized
access to a computer belonging to other people. It is the process by which cyber
criminals also known as hackers gain access to a computer. After entering in that
computer, a hacker can find weaknesses (or pre-existing bugs) in the security
settings and exploit them in order to access available information. Hackers can
also install any malware such as spyware or Trojan horse, providing a back door in
where to enter and search for information.
4.2.4. Firewall
A firewall is a network security device that monitors incoming and outgoing network
traffic and permits or blocks data packets based on a set of security rules. Its
purpose is to establish a barrier between an internal network and incoming traffic
from external sources such as the internet in order to block malicious traffic like
viruses and hackers.
i. How does a firewall Work ?
Firewalls carefully analyze incoming traffic based on pre-established rules and filter
traffic coming from unsecured or suspicious sources to prevent attacks. Firewalls
guard traffic at a computer’s entry point, called ports which is where information is
exchanged with external devices.
ii. Types of Firewalls
Firewalls can either be software or hardware, A software firewall is a program
installed on each computer and regulates traffic through port numbers andapplications, while a physical firewall is a piece of equipment installed between the network and the gateway.
APPLICATION ACTIVITY 4.2
1. Discuss and write a brief report on the importance of web security at your
school, in Rwanda and in the whole world.
2. In a bank, any customer can create and use an identity (e.g. a user name
and password) to log into that bank’s online service but the bank’s policy
must ensure that the customer can only access individual account online
once his/her identity is verified.
a. Identify which type of security is used in this bank?b. Why is that imposed security important?
4.3. URL and its partsActivity 4.3
Each year all students of P6, Senior three and Senior six pass the national
exam. Marking is the second step that follows. After marking, Rwanda Basic
Education Board avails the result on its web application so that each student
can view the results. Give and explain the steps to go through for accessing
national exam results
1. Briefly explain the term web browser
2. Differentiate between a web page and website as used when referring to
the internet
a. Web browser
Commonly referred to as a browser. It is a software program that allows a user
to locate, access, and display web pages. They are used primarily for displaying
and accessing websites on the internet as well as other content created using
appropriate languages such as Hypertext Markup Language (HTML) and Extensible
Markup Language (XML).
Examples of browsers: Mosaic, Netscape Navigator, Internet Explorer, Mozilla
Firefox, Opera and Google Chrome.
b. Website
It is a collection of related web pages stored as a single file in a web server. It is also
defined as a group of World Wide Web pages usually containing hyperlinks to each
other and made available online by an individual, company, educational institution,government, or organization
c. Webpage:
This is hypertext and hypermedia documents containing information about an
individual or organization. It is accessible through the internet or other networks
using an internet browser.
A web page is accessed by entering a URL address and may contain text, graphics,
and hyperlinks to other web pages and files.
4.3.1. Uniform Resource Locator (URL)
The term Uniform Resource Locator abbreviated as URL commonly known as
website address is a unique address of each web page and identifies the location
of that specific web page on the internet. An example of URL is: http://www.yahoo.
com
4.3.2. Parts of URL
The URL consists of three main parts namely: Protocol, Domain also known as host
name and Resource ID.
i. Protocol
It is a set of rules that governs how data is transmitted over a network. There are
many types of protocols used in a network. In a URL address, the protocol is shown
at the beginning of the address followed with a colon and double slashes. In the
example above the protocol is http (Hypertext Transfer Protocol).
Nowadays, HTTPS, which stands for Hypertext Transfer Protocol Secure, is the most
common used protocol. It tells a web browser to encrypt any information entered
onto the page, like the passwords or credit card information, so cybercriminals
cannot access it.
ii. Server name or Host name
It identifies the computer on which the resource is located. This computer is known
as a remote server. Most web server names begin with the letters www (For
example www.igihe.com)
The server name always ends with a dot and a three or two-letter extension called
the domain name.
iii. Domain name
The domain is important because it usually identifies the company, agency or
organization that is directly responsible for the information, or is providing the
computer space where the information is kept. Sometimes it indicates the country
where the server is located.
The Top-Level Domain (TLD) specifies what type of entity an organization registers
as on the internet. For example, “.com” is intended for commercial entities. Here
below are some common top-level domain names:
• com: identifies company or commercial sites.
• org: for non-profit organization sites.
• ac: for academic/educational institution.
• edu: for educational sites.
• go: for government agencies sites.
• net: for Internet service providers.
• co: for company.
• mil: for military organization.
Examples of country domains are .rw for Rwanda; .ke for Kenya; .uk for United
Kingdom; .jp for Japan; .tz for Tanzania; .us for United States; .au for Australia; .ca
for Canada; etc.
iv. Sub domain
Website is like a house; sub domains are like specific rooms in that house. A sub
domain in a URL indicates which particular page of a website the web browser
should serve up.
v. Resource ID
It identifies the file name and the folders or subfolders under which the webpage is
stored on the remote server.Example of resource ID is /index.php/ icons/services
APPLICATION ACTIVITY 4.3
1. What do you understand by the term web address
2. Describe all parts of URL3. What do mean by the term Top level domain?
4.4. Search on the internet
4.4.1. Strategies for better search results:
4.4.1.1. Simple search techniqueActivity 4.4
1. Considering the image below of Google search engine window. Name theparts labeled from A to G
2. Open the browser in address bar, type the most used search engine and in
search box type the following text “the proper use of ICT in Rwandan school”Explain what you observe after
Search on the internet requires the use of search engines, such as Google or Ask.
The words that are typed in the search box are called keywords, and should be
directly related to the topic that one is searching for.
Understanding how to perform searches for online information increase the chances
of finding the needed information.
Search Engine: Search Engines are programs that help the user look for and
identify items that corresponds to keywords or phrases specified from the World
Wide Web. Examples include; Yahoo, Google, Bing and Ask.com among others.
A. Strategies to pinpoint specific information online
Searching the internet can be a frustrating; researcher may enter a word or a phrase
into a search engine and get irrelevant information. What is need is the ability to
refine the search to get exactly what is needed.
1. Vary the Search Engine
Search engines search through about millions of active websites to provide content
and source of content. No search engine is perfect, they all have shortcomings that
are avoided only by the techniques of the user while searching.
Keywords are the terms that searcher uses to find content on the internet. Making
the keywords as specific as possible will lead search engine to track down the
information that user needs.
2. Simplify the Search Terms
Some engines include Stop Words in their searches. These are frequently used
words such as prepositions (in, of, on), conjunctions (and, but) and articles (a,
the), which means that the search results have more pages of search results than
needed.
It is usually best to eliminate stop words from the internet searches. The main
exception is if the search is based on looking for a specific title or name that includes
them.
3) Use Quotation Marks
Enclosing a search term also known as search query within quotation marks
prompts the search engine to search for that specific word or phrase.
If the term is a single word, using quotation marks will cut out stemmed variations
of it. For example, if searching for the word director, the researcher likely receives
a lot of results for direct, direction, directions, and so on typing “director” with
quotation marks, ensure that only results for that stem word are displayed.
If the search term is a phrase, the search will be for that specific phrase, rather than
for all the component words as individual items. For example, if searching for the
phrase director of human resources, without quotation marks, the search returns
results based on all of the words in the phrase. Thus, surrounding the term with
quotation marks, will generate results that feature this specific term.
4. Remove unhelpful words
The use of a hyphen, small dash or minus sign immediately before a word excludes
it from a search.
For example, typing in marketing -digital will exclude digital from the search
engine, making it easier to find the information searched for. Typing marketing
-digital -social would allow researcher to get rid of even more confusion.
5. Refine the search using operators
Other characters or terms, known as operators allow to narrow down the internet
search in more targeted ways. A few of those are explored here below:
• Wildcard searches: use the * symbol as a placeholder for another word. For
example, searching for * man in the world returns results for the richest man
in the world, the tallest, the oldest, and so on. Wildcard searches are also
useful for example when researcher do not know the full text of a quote.
• Combination searches: the OR operator enables user to search for two or
more terms simultaneously, and is most useful when those terms are very
similar. For example, typing selling OR retailing, will return pages where
either of the terms is used, without both needing to be present.
• Another way to combine searches is to use AND. This operator ensures that
researcher receives only search results that include two or more terms.
• Search in a specific Site: Typing the site followed by the URL of the website
that researcher wish to search and a search term limit the search to a single
website. For example, the site: reb.rw” Director General” will return all the
pages from reb.rw that feature the term “Director General.”
• Finding related sites: A useful operator is related. Typing this in front of a web
address like in the search sentence “related: igihe.com” (don’t consider the
quotes) will deliver a range of websites that are similar to igihe.com.
6. Avoid the use of difficult word to recognize (Search Pitfalls)
Note: When searching online, it is important to bear in mind that the use of
abbreviation cannot give the relevant result.
Whatever written in search box of search engine, the search engine tries to provide
relevant information related to the search query. The window below shows what
the search engine displays when researcher wants to get information about currentRwandan District
B. Keywords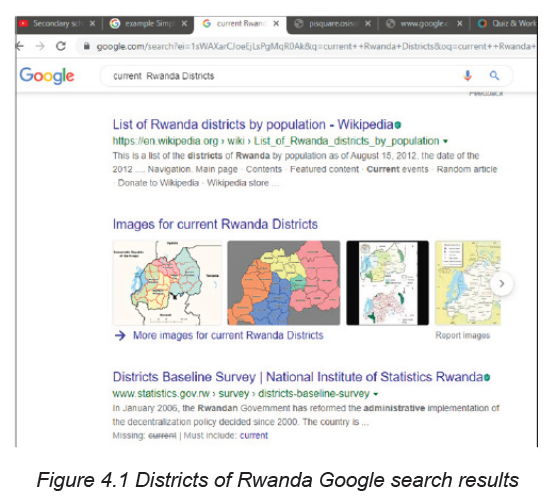
Keywords are the words that the search engines use to find pages. Generally, the
more specific the word, the better the returned results will be, because the page
which contains that word will more likely have something the user intended to look
for.
APPLICATION ACTIVITY 4.4
1. Using Google search engine conduct a research about the topic” IMPACT
OF GIRA INKA MUNYARWANDA”
2. Using Search in a Specific Site, Conduct a research about the all prime
ministers of your country .
4.4.1.2 Advanced search techniques
Activity 4.5
1. Conduct a research on internet about Boolean operators
2. Using different search techniques which include Boolean operators,
quotation marks,… do a research on the internet about the sexual
development of a human from birth to adolescence .
i. Advanced search techniques using Boolean operators
Boolean searching, also known as searching using Boolean Operators in between
the search words is the single most effective advanced search techniques used to
improve the search results, making them more relevant and precise. While using
these operators capitalize the words AND, OR, and NOT to form the most effective
search queries. Additionally, quotations are important when searching for a phrase
or multiple phrases.
Examples:
• Keyword1 AND Keyword2: Results must include both results
• Keyword1 OR Keyword2: Results must include at least one of the keywords
• Keyword1 NOT Keyword2: Results must exclude Keyword2
The Boolean logic expression “Lesson and Tutorial” once typed in search engine
will ensure that the engine returns document which contains both words.
The Boolean logic expression “power imbalance” OR “power balance in
mediation “once typed in search engine will ensure that the engine returns any
document which had either of the terms.
The Boolean logic expression “Lesson Not Tutorial” once typed in search engine
will ensure that the engine returns any document which contains Lesson but nodocument contain the word Tutorial will appear in the same page of search engine.
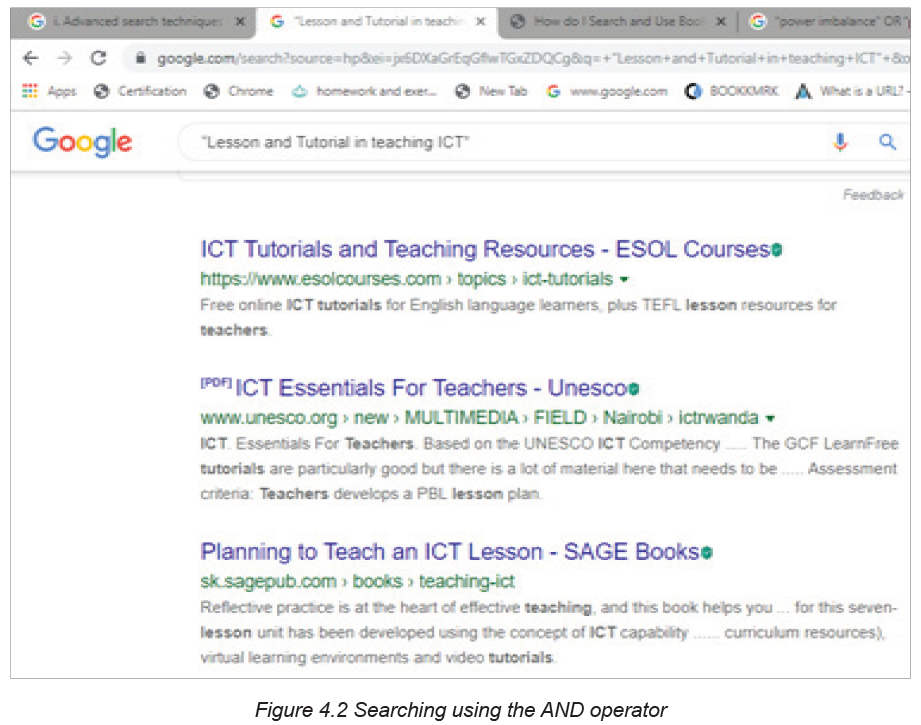
When the AND operator is used in the search query, the search engine returns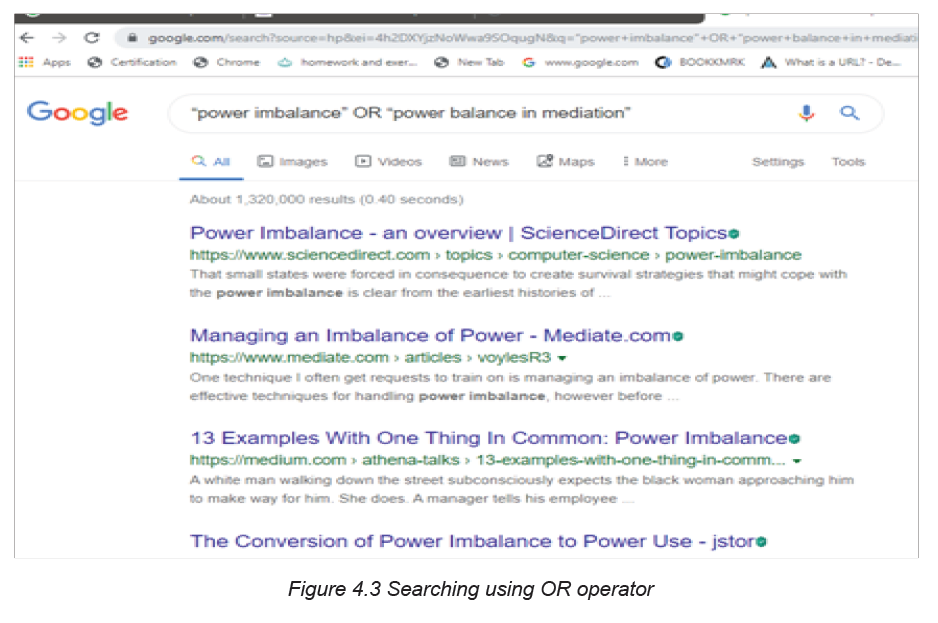
results whose content has both keywords on either side of the operator. In this case
the words lesson and tutorial will appear in the search results. On the other hand,
using the OR operator will return only results containing one of the operand words.
Note: both or none of the keywords may not appear in the search results when
the operator AND, OR are used but when the link is opened the opened page will
contain those keywords
ii. Advanced search technique using quotation marks
Quotation marks (“”) can be used in search engine to avoid finding similar terms
or derived words. They are used around phrases. The use of quotation marks tells
the search engine to only bring back pages with the typed term in exact order they
were typed.
Example: typing the “health and care reform” in search engine is accurate than
typing health and care and reform and will display in the search results that
sentence in quotes
iii. Advanced search techniques using tilde sign (~)
When the tilde operator is placed in front of a keyword, it also searches for words
that are synonyms of that keyword. The searcher can use the tilde operator (~) to
get Google or other search engines to expand the search with related keywords.
This is helpful when one does not know the entire search query to use.
iv. Advanced search technique using NEAR
This operator is a more specific form of the AND operator. It ensures that the
document contains both terms and that they are located near each other. In many
lengthy documents, just using the operator AND might not provide useful results as
the two keywords might be located in very different parts of the document and might
not be related to one another.
Example: The expression “resistance NEAR physics” used in the field of physics
search engine will ensure that the engine uses both words in its search and ranking
logic that both words appear
v. Advanced search techniques using parenthesis
The operators AND, NEAR, OR and NOT are powerful in their own right but when
used in conjunction with parentheses, they can offer substantial control over the
search logic executed by the engine. Parentheses are used in Boolean logic
similar to the way they are used in mathematical equation, limiting and ordering
relationships between variables.
Example: If one wants to find a web-based internet tutorial, it is better to use the
search criteria internet AND (tutorial OR lesson). The documents returned must
contain both of the word internet and tutorial or internet and lesson. Obviously, the
parentheses are used to distribute the keyword internet to one of the two “OR”
words inside the parentheses.
APPLICATION ACTIVITY 4.5
1. Using the advanced search techniques seen, search on the internet about
these topics:
a. Non-renewable energy
b. The power of the mind
3. Discuss about the use of NEAR keyword used in advanced search
techniques
4.4.1.3. Searching for documents, books, images, video on the
internet
Activity 4.6
1. One day an ICT teacher wanted to teach about the topics “assembling
and disassembling computer”. The day before the teacher gave homework
to the students to go to the internet and watch for video showing how to
conduct the activity to assemble and disassemble computer.
a. Suppose you are in that class, search for those videos on the internet
b. Analyze the videos got and compare them in terms of their relatedness to
the topic
Finding specific information on the internet is compared to searching for information
in the library. It is not necessary to have experience in internet searching or even to
know where to locate search sites. Different ways of searching for document, books
and video on internet are elaborated in the sections to follow.
A. Searching for documents
Most information is found on the internet by using search engines. While searching
for documents online using search engine simply require the typing of search query
in search box, the search engine displays a lot of information which can be in
millions of pages like in the image below where more than 6 millions of pages arereturned.

Accessing document from internet
The process of getting files from the internet is known as downloading. The
downloaded files can be viewed, saved or printed. Any attachment sent in an
internet needs to be downloaded.
The process of putting information, document, web pages, images and files onto a
web server is also known as uploading
B. Searching for book
There are different ways to search for online book such as using Wikipedia,
Google as search engine; researcher can even search for books which have been
uploaded to any site such as in-house books uploaded to the REB website. When
the searched book is found, the next step is to download it.
To search for a book using Wikipedia, one needs just to know the book Title, Author,
publication house, and date of publication for that book.
There are free online websites such as www.free-ebooks.net but also there are
some websites where books are found after payment. Those websites are like
amazon, barner and noble.
C. Searching for images
Most people use the web to search for images. They like to search for images
online and there are many sites and search engines dedicated just to searching
different kinds of images. While searching for online images consider the copyright
issues before using them.
To search and download images from the internet follow these steps:
1. Type “google.com” in the web address to find the image to download.
2. Type the name of the image needed, in the available list of related images
select the needed image.
3. Right-click to the image to save.
4. Click Save image as, searcher can even use “copy image as” option.
5. Choose location where to save the image.
D. Searching for video on the internet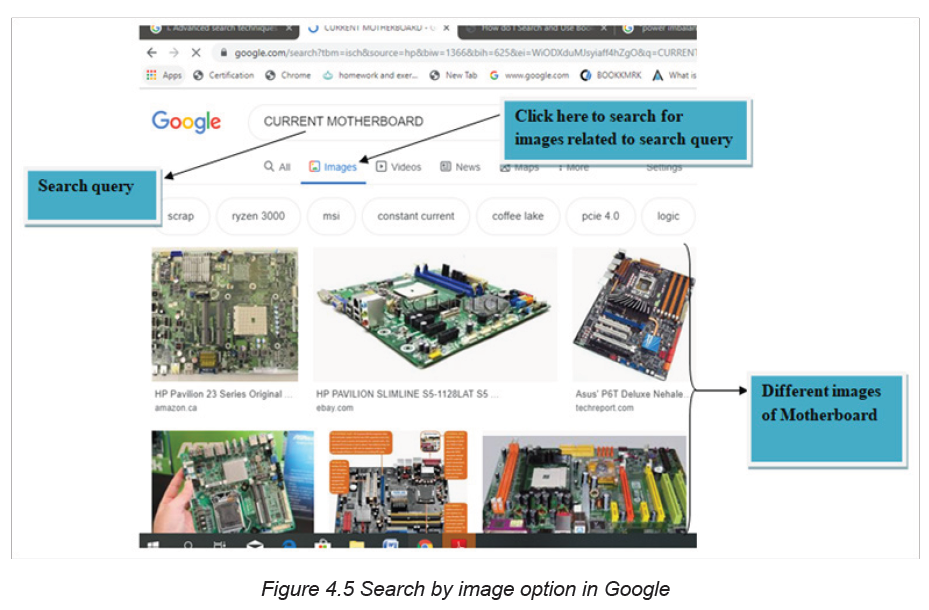
Internet video or online video is the general field that deals with the transmission of
video over the internet. Internet video exists in different formats, such as MPEG-4
AVC, AVCHD, FLV, and MP4 MP, MP4A etc. Those videos can be accessed through
several online video hosting services, such as YouTube, as well as Vimeo, Twitch,
and Youku, vid mate etc.
D.1. Searching for video using search engine and video icon
It is easy to access videos through the use of video icon located on search engines.
The process of locating videos simply requires to type the name and the author
of the video in search box of search engine and thereafter click on video icon asshown in the figure below:
D.2. Search video on internet using online video hosting services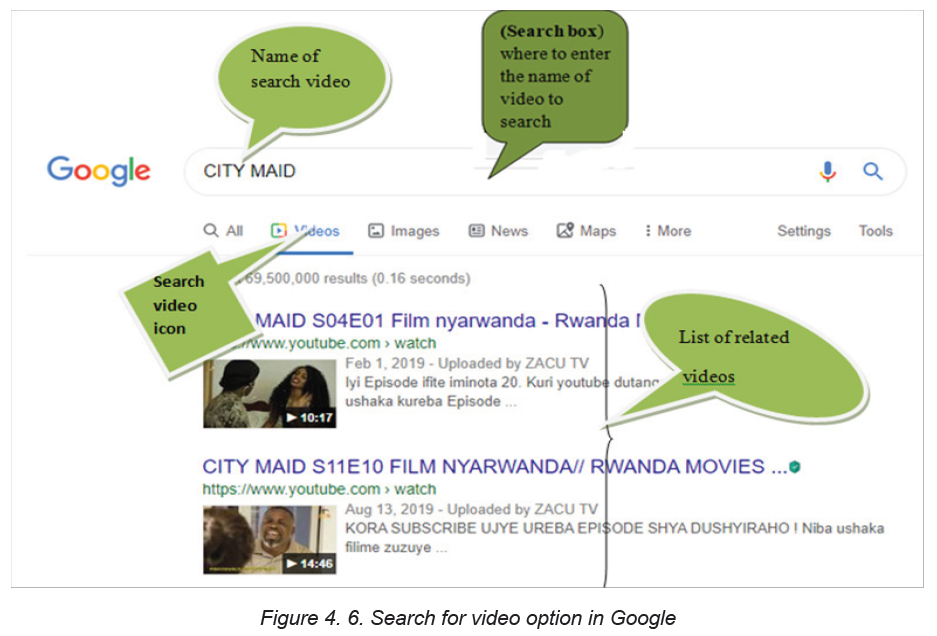
Internet video or online video such as YouTube, vimeo, Twitch, and youku, vidmate
for Smartphone are very useful tools that help to search for video.
To search for video online proceed as follows:
• Open the browser
• In web address or URL type the online video hosting services such as youtube.com
• In the opened webpage just write the name of the video by specifying its
author in order to avoid confusion.Here is a window showing how to find a video using YouTube online hosting service.
Once a video is seen it can be watched online or downloaded and saved using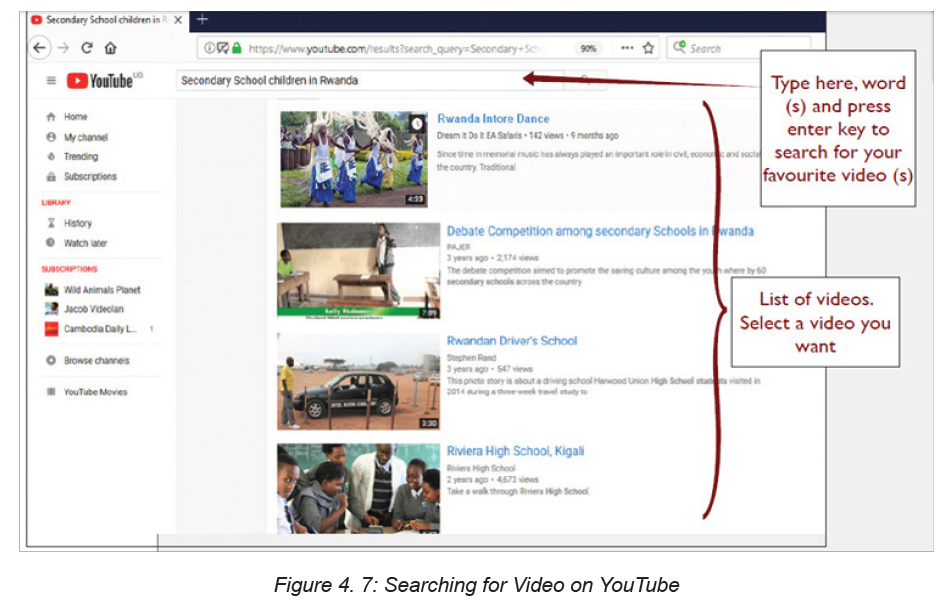
different appropriate software such as YTD Video Downloader, Internet Download
Manager so that they can be watched offline.
D.3. Searching for images and videos on internet using add-on software
• Software add-on
This is a piece of software that adds a specific feature or capability to an existing
software application. A software add-on cannot be run independently; it is just a
software extension.
Examples of common add-ons are Adobe Flash, QuickTime, Download Helper and
Silverlight.
• Download Helper
This is a tool used to extract videos and image files from websites and save them
to the hard drive.
• Download file (Video) using add-ons/download helper
Type in the Address bar “www.YouTube.com”. Locate a favorite video and click
on it.
To download a video on YouTube, there is a red button under Active Video download.
If Download Helper is used and there is an active video on any website, the icon isactive for downloading it, see the figure below.
Click the above Download button of the active video then Save As dialog box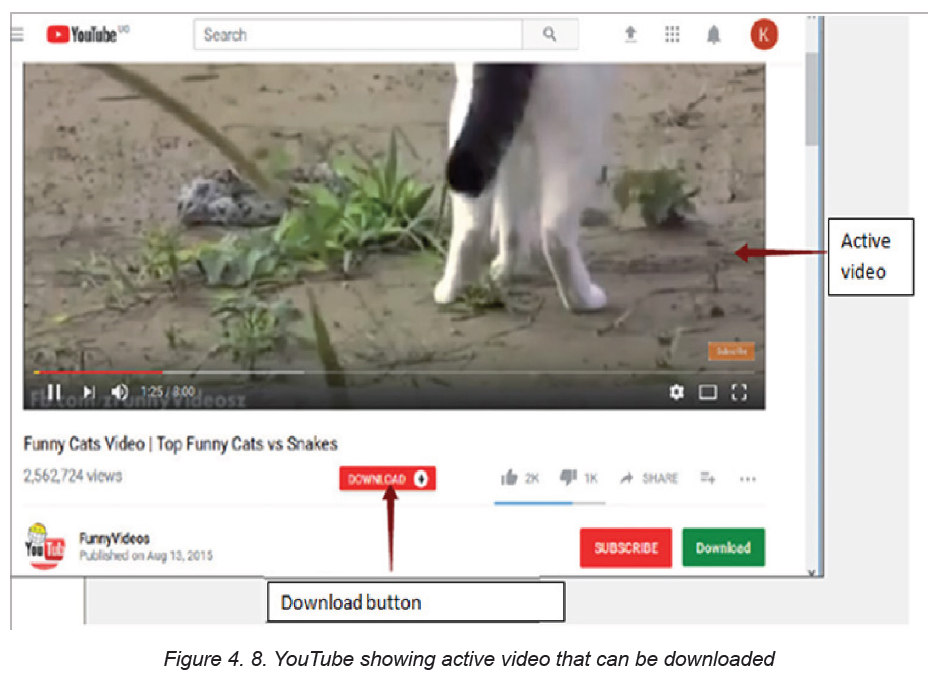
is displayed and at this stage user can select the location where to save the
downloaded video.
Note: YouTube has been designed for users who only watch and view videos on
their website. In case to save the video on computer is needed, select from a variety
of online downloader programs to download the video.
APPLICATION ACTIVITY 4.5
1. a) Through the use of internet and by using different techniques, search for
a video on any one of the three video hosting services (YouTube, Vmeo,
Twitch). The video to search for is about “grain germination”
b) Which one gives more related search results? Explain
2. Search on internet a book called “Imigani miremire ” written by Aloys
BIGIRUMWAMI
3. Create a folder on Desktop and call it your name, thereafter Search on
internet the current map of Rwanda and save it in the created folder
Take an image of your classmates in the classroom and save it on the computer
with internet connectivity. Using that saved image search for similar images of
students (or student teachers) in the classroom.
4.4.2 Searching by image
Activity 4.7
The term search by image also called “reverse photo lookup” is a type of online
search where, user instead of typing in a text-based keyword also known as search
query, uploads an image to find visually similar images and relevant details about
the query image. Here below are procedures to conduct the search by image:
1. Open Google Images (images.google.com)2. Click on the camera icon in the search box.
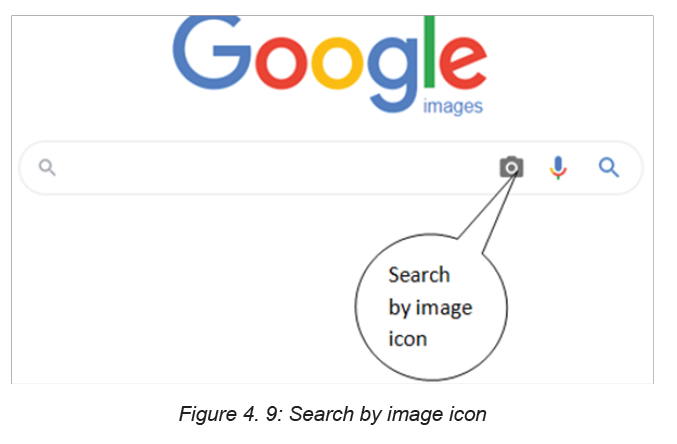
3. Click Upload an image.
1. Click Choose file’ and browse through the image from PC.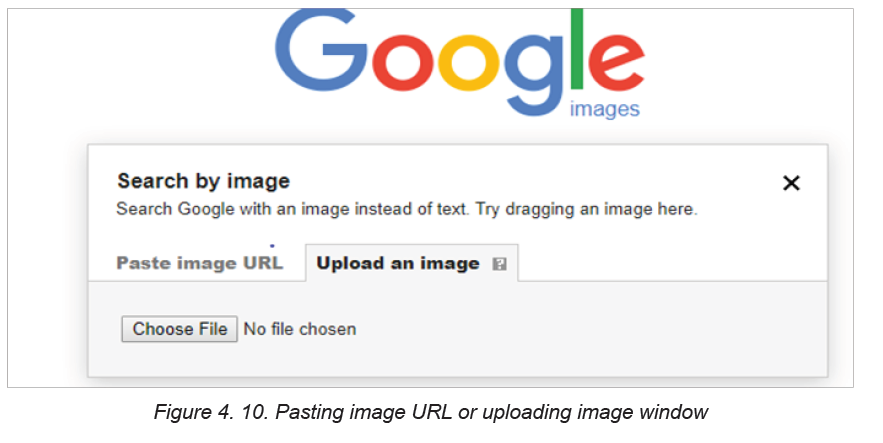
2. Select the image and upload it to Google image.
In the figure above images can be searched by pasting the address (Paste image
URL) of searched image or by uploading it. The term upload has been seen earlier.
Here below is the description of the downloaded image called download33. Theimage shows that it is related to images describing the smart classroom.
APPLICATION ACTIVITY 4.7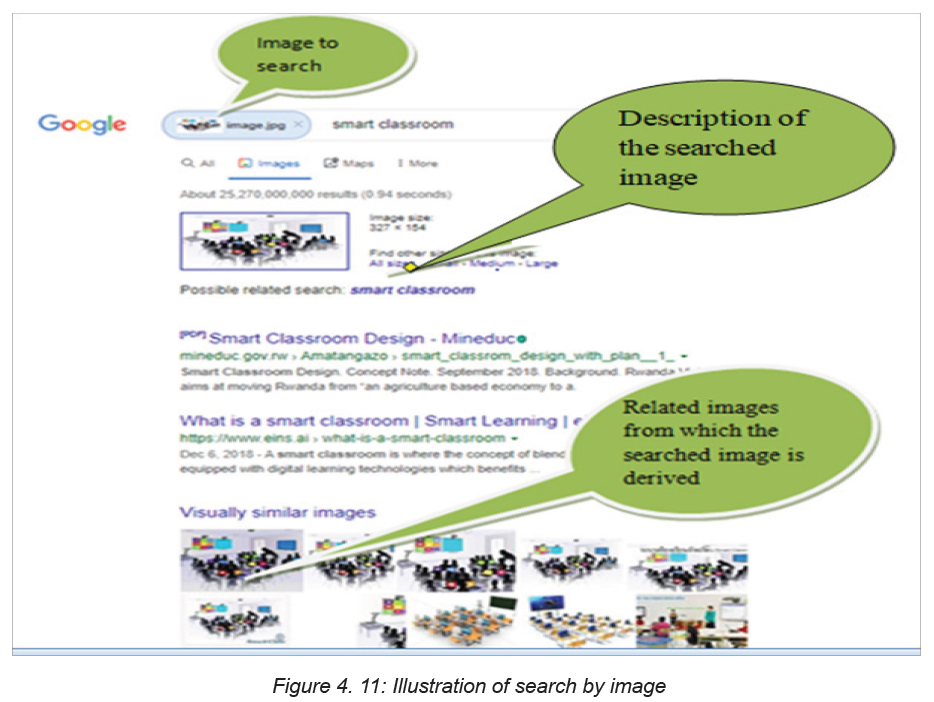
Download ICT books for your subject available on the internet and save them on
your computer.
4.5. Browser’s techniques for remembering
Activity 4.83. What is the role of the cord found in the book below
2. Tom Likes watching movies related to Surgical Pathology on YouTube.
Whenever he opens YouTube he finds Surgical Pathology related topics
displayed the first. For his friend Kamana who likes to watch videos on
History of Rwanda, videos on Surgical Pathology are not displayed.
Discuss the possible reason for this.
People who use the internet testify that the internet seems to be intelligent based on
the feedback and suggestions they get from it. Some websites offer the possibilities
to store some data like details of a filled form, user name and passwords in such a
way that on the next visit to the same website those data won’t need to be refilled.
Some websites like YouTube, social media websites and e-commerce websites
provide suggestions to their visitors depending on their experience for the last visit
on the same website. The different mechanisms through which this is achieved are
elaborated in this topic.
A. Cookies
Cookies are small files which are stored on a user’s computer. They are designed
to hold a modest amount of data specific to a particular client and website and can
be accessed either by the web server or the client computer.
A computer cookie consists of information. When user visits a website, the website
sends the cookie to the computer. The computer stores it in a file located inside the
web browser of the used computer.
The purpose of the computer cookie is to help the website keep track of user visitsand different activities carried out by the users
♦ Some activities of cookies
• Registering which people have visited what pages on a website. This
information can then be used to choose the right advertisement or otherwise
tailoring the pages the user may view. Many cookies used for advertising and
tailoring content are third-party cookies.
• Monitoring the traffic through statistics to improve the site and learn more
about different target groups.
• Keeping track of the selected language.
♦ Where to locate, enable or delete cookies
1. Open the browser. Because cookies are stored in the web browser, the first
step is to open the browser.
2. Find where cookies are stored. Each browser manages cookies in a different
location.
For example, in Internet Explorer, find them by clicking “Tools” and then Settings.
And then click advanced settings”
In Chrome, choose “Preferences” from the Chrome menu in the navigation bar,
display settings. Then expand the “Advanced” option to display “Privacy and
security.” From there, open “Content settings” and “Cookies.”
1. Manage the cookies. Every browser gives a range of options for enabling
or deleting cookies. Internet Explorer for instance, allows managing cookies
under “Privacy” and “Advanced.” In Chrome, find where cookies are stored
as outlined above, and then select the management options under “Cookies.”
B. Bookmark
When referring to an Internet browser, a bookmark or electronic bookmark is a
method of saving a web page’s address. In Microsoft Internet Explorer, bookmarks
are referred to as favorites.
♦ The purpose of bookmark
A bookmark is very useful when user finds a webpage that should be remembered
in order to be able to look at it another day. Bookmarking is like creating a shortcut
for quick access to that web page.
Here below is a list of shortcuts that can be used to access and view the bookmarks
in a browser:
• Google Chrome: Ctrl+Shift+O• Mozilla Firefox: Ctrl+B or Ctrl+ Shift+B
• Microsoft Edge: Ctrl+I
• Internet Explorer: Ctrl+I
• Opera: Ctrl+Shift+B
♦ Process of viewing bookmark in Google chrome
1. Open the Google Chrome browser.2. Navigate to the page to bookmark.

3. Press Ctrl+D or click the star icon on the far side of the address bar
d. Cache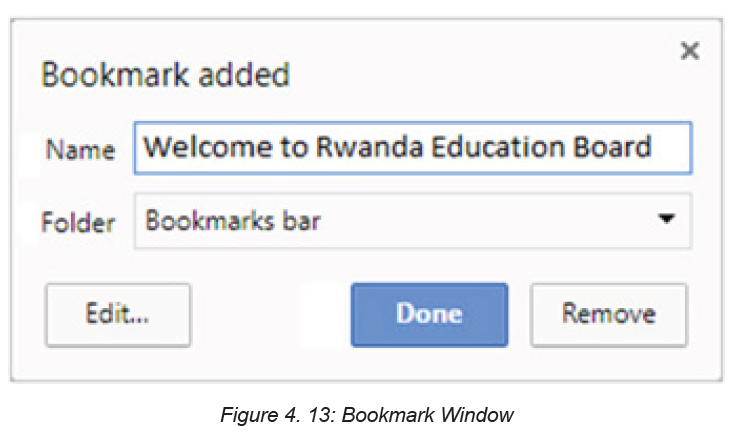
A web cache also known as a HTTP cache or page cache is a system that temporarily
stores data such as web pages, images and similar media content when a web
page is loaded for the first time.
When a user visits a page for the first time, a site cache commits selected content
to memory and when that same page is visited again, the site cache is able to recall
the same content and reload it much quicker when compared to the first visit.
e. Browser history
In computing system, the term web browsing history refers to a list of web pages
a user has visited recently and associated data such as page title and time of visit
which is recorded by the web browser software as standard for a certain period
of time. Web browsers software do this in order to provide the user with a back
button and a history list to go back to pages they have visited previously as well as
displaying visited links
which is recorded by the web browser software as standard for a certain period
of time. Web browsers software do this in order to provide the user with a back
button and a history list to go back to pages they have visited previously as well as
displaying visited links
Viewing browsing history in Google Chrome:
All web browsers keep a record of every page visited in their web history. Here are
the steps followed to view a browser’s history:
1. Open the browser.
2. Click the icon located to the far-right corner of Google Chrome under the
closing icon.
3. Select History. This option is near the top of the drop-down menu. ...
4. Click History. It’s at the top of the pop-out menu.5. Review the browsing history
APPLICATION ACTIVITY 4.8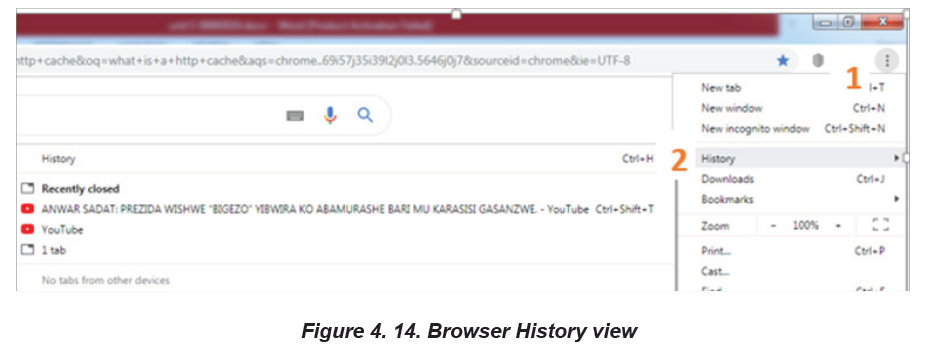
1. Explain the purpose of Bookmark, cookies Cache.
2. Using internet explain three ways to view bookmarks using differentbrowsers.
End unit assessment
1. What is URL? Explain the five parts of URL
2. What does the prefix https:// in a browser address field mean?
3. Differentiate web page from web site
4. When moving from one web page to another, it is a good to open each web
page in a different window. Try opening the following links, each in its own
window: www.igihe.com, www.reb.rw, www. google.com
5. What is a browser’s page history? What is its purpose?
6. Define the term search engine and list at least three examples of the most
common ones
7. Nowadays most services are carried out online by using the web
application www.irembo.gov.rw. With your computer connected to Internet,
search for steps to be followed while applying for National ID using thisweb application.
BIOGRAPHY
1) National Curriculum Development Centre (NCDC). (2011). ICT Syllabus for
Upper Secondary. Kigali.
2) MYICT. (2011). National ICT strategy and plan NICI III-2015.Kigali.
3) National Curriculum Development Centre (NCDC). (2006). ICT syllabus for
Lower Secondary Education. Kigali.
4) Pearson Education. (2010). Computer Concepts.
5) Rwanda Education Board (REB), (2019), ICT Syllabus for TTC, (2019),
Kigali
6) Rwanda Education Board (REB) (2019), Computer Science S5 student’s
book
7) Rwanda Education Board (REB) (2019), Computer Science S6 student’s
book
8) Rwanda Education Board (REB) (2019), Information and Communication
Technology for Rwandan Schools Secondary 1 Students’ Book
9) Rwanda Education Board (REB) (2019), Information and Communication
Technology for Rwandan Schools Secondary 1 Students’ Book
10) Rwanda Education Board (REB) (2019), Information and Communication
Technology for Rwandan Schools Secondary 2 Students’ Book
11) Longhorn Publishers (2016) Computer Science For Rwandan Schools
Senior Four Student’s Book
12) Fountain Publishers (2016) Information and Communication Technology(ICT) for Rwanda Schools Learner’s Book Senior Three