UNIT 3: MOTIFS, PATTERN AND DESIGN PROCESS
Key Unit competence:
To be able to create new design from motifs and patterns and apply them onthe surface using different techniques.
3.1. Applying new designs from motifs and patterns on
surfaces using different techniques.
Motif is a single design and a pattern is a repetition of the motif in a design.
The following is the example of motif and pattern.

• Using impression technique
There are times you can transfer a pattern from one source to another by
impression. Patterns from hard surface as biscuits, rocks, stones, tree bark,
coin, shoe sole, prepared clay with different patterns etch are needed to usethis method.

Stamping technique
Stamping is a craft in which some type of ink is applied to an image or pattern
that has been carved. The ink coated rubber stamp is pressed onto any type
of medium such that the colored image is transferred to the surface or other
medium.
One can make a stamp using a sharpen razor and waste of gumboots made in
rubber. You draw the design in reverse, remove the background, put the piece
of gumboot on the support and put the design in the ink pad, then stamp on thesurface.

• Stenciling technique
Stenciling technique produces an image or pattern by applying paint to
a surface over an intermediate object with designed gaps in it which create
the pattern or image by only allowing the pigment to reach some parts of the
surface. The key advantage of a stencil is that it can be reused to repeatedly and
rapidly produce the same letters or design. With some designs, this is done by
connecting stencil islands (sections of material that are inside cut-out “holes”
in the stencil) to other parts of the stencil with bridges (narrow sections ofmaterial that are not cut out).


Parts of a stencil
The result when you forgot bridge
Some letters and numbers like I, J, K, L, M, N, S, T, U, V, 1, 2, 3, 5,… don’t need
bridges when cutting them, but letters like A,B, D, O, P, R,4, 6, 8, 9, 0,… need
bridge to support or protect the island. This is not only on numbers and letters
but also on shapes or other designs, bridges are sometimes needed.
The following is another form of stenciling technique which use digital tool:
Screen printing is a printing technique that uses a woven mesh to support an
ink-blocking stencil to receive a desired image. There are many ways of making
screen printing depending on the used materials.
The following steps can be used in general for screen printing
techniques
Method 1: using film of two layers
Step 1: Prepare your screen
Step 2: Make a design, using freehand or computer
Step 3: transfer the design on film,
Step 4: cut the film, remove the design
Step 5: burn the cut out of the design on the screen using thinner and
brush or sponge, you can dilute the thinner with water because thinner is
too strong, it can damage the design
Step 6: coat the rest of the screen with masking tape, let only where ink
will pass.
Step 7: start printing. And after wash and dry your screen. You can also
iron your t-shirt or fabric to fix well the design on the fabric.
Method 2: using photo emulsionStep 1: Prepare your screen
Step2: make a design using computer, or free hands (better to use a marker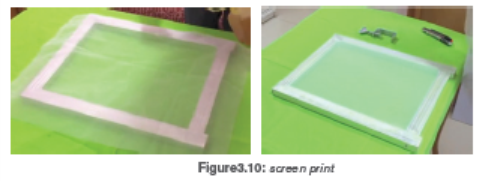
or ink pen)
Step 3: print with a printer your design on film (a translucent paper)
Step 4: coat your screen with emulsion and let it dry in dark place
Because light destroys the emulsion, for 24hours but to save time you can
use hair dryer to be quick.
Step 5: stick the film on top of the screen and burn it using light bubble or
add few petrol on the screen and stick the film and expose it to thesun when you don’t have the appropriate light bubble.
Step 6: start printing. And after wash and dry your screen. You can also iron
your t-shirt or fabric to fix well the design on the fabric.
Materials to be used:
Fabric, Canvas stretcher, woven mesh, Staples or nails to mount the woven
mesh on the screen, Staple gun or a small hummer, Thick printer paper, printer
(optional), pencil, utility knife, masking tape, screen printing fabric ink, squeegee(D-cut or square-edged), Water, Sponge.
A. Ink
B. Squeegee
C. Image or design
D. Photo-emulsion or film
E. ScreenF. Printed image.

