UNIT 5: MODELLING SIMPLE CLAY FORMS AND FIGURES
Key Unit competence:To be able to make clay object by using different techniques of modeling.

5.1 Techniques of decorating clay surfaces
Decorating clay figures is one of the most rewarding aspects of working in clay.
It is the time when you can add color and life to a bare clay surface that can
show your creative talents. Decorations can be made before or after firing the
clay figure. Firing can be done by putting the clay object in a kiln and fired so
as to harden it.
There are different techniques you can use to decorate clay object like; incision,
impression, marking, grazing and varnishing, painting…
• Painting
Painting of surface is done using water color paints. Oil paint maybe used on object made in clay.
• Incising is to engrave a design by cutting or scraping into the clay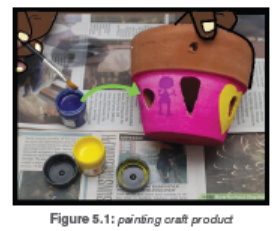
surface at any stage of drying, from soft to bone dry. ... Note: Incising
becomes sprigging when it goes through the clay, leaving a hole ratherthan continue with additional carving.
• Impression
Impressing is a type of decoration produced by pressing something on thesurface of the clay when it is still soft or stamped decoration.
• Marking design using cord
It is known as cord marking is the decorative technique in which cord or string
wrapped around a paddle and pressed against an unfired clay vessel, leavingthe twisted mark of the chord.
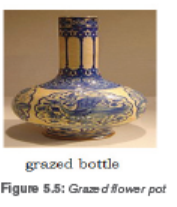
• Grazing
This is applying chemical on fired clay to create shining or various colours afterthe firing.
5.2. The techniques and process of decorating ceramic
object.

Sand the pot to smooth any rough spots. Do this outside in the grass, if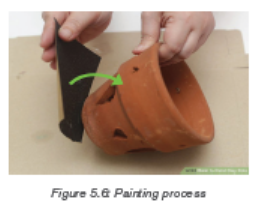
you can, to reduce cleanup. If you do it inside, or even in a garage, you may want
to lay newspaper down so the dust doesn’t get everywhere.
Soak the pot for 1 hour. This is good for new pots because it will loosen any
stickers for easier removal. It is also good for pots you have planted in before
because it will loosen any dirt.
Scrub the pot with a brush. While soaking the pot may loosen the dirt, used
pots are likely to need a scrubbing to get them completely clean. The paint will
not go on even or stick properly if there is any dirt or debris.
Let the pot dry completely. Painting the pot while it is still wet will cause the
paint not to stick, so set it out to dry. If it’s a sunny day, put it outside to dry the
pot faster. The time it takes to dry may depend on the size of the pot.
Use foam brushes to paint the pot. Bristled brushes tend to leave streaks,
so using a foam brush will give you a more even coat. You may want a couple
brushes of different sizes, especially if you want to paint any kind of patterns on
the pot.
Tape off stripes or sections You can paint the pot one solid color, but for
more variety or for fun designs, painters tape is a great option. With this variation,
you’ll tape and paint over the tape for the first coat. Once the paint dries, you’ll
take the tape off and paint the areas that were under the tape before.
Paint the outside and 1-2 inches down the inside. You can use any paint
you want for the main coats. It’s cheapest to use leftover paint you already have
around. Exterior or interior paints are both fine, as well as acrylic craft paint.
Spray paint works well, too.
a).Vanishing process
Varnish can provide a beautiful finish to clay projects and paintings. Before
applying varnish to clay, sand your piece and clean your workspace. Apply the
varnish in several thin layers, letting each one dry thoroughly before proceedingto the next.
b) Incising process
1. Make an object using clay.
2. Before drying object, make design you need on it.
3. Incise the design into the object.4. Let the object dry
C) Impression Process
There are times you can transfer a pattern from one source to another by
impression. Patterns from hard surface as biscuits, rocks, stones, tree bark,
coin, shoe sole, prepared clay with different patterns etch are needed to use
this method.
1. Make an object using clay
2. Choice any source that you will use for impression
3. Impress source on wet object before drying4. Let object dry.


REFERENCES
Books references:
Kenya Literature Bureau (2007). Distinction Creative Arts, For Primary Teacher
Education.
Kenya Literature Bureau (2010). Distinction Creative Arts, For Primary Teacher
Education.
Studio technology revision question and answers 2016.
Arts, crafts &design a piratical guide for teachers’ key strategies 1&2 1997.
Graphic art Baker Apollo 2010.
Online references:
https://en.wikipedia.org/wiki/Cave_of_Altamira
https://www.instructables.com/id/Digital-Painting-Lesson-1-The-basics-ofusing-
a-gr/https://www.designhill.com/design-blog/top-9-tips-for-creatingsurface-
pattern-designs-on-your-own/https://sewguide.com/fabric-stampingtechniques
https://www.techradar.com/news/best-drawing-and-painting-software
http://www.prochemical.com/directions/Folding.htm
https://www.ritstudio.com/techniques/creative-techniques/how-to-tie-dyeusing-
the-bucket-method/
http://www.dharmatrading.com/gifts/the-spiral-tie-dye-basics.html
http://www.prochemical.com/directions/Folding.htm
http://www.skiptomylou.org/how-to-spiral-tie-dye/
http://www.dharmatrading.com/gifts/the-spiral-tie-dye-basics.htmlhttp://www.prochemical.com/directions/Folding.htm
