Topic outline
Creative Performance ECLPE,SSE,LE
Quiz: 1File: 1PART I UNIT 1:KEY CONCEPTS OF FINE ARTS AND CRAFTS
Key unit competence: To be able to describe the meaning of
the key concepts and importance of FineArts and Crafts.
Introductory Activity
After observing the figure, identify the activities shown above and discuss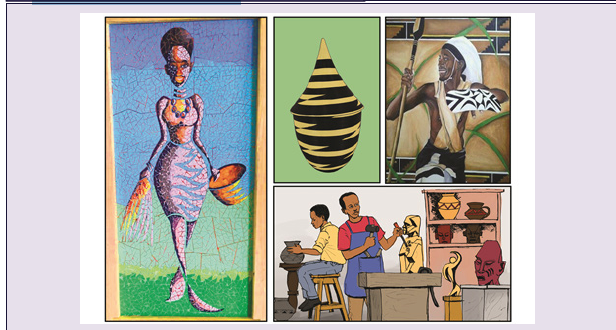
the functions of crafts in Society today.
1.1.Definition of concepts
Activity 1.1
Explain the following concepts:
a. Arts
b. Crafts
1.1.1 Arts
Art is a way to express ideas, thoughts, and feelings, using a variety of
materials. Paintings, sculptures, huge bridges, and landmark buildings areall ways in which artists express themselves visually.
1.1.2. Crafts
Craft is an activity, which needs skills and use of hands in order to produce
various objects. There are different types of crafts such as:• Baskets
• Craft bags
• Masks
• Hats
• Pots
• Paper crafts
• Batik
• Collage• Mosaic
Application activity 1.1
• After explaining the term craftwork, describe the types of crafts.• Discuss the major steps that deal with craft production.
1.2.Importance of art and crafts
Activity 1.2
Describe the importance of art and crafts.
1.2.1. Important of art and crafts
There are three general perspectives upon which to address this statement.
a. From an individual’s perspective
The importance of art in an individual’s life is a broadening of perspective
and a deepening of insight into well, literally everything about the human
condition. From an observer’s perspective, art connects us to one another
on a visceral level.
Cumulatively, society benefits from the positive contributions resulting from
affirmative expressions of community life within larger societies. The art
helps individual to respond to art or to make art and this allows them to enjoy
the world of aesthetic.
b. From a community’s perspective
Art and crafts bring attention related to; overlooked, misunderstood,
misrepresented, or misapprehended in ways, which provide unmatched
clarity in creating and understanding. Art can mobilize a community and
motivate social change, which contributes to stability within larger societies.
c. From a society’s perspective• Art and crafts reflect the deepest truths about life, the human condition,Application activity 1.2
and society in general.
• Art and crafts provoke social introspection and define boundaries while
providing clarity on issues.
• Art provides the public with psychologically supportive outlets of
expressions, which contribute toward overall social stability.
• Artistic activity provides a healthy return on investment to every level
of an economy.
• Artistic history provides us with deep insights into our evolution as
species. It is an activity that provides insights into our future like everyother discipline of discovery.
• Most of the craftworks need finishing in order to have a final product,discuss its meaning and its importance in craft.
1.3.Components of artworkActivity 1.3
Describe the components of art and crafts work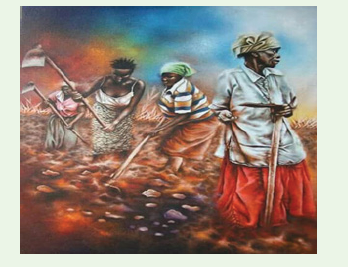
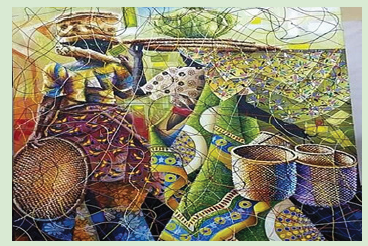
1.3.1.Subject matter
This is the main idea in a work of art. It may be rendered in an abstract
manner or in representational way. It is referred to as theme and often, gives
the work its name.
1.3.2.Composition
This is a total appearance of the physical object of art. It deals with the
organization and use of the elements of art. (For example, lines, shape,
form, value, texture, color). The elements are organized to follow principals
like balance, proportion, dominance, rhythm, harmony and unit.
1.3.3.Content or meaning
This deals with quality or significance of an artwork and the experience it
gives to a consumer. This includes the emotions or intellectual responses itarouses.
Subject matter, composition and content or meaning are the three
components of artwork, we shall further look at the elements of art andprincipals of organization, which go to the conception of art composition.
Application activity 1.3
• Analyze the content of artwork above and give its main idea.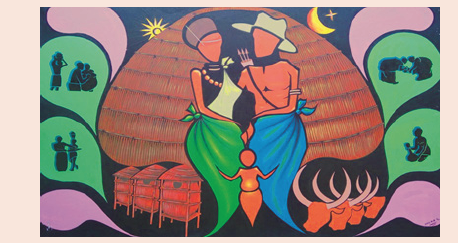
End unit assessment 1
1. In order to understand art and crafts better, it is necessary to define
different terms below.a. Arts2. Discuss the benefits of art and crafts to the society.
b. Crafts3. Give and explain the component of art and crafts.
UNIT 2:DRAWING STILL LIFE AND NATURE
Key unit competence: To be able to make detailed drawing of
still life and nature studies by applying
elements and principles of art usingdifferent techniques, tools and materials.
Introductory Activity
Make a research on elements and principles used in art and crafts.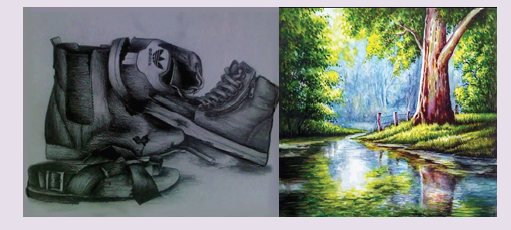
1. List down drawing materials and tools.
2.1 Elements of art and crafts
Activity 2.1
Referring to the drawing above, define the following elements of art and
crafts:
a. Line
b. Texture
c. Value
d. Shape
e. Color
f. Formg. Space
a. Lines
A line is a path of point moving through space. A line is one of the tools used
to describe the appearance of a form or object. There are different types oflines, each expresses different feelings, and they are as follows:

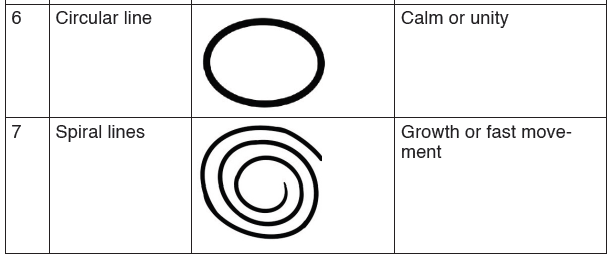

Different types of lines.
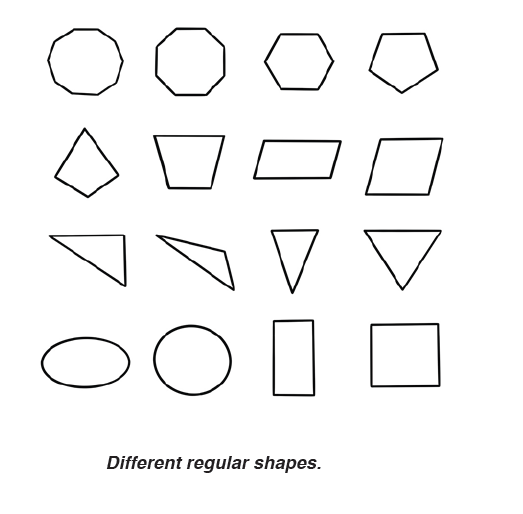
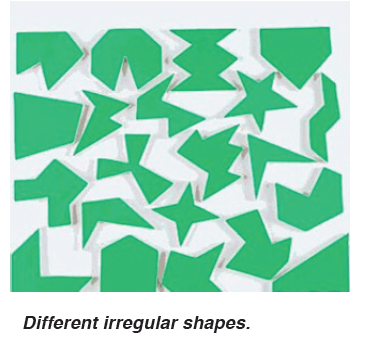
b. Shapes
Shape is a flat, two-dimensional area with height and width. It is made
when two ends of a line meet. There two types of shapes: regular shape orgeometric and irregular or organic shape.
• The regular shape
• The irregular shape
c. Texture
Texture is the roughness or smoothness of the surface. They are two typesof texture:
• Tactile texture is how you feel if you touch on a surface.
• Visual texture is the way a surface appears to you through the sense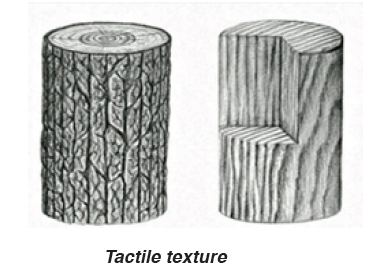
of vision.
d. Value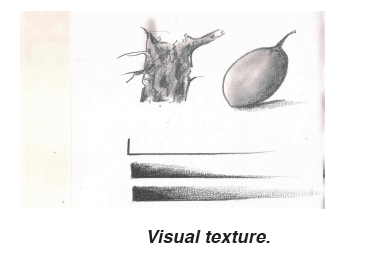
Value refers to the lightness or darkness of a colour.
e. Color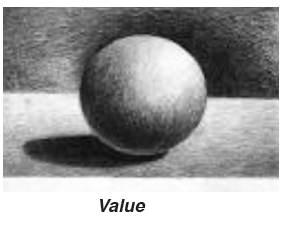
Color is the characteristic appearance of surface in the presence of light.
There are three main kinds of colours:
i. Primary colours: are yellow, red and blue. Primary means basicor first, these hues cannot be obtained from other colours.
ii. Secondary colours: are orange, green and purple or violet. A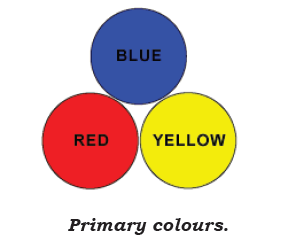
secondary colour is mixture of two primary colours.
iii. Tertiary color : is a new colors from the mixture of any primary colour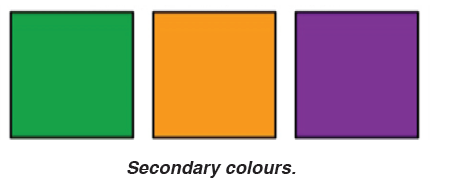
with another secondary color .
Example: yellow-green, yellow-orange, blue-green, blue-purple, red-orange,and red-purple.
Note: Colour may be used objectively to represent forms as appear in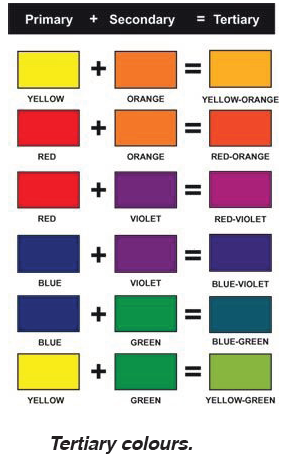
nature for example; green trees and may be used subjectively as the artistschooses to express himself for example; purple water.
f. Space
Space means the area in and around an object. There are two kinds of
space:i. Positive space, is area occupied by an object.
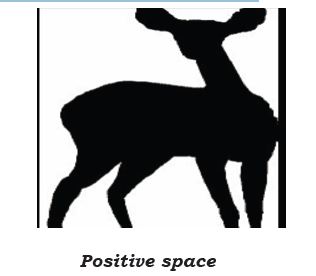
ii. Negative space, is area around the object that defines its edges.
g. Form
A form is an object with three dimensions; height, width and depth. They are
two types of forms:• Geometric forms such as, cube, sphere, cylinder, …
Different geometric forms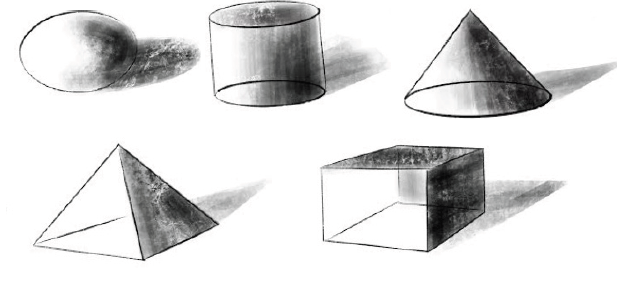
• Organic forms Such as stones, cabbages, sweet potatoes, etc.
Application activity 2.1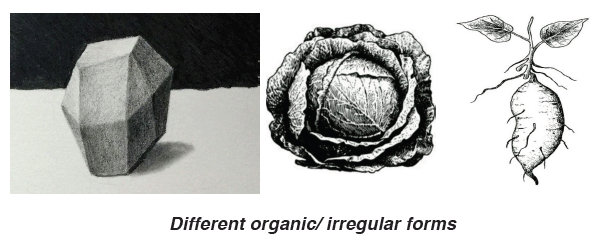
• What do you understand by the elements of design?• Describe tactile texture.
2.2.Principles of art and craftsActivity 2.2
Observe the drawing above and list the principles of arts and crafts used.
We have seen the elements of art as color, form, line and dot, shape, space,
value and texture that are used in drawing and painting. This lesson shows
the principles of art that are not the rules, but guidelines enabling to create a
picture that is pleasing to look at. They include balance, rhythm/movement,
perspective, dominance/emphasis, unity, and proportion.
1. Balance: It refers to feeling of equality in weight, attention, or
attraction of the various visual elements. They are three main types of balance:
a. Symmetrical balance/Formal balance: here the axis passes throughthe composition, dividing it into two equal parts.
Asymmetrical balance/informal balance: the sides of axis are not identical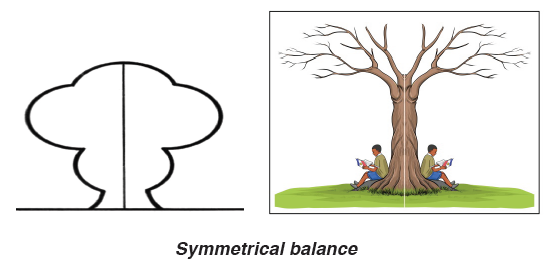
but they balance out.
Assymmetrical balance
b. Radial balance: It is a form of balance where elements are arrangedaround the center point.
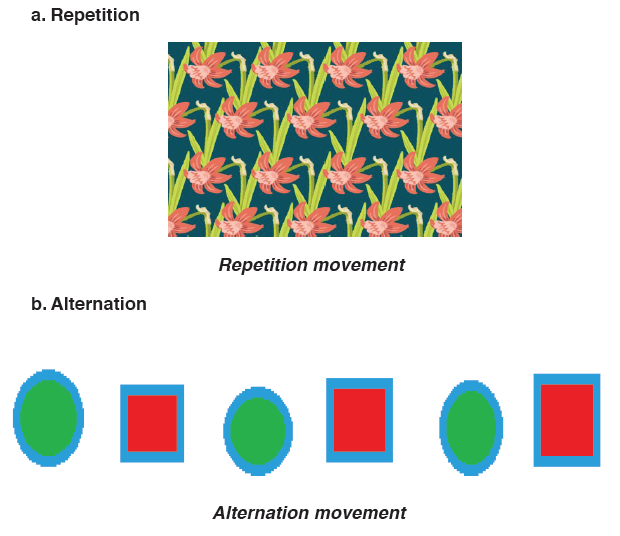
2. Rhythm/movement: refers to a regular beat, whereas movement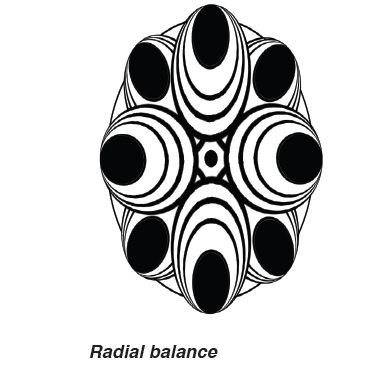
refers to motion. In work of art rhythm and movement can be createdcontinuously. There are three types of rhythm:
4. Proportion: It refers to the relationship of different parts of an object
in terms of size. It is about the ration of one part in relation to another.
The principle requires that part of a given form or composition berelated in such a way that they are visually acceptable or pleasing.
5. Unity/ harmony: It is achieved when all elements in a given work of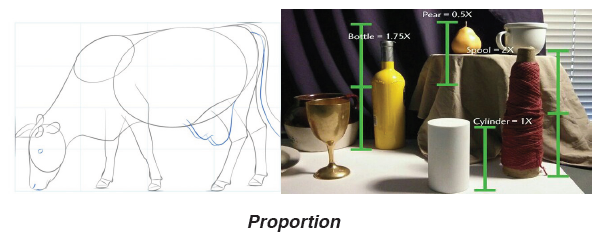
art are used. This deals with a consistent and orderly whole. Related
elements are used to create comfortable combinations as they adaptto each other easily. Circles and ovals are harmonious.
6. Dominance/ emphasis: It deals with an element assuming more
important than others in the same composition. This could be a
strongly contrasting part in terms of colour, shape, texture, tonalvalue,line or size.
Application activity 2.2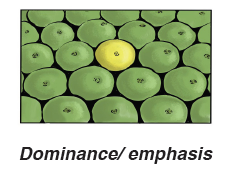
• Mention and explain different types of balance.
• Give the types of rhythm/movement
• Individually make a mixture of colours in order to get colour thatcan used to paint similar colour of your chair
2.3.Drawing materials and toolsActivity 2.3
After observing these drawings, what are the materials and tools used in
producing those drawings?
Materials, tools and equipment for drawing
1. Paper
A paper is very important material in drawing. It acts as a surface for drawing
on. There are different types of papers and they vary according to thickness
and texture.
Types of paper according to texture:
• News print papers (cheapest)
• Blotting paper
• Manila paper
• Bond paper
• Strawboard paper
• Hardboard paper and so on…
According to the size, there are papers of A0, A1, A2, A3, and A4 (duplicate paper).
A0 is the largest size.
Note: Cartridge paper is the best quality for technical drawing.
2. Pencils
Lead and black are the basic drawing pencils. They come in different ranges:
9B, 8B, 7B, 6B, 5B, 4B, 3B, 2B, B, H, HB, 2H, 3H, 4H, 5H, 6B and HB
• “H” pencils are the hard pencils.
• “B” pencils are Soft pencils.
• HB pencils are the medium pencils; they are very good for general
drawing.
NOTE: The higher the number before the letter the hardest or softest
the pencil becomes.
Pencils are used to draw a sketch or to make shade in drawing3. Charcoal
Charcoal is used in drawing and sketching like a pencil. Individual may make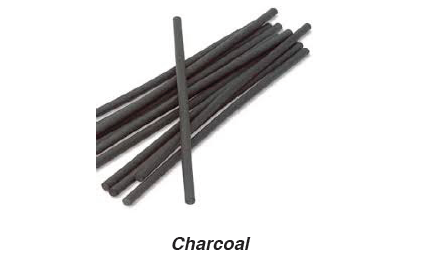
some charcoal, but other may be brought commercially prepared.
4. Masking tape
It used to fix the work paper onto the drawing board when drawing.
5. Drawing board
It holds the work paper while drawing. It slants the paper to give a good
drawing position.
6. Set squares
It is used in taking measurements and drawing lines.
7. Tee squares
It enables in drawing horizontal lines, which are parallel.
8. A pair of compasses
It enables in drawing circles, curves, arcs and again for bisecting angles and
straight lines.
9. Erasers or rubbers
They are used for removing (cleaning, clearing or deleting) marks or mistakes.
Eraser normally rubs off both pencil and ink. However, it is advisable to
minimize rubbing so that the texture of the paper should not be interfered.
10. Sharpener
A pencil sharpener is a tool for sharpening a pencil nib by shaving away its
worn surface. Pencil sharpeners may be operated manually or by an electric
motor.
11. A pair of scissors, used to give preferable size to the paper.12. Markers are used mostly to write the title and names of drawing.
Application activity 2.3• Discuss on any three basic materials and tools used in drawing still life.
2.4.Types of drawingActivity 2.4
2.4.1.Types of drawing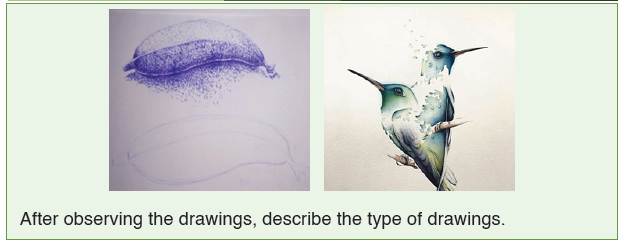
A. Drawing from observation:
a. A still life is a work of art depicting mostly inanimate subject matter,
typically commonplace objects—which may be either natural (food,
flowers, plants, rocks, or shells) or man-made (drinking glasses, books,vases, jewelry, coins, pipes, and so on).
b. Nature drawing involves drawing nature objects like leaf, fruits, and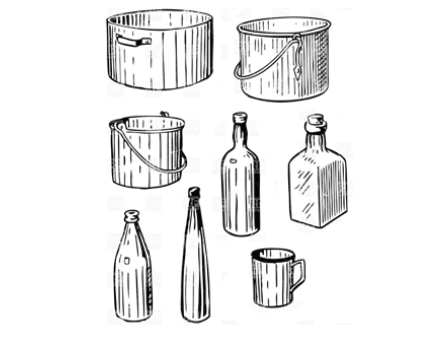
flowers
c. Human figure involves drawing a person in different positions; when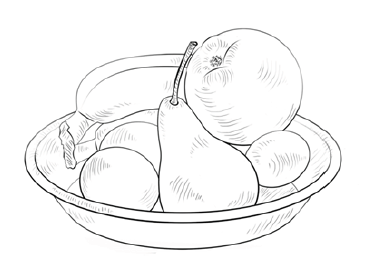
drawing human being from observation the person who poses to be
drawn is called a model. For a model you can draw specific part or thewhole.
d. Scenery drawing: is about drawing outdoor and involves drawing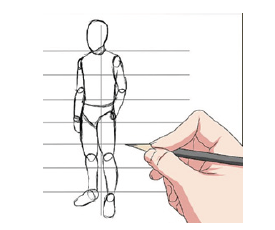
landscape, sea- secapes and town-escapes.
B. Imagination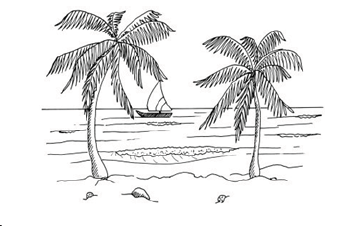
Imagination is drawing in an original creation. Not at all from experience,
but conceived purely in the mind. It may have a touch of reality because
imagination may be influenced by experience, but it can be as far from realityas possible to the point of looking absurd or bizarre.
C. Imitation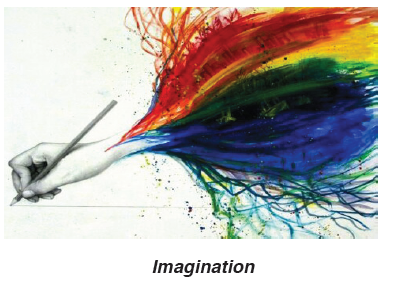
Imitation can be defined as the act of copying, mimicking, or replicating
behavior observed or modeled by other individuals. Current theory and
research emphasize that imitation is not mechanical “parroting,” butcomplex, goal-oriented behavior, which is central to learning.
2.4.2 Human figure drawing from observation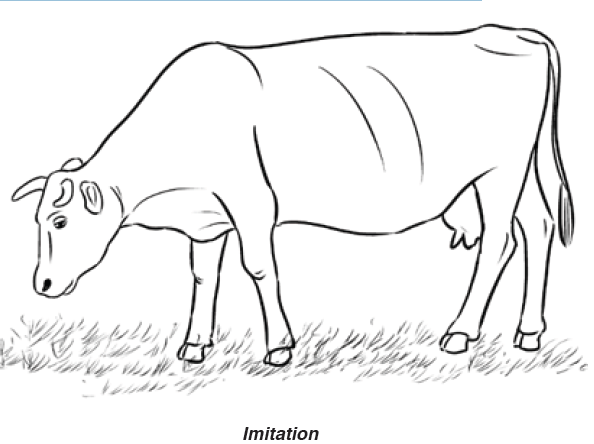
A Human figure drawing is a drawing of the human form in any of its
various shapes and postures using any of the drawing media. In this, the
living person is the subject. To draw a human form well, one needs to have
an understanding of the human body structure. There are basic proportions
associated with the human face and the human body.
For drawing adult proportion you need to renew that the height of the
whole body is eight time of the height of the head. Proportion of the child
vary according to age , a child with 1 year the height of the body is four timeof the height of the head
Human figure drawing from observation involves using your eyes to observe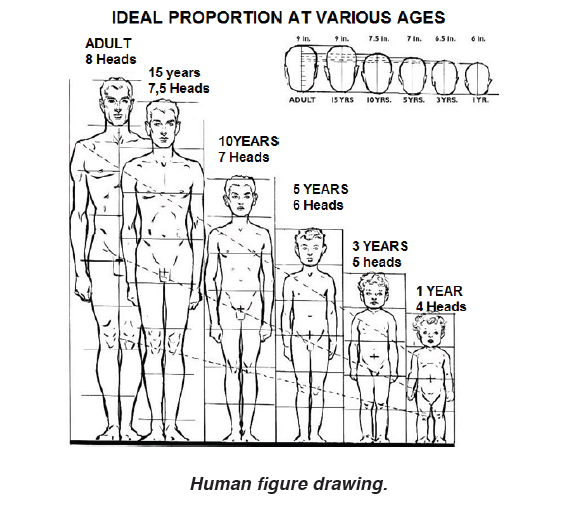
directly the person that you are drawing.
Artists take a variety of approaches to drawing the human figure. They may
draw from live models or from photographs, from skeletal models, or from
memory and imagination.
Drawing from imagination involves mental ability or creativity to make new
artworks using different material and tools.
2.4.3.Drawing landscape/scenery
A landscape painting or drawing refers to an artwork whose primary focus is
natural scenery, such as mountains, forests, cliffs, trees, rivers, valleys, etc.
As a landscape in the sense of a landscape drawing, we understand
representations of the environment created by nature or man. Typical
landscape drawings depict natural landscapes, mountains, cities, factory
landscapes, seascape, park landscapes et cetera. In contrast to a still life
- To name just one example - a landscape drawing shows a much largersection of the environment.
Here is a summary of everything you need to consider when drawing or
painting a landscape:
1. Choice of a landscape / surroundings (city, nature, meadow,
mountains, sea ...)
2. Search and choice of eye catchers (focal points) and interesting
objects and structures
3. Position the horizon
4. Choice of the image detail / total composition
5. Choice of a season
6. Choice of weather conditions7. Draw it!
2.4.4 Perspective methods in landscape drawings
In addition, there are still more tricks on how to draw landscapes better (now,
however, it will be somewhat technical). An important aspect of a landscape
is the perspective.
All objects are smaller the further they are away from us. This effect of the
distance is of course very strong in the landscape, as we look far into the
distance. The decrease in size of the objects can illustrated relatively easily
with a drawing aid: The perspective with vanishing points.
Perhaps you may have already heard of perspective drawing with the help of
vanishing points. The principle means that all objects become smaller alongvanishing lines. These lines all converge at a point that lies on the horizon.
Application activity 2.4
• Differentiate sketch from imagination
• Which points do you consider when you are drawing or painting landscape?
2.5.Techniques of shading in drawing
Activity 2.5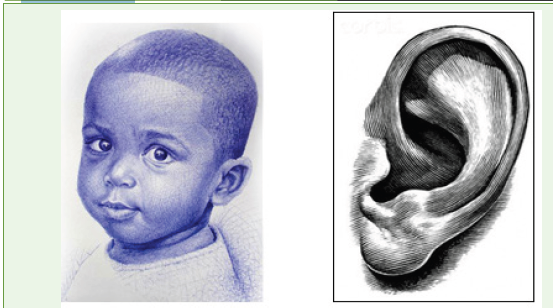
After observing these drawings, explain the techniques of shading used.
Techniques used for applying shading to an object are quite varied. Each
technique produces a different texture and “feel” to the drawing. The drawing
medium used may determine the shading technique that applied in the
drawing.
The most common application techniques include:
Hatching: Lines drawn in the same direction. By drawing lines close together,
darker values are created. Leaving more space between lines results in
lighter values. For rounded objects, the lines may curve slightly around theform - following the contours of the object.
Cross-Hatching: Lines cross over each other. The density at which the lines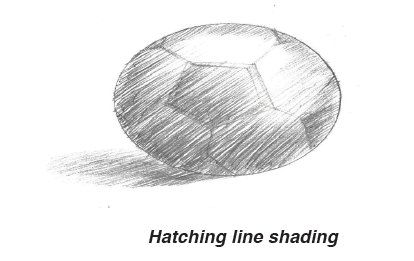
cross over each other determines the value that produced.
Mass toning/Blending: Smooth gradations of value are produced either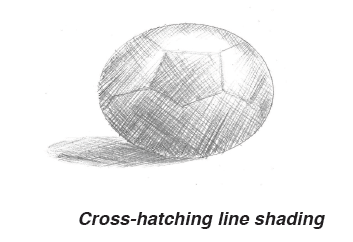
by adjusting the amount of pressure applied to the medium or by using ablending tool, such a blending stump.
Rendering: Using an eraser to remove the medium to produce lighter values.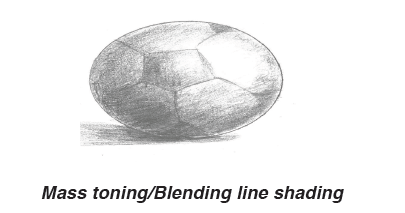
This technique is typically used in conjunction with blending.
Random lines: Loose applications of crossing lines. The frequency in which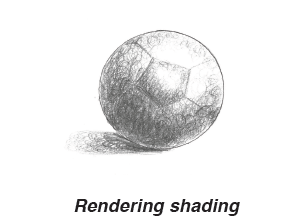
the lines cross over each determines the value produced.
Stippling/ dots method: Applying countless small dots to build up darker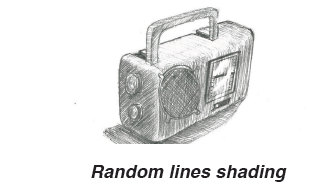
and lighter values in a drawing, the density of the dots determines the valueproduced.
Activity 2.6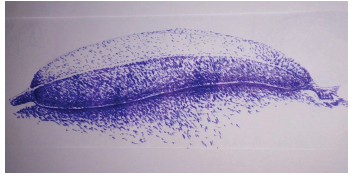
• Differentiate sketch from imagination
• Which points do you consider when you are drawing or painting
landscape?
End unit assessment
1. Define the following terms:
a. Visual texture
b. Radial balance
c. Proportion
2. Distinguish between objective and subjective colors.3. By using illustrations, explain techniques of shading.
UNIT 3 :MOTIF AND PATTERN DESIGN PROCESS
Key unit competence: To be able to design the various motifs,
patterns from different sources ofinspiration
Introductory Activity
1. Observe patterns and motif designs above and define the following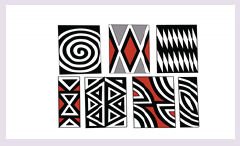
terms:
• motifs
• patterns.
2. Give the materials and tools used in motif and pattern making.3. Create different motifs and patterns.
3.1.Definition of concepts
Activity 3.1
1. Discuss any three basic tools used in pattern making.
2. Explain categories of regular pattern
• Pattern
Pattern making is an art of putting shapes or group of shapes in a repeated
manner to cover an area. Patterns can make in any pictorial composition:
mosaic, collage, drawing, painting, printing and even through simple cut and paste.
• Motif
A motif is an element of a pattern, image or shape, which is required in
design. It may repeat in a design or composition, often many times or mayjust occur once in a work.
Design process is the activity of making a motif.
Motif can be created from simple shape. They can be regular or irregular.
Regular shapes include circle, triangle, square, oval, and others. Shapes
can be combined to form patterns.
Categories of pattern
Regular repeat: pattern displays the same motifs repeatedly on a given
surface. Some regular repeat patterns include:
Full repeat: The motif is repeated regularly in each square/rectangular space.
Full-drop repeat: in this pattern formation, each subsequent space skippedas the motif is rendered as shown below:
Half drop repeat: A grid is made such that the subsequent row of squares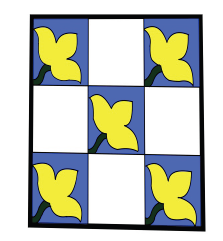
drop half way as shown below.
Alternate repeat: In regular repeat patterns, the motif used can alternate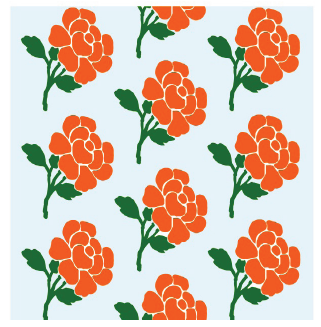
repeat patterns. In alternate repeats, there can be two motifs, which combineto form a repeat as shown below.
Irregular repeat patterns: the motifs are arranged in many styles of the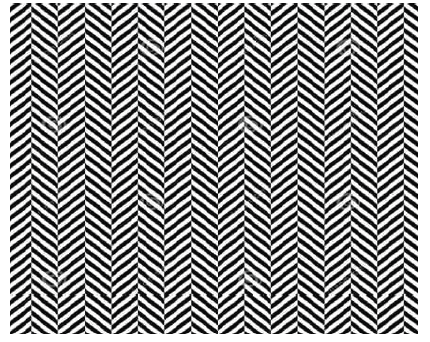
surface. This means that there is no specific flow even through the samemotif has used to create a pattern. This again called random repeat.
List of pattern making tools and their uses for design: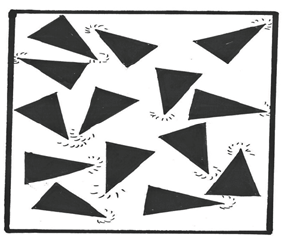
The tools required for pattern making are given below, basing on order oftheir usage
• Measuring devices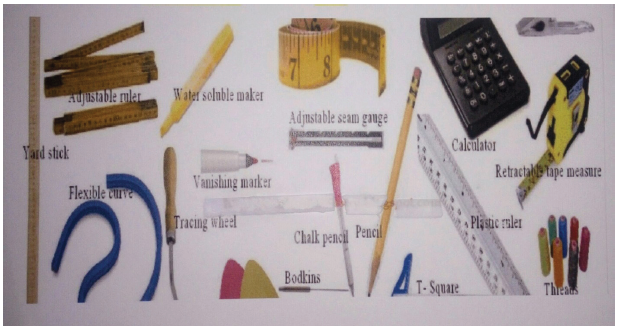
• Drafting devices
• Marking devices
• Cutting devices
• Sewing devices• Finishing or pressing devices
Measuring devices:
Measuring tools are the most essential tools in making a pattern. The key to
success in garment construction lies in taking accurate measurements of the
subject and by using the appropriate tool for pattern making.
• Measuring tape: It is indispensable for taking body measurements.
It is 152 cm or 60″ long with measurements on both sides. One of its
ends is made of metal having 3″ length and the other is made of the
same metal having 1/2″ length. The side with the 1/2″ length used
for measuring a circular area, while the side with 3″ length used for a
vertical area.
• Ruler: It is the best device for taking long straight measurements. It is
mostly used for checking grain lines and marking hems.
Drafting devices:
Drafting equipment are for making paper patterns. This is the second stage
of pattern making. Using the measurements taken, the drafting is carried out
according to the design of a garment. The following drafting equipment is
used:
• Compass: It mainly used for making a curve for umbrella cloth.
• Brush: A brush is used on Milton cloth to rub the mistakes while drafting.
• Paper: Is for drafting by placing on the drafting table. While using brown
paper, a grain line should follow.
• Pencil: For marking on brown paper.
• Rubber: It is used for deleting mistakes. Good quality rubber, which
does not leave black lines, should select.
• Red and blue pencils: Are used for marking on fold (red line) and
grain line (blue arrow).
Marking Devices:
Marking devices are used for transferring the details of the paper draft to the
fabric.
• Design ’s chalk: It is made up of china clay and is available in different
colors. It is used for marking the paper patterns on the cloth. Alterations
and construction markings are drawn using tailors’ chalk.
• Chalk in pencil form: This is used like a pencil and it marks thinaccurate lines. This is used for marking pleats, darts and buttonholes.
Cutting Devices:
Cutting devices/equipments should be selected and used with maximum
accuracy. A slight change in cut results in huge fitting problems. These tools
must be selected and maintained properly in order to use them effectively.
• Cutting table and cutting board: A cutting table is 6′ long, 4′ wide
and 3′ height. People working in a standing position use the table and
people who work seated use a cutting board. A cutting board should be
6″ height.
• A pair of scissors: These are used for cutting garments. They are
7–10″ in length.
• Paper cutting scissors: These are small scissors available in various
sizes and meant for cutting paper.
Sewing Devices:
Sewing can be carried out either manually or by a machine. For hand sewing,
the following are required:
• Needles: These needles come in denominations of a 0 to 12 numbers.
Based on the thickness of cloth, the needle number is used.
• Pins: Pins are used for fixing the patterns on the cloth. They come in
different colors.
• Pincushion: It is used for keeping pins together.
Finishing or Pressing Devices:
The following equipment are needed for pressing:
• Iron: A good brand with after sale services should be chosen. A steam
iron with a thermostat regulator is preferred.
• Ironing board: For ironing clothes, a table or ironing board can be
used. An ironing board is 36″ long and 12″ wide. Six inches are left on
its right side to keep the iron box. The left side of the board is angular
and is suitable for ironing dart edges and sleeve darts while stitching.
The table or ironing board should have proper stuffed backing.
Application activity 3.1
• Differentiate a motif from a pattern• Explain the importance of rulers in pattern making
3.2.Process of making motif and pattern
Activity 3.2
Describe any two motifs styles
The process of making motifs and pattern depend on the motifs styles.
Motifs styles
There are different styles that can be used to create both regular and irregular
repeat patterns.
• Linear patterns. In linear patterns, zig-zags, wavy, straight or circularlines can be used to create repeat patterns.
• Numeral forms. When the numerals produce interesting patterns, they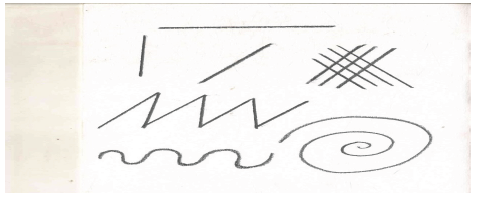
lose their identities and become beautiful motifs.
• Real objects can be used as stencils or templates to make patterns.
They should be arranged in the desired pattern and then colour appliedas desired.
• Letter forms. Using letterforms as motifs, both low case and upper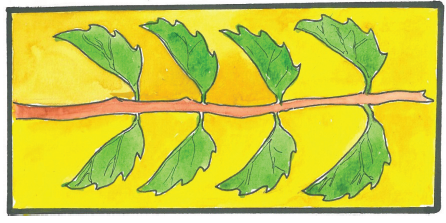
case can produce interesting designs.
Making patterns using stencils and templates.
Cut out stencils and templates are used in pattern making. The pattern
produced can either be positive.
Negative design: In the negative pattern, the cut out shape of a template iscoloured from the outside. This makes a positive design.
Application activity 3,2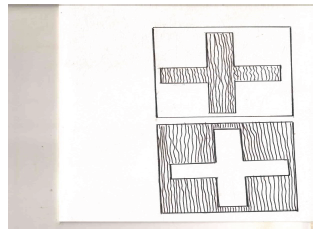
• By drawing, create any two patterns.
• With illustration, differentiate an alternate pattern from full repeat pattern.End unit assessment 3
1. Give the name of the smallest unit of a pattern
2. Explain the following terms:
• Regular pattern
• Irregular pattern3. Create a pattern for each style.
UNIT 4:LETTERING
Key unit competence: To be able to make a graphic work with
handwriting using cursive and print
letters in both lower and upper-caseletters.
Introductory Activity
A B C D E F G H I J K L M N Q R S T U V W X Y Z
a b c d e f g h i j k l m n o p q r s t u v w x y
1. Discuss the elements used in pictures above.2. Make greeting cards by using lettering styles
4.1.Elements of lettering
Activity 4.1
Discuss about different writing of lettering styles
Identify the basic elements of graphic art
Calligraphy is writing with a single pass to create written art, hand lettering is
a composition created with drawn letters, and typography uses prefabricated
and designed letters. Essentially, hand lettering is the illustration of letters
that come together to create a single, unified piece.
Graphic design It is visual communication and the aesthetic expression of
concepts and ideas using various graphic elements and tools. It involves
the use of images, symbols or even words.
The basic elements of graphic design.
There are six main elements of graphic design; the line, the shape, the
color, the texture, the value and the space.
1. The line
The line is usually present in every design, even if it is a solid border of 1px
or a dotted one of 5px. Every website has lines, but the minimalistic style
that became more popular in the past couple of years tries to erase the linesfrom the layouts, or at least to decrease the use of them.
The lines can be long, red, straight, thin, blue, dashed, short, black or
curved; they are all into the same category. They are most of the time used
for delimitation between different sections of a design, or are used to direct
a viewer’s vision in a specific direction.
2. The shape
The shape, or the form, is the second most used element of a web design.
They are actually lines combined in different shapes. The forms are still
popular and this is because if there is something that needs to stand out,
forms are one of the ways to do it.
There can be circles, squares, rectangles, triangles or any other abstract
shape; most of the designs include at least one of these. Minimalistic designs
use it a lot, because they often based on illustrations and drawings.
3. Textures
The textures can look similar to solid background colors, but if they analyzed
closer, small but effective differences can noticed.
Texture styles include paper, stone, concrete, brick, fabric and natural
elements, among flat or smooth colours. Textures can also be subtle or
pronounced and can used sparingly or liberally. They work with pretty much
everything.
Even if they do not seem important, the textures can totally change a website
and offer a very different visual impact.
4. Colour
The colour may even be the most important element of a design, because it
offers the most powerful visual impact at a single glance. Colour is obvious
and does not need basic graphic skills to be noticed.
While lines and shapes mean the same thing as in the reality, only at a
little more profound level, the color means exactly the same thing as in the
nature. Colour creates emotions – red is passionate, blue is calm, green is
natural.
Even if you do not realize this, colours have a clear effect on your mind.
Studies were done; a person who lives in a red environment has a higher
heartbeat and pulse than a person living in a blue environment. The humanbrain sees this and influences the rest of the body.
Therefore, colour theory is very important to know, because not many
designers can call themselves experts in this field. Being a master of colours
might make the difference between a good design and a stunning one.
Please, this is not saying that you have to know all of them, but knowing
how hue, saturation, shade, tint, tone or chroma work together is crucial for
a graphic designer.
5. Value
value is more general and represents how dark or light a design is. Value
has a lot to do with mood too, only at a more profound level.
6. Space
The space and how it, used is crucially important in design. Lately the “white
space” (also called negative space) became widely because it allows the
human eye to read easier.
For whoever is not familiar with the term “white space”, it does not mean
precisely space filled with white, but every area of the design that only filled
with the background color. You can see several examples below for better
understanding of the concept.
Application activity 4.1
• What do you understand by calligraphy?
• Discuss any three elements of graphic design
4.2.Process of making calligraphy text / cursive letter
Activity 4.2
By following the procedure of making calligraphy (cursive letter), construct
the letters of alphabet.
Calligraphy means “beautiful writing” in Greek and spans thousands of
years and countless cultures. There are several styles, including Western,
Eastern Asian, Southern Asian, and Islamic. All calligraphy uses the same
basic principles to create beautiful lettering. If you want to practice the art of
decorative handwriting, all you need to do is follow a few simple steps.
Cursive letters are a handwriting in which letters are formed and joined ina rapid stroke
Lowercase Cursive Letters
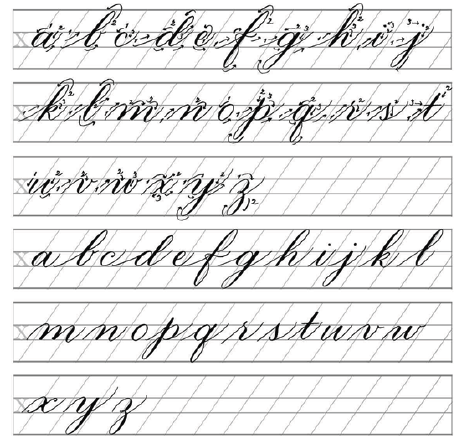
Uppercase Cursive Letters
4.3.print letters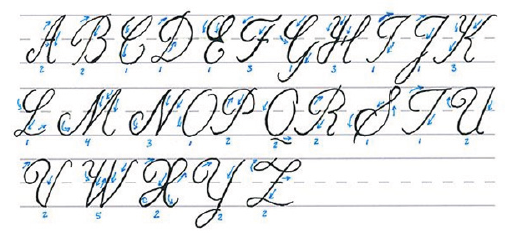
Print letters are not joined together and they are look like the letters in a book
or newspaper.
Lowercase Print Letters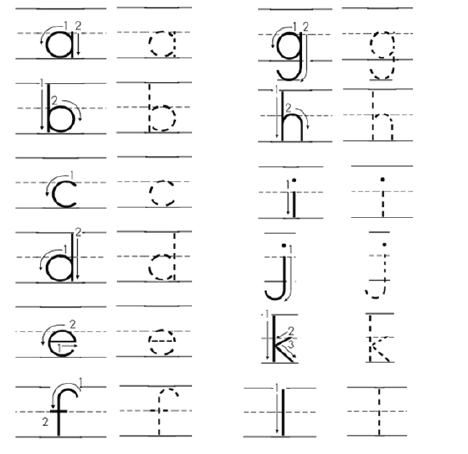
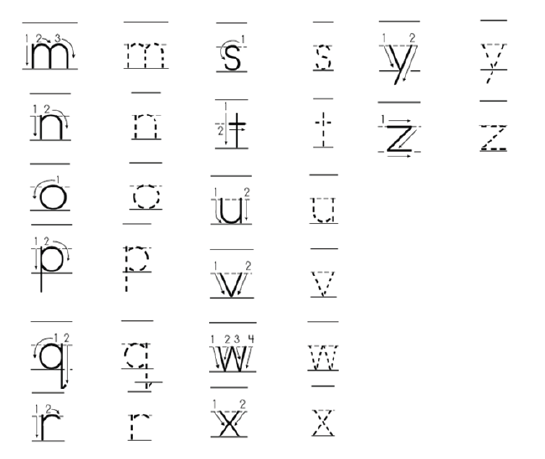
Uppercase Print Letters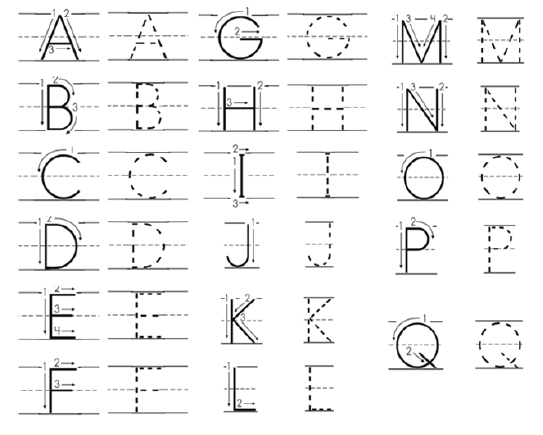

4.4.SPACING
Spacing: is a study of a space between letter when designing a typographic
work which refers to the nature of line that are made letter.
Spacing between letters, words and lines is very important. It has a big effect
on the readability (legibility) of a text.• The space between 2 words takes the space of the width of one letter.In typography there two main types of spacing which are mechanical and
• The letters W and M take more space than others.
• The letters I and J take less space than others.
• The space between the letters will be always the same in mechanical
spacing.
• When 2 capital letters A and V or W are following each other, the space
between them becomes short.
optical spacing
Mechanical Spacing: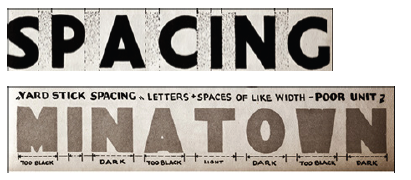
The yard- stick spacing of ‘’ minatown’’ shows what happens letters are all
fitted into like areas with the same distance between them. Note how spotty
the different letters look, especially the M, A and W and how unrelated
the irregular letters appear. By making the M, N, A and W wide and fitting
the irregular letters optically to compensate for their shape an even tone isobtained over all.
Optical Spacing
The example shown here illustrate how the different combinations work out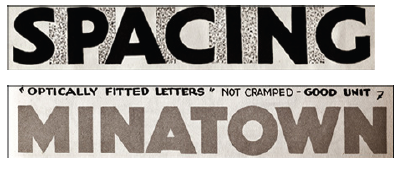
in use. In the word ‘’ spacing’’ letter of the same size and shape are spaced
in both ways. Note how legibility and unity are destroyed by mechanical
arrangement. Using a ‘’ yard-stick’’ to measure the width or distance between
letter seldom produces results and is generally detrimental to legibility.
Application activity 4.2
• Use lowercase and uppercase lettres to design your names in both
cursive and print letters in the area of 20 cm for height and 20 cm
for width by taking into consideration optical spacing.
End unit assessment 4
1. With your knowledge and skills, you have about calligraphy writing,
design these words “Rwanda Education Board” in both cursive
and print letters.UNIT 5:collage
Key unit competence: to be able to make collage works with
cutting and pasting techniques
Introductory Activity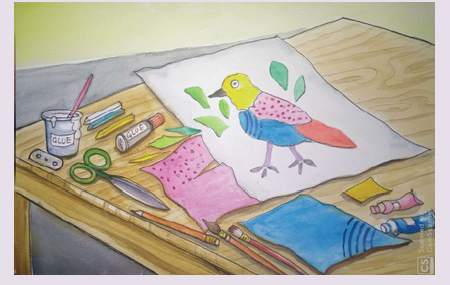
Make a research on collage materials and tools, techniques used for
making collage.
Create collage artwork
5.1. Materials, tools and equipment needed to make collage works.
Activity 5.1
Referring to different finished collage works, define the following terms:
Collage
Identify the articles and materials from the surrounding that may be usedin making collage.
5.1.1 Collage
Collage (/kəˈlɑːʒ/, from the French: coller, “to glue”;) is a technique of an art
production, primarily used in the visual arts, where the artwork is made from
assemblage of different forms, thus creating a new whole.
Texture is the main element of collage.
5.1.2 Materials and tools used in collage.
You can use almost anything you like to create your collage. Commonly
used items are magazine pictures, glue, photographs, or fancy paper. If you
are interested in making collages, it is better to start gathering materials
before you begin the collage process.
Finding Materials
A good starting point is to go through your craft cupboards, magazine racks,
and even your junk drawers to find unique items you can use. Another way to
find materials for a new collage is simply to take a walk outside. You may find
old paper, discarded bottle caps, or other treasures. As long as the materials
are safe and (mostly) clean, feel free to use them in your art project. Found
objects will provide character to the piece in a way that plain paper cannot.
Put aside any objects in a large ziptop bag, an empty shoebox, or another
area in your workspace. You don’t have to use all the materials at once and
it’s helpful to build up a stash of supplies. For other ideas, check out this list
of creative collage materials for a good starting point:
• Glue
• Buttons
• Coloring book pages
• Craft foam
• Crayon shavings
• Fabric
• Fancy paper (like those used in scrapbooking)
• Feathers
• Flower petals
• Greeting cards
• Leaves
• Magazine pages
• Newspaper clipping
• Photographs
• Playing cards
• Postcards
• Puzzle pieces
• Rice
• Rubber bands
• Sandpaper
• Seeds
• Spices
• Stickers
• String
• Tissue paper
• Toothpicks
• Wire
• Wrapping paper
Other Materials
This list has many three-dimensional items on it. If you are going this route,
try to use smaller and/or flatter items. You will likely want to have a few
different adhesives, especially if you are using larger materials in your
collage. Standard white glue is helpful, as is a glue gun, spray adhesive, and
rubber cement. A glue gun is the best option for larger or heavier items. It
can be a tricky tool for smaller delicate items. Scissors and a razor or Exacto
knife is helpful to precisely cut the materials you are using. Remember, there
is no right or wrong way to make a collage. Choose an item above to use,
use your own unique items, or even make a collage using a variety of items.
It is up to you.
Framing
To add a professional touch to your collage, you can frame it once it’s
complete. Depending on your budget, you can take a collage to a framer
or frame it yourself. Prior to framing, make sure the college is completely
finished to your liking. Remove any stray bits of materials or strings from
the glue gun. A tweezers can be useful to help remove tiny elements. If you
are framing it yourself, a shadow box style frame usually works well for a
college. Since the art may be three-dimensional, a shadow box will allow
more room for your collage. Hang the completed work on the wall, present itto someone, or sell it.
Application activity 5.1
• Describe the main element of collage.
• Describe the main element of mosaic.• Explain any four articles and materials used in making collage.
5.2 Processes/steps of making collage
Activity 5.2
Describe the procedure of making collage, and make collage work.
a. Collect all kinds of materials from the surrounding
b. Sort them according to shapes, colors, texture and size.
c. Prepare the sketch or design to be made
d. Experiment with the materials by press placing them onto the sketch.
Arrange them according to the way the designs expected to appear.
e. When satisfied that the arrangement interprets the theme intended,stick the materials onto the ground and leave to dry.
Application activity 5.2
• Describe the process of making a collage.• Make collage works by using different articles.
End unit assessment 5
1. Give relationship between collage and mosaic.2. Make a collage pictorial composition based on the market day.
UNIT 6: MODELLING
Key unit competence: To be able to prepare clay and modelsimple object and figures.
Introductory Activity
1. Observe ceramic objects and explain the characteristics of clay.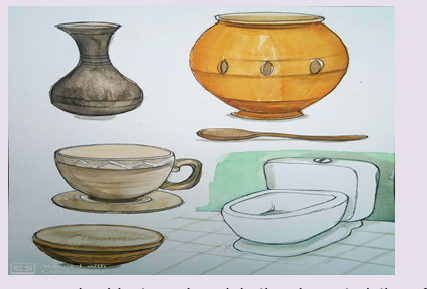
2. Following all the steps, prepare clay to be used.3. Make some ceramic object by using clay prepared.
6.1. Characteristics of clay
Activity 6.11. After observing the drawings located in introductory activity of unita. Ceramic
6, define the following concepts:
b. Clay
c. Modelingd. Sculpture
6.1.1.Definition
Ceramic
Ceramic is the art or technology of making work of art or objects of clay and
similar materials treated by firing.
Clay
Clay is an earthy material that is plastic when moist but hard when fired,
that is composed mainly of fine particles of hydrous aluminum silicates
and other minerals, and that is used for making work of art, brick, tile, and
pottery.
Modeling
This is the art of shaping an image from different soft materials such as clay.
Sculpture
Is the art of creating figures and forms in three dimensions. It also means an
art of producing statues/forms from clay, wood, stones or any other material
found usable.
6.2.1.Characteristics of clay/ Physical properties
There are three main important properties of clay:
Plasticity: This is the quality that makes clay a material that can be easily
shaped to make many forms.
Porosity: is the ability of clay to hold water and air, all clay has a lot of water
lodged in it. To reduce the water content, a chamotte/ grog is added.
Vitrification: This is the quality that makes clay products yield to high
temperature as they go through the process of firing. This makes them hard
brittle and strong.
Application activity 6.1• Discuss the three physical properties of clay.
6.2.Clay preparationActivity 6.2
Using the drawing above as a reference, discuss the steps of clay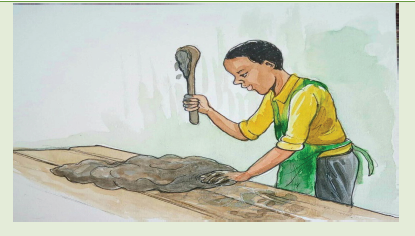
preparation
6.2.1.Steps of clay preparation
When clay is dag out from the source, and corrected with the container.
Water is added in it to make slip (porridge like structure). The slip is then
left to settle for some days, this allows the light impurities to go up and
heavy impurities go to the bottom. The big impurities such as sticks, stones,
leaves and stalks can be removing easily. It is then passage through a wire
mesh sieve to remove the remaining impurities into a basin or a bucket. It
left to stand for a few days. During this time, water corrects on top of the
clay. It poured out and then slip clay, which by now has started to solidify, is
poured out from the bucket into plastic sheeting or any appropriate slab for
maturating.
6.2.2.Preparation for use
Clay must be worked to an even consistency. This means that it should have
the right amount of moisture. This enables to be freely shaped. All the air
pockets should be removed otherwise the vessel would break during firing.
It should be homogeneous in texture.
6.2.3.Wedging
This is the process of removing air bubbles from the clay. The lump of clay is
slammed vigorously on a firm bench base. Every slam is followed by cutting
through the lump of clay using a thin wire. This allows the lodged air to
escape. Join the uncut side of the lump and slam again. This process canbe repeated as many times as possible.
After wedging process, the clay is either rolled or kneaded. This is beating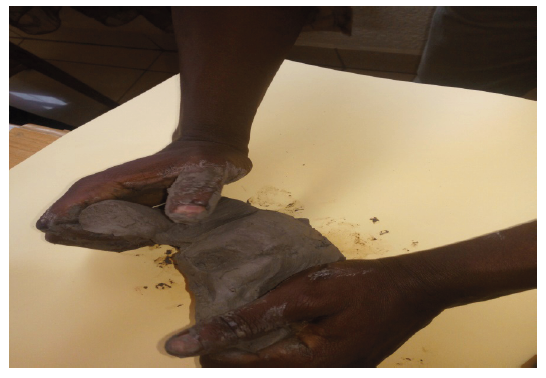
and mixing the dough of clay with both hands in the same way wheat flouris prepared for baking.
6.2.4.Storage
The storage of clay is very crucial to any work of pottery. The container in
which clay is stored should be painted, from both the outside and the inside,
if it is made of iron to prevent it from rusting. The container should then be
lined with a moistened sack before putting the clay. Clay should never be left
to dry and harden. A dampened sack should be used to cover on the clay.
The dampened sack for covering should then drip to the water to keep it wet.
This will protect the clay from drying up quickly. In case the clay dries, beat
it to make a compact block using sack. Dip it in water for a short time and
repeat the wedging process again.
Application activity 6.2
• Describe the process of wedging.• Give reasons why storage of clay is an important factor in ceramic.
6.3.Clay modeling
Activity 6.3
1. Define the following terms,
• Relief modeling
• Round modeling2. Discuss the techniques/ methods of modeling.
6.3.1.Definition
Relief modeling is done on a base. It is not free standing; it gains support
from the background. There are two main types of relief modeling:
• Low relief modeling• High relief modeling
Round modeling: it can be referred to as freestanding modeling in that, one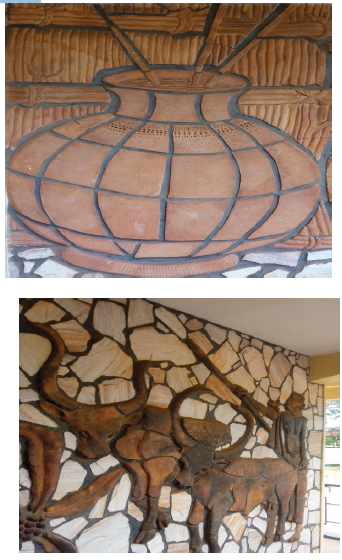
can turn around to view it from all directions or work around it.
Tools and materials used in modeling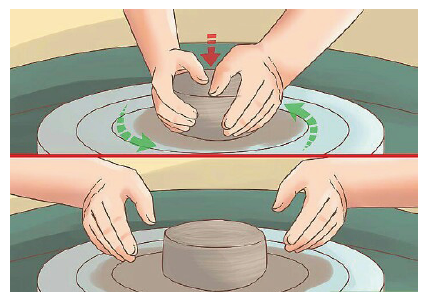
Chamois
Chamois skin is great for compressing the edges of your pottery. The skin
can also be used to smooth any pottery ware that has a rough surface.
Towels
A towel is a necessity in pottery. When you are throwing, it is ideal to wipe
your hands occasionally as well as placing the towel on your lap to avoid
ruining your clothes.
Potter’s Needles
Potter’s needles are long heavy needles set into wooden, metal or plastic
handles are one of the most versatile tools in pottery. They are used to trim
the top of your pottery ware while it is on the wheel. The needles are also
used for scoring slabs of clay.
Cut-Off Wires
Cut-off wires have a wooden handle on each end; and are used to cut large
clumps of clay. The wire also helps to remove any excess clay that remainson the wheel.
Scrappers and Ribs
These two tools are excellent for smoothing pottery ware and shaping them
while they are on the wheel.
Fettling Knives
This particular type of a knife is used to cut slabs of clay or to remove the
fettle of your pottery ware. The fettle is the small ridge of material that is left
where the pieces of the mold join together.
Ribbon Tools
Ribbon tools are great for trimming any green-ware. It also helps in hand
building your ceramic ware. Although these tools work great for trimming,
they are too fragile to be used during the throwing process.
Wooden Modeling Tools
These particular tools are also ideal for any hand-building projects. They
also work in trimming process.
Calipers
Calipers are used to measure the inner and outer dimensions of pottery
ware. This comes in handy for projects such as jars and saucers.
Box
Having a box to carry all of your pottery tools is ideal for anyone that is taking
pottery classes or teaching classes is different areas. It is worth including
some accessories such as transfers for ceramics or ceramic decals, which
will improve the decorative value of your projects.
6.3.2.Modeling methods
Pinching method: A lump of clay is molded into a ball in the hands. A
groove/ hole is created in the middle of the ball using the thumb. Pinching is
then done to form the walls by rotating a lump of clay. (The article is shaped
as the ball is pressed in a pinching motion). The technique is also called
thumb method.
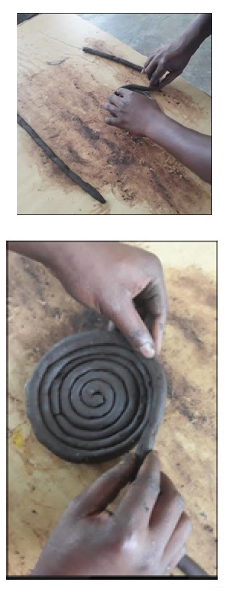
Coiling: There are many ways to build ceramic objects using the coiling
technique. To do this, the potter takes clay, rolls it until it forms a long roll.Then, by placing one coil on top of another to form different shapes.
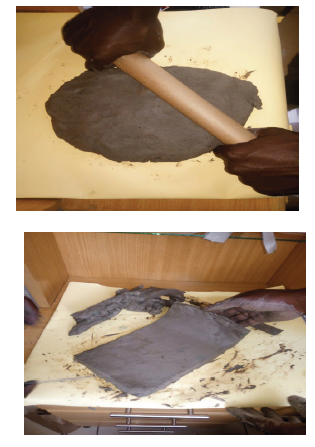
Slab method: Slabs of clay are prepared and then pressed together to make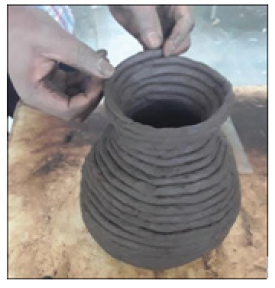
articles such as a jug, pot… a slab is a flat piece of clay rolled out using
rolling pin or bottles or simply even by pressing between hands. Slabs are
cut to required shapes. To join then, scratches are made and slip is applied.The slabs are then pressed to fix.
Ball: Ceramic balls are manufactured by pressing a ceramic powder binder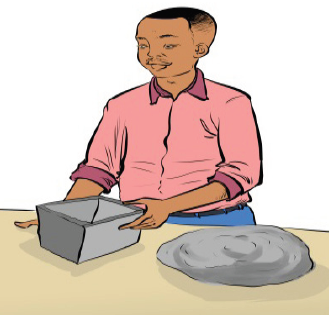
mixture in a perform shape. After the ball is sintered, the part lines areremoved via finish-grinding.
6.3.3.Modeling process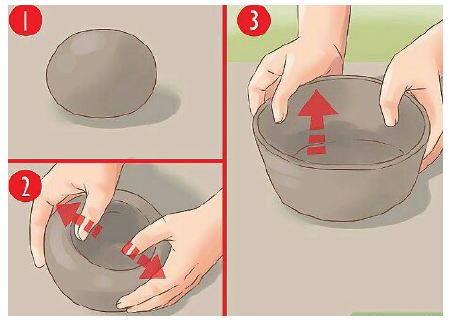
• Make research on some object you wish to model.
• Make sketches for an object researched on
• Look for suitable row materials
• Prepare tools, materials and surface.
• Choose method you wish to use for example, pinching method
• Prepare the work place/ surface
• Take a ball of well wedged clay and place it on the bench
• Make a well-rounded ball of clay using your hands
• Holding the lump between your fingers, press in the thumb from top of
the ball of clay
• Turn it round slightly sliding the ball on the surface as the thumbs work
from the inside
• Dampen the hands with water continue to work until the right thickness
of vase walls is achieved
• Flatten any threading crack
• When the work is finished, use a flattening tool to cut away any
unnecessary edges on the vase• Put the vase under the shade and wait for it to dry.
Application activity 6.3
• What is the process of making a simple clay object?• Using clay, model domestic objects.
End unit assessment 6
1. Describe the methods that can be used in modeling.
2. Using prepared clay, make flowerpot / vase, decorate it with motifs,and pattern designs.
UNIT 7:WEAVING USING BASIC LOCAL MATERIALS
Key unit competence: To be able to create a various forms of
craft works by manipulating differenttools and raffia.
Introductory Activity
Observe weaving works and answer the following questions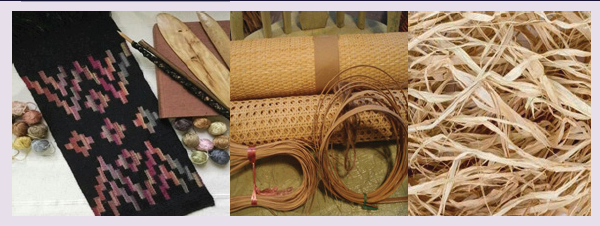
1. Differentiate between warps and wefts.2. Describe main techniques used in weaving.
7.1Materials and tools
Activity 7.1
1. According to domestic objects weaved, describe the essential tools
and materials used then deduce the definition of weaving.
Weaving
Weaving is the art of interlacing two distinct sets of threads (yarns) crossing
each other at right angles. The vertical threads called warps and thehorizontal threads called wefts.
To weave, one needs;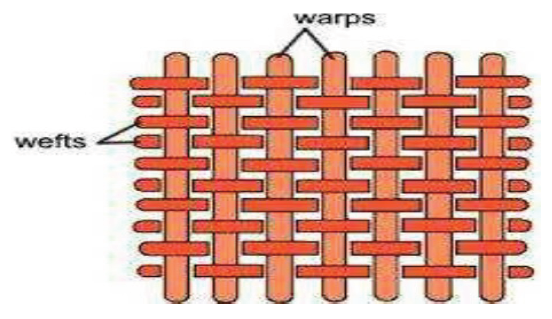
1. Yarns: These can be threads from natural fiber or synthetic materials.
2. A loom: These are of different types. The choice depends on item
to be made and the materials available. Loom accessories include
shuttles, heddles, shed sticks and others like table-rooms are a bit
complex. Factory looms are large and quite complicated.
Materials and tools used for finishing. These include needles, ruler,
cardboard, threads, scissors and pieces of wood or frames, leathers, ribbons
and bindings. You can use virtually any type of yarn to create your warp/ weft
truly. Weavers commonly use Cotton. It is soft and pliable, yet sturdy and
strong. This combination makes it the perfect yarn to use to create your
warp/ weft.
Application activity 7.1
• Explain the following terms:
a. Yarns
b. A loom• List the materials and tools required in weaving.
7.2.Weaving process/ ways of weaving
Activity 7.2
1. From the answers to the activity 7.1, explain any two weaving
techniques.
2. What do you understand by Dowel loom?
The process of weaving starts from analyzing designs and material
preparations, apply one of the weaving techniques.
Weaving techniques
How the weft made to intersect through the warps results in a fabric with
particular characteristics. The method is referred to as techniques.
a. Cross (plain weave)
A plain weave structure is created when a weft goes in and out the warpsin a pattern of one over one. The weave diagrammatically is shown below:
b. Diagonal (twill weave)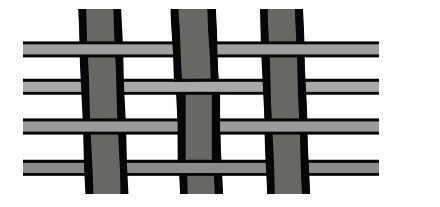
A twill weave structure usually creates diagonal lines on the woven fabric
and is popular with suiting materials. The weave is created by passing one
weft over one warp, under two, over one and so on. It can also be one weft
over one warp under three, over one and so on. The threads that look looseare called floats.
c. Twining weave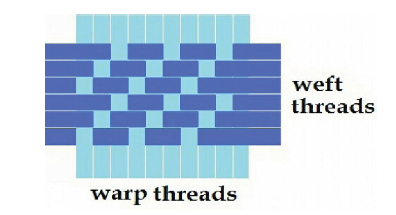
A twining weave structure forms a chained formation dense fabric. Theweave is created by interlocking two crossing wefts around one warp.
d. Ghiordes knot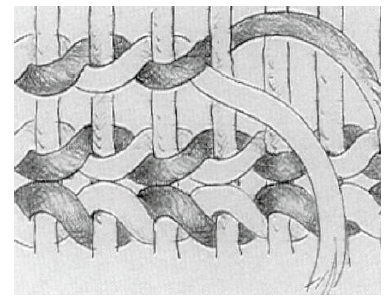
A Ghiordes knot is a type of technique that creates a pile like a towel or a
bushy rag. Pieces of thread (yarn) are cut short. Two rows plain weave are
done. The next rows are done by wrapping the short-cut threads around the
warps in a loop called the Ghiordes knot. The next two lines are done in plainweave. Then a row of knots follows and so on. The knot is made as follows:
Different simple looms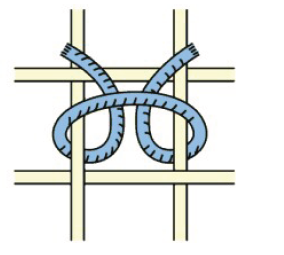
Card looms
There are various card looms, that is serrated rectangular card loom and
circular card loom. To make these looms, one needs a card (manila or
straw board), a pair of scissors or a razor blade, a ruler and other geometric
equipment. There has to be accurate measuring, drawing and cutting. Thewarp threads are then stretched on the loom ready for weaving.
Dowel loom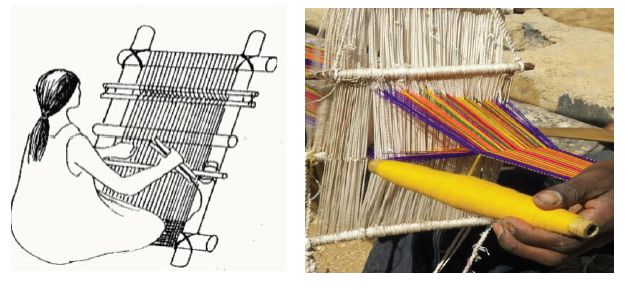
A dowel loom is made up of four strong sticks joined together by tying or
nailing. The warp threads are simply tied up and down the two further apartadjacent ends as shown.
Frame loom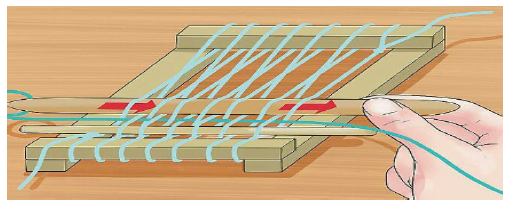
A frame loom is made up of a wooden frame with nails driven across two
adjacent ends. The warps are stretched across the frame, with the nailsregulating their spacing as shown below.
Application activity 7.2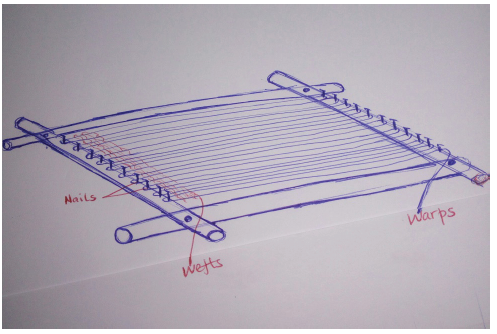
• Describe how to create the following weave constructions.
a. Twining weaveb. Ghiordes knot
End unit assessment 7
1. Using knowledge and skills you gained from weaving module,
make your own loom.
2. By using one of the weaving techniques, apply it and make an objectUNIT 8: EMBROIDERY MOTIFS AND PATERNS ON FABRICS AND OTHER SURFACES.
Key Unit competence: To be able to create different designs
of embroidery on different textiles
by manipulating various techniques,materials and tools.
Introductory Activity
1. Describe the type of art and craft that was applied on the works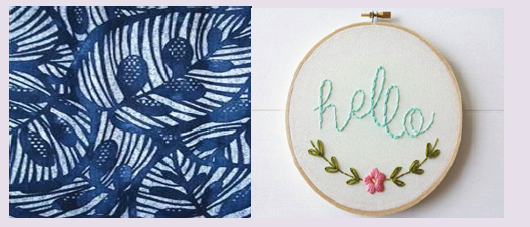
above.2. Discuss the items that can be made by embroidery technique.
There are several techniques used in applying different designs on surfaces.
The most common techniques of decorating fabrics are; Tie and dye, Batik,
Printing, Embroidery and Painting.
8.1.Materials and tools used in embroidery
Activity 8.1
1. Describe the importance of embroidery in daily life of our society.
By definition, embroidery is the art of decorating fabric or other materialsby stitching designs using thread and needles.
Embroidery is done by making a fabric beautiful with colorful designs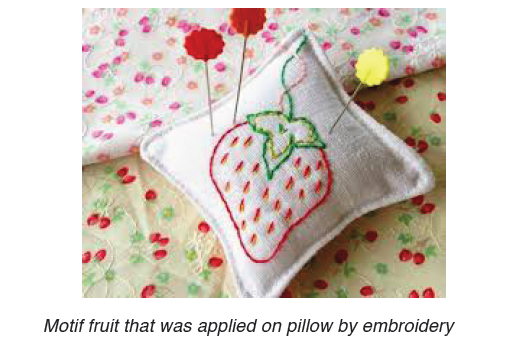
with the help of needles and threads. It may be used to embellish almost
everything, from the smallest handkerchief to big home furnishing like even
curtains or bedcovers. Different types of garments including that of children,
furnishings, such as bed sheets, pillow covers, tablecloth, wall hangings,
etc. are embroidered to give a rich look.
It is an art to express the creativity using different types of techniques,
like beadwork, metal thread work, appliqué work, decorative thread work,
cutwork, patchwork (refers to the art of sewing small geometric fabric cut
outs together by hand or machine until a large piece is obtained.), etc.
The term appliqué means the art of applying small fabric cut out on large
background piece of fabric by sewing using a thread and a needle to createdecorative designs.
The tools and materials needed to make embroidery are;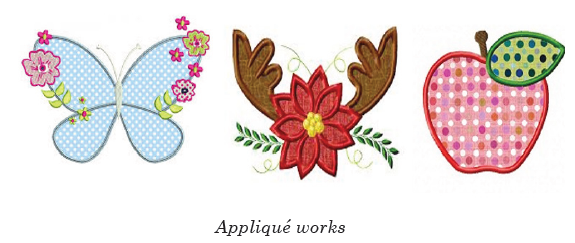
1. Fabric: this is where embroidery design and patterns are sewed.
2. Embroidery needles: for stitching patterns using embroidery
threads.
3. Embroidery threads: to stitch patterns on the fabric.
4. Pattern: is needed as reference for good looking and beautiful
embroidery work.
5. A pair of scissors: for cutting fabrics and threads.
6. Lead pencil: is needed for tracing the design on the fabric.
7. Carbon paper: this is needed for transferring the design to the fabric.
8. Embroidery hoop: for tightening the fabric to ease stitching andensure a clean design.
Application activity 8.1
1. Explain different materials used in making embroidery.
8.2.Process of sewing different design patterns on cloth
and other surfaces
Activity 8.2
Explain systematically the process of making an embroidery piece.
Sources of embroidery making
Most of the best patterns are gotten from objects from our surroundings; the
sources of inspiration from the environment may be plants, flowers, leaves,trees, animals, birds and still life objects we use.
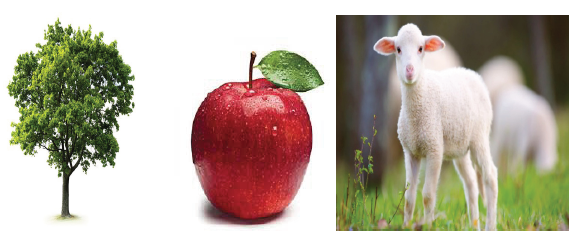
Figures that show different source of inspiration to develop motifs and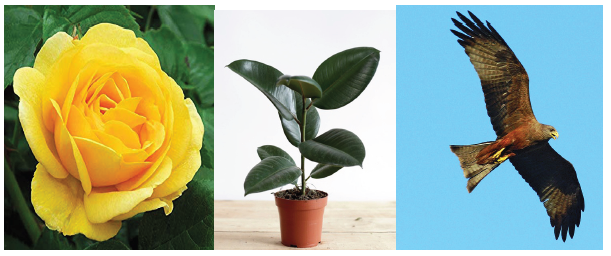
patterns
Some of the materials we use in our dairy life are products made from
embroidery technique (used by needles and thread), they have beauty
because of the designs that were applied on. They include the following:
• Dresses
• Hand bags
• Wall hangings
• Pillow cases
• Bed covers
• Chairs covers
• Curtain
The systematic process of making an embroidery piece is as follows:
• On white piece paper, create an embroidery design using colored
pencils. Capture all the needed color impressions. Finally make a fine
and clear outline of the design.
• Acquire tools and materials. Among others, include fabric, embroidery
threads, embroidery hoop, embroidery needles, a pair of scissors and
carbon paper.
• Wash, dry and iron the fabric removing all creases and folds for even
stitching.
• Place a piece of carbon paper on the fabric and place the design on
top. Using a pencil, trace the design on the fabric.
• Fix the fabric to the hoop. Ensure that it is as tight as possible and will
not slip out.
• Thread the needle and start stitching. Using different stitches, stitch
the design until all your designs and patterns have been embroidered.
• Once you are done with your stitching, turn your hoop upside down. By
using a pair of scissors, trim off the excess thread leaving a hanging
tail about an inch.
Briefly, the hand embroidery will be made through the following process:
• Hand embroidery process starts with sketching a design to be
embroidered.
• The design is then transferred to the fabric either using carbon paper
or tracing at a lit table.
• The fabric is mounted on an embroidery hoop in order to stretch the
fabric for easy stitching.
• Using an embroidery needle and thread, the patterns are sewn onto
the fabric.
• Threads of different colors can be used on different sections of the
design according to the original design.
Once the sewing is done, all hanging threads must be trimmed off using a
pair of scissors to finish the embroidery process.
Application activity 8.2
• Explain different sources of inspiration in embroidery making.
• Create and trace your chosen design on piece of cloth to bestitched.
8.3.Techniques of embroideryActivity 8.3
1. Observe the image above and explore where the designer found
an inspiration.
Choosing materials and tools to use in embroidery depends on the function
of embroidered fabric and techniques.
a. Blanket or button hole stitch
This stitch is traditionally used by embroider on the blankets’ borders. You
can space the vertical stitches, as you want (more space for a lighter effect,
less space for an opaque effect). They will be prettier if they have the samesize.
b. Running stitch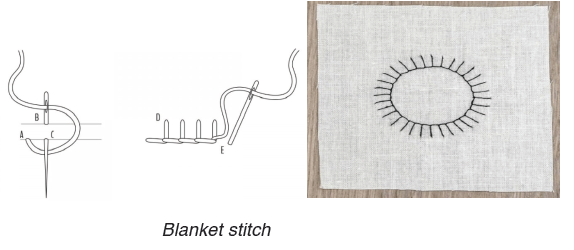
This is the simplest stitch to use. A needle is inserted in and out of the fabric
to form horizontal line of stitches.This type of stitch is used in joining fabrics. It can be used to outline patterns.
c. Feather stitch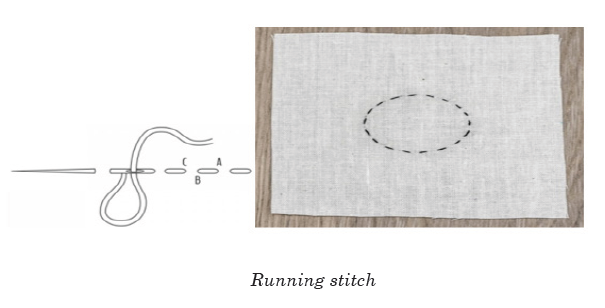
It is used for decorating border edges, seem embellishment, foliage and stems.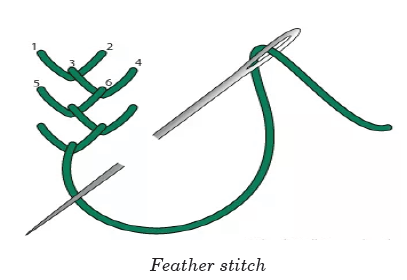
d. Stem stitch
Stem stitch is to outline designs and to give raised effects. The needle is
inserted from the wrong side of the fabric, the thread is then held down with
the left thumb, and the needle is inserted from right to left so that it comesout at the first point.
e. Cross stitch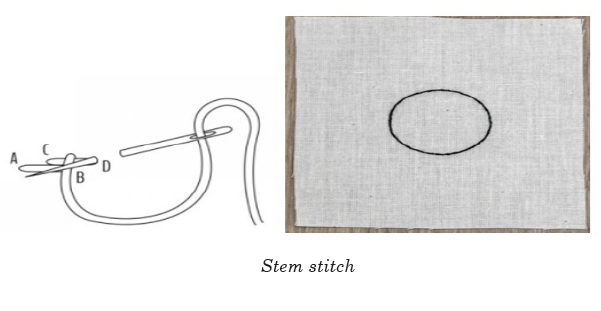
It is used for borders and filling if worked in adjacent rows.
f. French knot
French knot is used in decorating dots, filling flower centers, leaves,plants and eyes.
Application activity 8.3
1. Distinguish Running stitch from French knot.
End unit assessment 8
1. Explain the following terms
a. Appliqué
b. Embroidery
3. Explain the materials and tools that are used to make embroidery
technique.
4. State materials you use that are made from embroidery technique.
5. Create a design on fabric whereby the running stitch technique will be used.
REFFERENCES
Books references:
Robyn Montana Turner (2005). Scott foresman art.
Robyn Montana Turner, Sara A. Chapman & James M. Clark (2005). Scott
foresman art.
Kenya Literature Bureau (2007). Distinction Creative Arts, For Primary
Teacher Education.
Kenya Literature Bureau (2010). Distinction Creative Arts, For Primary
Teacher Education.
Studio technology revision question and answers 2016.
Arts, crafts &design a piratical guide for teachers’ key strategies 1&2 1997.
Graphic art Baker Apollo 2010.
Online references:
• Quora: why art is so importance to society.
• The spruce crafts
• Web designer.com
• Wiki how.
• Auburn university.• Clothing industry.
PART TWO: MUSIC UNIT 1:INTRODUCTION TO THE HISTORY OF MUSIC
Key unit competence: Be able to appraise the history of Music
Introductory Activity
1. Brainstorm different concepts in Music and define them.
2. Using different resources, discuss the History of Music in
different ancient times to date (Medieval, Renaissance, Baroque,
Classical, Romantic, and the Modern period) from the point of
view of style and the famous composer(s) at each period.
3. Choose a work from any music style of a pioneer as a model andperform it before the peers
1.1. Definition of concepts
Activity 1.1
1. Brainstorm different concepts related to Music and define them
2. Make research from different resources and find other concepts
related to Music
3. Listen to different voices produced by different things including
animals, musical instruments, vehicles and other people who are
speaking loudly in noisy places.
a. What do you understand from them?
b. Differentiate between sound and noise
3. Choose a choral song of your preference. Try it individually and
then in groups of more than four. What do you find as difference of
the qualities of the two?
1.1.1.What is Music
Music is defined as sounds that are arranged in a way that is pleasant or
exciting to listen to.
It is evenly a combination of sounds that are pleasant to the ear both inmelody and rhythm.
1.1.2.Ballet
Ballet is defined as a theatrical presentation of dancing usually with Music,
sometimes in the form of a story.
1.1.3.Dance
It is a sequence of rhythmic steps or movement usually performed to Music
for pleasure or as a form of social interaction.
1.1.4.Ensemble
A group of musicians, dancers, actors and others who perform together.
1.1.5.Harmony
Two or more notes played simultaneously to produce a chord. It is also
defined as a relationship between two distinct musical pitches played
simultaneously.
1.1.6.Movement
In Music, movement is defined as an art of moving the parts of the body or
moving from one place to another through a dance.
1.1.7.Orchestra
It is a large group of musicians who play together on various instruments in
different sections, usually including some from strings, woodwind, brass and
percussion.
1.1.8.Pitch
Pitch is defined as a highness or lowness of a musical sound.
1.1.9.Rhymes
Those are repetitive words with the same sounds used especially in Music
and poetry.
1.1.10.Rhythm
Rhythm is defined as a repetitive arrangement of short or long sounds in
Music.
1.1.11 Sound
A sound is a regular vibration transmitted through an elastic liquid and gas
with frequencies capable of causing the organs of hearing to detect it. When
the vibration is not regular, it is said to be noise.
1.1.12.Monophony
It is the simplest of musical textures, consisting of a melody or tune, typicallysung by a single singer or played by a single instrument player.
1.1.14 Homophony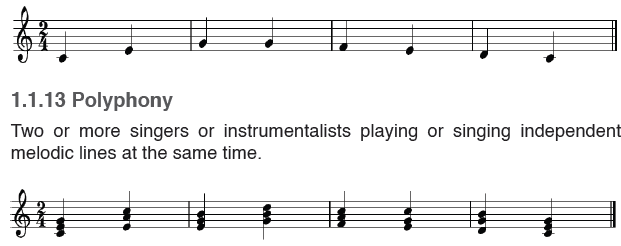
A melody accompanied by chords.
Application activity 1.1
1. Define the following terms:
a. Music
b. A pitch
c. Harmony
d. Dance
2. Differentiate sound from noise
3. Explain other concepts that you found on the internet
4. According to the number of melodies available how do you
differentiate monophony from polyphony?
5. Create your own songs and sing them as monophony andpolyphony
1.2.The main periods of Music
Activity 1.2
1. Go to the internet and search the evolution of Music from the
ancient times to date, and then present your findings before the peers.2. Name the famous musicians you know from the ancient times.
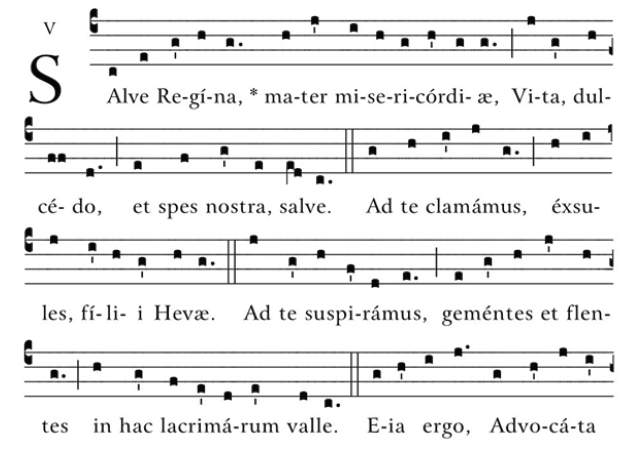
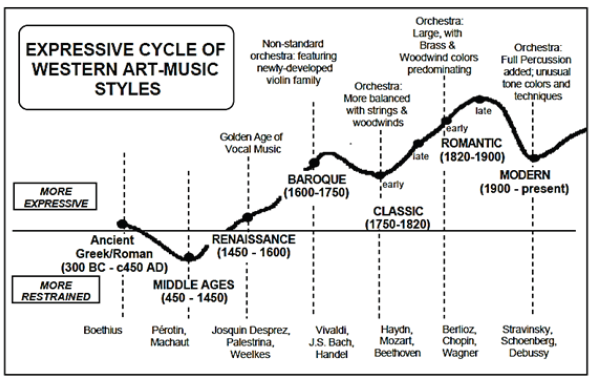
1.2.1 Medieval music (6th – 14th century)
During the medieval period, Music was characterized by the plainsong
liturgical music of the Roman Catholic Church, the largest part of which was
“Gregorian Chant.”For example: SALVE REGINA
Source: “Salve Regina”, International Marian Research Institute, University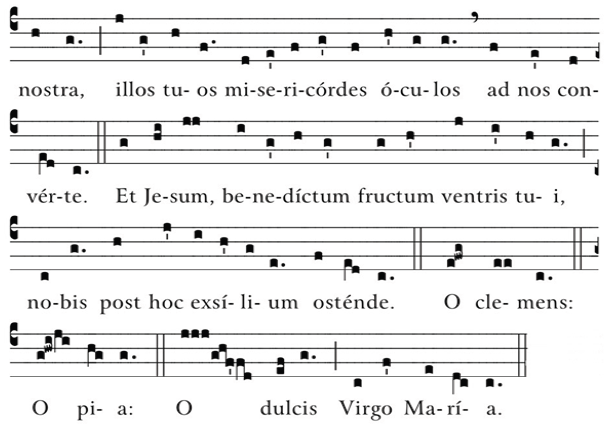
of Dayton”. Campus.udayton.edu.
The songs of that period were named Gregorian chant due to the mostcomposer of the time was Pope Gregory I.
During the 9th century, several developments took place where the church
made efforts to unify chant traditions and suppress many of them in the favor
of the Gregorian liturgy, then the earliest polyphonic music were sung.
During that period many schools evolved where Music was taught, musical
notation was developed and till the 14th century, there were many music
forms where most of them were composers of one to three voices likely with
musical instrument accompaniment.
Other famous composers of the medieval period were Guillaume De Machaut
and Francesco Landini.
1.2.2 Renaissance music (15th -17th century)
The renaissance Music is a vocal and instrumental music, written and
performed in Europe during the renaissance era. Consensus among music
historians has been with the end of medieval era, and to close it around 1600
with the beginning of the Baroque period.
The beginning of renaissance music started in the mid-15th century in Northern
Europe especially in France, Netherland and Belgium. The style of Music
was still polyphonic and there were different forms of sacred composition,
including: the motet and the laude. There were also secular forms such as:
the chanson the frottola and the madrigal.
During renaissance, there was invention of printing which influenced more
the musical style. Before Palestrina, the most composer of the 16th centurywas Josquin Des Prez. (Robert, 1994)
By the middle of the 16th century, there was the counter-reformation Council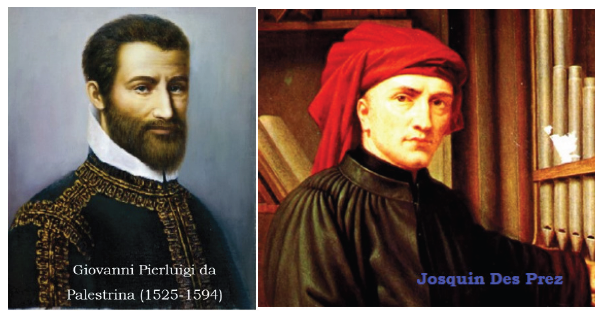
of Trent (1545-1563) exemplified in Music of Giovanni Pierluigi Da Palestrina.
The famous composers included: Andrea, Giovanni and Claudio Monteverdi.
In this period, they raised polyphonic forms built on the protestant chorales
which replaced the Roman Catholic Gregorian Chants as a basis of sacred
music. The end of renaissance was characterized by a style known as
monody and a corresponding staged dramatic form known today as opera.
The major and minor modes began to predominate over the old Church
mode.
1.2.3 Baroque period (1600-1750s)
The Baroque era took place when the first opera was written. The Baroque
era witnessed the creation of a number of musical genres which would
maintain a hold on composition for years to come, yet it was the Classical
period which saw the introduction of a form which has dominated instrumental
composition to the present day: sonata form. With it, came the development
of the modern concerto, symphony, sonata, trio and quartet to a new peak ofstructural and expressive refinement.(Bukofzer&Manfred,F. 1947).
Important composers were: Bach, Archangelo, Couperin, Frescobaldi,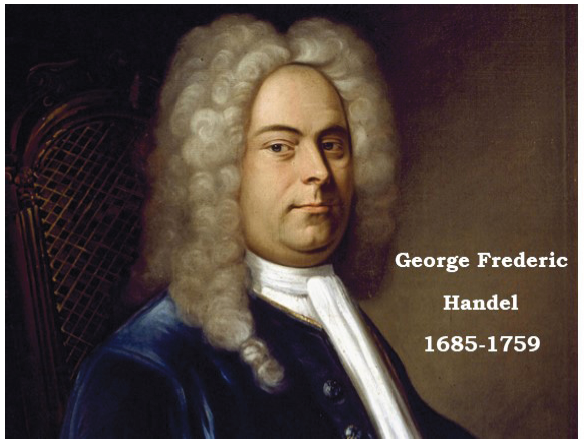
George Frederick Handel, Lully, Claudio Montevaldi, George Phillip and
Antonio Vivaldi.
1.2.4 Classical music era
Music of the classical period was characterized by homophonic texture.
During that period, instrumental music quickly replaced opera and other
forms. However, Opera did not disappear. In that period, Wolfgang AmadeusMozart was the most influential.
At the end of Classical period Ludwig Van Beethoven and Frantz Schubert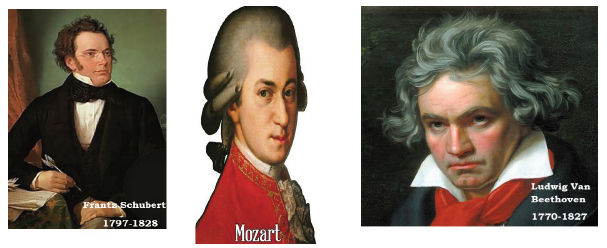
were transitional composers leading into the Romantic period.
1.2.5 Romantic music
The Romantic era was the golden age of the virtuoso, where the most
fiendishly difficult music would be performed with nonchalant ease, and
the most innocuous theme in a composition would be developed at great
length for the enjoyment of the adoring audience. The emotional range of
Music during this period was considerably widened, as was its harmonic
vocabulary and the range and number of instruments which might be called
upon to play it. Music often had a ‘programme’ or story-line attached to it,
sometimes of a tragic or despairing nature, occasionally representing such
natural phenomena as rivers or galloping horses.
The late 19th century saw a dramatic expansion in the size of orchestra and
in the role of concerts as part of urban society. Famous composers of thesecond half of the 19th century include: Johann Strauss, Verdi and Wagner.
1.2.6 The Modern music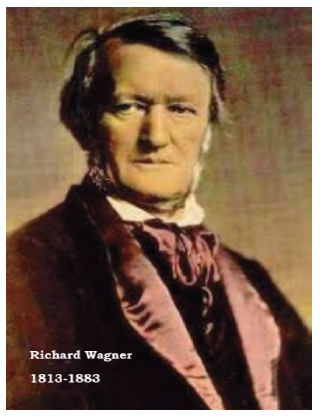
During this period, radio gained popularity Worldwide, new media and
technologies were developed to record, capture, reproduce and distribute
Music. Music performances became increasingly visual with the broadcast
and recording of music videos and concerts.
Music of all kinds became portable. Headphones allowed people sitting next
to each other listen to entirely different performances or share the same
performance. There was the invention of musical amplification and electronic
instruments, especially the synthetizer.
In the early 20th century, many composers including Rachmaninoff, Richard
Strauss, Giacomo Puccini, and Edward Elgar, continued to work in forms
and in a musical language that derived from the 19th century.
However, modernism in music became increasingly prominent and important;
among the most important modernists were Alexander Scriabin and Claude
Debussy.
Different styles on Music were developed such as:
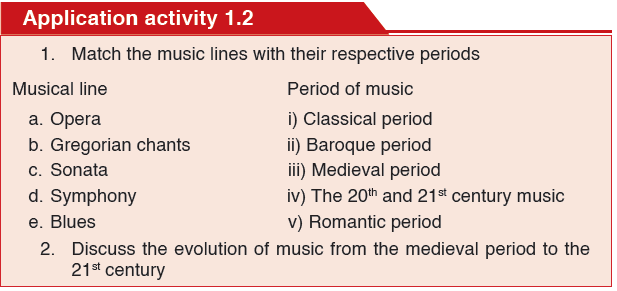
• Blues:
Blues musicians such as Muddy Waters brought the Delta Blues, played
mostly with acoustic instruments, from the Mississippi delta north to cities
like Chicago, where they used more electric instruments to form the Chicago
Blues.
• Country music:
Country music, once known as Country and Western music, is a
popular musical form developed in the southern United States, with roots in
traditional folk music, spirituals, and the blues.
• Disco:
Disco is an up-tempo style of dance music that originated in the early 1970s,
mainly from funk, salsa, and soul music. Its name is derived from the Frenchword discothèque.
• Hip Hop:
Hip hop music, also referred to as rap or rap music is a music genre formed
in the United States in the 1970s that consists of two main components:
rapping (act of being MC) and the act of being a DJ (audio mixing and
scratching).
• Jazz:
Jazz has evolved into many contrasting subgenres including smooth
jazz, Bebop, Swing, Fusion, Dixieland and free jazz. Jazz originated in the
early 20th century out of a combination of the Blues, Ragtime, Brass Band
Music, Hymns and Spirituals, Minstrel music and work songs.
• Polka:
The polka, which first appeared in Prague in 1837, continued to be a popular
form of dance music through the 20th century, especially in Czechoslovakia,
Poland, and areas of the United States with a large population of central-
European descent.
• Rock and roll:
Rock and roll developed from earlier musical forms including rhythm andblues, which had earlier been called race music, and country music.
1.3 Importance of Music
Activity 1.3
Choose a song to be performed during the following ceremonies:
1. Birthday
2. Itorero
3. Marriage4. Death.
1.3.1 The role of Music in the society
Every society can be said to have some types of Music which like language
identifies the particular community. Music plays an important role in the
society. This includes:a. Music as major component in religious services.
b. Music is used as an important symbol of identity of a given cultural
group.
c. Music is used as medium for transmission of knowledge and values. In
this case, it holds history and is a tool for disseminating new ideas.
d. Music is used for enjoyment and leisure
e. Music is used for physical development through dancing and children’s
play songs.
f. Music enhances positive attitudes like co-operation and respect others
g. Music is used for therapeutically services because of its ability to soothe
(to make someone feel calmer and lesser anxious, upset or angry) or
relax.
h. Music is used for celebrating important events and occasions. In African
societies, the important stages of person’s life are marked with Music.
i. In early childhood years, it enhances memory in numeracy and literacy.j. In film making and social events, it creates or enhances desired moods.
1.3.2 The role of Music in education
a. Music is integrated in the teaching of other subjects. For example, in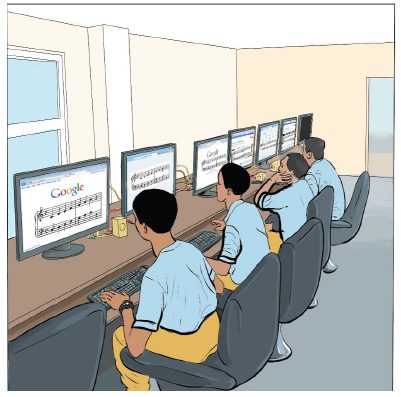
Religious education, a memorable song may be used to emphasize the
moral objectives of a lesson.
In Mathematics, songs can be used to teach young children certain
topics such as numbers.
b. Singing enriches a person’s vocabulary
c. Music enhances creative thinking.
d. Sight singing, playing of instruments and music analysis enhances
logical reasoning and stretches the capabilities of the brain
e. Singing provides a break from monotony of the lectures. The variety
helps sustain concentration.
f. Music contributes to the achievements of the national goal of education.
It promotes national unity and nationalism through the performance of
cultural pieces from different communities.
g. Music contributes towards individual expression and self-fulfillment. It
provides an opportunity for talent development, enjoyment as well as
for sharing experiences with others
h. Learning to play musical instruments trains an individual to be patient,
disciplined and self-motivated. In the end, mastering these skills brings
about a sense of satisfaction and self-confidence. This leads to be
familiar with the desired values.1.3.3 Role of Music in national ceremonies
In modern society, Music is still used in most of the occasions mentioned
above. However, it is now also used in national ceremonies like Liberationday, Hero’s day, Women day, Labor Day, etc. During these occasions, Music
is used for the following purposes:
• To promote patriotism,
• To praise the country, the government and its people,
• To give thanks to God and worship God,
• To make the occasions colorful,
• As a tool for communicating and educating people on emerging issues
like HIV and AIDS.
• To honor those considered to be heroes of the nation
• For entertainment purposes
• To review political or development achievements• To remind of a people national history.
1.3.4 Role of Music in different occasions and ceremonies
In traditional African societies, a person goes through four rites of passages: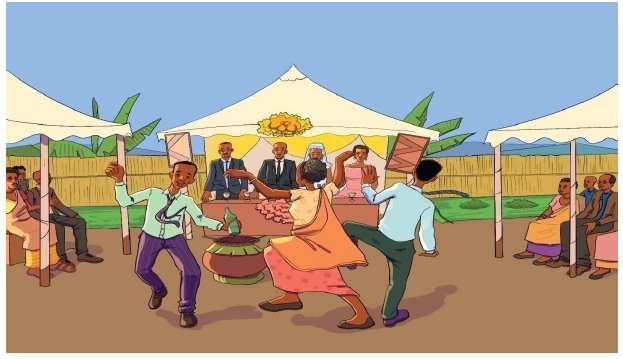
birth, initiation, marriage and funeral. Each of these rites was marked by
ceremony in which Music played an integral part. These rites of passage are
a. In birth occasion, the community, mainly represented by the womenfolk,
welcomed the newborn with gifts and adornment and lots of music. The
role of Music was simply to mark the occasion as well as to welcome
the newborn into the society. Music was also used to congratulate theparents for adding a “gift “to the community.
b. For initiation, song and dance was regarded highly in the period prior
to, during and after the ceremony. The role of Music was to mark the
occasion with songs that were only specific to this period.
c. The marriage rite of passage was marked by cultural ceremony. Music
was used to celebrate the occasion and entertain all those present. The
couple would also receive advice in form of song and dance about thecustoms and expectations of community.
d. The final rite of passage was marked with certain songs and dance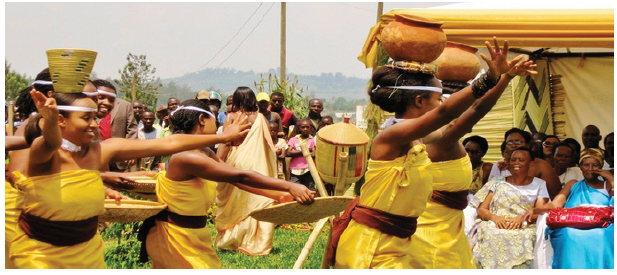
specific only to this period.
e. Certain other occasions were also marked with song and dance. Such
occasions include war, beer drinking parties, during work occasions like
milking, hunting, jogging in group.
1.3.5 Music is also used for commercial purposes
For examples:a. In advertisement to capture people’s attention;Application activity 1.3b. To highlight the worth of a product or service for purposes of marketing.
1. Create and sing at least 4 songs used in Rwandan society in the
following occasions:
a. Birth
b. Marriage
c. Jogging
d. Liberation day
2. Discuss the importance of Music to people with concrete
examples.3. Explain roles Music in teaching and learning.
End unit assessment 1
1. In order to better understand Music, it is necessary to define the
following terms:
a. Music
b. Dance
c. Rhythm
d. Pitch
e. Movement
2. Music has changed with time. It underwent different changes that
transformed it and related it with time.
a. Describe each period and associate each with a music style
and a famous composer
b. Select a style of one composer and perform it before the peers
3. Musical sound has different elements and properties
a. Create a song of your preferences and perform it respecting
different textures.
b. Differentiate sound from noise4. Describe the importance of Music and its implication in daily life.
UNIT 2: BASIC MUSICAL SYMBOLS
Key Unit Competence: Be able to sight sing using three notes(Do-Mi-Sol).
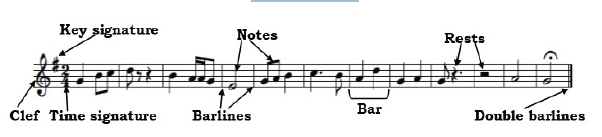
Introductory Activity
1. Using the written music above, observe and imitate the signs
used when writing Music
2. Draw five parallel and equidistant lines, then put the signs in your own way
3. Among those signs, what do you think is a staff, a key, notes and rests?4. Write and sing notes in the staff
2.1 Musical staff
Activity 2.1Study the following figure and answer the questions below:
1. How many lines are there in the figure?
2. Draw your own figure based on the model observed and count thespaces between the lines
In musical notation, the staff or stave is a set of five horizontal lines and fourspaces on which musical notes symbols and musical symbols are placed
2.1.1 Lines and spaces of the staff

This collection of five (5) lines and four (4) spaces is called a staff. We can
refer to each line and each space by its number and we count them from the
bottom. The lines of the staff have the same distance between them.2.1.2 Ledger lines
A ledger line is a short line placed above or below a staff to accommodate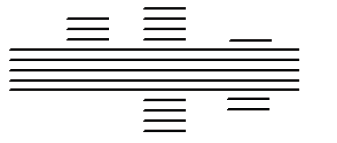
notes higher or lower than the range of the staff. Ledger lines are used when
notes are too high or too low for the staff. They work like staff extenders.
As you can see they are small lines, and the notes are written either in the
space above the lines or on the lines.
Application activity 2.1
1. Draw a musical staff and indicate the order of lines and spaces
2. Explain the importance of a musical staff in music3. Where are ledger lines located and why?
2.2 Musical notes and rests
Activity 2.2Observe the following forms and describe the difference between them
In Music, the term note has two primary meanings: a sign used in musical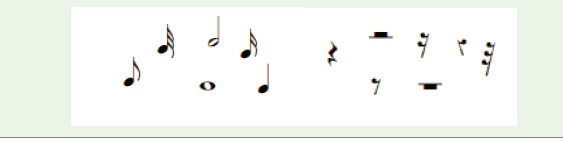
notation to represent the relative duration and pitch of a sound; a pitchedsound itself.
2.2.1 The shapes and duration of notesa. Semibreve (whole note)
The longest note in common use today is a semibreve represented by the
symbol O. The note has the shape of an egg or letter O. We must remember
that the lines of the staff must pass in the center of the note if it is on the line.
When it is in space it must be exactly between the lines. The semibreve has
four (4) beats or times long.a. Minim (half note)
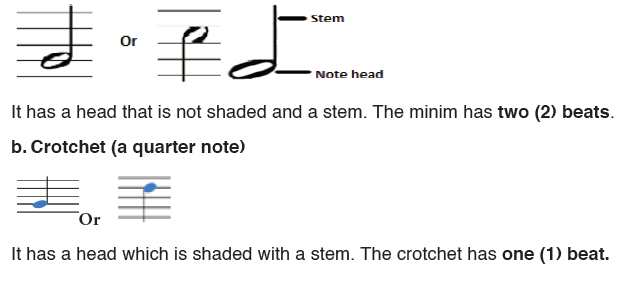
Notice: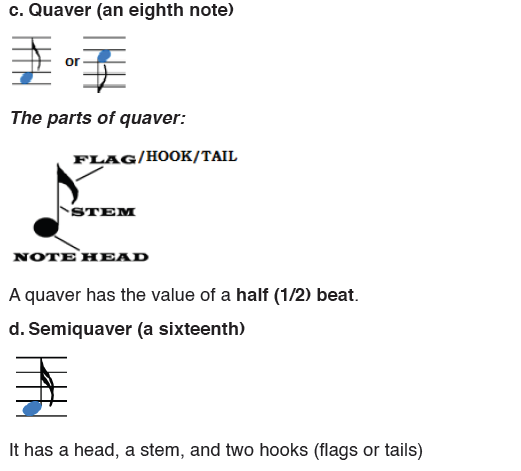
i. If a note is placed above the third line of the staff, the stem faces
downwards. When it is below the third line of the staff, the stem
faces upwards. If it is on the third line, the stem may face downwardor upwards.
ii. The oval part of a note is called the note head. Notes shorter than
Semibreve have a stem attached to the note head. Notes shorter than
crotchet have flags or beams, depending on the rhythmic context.
Quaver has one flag (or beam), Semiquaver notes have two flags
(or two beams), and so on. The position of the note head on the staffindicates the pitch of the note.
2.2.2 Symbols of the musical rests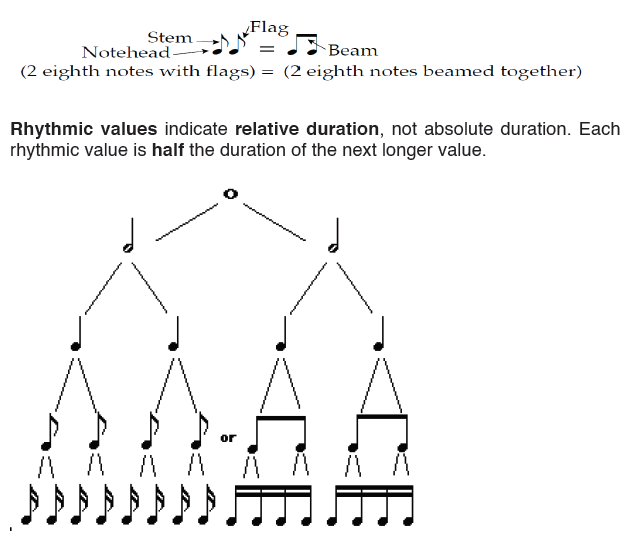
Music consists of silences as well as sounds. In many pieces of music, one
or more players or singers may be silent for few times. The silences are
called “Rests”. We can have rests anywhere in music, at the beginning, in
the middle or at the end of a piece of music. In staff notation, rests are shown
differently. Each note has its equivalent rest sign. Rest is a period of silenceof a particular length in music and shown by the signs.
The semibreve rest indicates a silence for the same duration as the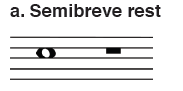
Semibreve. Semibreve rests are drawn as filled-in rectangles hanging underthe fourth line.
b. Minim rest
The minim rest indicates a silence for the same duration as the Minim.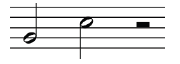
Minim rests are drawn as filled-in rectangles placed on the third line.
c. Crotchet rest
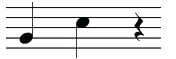
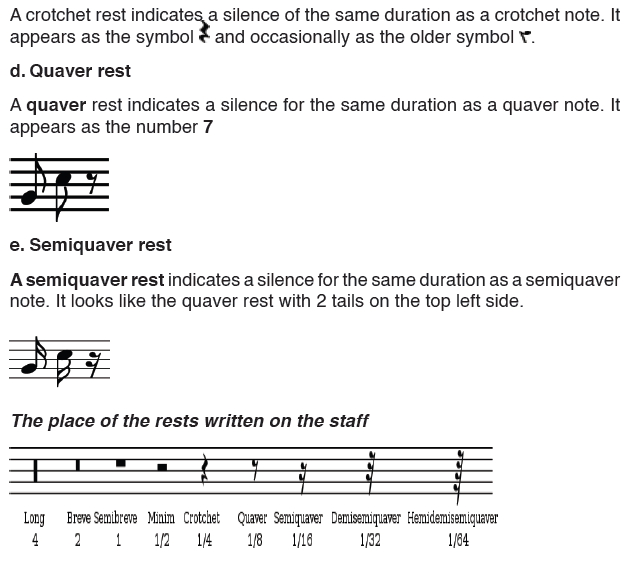
2.2.3 Duration and value of the rests
The crotchet has a value of one time. Then the crotchet rest has the same
value. All the other rests have the same value as the correspondent note.
About the value, normally each of these rests is half as long as the restabove it.

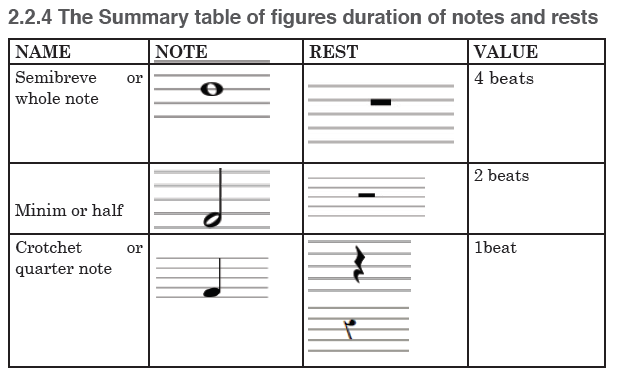
The semibreve rest is written under the 4th line of the staff while the minim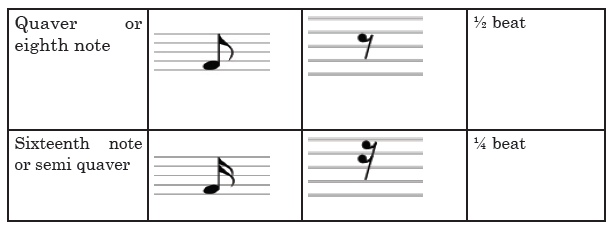
rest is on the 3rd line of the staff.
But the crotchet rest, the quaver rest and the semiquaver are placed in themiddle of the staff (it means between the 2nd line the 4th line of the staff).
2.3 Musical clef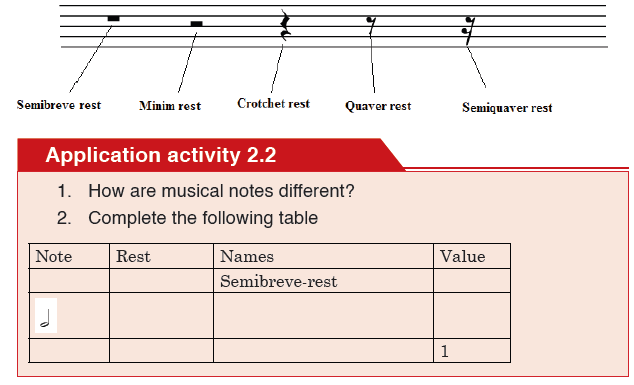
Activity 2.3
1. Using various resources, find the definition of a musical clef
2. Where is a clef placed and why?3. Draw different musical clefs.
A clef (French: clef “key”) is a musical symbol used to indicate the pitch
of written notes placed on one of the lines at the beginning of the staff, it
indicates the name and pitch of the notes on that line. The three clefs used
are G, F, and C. Since about 1750 the G and F clefs have assumed a standard
position. The C clef is still used on different lines for different instruments
(See the illustration in 1.2.). Each type of clef assigns a different reference
note to the line on which it is placed. This line serves as a reference point by
which the names of the notes on any other line or space of the staff may be
determined.2.3.1 Treble Clef /G clef
It is a clef used for the high voices. It establishes the second line of the staff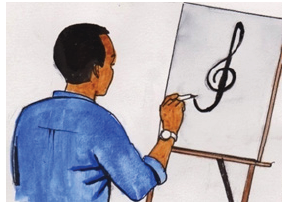
and fixes the line as G. Let’s learn how to draw it:Take a close look at the treble clef:
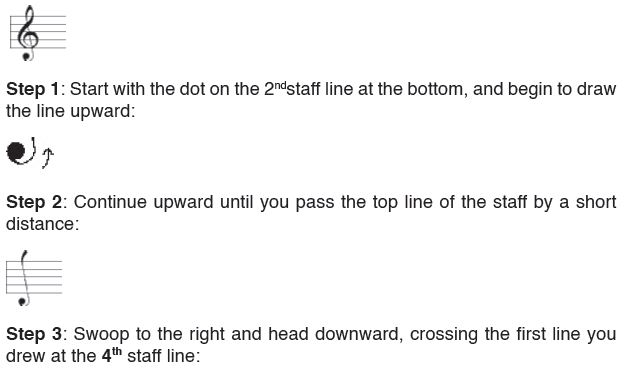
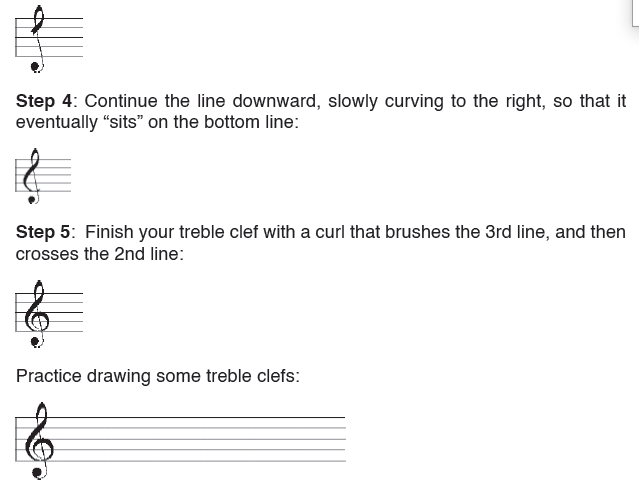
2.3.2 Bass clef/F clef
It is a clef used for the high voices. It establishes the second line of the staff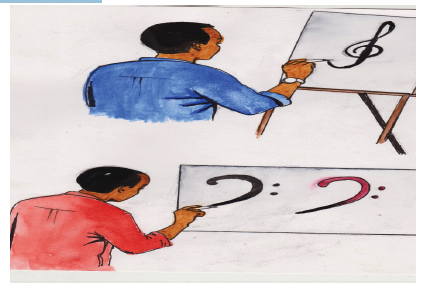
and fixes the line as G. Let’s learn how to draw it:Let’s learn how to draw it:
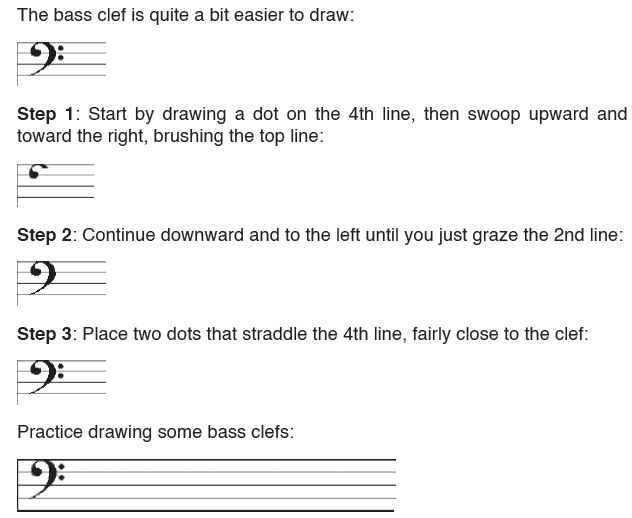
2.3.3 The C clef
The C-clef is still used on different lines for different instruments.
Application activity 2.3
1. Explain the types of musical clefs2. Using illustrations, describe the difference between G and F clefs
2.4 Sol-fa notation
Activity 2.4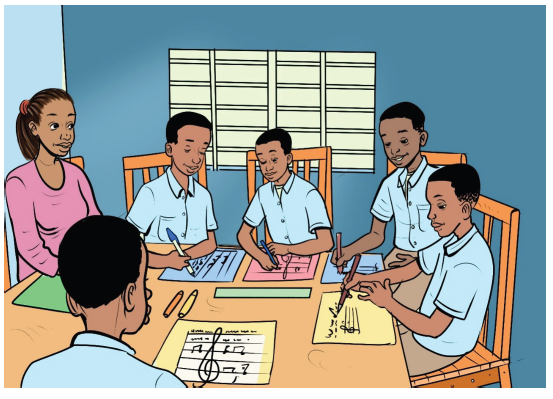
1. Using various resources, describe the origin of musical notes.
2. Basing on G clef, show the relationship between notes.
Sol-fa notation is a pedagogical technique for teaching sight-singing, invented
by Sarah Ann Glover (1785–1867) of Norwich, England and popularized
by John Curwen who adapted it from a number of earlier musical systems.
It uses a system of musical notation based on movable do solfège, whereby
every tone is given a name according to its relationship with other tones in
the key: the usual staff notation is replaced with Anglicized solfège syllables
(e.g. do, re, mi, fa, sol, la, ti, do) or their abbreviations (d, r, m, f, s, l, t,
d). “Do” is chosen to be the tonic of whatever key is being used (thus the
terminology moveable Do). The original solfège sequence started with “Ut”
which later became “Do”.
2.4.1 Origin of the musical notes
The origin of the name of the notes is in a Gregorian song: the hymn of the
feast of Saint John the Baptist. This hymn, written in Latin, presents the
following particularity. Every verse begins on one degree higher than the
precedent. So the corresponding notes were named according to the firstsyllable of each of the verses
Ut queant laxis, Resonare fibris, Mira gestorum, Famuli tuorum, Solve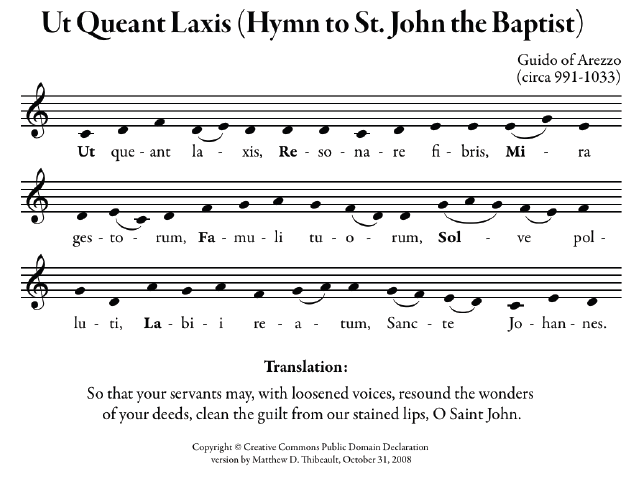
polluti, Labii reatum, Sancte Iohannes (Ut became Do)
Therefore, we have seven names of notes: Do – Re –Mi – Fa – Sol – La - Si
(French version), or C – D – E – F – G –A –B (English version).2.4.2 The names of the notes on the musical staff
Reference taken from the paragraph 2.3, the treble clef called G clef is
placed on the second line of the staff, and so it gives its name to the note
that is on that line. Hence, the note on the second line is called G. according
to the series of notes, C will be found on the first ledger line below the staff.
Therefore, the names of notes on the lines of the treble staff are Mi(E),Sol(G), Si(B), Re(D), and Fa (F).
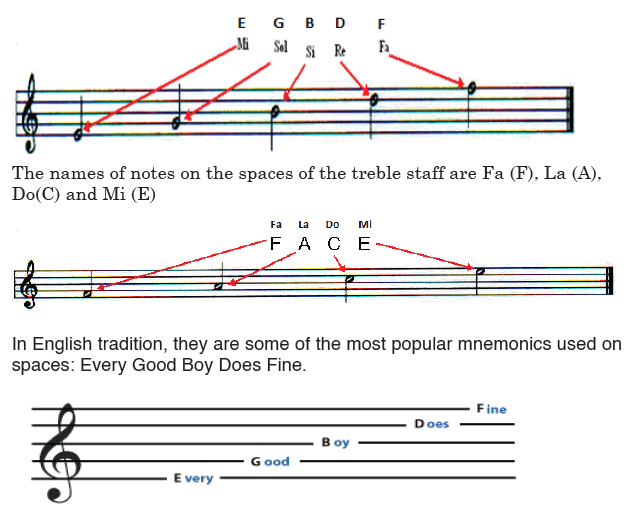
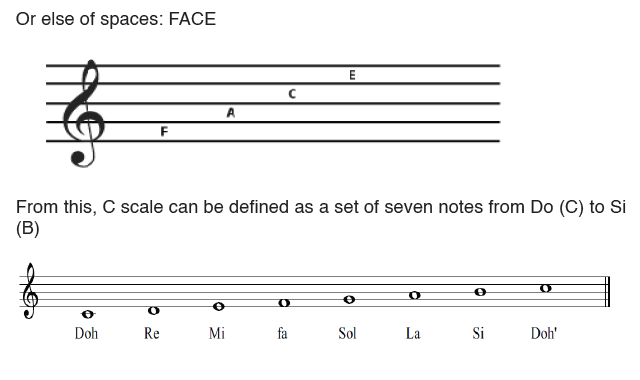
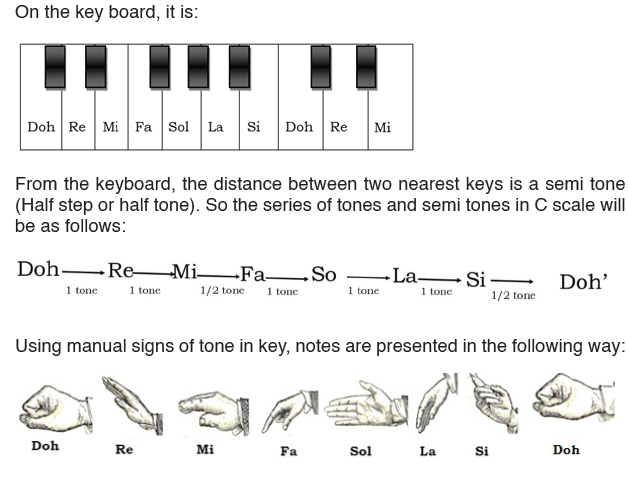
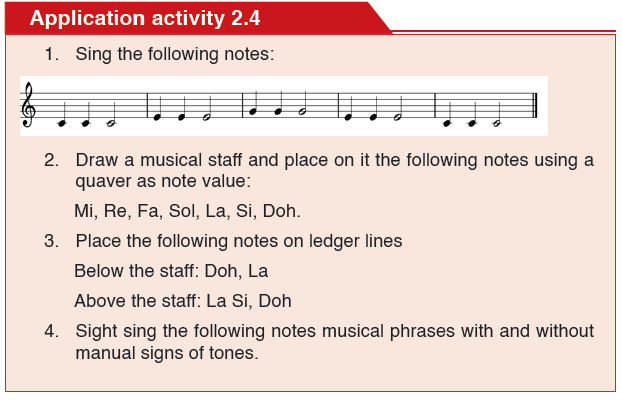
2.5 Grand staff.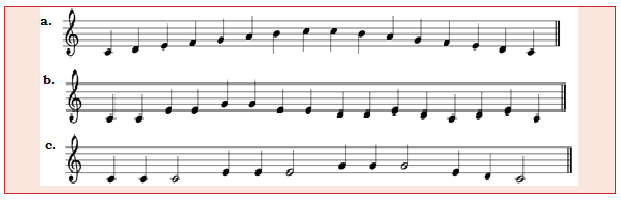
Activity 2.5
On a musical sheet, you have seen two staves combined together with the
1st written using G clef and the 2nd with F clef.
1. Why are those staves combined?
2. What is the relationship between them?
When writing music, notes are either below or beyond the staff. In order to
avoid many notes on ledger lines, musicians use the combined treble andBass staves. This form is called “Grand Staff.”
By comparing the names of lines and spaces in both the treble clef (G clef)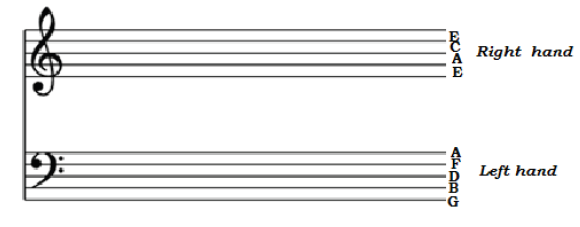
and the bass clef (F clef). One may notice that while the note C is on the
ledger line bellow the staff with the G clef, it is on a ledger line above the staffwith F clef. If both staffs are combined, the following diagram is obtained.
The great staff or Grand staff combines both the G clef and the F clef and
consists of 11 lines. The line C in the ledger line between the treble staff and
the bass staff is called MIDDLE C.
When notes are in the treble and bass staves, the performers are supposed
to sing all the notes in the treble and bass staves. Most of the time, notes in
G staff are sung by Soprano and Alto voices while those in F staff are sung
by Tenor and bass voices.
Application activity 2,5
1. Using examples explain the difference between short and grand staves.2. Sing the following melody
End unit assessment 2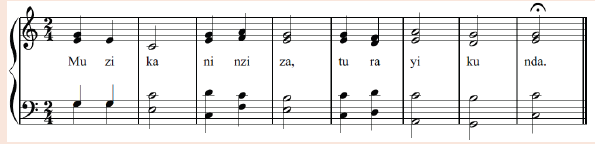
1. Compare and contrast the musical notes and rests
2. G and F clefs have a close relationship. Discuss
3. Describe the origin of musical notes that are used when writing music
4. You are going to teach musical notes to a person with deaf and/or
dumb impairment. How will you proceed?
5. Indicate the beat that are in the following notes:
a. A minim and two quavers
b. Five whole rests and two crotchet notes6. Sight sing the following piece of music
7. Write the following notes in the staff using a crotchet as note value:
Sol-Sol-Mi-Sol-Mi-Mi-Doh-Doh
UNIT 3: SIMPLE TIME SIGNATURES
Key Unit Competence: Be able to sol-fa respecting the simpletime signatures.
Introductory Activity
Analyze the following fractions:, and1. What is the meaning of both numerators and denominators inThe time signature (also known as meter signature, or measure signature)
Mathematics?
2. In Music, relate the above fractions to the grouping of notes indifferent bars
is a notational convention used in Western musical notation to specify how
many beats (pulses) are contained in each measure (bar), and which note
value is equivalent to a beat.
In a music score, the time signature appears at the beginning as a time
symbol or stacked numerals, immediately following the key signature (or
immediately following the clef symbol if the key signature is empty). A midscore
time signature, usually immediately following a bar line, indicates a
change of meter.(Emmons, 2008)
Simple time signatures consist of two numerals, one stacked above the
other. The lower numeral indicates the note value that represents one beat
(the beat unit). This number is typically a power of two. The upper numeral
indicates how many such beats constitute a bar.
The measure or bar is the group of notes, rests or notes and rests written
between two bars of measure. The bars of measures are the vertical lines
on the staff that separate the measures. On the staff the bar line of measure
starts from the fifth line and stops on the first line. At the end of piece ofmusic, we put a double bar of measure.

3.1. Dotted notes and rests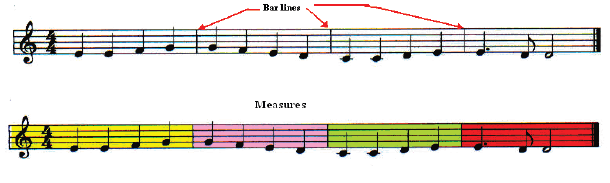
Activity 3.1
In the previous unit, you have seen the notes and their values
1. a. Write the following and associate each with its related value:• A semibreveb. If a dot written on the right of each note equal the half value of it.
• A crotchet
• A quaver rest
Do it to the previous notes and calculate the values obtained.
2. Draw a musical staff and put the following notes:A dotted minim, a quaver, a dotted crotchet, a semi quaver and a
two dotted minima, two dotted crotchet rest, a dotted minim rest,
a dotted quaver rest. a dotted crotchet rest, a dotted quaver rest
In Western musical notation, a dotted note or rest is a note or rest with a
small dot written to the right of it. In modern practice, the first dot increasesthe duration of the basic note or rest by half of its original value.
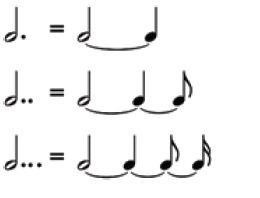
Application activity 3.1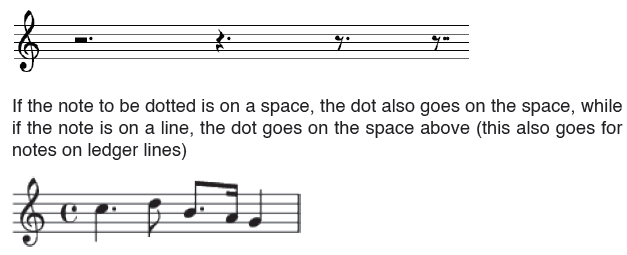
1. Differentiate the dotted and undotted notes and rests
2. What do you take into consideration when writing dotted notes in
a musical staff?
3.2 Two four time (Simple duple meter)\
Activity 3.2
1. Given a crotchet as basic rhythm. How many crotchet notes will be
put in a bar of simple duple time signature?
2. Draw musical staffs and add notes respecting the two four-time signature.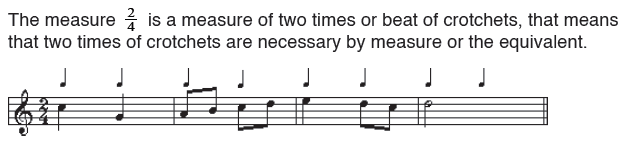
The ‘2’ tell us that there are 2 beats in every bar
The ‘4’ tell us that each beat is one quarter note long
In simple Two Four time, there are two beats in a bar. The first beat is stressed/
strong(accented) while the second is lighter/weak(Unaccented).Here below, it is shown the way of beating the above measure
Application activity 3.2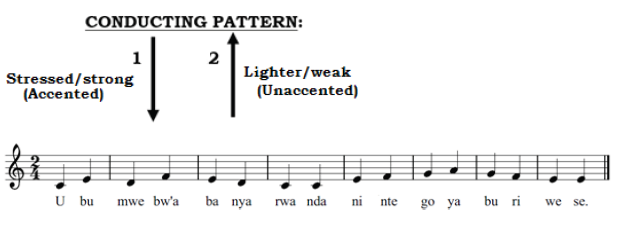
1. How many beats are there in a bar of simple duple time signature
2. Draw the conducting pattern of two four meter
3. Sight sing the following melody respecting two four-time signaturewith its conducting pattern:
3.3 Three four time (Simple triple meter)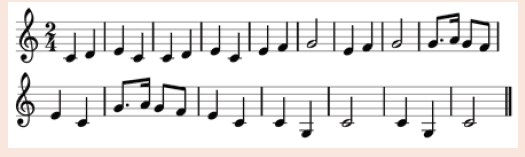
Activity 3.3
1. Given a crotchet as basic rhythm. How many quaver notes will be
put in a bar of simple triple time signature?
2. Draw musical staffs and add notes and rests respecting the threefour-time signature.
In simple three four time, there are three beats in a bar. The first beat is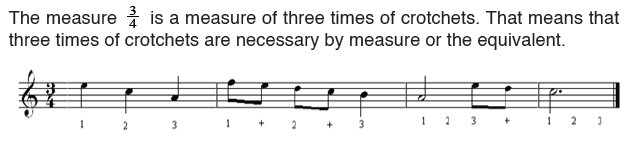
stressed/strong (accented) while other two are lighter/weak (Unaccented).Here below, it is shown the way of beating the above measure
Application activity 3.3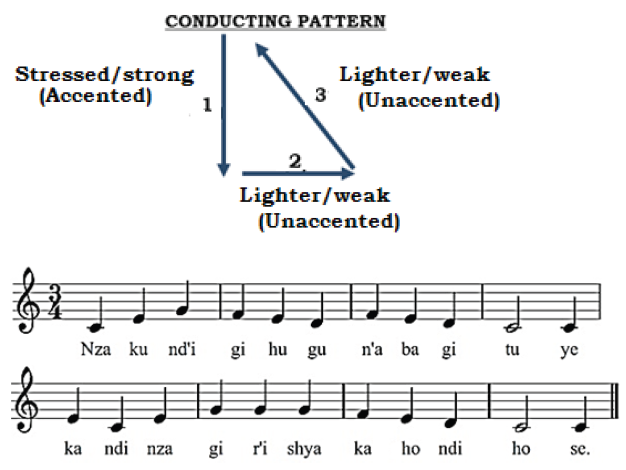
1. How many beats are there in a bar of simple triple time signature?
2. Draw the conducting pattern of three four meter.
3. Sight sing the following melody respecting three four-timesignature with its conducting pattern:
3.4 Four four-time (Simple quadruple meter)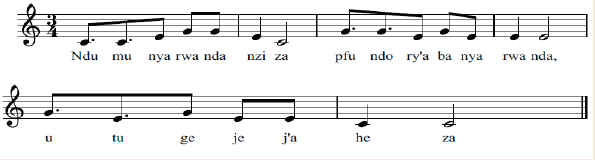
Activity 3.4
1. Given a crotchet as basic rhythm. How many minim notes will be
put in a bar of simple quadruple meter?
2. Draw musical staffs and add notes respecting the four four-time signature.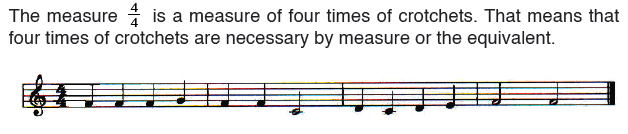
In simple Four four time, there are four beats in a bar. The first beat is stressed/
strong (accented), the second beat isgetting lighter/weak (Unaccented)
while other two are lighter/weak.Here below, it is shown the way of beating the above measure
Complete measure: all measures of a piece must be complete, with the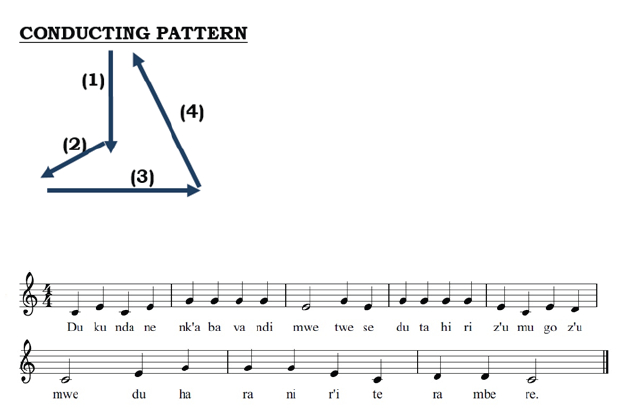
exception of the first and the last measure if there is anacrusis. It means
that all measures must have the number of time designated by the time
signature.The anacrusis:
By definition, the anacrusis is a note or series of notes that comes before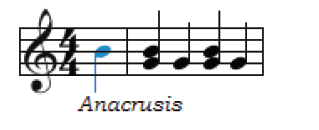
the first complete measure of a composition; an introductory (and optional)
measure that does not hold the number of beats expressed by the time
signature. The anacrusis prepares your ears for the next measure’s downbeat
and is therefore sometimes referred to as the ‘upbeat’ In traditional notation,
the amount of beats in the anacrusis is taken out of the very last measure of
the song to even out the difference.
Sometimes, the anacrusis is an incomplete measure by which can start a
piece of music. This incomplete measure should be completed by the lastmeasure.
Application activity 3.4
1. How many beats are there in a bar of simple quadruple time
signature?
2. Draw the conducting pattern of four four-meter.
3. Sight sing the following melody respecting four four-time signaturewith its conducting pattern:
End unit assessment 3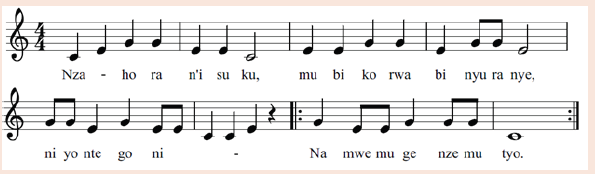
1. What is anacrusis?
2. In time signature, there are two numerals. What are they standing for?
3. How many beats are there in:
a. A bar of four four-time
b. Three bars of simple triple meter
c. Six bars of two four time
4. Draw the conducting pattern of:
a. Simple triple meter
b. Four four-time
5. Respecting the simple time signature, sight sing the followingmelody:
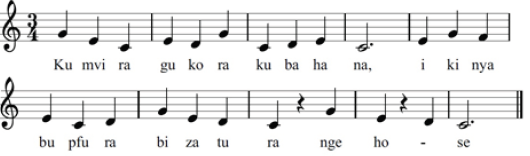
UNIT 4: COMPOSITION OF SHORT MELODIES
Key Unit Competence: Be able to compose a melody with andwithout musical notation.
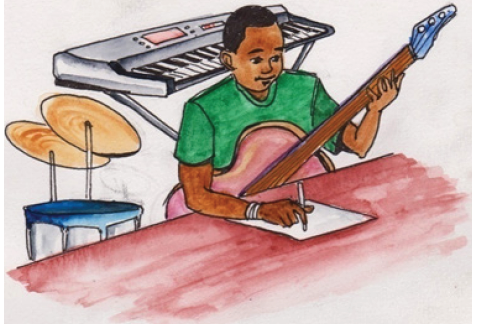
Introductory Activity
1. Differentiate a lyric from a melody
2. Discuss the order of activities during composition of songs:
Getting impressed, composing melody, composing lyrics, gettingan idea, organizing the idea, being inspired.
Composing a melody involves making up and then writing one’s own melody.
The melody can be written using various note values, including semibreves,
minims, crotchets and others. The notes are combined in various ways to
make the required rhythms for the melody.
Different pitches are used together with the rhythms to make up a melody.
The composition is carried out in different keys and modes (C major, A minor,B minor, G minor, F major,…)
4.1. Composing lyrics
Activity 4.1
a. Sing different songs of your choices. Then, identify and describe their
parts.
b. Describe the contribution of those parts to the quality of the songs.
Lyrics are words that make a song. When writing lyrics, the composer must
be impressed by a given situation that will inspire him/her an idea. Let us
cross through the following five steps of writing lyrics.
Step 1: Understanding common structures
With this step, the following are considered:
a. Understand the parts of a song.
There are several parts of a song. Your song can include all of them or none
of them. They include:i. An IntroductionThis is the section at the beginning which leads into the song. Many songs
do not have an introduction, so don’t feel like you have to use it.ii. A VerseThis is the main part of the song. It is usually fifty percent to twice the number
of lines as the chorus but it does not have to be. What gives away a section
of a song as a verse is that the melody is the same but the lyrics are different
between the different verses.iii. A ChorusThe chorus is the part of the song that repeats without changing: both the
lyrics and melody are unchanged or nearly unchanged.iv. A BridgeThe bridge is a part that exists in some songs but not all. Usually coming
sometime after the second chorus, the bridge is a part of the song that
sounds completely different than the rest of the song. It is usually short, justa line or two of lyrics, and will sometimes lead into a key change.
b. Start with the AABA structure.
The AABA structure is probably the most common structure of a song in
modern popular music. In the study of song structures, A usually signifies a
verse and B usually signifies a chorus. In other words, in this structure there
are two verses, a chorus, and then a final verse.
c. Experiment with other structures.
There are of course, many different standard song structures. You can try
AABB, ABA, AAAA, ABCBA, ABABCB, ABACABA...C usually signifies a
bridge
Step II: Getting inspiration
a. Use stream of consciousness exercises.
Stream of consciousness writing is where you just write and keep writing and
don’t stop: just write everything that comes into your head. This will capture
many ideas that change quickly but it can help you find ideas when you’re
really lost. Come up with as many words as you can, without worrying if
they’re interesting.
b. Look at existing songs.
Look at songs which are known for great lyrics to get inspiration. You can
learn a lot from thinking about what makes a song good and what makes a
song bad. Look for the kinds of things they talk about, how they talk about
them, what rhymes they use, the rhythm of the lyrics, etc.
c. Use your own opinions on what type of music you want to write, and
figure out what types of lyrics you like and dislike.
d. Look at existing poems
If you’re hard up for inspiration but you want to keep practicing your song
writing, try adapting existing poems.
e. Be true to your style
Don’t ever look at how others write songs and feel like you have to do the
same; everyone has a different style.
f. Keep writing to get to the good stuff
Everyone has to make bad things on the way to making good things. Write
as much as you can until you feel it is finished or ready to be set aside. To
even write a single word or sound is an excellent start. Let the song ferment.
Songwriting takes time! Keep everything. If you write a single sentence of asong down, it always leads to something else sooner.
g. Write all the time
Write about your feelings. Write about the world around you. Describe a
person or a thing that matters to you. This is to help you find the words
worthiest of a song.
Step III: Finding your words
a. Show, don’t tell
The best lyrics, like any good writing, get us to feel emotions because they
capture that experience, not because they tell us what to feel. Try to write
about what it’s like to feel something, instead of just telling your audience.
Brainstorm some ideas so you can see what you have and choose or even
build off of an existing idea. It is probably best if you have an inspiration.
b. Rhyme within reason
You should avoid having all of your lines rhyme, and the rhymes that you do
use should look natural. Don’t put weird phrases or words into your lyrics just
to get a rhyme. Really, your lyrics don’t have to rhyme at all. Plenty of songs
have non-rhyming lyrics.
c. Try non-standard rhyme schemes
If you do want to make your rhyming stand out a bit more and avoid sounding
cheesy, you can experiment with different styles of rhyming
Step IV: Keeping music in mind
a. Understand music notation.
Learn about how music notation works (bars, measures, notes, rests, etc.)
so that you can make sure your lyrics fit in with the music.
b. Start with a melody already written
When you first start songwriting, if you’re doing it on your own it’s best to
start with a melody already written. This is easier for most people than trying
to create a melody which matches existing lyrics.
c. Stay in a single range
When you come up with a melody, keep the notes within a reasonable range
so that someone can actually sing it. Think about your singers.
d. Add in parts for the singer to take a breath.
Singers are human too and they need to breathe. Put an extra two to four
beats here and there that allow the singer to stop for a second to catch theirbreath. This also gives the listener a chance to take in what you are saying.
Step V: Wrapping up
a. Read what you wrote
What is the bigger picture? Does the song form a narrative, a declaration,
or a description? Is it a call to action, a set of directions, or a greeting?
Is it philosophy or a reflection? Is it genuinely nonsensical? Does it have
multiple forms? Start moving around words and changing them so they fit
in with the rest of the lyrics. Think about how you want to come across and
how that balances with what you want to say. Do you like the placement of
the vowel and consonant sounds? Does a line have multiple meanings?
Does a particular phrase stand out? Do you want to repeat a line or word?
Remember the first time an audience hears a song; they only hear the parts
that stand out the most.
b. Rewrite
Who says you can’t change what you have written? If you like the original,
then keep it. But most lyricists need to play with the song a bit to get that
perfect sound. A good song can be written in one draft, but more often it
takes a while. Even move around entire verses so the song has continuity.
Sometimes, a song takes on a whole new meaning.
c. Consult with others
Once you’re done with your song, it can be a really good idea to share a test
version with others. Even if they’re just reading your lyrics, they may be able
to find places where the rhythm is off or where the rhymes sound strange.
Of course, Music by committee is a bad idea but if they catch something and
you agree it’s wrong, fix it!
Application activity 4.1
Following the steps of writing lyrics, compose lyrics relating to the
following topics:
a. Patriotism
b. Unity
c. Hard workd. Integrity
4.2 Composing a melody
Activity 4.2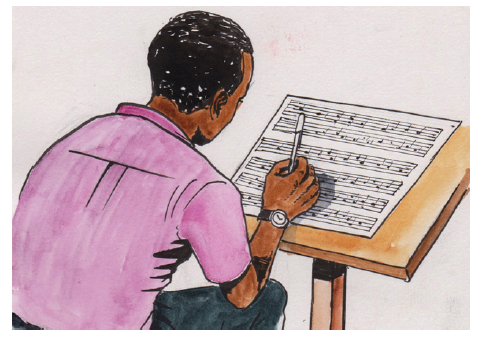
1. Using the lyrics written in the activity 4.1, divide the words into
syllables respecting the nature of rhymes.
2. Mark the accented syllables and choose the time signature to be used.
3. Work out a tune that captures the theme and spirit of the lyrics.
4. Set the words to the tune by writing each syllable directly under the
notes for which it is meant.
In writing melodies to given lyrics, the following steps should be followed:i. Interpret the words to get the themes and spiritii. Recite the words in speech rhythm, to be certain of the syllables. Thisshould also be an indicator as to the note values to be used.
Example: inkokô ya Nkuusi differs from inkooko ya Nkuusi
iii. Divide the words into syllables using dashes (-). Note the number of
syllables as it may assist in deciding the time.
iv. Mark the accented syllables. This should indicate the position of bar
lines.
v. Work out the appropriate time signaturevi. Work out the appropriate rhythm, which should lead to choice ofnotes values to be used.
vii. Work out a tune that captures the theme and spirit of the lyrics. If it
is a happy theme, the melody should accordingly sound bright andinspiring
viii. Set the words to the tune by writing each syllable directly under theExample of composing a song
notes for which it is meant. Remember there should be a note for
each syllable. If a syllable takes two or more notes, a slur should beused to ensure their smooth performance to that one.
Given the topic: “Unity or Ubumwe”
Umuco nyarwanda ipfundo ryacu
Ururimi rwacu ni ubukungu
Turabusangiye ntiducurane
Ubumwe bwacu tububumbatire
Tujye mu mugongo w’ubunyarwanda.
By composing lyrics:
U-mu-co-nya-rwaa-nd’i-pfuu-ndo-ryaa-cu
U-ru-ri-mi-rwaa-cu-n’u-bu-kuu-ngu
Tu-ra-bu-saa-ngi-ye-nti-du-cu-ra-ne
U-bu-mwe-bwaa-cu-tu-bu-bu-mba-ti-re
Tu-jye-mu-mu-goo-ngo-w’u-bu-nya-rwa-nda.Then composing a melody, the result is:
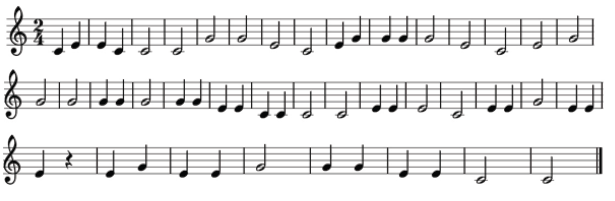
Finally, matching the melody composed with lyrics:
Application activity 4.2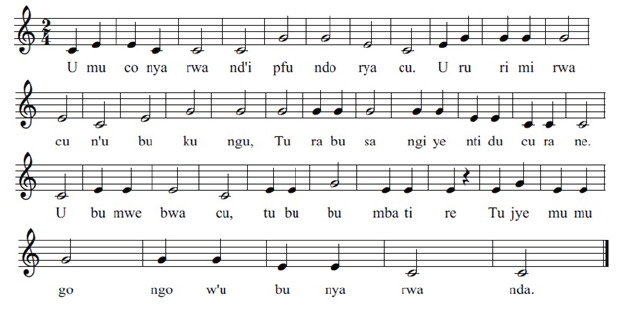
Following the application activity 4.2, compose melodies to match thelyrics composed.
End unit assessment 4
1. Describe different steps of composing lyrics
2. Discuss the main parts of a well composed song
3. You are invited in a graduation ceremony and you are asked to
compose a song just to please the guests. Compose a song that
you would compose and perform it before the peersUNIT 5:MODERN AND TRADITIONAL MUSICAL INSTRUMENTS
Key Unit Competence: Be able to play modern and traditionalmusical instruments.1
Introductory Activity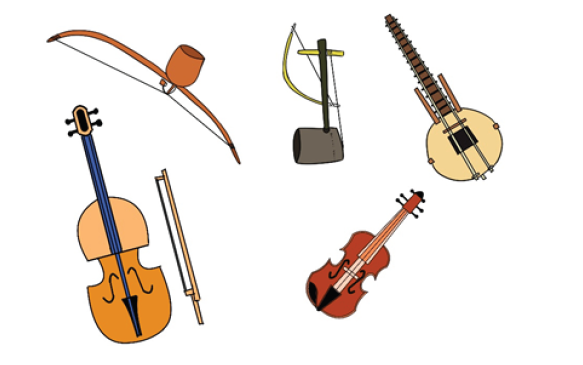
1. You have seen a military parade playing on different musical
instruments. Identify different instruments they use to perform.
2. In Rwanda, there are different instruments used when
accompanying songs. Describe them.
3. Use available instruments and perform different songs before the peers.
The grouping of an instrument is often determined by the making. It may also
be determined by the means of sound production. There are 3 main groupsof musical instruments. These are:
5.1 Stringed instruments or chordophones
Activity 5.1
1. Considering musical instruments with strings, classify them
according to their ways of producing sounds
2. Play the available stringed musical instruments accompanying
songs of different styles (religious, folkloric etc.
Stringed instruments produce sound when the player makes one or more
strings vibrate. They are two basic types:
a. Bowed stringed instruments
Bowed stringed instruments are usually stroked with a bow. The pressure of
the bow on the strings produces vibrations that are amplified by the body of
the instrument (case of resonance). To produce other pitches, the musician
shortens the strings by pressing down on them with the fingers.Examples: violin, viola, cello, iningiri.
b. Plucked stringed instruments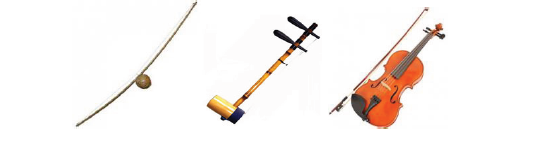
Plucked stringed instruments are played by plucking strings with the fingers
or a pick. The guitar is the common plucked instrument. Other examples are:harp, lute, mandolin, banjo, inanga.
Application activity 5.1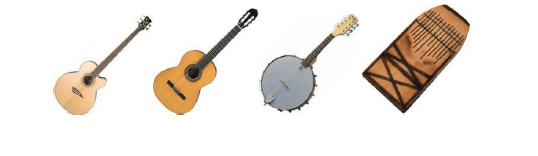
1. Differentiate the bowed from the plucked musical instruments
2. Using any available stringed instrument, play the notes Do-Mi-Sol
5.2 Wind instruments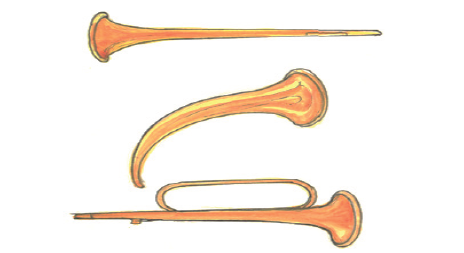
Activity 5.2
1. Considering musical instruments that are blown in, classify them
according to their ways of producing sounds
2. Play the available wind musical instruments accompanying songs
of different styles (religious, folkloric, etc.
Wind instruments produce sounds when the player blows in. they are two basic types.
a. Brass instruments
For brass instruments, the vibrations of the player’s lips make the column of
air vibrate. For example, French horn, tuba, trombone, saxophone, trumpet etc.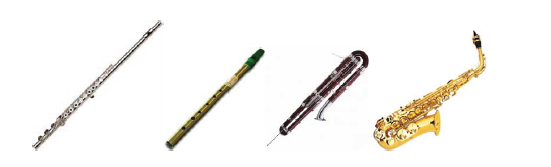
b. Woodwind instruments
Most of woodwind instruments have a reed which vibrates when the player
blows in it, making the column of air vibrates. Sound is produced from the
flute when the player blows across the mouth piece, causing vibrations ofthe column of air. Examples: Piccolo, flute, clarinet, oboe, bassoon, recorder.
Application activity 5.2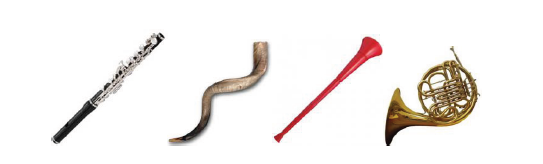
1. Differentiate the brass from the woodwind musical instruments2. Using any available wind instrument, play the notes Do-Mi-Sol
5.3 Percussion and other musical instruments
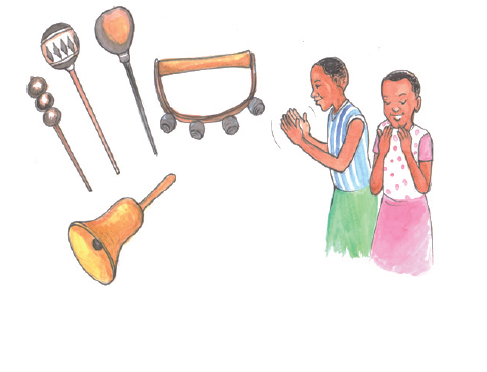
Activity 5.3
1. Considering musical instruments that are hit or shaken, classify
them according to their ways of producing sounds
2. Play the available percussion musical instruments accompanying
songs of different styles (religious, folkloric, etc.
3. Discuss the instruments that have keys and those that are used to
amplify sounds.
Percussion instruments produce sounds when shaken, clapped, struck,
and banged, shook, or hit with a stick or a mallet. When a membrane (the
stitched part) of a drum is hit, it vibrates and creates a sound. Instruments
such as xylophones or chimes have a series of tubes or bars you strike one
of the tubes or bars a sound is produced.
Examples: Percussion instruments are two types:
a. Membranophones
They have a membrane which vibrates when it is hit. For example:drums.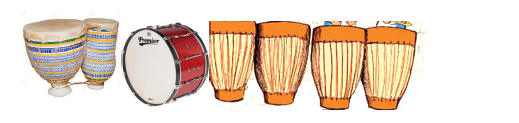
b. Idiophones
They produce sound when shaken, clapped, struck, and banged, shook orhit. Examples: cymbals, bells, triangle, amayugi, ikinyuguri …
Notice: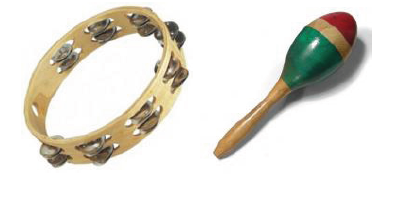
Body percussion are different sounds and rhythms made by using parts of
body. Examples: Clap, stamp, slap, whistle…Some musical instruments can
be keyboard instruments or electronic instruments.c. Other musical instruments
Keyboard instruments have a series of keys connected with a device that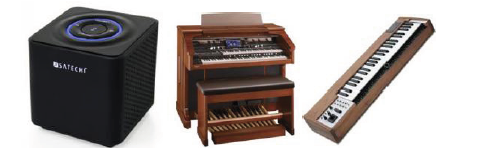
produces tones. The musician presses the keys to make sounds. The most
popular keyboard instruments are: piano, pipe organ.
Electronic instruments include that generate sounds electrically and
those that electrically amplify sound produced by the instrument. The most
common electronic instrument is electric guitar. It makes louder and more
varied tones than an ordinary guitar. Other examples are electric piano an
electric organ.
An electronic instrument called synthetizer is used to create original sounds
or to imitate sounds of other musical instruments.
Application activity 5.3
1. Differentiate the membranophones from the idiophones musical
instruments
2. Using examples, explain what body percussion is?
3. Play C scale on the piano keyboard.
4. Using any available keyboard instrument, play the notes Do-Mi-Sol.
End unit assessment 5
1. A guitar is different from a trumpet. How is it so?
2. How are keyboard instruments played?
3. Classify the following musical instruments in their relative classes:
umuduri, ikondera, ishakwe, cymbals, triangle
4. Using available materials create your own instruments andaccompany a song with them.
UNIT 6: RWANDAN TRADITIONAL DANCES
Key Unit Competence: Be able to perform Rwandan traditionaldances
Introductory Activity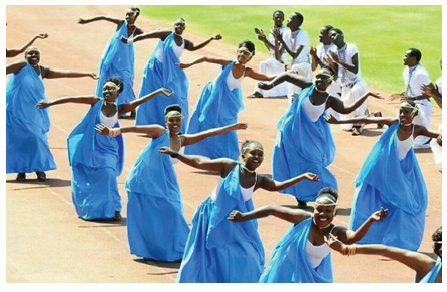
In Rwanda, there are different ceremonies in which different songs are
sung and performed.1. Sing different songs that are performed in different ceremonies
in Rwanda.
2. What traditional dance is it performed to your living area?
3. With your colleagues, try to perform some of them.
Picture of dancers and singers with instruments
Music and dance are an integral part of Rwandan ceremonies, festivals,
social gatherings, and storytelling. The most famous traditional dance is
Intore, a highly choreographed routine consisting of three components: the
ballet performed by women; the dance of heroes performed by men and the
drums.
Traditionally, Music is transmitted orally with styles varying between the
social groups. Drums are of great importance, the royal drummers having
enjoyed high status within the court of the Umwami. Drummers usually playtogether in groups of seven or nine.
6.1 Dances of local ceremonies
Activity 6.1
1. Brainstorm different dances performed in local ceremonies across
the country.
2. Share the ideas and perform before the peers
3. Judge and choose the well performed and imitate it.6.1.1 Igishakamba
Igishakamba is one of Rwandan traditional dances found in different countries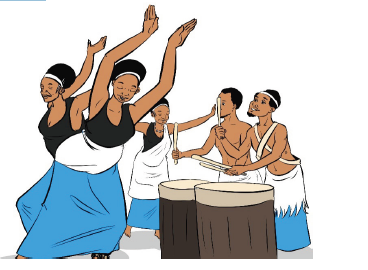
of Africa and it is performed by males and females during ceremonies. The
dance is performed during weddings, ceremonies and important cultural
events. Notably, Igishakamba dancers and drummers, express communal
desires, values and collective creativity.6.1.2 Umushayayo
Umushayayo is the common dance of women. The female’s dance is usually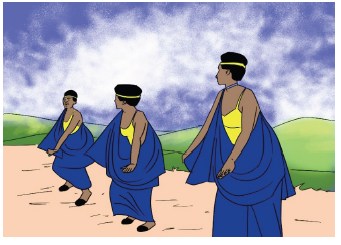
compared to ballet. It is meant to display the grace as well as the beauty
of the women of Rwanda as they emulate the movements of cows and
wildlife. Its strength is the Graceful movement of Rwandan women highlight
kindness, goodness, purity and the radiant beauty of what many considerAfrica’s most beautiful women.
6.3.1 Ikinimba
Ikinimba dance is performed as part of a courtship ritual. Songs that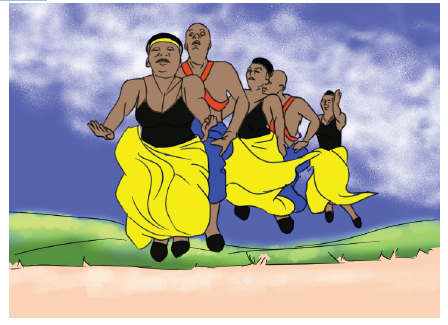
accompany this dance are focused on advising the future bride on how to
deal with her prospective in-laws. Once a woman was married, she was no
longer eligible to perform in the dance.6.1.4 Umudiho
It is one of Rwandan traditional dances that is performed by both men and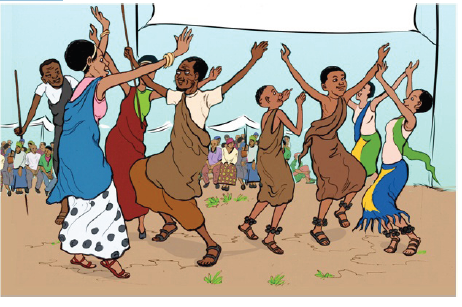
women, especially during ceremonies. It is danced rhythmically with musical
accompaniment and those who perform it are always happy.
Application activity 6.1
1. Discuss the Rwandan traditional dances performed in local
ceremonies and how they are performed based on gender.
2. Differentiate Ikinimba and Umudiho.
6.2 Dances of the court ceremonies
Activity 6.2
1. At the court of Umwami, there were different ceremonies. Describe
the dances that were performed in those ceremonies?2. Discuss the set of drums that were played in the court ceremonies
6.2.1 Umuhamirizo
It is performed by men wearing grass wigs, carrying spears and bells on each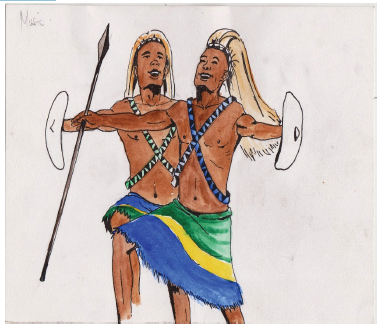
foot which make a rhythm in the background. The dancers move from side
to side combining grace and complex choreography with a raw aggression.
At certain stages the dancers stop with arms outstretched and make bloodcurdling
battle cries. These calls are individual to each dancer and represent
warriors claiming the details of achieved performances from the battle.6.2.2 Drums (Umurishyo w’ingoma)
Drums have immense importance in Rwandan ceremonies. The ingoma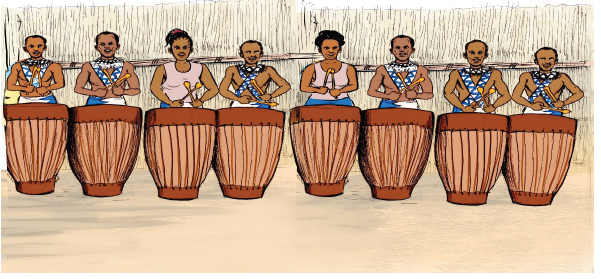
is usually played on festive occasions or to welcome an important guest.
The drummers use two wooden sticks called imirishyo. To ensure that the
instrument plays the right tone, the membrane is warmed up by placing it
near a fire or under the sun.
The ingoma ensemble that plays nowadays comprises eight to ten drummers,
each with his own drum. There are four types of drum, each having a different
pitch: the ishakwe, the inyahura, the igihumurizo and the Inumvu.
• The ishakwe is the smallest (47 cm high) and has a high tone. There
is always just one in the ensemble, with the task of establishing the
rhythm and then playing an ostinato rhythm as the basis for the other
drums.
• The inyahura (up to 78 cm high) has a medium tone and the ensemble
usually has three or four of these. The leader of the ensemble plays
this type of drum. He is also the one who plays the solo rhythm and
ensures continuity between the various successive rhythms.
• The drums with the deepest tone are called the igihumurizo and are 85
cm high, although they have a much larger diameter than the inyahura.
They usually play an invariable ostinato rhythm together with the
inyahura.
• The Inumvu: those are drums with a high tone but they produce a
higher tone when they are not warmed up by placing it near a fire orunder the sun as it is done for others. They are also called “Impuma.”
Application activity 6.2
1. Umuhamirizo was the most famous traditional dance at the court
of Umwami. How was it performed and why?
2. What do you understand by Imirishyo?
3. Drums were of great importance within the court of the Mwami.
Discuss the kinds of drums and how they are played.
End unit assessment 6
1. What do you understand by a Rwandan traditional dance?
2. Differentiate Umushayayo from Umuhamirizo.
3. Sing different Rwandan traditional dances and perform thembefore the peers.
REFERENCE BOOKS
Robert Stewart: An Introduction to Sixteenth-Century Counterpoint and
Palestrina’s Musical Style (Ardsley House, Publishers, 1994),
Gustave Reese: Music in the Renaissance (W.W. Norton & Co., New York,
1954).
Burton, Anthony (2002). A Performer›s Guide to the Music of the Classical
Period. London: Associated Board of the Royal Schools of Music.
p. 3. ISBN 978-1-86096-1939.
Downs, Philip G. (1992). Classical Music: The Era of Haydn, Mozart, and
Beethoven, 4th vol of Norton Introduction to Music History. W.W. Norton &
Company. ISBN 0-393-95191-X (hardcover)
Bukofzer, Manfred F. (1947). Music in the Baroque Era: From Monteverdi
to Bach. New York: E. W. Norton & Company, Inc. ISBN 0-393-09745-
5, Burrows, Donald (1991). Handel: Messiah. Cambridge, New York, and
Melbourne: Cambridge University Press. ISBN 0-521-37620-3.
Tim Emmons, Odd Meter Bass: Playing Odd Time Signatures Made Easy(Van
Nuys: Alfred Publishing, 2008): 4. ISBN 978-0-7390-4081-2.
Stephen E. Hefling. “Dotted rhythms”. In Deane L. Root (ed.). Grove Music
Online. Oxford Music Online. Oxford University Press
Taylor, Eric (2011). The AB Guide to Music Theory Part I. ABRSM.p. 18. ISBN 978-1-85472-446-5
ADDITIONAL NOTES20 Important Benefits of Music in our schools
Why is Music Education in schools important? ... Unfortunately, many schools
have begun to exclude Music from their curriculums to make room for other
subjects. Music is an extremely important subject for all children to learn and
can lead to better brain development, increases in human connection, and
even stress relief.
In fact, nearly everyone enjoys Music, whether by listening to it, singing,
dancing or playing an instrument. But despite this almost universal interest,
many schools are having to do away with their Music education programs.
This is a mistake, with schools losing not only an enjoyable subject, but a
subject that can enrich students’ lives and education. Read on to learn why
music education is so important, and how it offers benefits even beyond
itself.
Musical training helps develop language and reasoning: Students who have
early musical training will develop the areas of the brain related to language
and reasoning. The left side of the brain is better developed with Music, and
songs can help imprint information on young minds.
A mastery of memorization: Even when performing with sheet music,
student musicians are constantly using their memory to perform. The skill of
memorization can serve students well in education and beyond.
Students learn to improve their work: Learning Music promotes craftsmanship,
and students learn to want to create good work instead of mediocre work.This desire can be applied to all subjects of study.
Increased coordination: Students who practice with musical instruments can
improve their hand-eye coordination. Just like playing sports, children can
develop motor skills when playing music.
A sense of achievement: Learning to play pieces of music composition on
a new instrument can be a challenging, but achievable goal. Students who
master even the smallest goal in Music will be able to feel proud of their
achievement.
Kids stay engaged in school: An enjoyable subject like Music can keep kids
interested and engaged in school. Student musicians are likely to stay in
school to achieve in other subjects.
Success in society: Music is the fabric of our society, and Music can shape
abilities and character. Students in band or orchestra are less likely to abuse
substances over their lifetime. Musical education can greatly contribute to
children’s intellectual development as well.
Emotional development: Students of Music can be more emotionally
developed, with empathy towards other cultures they also tend to have
higher self-esteem and are better at coping with anxiety.
Students learn pattern recognition: Children can develop their math and
pattern-recognition skills with the help of musical education. Playing music
offers repetition in a fun format.
Better SAT scores: Students who have experience with music performance or
appreciation score higher on the SAT. One report indicates 63 points higher
on verbal and 44 points higher on math for students in music appreciation
courses.
Fine-tuned auditory skills: Musicians can better detect meaningful,
information-bearing elements in sounds, like the emotional meaning in a
baby’s cry. Students who practice music can have better auditory attention,
and pick out predictable patterns from surrounding noise.
Music builds imagination and intellectual curiosity: Introducing Music in the
early childhood years can help foster a positive attitude toward learning and
curiosity. Artistic education develops the whole brain and develops a child’s
imagination.
Music can be relaxing: Students can fight stress by learning to play music.
Soothing music is especially helpful in helping kids relax.
Musical instruments can teach discipline: Kids who learn to play an instrument
can learn a valuable lesson in discipline. They will have to set time aside to
practice and rise to the challenge of learning with discipline to master playingtheir instrument.
Preparation for the creative economy: Investing in creative education can
prepare students for the 21st century workforce. The new economy has
created more artistic careers, and these jobs may grow faster than others in
the future.
Development in creative thinking: Kids who study the arts can learn to think
creatively. This kind of education can help them solve problems by thinking
outside the box and realizing that there may be more than one right answer.
Music can develop spatial intelligence: Students who study Music can improve
the development of spatial intelligence, which allows them to perceive the
world accurately and form mental pictures. Spatial intelligence is helpful for
advanced mathematics and more.
Kids can learn teamwork: Many musical education programs require
teamwork as part of a band or orchestra. In these groups, students will learn
how to work together and build camaraderie.
Responsible risk-taking: Performing a musical piece can bring fear and
anxiety. Doing so teaches kids how to take risks and deal with fear, which
will help them become successful and reach their potential.
Better self-confidence: With encouragement from teachers and parents,
students playing a musical instrument can build pride and confidence.
Musical education is also likely to develop better communication for students.Source: This article originally appeared on the Bachelor’s Degree website