General
- P3: Creative Arts-Fine Artc (Teachers Guide) File Uploaded 26/07/22, 17:49
UNIT SIX: EMBROIDERY
6.1. Key unit competence
To be able to manipulate different tools and materials to make different embroidery patterns on textiles.
6.2. Prerequisite skills
In this unit, we may use examples from many elements seen in the previous units especially in Drawing and Painting still life elements and nature. As far as weaving and decorating pieces of cloth is concerned, the learner will use the technique of drawing diverse fashions on clothes. Also, concerning the selection of colors, the learner may use colors he/ she used in the lessons on painting.
6.3. Cross-cutting issues to be addressed
In this unit, special attention will be given to learners with hearing and speech disabilities by placing them to the front near the teacher so that they can assist them particularly, explaining to them using signs and pictures. In addition, as the teacher is helping learners to form the groups, he/she should take into account the fact that both boys and girls are represented, hence gender balance is respected.
6.4. Introducing the unit
• Showing learners weaved pieces of cloth used to decorate the sitting room and ask them to exchange them basing on the objectives, their characteristics and colors of artwork.
• Tell learners to prepare the materials and start weaving diverse fashions using pictures made from the surrounding.
6.5 . Lessons to be taught
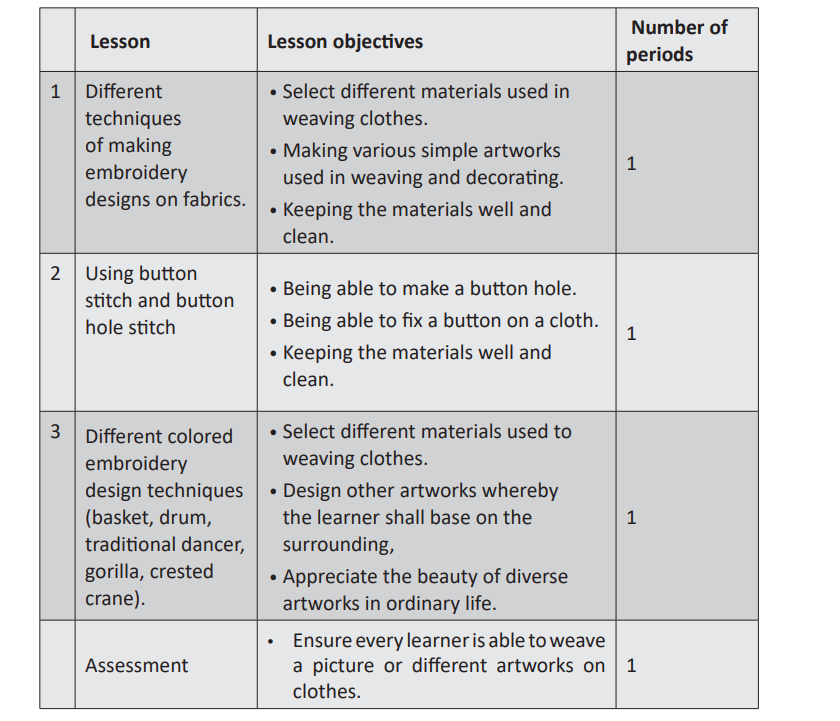
Lesson 1: Different techniques of making embroidery designs on fabrics.
a. Learning Objectives
• Select different materials used to weave clothes
• Making different simple artworks used in weaving and decorating
b. Teaching and Learning Materials
• Pencil
• Weaved clothes
• Thread in different colors
• Paper
• Small fabrics,
• Needle.
c. Methodology
Introduction
• The teacher shows to the learners some embroidery made by other and learners mention used materials and steps.
• The teacher tells learners to observe end exchange views on embroidery products.
Lesson Development The teacher;
• Distributes materials that will be used to make puppets. Gives instructions to the learners.
• Demonstrates how to make embroidery design on fabric.
• Invites learners to sketch where they are going to put embroidery design.
• Tells learners to start making embroidery stitches on fabric.
• Moves closer to each group to give help where necessary and to give advice.
Assessment
• Invite learners in groups to present their embroidery stitches and to share views on them.
• Tell groups of learners to select the most well weaved clothes
• Appreciate the work done by learners and to advise them on what went wrong
• Clean the place and the materials they have used and keep these materials well.
Lesson 2: The technique of fixing a button and its hole stitches.
a. Learning Objectives
• Name different techniques used to fix a button and to decorate.
• Make diverse simple artworks used in weaving and decorating
b. Teaching and Learning Materials
• Pencil
• Thread
• Small tissues
• Needle
• Cutting materials.
c. Methodology
Introduction
• Ask learners to tell if they know where buttons are fixed.
• Invite learners to prepare the materials at the same time inserting the thread in the needle.
Lesson Development
• Provide learners with instructions of how the button is fixed.
• Invite learners to use the thread and the needle as they are fixing a button following the instructions of the teacher.
• The teacher comes closer to each group to advise them and to assist them where necessary
• Show learners how to make and weave the button hole
• Make and weave the button hole
• The technique of the button hole and fixing the button
• The technique of the button hole and fixing the button
• Tinishing button hole
Assessment
• Invite learners in groups to present pieces of cloth where they have fixed a button end weaved its button hole.
• Tell learners in groups to select buttoned pieces of cloth and well weaved button holes.
• Appreciate the work done by learners and guide them where they did not perform well.
• Clean the place and the materials they have used and then keep the materials well.
Lesson 3: Techniques of weaving using pictures from the surrounding a. Learning activities
• Design other artworks basing on elements found in the surrounding for making embroidery design.
• Appreciate the beauty of various artworks in ordinary life.
b. Teaching and Learning Materials
• Pencil
• Paper
• Colored thread
• Small pieces of cloth
• Different kinds of needle
• Cutting materials.
c. Methodology
Introduction
• The teacher shows to learners some embroidery made by other people and learners mention used materials and steps.
• The teacher tells the learners to observe end exchange views on embroidery products.
Lesson Development
• The teacher distributes materials that will used to make puppets.
• The teacher gives instructions to the learners.
• The teacher demonstrates how to make embroidery design on fabric.
• Let learners think object from environment they are going to design for making it embroidery.
• Learners sketch where they are going to put embroidery design.
• Learners to start making embroidery on fabric.
• The teacher moves closer to each group to help where necessary, and to give advice.
Assessment
• The teacher invites learners to present made embroidery design of objects inspired from the surroundings.
• Ask learners in groups to select well designed embroidery.
• Ask learners to arrange the materials and to keep them well.
6.6. End of unit 6 assessment
• The teacher invites learners to make embroidery design of a drum on a fabric.
• The teacher invites learners to make embroidery design of a bird on a fabric.
6.7. Additional activities
• The teacher invites learners to make embroidery design of a tree on a fabric.
REFERENCES
a. Mock, R. (1955). Principles of Art Teaching; 1st Edition, University of London Press, England.
b. Elizabeth K. E. (2010). Distinction, Creative Arts, year 2, Kenya Literature Bureau, Nairobi.
c. Elizabeth K. E. (2010). Distinction, Creative Arts, year1, Kenya Literature Bureau, Nairobi. d. Obonyo O.
D., Elizabeth C. (2008). Art and Design forms one and two, East African Educational Publishers.
e. Richard H., Art & Design, French’s road, Cambridge CB43NP, Pearson Publishing.
f. Baker A. (2010). Fundamentals Graphic Art, Trinity Books Ltd, Uganda.
g. Minisiteri y’Uburezi, Ikigo Gishinzwe Integanyanyigisho (2015). Integanyanyigisho y’ubugeni mberajisho mu kiciro cya mbere cy’amashuri abanza. Kigali