Topic outline
General
- P3: Creative Arts-Fine Artc (Teachers Guide) File Uploaded 26/07/22, 17:49
UNIT 1: General Introduction
1.0. About the teacher’s guide
This book is a teacher’s guide for Creative Arts (Fine Art &Crafts) in Lower Primary Three. It is designed to help teachers in the implementation of competence-based curriculum specifically Creative Arts (Fine Art & Crafts and Music) syllabus. As the name says, it is a guide that teachers can refer to when preparing their lessons. Teachers may prefer to adopt the guidance provided but they are also expected to be more creative and consider their specific classes’ contexts and prepare accordingly.
1.1. The structure of the guide
This section provides a paragraph presenting the guide, overall structure, the structure of a unit and the structure of a lesson. A brief explanation is given on each component to guide the users.
1.2. Methodological guidance
1.2.1. Developing competences
Since 2015, Rwanda shifted from knowledge -based to a competence-based curriculum for pre-primary, primary and general secondary education. This called for changing the way of learning by shifting from teacher centered to a learner centered approach. Teachers are not only responsible for knowledge transfer but also for fostering children’s learning achievement and creating safe and supportive learning environment. It implies also that a learner has to demonstrate what he/ she is able to do using the knowledge, skills, values and attitudes acquired in a new or different given situation.
The competence-based curriculum employs an approach of teaching and learning based on discrete skills rather than dwelling on only knowledge or the cognitive domain of learning. It focuses on what a learner can do rather than what a learner knows. Learners develop basic competences through specific subject unit competences with specific learning objectives broken down into knowledge, skills and attitudes. These competences are developed through learning activities disseminated in learner centered rather than the traditional didactic approach. A learner is evaluated against some set standards to achieve before moving on. In addition to specific subject competences, learners also develop generic competences which are transferable throughout a range of learning areas and situations in life. Below are examples of how generic competences can be developed in Creative Arts (Fine Art & Crafts and Music)
Critical Thinking and problem solving
These activities require students to think critically about subject content. Groups can be organized to work in different ways e.g. taking turns, listening, taking decisions, allocating tasks, disagreeing constructively etc.
• Observe and analyze example; mark out areas in the school and get different groups to record still life and nature living things like insects, persons, animals and bird life.
• Identify a problem and design a methodology to collect the information needed to solve the problem.
• Make basic art equipment out of locally available materials.
Research and problem solving
In the subject of Creative Arts (Fine Art & Crafts and Music), you should get more information by:
• Using internet and a Library.
• Creating a School Library.
• Collecting data through observation.
• Looking for art materials from nearest environment.
Creativity and Innovation
This will be seen as long as learners do the following:
• Drawing and painting.
• Designing posters, motifs, and patterns.
• Modelling clay objects and weaving crafts.
• Writing and designing different items from letter styles and illustrations.
• Making practice in this subject.
• Inventing new ways of doing creative things.
• Identifying problems which require data collection to solve.
• Identifying local problems and devise ways to resolve them.
Communication Skills
• Telling stories related to the lessons of Creative Arts (Fine Art & Crafts and Music) needed to be studied.
• Presenting ideas verbally or in writing.
• Writing different letter styles for different purposes.
• Reading texts related to Creative Arts (Fine Art & Crafts and Music).
Teamwork, Cooperation, Personal and Interpersonal management and life skills
• Working in pairs that are useful for sharing reading and comprehension in lower grades but also for planning research, problem solving and planning experiments, etc.
• Small group work. • Large group work.
• Data collection from the environment.
• Collecting community photographs and artworks to make a class of the local community.
Lifelong Learning
• Taking initiative to update knowledge and skills with minimum external support.
• Coping with the evolution of knowledge and technology advances for personal fulfillment
• Seeking out friends more knowledgeable in areas that need personal improvement and development
• Exploiting all opportunities available to improve knowledge and skills in Creative Arts (Fine Art & Crafts and Music)
1.2.2 Addressing cross- cutting issues
Among the changes in the competence-based curriculum, there is the integration of cross -cutting issues as an integral part of the teaching learning process. The eight cross-cutting issues identified in the national curriculum framework are the f`ollowing:
• Gender.
• Peace and values education.
• Financial education.
• Standardization culture.
• Inclusive education.
• Environment and sustainability.
• Genocide studies.
Some cross-cutting issues may seem specific or particular in Creative Arts (Fine Art & Crafts and Music) but the teacher needs to address all of them whenever
an opportunity arises. In addition, learners should always be given an opportunity during the learning process to address these cross-cutting issues both inside and outside the classroom.
This book of Creative Arts (Fine Art & Crafts and Music) has some learning activities through which some cross - cutting issues will be developed as shown in the table below:

1.2.3. Attention to special educational needs specific to this subject
In the classroom, learners learn in different ways depending 0n their learning pace, needs or any other special problem they might have. However, the teacher has the responsibility to know how to adopt methodologies and approaches in order to meet the learning needs of each student in the classroom. Also, teachers need to understand that learners with special needs need to be taught differently or need some accommodations to enhance the learning environment. This will be done depending on the subject and the nature of the lesson.
In order to create a well-rounded learning atmosphere, teachers need to:
• Remember that learners learn in different ways so they have to offer a variety of activities (e.g. role-play, music and singing, word games and quizzes, outdoor activities and practical works).
• Maintain an organized classroom (art rooms) and limit distraction. This will help learners with special needs to stay on track during lessons and follow instructions easily.
• Vary the pace of teaching to meet the needs of each learner. Some learners process information and learn more slowly than others.
• Break down instructions into smaller, manageable tasks. Learners with special needs often have difficulty in understanding long-winded or several instructions at once. It is better to use simple, concrete sentences in order to facilitate them understand what you are asking.
• Use clear consistent language to explain the meaning and demonstrate or show pictures if you introduce new words or concepts.
• Make full use of facial expressions, gestures and body language.
Pair a learner who has a disability with a friend. Let them do things together and learn from each other. Make sure the friend is not over protective and does not do everything. Both learners will benefit from this strategy.
• Use multi-sensory strategies. As all learners learn in different ways, it is important to make every lesson as multi-sensory as possible. Learners with learning disabilities might have difficulty in one area while they might excel in another. For example, use both visual and auditory cues.
Below are general strategies related to each main category of disabilities and how to deal with every situation that may arise in the classroom. However, the list is not exhaustive because each learner is unique with different needs and that should be handled differently.
Strategies to help a learner with developmental impairment:
Use simple words and sentences when giving instructions.
• Use real objects that the learner can feel and handle. Rather than just working abstractly with pen and paper
Break a task down into small steps or learning objectives. The learner should start with an activity that s/he can do already before moving on to something that is more difficult.
• Gradually give the learner less help.
• Let the learner work in the same group with those without disability.
In the subject of Creative Arts (Fine Art & Crafts and Music), you should get more information by:
• Using internet and a Library.
• Creating a School Library.
• Collecting data through observation.
• Looking for art materials from the nearest environment.
Strategies to help a learner with visual impairment:
• Help learners to use their other senses (hearing, touching, smelling and tasting) to play and carry out activities that will promote their learning and development.
• Use simple, clear and consistent language.
• Use tactile objects to help explain a concept.
• If the learner has some sight, ask them what they can see.
• Make sure the learner has a group of friends who are helpful and who allow him/ her to be as independent as possible.
• Plan activities so that learners work in pairs or groups whenever possible.
Strategies to help a learner with hearing impairment:
• Strategies to help learners with hearing disabilities or communication difficulties.
• Always get the learner’s attention before you begin to speak.
• Encourage the learner to look at your face.
• Use gestures, body language and facial expressions.
• Use pictures and objects as much as possible.
• Ask the parents/caregivers to show you the signs they use at home for communication use the same signs yourself and encourage other learners to also use them.
• Keep background noise to a minimum.
Strategies to help a learner with physical disabilities or mobility difficulties:
• Adapt activities so that learners who use wheelchairs or other mobility aids and other learners who have difficulty in moving can participate.
• Ask parents/caregivers to assist with adapting furniture e.g. The height of a table may need to be changed to make it easier for a learner to reach it or fit their legs or wheelchair.
• Get advice from parents or a health professional about assistive devices.
Adaptation of assessment strategies:
Each unit in the teacher’s guide provides additional activities to help learners achieve the key unit competence. Results from assessment inform the teacher which learner needs remedial, consolidation or extension activities. These activities are designed to cater for the needs of all categories of learners; slow, average and gifted learners respectively.
• Easy activities should be given to learners with physical and mental disabilities
• Use tangible materials and textual for learners with visual impairment.
During the assessment activities of this subject of Creative Arts (Fine Art & Crafts and Music)), the teacher has to take into consideration the visually impaired learners so that the tasks to be given can match with the level of visual impairment of the learners in the classroom.
1.2.4. Guidance on assessment
Assessment is an integral part of teaching and learning process. The main purpose of assessment is for improvement. Assessment for learning/ continuous/ formative assessment intends to improve learners’ learning and teacher’s teaching whereas assessment of learning/summative assessment intends to improve the entire school’s performance and education system in general.
1.2.4. a. Continuous/ formative assessment
An ongoing process arises out of interaction during teaching and learning. It includes lesson evaluation and end of sub unit assessment. This formative assessment should play a big role in teaching and learning process.
The teacher should encourage individual, peer and group evaluation of the work done in the classroom and uses appropriate competence-based assessment approaches and methods.
In this subject of Creative Arts (Fine Art & Crafts and Music), there are learning activities which help learners to acquire knowledge and skills in right ways. This helps learners for learning progress on different lessons.
This type of assessment is done prior to or during instruction and is intended to inform teachers about the learners’ prior knowledge and skills, in order to assist with planning. It is used to make judgments about different aspects, which includes learners’ grouping, unit and lesson plans and instructional strategies.
The teacher will assess how well each learner masters both the subject and the generic competencies described in the syllabus, and from this, the teacher will gain a picture of the all-round progress of the learner. The teacher will use one or a combination of the following: (a) observation (b) pen and paper (c) oral questioning.
1.2.4. b. Summative assessment
The assessment can serve as summative or formative depending on its purpose. The end of the unit assessment will be considered as summative when it is done at the end of the unit.
It will be formative assessment, when it is done in order to give information on the progress of students and from there decide what adjustments need to be done.
The assessment done at the end of the term and end of the year is considered as a summative assessment. It makes the teacher, school and parents informed of the achievement of educational objectives and think about improvement strategies. There is also an end of level/ cycle assessment in form of national examinations.
Assigning students grades is an important component of teaching for ending unit assessment as well as final term exams. Assessments are emphasized on:
• Skills
• knowledge
• Value
• Attitudes
1.2.5. Pupils’’ learning styles and strategies to conduct teaching and learning process
There are different teaching styles and techniques that should be catered for. The selection of teaching method should be done with the greatest care and some of the factors to be considered are; the uniqueness of subjects, the type of lessons, the particular learning objectives to be achieved, the allocated time to achieve the objectives, the instructional materials available, the physical/sitting arrangement of the classroom, the individual students’ needs, the abilities and learning styles.
There are mainly four different learning styles as explained below:
Active and reflective learners
Active leaners tend to retain and understand information best by doing something actively with it, discussing or applying it and explaining it to others. Reflective learners prefer to think about it quietly first. Sensing and intuitive learners Sensing learners tend to like learning facts whereas intuitive learners often prefer discovering possibilities and relationships. Sensing learners often like solving problems by well-established methods and dislike complications and surprises, while intuitive learners like innovation and dislike repetition. Visual and verbal learners Visual learners remember best what they see i.e. Pictures, diagrams, flow charts, time lines, films, demonstrations, etc. Verbal learners get more out of written words and spoken explanations.
Visual and verbal learners
Visual learners remember best what they see i.e. Pictures, diagrams, flow charts, time lines, films, demonstrations, etc. Verbal learners get more out of written words and spoken explanations.
Sequential and global learners
Sequential learners tend to gain understanding in linear steps, each step following logically the previous one. Global learners tend to learn in large jumps, absorbing material almost randomly without seeing connections, and then suddenly “getting it.”
Additional activities can be added for learners who are quick and extensional activities for those who are slow.
1.2.6. Teaching methods and techniques that promote the active learning
The different student learning styles mentioned above can be catered for, if the teacher uses active learning whereby learners are really engaged in the learning process.
What is Active learning?
Active learning is a pedagogical approach that engages students in doing things and thinking about the things they are doing. In active learning, learners are encouraged to bring their own experience and knowledge into the learning process.
The role of the teacher in active learning
The teacher engages learners through active learning methods such as inquiry methods, group discussions, research, investigative activities and group and individual work activities.
• He/she encourages individual, peer and group evaluation of the work done in the classroom and uses appropriate competence-based assessment approaches and methods
• He provides supervised opportunities for learners to develop different competences by giving tasks that enhance critical thinking, problem solving, research, creativity and innovation, communication and cooperation
• Teacher supports and facilitates the learning process by valuing learners’ contributions in the class activities
The role of learners in active learning
Learners are key in the active learning process. They are not empty vessels to fill but people with ideas, capacity and skills to build on for effective learning.
A learner engaged in active learning:
• Communicates and shares relevant information with other learners through presentations, discussions, group work and other learner-centered activities (role play, case studies, project work, research and investigation)
• Actively participates and takes responsibility for their own learning
• Develops knowledge and skills in active ways • Carries out research/investigation by consulting print or online documents and resourceful people, and presents his findings
• Ensures the effective contribution of each group member in assigned tasks through clear explanation and arguments, critical thinking, responsibility and confidence in public speaking
• Draws conclusions based on the findings from the learning activities
1.2.7. Main steps for a lesson in active learning approach
All the principles and characteristics of the active learning process highlighted above are reflected in steps of a lesson as displayed below. Generally, the lesson is divided into three main parts whereby each one is divided into smaller steps to make sure that learners are involved in the learning process. Below are those main parts and their small steps:
a. Introduction
Introduction is a part where the teacher makes connection between the current and previous lesson through appropriate technique. The teacher opens short discussions to encourage learners to think about the previous learning experience and connect it with the current instructional objective. The teacher reviews the prior knowledge, skills and attitudes, which have a link with the new concepts to create good foundation and logical sequencings.
b. Lesson Development
The development of a lesson that introduces a new concept will go through the following small steps; discovery activities, presentation of learners’ findings, exploitation, synthesis/summary and exercises/application activities explained below:
b.1. Discovery activity
Step 1
• The teacher discusses convincingly with students to take responsibility of their learning.
• He/she distributes the task/activity and gives instructions related to the tasks (working in groups, pairs, or individual to instigate collaborative learning, to discover what to be learned).
Step 2
•The teacher lets the students work collaboratively on the task.
• During this period the teacher refrains from intervening directly on the knowledge.
• He/she then monitors how the students are progressing towards the knowledge to be learned and boost those who are still behind (but without communicating to them the knowledge)
b.2. Presentation of learners’ productions
• In this episode, the teacher invites representatives of groups to present
the students’ productions/findings
• After three/four or an acceptable number of presentations, the teacher decides to engage the class into exploitation of the students’ productions
b.3. Exploitation of learner’s productions
• The teacher asks the students to evaluate the productions i.e. which ones are correct, incomplete or false
• Then the teacher judges the logic of the students ‘production, corrects those that are false, completes those that are incomplete and confirms those that correct.
b.4.Institutionalization (summary/conclusion/ and examples)
The teacher summarizes the learned knowledge and gives examples that illustrate the learned content.\
b.5. Exercises’/Application activities
• Exercises of applying processes and products/objects related to learned unit/ subunit. Exercises in real life contexts
• Teacher guides learners to make the connection of what they learnt to real life situations. At this level, the role of the teacher is to monitor the fixation of process and product/object being learned
c. Assessment
In this step, the teacher asks some questions to assess achievement of instructional objective.
• During the assessment activity, learners work individually on the task/activity.
• The teacher avoids intervening directly. In fact, results from this assessment inform the teacher on the next steps for the whole class and individuals.
• In some cases, the teacher can end with a homework assignment.
2. SAMPLE LESSON PLAN
The teacher’s guide provides more than one lesson plan taking into consideration the type of lesson in the subject using the CBC format. Teaching requires good preparation to be effective.
This is the only way that learning can be enhanced and assured. The teacher will find his/her work easier if she/he goes to class well prepared with the lesson content organized in a logical manner. Even the experienced Creative Arts (Fine Art & Crafts and Music) teacher needs a lesson plan in order to use the lesson time effectively.
Below is a sample of a lesson plan.
School name ………………………………………. Academic year: …………...
Teachers’ Name...…............................................

 Labels: 6
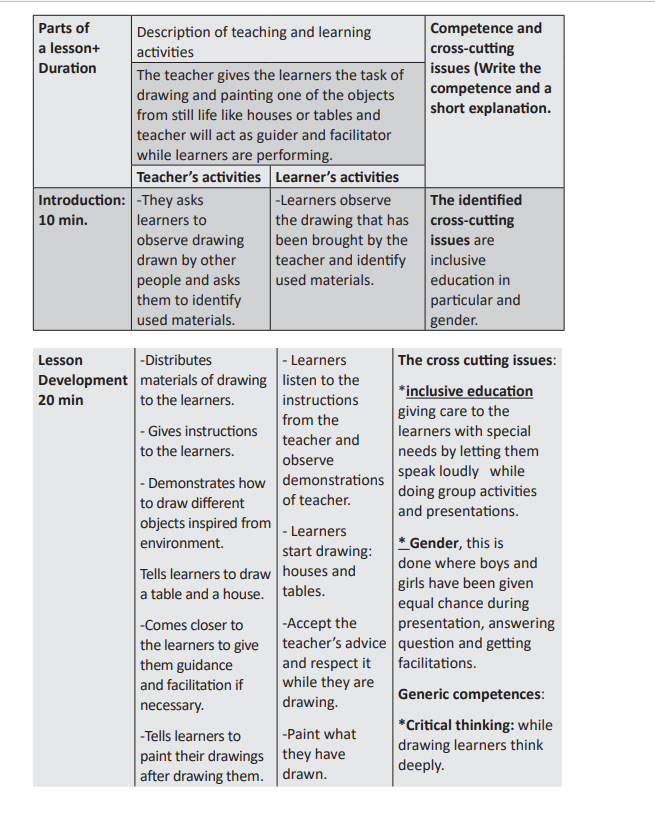
UNIT ONE: DRAWING AND PAINTING STILL LIFE AND NATURE
1 .1. Key unit competence
To be able to draw and paint objects with different shapes and polygons.
1.2. Prerequisite skills .
In this unit, the teacher should guide learners to apply the technique of drawing and painting using different tools. Let learners draw and paint still life elements and nature. In that activity, learners can discover the beauty of the surrounding. After being guided, they present the results and give comment on them in mutual respect.
1.3. Cross-cutting issues to be addressed
• Environment protection as learners draw still life elements and nature such as plants, insects and animals.
• Financial education whereby learners give importance to the tools because they cost money, hence they should not be expended carelessly.
1.4. Introducing the unit
In the introduction, the teacher asks learners shapes, still life and environmental elements they know and colors of the shapes.
1.5. Lessons to be taught

Lesson one: Drawing and painting objects of different shapes inspired from the surrounding.
a. Learning Objectives
• Draw and paint in different ways
• Appreciate the beauty of pictures made by the learner or by others basing on their characteristics.
b. Teaching and Learning Materials
• Pencil
• Colored pencils
• Rubber
• Sharpener
• Drawing paper
c. Learning techniques
• Individual work
• demonstration
• Group discussion
d. Methodology
Introduction
• Teacher shows drawings and paintings made by others to the learners and asks them to identify materials used and steps.
• Learners observe the materials and tools and exchange views on shapes found with them.
Lesson Development
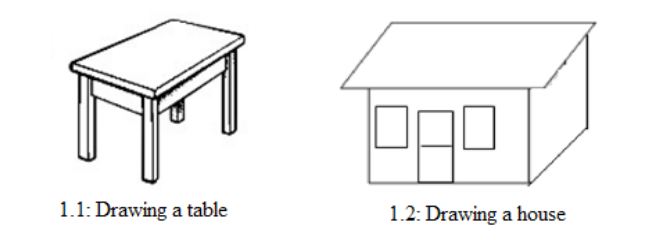
• Teacher distributes materials and gives instructions to the learners.
• Teacher demonstrates how to draw and paint objects with simple shapes.
• Learners observe the teacher’s demonstrations and ask some questions for better understanding.
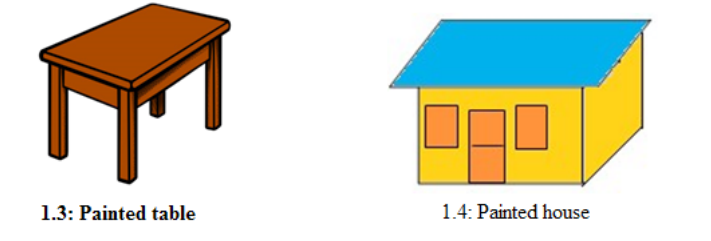
• Learners start drawing their own objects.
After drawing learners start paint finished drawing.
• Teacher invites learners to present pictures they have drawn.
• Invite learners to select the best pictures.
• Appreciate the work of learners.
• Teacher and learners arrange the materials and tools and to keep them properly.
ii. Drawing plants
• Teacher tells learners to get out of class and observe the surrounding.
• Teacher asks learners to exchange views on what they have seen in the surrounding, focusing on plants.
• Teacher demonstrates how to draw nature object.
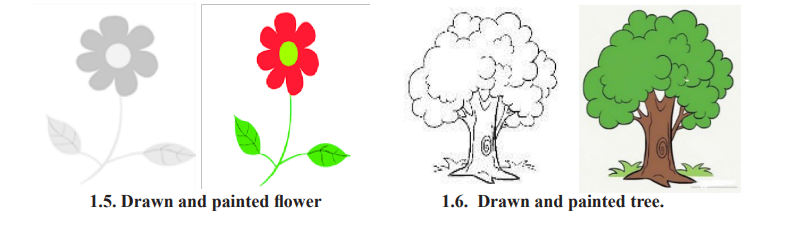
• Learners draw objects observed from the environment like (flowers, trees, leaves) and paint them using related colors.
• The teacher moves closer to each group to give them guidance and facilitation where necessary.
• The teacher invites learners to present their work such as the flower, the tree or the leaves.
• The teacher asks learners to select the best pictures.
• They appreciates pictures made by the learners.
iii. Drawing animals
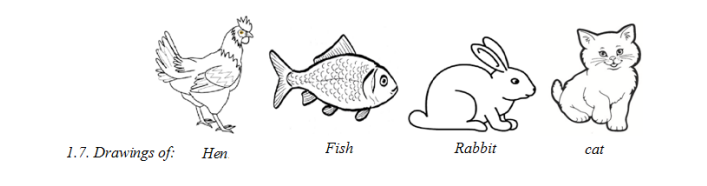
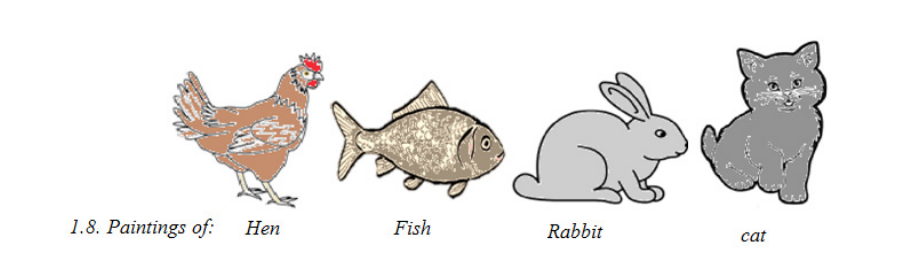
How the drawing lesson of bird, fish, rabbit, and cat is delivered • Take the learners in a place where they can see animals or be shown pictures of these animals( bird, fish, rabbit, cat) • Learners to draw animals they have seen.
The teacher;
• Comes closer to each group to give them advice
• Invites learners to present their pictures and to comment on them
• Invites learners to select the best pictures.
• Appreciates pictures made by the learners.
iv. Drawing a person
• Invites the learners in groups to exchange their views on pictures of a person they have seen.
• Tells learners to show parts of the human body
• Asks learners to draw a person
• Gives guidance and facilitation to the learners.
Assessment
• Tell learners to present their pictures and comment on them
• Invite learners to select the best pictures.
• Appreciate learners’ pictures.
• Learners make hygiene of used materials and working place
Lesson 2: Drawing and painting from memory objects inspired from environment.
a. Learning Objectives
• Drawing From observation and from objects with various shapes in the surroundings.
• Love and preserve nature.
b. Teaching and Learning Materials
• Colored pencils
• Rubber
• Sharpener
• Drawing paper
• Pencil.
c. Learning techniques
• Individual work
• Group work
• Group Discussion
• Trial.
• Demonstration
d. Methodology Introduction
• Learners get out of the classroom and observe the surrounding (plants, straw, flowers, trees….)
• Teacher asks learners objects they have observed and to name materials that can be used to draw them.
Lesson development
• Teacher distributes drawing and painting materials to learners and gives instructions to learners.
• Teacher demonstrates how to draw objects from observation
• Learners draw different plants and animals
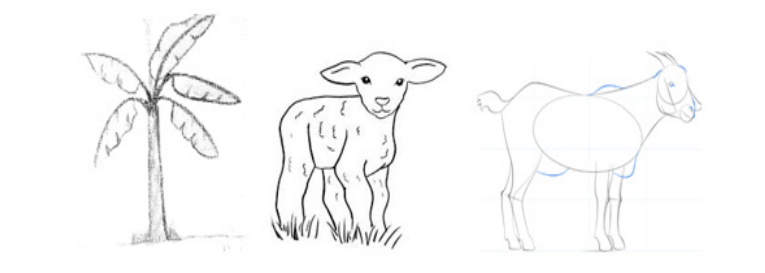
1.10. Drawing of: Banana Sheep Goat
• Invite learners to paint pictures they have made using related colors
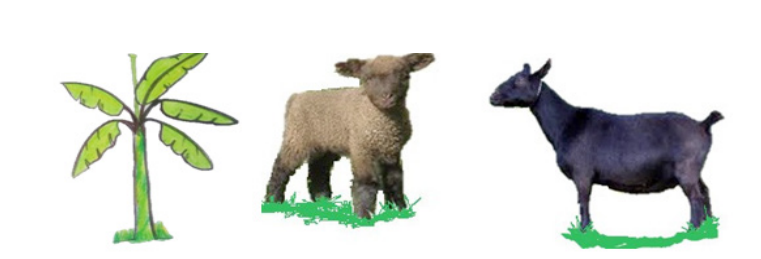
1.10. Painting of: Banana Sheep Goat
• Teacher come closer to each group of learners and advises them. • The teacher invite learners to present pictures they have made and comment on them.
Assessment
The teacher;
• Tells learners to present their pictures and comment on them
• Invites learners to select the best pictures.
• Appreciates learners’ pictures.
• Learners clean the used materials and working place
Lesson 3: Mixing paint from three basic colors a. Learning Objectives
• Teacher asks learner different colors they know and how we can find them.
• Learners say different colors and different ways we can get some new colors like mixing two different colors to create a new color. b. Teaching and Learning Materials
• Colored pencils
• Water color
• Oil paint
• Thinner
• Empty containers
• Sharpener
• Water
• brushes
• Drawing paper
• Pencil.
d. Methodology Introduction
• Teacher displays in front of the learners charts where there is a variety of colors printed on them.
• Learners name colors observed on charts.
Lesson Development
• Teacher distribute materials to the learners
• Teacher demonstrates how to mix different colors to create new colors.
• Learners start mixing primary colors in order to get secondary colors.
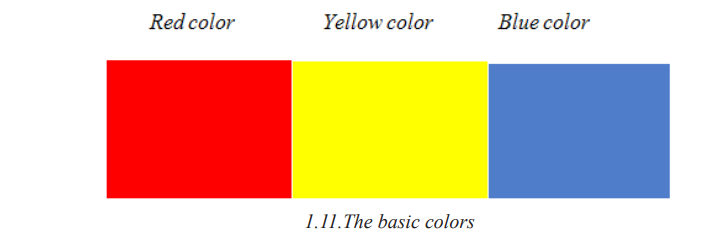
i. The three basic or primary colors are as follows
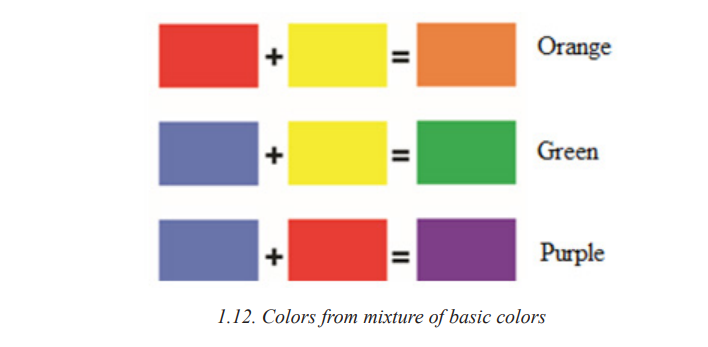
How mix two primary or basic colors for getting new second color
• The teacher invites learners to draw the orange using two colors at secondary level( green color and orange)
Assessment
• Tell learners to present their drawings
• Learners appreciate good paintings
• Learners clean up their work place and the used materials
Lesson 4: Types of colors that change the look of others and their use
a. Learning Objectives
• Tell the use of different colors on artworks
• Drawing and painting in different ways
• Appreciate the beauty of drawings basing on the characteristics of what he/ she has made or that were made by others.
b. Teaching and Learning Materials
• Pencil
• Colored pencils
• Brush
• Paint ( black and white)
• Drawing paper
• Rubber
• Sharpener
• Circle of colors.
• Empty containers.
2. Methodology Introduction
• Teacher display in front of learners charts where there is a variety of colors with light and darker value printed on them.
• Learner names colors observed on charts.
Lesson Development
• Invite learners to use colors that change the look of other colors drawing step by step, from black to white and from white to black.

Teacher tells learners to mix black or white with other colors so that they may get colors with different value.
Assessment
• Tell learners to present their drawings
• Learners appreciate good paintings
• Learners tidy the work place and used materials
1.6. End of Unit One
assessment
• Draw the flower, a leaf and the rabbit
• Invite learners to draw plants using colors found in the surrounding
• Ask learners to draw using the mixture of basic colors
•Tell learners to mix colors that change the look of other colors.
1.7. Additional activities
• Draw and paint one of the objects from home using different colors that present light and darker value.
UNIT TWO: : PRINT MAKING
2.1. Key unit competence
To be able to design picture and print it on surfaces using various materials and tools.
2 .2 .Prerequisite skills
In this unit, the teacher should be able to guide learners apply the technique of print making, using different materials found in their community. Let learners print make using real materials and tools found in their community. In this activity, learners can appreciate the beauty of nature. After, he/she guides them to present their work and comment on it with respect.
2.3. Cross-cutting issues to be addressed
• Taking care of every learner focusing on their specificity; one who can’t use the hand in paint to print make will use the foot, for example.
• Environmental protection as learners print make pictures from the surrounding such as leaves, straw, and so on.
• . Financial education since learners give importance to the tools used and not misuse.
2.4. Introducing the unit
To introduce the print making lesson, the teacher can bring teaching and learning materials. This means a simple print made tissue learners can get, then he/she tells them that they should print the same.
2.5. Lessons to be taught

Lesson 1: Print making using simple materials
a. Learning Objectives The learner should be able to:
• Select different materials and techniques used in printmaking.
• Use materials for printmaking.
• Appreciate the beauty of print made materials and tools.
b. Teaching and Learning Materials
• Materials used to draw and print make
• Pencil
• A drawing paper or a tissue
• A cutting tools
• Paint
• Rubber.
• block
c. Methodology
Introduction
• Teacher shows to the learners some prints made by others.
• Teacher asks learners to identify materials used to print the observed prints.
• Learners mention materials used for making observed print.
Lesson Development
• Teacher distributes materials for printing to the learners.
• Teacher gives instructions to the learners.
• Teacher demonstrates how to make print making using basic materials.
• Learners start making their own prints using a leaf, the hand and paint.

• Teacher moves around learners for providing guidance and facilitation where necessary.
• Learners finish their work
Assessment
• Ask learners to present print made papers
• Invite groups to select the best print made papers basing on the given instructional objectives
. • Appreciate the work done by the learners
• Cleaning and keeping well print made materials and tools
Lesson 2: Applying patterns on small fabric with different materials inspired from the surrounding and having different shapes.
a. Learning Objectives
The learner will be able to:
• Show the techniques used to print make pictures and colors on materials and tools.
• Design pictures using different materials.
• Appreciate the beauty of print made pictures.
b. Teaching and Learning Materials Materials used to draw and print make.
• Tissue
• Paint
• Leaf
• Maize stem
• Bottle tops
c. Methodology
Introduction
Invite learners in groups to discuss about different pictures they see on clothes
Lesson Development
• The teacher distributes materials for printing to the learners.
• The teacher gives instructions to the learners.
• The teacher demonstrates how to make print making using basic materials.
• Learners start making their own prints using a leaf, the hand and paint.
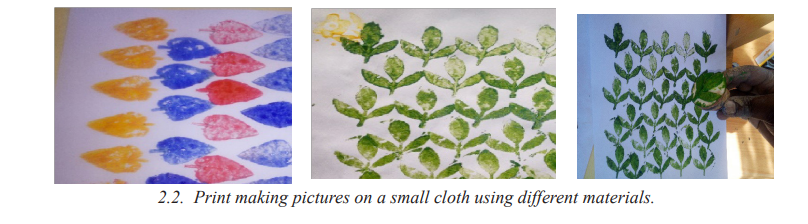
• The invites learners in groups to print make on small pieces of cloth using materials found in their community.
• The teacher moves closer to each group for assistance where necessary and to advise them.
Assessment
• Invite learners to present the print made pieces of cloth.
• Invite learners in groups to select the best printed pieces of cloth basing on the given instructional objectives.
• Appreciate the work done by learners.
• Invite learners to clean the materials and to keep them well.
Lesson 3: Prepare and print a design of images observed from others prints.
a. Learning Objectives The learner will be able to:
• Select materials and different techniques used in print making.
• Design pictures using different materials. • Appreciate the beauty of print made materials.
b. Teaching and Learning Materials
• Materials used to draw and to print make
• Cloth
• Paint
• Leaf
• Picture of car
• Bottle cap
c. Methodology Introduction
• The teacher invites learners to observe pictures of people who are making design to be used for print make.
• Learners name used materials.
Lesson Development
• The teacher distributes materials for printing to the learners.
• The teacher gives instructions to the learners.
• The teacher demonstrates how to make design for print making.
• Each Learner starts make designs for print making.
• Learners start making their own print making.

• The teacher moves closer to each group and advises them.
• Learners finish their work
2.6. End of Unit Two assessment
• Ask learners to design decorative pattern to be printed on a fabric.
• Invite learners to make prints using different materials found in their community.
2.7. Additional activities
• Invite learners to make prints on pieces of cloth using materials they have been given.
UNIT THREE: BUILDING CLAY FIGURES
3.1. Key unit competence
To be able to model figures of one’s choice using different materials.
3.2. Prerequisite skills
In this unit, the teacher should be able to guide learners apply techniques used in shaping different materials and tools using red soil ( inombe) or clay. Let learners shape pictures using different materials found in their community. In such an activity, they use red soil ( inombe) or clay. As a result, learners can appreciate the beauty of nature.
3.3. Cross-cutting issues to be addressed
• Environmental protection as learners are shaping
• Financial education whereby learners give importance to the tools because they cost money, hence they should not be expended carelessly.
• Taking care of every learner focusing on their specificity.
3.4. Introducing the unit
To introduce the unit on shaping pictures with substantial thickness, the teacher can bring Teaching and Learning Materials, i.e. different simple materials and tools related to the ones learners are able to get; he/she asks them if they can identify which material they are made of and then tells them to proceed the same way.
3.5. Lessons to be taught
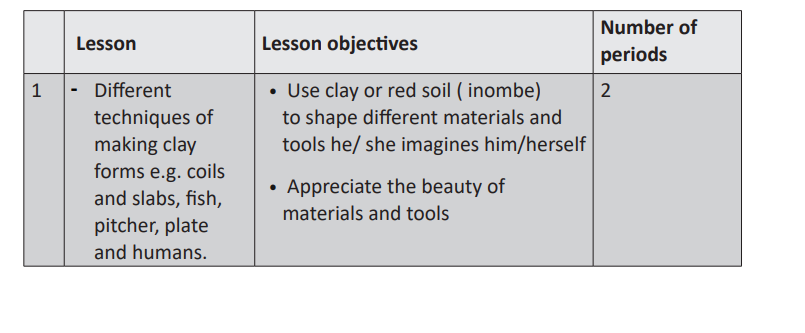
Lesson 1: Different techniques of making clay forms e.g. coils and slabs e.g. fish, pitcher, plate and humans.
a. Learning Objectives
• Use clay or red soil (inombe) to shape fish, a small pot, a plate, people or different other materials and tools imagined by him/herself.
• Perform and appreciate the beauty of materials and tools.
b. Teaching and Learning Materials
• Materials used to design pictures with substantial thickness.
• Ordinary clay and plasticize.
c. Methodology
Introduction
• Teacher displays some pictures of persons who are modeling clay figures.
• Teacher asks learners materials to be used for modeling and to differentiate used techniques.
• Learners answer asked questions by mentioning the used techniques such as coiling and slab making
Lesson Development
• The teacher distributes materials for modeling to the learners.
• The teacher gives instructions to the learners.
• The teacher demonstrates how to use coiling technique for modeling.
• Each Learner starts modeling using wished techniques.

Learners Finish modeling
Assessment
• Invite learners in groups to present pictures they have modeled.
• Invite learners to select the best modeled form.
• Appreciate the work done by learners.
• Clean the place and the materials they have used and keep these materials.
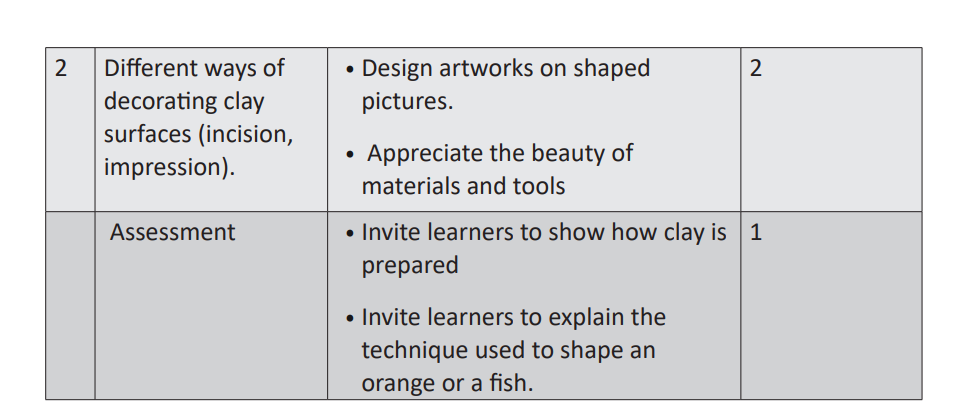
Lesson 2: Different ways of decorating clay surfaces (incision, impression)
a. Learning Objectives
• Draw up artworks on pictures with substantial thickness using different materials.
• Appreciate the beauty of an object made by him/her or by others.
b. Teaching and Learning Materials
• Stone clay
• Stick
• Brush
• Stone
• Clay
• Bottle cap
• Pen
• Knife
C. Methodology
Introduction
• The teacher displays some pictures of persons who are decorating clay figure
• The teacher asks learners materials to be used for decoration and to differentiate used techniques.
• Learners answer asked questions by mentioning the used techniques such as incision and impression
Lesson Development
• The teacher distributes materials for modeling and decorating clay figures to the learners.
• The teacher gives instructions to the learners.
• The teacher demonstrates how to use incision and impression techniques of decorating clay figures.
• Each Learner starts modeling using wished techniques.

Assessment
• Invite learners to display decorated forms.
• Invite group of learners to select the best decorated pictures and materials and tools
• Appreciate the work done by learners
• Clean the place and the materials they have used and keep these materials well.
3.6. End Unit assessment
• Ask learners to model plates.
• Ask learners to decorate modeled plates.
3.7. Additional activities
• Modeling on your choice any home materials and decorating it.
UNIT FOUR: WEAVE USING DIFFERENT MATERIALS AND TOOLS FROM THE SURROUNDING.
4.1. Key unit competence
To be able to weave various articles using different materials and tools from the surrounding.
4.2. Prerequisite skills
In this unit, the teacher should be able to guide learners apply the techniques used to make up different materials and tools such as fabricating a ball, a small basket, etc. In this kind of activity, they use different materials found in their community. Thus, learners can appreciate the beauty of nature. After that, the teacher guides them to present their work and to exchange views on it.
Cross-cutting issues to be addressed
• Environment protection as learners make their materials.
• Financial education since they make their own materials without spending money to buy them, hence they should not be expended carelessly.
• Taking care of every learner focusing on their specificity.
4.4. Introducing the unit
To introduce this unit entitled “Textile Decoration”, the teacher can bring Teaching and Learning Materials. This means simply made materials related to what learners are able to get, and he/she asks them to identify the material they are made of., The teacher also tells the learners that they are going to proceed the same way. Thereafter, they exchange views on the importance of weaved materials and tools, in everyday life.
4.5. Lessons to be taught
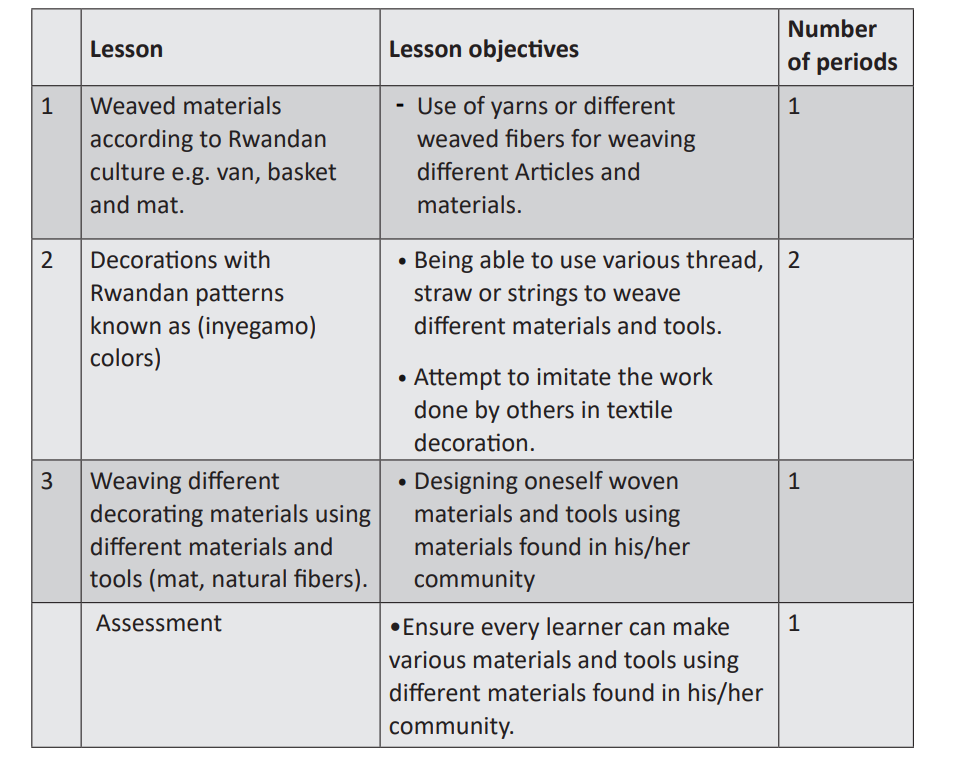
Lesson 1: Weaved materials according to Rwandan culture e.g. van, basket and mat
a. Learning Objectives
• Use thread, different fibers or other materials found in learners’ community to make different materials and tools.
• Appreciate the beauty of materials and tools.
b. Teaching and Learning Materials
• Home woven materials.
• All sorts of straw thatch and natural fibers such as; bamboo, sisal, cactus, papyrus, banana fibers, ubukangaga, ubunyundo, ubusuna, ubuhivu, ishinge, intamyi, imamfu, intaratare, iminaba…
• Thread.
• Needle
• Rwandan iron traditional needle.
c. Methodology
Introduction
• Teacher asks learners to give example of weaved materials found home.
• Learners list weaved materials found at their home
Lesson Development
• The teacher distributes materials for weaving to the learners.
• The teacher gives instructions to the learners.
• The teacher demonstrates how to weave one of materials used in Rwandan culture.
• Learners start weaving basket.

Assessment
• Invite learners to present the basket or the van they have made
• Invite learners in groups to select the best woven materials and tools basing on the given instructional objective.
• The teacher comes closer to each group to help them where necessary, and to advise them.
• Cleaning the place, the materials used and keep these materials well.
Lesson 2: Weaving different artworks using various materials
a. Learning Objectives The learner will be able to:
• Name different woven materials and tools, basing on Rwandan culture (Van, basket, windscreen, colored artworks, etc.,)
• Imitate the work done by others in textile decoration
• Appreciate the beauty of the materials and tools and advise learners.
b. Teaching and Learning Materials
• Home woven materials and tools.
• All sorts of straw thatch and natural fibers such as: bamboo, sisal, cactus, papyrus, banana fibers, ubukangaga, ubunyundo, ubusuna, ubuhivu, ishinge, intamyi, imamfu, intaratare, iminaba, etc…
• Thread
• Needle
• Rwandan iron traditional needle.
c. Methodology
Introduction
• Invite learners in groups to share ideas on Rwandan artworks (characteristics and techniques of making artworks).
Lesson Development
• Ask learners to prepare materials used to weave mats and windscreens
• Invite learners to start weaving mats or windscreens
• Invite learners in groups to stick artworks on mats and windscreens Invite learners to weave a mat and a windscreen using materials found in their community
Come closer to each group and give help and advice where necessary

Assessment
• Invite learners to explain the technique of weaving a mat or a windscreen and how to stick artworks on them.
• Tell learners to select the best woven mats or windscreens.
• Appreciate the work done by learners and give them advice where necessary.
• Clean the place and the materials they have used and keep these materials well.
4.6. End of unit 4 assessment
• Ask learners to weave a mat.
• Invite learners to weave a basket.
• Invite learners to weave decorative objects.
4.7. Additional activities
• Weaving hat.
• Invite learners to weave a windscreen.
UNIT FIVE: PUPPETRY AND COLLAGE MAKING WORK
5.1. Key unit competence
To be able to make different puppets and making new collage work.
5.2. Prerequisite skills
In the units preceding this one, the learners studied the main objectives and different shapes in Drawing and Textile Decoration. , and he/she drew some of the materials and tools found in the environment. The learner also acquired the competence of selecting the materials found in his/her community, and was taught how to protect the environment. To make puppets and collage, the learner will use skills mentioned above.
5.3. Cross-cutting issues to be addressed
Materials used by the learner in this unit to make puppets and collage are selected from the surrounding, thus he/she should protect them as they are sources of life as well as the sources from which we get elements we use in our daily life. In addition, when the teacher helps learners to form the groups, he/she ensures that both boys and girls are represented, hence gender balance is respected. Another cross cutting issue found in his unit is inclusive education as the teacher should pay special attention to learners with disabilities.
5.4. Introducing the unit
To show learners different puppets and invite them to exchange views on them basing on their objectives as well as on the materials used to make them. To show learners different pictures including stuck ones, and ask learners to differentiate between them giving ideas on the characteristics of the materials used in making such pictures.
5.5. Lessons to be taught

Lesson 1: Collage of diverse materials and tools to make pictures
A. Learning Objectives
• Collage of materials and tools imitating diverse pictures made by others.
• Mention the technique used to stick useless materials and tools and others from which puppets are made, or stuck pictures.
• Utilize materials and tools and appreciate the beauty of materials and tools made.
b. Teaching and Learning Materials
• Syllabus
• Paper
• Pencil
• Pictures
• Materials from the surrounding
• Cutting materials
• Glue.
c. Methodology
Introduction
• The teacher distributes to the learners some art work made using collage technique and lets them make guided observation.
• Learners mention used materials and steps.
Lesson Development
• The teacher distributes materials for weaving to the learners.
• The teacher gives instructions to the learners.
• The teacher demonstrates how to make collage by sticking together different articles.
• The teacher tells learners to prepare the materials used in collage.
• Learners start making collage work.
• The teacher moves closer to each group to help learners where necessary, and to advise them.

Assessment
• Invite learners in groups to present pictures they have made using collage technique.
• Ask learners in groups to select the best pictures
• Appreciate the work done by learners
• Clean the place and the materials they have used and then keep the materials well.
Lesson 2: Create puppets inspired from the surrounding using different materials
a. Learning Objectives
• Assemble different articles for making puppets
• Love and protect well nature.
b. Teaching and Learning Materials
• Materials found in the surrounding
. • Tools for cutting.
• Fibers
c. Methodology
Introduction
• The teacher shows the learners puppets made in different ways, by using diverse materials and asks them to share their views on them.
• Learners share ideas about materials that have been used to make puppet.
Lesson Development
• Teacher distributes materials that will used to make puppets.
• The teacher gives instructions to the learners.
• The teacher demonstrates how to make puppet using recycled different articles.
• The teacher invites learners to prepare materials found in the surrounding used to make different puppets.
• The teacher tells the learners to make a ball using materials found in their community.
• The teacher invites learners to make different puppets related to the surrounding (a little animal for example, etc.)
• The teacher moves closer to each group to help them where necessary, and advises them.

Assessment
• The teacher tells learners to present their puppets made and exchange ideas on how they are made.
• The teacher tells groups of learners to select the best pictures.
• The teacher appreciates the work done by learners.
• The learners clean up the place and the materials they have used and then keep the materials well.
5.6. End of unit 5 assessment
• Tell the learners to make a picture of rabbit using the technique of collage.
• Ask learners to make the puppet of a bird from pieces of fabrics.
5.7. Additional activities
Invite learners to apply the technique of collage to make a car Tell learners to recycle pieces of fabrics to make little animals.
UNIT SIX: EMBROIDERY
6.1. Key unit competence
To be able to manipulate different tools and materials to make different embroidery patterns on textiles.
6.2. Prerequisite skills
In this unit, we may use examples from many elements seen in the previous units especially in Drawing and Painting still life elements and nature. As far as weaving and decorating pieces of cloth is concerned, the learner will use the technique of drawing diverse fashions on clothes. Also, concerning the selection of colors, the learner may use colors he/ she used in the lessons on painting.
6.3. Cross-cutting issues to be addressed
In this unit, special attention will be given to learners with hearing and speech disabilities by placing them to the front near the teacher so that they can assist them particularly, explaining to them using signs and pictures. In addition, as the teacher is helping learners to form the groups, he/she should take into account the fact that both boys and girls are represented, hence gender balance is respected.
6.4. Introducing the unit
• Showing learners weaved pieces of cloth used to decorate the sitting room and ask them to exchange them basing on the objectives, their characteristics and colors of artwork.
• Tell learners to prepare the materials and start weaving diverse fashions using pictures made from the surrounding.
6.5 . Lessons to be taught
Lesson 1: Different techniques of making embroidery designs on fabrics.
a. Learning Objectives
• Select different materials used to weave clothes
• Making different simple artworks used in weaving and decorating
b. Teaching and Learning Materials
• Pencil
• Weaved clothes
• Thread in different colors
• Paper
• Small fabrics,
• Needle.
c. Methodology
Introduction
• The teacher shows to the learners some embroidery made by other and learners mention used materials and steps.
• The teacher tells learners to observe end exchange views on embroidery products.
Lesson Development The teacher;
• Distributes materials that will be used to make puppets. Gives instructions to the learners.
• Demonstrates how to make embroidery design on fabric.
• Invites learners to sketch where they are going to put embroidery design.
• Tells learners to start making embroidery stitches on fabric.
• Moves closer to each group to give help where necessary and to give advice.
Assessment
• Invite learners in groups to present their embroidery stitches and to share views on them.
• Tell groups of learners to select the most well weaved clothes
• Appreciate the work done by learners and to advise them on what went wrong
• Clean the place and the materials they have used and keep these materials well.
Lesson 2: The technique of fixing a button and its hole stitches.
a. Learning Objectives
• Name different techniques used to fix a button and to decorate.
• Make diverse simple artworks used in weaving and decorating
b. Teaching and Learning Materials
• Pencil
• Thread
• Small tissues
• Needle
• Cutting materials.
c. Methodology
Introduction
• Ask learners to tell if they know where buttons are fixed.
• Invite learners to prepare the materials at the same time inserting the thread in the needle.
Lesson Development
• Provide learners with instructions of how the button is fixed.
• Invite learners to use the thread and the needle as they are fixing a button following the instructions of the teacher.
• The teacher comes closer to each group to advise them and to assist them where necessary
• Show learners how to make and weave the button hole
• Make and weave the button hole
• The technique of the button hole and fixing the button
• The technique of the button hole and fixing the button
• Tinishing button hole
Assessment
• Invite learners in groups to present pieces of cloth where they have fixed a button end weaved its button hole.
• Tell learners in groups to select buttoned pieces of cloth and well weaved button holes.
• Appreciate the work done by learners and guide them where they did not perform well.
• Clean the place and the materials they have used and then keep the materials well.
Lesson 3: Techniques of weaving using pictures from the surrounding a. Learning activities
• Design other artworks basing on elements found in the surrounding for making embroidery design.
• Appreciate the beauty of various artworks in ordinary life.
b. Teaching and Learning Materials
• Pencil
• Paper
• Colored thread
• Small pieces of cloth
• Different kinds of needle
• Cutting materials.
c. Methodology
Introduction
• The teacher shows to learners some embroidery made by other people and learners mention used materials and steps.
• The teacher tells the learners to observe end exchange views on embroidery products.
Lesson Development
• The teacher distributes materials that will used to make puppets.
• The teacher gives instructions to the learners.
• The teacher demonstrates how to make embroidery design on fabric.
• Let learners think object from environment they are going to design for making it embroidery.
• Learners sketch where they are going to put embroidery design.
• Learners to start making embroidery on fabric.
• The teacher moves closer to each group to help where necessary, and to give advice.
Assessment
• The teacher invites learners to present made embroidery design of objects inspired from the surroundings.
• Ask learners in groups to select well designed embroidery.
• Ask learners to arrange the materials and to keep them well.
6.6. End of unit 6 assessment
• The teacher invites learners to make embroidery design of a drum on a fabric.
• The teacher invites learners to make embroidery design of a bird on a fabric.
6.7. Additional activities
• The teacher invites learners to make embroidery design of a tree on a fabric.
REFERENCES
a. Mock, R. (1955). Principles of Art Teaching; 1st Edition, University of London Press, England.
b. Elizabeth K. E. (2010). Distinction, Creative Arts, year 2, Kenya Literature Bureau, Nairobi.
c. Elizabeth K. E. (2010). Distinction, Creative Arts, year1, Kenya Literature Bureau, Nairobi. d. Obonyo O.
D., Elizabeth C. (2008). Art and Design forms one and two, East African Educational Publishers.
e. Richard H., Art & Design, French’s road, Cambridge CB43NP, Pearson Publishing.
f. Baker A. (2010). Fundamentals Graphic Art, Trinity Books Ltd, Uganda.
g. Minisiteri y’Uburezi, Ikigo Gishinzwe Integanyanyigisho (2015). Integanyanyigisho y’ubugeni mberajisho mu kiciro cya mbere cy’amashuri abanza. Kigali