UNIT 4 : FODDER
4.1 Learning Objectives
Key Unit Competence:
Learners should be able to successfully conduct cultivation of fodder grasses.
(i) Knowledge and understanding
• Define the fodder grasses.
• Discuss the importance of fodder grasses.
• Explain propagation methods of fodder grasses.
• Express cultural practices done on fodder grasses.
(ii) Skills
• Perceive the fodder grasses grown in school surrounding.
• Recognise the importance of fodder grasses grown in Rwanda.
• Stand for propagation methods of fodder grasses.
• Conduct fodder grasses’ cultivation.
(iii) Attitudes and values
• Agree with the colleagues to the fodder grasses cultivated.
• Appraise the importance of fodder grasses.
• Take care while searching the methods of propagation of fodder grasses.
• Be careful when conducting cultural activities.
Introduction
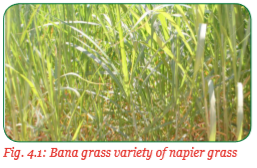
Livestock feed is one of the most important factor to consider when choosing a livestock enterprise. Livestock feed consists of 75 per cent plant materials in form of foliage. This foliage includes fodder and pastures. Land for pasture supply is increasingly becoming smaller due to population pressure. Livestock farmers, therefore, are forced to divide the limited food crop land with the growing of fodder for livestock. This is more so, for dairy farmers who require a continuous supply of high quality fodder for their livestock. Cultivated fodder grasses such as Napier, Guatemala, Brachiaria, Columbus and Sudan grass as well as multipurpose cereal fodder crops which include maize, oats, pearl or bulrush millet, offer the best alternative to natural pastures. Good fodder production systems start with improved varieties of fodder grasses; proper management in the field, harvesting at the right stage and proper conservation systems. This unit discusses different types of fodder grasses. The photographs below illustrate different statements:
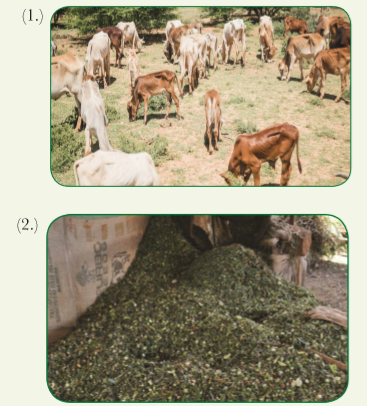
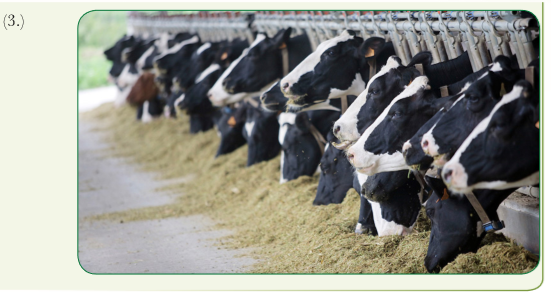
Observe them and carryout the following activities:
(i) Explain what is happening in photographs 1, 2 and 3 above.
(ii) Find out the cause of emaciation of cattle in photograph 1 and give the reason for making fodder into the form shown in photograph 2.
(iii) What do you think are the solutions to those problems in photograph 1 and 2?
(iv) Propose a sustainable solution to those challenges.
4.2 Definition of fodder grasses
Activity 1 4.1: A Research activity to find out the meaning of fodder grasses
Using the reference materials provided, carry out the following activities:
(i) Find out the meaning of fodder grasses.
(ii) Discuss and record your findings.
(iii) Present your findings to the class.
(iv) Take teacher’s summary notes.
Fodder grasses are crops grown and then harvested for livestock mainly through cutting. They are then chopped into small pieces and fed to livestock. Fodder grasses such as nappier grass and guatemala grass mainly supply carbohydrates and fibre in livestock feed. Carbohydrates are enegy giving food which fibre materials facilitate the movement of food through the gut besides providing physical satisfaction to the animal. Ruminant animals digest the cellucose in the fodder grass to provide the nutrients needed by the animal. Fodder grasses are either conserved as standing hay or silage. Standing hay is that fodder crop that is left in the farm after maturing to be harvested during time of scarcity foliage is the fodder that is conserved as fermented fodder in structures known as silos.
4.3 Some fodder grasses cultivated in Rwanda
Activity 1 4.2: A field visit to explore fodder grasses cultivated around the school
Make a visit to the farms around the school and carry out the following activities:
(i) Find out the fodder grasses that are commonly grown in the farms.
(ii) Discuss and record your findings.
(iii) Present your findings to the class.
(iv) Take teacher's summary notes.
The following are some of the fodder grasses cultivated in Rwanda:
• Napier grass – (Pennisetum purpureum)
• Guatemala grass – (Tripsacum andersonii)
• Para grass – (Brachiaria mulato)
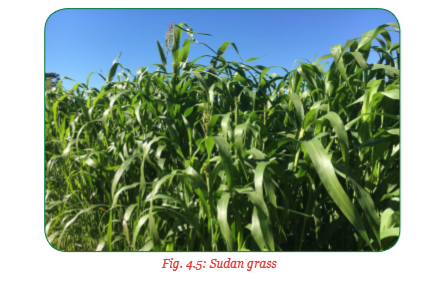
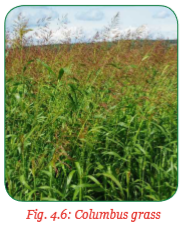
• Fodder sorghums – Colombus grass (Sorghum almum) and Sudan grass (Sorghum sudanense)
• Cereal fodder – These include:
(i) Pearl or Bulrush millet
(ii) Oats (Avena Sativa)
(iii) Maize (Zea mays)
(a) Napier grass (Pennisetum purpureum)
Napier grass is also referred to as elephant grass due to its tall characteristics and vigorous growth. It tillers freely and a single clump may produce more than 50 tillers under favourable climatic and soil conditions.
However, the grass is coarse textured, the leaf blade and sheaths are hairy and leaf margins are sharp. The stems are less juicy and fibrous. Nevertheless, it has been extensively bred with other fine textured succulent and palatable varieties to produce several hybrids.
The hybrid napier is a perennial grass which can be retained on the field for 2–3 years. It produces numerous less larger leaves, softer and less persistent hairs. The stems are fibrous with more tillers. Napier grass is the highest yielding perennial tropical fodder grass and is mostly used for the cut-and-carry forage stall feeding. It can be conserved as hay or silage.
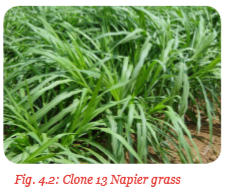
There are several varieties of Napier grass, such as:
• Bana grass – This is a leafy grass with a lot of hairs, which cause irritation during handling. However, it is susceptible to napier grass head smut disease.
• Clone 13 – This variety of napier grass is resistant to white mould disease. It is high yielding but its stems are difficult to establish. It is also susceptible to napier grass head smut disease.
• French Cameroon – This is a high yielding variety which establishes easily from the canes. However, it is also susceptible to napier grass headsmut disease. It has more other varieties which include Kakamega and both are tolerant to napier grass head smut disease and Pakistan hybrid, which does well in dry areas. Uganda hairless and Gold Coast are other varieties.
(b) Guatemala grass (Trypsacum andersonii)
This grass originated from Mexico and South America and introduced for fodder in many countries. It is a warm season grass that grows well from sea level up to altitude of 1800 m above sea level. It is tolerant to waterlogging and flooding. It is a robust strong rhizomatous tufted and leafy perennial grass that forms large bunches. The stem can grow up to 3.5 m – 4.5 m tall with a diameter of 1 cm – 5 cm. It is late maturing and can remain leafy for a long time.
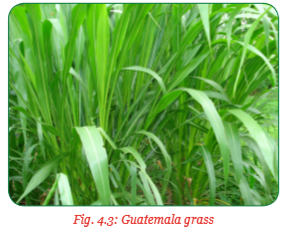
It has shallow roots and hence does not grow well during drought. However, the roots become stronger as the grass matures and stores nutrients necessary for regrowth after cutting. The leaves are long and sparcely haired. Flowers are sterile and hence does not produce viable seeds. It is propagated by stem cuttings. Guatemala is cultivated primarily for fodder in the cut-and-carry systems (zero grazing).
(c) Para grass (Brachiaria mulato)
This grass is also known as buffalo grass, water grass or Angola grass. It is grown near sewage water disposal. It is a coarse trailing perennial grass that spreads by surface runners which produce roots profusely at the nodes. It has a flowering stem that grows 1m – 2 m high. Its stems are erect, leafy, hollow and succulent with hairy nodes. Its leaf blades are dark green in colour and are 25 cm – 30 cm long and 1 cm – 2 cm wide. The inflorescence is a panicle. It prefers hot and humid climate with an annual rainfall of 1000 mm –1500 mm. It withstands waterlogging and flooding but cannot grow in arid and semi-arid areas. It is a nutritious palatable fodder grass, which is free from toxic effects. It is used for making silage.

(d) Fodder sorghum
This crop was domesticated from wild sorghum (Sorghum arundinaceum) in Africa. It is drought resistant and, therefore, grow well in the dry areas. Sorghum is an upright growing grass which is grown for both grains and fodder. The forage sorghum grows to 1.8 m – 4 m tall and has potential for high yields.
It is usually harvested once and fed as green fodder or silage. Sorghum plants especially the young plants contain an alkaloid substance which releases hydrocyanic or prussic acid when wet. This substance is toxic to livestock. To prevent poisoning, the crop should be cured in the field by wilting or drying before ensiling. Sorghum also tend to accumulate nitrates during the drought period which is also poisonous to livestock.
Sorghum is an annual grass with an erect stem bearing nodes and internodes. The leaves are thin, long and smooth. The leaf blades are covered by a waxy sheath which protects them against water loss.
It has a heavy tillering ability, where the tillers develop their own roots. The stalks are juicy and sweet though this depends on the variety. This makes them palatable to livestock. The seeds produced in the panicle are viable hence used for propagation.
There are two sorghum varieties recommended for the drier regions of East Africa; the Sudan and Columbus grasses. See figure 4.5 and 4.6.
(i) Sudan grass (Sorghum Sudanence)
This grass usually grows about 1 m – 2.5 m tall and has a stem that is about 1cm in diameter. It develops only fibrous roots and does not have rhizomes. It has a high tillering ability. Sudan grass is early maturing and suitable where the moisture is limited. They produce more silage than the other varieties.
(ii) Columbus grass (Sorghum almum)
This is a robust growing shortlived perennial fodder grass. It has numerous tillers with thick short rhizomes. The stems are thick and solid and can reach up to 4.5 m tall. Leaves are waxy and are 2.5 – 4.0 cm wide. It withstands drought but does not tolerate waterlogging and flooding. It is valuable for fresh fodder and is cut to make hay or silage. It is one of the most salt tolerant grass.
(e) Pearl millet or bulrush millet (Pennisetum glaucum)
Pearl millet is also known as bulrush millet. It is a deep rooted tall robust growing and free tillering annual fodder grass. It has been selected or bred mainly for fodder production.
It grows to a height of 4 m. The stems are solid and can be up to 2 cm in diameter. It has nodes and internodes. Leaves grow up to 100 cm long and 8 cm wide. The leaves are flat and hairy. The seed head is a spike that grows up to 46 cm long. Seeds born in the spikelets are rounded and about 3 mm in diameter and with several colours ranging from pearly, white grey, yellow grey or greenish grey depending on variety. Bulrush millet is also grown for seeds which are consumed by human beings and birds.

(f) Oats (Avena sativa)
This cereal fodder is of Asian origin. It is an annual grass which is adapted to cold regions of the high altitude around 2100 m above sea level. It has a shortened stem which grows upright up to 1.5 m tall. Its tillers arise from the base of the stem and form a dense cluster. The number of tillers produced depend on the variety and ecological conditions. Where the ecological conditions are favourable, one plant may form up to 30 tillers. This increases fodder production per unit area of land. They form panicles which contain the seeds. There are several varieties of oat grown for fodder and also for grain production. As a fodder, oat provides soft palatable herbage rich in crude protein (10 – 12%). The composition of the fodder varies with the stage of growth at which it is cut. It is fed as straws, hay or silage.

(g) Fodder maize (Zea mays)
Maize crop has a variety of uses. It is basically grown for grains and fodder for livestock. It is a shallow rooted annual cereal crop which is supported on the ground by special type of prop roots which grow from the lower nodes of the stem. It has a succulent stem which grows up to 1.5 m – 3 m tall depending on the variety and climatic condition. The stem has nodes and internodes. Leaves which are born from the nodes are dark green, wide and tapered and are arranged alternatively on the stem. Maize produces viable seeds known as a caryopsis after cross fertilisation.
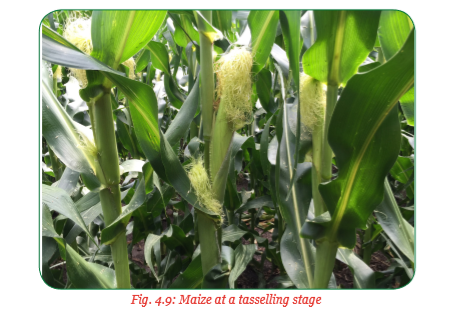
It is a rich source of starch, proteins and edible oils. It produces fodder with the highest crude protein about 9.9% at the early stages of growth up to full bloom stages. This decreases to 7% at milky stage and 6% at maturity.
Dry matter production is at 14% at early stages up to bloom stage. It increases to 20% at milky stage and 29% at maturity. Forage yield is the highest at 30 ton/acre in the early stages up to bloom stage. To get maximum benefit, the fodder should be harvested at full bloom stage, that is, when the grains are milky.
The best type of fodder grass to grow should have the following characteristics:
(i) Have a wide range of adaptability to different soil types.
(ii) Species which are able to reproduce fresh shoots by tillering and able to withstand or recover from cutting.
(iii) Grasses that maintain continuous vegetative growth even during drought or cold periods.
(iv) Grasses that spread by rhizomes or stolons, which readily form adventitious roots, give rapid ground cover and soil and water conservation sustainability.
(v) Rooting system that bind the soil particles together forming a sod and brings to the surface layer nutrients which have been leached by heavy rainfall.
(vi) Species that possess the qualities of higher productivity, palatability, high nutritive value and adaptation to local soils and climatic conditions.
Exercise 4.1
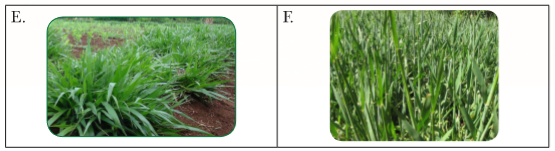
The pictures A, B, C, D, E and F show different fodder grasses grown for feeding animals. Study them carefully then identify those that are grown for fodder only and those that are multipurpose.

4.4 Importance of fodder grasses
Activity 4.3: Research activity to find out the importance of fodder grasses
Using the reference materials provided, carry out the following activities:
(i) Find out the importance of fodder grasses.
(ii) Discuss and record your findings.
(iii) Present your findings to the class.
(iv) Take teacher's summary notes.
Fodder grasses have the following importance:
1. Feeding livestock
Fodder grasses make the bulk for feeding ruminant livestock such as cattle, sheep and goats. They provide an easy method of feeding confined animals such as those in zero grazing structures. The fodder is cut and carried to where the animals are confined. The fodder can be fed to the animals in the following forms:
(a) Green fodder
After planting the grass, fodder is left to grow until it reaches the stage of defoliation before it is cut. After cutting, the grass is chopped to small pieces of about 2.5 cm and then fed to the animals. The stage of defoliation differs with different types of fodder grasses as follows:
• Napier grass – The French Cameroon takes 3 months to reach first cutting. Thereafter it should be cut after 6–8 weeks. Bana grass should be cut before it reaches 1.5 m tall after which it becomes very coarse and fibrous.
• Guatemala grass – This broad leaved grass grows very vigorous. It takes long to flower and therefore first cutting or defoliation can be delayed to 6 months after planting.
• Sorghum – The two varieties of sorghum are the Columbus and Sudan grass. They last in the field for 18 months during which period, they are harvested several times for green fodder. However, sorghum should not be fed to animals immediately after cutting. It should be allowed to wilt or dry for 2 days before feeding to the animals. This is to avoid prussic and hydrocyanic acid poisoning.
• Fodder maize – This can be harvested through thinning of excess plants and by cutting the tillers which are not needed. These are fed whole to the animals. Defoliation can also be done. This is the removing of one or two leaves per plant every week once the silking stage is over. The leaves are fed to the animals while green. Topping is the cutting of the green part of the plant above the cob. This is cut and fed to the animals.
• Para grass or the Brachiaria grass. It can be fed as green fodder, hay or conserved as silage since it has no toxic effects to livestock.
(b) Silage
This is green fodder preserved through the process of fermentation to produce a stable product which reduces spoilage. The pH of the materials is 4.2 which prevents decomposition and deterioration of the fodder.
The fodder is preserved in a structure called a silo. It is a way of storing fodder in its highest quality for use during the periods of scarcity. It has the following benefits:
• Silage is good source of nutritious food.
• It makes animals gain weight in short periods especially in sheep.
• Dairy cows produce more milk when fed on silage as compared to natural grazing.
• Silage is useful in dry periods when there is little grazing.
(i) Steps in making silage from fodder maize in a pit silo
Step I – Growing the fodder maize
Choose a variety which grows fast and produces large quality of herbage.

Step II – Selecting a site for the pit silo
The area selected should be slightly sloping for good drainage. Dig a wedgeshaped pit with a slender bottom than the top. The size and dimension depend on the amount of fodder to be stored. For example, to make 20 bags of fodder, the pit dug should be 2 cubic metres and will need 10 metres of polythene and 30 litres of molasses.

Step III – Harvesting the crop when at milky stage
This is the stage at which fodder maize is nutritious, easily digestible and has the required crude fibre. Chop the crop into pieces of 2.5 cm – 3 cm using a chaff cutter.
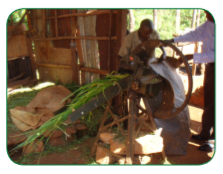
Fig. 4.12: Chopping fodder with a chaff cutter
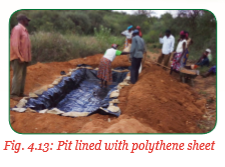
Step IV – Lining up the silo pit
This silo pit should be lined from bottom to top with the polythene sheet. This is done by covering the whole bottom and the sides with the sheet.
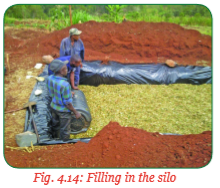
Step V – Filling the silo pit with the chopped fodders
This is done by adding a thin layer at a time. Then compacting each layer after spreading with a roller or heavy drum of water or trumpling by humans.
Repeat the process until 1/3 of the pit is covered.
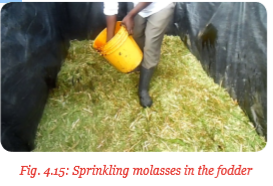
Step VI – Adding molasses to the materials
Dilute 1 litre of molasses with 3 litres of water and sprinkle evenly on the compacted fodder. A knapsack sprayer can be used to spray the solution evenly throughout the silage.
Step VII – Adding more chopped fodder
This is added in layers, one at a time; compact and then spray with molasses solution as in steps V and VI. Repeat this process of adding the fodder and compacting until the pit is filled to form a doom shape.

Step VIII – Covering the pit with the polythene sheet
This is done to prevent entry of water into the silage. Dig a small trench around the silo to redirect run-off water away from the silo.

Fig. 4.17: Covering the doom with black poly sheet
Step IX – Covering the polythene sheet with a layer of soil
This is done to prevent polythene damage by birds, animals and rain. Fermentation of the fodder to produce a stable product may take weeks. The silage should be left until there is need to use the fodder. If well prepared, the silage can last for 2 years.

Step X – Using the silage
Open the pit from the lower side of the slope and take enough silage fodder for one day then close the pit again.

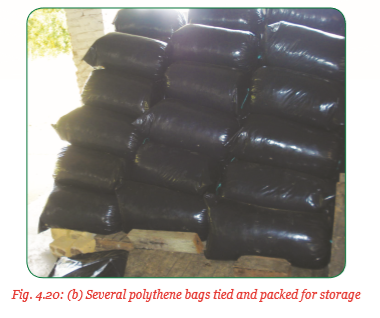
(ii) Making silage in bags
This is a new technology where the chopper green fodder from either maize or napier grass is stored in large polythene bags. The process is very simple, where the green fodder is chopped into small pieces of 2.5 cm –3 cm long. The bags are filled with the chopped materials.
The materials are compressed properly to remove all the air, thereby preventing decomposition once the bag is filled and tied. The feed is stored this way without losing its nutritive quality, for up to one year.

Advantages of silage making
Making and feeding animals on silage has the following advantages:
(i) Use of silage increases the stocking rate, thus more animals are kept in a small area and fed on silage.
(ii) There is availability of high quality succulent feed all year round.
(iii) More herbage can be stored in a small area.
(iv) It does not depend on the weather conditions. Silage can be made with any materials that are available.
(v) It can be fed directly without any liquid additives.
(vi) Land can be used to produce more fodder after the crop is ensiled.
Characteristics of good quality silage Good quality silages should:
(i) Be made from high quality fodder cut at the correct stage of growth.
(ii) Have a pleasantly acidic aroma. (iii) Be free from moulds and smell of burnt sugar.
(iv) Retain the original colour of the crop from which it is made.
(v) Not sticky or greasy.
(c) Hay
Hay is fodder that is conserved through drying to remove the water content so that it can be stored without rotting or becoming mouldy. Reducing the moisture content slows down the rate of growth of micro-organisms that bring spoilage. The moisture content of the fodder should be reduced to about 15%. Not all fodder grasses are suitable for hay making.
Steps in making good quality hay
When the fodder grass for hay is ready in the farm, it should be harvested at the end of the rainy season when there is plenty of sunshine and the grass fodder is still green. However, the stage of harvesting depends on the particular fodder grass crop.
Step I – Cutting the fodder
This is done using sickles, machetes, or any other fodder cutting tool when 50% of the crop has flowered. This is the best stage to optimise both the quality and quantity of the fodder.

Step II – Drying the fodder
This is done by spreading the fodder in the field to dry for about 4 hours. If the field is open, dry under shade to prevent scorching the leaves.
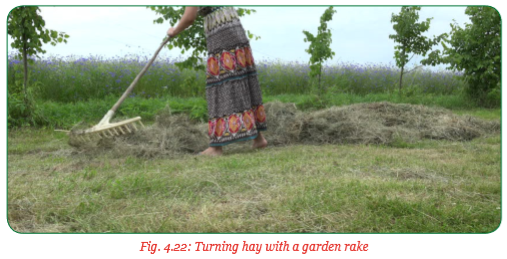
Step III – Turning the fodder
This ensures even drying of the whole herbage. Repeat the turning every 4–5 hours for the next 2–3 days. Test whether the grass is dry enough for the next step. Hay is properly dried when no sap (moisture) oozes out of the stems when twisted.
Drying hay under controlled conditions is referred to as curing. When hay is properly cured, it can be made into bales for storage or stored in a tripod.
(i) Baling hay
Baling refers to the gathering of hay into regular compact cubes which are easy to transport and store. It can be carried out using a mechanical baler as shown in figure 4.23 or manually. Manual baling of hay is carried out as follows:
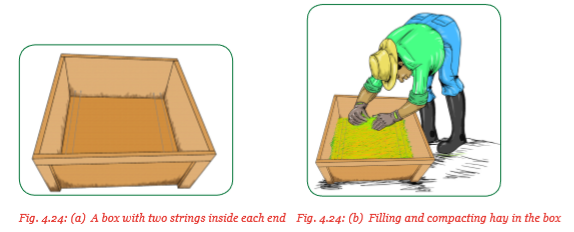
(a) A baling box of about 85 cm long × 55 cm wide and 45 cm deep is prepared. The box should be open on both top and bottom. If hay is properly compacted, this size of a box will produce a bale of 20 kg.

Two strong strings are placed inside each end of the box. The strings protrude at both ends. They should be long enough to tie the bale.
(b) The cured hay is gathered into the box, layer by layer while compacting each fill.
(c) The hay bales are tied tightly on both ends using the strings and then push the bale out of the box. These bales can now be stored in a shed or a barn.

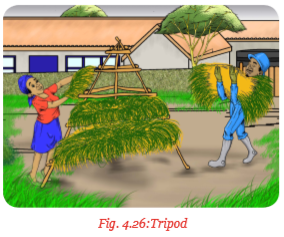
(ii) Storing hay using tripods
Hay which is not baled can be stored in a tripod. A tripod is a structure made using three wooden poles or metal rods of 5 cm thickness and 2–3 m long. They hold about 125–500 kg of cured hay. A network of ropes or wires is made over this framework. Cured hay is then packed into the tripods and compressed with long sticks or bamboo. The ropes or wires are tied across to keep the hay in compact position. Long grass is placed on top to shelter the hay from strong sun and rain. The tripods method is carried as follows:
(a) The tripods are prepared as shown in figure 4.26 using three wooden poles by pushing them into the soil and then tie the ends of the poles tightly with a wire. Cross over three bamboo sticks, the ends of each stick meets with the other at a specific point of the three poles.
(b) The ground under the tripod stand is cleared in case there are any vegetation. Then pack the cured hay inside the three poles of the tripod.
(c) The hay is compacted by pushing back the three bamboo sticks and tie. Continue filling in the hay and holding with the tied bamboo sticks or wires until full. The triangular shape of the tripod will help drain rain water without percolating into the hay. It is covered with another layer of hay on top. This will be wasted hay due to absorption of water or scorching by the sun.
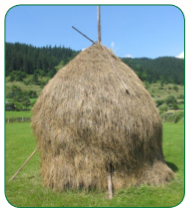
Fig. 4.27: Tripod packed with hay
Advantages of hay making
Hay making and feeding animals with hay has the following advantages:
(i) Fodder can be preserved for long periods of time. This prevents wastage in the farm due to overgrowing and plant deterioration.
(ii) There is availability of nutritious feed to the animals even during the periods of scarcity.
(iii) Good quality hay may be used to replace the amount of concentrates given to the animals. This reduces the cost of feeding.
(iv) Fodder can be harvested at the stage of maximum nutrients to give way for more herbage to sprout. This increases land productivity.
(v) It helps to reduce bulkiness of the fodder such that transportation and storage are made easy.
Characteristics of good quality hay
(i) Hay should retain the original aroma and colour if properly prepared.
(ii) It should be free from foreign materials such as dusts.
(iii) It should maintain leafiness of the original materials. The loss of leaves means hay was scorched and not cured.
(iv) It should be palatable and acceptable to the animals.
2. Used as stakes for climbing crops
Certain plants grow as vines while others as creepers, when support is not available. Vines have long stems which are weak to grow upwards. A vine will use other fodder grasses with strong upright growing stems for support. This will enable the vine plant to reach sunlight. The climbing crops use several methods to climb on the fodder grasses for support.
• They twine their vines around the stems of the grasses.
• They use adventitious clinging roots to climb on the erect growing grass.
• They use twining petioles.
• They use tendrils which can be specialised shoots, leaves or even inflorescence. These tendrils produce adhesive pads at the end that attaches on to the stems of the grass.
• When horticultural plants such as cucumber, climbing beans and other vegetable crops are grown with fodder grasses such as napier grass, maize, sorghum and guatamala grass, they grow well and healthy.
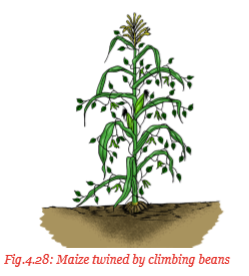
This is because they get support to grow above the ground free from infection. It also prevents them from being shaded off by other taller plants.
3. Maintenance of soil fertility
The ability of the fodder grasses to grow on soils with low availability of soil nutrients is associated with their high capacity to absorb nutrients at low levels of supply to optimise their growth. This adaptability is associated with:
(a) Large rooting systems.
(b) Fine roots with long hairs, high rates of nutrient absorption per unit length of root.
(c) Greater and more effective translocation of nutrients from the roots to the shoots.
(d) Low growth rates.
(e) High nutrient use efficiency.
(f) Grass clumps can sometimes send their roots to 4–5 metres below the surfaces. This brings up nutrients which have been leached into the soil.
Other ways in which fodder grasses help improve soil fertility include:
• They produce dense stands which help smother weeds thus prevent soil exhaustion.
• They improve soil health and physical condition through addition of higher amounts of organic residues in the soil.
• When grown in association with selected legume fodder, they improve the quality of herbage as well as help to economise on the use of nitrogenous fertilisers.
• The left-overs after feeding animals are used to make compost manure which is used in crop production.
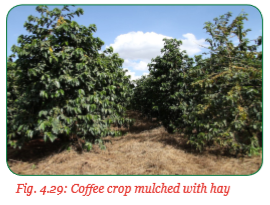
• Wasted fodder is used as mulching materials in crop production. These materials decompose with time to release nutrients to the soil as well as produce humus which improves soil structure.
4. Soil conservation
Fodder grasses possess a number of characteristics which enable them to adopt in different habitats. Most of all their ability to cope with seasonal and unpredictable rainfall, their rooting systems and ability to survive cutting. These factors make the fodder grasses important in soil conservation as follows:
(a) Fodder grasses control soil erosion in the following ways:
(i) They reduce the force of the raindrop by intercepting it as it falls.
This reduces the erosive force of the raindrop.
4.4 Propagation methods of fodder grasses
Activity 4.4: Research activity to find out the propagation methods of fodder grasses
using the references provided, carry out the following activities:
(i) find out the propagation of fodder grasses.
(ii) Discuss and record your observation.
(iii) present your findings to the class.
(iv) Take teacher's summary notes.
Fodder grasses are propagated using seeds and vegetative materials.
(a) Seed propagation
Most cereal fodder crops such as pearl or bulrush millet, oats, maize and others are propagated from seeds. Therefore, to produce a healthy crop with good yield, it is important to start with well selected seeds for sowing. To get the required plant stand; healthy, large and good ear-heads need to be selected at the time of harvesting. Seeds from such ear-heads are stored in well ventilated and low moisture conditions. Cereal fodder seeds are given specific treatment depending on the type as follows:
(i) Treatment of pearl or bulrush millet seeds
When planting millet for fodder or grains, it is recommended to use certified seeds. These are seeds treated against various elements such as pests, diseases, hardening and nutrient deficiencies.
• Treating seeds using appropriate chemicals prior to planting prevents seed borne diseases as well as soil borne pests.
• Seeds are treated with bio-fertilisers for nutrient deficiencies, for example, nitrogen and phosphorus followed by seed hardening for better germination and growth.
This is carried out as follows:
– Soak the seeds in 2% dihydrogen phosphate solution (20 gms in one litre of water) for 6 hours.
– Use 350 mls of dihydrogen phosphate solution for 1 kg of seeds.
– Dry the seed under the shade to the original moisture level.
– Soak the seeds again in 0.1% solution of thio-urea for 6 hours before sowing.
• To control smut disease, soak the seeds, mix with 300 mesh sulphur powder at 4 g of sulphur/1 kg of seeds.
• Soak the seeds in 30% salt solution (3 kg of common salt in 10 litres of water) to control ergot disease.
• To control downy mildrew, treat seeds with metalaxyl (Apron 35 SD) at 6 g of chemical for 1 kg of seeds.
• Soaking seeds for 1 hour with 1% of 2-chloroethanol and 0.5% sodium hypochlorite solution to increase germination rates. Note: Seed treatment can be done manually or in treatment drum for large quantities.
(ii) Treatment of maize seeds
Most maize seeds are delivered to farmers, coated with an insecticide or fungicide or both as a seed dressing.
Seed treatments are added to the seed to protect seedlings against soil and seed borne diseases and pests, to enhance germination and to promote seedling emergence during the critical few weeks after planting.
Insecticidal seed dressing also protect stored maize seeds from grain borers. Some nutritional products such as boron and molybdenum are also added as dressing to enhance seedling germination vigour and emergence.
(iii) Treatment of oat seeds
When planting oat seeds for fodder, the selection of a suitable variety is very important. In this case, consider adaptability to ecological conditions of the area, disease resistance, herbage productivity, weed free and germination potential. Certified seeds should always be used.
Agrochemicals are used to dress the seeds against such disease as smuts. Smuts is a seed borne disease and therefore the seeds should be treated with systematic fungicides which infuses into the seed coats.
Procedure for dressing the seeds
• Measure the required quantities of seeds to be treated.
• Measure the required amount of fungicide depending on the manufacturer's instructions.
• Place one half of the required seeds into a container and mix thoroughly with one half of the fungicide.
• Add the other half of the seeds and the fungicide into the container and mix together until all the seeds are well covered with the fungicide. • The seeds are then ready for planting. Precautions should be taken to avoid poisoning.
(iv) Brachiaria is both propagated by seeds and vegetative materials
Seed propagation is more convenient to farmers who produce fodder on largescale. For seed propagation, 2.5–3 kgs of seeds are used per hectare. The seeds have high germination potential. They should be treated against fungal diseases and soil borne pests. This is done by dressing the seeds in a mixture of insecticide and fungicide powder as recommended.
(b) Vegetative propagation in fodder grasses
There are two methods of vegetative propagation used in fodder grasses. These methods include use of cuttings and layering.
Use of cuttings in propagation of fodder grasses
A cutting is a vegetative plant part which is separated from the parent plant in order to regenerate itself thereby forming a whole new plant. The plant that is formed has all the parts including the roots, stems and leaves.
There are three types of cuttings which are used to propagate fodder grasses. These include stem or culm cuttings, root cuttings, or slips, stolon node cuttings and split root cuttings.
• Stem cuttings: These are planting materials which are planted directly into the field, however there are some cuttings which are small and need to be raised into the nursery first. The stem cuttings, for example, those of napier grass should be taken from the parent plant which has been allowed to grow for 6 months. The stems are cut into pieces known as ‘setts’. The setts should be 30 cm – 45 cm long and should have 3–5 nodes.
Preparation of napier stem/cane cuttings
(i) Preparation of tools: A sharp tool such as a knife or sharp blade should be used. This reduces injury to the parent plant.
(ii) Disinfection of the tools: The tools should be dipped in alcohol or a mixture of bleach and water (one part of bleach into nine parts of water). This prevents transmission of diseases from infected plant parts to health ones.
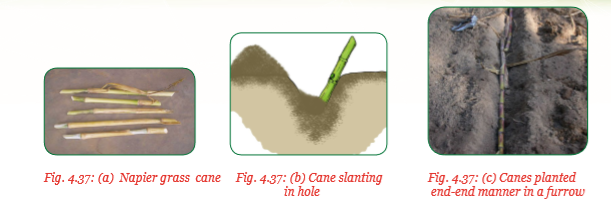
(iii) Preparation of the canes selected from parent plants by cutting at a slanting manner to leave 3–5 nodes and a length of 30 cm – 45 cm.
(iv) Plant the canes either slanting in the holes or end to end in the furrows. Brachiaria and Guatemala fodder grasses are also propagated from stem cuttings. These cuttings are prepared and treated the same way as for napier grass.
• Rhizome cuttings: These cuttings are made by splitting a clump 6 months old into single plants of between 5 and 10 cm in length. The root portion should be between 5 and 10 cm and the shoot between 5 and 10 cm. Guatemala, napier and brachiaria grass are propagated using rhizome cuttings.

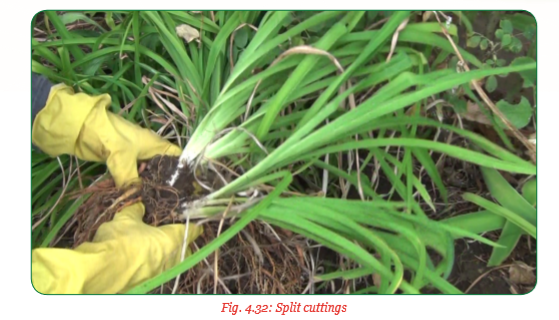
• Split cuttings: Most clumping grasses can also be propagated from splits. These are small plants which are divided or split from the original mother plants. They are made from splitting tillers from the mother plant.

Each split contains some roots and shoot. The shoot is trimmed to 15 cm and the lateral roots are also trimmed. Each split includes at least two to three tillers (shoots). They are dipped in various treatments which include rooting hormones, manure slurry or into shallow water to produce roots. However, some splits can be raised in nursery or planted directly into the field. Fodder grasses that can be propagated using splits include napier grass, Guatemala grass and Brachiaria mulato grass.
Use of layering in propagation of fodder grasses
Some stoloniferous grasses grow out stems or stolons along the soil surface. These stolons have nodes and internodes. When these nodes touch the soil, they produce roots and new shoots. The stems can then be pulled up and cut to produce planting materials.
Methods of layering fodder grasses
The methods used in layering fodder grasses include stool or mound layering, compound layering, using stolons, runners and rhizomes.
• Stool/mound layering
This can be done to certain fodder grasses such as napier, brachiaria, Guatemala and sorghums that can easily shoot after cutting. The grass is harvested by cutting up to 2.5 cm from the grouped level to leave a stump. The stump is then covered with a mound of soil and allowed to shoot. New shoots will appear on the ground level from the mound. The soil is removed and the new shoots are separated from the parent stump carefully. The new shoots should be separated with enough roots. These are then planted directly into the field or nursery bed to harden the transplanted.

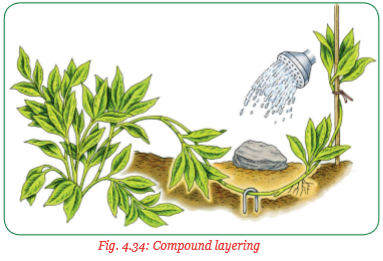
• Compound layering on stolons, runners and rhizomes stolons
A stolon is a horizontal, fleshly stem that can root, then produce new shoots from the rooted region. Stolons grow above the ground. Grasses that produce stolons are propagated by severing the new plants from the parent stems. To increase their rooting, more soil is heaped to the rooting nodes of the stolons and then these nodes are separated after rooting to produce individual plantlets.
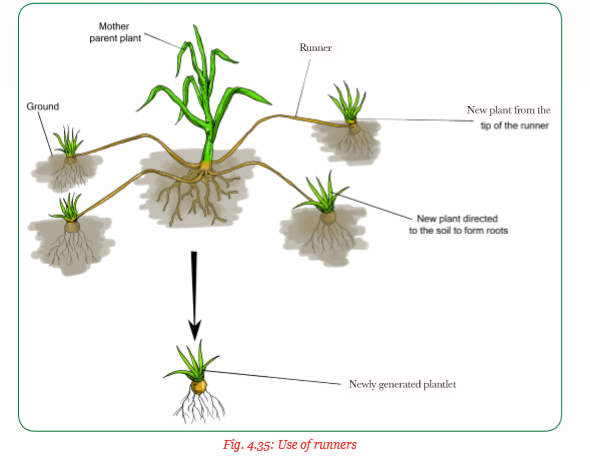
• Use of runners
Brachiaria grass is a trailing perennial grass which can be propagated with runners. A runner is a slender stem that originates from a leaf axil and grows along the ground or downwards producing a new plant at its tips. For the runners, the growing plantlets are directed into the soil so that they can form roots after which plantlets are uprooted and planted.
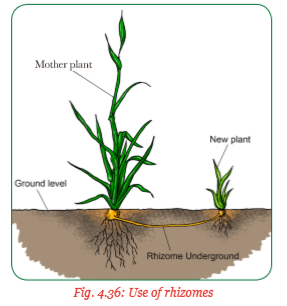
• Use of rhizomes
A rhizome is a swollen stem of a plant that grows horizontally underground. Rhizomatous grasses spread below the ground using stems known as rhizomes. The rhizomes terminate to form new shoots at positions away from the mother plant. As the new shoots mature, they produce rhizomes that also form new shoots. The new shoots can then be uprooted and planted in the field.
4.6 Cultural practices of fodder grasses
1. Napier grass
Activity 4.5: A field visit to carrying out cultural practices in napier grass
Make a visit to the school farm or a farm near the school where land is prepared and carry out the following activities:
(i) Plant napier grass on the already prepared land.
(ii) Carry out weeding when the napier grass establishes.
(iii) Carry out harvesting of the napier grass.
(iv) Discuss and record your findings.
(v) Present your findings to the class.
(vi) Take teacher's summary notes.
The following are the cultural practices when growing napier grass:
(a) Planting
Napier grass is a sterile hybrid and, therefore, it is established from rooted slips or by stem cuttings. The cuttings have 2–3 nodes. It can be planted in pure stands or intercropped with forage legumes.
There are two methods of establishing napier grass. The Conventional method and the Tumbukiza method.
(i) Conventional method
This method involves planting one cane with 3–4 nodes or root split in holes of 15 cm – 30 cm deep. The spacing adopted depends on the amount of rainfall in the area. For example, the spacing of 0.5 m × 0.5 m is used in areas with over 1400 mm of rainfall/annum. In areas with 950 mm –1400 mm of rainfall, a spacing of 1 m × 0.5 m is used.
The setts are buried in a slanting manner in the soil to leave one node above the ground or placed end to end in the furrows.
When planting, 1–2 50 kg bags of Tripple superphosphate (TSP) or Double superphosphate fertilisers per hectare are used at planting time. This is followed with topdressing with 5–7 50 kg bags of Calcium Ammonium Nitrate (CAN) fertiliser in three splits per year. Thereafter, CAN should be applied after every cutting and weeding.
• 10 tonnes/hectare of farmyard manure is applied at planting and also after every harvesting.
(ii) Tumbukiza method
Tumbukiza is a Kiswahili word meaning “placing in a hole”. It is a recent method of planting napier grass to increase productivity per unit area of land. The method involves planting cuttings or root splits in well-manured large holes as follows:
• Dig a round or rectangular hole known as pits about 60 cm deep, 60 – 90 cm wide and any length required. The pits should be 100 cm away from each other.
• Separate the top and the subsoil when digging the pits.
• Mix every 20 litre container of top soil with 1 – 2 litre containers of farmyard manure and refill this mixture back into the pit.
• Leave a space of about 15 cm unfilled from the top of each pit.
• Plant 5–10 cane cuttings or single root splits in the pit.


This method has the following benefits:
• It requires less land.
• Regrowth of the napier is faster after cutting.
• Manure is easily used by placing in the pit. Slurry can be applied in the pits immediately after harvesting.
• The pit helps to conserve soil and water preventing soil erosion.
• It holds water for the crop when the rainfall is little.
(b) Weed control – The newly planted crop is kept weed free by carrying out 2 rounds of hand weeding. The first weeding being done 3 weeks after planting, then second weeding is done 3–4 weeks after the first weeding.
(c) Harvesting – Napier grass is ready for cutting 4 months after planting; by which it is one metre tall. The first cutting should be done at 5 cm from the ground level. This allows more regrowth to form new shoots. Cutting intervals depend on the rainfall availability though successive harvesting should be done when the crop is always 1.5 metres high. The yields expected from napier grass is 20,000 – 40,000 kg of fresh fodder/ ha. It is recommended to leave freshly cut napier under a shade for 12 hours before it is chopped.
A dairy cow of a live weight of 400 kg should be given 60 kg of freshly chopped napier grass per day. Napier grass can also be conserved as silage.
2. Guatemala grass and Brachiaria grass
Activity 4.6: A field visit to carry out cultural practices in Guatemala grass (Trypsacum andersonii) and para grass (Brachiaria mulato)
Make a visit to the school farm or a farm near the school with a piece of land prepared for planting Guatemala and brachiaria fodder grasses. Then carry out the following activities:
(i) Plant Guatemala and brachiaria grasses on the prepared piece of land.
(ii) Carry out weeding when the fodder grasses establish.
(iii) Carry out harvesting when the fodder is ready for harvesting.
(iv) Discuss and record your findings.
(v) Present your findings to the class.
(vi) Take teacher's summary notes.
The cultural practices carried out when growing Guatemala and Brachiaria fodder grasses are as follows:
2.1. Guatemala grass
(a) Planting – Guatemala grass is propagated from stem cuttings or rooted culms. Planting should be done at the beginning of the rains. It can be planted alone or with fast growing twinning legumes since it provides stakes for their support. Guatemala produces viable seeds which can be used for propagation. However, fodder established from seeds take long to reach the first cutting height than the fodder established from cuttings and splits. It is planted in furrows spaced at 0.5 metres apart within the rows. Holes can also be used especially when planting stem cuttings. Planting should be done at the beginning of the rains.
(b) Weed control – Guatemala grass can resist weed competition after establishment. However, the field should be kept weed free for the first 6 weeks to allow the grass to establish without competition. After properly established, Guatemala grass grows vigorously to smother weeds. In case of broad leaved weeds, they should be controlled by uprooting, slashing or use of selective herbicides.
(c) Harvesting – Guatemala grass is first cut when it is 4–6 months old. It is fed as green fodder or used to make hay or silage. If harvested for direct feeding, Guatemala should be cut when it reaches 100 cm – 120 cm high at about 10 cm – 25 cm from the ground level. The grass does not withstand heavy grazing or frequent cutting. Cutting (defoliation) frequency should be after about 30 days in wet seasons and 42–45 days in dry seasons. If it is for silage making, then it should be wilted before ensiling. It has high ability to remain leafy for a long time.
2.2. Para grass (Brachiaria mulato)
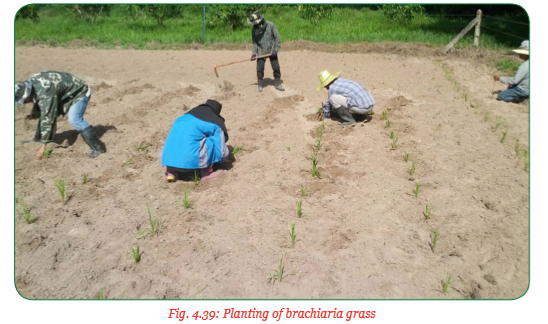
(i) Planting – Land for planting this grass is prepared thoroughly by 3–4 ploughings and harrowing to remove weeds. Planting is done at the beginning of the rains for the rainfed crop and when the soil has enough moisture for the irrigated crops. It is propagated from stem cuttings or pieces of creeping shoots. These are cut about 15 cm – 30 cm long with three nodes. They are planted in a slanting manner. Slips can also be used for planted and are placed about 50 cm – 60 cm apart, that is, between the rows and between the plants. They produce tillers quickly which cover the field. When slips are planted, their yields range from 27000–40000 kg per ha.
(ii) Weed control – Land should be kept weed free for the first two months up to when the grass becomes aggressive to compete with other plants. Once established, it effectively smothers weeds.
(iii) Harvesting – The first harvesting takes about three months after planting when the grass reaches a height of 60 cm – 75 cm. Subsequent cutting or defoliation should be done 30–40 days interval. It gives an annual yield of 70 tonnes/hectare. It is good for silage making. It contains crude protein of 2.8–16.1% and crude fibre of 28–34%.
3. Fodder maize and sorghum
Activity 4.7: A field visit to carry out cultural practices in growing of fodder maize and sorghum (Colombus and Sudan grass)
Make a visit to the farm where land has been prepared for planting fodder maize and sorghum and carry out the following activities:
(i) Plant fodder maize and sorghum.
(ii) Carry out weed control after the crops germinate.
(iii) Carry out harvesting of the crops at the right stage.
(iv) Discuss and record your findings to the class.
(v) Take teacher's summary notes.
3.1. Fodder maize
The following practices are carried out when growing fodder:
(i) Planting – Fodder maize is established from seeds which are medium in size. A seedbed for planting maize should be deeply ploughed and harrowed to a medium tilth before planting.
The amount of seeds used is about 50–60 kg per hectare which are planted at 5 cm deep in the soil. Planting should be done at the beginning of the rains or dry planting. NPK fertiliser is used when planting at a rate of 60–120 kg N, 40–60 kg P and 40 kg K/ha depending on the soil fertility. When row planting is done, the spacing adapted should be 75 cm × 18 cm or 60 cm × 22 cm.
(ii) Weeding – Proper land preparation removes all the weeds and makes sure that weeds are not a problem. However, if weeds grow during the first 6 – 8 weeks, they should be removed through cultivation, uprooting or use of selective herbicides. Weeds that grow before harvesting of the crop, should be uprooted.
(iii) Harvesting – Fodder maize is harvested at the dough stage or at milk stage, when the crop has high crude protein about 9.8% and crude fibre. Fodder maize makes high quality silage and also supplies green fodder which has no toxic effect to livestock. Fodder maize can be harvested manually by cutting with machetes or mechanically using forage harvesters incase it is for silage making. The harvested fodder is cut and chopped into small pieces ready for ensiling.
3.2. Sorghum
The two types of fodder sorghums include the Columbus grass (sorghum almum) and the Sudan grass (Sorghum sudanense). They require the same ecological conditions and cultural practices such as:
(i) land preparation
(ii) planting
(iii) weed control
(iv) harvesting.
(i) Planting – Sorghum is established from seeds which are small in size. The seedbed should, therefore, be of fine tilth. Sorghum should be planted at the beginning of the rains for the crop to make maximum use of the moisture. Sorghum is planted at a spacing of 60 cm × 15 cm and at a planting depth of 2.5 cm – 5 cm. Row planting can be done where sorghum is interplanted with other crops. However, for pure stands, sorghum can be broadcasted.
(ii) Weed control – The field should be kept weed free during the first 6–8 weeks to prevent nutrient and moisture competition. Sorghum is quick growing and therefore if planted at correct rainfall regime and correct density, it has potential to shade out or smother weed. In addition, root exudates reduce the growth of weeds such as pigweed, nut grass, African fox tail and others. Parasitic weed such as Striga asiatia which is common in sorghum should be removed by uprooting before it flowers. Wild sorghum is also a common weed in a sorghum field. Weed control by cultivation is effective.
(iii) Harvesting – The first harvesting should be done when the grain reach early or late dough stage, then cut every 6–8 weeks interval and should be ploughed off after 5–6 cuttings because they become uneconomical to keep. They should not be cut earlier than 6 weeks to avoid prussic acid poisoning.
4. Fodder Oats and Pearl or Bulrush millet
Activity 4.8: A field visit to carry out cultural practices in growing fodder oats and pearl or bulrush millet
Make a visit to a farm which is prepared for planting fodder oats and bulrush millet and carry out the following activities:
(i) Plant oat and millet.
(ii) Weed the crop when it is well established.
(iii) Harvest the crop when it reached the right stage for fodder.
(iv) Discuss and record your findings.
(v) Present your findings to the class.
(vi) Take teacher's summary notes.
4.1. Fodder Oats
The following are cultural practices carried out when growing oats:
(i) land preparation
(ii) planting
(iii) weed control
(iv) harvesting.
(i) Planting – Oat is established from seeds which should be selected properly or plant certified seeds. Oat seeds are small and, therefore, require a properly prepared seedbed with a fine tilth.
• Seedrate –70–80 kg/ha of certified seeds to give a uniform stand. For pure stands, the seedrate should be 70–80 kg/ha while for mixtures, it should be 30 – 40kg/ha. Oats can be inter cropped with vetch at 20 kg/ha.
• Spacing – Low tillering varieties should be planted at a spacing of 20 – 25 cm in between the rows while high tilllering type at a spacing of 30 cm between rows.
• Fertilisers – 2 to 3 bags of Triple superphosphate (TSP)/hectare are used at planting time.

(ii) Weeding – Hand weeding is recommended in oats. However, if the crop is planted in pure stand as a (monocrop), then selective herbicides can be used. 2,4-D is an effective herbicide to control broad leaved weeds in oats.
(iii) Harvesting – The harvesting period in oats determines the herbage yield and quality.
• The single cut oat varieties should be harvested when 50% of the crop has flowered.
• The double cut oat varieties; first cut should be done 60 days after planting followed by seed cut at 50% flowering stage.
• In multiple cut varieties; the first cut should be done at 60 days old, second cut after 105 days and third cut at 50% flowering.
• For good regrowth; the first cut should be done at 8 cm – 10 cm above the ground which leaves enough foliage for regrowth.
Yields – Average green fodder from:
• Single cut varieties ranges from 30–45 tonnes/ha.
• Double cut varieties yield 40–55 tonnes/ha.
• Multiple cut varieties yield 45–60 tonnes/ha.
4.2. Pearl or bulrush millet
The following are cultural practices when growing pearl millet (bulrush millet):
(i) land preparation
(ii) planting
(iii) weed control
(iv) harvesting.
(i) Planting – Bulrush millet have very small seeds which require well prepared seedbed with fine tilth. They are established from these seeds which are very viable. The seeds for sowing should be properly selected or certified seeds should be used.
• Seeedrate – 6 to 15 kg/ha of certified seeds should be sown into moist soil. They should be drilled to give a uniform stand. • Spacing – Should be sown in rows which are spaced at 35 cm and sown at a depth of 1cm – 1.5 cm. If sown deeper, the seeds will not emerge and this will lead to gaps. • Broadcasting – It can also be done for fodder production.
Bulrush millet responds well to fertilisers especially nitrogenous.
(ii) Weed control – The field should be kept weed free the first 30 days. However, rapid growth of millet usually smothers weeds but a well prepared seedbed is required to overcome weed problems. Pre-emergence herbicides such as Atrazine can be used. Broad leaved weeds that appear and wild finger millet (Eleusine indica) weed can be uprooted manually or through hand weeding.
(iii) Harvesting – Pearl millet can be grazed on or harvested for hay or silage. When grazed on, it does not do well in fodder production. It should be cut for hay or silage when 2 – 3 ft tall. This prevents the fodder from becoming too coarse. Pearl millet/bulrush does not produce prussic acid like the sorghum species and the Sudan grass. It can be given as green fodder to the animals. Harvesting should be done during the 13th – 16th week after planting. It yields about 21,735 kg of dry matter per hectare. After defoliation (cutting), regrowth yields are higher.
Group activity
Preparing silage from the harvested fodder maize
Make a visit to the farm to carry out the following activities:
(i) Select a good site for the trench silo.
(ii) Prepare the site and dig the silo to the required size.
Note: The size of the silo depends on the fodder materials available, for example, a silo of either 3 m × 2 m × 1 m or 4 m × 1.5 m × 1 m would be convenient to work with for this group activity.
(iii) Harvest the fodder maize and prepare it for ensiling.
(iv) Fill the silo with the materials and carry out all the necessary activities in the preparation of silage.
(v) Cover the silo with the polythene sheet and a layer of soil on top.
(vi) Use the silage as required.
(vii) Discuss and record your findings at the end of the project.
(viii) Report your findings to the class.
(ix) Take teacher's summary notes.
Unit Summary
The most important source of food for livestock is roughage especially from green fodder. This fodder should be of good quality. Animals require fodder from both legumes and grasses.
Fodder grasses are forage crops which are cultivated for feeding livestock. They include grasses such as napier, Guatemala, brachiaria, columbus and Sudan grass. Multipurpose crops grown for human grains as well as for fodder include maize, oats and millet. Apart from supply of feeds for livestock, fodder grasses provide support for climbing plants incase they are intercropped, maintain soil fertility and are used in soil conservation.
Most of the fodder grasses produce viable seeds which are used for propagation. However, there are some grasses which are propagated vegetatively by cuttings and layering methods. These crops require proper management during their growth and so several cultural practices are carried out to ensure high productivity. These include proper and timely planting, weed control and harvesting at the right stage. They can be fed when green or conserved as hay or silage.
Key terms
1. Biomass – Total dry quantity of materials produced by a plant species per unit area of land.
2. Bloom stage – Flowering stage of a plant.
3. Cellulose – Indigestible fibre which is the main constituent of a plant cell wall. It is only digested by ruminants.
4. Certified seeds – Seeds which have been tested and established to have the required qualities.
5. Clones – Plants derived from vegetative parts.
6. Clump – Cluster of grass from the same stem.
7. Conserved fodder – Forage materials cut and preserved for future use.
8. Crude fibre – A measure of the quantity of indigestible cellulose and hemicellulose present in a feedstuff.
9. Crude protein – The total protein content in a feedstuff determined by its nitrogen content.
10. Culm – The hollow stem of a grass or cereal plant.
11. Cut and carry method – The practice of cutting the fodder from the field and bringing to animals in confinement.
12. Defoliation – This refers to the grazing or cutting fodder or the removal of the foliage material from fodder or pasture.
13. Double cut – Sprouting after the first harvest to give another harvest and then dries up.
14. Dry matter – The material that remains after removing water which represents the nutrients in a feedstuff.
15. Fungicides – Chemicals used to control fungal diseases. 16. Germination potential – The ability of seeds to germinate given proper conditions.
17. Herbage – The succulent part of herbaceous vegetation used to feed animals.
18. Hybrid – A cross between two different varieties of a plant.
19. Hydrocyanine – A potentially poisonous organic substance found in certain plants.
20. Insecticides – Chemicals used to kill any insect pests.
21. Internodes – A part or space between two nodes or joints as in the stem of a plant.
22. Mesh sulphur powder – An organic substance containing methianine, sulphur and hydrogen.
23. Mixed stand – A mixture of plants grown together on the same piece of land.
24. Molasses – The thick dark brown syrup obtained from raw sugar during processing which is fed to animals as a feed additive for energy.
25. Multiple cuts – A fodder that sprouts after every harvesting to give several harvests.
26. Nodes – The joints on the plant stems that hold one or more leaves as well as the buds which grow into branches.
27. Palatability – Appetising or acceptable and agreeable to taste.
28. Pasture – A land cover of grass and legume species for grazing animals.
29. Polysaccharide – Complex carbohydrate made of several units of simple sugars such as glucose.
30. Prussic acid – An organic substance that is metabolised by animals to form cyanide which is poisonous.
31. Pure stand – A crop that is planted alone on a piece of land.
32. Root exudates – Substances released from plant root system depending on environment and the need for them, for example, to kill weeds, pests or diseases.
33. Ruminants – Animals that are able to digest coarse fibre found in plant tissues.
34. Selective herbicides – Chemicals which kill certain types of plants and leave others.
35. Setts – Canes or stems for planting which have been cut or prepared to be of the same size as required.
36. Single cut – A fodder that dries up after the first harvesting.
37. Smother – Kill weeds by covering to suffocate and prevent sunlight from reaching them.
38. Sterile – Unable to produce viable seeds or to produce offsprings.
39. Succulent plants – Plants family with thick, fleshly leaves.
40. Tendrils – Growths from nodes that twine around hard parts of other plants to support some herbaceous plants.
41. Tillers – These are side shoots of a plant that grow from the base of the main shoot or stem. They are common in grass family.
42. Toxic effect – Poisonous.
43. Varieties – These are cultivated plants when considered as a group.
44. Zero grazing – A system of livestock production in which the animals are confined and food and water brought to them.
End of Unit 4 Assessment
1. Describe the stages of baling hay.
2. Discuss the importance of harvesting fodder grasses at the correct stage of growth.
3. The diagrams below show different cereal crops which are grown for fodder. Study them and answer the questions that follow.
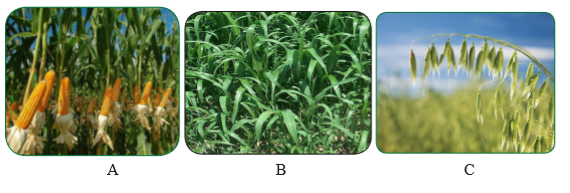
(a) Identify the cereal crops A, B and C.
(b) Which one of the fodder crops shown in the diagrams has poisoning effect to the animals if fed when wet?
(c) How should the fodder crop be handled when feeding animals to reduce the poisonous effect?
(d) At what stage should the crop A and B be harvested for fodder?
(e) Give two reasons for the answer in
(d) above.
4. Outline three advantages of making silage.
5. Describe the “tumbukiza” method of planting napier grass.
6. Describe the steps in making silage from fodder maize using a pit silo.