Topic outline
UNIT 1 : SOIL
Key Unit Competence:
Learners should be able to identify types, causes, factors, effects of soil erosion and carry out soil conservation practices.
1.1 Learning Objectives
(i) Knowledge and understanding
• Define soil erosion.
• State types of soil erosion.
• Differentiate causes of soil erosion.
• Name factors affecting soil erosion.
• Determine effects of soil erosion
• Name factors affecting soil exhaustion.
• Describe environment conservation measures.
• Carry out environment conservation measures.
(ii) Skills
• Recognise the meaning of soil erosion.
• Compare types of soil erosion.
• Examine causes of soil erosion.
• Recognise factors affecting soil erosion point.
• Point out soils affected by erosion.
• Recognise factors affecting soil exhaustion.
• Perceive various measures of environment, protection and conservation.
• Practise various measures of environment protection and conservation.
(iii) Attitudes and values
• Show concern of eroded soil.
• Agree on types of soil with group members.
• Participate actively in group discussion.
• Listen carefully to his/her colleagues notice on effects of soil erosion.
• Appreciate the importance of environment conservation.
• Show awareness and interest about protected environment.
Introduction
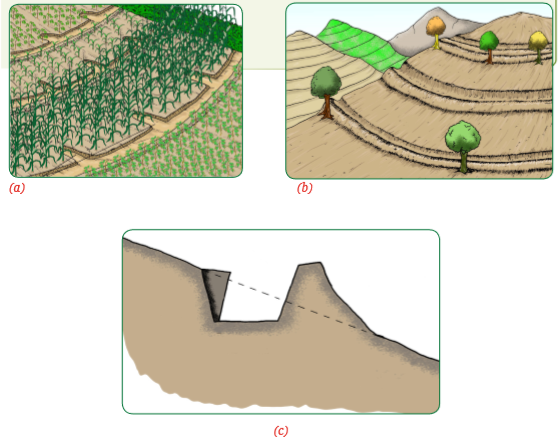
This unit addresses the problems brought about by soil erosion and how it can be controlled when carrying out farming practices. A farmer of GAKENKE District has grown maize crop on 1 ha soil as shown on the following photo.
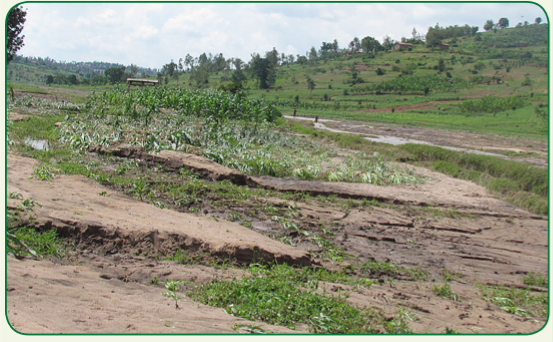
When the rainfall fell, all the crops were washed away to the hillside and consequently the production went down. The farmer calls up on you for help. Analyse the photo and identify the problem that may have occurred on the field. Propose possible solutions to the problem.
1.2. Soil erosion definition
Activity 1 1.1: Research activity to find out the meaning of soil erosion
Using the references provided, carry out the following activities:
(i) Find out the meaning of soil erosion from the internet, library books, textbooks and video shows.
(ii) Discuss and record your findings.
(iii) Present your findings to the class.
(iv) Take teacher’s summary notes.
Soil erosion is defined as the gradual removal of the soil particles and their movement from one place to another. It occurs naturally but can be accelerated by human activities. The soil particles are first detached from the ground and then carried away by different agents. Bare land is easily eroded than vegetated land.
1.3 Types of soil erosion
Activity 1 1.2: Field visit in the school compound or hill side environment to observe and find out signs of erosion in the area
Make a visit to the school compound or hill side environment and carry out the following activities:
(i) Find out the signs of erosion in the area.
(ii) Identify the types of erosion and types of soils eroded in the area.
(iii) Discuss and record your findings.
(iv) Present your findings to the class.
(v) Take teacher’s summary notes.
The following are types of soil erosion:
• Splash erosion • Gully erosion
• Sheet erosion • Soil exhaustion
• Rill erosion
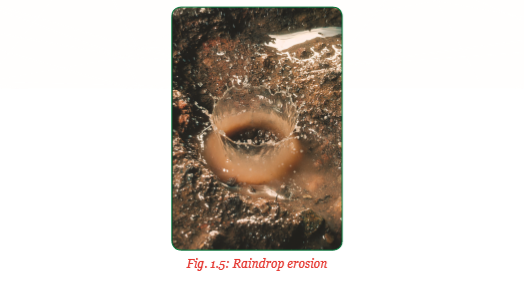
(a) Splash erosion – It is also known as raindrop erosion. It is as a result of soil splashing from the impact of water drops directly on the soil particles. The drops strike bare soil with high impact and splash the soil particles laterally. In addition, the falling raindrops also keep fine materials and plant nutrients in suspension to be easily removed by run-off.

(b) Sheet erosion – This is a type of erosion whereby a thin layer of top soil is removed uniformly by agents of soil erosion. It occurs after heavy downpours are experienced on a piece of land which is bare or recently cultivated. The loose layer of the soil is carried away into the lower areas, valleys or rivers.

(c) Rill erosion – This is a type of erosion which occurs where continuous sheet erosion has taken place, forcing water to make small shallow channels as it flows down. The rills direct the water down the slope, carrying soil particles with it. Rill erosion takes place on a newly cultivated piece of land in case rain falls immediately after cultivation.
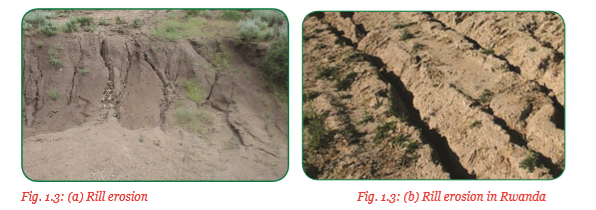
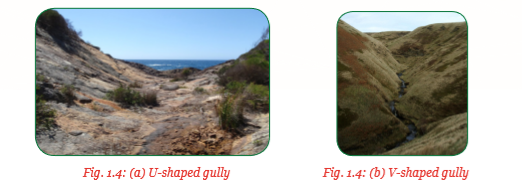
(d) Gully erosion – Gullies are long deep ditches with steep sides which are formed as a result of heavy soil erosion taking place for a long time. They form where continuous flow of water in rills has taken place, carrying away large quantities of soil. When rills become enlarged, they form gullies. Gully formation takes place systematically as follows:
(i) Water moves down bare land.
(ii) Rills are formed.
(iii) Widening and deepening of the rills through continuous erosion to form channels.
(iv) The channels are further widened and deepened at the base to form gullies.
Newly formed gullies are usually V- shaped, with a wide surface and a narrow bottom. However, where gully erosion has taken place for a long time and the soil is removed “top- bottom” in a uniform way, a U-shaped gully results. V-shaped gullies form where the soil is loose alternating with hard un-weathered rocks. U-shaped gullies are found where there is uniform type of soil.
(e) Soil exhaustion – This is a condition whereby the nutrients in the soil have been removed for plant use at a higher rate than they are replaced. This makes the soil to have below optimum levels of nutrients to support plant growth. Soil that is exhausted of nutrients is loose and pliable. The soil structure cannot hold particles together hence soil particles are easily moved by erosive agents.
1.4 Causes or agents of soil erosion
Activity 1 1.3: A field visit to the school compound or the environment to observe and identify causes of soil erosion
Make a field visit to either the school compound or the area around the school and carry out the following activities:
(i) Observe and identify different types of soil erosion in the area.
(ii) Find out the agents that may have caused the type of soil erosion identified.
(iii) Discuss and record your findings.
(iv) Present your findings to the class.
(v) Take teacher’s summary notes.
Soil erosion is the most devastating process that cause land degradation worldwide. It is caused by moving water, animals and poor human activities. It leads to desertification, loss of life, water and farming land. Soil erosion should be controlled when carrying out all types of farming.
There are many factors that operate together to cause soil erosion. These factors are referred to as the agents of soil erosion.
They include:
• Moving water
• Wind
• Animals
• Human activities
(a) Moving water
Moving water is the main agent of soil erosion in Rwanda. This is so especially in arable hilly areas with high rainfall. Erosion caused by water means the removal of the surface soil due to the action of moving water over the surface. As the rain falls, what appears first is the action of the raindrops and then the run-off. Kinetic energy is used in these types of erosion.
(i) Raindrop/splash erosion:
When the raindrop moves soil directly, it causes splash erosion. Soil erosion occurs when the falling drops hit the soil and splash. The soil surface is destroyed, breaking up the soil crumbs and causing capping on the soil surface. The effects of the raindrop action which are important in this erosion are:
• Flattening effect on the soil.
• Movement of soil downhill.
• Breakdown of the soil particles which may reduce the nutrient holding capacity of the soil.
• Reduction in infiltration rate of the rain water. Fast falling raindrops tend to bounce off the soil surface rather than penetrate into it. Capping also reduces water penetration.
(ii) Surface run-off: This is also known as overland flow. It is the flow of water that occurs when excess storm water flows over the land surface. It may occur due to any of the following:
• Soil may be fully saturated.
• Rainfall may fall so fast that the soil has no time to absorb it.
• The hard rock is too close to the surface such that the shallow soil cannot absorb the water.
A land area producing run-off which drains to a common outflow point is called a watershed. Moving water also picks up and carries rocks and other physical materials which may also accelerate the rate of soil erosion.

(b) Wind erosion
This erosion is a problem in flat, bare dry areas with sandy soils or where soil is loose, dry and finely granulated. Wind erosion involves the detachment, transportation and deposition of the soil particles by wind. Loose sandy soils with a poor soil structure are most likely to be eroded by wind. Low rainfall causes lack of vegetative cover.
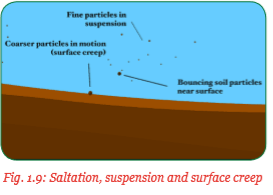
Vegetation that barely grow has poor rooting system which cannot hold the soil particles together. Wind velocity causes the soil to move depending on the size of the particle. Some particles move by saltation, others by suspension while others just creep on the surface.
(i) Saltation: This type of erosion moves a big fraction of the soil. Fine soil particles are lifted into the air and drift horizontally across the surface. They cause surface damage and where vegetation exists, it is also damaged by uprooting. Soil particles moved through saltation, keep on bouncing back on the ground knocking off other particles.
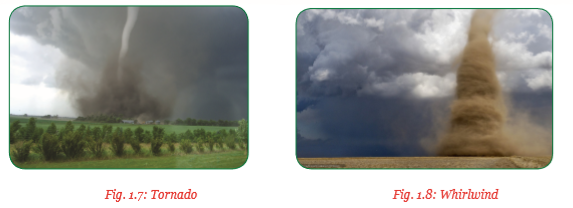
(ii) Suspension: Occurs when fine dust are lifted above the ground by wind. They collide into each other in the air and break further. This makes it easy for them to be carried to extremely long distances. It is the most spectacular form of wind erosion such as whirlwind and tornadoes as shown in figures 1.7 and 1.8.
(iii) Creep: Large soil particles which are too heavy to be lifted by the wind are moved through surface creep. This is the process whereby soil particles roll across the surface after hitting particles in saltation.
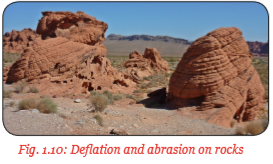
Wind generally causes erosion by deflation and abrasion:
• Wind abrasion – This is the process of erosion produced by the suspended particles that impact on soil objects. Wind-blown particles that move at high speed wears away rocks by abrasion.
• Wind deflation – Wind causes the lifting and transporting of lighter particles from a dry soil, leaving behind a surface of coarse grained sand and rocks. These are then deposited in another place.
(c) Animals
Animals of all sizes contribute to the process of soil erosion as follows:
(i) Animals that live on the ground, break up the soil, dig tunnels and move the soil around. This makes the soil more susceptible to water and wind erosion.
(ii) Grazing stock animals such as cattle, sheep and goats, pull out entire plants and roots causing barrenness of land.
(iii) Large animals with heavy hooves and feet such as camels, cattle and horses. Their impact cause soil compaction which prevents water absorption and run-off.
(iv) Pigs and hogs dig out roots and tubers, exposing the soil to rain and water.
(d) Human activities
The largest problem of soil erosion is created by human beings through activities such as:
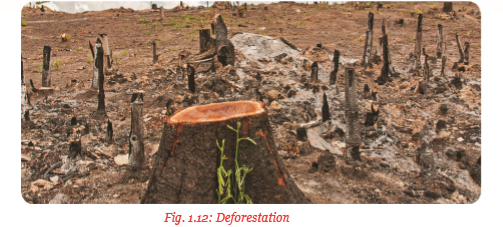
• Deforestation.
• Overgrazing.
• Poor methods of farming.
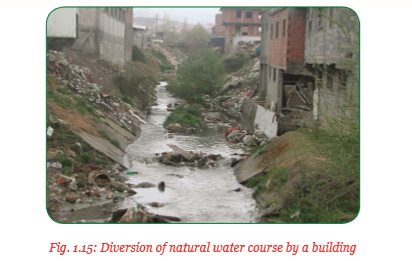
• Diversion of natural drainage courses.
• Wrong orientation of structures such as roads, railways, embankment and bridges.
(i) Deforestation – This is brought about by indiscriminate cutting down of trees for fuel or to create farming land. Roots of trees bind the soil particles and regulate the flow of water. Thus when they are removed, soil erosion takes place.
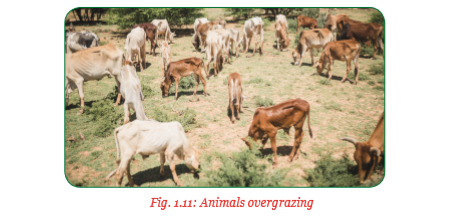
(ii) Overgrazing – Forests and grasslands provide fodder needed for animals. There is plenty of forage during the rainy seasons. However, during drought, there is great shortage, making animals to graze to the ground and uproot the plants. This leads to destruction of the structure of the soil. Moreover, the grazing animals pulverise the soil with their hoofs making it easy to be eroded.
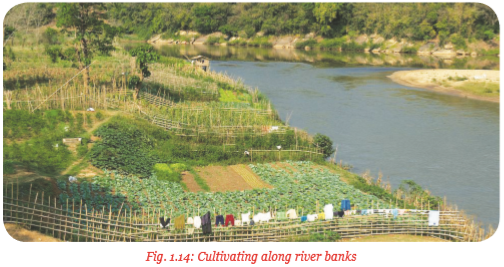
(iii) Poor methods of farming – These include wrong ploughing such as along the slope, poor cropping systems and indiscriminate cultivation near the river banks.
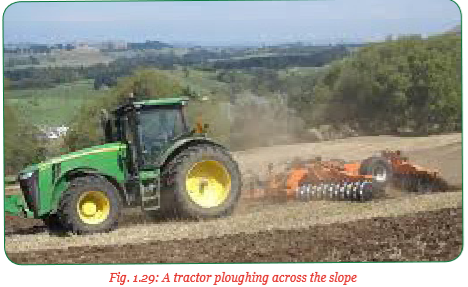
• Ploughing along the slopes: This means ploughing up and down a slope. It makes it easy for the run-off to flow down the slope at a high speed, carrying soil along with it. The furrows created by the plough directs water downslope with high velocity. Under good farming practices, ploughing should be done across the slope. This produces ridges and furrows that hold water longer thus increasing water infiltration into the ploughed land. Consequently, this will check soil erosion.
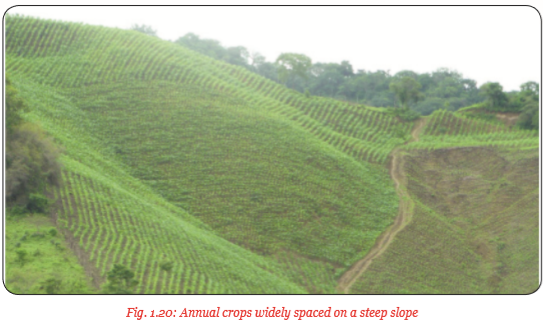
• Poor cropping systems: Poor cropping systems such as planting annual crops on slope areas, lack of crop rotation, late planting, use of wide spacing or wrong spacing, excessive cultivation and over-irrigation. All these are poor practices and reduce the ground cover exposing the soil to agents of soil erosion.
• Cultivating along river banks: This causes river bank erosion, a type of erosion which occurs along the sides of the river. It widens and deepens the river thus reducing the potential size of land for cultivation.
(iv) Diversion of natural drainage courses – Man-made constructions such as ditches, drains or streams obstruct the natural water courses. This can be either through intentional or negligent diversion of the natural water courses, excess surface water run-off from paved or covered land areas, damage or collapse of existing drainage systems and over-development of land without proper drainage. This causes soil erosion, deposition and flooding.
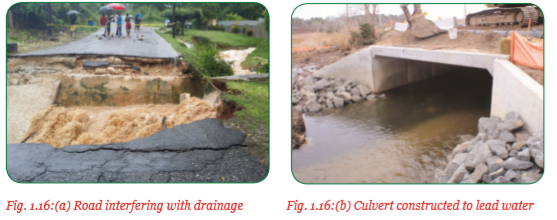
(v) Wrong orientation of infrastructure – These structures include roads, railways, bridges and embankment. They cause soil erosion when the drainage of these infrastructure conflict with the drainage systems of the adjacent farmlands. Well designed systems of side drains and culverts should be installed to lead water from these structures.
1.5 Factors affecting soil erosion
Activity 1 1.4: Research activity to find out the factors affecting soil erosion
Using the references provided, carry out the following activities:
(i) Find out the factors affecting soil erosion.
(ii) Discuss and record your findings.
(iii) Present your findings to the class.
(iv) Take teacher’s summary notes.
The following are the factors that affect soil erosion:
• Rainfall
• Topography/relief
• Vegetation cover
• Nature and type of vegetation
• Nature and type of soil
• Farming practices
• Wind velocity
(a) Rainfall – Rainfall is one of the most important factors affecting soil erosion. The most important rainfall aspect that affect soil erosion is intensity. Rainfall intensity is the amount of rainfall that falls in an area per unit time. It affects the energy of the raindrop and the speed of water runoff. This in turn accelerates erosion. This effect is especially experienced in areas without vegetation.

(b) Topography – This is also known as relief or the slope of land. It affects the speed at which water run-off takes place. Soil erosion in steep areas is more pronounced than in gentle areas. As the speed of water increases, it becomes more forceful and erosive.
(c) Nature and type of vegetation cover – Wherever there is enough rainfall for vegetation to grow, the soil is naturally covered with a protective layer. This cover may include grassland, woodland or shrubs which absorb the force of heavy rain storms and strong winds and allows the rain water to soak down into the soil. It then percolates slowly into the sub-soil. Forests on steep slopes are particularly important for protection of the catchment or watersheds which provide water supply. Organic matter supply from decomposted leaves, roots and crop residues help to maintain good soil structure and porosity which prevents water run-off.
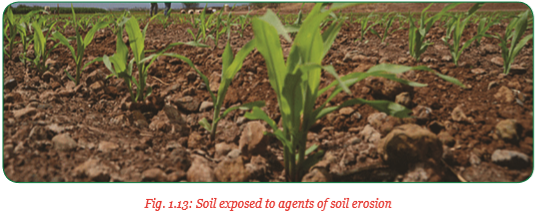
(d) Nature and type of soil – Some soils are more easily erodable than others. Soil resistance to erosion is based on its physical characteristics. Soils with high level of organic matter and good structure are resistant to erosion. Fine sandy and silty soils are easily eroded as shown in figure 1.19.

(e) Farming practices – Farming practices such as planting of annual crops on steep slopes, clean weeding, burning of land, excessive cultivation either expose the soil to agents of soil erosion or destroy the soil structure. Destroyed soil structure cannot be able to absorb water and resist run-off.
(f) Wind velocity – Wind is air in motion. Velocity refers to the speed of wind blowing over a particular area per hour. Wind velocity of 21 kilometres per hour at 30 cm above the ground is capable of moving small amounts of soil. However, if wind velocity increases, then it can move large branches of trees as well as clouds of dust.
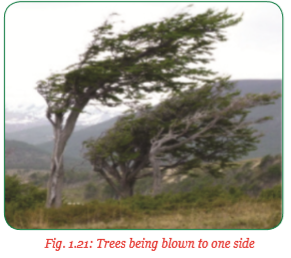
Wind of high velocity can be disastrous when it blows over bare land with loose dry soil particles. The soil moved is then deposited into water masses thus creating water pollution, sedimentation and reduced volume of stored water.
1.6 Effects of soil erosion
Activity 1 1.5: Video show and research activity to find out the effects of soil erosion
Watch a video show on eroded areas in Rwanda and then carry out the following activities:
(i) Find out the areas which are mostly affected by soil erosion in Rwanda.
(ii) From the video show, identify the various effects of soil erosion.
(iii) Discuss and record your findings.
(iv) Present your findings to the class.
(v) Take teacher’s summary notes.
Soil erosion has the following effects:
• Desertification
• Loss of soil fertility
(a) Desertification – It is a process of land degradation by which land becomes progressively drier and eventually drifts into a desert. This describes the human and climatic processes which reduce biological activities to a point where desert-like conditions prevail. Land that was productive biologically is transformed into a wasteland. Desertification is as a result of deforestation, drought or inappropriate farming activities. Soil erosion by wind and water, carry away top fertile soil leaving a mixture of dust and sand which is highly infertile.
The result of desertification is mass migration. When rural land is unable to support the local population, people are forced to move elsewhere, usually in urban areas.
(b) Loss of soil fertility – Soils lose fertility when the qualities that support plant growth are no longer there. This is through:
(i) Loss of essential nutrients for growth: This loss can either be through plant removal or through soil erosion and leaching.
(ii) Loss of organic matter: Organic matter provides many benefits to the soil which include increasing water holding capacity, maintaining soil structure, ability to hold nutrients until plants require them and increases water permeability.
(iii) Loss of soil structure: The granular crumb-like structure of the top soil is desirable for good plant growth. Good soil structure allows air and water to penetrate easily and allows roots penetration.
1.7 Factors causing soil exhaustion
Activity 1 1.6: Research activity to find out factors that cause soil exhaustion
Using the references provided, carry out the following activities:
(i) Find out the factors that cause soil exhaustion.
(ii) Discuss and record your findings.
(iii) Present your findings to the class.
(iv) Take teacher’s summary notes.
Soil exhaustion is caused by the following factors:
• Overcropping
• Leaching
• Overgrazing
• Burning of plants
(a) Overcropping – This is the practice of growing a crop on a piece of land continuously without resting the land. Every time the crops are harvested, they remove large quantities of soil nutrients. These nutrients are not replaced before the next cropping as a result of which the soil becomes exhausted.
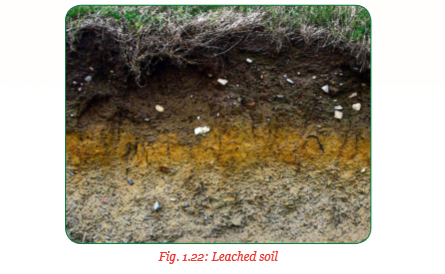
(b) Leaching – This is the movement of soluble plant nutrients vertically from the top soil to the lower horizons of the soil where plant roots cannot get them. It takes place when water dissolves the mineral salts and move down through soils which is excessively drained. The soil is left infertile as shown in figure 1.22.
(c) Overgrazing – This is where animals are kept in larger numbers than a piece of land can support resulting to overgrazing. Animals eat all vegetation and uproot the maintenance foliage. Maintenance foliage is the lowest level of grass or legume species that should be left holding onto the ground after the animals remove the rest through grazing. It helps the pasture or foliage to recover after the rains. When the maintenance foliage is removed, land is left bare and run-off increases after a heavy downpour. This leads to soil erosion. The top fertile soil is removed and the land which was productive becomes barren

(d) Burning of plants – When the vegetation that serves as a soil protective cover is burned, the soil is exposed to agents of erosion. Organic matter is destroyed leading to destruction of soil structure. The ash accumulation formed after burning causes nutrients imbalance in the soil. This prevents absorption of other nutrients. Microbial activities such as nitrogen fixation and decomposition are interfered with due to death of organisms. Such soils become infertile as illustrated in figure 1.24 below.

Exercise 1.1
The photographs in table 1.1 show different practices that lead to loss of soil fertility. Study them carefully and then name each of the practice illustrated and state the damage it produces on the soil.

Soil exhaustion can be prevented through use of good farming practices such as:
(i) Crop rotation – This is the growing of different types of crops or crops of different families on the same piece of land in an orderly sequence. This sequencing is made possible by dividing a piece of land into plots. In each plot, different crops are grown in particular seasons.
Exercise 1.2
Table 1.2 shows a list of crops grown in season one on a piece of land divided into four plots A, B, C and D. Study the table and then draw another table that indicate the types of crops to be grown on each plot in the subsequent season. Table 1.2 shows types of crops grown in four plots in season one.

Crop rotation helps in maximisation of soil nutrients. It also improves soil fertility and controls soil erosion by improving the soil structure.
(ii) Adding fertilisers – Fertilisers are materials that contain plant nutrients in form of elements. They can be chemical substances known as inorganic fertilisers or decomposed organic matter referred to as manures. They are added to the soil to replace the exhausted soil nutrients thus restoring fertility.

(iii) Mixed cropping – This is the growing of two or more crops in the same piece of land but on separate plots or sections at the same time. It facilitates crop rotation and helps restore soil fertility.

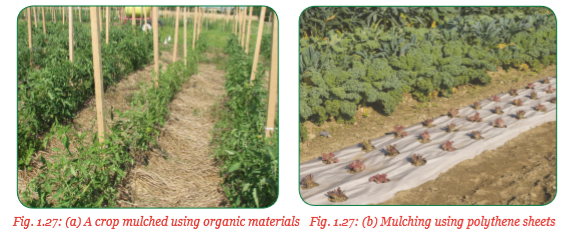
(iv) Mulching – This is provision of protective materials on the surface of the soil. These materials can be organic such as crop residues or inorganic such as black polythene sheets. The mulches protect the soil from the impact of the raindrop and run-off. They also control weeds thus preventing soil exhaustion as shown in figure 1.27 (a) and (b).
(v) Weeding – This is the removal of weeds from a piece of land where crops are growing. Weeds are plants which grow where they are not needed. They impose competition for nutrients with the growing crops hence exhaust the soil. They are removed by slashing, uprooting, mulching or use of herbicides depending on the type.
(vi) Avoiding overgrazing – Overgrazing reduces ground cover and makes the soil to be vulnerable to the soil erosion agents. It also overstretches the use of soil nutrients by pastures and other foliage taken up by animals. These nutrients should be replaced.
1.8 Prevention methods of soil erosion
Activity 1 1.7: A field visit to the hillside to observe prevention methods of soil erosion
Visit a hillside to observe prevention methods of soil and carry out the following activities:
(i) Observe the prevention methods of soil erosion carried out on the hillside
(ii) Identify prevention methods of soil erosion observed.
(iii) Discuss and record your findings.
(iv) Present your findings to the class.
(v) Take teacher's summary notes.
Prevention methods of soil erosion include the following:
• Mulching
• Reforestation
• Terracing
• Contour ploughing
• Strip cropping
• Cover cropping
• Reduction of grazing
(a) Mulching – This involves the provision of protective materials over the soil surface to prevent soil erosion. These materials can be obtained from plants such as grass, leaves and twigs. They can also be obtained from artificially provided materials such as black polythene sheets. Mulches prevent agents of erosion from detaching soil particles and transporting them away.
(b) Reforestation – This is the practice of planting trees on farm land where they have been cut down. Trees help to intercept the raindrops, reducing their erosive force, their roots hold the soil particles together making them able to resist removal by water or wind. They also provide wind breaks reducing the spread of wind and its erosivity. Leaves shed off by trees decompose to humus which improves the soil structure thus increasing water infiltration.
(c) Terracing – This is a mechanical method of preventing soil erosion where the slope of land is modified into a series of successively flat surfaces to minimise the slope and therefore the speed of water flow or interupting the course of water flow preventing erosion.
(d) Contour ploughing – This is ploughing across the slope of the land. The furrows made while ploughing reduces the speed of runoff thus reducing its erosive power. The soil in the runoff is deposited into the furrows.
(e) Strip cropping – It is a method of farming which involves planting of different crops into alternate strips. The crop types are alternated in terms of their nature of foliage, root type and depth and the size of the plants. This makes the plants utilise different nutrients from the soil and covering of the soil surface thus preventing soil erosion.
(f) Cover cropping – This involves the establishment of a crop that spread out on the surface of the soil to provide it with a cover. The crop helps to control soil erosion by preventing the movement of soil and the impact of the rain drops. Crops used as cover crops include sweet potatoes, spreading varieties of beans, lucerne desmodium and grasses.
(g) Reduction of grazing – Grazing is reduced by keeping the correct number of animals in a given piece of pasture land. Animals get enough pasture from this area and leave enough foliage to protect the soil against erosive agents thus preventing erosion.
1.9 Various measures for soil conservation
Activity 1 1.8: A field visit to observe hill sides protected against erosion and to identify cultural measures of soil conservation
Visit hill sides protected against soil erosion and carry out the following activities:
(i) Observe the hill sides protected against soil erosion.
(ii) Identify the protective measures used against soil erosion.
(iii) Discuss and record your findings.
(iv) Present your findings to the class.
(v) Take teacher’s summary notes.
Soil conservation measures are divided into two categories:
• Cultural measures
• Mechanical measures
(a) Cultural measures – These are farming practices which help to minimise soil erosion. They aim at maintaining soil fertility and soil structure. Cultural measures of soil conservation are methods of farming that are sustainable to the environment. Sustainable farming means production of food, plants and animal products using farming techniques that are beneficial to the environment. They preserve the soil and are economically beneficial. They include:
(i) Strip cropping – This practice is also called contour strip cropping. It is the growing of crops in alternate strips of the land. It is applicable where grass is grown in rotation with annual food crops. For example, maize can be grown with grass in rotational strips. When water from the maize strip reaches the grass strip, it is distributed through the grass and infiltrates into the soil, leaving the eroded soil behind.

(ii) Contour farming – This means that all the farming operations such as ploughing, planting, ridging and weeding are carried out along the contours. Ploughing up and down the slope creates lines which guides flowing water to move faster downslope initiating rill erosion. In contour ploughing and planting, the lines or ridges created hold the water, thus preventing rill erosion.
(iii) Permanent pasture – A pasture is a piece of land on which grass or legume species of plants are maintained for the purpose of grazing animals. The grasses or legume can be mixed or pure stands. Grasses have numerous fibrous roots that help to hold the soil particles together. They spread very quickly providing a good ground cover against splash erosion.
Legumes on the other hand have deep taproot and numerous fibrous roots which hold soil together. Their nitrogen fixing ability help to enrich the soil with nutrients which ensure continuous growth of vegetative cover to prevent soil erosion.
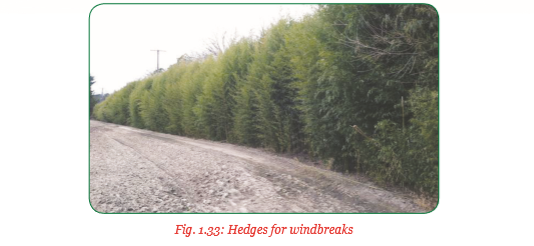
(iv) Windbreaks – A windbreak is a row of trees planted perpendicularly to the prevailing direction of strong winds. The trees should be spaced at 1.5 m – 3 m from each other. Windbreaks protect both the windward side (the side where the wind is blowing from) and the leeward side (the side where the wind is blowing to).

Windbreak trees such as Eucalyptus, Hakea saligna and Grevillea spp. should be planted in long and continuous rows without gaps. However, windbreak trees should not form a dense wall to prevent the shadding effects on crops on the leeward side.
Also, when the wind is blocked, it creates turbulence on the crops to be protected. Blocking the wind creates strong air currents that damage crops and cause soil erosion as shown in figure 1.32 (a) and (b).
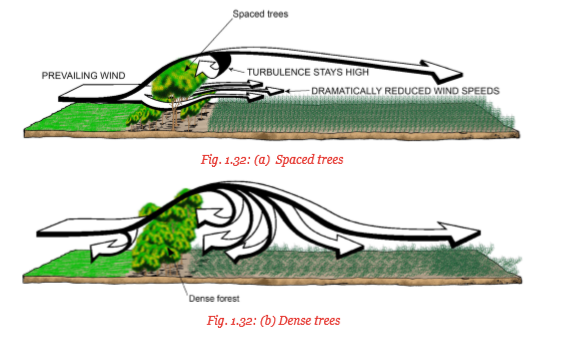
The distance from one windbreak to another should be 15 – 20 times the height of the trees. Smaller trees or shrubs planted to form a hedge on both windward and leeward sides are also effective.
Windbreaks reduce the speed of wind thus causing deposition of soil eroded elsewhere. They act as shelter belts decreasing the rate of evapotranspiration of the crops protected.
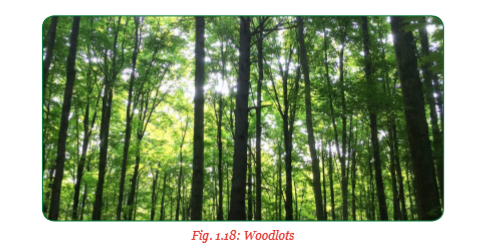
(v) Afforestation and reafforestation – Afforestation is the practice of planting trees in an area where they have never been planted. Reafforestation on the other hand is the practice of planting trees where they have been cut down. Afforestation also entails establishing forests in the slopy areas of the country. Rwanda is a mountainous country and, therefore, a forest cover of more than 10% as dictated by the international agreement need not be overemphasised.

Trees are important in soil conservation and in the rehabilitation of eroded areas. They help in the following ways:
• Maintain a favourable climate.
• Prevent or reduce wind erosion.
• Provide favourable conditions for the recycling of nutrients in the soil.
• Add humus and nitrogen to the soil, thus improving soil structure and fertility.
• Produce buds, leaves and fruits used by human and livestock as food.
• Provide ideal environment for wildlife.
• Carry flowers that are the main source of honey.
• Provide timber and timber products.
• Increase the value of a particular piece of land.
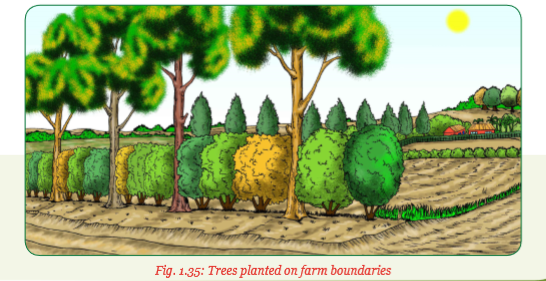
Trees may also be established and integrated with other cultivated crops. This practice is referred to as agroforestry. In this case, trees are planted in the following areas:
• Parts of the farm not suitable for crops, for example, the steep or sloppy areas.
• Eroded areas which include the gullies to rehabilitate them.
• On river banks to reduce river bank erosion.
• Along cut-off drains and terraces.
• As windbreakers, and as the farm boundaries as shown in figure 1.35.
(vi) Cover cropping – This involves the establishment of a crop that spreads out over the surface of the soil to provide it with protection. Cover crops help to control soil erosion by preventing the movement of soil and the impact of the raindrop. They also prevent the soil from being baked hard by the sun thus preserving soil moisture and volatile soil nutrients. Crops used as cover crops include sweet potatoes, spreading varieties of beans, lucerne, desmodium, grasses, among others.

Other cultural methods of soil conservation include:
• Crop rotation
• Mixed cropping
• Mulching
• Reduction of grazing
(b) Mechanical methods of soil conservation
Activity 1 1.9: A field visit to observe and identify mechanical methods of soil conservation
(i) Observe how the following mechanical constructions have been done; bench terraces, ridges, graded bunds, diversion channels (ditches), antierosive ditches and stone lines.(ii) Discuss and record your findings.
(iii) Present your findings to the class.
(iv) Take teacher’s summary notes.
Mechanical or physical methods of soil erosion control involve earth-moving and soil shaping to produce the desired structures such as terraces, ridges, graded bunds, diversion channels, anti erosive ditches and stone lines.
They concentrate water in an artificial channel, that is, in one area if not well constructed, therefore, they may fail to work. They should be designed correctly, constructed properly and maintained always.
Construction works
Most of the structures for controlling soil erosion are constructed along the contours. Therefore, their construction starts with establishing the contour lines.
Contour lines run horizontally across a slope jointing points of the same elevation. These lines are important for certain soil conservation measures such as contour planting, terracing or making contour ridges.
Before planting on the contour line or making a contour ridge, it is important to ascertain and mark the contour lines. This can be done simply by using:
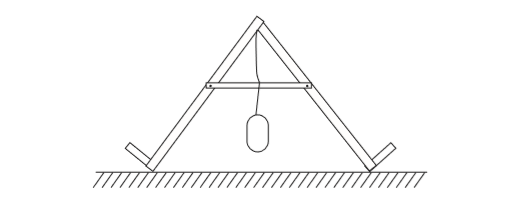
(i) An A-frame
(ii) Transparent water hose level
Activity 1 1.10: A practical activity of making and using an A-frame and a transparent water hose level to mark the contour lines on a sloppy piece of land
Using the materials provided, carry out the following activities:
(i) Make an A-frame and a transparent water hose level.
(ii) Use an A-frame and the transparent water hose level to mark on the contour lines using wooden pegs.
(iii) Discuss and record your findings.
(iv) Present your findings to class.
(v) Take teacher’s summary notes.
Procedure for making an A-frame
1. Drill a hole on end piece of 2 m wood at the top end at exactly the same point.
2. Place the 2 pieces of wood together to form an inverted V- shape and screw them tightly together. The screws should go through the holes drilled.
3. Measure the mid-point of one piece of wood and then drill a hole through it.
4. Take the 1 m long piece of wood and drill a hole on one end. This piece is called a cross bar.
5. Screw the cross bar at the mid-point of the 2 m long piece of wood where the hole was drilled. The two pieces of wood will now form the shape of a letter A.
6. Make an A-frame to stand upright on a level ground and adjust the cross bar to the mid-point of the second piece of wood using a spirit level.
7. When the spirit level is centred, mark the position of the cross bar on the mid-point of the second piece of wood and drill a hole.
8. Screw the cross bar (1m long wood) onto the second 2 m long wood firmly.
9. Fold the 2.5 m string into two equal parts and tie one end at the midpoint of the apex of an A-frame.
10. Place a weight or a stone at the lower end of the string and tie it tightly.
11. The weight should make the string swing in between the two legs of an A- frame.
12. The string and the weight will be used to ensure the two legs of an A- frame are on level ground when the string is in the mid-point of the cross bar.
13. An A-frame is now ready for use.

If an A- frame is to be used to mark accurately different slopes, then use blocks of wood of different thickness as follows:

The wood should be exactly 2 m long for the above measures to give accurate gradients.
Establishing a level contour line using an A-frame
1. After placing the two legs of an A-frame on the same level ground, mark the spot where one of the legs is standing with a peg or stone.
2. Then lift that leg, while the other leg remains in place and rotate an A-frame (in a semi circle) until the lifted leg is on the opposite side. Now place it on the ground and adjust it until the weighted string touches the mid-point mark of the cross bar.
3. Place a peg where the second leg of an A-frame has been standing.
4. Lift the second leg and rotate it until it is on the opposite side of the frame.
5. Repeat this process marking the ground where each leg stands before moving it to the opposite side.
6. When these points are marked across the slope, the line that joins the pegs together on the ground is the contour line.
7. Ridges, terraces or crops can be planted along the contour line.

After establishing the countour lines, mechanical construction can be made along these contour lines.
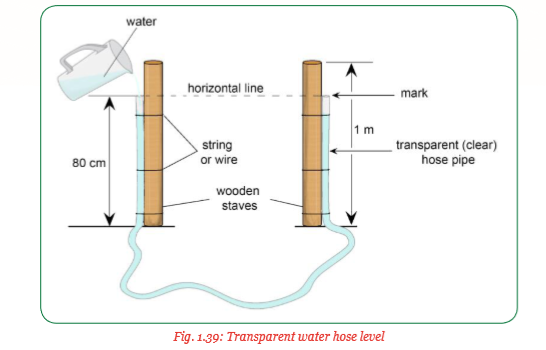
Procedure for making a transparent water hose level
(i) Make a mark on each of the staves about 80 m from the bottom.
(ii) Place the ends of the hose pipe level with the top of the staves so that the pipes runs the full length of the staves.
(iii) Attach the hose pipe to the stave using the strings or wire.
(iv) Place the staves side by side making sure the marks are exactly opposite each other.
(v) Fill the hose pipe with water from one end until the level of the water reaches the marks on the staves. This is shown in figure 1.39.
(vi) Check to make sure that there are no bubbles in the hose pipe.
(vii) The level is now ready for use.
Using the transparent water hose level to trace the contour lines:
(a) Place the wooden poles besides each other and the level of water in the hose pipe at the same level.
(b) Mark the position of the first pole with a peg and name it A.
(c) Move the second pole B to different locations along the ground until the two marks are at the same level with the water level.
(d) Mark this position with another peg.
(e) Move post A to where post B is and move post B to different locations along the ground as in (c).
(f) Repeat these operations until the end of the land.
(g) The line made by wooden pegs is the contour line.
Activity 1 1.11: A practical activity of constructing terraces, ridges, bunds and diversion channels
Make a field visit to an area where terraces, ridges, bunds and diversion channels are being constructed and carry out the following activities:
(i) Determine the contour line using an A-frame or the transparent water hose level, wooden pegs and the garden line.
(ii) Use the materials provided to construct the terrace, ridge, bund and a diversion channel.
(iii) Discuss and record your findings.
(iv) Present your findings to the class.
(v) Take teacher’s summary notes.
Terracing
A terrace is an earth-embankment constructed across the slope to control runoff and minimise soil erosion. It acts as an intercept to the landslope and divides the sloping land into strips thus reducing the slope length available for run-off. Soil loss downslope has been found to be proportional to the square root of the length of the slope. Thus, by shortening the length of the slope, soil erosion is reduced. Terraces block the movement of the run-off and reduce their velocity.
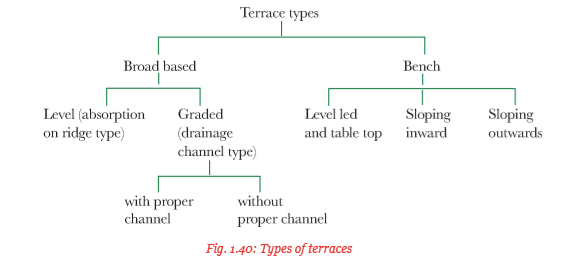
Terraces are classified into two major types; broad-based and bench terraces. The broad-based terraces are used where the main purpose is either to remove or retain water on sloping land for cultivation whereas bench terraces are mainly to reduce the land slope.
(a) Bench terraces – Bench terraces consists of a series of platforms constructed along the contours which cut into the hill slope in a step-like formation. These platforms are separated at regular intervals by a vertical drop or a steep sided wall which is protected by vegetation packed with stones. The hill slope are converted to cultivatable platforms. They can also be converted into irrigated fields or orchards.

Construction
In designing the bench terrace, it is important to consider:
• The average rainfall of the area.
• The soil type.
• The soil depth.
• The slope of the land.
It is also important to determine the following:
(i) The type of bench terrace, i.e., where the riser (sides) will be inclining at a slope of (1/2: 1, V:H) or the vertical type at a slope of (1:1, V:H)
(ii) The terrace width.
(ii) The terrace cross section.
(iv) The terrace spacing or the depth of cut.
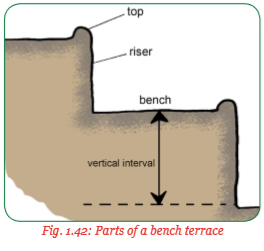
The terrace spacing is the vertical interval between two terraces.
Excavated bench terraces
The terrace width is the distance between two risers. The soil that is cut from the upper part of the slope is used to fill lower part which forms the riser. The construction can start from the highest point or lowest point and proceeds downwards. The soil excavated is thrown downwards to form the riser. The excess top soil is spread to flatten the bench.
Where the construction starts from the lower most part and proceeds upwards, the soil excavated is thrown upwards to form the riser. The top soil from the second terrace is spread on the first terrace and the process continues for the subsequent terraces.
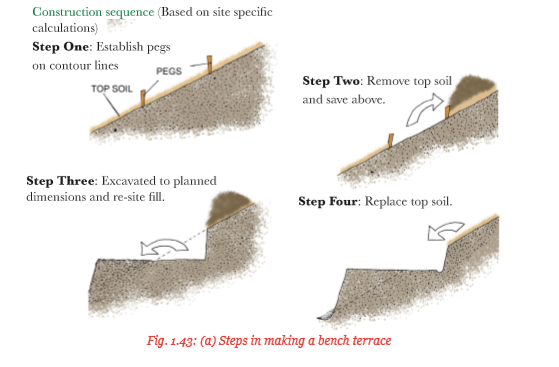
The procedure of constructing a bench terrace is as follows:
Step I – The contour lines are established, measured and then marked with wooden pegs.
Step II – The top soil is removed from the space between two pegs and thrown upwards.
Step III – The remaining sub soil is excavated up to the required depth and thrown downward to the bench.
Step IV – The top soil which had been thrown upwards is returned and spread to the bench to level it.
These four steps will construct one bench terrace along one contour line. The process is repeated for the other terraces. Figure 1.43 (a) shows the bench terrace construction steps.
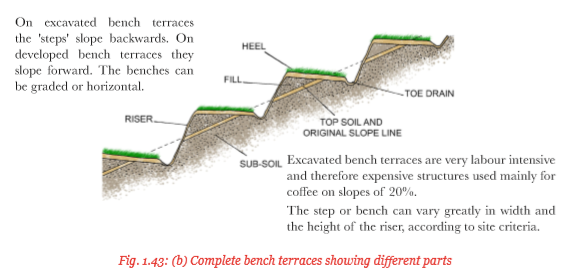
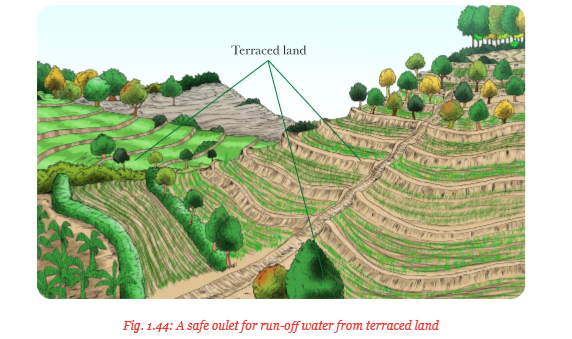
Grass is then planted on the heel of the embankment or riser to stabilise it. A toe-drain is dug at the foot of every raiser (embankment) to carry away the runoff. Suitable outlets should then be provided to dispose of the run-off safely. In most cases, one of the sides of the hill slope where vegetation is well established can be used as an outlet. A channel can also be created as a waterway to dispose of the run-off safely, as shown in figure 1.44.
Benches
Water should not be allowed to accumulate in any part of the terrace. All runoff should collect at the toe drains for safe disposal or infiltration. Ploughing should be done with care to avoid destroying the toes.
Risers
These are also called embankments. Grasses should be grown on the risers. Any small break of the riser or embankments should be repaired as a maintenance practice after heavy rains.
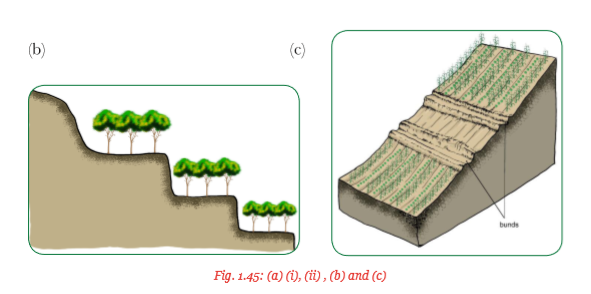
(b) Progressive terraces – This is the most common form of erosion control measure. It is applicable on moderately steep slopes and is easily combined with agroforestry measures. The combination of bunds and ditches slow down the movement of water and soil. In the course of time, soil accumulate behind the bunds and “progressively” a terrace is formed. Bunds are usually strengthened with perennial fodder grasses, legumes or trees.
Exercise 1.3
Study the diagrams below carefully and identify the type of construction.

Ridges
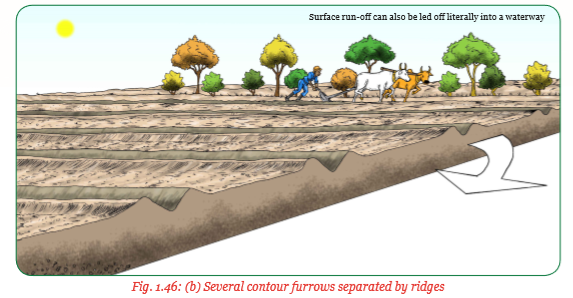
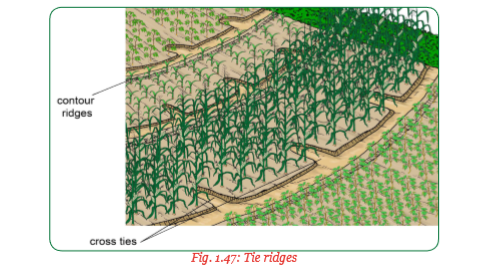
A ridge is a strip of ground or earth thrown up by a plough or left in between furrows. The small earthen ridges are 15 cm – 20 cm high with an up slope furrow which accommodates run-off from a catchment strip in between the ridges. The catchment strips are usually uncultivated but if used for water harvesting and to increase infiltration, crops can be planted. These ridges reduce soil erosion and allow water to seep into the ground. They also trap eroded soil. Furrows can be blocked at regular intervals with similar ridges of soil. This prevents water from moving through the furrow. The water is held in the furrows for long. The ridges may be between 1.5 m and 10 m apart. There are two types of ridges;
contour ridges and tie ridges.
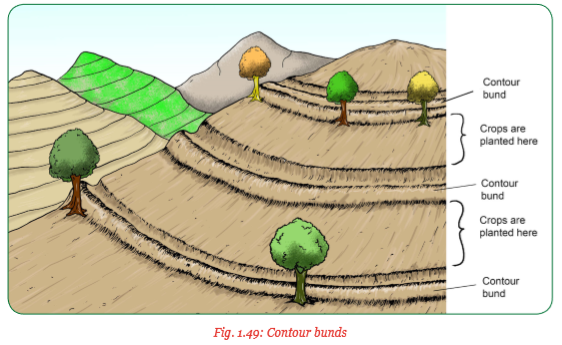
(a) Contour ridges – Making contour ridges involves building a series of earthen or stone barriers (bunds) along the contour line. They retain water in the furrows and allow it to seep into the ground.

(b) Tie ridges – These are ridges where the furrows in between the ridges are blocked with similar ridges of soil. The small ridges that block these furrows are known as cross ties. Cross ties are made at right angles to the contour to make the ridges more effective in trapping water. The cross ties prevent water from flowing along behind the contour ridge and collect water to the lowest point. They prevent the water from breaking through the ridge. This prevents gully formation. Cross ties can be spaced at 10 m interval in gently sloping areas with low rainfall. However, in steeper slopes and in areas of high rainfall, they should be spaced closer at 4 m – 5 m interval.
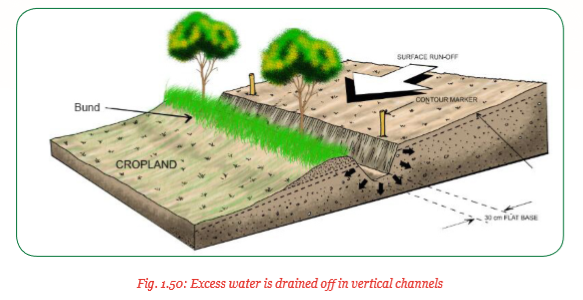
Bunds
A bund is an embankment-like structure constructed across the landslope. They are used to modify the surface of the slope of the land increasing retention of water and safe disposal of run-off water.
They serve the following purposes:
(i) Increase the time of stay of run-off water in order to increase infiltration time.
(ii) Decrease the effect of landslope and speed of run-off by intercepting the slope at several points thus decreasing the erosivity of run-off water.
(iii) They protect the soil from erosion caused by the run-off.
Bunds should be 1m – 2 m wide and about 60 cm high. They are best used for small cultivated areas on moderate slope and should be about 30 m apart. However, they should be close together on steeper slopes.

There are two types of bunds made for controlling soil erosion. These include: Contour bunds and graded bunds.
The type of bunds to be used depend on the following factors:
(a) Contour bunds – These type of bunds are constructed along the contours. Contour bunds sometimes are constructed with small offshoots called tie-bunds emanating from them to facilitate better erosion control. The ties are placed every 5 cm –10 cm of the bund to enable any run-off water to seep into the soil and prevent it from running along the channel above the bund.• Slope of land.
• Amount of rainfall.
• Soil type.
• Purpose or the use of bunds.
Countor bunds are recommended for areas with low rainfall less than 600 mm/annum with permeable soils and landslope less than 6%. They prevent soil erosion as well as conserve water for the crop.
(b) Graded bunds – These type of bunds are used for safe disposal of excess run-off in areas of high rainfall and impervious soil. They require establishment of grassed waterway as an outlet for safe disposal of excess water accumulated over bunded area. The grassed waterways should not be overgrazed or left without vegetation.
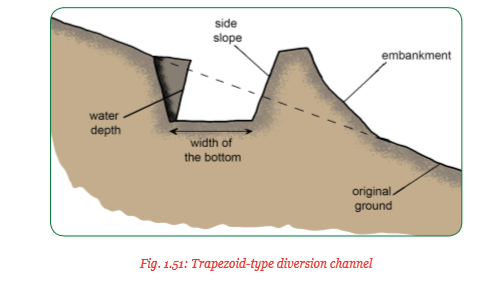
Diversion channels
These are earth structures constructed across a field to intercept and divert surface run-off from the slope above and drain it to a safe outlet.
The structures can be in form of a trench, a narrow base channel or a ditch.
• Narrow based channels are constructed for gentle sloping areas of about 15% slope.
• Ditches are constructed on steep slopes with small quantities of run-off to be diverted.
• Trench types are used where large quantities of run-off are to be diverted at foothills.
Use of diversion channels
Diversion channels are used to:
(i) Protect cultivated lands, roads or farm buildings at the foot of the hill by diverting run-off.
(ii) Protect other conservation structures such as terraces and bunds which have been made on land at the slopes and foot of the hills.
(iii) Collect water run-off and channel it to ponds or other storage structures.
(iv) Prevent gullies from developing.
Diversion channels are used in the following areas:
• Where run-off endangers low lying lands below and within the hill slope, roads and other conservation areas.
• Where a gully is developing.
• Where a piece of land or a farm above the slope concentrates run-off which is damaging the land below.
Construction of diversion channels
1. The land where the channel is to be constructed is cleared and all vegetation and stumps removed.
2. Deep digging is carried out to make the channel as deep as required and the soil thrown downwards to create the embankment.
3. The embankment (the fill) on the lower side is compacted layer by layer to make it firm.
4. Extra soil from the lower side can be used to increase the height and width of the embankment (fill) if necessary.
The upslope areas of the diversion channels should be protected with vegetation in order to make it effective. Grass should be grown on the sides and the embankment to stop soil from coming down or breaking into the channels. Diversion channels or ditches should safely discharge storm or run-off water to non-eradible areas such as:
• Natural waterways, for example, rivers.
• Stony or rocky grounds.
• Grassland or forest with well established cover vegetation.
• Artificial waterways.
Maintenance of diversion channels
Deposits of silt in the channel should always be removed and thrown to the underlying land. This is to make sure that water flows freely all the time. Any large plants, trees or bushes should be cleared from the embankment trench or channel. The roots of trees may cause cracking and breaking of the embankment.
Exercise 1.4
The following photographs show structures constructed along the contour lines to control soil erosion by preventing run-off. Study the structures and then carry out the following activities:
(i) Identify the structures.
(ii) Compare structures
(a) and
(b) and then give four differences between them.
Activity 1 1.12: Field activity and a practical activity for constructing anti-erosive ditches and stone lines
Make a field visit to an area where anti-erosive ditches and stone lines are being constructed and carry out the following activities:
(i) Observe the construction of anti-erosive ditches and stone lines.
(ii) Use the materials provided to construct anti-erosive ditches and stone lines.
(iii) Discuss and record your findings.
(iv) Present your findings to the class.
(v) Take teacher’s summary notes.
Anti-erosive ditches
These are structures which are designed to protect agricultural land from erosion caused by rainfall.
There are many types of anti-erosion ditches and ridges. The most suitable type for the land in question depend on:
• Rainfall intensity.
• The nature of the soil, for example, permeability.
• The slope of the land.
• The use to which the land is put, that is, the type of crop to be grown.
Steep sloping land (slope greater than 25%)
This type of land is basically grazing land or on forest. The purpose of antierosion structures on such land is to protect the cultivated land which lies below it. The appropriate structures are ditches or terraces with silt catchment pits or trees.
(a) Silt catchment pits
This type of ditch is used to stop the flow of overland run-off water and allow it to be absorbed by the soil as well as collect the sediments carried by the water in the pit.
The structures are located uphill from cultivated land. They have rectangular sections which are 40 cm wide 20 cm deep and between 3 m and 25 m in length. They are dug along the contour line with 2 m of levelling between each ditch.
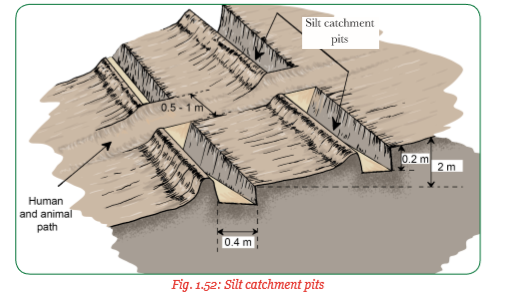
The ditches are blocked off in a zigzag pattern by a mound of earth about 50 cm – 100 cm wide after every 3 cm – 25 m to provide a path for human and animals.
(b) Forest tiering
This kind of tiering is used on a steep ground to allow plantation to be established.
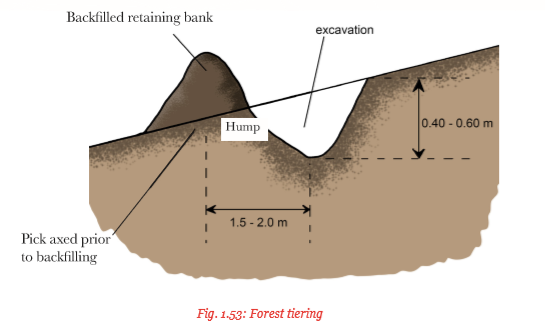
The ditch is dug uphill from the retaining ridge to allow the water to be reabsorbed by the soil.
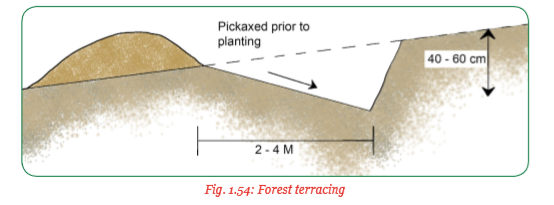
(c) Forest terracing
This system is used on slopes of between 15% and 20%. Fruit trees may be used for the plantation at the base of the ridge as shown in figure 1.54 below.
(d) Cropping terracing
These are built on slopes less than 15%. They form gentle cross section where farm machinery has easy access to the land. There are two main types; the channel and crest type. These are shown in figures 1.56 and 1.57.
(i) Channel type terrace – This has a deeper ditch and a higher hump. It is used to divert the water from farmland.

(ii) Crest type terrace – Where the hump is raised and the ditch is shallow so that the water is retained and absorbed.

Construction procedure for the anti-erosive ditches
1. The site where these ditches are constructed should be determined by the community as a project.
2. Work should begin with the highest lying fields.
3. The contour lines should be determined and marked first before construction starts. This can be done using an A-frame or the transparent water hose level.
4. Excavation work of the trench should be done by digging the soil with pick axes and removing it with a shovel.
5. The earth which is excavated from the ditches should be backfilled down hill to make the banks or embankments. This backfilling materials should be compacted by stamping with foot animals or hand rammers.
6. Compaction should be done after every 10 cm layer is added.
7. The slopes between the ditches and retaining banks should be protected with vegetation.
Maintenance of anti-erosive ditches
(i) Ensuring the embankments remain horizontal.
(ii) Reinforce and repair any part of the structure which has become weak by compacting.
(iii) Filling in the gullies or gaps with earth and compacting well.
(iv) Vegetation or the grass cover should be protected to remain adequate.
(v) If trees prevent the growth of grass under cover, they should be cut.
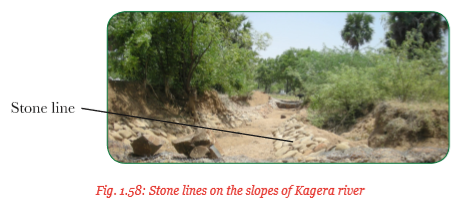
Stone lines
These are long rows of stones piled together to form barriers across the field. Stone lines are commonly used in the dry and humid areas of Africa to control soil erosion.
They are used in places where there are loose stones in the fields. Stone lines are made by heaping stones about 0.4 m –0.6 m wide and 0.5 m along the slope to trap soil carried by run-off water. They slow down the run-off and soil gradually builds up behind these lines of stones. They are used on both flat and sloppy lands.
The distance between the lines depends on the slope and the amount of stones available. It should be about 20 m – 25 m apart on a gently sloping areas and 8 m – 12 m in steep areas. If the stones collected from the farm are not enough, they can be ferried using donkey carts or lorries from other places such as quarries. Stone lines follow the contour lines which should be determined using an A-frame or the transparent water pipe level. Grass or trees are planted on either sides of the stone lines in order to give an effective conservation farming. Planting pits are often used with stone lines as shown in figure 1.57 (a) and (b).
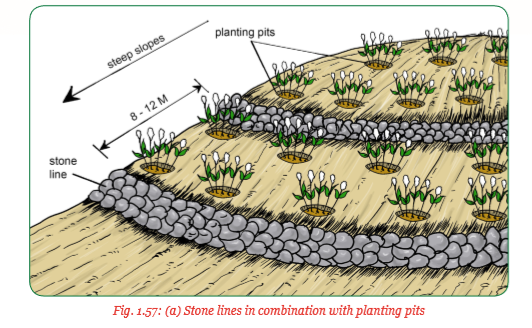

Construction procedure for the stone lines
1. Collect many different sized stones.
2. Pile the stones on the contour lines marked with an A-frame.
3. Pile a line of 0.4 m – 0.6 m wide and 0.5 m high; put them close together to prevent any gaps in between.
4. Plant some shrubs on either side of the stone line in pits. Stone line have very little maintenance practices except to return the fallen off stones in the line.
Activity 1 1.13: Field visit with practical activity to establish a grass filter strip, trash line and constructing a gabion
Visit a farm or an area where filter strips, trash lines are being established and a gabion is under construction and carry out the following activities:
(i) Observe the establishment of the filter strips, trash lines and the construction of the gabion.
(ii) Use the materials provided to establish a filter strip and trash line and take part in gabion construction.
(iii) Discuss and record your findings.
(iv) Present your findings to the class.
(v) Take teacher’s summary notes.
Filter strips
Filter strips are uncultivated strips measuring at least 1m – 2 m wide along the contour between the cultivated strips which are wider than 30 m. The strips are normally of grass and they are suited to low lying fields. They can easily be integrated into the existing landscape and if well designed, they provide beauty.
They capture sediments and other materials by slowing run-off water flowing from a field. As water is slowed, large soil particles rapidly settle out. Small clay particles need a longer flow distance to settle out in the filter. A longer strip width is needed to remove finer soils. They work best in uniform depth across the filter and on relatively flat slopes.

Their effectiveness depends on:
(i) Soil characteristics.
(ii) Slope, shape and area of the field draining to the filter.
(iii) Type and quality of vegetation.
(iv) Width of the strip.
(v) Proper installation and maintenance.
How to establish a grass filter strip
1. Determine where the filter strips are required, their width and the number required. This depends on the area to be covered.
2. Prepare the strips into weed free seedbeds.
3. Plant suitable grass such as sugar cane, Cetaria sphacelotheca, Paspalum notatum but avoid creeping grasses such as star grass. Deep-rooted legumes can also be used.
4. Planting should be done during the rains when the other crops are being planted to avoid drying of the grass strips.
Maintenance of filter strips
(i) Frequent inspection especially after heavy rains to remove accumulated sediments.
(ii) Minimise the development of erosion channels by repairing them or planting more grass.
(iii) Plant more grass or reseed bare patches.
(iv) Mow or remove vegetation regularly to leave a height of 15 cm.
(v) Test the soil periodically to ensure healthy growth of grass or vegetation.
(vi) Control or remove unwanted trees, bush or noxious weeds.
(vii) Fence off livestock from the strips to maximise the filtering potential.
(viii) Discourage use of machinery such as mowers through the strips.
(ix) Filter strips should be used with good agricultural practices such as pasture management, proper nutrients and pest management to enhance effectiveness.

In general, vegetative filter strips are effective in:
(i) Reducing sediments and nutrients in run-off from crop lands.
(ii) Controlling run-off in the form of shallow uniform flow compared to concentrated heavy flows.
(iii) Trapping clay-sized particles compared to silt and sand-sized particles when filter width is longer.
Trash line
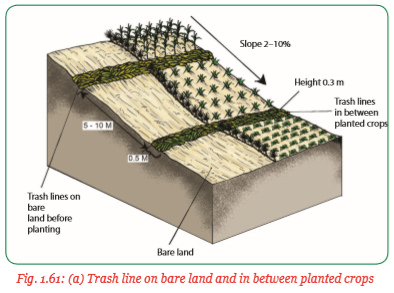
A trash line is a pile of vegetative materials made of crop residues, weeds and prunings laid along the contour lines to slow down the flow of run-off. They are placed in definite lines leaving the rest of the land bare as shown in figure 1.61 (a).
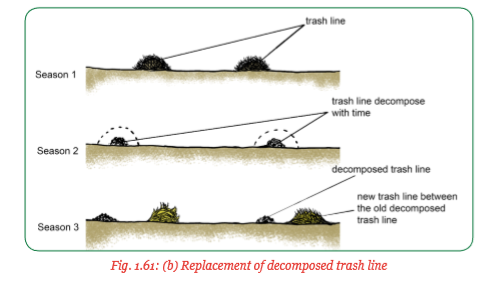
The trash decompose within the first season and add organic matter to the soil.
During the second season, another trash line is built in the middle of the old trash line as shown in figure 1.61 (b).
These are then replaced in the coming seasons with fresh materials each time on different contour lines within the farm. Trash lines are recommended as the first stage to develop bench terraces. In this case, wooden pegs are placed along the lower side of the trash line to stabilise them. It is important that crop residues used in the trash line are free from any diseases and pests.
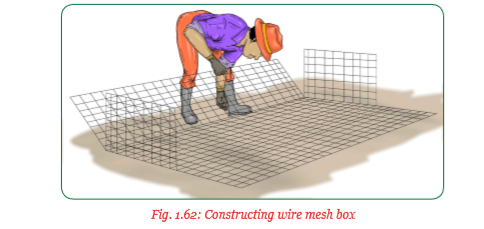
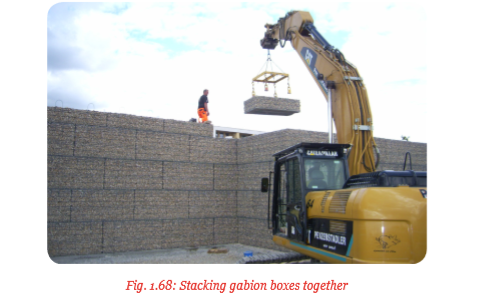
Gabions
These structures are also referred as porous dams. Gabions are boxes made of woven wire mesh which are filled with stones at the site to form flexible permeable and permanent structures. The structures act as retaining walls, channels and weirs for erosion control. All the mesh wire boxes are reinforced with iron rods of greater diameter at the edges to strengthen them. The gabions are divided into several cross ties. The gabion boxes can be of various sizes, for example, 2 m long by 1m width and 1m high. The boxes may be arranged beside each other.
The internal stability of the gabion is dictated by:
• The way each store interlock with each other in the mesh.
• Their weight which helps them to resist the hydraulic force created by moving water.
Construction and installation of gabions
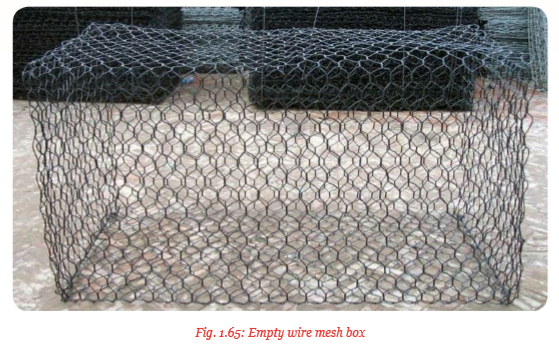
Step I – Shows panels of wire mesh sheets fitted together which will be folded to form the boxes, as shown in figure 1.62.
Step II – Wire mesh sheet panels are folded together to form rectangular boxes, as shown in figure 1.63.

Step III – Excavating the site where the gabion is to be placed and levelling the ground together with embankment. Loose materials and vegetation removed, as shown in figure 1.64.

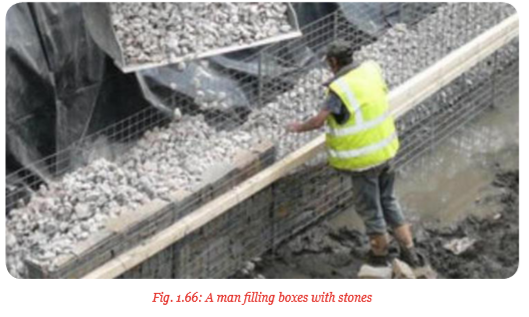
Step IV – Placing the gabion units to the site.
Step V – Filling in the boxes with stones.
Step VI – Close the lid and finish the box by attaching vertical braces to the lid.
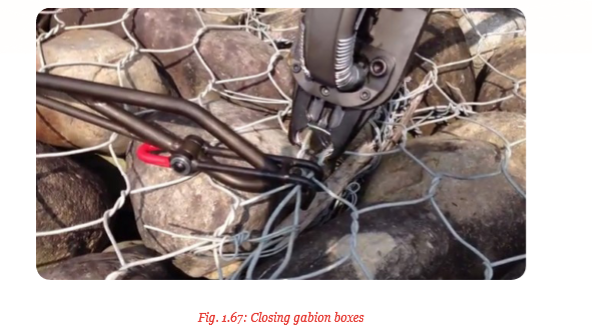
Step VII – Placing more boxes on top of the finished one. Attach the boxes to each other with the wire, then fill with stones. The boxes should fit the area to be covered exactly.
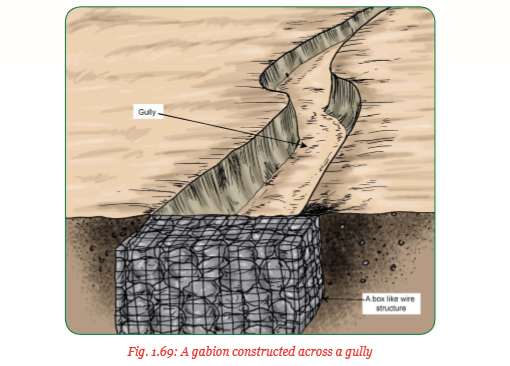
A single box gabion can be constructed at the end of a gully as shown in fig. 1.69.
Stones used to fill in the gabion boxes should be obtained from a nearby source to reduce cost of transportation. The best stone size should be 100 mm – 250 mm in diameter to produce a well packed gabion.
The exposed side of the box should be lined with stones of equal sizes, neatly packed with the flat side against the mesh. Smaller stones should be packed in between the larger ones to reduce space. Gabion boxes should not be filled with mechanical equipment to prevent spaces left in between.
Uses of gabions
Gabions are used:
1. To slow the speed of concentrated run-off.
2. In conditions where water velocity is so high that it causes gully formation.
3. On steeper slopes to stabilise the area especially where the slope drops to a road or any other structure.
4. To protect earth embankments in steep areas from sliping over.
5. To protect farms, buildings, roads, railways and other structures constructed on the edges of a slope.
6. To help in recovering eroded areas by filling in already formed gullies.
7. To prevent gullies from forming in areas where they may be prevalent.
Advantages of using gabions
• They are easy to handle and construct.
• Once constructed, they are permanent.
• They are permeable to water thus allow water to pass through them.
• They filter the soil in run-off and with time, this soil fills in the gully.
Maintenance of gabions
(i) Should be inspected regularly after each heavy storm.
(ii) Should be repaired in case the storms cause any damage.
Unit Summary
Soil erosion is the gradual removal of the top soil through the action of water, wind, animals and human beings.
The eroded soil is finally deposited into water bodies and reservoirs causing siltation and reduction in water storage capacity. Soil erosion is accelerated by the following factors: Rainfall of high intensity, steep slopes, lack of vegetation cover or bare ground, loose shallow soils, poor farming practices and wind of high velocity.
Soil erosion leads to desertification and loss of soil fertility hence land becomes barren in terms of agricultural production. In addition, soil exhaustion may occur as a result of overcropping, leaching, overgrazing and burning of organic matter.
However, soil erosion can be prevented using cultural and mechanical measures. Cultural measures used to prevent soil erosion include use of good practices such as crop rotation, mixed cropping, mulching, weeding, contour farming, strip cropping and controlled grazing.
Mechanical methods also referred to as physical or structural measures of controlling soil erosion include terracing, ridging, construction of graded bunds, diversion channels, anti-erosive ditches, stone lines, filter strips and gabions of porous dams.
When soil conservation measures are carried out, soil erosion is controlled. Less soil erosion means better soil quality with soil retaining nutrients which naturally lead to better and more improved crop yield. Erosion control also reduces expenses incurred in drainage and water filtration. It prevents longterm damage to the environment.
Group activity
1. (a) Walk around the school compound or farm after a heavy downpour and check out for signs of splash, sheet, rill or gully erosion.
(b) Find out where the run-off that caused the type of erosion visible originated from.
2. (a) Mark out four plots on a slightly sloppy area of the school compound or farm. The plots should border each other. Label the plots A, B, C and D.
(b) Dig a trench at the foot of the plots stretching from one end of the plots to the other end.
(c) Spread a sheet of polythene paper on the trench.
(d) Carry out the following on each plot: Plot A – Leave it bare. Plot B – Cover with dry grass. Plot C – Plant beans and allow them to grow up to the first weeding. Plot D – Plant a fast spreading grass.
(e) Compare the amount of soil collected on the polythene sheet from each plot at the end of the seasons.
(f) Find out the following from the results:
(i) Which plot was most vulnerable to soil erosion?
(ii) Which plot had the least soil erosion and why?
Key terms
1. Agroforestry – Growing woody perennials under the same land unit with agricultural crops and pastures for livestock.
2. Barren land – A piece of land that is unable to support the growth of crops.
3. Barrier – An obstacle that prevents movement or access.
4. Bund – A ridge of earth placed in a line along the contour run-off and soil erosion.
5. Contour – A line joining all places of the same height above sea level.
6. Controlled grazing – Livestock grazing limited to specific area.
7. Cropping systems – The order in which the crops are cultivated on a piece of land over a fixed period of time.
8. Desertification – Transformation of land which was once suitable for agriculture into arid and barren.
9. Ditch – A long narrow trench or channel.
10. Diversion dyke – A temporary ridge of soil constructed at the top of a cut of hill slope to divert over land flow from a small area away from unstable slope.
11. Infiltration – The seepage of water into the soil.
12. Infrastructure – The basic physical systems that provide services such as transport, communication, water and sewage.
13. Kinetic energy – Energy possed by moving objects.
14. Leeward side – The side which is sheltered from the prevailing wind.
15. Microbial activities – Activities of the micro-organisms such as bacteria, fungi, protozoa and viruses in the soil.
16. Overland flow – The flow of water on the surface of the land that occurs after a storm.
17. Perennial – A plant that grows for more than one year.
18. Pollution – Introduction of contaminants or toxic substances that cause adverse change into the natural environment.
19. Ridge – A long raised strip of earth.
20. Run-off – Rainfall or other type of water that does not infiltrate into the soil but flows across the surface.
21. Sedimentation – Depositing of small solids such as soil particles.
22. Shrub – A woody plant that remains less than 10 metres tall and produces shoots or stems from its base.
23. Siltation – The process by which water becomes dirty as a result of fine mineral particles in water.
24. Slope – The inclination or angle of the land surface which can be measured as a percentage or in degrees.
25. Soil capping – This is the formation of a hard crust on the soil surface that limit permeability of water.
26. Watershed – A unit of the landscape that consists of all the drainage area and channels contributing to a single stream or river.
27. Waterway – A natural or artificial watercourse or channel for the flow of water
28. Windward side – Towards the direction from which wind blows. The side which faces the prevailing wind.
29. Wood stave – A vertical wooden post or plank in a building or other structures. It is also known as staff.
End of Unit 1 Assessment
1. Differentiate between sheet and rill erosion.
2. Explain how overgrazing increases soil erosion.
3. Draw a well labelled diagram showing contour farming.
4. Suggest the type of land where each of the following soil erosion control measures would mostly apply:
(a) Use of trash line.
(b) Use of diversion channels.
(c) Use of gabions or porous dams.
5. The diagrams below show a soil erosion control structure. Study them carefully then answer the questions that follow.
(a) Identify the structure in the diagram.
(b) Name the parts labelled A and B.
(c) Give two functions of the part labelled B in soil erosion control.
6. The following diagram illustrates a method used in laying down terraces. Study it carefully and then answer the questions that follow.
(i) Identify the method illustrated.
(ii) Briefly explain how the method is used in laying down terraces.
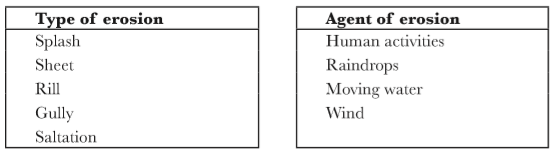
7. Match the following types of erosion with most common agent using an arrow:
8. Why is it recommended to carry out farming activities along the contour?
Files: 2UNIT 2 : CEREALS
Key Unit Competence:
Learners should be able to conduct cultivation of cereals.
2.1 Learning Objectives
(i) Knowledge and understanding
• State the characteristics of cereals.
• Give examples of cereals grown in Rwanda.
• Discuss the importance of cereals.
• Explain the cultural practises done on cereals.
(ii) Skills
• Detect characteristics of cereals.
• Select common cereals cultivated in Rwanda.
• Recognise the importance of cereals.
• Conduct cereals cultivation.
(iii) Attitudes and values
• Agree to the characteristics of cereals.
• Be aware of cereals cultivated in Rwanda.
• Appraise the importance of cereals.
• Show team spirit in research and group discussions.
• Show concern while doing cultivation techniques of cereals.
Introduction
Most farmers in Bugesera District faced a problem of low production of maize because they did not reflect the time of sowing. The main cause was the use of hand hoe on large area and manpower labourers were not available. Help them to find the solution of that problem. Link these solutions to the improvement of maize yield.

2.2 Botanical characteristics of cereals
Activity 1 2.1: A field visit to a field growing cereals to observe the characteristics of cereals
Visit a farm where cereal plants such as maize, sorghum and wheat are grown and carry out the following activities:
(i) Observe the characteristics of the leaves, the stems and the inflorescence of the cereals grown.
(ii) Uproot the plants and observe the characteristics of the roots.
(iii) Discuss and record your findings.
(iv) Present your findings to the class.
(v) Take teacher’s summary notes.
Cereals belong to the grass family graminae and are mainly cultivated for production of seeds. They are the most cultivated crops in the world. Cereals provide carbohydrates. They are mainly used as staple foods.
Cereal plants have the following characteristics:
(i) Leaves – Cereals have narrow, long leaves with parallel veins, a characteristic of all monocots.
(ii) Stems – They have herbaceous stems which grow vertically with nodes and internodes.
(iii) Roots – They have shallow and fibrous roots.
(iv) Inflorescence – The flowers are small and clustered to form an inflorescence. However, in some plants such as maize, the male and female parts of the flowers are separated to form a tassel and a cob respectively.
(v) Buds – These are the growing points of the plants. Cereals have hidden buds.
(vi) Seeds – The grain seed is a fruit known as a caryopsis which is composed of an endosperm, germ and bran.
Exercise 2.1
Study the figure and identify the parts labelled A, B, C and D.

Exercise 2.2
The following pictures show different inflorescence of cereal crops. Study them carefully and identify the types of the cereal crops labelled E, F, G and H.

2.3 Cereals cultivated in Rwanda
Activity 1 2.2: Research or a discussion to find out the types of cereals cultivated in Rwanda.
Using the materials provided, carry out the following activities:
(i) Identify the cereals in the pictures provided.
(ii) Search on the internet or library on the cereals grown in Rwanda.
(iii) Sketch on the map the various areas where different cereals are produced in Rwanda using a suitable key.
(iv) Find out the most and least produced cereals in Rwanda.
(v) Discuss and record your findings.
(vi) Present your findings to the class.
(vii) Take teacher's summary notes.
Some of the cereals cultivated in Rwanda include rice, maize, sorghum and wheat.
(a) Rice
This is a primary cereal cultivated in the tropical region such as the lowlands of Africa and in flood plain regions through flood irrigation. Highland rice can also be cultivated although this type is not irrigated but rainfed.
Rice production is encouraged in Rwanda to supplement importation. Rice is produced by companies such as NAUR Ltd., SODAR, MBI Co. Ltd., Dukorerehamwe, Nyagatare Rice Company, Kihere Gafunzo Rice Mill, Gatsibo and Mayange Rice Mills. In 2009, 44907 farmers grouped into 60 cooperatives were engaged in rice production producing 17,355 metric tonnes.
(b) Maize
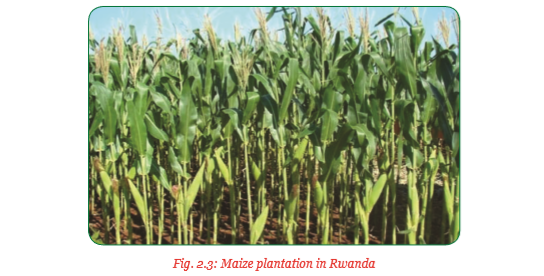
This is a staple food in East Africa. It is also used to make livestock feed in form of fodder where the stems are chopped or grains used as ingredients in making various products.
Maize is grown in all regions in Rwanda. Dried grains are grounded to produce maize flour. Surplus maize is exported to neighbouring countries. With the use of modern methods of farming and farm machinery, the yield is about 3 tonnes per hectare. (Source: Rwanda statistical year book 2015)
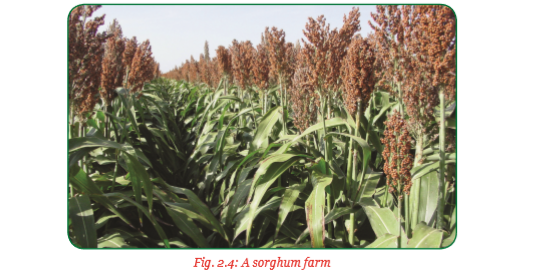
(c) Sorghum
This is an indigenous cereal crop. It is an important crop since it is drought resistant and requires less fertiliser as compared to maize. Sorghum is used for traditional ceremonies such as “Umuganura” and in marriage celebrations. A lot of sorghum is produced around Kigali.
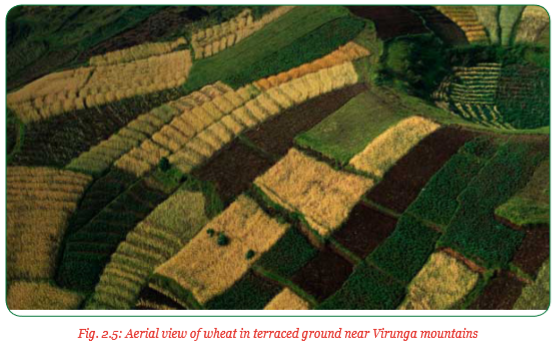
(d) Wheat
This is the fourth most important cereal crop grown in Rwanda. It is cultivated in Congo-Nile crest, volcanic soils and Buberuka highlands which include Burera, Musanze, Nyabihu, Rulindo, Gakenke, Gicumbi, Karongi, Ngororero, Rutsiro, Nyamagabe and Nyaruguru districts.
The average yield is 2–3 tonnes/ha. Wheat production is encouraged to reduce importation which is used to make pasta. Over 600,000 ha are used in its production which is more mechanised and modernised.
Wheat is used to make flour that is used to make bread and other wheat products.
2.4 Importance of cereals
(a) Nutritional importance of cereal crops
Activity 1 2.3: Research and discussion activity for finding out the importance of cereal crops
(i) Find out the importance of cereal crops from library books and internet.
(ii) Discuss and record your findings.
(iii) Present your findings to the class.
(iv) Fill in the table 2.1 on page 83.
(v) Take teacher's summary notes.

Cereals are important in all societies worldwide. They are used as staple foods together with other foods and provide 60% –70% of the diet requirements of a society.
Cereal crops have the following importance:
Nutritional importance:
• Cereals contain 60 % – 70% starch which is a carbohydrate. They are rich in fibre and, therefore, recommended for use in baby foods.
• Cereals are also rich in proteins which is important for growth and repair of body tissues.
• Cereals contain vitamins particularly vitamin E and important minerals such as calcium, zinc, selenium and copper.
• Cereals contain oil which is an important source of energy. Vegetable oils can be extracted and used as cooking oil.
• Cereals are used as fodder when grown at a more close spacing and are harvested at flowering stage or when the kernels are at milk stage. The most commonly used cereals for fodder is maize and sorghum.
(b) Agricultural importance of cereals
Activity 1 2.4: Research activity to find out the agricultural importance of cereals
Use the materials provided to:
(i) Find out the agricultural importance of cereal crops from library books, textbooks and the internet.
(ii) Discuss and record your findings.
(iii) Present your findings to the class.
(iv) Take teacher’s summary notes.
Agricultural importance of cereals include:
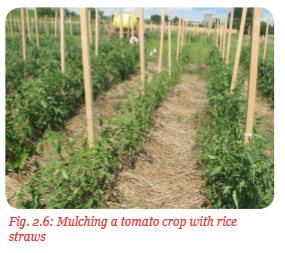
• Provision of mulching materials; stalks and straws from cereals harvesting are spread evenly between the crops to provide organic mulch. This mulch smothers weeds, conserves moisture and improves soil structure after decomposition.
• Organic manure production
– Leafy cereals such as maize and sorghum are chopped and filled in a compost pit/heap.
– Straw used as animal bedding may be heaped to form farmyard manure.
– Leafy cereals can be incorporated into the soil at flowering stage using a disc harrow. The plants are left to decompose as green manure.
Other uses of cereals
• Source of employment: Cereal farms employ a large number of people who engage in preparing land, planting, weeding and harvesting.
• Source of government revenue and foreign earnings: Surplus cereals produced in the country are exported to the neighbouring countries which bring in foreign exchange.
• The government taxes the farmers to get income for providing social amenities and constructing structures such as roads, bridges, schools and hospitals.
• Socio-cultural practices: Cereals such as sorghum are important in the society. They are used in the making of traditional brews, presented in marriage ceremonies and exchanged as a sign of goodwill between different families.
• Source of income: Surplus cereal grains are sold to earn farmers income used to buy farm inputs such as machinery, fertilisers and seeds.
2.5 Cultural practices of cereals
2.5.1. Cultural practices of paddy rice
Activity 1 2.5: A field visit to find out the cultural practices in the production of paddy rice
Visit a farm producing paddy rice and carry out the following activities:
(i) Carry out land preparation.
(ii) Carry out planting of rice seeds.
(iii) Carry out transplanting.
(iv) Carry out cultural practices in the production of transplanted rice.
(v) Observe harvesting techniques in rice production.
(vi) Discuss and record your findings.
(vii) Present your findings to the class.
(viii) Take teacher's summary notes.
Rice production in Rwanda is carried out through both rain-fed and irrigation methods. Rain-fed rice growing is carried out in the highland under natural rainfall conditions. It is, therefore, referred to as upland rice.
Irrigated rice growing is carried out in the lowlands. The lowland rice is grown in flooded fields. It is, therefore, referred to as paddy rice. Improved varieties of paddy rice include, Afaa (faya), Kaogo, IR8, IR22 and IR257.
(a) Land preparation for paddy rice
The fields for planting paddy rice are prepared differently from the other cereal crops since flooding is required.
After clearing, the fields are divided into blocks of 0.4 hectares each. Each block is levelled and bunds of about 30 cm – 45 cm are constructed with inlets and outlets to control water. The fields are then flooded with water up to 7 cm – 10 cm high. This water is allowed to remain in the fields for 4 days before rotavation. Rotavators are used to puddle the flooded fields. Where tractor-drawn rotavators are not available, digging implements such as hand hoes can be used to puddle the soil. The puddled fields are then levelled to allow uniform depth of planting as illustrated in figure 2.9.

The level of the water in the field is reduced by draining to about 5 cm to allow transplanting.
(b) Sowing rice
Seeds for the upland rice are sown directly into the field, while for the lowland rice (puddy rice), the seedlings are raised into the nursery before they are transplanted.
(i) Preparation of a nursery bed
A nursery bed for raising rice seedlings is prepared as follows:
• A single nursery bed for raising rice seedlings should measure 18.5 m × 18.5 m.
• The land is cleared and all the trash is removed.
• Bunds are constructed by heaping the soil to a height of 30 cm – 45 cm round the bed to hold water.
• Inlet and outlet channels are then constructed to control water.
• The land is then prepared by a rotary cultivator or deeply dug using a hand hoe.
• The cultivated land is then flooded up to 10 cm high.
• The nursery bed is then puddled to form a smooth paste.
• Levelling is done by dragging a levelling board through the nursery bed.
(ii) Sowing seeds in the nursery
• Selected seeds are pre-germinated by soaking them in water for 24–36 hours. This is done by placing the seeds in a gunny bag which has been dipped in water.
• 25 kg of sulphate of ammonia fertiliser is applied per each nursery bed.
• Water in the nursery bed is drained to leave a level of 1.5 cm before planting.
• Pre-germinated seeds are then broadcasted at a rate of 20 kg per each nursery bed of 18.5 m × 18.5 m.
• Water level is maintained at 1.5 cm and increased gradually to a height of 2.5 cm – 5 cm as the seedlings grow.
(iii) Weed control This should be done through flooding to control non-aquatic weeds and use of selective herbicides against broad leaved weeds such as water hyacinth.
(iv) Pest control Soil borne pests are controlled through flooding while spraying with recommended insecticides is carried out to control foliage pests.
(v) Disease control Resistant varieties are used to control fungal diseases such as rice blast and smuts. Fumigants such as carbafuran are used during land preparation to control soil borne disease organisms.
(vi) Fertiliser application 25 kg of Diammonium phosphate fertilisers should be applied through bund application method 10 days before uprooting the seedlings for transplanting.
(vii) The seedlings are ready for transplanting after 2 – 3 weeks when they reach 15 cm tall. They should have 4–6 true leaves depending on the variety.
Exercise 2.3
Table 2.2 illustrates the processes of establishing rice seedlings in a nursery bed. Study it and then in groups, discuss the illustrations and identify each activity shown in the illustrations.
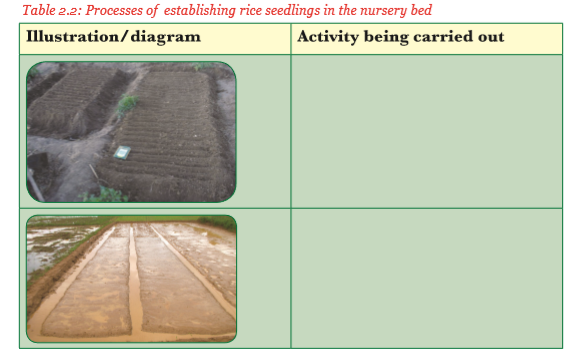

(c) Transplanting and fertiliser application
Transplanting of rice seedlings is carried when the puddled fields are levelled. At this stage, the water level is about 5 cm deep to allow the seedling roots to hold onto the mud.
Double superphosphate fertiliser is broadcasted in the puddle fields at the rate of 120 kg per hectare. Sulphate of ammonia fertiliser is applied at the rate of 125 kg per hectare just before transplanting and 125 kg per hectare 40 days after transplanting. Seedlings are then transplanted at a spacing of 10 – 20 cm × 10 – 20 cm depending on the variety.
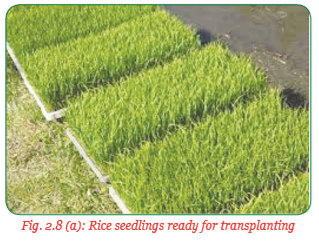
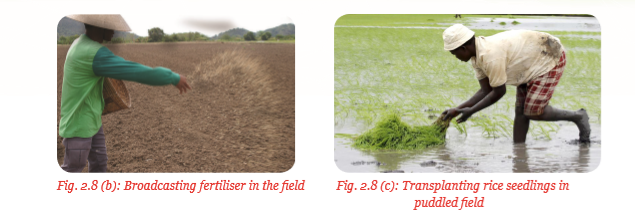
(d) Field maintenance practices
(i) Water control
The level of water in the field is increased from 5 cm at planting time, gradually to a height of 15 cm, by the time the seedlings are fully grown. Water level in the field should be maintained at 1 3 the height of the plant. Water should be allowed to flow slowly through the fields. If the flow of water is not possible, then old water should be drained and fresh water added every 2–3 weeks. Water should be drained completely, the last 2–3 weeks before harvesting to allow the fields and the crop to dry.
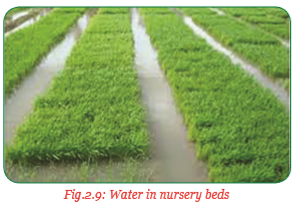
(ii) Weed control
Terrestrial weeds are easily controlled by flooding. Water weeds which manage to survive in flood water are controlled using effective herbicides such as propanil and butachlor. These weeds can also be uprooted.
(iii) Pests and their control
Soil borne pests such as cutworms and crickets are controlled by flooding while stem borers are controlled by spraying effective insecticides.
(iv) Diseases and their control
• Rice blast: This is a fungal disease caused by Pericularia oryzae. It attacks rice stalks at the base of the panicle and the leaves.
Symptoms
The stalks bear brown lesions and the panicle is covered with olive brown fungal mass. The panicles break easily at the lesioned parts of the ears, resulting to no grain formation. This condition is known as empty heads, which leads to low yields of grains.
Control
Rice seeds should be treated with fungicides before planting. Disease-free and resistant varieties should be used.
• Rice yellow mottle virus disease: This is a viral disease which attacks rice leaves.
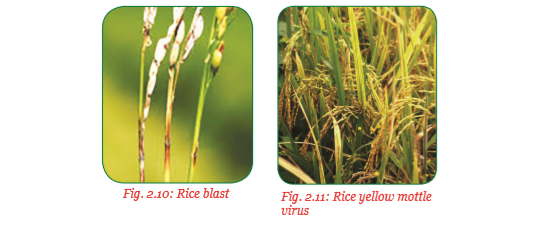
Symptoms
It is characterised by yellow or orange leaf discolouration, stunted growth and empty spikelets.
Tillering of the plants is also reduced and the plants may die following severe infections.
Control
Use of resistant rice varieties and control of insect vectors with effective insecticides.
(e) Harvesting rice
Rice is harvested by hand using sickles to cut stems of ripe brown rice plants. The rice plants are tied together to form a bale.
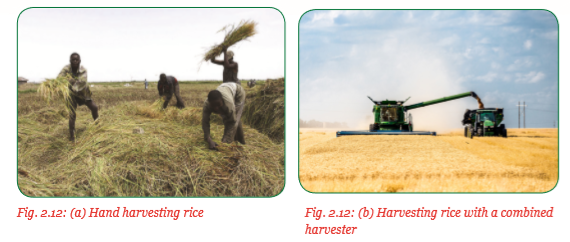
Rice may also be harvested using a combined harvester which combines harvesting and threshing. The hand cut rice stalks are then threshed by holding the stem end and hitting against the ground.
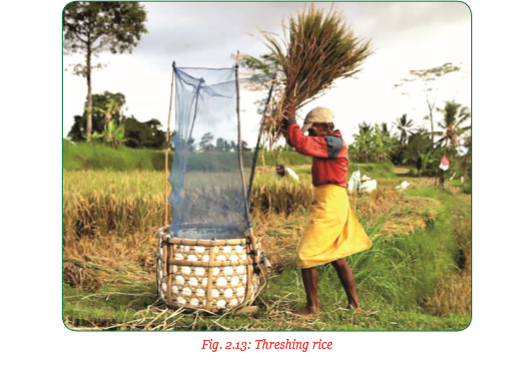
Exercise 2.4
Table 2.3 shows various field maintenance practices carried out in rice production. Study them carefully and then fill in the blank spaces.
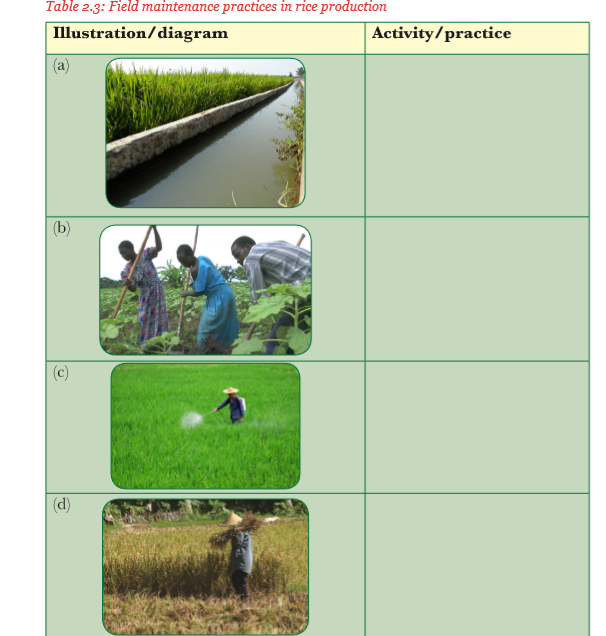
2.5.2 Cultural practices of maize
Activity 1 2.6: Practical activity to carry out cultural practices in the production of maize
2.5.2 Cultural practices of maize
Activity 1 2.6: Practical activity to carry out cultural practices in the production of maize
Using the materials provided:
(i) Carry out cultural practices in the production of maize.
(ii) Discuss your findings and record your observations.
(iii) Report your findings to class.
(iv) Take teacher’s summary notes.
Maize should be planted early, at the beginning of the rains so that the crop can make maximum use of available moisture. Dry planting can be practised in areas with short rain seasons.
The varieties of maize planted in Rwanda depend on the altitude and other ecological requirements such as rainfall amount and temperature. These varieties include M081, RHM102, M104, M10Z, Z607, KH500-46A, KH50031A and RHM103.
(a) Land preparation
Land should be prepared early during the dry season to allow all the weeds to dry and to give time for other practices to be done on time.

(b) Planting
Planting maize is either done by hand or tractor-operated machinery such as seeders and planters.

(i) Hand planting
When hand planting, a garden line is used to ensure that the planting lines are straight.
Holes are dug at a spacing of 75 cm – 90 cm × 23 cm – 30 cm depending on the variety. Soil fertility and soil moisture conditions and a depth of 10 cm –15 cm. In Rwandan context we commonly use 80cm × 30cm with two seeds and 70cm × 30cm with one seed.
Ridging may be done in poorly drained soils where the ridges are raised 15 cm – 20 cm high. Ridging is done by special cultivation known as ridgers as shown below.
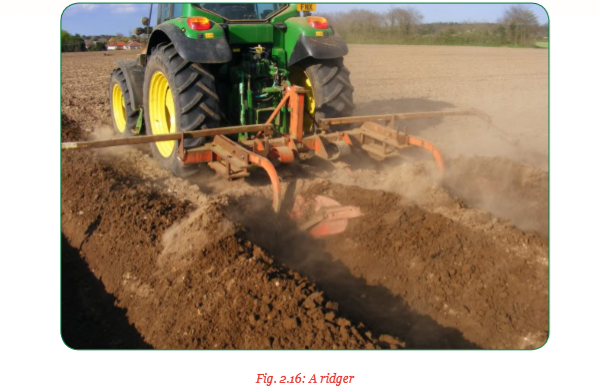
Making ridges for planting
• Apply 100 kg –150 kg of double superphosphate fertiliser/ha or 1–2 teaspoons/hole.
• Apply 7–10 tonnes of well decomposed manure/ha or a handful of manure/ hole.
• Place 2 seeds per hole after mixing thoroughly with soil and cover with 2.5 cm – 5 cm of soil.
Row planting
Straight furrows are made by digging or using ridgers or mouldboard ploughs 90 cm – 100 cm apart. The seeds are placed singly at a spacing of 23 cm – 30 cm. 100–150 kg of double superphosphate is applied within the furrows mixed with 7–10 tonnes of manure.
(ii) Mechanised planting
This involves the use of machinery to plant maize seeds. The seeds and phosphatic fertilisers are placed into seeders known as planters or seed drills.
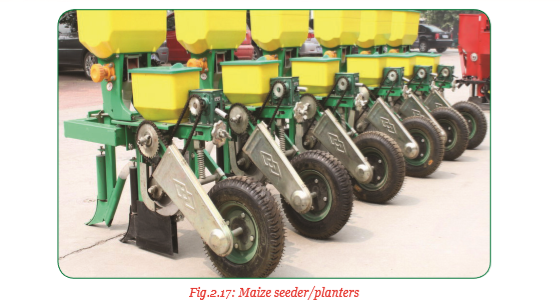
Planters
The fertiliser holding hopper is larger than the seed hopper and placed right in front of it.
The planter has a furrow opener, a kind of ridger. The seeds are placed below the fertiliser level at a predetermined distance or spacing. The seed rate and fertiliser rate is set using a seed and fertiliser plate. The furrow is then closed with a groove at the centre of the ridger.
(c) Fertiliser application
When planting maize, about 100 kg – 150 kg of double superphosphate fertiliser is used per hectare. However, there are other compound fertilisers which can be applied at the time of planting, for example, 20-20-0 is used at a rate of 200 kg per hectare. Organic manures also give good responses. Planting: 0M:10T/ha, NPK 17-17-17: 125kg/ha, DAP:100kg/ha or alternative of NPK. Weeding: 100kg of Urea. Soil acidity: 2.5 tonnes – 5 tones of lime, 2 weeks before planting.
(d) Maintenance practices
(i) Gapping: Gapping is carried out where the seeds fail to germinate within the first two weeks of germination.
(ii) Thinning: Thinning is done by uprooting overcrowded seedlings to leave one plant per hole depending on the spacing.
(iii) Topdressing: Topdressing is done by applying 200 kg of sulphate of ammonia or calcium ammonium nitrate in two split applications. The first is done when the maize is knee high and the second when the maize is tussling.
(iv) Weed control: Weeding is done by tillage to control annual weeds, uprooting and burning to control noxious weeds and those growing close to the crops. Selective herbicides can be used to control broadleaved weeds. Proper spacing ensures that the weeds are smothered before they get established. Maize tillers are removed during weeding to prevent competition for nutrients.
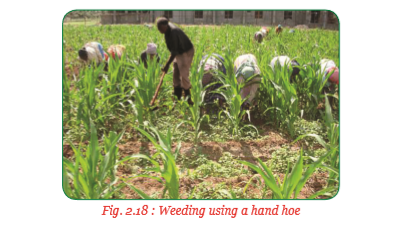
(v) Earthing up: Soil is placed around the base of the maize plants in heaps. This provides support to prevent lodging of the plants. See figure 2.19.
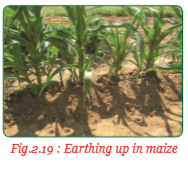
(vi) Pests and their control: Maize is attacked by several pests which include:
• Maize stalk borer There are two types of stalk borers that attack maize in the field.
These are:
– Chilo spp.
– Busseola fusca Adult moths lay their eggs in the funnel of the leaves and the larvae eat holes and bore into the stems where they cause damage. The larvae also attack the maize cobs.
Damage
– They destroy the growing points of maize stem leading to death of the plant.
– They destroy maize grains leading to low yields.
Control
The pests can be controlled by early planting, rogueing, field hygiene and use of effective pesticides such as stalk borer dust. This dust is applied down the funnel of each plant when about 30 cm high.

• Army worms (Spodoptera exempta)
These are migratory pests which move from zone to zone in large numbers. Army worms are larvae of moths. They are greyish-green in colour with characteristic black stripes at the back on both sides.
Damage
They eat large quantities of maize leaves causing heavy defoliation. This leads to total loss of photosynthetic materials hence lack of production.
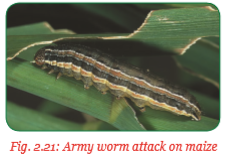
Control
It is recommended to use effective pesticides in the farm. However, since they are migratory pests and appear in outbreaks, their control involves internal cooperation from neighbouring countries, for example, the East African Army Worm Forecasting Programme involves many East African countries who collaborate their efforts to combat this pest.
• Aphids (Phopalosiphum maidis)
These are pests which pierce and suck sap from young maize leaves.
Damage
They cause distortion of the leaves and transmit viral diseases from one plant to the other.
Control
They are controlled by spraying the crop with effective insecticides.

• Birds
Damage
They eat the grains at milky stage. They remove the husks to reach the grains. This opens up route for the water to get into the grains, causing rotting.
Control
Birds can be scared away using scarecrows, noise or throwing stones at them.
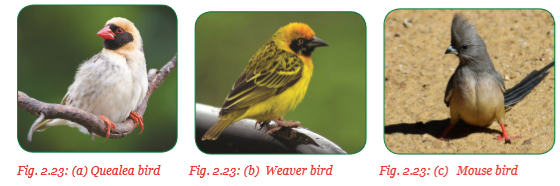
(vii) Maize diseases and their control
• Maize streak virus diseases
This is a viral disease which attacks the leaves and is spread by aphids and leaf hoppers (Cicadulina mbila).
Symptoms
Yellow longitudinal stripes which run parallel to the mid-rib of the leaves. This reduces the photosynthetic area of the leaves. Ears are often small and partially filled leading to low yields.
Control
It is controlled by use of certified seeds, early planting, uprooting and burning affected plants to prevent further spread.
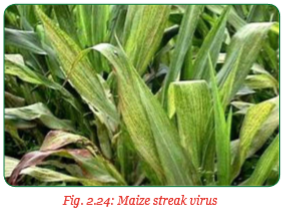
• Maize smuts
This is a fungal disease caused by the fungus Ustilago maydis.
Symptoms
The fungus attacks grains and tassels causing masses of black powder on them.
Control
It is controlled by crop rotation, field hygiene and rogueing.
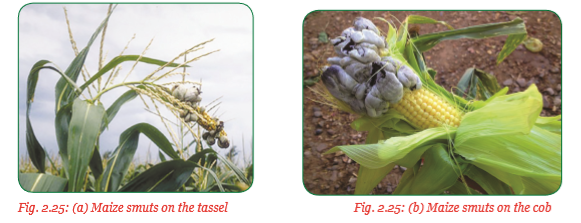
• White leaf blight
It is caused by a fungus Helminthosporium turcicum which attacks the leaves.
Symptoms
Oval grey and thin lesions on the leaves.

Control
Planting resistant varieties and field hygiene.
• Maize rust
This is a fungal disease caused by Puccinia polysora which attacks leaves.
Symptoms
Circular brown powdery pustules on both surface of the leaf. This reduces the photosynthetic surface of the leaf.
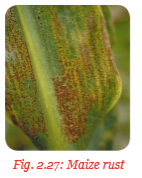
Control
Planting resistant varieties and field hygiene.
(e) Harvesting maize
Maize plants are cut and stocked when the stems and leaves are brown and dry. This is manual harvesting by small-scale farmers. Cobs are then dehusked, dried and shelled.
Shelling can be done by hand or by use of mechanical maize shellers. In large-scale maize production, combined harvesters are used. These harvesters have shelling mechanism to separate the grains from the cobs. Harvested maize is then sun-dried to reduce moisture for storage.

Exercise 2.5
Table 2.4 shows various field maintenance practices carried out in maize production. Study them carefully and then identify the practices being carried out.

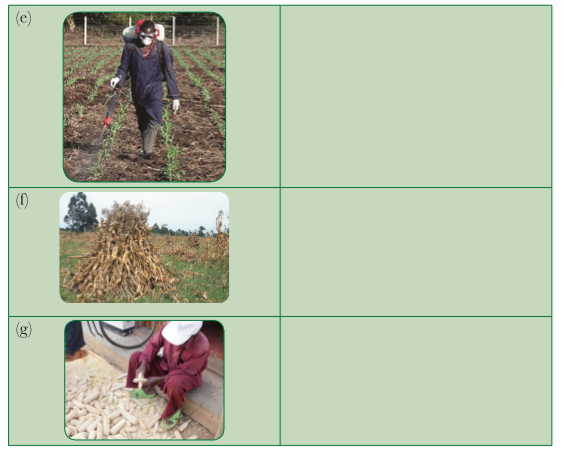
2.5.3 Cultural practices of sorghum
Activity 1 2.7: Practical activity to carry out cultural practices in the production of sorghum
Using the materials provided:
(i) Carry out cultural practices in the production of sorghum.
(ii) Discuss your findings and record your observations.
(iii) Report your findings to class.
(iv) Take teacher’s summary notes.
Sorghum is the second most produced cereal crop after maize. Sorghum is grown mainly in the eastern and southern parts of Rwanda. Sorghum is drought resistant and can tolerate waterlogging conditions. It produces good yields in infertile soils.
Sorghum grains are ground into flour which is cooked to form “meal”. The grains are an important ingredient used to make banana wines. Young growing crops are used as fodder where they are wilted or used to make silage. Some sorghum varieties used to make fodder contain prussic and hydrocyanic acid. These should be left to dry for two days before they are utilised.
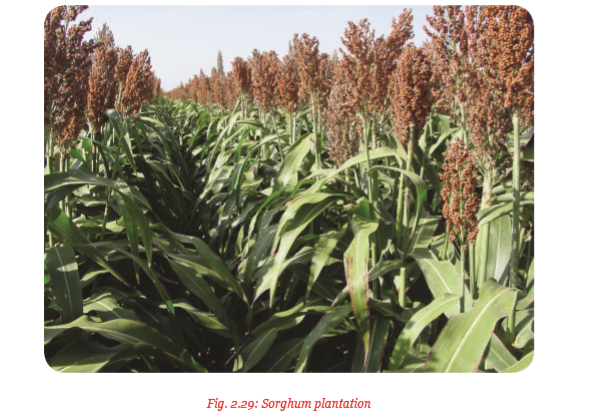
The varieties of sorghum grown include serena and seredo. Serena matures in about
 months and is brown seeded. Other varieties include dobbs, epuripon and sekedo.
 Exercise 2.6
Table 2.5 below shows different varieties of sorghum cultivated in various parts of the world. Study the diagrams and use internet to identify each variety.

The varieties of sorghum are categorised into three types based on the following criteria:
(a) Panicle type
This is the type of flowering panicle. There are three types of which include:
• Open panicle
• Compact panicle
• Goose neck panicle – This type is resistant to bird pests at milk stage.
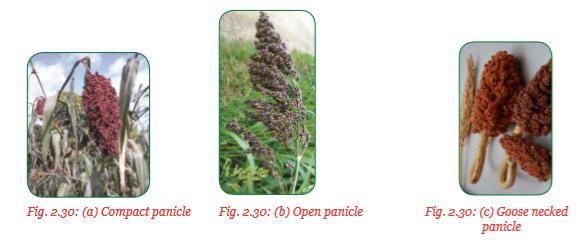
(b) Seed colour type
The sorghum varieties are grouped into:
• Brown seeded type
• White seeded type
The white seeded type is low in tannin and, therefore, sweeter. This type is preferred for brewing. It is more susceptible to birds attack.
The brown seeded type is higher in tannin and, therefore, bitter. It is mixed with cassava and other plants to prepare flour. Is more resistant to bird pests attack.
(c) Level of tannin
Sorghum varieties are grouped into those with high tannin and those with low tannin. Those with high tannin are bitter and those with low tannin are sweeter.
(a) Land preparation
(i) Land clearing
Land should be prepared early during the dry season by slashing, tree felling, destumping, bush clearing to remove perennial, annual and biennial weeds. Raking is done to remove the crop residue and slashed weeds.
(ii) Primary cultivation
Primary cultivation is done by digging in small farm holdings or ploughing in medium to large farms. The ploughing should be done deeply to open the soil for aeration and infiltration of water. The surface trash and weeds should be buried completely. Ploughing should be done during the dry season to allow enough time for other farming operations to be carried out.
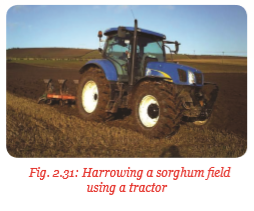
(iii) Secondary cultivation Secondary cultivation after primary cultivation through harrowing and digging to achieve medium tilth. Harrowing is done by use of hand hoes and tractor or ox-drawn harrows.
(b) Planting Sorghum is planted using the following methods:
(i) Broadcasting
(ii) Row planting
(iii) Intercropping
Broadcasting
The seedbed is prepared from medium to fine tilth. The seeds are then evenly broadcasted. Phosphatic fertilisers can be added to improve root development.
Row planting
The holes are dug at a spacing of 60 cm – 75 cm by 15 cm – 20 cm. The seeds are sown singly or two per hole. When one seed is planted, it encourages a lot of tillering. Manure is applied at a rate of 7 tonnes /ha.
Intercropping
Sorghum can be sown together with other crops such as beans, soya beans and other pulses. This is done by planting sorghum seeds with beans in the same hole or furrow.
(c) Field management practices
(i) Gapping
Gapping is done by replanting seeds where they failed to germinate two weeks after planting.
(i) Thinning
Thinning is done when broadcasting type of planting has been used. The shoots are left at a spacing of 45 cm – 60 cm × 15 cm – 20 cm. The uprooted shoots can be fed to livestock where more thinning is done. Sorghum produces more tillers.
(iii) Weeding
Annual weeds are controlled through tillage and use of selective herbicides 2–3 weeks after planting. The striga weed (purple witchweed) Striga hermonthica is a noxious and notorious parasitic weed to sorghum plants.

Striga is controlled by the following methods:
(a) Crop rotation.
(b) Vigorous uprooting.
(c) Intercropping with desmodium (push and pull system)
(d) Proper seedbed preparation.
(e) Use of selective herbicides against the witchweed.
(iv) Pest Control
Pests that affect sorghum include:
• Birds
These affect sorghum during the milte stage of maturity. The most notorious bird pests include Sudan dioch, waver birds and mouse bird.
• Sorghum shoot fly
The larva of the sorghum shoot fly affects the stems of young plants which damages the stem leading to wilting of the plants and severe tillering.

(v) Disease control
Diseases which affect sorghum include:
• Leaf blight (Helminthosporum turcicum)
Control is carried out through:
(a) Planting resistant varieties.
(b) Using certified disease free seeds.
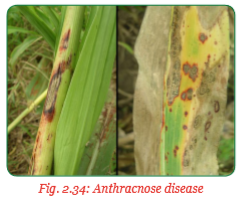
• Anthracnose (Colletotrichum gruminicola)
This is a fungal disease which affects sorghum. The symptoms include dark, water soaked lesions on stems, leaves or fruit.
It is controlled by the following methods:
• Use of resistant varieties.
• Crop rotation with non-cereal crops such as beans.
• Proper disposal of crop residue.

• Sooty stripe (Ramulispora sorghi)
This is a fungal disease which affects sorghum. The symptoms include:
• Reddish brown lesions on the leaves.
• The centre of these lesions form black sooty bodies which appear as soot.
Sooty stripe is controlled by:
• Use of resistant varieties.
• Crop rotation.
• Destruction of crop residues and ratoons which are infected.
Other diseases include loose smut and head smut which affect the panicle.
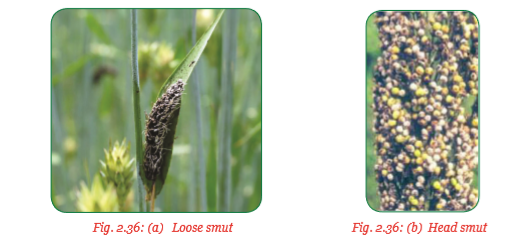
(vi) Control of tillers
Tillers in sorghum plants can affect their production. It is recommended to remove excess tillers so that each plant has 2–3 tillers. The uprooted tillers are fed to livestock.

(d) Harvesting
Sorghum is ready for harvesting at 3–4 months of age after planting depending on the variety and ecological conditions.
The panicles which are ripe and oftenly large kennels with slightly dark colour are cut off using a sharp knife. The panicles are sun dried and stored unthreshed in granaries. Dried sorghum heads are threshed mechanically using a threshing machine or by hand through hitting with a light stick.
The yield ranges from 500–1500 kg/ha. Sorghum can be left to grow as a ratoon for the second and third crop although the yields of the ratoon are much lower.
Exercise 2.7
The photographs below show activities carried out during sorghum harvesting. Study them carefully and then identify each activity.

2.5.4 Cultural practices of wheat
Activity 1 2.8: A field visit to find out the cultural practices in the production of wheat
Visit a farm producing wheat and carry out the following activities:
(i) Observe and record the methods of land preparation.
(ii) Observe the planting of wheat manually and by use of a seed drill dragged by a tractor.
(iii) Carry out cultural practices after germination in the field containing wheat.
(iv) Observe the harvesting methods in wheat production.
(v) Discuss and record your observations.
(vi) Present your findings to the class.
(vii) Take teacher’s summary notes.
Wheat has become an increasingly important crop in Rwanda. It is grown to reduce the need for import of wheat from neighbouring countries. Wheat is grown in the highlands where rainfall is reliable and the level of humidity is low, which minimises diseases. Wheat is grown to supply the baking industry and making of macaroni, spaghetti and in the confectionary industry. The straws got after harvesting wheat is used as livestock feed and as bedding for livestock. It can also be used as mulch.
The varieties of wheat grown in Rwanda include Musama, Uganda 6, Morroco, KS- Mwamba, among others.
(a) Land preparation
(i) Land clearing
Land for growing wheat should be prepared early during the dry season by slashing, bush clearing and removal of trash and previous crop residue.
(ii) Primary cultivation
Primary cultivation is done through ploughing since wheat requires a fairly larger farm. A mould-board plough is recommended. Cultivation should be done early to allow enough time for other subsequent activities to take place.
(iii) Secondary cultivation
Harrowing of land is done two or three times until a fine tilth is achieved. The wheat seeds are smaller and, therefore, require a fine tilth. Levelling of land is done by use of a tine harrow.
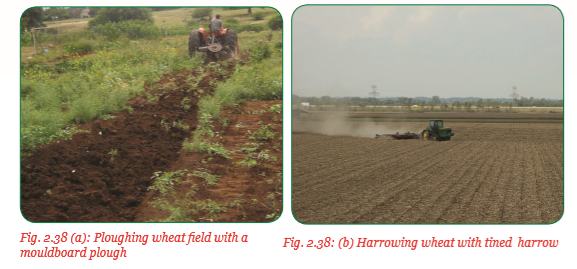
(b) Planting
Wheat is commonly planted using tractor-drawn planters called wheat drillers where the seeds and fertiliser are placed in the soil simultaneously.
Wheat seed can also be broadcasted after spreading phosphatic fertiliser over the prepared land. When planting using the wheat drill, the seed rate is between 44 –132 kg/ha.
Under the optimum soil condition, 88 kg/ha of seed is planted.
(c) Fertiliser application
During planting, 95 kg – 120 kg of phosphate is applied per hectare. Nitrogen is also important at the production of wheat. 67 kg of nitrogen is applied per hectare in two splits. 45 kg of nitrogen/ha at planting through drilling and the other split during maximum growth.

Fertiliser can also be mixed with fungicides and insecticides and applied as foliar feed.
(d) Field maintenance practices
(i) Weed control
• This is done by proper seedbed preparation to control annual weeds at planting time.
• An appropriate spacing is also important in controlling weeds. When the crops grow, they form a canopy which smothers the weeds.
• Use of selective herbicides to control broad leaved weeds such as black jack, pigweed, cleavers and bindweed.
(ii) Pests control
Birds
Birds are the most serious pests in wheat farming. The most notorious being the Sudan dioch (Quelea aethiopica) and the mouse bird (Collius spp.).
Damage
They eat large quantities of wheat grains leading to low yields.
Control
The birds are controlled using chemicals, scaring and destroying their breeding places by burning or using explosives.
Wheat stem borers
Damage
The larvae which are caterpillars bore into the stem and feed on the central shoot. The infected plant produces ‘dead hert’ or ‘white ear heads’.
Control
Spraying using effective insecticides.
(iii) Disease control
Wheat rust
This is a fungal disease caused by Puccinia graminis which attack the leaves.
Symptoms
• Brown rusty powdery.
• Mass on the leaves.
Damage
The rusty coloured dust reduce the photosynthetic area of the leaves resulting to low yields.
Control
Spraying with copper fungicides such as bordeaux mixture.
Loose smuts
A fungal disease caused by Ustilago nuda which attacks the head.
Symptoms
Black powder on the panicle of wheat.
Control
Hot water treatment of wheat seeds before planting, use of certified seeds, crop rotation and field hygiene.
Other diseases of wheat include bacterial leaf blight downy mildew powdery milded and anthracnose. They are controlled by spraying with copper based fungicides, planting resistant varieties and use of certified seeds.
(e) Harvesting
Wheat is ready for harvesting after 4–5 months when the straw is yellow to brown in colour. Harvesting is done by machine using a combined harvester or by use of hand where a sickle is used to cut off the stems. The combined harvester combines both harvesting and threshing of the wheat.
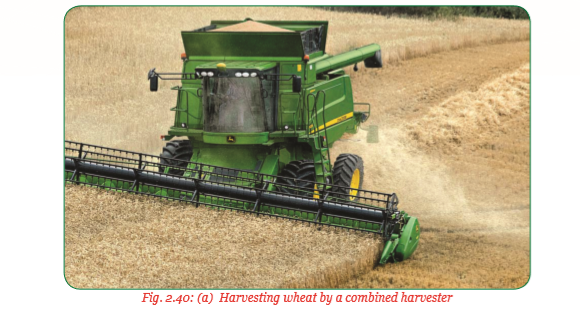
Group activity
Video on production of rice.
Use the references provided to carry out the following activities:
(i) Watch a video on the steps of growing paddy rice.
(ii) Discuss and record your findings on growing of paddy rice.
(iii) Present your findings to the class.
(iv) Take teacher’s summary notes.
Unit Summary
Cereals are grain crops which belong to the grass Family graminae. The seed is also a fruit known as kernel or a caryopsis. Cereals provide man with carbohydrates and are widely produced and consumed as staple crops. Cereal plants have herbaceous stems, narrow and parallel veined leaves hidden buds with flowers on inflorescence and fibrous roots.
Cereal crops cultivated in Rwanda include rice, maize, sorghum and wheat. Rice is mainly produced under irrigation in the swampy lowlands. Wheat is produced in the cooler highlands while maize is produced in the medium altitude areas.
Cereals are mainly grown for food, bedding for livestock, income, source of employment, source of government revenue, provision of grains for sociocultural practices, preparation of manure and mulch. Cereal production practices include land preparation, planting, weeding, gapping, thinning, pest and disease control and harvesting.
Key terms
1. Bran – Hard outer layer of a cereal grain consisting of the pericarp.
2. Bread – Staple food prepared from dough of flour from cereal grains, mixed with water and yeast then baked.
3. Bund – A raised soil embankment with plants grown on them.
4. Caryopsis –Is a fruit of a grain crop which resembles a seed. It contains an endosperm and embryo enclosed in a pericarp.
5. Cereals – These are grain crops commonly produced to produce carbohydrates and used as staple food in some regions.
6. Combined harvester – A machine which combines the practice of harvesting and threshing mature cereal crops.
7. Destumping – Removal of stumps from a field after falling trees.
8. Endosperm – Part of a grain which stores food for the developing embryo during germination.
9. Fibre – A substance that contains a large amount of cellulose and lignin that is not easily digestible.
10. Fibrous roots – Thin and highly branched root system originating from the stem. Usually feed in grasses.
11. Fodder – Plants that are harvested and chopped for use by livestock.
12. Fungicide – A chemical used to kill fungal organisms and diseases.
13. Gapping – Replanting seeds where they failed to germinate or were destroyed by pests.
14. Germ – Part of a grain that develops to a plant (also the embryo).
15. Green manure – Manure made from incorporating green leafy plant materials into the soil through cultivation.
16. Herbaceous – Succulent plants with no persistent woody stem above the ground.
17. Herbicide – A chemical which kills plants.
18. Hidden buds – A bud which is covered or enclosed with other leaves usually seeds in grasses.
19. Inflorescence – A group or a cluster of flowers arranged on a stem.
20. Mould-board plough – A plough with a part fixed at its end called a mould-board that inverts cut furrow slices during ploughing.
21. Mulch – Materials which are placed over the soil surface and between crops to smother weeds and conserve soil moisture.
22. Narrow leaved – Grass type of leaf with narrow leaf blade and parallel veins.
23. Prussic acid – An organic substance that is metabolised by animals to form cyanide which is poisonous.
24. Rice mill – A machine which is used to separate bran from the seeds by polishing them.
25. Ridger – An implement which is used to open furrows.
26. Rotary cultivator – A ploughing implement which combines the practices of primary slices during ploughing.
27. Silage – Fodder converted into succulent feed for livestock through processes of anaerobic bacterial fermentation.
28. Soil fumigation – Application of chemicals in the soil to kill or sterilise the soil by suffocating the organisms.
29. Staple –Basic food.
30. Subsoiling – A method of cultivation where ploughs dig deep to bring up soil from lower levels to upper levels.
31. Surplus – Excess.
32. Thinning – Removing excess seedlings from a planting hole or bed by uprooting.
End of Unit 2 Assessment
1. Study the diagram below and on it label parts A, B, and C.
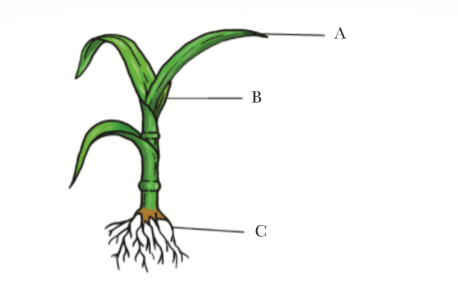
2. Carry out preparation of land to suitable tilth for planting maize.
3. Carry out fertiliser application in wheat production.
4. Describe water control in the production of rice.
5. State two ways of controlling yellow mottle virus in rice.
6. Give two reasons for removing tillers in maize and sorghum.
7. Identify the disease in the illustration provided below that affect maize.
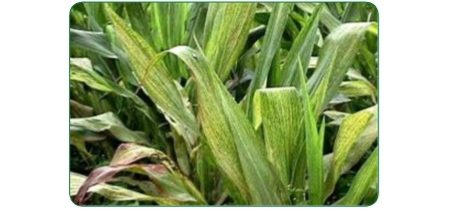
8. Draw the three categories of sorghum based on their panicle type.
UNIT 3 : ORNAMENTALS
Key Unit Competence:
Learners should be able to conduct cultivation of a range of ornamental plants.
3.1 Learning Objectives
(i) Knowledge and understanding
• Define ornamentals in Rwanda.
• Give examples of ornamentals in Rwanda.
• Discuss the importance of ornamental plants.
• Explain the different methods of ornamental propagation.
• Explain cultural practices done on ornamental plants.
(ii) Skills
• Recognise the meaning of ornamental plants.
• Select common ornamentals cultivated in Rwanda.
• Recognise the importance of ornamental plants.
• Conduct propagation methods of ornamental plants.
• Conduct ornamental cultivation.
• Carry out pruning for some ornamentals cultivated.
(iii) Attitudes and values
• Take care to find the significance of ornamentals.
• Notice the main ornamentals grown in Rwanda.
• Appraise the importance of ornamental plants.
• Be careful when observing video to follow all steps of each activity.
• Show concern while doing cultural practices of ornamentals.
• Avoid risks when conducting cultural practices.
Introduction
The growing of ornamentals known as floriculture is a major branch of horticulture. As its people continue to appreciate the beauty of God’s creation, ornamental farming has continued to increase in popularity. It has become a major foreign exchange earner for world economies, Rwanda included. People use ornamentals as cut flowers, house plants and outdoor plants where they display their beauty.
Ornamental crops play a very significant role in the society of Rwanda. However, the farmers who grow them for the purpose of doing business are still few. This causes a problem of insufficient quantities of flowers to be used in different ceremonies such as decoloration and religious functions among others.
(a) What do you think may limit farmers from growing the flowers?
(b) If one of limits is unawareness. Guide the farmers on how to carry out main flower growing activities namely weeding, pest and disease control.
Ornamentals are plants which are grown for decorative purposes in landscapes, flower gardens, parks and indoors. The photos below give an overview of the unit.

3.2 Definition of ornamentals
Activity 1 3.1: Research activity to find out the meaning of ornamentals
Use the references provided to carry out the following activities:
(i) Find out the meaning of ornamentals.
(ii) Discuss and record your findings.
(iii) Present your findings to the class.
(iv) Take teacher's summary notes.
Ornamentals are plants or trees grown for the purpose of decoration. They have an attractive appearance. They are used in beautifying the environment in which human beings live. They are used to beautify the landscape and flower gardens. Trees become ornamentals only when they are tendered and used as part of a garden, park or landscape setting. If ornamental plants are not tendered, they cease to be ornamentals. The cultivation of ornamentals is known as floriculture or simply flower farming. Floriculture is a branch of horticulture.

3.3 Some ornamentals cultivated in Rwanda
Activity 1 3.2: A field visit to observe and explore Ornamental plants grown in Rwanda
Visit a place or a farm where ornamentals are grown and carry out the following activities:
(i) Observe the ornamental plants grown or growing in the farm.
(ii) Identify the ornamental plants observed in the farm.
(iii) Discuss and record your findings.
(iv) Present your findings to the class.
(v) Take teacher’s summary notes.
Exercise 3.1
Table 3.1 below shows photographs of ornamentals grown in Rwanda. Study them carefully and then identify them.
Table 3.1: Ornamental plants grown in Rwanda
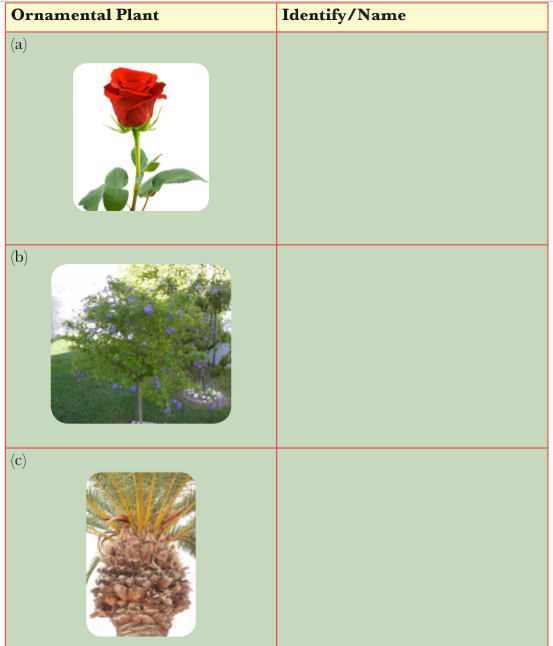

Ornamental plants cultivated in Rwanda include the following:
1. Roses
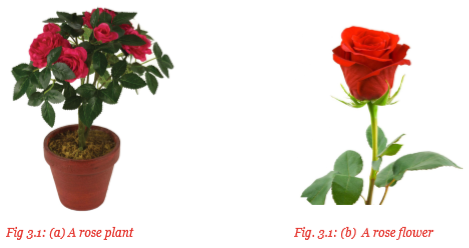
A rose is a perennial flowering plant. It belongs to the genus Rosa in the family Rosaceae. The genus Rosa has many species and cultivated varieties or cultivars. Roses are grown for their beautiful flowers which often have pleasant smells. The flowers vary in size, shape and colour. The colours range from white, yellow, pink to different shades of the red colour. The sepals and petals of therose flower are five in number with numerous stamens. The carpels vary in number from one to many depending with the particular species.
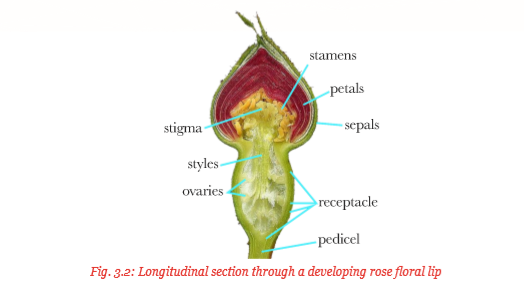
In Rwanda, roses are grown in large greenhouses mainly for the export market as there is little domestic demand for rose flowers. The cutflowers are mainly exported to Holland and Belgium. Roses are also grown in flower gardens and parks due to their attractive appearance.
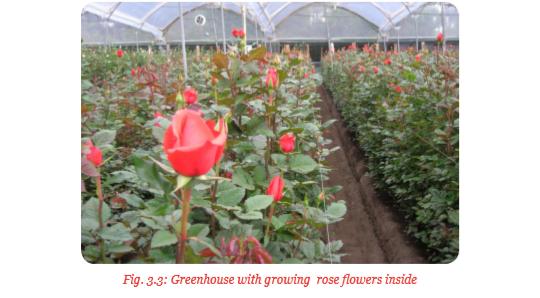
2. Duranta (Duranta erecta)
Duranta erecta is a species of flowering shrubs in the verbena family known as verbernaceae. It is widely grown as an ornamental plant.
It produces flowers with colours ranging from light blue to light purple. They develop yellow, ball-shaped fruits. These fruits have chemicals which are poisonous to human but harmless to birds, therefore, birds enjoy eating them. The plant is suited for border areas and living hedges.
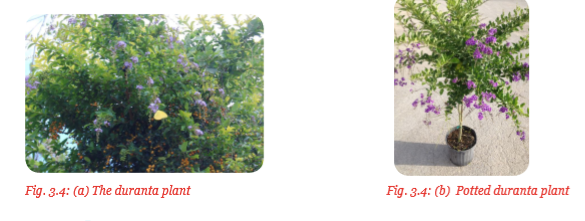
3. Palms
There are many species of palm trees. Some are small but others grow to more than 100 feet high. Most palms are tropical but a few others grow in the sub-tropical regions. Palm leaves are distinguished by their large compound evergreen leaves known as frounds. The leaves are arranged at the top of a solitary or unbranched stem. A few palms grow as a dense cluster without a trunk. This is what provides the real beauty of the palm tree.
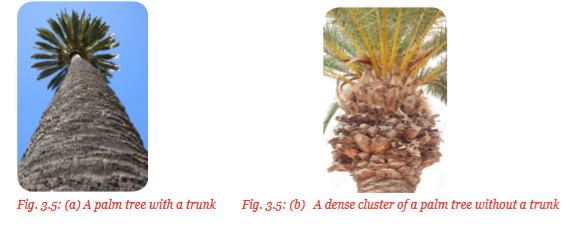
Some palm trees provide food for humans while others are grown for ornamental purposes.
Ornamental palms are grown to provide beauty and sometimes shade in parks. Although palms have flowers, their ornamental characteristics are due to their leaves and the general appearance (form) of the palm trees providing beauty and shades in parks and around homesteads.

4. Anthurium
Anthurium is also known as Anthurium tail flower, flamingo flower or lace leaf. The flower originated from America where it grows naturally.
Plant characteristics
Anthurium is a herbaceous monocotyledonous perennial plant. It is an evergreen flowering plant that belongs to the Araceae family. The family has over 800 species which are mainly epiphytes with a few terrestrials.
(i) Inflorescence – The inflorescence also known as the spadix bears small flowers which contain both male and female structures. The flowers are contained in dense spirals on the spadix which is elongated to form a spike.
(ii) Spathe – This is a type of a bract. The spathe is of variable shape in many species but is mainly lance shaped. The spathe may extend out flat or in a curve.

(iii) Leaves – The leaves are heart-shaped and deep green. Anthuriums are grown for their brightly coloured spadix, spathes and beautiful leaves. The spadix and the spathe are the main focus of anthurium breeders who develop cultivars with bright colours and unique shapes. Many anthuriums are grown as house plants although some are grown as outdoor plants in mild climates and shady spots. Anthuriums can be propagated by seed or vegetatively by cutting.
5. Bougainvillea
Bougainvillea are perennial thorny flowering plants which belong to the genus bougainvillea.
This genus consists of many species which are either vines, bushes or trees. Some of the species include, B glabra, B.
Plant characteristics
(a) Flower – The bougainvillea flower is white in colour and consists of both the male and female parts. The flower which is tube-like in shape is surrounded by three or six brightly coloured bracts depending with the species. The colours of the bracts ranges from white, yellow, orange, purple, pink, magenta and red. The beauty of the bougainvillea is attributed to the bracts rather than the flower.
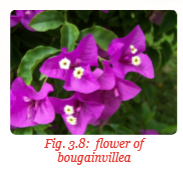
(b) Leaf – Bougainvillea leaves are elliptical (oval) in shape. The leaves may be green or variegated. It is important to note that the brightly coloured bracts surrounding the white flowers are leaves.

(c) Thorns – Bougainvillea have small thorns which are curved at the tips as shown in fig. 3.10.
Some of the most popular bougainvillea varieties include:


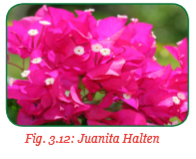
(a) California Gold
The golden yellow California is a vigorous growing variety that produces vines that are 20 to 30 ft long. Its bracts vary in colour with various shades of true yellowgold.
(b) Juanita halten
The Juanita Halten has lush foliage which is subtly variegated with light and dark green leaves splatter painted with gold.
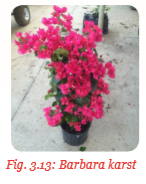
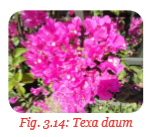
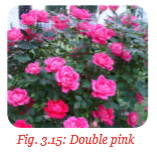
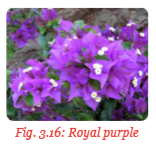
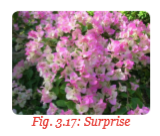
(c) Barbara karst
This is a vigorous growing and slowy variety with bright red to bluish crimson bracts.The vines grow up to 20 to 30 ft long.
(d) Texa daum
This variety has huge clusters of small pink flowers. It is a vigorous plant with arching branches that grow up to 20 to 30 ft long.
(e) Double pink
It is a double flowered, bushy variety having pure pink bracts as shown in figure 3.15.
(f) Royal purple
This is a bushy plant with large bracts borne profusely with rich deep green foliage. It is frequently used in hanging baskets and containers.
(g) Surprise
This variety produces a combination of both pink and pure white bracts that one might tend to think that the plant is a graft while it is not. The bract may be sometimes pink and at times all white. It is a medium size plant with solid green foliage.
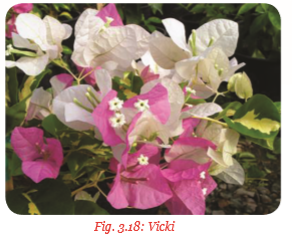
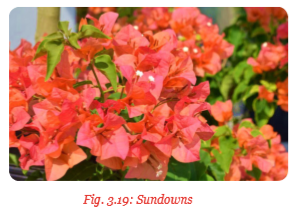
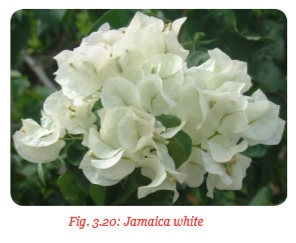
Vicki
This variety has a rich cream and gold variegated green foliage with pink and white bracts. Some bracts are pure white, some are pure pink and others are white with pink tips. It does best in containers.
(i) Sundown
It has apricot coloured bracts which open as a deep orange and mature to a light pink. It has a moderate growth rate with bushy, dark green foliage.
(j) Jamaica
white It is an evergreen shrubby vine that produces vibrant coloured papery, petal-like big white bracts viewed in light green. It is moderately vigorous. It is supported by tying to a fence or wall as it is growing. Its vines grow up to 15 to 30 ft in length.
3.4 Importance of ornamental plants
Activity 1 3.3: Research activity to find out the importance of ornamental plants grown in Rwanda
Use the references provided to carry out the following activities:
(i) Find out the importance of ornamental plants.
(ii) Discuss and record your findings.
(iii) Present your findings to the class.
(iv) Take teacher’s summary notes.
Ornamental plants are important for the following reasons:
(a) Adding beauty
Ornamental plants have aesthetic value. They are grown in landscapes, flower gardens and indoors to beautify the surrounding. Ornamentals with brightly coloured flowers break up the browns and greens that naturally occur outside, thus beautifying the environment and making it pleasant to live in, as shown in figure 3.21 below.
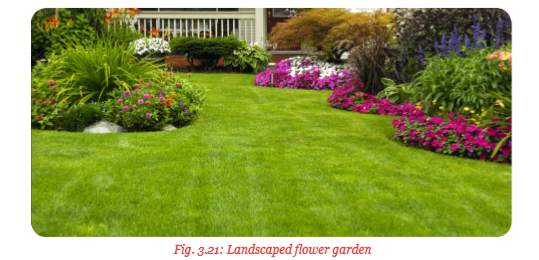
(b) Fragrance
Many ornamental plants and especially the flowering types produce sweet smells or aroma. For example, lavender is highly valued for its pleasing fragrance besides being harvested for lavender oil. It is commonly planted in home landscapes for its scent when it is blooming. Some fragrant ornamentals are beneficial in repelling insects such as ants, mosquitoes and flies. The flower of ageratum plant, for example, produces a substance known as coumarin which is a natural mosquito repellant.

(c) Attracting wildlife
Some ornamental plants provide nutrition and shelter for many wildlife animals such as birds and insects. These animals get attracted to ornamental plants for livelihood. In the process, some of these animals such as bees and birds help in cross pollination and propagation of the plants. This makes the attractiveness of the ornamental plants beneficial to the ecosystem. The berry producing ornamentals such as hawthorn and crabapple are good examples.

(d) Cleaning the air
Green plants use carbon (IV) oxide in the manufacture of their own food in a process known as photosynthesis. During this process of photosynthesis, oxygen is released as a byproduct.

This oxygen helps to replenish the oxygen removed from the air by other life processes such as respiration. These plants, therefore, help to reduce the amount of carbon (IV) dioxide and increase the amount of oxygen in the air.
This natural air cleaning process is particularly helpful in indoor environments. House plants improve the quality of air in the house. Examples of such house plants include spider plants.
(e) Ceremonial and religious use
Cut flowers are used for decoration in worship places, for example, churches as a sign of purity and the glory of God. They are also used in ceremonies such as weddings as a sign of happiness. It is a common practice to place ornamentals on the tombs of the departed during burial ceremonies. Various types of roses are used as cut flowers for the ceremonial and religious purposes.
3.5 Propagation methods of ornamental plants
Activity 13.4: Watching a video showing methods of propagating ornamental plants
Watch a video show on methods of propagating ornamental plants and carry out the following activities:(i) Identify the methods of propagating ornamental plants observed in the video show.
(ii) Discuss and record your observations.
(iii) Present your findings to the class.
(iv) Take teacher’s summary notes.
Plant propagation is the process of producing new plants from the mother plant. There are two methods of plant propagation, vegetative propagation and seed propagation.
Vegetative propagation is the use of vegetative parts and structures of a plant such as stems, leaves, roots and bulbs to create new plants. Seed propagation on the other hand is the use of seeds to produce new plants. Methods of propagating ornamental plants are as follows:
1. Cuttings
Cuttings are portions of plants which are cut and then used as planting materials. The portions may be from stems, roots or leaves. Most woody ornamental plants are propagated from stem cuttings because they produce roots easily.
A stem cutting must have a bud which develops into a shoot. Cuttings should produce leaves immediately they are planted so that they can start making their own food. They may also be induced to produce roots by use of rooting hormones. Cuttings may also be planted directly into the seedbed or raised in special nurseries before being transplanted. Once the cuttings have developed roots, they give rise to new plants. Ornamentals propagated through cuttings include roses, duranta, anthurium and bougainvillea.
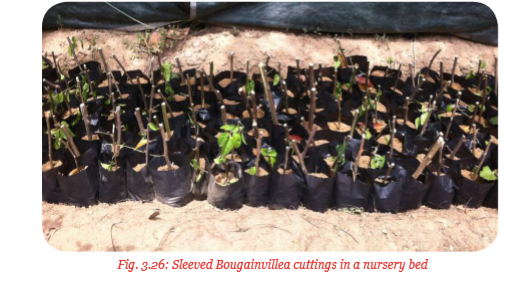
Types of stem cuttings
There are four main types of stem cuttings based on the growth stage of the stock plant.
These are:
• Herbaceous cuttings
• Softwood cuttings
• Semi-hardwood cuttings
• Hardwood cuttings
Herbaceous cuttings are made from non-woody plants such as chrysanthemums. A 7.5 cm – 12.5 cm piece of stem is cut from the plant. The leaves on the lower one-third to one-half of the stem are removed. Most herbaceous stem cuttings are prepared from succulent, new growth of woody plants just before it begins to harden.
(i) The softwood cuttings: These are tender and, therefore, require extra care to keep them from drying out softwood cuttings root quickly.
(ii) Semi-hardwood cuttings: These are usually prepared from partially mature wood of the current seasons growth. The wood is firm and leaves of mature size.
(iii) Hardwood cuttings: These are taken from dormant mature stems.
Factors affecting the rooting of cuttings
(a) Temperature – Cuttings require warm temperatures around the root zone and cool temperatures for the aerial part in order for them to produce roots. Most species will root well at the optimum temperature range of 22 – 27˚C during the range of 15 – 21˚C during the night.
(b) Relative humidity – Proper rooting of cuttings require high humidity which lowers the transpiration rate. It also increases and maintains leaf turgidity all the time. Therefore, cuttings should be rooted under shaddy conditions where relative humidity can be regulated. The propagation area can also be sprayed with water to keep it moist.
(c) Light intensity – Softwood cuttings need high intensity light to produce roots. Light promotes the production of roots since it affects the rate of photosynthesis. Hardwood cuttings do well in dark conditions since they have high amount of stored carbohydrates and, therefore, rooting is faster in dark conditions.
(d) Oxygen supply – Cuttings require adequate supply of oxygen for them to develop roots. The rooting media should, therefore, allow proper aeration.
(e) Chemical treatment – Rooting hormones induce root production in cuttings. Common hormones used to induce rooting include indole acetic acid (IAA), indole butyric acid (IBA) and Naphthalene acetic acid (NAA).
(f) Leaf area – Softwood cuttings require a lot of leaves for photosynthesis while hardwood cuttings will produce roots faster without leaves.
Propagation of Bougainvillea using cuttings
Procedure
1. Select a hardwood cutting from the B. spp. required and cut it off the plant.

2. Prune off the cutting by removing excess leaves and flowers and the older lower woody part. Leave a 4’ long cutting.

3. Cut each piece and the bottom where there are nodes at a slanting manner and dip in a rooting hormone and anti-fungal to prevent rotting.
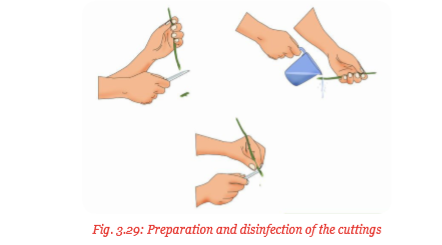
The cuttings are ready for planting.
Planting the cuttings
(i) Prepare the potting mixture by putting soil which is well mixed with organic matter such as compost manure in polythene bags and arrange them in a nursery site.

(ii) Wet the soil in the polythene bags and insert the bony cuttings in each polythene bag at a slanting angle.
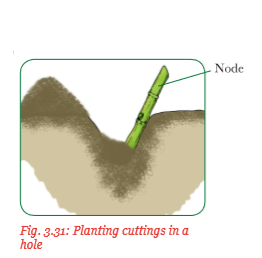
(iii) Keep the polybags moist under shade until the cuttings produce sprouts at the nodes. This will take about 8 – 10 weeks.

(iv) Leave the cuttings until the shoot produces 4 – 6 leaves. Allow the cuttings to grow for 3 months for proper root formation. Reduce watering the last 2 weeks before transplanting and remove the shade or take them to an area where they are exposed to the sun. This is known as ‘hardening off’.
(v) Transplant the cuttings by removing the polythene bag carefully to avoid root damage.
2. Budding
This method is also known as bud grafting. Budding is the practice of cutting a vegetative bud, the scion to a seedling of another plant, the root stock. The scion has only one bud and some bark with litter or no wood at all. It is held tightly on the rootstock by tying with a budding tape until it produces a shoot. Ornamental plants propagated through budding include roses and bougainvillea.
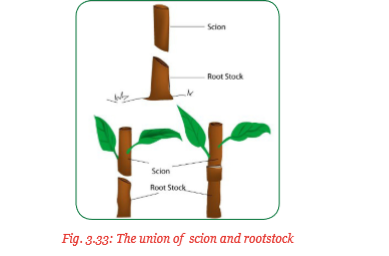
Methods of budding
(a) T-Budding
In this method, the rootstock is prepared by making a T-shaped incision through the bark down to the wood. The T-shaped incision is made 15 cm – 20 cm above the ground using a special sharp knife known as budding knife. The bark is then raised and the bud inserted. This is done by sliding the bud downwards under the lifted bark until it lies between the edges of the bark and is well done below the horizontal incision. The bud is then firmly tied using either a budding tape, rubber strips or polythene strips


The wrapping is removed about two weeks after budding in order to inspect the bud. If it is green, then it has been accepted by the rootstock. Once the bud develops into a shoot, the shoot of the rootstock is cut about 1 cm – 2 cm above the union. When the young shoot is above 25 cm, it is supported through staking to prevent it from being destroyed by wind.
Propagation of roses through T-budding
The following is the procedure of propagating roses through T-budding:


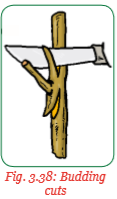
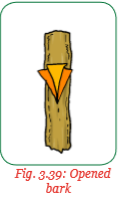

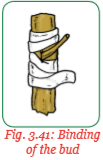
(i) Prepare the rose plant that you intend to bud. This is done by trimming the plant down to about 45 cm from the ground level.
(ii) Prepare the buds. This is done by selecting and cutting bud sticks from the previous year growth. The bud stick is a cutting that has about 4–6 fully developed buds cut from a plant with desired characteristics, for example, flower colour. The bud sticks are placed in water for several hours.
(iii) Cut the buds. Use craft knife or razor blade to carefully slice the buds from the bud sticks. Take a reasonable size slice about ½ inch long. Use your knife to remove the hard section out of the bud.
(iv) Make a T-cut in the rose plant to be budded. Make two cuts, one horizontal and another vertical to make a T-cut on the plant to be budded. The horizontal and vertical cuts should be about 1 inch. The cuts should be deep enough to reach the combining layer. However, the cut should not go through this layer.
(v) Peel back the flaps of the T-cut just enough to see this layer.
(vi) Slid the bud downward under the peel bark until it lies between the edges of the bark and is well below the horizontal cut.
(vii) Bind (tie) the bud Tie the bud firmly to the stock using a budding tape.
Once the bud has formed a successful union with the stock, reduce the top foliage. Cut the stock about 1 – 2 above the stock when the bud has produced a shoot of about 25 cm high.

Note: Budding in done in the afternoon so as to give them an overnight to settle before being exposed to the scorching sun.
(b) Top budding
This method involves inserting buds at the desired locations on young or small trees.
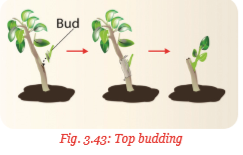
(c) Patch budding
In this method, the bark with a bud is removed from the scion stem and inserted into a patch where the bark has been removed from the rootstock. The union is then tied on the top and bottom so as to hold tightly.
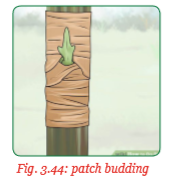
(d) Chip budding
In this method, a chip of wood containing bud is cut out of a plant with the desirable properties. A similar chip is cut out of the rootstock. The scion bud is then placed in the cut in such a way that the cambium layers’ match.
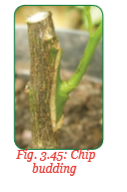
The bud is fixed in place by tying with grafting tape. This is mainly done in summer.
3. Grafting
This is the practice of uniting two separate woody stems. One of the two parts provides the base and has a rooting system while the other stem is obtained from another plant. The part with the rooting system is known as the rootstock and the part with which is grafted on to the rootstock is known as the scion. The scion should have at least one bud which develops into the new plant. The ability of the scion and rootstock to form a successful union is referred to as compatibility. Ornamentals propagated through grafting include bougainvillea, roses and duranta.
Methods of grafting
(a) Whip and tongue grafting
(b) It is used for materials in which the scion and the rootstock are of the same diameters. A slanting cut is made with a sterilised sharp knife on the scion and top of the stock. The separated parts are fitted together and wrapped with a grafting tape or polythene strip.
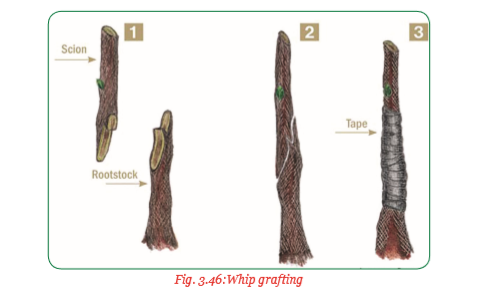
Procedure
(i) Cut off the stock using diagonal cut. The cut should be about four to five times the diameter of the stock to be grafted. Make the same cut at the base of the scion.
(ii) Fit the scion into the rootstock so that they interlock whip and tongue. Ensure that the cambia are aligned.
(iii) Wrap the junction with a grafting strip or twine and steal it with grafting wax or grafting paint.
(b) Side grafting
This method is practised when the rootstock has a large diameter than the scion. The scion is inserted into the side of the stock.

(c) Bark grafting
In this method, the rootstock is cut and a vertical slit is made through the bark where the scion is inserted. Multiple scions are usually inserted around the cut surface of the rootstock.

Procedure
(i) Cut the base of each scion to 3 cm – 5 cm tapered wedge on one side only.
(ii) Loosen the bark slightly and insert the scion such that the wedge-shaped tapered surface of the scion lies against the exposed wood under the flap of bark.
(iii) Push the scion down into the place behind the flap of the bark.
(iv) Replace the bark flap and nail the scion in place.
(v) Seal all the exposed surfaces with grafting wax or grafting paint.
(vi) Once the scions have begun to grow, leave only the most vigorous one on each stub, prune out all the others.
(vii) Stake the new shoot during the first few years.
Note: Scions are inserted every 6 cm – 8 cm of the rootstock.
4. Splitting Splits are plantlets divided from the existing mother plant with complete leaves and rooting system. The splits may be planted directly into the field or first raised in a nursery before being transplanted to the field. Ornamentals propagated through splitting include palms, roses, anthuriums and duranta.
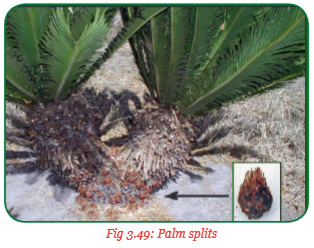
Splitting palm trees
Various palms have a clumping or suckering growth habit and respond very well to division.
Dividing a clump
(i) Identify roots feeding one or two stems.
(ii) Use a disinfected knife or shears blade to divide the stems from the rest of the plant ensuring minimal damage to the roots as possible.
(iii) Plant the splits in potted containers and keep them under a shade.
Dividing suckers
Some palms produce suckers which are straight shoots that grow upwards from the root ball and often can be removed and used to make new plants. Before dividing suckers from a palm tree, water the mother plant well to loosen the soil and allow roots to separate easily. Gently pull one sucker upwards to identify its roots. Cut the roots free from the main root ball and remove the sucker with its roots to plant elsewhere, either directly in the field or in potted containers.
5. Layering
In this method, a part of a plant is induced to produce roots while still attached to the parent plant. Once the parts produce roots, it is cut off from the parent plant and planted as a new plant. Ornamentals propagated through layering include roses, duranta, anthurium and bougainvillea.
Types of layering
(a) Tip Layering
In this case, the shoot bearing the terminal bud is bent to the ground and then covered with a layer of moist soil. It is held in position by use of pegs. The covered part is induced to produce fruit by wounding it or by use of growth hormones. It is then cut off from the mother plant and transplanted.

(b) Trench layering
In this method, the branch of stem is bent, laid in a trench and then held in position by use of pegs. The trench is then covered with a layer of moist soil. The buds develop shoots that grow upwards. Roots are produced at the parent base of its shoot. The shoots are then cut off from the plant and transplanted.

(c) Compound layering
It is also referred to as serpentime layering. In this method, the branch to be used for layering is bent several times and held in position with pegs. This produces several new rooted planting materials from the same branch.
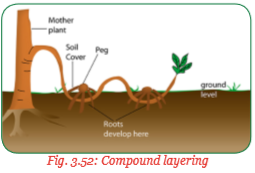
(d) Marcotting
It is also known as aerial layering. It is commonly used on hardwood plants where the stem cannot bend easily to reach the ground. Some moist rooting medium is heaped around the section of the branch whose bark and combined layer have been removed. The rooting medium is then wrapped in a polythene sheet to hold the soil and maintain the soil moist. At the point where the bark has been removed, auxins are accumulated and thereafter induce development of the roots. The rooting medium quickens the process of rooting.
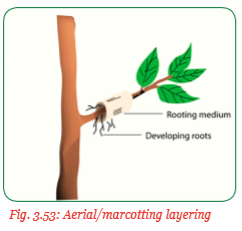
6. Seed propagation
This is the use of seeds to create new plants from the parent plant. Seeds are produced by flowering plants after pollination and fertilisation. They contain the part on the plant that germinates and subsequently grows into a new plant. Ornamentals that may be propagated through seeds include roses, duranta, palms, anthurium and bougainvillea. However, some ornamentals such as bougainvillea are more easily propagated through cuttings and layering than through seeds. The seeds of various ornamental plants are shown in figure 3.54 below.

Propagation of ornamentals through seeds takes place through the following steps:
(a) Seeds gathering
The seeds are gathered from their mother plants. They are either obtained from fruits or collected from the ground around their mother plants. The seeds are then prepared for planting through various ways.
(b) Breaking seed dormancy
Some seeds undergo a dormancy period between maturity and the time they sprout. The dormancy period is the stage whereby a seed cannot germinate. This is the stage of inhibited growth of a seed. Seed dormancy should be broken before the seed is planted. The following methods are used to break seed dormancy:
1. Mechanical method– This is a method which aims at scratching the seed coat to make it permeable to water. It is also known as scarification. Scarification is done by scrubbing small-sized seeds against hard surface such as sand paper while filing or pricking the seed coat with a knife. It is done to large-sized seeds such as croton seeds.
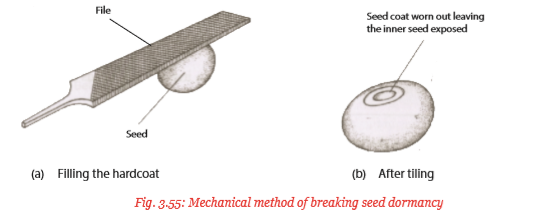
2. Heat treatment– This involves the use of hot water or burning the seeds lightly. It softens the seed coat making it permeable to water and thus is able to germinate. The seeds are soaked in hot water of about 80° C for 3 to 5 minutes after which the water is allowed to drain off. Burning also serves the same purpose as hot water treatment. In this case, trash is spread over the seeds which is already covered with a thin layer of soil. The trash is burned after which the seeds are retrieved and planted. However, overheating should be avoided as this will destroy the seeds.

3. Chemical treatment – In this method, seeds are dipped in some chemicals such as concentrated sulphuric acid for about two minutes and then removed. The chemicals wear off the seed coat making it permeable to water. However, care should be taken not to leave the seeds in the chemicals for too long as chemicals will kill the embryo.
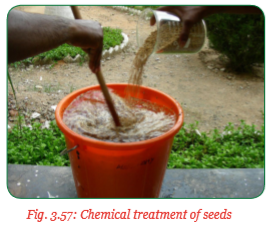
4. Soaking in water – Seeds are soaked in water for a period of between 24 and 48 hours until they swell. They are then removed and planted immediately. The seeds treated in this way germinate very fast.
(c) Seed dressing
This is the coating of seeds with a fungicide or an insecticide or a combination of the two chemicals. The chemicals protect the seedlings from soil-borne diseases and pests.
3.6 Cultural practices of ornamentals
1. Roses
Activity 1 3.5: A field visit to conduct cultural practices of rose plants
Visit a farm growing roses and carry out the following activities:
(i) Observe the activities going on in the farm.
(ii) Participate in the activities going on in the farm such as planting, pruning, application of fertilisers, watering, mulching, weed control and pest management.
(iii) Discuss and record the activities carried out.
(iv) Prepare a report of your findings.
(v) Present your report to the class.
(vi) Take teacher’s summary notes.
The cultural practices of roses are as follows:
(a) Land preparation
Land on the selected site is prepared early before planting to allow the soil to settle. About 5 cm – 10 cm layer of organic matter is applied on the land before tillage. The organic matter is incorporated into the soil during cultivation. This helps to improve soil tilth and texture.
(b) Planting
Roses are mainly propagated through cuttings which are raised in the nursery. Holes measuring 45 cm long × 45 cm wide and 45 cm deep are dug on the prepared land at a spacing of 2.0 cm × 1.0 m 10 kg of well rotten farmyard manure which is mixed with a phosphatic fertiliser is applied to each hole before planting. During planting, the holes are thoroughly watered. Cuttings with 2–3 buds are dipped into IBA (Indolebutyric acid) or (IAA Indoleacetic acid) at 500 ppm (Parts Per Million) and then used as planting materials. The cuttings are placed at the centre of the hole. Topsoil is then returned to the hole and the soil firmed around the cutting.
(c) Pruning
Roses are pruned when the plants are in the dormant or near dormant stage. The vigorous past season shoots are cut back to half the length. All the weak, diseased, crisis crossing and unproductive shoots are removed. The cut ends are protected by the appropriate chemical to prevent secondary infection.
(d) Fertilisation
(i) Use of biofertilisers 2 kg of azospirillum and an equal amount of phospho bacteria are applied at the time of planting. These are mixed with 100 kg of farmyard manure and applied to the planting holes.
(ii) Manuring After pruning, the rose plants are manured at the rate of 10 kg farmyard manure per plant.
(iii) Foliar fertilisers/feed Foliar application of 0.2% micronutrients mixture containing 20 g MnSO4 + 15 g MgSO4 + 10 g FeSO4 + 5 g B produces bright coloured flowers. The foliar spray is prepared by dissolving 2 g of the mixture in every one litre of water. Enough spray is prepared depending on the size of the field with the flowers.
(e) Watering
Water is applied once in two days until the plants establish and once a week thereafter. Fresh water should be used in watering the plants.
(f) Mulching
Mulching is the spreading of a protective covering around the rose bushes and on top of the surrounding soil. Mulch is applied after pruning the plants. Mulching helps in preventing loss of soil moisture through evaporation, weed control, improving soil structure and moderating soil temperature. It also cuts on the cost of irrigating the flowers as less water is applied.
Types of mulch materials used in roses
– Organic mulch
– Inorganic mulch

• Organic mulch–This includes grass chippings, wood chips and cocoa hulls. The advantages of using organic mulch is that they decompose and add nutrients to the soil.
• Inorganic mulch–This includes stones, gravel and shredded rubber. These materials keep the ground warm and smothers weed.
(g) Weed control
Weeds such as pig weed, oxalis and chickweed are common in rose fields and landscapes. These weeds are controlled through the following methods:
(i) Mulching –A 5 cm –10 cm layer of organic materials such as wood chips help to reduce annual weeds and also make hand-weeding easier.
(ii) Hand weeding –This is the use of hand tools such as hand-hoes to remove weeds. These tools should be used with care so as not to damage the roots. Roses are shallow rooted plants.
(iii) Use of herbicides – Pre-emergence herbicides can be used around the roses before weeds emerge or after weeds are removed and before others germinate. Post-emergence herbicides are used to control established grasses. Great care must be taken while applying these herbicides as roses are affected by post-emergence broad leaved herbicides such as 2,4- D and non-selective herbicides such as round-up. The effects may include the proliferation of small, narrow shoots and leaves. So care must be taken to avoid herbicide drifts to unintended areas during spraying.
The common pests for roses include aphids and the red spider mite.
(i) Aphids
There are two common types of aphids that attack roses. These are; the large green or pink aphids. It attacks the growing tips and flower buds.
Their attack on flower buds results in flower petals which are puckered, small and of off-colour. The whole bud may also turn brown and fail to open. The small aphid which is green suck plant sap from the underside of the leaves and produces honey dew.
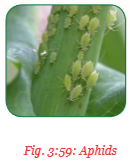
Control
A cold water wash on the plants washes aphids off the plants. So aphids are effectively controlled through overhead irrigation.
(ii) Red spider
mite It is also called the two spotted spider mite. It causes severe damage to the rose foliage. Spider mites are very small and may not be seen without the help of a magnifying lens. A yellow mottled pattern on the leaves may indicate spider mite attack.
Control
− Frequent spraying with a strong stream of water.
− Spraying with the recommended acaricide under heavy infestation.
Other rose pests include thrips that feed on the unfolding flower bud and stem borers whose attack results in dieback of the rose plants.

(i) Diseases Control
There are three major rose diseases. These are: Powdery mildew, black spot and rusts.
(i) Powdery mildew
It is caused by a fungus known as Podosphaera pannosa. It is the most prevalent disease in roses. It survives in dormant buds, leaves and shoots. Its attack results in distorted and deformed leaves. Infected flowers often fail to open. There is shedding of leaves under severe attack.
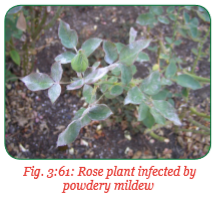
Control
− Spraying with appropriate fungicide such as Benomyl carbendezim or copper-oxychloride and avoid damp conditions.
(ii) Black spot
It is caused by a fungus known as Diplocerpon rosae. It is the most serious disease of roses. The disease forms black spots all over the foliage of the rose bushes. If unchecked, it may lead to total defoliation of the rose plant. The process of photosynthesis is affected and, therefore, the life of the plant.
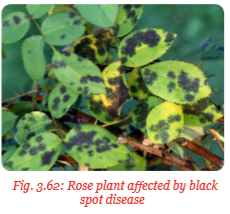
Control
Spraying with an appropriate fungicide. Such as Benomyl, carbondezim or copperoxychloride.
(iii) Rust disease
It is caused by a parasitic fungus known as Phragmidium tuberculatum. It affects the leaves which turn yellow and are rust coloured. It may also cause the affected leaves to drop off.

Control
Spraying with an appropriate fungicide such as Benomyl, carbondezim or copperoxychloride. Other rose diseases include downy mildew, rose rosette, crown gall, mosaics, stem cankers and blight.
(j) Harvesting
Harvesting rose flowers is done using sharp secateurs at the tight bud stage. This is when the colour is fully developed and the petals have not yet started unfolding. Leave 1–2 mature leaves on the plant after the flower has been cut. These leaves encourage production of new strong shoots.
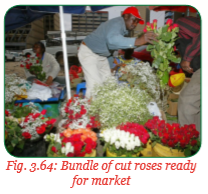
Harvesting is done preferably during early morning hours.
2. Duranta and Palm trees
Activity 1 3.6: Practical activity of cultural practices of duranta and palm trees
Visit a farm where duranta and palm trees are grown and carry out the following activities:
(i) Observe the activities going on in the farm.
(ii) Participate in the activities going on in the farm such as land preparation, planting ornamental plants, pruning, fertiliser application, watering, weed control and pest management and disease control.
(iii) Discuss and record your findings.
(iv) Present your findings to the class.
(v) Take teacher’s summary notes.
2.1 Duranta (Duranta erecta)
(a) Land preparation
Ornamental duranta may be grown on prepared ground as a hedge or planted in containers, for example, pots where the plant is to be placed on the ground, the selected site is prepared by clearing the vegetation around the site. Planting holes are then dug at a spacing of about 30 cm within the row. This gives the plants enough space to grow. It is also close enough for the plant to establish a hedge where the plant is to be planted into containers. A good soil mix is put into the container that has plenty of planting holes at the bottom.
(b) Planting
Duranta may be propagated through seed or cuttings. However, cuttings are more commonly used. Use hardwood cuttings for propagation. While planting, dip the end of a 15 cm cutting into a rooting hormone and then plant directly. Roots develop fairly quickly. Rooted cuttings may also be used. Seeds also do well.
(c) Pruning
Prune duranta by removing any shoots that grow beyond the desired growth size and shape. Pruning cuts should be made with shears across the branches. Wear hand gloves and protective eye wear to protect againct the sharp thorns. The renewal pruning is necessary to keep an attractive shape and to remove old and diseased plant parts.
Procedure of pruning duranta
(i) Clean the pruning shears before pruning and between cuts especially when the plant has a disease.
(ii) Cut away dead, damaged old or diseased branches at the base of the tree.
(iii) Cut overgrowth back to a desirable shape and size.
(iv) Cut off branches that grow close to the ground.
(v) Remove water sprouts and suckers from the base of the tree.
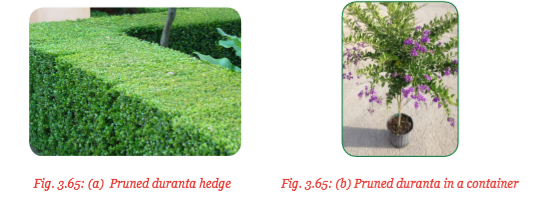
(d) Fertilisation
A complete fertiliser of 10:10:10 is applied four times in a year from the time the new growth starts. The fertiliser (10:10:10) is a slow release fertiliser meaning it releases the nutrients NPK slowly into the soil. Apply the fertiliser at the rate of 1 table spoonful per square foot of the soil and a handful of compost manure underneath the plants canopy. Broadcast the fertiliser in a 30 cm ring around the base of the plant. Rake the fertiliser into the top 7.5 cm of the soil and water the area to activate the fertiliser. However, note that inorganic fertilizer cannot be used without organic fertilizer. The two must be used to give optimal level of output.

(e) Watering
It is important to water the plant frequently while it is establishing. Water requirement after establishment are low. Watering should ensure the soil is moist and especially during times of drought. Water newly planted duranta plant weekly or whenever the soils start to dry out. Thereafter, water only during periods of extended dry weather, otherwise duranta has a good drought tolerance. Apply water around the root zone using a hose pipe in the morning.

(f) Mulching
Apply 5 cm –10 cm layer of mulch around the base of the duranta but ensure the mulch material do not get into contact with the trunk. This prevents the formation of mold or rot. Organic mulch is used. This may be from debris such as dead leaves and twigs. Mulching conserves moisture in the soil and helps to control weeds.
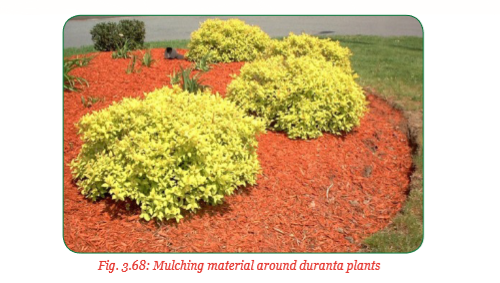
(g) Weed control
Duranta is affected by common garden weeds especially in the early stages of establishment. This competes with the plant for water, space and nutrients. These weeds are controlled by manual weeding. Later on, its leaf canopy smothers the weeds beneath.
The most serious pest that attack duranta is the whitefly which cause damage on the leaves. The flies suck plant sap. They are controlled by systematic pesticides applied through the roots. Other pests include root knot nematodes that cause damage to the roots and interfere with the plants transport system, mealy bugs and scale insects.

(i) Disease control
Diseases that affect duranta include:
(a) Anthracnose
This is a fungal disease that attacks/affects the leaf tissues. It is controlled by spraying the plant with a fungicide.
(b) Leaf spots
Bacterial leaf spots are caused by a bacterium known as Pseudomonas cichorii and the Xanthomas spp. The disease affects the leaves reducing their photosynthetic area and, therefore, damaging the plant. The black leaf spot is caused by black spot fungus known as Diplocarpon rosae.
Control
– Disinfecting pruning tools in a solution made by mixing 1 part bleach to 4 parts water to prevent spreading of the disease.
– Pruning infected leaves/rogueing.
– Spraying with a fungicide to control the leaf spot caused by black spot fungus.
– Spraying with an appropriate chemical to control bacterial leaf spots. Other diseases of duranta include leaf mosaics caused by a virus and dieback.
(j) Harvesting
Berries are harvested when ripe for seed extraction. Gloves should be worn when handling the berries since they are poisonous.
2.2 Palms
(a) Land Preparation
A suitable site for planting palm trees is selected. This may either be in the landscape flower garden or park. Holes which are twice the diameter of the root ball of the palm seedlings are dug at the site. The depth of the holes is equivalent to that of the root ball.
(b) Planting
Palms are propagated from splits which may first be raised in containers or planted directly. During planting, palm seedlings are removed from their containers. The planing holes are first watered before planting. The seedlings are placed in the holes. The holes are then backfilled with soil to promote root growth. Then water the seedlings, place three stakes each about 0.9 m long in a triangular shape around the palm. Fold soft material into long strips and wrap them around the tree's trunk. Fasten the strips to the stakes. Remove stakes within one year.
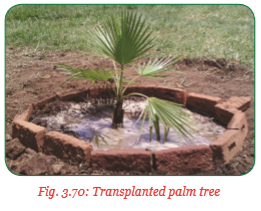
(c) Pruning
Pruning in palm trees involves removing old and dead leaves (fronds) and old fruit stems. Remove old and dead fronds from the palm tree. The old fronds should be removed when they turn brown and there is no green left in them. Old fruit stems should also be removed. A hand pruner is used for smaller palms while a sharp pruning saw should be used for larger leaves and stems. The pruning tool should be treated with alcohol or hydrogen peroxide every time a different plant is to be pruned to prevent spread of diseases from one plant to another. Cut the leaves as close to the trunk as possible taking care not to injure the plant.
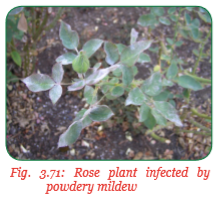
Note: Do not plant palm trees near overhead utility wires.
(d) Fertilisation
Apply a complete fertiliser, for example, NPK 17:17:17 or NPK 20:10:10 3-4 weeks after planting. This is repeated three times in a year. The fertiliser is applied around the plant over the entire root zone. However, the fertiliser does not get into contact with the plant or roots. Palm trees also respond very well with foliar feeds. It is important to mix organic and inorganic fertilizer.
(e) Watering
Apply water frequently to help the plant develop more roots. Field grown palms require extra watering. This is because these plants had their root cut. However, avoid too much watering as this may inhibit root growth. Water 3–4 times a week. The moisture loving varieties may need frequent watering. Watering should be done in the morning and evening.
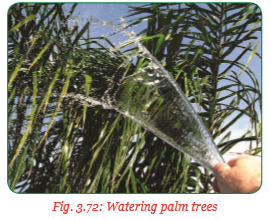
(f) Mulching
Apply 5 cm –10 cm deep layer of mulch near the trunk. It should be thicker near the root zone. Too much mulch may cause rotting and fungal attack. The mulch help to control weeds. Give warmth to the plant, conserve soil moisture and therefore reducing irrigation costs.
(g) Weed control
Methods of weed control include:
(i) Use of herbicides
Some species are affected by herbicides especially when the herbicides get into contact with green foliage or exposed roots. This could result into brown leaf spots, deformed new growth and possibly death of the plant.
(ii) Uprooting
Uprooting of weeds is done until the plant is properly established. Later on, the leaf canopy hinders the growth of weeds beneath especially the broad leaved weeds.
The most common pests of palm trees are insects and spider mites.
(i) Insect pests Insect pests consists of the following:
• Sucking insects such as mealy bugs, aphids and scale insects. They are the most common insect pests of palm trees. They suck plant sap. Mealy bugs and aphids leave behind them a sticky matter (Excreta) called honeydew.

• Chewing insects such as caterpillars of many insects. They eat palm leaves making large holes. A good example of these caterpillars is the palm leaf skeletoniser, i.e., is a small caterpillar that is usually found in large colonies in any part of the palm leaf.
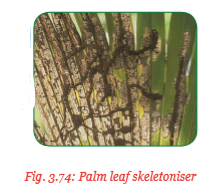
• Boring insects – Weevils such as the red palm weevil burrow into the centre of the palm tree and feed there thus making great damage to many of large palm trees. This may lead to the fall of the top part of the plant.

Control of insect pests
• Spraying with an appropriate insecticide which is applied repeatedly especially for scale insects.
(ii) Mites pests
Palm spider mites feed on any part of the palm leaf. Leaves become pale under severe attack.
Control
Mite pests can be controlled by using miticide but washing with insecticidal soap or applying horticultural oil on the affected parts may also be used.
(i) Disease control
Most of the palm diseases are fungal. The most common palm diseases include the following:
(i) Bud
It is the most common and devastaating disease of the palm trees. It is caused by a fungus known as phytophthora palmivora. The symptoms of attack include discolouration of the spear leaf. As the infected spear leaf unfolds, large dark brown fond rots are produced that progress into the leaf base thus killing the bud. Eventually leaves are lost leaving only bare trunks. This may lead to the death of the palm tree.
Control
• Use of clean seeds.
• Pruning old growths.
• Trimming severaly diseased leaves and removing diseased petioles and sheaths. Use of drip irrigation instead of overhead irrigation so as to reduce wet foliage.
• Roguing/destroying severely damaged plants.
• Use of appropriate fungicides.
• Proper spacing.
(ii) Leaf spots and severe blights
They are also caused by fungus of the pestalotiopsis species. Leaf spots begin as small grey-green irregular circular to elongated lesions that expand to large spots and blights within laminatan to grey centres and black to dark brown edges. Large spots are irregular in shape and somewhat vein-limited. The spear leaf may be infected and part or all of the leaf and bud gets rotten. Young palms develop leaf lesions that advance to the bud, killing the plants.

Control
Similar to that of bud rot above. Other diseases of palm trees include, fusarium wilt.
(j) Harvesting
Palm leaves are harvested in different stages of their maturity and sizes to decorate flower arrangements, wreaths and bouquets. The leaves are also used in some religious celebrations such as Palm Sunday. They provide shade and their leaves can be used as thatch and can be woven to form mats and baskets.
3. Anthurium (Anthurium Andreanum)
Activity 3.7: A Field visit to find out the cultural practices of anthurium.
Visit a farm where anthurium plants are grown and carry out the following activities:
(i) Observe the activities going on in the farm.
(ii) Participate in the cultural activities going on in the farm such as land preparation, planting, pruning, fertiliser application, weed control, watering, pest management, disease control and harvesting.
(iii) Discuss and record your findings.
(iv) Present your findings to the class.
(v) Take teacher’s summary notes.
(vi) Alternatively use internt search to find out where Anthurium is found.
Cultural practices of anthurium are as follows:
(a) Land preparation
Anthurium is an epiphyte and therefore its growth requires a soil-free growing medium which is well aerated but retains enough moisture for the plant.
It should also provide support/anchorage to the plant. For this reason, raise the bed. Culture for large-scale production is recommended rather than growing them in containers. Flat land is recommended for the construction of the beds. However, where land is not flat, terracing may be required before construction of the beds. A plastic material is placed on the ground before the beds are prepared in order to control soil borne pests and diseases.
The beds should be about 30 cm high and the area completely secured by chicken wire or other fencing materials. The beds are then filled with the growing medium which consists of the following materials:
• Leaf mould/compost – 4 parts
• Cattle manure (Fym) – 2 parts
• Sand – 1 part
• Coconut husks cut into 2.5 cm
Square pieces may also be used as a growth medium. This medium should be topped up every year. Tree form chips may also be used as a medium for anthurium culture.
Note: The growth medium may be prepared on the ground by digging out the soil and then filling with the growth medium as above. In this case, the bottom is overlaid with medium sized pieces of tile or charcoal to enhance drainage.
(b) Planting
Anthurium is propagated through cuttings, seeds or tissue culture. However, propagation by cutting is much more preferred than the others as it is the easiest. The seedlings are planted in the growth medium at a spacing of 30 cm × 30 cm which is referred to as the closer spacing or 30 cm × 45 cm. Anthurium established through seed is also planted at the same spacing. Anthurium may also be planted in containers usually pots. Ensure the containers have bottom drain holes to avoid rotting of the plant. Anthurium planted in containers is mainly used for indoors. See figure 3.77 (b) below.

(c) Pruning
Anthurium plants are pruned down to four leaves per plant. Closer spacing of 30 cm × 30 cm requires continuous pruning to maintain 3–4 leaves per plant at all times. This pruning encourages the plant to sprout new leaves and new blossoms. It does not affect flower production and the growth of the plant.
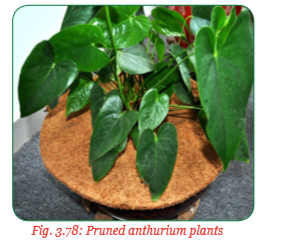
(d) Fertilisation
Fertilisation starts right from the preparation of the growth medium. About 250 kg of triple superphosphate (TSS) per hectare is mixed with the growth medium before planting. A complete fertiliser of 13:13:20 is applied at planting time at the rate of 4 g per plant/hole. A foliar feed of 20:20:20 is applied through the foliage later in growth of plants. During flowering, a foliar feed of 20:30:20 NPK is applied to promote the blossoming of the flower. Fertilisers with Ca and Mg elements may also be added in liquid form. Calcium Carbonate as a liming material should be added to the growth medium to maintain the pH at around 5.5. + organic fertilizer.
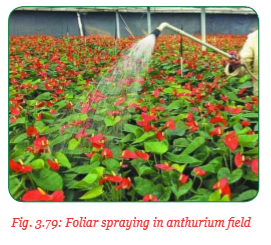
(e) Watering
Anthurium plants need daily watering when the rains are scarce. Water applied to the plants should be of good quality and without chlorine. Overhead or sprinkler irrigation is recommended. The fields should be watered three times a day during the dry season as need may arise during the wet season. Drip irrigation may also be used to irrigate anthurium plants as shown in figure 3.80 below. For anthurium planted in containers, water until it runs from drain holes at the bottom.
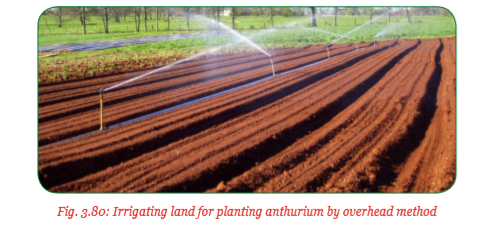
(f) Mulching
Mulching is required for the anthurium plants. It helps to control weeds and conserve moisture in growth medium. The anthurium plants also grow into the mulch and spread. This provides support to the plant. The most common mulching material in the cultivation of anthurium is sawdust.
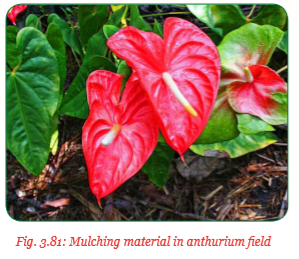
(g) Weed control
Weeds in anthurium fields/beds are controlled through manual weeding. Use of herbicides is not recommended as the chemicals may be toxic to anthurium plants.
Pests attack stressed and neglected anthurium plants. The common pests of anthurium include insects, spider mites and nematodes.
(i) Insect pests
Sucking insect pests such as aphids, mealy bugs, scale insects and thrips are the most serious insect pests in anthurium. They suck plant sap thus interfering with the growth of the plant. Anthurium plants have thick leaves which are not a favourite for the chewing insects.
Control
• Use of a short sharp blast of cold water which dislodge the insects from the plants.
• Use of organic insecticides prepared, for example, pyrethrum based insecticides.
• Use of horticultural soap or oil sprays which are natural and do not harm the plant.
• Use of malathion based spray for the control of mealy bugs which are difficult to control using the other methods.
(ii) Mites
– Spider mites suck plant sap leaving yellow stippling in leaves. They also cause heavy damage in large infestations.
– A sharp blast of cold water can be used in the affected parts to dislodge them. Spraying with the horticultural soap or oil not likely to damage the plant.
(i) Disease control
Anthurium is affected by the following diseases:
(i) Bacterial blight
It is caused by a bacterium known as Xanthomonas axonopodis var. die effenbachiae.
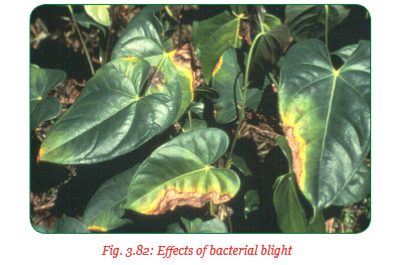
The disease affects the foliage of the plant and the vascular bundles. The symptoms include water soaked spots near the margins of the leaves. Tissues surrounding the affected areas turn yellow. The pathogen quickly moves into the vascular tissues of petioles and stems thus disrupting the translocation of nutrients and transportation of water. This results in water stress.
Control
Application of the appropriate agricultural chemicals .
(ii) Fungal or bacterial leaf spots
The leaf spot disease affects the foliage of the plant. Leaf spot desease can be caused either byfungus or a bacterium. Fungal leaf spot is controlled by avoiding over-watering and spraying with a fungicide to treat serious problems. Bacterial leaf spots are also controlled by spraying appropriate chemicals. The appropriate chemicals to control Bacterial leaf spot include; antibiotic streptomycin about 500gm in 1,125litres of water/ha every week fro 6 to 8 weeks. Fungal leaf spot is controlled using fungicides such as copper-maneb combination at 7-14 days interval. The leaf spot disease may also be controlled by destroying the affected plants and replacing with healthy ones.
Other diseases of anthurium include anthracnose root rot and damping off.
(j) Harvesting
Anthurium is a good producer of cut flowers. The flowers are harvested
 years after initial planting in the nursery. Harvesting of flowers continues for five years from the same plant.
 Yield per year
Year 1 – No flowers
Year 2 – 250,000 flowers per ha
Year 3 – 300,000 flowers per ha
Year 4 – 350,000 flowers per ha
Year 5 – 350,000 flowers per ha
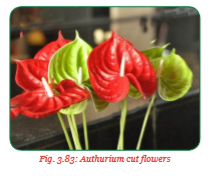
Anthurium flowers are usually harvested once a week. The flowers mature on the spadix( anthurium inflorescence) from the base towards the apex. As they mature, they change colour from the base to the tip of the spadix within a period of 3/4 weeks. Most anthurium blooms are harvested at 3 4 maturity. At this time, they have the longest shelf life as cut flowers of up to about 14 days.
4. Bougainvillea
Activity 3.8: Field visit and practical activity to find out cultural practices of bougainvillea
Visit a farm where bougainvillea are grown and carry out the following activities:
(i) Observe the activities going on in the farm.
(ii) Participate in the cultural activities going on in the farm such as land preparation, planting, pruning, watering, weed control, mulching, pest management, disease control and harvesting of flowers.
(iii) Discuss and record your findings.
(iv) Present your findings to the class.
(v) Take teacher’s summary notes.
(a) Land preparation
Bougainvillea may be planted in the ground or in containers. Where the bougainvillea is to be planted in the ground, the land is well prepared before digging the planting holes. Holes are dug as deep as the plant's root ball. A high phosphate fertiliser is added to the hole. If you are planting the bougainvillea in a container, choose a soil mix with the appropriate pH level of around neutrality 6.5–7.0.
(b) Planting
Bougainvillea is mainly propagated from cuttings which are raised in polythene bags before being planted. The procedure of planting the seedlings is as follows:
• Remove the seedlings from the polythene bag or any other container.
• Wet the root ball.
• Place the seedling into the hole.
• Backfill soil in the hole.
• Firm the soil around the base of the plant.
If the bougainvillea is being planted in a container, choose one with plenty of drainage holes as bougainvillea does not do well in waterlogging conditions.
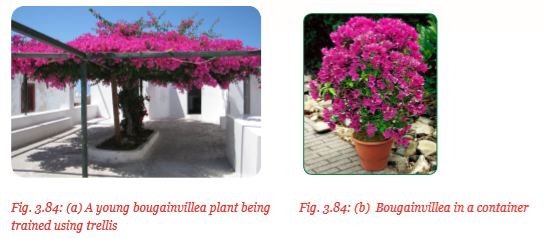
(c) Pruning
It is also referred to as pinching. Pinching is the cutting off a part of the plant's stem. The stem may either be soft or hard and therefore the pinching may either be soft or hard pinching respectively.

• Soft pinching is the removal of a tender tip of a new growth from a branch. It promotes side shoot branching.
• Hard pinching is the removal of a large part of a branch from a plant. It is taken when controlling the growth of stems which have overgrown in order to maintain the shape of the plant.
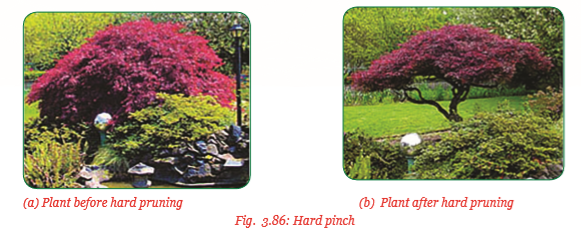
(d) Fertilisation
Fertilisation starts at planting time. A high phosphate fertiliser is added to the hole to promote root growth and help the flowers to bloom. Apply a teaspoonful of complete fertiliser such as the hibiscus food 12-4-18 NPK once a month. This encourages flowering rather than excessive leaf growth.
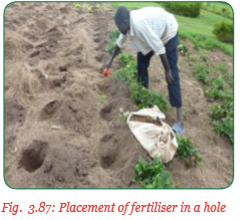
(e) Watering
Water the plant sparingly. Bougainvillea plants weaken with too much watering, growing vegetatively at the expense of flower production. However, allowing the soil to dry out causes the plant to suffer water stress. Bougainvillea plants do not stand waterlogging conditions.
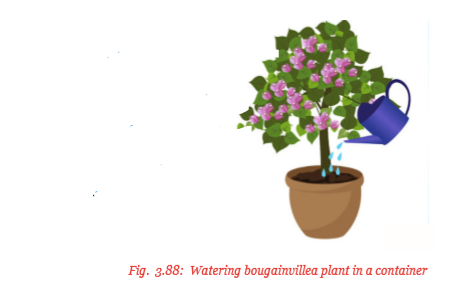
(f) Mulching
Bougainvillea is mulched with compost manure, wood chips, dry grass or straw. About 5 cm – 7.5 cm layer of mulch should be applied over the ground. The mulch helps to conserve soil moisture and prevent weed growth. The mulch should be spread on the ground but should not get into contact with the plant. Leave about 7.5 cm – 10 cm distance between the mulch material and the plant stem.
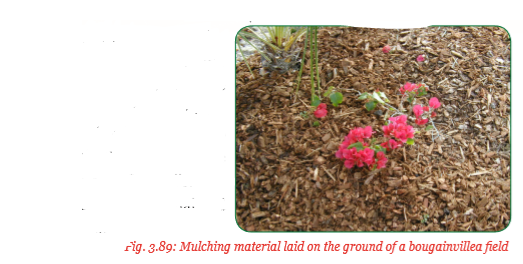
(g) Weed control
The following are methods of controlling weeds in a bougainvillea field:
(i) Uprooting – Weeds are pulled out by hand between the plants. This method leaves no damage to the plant as when herbicides are used.
(ii) Shallow cultivation using hand hoes to remove weeds. Care must be taken not to injure the bougainvillea plants or exposing the roots to the heat of the sun.
(iii) Mulching – The mulching material hinders the growth of weeds thus helping to control them. It also makes manual cultivation easy.
(iv) Use of organic herbicides – Organic herbicides are sprayed into the field for natural weed. Spraying should be done in the morning to avoid drifts of the chemical spray by wind.
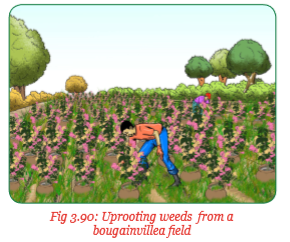
(i) Sucking insects such as aphids, mealy bugs, scale insects and the giant whiteflies. Aphids are the most serious sucking insects that attack the bougainvillea. They attack the stressed and neglected bougainvillea plant. The aphids cluster together on leaves and new growths. Aphids suck plants sap producing excreta known as the honey dew. Honey dew attacks fungus that creates a sooty mold, a black powdery substance on the surface of the affected plant parts.
Control
• Aphids are controlled by applying a hard jet of water from the hose pipe.
• Applying an insecticide prepared from dishwashing soap added to 1 cup of vegetable oil.
 of this solution is mixed with 1 cup of warm water and used to spray the aphids as an insecticide. The other sucking insects are controlled by spraying thoroughly a mixture of 2 table spoonfuls of neem oil in 1 gallon of water on the leaves. They are shown in figure 3.91 (a) and (b) below.
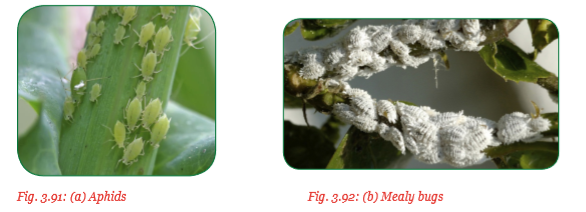
(ii) Chewing insects such as caterpillars. An example of these caterpillars is the bougainvillea lopper (Disclisio prosta stellata) which is a 2.5 cm long yellow, green or brown caterpillar. It feeds on leaves in the evening making ragged leaf edges and may totally defoliate the plant.
Control
• Spraying with an insecticide.
• Hand picking and killing.
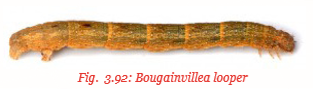
(i) Diseases control
Bougainvillea are affected by several types of diseases. Some of these include:
(i) Leaf spot
Bougainvillea are affected by both fungal and bacterial leaf spots. The reddish-brown spots appear on leaves spreading to other parts of the bougainvillea. This affects the growth of the plant.
Control
• Killing the plant dry.
• Pruning to reduce branches and enhance air circulation within the plant.
• Rogueing: Cutting and destroying affected branches to prevent disease spread.
• Applying fungicides to minimise the spread of the infection.
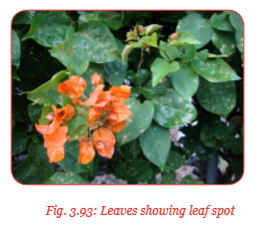
(ii) Chlorosis
This is a deficiency disease. It occurs on new or mature plant growth due to the deficiency of iron and magnesium. The plant parts leaves become yellow.
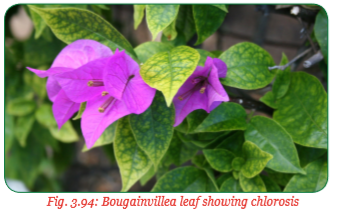
Control
• Raising soil pH by applying iron sulphate or aluminium sulphate.
• Applying 1–2 teaspoonful of episom salt diluted in 1 gallon of water.
(iii) Root rot
This disease is caused by fungus such as Rhizoctonia spp pythium spp. and Phytophthora spp. fungus affect the roots causing diseases or malfunction.

Fig. 3.95: Bougainvillea plant suffering from root rot
Control
• Rogueing – Removing and destroying infected plants.
• Reducing watering. • Applying a broad spectrum fungicide during planting.
(j) Harvesting
Harvesting bougainvillea requires proper timing. The brightly coloured petals are hand-picked by pulling each bract off the plant. The bracts are put in baskets and taken to drying room to dehydrate. They can now be used to prepare products as bouquets for weddings and other ceremonies.
Group activity
Practical work on ornamental pruning
Visit a farm where ornamentals are grown and carry out the following activities:
(i) Observe and identify the ornamentals grown in the farm.
(ii) Using the tools provided, carry out pruning of the ornamentals in the farm.
(iii) Discuss and record your findings.
(iv) Present your findings to the class.
(v) Take teacher’s summary notes.
Unit Summary
Ornamentals are plants which are grown for the purpose of decoration. They are used in beautifying the environment in which human beings live.
Ornamentals are grown in such places as the landscape, flower gardens, greenhouses and in containers. Trees become ornamentals only when they are tendered and used as part of a garden, park or landscape. The cultivation of ornamentals is known as floriculture. Importance of ornamentals include adding beauty, fragrance, attracting wildlife, cleaning the air, ceremonial and religious use. Ornamentals grown in Rwanda include roses, duranta, palms, anthurium and bougainvillea. Ornamentals are propagated through cuttings, budding, grafting, splitting, layering and seed.
Cultural practices in the growing of ornamentals include land preparation, planting, pruning, fertiliser application, watering, weeding, pest management, disease control and harvesting for ornamentals grown for cut flowers. Some ornamentals are used as indoor house plants while others are grown as outdoor plants where they display their beauty.
Key terms
1. A spadix – A spike of minute flowers closely arranged around a fleshy axis and typically enclosed in a spathe.
2. A spathe – A sheathing bract enclosing the flower cluster of some plants such as palm trees and members of the Araceae family, e.g., Anthurium.
3. A spike – A flower cluster (inflorescence) formed of many flower heads attached directly to a long stem.
4. Bouquet – An attractively arranged bunch of flowers especially one presented as a gift or carried at a ceremony such as a wedding.
5. Bract – A modified leaf associated with a reproductive structure such as of a flower.
6. Budding – This is the practice of uniting a vegetative bud known as the scion to the rootstock of another plant.
7. Cultivar – It is the cultivated variety of a plant that has been developed for a particular region by plant breeders.
8. Cut flowers – Flowers or flower buds that have been cut from the plant bearing it. Cut flowers are used for decorative uses in homes or in ceremonies. They form the bulk of the flower industry.
9. Epiphytes – Plants that grow harmlessly upon other plants, mainly on tree barks.
10. Floriculture – Branch of horticulture that deals with the growing of flowers and ornamental plants.
11. Flower garden – A garden where flowers are grown and displayed.
12. Fragrance – A pleasant sweet smell.
13. Grafting – This is the practice of uniting two separate woody stems.
14. Herbicides – Chemical substances used to kill unwanted plants in cultivated fields.
15. Honeydew – A sticky substance produced by sucking insects as excreta which is used by sugar ants.
16. Horticulture – Branch of agriculture that deals with the growing of high value crops such as vegetables, flowers and fruits.
17. House plants – These are plants that are grown indoors, in homes and offices.
18. Inflorescence – A group or cluster of flowers arranged on a stem axis.
19. Indole acetic acid (IAA) and Indole butyric acid (IBA) – These are plant growth hormones used to stimulate root development in cuttings.
20. Landscape – The visible features of an area of land, its landforms and how they integrate with natural and man-made features.
21. Ornamental farming – The growing of ornamental plants.
22. Ornamental plants – Plants grown for the purpose of decoration.
23. Ornamental trees – Trees used or part of a garden, park or landscape setting.
24. Outdoor plants – Plants that are grown in places where there is enough sunshine, outside houses and where there is no shade.
25. Park – An area of natural or planted space reserved for human enjoyment and recreation.
26. Post-emergence herbicides – Selective herbicides applied after the planted crop emerges from the ground.
27. Pre-emergence herbicides – Herbicides applied before the planted crop appears up through the ground surface. They are mainly non- selective.
28. Pruning – Trimming a tree, shrub or hedge by cutting away dead or overgrown branches or stems to stimulate fresh growths.
29. Seed propagation – Development of new plants from a seed.
30. Terrestrial plants – Plants that grow on land conditions as opposed to aquatic plants or epiphytes.
31. Variegated plants – Plants whose leaves have differently coloured zones.
32. Vegetative propagation – This is the development of new plants from vegetative parts such as leaves, stems and roots. It is also known as cloning.
End of Unit 3 Assessment
1. Outline the importance of ornamental plants.
2. The following are ornamental plants grown in Rwanda:
• Roses
• Duranta
• Palm tree
• Anthurium
Which of the above ornamental plant is best suited for:
(i) Planting in a landscape?
(ii) Planting to form a hedge?
(iii) Planting for cut flowers?
(iv) Planting as a house plant?
3. Match the pests given in set A below to the damage they cause as shown in set B.
Set A
(a) Aphids
(b) Mealy bugs
(c) Loopers
(d) Red palm weevils
Set B
(i) Uproot young seedlings
(ii) Chew the leaves
(iii) Suck plant sap
(iv) Defoliate the plants
(v) Damage the flower petal
(vi) Damage the stem when burrowing
4. Name the labelled parts of the rose plant flower illustrated below.

5. Discuss the production of roses under the following subheadings:
(a) Planting
(b) Fertilisation
(c) Watering
(d) Weed control
(e) Harvesting
6. Study the illustration below and then answer the questions that follow:

(a) Identify the disease.
(b) Explain how the disease is controlled.
UNIT 4 : FODDER
4.1 Learning Objectives
Key Unit Competence:
Learners should be able to successfully conduct cultivation of fodder grasses.
(i) Knowledge and understanding
• Define the fodder grasses.
• Discuss the importance of fodder grasses.
• Explain propagation methods of fodder grasses.
• Express cultural practices done on fodder grasses.
(ii) Skills
• Perceive the fodder grasses grown in school surrounding.
• Recognise the importance of fodder grasses grown in Rwanda.
• Stand for propagation methods of fodder grasses.
• Conduct fodder grasses’ cultivation.
(iii) Attitudes and values
• Agree with the colleagues to the fodder grasses cultivated.
• Appraise the importance of fodder grasses.
• Take care while searching the methods of propagation of fodder grasses.
• Be careful when conducting cultural activities.
Introduction
Livestock feed is one of the most important factor to consider when choosing a livestock enterprise. Livestock feed consists of 75 per cent plant materials in form of foliage. This foliage includes fodder and pastures. Land for pasture supply is increasingly becoming smaller due to population pressure. Livestock farmers, therefore, are forced to divide the limited food crop land with the growing of fodder for livestock. This is more so, for dairy farmers who require a continuous supply of high quality fodder for their livestock. Cultivated fodder grasses such as Napier, Guatemala, Brachiaria, Columbus and Sudan grass as well as multipurpose cereal fodder crops which include maize, oats, pearl or bulrush millet, offer the best alternative to natural pastures. Good fodder production systems start with improved varieties of fodder grasses; proper management in the field, harvesting at the right stage and proper conservation systems. This unit discusses different types of fodder grasses. The photographs below illustrate different statements:
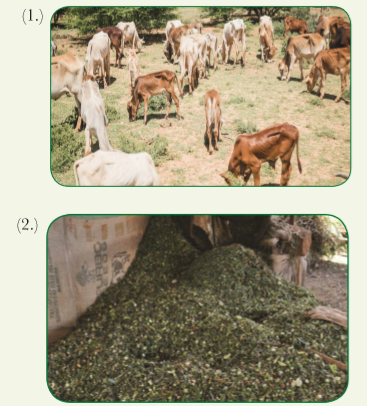
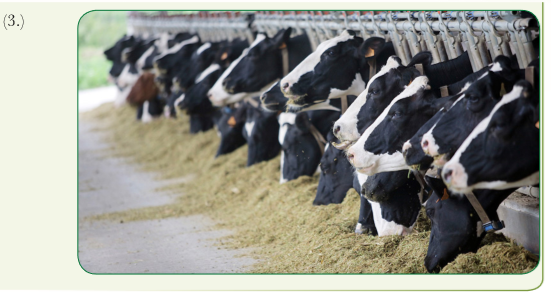
Observe them and carryout the following activities:
(i) Explain what is happening in photographs 1, 2 and 3 above.
(ii) Find out the cause of emaciation of cattle in photograph 1 and give the reason for making fodder into the form shown in photograph 2.
(iii) What do you think are the solutions to those problems in photograph 1 and 2?
(iv) Propose a sustainable solution to those challenges.
4.2 Definition of fodder grasses
Activity 1 4.1: A Research activity to find out the meaning of fodder grasses
Using the reference materials provided, carry out the following activities:
(i) Find out the meaning of fodder grasses.
(ii) Discuss and record your findings.
(iii) Present your findings to the class.
(iv) Take teacher’s summary notes.
Fodder grasses are crops grown and then harvested for livestock mainly through cutting. They are then chopped into small pieces and fed to livestock. Fodder grasses such as nappier grass and guatemala grass mainly supply carbohydrates and fibre in livestock feed. Carbohydrates are enegy giving food which fibre materials facilitate the movement of food through the gut besides providing physical satisfaction to the animal. Ruminant animals digest the cellucose in the fodder grass to provide the nutrients needed by the animal. Fodder grasses are either conserved as standing hay or silage. Standing hay is that fodder crop that is left in the farm after maturing to be harvested during time of scarcity foliage is the fodder that is conserved as fermented fodder in structures known as silos.
4.3 Some fodder grasses cultivated in Rwanda
Activity 1 4.2: A field visit to explore fodder grasses cultivated around the school
Make a visit to the farms around the school and carry out the following activities:
(i) Find out the fodder grasses that are commonly grown in the farms.
(ii) Discuss and record your findings.
(iii) Present your findings to the class.
(iv) Take teacher's summary notes.
The following are some of the fodder grasses cultivated in Rwanda:
• Napier grass – (Pennisetum purpureum)
• Guatemala grass – (Tripsacum andersonii)
• Para grass – (Brachiaria mulato)
• Fodder sorghums – Colombus grass (Sorghum almum) and Sudan grass (Sorghum sudanense)
• Cereal fodder – These include:
(i) Pearl or Bulrush millet
(ii) Oats (Avena Sativa)
(iii) Maize (Zea mays)
(a) Napier grass (Pennisetum purpureum)
Napier grass is also referred to as elephant grass due to its tall characteristics and vigorous growth. It tillers freely and a single clump may produce more than 50 tillers under favourable climatic and soil conditions.
However, the grass is coarse textured, the leaf blade and sheaths are hairy and leaf margins are sharp. The stems are less juicy and fibrous. Nevertheless, it has been extensively bred with other fine textured succulent and palatable varieties to produce several hybrids.
The hybrid napier is a perennial grass which can be retained on the field for 2–3 years. It produces numerous less larger leaves, softer and less persistent hairs. The stems are fibrous with more tillers. Napier grass is the highest yielding perennial tropical fodder grass and is mostly used for the cut-and-carry forage stall feeding. It can be conserved as hay or silage.
There are several varieties of Napier grass, such as:
• Bana grass – This is a leafy grass with a lot of hairs, which cause irritation during handling. However, it is susceptible to napier grass head smut disease.
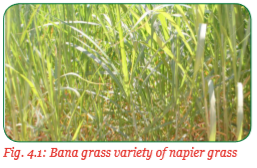
• Clone 13 – This variety of napier grass is resistant to white mould disease. It is high yielding but its stems are difficult to establish. It is also susceptible to napier grass head smut disease.
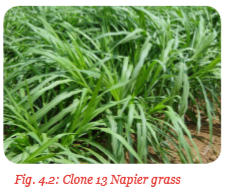
• French Cameroon – This is a high yielding variety which establishes easily from the canes. However, it is also susceptible to napier grass headsmut disease. It has more other varieties which include Kakamega and both are tolerant to napier grass head smut disease and Pakistan hybrid, which does well in dry areas. Uganda hairless and Gold Coast are other varieties.
(b) Guatemala grass (Trypsacum andersonii)
This grass originated from Mexico and South America and introduced for fodder in many countries. It is a warm season grass that grows well from sea level up to altitude of 1800 m above sea level. It is tolerant to waterlogging and flooding. It is a robust strong rhizomatous tufted and leafy perennial grass that forms large bunches. The stem can grow up to 3.5 m – 4.5 m tall with a diameter of 1 cm – 5 cm. It is late maturing and can remain leafy for a long time.
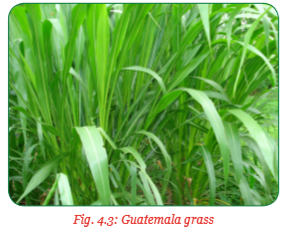
It has shallow roots and hence does not grow well during drought. However, the roots become stronger as the grass matures and stores nutrients necessary for regrowth after cutting. The leaves are long and sparcely haired. Flowers are sterile and hence does not produce viable seeds. It is propagated by stem cuttings. Guatemala is cultivated primarily for fodder in the cut-and-carry systems (zero grazing).
(c) Para grass (Brachiaria mulato)
This grass is also known as buffalo grass, water grass or Angola grass. It is grown near sewage water disposal. It is a coarse trailing perennial grass that spreads by surface runners which produce roots profusely at the nodes. It has a flowering stem that grows 1m – 2 m high. Its stems are erect, leafy, hollow and succulent with hairy nodes. Its leaf blades are dark green in colour and are 25 cm – 30 cm long and 1 cm – 2 cm wide. The inflorescence is a panicle. It prefers hot and humid climate with an annual rainfall of 1000 mm –1500 mm. It withstands waterlogging and flooding but cannot grow in arid and semi-arid areas. It is a nutritious palatable fodder grass, which is free from toxic effects. It is used for making silage.

(d) Fodder sorghum
This crop was domesticated from wild sorghum (Sorghum arundinaceum) in Africa. It is drought resistant and, therefore, grow well in the dry areas. Sorghum is an upright growing grass which is grown for both grains and fodder. The forage sorghum grows to 1.8 m – 4 m tall and has potential for high yields.
It is usually harvested once and fed as green fodder or silage. Sorghum plants especially the young plants contain an alkaloid substance which releases hydrocyanic or prussic acid when wet. This substance is toxic to livestock. To prevent poisoning, the crop should be cured in the field by wilting or drying before ensiling. Sorghum also tend to accumulate nitrates during the drought period which is also poisonous to livestock.
Sorghum is an annual grass with an erect stem bearing nodes and internodes. The leaves are thin, long and smooth. The leaf blades are covered by a waxy sheath which protects them against water loss.
It has a heavy tillering ability, where the tillers develop their own roots. The stalks are juicy and sweet though this depends on the variety. This makes them palatable to livestock. The seeds produced in the panicle are viable hence used for propagation.
There are two sorghum varieties recommended for the drier regions of East Africa; the Sudan and Columbus grasses. See figure 4.5 and 4.6.
(i) Sudan grass (Sorghum Sudanence)
This grass usually grows about 1 m – 2.5 m tall and has a stem that is about 1cm in diameter. It develops only fibrous roots and does not have rhizomes. It has a high tillering ability. Sudan grass is early maturing and suitable where the moisture is limited. They produce more silage than the other varieties.
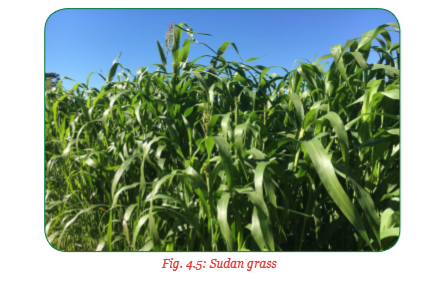
(ii) Columbus grass (Sorghum almum)
This is a robust growing shortlived perennial fodder grass. It has numerous tillers with thick short rhizomes. The stems are thick and solid and can reach up to 4.5 m tall. Leaves are waxy and are 2.5 – 4.0 cm wide. It withstands drought but does not tolerate waterlogging and flooding. It is valuable for fresh fodder and is cut to make hay or silage. It is one of the most salt tolerant grass.
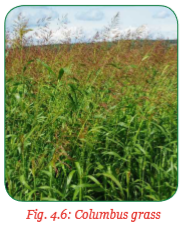
(e) Pearl millet or bulrush millet (Pennisetum glaucum)
Pearl millet is also known as bulrush millet. It is a deep rooted tall robust growing and free tillering annual fodder grass. It has been selected or bred mainly for fodder production.
It grows to a height of 4 m. The stems are solid and can be up to 2 cm in diameter. It has nodes and internodes. Leaves grow up to 100 cm long and 8 cm wide. The leaves are flat and hairy. The seed head is a spike that grows up to 46 cm long. Seeds born in the spikelets are rounded and about 3 mm in diameter and with several colours ranging from pearly, white grey, yellow grey or greenish grey depending on variety. Bulrush millet is also grown for seeds which are consumed by human beings and birds.

(f) Oats (Avena sativa)
This cereal fodder is of Asian origin. It is an annual grass which is adapted to cold regions of the high altitude around 2100 m above sea level. It has a shortened stem which grows upright up to 1.5 m tall. Its tillers arise from the base of the stem and form a dense cluster. The number of tillers produced depend on the variety and ecological conditions. Where the ecological conditions are favourable, one plant may form up to 30 tillers. This increases fodder production per unit area of land. They form panicles which contain the seeds. There are several varieties of oat grown for fodder and also for grain production. As a fodder, oat provides soft palatable herbage rich in crude protein (10 – 12%). The composition of the fodder varies with the stage of growth at which it is cut. It is fed as straws, hay or silage.

(g) Fodder maize (Zea mays)
Maize crop has a variety of uses. It is basically grown for grains and fodder for livestock. It is a shallow rooted annual cereal crop which is supported on the ground by special type of prop roots which grow from the lower nodes of the stem. It has a succulent stem which grows up to 1.5 m – 3 m tall depending on the variety and climatic condition. The stem has nodes and internodes. Leaves which are born from the nodes are dark green, wide and tapered and are arranged alternatively on the stem. Maize produces viable seeds known as a caryopsis after cross fertilisation.
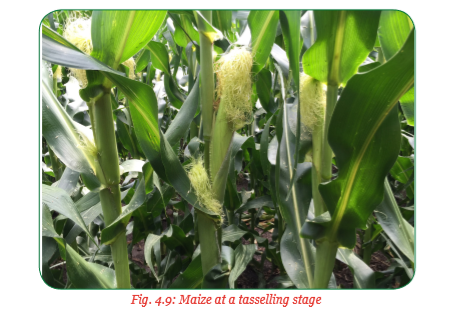
It is a rich source of starch, proteins and edible oils. It produces fodder with the highest crude protein about 9.9% at the early stages of growth up to full bloom stages. This decreases to 7% at milky stage and 6% at maturity.
Dry matter production is at 14% at early stages up to bloom stage. It increases to 20% at milky stage and 29% at maturity. Forage yield is the highest at 30 ton/acre in the early stages up to bloom stage. To get maximum benefit, the fodder should be harvested at full bloom stage, that is, when the grains are milky.
The best type of fodder grass to grow should have the following characteristics:
(i) Have a wide range of adaptability to different soil types.
(ii) Species which are able to reproduce fresh shoots by tillering and able to withstand or recover from cutting.
(iii) Grasses that maintain continuous vegetative growth even during drought or cold periods.
(iv) Grasses that spread by rhizomes or stolons, which readily form adventitious roots, give rapid ground cover and soil and water conservation sustainability.
(v) Rooting system that bind the soil particles together forming a sod and brings to the surface layer nutrients which have been leached by heavy rainfall.
(vi) Species that possess the qualities of higher productivity, palatability, high nutritive value and adaptation to local soils and climatic conditions.
Exercise 4.1
The pictures A, B, C, D, E and F show different fodder grasses grown for feeding animals. Study them carefully then identify those that are grown for fodder only and those that are multipurpose.

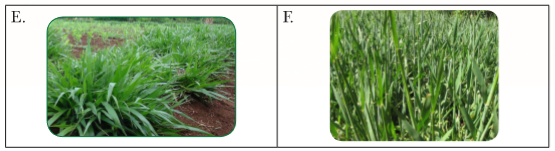
4.4 Importance of fodder grasses
Activity 4.3: Research activity to find out the importance of fodder grasses
Using the reference materials provided, carry out the following activities:
(i) Find out the importance of fodder grasses.
(ii) Discuss and record your findings.
(iii) Present your findings to the class.
(iv) Take teacher's summary notes.
Fodder grasses have the following importance:
1. Feeding livestock
Fodder grasses make the bulk for feeding ruminant livestock such as cattle, sheep and goats. They provide an easy method of feeding confined animals such as those in zero grazing structures. The fodder is cut and carried to where the animals are confined. The fodder can be fed to the animals in the following forms:
(a) Green fodder
After planting the grass, fodder is left to grow until it reaches the stage of defoliation before it is cut. After cutting, the grass is chopped to small pieces of about 2.5 cm and then fed to the animals. The stage of defoliation differs with different types of fodder grasses as follows:
• Napier grass – The French Cameroon takes 3 months to reach first cutting. Thereafter it should be cut after 6–8 weeks. Bana grass should be cut before it reaches 1.5 m tall after which it becomes very coarse and fibrous.
• Guatemala grass – This broad leaved grass grows very vigorous. It takes long to flower and therefore first cutting or defoliation can be delayed to 6 months after planting.
• Sorghum – The two varieties of sorghum are the Columbus and Sudan grass. They last in the field for 18 months during which period, they are harvested several times for green fodder. However, sorghum should not be fed to animals immediately after cutting. It should be allowed to wilt or dry for 2 days before feeding to the animals. This is to avoid prussic and hydrocyanic acid poisoning.
• Fodder maize – This can be harvested through thinning of excess plants and by cutting the tillers which are not needed. These are fed whole to the animals. Defoliation can also be done. This is the removing of one or two leaves per plant every week once the silking stage is over. The leaves are fed to the animals while green. Topping is the cutting of the green part of the plant above the cob. This is cut and fed to the animals.
• Para grass or the Brachiaria grass. It can be fed as green fodder, hay or conserved as silage since it has no toxic effects to livestock.
(b) Silage
This is green fodder preserved through the process of fermentation to produce a stable product which reduces spoilage. The pH of the materials is 4.2 which prevents decomposition and deterioration of the fodder.
The fodder is preserved in a structure called a silo. It is a way of storing fodder in its highest quality for use during the periods of scarcity. It has the following benefits:
• Silage is good source of nutritious food.
• It makes animals gain weight in short periods especially in sheep.
• Dairy cows produce more milk when fed on silage as compared to natural grazing.
• Silage is useful in dry periods when there is little grazing.
(i) Steps in making silage from fodder maize in a pit silo
Step I – Growing the fodder maize
Choose a variety which grows fast and produces large quality of herbage.

Step II – Selecting a site for the pit silo
The area selected should be slightly sloping for good drainage. Dig a wedgeshaped pit with a slender bottom than the top. The size and dimension depend on the amount of fodder to be stored. For example, to make 20 bags of fodder, the pit dug should be 2 cubic metres and will need 10 metres of polythene and 30 litres of molasses.

Step III – Harvesting the crop when at milky stage
This is the stage at which fodder maize is nutritious, easily digestible and has the required crude fibre. Chop the crop into pieces of 2.5 cm – 3 cm using a chaff cutter.
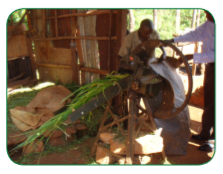
Fig. 4.12: Chopping fodder with a chaff cutter
Step IV – Lining up the silo pit
This silo pit should be lined from bottom to top with the polythene sheet. This is done by covering the whole bottom and the sides with the sheet.
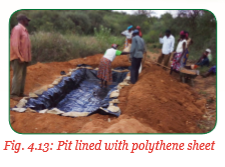
Step V – Filling the silo pit with the chopped fodders
This is done by adding a thin layer at a time. Then compacting each layer after spreading with a roller or heavy drum of water or trumpling by humans.
Repeat the process until 1/3 of the pit is covered.
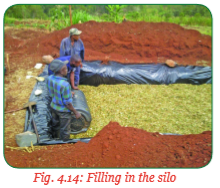
Step VI – Adding molasses to the materials
Dilute 1 litre of molasses with 3 litres of water and sprinkle evenly on the compacted fodder. A knapsack sprayer can be used to spray the solution evenly throughout the silage.
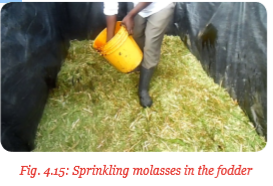
Step VII – Adding more chopped fodder
This is added in layers, one at a time; compact and then spray with molasses solution as in steps V and VI. Repeat this process of adding the fodder and compacting until the pit is filled to form a doom shape.

Step VIII – Covering the pit with the polythene sheet
This is done to prevent entry of water into the silage. Dig a small trench around the silo to redirect run-off water away from the silo.

Fig. 4.17: Covering the doom with black poly sheet
Step IX – Covering the polythene sheet with a layer of soil
This is done to prevent polythene damage by birds, animals and rain. Fermentation of the fodder to produce a stable product may take weeks. The silage should be left until there is need to use the fodder. If well prepared, the silage can last for 2 years.

Step X – Using the silage
Open the pit from the lower side of the slope and take enough silage fodder for one day then close the pit again.

(ii) Making silage in bags
This is a new technology where the chopper green fodder from either maize or napier grass is stored in large polythene bags. The process is very simple, where the green fodder is chopped into small pieces of 2.5 cm –3 cm long. The bags are filled with the chopped materials.
The materials are compressed properly to remove all the air, thereby preventing decomposition once the bag is filled and tied. The feed is stored this way without losing its nutritive quality, for up to one year.

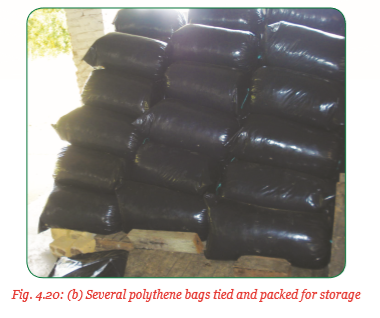
Advantages of silage making
Making and feeding animals on silage has the following advantages:
(i) Use of silage increases the stocking rate, thus more animals are kept in a small area and fed on silage.
(ii) There is availability of high quality succulent feed all year round.
(iii) More herbage can be stored in a small area.
(iv) It does not depend on the weather conditions. Silage can be made with any materials that are available.
(v) It can be fed directly without any liquid additives.
(vi) Land can be used to produce more fodder after the crop is ensiled.
Characteristics of good quality silage Good quality silages should:
(i) Be made from high quality fodder cut at the correct stage of growth.
(ii) Have a pleasantly acidic aroma. (iii) Be free from moulds and smell of burnt sugar.
(iv) Retain the original colour of the crop from which it is made.
(v) Not sticky or greasy.
(c) Hay
Hay is fodder that is conserved through drying to remove the water content so that it can be stored without rotting or becoming mouldy. Reducing the moisture content slows down the rate of growth of micro-organisms that bring spoilage. The moisture content of the fodder should be reduced to about 15%. Not all fodder grasses are suitable for hay making.
Steps in making good quality hay
When the fodder grass for hay is ready in the farm, it should be harvested at the end of the rainy season when there is plenty of sunshine and the grass fodder is still green. However, the stage of harvesting depends on the particular fodder grass crop.
Step I – Cutting the fodder
This is done using sickles, machetes, or any other fodder cutting tool when 50% of the crop has flowered. This is the best stage to optimise both the quality and quantity of the fodder.

Step II – Drying the fodder
This is done by spreading the fodder in the field to dry for about 4 hours. If the field is open, dry under shade to prevent scorching the leaves.
Step III – Turning the fodder
This ensures even drying of the whole herbage. Repeat the turning every 4–5 hours for the next 2–3 days. Test whether the grass is dry enough for the next step. Hay is properly dried when no sap (moisture) oozes out of the stems when twisted.
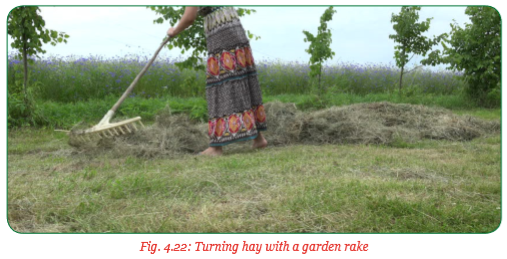
Drying hay under controlled conditions is referred to as curing. When hay is properly cured, it can be made into bales for storage or stored in a tripod.
(i) Baling hay
Baling refers to the gathering of hay into regular compact cubes which are easy to transport and store. It can be carried out using a mechanical baler as shown in figure 4.23 or manually. Manual baling of hay is carried out as follows:
(a) A baling box of about 85 cm long × 55 cm wide and 45 cm deep is prepared. The box should be open on both top and bottom. If hay is properly compacted, this size of a box will produce a bale of 20 kg.

Two strong strings are placed inside each end of the box. The strings protrude at both ends. They should be long enough to tie the bale.
(b) The cured hay is gathered into the box, layer by layer while compacting each fill.
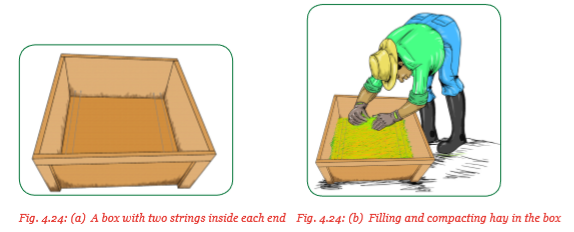
(c) The hay bales are tied tightly on both ends using the strings and then push the bale out of the box. These bales can now be stored in a shed or a barn.

(ii) Storing hay using tripods
Hay which is not baled can be stored in a tripod. A tripod is a structure made using three wooden poles or metal rods of 5 cm thickness and 2–3 m long. They hold about 125–500 kg of cured hay. A network of ropes or wires is made over this framework. Cured hay is then packed into the tripods and compressed with long sticks or bamboo. The ropes or wires are tied across to keep the hay in compact position. Long grass is placed on top to shelter the hay from strong sun and rain. The tripods method is carried as follows:
(a) The tripods are prepared as shown in figure 4.26 using three wooden poles by pushing them into the soil and then tie the ends of the poles tightly with a wire. Cross over three bamboo sticks, the ends of each stick meets with the other at a specific point of the three poles.
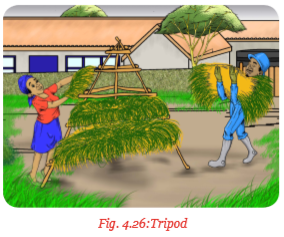
(b) The ground under the tripod stand is cleared in case there are any vegetation. Then pack the cured hay inside the three poles of the tripod.
(c) The hay is compacted by pushing back the three bamboo sticks and tie. Continue filling in the hay and holding with the tied bamboo sticks or wires until full. The triangular shape of the tripod will help drain rain water without percolating into the hay. It is covered with another layer of hay on top. This will be wasted hay due to absorption of water or scorching by the sun.
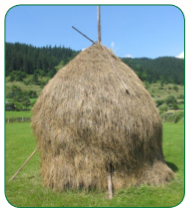
Fig. 4.27: Tripod packed with hay
Advantages of hay making
Hay making and feeding animals with hay has the following advantages:
(i) Fodder can be preserved for long periods of time. This prevents wastage in the farm due to overgrowing and plant deterioration.
(ii) There is availability of nutritious feed to the animals even during the periods of scarcity.
(iii) Good quality hay may be used to replace the amount of concentrates given to the animals. This reduces the cost of feeding.
(iv) Fodder can be harvested at the stage of maximum nutrients to give way for more herbage to sprout. This increases land productivity.
(v) It helps to reduce bulkiness of the fodder such that transportation and storage are made easy.
Characteristics of good quality hay
(i) Hay should retain the original aroma and colour if properly prepared.
(ii) It should be free from foreign materials such as dusts.
(iii) It should maintain leafiness of the original materials. The loss of leaves means hay was scorched and not cured.
(iv) It should be palatable and acceptable to the animals.
2. Used as stakes for climbing crops
Certain plants grow as vines while others as creepers, when support is not available. Vines have long stems which are weak to grow upwards. A vine will use other fodder grasses with strong upright growing stems for support. This will enable the vine plant to reach sunlight. The climbing crops use several methods to climb on the fodder grasses for support.
• They twine their vines around the stems of the grasses.
• They use adventitious clinging roots to climb on the erect growing grass.
• They use twining petioles.
• They use tendrils which can be specialised shoots, leaves or even inflorescence. These tendrils produce adhesive pads at the end that attaches on to the stems of the grass.
• When horticultural plants such as cucumber, climbing beans and other vegetable crops are grown with fodder grasses such as napier grass, maize, sorghum and guatamala grass, they grow well and healthy.
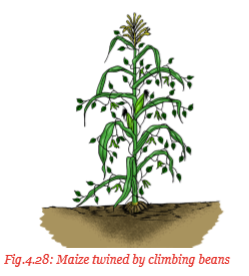
This is because they get support to grow above the ground free from infection. It also prevents them from being shaded off by other taller plants.
3. Maintenance of soil fertility
The ability of the fodder grasses to grow on soils with low availability of soil nutrients is associated with their high capacity to absorb nutrients at low levels of supply to optimise their growth. This adaptability is associated with:
(a) Large rooting systems.
(b) Fine roots with long hairs, high rates of nutrient absorption per unit length of root.
(c) Greater and more effective translocation of nutrients from the roots to the shoots.
(d) Low growth rates.
(e) High nutrient use efficiency.
(f) Grass clumps can sometimes send their roots to 4–5 metres below the surfaces. This brings up nutrients which have been leached into the soil.
Other ways in which fodder grasses help improve soil fertility include:
• They produce dense stands which help smother weeds thus prevent soil exhaustion.
• They improve soil health and physical condition through addition of higher amounts of organic residues in the soil.
• When grown in association with selected legume fodder, they improve the quality of herbage as well as help to economise on the use of nitrogenous fertilisers.
• The left-overs after feeding animals are used to make compost manure which is used in crop production.
• Wasted fodder is used as mulching materials in crop production. These materials decompose with time to release nutrients to the soil as well as produce humus which improves soil structure.
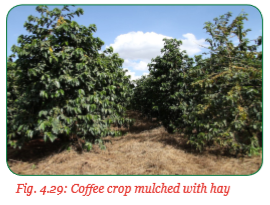
4. Soil conservation
Fodder grasses possess a number of characteristics which enable them to adopt in different habitats. Most of all their ability to cope with seasonal and unpredictable rainfall, their rooting systems and ability to survive cutting. These factors make the fodder grasses important in soil conservation as follows:
(a) Fodder grasses control soil erosion in the following ways:
(i) They reduce the force of the raindrop by intercepting it as it falls.
This reduces the erosive force of the raindrop.
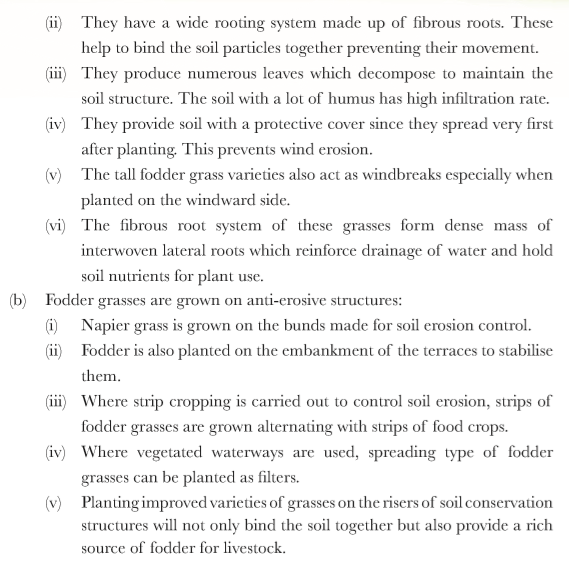
4.4 Propagation methods of fodder grasses
Activity 4.4: Research activity to find out the propagation methods of fodder grasses
using the references provided, carry out the following activities:
(i) find out the propagation of fodder grasses.
(ii) Discuss and record your observation.
(iii) present your findings to the class.
(iv) Take teacher's summary notes.
Fodder grasses are propagated using seeds and vegetative materials.
(a) Seed propagation
Most cereal fodder crops such as pearl or bulrush millet, oats, maize and others are propagated from seeds. Therefore, to produce a healthy crop with good yield, it is important to start with well selected seeds for sowing. To get the required plant stand; healthy, large and good ear-heads need to be selected at the time of harvesting. Seeds from such ear-heads are stored in well ventilated and low moisture conditions. Cereal fodder seeds are given specific treatment depending on the type as follows:
(i) Treatment of pearl or bulrush millet seeds
When planting millet for fodder or grains, it is recommended to use certified seeds. These are seeds treated against various elements such as pests, diseases, hardening and nutrient deficiencies.
• Treating seeds using appropriate chemicals prior to planting prevents seed borne diseases as well as soil borne pests.
• Seeds are treated with bio-fertilisers for nutrient deficiencies, for example, nitrogen and phosphorus followed by seed hardening for better germination and growth.
This is carried out as follows:
– Soak the seeds in 2% dihydrogen phosphate solution (20 gms in one litre of water) for 6 hours.
– Use 350 mls of dihydrogen phosphate solution for 1 kg of seeds.
– Dry the seed under the shade to the original moisture level.
– Soak the seeds again in 0.1% solution of thio-urea for 6 hours before sowing.
• To control smut disease, soak the seeds, mix with 300 mesh sulphur powder at 4 g of sulphur/1 kg of seeds.
• Soak the seeds in 30% salt solution (3 kg of common salt in 10 litres of water) to control ergot disease.
• To control downy mildrew, treat seeds with metalaxyl (Apron 35 SD) at 6 g of chemical for 1 kg of seeds.
• Soaking seeds for 1 hour with 1% of 2-chloroethanol and 0.5% sodium hypochlorite solution to increase germination rates. Note: Seed treatment can be done manually or in treatment drum for large quantities.
(ii) Treatment of maize seeds
Most maize seeds are delivered to farmers, coated with an insecticide or fungicide or both as a seed dressing.
Seed treatments are added to the seed to protect seedlings against soil and seed borne diseases and pests, to enhance germination and to promote seedling emergence during the critical few weeks after planting.
Insecticidal seed dressing also protect stored maize seeds from grain borers. Some nutritional products such as boron and molybdenum are also added as dressing to enhance seedling germination vigour and emergence.
(iii) Treatment of oat seeds
When planting oat seeds for fodder, the selection of a suitable variety is very important. In this case, consider adaptability to ecological conditions of the area, disease resistance, herbage productivity, weed free and germination potential. Certified seeds should always be used.
Agrochemicals are used to dress the seeds against such disease as smuts. Smuts is a seed borne disease and therefore the seeds should be treated with systematic fungicides which infuses into the seed coats.
Procedure for dressing the seeds
• Measure the required quantities of seeds to be treated.
• Measure the required amount of fungicide depending on the manufacturer's instructions.
• Place one half of the required seeds into a container and mix thoroughly with one half of the fungicide.
• Add the other half of the seeds and the fungicide into the container and mix together until all the seeds are well covered with the fungicide. • The seeds are then ready for planting. Precautions should be taken to avoid poisoning.
(iv) Brachiaria is both propagated by seeds and vegetative materials
Seed propagation is more convenient to farmers who produce fodder on largescale. For seed propagation, 2.5–3 kgs of seeds are used per hectare. The seeds have high germination potential. They should be treated against fungal diseases and soil borne pests. This is done by dressing the seeds in a mixture of insecticide and fungicide powder as recommended.
(b) Vegetative propagation in fodder grasses
There are two methods of vegetative propagation used in fodder grasses. These methods include use of cuttings and layering.
Use of cuttings in propagation of fodder grasses
A cutting is a vegetative plant part which is separated from the parent plant in order to regenerate itself thereby forming a whole new plant. The plant that is formed has all the parts including the roots, stems and leaves.
There are three types of cuttings which are used to propagate fodder grasses. These include stem or culm cuttings, root cuttings, or slips, stolon node cuttings and split root cuttings.
• Stem cuttings: These are planting materials which are planted directly into the field, however there are some cuttings which are small and need to be raised into the nursery first. The stem cuttings, for example, those of napier grass should be taken from the parent plant which has been allowed to grow for 6 months. The stems are cut into pieces known as ‘setts’. The setts should be 30 cm – 45 cm long and should have 3–5 nodes.
Preparation of napier stem/cane cuttings
(i) Preparation of tools: A sharp tool such as a knife or sharp blade should be used. This reduces injury to the parent plant.
(ii) Disinfection of the tools: The tools should be dipped in alcohol or a mixture of bleach and water (one part of bleach into nine parts of water). This prevents transmission of diseases from infected plant parts to health ones.
(iii) Preparation of the canes selected from parent plants by cutting at a slanting manner to leave 3–5 nodes and a length of 30 cm – 45 cm.
(iv) Plant the canes either slanting in the holes or end to end in the furrows. Brachiaria and Guatemala fodder grasses are also propagated from stem cuttings. These cuttings are prepared and treated the same way as for napier grass.
• Rhizome cuttings: These cuttings are made by splitting a clump 6 months old into single plants of between 5 and 10 cm in length. The root portion should be between 5 and 10 cm and the shoot between 5 and 10 cm. Guatemala, napier and brachiaria grass are propagated using rhizome cuttings.

• Split cuttings: Most clumping grasses can also be propagated from splits. These are small plants which are divided or split from the original mother plants. They are made from splitting tillers from the mother plant.

Each split contains some roots and shoot. The shoot is trimmed to 15 cm and the lateral roots are also trimmed. Each split includes at least two to three tillers (shoots). They are dipped in various treatments which include rooting hormones, manure slurry or into shallow water to produce roots. However, some splits can be raised in nursery or planted directly into the field. Fodder grasses that can be propagated using splits include napier grass, Guatemala grass and Brachiaria mulato grass.
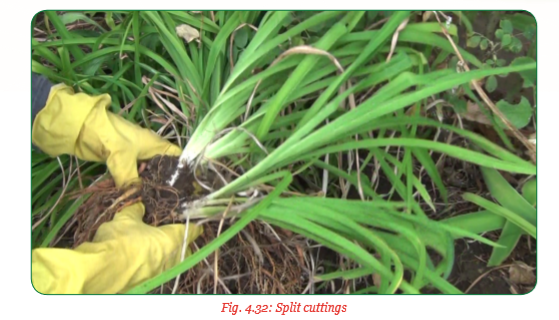
Use of layering in propagation of fodder grasses
Some stoloniferous grasses grow out stems or stolons along the soil surface. These stolons have nodes and internodes. When these nodes touch the soil, they produce roots and new shoots. The stems can then be pulled up and cut to produce planting materials.
Methods of layering fodder grasses
The methods used in layering fodder grasses include stool or mound layering, compound layering, using stolons, runners and rhizomes.
• Stool/mound layering
This can be done to certain fodder grasses such as napier, brachiaria, Guatemala and sorghums that can easily shoot after cutting. The grass is harvested by cutting up to 2.5 cm from the grouped level to leave a stump. The stump is then covered with a mound of soil and allowed to shoot. New shoots will appear on the ground level from the mound. The soil is removed and the new shoots are separated from the parent stump carefully. The new shoots should be separated with enough roots. These are then planted directly into the field or nursery bed to harden the transplanted.

• Compound layering on stolons, runners and rhizomes stolons
A stolon is a horizontal, fleshly stem that can root, then produce new shoots from the rooted region. Stolons grow above the ground. Grasses that produce stolons are propagated by severing the new plants from the parent stems. To increase their rooting, more soil is heaped to the rooting nodes of the stolons and then these nodes are separated after rooting to produce individual plantlets.
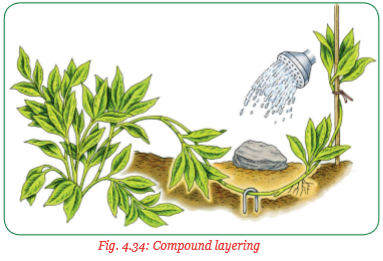
• Use of runners
Brachiaria grass is a trailing perennial grass which can be propagated with runners. A runner is a slender stem that originates from a leaf axil and grows along the ground or downwards producing a new plant at its tips. For the runners, the growing plantlets are directed into the soil so that they can form roots after which plantlets are uprooted and planted.
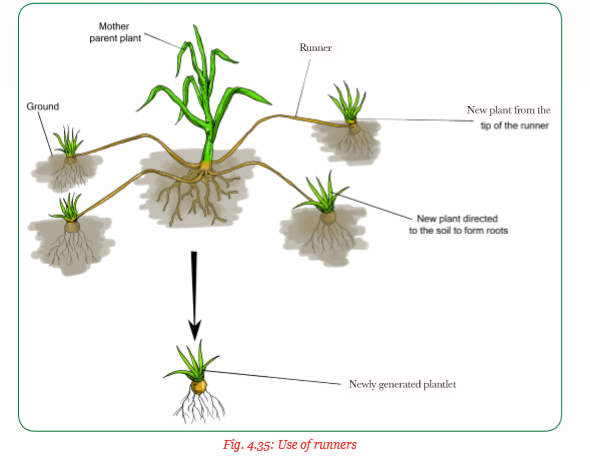
• Use of rhizomes
A rhizome is a swollen stem of a plant that grows horizontally underground. Rhizomatous grasses spread below the ground using stems known as rhizomes. The rhizomes terminate to form new shoots at positions away from the mother plant. As the new shoots mature, they produce rhizomes that also form new shoots. The new shoots can then be uprooted and planted in the field.
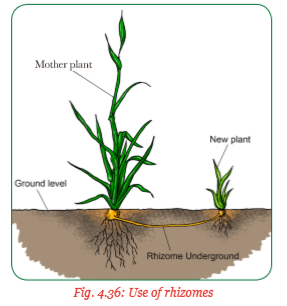
4.6 Cultural practices of fodder grasses
1. Napier grass
Activity 4.5: A field visit to carrying out cultural practices in napier grass
Make a visit to the school farm or a farm near the school where land is prepared and carry out the following activities:
(i) Plant napier grass on the already prepared land.
(ii) Carry out weeding when the napier grass establishes.
(iii) Carry out harvesting of the napier grass.
(iv) Discuss and record your findings.
(v) Present your findings to the class.
(vi) Take teacher's summary notes.
The following are the cultural practices when growing napier grass:
(a) Planting
Napier grass is a sterile hybrid and, therefore, it is established from rooted slips or by stem cuttings. The cuttings have 2–3 nodes. It can be planted in pure stands or intercropped with forage legumes.
There are two methods of establishing napier grass. The Conventional method and the Tumbukiza method.
(i) Conventional method
This method involves planting one cane with 3–4 nodes or root split in holes of 15 cm – 30 cm deep. The spacing adopted depends on the amount of rainfall in the area. For example, the spacing of 0.5 m × 0.5 m is used in areas with over 1400 mm of rainfall/annum. In areas with 950 mm –1400 mm of rainfall, a spacing of 1 m × 0.5 m is used.
The setts are buried in a slanting manner in the soil to leave one node above the ground or placed end to end in the furrows.
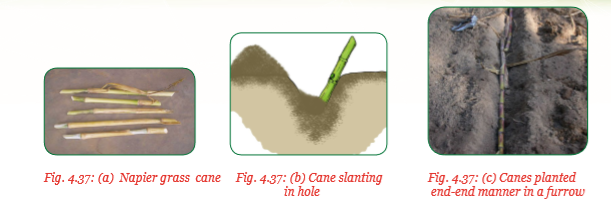
When planting, 1–2 50 kg bags of Tripple superphosphate (TSP) or Double superphosphate fertilisers per hectare are used at planting time. This is followed with topdressing with 5–7 50 kg bags of Calcium Ammonium Nitrate (CAN) fertiliser in three splits per year. Thereafter, CAN should be applied after every cutting and weeding.
• 10 tonnes/hectare of farmyard manure is applied at planting and also after every harvesting.
(ii) Tumbukiza method
Tumbukiza is a Kiswahili word meaning “placing in a hole”. It is a recent method of planting napier grass to increase productivity per unit area of land. The method involves planting cuttings or root splits in well-manured large holes as follows:
• Dig a round or rectangular hole known as pits about 60 cm deep, 60 – 90 cm wide and any length required. The pits should be 100 cm away from each other.
• Separate the top and the subsoil when digging the pits.
• Mix every 20 litre container of top soil with 1 – 2 litre containers of farmyard manure and refill this mixture back into the pit.
• Leave a space of about 15 cm unfilled from the top of each pit.
• Plant 5–10 cane cuttings or single root splits in the pit.


This method has the following benefits:
• It requires less land.
• Regrowth of the napier is faster after cutting.
• Manure is easily used by placing in the pit. Slurry can be applied in the pits immediately after harvesting.
• The pit helps to conserve soil and water preventing soil erosion.
• It holds water for the crop when the rainfall is little.
(b) Weed control – The newly planted crop is kept weed free by carrying out 2 rounds of hand weeding. The first weeding being done 3 weeks after planting, then second weeding is done 3–4 weeks after the first weeding.
(c) Harvesting – Napier grass is ready for cutting 4 months after planting; by which it is one metre tall. The first cutting should be done at 5 cm from the ground level. This allows more regrowth to form new shoots. Cutting intervals depend on the rainfall availability though successive harvesting should be done when the crop is always 1.5 metres high. The yields expected from napier grass is 20,000 – 40,000 kg of fresh fodder/ ha. It is recommended to leave freshly cut napier under a shade for 12 hours before it is chopped.
A dairy cow of a live weight of 400 kg should be given 60 kg of freshly chopped napier grass per day. Napier grass can also be conserved as silage.
2. Guatemala grass and Brachiaria grass
Activity 4.6: A field visit to carry out cultural practices in Guatemala grass (Trypsacum andersonii) and para grass (Brachiaria mulato)
Make a visit to the school farm or a farm near the school with a piece of land prepared for planting Guatemala and brachiaria fodder grasses. Then carry out the following activities:
(i) Plant Guatemala and brachiaria grasses on the prepared piece of land.
(ii) Carry out weeding when the fodder grasses establish.
(iii) Carry out harvesting when the fodder is ready for harvesting.
(iv) Discuss and record your findings.
(v) Present your findings to the class.
(vi) Take teacher's summary notes.
The cultural practices carried out when growing Guatemala and Brachiaria fodder grasses are as follows:
2.1. Guatemala grass
(a) Planting – Guatemala grass is propagated from stem cuttings or rooted culms. Planting should be done at the beginning of the rains. It can be planted alone or with fast growing twinning legumes since it provides stakes for their support. Guatemala produces viable seeds which can be used for propagation. However, fodder established from seeds take long to reach the first cutting height than the fodder established from cuttings and splits. It is planted in furrows spaced at 0.5 metres apart within the rows. Holes can also be used especially when planting stem cuttings. Planting should be done at the beginning of the rains.
(b) Weed control – Guatemala grass can resist weed competition after establishment. However, the field should be kept weed free for the first 6 weeks to allow the grass to establish without competition. After properly established, Guatemala grass grows vigorously to smother weeds. In case of broad leaved weeds, they should be controlled by uprooting, slashing or use of selective herbicides.
(c) Harvesting – Guatemala grass is first cut when it is 4–6 months old. It is fed as green fodder or used to make hay or silage. If harvested for direct feeding, Guatemala should be cut when it reaches 100 cm – 120 cm high at about 10 cm – 25 cm from the ground level. The grass does not withstand heavy grazing or frequent cutting. Cutting (defoliation) frequency should be after about 30 days in wet seasons and 42–45 days in dry seasons. If it is for silage making, then it should be wilted before ensiling. It has high ability to remain leafy for a long time.
2.2. Para grass (Brachiaria mulato)
(i) Planting – Land for planting this grass is prepared thoroughly by 3–4 ploughings and harrowing to remove weeds. Planting is done at the beginning of the rains for the rainfed crop and when the soil has enough moisture for the irrigated crops. It is propagated from stem cuttings or pieces of creeping shoots. These are cut about 15 cm – 30 cm long with three nodes. They are planted in a slanting manner. Slips can also be used for planted and are placed about 50 cm – 60 cm apart, that is, between the rows and between the plants. They produce tillers quickly which cover the field. When slips are planted, their yields range from 27000–40000 kg per ha.
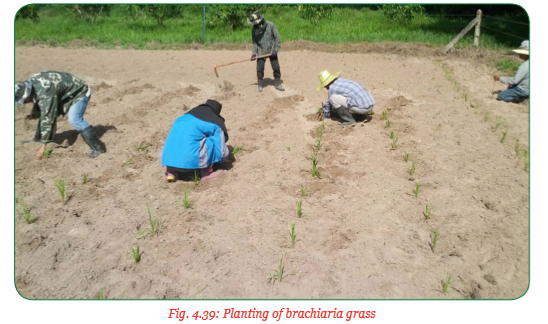
(ii) Weed control – Land should be kept weed free for the first two months up to when the grass becomes aggressive to compete with other plants. Once established, it effectively smothers weeds.
(iii) Harvesting – The first harvesting takes about three months after planting when the grass reaches a height of 60 cm – 75 cm. Subsequent cutting or defoliation should be done 30–40 days interval. It gives an annual yield of 70 tonnes/hectare. It is good for silage making. It contains crude protein of 2.8–16.1% and crude fibre of 28–34%.
3. Fodder maize and sorghum
Activity 4.7: A field visit to carry out cultural practices in growing of fodder maize and sorghum (Colombus and Sudan grass)
Make a visit to the farm where land has been prepared for planting fodder maize and sorghum and carry out the following activities:
(i) Plant fodder maize and sorghum.
(ii) Carry out weed control after the crops germinate.
(iii) Carry out harvesting of the crops at the right stage.
(iv) Discuss and record your findings to the class.
(v) Take teacher's summary notes.
3.1. Fodder maize
The following practices are carried out when growing fodder:
(i) Planting – Fodder maize is established from seeds which are medium in size. A seedbed for planting maize should be deeply ploughed and harrowed to a medium tilth before planting.
The amount of seeds used is about 50–60 kg per hectare which are planted at 5 cm deep in the soil. Planting should be done at the beginning of the rains or dry planting. NPK fertiliser is used when planting at a rate of 60–120 kg N, 40–60 kg P and 40 kg K/ha depending on the soil fertility. When row planting is done, the spacing adapted should be 75 cm × 18 cm or 60 cm × 22 cm.
(ii) Weeding – Proper land preparation removes all the weeds and makes sure that weeds are not a problem. However, if weeds grow during the first 6 – 8 weeks, they should be removed through cultivation, uprooting or use of selective herbicides. Weeds that grow before harvesting of the crop, should be uprooted.
(iii) Harvesting – Fodder maize is harvested at the dough stage or at milk stage, when the crop has high crude protein about 9.8% and crude fibre. Fodder maize makes high quality silage and also supplies green fodder which has no toxic effect to livestock. Fodder maize can be harvested manually by cutting with machetes or mechanically using forage harvesters incase it is for silage making. The harvested fodder is cut and chopped into small pieces ready for ensiling.
3.2. Sorghum
The two types of fodder sorghums include the Columbus grass (sorghum almum) and the Sudan grass (Sorghum sudanense). They require the same ecological conditions and cultural practices such as:
(i) land preparation
(ii) planting
(iii) weed control
(iv) harvesting.
(i) Planting – Sorghum is established from seeds which are small in size. The seedbed should, therefore, be of fine tilth. Sorghum should be planted at the beginning of the rains for the crop to make maximum use of the moisture. Sorghum is planted at a spacing of 60 cm × 15 cm and at a planting depth of 2.5 cm – 5 cm. Row planting can be done where sorghum is interplanted with other crops. However, for pure stands, sorghum can be broadcasted.
(ii) Weed control – The field should be kept weed free during the first 6–8 weeks to prevent nutrient and moisture competition. Sorghum is quick growing and therefore if planted at correct rainfall regime and correct density, it has potential to shade out or smother weed. In addition, root exudates reduce the growth of weeds such as pigweed, nut grass, African fox tail and others. Parasitic weed such as Striga asiatia which is common in sorghum should be removed by uprooting before it flowers. Wild sorghum is also a common weed in a sorghum field. Weed control by cultivation is effective.
(iii) Harvesting – The first harvesting should be done when the grain reach early or late dough stage, then cut every 6–8 weeks interval and should be ploughed off after 5–6 cuttings because they become uneconomical to keep. They should not be cut earlier than 6 weeks to avoid prussic acid poisoning.
4. Fodder Oats and Pearl or Bulrush millet
Activity 4.8: A field visit to carry out cultural practices in growing fodder oats and pearl or bulrush millet
Make a visit to a farm which is prepared for planting fodder oats and bulrush millet and carry out the following activities:
(i) Plant oat and millet.
(ii) Weed the crop when it is well established.
(iii) Harvest the crop when it reached the right stage for fodder.
(iv) Discuss and record your findings.
(v) Present your findings to the class.
(vi) Take teacher's summary notes.
4.1. Fodder Oats
The following are cultural practices carried out when growing oats:
(i) land preparation
(ii) planting
(iii) weed control
(iv) harvesting.
(i) Planting – Oat is established from seeds which should be selected properly or plant certified seeds. Oat seeds are small and, therefore, require a properly prepared seedbed with a fine tilth.
• Seedrate –70–80 kg/ha of certified seeds to give a uniform stand. For pure stands, the seedrate should be 70–80 kg/ha while for mixtures, it should be 30 – 40kg/ha. Oats can be inter cropped with vetch at 20 kg/ha.
• Spacing – Low tillering varieties should be planted at a spacing of 20 – 25 cm in between the rows while high tilllering type at a spacing of 30 cm between rows.
• Fertilisers – 2 to 3 bags of Triple superphosphate (TSP)/hectare are used at planting time.

(ii) Weeding – Hand weeding is recommended in oats. However, if the crop is planted in pure stand as a (monocrop), then selective herbicides can be used. 2,4-D is an effective herbicide to control broad leaved weeds in oats.
(iii) Harvesting – The harvesting period in oats determines the herbage yield and quality.
• The single cut oat varieties should be harvested when 50% of the crop has flowered.
• The double cut oat varieties; first cut should be done 60 days after planting followed by seed cut at 50% flowering stage.
• In multiple cut varieties; the first cut should be done at 60 days old, second cut after 105 days and third cut at 50% flowering.
• For good regrowth; the first cut should be done at 8 cm – 10 cm above the ground which leaves enough foliage for regrowth.
Yields – Average green fodder from:
• Single cut varieties ranges from 30–45 tonnes/ha.
• Double cut varieties yield 40–55 tonnes/ha.
• Multiple cut varieties yield 45–60 tonnes/ha.
4.2. Pearl or bulrush millet
The following are cultural practices when growing pearl millet (bulrush millet):
(i) land preparation
(ii) planting
(iii) weed control
(iv) harvesting.
(i) Planting – Bulrush millet have very small seeds which require well prepared seedbed with fine tilth. They are established from these seeds which are very viable. The seeds for sowing should be properly selected or certified seeds should be used.
• Seeedrate – 6 to 15 kg/ha of certified seeds should be sown into moist soil. They should be drilled to give a uniform stand. • Spacing – Should be sown in rows which are spaced at 35 cm and sown at a depth of 1cm – 1.5 cm. If sown deeper, the seeds will not emerge and this will lead to gaps. • Broadcasting – It can also be done for fodder production.
Bulrush millet responds well to fertilisers especially nitrogenous.
(ii) Weed control – The field should be kept weed free the first 30 days. However, rapid growth of millet usually smothers weeds but a well prepared seedbed is required to overcome weed problems. Pre-emergence herbicides such as Atrazine can be used. Broad leaved weeds that appear and wild finger millet (Eleusine indica) weed can be uprooted manually or through hand weeding.
(iii) Harvesting – Pearl millet can be grazed on or harvested for hay or silage. When grazed on, it does not do well in fodder production. It should be cut for hay or silage when 2 – 3 ft tall. This prevents the fodder from becoming too coarse. Pearl millet/bulrush does not produce prussic acid like the sorghum species and the Sudan grass. It can be given as green fodder to the animals. Harvesting should be done during the 13th – 16th week after planting. It yields about 21,735 kg of dry matter per hectare. After defoliation (cutting), regrowth yields are higher.
Group activity
Preparing silage from the harvested fodder maize
Make a visit to the farm to carry out the following activities:
(i) Select a good site for the trench silo.
(ii) Prepare the site and dig the silo to the required size.
Note: The size of the silo depends on the fodder materials available, for example, a silo of either 3 m × 2 m × 1 m or 4 m × 1.5 m × 1 m would be convenient to work with for this group activity.
(iii) Harvest the fodder maize and prepare it for ensiling.
(iv) Fill the silo with the materials and carry out all the necessary activities in the preparation of silage.
(v) Cover the silo with the polythene sheet and a layer of soil on top.
(vi) Use the silage as required.
(vii) Discuss and record your findings at the end of the project.
(viii) Report your findings to the class.
(ix) Take teacher's summary notes.
Unit Summary
The most important source of food for livestock is roughage especially from green fodder. This fodder should be of good quality. Animals require fodder from both legumes and grasses.
Fodder grasses are forage crops which are cultivated for feeding livestock. They include grasses such as napier, Guatemala, brachiaria, columbus and Sudan grass. Multipurpose crops grown for human grains as well as for fodder include maize, oats and millet. Apart from supply of feeds for livestock, fodder grasses provide support for climbing plants incase they are intercropped, maintain soil fertility and are used in soil conservation.
Most of the fodder grasses produce viable seeds which are used for propagation. However, there are some grasses which are propagated vegetatively by cuttings and layering methods. These crops require proper management during their growth and so several cultural practices are carried out to ensure high productivity. These include proper and timely planting, weed control and harvesting at the right stage. They can be fed when green or conserved as hay or silage.
Key terms
1. Biomass – Total dry quantity of materials produced by a plant species per unit area of land.
2. Bloom stage – Flowering stage of a plant.
3. Cellulose – Indigestible fibre which is the main constituent of a plant cell wall. It is only digested by ruminants.
4. Certified seeds – Seeds which have been tested and established to have the required qualities.
5. Clones – Plants derived from vegetative parts.
6. Clump – Cluster of grass from the same stem.
7. Conserved fodder – Forage materials cut and preserved for future use.
8. Crude fibre – A measure of the quantity of indigestible cellulose and hemicellulose present in a feedstuff.
9. Crude protein – The total protein content in a feedstuff determined by its nitrogen content.
10. Culm – The hollow stem of a grass or cereal plant.
11. Cut and carry method – The practice of cutting the fodder from the field and bringing to animals in confinement.
12. Defoliation – This refers to the grazing or cutting fodder or the removal of the foliage material from fodder or pasture.
13. Double cut – Sprouting after the first harvest to give another harvest and then dries up.
14. Dry matter – The material that remains after removing water which represents the nutrients in a feedstuff.
15. Fungicides – Chemicals used to control fungal diseases. 16. Germination potential – The ability of seeds to germinate given proper conditions.
17. Herbage – The succulent part of herbaceous vegetation used to feed animals.
18. Hybrid – A cross between two different varieties of a plant.
19. Hydrocyanine – A potentially poisonous organic substance found in certain plants.
20. Insecticides – Chemicals used to kill any insect pests.
21. Internodes – A part or space between two nodes or joints as in the stem of a plant.
22. Mesh sulphur powder – An organic substance containing methianine, sulphur and hydrogen.
23. Mixed stand – A mixture of plants grown together on the same piece of land.
24. Molasses – The thick dark brown syrup obtained from raw sugar during processing which is fed to animals as a feed additive for energy.
25. Multiple cuts – A fodder that sprouts after every harvesting to give several harvests.
26. Nodes – The joints on the plant stems that hold one or more leaves as well as the buds which grow into branches.
27. Palatability – Appetising or acceptable and agreeable to taste.
28. Pasture – A land cover of grass and legume species for grazing animals.
29. Polysaccharide – Complex carbohydrate made of several units of simple sugars such as glucose.
30. Prussic acid – An organic substance that is metabolised by animals to form cyanide which is poisonous.
31. Pure stand – A crop that is planted alone on a piece of land.
32. Root exudates – Substances released from plant root system depending on environment and the need for them, for example, to kill weeds, pests or diseases.
33. Ruminants – Animals that are able to digest coarse fibre found in plant tissues.
34. Selective herbicides – Chemicals which kill certain types of plants and leave others.
35. Setts – Canes or stems for planting which have been cut or prepared to be of the same size as required.
36. Single cut – A fodder that dries up after the first harvesting.
37. Smother – Kill weeds by covering to suffocate and prevent sunlight from reaching them.
38. Sterile – Unable to produce viable seeds or to produce offsprings.
39. Succulent plants – Plants family with thick, fleshly leaves.
40. Tendrils – Growths from nodes that twine around hard parts of other plants to support some herbaceous plants.
41. Tillers – These are side shoots of a plant that grow from the base of the main shoot or stem. They are common in grass family.
42. Toxic effect – Poisonous.
43. Varieties – These are cultivated plants when considered as a group.
44. Zero grazing – A system of livestock production in which the animals are confined and food and water brought to them.
End of Unit 4 Assessment
1. Describe the stages of baling hay.
2. Discuss the importance of harvesting fodder grasses at the correct stage of growth.
3. The diagrams below show different cereal crops which are grown for fodder. Study them and answer the questions that follow.
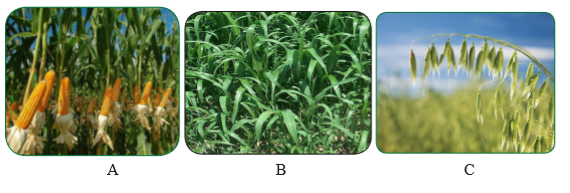
(a) Identify the cereal crops A, B and C.
(b) Which one of the fodder crops shown in the diagrams has poisoning effect to the animals if fed when wet?
(c) How should the fodder crop be handled when feeding animals to reduce the poisonous effect?
(d) At what stage should the crop A and B be harvested for fodder?
(e) Give two reasons for the answer in
(d) above.
4. Outline three advantages of making silage.
5. Describe the “tumbukiza” method of planting napier grass.
6. Describe the steps in making silage from fodder maize using a pit silo.
UNIT 5 : ANIMALS (fish and bees)
Key Unit Competence:
Learners should be able to recognise fish species by their characteristics and make successful beehive.
5.1 Learning Objectives
(i) Knowledge and understanding
• Explaining characteristics of fish species.
• Describe differences between fish species.
• State the characteristics of fish species and breeds to rear.
• Define bee keeping and explain its importance.
• State categories of bees.
• Explain the process of making beehives.
• Carry out management of bee hive and harvesting of honey.
(ii) Skills
• Find out fish species with comparison of their anatomic characteristics.
• Select fish species to rear.
• Perceive bee hives containing bees and its importance.
• Recognise the categories by their characteristics.
• Make beehives.
• Practise management activities of bee hive and harvest honey bee.
(iii) Attitudes and values
• Observe attentively fish species and their characteristics.
• Participate actively in group discussion and interact positively with colleagues.
• Be attentive in choosing fish species and breeds to rear.
• Agree with colleagues on the definition and importance of bee keeping.
• Pay attention and be attentive while observing bee categories and characteristics.
• Show concern to make beehives.
• Be careful and avoid risks to yourself and others while managing beehive and harvesting of honey.
Introduction
The practice of keeping fish in artificial pond is referred to as pisciculture. Pisciculture in Rwanda is an important business because of the need to introduce affordable animal proteins in the people’s diet. The significant lack of animal proteins indicate substantial potential demand for fish, most of which is cultivated using different systems such as monoculture, polyculture and integration of fish with other animals such as pigs, chicken or ducks in pens besides or over the fish ponds to increase efficiency and profitability. On the other hand, the practice of keeping bees is referred to as apiculture. The demand for bee-keeping and its products also increases as a result of which commercial production will require improved hives and bee equipment. This unit addresses important types of fish and the making of improved hives and bee management. Observe the following photographs carefully:
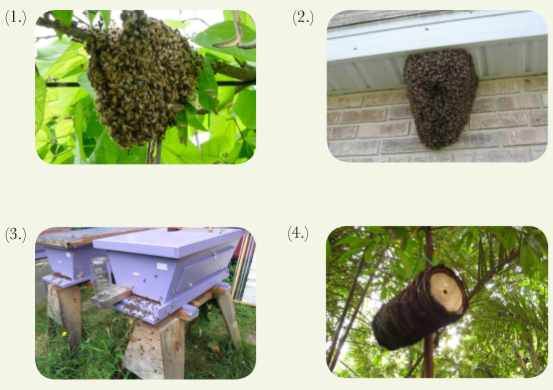
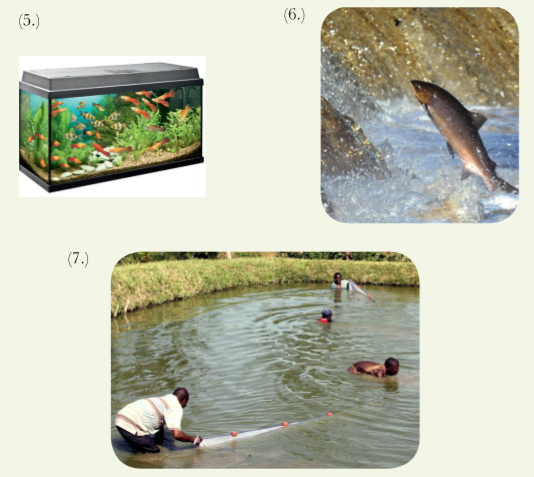
Analyse the photographs and answer the following questions:
1. What is happening in these photographs?
2. What can be done on photographs number 1 and 2 to solve the problem?
3. Analyse the three methods of keeping fish and point out the difference between them in the above photographs.
4. Based on these photographs 5, 6 and 7, identify the criteria taken into account when selecting anyone of the methods of keeping fish.
5.2 Fish species and main characteristics
Activity 5.1: Research and/or a group activity to observe and identify fish species using their anatomical characteristics
Using the reference materials provided, together with internet, carry out the following activities:
(i) Find out the anatomical characteristics of the following fish species:
– Limnothrissa miodon
– Clarias
– Tilapia
– Limnothrissa haplochromis
– Carp
(ii) Discuss and record your findings.
(iii) Present your findings to the class.
(iv) Take teacher’s summary notes.
Fish are naturally found in rivers, lakes, seas and other large water bodies. These sources of fish are away from the fish consumption areas. This makes fish availability difficult and their cost high. This means the need to rear fish in artificial ponds in order to supply the ever increasing high demand.
The following fish species are reared in artificial fish ponds:
(i) Limnothrissa miodon
(ii) Clarias (iii) Tilapia
(iv) Limnothrissa haplochromis
(v) Carps
External structure of fish
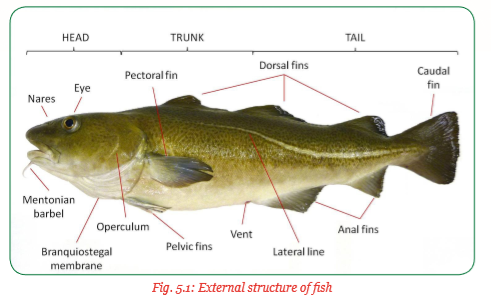
Different types of fish are distinguished from their external characteristics as follows:
(a) Limnothrissa miodon
Also known as Lake Tanganyika sardine. This fish is found in the shores and bays. It is nocturnal and feeds on plankton especially atyid shrimps and also on copecods sprawns. It has no cannibalism tendencies.
Anatomical characteristics
(i) Its body is fairly slender. With pre-pelvic scutes not strongly keeled, beginning behind the base of the last pectoral fin ray.
(ii) Its maxilla blade is over four times as long as its shaft. Its lower toothed edge continues forward to meet the hind tip of the pre-maxilla. The second supra-maxilla which is asymmetrical to the lower half is larger.
(iii) The lower gill rakers are larger and slender.
(iv) It has a distinct silver stripe along the flank.
(v) The snout is broad with tapering sides but not concave when viewed from above.
(vi) It has a larger bladder which is responsible for its ability to move greater vertical distances.

(b) Clarias (Clarias spp.) The clarias species, for example, Clarias gariepinus or the African sharp tooth catfish belong to the family Clarridae, the air breathing catfishes. The name clarias is from the Greek word “chlaros” which means lively. This is in reference to the ability of the fish to live for a long time without water.
Clarias fish are of great economic importance in fisheries and fish culture. They grow very fast and feed on a large variety of agricultural by- products. They are hardy and tolerate adverse water quality conditions. They can be raised in high densities resulting to high net yields. This fish can be sold live and hence attain high price than tilapia in some countries.
It matures fast and reproduces highly, even under confinement. They require less space and have high feed conversion rate. Clarias have been used to control overbreeding in tilapia and as a bait for fishing in Lake Victoria.
Anatomical characteristics
(i) Clarias are recognised by their long-based dorsal and anal fins which give them an eel- like appearance.
(ii) They have slender bodies, a flat bony head and a broad terminal mouth with four pairs of barbels.
(iii) They have large accessory breathing organ composed of modified gill arches.
(iv) Only the pectoral fins have spines.
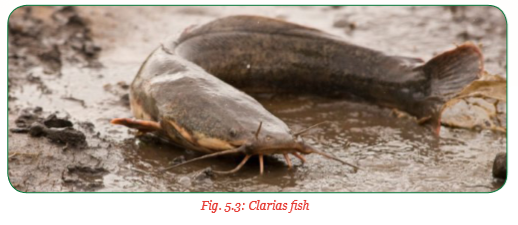
(c) Tilapia There are several important species of tilapia fish which include the Nile tilapia, Oreochromis niloticus, Oreochrormis aurens, Tilapia macrochir and T. rendalli which is not fast growing since increase in weight is 0.5 g/day and others.
Tilapia are mainly fresh water fish inhabiting shallow streams, ponds, rivers and lakes. They are of increasing importance in aquaculture and aquaponics. They have high quality delicious meat hence popular. Tilapia are mouth breeding fish which means that they carry the fertilised eggs and young fish in their mouths for several days after the yolk sac is absorbed.
Anatomical characteristics
(i) Tilapia is a bony fish.
(ii) Has steamlined body for easy movement.
(iii) It is covered with scales for protection.
(iv) The body is divided into head, trunk and tail.
Head
• Starts from the tip of the mouth to the end of the operculum.
• The upper and lower jaws bound the terminal mouth.
• Have teeth.
Trunk
• Starts from the operculum to the anus.
• It bears the fins, pectoral, pelvic which are paired, dorsal fin, ventral and caudal which are used for balancing and swimming.
Tail
• It consists of the rest of the body from the anus to the caudal fin.
Gills
• These are for respiration.
• There is one on either side of the head.
• Each gill is a red comb-like structure supported on a curved bony bar called gill arch.
• Each gill has two slender structures called gill filament.
(d) Limnothrissa haplochromis
These are small bony fish, smaller in size compared to the others in the same genera. They are mostly used in aquariums.
Anatomical characteristics
(i) Have relatively large eyes and a few scales in the midlateral line.
(ii) Have a smaller body depth than the other species.
(iii) Males have bluish to dark grey brown colour. Sometimes the dorsal flanks are greenish and the ventral parts are yellow with red areas in unpaired fins. The male colours change depending on their mood, switching between yellow and blue colour for the dominant males. The other males remain colourless and can be mistaken for females. The females are grey in colour.
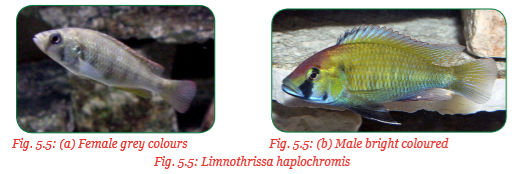
(e) Carps Carp fish are various species of oily freshwater fish from the family Cryprinidae common in Europe and Asia. They have been introduced to various locations including East African lakes. Carps are said to be unattractive slimy fish and choose to live in turbid or brackish water, so referred to as “trash fish” by fishermen. They adapt well to pond life and used extensively in aquaculture. They are herbivorous, eating water plants and also omnivorous, eating small insects and crustaceans.
Anatomical characteristics
(i) Mouth and snout– These are sub-terminal with two barbels on each side. They have no teeth. The shorter barbels are found at the tip of the snout and the longer barbels at the corners of the mouth.
(ii) Body pattern – Body colours are variable from solid dark brown to golden or olive brown on the back and flanks to tan, cream or yellowish white. The body shape is slightly laterally compressed somewhat ventrally flattened.
(iii) Fins – Carps have dorsal fins with a serrated spine and 15–23 soft rays. Anal fins also have serrated spine and 4–6 soft rays.
There are differences in the different carps species as follows:
Common carp
This is the most domesticated and cultivated of the carps species. It is omnivorous, eating the benthic fauna and decaying vegetable matter. They burrow in the pond bottom in search of food, also make good use of artificial supplements.
• They grow at the rate of 1kg/year. The body is fully scaled with large scales.
• They are light gold to dark brown in colour. They have large scales covering their entire body.

Grass carp
This type of carp fish is suitable for biological control of aquatic weeds especially in rice fields.
• In its early life, it feeds on plankton then macrophytes.
• It is a voracious eater and show preference for vegetable foods such as grass, leaves and weeds.
• They also accept supplementary artificial foods. They do not have barbels on their mouths.

Leather carps
These species have no scales on the body.
Mirror carps
These species have extra large spotty scales in a few parts of the body though some are fully scaled. Eyes are on the lower part of the side of the head.
Linear carps
Their scales form relatively straight line that run across the back and the side of the body.
Ghost carp
White or light in colour. It is not an albino since they have pigment in their eyes which are black.
Koi carp
These are ornamental fish having different colours ranging from white, black, red, yellow, blue and cream.
Exercise 5.1
The pictures below show different types of carps species. Study and identify them using the descriptions given above.

5.3 Selection criteria of suitable fish species to rear
Activity 5.2: Research to find out the selection criteria of suitable species of fish to rear
Use the references provided to carry out the following activities:
(i) Find out the selection criteria of suitable species of fish to rear.
(ii) Discuss and record your findings.
(iii) Present your findings to the class.
(iv) Take teacher’s summary notes.
Although a large number of fish species grow successfully in ponds, only a restricted number of species are usually cultivated on commercial scale. This is because the commercial pond culture basically aim at getting the maximum number of fish and optimum utilisation of the natural and supplementary food. This can only be found in certain fish species.
In order to select suitable fish species to rear, the following criteria are used:
(i) Adaptability to undrainable pond environment – Some fish species prefer free movement in large masses of water. Such fish may not be suitable for restriction.
(ii) Faster growth rate – This means they reach market weight earlier and be sold.
(iii) Efficient utilisers of natural food resources of the pond – Such fish will not eat a lot of artificial food supplements.
(iv) Efficient converters of artificial feed hence no food wastage.
(v) Hardy and not easily affected by diseases.
(vi) Easy to breed and to rear the young ones.
(vii) Prolonged breeding period or have multiple breeding within a certain period.
(viii) Non-predaceous, plankton eating and preferably be herbivorous and detritus feeder.
(ix) Should produce palatable and highly nutritious meat.
(x) Should have high market demand and fetch high prices.
These qualities may not be in one fish species but the species with more of the required traits should be considered. Figure 5.9 below shows fish pond with all the parts.
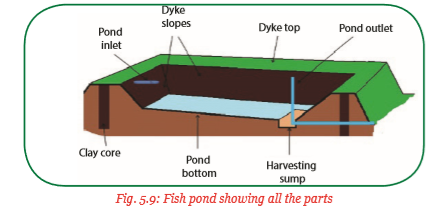
5.4 Definition and importance of bee-keeping
Activity 5.3: A research activity to find out the definition and importance of bee-keeping
Use the references provided to carry out the following activities:
(i) Find out the definition and the importance of bee-keeping.
(ii) Discuss and record your findings.
(iii) Present your findings to the class.
(iv) Take teacher’s summary notes.
Bee-keeping is the art and science of rearing honey bees. The bees are reared in structures known as hives in order to produce honey and other bee products. It is also referred to as apiculture. The practice is an improved ancient human activity of collecting honey from wild bee colonies. It started with the domestication of the same wild bees in different types of structures which today are known as hives.
The importance of keeping bees may be summarised as follows:
(a) As a source of food – Honey, a product from the honey bees, is a delicious and nutritive food for human. It is eaten whole or mixed with other foods as a supplement. In many communities, it is mixed with simsim and groundnuts. Bee products such as royal jelly, pollen and brood are also used as proteinous foods. Young brood are given to malnourished children in some societies.
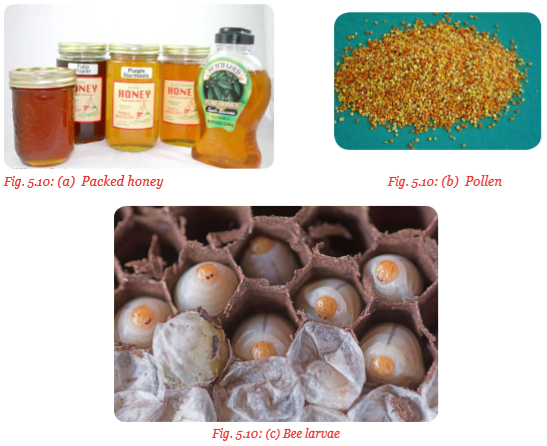
(b) As a source of medicine – Bee products such as bee venom, honey and propolis are used for the treatment of various ailments.
(i) Bee venom– Used to treat bee poisoning and is therapeutic to Parkinson disease.
(ii) Propolis – Used to treat and relieve arthritis, asthma, sinusis and others.
(iii) Honey – Used as an antiseptic on raw wounds and burns, also treats coughs, measles, stomach upsets. Honey has antibiotic properties to kill micro-organisms. It is also used in preservation of meat and other foods.

(c) For cultural purposes– Honey is used to make traditional brews in most communities. This brew has several cultural importance. For example, dowry negotiation ceremonies cannot take place without this brew while honey itself forms part of the dowry.

(d) As a source of income – Honey and other bee products extracted from the hive are sold either locally or exported to generate income for the farmers.

(e) Source of employment – The bee-keeping industry provide employment to a big population including the bee farmers, carpenterswho make the hives, value adding, food and beverage industries, pharmaceutical industries and others.

Fig. 5.14: Carpenter making a beehive
(f) Source of bees wax – This is another bees product which has a lot of value. It is used in cosmetic industries for soap making, pharmaceutical industries to make pill coatings, paint and shoes polish industries.
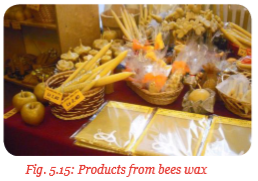
(g) Pollination – The honey bee is known to pollinate many cultivated and wild plants as it collects nectar, pollen, resins and gums. Crops such as maize, pawpaws, sunflower and others are known to increase their yields in the presence of bees.

Fig. 5.16: A bee pollinating a flower when collecting nectar

(i) Bee-keeping is a cheap occupation due to the following reasons:
• It does not require a lot of land. Land is always a limiting factor to small-scale farmers.
• It does not require a lot of expenses, for example, in terms of feeding except during drought.
• The materials needed to start a bee-keeping business are cheap and locally available.
• Raw materials for making honey such as nectar and pollen may be wasted if bees are not kept.
• They can be profitably kept in the semi-arid and arid areas which may be unsuitable for crop production. This makes such areas productive.
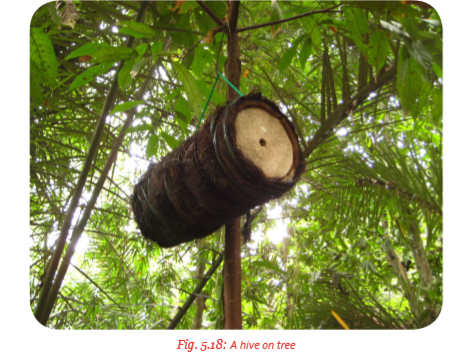
(j) Api-tourism and scientific research bee reserves attract tourists and scientists who carry different scientific research in them.
(k) Hobby – Bee-keeping is used by several people as a hobby. It is an enjoyable activity away from the formal type of employment.
5.5 Categories of bees in a colony and their characteristics
Activity 5.4: A field visit to an apiary to observe and find out the different categories of bees and their characteristics
Make a visit to a farm with an apiary and carry out the following activities:
(i) Find out the types of bees in any one of the hives in the apiary.
(ii) Categorise the bees according to their characteristics.
(iii) Discuss and record your findings.
(iv) Present your findings to the class.
(v) Take teacher’s summary notes.
Honey bees are social insects which live in colonies of between 10,000 and 60,000 bees. A colony consists of three categories of bees, queen, workers and drones. Each category is known as a caste. The caste consists of males and female bees. The drones are the male bees while the queen and the workers are female bees.
A bee-keeper needs to be able to identify these different castes of bees for proper management. The knowledge of the parts of a bee is important to be able to find out the differences between the bees.
Parts of a Bee

The following are characteristics of each category or caste of bees in a colony:
(a) Queen bee The queen is a fertile female bee which develops from a fertilised egg.
(i) The body is larger than a worker bee and longer than a drone bee.
(ii) The wings are shorter in proportion to her body length.
(iii) The abdomen is long, slender and tapering for depositing eggs in the cells of the comb. They produce a short smooth sting with 2–5 barbs.
(iv) The head is round and small with small eyes at each side.
(v) Hind legs are straight and shorter than the abdomen.
(vi) The proboscis is short.
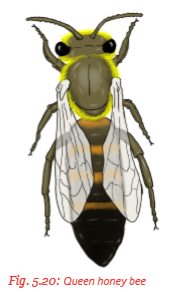
The queen bee larva is fed on a food substance called royal jelly secreted by the worker bees. The larvae develops within 15–16 days. She is fed on royal jelly throughout her lifetime. The virgin queen is mated 5–10 days after emerging from comb cell. The queen is mated on a flight with 8–10 drones. The mating flight lasts for a few days and the fertile queen comes back to the hive to lay eggs. The queen can store enough sperms to last for her lifetime. She can lay between 1500 and 2000 eggs per day. Her lifespan is 3–5 years.
Functions of the queen bees
The queen bee functions in the hive include:
• To lay eggs: She determines at will when to lay the fertilised eggs which develop into either queen bees or worker bees and unfertilised eggs which develop into drones.
• To keep the colony together: The queen produces a pheromone known as queen substance which keeps the members of the colony together. This substance will guide the worker bees on how to identify the hive when they come back from foraging. It also helps them to identify each other. The queen substance also inhibit ovary development in worker bees. There is only one queen at a time in the colony.
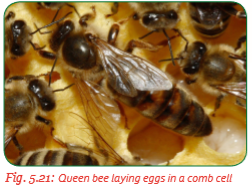
(b) The worker bees
The worker is a sterile female bee which develops from a fertilised egg. They do not lay eggs under normal circumstances, except when the colony has no queen. They have the following characteristics:
(i) The body is small with a short abdomen which produces a long sting with 8–11 barbs.
(ii) The head is triangular in shape with small compound eyes on each side.
(iii) The proboscis is long for extracting nectar deep into the flowers.
(iv) The wings are long to cover the whole length of the abdomen.
(v) The legs are hairy. The hind legs are long, strong and hairy with pollen basket, brush and press. This is used as an equipment to collect pollen.
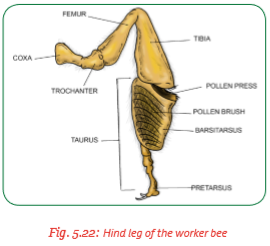
Worker bees are the largest group of bees, totalling about 60,000 in a strong colony. When the young larvae hatch, they are fed on royal jelly and pollen until maturity. They take 21 days to mature after which they feed on honey and pollen. They begin their chores when they are 20 days old, starting with short flights. This helps them to get acquainted with their surroundings and be able to identify the hive. Their lifespan is 4–6 weeks.

Functions of the worker bees
They carry out all the chores of the hive which include:
• Protection and defending the hive.
• Clean the hive.
• Collect food (nectar, pollen) and water.
• Feed the queen, brood and drones.
• Build the combs.
• Prepare a new queen when need be.
• They determine whether the queen is incapacitated, kill her and prepare for another queen in the queen cells at the edge of the combs.
• Scout for new locations to swarm to.

(c) Drones
The drone is a male bee which develops from an unfertilised eggs, laid by the queen, though occasionally by workers whose ovaries develop in the absence of the queen. The eggs of the drones are laid in larger cells than for the worker bees. They take 24 days to mature. There are about 100–150 drones in a normal colony. They die soon after mating since their reproductive organs rapture beyond repair during mating.
They have the following characteristics:
(i) Large blunt abdomen.
(ii) The head is rounded with two big compound eyes that meet at the back of the head.
(iii) They have a large wing span, covering the whole length of the abdomen.
(iv) The body is covered with black hairs.
(v) They do not have any sting.

Functions of the drones
• They mate the queen: They congregate outside the hive and wait for the queen while patrolling the hive. They fly about 9-15 m above the ground to mate.
• They cool the hive: They flap their wide wings at high speed increasing air movement.
Table 5.1: Summary of the characteristic differences between the honey bee castes
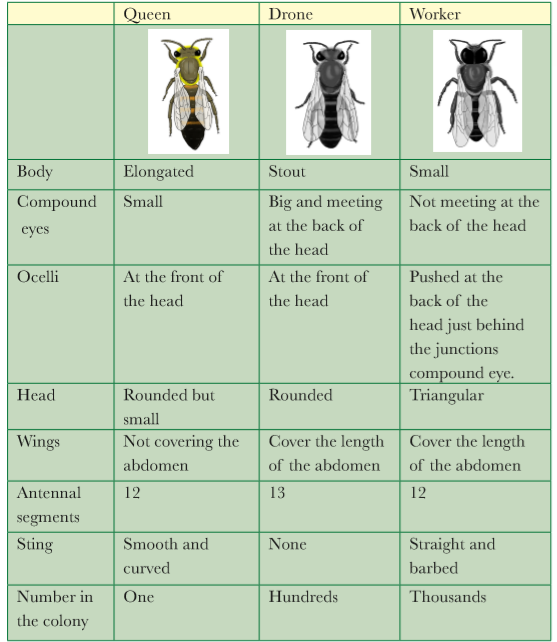
5.6 Beehive making
1. Construction materials
Activity 5.5: A research activity to find out the materials required for making beehives
Use the references provided to carry out the following activities:
(i) Find out the type of materials required to construct the following types of bee hives:
• The long hive
• The top bar hive
• The langstroth hive
(ii) Discuss and record your findings.
(iii) Present your findings to the class.
(iv) Take teacher’s summary notes.
The materials required to construct beehives depend on the type of hives to be constructed.
Types of beehives
(a) The log hive: Log hives are traditional hives which have been used for many years by different communities. This hive is a fixed comb hive where the inner materials of a log of a tree is scooped out to leave it hollow. The honey combs are cut out when harvesting, thus destroying the brood. The materials used to make this hive are cheap and locally available.
Construction materials
The following are the construction materials for the log hive:
• A cylindrical log; a tree trunk of 90 cm –120 cm and 30 cm – 35 cm diameter.
• Two cylindrical end covers of 30 cm – 35 cm in diameter.
• A plain wire about 75 cm long.
• A stick with V-shaped hook at one end and an inverted V- shape at the other end.
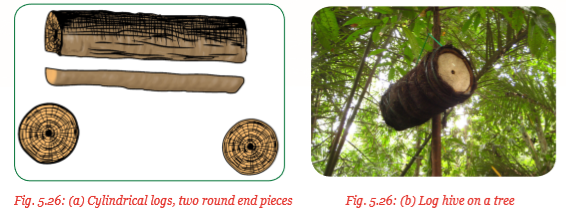
(b) The Top Bar Hive (TBH): The top bar hive is a movable comb hive. Narrow bars normally of wood rest across the top part of a box-like container and hence the name top bar hive. The box forms the space that contains the bees nest. Bees build combs on the bars which are wide enough to give proper spacing between combs. A bar with its attached comb and adhering bees can be removed from the hive and examined. Each comb is built naturally by the bees, suspended from its top bar. Top bars are the slats of timber on top of the hive to which bees attach their combs. They are placed side by side to completely cover the whole hive container or space. An outer lid or cover is provided over the bars for additional protection from the weather elements.
Construction materials
The following are the construction materials for the top bar hive:
• Sawn timber of about 3 cm thickness. This timber should be smooth and enough to make the side pieces, bottom piece, the end pieces and the top bars
• 1 sheet of corrugated iron sheet about 3 m wide
• Plain wire about 5 m long
• 1 kg, 5 cm nails
• 6.4 cm nails, 4–5 pieces
Cider or cypress timber is the best for the construction of the top bar hive. These materials will be cut to size during the construction of the top bar hive.
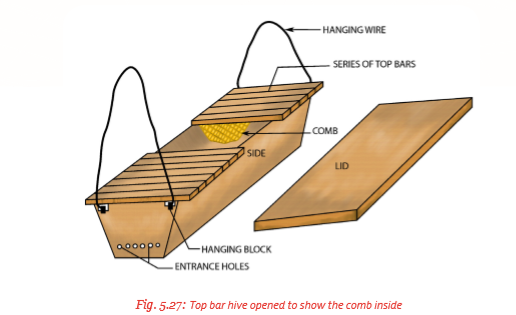
(c) The langstroth hive
This is an American hive named after the founder Lorenzo Lorraine Langstroth. It is another movable comb hive. It is made of two tiers, brood chamber and the super chambers for the honey with a framed wire mesh for the queen excluder.
Construction materials
The following are the construction materials for the Langstroth hive:
• Sawn timber of about 3 cm thickness. This should be enough to construct the chambers of the hive as required
• Mesh wire of 4 × 4 mm mesh size, one piece of 60 × 50 cm is required
• Nails or deck screws
• 80 × 40 cm sheet of 3 4 inch plywood
• 50 mm nails (2 inches nails )
• White or light paint about 5 litres tin
• Timber frames; these can be bought when they are ready made

2. Beehive making process
Activity 5.6: A practical activity to construct the top bar hive
Use the materials provided to carry out the following activities:
(i) Construct the top bar hive.
(ii) Discuss and record findings.
(iii) Report your findings to the class.
(iv) Take teacher’s summary notes.
Procedure for constructing a top bar hive
1. Cut the timber into the following pieces:
• 2 -end pieces each measuring 48.3 × 27.5 × 18.9 cm
• 2-side pieces each measuring 90.0 × 27.5 cm
• 1- bottom piece measuring 86.0 × 19.0 cm
• 27 pieces top bars each measuring 48.3 × 3.2 cm
The cut pieces are as shown in figure 5.29 (a).
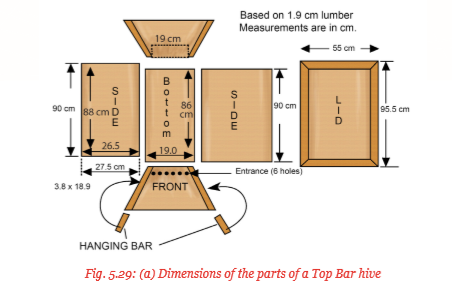
2. Drill six holes on the narrow end of one of the end pieces.
3. Assemble the pieces as follows:
(i) Hold the two side pieces upright as shown in figure 5.29 (b) below.
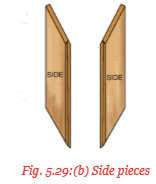
(ii) Place the drilled end of one end piece on top of the side at the bottom end of the two side pieces. The drilled edge of the end piece should be at the slope cut of the side pieces as shown in figure 5.29 (c). Fix the edges together with the 5 cm nails.
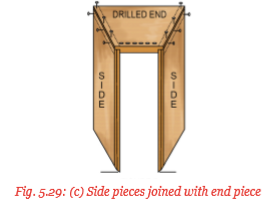
(iii) Repeat this procedure for the other end piece which does not have holes on it. Fix it in place firmly with the 5 cm nails.
(iv) Now turn the whole structure upside down so that the narrow side faces upright. Fix the bottom piece on top firmly with the 5 cm nails, all round. Attach the hanging blocks on the end pieces on both ends, using the 6.4 cm nails. This is shown in figure 5.29 (d).
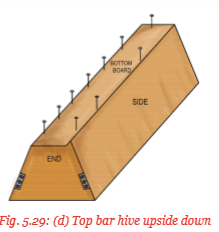
The hanging blocks should be nailed at the position where they will not interfere with the lid.
4. Prepare the top bars by chiseling both sides of the top bars to leave a protruding strip of wood where the starter wax is applied. This is shown in figure 5.29 (e)

5. Construct the top cover as follows:
(i) Cut a piece of corrugated iron sheet measuring 100.5 × 60 cm using a pair of tinsnip.
(ii) Fold and nail about 5 cm length of the iron sheet round a timber frame to make the safety edges of the top lid or cover. The final dimensions of the top lid should be 95.5 × 55 cm with a safety edge.
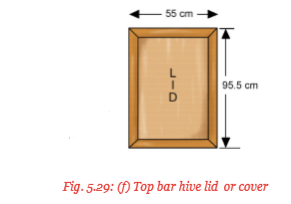
3. Management of the beehive
Activity 5.7: Field visit to a farm with an apiary to carry out beehive management practices
Make a visit to a farm with beehives in an apiary and carry out the following activities:
(i) Observe the siting of an apiary and the arrangement of the beehives in the apiary.
(ii) Carry out the following hive management practices:
• Stocking of the hive.
• Hive inspection.
• Feeding of the bees.
• Controlling pests and diseases.
(iii) Discuss and record your findings.
(iv) Present your findings to the class.
(v) Take teacher’s summary notes.
Siting the apiary and arrangement of the beehives in the apiary
(a) The site
The site where the apiary is located should be a place;
(i) Where forage plants or flowering plants are available.
(ii) Where water is easily available.
(iii) Well sheltered from strong wind and sun. There should be a hedge which is free from noise and any other disturbances.
(iv) Away from human beings and livestock thus from homesteads and busy roads.
(v) Without any bad odours.
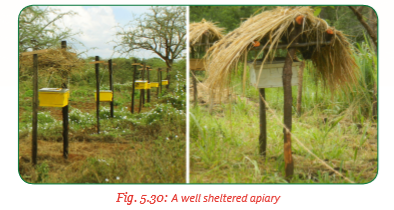
(b) Arrangement of the hives in the apiary
Hives in the apiary should be placed in such a way that they allow easy movement, high stocking rate and achieve good control of pests, in case they are present. The following hive arrangement may be adapted:
(i) Hanging patterns
Here the hives are suspended between posts with plain wires. The hives should be at least 1 m above the ground level. The bee entrance should face outwards and the posts fixed firmly. This method controls hive pests such as the honey badgers, monkeys and also insect pests like sugar ants.
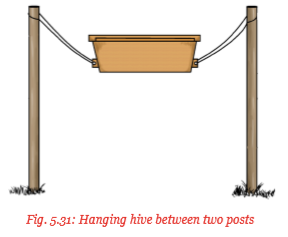
Hanging include:
• Single pattern: In this pattern, a single hive is suspended between two posts as shown in figure 5.31.
• Line pattern: This is where hives are suspended on posts in a straight line. This pattern is convenient especially where there is a narrow strip of land for the apiary.

• Cross pattern: In this pattern, the hives are suspended with one post at the centre being shared by four hives to form a cross-like pattern. This method saves on the posts and the space used. Entrance holes should face outwards.
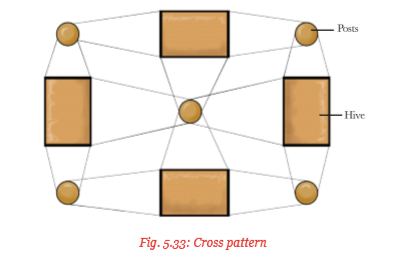
• Zigzag pattern: Here, the hives are suspended on post to form a zigzag pattern appearing like letter Z. This method is suitable in terrain that is not even and also on sloppy areas. The entrance should always face outwards.

(ii) Placement method
In this method, hives are placed on permanent platforms about 1 m above the ground level. This method is convenient when working with the bees. However, it is only suitable where there are no pests.
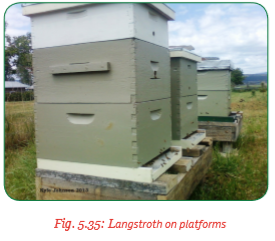
(iii) Modified hanging method
In this method, the hives are placed on a platform which is then suspended between posts using plain wires. This method is meant to guard against the badgers, monkeys and squirrels.

Maintenance of the apiary The apiary should have a conducive environment for the bees.
Therefore, the following maintenance practices should be carried out:
– Clearing undesirable vegetation around the hives to press pests.
– Replacing broken posts and platforms.
– Avoid use of pesticides around the apiary.
– Removing all wasted pieces of combs after harvesting.
Beehive management practices
The following are beehive management practices:
(a) Stocking the beehives
Most bee-keepers place empty hives in an apiary and wait for the bees to occupy them naturally. This may take a long time. Therefore, it is recommended to set up a catcher box or to use a swarm net to catch the bees from elsewhere and stock them in the hive as shown in figure 5.37.
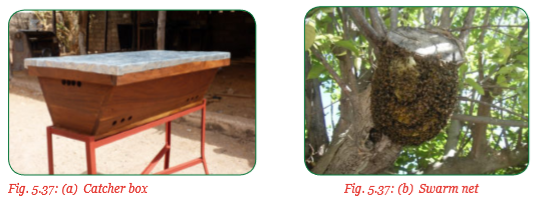
Once the bees are in the catcher box or the swarm net, the bees can be transferred easily to the hive. The top bars from the catcher box already have some combs build on them. These top bars are transferred to the hive and replaced with those from the hive.
The next thing is to locate and transfer the queen bee to the hive. When this is done, the other bees will follow with ease to the hive. It is important to remember that when bees are on a sloping surface, they will always move upwards. Therefore, the hive should be placed higher than the catcher box with the entrance holes facing each other. The two are then connected with a sloping board.

(b) Supplementary feeding of the honey bee
Naturally, the food for the honey bee consists of nectar, honey, pollen and water. However, when environmental conditions become difficult, it is necessary to give the bees supplementary foods. This is to prevent the bee colony from absconding. Conditions that may make it necessary to feed the honey bees include:
(i) Drought conditions: When there is severe drought, bees may not get food and water in proximity. This may make the bees run away. To prevent this, the bees are fed on a sugar syrup made of sugar and water at a ratio of 1: 1, combs of honey from the previous harvesting and pollen supplements for proteins. The feed should be placed close to the beehive or in a feeder box for the top bar hive.
(ii) New colonies: A newly established bee colony that either entered the hive on its own or brought in with a catcher box need to be fed with the syrup to give it time to familiarise itself with the surrounding as well as to multiply and increase in number.
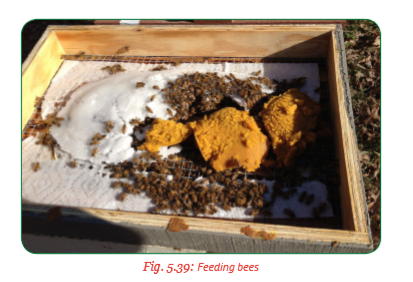
(c) Controlling diseases and enemies of bees
Honey bee diseases
The honey bee is affected by several diseases mostly attacking the brood. The diseases of the brood include foul brood, sac brood, stone brood and chalk brood.
Foul brood disease – These are bacterial diseases which are spread by infected equipment. These are controlled by use of antibiotics and destruction of the affected colonies.
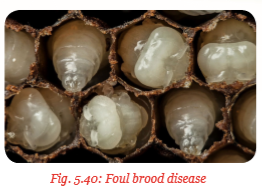
Sac brood disease
This is a viral disease which attack sealed brood. It is controlled by maintaining a strong colony through proper feeding.
Stone brood and chalk brood diseases
These are fungal diseases which attack the brood at all stages of development. They are controlled by keeping the hive clean, removing the moulds from the hive and destroying the affected combs.
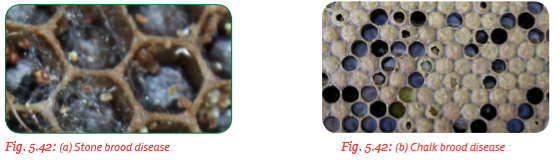
Honey bee enemies
The honey bee has many enemies, some of which are predators. They attack the honey bee in colonies and reduce their performance. These enemies are categorised into:
(i) Insects – Those which include wax moths, beetles, safari ants, sugar ants, termites, bee louse and pirate wasps.
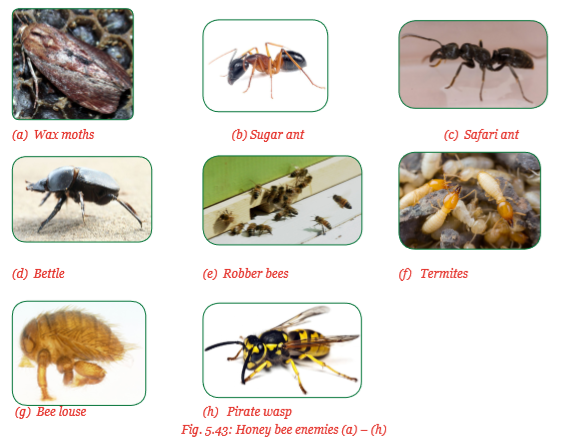
Insect pests are generally controlled by:
• Maintaining a strong colony through proper feeding during drought.
• Removing destroyed combs.
• Fumigation with ethylene dibromine to control moths.
• Reduce the bee entrance space to prevent entry of beetles.
• Greasing the hanging wires and posts to create barriers for the ants.
• Clearing the bushes around the hives.
• Use of tobacco smoke to dislodge the lice from the bees.
• Use of wasp traps to prevent the robber bees.
• Avoid leaving pieces of honey combs outside the hive .
(ii) Mammals – Mammals that predate on the honey bees, eat the honey, the brood and destroy the hives. They include human beings, honey badger, monkeys and squirrels.
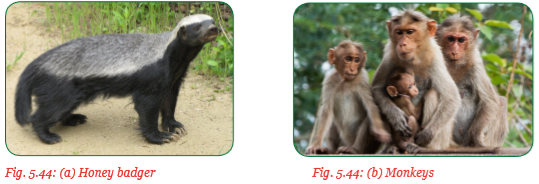
These predators are controlled by:
• Suspending the hive by use of wires.
• Proper and securely fencing the apiary.
• Use of bee house.
• Scaring and surveillance.
• Setting traps.
(iii) Amphibians – These include frogs and toads. They feed on the bees. They are controlled by making sure that the apiary is not set in marshy areas.
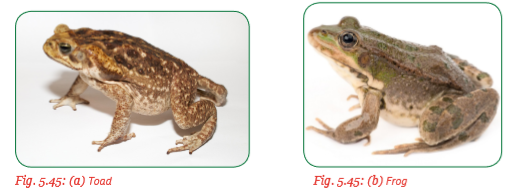
(iv) Reptiles – These include lizards, geckos and snakes. They eat the bees, brood and honey. They are controlled by chasing them away and clearing the apiary.

(v) Birds – These include the honey guide and the European bee eater bird. They feed on the bees, the brood and the honey. They are controlled by scaring.

4. Harvesting of honey
Activity 5.8: A field visit to an apiary to harvest honey
Make a visit to an apiary with beehives and carry out the following activities:
(i) Inspect the hive to find out the condition of the bees, brood and the queen.
(ii) Find out whether the honey is ready for harvesting.
(iii) Harvest the honey and any other hive products.
(iv) Discuss and record your findings.
(v) Present your findings to the class.
(vi) Take teacher’s summary notes.
Honey harvesting involves identifying the ripe honey to take away for processing. In order to identify whether the honey is ready for harvesting, the hive should be inspected first.
Hive inspection
This is carried out before harvesting honey to find out the following:
(a) Whether the honey is ready for harvesting: Only the combs with capped honey are ready for harvesting. This means that the honey cells of the combs are full to the brim with honey and then sealed with a thin layer of wax. If honey is harvested when it is not ready, it will have a lot of water hence poor quality.

(b) The condition of the queen. A healthy queen should be able to place an egg properly at the bottom of the brood cell, lay 1500 eggs per day and be able to regulate the number of drones in the colony. Failure to do this, the queen may be sick, old or has become less prolific. This queen is replaced by the workers. During routine inspection, the bee-keeper should be able to notice such activities.
(c) Condition of the colony: When the colony becomes overpopulated, the bees prepare to divide by raising a new queen. This is carried out by the worker bees. They create queen cells on the surface of the comb and feed the young larvae with royal jelly to raise a young queen. The old queen then takes off to start another colony leaving the young queen to continue. During inspection, the beekeeper will be able to identify colony division and assist. This will prevent the bees from swarming and, therefore, be retained as a new colony in another hive.
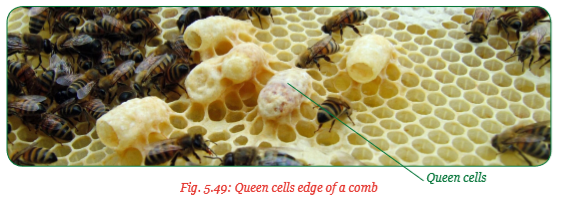
To approach the hive for inspection safely, it is important to wear the protective clothing which include the following:
(i) Coverall– This is also called a bee suit. It is made of lose fitting smooth material which is light coloured, for example, white or cream. It should have long sleeves and long trousers with elastic bands at the end.
(ii) Head veil –This is used to protect the head. It has a top made of the same material as the coverall while the sides are wire mesh or wire netting to allow visibility. The neck should have tight elastic band at the end.
(iii) Hand gloves – Should be made of leather, same colour as the coverall. They should be a pair with tight elastic band at the opening.
(iv) Gumboots – These are used to protect the legs. They should be the same light coloured materials as the coverall.
(v) A smoker – It is an equipment used to emit smoke when puffed. It should be lit on the side.


Other equipment used during hive inspection include:
(a) Hive tool: This is an iron bar about 25 cm long with a sharp straight end and bent on the other end. The sharp end is used for separating the top bars, cutting the honey combs and scrapping propolis. The bend side is used as a hammer.
(b) Bee brush. This brush is made of sisal fibres and a handle. It is used to brush off honey bees from the honey combs back to the hive.

(c) Queen excluder – This is an equipment which is used to restrict the queen within the brood area. It prevents the queen from laying eggs on certain top bars which are left for honey. This makes sure that the brood are not destroyed during honey harvesting. Queen excluder is made up of wire mesh size 4 mm × 4 mm which is large enough to allow the worker bees to pass through but prevent the queen. The mesh is mounted on wooden frame with the top frames the same size as the top bars. When in use, it replaces one of the top bars.
(d) A feeder box – This box is made up of water proof cardboard with entrances on both sides. The cardboards are double and joined onto a frame on the two sides and bottom such that the hollow space created is where sugar syrup is put. The top frame of the feeder box is the same size as the top bars. When in use, it replaces one top bar.
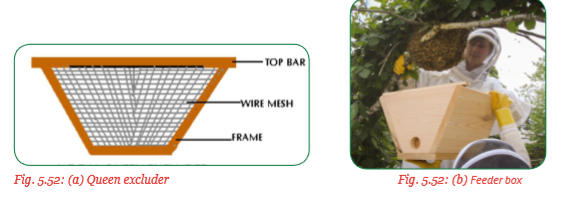
(e) Catcher box – It is an equipment made to resemble the hive, though smaller in size. It is used to trap the bees from any other place and bring them to the apiary.
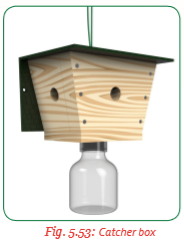
After the correct tool, equipment and protective clothing are prepared, the following procedure is used when harvesting honey:
1. Collect all the tools and equipment required.
2. Put on the protective clothing.
3. Light a smoker.
4. Quietly approach the hive from the back or sides, standing in front of the hive entrance will obstruct the bees. This irritates them and makes them defensive.
5. Smoke the entrance and the sides of the hive lightly. This makes the bees to move inside the hive and start eating the honey.
6. Open the hive cover quickly and smoke through the top bars. Puff about four times and return the cover for 2 minutes. Avoid oversmoking because it produces a smoky smell in the honey.
7. Now remove the cover and then each top bar, one after the other by separating them with a hive tool.
8. Inspect for pests, diseases and capped combs.
9. Brush the bees from the capped combs only and cut the comb into the honey container. Combs with brood and pollen should not be removed.
10. When all the ready combs are harvested, replace the lid and then back to its position. Clean all the broken combs around the area before leaving and return the hive to its normal position.
11. Carry the equipment, tools and the container of honey to the store and processing respectively.
Group activity
Construct a langstroth hive, place it next to the top bar hive then carry out the following activities:
(i) Find out the differences between the structure of the top bar hive and the langstroth hive.
(ii) Find out how the honey is harvested from the langstroth hive.
(iii) Harvest honey from the langstroth hive and the top bar hive. Compare the quantities of honey harvested.
Unit Summary
Aquaculture is the art and science of rearing fish in artificial ponds. It is a growing business in Rwanda because of the need to provide affordable animal proteins in human diet. Fish are reared in combination with other animals such as chicken, pigs and other small animals to reduce the cost of production.
However, monoculture in fish production is also used. The common species of fish reared include Limnothrissa miodon, Clarias spp, tilapia, Limnothrissa haplochromis and Carp spp. However, there are other fish species that are also becoming important.
These fish species can be distinguished through their anatomical characteristics. When rearing fish in ponds, proper selection of suitable species is important. Other criteria to consider include adaptability to undrainable pond environment and of most important, have fast growth rate with easy breeding.
Bee-keeping is as important as keeping other livestock. The turnover to capital invested is easy and fast. They provide food, medicine, income, employment and cater for cultural practices. Bees are easy to keep especially where the environment is suitable and with the correct equipment.
Some of the equipment required for bee-keeping include the hive. Most types of hives are cheap and easy to construct, use and maintain. When a beekeeper is able to differentiate between the three castes of bees, the management becomes easy.
Honey harvesting is a skill that require knowledge of the bee behaviour, otherwise bees produce honey with minimum effort from the farmer, all you have to do is provide conducive environment and feed them during the periods of scarcity.
Key terms
1. Pisciculture – Rearing of fish in artificial ponds.
2. Aquaponics – A system that combines the raising of aquatic organisms and growing of plants in the same water.
3. Barbels – A slender external whisker-like tactile organ on the jaw or other part of the head of certain fishes.
4. Benthic fauna – The community of organisms that live on or in the bottom of a waterbody.
5. Cannibalism – It is eating the flesh of another animal of its own kind.
6. Castes – A system of dividing organisms into classes or social groups.
7. Concave – Having an outline or a surface that curves inwards.
8. Detritus feeder or detritus eater – Is an organism such as bacterium, fungus or insects that feed on dead plants or animal matter.
9. Forage plants – These are flowering plants from which bees collect nectar, pollen, gums and resins.
10. Gums – A viscous secretion of some trees and shrubs that harden or dry but soluble in water.
11. Herbivorous – Feeding on plants.
12. Langstroth hive – A hive that is named after Lorenzo Lorraine Langstroth who invented and designed it.
13. Macrophytes – An aquatic plant which can be seen with the naked eyes.
14. Monoculture – An agricultural practice of rearing a single species of livestock.
15. Nectar – A sugary fluid secreted by plants in the flowers collected by bees to make honey.
16. Omnivorous – An organism that feeds on both plants and animals.
17. Palatable – Pleasant or agreeable to taste.
18. Pheromone – A chemical substance produced by an insect, for example, the queen bee that affect the behaviour of others of its species.
19. Plankton – Microscopic aquatic organisms floating in water that provide food source for other larger organisms.
20. Pollen – Fine powdery substance produced by the anthers in the flower and collected by bees as feed for young ones.
21. Pollution – The transfer of pollen grains from the anthers to the stigma.
22. Polyculture – An agricultural practice of rearing more than one species of animal at the same time.
23. Resins – A sticky organic exudate from certain trees and plants such as cider, fir and pines.
24. Sub-terminal – Situated or occurring near but not precisely at the end.
25. Turnover to capital – The rate at which an investment is able to bring back money invested and profit.
End of Unit 5 Assessment
1. Outline the importance of honey bees.
2. Make a comparison between the queen bee and the worker bee.
3. Describe the qualities of good quality honey.
4. (a) List four insect pests that attack honey bees.
(b) Outline how the above insect pests of honey can be controlled.
5. Describe the precautions taken when handling honey bees.
6. Analyse the anatomical characteristics of the clarias fish.
7. Study the illustration below carefully and then answer the questions that follow:
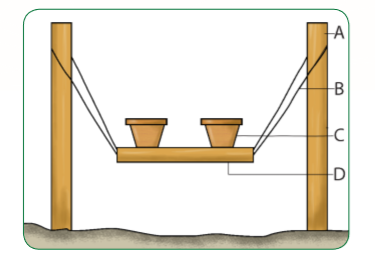
(a) Name the parts labelled A, B, C and D.
(b) Give two reasons for suspending the hives on the posts with wires.
8. Explain the procedure of harvesting honey from a Top Bar Hive.
9. The following equipment is used in harvesting honey from the top bar hive. Study it carefully and then answer the questions that follow:

(a) Identify the equipment.
(b) What is the use of the equipment during honey harvesting?
UNIT 6 ; ANIMALS (pigs and poultry)
Key Unit Competence:
Learners should be able to successfully conduct rearing of poultry and pig.
6.1 Learning Objectives
(i) Knowledge and understanding
• Explain the conditions suitable for aviary and pigsty.
• State materials used to construct an aviary and pigsty.
• Carry out construction of aviary and pigsty.
• List the ingredients of an appropriate diet for pig or poultry as per growth rate.
• Describe a feeding plan for a pig or poultry.
• Identify, name and describe pig and poultry common diseases and enemies.
• Describe health control methods in pig and poultry farms.
• Apply sanitation rules in ruminant farms.
(ii) Skills
• View standards of aviary and pigsty.
• Select and gather materials to construct aviary and pigsty.
• Construct aviary and pigsty.
• Select appropriate food for a pig.
• Select appropriate diet for poultry.
• Practise pig feeding/implement a pig feeding plan.
• Recognise pig and poultry feeding plan.
• Recognise pig and poultry diseases by their visible symptoms in farms.
• Practise rules for pig or poultry farm sanitation.
(iii) Attitudes and values
• Be active in discussions and attentive in observing constructed aviary and pigsty.
• Manipulate carefully aviary and pigsty construction materials.
• Participate willingly in construction of aviary and pigsty.
• Participate actively in group discussion and interact positively with colleagues.
• Observe attentively food distribution operation for both pigs and poultry.
• Be careful and cautious in distributing foods for pig and poultry.
• Be active in group discussions and interaction.
• Have positive attitude when interacting with colleagues.
• Be attentive and diligent in observing sick pig and poultry and sanitation state of the farms.
• Be attentive and cautious in implementing prophylatic plan in pig and poultry farms.
• Co-operate when colleagues ask to carry out sanitation rules and activities.
Introduction
Animal production is a very important component of agriculture in Rwanda. Various species of animals are kept to produce different products. Poultry, for example, produce eggs and meat while pigs produce pork and bacon. Pig skin is used to produce suede which is used to prepare different leather products. These animals should be properly fed and kept in well prepared structures to protect them from bad weather elements and predators. The structures should also be spacious and easy to clean so as to prevent disease infection. Poultry is a class of domesticated birds which include chickens, ducks, geese, turkeys, pigeon and ostriches. They are mostly kept in farm under confinement, though some are kept under free range systems.
Pigs are mammals with stout bodies, flat snouts, small eyes and large ears. When in the wild, they are social animals and live on roots of plants, fruits and fleshy leaves. However, when domesticated, they are mostly kept in confinement and are fed on grain offals and kitchen swill.
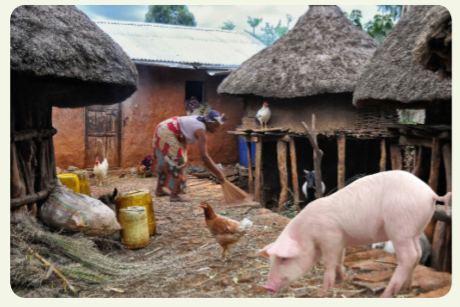
Analyse the above photograph carefully:
1. What are the consequences of humans living with animals in the same house?
2. Prepare the possible solutions to the above problem?
6.2 Standards of aviary and pigsty
Activity 6.1: A field visit to a non-ruminant farm where poultry and pigs are reared to observe shelters, materials they are made of and how they are arranged
Make a field visit to a non-ruminant farm where poultry and pigs are reared and then carry out the following activities:
(i) Observe the shelters, the materials they are made of and how they are arranged.
(ii) Discuss the operations that are carried out when constructing these shelters.
(iii) Record your findings.
(iv) Present your findings to the class.
(v) Take teacher’s summary notes.
1. Aviary
An aviary is a large enclosure for confining poultry.
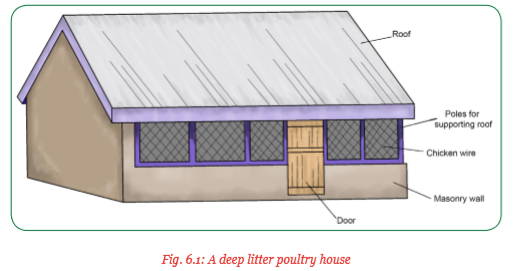
A standard aviary should allow the poultry sufficient space to:
(i) Fly, walk and exercise so as to maintain good health.
(ii) Perform and nuptial display and mate.
(iii) Avoid other aggressive poultry.
(iv) Cater for the young poultry and their parents.
(v) Allow privacy retreat, mainly for the hens. Poultry can be housed in various sizes and styles of aviaries such as:
(a) Cages or cabinets.
(b) Suspended cages.
(c) Small to medium sized aviaries.
(d) Habitat aviaries.
(e) Large parrot aviaries.
Factors influencing housing of poultry are:
(i) Size and shape of the aviary or cage (vi) Stocking rate
(ii) Humidity (vii) Species of birds
(iii) Lighting (viii) Local climate (iv) Floor
(ix) Security (v) Vibration within the aviary
Stocking rate
Standard stocking rate in the battery cage system, each bird is allowed 400cm square of the cage surface while in the deep litter system, the stocking rate is, 4-6 layers, 11-15 broiler birds per square metre.
Conditions for a suitable aviary
Birds require regular exercises and mental stimulation. It is important to ensure that these needs are met when housing them; consider:
(a) Space
This depends on the size of poultry. It should allow free movement and flight without causing injuries. Poultry need a lot of vertical space for flight.
(b) Perches and roosts
They need movable perches and other objects to play with when interacting with each other.
(c) Other factors
• Weather – They should be protected from extremes of temperature, wind, rain and direct sun.
• Ventilation – They need adequate ventilation with protection from draughts and fumes. Half the largest side of the house should be wire netting or mesh.
• Noise – Birds should be protected from loud or sudden noises to avoid stress.
Houses should also be provided with:
(i) Clean and hygiene environment.
(ii) Adequate number of feeding and watering equipment.
(iii) Sufficient nesting materials especially for breeding.
(iv) Bathing water from particular species, for example, ducks.
(d) The houses should also be:
• Predator-proof.
• Escape proof.
• Simple, for ease of movement.
2. Pigsty
This is an enclosure for raising domestic pigs.

Pigs need dry bed and protection from extreme temperature and sun. They need enough space, fresh air hygiene, access to feed and water and good sleeping area.
Conditions for a suitable pigsty
(a) Environment requirement
(i) Temperature: The critical temperature requirement for pigs vary according to their total body weight and the house conditions. Newborn piglets need 27–35˚C while adults can manage up to 16˚C. Chilly effects are fatal. High temperatures can be reduced by spray or cooling the house with water.
(ii) Drought: Droughty conditions lower temperature and make the house chilly. Cracks on the walls should be sealed to prevent drought. Wind breaks should be provided.
(iii) Dryness: A dry concrete floor warms easily. Dry bedding of straw or wood shavings should be spread on the concrete to provide insulation.
(iv) Ventilation and insulation: Fresh air in the building is important to remove water vapour, carbon dioxide, ammonia, airborne dust, bacteria and odours. However, the walls should be well insulated to prevent loss of heat through conduction.
(b) Building orientation
The buildings should be constructed facing away from the direction of the wind. Selected trees can be planted in the shelter belt to break the wind.
(c) Hygiene
Sheds should be clean, dry and dust-free to reduce disease infections. Pig sheds should have sufficient effluent channels to remove manure and dirty water.
(d) Space
Stocking rate should be checked to prevent reducing the performance of the pigs. Minimum floor space requirement is as follows:
(i) Growers up to 10 kg– 0.14m2/pig
up to 11 – 20 kg – 0.22m2/pig
up to 21 – 40 kg – 0.36m2/pig
up to 41 – 60 kg – 0.47m2/pig
up to 61 – 80 kg – 0.57 m2/pig
up to 81– 100 kg – 0.66 m2/pig
(ii) Sows and litters with farrowing – 3.2 m2 crates litter of piglets up to four weeks of age.
(iii) Adults sows in stalls – 0.6 m × 2.2 m (iv) Adults boars in stalls – 0.7 m × 2.4 m (v) Boars in individual pens – 6.0 m2
This space allowance provides for a dunging area.
(e) Feeding and watering
Each pig requires adequate access to feed and water. Poor access leads to uneven growth, impaired feed conversion efficiency and increased proportion of poor graded pigs.
Feeding
The space required per pig at the feed trough is as follows:
(i) At eight weeks (weaners ) – 0.15 m/pig
(ii) Growers – 0.25 m/pig
(iii) Finishers – 0.3 m/pig (iv) Breeding stock – 0.45 m/pig
Watering
Water should be available all the time. It should be clean, cool and good quality. Bite-type nipples or pressure plate operated bowl drinkers can be used for the weaners. At least one drinker for every 6–8 weaners.
Growers and finishers should have one drinker for every 10–15 pigs. At least 140–160 litres of water per sow per day but when flushing, 250–300 litres per sow per day.

(f) pens
(i) Pen floor: The pen floor should be partly or fully slatted for ease of cleaning. However, sold concrete is also used.
(ii) Dry sows: Can be housed individually or in groups. However, if housed in groups, they should be protected from aggression by other sows especially during early pregnancy. This can cause embryos to dislodge from the uterine wall and die. Each sow should be allowed a space of 1.4 m2 on the floor.
(iii) Farrowing and suckling pens: Farrowing crates and heated creeps increase piglet survival. Crates are adjustable to fit the growth of the piglets. Farrowing pens should be 2.1 m × 1.65 m, 2.1 m × 1.8 m or 1.8 m × 1.8 m. The floor should remain dry and artificial heating is incorporated.
(iv) Grower pens: Weaners are reared in grower pens from 10 weeks of age. To prevent growth setbacks and stress, regular movements should be avoided. Enough space should be provided.
(v) Boars pens: This pen is used for holding mature boar for mating. The space provided should cater for boar and sow during mating. A breeding crate is installed.
(g) Location
Sufficient distance between piggery, ponds, manure or used bedding disposal areas to prevent odours. Waste should not be drained into natural water sources such as rivers.
6.3 Fitting materials to construct aviary and pigsty
Activity 6.2: A research activity to find out the type of materials used to construct an aviary and pigsty, and how they are arranged
Note: In this activity, you will be required to use the observation and the findings from the field visit conducted in Activity 6.1 to carry out the following activities:
(i) Find out the materials used to make the aviary and pigsty from internet, library books and photographs.
(ii) Find out how the materials are arranged when constructing the shelters.
(iii) Discuss and record your findings.
(iv) Present your findings to the class.
(v) Take teacher’s summary notes.
Aviaries and pigsties require different construction materials:
(a) Choice of materials
When choosing the materials to construct aviaries and pigsties, the following factors should be considered:
• Suitability to the weather conditions of the area – Materials which resist the climatic condition should be chosen.
• Availability – It is important to use local materials which are easily available.
• Cost of the materials – Cost should be analysed against benefits. The poultry or piggery project should be able to pay for the cost of building within a specified period. Affordable materials should be used. Cost of maintenance after construction should be considered.
• Durability – Materials which are long lasting should be used to avoid frequent replacement.
(b) Skills for handling and using the materials when constructing should be available.
(c) Risks against fire, pollution of the surrounding areas and health of the birds and pigs should be a major factor to consider.
(d) Future modification and expansion of the building incase production level changes.
(e) Conformity with the existing government policies.
The following materials are used for construction of aviaries and pigsties:
(i) Timber:
This is used to construct the roof structure, walls and sometimes the floor if it is slatted. It should be treated so that it lasts longer. Timber can be used in form of posts, plywood frames or logs. Workability of the timber should also be considered. It should be easy to saw, shape or nail. It is easier to work with softwood when constructing aviaries and piggeries other than hard wood. It should be used in places where it does not come into contact with water frequently. This will avoid rotting.

(ii) Bricks: These are sun-dried mud blocks or they can be fire burned to make them last longer. They are used to construct the walls.

(iii) Cement
Cement is used to bind and hold the bricks together. It is hydrated with water and mixed with sand to make mortar. The mixture is placed between the bricks and also as plaster to smoothen the walls and floors.
(iv) Concrete
This is a mixture of sand, cement and stones commonly called gravel or ballast. Water is in correct proportions. When the mixture sets, it forms a hard stone-like structure. The relative proportions of cement, water and the aggregates influence the binding and the strength of the concrete. It produces a fairly expensive building when used.
Normal mixtures of the ingredients depend on where the blocks are to be used, for example, concrete floors, floor slabs and walls of pigs and poultry housing require 1:3:4 ratios of cement, sand and ballast.
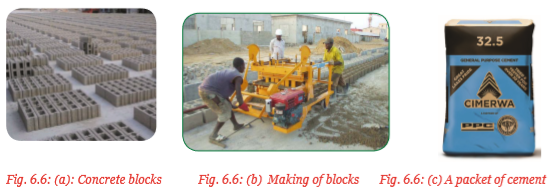
(v) Roofing sheets
These are used as roofing materials. They can also be used for the walls.
Materials used for roofing should:
• Be leak-proof and withstand the effects of wind.
• Be light in weight to avoid heavy pressure on the walls.
• Offer insulation against sound and heat.
• Be of good appearance to provide beauty.
The following materials can be used for roofing:
(i) Galvanised corrugated iron sheets.
(ii) Corrugated aluminium sheets.
(iii) Asbestos sheeting.
(iv) Thatch materials.
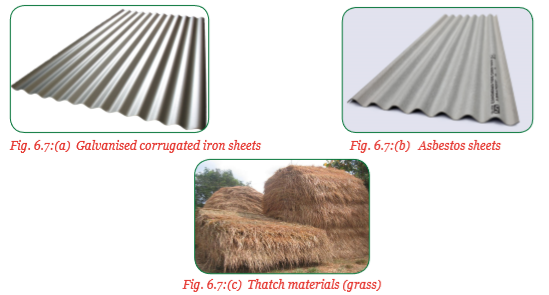
(vi) Wire mesh
Wooden wires are used to construct half of the wall on the leeward side of the shelter. This allows proper ventilation of the shelter.
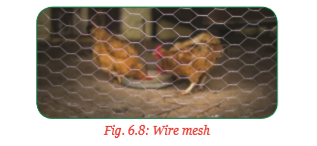
(vii) Hinges
These are used to fix doors, windows and gates. They allow free movement when opening and closing the house.
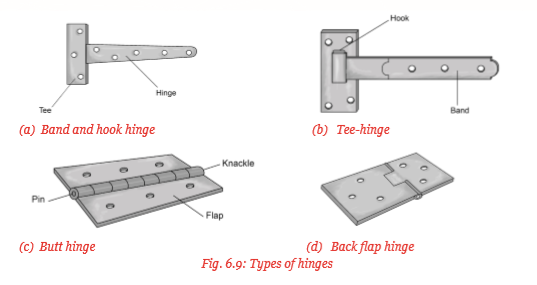
(viii) Fasteners
These are used to hold building materials together. They include:
(a) Nails – These are used to hold the timber together. Different sizes of nails are used depending on the thickness of timber.
(b) Screws – These are stronger than nails hence used where more joining power is required.
(c) Bolts and nuts – These are used where stronger joints are needed. They provide more strength than nails and screws. They should be used with washers to prevent the nuts from sinking into wood.

6.4 Aviary and pigsty construction
Activity 6.3: A practical activity to construct a standardised aviary and a pigsty
Using the materials provided, carry out the following activities:
(i) Collect all the materials required for the construction of either an aviary or a pigsty.
(ii) Construct a standard aviary or pigsty.
(iii) Discuss and record your findings.
(iv) Present your findings to the class.
(v) Take teacher's summary notes.
Proper planning and purchase of construction materials should be done. It is important to consider the type, size and the cost of house required.
(a) Aviary construction
To construct a deep litter poultry house for 200 birds, the following materials are required:
• Corrugated iron sheets 2 m long – 52 pieces
• Chicken wire mesh 30 m rolls – 5 rolls
• Wire mesh 4 ft × 8 ft – 3pcs
• Ballast – 7 tonnes
• Sand – 8 tonnes
• Cement – 8 bags
• Cedar posts (9 ft) – 30 pieces
• Offcuts – 150 pieces
• Nails 3 inches and 4 inches – 5 kgs
• 2 inches – 5 kgs
• Timber 2 inches × 4 inches – 360 ft
• 2 inches × 2 inches – 360ft
• Doors 0.9 × 2 m flush – 4 pieces
• Free range top rafters 9ft – 6 pieces
• Binding wire – 2 kgs
These materials can be replaced with any other alternative as long as they are cheap and easily available. A building has three parts; the floor, walls and the roof.
Construction of the floor
A smooth concrete floor is recommended. It is durable, vermin proof, easy to clean and disinfect. It should have a concrete thickness of 80 mm –100 mm. The concrete should be mixed at a ratio of 1:2:4 or 1:3:5. The floor base should be raised about 150 mm high with hardcore compaction before the concrete mixture is poured.
Construction of the walls
1. A stone or masonary wall is built from the concrete floor and raised about 1000 mm high all round.
2. Strong timber frames of 2 × 4 inches are set all round into the concerete floor about 500 mm deep. They should be at a distance of 1 mm from each other. These frames will support the roof and the timber offcuts, for the walls. The walls should be 2.5 m high at the front and 2 m high at the back.
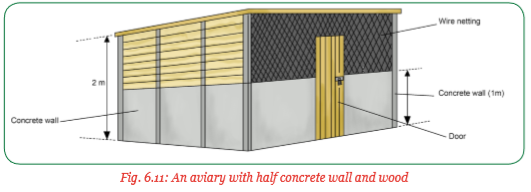
3. The offcuts are nailed on the timber frames about 2 m high at the back and 1.5 m high at the front to form the wall as shown in fig. 6.12. This is for a half gabble house.

4. A door space of 3 ft wide and 1.25 m high is left at the front. A ventilation space of 1 m high should be left at the front.
5. Chicken wire mesh is then nailed to cover the whole width of the ventilator space at the front.
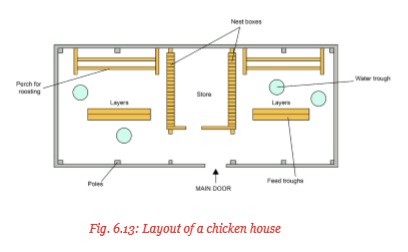
Construction of the roof
(i) Timber frames of about 2 × 2 ft are nailed on the timber set vertically into the concrete floor horizontally to form the roof. These horizontal timber are called purlins. Roofing materials are fixed on these purlins.
(ii) Corrugated iron sheets are fixed on the purlins. A roof overhang of 500 mm is allowed both sides to protect the walls from rain and sun.
Fixing the door
The door is fixed with 2–3 hinges and screws. The door should be timber and should open inwards. Fig . 6.14 shows the type of wooden doors to be used.
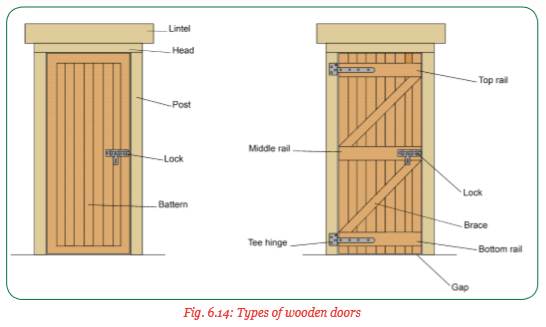
(b) Pigsty construction
A pigsty is divided into several units called pens which house different pigs according to age, sex and development stages.
Materials and quantities required
(a) The floor – The materials used for the floor and walls should be resistant to rotting to allow daily washing. They should also resist strong chemicals such as disinfectants and detergents. The floor should be smooth and flat to prevent injuries. The pens can be fitted with water troughs and feed troughs which can be permanent or movable to allow cleaning. Pens for boars are fitted with breeding crates while the farrowing pens require farrowing crates. The floor should have a slope towards the outside to allow drainage of water and urine.
(b) The walls – They should be concrete or raised about 30 cm high with concrete or stone to allow cleaning. The rest of the walls are wooden or made of iron sheets, where the ambient temperatures allow.
(c) The roof – It is made of properly insulated materials such as asbestos or iron sheets if insulation is provided.
House partitions
Pens are partitioned according to the requirement of the types of pigs to be housed. Each pen consists of:
(i) A resting area and feeding area.
(ii) A sunning and dunging area.
(iii) An area for exercises.
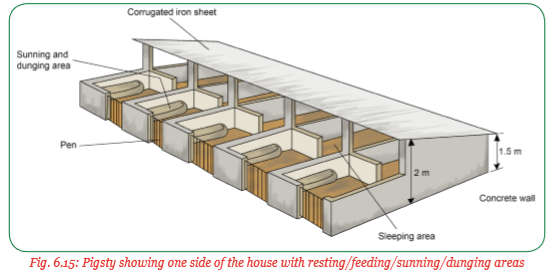
(i) The breeding or mating pen
This pen is used to house mature boar kept for service. It should be 6 m × 3 m. The pen is large enough to accommodate both the sow and the boar during mating.

(ii) The farrowing pens
Each pen should measure about 2.4 m × 1.52 m. It should be closed type with walls measuring 2.5 m to 3 m high and window space on the leeward side. It should have guard rails places 0.2 m from the ground and 0.2 m from the walls. A space of 1.5 – 2 m2 should be left as a the creep area.
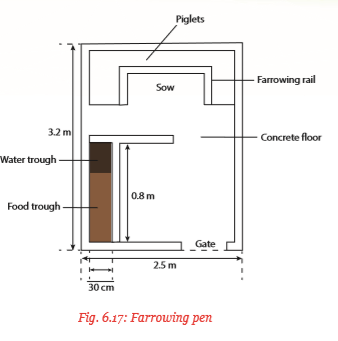
(iii) Growing or finishing pig unit Growers or finishers are mostly raised on concrete or slatted floor. Solid walls for the unit are about 1.2 m high while the rest is covered with wire mesh. The roof is about 2.4 m to 3 m high at the high side and 1.8 m to 2 m at the lower side. Each pen should be 2.4 m – 3 m × 9.3 m.
Other requirements
(a) Design – The building can be narrow with pens on one side and an alley on the other side as shown in figure 6.18.

The building can also be wide with several pens on both sides and an alley in the middle as shown.
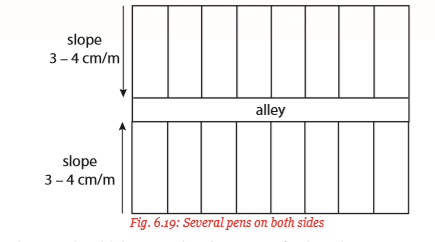
(b) Each pen should have a sleeping area, feed and water troughs and a dunging area. Walls for the dunging should be 1.5 m high to allow the sun. Thus the dunging area is also known as sunning area, where the pigs go to bask.
(c) Where the floor is concrete, it should slope about 3 cm – 4 cm towards the drainage gutters in the alley. Warm bedding should be provided in the sleeping area.
(d) Where possible, instead of concrete water troughs, automatic water nipples can be fixed.
6.5 Non-ruminant (poultry and pig) feeding
Activity 6.4: A field visit to a poultry and pig farm to find out their feeding and feeding plans
Make a visit to a poultry and pig farm and carry out the following activities:
(i) Find out food ingredients of poultry and pigs and how food is distributed.
(ii) Discuss and record your findings.
(iii) Present your findings to the class.
(iv) Take teacher’s summary note.
When kept under free range poultry forage for most of their feeds, they eat insects’ grain spilled by other animals and some plants around the farm. They are also given kitchen swill to supplement with forage. Poultry kept in confinement are fed from their houses. Their feed consists mostly of grain and other by-products from food processing industries.
Poultry and pigs are non-ruminant animals. Non-ruminant animals are animals with only one stomach compartment and therefore they cannot break down food with a lot of crude fibre. These animals are also referred to as monogastric. Like humans, poultry and pigs are omnivorous. Fig. 6.20 (a) and (b) show the digestive systems of poultry and pigs respectively.
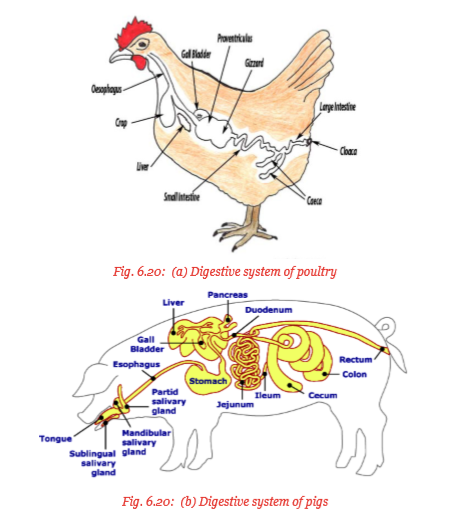
Unlike the ruminants, poultry and pigs do not have the rumen-reticulum complex which harbours micro-organisms for breaking down crude fibre. However, both have caeca which harbour a few micro-organisms. This means that they can handle very little fibre in their diet. The diets of poultry and pigs should consist of fibre from soft vegetables such as kales, cabbages and others, energy proteins, vitamins and minerals. These feeds are given as concentrates in form of mash, pellets or cakes. They are given in dry form and therefore poultry and pigs need to be given plenty of clean water always.
Exercise 6.1
The following illustrations show different types of feedstuffs given to animals in the farm. Study them carefully and identify the ones that are fed to poultry and pigs.
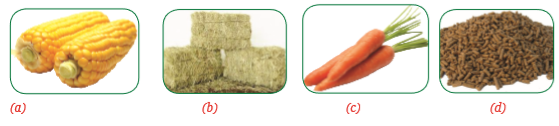
6.5.1 Food for pigs
Activity 6.5: A research activity to find out feed diet given to pigs
Use the references provided to carry out the following activities:
(i) Find out the type of feed that consist of the diet for pigs.
(ii) Discuss and record your findings.
(iii) Present your findings to the class.
(iv) Take teacher’s summary notes.
Pig diet is composed of the following:
(a) Grain offals
Like poultry, pigs eat grain offals such as grain hulls, bran germ, gluten, middlings, grain screenings, groats, mill run, maize hominy, rice polishings, wheat red dog and wheat shorts.
(b) Industrial by-products
The primary aim of using industrial by-products to feed pigs is to reduce the cost of raising pigs. A variety of by-products are available for pig diets. They include:
(i) Wheat middlings – These are by-products of flour milling industry. Their feed value is related to how much flour is removed from the grain when milling. They contain 15–17% crude proteins, 8.5% crude fibre, 4% fat and high in calories values. About 30% of pelleted feeds for pigs is made of midds. However, midds can be a significant source of mold and mycotoxin in swine feeds if not well stored.
(ii) Bakery by-products – These are by-products of baking and cereal industries. They vary in nutritive value depending on the source, for example, pasta, cookies, cereal fines and flakes. They should be given when fresh since they are high in fat and subject to oxidative rancidity. They can also become mouldy if stored for too long or not dried properly. Overdrying may reduce lysine availability. They contain 11% crude protein, 0.24 lysine, 10% fat and high calories value.
(iii) Meat and bone meal (MBM) – Pigs can be fed on meat and bone meal from ruminant slaughter industries. MBM from ruminants contain 50% crude proteins, 9% calcium, 4.4% available phosphorus, 2.08% lysine and high caloritic value.
(iv) Liquid by-products include:
- • Cheese whey: This is liquid dairy by-products which contain 5% dry matter, 12 – 13% crude proteins and 60 – 70 % lactose. The salt (sodium) contact may be variable and normally limits the use of whey as a pig feed. It is particularly good for feeding growing pigs. It is a by-product of making cheese from milk.
• Liquid wheat starch: By-product of extraction of starch and gluten from wheat. It contains 25% dry matter, 50 – 60% sugars and starch and 10–12% crude protein. Excessive intake of sugars may cause secretory diarrhoea in young pigs.
• Potatoes steam peel: Residue from the process of peeling potatoes using pressure and high temperature. It contains 14% dry matter, 13% crude proteins and 40 – 50% starch and sugars. However, solanine in potatoes might bring poisoning in young pigs. Too much of potatoes peel feed should be avoided.
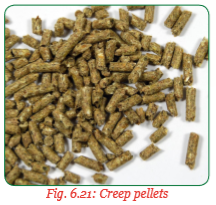
• Skim or whole milk: Whole milk contains 12% dry matter, 28% crude proteins and 4% lactose. Skim milk contains 9 – 10 % lactose.
• Ice cream mix: A fat rich by- product that is usually a blend of residual ice cream lots and other dairy ingredients. Contains 28% dry matter, 8% proteins, 20% fat and 60% lactose. It is necessary to monitor its nutritional level constantly since it can change.
• Semi-moist dried distillers grain with solubles (DDGS): It is an excellent alternative liquid feed in pigs. It reduces cost of feeding and does not require careful monitoring.
(c) Tubers
Root tubers constitutes a rich source of carbohydrate energy in the diet of pigs. The energy in roots is in form of starch which is similar in starch from cereals. The root tubers include:
• Cassava: Cassava roots contain 30 – 40% dry matter depending on variety, soil type, moisture and age of the roots, with starch being about 90% of the total dry matter. They have 2 – 4% crude protein. The roots also contain vitamin C, thiamine, riboflavin and niacin.
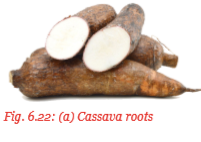
However, the presence of cyanogenic glycoside in cassava limits its use in pig diet though chopping, crushing followed by sun-drying removes the glycoside and the hydrocyanic acid. Boiling removes cyanide and glycoside. Drying with hot air removes both hydrocyanic acid.
The digestibility of cassava based diets has shown to be superior to that of cereals. Cassava are fed to pigs in form of cassava root meals, cassava root silage and as fresh cassava roots.
• Sweet potato: Sweet potato roots contain high starch content, vitamin A, ascorbic acid, thiamine, riboflavin and niacin. Fresh vines also provide up to 27% dry matter, 40% protein for growing and finishing pigs.
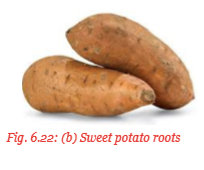
Sweet potatoes are fed as raw roots, cooked peeled and non-peeled. The cooked forms are more digestible than the raw and hence increases average daily weight gain faster. They can be used to completely substitute maize.
(d) Blood flour
This is also known as blood meal. It is a dry powder made from animal blood. It usually comes from livestock slaughter house by-product. It is collected during slaughter, dried and made into blood meal.
Blood meal contains protein and is used to supplement diets based on cereal grain plant and by-products and forages. The method used to dry the blood does not affect the nutritional quality of the protein in the meal.
Methods of drying blood
(i) Batch dry rendering – It involves the cooking of whole blood in a jacketed cylindrical cooker that is heated indirectly by steam at a high pressure.
(ii) Ring dried rendering – This involves coagulating the blood by steam heating. The coagulum is centrifuged and dried with hot gas in a ring drier.
(iii) Spray dried rendering – Spray dried blood meal is manufactured using a similar
method for skim milk powder. In this case, the liquid blood is sprayed inside a warm chamber and then becomes fine powder instantly.

Ring dried and spray dried blood meal have a greater content of total and available amino acids which is of better nutritional quality. Blood meal can also be solar or oven dried by small-scale farmers. Blood is collected in large pans and boiled slowly while constant stirring. It is reduced to a moisture content of 10 –12% and then spread on a concrete floor for sun-drying.
It is fed mixed with bran or other by-products from cereal grains. Drum drying is also done where raw blood is made to form a free-flowing slurry that is deposited onto the surface of a heated drier drum to form a film. The film is rapidly dried and scraped off and made in flakes.
(e) Grasses
Pigs pick some grass from the sunning yard and when foraging. However, the digestive system is not adopted to digest the cellulose in grass since they have a simple stomach. Therefore, pigs make little use of grass. Fresh grass contain a lot of vitamins and water. The grass provides the roughage needed to facilitate the movement of food through the gut and, therefore, prevent constipation.
(f) Concentrates
This is a feedstuff which contain high nutritional value and little fibre. There are two types of concentrate feeds, the energy concentrates and the protein concentrate. While the energy concentrates contain high carbohydrate content for energy, the protein concentrate are rich in proteins. The concentrates fed to pigs are well balanced with carbohydrates, proteins, vitamins and minerals. The type of concentrate feeds given to pigs depends on the age, size, breeding stage and environment.
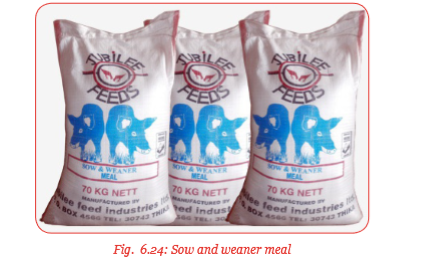
(g) Water
Water is the most abundant compound and performs important functions in the body of pigs. Pigs require water for various reasons, which include, metabolic functions, adjustment of body temperature, movements of nutrients into the body tissues, removal of metabolic waste, production of milk and for growth and reproduction. In general, pigs require 9 – 23 litres of water per day depending on the production stage.
These are coarse residues obtained after oil is extracted from the oil seeds. They are rich in proteins, minerals and are valuable as feeds. The feed is in form of a solid compressed/solid cake. There are different types of oil cakes:
(i) Groundnut cake: This is widely used in pig feed due to its low fibre and high protein content. However, it has a high risk of aflotoxin if poorly stored.
(ii) Cotton seed cake: Levels of cotton seed cake fed to pigs and poultry go up to 10% of total feed intake.
(iii) Sunflower seed cake: These are used freely to balance diets of pigs and poultry since they have no toxic compounds.
(iv) Palm kernel cake: This is low in protein content as compared to the other oil seed cakes.
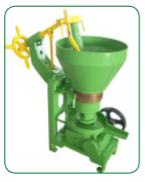
Fig. 6.25: Oil pressing mill (extraction)
6.5.2. Food for poultry
Activity 6.6: Research activity for find out food diet for poultry
Using the reference provided, carry out the following activities:
(i) Find out the type of food that consist of the diet for poultry.
(ii) Discuss and record your findings.
(iii) Present your findings to class.
(iv) Take teacher’s summary notes.
Poultry diet consists of the following:
(a) Grain offals (grain by-products )
The common cereal offals or by-products fed to poultry include:
(i) Grain hull – This is an outer covering of the grain seed. The most common hulls are from rice and oat milling. This is because these cereals have a hull of 25% in the seeds. Sorghum and other cereals produce a hull of 3% – 6% of the total grain weight. Grain hulls are low in energy and crude proteins but a good source of crude fibre. Hulls are given to poultry as roughages.
(ii) Bran – This is the coarse outer covering of a seed. It also contains a little flour in it. The most common bran are corn, rice and wheat. Nutritionally, bran contains fibre and protein.
(iii) The germ – This is the embryo of the seed. Germ meals are high in lipids and proteins. The most common feed germ meals are obtained from maize and wheat.
(iv) Gluten feed or meals – These are by-products of wet-milling. Gluten is the substance that remain after the removal of the germ and the starchy endosperm. Gluten meals are sources of proteins. The most common cereals used for gluten meals are maize and sorghum.
(v) Middlings – These are by-products from the production of flour. They include bran, shorts, germs, flour and tailings, wheat and rye are the most cereals that produce middlings. Wheat middlings should contain atleast 9.5% crude fibre.
(vi) Grain screenings – These are mixtures of different materials that contain a minimum grain content of 70%. Grain screenings can include various combinations of dust, chaff, weed seeds, broken grains, unsound grains and other materials separated during cleaning and processing the grains.
(vii) Groats – These are the grain seeds without the hull. The most common are oat and rice groats. Groats contain relatively low crude fibre content and a higher percentage of protein than the original grain.
(viii) Mill run or mill by-product – This consists of bran, shorts, germ, flour and tailings. It is a by-product of most of the cereal grains.
(ix) Maize hominy feed – This include maize bran, germ and flour. It contains a higher percentage of both crude proteins and fibre than the original maize grain. Maize hominy is, however, lower in crude fibre content compared to other by-products.
(x) Rice polishing – These are residues created when polishing rice to make it white. The polishings are low in crude fibre though high in fat and are good source of vitamin (B1) thiamine.
(xi) Wheat red dog – This is a by-product of milling wheat and includes tailings with some bran, germ and flour. Has a fibre content of 4%.
(xii) Wheat shorts – These are also by-products of wheat milling which include some bran, germ and flour and tailings. Have a maximum crude fibre content of 7%.
(b) Insects
Non-confined poultry fed for themselves. The larger part of their food consists of insects, vegetation and sand particles. Confined bird can also be raised on insects. The insects provide the birds with protenous feed, iron, calcium and omega. Insects such as silk worms, locusts, crickets, fly larvae, earthworms and grasshoppers are safe to feed poultry.

(c) Fodder for feeding poultry
Poultry is a class of birds which are non-ruminants and, therefore, cannot handle a lot of roughages. They can be fed on sprouted fodder.
Sprouted fodder – These constitute grains which have been sprouted to produce seedlings. They are allowed to grow for 7 –10 days. They are fed to poultry when they have grown their second leaves. The commonly sprouted cereal grains include wheat barley and oats. Legumes include sunflower, Lucerne, beans, lentils, clover. Sprouting increases the nutrients in the grains by almost six times. It also increases digestibility.
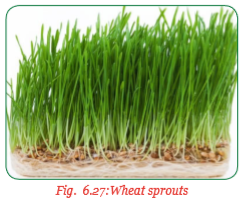
Feeding sprouted fodder to supplement the normal layers mash has the following benefits:
• It reduces the overall feed costs.
• Birds produce better tasting eggs with a more vibrant yellow coloured yolks.
• Improves the laying percentage.
• Improves the health condition of the birds.
Procedure for sprouting fodder
(i) Select the type of grains required, for example, wheat, barley.
(ii) Soak the grains in water for 12–24 hours.
(iii) Drain off the water and rinse the grains.
(iv) Pour the soaked grains on a shallow tray or a wet gunny bag. The layers of grains should not exceed 2.5 cm deep. This allows air to flow easily and prevents the growth of moulds.

(v) Set the grains in a sunny area. (vi) Rinse and strain the seeds through a fine wire mesh 2–3 times a day. This should be done for the first few days until roots start to grow. (vii) Once the grains start to sprout, the roots can be seen on the underside with green fodder on the top. The sprouts should not be distributed. (viii) A growth of about 10 cm –15 cm of the fodder will result in about one week. It is now ready to be fed. (ix) Flip the fodder mat out of the tray and chop into small pieces for the chicken.
Chick fodder cakes
Sprouted fodder is also used to feed brooder chicks. It is fed in form of “fodder cakes”.
It has the following advantages:
(i) It is nutritious.
(ii) It is inexpensive.
(iii) It keeps the chicks busy.
The “fodder cakes” are small containers which may be round or rectangular in shape. It is grown using the same procedure as the sprouted fodder.
Graminae’s grains
They are grains from cereal crops. The most important cereal grains being maize, rice, wheat, barley and sorghum. They are edible seeds from the grass crops. These crops belong to the family graminae agronomically. The seeds mostly form a caryopsis which is a fruit with fused testa. The grains are processed into products such as starch, malt, biofuel and sweeteners (high fructose syrup). Their by-products form the bulk of poultry feed called grain from offals.
Blood flour
A dry powder made from animal's blood which is also fed to poultry as well as pigs which are described under food for pigs on page 290 of this book. It is fed to different types of poultry as follows:
• In broilers – Blood meal is a good protein source which is used to replace fish meal. It results in improved performance and greater profits.
• Laying hens – Blood meal is palatable as other animal products. Sundried blood meal is given at 4.5% of the birds diet. It increases feed intake, live weight gain, egg weight and yolk colour. It also improves iron (Fe) content in yolks.
However, it should not be used to replace soyabean meals fully in layers diets since it can cause undesirable flavour in eggs.
(f) Oil cakes
Poultry is also fed on seed cakes which are compressed by-products of oil extraction. The most common oil seeds used as cotton seeds are sunflower, groundnuts and palm kernel cake.
6.5.3 Pig feeding according to the development stage
Activity 6.7: A research activity to make feeding plans for pigs and feeding pigs according to the development stage
Using the references and materials provided, carry out the following activities:
(i) Find out the feeding plans for pigs according to development stage from the internet, library books and textbooks.
(ii) Make feeding plans for pigs according to different stage of development.
(iii) Use the feeding plans made to feed pigs according to different stage of development.
(iv) Discuss and record your findings.
(v) Present your findings to the class.
(vi) Take teacher’s summary notes.
Pigs have fast growth rate and reach maturity within 5–7 months. They are prolific and provide a rapid rate of returns to capital invested. However, pigs require high quality well balanced feeds. They tend to compete with humans for feedstuffs such as cereal grains, legumes and tubers, since they are monogastric.
The nutritional needs for pigs change each week for nursery piglets and each month for the grower pigs. The nutritional quality of the feed especially protein level should be correct for the pigs at each stage. The protein requirement for the different stages are as follows:
• Piglets – 18–20% protein
• Growers – 16% protein
• Sows – 15% protein
The type of concentrate feed given to the pigs depends on the stage of growth as follows:
(i) Piglets – 1 day to 8 weeks old; are given creep pellets.
(ii) Growering pigs are given sow and weaner meal.
(iii) Fattening pigs are given pig finisher meal.
(iv) Breeding pigs are given sow and weaner meals.
Creep feeding
Creep feeding is specifically formulated for piglets from 10 days old to weaning at 8 weeks old. It is easily digestible and is high in proteins about 20–23%. It is low in fibre content. The name creep is derived from the fact that it is placed in the section of the pen called creep area. This is where the piglets can reach but not the sow. Creep feeding should start when the piglets are 10–14 days of age and continue up to weaning. It introduces the young piglets to dry feed consumption.
Feeding orphaned piglets
Piglets can be orphaned due to the death of the mother after farrowing or from lack of milk in the mother due to poor health. They can be raised as follows:
(i) Feeding with milk replacers where available.
(ii) Hand feeding or bottle feeding with cow’s milk.
(iii) Foster mothering; in which case the foster sow should have farrowed within 48 hours of the birth of the orphaned piglets.
Feeding the growers
Growers are the weaned pigs which are prepared for sale, slaughter or breeding. They are fed on a complete balanced diet in sufficient quantities. They are given sow and weaner meal containing 16% protein immediately after weaning. However, during the finishing period from 23 kg to slaughter weight, they are fed on pig finisher meal with 14% protein. They should be given plenty of clean water in water trough or nipples.
Feeding the breeding stock
The growing pigs which are being prepared for breeding are called the breeding stock. They include gilts and young boars. Older breeders such as pregnant and dry sows are also part of the breeding stock. They are fed on sow and weaner meal which is well balanced at a rate of 1.8 – 2 kg per day. It contains 14% protein.
Lactating gilts and sows should be fed 15% crude protein diet at the rate of 3 kg per day for the sow and an addition of 0.25 kg per day for every piglet. The quantities of feed given to each group of pig is as shown in table 6.1.
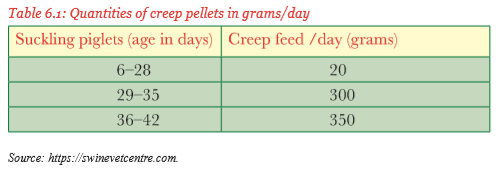
Creep pellets should be mixed gradually with pig finisher meal for the fattening pigs from 43–56 days (7–8 weeks) of age for gilts and barrows meant for breeding.
Creep pellets should be mixed gradually with sow and weaner meal from the age of 43–56 days (7–8 weeks) in preparation for weaning. The quantities of feed given to the fattening pigs is shown in table 6.2.

Pregnant (in pig) sows and gilts should be given sow and weaner meal according to stage of gestation as shown in table 6.3.
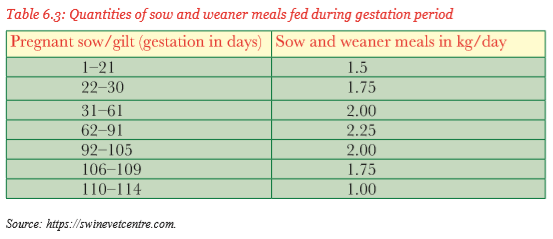
Note that sow and weaner meal is reduced for the pregnant sow or gilt so that it is feeding on 1kg by the end of gestation. The reduced feed is replaced with bran at the same rate to avoid constipation. Lactating sows should be given sow and weaner meal.
Table 6.4 shows the feeding plan for lactating sows.
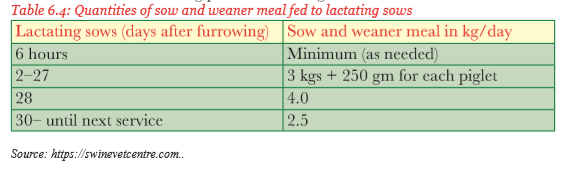
The frequency of feeding per day should be as follows:
1. Piglets (1 day – 8 weeks old) should be fed throughout the day.
2. Weaned piglets should be fed 4 times/day.
3. Growing pigs are fed 3 times per day.
4. In pig and lactating sows should be fed 2 times a day.
5. Boars should be fed 2 times a day.
Water requirement
Clean water should be given adilibutum, that is, throughout the day and night. Pigs should drink water as they require since the feeds they eat are dry. Table 6.5 shows the amount of minimum water required per pig per day.
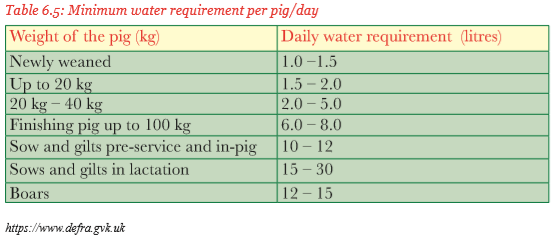
6.5.4 Poultry feeding according to stage of development, species and breed
Activity 6.8: A research activity to make feeding plans for poultry to stage of development, species and breed
Using the references and materials provided, carry out the following activities:
(i) Find out the feeding plans for poultry due to stage of development, species and breed from library books, internet and your experience from the farm visit.
(ii) Make feeding plans for poultry according to different stage of development, species and breed.
(iii) Use the feeding plans made to feed poultry according to different stages of development, breed and species.
(iv) Discuss and record your findings.
(v) Present your findings to the class.
(vi) Take teacher’s summary notes.
Poultry production is divided into three categories:
(i) Keeping layer birds for egg production.
(ii) Keeping broiler birds for meat production.
(iii) Keeping indigenous birds for meat and eggs.
In all these cases, feeding of the birds depend on the species, type of breed and the stage of development. There are three types of concentrate feeds given to poultry depending on the development stage.
(i) Starter feed – for layer chicks from a day old to 8 weeks.
(ii) Growers mash – for the growing birds.
(iii) Layers mash – for the laying birds.
(iv) Breeders mash – for the birds kept for the production of fertile birds.
(v) Broilers mash – for the table birds.
(vi) Broilers finisher mash – for the table birds prepared for slaughter.
Feeding plan for layer birds
Chick and duck mash should be fed to the birds in the first eight weeks. This should be followed by growers mash up to 2 weeks before the start of lay. Birds are then put on layers mash up to the end of production. During the changes of the rations, the two rations should be mixed so that the change is gradual.
Table 6.6 shows layers feeding plan.

Feeding plans for broilers or meat birds
Broiler birds have been genetically selected for rapid growth rate and efficient feed conversion. They are fed throughout to ensure full market size within a specific period.
The feeding of broiler involves two diets and uses phase feeding system as follows:
(i) First 2 weeks – broilers starter mash.
(ii) The 3rd week – feed broiler finisher mash.
(c) Each level is fortified with toxin binder to kill toxins which may be contaminating the feed. It also contains probiotics to kill pathogens.
The quantities of each feed per bird is shown in table 6.7. Water is given adilibitum.
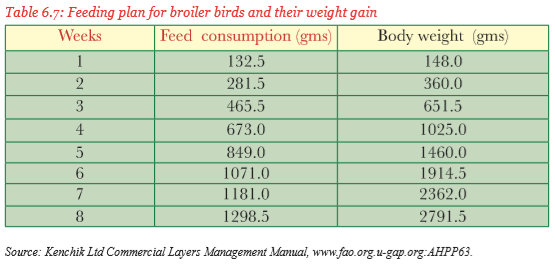
6.6 Pig and poultry, parasites and diseases
Activity 6.9: A field visit to farms where pigs and poultry are reared to find out parasites and diseases of pigs and poultry, and how they are controlled
Make a visit to farms where pigs and poultry are reared and carry out the following activities:
(i) Find out the type of parasites and diseases that affect pigs and poultry.
(ii) Observe the parasites and diseases that attack pigs and poultry and match each disease or parasites with the characteristics.
(iii) Discuss and record your findings.
(iv) Present teacher’s summary notes.
Pigs and poultry parasites – These are parasites which attack pigs and poultry in the farm. Pigs and poultry parasites are divided into two categories namely;
(a) External parasites also referred to as ecto-parasites.
(b) Internal parasites also referred to as endoparasites.
6.6.1 External parasites of pigs
These parasites attack the external part of the body either on or under skin. Pigs are attacked by the following external parasites:
• Ticks
• Mites
• Lice
• Fleas
(i) Ticks
The type of tick that attacks pig is known as the bont legged tick (Amblomma spp). It is common in confined pigs.
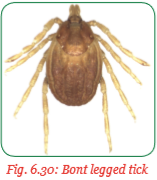
Preferred sites – The larvae and nymphs are found attached under the tail, udder, scrotum and tail bristles.
Disease transmitted – This tick transmits sweating sickness in pigs which also affects cattle, sheep and goats.
Control – Spraying and dusting the pig and bedding with acaricides.
(ii) Sarcoptic mange mite
This is a small greyish-white, round parasite of about 0.5 mm in size.
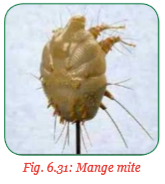
Sites of attack – It is found encrusted in the ears. It is spread to the piglets by the sow. It dies quickly if the pen is vacated for 5 days.
Damage – It causes severe hypersensitivity or allergy in sow.
Symptoms
(i) The pig shakes the ears vigorously and severe rubbing of the skin against the pen walls.
(ii) It produces small red pimples on the skin, covering the whole body.
(iii) In chronic form, there is encrustations on the ears and sides of the neck, elbows and the top of the neck.

Control
• Maintain biosecurity measures, that is, the incoming stock should be thoroughly investigated and sprayed.
• Spraying with miticides regularly.
• Leave the pen – vacant for three days clean and disinfect thoroughly.
(iii) Lice – Pig lice (Haemotopinus suis)
It has piercing and suckling mouth parts. It is greyish-brown in colour with black markings.
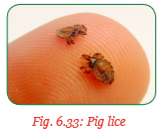
Sites of attack – The louse is seen in all parts of the body especially the skin folds of neck, jowl, flanks, inner legs and ears. It is spread through contact during huddling and from infested pens.
Damage – Causes anaemia in young pigs and affect growth rate and feed efficiency.
Control
• Spray with acaricides, although the infective eggs are resistant but a repeat spray will kill the hatched larvae.
• Dress bedding with granules of insecticides.
• Clean and treat pens before use.
(iv) Ringworms
Fungal disease found in both outdoor and indoor pigs. It affects pigs at all ages.
Cause – Microsporum nanum is the most common fungal infection in pigs. Higher infections are experienced in unhygienic conditions, where the stocking rate is high with high humidity and dirty bedding.
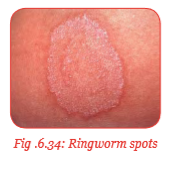
Symptoms
(i) Lesions found all over the body.
(ii) Circular spots which enlarge to cover a big area.
(iii) The skin turn reddish to light brown.
Control
• Maintenance of proper sanitation through removal of used dirty and wet bedding.
• Provide antibiotics to infected pigs.
(v) Other external parasites
• Mosquitoes – bite and irritate the pigs.
• Flies – cause annoyance and may transmit infectious diseases such as salmonellosis.
Irritation and annoyance may through the pig off-feed leading to poor growth and loss of weight.
6.6.2 Internal parasites of pigs Pigs
performance is influenced by internal parasites greatly. They can also kill young pigs.
Effects: Internal parasite infestations in pigs lead to the following effects:
• Loss of appetite.
• Reduced daily weight gain rate.
• Poor feed conversion.
• Increased susceptibility to pathogens that cause diseases. Examples of internal parasites in pigs include:
1. Pork tapeworm (Taenia solium)
This tapeworm is an intestinal zoonotic parasite prevalent in areas where pork is eaten. The adult worm is white, flat with segmented body. It has a distinct head called scolex with suckers and hooks for attachment. It uses two hosts to complete its life cycle. The intermediate host is the pig and humans are the definitive hosts.
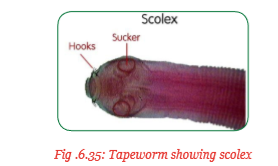
Transmission – It is transmitted to pigs through human faeces or contaminated fodder and to humans through uncooked or undercooked pork. Its life cycle is as follows:
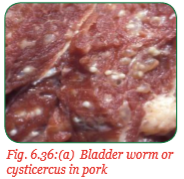
• Pigs ingest infective eggs which develop into larvae.
• The larvae enter into the muscles of the pig and form a bladder worm called cysticercus. It has an inverted scolex.
• Once the pork is eaten by human, the cystercercus everts itself and attaches on the walls of the intestines.
• It grows proglottids which are shed off when mature from human with faeces and the cycle repeats again.

Symptoms
(i) General emaciation.
(ii) Scouring especially in piglets.
(iii) Oedematous swelling on the muscles especially the jaw muscles.
(iv) Parasite segments (proglottids) are seen in the feaces.
(v) Anaemia especially in piglets.
2. Red stomach worm (Hyostongylus rubidus)
This is a blood sucking nematode which is found in the pasture. They invade the stomach and may lead to gastritis, submucosal oedema and formation of ulcers.
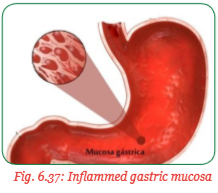
Symptoms
(i) Loss of body condition.
(ii) Thin sow syndrome.
(iii) Blood stained faeces due to bleeding of the stomach ulcers, as shown in fig. 6.39.
3. Large roundworm (Ascaris suum)
This is the most important gastro-intestinal worm of pigs. It is common in growing pigs than in adult pigs. Female worms are large than the males.

Damage
Heavy infestation may lead to blockage of small intestines and bile ducts.
Symptoms
(i) Loss of appetite.
(ii) Vomiting.
(iii) Death if small intestines are ruptured.
(iv) Growth rate and feed efficiency are depressed by up to 10%.
(v) Haemorrhage of the liver caused by larvae, migration through the liver to the white spots called ‘milk spots’ appear on the liver, as shown in fig. 6.41(b).
(vi) Migrating larvae cause pneumonia when they move to the lungs. This may lead to death.
(vii) May suffer from asthmatic cough with difficult breathing.

4. Other parasites include:
(i) Kidney worm (Stephanurus dentatus)
(ii) Whipworm (Trichuris suis)
(iii) Intestinal threadworm (Strongyloides ransomi)
Internal parasite control
To control internal parasites in pigs, good sanitation and adequate nutrition are important measures. These help in reducing the adverse effects of infestation. The major method of transmission is through contamination of food, soil or bedding with faeces or urine. The usual disinfectants may not kill eggs, larvae and worms hence the following measures:
• Thorough cleaning of the houses and equipment with detergent and steam or hot water.
• Burning of infected surfaces and bedding materials.
• Use of hydrated lime mixed with water to wash all the surfaces and equipment.
• Therapeutic treatment of pigs with anthelmintics can be carried out through deworming. However, this is a temporary measure unless the conditions for trasmisison are completely removed.
• For tapeworm control, meat should be cooked properly, freezing to 40oC for 24 hours, good hygiene with proper disposal of human waste.
6.6.3 External parasites of poultry
(i) Chicken mites – These are also called red mites or roost mites. They suck blood from the birds. Egg production drops and young chicken may die. Chicken mites hide in cracks and crevices during the day.
(ii) Scaly leg mites – They cause scaly legs and live under these scales on the feet and legs of chicken. Heavy infestation may cause rough appearance and enlargement of the legs.
(iii) Poultry lice – The most common type of lice poultry is body louse. Other lice that attack poultry include fluff, wing, shaft and head lice all of which are chewing lice. Infected birds loose weight, egg production, drops and young birds may die.
(iv) Fowl tick – These ticks are dark-coloured blood suckers. They hide in cracks during the day and attack the birds when sleeping.
(v) Fleas and bedbugs – These are also blood suckers and may become a problem in the poultry house. Fleas stay on the birds while bedbugs feed on the bird at night and hide during the day.
(vi) Flies – These do not attack poultry. However, they may become nuisance around the house and heavy infestation maybe a problem with neighbours.
Exercise 6.2
Table 6.8 shows photographs of external parasites of poultry. Study them carefully then identify each one of them and state their effects in poultry.


Control of external parasites
• Insecticides are used in dust or spray form to dust the whole house and the birds.
• Pets, vermin and flying birds should be kept off the poultry house.
• Manure and litter should be removed and disposed of properly.
6.6.4 Internal parasites of poultry
Internal parasites that affect poultry include large round worms, crop worms, cecal worms, tapeworms, flukes, gapeworms and gizzard worms.
(i) Large roundworms
These are nematodes which spend their entire life cycle in the small intestines. The eggs pass out with dropping and have to go through a period of development before they infect other poultry. When in large numbers, they may block the movement of food through the intestines.
(ii) Tapeworms
Eggs of tapeworms develop in an intermediate host such as flies, beetles, slugs, earthworms or grasshoppers before they are picked by the birds. Poultry is the definitive host. The eggs develop in small intestines of the chickens and start laying eggs which pass out with droppings. This parasite also affects quails, turkeys and guinea fowls.
(iii) Gizzard worms
Gizzard worms have an indirect life cycle. That is, the eggs develop in an intermediate host such as grasshoppers, weevils and certain species of beetles. When the infected host is swallowed by poultry, the larvae develop into a mature parasite and invade the gizzard of the chicken. They lay eggs which pass out with droppings. This parasite also affects turkeys.

(iv) Cecal worms
They are found only in the ceca of chicken. The chicken, ingest eggs from the soil or by eating eggs from the soil or by eating infected earthworms. The parasite also affects ducks, geese, guinea fowl, pea fowl, pheasants and turkeys.
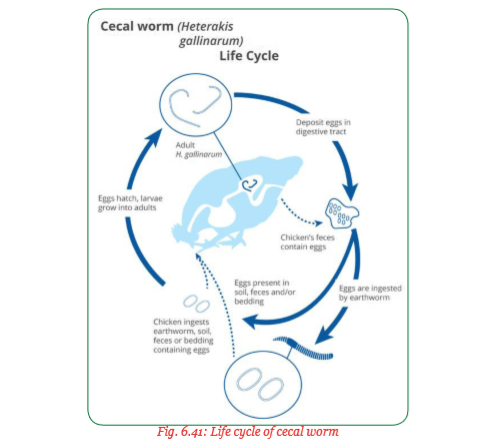
(v) Gape worm
These worms use two hosts to complete their life cycle. They use earthworms, snails, slugs, houseflies or centipedes as intermediate host and poultry as definitive host. They also occur in turkeys, pheasants, guinea fowls and other wild birds. The adult males and females are permanently attached to each other. They are found attached to the lining of the trachea and eggs are coughed out by the birds or pass out with droppings.
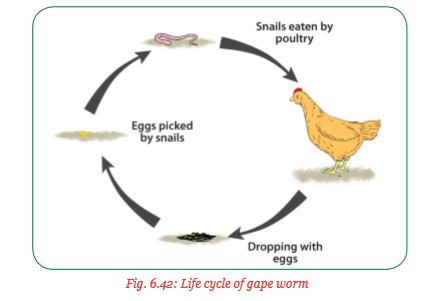
Control of internal parasites in poultry
This can be done through:
• Maintaining proper sanitation.
• Controlling insects and keeping wild birds away.
• The houses for confined birds should, where possible, have wire mesh or be of slatted floor. This keeps off the droppings from the birds.
• The flock should always be checked for the signs of infection in birds and precautions taken.
• Birds should be periodically dewormed with recommended antihelmintics.
6.6.5 Pig diseases
Activity 6.10: A research to find out the diseases that commonly attack pigs, their causes, symptoms, damages and control measures
Use the references provided to carry out the following activities:
(i) Find out the diseases that attack pigs, their causes, symptoms, damages and control measures from the internet, library books, video tapes and colour photographs.
(ii) Discuss and record your findings.
(iii) Present your findings to the class.
(iv) Take teacher’s summary notes.
Disease is a condition where the harmony in the function of body organs is upset and disturbed. It can result in large losses of profit for pig and poultry keepers. In prevention, sound knowledge of the disease, characteristics and use of modern drugs is important.
The most common pig diseases include taeniasis pasteurellosis, brucellosis, porcine epidemic diarrhoea and coccidiosis.
(a) Taeniasis
This disease affects pigs from tapeworm infestation. It is also known as cysticercosis. Cysticercosis is a tissue infection caused by the larvae stage cysts of the tapeworm.
Cause
Pigs develop cysticercosis from swallowing the tapeworm eggs in the feaces from an infected human. The eggs hatch in the small intestines and larvae migrate throughout the body forming cysts in the muscles. The cysts can form in the brain causing a condition called neurocysticercosis.
Symptoms
The symptoms vary depending on the part of the body where the cysts form.
(i) Muscles – If the cysts form in the muscles, there will be lumps on the under skin, which may be visible or felt.
(ii) Eyes – Cysts may float in the eyes and cause blurred vision or a detached retina.
(iii) Brain, spinal cord neurocysticercosis which cause seizure, loss of body balance and death.
(iv) Liver and lungs – The cysts cause cysticercosis disease or fever.

Control
Control tapeworm infection in human through proper sanitation.
(b) Pasteurellosis
This disease is also known as Haemorrhagic septicaemia. It is an infectious disease affecting cattle, sheep and pigs. It is common where animals are overcrowded. Young animals are more suspectible than older animals.
Cause
It is caused by the bacterium Pasteurella septicum
Symptoms
The acute form of the disease is characterised by:
(i) A rise in body temperature of as high as 42°C.
(ii) Muscular twitching.
(iii) Swelling in the throat causing difficulties in breathing.
(iv) Loss of appetite.
There may be diarrhoea with blood spots in the chronic form.
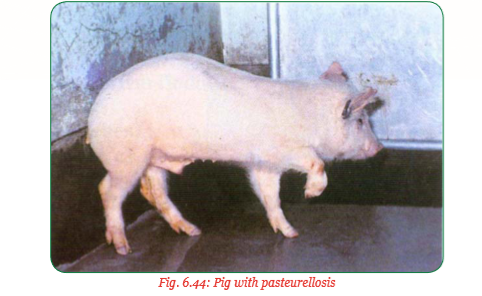
Damages
Loss of animals through death which may occur in 12–36 hours.
Control and treatment
Treatment can be given using sulphonamides or antibiotics. Animals can be vaccinated with a P1-3/pasteurella vaccine every six months. Proper housing and feeding also control the disease. However, chronic cases should be slaughtered and destroyed.
(c) Brucellosis
Also known as contagious abortion. It is a bacterial disease affecting pigs, cattle, sheep and goats. It is zoonotic, contagious and infectious.
Cause
Brucellosis is caused by the bacterium Brucella suis in pigs. It is spread through ingestion of infected tissues or fluids. Infected boars may transmit the disease to the sows during service.
Symptoms
Abortion of about 0–80% of the infected cases which may occur early in gestation and may not be detected. Sterility in sows, gilts and boars can occur. Orchitis and reduced libido in boars.
Control and prevention
• Testing and culling or isolating the cases that test positive.
• Slaughtering and burning the infected animals.
• Intensive disinfection after handling infected materials.
Damage
Large loss of animals through death.

(d) Porcine epidemic diarrhoea (PED)
This is a condition of severe diarrhoea which affects pigs. It is not zoonotic hence does not pose any risk to other animals including humans.
Cause
It is caused by a coronavirus which infects the cells lining the small intestines of a pig. The virus is spread via the faecal-oral route, that is, the infected faeces of pigs. This faeces can be brought in by trucks, human boots and clothes. The virus is not systematic and does not enter other tissues.
Symptoms
In adult swines, the disease is mild and mortalities are rare. The pigs may suffer from acute watery diarrhoea and mild fever, loss of appetite and listlessness. Newborn piglets die within five days of infection. This disease has high mobility rate but low mortality rate in pigs.
Control
• Provision of clean dry, draught-free environment in pig houses.
• Give plenty of clean drinking water.
• Drinking water can be supplemented with electrolytes.
• Vaccination and proper disinfection.

(e) Coccidiosis
This is a protozoan disease that attack all animals including man.
Cause
Coccidiosis is caused by a group of protozoan parasites known as coccidia of Eimeria spp. Pigs are affected by a specific coccidian which infects the lining of the alimentary canal. It is common in pens that are not cleaned well.

Symptoms
The disease is common in sucking piglets 5–15 days old but occasionally in finishers and adults. Diarrhoea in piglets due to damage caused to the walls of the small intestines. This is followed by secondary bacterial infections. The animals produce faeces which vary in consistency and colour from yellow to grey-green or bloody according to the severity of the disease.
Damage
The parasite damages the walls of the pig's intestines leading to secondary infection of bacteria and virus. These infections may kill the pig. They become thin quickly and die from dehydration.
Control
• The sick piglets should be separated immediately from the others.
• Piglets area should be kept dry, warm and clean always and disinfected.
• Provision of electrolyte fluid.
Exercise 6.3
Table 6.9 shows illustrations of some practices used to control diseases in pigs. Study them carefully and then identify the practices being carried out and the disease(s) controlled.

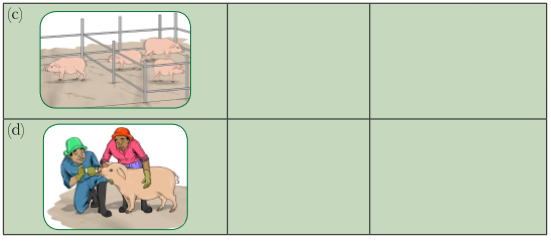
6.6.6 Poultry diseases
Activity 1 6.11: A research activity to find out the diseases that commonly attack poultry, their causes, symptoms, damages and control measures
Use the references provided to carry out the following activities:
(i) Find out the diseases that attack poultry, their causes, symptoms, damages and control measures from the internet, library books, video shows and colour photographs.
(ii) Discuss and record your findings.
(iii) Present your findings to the class.
(iv) Take teacher’s summary notes.
The poultry kept in the farm have a certain risk of introduction of disease causing organisms. This risk occurs because of the interaction between the infectious organisms and the birds. The most common diseases of poultry reared in the farm include the Newcastle disease, pullorum, coccidiosis, mycotoxicosis and Marek’s disease. The measures used to control these diseases largely depend on size of the farm, link to the other farms, physical facilities and the operational procedures implemented.
(a) Newcastle disease
It is also known as respiratory nervous disorder. This disease is very contagious and infectious. It affects birds of all ages and most of them die. It is a notifiable disease in Rwanda.
Cause
Newcastle disease is caused by a virus paramyxo virus which affects chickens and turkeys.
Symptoms
(i) Respiratory disorders such as sneezing and gasping.
(ii) Nervous disorders manifested by tremours of the entire body.
(iii) Partial paralysis of legs appear.
(iv) Constant twisting of the head or circling motion in some birds.
(v) Older birds show frequent coughing, throat rattle, lack of appetite and decline in egg production.
Damage The disease is airborne and therefore has high mobility rate. Birds die in large numbers, that is, can wipe a whole flock suddenly.
Control Newcastle disease has no treatment but prevented through:
• Vaccination programmes should be adhered to strictly as follows:
– Administer intra nasal drop at 2–3 weeks old.
– Administer eye drops at 18 weeks old.
– Administer in drinking water at every six months interval.
• When nasal or eye drops are used, the vaccine should be used as per the manufacturer's specification. A dropper should be used.
• If the vaccine is administered in drinking water, it should be mixed thoroughly with clean water and given immediately. Water should be withheld a few hours before vaccine is administered.
• Mass slaughter of the whole flock is carried out, then the carcasses burned.
• Quarantine measures.
(b) Pullorum disease
This disease is also known as bacilliary white diarrhoea (BWD). It is an acute and infectious disease which affects chicks.

Causes
Pullorum disease is caused by a bacterium Salmonella pullorum. It affects chickens and turkeys, quails, pheasants, ducks, peacocks and guinea fowls. It can be eggborne transmitted to unhatched chick through the egg. Infected birds can also spread it through their droppings to the chicks after hatching.
Symptoms
(i) Chicks hatched from the infected eggs appear weak with depressed appetite, poor growth and may die later.
(ii) Older birds look depressed with ruffled feathers, pale shrunken combs, diarrhoea.
(iii) Mortality rate can reach 25–60%.

Damage
• Loss of chicks before hatching and immediately after hatching.
• Loss of adult birds.
• Loss of egg production.
Control
• Kill the infected birds which serve as carriers.
• Proper selection of healthy eggs for incubation.
• Intensive disinfection of the incubators before placing new eggs for hatching.
• If natural incubation is carried out, hatching nests and laying boxes should be disinfected by cleaning with quick lime.
(c) Coccidiosis
This disease affects the young as well as the adult birds. It is more likely to occur when birds are confined in a small area than in the open range system. It attacks chickens, ducks and turkeys.
Cause
Coccidiosis is caused by a protozoa known as coccidia of the Eimeria species. This protozoa infects the lining of the alimentary canal. It is transmitted through ingestion of infected droppings.
Symptoms
(i) Production of white, yellow or blood stained diarrhoea.
(ii) Unthriftness may be seen in birds.
(iii) Lack of appetite leading to drop in egg production.
(iv) If not attended to, birds may die in mass though death is not sudden.
Control
• Use of coccidiostat both for prophylactic measures (prevention) and for cure. The drug should be mixed with drinking water or with feeds.
• House perches, laying boxes and equipment for watering and feed should be kept clean and disinfected.
• Humans entering the house should disinfect at the entrance.
• Overcrowding of the birds should be avoided.
• Dry litter should be maintained through provision of proper ventilation. Also by avoiding water spillage.

(d) Mycotoxicosis
Fungal or mycotic diseases cause high economic losses in poultry production due to the production of mycotoxins. Mycotoxins are secondary fungal metabolites produced in grains or poultry feed.
Cause
Mycotoxicosis is a secondary fungal infection brought about by the fungus produced in grains or poutry feeds. Birds can also pick the toxins from contaminated litter.
Symptoms
(i) They cause high mortality in young birds.
(ii) Stunted growth or slow growth rate.
(iii) Diarrhoea and fatal encephalitis.
(iv) Reduced egg production in mature birds.
(v) Low hatchability of eggs.
(vi) Death may occur.
Damage
Mycotoxins cause the production of immunosuppression in birds which make them prone to bacterial and viral infections.
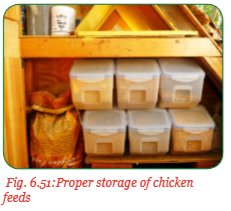
(e) Marek’s disease
This disease is highly contagious. It affects chickens, quails, turkeys and pheasants.
Cause
The disease is caused by Marek's virus of the herpes group which causes tumour in the body. It accumulates in feather follicles and spread in dust. Can remain in the poultry house for 6 months. The virus can be transmitted directly through oral ingestion or indirectly through inhalation.
Symptoms
Marek’s disease presents itself in three forms:
(i) Nervous form
• It attacks the nervous cells producing tumours and cause weakness, inco-ordination and paralysis of wings, legs and necks.
• Legs stretch in one direction, wings droops, necks appear lowered or rigid tarticollus (one direction).

• Diarrhoea and loss of appetite occur.
• Has a mortality rate of 5–25%.
(ii) Abdominal form
• Diarrhoea and emaciation are common.
• Excessive enlargement of the abdomen.
• Sudden death.
• Has a mortality rate of 40–50%.
(iii) Ocular (eye) and skin form
• Attack older birds during late laying stage (12–18 months).
• Eye iris turns grey.
• Skin nodules form in feather follicles. When affected birds are slaughtered, they show greyish soft nodules in organs, for example, muscle, liver, ovary, spleen, lungs, heart and skin.
Control
There is no effective treatment of Marek’s disease. Control is through vaccination. High hygiene and sanitation measures should be maintained. This avoids early exposure of young chicks to the disease. Vaccination is performed before hatching where the 18 days old egg is in ovo injected or injection of dayold chicks.
6.7 Farm sanitation (rules for a pig and poultry farm sanitation)
Activity 6.12: A visit to a poultry or pig farm to practice hygiene measures
Make a visit to a nearby farm or school farm and carry out the following activities:
(i) Clean all the houses where the animals or birds are, using the materials provided.
(ii) Disinfect the houses and the equipment used by the animals or birds.
(iii) Dust all the areas where external parasites might hide.
(iv) Discuss and record your findings.
(v) Present your findings to the class.
(vi) Take teacher’s summary notes.
Hygiene and sanitation play a major role in any effective disease control programme for poultry and pig production premises.
Among the most important requirement to facilitate hygiene and sanitation is to adopt the “all in-all out” method. This is where all the birds within should be of the same age group. It is also important to restrict each enterprise to a single type of breed.
Poultry and pig premises should be well equipped with facilities for entry of each new batch of animals and exit of the market animals and birds. They should also be equipped with mechanisms of disinfection, fumigation, removal of dead carcass and isolation of sick animals.
Sanitation conditions in both poultry and pig production include:
1. The houses should be constructed away from other livestock premises and away from roads connecting to other livestock premises.
2. The houses should be constructed of materials which can be easily cleaned and disinfected.
3. All vegetation around these premises should be cleared.
4. Drinking water source for the animals and birds should be in a place away from contaminants and pollutants.
5. Water source should be close and with enough water especially for the pigsty.
6. Waste water from premises should have a proper drainage to keep the area dry and free from flies.
7. Litter and manure from the floor of the houses should be removed and heaped for composting at the distant and covered with polythene sheets.
8. The maintenance of a disinfection system or foot bath at the entrance of each house prevents introduction of infectious organisms.
Sanitation rules in a poultry and pig farm can be summarised as follows:
(a) Proper housing – Poultry and pig houses need to be kept clean always. Disinfection helps to kill disease-causing organisms and prevent their multiplication. Waste materials and vegetation around the house should be cleared to control vermin.
(b) Proper disposal of dead birds and pigs should be done by burning or burying the carcass deep to prevent the spread of diseases.
(c) Isolation and quarantine – Sick birds and animals should be isolated from the healthy ones and nursed separately to recovery. Incase of highly infectious and contagious diseases, quarantine measures should be taken. These measures will involve several farms in a large area.Therefore, the local government should be involved and the public notified.
(d) Proper nutrition – Birds and pigs that are well fed with balanced diet remain healthy since they are able to resist diseases and will not suffer from deficiency disorders.
(e) Slaughterring and burning. Infected animals should be culled and slaughtered. Any animals slaughtered for the purpose of disease and parasite control should be burned and buried deep. The area should be restricted from animals and humans.
Group activity
Feeding and carrying out sanitation in a non-ruminant (poultry and pig) farm
Visit a farm where poultry or pigs are reared. This can either be the school farm or neighbouring farm. The activities will be carried out for a whole school term on daily basis. You will need one hour everyday after classes. Each group will be given one day per week. Working in groups, carry out the following activities:
(i) Feed the pigs or poultry using the feeds supplied and the feeding plans that is followed in the farm.
(ii) Clean and disinfect the whole premises, the waterers, the feeders, the roosts and any other equipment in use.
(iii) Dust the houses after cleaning and clear the area around the houses.
(iv) Discuss and record your findings.
(v) Present your findings to the class.
(vi) Take teacher’s summary notes.
Unit Summary
Confined birds are housed in structures called aviaries while pigs in pigsties. Ideal aviaries and pigsties should provide the proper conditions required for feeding, breeding exercises and protection from diseases and adverse climatic conditions. They should be constructed with materials that are affordable, available and able to keep the animals safe.
Standard aviaries constructed should cater for different groups of poultries according to sex, development stage and species. Thus, different groups of birds should be housed separately since they require different housing conditions. The same is applicable to the pigs. Different groups of pigs require different housing conditions. Therefore, the units of housing which is known as pens should be constructed to cater for the pigs according to their sex and development stage.
Pigs and poultry are non-ruminant and so feed on diets they can easily handle. The food for the pigs consists of grain offals such as industrial by products from grains and by-products from animal tissues such as meat and bone meal, milk and milk products, blood flour, water and oil cakes. In addition to most of these foods, poultry require insects, sprouted fodder and whole grains. Their feeding follow different feeding plans which should be adhered to strictly.
Poultry and pigs are attacked by many enemies and diseases. The enemies are referred to as parasites which deprive the birds and pigs of their food, as well as transmit some diseases. The common external parasites include lice, fleas, mites, ticks, fleas and mosquitoes. These are controlled through spraying and dusting using effective insecticides and acaricides.
Poultry and pigs are also affected by internal parasites which include different types of worms. These have adverse effects on the health of the livestock and intensive control is important. Methods such as maintenance of hygienic conditions through cleaning and disinfection, deworming and proper sanitation by humans help to reduce transmission.
Diseases that attack pigs include taeniasis, pasteurellosis, brucellosis, porcine epidemic diarrhoea and coccidiosis. Some of these diseases are viral and lead to losses of animals while others are bacterial and can be treated. Vaccination, provision of antibiotics, disinfection and maintenance of biosecurity are all integrated methods of controlling these diseases.
Diseases that affect poultry include Newcastle disease, pullorum, coccidiosis, mycotoxicosis and Marek’s disease. Most of these diseases are viral. However, poultry diseases do not affect human beings though they lead to huge economic losses in terms of capital invested. Effective control measures include vaccination, farm sanitation and maintaining biosecurity in the farm.
Key terms
1. Acaricides – Chemicals used to kill ticks.
2. Acute disease – It is a disease or disorder that lasts a short period and comes on rapidly.
3. Adilibutum – All the time, provided without a measure or without limit.
4. Airborne – Acquired through the air by inhalation.
5. Allergy – A number of conditions caused by hypersensitivity of the immune system to something in the environment.
6. Anaemia – A condition where lack of iron in the body leads to reduction in red blood cells.
7. Annoyance – To become a nuisance or to irritate.
8. Biosecurity – A set of measures designed to protect the farm from the entry and spread of parasites and diseases.
9. Boar – A mature male pig.
10. Breeding crate – Wooden or metallic and used during mating to prevent heavy boars hurting small sows.
11. Broiler – Domestic fowl bred and raised specifically for meat production.
12. Cake – The mass that results from pressing seeds, meat or fish to remove oils, fats or other liquid.
13. Casein – The protein from skim milk used to make cheese.
14. Chaff – Glumens, hulls, joints and small fragments of straw that are separated from seed in threshing or processing.
15. Chronic – It is a condition that is persistent or long lasting in its effects.
16. Crude proteins (cp) – The sum total of all nitrogenous compounds in a feed.
17. Definitive host – The primary host in which a parasite reaches maturity and reproduces sexually.
18. Draught – Dry, cold windy conditions blowing through livestock houses.
19. Dry matter (dm) – Actual percentage of proteins, carbohydrates and minerals in feed.
20. Feed conversion ratio (FCR) – A measure of the animals ability to change feed mass into desired output.
21. Feed efficiency – A measure to determine the ability of an animal to turn feed nutrients into products.
22. Furrowing crate – A small metal cage in which pregnant sows are restrained before giving birth until piglets are weaned.
23. Gilt – A young female pig from weaning to first parturition.
24. Granule – A small compact particle of a substance.
25. Hooks on scolex – These are part of a structure called rostellum on the tapeworm's head used for attachment.
26. Infective egg – A parasite egg with a developed larvae inside it.
27. Irritation – State of inflammation or painful reaction to an allergy.
28. Lactating sow – Sow that is in milk and suckling young ones.
29. Lactation – The secretion of milk from the mammary glands.
30. Litter – Fibrous materials used on the floor of poultry and pig houses.
31. Mash – A mixture of food ingredients in meal farm.
32. Meal – An ingredient(s) that has been ground or reduced to a particle size large than flour.
33. Metabolite – A product of metabolic action.
34. Mobility rate – The ease and speed at which a disease spreads in an area.
35. Mortality rate – (also death rate) is a measure of the number of deaths in a particular population compared to the size of that population per unit of time.
36. Offal – Low grade residue left from the milling of some products.
37. Pellets – Agglomerated feed formed by compaction or feed compacted to form different shapes.
38. Piglet – A young pig from birth to weaning.
39. Proglottid – It is a segment of tapeworm containing both male and female reproductive organs which detarches from the body and spreads the infective eggs.
40. Ration – The total amount of feed (diet) allocated to one animal for a 24-hour period.
41. Roughage – Plant material high in crude fibre but low in digestibility and low in protein.
42. Scolex – The anterior headlike segment of a tapeworm having suckers and hooks for attachment.
43. Scratch grain – Whole cracked or coarsely cut grain.
44. Secondary host – (also intermediate host) A host that harbours a parasite for a short transitional period during which some developmental stages are completed.
45. Shelter belt – A line of trees or shrubs planted to protect structure from strong wind.
46. Slatted floor – Wooden or metal floor with narrow gaps between slats to allow discharge of droppings and urine.
47. Sow – A mature female pig after first parturition.
48. Stocking rate – The number of animals on a given amount of land over a certain period of time.
49. Sub-mucosal tissues – A layer of connective tissues that supports the mucous membranes.
50. Sucker on scolex – It is a muscular structure for suction on the host or subtrate.
51. Supplement – A feed used with another to improve nutritive value.
52. Symptom – A physical or mental feature that is indicative of a disease condition.
53. Systematic – Starts in one part of body and then spreads to the other organs and systems.
54. Therapeutic measures – Services that are intended to help cure a disease.
55. Transmission – The mode in which a disease spreads from the source to the animal.
56. Whey – The watery part of milk separated from the coagulated curd.
57. Zoonotic disease – A disease that is naturally transmissible from vertebrate animals to humans and from humans to the animals.
End of Unit 6 Assessment
1. Describe the distinguishing characteristics of a non-ruminant animal.
2. Study the set of materials given in set A below and then match them with their functions given in set B.

3. Describe the qualities of good materials for roofing a poultry house.
4. A Secondary 3 student was given the following feedstuff to prepare a balanced diet for feeding pigs. Extract the feedstuffs that the student would have used to make a balanced diet from the list given below.
(i) Wheat bran
(ii) Meat and bone meal
(iii) Skim milk
(iv) Cassava tubers
(v) Blood flour
(vi) Fresh grass
(vii) Concentrates
(viii) Oil cakes
5. The table below shows diseases that attack poultry and pigs. Study it carefully and then fill in the blank spaces.
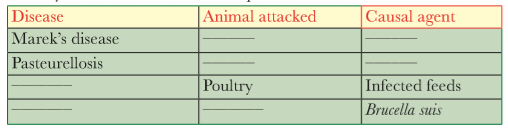
6. The picture below shows a pig attacked by certain internal parasites. Study it carefully and then answer the questions that follow.

(a) Identify the parasite the pig is suffering from.
(b) Give two reasons for your answer in (a) above.
(c) State four control measures that should be taken to control the parasite in the farm.
7. Outline four benefits of feeding layer birds with sprouted fodder.
UNIT 7 : Integrated livestock-fish farming
Key Unit Competence:
Learners should be able to successfully run an integrated livestock-fish farm
7.1 Learning objectives
(i) Knowledge and understanding
• Define and describe integrated livestock-fish farm.
• Explain the importance of integrated livestock-fish farming systems.
• Describe types of integrated livestock-fish farming.
• Explain conditions suitable for shelters in integrated livestock-fish farming.
• Describe the techniques of constructing integrated livestock-fish farming shelters.
• Describe maintenance operations in integrated livestock-fish farming shelters.
• List the ingredients of an appropriate diet for fish.
• Define fertilisation of a fish pond.
• Carry out feeding of fish.
• Explain a prophylactic plan in integrated livestock-fish farms.
• Apply rules for integrated fish farm sanitation.
(ii) Skills
• Recognise integrated livestock-fish farms.
• Find out types of integrated livestock-fish farms.
• Select and gather materials to construct shelters in integrated livestock-fish farming.
• Construct shelters in integrated livestock-fish farming.
• Carry out maintenance operations in a fish pond.
• Select healthy food for fish reared.
• Practise fish feeding.
• Recognise fish diseases through visible symptoms in integrated fish farms.
• Make a prophylactic plan in an integrated fish farming.
• Practise rules for integrated fish farm sanitations.
(iii) Attitudes and values
• Be attentive in observing integrated livestock-fish farms.
• Take initiative of observing integrated livestock-fish farms for deducing its importance.
• Show concern while describing types of integrated livestock-fish farms.
• Be concerned by fitting the matrix and standards.
• Be careful in constructing integrated livestock-fish infrastructure.
• Be careful in maintaining integrated livestock-fish farming infrastructure.
• Participate actively in group discussions and interact positively with colleagues while selecting food for fish.
• Observe attentively food distribution operations.
• Manipulate carefully and cautiously fish food while distributing them.
• Observe attentively fish ponds affected by enemies and diseases.
• Implement attentively and cautiously prophylactic plan in an integrated fish pond.
• Co-operate with colleagues to carry out sanitation rules.
Introduction
Integrated livestock-fish farming is the rearing of fish in combination with other agricultural operations centred around the pond. It ensures maximum utilisation of available resources and recycling of wastes for maximum agricultural production and especially of fish. Fish is a major source of protein in human diets and livestock feed. In integrated livestock-fish farming, the rearing of fish is combined with the keeping of livestock such as poultry, rabbits and pigs which provide manure for fertilisation of the ponds. It may also include the growing of vegetables using the pond water for small-scale irrigation.
Analyse the following photographs and answer the following questions:
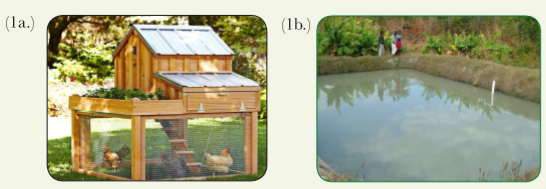
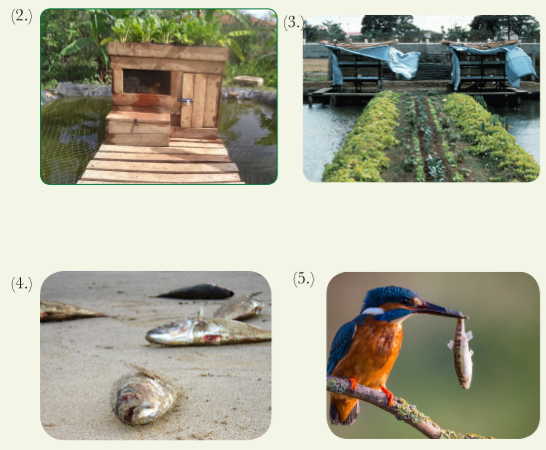
1. What is your observation on photographs number 1a, 1b, 2, and 3?
2. What is happening in the photographs number 4 and 5?
3. Prepare the solution to overcome the problem that occurred on photograph 4.
4. Prepare the solution to overcome the problem that occured on photograph 1a and 1b.
7.2 Definition of integrated livestock-fish farming
Activity 7.1: A video show to find out the meaning of integrated livestock-fish farming
Using the references provided, carry out the following activities:
(i) Identify the components of the livestock- fish integration illustrated in the pictures or charts provided.
(ii) From the observation made, discuss the meaning of integrated livestock- fish farming.
(iii) Record your findings.
(iv) Present your findings to the class.
(v) Take teacher’s summary notes.
Integrated livestock-fish farming is a system of producing fish in combination with other agricultural or livestock farming operations centred around the pond. Fish benefits from the manure, from the livestock kept in sheets constructed over the fish pond or adjacent to them. The manure may be added directly to the fish pond where livestock structures are constructed over a fish pond or the materials may be directed to the fish pond from the livestock structures constructed adjacent to the fish pond. Bags of manure may also be placed in the fish pond.
The manure supply essential nutrients such as phosphorus and nitrogen to the pond ecosystem. The nutrients from the animal wastes are used to support the growth of planktons in the ponds which serve as food for fish. Planktons are very small forms of life such as algae which serve as the natural food for fish. Some food remains in the manure from the animal yards may also serve as food for fish. Integrated livestock-fish farming is a form of diversification where the farm resources are utilised to the maximum by rearing fish in association with livestock. The rearing of fish is also known as aquaculture.

7.3 Importance of integrated-fish farm in the pond
Activity 7.2: A research or group discussion activity to find out the importance of integrated fish farms
Using the references provided, carry out the following activities:
(i) Find out the importance of integrated livestock-fish farming from the internet, library books and video show.
(ii) Discuss and record your findings.
(iii) Present your findings to the class.
(iv) Take teacher’s summary notes.
The importance of integrated livestock-fish farms include the following:
(i) There is increased production of fish meat which is rich in proteins. Fish meat is low in cholesterol and therefore recommended for healthy reasons.
(ii) Nutrients in animal wastes and spilled feeds are recycled and used as fertilisers in fish ponds or they may be used as food for cultured fish.
(iii) There is maximum use of resources in the farm.
(iv) It reduces the cost of production as resources are well utilised or recycled.
(v) It acts as a source of income for the small-scale farmers and therefore alleviates poverty.
(vi) It helps to create jobs; people working in the farms derive their source of living from the farming enterprises.
(vii) There is sustainable resource management; this assures future generations of sustainable production in the farms.
(viii) It helps to avoid environmental pollution; materials from the animal yards which would otherwise end up in the water bodies are well utilised thus helping to clean up the environment.
7.4 Types of integrated livestock-fish farms
Activity 1 7.3: A field visit to an integrated livestock-fish farm to observe types of integrated livestock-fish farming systems
Visit an integrated livestock-fish farm and carry out the following activities:
(i) Identify the livestock species and breeds reared in the farm.
(ii) From the observation made in the farm, identify the type of livestock- fish integration practised in the farm.
(iii) Discuss the advantages of the type of integrated fish farming practised in the farm.
(iv) Record your findings.
(v) Present your findings to the class.
(vi) Take teacher’s summary notes.
Integrated livestock-fish farms are categorised on the basis of the livestock species reared in association to fish farming. Common types of livestock-fish integration in farms include the following integration:
1. Fish-poultry integration– This is the practice of rearing fish in association to a poultry enterprise. The poultry manure is rich in nitrogen. The poultry structure may be constructed over or adjacent to the fish pond. The droppings from the birds enrich the pond water with essential nutrients needed by the planktons.
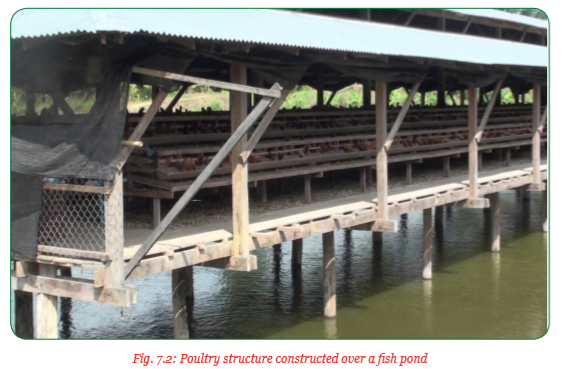
The poultry species that may be reared in association with fish farming include ducks and chicken.
2. Fish-poultry-vegetables integration – This is the practice of growing vegetables in addition to the keeping of poultry and fish rearing. The vegetables benefit from the poultry manure. The vegetables are in turn used by the poultry and the fish in the pond. Manure from the poultry is applied to the ponds. This can be directly from the poultry structures or bagged manures placed in the pond. The vegetables are grown on the dykes and the land adjacent to the pond. Where land is limited, vegetables may be grown on the roof of the poultry house.
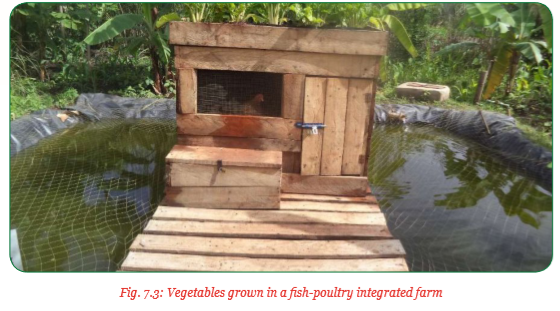
3. Fish-rabbit-vegetables integration – This is the practice of growing vegetables in addition to the keeping of rabbits in association with fish farming, as a third component of the integration. The vegetables are used for feeding rabbits which produce manure that is in turn used to supply nutrients for the planktons in fish ponds. The planktons are the natural food for fish. Water from the fish pond can be used to irrigate the vegetables after the fish is harvested.
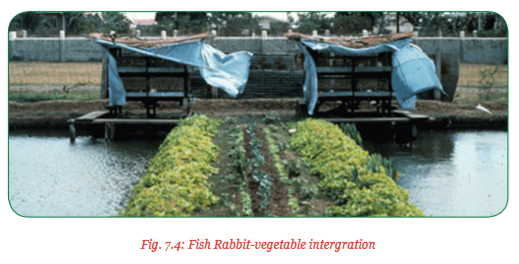
4. Fish - pig integration – This is the practice of keeping pigs in association with fish farming. Pigs provide manure that is rich in nitrogen and phosphorous. The manure promotes the growth of planktons which are the primary food for fish.
In this system, pigs are neared in houses constructed on the upper bank of the pond. Waste, food and excreta washed from the pig house are allowed to flow into the fish pond. Alternatively, pigs may be reared in houses with slatted floors constructed above the fish pond. In this case the pig excreta and the feed wastes allowed to get into the pond directly. Vegetables may also be grown in association to the pig-fish integration in which case the system becomes a pig-fish vegetables integration.
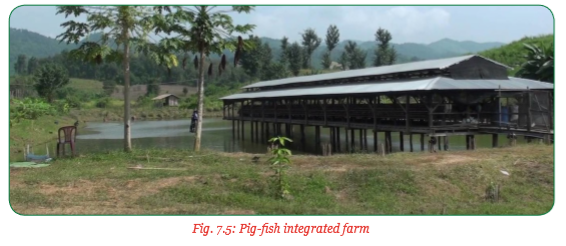
7.5 Integrated livestock-fish farming infrastructure
Activity 1 7.4: A field visit to an integrated livestock-fish farm to observe and find out integrated livestock- fish shelters and their construction materials
Visit an integrated livestock-fish farming pond and carry out the following activities:
(i) Observe and identify the shelters and materials used in the integrated livestock-fish farming.
(ii) Observe the arrangement of the various shelters and how they relate to each other.
(iii) Discuss and record your findings.
(iv) Present your findings to the class.
(v) Take teacher’s summary notes.
The infrastructure for integrated livestock-fish farming consists of the following:
1. A fish pond or fish ponds
A fish pond is a structure used in the rearing of fish. It is filled with fresh water and stocked with fish. The life of a fish depends on water. It provides for the fish’s movement, feeding, breathing and resting. Therefore, a fish pond is very important in integrated livestock-fish farming. The fish pond may be constructed separately from other livestock structures or it may be constructed in association with other livestock structures in which case it is referred to as an integrated fish pond.
2. Shelters for housing livestock reared in combination with fish farming
The livestock shelters may either be a poultry house, a rabbit hutch or a piggery. These structures may either be constructed over the fish pond(s) or adjacent to the ponds. The structures constructed over the pond should have slatted floors to allow animal droppings to pass through. For structures adjacent to the pond, there should be a mechanism for getting the manure into the pond. Manure from the animal houses is used for fertilisation of the pond.
7.6 Construction materials for integrated livestock-fish farm shelters and constructing an integrated livestock fish pond
Activity 1 7.5: A video show to find out the materials used to construct integrated livestock-fish shelters
Using the references provided, carry out the following activities:
(i) Find out the materials used for the construction of integrated livestock; Fish shelters from library books, video show and internet.
(ii) Discuss the factors to consider in choosing construction materials.
(iii) Discuss and record your findings.
(iv) Present your findings to the class.
(v) Take teacher’s summary notes.
Factors to consider in selecting construction materials
(i) Availability of the materials.
(ii) Cost of the materials in relation to economic status of the farmer.
(iii) Nature of the soil at the selected site.
(iv) Suitability of each type of material to the prevailing weather conditions.
(v) Durability of the materials. (vi) Strength of the materials.
The materials used or needed in the construction of integrated livestock-fish farming shelters depend on the economic status of the farmer and the nature of the soil in the farm. They also depend on the type of integration adopted. Materials required for the construction of these structures include:
(i) Cement, sand and ballast – These materials are needed for making concrete needed for the construction of the pond floor and walls. Concrete is also needed in laying the foundation floor for livestock structures. Cement, sand and ballast are mixed in the ratio of 1:2:3 respectively by volume for the pond floor and walls. Water used in the mixing of these ingredients should be free from soil and other impurities.
(ii) Stones – Quarry stones These are needed for the construction of the wall of the rabbit and poultry structures. They make durable structures but they are expensive to buy and transport over long distances.
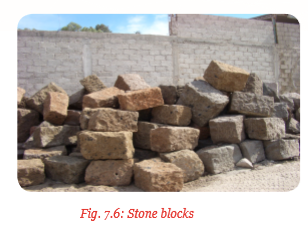
(iii) Concrete blocks – These are made up of cement, sand and ballast in the ratio of 1:2:3 respectively by volume. The amount of water added should be controlled to ensure a mixture which is not very dry or wet. Concrete blocks may be used instead of stone blocks.
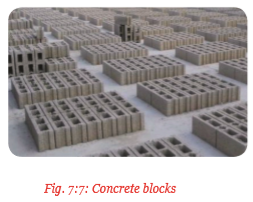
(iv) Bricks – They are prepared by using special types of soil with a high amount of clay. The clay is thoroughly puddled with water and moulded in special form boxes to get the desirable shapes and sizes. They are first dried before they are baked in a kiln. The bricks make durable structures if well joined with mortar. They are used in making foundations and walls of the livestock structures.

(v) Timber – This is used for pole rails, trusses, parlins, rafters, struts and the beams in construction work. Sawn timber produces boards of various sizes for floors and fascia boards. If timber is well treated, it produces structures which are resistant to insect damage, weather elements and fungal attack.

(vi) Corrugated iron sheets – They are used for making walls and roofs. They are usually supported on wood frames. Structures made of iron sheets are durable, resistant to insect damage and weather elements. They are also leak proof. However, insulation may be needed to modify temperatures where they are used.
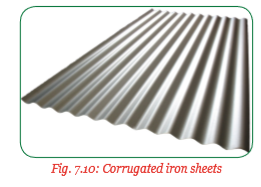
(vii) Thatch – It is used for roofing poultry and rabbit houses. It can be made from coconut leaves or tall grass varieties, papyrus weeds, water weeds, dry banana leaves and bracken ferns. They can be effective roofing materials and good insulators. However, they are prone to insect damage and hence require constant replacement. They are also prone to fire.
(viii) Other materials – Include nails, hinges, screws, nuts and bolts, latches and wire mesh.
Activity 7.6: A practical activity to construct a standardised integrated livestock-fish pond
Using the materials provided, carry out the following activities:
(i) Select a suitable site for the fish pond.
(ii) Test the soil type to determine suitability of the site.
(iii) Construct an integrated livestock-fish pond on the selected site using the materials provided and according to the number of fish and species to be stocked.
(iv) Discuss and record your observations.
(v) Prepare your project report.
(vi) Present your report to the class.
(vii) Take teacher’s summary notes.
The procedure of constructing an integrated livestock-fish pond is as follows:
(i) Select a suitable site for the construction of a fish pond.
It is important to consider the following:
• How the water will be brought to the site.
• The type of soil when building the pond, this is for the earth pond.
• The size, shape and depth of the pond.
• The shape of the pond bottom to allow drainage.
• The water of the pond used for irrigation.
(ii) Using pegs, mark the dimensions of the pond from the water source to the entrance, exit and the channel that drains water away from the pond.
(iii) Clear the vegetation around the selected site using slashers and collect the trash away from the pond area using rakes.
(iv) Using holes, dig out the soil from the pond area keeping the top soil in a separate place as it will be used again. Ensure you maintain the correct dimensions of the pond after removing the soil from the pond. The upper side of the pond should be 0.5 m deep and the lower one should be 1.5 m deep.
(v) Construct the dyke; the dyke is the wall that is constructed all around the pond. The dyke is established by digging a trench 0.5 m wide all around the pond. The depth of the trench should be lower than the general level of the pond bottom. The trench is then filled with clay and compacted or concrete may be used instead of clay to prevent seepage.
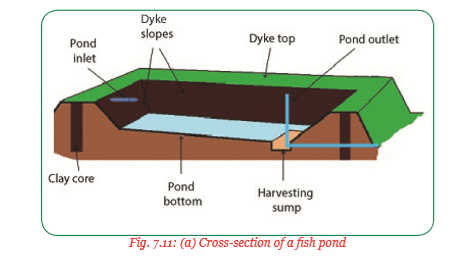
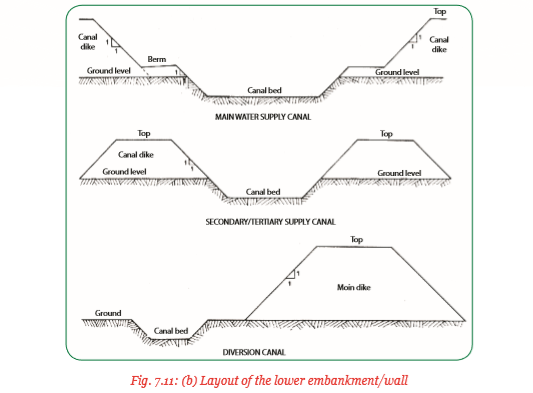
(vi) Construct the pond’s inlet, outlet and spillway. The inlet is a canal or pipe at the entrance to the pond. It is made in the dyke slightly above the level of pond water. A screen of fine mesh is made across the inlet to prevent the entrance of undesirable or strange species of fish. The outlet is made at the deeper end of the pond just a little above the bottom of the pond. A pipe is put and cemented round it to make the outlet firm. A screen of fine wire mesh is fitted at the mouth of the outlet to prevent the fish from swimming away. The spillway is a channel to allow excess water to flow out of the pond without overflowing on the dykes. Grass or vegetables may be planted on the embankment.
(vii) Allow water to fill in the pond through the inlet pipe up to the required level, just below the overflow pipe. The fish will use the deep end of the pond (1.5 m) to spawn or lay eggs while the shallow end (0.5 m) will be used for sunning.
(viii) Construct the shelter to house the livestock being kept in association with fish rearing. The structure may be constructed over the fish pond or adjacent to the fish pond. The structure could either be an aviary or a rabbit hutch. Where the structure is constructed over the pond, a slated floor is made to allow droppings from the animals to pass through to the pond water.

After the construction of the pond, water is allowed into the pond. Fish is then stocked in the pond. The pond is stocked with young fish known as fingerlings. The fingerlings are obtained from hatcheries such as Kigembe Tilapia Hatchery. The fingerlings are transported in oxygenated containers such as polythene bags, milk cans or drums. The water in the containers should be clean and at a temperature of about 10°C Celsius. Fingerlings are introduced into the pond by lowering the container into the water and tilting it to allow them to swim away. In stocking, an average 5–10 fingerlings per 5 m2 of the fish pond is appropriate.
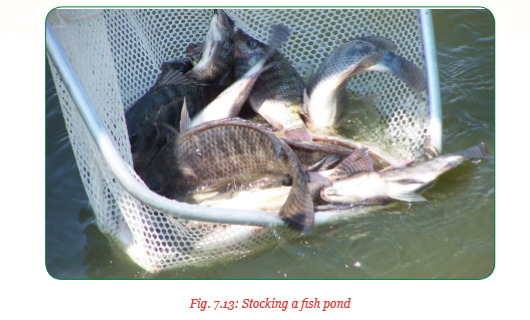
In the same way, the appropriate livestock to be kept in association to the fish rearing are introduced to the livestock structure to supply the manure.
7.7 Management and maintenance of integrated livestock-fish infrastructure
Activity 1 7.7: A practical activity to manage and maintain an integrated livestock-fish infrastructure
Using the materials provided, carry out the following activities in an integrated livestock-fish shelter:
(i) Clean up the pond banks.
(ii) Maintain the water level and quality in the pond.
(iii) Clean up the aviary and or rabbit hutch.
(iv) Discuss and record your observations.
(v) Present your findings to the class.
(vi) Take teacher’s summary notes.
The management and maintenance of an integrated livestock-fish infrastructure involves the following practices:
• Cleaning up the pond banks – All foreign objects in the pond banks should be removed and vegetation cleared.
• Management of the water level – Level of pond water should be maintained at its maximum. It should be free from physical and chemical impurities.
• Cleaning of the livestock structures such as aviaries and rabbit hutches– These structures should be cleaned to safeguard the lives of the animals housed in them.
• Repairing the dyke and any structure – Any cracks on the dykes should be sealed and any broken parts of the house be repaired.
7.8 Fish food and fertilisation of the pond
Activity 1 7.8: A field visit to an integrated livestock-fish farm to observe fish foods and fertilisation of fish ponds
Visit an integrated livestock-fish farm and carry out the following activities:
(i) Observe and identify the fish foods supplied/distributed to the farm.
(ii) Determine the different ingredients of fish diets.
(iii) Discuss your findings.
(iv) Present your findings to the class.
(v) Take teacher’s summary notes.
Food for feeding fish include the following:
(a) Grain offal – they are by-products of the dry milling of common cereal grains such as wheat or rice. Wheat offal is made up of germ, bran, coarse middling and fine middling. It contains about 14.5% to 17.6% crude protein, 10% crude fibre and 3.4% – 6.4% minerals (crude ash). Its low fibre content makes it suitable for feeding animals with a simple stomach such as fish.
(b) Herbs – Herbs are included in the fish diet mainly as food additives more than they are for nutrient supply. The additives make fish resistant to diseases and also acts as antibiotics and antifungal drugs for controlling diseases. They are also used as growth promoters and stress resistance boosters. Examples of such herbs include lettuce, garlic, raw carrots and pineapples. Some herbs are anti-parasites controlling internal parasites.
(c) Concentrates – Concentrates are the commercial feeds to fish. They are characterised by the following:
• High nutrient content • High dry matter content
• Long life • Less bulky
Concentrates are of two types: Energy or carbohydrates concentrates and protein concentrates. Energy concentrate sources include maize germ and bran, wheat pollard and bran, sorghum and cassava. Protein sources include maize gluten meal, cotton seed meal, sunflower meal, ground nut meal, soya meal, fish meal and copra meal. These are the sources of concentrates for feeding fish.
(d) Livestock dung/Farmyard manures – Dung from the livestock shelters constructed either above the fish pond or adjacent to it helps in pond fertilisation. The manure from the animals contains nutrients needed for the growth of water weeds and planktons. Planktons are the natural food for the fish. Therefore, pond fertilisation promotes the growth of planktons and therefore provides natural food for the fish. The dung may also be directed to the fish pond from the livestock houses in form of slurry.
Activity 7.9: A research activity to find out the meaning of pond fertilisation
Using the references provided, carry out the following activities:
(i) Enter a search engine or search in library books to find out the meaning of fertilising a fish pond.
(ii) Discuss and record your findings.
(iii) Present your findings to the class.
(iv) Take teacher’s summary notes.
In the fertilisation of a fish pond, manures or inorganic fertilisers are added to the pond to stimulate the growth of planktons such as algae which are the natural food for fish. The manure or fertilisers supply essential nutrients such as phosphorus and nitrogen needed for the growth of planktons. Farmyard and compost manures are added to the pond either directly from the livestock houses or in bags which are placed into the fish pond.
7.9 Feeding quantity according to the size of the pond, and type of fish species
Activity 7.10: A visit to a fish farm to find out how fish is fed
Using the materials provided, carry out the following activities:
(i) Observe and identify different fish feeds displayed.
(ii) Discuss the criteria for feeding fish.
(iii) Prepare a feeding plan for fish based on the number and species of fish reared per pond.
(iv) Discuss and record your findings.
(v) Present your findings to the class.
(vi) Take teacher’s summary notes.
Fish are fed on the basis of the number of fish reared per pond and the specific fish species reared in the ponds. The number of fish reared in the pond depend on the size of the pond. The size of the pond dictate the methods of feeding used. For example in narrow or small ponds, feed should be spread evenly around the perimeter of the pond. However, in larger pond, other methods are used to distribute the feed evenly in the pond, some of which include, use of boats or feed blowers.
Sometimes depending on the size of the pond, feed can be concentrated within selected sites in the pond to avoid contact of the feed with the pond bottom. This can be done using the following methods;
(a) A raised pond floor area: This is a mould made by piling soil in a selected area of the pond to make a raised platform where the feed is placed.
(b) A fixed floating frame: This frame is made of bamboo where food items such as green fodder, chopped aquatics plants, or finely ground bran are placed.
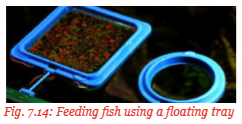
(c) A fixed submerged tray: Also made of split bamboo on which sinking feed is placed. A floating tray can also be used where it is tethered to the pond bark, so that it floats in all directions of the pond.
(d) Perforated devices: These include woven baskets, plastic containers or pockets made of small – mesh wire netting. In this case the fish obtain its food by nibbling and sucking moist mash through the holes.
The frequency of feeding is determined by the specific fish species and the type of food given to them. It is important to note that fish will continue eating as long as food is there and they are hungry. Therefore, it is possible to overfeed fish. Excess food should, therefore, be avoided.
Tables 7.1, 7.2 and 7.3 show feeding plans for tilapia, trout and catfish respectively.
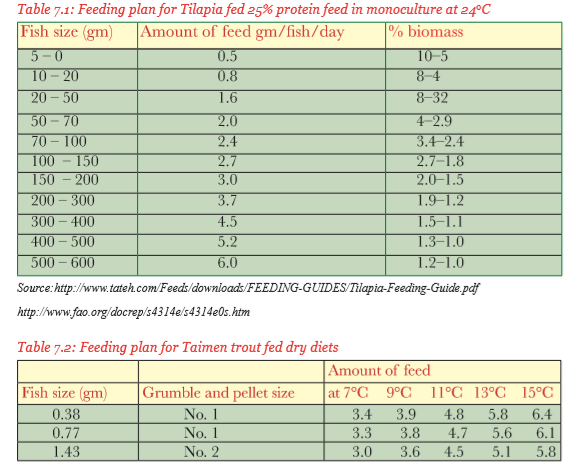

Schedule for feeding fish should be once a day. The daily ration may also be split into two and therefore fish fed twice a day. However, there are feeding schedule which are species specific, for example, catfish prefer to eat at night when it is dark. So food should be supplied in the evening when the lights go down. Some species feed very early in the morning and will require to be fed early in the morning. Note that herbivorous fish feed on plants throughout the day.

7.10 Fish pond enemies and diseases
Activity 1 7.11: A research activity to find out the pond enemies and diseases of fish and their characteristics
Use the references provided to carry out the following activities:
(i) Find out the enemies of fish and give their possible solutions, from internet and library books.
(ii) Discuss and record your findings.
(iii) Present your findings to the class.
(iv) Take teacher’s summary notes.
Fish pond enemies include fish predators and parasites. Fish predators include those animals that catch and kill fish for food. Fish parasites on the other hand are organisms that live in fish and derive their nourishment from them. Fish predators include those animals that injure fish without feeding on them. Some of the fish predators include the following:
(a) Birds
Birds are the most common fish predators. The most serious bird predator in ponds is the kingfisher which catches and eats the fish. The bird positions itself strategically on trees and bushes around the pond. On spotting a fish, the kingfisher dives into the water and comes out with the fish. Therefore, the control measure for the kingfisher is to clear all the bushes and trees near ponds.
(b) Bees
These are not a problem to the fish but prevent humans from working at the pond attending the fish.

Fish parasites include:
(c) Nematode worms
Nematode worms live in the alimentary canal of fish. They feed on the food meant for the fish thus depriving fish of their food.

Activity 7.12: Watching a video on different diseases of fish and their characteristics
Watch a video on fish disease and their characteristics and then carry out the following activities:
(i) Identify fish diseases and their characteristics.
(ii) Discuss and record your findings.
(iii) Present your findings to the class.
(iv) Take teacher’s summary notes.
The diseases of fish and their characteristics are as follows:
1. Columnaris
This disease is caused by a bacterium known as Flavobacterium columnare. The bacterium thrive well in fresh waters common in ponds. The disease is highly contagious. The disease enters the fish through the gills, mouth or wounds. It is prevalent in ponds where there is overcrowding of fish or where dissolved oxygen levels are low.
Symptoms
(i) Frayed and ragged fins.
(ii) Presence of ulcers (wounds) on the skin. This may appear as a white cloudy fungus-like patches especially on the gill filaments.
(iii) Gills change colour by either becoming light or dark brown.
(iv) Fish breathe rapidly or fast.
(v) Anorexia or loss of appetite.
(vi) Listlessness.

Damage
The disease has a high death rate and especially where no treatment is given to the fish.
Control
• Treatment using a combination of antibiotics.
• Dipping in medicated fish bath prepared from methylene blue or potassium (VII) manganate and salt.
• Lowering pond temperature to 24°C.
• Use of medicated food containing antibiotics for internal infections.
• Application of potassium (VII) manganate, copper sulphate or hydrogen peroxide on externally infected fish.
• Vaccination of fish to prevent outbreak.
2. Gill disease
The gill disease may be parasitic or infectious depending on its causative agent. Therefore, there is amoebic gill disease which is caused by amoeba and bacterial gill disease which is caused by bacteria.
Amoebic gill disease is caused by Neoparamoeba perurans, a common amoebic in fish reared in ponds. Bacterial gill disease is caused by bacteria that affects the gills of fish externally. The disease is prevalent in conditions of overcrowding.
Symptoms
The amoebic gill disease is characterised by:
(i) Mucus build-up on the gills of infected fish.
(ii) White spots on the gill.
(iii) Deterioration of the gill tissue.
(iv) Difficult in breathing.
Bacterial gill disease is characterised by:
(i) The presence of large numbers of filamentous bacteria on the gills.
(ii) The gill filament fuse reducing the ability of the gills to supply oxygen to the blood. This results in death of fish especially where there is no treatment.
Damage
The disease is highly fatal resulting in heavy losses.
Control
• Avoid overcrowding in the fish ponds, i.e., keeping the optimum of fish in the ponds.
• Maintaining hygiene in the ponds to prevent the growth of the bacteria.
• Treatment by use of chloramine-T which is allowed to flow through the gills for about 60 minutes or 1 hour. However, high concentrations of the chemical should be avoided.
3. Dropsy disease
Dropsy is a health condition in fish where the fluid inside the body cavity on the tissues of a fish builds up and as a result, the fish body swells up. So, the disease is characterised by the swelling of the fish body, a condition also known as oedema. Dropsy is a symptomatic disease in that it indicates a number of underlying diseases which may include bacterial infections, parasitic infections or liver dysfunction. Dropsy may or may not be contagious depending on the causative agent of the underlying disease. Common dropsy is caused by a bacterium of the genus aeromonas.
Symptoms
(i) Swelling of the whole body or bloating.
(ii) Scales protruding from the body.
(iii) Anonexia; loss of appetite.
(iv) Sunken eyes or listlessness.

Damage
The disease is highly fatal and leads to heavy losses especially if it is not treated.
Control
• Isolation of the sick fish in a hospital tank to prevent the underlying disease from spreading.
• Treating the sick fish with antibiotics.
• Creating a salt bath by adding not more than 2.5 teaspoonful of epsom salt (magnesium sulphate) for every 10 gallons of water into the hospital tank. The magnesium sulphate in the episom salt helps to drain the excess water out of the fish body and therefore remove the swelling.
• Feeding the fish with antibacterial fish food made by mixing 1% of the fish food and antibiotics. This should be continued for 7 days.
• Provide good quality water.
• Avoid overcrowding that may give the fish stress that encourage opportunistic diseases.
4. Fin rot
Fin rot is a symptom of disease or the actual disease in fish. It may be caused by a bacterium known as Pseudomonas fluorescens which causes ragged rotting of the fins. The disease could also be caused by a fungal infection which causes rotting of the fin more evenly and is likely to produce white ‘edges’ on the fins. Both types of infections may occur together. These infections may be brought about by poor water conditions, injury, poor diet, stress or a secondary infection in a fish which is already stressed by other diseases. Fin rot starts at the edge of the fin and continue developing until it reaches the fin base. From the fin the disease advances to the fish body.
Symptoms
(i) Fin edges turn black or brown.
(ii) Fins fray.
(iii) Inflammation of the base of the fins.
(iv) The whole fin may rot and fall off.
(v) White dots appearance on the fins.
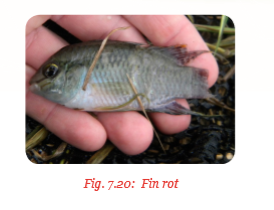
Damage
Damage to the fins means the fish movement is impaired. This means that other activities such as feeding are also affected and may result to death especially if treatment is not given at the right time.
Control
• Change of water; provision of good quality water.
• Treatment with phenoxethanol malachite green or mythylene blue.
• Checking and correcting water pH.
• Use of antibiotics and antifungal medication.
• Checking and correcting water temperature.
• Giving fresh foods.
• Avoid overcrowding in the pond which may lead to stress.
5. Hole in the head
It is a common disease of fresh water fish such as tilapia. The disease is caused by a flagellate parasite known as hexamita. The parasite basically affects the intestinal tract but spreads to the other parts of the fish such as the gall bladder, abdominal cavity, spleen and kidneys. As the disease advances to other parts of the body, lesions appear in the head. These lesions open up forming a hole which may discharge small white threads that contain parasitic larvae. Secondary bacterial and fungal infections may then occur through these openings leading to more serious diseases or even death if the condition is not treated early and in good time. The disease is also said to be caused by adverse environmental factors.
Symptoms
(i) Lesions on the head and lateral line.
(ii) Loss of appetite.
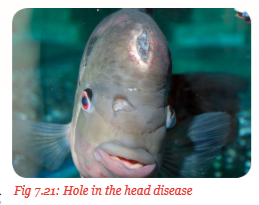
Control
• Control the parasite heximita.
• Improving water quality.
• Improving nutrition by supplementing with vitamin and mineral rich feeds.
• Adding antibiotic metronidazole to the treatment tank housing the infected fish.
• Giving fresh or frozen feeds to the fish.
• Control secondary infections by giving antibiotics such as maracyn, kanacyn-orfieran-2.
• Isolate sick fish from the healthy ones.
• Remove stressors such as overcrowding, poor quality water and extremes of temperatures which weaken the fish’s immune system.
6. Pop-eye disease
This is a health condition where one or both eyes of the fish protrudes from the body. This disease is also referred to as exophthalmia which means swelling of the eye. It is a symptomatic disease in that it indicates the presence of other underlying infections in the fish. The disease may be caused by a bacterial infection, injury from tightening or poisoning from poor quality water.
Symptoms
(i) Bulging or protruding eyes due to the build-up of fluid either behind the eye or within the eye.
(ii) Anorexia or loss of appetite.
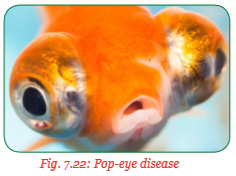
Damage
Loss of sight; if the disease is not detected in good time. The fish lose one or both of its eyes and therefore its eye sight. Fish could die due the hexamita infections.
Control
• Isolation into a hospital tank followed by treatment.
• Changing the water daily or addition of epsom salt. The magnesium sulphate in the epsom salt helps to remove the fluid in the eye socket.
• Providing healthy diets to the fish.
• Use of antibiotics to control the secondary bacterial infection.
• Reduce chances of physical damage.
• Provide healthy pond environment.
7. Cloudy-eye disease
It is also referred to as cloudy vision. It is a symptomatic disease which may indicate an underlying disease. The disease has many causes. The most common cause of the disease is poor water quality. High levels of ammonia nitrite and nitrates cause the eyes to become cloudy. Low water pH (acidic pH) could also cause cloudy disease. Secondary infections especially bacterial infections may worsen the situation. Medication, poisoning and overdosing may also cause the disease.
Symptoms
Cloudy eyes – The fish eye becomes cloudy almost to the point of whiteness.

Damage
Reduced vision of the fish which may make movement of the fish difficult. The disease is however, not fatal.
Control
• Addition of antibiotics to the water or food may help to cure the disease.
• Improving diet.
• Dimming the lighting.
8. Water quality induced diseases
Water in the pond is said to be of good quality if:
(i) The temperature is within its optimum range; 20°C to 26°C.
(ii) It has the correct concentration of dissolved oxygen.
(iii) It has pH around neutrality 5.9 to 7.0.
(iv) Low concentration of nitrogenous compounds such as ammonia nitrite and nitrates.
(v) Does not have organic pollutants.
Extremes of temperature, dissolved oxygen concentration pH and nitrogenous compounds together with organic pollutants make the pond water to be of poor quality. Poor water quality causes stress in fish if the situation is not rectified in good time. The body of fish responds to stress by releasing hormones known as corticosteroids from adrenal glands.
Corticosteroids have varying effects in the body of the fish. One of these effects is that it suppresses the immune system of the fish by lowering lymphocytes numbers and the antibody-production capacity in the fish. This results to the fish being affected by other opportunistic diseases such as bacterial and fungal infections. Corticosteroids also alter the levels and patterns of the reproductive hormones that influence maturation.
Symptoms
Retarded growth – Overproduction of corticosteroids due to stress may alter the metabolic reactions in fish, leading to retarded growth and delayed maturation.
Control
• Stress induced diseases or health complications are controlled by improving the quality of water.
• The environmental factors of temperature, dissolved oxygen concentration, pH and nitrogenous compounds concentration should be checked and regulated accordingly. This can be done by changing the water regularly.
9. Fungal diseases
Fungal diseases are those diseases that are caused by fungi. Fungal diseases in fish are more indicative of other serious problems. Fungal diseases in cultured or pond fish include:
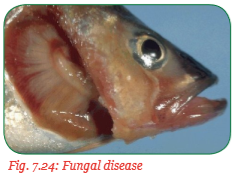
(a) Branchiomycosis
This disease is also known as gill-rot disease. It is caused by two fungi; Branchiomyces sangunis and Branchiomyces demigrans. The fungi thrive in pond water with frequent organic pollutions. The disease is endemic, occurring at certain periods when there is an outbreak. The outbreaks and the duration of the disease depend on the environmental factors, the most important being water temperature. It occurs most frequently when the water is above 20°C with an optimum 26°C. It is associated with low dissolved oxygen concentration, reduced water flow and overcrowding.
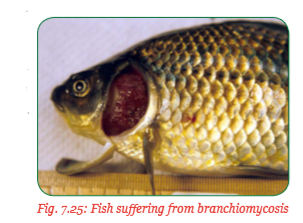
It occurs as a secondary infection when the mucus layer of the skin, fins and gills undergo mechanical or chemical injury or damage. The fungal spores are transmitted by water to the gills. The spores adhere to the gills, germinate and produce hyphal.
Symptoms
(i) Reduced movement.
(ii) Difficult breathing.
(iii) The fungus develops on the gill tissue.
(iv) Fish are inactive and are easily caught by hand.
(v) Gills may be appearing red from impaired blood circulation.
(vi) Fish gather in groups at water inlet and die.
Control
• Proper sanitation and disinfection of the area around the pond.
• Burning dead fishes or deeply burying the carcase.
• Drying the ponds with the fungi and treated with quicklime (calcium oxide) or copper sulphate at 2 to 3 kg/ha. • Sick fish are treated with malachite green.
• Quarantine – restricting movement of fish.
• Increased water supply.
• Removing stressors, for example, regulating pond temperatures and dissolved oxygen concentrations.
• Proper feeding – regulating the feed rate.
(b) Saprolegniasis
It affects fish and fish eggs. It is caused by members of the saprolegnia species called “water molds”. Members of this species are common in fresh or blackfish water. The fungus grows at temperatures between 1°C and 32.5°C. The disease attack an existing injury on the fish and can spread to healthy ones.
Symptoms
(i) Cotton-like material on skin, fins, gills or eyes of fish and on eggs and especially those that are damaged.
(ii) On observing sections of the tissue under a microscope, there appears tree-like branching called hyphae.
(iii) Fish are less responsive to external stimuli.
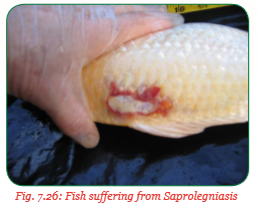
Damage
There is great losses of the fish and especially through predation.
Control
• Changing water regularly.
• Avoiding overcrowding conditions to minimise injury.
• Proper nutrition. • Improved sanitation around the pond.
• Treatment by use of potassium permanganate, formalin and iodine solutions.
• Bath treatment in sodium hydroxide (NaOH), Copper Sulphate (CuSO4) or Potassium permanganate (KMnO4).
(c) Icthyophonosis disease
It is caused by the fungus Icthyophonus hoferi. It thrives in both fresh and salt water in temperatures ranging from 3°C – 18°C. The disease is spread by fungal cysts which are released in the faeces and by eating infected fish. The cysts are transmitted through ingestion (swallowing) of the infective spores.
Symptoms
(i) Rough skin.
(ii) Swinging movement of the fish.

Control
• Avoiding feeding cultured fish with raw fish products to prevent spread. Such materials should be cooked to destroy the infective life stages.
• Isolation of the sick fish from the healthy ones.
• Disinfection of the hospital tanks.
Exercise 7.1
The table below shows different illustrations of fish diseases. Study them carefully and fill in the blank spaces
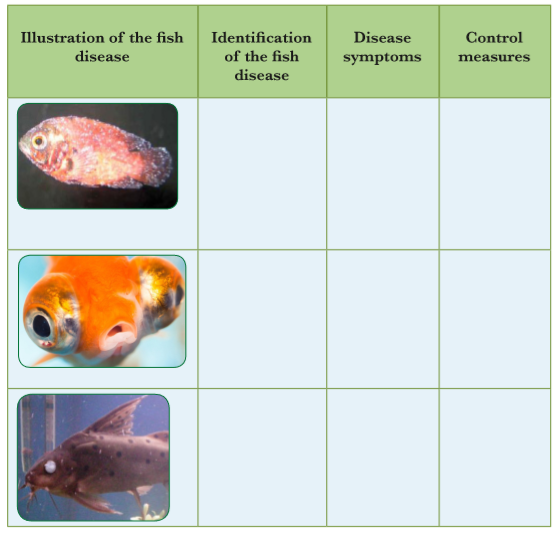
7.11 Fish pond sanitation
Activity 7.13:A visit for carry out fish pond sanitation rules in an integrated livestock-fish farm
Visit an integrated livestock-fish farm and carry out the following activities:
(i) Find out the sanitation measures carried out in the farm.
(ii) Draw a routine plan for the integrated livestock-fish farm.
(iii) Carry out all the routine practices in the integrated livestock-fish farm using the materials provided.
(iv) Discuss your activities and record your findings.
(v) Present your findings to the class.
(vi) Take teacher’s summary notes.
Pond sanitation include all the routine practices carried out in and around the pond to prevent or reduce the occurrence of diseases and parasites thus promoting the health of the fish. It includes proper disposal of wastes and dirt from the pond which may predispose the fish to diseases.
Pond sanitation rules include the following:
1. Proper housing and hygiene
Overcrowding in the fish ponds should be avoided. The correct population of fish per pond should be observed according to the various fish species. Livestock shelters over or adjacent to the fish pond should be well constructed and the correct number of animals kept in them. The shelters should have the following structural requirements:
(a) Well ventilated and free from the cold dry winds.
(b) Have adequate space for the animals.
(c) Allow proper drainage and deposition of faecal waste.
(d) Leak proof.
(e) Well lit.
(f) Easy to clean.
Feeding and watering equipment in the livestock shelters and any other equipment for handling fish should be kept clean.
2. Cleanliness
The area around the integrated-fish farming structures should be cleared and kept free from refuse. Animal houses and the fish pond should be thoroughly cleaned.
3. Provision of good quality water in the pond
Ensuring there is good quality water in the ponds helps to avoid stress in the fish, thus controlling environmental diseases. The water should be within the optimum range of temperature, dissolved oxygen concentration, pH and nitrogenous compounds for specific fish species. These should be checked regularly and controlled accordingly. All chemical and physical impurities should be removed from the pond water.
4. Use of antiseptics and disinfectants
After cleaning, the livestock houses should be disinfected with the recommended disinfectants such as formalin, chlorine, water and detergents. This helps to prevent animals from contracting diseases. Foot baths should be strategically placed at the door of the poultry houses to prevent entry of disease-causing organisms.
5. Isolation of sick animals
Sick fish should be isolated and kept in hospital tanks where they are given specialised treatment. Sick livestock in the shelters should also be isolated and treated to prevent disease spread.
6. Imposing quarantine
The movement of livestock and their products from the infected to uninfected areas should be avoided. This helps to prevent disease spread.
7. Proper nutrition
Fish should be provided with the correct amounts of feeds. Overfeeding should be avoided as this may lead to pollution of the fish pond. The correct feeding plan for specific fish species such as tilapia, trout, catfish and carp fish should be observed. Similarly, livestock reared in combination with the fish should be well fed and provided with plenty of clean water and mineral supplements in case of rabbits.
8. Proper disposal of carcases and waste
water All carcases from sick animals should be burned completely or buried deeply in the soil to prevent spreading of diseases. Water from the ponds should be properly treated before it is released to natural water channels. This is done in stabilisation ponds known as lagoons. The water is treated in these lagoons until it is safe to be discharged to the wetlands.
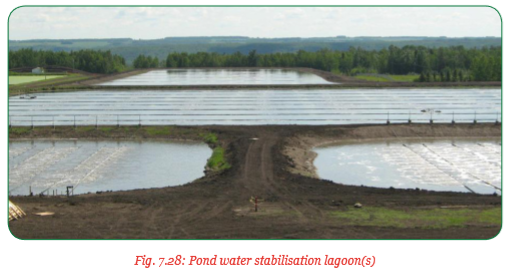
Group activity
Identifying fish diseases in an integrated livestock-fish pond
Visit an integrated livestock-fish farm and working in groups, carry out the following activities:
(i) Find out the different fish species reared in the farm.
(ii) Observe carefully for any disease symptoms among the fish species reared in the farm.
(iii) Using the photographs and charts provided together with the Secondary 3 Agriculture Students' Book, match the characteristics of the disease symptoms observed and the ones in the materials provided and identify the disease(s) affecting the fish species reared in the farm.
(iv) Discuss and record your findings.
(v) Present your findings to the class.
(vi) Take teacher’s summary notes.
Unit Summary
Integrated livestock-fish farming is a system of producing fish in combination with other agricultural or livestock farming operations centred around the pond. In this arrangement, fish benefits from the manure from the livestock kept in association with fish rearing. This manure promotes the growth of planktons in the fish pond. Planktons such as algae are the natural foods for fish.
Integrated livestock-fish farming is based on the understanding and exploitation of the existing natural relationships between living organisms in an ecosystem. Integrated fish farming is important for the following reasons:
(i) Economic reasons – To the farmers; it is a way of diversification where there is a continuous supply of income from the sale of fish, farm animals such as rabbit and poultry and from vegetables.
(ii) Environmental reasons – Fish kept in the pond helps to dispose of manure from the animal houses whereas the vegetables can use the waste water drained from the fish pond.
There are different types of livestock – fish integration depending on the type of animals kept in association with fish rearing. Some of these fish farming integration include:
(i) Fish-poultry integration.
(ii) Fish- poultry-vegetable integration.
(iii) Fish- rabbit-vegetables integration.
(iv) Fish-pig integration.
In order for the integrated livestock-fish farming to succeed, the necessary infrastructure must be put in place. These are a fish pond or fish ponds and various shelters for housing the livestock to be kept in combination with fish.
In choosing the materials for the construction of integrated fish farming, the following factors should be put into consideration:
(i) Availability of the materials.
(ii) Cost of the materials.
(iii) Nature of the soil at the selected site.
(iv) Suitability of materials.
(v) Durability of the materials and the strength of the materials.
Materials for the construction of the integrated livestock-fish farming include the following:
(i) Cement, sand and ballast for making concrete.
(ii) Stones, bricks or concrete blocks.
(iii) Timber or wood.
(iv) Corrugated iron sheets or thatch for roofing.
(v) Nails, nuts and bolts, hinges, screws and latches.
(vi) Various wire mesh.
After selecting the construction materials, a suitable site is selected for the construction of the integrated livestock-fish pond. The site is then prepared for the construction of the integrated livestock-fish farming pond. Once the pond is constructed, water is allowed in and fish stocked in the pond. The pond is stocked with young fish known as fingerings from various hatcheries in Rwanda, for example, Kigembe Tilapia Hatchery. Similarly, the appropriate livestock to be kept in association with fish rearing are selected and introduced into the livestock shelters to supply manure for fertilisation of the fish pond.
After the integrated livestock-fish farming has been established, it has to be managed and maintained for the enterprise to succeed. The management and maintenance of an integrated livestock-fish farming infrastructure involves the following practices:
(i) Cleaning up the pond banks.
(ii) Controlling the level and quality of the water in the pond.
(iii) Cleaning the livestock shelters constructed in relation to the fish pond such as aviaries and rabbit hutches.
(iv) Repairing the pond dykes and the livestock structures.
(v) Feeding the fish in the ponds and the animals in the shelters.
Food for the fish reared in ponds include:
• Grain offals
• Herbs
• Concentrates
• Compost
• Livestock dung
The livestock dung is meant for fertilisation of the pond. Fertilisation of the pond refers to the addition of manures or fertilisers to support the growth of planktons, the natural food for fish.
A feeding plan should be made to guide the feeding of fish. This is done for every species of fish in the farm. The feeding plan helps to avoid overfeeding or underfeeding the fish. There are enemies of fish and diseases which may disrupt their growth in the pond.
The enemies of fish include:
• Birds
• Bees
• Nematodes
The diseases of fish include the following
• Columnaris
• Gill disease
• Fin rot
• Hole in the head
• Pop-eye
• Cloudy eye
• Water induced diseases
• Fungal diseases
These diseases cause a lot of damage to fish enterprise and therefore appropriate measures should be taken to control them through various sanitation measures. The following are the sanitation rules for an integrated livestock-fish pond:
(i) Proper housing and hygiene.
(ii) Cleanliness in and around animal houses.
(iii) Provision of good quality water in the pond.
(iv) Use of antiseptics and disinfectants.
(v) Isolation of sick animals.
(vi) Imposing quarantine.
(vii) Proper nutrition.
(viii) Provision of clean equipment in the animal houses.
(ix) Proper disposal of carcases.
Key terms
1. Antibiotics – These are drugs used in the treatment and prevention of bacterial infections.
2. A stressor – An agent of stress.
3. Aviary – Structure in which poultry are kept/poultry house.
4. Concentrates – These are commercial livestock feeds that have a high protein or carbohydrate content and a low fibre content.
5. Cultured fish – Fish that is reared in ponds
6. Diversification – The practice of allocating productive resources in different enterprises so that should one fail, the farmer benefits from the others.
7. Ecosystem – This is a natural community of interacting organisms and their physical environment.
8. Enterprise – A single unit of production.
9. Feed plan – A feeding schedule for fish which is based on the species and population of fish reared in pond.
10. Fingerlings – These are young/juvenile fish about the size of human fingers.
11. Fish pond enemies – These are animals that either kill fish for food or cause injury to the fish.
12. Fish predators – These are animals that kill fish for food.
13. Integrated fish pond – This is a fish pond that is constructed in such a way that it has provisions for keeping livestock such as poultry or rabbits either above it or beside it.
14. Integrated livestock-fish farming – A farming system where fish are reared in combination with other livestock animals.
15. Integrated livestock-fish farming infrastructure – These are shelters used for reared/keeping the various components of animals in an integrated fish farm.
16. Integration – The act or process of combining two or more things to come up with whole/the act of making something a part of a large group or organisation.
17. Lesion – A region in an organ or tissue that has suffered damage through injury or disease.
18. Medicated bath – Medicine dispersed in water which is used in controlling external body disorders in animals.
19. Planktons – Lower forms of life such as algae which serves as the natural food for fish
20. Pond fertilisation – This is the addition of manure or inorganic fertilisers to the pond to stimulate the growth of plantations.
21. Rabbit hutch – Rabbit house.
22. Roughages – These are livestock feed that have a high crude fibre content with low protein and carbohydrate content.
23. Sanitation measures/rules – These are hygienic means of promoting and protecting the health of animals.
24. Stress – Any form of discomfort/threats to the well-being of an organism.
25. Sustainable resource management – This is the utilisation of resources in a manner that will ensure the resources remain productive for generation to come.
26. Vaccination – The administration of vaccine (antigen) to stimulate the individual’s immune system to produce antibodies that combat any form of foreign body/protein/antigen.
End of Unit 7 Assessment
1. (a) Explain what an intergrated livestock-fish farming is.
(b) Give two ways in which livestock shelters in integrated livestock fish farming may be constructed in relation to the fish pond.
2. Outline the factors to consider in selecting the site for the construction of integrated livestock-fish pond.
3. Explain how you would identify the type of integration in an integrated fish farm.
4. Outline the maintenance practices carried out on an integrated livestock- fish farming shelters/infrastructure.
5. Describe columnaris disease in fish under the following sub-headings:
(a) Causative agent
(b) Symptoms of attack
(c) Damage caused
(d) Control measures
6. The diagram below shows parasite and predators of fish in the pond. Study them and then answer the questions that follow:
(a) Identify figure A and B.
(b) Group them into parasites and predators.
(c) Outline the methods of controlling A.
7. Identify the characteristics of good quality water for fish reared in ponds.
UNIT 8 : Co-operative farming
Key Unit Competence:
Learners should be able to explain co-operative farming and its contribution to agro-economic problem-solving in Rwanda.
8.1 Learning Objectives
(i) Knowledge and understanding
• Describe the importance of co-operatives in Rwandan production growth.
• Classify the co-operatives.
• Explain principles of co-operatives.
• State factors necessary for co-operatives’ success.
(ii) Skills
• Defend importance and values of co-operatives using examples.
• Recognise types of co-operatives.
• Defend co-operative principles.
• Criticise necessary factors involved in success of co-operatives.
(iii) Attitudes and values
• Appreciate the importance of co-operatives.
• Promote co-operative values.
• Understand perspectives of co-operatives in problem-solving.
Introduction
A farmer named Mr. Kubwayo has grown irish potatoes on 20 ares in his farm. After the harvesting he found that the yield was more than enough to his small family. He decided to carry a half of the harvest to the market. On arriving at the market he was not allowed to retail the harvest to consumers as he as not a member of cooperative society which has right to retail and was directly obliged to sell it to that co-operative at lower prices.
1. What should happen if Mr. Kubwayo was a member of that cooperative?
2. In what ways can people work together to increase their production?
Co-operative farming is a voluntary organisation in which farmers pool their resources. It helps to uplift those who may not have enough capital and resources to improve their farming. There are several types of farming co-operatives which include; producers, consumers, multi-stakeholders co-operatives. They are run on the principles of co-operatives. The success of co-operatives depends on its structure, culture and the risks taken. The picture(s) below give an overview of the unit.

8.2 Importance and values of co-operatives in production growth in Rwanda
Activity 8.1 Research activity to find out the importance and values of co-operatives in production growth in Rwanda
Use the references provided to carry out the following activities:
(i) Discuss the importance and values of co-operatives in production growth in Rwanda.
(ii) Record your findings.
(iii) Present your findings to the class.
(iv) Take teacher’s summary notes.
A co-operative is an organisation of people who have joined together voluntarily with a common purpose for mutual economic benefits. The importance and values of co-operatives in Rwanda include the following:
(i) Self-help: Co-operatives help members to pool resources together for selfhelp initiatives that improve their livelihood. This helps to uplift each other economically.
(ii) Self-responsibility: Members of co-operative societies learn the art of being responsible for their own livelihood without looking upon the government for support.
(iii) Democracy: Members of co-operatives learn to follow democratic principles in carrying out activities in social groups. Co-operatives educate their members on the need of democracy in fostering social harmony and order. This promotes peace and unity in the nation.
(iv) Equity: Members learn the need to treat others fairly and equally in a social set-up.
(v) Equality: Members learn to appreciate and treat one another as equals in a social organisation irrespective of age, gender, tribe, race or religion.
(vi) Solidarity: Co-operatives are based on the principle of unity is strength. Members learn to appreciate the benefits of being united and having a common voice in pursuing a certain goal in life rather than being a lone ranger.
8.3 Types of co-operatives
Activity 8.2: Research activity for describing different types of co-operatives
Using the references provided, carry out the following activities:
(i) Describe different types of co-operatives.
(ii) Discuss and record your findings.
(iii) Present your findings to the class.
(iv) Take teacher’s summary notes.
Co-operatives are formed to cater for certain needs of their members. Therefore, co-operatives are categorised on the basis of goals for which they were established. The following are types of co-operatives:
1. Producer co-operatives
These are co-operatives whose members are engaged in agricultural production. Members pool their resources together to buy large tracts of land such as large estates. Instead of dividing up the land and sharing such capital as tractors and other machinery, they decide to work on the farm as a group and share benefits known as dividends at the end of the year. Each farmer gets dividends according to his or her share capital produced. Co-operatives are engaged in large-scale agricultural production. Example of producer cooperatives are ABADATEZUKA KU MURIMO, GATARAGA and ABIZERAPANA, GATARAGA.

2. Multi-purpose co-operatives
These are co-operatives that diversify their activities. They carry out several activities at the same time. These activities could include credit lending, production, input supply and marketing. For example, GATERE TEA FARMERS SAVINGS AND CREDIT CO-OPERATIVE (GTF)
3. Worker co-operatives
These are co-operatives that are owned and managed by some or all its workers. They are usually fairly small and have no separate board of managers. Everyone takes a direct role in its policy making in a democratic manner. For example, ISHEMA RYAGU and YOBOKA ITUMANAHO RUSIZI (KOYIRU)
4. Worker-shareholder co-operatives In these co-operatives, a group of workers acquire a block of shares in an organisation and therefore become partial owners of the enterprise. For example, NASHO CROP TRADING CO-OPERATIVE (NCTC) and MWALIMU SACCO.
5. Consumer co-operatives These are co-operatives that are basically involved in selling farm inputs. They buy the inputs in bulk and thereafter sell them to their members at fair prices. In addition to this, they offer marketing services to their members.
8.4 Principles of co-operatives
Activity 8.3: Research activity to find out the principles of cooperatives
Using the reference provided, carry out the following activities:
(i) Identifying the principles of co-operatives.
(ii) Discuss and record your findings.
(iii) Present your findings to the class.
(iv) Take teacher’s summary notes.
Co-operative principles are guidelines through which co-operatives put their values into action. Co-operatives operate on the following principles:
(i) Voluntary and open membership: Members can join voluntarily on paying a membership fee regardless of race, religion, gender and political inclinations as long as they are adults and of sound mind. Withdrawal of membership is also voluntary.
(ii) Democratic member control: Co-operatives are democratically ran on the basis of one-man-one-vote basis. The members have equal rights upon withdrawal of membership, members get back their share contributions. A member may buy shares up to a specific maximum limit in a co-operative. This avoids domination of the members by one member or a group of members.
(iii) Members economic participation: Any money occurring from the share capital is distributed to the members as dividends on the basis of share contributions. Similarly, any loss to the co-operative is also distributed to the members on the basis of share contribution.
(iv) Autonomy and independence: Co-operatives are economically autonomous and free from any interference from the government. They should also not be inclined to any political party.
(v) Education, training and information: Members should be continuously educated to ensure that they are knowledgeable in relevant skills and are conversant with the co-operative affairs. The co-operative should also train its members on the latest technology required in production and provide information concerning market research, commodity prices, supply and demand, inputs, pests and disease control and the effects of climate change on production.
(vi) Co-operation among co-operatives: This is all about the co-operative spirit. Co-operatives are supposed to join the co-operative movement at the local, district, national and international levels to promote the cooperative spirit.
(vii) Concern for community: The co-operative should have concern for the community within which it operates. This should be in form of allocating a portion of the income to the welfare of the community. This is a social responsibility of a co-operative. Co-operatives give back a certain percentage of their profit to the community in which they operate.
8.5 Factors necessary for the success of co-operatives
Activity 8.4: Research activity to find out the factors that contribute to the success of co-operatives
Using the references provided, carry out the following activities:
(i) Identify the factors that are necessary for the success of co-operatives.
(ii) Discuss and record your findings.
(iii) Present your findings to the class.
(iv) Take teacher’s summary notes.
The following are the necessary factors for the success of a co-operative:
1. Organisational structure
This is a formal system or set-up of tasks and reporting relationships that co-ordinates and motivates members of an organisation to work together in order to achieve set goals and objectives. It determines how the resources of an organisation are allocated and utilised in the production of goods and services. The success or failure of an organisation to a large extent depends on its structure.
If resources are properly utilised, there is success otherwise the organisation collapses. A co-operative is an organisation and its success depends on its structure. Different types of co-operatives have different structures. Co-operatives are democratically ran and therefore power lies with the members. The members vote to elect members of the board of directors. The board of directors hires the management who in turn hires the staff in consultation with the board of directors. The senior management is answerable to the board of directors while the board of directors is answerable to the people.
They must, therefore, give a report during annual general meetings. Where the structure does not clearly define the flow of authority, there is no accountability and no one takes responsibility in case of a loss. This may lead to the collapse of the co-operative. Therefore, the type of structure contributes to the success or downfall of a co-operative. Figure 8.5 is the flow chart of an organisational structure in a co-operative.
Exercise 8.1
Discuss in groups and find out what A, B, C and D stands for in the organisation structure illustrated.
2. Organisational culture
Organisation culture is a system of shared common values, norms and beliefs of an organisation. It gives meaning to the actions and procedures within an organisation.
It is the glue that holds members of an organisation together and what keeps them focused on the achievement of the organisation's goals and objectives where the core values of a co-operative are clearly stated and adhered to in the day-to-day life of a co-operative, it leads to prosperity, otherwise failure to uphold these values may lead to the collapse of the cooperative.
Co-operatives have maintained the core values of honesty, openness, social responsibility and caring for others. These core values form the organisational culture of a co-operative. If they are well adhered to, they lead to the success of a co-operative otherwise, the co-operative falls apart.
3. Risks bearing
Risk is defined as the difference between what is expected and what is observed or the actual outcome of a business plan. The future is not known, it is said to be uncertain. Therefore, people move into the future by taking risks.
Every organisation must, therefore, be prepared to bear the risks of investing in certain businesses. Co-operatives must, therefore, put in place measures to minimise risks in their investments. This may be done through the following:
(i) Diversification: This is the allocation of productive resources in several and different enterprises so that, should one fail, members benefit from the others.
(ii) Selecting more certain enterprises: Some enterprises have more steady income than others. It is better to choose an enterprise which earns a more steady income though less profitable.
(iii) Contracting: The co-operative may enter into a contract with consumers to supply certain goods over a specified period of time and at an agreed price. Such a contract guarantees members of a constant and fixed market for their produce.
(iv) Insurance: Insurance companies take the risk of insuring farm machinery, crops and livestock against loss. Individual members or the co-operative society pay small amounts of money known as premium as insurance cover to an insurance company. The cover guarantees the members of compensation in the event of a loss. It covers losses due to crop failure, death of livestock, theft, fire and accidents involving farm machinery.
(v) Input rationing: This involves controlling the amount of inputs in various enterprises. Farmers may apply less inputs than the optimum required for an enterprise so that, should unfavourable conditions lower yields or prices fall, they suffer less loss than if they had used the optimum inputs. They can also use additional inputs in enterprises that have better chances of giving higher returns.
(vi) Flexibility in production methods: Farmers may design their enterprises in such a way that, should there be a need to change from one enterprise to another in response to change in demand, they can easily do so with minimum expenses. For example, livestock buildings should be constructed in such a way that they can with minimum modifications be used to house different types of livestock.
(vii) Adopting modern methods of production: Adopting a new technique in production may reduce the amount of risk. For example, spraying crops against pests and diseases, vaccinating livestock against diseases and irrigating crops can enhance chances of high production. However, adopting these modern methods of production involves extra costs. But by incurring them, they help to avoid the would-be losses.
Group activity
A visit to a co-operative society premises to study the organisation and running of a co-operative.
Visit a co-operative society premises and carry out the following activities:
(i) Observe the activities being carried out at the co-operative society. From the activities being carried out, determine the type of the co-operative.
(ii) Find out how the co-operative was formed.
(iii) Establish the core values of the co-operative.
(iv) Establish the organisational structure of the co-operative.
(v) Discuss and record your findings.
(vi) Present your findings to the class.
(vii) Take the teacher’s summary notes.
Unit Summary
A co-operative is an organisation of people who have joined together voluntarily for mutual economic benefits. Co-operatives uphold the following values; selfhelp initiatives, self-responsibility, democracy, equity, equality and solidarity.
Co-operatives are formed to cater for the needs of their members. They are, therefore, categorised on the basis for which they were established. The different types of co-operatives include:
(i) Producer co-operatives.
(ii) Multi-purpose co-operatives.
(iii) Worker co-operatives.
(iv) Worker- shareholder co-operatives.
(v) Consumer co-operatives.
(vi) Marketing co-operatives.
Co-operatives operate on the following principles:
(i) Voluntary and open membership.
(ii) Democratic member control.
(iii) Members economic participation.
(iv) Autonomy and independence.
(v) Education, training and information for members.
(vi) Co-operation among co-operatives.
(vii) Concern for community within which the co-operative is established. The factors that contribute to the success of co-operatives include organisational structure, culture and risk bearing.
Key terms
1. Co-operative movement – A worldwide movement that aims to share profits and benefits from jointly owned commercial enterprises among members.
2. Co-operative principles – Guidelines through which co-operatives put their values into action or practice.
3. Co-operative value – Beliefs about what co-operatives consider to be good, right and desirable.
4. Co-operative – An organisation of people who have joined together voluntarily with a common purpose for mutual economic benefits.
5. Contract – Legal agreement between two parties or people to do something.
6. Democracy – Belief in freedom and equality between people in which power is either held by elected representatives of the people or directly by the people themselves.
7. Diversification – Allocating productive resources in several and different enterprises so that, should one fail, members benefit from the others.
8. Dividends – Profit of a business organisation that is paid to the shareholders or people who own shares in it.
9. Equality – The right of different people or groups of people in society to have similar social position and receive the same treatment.
10. Equity – Situation in a society where everyone is treated fairly and equally.
11. Goal – The broad aim or purpose of doing something.
12. Insurance – A legal undertaking by a company to compensate someone or a group of people for losses incurred through theft, fire, accident or injury after regular payments of a certain amount of money known as premium.
13. Organisational culture – A system of shared common values, norms and beliefs of an organisation.
14. Organisational objective – The expected outcome of an organisation’s work plan.
15. Organisational structure – A formal system of tasks and reporting relationships that co-ordinates and motivates members of an organisation to work together in order to achieve set goals and objectives.
16. Organisation – A group of people who work together in an organisational way for a shared purpose or an arrangement of parts that make a whole.
17. Risk – Difference or divergence between the expected outcome and the actual outcome of an undertaking or enterprise.
18. Share capital – A large amount of money and possessions used for starting a new business contributed by members of the business organisation.
19. Shareholder – A person who owns shares in a business organisation.
20. Shares – One of the many equal parts that the ownership of the business organisation is divided into.
21. Solidarity – Agreement between members of a group.
End of Unit 8 Assessment
1. Explain how the organisational structure of a co-operative contribute to its success.
2. Describe the difference between producer and consumer co-operatives.
3. Explain the difference between profit and dividend.
4. Differentiate between risks and uncertainties.
5. Analyse five main importance and values of co-operatives in promoting production growth in Rwanda.
6. Explain how co-operatives control their membership.
7. Outline four core values of a co-operative.
References
A., D. R. Ker et al. Agriculture in East Africa: An Introduction to Principles and Practices. Edward Arnold (publishers) Ltd.
D. N. Ngugi , P. K. Karau & W. Nguyo East African Agriculture. Macmillan Press Ltd.
D. Rocheleau et al. Agroforestry in Dry Land African. International Council for Research in Agroforestry (ICRAF).
C.L. Wilson et al. Botany 5th Edition.
Glenn O. Schwad et al. Elementary Soil and Water Engineering 2nd edition pilated by Toppan Printing Company, Japan.
P. G. D Chard et al. Focus on Agriculture, a secondary course for Zimbabwe Bk 3. College Press.
G.R. Jones et al. Contemporary management, 2013.
Secondary Agriculture Student's Book 4 Kenya Literature Bureau. Third Edition.
Soil Conservation in Kenya: Manual by the Ministry of Agriculture, Soil and Water Conservation, branch in Nairobi.
Secondary Agriculture Student's Book 3. KLB Third Edition.