UNIT 3 : ORNAMENTALS
Key Unit Competence:
Learners should be able to conduct cultivation of a range of ornamental plants.
3.1 Learning Objectives
(i) Knowledge and understanding
• Define ornamentals in Rwanda.
• Give examples of ornamentals in Rwanda.
• Discuss the importance of ornamental plants.
• Explain the different methods of ornamental propagation.
• Explain cultural practices done on ornamental plants.
(ii) Skills
• Recognise the meaning of ornamental plants.
• Select common ornamentals cultivated in Rwanda.
• Recognise the importance of ornamental plants.
• Conduct propagation methods of ornamental plants.
• Conduct ornamental cultivation.
• Carry out pruning for some ornamentals cultivated.
(iii) Attitudes and values
• Take care to find the significance of ornamentals.
• Notice the main ornamentals grown in Rwanda.
• Appraise the importance of ornamental plants.
• Be careful when observing video to follow all steps of each activity.
• Show concern while doing cultural practices of ornamentals.
• Avoid risks when conducting cultural practices.
Introduction
The growing of ornamentals known as floriculture is a major branch of horticulture. As its people continue to appreciate the beauty of God’s creation, ornamental farming has continued to increase in popularity. It has become a major foreign exchange earner for world economies, Rwanda included. People use ornamentals as cut flowers, house plants and outdoor plants where they display their beauty.
Ornamental crops play a very significant role in the society of Rwanda. However, the farmers who grow them for the purpose of doing business are still few. This causes a problem of insufficient quantities of flowers to be used in different ceremonies such as decoloration and religious functions among others.
(a) What do you think may limit farmers from growing the flowers?
(b) If one of limits is unawareness. Guide the farmers on how to carry out main flower growing activities namely weeding, pest and disease control.
Ornamentals are plants which are grown for decorative purposes in landscapes, flower gardens, parks and indoors. The photos below give an overview of the unit.

3.2 Definition of ornamentals
Activity 1 3.1: Research activity to find out the meaning of ornamentals
Use the references provided to carry out the following activities:
(i) Find out the meaning of ornamentals.
(ii) Discuss and record your findings.
(iii) Present your findings to the class.
(iv) Take teacher's summary notes.
Ornamentals are plants or trees grown for the purpose of decoration. They have an attractive appearance. They are used in beautifying the environment in which human beings live. They are used to beautify the landscape and flower gardens. Trees become ornamentals only when they are tendered and used as part of a garden, park or landscape setting. If ornamental plants are not tendered, they cease to be ornamentals. The cultivation of ornamentals is known as floriculture or simply flower farming. Floriculture is a branch of horticulture.

3.3 Some ornamentals cultivated in Rwanda
Activity 1 3.2: A field visit to observe and explore Ornamental plants grown in Rwanda
Visit a place or a farm where ornamentals are grown and carry out the following activities:
(i) Observe the ornamental plants grown or growing in the farm.
(ii) Identify the ornamental plants observed in the farm.
(iii) Discuss and record your findings.
(iv) Present your findings to the class.
(v) Take teacher’s summary notes.
Exercise 3.1
Table 3.1 below shows photographs of ornamentals grown in Rwanda. Study them carefully and then identify them.
Table 3.1: Ornamental plants grown in Rwanda
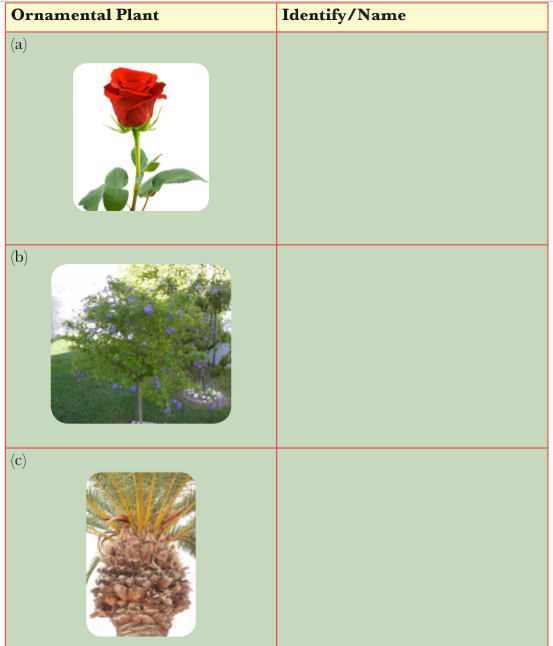

Ornamental plants cultivated in Rwanda include the following:
1. Roses
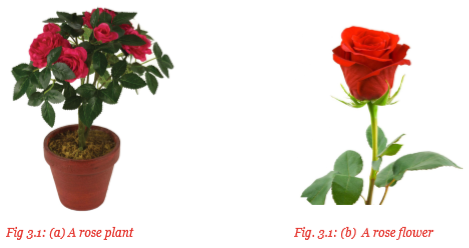
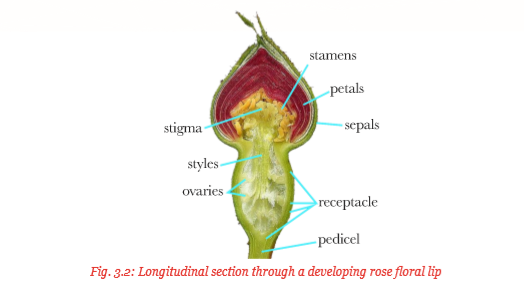
A rose is a perennial flowering plant. It belongs to the genus Rosa in the family Rosaceae. The genus Rosa has many species and cultivated varieties or cultivars. Roses are grown for their beautiful flowers which often have pleasant smells. The flowers vary in size, shape and colour. The colours range from white, yellow, pink to different shades of the red colour. The sepals and petals of therose flower are five in number with numerous stamens. The carpels vary in number from one to many depending with the particular species.
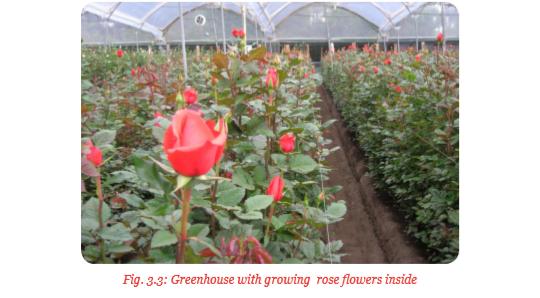
In Rwanda, roses are grown in large greenhouses mainly for the export market as there is little domestic demand for rose flowers. The cutflowers are mainly exported to Holland and Belgium. Roses are also grown in flower gardens and parks due to their attractive appearance.
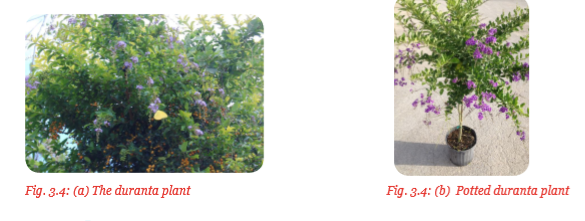
2. Duranta (Duranta erecta)
Duranta erecta is a species of flowering shrubs in the verbena family known as verbernaceae. It is widely grown as an ornamental plant.
It produces flowers with colours ranging from light blue to light purple. They develop yellow, ball-shaped fruits. These fruits have chemicals which are poisonous to human but harmless to birds, therefore, birds enjoy eating them. The plant is suited for border areas and living hedges.
3. Palms
There are many species of palm trees. Some are small but others grow to more than 100 feet high. Most palms are tropical but a few others grow in the sub-tropical regions. Palm leaves are distinguished by their large compound evergreen leaves known as frounds. The leaves are arranged at the top of a solitary or unbranched stem. A few palms grow as a dense cluster without a trunk. This is what provides the real beauty of the palm tree.
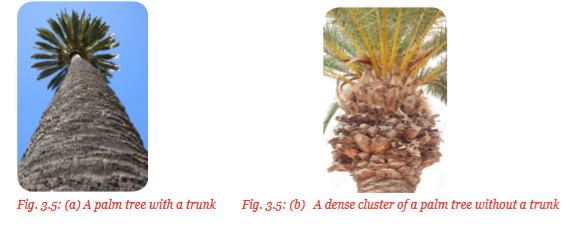
Some palm trees provide food for humans while others are grown for ornamental purposes.
Ornamental palms are grown to provide beauty and sometimes shade in parks. Although palms have flowers, their ornamental characteristics are due to their leaves and the general appearance (form) of the palm trees providing beauty and shades in parks and around homesteads.

4. Anthurium
Anthurium is also known as Anthurium tail flower, flamingo flower or lace leaf. The flower originated from America where it grows naturally.
Plant characteristics
Anthurium is a herbaceous monocotyledonous perennial plant. It is an evergreen flowering plant that belongs to the Araceae family. The family has over 800 species which are mainly epiphytes with a few terrestrials.
(i) Inflorescence – The inflorescence also known as the spadix bears small flowers which contain both male and female structures. The flowers are contained in dense spirals on the spadix which is elongated to form a spike.
(ii) Spathe – This is a type of a bract. The spathe is of variable shape in many species but is mainly lance shaped. The spathe may extend out flat or in a curve.

(iii) Leaves – The leaves are heart-shaped and deep green. Anthuriums are grown for their brightly coloured spadix, spathes and beautiful leaves. The spadix and the spathe are the main focus of anthurium breeders who develop cultivars with bright colours and unique shapes. Many anthuriums are grown as house plants although some are grown as outdoor plants in mild climates and shady spots. Anthuriums can be propagated by seed or vegetatively by cutting.
5. Bougainvillea
Bougainvillea are perennial thorny flowering plants which belong to the genus bougainvillea.
This genus consists of many species which are either vines, bushes or trees. Some of the species include, B glabra, B.
Plant characteristics
(a) Flower – The bougainvillea flower is white in colour and consists of both the male and female parts. The flower which is tube-like in shape is surrounded by three or six brightly coloured bracts depending with the species. The colours of the bracts ranges from white, yellow, orange, purple, pink, magenta and red. The beauty of the bougainvillea is attributed to the bracts rather than the flower.
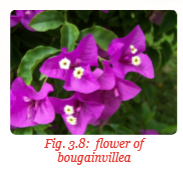
(b) Leaf – Bougainvillea leaves are elliptical (oval) in shape. The leaves may be green or variegated. It is important to note that the brightly coloured bracts surrounding the white flowers are leaves.

(c) Thorns – Bougainvillea have small thorns which are curved at the tips as shown in fig. 3.10.
Some of the most popular bougainvillea varieties include:


(a) California Gold
The golden yellow California is a vigorous growing variety that produces vines that are 20 to 30 ft long. Its bracts vary in colour with various shades of true yellowgold.
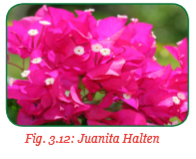
(b) Juanita halten
The Juanita Halten has lush foliage which is subtly variegated with light and dark green leaves splatter painted with gold.
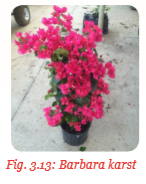
(c) Barbara karst
This is a vigorous growing and slowy variety with bright red to bluish crimson bracts.The vines grow up to 20 to 30 ft long.
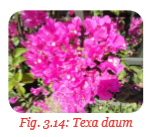
(d) Texa daum
This variety has huge clusters of small pink flowers. It is a vigorous plant with arching branches that grow up to 20 to 30 ft long.
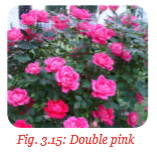
(e) Double pink
It is a double flowered, bushy variety having pure pink bracts as shown in figure 3.15.
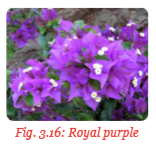
(f) Royal purple
This is a bushy plant with large bracts borne profusely with rich deep green foliage. It is frequently used in hanging baskets and containers.
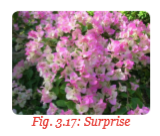
(g) Surprise
This variety produces a combination of both pink and pure white bracts that one might tend to think that the plant is a graft while it is not. The bract may be sometimes pink and at times all white. It is a medium size plant with solid green foliage.
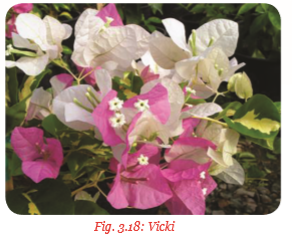
Vicki
This variety has a rich cream and gold variegated green foliage with pink and white bracts. Some bracts are pure white, some are pure pink and others are white with pink tips. It does best in containers.
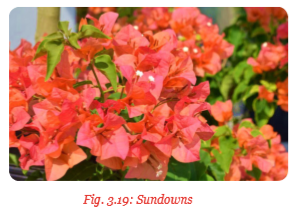
(i) Sundown
It has apricot coloured bracts which open as a deep orange and mature to a light pink. It has a moderate growth rate with bushy, dark green foliage.
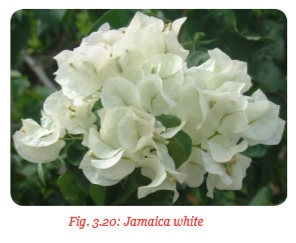
(j) Jamaica
white It is an evergreen shrubby vine that produces vibrant coloured papery, petal-like big white bracts viewed in light green. It is moderately vigorous. It is supported by tying to a fence or wall as it is growing. Its vines grow up to 15 to 30 ft in length.
3.4 Importance of ornamental plants
Activity 1 3.3: Research activity to find out the importance of ornamental plants grown in Rwanda
Use the references provided to carry out the following activities:
(i) Find out the importance of ornamental plants.
(ii) Discuss and record your findings.
(iii) Present your findings to the class.
(iv) Take teacher’s summary notes.
Ornamental plants are important for the following reasons:
(a) Adding beauty
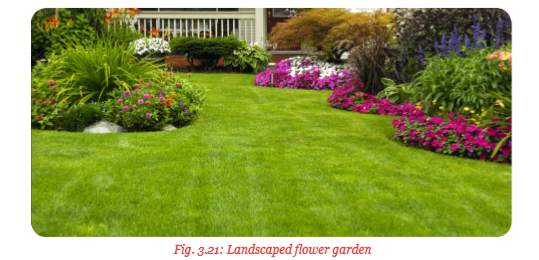
Ornamental plants have aesthetic value. They are grown in landscapes, flower gardens and indoors to beautify the surrounding. Ornamentals with brightly coloured flowers break up the browns and greens that naturally occur outside, thus beautifying the environment and making it pleasant to live in, as shown in figure 3.21 below.
(b) Fragrance
Many ornamental plants and especially the flowering types produce sweet smells or aroma. For example, lavender is highly valued for its pleasing fragrance besides being harvested for lavender oil. It is commonly planted in home landscapes for its scent when it is blooming. Some fragrant ornamentals are beneficial in repelling insects such as ants, mosquitoes and flies. The flower of ageratum plant, for example, produces a substance known as coumarin which is a natural mosquito repellant.

(c) Attracting wildlife
Some ornamental plants provide nutrition and shelter for many wildlife animals such as birds and insects. These animals get attracted to ornamental plants for livelihood. In the process, some of these animals such as bees and birds help in cross pollination and propagation of the plants. This makes the attractiveness of the ornamental plants beneficial to the ecosystem. The berry producing ornamentals such as hawthorn and crabapple are good examples.

(d) Cleaning the air
Green plants use carbon (IV) oxide in the manufacture of their own food in a process known as photosynthesis. During this process of photosynthesis, oxygen is released as a byproduct.
This oxygen helps to replenish the oxygen removed from the air by other life processes such as respiration. These plants, therefore, help to reduce the amount of carbon (IV) dioxide and increase the amount of oxygen in the air.
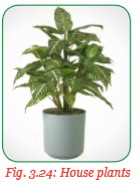
This natural air cleaning process is particularly helpful in indoor environments. House plants improve the quality of air in the house. Examples of such house plants include spider plants.
(e) Ceremonial and religious use
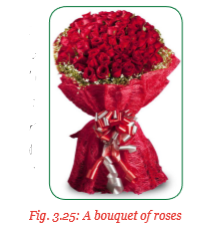
Cut flowers are used for decoration in worship places, for example, churches as a sign of purity and the glory of God. They are also used in ceremonies such as weddings as a sign of happiness. It is a common practice to place ornamentals on the tombs of the departed during burial ceremonies. Various types of roses are used as cut flowers for the ceremonial and religious purposes.
3.5 Propagation methods of ornamental plants
Activity 13.4: Watching a video showing methods of propagating ornamental plants
Watch a video show on methods of propagating ornamental plants and carry out the following activities:(i) Identify the methods of propagating ornamental plants observed in the video show.
(ii) Discuss and record your observations.
(iii) Present your findings to the class.
(iv) Take teacher’s summary notes.
Plant propagation is the process of producing new plants from the mother plant. There are two methods of plant propagation, vegetative propagation and seed propagation.
Vegetative propagation is the use of vegetative parts and structures of a plant such as stems, leaves, roots and bulbs to create new plants. Seed propagation on the other hand is the use of seeds to produce new plants. Methods of propagating ornamental plants are as follows:
1. Cuttings
Cuttings are portions of plants which are cut and then used as planting materials. The portions may be from stems, roots or leaves. Most woody ornamental plants are propagated from stem cuttings because they produce roots easily.
A stem cutting must have a bud which develops into a shoot. Cuttings should produce leaves immediately they are planted so that they can start making their own food. They may also be induced to produce roots by use of rooting hormones. Cuttings may also be planted directly into the seedbed or raised in special nurseries before being transplanted. Once the cuttings have developed roots, they give rise to new plants. Ornamentals propagated through cuttings include roses, duranta, anthurium and bougainvillea.
Types of stem cuttings
There are four main types of stem cuttings based on the growth stage of the stock plant.
These are:
• Herbaceous cuttings
• Softwood cuttings
• Semi-hardwood cuttings
• Hardwood cuttings
Herbaceous cuttings are made from non-woody plants such as chrysanthemums. A 7.5 cm – 12.5 cm piece of stem is cut from the plant. The leaves on the lower one-third to one-half of the stem are removed. Most herbaceous stem cuttings are prepared from succulent, new growth of woody plants just before it begins to harden.
(i) The softwood cuttings: These are tender and, therefore, require extra care to keep them from drying out softwood cuttings root quickly.
(ii) Semi-hardwood cuttings: These are usually prepared from partially mature wood of the current seasons growth. The wood is firm and leaves of mature size.
(iii) Hardwood cuttings: These are taken from dormant mature stems.
Factors affecting the rooting of cuttings
(a) Temperature – Cuttings require warm temperatures around the root zone and cool temperatures for the aerial part in order for them to produce roots. Most species will root well at the optimum temperature range of 22 – 27˚C during the range of 15 – 21˚C during the night.
(b) Relative humidity – Proper rooting of cuttings require high humidity which lowers the transpiration rate. It also increases and maintains leaf turgidity all the time. Therefore, cuttings should be rooted under shaddy conditions where relative humidity can be regulated. The propagation area can also be sprayed with water to keep it moist.
(c) Light intensity – Softwood cuttings need high intensity light to produce roots. Light promotes the production of roots since it affects the rate of photosynthesis. Hardwood cuttings do well in dark conditions since they have high amount of stored carbohydrates and, therefore, rooting is faster in dark conditions.
(d) Oxygen supply – Cuttings require adequate supply of oxygen for them to develop roots. The rooting media should, therefore, allow proper aeration.
(e) Chemical treatment – Rooting hormones induce root production in cuttings. Common hormones used to induce rooting include indole acetic acid (IAA), indole butyric acid (IBA) and Naphthalene acetic acid (NAA).
(f) Leaf area – Softwood cuttings require a lot of leaves for photosynthesis while hardwood cuttings will produce roots faster without leaves.
Propagation of Bougainvillea using cuttings
Procedure
1. Select a hardwood cutting from the B. spp. required and cut it off the plant.

2. Prune off the cutting by removing excess leaves and flowers and the older lower woody part. Leave a 4’ long cutting.

3. Cut each piece and the bottom where there are nodes at a slanting manner and dip in a rooting hormone and anti-fungal to prevent rotting.
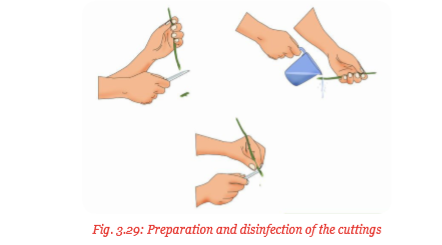
The cuttings are ready for planting.
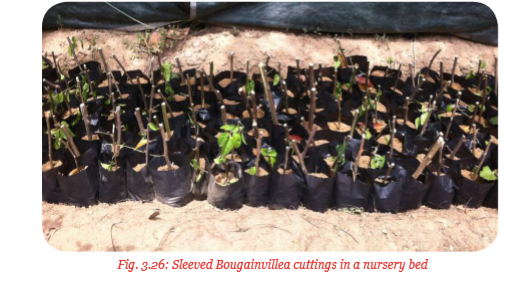
Planting the cuttings
(i) Prepare the potting mixture by putting soil which is well mixed with organic matter such as compost manure in polythene bags and arrange them in a nursery site.

(ii) Wet the soil in the polythene bags and insert the bony cuttings in each polythene bag at a slanting angle.
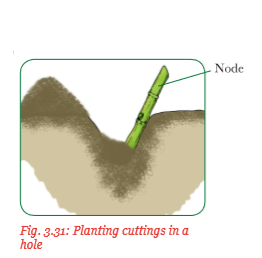
(iii) Keep the polybags moist under shade until the cuttings produce sprouts at the nodes. This will take about 8 – 10 weeks.

(iv) Leave the cuttings until the shoot produces 4 – 6 leaves. Allow the cuttings to grow for 3 months for proper root formation. Reduce watering the last 2 weeks before transplanting and remove the shade or take them to an area where they are exposed to the sun. This is known as ‘hardening off’.
(v) Transplant the cuttings by removing the polythene bag carefully to avoid root damage.
2. Budding
This method is also known as bud grafting. Budding is the practice of cutting a vegetative bud, the scion to a seedling of another plant, the root stock. The scion has only one bud and some bark with litter or no wood at all. It is held tightly on the rootstock by tying with a budding tape until it produces a shoot. Ornamental plants propagated through budding include roses and bougainvillea.
Methods of budding
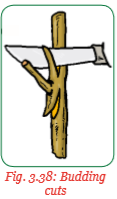
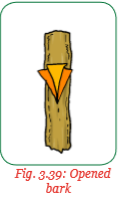
(a) T-Budding
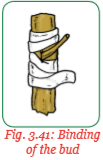
In this method, the rootstock is prepared by making a T-shaped incision through the bark down to the wood. The T-shaped incision is made 15 cm – 20 cm above the ground using a special sharp knife known as budding knife. The bark is then raised and the bud inserted. This is done by sliding the bud downwards under the lifted bark until it lies between the edges of the bark and is well done below the horizontal incision. The bud is then firmly tied using either a budding tape, rubber strips or polythene strips


The wrapping is removed about two weeks after budding in order to inspect the bud. If it is green, then it has been accepted by the rootstock. Once the bud develops into a shoot, the shoot of the rootstock is cut about 1 cm – 2 cm above the union. When the young shoot is above 25 cm, it is supported through staking to prevent it from being destroyed by wind.
Propagation of roses through T-budding
The following is the procedure of propagating roses through T-budding:


(i) Prepare the rose plant that you intend to bud. This is done by trimming the plant down to about 45 cm from the ground level.
(ii) Prepare the buds. This is done by selecting and cutting bud sticks from the previous year growth. The bud stick is a cutting that has about 4–6 fully developed buds cut from a plant with desired characteristics, for example, flower colour. The bud sticks are placed in water for several hours.
(iii) Cut the buds. Use craft knife or razor blade to carefully slice the buds from the bud sticks. Take a reasonable size slice about ½ inch long. Use your knife to remove the hard section out of the bud.
(iv) Make a T-cut in the rose plant to be budded. Make two cuts, one horizontal and another vertical to make a T-cut on the plant to be budded. The horizontal and vertical cuts should be about 1 inch. The cuts should be deep enough to reach the combining layer. However, the cut should not go through this layer.
(v) Peel back the flaps of the T-cut just enough to see this layer.
(vi) Slid the bud downward under the peel bark until it lies between the edges of the bark and is well below the horizontal cut.
(vii) Bind (tie) the bud Tie the bud firmly to the stock using a budding tape.
Once the bud has formed a successful union with the stock, reduce the top foliage. Cut the stock about 1 – 2 above the stock when the bud has produced a shoot of about 25 cm high.

Note: Budding in done in the afternoon so as to give them an overnight to settle before being exposed to the scorching sun.
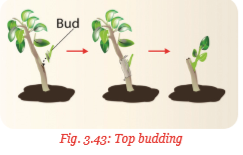
(b) Top budding
This method involves inserting buds at the desired locations on young or small trees.
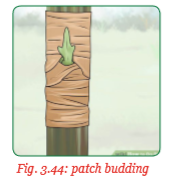
(c) Patch budding
In this method, the bark with a bud is removed from the scion stem and inserted into a patch where the bark has been removed from the rootstock. The union is then tied on the top and bottom so as to hold tightly.
(d) Chip budding
In this method, a chip of wood containing bud is cut out of a plant with the desirable properties. A similar chip is cut out of the rootstock. The scion bud is then placed in the cut in such a way that the cambium layers’ match.
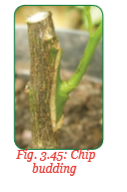
The bud is fixed in place by tying with grafting tape. This is mainly done in summer.
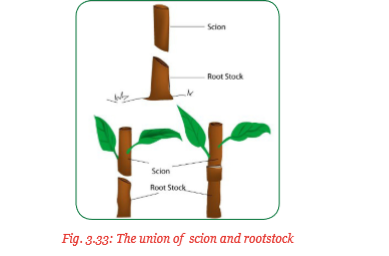
3. Grafting
This is the practice of uniting two separate woody stems. One of the two parts provides the base and has a rooting system while the other stem is obtained from another plant. The part with the rooting system is known as the rootstock and the part with which is grafted on to the rootstock is known as the scion. The scion should have at least one bud which develops into the new plant. The ability of the scion and rootstock to form a successful union is referred to as compatibility. Ornamentals propagated through grafting include bougainvillea, roses and duranta.
Methods of grafting
(a) Whip and tongue grafting
(b) It is used for materials in which the scion and the rootstock are of the same diameters. A slanting cut is made with a sterilised sharp knife on the scion and top of the stock. The separated parts are fitted together and wrapped with a grafting tape or polythene strip.
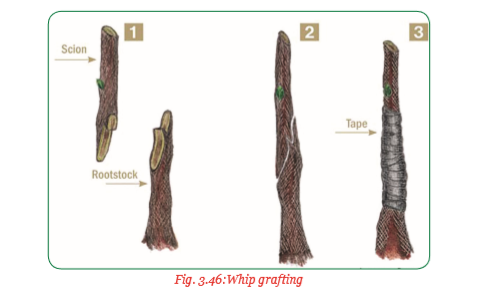
Procedure
(i) Cut off the stock using diagonal cut. The cut should be about four to five times the diameter of the stock to be grafted. Make the same cut at the base of the scion.
(ii) Fit the scion into the rootstock so that they interlock whip and tongue. Ensure that the cambia are aligned.
(iii) Wrap the junction with a grafting strip or twine and steal it with grafting wax or grafting paint.
(b) Side grafting
This method is practised when the rootstock has a large diameter than the scion. The scion is inserted into the side of the stock.

(c) Bark grafting
In this method, the rootstock is cut and a vertical slit is made through the bark where the scion is inserted. Multiple scions are usually inserted around the cut surface of the rootstock.

Procedure
(i) Cut the base of each scion to 3 cm – 5 cm tapered wedge on one side only.
(ii) Loosen the bark slightly and insert the scion such that the wedge-shaped tapered surface of the scion lies against the exposed wood under the flap of bark.
(iii) Push the scion down into the place behind the flap of the bark.
(iv) Replace the bark flap and nail the scion in place.
(v) Seal all the exposed surfaces with grafting wax or grafting paint.
(vi) Once the scions have begun to grow, leave only the most vigorous one on each stub, prune out all the others.
(vii) Stake the new shoot during the first few years.
Note: Scions are inserted every 6 cm – 8 cm of the rootstock.
4. Splitting Splits are plantlets divided from the existing mother plant with complete leaves and rooting system. The splits may be planted directly into the field or first raised in a nursery before being transplanted to the field. Ornamentals propagated through splitting include palms, roses, anthuriums and duranta.
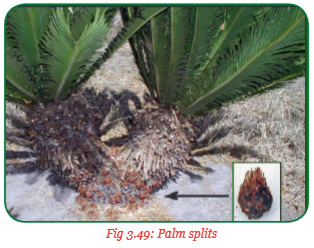
Splitting palm trees
Various palms have a clumping or suckering growth habit and respond very well to division.
Dividing a clump
(i) Identify roots feeding one or two stems.
(ii) Use a disinfected knife or shears blade to divide the stems from the rest of the plant ensuring minimal damage to the roots as possible.
(iii) Plant the splits in potted containers and keep them under a shade.
Dividing suckers
Some palms produce suckers which are straight shoots that grow upwards from the root ball and often can be removed and used to make new plants. Before dividing suckers from a palm tree, water the mother plant well to loosen the soil and allow roots to separate easily. Gently pull one sucker upwards to identify its roots. Cut the roots free from the main root ball and remove the sucker with its roots to plant elsewhere, either directly in the field or in potted containers.
5. Layering
In this method, a part of a plant is induced to produce roots while still attached to the parent plant. Once the parts produce roots, it is cut off from the parent plant and planted as a new plant. Ornamentals propagated through layering include roses, duranta, anthurium and bougainvillea.
Types of layering
(a) Tip Layering
In this case, the shoot bearing the terminal bud is bent to the ground and then covered with a layer of moist soil. It is held in position by use of pegs. The covered part is induced to produce fruit by wounding it or by use of growth hormones. It is then cut off from the mother plant and transplanted.

(b) Trench layering
In this method, the branch of stem is bent, laid in a trench and then held in position by use of pegs. The trench is then covered with a layer of moist soil. The buds develop shoots that grow upwards. Roots are produced at the parent base of its shoot. The shoots are then cut off from the plant and transplanted.

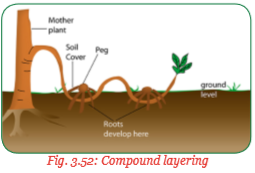
(c) Compound layering
It is also referred to as serpentime layering. In this method, the branch to be used for layering is bent several times and held in position with pegs. This produces several new rooted planting materials from the same branch.
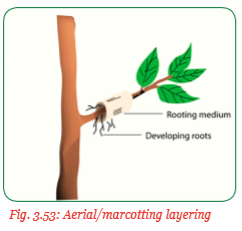
(d) Marcotting
It is also known as aerial layering. It is commonly used on hardwood plants where the stem cannot bend easily to reach the ground. Some moist rooting medium is heaped around the section of the branch whose bark and combined layer have been removed. The rooting medium is then wrapped in a polythene sheet to hold the soil and maintain the soil moist. At the point where the bark has been removed, auxins are accumulated and thereafter induce development of the roots. The rooting medium quickens the process of rooting.
6. Seed propagation
This is the use of seeds to create new plants from the parent plant. Seeds are produced by flowering plants after pollination and fertilisation. They contain the part on the plant that germinates and subsequently grows into a new plant. Ornamentals that may be propagated through seeds include roses, duranta, palms, anthurium and bougainvillea. However, some ornamentals such as bougainvillea are more easily propagated through cuttings and layering than through seeds. The seeds of various ornamental plants are shown in figure 3.54 below.

Propagation of ornamentals through seeds takes place through the following steps:
(a) Seeds gathering
The seeds are gathered from their mother plants. They are either obtained from fruits or collected from the ground around their mother plants. The seeds are then prepared for planting through various ways.
(b) Breaking seed dormancy
Some seeds undergo a dormancy period between maturity and the time they sprout. The dormancy period is the stage whereby a seed cannot germinate. This is the stage of inhibited growth of a seed. Seed dormancy should be broken before the seed is planted. The following methods are used to break seed dormancy:
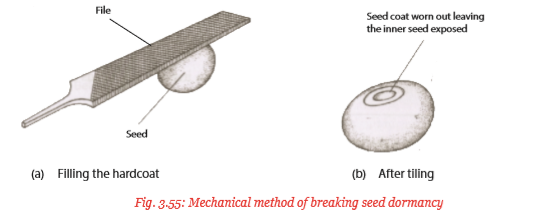
1. Mechanical method– This is a method which aims at scratching the seed coat to make it permeable to water. It is also known as scarification. Scarification is done by scrubbing small-sized seeds against hard surface such as sand paper while filing or pricking the seed coat with a knife. It is done to large-sized seeds such as croton seeds.
2. Heat treatment– This involves the use of hot water or burning the seeds lightly. It softens the seed coat making it permeable to water and thus is able to germinate. The seeds are soaked in hot water of about 80° C for 3 to 5 minutes after which the water is allowed to drain off. Burning also serves the same purpose as hot water treatment. In this case, trash is spread over the seeds which is already covered with a thin layer of soil. The trash is burned after which the seeds are retrieved and planted. However, overheating should be avoided as this will destroy the seeds.

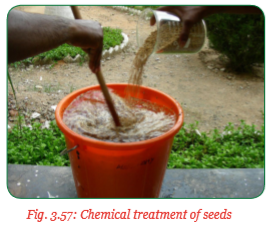
3. Chemical treatment – In this method, seeds are dipped in some chemicals such as concentrated sulphuric acid for about two minutes and then removed. The chemicals wear off the seed coat making it permeable to water. However, care should be taken not to leave the seeds in the chemicals for too long as chemicals will kill the embryo.
4. Soaking in water – Seeds are soaked in water for a period of between 24 and 48 hours until they swell. They are then removed and planted immediately. The seeds treated in this way germinate very fast.
(c) Seed dressing
This is the coating of seeds with a fungicide or an insecticide or a combination of the two chemicals. The chemicals protect the seedlings from soil-borne diseases and pests.
3.6 Cultural practices of ornamentals
1. Roses
Activity 1 3.5: A field visit to conduct cultural practices of rose plants
Visit a farm growing roses and carry out the following activities:
(i) Observe the activities going on in the farm.
(ii) Participate in the activities going on in the farm such as planting, pruning, application of fertilisers, watering, mulching, weed control and pest management.
(iii) Discuss and record the activities carried out.
(iv) Prepare a report of your findings.
(v) Present your report to the class.
(vi) Take teacher’s summary notes.
The cultural practices of roses are as follows:
(a) Land preparation
Land on the selected site is prepared early before planting to allow the soil to settle. About 5 cm – 10 cm layer of organic matter is applied on the land before tillage. The organic matter is incorporated into the soil during cultivation. This helps to improve soil tilth and texture.
(b) Planting
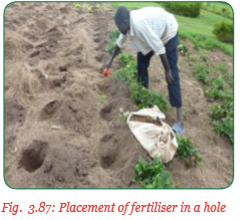
Roses are mainly propagated through cuttings which are raised in the nursery. Holes measuring 45 cm long × 45 cm wide and 45 cm deep are dug on the prepared land at a spacing of 2.0 cm × 1.0 m 10 kg of well rotten farmyard manure which is mixed with a phosphatic fertiliser is applied to each hole before planting. During planting, the holes are thoroughly watered. Cuttings with 2–3 buds are dipped into IBA (Indolebutyric acid) or (IAA Indoleacetic acid) at 500 ppm (Parts Per Million) and then used as planting materials. The cuttings are placed at the centre of the hole. Topsoil is then returned to the hole and the soil firmed around the cutting.
(c) Pruning
Roses are pruned when the plants are in the dormant or near dormant stage. The vigorous past season shoots are cut back to half the length. All the weak, diseased, crisis crossing and unproductive shoots are removed. The cut ends are protected by the appropriate chemical to prevent secondary infection.
(d) Fertilisation
(i) Use of biofertilisers 2 kg of azospirillum and an equal amount of phospho bacteria are applied at the time of planting. These are mixed with 100 kg of farmyard manure and applied to the planting holes.
(ii) Manuring After pruning, the rose plants are manured at the rate of 10 kg farmyard manure per plant.
(iii) Foliar fertilisers/feed Foliar application of 0.2% micronutrients mixture containing 20 g MnSO4 + 15 g MgSO4 + 10 g FeSO4 + 5 g B produces bright coloured flowers. The foliar spray is prepared by dissolving 2 g of the mixture in every one litre of water. Enough spray is prepared depending on the size of the field with the flowers.
(e) Watering
Water is applied once in two days until the plants establish and once a week thereafter. Fresh water should be used in watering the plants.
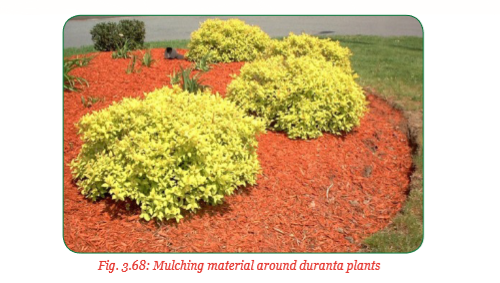
(f) Mulching
Mulching is the spreading of a protective covering around the rose bushes and on top of the surrounding soil. Mulch is applied after pruning the plants. Mulching helps in preventing loss of soil moisture through evaporation, weed control, improving soil structure and moderating soil temperature. It also cuts on the cost of irrigating the flowers as less water is applied.
Types of mulch materials used in roses
– Organic mulch
– Inorganic mulch

• Organic mulch–This includes grass chippings, wood chips and cocoa hulls. The advantages of using organic mulch is that they decompose and add nutrients to the soil.
• Inorganic mulch–This includes stones, gravel and shredded rubber. These materials keep the ground warm and smothers weed.
(g) Weed control
Weeds such as pig weed, oxalis and chickweed are common in rose fields and landscapes. These weeds are controlled through the following methods:
(i) Mulching –A 5 cm –10 cm layer of organic materials such as wood chips help to reduce annual weeds and also make hand-weeding easier.
(ii) Hand weeding –This is the use of hand tools such as hand-hoes to remove weeds. These tools should be used with care so as not to damage the roots. Roses are shallow rooted plants.
(iii) Use of herbicides – Pre-emergence herbicides can be used around the roses before weeds emerge or after weeds are removed and before others germinate. Post-emergence herbicides are used to control established grasses. Great care must be taken while applying these herbicides as roses are affected by post-emergence broad leaved herbicides such as 2,4- D and non-selective herbicides such as round-up. The effects may include the proliferation of small, narrow shoots and leaves. So care must be taken to avoid herbicide drifts to unintended areas during spraying.
The common pests for roses include aphids and the red spider mite.
(i) Aphids
There are two common types of aphids that attack roses. These are; the large green or pink aphids. It attacks the growing tips and flower buds.
Their attack on flower buds results in flower petals which are puckered, small and of off-colour. The whole bud may also turn brown and fail to open. The small aphid which is green suck plant sap from the underside of the leaves and produces honey dew.
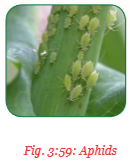
Control
A cold water wash on the plants washes aphids off the plants. So aphids are effectively controlled through overhead irrigation.
(ii) Red spider
mite It is also called the two spotted spider mite. It causes severe damage to the rose foliage. Spider mites are very small and may not be seen without the help of a magnifying lens. A yellow mottled pattern on the leaves may indicate spider mite attack.
Control
− Frequent spraying with a strong stream of water.
− Spraying with the recommended acaricide under heavy infestation.
Other rose pests include thrips that feed on the unfolding flower bud and stem borers whose attack results in dieback of the rose plants.

(i) Diseases Control
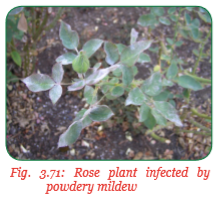
There are three major rose diseases. These are: Powdery mildew, black spot and rusts.
(i) Powdery mildew
It is caused by a fungus known as Podosphaera pannosa. It is the most prevalent disease in roses. It survives in dormant buds, leaves and shoots. Its attack results in distorted and deformed leaves. Infected flowers often fail to open. There is shedding of leaves under severe attack.
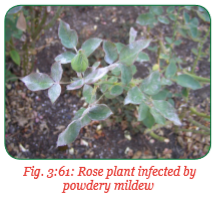
Control
− Spraying with appropriate fungicide such as Benomyl carbendezim or copper-oxychloride and avoid damp conditions.
(ii) Black spot
It is caused by a fungus known as Diplocerpon rosae. It is the most serious disease of roses. The disease forms black spots all over the foliage of the rose bushes. If unchecked, it may lead to total defoliation of the rose plant. The process of photosynthesis is affected and, therefore, the life of the plant.
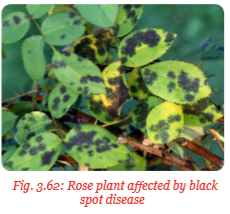
Control
Spraying with an appropriate fungicide. Such as Benomyl, carbondezim or copperoxychloride.
(iii) Rust disease
It is caused by a parasitic fungus known as Phragmidium tuberculatum. It affects the leaves which turn yellow and are rust coloured. It may also cause the affected leaves to drop off.

Control
Spraying with an appropriate fungicide such as Benomyl, carbondezim or copperoxychloride. Other rose diseases include downy mildew, rose rosette, crown gall, mosaics, stem cankers and blight.
(j) Harvesting
Harvesting rose flowers is done using sharp secateurs at the tight bud stage. This is when the colour is fully developed and the petals have not yet started unfolding. Leave 1–2 mature leaves on the plant after the flower has been cut. These leaves encourage production of new strong shoots.
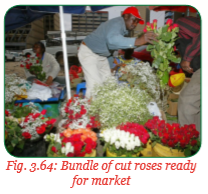
Harvesting is done preferably during early morning hours.
2. Duranta and Palm trees
Activity 1 3.6: Practical activity of cultural practices of duranta and palm trees
Visit a farm where duranta and palm trees are grown and carry out the following activities:
(i) Observe the activities going on in the farm.
(ii) Participate in the activities going on in the farm such as land preparation, planting ornamental plants, pruning, fertiliser application, watering, weed control and pest management and disease control.
(iii) Discuss and record your findings.
(iv) Present your findings to the class.
(v) Take teacher’s summary notes.
2.1 Duranta (Duranta erecta)
(a) Land preparation
Ornamental duranta may be grown on prepared ground as a hedge or planted in containers, for example, pots where the plant is to be placed on the ground, the selected site is prepared by clearing the vegetation around the site. Planting holes are then dug at a spacing of about 30 cm within the row. This gives the plants enough space to grow. It is also close enough for the plant to establish a hedge where the plant is to be planted into containers. A good soil mix is put into the container that has plenty of planting holes at the bottom.
(b) Planting
Duranta may be propagated through seed or cuttings. However, cuttings are more commonly used. Use hardwood cuttings for propagation. While planting, dip the end of a 15 cm cutting into a rooting hormone and then plant directly. Roots develop fairly quickly. Rooted cuttings may also be used. Seeds also do well.
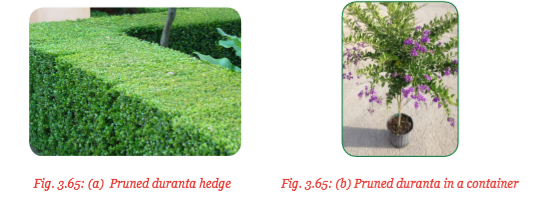
(c) Pruning
Prune duranta by removing any shoots that grow beyond the desired growth size and shape. Pruning cuts should be made with shears across the branches. Wear hand gloves and protective eye wear to protect againct the sharp thorns. The renewal pruning is necessary to keep an attractive shape and to remove old and diseased plant parts.
Procedure of pruning duranta
(i) Clean the pruning shears before pruning and between cuts especially when the plant has a disease.
(ii) Cut away dead, damaged old or diseased branches at the base of the tree.
(iii) Cut overgrowth back to a desirable shape and size.
(iv) Cut off branches that grow close to the ground.
(v) Remove water sprouts and suckers from the base of the tree.
(d) Fertilisation
A complete fertiliser of 10:10:10 is applied four times in a year from the time the new growth starts. The fertiliser (10:10:10) is a slow release fertiliser meaning it releases the nutrients NPK slowly into the soil. Apply the fertiliser at the rate of 1 table spoonful per square foot of the soil and a handful of compost manure underneath the plants canopy. Broadcast the fertiliser in a 30 cm ring around the base of the plant. Rake the fertiliser into the top 7.5 cm of the soil and water the area to activate the fertiliser. However, note that inorganic fertilizer cannot be used without organic fertilizer. The two must be used to give optimal level of output.

(e) Watering
It is important to water the plant frequently while it is establishing. Water requirement after establishment are low. Watering should ensure the soil is moist and especially during times of drought. Water newly planted duranta plant weekly or whenever the soils start to dry out. Thereafter, water only during periods of extended dry weather, otherwise duranta has a good drought tolerance. Apply water around the root zone using a hose pipe in the morning.

(f) Mulching
Apply 5 cm –10 cm layer of mulch around the base of the duranta but ensure the mulch material do not get into contact with the trunk. This prevents the formation of mold or rot. Organic mulch is used. This may be from debris such as dead leaves and twigs. Mulching conserves moisture in the soil and helps to control weeds.
(g) Weed control
Duranta is affected by common garden weeds especially in the early stages of establishment. This competes with the plant for water, space and nutrients. These weeds are controlled by manual weeding. Later on, its leaf canopy smothers the weeds beneath.
The most serious pest that attack duranta is the whitefly which cause damage on the leaves. The flies suck plant sap. They are controlled by systematic pesticides applied through the roots. Other pests include root knot nematodes that cause damage to the roots and interfere with the plants transport system, mealy bugs and scale insects.

(i) Disease control
Diseases that affect duranta include:
(a) Anthracnose
This is a fungal disease that attacks/affects the leaf tissues. It is controlled by spraying the plant with a fungicide.
(b) Leaf spots
Bacterial leaf spots are caused by a bacterium known as Pseudomonas cichorii and the Xanthomas spp. The disease affects the leaves reducing their photosynthetic area and, therefore, damaging the plant. The black leaf spot is caused by black spot fungus known as Diplocarpon rosae.
Control
– Disinfecting pruning tools in a solution made by mixing 1 part bleach to 4 parts water to prevent spreading of the disease.
– Pruning infected leaves/rogueing.
– Spraying with a fungicide to control the leaf spot caused by black spot fungus.
– Spraying with an appropriate chemical to control bacterial leaf spots. Other diseases of duranta include leaf mosaics caused by a virus and dieback.
(j) Harvesting
Berries are harvested when ripe for seed extraction. Gloves should be worn when handling the berries since they are poisonous.
2.2 Palms
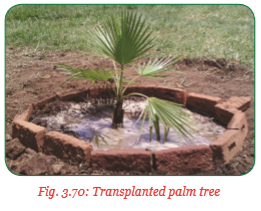
(a) Land Preparation
A suitable site for planting palm trees is selected. This may either be in the landscape flower garden or park. Holes which are twice the diameter of the root ball of the palm seedlings are dug at the site. The depth of the holes is equivalent to that of the root ball.
(b) Planting
Palms are propagated from splits which may first be raised in containers or planted directly. During planting, palm seedlings are removed from their containers. The planing holes are first watered before planting. The seedlings are placed in the holes. The holes are then backfilled with soil to promote root growth. Then water the seedlings, place three stakes each about 0.9 m long in a triangular shape around the palm. Fold soft material into long strips and wrap them around the tree's trunk. Fasten the strips to the stakes. Remove stakes within one year.
(c) Pruning
Pruning in palm trees involves removing old and dead leaves (fronds) and old fruit stems. Remove old and dead fronds from the palm tree. The old fronds should be removed when they turn brown and there is no green left in them. Old fruit stems should also be removed. A hand pruner is used for smaller palms while a sharp pruning saw should be used for larger leaves and stems. The pruning tool should be treated with alcohol or hydrogen peroxide every time a different plant is to be pruned to prevent spread of diseases from one plant to another. Cut the leaves as close to the trunk as possible taking care not to injure the plant.
Note: Do not plant palm trees near overhead utility wires.
(d) Fertilisation
Apply a complete fertiliser, for example, NPK 17:17:17 or NPK 20:10:10 3-4 weeks after planting. This is repeated three times in a year. The fertiliser is applied around the plant over the entire root zone. However, the fertiliser does not get into contact with the plant or roots. Palm trees also respond very well with foliar feeds. It is important to mix organic and inorganic fertilizer.
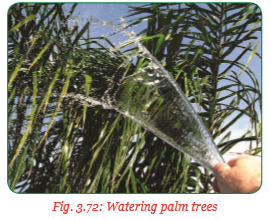
(e) Watering
Apply water frequently to help the plant develop more roots. Field grown palms require extra watering. This is because these plants had their root cut. However, avoid too much watering as this may inhibit root growth. Water 3–4 times a week. The moisture loving varieties may need frequent watering. Watering should be done in the morning and evening.
(f) Mulching
Apply 5 cm –10 cm deep layer of mulch near the trunk. It should be thicker near the root zone. Too much mulch may cause rotting and fungal attack. The mulch help to control weeds. Give warmth to the plant, conserve soil moisture and therefore reducing irrigation costs.
(g) Weed control
Methods of weed control include:
(i) Use of herbicides
Some species are affected by herbicides especially when the herbicides get into contact with green foliage or exposed roots. This could result into brown leaf spots, deformed new growth and possibly death of the plant.
(ii) Uprooting
Uprooting of weeds is done until the plant is properly established. Later on, the leaf canopy hinders the growth of weeds beneath especially the broad leaved weeds.
The most common pests of palm trees are insects and spider mites.
(i) Insect pests Insect pests consists of the following:
• Sucking insects such as mealy bugs, aphids and scale insects. They are the most common insect pests of palm trees. They suck plant sap. Mealy bugs and aphids leave behind them a sticky matter (Excreta) called honeydew.

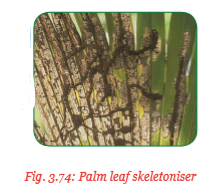
• Chewing insects such as caterpillars of many insects. They eat palm leaves making large holes. A good example of these caterpillars is the palm leaf skeletoniser, i.e., is a small caterpillar that is usually found in large colonies in any part of the palm leaf.
• Boring insects – Weevils such as the red palm weevil burrow into the centre of the palm tree and feed there thus making great damage to many of large palm trees. This may lead to the fall of the top part of the plant.

Control of insect pests
• Spraying with an appropriate insecticide which is applied repeatedly especially for scale insects.
(ii) Mites pests
Palm spider mites feed on any part of the palm leaf. Leaves become pale under severe attack.
Control
Mite pests can be controlled by using miticide but washing with insecticidal soap or applying horticultural oil on the affected parts may also be used.
(i) Disease control
Most of the palm diseases are fungal. The most common palm diseases include the following:
(i) Bud
It is the most common and devastaating disease of the palm trees. It is caused by a fungus known as phytophthora palmivora. The symptoms of attack include discolouration of the spear leaf. As the infected spear leaf unfolds, large dark brown fond rots are produced that progress into the leaf base thus killing the bud. Eventually leaves are lost leaving only bare trunks. This may lead to the death of the palm tree.
Control
• Use of clean seeds.
• Pruning old growths.
• Trimming severaly diseased leaves and removing diseased petioles and sheaths. Use of drip irrigation instead of overhead irrigation so as to reduce wet foliage.
• Roguing/destroying severely damaged plants.
• Use of appropriate fungicides.
• Proper spacing.
(ii) Leaf spots and severe blights
They are also caused by fungus of the pestalotiopsis species. Leaf spots begin as small grey-green irregular circular to elongated lesions that expand to large spots and blights within laminatan to grey centres and black to dark brown edges. Large spots are irregular in shape and somewhat vein-limited. The spear leaf may be infected and part or all of the leaf and bud gets rotten. Young palms develop leaf lesions that advance to the bud, killing the plants.

Control
Similar to that of bud rot above. Other diseases of palm trees include, fusarium wilt.
(j) Harvesting
Palm leaves are harvested in different stages of their maturity and sizes to decorate flower arrangements, wreaths and bouquets. The leaves are also used in some religious celebrations such as Palm Sunday. They provide shade and their leaves can be used as thatch and can be woven to form mats and baskets.
3. Anthurium (Anthurium Andreanum)
Activity 3.7: A Field visit to find out the cultural practices of anthurium.
Visit a farm where anthurium plants are grown and carry out the following activities:
(i) Observe the activities going on in the farm.
(ii) Participate in the cultural activities going on in the farm such as land preparation, planting, pruning, fertiliser application, weed control, watering, pest management, disease control and harvesting.
(iii) Discuss and record your findings.
(iv) Present your findings to the class.
(v) Take teacher’s summary notes.
(vi) Alternatively use internt search to find out where Anthurium is found.
Cultural practices of anthurium are as follows:
(a) Land preparation
Anthurium is an epiphyte and therefore its growth requires a soil-free growing medium which is well aerated but retains enough moisture for the plant.
It should also provide support/anchorage to the plant. For this reason, raise the bed. Culture for large-scale production is recommended rather than growing them in containers. Flat land is recommended for the construction of the beds. However, where land is not flat, terracing may be required before construction of the beds. A plastic material is placed on the ground before the beds are prepared in order to control soil borne pests and diseases.
The beds should be about 30 cm high and the area completely secured by chicken wire or other fencing materials. The beds are then filled with the growing medium which consists of the following materials:
• Leaf mould/compost – 4 parts
• Cattle manure (Fym) – 2 parts
• Sand – 1 part
• Coconut husks cut into 2.5 cm
Square pieces may also be used as a growth medium. This medium should be topped up every year. Tree form chips may also be used as a medium for anthurium culture.
Note: The growth medium may be prepared on the ground by digging out the soil and then filling with the growth medium as above. In this case, the bottom is overlaid with medium sized pieces of tile or charcoal to enhance drainage.
(b) Planting
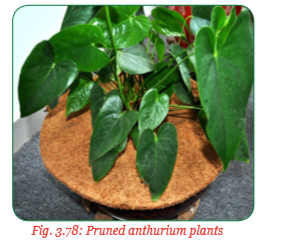
Anthurium is propagated through cuttings, seeds or tissue culture. However, propagation by cutting is much more preferred than the others as it is the easiest. The seedlings are planted in the growth medium at a spacing of 30 cm × 30 cm which is referred to as the closer spacing or 30 cm × 45 cm. Anthurium established through seed is also planted at the same spacing. Anthurium may also be planted in containers usually pots. Ensure the containers have bottom drain holes to avoid rotting of the plant. Anthurium planted in containers is mainly used for indoors. See figure 3.77 (b) below.

(c) Pruning
Anthurium plants are pruned down to four leaves per plant. Closer spacing of 30 cm × 30 cm requires continuous pruning to maintain 3–4 leaves per plant at all times. This pruning encourages the plant to sprout new leaves and new blossoms. It does not affect flower production and the growth of the plant.
(d) Fertilisation
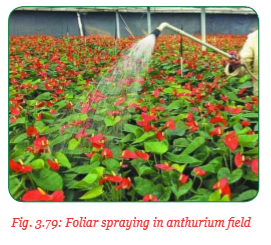
Fertilisation starts right from the preparation of the growth medium. About 250 kg of triple superphosphate (TSS) per hectare is mixed with the growth medium before planting. A complete fertiliser of 13:13:20 is applied at planting time at the rate of 4 g per plant/hole. A foliar feed of 20:20:20 is applied through the foliage later in growth of plants. During flowering, a foliar feed of 20:30:20 NPK is applied to promote the blossoming of the flower. Fertilisers with Ca and Mg elements may also be added in liquid form. Calcium Carbonate as a liming material should be added to the growth medium to maintain the pH at around 5.5. + organic fertilizer.
(e) Watering
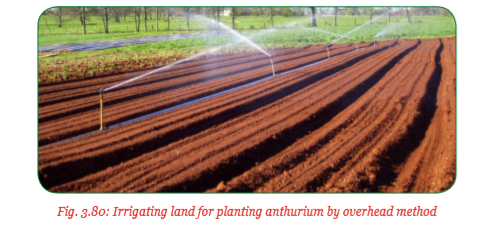
Anthurium plants need daily watering when the rains are scarce. Water applied to the plants should be of good quality and without chlorine. Overhead or sprinkler irrigation is recommended. The fields should be watered three times a day during the dry season as need may arise during the wet season. Drip irrigation may also be used to irrigate anthurium plants as shown in figure 3.80 below. For anthurium planted in containers, water until it runs from drain holes at the bottom.
(f) Mulching
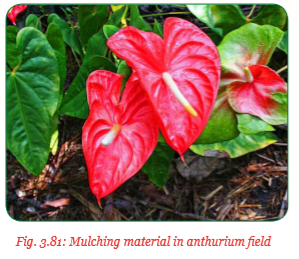
Mulching is required for the anthurium plants. It helps to control weeds and conserve moisture in growth medium. The anthurium plants also grow into the mulch and spread. This provides support to the plant. The most common mulching material in the cultivation of anthurium is sawdust.
(g) Weed control
Weeds in anthurium fields/beds are controlled through manual weeding. Use of herbicides is not recommended as the chemicals may be toxic to anthurium plants.
Pests attack stressed and neglected anthurium plants. The common pests of anthurium include insects, spider mites and nematodes.
(i) Insect pests
Sucking insect pests such as aphids, mealy bugs, scale insects and thrips are the most serious insect pests in anthurium. They suck plant sap thus interfering with the growth of the plant. Anthurium plants have thick leaves which are not a favourite for the chewing insects.
Control
• Use of a short sharp blast of cold water which dislodge the insects from the plants.
• Use of organic insecticides prepared, for example, pyrethrum based insecticides.
• Use of horticultural soap or oil sprays which are natural and do not harm the plant.
• Use of malathion based spray for the control of mealy bugs which are difficult to control using the other methods.
(ii) Mites
– Spider mites suck plant sap leaving yellow stippling in leaves. They also cause heavy damage in large infestations.
– A sharp blast of cold water can be used in the affected parts to dislodge them. Spraying with the horticultural soap or oil not likely to damage the plant.
(i) Disease control
Anthurium is affected by the following diseases:
(i) Bacterial blight
It is caused by a bacterium known as Xanthomonas axonopodis var. die effenbachiae.
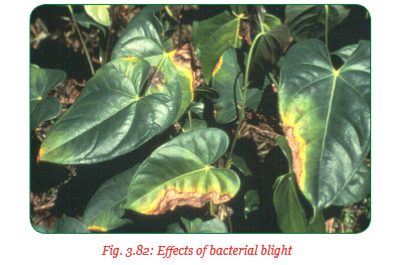
The disease affects the foliage of the plant and the vascular bundles. The symptoms include water soaked spots near the margins of the leaves. Tissues surrounding the affected areas turn yellow. The pathogen quickly moves into the vascular tissues of petioles and stems thus disrupting the translocation of nutrients and transportation of water. This results in water stress.
Control
Application of the appropriate agricultural chemicals .
(ii) Fungal or bacterial leaf spots
The leaf spot disease affects the foliage of the plant. Leaf spot desease can be caused either byfungus or a bacterium. Fungal leaf spot is controlled by avoiding over-watering and spraying with a fungicide to treat serious problems. Bacterial leaf spots are also controlled by spraying appropriate chemicals. The appropriate chemicals to control Bacterial leaf spot include; antibiotic streptomycin about 500gm in 1,125litres of water/ha every week fro 6 to 8 weeks. Fungal leaf spot is controlled using fungicides such as copper-maneb combination at 7-14 days interval. The leaf spot disease may also be controlled by destroying the affected plants and replacing with healthy ones.
Other diseases of anthurium include anthracnose root rot and damping off.
(j) Harvesting
Anthurium is a good producer of cut flowers. The flowers are harvested
 years after initial planting in the nursery. Harvesting of flowers continues for five years from the same plant.
 Yield per year
Year 1 – No flowers
Year 2 – 250,000 flowers per ha
Year 3 – 300,000 flowers per ha
Year 4 – 350,000 flowers per ha
Year 5 – 350,000 flowers per ha
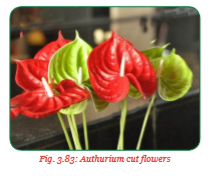
Anthurium flowers are usually harvested once a week. The flowers mature on the spadix( anthurium inflorescence) from the base towards the apex. As they mature, they change colour from the base to the tip of the spadix within a period of 3/4 weeks. Most anthurium blooms are harvested at 3 4 maturity. At this time, they have the longest shelf life as cut flowers of up to about 14 days.
4. Bougainvillea
Activity 3.8: Field visit and practical activity to find out cultural practices of bougainvillea
Visit a farm where bougainvillea are grown and carry out the following activities:
(i) Observe the activities going on in the farm.
(ii) Participate in the cultural activities going on in the farm such as land preparation, planting, pruning, watering, weed control, mulching, pest management, disease control and harvesting of flowers.
(iii) Discuss and record your findings.
(iv) Present your findings to the class.
(v) Take teacher’s summary notes.
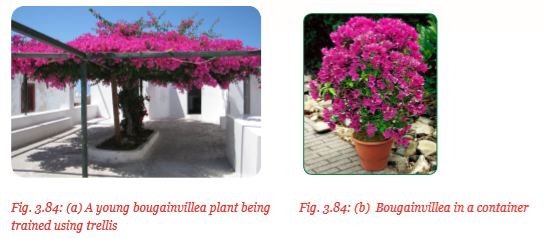
(a) Land preparation
Bougainvillea may be planted in the ground or in containers. Where the bougainvillea is to be planted in the ground, the land is well prepared before digging the planting holes. Holes are dug as deep as the plant's root ball. A high phosphate fertiliser is added to the hole. If you are planting the bougainvillea in a container, choose a soil mix with the appropriate pH level of around neutrality 6.5–7.0.
(b) Planting
Bougainvillea is mainly propagated from cuttings which are raised in polythene bags before being planted. The procedure of planting the seedlings is as follows:
• Remove the seedlings from the polythene bag or any other container.
• Wet the root ball.
• Place the seedling into the hole.
• Backfill soil in the hole.
• Firm the soil around the base of the plant.
If the bougainvillea is being planted in a container, choose one with plenty of drainage holes as bougainvillea does not do well in waterlogging conditions.
(c) Pruning
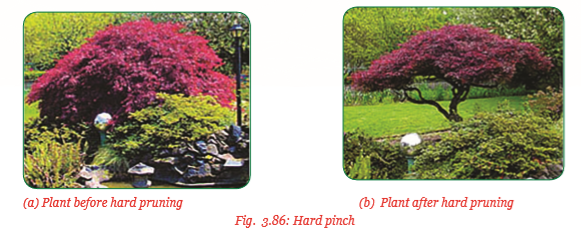
It is also referred to as pinching. Pinching is the cutting off a part of the plant's stem. The stem may either be soft or hard and therefore the pinching may either be soft or hard pinching respectively.

• Soft pinching is the removal of a tender tip of a new growth from a branch. It promotes side shoot branching.
• Hard pinching is the removal of a large part of a branch from a plant. It is taken when controlling the growth of stems which have overgrown in order to maintain the shape of the plant.
(d) Fertilisation
Fertilisation starts at planting time. A high phosphate fertiliser is added to the hole to promote root growth and help the flowers to bloom. Apply a teaspoonful of complete fertiliser such as the hibiscus food 12-4-18 NPK once a month. This encourages flowering rather than excessive leaf growth.
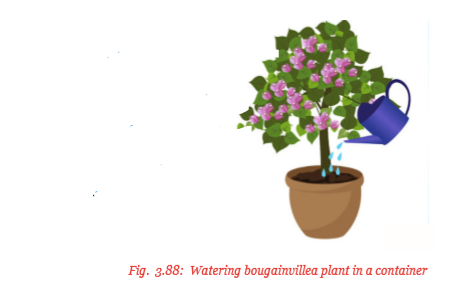
(e) Watering
Water the plant sparingly. Bougainvillea plants weaken with too much watering, growing vegetatively at the expense of flower production. However, allowing the soil to dry out causes the plant to suffer water stress. Bougainvillea plants do not stand waterlogging conditions.
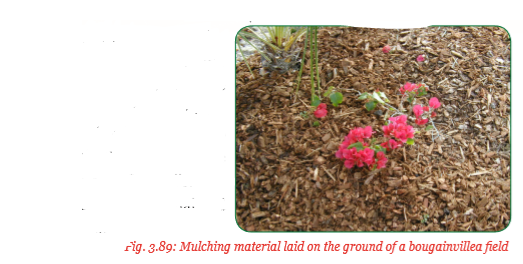
(f) Mulching
Bougainvillea is mulched with compost manure, wood chips, dry grass or straw. About 5 cm – 7.5 cm layer of mulch should be applied over the ground. The mulch helps to conserve soil moisture and prevent weed growth. The mulch should be spread on the ground but should not get into contact with the plant. Leave about 7.5 cm – 10 cm distance between the mulch material and the plant stem.
(g) Weed control
The following are methods of controlling weeds in a bougainvillea field:
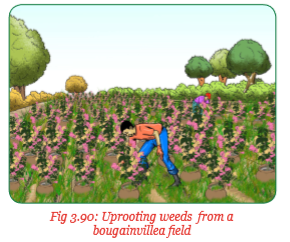
(i) Uprooting – Weeds are pulled out by hand between the plants. This method leaves no damage to the plant as when herbicides are used.
(ii) Shallow cultivation using hand hoes to remove weeds. Care must be taken not to injure the bougainvillea plants or exposing the roots to the heat of the sun.
(iii) Mulching – The mulching material hinders the growth of weeds thus helping to control them. It also makes manual cultivation easy.
(iv) Use of organic herbicides – Organic herbicides are sprayed into the field for natural weed. Spraying should be done in the morning to avoid drifts of the chemical spray by wind.
(i) Sucking insects such as aphids, mealy bugs, scale insects and the giant whiteflies. Aphids are the most serious sucking insects that attack the bougainvillea. They attack the stressed and neglected bougainvillea plant. The aphids cluster together on leaves and new growths. Aphids suck plants sap producing excreta known as the honey dew. Honey dew attacks fungus that creates a sooty mold, a black powdery substance on the surface of the affected plant parts.
Control
• Aphids are controlled by applying a hard jet of water from the hose pipe.
• Applying an insecticide prepared from dishwashing soap added to 1 cup of vegetable oil.
 of this solution is mixed with 1 cup of warm water and used to spray the aphids as an insecticide. The other sucking insects are controlled by spraying thoroughly a mixture of 2 table spoonfuls of neem oil in 1 gallon of water on the leaves. They are shown in figure 3.91 (a) and (b) below.
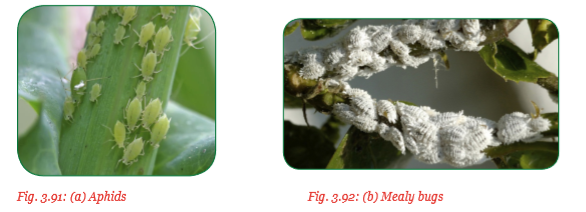
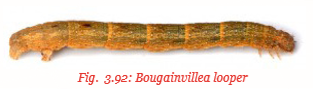
(ii) Chewing insects such as caterpillars. An example of these caterpillars is the bougainvillea lopper (Disclisio prosta stellata) which is a 2.5 cm long yellow, green or brown caterpillar. It feeds on leaves in the evening making ragged leaf edges and may totally defoliate the plant.
Control
• Spraying with an insecticide.
• Hand picking and killing.
(i) Diseases control
Bougainvillea are affected by several types of diseases. Some of these include:
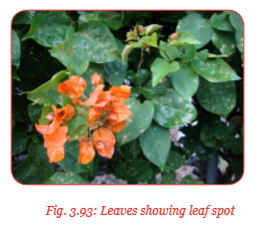
(i) Leaf spot
Bougainvillea are affected by both fungal and bacterial leaf spots. The reddish-brown spots appear on leaves spreading to other parts of the bougainvillea. This affects the growth of the plant.
Control
• Killing the plant dry.
• Pruning to reduce branches and enhance air circulation within the plant.
• Rogueing: Cutting and destroying affected branches to prevent disease spread.
• Applying fungicides to minimise the spread of the infection.
(ii) Chlorosis
This is a deficiency disease. It occurs on new or mature plant growth due to the deficiency of iron and magnesium. The plant parts leaves become yellow.
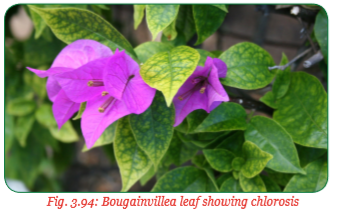
Control
• Raising soil pH by applying iron sulphate or aluminium sulphate.
• Applying 1–2 teaspoonful of episom salt diluted in 1 gallon of water.
(iii) Root rot
This disease is caused by fungus such as Rhizoctonia spp pythium spp. and Phytophthora spp. fungus affect the roots causing diseases or malfunction.

Fig. 3.95: Bougainvillea plant suffering from root rot
Control
• Rogueing – Removing and destroying infected plants.
• Reducing watering. • Applying a broad spectrum fungicide during planting.
(j) Harvesting
Harvesting bougainvillea requires proper timing. The brightly coloured petals are hand-picked by pulling each bract off the plant. The bracts are put in baskets and taken to drying room to dehydrate. They can now be used to prepare products as bouquets for weddings and other ceremonies.
Group activity
Practical work on ornamental pruning
Visit a farm where ornamentals are grown and carry out the following activities:
(i) Observe and identify the ornamentals grown in the farm.
(ii) Using the tools provided, carry out pruning of the ornamentals in the farm.
(iii) Discuss and record your findings.
(iv) Present your findings to the class.
(v) Take teacher’s summary notes.
Unit Summary
Ornamentals are plants which are grown for the purpose of decoration. They are used in beautifying the environment in which human beings live.
Ornamentals are grown in such places as the landscape, flower gardens, greenhouses and in containers. Trees become ornamentals only when they are tendered and used as part of a garden, park or landscape. The cultivation of ornamentals is known as floriculture. Importance of ornamentals include adding beauty, fragrance, attracting wildlife, cleaning the air, ceremonial and religious use. Ornamentals grown in Rwanda include roses, duranta, palms, anthurium and bougainvillea. Ornamentals are propagated through cuttings, budding, grafting, splitting, layering and seed.
Cultural practices in the growing of ornamentals include land preparation, planting, pruning, fertiliser application, watering, weeding, pest management, disease control and harvesting for ornamentals grown for cut flowers. Some ornamentals are used as indoor house plants while others are grown as outdoor plants where they display their beauty.
Key terms
1. A spadix – A spike of minute flowers closely arranged around a fleshy axis and typically enclosed in a spathe.
2. A spathe – A sheathing bract enclosing the flower cluster of some plants such as palm trees and members of the Araceae family, e.g., Anthurium.
3. A spike – A flower cluster (inflorescence) formed of many flower heads attached directly to a long stem.
4. Bouquet – An attractively arranged bunch of flowers especially one presented as a gift or carried at a ceremony such as a wedding.
5. Bract – A modified leaf associated with a reproductive structure such as of a flower.
6. Budding – This is the practice of uniting a vegetative bud known as the scion to the rootstock of another plant.
7. Cultivar – It is the cultivated variety of a plant that has been developed for a particular region by plant breeders.
8. Cut flowers – Flowers or flower buds that have been cut from the plant bearing it. Cut flowers are used for decorative uses in homes or in ceremonies. They form the bulk of the flower industry.
9. Epiphytes – Plants that grow harmlessly upon other plants, mainly on tree barks.
10. Floriculture – Branch of horticulture that deals with the growing of flowers and ornamental plants.
11. Flower garden – A garden where flowers are grown and displayed.
12. Fragrance – A pleasant sweet smell.
13. Grafting – This is the practice of uniting two separate woody stems.
14. Herbicides – Chemical substances used to kill unwanted plants in cultivated fields.
15. Honeydew – A sticky substance produced by sucking insects as excreta which is used by sugar ants.
16. Horticulture – Branch of agriculture that deals with the growing of high value crops such as vegetables, flowers and fruits.
17. House plants – These are plants that are grown indoors, in homes and offices.
18. Inflorescence – A group or cluster of flowers arranged on a stem axis.
19. Indole acetic acid (IAA) and Indole butyric acid (IBA) – These are plant growth hormones used to stimulate root development in cuttings.
20. Landscape – The visible features of an area of land, its landforms and how they integrate with natural and man-made features.
21. Ornamental farming – The growing of ornamental plants.
22. Ornamental plants – Plants grown for the purpose of decoration.
23. Ornamental trees – Trees used or part of a garden, park or landscape setting.
24. Outdoor plants – Plants that are grown in places where there is enough sunshine, outside houses and where there is no shade.
25. Park – An area of natural or planted space reserved for human enjoyment and recreation.
26. Post-emergence herbicides – Selective herbicides applied after the planted crop emerges from the ground.
27. Pre-emergence herbicides – Herbicides applied before the planted crop appears up through the ground surface. They are mainly non- selective.
28. Pruning – Trimming a tree, shrub or hedge by cutting away dead or overgrown branches or stems to stimulate fresh growths.
29. Seed propagation – Development of new plants from a seed.
30. Terrestrial plants – Plants that grow on land conditions as opposed to aquatic plants or epiphytes.
31. Variegated plants – Plants whose leaves have differently coloured zones.
32. Vegetative propagation – This is the development of new plants from vegetative parts such as leaves, stems and roots. It is also known as cloning.
End of Unit 3 Assessment
1. Outline the importance of ornamental plants.
2. The following are ornamental plants grown in Rwanda:
• Roses
• Duranta
• Palm tree
• Anthurium
Which of the above ornamental plant is best suited for:
(i) Planting in a landscape?
(ii) Planting to form a hedge?
(iii) Planting for cut flowers?
(iv) Planting as a house plant?
3. Match the pests given in set A below to the damage they cause as shown in set B.
Set A
(a) Aphids
(b) Mealy bugs
(c) Loopers
(d) Red palm weevils
Set B
(i) Uproot young seedlings
(ii) Chew the leaves
(iii) Suck plant sap
(iv) Defoliate the plants
(v) Damage the flower petal
(vi) Damage the stem when burrowing
4. Name the labelled parts of the rose plant flower illustrated below.

5. Discuss the production of roses under the following subheadings:
(a) Planting
(b) Fertilisation
(c) Watering
(d) Weed control
(e) Harvesting
6. Study the illustration below and then answer the questions that follow:

(a) Identify the disease.
(b) Explain how the disease is controlled.