Key unit competence
Create graphics using basic graphic elements and edit predefined graphics.
7.1 Introduction
sketch something on paper (a man or a house) and what you have is a piece of analog information. Changing what you draw can be easy or hard: you can erase pencil or charcoal marks easily enough, and you can scrape off oil paints and redo them with no trouble; but altering water colors or permanent markers, swapping colors or resizing your picture is more complicated.
that’s why it is more efficient to draw a picture on a computer screen and what you have is a piece of digital information (your picture is stored as a series of numbers). Change the numbers and you can change the picture, in the blink of an eye or even quicker. It’s easy to shift your picture around the screen, scale it up or down, rotate it, swap the colors, and transform it in all kinds of other ways. once it’s finished, you can save it, incorporate it into a text document, print it out, upload it to a web page, or email it to a client or work colleague, all because it’s digital information.
7.2 Definition
7.2.1 Computer graphics
this is the use of a computer and specialized programs to produce and manipulate pictorial images.
the purpose of creating computer graphics is mainly for: Animation, business presentation and scientific research.
there are two very different ways of drawing digital images on a computer screen, known as raster and vector graphics.
7.2.2 Bitmap/ Raster graphics
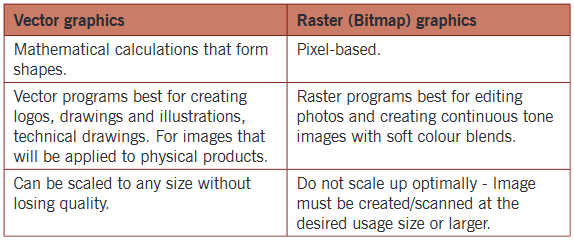
A bitmap (or raster graphic) is a digital image composed of a matrix of dots. A bitmap graphic is composed of many tiny parts, called pixels, which are often many different colors. It is possible to edit each individual pixel.
When you take a photograph using a digital camera or scan an image from a magazine, you are creating a bitmap graphic.
since the computer has to store information about every single pixel in the image, the file size of a bitmap graphic is often quite large. When you resize a bitmap graphic, it tends to lose quality.
7.2.3 Vector graphics
Vector graphics are graphics stored and drawn with instructions rather than grids of pixels. Vector images are mathematical calculations from one point to another that form lines and shapes. If you zoom into a vector graphic it will always look the same.
7.2.4 Comparing Raster graphics and Vector graphics
7.2.5 Resolution
Resolution is the total number of pixels that make an image. In general, the more pixels used when capturing an image, the sharper the stored image is. this is called resolution, it is measured in dots per inch (dpi).
7.2.6 2-Dimensional computer graphics
2-Dimensional computer graphics are mainly used in applications that were originally developed upon traditional printing and drawing technologies. In those applications, the two-dimensional image is not just a representation of a real-world object, but an independent artifact with added semantic value. two-dimensional (2D) models are therefore preferred because they give more direct control of the image than 3D computer graphics, whose approach is more akin (similar) to photography than to typography.
7.2.7 3-Dimensional computer graphics
3D graphics, compared to 2D graphics, are graphics that use a three-dimensional representation of geometric data. For the purpose of performance, this is stored in the computer. this includes images that may be for later display or for real-time viewing.
7.2.8 Core elements of computer graphics
·Modelling is the process of developing a mathematical representation of any three-dimensional surface (3D) of an object (either living or non-living) via specialized software. the product is called a 3D model.
·Rendering is the process of converting automatically 3Dwire frame models into 2D images with 3D photo realistic effects or non-photo realistic rendering on a computer.
·Animation is a process that uses computer generated images to create animated scenes. An animated scene starts with one picture, which is referred to a frame.
·Interaction is a technique of using a physical input/output device to perform a broad task in a human-computer dialogue.
7.3 Graphic file format
7.3.1 Definition
Graphic images are stored digitally using a small number of standardized graphic file formats such as:
- BMP : Limited file format that is not suitable for use in pre press. It is a file extension for Bitmap file.
- GIF: Graphic Interchange Format mainly used for internet graphics.
- JPEG: Joint Photographic experts Group which is used for internet graphics, photos, etc.
- TIFF:tag Image File Format a popular and versatile bitmap file format.
- PNG: Portable network Graphics.
7.4 Areas of graphics use
Graphics are visual elements often used to point readers and viewers to particular information. they are also used to supplement text in an effort to aid readers in their understanding of a particular concept or make the concept more clear or interesting.
- Entertainment: Animated pictures, audio – videos, and TV shows, Computer games.
- Advertisement: Graphics are among the primary ways of advertising the sale of goods or service e.g. creating logos.
- Book illustrations:to produce illustrations which summarize various kinds of data. e.g. it is used to illustrate themes and concepts such as human anatomy in Biology and diagrams in mathematics.
- Magazines: Magazines contain graphic materials in abundance to attract readers.
- Education: As learning and teaching aid.
- Computing designing computer games, web sites.
7.5 Graphics software
Graphics software are better at creating and manipulating bitmaps or vector graphics.
7.5.1 Bitmap/Raster graphics software
this software includes Microsoft Paint and Adobe Photoshop.
Microsoft Paint
A paint program is a software graphics program that allows the user to draw or paint bit mapped images on a computer.
Adobe Photoshop
this is a professional software used in photography, design and video editing. It is a program that can edit images of any type. It was developed by Adobe systems. Photoshop is mainly a raster graphics editor. Photoshop is used in a similar way as Paint but in a more professional style. More information about Adobe is provided at the end of the unit.Vector graphics software
Vector graphics software
commonly used include: Adobe Illustrator, Adobe Free Hand, Corel Draw, Paint shop Pro.
7.5.2 Microsoft Paint
Windows operating system comes with a basic, easy-to-use image creation program called Microsoft Paint which is a basic raster graphics program capable of creating, opening, and basic editing of image files, including BMP, JPG, GIF, and PNG. the default bitmap file type for Paint is BMP.
Activity 7.1
Launch MS Paint program on your computer
Follow these steps to open Ms Paint:
·Click the start button, all programs.
·From windows accessories, choose Paint.the following window appears.
Understand the canvas
When Paint launches, you’ll see a white “canvas” appear on the screen. Imagine this canvas as a piece of paper for you to draw or write on. You can adjust the size of the canvas before you start creating your masterpiece.
7.6 Basic graphic elements (with MS Paint)
7.6.1 Line and curve tools
Using the already open paint program, you are going to locate and use the following tools;
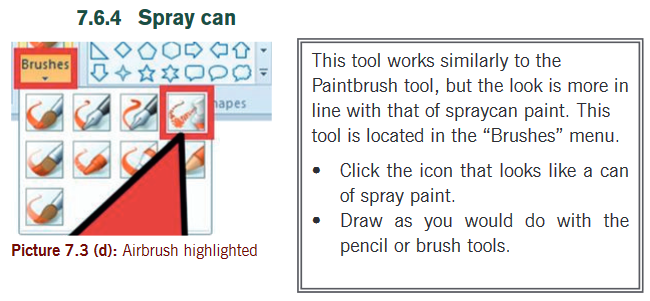
7.6.2 Paintbrush too
Activity 7.2
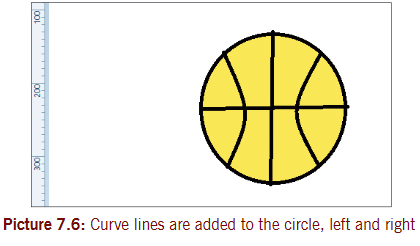
Use an ellipse tool to create a basketball with a suitable background.
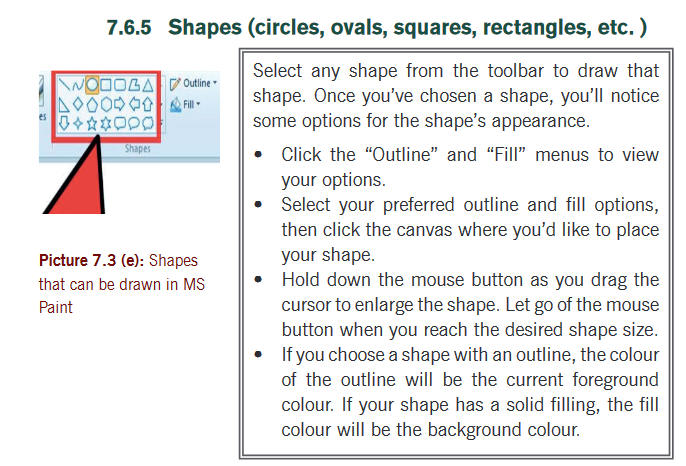
7.6.7 Ellipse tool
to get a round shape that has a black outline and an orange interior, use the following steps:
Step 1:Choose the ellipse tool.
Step 2:In the Fill options area, choose ▼ then select solid color. this will set foreground color for the outside, and set background color for the inside.
Step 3:Click the foreground Color box, and then click black to set the foreground color.
Step 4:Click the background Color box, and then click orange to set the background color.
Step 5:Click and hold the left mouse button and drag the mouse to form the oval.
Tip:to make it perfectly round, hold down the shift key as you drag the mouse.
Step 6:Use line tool.
·now choose the Line tool,
·then set size, and draw the vertical /horizontal lines, by dragging the mouse.
Tip:to make the lines perfectly straight, hold down the shift key as you drag.
Step 7:Curve tool.
·now, choose the Curve tool.
·Draw a straight line to the left of your vertical line.
·Click in the middle of the new line and drag it toward the vertical line to curve it.
IMPORTANT:to lock in the new shape, click on some other tool, like the selection tool.
·now, choose the Curve tool again.
·Draw a straight line to the right of your vertical line.
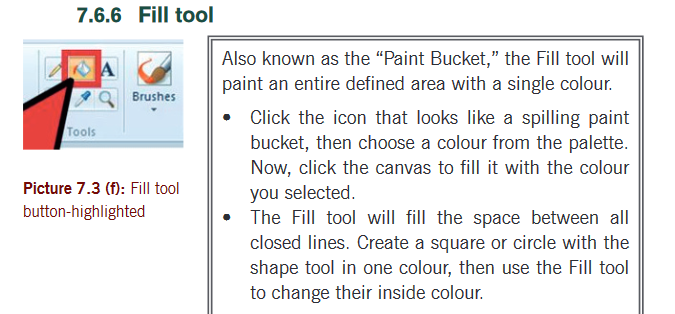
Step 8:Fill tool.
·now, go ahead and fill the white canvas with a different color.
·the Fill with color tool will flood a connected area with the color you choose.
·the final product should look something like this:
Step 9: save your work.
·From File menu, choose save as.
·From a dialog box, choose BMP picture.
·Choose the location where you want to save.
·type the name you wish to use (ball) make sure it will be saved as a 24 bit Bitmap – this will add .bmp to the filename for example: ball.bmp. We shall use this file later on
7.7 Graphic features
In order to use graphics features well, you should learn to select images or parts of the image to be affected/changed by the graphic feature. to select is to choose an option from two or more available options. Practice selecting image parts you may need to cut, copy or fill with color.
7.7.1 Selection tools
there are two different tools you can use to select parts of your image:
- Rectangular selection (a dotted outline of a rectangle).
- Free form selection (a dotted outline of oval shape).
Free-form selection allows you to draw your own freehand selection line around an image, while the rectangular selection tool lets you draw a rectangle around an image.
Steps to select an image
Step 1:Click the arrow beneath the “Select” button.
Step 2:Choose “Rectangular” or “Free form.” see picture 7.9(a).
Step 3: to use either tool selected, start by clicking at the top left corner of your image, then hold down the mouse button as you trace your way around the image. then release the mouse.
7.7.2 Copy and paste (a selected image)
Follow the steps given below to copy your image:
Step 1: select Image and make sure the image is highlighted with dotted rectangle.
Step 2:Copy the selected area by pressing Ctrl+C or click Copy command from the Home tab.
Step 3:Paste the image using Ctrl+V or Paste command on the Home tab.
Note: You can paste the copied selection in the same file in Paint or in other compatible programs, like Microsoft Word or Microsoft PowerPoint.If the image you want to copy has a background color that you don’t want to be a part of your selection, then:
- Check “Transparent Selection” in the select menu.
- And to disable this later, click back to the top selection icon.
Let us draw an image of a basketball net as shown below. By so doing we are to learn the following tools; copy and paste, move, resize, flip, skew, rotate, cutout, trim. these actions are repeated in this unit for purposes of learning more about paint in respective sections.
Copy and paste
Follow steps 1 to 3 in section 7.7.2 to copy and paste the image. the results may appear as shown in picture 7.9(c).
7.7.3 To move an image
Step 1: select the image to be moved.
Step 2:Click on the selection and drag to a new position. see picture 7.9(d), the pasted copy has been moved to lower left corner.
7.7.4 To resize an image
We are going to use original image and we resize it manually.Use the following steps to resize an image:
Step 1: select the image
Step 2:Click in any of the selection boxes and drag inwards (to reduce size) or drag outwards (to enlarge its size). see picture 7.9(e).
Note: You can also resize the image using the resize tool in the image group. This is covered later on in this unit.
7.7.5 To flip an image
Use the following steps to flip an image:
Step 1: select the image to be flipped.
Step 2:In the Image group click Rotate tool and then select Flip vertical or Flip horizontal. see picture 7.9(f), how the resized image is flipped horizontally.
7.7.6 To rotate the image
Steps:Repeat steps 1 and 2 of part (d) above but instead of selecting a flipping option, select a rotate option e.g. Rotate right 900. this task is repeated in other activities later in this book.
7.7.7 To skew an image
Step 1: select an image.
Step 2:Click Resize tool in the Image group.
Step 3:In the Resize and Skew dialog box, use section down for skew and type in Degrees for skewing the image.
7.7.8 Cut-out or trim an image
Step 1: select a part of the image you want to cut-out or trim.
Step 2:Press delete key on keyboard.
Activity 7.3(a)
a) Draw the shape of a heart and fill it with red color.
b) Move the shape to the left side on the page.
c) Copy and paste any half of the shape and move the pasted copy on the right side of the page.
d) type a Green bold text of font size 26 in the pasted copy as “Divided heart” and “one Heart” text in the original image.
e) erase a small part of the original shape that you want.
f) Apply a suitable background to the shapes and save your file as ‘our Hearts’.
Follow the steps given below to perform this activity
- open Ms Paint.
- Pick the Heart shape and draw it in an appropriate size. Use rectangular selection and move the shape towards the left margin.
- select Red color from the Colors group – Home group or color palette.
- select Fill with color button from Tools group – Home tab.
- Use Rectangular selection option on select menu and draw a rectangle covering half of the heart.
- on the Home tab, click Copy.
- Click Paste button.
- Click the pasted copy and drag to a new position you want towards the right margin.
- Click on the text button and draw a textbox over the pasted copy and type your text. Repeat the same action and type text in the original image as required.
- Pick Eraser tool and remove any small part of the original heart.
- Pick green color and select Fill with color button. then click any part outside the shapes.
- save your file with a name. (see results of this activity in picture 7.12).
7.7.9 Add text
to add text, follow the steps given below:
- select the text tool, which is signified by the letter “A,” then,
- Double-click somewhere on the canvas to start typing.
- Make sure the text in the textbox is exactly the way you want it before switching to another tool (you will be unable to edit text after closing the textbox).
- to increase the textbox size (which will give you more room to type). Hold the mouse over one of the square corners until the cursor turns to an arrow, then drag the box to a larger size.
- Choose a font face and size from the top of the screen and begin typing.
- to change the color, size or face of the text after you type, highlight the text, then choose the new color, size, etc. When you are typing, click somewhere outside of the textbox to leave the tool.
7.7.10 To erase something you have drawn with Eraser tool
Follow the steps given below;
- Click the Eraser icon (see picture 7.12(a))
- Drag over the area you would like to disappear several times until it disappears.
Note: Like other tools, you can adjust the width of the eraser with the Size menu.
7.7.11 Vector Graphics
to create and edit or reshape vector graphics suitably requires you to use a vector graphics software such as Adobe Illustrator, Adobe Freehand or Corel Draw. You can also introduce a Raster graphic into a vector graphics software and edit by converting it to vector graphic. For our case we use Adobe Illustrator. With Adobe Illustrator, you can design logos, t-shirt design, posters and flyers as vector graphics.
Activity 7.3
(b)a) Using Adobe Illustrator, create the following vector graphics or shapes as they appear and save the project as Better shapes.
b) Reshape or edit the graphics drawn in (a) above to appear as shown below
Follow the steps given below to perform this activity.
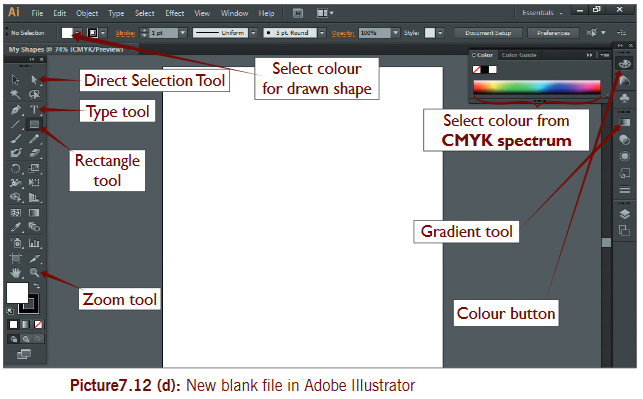
Step 1: open Adobe Illustrator, a vector graphics software. the window for Adobe Illustrator appears below.
Step 2:Click on File menu and select ‘New’ button to get a new document dialog box (shown below). name your file as My Shapes.
Step 3: start creating the shapes using various tools
to create the square:click the Rectangle Tool on the toolbox and then drag in the white background to draw the square.
to draw other shapes, click on white graphic near the rectangle tool to display other shape tools. then click on the ellipse tool to draw the circle/oval shape and afterwards click on the rounded rectangle tool to draw the rounded rectangle.
Step 4:Fill the square with green; the circle with gradient fill and rounded rectangle with brown color and increase on its shape outline.
to fill green color in the square, select the square using the selection tool, click where there is green color on the CMYK spectrum on the right of the window (or from alternative color button on toolbar).
to fill gradient in the circle/oval, select the circle and then click on the gradient button.
to fill the rounded rectangle with brown color, select it first, then click on the alternative color button on the toolbar.
Increase the outline of the rectangle by increasing points in the shape outline size.
b) To reshape or edit the graphics
Step 1: To reshape or edit the square: select the square, click on Effect menu and on the menu click Distort & Transform and then select the zigzag... effect. In the Zigzag dialog box, adjust the size to be 12 pts and ridges to be 5. then click OK.
To insert text in the square; select Type Tool on the toolbox and draw a box in shape where you can type text. type in the text in the shape. Change font size to 24pt, Book Antiqua; using the Character button on the upper toolbar. see picture 7.12(i).
To change text color, select typed text and click on red color from the CMYK spectrum colors on the right of the window or using alternative option on the upper toolbar. Lastly click the center button on the upper toolbar.
Step 2: To edit circle oval; select it and on the effect menu click Texture and then Traquelure. see picture 7.12 (k). In the Traquelure dialog box that displays, (you can adjust the crack spacing depth and brightness as you like), click OK. select radial gradient on the right.
the traquelure dialog is shown below
Step 3: to reshape the rounded rectangle, select it and click Effects menu. on the menu, click Warp and select Shell lower in the sub menu.
to add special fill effects, click Pixelate on the effects menu and then select Mezzotint.
to add text to the rounded rectangle, repeat as done in step 1 above.
the suggested answers for the activity are shown in picture below.
Saving a project
Click on File menu and select Save As.the Illustrator options dialog box displays as shown below. Click OK. the save dialog box displays. type in the file name and click on ‘Save’ button.
7.7.12 Manipulate nodes and control points
these are the selection boxes and circles that appear when you select an image for reshaping. Point on one of the node or point until the pointer changes shape of double pointed arrow. then click and drag inwards or outwards to reduce size or enlarge its size respectively.
7.8 Graphics formatting
Activity 7.4
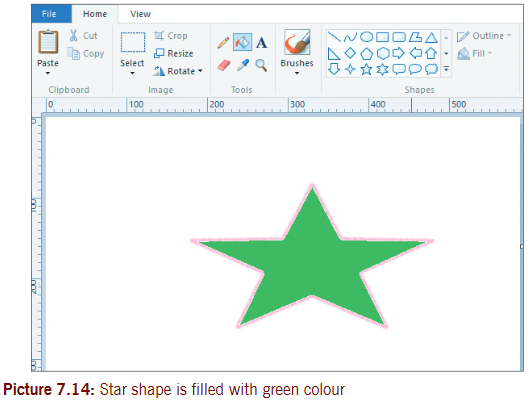
a) Create a new Paint file and draw a star object (another object of your choice).
b) Fill the object outline to color red and fill color to green (or light green).
c) Insert text as “star” in the star shape. Adjust the font size to a suitable size.
d) save the file as ‘Green star’.
Follow the guidelines given below
7.8.1 Colors for the outlines and fill of objects
- select a pencil or a shape to use.
- Click the outline button from shapes, select the option you want eg. (no fill, marker, crayon,..).
- click the desired color.
- Drag the mouse to draw the object, then resize the object.
7.8.2 Create shading and fill objects with patterns and textures
- Click on Fill With color tool, then choose the desired color.
- Click inside the object.
- Fonts as part of the graphic design.
7.9 Edit image
to edit image means to make changes that make an object more meaningful. You can edit a newly created image or an existing image.
Paint can open up many different image types, including *.bmp, .gif, .jpg/.jpeg, .tif/.tiff, and .png. to open a file in Paint,
- Click “File,” then “Open.”
- navigate to the folder where your image file is stored and click “open.”
Activity 7.5
a) open Microsoft Paint and add an image of a bird from your computer or from Internet (you may also opt to use any other image you already have).
b) Crop part of the image and save it as ‘cropped’.
c) Resize the image by 150% horizontally and vertically.
d) Rotate the original image by ‘Flip Horizontally’.
e) Using rotated image, zoom into the eye of the bird. Afterwards you can zoom out.
7.9.1 Crop an image
With an image open in Paint,
·Click the “Select” tool at the top of the screen.
·Highlight the area you want to crop by clicking and dragging with the cursor. everything inside the dotted lines is your new image, that you can save or transfer to another location in the document
·Click “Crop”.
·You will remain only with the selected part.
7.9.2 Resize an image
·Click “Image,” then select “Resize”.
·type a new size (in pixels, or by percent, as you did when creating the canvas) to increase or decrease the image size.
7.9.3 Rotate an image
to flip an image upside down (or some other direction), use the Flip and Rotate tools.
·on the toolbar, click “Rotate” and choose a direction in the menu.
7.9.4 Magnify an area of a picture/Zoom
·Click the magnifying glass icon to enable the Zoom tool. ·to zoom in, click anywhere on your image with the left mouse button. ·to zoom out, click with the right mouse button. Alternatively, ·Use the keyboard shortcuts Ctrl+ Pg Up to zoom in and Ctrl+ Pg Dn to zoom out.
7.9.5 Stretch or skew an image
You can distort an image with the “skew” feature.
·Click “Image,” then select “Resize/Skew”.
·to stretch/distort the image by degree, type a number (in degrees) in the boxes marked “horizontal” and “vertical”, in the Resize and Skew dialog box.
·Given that you earlier used a different image like this in 7.20 (a) below, you would skew it by 20degrees and it changes as shown in 7.20(b).
7.9.6 Changing pixels
If you want to resize the image, and you don’t care if it gets a bit stretched, then:
·select Pixels.
·Uncheck the Maintain aspect ratio checkbox.
·enter a width (Horizontal) and a height (Vertical) in Pixels.
·Click OK.
7.9.7 The Color Picker
the small eyedropper icon represents the Color Picker tool.
·Click this tool, then
·Click somewhere in your drawing. the area you click will now become the foreground color for your next tool of choice.
7.9.8 Change color
You can edit any of the colors by adjusting their hue, brightness and other options in the Paint color mixer.
·Click “edit colors” or “Define Custom Colors” to enter the color mixer.
·After you have decided on a color you like, click “Add to Custom Colors.”
7.9.9 Brushing Tools
Ms Paint has several brushing tools you can use to make your image artistic in appearance. Below is an image showing collection of all the brushes in paint.
Here below is a table showing the effect of each of the brushes.
Note: apply these brush effects on your pictures the way you like.
Activity 7.6
Editing image
- open ball.bmp file that you created earlier when saving files.
- Crop the upper part of the ball and paste it at the right of the entire ball.
- Use eraser and fill with color tools to come up to the following result.
Activity 7.7
Drawing a flower
1. Open up Microsoft Paint from the Accessories folder in your start Menu.
2. Drawing the stem using the wavy line tool, draw a curved and dark green line of medium-thick thickness in a position like in the picture. In order to curve the line, draw a straight line and then click and drag where you want to curve it. You can curve each line twice.
- Click Fill with color tool, choose yellow from colors group.
3. Choose the circle tool with a light yellow outline and a light yellow fill to draw a petal.
·Choose circle, then from outline choose mark then you click light yellow.
·Make an appropriately sized oval in the top left corner.
·then fill the circle.
4. select the petal, copy it and then paste in another petal.
5. Drag the petal down to the end of the stem.
6. Re-select the other petal using the box tool and then drag the petal down to the left side of the stem. Make sure that the second option is selected on the sidebar under the main tools as it will make sure not to overlap any of your previous work.
7. Hit Ctrl -V to create another petal
8. Click Rotate, then choose Rotate right 90º.
9. Move the petal down onto the flower.
10. Copy and paste the vertical petal, then drag it and draw a circle and fill light yellow as shown in picture 7.33.
11. Use curve line to add small petals and fill with yellow.
12. starting at the base of the stem, draw the leaves on both sides.
·Use a pencil to draw leaves and fill them with green color.
13. Use Pencil tool to add in some veins and make the leaves look more realistic
7.9.10 Working with layers in MS Paint
Steps for working with layers in Paint
Step 1:Draw an image (initial sketch) you want using a color you do not want to be its final. In our case we are going to draw a book. Let us use Indigo color pencil.
Note: Make sure the color you make your sketch is not the same color you want your final drawing to be.
Step 2: select your final line-art color you want and put it in the Color 1 slot, leaving Color 2 slot with white color. In our case let us use red color. trace over your sketch using color 1 slot. save your file as book. the sketch may appear as shown in picture 7.38.
Step 3:Put your initial sketch colour(Indigo) in Color 1 slot, leaving color 2 slot white. Click on the eraser button and then RIGHt-CLICK while erasing your drawing. this action will remove the original color.
Step 4:Repeat step 2 and step 3 to get many different versions of the book. save each different version you create and compare later. You can also fill in colors.
7.9.11 Microsoft Paint 3D
Microsoft Paint 3D is a new application (app) in Windows 10 Creators Update, designed for working with 3D graphics. It replaces the old Microsoft Paint program that allows users to sketch objects in 2D. It is a new version of Ms Paint. Ms Paint 3D comes with newer versions Windows 10 and it is meant to make 3D scenes, cartoons 3D objects much of fun.
You still have the opportunity to use both Paint and Paint 3D on your computer. You can use Paint 3D to turn photos into 3D models, add colors and textures to models you make from 3D.
Starting Paint 3D
Click start and type paint in the search box. Paint 3D is one of the items listed, click on it to open. see picture 7.10. eventually paint 3D opens with a welcome screen.
Paint 3D interface has the canvas, a flat, 2D digital backdrop for your scene. the canvass is an empty white background and appears behind your 3D image. see picture 7.40.
Activity 7.8(a)
Using Ms Paint 3D, create the dog as shown below. then apply changes that will make dog A appear as shown by dog B. Use orange, green and dark grey color plus a polished metal brush. Apply a spearmint effect, type the text “My dog is nice” on your model and save it as my dog.
Use the following steps to perform activity 7.8 (a).
Step 1: Click on 3D objects on toolbar. on the Tools pane, select dog button and drag in the canvas to draw the dog. see picture 7.41 (c).
Step 2:Click Tools on the toolbar and select a desired tool. In this case will select spray can tool and then select orange color. Click on the parts of the dog to fill them. Rotate the dog using the floating rotate tool and apply orange color. select gray color and apply on tail, legs and mouth parts. select water color and green color and apply on neck parts of the dog. see picture 7.41 (d).
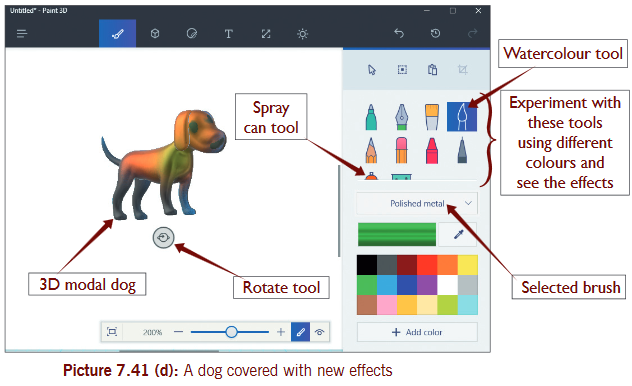
Step 3: Click on the Effects button on the toolbar and select the spearmint effect in the tools pane. the results appear as shown in picture 7.41 (e).
Step 4: type text “My dog is nice”select the text tool on the toolbar and draw a box where you want in the canvas and then type the desired text.
Step 5: save your file as a project. Procedure for saving Paint 3D project:Click on the Expand menu button and then select Save As. see picture 7.41 (f).
the complete project in 3D will appear as shown in picture 7.41 (g).
Activity 7.8 (b)
1. Draw the following pictures in Microsoft Paint and save the files as their names shown.
2. Imagine and draw a picture of a learner seated attentively in a classroom lesson using graphics software of your choice.
7.10 Using Photoshop
At the start when you open Photoshop it displays a dark interface as shown below in picture 7.42.
7.10.1 Create a new Photoshop file
Step 1:When Photoshop opens, click on File menu and select New.In the new document screen that appears, select a category of orientation for your document; then type in the file name in the PRESETS DETAILS pane.
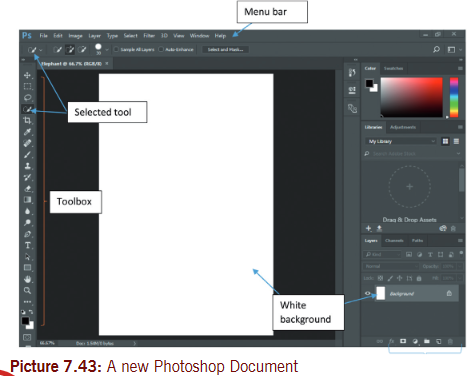
Click OK at the bottom. the new named document will display with a white background as shown in picture 7.42.
Activity 7.9
Use the available digital camera and take desired photos as you master how to use it. Pick a suitable rough photo from your camera or open an existing rough photo in Photoshop . edit the photo by :
a) Adjust image size to a suitable size.
b) Reduce the roughness of the background or skin.
c) Apply desired text depending on the image applied in the upper right hand corner.
d) Crop part of the image and discard the rest. save changes.
e) Rotate the cropped image by 180 degrees.
Follow procedure below
7.10.2 Open an image
Step 1:Open or Add an image: In a new file select Open on file menu.
Step 2: select an image you want. the image I have chosen here below is an elephant:
7.10.3 Resize image
Step 3:Adjust Image Size: Use Image menu and adjust image to the size you want. Click Image Size on the Image menu Make other adjustments using Image menu. see picture 7.46.
Note: In case of a mistake you make in using Tools, press CTRL+Z (Undo) but if there are several mistakes, then press ALT+CTR+Z to reverse those actions.
7.10.4 Use brushing tools
Step 4:Remove some rough elements on the animal skin. Use the Spot Healing Brush and Blur tool. Afterwards apply some light on parts using Dodge tool.
7.10.5 Add text to photo
Step 5:Add text to the upper right hand corner as “African elephant”. Use the ‘Horizontal Type Tool’ and draw a textbox in required position. type the text. You can format the text using menu items below the menu bar. the text may appear as shown in picture 7.48.
7.10.6 Crop an image
Step 5:To Crop an image. select the Crop Tool from image menu or from toolbox and then select part of the picture you want to crop. You can press the check button on toolbar.
7.10.7 Rotate an image
Step 6:Using the Image menu, on Image Rotation menu select 1800. You can use a different option.
Note: Photoshop generates better picture because many actions are done in a much professional way using advanced tools. Practice editing images using all the tools available in Photoshop to build your skill. If you need to draw lines and shapes within your image, you can use Pen tool.
Keyboard shortcuts
Keyboard shortcuts can greatly increase your productivity. Here are some of the more common ones:
- new Canvas: Ctrl+N
- Cut: Ctrl+X
- Paste: Ctrl+V
- Copy: Ctrl+C
- save: Ctrl+S
- Delete: Del
- Print: Ctrl+P
- Undo: Ctrl+Z
- Highlight All: Ctrl+A
- open: Ctrl+O
- Redo: Ctrl+Y
- Hide toolbar: Ctrl+T
- open Attributes: Ctrl+E
- stretch And skew: Ctrl+W
Multiple choice questions
1. Which of the following will you use to select any irregularly shaped part of the picture?
A. Free-Form select B. select
C. eraser D. Fill with Color
2. Which of the following indicates the current foreground and background colors?
A. Free-Form B. eraser
C. Color box D. select
3. Which of the toolbox is used to erase areas of your picture?
A. Free-Form B. eraser
C. Magnifier D. Brush
4. Which of the following will you use to fill the entire picture or an enclosed shape with color?
A. Airbrush B. Fill With Color
C. Pencil D. Color box
5. to zoom in on a section of your picture, you should use;
A. Magnifier B. Free-Form
C. Brush D. eraser
6. to select any square or rectangular part of the picture, which toolbox will you use?
A. Line B. Fill with color
C. Free-form select D. select
7. Which of the following is used to set the current foreground or background color of a canvas?
A. Airbrush B. Brush
C. Pick color D. text
8. A toolbox used to draw thin, free form lines or curves.
A. Pencil B. Airbrush
C. Brush D. text
Practical work
1. Create a simple image using some of the drawing tools in Paint (Pencil, Brush, Airbrush and Filled shapes).
a) selecting and moving part of an image.
b) selecting and copying part of an image.
c) storing an image in a file Bmp as a large uncompressed file and Jpg as a smaller compressed file.
d) Using the image in a Word document.
2. Use Paint to create the following effects:
Draw a picture of some people stick figures. Be creative! the Figure below is an example.
3. Draw the following
4. Using Ms paint, draw a flag of Rwanda as shown below.
a) Create a folder named ‘lab2’. Create an image using Microsoft Paint, and save as a 24 bit .bmp file start with a good size canvas, use lots of colors: DO something interesting! Include many different colors, lines, circles, etc. save as a 24 bit .bmp file called 24bit.bmp.
b) • Save as a 256 color.bmp file called 8bit.bmp.
• save as a 16 color .bmp file called 4bit.bmp.
• save as a monochrome .bmp file called 2bit.bmp.
• Close Paint.• start a new Paint session, and open 24bit.bmp.
• save as a tiff file called 24bit.tif.
• Close Paint.
• start a new Paint session, and open 24bit.bmp.
• save as a gif file called 24bit.gif (will warn about color loss).
• Close Paint.
• Browse to your lab2 folder, and compare file size.
• Right click each image, and choose Preview to compare how the images look.
5. take a picture of yourself using a digital camera and edit the photo in a way you wish using various tools on the toolbox and menu. In case of absence of a camera, use any available photo on your computer and perform editing functioning to crop, resize, flip, rotate and magnify parts of the picture.
6. scan or search from Internet for these pictures below and introduce them into Photoshop. edit the pictures by adjusting their brightness or contrast, resize and change their color or add a different background. save the changes. Use other pictures provided by the teacher and edit them accordingly.
7. Create a line, a curve, polygon, a circle and a square using Photoshop. Make the shape outlines colored and filled with color effects where possible. Apply accompanying text. save the file as super shapes.
8. Draw the pictures below using Ms Paint and then Ms Paint 3D.
 7.2.5 ResolutionResolution is the total number of pixels that make an image. In general, the more pixels used when capturing an image, the sharper the stored image is. this is called resolution, it is measured in dots per inch (dpi).7.2.6 2-Dimensional computer graphics2-Dimensional computer graphics are mainly used in applications that were originally developed upon traditional printing and drawing technologies. In those applications, the two-dimensional image is not just a representation of a real-world object, but an independent artifact with added semantic value. two-dimensional (2D) models are therefore preferred because they give more direct control of the image than 3D computer graphics, whose approach is more akin (similar) to photography than to typography.7.2.7 3-Dimensional computer graphics3D graphics, compared to 2D graphics, are graphics that use a three-dimensional representation of geometric data. For the purpose of performance, this is stored in the computer. this includes images that may be for later display or for real-time viewing.7.2.8 Core elements of computer graphics·Modelling is the process of developing a mathematical representation of any three-dimensional surface (3D) of an object (either living or non-living) via specialized software. the product is called a 3D model.·Rendering is the process of converting automatically 3Dwire frame models into 2D images with 3D photo realistic effects or non-photo realistic rendering on a computer.·Animation is a process that uses computer generated images to create animated scenes. An animated scene starts with one picture, which is referred to a frame.·Interaction is a technique of using a physical input/output device to perform a broad task in a human-computer dialogue.7.3 Graphic file format7.3.1 DefinitionGraphic images are stored digitally using a small number of standardized graphic file formats such as:
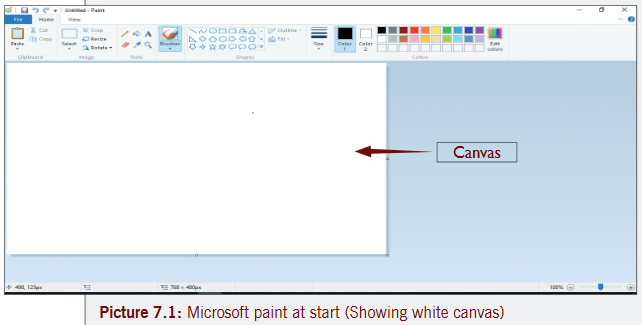 Understand the canvasWhen Paint launches, you’ll see a white “canvas” appear on the screen. Imagine this canvas as a piece of paper for you to draw or write on. You can adjust the size of the canvas before you start creating your masterpiece.7.6 Basic graphic elements (with MS Paint)
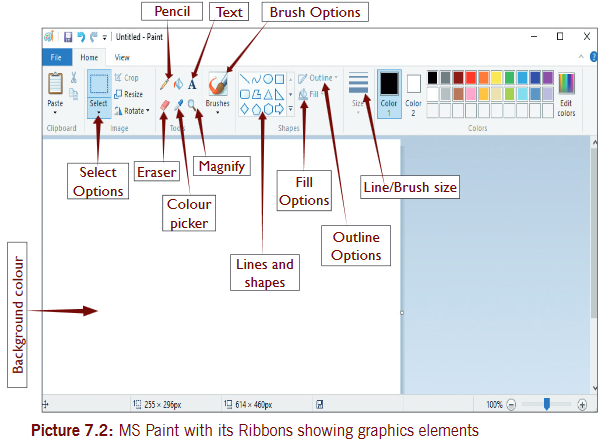 7.6.1 Line and curve toolsUsing the already open paint program, you are going to locate and use the following tools;
 7.6.2 Paintbrush too
 Activity 7.2Use an ellipse tool to create a basketball with a suitable background.7.6.7 Ellipse toolto get a round shape that has a black outline and an orange interior, use the following steps:Step 1:Choose the ellipse tool.Step 2:In the Fill options area, choose ▼ then select solid color. this will set foreground color for the outside, and set background color for the inside.Step 3:Click the foreground Color box, and then click black to set the foreground color.Step 4:Click the background Color box, and then click orange to set the background color.Step 5:Click and hold the left mouse button and drag the mouse to form the oval.
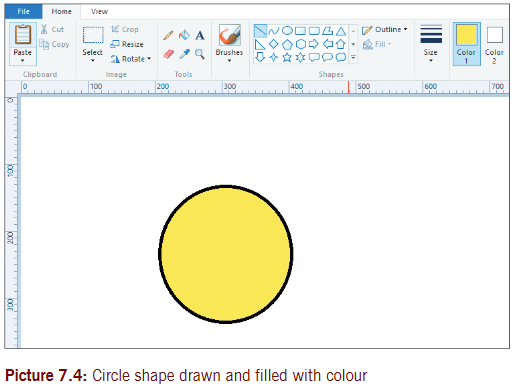 Tip:to make it perfectly round, hold down the shift key as you drag the mouse.Step 6:Use line tool.·now choose the Line tool,·then set size, and draw the vertical /horizontal lines, by dragging the mouse.
 Tip:to make the lines perfectly straight, hold down the shift key as you drag.Step 7:Curve tool.·now, choose the Curve tool.·Draw a straight line to the left of your vertical line.·Click in the middle of the new line and drag it toward the vertical line to curve it.IMPORTANT:to lock in the new shape, click on some other tool, like the selection tool.·now, choose the Curve tool again.·Draw a straight line to the right of your vertical line.
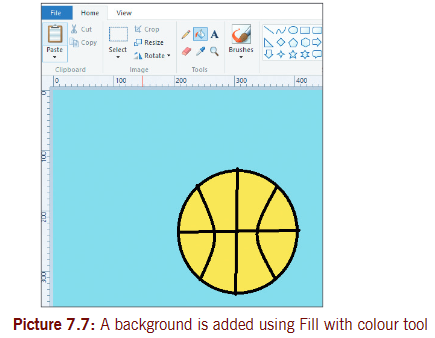 Step 9: save your work.·From File menu, choose save as.·From a dialog box, choose BMP picture.
 ·Choose the location where you want to save.·type the name you wish to use (ball) make sure it will be saved as a 24 bit Bitmap – this will add .bmp to the filename for example: ball.bmp. We shall use this file later on7.7 Graphic featuresIn order to use graphics features well, you should learn to select images or parts of the image to be affected/changed by the graphic feature. to select is to choose an option from two or more available options. Practice selecting image parts you may need to cut, copy or fill with color.7.7.1 Selection toolsthere are two different tools you can use to select parts of your image:
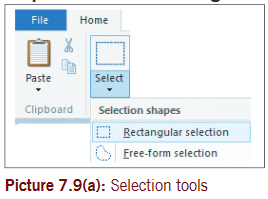 Step 3: to use either tool selected, start by clicking at the top left corner of your image, then hold down the mouse button as you trace your way around the image. then release the mouse.7.7.2 Copy and paste (a selected image)Follow the steps given below to copy your image:Step 1: select Image and make sure the image is highlighted with dotted rectangle.Step 2:Copy the selected area by pressing Ctrl+C or click Copy command from the Home tab.Step 3:Paste the image using Ctrl+V or Paste command on the Home tab.Note: You can paste the copied selection in the same file in Paint or in other compatible programs, like Microsoft Word or Microsoft PowerPoint.If the image you want to copy has a background color that you don’t want to be a part of your selection, then:
 Copy and pasteFollow steps 1 to 3 in section 7.7.2 to copy and paste the image. the results may appear as shown in picture 7.9(c).
 7.7.3 To move an imageStep 1: select the image to be moved.Step 2:Click on the selection and drag to a new position. see picture 7.9(d), the pasted copy has been moved to lower left corner.
 7.7.4 To resize an imageWe are going to use original image and we resize it manually.Use the following steps to resize an image:Step 1: select the imageStep 2:Click in any of the selection boxes and drag inwards (to reduce size) or drag outwards (to enlarge its size). see picture 7.9(e).
 Note: You can also resize the image using the resize tool in the image group. This is covered later on in this unit.7.7.5 To flip an imageUse the following steps to flip an image:Step 1: select the image to be flipped.Step 2:In the Image group click Rotate tool and then select Flip vertical or Flip horizontal. see picture 7.9(f), how the resized image is flipped horizontally.
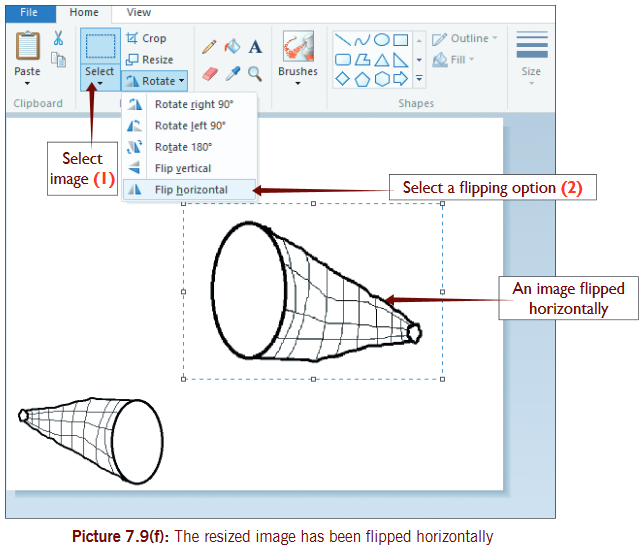
 7.7.7 To skew an imageStep 1: select an image.Step 2:Click Resize tool in the Image group.Step 3:In the Resize and Skew dialog box, use section down for skew and type in Degrees for skewing the image.7.7.8 Cut-out or trim an imageStep 1: select a part of the image you want to cut-out or trim.Step 2:Press delete key on keyboard.Activity 7.3(a)a) Draw the shape of a heart and fill it with red color.b) Move the shape to the left side on the page.c) Copy and paste any half of the shape and move the pasted copy on the right side of the page.d) type a Green bold text of font size 26 in the pasted copy as “Divided heart” and “one Heart” text in the original image.e) erase a small part of the original shape that you want.f) Apply a suitable background to the shapes and save your file as ‘our Hearts’.Follow the steps given below to perform this activity
 7.7.10 To erase something you have drawn with Eraser toolFollow the steps given below;
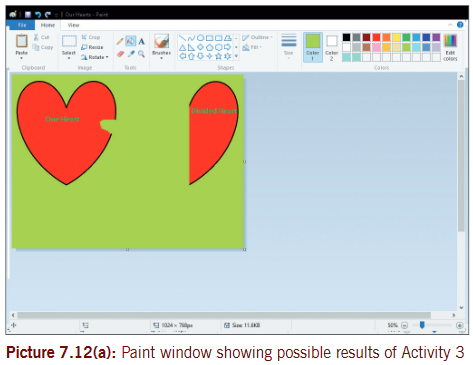 7.7.11 Vector Graphicsto create and edit or reshape vector graphics suitably requires you to use a vector graphics software such as Adobe Illustrator, Adobe Freehand or Corel Draw. You can also introduce a Raster graphic into a vector graphics software and edit by converting it to vector graphic. For our case we use Adobe Illustrator. With Adobe Illustrator, you can design logos, t-shirt design, posters and flyers as vector graphics.Activity 7.3(b)a) Using Adobe Illustrator, create the following vector graphics or shapes as they appear and save the project as Better shapes.
 b) Reshape or edit the graphics drawn in (a) above to appear as shown below
 Follow the steps given below to perform this activity.Step 1: open Adobe Illustrator, a vector graphics software. the window for Adobe Illustrator appears below.
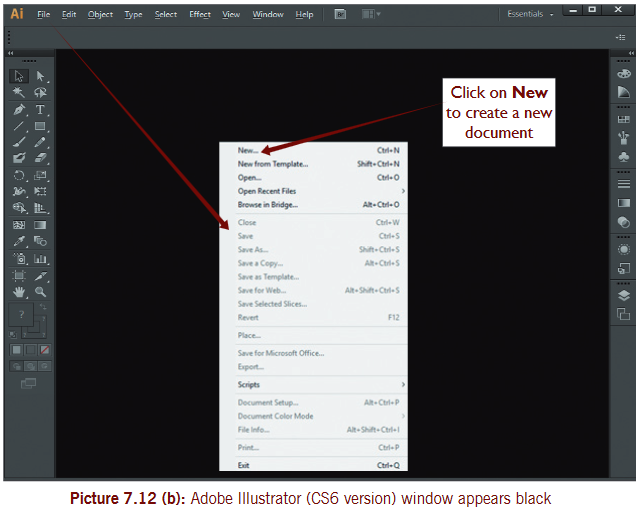 Step 2:Click on File menu and select ‘New’ button to get a new document dialog box (shown below). name your file as My Shapes.
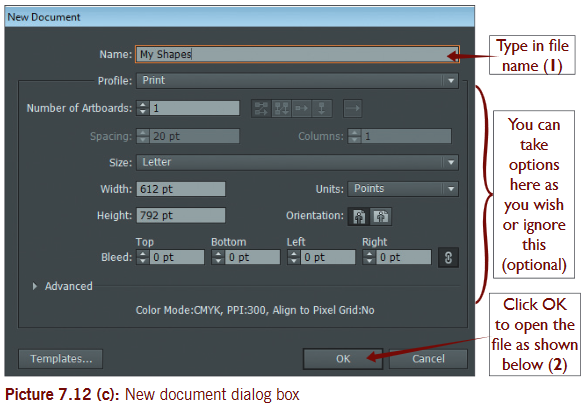
 Step 3: start creating the shapes using various toolsto create the square:click the Rectangle Tool on the toolbox and then drag in the white background to draw the square.to draw other shapes, click on white graphic near the rectangle tool to display other shape tools. then click on the ellipse tool to draw the circle/oval shape and afterwards click on the rounded rectangle tool to draw the rounded rectangle.
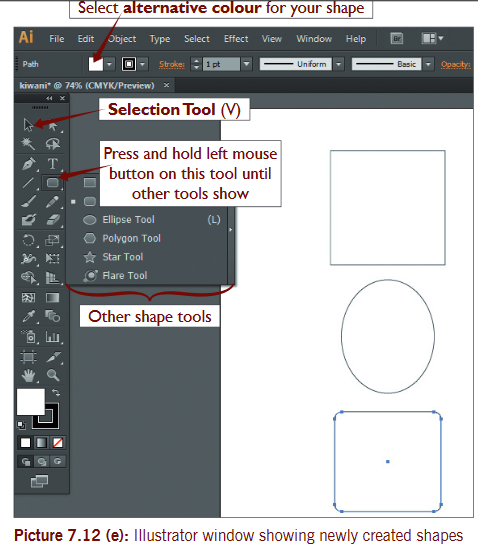 Step 4:Fill the square with green; the circle with gradient fill and rounded rectangle with brown color and increase on its shape outline.to fill green color in the square, select the square using the selection tool, click where there is green color on the CMYK spectrum on the right of the window (or from alternative color button on toolbar).to fill gradient in the circle/oval, select the circle and then click on the gradient button.to fill the rounded rectangle with brown color, select it first, then click on the alternative color button on the toolbar.Increase the outline of the rectangle by increasing points in the shape outline size.
 b) To reshape or edit the graphicsStep 1: To reshape or edit the square: select the square, click on Effect menu and on the menu click Distort & Transform and then select the zigzag... effect. In the Zigzag dialog box, adjust the size to be 12 pts and ridges to be 5. then click OK.
 To insert text in the square; select Type Tool on the toolbox and draw a box in shape where you can type text. type in the text in the shape. Change font size to 24pt, Book Antiqua; using the Character button on the upper toolbar. see picture 7.12(i).
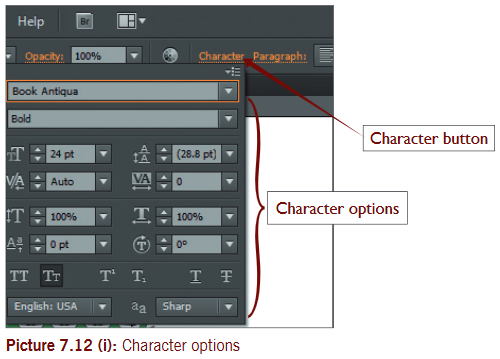 To change text color, select typed text and click on red color from the CMYK spectrum colors on the right of the window or using alternative option on the upper toolbar. Lastly click the center button on the upper toolbar.
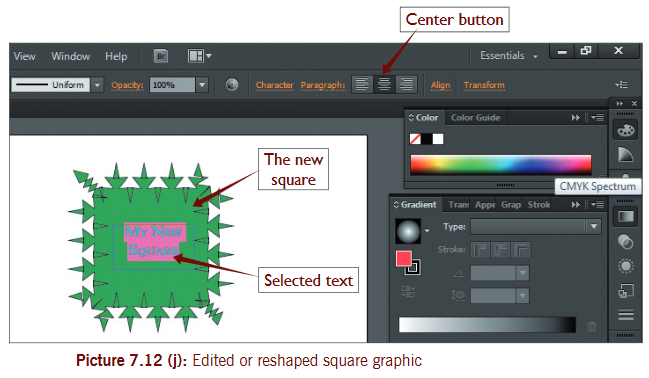 Step 2: To edit circle oval; select it and on the effect menu click Texture and then Traquelure. see picture 7.12 (k). In the Traquelure dialog box that displays, (you can adjust the crack spacing depth and brightness as you like), click OK. select radial gradient on the right.
 the traquelure dialog is shown below
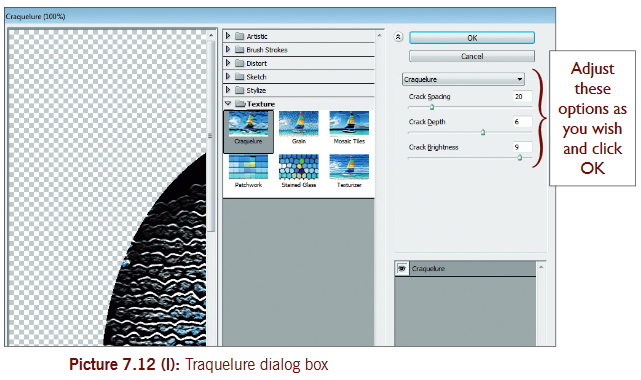 Step 3: to reshape the rounded rectangle, select it and click Effects menu. on the menu, click Warp and select Shell lower in the sub menu.
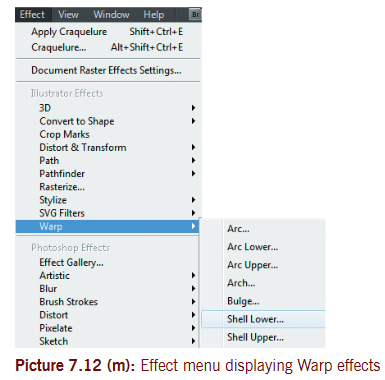 to add special fill effects, click Pixelate on the effects menu and then select Mezzotint.
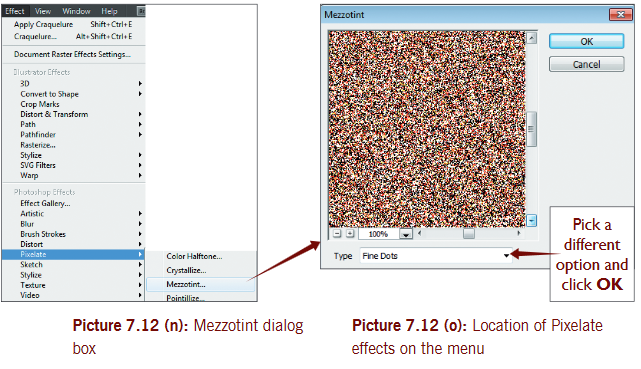 to add text to the rounded rectangle, repeat as done in step 1 above.the suggested answers for the activity are shown in picture below.
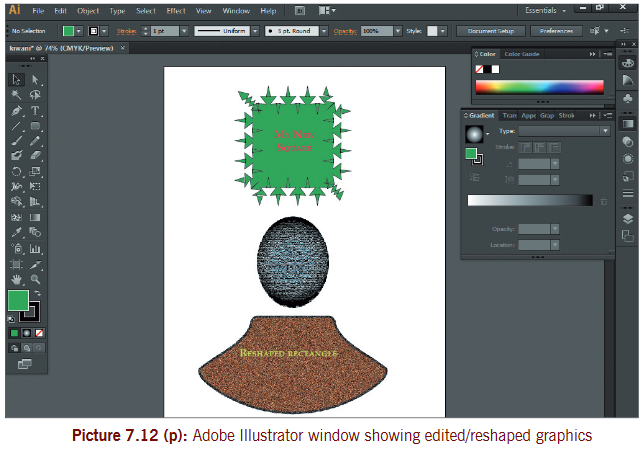 Saving a projectClick on File menu and select Save As.the Illustrator options dialog box displays as shown below. Click OK. the save dialog box displays. type in the file name and click on ‘Save’ button.
 7.7.12 Manipulate nodes and control pointsthese are the selection boxes and circles that appear when you select an image for reshaping. Point on one of the node or point until the pointer changes shape of double pointed arrow. then click and drag inwards or outwards to reduce size or enlarge its size respectively.
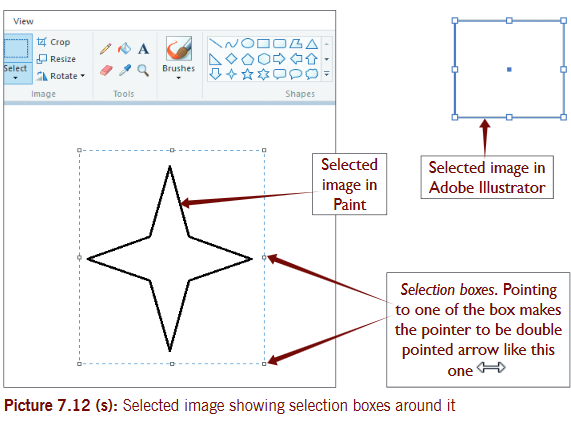 7.8 Graphics formattingActivity 7.4a) Create a new Paint file and draw a star object (another object of your choice).b) Fill the object outline to color red and fill color to green (or light green).c) Insert text as “star” in the star shape. Adjust the font size to a suitable size.d) save the file as ‘Green star’.Follow the guidelines given below7.8.1 Colors for the outlines and fill of objects
 7.8.2 Create shading and fill objects with patterns and textures
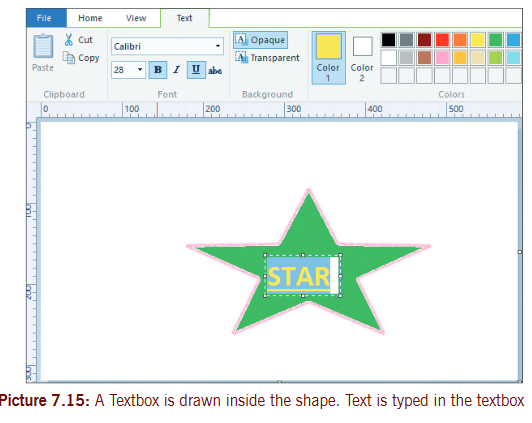 7.9 Edit imageto edit image means to make changes that make an object more meaningful. You can edit a newly created image or an existing image.
 ·Click “Crop”.
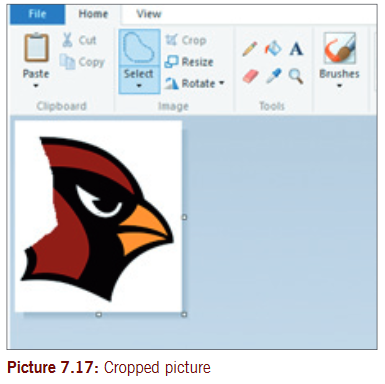 ·You will remain only with the selected part.7.9.2 Resize an image·Click “Image,” then select “Resize”.·type a new size (in pixels, or by percent, as you did when creating the canvas) to increase or decrease the image size.
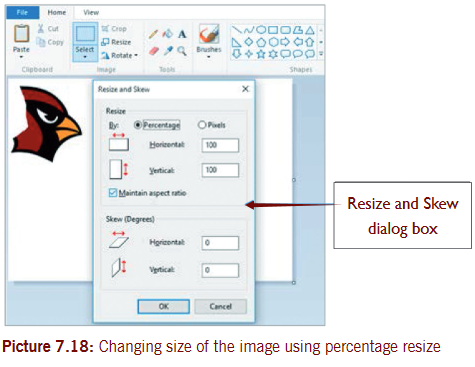 7.9.3 Rotate an imageto flip an image upside down (or some other direction), use the Flip and Rotate tools.·on the toolbar, click “Rotate” and choose a direction in the menu.
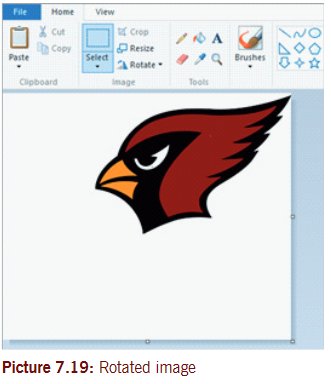 7.9.4 Magnify an area of a picture/Zoom·Click the magnifying glass icon to enable the Zoom tool. ·to zoom in, click anywhere on your image with the left mouse button. ·to zoom out, click with the right mouse button. Alternatively, ·Use the keyboard shortcuts Ctrl+ Pg Up to zoom in and Ctrl+ Pg Dn to zoom out.7.9.5 Stretch or skew an imageYou can distort an image with the “skew” feature.·Click “Image,” then select “Resize/Skew”.·to stretch/distort the image by degree, type a number (in degrees) in the boxes marked “horizontal” and “vertical”, in the Resize and Skew dialog box.·Given that you earlier used a different image like this in 7.20 (a) below, you would skew it by 20degrees and it changes as shown in 7.20(b).
 7.9.6 Changing pixelsIf you want to resize the image, and you don’t care if it gets a bit stretched, then:·select Pixels.·Uncheck the Maintain aspect ratio checkbox.·enter a width (Horizontal) and a height (Vertical) in Pixels.·Click OK.
 7.9.7 The Color Pickerthe small eyedropper icon represents the Color Picker tool.·Click this tool, then·Click somewhere in your drawing. the area you click will now become the foreground color for your next tool of choice.
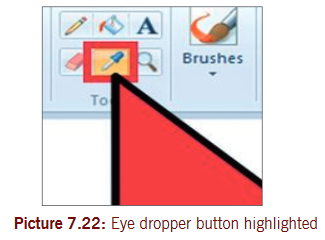 7.9.8 Change colorYou can edit any of the colors by adjusting their hue, brightness and other options in the Paint color mixer.·Click “edit colors” or “Define Custom Colors” to enter the color mixer.·After you have decided on a color you like, click “Add to Custom Colors.”
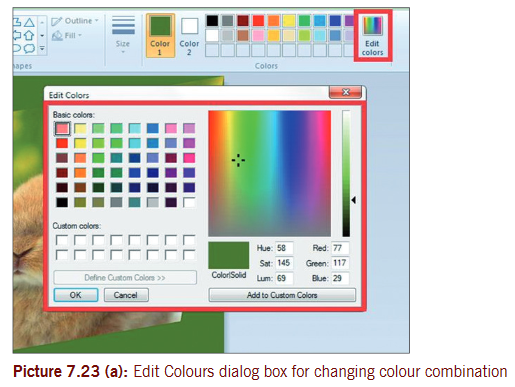 7.9.9 Brushing ToolsMs Paint has several brushing tools you can use to make your image artistic in appearance. Below is an image showing collection of all the brushes in paint.
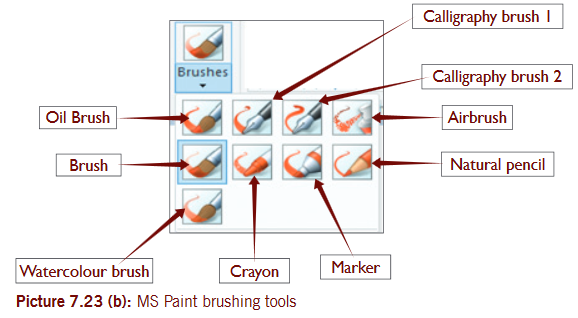 Here below is a table showing the effect of each of the brushes.
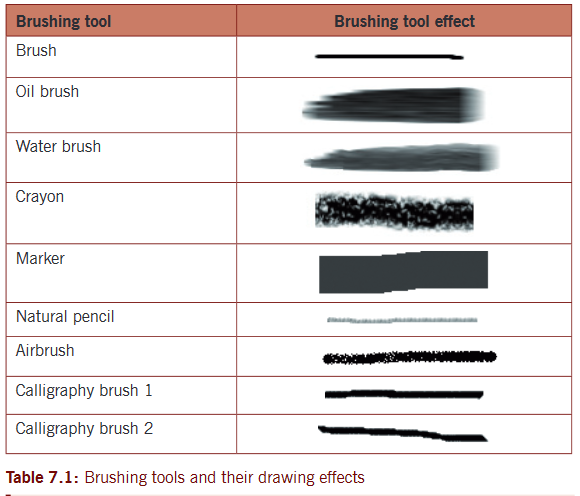 Note: apply these brush effects on your pictures the way you like.Activity 7.6Editing image
 Activity 7.7Drawing a flower1. Open up Microsoft Paint from the Accessories folder in your start Menu.2. Drawing the stem using the wavy line tool, draw a curved and dark green line of medium-thick thickness in a position like in the picture. In order to curve the line, draw a straight line and then click and drag where you want to curve it. You can curve each line twice.
 3. Choose the circle tool with a light yellow outline and a light yellow fill to draw a petal.·Choose circle, then from outline choose mark then you click light yellow.·Make an appropriately sized oval in the top left corner.·then fill the circle.
 4. select the petal, copy it and then paste in another petal.
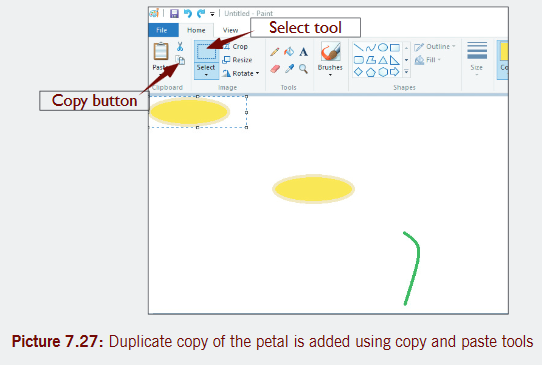 5. Drag the petal down to the end of the stem.
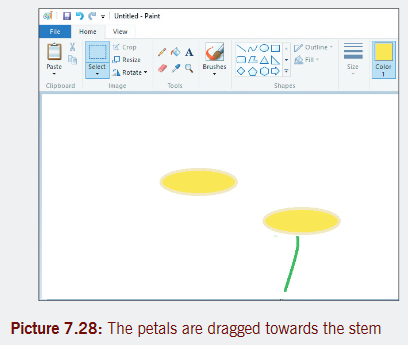 6. Re-select the other petal using the box tool and then drag the petal down to the left side of the stem. Make sure that the second option is selected on the sidebar under the main tools as it will make sure not to overlap any of your previous work.
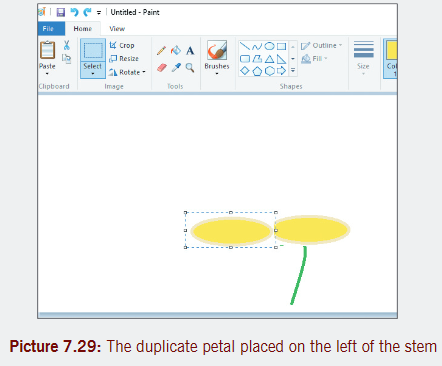 7. Hit Ctrl -V to create another petal
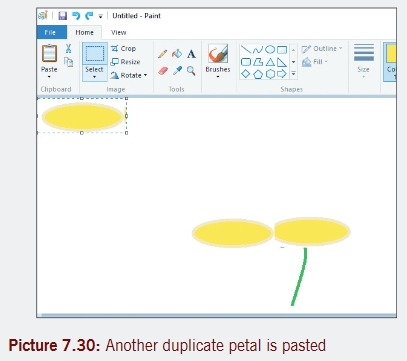 8. Click Rotate, then choose Rotate right 90º.
 9. Move the petal down onto the flower.
 10. Copy and paste the vertical petal, then drag it and draw a circle and fill light yellow as shown in picture 7.33.
 11. Use curve line to add small petals and fill with yellow.
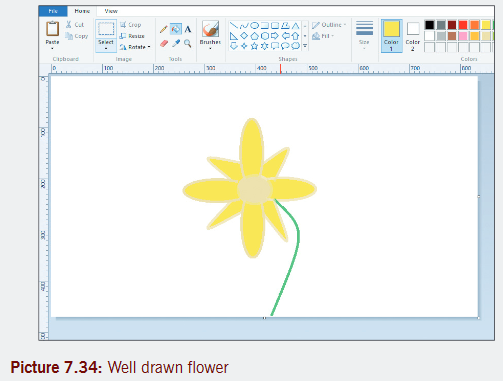 12. starting at the base of the stem, draw the leaves on both sides.·Use a pencil to draw leaves and fill them with green color.
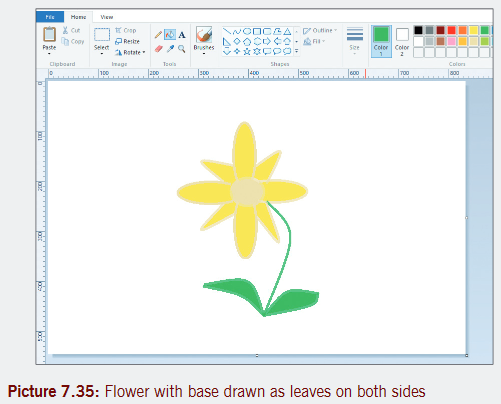 13. Use Pencil tool to add in some veins and make the leaves look more realistic
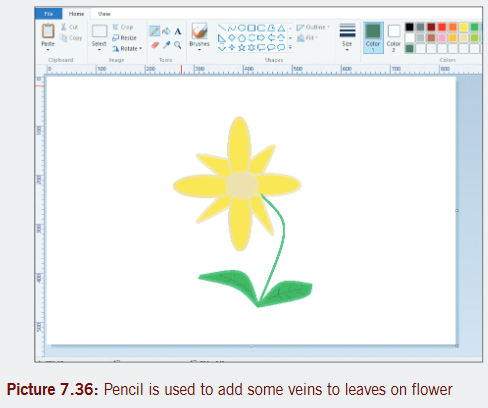 7.9.10 Working with layers in MS PaintSteps for working with layers in PaintStep 1:Draw an image (initial sketch) you want using a color you do not want to be its final. In our case we are going to draw a book. Let us use Indigo color pencil.Note: Make sure the color you make your sketch is not the same color you want your final drawing to be.
 Step 2: select your final line-art color you want and put it in the Color 1 slot, leaving Color 2 slot with white color. In our case let us use red color. trace over your sketch using color 1 slot. save your file as book. the sketch may appear as shown in picture 7.38.
 Step 3:Put your initial sketch colour(Indigo) in Color 1 slot, leaving color 2 slot white. Click on the eraser button and then RIGHt-CLICK while erasing your drawing. this action will remove the original color.
 Step 4:Repeat step 2 and step 3 to get many different versions of the book. save each different version you create and compare later. You can also fill in colors.7.9.11 Microsoft Paint 3DMicrosoft Paint 3D is a new application (app) in Windows 10 Creators Update, designed for working with 3D graphics. It replaces the old Microsoft Paint program that allows users to sketch objects in 2D. It is a new version of Ms Paint. Ms Paint 3D comes with newer versions Windows 10 and it is meant to make 3D scenes, cartoons 3D objects much of fun.You still have the opportunity to use both Paint and Paint 3D on your computer. You can use Paint 3D to turn photos into 3D models, add colors and textures to models you make from 3D.Starting Paint 3DClick start and type paint in the search box. Paint 3D is one of the items listed, click on it to open. see picture 7.10. eventually paint 3D opens with a welcome screen.

 Paint 3D interface has the canvas, a flat, 2D digital backdrop for your scene. the canvass is an empty white background and appears behind your 3D image. see picture 7.40.Activity 7.8(a)Using Ms Paint 3D, create the dog as shown below. then apply changes that will make dog A appear as shown by dog B. Use orange, green and dark grey color plus a polished metal brush. Apply a spearmint effect, type the text “My dog is nice” on your model and save it as my dog.
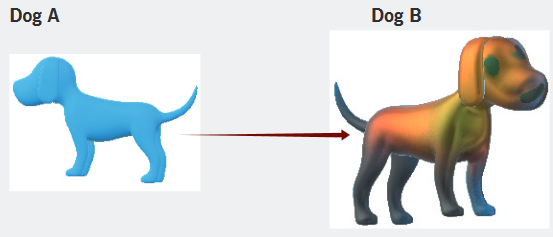 Use the following steps to perform activity 7.8 (a).Step 1: Click on 3D objects on toolbar. on the Tools pane, select dog button and drag in the canvas to draw the dog. see picture 7.41 (c).
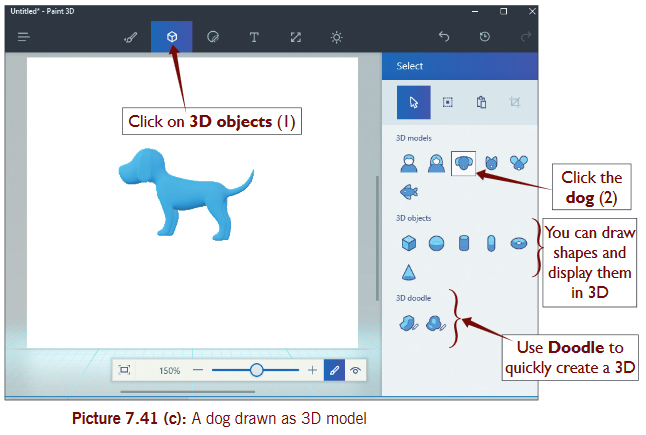 Step 2:Click Tools on the toolbar and select a desired tool. In this case will select spray can tool and then select orange color. Click on the parts of the dog to fill them. Rotate the dog using the floating rotate tool and apply orange color. select gray color and apply on tail, legs and mouth parts. select water color and green color and apply on neck parts of the dog. see picture 7.41 (d).
 Step 4: type text “My dog is nice”select the text tool on the toolbar and draw a box where you want in the canvas and then type the desired text.Step 5: save your file as a project. Procedure for saving Paint 3D project:Click on the Expand menu button and then select Save As. see picture 7.41 (f).
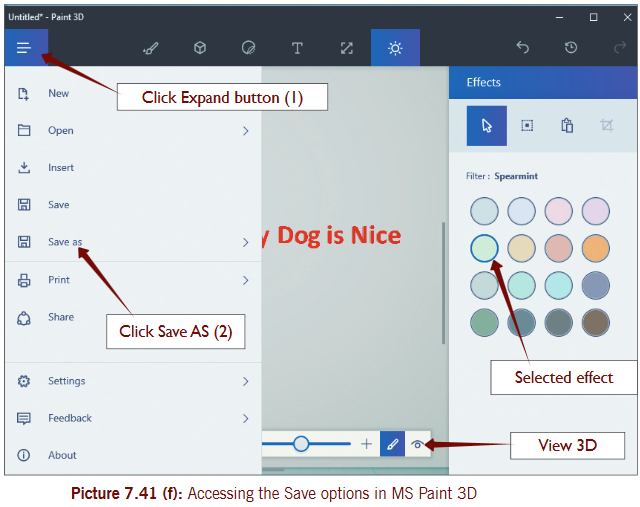 the complete project in 3D will appear as shown in picture 7.41 (g).
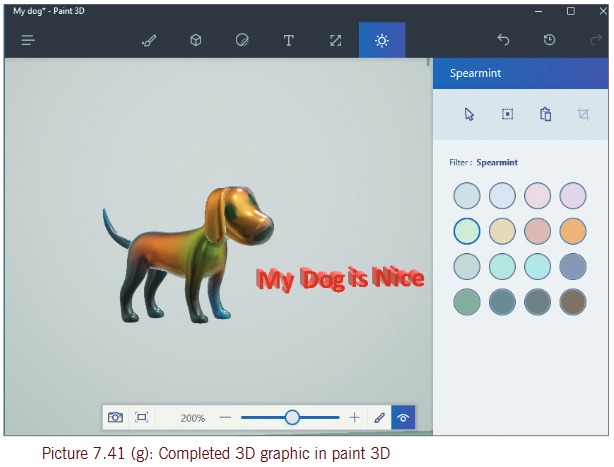 Activity 7.8 (b)1. Draw the following pictures in Microsoft Paint and save the files as their names shown.
 2. Imagine and draw a picture of a learner seated attentively in a classroom lesson using graphics software of your choice.7.10 Using PhotoshopAt the start when you open Photoshop it displays a dark interface as shown below in picture 7.42.7.10.1 Create a new Photoshop fileStep 1:When Photoshop opens, click on File menu and select New.In the new document screen that appears, select a category of orientation for your document; then type in the file name in the PRESETS DETAILS pane.Click OK at the bottom. the new named document will display with a white background as shown in picture 7.42.
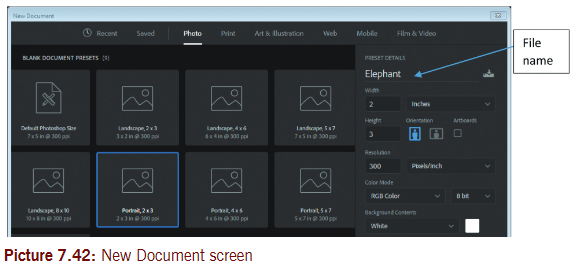
 Activity 7.9Use the available digital camera and take desired photos as you master how to use it. Pick a suitable rough photo from your camera or open an existing rough photo in Photoshop . edit the photo by :a) Adjust image size to a suitable size.b) Reduce the roughness of the background or skin.c) Apply desired text depending on the image applied in the upper right hand corner.d) Crop part of the image and discard the rest. save changes.e) Rotate the cropped image by 180 degrees.Follow procedure below7.10.2 Open an imageStep 1:Open or Add an image: In a new file select Open on file menu.Step 2: select an image you want. the image I have chosen here below is an elephant:
 7.10.3 Resize imageStep 3:Adjust Image Size: Use Image menu and adjust image to the size you want. Click Image Size on the Image menu Make other adjustments using Image menu. see picture 7.46.Note: In case of a mistake you make in using Tools, press CTRL+Z (Undo) but if there are several mistakes, then press ALT+CTR+Z to reverse those actions.
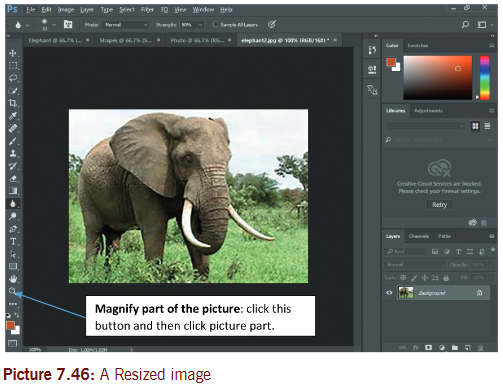
 7.10.4 Use brushing toolsStep 4:Remove some rough elements on the animal skin. Use the Spot Healing Brush and Blur tool. Afterwards apply some light on parts using Dodge tool.7.10.5 Add text to photoStep 5:Add text to the upper right hand corner as “African elephant”. Use the ‘Horizontal Type Tool’ and draw a textbox in required position. type the text. You can format the text using menu items below the menu bar. the text may appear as shown in picture 7.48.
 7.10.6 Crop an imageStep 5:To Crop an image. select the Crop Tool from image menu or from toolbox and then select part of the picture you want to crop. You can press the check button on toolbar.7.10.7 Rotate an imageStep 6:Using the Image menu, on Image Rotation menu select 1800. You can use a different option.
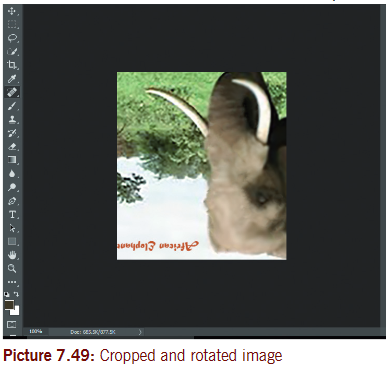 Note: Photoshop generates better picture because many actions are done in a much professional way using advanced tools. Practice editing images using all the tools available in Photoshop to build your skill. If you need to draw lines and shapes within your image, you can use Pen tool.Keyboard shortcutsKeyboard shortcuts can greatly increase your productivity. Here are some of the more common ones:
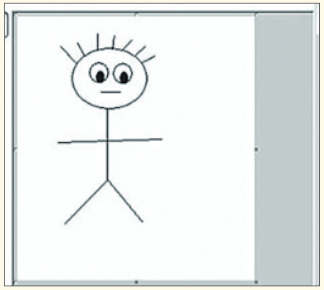 3. Draw the following
 4. Using Ms paint, draw a flag of Rwanda as shown below.
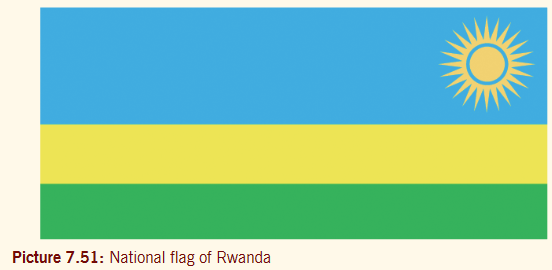 a) Create a folder named ‘lab2’. Create an image using Microsoft Paint, and save as a 24 bit .bmp file start with a good size canvas, use lots of colors: DO something interesting! Include many different colors, lines, circles, etc. save as a 24 bit .bmp file called 24bit.bmp.
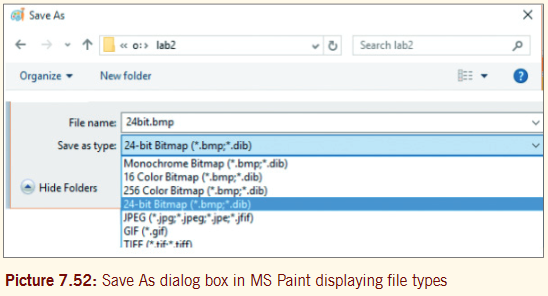 b) • Save as a 256 color.bmp file called 8bit.bmp.• save as a 16 color .bmp file called 4bit.bmp.• save as a monochrome .bmp file called 2bit.bmp.• Close Paint.• start a new Paint session, and open 24bit.bmp.• save as a tiff file called 24bit.tif.• Close Paint.• start a new Paint session, and open 24bit.bmp.• save as a gif file called 24bit.gif (will warn about color loss).• Close Paint.• Browse to your lab2 folder, and compare file size.• Right click each image, and choose Preview to compare how the images look.5. take a picture of yourself using a digital camera and edit the photo in a way you wish using various tools on the toolbox and menu. In case of absence of a camera, use any available photo on your computer and perform editing functioning to crop, resize, flip, rotate and magnify parts of the picture.6. scan or search from Internet for these pictures below and introduce them into Photoshop. edit the pictures by adjusting their brightness or contrast, resize and change their color or add a different background. save the changes. Use other pictures provided by the teacher and edit them accordingly.
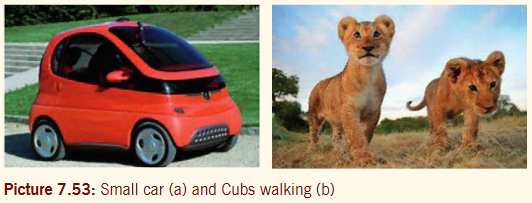 7. Create a line, a curve, polygon, a circle and a square using Photoshop. Make the shape outlines colored and filled with color effects where possible. Apply accompanying text. save the file as super shapes.8. Draw the pictures below using Ms Paint and then Ms Paint 3D.