General
- Agriculture S2 SB File Uploaded 24/01/22, 15:50
Unit 1:SOIL
Introduction
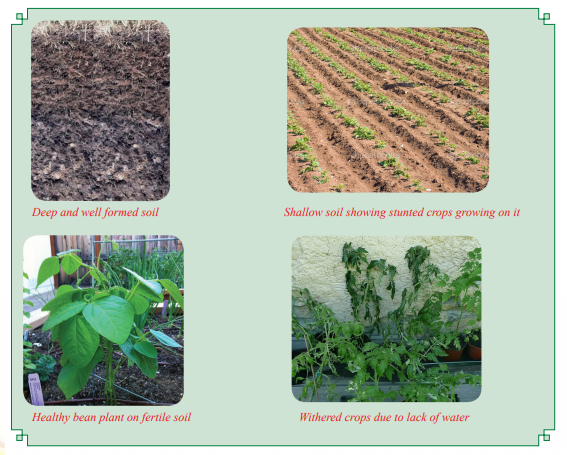
Soil is an important natural resource used in agricultural production. It should, therefore, have the necessary nutrients to support and sustain crop production. A fertile soil can be determined by observing its physical characteristics and carrying out soil tests. It can also be deduced by observing its plant’s indicatory signs. The plant’s signs that indicate the lack of certain nutrients in the soil are known as nutrient deficiency symptoms. Soil fertility can be improved by adding organic manures and inorganic fertilisers into the soil. This unit explores the various characteristics of a fertile soil and their plant’s indicatory signs, factors affecting soil fertility, availability of nutrients in the soil and improvement of soil fertility through the application of organic and inorganic fertilisers. The photographs below gives an over view of the unit.
1.1 Definition of soil fertility
Activity 1.1: Finding out the meaning of soil fertility
Materials required
•Dictionary
• Internet
• Library books
(i) Find out the meaning of soil fertility from the dictionary, library books and internet.
(ii) Discuss and record your findings.
(iii) Present your findings to the class.
(iv) Take the teacher’s summary notes. Soil fertility is defined as the ability of the soil to provide crops with the required nutrients in their proper proportions for sustained high production. The supply of these nutrients must be adequate for crops to grow well and produce high yields indefinitely.
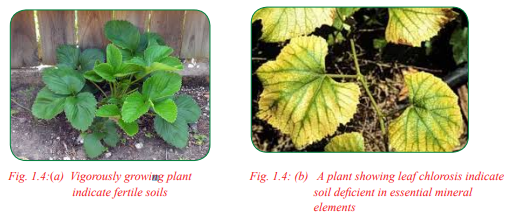
1.2 Characteristics of fertile soil and its plant indicators
Activity 1.2: A field visit to study the characteristics of fertile soils and its plant indicators
Materials required
• Questionnaire
• School farm
• Water
• pH meter
• Indicator paper
Visit the school farm or a neighbouring farm and carry out the following activities:
(i) Observe the colour of the soil in the farm.
(ii) Determine the type of soil by feeling the soil between your fingers when dry and when wet, then carry out the ribbon test.
(iii) Estimate the soil pH by use of a pH meter or colour indicator paper method.
(iv) Observe the leaves of the crops in the farm and identify symptoms of nutrient deficiencies if any.
(v) Record all your observations and discuss them.
(vi) Present your findings to the class.
(vii) Take the teacher’s summary notes.
Fertile soils have the following characteristics:
(i) Good depth: Deep soils give plant roots a greater volume to obtain plant nutrients
and provide strong anchorage. Crops growing in shallow soils get less nutrients and are liable to lodging.

(ii) Well drained: Well drained soils are properly aerated. This promotes healthy root development and prevent the build up of carbon (IV) oxide to toxic levels in the soil. Most plants die in waterlogged soils due to lack of air.

(iii) Good water-holding capacity: This ensures that enough water is retained for plant use. Soils that lose water easily are not able to sustain crop growth in case of a dry spell.
(iv) Adequate nutrients supply: The soils should supply the nutrients required by plants in their correct amounts and in forms that are available to the crops. Crop nutrients deficiency symptoms are seen in soils with less nutrients.
(v) Correct soil pH: Different crops require different soil pH. Soil pH affects nutrients available since certain plant nutrients are only available at specific soil pH. Extremes of soil pH lead to crop failure.
(vi) Adequate lime to keep the pH around neutral: Most crops do well at pH around neutrality (pH of 6.5 – 7.5).
(vii) Free from excessive infestation ofsoil borne pests and diseases: Crops growing in healthy soil produces high yields of high quality and low yields are experienced in soils infested by pests and diseases. (viii) Dark colours: The dark colour absorbs the heat of the sun, thus improving soil temperature. Soil temperature affects the rate of reactions taking place in the soil. It also affects the activities of soil micro-organisms. Light coloured soils have poor heat absorption and retention capacity.

(ix) Not saline: Fertile soils are free from excessive accumulation of salts which lead to water stress in plants.
1.3 Factors affecting soil fertility
Activity 1.3: Observing the role of water in plants
Materials required
• Portable containers labelled A and B
• Tomato or kale seedlings
• Water
• Stakes
• Pesticides (Insecticides and fungicides)
• Phosphatic fertilisers
• Nitrogenous fertilisers
• Knapsack sprayer
Using the materials provided; carry out the following activities:
(i) Grow two sets of crops (preferably tomato or kale) in portable containers labelled A and B. Provide adequate water to the crop in container labelled A and inadequate water to the crop in container labelled B for a period of 2–3 weeks to act as a control experiment and make observations.
(ii) Record your observations on a daily basis.
(iii) Discuss your results and make recommendations.
(iv) Present your findings in class.
(v) Take teacher’s summary notes.
Soil fertility is affected by the following factors:
(i) Availability of water in the soil
Soil water come from rainfall or irrigation in arid and semi-arid areas. Soil water is useful in plants in many ways. It acts as a transport agent, a cooling agent and as a raw material in the process of photosynthesis. As a transport agent, water transports nutrient elements absorbed from the soil to the various points of utilisation in the plant. Lack of enough water means these nutrients are not transported to where they are needed in the plant and this may lead to impairment in the process of photosynthesis. The result of water shortage (stress) in plants is retarded growth, reduced crop yields or total crop failure in extreme water shortage. Therefore, availability of water in the soil affects soil fertility. There must be adequate water in the soil for it to produce to its maximum potential. Study the illustration (a) and (b) in Fig 1.5 below and identify the one showing plants growing under water stress.

(ii) Water drainage
Excessive water in the soil is equally not good. The soils become waterlogged. Such soils lack enough air and respiration in roots and other living organisms is impaired. The results is poor nutrients uptake especially where active transport is involved. Therefore, too much water in the soil affects soil fertility. Excess water in the soil should be removed through the provision of proper drainage to ensure adequate supply of air in the soil.
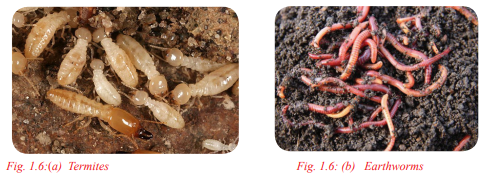
(iii) Activity of soil organisms
Soil micro-organisms play an important role in soil fertility;
• Decomposers; Termites and earth worms break down organic matter in the soil into humus. This process releases plant nutrients into the soil.
• Nitrogen fixing bacteria in the soil such as Rhizobium that lives in the root nodules of leguminous crop convert free nitrogen in soil air into nutrients which are absorbed by plants. Other free living bacteria that fix nitrogen into nitrates in the soil include; Azotobacter and clostridium. These bacteria improve the fertility of the soil.
• Denitrifying bacteria that live in waterlogged and compacted soils convert nitrates into nitrogen gas and Ammonium ions into Ammonia gas. These gases escape into the atmosphere thus lowering the fertility of the soil. Proper drainage of the soil improves the activity of nitrogen fixing bacteria which are aerobic and impairs the activity of denitrifying bacteria which are anaerobic.
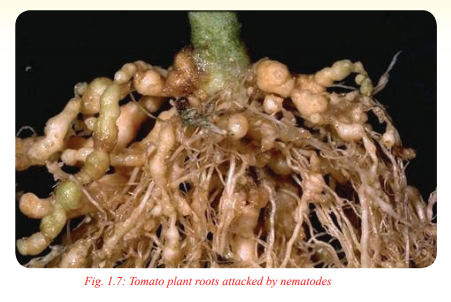
• Some soil living organisms are pathogenic and cause diseases to crops. For example, most fungal and bacterial diseases are soil borne. Other soil living organisms attack, for example, nematodes attack crop roots resulting in wilting.
1.4 Factors affecting the availability of plant nutrients
Activity 1.4: Video Case
Materials required
• Television
• Video tape or flash disk
• Video player or DVD Watch a video show on any of the following topics:
(a) Effects of water stress on crop production.
(b) Mineral deficiency symptoms in crops.
(c) Effects of saline soils on crop production.
(i) Discuss what you have observed and suggest solutions to the problems observed in the video show.
(ii) Record your findings.
(iii) Present your findings to the class.
(iv) Take teacher’s summary notes on the video show.
The following are factors that affect the availability of plant nutrients:
(i) Soil pH: Soil pH affects the availability of various nutrients, for example, low pH makes phosphorus and molybdenum less available while high pH makes manganese, potassium, iron, boron and zinc less available.
(ii) Organic matter content: Soil organic matter is broken down by micro-organisms to release nutrients. The residue known as humus increases the cation exchange capacity (CEC) of the soil thus making more nutrients available to the plants.
(iii) Soil texture: It influences the drainage and aeration of the soil. Coarse textured soils tend to be free draining and lose a lot of nutrients through leaching and, therefore, are less fertile. Fine textured soils, for example, clay tend to be waterlogged during the rainy season and, therefore, are poorly aerated as a result of which respiration in plant roots is impaired and therefore are not able to absorb plant nutrients. The activity of decomposers and Nitrogen fixing bacteria are reduced while the activity of the denitrifying bacteria is increased. Moderately textured soils are well aerated and, therefore, plant roots are able to absorb nutrients. The activities of decomposers and Nitrogen fixing bacteria are also at their optimum, thus making nutrients available to the plants.

(iv) Climate: Climatic factors such as rainfall and temperature affect the availability of plant nutrients. Rainfall of high intensity results in soil erosion and washing down of soluble nutrients thus making them unavailable to the plants. High temperatures result in volatilisation of soil nutrients such as nitrates and Ammonium ions. This makes nitrogen unavailable to the plants.
(v) Leaching of soil nutrients: Leaching is the washing down of soluble nutrients from the soil especially after a heavy downpour of rain. The nutrients move to lower horizons of the soil, where they are out of reach by plant roots. This makes the nutrients unavailable to the plants. Leaching is more common in sandy soils which are free draining.
(vi) Soil compaction: When the soil is compacted, air content is reduced. This leads to poor respiration of plant roots and other living organisms in the soil. The plant roots are unable to absorb nutrients while micro-organisms are unable to act on organic matter to release nutrients. The activities of denitrifying bacteria are also increased resulting in unavailability of nitrogen to plants.
(vii) Crop removal: Continuous cropping results in a lot of nutrients being removed from the soil through harvesting. This eventually makes the soil infertile. The soils should be replenished by addition of organic fertilisers or inorganic fertilisers. Crop rotation also helps the soil to regain its fertility and especially where the land is left uncultivated for sometime.
(viii) Use of sensitive crops: Different crops have different nutrient requirement, for example, maize requires a high amount of nitrogen, phosphorus and potassium while beans require less nitrogen and more phosphorus. Too much nitrogen in maize causes succulency and lodging while in beans it leads to vegetative growth instead of production of pods.
(ix) Nutrient interactions in the soil: The presence of some nutrients in the soil may hinder the availability of others. For example, excess phosphorus in the soil leads to unavailability of iron as it is converted into insoluble compounds which cannot be absorbed by plants. In this form, iron is said to be fixed or unavailable.
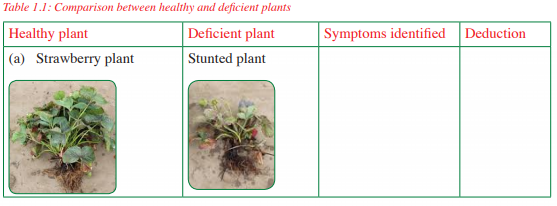
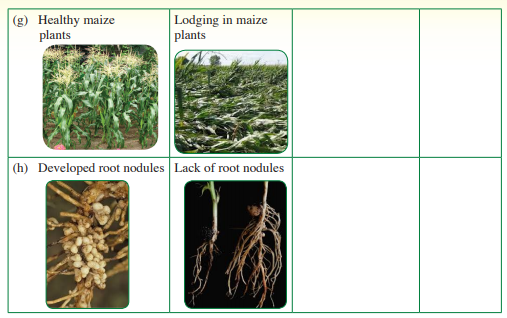
1.5 Symptoms of mineral nutrient deficiencies
Activity 1.5: Identifying deficiency symptoms in plants
Materials required
• Colour photographs of plants with nutrient deficiency symptoms.
• Live plants with nutrient deficiency symptoms. Study the photographs provided in the table below and live plants provided and carry out the following activities:
(i) Identify the deficiency symptoms shown by each plant.
(ii) Discuss your observation as required in table 1.1.
(iii) Draw a table and record your findings.
(iv) Present your findings to the class.
(v) Take teacher’s summary notes.

Activity 1.6: Observing deficiency symptoms in crops
Materials required
• A plot of land measuring 3 × 4 m
• A fast growing crop such as maize or transplanted kales or tomatoes
• Phosphatic fertilisers
• Nitrogenous fertilisers Use the materials provided to carry out the following activities:
(i) Grow four different sets of crops on a plot of land measuring 3 × 4 m. Choose a fast growing crop such as maize or transplanted kales or tomatoes. This should be done as follows: Group I – Grow crop without any fertiliser. Group II – Grow crop with phosphatic fertiliser and no topdressing with nitrogenous fertiliser. Group III – Grow the crop with phosphatic fertiliser and topdress with nitrogenous fertiliser. Group IV– Grow the crop without phosphatic fertiliser but topdress with nitrogenous fertiliser.
(ii) Record your observations daily and discuss them.
(iii) Present your findings to the class after a period of 3–4 weeks.
(iv) Take the teacher’s summary notes.
Deficiency symptoms are physical signs showing that a crop is lacking some mineral elements. Some of the mineral nutrient deficiency symptoms include:
(i) Yellowing of the leaves: In this case, plant leaves lose chlorophyll and become yellow, which is also referred to as chlorosis. Chlorosis is a common occurrence in the deficiencies of nitrogen, potassium and sulphur. The deficiency of magnesium results in a special type of chlorosis where only the parts between the veins become yellow. This type of chlorosis is referred to as inter-veinal chlorosis.
(ii) Stunted growth: This is slowed growth also known as dwarfing in extreme conditions. It results in a situation where the deficiency leads to the impairement of the process of photosynthesis. It may occur in the deficiencies of nitrogen, phosphorus, potassium, sulphur and calcium.
(iii) Die back: This is the drying of the plant from the shoot tips downwards. It may occur as a result of calcium deficiency. (iv) Premature fall of leaves and flowers: This is common in the deficiency of nitrogen and potassium.
(v) Production of a purple pigment: Known as anthocyanin instead of chlorophyll. It can also appear after chlorosis. Anthocyanin is common in the case of nitrogen, phosphorus and magnesium deficiencies.
(vi) Leaf curling: It is also known as leaf roll where plants have folded leaves. It is due to lack of magnesium.
(vii) Lodging: This is falling off of crops due to weak stems and poor root development. This is due to lack of phosphorus and potassium.
(viii) Poor nodulation in leguminous plants: This is mainly due to lack of phosphorus and sulphur.
(ix) Leaf scorch: Edges of leaves appear scorched due to lack of potassium.
1.6 Definition of organic manures
Materials required
• Dictionary
• Library books
• Internet
Activity 1.7: Finding out the meaning of organic manures
Using the reference materials provided, carry out the following activities:
(i) Find out the meaning of organic manures from dictionary, library books and internet.
(ii) Discuss and record your findings.
(iii) Present your findings to the class.
(iv) Take the teacher’s summary notes
Organic manures are materials that are derived from decomposed plants and animal remains, which are to be applied to the soil to release plant nutrients. The endproduct of this decomposition process is known as humus. Humus greatly influence soil chemical properties such as soil pH and Cation Exchange Capacity (CEC). They supply a wide range of essential plant nutrients. The nutrient content in organic manures
cannot be quantified. Organic manure are important for the following reasons:
• They supply a wide range of essential plant nutrients.
• They influence the soil pH and cation exchange capacity.
• They have a long residue effect in the soil.
• They improve soil physical properties such as water-holding capacity, capillarity, drainage and aeration. • They reduce toxicity in the soil by absorbing harmful chemicals.
1.7 Types of organic manures
Activity 1.8: Identifying different types of manures
Materials required
• Samples of farmyard manure and compost manure placed in shallow containers
• Green leafy leguminous plants such as soya bean plants, lucerne and desmodium plants
Use the materials provided to carry out the following activities:
(i) Identify the types of manure provided and compare them.
(ii) Note the differences between farmyard manure and compost manure.
(iii) Observe the green plants provided (such as soya bean plants, lucerne and green leaf desmodium) and discuss their characteristics.
(iv) Present your findings to the class.
(v) Take the teacher’s summary notes.
Organic manures are classified as follows:
Manures are classified on the basis of the method of preparation and the materials from which they were made. There are four types of organic manures based on this classification. They include:
(i) Compost manure: This is manure prepared from composting or heaping organic materials and allowing them to decompose under controlled conditions, either in a pit or a heap. The compost materials include crop residues and animal waste or plant material only. The following factors should be taken into consideration in selecting a site for preparing compost manure:
• Drainage – The place should be well drained to avoid waterlogging which may lead to leaching of nutrients from the manure.
• Direction of prevailing winds – The site should be away from the dwelling place to prevent bad odour being blown from the compost manure to the homestead.
• Size of the farm – The site should be centrally placed within the area of the farm where manure is to be used as manures are bulky to transport.
• Accessibility – This makes it easy to transport the materials used to make the manure when ready.
(ii) Farmyard manure: This manure is prepared from a mixture of animal waste and litter used as beddings in animal houses. The mixture is then allowed enough time to decompose before it is used as manure. The quality of farmyard manure is determined by the following factors:
• The type of animal used – Dung from fattening animals has a high level of nutrients than that from dairy animals. Dung from non-ruminants such as pigs and poultry, which absorb less nutrients from their feed has a higher level of nutrients than that from ruminant animals.
• Types of food eaten – Feedstuffs that are highly nutritious result in manure which has a high level of nutrients.
• Type of litter used – The best litter is that which has a high urine absorption capacity, decomposes fast and has a high nutrient content.
• Method of storage – Farmyard manure should be stored in a well sheltered place with a leak-proof roof and a concrete floor to prevent loss of nutrients through leaching and vapourisation.
• Level of decomposition – Well rotten manure is rich in nutrients and is easy to handle and mix with the soil.
(iii) Green manure: This is manure prepared from green plants. The plants are grown and then incorporated into the soil to improve soil fertility. Leguminous plants such as ground nuts, cowpeas, sun hemp cloves, lucerne and beans are preferred as they also fix nitrogen, otherwise maize, sorghum and sunflower may also be used.
Characteristics of plants used as green manure include the following:
• Highly vegetative or leaf for faster decomposition.
• Fast growth rate so that they may take a shorter time in the field.
• Have a high nitrogen content.
• Able to rot or decompose quickly.
• Hardy and, therefore, able to grow in poor conditions.
(iv) Night soil: This is manure prepared from human waste (urine and faeces). Defaecation is done in a container or bucket at night. The faeces which may or may not include urine are then covered with soil. The material is now called night soil. The night soil is collected by a night soil collector and then deposited somewhere to undergo decomposition. The night soil is then treated to make it safe for handling. This is usually done to get rid of worms which may be in the human waste and to remove other heavy metals. This practice is common in areas with a high population density especially in urban areas where there are no sewage systems. This type of manure may be used in flower farms but may not be suitable for vegetable crop gardens.
1.8 Types of composts
Activity 1.9: Finding out the types of composts
Materials required
• Internet search
• School library books
• Dictionaries
• Textbooks
Using the references provided, carry out the following activities:
(i) Find out the types of composts.
(ii) Discuss and record your findings.
(iii) Present your findings to the class.
(iv) Take teacher’s summary notes.
There are two types of composts. These are:
(i) Heap compost – This type of compost is prepared by heaping the material to be composed in a heap or stack on the ground. The materials are held together by posts which are fixed at a distance of 1.2 m apart to form the four corners of the heap. Timber boards are fixed on the sides to hold the heaped materials.

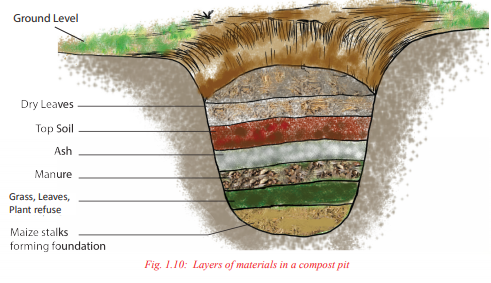
(ii) Pit compost – This type of composed is prepared by placing the materials in a pit. This method of preparation is also known as the indore method after a place called Indore in India where it was derived. In this method, the materials to be composted are packed into a pit measuring 1.2 m long, 1.2 m wide and 1.2 m deep. The materials are placed in layers starting with fibrous materials such as maize stalks which form the foundation of the compost layers.
1.9 Steps in making compost manure using the pit method
Activity 1.10: A field visit to observe the steps followed in making compost manure
Materials required
• A questionnaire
• Note book
• Pen
Visit a farm where compost manure is being prepared and carry out the following activities:
(i) Observe the method of composting being used in the farm.
(ii) Take note of the siting of the compost pits or heaps in reference to the homestead and the area where the manure is to be used.
(iii) Take the measurements of the compost pits or heaps.
(iv) List the materials being used in composting and note their uses.
(v) Note the order in which the materials are being packed in the compost pit.
(vi) Discuss and record your observation. (vii) Present your findings to the class.
(viii) Take teacher’s summary notes
The following are the steps in making compost manure using the pit method:
(i) Select a suitable site for digging the compost pit.
(ii) Clear the vegetation on the site.
(iii) Mark the size of the pit using pegs.
(iv) Dig out a pit measuring 1.2 m long, 1.2 m wide and 1.2 m deep.
(v) Collect materials for preparing compost manure which should include the following:
• Maize stalks, wheat straws or rice straws (whichever is available)
• Fresh grass, hedge trimmings, prunings, fresh young weeds and kitchen waste
• Wood ash
• Well rotten manure
• Garden soil
• Dry leaves
• Phosphatic or potassic fertilisers
(vi) Arrange the materials in the pit in layers as follows:
• Pack 10 cm fibrous materials of maize stalks, wheat or rice straws at the bottom of the pit to form the foundation of the compost materials.
• Add a 15 – 10 cm layer of fresh materials such as fresh grass, trimmings, prunings, weeds and kitchen waste.
• Add a 2.5 cm layer of well rotten manure to provide nutrients for the microorganisms.
• Add a 2.5 thin layer of wood ash phosphatic or potassic fertilisers to improve the level of phosphorus and potassium in the resulting manure.
• Add a 2.5 cm layer of top soil to introduce micro-organisms into the compost pit.
• Repeat the above sequence of layers until the pit is full.
• Add a layer of soil to cover the pit and then cover it with any leaves.
• Push a long stick through the middle of the pile bottom of the pit to monitor the temperature in the middle of the pile. The temperatures should be controlled accordingly. If too hot, sprinkle some water and if too cold, turn the materials. Normal composting temperatures should be between 60°C and 65°C. The materials produce no heat when fully decomposed.
• Regularly turn the materials for even decomposing.
Activity 1.11: Making compost manure using the pit method
Materials required
• Hand hoe
• Maize stalks
• Wood ash
• Well rotten manure
• Green leaves/kitchen waste/grass
• Garden soil
• Spade
Using the materials provided, carry out the following activities:
(i) Prepare compost manure using pit method.
(ii) Take note of the time taken to prepare manure using this method.
(iii) Discuss and record your observations.
(iv) Present your findings to the class.
(v) Take teacher’s summary notes. When preparing compost manure, the following precautions should be taken:
(i) Keep the materials moist during the dry season. This is to facilitate decomposition.
(ii) Avoid compacting the materials in the pit. This allows air supply for microbial activities.
(iii) Ensure that running water does not get into the pit during the rainy seasons. This is to prevent waterlogging which prevents leaching of nutrients from the compost materials.
(iv) Check the temperature stick every week to ensure normal composting temperatures and help test when the materials are fully decomposed.
Activity 1.12: A visit to a zero grazing unit to observe steps in making farmyard manure
Materials required
• A questionnaire
• Note book
• Pen
Visit a zero grazing unit and carry out the following activities:
(i) Observe the various steps used in making farmyard manure.
(ii) Take note of the materials used as beddings in the animal sleeping cubicles.
(iii) Observe the storage of the farmyard manure. (iv) Discuss and record your observation.
(v) Present your findings to the class. (vi) Take the teacher’s summary notes.
1.10 Steps in making farmyard manure
Activity 1.13: Preparation of farmyard manure
Materials required
• Confined farm animals
• Litter materials such as maize stalks, grass, wood shavings, saw dust, straws or crushed maize cobs
• Shovel • Manure fork
• Manure shed
• Wheelbarrow
Use the housed animals in the school farm or the neighbouring farms to carry out the following activities:
(i) Prepare farmyard manure by following the steps outlined above.
(ii) Discuss and record your observation.
(iii) Present your findings to the class.
(iv) Take teacher’s summary notes.
The following are steps in the preparation of farmyard manure:
(i) Provide beddings in the houses of farm animals. The beddings may be either grass, wood shavings or sawdust, maize stalks, maize cobs or coffee husks.
(ii) Allow time for the animals to deposit their droppings and urine on the beddings and to mix them through trampling.
(iii) Remove the mixture of the droppings and beddings using a shovel or manure fork from the animal houses and replace it with new beddings. This is shown in fig. 1.11. (iv) Place the materials removed from the animal houses in a specially prepared shed and add new layers of the used beddings until a heap is formed.
(v) Give the materials in the heap time to decompose. It may take 4 – 6 months for the materials to be completely decomposed. The manure is now ready for use in the farm.

1.11 Main inorganic fertilisers
Activity 1.14: A field visit to a shop of inorganic fertilisers to observe and manipulate fertilisers
Materials required
•Questionnaire
• Various types of fertilisers
• Note book
• Pen
Visit a shop where inorganic fertilisers are sold and carry out the following activities:
(i) Name the fertilisers supplied/sold in the shop.
(ii) Calculate the fertiliser ratio of the compound fertilisers in the shop from the fertiliser’s grade indicated on the bags.
(iii) Observe the colours of the various fertilisers.
(iv) Manipulate the fertilisers by touching and feeling in your hands to find out the farm in which they occur. (v) Record your observations and discuss them.
(vi) Present your findings to the class.
(vii) Take teacher’s summary notes.
Inorganic fertilisers are chemically prepared compounds that are added to the soil to improve its fertility. They contain one or more of the three primary macro-nutrients, namely Nitrogen, phosphorus and potassium (NPK). A fertiliser that contains only one of the primary macro-nutrients is known as a straight fertiliser, for example, urea. A fertiliser that contains two or more (three) of the primary macro-nutrients is known as a compound fertiliser, for example, Diammonium phosphate (DAP) and various NPK fertilisers such as 20–20–0, 10–10–10, 20–10–10 and 17–17–17.
The main inorganic fertilisers include:
(a) Urea: This is a nitrogenous fertiliser which contains 45–46% nitrogen and has the following properties: (i) It induces negligible acidity.
(ii) It has a white granular appearance.
(iii) It is highly susceptible to volatisation and prone to leaching as it is highly soluble in water.
(iv) It has a high scorching effect due to the ammonium content.
Urea is rarely used, except in crops such as sugar cane, which has a high absorption capacity.
(b) Diammonium phosphate (DAP): This is a compound fertiliser with a grade 18- 46-0.
(i) It contains 18% nitrogen and 46% phosphate.
(ii) It is moderately acidic.
(iii) It has a grey granular appearance.
(c) NPK fertilisers: These fertilisers contain nitrogen, phosphates and potassium oxide in varying proportions. NPK fertilisers include 23-23-0, 17-17-17, 20-10- 0 and 15-15-15. They are used when planting cereals and grass crops used for forage.
Group Activity
Working in groups, discuss the advantages and disadvantages of using organic manures as compared to the use of inorganic fertilisers. Give a report of your findings to the class.
Unit Summary
Soil fertility is the ability of the soil to provide crops with the required nutrients in their proper proportions. For sustained high production, fertile soils are characterised by the following:
• Good depth
• Proper drainage
• Good water-holding capacity
• Adequate nutrients supply
• Correct soil pH
• Free from excessive infestation of soil borne pests and diseases
• High organic matter content
• Not saline Soil fertility is affected by availability of water. Water drainage and the activity of soil micro-organisms. The availability of soil nutrients is affected by the following factors:
• Soil pH also known as soil reaction
• Organic matter content of the soil
• Soil texture
• Climate
• Leaching of soil nutrients
• Soil compaction
• Crop removal
• Use of sensitive crops
• Nutrients interactions in the soil Lack of essential nutrients in the soil is indicated by certain signs on the crops. These signs are known as deficiency symptoms. These symptoms include the following:
• Chlorosis/yellowing
• Stunted growth/retarded growth /dwarfing
• Dieback
• Premature fall of leaves and flowers
• Production of anthocyanin pigment
• Leaf curling
• Lodging
• Poor nodulation in legumes
• Leaf scorch Soil fertility is improved by addition of organic manures and inorganic fertilisers. Manures are organic substances added to the soil to improve its fertility. There are four types of organic manures. These include:
• Compost manure
• Farmyard manure
• Green manure
• Night soil
Inorganic fertilisers are chemically prepared compounds which are added to the soil to improve its fertility. The main inorganic fertilisers include urea, DAP and NPK.
Key Terms
1. Soil fertility – This is the ability of the soil to provide crops with the required nutrients in their proper proportions for sustained high production.
2. Soil pH – This is the degree of acidity or alkalinity of a soil solution.
3. Saline soils – Soils with excessive amounts of salts.
4. Irrigation – Artificial application of water to the crops.
5. Water stress – Shortage of water in crops.
6. Stunted growth – This is slowed growth in crops.
7. Waterlogged soils – Soils with excessive amount of water.
8. Pathogenic – Disease causing.
9. Chlorosis – Yellowing of leaves.
10. Leaf curling – Folding of leaves.
11. Nodulation – Production of swellings called nodules in the roots which habour nitrogen fixing bacteria in leguminous crops.
12. Macro-nutrients – These are mineral elements needed by plants in large amounts.
13. Micro-nutrients/trace elements – These are mineral elements that are needed by plants in small amounts.
14. Anaerobic respiration – Respiration that takes place only in the absence of oxygen.
15. Aerobic respiration – Respiration that takes place only in the presence of oxygen.
16. Fungal disease – Diseases caused by fungi.
17. Bacterial diseases – Diseases caused by bacteria.
18. Microbial activity – The activity of micro-organisms.
19. Agrochemicals – Agricultural chemicals.
20. Compost manure – Manure prepared by composing (heaping) vegetative materials.
21. Farmyard manure – Manure prepared from animal wastes mixed with litter.
22. Green manure – Manure prepared by incorporating green plants into the soil.
23. Night soil – Manure prepared from human waste.
24. Inorganic fertilisers – These are chemically produced compound components added to the soil to improve its fertility.
25. Fertiliser grade/Analysis – The amount of each nutrient contained in a fertiliser expressed as a percentage.
26. Fertiliser ratio – Amount of each nutrient contained in a fertiliser expressed as a ratio of N: P2 O5 : K2 O.
27. Hygroscopic – Ability to absorb atmospheric water moisture.
28. Volatilisation – Ability to escape into the atmosphere in form of a gas.
29. Zero grazing unit – Structures used for holding animals in a livestock rearing system that does not allow animal to graze on pastures.
30. Straight fertiliser – A fertiliser that contains only one of the primary macronutrients (NPK).
31. Compound fertiliser – A fertiliser that contains two or more of the primary macro-nutrients (NPK).
32. Complete fertiliser – A fertiliser that contains all the three primary macronutrients (NPK).
33. Organic manures – These are fertilisers that are made from animal matter, human excreta or vegetable matter.
34. Nitrogenous fertiliser – A fertiliser that contains nitrogen as the only primary macro-nutrient.
35. Potassic fertiliser – A fertiliser that contains potassium as the only primary macro-nutrient.
36. Phosphatic fertiliser – A fertiliser that contains phosphorus as the only macronutrient.
37. Ribbon test – A test used to determine the amount of clay in a soil by rolling wet soil between the palms.
38. Active transport – Process through which ionic substance are absorbed by plants against a concentration gradient using energy
Revision Questions
1. Define soil fertility.
2. Explore five characteristics of fertile soils.
3. State three factors that affect soil fertility.
4. (a) Define soil pH.
(b) Describe how to estimate soil pH using a pH meter.
5. Name two free living bacteria that fix nitrogen in the soil.
6. The diagrams below show plants with mineral deficiency symptoms. Study them carefully and then name the mineral elements lacking in the soil in each case.

7. Explain five factors that influence the availability of nutrients in the soil.
8. Give two ways of expressing the nutrient content of a fertiliser.
9. (a) What is night soil?
(b) Draw a well labelled structure of a compost heap showing how the layers follow each other.
10. State the factors that determine the quality of farmyard manure.
11. Analyse the plants listed below for their suitability in the production of green manure:
(i) Beans
(ii) Napier grass
(iii) Desmodium
12. What is the meaning of the following terms:
(i) Leaching?
(ii) Volatilisation?
13. What is the importance of the following materials used in the preparation of compost manure:
(i) Well-rotten manure?
(ii) Garden soil?
(iii) Wood ash?
14. What is the meaning of the following terms as used in describing inorganic fertilisers:
(i) Straight fertiliser?
(ii) Compound fertiliser?
(iii) Complete fertiliser?
15. Describe the characteristics of the following inorganic fertilisers:
(a) UREA
(b) DAP
- S2: Agriculture TG File Uploaded 27/10/21, 16:25