Topic outline
General
- Agriculture S2 SB File Uploaded 24/01/22, 15:50
Unit 1:SOIL
Introduction
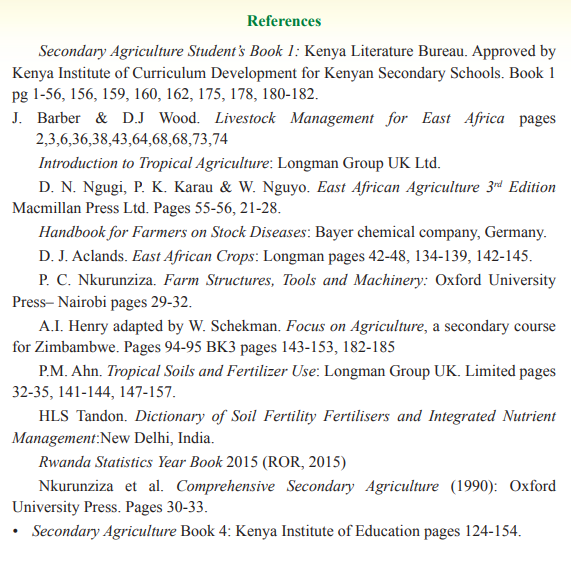
Soil is an important natural resource used in agricultural production. It should, therefore, have the necessary nutrients to support and sustain crop production. A fertile soil can be determined by observing its physical characteristics and carrying out soil tests. It can also be deduced by observing its plant’s indicatory signs. The plant’s signs that indicate the lack of certain nutrients in the soil are known as nutrient deficiency symptoms. Soil fertility can be improved by adding organic manures and inorganic fertilisers into the soil. This unit explores the various characteristics of a fertile soil and their plant’s indicatory signs, factors affecting soil fertility, availability of nutrients in the soil and improvement of soil fertility through the application of organic and inorganic fertilisers. The photographs below gives an over view of the unit.
1.1 Definition of soil fertility
Activity 1.1: Finding out the meaning of soil fertility
Materials required
•Dictionary
• Internet
• Library books
(i) Find out the meaning of soil fertility from the dictionary, library books and internet.
(ii) Discuss and record your findings.
(iii) Present your findings to the class.
(iv) Take the teacher’s summary notes. Soil fertility is defined as the ability of the soil to provide crops with the required nutrients in their proper proportions for sustained high production. The supply of these nutrients must be adequate for crops to grow well and produce high yields indefinitely.
1.2 Characteristics of fertile soil and its plant indicators
Activity 1.2: A field visit to study the characteristics of fertile soils and its plant indicators
Materials required
• Questionnaire
• School farm
• Water
• pH meter
• Indicator paper
Visit the school farm or a neighbouring farm and carry out the following activities:
(i) Observe the colour of the soil in the farm.
(ii) Determine the type of soil by feeling the soil between your fingers when dry and when wet, then carry out the ribbon test.
(iii) Estimate the soil pH by use of a pH meter or colour indicator paper method.
(iv) Observe the leaves of the crops in the farm and identify symptoms of nutrient deficiencies if any.
(v) Record all your observations and discuss them.
(vi) Present your findings to the class.
(vii) Take the teacher’s summary notes.
Fertile soils have the following characteristics:
(i) Good depth: Deep soils give plant roots a greater volume to obtain plant nutrients
and provide strong anchorage. Crops growing in shallow soils get less nutrients and are liable to lodging.

(ii) Well drained: Well drained soils are properly aerated. This promotes healthy root development and prevent the build up of carbon (IV) oxide to toxic levels in the soil. Most plants die in waterlogged soils due to lack of air.

(iii) Good water-holding capacity: This ensures that enough water is retained for plant use. Soils that lose water easily are not able to sustain crop growth in case of a dry spell.
(iv) Adequate nutrients supply: The soils should supply the nutrients required by plants in their correct amounts and in forms that are available to the crops. Crop nutrients deficiency symptoms are seen in soils with less nutrients.
(v) Correct soil pH: Different crops require different soil pH. Soil pH affects nutrients available since certain plant nutrients are only available at specific soil pH. Extremes of soil pH lead to crop failure.
(vi) Adequate lime to keep the pH around neutral: Most crops do well at pH around neutrality (pH of 6.5 – 7.5).
(vii) Free from excessive infestation ofsoil borne pests and diseases: Crops growing in healthy soil produces high yields of high quality and low yields are experienced in soils infested by pests and diseases. (viii) Dark colours: The dark colour absorbs the heat of the sun, thus improving soil temperature. Soil temperature affects the rate of reactions taking place in the soil. It also affects the activities of soil micro-organisms. Light coloured soils have poor heat absorption and retention capacity.

(ix) Not saline: Fertile soils are free from excessive accumulation of salts which lead to water stress in plants.
1.3 Factors affecting soil fertility
Activity 1.3: Observing the role of water in plants
Materials required
• Portable containers labelled A and B
• Tomato or kale seedlings
• Water
• Stakes
• Pesticides (Insecticides and fungicides)
• Phosphatic fertilisers
• Nitrogenous fertilisers
• Knapsack sprayer
Using the materials provided; carry out the following activities:
(i) Grow two sets of crops (preferably tomato or kale) in portable containers labelled A and B. Provide adequate water to the crop in container labelled A and inadequate water to the crop in container labelled B for a period of 2–3 weeks to act as a control experiment and make observations.
(ii) Record your observations on a daily basis.
(iii) Discuss your results and make recommendations.
(iv) Present your findings in class.
(v) Take teacher’s summary notes.
Soil fertility is affected by the following factors:
(i) Availability of water in the soil
Soil water come from rainfall or irrigation in arid and semi-arid areas. Soil water is useful in plants in many ways. It acts as a transport agent, a cooling agent and as a raw material in the process of photosynthesis. As a transport agent, water transports nutrient elements absorbed from the soil to the various points of utilisation in the plant. Lack of enough water means these nutrients are not transported to where they are needed in the plant and this may lead to impairment in the process of photosynthesis. The result of water shortage (stress) in plants is retarded growth, reduced crop yields or total crop failure in extreme water shortage. Therefore, availability of water in the soil affects soil fertility. There must be adequate water in the soil for it to produce to its maximum potential. Study the illustration (a) and (b) in Fig 1.5 below and identify the one showing plants growing under water stress.

(ii) Water drainage
Excessive water in the soil is equally not good. The soils become waterlogged. Such soils lack enough air and respiration in roots and other living organisms is impaired. The results is poor nutrients uptake especially where active transport is involved. Therefore, too much water in the soil affects soil fertility. Excess water in the soil should be removed through the provision of proper drainage to ensure adequate supply of air in the soil.
(iii) Activity of soil organisms
Soil micro-organisms play an important role in soil fertility;
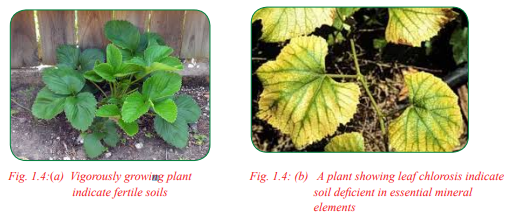
• Decomposers; Termites and earth worms break down organic matter in the soil into humus. This process releases plant nutrients into the soil.
• Nitrogen fixing bacteria in the soil such as Rhizobium that lives in the root nodules of leguminous crop convert free nitrogen in soil air into nutrients which are absorbed by plants. Other free living bacteria that fix nitrogen into nitrates in the soil include; Azotobacter and clostridium. These bacteria improve the fertility of the soil.
• Denitrifying bacteria that live in waterlogged and compacted soils convert nitrates into nitrogen gas and Ammonium ions into Ammonia gas. These gases escape into the atmosphere thus lowering the fertility of the soil. Proper drainage of the soil improves the activity of nitrogen fixing bacteria which are aerobic and impairs the activity of denitrifying bacteria which are anaerobic.
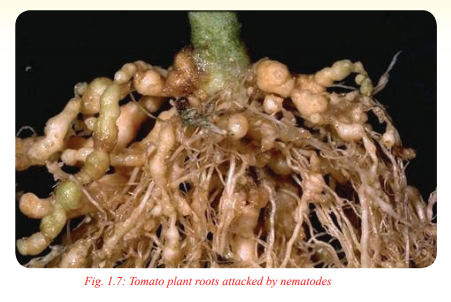
• Some soil living organisms are pathogenic and cause diseases to crops. For example, most fungal and bacterial diseases are soil borne. Other soil living organisms attack, for example, nematodes attack crop roots resulting in wilting.
1.4 Factors affecting the availability of plant nutrients
Activity 1.4: Video Case
Materials required
• Television
• Video tape or flash disk
• Video player or DVD Watch a video show on any of the following topics:
(a) Effects of water stress on crop production.
(b) Mineral deficiency symptoms in crops.
(c) Effects of saline soils on crop production.
(i) Discuss what you have observed and suggest solutions to the problems observed in the video show.
(ii) Record your findings.
(iii) Present your findings to the class.
(iv) Take teacher’s summary notes on the video show.
The following are factors that affect the availability of plant nutrients:
(i) Soil pH: Soil pH affects the availability of various nutrients, for example, low pH makes phosphorus and molybdenum less available while high pH makes manganese, potassium, iron, boron and zinc less available.
(ii) Organic matter content: Soil organic matter is broken down by micro-organisms to release nutrients. The residue known as humus increases the cation exchange capacity (CEC) of the soil thus making more nutrients available to the plants.
(iii) Soil texture: It influences the drainage and aeration of the soil. Coarse textured soils tend to be free draining and lose a lot of nutrients through leaching and, therefore, are less fertile. Fine textured soils, for example, clay tend to be waterlogged during the rainy season and, therefore, are poorly aerated as a result of which respiration in plant roots is impaired and therefore are not able to absorb plant nutrients. The activity of decomposers and Nitrogen fixing bacteria are reduced while the activity of the denitrifying bacteria is increased. Moderately textured soils are well aerated and, therefore, plant roots are able to absorb nutrients. The activities of decomposers and Nitrogen fixing bacteria are also at their optimum, thus making nutrients available to the plants.

(iv) Climate: Climatic factors such as rainfall and temperature affect the availability of plant nutrients. Rainfall of high intensity results in soil erosion and washing down of soluble nutrients thus making them unavailable to the plants. High temperatures result in volatilisation of soil nutrients such as nitrates and Ammonium ions. This makes nitrogen unavailable to the plants.
(v) Leaching of soil nutrients: Leaching is the washing down of soluble nutrients from the soil especially after a heavy downpour of rain. The nutrients move to lower horizons of the soil, where they are out of reach by plant roots. This makes the nutrients unavailable to the plants. Leaching is more common in sandy soils which are free draining.
(vi) Soil compaction: When the soil is compacted, air content is reduced. This leads to poor respiration of plant roots and other living organisms in the soil. The plant roots are unable to absorb nutrients while micro-organisms are unable to act on organic matter to release nutrients. The activities of denitrifying bacteria are also increased resulting in unavailability of nitrogen to plants.
(vii) Crop removal: Continuous cropping results in a lot of nutrients being removed from the soil through harvesting. This eventually makes the soil infertile. The soils should be replenished by addition of organic fertilisers or inorganic fertilisers. Crop rotation also helps the soil to regain its fertility and especially where the land is left uncultivated for sometime.
(viii) Use of sensitive crops: Different crops have different nutrient requirement, for example, maize requires a high amount of nitrogen, phosphorus and potassium while beans require less nitrogen and more phosphorus. Too much nitrogen in maize causes succulency and lodging while in beans it leads to vegetative growth instead of production of pods.
(ix) Nutrient interactions in the soil: The presence of some nutrients in the soil may hinder the availability of others. For example, excess phosphorus in the soil leads to unavailability of iron as it is converted into insoluble compounds which cannot be absorbed by plants. In this form, iron is said to be fixed or unavailable.
1.5 Symptoms of mineral nutrient deficiencies
Activity 1.5: Identifying deficiency symptoms in plants
Materials required
• Colour photographs of plants with nutrient deficiency symptoms.
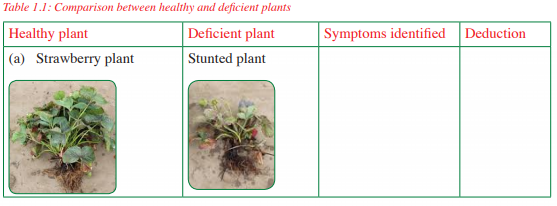
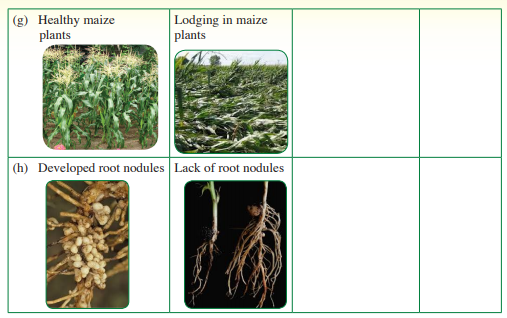
• Live plants with nutrient deficiency symptoms. Study the photographs provided in the table below and live plants provided and carry out the following activities:
(i) Identify the deficiency symptoms shown by each plant.
(ii) Discuss your observation as required in table 1.1.
(iii) Draw a table and record your findings.
(iv) Present your findings to the class.
(v) Take teacher’s summary notes.

Activity 1.6: Observing deficiency symptoms in crops
Materials required
• A plot of land measuring 3 × 4 m
• A fast growing crop such as maize or transplanted kales or tomatoes
• Phosphatic fertilisers
• Nitrogenous fertilisers Use the materials provided to carry out the following activities:
(i) Grow four different sets of crops on a plot of land measuring 3 × 4 m. Choose a fast growing crop such as maize or transplanted kales or tomatoes. This should be done as follows: Group I – Grow crop without any fertiliser. Group II – Grow crop with phosphatic fertiliser and no topdressing with nitrogenous fertiliser. Group III – Grow the crop with phosphatic fertiliser and topdress with nitrogenous fertiliser. Group IV– Grow the crop without phosphatic fertiliser but topdress with nitrogenous fertiliser.
(ii) Record your observations daily and discuss them.
(iii) Present your findings to the class after a period of 3–4 weeks.
(iv) Take the teacher’s summary notes.
Deficiency symptoms are physical signs showing that a crop is lacking some mineral elements. Some of the mineral nutrient deficiency symptoms include:
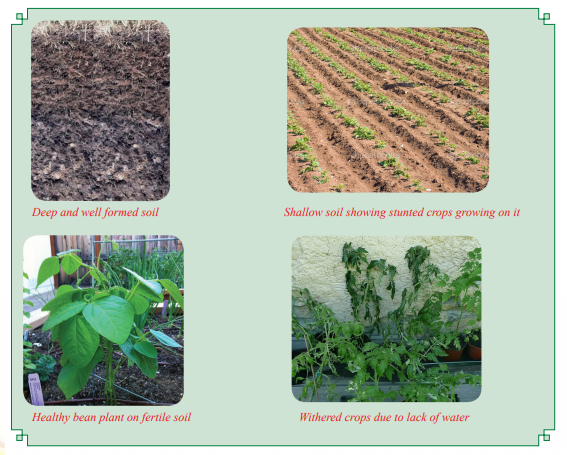
(i) Yellowing of the leaves: In this case, plant leaves lose chlorophyll and become yellow, which is also referred to as chlorosis. Chlorosis is a common occurrence in the deficiencies of nitrogen, potassium and sulphur. The deficiency of magnesium results in a special type of chlorosis where only the parts between the veins become yellow. This type of chlorosis is referred to as inter-veinal chlorosis.
(ii) Stunted growth: This is slowed growth also known as dwarfing in extreme conditions. It results in a situation where the deficiency leads to the impairement of the process of photosynthesis. It may occur in the deficiencies of nitrogen, phosphorus, potassium, sulphur and calcium.
(iii) Die back: This is the drying of the plant from the shoot tips downwards. It may occur as a result of calcium deficiency. (iv) Premature fall of leaves and flowers: This is common in the deficiency of nitrogen and potassium.
(v) Production of a purple pigment: Known as anthocyanin instead of chlorophyll. It can also appear after chlorosis. Anthocyanin is common in the case of nitrogen, phosphorus and magnesium deficiencies.
(vi) Leaf curling: It is also known as leaf roll where plants have folded leaves. It is due to lack of magnesium.
(vii) Lodging: This is falling off of crops due to weak stems and poor root development. This is due to lack of phosphorus and potassium.
(viii) Poor nodulation in leguminous plants: This is mainly due to lack of phosphorus and sulphur.
(ix) Leaf scorch: Edges of leaves appear scorched due to lack of potassium.
1.6 Definition of organic manures
Materials required
• Dictionary
• Library books
• Internet
Activity 1.7: Finding out the meaning of organic manures
Using the reference materials provided, carry out the following activities:
(i) Find out the meaning of organic manures from dictionary, library books and internet.
(ii) Discuss and record your findings.
(iii) Present your findings to the class.
(iv) Take the teacher’s summary notes
Organic manures are materials that are derived from decomposed plants and animal remains, which are to be applied to the soil to release plant nutrients. The endproduct of this decomposition process is known as humus. Humus greatly influence soil chemical properties such as soil pH and Cation Exchange Capacity (CEC). They supply a wide range of essential plant nutrients. The nutrient content in organic manures
cannot be quantified. Organic manure are important for the following reasons:
• They supply a wide range of essential plant nutrients.
• They influence the soil pH and cation exchange capacity.
• They have a long residue effect in the soil.
• They improve soil physical properties such as water-holding capacity, capillarity, drainage and aeration. • They reduce toxicity in the soil by absorbing harmful chemicals.
1.7 Types of organic manures
Activity 1.8: Identifying different types of manures
Materials required
• Samples of farmyard manure and compost manure placed in shallow containers
• Green leafy leguminous plants such as soya bean plants, lucerne and desmodium plants
Use the materials provided to carry out the following activities:
(i) Identify the types of manure provided and compare them.
(ii) Note the differences between farmyard manure and compost manure.
(iii) Observe the green plants provided (such as soya bean plants, lucerne and green leaf desmodium) and discuss their characteristics.
(iv) Present your findings to the class.
(v) Take the teacher’s summary notes.
Organic manures are classified as follows:
Manures are classified on the basis of the method of preparation and the materials from which they were made. There are four types of organic manures based on this classification. They include:
(i) Compost manure: This is manure prepared from composting or heaping organic materials and allowing them to decompose under controlled conditions, either in a pit or a heap. The compost materials include crop residues and animal waste or plant material only. The following factors should be taken into consideration in selecting a site for preparing compost manure:
• Drainage – The place should be well drained to avoid waterlogging which may lead to leaching of nutrients from the manure.
• Direction of prevailing winds – The site should be away from the dwelling place to prevent bad odour being blown from the compost manure to the homestead.
• Size of the farm – The site should be centrally placed within the area of the farm where manure is to be used as manures are bulky to transport.
• Accessibility – This makes it easy to transport the materials used to make the manure when ready.
(ii) Farmyard manure: This manure is prepared from a mixture of animal waste and litter used as beddings in animal houses. The mixture is then allowed enough time to decompose before it is used as manure. The quality of farmyard manure is determined by the following factors:
• The type of animal used – Dung from fattening animals has a high level of nutrients than that from dairy animals. Dung from non-ruminants such as pigs and poultry, which absorb less nutrients from their feed has a higher level of nutrients than that from ruminant animals.
• Types of food eaten – Feedstuffs that are highly nutritious result in manure which has a high level of nutrients.
• Type of litter used – The best litter is that which has a high urine absorption capacity, decomposes fast and has a high nutrient content.
• Method of storage – Farmyard manure should be stored in a well sheltered place with a leak-proof roof and a concrete floor to prevent loss of nutrients through leaching and vapourisation.
• Level of decomposition – Well rotten manure is rich in nutrients and is easy to handle and mix with the soil.
(iii) Green manure: This is manure prepared from green plants. The plants are grown and then incorporated into the soil to improve soil fertility. Leguminous plants such as ground nuts, cowpeas, sun hemp cloves, lucerne and beans are preferred as they also fix nitrogen, otherwise maize, sorghum and sunflower may also be used.
Characteristics of plants used as green manure include the following:
• Highly vegetative or leaf for faster decomposition.
• Fast growth rate so that they may take a shorter time in the field.
• Have a high nitrogen content.
• Able to rot or decompose quickly.
• Hardy and, therefore, able to grow in poor conditions.
(iv) Night soil: This is manure prepared from human waste (urine and faeces). Defaecation is done in a container or bucket at night. The faeces which may or may not include urine are then covered with soil. The material is now called night soil. The night soil is collected by a night soil collector and then deposited somewhere to undergo decomposition. The night soil is then treated to make it safe for handling. This is usually done to get rid of worms which may be in the human waste and to remove other heavy metals. This practice is common in areas with a high population density especially in urban areas where there are no sewage systems. This type of manure may be used in flower farms but may not be suitable for vegetable crop gardens.
1.8 Types of composts
Activity 1.9: Finding out the types of composts
Materials required
• Internet search
• School library books
• Dictionaries
• Textbooks
Using the references provided, carry out the following activities:
(i) Find out the types of composts.
(ii) Discuss and record your findings.
(iii) Present your findings to the class.
(iv) Take teacher’s summary notes.
There are two types of composts. These are:
(i) Heap compost – This type of compost is prepared by heaping the material to be composed in a heap or stack on the ground. The materials are held together by posts which are fixed at a distance of 1.2 m apart to form the four corners of the heap. Timber boards are fixed on the sides to hold the heaped materials.

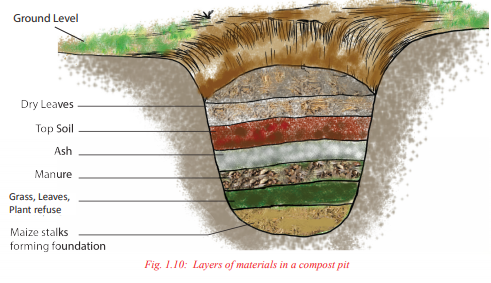
(ii) Pit compost – This type of composed is prepared by placing the materials in a pit. This method of preparation is also known as the indore method after a place called Indore in India where it was derived. In this method, the materials to be composted are packed into a pit measuring 1.2 m long, 1.2 m wide and 1.2 m deep. The materials are placed in layers starting with fibrous materials such as maize stalks which form the foundation of the compost layers.
1.9 Steps in making compost manure using the pit method
Activity 1.10: A field visit to observe the steps followed in making compost manure
Materials required
• A questionnaire
• Note book
• Pen
Visit a farm where compost manure is being prepared and carry out the following activities:
(i) Observe the method of composting being used in the farm.
(ii) Take note of the siting of the compost pits or heaps in reference to the homestead and the area where the manure is to be used.
(iii) Take the measurements of the compost pits or heaps.
(iv) List the materials being used in composting and note their uses.
(v) Note the order in which the materials are being packed in the compost pit.
(vi) Discuss and record your observation. (vii) Present your findings to the class.
(viii) Take teacher’s summary notes
The following are the steps in making compost manure using the pit method:
(i) Select a suitable site for digging the compost pit.
(ii) Clear the vegetation on the site.
(iii) Mark the size of the pit using pegs.
(iv) Dig out a pit measuring 1.2 m long, 1.2 m wide and 1.2 m deep.
(v) Collect materials for preparing compost manure which should include the following:
• Maize stalks, wheat straws or rice straws (whichever is available)
• Fresh grass, hedge trimmings, prunings, fresh young weeds and kitchen waste
• Wood ash
• Well rotten manure
• Garden soil
• Dry leaves
• Phosphatic or potassic fertilisers
(vi) Arrange the materials in the pit in layers as follows:
• Pack 10 cm fibrous materials of maize stalks, wheat or rice straws at the bottom of the pit to form the foundation of the compost materials.
• Add a 15 – 10 cm layer of fresh materials such as fresh grass, trimmings, prunings, weeds and kitchen waste.
• Add a 2.5 cm layer of well rotten manure to provide nutrients for the microorganisms.
• Add a 2.5 thin layer of wood ash phosphatic or potassic fertilisers to improve the level of phosphorus and potassium in the resulting manure.
• Add a 2.5 cm layer of top soil to introduce micro-organisms into the compost pit.
• Repeat the above sequence of layers until the pit is full.
• Add a layer of soil to cover the pit and then cover it with any leaves.
• Push a long stick through the middle of the pile bottom of the pit to monitor the temperature in the middle of the pile. The temperatures should be controlled accordingly. If too hot, sprinkle some water and if too cold, turn the materials. Normal composting temperatures should be between 60°C and 65°C. The materials produce no heat when fully decomposed.
• Regularly turn the materials for even decomposing.
Activity 1.11: Making compost manure using the pit method
Materials required
• Hand hoe
• Maize stalks
• Wood ash
• Well rotten manure
• Green leaves/kitchen waste/grass
• Garden soil
• Spade
Using the materials provided, carry out the following activities:
(i) Prepare compost manure using pit method.
(ii) Take note of the time taken to prepare manure using this method.
(iii) Discuss and record your observations.
(iv) Present your findings to the class.
(v) Take teacher’s summary notes. When preparing compost manure, the following precautions should be taken:
(i) Keep the materials moist during the dry season. This is to facilitate decomposition.
(ii) Avoid compacting the materials in the pit. This allows air supply for microbial activities.
(iii) Ensure that running water does not get into the pit during the rainy seasons. This is to prevent waterlogging which prevents leaching of nutrients from the compost materials.
(iv) Check the temperature stick every week to ensure normal composting temperatures and help test when the materials are fully decomposed.
Activity 1.12: A visit to a zero grazing unit to observe steps in making farmyard manure
Materials required
• A questionnaire
• Note book
• Pen
Visit a zero grazing unit and carry out the following activities:
(i) Observe the various steps used in making farmyard manure.
(ii) Take note of the materials used as beddings in the animal sleeping cubicles.
(iii) Observe the storage of the farmyard manure. (iv) Discuss and record your observation.
(v) Present your findings to the class. (vi) Take the teacher’s summary notes.
1.10 Steps in making farmyard manure
Activity 1.13: Preparation of farmyard manure
Materials required
• Confined farm animals
• Litter materials such as maize stalks, grass, wood shavings, saw dust, straws or crushed maize cobs
• Shovel • Manure fork
• Manure shed
• Wheelbarrow
Use the housed animals in the school farm or the neighbouring farms to carry out the following activities:
(i) Prepare farmyard manure by following the steps outlined above.
(ii) Discuss and record your observation.
(iii) Present your findings to the class.
(iv) Take teacher’s summary notes.
The following are steps in the preparation of farmyard manure:
(i) Provide beddings in the houses of farm animals. The beddings may be either grass, wood shavings or sawdust, maize stalks, maize cobs or coffee husks.
(ii) Allow time for the animals to deposit their droppings and urine on the beddings and to mix them through trampling.
(iii) Remove the mixture of the droppings and beddings using a shovel or manure fork from the animal houses and replace it with new beddings. This is shown in fig. 1.11. (iv) Place the materials removed from the animal houses in a specially prepared shed and add new layers of the used beddings until a heap is formed.
(v) Give the materials in the heap time to decompose. It may take 4 – 6 months for the materials to be completely decomposed. The manure is now ready for use in the farm.

1.11 Main inorganic fertilisers
Activity 1.14: A field visit to a shop of inorganic fertilisers to observe and manipulate fertilisers
Materials required
•Questionnaire
• Various types of fertilisers
• Note book
• Pen
Visit a shop where inorganic fertilisers are sold and carry out the following activities:
(i) Name the fertilisers supplied/sold in the shop.
(ii) Calculate the fertiliser ratio of the compound fertilisers in the shop from the fertiliser’s grade indicated on the bags.
(iii) Observe the colours of the various fertilisers.
(iv) Manipulate the fertilisers by touching and feeling in your hands to find out the farm in which they occur. (v) Record your observations and discuss them.
(vi) Present your findings to the class.
(vii) Take teacher’s summary notes.
Inorganic fertilisers are chemically prepared compounds that are added to the soil to improve its fertility. They contain one or more of the three primary macro-nutrients, namely Nitrogen, phosphorus and potassium (NPK). A fertiliser that contains only one of the primary macro-nutrients is known as a straight fertiliser, for example, urea. A fertiliser that contains two or more (three) of the primary macro-nutrients is known as a compound fertiliser, for example, Diammonium phosphate (DAP) and various NPK fertilisers such as 20–20–0, 10–10–10, 20–10–10 and 17–17–17.
The main inorganic fertilisers include:
(a) Urea: This is a nitrogenous fertiliser which contains 45–46% nitrogen and has the following properties: (i) It induces negligible acidity.
(ii) It has a white granular appearance.
(iii) It is highly susceptible to volatisation and prone to leaching as it is highly soluble in water.
(iv) It has a high scorching effect due to the ammonium content.
Urea is rarely used, except in crops such as sugar cane, which has a high absorption capacity.
(b) Diammonium phosphate (DAP): This is a compound fertiliser with a grade 18- 46-0.
(i) It contains 18% nitrogen and 46% phosphate.
(ii) It is moderately acidic.
(iii) It has a grey granular appearance.
(c) NPK fertilisers: These fertilisers contain nitrogen, phosphates and potassium oxide in varying proportions. NPK fertilisers include 23-23-0, 17-17-17, 20-10- 0 and 15-15-15. They are used when planting cereals and grass crops used for forage.
Group Activity
Working in groups, discuss the advantages and disadvantages of using organic manures as compared to the use of inorganic fertilisers. Give a report of your findings to the class.
Unit Summary
Soil fertility is the ability of the soil to provide crops with the required nutrients in their proper proportions. For sustained high production, fertile soils are characterised by the following:
• Good depth
• Proper drainage
• Good water-holding capacity
• Adequate nutrients supply
• Correct soil pH
• Free from excessive infestation of soil borne pests and diseases
• High organic matter content
• Not saline Soil fertility is affected by availability of water. Water drainage and the activity of soil micro-organisms. The availability of soil nutrients is affected by the following factors:
• Soil pH also known as soil reaction
• Organic matter content of the soil
• Soil texture
• Climate
• Leaching of soil nutrients
• Soil compaction
• Crop removal
• Use of sensitive crops
• Nutrients interactions in the soil Lack of essential nutrients in the soil is indicated by certain signs on the crops. These signs are known as deficiency symptoms. These symptoms include the following:
• Chlorosis/yellowing
• Stunted growth/retarded growth /dwarfing
• Dieback
• Premature fall of leaves and flowers
• Production of anthocyanin pigment
• Leaf curling
• Lodging
• Poor nodulation in legumes
• Leaf scorch Soil fertility is improved by addition of organic manures and inorganic fertilisers. Manures are organic substances added to the soil to improve its fertility. There are four types of organic manures. These include:
• Compost manure
• Farmyard manure
• Green manure
• Night soil
Inorganic fertilisers are chemically prepared compounds which are added to the soil to improve its fertility. The main inorganic fertilisers include urea, DAP and NPK.
Key Terms
1. Soil fertility – This is the ability of the soil to provide crops with the required nutrients in their proper proportions for sustained high production.
2. Soil pH – This is the degree of acidity or alkalinity of a soil solution.
3. Saline soils – Soils with excessive amounts of salts.
4. Irrigation – Artificial application of water to the crops.
5. Water stress – Shortage of water in crops.
6. Stunted growth – This is slowed growth in crops.
7. Waterlogged soils – Soils with excessive amount of water.
8. Pathogenic – Disease causing.
9. Chlorosis – Yellowing of leaves.
10. Leaf curling – Folding of leaves.
11. Nodulation – Production of swellings called nodules in the roots which habour nitrogen fixing bacteria in leguminous crops.
12. Macro-nutrients – These are mineral elements needed by plants in large amounts.
13. Micro-nutrients/trace elements – These are mineral elements that are needed by plants in small amounts.
14. Anaerobic respiration – Respiration that takes place only in the absence of oxygen.
15. Aerobic respiration – Respiration that takes place only in the presence of oxygen.
16. Fungal disease – Diseases caused by fungi.
17. Bacterial diseases – Diseases caused by bacteria.
18. Microbial activity – The activity of micro-organisms.
19. Agrochemicals – Agricultural chemicals.
20. Compost manure – Manure prepared by composing (heaping) vegetative materials.
21. Farmyard manure – Manure prepared from animal wastes mixed with litter.
22. Green manure – Manure prepared by incorporating green plants into the soil.
23. Night soil – Manure prepared from human waste.
24. Inorganic fertilisers – These are chemically produced compound components added to the soil to improve its fertility.
25. Fertiliser grade/Analysis – The amount of each nutrient contained in a fertiliser expressed as a percentage.
26. Fertiliser ratio – Amount of each nutrient contained in a fertiliser expressed as a ratio of N: P2 O5 : K2 O.
27. Hygroscopic – Ability to absorb atmospheric water moisture.
28. Volatilisation – Ability to escape into the atmosphere in form of a gas.
29. Zero grazing unit – Structures used for holding animals in a livestock rearing system that does not allow animal to graze on pastures.
30. Straight fertiliser – A fertiliser that contains only one of the primary macronutrients (NPK).
31. Compound fertiliser – A fertiliser that contains two or more of the primary macro-nutrients (NPK).
32. Complete fertiliser – A fertiliser that contains all the three primary macronutrients (NPK).
33. Organic manures – These are fertilisers that are made from animal matter, human excreta or vegetable matter.
34. Nitrogenous fertiliser – A fertiliser that contains nitrogen as the only primary macro-nutrient.
35. Potassic fertiliser – A fertiliser that contains potassium as the only primary macro-nutrient.
36. Phosphatic fertiliser – A fertiliser that contains phosphorus as the only macronutrient.
37. Ribbon test – A test used to determine the amount of clay in a soil by rolling wet soil between the palms.
38. Active transport – Process through which ionic substance are absorbed by plants against a concentration gradient using energy
Revision Questions
1. Define soil fertility.
2. Explore five characteristics of fertile soils.
3. State three factors that affect soil fertility.
4. (a) Define soil pH.
(b) Describe how to estimate soil pH using a pH meter.
5. Name two free living bacteria that fix nitrogen in the soil.
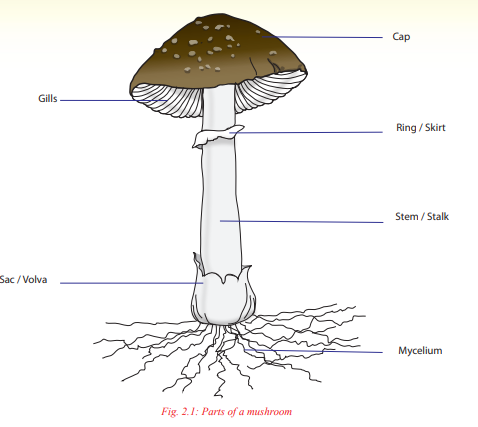
6. The diagrams below show plants with mineral deficiency symptoms. Study them carefully and then name the mineral elements lacking in the soil in each case.

7. Explain five factors that influence the availability of nutrients in the soil.
8. Give two ways of expressing the nutrient content of a fertiliser.
9. (a) What is night soil?
(b) Draw a well labelled structure of a compost heap showing how the layers follow each other.
10. State the factors that determine the quality of farmyard manure.
11. Analyse the plants listed below for their suitability in the production of green manure:
(i) Beans
(ii) Napier grass
(iii) Desmodium
12. What is the meaning of the following terms:
(i) Leaching?
(ii) Volatilisation?
13. What is the importance of the following materials used in the preparation of compost manure:
(i) Well-rotten manure?
(ii) Garden soil?
(iii) Wood ash?
14. What is the meaning of the following terms as used in describing inorganic fertilisers:
(i) Straight fertiliser?
(ii) Compound fertiliser?
(iii) Complete fertiliser?
15. Describe the characteristics of the following inorganic fertilisers:
(a) UREA
(b) DAP
Files: 2UNIT 2:MUSHROOMS
Introduction
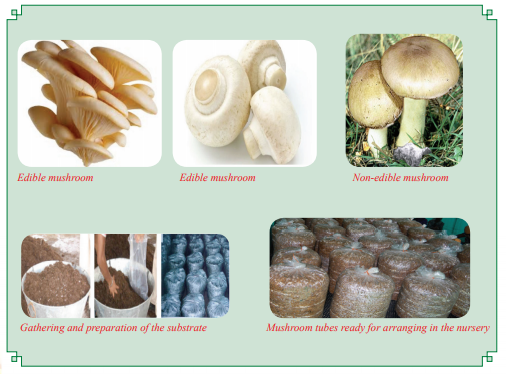
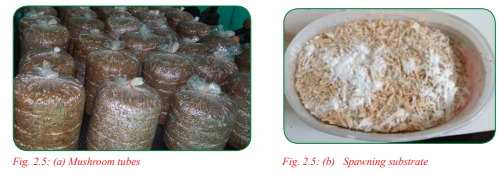
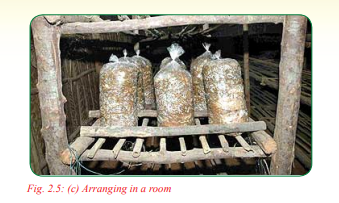
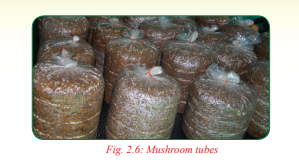
Though mushrooms are classified as vegetables, they are not plants as such, but belong to the fungi kingdom. However, they provide several important nutrients to human beings and this makes their cultivation beneficial. Mushrooms are divided into two categories, the poisonous and the edible mushrooms. This unit gives an insight on the identification of the edible mushrooms from the non-edible ones. It also gives practical experiences on how to grow the edible mushrooms. The process of growing mushrooms starts with the gathering and preparation of substrate materials where the mushrooms are grown, mushroom tube making and arranging the tubes in prepared nursery beds. Also addressed in this unit are the conditions suitable for mushrooms establishment and growth, up to the time they are ready for harvesting. The pictures below gives an over view of the unit.

2.1 Definition of mushroom
Activity 2.1: Finding out the meaning of mushrooms
Materials required
• Dictionary
• Textbooks
• Internet
Using the references provided, carry out the following activities:
(i) Find out the meaning of mushroom from the dictionary, text books and internet.
(ii) Discuss and record your findings.
(iii) Present your findings to the class.
(iv) Take the teacher’s summary notes. Mushroom is the fruiting body of a macro-fungus. A fungus is a non-photosynthetic organism that feeds on dead plant materials and organic matter.
2.2 Types of mushrooms
Activity 2.2: Finding out the different types of mushrooms
Materials required
• Internet
• School library
• Pictures of mushrooms
• Video tapes or CDs.
Using the materials provided, carry out the following activities:
(i) Find out the edible types of mushrooms and the non-edible mushrooms.
(ii) Find out the types of mushrooms for commercial production.
(iii) Discuss and record your observations.
(iv) Present your findings to the class.
(v) Take teacher’s summary notes.
There are two types of mushrooms:
• Edible types.
• Non-edible types or poisonous mushrooms
(a) Edible types of mushrooms: These are mushrooms that are eaten by human beings without causing any harm.
There are five common types of edible mushrooms grown in East Africa.
(i) Button mushrooms (Agaricus spp) – Has very short stalks almost nonvisible when growing. It is white in colour and the cap looks like a button.
(ii) Oyster mushroom (Plerotus spp) – Completely white with oyster shell shape.
(iii) Shiitake mushroom (Lentinula edodes) – Has a large brown cap which cracks when overgrown.
(iv) Chinese mushroom (Ganoderma) – They are pink in colour with brown stalks.
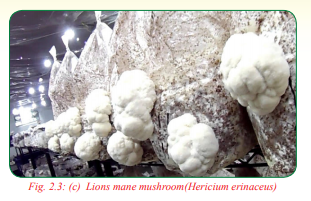
(v) Lions mane mushroom (Hericium erinaceus) – It is white in colour and the caps have cotton like appearance.

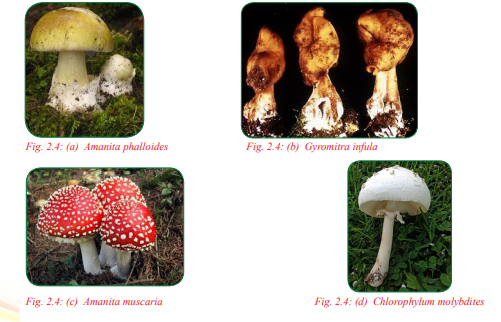
(b) Non-edible types of mushrooms These are poisonous though they resemble and taste like the edible mushrooms. They include:
(i) Amanita phalloides – Golden brown in colour with staut stalk.
(ii) Gyromitra infula – Brown in colour but appear red when cooked. They have a white stock.
(iii) Amanita muscaria – This is red in colour with white cotton-like spots on the cap. It has a white staut stalk and is the most poisonous of all mushrooms in this category.
(iv) Chlorophylum molybdites – It is white in colour with a white ring on the stalk.
2.3 Propagation of mushrooms
Activity 2.3: Finding out the process of propagation of mushrooms
Materials required
• Library books
• Internet
• Video
Using the references provided, carry out the following activities:
(i) Find out the stages involved in mushroom propagation.
(ii) Discuss and record your findings.
(iiii) Present the report to the class.
(iv) Take teacher’s summary notes.
Mushroom propagation is the practice of growing mushrooms. It involves mushroom compost making, spawning or seeding the compost, casing and pinning.
Compost making: Involves gathering of materials such as bargasse, coffee husks, sawdust, rice husks and sterilising them by heating in steam. Other materials such as lime and molasses are added.
Spawning: Involves sprinkling of mushroom spores on the sterilising culture which is then left to establish under controlled conditions of temperature and humidity.
Casing and pinning mushrooms: Involves transferring the established mycelium into mushroom tubes, logs or a mushroom house containing substrate.
2.4 Production of mushroom tubes
Activity 2.4: Mushroom tube making
Materials required
• Substrate materials such as straw, sawdust, maize cobs and banana fibres.
• Equipment such as drums, polythene bags and sisal strings.
• Supplements such as lime, animal concentrate, soya meal and molasses.
• Fuel such as charcoal and firewood.
Using the materials provided, carry out the following activities:
(i) Prepare mushroom tubes by filling polythene bags with mixed substrates and supplements.
(ii) Tie the mushroom tubes with strings and pack them into clean bags or large cooking pots.
(iii) Sterilise the mushroom tubes by steaming for 3–4 hours in heated water drums.
(iv) Leave the mushroom tubes to cool overnight. (v) Discuss and record your observations.
(vi) Present your findings to the class.
(vii) Take teacher’s summary notes.
A mushroom tube is a sack, polythene bag or crate containing growing materials which have been sterilised and used to grow mushrooms. The materials needed in the mushroom tube making include:
(a) Substrate or compost – This constitutes of grass chaff, saw dust, straw, sugarcane bargasse, dry groundnut waste, banana fibres, dry banana leaves, straws, maize cobs and stalks.
These materials mainly provide carbohydrates.
(b) Containers such as empty gunny bags, sisal sacks, crates, wooden racks and polythene bags.
(c) Equipments – The following equipment are required:
• Drum which is clean
• A big cooking pan or sufuria with lid
• Plastic rings
• Cotton wool
• Preparation table or large leakproof paper.
• Weighing scale
• Water
• Fuel for heating, for example, firewood or charcoal
• Methylated spirit
• Mushroom spawn or seeds
(d) Supplements – These are added to provide different types of nutrients needed for mushroom growth. They include; lime, molasses, animal concentrates and soya bean meal.
The steps followed in making mushroom tube include:
(i) Gathering of compost making materials.
(ii) Mixing substrate with supplements: These materials are gathered, chopped into small pieces and washed clean using water to remove soil particles. They are then mixed with supplements.
(iii) Drying: The compost material should not be very wet because it encourages growth of unwanted fungi and bacteria. Excess water is, therefore, removed by squeezing.
(iv) Packing up or bagging: The semi-dried compost material is crushed and packed in polythene bags or gunny bags known as tubes.
(v) Composite sterilisation: The competitive micro-organisms such as bacteria and unwanted spores of other fungi are killed through steaming for 3 hours or using chemicals such as isopropyl alcohol and hydrogen peroxide. After sterilisation the compost is left to cool overnight.
(vi) Mycelium sowing: The preparation table is sterilised and the mushroom substrate spread on it. The mushroom spawn is spread evenly on the substrate and covered. The temperature and humidity is controlled at 20°C and 90 – 95% humidity. The substrate with white mycelium is transferred to mushroom tubes or the field.
2.5 Factors affecting mushroom tube making
Activity 2.5: A field visit to observe factors affecting mushroom tube making and mushroom cultivation Materials required
• Questionnaire
• Note books and pens
Make a visit to a co-operative or a household producing mushrooms and carry out the following activities: (i) Observe mushroom tube making and growing of mushrooms.
(ii) Find out the factors affecting mushroom tube making.
(iii) Discuss and record your observations.
(iv) Present your findings to the class.
(v) Take the teacher’s summary notes.
Mushroom tube making is affected by the following factors:
1. Availability of mushroom substrate material: such as sawdust, straw, sugarcane bargasse.
2. Availability of transport: The materials for making compost are bulky, therefore, they should not be acquired from a distant source. They should be easily transported using wheelbarrow, lorries and tractor trailers.
3. Cleanliness of the substrate material: Dirty substrate introduces unwanted bacteria and fungi, which interfere with growth process.
4. Method of sterilisation: Once the mixed substrate materials have been packed, there are several methods of sterilisation. The cost of the equipment or chemical determines the method used which include use of pressure cookers, use of a drum or large cooking pot with water. Chemicals on the other hand are expensive and require a trained person to use. It is cheaper to heat in steam at 70°C , 80°C for 3 – 4 hours in a drum.
5. Type of packing materials: The recommended packing material is use of clear
polythene bags measuring 25–30 cm wide against 45 cm length although this is subject to the availability and laws of the country.
2.6 Mushroom cultivation techniques
Activity 2.6: Cultivating mushrooms in the nursery
Materials required
• Mushroom tubes containing growing mycelium
• Mushroom house with benches or hanging rods
• Water
• Thermometer
• Hose pipes
Using the materials provided, carry out the following activities:
(i) Prepare a mushroom house by cleaning and watering the walls.
(ii) Transfer the mushroom tubes in the house and hang them by the rods from the roof.
(iii) Make small holes on the side of the mushroom tubes.
(iv) Provide shade to prevent direct light.
(v) Water the mushroom tube once a day by sprinkling or spray misting.
(vi) Weed by removing unwanted or old mushrooms.
(vii) Crop the mushrooms between 7 and 14 days or four days after the fruiting caps begin to appear.
(viii) Discuss and record your findings.
(ix) Present your findings to the class.
(x) Take teacher’s summary notes.
Mushroom cultivation involves the transfer of spawned mushroom to growth material or the substrate into a specially prepared room where light, temperature and humidity are controlled. In this room, the young mushrooms are cared for until they are ready to be harvested, where they can be sold fresh or they can be dried, packed and sold. It involves the following:
1. Inoculation process
This process involves introducing mushroom spawn into the sterilised substrate. The spawn is evenly spread over the substrate at the rate of 7 kg per one tonne wet substrate. Different mushroom types have different spawning rate. The lighter the spore ratio to the substrate, the faster the colonisation of the sterile substrate. Study the photographs provided in the Table 2.1 and then identify the activities being carried out, materials required for each stage and the procedure.


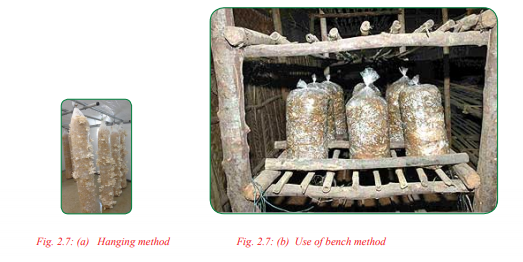
2. Arranging mushroom tubes in the nursery bed
After the process of inoculation, the polythene bags with sterile substrate are arranged in a nursery bed. This is a room specially prepared with benches where humidity, temperature and light are controlled. The bags are either packed on a bench or hang from the roof or an elevated point after the mycelium spread and seen as a white mass. The bags are opened or holes made on the plastic bags.
3. Shading
Mushrooms which are grown in green houses or fields should be provided with a shade to prevent strong light.
4. Watering and weeding
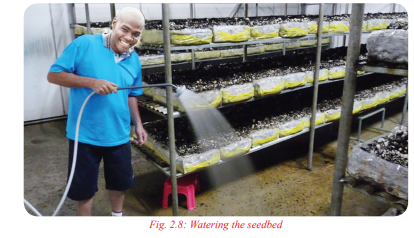
Watering is important to maintain the humidity of the substrate. The air humidity should be maintained at between 90% and 95%. This prevents production of mushrooms with a scaly skin. Watering is done by sprinkling or spray misting water once a day. It is also necessary to make holes measuring 1cm diameter on the polythene bag. This allows the small mushroom heads to force themselves out of the bag. Weeding is done by removing unwanted or old mushrooms.
5. Harvesting
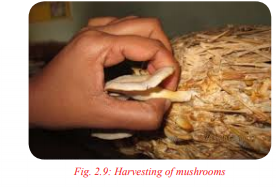
Mushroom will start to appear in 7–14 days. They should be picked when fully grown or when they stop growing. This happens 4 days after the fruiting caps begin to appear. Picking is done by twisting the mushroom stalk once to free them from the substrate medium. All old or aborted mushrooms should be removed from the substrate surface and discarded. After harvesting, the substrate should be kept moist to allow growth of another crop of mushrooms. Harvesting can be done 4–5 times depending on the species but the greatest harvest takes place between the first and second harvest.
2.7 Factors affecting mushroom cultivation
Activity 2.7: Finding out the factors affecting mushroom cultivation
Materials required
• Library books
• Internet
• Textbooks
Using the references provided, carry out the following activities:
(i) Find out the factors affecting mushroom cultivation.
(ii) Discuss and record your findings.
(iiii) Present your findings to the class.
(iv) Take teacher’s summary notes.
The following factors are required to ensure a good crop of mushrooms:
(i) Light: Mushrooms require light to grow but not direct sunlight. Regular strong reading light is sufficient. The mushroom cultivation house can also be left dark overnight. Shading can be provided to minimise light.
(ii) Temperature: Mushrooms grow well in a temperature range of about 20°C – 25°C. It is recommended to put a thermometer to monitor the temperature of the mushroom cultivation house.
(iii) Water and humidity: It is important to water the mushrooms to maintain the humidity at between 90 and 95% every once a day. Too little water makes the growth of mushrooms slower and leads to cracking of the fruiting caps. Too much water results in rotting of the substrate which encourages growth of unwanted bacteria and fungi.
(iv) Amount of oxygen: Oxygen is required to stimulate growth. It is necessary to open the windows or liners to encourage free circulation of air. Lack of fresh air will prevent mushrooms from growing and produce long stringy mushrooms.
(v) Mushroom diseases: Mushroom cultivation is subject to attack by both bacteria and fungal diseases. (a) Fungal diseases
(i) Dry bubble: Caused by a fungus Verticillum fungicola. The symptoms include brown spots on the mushroom caps and is controlled by reducing the relative humidity and temperature to 14°C, disinfection of the substrate by steaming and disinfecting harvesting tools.
(ii) Wet bubble: Caused by a fungus Mycogone pemicosa. The symptoms include malformed cap and stalk. The disease mushrooms are covered with white mycelium on the cap. A foul smell is also produced. The control involves steaming of the substrate at 70–80°C for at least three hours.
(iii) Other fungal diseases include Mildew and Aphanocladium disease.
(b) Bacteria diseases which affect mushrooms include brown blotch, mummy disease and drippy gill.
(i) Level of nutrients Good mushroom production depends on the amount of carbohydrates, proteins and calcium. The recommended amounts are 5–10% of substrate weight carbohydrates, 2–4% of protein and 2% calcium in form of lime water.
(ii) Size of bag The recommended size of the bag should be 30 cm wide and 45–90 cm long for easy transportation and management.
Group Activity
Observation, preparation and harvesting of mushrooms
Visit a co-operative or farmer growing mushrooms around the school and carry out the following activities: (i) Observe and record the types of substrates the farms use for growing mushrooms.
(ii) Observe and record the substrate packing and sterilisation process and record the most applicable and cheap method to be carried out in the school.
(iii) Observe the inoculation and capping process. During the process, ask how much spawn is applied per quantity of substrate.
(iv) Arrange the mushroom tubes in the nursery bed.
(v) Observe the mushroom cultivation management practices.
(vi) Ask about the challenges facing mushroom production.
(vii) Observe a demonstration of the mushroom harvesting process and participate in picking mature mushrooms.
(viii) Observe the process of packing harvested mushroom in readiness for selling.
(ix) While in school, discuss your observations in the farm and make a report.
(x) Present your findings to the class.
(xi) Take the teacher’s summary notes.
Unit Summary
A mushroom is a fruiting body of macro-fungus whose parts or whole body are utilised. There are two types of mushrooms.
• Edible mushroom
• Non-edible mushroom. These are mostly poisonous.
Mushroom propagation is the agricultural practice of growing mushrooms using special facilities and mushrooms growing rooms. It involves mushroom tube making, inoculation, incubation, watering and weeding mushrooms and finally harvesting mushrooms. Mushroom propagation begins with substrate/compost making which is washed, sterilised and packed in bags either plastic bags or gunny bags in a process known as mushroom tube making.
A mushroom tube is a sack or bag made of polythene containing mushroom growing materials that have been sterilised. Mushroom growing materials include sawdust, grass chaff, dry groundnut waste, straw, maize cobs and chopped maize stalks. Mushroom growing containers include sisal sacks, polythene bags, empty gunny bags, crates and wooden racks.
Mushroom growing equipment includes a large metal drum or large cooking pot with a lid, plastic rings, weighing scale, water, fuel such as firewood and charcoal, methylated spirit and mushroom spawn seeds or mushroom spores. Mushroom supplements include animal concentrate, soya meal, rice bran or wheat bran, molasses and lime. The process of mushroom tube making involves:
• Gathering of substrates or compost manure.
• Washing of substrate.
• Mixing substrate with ingredients and supplements.
• Drying.
• Packing the substrate in tubes.
• Compost or substrate sterilisation.
• Mycelium sowing.
• Observation of growing mycelium.
Substrate sterilisation involves boiling of the substrate in steam at 70 – 80°C for 3–4 hours or using a pressure cooker heating the substrate at 120°C for 15 minutes. Mycelium spores or spawn should be obtained from reputable mushroom growing. Apply 0.3–0.5 kg of spawn per 6–8ft3 of sterilised substrate or 0.3–0.5 kg of spawn per 12–15ft3 or 7 kg of spawn per tonne of wet substrate.
The factors affecting mushroom tube making include:
(i) Availability of mushroom substrate materials.
(ii) Availability of transport.
(iii) Cleanliness of substrate.
(iv) Method of sterilisation.
(v) Type of packing material.
(vi) Type and amount of mycelium spores and spawn used during inoculation.
(vii) Temperature and humidity of the substrate. Mushroom cultivation involves the transfer of spawn mushroom to growing material then transferring the same to a specially prepared nursery bed with controlled light, temperature and humidity
Key Terms
1. Mycelium – These are fungal threads that spread over and in the substrate which later sprout to mushroom.
2. Spores – These are minute mushroom seeds that appear like powder. They are spread over a sterile culture substrate during inoculation.
3. Compost or substrate – This is a mixture of straw, sawdust, lime water, wheat bran and soya meal where the spores are inoculated after sterilisation.
4. Nursery bed – This is the space used to grow mushrooms where the temperature, humidity, light and oxygen concentration are controlled. They can also be referred to as shelves.
5. Mushroom – This is a fruity body of macro-fungus.
6. Mushroom tube is a sack – Bag or crate containing mushroom growing materials.
7. Bagging – This is the process of putting mushroom growing substrate in a bag or tray.
8. Compost sterilisation – This is the process of killing germs and other unwanted micro-organisms in a substrate using heat, steam or chemicals.
9 Spawning – This is the introduction of a pre-sown substrate mycelium known as a spawn into a substrate by sprinkling.
10. Inoculation – Used similarly as spawning.
11. Bargasse – The fibre remnants of sugar cane after it has been crushed to extract the juice.
12. Gunny bags – Bags made of sisal fibres.
Revision Questions
1. What is a mushroom?
2. Name two types of mushrooms.
3. (a) Name four edible mushroom types.
(b) Name four non-edible mushroom types.
4. Identify the mushroom type shown in the figure below:

5. Which of the following statements best describes mushroom propagation?
A. Transfer of mushroom tubes into specifically prepared rooms where environmental conditions are controlled.
B. An organic substance originating from plants and used to grow mushroom.
C. Allowing a mushroom spawn to colonise a substrate by providing the optimum condition for mushroom growth.
D. Introduction of a spawn into a subtrate by sprinkling.
6. Give examples of mushroom growing substrate or materials.
7. Describe the processes involved in making mushroom tubes.
8. Outline the importance of compost/substrate sterilisation.
9. List factors affecting mushroom tube making.
10. Carry out the activities involved in mushroom cultivation.
11. Why is it important to spread the spawn or spores over the surface of the substrate while planting or inoculating the substrate?
12. State the importance of watering the substrate during mushroom cultivation.
13. Carry out the harvesting of mushrooms.
14. Explain how the following factors affect mushroom cultivation:
(a) Water and humidity.
(b) Mushroom diseases.
15. The following activities are carried out during mushroom production process:
(i) Gathering and chopping substrate.
(ii) Watering of the mushroom tubes.
(iii) Packing the bags containing substrate in the nursery bed.
(iv) Sterilising substrate to kill harmful organisms.
Which set of activities is correct for mushroom inoculation process?
A. (i) and (iii)
B. (i) and (iv)
C. (ii) and (iii)
D. (ii) and (iv)
Unit 4: LEGUMES
Introduction
A legume is any dicotyledonous plant that belong to the family leguminosae also known as fabaceae. They are mainly grown for their grain seed known as pulse or as food for livestock known as fodder. Legumes may also be grown for preparation of green manure. Common pulses grown in Rwanda for human consumptions include beans, peas, groundnuts and lentils while legume fodder include lupins, white clover/ lucern and desmodium.
This unit will help explore the legumes grown in Rwanda, importance of legumes, propagation methods, cultural practices in legumes, post-harvest techniques for soya beans, groundnuts and conservation of fodder legumes for feeding animals. The following pictures give an insight to the unit:

4.1: Definition of legumes
Activity 4.1: Finding out the definition of legumes
Materials required
• Dictionary
• Library books
• Internet
Using the references provided:
(i) Find out the meaning of legumes using dictionary, library books and internet.
(ii) Discuss and record your findings. (iii) Present your findings to the class.
(iv) Take teacher’s summary notes.
A legume is a plant which bears a fruit known as a pod. Such pod seeds or vegetative parts are used as food for human and livestock. Legumes grown for seeds are referred to as pulses while those for livestock feed are referred to as fodder legumes.
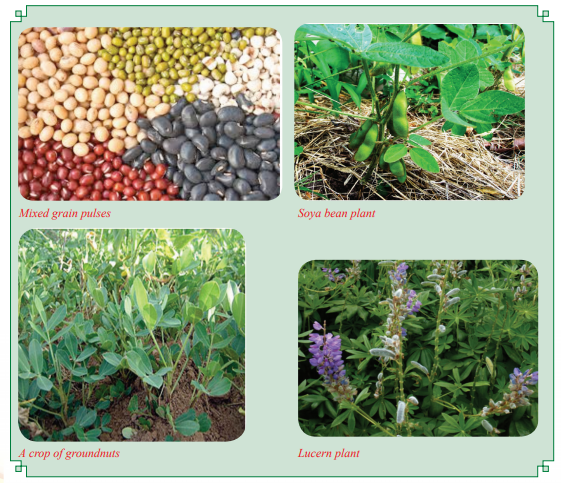
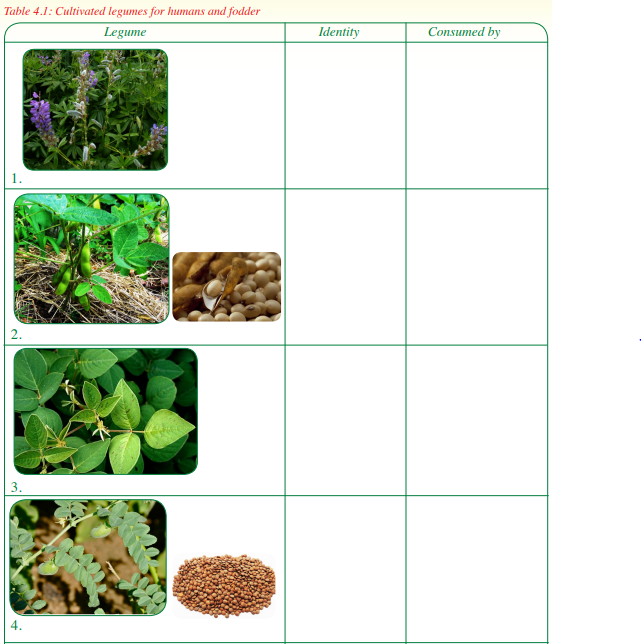
4.2 Legume names and types
Activity 4.2: Identifying legumes
Materials required
• Legume seeds such as beans, soya beans, groundnuts, lentils, alfafa, lupin, clovers, desmodium
• Photographs of legumes, in table 4.1
(i) Identify the legume provided in table 4.1 and categorise them into those consumed by human and that consumed by livestock.
(ii) Use the photographs provided to identify the legumes which are displayed.


(iii) Classify the legumes into:
(a) Pulses – edible by human.
(b) Forage legumes
(iv) Discuss and record your findings.
(v) Present your findings to your class. (vi) Take the teacher’s summary notes.
Legumes are divided into:
1. Fodder legumes
2. Legumes edible by humans
Legumes edible by humans include:
(a) Beans
(b) Soya
(c) Peas
(d) Groundnuts
(e) Lentils
Fodder legumes include:
(a) Lupins
(b) White clover
(c) Lucern
(d) Desmodium
4.3 Importance of legumes
Activity 4.3: A field visit to find out the importance of legumes
Materials required
• Questionnaire
• Note books
Visit an agricultural farm dealing with legume production and then carry out the following activities:
(i) Identify the legumes cultivated in the farm.
(ii) Classify the legumes into fodder and pulses.
(iii) Find out the importance of each legume to:
(a) Human being
(b) Livestock
(c) The environment
(iv) Discuss and record your findings.
(v) Present your findings to the class.
(vi) Take teacher’s summary notes.
Legumes are important source of proteins and roughages for both humans and livestock.
The following are the importance of legumes:
(a) Feed for human beings and livestock
Legumes used as livestock feed are referred to as pasture or fodder. The flowers of legumes provide nectar and pollen for honey bees. Other legumes such as beans, peas, ground nuts and soya beans are used as food for human beings. These legumes provide proteins, minerals and vitamins to both livestock and human beings.
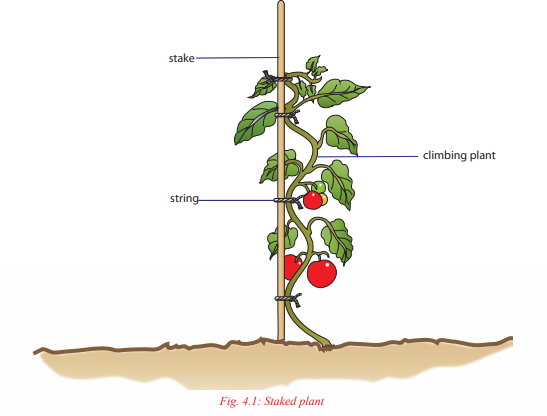
(b) Provide stakes for climbing crops
Legumes such as pigeon pea, calliandra, leuceana and sesbania have woody stems. They provide support to climbing crops such as tomatoes and climbing beans.
(c) Improve soil fertility
Legumes, in association with nitrogen fixing bacteria in their root nodules, fix nitrogen to the soil improving fertility. Leaves drop to the ground and decompose to form humus. Humus releases nutrients to the soil. Some legumes have a long tap root system which enables them to utilise nutrients from the lower soil horizons. These also bring up leached nutrients to the surface.
(d) Soil conservation
Legumes conserve soil in the following ways:
• They are used as cover crops preventing soil erosion.
• Their roots are deep and extensive thus binding soil particles together. This improves soil structure.
• Legumes conserve soil moisture by preventing excessive evaporation through the provision of surface cover.
• Leaves that drop from the legume plants decompose to form humus that binds soil particles together.
(e) Raw materials for food processing industries
Legumes such as soya beans and ground nuts are used as a source of vegetable oils, margarine and peanut butter. Soya bean is ground and used to make protein based supplements used as human food and concentrates for livestock.
(f) Source of income
Legumes are sold to provide income for the farmer such as bean seeds, French beans and fodder for livestock.
(g) Medicinal value
Some legumes provide chemical compounds which protect the body against various diseases and disorders such as cancer, depression, indigestion and metabolic imbalances.
Source of fuel Woody
legumes are harvested through lopping and coppicing and used as a source of fuel. Such legumes include calliandra, leuceana and sesbania.
4.4 Propagation methods of legumes
Activity 4.4: A field visit to observe and find out the propagation methods of legumes
Materials required
• Questionnaire 108
• Note books
• Pen
Visit a farm producing legumes, then:
(i) Find out the methods of propagating legumes practised in the farm.
(ii) Discuss and record your findings.
(iii) Present your findings to class.
(iv) Take teacher’s summary notes.
Propagation is the practice of generating new plant to multiple crops. In legumes, it can be done using materials such as cuttings, layers and seeds.
(a) Cuttings
A cutting is a part of a plant which can develop into a new plant when removed from the mother plant. Legumes are propagated from stem and root cuttings. These plant parts are given the necessary conditions to produce new plants. The new plants are similar in characteristics to the mother plant. Conditions necessary for rooting of cuttings:
(a) Temperature: Warm temperatures are required at the root zone for proper rooting of cuttings. The optimum temperature required by most plant species is 22o C – 27°C during the day and 15°C–21°C during the night.
(b) Relative humidity: Proper rooting of cuttings require high humidity which helps to reduce the rate of transpiration. To regulate the humidity, special structures such as greenhouses can be used.
(c) Light intensity: Soft wood cuttings need high light intensity to produce roots and shoots. Hardwood cuttings will produce roots well in dark conditions. These conditions are easy to provide when cuttings are used in green houses or other special structures.
(d) Oxygen supply: Proper ventilation is required in the structures where the rooting of cuttings is carried out. This is to supply plenty of oxygen required for root formation. The rooting medium used should be well aerated.
(e) Chemical treatment: Cuttings can be treated with medium containing rooting hormone to induce faster root formation. These hormones include: Indoleascetic acid (IAA), Indolebutyric acid (IBA) and Naphthaleneacetic acid (NAA).
(f) Leaf area: Soft root cuttings should be planted with the leaves due to the fact that they require a lot of carbohydrates to develop roots. These leaves carry out photosynthesis. The hardwood cuttings leaves are pruned off before planting since the cuttings have a lot of stored carbohydrates which is used for rooting.
(b) Layering
Activity 4.5: Layering in legumes
Materials required
• Growing silver leaf desmodium
• Planting pots
• Wooden pegs
• Hand hoe
• Secateurs
• Sticks
• Strings
• Mulching material
• Stump for lucerne
Visit a farm growing legumes such as silver leaf desmodium, lucerne, sesbania and pigeon peas. Then, using the materials provided, carry out the following activities:
(i) Group I – Carry out mound layering on recently cut lucerne stamp.
Group II – Carry out aerial layering in woody legumes such as sesbania and pigeon peas.
Group III – Carry out tip layering on silver leaf desmodium.
Group IV – Carry out trench layering on silver leaf desmodium.
Group V – Carry out serpentine layering silver leaf desmodium.
Group VI – Carry out on silver leaf desmodium.
(ii) Visit the farm regularly to carry out maintenance practices on the layered plants.
(iii) Discuss and record your findings.
(iv) Report your findings to the class.
(v) Take the teacher’s summary notes.
Layering is inducing of part of a plant to produce roots while still attached to the mother plant. The rooted plant is then cut and planted. Layering promotes a high success rate in legume propagation since it prevents water stress and carbohydrates shortage that affects cuttings. Layering may be enhanced by wounding part of the plant to be layered or bending it sharply and covering it with a rooting medium. Methods of layering legumes include:
(i) Mound or stool layering
(ii) Tip layering
(iii) Simple layering
(iv) Trench layering
(v) Compound or serpentine layering
(vi) Aerial or marcotting layering
The different methods of layering in legumes are carried out as follows:
(i) Mound (stool) layering
• Cut the plant back to about 2.5 cm above the ground.
• Mound moist soil over the emerging shoots.
• Keep the soil moist.
• Detach the new seedling from the mother stump and plant separately.
Examples of legumes layered through this method include green leaf desmodium, silver leaf desmodium, perennial soya bean.

(ii) Tip layering
• Dig a hole about 7.5 cm deep.
• Force the branch with the shoot into the hole leaving about 15 cm of shoot above the ground. Hold this branch with a peg.
• Support the shoot with a stick as shown.
• Cut off the new rooted shoot and plant as a new plant.

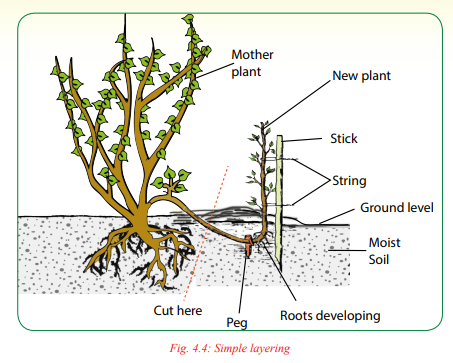
(iii) Simple layering
• Bend the stem to the ground.
• Hold it in place using a peg leaving about 15 cm of the shoot above the ground.
• Cover the part of the ground with moist soil.
• Keep the soil moist.
• Detach the seedling from the mother plant once the roots are formed and plant it separately
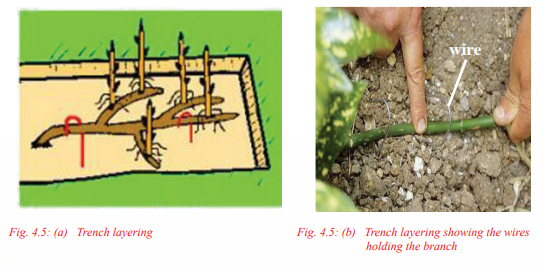
(iv) Trench layering
• Dig a trench about 7.5 cm deep next to the mother plant, and about 90 cm long.
• Force the branch into the trench and hold it in place with pegs about 30 cm apart from each other.
• Cover with moist soil.
• Keep the soil moist.
• Detach and uproot each separate part and plant in different holes.
(v) Compound or serpentine layering
• Force a branch from the mother plant onto the ground.
• Hold it in place at intervals of above 30 cm apart using pegs.
• Cover the pegged portions with moist soil.
• Keep the soil moist.
• Cut the shoots off their mother branch and plant.

Seed Propagation in Legumes
Legumes are also propagated using seeds. Some legume seeds require special treatment before planting. The treatment methods include:
(a) Breaking seed dormancy.
(b) Seed inoculation.
(c) Seed dressing.
(a) Breaking seed dormancy
It is carried out to increase the germination percentage. This is done using the following methods: Soaking in water, mechanical scarification, light burning, use of growth regulators such as gibberellins and stratification.
(b) Seed inoculation
In areas deficient with Rhizobium bacteria, legume seeds should be coated with an inoculant or nitroculture. These are preparations which contain the right strain of Rhizobium bacteria depending on the legume. This encourages nodulation and nitrogen fixation.
(c) Seed dressing
This is coating the seeds with a fungicide or insecticide or both of them. These chemicals protect the seed from damage by pests and diseases. Certified seeds are obtained when they have been inoculated and dressed with chemicals. Inoculated seeds should not be dressed with chemicals.
4.5 Cultural practices in legumes
Activity 4.6: A field visit to a farm where legumes are grown to observe cultural practices
Materials required
• Questionnaire
• Note books
• Pen
Visit a farm where legumes are grown and carry out the following activities:
(i) Observe the cultural practices carried out when growing legumes.
(ii) Prepare the land for planting soya beans or groundnuts.
(iii) Discuss and record your findings.
(iv) Present your findings to the class.
(v) Take teacher’s summary notes.
These are routine practices carried out in the farm during the production of a legume crop from planting to harvesting. They include, land preparation, sowing, gapping, thinning, weeding, fertiliser application, pest and disease control and harvesting.
(a) Land preparation
All the vegetation should be cleared before primary cultivation. This should be done during the dry season to allow the weed to dry. Tree stumps should be removed. Land should be dug or ploughed and then harrowed to the required tilth. A fine tilth is required for small seeds, while large seeds require medium tilth. Where the land is sloppy, soil conservation measures should be carried out.
(b) Sowing
Sowing should be done early at the onset of the rains so that the plants can make maximum use of available rains or moisture. Holes are made at the recommended spacing for each crop. The seeds are then placed in the holes at the recommended rate. Small seeded legumes may be drilled or broadcasted. The seeds are then covered with soil. During planting, phosphatic fertilisers are then covered with soil. The rates used depend on the type of fertiliser. Hand planting can be done on small farms while tractor planters are used on large farms.
(c) Field management practices
After crop emergence, the following field management practices are carried out:
(i) Gapping – Seeds that did not germinate should be replaced so as to maintain the correct plant population.
(ii) Thinning – Excess seedling that germinate in one hole or in clusters should be removed to prevent competition for moisture, light, nutrients and space.
(iii) Weed control – Field should be kept weed free especially during the early stages of growth. Shallow weeding is done to prevent root damage. Weeding should be carried out when soil is moist. Mechanical weeding should not be carried out during flowering to prevent knocking of flowers. Weeding should not be carried out on a wet day to prevent spread of fungal infection. It is recommended to uproot weeds during flowering. Chemical weed control is discouraged in growing of pulses. This is because they are sensitive to chemicals. Herbicides may be used in forage legumes.
(iv) Fertiliser application – Phosphatic fertiliser are used during planting.
(d) Disease control – Legumes are affected by fungal, bacterial and viral diseases. Fungal diseases include angular leaf spot, blights, anthracnoses, rusts, mildews and vascular wilts. Table 4.2 (a) shows legume crops attacked by fungal diseases. Study the symptoms and then name the crops attacked and the control measures for each disease.


They are controlled using the following methods:
(i) Regular spraying using fungicides before the crop is attacked.
(ii) Planting certified seeds to prevent disease transmission from the seed to the growing crop.
(iii) Use of resistant varieties.
Bacterial diseases include: Bacterial blight and halo blight. Table 4.2 (b) shows symptoms of legumes suffering from bacteria diseases. Study these symptoms and then name the crops attacked and control measures for each disease.

Bacteria diseases are controlled through the following methods:
(i) Rogueing to ensure infected plants do not transmit diseases to healthy plants.
(ii) Use of clean and certified seeds to prevent infection.
(iii) Crop rotation breaks the life cycle of the disease.
(iv) Close season to starve the disease organisms already in the soil to death.
(v) Control of vectors to prevent spread of diseases.
Viral diseases include rosettes, mosaics and leaf curls. These diseases are controlled through the following methods:
(i) Rogueing.
(ii) Use of certified seeds or planting material.
(iii) Crop rotation. (iv) Control of vectors.
(e) Pest control
There are few pests of economic importance to legumes. These include the pea blue butterfly and aphids.
These pests are controlled through:
(i) Rogueing
(ii) Crop rotation
(iii) Use of recommended insecticides
(iv) Proper spacing

Harvesting of Legumes
The stage of harvesting legumes is determined by use of the specific crop products. Pulses are harvested when the grains are mature and dry. They are uprooted and placed on a tarpaulin for threshing. Fodder legumes are harvested when they are highly nutritive and have adequate foliage yield. This is when about 50% of the crop has flowered. They are harvested, chopped into smaller pieces and taken to the zerograzed animals or dairy animals when they are being milked.
Growing of soya beans and groundnuts
Land preparation
It is done during the dry season by slashing previous crop residue, weeds and destumping. Digging or ploughing deeply the soil, harrowing to medium tilth and making of planting holes is done before the rainy season.
Holes dug for soya bean are spaced at 45 cm × 30 cm while for groundnuts are spaced at 60 cm × 15–30 cm and a depth of at least 5 cm depending on soil moisture conditions.
Planting
Done at the onset of rainfall. A teaspoon of phosphate fertiliser such as double super phosphate is applied per hole. Plant one to two seeds per hole and cover lightly with soil.
Field practices
These are carried out after germination which take place between 5 and 9 days. These practices include:
• Gapping to replace seeds where germination failed to take place or damaged by pests.
• Thinning is done by uprooting overcrowded seedlings leaving only vigorously growing seedlings to maintain correct plant population.
• Control weeds through tillage, uprooting and use of selective herbicides against grasses. Avoid weeding during flowering as this knocks off flowers reducing pod formation.
• Apply farmyard manure at a rate of 10 tonnes per hectare.
• Control diseases and pests through rogueing, regular spraying with fungicides, planting certified seeds, use of resistant varieties, close reason and using recommended insecticides against insect pests.
Harvesting
Soya beans are harvested when mature and dry by uprooting. Groundnuts pods are also uprooted by using a forked hoe. The plants are further dried on a tarpaulin. Threshing is done by hitting with a light stick or using machines known as threshers. The seeds obtained are winnowed and further dried. The seeds are then dusted to control pests, and packed in bags and taken for storage or the market.
4.6 Post-harvest techniques for soya beans and groundnuts
Activity 4.7: A field visit to observe post-harvest techniques of legumes
Materials required
• Questionnaire
• Note books
• Pen
Make a visit to the farm where legumes such as groundnuts and soya beans are grown and then:
(i) Observe the following post-harvest techniques of legumes drying, cleaning, handling, packaging and conditioning.
(ii) Discuss in groups the ways the post-harvest techniques are done.
(iii) Make a report of your findings.
(iv) Present your findings to the class.
(v) Take teacher’s summary report.
Post-harvest techniques are practices carried out to prepare produce for use or for marketing. Post-harvest practices carried out for legumes used by human beings for food are different from those carried out for fodder legumes grown for livestock. Post-harvest activities carried out for legumes edible by humans (soya bean and groundnuts) include:
Soya beans
(a) Threshing – This can be done manually or mechanically when soya beans are dried. Manual threshing is common in Rwanda while mechanical threshing may be cost effective for large-scale production.
(b) Winnowing – Should be done if threshing is done manually. Wind energy is used to separate the chaff from the grains.
(c) Drying – The grains are spread on a clean surface under the sun to reduce the moisture content to 1– 12.
(d) Handling – Soya bean grains should be handled with a lot of care to prevent contamination and post- harvest losses. The grains may be affected by aflatoxin which causes food poisoning to human beings.
(e) Conditioning, packaging and storage – Soya beans should be stored at a moisture content of 11 – 12. The dryness can be ascertained by cracking with teeth or dropping on a bottle. Dry soya beans will produce a characteristic rattling sound when properly dry. The dried grains should be packed in 50 – 100 kg bags.
The bags are placed on a rack to prevent chilling from the floor. Good storage influences the quality and this reduces the chances of germination while in the store. High temperature should be avoided as this increases deterioration and reduces seed viability.
Groundnuts
(a) Shelling: This is the removal of the nuts from the shells. It can be done manually or by a hand operated machine which separates the shells from the nuts.
(b) Drying: The shelled grains are sun-dried to a moisture content of 6.6 – 7%. Driers can be used in case of a cloudy day.
(c) Cleaning and grading: Cleaning is done to ensure that all foreign materials such as weed seeds, split seeds, stones and leaves are removed. The nuts are then sorted according to colour and size.
(d) Handling: The nuts should be handled carefully to prevent contact with water. Water increases the chances of growing moulds, some of which produces aflatoxin. Aflatoxin causes food poisoning to human beings and livestock.
(e) Conditioning, packaging and storage: Dry nuts should be packed in dry containers such as gunny bags, pots and gourds. The bags are stacked up to 10 bags high on separate stacks to allow free circulation of air. The bags are piled on wooden racks to avoid damage from dampness. The bags should be dusted with insecticides to protect the pods from storage pests.

Fodder legumes
Activity 4.8: Making hay using a baling box
Materials required
• Fodder crop for hay making
• Machete
• Baling box
• String
Using the materials provided, carry out the following activities:
(i) Harvest the fodder crop and leave it to dry.
(ii) Prepare the hay bales using the materials provided.
(iii) Remove the bales from the bail box and store them appropriately.
(iv) Discuss and record your findings. (v) Present your findings to the class.
(vi) Take teacher’s summary report.
Fodder legumes can be stored as hay or silage. Hay is fodder that is preserved dry while silage is fodder preserved in succulent or wet form.
Steps in hay making
(i) The crop for hay making is cut at the right stage when 50% of the crop is flowering. The cut fodder is spread on the ground under a shade to dry.
(ii) It is then turned regularly as it dries to ensure uniform drying.
(iii) The crop should be dried for 2 – 3 days.
(iv) The fodder should retain its original colour and rattle with a little noise.
(v) When the stems are twisted, they should not break and sap should not ooze out.
(vi) The fodder crop should be chopped using a machete to make it easy to compact during baling.
(vii) A baling box with the dimensions of the hay bales measuring (75 cm × 30 cm × 30 cm) should be used in making the hay.
(viii) Two strings are placed at each end of the baling box.
(ix) The box is filled with dry fodder. It is now called hay.
(x) The hay is compressed to form a compact cube in the box.
(xi) The bale is tied tightly with a string and the box turned upside down to remove the bale of hay.
(xii) The hay bales are then stored in a shed.
The illustrations below show the process of making hay. The steps followed are not placed in the order in which they take place. Study the illustrations and then arrange them in their correct order.
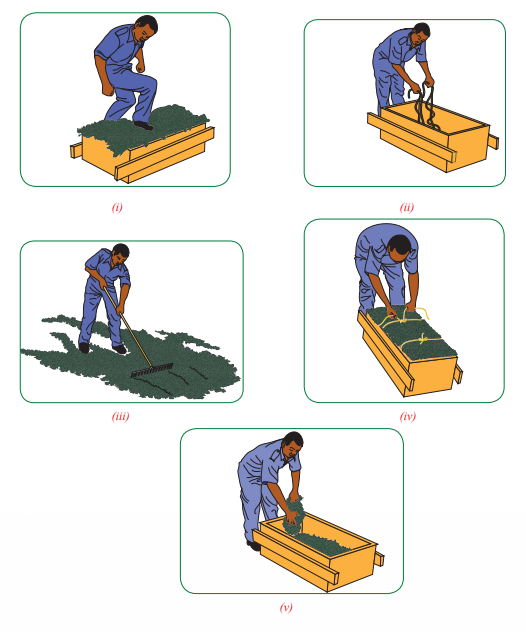
Silage Making
Activity 4.9: Silage making using the trench silo making
Materials required
• Crop for silage making
• Machete
• Polythene shed of appropriate length
• Garden line
• A piece of land
• Hand hoes
• Silage thermometer
• Spade/shovel
• Drum filled with water
• Wood pegs
Using the materials provided, carry out the following activities:
(i) Harvest the fodder crop and chop the crop into small pieces.
(ii) Allow the materials to wilt.
(iii) Use the materials provided to prepare silage.
(iv) Discuss and record your findings.
(v) Present your findings to the class.
(vi) Take teacher’s summary notes.
Silage is livestock feed made from fodder which is partially fermented, stored and fed to animals. Silage is prepared and stored in structures known as silos. Succulent legumes such as lucerne are used.
Ensiling procedure
1. The crop isready for harvesting when about 20 –50% of the plants have flowered.
2. A trench measuring 5 m long × 3 m wide and 1.25 m deep is prepared.
3. The site should be on a gently sloppy ground to encourage drainage.
4. Cut the crop and chop into small pieces using a machete or a chaff cutter.
5. The chopped plant material is wilted.
6. A polythene sheet is laid in the trench. It should be large enough to overlap on the surface.
7. The chopped materials are filled into the silo and compacted at every stage.
8. Heavy rollers can be used to compact the material or a drum full of water is used to compact the materials. 9. The temperature of the material should be taken using a silage thermometer. The optimum temperature is maintained at 32°C.
10. The material is then covered with the plastic sheet to keep out oxygen and maintain anaerobic conditions.
11. A layer of soil is put over the polythene sheet to form a dome shape.
12. A trench is dug around the silo to prevent water runoff from entering the silo.
13. The temperatures should constantly be checked during the first three weeks until the temperature becomes stable. The silage is then ready for use by livestock.
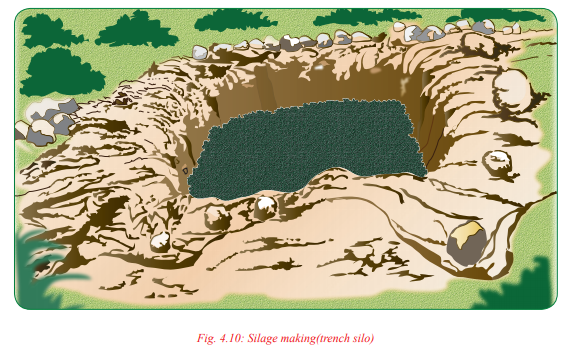
Group Activity
Preparation of planting materials for propagating legumes
Materials required
• Cuttings
• Layerings
• Seeds of leuceana, beans
• Innoculants
• Fungicides
• Insecticides
• Water
• Containers
Visit the school farm and prepare planting materials for legumes using the following methods:
(i) Breaking seed dormancy through scarification, soaking. Apply rooting medium to the cutting ends.
(ii) Dress the seeds, cuttings and layering using recommended pesticides and fungicides.
(iii) Apply the right strain of rhizobium to legume seeds through inoculation.
(iv) Discuss and record your findings.
(v) Present your findings to the class.
Unit Summary
• A legume is a plant which bears a fruit known as a pod.
• Legumes are classified into:
(i) Pulses – eaten by human beings.
(ii) Fodder – eaten by livestock.
Legumes are very important to human beings as they provide essential proteins to human beings and livestock. They provide vegetables for human diet and are useful as a supplementary feed for livestock. Many legumes have medicinal properties. Fodder trees and shrubs are also useful in agroforestry and help in reducing soil erosion by acting as wind breakers. They also bind soil particles thus improving soil structure and soil properties. Fodder trees and shrubs also provide flowers improving bee keeping. Some legumes such as desmodium are important in controlling stalk borers and the witch weed. Other legumes such as the pigeon peas are a source of stakes for climbing plants. Legumes are propagated by seeds and vegetatively by cuttings. Their post-harvest techniques include threshing, shelling, drying, conditioning, cleaning, handling, packaging and storage.
Key Terms
1. Pulses – Grain legumes used as human food.
2. Fodder – Pasture cut before feeding to livestock.
3. Agroforestry – Growing of trees or shrubs, pastures (keeping livestock) and growing crops on the same piece of land.
4. Stakes – Supports for growing plants.
5. Plant propagation – Multiplication of plants.
6. Dormancy – A period when planting material cannot sprout or germinate even though they are provided with necessary condition for germination.
7. Scarification – Mechanical breakage of a seed coat to break dormancy.
8. Growth regulators – Hormones that control growth.
9. Certified seeds – Seeds that are of high quality and resistant to disease attack.
10. Threshing – Separation of the seed from the pod. It also refers to shelling.
11. Conditioning – Preparing produce to escape rotting and attack pests, for example, by drying to the correct moisture content.
12. Viability – Ability to germinate or sprout.
13. Crop rotation – Growing of different crops on the same piece of land in particular order or sequence. 14. Inoculation – Coating legume seeds with the right type of artificial nitrogen fixing bacteria to stimulate production of root nodule.
15. Herbicides – Chemicals that kill weeds.
16. Sorting – Selecting to separate into grades.
17. Grading – Grouping according to size, colour, texture and quality.
18. Forage – Plant material either growing naturally or planted for the purpose of feeding to livestock.
19. Hay – Fodder preserved in dry form.
20. Silage – Fodder preserved in wet form.
21. Silo – Structure for preserving silage.
22. Ensiling – Preparation of silage.
Revision Questions
1. What is a legume?
2. Select common legumes grown in Rwanda.
3. Describe the importance of legumes in soil conservation.
4. Give two classes of legumes depending on the use.
5. Predict the characteristics of soil where legumes are grown.
6. Below are post-harvest practices carried out in groundnut production. Study them carefully and answer the question that follows:
(i) Conditioning
(ii) Shelling
(iii) Cleaning and grading
(iv) Packing and storage
Which of the following arrangement represents the correct order?
A. (ii), (iii), (i), (iv)
B. (i), (ii), (iii), (iv)
C. (ii), (i), (iv), (iii)
D. (iii), (iv), (ii), (i)
7. Carry out three post-harvest techniques in groundnuts.
8. Give characteristics of legumes used for:
(a) Hay making
(b) Silage making
9. Carry out the preparation of hay.
10. What is seed inoculation?
11. Give five methods of breaking dormancy in legume seeds.
12. The following operations are carried out during the growing of legumes in the field:
(i) Inoculation
(ii) Harrowing
(iii) Thinning
(iv) Pest and disease control
(v) Drying in the sun Which of these operations are carried out during the growing of soya beans? A. (i) , (ii)
B. (iii), (iv)
C. (iii), (v)
D. (ii), (iv)
UNIT 5:RUMINANTS
Introduction
Ruminants are mammals that are able to acquire nutrients from plant-based food by use of microbes in a specialised stomach compartment known as rumen. They include domestic and wild animals as well. Domestic ruminants include animals such as cattle, sheep and goats. Each has different ʻtypes᾿ of animals based on the product it is kept for and ʻbreeds᾿, based on the place of origin and characteristics. This unit deals with cattle, sheep and goats, describing their characteristics, management in terms of feeding, housing, diseases that attack them and their symptoms and control. The pictures below give an overview of the whole unit.

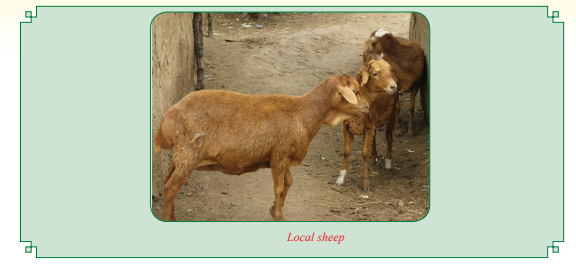
5.1: Definition of ruminant
Activity 5.1: Finding out the meaning of the term ruminant
Materials required
• Dictionaries
• Internet and search engine
• Library books
• Note books
(i) Use internet, dictionary, library books and your own experience to find out the meaning of the term ruminant.
(ii) Discuss and record your findings.
(iii) Present your findings to the class.
(iv) Take teacher’s summary notes.
A ruminant is a herbivorous mammal that chews cud and has a specialised stomach which ferments plant based food material known as rumen. Ruminants have four stomach chambers namely rumen, reticulum, omasum and abomasum.

5.2 Ruminant species reared in Rwanda
Activity 5.2: A visit to an agricultural and veterinary schools or ruminant farms to observe ruminant species kept in Rwanda
Materials required
• Questionnaire
• Note books
Visit an agricultural and veterinary school or ruminant farm to observe ruminant species reared in Rwanda, then carry out the following activities:
(i) Observe the type of ruminants reared in the farm and name them.
(ii) Find out the difference between the different ruminant species observed.
(iii) Find out whether there are other ruminants not observed in the farm or school.
(iv) Discuss and record your observation.
(v) Present your findings to the class.
(vi) Take the teacher’s summary notes.
The ruminant species of animals kept in Rwanda include cattle, sheep and goats. Study the photographs below which show livestock species kept in Rwanda. Identify the animals which are ruminants and name each one of them.

5.3 Ruminant breeds and their characteristics
Activity 5.3: Finding out the characteristics of ruminant breeds
Materials required
• Video of ruminants breeds
• Internet
• Coloured photographs of cattle breeds, goat breeds and sheep breeds
• Magazines on ruminant breeds
• Note books
Watch a video show on different ruminant breeds as well as use the colour photographs and magazine provided to carry out the following activities.
(i) Identify the different ruminant breeds.
(ii) Find out the characteristics of each breed.
(iii) Present your findings to the class.
(iv) Take teacher’s summary notes.
(a) Cattle breeds – they include the Ankole, Friesian and Jersey. They are divided into dairy, beef and dual-purpose breeds.
(b) Goat breeds – are divided into dairy goats and meat goats. Dairy goats include Saanen, Togenburg and Alpine. Meat goats include local goats, Boer and Ethiopian galla.
(c) Sheep breeds – are divided into mutton sheep and wool sheep. Wool sheep include Merino, Corriedale, Mountain white and Romney Mursh. Mutton sheep breeds include local sheep and Dorper.
Ruminant breeds are identified using external features such as colour, size, body conformity and the origin.
Characteristics of Cattle Breeds
To understand the characteristics of cattle breeds, it is important to learn the parts of the body of cattle.
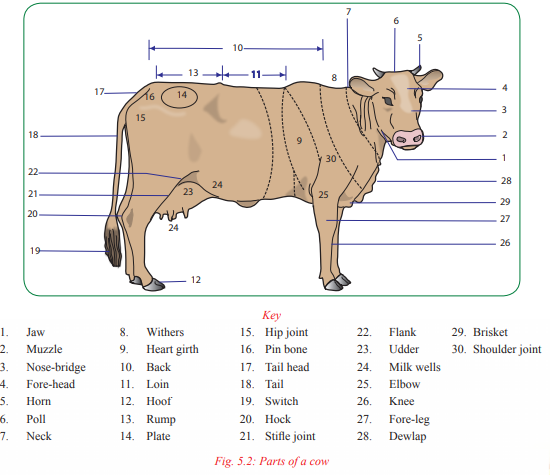
(a) Ankole Cattle
This is an indigenous cattle originally from the Sanga cattle which is native to Africa. It has the following characteristics:
(i) Long distinctive horns that can reach a length of up to 1.2 metres each.
(ii) Brown in colour or deep red though there are some shades of black and white.
(iii) Medium in size with bulls weighing 450 – 730 kg, cows weigh 430 – 540 kg, calves are born with a live weight of 14 – 23 kg.
(iv) Have a pendulous dew lap and umbilical fold.
(v) Have humps of varying sizes.
(vi) They are more tolerant to tropical diseases and well adapted to local climate.
(vii) They are mainly kept for meat and milk. They produce about 1 – 2 kg of milk per day.

(b) Friesian
It is also known as Holstein and is an exotic dairy breed from Holland. It has the following characteristics: (i) Black colour with white patches or white colour with black patches.
(ii) It is large in size with bulls weighing 900 – 1000 kg and cows 550 – 680 kg. Calves are born with a weight of 35 – 40 kg.
(iii) It produces the highest amount of milk per lactation period which is 9,150 kg per lactation of 305 days with good management.
(iv) The heifers mature at 21 months and calves down the age of 30 months.
(v) It is well adapted to the highlands of Rwanda.
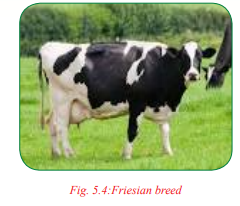
(c) Jersey
This is the smallest of the exotic dairy breeds. It originated from the English Channel Island breeds. Jersey breed has the following characteristics:
(i) The colour varies from light yellow brown or fawn to a shade of black.
(ii) It has protruding black eyes and the tail switch and muzzle are black in colour. It has a slightly dished face and a wedge shape.
(iii) This is the smallest of all dairy breeds. The bulls weigh 540 – 820 kg and cows weigh 350 – 450 kg. The calves are born with a live weight of 20 – 25 kg.
(iv) The cows produce 4, 270 kg of milk per lactation period of 305 days with good management. Its milk has a butterfat content of 5 – 5.3%.
(v) The heifers mature early at between 15 and 18 months and have their first calving at between 24 and 27 months of age.
(vi) It is adapted to the medium altitude to high altitude regions of Rwanda.
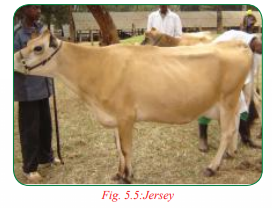
Characteristics of Goat Breeds
Goats are small hardy ruminants mainly kept by small-scale farmers. The following diagram shows the general parts of a goat. No. 60 parts of a goat
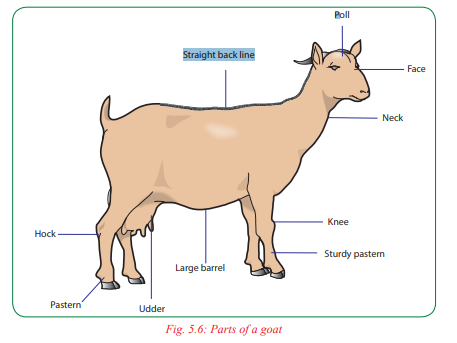
Goat breeds include:
(a) Saanen: This breed originated from Switzerland and is mainly kept for milk production. It has the following characteristics:
(i) Large in size.
(ii) White in colour.
(iii) Has upright ears pointing forward.
(iv) Have an average milk production of 3 – 3.5 litres per day with a butterfat content of 4%.

(b) Alpine: This is an exotic dairy breed that originated from Britain. Its characteristics include:
(i) The colour varies from brown chamois colour to white or grey stripes on its back. It may also have facial stripes.
(ii) Medium sized with males weighing 77 kg and females weigh 61 kg.
(iii) Has backward pointing horns and has a beard.
(iv) Kept mainly for milk production 2,134 litres of milk per lactation period.

(c) Local goats (small East African goats): The local goats are indigenous to Rwanda and other East African countries. They are mainly kept for meat and are small in size. They have the following characteristics:
(i) The colour ranges from pure white to pure black with mixes of roan and speckled brown.
(ii) Males weigh up to 30 – 40 kg and does weigh 25 – 30 kg.
(iii) Have backward pointing horns, males have mane and beards.
(iv) They are kept for milk and meat.
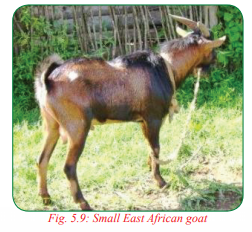
(d) Ethopian Galla: This is an indigenous meat goat, mainly found in the horn of Africa. It has the following characteristics:
(i) It is white in colour but with a black skin. The muzzle underneath the tail and feet are black in colour.
(ii) The males weigh up to 70 kg while the females weigh 45 – 66 kg.
(iii) Mainly kept for meat and milk production.
(iv) It is a hardy breed and is kept mainly in the marginalised areas.

(e) Boer: This goat was developed through crossing indigenous goats from South Africa. It has excellent meat quality. It has the following characteristics:
(i) It has white bodies with a distinctive brown head.
(ii) It has long pendulous ears.
(iii) It is fast growing reaching a slaughter weight of 22 – 36 kg in about 90 days.
(iv) Males weigh about 76 – 89 kg when mature and females weigh 70 kg.
Characteristics of Sheep Breeds
Sheep are small ruminants covered with wool or hair.
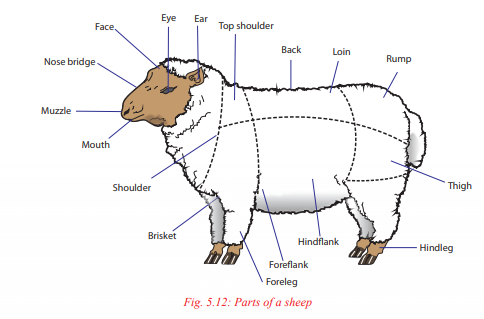
(a) Local Sheep
Local sheep are native to Rwanda and other East African countries. They have the following characteristics:
(i) Have small bodies weighing an average of 40 – 60 kg when mature.
(ii) They have different colour shades ranging from dark brown to white or a mixture of the colours.
(iii) They are hardy and are kept in the marginalised areas with little rainfall. They are kept for mutton production.
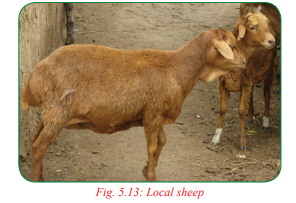
(b) Mountain white sheep
These sheep originate from Wales and are mainly kept for wool production. Their characteristics include:
(i) They are a small hardy breed.
(ii) Males have horns while females are polled.
(iii) They produce wool of a staple length above 5 cm – 7.5 cm.
(iv) They survive well in cool mountainous regions of Rwanda.
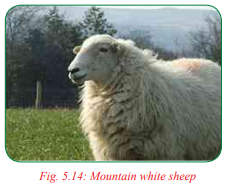
(c) Merino Sheep
This is an exotic breed that originate from Spain. It is kept for wool production. It produces the finest type of wool. It has the following characteristics:
(i) Small bodied with a dropping rump and narrow chest.
(ii) Muzzle is flesh coloured.
(iii) Hooves, wool and horns are white in colour.
(iv) Hardy breed that is kept under extensive conditions.
(v) Can tolerate cool highland places.
(vi) Mainly kept for wool, whose staple length is 8 – 10 cm.

(d) Corriedale Sheep
It is a dual purpose breed which originated from Australia and has the following characteristics:
(i) It is polled with the head covered with wool that covers the eyes. It hence suffers from wool blindness. (ii) Produces good quality wool of medium staple length of 8.9 cm – 15.2 cm.
(iii) Rams weigh 84 – 90 kg.
(iv) Used to crossbreed with other breeds to improve wool and mutton quality.
(v) Has a broad body.

(e) Dorper
It is fast growing mutton sheep developed in South Africa. It has the following characteristics:
(i) It is white in colour with a black head.
(ii) Has a short fleece and, therefore, suitable for rearing in hot and dry areas.
(iii) Fast growing with male weighing 82 kg – 91 kg.
(iv) Has a high lambing percentage producing twins.
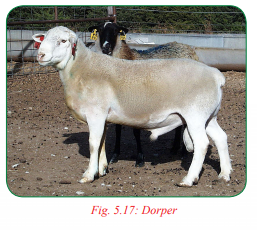
5.4: Ruminant shelter standards
Activity 5.4: A visit to a multipurpose farm to observe ruminant shelter standards
Materials required
• Questionnaire
• Note books
• Pens
Visit a a farm where ruminants are reared and carry out the following activities:
(i) Observe cattle shelter, goat shelter and sheep shelter.
(ii) Record the materials used to make the shelter.
(iii) Observe and record the shelter features which are ideal for keeping livestock.
(iv) Discuss and record your findings. (v) Present your findings to class.
(vi) Take teacher’s summary notes.
Ruminant shelters are farm structures which are built to house ruminants. They vary in size, design and shape depending on the type of animals housed. Ruminant shelters should have the following features:
(i) Be spacious to accommodate a number of animals without causing congestion.
(ii) Secure to protect the animals from dangerous wild animals and thieves. Strong materials made from timber, wood, steel or concrete are used. Other deterent features such as electricity, thorns, broken glass can be included.
(iii) Proper drainage which allows urine, water and other waste products to flow off preventing accumulation. It also facilitates easy cleaning.
(iv) Be free from draught winds, these are cold winds which can predispose the animals to respiratory diseases such as pneumonia.
The following are factors to consider when constructing ruminants shelter:
(a) Siting ruminant shelters
When siting livestock shelters, the following factors should be considered:
(i) Location of the homestead: Should be located at a place where there is a good view so that the farmer can quickly assess the condition of the ruminants even from the farm house.
(ii) Accessibility: The farmer should be able to get to the shelter from any part of the farm with ease.
(iii) Security: The livestock shelter should be safe from wild animals, thieves and other stray livestock.
(iv) Direction of prevailing wind: The shelter should be on the leeward side of the homestead so that bad smells cannot drift to the homestead.
(v) Well-drained place preferably gently sloping: This encourages free movement of running water that prevents damp conditions.
(vi) Relationship with other structures: Livestock structures should be close to one another so as to save time and have efficient labour management when carrying out routine farm activities.
(vii) Farmer’s tastes and preferences: The shelters should satisfy farmer’s liking.
(viii) Nearness to water and electricity: Water should be easily available in these shelters for cleaning and for animals to drink. Electricity is required for performing some operations such as operating milking machines.
(b) Materials for construction
The materials selected for construction of shelters should be:
(i) Durable so that they would not be replaced or repaired frequently.
(ii) Available to allow a farmer have ease of choice and construction.
(iii) Cheap or affordable. (iv) Suitable for the enterprise.
(v) Suitable to the prevailing environmental conditions.
(vi) Strong for the intended use of the structure.
(vii) Easy to work with.
Activity 5.5: Observing cattle, sheep and goat shelter while in a multi-purpose farm
Materials required
• Questionnaire
• Note book
While in a multi-purpose farm where cattle, sheep and goats are reared, carry out the following activities:
(i) Observe all the shelters taking note of the materials used for construction.
(ii) Observe and record how the materials have been arranged to make the shelters.
(iii) Take accurate measurements of all the details and the materials used in each part.
(iv) Discuss the different operations carried out when constructing the shelters.
(v) Record your observations.
(vi) Present your findings to the class.
(vii) Take teacher’s summary notes.
Cattle shelters
Cattle that are properly housed perfom better than those kept outside without shelters. These shelters help to protect cattle from adverse weather conditions as well as keep off diseases.The commonest cattle shelters include sheds, zero grazing unit, milk sheds and calf pens.
Cattle shed
This is a simple, roofed structure, usually made of wood or metal used as a shelter for animals. Most cattle sheds have open walls.
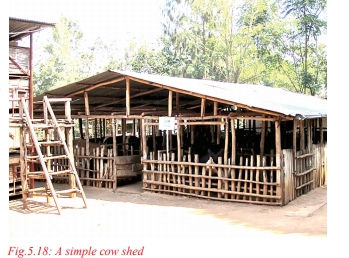
Zero grazing
This is a structure for housing dairy animals where feed and water are provided within the unit. It is an intensive system of dairy production that allows for easy monitoring of animals.The animals are not exposed to the environmental hazards compared to open grazing.The floor of zero grazing unit should be concrete from the milking stalls to the walking and dunging area.The sleeping cubicles should have an earthen floor which is soft to give comfort to the sleeping cow.
Construction material for zero grazing unit include:
• Corrugated iron sheets for roofing
• Wooden posts
• Rails which are of timber
• Concrete (cement, sand and ballast)
• Nails, bolts and nuts
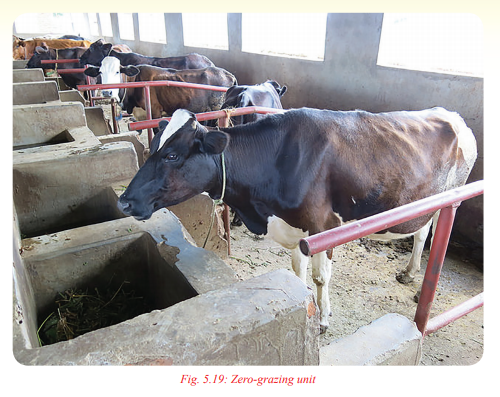
Zero grazing unit should also have a feeding and watering area, calf pen and an area for chopping or preparing the feeds. The concrete floor should have side drainage to lead water, urine and dung to disposal area.
Calf pens
This is an enclosure for confining calves. It can be constructed as part of the zerograzing unit or as separate unit. Calf pens are constructed near the milk sheds to make it easy to feed the calves with milk at body temperatures. They can be movable or permanent depending on the dairy management in the farm.
Requirement of the calf pens
A good calf pen should have the following:
Well ventilated – This to provide fresh air to prevent air borne organisms, minimise dust, eliminate noxious odours, remove excess moisture and heat without causing a lot of draught on the calf.
Free from draught – Calves need a dry, draught-free environment to maintain their body temperature and give calves the comfort they require.
Well drained – The floorshould be of materialsthat can drain urine and allow droppings to fall off. Blatted floors which warm bedding materials are recommended. The walls should not be painted to prevent lead poisoning since calves have a habit of licking the walls. Young calves should be single housed to prevent licking each other which creates digestion problems from hair swallowed, as it forms indigestible balls. Calves can be put into group pens at the age of 4 months after weaning. Groups of 6 –12 calves are allowed in one pen which is spacious enough to prevent overcrowding.

Sheep shelters
The type of shelters used for sheep depends on the weather conditions of an area. Traditional barns, pole buildings or metal buildings can be used. A low cost shelter to protect the animals from cold and hot sun is preferred.The shelters should be built on an elevated well drained area, well protected from the wind.
The house can be divided into pens for lambing, the ewe with lambs, the ram and for the rest of the sheep. This is in case the animals are confined.The floor should be slatted and with bedding to keep the hair sheep warm and wool sheep clean. Sheep shelter resemble the same one used for the goats as shown in Fig. 5.21.
Construction of a goat shelter
Activity 5.6 Construction of a goat shelter
Materials required
• Timber
• Ply wood
• Crow bar
• Concrete
• Claw hammer
• Nails
• Iron sheets
• Wire mesh
Using the materials provided, carry out the following activities:
(i) Prepare different parts of the goat shelter by digging holes, planning timber and sawing timber to the required sizes.
(ii) Assemble the goat shelter using the parts you have prepared.
(iii) Observe caution when handling tools during the construction of the goat shelter.
(iv) Discuss and record your observations and experiences.
(v) Present your findings to the class.
(vi) Take teacher’s summary notes. A goat shelter is a place where goats are kept. Goat shelters are made based on the following:
(i) Age groups of animals to be housed.
(ii) Sex of animal to be housed.
(iii) Type of enterprise either dairy production or meat production.
Requirements of a goat shelter
(i) Spacious enough to allow freedom of movement.
(ii) Free from draught winds.
(iii) Well ventilated and dry to avoid humid conditions.
(iv) Easy to construct and undertake repairs whenever necessary.
(v) Strong to support the intended weight of goats and farmer while working inside.
Procedure of constructing a goat shelter:
(i) Select a suitable site.
(ii) Clear vegetation around the site at least 3.3 m × 3.3 m for three goats.
(iii) Measure the dimension of the structure you intend to keep the goats.
(iv) Mark the four corners of the site using wooden pegs.
(v) Dig holes at least 60 – 90 cm deep at the corners.
(iv) Environmental conditions such as prevailing wind.
(v) Topography and drainage.
(vi) Skills of the farmer.
(vi) Place poles in the holes and reinforce with concrete.
(vii) Allow the concrete to firm and dry. (viii) Pack soil into the hole and ram it firm.
(ix) Fix wooden boards on the sides exposed to the windward side.
(x) Make a wall plate by fixing wooden frames 2 – 4 inches wide against the wall.
(xi) Fix rafters over the sloping length of the goat house.
(xii) Fix the purlins at considerable length from each other and then fix the iron sheets.
(xiii) Construct a raised slated floor at least 0.6 m – 0.9 m above the ground by fixing a firm wooden floor frame using wooden beams measuring 3 inches by 4 inches.
(xiv) Fix wooden planks over the frames to leave spaces of about 1.4 cm – 1.6 cm apart to allow droppings to fall.
(xv) Construct an inclined passage to the door with an elevation of less than 45°.
(xvi) Place feeder waterers and raised bed where the goat can rest. Place straw on the bed.

5.5 Selection criteria for goats, sheep and cattle
Activity 5.7: A field visit to observe the selection criteria for ruminant animals
Materials required
Questionnaire
• Note book
Visit a ruminant farm with ideal ruminant breeds and carry out the following activities: 147
(i) Observe the features of a dairy goat breed and that of a meat goat breed.
(ii) Compare the characteristics of the two types of breeds.
(iii) Observe the characteristics of mutton sheep and wool sheep breeds, make a comparison between them.
(iv) Observe the characteristics of Ankole, Friesian and Jersey cattle breeds and compare the two.
(v) Discuss and record your findings.
(vi) Present your findings to the class.
(vii) Take the teacher’s summary notes.
Selection is a process of choosing livestock with unique characteristics for a production enterprise. Livestock are mainly kept for products such as milk, meat, skin and hide and wool or hair.
(a) Selection of goats
Dairy goats: When selecting a dairy goat, the following should be considered:
(i) Udder structure and teat placement should be large and well rounded and not hanging below the hocks. The teats should be two in number and not fish teats, teats with spots or bottle-shaped teats.
(ii) Grow fast and mature early.
(iii) Should be alert and active. (iv) Should have normal but good appetite.
(v) The mucous membranes or membranes within the eyes, nose, ears, anus and tongue should be bright pink.
Meat goats: The following criteria should be considered:
(i) Should have well proportioned natural base.
(ii) Should have a well muscled body which is deep and balanced.
(iii) Should have a high growth rate potential and be good converters of forage to meat.
(iv) Should have fast growth to get to market weight early.
(b) Selection of sheep
When selecting sheep for mutton production, the following characteristics should be considered:
(i) A wide straight back.
(ii) Smooth shoulders.
(iii) Fullness through the heart or girth area.
(iv) A good spring of ribs.
(v) Long well balanced body with adequate skeletal size.
(vi) The feet and forelegs should be straight and not bowed or wide apart with strong feet and pasterns. The hind legs should be normal spaced and the rump in line with the hocks.
(vii) The mouth should be normal without the upper or lower jaw longer than the other.
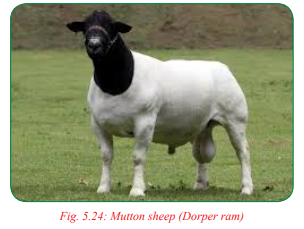
Wool sheep: When selecting wool sheep consider:
(i) Wool with long staple length with low shrinkage and crinkle.
(ii) Fleece should be white colour for easy dyeing.
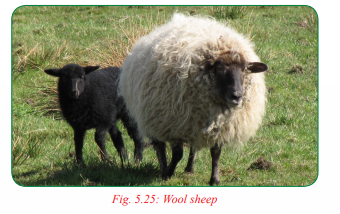
(c) Selection criteria for cattle
The selection criteria for cattle depends on the type of production. For dairy breeds, the following are considered:
Dairy cattle breeds should have the following characteristics:
(i) Wedge shaped body to triangular in shape with wide hind quarters and a tapering shape towards the head.
(ii) Well developed hind quarters with big room for larger udder.
(iii) Large and well developed udder and teats with prominent milk veins.
(iv) Lean body with little flesh.
(v) Large stomach capacity.
(vi) Mild temperament and docile.
(vii) Fertile with short calving period.
(viii) Reduced navel.

Selection criteria for beef cattle breeds
(i) Head should be large, with thick neck.
(ii) Should have a straight topline for exotic.
(iii) The legs should be short to support a heavy body.
(iv) The main body and ribs are cylindrical, well fleshed and muscled.
(v) The hump should be large and erect for local breeds.
(vi) The hoofs and pastern should be wide and strong to support a heavy body.
(vii) The animal should have a normal walking gait and limping.
(viii) The body should be fat with deep muscles.
In beef breed cows, the teats are small and udder is reduced in size.5.6 Feeding ruminants
Activity 5.8: Finding out the types of feeds required for feeding ruminants
Materials required
• Library books
• Textbooks
• Internet
Using the references provided, carry out the following activities:
(i) Find out the types of feeds given to ruminants.
(ii) Discuss and record your findings.
(iii) Present your findings to the class.
(iv) Take teacher’s summary notes.
Fodder species for ruminants
Ruminants are fed with the fodder and concentrates. Fodder crops are grown and then harvested before feeding livestock.Types of fodder
The types of fodder grown include:
(i) Grass
(ii) Legumes
Grass fodder
These supply energy in form of cellulose to livestock.
They are succulent leafy grasses and include:
(i) Napier grass
(ii) Guatemala grass
(iii) Sudan grass
(iv) Maize
Legume fodder
These mainly supply proteinsto livestock. They are leafy legumes. The leaves, flowers and pods are consumed. These include:
(i) Lucerne
(ii) Desmodium
(iii) Vetch
(iv) Leuceana
(v) Sesbania
The following photographs show different types of legume and grass fodder used to feed ruminants. Study them then identify and classify the fodder into either legume or grass.

Concentrates
Concentrates are livestock feeds which have a high nutritional value and little fibre. There are two types of concentrates. These include:
Energy concentrates
They provide energy to the ruminants. Energy concentrates have a high content of carbohydrates. They include molasses, ground flour of various grains.
Protein concentrates
These are livestock feeds with high protein content. They are mainly obtained from animal sources such as milk, blood, bones, plants, mainly legumes or oil crops such as beans, soya, ground nuts, simsim and sunflower. Seeds are ground to produce a meal or a cake.
Vitamins
These are supplements given in form of premixes where various concentrated vitamins in powder, dissolved liquid form or injectables are given to livestock. Vitamins provide essential growth requirement and include vitamins A, B, C, D, E and K.
Minerals
These are given as food supplements. They are required in small amounts to support various metabolic processes in the livestock bodies. The minerals include phosphorus, calcium, iron, iodine, zinc, copper, cobalt, chlorine and sodium. Mineral salts are given in form of powders or mineral blocks.

Feeding goats
Activity 5.9: A visit to a farm to observe feeding of ruminants (cattle, sheep and goats)
Materials required
• Questionnaire
• Note book
Visit a farm around your school or within school farm where the ruminants are kept and carry out the following activities:
(i) Find out the types of feeds given to goats, sheep and cattle and record your findings.
(ii) Ask the frequency of feeding the goats, sheep and cattle with the different nutrients or food substances. (iii) Discuss and extrapolate the different ingredients of a goat, sheep and cattle diets.
(iv) Make a feeding plan for different ruminants according to age groups.
(v) Discuss and record your findings.
(vi) Present your findings to the class.
(vii) Take teacher’s summary notes.
Feeding goats mainly involves giving plant materials. Goats should also be fed according to their age and type of enterprise, either milk goats or meat goats. The following are some of the feeding practices for goats:
(a) Creep feeding or feeding of kids.
(b) Feeding when weaning goats.
(c) Feeding of adult goats which involve:
(i) Flushing
(ii) Steaming up
(iii) Fattening
There are two main reasons for feeding goats:
(i) Maintenance
(ii) Production
When carrying out maintenance, all food nutrient requirements are provided in their correct proportions but only to sustain the animal life. While feeding for production, an extra amount above the maintenance is given to support production such as milk production and meat production.
Factors affecting nutrient requirement of goats
These factors include:
(i) Activity level in terms of production and maintenance.
(ii) Stage of pregnancy of kidding rate.
(iii) Stage of lactation or amount of milk produced.
(iv) Rate of growth. (v) Type of production enterprise.
(vi) Body condition such as weight and health status.
(vii) Market requirements.
(viii) The age and weight of the goat.
Feeding young goats
After birth the young goats can either be fed naturally and be allowed to run with their mothers and to suck naturally. This practice is common with meat goats such as Ethiopian Galla and Boer.
Artificial feeding or hand feeding
Artificial feeding
Young goats are separated from their mothers after 7 days. Milk is then given to the young goats using baby bottles and teats or using clean buckets. Artificial feeding is done to dairy goats or goats which have been orphaned early. Each kid is given about 0.5 litres of milk per day at the beginning and is increased to 1.25 litres of milk per day by the third week. Bottle feeding is done twice a day in the morning and evening. Dairy concentrates such as dairy meal and good quality hay or wilted Lucerne is introduced at 3 – 4 months of age.
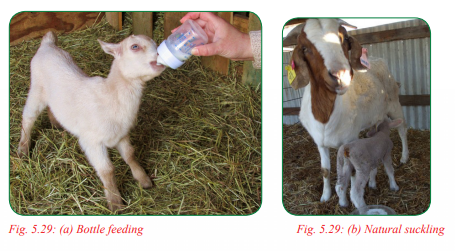
Importance of feeding young goats with colostrums
Colostrum is the first milk that a doe produces after giving birth.
Colostrum has the following properties:
(i) Highly digestible.
(ii) Contains antibodies to protect the young goats from diseases.
(iii) Highly nutritious and contains minerals, vitamins, proteins and important sugars.
(iv) Acts as a laxative to clean the stomach contents.
Feeding weaning goats
Weaning is the introduction of solid feeds to kids of young goats. They introduce micro-organisms in the rumen and make rumen strong to adapt and accept solid feeds. Early weaning is done at 35 days of age and when there is a limited supply of milk. The following feeds can be given:
(i) Hay
(ii) Wilted lucerne
(iii) Dairy concentrates
(iv) Milk in limited amounts
Late weaning is mainly done to meat goats. Weaning is mainly done when the young goats are two and a half times their birth weight, for example, if they were born at 5 kg weight they should be weaned at about 5 kg of weight. Young goats suffer from weaning shock where they suffer from diarrhoea and weight loss.
Feeding adult goats
Goats are browsers and prefer feeding on leaves from twigs and short trees. Goats would browse on moist indigenous shrubs such as acacia, lantana and grass. This can be supplemented using:
(i) Pasture hay
(ii) Lucerne
(iii) Grain rations
(iv) Concentrates in form of dairy meal
(v) Salt licks or mineral licks
(vi) Vitamin premixes
(vii) Enough clean water
Feeding plan for goats
The following is a summary of the feeding plan for different age groups:
Kids
• Suckle colostrum during the first 3 – 4 hours and continue for three days. Meat goats are left with mothers to continue sucking until weaning.
• Dairy goats are separated after 7 days and hand feeding is done or bottle feeding is done. Giving 0.5 litres of milk per day for first week and increased to 1.25 litres of milk per day by 12th week or weaning time twice daily.
• Introduce soft herbage in form of wilted lucerne and hay at 8 weeks or two and a half times the birth weight.
• Daily meal can be given at a rate of 250 grams per day, also an artificial grain mix can be used by mixing the following ingredients:
(i) Crushed maize 60%
(ii) Wheat bran or soya meal 10 – 30%
(iii) Trace minerals 0.5%
(iv) Dicalcium phosphate 0.5%
(v) Vitamins 0.5% Orphaned kids can also be adopted or given to foster mothers.
Weaners
Introduce hay fodder or lucerne fodder at 12 weeks of age giving more protein based plants.
• Dairy meal can also be given or an artificial grain mix, though the amount needs to be increased depending on the body weight. Between 1 and 2 kg of grain mix with at least 14% protein and 15% or 16% crude fibre.
• Water should always be given.
• The young goats should also be allowed to graze with other goats. If they are meat goats or if they are dairy goats, they should be put in a different pen and a hay rack suspended for them.
Adult goats
Adult goats feed on plant material which includes grass and leaves or twigs of various varieties and types of plants. However, this needs to be supplemented with waste products such as carrots, peelings of sweet potatoes, bananas, pods of legume plants. If forages are used then the forage has to be a mixed grass legume hay or pasture. A good mixture is that of grass and sweet potatoes or grass and clover. Pastures can be 157 utilised continuously or on a rotational basis.
• Dry forage in form of hay or lucerne should be provided.
• Legume fodder such as calliandra, leuceana, sesbania, vetch, desmodium should be given on a routine basis.
• Dairy goats should be supplemented with dairy meal.
• Mineral lick and vitamins should be provided.
Other forms of feeding adults include:
(a) Flushing which involves giving both the buck and doe high quality feeds and in increased amounts around breeding time. This should be done 2 – 3 weeks before breeding begins and continues for a further 3 weeks after mating.
(b) Steaming up. This is a practice of giving highly nutritious feed to a doe around the time of giving birth. In goats it is done 3 – 4 weeks before kidding. Steaming up helps to:
(i) Provide nutrients to growing foetus.
(ii) Build energy for giving birth.
(iii) Improve milk production.
(iv) Promote good health of the mother.
(c) Feeding nursing does
• The does should be allowed to graze normally or browse normally however, it is important to give additional feeds which are rich in carbohydrates and proteins.
• Additional mineral supplements and vitamins are required.
• Also clean water should be provided.
5.7 Feeding cattle
Feeding dairy cattle
Newborn calves are separated from their mother after birth and then fed artificially. They are fed on colostrum for the first 3 – 5 days. They are then fed on milk according to body weight until sixty days of age. Those calves not on mother’s milk should be given milk replacers.
Calf starter pallets should be provided from one week of age. Starter rations are rich in minerals and vitamins. The calf is fed with wilted lucerne and soft grass at the rate of 8 – 10% of the body weight.
Early weaning – The calf is weaned 4 – 5 weeks of age by reducing milk and increasing dry feed at a rate of 1.5% of body weight. Early weaning is carried out also to control scours. Hay or silage is given from 8 – 10 weeks to four months.
Late weaning – It is done at 9 – 10 weeks before solid feeds are introduced. This should continue to four months of age.
Feeding heifers, bulls
They should be given solid feeds such as grass, legumes, concentrates and salts to encourage growth and early maturity at 15 months.
Grains, pastures and hay mixture should be given depending on body size.
Feeding dairy heifers
Flushing is carried out by providing a high plan of nutrition between 15 and 18 months just before mating. Steaming up is carried out by providing nutritious feed to gestating cows 60 days before calving to increase the growth rate of foetus, building milk reserves and general well being of the dairy cow.
Feeding dairy cows
Enough pasture, concentrates, minerals and vitamins given at least 3 – 4 % of body weight. The dry matter of feeds in the form of napier grass provide dairy meal at the rate of 1 kg to 2 kg per day.
Provide adequate energy and protein concentrates for every 1.5 kg of dairy meal. A cow produces an extra 3 kg of milk. A cow producing 20 litres of milk is fed on 9 kg of dairy meal per day. Provide enough water to drink.
Feeding beef cattle
The calves of beef cattle are left to stay with their mothers to suck until 4 – 5 months of age. Provide pastures, concentrates, minerals and vitamins from 3 months to 15 – 20 months of age.
Feed adult cattle with enough pasture, concentrates and water. Occasionaly, give grains to improve the nutritive quality of feeds. Provide enough water to drink.
5.8 Feeding sheep
Feeding lambs – Allow lambs to suckle colostrum for the first 3 – 5 days. The lambs should suckle at least 1 hour after birth.
Introduce dry feeds to lambs at 2 weeks of age. Give to the orphaned and abandoned lambs to foster mothers.Reduce the quality of milk given between 45 and 60 days old. Provide milk replacers if there are no other sources of milk. Provide creep feed in form of creep pellets at 10 days of age. Give each lamb about 0.1 kg of creep pellets per day and increase to 0.5 kg by 45 – 60 days. Provide enough clean water to drink.
Weaning
Introduce solid feeds at 25 – 30 days of age by providing soft herbage, wilted lucerne and concentrates. Provide enough clean water for drinking and antibiotics in feeds to minimise attack by enterotoxemia disease.
Older sheep
Provide a high plane of nutrition with highly nutritious concentrates so that they can reach market weight early. This is when the lambs weigh between 30 and 40 kg depending on the breed. Rams are given more grains. The feeding of pastures is also allowed.
Feeding ewes
Flushing is done 4 – 6 weeks before mating to encourage twining and facilitates conception. Steaming up is done 3 – 4 weeks before lambing to encourage growth of foetus and build energy reserves of the ewe. Enough water is provided during lactation.
• Questionnaire
• Note books
Visit a farm where ruminants such as cattle, sheep and goats are kept and carry out the following activities: (i) Find out the type of diseases that attack cattle, sheep and goats in the farm.
(ii) Find out the symptoms, damages and how the diseases are controlled.
(iii) Discuss and record your findings.
(iv) Present your findings to the class.
(v) Take teacher’s summary notes.
A disease is any condition which alters or changes the state of the body of an animal or its organs and, therefore, interrupts the proper performance of its functions.
Cattle Diseases
Cattle may be affected by the following diseases:
Brucellosis
Also known as contagious abortion or Bang’s Disease. The disease also affects goats, sheep, pigs and man.
Causative agent
This disease is caused by a bacterium of the Brucella spp. In cattle it is caused by Brucella abortus. Brucellosis is a contagious disease which means it is spread through contact. It is also zoonotic thus can be transmitted to humans.
Symptoms
(i) Spontaneous abortion or sudden abortion of foetus or premature birth in later stages of pregnancy.
(ii) Retained placenta.
(iii) Barrenness and low libido in males. Males have swollen and inflammed testicles.
(iv) Brown, yellow, slimy, odourless discharge from the vulva occurs after abortion.
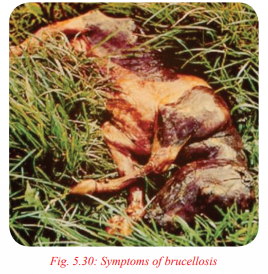
Control
(i) Artificial insemination. 161
(ii) Affected animals should be culled and disposed of.
(iii) Vaccination of all young animals against brucellosis.
(iv) Avoid contact with aborted foetus for the farmer.
(v) Carry out blood test to determine the animals affected which should be disposed of and to detect the ones not affected.
(vi) Cleanliness of animal houses and milking equipment.
(vii) There is no effective treatment.
Babesiosis
This disease is also known as red water. It is a vector-borne disease caused by protozoa and transmitted by blue tick and brown ear ticks. This disease also attacks sheep.
Causative agent
This disease is caused by a protozoa known as Babesia spp which attacks red blood cells. In cattle the protozoa is known as Babesia divergens and Babesia bovis.
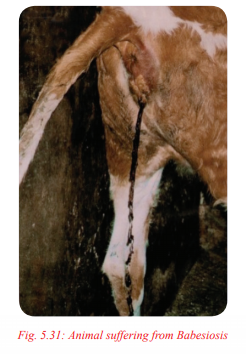
Symptoms
(i) High body temperature.
(ii) Lack of co-ordination.
(iii) Poor appetite.
(iv) Production of dark red or brown coloured urine.
(v) Nervous signs such as grinding of teeth.
(vi) Anaemia, swollen liver, pale tongue.
(vii) Non-productive cough and oedema of lungs.
Control
(i) Regular dipping and spraying livestock using recommended acaricides.
(ii) Treatment using tetracycline antibiotics.
Tuberculosis
Tuberculosis is a bacterial disease that is highly infectious and zoonotic, transmitted to humans through milk and inhalation of spores.
Causative agent
This disease is caused by a bacteria known as Mycobacterium bovis. Although a variety of other species can cause tuberculosis.
Symptoms
(i) Soft chronic cough.
(ii) Difficulty in breathing.
(iii) Dullness.
(iv) Swelling of lymph nodes due to tubercles.
(v) Loss of appetite. (vi) Fluctuating fever.

Control
(i) Proper ventilation in animal houses.
(ii) Avoid overcrowding livestock or keeping many livestock in a small space.
(iii) Screening of infected animals using blood tests and isolating them.
(iv) Pasteurisation of milk and meat inspection.
(v) Vaccination of young animals in areas endemic to the disease.
(vi) Proper disposal of carcasses.
Bovine Anaplasmosis
Anaplasmosis is a vector-borne disease transmitted by blue ticks, contaminated surgical instruments and hypodermic needles which affects the red blood cells. The other animals affected include sheep and goats.
Causative agent
This disease is caused by a protozoa known as Anaplasma marginale and Anaplasma centrale.
Symptoms
(i) Fever with high body temperature.
(ii) Anaemia which is indicated by paleness of gum and tongue.
(iii) Constipation.
(iv) Low milk production in lactating cows because milk flow to udder ceases.
(v) Jaundice.
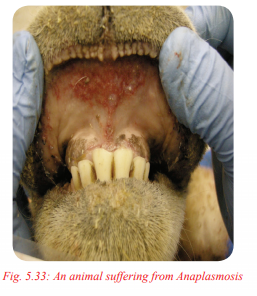
Control
(i) Regular dipping and spraying of cattle using recommended acaricide.
(ii) Treatment with antibiotics such as oxytetracycline.
(iii) Giving iron injections.
(iv) Control of mosquitoes and other biting insects.
(v) Using sterilised surgical instruments and hypodermic needles.
East Coast Fever
East Coast Fever is a vector-borne disease transmitted by brown ear ticks. Also known as Theirelliosis. Local cattle breeds are fairly resistant.
Causative agent
This disease is caused by a protozoa known as Theilevia parva.
Symptoms
(i) Swollen lymph nodes around the base of the ears, shoulders and stifle joints.
(ii) Fever.
(iii) Animal produces a lot of saliva.
(iv) Animal produces a lot of tears from eyes.
(v) Difficulty in breathing and coughing.
(vi) Sight impairment.

Control
(i) Regular dipping and spraying to control ticks using recommended acaricides. 165
(ii) Fencing to keep off unwanted animals and wildlife.
(iii) Treatment using recommended drugs.
(iv) Cross breeding with indigenous breeds which are more tolerant to the disease as compared to exotic cattle breeds.
Heart Water
This is a vector-borne disease affecting cattle and is transmitted by the bont tick, and the East African bont tick. Local breeds are fairly resistant to the disease. It also attacks sheep and goats.
Causative agent
Heart water is caused by a protozoan Ehrlichia ruminantium formerly known as Cowdria ruminantium.
Symptoms
(i) Sudden rise in body temperature.
(ii) Loss of appetite.
(iii) Restlessness.
(iv) Difficulty in breathing and coughing.
(v) Neurological signs which include chewing movements, protrusion of tongue, twitching eyelids, high stepping gait and mild in co-ordination.
(vi) Convulsions.
(vii) Death within one to two weeks.
(viii) Postmortem shows red to straw coloured fluid within the heart.
Control
(i) Regular dipping and spraying animals using recommended acaricides against ticks.
(ii) Treatment in early stages using antibiotics such as tetracycline.
(iii) Vaccination against heart water in calves between 5 and 8 weeks old.
Goat Diseases
Activity 5.11: Observing a video or pictures of different goat diseases
Materials required
• Photographs of goat disease symptoms
• Magazines
• Videos of goat diseases
• Internet and search engines
Use the materials provided to carry out the following activities:
(i) Observe the symptoms of goat diseases.
(ii) List the characteristics of the symptoms and damages of each disease observed.
(iii) Discuss and record your findings. (iv) Present your findings to the class.
(v) Take teacher’s summary notes.
Goats are hardy and fairly tolerant to most tropical diseases. They are commonly affected by the following diseases:
Blue Tongue
Blue tongue is a contagious viral disease which is spread by biting insects particularly the midge. Animals also attacked include cattle and sheep.
Causative agent
Blue tongue is caused by a virus known as a blue tongue virus of the genus orbivirus.
Symptoms
(i) Fever.
(ii) Excessive salivation.
(iii) Swelling of the face, tongue and lips.
(iv) The tongue and lips appear blue to purple in colour.
(v) Nasal discharge with strained breathing.
(vi) Lesions in the foot leading to lameness.

Control
(i) Quarantine.
(ii) Vaccination.
(iii) Control of biting insects such as midge.
Heart Water in Goats
This is a vector-borne disease affecting cattle and is transmitted by the bont tick, and the East African bont tick. Local breeds are fairly resistant to the disease. It also attacks sheep and cattle.
Causative agent
Heart water is caused by a protozoan Ehrlichia ruminantium formerly known as Cowdria ruminantium.
Symptoms
(i) High body temperature.
(ii) Anaemia which is indicated by paleness of the gums and tongue.
(iii) Constipation.
(iv) Low milk production in lactating because milk flow to the udder ceases.
(v) Jaundice.

Control
(i) Regular dipping and spraying of goats using recommended acaricide.
(ii) Treatment with antibiotics such as oxytetracycline.
(iii) Giving iron injections.
(iv) Control of mosquitoes and other biting insects.
(v) Using sterilised surgical instruments and hypodermic needles.
Vesicular Stomatitis
Vesicular stomatitis is a contagious viral disease that is also zoonotic. Has an incubation period of 28 days. Vesicular stomatitis is a notifiable disease. This disease also affects sheep, goats, horses and donkeys.
Causative agent
This disease is caused by a virus of the family Rhabdoviridae
Symptoms and signs
(i) Excessive salivation.
(ii) Raised blister like lesions in the inner surfaces of the lips, gums, tongue and dental pad.
(iii) Blisters may also appear on the nostrils, vulva, teats and coronary band. The blisters break causing ulcers.
(iv) Lameness.
(v) Reluctance to eat due to wounds in the mouth.
(vi) High body temperature.
(vii) Drop in milk production in lactating does.
(viii) Affected animals may recover after some time.
Control
(i) Quarantine.
(ii) Isolation of infected animals.
(iii) Control of insect vectors and sterilisation of surgical instruments.
(iv) Using protective clothing when handling infected animals such as using gloves and facial masks.
(v) There is no effective treatment although the isolated animals may be reintroduced to the herd 21 days after the last lesion has healed.
Caprine Arthritis Encephalitis
This is an infectious viral disease which mainly affects goats. The virus is mainly spread through colostrums and milk. It is transmitted through semen and mother to the kid while in the uterus. It is also important to note that the Saanen breed is highly susceptible.

Causative agent
This disease is caused by a virus of the lentivirus group.
Symptoms
(i) Arthritis in any joints due to inflammation of the tendon sheaths resulting in big knees thus lameness.
(ii) Pneumonia.
(iii) Meningitis and neurological symptoms such as pressing head against the wall, wobbly gait and walking in circles.
(iv) Viral mastitis in does.
(v) Loss of hair around the neck.
Control
(i) Isolation of infected goats.
(ii) Feeding kids with artificial colostrums or cattle colostrums and milk.
(iii) Quarantine.
(iv) Notifying authorities.
(v) Screening affected goats and disposing of or culling them.
There is no treatment or vaccination currently available.
Clostridial Infections
Clostridium is a bacterium that is naturally found in soils. A few species causes infections to various livestock and man. The primary mechanism in which these affect animals is through production of a toxin which affects the nervous system after being ingested or entering through a wound.
There are four diseases of clostridium that are important. These are:
1. Black Quarter
2. Botulism
3. Enterotoxemia
4. Tetanus
Black Quarter
This is a bacterial disease which is infectious and acute. Animals that are affected also include:
(i) Cattle of between ages of 8 and 18 months.
(ii) Sheep (common after shearing).
Causative agent
This disease is caused by a bacteria known as clostridium chauvei and lostridium septicum The bacteria enters the body through a wound or contaminated water.
Symptoms
(i) Lameness and animal is forced to lie down in severe cases.
(ii) Affected quarter or leg gets swollen and produces a crackling sound when touched.
(iii) Body temperature rises.
(iv) Grunting and grinding of teeth.
(v) Animal stops chewing cud.
(vi) Death occurs suddenly.
(vii) Blood oozes from nose and mouth of dead animal which was infected.
(viii) Postmortem reveals the affected muscles of the leg appear dark and produce a bloody froth with smell of rancid butter
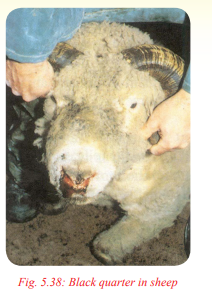
Control
(i) Vaccination using Blanthrax vaccine which also controls anthrax.
(ii) Treatment using antibiotics such as penicillin and tetracycline.
(iii) Use of antitoxin serum against the black quarter toxin.
(iv) Carcass should be buried deep in soil at least 2 m or burnt completely to ashes.
Botulism
Botulism is a rare but fatal condition caused when toxins from the botulinum bacteria affect livestock. The botulism bacteria is ingested leading to the condition. Other animals also affected include cattle and sheep.
Causative agent
This disease is caused by a bacterium known as clostridium botulinum. It has an incubation period of 8 – 36 hours.
Symptoms
(i) Severe abdominal pains.
(ii) Difficulty in breathing.
(iii) Difficulty in swallowing and animal stops chewing cud.
(iv) Paralysis of the hind limbs.
(v) Diarrhoea.
(vi) Unco-ordinated gait.
(vii) Drooling of saliva.
(viii) Paralysis and eventually death.
Control
(i) Vaccination against botulism.
(ii) Observe hygiene when preparing animal feeds such as silage and hay.
(iii) Clinical care for affected animals.
(iv) Burning of affected carcasses.
(v) Cleaning and disinfection of affected animal houses.
Enterotoxemia
This is also known as an overfeeding disease or pulpy kidney in goat and sheep production. This is an acute and infectious disease that is introduced in livestock through feeding contaminated food. This disease also affects cattle and sheep
Causative agent
This disease is caused by bacterium called clostridium perfringes commonly found in soil and intestinal track of mammals.
Symptoms
(i) Diarrhoea.
(ii) Dehydration.
(iii) Rapid mortality in lambs and kids.
(iv) Convulsions and wide opening of the eyes.
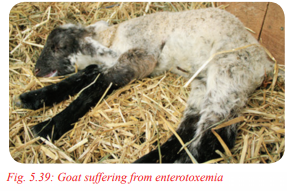
Control
(i) Vaccination against enterotoxemia.
(ii) Disinfection of animal houses, feeding and watering troughs.
(iii) Hygiene standards should be maintained.
Diseases of Sheep
Activity 5.12: Observing a video or pictures of different sheep diseases
Materials required
• Photographs of sheep disease symptoms
• Magazines
• Videos of sheep diseases
• Internet
Use the materials provided and or internet to carry out the following activities:
(i) Observe the symptoms of the different diseases that attack sheep.
(ii) Note their characteristics and damages.
(iii) Discuss and record your findings.
(iv) Present your findings to the class.
(v) Take teacher’s summary notes.
Sheep are commonly affected by the following diseases:
Blue Tongue
Blue tongue is caused by a virus known as blue tongue virus of the genus Orbivirus.
Symptoms
(i) High fever with high body temperature.
(ii) Excessive salivation.
(iii) Swelling of the face, tongue and lips.
(iv) The tongue and lips appear blue to purple in colour.
(v) Nasal discharge with strained breathing.

Control
(i) Use of quarantine.
(ii) Vaccination.
(iii) Control of biting insects such as midge.
Cryptococcosis
This is a fungal disease that affects livestock and also human beings. It is, therefore, a zoonotic disease. It also affects cattle and goats.
Causative agent
The disease is caused by a yeast like fungus known as Cryptococcus neoformans. Sheep get exposed to the disease through inhalation and, therefore, affects the lungs.
Symptoms
(i) Ulcerative lesions in the nose.
(ii) Congested or cloudy conjunctiva.
(iii) Enlarged lymph nodes.
(iv) Difficulty in breathing which is rapid and laboured.
(v) Grunting and gaggling sounds when breathing and coughing.
(vi) Loss of appetite.
(vii) Dehydration.
(viii) Loss of hair or wool.
(ix) Death in severe infections.

Control
(i) Killing and disposing of infected sheep.
(ii) Treatment using systemic fungicides and antibiotics.
(iii) Management of skin lesions within the nose.
(iv) Isolation and treatment of sick animals.
(v) Wearing protective clothing when handling sick sheep to prevent spread to other animals and the farmer.
Vesicular Stomatitis
Vesicular stomatitis is a contagious viral disease that is also zoonotic when man handles infected animals or their product. Has an incubation period of 2 – 8 days. Vescular stomatitis is a notifiable disease. It also affects cattle, goats, horses and donkeys.
Causative agent
It is caused by a virus of the family Rhabdoviridae.
Symptoms
(i) Excessive salivation.
(ii) Raised blister like lesions in the inner surfaces of the lips, gums, tongue and dental pad.
(iii) Blisters may also appear on the nostrils, vulva, teats and coronary band. The blisters break causing ulcers.
(iv) Lameness.
(v) Reluctance to eat due to wounds in the mouth.
(vi) High body temperature.
(vii) Drop in milk production in lactating ewes.
(viii) Affected animals may recover after some time
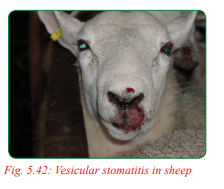
Control
(i) Quarantine.
(ii) Isolation of infected animals.
(iii) Control of insect vectors and sterilisation of surgical instruments.
5.10 Sanitation in ruminant farms
Activity 5.13: A visit to a ruminant livestock farm to observe sanitation
Materials required
• Questionnaire
• Note book
Visit a ruminant livestock farm near your school and carry out the following activities:
(i) Find out the daily activities carried out in the farm to ensure proper sanitation.
(ii) Prepare a routine plan for the whole day for a dairy cattle farm, goat farm or sheep farm.
(iii) Discuss the routine activities carried out when managing ruminant livestock.
(iv) Make a report of your findings. (v) Present your findings to the class.
(vi) Take the teacher’s summary notes.
Sanitation
Sanitation is an important routine practice in farms. Sanitation involves the removal of dirt and other refuse which would be a likely predisposing factor of some livestock disease. Sanitation rules in a ruminant farm include:
1. Proper housing and hygiene
All animal houses should meet the recommended structural requirements such as:
(a) Well ventilated but free from drought winds.
(b) Have adequate spaces.
(c) Allow proper drainage and deposition of faecal waste.
(d) Be leak-proof.
(e) Be well lit.
(f) Easy to clean.
(g) Free of parasites.
2. Use of antiseptic and disinfectants
To prevent diseases, the livestock house should be disinfected using recommended antiseptic and disinfectants such as formalin, chlorine water and soap or detergents.
3. Proper disposal of carcasses and waste
All carcasses from sick animals should be buried deeply in soil or burnt completely to prevent spread of diseases. Droppings and other wastes are possible carriers of disease-causing organisms and internal parasites. They should be put in a compost pit or heap and covered with soil.
4. Isolation of sick animals
This is a preventive measure where all animals showing clinical symptoms are separated from the rest of the herd to prevent spread of infectious and contagious diseases. Isolation should continue until the animal recovers.
5. Imposition of quarantine Quarantine
involves restriction of movement of animals and their products from one farm to another or one region to another. Quarantine is imposed when a notifiable disease is present. It prevents spread of such diseases. During quarantine other measures such as vaccination or treatment are employed.
6. Slaughtering and burning infected animals
Some livestock diseases are notifiable and dangerous. To prevent disease spread,all sick animals are slaughtered and burned or buried deeply in the soil. In some cases, the whole herd is slaughtered to prevent disease spreading.
7. Proper nutrition
Always provide clean and fresh food to livestock to prevent some diseases like botulism. Provide clean water which prevents spread of some diseases through water. A high plan of nutrition gives the animal energy and helps to control nutritional deficiency disorders.
8. Provision of clean equipment
Feed and water troughs should be cleaned everyday to prevent spread of contagious diseases. All surgical equipment such as hypodermic needles and syringes should be sterilised before use. Animal handling equipment such as milking machines, burdizzo and hoof trimmers should be cleaned thoroughly before use to prevent spread of diseases.
Group Activity
Carrying out Sanitisation in a Ruminant Livestock Farm
Visit the school farm or a ruminant livestock farm and working in groups, carry out the following activities: (a) Clean and disinfect livestock houses and shelters.
(b) Clean animal handling equipment.
(c) Remove accumulated livestock wastes from around animal houses and shelters of livestock.
(d) Give clean food and water to livestock.
(e) Observe caution when cleaning, practising sanitation activities and handling chemicals in the ruminant livestock farm.
(f) Record and discuss in groups the activities carried out and report your findings in class.
(g) Take teacher’s summary notes.
Unit Summary
• Ruminants are herbivorous animals that chew cud.
• Their digestive system consists of four stomach chambers, the rumen, reticulum, omasum and abomasum. Ruminant species kept in Rwanda include cattle, sheep and goats. These may be originated locally or imported from other continents to boost production. The ruminant breeds in Rwanda are kept for meat, milk and wool production.
• Cattle breeds kept in Rwanda include Ankole, Friesian and Jersey.
• Cattle provide milk and meat. Goat breeds kept in Rwanda include local sheep, Alpine, Boer, Ethiopian galla and Saanen, among others. Goats provide meat and milk. Sheep breeds kept in Rwanda include local sheep, mountain white, merino, corriadale and dorper. Sheep provide meat and wool.
• When siting ruminant shelter, the following factors are considered; location of the homestead, accessibility, drainage, security, direction of prevailing wind, farmer’s tastes and preferences, nearness to sources of water and electricity.
• When constructing a livestock shelter, the materials to be used should be durable, affordable, suitable for the enterprise, climate strong and easy to work.
• When constructing a goat shelter the following factors are considered: age group of the animal enterprise, environmental conditions, drainage and skills of the farmer.
• A goat shelter needs to be spacious, free from cold winds, well ventilated, easy to construct and less dependent on support for farmer when carrying out routine practices. The following materials are required when constructing a goat house: timber, plywood, concrete, iron sheets and nails.
• The selection criteria for sheep include a natural base width, muscle volume and style balance, growth potential and age. Cattle are selected on the basis of their production enterprise which include head, topline legs, main body and ribs, humps and hooves walking gait, fat, muscle, teat size and fertility.
• Ruminant fodder includes grass and legumes. Grass fodder include napier grass, Guatemala grass and Sudan grass. Legume fodder include lucerne, desmodium, vetch, leuceana and sesbania.
• Concentrates provide energy and proteins to livestock. Energy concentrates include molasses ground grains, protein concentrates include animal based products such as blood, bone and milk. Plant based protein concentrates include beans and various oil seed cakes. Minerals and vitamins are provided in form of mineral licks and vitamins premixes. These supply essential elements for proper growth.
• Methods of feeding goats include creep feeding or feeding young goats, weaning, flushing, steaming up and fattening.
• Cattle diseases include brucellosis, babesiosis, thereliosis or East Coast fever, heart water and enteric fever. Goat diseases include blue tongue, heart water, vesicular stomatitis, caprine arthritis encephalitis and clostridial infections.
• Sheep diseases include blue tongue, cryptococcosis, heart water, vesicular stomatitis. It is important to observe strict sanitation in livestock production to 179 prevent spread of livestock diseases and ensure clean products, healthy farmer and healthy population.
Key Terms
1. Oxen – Castrated male cattle used in providing power when pulling carts or ploughs.
2. Wealth – The assets owned by an individual.
3. Lactation period – A period when a cow produces milk after birth until it is dried up.
4. Butter fat content – The proportion of butter fat in milk.
5. Exotic – Imported from Europe or temperate countries.
6. Polled – Without horns.
7. Native/indigenous – Originated or found locally.
8. Staple length of wool – The quality measure of the length of wool.
9. Concrete – A mixture of cement, sand and gravel mixed with water and used for building.
10. Infectious – A disease caused by micro-organisms and can easily be spread from one animal to another.
11. Contagious – A disease which is spread through contact with the disease-causing agent.
12. Paralysis – Inability to co-ordinate the body due to damages in the nervous system.
13. Vaccine – A weakened disease-causing agent introduced to animals to stimulate the body to produce antibodies.
14. Neurological signs – Deviation from the normal behaviour caused by the nervous disorders.
15. Fever – Change in temperature.
16. Isolation – Separation of a sick animal from a healthy one to prevent the spread of diseases.
17. Anaemia – Loss of red blood cells.
18. Constipation – Inability to digest.
19. Cross breeding – Breeding two animal breeds of the same species which are not related.
20. Dehydration – Loss of water from the body.
21. Tick – An external parasite that transmits diseases to livestock.
22. Acaricide – A chemical used to control ticks.
23. Antibiotic – A chemical used to treat bacterial diseases.
24. Ad-libutum – Without a measure.
25. Abbatoir – A livestock slaughter house.
26. Slated floor – A wooden floor with small spaces between timber slabs to allow passage of droppings in goat houses.
27. Tropical diseases – Diseases commonly found within the tropic.
28. Fodder – Crop grown and harvested for livestock.
29. Concentrates – Feed containing high fibre content, high protein content and low fibre content.
30. Hand feeding – Feeding of young animals using milk bottles or buckets.
31. Laxatives – Substances that loosen stool and increase bowel movement.
32. Weaning – Introduction of solid feeds to young animals.
33. Quarantine – Restriction of movement of livestock or their products during a disease outbreak.
34. Zoonotic – A disease which is transmissible between man and livestock.
35. Tubercles – Swellings in body organs due to tuberculosis infection.
Revision Questions
1. What is a ruminant animal?
2. Name ruminant livestock kept in Rwanda.
3. State three importance of keeping ruminant livestock.
4. The following diagram is an illustration of a cow. Study it and name the parts labelled A, B, C, D, E and F on the diagram.

5. State the external characteristics of the following goat breeds:
(a) Local goat
(b) Alpine
(c) Saanen
(d) Ethiopian Galla
(e) Boer
6. Describe the external characteristics of the following sheep breeds:

7. Explain the factors to consider when siting livestock structures.
8. Outline the procedure of constructing a goat shelter.
9. State the selection criteria for the following ruminant breeds:
(a) Dairy goats
(b) Meat goats
(c) Sheep for mutton
(d) Dairy cattle
10. List three grass fodder crops.
11. List three legume fodder crops.
12. What is a concentrate as used in livestock feeding?
13. State the importance of feeding a young goat with colostrums.
14. Describe weaning in young goats. 15. Make a feeding plan for an adult goat.
16. List the causes of diseases in livestock.
17. State the causes of the following livestock diseases:
(a) Brucellosis in cattle
(b) Babesiosis in cattle
(c) Tuberculosis in cattle
18. Identify the disease shown by each photograph below:

19. State the control of the following livestock disease:
(a) East Coast fever
(b) Black Quarter
(c) Cryptococcosis
20. Describe four sanitation rules in a ruminant farm.
UNIT 6:LIVESTOCK PRODUCTS
Introduction
Globally there is a rapid increase in the production and consumption of livestock products and which is expected to continue growing. However, increasing productivity, especially in the small to medium production system, is limited by lack of proper marketing channels. As a result, losses and wastage are incurred. Interventions in terms of proper handling, value-addition and preservation technologies are required. This does not only increase the shelf-life of these products, but also increases income generation for the small and medium livestock keeper. This unit addresses how livestock products, and by-products from cattle, pigs, poultry and rabbit can be preserved. The pictures below show fresh and preserved livestock products with some contrast of how some of these products can get spoilt.
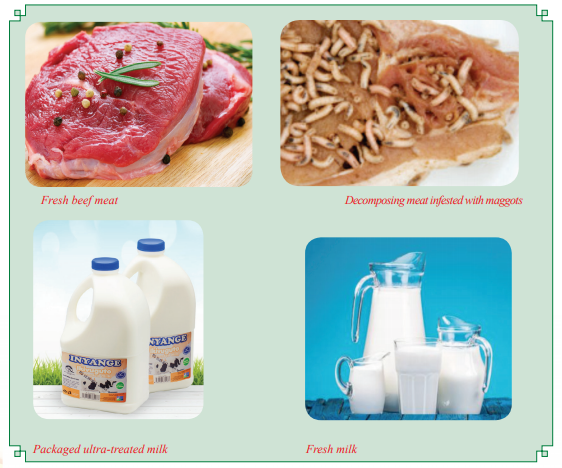

6.1: Importance of preservation of livestock products
Activity 6.1: Observing destroyed and fresh products
Materials required
• Destroyed and fresh livestock products such as meat, milk, skin, ice cream, cheese and blood
• Hand gloves
• Scalpels
Use the products exhibited to carry out the following activities:
(i) Observe the characteristics of the destroyed livestock products and fresh livestock products displayed. (ii) Compare the characteristics of the destroyed livestock products with fresh livestock products displayed. (iii) Record your observations in table 6.1 below and discuss your findings.

(iv) Using your experience, find out the importance of preserving livestock products.
Note: Do not taste any of the materials provided.
(v) Present your findings to the class.
(vi) Take the teacher’s summary notes.
Preservation is the process of preventing deterioration of products. Livestock products such as meat, milk and eggs form a major component of the economy of any nation as source of food. Most livestock products, like other agricultural products, are highly perishable, meaning that they easily go bad. They should, therefore, be kept properly in order to maintain their quality
The preservation of livestock products is important for the following reasons:
(i) To increase their shelf-life Shelf-life is the period of time that a product remains in good condition under storage.
(ii) To lower the activity of micro-organisms and, therefore, prevent rotting of products.
(iii) To add value to the products – Processed livestock products fetch higher prices in the market hence high profits.
(iv) To add flavour to the food – Processed livestock products improve in smell, taste, appearance, colour and texture.
General methods of preserving livestock products
The following are the general methods of preserving livestock products:
(a) Drying
This is a method of preservation where water is removed through evaporation. The evaporation may be done through sun drying or by use of an air current (air drying). Drying inhibits the growth of micro-organisms that cause spoilage of the products. It is one of the oldest methods of preservation. It is used for preserving meat, fish, hides and skin.
(b) Salting
This is a method of preservation where dry table salt is applied on the surface of the product. The salt removes water from the product by osmosis. Salting inhibits the growth of pathogenic organisms such as bacteria and fungi as they get dehydrated by the high salty environment and die or become temporarily inactivated. It is one of the oldest method of preservation and is used for the preservation of meat, fish, hides and skin.
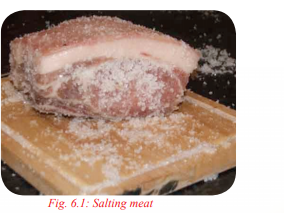
(c) Smoking
This is a method of preservation where the product is exposed to smoke from a burning material usually wood. This method is usually applied on food products. Besides preserving the food, smoking also adds flavour to it. This method is used on meat, fish and cheese.

(d) Cooling or refrigeration
Cooling is a method of preservation where ambient temperatures are lowered to levels where microbial activities are greatly reduced. This may be done through refrigeration or use of any other coolant such as water to conduct heat away from the product. This method is used for preserving food substances such as meat, milk and fish.
(e) Heat treatment
This is the preservation of livestock products by the application of heat to the product. It includes heat treatment measures as boiling of food, milk (pasteurisation), cooking and wasting of meat. Very high temperatures destroy micro-organisms that cause food spoilage.
(f) Freezing
This is a method of preservation where the growth of micro-organisms is slowed down by very low temperatures of about -23°C. The frozen water is also not available to the micro-organisms and this further reduces the activity of micro-organisms.

(g) Canning
In this method of preservation, food is cooked and sealed in a sterile container. It is then boiled to kill any remaining bacteria. This method is used for preserving meat and milk products.
The carbohydrates in the food are converted into alcohol and organic acids, for example, lactic acid. Lactic acid prevents further action by micro-organisms thus preserving the food. Fermentation is brought about by beneficial micro-organisms under anaerobic conditions. This is an old method of food preservation. It is used to preserve meat and milk products.
(i) Sugaring
This is a method of preserving meat where sugar is applied in form of honey, syrup and solids. The sugar then absorbs water in the products through osmosis. This lowers the activity of the micro-organisms which destroys the product. Sugar also promotes the growth of favourable micro-organisms such as lactobacillus which produce lactic acid. Lactic acid prevents growth of unwanted micro-organisms.
(j) Jellying
This is a method of preservation where the material to be preserved is kept in a substance that solidifies to form a gel, for example, gelatin. It is used in the preservation of meat.
(k) Use of chemicals
This is the use of chemicals to preserve livestock products. It is commonly used in the preservation of food materials such as meat, hides and skin. Common chemicals used in food preservation include sodiumbenzoate, sodium nitrite and sulphur (IV) oxide. These chemicals inhibit the growth of micro-organisms that spoil food.
(l) Pickling
This is the use of an edible anti-microbial liquid to preserve food. Examples of such liquids include brine (strong salt solution), vinegar and vegetable oils such as olive. This method is used in storing meat and eggs.
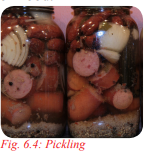
(m) Vacuum packing
This is the storing of food in a vacuum environment usually in an air-tight bag or bottle. The vacuum condition deprives micro-organism of oxygen thus reducing their activity. This method is used for preserving cheese.

6.2 Preservation of cattle products and by-products
Activity 6.2: A field trip to livestock processing industries and a dairy to observe processed products Materials required
• Note book
• Questionnaire
• Pen
(i) Visit a livestock product processing industry and a dairy to observe different operations carried out to preserve livestock products in the industry and the dairy.
(ii) Video case to identify different methods of preserving cattle products:
Materials required
• Video tape or video showing cattle products preservation methods.
• Screen/video player or television
Watch a video showing different methods of preserving cattle products and byproducts then carry out the following activities:
(i) Identify the different methods used to preserve different cattle products and byproducts.
(ii) Discuss the methods of preservation observed and make a report.
(iii) Present your findings to the class.
(iv) Take teacher’s summary notes.
Products obtained from cattle include, meat, milk, ice cream, cheese and yoghurt, while the by-products include hide, tallow, gelatin, leather, blood, horns and bones. Most of these products are perishable and require preservation.
Preservation of cattle products
(a) Meat
After dressing of the carcass, meat is cut into thin strips or flat pieces while fresh and then preserved as follows:
(i) Drying – The strips of meat are sun-dried or open air dried to reduce moisture content which discourages growth of bacteria hence spoilage. The disadvantage of this method is contamination of meat with dust and insects.
(ii) Curing – The dried meat strips may be cured through salting, sugaring and smoking. Curing removes excess water from the meat reducing microbial spoilage. Sugaring is done where sweet meat products are required. Smoking removes water and adds flavour to the meat.
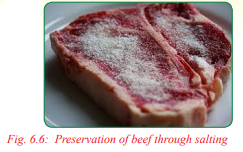
(iii) Boiling or cooking – Cured meat can be cooked or boiled before consumption. Raw meat is cooked or boiled and packed in sterile containers. The containers are further sterilised.
(iv) Freezing and refrigeration – Pieces of raw meat or raw meat strips are put in a freezer where temperatures are low to inactivate the activities of micro-organisms.
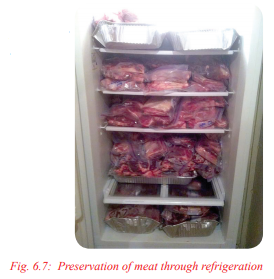
(v) Fermentation – The meat to be preserved is first crushed to form minced meat and mixed with spices, vinegar and wine and packed in nature edible cellulose casing and hung to dry
(b) Raw milk
Milk is a highly perishable animal product. Raw milk is preserved through the following methods:

(i) Pasteurisation
Involves heating milk to a temperature of 50°C – 60°C and then cooling rapidly. The pasteurised milk is then packed in sterile containers such as tetra pack and bottles.
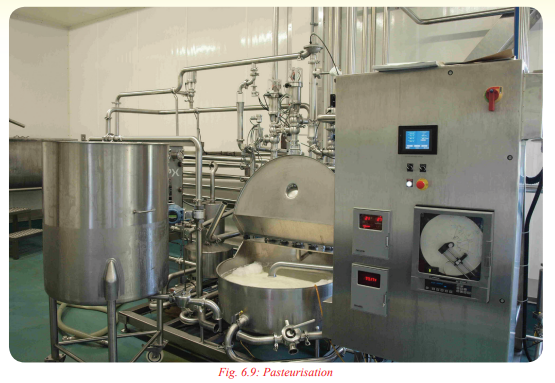
(ii) Use of chemicals
Chemicals such as hydrogen peroxide, sodium thiocynate and sodium bicarbonate are used to preserve milk. They inhibit the growth of anaerobic bacteria thus increasing the shelf-life of milk.

(iii) Cooling and freezing
Raw milk is subjected to low temperature to minimise the activity of microorganisms and their multiplication. This is a common method of milk preservation of raw milk and homogenised milk at the shop shelves.

(iv) Boiling
This is the most common method of preserving raw milk. When milk is heated at 100°C most of the bacteria which cause milk spoilage are killed. This increases the keeping quality and shelf-life of milk. It is a common method of preserving milk at home.
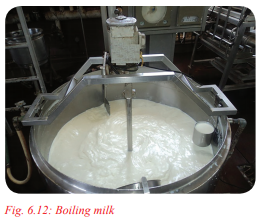
(v) Ultra heat treatment
This milk is heated at a temperature between 130°C and 135°C for a second and immediately packed and cooled. The milk quality is maintained. This temperature also kills micro-organisms such as Bacillus tuberculosis and Brucella arbotus found in fresh milk.
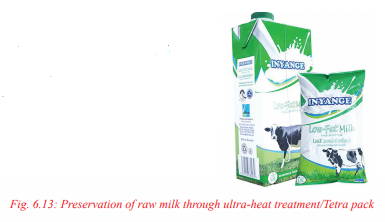
(c) Ice cream
Newly churned ice cream should be chilled immediately and stored in a freezer as far back as possible. This makes it remain firm and keeps the ice crystals small. It should be stored in an airtight container. It should only last for a week or two to keep its flavours and texture.

(d) Cheese
In the preservation of cheese, the following is important:
(i) It should not be wrapped tightly to allow the pungent ammonia smell to come out.
(ii) Cheese should be wrapped in cheese bags or cheese paper which is porous and allow cheese to breath. If cheese is wrapped in plastic bag, it will take the flavour of the plastics.
(iii) The paper should always be replaced after unwrapping. Softer cheese should be kept in brine solution. The solution should be replaced every few days to prevent contamination.
(iv) Cheese cuts should be rubbed in a light coat of olive, canola or vegetable oil and stored in air tight container to prevent molds. Cheese is also preserved through refrigeration.

(e) Yoghurt
Yoghurt is preserved through refrigeration. Rapid cooling of yoghurt inactivates further bacteria, action to stabilise lactic acid. Yoghurt will keep for about 10–21 days if held in a refrigerator at 4.4°C or lower. Yoghurt may also be salted and dried to preserve it.

Preservation of cattle by-products
Cattle by-products include: hide, tallow, gelatin, leather, blood, horns and bones.
Hide
The hide is preserved through curing and drying up. The table below shows different cattle by-products. Discuss it in groups and then complete the table by filling in the methods used to preserve each by-products.

(i) Curing
Curing of the hide is done by application of salt, which is referred to as salting. Salting is done in the following ways:
• Wet salting The fleshed and washed hide are left in a cool room for several hours so that they can lose heat. They are then spread with the flesh side up on a wooden platform which is about 10 cm high. The flesh side is then covered with layers of salt. Salt absorbs moisture from the hide and, therefore, decomposition cannot occur. The salt is then shaken off from the hide.
• Brining The washed hide is soaked in a drum containing brine overnight. After which is air dried or sun dried.
• Dry salting A layer of salt is applied on the flesh side of the hide after flaying. Salt prevents decomposition which may occur during the first few days of hide curing. It is then suspended on a frame to dry.
• Quick drying A lot of salt is rubbed vigorously on the flesh side of the hide, immediately after flaying. The salt is applied at the rate of 2 kg per hide. The hide is then folded and rolled like a blanket. It is placed under a heavy weight for about two days. It is then unfolded and suspended by a frame to dry.
(ii) Drying
Hides are dried by suspending them in a frame in such a way that there is free air circulation from all the sides. The frames measure 2.7 m × 3.1 m for large hides and 2.7 m × 2.4 m for the smaller hides. The distance between the frames should not be less than 23 cm in order to allow free circulation of air and permit the operator to pass between them. The hides are laced on the frames with sisal strings, bark or skin straps. Avoid using the wire for lacing because it is not elastic and can tear the hole out. It may also rust leading to formation of stains during tanning.
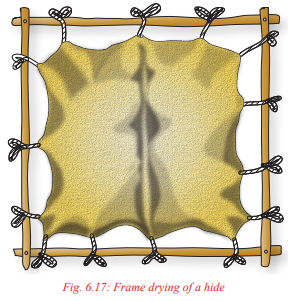
6.3 Preservation of pig products and by-products
Activity 6.3: Finding out the methods of preserving pig products and by-products
Materials required
• Textbooks
• Dictionaries
• Internet
Use the references provided to:
(i) Find out the methods of pig products and by-products preservation.
(ii) Discuss and record your findings.
(iii) Present your findings to the class.
(iv) Take teacher’s summary notes.
Pig products include; meat (pork and bacon) and pig fat known as lard, while pig byproducts include suede and gelatin.
Preservation of pig products
(i) Preservation of Pork
After dressing the pig carcass, the meat is cut into slabs of between 4 and 6 inches. The meat is then cured by applying salt and sugar mixture. The pieces of meat are well coated with the mixture. The meat is then kept in a crock or jar which is covered tightly with cheese cloth. The containers are then kept in a freezing condition of about 3.0 – 3.5°C for at least a month. The pork may also be preserved by brining. This is done by packing the pieces of meat in a sterilised crock or jar and covering with a brine made up of water, salt and brown sugar. Ensure that the salt and sugar mixture is properly dissolved in water. Cover the container and store for a week at about 3°C.
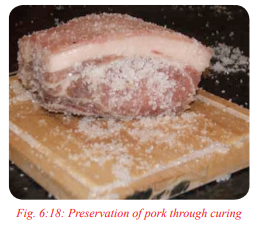
(ii) Preservation of Bacon
Bacon is meat obtained from a pig. The following methods are used to preserve bacon:
(a) Salting: Either in brine or in dry salt, cold drying, boiling and smoking.
(i) Salting involves putting bacon in either dry salt or brine which dehydrate the meat killing bacteria. This process involves cleaning the raw meat then covering it in salt for about one month while it is gradually pressed. Pressing is done to remove all the fluids and blood. Spices and herbs are also added.
(ii) Smoking involves cutting small pieces of bacon which are then placed over a smoky flame. This kills bacteria and also improves the quality of bacon.
(iii) Cold drying involves salting then hanging the bacon in cold wind for approximately one month. Cold drying dehydrates the meat and kills micro-organisms which causes spoilage.
(iv) Boiling involves heating of pork in brine or lard to kill micro-organisms using high temperature.
(b) Use of chemicals: Nitrates are added to ground bacon. These chemicals kill micro-organisms and provide a hostile environment which prevents the growth and multiplication of bacteria. Nitrates also make the meat have a distinctive pink or red tinge and imparts a flavour.
(c) Fermentation: The bacon is first crushed to form minced meat. Bacon is mixed with a variety of ingredients which include garlic, salt, spices, vinegar and wine. The meat is allowed to ferment for one day. Then is packed in a natural edible cellulose casing and hung to dry.
(iii) Preservation of Lard
Lard is fat derived from pig meat. It is preserved through heating and cooling. The fat is chopped into small pieces and then heated until melting takes place. The meat particles are removed through decanting. The lard is put in bottles while still hot and sealed. It is allowed to cool.

Preservation of pig by-products
Pig by-products include suede and gelatin. For each by-product listed in the table below, fill in the methods of preservation.

6.4 Preservation of poultry products
Activity 6.4: Finding out the methods of preserving poultry products and by-products
Working in groups:
(i) Find out how poultry products and by-products are preserved from dictionaries, textbooks and internet. (ii) Record and discuss your findings.
(iii) Present your findings to the class.
(iv) Take teacher’s summary notes.
Poultry products include meat and eggs. If the meat is from the domestic fowl(chicken) it is known as chicken. Discuss in groups and indicate the methods of preserving poultry products by filling in the table below:

6.5 Preservation of rabbit products
Activity 6.5: Finding out how rabbit products and by-products are preserved
Materials required
• Textbooks
• Dictionaries
• Internet
Use the references provided to:
(i) Find out the methods of preserving rabbit products and by-products from text books, dictionaries and internet.
(ii) Discuss and record your findings.
(iii) Present your findings to the class.
(iv) Take teacher’s summary notes.
Rabbit products include meat and fur. Discuss the methods of preserving rabbit products and indicate by filling in the table below:
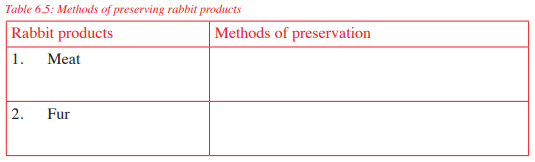
Group Activity
Working in groups, carry out the following activities:
(i) Group I – Discuss different methods of preserving cattle products.
Group II – Discuss different methods of preserving pig products.
Group III – Discuss different methods of preserving poultry products.
Group IV – Discuss different methods of preserving rabbit products.
(ii) Make a report on your findings.
(iii) Present your findings to the class.
(iv) Take teacher’s summary notes.
Unit Summary
Preservation of livestock products is a very important and necessary practice in livestock production. Most of the livestock products get spoilt by micro-organisms and oxidation after they are obtained from the livestock. This is due to lack of proper preservation measures. Preservation measures aim at reducing the activities of microorganisms and preventing oxidation of products. Preservation measures taken either kill the micro-organisms or inhibit their activities. This may be achieved through the following measures:
(i) Raising the temperatures to high levels which destroy the micro-organisms through cooking, boiling or roasting the products.
(ii) Lowering the temperature levels that inactivates the micro-organisms through cooling, refrigeration and freezing.
(iii) Preventing micro-organisms from getting water for survival, through drying, freezing, salting, sugaring, smoking and use of honey.
(iv) Preventing micro-organisms from getting oxygen by use of honey, vacuum packing, freezing, smoking and refrigeration.
(v) Dehydrating the micro-organisms by salting and sugaring.
Key Terms
1. Preservation – Process of preventing deterioration of products.
2. Perishable – Gets destroyed easily through decomposition.
3. Shelf-life – Period of time that a product can remain in good condition under storage.
4. Micro-organisms – Organisms that are too small to be observed through the naked eyes.
5. Pathogens – Organisms that cause diseases.
6. Salting – Application of dry salt on the surface of a product to preserve it.
7. Smoking – Exposing a product to smoke in order to preserve it.
8. Drying – Removal of water from a substance/product through evaporation.
9. Refrigeration – Removal of heat from a substance under controlled conditions.
10. Cooling – Lowering the temperatures of substance.
11. Freezing – Lowering the temperatures of a substance to a point where water solidifies.
12. Canning – Preservation of cooked food in sealed containers.
13. Anaerobic respiration – Breakdown of carbohydrates in the absence of oxygen.
14. Fermentation – Preservation by allowing the sugars in a food substance to undergo anaerobic respiration where the acids or alcohol produced protects the food from further spoilage by micro-organisms.
15. Sugaring – The application of sugar to the surface of a substance to withdraw water by osmosis.
16. Jellying – Preservation of a food material in a substance that later on solidifies to form a gel.
17. Pickling – Preservation of food in an anti-microbial edible liquid, for example, olive oil.
18. Vacuum packing – Preservation of food in an airtight bag or bottle.
19. Tallow – Fats from cattle meat. 20. Lard – Fats from pig meat.
20. Lard – Fats from pig meat. 200
21. Gelatin – A translucent flavourless food substance derived from animal products.
22. Pork – Fresh pig meat.
23. Bacon – Processed pig meat that has been preserved through salting or brining.
24. Suede – Leather from pig skin.
25. Beef – Cattle meat.
Revision Questions
1. What is preservation?
2. State five importance of preserving livestock product.
3. State five indicatorsthat help to determine whether a product isfresh or destroyed.
4. The following are various livestock products and by-products. Study them carefully and then group them into products and by-products. Hide, raw milk, eggs, fur, tallow, yoghurt, pork and suede.
5. Explain one factor which is common in the following methods of preserving livestock products; salting, sugaring, drying and freezing.
6. Describe five methods of preserving cattle meat.
7. Explain the following methods of preserving livestock products:
(i) Fermentation (ii) Use of honey
(iii) Pickling
8. Carry out the preservation of hides using frame drying method.
9. The photograph below illustrates a method of preserving meat. Study it and identify the method of preservation.

10. Name two rabbit products.
11. Give two advantages of smoking as a method of preservation.
12. The following are methods of preserving livestock products.
(i) Canning
(ii) Salting
(iii) Pickling
(iv) Cooling
Which of the following sets are methods of preserving eggs?
A. (i) and (ii)
B. (ii) and (iii)
C. (iii) and (iv)
D. (i) and (iv)
UNIT 7:PROBLEMS AND SOLUTIONS OF AGRICULTURE
Introduction
The agricultural sector in Rwanda, like any other in the world, has its own challenges. However, efforts are being made to address these challenges in order to improve agricultural production in Rwanda. This unit highlights some of the problems facing agriculture in Rwanda and their possible solutions. The following figures give an overview of the unit:

7.1 Problems facing agriculture in Rwanda
Activity 7.1: Finding out problems facing agriculture in Rwanda
Materials required
• Any internet available
• School library
• Videos
Use the references provided to:
(i) Carry out research on the problems facing agriculture in Rwanda. Alternatively, watch a video show on problems facing agriculture in Rwanda.
(ii) Discuss and record your findings.
(iii) Present your findings to the class.
(iv) Take the teacher’s summary notes.
The agricultural sector in Rwanda is faced with a lot of challenges or problems.
(a) Land shortage
Land sizes per unit holding in Rwanda are generally small. This is attributed to high population density. The other reason is that most of the Western, Northwestern parts of the country and parts of Central Rwanda are mountainous. Rwanda has an area of 26,336 km2 of land. The total arable land in Rwanda is about 1.4 million hectares which is 52% of the total land. However, the actual cultivated land exceeds 1.6 million hectares. Another 0.47 million hectares are under permanent pastures, meaning that well over 70 % of the country’s total land surface is exploited for agriculture (ROR 2008).
(b) Lack of capital
Capital includes all the man-made assets used in the production of desired goods. According to Rwanda statistical year book 2015, about 39.1% of the people of Rwanda live below the poverty line and, therefore, are not able to invest heavily in farming. Farming methods remain at subsistence levels. Most of the farmers use hand tools and simple mechanisation using animal-drawn implements for cultivation in large-scale. Mechanisation is limited to a few commercial farms that can afford them.
(c) Pests and diseases
Pests and diseases in both crop and livestock remain a major challenge in agricultural 204 production in Rwanda. This reduces farm outputs greatly. This is attributed to lack of the necessary information and capital in the control of pests and disease and conducive environment for the multiplication of pests and disease causing organisms. Common livestock parasites include: ticks and internal parasites while diseases include: the tickborne diseases for East Coast fever. Others include foot and mouth disease, rinderpest and Newcastle in poultry.
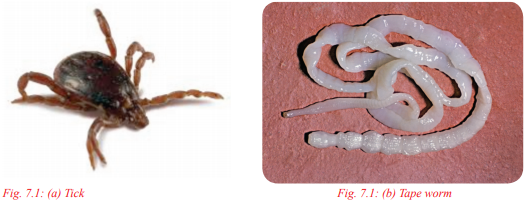
(d) Unstable prices
The prices of both farm inputs and products keep on changing from one season to another. This poses a challenge in the planning for the production as farmers are not certain of the profit or gross maximum to be realised. This creates the problem of risks and uncertainties. A wrong choice of an enterprise may result in farmers getting very little and this discourages them in the following season.
(e) Rainfall distribution
Rwanda has two main rain seasons. The first one occurs between the months of February and June and the second one between the months of September and December with an average annual rainfall of about 1231 mm (source: Rwanda statistical year book, 2015). Most of this rainfall occurs in the Western and Northwestern parts of Rwanda while the Southeastern and Eastern parts of the country receives relatively low rainfall. These are two dry spells in Rwanda, one between June and September. There is less rainfall and a short one between December and February.
(f) Bad attitude towards agriculture
Most educated people and especially the youth regard agriculture as a dirty job meant for the illiterate. They prefer the white collar jobs available in urban areas. They do not consider agriculture as a career or take it as a business. The situation is made even 205 worse by the low wages in agricultural sector compared to the industrial sector. This has made agricultural production to remain generally low for a long period of time in Rwanda.
(g) Malnutrition
Lack of food and proper balanced diet leads to a weak population which cannot provide physical labour to the sector. Lack of necessary labour leads to poor agricultural production.
Some farmers are not aware of the existing markets of their products and the prices offered in these markets. They lack important market information and, therefore, end up being exploited by the middlemen. Sometimes farmers produce more than the market demands leading to lack of market for their products. This discourages them from producing more.
(i) Lack of proper storage facilities
Agricultural goods are seasonal but their demand is distributed throughout the year. They are also highly perishable. A lot of agricultural products go to waste during this stage due to lack of proper storage. Most farmers construct granaries which are very small and inadequate. The crop products are destroyed by storage pests in these structures or get destroyed through rotting due to leaking roofs.
(j) Poor transport facilities
Farmers lack the means to transport their products to the markets in the urban areas due to the high poverty levels. As a result, farmers sell their products at the farm level. This leads to exploitation by middlemen who will not let the farmers know the true market situation. Some farm products end up going bad altogether in the farm due to lack of proper transport.
7.2 Solutions to problems facing agriculture in Rwanda
Activity 7.2: A visit to a field day organised by an agricultural institution or agricultural research institute to find out how farmers respond to challenges they face while farming in Rwanda
Materials required
• Questionnaire 206
• Note book
• Pen
Attend a field day organised by an agricultural research institution and carry out the following activities: Working in groups:
(i) Participate in the field day activities.
(ii) Find out from the farmers the problems they face while farming and how they solve them.
(iii) Record and discuss your findings.
(iv) Present your findings to the class.
(v) Take the teacher’s summary notes.
Various efforts have been made in an attempt to solve the problems facing agriculture and alleviate the economy of Rwanda which is based in Agriculture. Research is also going on to find out solutions to the problems facing Agriculture in Rwanda.
The following are possible solutions to the problems facing agriculture in Rwanda:
(a) Intensive agriculture
This problem can be solved through the following:
(i) Use of intensive farming systems – This is to ensure increased production per unit area. Some of the intensive systems include:
• Zero grazing – This is the rearing of livestock especially dairy cattle and goats in structures known as zero grazing stalls or units. The structures have provisions for feeding, milking and sleeping. Due to the reduced movements and proper feeding, zero grazed animals produce more milk compared to those on the free grazing. However, the system is labour demanding and require heavy capital investment.
• Use of green houses – Green houses are structures in which the environmental conditions such as temperature, relative humidity, soil fertility, wind, carbon (IV) oxide concentration of a place are regulated to create a micro-climate where crops which under normal conditions would not grow in a particular area are grown. High value horticultural crops such as tomatoes and cabbages are grown in green houses. The green houses are used to grow crops in off seasons because they do not rely on rainfall, instead the crops are irrigated. Other methods of intensive farming include; irrigation, use of fertilisers and growing high value crops such as vegetables, flowers and fruits.
(ii) Use of improved livestock – These animals are developed by upgrading local animals with the exotic ones through artificial insemination.
(iii) Use of improved seeds – These are high yielding, early maturing consumables. These are developed in research stations.
(iv) Use of modern farming techniques – Modern farming techniques such as spraying crops against diseases and pests, vaccinating livestock against diseases and irrigating crops can enhance the chances of high production and reduce the amount of risk. However, adopting these modern methods involves extra costs.
(v) Improving land tenure systems – It is used to consolidate land and reduce land fragmentation. This increases land sizes under one holding and encourages large-scale farming and mechanisation of farming activities.
(b) Provision of capital
This problem can be solved through the following ways:
(i) Forming co-operative societies – Under co-operatives, farmers pool resources together and enjoy economies of scale.
(ii) Borrowing capital – Borrowed capital is known as credit or loan. Farmers should be able to access capital from commercial banks, co-operatives and other credit giving institutions. The institutions should make borrowing terms easy to the farmer.
(iii) Government subsidies on farm inputs and outputs – The government can subsidise on farm inputs by reducing tax on agricultural inputs such as fertilisers, seeds and agrochemicals. This will reduce the prices of these farm inputs thus reducing production cost. It can also reduce excess supply by buying farm produce at a high price and then later on selling the produce to recover its money.
(c) Plant protection
This can be achieved through the following:
(i) Supplying agrochemicals at prices that farmers can afford. (ii) Planting resistant crop varieties.
(iii) Providing extension services to farmers either by “visit and train” or organising field days.
(d) Maintaining stability in the commodity
prices Changes in commodity prices emanates from the market forces of supply and demand and as long as supply and demand keep on changing the prices of commodities will also keep on changing. The solution to the problem of fluctuating commodity prices will have to do with either minimising the effect or regulating supply. This problem can be solved through the following ways:
(i) Contracting – Farmers may enter into contract with consumers to supply certain goods over a specified period of time at an agreed price. Such a contract guarantees them a constant and fixed market for their produce. The only disadvantage is that should the prices rise, the farmers would not benefit.
(ii) Diversification – The agricultural sector should be diversified by producing various products so that while the prices of some products may be going down, the prices of others may be going up thus neutralising the effect of fluctuations of commodity prices.
(iii) Operating a buffer stock and stabilisation fund scheme to take care of shortage in production.
(iv) Signing international agreements on crop production, for example, the International Coffee Agreement to keep prices stable.
(e) Irrigation
Rwanda happens to have very many fresh water lakes and rivers. The rivers Nyabarongo and Akagera which forms part of the upper Nile drains their waters into Lake Victoria, a fresh water lake. Rusizi River drains the western region of Rwanda. This water can be used for irrigation. Swampy areas in the eastern regions are already being utilised in food production. Other water harvesting methods can be devised to ensure as much water as possible is harvested for agricultural production.
(f) Attitudinal change towards Agriculture
This can be achieved through:
(i) Sensitisation of the people of the opportunities existing in agriculture so that they can view agriculture as a business.
(ii) Improve wages and provision of incentives in the agricultural sector so that they can be at the same level with those in other employment sectors and, therefore, attract more people into the farms.
(iii) Educating young people in schools on the importance of agriculture to the economy of Rwanda. The introduction of agriculture in the lower secondary education in Rwanda is a step in the right direction. It will go a long way in orientating the youth towards agriculture.
(g) Construction and maintenance of feeder roads
The government should ensure that all feeder roads to agricultural productive areas are accessible during the wet season by making them all weather roads.
This can be achieved through:
(i) Carrying out market research to find out more markets of the agricultural products.
(ii) Venturing in across the border markets that have been created by the integration of the East Africa countries into the East African Community in which Rwanda is a member.
(iii) Formation of co-operative societies to sell goods on behalf of the members.
(iv) Use of the marketing boards to assist farmers market their produce.
(i) Improving storage facilities
Through the construction of good and improved storage facilities, farm products can be stored for a long period awaiting good market prices. The stores should be made rodent-free and leak-proof. The crop products stored should be properly dried and dressed with chemicals to keep off storage pests.
(j) Provision of better transport facilities
This can be done through the following ways:
(i) Forming co-operatives to pool resources together to acquire means of transport.
(ii) Providing credit facilities to individual farmers to enable them acquire means of transport for their produce to the markets.
(iii) Marketing boards can also provide transport for their respective crop produce grown by farmers.
Group Activity
Working in groups, carry out the following activities:
Group I – Find out the meaning of intensive farming.
Group II – Find out the characteristics of intensive farming.
Group III – Find out various systems of intensive farming in Rwanda.
Group IV – Find out the merits and demerits of intensive farming, as a solution to the problems of farming in Rwanda.
(i) Present your findings to the class.
(ii) Take teacher’s summary notes.
Unit Summary
The agricultural sector in Rwanda has a lot of challenges and problems. However, these problems are not unique to Rwanda but are common anywhere in the world where agriculture is practised. The difference lies in the way different people or countries respond to the challenges. Some of the problems facing agriculture in Rwanda include:
• Shortage of land.
• Lack of capital.
• Pests and diseases.
• Unstable prices.
• Poor rainfall distribution.
• Bad attitude towards agriculture.
• Poor road network.
• Insufficient market for agricultural goods.
• Lack of proper storage facilities.
• Poor transport facilities.
These problems can be solved through various means and approaches. Research is going on to come up with new methods of handling the challenges facing agriculture in Rwanda
Key Terms
1. Field day – A day set aside when farmers meet in a demonstration farm and taken through various methods of carrying out agricultural activities by agricultural experts or officers.
2. Capital – All man-made assets used in the production of goods and services.
3. Animal-drawn implements – These are implements that are pulled by trained animals while working. 4. Extension service – Advice given to farmers by experts.
5. Visit and train – Amethod of giving extension servicewhere agricultural officers visit farmers in their farm and advise them on how to carry out agricultural activities.
6. Mechanisation – Use of machines in carrying out agricultural activities.
7. Intensive farming – System of farming that involves heavy capital investment.
8. Seed dressing – Covering or coating of seeds with a pesticide or insecticide to protect from damage by pests and diseases.
9. Pests – Living organisms that cause damage to crops. A parasite is an organism that derives its livelihood from another (a host) causing damage to it.
10. Supply – Quantity of goods that sellers are willing to sell at a specified price in a given market and time.
11. Demand – Quantity of goods that consumers are willing and able to buy at a specific price in a given market and time.
12. Perishable – Easily damaged.
13. Middlemen – These are traders who move from one farm to another buying agricultural goods from farmers.
14. Zero grazing – Rearing of livestock in structures known as stalls.
15. Green houses – These are crop production structures in which high value crops are grown under controlled environmental conditions.
16. High value crops – Highly perishable crops that fetch high prices when fresh, for example, tomatoes, cabbages, onions and melons.
17. Land tenure system – System of land ownership.
18. Large-scale farming – System of farming carried out on a large piece of land which is over 20 hectares.
19. Hybrid seeds – Seeds developed by crossing two or more pure lines of crops.
20. Upgrading – The improvement of local animals by crossing with exotic animals for high production.
21. Co-operative – Organisation of people who have joined together voluntarily with a common purpose for mutual benefit.
22. Borrowed capital – Credit or loan or borrowed funds.
23. Buffer stocks – Agricultural produce that are stored only to be released during time of scarcity to offset shortage and stabilise prices of commodities.
24. Stabilisation fund – A fund set aside by the government to import agricultural commodities in the event of a shortage so as to stabilise the price of the commodity.
25. Diversification – Allocating resources in more than one enterprise so that should one enterprise fail the farmer benefits from the other.
26. Enterprise – A single unit of production.
27. Agrochemicals – Chemicals used in agricultural production such as pesticides, herbicides and insecticides.
28. Government subsidies – These are government incentives given to farmers to motivate them to produce more and, therefore, prevent the shortage of an agricultural commodity.
29. Contracting – Entering into an agreement between two parties that is legally binding.
30. Farm inputs – Capital used in agricultural production, for example, seeds, fertilisers and agrochemicals.
31. Marketing boards – These are statutory bodies established by an Act of Parliament to oversee the production and marketing of a particular produce.
32. Gross margins – Profit realised from the sale of produce when the fixed costs are not considered.
Revision Questions
1. State five problems facing agriculture in Rwanda and give one possible solution in each case.
2. Describe two ways by which farmers can intensify farming.
3. What is the meaning of the following terms:
(a) Mechanisation?
(b) Diversification?
(c) Zero grazing?
4. Differentiate between supply and demand as used in agriculture.
5. (a) What is borrowed capital?
(b) Give two sources of borrowed capital.
6. (a) What is government subsidy?
(b) Give two ways in which government gives subsidy to farmers.
7. Give two ways in which extension service may be provided to the farmers.
8. (a) What is an enterprise?
(b) Give two examples of agricultural enterprises.