General
- Fine Arts an crafts S2 SB File Uploaded 24/01/22, 15:12
- S2: Fine Arts & Crafts TG File Uploaded 11/08/22, 21:48
UNIT 6:Motifs, pattern in embroidery, batik, tie and dye and design technology
My goals
By the end of this Unit, I will be able to:
⦿ Describe the materials and tools used for designing
textiles.
⦿ Create motifs using different tools for textile decoration.
⦿ Make patterns using batik technique.
⦿ Create a pattern using tie and dye.
Introduction
In Unit two you made patterns using different printing
techniques. The techniques you used are referred to as surface
resist. There are other methods of resisting a liquid (colour or
dyes) from entering a cloth or another surface. In this unit we
are going to study about batik and tie and dye methods of
textile decoration. These are called bound resist techniques.
For example look at the patterns in Figures 6.1, 6.2, 6.3 and
6.4.

Activity 1
Identifying patterns
1. Look at Figures 6.1 to 6.4 and differentiate batik
designs from tie and dye designs.
2. What makes the two patterns different?
3. Identify the colours used.
4. Look for similar patterns from your local area and
discuss them with your classmates.
You may observe that patterns made using batik technique
are bolder than those made using tie and dye. However, one
has to plan the patterns in advance before using either batik
or tie and dye
Making motifs and patterns for batik
In batik, we use wax to resist dyes from occupying certain
areas in your pattern. Whenever you are applying dyes, begin
with light colours, then add dark colours as you complete the
work. These colours mix with each other to create interesting
tones.
In order to make a batik article, you need the following
materials:
· Pencil and paper
· Cloth (A cotton cloth works better). Remember, you should
wash and iron the cloth before using it in any design work.
· Wax (this can be either bee wax or paraffin wax)
· Brushes of different sizes
· Dyes of different colours
· Containers for mixing dyes
· A heating source
· A source pan
· Rough papers, such as news papers
· Iron box or flat iron
Then follow these steps to make your batik article.
Step 1
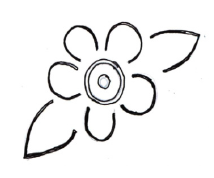 Using a pencil, sketch your pattern
on paper. Your pattern should be
simple as the one shown shown in
Figure 6.5. A complicated pattern
will give you a hard time to work
on. Mix the dyes in water, following
the instructions for mixing which
appear on these dyes.
Figure 6.5: Sketches for a batik work
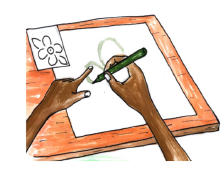 Step 2
Spread your cloth on a table. Then
transfer the sketch on to the cloth
as you follow the proportions of your
sketch. Look at Figure 6.6.
This can be done by re-drawing it with
a pencil or you may use a stencil if the
sketch does not need enlargement.
Figure 6.6: Transferring the sketch on to the cloth
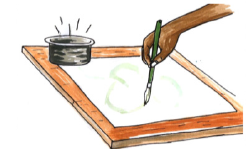
 Step 3
Put wax in a source pan and heat it
until it melts into liquid as shown in
Figure 6.7. Use little heat when the
wax melts, to keep it in liquid form.
Figure 6.7: melting wax
 Step 4
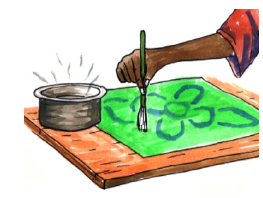
Dip the brush bristles in the molten
wax and block the sketched lines on the
cloth as in figure 6.8. Never leave the
brush in hot wax for long, it could easily
get burnt.
You should put a paper or papers below
the cloth in order to stop it from getting
stuck on the table.
Figure 6.8: Applying wax on the clot
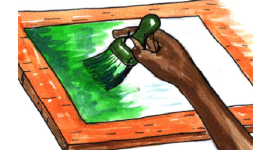 Step 5
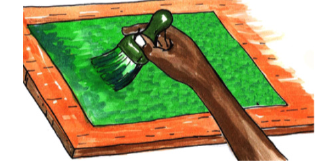
Using a relatively big brush, paint
your cloth with a light colour. Then
let the cloth dry. Never dry the cloth
under hot sun because it melts the
wax put on earlier. See figure 6.9.
Figure 6.9: Painting the cloth with dyes
 Step 6
Apply wax to places where you want
to maintain the first colour. Then
paint the cloth with another colour
(darker than the first).
Look at figure 6.10
Figure 6.10: Painting the cloth with wax
Step 7
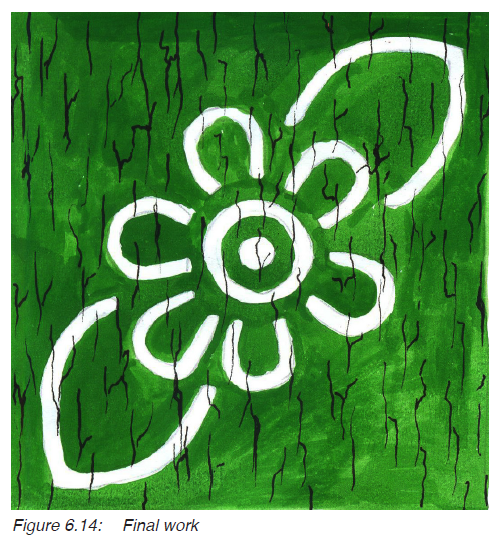
When you are done with the colours you wanted, apply wax
on the entire cloth. Let it dry up and then crackle it (create
cracks through the wax).
 Step 8
Paint the cloth with
the darkest colour as
shown in Figure 6.11.
Let it dry up.
Figure 6.11: Painting the cloth with the darkest colour
 Step 9
Crease the cloth to remove
the wax as shown in Figure
6.12.
When you are done, remove
the excess wax by putting
the cloth between papers
and ironing it as shown in
Figure 6.13.
Figure 6.12: Creasing the cloth to remove wax

Activity 2
1. Follow the steps given to make your own batik article.
2. Display and discuss your work with your classmate.
Take note
Melting wax and making batik work requires a well ventilated
place.
Be careful as you work with hot molten wax. It can easily burn
you.
Making patterns for Tie and dye
The process of making patterns for tie and dye begin with
tightly tying the cloth, and dipping it in boiling dyes before
bringing it out to dry. Therefore the name comes from the
process of making the patterns, “first tie the cloth and then
dye it in dyes”.
To make tie and dye patterns, you need the following
materials:
· Cloth
· Raffia or nylon threads
· Dyes
· Water
· Heat source
· Cutters
· Wax
·· Salt (this is usually added in the dyes as they are boiled)
Patterns for tie and dye largely depend on how the cloth is
treated before dyeing it. The cloth is tied in order to resist
dyes from going to unwanted areas. After tying the cloth, it is
dipped in dyes and boiled for about 30 minutes (or according
to the instructions on the tin for a given dye).
It is then removed from the dye and made to dry under shade.
The tying should be tight in order to limit dye from going to
places they are not supposed to.
You can use different colours to dye your cloth. But before
dyeing the cloth in another colour, the first colour should be
dry. Then more tying is done to preserve the first colour. The
threads are not removed until the cloth is totally dry.
Activity 3
1. Look for tie and dye patterns from your local area.
2. What shapes can you see in these patterns?
There are several ways of treating the cloth, these include:
1. Folding and gathering
2. Stitchery
1. Folding and gathering
There are several ways of folding and gathering the cloth
these include pleats, strips, circles and spirals. These are
demonstrated in Figure 6.14. In all the styles shown, the cloth
is twisted first, then it is tied to form a given pattern.
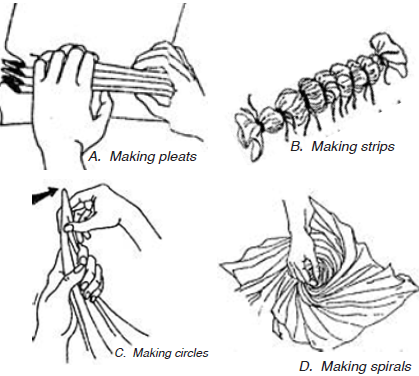
Figure 6.15: Ways of making patterns for tie and dye
After folding and gathering the cloth, its is then tied and
emersed in dyes as shown in figure 6.16. The cloth is boiled
for some time as indicated on the dyes, look at Figure 6.17.
After dyeing the cloth it is left to dry under a shade if you are
to use several colours, the process is repeated. You add more
ties after drying the cloth and dip it into the second colour.
Then when you are done with all colours, the cloth is unfolded
and ironed and the patterns of final work appear as shown in
figure 6.18

Activity 4
1. Observe the patterns in Figure 6.14 and try them out on
a piece of cloth.
2. Dye the cloth to see the outcome.
Now take a look at how the patterns look like on the final work
in Figure 6.18, after dyeing the cloth.

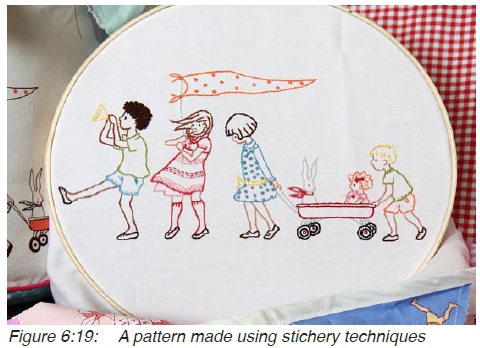
2. Stitchery
For this technique, you need a needle and threads (preferably
nylon threads or raffia). For example the pattern in Figure 6.15
was a result of stitchery. You begin by sketching the patterns
on the cloth, then you sew them with a running stitch. But
you leave threads of a reasonable length hanging. These are
the threads used to tie the cloth when it comes to dyeing it.
Figure 6.19 A pattern made using stichery techniques. You
can now look at the pattern made by use of threads on a cloth
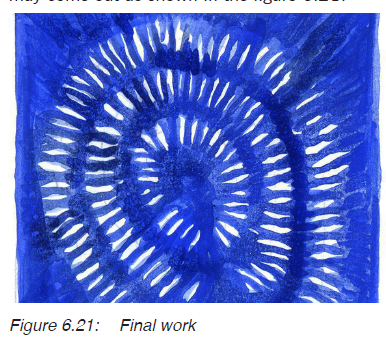
in figure 6.20.
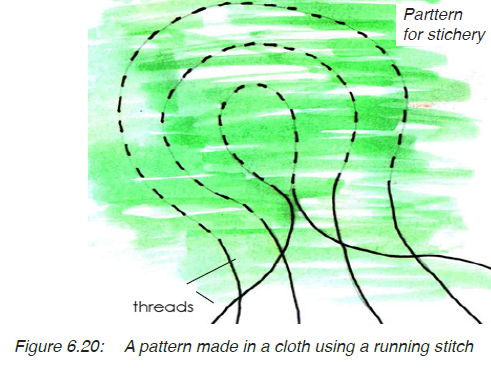
While using the stitchery technique, threads are pulled and
tied at intervals depending on the planned design and colours.
Then the cloth is dipped in dyes following the same process as
the one you used in folding together on page 83. Your pattern
may come out as shown in the figure 6.21.
Take note:
· Just like the case of batik works, the process of dyeing the
cloth should always begin with light colours.
· You need to know the colour combinations before doing tie
and dye. These were studied in Unit one.
Activity 5
1. Draw a pattern for stitchery on a piece of paper.
2. Sew the stitch on a piece of cloth.
3. Dye the pattern and observe the outcome
Assessment
Create a pattern on a cloth (1/2 square meter) using one of the
techniques discussed in this unit.
1. Get a piece of cloth (1/2 square meter) and create patterns
by folding it into either circles or pleats
2. Tie the cloth into different values and dip it into a light dye
3. Repeat the processes in ‘2’ atwith different parts in the
second dye.
4. Unfold the cloth and let it dry. Then iron your cloth and
display it.
Glossary
Bound resist: a technique of decorating cloth in which dyes
are stopped from going to certain areas on a
cloth by either tying, or using wax.
Surface resist: a technique of decorating a cloth in which
printing ink is limited to particular areas by using
a stencil, or graphic film or photo emulsion.
Crackling: a technique used to create rugged lines on a
batik work when it is completed.
Stitchery: a tie and dye method in which threads are used
to create patterns on a cloth.
Dye: a material which is used to change the colour
of another materials either directly or by use of
heat.
Crease: a process of squeezing a cloth in order to remove
excess wax.
Pleats: folds created in a pieces of cloth as a process of
creating patterns on it before dipping it in dyes.