General
- Fine Arts an crafts S2 SB File Uploaded 24/01/22, 15:12
- S2: Fine Arts & Crafts TG File Uploaded 11/08/22, 21:48
UNIT 4:Methods of Modelling Clay Figures and Forms
My goals
By the end of this Unit, I will be able to:
⦿ Describe the process of preparing clay.
⦿ Make a sculpture in clay.
⦿ Decorate the surface of a clay piece.
⦿ Make a mask and decorate it.
⦿ Share ideas with others about modelling.
Introduction
Modelling is a very old activity which has been done by
different cultures. It includes both pottery and sculpture.
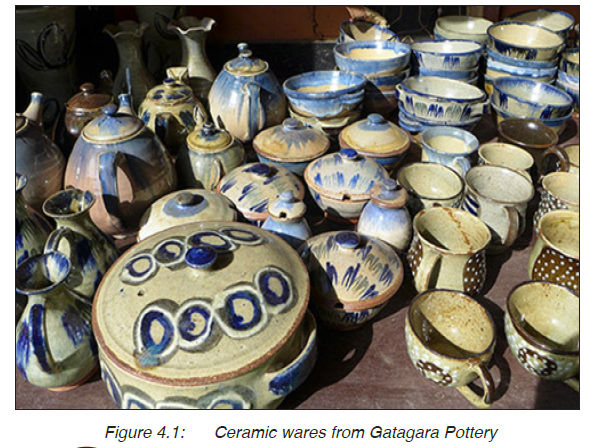
There are many figures which have been formed using clay.
For example look at the ceramic wares from Gatagara Pottery
in Figure 4.1.
Activity 1
1. Look at Figure 4.1 and mention the different objects in
the picture.
2. Identify the patterns used to decorate these objects.
3. Which materials were used to make these products?
In Senior One you studied about modelling where you learnt
about clay and its uses. You also studied about the different
methods of making ceramics (such as pots, cups and bowls);
these include pinch, coil and slabs. You studied about the
different methods of decorating ceramic articles. You learnt
that clay was used as the basic material for ceramics. Clay
can further be used in other ways.
In this unit, we are going to learn more about modelling in clay
by exploring additive and subtractive methods. For example,
look at the two sculptures in Figure 4.2.

Figure 4.2: A male and female sculpture made out of clay
Activity 2
1. Observe the sculpture in Figure 4.2 and identify the
activites represented.
2. Discuss the sculptures in terms of form and use of clay.
3. Look at the surface of these sculptures and discuss how
their texture was made.
Clay preparation
In Senior One you learnt about clay preparation. You studied
about four different methods of clay preparation namely;
The plastic method: The method is often used in brick
making. The available moisture in clay
is used to prepare it.
The wet method: Where clay is dissolved in water to
form shap. Then it is wedged to loose
moisture and prepare it for use. It is
good for making pottery.
The dry method: Clay is dried, pounded and crushed
into powder form. It is often used in
factories for making tiles.
The semi dry method: Combines both dry and plastics
methods.
Each method has got advantages depending on where it
is being used. However, it is always important to get rid of
unwanted materials such as stones, plant roots from clay
during its preparation. Grog is always added in clay for
sculpture in order to make it stronger and to ease the firing
process.
Remember, clay has to be kneaded and pressed during its
preparation in order to get rid of air pockets. This is also done
in order for the clay to become more plastic.
Activity 3
1. Discuss the four different methods of clay preparation.
2. Which method is more suitable for preparing clay for
pottery?
3. Which method is more suitable for the preparation of
clay for sculpture?
4. Follow an appropriate method and prepare your clay.
Keep it in a safe place.
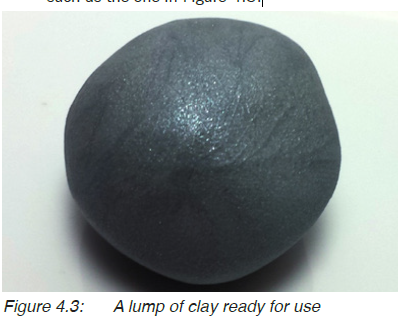
Take note:
· The quality of clay determines the quality of the object
formed. When clay is well prepared, it can be used to form
fine objects.
· Objects can easily break if they are made from poorly prepared
clay.
· Ready clay should not crack when pressed, it should be even
such as the one in Figure 4.3.
Moulding different clay figures
Your hand is the basic tool while moulding clay. This applies
to both additive and subtractive methods of forming art works.
Clay figures can be made by use of the following methods:
· Using coils
· Using slabs
· Additive method
· Subtractive method
Activity 4
Discuss the four methods above and write how each one of
them can be applied for making clay work.
make clay figures such as masks. As you may have observed,
these methods are commonly used to make pottery and
ceramic sculpture. You can make a sculpture using the additive
method, by putting together small pieces of clay until you get
the whole sculpture desired. For example, the sculptures in
Figure 4.2 were made using the additive method.
Substractive method is where you begin with a big piece of
material which you keep reducing until the required sculpture
is got. Subtractive method commonly applies to such materials
as wood and stone. However, it could be used in clay. For such
a method, you pile up a lump of clay, then you keep removing
pieces until you get the required form.
How to make a mask from a mold
Remember, a mask is an object which is normally put on the
face to disguise one’s identity. Since it is to be worn on the
face, a mask is usually made of light materials such as wood,
plastic and paper. For example, look at the masks in Figure
4.4.
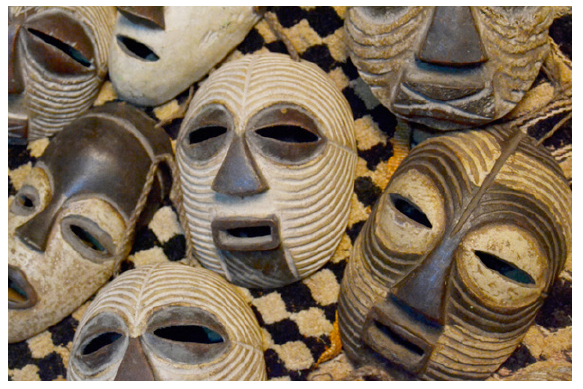
Figure 4.4: Local masks
You can make a mask of your own using a mold. A mold is a
form which is used to give shape to another softer material. In
this unit we shall use clay to make a mold.
In order to make a mask using a mold, you begin by thinking
about the purpose of your mask. From the purpose you can
develop a title for your mask. For example, your mask could
be used to entertain people on a festive occasion. You need
the following materials in place.
· Clay
· Waste papers
· Glue
· Polythene material
· Vaseline
· Colours
· Brushes
· Small stones or seeds
· Raffia and threads
Then you follow the steps below:
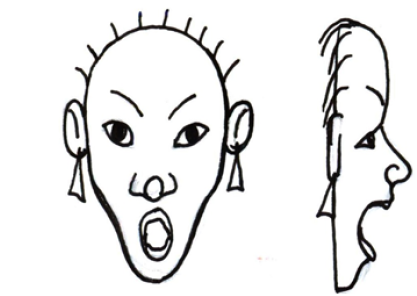 Step 1
Develop sketches for
your mask as shown
in Figure 4.5. Making
a sketch helps you
to develop and put
ideas together and it
acts as a guide while
forming your work.
Figure 4.5: Sketches for a mask showing the front and side view
Step 2
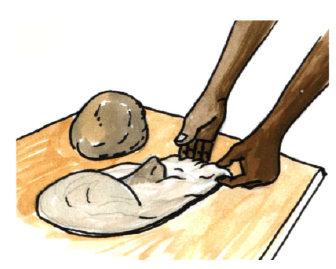 Use clay to make your mask
mold. Look at Figure 4.6.
Avoid creating pockets on
your mold. These are areas
with depressions within
the mold. Such pockets
make it difficult to remove
the mask off your mold.
Figure 4.6: Forming a mold for the mask out of clay
Step 4
 Use a tool to create a smooth
finishing on your mold as
shown in Figure 4.7. This
could be a table knife or a
smooth stick. This would
further help you to remove
your mask so easily. Never
allow your mold to get
dry. Always cover it with a
polythene material whenever
you break off.
Step 4
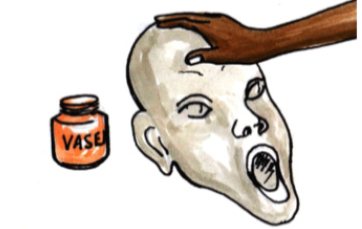 When you are done
with the mold, smear
its surface with
Vaseline. (Figure
4.8). This eases the
removal of the mask
after completion
Figure 4.8: Smearing the clay mold with vaseline
Step 5
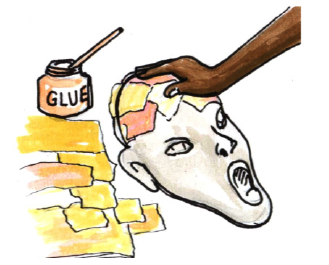 Tear small pieces of paper
and carefully use glue to
fit them on your mold
as shown in Figure 4.9.
When you are done with
the first layer, apply glue
and add another layer.
Whenever you add three
to four layers expose your
work to get dry.
Figure 4.9: Applying papers on the clay mold
Step 6
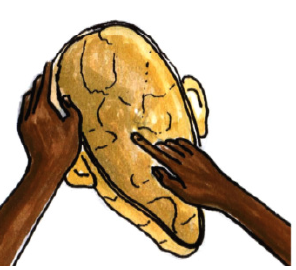 When you are done and
satisfied with the thickness
of the mask, carefully get
it off the mold. This can be
done by scooping clay out
and you remain with the
image in papers. Then turn it
around and work on its inner
parts. Look at Figure 4.10.
The inner part of your mask
should be as smooth as the
outer part
Figure 4.10: Finishing the inner part of the mask after
Step 7
 Then cut out the
provision for the eyes
as shown in Figure
4.11. Prepare colours
and paint your mask
according to your plan
or sketch. Add a string
for holding your mask in
place.
Figure 4.11: Cutting out the provision for the eyes
Step 8
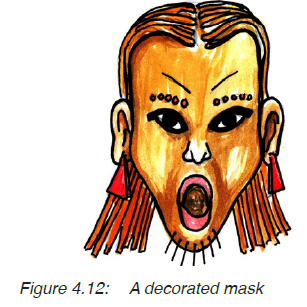 Your mask could be
decorated further by
adding more colours,
raffia and a rough texture
with small stones or
seeds. For example look
at Figure 4.12.
Activity 4
1. Follow the steps above and make your mask to be
used on an occasion. Decorate it using the available
materials.
2. Display your work and discuss it with classmates
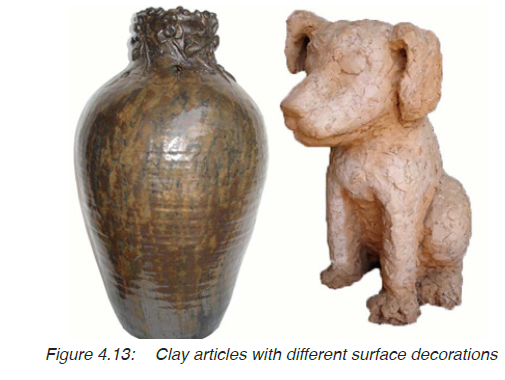
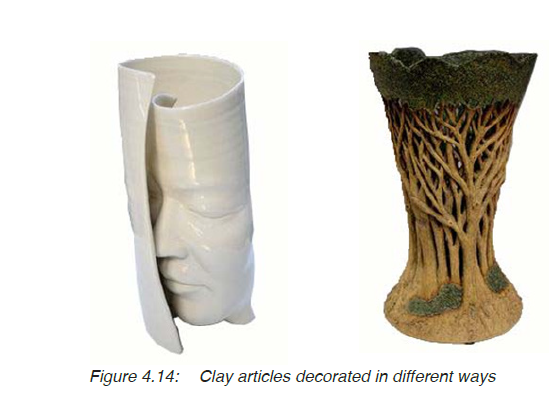
Decorating clay surfaces
Clay naturally has its texture. But this can be changed by use
of different tools to improve the appearance of the art work.
Consider the following techniques of decorating clay
surfaces:
· Smoothening: the article is made smooth with a tool, then it
is fired.
· Glazing: glaze is applied to the surface of the article at bisque
level, the article is then fired for the second time. Glazing can
be done in one uniform colour or with patterns.
· Painting: a technique where colours are applied to an article
after firing. Such colours are applied following particular
patterns.
· Incision: this is done by using a tool to cut patterns into the
surface of an article.
· Building: the surface of an article is decorated by adding small
pieces on the surface while following a particular pattern.
Activity 5
Observe the clay pieces in Figure 4.13 and 4.14, and
mention the technique which was used to decorate its
surface. (Choose from these; building, incision, painting,
glazing and smoothening).
Assessment
1. Use clay to prepare a mold of your choice. Don’t let your
mold dry up.
2. Using waste papers and glue, prepare a mask and decorate
it.
3. Display and discuss your skills regarding creativity and use
of materials.
4. Describe four techniques of decorating a pottery article.
Glossary
Grog: crashed fired clay which is usually added in
clay to make it stronger and to ease its firing
process.
Additive method: a method of making clay works by putting
together smack pieces of clay.
Subtractive method: a method of making artworks by removing
small bits off the original shape until the
required form is got.
Glaze: a coating of coloured, opaque, or transparent
material applied to ceramics before firing.
Mold: a hollow form or matrix for giving a particular
shape to something in a molten or plastic
state.
Kneading: a processing of folding, pressing and stretching
a soft substance such as clay, and making it a
smooth uniform mass.
Pressing: exerting force on a substance such as clay to
flatten it.
Pocket: depressions within a given surface.