General
- Fine Arts an crafts S2 SB File Uploaded 24/01/22, 15:12
- S2: Fine Arts & Crafts TG File Uploaded 11/08/22, 21:48
unit 1:Still Life and Nature
My goals
By the end of this Unit, I will be able to:
⦿ Explain the elements of art.
⦿ State the difference between dry and wet media.
⦿ Draw and paint objects in composition.
⦿ Paint a landscape.
⦿ Draw from a human figure.
⦿ Respect the opinions given by others about my own
work.
Introduction
In Senior One, you were introduced to different materials used in
drawing and painting. You also practiced with the elements of art such
as shape, line, tone, colour and texture. You also observed and drew
objects in composition as still life, as well as single objects picked from
nature.
Remember, still life is the study of objects in composition, in relation to
their immediate background. Yet nature is the analytic study of objects
from the natural environment.
Based on your past experience, do Activity 1.
Activity 1
1. Visit your surroundings and pick a twig with three
leaves.
2. Using a pencil and paper draw the twig.
3. Exchange your drawing with your neighbour.
4. Discuss each other’s drawing by pointing out the
strengths and weaknesses that you are able to observe.
(Assessment is done in terms of use of space, shapes,
tones and texture).
5. How can such weaknesses be improved for a better
drawing?.
Observation of the drawings
I hope you were able to observe that in some drawings from
Activity 1, the object was too small for the paper. In some
drawings still, the object could not fit on the paper. The two
cases usually happen if you have not taken time to compare
the size of the object with that of the paper. Space should be
used comparatively, to make sure that the object drawn fits
well on the paper.
Observe the two pictures in Figure 1.1 and answer the
questions in Activity 2.

Figure 1.1: Studies of plants
Activity 2
1. Identify the different types of lines used in the two
pictures.
2. Mention the colours that were used in the two pictures.
3. Describe the types of shapes in the pictures.
4. Describe the kind of texture in the work.
Elements for drawing and painting
Remember, in order to draw and paint well, you need the
building blocks to follow. These are the elements of art. They
include space, line, shape, tone, form, structure, colour and
texture.
(a) Space
When you look around you, you can see different objects, and
people including your neighbour. But at the same time there
are areas you can see which are occupied by nothing. All
these are part of space. Therefore space is simply emptiness.
However, in drawing and painting, we have both negative and
positive space. For example, look at how space was used in
Figure 1.2
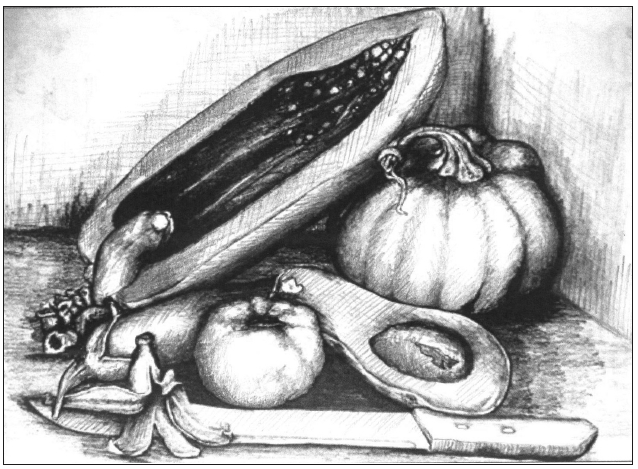
Figure 1.2 : A still life composition of fruits
The area occupied by objects in the composition is called the positive
space. The area around the objects is what we call negative space.
We always begin drawing and painting by identifying the space in
which to create our compositions. After identifying space, we use
other elements to form our drawings and paintings.
Observe the compositions in Figures 1.3 and 1.4 and work out
activity 3.
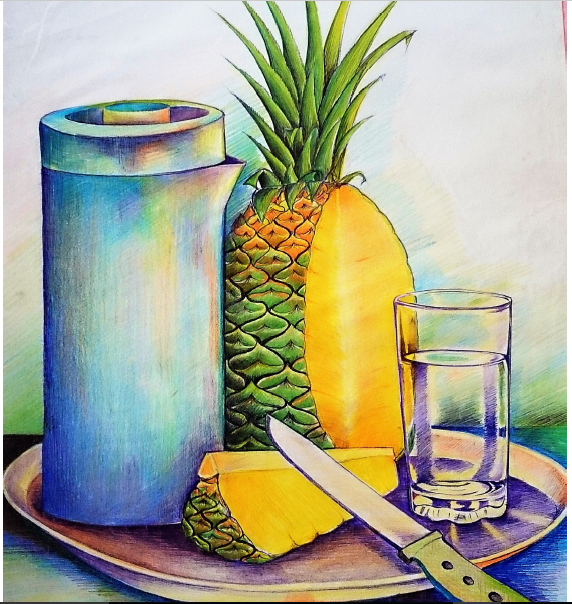
Figure 1.3: A still life composition in colour
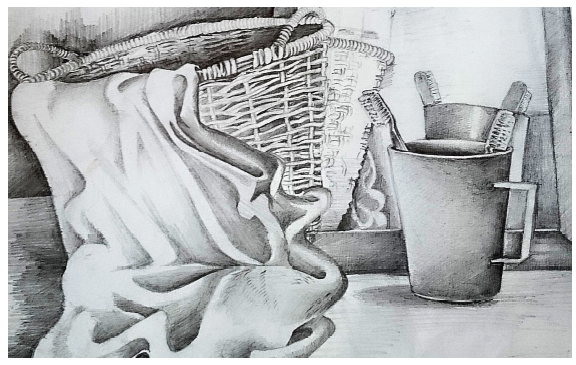
Activity 3
Space in a still life composition
1. Identify the positive and negative spaces in the two
pictures above.(ie Figure 1.3 and Figure 1.4)
2. Comment on how space was created in the two
compositions.
3. Mention the objects and the colours used in the two
different pictures.
Take note:
The paper you are given for drawing or painting provides you
with the space in which to fit your drawing or painting.
In drawing and painting, a good composition balances space.
The picture you draw has to fit within the space provided.
Never cut off parts of the object drawn or painted in a given
space.
Leave same space on the left and right side of the paper. The
upper space should be bigger than the lower space left on
the paper, thats how negative space is balanced in drawing
and painting.
Space is controlled in order to create a feeling of depth in the
composition.
(b) Line and shape
In Senior One, you identified the different materials used in
drawing. After identifying what to draw in a given space and
the suitable materials to use, we use lines to draw or paint.
Lines play a vital role in drawing different shapes of objects.
Remember, shapes can be either geometric or natural
(organic).
Geometric shapes are more regular, they include circles,
squares, rectangles and triangles. Natural shapes are irregular
such as a shape of a stone, tree or leaf.
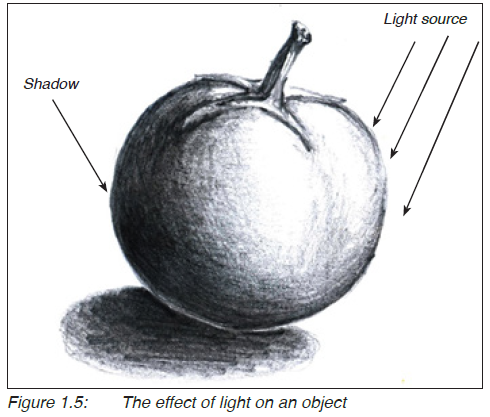
(c) Tone and form
After drawing the required shapes of objects in the composition,
then you can apply tones according to the light direction. It is
the tones that bring out the forms of objects in the composition.
As light fall on an object, it casts a shadow on the opposite
side.
Therefore tone refers to the variation from light to dark on the
surface of an object as light falls on it. On the other hand form
is the roundness of an object.
For example, look at the effect of light on the drawing of a
tomato in Figure 1.5.
Activity 4
Responding to light and shade
1. Arrange three objects from your surroundings to form a
composition.
2. Using a pencil and paper, draw the composition; first in
lines and then shade the composition to create forms
and shadows.
3. Display your work and discuss it with your friends
regarding the use of tones to create the forms in the
composition.
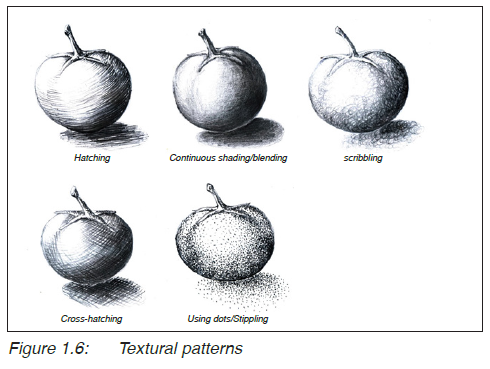
(d) Textural patterns
During the process of trying to draw the forms of objects
in a given composition, there is need to show their surface
quality (texture). Are the objects smooth, rough or coarse?
This question is answered by using textural patterns that fit
the objects being studied. Textural patterns depend on the
shading technique used. For example, look at the textural
patterns on the objects in Figure 1.6.
Hence, textural patterns refer to the appearance of the surface
of an object according to the shading technique used.
Activity 5
Dealing with textural patterns
1. Pick three objects with different texture, from your
surroundings and arrange them to form a composition.
2. Draw the objects on a piece of paper and use different
shading techniques to capture the different surface
qualities of the objects.
Take note:
· Texture varies with the form of a given object.
· Where the tone is light, the texture is light and vice versa
Types of colour application
In Senior One, you studied about colour and you looked at
primary and secondary colours. Primary colours are basic and
are only three ie. Red, Yellow and Blue. Besides, secondary
colours are got after combining two primary colours. Secondary
colours include orange, green and violet. When you combine
a secondary colour with a primary colour, you get a tertiary
colour. For example, study the colour combinations in Figure
1.7 and Figure 1.8.


Activity 6
Colour mixing
Mix the different colour combinations. Remember to always
use equal amounts of the different colours in order to come
up with the right mixture.
Colours can be used to capture objects in a still life composition.
Colour can be classified under different properties such as
hue or purity, value and intensity. A hue refers to a colour in
its purest state. The common hues include yellow, red, blue,
green and purple as they appear on a colour wheel. Look at
Figure 1.9.
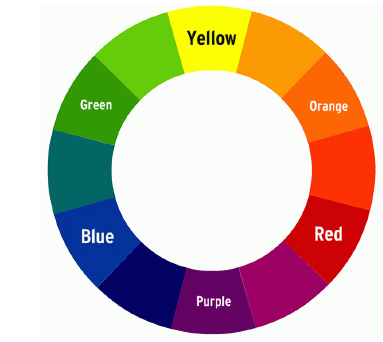
Figure 1.9: Colour Hues
Value refers to the darknes or lightness of a colour; if a colour
is dark, its value is low and if a colour is light, its value is light
for example, look at Figure 1.10.
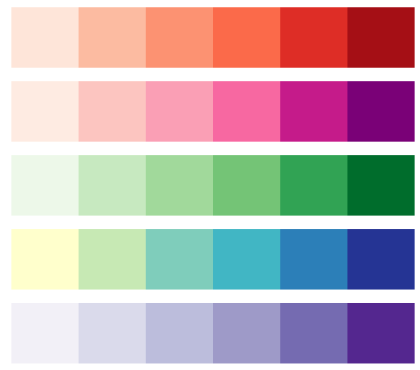
Figure 1.10: Colour Value
On the other hand intensity refers to the brightness or dullnerss
of a colour, for example look at Figure 1.11 Intensity also
refers to saturation.

Colour can also be classified as being (colour temperature)
hot, cool, complementary and supplementary/analogous. Hot
colours strike the eye; these include red, yellow and orange.
Cool colours do not strike the viewer’s eyes; they include;
brown, green and blue. Supplementary colours appear next to
each other on the 12 part colour wheel eg; yellow and orange
or blue and purple. Complementary colours appear opposite
each other on the colour wheel such as; green and red or
yellow and purple.
In painting, black is considered to be a shade, a colour
darkens when it is added with black. On the other hand white
is consider to be a tint. A colour becomes lighter when added
with white.
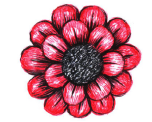
In order to paint a good picture, select colours according to the
natural appearance of the objects being studied. For example
look at Figure 1.12 and observe how colours were used to
reflect the natural appearance of the objects
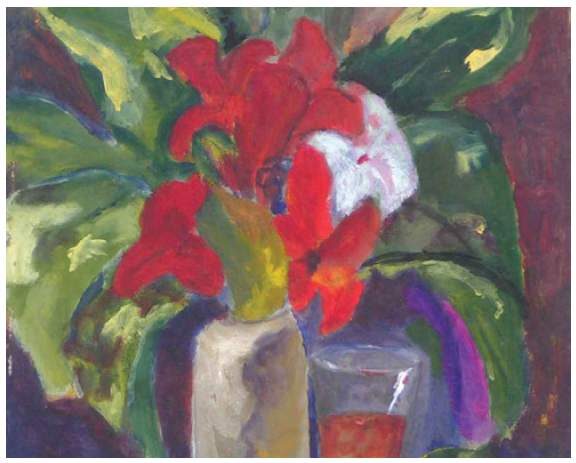
Figure 1.12: A painting of flowers
.Activity 7
Observation exercise
Observe the picture in Figure 1.12 and do the following:
1. Identify the objects in the composition by their colours.
2. Mention the primary colours, secondary colours and
tertiary colours that you can see in the composition.
The Principles of Art
As you follow elements of art while drawing and painting, you
need to follow guidelines. These guidelines or rules are referred
to as the principles of art. They include balance, rhythm,
pattern, perspective, unity/harmony and proportionality.
1. Balance: This refers to a state of equilibrium when all
elements in an artwork are well arranged. Balance can be
symmetrical, asymmetrical or radial.
 (i) Symmetrical balance is also called
formal balance. This is achieved when
the opposite parts in an artwork are
exactly or nearly the same in respect to
a vertical / horizontal axis. For example,
look at the symmetrical balance on the
human face in Figure 1.13.
Figure 1.13: The human face
(ii) Asymmetrical balance is also
called informal balance. It

refers to balance by visual
weight. It can be achieved
when a work of art is looked
at in totality when all parts of
the work seem to agree with
each other even if they are not
equal with each other. For example
look at Figure 1.14
Figure 1.14: A painting showing asymmetrical balance
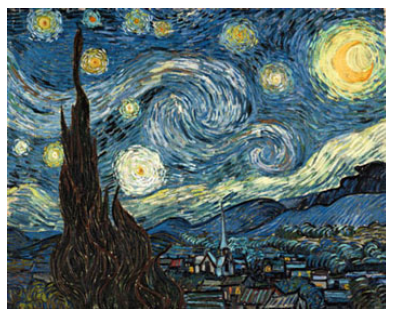
 (iii) Radial balance is a type
where elements are
equally distributed from
the center. For example
Figure1.15
Figure 1.15: A painting showing radial balance.
Activity 8
Look at the works of art from your surroundings and
identify those where symmetrical, asymmetrical and radial
balance has been achieved.
2. Rhythm is a principle of art which focuses on visual
movement in a work of art. It is achieved when there is a
feeling of movement from one part of the work to the other.
For example, look at the design in Figure 1.16
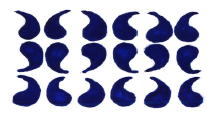 3. Pattern refers to repetition of elements such
as line, colour texture over and over to create
an impression work of art. For example,
the design in Figure 1.16 consists of curved
patterns.
Figure 1.16: A design showing rhythm and pattern
Activity 9
(i) Choose one geometric shape (eg circle, triangle and
square) draw and repeat it several times on a piece of
paper to form a pattern with rhythm. You are free to
use any colours of your choice.
(ii) Display your work and discuss it with your fellow
students to judge which pattern is more rhythmic.
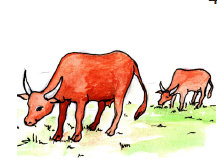 4. Perspective: In Senior One, you were
introduced to linear perspective, where
you focused on the use of lines to show
perspective in landscapes. As a principle
of art, perspective refers to the variation
in size, tone and colour of objects with
distance. Near objects look bigger/brighter
compared to those seen at a distance. For
example look at Figure 1.17.
Figure 1.17: Animals seen at different points.
 5. Unity/harmony: This
principle is achieved
when all, elements
in given work of
art (such as lines,
colour and texture)
agree with each
other. For example,
look at Figure 1.18.
Figure 1.18: A painting showing unity/harmony
6. Proportionality: This refers to the relationship of different
parts of an object in terms of size. Naturally, there are sizes
which are considered normal and when such sizes change
compared to others, they are considered abnormal. For
example the size of human hands is small compared to
that of legs. Or a passion fruit is considered smaller than
a pumpkin. Therefore when drawing or painting, always
consider the right sizes of the objects or parts of the objects
in order to achieve the right proportions.
Take note:
 In drawing and painting some
objects which are known to be
small may appear bigger than
those which are known to be
big, due to perspective. For
example look at the drawings
in Figure 1.19.
Figure 1.19: Passion fruit appearing bigger than a pawpaw
Working with dry and wet media in drawing and painting
What we use to draw and paint pictures (such as pencils,
crayons, pastels and water colours) is often referred to as a
medium. When there are many different materials, they are
referred to as media. Media can either be dry or wet.
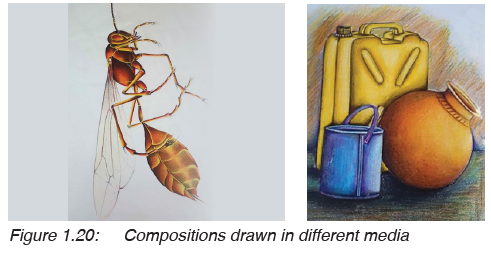
Drawing with dry media
Pencils are commonly used in drawing. These are part of the
dry media. Dry media refer to materials which do not flow.
Other dry media include crayons and coloured pencils. For
example, look at the two drawings in Figure 1.20. One was
drawn using crayons and the other one by use of coloured
pencils.
Activity 10
Drawing with dry media
1. Look at Figure 1.20 and identify the picture drawn with
crayons and the one drawn with coloured pencils. What
is the difference?
2. Using either coloured pencils or crayons draw a
composition of three objects picked from your
surroundings.
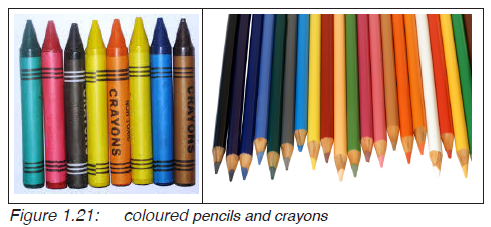
Take note:
Coloured pencils usually give a clear picture compared to
crayons.Crayons differ from pencils as shown in Figure 1.21
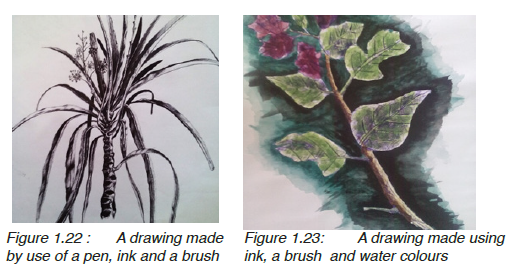
Drawing or painting with wet media
Wet media refer to materials which can flow. Using such
materials requires you to add a liquid in order to make it
flow well. You may need a brush in order to paint a given
composition.
These materials include inks, water colours and powder
colours. Observe Figures 1.22 and 1.23, and work out the
questions that follow.
Activity 11
1. What is the difference between the two drawings in
Figure 1.22 and 1.23?
2. Using a pen and ink draw a twig of a plant from your
school compound.
3. Display your work and discuss it with your friends,
regarding how the materials have been used to create
tones and form.
Take note:
When you are going to draw or paint with wet media, always
begin with a sketch in pencil. This helps you to draw the right
shapes and the proper arrangement of the objects in a given
composition. Pencil work can easily be adjusted by rubbing
out. Ink and water colours cannot easily be changed.
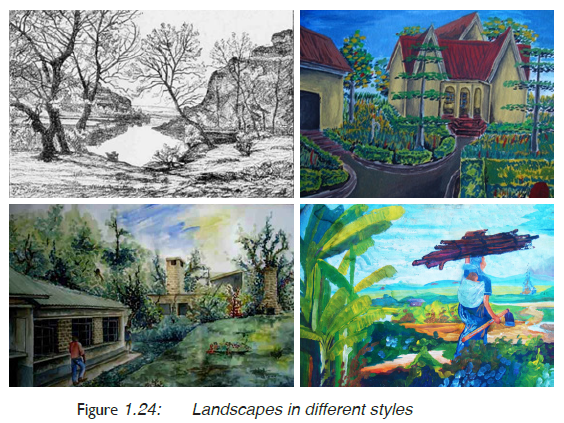
Study of a landscape
Our environment is a rich resource for the study of landscape.
A landscape is the natural scenery. Such sceneries include
plants, houses, etc. You will enjoy your studies by moving out
of your classroom and observe the surroundings. Look at the
landscapes in Figure 1.24 and try out Activity 12.
Activity 12
Study the landscapes in figure 1.24 and do the following:
1. List the different objects in the four landscapes.
2. Identify the materials that were used to draw or paint
these landscapes.
3. Discuss how space was used, how the shapes of different
objects were painted/drawn and the sizes of objects were
varied to achieve depth.
Much as your environment is rich for your studies of a
landscape, you do not have to include everything that you see.
You need to select the best view. This can be done by using
a view finder. A view finder is made by cutting a rectangular
shape on a cardboard, as shown in Figure 1.25.
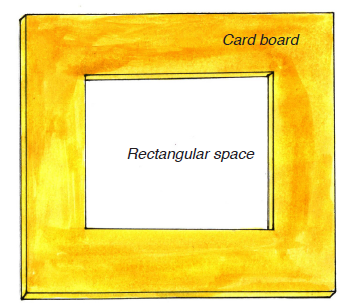
Figure 1.25: A view finder
How to use a view finder to study a landscape
You hold your view finder in one hand and through its space,
observe the landscape ahead of you. You then you sketch only
those objects which appear within the view finder’s space.
Look at the Figure 1.26.
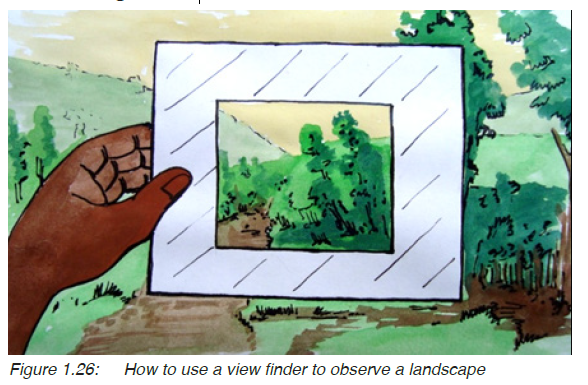
Take note:
The closer the view finder is to your eyes the bigger the area
of study and vice versa.
Keep the distance between the view finder and your eyes
uniform throughout your study of the landscape
Activity 13
Study of a landscape
1. Using a cardboard and cutter, prepare your view finder.
2. Go outside your classroom and use your view finder to
select a suitable view from your surroundings.
3. Draw or paint the landscape.
4. Display your work and discuss it with your friends.
Human figure drawing
In Senior One, you were introduced to human figure drawing
and you learnt that human figures can be drawn either from
observation or imagination. You also learnt that getting the
right posture (the way the human figure is sitting or standing)
of the human figure is important. This demands for continuous
practice with different studies of the human figure with
different materials. Now study the images in Figure 1.27 and
work out activity 14.
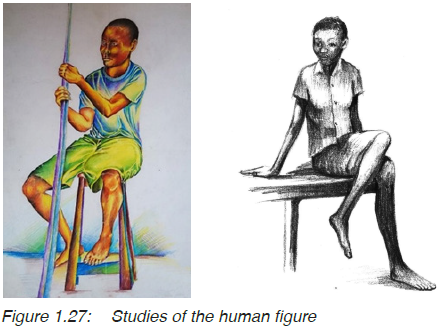
Activity 14
1. Study the seated figures in Figure 1.27 and discuss how
lines, shape, colour, tones texture and space were used to
bring out the posture.
2. Draw one of these pictures on a piece of paper.
3. Share your work with your neighbour and discuss it
regarding the posture and use of space. How do the
different parts of the body relate to each other in your
drawing? (Proportions).
How to get the right proportions
In the examples above, you note that the artists tried to get the
right proportions of the human figures. You can always check
the proportions of your human figure drawing by comparing
the size of the head to the rest of the body parts.
Activity 15
Stand up, look at each other and discuss the following:
1. Compare the size of the arms to the rest of the body.
2. Compare the size of the legs to the rest of the body.
3. Lastly compare the size of the head to the rest of the body
parts (i.e. the hands, legs and the torso).
A fully grown human being is believed to have about eight
head-lengths in height. Figures 1.28 and 1.29 show the
relationship between the head-length and the rest of the body
parts of the female and male human figures.

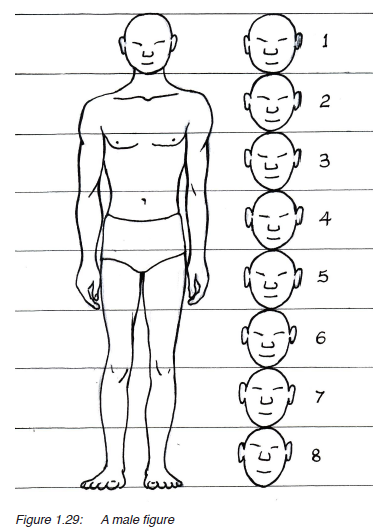
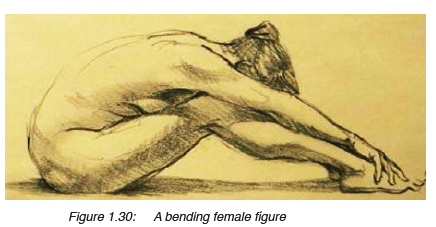
You can observe that the elbow is at the same line with the
navel for a standing posture. The lower leg matches with the
upper leg and the torso in height. There are two head-lengths
for the lower leg and the same applies to the upper leg and
torso each. The height of the head matches with the length
of the foot of the human figure. For example, observe the
relationship of the body parts in Figure 1.30.
Activity 16
1. The following drawings were made by Senior Two
students. Observe the human figures in Figure 1.31 and
discuss the challenges with their proportions.

2. Following the right proportions draw a human figure in a
standing posture.
3. Display your work and discuss it with friends, regarding
proportions and posture.
Assessment
1. What is the difference between dry and wet media?
2. Using materials of your choice, draw an insect or animal from
your surroundings.
3. Draw or paint a standing boy, dressed in a short sleeved shirt
and a pair of shorts.
Glossary
Head-length: the size of the head from the chin to the end of the
forehead.
Imagination: using one’s mind to create ideas.
Negative space: area around the objects in a drawing or painting.
Observation: using eyes to look at something in details.
Posture: the way a human figure appears to the viewer, either
standing, sitting of sleeping.
Positive space: the area occupied by objects in a drawing or painting.
Proportions: relationship of different body parts of a given object.
Resource: a set of things from which an idea is developed.
Torso: the middle part of the human figure excluding the
hands, legs and head.
Landscape: a natural scenery which may include, plants houses,
animals etc.
Element of art: building blocks followed while making and talking
about a work of art.
View finder: a card with a square or rectangular space used to
select a particular area in a landscape for study.
Dry media: materials which do not flow such as pencils and
crayons.
Wet media: materials which flow as they are used in drawing
such as painting.
Still life: a study of objects in composition in reflection to their
immediate background.
Nature: a study of objects picked from the natural
environment.
Principles of Art: guide lines or rules followed while making or
talking about a work of art.
- S2: S1 Fine Art and Crafts - SB File Modified 26/07/21, 12:16