General
- ICT S2 SB File Uploaded 24/01/22, 15:32
Unit 9:Game Programming (Scratch)
Key Unit Competency: By the end of this unit, you should be able to:
Design a game, collect data in a table and add game rules.
Introduction
Game programming is the process of writing codes that make things happen in a video game. It involves taking the design specifications of the game designs, combining the art and sound and translating it all into a playable game.
The educational value of game programming in Scratch extends beyond providing an easy and interesting introduction to programming.Programming requires logical thinking, critical reasoning, problem identification and solving skills and persistence.
9.1 Game Concepts
To create a basic game, the student must have an idea of the game name, list of sprites, sprite interaction, backgrounds and the counter rule and level advancement rule. The following stages are involved when creating a game to ensure clarity and greater understanding:
(i) Design the game.
(ii) Create game sprites.
(iii) Add game rules to game sprite(s).
(iv) Change background when the sprite moves.
(v) Manage scores and levels.
9.1.1 Game Name
When creating a game, it is important to assign a unique name to it. This is done in order to be able to retrieve and play the game easily. It is good practice to have the name of the game related to the nature of the game.
For example:
When creating a Cat and Mouse game a favourable name would be: Cat_Mouse Game.
9.1.2 List of Sprites
Designing a Game This involves creating a basic table that can be filled in as shown below:
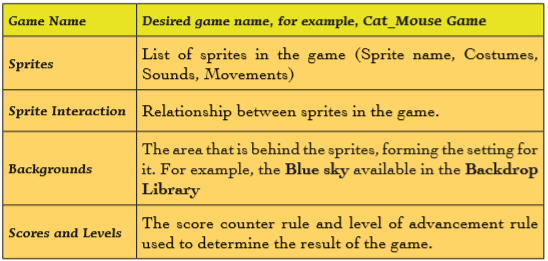
Table 9.1: Aspects of a game
After creating a basic table, it can be expanded by placing each item to its own table as shown in the Cat-Mouse-Cake Game example below:
Example 9.1
(i) The Cat moves back and forth across the screen and keeps moving in one direction. When it hits the edge of the stage, it bounces back. When the Cat touches the Mouse, it produces the sound, Meow2 and the thought bubble Meow!!! is displayed. The background switches to Brick Wall1 when the Cat eats the Mouse.
(ii) The Mouse reappears after four seconds.
(iii) The Mouse chases the mouse-pointer in steps and when it touches the Cat sprite, it disappears. The Mouse reappears after a certain period of time.
(iii) The Cake disappears when it is touched by the Mouse; that is, it is eaten. The background switches to Garden Rock when the Cake is eaten and the Cake keeps changing between Cake-a and Cake-b costumes. The following are the relevant tables that can be associated with this game.
(a) Game Name Table

Table 9.2: Game name table for the Cat_Mouse table.
(b) Sprites Table
The table below provides a list of the sprites in a project with details about the name, costumes, sounds and movements.
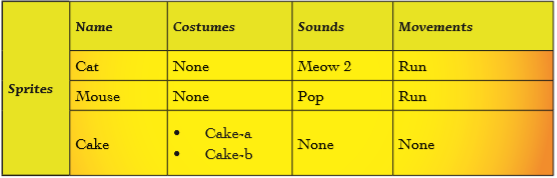
Table 9.3: List of sprites in the Cat_Mouse_Cake game
(c) Sprite Interaction Table The table below lists all the relevant interactions between various sprites in the project.
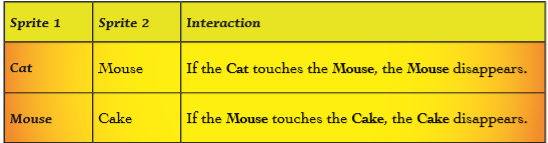
Table 9.4: Interaction of sprites in the Cat_Mouse_Cake game
(d) Backgrounds Table The table below lists the relevant backgrounds in the project.
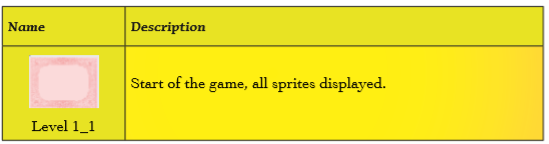
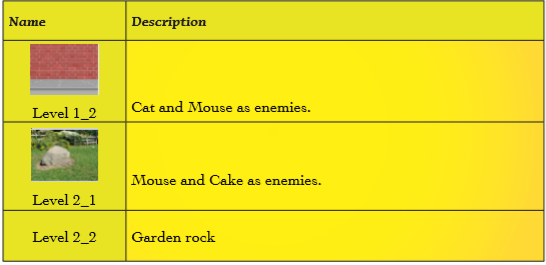
Table 9.5: Backgrounds table
(e) Levels Table
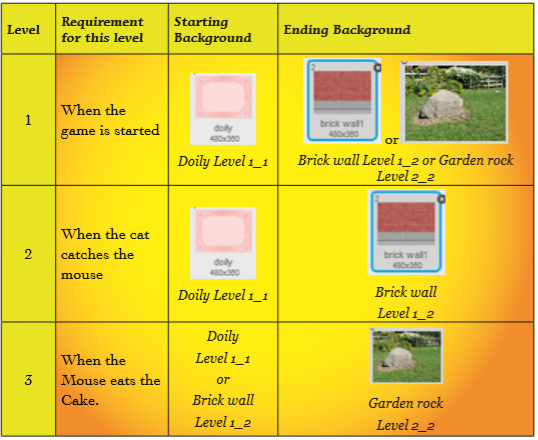
Table 9.5: Levels table
Costumes
Sprites can have different costumes. Once a sprite has been inserted in a game, its appearance can change to any of the available costumes. The game designer can also draw a costume for a sprite.
However, some sprites do not have costumes. In the Cat_Mouse_Cake game, the cake has two costumes, namely cake-a and cake-b. The mouse and cat do not have costumes. To switch between costumes, do the following:
(i) Select the sprite if already inserted, otherwise insert the sprite.
(ii) Click on the costume tab.
(iii) Select the desired costume from the available thumbnails displayed. Figure 9.1 shows the available Cake costumes in this game.
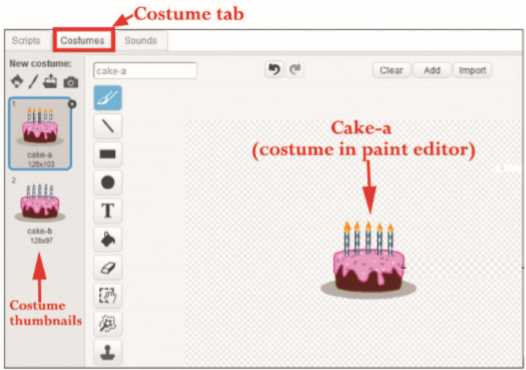
Figure 9.1: Cake costumes
Sounds
A sprite existing in a game can be assigned a sound. By default, some sprites do not have sounds assigned to them. The designer can choose sound from the sounds library, record new sound or
upload a sound from file. In the Cat_Mouse_Cake game described above, the Cat has the Meow sound.To assign a sound to a sprite, do the following:
(i) Select the Sprite.
(ii) Click on the Sounds tab.
(iii) Select the sound from the thumbnail displayed. If no sound is displayed in the thumbnail area, click on the Speaker icon to choose sound from library, click the Record button icon to record new sound or click on Folder/ Import button to select the sound file from the computer.
Figure 9.2 shows the available Cat sound.
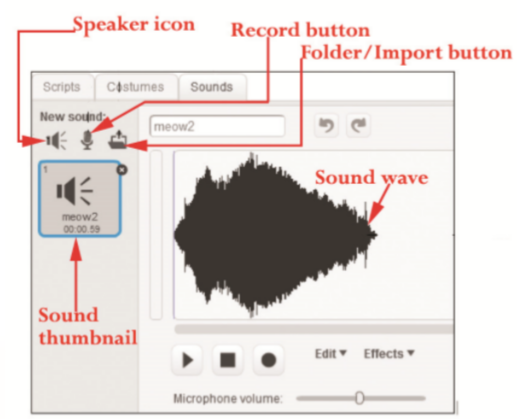
Figure 9.2: Sounds tab displaying selected sound
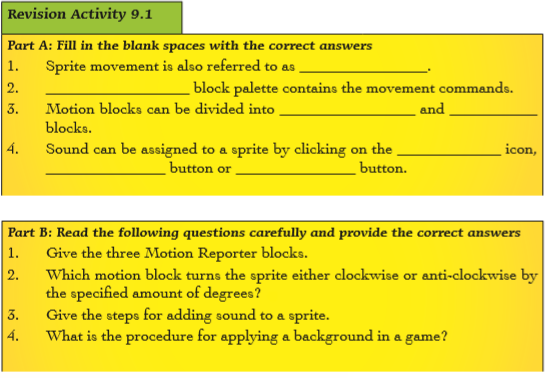
Movement
Sprite movement is also referred to as sprite action. The Motion block palette contains the commands for assigning controlling movement to a sprite. There are seventeen Motion blocks categorized into two namely Motion Stack blocks and Motion Reporter blocks with fourteen and three blocks respectively.
Figure 9.3 shows the Motion Stack blocks.

Figure 9.3: Motion Stack blocks
• Move () steps: Moves the sprite in the direction it is facing the amount of steps specified.
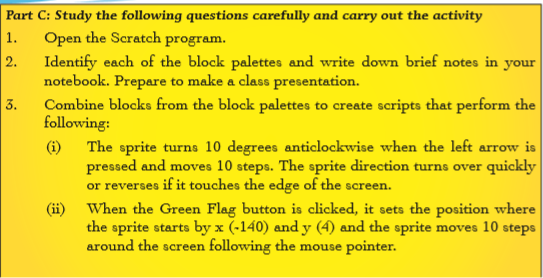
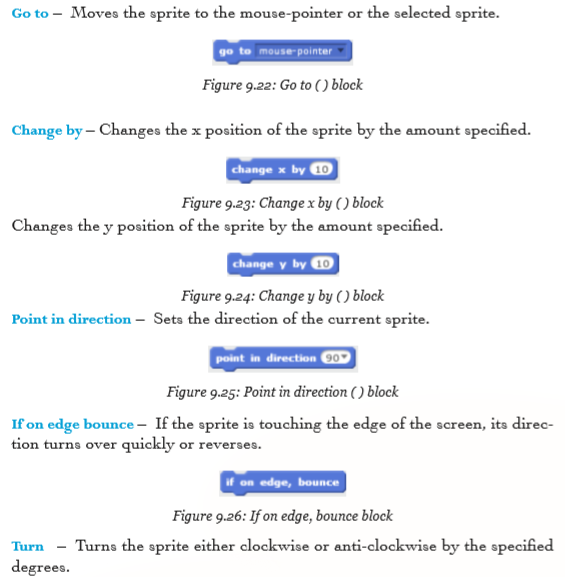
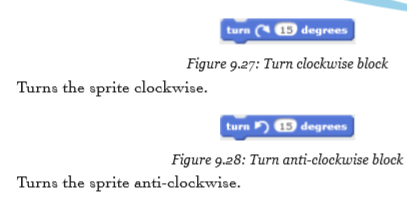
• Turn () degrees: Turns the sprite either clockwise or anti-clockwise by the specified amount of degrees.
• Point in direction (): Points the sprite in the direction specified.
• Point towards (): Points the sprite towards the mouse-pointer or the selected sprite.
• Go to x: () y: (): Moves the sprite to the specified x and y positions.
• Go to (): Moves the sprite to the mouse-pointer or the selected sprite.
• Glide () secs to x: () y: (): Moves a sprite smoothly to an x y position on the stage by the amount of time specified.
• Change x by (): Changes the x position of the sprite by the amount specified.
• Set x to (): Sets the x position of the sprite by the amount specified.
• Change y by (): Changes the y position of the sprite by the amount specified.
• Set y to (): Sets the y position of the sprite by the amount specified.
• If on edge, bounce: This means that if the sprite is touching the edge of the screen, its direction turns over quickly or reverses.
• Set rotation style (): Determines the manner in which the sprite rotates. The following are Motion Reporter blocks:
• X position: Displays the X position of the sprite.
• Y position: Displays the Y position of the sprite.
• Direction: Displays the direction of the sprite.
The following are Motion Reporter blocks:
• X position: Displays the X position of the sprite.
• Y position: Displays the Y position of the sprite.
• Direction: Displays the direction of the sprite.

Figure 9.4: Motion Reporter blocks
Check-marking the Reporter block option displays a counter at the stage area.
9.1.3 How Sprites Interact in this Game
In a game different sprites interact with each other for the success of the game. In the interaction class, there are different commands which are used when creating a game. In the example of Cat_Mouse_Cake game, the sprites name Cat, Mouse, and Cake relate with one another as shown earlier in Table 9.4.
9.1.4 List of Backgrounds
The term background refers to those things that can be seen behind the main things. There are various backgrounds in Scratch and can be accessed through the backdrop pane. The user can choose a backdrop from library, paint a new backdrop, upload a backdrop from file or get a new backdrop from camera. To apply a background in a game, do the following:
(i) Click on the icons under New backdrop and select the desired option.
(ii) To choose backdrop from library, click the Choose backdrop from library
icon. This displays the Backdrop Library.
(iii) Scroll to view all backdrops available in Scratch or click on each folder under the Backdrop Library pane to view the backgrounds underneath.
(iv) Select the desired background.
(v) Click OK to apply.
The following are some of the available backgrounds in Scratch 2.0.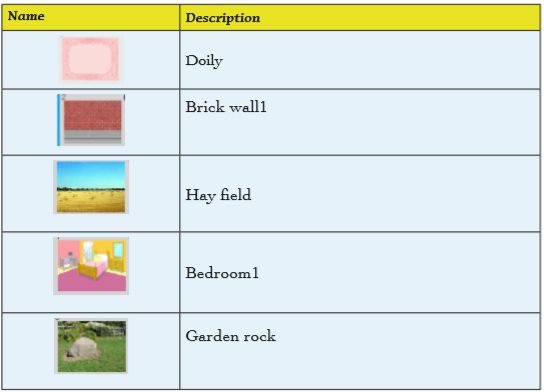
Table 9.7: Examples of backgrounds in Scratch 2.0 From
From example 9.1, the following scripts apply to the sprites: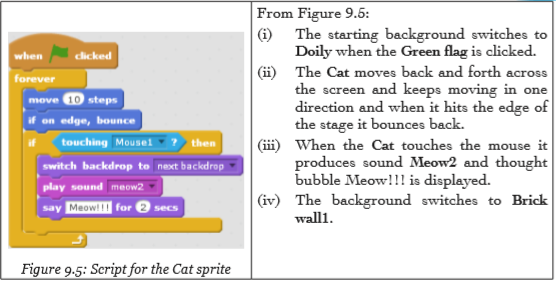
From Figure 9.6 below, the mouse chases the mouse-pointer in steps and when it touches the Cat sprite, it disappears; that is, it is eaten. The Mouse reappears after four seconds.From Figure 9.7 below, the Cake disappears when it is touched by the Mouse; that is, it is eaten and reappears after two seconds. The background switches to Garden rock when the Cake is eaten and the Cake keeps changing between Cake-a and Cake-b costumes.
Figure 9.6: Script for the Mouse sprite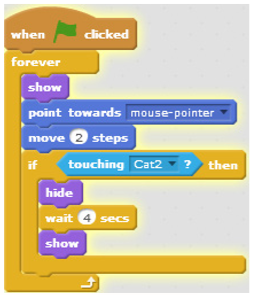

Figure 9.7: Script for the Cake sprite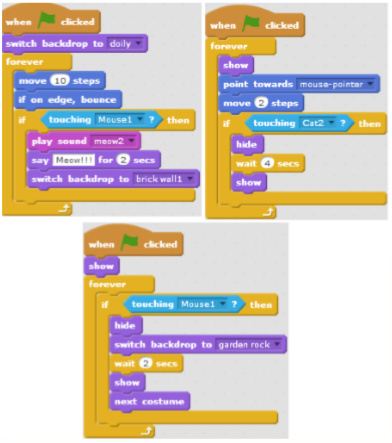
Figure 9.8: Final Scripts for the Cat_Cake-Mouse game
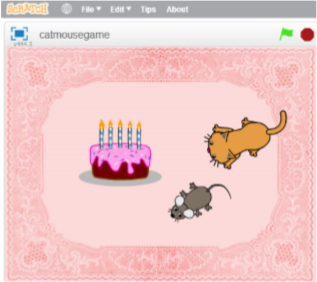
Figure 9.8: Cat_Mouse_Cake game
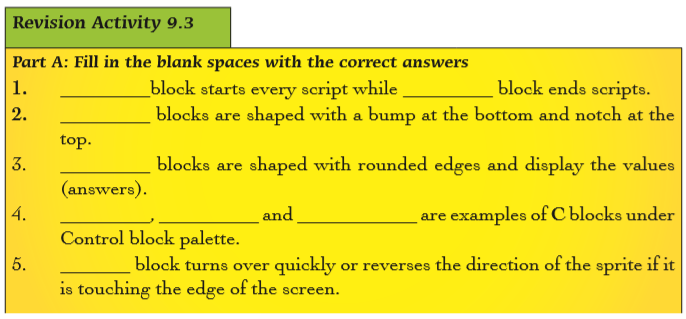
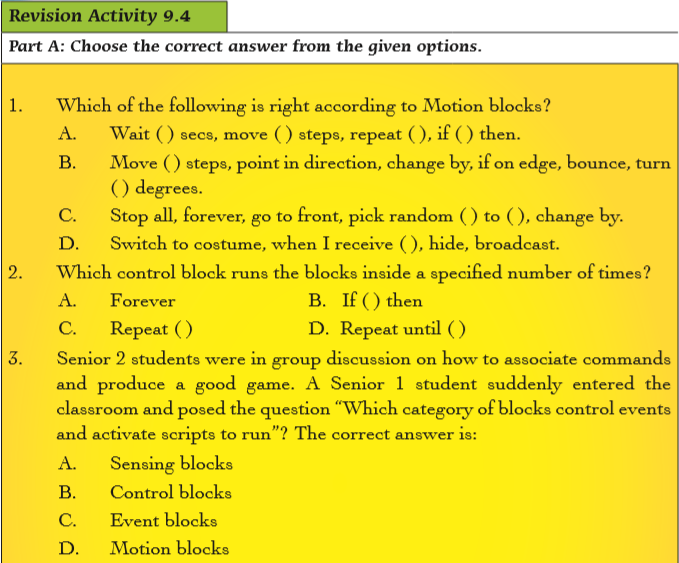
9.2 Commands to Set Game Rules
The following are some of the commands used in setting game rules: Switch to costume, forever, if, touching colour, broadcast, when I receive, go to, change by, show, repeat, hide, wait, stop all, point in direction, round pick random, if on edge bounce, turn and if else among others.
To use these commands, do the following:
(i) Click on the Scripts tab.
(ii) Select the desired block palette.
(iii) Click and drag the desired block to the script area.
The above commands have been categorised under the various block palettes they are found as discussed below;
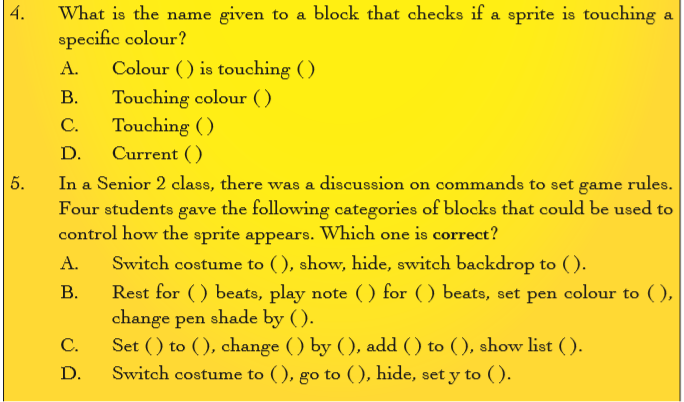
9.2.1 Looks Block palette
Switch costumes to: Changes to a specified sprite or stage costume.

Figure 9.9: The Switch costumes to block
Show: Displays the sprite.

Figure 9.10: Show block
Hide: Hides the sprite.

Figure 9.11: Hide block
Other commands under the Looks block palette include the following:
• Say
for
• Say
• Think
• Think
• Next costume: Changes the sprite's or stage's costume to the next one in the costume list.
• Switch backdrop to
• Change
• Set
• Clear graphic effects: Removes all graphic effects on the sprite.
• Change size by
• Set size to
• Go to front: Puts a sprite in the front.
• Go back
9.2.2 Control Block Palette
Forever – Runs the blocks inside over and over.

Figure 9.12: Forever block
If – Activates the blocks inside it if the condition is true.
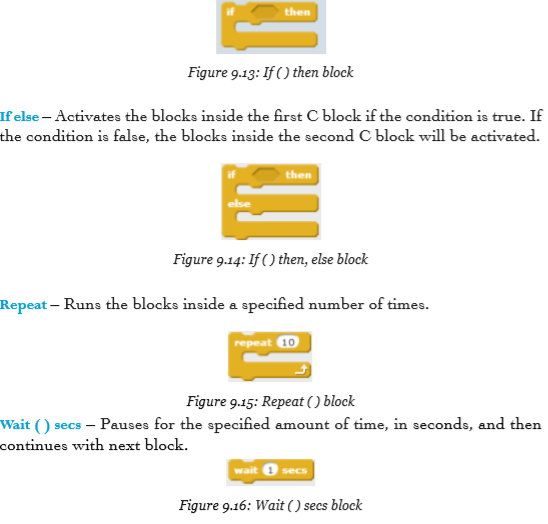

Other commands under the Control block palette are:
• Create clone of
• Repeat until
• Delete this clone: Erases a specified clone.
• When I start as a clone: It is activated whenever a clone is created and will only be run by that clone
9.2.3 Sensing Block Palette
Touching colour – Reports true if sprite is touching specified colour.

Figure 9.19: Touching colour
Other commands under the Sensing block palette are:
• Ask
• Reset timer: Sets the timer to zero.
• Turn video
• Set video transparency to
• Set video transparency to
• Answer
• Mouse x
• Mouse y
• Loudness
• Timer
• Video
• Video
• Current
• Days since 2000; and
• Username
9.2.4 Events Block Palette
Broadcast – Sends a message to all sprites and activates When I receive

Figure 9.20: Broadcast
When I receive – The script activates when the specified broadcast message is received.
Figure 9.21: When I receive
9.2.5 Motion Block Palette
9.2.6 Operators Block Palette


Example 9.2: Creating a game
Collect detailed data in the table The following are the two relevant tables that can be associated with this game.
Game Name Table

Tables 9.8: Game Name table for the Car Racing game
Sprites Table
There is only one sprite for this game, that is, the Car.

Tables 9.9(a): Car sprite table
Background Table
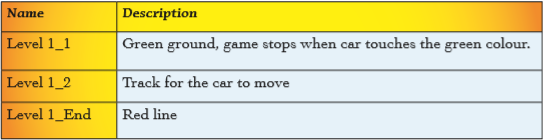
Tables 9.9(b): Background table
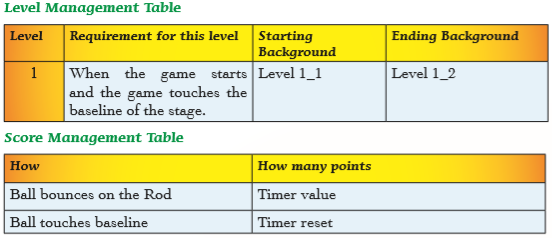
Score Management Table
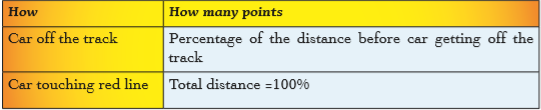
Table 9.9(c): Scores table
Sprite Interaction Table
The sprite interacts with the backgrounds; that is, the Track (black colour) and the Grass (green colour). This is shown in the table below.

Table 9.10: Sprite Interaction table
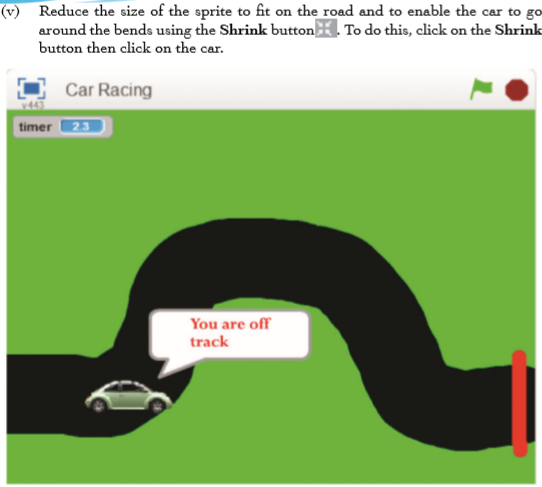
Game rules
(i) The car goes back to the beginning of the track after 2 seconds if it touches the grass and a message “You are off track” is displayed.
(ii) If the car gets to the end of the track by touching the Red line, a message “Congratulations” is displayed for 2 seconds followed by a timer showing how long it took for the car to get to the finish line.
To create the game:
(i) Delete the Cat sprite.
(ii) Create background. Go to the Stage backdrop pane and click Fill with colour. Click the Scripts area to apply the preferred background colour. The background colour for this game is green to signify green grass.
(iii) Paint a road running across the screen and draw a coloured line at one end to mark the finish line. To paint a road and line, use the Brush and Line icons respectively. The road is black and the finish line is red.
(iv) Add a new sprite. The sprite for this game is a Car. Go to Choose sprite from library and click Transportation. Select Car-Bug.
Set game rules
(i) Program the arrow keys to move the car using the following scripts:
(ii) Rule: If the car touches the grass
The Car continually moves 1 step when the Green flag is clicked. If the Car touches green colour (grass), a message “You are off track” will be displayed for two seconds and it goes back to the starting point. The game is won if the Car gets to the finish line as explained in figure 9.32.
Note: To get the correct colour, click in the colour box of the
 block. The arrow turns into an eyedropper. Move the eyedropper over the area of the stage containing the desired colour and click to reflect the new colour.
Figure 9.32: Scripts to move the Sprite

Figure 9.33: Script to control the Sprite if it touches grass
Note: To get the correct colour hold the dropper over the area of the stage containing the desired colour.
(iii) Rule: If the car gets to the end of the road.
A message “Congratulations” is displayed for 2 seconds each time the car touches the Red line, followed by a timer that takes 10 seconds showing how long it took for the car to get to the finish the line.
(iv) Combine the if conditions

Final Script for the Car racing game
The above scripts can be combined using the if
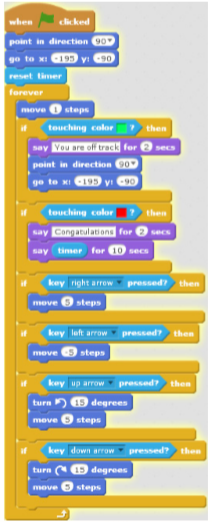
Figure 9.36: Final Script for the Car racing game
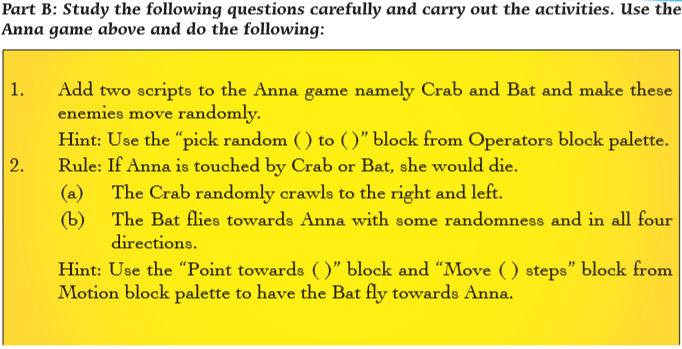
Example 9.3: Creating a simple game after observing the Mario game
In this game, the Mario sprite has been replaced with Anna sprite from the Sprite Library

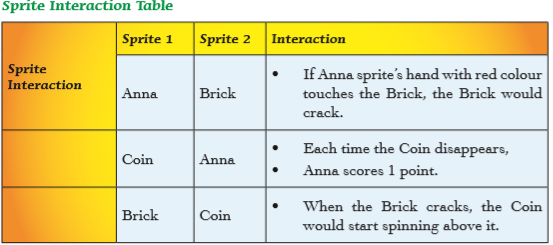

Rule: How Anna can Score
• If Anna sprite’s hand with red colour touches the Brick,the Brick would crack.
• When the Brick cracks, the Coin would start spinning above it.
• Anna will get one point each time she collects the Coin.
To create the game:
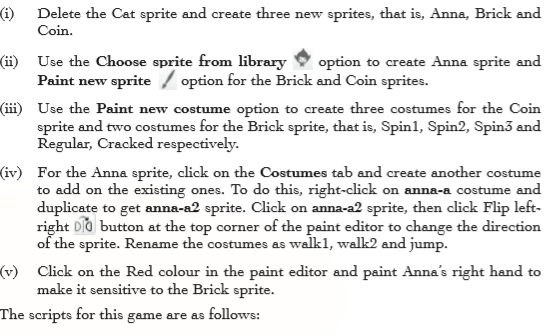
(i) Scripts for the Anna Sprite
• The first script takes Anna to the starting location when the game starts.
• The two that follow enable Anna to switch between costumes while moving both left and right when the left and right arrows are pressed.
• When space key is pressed Anna sprite switches to jump costume and changes its Y position by 50 and -50 after a wait of 0.5 seconds.
• The score increases by 1 when Anna sprite receives the coin_collected message.

Figure 9.37: Scripts for the Anna Game
(ii) Scripts for the Brick Sprite
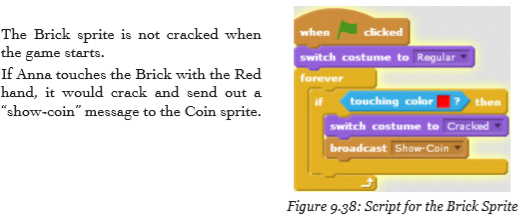
Note:
• A colour, for example, Red used in this game is known as a sensitive colour and the Brick is known as a colour-sensitive sprite of the Red colour.
• A sensitive colour of a colour-sensitive sprite is a colour to which the sprite is sensitive and responds when touched.
• A good sensitive colour for a colour-sensitive sprite is a colour that has not been used by any sprite in the project.
• Any colour can be used as a sensitive colour.
(iii) Scripts for the Coin Sprite
• The first script creates a spinning effect such that the Coin would forever turn switching between costumes at intervals of 0.2 seconds when the Green Flag button is clicked.
• The second script displays avari able named Coins_left set to 1. The Coin is hidden when the game starts.
• The third script checks if Coins_left is greater than 0 when it receives a show coin message from the Brick sprite.
• If the answer is Yes, then the coin will be displayed spinning five times and then be hidden.
• A “coin_collected” message will be sent out, reduce coins_left by 1 and finally stop
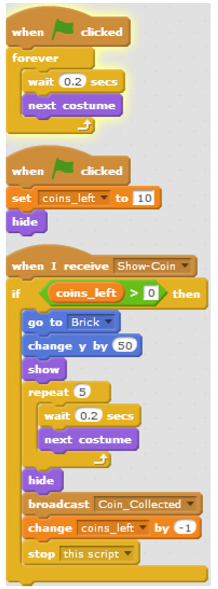
Fig. 9.39: Scripts for the Coin Sprite

Figure 9.40: Stage area showing Anna Game
Figure 9.40 shows a Brick that has cracked after being touched by Anna’s hand that contains Red colour. The Coin spins above the brick by switching between costumes and disappears when touched by Anna, thus increasing the score by 1 and reducing coins_left by 1
Example 9.4: Creating a ping pong game
The following is an example of a Ping-Pong Game. In this game, there are two sprites that interact to control the game.

Note that in this game, a timer has been used instead of a variable to display the score and continuously counts until the game is restarted by pressing the Green Flag button.
Game rules
(i) The paddle controls the ball from touching the base line of the stage.
(ii) The game stops if the ball touches the base line of the stage.
To create the game
(i) Delete the Cat sprite.
(ii) Go to the Stage backdrop pane. Click on Backdrops. Add the preferred base line using the paint brush or line. For this game, a thick red line has been used.
(iii) Add a new Sprite called Rod. For this game, a black line has been used.
(iv) Add another Sprite called Ball. Either draw the ball or select it from the Sprite Library.
Set game rules

(iii) Rule: If the ball does not touch the base line of the stage, the game continues.
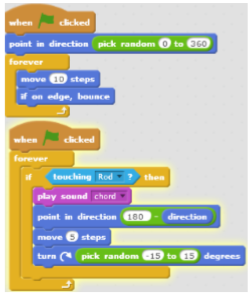
Figure 9.43: Scripts to control the Game
Final Scripts for the Ping Pong game

Figure 9.44: Scripts for the Ping Pong game
The first script controls the movement of the Ball and the other script controls the Rod.
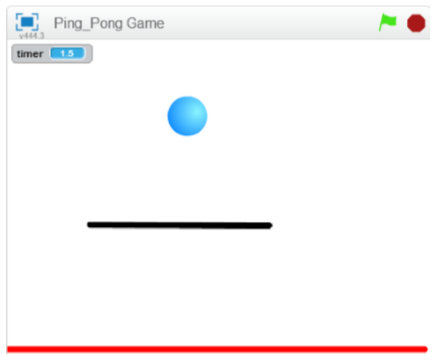
Figure 9.45: Stage area showing the Ping-Pong Game

Figure 9.46: Starting background for the Ping pong game
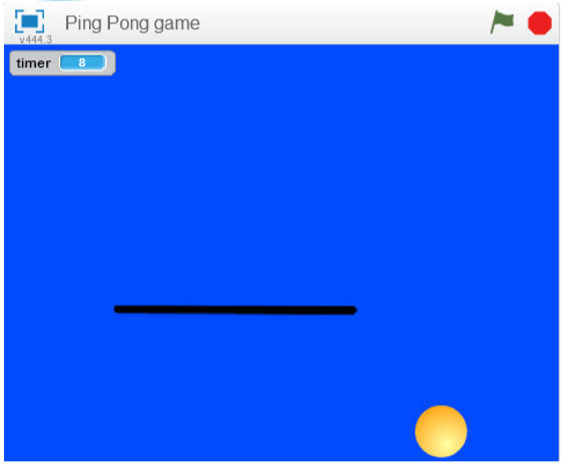
Figure 9.47: Ending background for the Ping pong game

9.4 Projects in Game Programming
Project 1: Helicopter Game
Create a game which can be used to pilot a helicopter in a cave with the following requirements:
1. Paint a cave.
2. Add a script to control the rising of the helicopter and simulate gravity.
3. Provide feedback to tell the user that the Game is over or Game is won. The game is won when the x position of the helicopter is greater than 205 and is over when it touches the edges of the cave.
4. Switch between costumes when the Game is over or when it is won.
5. Add sound using Audacity to signal the helicopter passing and crashing.
Project 2: Moving Eyes Game
Create a game with a set of moving eyes that follow the mouse. Required:
1. Paint a person’s face.
2. Create 2 sprites for the eyes and add scripts to move the eyes.
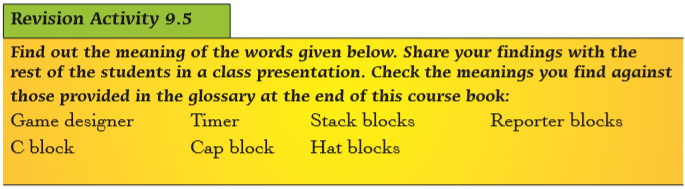
9.5 Definition of Key Words in this Unit