General
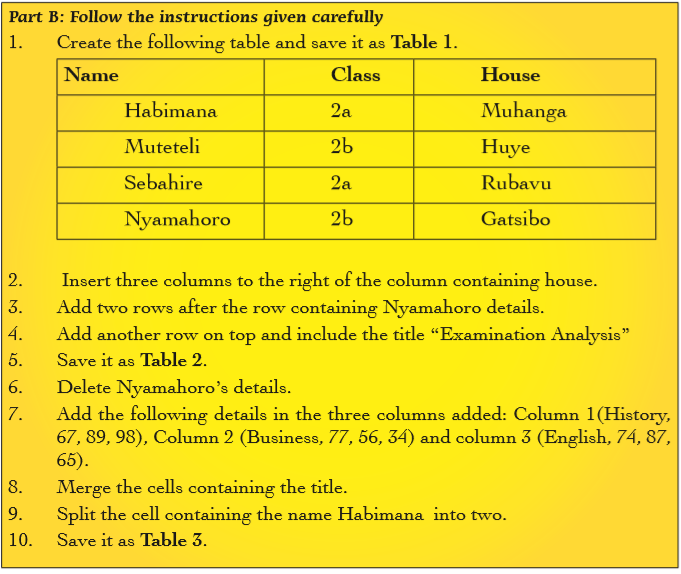
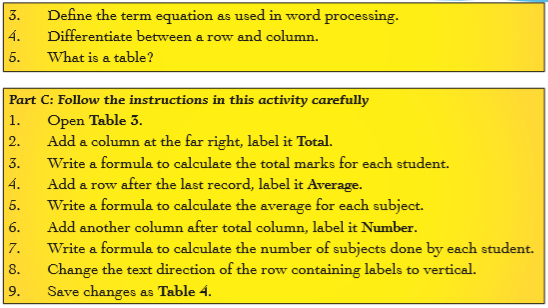
- ICT S2 SB File Uploaded 24/01/22, 15:32
Unit 3:Objects in a Document
Key Unit Competency: By the end of this unit, you should be able to:
1. Insert symbols, pictures, tables, and objects in a document.
Introduction
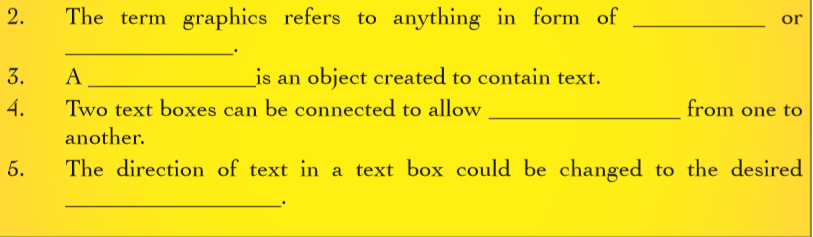
This unit deals with insert in and manipulation of graphics in a word document. The term graphics refers to anything in the form of images or pictures. The graphical objects could be in form of textboxes, tables, pictures, equations, symbols, word art and tables.
3.1 Objects: Insert and Format Text Boxes
The word processing program allows the user to insert a text box in a document. A text box also known as a text field or a text entry box is a graphic that is intended to enable the user to input textual information to be used by the program. A text box may contain simple text, a quote, or any other information that the creator may wish to use. Text boxes may be used in the following situations:
• Drawing attention to a piece of text.
• Enhancing the layout of a document.
• Inserting a label on an object or in the margin.
3.1.1 Inserting a Text box in a Document
Method 1: Using the Insert Tab to insert a text box in a document
To add a text box in a document, do the following:
(i) Click on Insert tab from the menu bar, select Text box from the Text group. A drop down menu appears as shown in Figures 3.1(a and b).
(ii) Click on the desired text box in the Built-In section or click on Draw text box to insert a customised one.
(iii) If Draw text box option is selected, the cursor changes to a plus sign in the document. Click and drag it in the desired location. Otherwise, begin typing in the box and the content in it will automatically be deleted.
(iv) The keyboard shortcut is as follows: Long press ALT, press N then X and finally D. Then insert the customised text box or use the arrow keys to select the desired option.
(iii) Type the desired text.
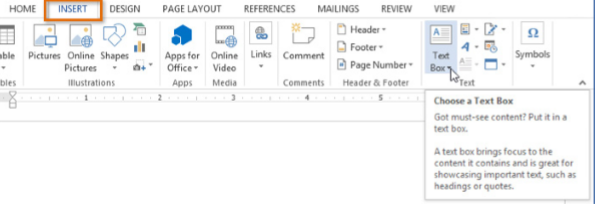
Figure 3.1(a): Selecting Text box from the Insert menu
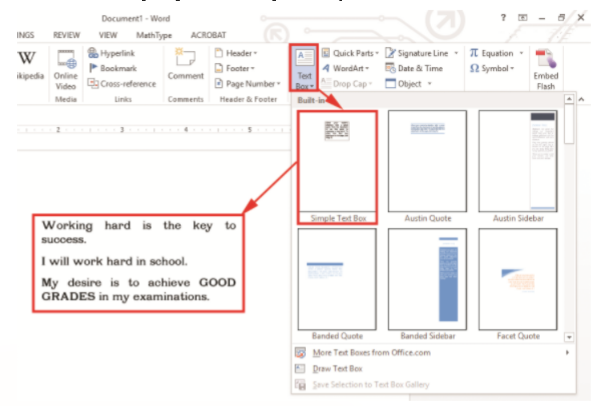
Figure 3.1(b): Inserting a simple text box
Method 2: Using the Shapes Feature to insert a text box in a document
You can use the Shapes feature to add a text box in a document. The steps are as follows:
(i) Click on Insert tab from the menu bar.
(ii) Select Shapes from the Illustrations group. A drop down menu appears as shown in Figure 3.2(a).

Figure 3.2(a): Using the shapes feature to draw a text box.
(ii) Click on the desired text box in the Built-In section use it to draw the desired shape.
(iii) Right-click the drawn Shape and choose Add Text from the pop-up menu.
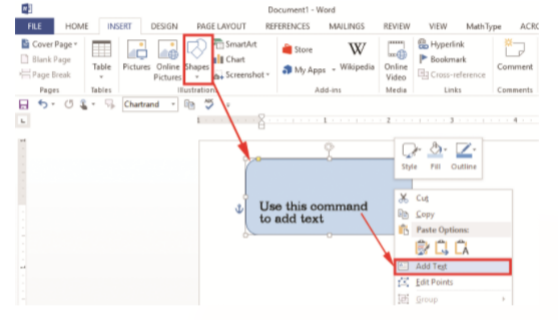
Figure 3.2(b): Inserting text into a shape
Practice Activity 3.1: Inserting text boxes
Draw text boxes of different shapes and add text as shown in Figure 3.2(c) on page 46.
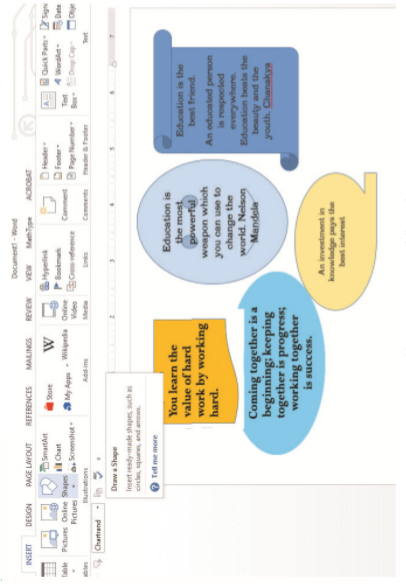
Figure 3.2(c): Inserting text into a different shapes
3.1.2 Formatting a text box
When a text box is highlighted in a document, the Drawing Tools tab which comes along with the Format tab in the menu bar is activated.
There are various formatting features available some of which include: editing the text box shape, creating a link, and changing text direction.
3.1.3 Editing the shape of a text box
The editing feature is used to change the shape of a drawing. To use this feature to change the shape of a text box, do the following:
(i) Click on the text box to select it.
(ii) Click on Format tab under Drawing Tools tab in the menu bar.
(iii) Select Edit Shape under Insert Shapes group. A drop down menu appears.
(iv) To change the shape of the text box, select the desired shape from Change Shape option as shown in Figure 3.3(a) on page 48.
The keyboard shortcut is as follows: Long press ALT, press JD then E and finally press the right arrow key.
(v) To edit points of a text box, click on the Edit Points option. The points are selected and the shape changes to red colour.
(vi) Once you select the points, you can drag them to the desired shape. In this case, the points were dragged to achieve the shape shown in Figure 3.3(c) on page 49.
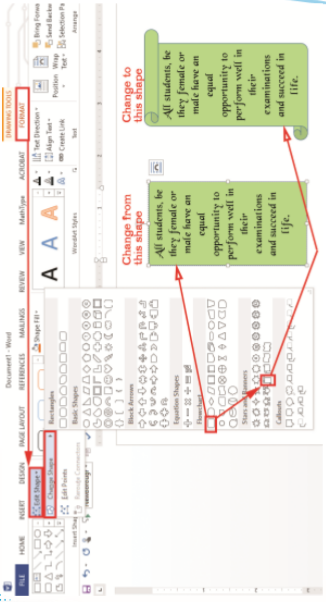
Figure 3.3(a): Changing the shape of a text box

Figure 3.3(c): Editing the points of a text box and dragging them to a desired shape

3.1.4 Modifying colours and lines for text boxes
The default colour for lines is black.
To change this colour to a desired one, do the following:
(i) Click on the text box.
(ii) Click on Format tab under Drawing Tools tab in the menu bar.
(iii) Select Shape Outline in the Shape Styles group. A drop down menu appears as shown in Figure 3.4(a). (iv) Click on the desired colour under Theme Colours to change the border colours.
(v) To remove the borders, click on No Outline.
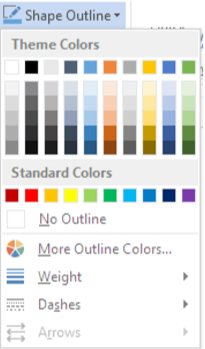
Figure 3.4(a): Changing the colour of lines
(vi) Click on Weight and select the desired line to change the line thickness or to change the line style.
(vii) Click on Dashes and select an option in the side kick menu. See Figure 3.4(b).

Figure 3.4(b): The weight and colour of the line have been changed to dashes style.
Practice Activity 3.3: Modifying the lines and colours for text boxes
Draw the text box labelled 1 as shown in Figure 3.5. Change its colour and lines to match those in the text box labelled 2.
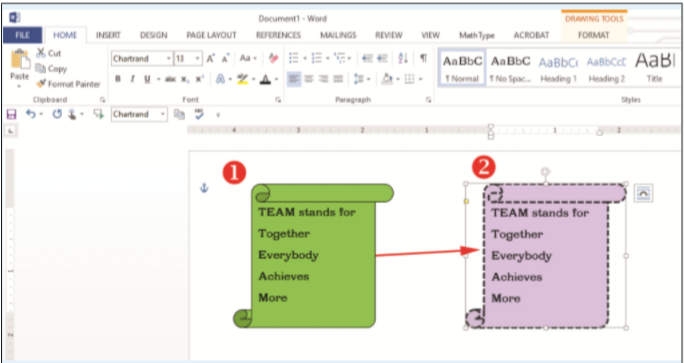
Figure 3.5: Modifying colours and lines for text boxes
3.1.5 Creating Links between Text Boxes
You may have text that you would like to run in a series of text boxes. You want the text to flow from one text box to the next and ensure that the reader will be able to follow the text.
This feature of creating links allows you to insert text that will flow from one text box to another. When the first text box is full, this feature allows the text to be inserted automatically to the next text box and fills it.
If you add or delete text in one text box, Create Link will adjust the text in the rest of the text boxes accordingly.
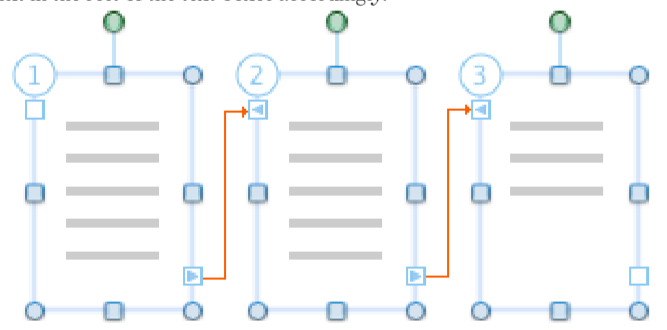
Figure 3.6: Text in linked boxes flows from one box to the next
To create a link between two text boxes, do the following:
(i) Add two text boxes and ensure that they are empty.
(ii) Click on the first text box.
(iii) Click on Format tab under Drawing Tools tab in the menu bar.
(iv) Select Create Link icon under Text group.
(v) Click on the next text box to automatically create the link.
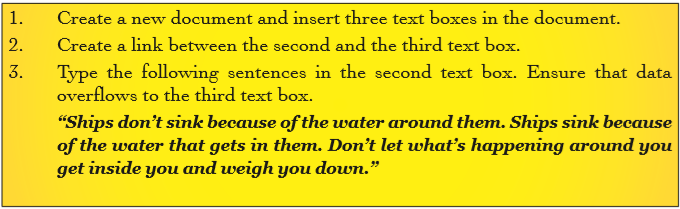
Practice Activity 3.4: Creating links between text boxes
Do the following:
(i) Create three text boxes.
(ii) Type the poem titled, Don’t Quit.
(iii) Link the three text boxes as shown in Figure 3.7 shown on page 53.
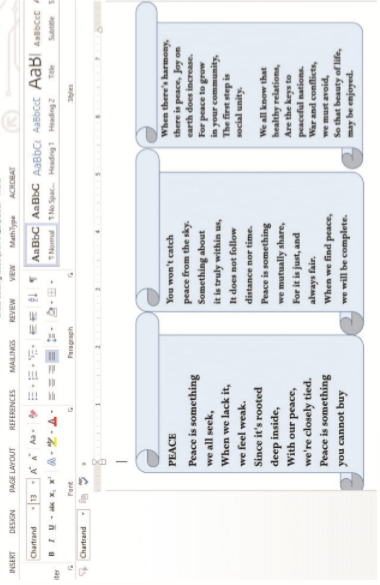
Figure 3.7: Linking text boxes
3.1.6 Text Direction in Text Boxes
The direction of text in a text box can be changed to the desired orientation using the following procedure:
(i) Highlight the content in the text box.
(ii) Click on Format tab under Drawing Tools tab in the menu bar.
(iii) Select Text Direction icon under Text group.
(iv) Click on the desired direction from the resulting drop down menu.
(v) If the desired option is not in the list, click on Text Direction Options. A dialog box appears as shown in Figure 3.8.
(vi) Select the desired orientation and click OK. Note: The keyboard shortcut is as follows: Long press ALT, press JD then AX and finally X.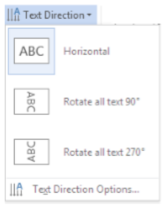
Figure 3.8: Changing the text direction.
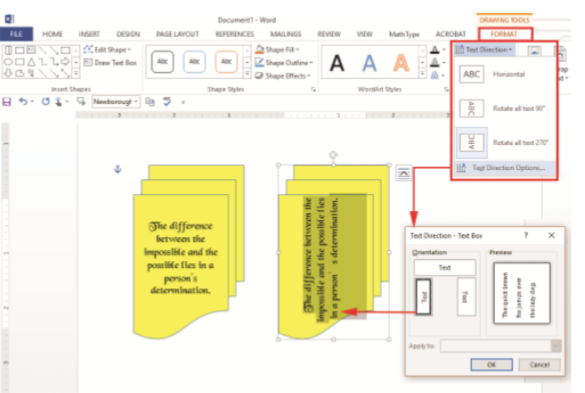
Figure 3.9: Other options available for changing text direction
3.1.7 Applying Fill Effects to a Text Box
The feature of Fill Effects adds colour inside the text box. To apply it, do the following:
(i) Click on the text box.
(ii) Click on Format tab under Drawing Tools tab in the menu bar.
(iii) Select Shape Fill in the Shape Styles group. A drop down menu appears as shown in Figure 3.10(a).
(iv) Click on the desired colour under Theme Colours to fill the shape.
(v) To remove fill added, click on No Fill box.
(vi) Click on Gradient and select the desired fill style, click on Texture and select an option in the side kick menu.
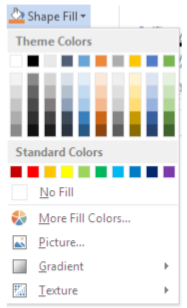
Figure 3.10(a): Filling a shape with colour
Note: The keyboard shortcut is as follows: Long press ALT, press JD then SF.

Figure 3.10(b): A shape with coloured borderline

Part B: Fill in the missing words to complete the sentences
Part C: Answer these questions

Part D: Do this practical activity
3.2 Adding Shapes
Various shapes can be added in a word document then formatted as required by the user.
3.2.1 Inserting Shapes
(i) Click on Insert tab from the menu bar, select Shapes icon from Illustration group. A drop down menu appears as shown in Figure 3.11(a).
(ii) Click on the desired shape, the pointer changes to a plus sign.
(iii) Position the pointer at the desired area of the document and drag it in the desired direction to draw the shape.
Note: The keyboard shortcut is as follows: Long press ALT, press N then SH.

Figure 3.11(a): Adding shapes
3.2.2 Formatting Shapes
Once a shape has been inserted in a document, one can format it. To format in this case means to arrange it in the desired way.
Some formatting styles that can be applied on a shape include the following: changing the shape; rotating the shape to an angle; and grouping a number of shapes into one image.
Most of these formatting features are contained in the drawing tool menu that is added on the menu bar anytime an image is inserted.
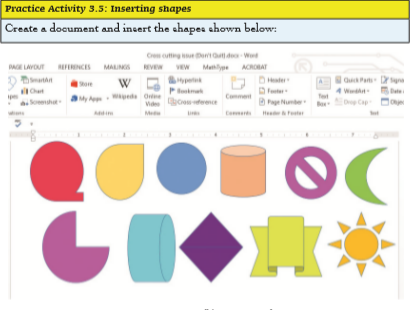
Figure 3.11(b): Inserting shapes
3.2.3 Using Drawing Tools
Drawing tools are normally used when another shape or line exists and is highlighted to activate the Drawing Tools menu option in a document. This reduces cluttering of options on the ribbon.
Figure 3.12 shows the ribbon displayed when the Drawing Tools tab is selected.

Figure 3.12: The drawing tools tab
3.2.4 Inserting Shapes
Insert shapes group is normally used for drawing different shapes according to the user’s preference. Examples of shapes that one can insert include lines, rectangles, basic shapes, arrows, flow charts, stars, banners, and speech bubbles as shown in Figure 3.13.

Figure 3.13: Inserting shapes
3.2.5 Shape Styles Group
Shape styles are used for formatting the shapes using fill colour, outline, or effects. Figure 3.14 shows insert shapes styles group.

Figure 3.14: Shape formatting styles
3.2.6 WordArt Styles Group
WordArt style is used for formatting text found in shapes using text fill, text outline, and text effects. WordArt enable you to create special text effects such as shadowed, rotated, stretched, and multicoloured text.
Method 1: Inserting WordArt
(i) On the Insert tab, click the Insert WordArt button.
(ii) In the WordArt gallery, click the WordArt style that you desire.
(iii) Replace the placeholder text with the text you want to format using WordArt.

Figure 3.15: Inserting WordArt styles
Method 2: Converting regular text to WordArt
To convert regular text to WordArt, do the following:
(i) Select the text you want to convert, then click the Insert tab.
(ii) Click the WordArt drop-down arrow in the Text group.
(iii) Word will automatically create a text box for the text, and the text appear in the selected style.

Figure 3.16: Converting text to a WordArt style

3.2.7 Text Group
It is usually used when formatting text in a shape by changing the direction, or alignment of the text, or when creating a link in text found in two shapes.
3.2.8 Arrange Group
It is used when arranging text and shapes in a document. It can also be used for changing position and rotating a shape.

Figure 3.17: Arranging text and shapes in a document

3.2.9 Formatting Features
Changing shape
To change a shape that has already been inserted, do the following:
(i) Select the shape.
(ii) Click on the adjustment handle which is normally a yellow diamond and drag it either inward or outward.
(iii) Release the mouse button once the desired shape is realized.
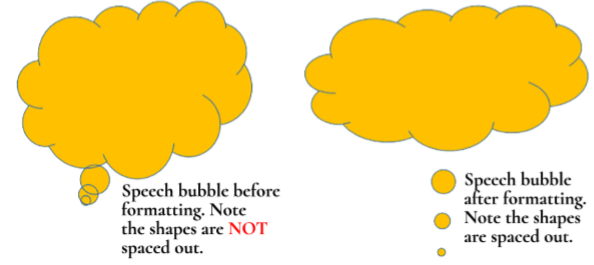
Figure 3.18: Using the formatting features to change a shape
Rotating (Method 1)
A shape can be rotated to a desired angle. Rotating is done to change the orientation of the shape. To rotate a shape, do the following:
(i) Click on the shape to be rotated.
(ii) Click on the handle and drag the picture to the desired direction.
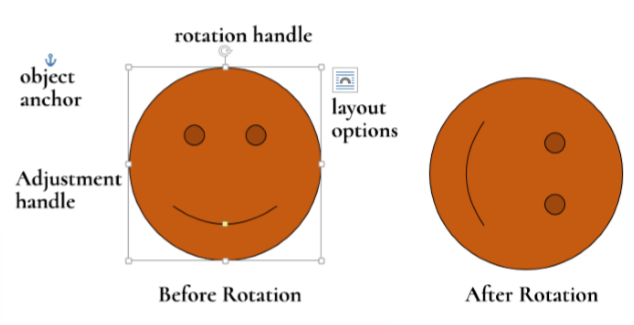
Figure 3.19: Rotating is done to change the orientation of the shape
Rotating (Method 2)
(i) Click on Format menu in the Drawing Tools menu.
(ii) Select the dialog box launcher in the Size group. A dialog box is displayed with the Size tab activated as shown in Figure 3.20
(iii) Type or select the degree of rotation in the Rotation box.
(iv) Click OK to apply. The keyboard shortcut for the above process is as follows: Long press ALT then JD and finally SZ.
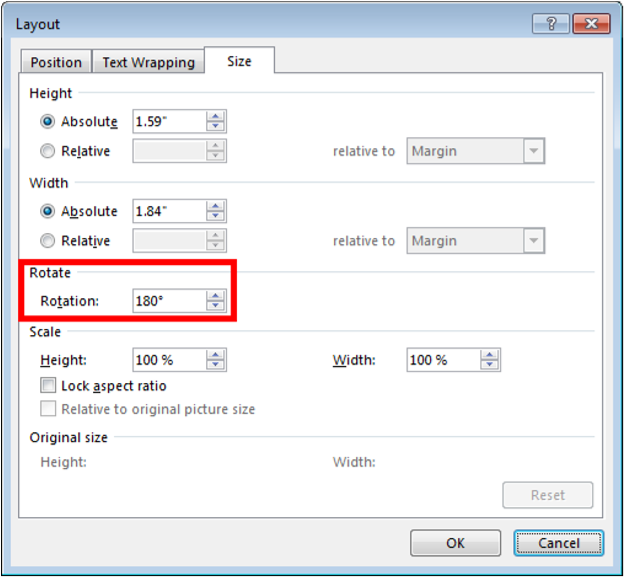
Figure 3.20: Changing the degree of rotation
Grouping
More than one shape can be grouped in one so that they are moved or formatted as a unit. To group shapes, do the following:
(i) Select the shapes by clicking on them as you hold the shift key down.
(ii) Right-click on the selected shapes. A pop-up menu appears as shown in Figure 3.21.
(iii) Select Group then Group again from the next pop-up menu. A canvas is automatically inserted around all the shapes and hence making it easier to format all the shapes at once.
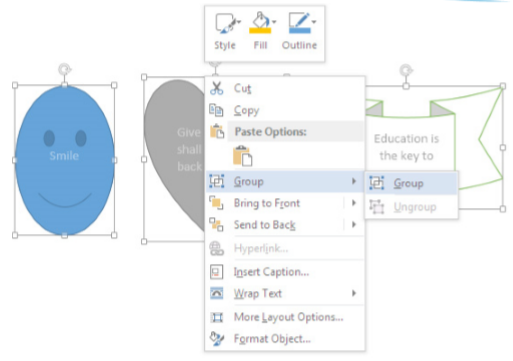
Figure 3.21: Grouping objects

Figure 3.22: Grouped objects
Shape effects
The following are some examples of effects that can be added on a shape: shadow, reflection, glow, soft edges, bevel and 3-D rotation. To add a shape effect, do the following:
(i) Select the picture.
(ii) Click on Format tab in the Drawing Tools tab from the menu bar, select the Shapes Effects icon from Shape Styles group. A drop down menu appears as shown in Figure 3.23.
(iii) Click on the desired effect to display other options in a pop-up menu.
(iv) Select the desired effect to automatically apply it to the shape.
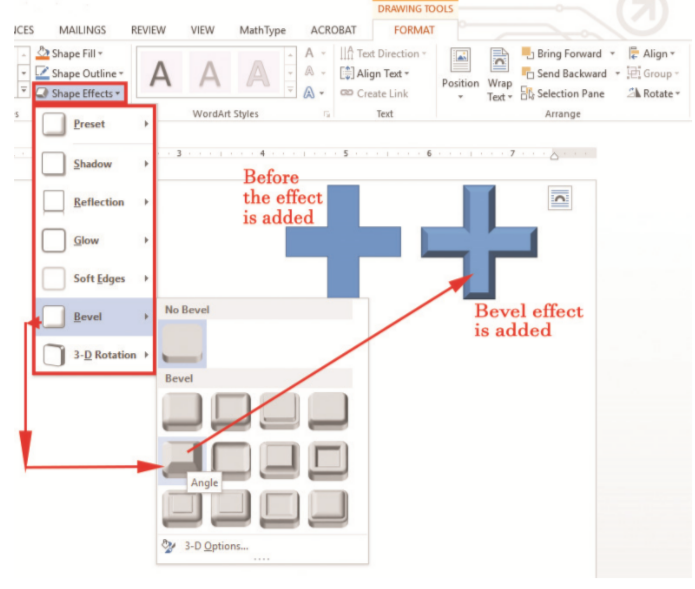
Figure 3.23: Shape effects options

Figure 3.24: Shape effects options
Adding text in shapes
Text can be added in a document using the following procedure:
(i) Right-click on the shape and select Add Text option from the pop-up menu as shown in Figure 3.25.
(ii) Type the desired text.
(iii) Click away from the shape. Figure 3.26 shows a cloud shape containing text, which is a message on peace.
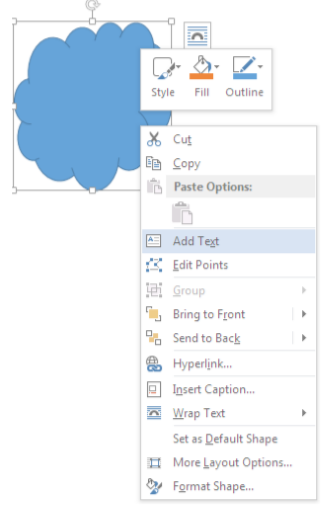
Figure 3.25: Adding text to a shape

Figure 3.26: A cloud shape with a peace message

3.3 Inserting Pictures and WordArt Objects
A picture can be inserted from the Internet or from an existing file.
3.3.1 Inserting pictures from the Internet(i) Position the insertion point where the picture is to be inserted.
(ii) Click Insert tab from the menu bar in the Illustrations group and click Online Pictures icon. If there is Internet connection, a dialog box is displayed as shown in Figure 3.27.
(iii) Type the name of the image to be located in the box provided. Click on Go button to display the result on the window as shown in Figure 3.28.
(iv) Click on the desired image then select Insert button.

Figure 3.28: Images displayed based on the search result

3.3.2 Inserting pictures from an existing file
(i) Position the insertion point where the picture is to be inserted.
(ii) Click Insert tab from the menu bar.
(iii) Under Illustrations group, click Pictures icon. A dialog box appears as shown in Figure 3.29.
(iv) Select the location where the picture is stored.
(v) Select the picture then click Insert command.
Note: The keyboard shortcut for the above process is as follows: Long press ALT, press N, then P.
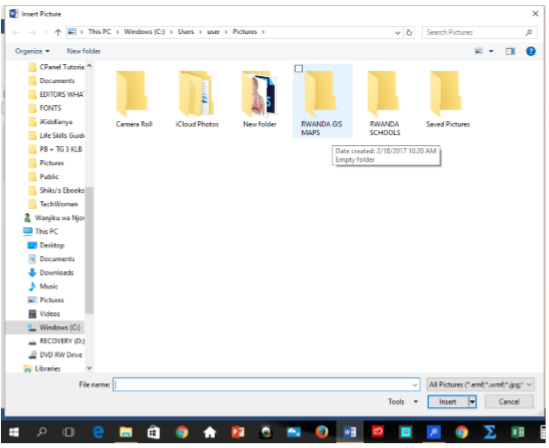
Figure 3.29: Inserting a picture from file
3.3.3 Inserting WordArt objects
(i) Position the insertion point where the WordArt is to be inserted.
(ii) Click Insert tab from the menu bar. Under Text group, click WordArt icon. A drop down menu appears containing a list of WordArt options as shown in Figure 3.30. The keyboard shortcut for the above process is as follows: Long press ALT, press N then W.
(iii) Select the desired WordArt option. It is automatically inserted in the document with the words, “Your text here” as shown in Figure 3.30.
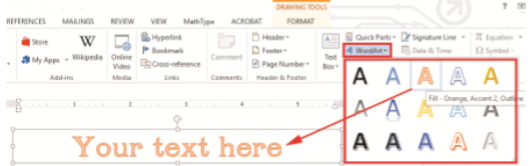
Figure 3.30: Word Art text box
(iv) Click inside the text box. The words in it will automatically be deleted. Type the desired text.
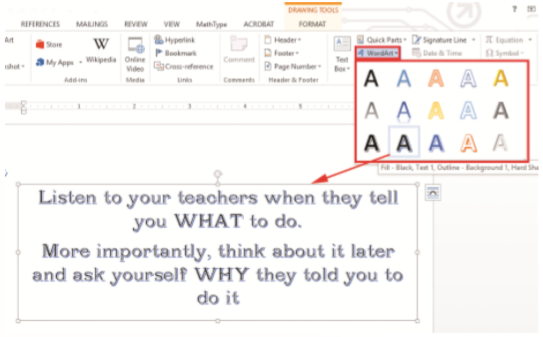
Figure 3.31: Inserting a WordArt object

Figure 3.32: Creating a document with text boxes
3.4 Equations and Symbols
The equations available in Microsoft Word 2013 are mathematical. Symbols and special characters are also available.
3.4.1 Inserting Symbols and Special Characters
Inserting symbols
Symbols are non-alphabetical signs that have specific meaning when used in a particular context. An example is the © symbol, which is a copyright symbol. To insert a symbol, use the following procedure:
(i) Position the insertion point where the symbol or the special character is to be inserted.
(ii) Click Insert tab from the menu bar. Under Symbol group, click Symbol icon. A drop down menu appears containing a list of symbols as shown in Figure 3.33. The keyboard shortcut for the above process is as follows: Long press ALT, press N then U. Select the desired symbol option to automatically insert it in the document.
(iii) However, if the desired symbol is not in the list, click on More Symbols command to display a dialog box as shown in Figure 3.33.
(iv) Select the desired symbol, then click the Insert button.
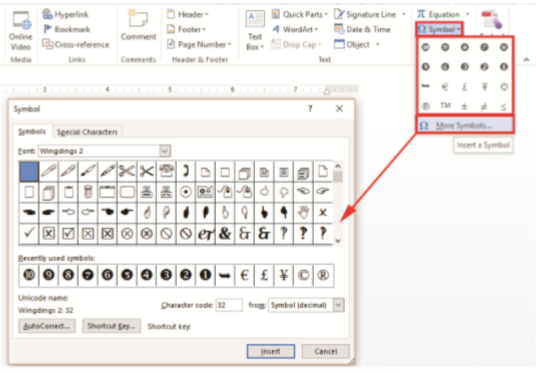
Figure 3.33: Inserting symbols
Inserting special characters
To insert a special character, use the following procedure:
(i) Position the insertion point where the special character is to be inserted.
(ii) Click Insert tab from the menu bar. Under Symbol group, click Symbol icon. A drop down menu appears containing a list of symbols and a More Symbols command as shown in Figure 3.33.
(iii) Click on More Symbols command, select Special Characters tab to display a dialog box as shown in Figure 3.34.
(iv) Choose the desired character then click the Insert button.
Note: The keyboard shortcut for the above process is as follows: Long press ALT, press N then U and finally M.

Figure 3.34: Inserting special characters.

3.4.2 Writing Equations
An equation is a mathematical statement that has two expressions, usually separated by equals sign. Equations comprise numbers, letters, operators, and symbols. To insert an equation in a document, do the following:
(i) Position the cursor where the equation is to be inserted.
(ii) Click Insert tab from the menu bar.
(iii) Under Symbol group, click Equation icon. The Equation Tools menu is added along with Design in the menu bar.
(iv) Click on Design to reveal the ribbon under it as shown in Figure 3.35(a).
Note: The keyboard shortcut for the above process is as follows: Long press ALT, press N then E.

Figure 3.35(a): Writing equations
(v) Select the desired equation from the Symbols group or Structures group to automatically insert it in the document. For example, to insert a quadratic equation, click on the equation in the Radical icon from the Structures group. Figure 3.35(b) shows a sample of a quadratic equation.

Figure 3.35(b): A mathematical expression used for calculating the value of x


3.5 Tables
A table is a feature that is used to present information in an organised layout. It consists of rows and columns intersecting to form cells where data is entered and manipulated. A cell is a box formed by the intersection of a row and a column in a table.
3.5.1 Inserting a Table
There are three ways of creating a table namely:
(i) Using the Graphic Grid.
(ii) Using the Insert Table feature.
(iii) Using the Draw Table tool.
Using the Graphic Grid
(i) Position the cursor where the table is to be inserted.
(ii) Click on Insert tab from the menu bar and select Table command under the Tables group
A drop down menu appears as shown in Figure 3.37.
(iii) Select the desired number of rows and columns from the grid.
Using the Insert Table
(i) Position the cursor where the table is to be inserted.
(ii) Click on Insert tab from the menu bar and select Table command under the Tables group.
(iii) Select Insert Table. A dialog box appears as shown in Figure 3.38.
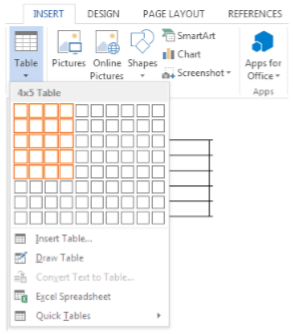
Figure 3.37: Using the graphic grid to insert a table
(iv) Type the number of columns required in the Number of columns box.
(v) Type the number of rows required in the Number of rows box.
(vi) Select the desired option under AutoFit behavior.
(vii) Click OK to apply.
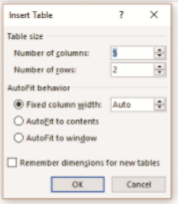
Figure 3.38: Inserting a table dialog box
Using the Draw Table Tool
(i) Position the cursor where the table is to be inserted.
(ii) Click on Insert tab from the menu bar and select Table command under the Tables group.
(iii) Click Draw Table to display a pencil. Start drawing the table by dragging the pencil in the direction where the table is to be displayed. Release the mouse button once the required cell size is realized.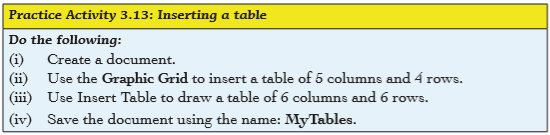
3.5.2 Formatting a Table
When a table is created, the Table Tools is added on the menu bar together with Design and Layout tabs. Most formatting features of a table are found in the Layout tab.The following are some of the formatting features: Inserting rows, inserting columns, deleting (row, column and table), merging cells, splitting cells and formulas among others. Figure 3.39 shows the ribbon containing the different formatting icons.

Figure 3.39: Tools for formatting tables
Inserting columns and rows in a table
Method 1
Inserting columns
To add a new column(s) in an already created table do the following:
(i) Place the cursor in any cell within the column to precede or succeed the new one.
(ii) Click Layout tab from the menu bar and select Insert Left or Insert Right command under the Rows & Columns group.
Deleting a row, table and column
To delete a row(s) in an already created table do the following:
(i) Select a cell in the respective table.(ii) Click Layout tab from the menu bar and select Delete command under the Rows &Columns group. A drop down menu appears as shown in Figure 3.40. Click on the desired option. Note: The keyboard shortcut for deleting rows, tables, and columns is as follows: Long press ALT, press JL then D.

Figure 3.40: Deleting cells, rows, tables, and columns
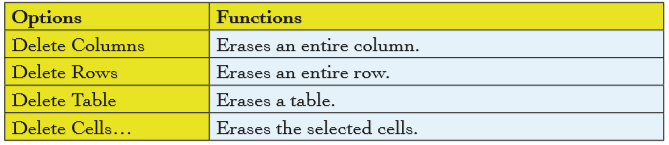
Figure 3.41: Options available in delete command
Method 2
Place the insertion point in the row or column next to which you want to insert a row or column.
(i) To insert rows: Right-click the mouse, then select Insert Row Below or Insert Row Above from the pop-up menu that appears. Your choice is dependent on what you desire.
(ii) To insert columns: Right-click the mouse, then select Insert Column to the Right or Insert Column to the Left from the pop-up menu that appears. Your choice is dependent on what you desire. See Figure 3.4 on page 78.
Place the insertion point in the row or column you want to delete.
(i) Right-click the mouse, then select Delete Cells... from the menu that appears.
(ii) Select Delete Cells.

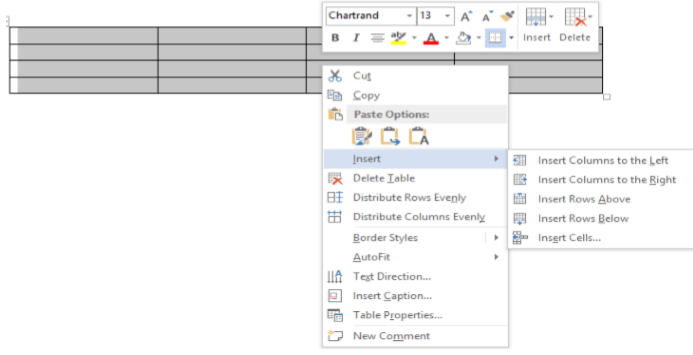
Figure 3.42: Inserting rows and columns by right-clicking
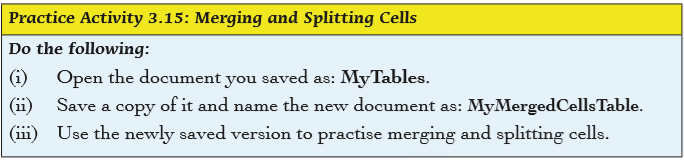
3.5.3 Merging Cells and Splitting Cells
Merge cells command is used to combine more than one cells to appear as one large cell while split cells command is used to divide a cell to more than one section hence appearing as many different cells.
Merging cells
The following is the procedure for merging cells:
(i) Select the cells to be merged.
(ii) Click Layout tab from the menu bar and select Merge Cells icon under the Merge group. The cells are automatically combined.
Splitting cells
The following is the procedure for splitting cells:
(i) Position the cursor in the cell to be split.
(ii) Click Layout tab from the menu bar and select Split Cells command under the Merge group. The keyboard shortcut is as follows: Long press ALT, press JL, then P.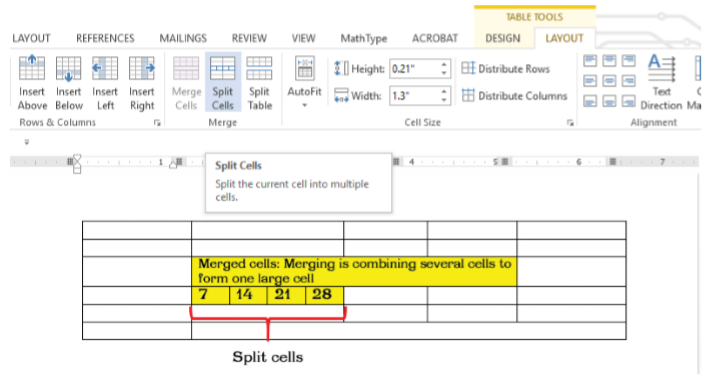
Figure 3.43: Merged and split cells
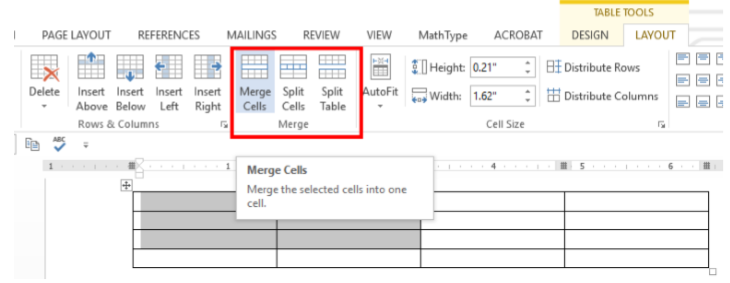
Figure 3.44: Merging and splitting cells
3.5.4 Table Auto Format and Formulas
Table Auto format
This option provides in-built table formats that enable the user to quickly design tables with a professional look. To apply this feature, do the following:
(i) Position the cursor where the table is to be inserted.
(ii) Click on Insert tab from the menu bar and select Table command under the Tables group.
(iii) Select Quick Tables. A dialog box appears as shown in Figure 3.45.
The keyboard shortcut is as follows: Long press ALT, press N then T and finally T.

Figure 3.45: A dialog box for auto formatting a table
Formulas
Formulas are used to perform calculations in a table. Microsoft Word 2013 enables the user to add formulas in a document in order to perform simple calculations. The user can do the following:
(i) Total numbers in a row or column.
(ii) Perform other calculations.
Total numbers in a row or column
(i) Click the cell in which the sum is to be displayed.
(ii) Click Layout tab from the menu bar and select fx command under the Data group. The formula dialog box is displayed as shown in Figure 3.46. The keyboard shortcut is Long press ALT, press JL then UL.

Figure 3.46: Formula dialog box
(iii) If the selected cell is at the bottom of a column of numbers, Microsoft Word proposes the formula =SUM (ABOVE). If the selected cell is at the right end of a row of numbers, the formula =SUM (LEFT) is proposed by Microsoft Word.
(iv) Click OK to apply if the proposal displayed is correct.
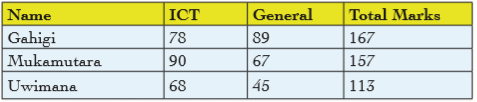
Figure 3.47: Total marks calculated
Notes
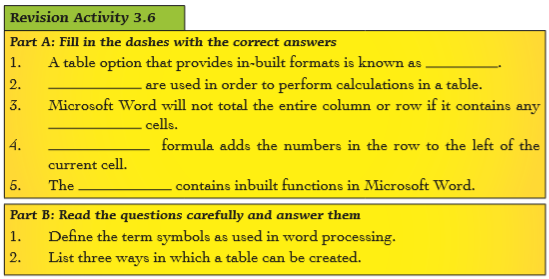
• If a column or a row contains any blank cells, Microsoft Word will not total the entire column or row. To total the entire row or column, type a zero in the blank cell.
• If a column or a row selected for totalling does not contain a value, Microsoft Word will not display any proposal in the formula box.
• Microsoft Word inserts the result of the calculation automatically in the selected cell. If the values in the referenced cells are changed, select the cell containing the result and then press F9 to update the value.
Perform other calculations in a table
The user can perform other calculations by selecting a function from the Paste function.
(i) Click the cell where the formula is to be typed.
(ii) Click Layout tab from the menu bar and select fx command under the Data group.
(iii) Delete the proposed formula from the Formula box if it is not desired except the equal sign.
(iv) Select a function from the Paste function box. For instance, to obtain average, click Average. The formula dialog box is displayed as shown in Figure 3.48.
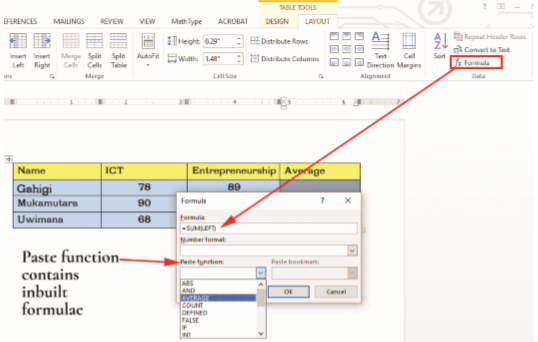
Figure 3.48: The Formula dialog box
(v) Click in the parenthesis and type “Left” or “Above” depending on where the cells are located. See Figure 3.49.
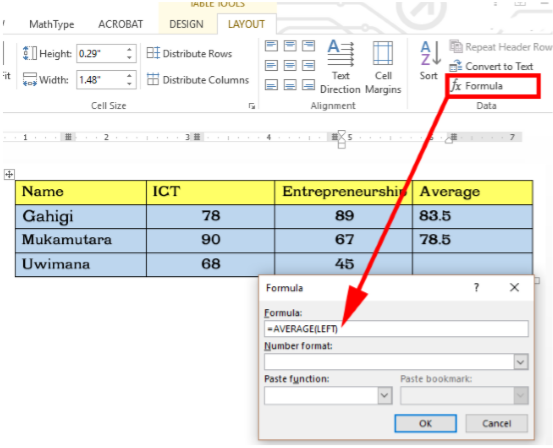
Figure 3.49: Average is used to display the mean of selected cell
(vi) In the Number Format box, enter a format for the numbers. For example, to display the numbers as a decimal percentage, click 0.00%.
3.5.5 Writing a Formula
You can sum numbers in a column or a row in a table. To add up a column or row numbers in a table, use the Formula command.
(i) Click the table cell where you want your result.
(ii) Click the Table Tools Layout tab and click Formula.
(iii) Check between the parentheses to make sure the selected formula includes the cells you want in the sum. In this case, the sum required is of the cells to the left. The formula to use is =SUM(LEFT)
(iv) Other formulas available are:
=SUM(ABOVE) adds the numbers in the column above the current cell.
=SUM(LEFT) adds the numbers in the row to the left of the current cell
=SUM(BELOW) adds the numbers in the column below the current cell.
=SUM(RIGHT) adds the numbers in the row to the right of the current cell.
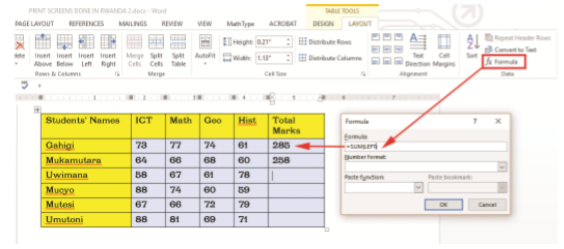
Figure 3.50: Summing numbers in rows and columns
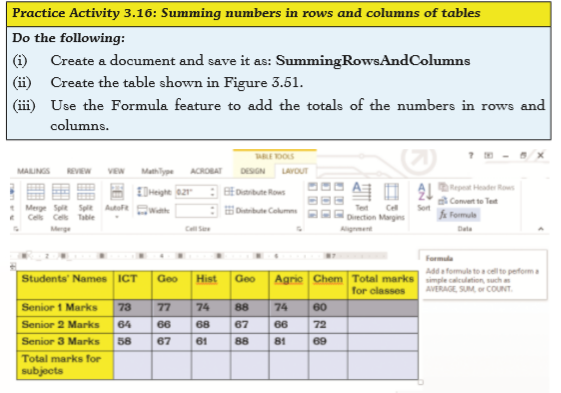
Figure 3.51: Summing numbers in rows and columns
3.5.6 Writing in a Table and Text Direction
To write data in a table, click on a cell then type the information.
To change the direction of text in a cell, do the following:
(i) Click on the cell where the data is to be displayed.
(ii) Click Layout Tab from the menu bar. Select Text direction icon in the Alignment group. The text direction is automatically changed. Keep clicking on Text direction command until the desired direction is reached. See Figure 3.52.
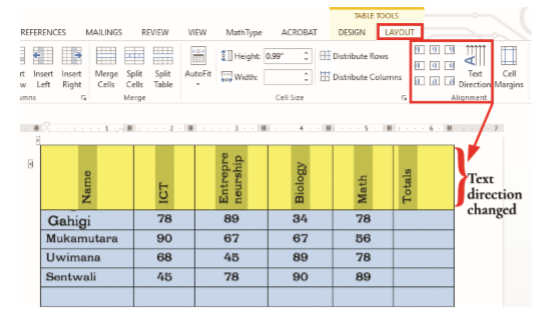
Figure 3.52: Changing of text direction
3.5.7 Table Properties, Layout, and Design
To change the properties of a table, do the following:
(i) Right-click on the table. A popup menu appears as shown in Figure 3.53.
(ii) Select Table Properties… option. A dialog box appears as shown in Figure 3.54.
(iii) The Table Tab is active by default. Make the desired changes such as indentation, alignment, border and shading, text wrapping, and indentation.
(iv) Click OK to apply.
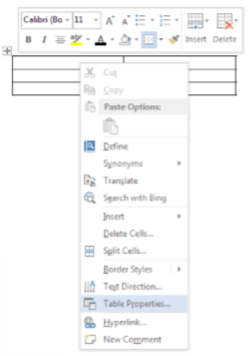
Figure 3.53: Table properties options
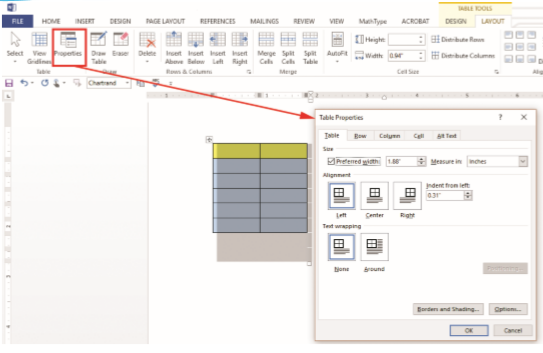
Figure 3.54: Table Properties dialog box
Borders and Shading
To change borders and shading style of a table, do the following:
(i) Right-click on the table. A pop-up menu appears as shown in Figure 3.55.
(ii) Select Table Properties… option. A dialog box for Borders and Shading appears as shown in Figure 3.56.
(iii) Click on Borders and Shading button. A dialog box appears as shown in Figure 3.57.

Figure 3.55: Table Properties in the pop-up menu
(iv) Borders tab is selected by default. Click on the desired line Style, Colour, and Width.
(v) To apply a shading style, click on Shading tab and select the desired option.
(vi) Under Apply to, select Table. Click OK to apply.
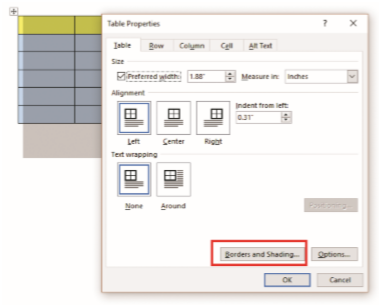
Figure 3.56: Borders and shading dialog box
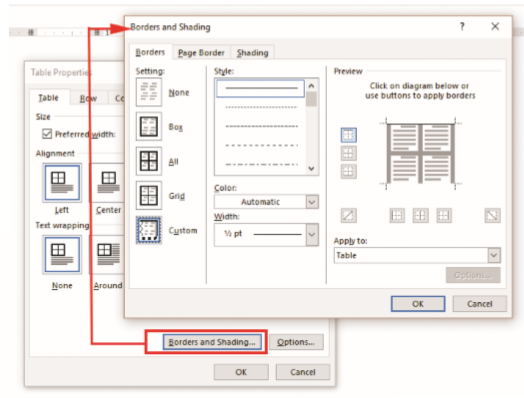
Figure 3.56: Borders and Shading dialog box


3.6 Definition of key words in this unit

Revision Exercise 3
