General
- ICT Y1 SB File Uploaded 1/11/21, 16:59
UNIT 1:INTRODUCTION TO XO LAPTOP
Key Unit competence
Identify different features of XO laptop and use them
Introductory Activity
1. 1. Kamanzi wanted to write a letter to his parents and asked
the school head teacher to lend him a computer. The head teacher
lent him an XO laptop. Kamanzi complained that since he has
never used an XO laptop he is not going to be able to use it as the
keyboard may have different keys than an ordinary computer and
the text processing program may also be different.
a. Give the roles of the keys which are specific to an XO laptop that
Kamanzi will have to know before using his borrowed XO laptop
b. Give examples of application programs found in an XO laptop that are very similar to office programs
2. Open XO laptop programs that are used in programming and
describe what you can do with each of those programs
The microcomputer type of computers consists of many types of computer namely desktop computers and laptop
computers but there is an extra type which is the laptops intended to be used by children called an XO laptop.
Like other computers, the parts of an Xo laptop are the hardware and the software parts.
The look of the hardware may be different from a conventional computers and the softwares are also different but
it is a computer in the bigger sense of the term.
1.1. The keyboard keys touchpad
1) You are already familiar with the keyboards of laptops and desktop computers.
a) observe the keys that are on the keyboard of xo laptop, identify the function of each key
b) What are the keys that are on the XO laptop computer keyboard
that cannot be found on a keyboard of a desktop computer?
c) What is the similarities between a laptop touchpad and a mouse?
An Xo laptop hardware has different parts comprising of an input unit, an output unit and the processing unit.
Among the parts that constitute the input unit are the keyboard and the touchpad.
A. Keyboard
The keyboard is the part of a computer whose role is to receive keystrokes as text,
characters and other commands into a computer or any other similar device.
The figure below shows an XO laptop keyboard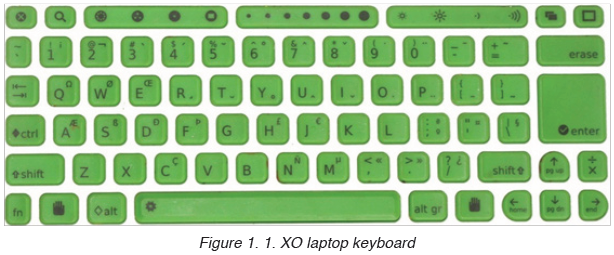
The keyboard above has different keys consisting of special keys, text keys, number keys
A.1. Special keyboard keys
Here is a list of special keys found on an XO laptop keyboard and their roles functions: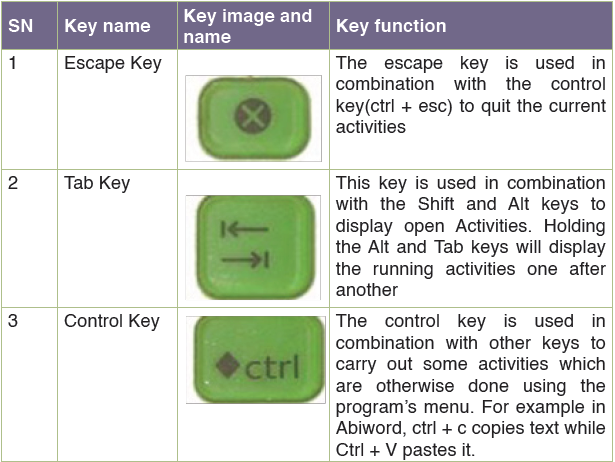
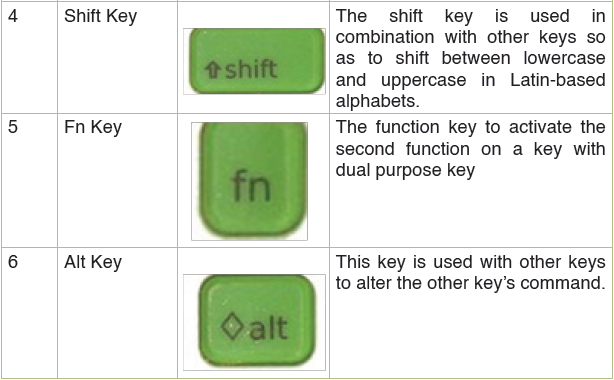
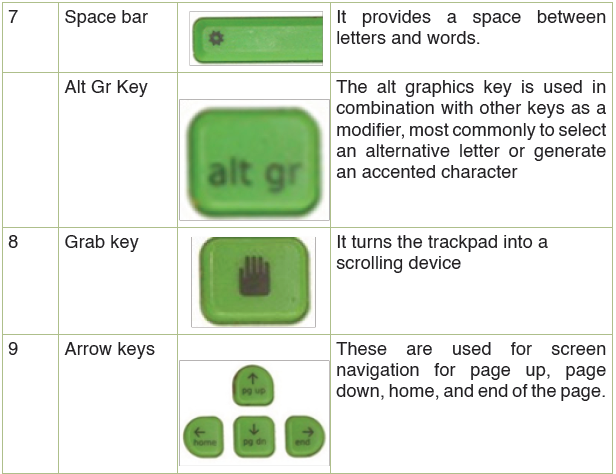
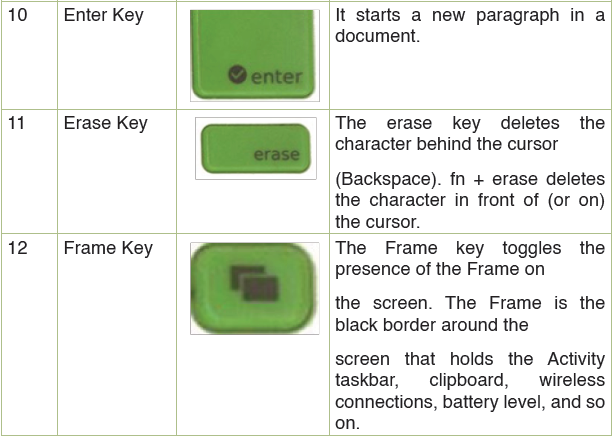
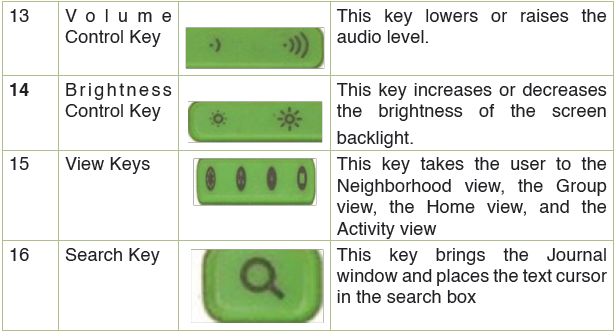 Table 1. 1. XO Laptop special keyboard keys
Note: Most of the special keys above are similar to those found on ordinary laptops and desktop computers keyboards.
A.2. Shortcut keys
Using XO laptop keyboard keys one can perform a task very quickly instead of going to the corresponding menu of a
given program. For example while in Spreadsheet one can copy text in another location by clicking on edit then Copy
and choose the location where to put the text then choose past, using a shortcut key this can be done by simply holding
down Ctlr+C (Copy) and going to the appropriate location and choose Ctlr+V (Paste).
Shortcuts on XO laptops start with either one of these keys: Ctlr, Alt, Shift, Fn
B. Touchpad
A touchpad is an input device on laptops or some keyboards that is used to move the cursor using a finger in place of
a mouse. As a computer user moves the finger on the touchpad, the cursor also gets moved.
Like mice, a touchpad has two buttons, one on the left and another on the right.
Those buttons play the role of the left and right buttons of a mouse.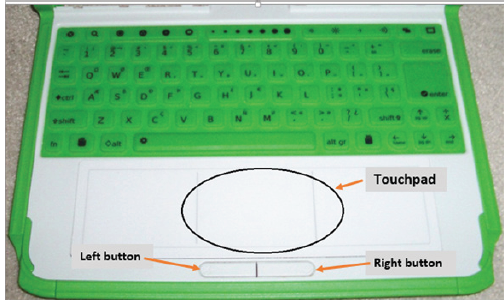
Figure 1. 2. XO laptop touchpad
Application activity 1.1
1. Using an XO laptop verify the use of different special keys where possible
2. Give at least 20 examples of shortcut keys that can be used with XO laptop
1.2. Brief introduction to different XO laptop interfaces
ACTIVITY 1.2:
1. Open your XO laptop and switch from Sugar to Gnome interface and from Gnome to Sugar interface
2. Describe each interface you have opened
In the world of computers, an interface is a boundary between two or more components of a computer system.
The computer system components can be software, hardware, peripheral devices and humans.
An interface between a computer and a human is a Human Computer Interface. For a
human to use an XO laptop the available interfaces are Sugar and Gnome
1.2.1. Sugar interface
Sugar is the interface that appears when an XO laptop is started. It has
different options which are presented as icons or activities such as Turtle art,
Browser, scratch, etc. In Sugar interface, everything is saved automatically in Journal.
To access the data, a user will need to open the Journal Activity.
When in the Sugar interface the first to appear is the Home View. The Home View has several modes.
Each mode has a different arrangement of Activities like the Ring mode in which favorite Activities are presented in a
ring, the Freeform mode in which favorite Activities are arranged in freeform
and a List view mode in which the installed Activities are presented in a list.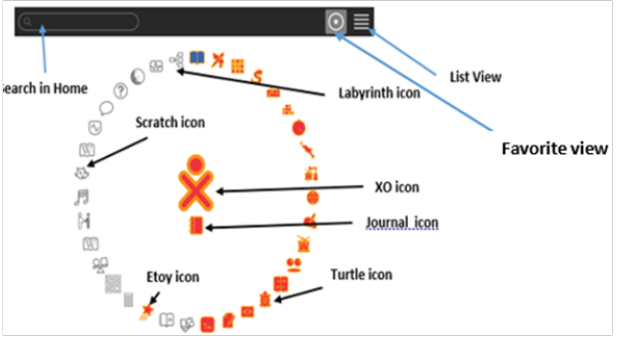
Figure 1. 3.The Sugar interface main window with activities icons
A.1. The journal
Journal is not an interface like Sugar but is one of the available options when one is on the Sugar interface.
Journal is like an XO laptop storage as whatever activity is done on the computer, it is saved in this location.
For this reason, it is good to delete some unwanted content of the Journal so as to
liberate space and make the XO laptop not so slow.
The Journal activity is an automated diary of everything done with an XO laptop.
The Journal can be used to organize work or revisit a past project.
Teachers and parents can use it to assess a child’s progress.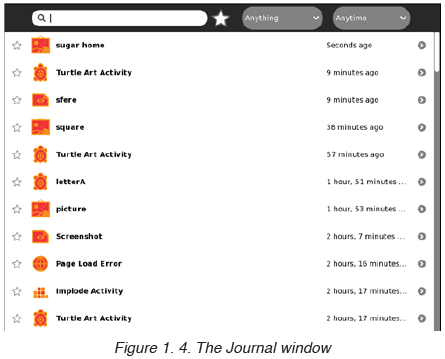
The Journal application presents items in a list view. Items can be arranged
in order of time or any other order chosen by the user.
1.2.2. Gnome interface
Gnome is another interface which is available in an XO laptop. It is an
interface through which one can have access to a number of programs like
Abiword, Spreadsheet,
In order to go in Gnome user interface while in Sugar go through these steps:
Click on my settings,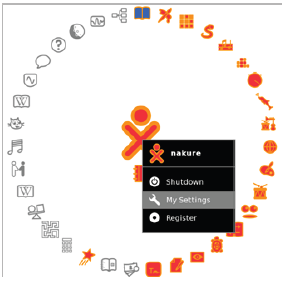
Figure 1. 5. The My Setting option of the Sugar interface
Once My Setting is clicked on choose Switch Desktop in the window that will appear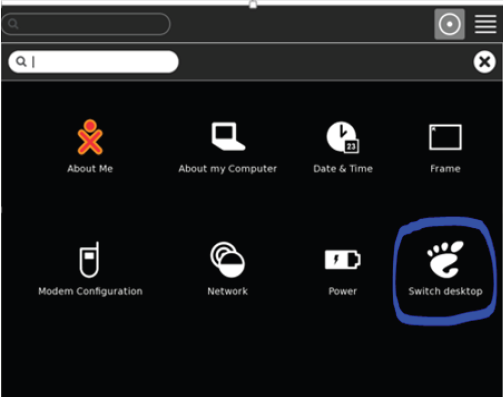
Figure 1. 6. My Setting main options
After clicking on Switch Desktop, click on Switch to GNOME on the window
below that will appear: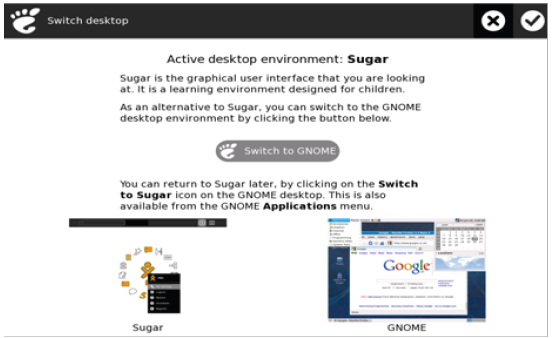
Figure 1. 7. Switch to GNOME window
Click on Restart Now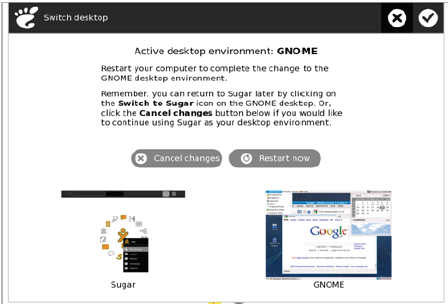
Figure 1. 8. Switch Desktop window with Restart Now option
The Gnome interface that will appear after restarting will look like in the image below: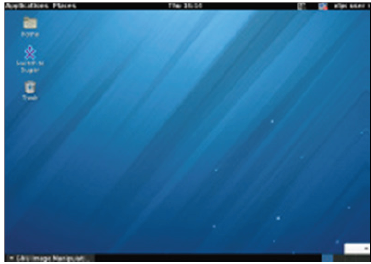
Figure 1. 9. The Gnome interface main window
Once in the Gnome interface, a user can switch back to Sugar interface by clicking on Applications,
then System Tools then go to Switch to Sugar the choose ok on the Switch Desktop window.
Application activity 1.2
1. Using an XO laptop open the Sugar interface and start the Write
activity to write your curriculum vitae (CV)
1.3. Abiword window
ACTIVITY 1.3:
1. Using the knowledge you have on Microsoft Office Word, open Abiword and identify its different menu
2. Write a small paragraph of three lines on your school and save it
Abiword is a word processing program which has basic word processing features such as list,
indents and character formats, and more sophisticated features like tables,
styles, page headers and footers, footnotes, templates, multiple views, page columns, spellchecking,
and grammar checking, etc.
A. Starting Abiword
To start Abiword go through these steps:- Go in the Gnome interface
- Go to applications,
- In the drop down list that will appears choose and click on Office,
- Choose and click on Abiword. The window below will pop up:
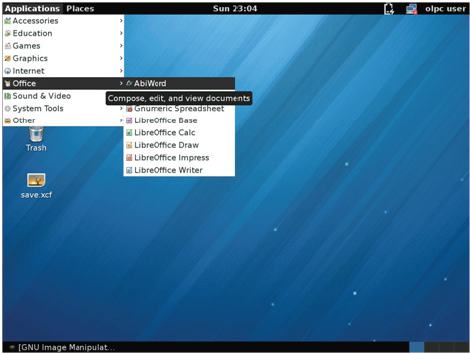
Figure 1. 10. Application Places window from where to start Abiword
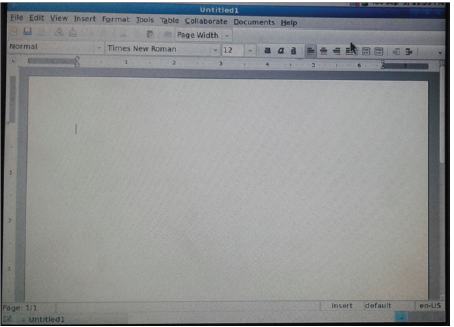
Figure 1. 11. AbiWord main window
B. Opening, saving and renaming an Abiword document
B.1. Opening a document
To open an Abiword go through these steps:
- Click on the Open option available under the File menu,
- Browse in the files/folders in order to choose which Abiword file to open.
- The Abiword document to open has to have a .doc document
- Double click the located file to open it
B.2. Saving a document
Once an AbiWord user has written text in the Abiword main window, there is
a need to save so that the text written does not get lost once the XO laptop is switched off.
To save an Abiword document do the following:
- Click the File menu
- Select ‘Save As’ option or click on the Save icon,
- Write the file name
- Choose the folder in where to save the file
- Then choose the file extention which is by default an AbiWord extension (. abw; zabw; abw.gz) and click Save
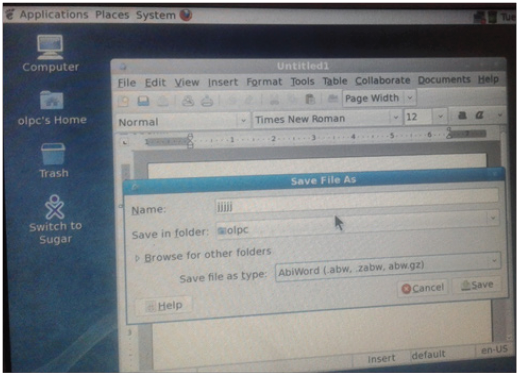
Figure 1. 12. Window for saving a file in AbiWord
B.3. Renaming a document
Renaming a file requires first to locate it and once it is located select it then
do a Right Click and choose Rename in the drop down list that will appear.
Write the new name of the file and press the Enter Key.
Application activity 1.3
1) Open Abiword program and write an essay on the history of XO
laptops and save it under your name on the desktop
1.4. Programming for children
1.4.1. Turtle Art
ACTIVITY 1.4:
Write a Turtle Art program to draw:
a. A rectangle
b. A pentagon
c. Letter B
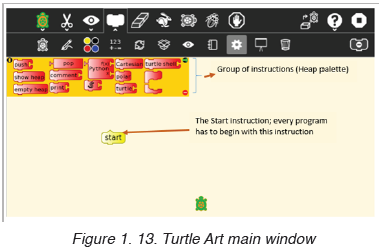
Turtle Art is a program found in an XO laptop with which one can draw colorful artwork by
dragging and dropping programming blocks which fit into one another in order to create a Turtle Art program.
The artwork or shapes are drawn by repeating instructions and conditionals following instructions.
To open Turtle Go to home page of the Sugar interface and click on turtle
art icon

 then select it and click on Start or start new. The Turtle Art main
window will appear
A. Elements of turtle art window
The turtle Art environment has got different tools including toolbars, palettes,
A.1. Turtle Art Tool bars:
This has all the tools that a Turtle Art programmer uses in order to assemble
instructions which create an Art program.
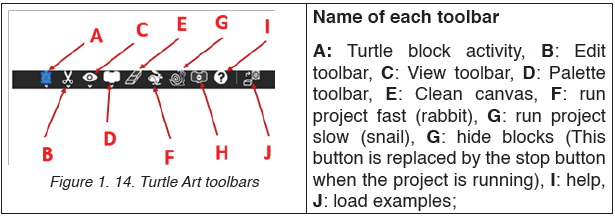
When each of the toolbars is clicked on, a number of available instructions is
displayed. The programmer will choose one or another instruction depending
on what is to be produced as an output of the program.
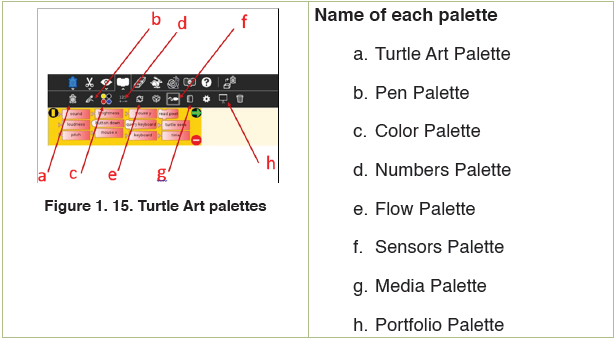
A.2. Turtle Art palettes
There is a number of palettes used for program construction. Programming
in Turtle involves adding blocks to a program by dragging an instruction from
the palette to the main area. Blocks can also be deleted by being dragged
back to the palette. The main principle is that the program blocks have to fit
into one another.
The main palettes found in the Turtle Art are displayed on the image below:
A.2.1. Instructions available for each palette
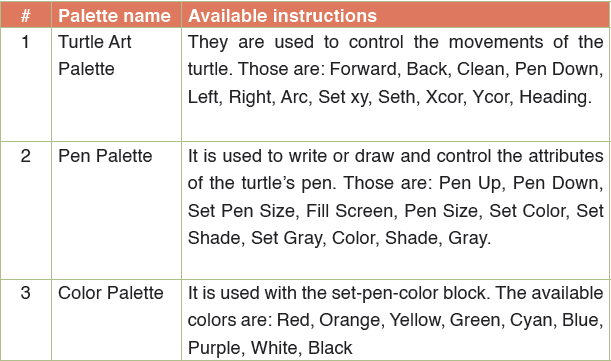

B. Example of different instruction use in Turtle Art programs
1.A program to draw a Square
A square is a geometric shape with four sides of equal size and four angles of equal size.
The window below shows program blocks and output for a program to draw a square.
Figure 1. 16. Program to draw a Square
Program interpretation
- The program starts with the Start instruction symbolizing the beginning of the program
- The forward command that follows instructs the turtle to move for a specified distance (300)
- The Right command instructs the Turtle to turn right by 90 degree
- The two instructions are repeated four times to draw the four lines
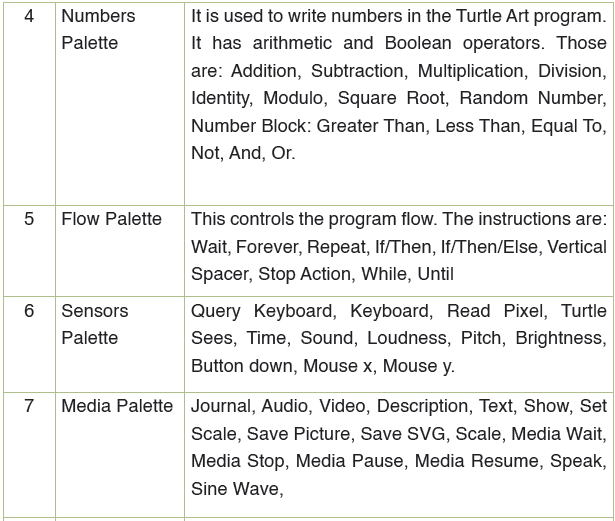
The program in the screenshot above can be rewritten by using Flow Palette
instructions to remove instruction repetition
Figure 1. 17. Square program with Flow Palette instructions
2. A program to draw letter A
The screenshot below contains program blocks and its output which is letter
A. Blocks have been assembled by dragging them from the palette. Blocks
that can work together have gaps that can fit into one another. Blocks from
the same palette are of the same color.
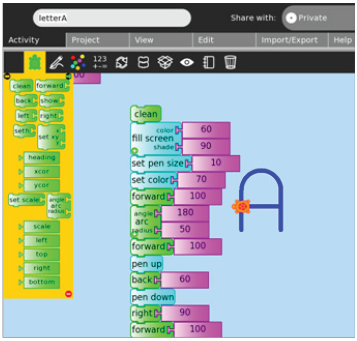
Figure 1. 18. Program to draw letter A
Program interpretation
- The program starts by cleaning everything
- Then the screen is filled with a light blue color by the use of Fill Screen command
- The line to be drawn is made to have a bigger size by the Set Pen Size
- command which is set at 10. The Set Color command changes the line’s color
- The Turtle start drawing under the instruction of the Forward command
- which instructs the Turtle to move by a distance specified in its arguments
- The Arc command will create part of a circle by specifying the angle size and the radius of the circle. After drawing this circle, the turtle will move forward as instructed by the Forward command that follow the arc command
- The Pen Up will pick up the pen so as not to continue to draw
- The back command will make the turtle return using the same route. As the pen is already up nothing will be drawn
- The pen down will make the pen ready for drawing. This is followed by the right command which will to make the turtle turn to the right with an 90 degree angle
- The Forward command will then draw the horizontal line found in the letter A
Note: For Turtle to draw and shape on the screen the pen needs to be down by using the Pen Down instruction block.
The Turtle Art pen may be not down as a result to the previously run program which made the pen up
Application activity 1.4
1. Using Turtle Art program write a program
a. To create a star on a green background
b. To write your name
2.
1.4.2. Scratch
ACTIVITY 1.5:
1. Start Scratch program by clicking on its icon located on the Sugar
interface, open two preexisting examples and execute them
a. Summarize your observation on the program you have opened
b. Referring to the observed examples explain the role of Scratch and what one can do with it
A. Starting Scratch
Scratch is a block-based visual programming language and online community
targeted primarily at children.
To start Scratch go to the Sugar interface and click on the Scratch icon
then choose Start new (or Start) or just click on the Scratch icon. The
window below will appear as the Scratch home page:
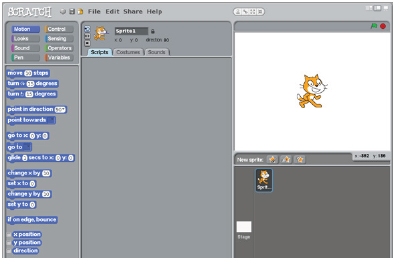
Figure 1. 19. Scratch main Window
The Scratch interface has three main sections: a stage area, blocks palette,
and a coding area to place and arrange the blocks into runnable scripts.
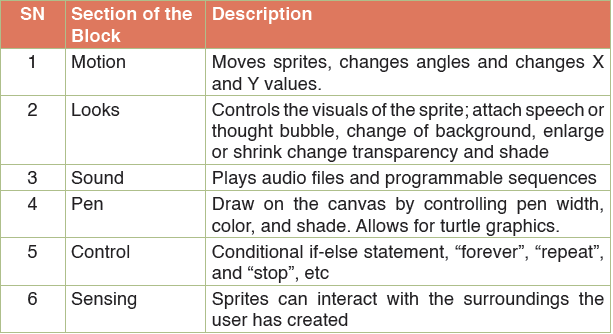
The Scratch main window has these menu: Motion, Control, Looks Sensing, Sound Operators, Pen, Variables.

An open program can be edited using the three main options to name Scripts which is used to write instructions,
Costume used to choose a Sprite or an image to use in a program and Sound for adding sound to be played while
the program is being executed.
B. Object animations
Objects are animated using programs that are created by dragging and
putting together program blocks while in the Script area. Before animating
an object first it is chosen as a costume. The common costume is Sprite but
this can be replaced by a custom made costume.
To choose a costume while in the scratch program Click on Costume, then
Import and browse folders for the new image to use as a costume. When
the programmer wants to have many images that will follow each other as
they are being played, it will be necessary to click on Import and browse for
those images many times
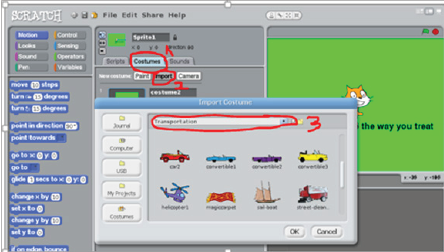
Figure 1. 20.Illustration of steps for choosing a costume image
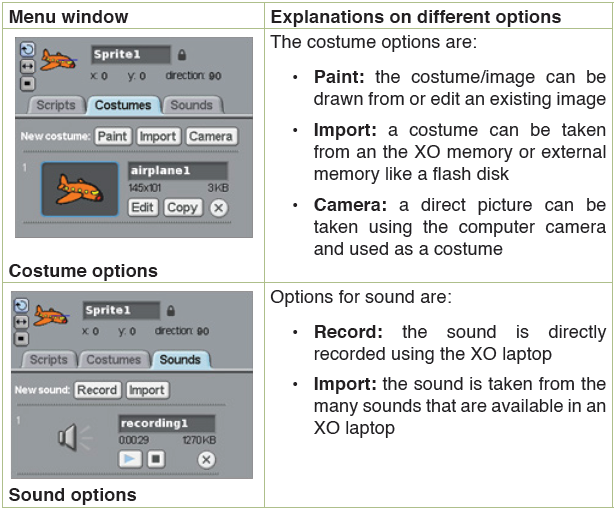
A chosen image can be edited in the paint editor or copied so as to have many same costumes.
A sound can be added to the image by clicking on the Sound menu then Import and again browse
the different sound available in the XO laptop this sound can also be recorded by clicking on the Record menu
next to the Import menu. The window for importing sounds is much like the one above.
The table below shows the different options available with costumes and sound
Example1:
Consider a scenario in which we want to have an aeroplane in the air which
is in motion and making the usual aeroplane noise and when this aeroplane
is clicked on it changes the direction by 30 degree.
Step 1: choose the costume by clicking on Costume then choose the Import option then browse for an aeroplane image
Step 2: Choose the sound to be produced by the aeroplane in motionpreferably choose an aeroplane sound.
To do this go to Sound click on Import
Step 3: now that the costume and sound have been chosen, arrange code
blocks depending on what is expected as an output from the program. In this
case simply the aeroplane will move and will produce aeroplane sound.
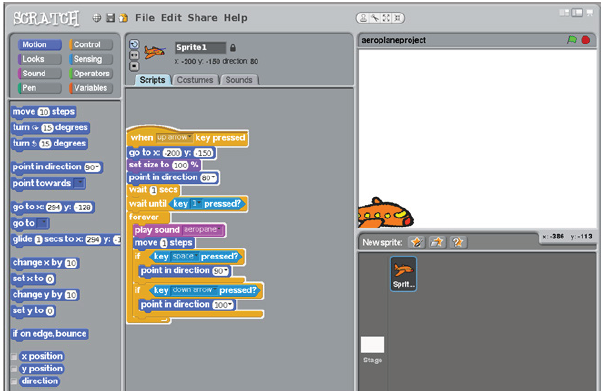
Figure 1. 21. Scratch program to animate an aeroplane
Program interpretation:
- The program above is ready to be executed after the up arrow key is
hit and the plane moves to the specified coordinates (x=-200, y=-150).
- The plane gets inclined at 80 degrees and waits for the “1” key to be hit
after at least one second. When “1” keys is hit the plane ascends
- The plane roars (plays sound) and move forward
- The plane is inclined at an angle of 90 degree as the space key gets hit
- Now that the Down Arrow is hit, the plane gets an inclination of 100 (descent-landing)

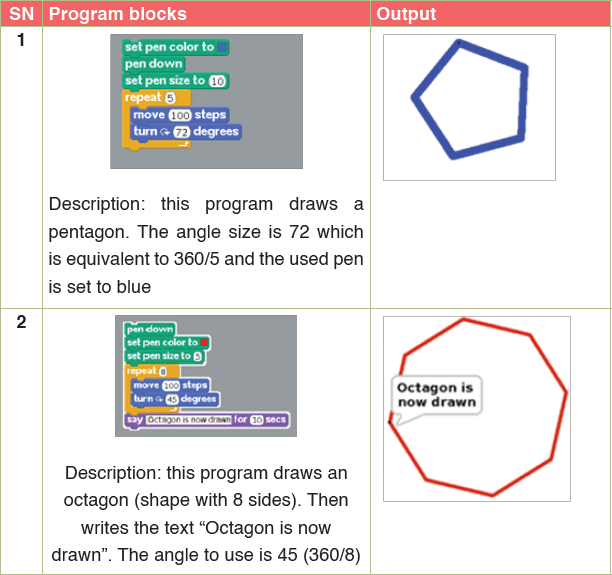
C. Drawing geometric shapes
Geometric shapes are drawn using the Pen menu which is made to make
motions by using the Pen’s own instructions and those found in other
menu namely Motion, Looks, Sound, Control, Sensing, Operators and Variables.
C.1. Example of a program to draw a Triangle
A triangle is a geometric shape having three sides and three angles meaning
that each angle has 120 degrees. The angle size here is important as it
is specified to set the turn angle of the pen. When a wrong angle is set, a wrong shape is drawn.
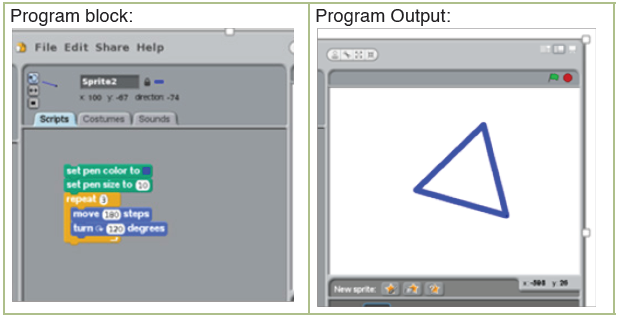
C.1.1.Program interpretation
Before writing this program, a dot has been set as a new sprite as the current
sprite cannot be used, the changing of the sprite has been done manually; it is not in the codes.
- The Set Pen Color to instruction changed the color of the pen, in the above program the color has been changed to blue
- The Set Pen Size increases the size of the pen or decreases it
- Sides can be drawn by using the Move and Turn instructions and this must be done many times depending on the number of sides to draw.
To avoid that a program be too long the Repeat instruction found in the Control menu is used.
C.2. Examples of other geometric shapes
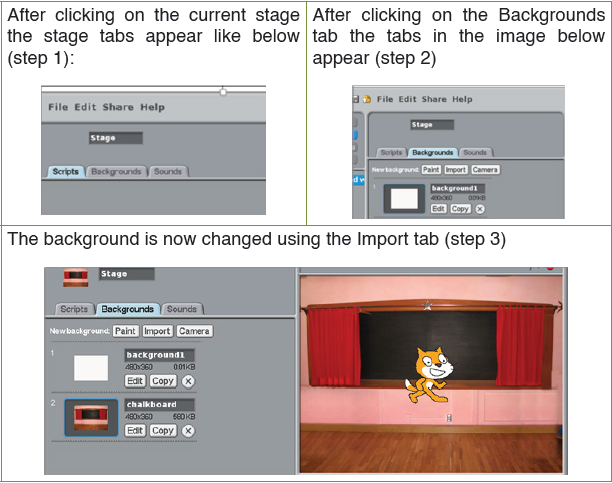
D. Background setting
A background is an image or scene that constitute a setting to the main figure or objects.
The outputs of the programs so far seen are on a white area, this area can be of a different color, can have an image
embedded in it. A background is set as a stage and before a background be used the image to use can be imported by
browsing for it in the compute, painted by using the tools available under the paint tab or taken using the XO laptop camera.
Steps for changing the background:
Step 1: Click on the existing stage image so as to get the stage’s tabs (Scripts, Backgrounds and Sounds)
Step 2 : Click on the Background tab
Step 3: Choose one of the options (Paint, Import and Camera) depending
on where to get the background from and follow the prompts.

Figure 1. 22. Scratch window with a stage having a white background
A program illustrating background setting and other functionalities available in scratch:
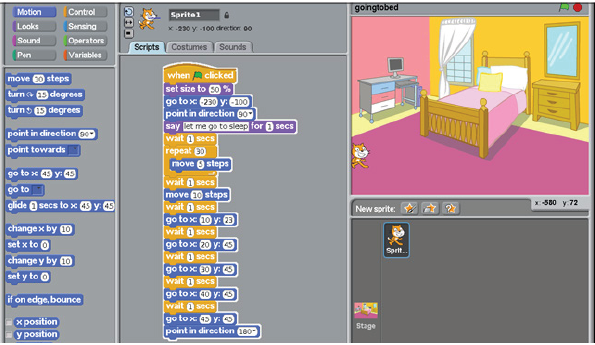
Figure 1. 23.A program to animate a Sprite so that it moves to the bed
E. Sound
For adding more life to an animated object in Scratch motion is not enough.
An animated object can produce sound and a background sound can be set as well.
The sound produced by an animated object (Sprite) or to be used as a
background (stage)sound can be regulated using instruction blocks.
Application activity 1.5
1. Using the Scratch program paint at least two cows.
Make them graze in a pasture and as they do so they make cow sounds
1.4.3. Etoys Projects:
ACTIVITY 1.6:
1. Open Etoys by clicking on the icon and do a right click and click
on Start. Click on the “Gallery of Projects” and open the Car and Pen Project (or any project)
a. Interpret the output of this project in relation to its program code
b. Edit the program code, observe the change in the object’s animation and interpret them
Etoys is a GUI (graphical user interface) environment software that allows to program by joining together code snippets
that are already written hence making programming with very easy.
With Etoy one can make games, multimedia presentations, computer art, animated storybooks, computer simulations
and many other projects.
A. Starting Etoys
To start Etoys go to the Sugar interface and right click on the Etoys icon and
choose Start. Immediately the Etoy main window below will appear:
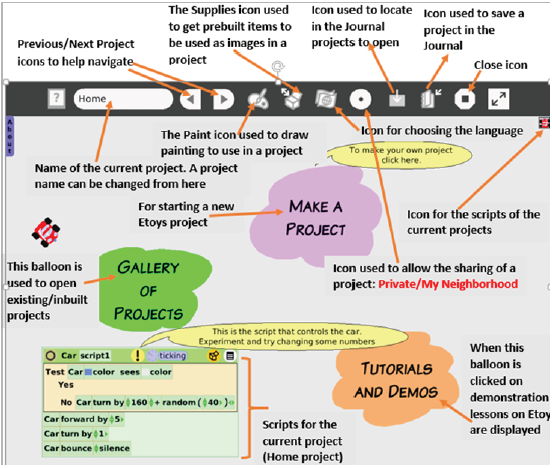
Figure 1. 24. Etoys project main window
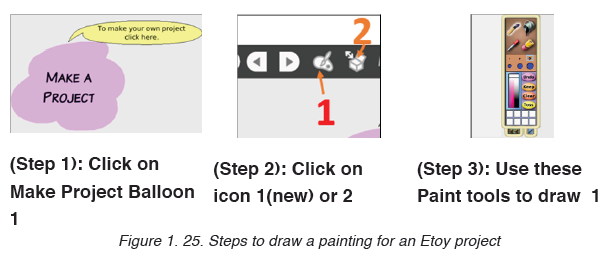
Now that the main window is opened, the programmer may start a new project by clicking on the “Make a Project”
balloon then click on the paint icon to draw an image to use in the project or choose from existing projects and then
paint the image by choosing appropriate tools.
B. Create animations: project to animate a car
Consider a project in which a car is going to be drawn in Paint then animated using program blocks.
For starting this project first the Etoys project will be opened as explained in the previous page then start painting
the car gothrough the steps below:
Step 1: draw a car using the the paint tools
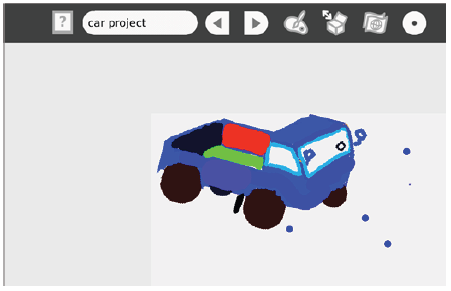
Figure 1. 26.Painted car
Step 2: Write program codes using the available blocks in order to animate (make move) the car
To do this select the painted object (car) then do a right click and immediately
the image handles appear. Click on the little Eye handle to get the program Viewer
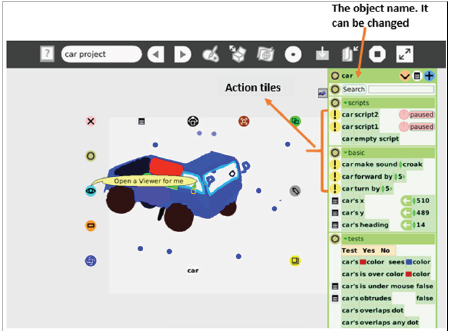
Figure 1. 27. The image with its Script
In the Script block there are two types of tiles; those with an exclammation
point in front of them called Action Tiles and those without that.
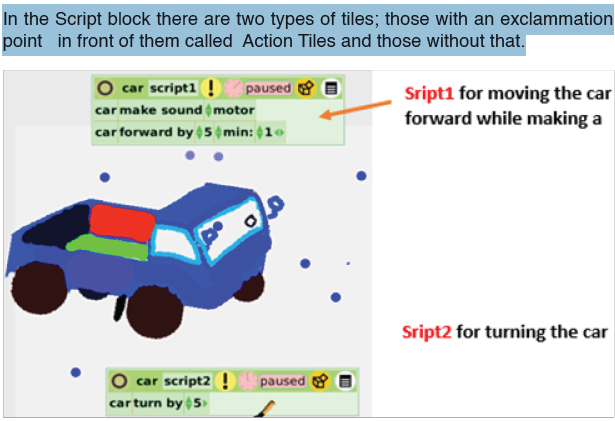
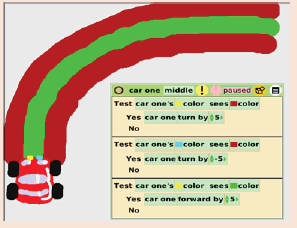
Figure 1. 28. Car objects with its animation scripts
With the scripts in the image above, the car can be made to move forward by
running (executing) the script1 like it can be made to turn by using script2.
Running a script is done by clicking on the clock icon and once the clock is clicked on the script is now being executed
the stick starts moving and the script status shows “ticking” instead of “paused”
C. Save, Open, Delete and Rename a project
Once a project is done it can be saved in the Journal by clicking on the “Keep a Copy” icon
 and the project will
 then be saved in the Journal.
That same project can be opened by locating it where it is stored and clicking on it. It can also be opened by using the
main Etoys menu “Find an Entry in the Journal” icon
 which will direct the user to the Journal on the file that need
 be clicked for opening.
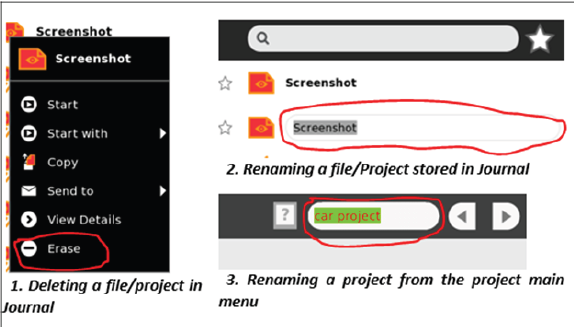
To delete a project locate it in the Journal do a right click and choose Erase. For renaming a project also locate it and click
on its name and immediately the name will be highlighted; you can now write the new name. It is also possible to rename a project directly from Etoys main menu. The window below shows how to delete and rename a file/project.
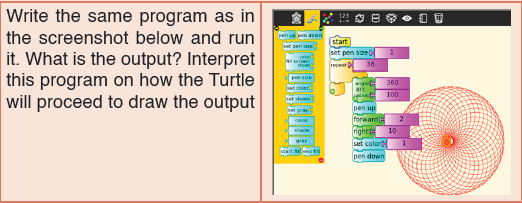
Application activity 1.6
1. Observe this image and its accompanying code. What does this program do?
2. Draw a roundabout (road) and make the car move in it. This car should make a car noise as it moves
End unit assessment
1. Take screenshots of the projects (Turtle, Scratch and Etoys projects) you have opened and save them on your flash disk
2. Using Turtle, Scratch and Etoys create a program to draw a house. Houses to be drawn are three (one for each project) and
the one created using Etoys has to be animated in such a way that the door opens and closed itself.
3. Through manipulating special keys found on an XO laptop keyboard explain their functions,