Unit 4:COMPUTER SOFTWARE Unit 4 INSTALLATION
Key Unit Competency
By the end of the unit, you should be able to:
• Install Operating System and Other Application Software.
• Use disk management tools.Unit Outline
• Types of computer software. • Installing operating system.
• Software license. • Installing device drivers.
• Software installation fundamentals. • Installing application software.
• Disk management.Introduction
Having learnt about various computer hardware devices and software, it is important to
have some basic skills on how to install computer software and manage the hardware
and software resources. In this unit, we discuss various types of software classified
according to purpose and acquisition. Later, we demonstrate how to install operating
systems such as Microsoft Windows 10, device drivers and application programs.4.1 Classification of computer Software
Generally, there are several ways of classifying computer software. In this book,
we shall discuss two ways of classifying software i.e. according to purpose and
acquisition.Activity 4.1: Classification of Computer Software
1. Research as an individual from the internet and books on:
(a) The classification of computer software.
(b) Purpose of each category of software.
2. Present your findings in your group discussion.4.1.1 Classification according to purpose
Computer software may be designed to manage hardware resources or to help the user accomplish specific tasks. In this regard, computer software may be classified as system software or application software.4.1.1.1 System software
System software performs a variety of fundamental operations that avails computer resources to the user. These functions include:
1. Booting the computer and making sure that all the hardware elements are working properly.
2. Performing operations such as retrieving, loading, executing and storing application programs.
3. Storing and retrieving files.
4. Performing a variety of system utility functions.
System software can further be subdivided into four sub-categories namely:
1. Operating systems.
2. Firmware.
3. Utility software.
4. Networking software.(a) Operating systems
An operating system refers to a type of system that software manages the hardware and control execution of application programs installed on the computer. To avoid conflicts, the operating system coordinates and schedules access to shared resources such as CPU, primary memory, storage devices, input devices, and output devices. Common examples of operating systems used on computers and portable devices include Android, Microsoft Windows, Linux, and Apple Macintosh. Examples of common operating systems include Linux and Macintosh (MacOS), and Microsoft Windows (e.g. 2000, XP, Vista, 7, 8, 10).(b) Firmware
Firmware is software embedded in a computer hardware or a computer program in a read-only chip data that is stored on a hardware device’s read-only memory to provides instruction on how the device should operate. Unlike normal software, firmware cannot be changed or deleted by an end-user without the aid of special programs. For example, devices like microwaves, digital cameras, and scanners have firmware used to control their basic operations.(c) Utility software
Utility software is a special program that performs commonly used services that make certain aspects of computing go on smoothly. Such services include sorting, copying, file handling, disk management etc. The two basic types of utility software are:
1. System-level utility: These helps the user to work with the operating system and its functions. For example, a utility software tells the user when he/she enters a wrong command and gives suggestions how the error can be corrected.
2. Application-level utility: These are utilities that make application programs run
more smoothly and efficiently. Such utility programs are commonly purchased
separately or may be part of an operating system.(d) Networking software
This type of software is mostly used to establish communication between two or more computers by connection them using a communication channel like cables to create a computer network. Networking software enables the exchange of data in a network as well as providing data security. Network software may come as independent software or integrated in an operating system. An example of networking software is novel netware.4.1.1.2 Application software
Application software, also known as application packages (apps) are programs that are designed to help users accomplish specific tasks. Table 4.1 gives examples and uses of common apps
4.1.2 Classification according to acquisition
Software can be classified according to acquisition as in-house developed or vendor
off-the-shelf software.4.1.2.1 Bespoke software
Bespoke or tailor-made software is a program developed or customized for a specific end-user or organization. For example, a bank may decide to manage hire programmers to develop an application for managing user’s sms-based access to banking information and services via mobile phones. Once developed, such application cannot be sold or transferred to another organization or end-user.4.1.2.2 Off-the-shelf software
Vendor off-the-shelf software are applications that are developed and packaged for sale or distribution via software vendors. Due to competition, most software developers bundles more than one application into integrated suite of programs such as Microsoft- Office 2013, Adobe Master Collection and Corel Suite. This the reason why the word package is sometimes used to refer to software product that are packaged and made available for paid-up download or purchase from software vendors.Activity 4.2: Classification of Software
1. Discuss with your classmate the various ways a user (individuals and organisations) can acquire software for their use.
2. Identify the advantages and disadvantages of each method of software acquisition.4.2 Software Licensing
Software is very crucial in accomplishing what we do with our computers and portable devices. To acquire, install and use software that is protected by copyright, you may have to download it for free or pay for license fee. Depending on conditions and
restrictions imposed by the End-User-Licence Agreement (EULA), computer software
may be classified into open source, proprietary, freeware, and shareware.4.2.1 Open source software
Open source refers to software whose source code (set of instructions) is madeavailable to users. The conditions and restrictions of open source EULA encourages the end-users to acquire the source code, modify and distribute modified versions of the original software. Examples of open source software include Linux operating system, OpenOffice, Mozilla Firefox, Thunderbird e-mail software, Apache web server, and MySQL database management system.4.2.2 Proprietary software
Proprietary software refers to commercial software whose source code is hidden from users. Modifications are only made by the software manufacturer. Proprietary software may be licenced for use at a fee or limited trial period. Examples of proprietary software that a user is required to pay for licence or use include Microsoft Windows, Microsoft Office, Adobe Acrobat Professional, Adobe Master Collection and CorelDraw.4.2.3 Freeware
Freeware is a category of software whose license allows for free of charge acquitition, use, making copies and distribution of copyrighted software for unlimited time. Unlike open source software, Freeware EULA does not allow users to modify or extend the softeware for sale as a commercial product. Examples of Freeware software include Adobe Reader, Google Talk, and AVG Free Antivirus.4.2.4 Shareware
Shareware is licensed commercial software that allow users to freely make and distribute copies of the software. The copyright holder for shareware may impose some conditions and restrictions in EULA that demand that, after testing the software, you pay to continue using it. Therefore, providing software as shareware is a marketing decision that does not change requirements with respect to copyright. Examples of shareware software include Winzip, Adobe Acrobat Professional Edition, Internet Download Manager (IDM) and CloneDVD.4.2.5 Ethical Use of Software License
The four categories of software licences discussed above impose legal, ethical and privacy conditions the user must agree with prior to acquisition and use. Unfortunately, some users engage in unethical behaviour such as piracy that violates software license agreement. The following are facts about piracy on copyright protected software:
• Piracy is illegal: Copyright law and intellectual property rights protects software authors and publishers, just as patent law protects inventors.
• Piracy is shameful act: Piracy can harm the image of an individual, community or country. If unauthorised copying proliferates in a society, the community losses integrity and incur legal liability.
• Piracy is intellectual property theft: Unauthorised copying of software is a form of theft that can deprive software developers of a fair return from products of
their intellectual work.Caution: It is important that you carefully read the license agreement when you acquire
software from the copyright owner. This will help you understand the conditions and
restrictions of the license on what you can and cannot do with the software.Activity 4.3: Software License
1. Research and then discuss with your classmate various categories of software installed in the computers in computer lab or school offices.
2. Read terms and conditions in the licence agreement of Windows 10, Ubuntu Linux, and Office 2013.4.3 Software Installation Fundamentals
The number of computer programs installed on a computer is only limited to hardware
specifications such as processor type, memory and storage capacity. Once a computer
meets recommended specifications, software installations is mostly an automated
process handled by a utility known as installer. This section demonstrate how to
install Windows 10, drivers and Office 2013 on a standard PC.4.3.1 System requirements
Before installing computer software whether an operating system, device drivers or
application software, there are minimum or recommended system specifications that
should be considered in terms of:
• Memory (RAM) capacity.
• Free hard disk space.• Processor type and speed.
• Graphics display.For example, the following are the minimum and recommended system requirements
for installation of Microsoft Windows 10 on standard desktop and laptop PCs:
• Processor type and speed: 1 Gigahertz (GHz) of CPU Speed or faster with support for PAE, NX, and SSE2
• Memory capacity: 1 Gigabyte (GB) of RAM on a 32-bit or 2 GB on 64-bit machine
• Storage space: 16 GB free-disk space on 32-bit or 20 GB on 64-bit machine
• Graphics card: Microsoft DirectX 9 graphics controller with WDDM driverActivity 4.4: Software Installation Requirements
In groups, research on the internet minimum and recommended specification for installing the following:
• Latest version of Microsoft Office
• Latest release of Kaspersky Antivirus
• Latest Ubuntu Linux4.4 Disk Preparation
Operating systems have software utilities or tools for preparing a new storage media or disk for use. Two commonly used disk preparation utilities are those for partitioning and formatting. Note that due to sensitivity of these operations, do not attempt these operations on a hard disk without the help of your computer teacher or computer lab assistant.4.4.1 Disk Partitioning
Partitioning a disk refers to the process of dividing a large physical disk into two or more
partitions called logical drives that are treated as independent drives. Before partitioning
a hard disk, you need to consider the type of file system (filesystem) to be created
on each partition. A filesystem is the structure used by operating system to store,
retrieve and update data on storage device. Examples of Windows filesystems include
File Allocation Table (FAT32), New Technology File System (NTFS) and extended
FAT (extFAT). To partition drive on a computer with no operating system, proceed
as follows:
1. Mount the installation media such as DVD or flash drive onto the computer.
2. Switch on the computer and press the key that enters BIOS setup.
3. Change boot sequence in order for the computer to boot from the installation media.
4. Once the windows setup that requires you to specify where to install windows,
create a new partition. You may also delete existing partitions but this is a sensitive
task that results to loss of data or programs.Activity 4.5: Disk management
Microsoft Windows 10 come with in-built disk management utilities used for creating,
resizing and deleting disk partitions. If you have Windows 10 installed, perform the
following tasks:
• Demonstrate and outline steps on how to access the disk management utility.
• Demonstrate and outline steps on how to create, and delete or resize an existing partition.4.4.2 Disk Formatting
Disk formatting is the process of preparing a data storage media such as a hard disk drive, solid-state drive (SSD), or USB flash drive or memory card for first time use. In some cases, the formatting operation may also create one or more new file systems. One reason for formatting a storage media is to make it compatible with the operating system. You may also format used media to make it blank for another use. It is important you back-up the media to be reformatted to avoid losing important files. To format storage media such as a flash disk, proceed as follows:
1. Click Start button, and then click File Explorer on the Start menu.
2. In the File Explorer window, click This PC on the left pane. The drives mounted on the PC are displayed on the right pane.
3. Right click on the drive to be formatted, and then click Format.
4. Specify the Capacity, File System and Allocation unit size as shown Fig.4.1.
6. Click Start button to format the drive.
4.5 Disk Management
Most operating systems come with Disk Management tools used for maintenance of storage media mounted on your computer. Some of the routine tasks performed by Disk Management include formatting, creating and deleting partitions, drive cleanup, disk scanning, system files checking, compression, de fragmentation of drive, backup and restoration. In this section, we go beyond drive formatting and partitioning discussed earlier to other disk management routines in Windows 10.4.5.1 Disk Cleanup
Disk cleanup is a maintenance utility used to free up space on a hard disk by deleting unnecessary files and Windows components that are no longer in use. This include
temporary internet files, downloaded program files and files in the recycle bin. To cleanup disk, proceed as follows:
1. Right click This PC on the desktop then click Manage to display Computer Management window.
2. Click Disk Management on the left pane of Computer Management window to display the list of drives.
3. Right click the drive you wish to cleanup, then click Properties. In the General tab of properties dialog box, click Disk Cleanup button.
4. In the cleanup window that appears, select the files to be deleted then click OK to cleanup the storage media.Activity 4.6: Disk Cleanup
1. Demonstrate how you would start disk cleanup utility in Windows 10, Linux or Android operating systems.
2. In Windows 10, identify types of files and components that can be removed using cleanup tool in order to save on hard disk space.
3. Demonstrate and outline procedure for removing temporary files and Windows components on a hard disk.4.5.2 Scanning disks
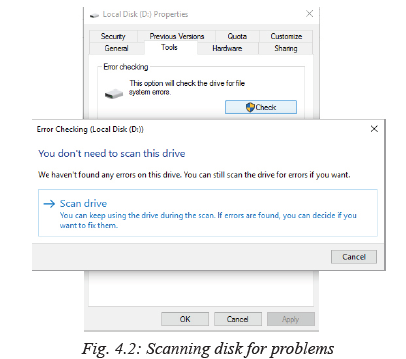
To check storage media for errors, most operating systems comes with check disk utility. In Windows, ScanDisk utility allows the user to scan and repair files and physical errors on storage media. When errors are encountered, ScanDisk marks affected sectors to prevent the operating system from storing information on them. To check a disk for errors, proceed as follows:
1. Click File Explorer on the Start menu to display the explorer window.
2. Click This PC on the left pane of File Explorer to display the drives.
3. Right click on the drive you wish to scan, and then click Properties.
4. In the Properties window that appear, click on the Tools tab.
5. Under Error Checking, click Check button shown in Fig.4.2.6. On the pop-up window that appears, click Scan drive.
4.5.3 System File Checker
System File Checker (SFC) is a utility available in Windows 10 used to check for corrupted operating system files. The SFC utility scans all system files and repairs corrupted ones where possible. To run the system file checker in command prompt, proceed as follows:
1. Right-click the Start button to display the context menu as shown in Fig. 4.3.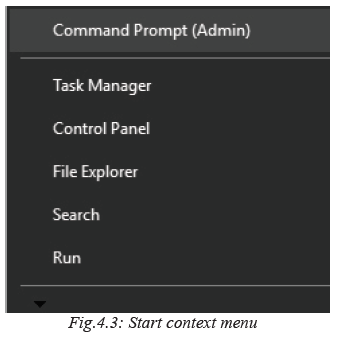
2. Click Command Prompt (Admin) to display the command prompt window.
3. Type sfc /scannow then press the enter key to start the scan process shown in
Fig. 4.4.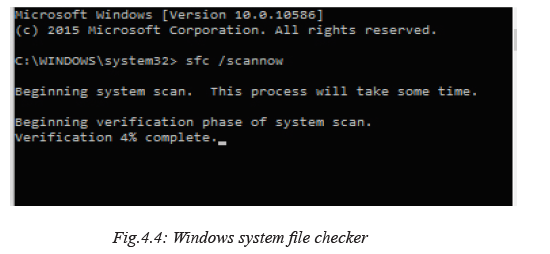
4.5.4 Disk Defragmentation
A storage media may have files scattered all over the surface of the disk hence resulting
to wastage of space and slow seek time. Defragmentation is the process of moving
file fragments to contiguous clusters to optimize on storage space and performance.
To defragment (defrag) a storage media, proceed as follows:
1. Click the Start button, and then click on File Explorer on the Start menu.
2. In the File Explorer window, click on This PC to display installed drives.
3. Right click on the drive you wish to defrag, then click Properties.
4. Click Tools in properties dialog box, then click the Optimize button
5. In the Optimize window, select the drive and then click the Analyze.
6. Click Optimize button to start defrag process as shown in Fig. 4.5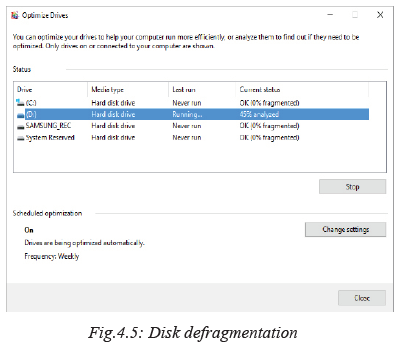
4.5.5 Disk Compression
Disk compression is a management routine used to store files in compressed versions
to save on disk space. When an Operating System (OS) attempts to save a file on
a compressed disk, the compression utility intercepts the file and compresses it.
Likewise when an OS attempts to open the file, the utility decompresses it first. To
compress a storage media, proceed as follows:
1. On the Start menu, click on File Explorer.
2. In the File Explorer window, click on This PC to display installed drives.
2. Right click on the drive to be compressed, then click Properties.
3. Click the General tab, then select Compress this drive to save disk space check
box as shown in Fig. 4.6.
4. Click Apply to display the popup window shown in Fig. 4.6.
5. Select compression option, then click OK to to close the pop-up window.
6. Finally, click OK to compress the drive.
4.5.6 Disk Backup
It is good practice to constantly keep copies (backup) of your important files on another drive to avoid loss of originals. Windows 10 has backup utility located under Settings menu used for backing up and restoring files. To use backup utility, proceed as follows:
1. On the Start menu, click Settings to display Setting window.
2. In the Settings window, click Update & security tab.
3. In the Update & Security list that appear, click Backup.
4. Click Add a drive under Automatically backup my files as shown in Fig. 4.7.
5. Click more options to specify backup options. Backup will be scheduled to automatically run as per your specifications.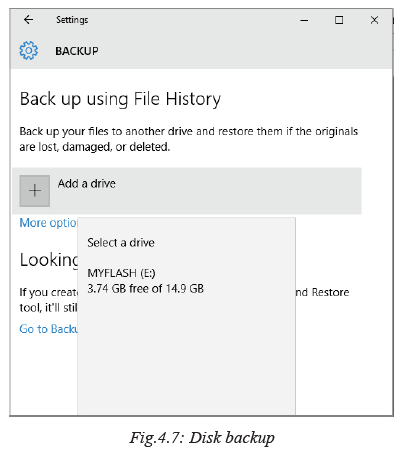
4.5.7 Setting Boot Order
Boot order also referred to as boot sequence defines the order in which the operating
system should check for the operating system’s boot files. The order can be changed
in BIOS setup as follows:
1. Turn on or restart the computer.
2. During power-on-self-test (POST), press the appropriate key(s) to enter the BIOS
setup screen such as shown in Fig. 4.8.
3. Specify boot order so that the computer boots from removable installation media.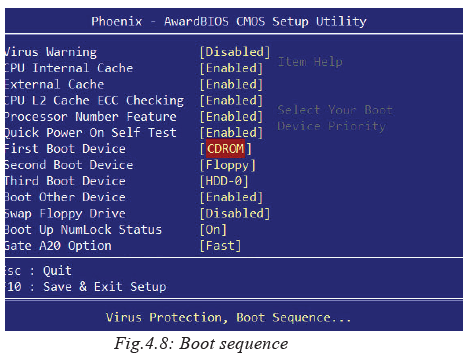
4.6 Installing Operating System
Installation of an Operating System is a fundamental process that starts with identifying minimum or recommended system specifications discussed earlier. In this section, we demonstrate how to download and install Microsoft Windows 10 Operating System. To start with, we demonstrate how to download windows 10 and create a bootable DVD or flash drive.4.6.1 Creating Windows 10 Installation Media
To upgrade from previous versions of Windows, Microsoft has adopted a hybrid web and media-based installation of Windows 10. If you opt for installation media, you have to download Media Creation Tool from Microsoft’s website. Media Creation Tool provides users with better experience in Windows 10 download compared to common download procedure. To create an installation media, proceed as follows:
1. Connect you computer to the Internet and use your favourite browser to visit Microsoft website. Navigate to Software Downloads, and search for Media Creation Tool.
2. Once the download page is displayed, select either 32-bit or 64-bit button depending on the architecture of your machine. To know the architecture of your PC, read the manual that came with the machine or use diagnostic utilities.
3. Download the tool onto your desktop or any location. Once the download is complete, select Create installation media for another PC on the screen shown in Fig. 4.9.
4. The screen shown in Fig.4.10 lets you specify the language, architecture and Windows 10 version to be installed.
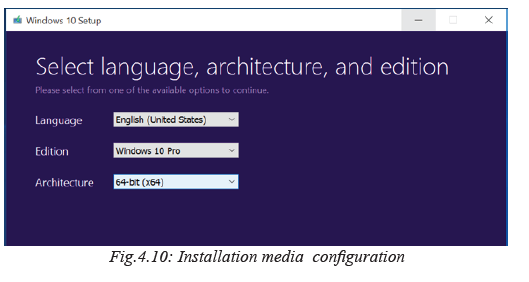
5. In the screen that appears, choose USB flash drive to create bootable media on
a memory stick. You’ll be required to insert a flash drive of with more that 3GB
free space. If you prefer using a DVD, choose ISO file so that you burn the image
onto DVD later.
6. Click Next to start the download process. Once the download is complete, you
may proceed to Windows 10 installation phase. In the next section, we take you
through the general steps of installing Windows 10 on a typical desktop PC.4.6.2 Installing Windows 10
Like earlier versions of Microsoft Windows, installation of Window 10 is a threephase process of copying files, installing features and drivers, and configuring settings. Microsoft provide two alternative of installing Windows 10:
• Upgrade: Users with licensed versions of Windows 7, 8 and 8.1 can upgrade to Windows 10 using the product key product key they used to install the older versions.
• New Installation: To install Windows 10 for the first time referred to as clean
install, you need to buy the license which you can get via email. Remember it is illegal to install pirated copy of Windows 10. In this section, we take you through general procedure for installing Windows 10
for the first time from USB flash drive:
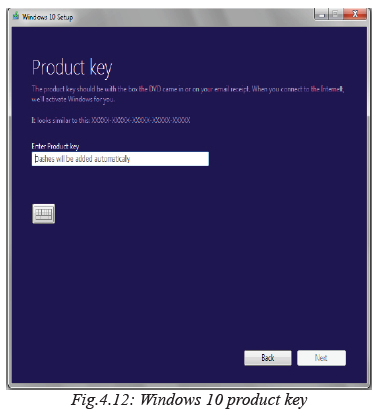
1. Insert the USB flash media created earlier using Media Creation Tool. Windows 10 setup screen shown in Fig. 4.11 is displayed. If the screen does not appear automatically, you may be required to change boot sequence in BIOS settings or use “Advanced startup options” available on certain devices.
2. In the next screen shown in Fig. 4.12, enter the product key sent to you through e-mail if you are installing Windows 10 for the first time. Alternatively, enter the product key that came with older version of Windows 7, 8 or 8.1 that you are upgrading. Click Next to proceed.
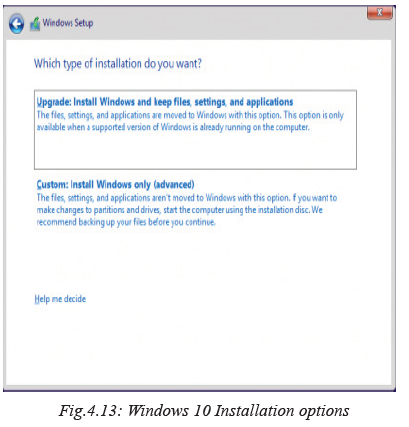
3. On the Install Now window, click Install Now button to display the screen of Fig. 4.13. Under Which type of installation do you want, choose Upgrade if you have a version of Windows 7 or 8 installed on your computer. If you are installing Windows 10 for the first time, choose Custom, then click Next.
4. In the next screen that appears shown in Fig. 4.14, select an existing partition or
create a new one where Windows 10 is to be installed. Note that partitioning a
drive is a sensitive task to be handled with care to avoid loss of programs or data.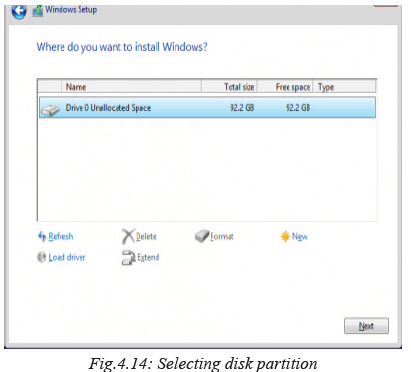
5. Once you specify the partition in which Windows will reside, clicking the Next
button takes you to the phase of copying Windows 10 files onto the partition as
shown in Fig. 4.15. It is after files have been copied that the third phase of drivers
and features configuration is started. During drivers and features configuration
phase, the PC restarts several times.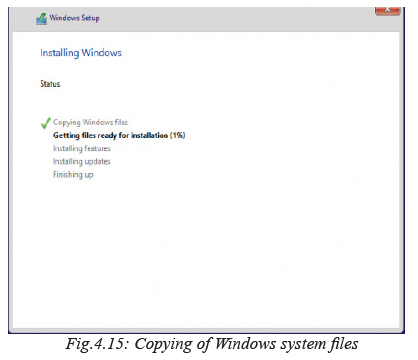
6. The moment the settings screen shown in Fig. 4.16 is displayed, choose whether
the installer should use express or customized setting. For privacy reasons, make
sure you read and understand the Privacy statement before choosing any other
two settings.
7. Next, sign in or create a Microsoft account when prompted as shown in Fig. 4.17.
Microsoft account is important because it allows the user to access Windows 10
resources e.g. online emails, cloud, and Apps.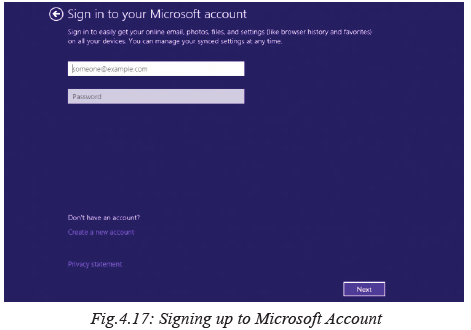
8. The final steps is to let the installer configure Apps before the desktop shown on
Fig. 4.18 is displayed. You are now ready to use Windows 10.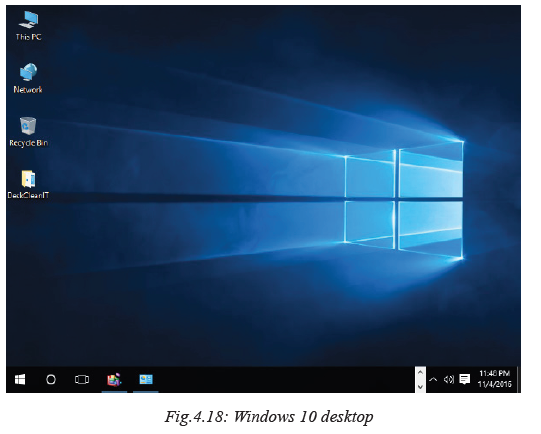
• Important: Once you install and activate Windows 10 on a device for the first time,
the installer registers your hardware with Microsoft’s servers. You don’t have to
enter the product key the next time you re-install Windows 10 on the same device.
Activity 4.7: Software Installation
1. In groups, demonstrate and outline steps on how to install various versions of
Microsoft Windows and open source operating systems such as Ubuntu Linux.
2. Configure the following Windows 10 desktop properties. In each case, outline
the steps followed to carry out the task:
(i) Change the background theme on the desktop.
(ii) Set desktop icons to display This PC, Network and Recycle bin icons.
(iii) Select icons that appear on the taskbar.Assessment Exercise 4.1
1. In reference to EULA, differentiate between open source software and proprietary software.
2. Demonstrate step-by-step how to you would partition hard disk.
3. Outline system requirements that need to be considered to install Windows 10 operating system.
4. Explain why it is good practice to install genuine copy of an operating system.4.7 Installing Device Drivers
A device driver is a utility program that acts as an interface between a hardware
device and the operating system. For a hardware device such as printer, keyboard or
scanner to function properly, its drivers must be installed. Once you connect a new
device such as a printer to a computer, the operating systems automatically detects
the device and installs appropriate drivers. If no drivers found from Windows drivers
list, you have to download or use drivers that came with the device.4.7.1 Installing drivers automatically
Automatic installation of drivers also known as plug-and-play means that once a new
device is detected by the computer, Windows searches and automatically installs for
appropriate drivers. The following are basic steps followed in the installation of
plug-and-play devices:
1. Connect the device to the computer.
2. Windows 10 detects the new device and signals plug-and-play service to
automatically install the device drivers.
3. If appropriate drivers are found, the device is automatically installed without user
intervention.
4. The computer may restart to configure the new device.4.7.2 Installing drivers manually
Often computer and hardware manufacturers place the drivers on a storage media or
provide them online for download. To manually install drivers, proceed as follows:
1. Right click This PC on the disktop and select Manage. The Computer
Management window shown in Fig. 4.19 is displayed.
2. Select Device Manager, click Action menu, then select Add legacy hardware
3. Follow instructions on the Add Hardware wizard that appears.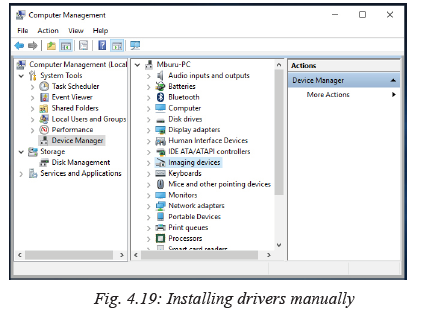
Activity 4.8: Device Drivers Installation
In groups, demonstrate and outline a step by step procedure for installing a new device
such as a printer or scanner on a computer running Windows 10 operating system.4.8 Installing Application Software
There are thousands of application software such as word processors, spreadsheets,
database management systems, desktop publishing software, education software
among others. Most software developers package several programs into a suite with
good example being Microsoft Office 2013. In this section, we demonstrate how to
install Microsoft Office 2013 suite on desktop PC:
1. Insert Microsoft Office 2013 DVD or USB installation media into the computer.
In the license agreement screen that appears, click the check box “I accept the
terms of this agreement” shown in Figure 4.20.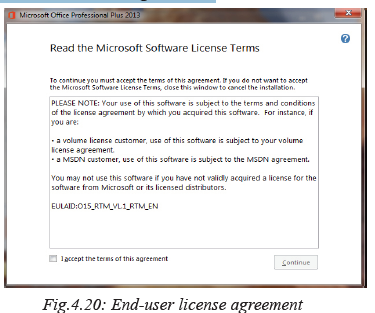
2. Once you accept Microsoft terms of agreement, choose whether to upgrade an
existing version or custom to install new copy as shown in Fig. 4.21.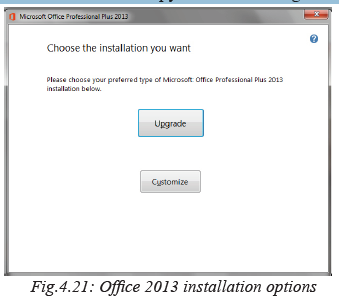
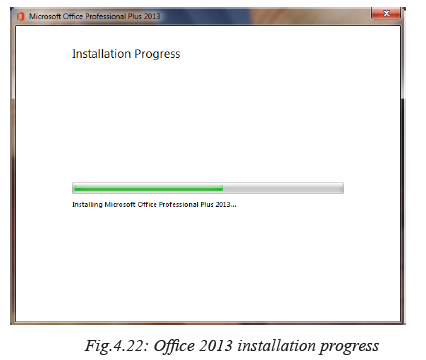
3. To upgrade an existing version of Microsoft Office, click Upgrade. Make sure the radio button “Remove all previous versions” is selected, and then click Next. The installation progress screen shown in Fig. 4.22 is displayed.
4. Once the installation process is complete, you may sign in for Microsoft account
to get online access to your documents from SkyDrive. SkyDrive is a Microsoft
name for cloud-based storage. Finally, the screen shown in Fig. 4.23 is displayed
to confirm that you have successfully installed Office 2013.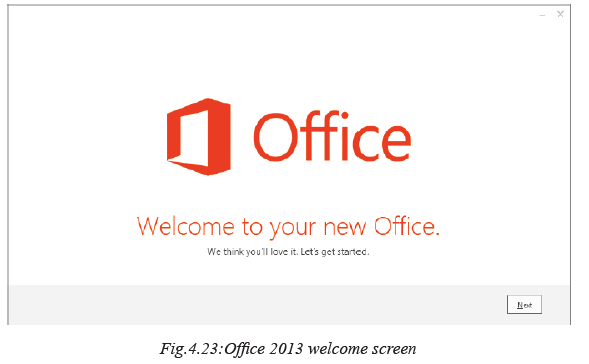
5. To confirm that Office 2013 has been installed, click the Start button then All
apps. The list of installed Microsoft Office 2013 apps is displayed as shown in
Fig. 4.24.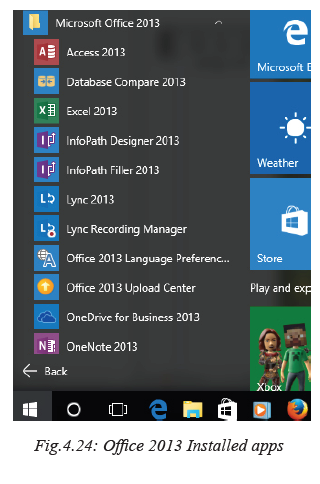
Activity 4.9: Installing Apps
Demonstrate how you would install an application software such as Microsoft Office
2016, Web browser or a Computer games in a computer running on Windows 10
Operating system.Unit Test 4
1. Explain the importance of reading the user manual before installing new software.
2. Outline the procedure you would follow to install device drivers and application software.
3. State four factors you would consider before purchasing application software.
4. State three hardware requirements to be considered when installing application software.
5. Explain importance of end-user license that comes with proprietary software.