Topic outline
Unit 1: COMPUTER FUNDAMENTALS
Key Unit Competency
By the end of the unit, you should be able to explain characteristics and evolution of
computers and appreciate impact of computers in the society.
Unit Outline
• Definition of computer science.
• Characteristics of computer.
• Classification of computer.
• Role of computers in society.
• History of computers.Introduction
In the current generation, use of computers has become a common practice in classrooms, business, offices, entertainment, health, broadcasting, and many
other areas. In this section, we discuss fundamental concepts, and characteristics,
applications and evolution of computers.1.1 Definition of a computer and computer science
To adapt to the ever changing technologies, there is need to understand fundamental
concepts, and characteristics of computers.Activity 1.1: Definition and parts of a computer
1. In groups of three, use search engines such as Google, or Bing to search for
standard definitions of the following terms:
• Computer
• Computer Science
2. Fig. 1.1 below shows a typical type of a computer. Define and name the parts
labelled (a) to (d).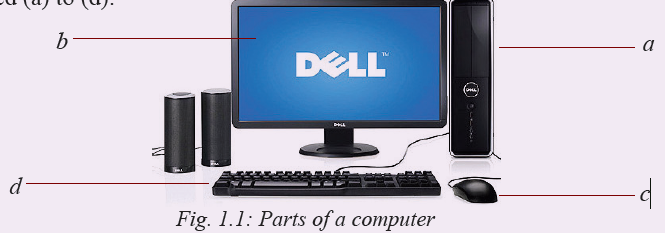
1.1.1 Definitions
Computer: A computer is an electronic device capable of receiving raw facts (data) and performing a sequence of operations on the data based on special computer instructions (processing) to produce desired output (information). Fig. 1.2 below illustrates this process.

Computer Science: Computer science is a branch of science that deals with theory of computation, or design and operation of computer hardware and software, and of the application of computers in all sectors.
Activity 1.2: Computer science
1. Do some research on the internet and write an essay on areas of study within Computer Science. These may include artificial intelligence, information systems, networks, security, database systems, human computer interaction, vision and graphics, numerical analysis, programming, software engineering, health informatics, bioinformatics and computational theories.
2. Identify other fields of study that are related to Computers Science offered in most colleges and universities in Rwanda.1.2 Characteristics of computers
Though humans are more intelligent than computers, much of the activities from business to space exploration are now carried out with the support of computers. Does this imply computers are better than human beings?Activity 1.3: Characteristics of a computer
Individually, do some research and write an essay describing why computers though not as intelligent as human beings, have characteristics that have made them preferred tools in the workplace. Some of the characteristics that should appear in the essay include: reliability, speed, accuracy, diligence, versatility, memory, feelings, intellectual ability. Upon completion of the essay, you should be able to appreciate that although
computers do not have feelings and intelligence like human beings, they are:1. Fast: A computer can perform in a few seconds the amount of work a human being can do in days, months or years.
2. Accurate: A computer is far much more accurate than human beings during data processing. The accuracy of the output obtained from a computer mainly depends on input provided. If the input is wrong, the computer processes wrongoutput hence the term Garbage In Garbage Out (GIGO). GIGO is a phrase used in computer science that implies that if invalid or erroneous data is entered into a computer (garbage in), the computer will process and output invalid or erroneous results (garbage out).
3. Versatile: Computers are versatile i.e. flexible in that they can be used to carry out different types of activities. For example, at one point using a word processor a computer can be programmed to process words like a typewriter and while using a spreadsheet to perform calculations like a calculator.
4. Reliable: Computers are more reliable because they do not get tired or bored in processing repeated work.
5. Power of remembering: Computers can store and recall high amount of information depending with the size of secondary storage media.
6. Diligent: Computers do not suffer from human related traits such as tiredness, and loss of concentration after working for long hours.1.3 Classification of computers
Activity 1.4: Classification of computer
1. In groups of three, use internet, magazines or other reference books to classify computers according to:
• Physical size and processing power.
• Functions they perform.
• Type of data they process.
2. Other than the above types of classifications, brainstorm on other factors that can be used to classify computers. Generally, computers can be classified using different criteria but the most common classifications are based on size, processing power, function, and type data processing.1.3.1 Types of computers according to size and power
When classified by physical size and processing power, computers can either be supercomputers, mainframe computers, minicomputers or microcomputers.1.3.1.1 Supercomputers
Supercomputers are the fastest, largest, most expensive and powerful computers available. They are able to perform many complex operations in a fraction of a second. Supercomputers are mainly used for scientific research, which requires enormous calculations. Some of the applications that justify use of supercomputers include aerodynamic design and simulation, petroleum research, defence and weapon analysis and telecommunications. Because of its weight, a supercomputer is kept in a special room as shown in Fig. 1.3.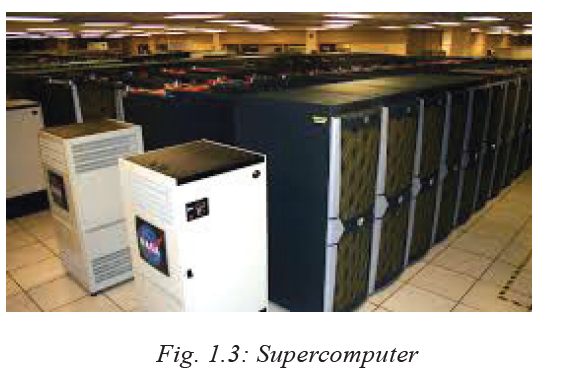
Activity 1.5: Uses of supercomputers
By doing research, explain how supercomputers are used by National Aeronautics and Space Administration (NASA) for aeronautics and aerospace exploration.
1.3.1.2 Mainframe computers
Mainframe computers such as shown in Fig 1.4 are less powerful and cheaper than supercomputers. While supercomputers may be described as giant computers, mainframes are said to be big in size. They are used for processing data and performing
complex mathematical calculations. They have a large storage capacity and can support a variety of peripherals. Mainframe computers are used as powerful data processors in large research institutions and organisations such as banks, hospitals
and airports, which have large information processing needs.
Activity 1.6: Mainframe computers
In groups, discuss and write a brief report on how mainframe computers are used in large organizations such as banks, hospitals, and airlines.
1.3.1.3 Minicomputers
Minicomputers shown in Fig. 1.5 are also known as small-scale mainframes because they were cheaper alternative to mainframes computers. Like mainframes, minicomputers are used in business organisations, laboratories, research institutions,
engineering firms and banks.
Activity 1.7: Distinction between mainframe and minicomputers
In groups, use reliable sources on the internet draw clear distinctions between mainframe and minicomputers.
1.3.1.4 Microcomputers
A microcomputer is the smallest, cheapest and relatively least powerful type of computer. It is called a microcomputer because its CPU is called a microprocessor, which is very small compared to that of minicomputers, mainframes and supercomputers. Microcomputers are commonly used in schools, business enterprises, cybercafé, homes and many other places. Today, the processing power of microcomputers has increased tremendously close that of minicomputers and mainframes.
Types of Microcomputers
Microcomputers may be classified into desktop and portable computers. A desktop such as shown in Fig. 1.6 are common types of microcomputer designed to fit conveniently on top of a typical office desk, hence the term desktop.
Portable computers are microcomputers small enough to be held by hand (handheld) or placed on the laps while working (laptop). Examples of Portable computers include laptops (notebook), tablets, and smartphones. Fig. 1.7 shows illustrations of notebook PC and a tablet.

Activity 1.8: Types and uses of microcomputers
1. In the school environment, at home or in business organization, identify the following types of microcomputers:
• Desktop computers • Notebooks/Laptop
• Tablets • Palmtops
2. In discussion groups, research from reliable internet sites how the term microcomputer came into being.
3. Using the illustrations given below, identify each type of microcomputer.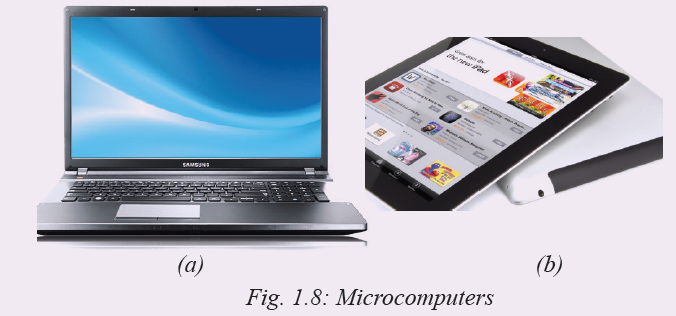
1.3.2 Types of computers according to functions
Regardless of the size and processing power, a computer can be classified according to functions they perform. In this case, we have servers, workstations and embedded computers. Servers and workstations are general purpose computers used to provide access to resources on a network while special purpose computers are dedicated to a single task.
1.3.2.1 Servers
A server is a dedicated computer that provides hardware or software resources to other computers on a local area network (LAN) or a over the Internet. Unlike desktop computers that have standard input and output devices attached, most servers such as shown in Fig. 1.9 do not require such peripheral devices because they are accessed remotely using remote access software. Because servers are expensive, a powerful desktop computer may be converted into a server by adding the appropriate hardware and software resources.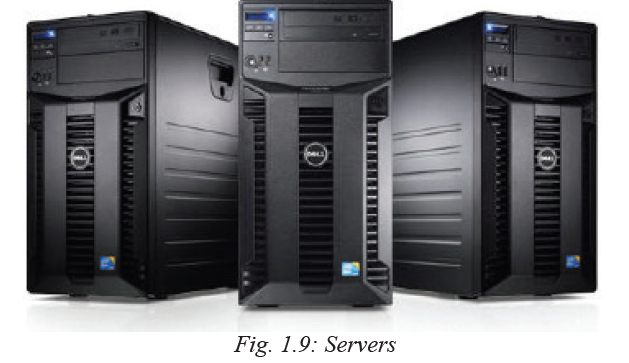
Generally, servers may be classified according to the task they perform. For example, a file server provides massive storage devices dedicated to storing files while a print server is used to access to more printers, and a network server is a computer that manages network traffic.
1.3.2.2 Workstation
A workstation is a name given to a computer connected to a server or network intended to be used by one person at a time, they are commonly connected to a server.
This means that all users who utilize a computer at their job or school are using a workstation. Commercially, workstations are used for business or professional use such as graphics design, desktop publishing and software development.
1.3.2.3 Embedded computers
Embedded computers are computing devices designed for a specific purpose. Generally, an embedded computer has an operating system that only runs a single application. Examples of embedded computing devices include dishwashers, ATM machines, MP3 players, routers, and point of sale POS terminals.Activity 1.9: Classification of computers
1. In the school environment, classify the following computers into servers, workstations, or embedded computers:
• Computer used to control access to hardware and software resources in a networked environment.
• Computer used to access hardware and software resources in a networked environment.
• Computer used in smart cards such as those used on ATMs and automated parking.
2. In your groups, discuss advantages and disadvantages of supercomputers over microcomputers.1.3.3 Types of computers according to data type
Computers can be classified into digital computers, analog computers or hybrid computers depending on the type of data they process.1.3.3.1 Digital computers
Digital computers perform calculations and logical comparisons by representing data and instructions as binary digits. This means that digital computers must convert data such as text, numbers, images, video and sound into a series of zeros and ones as represented by the signal waveform in Fig. 1.10. The data signal is either at 0V or 5V. In this case +5 or -5V represent a 1. Most of the computers used today such as desktop computers, laptops and tablets are digital computers.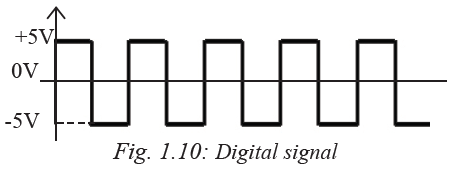
1.3.3.2 Analog computer
These are computers that process data that is continuous (analog) in nature. An analog signal is one which has a value that varies smoothly from peak to minimum and vice versa.
For example, the sound waves that your mouth produces when you speak are analogue - the waves vary in a smooth way as shown in Fig 1.11. In the early days of computer evolution, most of the computers were analog in nature. Today analog
computers are specialized devices used in engineering and scientific applications unlike those used to measure speed, temperature and pressure data.
Activity 1.10: Classification of computers
1. Research for details from the internet, magazines or other reference books and define the following types of computers:
• Analog computers
• Digital computers.
• Hybrid computers.
2. Discuss advantages and disadvantages of the three types of computers.Assessment Exercise 1.1
1. Explain some of the characteristics that make a computer suitable for processing repetitive tasks.
2. Differentiate between the following terms:
(a) Mainframe and minicomputers.
(b) Analog and digital data.
(c) Servers and workstations.
3. Draw a sketch of a desktop computer and label the main physical parts.1.4 Role of computers in society
Computers play very important roles in various socio-economic sectors such as economics, offices, financial institutions, industries, health, communication, security, education, entertainment and libraries. In this section, we discuss common application areas of computers in our society.
1.4.1 Economics
Computers enables governments, businesses and individuals to plan, budget and tract their revenues and expenditures. Increased computing power means that it has become possible to perform economic analysis both at macro and micro-economic level.
1.4.2 Retail stores
Most retail stores use computers to help in the management of daily activities like stock control. The stock control system keeps account of what is in stock, what is sold and what is out of stock. The management is automatically alerted whenever a particular item or items are running out of stock that need reordering.
1.4.3 Offices
Computers have increased efficiency in offices by reducing the time and effort needed to access and receive information. Most modern office functions have been automated for efficient service delivery.
1.4.4 Financial institutions
In the banking sector, computers and mobile devices such as cellphones can be used to withdraw or get any service from different branches. Special cash dispensing machines called automated teller machines (ATM’s) have enabled automation of cash deposits and withdrawal services. Efficiency has also been increased due to better record keeping and document processing brought about by use of computers.
1.4.5 Industries
Computers are being used to monitor and control industrial processes. The computer age has seen wide use of remote controlled devices called robots. A robot is a machine that works like a human being but performs tasks that are too unpleasant, dangerous, or complex and tedious to assign to human beings.
1.4.6 Health
Computers are used to keep patients’ records in order to provide easy access to a patient’s treatment and diagnosis history. Computerised medical devices are now being used to get a cross sectional view of the patient’s body that enables physicians to get proper diagnosis of the affected body parts with high levels of accuracy. Computers also control life support machines in Intensive Care Units (ICU).
1.4.7 Communication
Integration of computers and telecommunication facilities has made message transmission and reception to be very fast and efficient. Because of the speed with which information can be transmitted around the world using computers, the world is said to have become a global village.
1.4.8 Security
Information stored in computers such as fingerprints, images and other identification details help law enforcers carry out criminal investigations.
1.4.9 Education
Computers are used in teaching and learning in schools, colleges and universities. Learning and teaching using computers is referred to as Computer Aided Learning (CAL) and Computer Aided Instruction (CAI). For example, experiments in subjects like Chemistry or Physics may be demonstrated using a special computer program that can depict them on the screen through a process called simulation. To take care of learners with special needs, computers with software and assistive technologies
such as microphone, braile keyboards and text magnifiers have been developed.1.4.10 Entertainment
Computers can be used at home for recreational activities such as watching movies, playing music and computer games. They can also be used in storing personal information, calculating, keeping home budgets and research.1.4.11 Library management
In a modern library, computers enable library personnel to easily access and keep updated records of books and other library materials. Library users can also use computers to search for titles instead of using the manual card catalogue.
Activity 1.11: Role of Computers in society
1. Match the following computer application areas numbered 1 - 8 with the role played in column numbered A - H.
1. Supermarket A – Forensic investigations
2. Hospital B – Entertainment
3. Bank C – Stock control
4. Hotel D – Booking rooms
5. Home E – Analysing academic data
6. School F – Motor vehicle assembly
7. Industry G – Remote monitoring of patients
8. Police station H – Processing cash transactions2. Apart from using computers and other ICT devices such as mobile phones as productivity tools at home and workplace, they can be used to address various social, environental and cultural issues. Brainstorm on how computers can be used in Rwanda to promote:
• Peace and reconciliation.
• Ndi Umunyarwanda philosophy.
• Environmental management.
• Sexuality and moral values.3. By visiting around and outside the school, discuss both positive and negative impact of computers in the following sectors:
• Education • Business
• Health • Entertainment
• Communication • Security control
• Financial management • Government1.5 History of computers
The computer, as we know it today, had its beginning with a 19th century English mathematics professor name Charles Babbage. Babbage designed the Analytical Engine and that is considered as the basic architecture of modern electronic computers are based on. It is not until 1937 when John Atanasoff and Clifford Berry built the first electronic digital computer called Atanasoff-Berry Computer (ABC). Since then, there have been major computer evolutions classified into five generations.
1.5.1 First generation (1940-1956): Vacuum tubes
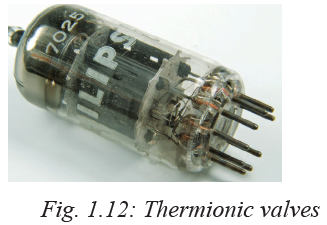
The first generation computers used electronic components known as vacuum tubes or thermionic values (Fig. 1.12) for circuitry and magnetic drums for memory. These types of computers were enormous, expensive, consumed a lot of power, and emitted a lot of heat which was often the cause of malfunctions. Input was based on punched cards and paper tape, and output was displayed on printouts. The three popular examples of first generation computers are Electronic Numeric Integrator and Calculator (ENIAC), Electronic Discrete Variable Automatic Computer (EDVAC) and Universal Automatic Computer (UNIVAC).
Activity 1.12: First generation computers
In groups explain why first generation computers were large in size, emitted a lot of heat, and consumed a lot of power.
1.5.2 Second generation (1956-1964): Transistors
The invention of transistors shown in Fig. 1.13 ushered in the second generation of computers that were made up of transistors that are superior vacuum tubes. However, these computers but did not see widespread use in computers until the late 1950s.
Although transistors still generated a great deal of heat, they were faster and more reliable than those made of vacuum tubes. In terms of input, computers in second generation relied on punched cards while storage was on magnetic cores. Examples of second generation computers include IBM’s 1401 and 7070, UNIVAC 1107, ATLAS LEO Mark III and Honeywell H200.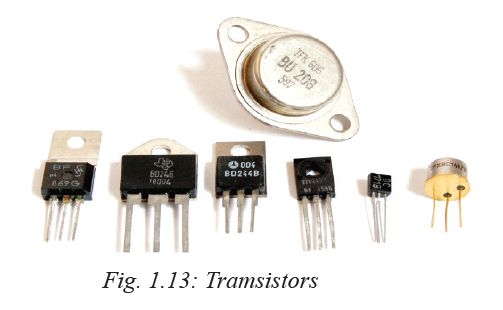
Activity 1.13: Second generation computers
Identify examples of second generation computers. By researching from Internet or other reliable reference, identify at least three examples of second generation computers.
1.5.3 Third generation (1964-1970): Integrated circuits
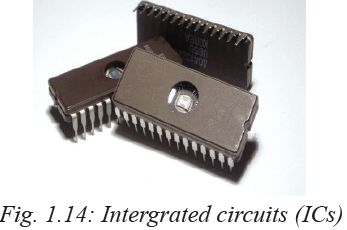
Development of electrical components known as integrated circuit (IC) was the hallmark of the third generation of computers. Fig. 1.14 shows illustration of ICs that are made up of transistors embedded on silicon chips called semiconductors. Most third generation computers allowed users to interact a computer through keyboards and monitors. For the first time, computers became accessible to a mass audience because they were smaller and cheaper than their predecessors. Examples of third generation computers include smaller and less expensive minicomputers such as IBM 360 and ICL 19000 series.
Activity 1.14: Third generation computers
Through research identify at least three examples of third generation computers.
1.5.4 Fourth generation (1970-Present): Microprocessors
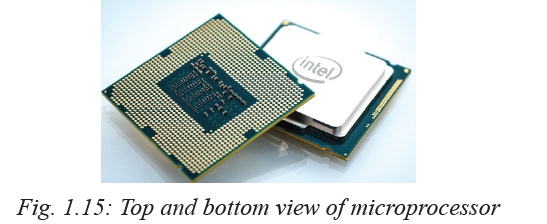
Further technological improvements on ICs saw very large intergrated (VLI) circuits which have thousands of integrated circuits built onto a silicon chip as microprocessor shown in Fig. 1.15. It is in the fourth generation computers that programs with graphical user interface (GUIs), mouse, and hand-held devices were introduced. Some the early examples of fourth generation computers include IBM 370 and 4300, Honeywell DPS-88 and Burroughs 7700.
1.5.5 Fifth generation (Present and beyond): Artificial intelligence
Tremendous improvement on hardware and software has given rise to what is loosely considered as the fifth generation computers that are based on artificial intelligence. The term artificial intelligence refers to capability of a computer to mimic human behaviour. The goal of fifth generation computing is to develop devices that are capable of learning, and respond to natural language input (voice recognition). In future, research outcomes in the fields of artificial intelligence and nanotechnology are expected to radically change the face of modern computers.
Activity 1.15: Fifth generation computers
By researching from Internet or other reliable reference material, identify at least three examples of fifth generation computers
Table 1.1 gives a summary of some of the main technological specifications and uses of computers from the first to fifth generation.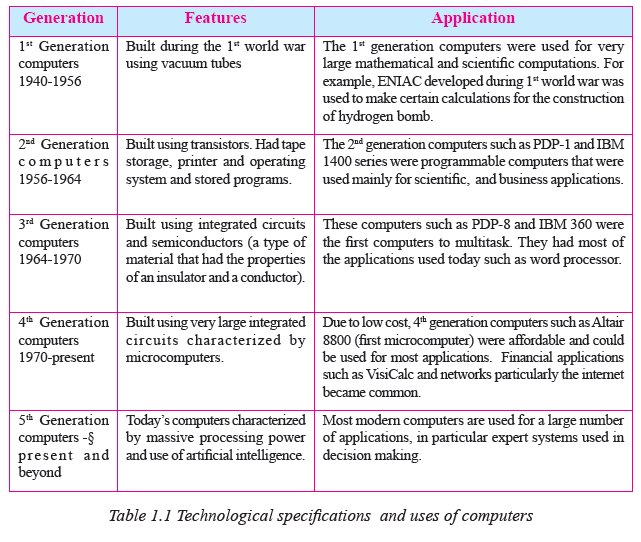
1. Match the following generations of computers with the technology used to develop them.
1. First generation A – Very large scale integrated circuit
2. Second generation B – Thermionic valves
3. Third generation C – Transistors
4. Fourth generation D – Integrated circuits
2. The age of modern electronic computers can be traced back to 1940s. In groups, discuss five generations that characterize modern electronic computers.Unit Test 1
1. What were the characteristics of first generation computers?
2. Draw a block diagram showing the evolution of computers in their generations and characteristics per each.
3. Define the term artificial intelligence.
4. Explain how integrated circuits contributed to the development of microcomputers.
5. Highlight some of the achievements of the fifth generation computers.Files: 3Assignments: 3Unit 2:COMPUTER ARCHITECTURE Unit 2 AND ASSEMBLY
Key Unit Competency
By the end of the unit, you should be able to:
• Identify computer components and their functions (input, output, processing and storage.
• Assemble, disassemble computers and perform basic maintenance services.Unit Outline
• Computer system.
• Computer hardware.
• Audio port and connector.
• Internal computer components.
• Assembling computers.
• Cleaning and disposing of computer components.Introduction
This unit introduces us to computer components and their functionality in order to have a common understanding of microcomputers regardless of their physical configuration. Later, the unit focuses on fundamentals of computer architecture that aims at equipping us with practical skills on how to assemble, disassemble, and repair desktop computers.
2.1 Computer System
Though there are various definitions of computer systems, in our context we define a computer system as the combination of hardware, software (programs), user (liveware) and data that forms a complete, working system.2.1.1 User
A computer system is not complete without people referred to as users or liveware. Although some types of computers can operate without much intervention from users, most personal computers are designed specifically for use by people.2.1.2 Hardware
In computer science context, hardware refers to physical components that make up a computer system. Common examples of hardware include system unit, keyboard, mouse monitor, printer, speakers, and modem.2.1.3 Software
The term software refers to a set of instructions also known as program that directs a computer what to do. Some programs operates computer hardware and other programs while others enable a computer user to perform specific tasks such as accounting.2.1.4 Data
Data consists of raw facts which the computer can manipulate and process into information that is useful to the user. In digital computers, data is converted from forms that people can understand such as text, numerals, sounds, and images into binary digit i.e. zeros and ones.
The four components that make up a computer system are illustrated in Fig. 2.1. Note
that the software component is represented by shelved software casings and programs
running in the computer, while data is illustrated by information on the screen and on a piece of paper on the desk.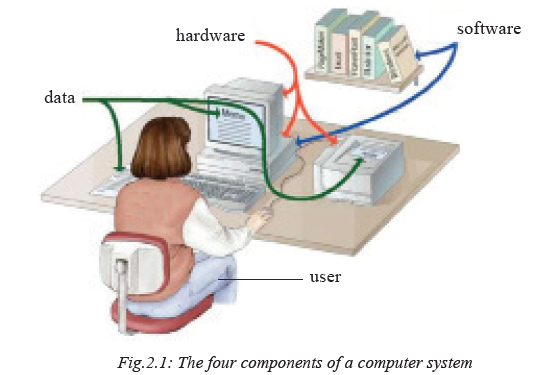
Activity 2.1: Computer Components
Using examples, explain the function of each of the four components of a computer system. Compare your answers with other members of your class and the below following discussion.
2.2 Computer functions
Computers manipulate (process) data (input) to produce information (output) and hold (store) processed information for future use as shown in Fig. 2.2.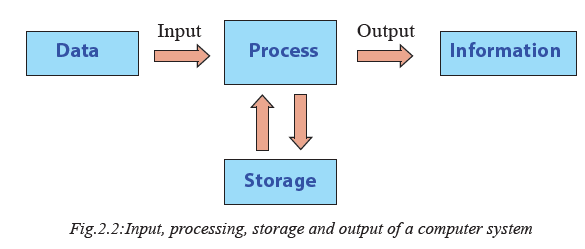
• Input: The first box on the illustration depicts how a computer receives input for processing.
• Process: The computer then performs processing such as calculations and comparisons.
• Output: The computer generates information that may be printed or displayed on a screen or in a specified format.
• Storage: Data and information may be stored for future use on storage devices such as hard disk, CD/DVD etc.2.3 Computer hardware
Generally the main hardware components of a typical desktop computer can be classified into two broad categories namely; peripheral devices as and the system unit.2.3.1 Peripheral Devices
Most desktop computers consist of external devices connected to a central housing known as the system unit. Collectively, external input devices such as keyboard and output devices such as the monitor are referred to as peripheral devices. Fig. 2.3 shows common examples of peripheral devices.Activity 2.2: Peripheral Devices
Fig. 2.3 shows peripheral devices that may be attached to the system unit of a microcomputer.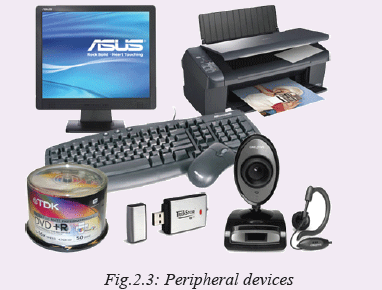
Identify each item and classify it as input, output or storage devices using descriptions given below:
• Peripheral device that enables the user to enter data and instructions into the computer through typing.
• To execute a command, the user moves the mouse which consequently moves the pointer on the screen.
• Television-like device that enables the user to display information such as text and videos from the computer.
• Peripheral device that looks like lever used to control a pointer on the screen mostly used for playing computer games.
• Devices used to display output from a computer onto a hardcopy such as plain papers.
• Peripheral device used to capture digital images and video and directly stores the content into computer storage.
• Peripheral device used to produce audio sound such as music from a computer.
• Secondary storage media/device that can be plugged into USB port to read or store data.
• Shiny round secondary storage media that is inserted into the system unit disk drive to read or store data.2.3.2 Computer case
The computer case, commonly referred to as the system unit, is the main hardware part in which internal components such as microprocessor, computer memory, and drives are housed. In terms of physical appearance (form factor), the two common types of systems units are tower type shown in Fig. 2.4(a) and desktop type in Fig. 2.4(b). The main difference is that, in tower system unit, the monitor rests on the table while in desktop types; the monitor may be placed on top of the system unit.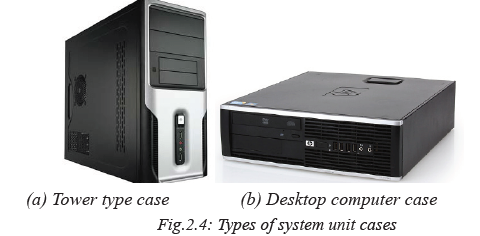
Activity 2.3: System Unit
1. Discuss with your partner what the system unit of a computer is.
2. Identify the types of system units.
3. State the advantage and disadvantages of each of computer cases.2.3.3 Ports and Connectors
A port is a physical or wireless interface between the computer and peripheral devices. Physically, you can identify ports such as shown in Fig. 2.5 through which devices may be connected using interface cables. In this section, we discuss ports such as serial, parallel, universal serial bus (USB), Ps/2, HDMI and VGA shown in Fig. 2.5 (a) and (b).Activity 2.4: Ports and Connector
1. Following the guidelines from the teacher, carefully unplug peripheral devices connected at the back of the computer. Depending on the physical configuration of a system unit, you may observe ports such as the shown in Figure 2.5 below.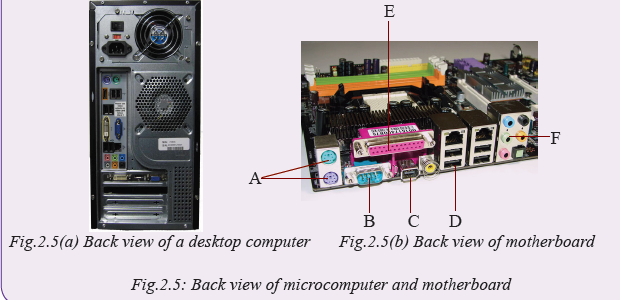
3. Using Fig. 2.5, identify the ports labelled A-F and demonstrate how each port connect peripheral devices to the system unit. Compare your work with the brief description given below:
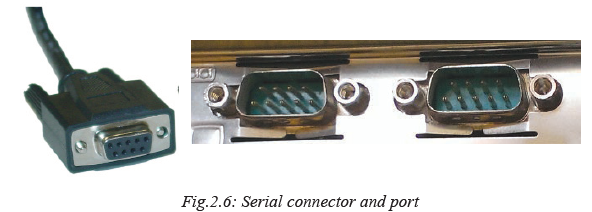
2.3.3.1 Serial port
Serial ports also known as RS232 ports are used to connect devices that transmit and receive data as a series of binary digits (bits). Although RS232 ports and cable shown in Fig. 2.6 have become obsolete, they were used to connect devices such as the mouse, serial modems and printers.
Activity 2.5: Serial Connector
In groups or individually, study the serial connector shown in Fig. 2.6 above and perform the following tasks:
• Identify whether the serial cable is used within the school or computer lab.
• If no serial cable is available in the school, count the number of pins shown on the illustration.
• State the disadvantages of RS232C port and explain why it has become obsolete.2.3.3.2 Parallel Port
A parallel port is an interface used to connect devices that transmit and receive multiple bits simultaneously (in parallel) hence it is faster than the serial interface. To connect devices such as printers and scanners to a parallel port, we use a 25-pin parallel cable also referred to as DB-25 shown in Fig. 2.7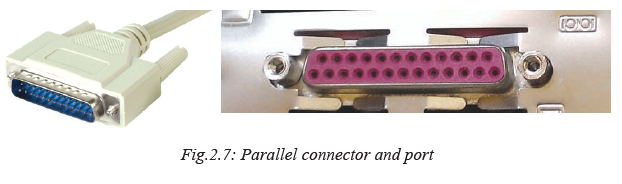
2.3.3.3 Universal Serial Bus
Universal Serial Bus (USB) is an industry standard interface that defines cables, connectors and protocols for connections between computers and peripheral devices. Universal serial bus (USB) is a high-speed serial port that has become the standard interface hence replacing most serial and parallel ports. It is now common to find USB ports on most electronic devices such as tablets, radios, TVs, mobile phones, and set-top boxes. One of the reasons the USB interface has become popular is because as many as 127 devices can be daisy chained and connected to a single port using USB cable such as the one shown in Fig. 2.8.

Activity 2.6: USB Port and Connector
• Explain three reasons why USB interface has replaced parallel and other serial ports on most computers and peripheral devices.
• Move around the computer room and do the following:
1. Find out how many USB ports the computers have.
2. Connect a mouse / keyboard / peripheral device to the computer’s system unit using a USB cable as directed by the teacher. Is the process simple or complicated?2.3.3.4 Personal System/2 ports
Previously, most computers came with a pair of Personal Systems 2 (PS/2) ports also known as mini-DIN. However, most computer manufacturers have phased out PS/2 ports in favour of USB interfaces and wireless connectivity. Fig. 2.9 shows a closer look of the PS/2 ports the one coded in pink to connect a keyboard while the green ports is used connects a mouse.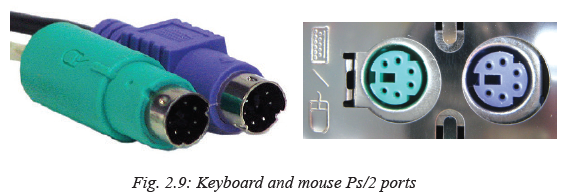
Activity 2.7: PS/2 Port and Connector
In groups, study PS/2 ports on the system unit or use Fig. 2.9(a) to explain the following:
• What colour codes are used to denote the mini-DIN ports for the keyboard and the mouse?
• Check behind your system unit and identify the mini-DIN ports if available. Sketch their appearance.
• What happens if by mistake you connect the keyboard to the mouse port?2.3.3.5 Video graphics array port
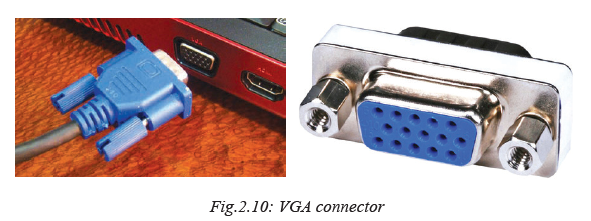
A Video Graphics Array (VGA) port is a D-shaped interface used to connect display devices such as TVs, monitor or LCD projectors to the computer. Fig. 2.10 shows an illustration of a 15-pin VGA cable used to connect a monitor or projects to a computer.
Activity 2.8: VGA Port and Connector
Study the VGA connector shown in Fig. 2.10 or in a computer lab and perform the following tasks:
• Count the number of pins on the VGA cable connector.
• Explain what happens when one of the pins on the VGA connectors happens to be damaged.
• In the computer lab, demonstrate how you would connect a monitor or projector to a VGA port.2.3.3.6 Audio Ports
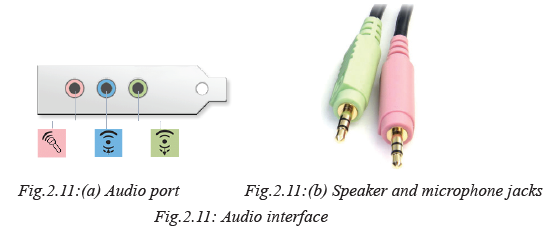
Most computers and mobile devices come with audio interface used to connect speakers, microphones (mic) and other audio devices. Fig. 2.11(a) shows three audio ports while Fig. 2.11(b) shows output (speaker) and input (microphone) jacks coded in green and pink colours.
Activity 2.9: Audio Port and Connector
Study the connector (jack) shown in Fig. 2.11(b) and perform the following tasks:
• What colours are used to distiguish between the audio and microphone ports.
• Explain what happens if the two are interchanged by plugging in the audio connector to the mic port and vise versa.
• In the computer lab, demonstrate how you would connect the speakers to audio and mic ports.2.3.3.7 Network port
Network interface is a port that connects a device to physical or wireless transmission media in computer network. Most computers today come with a network interface known as RJ45 shown on Fig. 2.12 (b) to which a transmission media with RJ45 connector shown in Fig. 2.12 (b) is plugged to establish a connection.
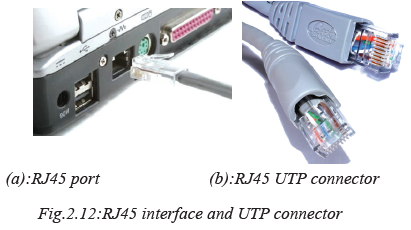
Activity 2.10: Network Interface
Study the RJ 45 connector in Fig.2.12 above or in the computer lab and perform the following tasks:
• Distinguish between network interface adapter and onboard modem.• Apart from Communication Network Riser (CNR) adapter, describe three types of network interface adapters and slots. Which adapter technology is the most current.
• In the computer lab, demonstrate how you would connect computer to local area network using RJ 45 port and connector.2.3.3.8 Firewire connector
Firewire port also referred to as IEEE 1394 is almost similar to USB but has higher data transmission rate. Therefore, firewire is suitable for streaming video from digital cameras to a computer. Fig. 2.13(a) shows an illustration of Firewire port while Fig. 2.13(b) shows the two ends of a firewire cable connectors.

2.3.3.9 High Definition Multimedia Interface
High Definition Multimedia Interface (HMDI) is an interface for transferring compressed and uncompressed digital audio or video data from HDMI-compliant device to a computer, projector, digital TV or audio device. HDMI is intended to be a replacement for analog video standards such as the VGA.
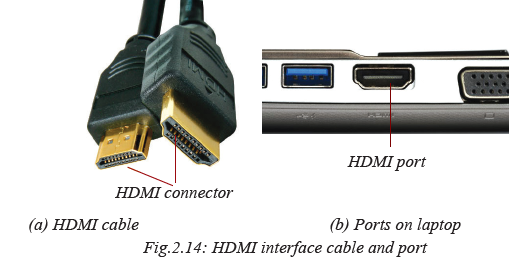
Activity 2.11: HDMI Port and Connector
Study Fig. 2.14 or HDMI interface and carryout the following tasks:
• Identify the devices within the school or at home that comes with HDMI interface.• Draw similarities and difference between the USB and HDMI ports and connectors.
• Through the help of the teacher in the computer lab, demonstrate how you would stream video clips from a video camera to a computer or digital TV through HDMI interface.2.3.3.10 Small Computer Systems Interface
Small Computer Systems Interface (SCSI) is a set of parallel interface standards defined by ANSI for attaching peripheral devices such as printers, disk drives, tape drives and scanners. Although SCSI port shown in Fig. 2.15 is available on some devices, it has become obsolete in favour of USB, Firewire, HDMI and wireless standards.
Activity 2.12: Connecting Peripheral Devices
1. In groups of two or three, check whether your computer has an SCSI interface and perform the following tasks:
• Research on ANSI standardization body and trace the evolution of SCSI interface, number of devices supported, and related viariations.
• Identify devices within the school or at home that comes with HDMI interface.
• Draw similarities and difference between the SCSI and parallel LPT1 ports and connectors.
2. Adan intends to start computer bureau services such as printing and cyber cafe in Kigali. Assuming Adan has come to seek advice on specifications to consider before purchasing computers:
• Use demonstration or illustration to help Adan differentiate between desktop and tower type system unit.
• Take Adan through the ports at the back of the system unit explaining to him the purpose of each.
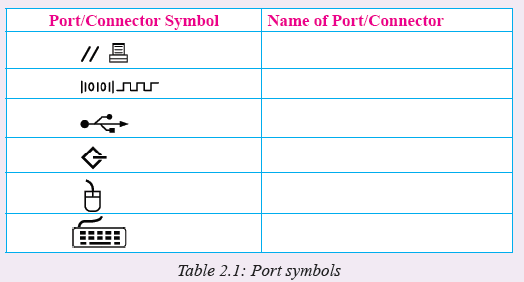
• Demonstrate and help Adan connect basic peripheral devices such as monitor, keyboard, mouse and printer to the right ports.3. To easily identify each of the ports and connectors, device manufacturers use symbolic colour codes and impressions. For example, Table 2.1 a list of symbolic representations of some of the ports discussed in this section. Identify and explain what port or connector each symbol stands for.
2.4 Internal Computer Components
We have already learnt about various peripheral devices and how they are connected to the system unit through ports. In this section, we discuss the main components found inside the system unit such as disk drives, motherboard, processor and memory. But, before we open the system unit cover, it is important that you observe the following safety precautions:
1. Always disconnect the computer from power source before starting to work on them.
2. Do not work on any peripheral device without the guidance of the tutor or laboratory technician.
3. Never work in isolation because you may need help in case of any emergency.
4. Always discharge static electricity that might have built up on the body by touching an earthed metallic object or wearing antistatic wrist member.Activity 2.13: Internal Computer Components
1. Through the guidance of your teacher or lab technician, work in groups of two or three to open the system unit cover to expose the internal components as shown in Fig. 2.16.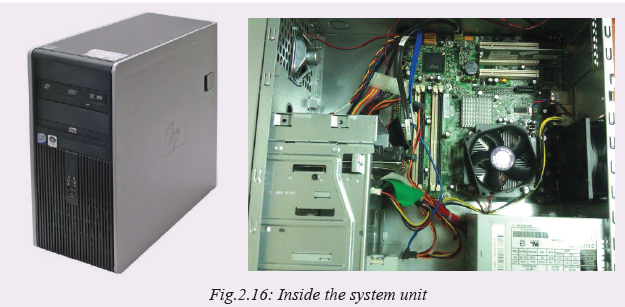
2. Observe and identify various components inside the system unit.
2.4.1 Power supply unit and connectors
The Power Supply Unit (PSU) shown in Fig. 2.17 converts alternating current (AC) from mains to direct current (DC) required by internal computer components. The current supplied to the internal components like motherboard, hard disk, and optical drives depends on the rating from the device manufacturer. Note that unlike desktop computers that are fitted with PSU, portable computers like laptops come with power adapters that convert AC to DC.
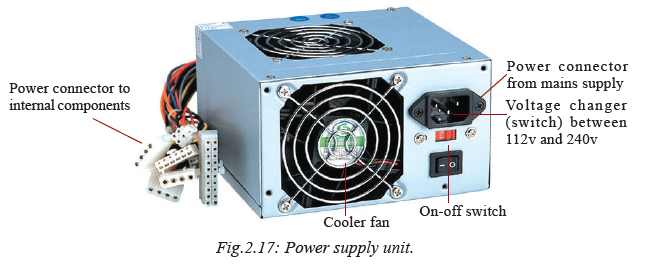
Types of power supply unit connectors
The power supply unit connectors can be classified into external and internal connectors. The external connectors are used to connect the power supply unit to the power outlet while internal connectors are used to supply and distribute power to internal devices inside the computer found inside a computer case. In the power supply unit shown in Fig. 2.17 above shows an examples of internal and external power connectors.
2.4.2 Motherboard
A motherboard shown in (Fig. 2.18) is the main printed circuit board onto which all components of the computer interconnect or are mounted and communicate with each other.

The following are the main components that are attached or mounted on the
motherboard. They are discussed later in the section:
1. Central Processing Unit (CPU): it is also called the microprocessor
2. Computer memory: They are various types of read only memory chips (ROMs) and random access memory modules (RAM).
3. Disk drives: hard disk drive and the optical disk drive.
4. Adapter cards: they add functionality to the computer e.g. network interface cards, TV/Radio cards, wireless network cards etc.2.4.3 Central processing unit (CPU)
The Central Processing Unit (CPU), also known as the processor, is the most important component of the computer. It is actually regarded as the “brain” of the computer because all processing activities are carried out inside the processor. In microcomputers, the CPU is housed inside the system unit. The CPU is mounted on a circuit board known as the motherboard or the system board. For ease of upgrade, most motherboards have a socket into which the contact pins shown in Fig 2.19 (b) are aligned to and inserted.
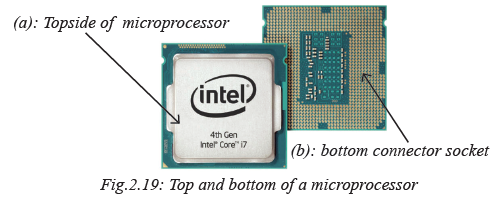
Activity 2.14: Central processing unit(CPU)
Using Fig. 2.21 (a) and (b), identify the type of microprocessor, and socket on the motherboard of your computer. The CPU is made up of three distinct components within it:
1. The Arithmetic Logic Unit (ALU): performs all arithmetic and logical operations.
2. Control Unit: interprets instructions and controls speed of execution using a clock.
3. Registers: special memories within the CPU for holding instructions and data.Role of the CPU
The CPU consists of three functional elements namely the Control Unit (CU), Arithmetic and Logic Unit (ALU). Figure 2.20 illustrates the functional elements of the CPU.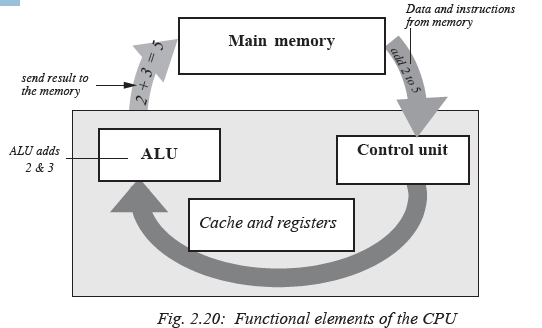
The control unit
The control unit coordinates all processing activities in the CPU as well as input, storage and output operations. It determines which operation or instruction is to be executed next. To coordinate these activities, the control unit uses a system clock. When the clock ticks, a task is ashered into the CPU for processing. When it ticks again, the task is ashered in/out of the CPU. Different tasks require different number of clock ticks (time lengths) in order for them to be fully processed.
The system clock sends electric signals as its means of communication to the CPU.
The number of pulses per second determines the speed of a microprocessor. The faster
the clock pulses, the faster the CPU, hence the faster the computer can process data.Arithmetic and logic unit (ALU)
Activity 2.15:
Group work: In groups of five, do the following:
1. Choose one of you to be the group leader. By consensus, select two lucky numbers for the group (any two numbers between 1 and 50). Assuming you select 9 and 18. The group leader assigns each member at least one of the following tasks at the same time:
Task A: 9 + 18 =
Task B: 18 – 9 =
Task C: 18 x 9 =
Task D: 18 ÷ 9 =
2. Let each of you provide an answer to the group. Compare your answers. What is the general name given to these operations?The arithmetic and logic unit is the location within which all arithmetic and logical
operations are carried out in the CPU. Basic arithmetic operations include; addition,
subtraction, multiplication and division.Logic operations are based on the computer’s capacity to compare two or more
values. For example, it may compare whether a piece of data is greater than or less
than, equal to or not equal to etc.In order for the ALU to be able to process data, it has special temporary storage locations called registers, which hold the data just before processing. Registers also hold the results after processing.
2.4.4 Computer memory
(a) Main/primary memoryActivity 2.16
Imagine yourself walking in a forest. You keep on seeing different types of trees as
you proceed along. Halfway through the forest, you meet a forest guard who shakes
your hand and asks you what you are doing in the forest. In groups of three, discuss
the following:
(i) When you reach the edge of the forest, are you likely to remember all the trees you
saw in the forest? Why?
(ii) Which tree are you likely to remember and why?NB: Discuss this in reference to short term memory and long term memory in human
beings. Present your views to the class.Human beings have memory, both short term and long term, where they keep information. Daily unimportant information is usually kept in the short term memory then discarded after a while. Important information is usually stored in the long term memory. It can be remembered even after many years. Computer memory is modelled along the same lines.
Activity 2.17
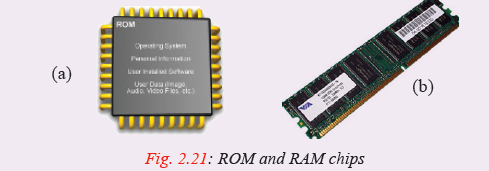
In S1, you were introduced to computer memory. In pairs, study the pictures in Figure 2.21. What do you think the acronym ROM stands for? What about RAM?
(a) Which one is temporary memory? Which one is permanent?
(b) Access the content provided by the teacher and research about the various types
of ROM and RAM, their advantages and disadvantages.
(c) Make a presentation in class as requested by the teacher.Main memory also known as primary storage is a type of storage that is directly accessible by the processor. Computer memory can be classified into Read Only Memory (ROM) and Random Access Memory (RAM). Figures 2.9 (a) and (b) show a ROM chip and RAM module respectively.
Read Only Memory (ROM)
Read Only Memory is used to store programmed instructions and data permanently or semi-permanently. Data and instructions stored in ROM are those which remain unchanged for long periods of time e.g. POST instructions, special purpose computers, computerised fuel pumps instructions etc. Depending on permanence of the instructions or data written on it, there are four
Types of Read Only Memory namely:
(i) Mask Read Only Memory (MROM): Once the content is written on it by the manufacturer, it cannot be changed. Examples of computer that use MROM based operating systems are those that require long term sustainability e.g. computers that run network operating systems or server operating systems.(ii) Programmable Read Only Memory (PROM): This allows the user to alter it only once after the content is written on it. Examples are the PROM compact disc and PROM intergrated circuit chips.
(iii) Erasable Programmable Read Only Memory (EPROM): This has a transparent quartz window through which its contents, can be erased by exposing it to ultra violet (UV) light, and then reprogrammed for another use.
(iv) Electrically Erasable Programmable Read Only Memory (EEPROM): This type of ROM can be erased and reprogrammed using electricity. An example of EEPROM is the memory that stores the basic input/output system (BIOS).
Characteristics of Read Only Memory (ROM) are:
1. One can only read its content but you cannot write on it unless it is a special type of ROM.
2. It is non-volatile i.e. its content is not lost when the computer is switched off.
3. Stores permanent or semipermanent instructions from the manufacturer called firmware. It can store semipermanent instructions because some variations of ROM chips can be programmed according to the user’s specification.Random Access Memory (RAM)
Random access memory (RAM) also known as working storage is used to hold instructions and data needed by the currently running applications. The information in RAM is continually read, changed, and removed. It is referred to as random access because its content can be read directly regardless of the sequence in which it was stored.
As opposed to ROM, the content in RAM is held temporarily and its content is lost once the computer is turned off. Therefore, before switching off the computer, it is important that one stores (saves) his/her work in a device that offers relatively permanent storage facility.
Characteristics of Random Access Memory (RAM) are:
1. Data can be read (retrieved) and written (stored) in it.
2. RAM is a temporary (volatile) storage because its content disappears when the computer is switched off.3. Its content is user defined i.e. the user dictates what is to be contained in the RAM.
The two main types of RAM are:Static RAM
Static RAM (SRAM) is a fast type of memory mostly located inside a microprocessor. For this reason, SRAM is used on special purpose memories such as cache memory. Cache memory is used to enhance the processing speed by holding data and instructions that are instantly required by the processor.Dynamic RAM
Dynamic RAM (DRAM) is a relatively slower type of RAM compared to SRAM. The term dynamic refers to the tendency for the stored charge to leak away, even with constant power supply. For this reason, DRAM requires periodic recharging (refresh) to maintain its data storage. Fig. 2.22 shows ROM and RAM on the motherboard.
Special purpose memories
Some minute types of memories are included inside a microprocessor or input/output devices, in order to enhance its performance. These memories include buffers, registers and cache memory as discussed earlier.Cache memory
Activity 2.18
Group work:
In groups of five, take the mobile phone that has been provided by the teacher. Scroll
through the following:
1. The Contacts lists.
2. The Recently called list.Why do you think you need to have a recently called list? Discuss the importance of
this list and present the finding to the class.Cache memory (pronounced as cash) is the fastest type of RAM. Its main aim is to store data that has been recently accessed by the processor. The belief is that the same data may most likely be required again soon. This would save the time of having to retrieve it from the slow secondary memory. This arrangement enhances overall computer performance by avoiding the slow secondary storage for recently used data. The only time data is retrieved from secondary storage is when no copy is in catche.
There are three types of cache memory namely:
• Level 1: also known as primary cache located inside the microprocessor;
• Level 2: also known as external cache that may be inside the microprocessor or mounted on the motherboard, and
• Level 3: is the latest type of cache that works with L2 cache to optimise system performanceBuffers
Activity 2.19
Brainstorming:
Study the picture of a dam provided by the teacher. Search for other pictures of dams on the internet. List down their names.
As a class, brainstorm on the driving forces that motivate construction of dams along rivers? Buffers are special memories that are found in input/output devices. Input data is held in the input buffer before being forwarded to the memory to avoid overloading the memory. The data can then be transferred to the memory at a reasonable pace to avoid flooding it.Output buffers play a similar role when sending data to the network or output device.
For example, printers have buffers where they can store massive documents sent by the
CPU for printing hence freeing the CPU to perform other urgent tasks as the printer
continues to print in the background. Buffers therefore play a controlling role between
devices to avoid a quick device flooding a slow device with data or instructions.Registers
Activity 2.20
Pair Work:
Most organisations have a waiting room where guests rest as they wait to see the company boss in turns.Discuss why such an arrangement is important. What is likely to occur if there is no
such arrangement for a busy office.As opposed to buffers, registers hold one piece of data at a time and are inside the CPU. Just like the secretary in Activity 2.16 who hosts and clears the next one person just before he/she sees the boss, registers hold that one data item just before or after processing within the CPU.
Examples of registers are:
Accumulator: This temporarily holds the results of the last processing step of the ALU.
Instruction register: This temporarily holds an instruction just before it is interpreted
into a form that CPU can understand.
Address register: This temporarily holds the next piece of data waiting to be processed.
Storage register: This temporarily holds a piece of data that is on its way to and from the CPU and the main memory.(b) Secondary memory
Activity 2.21
Research on the internet about secondary/tertiary memory. Is it temporary or permanent? Which devices are referred to as secondary/tertiary storage devices?
Why are some of these devices referred to as mass storage devices?Secondary storage, also referred to as auxiliary storage, are devices that provide alternative long-term storage for programs, data and information. Because of their large capacity they also referred to as mass storage devices. They are regarded as secondary because unlike primary storage, they are not directly accessible by the CPU. Secondary storage devices can be classified according to:
(a) Portability: removable and fixed
(b) Technology used to store and retrieve data: magnetic, optical, magneto-optical and solid state.In this section, we discuss these devices by indicating whether a device or media is removable and the technology used to store data on it.
Removable storage
Removable storage media are those that are not housed inside the computer. Data is read and written into the media using a device known as drive. Examples of removable storage include optical disks (e.g. CD’s, VCD’s and DVD’s) and solid state devices (e.g. Flash disks). Others include the floppy diskettes, magnetic tapes and magnetic disks which have become virtually obsolete in the personal computing space.Optical storage media
Activity 2.22
Study the pictures in Figure 2.23. Have you seen them before in real life?
(a) State three areas where you have witnessed the disks being used.
(b) Using a ruler, measure the diameter of each and note down. Investigate on the internet about the diameters of such disks.
(c) What advantages do you think they offer to the user?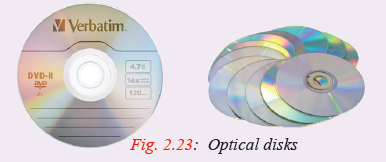
Optical storage media are so called because data is written and read from them using a laser beam. A laser beam is a very strong concentrated light. Two reasons why optical storage media are used:
1. They store very large volumes of data.
2. Data stored in them is more stable and more permanent than the magnetic media.Compact disks (CD)
Compact disks hold large quantities of data and information. One disk can hold as much as 700MB. They are mostly used to store data and information that requires a lot of space such as video clips, software, sounds etc. Currently compact disks are available in three forms namely:
Compact disk-read only memory (CD-ROM): Compact disk read only memory (CDROM)
as the name suggests contain data that can only be read but cannot be written on. To record data the recording surface is made into pits and lands (bumps). When a laser beam fall on the land,this is interpreted as 1, otherwise a zero is recorded.Compact disk-recordable (CD-R): Compact disk recordable (CD-R) are coated with special dye which changes colour to represent data when burned using a laser beam. Once data is burned on a CD-R, it becomes read only.
NB: CD-ROMs and CD-Rs are referred to as Write Once Read Many (WORM.) Data is only recorded once but can be read as many times as possible. Compact disk-rewritable (CD-RW): Unlike the CD-Rs, these types of compact disks allows the user to record, erase and rewrite new information just as one would with floppy disks.
Digital versatile disks
Digital Versatile Disk (DVD), also known as digital video disk resembles a compact disks in every aspect. The only difference is that they have a higher storage capacity over 17 Gigabytes of data. Figures 2.23 (seen earlier) shows various examples of optical disks.Optical card
An optical card stores data and is read optically on a stripe rather than using magnetic ink. These types of cards are mostly used in banking and other business organisations to record customer details. Figures 2.24 below shows examples of an MICR reader reading a cheque and an optical card in the optical card reader.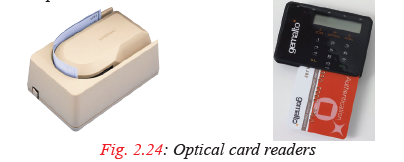
Solid state storage media
Activity 2.23
Study the pictures in Figure 2.25. What do you think they represent? Also compare them with the samples provided by the teacher. Where in real life have you used or seen people using these components? What are the names of these components?
Solid state storage is a non-volatile storage that makes use of integrated circuits
rather than mechanical, magnetic or optical technology. They are referred to as solid state because they do not have movable parts. Some examples of solid state devices are memory sticks (Figure 2.13 (b) and (c)) and flash disk drives (Figure 2.13(a)).Non-removable/fixed storage media
The hard disk and its structure
Activity 2.24
Access the website provided by the teacher and read about the hard disk of a computer.
(a) Search for pictures of the hard disk on the internet in order to learn about its structure.
(b) How does it store data? What are tracks, sectors and platters?
(c) Make a brief presentation to the class concerning your findings.
The hard disk is a secondary storage device that stores data and programs installed in
a computer for a long time (permanently) even after the computer has been switched
off. The data includes any created documents and downloaded such as text, photos
and music. When the computer requires to process data and instructions stored on the
hard disk, the it has to be fetched first and placed in primary memory (RAM). When
the data and instructions are in RAM, they can be easily fetched into the cache then
the registers as directed by the control unit of the CPU.Traditionally, the hard disk is mounted inside the computer. For this reason we refer to it as a fixed disk. However, this is not always the case because some hard disks
are removable.
The hard disk is made up of metallic disk platters together with a read/write head,
housed in a protective metal case (Figure 2.26(a)).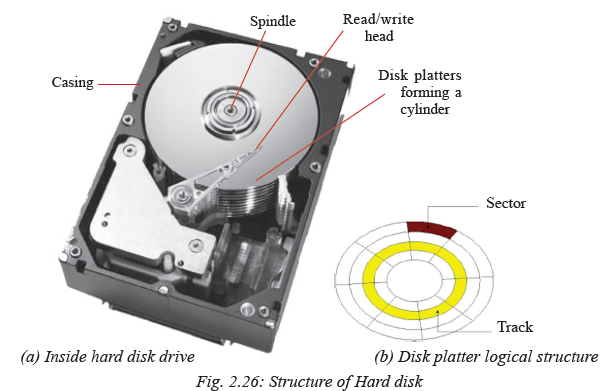
The one or more metallic platters, stacked on top of each other but not touching one another. The stack of platters is attached to a rotating pole called a spindle. If it has more than one platter, they are stacked on top of each other to form a cylinder. A cylinder requires multiple read/write heads, one for each platter.
The read/write head floats just above the surface of the rapidly rotating disk to read or write data. On the surface of each disk are special read/write circular regions called tracks (Figure 2.26 (b)). Each track is divided into angular sections called sectors similar to the sector of a circle.
Most computer hard disks are connected to the motherboard via channel called controllers. Some of these controllers are Integrated Drive electronic (IDE), enhanced
IDE or AT attachment (ATA).Disk drives
A disk drive is hardware device in or attached to a computer that reads the data stored on a disk and writes data onto the disk for storage. Drives are mounted in drive bays in the system unit chassis. Examples of disk drivers inside the systems unit include optical (CD/DVD) drives, hard disk drives and tape drives. Figure 2.27(a) shows an illustration of hard disk drive mounted in the system unit while Fig 2.27(b) shows a CD/DVD drive on a Laptop.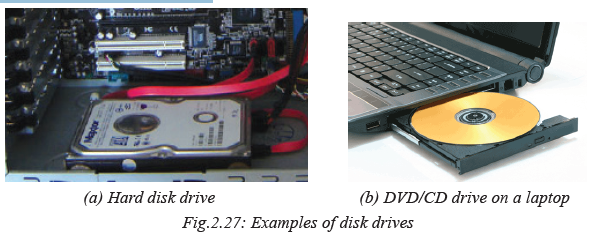
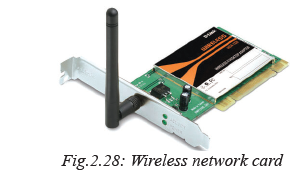
2.4.5 Adapter card
Adapter card or add-on card is a circuit board used to increase functionality of a computer e.g. adding a TV receiver, and wireless network etc. Fig. 2.28 shows a wireless network card. It enables the computer to connect to a Wi-Fi hotspot.
2.4.6 Elements attached to the motherboard
As mentioned earlier, some of the basic elements attached to the motherboard include CPU Socket, RAM slots, silicon chips, BIOS, expansion slots, CMOS battery, and controllers and electronic data buses.
• CPU Socket: The CPU or processor socket is the connector that houses the CPU to establish mechanical and electrical contact between the processor and the motherboard. Some sockets uses Pin Grid Array (PGA) that consists of holes where pins on the underside of the processor connects
• RAM slots: The RAM slots or sockets located near the processor are connectors
that establish contact between memory modules and the motherboard. Depending on the type of motherboard, there may be 2-4 RAM slots (banks) that determine the amount of memory that can be installed.
• Chipset: Normally a chipset is an element that facilitates intercommunication between the microprocessor to the rest of the components on the motherboard.
• Expansion slot: Alternatively referred to as bus slot or port is a connection on the motherboard to which an expansion card can be plugged in order to expand the capability of a computer.
• CMOS battery: Complementary metal-oxide semiconductor (CMOS) is a small amount of memory on a computer motherboard used to store BIOS settings. To avoid losing the settings, CMOS is powered by a button-like cell referred to as CMOS battery.
• Data buses: if you carefully observe the surface of a motherboard, you will see printed electronic pathways or lines between components. These pathways are referred to as data buses because they are used to transfer data and instructions between components inside the computer.Assessment Exercise 2.1
1. Distinguish between the following:
(a) AC and DC power supply.
(b) Bluetooth and infrared connectivity.
(c) Firewire and USB ports.
(d) 5-pin DIN and PS/2 ports.
2. Explain three types of serial ports available on a typical desktop computer.
3. State two advantages of USB port over the parallel port.
4. Explain how you would connect both data projector and monitor to a single computer.2.5 Assembling desktop computers
With the knowledge and skill in handling internal and external components of a desktop computer, it’s now time to roll-up your sleeves to assemble and disassemble a computer. However, before you proceed, remember to observe safety precautions in order to avoid health injuries or damages to delicate computer components. Let’s start by having a look at tools that you may need to assemble or dis-assemble a computer.Activity 2.25: Assembling a computer
Looking at a toolkit in the computer lab or illustration shown in Fig. 2.29 identify the following tools:
1. Extended extractor: also called a part grabber are, used for retrieving dropped objects, such as jumpers or screws, from inside the computer.
2. Antistatic wrist member.
3. Torx screw drivers of varying sizes.
4. Multimeters used to measure the resistance, voltage, and/or current within computer components.
2.5.1 Step 1: Mounting Hard disk drives
Hard disk drives are usually mounted on the system unit case and connected to the motherboard through either Enhanced Integrated Drive Electronics (EIDE), Small Computer System Interface (SCSI) or Serial Advanced Technology Attachment (SATA) cable interface. SATA is one of the latest technologies. It supports hotswapping i.e. a drive can be detached or attached to the motherboard while the computer is ON. Fig. 2.30 illustrates how to mount a SATA hard disk drive.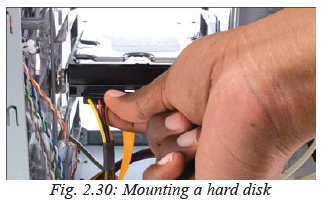
Activity 2.26: Mounting a Hard Disk
In groups or individually, follow the guidelines below to mount a hard disk drive:
1. Determine whether the motherboard has an empty SATA controller socket.
2. Slide the hard drive into the available bay on the system unit casing and secure it firmly by screwing or using the restraining mechanism provided by the manufacturer.
3. Plug in the SATA interface cable to the drive and to motherboard SATA/IDE controller.
4. Connect the power cable from the power supply unit to the back of the hard drive as shown in Fig. 2.30.2.5.2 Step 2: Installing optical drives
Optical drives such as CD and DVD drives are attached and detached from the sytem unit in the same way as hard disk drives.
Activity 2.27: Installing optical drives
In groups or individually, follow the guidelines below to mount an optical drive:
1. Determine whether the motherboard has an empty SATA or EIDE controller socket.
2. Slide the optical drive into available bay on the system unit casing and secure it firmly by screwing or using the restraining mechanism provided by the manufacturer.
3. Plug in the SATA or EIDE interface cable to the back of the drive and motherboard controller.
4. Connect a power cable from the power supply unit to the back of the optical drive
similar to procedure used to insert power at the back of hard disk drive.2.5.3 Step 3: Mounting power supply unit
To replace a damaged Power Supply Unit proceed as follows:
1. Turn off the power and remove the power cable from the socket, and then unscrew
the faulty power supply unit.
2. Unplug power cables connected from the power supply unit to internal drives
and P1 on the motherboard, and then remove the faulty unit.
3. Insert a new power supply unit and fasten the screws that hold the power supply
onto the chassis. Connect P1 from the power supply unit to the motherboard.
5. Connect power supply cables from the unit to other internal components such as disk drives.2.5.4 Step 4: Mounting motherboard
There are several types of motherboards ranging from the outdated Advanced Technology (AT) and Advanced Technology Extended (ATX) to the current.Fig. 2.31 shows an illustration on how to mount a motherboard.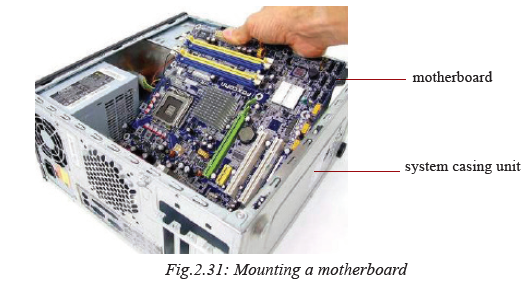
Activity 2.28: Mounting a motherboard
In groups of two or three, demonstrate how to mount a motherboard using the following guidelines:
• Line it up properly on the chassis, screw and fit it into place.
• Mount the processor, RAM modules and any expansion cards separately.
• Plug in the power cable denoted with P1 connector from the power supply unit.
• Connect other internal components onto the board, and then connect the monitor, keyboard and mouse to the system unit.
• Test for power and ensure that internal and external components are initializing correctly during POST.2.5.5 Step 5: Installing computer memory
Fig. 2.32 shows how to install a RAM module. Open the clips, align the module with the slot then press into position until the clips hold tight.
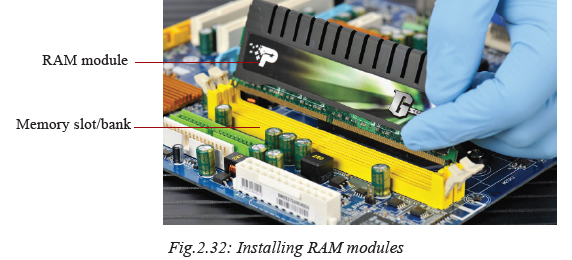
Activity 2.29: Installing a computer memory
Before you attach or detach a memory (RAM) module, you need to make some considerations. In class, discuss such considerations e.g. motherboard architecture,
number of memory banks available, type and speed of the processor, and maximum
memory capacity.
Through the guidance of the teacher, install a RAM module using the following
guidelines:
1. Discharge any static charges before touching the module.
2. Place the module upright in the slot so that the notches on the module are lined
up with the tabs on the memory slot.
3. Gently press down on the module. The retention clips on the side should be raised
to the locked position. You might need to guide them into place with your fingers.NB: Once mounted, the new memory module is automatically detected during bootup
and its capacity calculated. However, if not properly inserted, the computer makes
a continuous beeping sound.2.5.6 Step 6: Replacing CMOS battery
Computers have a Complementary Metal-Oxide Semiconductor (CMOS) battery that
powers the BIOS chipset to ensure basic settings such as date and time are up-to-date.Activity 2.30: CMOS Battery Replacement
Study the motherboard and perform the following tasks:
1. Identify the CMOS cell battery mounted on the motherboard as shown in Fig. 2.33.
• Install the new battery so that the bottom is in contact with the motherboard.
• Restart the computer and press the key or combination of keys to enter BIOS
setup.
• To restore the settings, use the BIOS setup menu. Alternatively, use automatic
configuration options.2.5.7 Step 7: Upgrading BIOS
Basic Input Output System (BIOS) is a firmware that stores Power On-Self Test instructions that are required to boot-up a computer. BIOS can be upgraded to support new devices in the market. The old one is flashed a new one installed from a suitable BIO manufacturer such as Phoenix.Activity 2.31: BIOS upgrade
Follow the teachers guidance to update and upgrade BIOS ROM:
1. Identify the manufacturer of the BIOS chip.
2. Back up the CMOS Settings and restart the computer using a combination of CTRL + ALT + DELETE keys.
3. Enter the CMOS settings program using the specified key or combination of keys, and then write down the settings.
4. Backup the old BIOS in case the upgrade results to system failure.
5. Insert the manufacturer’s BIOS utility disk. The disk contains a program that
automatically flashes the BIOS.
6. Restart the computer. If successfully done, the BIOS retains the new firmware.2.5.8 Step 8: Mounting adapter card
There are several types of adapter cards. These include Industry Standard Architecture
(ISA), Extended ISA (EISA), Peripheral Component Interconnect (PCI), Accelerated Graphics Ports (AGP), Video Electronics Standards Association (VESA), Audio Modem Riser (AMR) and Communication Network Riser (CNR).Activity 2.32: Adapter Card
1. Using reliable internet sites or reference materials, discuss the architecture of each type of the adapter cards highlighted above.
2. Study the adapter card shown in Fig. 2.34 and describe its function.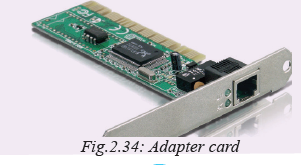
3. Through the guidance of the teacher, mount an adapter card using the following guidelines:
(a) Turn the computer off and ensure that you carry out proper ESD procedures.
(b) Position the controller card upright over the appropriate expansion slot.
(c) Place your thumbs along the top edge of the card and push straight down.
(d) Secure the card to the chassis using the existing screw holes.2.5.9 Step 9: Mounting a microprocessor
Like other computer components that become obsolete with time, you may find it more cost-effective to upgrade the processor than buying a new computer. Before purchasing or installing a new processor, make sure it is compatible with the motherboard. For example, you cannot install an AMD processor in an Intel motherboard and again not all processors from the same manufacturer uses the same socket.Activity 2.33: Installing a Microprocessor
In groups or individually, mount a microprocessor onto a motherboard using the
following guidelines:
1. Ensure that the lever is raised up perpendicularly.
2. Gently place the processor in the socket but do not push, as shown in Fig. 2.35.
3. Lower the lever to grip the CPU into place.
4. Connect the processor fan to the motherboard.
2.6 Replacing a laptop battery
No matter how well you treat your laptop’s battery, it will eventually degrade and die. When the battery weakens, Microsoft Windows gives warning like “consider replacing your battery” or adding a red X on the battery icon. This is the time to replace the battery to avoid disappointments!Activity 2.34: Laptop Battery Replacement
In groups or individually, remove and replace a worn-out laptop battery using the
following guidelines:
1. Press the battery release button or unscrew the cover.
2. Remove the battery compartment’s cover.
3. Slide the wornout battery out, and then insert the new one.2.7 Upgrading laptop memory
Like in desktop computers, it is possible to upgrade or replace a RAM module of
a notebook PC. Unlike the desktop PC RAM module, notebook PC RAM module
such as Small Outline DIMM (SoDIMM) are small in size.Activity 2.35: laptop memory Upgrade
To upgrade laptop memory proceed as follows:
1. Open the computer’s case or memory compartment cover.
2. Insert the RAM module into an available slot at an inclined angle as shown in Figure 2.36.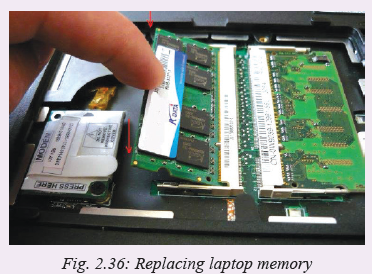
2.8 Disassembling desktop computer
Disassembling a computer mean detaching external and internal components from the system unit. This process involves unplugging, unscrewing and sliding out components depending on mechanism used to connect to the system unit or mount it onto motherboard. To disassemble a desktop computer, proceed as follows:
1. Disconnect the computer from the source of power by unplugging the power cable from power supply unit.
2. Unplug peripheral devices attached to the system unit such as monitor, keyboard, mouse and printer.3. Open the outer cover on the system unit by unscrewing or sliding it out. Some
desktop computers have large knobs you can remove by hand to open the system
unit cover.
4. Remove the adapter cards by first unscrewing it on the cases, and then gently
unplug it off the motherboard as shown in Fig. 2.37.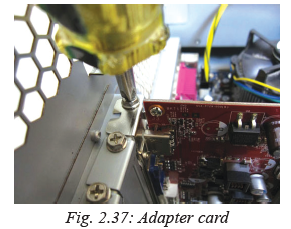
5. Remove the fixed drives such as hard disk and optical (CD/DVD) drives by unscrewing and disconnecting them from power supply unit. Next, disconnect the IDE or SATA interface cable that connects the drive to the motherboard.
6. Remove memory (RAM) modules by pressing the tabs located on both ends down away from the memory slot. The module will lift slightly. Carefully hold the module by the edges and to remove it from the motherboard.
7. Remove the power supply unit starting with power connector to motherboard, CPU fan cabinet fan, power buttons and drives if any. Next, unscrew the unit to unmount it from the system casing
8. Remove the CPU and its fan by first unscrewing the cooler fan from the motherboard. You unlock the processor from the socket by lifting the level as shown in Fig. 2.38.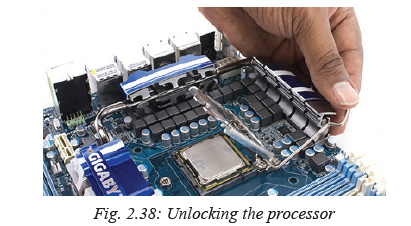
9. Finally, unscrew the motherboard to unplug it from the system unit casing. This leaves you with an empty shell of the casing.
Assessment Exercise 2.2
1. Differentiate between the following:
(a) EIDE and SATA hard disk drive.
(b) Baby AT and ATX motherboard.
(c) PGA and SECC processors.
(d) AMR and CNR expansion cards.
2. Explain why it is important to use the right tool for the right purpose when repairing, upgrading or assembling a desktop PC.
3. List some of the common tools available in a computer maintenance toolkit.
4. Explain five types of expansion cards used on desktop computers.
5. Outline the procedures you would follow to install the following:
(a) PGA2 processor.
(b) DDR2 RAM module.
(c) CNR modem add-on card.
6. You have just installed a new power supply, but the computer doesn’t seem to be
getting any power. What might be the problem?
7. You want to upgrade your BIOS by “flashing” it. Outline the procedure you should follow.
8. Explain how you would perform the following operations:
(a) Replace a faulty notebook PC battery.
(b) Upgrade laptop memory.
(c) Add a PC card.Activity 2.36: Assembling a desktop computer
University of Rwanda College of Science and Technology (URCST) has started a project aimed at assembling state of art desktop computers. As a member of the team, you are required to identify the components required to assemble a desktop computer.
1. Demonstrate step by step how to assemble a PC starting with the
following internal components:
• Motherboard
• Processor
• RAM
• Hard disk drives
2. Assuming you are using a single EIDE controller to mount two CD-ROM/DVD drives, explain how you would configure the two drives.
3. One of the clients makes a call informing you that one of the computers she bought consistently loses its date/time settings. Outline the procedure you would follow to solve the problem.2.9 Cleaning and disposal of computer components
Regular cleaning and proper disposal of computer components is a proactive environmental and social practice that helps in mitigating health and environmental problems.2.9.1 Cleaning using liquids
Before using a liquid cleaner, make sure that the computer or device is off and completely dry. Before cleaning a computer, take note of loose components or connections and tighten them up.Activity 2.37: Cleaning computer devices
1. Highlight three benefits of cleaning a computer and peripheral devices regularly.
2. Using mild, soapy water and lint-free cloth, wipe off dusty components such as keyboard, mouse, system unit and monitor. For devices that are damaged by water, make use of chemical or alcohol solvents. Note that some chemical solvents may be hazardous to humans and the environment hence they should be handled with care.2.9.2 Blowing dust and debris
Dust can cause electrostatic discharge leading to overheating of components inside the computer while debris may affect the mechanical parts. To remove debris, a blower shown in Fig. 2.39 uses compressed air to remove such debris dust in system unit, keyboard, expansion slots and ports
Activity 2.38: Blowing Dust and Debris
1. To remove dust and debris in the system unit, use a blower or hand-held vacuum cleaner.
2. Using a hand-held vacuum cleaner, carefully clean inside the computer making sure you do not damage delicate components.2.9.3: Replacing printer cartridges
Although there are various types of printers and associated models, we follow the same basic steps to replace ink or toner cartridges. In this section, we outline general procedure for replacing ink or toner cartridge regardless of printer type and model.1. Turn on your printer and open the lid/flap that encloses the cartridges and then remove the cartridge or cartridges you want to replace as shown in Fig. 2.40.

2. Take note of the cartridge model number and type. This is the number that you use to purchase new cartridge. If you are unsure of the number, take the cartridge as sample to a vendor for help.
3. Once you purchase a new cartridge, remove the protective sticker covers, strap and sticker before installing the cartridge such as shown in Fig. 2.41.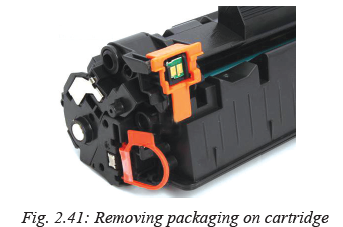
4. Gently insert the cartridge into the printer. Note that most cartridges easily lock
into place with a little pressure.
5. Once you install the cartridge(s), connect the printer to the computer, and print a test page to make sure that the cartridges have been installed correctly. You may be required to reconfigure printer heads for best quality.Activity 2.39: Safety Precautions
1. In the class, discuss how the government clean-up activities in Rwanda has helped in dealing with disposal of computer parts, cartridges and plastic bags that come with some computer components.
2. Explain health and environment dangers that may occur due to improper disposal of laptop or mobile phone batteries containing lithium, mercury, or nickelcadmium.Assessment Exercise 2.3
1. A customer is complaining that the power in the office sometimes surges, some times causes blackouts and has EMI. What single device should you recommend to help the most in this situation?
2. A printer in the college office has recently started experiencing paper jams. They seem to be occurring quite frequently. Explain the probable causes.
3. A printer is producing garbled printouts with characters that don’t make any sense. Identify the likely cause.
4. State two components that are most likely to be replaced in a laser printer
5. Explain why it is important to regularly blow out dust from a c omputer.
6. State the cleaning solution to CD/DVD drive, keyboard and monitorUnit Test 2
1. Write the following abbreviations in full as used in computer systems:
(a) USB (b) SCSI (c) IDE
2. Explain the following features:
(a) PGA2 socket (b) Local buses
(c) Cache memory (d) Memory banks
3. Explain four types of ports available on a computer giving one example of a device connected to each.
4. Differentiate between CRT and LCD monitors giving two advantages of each.
5. A customer is planning to buy a computer and has approached you for advice. The customer wants to use the computer for digital video editing. Explain six hardware requirements the customer should consider.
6. You have decided to upgrade the processor and memory capacity of a computer from duo core 1.7 GHz with 256 MB of RAM to i7 processor and 4GB of RAM. Outline the steps you would follow.
7. Outline the procedure you would follow to replace a power supply unit.
8. Your computer has three hard drives installed; two on the primary controller and one on the secondary controller. You are planning to install a fourth drive without changing the designations of the existing drives. Outline the procedure you would
follow to install and configure two IDE drives such as a hard disk and a CD drive on a single Hard Disk Controller.
9. A customer has complained about a problem in playing audio music though the media player shows that the music is playing. Describe the steps you would follow
to troubleshoot the problem.
10. Explain the importance of preventive maintenance, highlighting some routine maintenance practices that need to be carried out in a computer laboratory.Unit 3:SAFE AND ETHICAL USE OF COMPUTERS
Key Unit Competency
By the end of the unit, you should be able to integrate safety guideline, ergonomics and ethical issues in computer use to have a good working environment.Unit Outline
• General safety guidelines
• Ethical issuesIntroduction
Although computers are useful tools, they can be harmful to health and environment. Furthermore, some computer components are delicate hence need to be handled with care. In this unit, we discuss safety precautions and ethical use of computers in order to protect the environment, computers and users from harm.3.1 General Safety Guidelines
To achieve productivity and healthy work or learning environment, most organizations put in place safety precaution guidelines to be observed when using mechanical or electronic devices. In this section, we discuss some of general safety guidelines that relate to safe use and care of computers and computer accessories. As a guide to ’best practice’, the guidelines and procedure discussed reflects identification precaution against common health problems, fire outbreaks, physical damage, climatic and environmental pollution.3.1.1 Common health problems
Prolonged use of computers and electronic devices may expose users to health risks such as Repetitive Strain Injuries (RSI), eye strain, headache, dizziness and electric shock. Below is a brief description of common health conditions arising from use of computers and electronic devices:
• Repetitive strain injuries results from wrist, hand, muscle, tendonitis and neck strains due to repetitive tasks such as typing.
• Persistent use or poor display of a computer monitor may cause computer vision syndrome whose symptoms include eyestrain, headaches and double vision.• Dizziness is a condition caused by lack of enough oxygen due to overcrowding or poor ventilation of a computer lab.
• Electric shock may be caused by touching live uninsulated power cables. To protect users against electric shock, power cables and power sockets should be well insulated.Activity 3.1: Safe Use of Computers
1. In groups, identify five factors that need to be considered in order to minimize health risks such as RSI and eye strain.
2. Electric power cables or surface of unearthed electronic equipment may expose users to health risk. Identify such health risks.
3. Explain why it is not advisable to take food substances and drinks in the computer lab.
4. In class, discuss effects of electromagnetic and radiowaves emitted by electronic devices such as monitors and mobile phones. How can the effects be minimized?3.1.2 Ergonomic furniture and equipment
The term ergonomic refers to applied science of equipment design with the purpose of optimising productivity while minimizing discomfort and fatigue. Good organic furniture and equipment helps in preventing health related risks such as arthritis, backache and fatigue. For example, a chair should be adjustable or movable to minimize fatigue experienced when using a computer.
Fig. 3.1 shows a sample of a table and adjustable chair that may be used in an office for computer laboratory. Notice that the chair has an upright backrest and high enough to allow user’s line of sight to be at the same level with top of the monitor.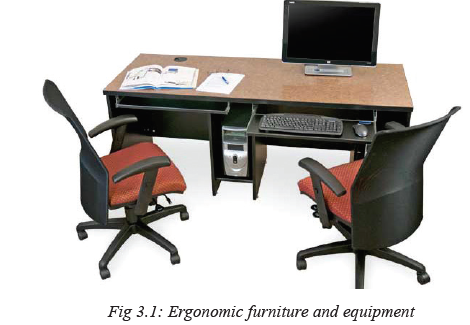
3.1.3 Correct sitting position
The correct sitting position is the posture in which you hold your sit or use ergonomic
furniture to keep the bones and joints in the correct alignment. This helps in decreasing
abnormal wearing of joint surfaces as well as reduce stress, backache, eye strain and
fatigue. Good sitting position requires a table to be of the right height relative to
the chair to provide comfortable hand positioning as shown in Figure 3.2. The seat
should have an upright backrest and should be high enough to allow the eyes of the
user to be level with the top of the screen.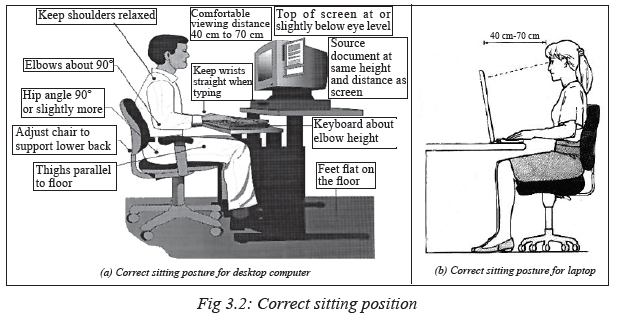
3.1.4 Fire Safety Guidelines
To protect computers and electronic equipment from accidental fire, there is need
for schools to enforce fire safety guidelines. Fire safety guidelines should emphasize
among other measures on where, how and when to use smoke detectors and fire
extinguishers.3.1.1.1 Smoke detectors
A smoke detector shown in Fig. 3.3(a) is a device used to detect smoke as an indicator
of fire outbreak. Once a smoke detector senses smoke, it may trigger a fire alarm
systems or produce audible and visual signal.3.1.1.2 Fire extinguishers
A fire extinguisher (Fig. 3.3(b)) is a fire protection device used extinguish or control
fire on solids, flammables and electrical devices. The four common types of fire
extinguishers are water fire extinguishers, foam fire extinguisher, dry powder fire
extinguishers and carbon dioxide (CO2) fire extinguishers. Although the water-based
fire extinguishers are the cheapest and most common, it is advisable to install carbon
dioxide (CO2) fire extinguishers in a computer laboratory. This is because water may cause corrosion of metallic components while dry powder may increase friction and
wear of mechanical parts.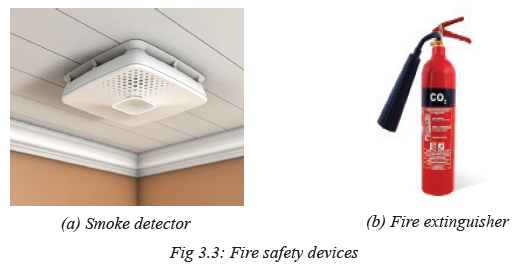
Activity 3.2: Fire Safety Guidelines
Visit various rooms in the school compound to identify whether the fire extinguishers
have been installed. If installed:
• What is the content of the extinguisher - liquid or non-liquid?
• Write down instructions provided on how use one of the extinguishers.
• Explain why liquid-based fire extinguishers are not recommended for use in a
computer lab.3.1.3 Physical Damage
Computers and electronic devices should be protected from physical damage that
may emanate from poor handling, electrostatic discharge (ESD) and unstable power
supply.3.1.5.1 Electrostatic Discharge
While opening a door with a metallic door when walking on a carpet, you may have experienced some form of electric shock. Such an experience is referred to as electrostatic discharge. Electrostatic discharge (ESD) refers to flow of static electricity when two triboelectric objects come into contact. Triboelectric objects are those that develop an electric charge when they rub against each other due to friction. ESD that is caused by build-up of electrostatic charges on your body! Fig. 3.4 shows an illustration of a symbol used to mark devices that are ESD sensitive.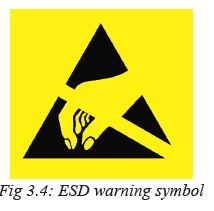
Activity 3.3: Electrostatic Discharge
1. In reference to physics or electronics, explain the principle behind static electricity and electrostatic discharge. Identify common examples of triboelectric objects.
2. In groups, conduct practical experiments to demonstrate how static electricity builds up on our dielectric materials. How do you measure electrostatic voltage?
3. Discuss some of the risks posed by electrostatic discharges and how to prevent such risks from damaging electronic components.3.1.6 Power devices
Computers and electronic devices require stable and correctly rated electric power. To protect the computer from damage that may be caused by irregular power supply, two commonly used devices are surge suppressors and Uninterruptible Power Supply (UPS). A surge suppressor also known as surge protector such as the one shown in Fig 3.5(a) is a device used to limit voltage supplied to electrical appliances. For example if the input voltage is more than 240 volts, the surge suppressor steps it down to a maximum of 240 volts hence protecting devices from electrical damage.An uninterruptible power supply UPS such as shown in Fig. 3.5(b) is device that provides emergency power backup in case the main power source fails.
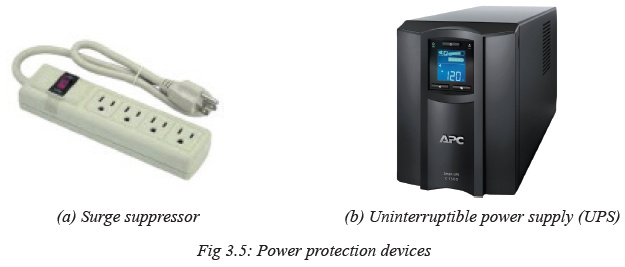
Activity 3.4: Power Protection Devices
1. In the computer lab or school compound, demonstrate how a standard UPS can be connected to a computer.
2. Research from internet how UPS regulates power supply to computers in case of
power surge, brownout or blackout.
3. Assuming the school intends to purchase several UPS units to setup in a new
computer lab of forty computers. Advise the management factors to consider
before purchasing the UPS.3.1.7 Climatic Change
Climatic change may affect computers and electronic equipment in a number of ways. For example, high temperatures affect functioning of semiconductor chips, while with high humidity causes corrosion of metallic components. To protect computers from damage during dry weather, dust covers and spread air conditioners should be used.3.1.8 Protecting Environment from contamination
Poor disposal of e-waste such as computer parts, CRT and LCD monitors, batteries, toner cartridges, plastic bags, chemical solvents, and printers such as the one shown in Fig.3.6 poses great environment risk. For example, long-term exposure to chemicals and components containing lead, candium, chromium, and mercury damages the nervous system, kidneys, bones, and endocrine system. Therefore, disposal of such e-wastes is not advisable and therefore should be regulated by establishing policy guidelines to avoid health risks and environmental pollution.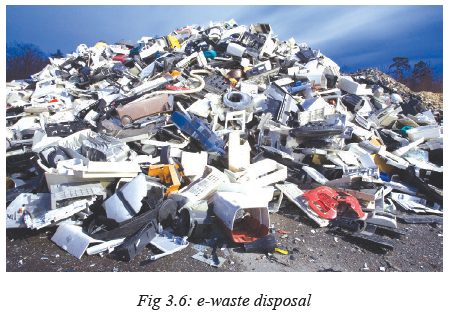
Activity 3.5: Computers and Environmental Protection
1. Define the term e-waste and discuss in class why it is important for Rwanda government to enforce e-waste disposal legislation and policy guidelines.
2. Disposable computers and electronic equipment may contain valuable components precious metals, glass and plastics which if recovered could provide business opportunities. Demonstrate your innovation and entrepreneurship skills by forming mock-up business entities that converts e-waste into commercial products.3.2 Ethical issues
The term ethics refers to a set of moral principles that govern the behaviour of an individual or society. In this regard, computer ethic refers to a set of moral principles that regulate use of computers. In this era termed as information age, lack of laws and standards on use of connected devices such as computers and mobile phone has raised numerous ethical concerns. The following are ethical issues that should be addressed at individual, social, and political level:
• Flaming: Flaming refers to messages that contain offensive, obscene or immoral words spread via social media applications such as WhatsApp and Facebook.
• Forgery: Availability of computers and high resolution imaging devices has made it possible for criminals to forge certificates, money and identity cards.
• Piracy: Piracy is a form of theft on intellectual property on copyrighted software products without proper authorization. To avoid violation of copyright laws, you need to understand various software licenses. These are commercial (propriety), freeware, shareware and open source discussed in the next unit under software installations.
• Terrorism: High penetration of internet and mobile phones has exposed most countries to evil plans of terrorists across the globe.
• Pornography: Availability of pornographic material in form of pictures and video has affected moral values of young children leading to immoral behaviour such as homosexuality and pre-marital sex.
• Fraud: Computers and mobile phones are being used to steal other people’s account details or money through fraudulent means such as fake websites and SMS messages.
• Corruption: Corruption has become social evil in private and public institution because it is seen as the easiest means to gaining social, economic or political favours. In some countries, mobile and internet-based money transfer has opened doors to corrupt behaviour that goes unnoticed by law enforcement agents.Activity 3.6: Ethical Issues
1. In goups, brainstorm on how technology use has influenced our morals in terms
of communication, privacy and intellectual property rights.
2. In open class discussion, brainstorm on ethical challenges arising from the use
of computers and mobile devices.
3. On the internet, search for the ten commandments of computer ethics proposed
by Computer Ethics Institute.
4. In group discussions, identify open source or proprietary software installed in the
computers indicating the intellectual property or copyright owner.Unit Test 3
1. Identify two alternative sources of backup power in case of blackout or brownout of main electricity.
2. Explain why it is important to avoid overcrowding in a computer lab.
3. Outline the procedure you would follow to put out fire in a computer lab that may have been caused by electrical fault.
4. Explain why it is not advisable to eat or drink in a computer lab.
5. State two reasons that make use powder-based fire extinguishers in a computer
lab unsuitable.
6. Differentiate between UPS and surge suppressors in terms of functionality.
7. Identify some of the causes of health risks such as computer vision syndrome,
back pain and failure of endocrine system.
8. Discuss the concept of ergonomics in terms of keyboard layout, office furniture,
and adjustable computer displays.
9. Outline policy guidelines that regulate acquisition and disposal of ICT equipment
outlined in Rwanda’s e-waste disposal policy.
10. In reference to computer software, explain three types of end-user licenses giving
an example of each.Unit 4:COMPUTER SOFTWARE Unit 4 INSTALLATION
Key Unit Competency
By the end of the unit, you should be able to:
• Install Operating System and Other Application Software.
• Use disk management tools.Unit Outline
• Types of computer software. • Installing operating system.
• Software license. • Installing device drivers.
• Software installation fundamentals. • Installing application software.
• Disk management.Introduction
Having learnt about various computer hardware devices and software, it is important to
have some basic skills on how to install computer software and manage the hardware
and software resources. In this unit, we discuss various types of software classified
according to purpose and acquisition. Later, we demonstrate how to install operating
systems such as Microsoft Windows 10, device drivers and application programs.4.1 Classification of computer Software
Generally, there are several ways of classifying computer software. In this book,
we shall discuss two ways of classifying software i.e. according to purpose and
acquisition.Activity 4.1: Classification of Computer Software
1. Research as an individual from the internet and books on:
(a) The classification of computer software.
(b) Purpose of each category of software.
2. Present your findings in your group discussion.4.1.1 Classification according to purpose
Computer software may be designed to manage hardware resources or to help the user accomplish specific tasks. In this regard, computer software may be classified as system software or application software.4.1.1.1 System software
System software performs a variety of fundamental operations that avails computer resources to the user. These functions include:
1. Booting the computer and making sure that all the hardware elements are working properly.
2. Performing operations such as retrieving, loading, executing and storing application programs.
3. Storing and retrieving files.
4. Performing a variety of system utility functions.
System software can further be subdivided into four sub-categories namely:
1. Operating systems.
2. Firmware.
3. Utility software.
4. Networking software.(a) Operating systems
An operating system refers to a type of system that software manages the hardware and control execution of application programs installed on the computer. To avoid conflicts, the operating system coordinates and schedules access to shared resources such as CPU, primary memory, storage devices, input devices, and output devices. Common examples of operating systems used on computers and portable devices include Android, Microsoft Windows, Linux, and Apple Macintosh. Examples of common operating systems include Linux and Macintosh (MacOS), and Microsoft Windows (e.g. 2000, XP, Vista, 7, 8, 10).(b) Firmware
Firmware is software embedded in a computer hardware or a computer program in a read-only chip data that is stored on a hardware device’s read-only memory to provides instruction on how the device should operate. Unlike normal software, firmware cannot be changed or deleted by an end-user without the aid of special programs. For example, devices like microwaves, digital cameras, and scanners have firmware used to control their basic operations.(c) Utility software
Utility software is a special program that performs commonly used services that make certain aspects of computing go on smoothly. Such services include sorting, copying, file handling, disk management etc. The two basic types of utility software are:
1. System-level utility: These helps the user to work with the operating system and its functions. For example, a utility software tells the user when he/she enters a wrong command and gives suggestions how the error can be corrected.
2. Application-level utility: These are utilities that make application programs run
more smoothly and efficiently. Such utility programs are commonly purchased
separately or may be part of an operating system.(d) Networking software
This type of software is mostly used to establish communication between two or more computers by connection them using a communication channel like cables to create a computer network. Networking software enables the exchange of data in a network as well as providing data security. Network software may come as independent software or integrated in an operating system. An example of networking software is novel netware.4.1.1.2 Application software
Application software, also known as application packages (apps) are programs that are designed to help users accomplish specific tasks. Table 4.1 gives examples and uses of common apps
4.1.2 Classification according to acquisition
Software can be classified according to acquisition as in-house developed or vendor
off-the-shelf software.4.1.2.1 Bespoke software
Bespoke or tailor-made software is a program developed or customized for a specific end-user or organization. For example, a bank may decide to manage hire programmers to develop an application for managing user’s sms-based access to banking information and services via mobile phones. Once developed, such application cannot be sold or transferred to another organization or end-user.4.1.2.2 Off-the-shelf software
Vendor off-the-shelf software are applications that are developed and packaged for sale or distribution via software vendors. Due to competition, most software developers bundles more than one application into integrated suite of programs such as Microsoft- Office 2013, Adobe Master Collection and Corel Suite. This the reason why the word package is sometimes used to refer to software product that are packaged and made available for paid-up download or purchase from software vendors.Activity 4.2: Classification of Software
1. Discuss with your classmate the various ways a user (individuals and organisations) can acquire software for their use.
2. Identify the advantages and disadvantages of each method of software acquisition.4.2 Software Licensing
Software is very crucial in accomplishing what we do with our computers and portable devices. To acquire, install and use software that is protected by copyright, you may have to download it for free or pay for license fee. Depending on conditions and
restrictions imposed by the End-User-Licence Agreement (EULA), computer software
may be classified into open source, proprietary, freeware, and shareware.4.2.1 Open source software
Open source refers to software whose source code (set of instructions) is madeavailable to users. The conditions and restrictions of open source EULA encourages the end-users to acquire the source code, modify and distribute modified versions of the original software. Examples of open source software include Linux operating system, OpenOffice, Mozilla Firefox, Thunderbird e-mail software, Apache web server, and MySQL database management system.4.2.2 Proprietary software
Proprietary software refers to commercial software whose source code is hidden from users. Modifications are only made by the software manufacturer. Proprietary software may be licenced for use at a fee or limited trial period. Examples of proprietary software that a user is required to pay for licence or use include Microsoft Windows, Microsoft Office, Adobe Acrobat Professional, Adobe Master Collection and CorelDraw.4.2.3 Freeware
Freeware is a category of software whose license allows for free of charge acquitition, use, making copies and distribution of copyrighted software for unlimited time. Unlike open source software, Freeware EULA does not allow users to modify or extend the softeware for sale as a commercial product. Examples of Freeware software include Adobe Reader, Google Talk, and AVG Free Antivirus.4.2.4 Shareware
Shareware is licensed commercial software that allow users to freely make and distribute copies of the software. The copyright holder for shareware may impose some conditions and restrictions in EULA that demand that, after testing the software, you pay to continue using it. Therefore, providing software as shareware is a marketing decision that does not change requirements with respect to copyright. Examples of shareware software include Winzip, Adobe Acrobat Professional Edition, Internet Download Manager (IDM) and CloneDVD.4.2.5 Ethical Use of Software License
The four categories of software licences discussed above impose legal, ethical and privacy conditions the user must agree with prior to acquisition and use. Unfortunately, some users engage in unethical behaviour such as piracy that violates software license agreement. The following are facts about piracy on copyright protected software:
• Piracy is illegal: Copyright law and intellectual property rights protects software authors and publishers, just as patent law protects inventors.
• Piracy is shameful act: Piracy can harm the image of an individual, community or country. If unauthorised copying proliferates in a society, the community losses integrity and incur legal liability.
• Piracy is intellectual property theft: Unauthorised copying of software is a form of theft that can deprive software developers of a fair return from products of
their intellectual work.Caution: It is important that you carefully read the license agreement when you acquire
software from the copyright owner. This will help you understand the conditions and
restrictions of the license on what you can and cannot do with the software.Activity 4.3: Software License
1. Research and then discuss with your classmate various categories of software installed in the computers in computer lab or school offices.
2. Read terms and conditions in the licence agreement of Windows 10, Ubuntu Linux, and Office 2013.4.3 Software Installation Fundamentals
The number of computer programs installed on a computer is only limited to hardware
specifications such as processor type, memory and storage capacity. Once a computer
meets recommended specifications, software installations is mostly an automated
process handled by a utility known as installer. This section demonstrate how to
install Windows 10, drivers and Office 2013 on a standard PC.4.3.1 System requirements
Before installing computer software whether an operating system, device drivers or
application software, there are minimum or recommended system specifications that
should be considered in terms of:
• Memory (RAM) capacity.
• Free hard disk space.• Processor type and speed.
• Graphics display.For example, the following are the minimum and recommended system requirements
for installation of Microsoft Windows 10 on standard desktop and laptop PCs:
• Processor type and speed: 1 Gigahertz (GHz) of CPU Speed or faster with support for PAE, NX, and SSE2
• Memory capacity: 1 Gigabyte (GB) of RAM on a 32-bit or 2 GB on 64-bit machine
• Storage space: 16 GB free-disk space on 32-bit or 20 GB on 64-bit machine
• Graphics card: Microsoft DirectX 9 graphics controller with WDDM driverActivity 4.4: Software Installation Requirements
In groups, research on the internet minimum and recommended specification for installing the following:
• Latest version of Microsoft Office
• Latest release of Kaspersky Antivirus
• Latest Ubuntu Linux4.4 Disk Preparation
Operating systems have software utilities or tools for preparing a new storage media or disk for use. Two commonly used disk preparation utilities are those for partitioning and formatting. Note that due to sensitivity of these operations, do not attempt these operations on a hard disk without the help of your computer teacher or computer lab assistant.4.4.1 Disk Partitioning
Partitioning a disk refers to the process of dividing a large physical disk into two or more
partitions called logical drives that are treated as independent drives. Before partitioning
a hard disk, you need to consider the type of file system (filesystem) to be created
on each partition. A filesystem is the structure used by operating system to store,
retrieve and update data on storage device. Examples of Windows filesystems include
File Allocation Table (FAT32), New Technology File System (NTFS) and extended
FAT (extFAT). To partition drive on a computer with no operating system, proceed
as follows:
1. Mount the installation media such as DVD or flash drive onto the computer.
2. Switch on the computer and press the key that enters BIOS setup.
3. Change boot sequence in order for the computer to boot from the installation media.
4. Once the windows setup that requires you to specify where to install windows,
create a new partition. You may also delete existing partitions but this is a sensitive
task that results to loss of data or programs.Activity 4.5: Disk management
Microsoft Windows 10 come with in-built disk management utilities used for creating,
resizing and deleting disk partitions. If you have Windows 10 installed, perform the
following tasks:
• Demonstrate and outline steps on how to access the disk management utility.
• Demonstrate and outline steps on how to create, and delete or resize an existing partition.4.4.2 Disk Formatting
Disk formatting is the process of preparing a data storage media such as a hard disk drive, solid-state drive (SSD), or USB flash drive or memory card for first time use. In some cases, the formatting operation may also create one or more new file systems. One reason for formatting a storage media is to make it compatible with the operating system. You may also format used media to make it blank for another use. It is important you back-up the media to be reformatted to avoid losing important files. To format storage media such as a flash disk, proceed as follows:
1. Click Start button, and then click File Explorer on the Start menu.
2. In the File Explorer window, click This PC on the left pane. The drives mounted on the PC are displayed on the right pane.
3. Right click on the drive to be formatted, and then click Format.
4. Specify the Capacity, File System and Allocation unit size as shown Fig.4.1.
6. Click Start button to format the drive.
4.5 Disk Management
Most operating systems come with Disk Management tools used for maintenance of storage media mounted on your computer. Some of the routine tasks performed by Disk Management include formatting, creating and deleting partitions, drive cleanup, disk scanning, system files checking, compression, de fragmentation of drive, backup and restoration. In this section, we go beyond drive formatting and partitioning discussed earlier to other disk management routines in Windows 10.4.5.1 Disk Cleanup
Disk cleanup is a maintenance utility used to free up space on a hard disk by deleting unnecessary files and Windows components that are no longer in use. This include
temporary internet files, downloaded program files and files in the recycle bin. To cleanup disk, proceed as follows:
1. Right click This PC on the desktop then click Manage to display Computer Management window.
2. Click Disk Management on the left pane of Computer Management window to display the list of drives.
3. Right click the drive you wish to cleanup, then click Properties. In the General tab of properties dialog box, click Disk Cleanup button.
4. In the cleanup window that appears, select the files to be deleted then click OK to cleanup the storage media.Activity 4.6: Disk Cleanup
1. Demonstrate how you would start disk cleanup utility in Windows 10, Linux or Android operating systems.
2. In Windows 10, identify types of files and components that can be removed using cleanup tool in order to save on hard disk space.
3. Demonstrate and outline procedure for removing temporary files and Windows components on a hard disk.4.5.2 Scanning disks
To check storage media for errors, most operating systems comes with check disk utility. In Windows, ScanDisk utility allows the user to scan and repair files and physical errors on storage media. When errors are encountered, ScanDisk marks affected sectors to prevent the operating system from storing information on them. To check a disk for errors, proceed as follows:
1. Click File Explorer on the Start menu to display the explorer window.
2. Click This PC on the left pane of File Explorer to display the drives.
3. Right click on the drive you wish to scan, and then click Properties.
4. In the Properties window that appear, click on the Tools tab.
5. Under Error Checking, click Check button shown in Fig.4.2.6. On the pop-up window that appears, click Scan drive.
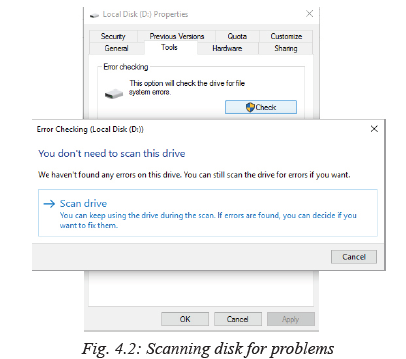
4.5.3 System File Checker
System File Checker (SFC) is a utility available in Windows 10 used to check for corrupted operating system files. The SFC utility scans all system files and repairs corrupted ones where possible. To run the system file checker in command prompt, proceed as follows:
1. Right-click the Start button to display the context menu as shown in Fig. 4.3.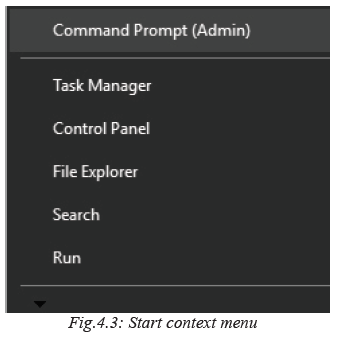
2. Click Command Prompt (Admin) to display the command prompt window.
3. Type sfc /scannow then press the enter key to start the scan process shown in
Fig. 4.4.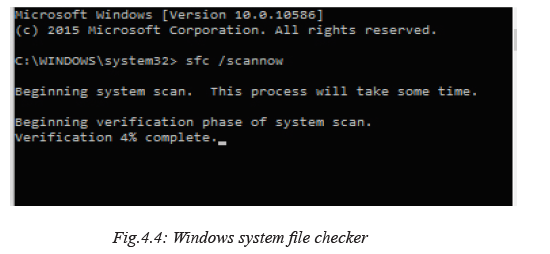
4.5.4 Disk Defragmentation
A storage media may have files scattered all over the surface of the disk hence resulting
to wastage of space and slow seek time. Defragmentation is the process of moving
file fragments to contiguous clusters to optimize on storage space and performance.
To defragment (defrag) a storage media, proceed as follows:
1. Click the Start button, and then click on File Explorer on the Start menu.
2. In the File Explorer window, click on This PC to display installed drives.
3. Right click on the drive you wish to defrag, then click Properties.
4. Click Tools in properties dialog box, then click the Optimize button
5. In the Optimize window, select the drive and then click the Analyze.
6. Click Optimize button to start defrag process as shown in Fig. 4.5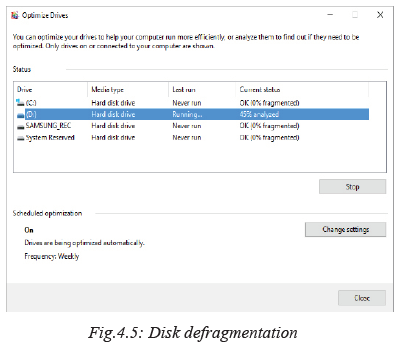
4.5.5 Disk Compression
Disk compression is a management routine used to store files in compressed versions
to save on disk space. When an Operating System (OS) attempts to save a file on
a compressed disk, the compression utility intercepts the file and compresses it.
Likewise when an OS attempts to open the file, the utility decompresses it first. To
compress a storage media, proceed as follows:
1. On the Start menu, click on File Explorer.
2. In the File Explorer window, click on This PC to display installed drives.
2. Right click on the drive to be compressed, then click Properties.
3. Click the General tab, then select Compress this drive to save disk space check
box as shown in Fig. 4.6.
4. Click Apply to display the popup window shown in Fig. 4.6.
5. Select compression option, then click OK to to close the pop-up window.
6. Finally, click OK to compress the drive.
4.5.6 Disk Backup
It is good practice to constantly keep copies (backup) of your important files on another drive to avoid loss of originals. Windows 10 has backup utility located under Settings menu used for backing up and restoring files. To use backup utility, proceed as follows:
1. On the Start menu, click Settings to display Setting window.
2. In the Settings window, click Update & security tab.
3. In the Update & Security list that appear, click Backup.
4. Click Add a drive under Automatically backup my files as shown in Fig. 4.7.
5. Click more options to specify backup options. Backup will be scheduled to automatically run as per your specifications.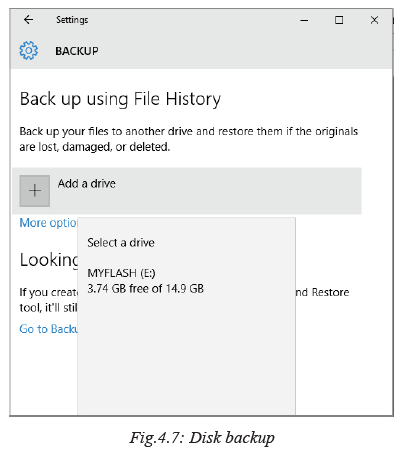
4.5.7 Setting Boot Order
Boot order also referred to as boot sequence defines the order in which the operating
system should check for the operating system’s boot files. The order can be changed
in BIOS setup as follows:
1. Turn on or restart the computer.
2. During power-on-self-test (POST), press the appropriate key(s) to enter the BIOS
setup screen such as shown in Fig. 4.8.
3. Specify boot order so that the computer boots from removable installation media.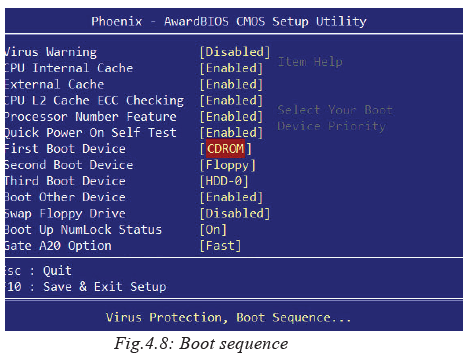
4.6 Installing Operating System
Installation of an Operating System is a fundamental process that starts with identifying minimum or recommended system specifications discussed earlier. In this section, we demonstrate how to download and install Microsoft Windows 10 Operating System. To start with, we demonstrate how to download windows 10 and create a bootable DVD or flash drive.4.6.1 Creating Windows 10 Installation Media
To upgrade from previous versions of Windows, Microsoft has adopted a hybrid web and media-based installation of Windows 10. If you opt for installation media, you have to download Media Creation Tool from Microsoft’s website. Media Creation Tool provides users with better experience in Windows 10 download compared to common download procedure. To create an installation media, proceed as follows:
1. Connect you computer to the Internet and use your favourite browser to visit Microsoft website. Navigate to Software Downloads, and search for Media Creation Tool.
2. Once the download page is displayed, select either 32-bit or 64-bit button depending on the architecture of your machine. To know the architecture of your PC, read the manual that came with the machine or use diagnostic utilities.
3. Download the tool onto your desktop or any location. Once the download is complete, select Create installation media for another PC on the screen shown in Fig. 4.9.
4. The screen shown in Fig.4.10 lets you specify the language, architecture and Windows 10 version to be installed.
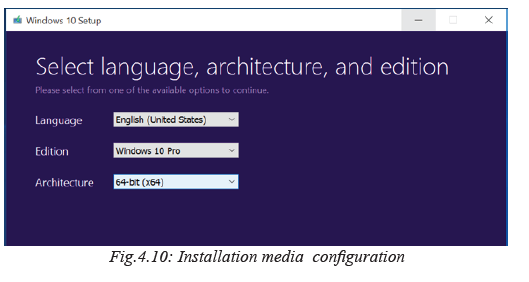
5. In the screen that appears, choose USB flash drive to create bootable media on
a memory stick. You’ll be required to insert a flash drive of with more that 3GB
free space. If you prefer using a DVD, choose ISO file so that you burn the image
onto DVD later.
6. Click Next to start the download process. Once the download is complete, you
may proceed to Windows 10 installation phase. In the next section, we take you
through the general steps of installing Windows 10 on a typical desktop PC.4.6.2 Installing Windows 10
Like earlier versions of Microsoft Windows, installation of Window 10 is a threephase process of copying files, installing features and drivers, and configuring settings. Microsoft provide two alternative of installing Windows 10:
• Upgrade: Users with licensed versions of Windows 7, 8 and 8.1 can upgrade to Windows 10 using the product key product key they used to install the older versions.
• New Installation: To install Windows 10 for the first time referred to as clean
install, you need to buy the license which you can get via email. Remember it is illegal to install pirated copy of Windows 10. In this section, we take you through general procedure for installing Windows 10
for the first time from USB flash drive:
1. Insert the USB flash media created earlier using Media Creation Tool. Windows 10 setup screen shown in Fig. 4.11 is displayed. If the screen does not appear automatically, you may be required to change boot sequence in BIOS settings or use “Advanced startup options” available on certain devices.
2. In the next screen shown in Fig. 4.12, enter the product key sent to you through e-mail if you are installing Windows 10 for the first time. Alternatively, enter the product key that came with older version of Windows 7, 8 or 8.1 that you are upgrading. Click Next to proceed.
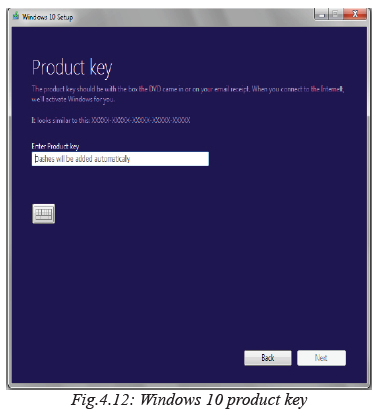
3. On the Install Now window, click Install Now button to display the screen of Fig. 4.13. Under Which type of installation do you want, choose Upgrade if you have a version of Windows 7 or 8 installed on your computer. If you are installing Windows 10 for the first time, choose Custom, then click Next.
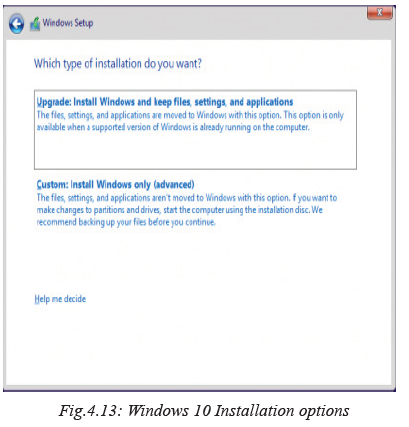
4. In the next screen that appears shown in Fig. 4.14, select an existing partition or
create a new one where Windows 10 is to be installed. Note that partitioning a
drive is a sensitive task to be handled with care to avoid loss of programs or data.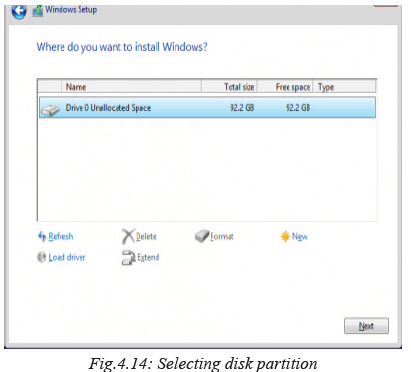
5. Once you specify the partition in which Windows will reside, clicking the Next
button takes you to the phase of copying Windows 10 files onto the partition as
shown in Fig. 4.15. It is after files have been copied that the third phase of drivers
and features configuration is started. During drivers and features configuration
phase, the PC restarts several times.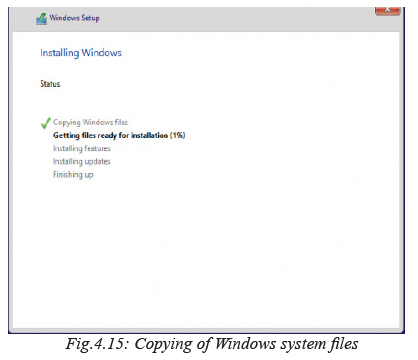
6. The moment the settings screen shown in Fig. 4.16 is displayed, choose whether
the installer should use express or customized setting. For privacy reasons, make
sure you read and understand the Privacy statement before choosing any other
two settings.
7. Next, sign in or create a Microsoft account when prompted as shown in Fig. 4.17.
Microsoft account is important because it allows the user to access Windows 10
resources e.g. online emails, cloud, and Apps.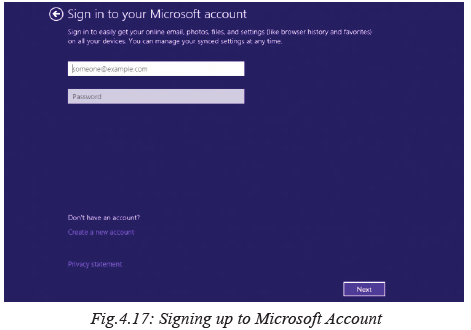
8. The final steps is to let the installer configure Apps before the desktop shown on
Fig. 4.18 is displayed. You are now ready to use Windows 10.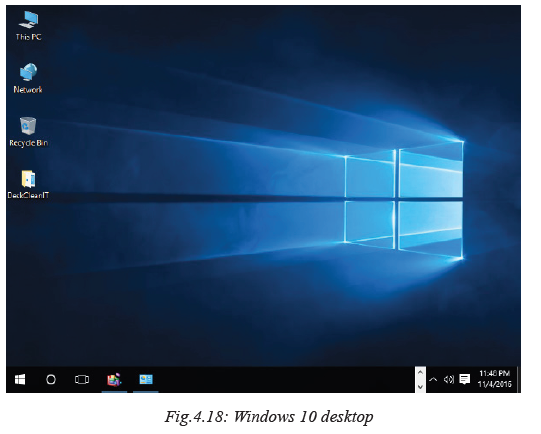
• Important: Once you install and activate Windows 10 on a device for the first time,
the installer registers your hardware with Microsoft’s servers. You don’t have to
enter the product key the next time you re-install Windows 10 on the same device.
Activity 4.7: Software Installation
1. In groups, demonstrate and outline steps on how to install various versions of
Microsoft Windows and open source operating systems such as Ubuntu Linux.
2. Configure the following Windows 10 desktop properties. In each case, outline
the steps followed to carry out the task:
(i) Change the background theme on the desktop.
(ii) Set desktop icons to display This PC, Network and Recycle bin icons.
(iii) Select icons that appear on the taskbar.Assessment Exercise 4.1
1. In reference to EULA, differentiate between open source software and proprietary software.
2. Demonstrate step-by-step how to you would partition hard disk.
3. Outline system requirements that need to be considered to install Windows 10 operating system.
4. Explain why it is good practice to install genuine copy of an operating system.4.7 Installing Device Drivers
A device driver is a utility program that acts as an interface between a hardware
device and the operating system. For a hardware device such as printer, keyboard or
scanner to function properly, its drivers must be installed. Once you connect a new
device such as a printer to a computer, the operating systems automatically detects
the device and installs appropriate drivers. If no drivers found from Windows drivers
list, you have to download or use drivers that came with the device.4.7.1 Installing drivers automatically
Automatic installation of drivers also known as plug-and-play means that once a new
device is detected by the computer, Windows searches and automatically installs for
appropriate drivers. The following are basic steps followed in the installation of
plug-and-play devices:
1. Connect the device to the computer.
2. Windows 10 detects the new device and signals plug-and-play service to
automatically install the device drivers.
3. If appropriate drivers are found, the device is automatically installed without user
intervention.
4. The computer may restart to configure the new device.4.7.2 Installing drivers manually
Often computer and hardware manufacturers place the drivers on a storage media or
provide them online for download. To manually install drivers, proceed as follows:
1. Right click This PC on the disktop and select Manage. The Computer
Management window shown in Fig. 4.19 is displayed.
2. Select Device Manager, click Action menu, then select Add legacy hardware
3. Follow instructions on the Add Hardware wizard that appears.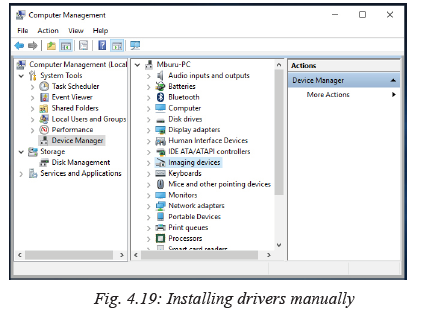
Activity 4.8: Device Drivers Installation
In groups, demonstrate and outline a step by step procedure for installing a new device
such as a printer or scanner on a computer running Windows 10 operating system.4.8 Installing Application Software
There are thousands of application software such as word processors, spreadsheets,
database management systems, desktop publishing software, education software
among others. Most software developers package several programs into a suite with
good example being Microsoft Office 2013. In this section, we demonstrate how to
install Microsoft Office 2013 suite on desktop PC:
1. Insert Microsoft Office 2013 DVD or USB installation media into the computer.
In the license agreement screen that appears, click the check box “I accept the
terms of this agreement” shown in Figure 4.20.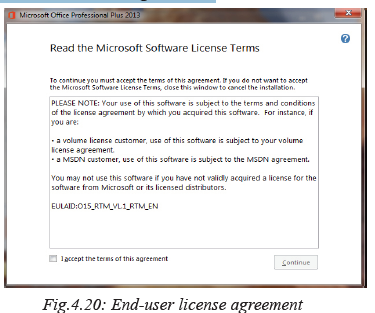
2. Once you accept Microsoft terms of agreement, choose whether to upgrade an
existing version or custom to install new copy as shown in Fig. 4.21.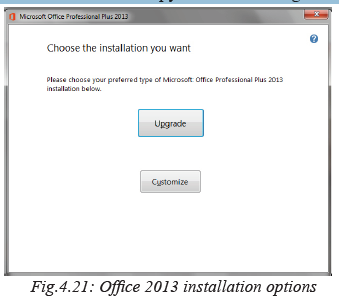
3. To upgrade an existing version of Microsoft Office, click Upgrade. Make sure the radio button “Remove all previous versions” is selected, and then click Next. The installation progress screen shown in Fig. 4.22 is displayed.
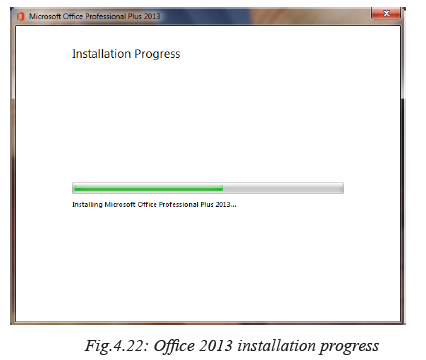
4. Once the installation process is complete, you may sign in for Microsoft account
to get online access to your documents from SkyDrive. SkyDrive is a Microsoft
name for cloud-based storage. Finally, the screen shown in Fig. 4.23 is displayed
to confirm that you have successfully installed Office 2013.
5. To confirm that Office 2013 has been installed, click the Start button then All
apps. The list of installed Microsoft Office 2013 apps is displayed as shown in
Fig. 4.24.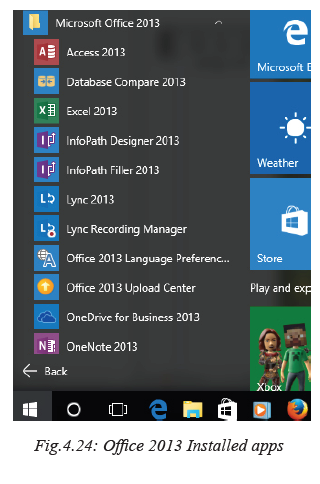
Activity 4.9: Installing Apps
Demonstrate how you would install an application software such as Microsoft Office
2016, Web browser or a Computer games in a computer running on Windows 10
Operating system.Unit Test 4
1. Explain the importance of reading the user manual before installing new software.
2. Outline the procedure you would follow to install device drivers and application software.
3. State four factors you would consider before purchasing application software.
4. State three hardware requirements to be considered when installing application software.
5. Explain importance of end-user license that comes with proprietary software.Unit 5: NUMBER SYSTEMS
Key Unit Competency
By the end of the unit you should be able to:
• Compute numbers in different base systems.
• Perform arithmetic operations on binary number.Unit Outline
• Fundamentals of number system.
• Number base systems.
• Converting decimal to other base systems.
• Binary to other base system conversion.
• Octal to decimal conversion.
• Octal to hexadecimal conversion.
• Hexadecimal to decimal conversion.
• Decimal fraction to binary conversion.
• Binary fraction to decimal conversion.
• Negative decimal to binary conversion.
• Arthmetic operations on binary numbers.Introduction
In Mathematics, we represent any number using a set of ten digits ranging from 0 to 9. However, in digital computers, any type of data is represented using two voltage states “on” and “off” represented using 0 and 1. In this unit, we begin by discussing types of number systems followed by demonstrations on how to convert numbers from one system to another. Later, we take you through four binary arithmetic operations namely addition, subtraction, multiplication and division.5.1 Fundamentals of Number Systems
The term number system refers to a set of symbols or numeric values (numbers) used to represent different quantities. In computer science, it is important to understand number systems because the design and organisation of digital computers depends on number systems. Historically, the ten digits ranging from 0 to 9 used to express any number originated from India. Because the number of digits is ten, we refer to it as base 10 or decimal number system.
In digital computers, any type of data whether numbers, alphabets, images or sound is represented using a sequence of two digits; 0 and 1. The two digits are referred to as binary digits (bits). Because knowledge of number systems is important, we begin this section with basic concepts associated with binary and decimal numbers.5.1.1 Bit, Byte and Nibble
In digital computers, data is represented using a sequence of bits, bytes, nibble and
word:
• Bit: Bit is a short form for binary digit referring to a single digit 0 or 1 used to represent any data in digital computers. In other words, a bit is the smallest unit used to represent data in digital computers.
• Byte: A byte is a sequence of bits used to represent alphanumeric characters and
special symbols. In most cases, computers represent any type of data using a
sequence of 8 bits.
• A nibble: A sequence of four bits representing half of a byte.
Fig. 5.1 shows an illustration that distinguishes the three terms.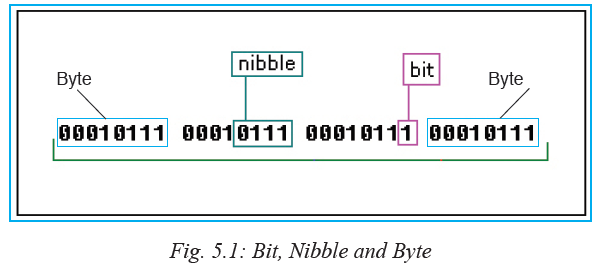
5.1.2 Magnitude of Numbers
Normally, the magnitude or weight of a digit in a number like 785 can be determined using base value (radix), absolute value, and positional (place) value.
• Base value: The base of a number also known as radix refers to the maximum number of digits used to represent a number system. For example, the number 785 falls within numbers 0 to 9 hence it is a base 10 number. When dealing with number systems, always remember to indicate the base value. For example, 4510 shows that 45 is a base 10 number.
• Absolute value: This is the face-value of a digit in a number system. For example, 5 in 785 has a face value of 5 regardless of its position in the number.
• Positional value: The positional (place) value is the position of a digit relative to other digits. For example, Table 5.1 shows the place value of 5 in 785 is ones while the digit with highest place value is 7 whose weight is 700.
Activity 5.1: Magnitude of numbers
In groups, research in the internet how each of the digits in 485 can be interpreted in terms of base value, absolute value, and place value.Assessment Exercise 5.1
1. Define the following terms:
(a) bit (b) byte (c) nibble
2. Differentiate between a byte and a nibble.
3. Binary number system is fundamental to understanding how a computer works. Explain why it is important to understand the concept of number systems.
4. Using an illustrations, explain how data is represented in digital computers.5.2 Number Base Systems
Number systems are determined by the base representing valid digits used to represent
a number. The four types of number systems used in computing are decimal (base
10), binary (base 2), octal (base 8), and hexadecimal (base 16) number systems.5.2.1 Decimal Number System
Decimal number system consist of ten digits 0-9 most of us are familiar with. The prefix deci in the word decimal is a Latin word deci that means ten. Because the decimal number system has ten digits, it is also known as a base 10 or denary number system. In computing, counting of decimal numbers start from 0.Significance of Decimal Digits
Significance of a digit refers to its weight that is determined by its absolute and place value. In a decimal number system, the most significant digit (MSD) is the leftmost, while the least significant digit (LSD) is the rightmost digit. For a number like 7085, Table 5.2 shows that 5 is the least significant having a place of 5 while 7 is the most significant with place value of 7000.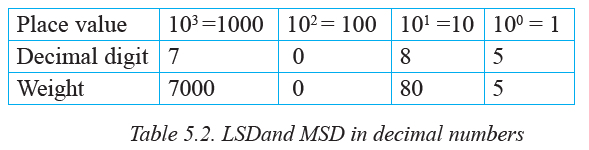
5.2.2 Binary Number System
Binary numbers consist of two digits – 0 and 1 referred to as binary digits, in short’
bits. In binary base system, the positional value of a number increases by powers of
two. When dealing with different number systems, always remember to indicate the
base of a binary number such as 10112.Significance of Binary Digits
The most significant digit (MSD) in a binary number is the leftmost digit, while the least significant digit (LSD) is the rightmost digit. For example, Table 5.3 shows that in binary number like 10112 the LSD on the right has weight of 1 that is (1 × 20), while the MSD has a weight of 8.
NB: The total weight of the binary number 10112 represents 11 in decimal numbers obtained by
adding: 8+0+2+1 = 1110
Activity 5.2: Types of number systems
Digital computers use a number system with a base of two, rather than base ten to represent any data. This is because it is much easier to engineer circuits that implement “binary number system.” In groups, discuss the four types of number systems and classify them according symbols used to represent any number. If 1011 represents 11 in decimal form, represent decimal numbers 0 to 15 in binary form.5.2.3 Octal Number System
The octal number system also known as octadecimal has eight digits ranging from 0 – 7 that are used to represent any number. This means that a number like 785 cannot be a valid octal number because 8 in between 7 and 5 is not within 0 to 7 digits.Significance of Octal Digits
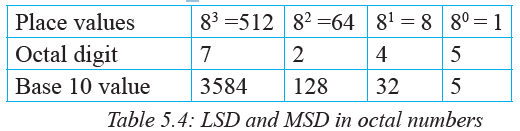
To get the decimal number equivalent to 7245 we add: 3584 + 128 + 32 + 5 = 3749
Thus; 72458 = 374910.5.2.4 Hexadecimal Number System
Hexadecimal is a base 16 number system consisting of 16 digits that range from 0
to 9, and A to F. The letters A to F are used to represent numbers 10 to 15 as shown
in Table 5.5. Always remember to indicate the base of a hexadecimal number using
the subscript 16 e.g. 4F916.
Significance of Hexadecimal Digits
In hexadecimal number system, significance of digits increases from right to left in
multiples of 16. For example, Table 5.6 shows in 94616, 6 is the LSD while 9 is the
MSD with decimal place value of 230410.
The decimal equivalent of 94616 is obtained by adding:
2304 + 64 + 6 =2374
Thus 94616 = 237410.
Table 5.7 below shows a summary of the four number systems classified according to
their base values: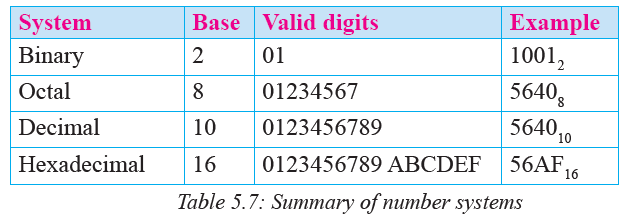
Activity 5.3: Octal and hexadecimal number systems
In groups of three, discuss the benefits and reasons for using octal and hexadecimal number systems.5.3 Converting Decimal to other Base Systems
Mathematically, it is possible to convert a number from one base system to another.
In the following section, we demonstrate how to convert decimal numbers to other
base systems.5.3.1 Decimal to Binary Number Conversion
To convert a decimal number to binary, there are two possible methods, the divisionremainder, and positional-value methods.5.3.1.1 Division-by-Base Method
In division-by-base method, a decimal number is repeatedly divided by the base until the dividend is indivisible by 2. In every division, write down the remainder on the right of the dividend. Read the sequence of 0s and 1s bottom-ups that represents the binary number. For example, to convert 4510 to binary form, proceed as follow: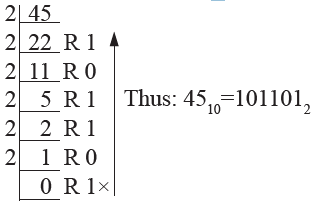
Explanation
1. Divide 45 by 2. We get 22 remainder 1.
2. Next divide 22 by 2. We get 11 remainder 0.
3. Continue dividing until the number is indivisible by 2. In this case, 1 is not divisible hence we write 0 remainder 1.
4. Read the remainder digits as 0s and 1s bottom up.NB: The remainder in the last division marked with asterisk is 1 because 1 is not perfectly divisible by 2 in the previous step. The following example demonstrates how to convert 10710 to binary form:

Explanation
1. Divide 107 by 2. We get 53 remainder 1.
2. Continue dividing until the quotient is not perfectly divisible by 2.
3. Read the remainders upwards.Activity 5.4: Converting decimals to binary form
Using division-by base method, convert the decimal number 247 to binary form. Confirm whether is the 111101112 is correct answer.5.3.1.2 Place value Method
The second method of converting decimal numbers to binary form is the place value method. For example, to convert 24710 to binary form, proceed as follows:
1. Start by writing down the place values in powers of 2 up to the value equal to or slightly larger than the number to be converted. For example, to convert 24710, write down the place values up to 28, i.e. 256 as shown in Table 5.8.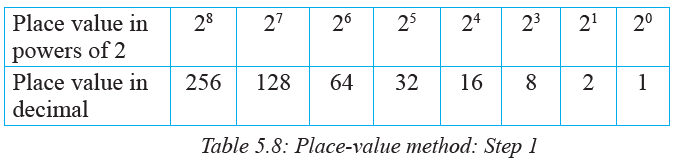
2. Subtract the highest place value i.e 256 from the number as shown in table 5.9.
If the difference is 0 or positive, write 1, otherwise write 0 if the difference is negative.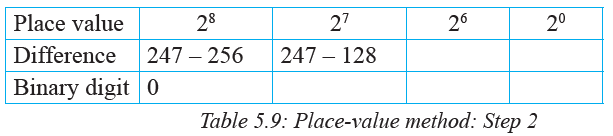
NB: Note that under the place value 28, we write 0 because 247-256 returns a negative value.
3. If the difference returned a negative carry forward the number, the next lower
significant place value and calculate the difference. Since 247 – 128 returns 119 (positive), write 1 as shown in Fig. 5.10.
4. Repeat the process until you encounter the least significant, until you subtract the
previous step difference from the least significant place value as shown in Table 5.11:
5. Read the binary digits from left to right. This gives us 011110111. Thus: 24710 = 0111101112.
Table 5.11 demonstrates how to use place value method to convert 10710 to binary form. First, write the place values up to 128, and then calculate the difference from left to right. If the difference is > =0, insert 1 otherwise insert 0 as shown in Table 5.11.

Thus: 10710=11010112
Activity 5.5: Decimal to binary conversion
1. Using the place value method, convert the following to binary number equivalent to:
(i) 14510
(ii) 128010
(iii) 520410
(iv) 800010
2. Using the place value and division by base methods convert each of the following base 10 numbers to their binary equivalents.
(a) 1010 (c) 4310 (e) 36510
(b) 51210 (d) 14310 (f) 954105.3.2 Decimal to Octal Conversion
To convert a decimal number to octal form, we repeatedly divide the dividend by the base value 8 until the quotient is indivisible by 8. The remainders consisting of digits between 0 and 7 are read upwards. For example, to convert 58610 to an octal number, proceed as follows: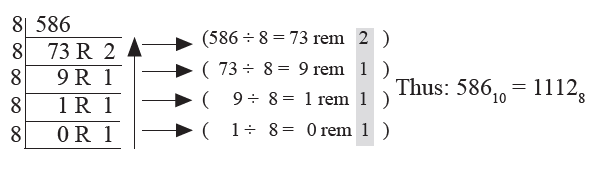
Activity 5.6: Decimal to octal conversion
Using division-remainder method, convert the following decimal numbers to octal form.
(a) 999 (b) 1875 (c) 5210 (d) 505
(e) 1810 (f) 3185 (g) 1000750
5.4.3 Decimal to Hexadecimal Convertion
To convert a decimal number to hexadecimal form, repeatedly divide the quotient by16 until the quotient is not divisible by the base value. The resulting remainders consisting of digits from 0-9, and A-F are read bottom-up. For example, to convert a decimal number 896 to hexadecimal form, proceed as follows:
Continue dividing until the quotient is no longer divisible by 16.
Read the remainders from bottom to top.
Thus: 89610 = 38010
Explanation
Divide the number by 16 and write down the quotient and the remainder. Note the remainder can be a digit between 0 and F. Taking another example let us convert a decimal 4056 to hexadecimal form.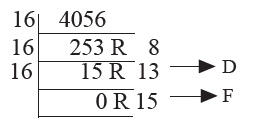
Since hexadecimal symbols between 10 and 15 are represented by letters A to F,
replace 15 with F and 13 with D in the remainders. Thus: 405610 = FD816Activity 5.7: Decimal to hexadecimal conversion
Using division-by base method, convert the following decimal numbers to their hexadecimal equivalents:
(a) 107 (b) 9850 (c) 5207 (d) 7500 (e) 70755.4 Binary to other Base System Conversion
Conversion of a binary number to other base systems is the reverse procedure to what we have covered in the previous section. In this section, we demonstrate how to convert binary numbers into decimal (base 10), octal (base 8) and hexadecimal (base 16) form.5.4.1 Binary to Decimal Conversion
To convert a binary number to decimal form, proceed as follows:
1. Write place values under which you place the bits from the least significant to the most significant as shown in Table 5.12. For example, Table 5.12 shows a binary number with digits placed under corresponding place values.
2. Multiply each bit by corresponding place value e.g starting with most significant e.g in case of 101101, multiply the left most bit by 32.
3. Sum the partial products to get the decimal number. In our case we add (1 × 28) + (0 × 24) + (0 × 23) + (1 × 22) + (1 × 21) + (1 × 20)
This gives us:
32 + 0 + 8 + 4 + 0 + 1 = 45Therefore, 1011012 = 4510

Activity 5.8: Binary to decimal conversion
1. Convert 1001002 to decimal equivalent. Check whether the returned decimal is
9 or 36.
2. Convert 10111102 to decimal form.
3. What is the decimal equivalence of 111111112?Assessment Exercise 5.2
Convert the following binary numbers to decimal form:
(a) 01012 (b) 11112 (c) 101011011102
(d) 101111112 (e) 10110012 (f) 11100011125.4.2 Binary to Octal Conversion
To convert a binary to Octal system group the One’s (1’s) and zero’s(0’s) into sets of three bits starting from right to left. The reason for grouping into 3 bits is because the maximum octal digit (7) has a maximum of 3 digits as shown in Table 5.13.
For example, to convert 110100012 to octal format, proceed as follows
1. Group the bits to sets of 3 starting from right.
2. Write down the octal digit represented by each set of bits as shown in Table 5.14: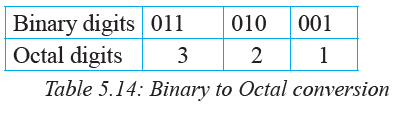
Thus: = 0110100012 ≡ 3218
Assessment Exercise 5.3
Convert the following binary numbers to Octal form.
(a) 10100100 (b) 10100111 (c) 1110010
(d) 101110101 (e) 10010010 (f) 11011111000
(g) 1100001011
(j) 1001101101010115.4.3 Binary to Hexadecimal Conversion
Similar to the approach used with octal number system, a binary number can be converted to hexademal format by grouping the bits to a set of 4 bits. This is because the largest hexadecimal digit i.e. F(15) has 4 bits as shown in Table 5.15: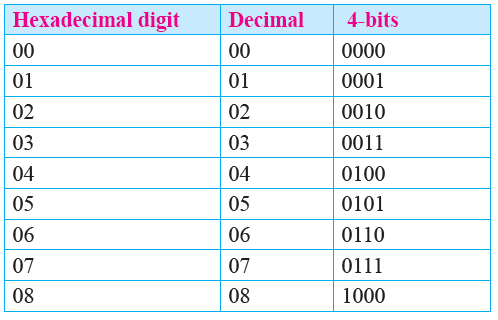
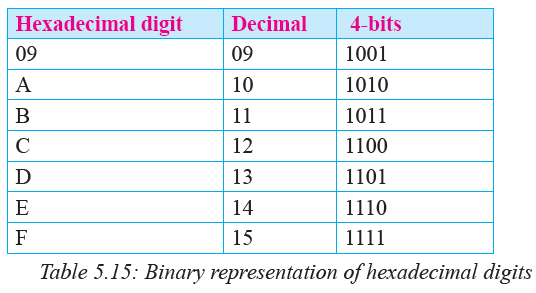
For example, to convert 110100012 to hexadecimal form, group the bits into sets of 4 starting
from right to left as follows: as shown in Table 5.16:
Thus: = 1101 00012 = D1
If a binary number does not have an exact set of 4 bits after grouping such as 1100100001,
proceed as follows:
1. Split the number into sets of 4 bits starting from right to left. In our case, we get
three complete sets and one incomplete one: 11 0010 0001
2. Because the leftmost set has two bits, add two zeros to it on the left to get: 0011 0010 0001
3. Using the binary equivalents in Table 5.17, place each the equivalent hexadecimal
digit under each of the set of bits.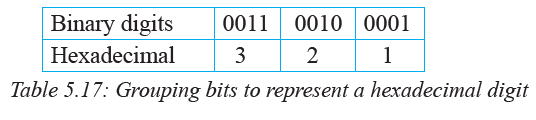
Thus: 00110100012 = 32116
Activity 5.9: Binary to hexadecimal conversion
1. Convert 101111001102 to its hexadecimal equivalent.
2. Convert the binary number 1110110112 to hexadecimal form.
3. Find the hexadecimal equivalence of 1101112.
4. Convert the binary number 01011102 to hexadecimal form.Assessment Exercise 5.4
1. Convert the following hexadecimal numbers to their binary equivalents:
(a) 10100101012 (b) 10010001112 (c) 111011111101
(d) 1001000001112 (e) 101110101101 (f) 1100101111011111
(g) 1011000010111005.5 Octal to Decimal Conversion
To convert octal numbers to decimal form, we use the division-by-base and place value methods used on binary numbers. For example, to convert 5128 to decimal form, proceed as follows:
1. Write each number under base 8 place value as shown in Table 5.18: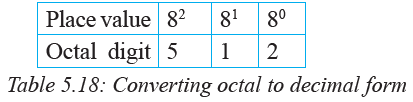
2. From left to right, multiply each digit by its place value as shown below:
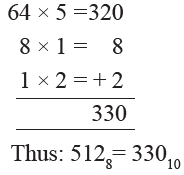
Assessment Exercise 5.5
Convert the following octal numbers to decimal form.
(a) 778 (b) 648 (c) 1028 (d) 12008 (e) 10008
(f) 1738 (g) 12385.6 Octal to Hexadecimal conversion
Because octal to hexadecimal conversions cannot be done directly, we first convert
given octal numbers to its decimal or binary equivalent. In the second step we convert the decimal or binary number to its hexadecimal equivalent.
1. To start with, we demonstrate how to use the two-stage approach to convert an octal number 10028 to hexadecimal:
10028 = (1 × 83) + (0 × 82) + (0 × 81) + (2 × 80)
= 1 × 512 + 0 × 64 + 0 × 8 + 2 × 1
= 512 + 0 + 0 + 2
2. Convert the decimal number 514 to hexadecimal using division-by-base method.: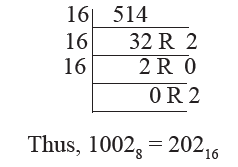
Alternatively, you can convert an octal number to hexadecimal by converting the number to binary form as follows:
1. Convert each octal digit to a 3-bit binary number as shown in Table 5.19 below: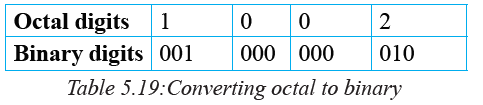
2. Convert the resulting binary number i.e. 0010000000102 to hexadecimal by grouping the bits into four groups starting from right:
3. Write down the hexadecimal equivalent of each of the 4-bit grouping as shown below: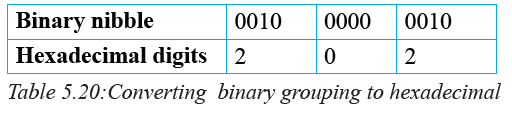
Therefore, 0010 0000 001002 = 20216
5.7 Hexadecimal to Decimal Conversion
To convert a hexadecimal number to base ten equivalent, proceed as follows:
1. First, write the place values starting from the right hand side.
2. If a digit is a letter such as an ‘A’ write its decimal equivalent.
3. Multiply each hexadecimal digit with its corresponding place value, and then add the partial products.
The following example illustrate how to convert 11116 to decimal form:
1. Write each digit under its place value as shown in Table 5.21.
2. Multiply each hexadecimal digit with corresponding places value and write down
the partial products (256 × 1) + (16 × 1) + (1 × 1) downwards as follows: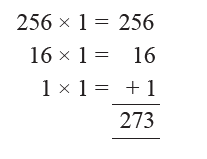
3. Add the partial products: 256 + 16 + 1 = 273
Thus: 11116 = 27310
Taking another example, let us convert A916 to decimal form: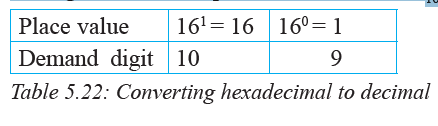
(i) Write each bexadecimal digit under its place value.
(ii) Add the partial products (16 × 10) + (1 × 9)
This gives us 160 + 9 = 1690
Thus: A916 = 16910Assessment Exercise 5.6
Convert the following hexadecimal numbers to decimal form:
(a) 3216 (b) CCD16 (c) EFE16 (d) 119 16 (e) 32816
(f) ABD16 (g) 10AFFD165.8 Decimal Fraction to Binary Conversion
In mathematics, a number with integer and fractional parts such as 87.25 is known as
a real number. In computing, a real number is referred to as floating point number.
The fractional part has a value that is less than 1 written as 1/x or 0.x. For example,
87.25 has a fractional part 0.25 that may also be written as 1/4. The weight of a
floating point number increases from right to left as shown in Table 5.23:
In computing, the same approach is used to represent fractional binary numbers.
For example, the fractional binary number 11.110112 may be represented as shown
in Table 5.24.
For example, to convert a number like 87.25 to binary form, first convert the integer
part using one of the methods discussed earlier. Then, convert the fractional part as
follows:
1. Start by multiplying the fractional part by 2 and write the partial product. For
example, 0.25 × 2 = 0.5.
2. Take the fractional part of the previous partial product and multiply it by 2. In
our case: 0.50 × 2 = 1.000.
3. Repeat until the fractional part on the right of decimal point of the partial product
is 0 or starts recurring. For example, in step 2 above, the fractional part is 000
hence we stop.
4. Read downwards the 0s and 1s on the left of the decimal point of partial products
as shown below:
To convert a floating point decimal number 7.375, proceed as follows:
1. Convert the integer part 7 using the division-by 2 or place value method. The
operation should return 111.
2. Convert the fractional part until the part on the right of decimal point is 0 or starts
recurring: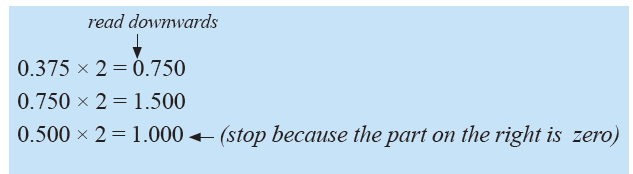
3. Read the digits on the left of decimal point downwards as shown by the arrow.
In this case, the digits are 0.011.
4. Combine the integer and fractional parts to get: 111+0.011= 111.0112 Thus: 7.37510 = 111.0112
In this example, we demonstrate how to convert a decimal number 0.40 that returns
a recurring binary fraction. We proceed as follows: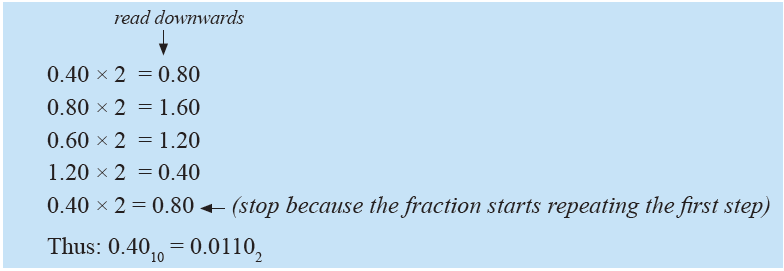
Activity 5.10: Decimal fraction to binary conversion
1. Convert the decimal number 43.562510 to binary form. Compare your answer with
101011.10012.
2. Convert the following floating point decimal numbers to binary form:
(a) 0.62510 (b) 0.45010 (c) 2.50010
(d) 5.162510 (e) 7.187510 (f) 0.350105.9 Binary Fraction to Decimal Conversion
To convert a floating point binary number like 11.0112 to decimal form, proceed as follows:
1. Convert the bits on the left of the decimal point into decimal form and sum-up the partial products as follows: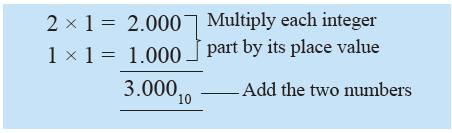
2. Next, convert the bits on the right of the decimal point to decimal form using
corresponding place values from left to right as shown below: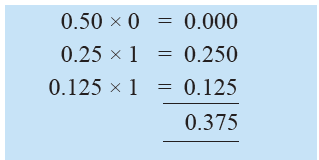
3. Finally, add the two decimal parts: 3.00010 + 0.37510 = 3.37510
Thus: 11.0112 = 3.37510Activity 5.11: Binary fraction to decimal conversion
Convert 11.110112 to decimal form and compare the value you get with 3.8437510.Assessment Exercise 5.7
1. Convert the following binary numbers to decimal form:
(a) 0.100112 (b) 0.00102 (c) 0.101012
(d) 11.01102 (e) 101.111102 (f) 100.11025.10 Negative Decimal to Binary Conversion
Conversion of negative decimal numbers to binary form is simplified by use of one’s
complement and two’s complement. One’s complement is a value obtained by inverting
each bit in a binary number while two’s complement is value obtained by adding 1
bit to one’s complement. In this section, we show how to use one’s complement and
two’s complement to convert a negative decimal number to binary form.5.10.1 Ones complement
One’s complement is a temporary step to finding twos complement of a binary number. To convert a binary number to ones complement, we invert 0 bits to 1s and vice versa. For example, the one’s complement of 10011102 may be expressed as a unary operation as follows:
~(1001110) = 0110001; where ~ stands for negation.Activity 5.12: One’s complement
Represent the following binary numbers to ones complement. In each case, state the decimal number represented by the ones complement.
(a) 11010012 (b) 11110102 (c) 101011012
(d) 10111112 (e) 10110012 (f) 1110011125.10.2 Two’s complement
Twos complement is another method used to represent negative numbers in binary form. Two’s complement of a number is obtained by getting the one’s complement then adding 1 bit.
For example, to find the two’s complement of the binary number 10011102, proceed as follows:
1. Convert 1001110 to one’s complement using unary operator (~) :
~(1001110) = 0110001;2. Add 1 bit to one’s complement to get the two’s complement:
0110001 + 1 = 0110010
Thus: Two’s complement of 1001110 = 0110010.
Taking another example, let us convert the decimal number 45 to binary form and express its negative value using twos complement.
The problem requires that you pad (insert) 0 bits to the left of the most significant bit
until the number has 8 bit. To get the 2s complement, proceed as follows:
1. 4510 to 8-bit binary form i.e 001011012.
2. Convert the binary number to one’s complement as follows:
~(00101101) = 11010010.
3. Add 1 to one’s compliment number as follows:
11010010 + 1 = 11010011.Activity 5.13: One’s and two’s compliment
1. In decimal number system, we may represent integers using nine’s complement while in binary, we use ones and twos complement. In groups, perform the following activities:
• Demonstrate how you would represent nines complement of decimal number like 945. Explain why this complementation is rarely used in computer processing logic.
• Explain the difference between ones and twos complement and demonstrate how you would represent a binary number like 110100102 using twos complement.
2. Convert the following negative decimal numbers to binary equivalent using one’s
and two’s complement:
(a) -20 (b) -55 (c) -108 (d) -5865.11 Arithmetic Operations on Binary Numbers
Basic arithmetic operators such as addition(+), subtraction(–), multiplication (×), division(/) can be used to manipulate binary numbers. In computers, these operations are performed inside the central processing unit by arithmetic and logic unit (ALU). Because, ALU only performs binary addition, subtraction operation is carried out using one’s or two’s complements. To perform multiplication and division, the ALU shifts the bits to the left or right before adding the operands.5.11.1 Binary addition
The four rules applied in binary additions are: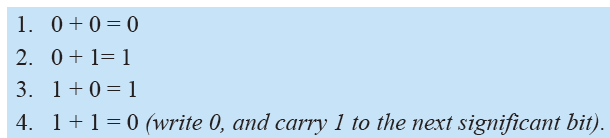
For example, to calculate binary addition 111 + 011, proceed as follows:
1. Arrange the bits vertically, and then add them from right to left like in decimal
numbers as shown below: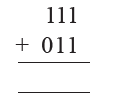
2. Start the add operation with the least significant digits on the right.
12 + 12 = 102 (write 0, and then carry 1)
3. Add the carry over digit from the previous step to the second least significant bit
to get:
12 + 12 + 12 = 112 (write 1, and then carry 1)
4. Finally, add the most significant bits, plus the carry over from the previous step
to get:
12 + 0 + 12 = 102, (write 10 because to this is is the leftmost)
Thus: 1112 + 0112 = 10102
The four steps are summarized in Table 5.25 below: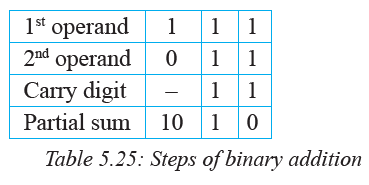
Activity 5.14: Binary addition
Workout binary addition of 001102 and 011012. Check if 100011 shown in Table 5.26
is the correct sum.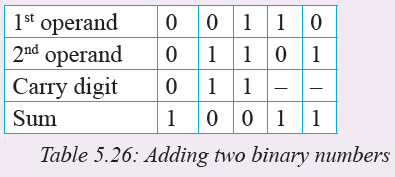
Activity 5.15: Binary addition
Find the sum of the following binary numbers: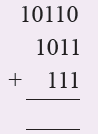
To find the sum of the three numbers, first add the two numbers, then add the partial
sum to the third number as follows: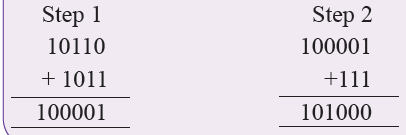
Assessment Exercise 5.8
Work out the following binary additions: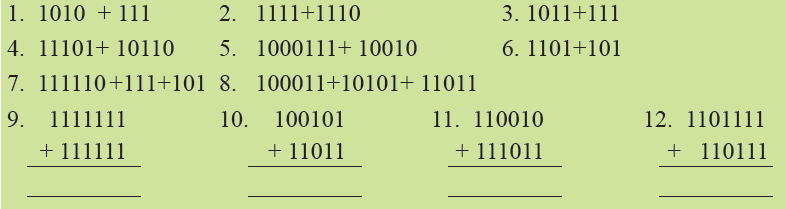
5.11.2 Binary subtraction
The four rules applied in binary subtraction are:
The following example illustrate binary subtraction using direct method:
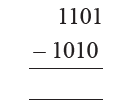
Starting from right to left, work out binary subtraction as follows:

Activity 5.16: Binary subtraction
Work out the following the binary difference:
(a) 100112 – 11002 (b) 10110 – 1011
(c) 101 – 100 (d) 10111 – 1111Assessment Exercise 5.9
Work out the following binary subtractions:
1. 11 001 2. 101 3. 11011 4. 1100 5. 111011
– 1 010 – 100 – 111 – 011 – 1106. 100010 – 11 7. 01101 – 1011 8. 11111111 – 10101101
9. 11101101 – 100111 10. 100000 – 1111Subtraction using one’s complements
Because a computer does not perform direct subtraction, one’s complement is an
alternative method used to find the difference of numbers. For example, to compute
5-3 using the ones complement, proceed as follows:
1. Rewrite the problem as 5 + (–3) to show that a computer performs subtraction
by adding 5 to ones complement of the decimal 3.
2. Convert the decimal number 3 to its 8-bit number, i.e., 000000112.
3. Convert 000000112 to ones complement, i.e., 111111002.
4. Convert the first operand i.e 5 from decimal to binary form. This gives us 00000101
in 8-bits.
5. Add the two binary numbers as shown below.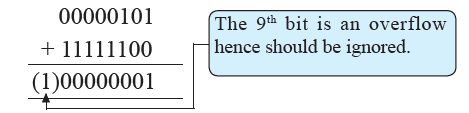
NB: We observe that the difference between the two numbers has nine bits instead
of the original 8. This extra bit is known as the overflow bit.Therefore, the result shows that the difference between 5 and 3 is 00000001; but
this is not true because the answer should be 00000010.
6. To get the correct answer, add the overflow bit back to the difference.
Thus the correct difference is:
00000001 + 1 = 00000010.Activity 5.17: Subtraction using ones compliments
Using 8 bits, find the ones complement of the negative decimal number -1310.
1. Convert the absolute value 1310 to an 8-bit binary number, 00001101.
2. Negate each bit such that zeros becomes 1’s and ones becomes 0’s to get
111100102. This represents -13 in binary form.Subtraction using twos complements
Like in one’s complement, the two’s complement of a number is obtained by negating
a positive number to negative number. For example to get the difference 5 – 3, using
the two’s complement, proceed as follows:
1. Rewrite the expression as addition of 5 + (–3).
2. Convert the absolute value of 3 into 8-bit binary equivalent i.e. 00000011.
4. Take the one’s complement of 00000011, that is 11111100.
5. Add 1 to the one’s complement i.e. 11111100+1 to get 11111101.
6. Convert 5 to binary and add it to two’s complement of 3 as follows:
NB: After adding the two numbers, the sum becomes a nine bit number. But because a computer can handle only 8 bits, the extra bit on the extreme left (most)
significant digit is referred to as overflow bit.
7. The bit in brackets is an overflow hence it should be ignored. Therefore, the
correct difference is 00000010.Activity 5.18: Subtraction using two’s complement
1. In terms of memory management, explain why an overflow bit resulting from
arithmetic operations is always discarded.
2. Using two’s complement, find the difference between the following decimal
numbers:
(a) 31-17 (b) 27-5
(c) 127-50 (d) 17-355.11.3 Binary Multiplication
The pen-and-paper method of binary multiplication is quite similar to that used in
decimal numbers only that the multipliers are 0s and 1s. In binary multiplications,
the four rules applied from right to left are: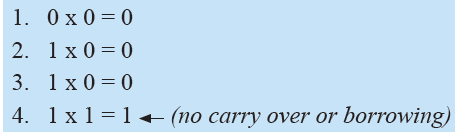
For example, to perform binary multiplication 1011 x 101, proceed as follows:
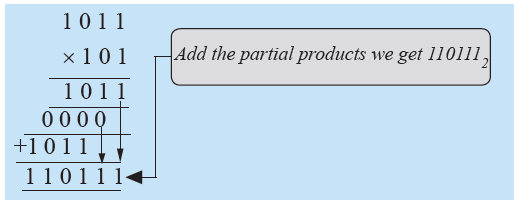
Explanation
1. Multiply the first multiplication with each digit of the second multiplication.
2. Shift the partial products to the left.
3. Add the partial products as follows:
1011 + 0000 + 1011 = 1101112Activity 5.19: Binary Multiplication
Perform the following binary multiplications:
(a) 101101 x 110
(b) 101101 x 111
(c) 1011.01 x 110.15.11.4 Binary Division
Binary division is a shift and subtract operation. In each step, the dividend is grouped
into bits which are divisible by the divisor, and then subtracted. For example, to
perform division of 101012 ÷ 112 proceed as follows: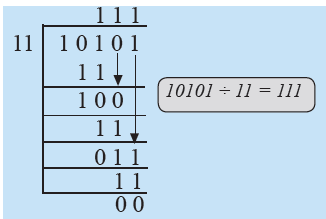
Explanation
1. Group the dividend into bits divisible by the divisor starting from left to right,
and then subtract.
2. Write down the quotient and the divisor from the dividend.
3. Drop down the next digit and check if the dividend is divisible by the divisor.
4. Continue until the resulting dividend is zero or not divisible.
Taking another example of binary division, let us workout 11100110÷110.
Therefore, 11100110÷110 = 100110 remainder 10
Activity 5.20: Binary division
Perform the following binary divisions:
(a) 1011 ÷ 11 (b) 10011 ÷ 101 (c) 1111 ÷ 11 (d) 11 ÷ 11Assessment Exercise 5.10
1. Convert the decimal number –7 to an 8-bit binary number using twos complement.
2. Using 16-bit word, find the two’s complement of the following decimal numbers:
(a) –3110 (b) –2810 (c) –510
3. Convert the following expressions to binary form and perform the operations
using one’s and two’s complement.
(a) 14 – 7 (b) 28 – 12 (c) 34 – 33 (d) 100– 50Unit Test 5
1. Differentiate between the following number systems:
(a) Octal and decimal number system.
(b) Binary and hexadecimal number systems.
2. Convert the following binary numbers to decimal form:
(a) 1011102 (b) 1010112 (c) 01102
3. Convert the following decimal numbers to binary form:
(a) 78910 (b) 57010 (c) 4210
4. Calculate the sum of the following binary expressions:
(a) 11102 + 11112 (b) 0012 + 1002 (c) 11012 + 10112 + 1002
5. Using ones and twos complement, workout the following arithmetic:
(a) 11001 – 1101 (b) 1000 – 101 (c) 100011 – 111
(d) 10101110 – 100110 (e) 10100110 – 101 (e) 111011 – 101
6. Using one’s and two’s complement, convert the following decimal numbers to
binary form:
(a) – 7510 (b) – 8010 (c) –10010
7. Determine the value of k in the following binary arithmetic operations:
(a) 100110 – k = 0010102
(b) k × 11012 = 10000012
8. Work out the decimal equivalents of the following binary numbers:
(a) 0.10010 (b) 101.11 (c) 11.101 (d) 0.001
9. Find binary equivalents of the following decimal numbers:
(a) 0.35 (b) 2.50 (c) 65.20 (d) 17.125Unit 6:BOOLEAN ALGEBRA AND LOGIC GATES
Key Unit Competency
By the end of this unit, you should be able to:
1. Identify different logic gates, theorems of boolean algebra and
evaluate boolean expressions.
2. Utilise laws of boolean algebra on boolean expressions and draw a
simple logic circuit using logic gates.Unit Outline
• Circuits and Logic gates.
• Logic gates.
• Truth tables
• Solving problems using logic circuits
• Boolean Algebra.
• Sum of Product (SOP) and Product of Sum (POS)Introduction
As you may be aware, most modern computers are digital and they use binary logic
to process data which is represented as a series of 0’s and 1’s. In this chapter, we start
by looking at simple logic circuits that form the fundamental building blocks of data
processing in computers. We then briefly look at boolean algebra and its connection
to logic reasoning.6.1 Circuits
Activity 6.1: Switching a torch on and off
Hold a torch. Switch it ON. After a while, switch it OFF. What do you think makes
the torch to give light when you move the switch to the ON position?Simplic circuits representing logic gates
Before we look at logic gates, let us try to represent basic logic operations using an
arrangement of switches that can control the states of a light bulb, either to go ON
or OFF. Figure 6.1 shows a normal simple electrical circuit: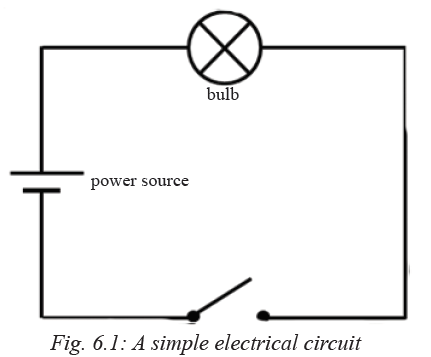
In Figure 6.1 above, when the switch is OPEN (state 0) the bulb is OFF (state 0) too.
When the switch is closed (state 1) then the bulb comes ON (state 1) too because
there is flow of electricity in the circuit.6.1.1 NOT circuit
Now study Figure 6.2 below. You will notice that it has a different arrangement. In
this circuit, when switch A is open, the bulb comes ON since there is a complete
flow of electrical current in the circuit. However, when A is closed, the bulb finds
itself in between two +ve opposing voltages that are equal to each other so it goes
OFF. Therefore, when the state of the switch is 1, that of the bulb is at 0. This is a
generally referred to as the inversion or NOT operation i.e. it inverts the input from
1 to 0 and vice versa.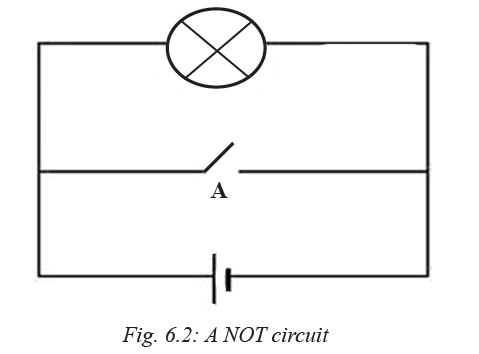
6.1.2 AND circuit
In Figure 6.3 below, both switch A AND B must be closed (in state 1) before the bulb can light. If either or both switches are open, the bulb is also OFF. This circuit represents the AND logic where all the switches must be closed in order to light the bulb.
6.1.3 OR Logic
Figure 6.4 below shows a circuit that represents the OR logic. In this case if either switch A OR B is closed, the bulb will light. The bulb will be off only if both switches A and B are open at the same time.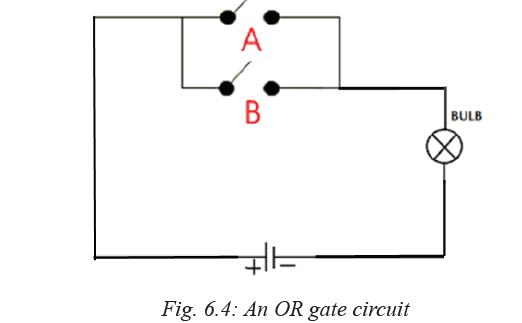
6.2 Logic gates
A logic gate is the basic building block of a digital circuit. A digital circuit is one that can only be in one of two states at any one time, either ON or OFF. An ON means there is high voltage in the circuit while an OFF means zero or no voltage in the circuit. It usually has an input side (with one, two or more inputs) and a single output. The input(s) can receive either ON or OFF signals usually represented by 1 or 0 then depending on the logic within the gate, the output can either be 1 (one) or 0 (zero). Although a single logic gate is simple, many of them are combined together into a complex maze to enable complex circuits which process data in the computer at the low level depending on the type of signals that are input.Basic logic gates
There are quite a number of different logic gates. However, the basic ones are shown
in table 6.1 below. Before discussing each one of them, take note of their names and
drawing. You should be able to identify and/or draw the representation of a particular
gate.
6.3 Truth tables
A truth table is a mathematical table used in boolean algebra or propositional logic to
compute the outcome of all possible combinations of input values i.e. it can be used
to tell whether an expression is valid for all legitimate input values. For example,
if the inputs A and B can take values 0 and 1; then possible combinations for inputs
(A,B) are {(0,0), ),(0,1), (1,0) and (1,1)}.
Assuming Q is the output, each logic gate gives different outputs based on the
combination of these values (see Figure 6.2).
The truth tables are important because they help us to know the output of each
individual gate given certain inputs hence we can use them to construct more complex
logic circuits that can solve real problems.
Given a particular truth table, it should be possible for you to know which logic gate
or combination of logic gates produced it. An increase in the number of logic gates
also expands the truth table.Truth tables for various logic gates
Based on the characteristics of individual logic gates discussed in Table 6.1, we can
be able to investigate the behaviour of each gate when a combination of inputs are
used. For the sake of simplicity, we look at gates that have only two inputs and one
output. We accomplish this by constructing truth tables. A truth table arranges all
possible input combinations and their relevant outputs (Figure 6.5). In this case, A
and B represent inputs to the logic gate while Q the output.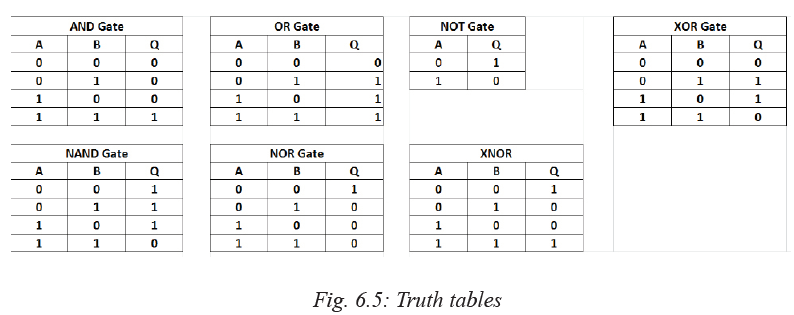
Activity 6.2: ICs and their internal logic gate structure
Groupwork:
The integrated circuits (ICs) that we have in our electronic devices like radios,
televisions, mobile phones, tablets and computers look like the pictures in Figure
6.6 (a). The internal structure of some of such ICs is shown in Figure 6.6(b)(i) and
(ii). Study them then answer the questions that follow: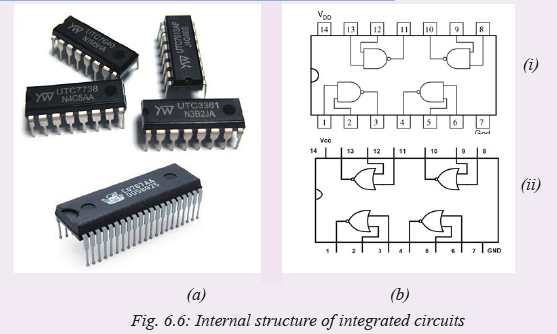
1. Identify the gates that are found in each of the ICs (i) and (ii) above.
2. In IC (i): If a high voltage signal is fed at pin 13 and a low voltage signal at pin 12, what will be the output at pin 11?
3. In IC (ii): If a low voltage signal is at pin 2 and 3, what will be the output at pin 1?Activity 6.3: Example of coming up with truth tables
Individual work:
Study the following logic circuit in Figure 6.7. Construct a truth table for the circuit.
Do not look at the provided solution first.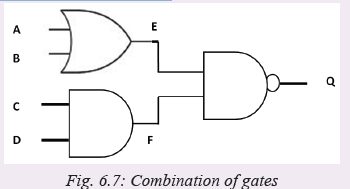
Solution: Notice that the logic circuit has four inputs. This expands the different input
combinations to 16 i.e: (A,B,C,D) = {(0000),(0001),(0010),(0011),(0100),(0101),(0
110),(0111),(1000),(1001),(1010),(1011),(1100),(1101),(1110),(1111)}.
How to work out the solution:
1. Start by looking at the inputs A and B. Remember that for an OR gate, if either
of them or both of them are 1 then the output E will be 1 otherwise it would be 0.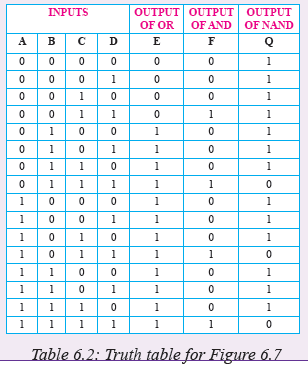
2. Move to the inputs C and D. Remember again that for an AND gate both inputs
need to be 1 in order for the output F to be 1 otherwise all other combinations
produce output F = 0.
3. Lastly, E and F are inputs to the NAND gate. For Q to be 0 then both E and F
must be 1 otherwise Q will be 1 in all other combinations. Therefore, the truth
table for the circuit in Fig. 6.7 is as shown in Table 6.2:Activity 6.4: Example of logic gate identification from given truth table
Pair Work:
Given the following truth tables (Table 6.3), draw and name the logic gate or combination of logic gates that can produce them. Assume A,B are inputs while Q is
the output. Try to answer before looking at the solution.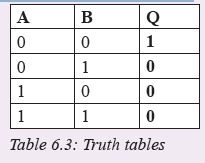
Solutions
(a) Looking at the truth table, the gate has two inputs. The output of the gate resembles
that one of an OR gate followed by a NOT gate. Hence, this is a NOR gate
(Figure 6.8).
6.4 Solving problems using logic circuits
Many problems in mathematics and computer science are solved through two valued
logic; every statement is either True or False (1 or 0). In life, problems are solved
by logically thinking through all possible courses of action and coming up with a
conclusion of the best way to solve the problem. In coming up with the solution, the
logician comes up with all valid arguments. Logical statements that describe problems
can therefore be solved using logical circuits or their equivalent truth tables.Activity 6.5: Example of using logic gates to construct a light switch
Think of a situation where you are requested to use the appropropriate logic gate(s) to construct a light switch i.e. when the switch is ON (True), the light is ON (True)
too; but when the switch is OFF (False), position of the light goes OFF (False) too.Solution
This is typically two NOT gates arranged one after the other. The truth table for the circuit will be as follows:
Activity 6.6: Solving real life problems
Groupwork:
In groups of four, try to find the solution to this problem. Do not look at the solution
provided first.
An alarm bell uses three sensors to determine whether it should sound or not. Two
sensors A and B are inside the room while C is hidden somewhere outside the room.
If either sensor A or B or both detect motion in the room and C never reported sensing
motion outside, then the system knows that there is an intruder. An ON signal is sent
to the bell and the bell rings loudly. Only authorised persons know where sensor C is
hidden outside the room. To safely enter the room, they have to follow a procedure i.e.
start by standing in front of C for the system to sense their presence before entering
the room. In that case all the sensors A, B and C will have detected the presence of
an authorised person, therefore, no signal will be sent to the alarm for it to ring. In
essence, as long as C detects motion, the alarm assumes that the person entering the
room is not an intruder. Draw a logic circuit that would represent this logic and do
a truth table for it.Solution
We have to start by reasoning based on the logic gates possible inputs and outputs.
Let us start by assuming the alarm has three inputs A, B and C. This means one of
the gates has one input - hence it must be a NOT gate! Let us make the following
assumptions when reasoning about the inputs A, B and C; and output X.
1. If a sensor senses motion then there is a 1 signal at the sensor. If there is no
motion, there is a 0 signal at the sensor.
2. If X = 1, the alarm bell rings otherwise it does not ring.We start by constructing a truth table for the alarm circuit based on all possible
combinations of inputs A,B and C and expected output X as shown in Table 6.4 (a)
below. What we know is that for all instances where C = 1, then X = 0 i.e. when C
detects motion the alarm bell will not ring even if A and B detect motion.
We also know that where either A or B or both are 1(detect motion) and C = 0 then
X = 1. Of course where both A and B are 0 then X = 0 too since there is no intruder!
We can then fill in the gaps as shown in Table 6.4(b).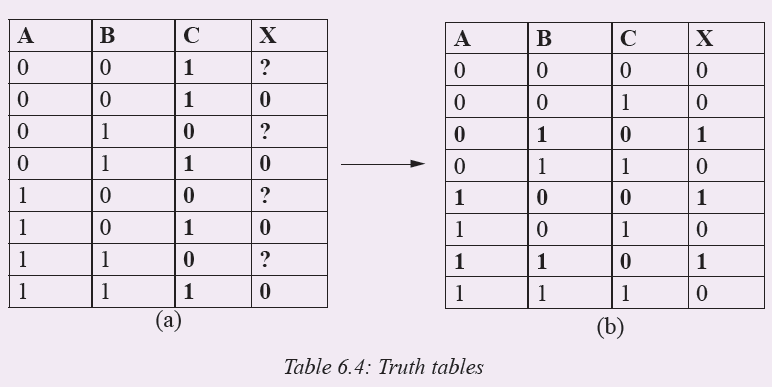
We can now construct a possible configuration of gates using a block diagram. All
we know for now is that one of the gates is a NOT gate. Let us conveniently assume
that the one on which sensor C is attached is our NOT gate. Looking at truth Table 6.4
(b) we can conclude that the output X of gate G2 depends on the output of the NOT
gate (E) together with that of G1 (D). Ideally, we keep remembering that whenever
E = 0, then X = 0.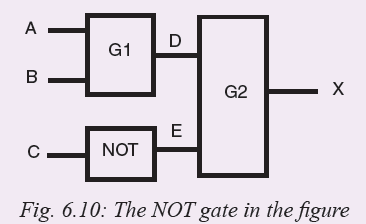
Let us expand the truth table (b) above, based on the knowledge we have to include
the outputs D and E. We can reason analytically to see whether we can finally find
out what type of logic gate G1 and G2 are: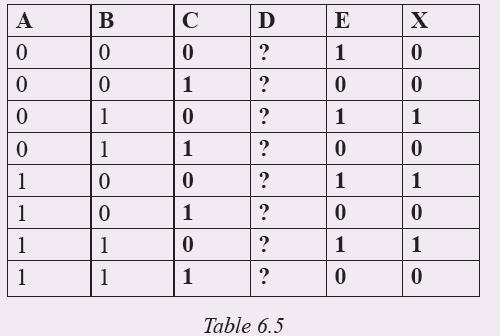
We take notice that every time either A or B or both are 1 then X = 1 only where E=1.
Therefore G2 behaves like an AND gate while G1 like an OR gate!! We sketch the
circuit (Figure 6.11) and verify it using a truth table:
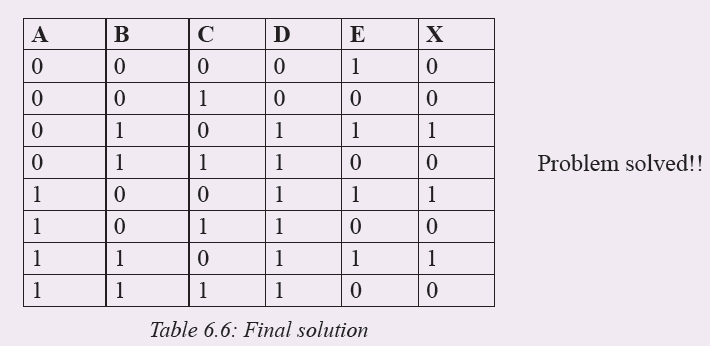
Assessment Exercise 6.1
1. Define a logic gate.
2. What is a logic circuits truth table?3. Assuming that a NOT gate has an input 0, what will be its output?
4. Draw a NOT gate. Draw its truth table.
5. Assuming that an OR gate has one input at 1 and the other one at 0.
What will be its output?
6. Draw an OR gate. Draw its truth table.
7. What is the difference between an OR gate and a NOR gate.
8. Draw a NOR gate. Draw its truth table.
9. Differentiate between an AND and NAND gate.
10. Draw a NAND gate and its truth table.
11. Draw an XOR gate and its truth table.
12. Draw an XNOR gate and its truth table.
13. Develop truth tables for the following logic circuits (Fig. 6.12):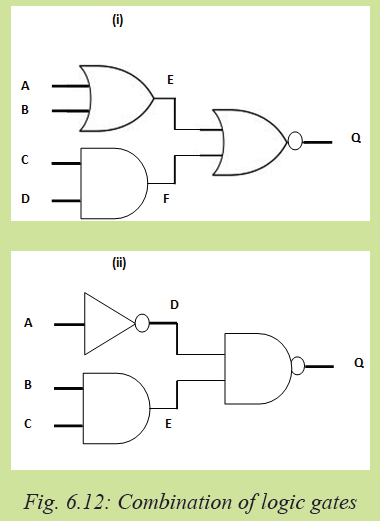
14. A company would like to come up with a logic circuit to monitor what is
happening in the boiler and get a warning well in advance before the situation
goes out of control. If the pressure (A), temperature (B) and humidity (C) are
low, then a signal is sent to the operator that there is something wrong with the
system. Similarly, if either pressure or temperature is high and the other low,
and the humidity is low, a signal will be sent to the operator. Develop a truth
table for this and draw the equivalent logic circuit.6.5 Boolean algebra
Boolean algebra was invented by George Boole in 1654. It can be used to automate the
manipulation of objects that control real life processes. This is because computers are
made up of digital switches that are either ON or OFF. Since the inputs and outcomes
of boolean algebra are either 1 or 0, it is a more natural way of representing digital
information or computing logic. The algebra is used to explain or solve problems
related to logic and digital circuits.6.5.1 Laws of boolean algebra
Boolean operations revolve around boolean operators. A boolean operator takes two
inputs of either 1 or 0 and output a single value also either 1 or 0.
There are several laws of boolean algebra. The most common operators that are used
to manipulate the various logic elements are the OR (+) and the AND(•) e.g.
A + B means A OR B.
A•B means A AND B or mostly just written as AB without the (•) symbol.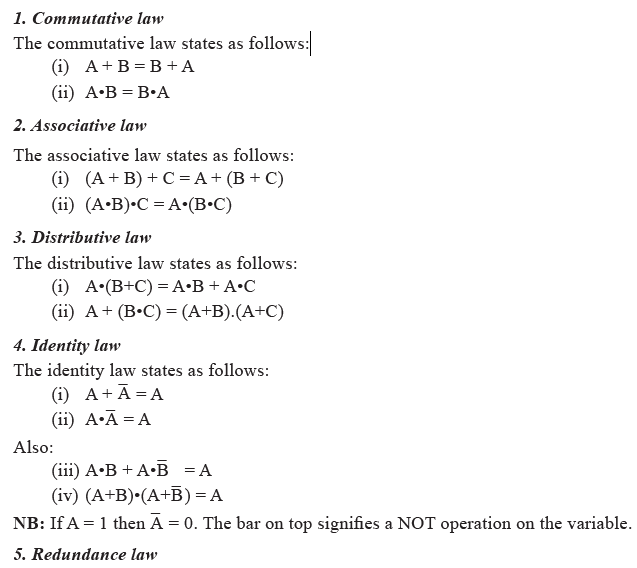
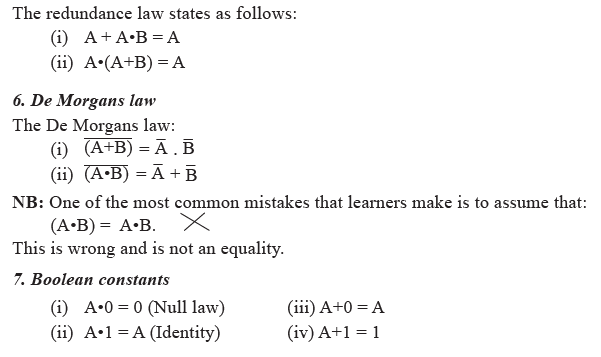
6.5.2 Boolean algebra simplification
Using the above laws, both simple and complicated boolean expressions and logic
circuits can be simplified and solved. Truth tables for the expressions are used to
come up with relevant solutions.
In normal algebra, it is possible to simplify complex expressions like 9x + 3y – 2x + 4y to their simplest forms like 7x + 7y i.e.
9x + 3y - 2x + 4y = 9x - 2x + 4y + 3y (simple rearrangement)
= 7x + 7y
Similarly, the boolean laws stated above can be used to simplify complex boolean
expressions. It is often the case that a complex boolean equation has to be simplified
into its simpler exact equivalent. This becomes very useful when one is designing
circuits and wants to minimise the number of gates needed to build the circuit. There
are two methods of simplifying boolean expressions:
1. Using truth tables.
2. Using boolean algebra which entails applying identities and De-Morgans law.
In this book, we shall rely on these laws as stated in section 6.5.1 and on truth tables.Activity 6.7: Boolean algebra example
Individual Work:
Study the example given below: Do the workings too as presented below.
Simplify the following boolean expression: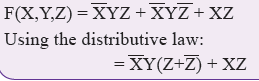

We can check using truth tables whether the complex form of the expression is
equivalent to the simplified form. The truth table for the complex form of the equation
is given below: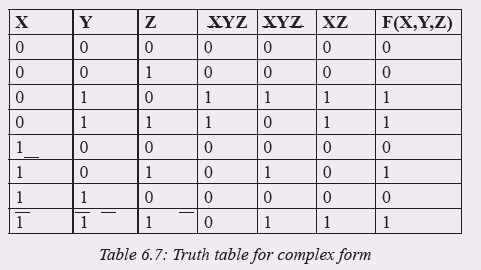
Let us look at row 1 to know how we are computing the values:
XYZ = 1•0•0 = 0 (remember for AND all have to be 1 to get a 1) i.e. on row
1 column 1, X; = on row 1 column 2 Y =0 and on row 1 column 3 Z = 0
XYZ = 1•0•1 = 0 (remember if A = 0 then A = 1)
XY = 0•0 = 0
F(X,Y,Z) = 0 + 0 + 0 = 0 (for row 1; remember OR gate)
F(X,Y,Z) = 0 + 1+ 0 = 1 (for row 3; remember OR gate if one of the
inputs is 1 the output is 1)
Let us now do the same with the simplified expression:
F(X,Y,Z) = XY + XZ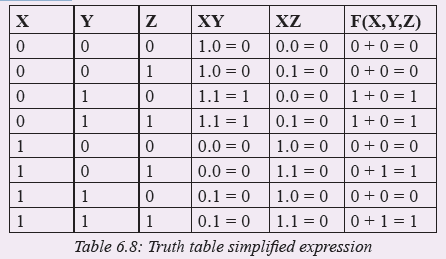
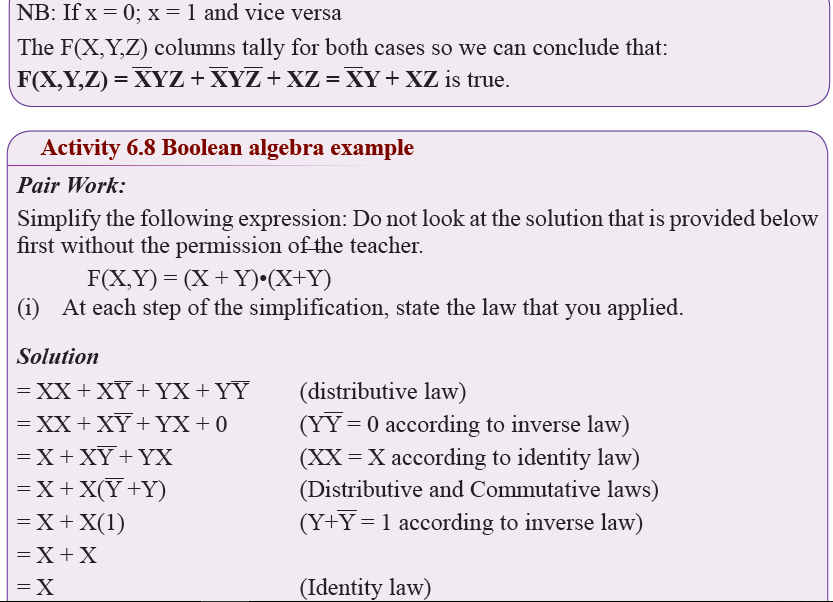
6.6 Sum of Product (SOP) and Product of Sum (POS)
Using truth tables to simplify boolean equations is good and straight forward.
However, when the logic circuits become more complex with more inputs, truth tables
become very cumbersome. It is desired therefore to find a better way of representing
logic in such scenarios. We use a standard form of boolean equations known as the
canonical form written in SOP or POS format. The SOP and POS equations help
a person to quickly derive solutions from a given logic table and come up with
equivalent logic circuits.6.6.1 Sum of products
We have so far seen that given a boolean value A, we assume that A = 1 and its
complement is A = 0. Conventionally, we can write a boolean expression which has
three variables in the following form:
F(A,B,C) = ABC + ABC + ABC
This kind of expression has three groups of the products of the variables A, B and
C (AND operations) which are summed together (ORed). We therefore call such an
expression a sum of products (SOP). Each term in the equation is called a minterme.g. ABC is one of the three minterms. However, note that the domain of three binary
variables is capable of generating eight different minterms but only three were chosen
for the above equation. We are going to see how such equations are generated from
truth tables.
In the SOP arrangement, the AND operations have precedence over the OR operations.
That means we first AND the terms in the minterms before we do the OR operations.
When representing minterms, we use a shorthand designation e.g. mx where x = 0,
1, 2 . . . n. For example, in the above domain where we have three binary variables
we can generate the following truth table.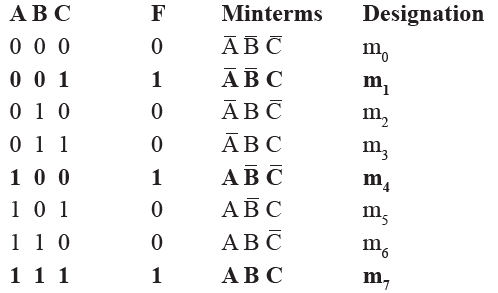
The minterms column represents the values of each variable A, B, C in the truth table
e.g. if A = 1 then we write it as A; If A = 0 we write it as A¯ in the minterm.
The values in the column F are user defined depending on how you wish your circuit
to behave i.e. in this case we want our circuit to give a 1 output if and only if:
¯A¯BC, AB¯C¯, ABC (i.e. check the rows where F = 1 as bolded in the table).
To create an equation that represents the required logic, we OR these minterms:
F(A,B,C) = ¯A¯BC + AB¯C¯ + ABC . . . . . . . . . . . . . . . . . . . . . . . . . . . . . . . (1)
This equation can be written using the designations as:
F = m1 + m4 + m7 as long as we have constructed the truth table
correctly and we know the variable combinations for each mx.NB: From the Equation 1 above, we can now be able to construct a logic circuit
that meets the conditions set by the equation. This method of coming up with logic
circuits is far much more easier. It means we can be able to work with a truth table
that has an arbitrary number of input variables and come up with simplified boolean
expressions which can then be used to construct logic circuits that meet the criteria set.Constructing an equivalent logic circuit
Let us now construct an equivalent logic circuit for Equation 1. We can quicklyunderstand each of the minterm combinations as follows:
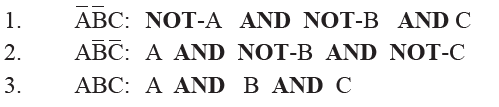
This means if you wish to create the logic circuit, you need three AND gates each
with three inputs for each of the variables in the minterms. The three outputs of the
AND gates then become inputs to a single OR gate of three inputs (remember you
have to OR the minterms). However, notice that we include a NOT gate on any input
that has a NOT operator in order to fulfill the required criteria (Figure 6.13).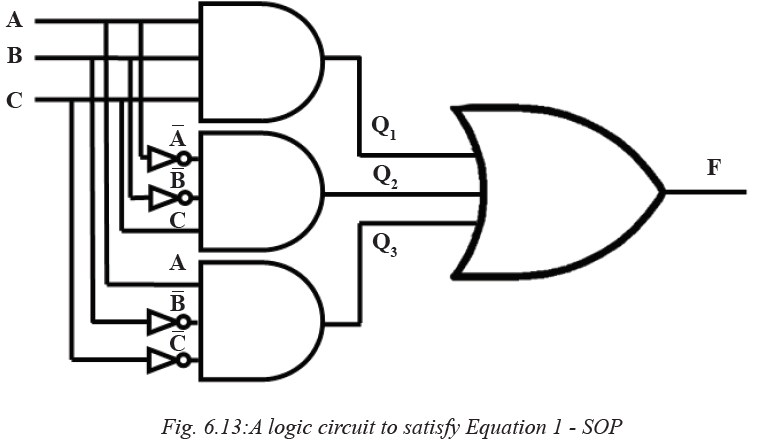
To verify whether the circuit meets the requirements of Equation 1, we can draw a
truth table to find out if we get a 1 output only at m1, m4 and m7 as is in Table .Activity 6.9: Verifying the logic circuit in Figure 6.13
Draw the truth table for the logic circuit in Figure 6.13. Discuss the outcome with
other students in the class as the teacher guides. Does your truth table have 1 outputs
in column F at m1, m4 and m7?6.6.2 Product of sums (POS)
The product of sums (POS) takes every combination of variables in the domain
and performs an OR operation. The OR operations are then ANDed. Each valid
combination is called a Maxterm and is designated as Mx where x = 1, 2, 3 . . . n.
The OR operations take precedence over the AND operations here. For example, if
we have a domain of three binary variables we can generate the following truth table: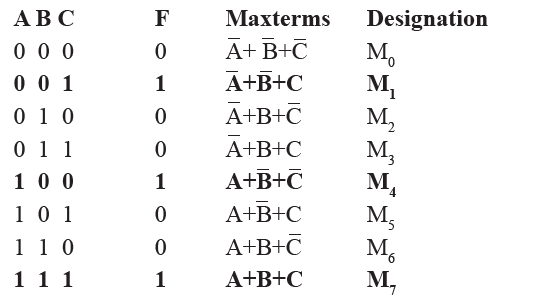
In this case, we can pick only those maxterms where the value of our function F = 1.
The maxterms can then be ANDed together as follows:
F(A,B,C) = (A¯+B¯+C)•(A+B¯+C¯)•(A+B+C) . . . . . . . . . . . . . . . . . . . . . . . . (2)
In order to design a logic circuit that will meet the criteria set by Equation 2, we
need three OR gates each with three inputs A, B and C. The output of the OR gates
can then be fed into an AND gate as shown in Figure 6.14.
Activity 6.10: Verifying the logic circuit in Figure 6.14
Draw the truth table for the logic circuit in Figure 6.14. Discuss the outcome with
other students in the class as the teacher guides. Does your truth table have 1 outputs
in column F at M1, M4 and M7?
Notice that as you work out the truth table for the logic circuit in Fig 6.14, all the
three OR gates need to give an output of 1 each i.e. Q1, Q2 and Q3 should all be equal
to 1 in order for the AND gate to give output of F = 1.Activity 6.11: Applying SOP and POS example
An air traffic control system controls the landing and taking off of aircrafts at the
airport. The system uses four input variables to determine whether an aircraft should
land or take off:
A: The direction and speed of the wind must be favourable.
B: The runway lights must be ON and clearly visible.
C: The runway must be clear and should not be slippery.
D: The pilot must be alert and in good health.
The system can give a green light for landing/take off in the following circumstances:
1. If B, C and D are okey. The pilot can be instructed on direction of landing/takeoff.
2. If all A,B,C,D are okey.
3. For all other combinations, the system will not allow landing/takeoff.
Use the sum of products strategy to come up with a logic circuit that can deliver the
right decisions to the air controller.
We start by constructing the truth table: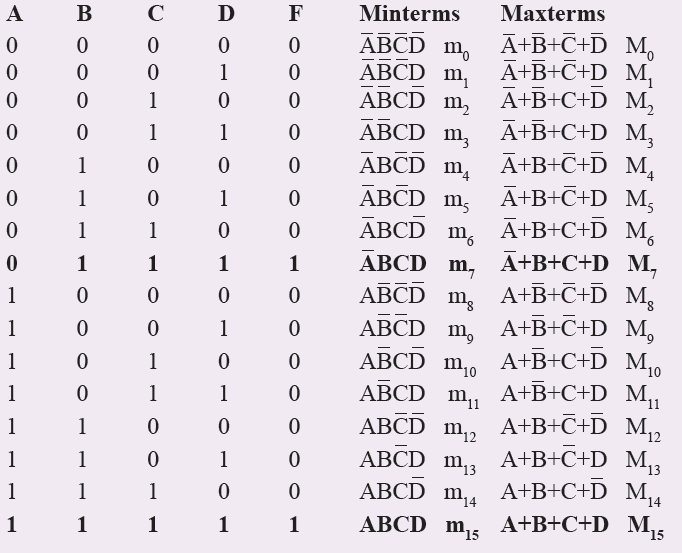
Notice that a four variable truth table is large. To satisfy the conditions 1,2 and 3
above, we set m7 and m15 as the only combination of the variables that will give us a
1 in the system i.e. the greenlight for a plane to land or take off. Following this, we
can then write the required equations as follows:

Equation 3 summarises the solution using the sum of products while Equation 4 uses the product of sums. After coming up with this equations, it is now possible to design logic circuits that would satisfy them. We shall develop the logic circuit for the sum of products. After that, we allow you to do the product of sums as an activity. Looking at Equation 3, we need two AND gates each with four inputs and one OR gate in order to come up with the equivalent logic circuit. The circuit is shown in
Figure 6.15.
Activity 6.12: POS logic circuit
Design the logic circuit for Equation 4 above. Share your solution with the rest of
the class.6.7 NAND and NOR as universal gates
Activity 6.13: NAND and NOR gates
Do some research about the NAND and NOR gates. Sketch them. Draw a two variable
truth table for each one of them. Present your work to the class.
Now look at Figure 6.13, 6.14 and 6.15. What gates have you used to create the logic
circuits with in all the examples and activities you have accomplished?We have discussed about different types of logic gates at the beginning of this chapter.
However, notice that the AND, NOT and OR gates are the most used when coming
up with logic circuits. Of course a combination of a NOT and AND gate creates a
NAND while that of a NOT and OR gates creates a NOR. Now NOR and NAND
gates have the unique property that any one of them can create and satisfy any logical
boolean expression if designed in a proper way. Hence we say that NAND and NOR
gates are universal gates.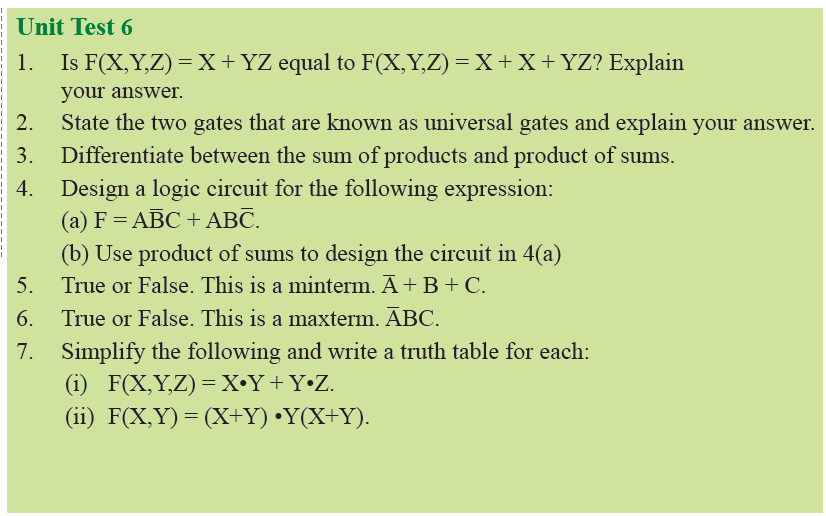
Unit 7:INTRODUCTION TO COMPUTER ALGORITHM
Key Unit Competency
By the end of the unit you should be able to:
• Identify appropriate steps to solve a problem.
• Identify an appropriate algorithm for a given problem.
• Represent graphically algorithm using flowchart.Unit Outline
• Algorithm concept.
• Design of algorithm.
• Variables.
• Constants.
• Operators and expressions.Introduction
Before developing a program, is it important that a programmer specifies the order in
which the set of instructions contained in the program are to be executed. This process
of defining the step-by-step procedure in which the instructions are to be executed is
known as algorithm design. In this unit, we begin by defining algorithm concepts
followed by discussion on tools used to design algorithms. Later, we demonstrate
how to express algorithm’s logic and concepts using pseudocode and flowcharts.7.1 Algorithm Concept
The term algorithm was derived from the name of the 9th century Persian
mathematician and astronomer Mohammed al-Khwarizmi. The concept has been
adapted in computer science to refer to a step-by-step procedure that specifies how
to perform a task or solve a problem. Therefore, a computer program is an algorithm
implemented using a programming language.
To ensure that an algorithm produces desired solution, a programmer is tasked with
the following roles:
1. Identify a problem that may be solved using a computer program.
2. Outline the social and technological factors that need to be considered before
converting the problem into a computer program.3. Provide possible solutions to a problem. This may be by means of using off-theshelf software or custom-made software.
7.1.1 Characteristics of Algorithm
A good algorithm is crucial to development of good computer programs. Some of
the characteristics of good algorithms include:
• Correctness: The goal during program design is to produce logical designs.
The design of a system is correct if the system satisfies user’s requirements. It
is the responsibility of a programmer to find the best possible design within the
limitations imposed by the requirements and environment in which the program
will be used.
• Verifiability: Verifiability is concerned with how easily the correctness of the
design can be checked. Design should be correct and it should be verified for
correctness.
• Completeness: Completeness requires that designs of different system
components be verified. This requires dry-running of system’s data structures,
modules, user interfaces, and module integration.
• Traceability: In order for a program to meet user’ needs and expectations, it is
important that the entire design be traceable from user requirements.
• Efficiency: Good design results in an efficient program that consumes less
processor time and memory space.
• Simplicity: Though a program may be complex, its simplicity is one of the most
important factors that influence its user-friendliness and ease of maintenance.
• Documentation: It is good practice to provide documentation containing details of a program algorithms.7.1.2 Role and Structure of algorithms
The role of algorithms is to support programmers in designing and implementing computer programs that solve a problem of importance. For example, consider a problem of finding the shortest route to travel between Kigali and Musanze. To solve such a problem, algorithm design follows a structured approach outlined below:
1. The programmer first analyses the problem to come up with problem specification as shown in Fig. 7.1. A problem specification defines input, processing and output required to solve the problem
2. Map the problem specification into an algorithm that defines the logic or
procedure for solving the problem.
3. Once an algorithm has been designed and tested against problem specifications,
implement it as a program using suitable programming languages.
4. Finally the program is installed on computers or portable devices to solve the
problem.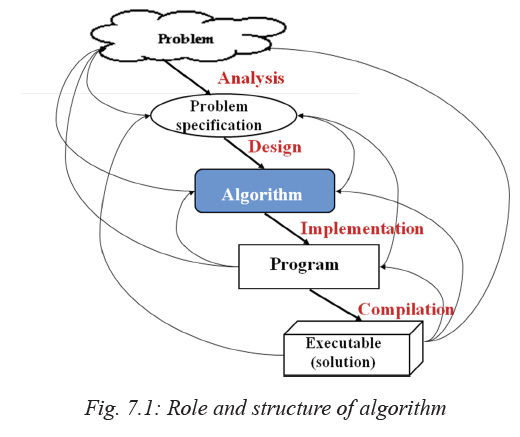
7.2 Design of Algorithms
Algorithms can be expressed in many ways such as using natural languages,
pseudocode, and flowcharts used for complex or technical algorithms. To avoid
ambiguities common in natural language statements, most programmers prefer using
structured design tools like pseudocode and flowcharts discussed in details later.7.2.1 Natural language
The term natural language refers to the ordinary language likes English or Kinyarwanda
used by human beings to communicate with each other in speech or writing. Because
an algorithm is a procedure for solving a problem, the natural languages can be used
to express the steps to be followed to solve a specific problem. For example, the
following is natural language algorithm for how to make a hot sauce:
1. Before you prepare a hot sauce, make sure you have garlic that is peeled and
chopped, fresh lime juice, distilled white, vinegar, olive oil, molasses, turmeric
and salt.
2. Now, combine the pepper, garlic, lime juice, vinegar, mustard, oil, molasses,
turmeric, and salt in a blender and puree until smooth. Correct the seasoning,
adding more salt or molasses to taste.
3. Transfer the sauce to a clean bottle. You can serve it right away, but the flavour
improves if you let it age for a few days.
The above ‘algorithm’ is a recipe, that is, a step-by-step instructions that takes raw
ingredients and produces a tasty product – hot sauce. However, one of the limitations
of such an algorithm is that it tends to be verbose or ambiguous. Furthermore, there
are different languages in the world which makes it difficult for an algorithm written
in a particular language to be universal. To avoid ambiguities inherent in natural
languages, there are language independent tools such as pseudocode and flowcharts discussed later in this section.Activity 7.1: Natural Language Algorithm
1. Consider a daily routine of waking up and going to class. Outline an algorithm
named “wakeup-to-class” starting with getting out of bed to attending the first
lesson of the day. If the routine is to be computerized, specify the order in which
statements are to be executed.
2. In groups, identify ingredients of preparing ibihaza or bugali. If the routine is to
be computerized, specifying the order in which statements are to be executed.
Discuss desirable qualities of recipe in terms of procedure for preparing the
product.
3. Consider a payroll program used to computer employee’s salary based on basic
salary, house allowance, commuter and overtime allowance. The basic salary is
based on eight hours per pay for five days a week. If monthly net salary is less
15% pay as you earn (PAYE) and 2.5% medical cover, perform the following
tasks:
• Using natural language such as English, develop an algorithm for a program
that calculates gross salary, net and total deductions.7.2.2 Pseudocode
Pseudocode is a standard method of describing an algorithm without use of any
specific programming language. The word pseudo means that although pseudocode
statements resemble real program code, it cannot be executed by a computer. The
purpose of pseudocode design is to help the programmers formulate their thoughts on
the organisation and sequence of a computer algorithm without the need of following
the actual coding syntax.
Although pseudocode is frequently used, there are no standard for its implementation.
In most cases, we borrow keywords such as PRINT, WRITE, INPUT, and READ
from programming languages like FORTRAN and Pascal to express an algorithm as
a pseudocode. For example, Fig. 7.2 depicts pseudocode that takes radius as input
to calculate and display area of a circle: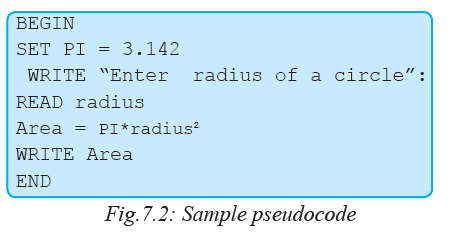
To avoid ambiguity experienced with the use of natural languages, the following are
basic rules to be followed when writing pseudocode:
1. Pseudocode statements should be short, clear and readable.2. The statements must not have more than one meaning i.e. should be unambiguous.
3. The pseudocode lines should be clearly outlined and identified clearly.
4. A pseudocode should show clearly the start and stop of executable statements
5. Input, output and processing statements should be clearly stated, using keywords
such as PRINT, READ, INPUT etc.Advantages of using pseudocode
The following are some the advantages of using pseudocode to express an algorithm:
1. Pseudocode is easy to use and create because it uses English-like statements.
2. Pseudocode requires very little syntax to write.
3. Statements of a Pseudocode can easily be translated to any high-level language.
4. Pseudocode reduces time spent in coding, testing, and modifying a system.
5. Pseudocode implements structured concepts in a better wayActivity 7.2: Expressing Algorithm using pseudocode
Neza deposited FRW 200 000 in a bank at interest rate of 8% per annum for a period
of five years. At the end of each year, the interest earned is added to the deposit and
the new amount becomes the deposit for that year. Formulate a pseudocode that
would be used to track growth of the investment.7.2.3 Flowcharts
A flowchart is a diagrammatic or symbolic representation of step-by-step solution to a given problem. Flowcharts use standard symbols that help programmers visualize input, processing and output operations to be performed by a computer program. Unlike natural languages and pseudocode, use of standardised symbols makes the flowcharts easier to interpret hence more universally acceptable. Table 7.1 below gives a brief description of six standard symbols used to create flowcharts.
The example shown in Fig. 7.3 depicts a flowchart that takes radius as input
to calculate and display area of a circle.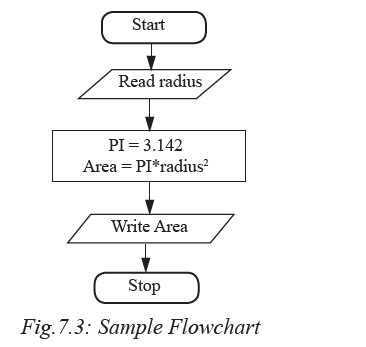
Explanation
1. The first symbol indicates start of the flowchart.
2. The parallelogram (second symbol) indicates the algorithm takes radius as input.
3. The rectangle indicates that:
(i) Pi is assigned constant 3.142
(ii) The area is calculated as Pi × radius2
4. The fourth box display Area as output
5. The last symbol is the exit.
The following are general rules that may be followed when expressing an algorithm
using flowchart:
1. Be sure to use the right symbol for the right purpose. For examples it is wrong
to use a terminal symbol for input.
2. All the symbols of a flowchart should be connected using arrows (flow lines)
and not plain lines.
3. The direction of flow should be from top to bottom, or sides depending on the
page layout.
4. The start and end of a flowchart must be indicated with (start/stop) terminal
symbol.
5. Flowchart should have only one entry point at the top and one exit point at the
bottom or side.
6. The decision symbol should have only two exit points for either true or false
on the sides, or bottom and one side.
7. If a flowchart does not fit one page or column, use connectors to indicate breaks
in the flowchartAdvantages of using flowcharts
The following are some the advantages of using flowcharts to express an algorithm:
1. Flowcharts are better way of communicating the system logic.
2. With a flowchart, problem can be analysed in a more effective way.
3. Graphical representation of design serves as good program documentation.
4. Flowchart makes it easier to debug and maintain a program.Activity 7.3: Expressing algorithm using flowcharts
1. Given that more emphases in algorithm design is on use of flowcharts and pseudocodes, differentiate the two algorithm design tools giving advantages of each.
2. Consider Neza’s case of FRW 200 000 deposit in a bank at interest rate of 8% per annum for a period of five years. Revisit the problem in Activity 7.2 and design a flowchart that would be used to keep track of interest earned each year.Assessment Exercise 7.1
1. Distinguish between pseudocode and flowchart. In each case, give advantages and disadvantages.
2. Jane wanted to design an examination system to be used in her school. Advise her on three algorithm design tools she may use.
3. Using illustrations, explain at least four standard symbols used in flowchart design.
4. In reference to decision flowcharts, differentiate between decision symbol and connector.
5. Explain three circumstances that may prompt a programmer to use a pseudocode instead of a flowchart.
6. State three advantages of using flowcharts over pseudocode in formulating an algorithm.
7. Hakizimana intends to automate library services starting with members registration. Draw a hierarchical diagram for the overall library system.7.3 Variables
A variable can be defined as a name also known as identifier that represents data values which can change. For example, in a mathematical problem of calculating area of a circle, radius can take any value as shown in table 7.2. Therefore, radius is an input variable while area is an output variable.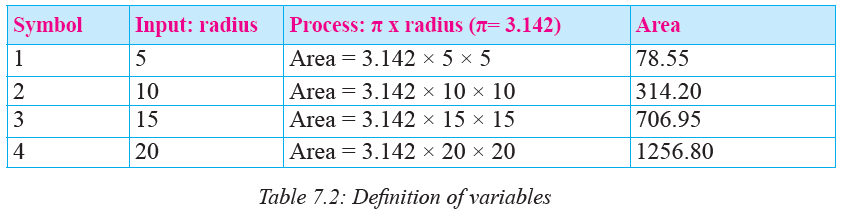
If this problem is solved using as a computer program, radius and area variables represents memory locations reserved to hold values that change during program execution as shown in the table.
7.3.1 Rules of Naming Variables and Keywords
The name given to variable is matter of choice by a programmer subject to the following rules:
1. Choose meaningful variable names that tell the reader of the program what the variable represents. For example, use sum instead of just s.
2. Each variable in the same algorithm should be identified using a unique name. For example you cannot use balls represent input, and balls to represent output
3. By convention, variable names should begin with a letter of the alphabet but may be followed by numbers. For example, use balls3 instead of 3balls.
4. Avoid using variable names that may conflict with reserved or keywords used in most programming languages.
5. Variable names made up of two or more words should not have space in between
the words, instead combine the two words or use an underscore. For example,
instead of using Basic Salary as variable name, use BasicSalary or Basic_salary.7.3.2 Declaration of Variables
Declaration of variable refers to identify and explicitly state input and output variables required to solve a problem. For example, suppose you are required to solve a problem of finding sum and average of three numbers. To identify and state input and output variable from the problem, proceed as follows:
1. Express the problem using natural language in order to identify input, processing and output requirements as shown below:
2. Identify a statement or statements that indicate input is required. In the above
algorithm, input is implied in the statement “Accept user input for 3 numbers.”
The statement implies that the user is expected to input numbers on the keyboard.3. Represent the input values as variables using symbolic names such as Num1,
Num2, and Num3.
Identify a statement or statements that indicate the algorithm provides output.
The algorithm indicates output using a statement “Display the reults.” Deeper
look at the algorithm points the result to calculated sum as average
4. Represent the output values as variables using symbolic names such as Sum,
Average
5. Rewrite the algorithm to indicate the input and output variables as shown below:
NB: Variable names should not have spaces between words. Instead use an underscore
to combine two words or start the next work with uppercase.7.3.3 Data types
In programming, data type determines the type of values that can be stored in a
variable. Most programming languages supports the following primary data types:
• Integers: Integers are whole numbers, which can either positive or negative
including zero. For example, 0, 5, -20, and 68 are integers.
• Real Numbers: These are numbers with a fractional part. Normally, the fractional
part follows a decimal point. For example, 68.67 is a real number.
• Character: Character data, sometimes referred to as “string” data, may consist
of any digits, letters of the alphabet or symbols which
• Boolean: Bolean data type is a type that can only take two values - true or fale.
In logic, the true value is represented by one (1) while false is represented by zero(0).
In addition to primary data types, most programming languages support composite
data types. A composite data type such as array, record and linked list is obtained by
combining several primary data types.7.3.4 Initialisation of Variables
Once a variable is declared it does not have a defined value, hence it cannot be used
until it is initialised by assigning it a value. Initialising a variable goes beyond
declaration to assign an initial value to a variable. For example, in our previous
algorithm, we can initialise variables Num1, Num2, Num3 with initial values as
shown below:
Input: Num1= 3, Num2 =5, Num3 =7,
The statement assigns the values to the variables such that if the algorithm is
implemented, the initial sum and average before any user input is calculated as:
Sum = 3+ 5 + 7; this returns 15
Average = 15/3; returns 5
Note that in a real program, if a variable has been declared but not initialised, the
memory location contains nothing, hence we say it holds a null until the user enters
values to be assigned to the variable. Fig. 7.4 shows how to initialise variables_A,
Temporary and Variable_B.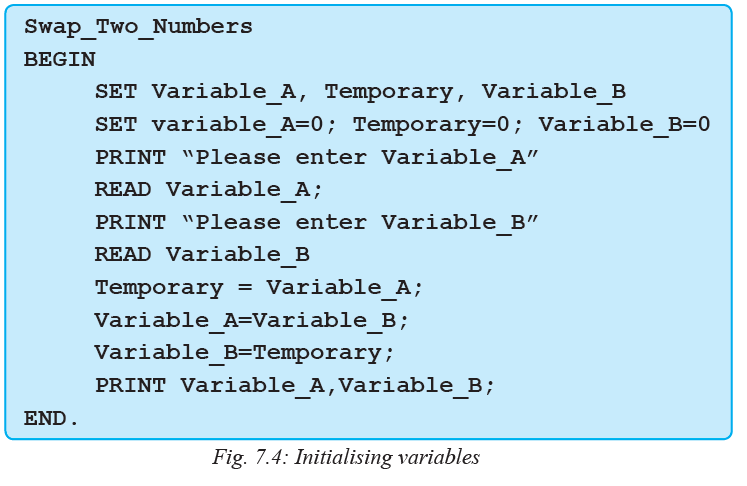
Activity 7.4: Declaring variables
1. In mathematics a variable is a symbolic number whose value is unknown yet.
Identify variables in the following algebraic expressions:
• y = mx + c
• ax2 + bx + c = 02. Study the pseudocode below and identify input and output variables. In each
case, indicate data type for each variable.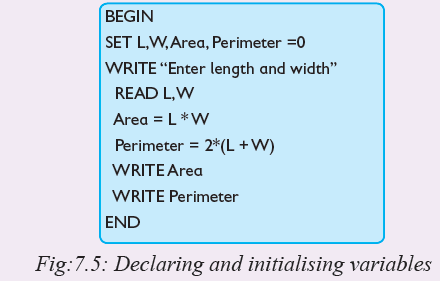
7.4 Constants
Unlike a variable which is an identifier for values that can change, a constant is a fixed value which cannot be changed. In mathematics and physics, examples of constants include pi (π), speed of light, and gravity. For example, referring back to the problem of calculating area of a circle discussed earlier, π is a constant whose value is 3.142. If implemented as a program, the value of π can never be changed during the program execution.Activity 7.5: Definition of constants
In mathematics and physics, a constant is a value that does not change. Study the algebraic expressions restated below and identify constants:
• y = mx + c
• ax2 + bx + c = 0Declaration of Constants
Declaring a constant refers to specifying a symbolic name for a value that cannot be changed during program execution.
In algorithm design constants may be declared as string or numeric constants.
A string constant is a sequence of characters such as “FRW 7200” that cannot
be manipulated mathematically while numeric constants such as 7200 can be
manipulated in a mathematical expressions. For example, to calculate area of a circle,
we can declare π (pi) as a numeric (constant) as follows:
• const double PI= 3.142
The pseudocode of Fig. 7.6 illustrates an algorithm in which TAXRATE and
DAILY_RATE are declared as numeric constants.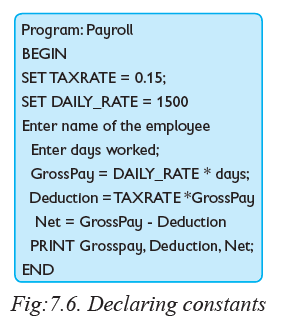
Activity 7.6: Declaring constants
Using internet, download introduction to C++ tutorials and familialise yourself with basic concepts. Using knowledge acquired from the tutorials explain the full meaning
of constant declaration const double PI= 3.142.7.5 Operators and Expressions
To write correct mathematical expressions, you need to understand operators used
in programming languages namely: assignment, arithmetic, relational, and logical operators.7.5.1 Assignment operators
The assignment operators such as (=) or (:=) causes the operand on the left side of the
operator to be replaced by the value on the right side. For example, in the following
expression, the value of x is replaced by the sum of a and b.
• x = a + bActivity 7.7: Operators and expressions
The order of evaluation of an arithmetic expression follows the rule known as
BODMAS. In a class discussion, brainstorm on how BODMAS relate to precedence
rule in evaluating the expressions.
x + y–10 × 13/y7.5.2 Arithmetic operators
Arithmetic operators are used to evaluate the four basic arithmetic operations: addition
(+), subtraction (-), division (/) and multiplication (*). In an expression such as 3+2,
addition operator adds the two operands to return a value, hence it is referred to as a
binary operator.7.5.3 Relational operators
Relational operators are used in boolean expressions that compares numeric or string
constants and returns a true or false. Such operators include: greater than (>), less
than (<), equal to ( =), less than or equal to (<=), greater than or equal to (>=), and
not equal to (< >). Relational operators are binary operators because they act on two
operands e.g. 5>3 that returns true.7.5.4 Logical operators
Logical operators derived from Boolean algebra are used on compound expressions
or conditions to return true or false. The three logical operators used in most
programming languages are AND, OR and NOT. Unlike AND and OR which are
binary operators, NOT is a unary like tild (~) in mathematics. This means that it
negates the operand on its right side; e.g. NOT true returns false.Activity 7.8: Logical operators
Consider a task of designing an automated alarm system that has the logic: “If the
door alarm sounds AND it is after six p.m. AND it is NOT a holiday, OR if it
is a weekend, then call the police.” Write a statement that would implement the
alarm logic7.5.5 Bitwise operators
Bitwise operators are similar to logical operators only that they are specifically used
to manipulate binary digits. The main Bitwise operators are AND, inclusive OR,
exclusive OR (XOR), NOT (~), binary left shift (<<), and binary right shift (>>).
Activity 7.9: Bitwise operators
1. Using sample expressions, distinguish between logical operators and bitwise
operators.
2. Study the truth table shown on Table 7.3 below and indicate values returned by
evaluating the expressions. Note that 1 is a binary value representing true and
0 represents false.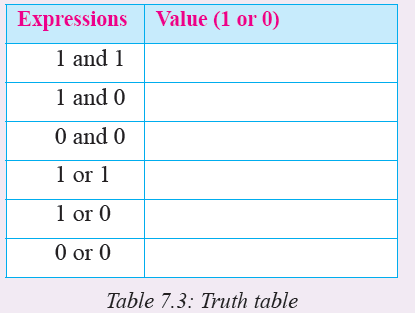
3. Design an algorithm for a program that would evaluate the following compound
statements:
• If (x = 30) AND (gender = “male”).
• IF (x = 20) OR (y <10).
• If (NOT false) OR (size > 5.4).7.5.6 Precedence of operators
Precedence of operators refers to established rule that assigns priority of each
operator used in an expression. For example, when writing complex expressions in
mathematics, we use precedence rule known as BODMAS that stands for Brackets,
Off, Division, Multiplication, Addition, and Subtraction. BODMAS rule means
that the highest priority is assigned to Bracket, with the lowest priority being assigned
to Subtraction. For example, in the expression below, unless we apply BODMAS
rule, the answer could be 6.5!
x = 5 + 8 ÷ 2
x = (5 + 8) ÷ 2 (if evaluated from left to right, we get 6.5)
x = 5 + (8 ÷ 2) (with BODMAS rule the result is 9)
Like BODMAS in mathematics, we use precedence rule in algorithms to assign
priority to each of the arithmetic, relational and logical operators. Table 7.4 shows
the order of precedence in each of the four categories from the highest to the lowest.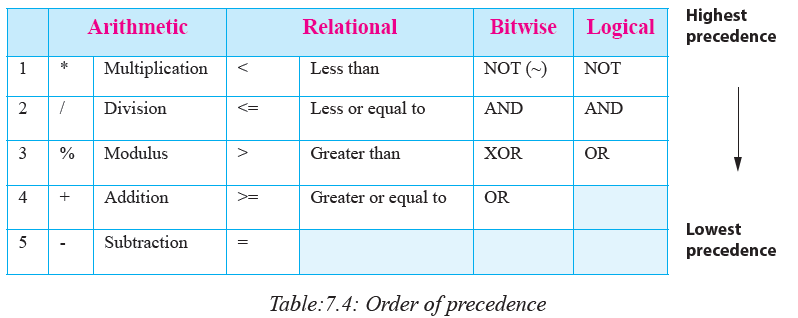
NB: In case an expression has multiplication and division such as 8*3/4, evaluation
is carries out from left to right.7.6 Read and Write functions
Functions are “self-contained” group of statements that accomplish a specific task.
In algorithms, the read function gets data from input devices like keyboard while
write functions prints output on devices such as screen.7.6.1 Read functions
To represent read functions in an algorithm, we use keywords like READ, INPUT, and
GET. For example, the following statements demonstrate how to use read functions
to get radius as input from keyword: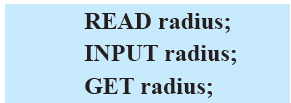
Good practice in algorithm design requires the READ functions to be in uppercase
while values to be read also known as parameters to be in lowercase. For clarity,
if a function is to read several paramenters, parenthesis may be used to enclose the
parameters as shown below: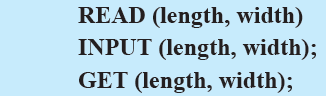
7.6.2 Write Functions
Like in read operations, we use keywords like WRITE, DISPLAY, and SHOW to
represent functions that display information on the screen. For example, the following
statements demonstrate how to display area on the screen:
For clarity, if a write function is to display several values, parenthesis may be used
to enclose the parameters as shown below: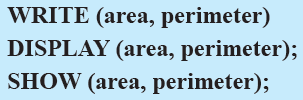
Activity 7.10: Read and write functions
1. Using read and write functions, formulate an algorithm that computes roots of
x from the following quadratic expressions = ax2 + bx + c.
2. Sebahive took a loan of FRW 400,000 from a local bank at interest rate of 12%
annually. Assuming the loan should be paid back in 4 years time, use read and
write functions in a pseudocode that computes monthly loan repayment.Assessment Exercise 7.2
1. Design an algorithm for a program that would be used to solve a quadratic equation:
y = ax2 + bx + c.
2. Design an algorithm for a program that would be used to compare three numbers
x, y and z, and then display the least among the three.
3. Differentiate between read function and write functions as used in algorithms.
4. Jere deposited FRW 200,000 in his savings account. The amount deposited earns
a 3% annual interest. Design an algorithm that would be used to calculate interest
after n years.Unit Test 7
1. Explain the following algorithm concepts:
(a) Precedence rule
(b) Variables
2. To get estimate the rate of fuel consumption, Lemba needs to calculate kilometres
per litre consumed by his car. Design an algorithm for a program that lets Lemba:
(a) Enter current fuel reading and after refilling.
(b) Enter kilometres and fuel reading after driving for at least 30 km on a highway.
The computer should then calculate and prints estimated consumption in km/
litre.
3. Draw a flowchart that prompts for five numbers, and then calculates sum and
average. The computer should display total sum and average of the five numbers.
4. Draw a flowchart that reads temperature for each day in a week, in celsius, converts
the celsius into fahrenheit and then calculate the average weekly temperatures.
The algorithm should display weekly average temperature in degrees fahrenheit.
5. Nyframahoro deposited FRW 2000 in a Micro-finance company at an interest rate
of 20% per annum. At the end of each year, the interest earned is added to the
deposit and the new amount becomes the deposit for that year. Draw a flowchart
that would track the growth of deposits over a period of seven years.Unit 8:CONTROL STRUCTURES AND ONE DIMENSION ARRAY
Key Unit Competency
By the end of the unit, you should be able to:
• Derive logic in algorithm which include control statements.
• Handle one dimensional array in algorithm.Unit Outline
• Conditional logic.
• Control structures.
• One-dimensional array.Introduction
Control structures are statements or symbols used in algorithms to represent the logical flow or order in which program statements are to be executed. In this unit we will begin by describing conditional logic that is fundamental to control structures. Later, we demonstrate how three control structures namely sequence, decision and iteration are used in algorithms. Before closing the unit, we discuss one of the elementary data structures known as one-dimensional array.8.1 Conditional logic
In everyday life we use statements like If I had the time and the money I would go buy a tablet and learn how to use it. Such a statement is a conditional logic implying that certain conditions must be satisfied for an action to be taken. Therefore, a conditional logic is a proposition formed by combining two or more facts using the words like if, case and then. The conditions in the if statement are combined using logical links like: and, or and not.8.1.1 Simple conditional logic
Simple conditional logical requires only one fact for an action to be taken, hence
statements do not require use of logical links like and, or and not. For example, the
following statement is a simple conditional logic because it only requires participation
in class for the teacher to take action: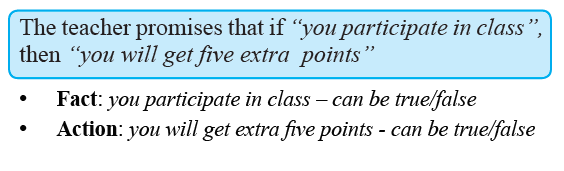
8.1.2 Compound conditional logic
Compound conditional logic make use of logical links to combine several facts for an action to be taken. For example, the following statement requires two conditions to be fulfilled for the teacher to take action:
• The teach promises that if “you are always punctual”” and “participates in class” then “you will get five extra points” This statement implies that the teacher can only award five extra points (true) if a student is always punctual (true) and participates in class (true). In Mathematics, facts and actions can be represented using symbols in a table as shown in Table 8.1.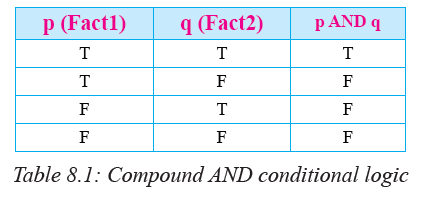
Conditions linked with AND logic requires an action to be taken only when all conditions
are true. For example, the third column in Table 8.1 above shows that the two conditions
must be true (T) for the teacher to award a student five extra points. The table also
shows four other possible outcomes depending on the true/false value of p and q.Conditions linked with an OR logic lead to an action when either one or both are true.
For example, the teacher may decide to awarded five points if a student is punctual or
participates in class. This statement can be represented using OR logic in a table as
shown in Table 8.2.
In algorithm design, there are many occasions conditional logic is required when
alternative actions are to be considered. In the next sections on control structures, we
demonstrate how to express conditional logic using relational and logical operators.For example the flowchart extract of Fig. 8.1 and equivalent pseudocode demonstrates
use of conditional logic to check if a person is an adult.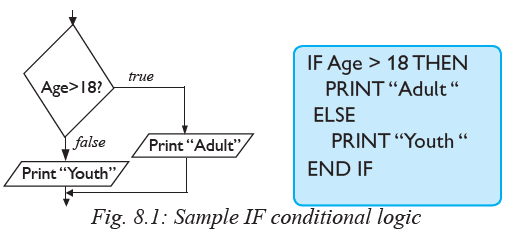
8.2 Control Structures
Control structures (statements) refer to a conditional logic that determines the flow
of an algorithm or execution of a program. The three types of control structures
discussed in this unit are sequence, selection and looping.8.2.1 Sequence Control Structure
Sequence control structure refers to logical flow of statement one after another in the
order in which they are written. This means that algorithms designed using sequence
control do not depend on evaluation of a conditional logic. The pseudocode shown in
Fig. 8.2 illustrates sequence control in which two numbers are first entered before sum
and product are calculated and displayed on the screen.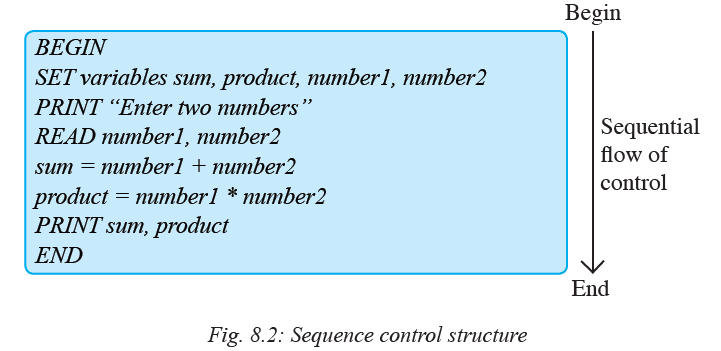
Activity 8.1: Sequential control structure
1. Formulate an algorithm that would prompt a user to enter the length and width of a rectangle. The program then calculates and displays the area and perimeter.2. Study the flowchart of Fig. 8.3 below and explain why the algorithm represents
a sequence control structure.
8.2.2 Selection Control Structure
Selection control structure also known as decision control statement is a conditional
logic used when there is one or more alternatives to choose from. If a selection
statement provides several alternatives to choose from, we refer to such as a statement
as case selection. The four types of selection control structure are if ...then, if...else,
nested if and switch/case.8.2.2.1 If …then selection
The if…then is a conditional logic used to test whether the condition is true before an action is taken. If the condition is true, the statement in the body of if statement is executed; otherwise nothing happens if false. The general syntax of if..then is expressed as follows:
If condition is true then
Do Task-A
For example, in the following statement, if...then condition tests whether mark is 80 and above. If the condition is true, the statement distinction is displayed on but this case, if the condition is false, nothing happens:
If mark >= 80 then
PRINT “distinction”
One important application of if…then selection is to validate user input. For example, the Fig. 8.4 shows a flowchart with if … then selection used to test whether a number entered is less than zero. If the number is negative, the algorithm displays invalid mark.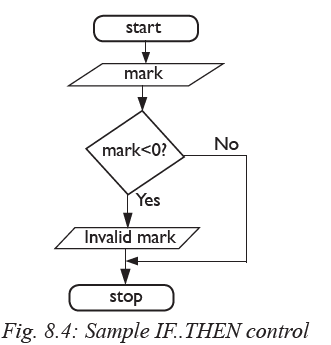
Explanation
1. Once the user enters a mark, the algorithms checks whether the input is less than
zero.
2. If true then statement ‘invalid mark’ is displayed, otherwise nothing happens.8.2.2.2 If ... else selection
If … else selection is suitable when there are two available options. In general the
format of if... else statement can be represented as: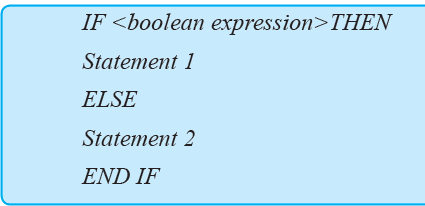
Explanation
The Boolean expression within If....then statement is first evaluated. If true, statement 1 is evaluated otherwise statement 2 is evaluated if the condition returns false. For example, Fig. 8.5 (a) and (b) shows the flowchart and pseudocode for checking voters eligibility depending on age. If a person is 18 years and above, the expression returns true and displays “Vote” else if a person is below the set age limit, the program displays “Do”.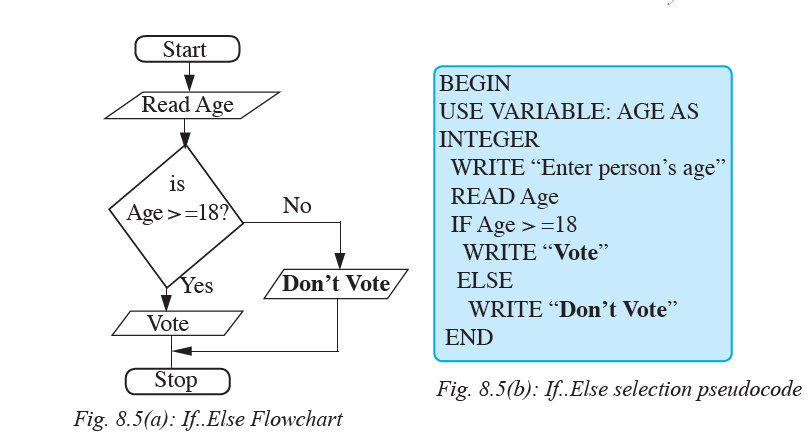
Activity 8.2: If ... else selection
1. Draw a flowchart for a program that reads two numbers and displays the larger
of the two numbers. The algorithm should use IF...ELSE selection to compare
the two numbers.
2. Study the flowchart shown in Figure 8.6 below and state the value of Z if the
following values of x and y are entered by the user:
(a) X = 20, Y = 10
(b) X = 19, Y = 20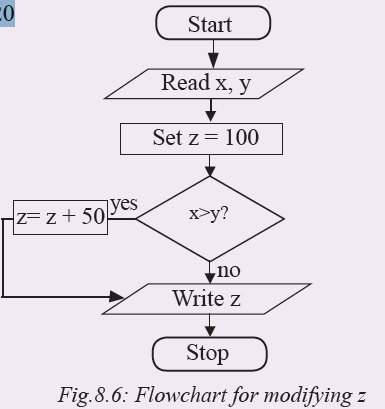
8.2.2.3 Nested IF
Nested IF selection is used where several options have to be considered to make a
selection. The general format of the Nested IF is: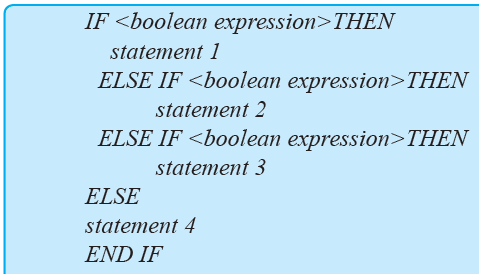
Explanation
1. The statement first evaluates if the condition is true. If true, the statement is executed.
2. If the first condition is false, the else if statement is evaluated. This continues until the else statement is encountered.
Note that in nested if selection, the last statement must be within else that executes the statement if the boolean expression returns false. When drawing a flowchart, if there are n options to select from, the number of diamonds representing IF should be n-1. For example, Fig. 8.7 shows an algorithm for a program that takes current date (Todate) and date of birth. Depending on the current date, the algorithm computes age used to classify the people into categories shown in table on top-right side.
Explanation
1. The user first enters a person’s date of birth (DoB) and the current date (ToDate) that are used to calculate age.
2. Based on age, the algorithm uses nested if to assign the person to one of the categories (cat) defined in the table on the right. For example, if age <1 as indicated in the first decision symbol, cat is assigned to kid using the statement: cat = kid;
3. The algorithm displays category of the person in the output symbol. For example, if cat is assigned to kid, the output symbol displays Grown up.Activity 8.3: Nested If selection
Fig. 8.8 shows an algorithm for a program that would be used to accept three numbers A, B and C, compare them and display the largest of the three. Co n v e r t the flowchart to a pseudocode.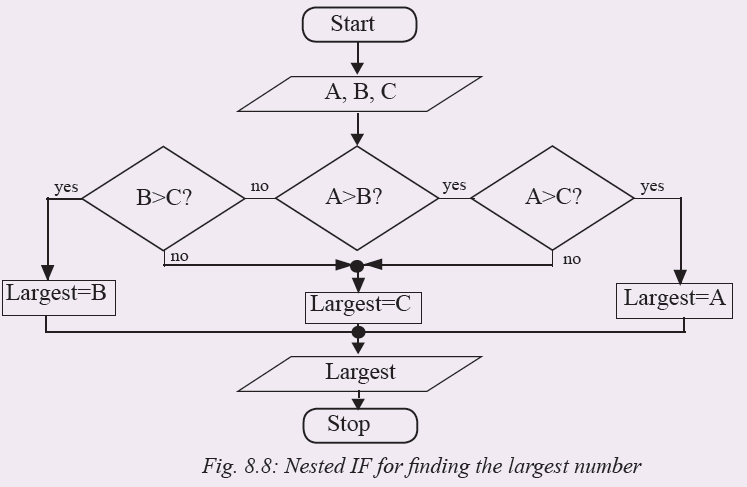
8.2.2.4 Switch/Case selection
An alternative to nested if selection is use of switch/case selection control. The following algorithm represents the general syntax of a switch statement.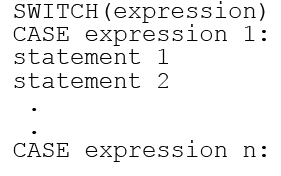
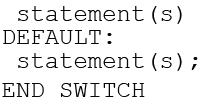
For example, the pseudocode of Fig. 8.9 shows a sample selection of menu items in
a hotel implemented using switch selection.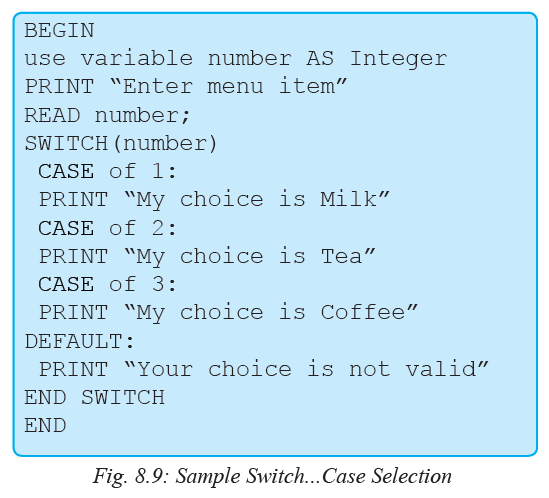
Explanation
1. The procedure accepts a number as input.
2. The switch statement checks if the input is number 1, 2 or 3. For example, if
number is 3, it displays “My choice is coffee”.
3. If the number entered does not fall within the three numbers, the DEFAULT
statement is executed.
To demonstrate further use of switch/case selection, Fig. 8.10 shows a flowchart used
to determine discounted price of products depending on the item code. For example,
if the product code is B123, its prefix B means that it belongs to category B. Note
that each category is used to determine the rate used to discount the cost of an item.
Activity 8.4: Switch/case selection
A school intends to develop a computer program that automates processing of computer science exam grades as follows:
• 70 – 100 A
• 60 – 69 B
• 50 – 59 C
• 40 – 49 D
• Below 40 E
Design a flowchart that expresses selection logic for a program that assigns grades
as per grading system above.8.2.3 Looping control Structure
The looping control structure, also referred to as iteration or repetition, causes the program to repeatedly execute statements within the loop until the condition is false. For example, consider repetitive task that occurs during shopping represented by the following natural language algorithm: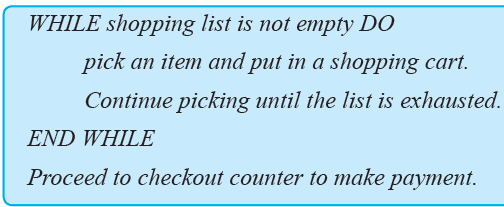
This algorithm describes a common practice of buying items in a retail outlet. The statements under the WHILE keyword indicate that a buyer continues picking items until the shopping list is exhausted. The keyword END WHILE shows that it is after picking all the items from the shopping list the buyer stops and proceeds to make payment at checkout counter.”
8.2.3.1 FOR Loop
For loop is a looping statement used to evaluate a condition before executing statement in the body of the loop. The for loop can be represented using the following general syntax:
FOR variable = lowerlimit TO upperlimit DO
statements;
END FOR
For example, the pseudocode of Fig. 8.11 shows how to use the FOR loop to design a program that displays the first 20 positive integers and their sum. Note that, as long as the lower limit is less than the upper limit, the number is added to sum and the count incremented by 1 until the lower limit is equal to or greater than the upper limit.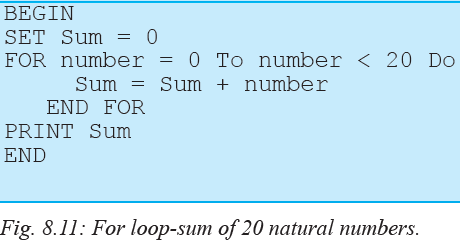
Explanation
1. The algorithm set initializes sum with zero.
2. The for loop sets the initial count to zero and maximum to 19 i.e number < 20.
3. In every loop the premium sum is updated by adding a number.
4. The for loop is existed once the maximum count is reached.Activity 8.5: For loop
A class of ten students took a quiz in computer science. Using the FOR loop, formulate an algorithm that would be used to compute cumulative total and mean score of the class.8.2.3.2 WHILE Loop
Like the FOR loop, WHILE loop first evaluates the condition before executing the body of the loop. Therefore, While loop executes statements zero or more times. The general syntax of a while loop can be expressed using the following pseudocode on the left or flowchart of Fig. 8.12 on the right.
For example, in a commercial bank, a customer may be allowed to withdraw money
through the ATM if the minimum balance is over RWF500 otherwise a message
“Insufficient funds” is displayed. Assuming for each transaction the minimum
withdrawable amount is 100, the control logic shown in Fig. 8.13 would be used to
enforce the business rule.
Explanation
1. The algorithm shows that the user first enters withdrawal amount. For example, if the user enters 2000, the conditional logic “if amount % 100 = 0” checks whether dividing the amount by 100 returns 0 as the remainder is 0. If the expression returns false, the algorithm displays a message “Try again” before prompting the user to re-enter amount. If true, the algorithm proceeds to check whether the current balance (bal) is above 500.
2. If the condition bal>500 returns false, the algorithm prints a message “Insufficient funds” before exit.
3. If the current balance is above 500, the algorithm proceed to the next step of debiting the account using the statement: bal = bal - amount
4. Finally, the algorithm displays withdrawal receipt on the screen.Activity 8.6: While loop
In groups, formulate an algorithm for automatically counting the number of times an electric fence alarm beeps. Once the number of beeps reaches 20, the system triggers a remote siren that alerts the security firm to send emergency response team. The looping control logic for counting beeps should represented designed with a while loop.To further demonstrate application of while loop, let’s look a problem of determining whether a calendar year such as 2016 is a leap year. Fig. 8.14 shows a flowchart for a program that would be used to receive a valid year, verify whether it is a leap year, and then print the result such as year 2016 is a leap year. Note that a leap year has 366 days and it is divisible by 4 except for years that are exactly divisible by 100. Years such as 2000 that are divisible by 100 and 400 are leap years.
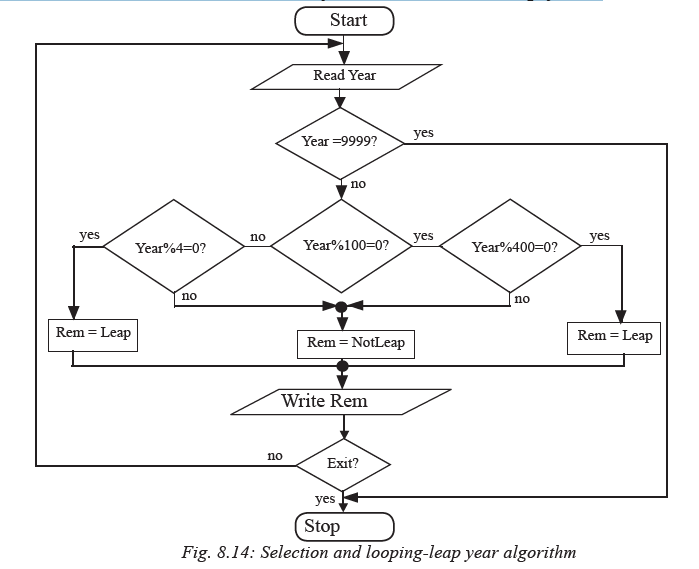
Explanation
1. The user enters a valid year or 9999 to quit the algorithm. For example, if the user enters 2016, “if Year%100 = 0” checks whether the remainder is 0 after dividing the by 100.
2. If the expression returns true, year% 400 is evaluated otherwise if false, year%4 is evaluated. In both cases, Rem (remark) is assigned to Leap using the statement:
Rem = Leap;
3. If after dividing by 100 returns a non-zero value, Rem is assigned to NotLeap using the statement:
Rem = NotLeap;
4. The algorithm displays Leap or NotLeap remark in the output symbol depending
on the result of the assignment statement.8.2.3.3 Repeat ...Until Loop
Repeat … Until control is similar to the while loop except that the statement is executed at least once. For example, Fig. 8.15 shows a pseudocode used to convert an integer number in base 10 to binary numbers represented by zeros and ones.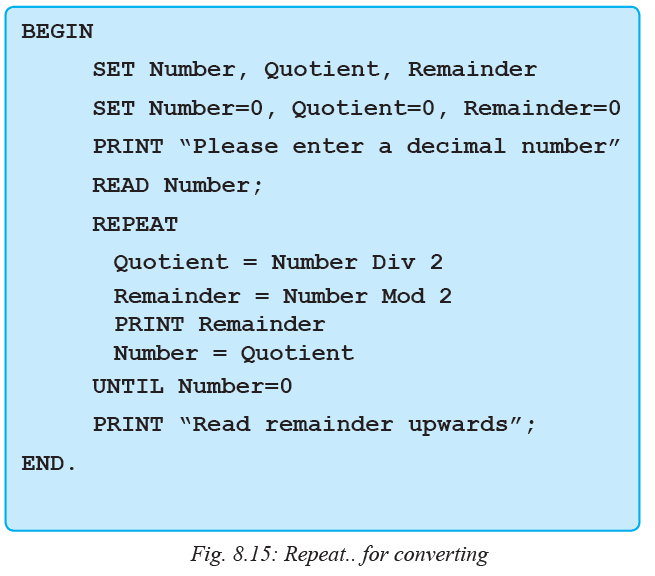
Explanation
1. The pseudocode starts with declaration of three variables that are initialised to zero.2. Once the user enters a number like 25, the algorithm uses reat ... until loop to repeatedly divide the number by 2 for example, 25 DIV2 returns 12.
3. The statement Number Mode 2 returns the remainder of integer division. For example, 25 Mod2 returns 1.Activity 8.7: Repeat until loop
1. Revisit the algorithm in Activity 8.6 and represent it using REPEAT.. UNTIL loop.
2. The flowchart of Fig 8.16 represents a program that would be used to compute sum of 50 integers. Study the algorithm and express loop construct using pseudocode.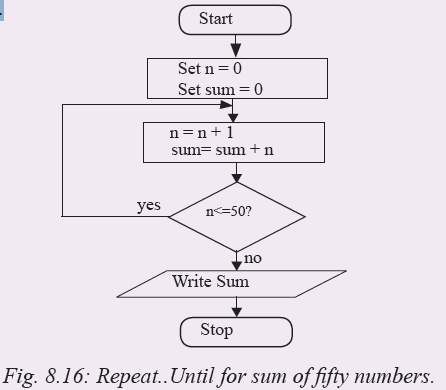
8.2.4 Finite and Infinite Loops
A finite loop repeatedly executes a set of instructions until a specific condition is met. On the other hand, an infinite loop (endless loop) continue looping indefinitely due to a condition that is never met. To force such a loop to terminate, you may have to forcefully shut down the computer or close a program by pressing a combination of keys such as Ctrl+C. For example, Fig. 8.17 shows an infinite loop in which the value of x is reset to 1 hence the condition x<5 holds forever.
Explanation
1. This section of an algorithm starts by initialising x to 0.
2. Once the algorithm enters the while loop the value of x is replaced with 1 then x + 1. This means what the value of x before printing is 2.
3. The algorithm prints X and then checks the condition to compare x (i.e. 2) with
5. Because 2<5, the algorithm enters the loop again. The value of x is reset to 1 then incremented to 2 and the looping continues.Activity 8.8: Finite and infinite loop
A college offers a course that prepares students for a motor vehicle driving test. In the previous month, twenty of the students who completed this course took both theory and practical tests. To keep record of test results, you have been asked to develop an algorithm using the following specifications:
• Prompt the user to enter driving test results for each student with a comment pass or fail.
• The algorithm displays a summary of the test results indicating the number of students who passed and the number who failed.
• If more than 85% of the students passed the test, the program displays a message “give commission to instructors!”
1. Carefully read the problem statement and identify the input, processing and output requirements.
2. Using top-down, stepwise refinement, state the conditional logic of the problem and represent the solution as a pseudocode or flowchart.8.2.5 Break and Continue Statements
Although a loop performs a set of repetitive task until a condition is met, sometimes it is desirable to skip some statement inside a loop or prematurely terminate the loop. In such cases, break and continue statements are used.8.2.5.1 Break statement
A break statement is used to force immediate exit from a loop or selection statements.
The statement is normally used with if statement such as the one shown in Fig. 8.18.
Once the condition is encountered the program flow is transferred to the next statement following loop or selection statements.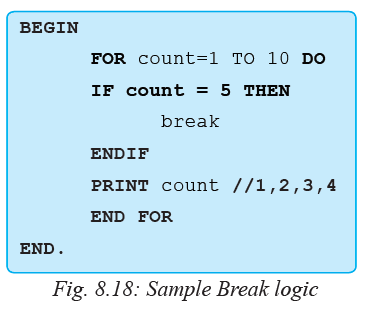
Explanation
1. The for loop initializes count to 1 and then sets the upper limit to 10.
2. Once the loop encounters 5, the break statement causes the algorithm to exit the
loop and print numbers 0, 1, 2, 3, 4 and 5. The numbers after 5 are ignored.8.2.5.2 Continue statement
The continue statement is used in looping to skip the remaining statements in the body of the loop and perform the next iteration. Like the break statement, continue statement is also used with if statements to specify the condition as shown in Fig. 8.19.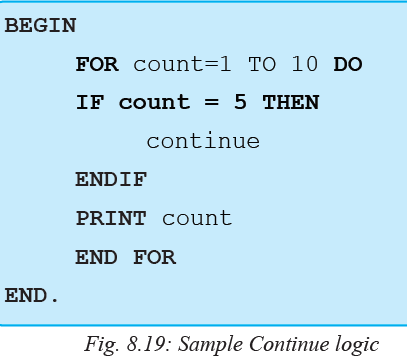
Explanation
1. The for loop initializes count 1 and then sets the upper limit to 10.
2. Once the loop encounters 5, the continue statement causes 5 to be ignored.
3. The algorithm prints the values 1, 2, 3, 4, 6, 7, 8, 9, 10 before exiting the loop.Activity 8.9: Break and continue
1. To test if a number n is a prime number, we could loop through 2 to n - 1 and test whether each number divides exactly into n giving a remainder of zero. Formulate an algorithm for a program that tests if the given number is prime number. The logic should use a loop and break statements to test the use input.
2. Develop a pseudocode for a program that accepts positive integers starting from zero. If the number is less than zero, program should print an error message and stop reading numbers. If the number is greater than 100, the program ignores the number and transfers control to the next iteration.8.2.6 Goto Statements
Goto is a jump statement that alters the flow of execution to a section of an algorithm or program identified by a goto label. Let’s take an example of an algorithm that would continue to prompt the user for a password until he or she enters secret as the password (Fig. 8.20). To repeat the prompt, a label named “again:” is placed at the start of the pseudocode shown below. If “secret” is not entered the algorithm uses the goto statement to go to again label to repeat the prompt.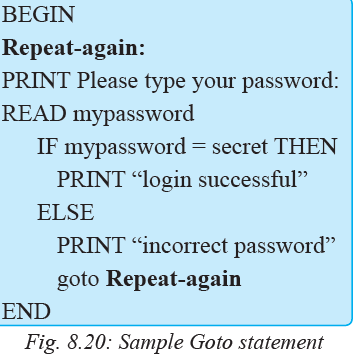
Note that although a goto statement is an easy method of controlling flow of execution, it is considered as bad program design practice because it can cause logic errors that may be difficult to detect especially in complex programs.
8.2.7 The Exit Statement
The exit statement may be used in algorithm design to indicate a point at which a program may terminate prematurely during processing. For example, the flowchart shown in Fig. 8.21 shows that once the user enters a number, the exit statement is evaluated. If exit is true, the program terminates without adding the number to sum.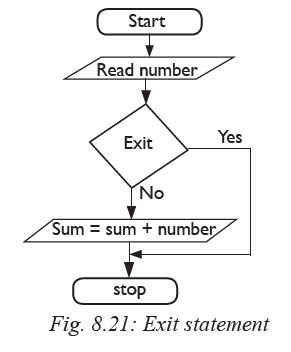
Assessment Exercise 8.1
1. Differentiate between selection and iteration control structures.
2. Explain the importance of the following selection statements:
(a) IF..THEN
(b) Nested IF
(c) SWITCH
3. Explain three types of looping control structures. Support your answers with
illustration.
4. Design an algorithm for a program that would be used to compare three numbers
x, y and z, and then display the least among the three.
5. State four types of selection control structures supported by most structured
programming languages.
6. Study the income taxation brackets used by Rwanda’s revenue authority and
draw a flowchart for a program that would be used to compute tax payable by an
employee depending on marital status and monthly income.8.3 One-Dimensional Array
A one dimensional array is a group of contiguous memory locations identified by the same name for storing data the same type. An array can be one dimension such as a list of items, two dimension such as a table or matrix. To make the concept of array clear, let us consider an entertainment hall that has capacity of 100 seats, 10 in each row. Suppose you and your friends would like to seat together along one row. The reserving one row of seats in an entertainment hall is equivalent to one-dimensional array. To access a particular element in an array, we specify the name of the array and the position number (index or subscript) of the element. A subscript is a position number that must be an integer or an integer expression. It is important to note that reserving too much memory location that are not likely to be occupied leads
to memory wastage. Table 8.3 shows an integer array called Scores containing 10 elements identified by indexes 0 to 9.
Note that each of the score elements may be accessed by giving the name of the array
i.e. Scores followed by the index of the element for example, Scores [5] returns the sixth element that holds 45 because counting starts from 0.8.3.1 Declaration of Arrays
An array occupy space in memory. Therefore, declaring an array is the same as declaring other variables only that a computer reserves contiguous memory locations enough to store the number of elements. The general syntax of declaring an array is:
• Arrayname: Array [elements] of datatype e.g.
• Scores: Array[10] of integer;
Once the Scores array is declared, the computer sets aside ten memory locations for
storing integers such as 65, 50, 19,30,20,45,60,89,55, and 72 shown earlier in Table 8.3.
Regardless of language used to implement arrays, the following are factors that need to be considered.
• Array name: Decide on a suitable array name that indicates several elements
are to be stored e.g. scores.
• Data type of elements: An array can only hold elements of the same data type.
• Size of array: The size of an array determines the maximum number of values that an array will hold.
• Dimension: An array can be one-dimensional list or multidimensional such as a table (matrix).Activity 8.10: One dimensional array
Study Table 8.4 that shows graphical representation of two arrays: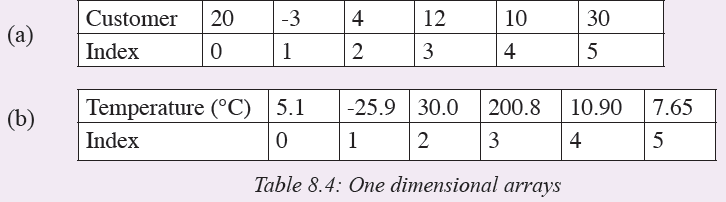
1. Determine each array name, data type and number of elements stored in each array.
2. Using section of a pseudocode, write a sample declaration for each array.8.3.2 Array initialization
Initialization refers to assigning an array initial values during declaration. For
example, elements of an array can be initialized during declaration by assigning them
to comma separated list as follows:
Scores: Array[10] = {34, 20, 45, 87, 92, 21, 43, 56, 12, 15}
The statement first declares an array of 10 elements and then initializes each element
with values enclosed in (curly) braces.8.3.3 Accessing Array Elements
In arrays, an element can be accessed by specifying the array name and the location (index) of the element. For example, to access the first element (index 0) in an arraynamed scores, use scores [0]. Once you access the element, you can then read or write a value into it.8.3.3.1 Reading array elements
To store (read) a value into an array, you need to know the name of the array and the index of the element. Then a READ function may be applied to the element. For example READ Scores [4] stores a value in the fifth location of the score array. Multiple values may be read into several elements using a FOR loop as shown in Fig. 8.22.
Explanation
1. The scores array is set to store 10 elements of integer type.
2. The for loop uses index as a counter to continously store ten elements 0 to 9.3. The for loop is eliminated once the ten elements have been read into the array.
8.3.3.2 Writing Array Elements
To write (display) elements from an array, use a write function together with the arrayname and location (index) of the element. To display a single value of an array you must provide the array name and index to the write operation. For example, the value in Scores [1] may be displayed by using PRINT Scores[1] . To display multiple values such as the 10 elements in the Scores array, use the FOR loop by setting the initial value to 0 and the upper limit to 9 as shown in Fig. 8.23 below: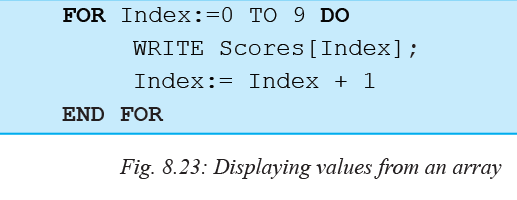
Explanation
This for loop is used to display 10 elements from the scores array. The index is incremented by 1 until the ten elements are displayed.Activity 8.11: Array of integers
Thirty students were asked to rate quality of the food in the student cafeteria on a scale
of 1 to 5 (1=poor, 2=fair, 3=neutral, 4 =good, and 5=excellent). Write a pseudocode for a program that places the 30 responses in an array of integers and summarizes the results of the poll in terms of counts and percentages.Assessment Exercise 8.2
1. Declare a one-dimensional array that represents a fleet of 25 buses numbered from 100 to 125.
2. The following is a list of numbers representing customers waiting to be served in a banks: 64, 25,69, 67, 80 and 85.
(a) Define an array named Customers and initialize it with the waiting list numbers.
(b) Develop an pseudocode for reading and writing the elements into customer array.
3. Formulate an algorithm that converts numbers from base 10 to binary and store the binary digits in an array and correctly displays the binary number.
4. Study Fig. 8.24 representing a pseudocode fragment for printing elements from and array. Identify possible errors and explain what happens if the error(s) are not corrected.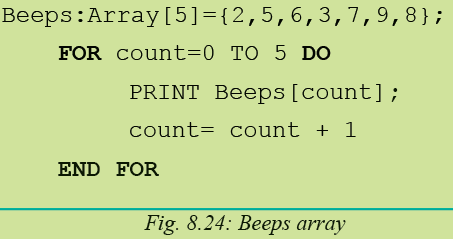
Unit Test 8
1. Differentiate between nested IF and switch/case selection.
2. Explain the importance of the following looping control statements:
(a) WHILE
(b) FOR
(c) REPEAT...UNTIL
3. Explain at least two reasons that would make a program to infinitely repeat execution of a loop. How can such undesirable behaviour be resolved?
4. Using illustrations, differentiate between a one-dimensional array and a matrix.
5. State four factors that need to be considered when declaring a one-dimensional array.
6. The Fig 8.25 below shows the faces of six-sided die with each side marked with dots representing faces 1 to 6. To generate random numbers, a player rolls a single die 6000 times and the frequency of each face that appears is stored in an array. Formulate an algorithm that would be used to count frequency of each face in an array.
Unit 9:INTRODUCTION TO COMPUTER PROGRAMMING
Key Unit Competency
By the end of the unit, you should be able to explain programming paradigms.Unit Outline
• Computer programming concepts.
• History of programming languages.
• High level programming languages.
• Computer programming paradigm.
• Features of good programming language.Introduction
Computers have been applied in different areas, from controlling nuclear plants to providing games in mobile phones. Because of this diversity in computer use, a computer, tablet or mobile must have relevant programs. This unit introduces basic concepts used in computer programming, evolution of programming languages and programming paradigms since the advent of the first programmable machine.Activity 9.1: Computer programming concepts
The structure of any language such as Kinyarwanda, Kiswahili, French, English or Chinese is described in terms of form (syntax) and meaning (semantic). In groups, research on the internet and use your knowledge in language studies to brainstorm on the two concepts.9.1 Computer Programming Concepts
Before we begin discussing the details of computer programming, we need to consider a few concepts that will be used from time to time in the rest of this book. In this section, we briefly highlight some of the fundamental concepts used in programming which includes:9.1.1 Computer program
A computer program refer to a set of instructions, written using a programming language to instruct a computer to perform a specified task. A program is like a recipe. It contains a list of ingredients (referred to as variables) and a list of instruction (statements) that tell the computer what to do with the variables.9.1.2 Software
Though the term software and program are used interchangeably, technically, software refers to a program and associated documentations, while a program is basically a set of executable instructions loadable into computer memory.9.1.3 Programming
Computer programming is a systematic process of writing a computer program using programming languages. The person who writes computer programs is referred to as a programmer. Other terms used to refer to a programmer are software developer and software engineer.9.1.4 Programming languages
A programming language is a formal language that specifies syntax and semantics rules used in writing a computer program. Some examples of programming languages include BASIC, C, C++, Java, Pascal, FORTRAN and COBOL.9.1.5 Source code
The term source code refers to a set of instructions or statements written by a programmer that are not yet translated into machine-readable form. A source code is mostly a text file written using programming languages like BASIC, Pascal, C or C++.9.1.6 Object code
Once a source code is written, it can be translated into machine readable form referred to as object code. To translate source code statement to object code is similar to the way one can translate English to Kinyarwanda, there are language translators used to translate source code to object code.9.1.7 Compilers and interpreters
A compiler is a language process that translates the entire source code into object code. The object file can be made into an executable program by carrying out another process known as linking. Linking combines compiled code with one or more existing object codes to create an execution file. In Windows operating system, you can easily identify an executable file because it has an EXE extension such as winword.exe. Unlike a compiler that translate the entire source code to object code, an interpreter translates source code one statement at a time. Because the interpreted statements are saved as an executable file, every time the program is run, each statement must be interpreted. Table 9.1 gives a summary of differences between compilers and interpreters.
Activity 9.2: Computer programming
Most students wonder how they would benefit from the study of mathematics and computer programming. In groups, brainstorm on some of the benefits of learning the two subjects and how the disciplines are interrelated.Assessment Exercise 9.1
1. Define the terms:
(a) computer programming,
(b) source code.
(c) object code.
2. Differentiate between the compilers and interpreters.
3. Though the terms program and software are used interchangeably, they are technically different. Explain the difference between the two.9.2 History of Programming languages
The person to be credited as the first programmer was a lady by the name Ada Byron in early 1800. Since then many programming languages have been developed over the years. These languages can be classified into two main categories and five generations. The first and second generations consist of low-level languages while the third to fifth generations comprise of high-level languages.9.2.1 Low-level Programming Languages
Low-level languages are regarded as low because they can be directly understood by a computer while some requires minimal translation to machine readable form. Low level-languages are classified into two generations: first generation languages also known as machine languages, and second generation languages referred to as assembly languages.9.2.2 First Generation Languages
First generation languages (1-GLs) refers to machine languages (binary code) used to program the first generation programmable computers such as UNIVAC and ENIAC. These computers were programmed by connecting wires on plug boards. The wiring configuration was used to represent data in binary form as a series of on’s (1) and off’s (0) in electronic circuits. Fig. 9.1 shows a sample binary code representing a program used to operate machines such as ENIAC.
NB: Machine programming was very slow, tedious and error prone. Furthermore, such a program is not portable because first electronic computers deferred from one another.
9.2.3 Second Generation Languages
The second generation languages (2-GLs) referred to as assembly languages marked the first successful attempt to make programming easier and faster. Most assembly languages allowed programmers to write programs as a set of symbolic codes known as mnemonics. Mnemonics are basically an abbreviation of keywords as shown in Fig. 9.2.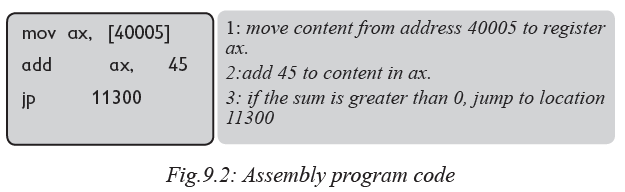
Unlike machine languages, program code written in assembly language has to be translated to machine code using a language processor known as assembler. An assembler is a special program that converts instructions written in low-level assembly code into machine code. Nevertheless, programs written using assembly languages are machine dependent hence not portable.
Activity 9.3: Second generation programming languages
In groups, research on the internet the programming languages used on Second generation computers such as IBM7094 and UNIVAC 1108.9.2.4 Benefits and limitations of low-level languages
Having looked at the two categories of low-level programming languages, let’s highlight some of the benefits and limitations of low-level languages. Benefits
1. Program written using low level languages requires small amount of memory space.
2. The processor executes them faster because they require minimal or no translation.
3. Low level languages are stable and hardly crash or break down once written.Limitations
1. Low level languages are difficult and cumbersome to use and learn.
2. They require highly trained experts both to develop and maintain.
3. Checking for errors (debugging) in low level programs is difficult and time consuming.
4. Low level programs are machine dependent hence they are not portable.Assessment Exercise 9.2
1. Define the terms binary code, mnemonics, and assembler.
2. Differentiate between machine languages and assembly languages.
3. Explain how the first generation computers were programmed using binary code.
4. Highlight three advantages and three disadvantages of low level languages.
5. Mr. Kwizera bought a new electrical kettle. On the power switch of if were two inscribed digits 0 and 1:
(a) Explain what each of the two symbols stand for.
(b) Explain why the two symbols are important in computers and computer programming.9.3 High-level Programming Languages
Due to drawbacks of low-level languages, high-level languages began to appear in 1950’s. High level languages that closely resembles natural (human) languages like English. Unlike low-level languages, high-level languages are independent of machine architecture. This means that, instead of a programmer spending more time learning the architecture of the underlying machine, more time is devoted towards solving a computing problem. Generally, high-level programming languages are classified into three generations namely: third generation (3-GLs), fourth generation (4-GLs), and fifth generation (5-GLs) programming languages.9.3.1 Third generation languages
Third level languages (3-GLs) are also known as procedural or structured programming
languages. Procedural languages make it possible to break down a program into components known as procedures or modules each performing a particular task. Examples of 3-GL include Pascal, FORTRAN (Formula Translator), BASIC (Beginners All-Purpose Symbolic Instruction Code), C, C++, Adca and COBOL (Common Business Oriented Language).9.3.2 Fourth generation languages
Fourth generation languages (4-GLs) were improvement on 3GLs meant to reduce
programming effort by making programming more easier and flexible.Furthermore, most 4GLs incorporates advanced programming tools for integrating
programs with databases and generating summarised reports. Examples of 4-GLs
include Structured Query Language (SQL), Focus, PostScript, RPG II,
PowerBuilder, FoxPro, Python, Progress 4GL, and Visual Basic.9.3.3 Fifth generation languages
Fifth generation languages (5-GLs) also known as natural languages are used to develop systems that solve problems using artificial intelligence. Artificial intelligence refers to computer systems that mimic human-like intelligence. Such intelligence include visual (seeing), perception, speech recognition, decision making and movement. Therefore, in 5GL programming, the programmer only worries about constraints required for the problem to be solved. Typical examples of 5GLs include Prolog, LISP, Scheme, Ocaml, and Mercury.9.3.4 Benefits and limitations of high-level languages
Having looked at the various high-level programming languages, let’s highlight some of the benefits and limitations associated with most of these languages.9.3.4.1 Benefits
1. High level languages are portable i.e. they are transferable from one computer
to another.
2. High level languages are user friendly and easy to use and learn.
3. High level languages are more flexible, hence they enhance the creativity of the
programmer and increase productivity in the workplace.
4. A program in high level languages is easier to correct errors.9.3.4.2 Limitations
1. Their nature encourages use of many instructions in a word or statement hence the complexity of these instructions slows down program processing.
2. They have to be interpreted or compiled to machine readable form before the computer can execute them.
3. They require large computer memory to run.Assessment Exercise 9.3
1. Distinguish between the following terms:
(a) Third generation.
(b) Fourth generation programming languages.
2. Briefly explain the evolution of programming languages. In each case, identify the generation and languages used.
3. State three advantages and three disadvantages of high-level languages.
4. On internet, conduct research to identify and discuss five examples of structured
programming language.9.4 Computer Programming Paradigms
The term paradigm was first used by Thomas Kuhn in his 1962 to refer to theoretical
frameworks within which all scientific thinking and practices operate. In other words,
paradigm refers to theory or ideas concerning how something should be done, made,
or thought about. Paradigm shift refers to fundamental change on how something
should be done, made, or thought about.9.4.1 Definition of Programming Paradigm
Programming paradigm refers to pattern, theory or systems of ideas that are used to
guide development of computer programs. In other words, it is a school of thought or
philosophy that defines concepts, practices and views on how computer programming
should be conceptualized or performed. Several programming paradigms have
evolved each of which presents programmers with a specific mode of thinking about
computer programming. In the next section, we classify programming paradigms into
imperative, functional, logic and object oriented.9.4.2 Classification of Programming Paradigms
Programming paradigm may be classified into four main categories namely imperative programming, functional programming, logic programming and object-oriented programming.9.4.2.1 Imperative programming paradigm
Imperative programming also referred to as procedure-oriented is a paradigm in which commands (program instructions) are executed in sequential order. One of the fundamental characteristic of programs written using imperative languages is that they have variables that change during program execution. For example, consider the following statement that adds two numbers x and y and assigns the result to a variable named sum: sum = x + y
Every time different values for variables x and y are provided, sum changes from the previous state to new state as shown in Table 9.2.
Programming languages that support imperative programming including machine languages, assembly languages, Basic, Pascal and C.
9.4.2.2 Functional Programming Paradigm
Functional programming is a paradigm based on concept of functions that consists of the function name and list of values known as parameters enclosed in parenthesis. The main difference between functional programming and imperative paradigm is that functional programming does not require use of assignment statements to manipulate variables. Instead, manipulation of variables is accomplished by applying functions to a list of parameters also known as arguments. The following syntax known as polish notation is used to represent a function and list of arguments:(function_name parameter1... parametern);
For example, consider a function that calculates sum of four parameters 5, 4, 7 and
9. We can use addition symbol (+) or mnemonic add to represent addition function as follows:
(+ 5 4 7 9) or (Add 5 4 7 9)
In this case, the function takes four parameters to calculate the total; this gives us 25. The parameters in this example can also be manipulated using other arithmetic functions like subtraction (-), multiplication (*) and division (/). Examples of programming languages that support functional paradigm include LISP, Scheme, Haskell, MetaLanguage (ML), Miranda, Caml, and F#.Activity 9.4: Programming paradigms
Using examples, differentiate between imperative, and functional programming paradigms.
In groups, brainstorm on benefits and limitations of functional programming paradigm. Use a sample function in Polish notation to demonstrate how to subtract or multiply three parameters.9.4.2.3 Logic Programming Paradigm
Logic programming is a rule-based paradigm that focuses on use of logic or predicate calculus. In logic programming paradigms, only facts and rules are declared to produce desired results. This means that a logic program is a set of facts that make use of a set of rules to answer a query. For example, the following statement in a language known as Prolog (standards for programming logic) could mean that if ann is the mother of shella, then ann is an ancestor of shella:ancestor(ann, shella) :- mother(ann, shella).
Logic programming paradigm fits well when applied in artificial intelligence (AI) that deal with the extraction of knowledge from basic facts and rules. In artificial intelligence, various logical assertions (proportions) about a situation are made to establish all known facts. Languages that emphasize logic programming paradigm include Prolog, GHC, Parlog, Vulcan, Polka and Mercury.
Activity 9.5: Logic programming
• In groups, brainstorm on benefits and limitations of logic programming paradigm.
• Use a sample functional program to demonstrate how rule-based program
statements are executed in regard to facts, rules, inference and answers to queries.9.4.2.4 Object Oriented Programming Paradigm
Object-Oriented Programming Paradigm (OOP) is the latest paradigm in which properties (data) and operations (procedures) are combined to form objects. Therefore, an object represents a real-world “thing” such as a person, animal, plant, place, or building. In object-oriented programming, similar objects are grouped together to form classes. For example, the Table 9.3 below shows three types of classes that define properties and operations applicable to each object: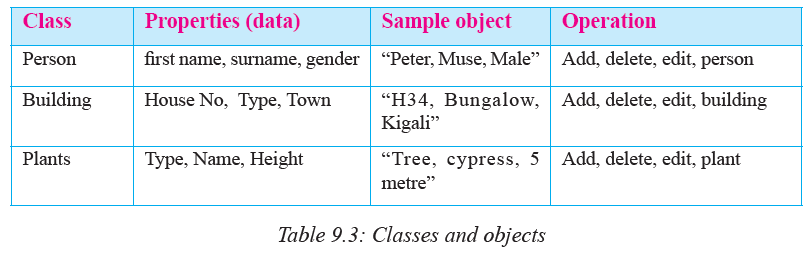
Because the latest paradigm shift is development of OPP programs, most imperative languages like C, Pascal and Basic have evolved to support OOP. Examples of programming languages that support OOP include Delphi Pascal, C++, Java, C#, Visual Basic.Net, and Objective-C.
In summary, Table 9.4 shows the four major programming paradigms namely
imperative, functional, logic, and object-oriented programming:
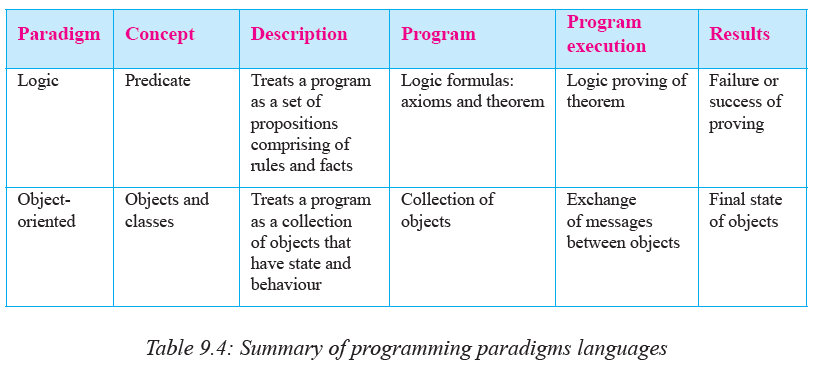
Activity 9.6: OOP Paradigm
• Though OOP differs significantly from procedure-oriented paradigm, we may not consider this category separate from imperative paradigms. This is because some object-oriented languages such as F# supports functional programming. Using valid references, defend or challenge this argument.
• In groups, discuss the terms classes, inheritance and polymorphism. In addition, brainstorm on benefits and limitations of object-oriented programming over imperative programming paradigm.9.5 Features of Good Programming Language
Criteria for evaluating programming languages and paradigms may be controversial but Sebesta in his book, “Concepts of Programming Languages, tenth edition” suggests four main criteria namely: readability, writability, reliability and cost.
• Overall simplicity: Overall simplicity of a programming language influences its ease of learning and readability.
• Good orthogonality: Relatively small set of simple constructs can be combined in a number of ways to provide required control and data structures of the language. Limited orthogonalilty makes it easier to learn, read, and understand a language.
• Adequate data types and data structures: Presence of adequate facilities for defining data types and data structures help increase the readability of a programming language.
• Clear syntax design: The syntax, or form, of the elements of a language has a significant effect on the readability of programs. For example, use of special words such as end if makes a program more readable.
• Support for abstraction: Programming language should provide facilities to define and then use complicated structures or operations in ways that allow many of the details to be ignored. Two types of abstraction are process (subprograms) and data abstraction (structures, records, objects).• Expressivity: Typically expressivity means that a language has convenient ways of
specifying computations. For example, in C, C++ and Java, the notation count++ is a more convenient and shorter way of incrementing count by 1 equivalent to count = count + 1.
• Mechanisms to handle exceptions: This is the ability of a program to intercept run-time errors or detect other unusual conditions, take corrective measures, and then continue with normal execution. A good programming language should provide mechanism to handle exceptions.
• Type checking: Type checking refers to testing for data type errors during program compilation or run-time (execution). Because run-time type checking is expensive, it is more desirable for a programming language to verify data type at compilt-time.
• Cost-effective: The total cost of a programming language can be evaluated in terms
of compiler cost, software development process, compilation time, implementation
platforms, programmer training and maintenance.Activity 9.7: Qualities of a good program
Research on internet and write brief report on characteristics of a good programming language.Exercise 9.4
1. Explain the concepts: object-orientation, and logic programming paradigms.
2. Explain why knowledge of programming language characteristics can benefit thewhole computing community.
3. Explain the programming paradigm supported by F# programming language.
4. Explain why is it useful for a programmer to have some background in language
design, even though he or she may never actually design a programming language?Unit Test 9
1. Differentiate between a computer program and software.
2. Explain how evolution of computers have influenced paradigm shift in computer programming.
3. List three examples of object-oriented programming languages.
4. Differentiate between procedural programming and functional programming
paradigms.
5. Pascal and FORTRAN are examples of _______ generation programming
languages.
6. Procedural languages make it possible to break down a program into components
known as ___________ or ________.
7. A programming paradigm in which a program is executed in sequenced order
is known as _________.Unit 10:INTRODUCTION TO C++ PROGRAMMING
Key Unit Competency
By the end of the unit, you should be able to write and execute a given algorithm
using C++ Programming language.Unit Outline
• Evolution and features of C++.
• Compiling and executing C++ programs.
• Input and output streams.
• Variables.
• Constants.
• Output formatting.Introduction
In 1980s when object-oriented programming started to gain grounds, Bjarne Stroustrup who was then a researcher at AT&T Bell Laboratories took the most popular language, C, and extended it with object-oriented features of SIMULA 67 and Smalltalk to facilitate object-oriented programming (OOP). To date, C++ is one of the best languages for multi-paradigm programming and a good language for learning procedural and object-oriented programming paradigms. In this unit, we begin by tracing the evolution of C++ then demonstrate how to write C++ programs.10.1 Evolution and features of C++
10.1.1 Evolution of C++
Evolution of C++ can be traced back to 1980 when Bjarne Stroustrup developed a language he referred to as “C with Classes” at Bell Laboratories. Motivated objectoriented programming pioneered in Smalltalk, Stroustrup included powerful features of SIMULA 67 into C with design goal of supporting object-oriented programming while retaining backward compatibility with C.By 1984, more enhancements had been added to “C with Classes” hence it was renamed C++. Therefore, the name C++ uses C increment operator (++) to indicate that C++ is an enhancement of C. This integration of object orientation into proceduraloriented C makes C++ a multiparadigm language suitable for developing system software like operating systems.
10.1.2 Features of C++
The design and evolution of C++ describes the principles of C++ that make it suitable language for cross-platform systems programming. This section gives an overview of C++ key design, programming and language-technical concepts that you mayneed to familiarise with before you start writing programs. The following are general
features of C++ that makes it one of the most powerful and flexible programming
supported by most computers.
• Portability: Programs written in C++ are portable across multiple hardware and software platforms. For example, a program developed to run on Microsoft Windows can be run on Linux or Macintosh operating systems with minimal or no modification.
• Object-oriented programming: The design goal of C++ is to support objectoriented programming. As mentioned earlier, instead of using function that access global variables, both data and variables are encapsulated into an object. This make data more secure because the communication between program objects is through message passing
• Keywords: Keywords also referred to as reserved words are words that have special meaning in a language and can only be used for intended purpose. C++ has a large number of reserved words such as include, main, while, for, if, else and return.
• Identifiers: In C++ programming, identifiers are symbolic names used to identify elements like variables and constants in a program. Because C++ s case sensitive, it is important to observe caution when creating user-defined identifiers.
• Operators: Operators are used to evaluate an expression that returns a value. The three main types of operators supported both by C++ are arithmetic (+, -, /,* and %), relational (e.g. >, <, = =, != ), and logical (&&, | |, !). Other compound operators include increment (++), decrement operators (– –), bitwise operators, and ternary (?operator.
• Storage in memory: In C++ a variable is a named storage location in computer memory for holding data of a particular type. Common data types supported by C++ include integers, floating-point (real), characters, arrays and records. C++ also supports complex data types such as struct(records), arrays and linked lots.
• Case sensitive: C++ is case-sensitive. This means that an identifier (symbolic name) in uppercase is different from the same identifier in lowercase. For example, an identifier “age” is completely different from “Age” or “AGE”. Most programmers C++ prefer to use lowercase for variable names, and uppercase in case of constants.
• Type checking: C++ provides a rules and mechanism for checking data types before execution starts. If a compiler detects inconsistence, it ensures that the data conversions defined in the language or by the user do not cause runtime errors or system failure.Assessment Exercise 10.1
1. Using examples, discuss the main features of C++ programming language.
2. Explain why C++ is regarded as a system programming language.
3. Describe chronologically, the evolution of C++ programming language.
4. Explain why C++ is regarded as multi-paradigm programming language.
10.2 Syntax of C++ Program
In C++, a program may consist of objects, functions, variables, and other components. However, regardless of size or complexity of a C++ program, the program has to include directives, and at least one function called main. For simplicity, the Fig. 10.1 shows general syntax of a C++ program: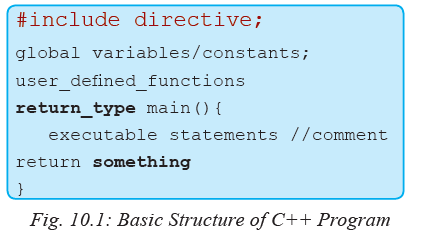
10.2.1 Sample C++ program
To demonstrate the general syntax of a C++ program, we start with a HelloWorld program 10.2(a) whose output is shown in Fig. 10.2(b). Such a program is widely used to introduce beginners to any programming language.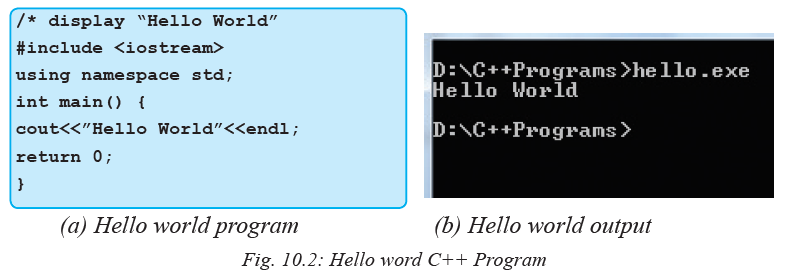
• The first line that starts with forward slash is a comment that describes what the program does. Comments are ignored by a compiler, but that may inform other programmers what the program is doing at any particular point. There are two types of comments: (/*...*/) or double-slash (//). The /* … */ multi-line comment instructs the compiler to ignore statements within the delimiters. On
the other hand, the // is a comment delimiter that instructs the compiler to ignore a single-line comment.
• The second statement #include <iostream> that starts with # is known as a preprocessor directive because it instructs a preprocessor to search for iostream file and insert it into your program. A preprocessor is a utility program that processes special instructions written in a C++ program. The preprocessor directive to include the iostream is critical because it contains input and output functions. In the past, the directive was accomplished using old style directive #include<iostream.h> that instructs a preprocessor to include iostream.h header file into the source code. In standard C++, this directive has been deprecated meaning that it is no longer supported by some compilers. However, to demonstrate
use of <iostream.h>, hello world program can be rewritten as follows (Fig. 10.3):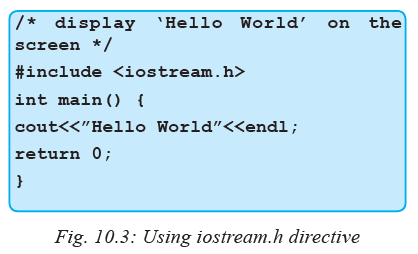
• Using namespace std; namespace is a feature in C++ used to ensure that
identifiers do not overlap due to naming conflict. Identifiers may overlap by
sharing different parts of a program. Each namespace such as std (standard)
defines a scope in which identifiers are placed. This eliminates the need to use
an operator called scope resolution operator represented by (:
• int main (); C++ programs consist of one or more functions. The parentheses
after main indicates that this is a subprogram unit known as a function. In
C++, the mainfunction is executed first regardless of its location within the
source code. The int (integer) before main
out (returns) integer to another function. The curley bracket { immediately after
body.
• cout <<“Hello World”;This is the statement that actually displays Hello World
statement on computer screen. The first word cout that stands for console out
is used to fetch output from computer memory and print it on the screen. In this
example, cout together with the symbol << known as stream insertion operator
causes Hello World to be printed on the screen.
Following Hello World string is the << endl that forces the cursor to be moved
to a new line. The alternative is use of ‘In’ as shown below.
cout “Hello World|n”;• return 0; When return statement is used at the end of a function, a value of 0 (zero) is returned to the operating system to indicate that the program has terminated successfully.
• The last curly bracket, } is a closing delimiter that denotes the end of the main function.10.2.2 Compiling and Executing C++ Program
Typically, compilation and execution of C++ programs goes through six phases: edit, preprocess, compile, link, load and execute illustrated in Fig. 10.4. In this section, we explain these steps used to create helloworld program discussed above using an open source development environment known as DevC++.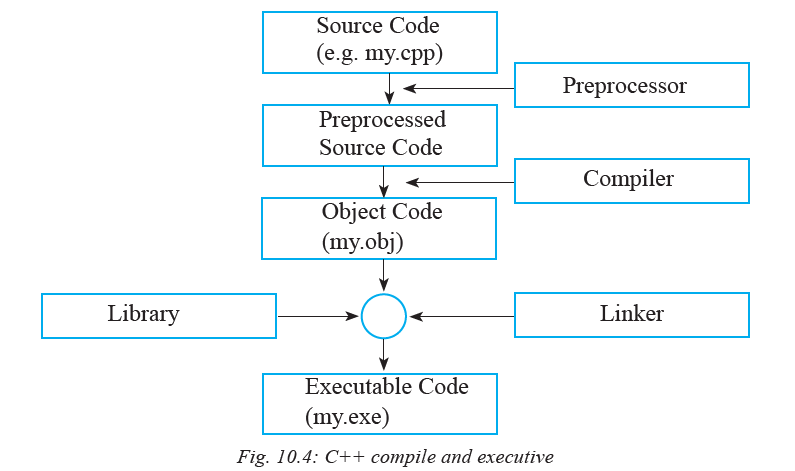
10.2.2.1 Editing Source code
In programming context, writing a program is commonly referred to as editing source code. You first create a C++ program source file such as the hello program discussed earlier using the editor, make necessary corrections and save the program on a secondary storage device, such as the hard drive with .cpp, .cxx, or .cc extensions e.g my.cpp. Each statements must end with a semicolon and a block of statements belonging to a function or control structure must be enclosed in curley brackets. The most common C++ statements include: input statements starting with cin >>, output statements that start with cout<<, and assignment such as an expression to add two numbers.There are several commercial and open source development tools available in which you can compile, build and run C++ applications. Common examples include GNU C++, Dev C++, Microsoft Visual C++, CodeLite, NetBeans and Eclipse.
10.2.2.2 Preprocessing
Once you issue the command to compile the source code, a preprocessor runs just before the compilation starts. The preprocessor obeys commands called preprocessor directives such as removing comments and blank spaces from the source code before compilation takes place.10.2.2.3 Compiling
Compiling is the next step after preprocessing in which the source code is translated into object code. For example, the above illustration shows that my.cpp source code is compiled to my.obj.10.2.2.4 Linking
C++ programs contain references to functions defined elsewhere such as the iostream. A linker combines the object code compiled from your source code with the imported library functions to produce an executable file. In Microsoft Windows, executable files have .exe extension such as My.exe shown earlier in Fig.10.4.10.2.2.5 Loading
Before a program is executed, it must be loaded from the disk into main memory. This is done by the loader that takes executable file from the storage media and loads it into main memory.10.2.2.6 Execute
Finally, the computer executes the program in memory. Once the program encounters the end marker, it is unloaded from main memory and control returned to the operating system. To execute a program, type the file name with exe extension e.g my.exe at the command prompt.Activity 10.1: Compiling and executing C++ program Write a C++ program named CPPTutorial that displays a statement “Programming in C++ is Fun”. Using illustrations, explain the process the program undergoes from to be translated from source code to an executable program.
Assessment Exercise 10.2
1. Explain the importance of the following compiler utilities:
(a) Preprocessor. (b) Linker.
2. Using an illustration, explain how a C++ program is compiled from source code to an executable file.
3. Identify integrated development environments (IDE) or tools that can be used to create C++ applications.4. Study the sample C++ code below and identify possible syntax errors:
5. Using appropriate C++ integrated development environment, create a program that displays in “Rwanda is a Beautiful Country”.
10.3 Input and Output Streams
In C++, input/output (I/O) operations occurs in streams which are sequences of bytes. During input operations, bytes flow from a device e.g., output keyboard to main memory while in output operations, bytes flow from main memory to devices, e.g., monitor. The C++ standard library contains iostream header that declares basic services required for stream I/O operations. The header defines cin and cout objects that correspond to the standard input stream, and output stream.10.3.1 Output Stream
Output capabilities in C++ are provided by a library file known as ostream. The ostream has an object called cout that stands for console out that prints output on a standard output, usually a display screen. The object is used in conjunction with stream insertion operator, which is written as << (two “less than” signs). For example, the following cout statement statement causes the statement “Let’s be one Nation” to be printed on the screen:cout<< “Let’s be one Nation”;
In this case, the << operator inserts the data that follows it on the right. In this case, “Let’s be one Nation” is displayed on the standard output stream.
10.3.2 Input Stream
In C++ handling input is done using the cin combined with >> known as stream extraction operator. cin represents the standard input device (or Console INput), i.e., keyboard. The symbol >> after the cin. The >> operator causes data input such as an integer value to be input from cin into computer memory. The operator must be followed by the variable that stores the data to be extracted from the stream. For example, the following statements extracts value such as 78 from keyboard buffer (temporary memory) and assigns it to score:cin>>score;
It is important to note that the >> operator skips black spaces encountered in the input stream. The following program demonstrates use of input and output stream to read (accept input) and write (display) the output.

Fig. 10.5 shows the output after running the program.
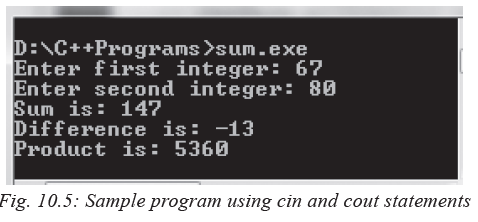
In the program, the cout << “Enter first integer: uses cout << outputstream to display a prompt message. This is followed by cin >> firstInt; statement used to read the user input from the keyboard and store the value into variable firstInt.
Activity 10.2: Inputstreams and outputstreams
Fig. 10.6 shows a pseudocode for a program that takes three numbers x, y and z, evaluates the expression and displays the result on the screen. Study the pseudocode and convert it to a C++ program.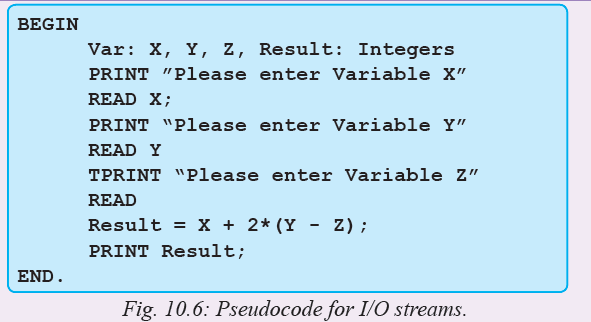
10.4 Variables and Data types
The main memory is divided into byte locations also called memory cells as shown in Fig. 10.7. The number associated with memory location is called memory address. A group of consecutive bytes is used as the location for a data item, such as an integer or character. In this section, we describe how to store data of as valuables in memory cells.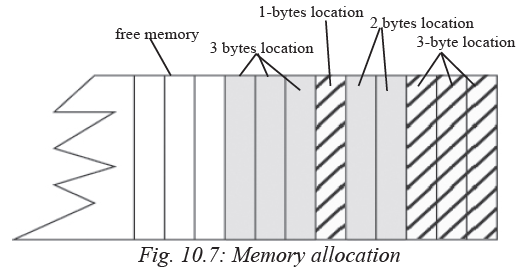
10.4.1 Variables
In C++, a variable can be defined as a portion or location in memory set aside to store a certain value such x or y whose content is subject to change. It is called a variable because the value stored in it can be changed. In C++, a variable must have a “name” also known as identifier to uniquely identify the variable and type of data that to be stored in the variable.Activity 10.3:Variables
In groups, let each member perform the following mental challenge for timed 30 seconds: Take the first number x whose value is 5 and store it in your memory. At the same time take another number y whose value is 2. Now, add 1 to the first number, then adds the two numbers, and finally deduct 4 from sum of x and y. What is the final answer?The mental process that you have just done in activity 10.3 with your memory is similar to what a computer can do with two variables. The same process can be expressed as pseudocode shown in Fig. 10.8:

The activity demonstrates how a computer can store millions of numbers in memory, conduct sophisticated mathematical operations, and return the answer within fraction of a second.
In C++, each variable requires an identifier (symbolic name) that distinguishes it from other variables. The following rules may be observed when naming variables and other identifiers in C++:
1. A valid identifier is a sequence of one or more letters, digits or underscores characters ( _ ). For example, x, sum, and age are valid identifiers.
2. C++ is a “case sensitive” language. This means that an identifier written in uppercase is not the same as that written in lowercase letters. For example, “House” is not the same as “house.”
3. Avoid using spaces between words. For My House should be written as one word like MyHouse or use an underscore to combine the two words (My_House).
4. Variable identifiers should always have to begin with a letter. For example, “3houses” is invalid.
5. Identifiers may start with an underscore character ( _ ), but in some cases the syntax is reserved for keywords.
6. The syntax rule of C++ defines keywords also known as reserved words, which have a unique meaning and must not be used for any other purposes. The reserved words already used are main, int, return, and using. The table below lists the reserved words of C++. C++ Reserved Words, all of which are in lower-case letters as shown in Table 10.1.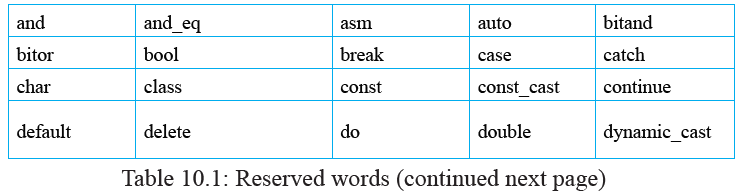

7. Avoid meaningless identifiers such as J23qrsnf, and restrict single letter variable names such as x or i to variables that are used temporarily in the a section of the program.
Activity 10.4: Rules of naming variables
From relevant sources, identify all the keywords in C++ and explain what would happen if a programmer uses one of these keywords as a variable identifier.10.4.2 Data types
The computer memory is organised in to cells that can store one or more bytes. A byte is the minimum amount of memory that we can manage in C++. To declare a variable, you must declare the type of variable so that the computer reserves enough bytes to store a value of that type.10.4.2.1 Data types
Primary data type refers to basic data types used to identify the type of values used in a program. The most common primary data types in C++ include: int, char, float, double, bool,
long int and short int. Table 10.2 shows summary of primary data types, memory size, and range of acceptable values.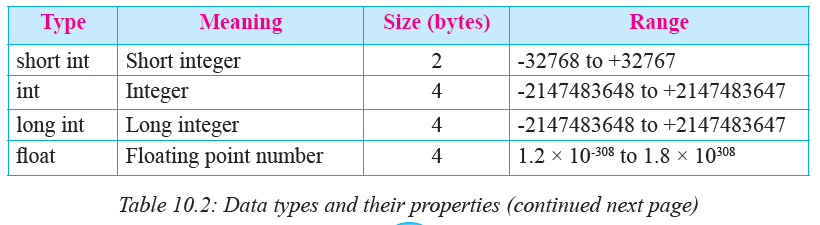

10.4.2.2 Complex data types
A complex data type is a combination data of similar or different types. C++ supports complex data types such as string, array, struct (record), enumerated type, linked lists, and pointers. Apart from string data type, other examples of complex data types include arrays, linked lists, stacks, queues, trees and graphs. In this section we only demonstrate how to declare a string. To declare data of the type string, use the general syntax. String var name e.g string student_name;Activity 10.5: Data types
In a C++ program, if user declares a short integer variable and enters a number such as 78,500 or a string like “pen”, the program may return a runtime error or display gabbage. Define the term memory overflow and explain the nature of results produced by such a program.10.4.3 Declaration of variables
Variable declaration refers to reserving memory location by specifying the type of data to be stored. To declare a variable in C++, we use the following general syntax:
data_type variable_name;
For example, the following two statements are valid declarations that instructs a computer to reserve 4 bytes for variable a, and 8 bytes for means core: mean_score.
int a;// reserve 4 bytes
double mean_score; //reserve 8 bytes
To declare more than one variables of the same type, use a single statement but seperate identifiers with commas as follows:
data_type variable1, variable2...variablen;
For example:
int first_Int, second_Int, sum, difference;
This declares four variables; first Int, second int sum and difference of integer type. The statement can also be written as follows.int first_Int;
int second_Int;
int sum;
int difference;Depending on the range of numbers to be represented, data types like short, long and int can either be signed or unsigned. Signed type represents both positive and negative values, while unsigned type can only represent zero and positive values. This can be specified using signed or unsigned as follows:
unsigned short int number_of_sisters;
signed int MyAccountBalance;Due to difficulties experienced in manipulating strings, C++ introduced a data type known as string. The data type treated as an object in C++ is associated functions (methods) used to manipulate literal strings.
Activity 10.6: Declaration of variables
1. Study the program of Fig. 10.9 that prompts a user to enter two numbers: a and b. The program then multiplies the two numbers, and displays a valid product on the screen. To avoid possible memory overflow, replace the product data type with appropriate size that will hold a large value:
2. Using suitable variable declaration, convert activity 10.3 consisting of variables x, y, sum and diff into a C++ program.
10.4.4 Scope of variables
The scope of a variable can either be global or local. A global variable is declared outside all functions while a local variable is declared within a function.. For example, the program shown in Fig. 10.10 declares global variables: area and perimeter outside the main function and local variables length and width within the main() function.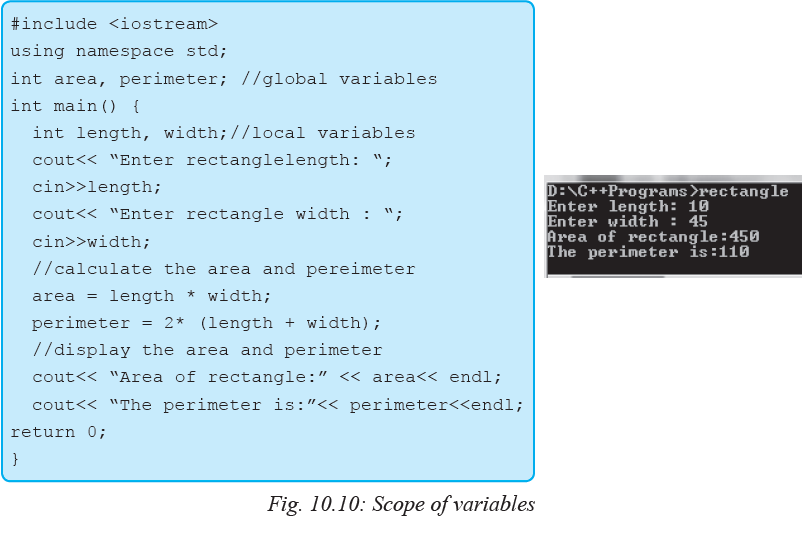
10.4.5 Initialisation of variables
By default, when you declare a variable, its value is unknown unless the user provides input. For a variable to store a concrete value, you can initialize it with a default value as follows:
data_type identifier = initial_value;
For example, to initialise Age with a default value 0, we write the definition:
unsigned int Age = 0; or unsigned int Age (0);
The program below shows how to initialise variables age and height to default values 24 and 5.7 as shown on the output screen. The program output shown in the following figure.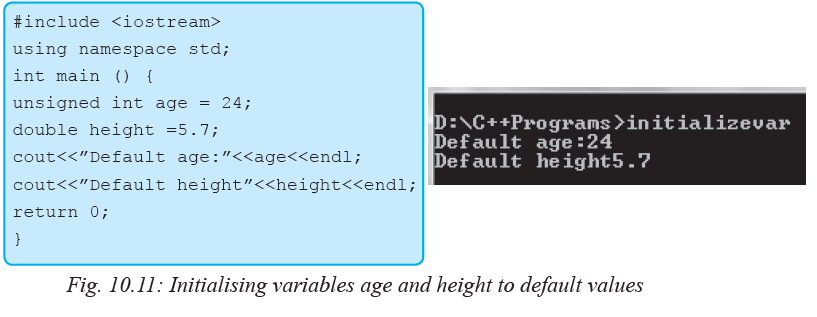
NB: Declaring and initializing a variable with a default value is referred to as defining a variable. In other words, to define a variable is to state its data type, identifier and assigning it an initial value.
Activity 10.7: Initialisation of variables
Consider earlier problem in Activity 10.3. By initializing x with 5 and y with 2, write a program that returns sum and difference.Assessment Exercise 10.3
1. Using C++ statement, demonstrate how to define a variable that stores Rwanda cities and towns. The variable should be initialised with the name of the capital city, i.e. Kigali.
2. Write a C++ program that can be used to compute hypotenuse of a right-angled triangle whose sides are a, b and c shown in Fig. 10.12 below. Note that in to easily solve the problem, you may be required to use an in-built square function.
10.5 Constants
Unlike variables, a constant is a value in memory that does not change during program execution. For example, in mathematics, pi is a constant whose numeric value is 22/7
or 3.142. In C++, constants may be classified into literal constants and symbolic constants.10.5.1 Literal Constants
Literals constants are used to express particular values within a program. For example, in the following statement, 25 is a literal constant because you can neither assign another value to it nor can you change it. x + 25;
Literal constants can be classified into integer numerals, floating-point numerals, characters, strings and boolean constants. For example, 75 is an integer literal constant, while 75.0 is a floating-point literal constant. On the other hand “K” a single
character constant while string.
Note that in C++, a character consists of one letter or numeral enclosed within single quotation marks such as ‘H’ while a string consists of one or more charactersin double quotation marks. Boolean literal constants takes only two values, i.e., true (1) or false (0).
10.5.2 Symbolic Constants
A symbolic constant is a constant that is represented using a symbolic name. Once a symbolic constant is initialised, its value cannot be changed. There are two ways to declare a symbolic constant in C++ are:
1. Using preprocessor directive #define. For example, the following statement declares a symbolic constant named sodas_crate that is replaced by 24 during execution:#define sodas_crate 24;
2. Using keyword const followed by the data type of the symbolic constant as shown in the statement below:
For example,const short int sodas_crate = 24;
The advantage is that the compiler is able to determine data type of the constant hence preventing possible runtime errors.
10.5.3 Declaring Constants
To declare a symbolic constant of a specific data type in C++ use the keyword const as follows:const double PI = 3.142;
The following program (Fig. 10.13) demonstrates how to declare a symbolic constant P1 used in a calculating area of a circle. See the output in Fig. 10.14.
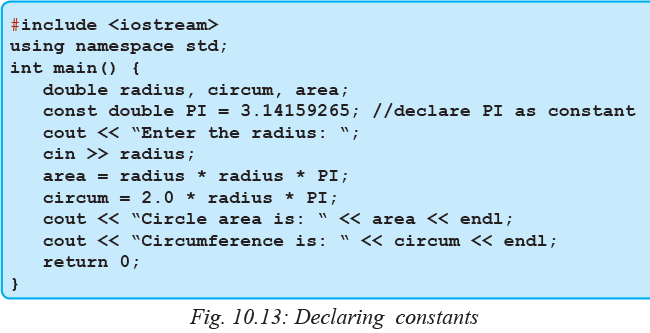
Fig. 10.14 shows a sample output after running the program.

Activity 10.8: Declaration of constants
Using C ++, write a C ++ program that prompts a user to enter the radius of a sphere,
the program then calculates the surface area and volume of the sphere. In the source
code, you must declare Pi as a symbolic constant whose value is 3.142.10.6 Output Formatting
In programming, creating nicely formatted output is a good programming practice to improve readability of output and the user interface. In C++, the output stream has special characters and objects called manipulators used to format numbers, character sand strings. In this section, we discuss a few manipulators found in <iostream>.10.6.1 The endl manipulator
When supplied with operator << at the end of a statements, endl object causes a newline
character to be inserted at the end of a line. For example, the Hello word statement in our first program can be formatted to appear on its own line with the cursor blinking on a new line using the statement below:cout << “Hello, world!” << endl;
10.6.2 The setw() manipulator
To produce number and string output formatted to fixed width in terms of number of character, C++ has a manipulator object called setw(). For example, setw(20) in the statement below adjusts the field width between the asterisk and Hello to 20 characters. If the characters are fewer, a blank space is inserted on the left of the output.cout<< “*”<< setw(20)<< “Hello!”<<endl;
10.6.3 The setprecision() manipulator
In C++, formatting floating point numbers may be rounded off to the nearest integer using setprecision() manipulator. The object is used together with fixed or scientific manipulators to specify the number of digits to be displayed. For example, the following statements rounds off the number to 2 decimal places:cout<<setprecision(2)<<fixed<<1234.56789
To use the setw() and setprecision() manipulators, you must include <iomanip> preprocessor directive. For example, the following program demonstrates how to use the three objects to format output as shown in Fig. 10.15.
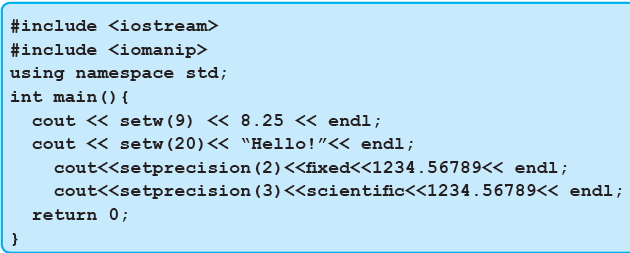
Fig. 10.14 shows the output formatted using sector(), setprecision fixed and scientific manipulators.

10.6.4 Format Base of Integer Output
In computing, the commonly used numeric constants are decimal integers, floating point (real numbers), octal (base 8) and hexadecimal (base 16). In C++ we use format specifier to format or convert a number from one base to another. To change the base of printed values use dec, oct, and hex manipulators. The following program demonstrates how to format the three number systems: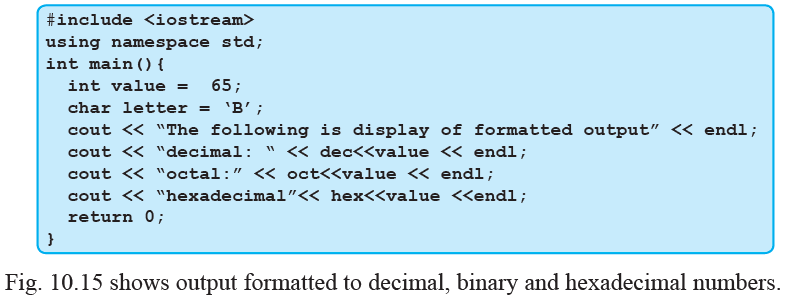
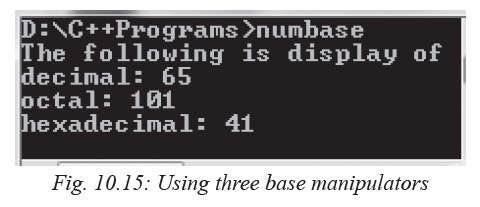
10.6.5 Format Output using Escape Sequence
Output formatting can also be accomplished using a combination of a backslash and a character, known as escape sequence. They are called escape sequences because the backslash causes an “escape” from normal way a character is interpreted by C++ compiler. An example of an escape sequence used instead of endl is the newline “\n” that causes the cursor to go to a new line. The following program uses “\t” escape sequence characters to format output into rows and columns.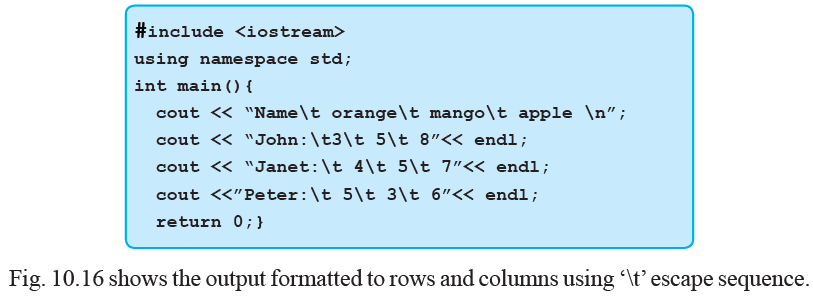
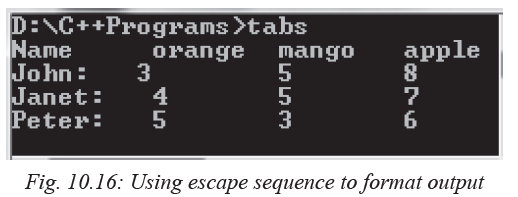
Table 10.4 shows a summary of common escape sequence used to format output:
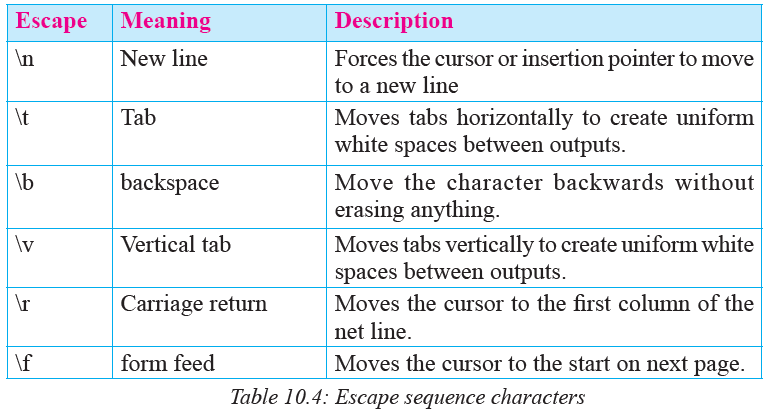
Activity 10.9: Formatted output
Create a BMI calculator program that reads the user’s weight in kilograms and height in meters, then calculates and displays the user’s body mass index in three decimal places using the expression below:
Assessment Exercise 10.4
1. Explain the importance of using fixed and scientific notation in formatting of floating-point numbers.
2. Using manipulator functions setw() and setprecision (), modify the program used for calculating surface area and volume of a sphere in Activity 10.9 so that the results are displayed correct to two decimal places.
3. Explain importance of the following escape sequence characters used to format output in C++ programs: \n, \b, \a, and \t.Unit Test 10
1. Define the term reserved word.
2. Explain why C++ is both procedural and object-oriented programming languages.
3. Explain how C++ evolved from C.
4. State five common features in C and C++ programming languages.
5. Differentiate between procedural and object-oriented programming.
6. State five rules that should be observed when choosing constant and variable
identifiers.
7. Why is it illegal to use a keyword such as if, else or for reserved for specific
purpose in C++?
8. Write a program showing the basic structure of a C++ program.
9. Write a C++ program that allows the user to enter marks for three subject. The
program should calculate, then display the total and mean score of the three
subjects.
10. Write a program that prompts a user to input five floating point numbers. The
program computes sum and average, and then displays the results correct to 3
decimal places.
11. Write a program that reads temperature for a week in degree celsius, converts
the celsius into Fahrenheit, and then calculate the average weekly temperature.
The program should display the output formatted to 2 decimal places.
12. Malaika took a loan of FRW 400 000 from a bank payable in three years at an
annual interest rate of 8%. Write a program that calculates total amount paid at
the end of the third year.Unit 11:EXPRESSIONS AND OPERATORS IN C++ LANGUAGE
Key Unit Competency
By the end of the unit, you should be able to apply expressions and operators in C++ programming.Unit Outline
• Expressions and operators.
• Classification of C++ operators.
• Classification of C++ expressions.Introduction
To write expressions that do not corrupt computer memory or return invalid results, you need to understand operators used in C++ programming language. This unit is related to the section on operators and expressions discussed earlier under the unit on introduction to programming. The unit also serves as a continuation to the previous unit on introduction to C++ programming. To begin with, we discuss in details operators used in C++ such as assignment, arithmetic, relational, logical, bitwise, and special operators. Later, we demonstrate how to form primary to complex expressions using C++ operators.11.1 Expressions and Operators
In mathematics, the term expression refers to a sequence of operators and operands that specifies relational or mathematical computation. An operator is a sign (e.g. +, -), or keywords, while an operand is numeric value manipulated by an operator.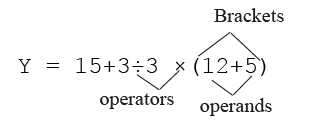
In programming context, an operator is a symbol or keyword that instructs a compiler to evaluate mathematical or logical expressions. In addition to mathematical operators, most programming languages support special operators some of which are English-like keywords. Given that C++ is a system programming language, most of its operators are special symbols available on a standard keyboard. This makes the language more portable, and internationally accepted because its syntax does not rely a lot on natural languages like English.
11.2 Classification of C++ Operators
Given that operators, operands and expressions go hand-in-hand, in every section we demonstrate how to apply an operator on operands using simple expressions.11.2.1 Arithmetic operators
The most basic mathematical signs are the arithmetic operators which include addition
(+), subtraction (−), multiplication (×), and division (÷). In C++, the same operators are used but multiplication and division operators are replaced with asterisk (*) and forward slash (/) respectively. Table 11.1 below gives a summary of the five arithmetic operators supported in C++.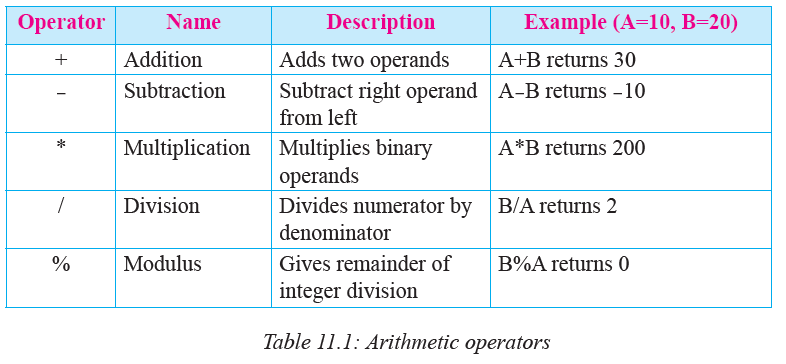
Observation on the table above shows that the only unusual operator in arithmetic is the modulus (%) symbol. In C++, the operator is used to return remainder of an integer division. For example:
remainder=7%4; //returns 3
test = 16%4; returns 0.The five arithmetic operators are binary operators because they take two operands. For example, the expression 8 + 7 contains a binary operator (+) and two operands, i.e., 8 and 7. The following program shows how to use of arithmetic expressions in C++ whose output is shown in Fig 11.1.
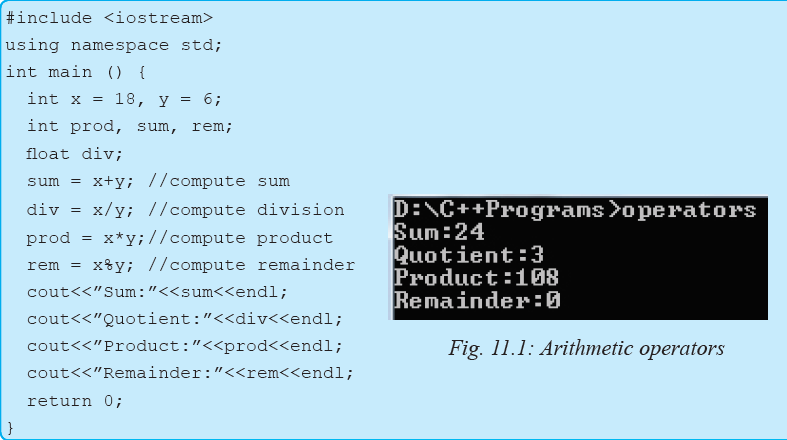
11.2.1.1 Procedure rule
Similar to BODMAS rule in mathematics, C++ uses precedence rule to evaluate arithmetic
expressions: The precedence rule from the highest to the lowest is as follows: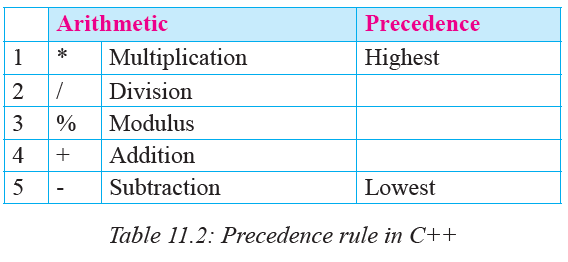
For example, in the following expression:
k = a * ((b + c)/d);
1. Operators in expressions contained within parentheses are evaluated first. Parentheses are said to be at the “highest level of precedence.” In cases of nested parentheses, the innermost pair of parentheses are applied first; in this case (b+c) is evaluated first.
2. Multiplication and division operations are applied next. If an expression contains several multiplication, division and modulus operations, operators are evaluated from left to right. This is because multiplication, division and modulus are said to be on the same level of precedence.
3. Addition and subtraction have the lowest precedence. If an expression contains several addition and subtraction operations, the operators are applied from left to right.Activity 11.1: Precedence rule
1. In groups, discuss how the precedence rule can be applied to determine the value of X in the following expression:X = 23 + 5 + (84* 9) + 6 / 3;
2. What are the possible values of X if the precedence rule is not applied?
3. Study the sample code below and identify an expression that replaces content of amount variable with product of quantity and price. The output is shown in Fig. 11.2.
4. Rewrite the following mathematical expression into a C++ assignment statement:
ax2 + bx + c.11.2.2 Assignment operators
The assignment operator that resembles equals to (=) causes the operand on the left side of the assignment operator to have its value changed to the value on the right side of the operator. For example, the following statement assigns the integer value 5 to the variable named fruit:
fruit = 5;
The part at the left of the assignment operator (=) is known as the lvalue (left value) and the right one as the rvalue (right value). The lvalue has to be a variable whereas the rvalue can be either a constant, a variable, result of an operation or any combination of these. The most important rule when assigning is the right-to-left rule: Assignment operation always takes place from right to left, and never the other way round. The following statement is invalid!
5 = students;Activity 11.2: Assignment operator
Study the program code below in which variables a, b and c are initialized with values 7, 9 and 10 respectively as shown in Fig 11.3. Determine the values printed by each of the cout statements if the value of a is 12 and b is 15.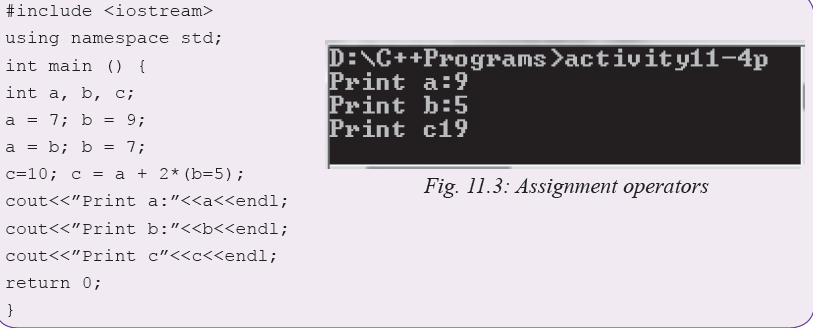
11.2.3 Compound Assignment Operators
C++ has a unique way of combining arithmetic and assignment operators compound operators typically referred to as self-assigned operators. The most commonly used self-assigned operators are conditional addition (+=), subtraction (-=), division (/=), multiplication (*=), and modulus (%=). Those used with other operators such as >>=, <<=, &=, ^=, |=) are left for class discussion. Table 11.3 gives a summary of the five self-assigned operators.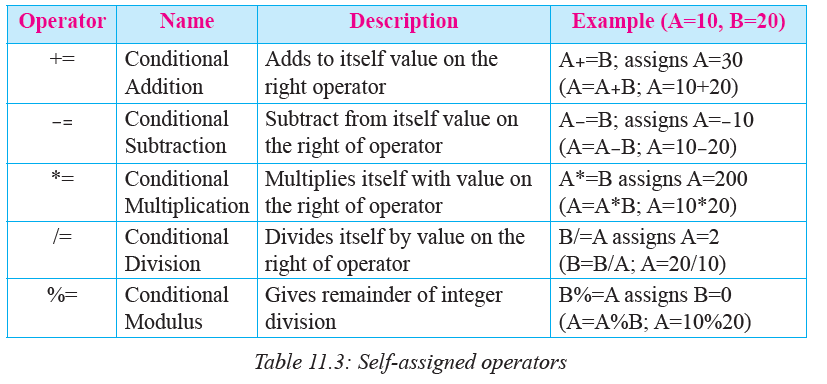
11.2.4 Increment and decrement operators
In C++, increasing a value by 1 is referred to as incrementing while decreasing it by 1 is decrementing. C++ supports a unary (++) operator as a shortcut to incrementing a value by 1 and decrementing (--) by 1. Note that the term unary means that the operator takes only one operand. For example, the following statements increases and decreases value of count by 1 respectively:count++; // equivalent to count=count+1.
Count--; // equivalent to count=count-1.The statements can also be expressed using self-assigned operators as follows:
count += 1; count -= 1;
One characteristic of ++ and -- operators is that they can be used as prefix and suffix. This means that, an operator can be written either before the variable e.g. ++count or after it as in, count++. The prefix increments the value, and then fetch it while postfix fetches the value first, then increments the original. For example, if x is 5 and you write:
int a = ++x;
the statement increments x to 6, and then fetches the value to assign it to a. The resulting value of a is 6 and that of x is also 6. If, after doing this operation, you write:
int b = x++;
the statement fetches the value in x. i.e., 6 and assigns it to b, then it goes back to increment x. Thus, the new value of b is 6, and that of x is 7.
Activity 11.3: Increment and decrement operators
Assuming orange = 15, banana = 35 and isombe = 13, clients= 3. Demonstrate how you would increment and decrement each item by 1?11.2.5 Relational operators
There are six relational operators supported in C++: equals (==), less than (<), greater than (>), less than or equal to (<=), greater than or equal to (>=), and not equals (!=). Like arithmetic operators, relational operators are also binary operators because they act on two operands e.g. 5>3 to return true or false.
Table 11.4 shows summary of relational operator in their order of precedence from highest to lowest.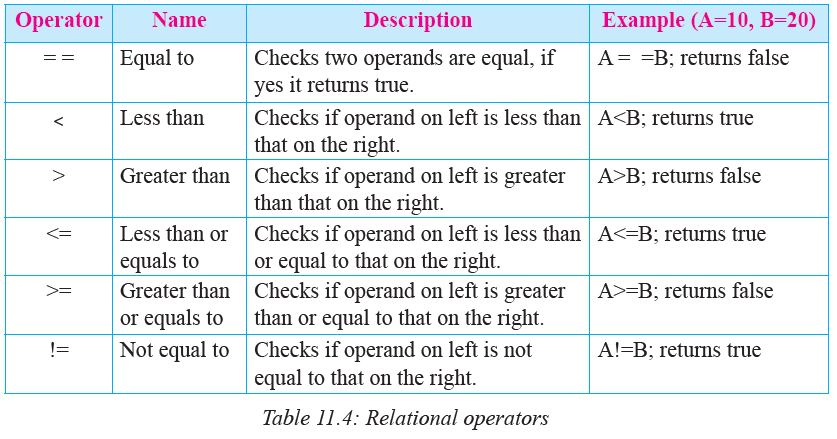
NB: In C++ the single (=) sign is used as an assignment operator while (==)is used as the equality sign.
Activity 11.4:Relational operator
Study the following program and determine the output after execution of statements consisting of relational expressions. Note that, in C++, evaluation of relational and logical expressions returns 1 for true or 0 representing false.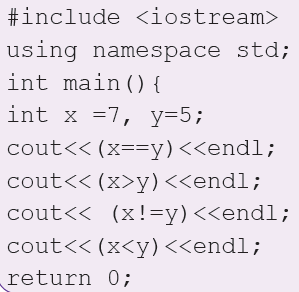
11.2.6 Logical operators
In C++, there are three logical operators used to form complex relational conditions. These are: && (AND), || (OR), and ! (NOT) also called negation. Whereas the && and || operators are binary, ! is a unary operator that takes only one operand on its right. Consequently, the operator negates the value or expression on its right to return opposite Boolean value. Table 11.5 gives a summary of the three operators.
Activity 11.5: Logical operators
Study the following program and determine the output after execution of the statements consisting of a mixture of relational and logical expressions.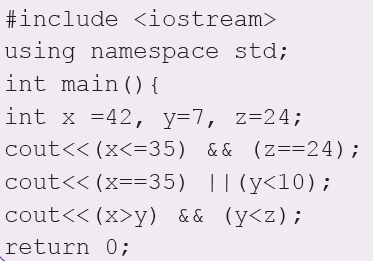
11.2.7 Bitwise operators
Unlike other operators mostly used to manipulate decimal (base 10) numbers, bitwise operators are used to manipulate binary numbers. Table 11.6 gives a summary of bitwise operators supported by C++ namely: AND (&) , inclusive OR ( | ), exclusive OR ( ^ ) one’s complement (~), binary left shift <<, and binary right shift.
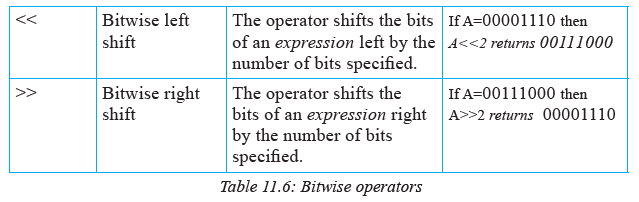
To illustrate how the operators &, | and ^ are used, we take two variables p and q. The columns p&q, p|q, and p^q in Table 11.7 shows the result of binary three expressions:
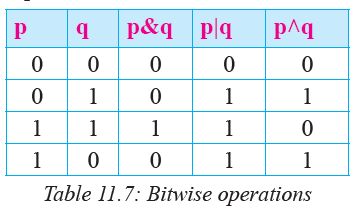
To apply Bitwise operators on decimal numbers, each number must first be converted
into binary form. For example, assuming two variables A and B have 60 and 13 respectively, we perform binary AND, inclusive OR, exclusive OR and one’s complement as follows:
Activity 11.6: Bitwise operators
1. Using C++ expressions, distinguish between logical operators, and bitwise operators for AND, OR and NOT.
2. Study the table 11.8 below and state the values returned by evaluating binary expressions p&q, p|q and p^q.
11.2.8 Conditional/Ternary Operator
The conditional operator represented by a question marks and colon (?condition ? result1 : result 2;
If condition on the left of (?) sign is true, the expression returns result 1, otherwise if the condition returns false, the expressions returns result 2. For example, the following statement displays 10, because 7 is not less than 5;
cout<< 7 < 5 ? 4 : 10; //displays 10
NB: The conditional operator and the IF...ELSE selection works exactly the same.
The only advantage is shortened code hence saving compile time.Activity 11.7: Conditional operators
Identify the value displayed on screen after evaluating by the the following
expressions:
11.2.9 Miscellaneous Operators
C++ supports other miscellaneous operators such as sizeof, cast [
address of [&], and scope resolution operator [::].11.2.9.1 The size of operator
The sizeof operator is an inbuilt function that accepts one parameter and returns the
size in bytes. For example, the following statement assigns 8 to memsize because a
double has 8 bytes:
memsize = sizeof (double);11.2.9.2 Address of operator [&]
The address of (&) operator is said to be overloaded operator because it can be used
for more than one operations. When applied on binary operands, it is interpreted by
the compiler as a bitwise & (AND) operator. But when the symbol is followed by
a variable as shown in the following statement, it returns memory address allocated
to the variable:
int location = &distance;The statement assigns memory address of distance to location which can be formatted
and displayed in hexadecimal format as follows:cout<<setbase(16)<<location;
11.2.9.3 Cast [
Type casting operator represented with brackets () converts (casts) a value from one data type to another. This is achieved by preceding the expression to be converted by the new type enclosed between parentheses (()) or using functional notation. For example, if distance is a float, it can be casted to an integer as follows:float distance = 3.14;
approx_dist = (int)distance; //C-type casting
approx_dist = int(distance); //functional notationNB: In C++, casting a variable declared as double or float to int results in loss of
precision due to loss in floating-point part. In the above example, the value
assigned to approx_distance is 3!11.2.9.4 Comma [ , ] operator
The comma (,) operator separates two or more expressions where only one expression
is expected. The result of the comma-separated list is the value of the last expression.
For example, the following expression assigns 3 to b first, then assigns b+2 to a, so
that a becomes 5 and b holds 3:a = (b=3, b+2);
11.2.9.5 Scope resolution [::] operator
The scope resoultion operator represented by two consecutive colons is used to identify and disambiguate similar identifiers used in different scopes. The operator is used to identify a member of a namespace or class. For example, if using namespace declaration is omitted in a C++ program, you can use:: to access cout as follows:
std::cout<<“I Enjoy Programming!\n”;11.2.10: Operator precedence in C++
When writing complex expressions with several operands, we may have some doubts about which operand is evaluated first and which later. In C++, the precedence rule is an established order in which an expression consisting of mixed operators is executed. Just like in BODMAS, the order of precedence can be changed by use of parenthesis. In summary, Table 11.9 gives precedence of the operators discussed in this section in order of the highest to the lowest.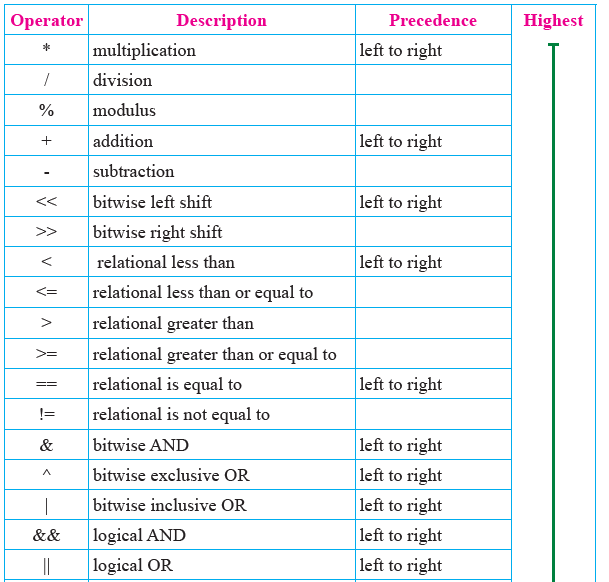
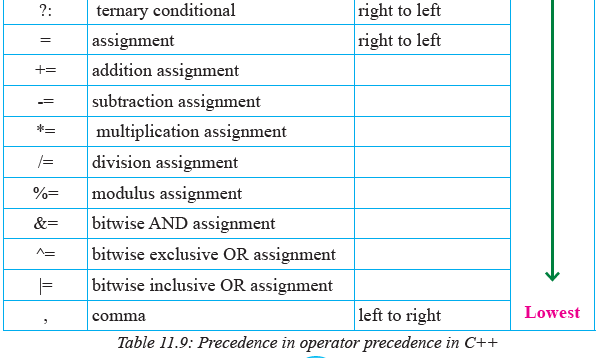
Assessment Exercise 11.1
1. Define the following terms as used in C++ programming:
(a) Expression
(b) Operand
(c) Operator
2. Giving example, differentiate between postfix and prefix operators.
3. Using sample codes, discuss five main categories of operators used in C++ Programming.
4. Explain the design goal that motivated the use of special characters as operators
in C++ programming language.
5. Assuming y has a value of 20, and x has 8. What would happen if a programmer
writes a statement to compare whether y is equal to x but instead writes:
y = x ;
6. Write the following mathematical expression as a C++ assignment statement.
y = ax3 + bx + 7
7. Perform bitwise AND, inclusive OR and one’s complement on the following
variables:
(a) Binary: p =1111111, q = 110011.
(b) Decimal: x = 25, y =50.
(c) Hexadecimal: m= DB, n = A2.
8. Between arithmetic, and relational operators, which category has higher precedence in C++. Give a table of summary on the order of precedence in the two categories.11.3 Classication of C++ Expressions
Depending on the type of operator used on one or more operands, expressions can
be classified into several categories based on complex or side effect. Remember
that, an expression is a sequence of operators and operands used for one or more of
these purposes:
• Computing a value from one or more operands.
• Generating “side effects” such as modifying variables.
In C++ programming, expressions may be classified into primary; postfix, unary,
binary, conditional; constant, and type casting expressions.11.3.1 Primary expressions
A primary expression is the most basic expression from which more complex expressions are built. Therefore, a primary expression can be as simple as having a single character or simple increment expression as shown below:120; // numeric constant
‘g’; // character constant
(x + 1 ); //increment expression11.3.2 Postfix expressions
Postfix expressions consist of primary expression in which operators like ++ follow a primary expression. For example, if C=0, and index =1, the following are postfix expressions that increment their values by 1:C++; //returns 1, and index++ //returns 2
11.3.3 Unary (Prefix) Expressions
A unary operator is placed on the left of an expression of only one operand. Such operators include address of (&), unary plus(+), unary minus (-), logical not (!), bitwise negation [~], increment [++], decrement [--], and sizeof. The following are examples of unary expressions.--6; //returns 5
++5; //returns 6
!(101100110); //returns 010011001Note that arithmetic signs + and – can be used as unary operators. The result of the unary plus operator (+) is the positive value of its operand, while that of unary negation operator (–) produces the negative of its operand. For example, if x = 5, then;
+x; //returns 5; and -x //returns -5
11.3.4 Binary Expressions
Binary operators act on two operands in an expression. The main categories of binary
operators are multiplicative (*, / and %), additive ( +,-), shift (<<, >>), relational (<, >, <=, >=, ==, !=), Bitwise & and |, logical && and ||, assignment (=) and compound assignment, as well as the comma operators. For example, the following are binary expressions:
sum = x + y;
ans =7!= 8; //returns true
y = a + k * (x * (x + 7));11.3.5 Ternary Expressions
A conditional operator is a ternary operator that takes three operands. For example, the sample code below tests if i is greater than j. Since i has 3 and j has 5, the first condition returns false hence the program prints “5 is greater”:int i = 3,j = 5;
cout<<(i>j?i:j)<<“is greater.”;11.3.6 Constant expressions
Since a constant value cannot be modified, C++ provides keyword const to enable programmers write expressions that enforce this constraint. The following C++ code contains an expression that declares size as a constant. The program then calculates and prints the product :int main (){
const double unitcost = 11.0;
double amount= 0.0;
int quanitity = 30;
amount = unitcost * quantity;
cout<<“Total.”<< amount<<endl;
return 0;}11.3.7 Type casting expressions
Type casting expressions are statements with explicit type conversions. By default
C++ syntax defines conversions between its fundamental types (int, char, float, double,
and char). This type of conversion that is automatically handled by the compiler
is referred to as implicit type conversion. For example, the following assignment
statements implicitly converts values from one type to another.
int main (){
int inum;
long lnum1, lnum2;
lnum1=inum;
lnum2=inum * lnum2;
return 0;}In the following program, area is converted from float to double. This is because the compiler automatically converts area to data type with the highest precision in the expression. In this case, the display is 8 bytes for a double instead of the 4 bytes used to store float.
int main() {
const double PI = 3.142;
float area, radius 3.5;
area = PI * radius*radius;
cout<<“ Mem Size:”<<sizeof(area)<<endl;
}You can also specify type conversions when you need more precise control of the conversions applied. This is achieved by using cast operator () within which is the type the operand is to be casted to. For example, the above code can be modified to force the area to be demoted to an integer value which leads to loss in precision:
int main() {
const double PI = 3.142;
float area, radius 3.5;
area = int(PI * radius*radius);
cout<<“Mem Size:”<< sizeof(area)<<endl;
}Activity 11.8: Expressions and operators
1. In C++ expressions, operators such as +, and -, can be overloaded such that their meanings depend on context of use. Using examples, explain how each of the operators can be used in a unary and binary expressions.
2. Using sample expressions, differentiate between binary expressions and tertiary expressions in C++ programming.Assessment Exercise 11.2
1. Differentiate between a “statement” and an “expression” as used in programming.
2. Using sample code, demonstrate how unary expression differs from binary and unary expressions.
3. Identify the output of the expression in the following C++ code snippet:
int main (){
int x=10;double y=3.5;
float product =0.0;
product = x * y;
cout<<product<<” “<<sizeof(product);
return 0;}Unit Test 11
1. Define the following terms as used in C++ programming:
(a) Operator precedence. (b) Self-assigned operator.
2. Differentiate between prefix expression and postfix expressions.
3. State two advantages of using special keyboard symbols as operators in C++
instead of English keywords.
4. Differentiate between bitwise inclusive ( | ) OR, and XOR (^).
5. To reference storage of a variable in main memory, two operators, namely size of and address of (&) may be used. Using sample code, differentiate between the two operators.
6. With aid of a table on ASCII character set, write a program that prints integer equivalent of alphabetic characters typed in lowercase and uppercase on the keyboard. Note that although the declaration should be of type char, the output should be of integer type.
7. Using a table, classify arithmetic, relational, assignments and bitwise operators in order of precedence starting with the highest.
8. Write C++ program that calculates and outputs surface are and volume of a sphere.
9. Write a C++ program that calculates and displays alternative roots of a quadratic equation:
root = ax2 + bx + c
10. Study the program given below and identify the correct output:
#include <iostream>
int main() {
using namespace std;
float num1, num2;
cout << “Enter first number: “;
cin >> num1;
cout << “Enter second number: “;
cin >> num2;
cout << “num1 = “ << num1 << “; num2 = “ << num2 << endl;
cout << “num1 + num2 = “ << num1 + num2 << endl;
cout << “num1 - num2 = “ << num1 - num2 << endl;
cout << “num1 * num2 = “ << num1 * num2 << endl;
cout << “num1 / num2 = “ << num1 / num2 << endl;
return 0;
} //end main11. Identify synthax errors in the following program and rewrite to make it complete:
#include <iostream>
u#include <iostream>
using namespace std;
int main() {
int dec1 = 2, dec = 4;
double num1 = 2.5, num2 = 5.0;
cout>>dec1<<“+“<<dec2<<“=“<<dec1+dec2<<end;
cout<<num1<<“+“<<num2<<“=“<<num1+num2<<end;
cout>>dec1<<“-“<<dec2<<“=“<<dec1-dec2<<end;
cout<<num1<<“-“<<num2<<“=“<<num1-num2<<end;
cout>>dec1<<“\“<<dec2<<“=“<<dec1\dec2<<end;
cout<<num1<<“\“<<num2<<“=“<<num1\num2<<end;
} //end mainUnit 12:CONTROL STATEMENTS IN C++
Key Unit Competency
By the end of the unit, you should be able to use control statements in C++ program to implement branching and iterations.Unit Outline
• Sequence control structures.
• Selection statements.
• Looping control statements.
• Jump control statements.Introduction
Control structure refers to a block of statements that determine the flow of control, or order in which program statements are executed. The flow of control in a program can be examined at three levels – expression level, statement level, and program level. In the previous unit, we examined flow of control within expressions, which is governed by precedence rule. In this unit, we move a step higher by looking at statement level flow of control implemented using sequence, selection, and iteration control statements.
This unit serve as a bridge to the next unit in which we discuss the highest level of control among program units known as procedures or functions. In this unit, we begin by reviewing of sequence control structure in which program statements are executed in the order they appear on the program. Later, we demonstrate how to write program statements that alter the flow of control using conditional logic.12.1 Sequence Control Structure
Sequence control structure is a simple flow of control in which statements are executed in the order they are written. So far, most of the C++ programs we have discussed are sequential in that, statements are executed in the order they appear in the program. For example, below is a sample program implemented using sequence control structures. The program execution starts by reading two numbers (num1 and num2), and then displays the value of each number before swapping (interchanging) them. The last two cout statements display the values of num1 and num2 after swapping them as shown on the output screen.
#include<iostream>
using namespace std;
int main(){
int num1, num2, swap;
cout<<”Enter first number: “;cin>>num1;
cout<<”Enter second number: “;
cin>>num2;
cout<<” Numbers before swapping: “<<endl;
cout<<”1. First Number =”<<num1<<endl;
cout<<”2. Second Number =”<<num2<<endl;
cout<<”\n”; //insert blank line
swap=num1; //assign value of num1 to swap
num1=num2; //replace num1 with num2 value
num2=swap;
cout<<” Numbers after swapping: “<<endl;
cout<<”1. First Number =”<<num1<<endl;
cout<<”2. Second Number =”<<num2<<endl;
return 0;
}The output screen shown in Fig. 12.1 shows the values of each number before and after swapping:
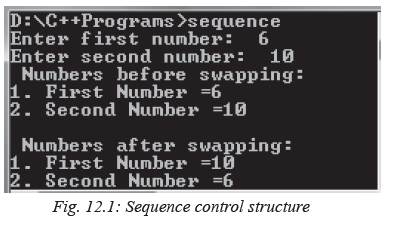
Activity 12.1: Sequence Control Structure
Consider the following programming problem:
Three integer values 50, 78, and 45 are to be placed in the three variables namely
max, mid, and min. Write a sequential program that swaps the three numbers to
display them in ascending order.12.2 Selection Control Structure
Situations arise whereby a program need to carry out a logical test, and then take an alternative action depending on the outcome of Boolean test. A Boolean test is an expression that uses relational operators; like = (equal to), > (greater than), < (less than), >= (greater than or equal to) and <= (less than or equal to) and three logical operators namely AND, OR and NOT. For example, consider a program to test if x is greater than 20 (x > 20). In such a case, if a user enters a value of x, it is compared against 20 and the program returns true or false depending on the outcome. Generally,
C++ supports four types of selection control statements that includes if, if... else,
nested if, and switch.12.2.1 The if control statement
The if selection is a control statement that performs an action if the condition is true,
or skips the action if the condition is false. This conditional logic can be implemented
in C++ using the general syntax on the left.This general syntax is an implementation
of flowchart section shown on the right.
For example, suppose the school administration decides to reward students whose examination score is 80% and above. This logic of if selection can be implemented in C++ using the following syntax in which the condition to test if score is greater or equal to 80 is enclosed in parentheses.
If (score>=80){
cout <<“Reward<endl;
}To further demonstrate how the if ... selection works, the following program prompts the user to enter a score. Once the statement is encountered, the score is compared against 80 in the boolean expression (score >=80). If score is above 0, the program prints Excellent otherwise nothing happens.
#include <iostream>
using namespace std;
int main() {
int score;
cout << “Enter mean score:”;
cin>>score;
if (score>= 80) {
cout<<”Excellent\n”;
} //end if
return 0;
}Fig 12.2 shows the output screen after running the program
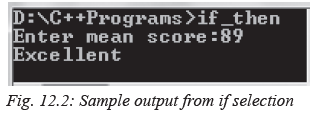
Activity 12.2: if selection statement
Using C++, write a program that prompts a user to enter a student’s mean score in
Computer Science. If the score is above 50%, the program should display “Pass”.12.2.2 The if… else selection
The if…else selection is conditional logic that specifies the action to be performed if the condition is true, or an alternative the action is false. In C++, if...else selection can be represented using the general syntax on the left. This general syntax is an implementation of flowchart segment shown the right.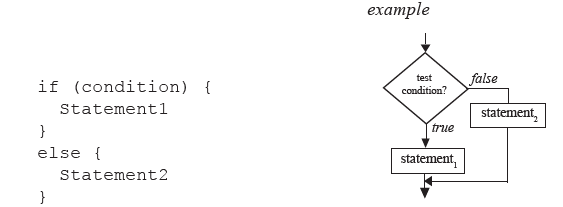
The following program demonstrates use of if..else by modifying the previous program of rewarding students. If the score is above 80%, the program displays “Reward” otherwise, the message “No reward” is displayed.
ifelse
#include <iostream>
using namespace std;
int main() {
int score;
cout << “Enter mean score:”;
cin >> score;
if (score >= 80) {cout << “Reward\n”;
} //end if
else {
cout << “No reward\n”;
} //end else
return 0;
} //end main
Fig. 12.3 is a sample display when the program is run.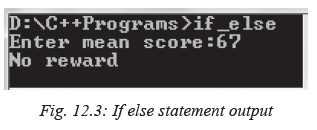
Activity 12.3: if ... else selection statement
The following algorithm represents a program that prompts the user to enter two numbers
x and y. The program then divides x by y. To avoid division by zero error, if the value of y is 0, the program should display an error message “Sorry: cannot divide by zero”.BEGIN
PRINT “Enter 2 numbers X and Y”
READ x, y
IF y = 0 THEN
PRINT “Error : Division by zero”
ELSE
result = x/y
PRINT X, Y, Quotient
END IF
END12.2.3 Nested if..else control statement
The nested if…else selection is a conditional logic that tests for multiple alternatives by placing if…else statements within another if…else statement. The general syntax of nested if statement can be expressed as shown on the left. This an implementation of a flowchart segment shown on the right
For example, the following program uses compound conditional logic in nested if selection to assign grade depending on average mark entered by the user.

Fig. 12.4 shows a sample output of grade assigned once the user enters 67 as the score.
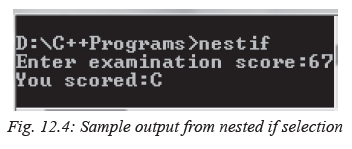
Activity 12.4: Nested if selection statement
In athletics, runners are awarded medals depending on position as follows: position
1: gold; position 2: silver and position 3: bronze. The rest of the runners are not
awarded any medal but receives appreciation message saying “Thank you for your
participation”. Using nested if...else statements, write a C++ program that determines
the medal to be awarded to runners depending on time each athlete touches the finish
line.
12.2.4 Switch... case selection
Similar to nested if selection, switch... case control statement is used to choose from several alternatives. Within the switch are actions (cases) associated with a constant value that must be evaluated before the statements within each case are executed. The syntax of the switch -- case selection is shown below and is demonstrated using the flow chart next to it: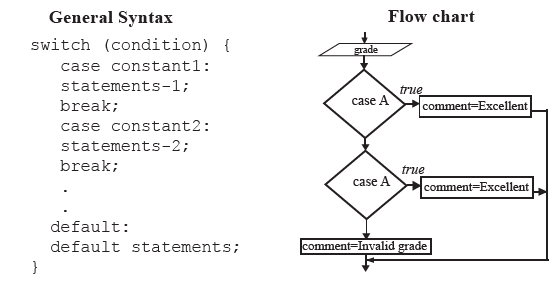
The switch in the first line is a reserved word that evaluates the condition in the
parenthesis. For example, in:
switch (grade);
If the value is equivalent to constant case ‘A’, the program evaluates the statement
under case A and exits. If the grade value happens to be ‘B’ the next case is evaluated.If no block under case evaluates to true, the statements following default i.e. “Invalid
grade” is executed. The following is a sample implementation of switch selection that assigns comment based on grade obtained.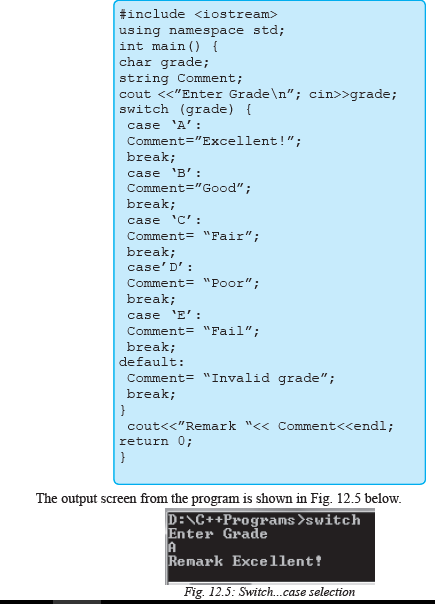
Activity 12.5: Switch selection statement
Write a C++ program that assign medals to athletes based on the following conditions;
1. If position 1, award Gold
2. If position 2, award Silver
3. If position 3, award Brown
4. If the position is not 1,2 and 3, display “no award”Assessment Exercise 12.1
1. Define the term selection in relation to program control structures.
2. State four types of selection control statements used in C++.
3. Differentiate between nested if and switch selection statements.
4. In what circumstance does selection depend on decision?
5. List three factors you would consider when choosing selection controls statement
in C++.
6. Write a program that would enable the user to enter student marks in three
subjects. The program should calculate mean marks and determine whether the
student has passed if the pass mark is 50%.12.3 Looping Control Statements
If a programming language does not provide means of repeating execution of program statements, programmers would be required to state every action in sequence, which is a waste of time and memory space. Primarily, C++ provides three types of looping control statements: while, do... while, and for.
The while and for control statements are pretest types of loop because they test the
condition before executing statements within the zero or more times. On the other
hand, the do ... while loop is a post-test loop that executes the body of the loop at
least once before testing the condition. Apart from the three control statements, C++
also supports a special kind of loop known as recursion discussed in the next unit
and recursive functions.Activity 12.6: Looping control structure
Assume that the school administration requires you to write a program that calculates
cumulative sum and average score of five students. To calculate the sum, the program
repeatedly reads each student mark, and finally calculates average once the score of
the last student is entered. In groups, design an algorithm for solving the problem,
and then implement it using C++ language.12.3.1 The while loop
The while loop is used if a condition has to be met before the statements within the loop are executed. Therefore, this type of loop uses a pre-test condition to determine if whether are to be executed zero or more times. In general, the while loop can be represented as follows: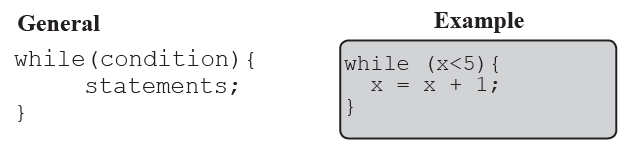
The following program executes statements in the while loop if the value entered by the user is less than one. For example, if the number is 10, the list is decremented by 1 as long as the condition (n>0) remains true. The algorithm of the program can be represented using a flow chart as shown next to the program code.
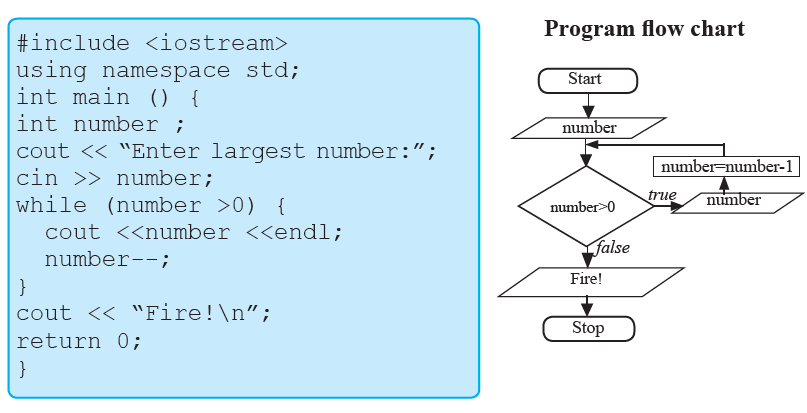
If the user enters 5 as the largest number, the sample output is shown in Fig. 12.6.
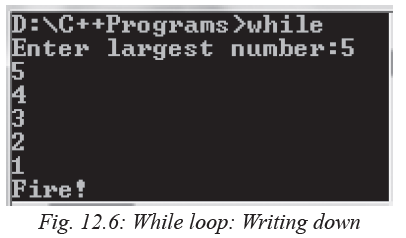
Consider a microfinance known as Tusadie Savings Society that pays 5% bonus on shares exceeding 100,000, and 3% on shares above 50,000. However, no bonus is paid if a member has shares below 50,000. The program below may be used to compute bonus for fifteen members.
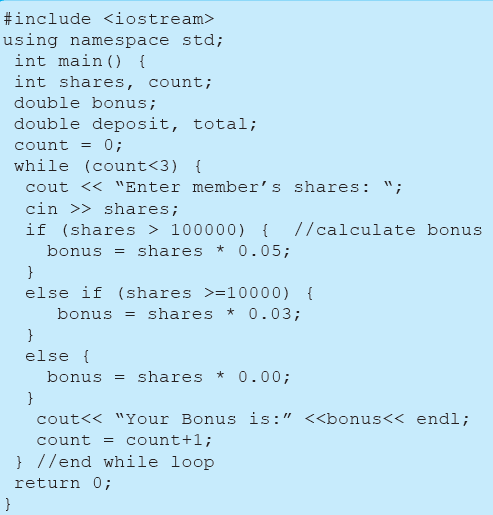
The sample output shown in Fig. 12.7 demonstrates the behaviour of the program once the user enters 80000,7800 and 12000 as shares for three members.
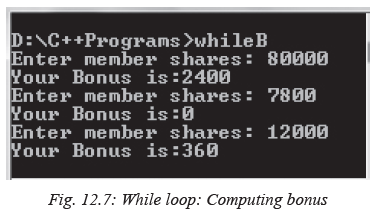
12.3.2 The do... while Loop
The do ...while loop is similar to while loop, only that the statements in the body of the loop are executed at least once. This is because the condition is tested after execution of the statements, granting at least one execution of statement even if is the condition is false. The general syntax of do...while loop is as follows: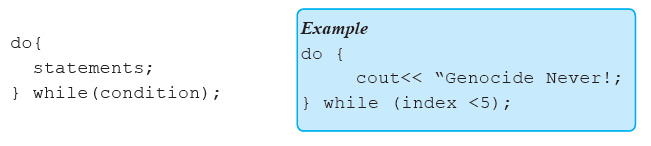
The following program executes statements within the do ...while loop at least once even if the value entered by the user is less than zero. If the number entered is 10, the list is decremented by 1 as long as the condition (n>0) remains true.
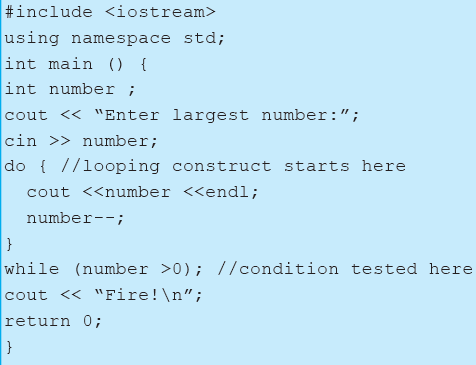
The following flowchart shows graphical representation of an algorithm used to create the program:

Fig. 12.8 shows a sample output after the user enters 7 as the largest number. Note that the number is decremented after every loop to 1 when the alert Fire is printed!

To demonstrate further how the do...while works, consider a real case in which gross
salary of employees of Kigali Bookshop is based on basic salary, bonus, experience
and monthly sales as follows:
(a) Employees who have worked for the company for more than 10 years receive additional pay of 10%.
(b) Monthly bonus is at rate based on monthly sales worth 250,000 as outlined in the following table: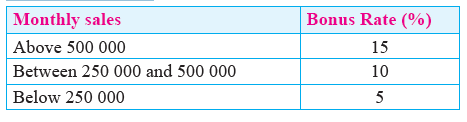
The following is the program implemented using C++ to calculate each employee’s gross salary depending on years of experience and sales.


Fig 12.9 shows the output from the program. Note that to get the output, nested if has also been used to test the years of experience and bonus given.
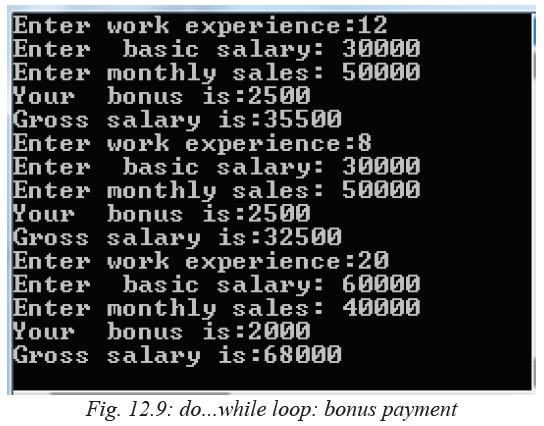
12.3.3 The for Loop
The for loop is designed to perform a repetitive action with a counter that is initialised and increased after each iteration. The for --loop is similar that of the while loop except that the incrementing or decrementing of the counter is done within the for statements as follows:for(initialization; condition; increment){
statements;
}For example, the following C++ code snippet is for a program that displays numbers from 0 to 10;
for(int index=0; index<=10; index++){
cout<< index <<endl;
}The code segments works as follows:
1. Declares and initialises index of integer type to 0. Most often, a control can be a single character like i or x.
2. Sets a boolean condition to be checked e.g. index <=10. If the value returned is true, execution enters into the body of the loop, otherwise the program skips the loop.
3. Executes the statements within the loop. This can be either a single or a block of statement enclosed in braces { }.
4. Increments the index by 1 (index ++) and tests the condition again before entering
the loop. If the value of index is greater than 10, the program exits the loop.
The following program demonstrates how to use the for loop. The program lists
numbers 0 to 10, followed by the message “Fire!”.#include <iostream>
using namespace std;
int main () {
for (int count=1; count <= 10; count++
) {
cout<<count<<endl; //display 1 to 10
cout<< "Fire!"<<endl;
} //end for
return 0;
}The for loop output shown in Fig. 12.10 shows how the value of index is incremented and then printed on the screen.

A for loop can also be used to count downwards from the upper limit to the lower limit using the syntax:
for(initialization; condition; decrement){
statements;
}For example, in the previous program, the upper limit 10 can be tested against the lower limit 1 print number in descending order using the following statements.
for(index=10; index>=1, index--)
cout<<index<<endl;
{
statements;
}12.3.4 Nested Loops
A loop inside another loop is known as nested loop. In C++, you can insert any type of loop inside the body of another loop. For example, you can insert a for, while or do-while loop inside another for loop as shown in the program segment below:for (int i=0;i<rows; i++){
for(int j = 0;j<cols;j++)
cout<<letter;
cout<<"\n";
}//end outer forIn this case, the inner loop is executed for every execution of the outer loop. The program below accepts a character as input, formats the characters into rows and columns and then displays the output as shown in Fig. 12.11.

Fig. 12.11 below shows a sample output from the program when the user keys in 4 rows, 4 columns and a character R as input.

Assessment Exercise 12.2
1. Define the term iteration control statements as used in structured programming.
2. State three types of looping control statements used in C++ programming.
3. Differentiate between while and do-while looping statements.
4. List three advantages of looping using looping control over sequential flow of
control.
5. Write a sample C++ code segment that demonstrates implementation of the
following control structures:
(a) Do...While. (b) For loop.
6. Write a program that would be used to display odd integers between 1 and 200.12.4 Jump Control Statements
Sometimes it is desirable to exit or skip some statement inside a selection or loop construct. This is achieved in C++ by use of jump statements such as break, continue, goto, and exit().12.4.1 The break statement
The break statement is a keyword used in the while, for, do…while and switch control statements to cause immediate exit from the body of the loop or selection. For example, once a break statement is encountered in the following loop, control is transferred to immediate statement following the loop:int main(){
int count;
for (count = 1; count <= 10; ++count ) {
cout << count << “ , “;
if ( count == 5 )
break; // skip count if its 5} //end for loop
cout << “The loop exits at:”<<count<<endl;
return 0;
} //end mainFig. 12.12 shows how the break statement inside the if conditional logic forces the program to exit the loop once 5 is encountered.

Activity 12.7: Looping control statements
Write a C++ for a program used to find sum and average of twenty positive integers
entered by user. If the input is negative, the program should exit from the loop and
display the cumulative and average.12.4.2 The continue statement
The Continue statement is used in repetition statements to cause the program to
skip the remaining statements in the body of the loop to test the condition. The only
common thing between the break and continue is that both use if selection to specify
the jump condition. For example, the program below prints values between one and
ten except 5: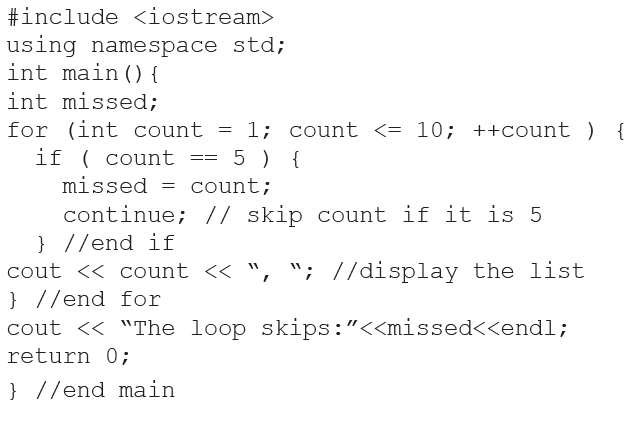
Fig. 12.14 shows a simple output in which 5 is skipped in the list. This is because the loop skips to test the condition even if 5 is encountered.
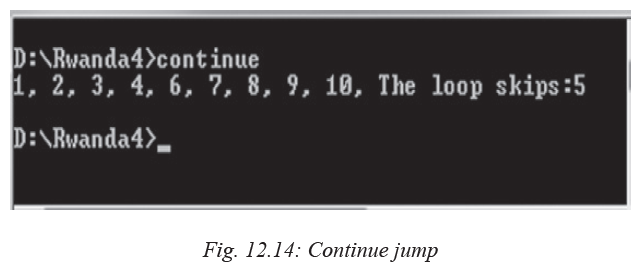
12.4.3 The goto Statement
The goto statement was used in early days of programming to specify the line the program should jump to. Like many structured programming languages, C++ sparingly uses goto for transfer of control. A goto jump in C++ is accomplished by writing the goto reserved word followed by the label of destination statement. A label is just a name followed by a colon (badloop: index++
if (index < 5){
goto badloop;
}To demonstrate how the goto statement works, the following program segment uses the goto keyword and if selection to implement a loop. To start with, the initial value of index (0) is tested against five (5). The condition causes the goto statement tojump to the label or exit the selection construct if the value of index is 5.
#include <iostream>
use namespace std;
int main(){
int index = 0;
label: index ++; //increment index
cout<<”Current index is:”<<index<<endl;
if(index < 5){
goto label; //jump to label
}
cout<< “Last index is:”<<index<<endl;
return 0;
}Fig. 12.13 shows a sample output from the program. Note that value of index is incremented by the statement index++
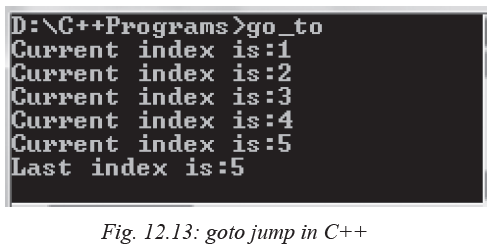
Because a goto statements can cause jumps to any location in your program, indiscriminate use of the statement can be a source of program bugs that may be hard to debug. Our advice is to use goto when absolutely necessary or completely avoid using it!
12.4.4 Exit
The exit() statement is an in-built function in C++ used to terminate a loop or program execution prematurely. For example, exit(1) statement in the following program causes the program to terminate before the statement “You’ll never see Me!” is displayed:
Fig. 12.14 shows a sample output from the program in which the statement following the exit() statement is never displayed!

Activity 12.8: Break, continue and exit()
1. Write a C++ program that tests if the given number is prime number. The logic should use a loop and break statements to test the use input.
2. Write a program that accepts numbers starting from zero. If the number is less than zero, the program should print an error message and stop reading the
numbers. Otherwise, if the number is greater than 100, the program ignores the number and executes the next iteration.
3. Write a program that accepts characters or special symbols as input and formats that output as a pattern such as shown below:
Assessment Exercise 12.3
1. Explain three types of jump control statement used to exit from a loop or selection statement.
2. Explain why it is not good programming practice to use the goto control statement.
3. Differentiate between break and continue statements.
4. Explain what happens when an exit () statement is used in a program.
5. Identify two circumstances in which the exit () statement may be used.
6. Write a program to demonstrate the use of continue and go to jump statements.Unit Test 12
1. Differentiate between if, and if..else statements in C++.
2. Write a sample program showing the general flow of the following control structures:
(a) Nested for. (b) do ...while.
3. Using a while loop, write a C++ program that would be used to display 50 numbers in descending order.
4. Write a program that would enable the user to enter student marks. The program should
then determine and display the grade based on grading criteria used by your school.5. Write a program in C++ that prompts for n numbers, accumulate the sum and then computes the average. The program should display sum and average formatted to 2 decimal places.
6. Write a program that reads temperature in degree celsius at least once a day in every week. The computer should convert recorded values into Fahrenheit and then calculate the average weekly temperature.
7. Nkosha deposited FRW 2 million in a bank at a fixed rate of 8% per annum for a period of five years. Write a program that calculates and outputs principal amount and interest for a period of seven years. The program should display amount rounded to nearest whole numbers
8. Malaika took a loan of FRW 200,000 from a commercial bank at 12% interest payable
in four years. Write a program that would keeps track of monthly repayments, and interest after four years. The program should display amount payable in each year.
9. Although the goto statement is an obsolete control in modern programming, the statement is sparingly used in some programming languages. Explain circumstances that necessitate its use in C++ programming.
10. Study and give the output of the following program.
Unit 13:FUNCTIONS IN C++ PROGRAMMING
Key Unit Competency
By the end of the unit, you should be able to define and use functions in C++ program.Unit Outline
• Fundamentals of C++ Functions.
• Types of functions.
• User-defined functions.
• Function declaration.
• Recursive functionsIntroduction
Structured programming employs a top-down design approach in which the overall program is broken down into separate units called modules, procedures or functions. In the previous unit, we have demonstrated how C++ implements structured programming using structures called control statements within a function called main.
In this unit, we demonstrate how a program can further be structured to more than one functions. To start with, we review basic concepts of modular programming, followed by detailed examination of library and user-defined functions. Finally, we demonstrate how C++ supports recursive functions inherent in procedural programming languages.13.1 Fundamentals of C++ Functions
Top-down approach in structured programming emphasizes on breaking down a program into smaller manageable components known as modules, procedures or functions. In C++, the smallest component having independent functionality is
known as a function. Every C++ program has at least one function called main13.1.1 Features of C++ Functions
Like in other structured programming languages, the following are characteristics of C++ functions:
• A function is a complete sub-program in itself that may contain input, processing and output logic.
• A function is designed to perform a well defined task.
• A function can be compiled, tested and debugged separately without the intervention of other functions.• A function has only one entry and one exit point.
• A function can interact with other functions using a mechanism known as function call and parameter passing.
• A function is designed in such a manner that it can be used with different programs or software system.
• The calling function is suspended during the execution of the called function.
This implies that there is only one function in execution at an y given time.
• Control is always returned to the caller when the function execution terminates.13.1.2 Benefits of using Function
Structured i:e modular programs have several benefits over non-modular programs (monolithic). Some of these benefits include:
• A structured program is easier to understand and test because it is made up of smaller manageable sub-programs than monolithic programs.
• It is easier to modify a structured program by adding or replacing some functions without affecting the entire program.
• Programmers productivity is increased, because each program function can be developed separately by several programmers.
• Structured approach to designing programs enhance the readability of a program.
• Functions can be saved as library functions to be used in other programs hence saving development time and cost.13.1.3 Limitations of using Functions
Although benefits of structured programming outways those of monolithic programming, the following are disadvantages associated with this approach:
• Structured programs need more memory space and extra time for execution. Because some functions repeat the task performed by other functions.
• Integration of various functions into a single program may be difficult because different people working on different modules may not use the same style.
• Testing and debugging of separate functions may be time consuming, thus reducing efficiency of a program.
• Global sharing of data by multiple functions is dangerous because one function can modify a global variable in a way that is invisible to anot her function.13.2 Types of Functions
Functions may be classified into two categories namely: Library or (built-in)functions and user-defined functions. Library function are compiled and put in C++ library to simplify programming task while user-defined function are the functions that we write to create a modular program.13.2.1 Library functions
So far, we have been writing programs by first including (importing) functions from C++ Standard Library. C++ Standard Library provides a collection of predefined functions for common input and output manipulation, calculations, error checking and many other useful operations. To use a library function, we first include its header file, then use a function that passes list of arguments from the calling portion of the program. For example, to find the square root of a number, we use square root function sqrt() as follows:root = sqrt(16);
The function sqrt() evaluates the square root of 16 and returns 4 which is then assigned
to the root. In this section, we demonstrate how to use mathematical, string and character manipulation functions.13.2.1.1 Math Functions
The C++ Library provides a collection of Math functions used to perform mathematical and trigonometric computations. For example, to raise 5 to power 3, we use the pow() function as follows:power = pow(5,3);//returns 125
Table 13.1 enumerates frequently used functions that require inclusion or importing of <cmath> or <math.h> header file using #include directive.
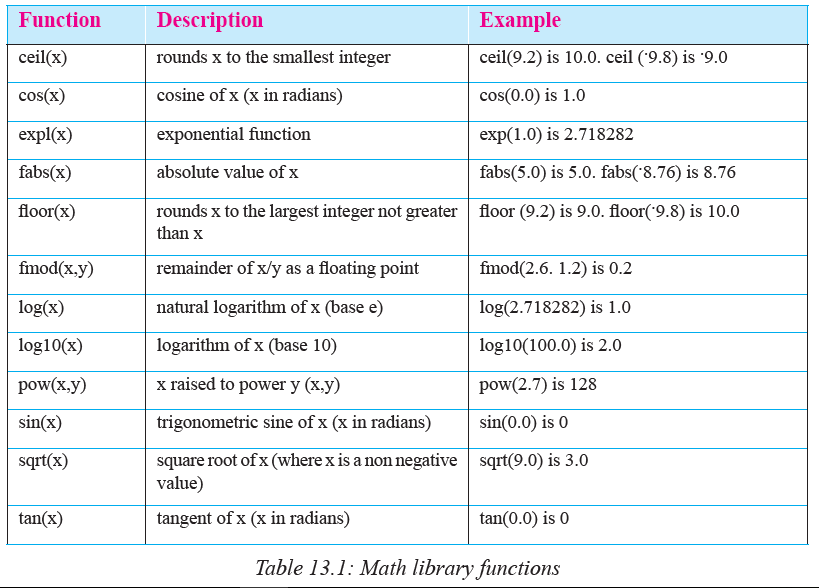
The program below uses two functions i.e. sqrt() and pow() to calculate hypotenuse of a right angled triangle: using the following expression:
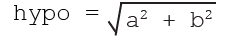
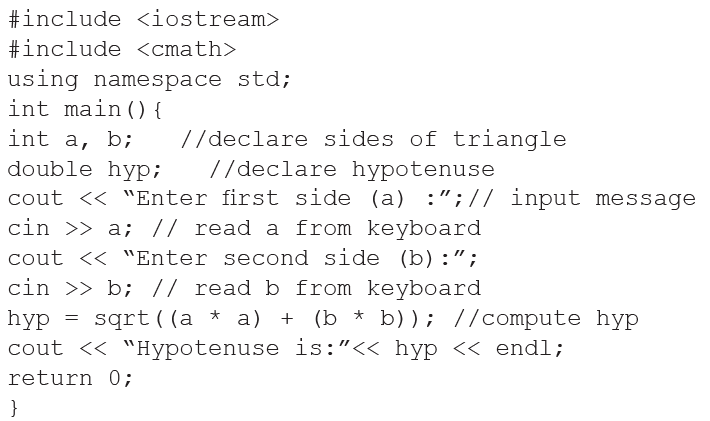
The illustration of Fig 13.1 shows the output after running the program.
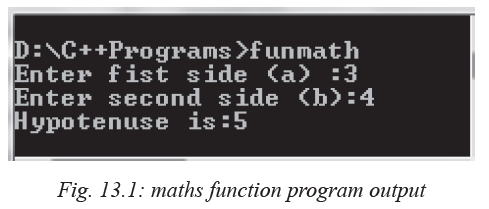
NB: To use the sqrt() function in the assignment statement, you must include <math> preprocessor directive as shown in the program.
13.2.1.2 Character Functions
Although a computer is a numerical machine, most often, data entered into a computer consist of numbers, characters and strings. The underlying fact is that characters are treated as integers. The C++ Library has in-built functions used to manipulate characters. The functions can be accessed by including <cctype> header file. For example, to convert a character c from uppercase to lower case, we use the following statement:letter = tolower(c)
For example, the program below uses tolower() function to convert a character from uppercase to lowercase.
#include <iostream>
#include <cctype>
using namespace std;int main(){
char letter, small;
cout << “Enter letters A-Z in uppercase:”;
cin >> letter; // read a from keyboard
small = tolower(letter);
cout << letter<<”lowercase is:”<<small<< endl;
return 0;
}Fig. 13.2 shows a sample output once the user enters H as the input. The character is converted to uppercase.
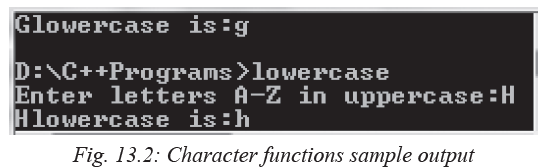
Table 13.2 below gives a summary of frequently used character manipulation functions accessible by including <cctype> header file.

The following program demonstrates how digital() and alpha() functions are used to test whether the user input is a letter or a number.
#include <iostream>
using namespace std;
int main(){
char grade;
cout << “Enter letters or number:”;
cin >> grade; // read a from keyboard
if (isdigit(grade)){
cout<<”The entry”<<grade<<”is number”<<endl;
}else if(isalpha(grade)){
cout<<”The entry grade is”<<grade<<endl;
}
else {
cout<<grade<<”may be a symbol”<<endl;
}
return 0;
}The output after entering a letter and a numeric value is shown in Fig.13.3 below:
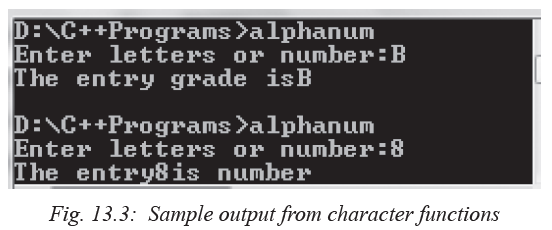
13.2.1.3 String Functions
The string-handling library provides many useful functions for manipulating string data, comparing strings, searching strings for characters and substrings. To use the string manipulation functions, you must include the <cstring> header file. For example, the following statement returns the number of characters in “My House” string: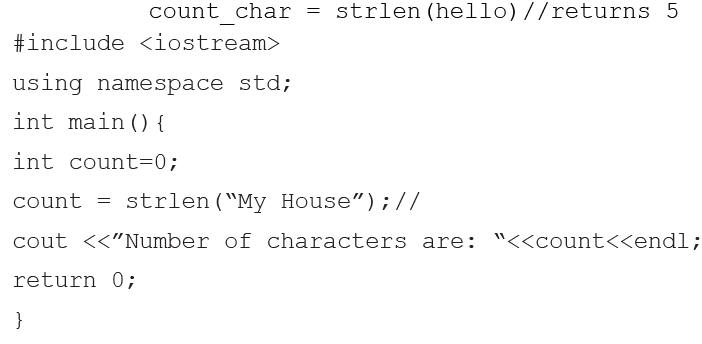
The sample output shown in Fig. 13.4 demonstrates how strlen() counts the number of
characters in My House string.
NB: The output shows that the number of characters are 8 because the space between
My and House is also counted as a character.
Table 13.3 below presents some common string manipulation functions supported by
C++.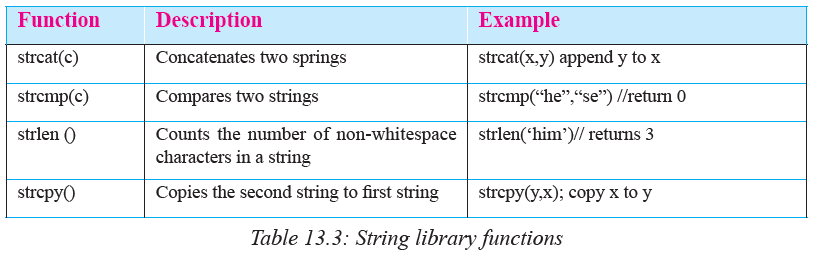
Activity 13.1: Library functions
In groups, review at least two programming languages installed on computers in the
computer lab. Perform the following tasks:
1. Identify at least ten math library functions and use an example to explain how
each function works.
2. Bisangwa took a loan of 400 000 FRW from a local bank at annual interest rate
of 12% . Assuming the loan should be paid in 4 years time, write a C++ program
that makes use of library functions to compute monthly loan rep ayment.13.2.2 User-defined Functions
We create user-defined functions to modularize a program or make it available in
C++ Library for use by other programmers. Creating user-defined functions require
that you declare the function name, return type, and list of arguments. After the
declaration, you can then define the function body by enclosing its statements in {
} braces as follows:

Explanation
• In the general syntax, type is the data type to be returned by the function. For example, in our previous examples, we have seen that main() returns int type.
• func_name is the identifier by which it will be possible to call the function. For example, main() with brackets indicates that it is a function.
• arg-list is a list of parameters also known as arguments that serves as placeholders for actual data to be received from another function. Arguments are separated by commas, with each comma-separated list consisting of data type followed by arguments e.g., int a. In our previous examples, main() with empty parenthesis list indicates that it does not receive arguments.
• statements is the function’s body that consists of a block of statements enclosed in { } braces. The statements include local variables, executable statements, and optional return statement. For example, main has the last statement as “return 0”. When a function is called by another function, execution is transferred to the function until the return statement or end of function is encountered. To demonstrate how functions work, the following program calculates the sum of two numbers received from the main function: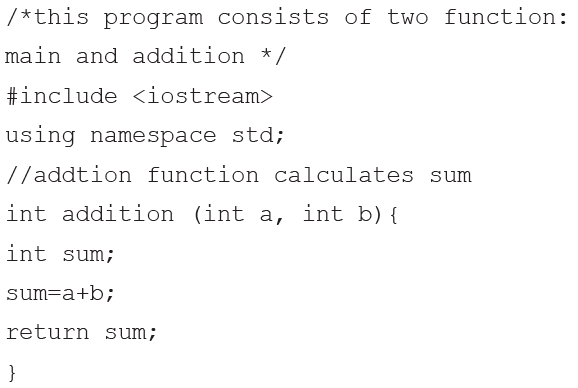
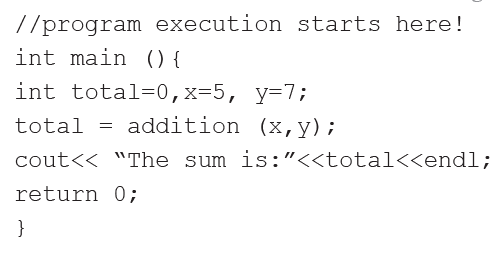
Fig. 13.5 shows a sample output from the program. Note that the screen does not explicitly show how the function was called.
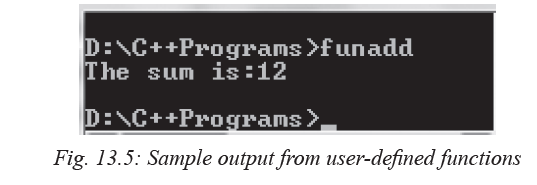
The following is a brief description about how the above progra m works:
• The execution environment in most cases in an operating system starts by calling
the main () function.
• The main function has three variables sum, x and y that are initialized to 0, 5
and 7 respectively.
• The next statement is referred to as function call that transfers control to a function
named addition. The x and y inside parentheses are called actual arguments
because they hold assigned values 5 and 7.
• The two values of x and y are “sent”, (passed) to a function called addition
through a process known as “parameter passing”. Note that the data type and
order in which the values are received should match that of the function call as
illustrated below:
• The control is passed to the addition function, arguments a and b known as formal parameters received from main(), i.e., 5 and 7 are assigned to as a and b follows:

• The two values are summed up and assigned to a variable (sum) in the addition function as follows:

• The statement return sum returns as a value of 12 and transfers control back to the
next statement following the function call in the main function. Note that the return
statement can be a value or an expression that returns a value such as:
• Finally, the main function prints the value received from addition function. Note the value has been assigned to total that is specific to main, hence referred to as local variable.
Activity 13.2: User-defined functions
1. Study the code snippet shown below and identify the function’s list of parameters, return type and the value returned by the maximum function:
2. Write a complete program in which the maximum function is called flow the
main ();
3. Write a program that computes area of a rectangle in a function called rect_area.
The rectangle then returns the calculated area to the main func tion.13.3 Function declaration
C++ requires that a function be defined before being called by the main () function or any other function. For example, addition function in our previous example comes before main. However, if you do not want to fully implement a function, you can first declare it and implement it later. To declare a function without implementing the body, write the function return type, name and parameter list followed by a semicolon at the end of the statement. The portion of a function that includes only the function name and list of arguments is called a function signature or prototype. For example, the following statement is a sample declaration for a function named maximum that takes 3 parameters.
1. Explain the purpose of each of the following statements:
(i) void maximum(int,int,int);
(ii) cout<< maximum(6,7,0);
2. Write a program that receives marks for three subjects: Mathematics, Computer Science and Physics/Economics. The program should pass received parameters to a function called calculator(). Once the calculator() function computes the mean score, the value is returned to a grader() function that determines mean grade as follows:
• 80 - 100 A
• 65 - 79 B
• 50 - 64 C
• Below 50 F13.3.1 Function Return Type and Arguments
We have seen that declaration of a function consists of return type, function name and a list of parameters. The return type and argument list can be of the following type:
• Primary data type – a function can return data types such as int, double, float, char and bool.
• Complex data types - a function can receive or return composite data structures like arrays, records (struct), linked list and string:
• Void type – this is a special type, which means a function does not return any value.
In C++, empty parenthesis also implies that the function takes void argument list.13.3.1.1 Functions with arguments and return type
A function can receive at least one argument and return a single value to the caller.
For example, the following printreport() function takes two parameters of int types,
computes quotient, and returns a value of double type:
double printreport(int x,int y){
return = x/y;
}
13.3.1.2 Functions with no arguments and no return type
The keyword void may be used to specify that a function neither receives arguments nor returns a value. For example, the printreport() function below does not receive arguments and returns void:
void printreport(void) {
int x = 5, y =10;
cout<<”Quotient is”<<x/y;
}13.3.1.3 Functions with arguments and no return type
A function can receive one or more arguments and return nothing. For example, the
following printreport() used void to explicitly declare that the function takes two
arguments but returns void:void printreport(int, int) {
cout<<”Quotient is”<<x/y;
}13.3.1.4 Functions with return type and no arguments
A function that receives nothing can be defined in a manner that it returns a value to the caller. For example, the printreport() function below does not receive arguments but returns void:double printreport(void) {
int x = 5, y =10;
return x/y;
}Activity 13.4: Function return type and arguments
1. Explain what happens if the return type is not explicitly declared, but the argument list is a mixture of types as shown below.caculator(int x, int y, float z){
return(x+y+z)
}2. Modify the calculator program created in Activity 13.5 to include a void function named printGrade that prints Average Mark and grade received from the grader() function
13.3.2 Scope of Variables and Constants
The scope specifies where a variable and a constant can be referenced in a program.
Scope of a variable can be either of global or local scope. Global identifiers can be referenced throughout a program, while local identifiers can only be referenced within the body of a function. Formal parameters are treated as local variables used exactly as if they had been declared in the function body. The following program demonstrates how to use global and local variables.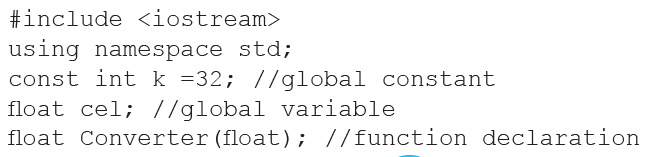

Fig. 13.6 below shows the output after the user keys in a value for degress fahrenheit:
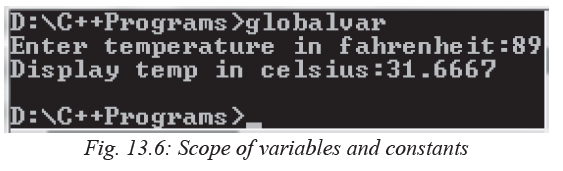
change a variable in a way that is invisible to another function. This sharing can
cause logic errors due to bugs that are very difficult to find.13.3.3 Parameter Passing
Parameter passing serves as the communication mechanism between two functions.
Once a call statement is encountered, the caller function passes actual parameters
to the function being called. For example, the program below ha s a call statement;
z=addition (x,y) that passes actual parameters 5 and 3 to addition function.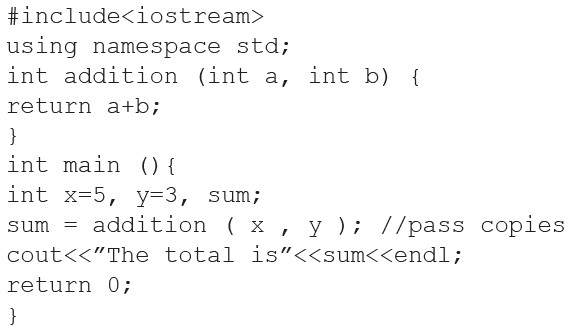
The output after running the program is shown in Fig. 13.7 below:
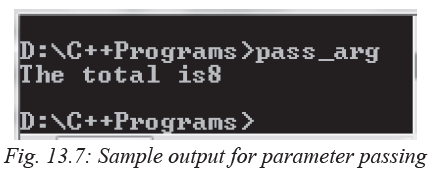
In this case, once the values of x and y are passed to addition function, they are assigned to a and b.
Activity 13.5: Parameter passing
1. Write a function named distance that calculates the distance between two points on a cartesian plane (x1, y1) and (x2, y2). All formal parameters and the return value should be of type double.
2. Determine whether the following program segments contain errors. For possible error(s), explain how it can be corrected.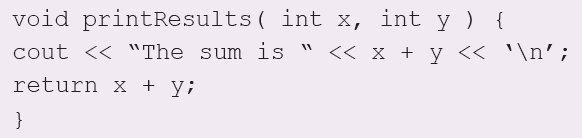
Assessment Exercise 13.1
1. Differentiate between definition prototype and function declaration.
2. State five advantages and three disadvantages of using functions.
3. State five common characteristics of a function.
4. Using Math library functions, write the following equation as a C++ expression:
y = ax3 + bx2 + cx +d.
5. Using examples, explain four functions that you can use to manipulate characters and strings.
6. Differentiate between void data type and empty parameter list.
7. Differentiate between global and local identifiers. Explain why it is undesirable to use global variables.
8. Using examples, differentiate between pass-by-value and pass-by-reference as used in structured programming.
9. Janet deposited 400,000 in her savings account. The amount deposited earns interest at 3% annually. Write a program that has a function called calculator that receives deposit and years from main() to calculate amount and accrued interest after n years. Note that interest rate should be global constant of double type.13.4 Recursive Functions
Some problems solved recursively are usually those in which you act on data and then act on the results the same way. Recursion is the process of repeating items in similar manner meaning that a recursive function is a function that calls itself in a similar manner. Such functions are useful in solving problems that are recursive in nature such as factorial, greatest common divisor (GCD) and fibonacci series.Activity 13.6: Recursive functions
1. Using your knowledge in Mathematics, demonstrate how you would compute factorial of integer numbers like 20!
2. Using a tree diagram, demonstrate how you would recursively determine the greatest common divisor (GCD) of two numbers, say, 420 and 42.
To demonstrate how recursive functions work. Let’s consider a mathematical problem
of finding factorial of a non-negative integer n, written as n! In order for the recursion
to terminate, the iterations must eventually converge to a base case such as 1 in n. For
example, 5! is the product of 5 * 4 * 3 * 2 * 1, which terminates at 1 to return 120.
Omitting the base case, or writing the recursion step incorrectly so that it does not
converge on the base case, causes “infinite” recursion analogous to infinite loop in a
looping control structures. The following program implements a recursive function
called factorial.
Fig. 13.8 shows a sample output after running the program.
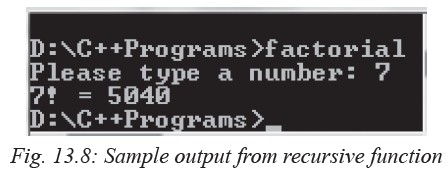
Explanation
1. The execution starts with the main function that prompts the user to type a number.
2. Once the number is entered, the function call factorial(number) in the last cout statement transfers control to the factorial function.
3. The factorial function receives the parameter and assigns it to n.
4. The factorial recursively calls itself in the statement factorial(n-1) until the base value -1 is reached.
5. The iteration stops and results displayed on the screen.
Let us consider another mathematical problem of generating Fibonacci series. In Fibonacci series, the next number is the sum of the previous two Fibonacci numbers as shown below:
0,1,1,2,3,5,8,13,21,…
This fibonacci series can be generated and displayed on th sreen by the following program:
Fig 13.9 shows the output screen of the program that prints a fobinacci series of natual
numbers 0 to 12.
13.4.1 Recursion vs iteration
• Iteration explicitly uses a repetition structure while recursion achieves repetition through repeated function calls.
• Both iteration and recursion involve a termination test: iteration terminates when the loop–continuation condition fails; recursion terminates when a base case is recognized.
• Iteration with counter-controlled repetition and recursion gradually approach
termination:
• Iteration modifies a counter until the counter assumes a value that makes the loop-continuation condition to fail; recursion produces simpler versions of the original problem until the base case is reached.
• Both iteration and recursion can occur infinitely: An infinite loop occurs with iteration if the loop-continuation test never becomes false; infinite recursion occurs if the recursion step does not reduce the problem during each recursive call in a manner that converges on the base case.
• Unlike iteration, recursive functions can be expensive in terms of processor time and memory space. This is because each recursive call causes another copy of the function to be created.Activity 13.7: Recursive functions
1. Implement a modular program for calculating Fibonacci series for nth term
received from main() function.
2. The greatest common divisors of two natural numbers can be easily determined recursively. Write a program for finding GCD of two natural numbers p and q
using the following function definition: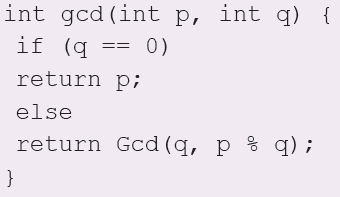
Assessment Exercise 13.2
1. Define the following terms:
(a) Recursion
(b) Recursive function
2. Differentiate between recursion and looping control statement.
3. Paul wrote a program that has factorial recursive function. However, after running the program, it was not terminating.
(a) What type of bug is making the program not to terminate?
(b) Advise Paul on how to eliminate the bug.
5. Explain why it is not advisable to use recursive functions if a problem can be solved using iterations.
6. Using an example, explain how a program would recursively find greatest common divisor of two natural numbers p and q.Unit Test 13
1. Explain the following concepts as used in C++ programming:
(a) Functions
(b) Arguments
(c) Parameter passing
2. Differentiate between library functions and user-defined functions.
3. Demonstrate how you would use library functions to compute volume of a sphere.
4. Helen wrote a modular program for finding the volume of a cube. Though the program was running, the calc_volume function was returning void causing unexpected output in the main function.
(a) What type of bug is making the program return invalid results?
(b) Advise Helen on how to eliminate the bug
5. Explain why parameter passing is an important concept in modular programming.
6. Global sharing of variables is one of the major reason for paradigm shift to object
oriented programming. Explain why.
7. Write a program that uses recursion to output fibonacci series from the first fifty natural numbers.
8. Write a program that reads temperature Celsius in the main function. The parameters is passed a function called calc_cel that returns double to a void function that displays the value of temperature in degrees Fahrenheit.
9. Jack deposits 20,000 FRW in a bank at an interest rate of 10% per annum. At the end of each year, the interest earned is added to the deposit and the new amount becomes the deposit for that year. Write menu-driven program that would be used to track interest over a period of five years.The program should output interest and principal amount accumalated in each year.10. Study and give the output of the following program.
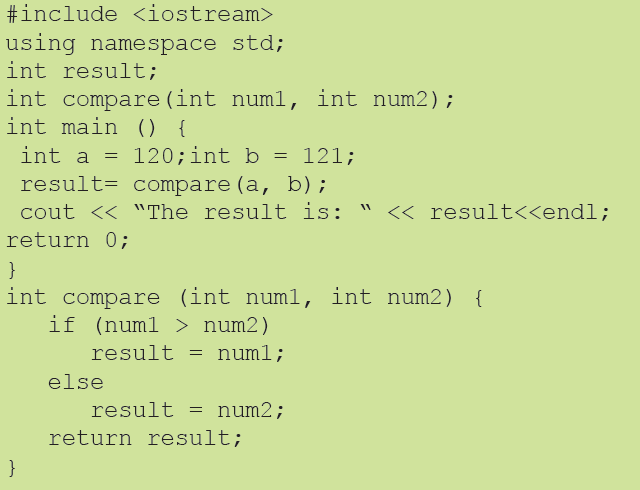
Unit 14:ARRAYS IN C++ PROGRAMMING
Key Unit Competency
By the end of this unit, you should be able to use arrays and strings in a C++ program.Unit Outline
• One-dimensional Arrays.
• Creating one-dimensional Arrays.
• Accessing Array Elements.
• Array of charactersIntroduction
This unit builds on earlier concepts on one-dimensional arrays, variables, data types and control structures. More specifically, this unit demonstrates how to create and manipulate one-dimensional arrays. We start by demonstrating how to create and manipulate one-dimensional array of numeric elements. Later, we demonstrate how to create one-dimensional array of characters also known as strings.14.1 One-dimensional Array
An array is a series of elements having the same name and data type placed in contiguous memory locations. To create an array in C++, you need to consider the following:
• Type of elements: The elements in an array must be of the same type. Some of the valid types stored in an array include primary data types (e.g. int, float, double, and char), and compound types such as string.
• Array size: Because arrays occupy space in memory, you must specify the number of elements beforehand so that the compiler sets aside enough memory space.
• Dimensions: Arrays can have any number of dimensions although it is likely that most of the arrays you create will be of one or two dimensions. To access elements in an array, you must indicate its position using a subscript (index) for each of its dimensions.14.2 Creating One-dimensional Array
In this section, we demonstrate how to create one-dimensional array of ten integers named house. The house array is first initialised to 10 values to be stored in each element.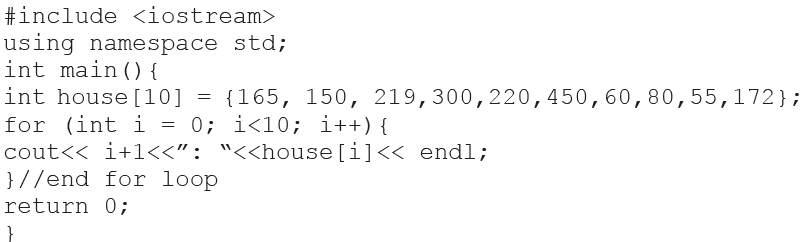
Fig. 4.1 shows a sample output after running the program. Note that the ten elements are listed from 1 to 10.

14.2.1 Declaration of Array
Declaring an array is similar to declaration of simple data types only that square []are used to instruct the computer to reserve enough memory locations to store array
elements. The general syntax of declaring a one-dimensional array is:type array name[number of elements];
Where type refers to data type to be stored in the array, followed by the array name and number of elements. For example, the follow array named house stores 10 elements of integer type:
int house[10];
Once you declare house array, the computer sets aside memory locations (addresses) for storing ten integer values such as 34,20,45,87,92,21,42,56,12 and 15.
Activity 14.1: Declaration of arrays
1. Study the following graphical representations of one-dimensional array and answer the questions that follow: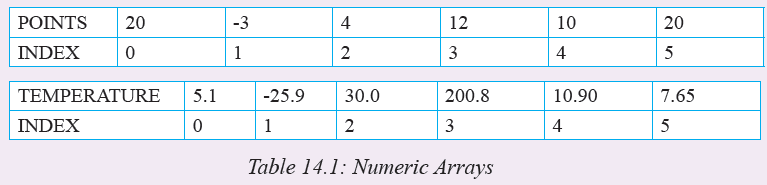
(a) Determine each array name, data type and number of elements stored in each array.
(b) Using C++, write declaration statement that sets the array elements to appropriate data type.
2. A bus has purchased a computer for its new automated reservations system. You are requested to program the new system that assigns seats to passengers for each trip. Using one dimensional arrays, design and write a program in c++ that assigns 30 seats as an array of integers. The output from the program should be the subscript and number, eg:
14.2.2 Initialisation of arrays
Array initialization refers to assigning elements to default values at compile time. In C++, elements of an array can be initialised during array declaration by assigning the array to list of comma-separated values enclosed in {}braces. For example, the house array in our example initialises the array as follows:int house[10]={165,150,219,300,220,450,60,80,55,172};
If there are fewer initialisers than the number of elements, the remaining elements are automatically initialised to zero. For example, the elements of the house array could have been initialized to zero as follows:int house[10] = {165,150};
The statement initialises the first two element to 165 and 150, and the remaining eight elements are initialised to two values followed by zeros as follows:
house[10] = {165,150,0,0,0,0,0,0,0,0};It is important to note that, declaration of an array does not automatically initialise elements to zero. To automatically initialise all elements to zero, use empty braces or initialise at least the first element to zero as follows:
int house[10]={0};
If the array size is omitted in the square bracket but elements initialised using comma-separated list of initialisers, the compiler assigns the array size enough to hold the number of elements in the list. For example, the definition below creates a five-element array:
int apartment[ ]={1,2,3,4,5};Activity 14.2: Initialising an array
1. Demonstrate how to initialise an array named product to the following list of
numbers: 21,32,43,54,65,76,87,88,99,200.
2. Explain whether the following array initialisation causes syntax error:
double product[8]={32,27,64,18,95,14};
3. Study the program below and explain line-by-line how the program works to provide desired output.
Compare your output with sample screen shown on Fig. 14.2 below:
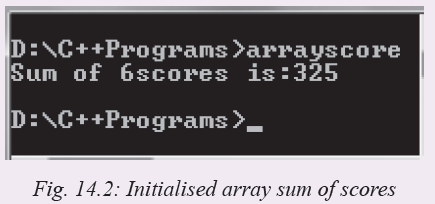
14.3 Accessing Array Elements
In one-dimensional arrays, each element can be accessed using subscript which is usually an offset of 1 from the number of elements using the following general syntax:
name[n-1];
The subscript n-1 is an offset of n elements because in C++, subscripts counts from 0. For example, to access the fifth element in the house array that has 50 elements, use the following syntax:
house[4];
The most convenient way to access multiple elements of an array is to use the for loop to be demonstrated later. The reason why for loop is desirable is because the number of elements is known beforehand.14.3.1 Reading values into Array Elements
To read values into a specific element of an array , use the following syntax:
cin>>name[n-1];
The statement uses the cin object to accept user input and stores the value into the element specified by n-1 offset. For example, the following statement prompts the user to enter a value that is stored into the fifth element:
cin>>house[4];
Instead of reading one element at a time, you can populate multiple array elements using the for loop. For example, to read multiple values into house array, use the for loop as follows: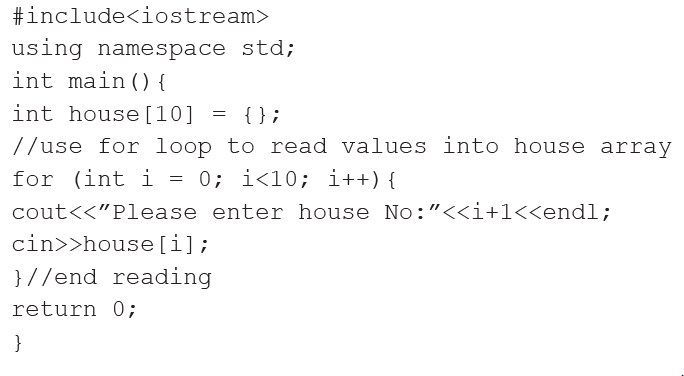
The program shown above populates the 10 elements of the house array as shown in Fig. 14.3.

The loop intialises the control variable i to zero and loops until it is nine. The cout
statement prints the statement “Please enter house no:”, which is followed by i+1 to
start counting from 1.14.3.2 Writing values from Array Elements
Similar to the syntax of reading values into array elements, you can display a single
value from array using the cout object as follows:
cout<<name[n-1]
For example, the following statement may be used to displays the fifth element from
the house array:
cout<<house[4];
To display multiple values from array elements, use the cout object and the for loop.
For example, the following for loop displays values from the house array:
for(int i=0; i<10;i++){
cout<<i+1<<”:“<<house[i]<< endl;
}
The following program is a modification of the code listing in activity 14.2 to
demonstrate how to read and write values from the array named house:
#include<iostream>
using namespace std;
int main(){
int house[10] = {};//use for loop to read values into house array
for (int i = 0; i<10; i++){
cout<<”Please enter house No:”<<i+1<<endl;
cin>>house[i];
}//end reading
//use for loop to print house array
for (int i = 0; i<10; i++){
cout<< i+1<<”: “<<house[i]<< endl;
}//end printing
return 0;
}Fig. 14.4 shows an illustration of the program after running it. The first part denotes the read operation while the second part displays the values.

Activity 14.3: Reading and writing array elements
Thirty students were asked to rate the quality of the food in the student cafeteria on a scale of 1 to 5 (1=poor, 2=fair, 3=neutral, 4 =good, and 5=excellent). Write a C++ program that stores 45 responses into one-dimensional array and give a summary of each case in terms of count and percentage.Assessment Exercise 14.1
1. Differentiate between one-dimensional array and multi-dimensional array.
2. Declare a one-dimensional array that represents a 99-element floating point array called cashflow.
3. Assuming the array in 2 above is implemented using C++, what are the first and last elements in the array?
4. The following is a list of numbers representing customers waiting to board a
25-seater bus that serve between Huye and Kigali:64, 25,69, 67, 80 and 85.
(a) Define an array named Passenger initialized to false if a seat is empty.
(b) Write a sample code that initializes to zero all the elements of Passenger array in question 4 above.
(c) Assuming the array is implemented in C++, write a program that would be used to read and display ticket numbers for 25 elements of fully booked bus.
5. Write a C++ program that converts a decimal number to binary form. Store the binary digits in an array and correctly displays the binary number.
6. Study the following code fragments and identify possible errors. In each case, explain the consequences of not correcting the error(s):
a. Assume that: int box[ 10 ] = { };
for ( int i = 0; i <= 10; ++i )
box[ i ] = 1;
Assume that: int ax[ 3 ];
cout << ax[ 1 ] << “ “ << ax[ 2 ] << “ “ << ax[ 3 ];7. Study the following program and give the output produced after running it:
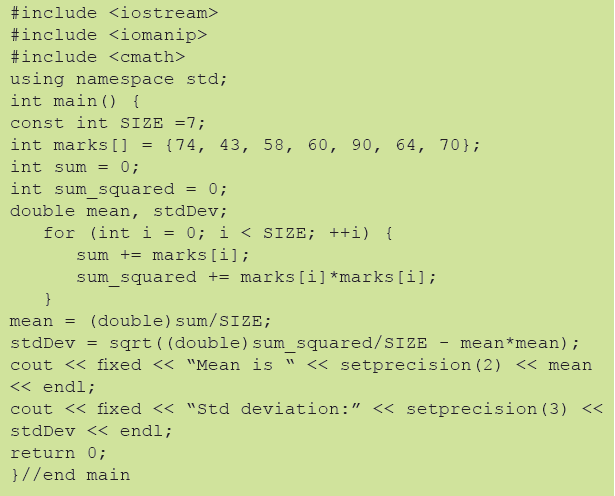
8. Identify and correct syntax error(s) in the following program.
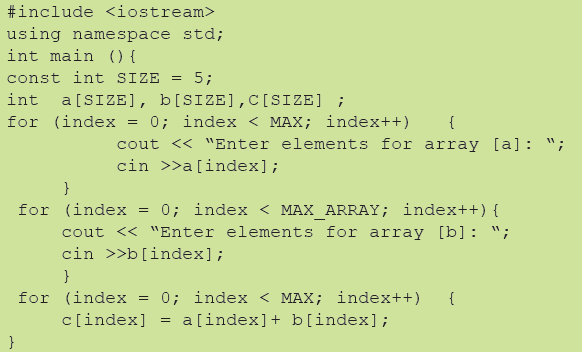
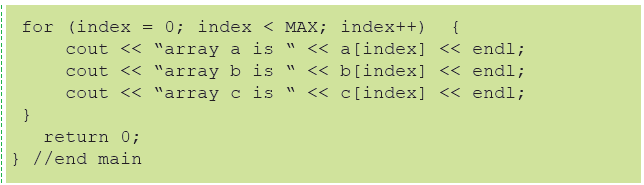
14.4 Array of Characters
To easily handle strings, C++ Standard Library implements string data type that is very useful in handling strings of characters. Because a string is made up of a group of characters, we can also represent them as arrays of char elements using the syntax:
char name[elements];
For example, to declare an array of characters called greetings, use the following syntax:
char Greeting[10];
It is important to note that an array has few characters elements than its size because the last element must store a special character signals end of the string.This special character denoted by ‘\0’ (backslash and zero) is called null character. The program below shows how to create an array of character named Greeting.
#include <iostream>
using namespace std;
int main(){
char Greeting[30];
cout << “Greet someone:”;
cin.get(Greeting, 30); //enter 29 characters
cout << “Greetings:”<<Greeting<< endl;
return 0;
}
Fig. 14.5 shows a sample output after running the program:
The program uses cin and get() function separated by a period to read characters and store a string of 29 characters. Note that in this case, the 30th element is reserved for the null terminator \0 that denotes the end of a string.
14.4.1 Initialisation of Strings
Similar to the syntax of initialising array of numbers, we can initialise an array of characters with some predetermined sequence of characters within {} braces as follows:char name[elements]={.,.,.,’\0’};
The dots in this case represents comma-separated characters enclosed in single quotes, and a null character toward the end. For example, the following definition initialises the Greeting array with “hello” string:
char Greeting[6]={`H’,`e’,`l’,`l’,`o’,`\0’};
Note that, although Hello string has five characters, the sixth element is used to hold `\0’ that signals end of the string. However, instead of initialising an array with comma-separated characters in {} braces, you can declare and initializse a string as follows:
char Greeting[ ]=“Hello”;
Note that, the size of Greeting array is determined by “Hello” enclosed in double quotes on the right. This type of initialisation does not require use of a null character because C++ compiler inserts it automatically.Activity 14.4: Initialising strings
Study the following graphical representations of one-dimensional array of characters and answer the questions that follow:
1. Determine the array name, data type and number of valid elements stored in the array.
2. Using C++, write declaration statement that assigns the array elements to values shown in the illustration.14.4.2 Reading and Displaying Strings
The cin object consists of special function such as get() used to read a valid sequence of null-terminated characters from the input stream. Normally, cout statement and string library functions may be used to display a string, substring or characters. Like the Greeting array discussed earlier, the following program declares a string called buffer that has a maximum of 79 characters: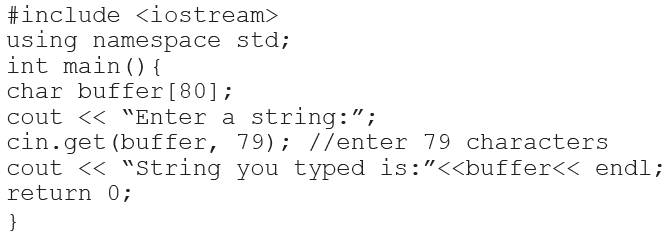
A sample output after running the program is shown in Fig. 14.6 below
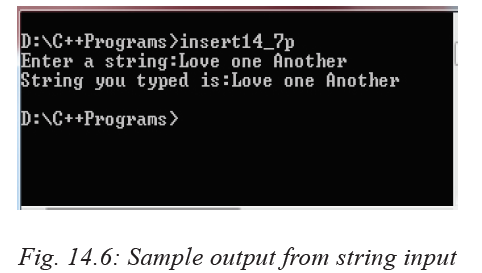
Note that the statement;
cin.get(buffer,79);
means that the get() function of cin object takes two parameters, i.e., the array and number of characters in the array. The array called buffer declared in line 4 is passed in as the first argument while 79 is the second argument that determines the maximum number of characters to be read. In this case, it must be 79 to allow for the null terminator. In addition to functions associated with cin and cout objects, you may also use library functions shown in Table 14.3 below to manipulate strings.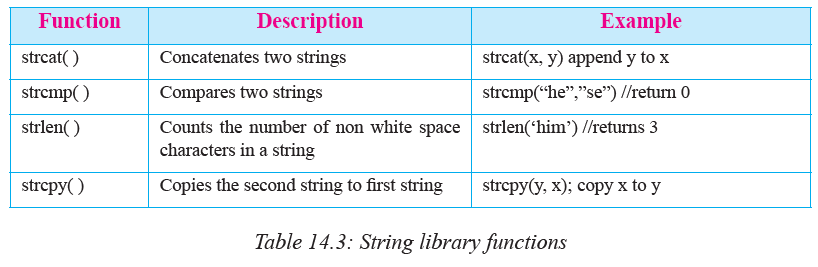
The program below demonstrates use of the two library function namely strcpy() and strlen().
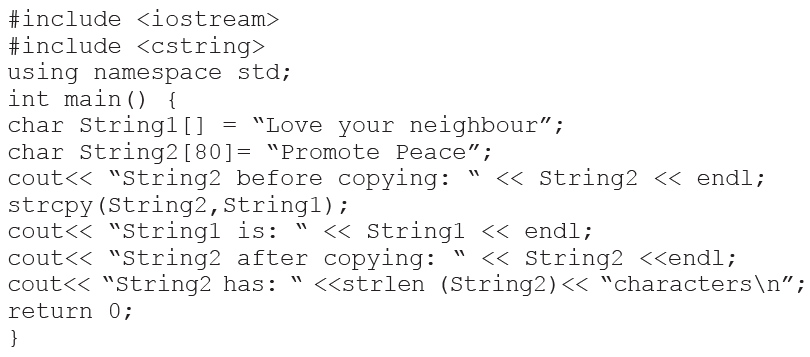
Fig. 14.7 shows a sample output from the program that copies and counts the number
of characters in a string.
Explanation
1. This program declares and initializes two strings namely String1 and string 2. String1 can hold any number of character because the number of elements is not defined while String2 can hold a string of 80 characters including the null terminator.
2. Once the program is executed, original value of String2, i.e., Promote Peace is displayed. The statement strcpy(String2,String1) replaces the first parameter (String2) with e second parameter (String1), hence replacing “Promote Peace” with “Love your neighbour”.
3. The new value after replacing original String2 with String1 is displayed as shown in Fig. 14.8
4. The strlen() function returns the total number of character i.e 19 including spaces in String2.Activity 14.5: String functions
• Identify C++ library functions used to manipulate strings such as counting number of characters, concatenating and copying.
• Write a program that uses string concatenation function to combine greetings and your name strings.Assessment Exercise 14.2
1. Explain the purpose of null character ‘\0’ in regard to array of characters.
2. Declare a one-dimensional array of characters that would be used to store names of major towns and cities in Rwanda.
3. Assuming the array in 2 above is implemented using C++, represent graphically how a string “Cyangugu” will be stored in the array of characters.
4. The following is a list of numbers representing customers waiting to be served in a banks: Ann, Ben,Helen, Paul, Joy and Ken. Create an array named Customers initialized using the names.
5. Write a program that would be used in reading and writing the elements into an array.
6. Differentiate between the following string initialization statements:char greet[ ]={‘H’,‘e’,‘l’,‘l’,‘o’,‘\0’};
char greet[ ]=“Hello”;Unit Test 14
1. Differentiate between array declaration and array initialization.
2. Explain at least two reasons that would necessitate the use of for loop in onedimensional
arrays.
3. State three factors you would considered when creating a one-dimensional array.
4. In C++, it is possible to read and display elements past the end of the array. How
can such a bug be detected and corrected?
5. Explain why storage of characters array is different from storage of numeric
elements in an array.
6. Differentiate between a null character and null value as used in arrays.
7. Using a sample program, demonstrate how you would use the get() function to
read a string in as an array of characters. The output from the program should be
displayed on the screen.
8. Differentiate between strcpy () and strncpy() library functions used to manipulate
strings.9. Write a c++ program that prompts the usr to enter his or her last name. the program should then display the name and the number of characters that makes up that name.
10. The figure below shows faces of six-sided die with each side marked with dots representing each face 1. To generate random numbers, a player rolls a single die 600 times and the frequency of each face is recorded in an array. Write a C++ program that would be used to output frequency of each face in a one-dimensional array.
11. Give the output produced by the following program:
#include <iostream>
#include <cstring>
using namespace std;
int main() {
char msg [ ]= “Hello World!”;
char msg1[ ] =”Computer Science”;
string msg2;
cout << msg << endl;
cout << strlen(msg) << endl;
cout << msg1[3] << endl;
msg2= strcat(msg,msg1);
cout << msg2 << endl;
cout << strcat(msg1, “ Study”) << endl;
} //end mainUnit 15:INTRODUCTION TO OPERATING SYSTEMS
Key Competency
By the end of this unit, you should be able to use operating systems.Unit Outline
• Definition of operating system.
• Functions of operating systems.
• Desirable characteristics of operating systems.
• Components of operating system.
• Common operating systems
• Smart phone operating systems
• History of operating systems
• Types of operating systems
• Basic MS-DOS commands and its main featuresIntroduction
This unit gives a broader view of the operating system by defining what it is, giving its functions in the computer and its characteristics. The components of the operating system and some of the common operating systems are explained. Finally, the unit gives you the history of computer operating systems.15.1 Definition of operating system
Activity 15.1:Research work
Group work:
Consider the following scenarios and answer the questions that follow:
1. On a busy construction site, many activities need to be accomplished. For example, we need workers and machines who will dig trenches, those who dress the stones, others who bend and position steel rods, concrete mixers etc.
(a) What will happen if all these activities are not properly planned and controlled?
(b) Who normally makes sure that the work is going on according to plan?
2. Imagine a football match or any other ball game. What would happen if:
(a) There is no referee?
(b) The referee is biased?
3. What role does the referee play in such games?
Now after the above discussions, access the internet and do some research about the operating system. Make brief notes about its definition, its importance etc. and select one of you to give a presentation to the class. An operating system consists of a set of complex programs that work together to control the operation of a computer by managing computer hardware and software
resources. It controls execution of user programs called applications and provides
an interface between the applications and the computer hardware.
Without the operating system, user applications would find it difficult to run on
the computer because they would need to have lower level programming to access
the hardware resources of the computer. However, the operating system masks this
complexity and enables user applications to easily access computing resources. Figure
15.1 below shows the role that the operating system plays in a computer.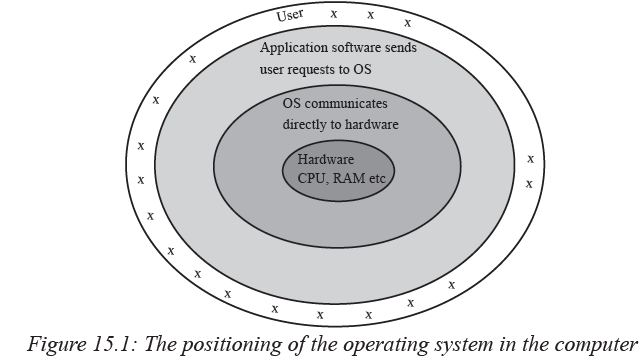
In essence, computers have two modes of operation: the user mode and the kernel mode. The operating system is the most important software that runs on the computer. It runs in what we call the kernel mode as a supervisor of all other programs (user applications) on the computer.
Activity 15.2: Operating system components
Pair Work:
In light of the knowledge that you already have, study Figure 15.2 below and describe the various components that are represented in the computing machine. How do the components interact with each other?
The hardware of the computer consists of the hardware logic e.g. circuit chips that can be manipulated using special manufacturer low level software routines. The hardware is made up of the system unit, mouse, screen, keyboard etc. After the hardware, we have the kernel mode of the operating system.
The operating system runs in kernel mode. The part of the operating system that runs in this mode is called the kernel, which has routines that respond to user requests. When a user places a request (issues a command) through the shell, eg. a read/write request, the relevant routine in the kernel passes the request to the firmware which in turn instructs the hardware to perform the task.
The part of the operating system that displays an interface to the user is called the operating system shell. Together with user applications, it runs in user mode, on top of the kernel. The user applications or the users interact with the shell which in turn talks to the kernel. Users run applications to accomplish various tasks.15.2 Functions of operating systems
The operating system is a resource manager. All the functions it performs are aimed at efficiently and effectively managing the resources of the computing machine. Let us look at some of the functions of an operating systems.15.2.1 Job scheduling
The operating system kernel schedules the use of resources. Scheduling determines which task will use what resource in the computer a particular time. Some tasks will be given priority over others due to the nature of request. Scheduling is achieved through a process called interrupt handling i.e. a program that requires to use a resource sends a special request called an interrupt to the operating system. After examining the interrupts received, the operating system decides which task would be given priority. Therefore an interrupt is a special request made by running tasks or processes to the operating system requesting for a particular needed resource.15.2.2 Resource control and allocation
The operating system maintains a set of queues made up of the processes waiting for a particular resource. Using the round robin technique or any other criteria, each process on the queue is given access to a resource in turns. A round robin technique is whereby each running task is allocated a particular resource for use in equal time intervals following a particular order. When the interval expires, the task releases the resource and waits behind the queue again for its chance to come round again.15.2.3 Input/output management:
The operating system uses special software called device drivers to manage and communicate with input/output devices such as keyboard, mouse, display, sound output devices, printers and scanners. It controls how the computer receives input from the user and how it gives output to the user.15.2.4 Memory management
The operating system divides the main memory into partitions. Each partition is allocated to a task or process that is running in memory. For example, if you are running a word processor application, it will be allocated memory by the operating system (O/S). The O/S then protects that allocated memory from other applications to avoid conflicts that can arise if two or more processes lay claim to the same.15.2.5 Error handling
The operating system performs error checking on hardware, software and data. It will always display error or exception messages in case they happen. It may suggest solutions to problems that are identified.15.2.6 Job sequencing/process management
The operating system arranges tasks to be processed in a particular order and clocks them in and out of the processor. A task is also called a process in the operating system. When a user for example, starts a word processor, it becomes a running process.15.2.7 Security
Modern operating systems implement security policies such that unauthorised users cannot get access to a computer or network resource easily. The most basic security mechanism is the user name and password required during system log on.15.2.8 File management
The operating system organises how files and folders are stored and accessed on the storage media. It creates a file system i.e. a root directory which contains all files and folders. Each folder or file created can be accessed through a direct path from the root directory to its location in the file system. The file system format is also created by the operating system e.g. Windows has the File Allocation Tables (FAT), New Technology File System (NTFS) etc. UNIX has the Unix File System (UFS).15.3 Desirable characteristics of operating systems
Activity 15.3: Research work
Groupwork:
Read the magazines/articles provided by the teacher covering the characteristics of an operating system. Access the website suggested by the teacher and do some research.
Note down the characteristics that seem to be key i.e. those that many authors seem to agree on. Use a search engine to search for more information on the same. Compile a two page report in readiness for a class discussion that will be facilitated
by the teacher.
The operating system of any computer has to have certain key characteristics in order
for it to function properly and satisfy the requirements of the users and application
programs. These characteristics include but are not limited to the following:15.3.1 Efficiency
An efficient operating system achieves high throughput and low average turnaround time. An efficient operating system ensures equitable management of resources, conflict resolution (to avoid deadlocks), quick response time etc.
Throughput means the ability to schedule and manage user requests as fast as possible in terms of resource allocation and task accomplishment. The operating system being the supervisor and manager of all the computing resources has to make sure that the scarce resources of the computer like processor time, memory and input/output devices are used efficiently.15.3.2 Robustness
A robust operating system is fault tolerant and reliable —the system will not fail due to isolated application or hardware errors, and if it fails, it does so safely. During exceptions, the operating system must minimise loss of data and prevent damage to system hardware. Such an operating system will provide services to each application unless the hardware it relies on fails.15.3.3 Scalability
A scalable operating system is able to support addition of more resources. If an operating system is not scalable, then it will quickly reach a point where additional resources will not be fully utilized. A scalable operating system can readily adjust its degree of handling resources e.g. if more memory, input/output devices or processor speed is added, it should scale to accommodate the new capabilities. In multi-processor systems, addition of more processors and hard disks should not cause the operating system to crash.15.3.4 Extensibility
An extensible operating system will adapt well to new technologies and provide capabilities to extend the operating system to perform tasks beyond its original design. This means that the architecture of the operating system need to be open to future improvement or enhancement.15.3.5 Portability
A portable operating system is designed such that it can operate on many hardware platforms and configurations. Application portability is also important, because it is costly to develop applications, so the same application should run on a variety of hardware configurations to reduce development costs. The operating system is crucial to achieving this kind of portability.15.3.6 Security
A secure operating system prevents users and software from accessing services and resources without authorization. Protection refers to the mechanisms that implement
the system’s security policy.15.3.7 Usability and Interactivity
An interactive operating system allows applications to respond quickly to user actions,
or events. Users find it intuitive to use through good user friendly interfaces.15.4 Components of operating systems
Activity 15.4: Research work on operating system
Using a search engine, find out the meaning of organization chart. How is it structured?
Using the knowledge you have acquired, analyse the organizational chart of your
school. In case there is none, you will have to create one. Answer the following
questions:
1. What structure does the chart take e.g. hierarchical, flat etc.
2. Why is it important for some elements to be at a higher level than others?
3. What do you think is meant by “line of control” or “line of command?”
4. In terms of authority, which level has the most power?
5. In terms of day to day running of the organization which level does the most
work?
An operating system is made up of several components. Each component has a specific
function or role that it should plays. The main components of an operating system are:15.4.1 Kernel
This is the central part of the operating system which consists of the core routines that manage input/output requests from user applications, the central processing unit and memory. It receives the instructions and converts them into data processing instructions for the central processing unit to execute. Figure 15.3 below depicts how a kernel interacts with various components of the computer.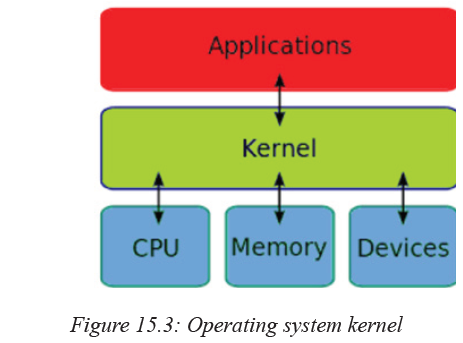
15.4.2 Shell
An operating system shell is a user interface that enables the user to interact with and access the services offered by the operating system. The user gives commands to the operating system through its shell. There are various types of shells:
(a) Command line shells: the user types commands at the prompt.
(b) Menu driven shells: the user selects commands from menus.
(c) Graphical user interface shells: the user selects graphical menus and icons.
Examples of command line operating systems are UNIX and Disk Operating System (DOS). Examples of menu driven operating systems are the DOS shell. Finally, examples of graphical user interface (GUI) operating system are Linux and Microsoft Windows.15.4.3 File system
The file system refers to the way that data is organised and accessed by the operating system. The operating system hides all the complexities of various devices to the user and presents a simple interface for accessing and utilising resources (a file system).
The most common way of organising data is setting up a directory structure on any accessible resource be it a hard disk, network drive or removable media in a hierarchical manner (Figure 15.4). The hierarchy starts with a root object then moving down to the branches. The data is usually organised into three levels:
(a) Drive: a drive is a logical storage location for files and folders. It is usually associated to a physical storage device or location e.g. drive C: for the hard disk drive. The root directory is created in a drive and is denoted by a backslash (\).
(b) Folders: a folder is a storage location of related files. Folders are created in the main directory forming a hierarchical tree structure.
(c) Files: a file is a storage location of related records.
A computer tree is usually an up-side-down one with the root being at the top and the folders and files branching off below the root (Figure 15.4).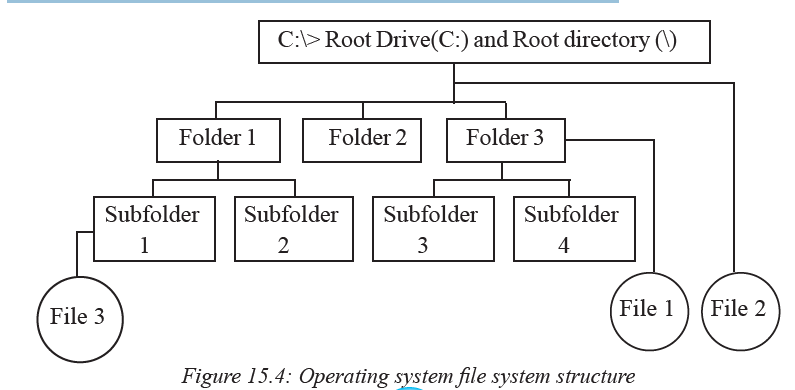
The tree structure makes sure that there is a clear path from the root to any of the folders or files in the file system.
Each operating system has its own signature file system data format. For example, Windows has file systems like File Allocation Tables (FAT32), Extended FAT (FAT64) and New Technology File System (NTFS). Unix on the other hand has what we call the Unix File System (UFS) also called the Berkeley Fast File System (FFS). Each file system has its own way of coding and decoding its data when writing or reading to a storage device.15.4.4 System resources
The operating system supervises the use of scarce system resources. Scarce because every application on the computer competes to use these resources. The O/S being the supervisor brings sanity in an environment that can easily degenerate into conflicts and deadlocks as various applications compete for the scarce resources. A deadlock is a situation where two or more processes needing the same resources each happen to hold onto one of the resources as they wait for each other to release the other resource. Such processes would freeze in waiting mode and non would proceed with the processing. These resources are:
1. The processor: processor time is one of the most sought after resources in the computer. Each executing task needs the attention of the processor in order for its requests to be executed. Scheduling makes sure that CPU time is equitably and efficiently distributed to various tasks.
2. Memory: this is also a scarce resource. each executing task requires memory. There is never enough memory especially in todays computing machines that run heavy multimedia applications. The memory must be properly managed to enforce mutual exclusion hence avoiding two or more tasks interfering with each other. each task should be allocated a protected memory address that cannot be used by any other task at the time of running.
3. Input/Output devices (I/O): these are critical to the smooth running of the computer. All running tasks require input of data or output of processed data. The I/O devices are therefore very important system resources. Efficient management of I/O improves the performance of the computer e.g. do not allocate I/O devices to idle tasks, give them to running tasks instead.15.5 Common operating systems
15.5.1 MS-DOS
MS-DOS stands for Microsoft Disk operating System. It was first developed by Microsoft Corporation, USA. Although virtually obsolete today, MS-DOS is a command line operating system that was developed to manage disks on a personal computer. The user issues commands at the shell prompt and the operating system reads and executes them. MS-DOS formed the foundation of today’s Microsoft Windows.
You can use some MS-DOS commands by opening the command prompt in windows i.e. On the Start menu, All Programs menu, point to Accessories then click Command Prompt
The command prompt window will pops up (Figure 15.5) in which you can type DOS commands like: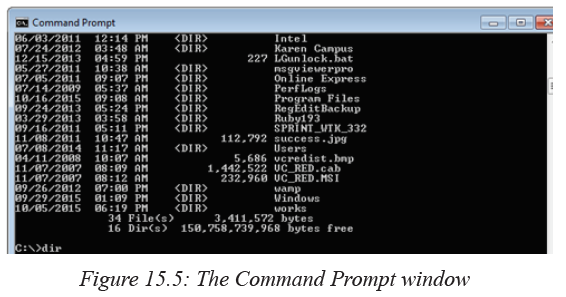
Activity 15.5: Dos commands
Individual Work: Use the following commands. After typing each command at the
prompt (C:/>) press the enter key. What do you observe?
1. Dir : the Dir command displays the contents of the current folder
2. cls : the cls command clears the screen
3. cd.. : move one directory lower in the directory tree
4. md Life : make a directory called Life
5. cd Life : move one directory higher to the directory called Life
6. cd\ : move to the root directory
Search for other DOS commands on the website suggested by the teacher and use them.15.5.2 UNIX
It was first developed at the Bell Labs research center in the USA in the 1970s by Ken Thompson. UNIX is a multitasking operating system which can support many users simultaneously. It is ideal in environments where service providers maintain centralised resources e.g. servers, internet connections, file servers etc. for access by many users. UNIX can run on servers, desktops and even laptops.
Because of its open source nature, many different groups have made contributions to improve it resulting in many versions of UNIX e.g. Sun Solaris UNIX and MacOS X. Because of its high security architecture, it has been the operating system of choice for many internet servers and servers for big organisations.15.5.3 LINUX
Activity 15.6: Linux shell commands
Start the computer running Linux. Read the manual / handout provided to you by the teacher to help you navigate the Linux environment. What version of Linux are you using? Open the shell and then do the following:
Follow the teachers instructions to use the following Linux commands in the Linux shell. Linux and unix share commands.
1. ls : What happens? This command should list the files in the current directory.
2. ls –l: What happens? You should see your files listed in the long format.
3. emacs Life: What happens? This command should create a file named Life and
enable you to edit it in a text editor.
4. cp Life Life1: copies the file Life and saves the copy as Life 1
5. rm Life: remove the file named Life from this directory
6. wc Life1: tell you how many words and characters are in the file Life1
Access the website suggested to you by the teacher to find out more about UNIX commands and use them to perform tasks.
Linux is a UNIX compatible operating system. It was developed by Linus Tovalds at the University of Helsinki, Finland. It has a graphical user interface (GUI) hence has become very popular among both individual and corporate users. You can use UNIX commands on Linux if you open the command shell. Linux has spread its wings for use not only on servers, and personal computers but also on portable devices like mobile phones, tablets etc. Figure 15.6 below shows a Linux desktop.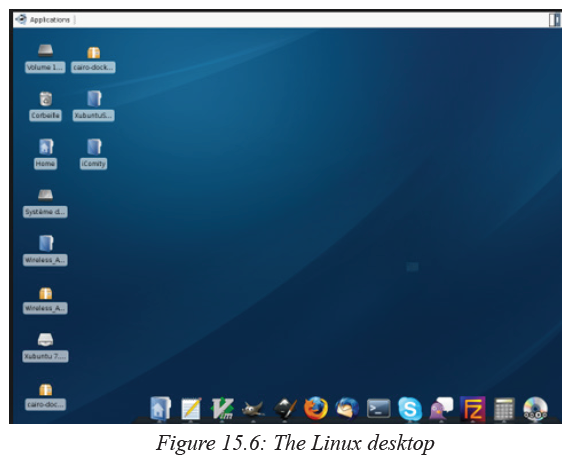
There are many versions of Linux including Ubuntu, SUSE and Red Hat Linux. Linux is structured into two major sections: the user mode and the kernel mode. each of these modes has various modules which perform specific tasks e.g. the user mode has the windowing system, graphics module etc. while the kernel has memory management, processing schedule etc.
15.5.4 MAC OS
Mac OS or Macintosh Operating system is a series of graphical user interface–based operating systems developed by Apple Inc. for their Macintosh line of computer systems. It is Mac OS which popularized the concept of graphical user interface on computers. Indeed, Mac OS to date even with all its variants on mobile devices leads in graphical user interface technology. That is why most publishing and multimedia firms prefer working in the Mac OS environment. The last Mac OS was Version 9. In 2012, Macintosh developed Mac Operating System X (Mac OS X) where X is the latest version build number. OS X is different from earlier versions of Mac OS because it is based on UNIX platform. One of the latest OS X is OS 10 (simply referred to as System 10 among users). Figure 15.7 below shows an Mac OS 10 desktop.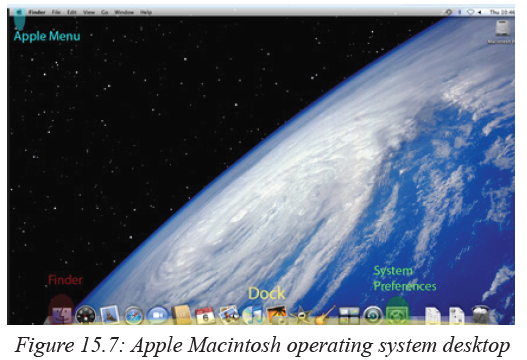
15.5.5 Microsoft windows
The Microsoft Windows family of operating systems originated as a graphical layer shell on top of the older MS-DOS environment for the IBM PC. Modern versions are divided into three main families: Windows NT, Windows Embedded and Windows Phone. Each family targets a certain market segment. The market segments targeted are:
1. Windows NT: servers, personal computers and laptops.
2. Windows Embedded: for devices that have limited computing resources e.g. mobile phones, motor vehicle controllers etc.
3. Windows Phone: for smartphones.The latest Microsoft Windows platforms are Windows 7, 8 and Windows 10. Windows 10 seeks to provide a unified operating system architecture for all devices be they mobile phones, computers, tablets etc. for easy interoperability. Figure 15.8 shows a picture of Microsoft Windows 10 desktop.
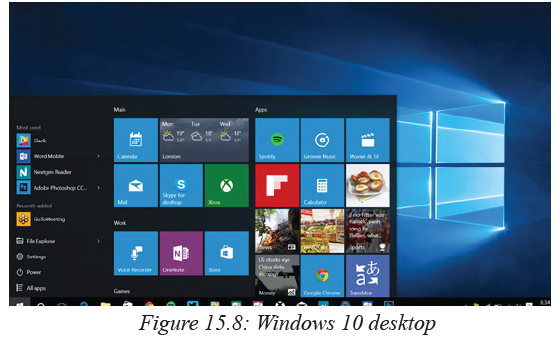
15.6 Smartphone operating systems
Activity 15.7: Working with smart phone
Groupwork:
Take the mobile phone provided to you by the teacher. Investigate its specifications as directed by the teacher e.g.
1. Find out the operating system it uses and the version.
2. Investigate the applications that it has.
3. How different is this phone from the normal phones?
4. What are the specifications for:
(a) RAM and internal memory size
(b) Processor type and speed
(c) Camera resolution in pixels
(d) Screen resolution and size
(e) Internet access rate i.e. Edge, 1G, 2G, 3G, LTE etc.
(f) Applications it can support e.g. mobile office, games, social media etc.
Draw a specifications table capturing all these information and present it in a class
discussion hosted by the teacher.
A smartphone or smart phone is an advanced mobile phone which has characteristics of a powerful computer. A typical smartphone has a powerful processor, large memory, powerful camera, touch large screen, fast internet access, many applications, an operating system etc. They typically combine the features of a mobile phone with a computer. Most smart phones were initially designed for high end or power userswhose needs go beyond simple calling, texting and low quality pictures. Such users require powerful phones in order to capture high resolution images, take minutes in meetings, link to work emails etc:
Therefore, due to the complexity of tasks that smartphones need to handle, they require an operating system. The key leading operating systems for smartphones in the world today are Android, Apple’s iOS and Windows Phone. We are going to look at these and a few others.15.6.1 Android operating system
Activity 15.8: Working with android phone
Groupwork: Take the Android phone provided to you by the teacher. Learn how to
do the following as instructed by the teacher:
1. Unlock the screen
2. To check the android version running on the phone
3. To download applications from the app store.
4. To view the phones specifications.
5. To access the messages, contacts and call activity log.
6. To play movies and view pictures.
7. To capture pictures and movies.
8. To send and receive messages, pictures and movies on social networks.
9. To access Mobile Office if it is present.
Android is developed by Google in collaboration with Open Handset Alliance (OHA)
to run on Linux kernel and provide an open platform for all types of mobile phone
architectures. Since its inception in 2005, android has taken the mobile device platform
by storm. Many phone and tablet manufacturers around the world today produce
Android compatible devices.
Due to its open nature, Android has attracted many mobile app developers who access the mobile hardware and develop intuitive applications, interfaces etc. Because of this, Android users have access to millions of free applications and resources. Although we are not discussing the architecture, it is worthwhile to note the three tier arrangement of application framework, libraries and the kernel. Apart from running on Linux, it has a GUI, web browser, and millions of applications developed by an ever growing forum of developers worldwide. Figure 15.9 shows an Android phone.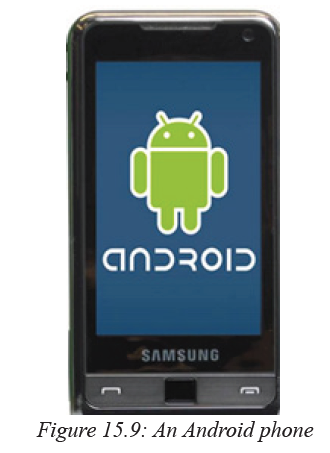
15.6.2 Apple operating systems
Activity 15.9 : Working with apple phone
Groupwork:
Take the Apple phone provided to you by the teacher. If the phone is not physically
present, search for iPhone on the internet to view the pictures and specifications.
Learn how to do the following instructed by the teacher:
1. Unlock the screen
2. To check the iOS version running on the phone
3. To download applications from the Apple app store.
4. To view the phones specifications.
5. To access the messages, contacts and call activity log.
6. To play movies and view pictures.
7. To capture pictures and movies.
8. To send and receive messages, pictures and movies on social networks.
9. To access Mobile Office if it is present.
Apple’s iOS is proprietary and runs on Apple iPhones, iPads, and iPods only. A special version of iOS powers the Apple smart watch too. It is a multi-touch and multi-tasking operating system for mobile devices. It enables the user to tap and touch the screen as a means of communicating with the device. Figure 15.10 below shows the picture of an iPhone.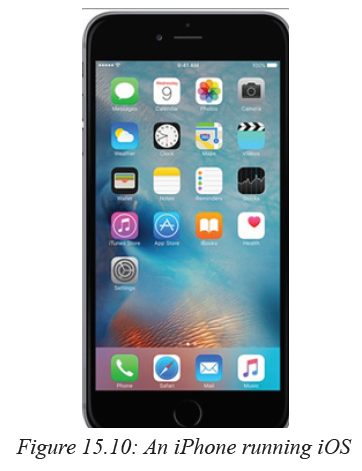
15.6.3 Windows phone operating system
Activity 15.10 : Working with Windows phone
Groupwork:
Take the windows phone provided to you by the teacher. If the phone is not physically present, search for windows phone on the internet to view the pictures and specifications. Learn how to do the following instructed by the teacher:
1. Unlock the screen
2. To check the Windows version running on the phone
3. To download applications from the Microsoft app store.
4. To view the phones specifications.
5. To access the messages, contacts and call activity log.
6. To play movies and view pictures.
7. To capture pictures and movies.
8. To send and receive messages, pictures and movies on social networks.
9. To access Mobile Office if it is present.
The Windows Phone operating system was designed to run on smart phones. It came after windows mobile. The latest is Windows 10 which was released early 2015. With this operating system, the phone can interoperate with all other Windows 10 devices like tablets, laptops and computers on the universal Windows 10 platform. Figure 15.11 shows a Windows phone. It can support windows based applications like Mobile Office.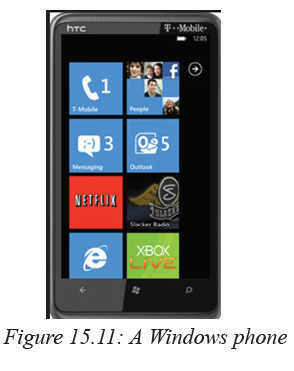
15.6.4 BADA operating system
Bada is a mobile phone operating system and a smartphone platform that was developed by Samsung Electronics. Bada supports wide range of devices, but it gained more popularity with high end devices such as Wave II and Wave. Samsung stopped supporting Bada in 2013. Figure 15.12 shows a Samsung Wave phone.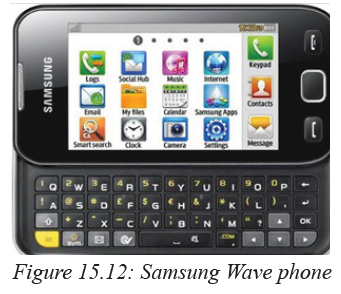
15.6.5 Palm Operating systems
Activity 15.11 : Working with Palm Operating Systems
Group work:
Take the PDA provided to you by the teacher. If the phone is not physically present,
search for windows phone on the internet to view the pictures and specifications.
Learn how to do the following instructed by the teacher:
1. Unlock the screen
2. To check the POS version running on the phone
3. To download applications from the Microsoft app store.
4. To view the phones specifications.
5. To access the messages, contacts and call activity log.6. To play movies and view pictures.
7. To capture pictures and movies.
8. To send and receive messages, pictures and movies on social networks.
9. To access Mobile Office if it is present.
Palm operating system also called Garnet OS was developed by Palm, Inc. It has a touch screen oriented graphical user interface and specifically targeted Palm personal digital assistants (PDA’s). Figure 15.13 shows a PDA running Palm OS.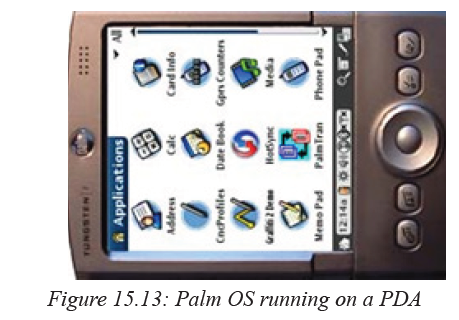
15.6.6 Blackberry operating systems
BlackBerry operating system was developed by Blackberry Limited, a Canadian company for its Blackberry line of mobile phones. Blackberry targeted corporate customers and could support many corporate applications like corporate email, remote data entry and other applications. Currently, Blackberries market share has greatly declined due to competition from other smart phones.15.6.7 Difference between computer operating systems, firmware, mobile phone operating system.
There are a lot of details involved in computer OS design, but one prominent fact is that computer operating systems were not really designed for mobile devices that have limited hardware and processing facilities. Instead, they evolved, and were understood, as part of a wired system, most commonly, as parts of a single physical machine. As such, developers and engineers focused a lot on of technical specifics related to items like boot protocols, program threads, multiple process handling, CPU operation, and other elements of the traditional OS.
The mobile operating system is a newer concept. In many ways, the mobile OS has built on what the computer OS has accomplished but with resource constraints in mind. In fact, many modern developers working with mobile operating systems tend to borrow much from computer OS but find themselves in the following dilemma:
1. The screen of the mobile phone is smaller by far to that of the computer.2. The processor of the mobile phone is far much less powerful than that of the
computer though this gap is being bridged rapidly.
3. The I/O devices on mobile phones are greatly limited unlike those on the
computer.
It is evident from the point above that the design and development of mobile phone
operating systems will be different and geared towards the following:
1. Support for touch screens or limited keypads instead of keyboards.
2. Support for small size screens instead of large ones.
3. Support for lower memories.
4. Support for lower processing speeds.15.7 History of computer operating systems
Activity 15.12:Research on historical development of operating systems
Groupwork:
Access the website suggested to you by the teacher and do research on the historical
development of operating systems.
The historical development of computer operating systems can be divided into
generations. As computing technology evolved so did the operating systems.15.7.1 The 1940’s to 1955: First Generations
The earliest electronic digital computers had no operating systems. A human operator
would enter instructions mechanically, one bit at time using rows of mechanical switches. It means the computer program was purely in machine language. The computers themselves we made of vacuum tubes and or relays. Programming languages were unknown therefore there was no operating system or let us say a mechanical human operated system was in force.15.7.2 The 1955 – 65: Second Generation
Transistors were introduced in early 1950’s to become a game changer. This saw the age of the first mainframe computers. A computer program could be written on paper (using FORTRAN or an assembler language) then it could be punched into cards. The cards could then run batch processes on the mainframes. General Motors Research Laboratories implemented the first operating systems in early 1950’s for their IBM 701 computer. The system ran one job at a time i.e. batch processing was common since tasks were piled and submitted in groups or batches. Figure 15.14 below shows how punched cards looked like: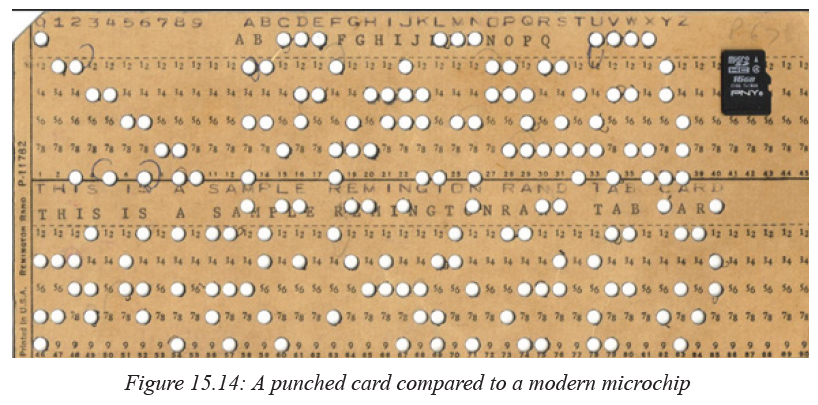
15.7.3 The 1965 – 80: Third Generation
Computing technology evolved into two different branches in the 60’s:
1. Powerful word-oriented scientific supercomputers designed for science and mathematics.
2. Character computers for use in commercial environments e.g. banking sector.
IBM combined the two concepts as integrated circuits started to take root. Operating systems became a bit more complex with spooling (which stands for Simultaneous Peripheral Operation On Line) i.e. jobs were copied onto the hard disk and the computer could now read the next job from there instead of from a tape drive or punched card.
MIT developed the first Compatible Time Sharing System (CTSS) in the 60s. The success of CTSS encouraged Bell labs and General electric to develop MULTICS (MULTiplexed Information and Computing Service) which could support many tasks simultaneously.15.7.4 Fourth Generation
With the development of large scale integrated (LSI) circuit chips, computer memory and processor chips that could be programmed became a possibility. Microprocessor technology evolved to the point that it became possible to build desktop computers as powerful as the mainframes of the 1970s.
The fourth generation operating systems of today are so advanced that they can support automation, multiprogramming, artificial intelligence etc. Modern operating systems run on all forms of platforms and can support many types of applications and processes.15.8 Types of operating systems
Activity 15.13: Types of operating systems
Study the magazines/books/handouts provided by the teacher. Note down the types
of operating systems and their characteristics.
Operating systems can be categorized as follows:15.8.1 Batch
Batch processing mode involves collecting data over a period of time. Processing of that data is carried out from the beginning to the end without user intervention. Once the processing begins, the user cannot interact with the running process. However, in case a process stalls, it is possible to switch to the next available batch job.Advantages
(a) Simple to run and operate.
(b) The CPU is not overloaded.Disadvantages
(a) There is lack of interaction between the user and job during the job processing
cycle.
(b) Low efficiency i.e. the CPU mostly idle due to the low input/output speed.
(c) Prioritisation of tasks within a batch is impossible.
(d) A big task holds onto resource for long denying other tasks until it processes.15.8.2 Network operating systems
A network operating system runs on a centralised computer called a server. A server
listens to user requests on the network in order to respond service them. It offers
services such as shared file resources and printers. The server manages important
functions like data, users and their network privileges, security, applications and
printer usage etc.Advantages
(a) Centralized focal point of network administration services reduces effort and
makes the server highly reliable.
(b) Network security is managed from the server hence policies are easily enforced.
(c) Easy upgrades to new hardware and software technologies.
(d) Remote administration of the server is possible.Disadvantages
(a) Server provides a single point of failure. Redundancy required to avoid this
weakness.(b) The server’s initial and running costs are high.
(c) Regular maintenance and updates are required.15.8.3 Multiuser or Time Sharing operating system
A multi-user operating system allows many different tasks to appear as if they are running at the same time. Each task is allocated a slice of the CPU time in a round robin manner. This type of processing is good because the CPU capacity is utilised efficiently and the user experiences better response time from the system.Advantages
(a) Quick response time.
(b) Reduces CPU’s idle time.
Disadvantages
(a) Complex implementation algorithms are need.
(b) The security and integrity of tasks running simultaneously in memory is difficult to implement i.e. tasks can interfere with each others resources.15.8.4 Distributed operating systems
A distributed operating system is a single operating system that manages resources on more than one computer system. Computers are linked together and communicate with one another using high speed media make them behave like a single computer Distributed systems provide the illusion that multiple computers are a single powerful computer, so that a process can access all of the system’s resources regardless of their location.Advantages
(a) Sharing of resources across the distributed system.
(b) Elimination of the single point of failure problem i.e. if one computer fails, a user can access resources through another working one.
(c) Load balancing across the distributed system means faster processing.Disadvantages
(a) Complex to set up and maintain.
(b) Keeping global synchronised time across the distributed system is not an easy time.15.8.5 Real time systems
In real time systems, user requests are received, processed and a response sent to the user within a specified time interval. Processing in real time systems happens online without unnecessary delays.
The time taken by the system to respond to an input request is called the response time. The response time should be small i.e. between 10 to 100 ms in order for the user to keep track of the current session.Advantages
(a) Immediate response to user requests.
(b) Direct interaction between the user and the system.
(c) Delivers critical services to the user.
Disadvantages
(a) Expensive to set up, monitor and maintain.
(b) Complex to set up and run.
15.9 Basic MS DOS commands and its main features
Below is a listing of each of the MS-DOS commands currently listed on Computer
Hope and a brief explanation about each command. This list contains every command
ever made available, which means not all the commands are going to work with your
version of MS-DOS.15.9.1 Starting DOS
Activity 15.14: How to learn and use MS-DOS
Follow the instructions detailed below to learn and use MS-DOS:
You can start DOS program as mentioned earlier. The symbol C:\> with a blinking
cursor after it is called the command prompt or DOS prompt. The flashing underscore
next to the command prompt is called the cursor.
The cursor shows where the command you type will appear. The DOS commands are
usually typed after this prompt. In DOS a filename consist of a filename an extension,
the filename should not exceed eight characters and the extension must not exceed
three characters.15.9.2 How are files named?
While newer versions of DOS support longer filenames, the standard DOS filename
format remains: 1-8 letter name, period, 3 letter extension eg:
PROGRAM.EXE
DATA.DAT
LETTER.DOC
The extension to a file’s name is there to allow files of a similar type to be grouped together. i.e. all word processor files might have the extension .DOC, while all picture files might have the extension. PIC While these extensions can be specified by the user, many programs have used them to differentiate between formats, and so they have gradually become standardized. For example you would expect a “.TXT” file to be a file containing unformatted text, or a “.BMP” file to be in a bit mapped graphics file format.To completely specify a file on your computer you must specify its drive and directory path, and its filename. However a file does not always have to be specified in this complete form: If it is in the current directory, then you can just enter its filename.
If your command prompt does not look like the example above, type the following at the command prompt, and then press ENTER:
DIR - Displays directory of files and directories stored on disk. In addition to files and directories, DIR also displays both the volume name and amount of free storage space on the disk (if there are files stored in the current directory). Note that both of these are for the entire DISK, not just for the path you specified.
The DIR command is also useful if you want to know what directories have been created on the specified disk. The directories will be displayed along with the files on the disk. They can be identified by the DIR label that follows the directory name.
Wildcard characters (? and *) can be used to specify groups of files.
To list files in C:
DIR has two options; /W or /P. /W (wide) causes the directory to be displayed horizontally across the screen. /P pauses the directory listing once the screen is filled. To view the contents of a directory in wide format

To view the contents of a directory one screen at a time

To display only files with the. TXT filename extension on the current drive that begin with the letters FIL, enter

To display only files on drive C that have no filename extension, enter

This form of the DIR command will also display directories. They can be identified by the DIR label that follows the directory name.
15.9.3 Creating a directory
To create and named FRUIT

To change to the new FRUIT directory, type the following at the command prompt:

The command prompt should now look like the following:

To create and work with a directory named ORANGES
Type the following at the command prompt:
MD ORANGES
To confirm that you successfully created the ORANGES directory, type the following at the command prompt:
DIR
The ORANGES directory is a subdirectory of the FRUIT directory. A subdirectory is a directory within another directory. Subdirectories are useful if you want to further subdivide information.
1. To change to the ORANGES directory, type the following at the command prompt:
cd ORANGES
The command prompt should now look like the following:
C:\FRUIT\ ORANGES >
2. To switch back to the FRUIT directory, type the following:
cd ..
The command prompt should now look like the following:
C:\FRUIT>
To Copy the file “letter.txt” to a file called “letter.bak”. (Creates “letter.bak” if it does not exist, and overwrites it if it does).
COPY letter.txt letter.bak [
To Copy any file with an extension PIC, in the PICTURES directory on the flash disk of drive E: to the root directory of the hard disk.
COPY E:\pictures\*.pic C:\15.9.4 Creating files
Use the copy con command e.g. to create a file called colors with red, green, blue and orange as the data items;
Copy con color.txt
Red
Green
Blue
Orange
Then press ctrl+z to terminate
DOS gives you a message that 1 File(s) has been copied15.9.4.1 Copying files
To copy one file to another use the COPY command type the followingCopy color.txtcolor2.txt and press enter
15.9.4.2 Type a File with DOS
If you need to check the contents of a particular file or any DOS file, you will need to use the TYPE command.
Type color2.txt and press return.
DOS prints the contents of the file.15.9.4.3 Rename a File
To rename color2.txt to sales.txt
rencolor2.txt sales.txt and press return.15.9.4.4 Rename a Group of Files
With the wildcard character *, you can also use the RENAME command to change a group of files.
To rename all files with a .txt to have a .bob type
Ren *.txt *.bob and press return.15.9.4.5 Format a Flash Disk
Usually a flash disk comes blank. Before using it you may need to format it. Formatting can be used to check for bad area on the disk and remove all the data on the disk. Formatting destroys all information on a drive and thus you should never format C: unless under instructions.
At the C:\> prompt type: format e: if e is the flash disk drive letter.15.9.4.6 Diskcopy Command
The Diskcopy command was designed to help a person to make an exact copy of a floppy disk. However, floppy disks have become obsolete. The command cannot be used on hard disk drives. It was designed for removable disks only.
To make an exact copy of a disk in drive E: on a disk in drive F:, the two disks need to be of the same size and have the same file system. The command is issued as followed:
Diskcopy E: F: <press enter key>
At the end of the Diskcopy operation, an exit code of 0 may be displayed to show that the operation was successful.15.9.4.7 CHKDSK
Checks a disk and provides a file and memory status report. Provides information on the space used, space available, bad sectors if any etc. to fix errors using CHKDSK type CHKDSK/F.15.9.4.8 Scandisk
Start the Microsoft ScanDisk program which is a disk analysis and repair tool used to check a drive for errors and correct any problems that it finds. Is a preferred method for fixing drive problems.15.9.4.9 Copying a File from the Hard Drive to a Flash Disk
C:/> Copy <insert filename here> E: and press return.Unit Test 15
1. What is the major difference between an application software and the operating system.
2. Draw a diagram representing the role of the operating system in the computer.
3. The_____ is the user level component of the operating system and it displays the _____ to the user where______ can be given.
4. The operating system runs in ______ mode.
5. Describe five functions of the operating system.
6. Explain five characteristics of a good operating system.
7. Write brief statements about the following:
(a) Command line shells.
(b) Menu driven shells.
(c) GUI shells.
8. Draw the structure of a file system and describe it.
9. Define the following: File, Folder, Drive, Directory.
10. How important are the following to the computer:
(a) Processor (b) Memory (c) I/O devices
11. Write brief notes about the following:
(a) UNIX operating system. (b) Linux operating system.
(c) Windows operating system. (d) Mac OS X operating system.
12. Describe a smartphone.
13. Justify the reason why smartphones need an operating system.
14. Compare and contrast a computer operating system and that of a mobile phone.
15. Briefly describe the following:
(a) Android. (b) iOS.Unit 16: HTML-BASED WEB DEVELOPMENT
Key Unit Competency
By the end of the unit, you should be able to build standard compliant web pages
using HTML.Unit Outline• Fundamentals of World Wide Web
• HTML syntax and structure
• HTML Elements
• Introdcution to XHTML
• Designing HTML pages
• Introduction to HTML5
• Migration from HTML to HTML5IntroductionOver the past three decades, large corporations, medium-sized and small-scale business organizations have been using website to communicate company information, manage their projects and transact on a paperless environment. Furthermore, people who didn’t know what the Internet was several years ago are now reconnecting with their friends and family members on social media such as Facebook. It is now a fact that web technologies are no longer a reserve of business entities but for each one of us in the society. In this unit, we will begin by reviewing basic concepts relating to world wide web. Later, we take you step-by-step on how to develop and publish websites using HTML4, XHTML and HTML5.Activity 16.1: Evolution of HTMLIn groups, discuss and write an essay on how the Internet and World Wide Web
(WWW) evolved from just a Project to the current trends seen today in Web 2.0.
Why is Tim-Berners Lee credited with the Invention of the WWW and the language
used to develop the web pages?16.1 Fundamentals of World Wide WebWorld wide web is an internet-based system or platform that allows hypertext documents to be interconnected by hyperlinks. A hyperlink is a word or phrase a user can click to move from one website or webpage to another. Website simply referred to as Web resides on one or more computers, referred to as web servers. Hypertext enables you to read and navigate text and visual information in a nonlinear way based on what you want to read next. The idea behind hypertext is that instead of reading text in a linear structure like in a book, you can easily jump from one point to another based on interests. The Web is cross platform because a user can access it on various devices such as desktop computers, tablets and mobile phones.16.1.1 Hypertext Markup Language
Hypertext Markup Language (HTML) refers to a language used to structure hypertext (web) documents for presentation on the World Wide Web. Unlike programming languages like C++, HTML is not a programming language but can be thought of as a presentation language used to instruct the browser on how to present text and multimedia content on the Web.16.1.2 Evolution of HTML
The HTML was invented by Tim-Berners Lee, the founder of world wide web. Lee’s original HTML version was based on a more complicated document processing language known as Standard Generalized Markup Language (SGML). Soon, Lee released different versions of HTML causing incompatibilities between different developers using different versions. This led to:
1. A consortium known as World Wide Web Consortium (W3C) was
established to standardize HTML.
2. The first standard version of HTML that was developed and maintained
by W3C was HTML 2.0 released in 1995. It specifies a set of tags that must
be supported by all browsers.
3. In 1996, release of HTML 3.2 standard then later HTML 4.0 in 1997.
4. Most web browsers today support a more strict variation of HTML known
as Extensible Hypertext Markup Language (XHTML) that supports mobile
web applications too.
5. Today, we have HTML5 which many browsers and developers are using to
develop web applications.Activity 16.2: Evolution of HTML
In groups, research on the internet the history of SGML in terms of the inventor,
purpose, and syntax of the language.16.2 HTML Syntax and Structure
HTML tags are used to define a set of common web page features such as titles,
paragraphs, and lists, tables, forms, images and multimedia. Below is a sample HTML
code that creates a blank web page. Using the basic code below, you can add more
and more features as you insert text and pictures. Notice that every tag has a start
tag e.g. <tagname> and an end tag e.g. </tagname>. 1. In Microsoft Windows, open Notepad by clicking All Programs, Accessories and then click Notepad.
2. Write or the HTML code above. To avoid syntax error, make use correct punctuations and tags.
3. To save the file, on the file menu, select Save As command to display the Save As dialog box.
4. In the file name box, type the name of the file with htm or html extension such as MyWebsite.html, and then select All files from Save as type dropdown list. Once you finish creating the web page, you may need to view it in a browser such as Explorer, Mozilla, Chrome or Safari. For example, to view mywebsite.html, proceed as follows:
1. Start your favourite browser and look for a menu or command button labeled
Open or Open File. Alternatively, in Windows, press Ctrl+O to display the Open
dialog box.
2. Select the drive or folder in which the html page was saved.
3. Double click the file to open it in your browser. The browser displays the web
page as shown in Fig. 16.1. 16.2.1 Types of HTML elements
HTML has different elements that perform different functions. The three most
common elements are:
1. Structural elements.
2. Presentational elements.
3. Hypertext.
Let us look at each of these and examples of elements under each.Structural elements
A structural element is one that is used to describe the structure of a web page content
i.e. the way the content is displayed on the page relative to each other conveys a
particular meaning to the user. For example, content under a heading h1 (first level
heading) would be considered as more important than content under a lower heading
level e.g. h2 (second level heading). Similarly, content within the same list block will
be considered as similar e.g. a list of towns within Rwanda etc. Presentation (style) elements
Presentational elements are used to specify the web page style or how the content will
be displayed on the page e.g. font size, color, margins, borders, layout etc. Examples of presentation elements are: Hypertext
The content on a web page is usually created and presented in the browser using a special format called hypertext. Different hypertext pages are linked together using hyperlinks. A hyperlink is special text or an image that the user can click on in order to jump to another section on the same page or to a different web page. One such element is the anchor written as <a> that makes text or image clickable. Once the user clicks the hyperlink, the web page pointed to is loaded e.g. 16.2.2 DOCTYPE and HTML Versions
The <!DOCTYPE> declaration is the first line in an html document placed before the <html> tag to help a browser to interpret the version of HTML used. These interpretations are found in the *.dtd file. The <!DOCTYPE> statement must be exact in spelling and case in order to have the desired effect.HTML versions
HTML can be classified into various versions depending since the first version dubbed
HTML 1.0 was released in 1991 by Tim Berners-Lee. Each version has a DOCTYPE used by a web browser to identify the version of HTML your document is using. In this section, we highlight four official set of HTML standard released since 1994.1. HTML 2.0 standard was released in 1994 by the HTML Working group lead by Tim Berners-Lee and Dan Connolly. The following DOCTYPE tells the browser to interpret the document using HTML 2.0 specification: 2. HTML 3.2: This standard was released in 1997 amidst competition by Microsoft and Netscape Communications control of the Internet. The HTML 3.2 DOCTYPE is written as:
 3. HTML 4.0: HTML 3.2 was enhanced by W3C into HTML 4.0 specification that was published late in 1997 and. The standard was finally approved as HTML 4.01 with the following three DOCTYPE declarations:• The following HTML 4.01 DOCTYPE declaration is used for documents that use
frameset element to divide a document page into partitions known as frames: • The HTML 4.01 Strict declaration that emphasizes on structure rather than formatting of HTML document. This means that elements and attributes such as font used for presentation are not supported: The following is DOCTYPE declaration for HTML 4.01 strict:
 • Unlike HTML 4.01 Strict, HTML4.01 transitional supports both structural and presentational elements and attributes. The following is DOCTYPE declaration for HTML 4.01 transitional:
 4. HTML 5 is the latest W3C standard that was published in 2014. The standard deprecates presentation tags and attributes used in HTML 4 as discussed later. Unlike HTML 4 DOCTYPE declaration that DTD, HTML5 uses the following simple DOCTYPE:16.3 HTML Elements
16.3.1 Tags and Attributes
HTML tags are used to mark up the start and end of an element. The general format of a tag is tag name enclosed in a pair of less than and greater than symbols (< >) as follows: The opening tag e.g. <title> “turns on” the element while the closing tag such as </title> turns it off. Through the unit, we provide adequate activities that will help you learn more about opening and closing tags. For example, to instruct a browser to present text as a paragraph, use the <p> opening and </p> closing tags as follows:<p>This is a new paragraph separated from others by a blank line</p>An attribute is used to define the property or characteristics of an element inside the
element’s opening tag. All attributes are made up of two parts: name and value. For
example, a paragraph may be right aligned using align attribute as follows:<p align=”left”>This is left aligned</p>In this section, we use basic example to describe commom tages used in HTML4.Activity 16.3: HTML elements and attributes
To create an HTML document, use a text editor or commercial tools such as Adobe Dreamweaver. Download and install Free HTML editors for Windows, Linux or Macintosh Operating Systems. Once you install your favourite editor, write the following HTML code and save the file as mypage.html.<!DOCTYPE html>
<html>
<head>
<title>Page Title</title>
</head>
<body><div>
<p>some content comes here...</p>
</div>
<div>
<p>some other content comes here...</p>
</div>
</body>
</html>In the following subsection, we highlight common HTML tages used to create a web page illustrated by this basic code.16.3.1.1 <html>
The <html> tag is the first page structure tag that indicates that the content of the page conforms to HTML specifications. Thus, <html> serves as a container for all the the the other tags that make up a web page. Always remember to close the element tag with </html> tag as shown in the following HTML code. Fig. 16.2 shows how the HTML page is displayed on the browser.<!DOCTYPE html>
<html>
...your web page...
</html> 16.3.1.2 <head>
The <head> tag is a container for other tags that contain information about the web page itself. This type of information that is not intended for the user is referred to as metadata. Generally, only a few tags are used in the <head> section to define title,and information about the web page (metadata) and. Never put any content intended to be displayed on the web page in the header tags. Here’s a typical example of how you should structure the <head> element:<!DOCTYPE html><html>
<head>
<title>Welcome to My First Website </title>
</head>
...your page...
</html>16.3.1.3 <title>
The <title> element is placed within the <head> to describe the content of the web page on the browser’s title bar. The text defined in the title is stored in as a bookmark making it easier for a search engine such as Google to display your page in the results page.16.3.1.4 <body>
The <body> tag marks the actual content of your web page. This includes text, images,
hyperlinks, video and any other type of content intended for the visitors of a website. The following is a skeleton web page showing how to use the opening<body> and
closing </body> tags:<!DOCTYPE html>
<html>
<head>
<title> Welcome to My First Website </title>
</head>
<body>
...your content...
</body>
</html>Fig. 16.3 shows how the sample page appears when displayed on a browser. Note that the title welcome to ... is displayed on the title bar of the browser. The only content in the body section is ... your content... 16.3.1.5 Heading tags
Heading tags are used in the body section to define section headings that stand out from the rest of text. HTML provided six levels of section headings - <h1>, <h2>, <h3>, <h4>, <h5>, and <h6>. Note that the size of the heading reduces progressively with h1 being the largest while h6 is the smallest. By default, when headings are displayed, the browser adds one line before and one line after that heading. The general syntax of heading element is:
<headlevel> tex</heading level>
For example to display Breaking News as heading using the following syntax:
<h1> Breaking News! </h1>
The following HTML document displays the six heading levels (h1 to h6)
<!DOCTYPE html>
<html>
<head>
<title>Heading Example</title>
</head>
<body>
<h1>This is heading 1</h1>
<h2>This is heading 2</h2>
<h3>This is heading 3</h3>
<h4>This is heading 4</h4>
<h5>This is heading 5</h5>
<h6>This is heading 6</h6>
</body>
</html>Fig. 16.4 Shows how the headings appear when displayed on a browser such as chrome or Mozilla Firefox.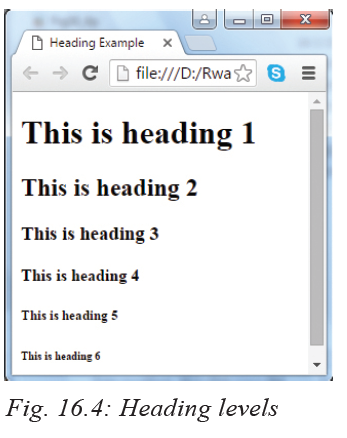 16.3.1.6 Paragraphs
The <p> tag offers a way to structure your text into paragraphs that are seperated from each other by a blank line. To add several paragraphs, each of the paragraphshould be enclosed between the opening <p> and closing </p> tag. For example:<!DOCTYPE html>
<html>
<head>
<title>Sample Paragraphs</title>
</head>
<body>
<p>This is the first paragraph of text.</p>
<p> This is the second paragraph of text.</p>
<p> This is the third paragraph of text.</p>
</body>
</html>Fig. 16.5 Shows how the paragraphs are displayed on the browser. By default, paragraphs are separated by blank lines.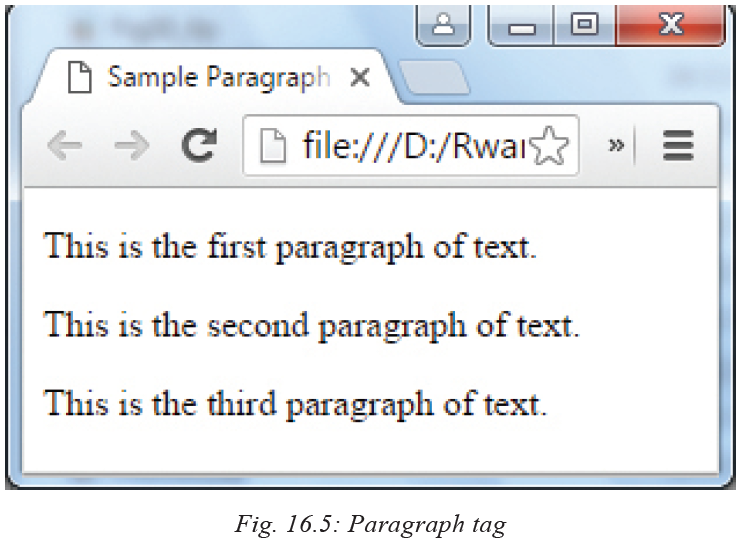 16.3.1.7 Comments
Comments are used to explain parts of HTML statement especially in complex documents to increase readability. They help other web developers understand the code even in future in case of modification. If used, comments are ignored by a browser when the page is displayed. To indicate that a statement is a comment, enclose it within <!-- …--> tags. For example, the following statements are interpreted by the browser as comments hence they are not displayed on the screen. Having looked the syntax of HTML 4, Table 16.1 gives quick overview of some of the elements discussed in this section.
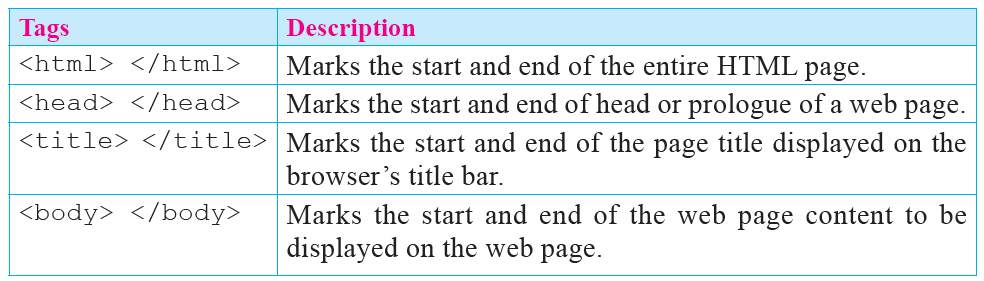
 Activity 16.4: HTML tags
1. Using heading and paragraph elements create a page that briefly describes topics that you would like to cover in your personal website, also known as a blog. The website should contain information such as brief description about yourself, academic profile, and career aspirations in separate paragraphs.
2. Explain what happens if you insert a blank line between the paragraphs but enclose the paragraphs within a single <p> ..</p> pair.16.4 Introduction to XHTML
As earlier mentioned another markup language is known as Extensible Markup Language (XML). The letter X in XHTML stands for extensible which means that an XHTML developer can define new elements.
Although XHTML and HTML 4.01 are almost same in terms of elements, the main difference between the two is that XHTML has strict rules for defining document structure. The following are some of the differences between the XHTML 1.1 and HTML 4.01 standard:• Unlike HTML 4, XHTML is case sensitive, hence all tags must be in lower case
e.g. <html>, <body>, <div>, <p>, <b> etc. No upper case or mixed case is allowed.
• Each tag must have a closing tag e.g. <div> </div> , <li> </li>.
• Unlike in HTML standard in which you can define an attribute and leave it blank, in XHTML each attribute must have a value.
Throughout the remaining part of this unit, we adhere to basic XHTML rules but
base our examples on HTML 4.01 standard. To take care of both standards, we use
HTML without the version number to stand for this hybrid approach.16.4.1 XHTML syntax and structure
XHTML standard contains doctype and elements used to define various parts of a
webpage. The following is a general structure of an XHTML document:<!DOCTYPE html PUBLIC “-//W3C//DTD XHTML 1.0 Transitional// EN”“http://www.w3.org/TR/xhtml1/DTD/xhtml1-transitional.dtd”>
<html>
<head>
<title>Sample XHTML Document</title>
</head>
<body>
<p> The content to be viewed comes here...</p>
</body>
</html>The above HTML page when viewed on a web browser appears as shown in Fig. 16.6 shown below. In the following subsection, we briefly discuss some of the features of XHTML starting with DOCTYPE declaration.16.4.2 DOCTYPE and XHTML VersionsBased on <!DOCTYPE> declarations, there are four versions of XHTML i.e. versions
1.0 Strict, 1.0 Transitional, 1.0 Frameset, and 1.1. declarations must be on the first line of the page.
1. XHTML 1.0 Strict:
Contains all HTML elements and attributes. However, it does not include presentational or deprecated elements (like font) and framesets are not allowed. Tags must be written as well-formed XML. It is declared as:<!DOCTYPE html PUBLIC “-//W3C//DTD XHTML 1.0 Strict//EN”
“http://www.w3.org/TR/xhtml1/DTD/xhtml1-strict.dtd”>2. XHTML 1.0 Transitional:
Contains all HTML elements and attributes, including presentational and deprecated
elements (like font) but framesets are not allowed. Tags must be written as wellformed
XML. It is declared as:<!DOCTYPE html PUBLIC “-//W3C//DTD XHTML 1.0 Transitional//EN”
“http://www.w3.org/TR/xhtml1/DTD/xhtml1-transitional.dtd”>3. XHTML 1.0 Frameset:
It allows framesets element to partition web page into columns. It is declared as:
<!DOCTYPE html PUBLIC “-//W3C//DTD XHTML 1.0 Frameset//EN”
“http://www.w3.org/TR/xhtml1/DTD/xhtml1-frameset.dtd”>3. XHTML 1.1:
Equivalent to XHTML 1.0 Strict, but allows you to add modules e.g. different language
support modules etc. It is declared as:
<!DOCTYPE html PUBLIC “-//W3C//DTD XHTML 1.1//EN”
“http://www.w3.org/TR/xhtml11/DTD/xhtml11.dtd”>16.4.3 XHTML elements and attributes
Observe the following rules when using XHTML:
1. Write a DOCTYPE declaration at the start of the XHTML document.
2. All elements and attributes should be written in lower case e.g <body>.
3. Each opening tag must have an equivalent closing tag.
4. Nest all the tags properly.
5. Attribute values must be enclosed in quote marks e.g. <td rowspan = “3”>.
6. Elements such as <b> and <i> have been replaced by <strong> and <em>
respectively.16.4.4 XHTML entities
An entity can be defined as a special character or symbol which may not be readily
available on the keyboard e.g. numeric, latin and special characters that can be
embedded on a web page using character entity references. The references have
both a numeric value as well as a named value. You can use either as summarised
in the table below:
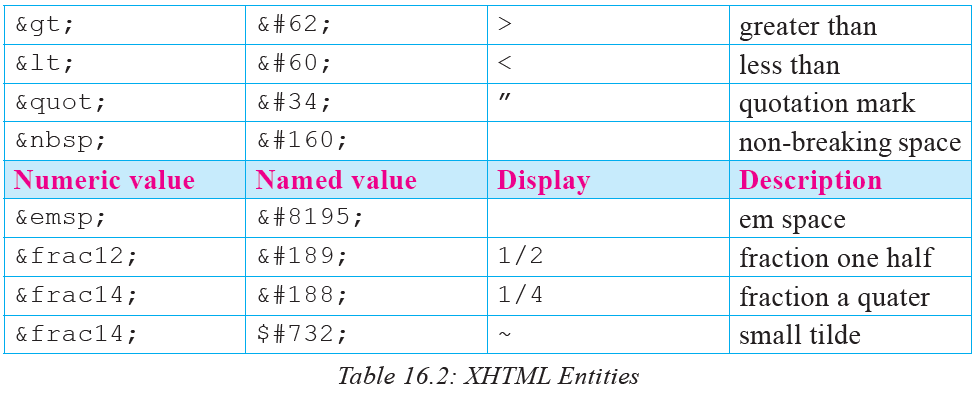 Activity 16.5: XHTML entities and page codes
Use the entities in Table 16.2 to do the following:
1. Insert the copyright symbol on a web page
2. Display: y > x on a web page
3. Display: 1/2 + 1/4 = 3/4 on a web page.
4. Most web browsers have a way of letting users view the HTML source of a web page. Demonstrate how you would display the source code of a REB home in Firefox, Windows Explorer, Chrome, Safari and Opera. Identify some similarities between the source code of viewed pages and the one you created in activity 16.3 in terms of organization and tags used.Assessment Exercise 16.1
1. Write the following acronyms in full:
(a) HTML
(b) XHTML
2. Differentiate between an HTML tag and HTML element.
3. Using examples, illustrate how the following HTML tags are used:
(a) Title
(b) Body
(c) Paragraph
(d) Heading
4. Using an example, describe the general structure of an HTML page.
5. Explain the importance of using HTML comments in a web page.
6. Why should DOCTYPE appear at the start of every HTML page.
7. Describe the steps you would follow to create a website.
8. List three software tools you can use to create a web page.
9. Write the entity that would display a copyright symbol on the screen.16.5 Designing HTML pages
In this section, we demonstrate how to design and present content in the body element using ordered lists, unordered list, image, hyperlink, and table elements.Activity 16.6: Designing HTML page
In groups, discuss how you can add different types of web content such as text, tables, forms, and images, audio and video clips. Explain how you would preview each of the content separately in a web browser.16.5.1 Ordered and Unordered Lists
HTML offers web developers with elements for displaying information in numbered or bulleted list. HTML supports three types of lists namely ordered list, unordered list, and definition list. The three are different in that:
• Ordered <ol> list is a container for enumerated items ordered using numbers such as 1, 2,3.
• Unordered list <ul> is a collection of related items that have no special order or sequence.
• Definition list <dl> is used for definitions such as glossaries that pair each label with some kind of description. The three list elements consist of nested tags that define the type of list.16.5.1.1 Creating ordered list
Ordered lists are lists in which each item is numbered or labelled with a counter such as alphabetic letters or roman numerals. It is advisable to create numbered lists only when the order or sequence of items on the list is relevant. To create an ordered list, use the <ol>...</ol> tags within which you include one or more <li>...</li> (list item) tags as shown in the following HTML document.<!DOCTYPE html>
<html>
<head>
<title>Numbered List</title>
</head>
<body>
<ol >
<li>Boot-up the Computer</li>
<li>Insert System DVD</li>
<li>Run the Setup Wizard </li>
<li>Restart the Computer</li>
</ol>
</body>
</html>Fig. 16.7 shows the list of four items after displaying the page on a browser.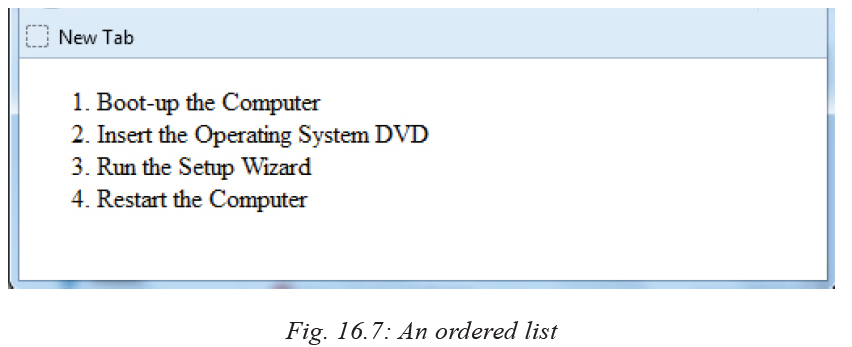 You can customize the numbering style of an ordered list using the type attributes
as follows:
<ol type = “counter-type”>....</ol>;
Example
<ol type = “a”> ...</ol>Activity 16.7: Ordered list
Suppose that you wanted three items in a list of ingredients to be in roman i, ii, iii instead of the default 1, 2, and 3. Modify the HTML document for Fig. 16.5 to display the items in roman numerals starting from v instead of 5.16.5.1.2 Creating unordered list
Unordered list is similar to ordered list only that the items are listed using bullets. To create unordered list, use <ul>...</ul> instead of <ol>..</ol> element as shown in the code below.<!DOCTYPE html>
<html>
<head>
<title> Fruits Menu</title>
</head>
<body>
<ul>
<li>Orange</li>
<li>Banana</li>
<li>Guava</li>
<li>Mango</li>
</ul>
</body>
</html>Fig. 16.8 is an example of a bulleted list of four items as displayed on a browser.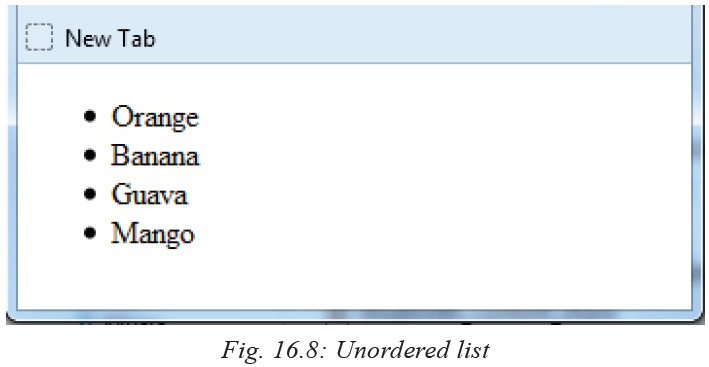 You can customize unordered lists using type attribute and values that denote bullet types such as disc, square, or circle. For example, to change the bullets displayed in Fig. 16.9 from round to square, use the following syntax:
<ul type = “bullet-type”>....</ul>;For example, to display unordered list shown in Fig. 16.7 as a square, bullets, use
the style attribute as follows:
<ul type = “square”> ..</ul>Activity 16.8: Ordered list
Suppose you wanted three items in a list of ingredients to be in numbered in Roman
I, II, III instead of number 1, 2, and 3. Create a webpage with an ordered list of items
displayed in uppercase Roman numbers I, II, III ...16.5.2 Creating definition list
A definition list is used to present a glossary of terms, or other definition lists like dictionary and encyclopedia. To create a definition list, use <dl> ... </dl> element in which you place <dt> ... </dt> to mark up the term and <dd> ... </dd> to mark up the definition part. Therefore a definition list consists of the following parts:
• <dl> - Defines the start of the list
• <dt> - A term
• <dd> - Term definition
• </dl> - Defines the end of the list
For example, the following HTML document shows a definition list for three terms:XTML, HTTP and CSS.
<!DOCTYPE html>
<html>
<head>
<title>Glossary of Terms </title></head>
<body>
<dl>
<dt><b>XHTML</b></dt>
<dd>XHTML stands for Extensible Hyper Text Markup Language</
dd>
<dt><b>HTTP</b></dt>
<dd> HTTP stands for Hyper Text Transfer Protocol</dd>
<dt><b>CSS</b></dt>
<dd>CSS stands for Cascading Style Sheet</dd>
</dl>
</body>
</html>Fig. 16.9 shows how the definition list of the code above is displayed on a browser.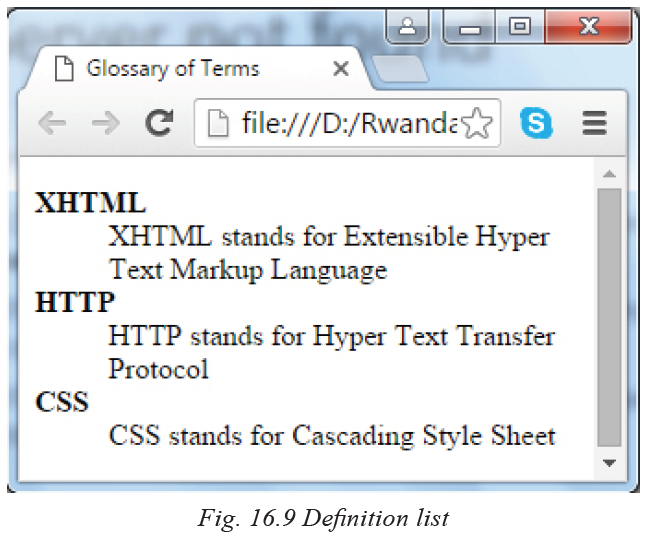 Activity 16.9: Definition list
Suppose that you want to display 10 Glossary terms using the definition list Modify the HTML document above to display the terms and their meaning.16.5.3 Creating nested lists
To create a nested list, put the entire list structure inside another list as shown below:<!DOCTYPE html>
<html>
<head><title>sample Nested List </title></head>
<body>
<ol>
<li>World wide web</li>
<li>Organization</li>
<li>Introduction to HTML</li>
<li>
<ul>
<li>Definition of HTML</li>
<li> HTML Syntax</li>
<li>Doc structure</li>
<li>Headings</li>
<li>Paragraphs</li>
<li>HTML Comments</li>
</ul>
</li>
<li>Hyperlinks</li>
<li>Advanced HTML</li>
</ol>
</body>
</html>
Fig. 16.10 shows an illustration of a nested list from the HTML code above.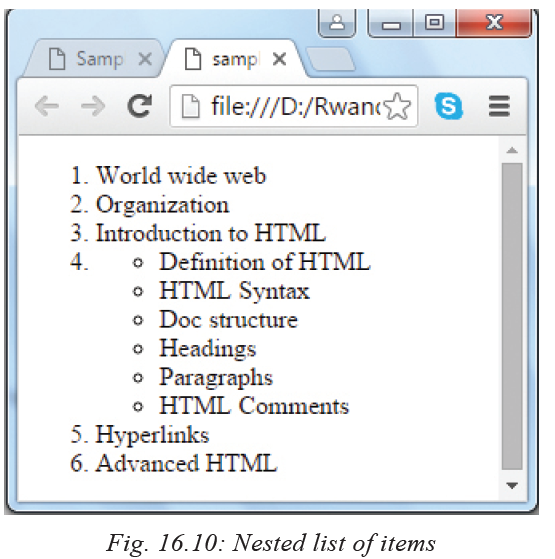 16.5.4 Inserting Images and Background
One of the most compelling features of latest HTML standard is the ability to embed images that make your website more attractive. The three types of images supported by HTML4 are GIF (Graphics Interchange Format), JPEG (Joint Photographic Experts Group) and PNG (Portable Network Graphics).
To insert an image onto a web page, use the <img> tag; img is an abbreviation of the word image. The <img> is an empty tag does not require a corresponding closing tag. The general syntax for inserting a graphical object or image is:
<img src=”Image URL” ... attributes-list/>The src in the img tag is an important attribute that specifies the location (source) or URL of the image you want to insert onto the page. For example, The following HTML code displays an image called house:<!DOCTYPE html>
<html>
<head>
<title> This is my House </title>
</head>
<body>
<p>This is the house I call My Home</p>
<img src=”house.jpg” alt= My House />
</body>
</html>
Fig. 16.11 shows how the web page looks when displayed on the browser NB: use of the alt attribute is a good practice to specify alternate text for an image, if the browser cannot display or locate the image.16.5.4.1 Setting Image size
You can specify the size using width and height attributes. The two attributes sets width and height of the image in terms of pixels or percentage of its actual size. For example, to set the size of the hows to occupy quarter of the screen, use:< img src = “house.gif” width =”25%” height = “25%” alt = “House” />16.5.4.2 Image Alignment
The <img> tag uses the align attribute to align an image on top, bottom, left or right of the browser window. For example, to align house.gif on top of the page, use align attribute as follows:
<img src = “house.gif” align = “top” alt = “House”/>NB: Although some browsers currently support align attribute, it is no longer supported in HTML5.16.5.4.3 Setting page Background Colour
HTML4 comes with background formatting elements such as color and bgcolor. However, since we do not intend to go against current trends in XHTML and HTML5, we deliberately avoid using these elements and their attributes.Activity 16.10: Embedding images
Using the image tag, embed various images on one of the web pages created earlier.
How do you insert images from a different location other than your current working folder?16.5.5 Inserting Hyperlinks
A hyperlink is a text, phrase or image that you click to go to another web page or a section within the current page. In most browsers, hyperlinks are often in blue and underlined. When you move a mouse pointer over a hyperlink, the arrow changes to a hand pointing at the link. Clicking the link takes you to a new page or place in the current page.Activity 16.11: Hyperlinks
A hyperlink can be plain text, image or email. In groups, research on the web how each of these three types of links can be added on HTML page to direct visitors to a section of the same page or another web page.From activity 16.10 you may have observed that hyperlinks allow visitors to navigate
between web sites by clicking on words, phrases, or images.16.5.5.1 Text Hyperlinks
To create a link in HTML, you need to know the name of the file (or URL of the file to which you want to link) and the text that will serve as the clickable hyperlink. To create a hyperlink use the anchor element: <a>...</a>. The <a> tag is called an anchor tag because it is used to create anchors for hyperlinks.16.5.5.2 Linking to a different Page
To create a link to other web pages, user the <a> tag and href hypertext reference attribute as shown in the following general syntax:
<a href=”Document URL”...attributes-list>Clicable Link Text</a>The href attribute is used to specify the URL of the file the link points to. For example,
to open a page with URL “http://www.tutorpoint.edu” use:<a href= “www.tutorpoint.edu”>Visit My Online Tutorial</a>The following code shows how to add text-based hyperlink into a HTML page:<!DOCTYPE html>
<html>
<head>
<title>Creating Hyperlinks</title>
</head>
<body>
<p>Click following link</p>
<a href=”http://www.tutorpoint.edu” >Visit Tutorial Site</a>
</body>
</html>
Fig. 16.12 shows how the link is displayed on the browser. In most browsers, a hyperlink is an underlined text and blue in colour. In our case, once the visitor clicks on the link, he or she is taken to the web page of the tutorial site as long as it is a valid URL.16.5.5.3 Linking to Page Sections
To create a link to a particular section of the same page, we use the name attribute
of the <a> tag. This is a two-step procedure as follows.
1. Create a link to the target web page within which you want to visit a specific
section using the following general syntax:
<h2>Link to a Page Section <a name=”sectionname”></a></h2>2. Create a hyperlink to the named section of the document where you want to visit.
For example, the following HTML code shows how to visit the top section of a
web page:
<a href=”/html/html_text_links.htm#top”>Go to Top</a>16.5.5.4 Image hyperlinks
To take care of people with special needs, you can also provide an image as a
hyperlink. Similar to defining a text link, we use anchor (<a>) tag as follows:
<a href= “www.tutorpoint.edu >
<img src=”/images/logo.png” alt=”Tutorials” border=”0”/> </a>16.5.6 Using Relative and Absolute URLs
To link web pages that are contained in the same or different locations, we use relative
or absolute URLs. A relative URL points to a file depending on its locations relative
to the current file. On the other hand, absolute URL points to a file depending on
actual locations.16.5.6.1 Specifying Relative URL
To specify relative URL we use the forward slashes (/) to refer to a directory within
the current or two dots (..) refer to the directory above the current. Table 16.3 shows
how to use relative URL to access flowers.html
 16.5.6.2 Specifying Absolute URL
Absolute URL points to a page by starting at the top level of directory hierarchy and working downwards to the target file. To specify an absolute path, you must start with a forward slash as shown in Table 16.4.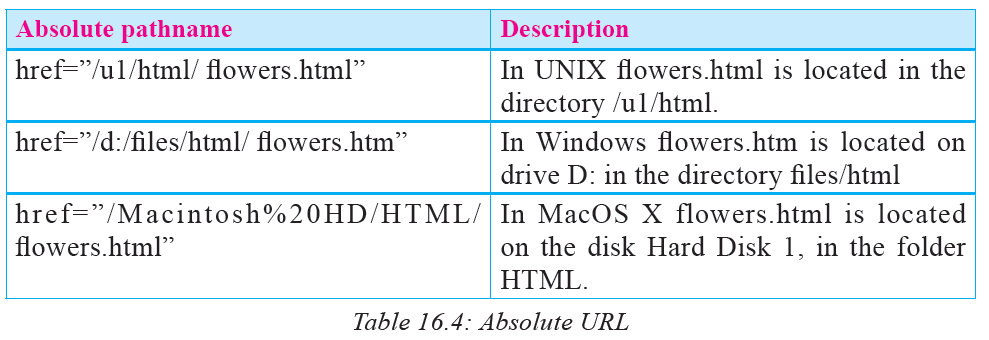 16.5.7 Creating Tables
Tables are used to organize data such as numbers, text, links and images into rows and columns. An intersection of a row and a column forms data cell in which table data is held as shown in Fig. 16.13. In HTML tables are created using the <table> tag which is a container for <tr> (table row) tag used to create rows and <td> (table data) tag used to create data cells. Before you create a table such as shown in Fig. 16.13, consider the following table-features:
• Caption: indicates the type of data presented in the table
• Table headings: the row that indicate the data displayed in each column
• Table cells intersection of rows and columns in which we insert data.
• Table data is the data or values in the table.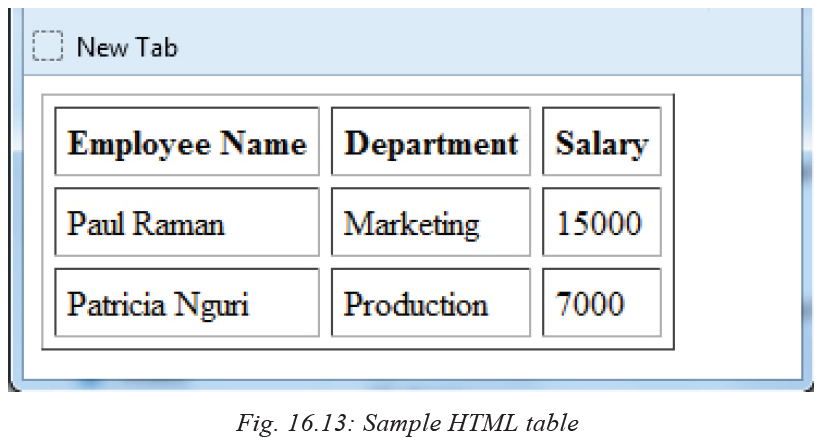 To create a table, we use the <table>…</table> element within which the following
elements are nested:
• <caption>..</caption> used to create the table caption
• <th> ...</th> tag is used to create the table heading
• <tr>...</tr> tag is used to create table rows
• <td>...</td> tag is used to create data cells
The following HTML code produces the table shown earlier in Fig. 16.13. Notice that the table starts with a <table> tag followed by border, cell padding and cell spacing attributes and ends with the closing </table> tag.<!DOCTYPE html>
<html>
<head>
<title>HTML Table Cellpadding</title>
</head>
<body>
<table border=”1” cellpadding=”5” cellspacing=”5”>
<tr>
<th>Employee Name</th>
<th>Department</th>
<th>Salary</th>
</tr>
<tr>
<td>Paul Raman</td>
<td>Marketing </td>
<td>15000</td>
</tr>
<tr><td>Patricia Nguri</td>
<td>Production</td>
<td>7000</td>
</tr>
</table>
</body>The following are basic atributes used to define or format an HTML table.16.5.7.1 Border Attribute
The border attribute takes numeric values that specify thickness of the border that surrounds all the table cells. If 0 is used, the border is invisible while. In our example above, the statement below create a border of 1 pixel thickness.
<table border=”1”>16.5.7.2 Height and Width attributes
To set the size of the table, use width and height attributes. The height and width attributes take width or height values in terms of pixels or percentage of the screen. For example, the statement below sets the table size to width of 400 pixels and height of 150 pixels.
<table border=”1” width=”400” height=”150”>16.5.7.3 Table Caption
The caption tag will serve as a title or explanation for the table and it shows up at the top of the table. However, it is important to note that the caption tag is deprecated in newer versions of HTML.Activity 16.12: Tables
In groups, use sample HTMP pages to demonstrate use of the following table features:
• The three elements used for separating a table into three sections header, body, and footer as shown.
• The table attributes such as colspan, rowspan, cellpadding, cellspacing used to format table cells.16.5.8 Creating Forms
You may need to gather information such student’s details and store such information in the server. The most common method for gathering such information is by using a form. For example, Fig. 16.14 shows a sample HTML form used to collect user registration details such as first name, last name, nationality and phone. When users fill forms and clicks the submit button, the data keyed into the form is sent (posted) to the web server for processing or storage into a database. To create HTML forms, we use the <form> ... <form> element as follows:<form action=”Script URL” method=”GET|POST”>
form elements like input, textarea etc.
</form>
For example, the following HTML code produces the form shown earlier in Fig. 16.15 in the next section, we discuss other elements and attributes used to format HTML forms.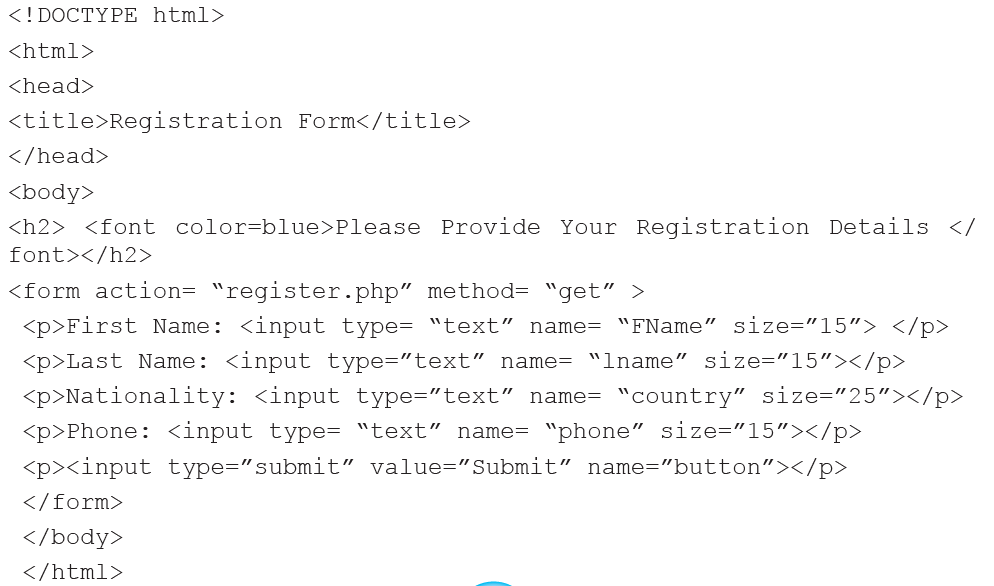 16.5.8.1 Form Action Attribute
The <form> tag takes several attributes key among them the action and method attributes used to accomplish the following:
• Action: This attribute is used to specify the file on the server that receives data from the form for processing. For example, the action attribute in the form tag below specifies a file named register.php that receives registration details after the user clicks the submit button:<form action=“register.php”> </form>16.5.8.2 Form Method Attribute
The Method attribute specifies how the data is to be sent to the web server. The two types of methods used are the post and get.
• Get Method: If a “GET” method is used, the data supplied in the form is appended
at the end of the URL as shown below:Note that in this example, using get method in a login form is not recommended unauthorized users may see actual username and password. The alternative is to use the post method.
• Post Method: Unlike the GET method, post method does not display submitted form data on URL because the parameters are passed as body of a HTTP request.Activity 16.13 Form attributes
In groups, discuss the difference between the post and get methods in terms of how
the two attributes send data to the back-end server script. Which method is preferred
for sending sensitive data such as username and password. Defend your argunment
using sample HTML pages.16.5.9 Form Controls
There are different types of form controls that you can use to facilitate data collection
information using HTML form. The most common controls include: text, textarea,
select, radio buttons, checkboxes, file select, command button and reset buttons.16.5.9.1 Text input
Input control is used to capture alphanumeric data such as text, password and hidden.
For example, the following statement defines text input for capturing username.
<label> Username:
<input type=”text” name=”uname” size = “15” />
</label>16.5.9.2 Hidden input
Sometimes it is importat to conceal the identity of information entered in the form using the input type. This is achieved by use of hidden input type. To create hidden input, set the input type to hidden as shown below:<input type=“hidden” name=“userid” value=“132”/>16.5.9.3 Textarea
Textarea control is a multi-line text input used when the user is required to give details
that may be longer than a single sentence. The attributes used with textarea tag are:
name, rows, and cols. For example, the following statement defines textarea named
comment that has 3 rows and 10 columns:<form >
Comments: <br />
<textarea rows=”3” cols=”10” name=”comment”>
</form>16.5.9.4 Checkbox
Checkbox controls are input type used when more than one option is required to be selected from a list of check boxes. However, the input type attribute must be set to checkbox value as shown by the following statement: 16.5.9.5 Select
The select control also known as dropdown box provides the user with various options in form of drop down list, from which a user can select one or more options. For example, the following select defines a dropdown for selecting only one option:<select name=”dropdown”>
<option value=”maths” selected>Mathematics</option>
<option value=”computer”>Computer Science</option>
</select>16.5.9.6 Submit and Reset Button
Submit input type used to create a button that automatically submits form data to web server. On the other hand, reset is used to refresh (reset)form controls to their default values. The following statements creates submit and reset buttons with values set to Send and Reset respectively: The following is an HTML code that implements input, textarea, checkbox, and select elements.
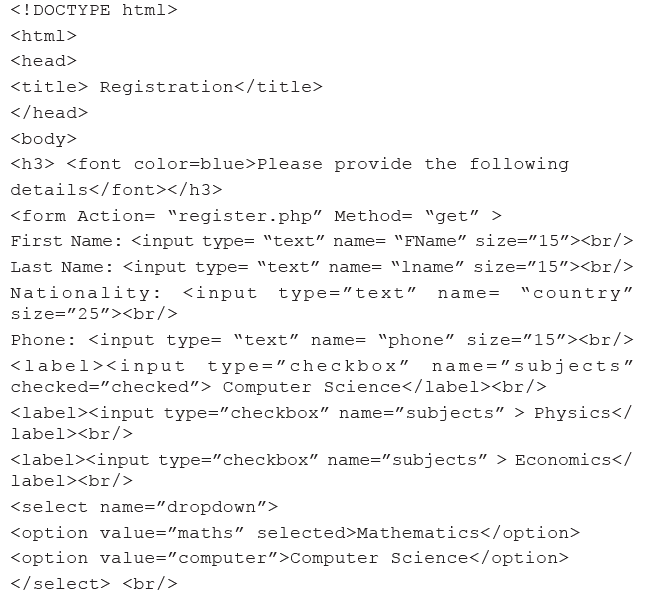
 The illustration shown in Fig. 16.15 shows how form controls discussed earlier are
displayed: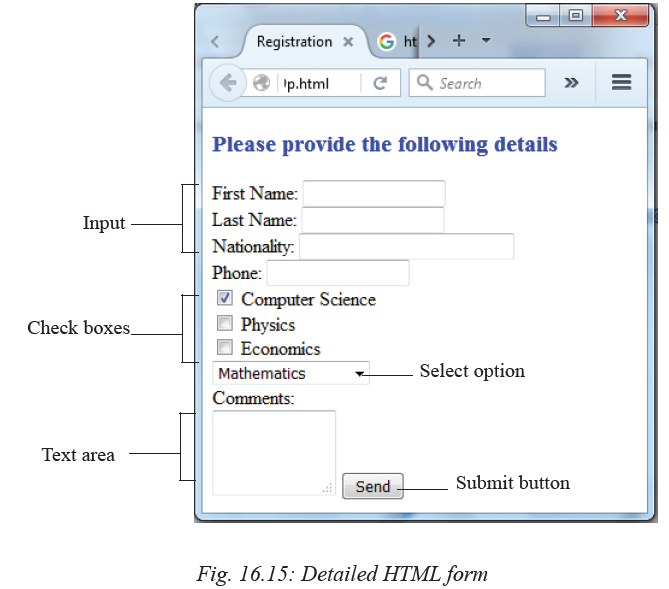 Activity 16.14: Form controls
Create a form that contains textarea, password, checkboxes and select, textarea, readonly
controls and radio buttons. Demonstrate how such a form would be used to post collected information to a web server for processing and storage.Assessment Exercise 16.2
1. State three advantages of using commercial web development tools such as Dreamweaver over text editors such as Notepad.
2. Explain five main features of an HTML form.
3. Explain four types of image formats that can be inserted into a web page.
4. Giving examples, differentiate between the following features
(a) Absolute and relative URL.
(b) Post and Get methods..
(c) Tag and attribute.
5. Outline a step-by-step procedure you would follow to insert the following Dreaweaver objects:
(a) Table
(b) Form
(c) Image
6. Differentiate between GET and POST methods used to senf form content to a web server.16.6 Introduction to HTML5
HTML5 is the fifth revised and newest version of HTML standard offering new features that support multimedia content more effectively than ther previous versions. In the long run, the new standard is meant to be a replacement for HTML 4.01, XHTML 1.0, and XHTML. To be supported by majority of browsers, HTML5 has been developed in collaboration with browser makers. This explains why most browsers are supporting the new HTML5 specification. In comparison to HTML4 and XHTML, HTML5 standard has adopted a flexible hybrid approach by:
• Relaxing some of the relaxing some of the rules that were imposed by XHTML 1.0 version.
• Removing elements and attributes deprecated in previous versions of HTML4 and XHTML.
• Removing elements and attributes that had been introduced in previous standards but are now superseded by Cascading Style Sheets.
• Providing new elements and attributes that allow for backward compatible with current and older browsers.16.6.1 HTML5 Syntax and Structure
HTML5 has a “custom” syntax that is compatible with HTML4 and XHTML documents published on the Web. However, the standard does not support most SGML-based features inherent in HTML4. In this sections, we discuss some of the unique features of HTML5. The code below shows the general syntax of HTML5 documents.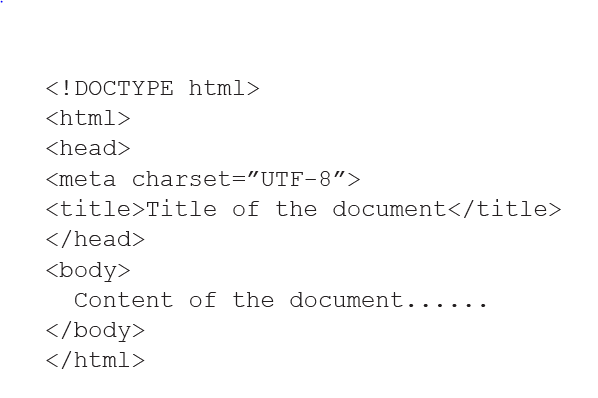 The following is an example of an HTML5 document that further demonstrates structural elements of HTML5 like header and footer.
 Fig. 16.16 Shows the output on the screen once document is loaded on a browser.
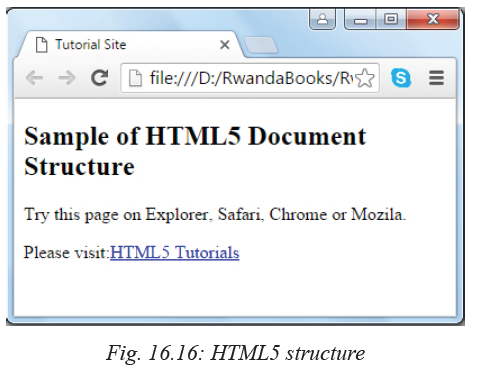 In the following subsection, we discuss some of the new features of HTML5 such as DOCTYPE declaration, elements and attributes.16.6.2 HTML5 Doctype
DOCTYPEs in previous HTML versions were longer because HTML4 and XHTML required a reference to SGML-based DTD. HTML5 standard is a radical departure from SGML restrictions to new features based on cascading style sheet (CSS) and Javascript. This is why doctype is a short statement written as:
<!DOCTYPE html>16.6.3 New HTML5 Elements
Basically HTML5 is about extending HTML4 and XHTML standards with new rich elements and attributes while deprecating or removing some. New elements have been introduced in HTML 5 to define structural elements, text-formatting instructions, form controls, input types, and multimedia content. The new HTML5 elements may be classified into three categories namely: structural, Input, and media elements.
• Structural elements: HTML5 offers new semantic elements used to define the
structure of a web page. Examples of structural elements include <article>,
<aside>, <header>, <footer>, <main>, <section>, <summary> and <nav>
• Input elements: New input types were introduced to address specific form input and formatting requirements for user input such as dates, numbers, and telephone numbers. Examples of new input types include color, date, datetime, time, email, number, tel, url
• Media elements: Due to high demand of multimedia content on the web, WC3 introduced new set of media elements in HTML5 to handle different media types without need for additional plugins such as Adobe flash. New media elements include <embed>, <audio>, <source>, <track> and <video>Table 16.18 provides a summary of new structural, input and media element supported
by the HTML5 standard: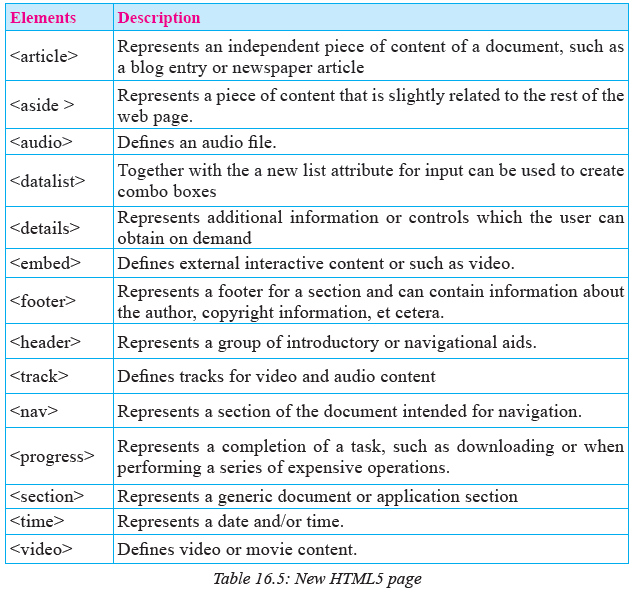 Activity 16.15: HTML 5 elements
In groups search for tutorials on HTML5 and list and new elements supported by HTML5. Explain whether the element is structural or media type.16.6.4 New HTML5 Inputs Types and Restrictions
In HTML4, we discussed some of the input elements that use the type attribute to specify the data input such as text and hidden. HTML5 supports new input types for forms that are meant to improve user experience and shorten web development time. Table 16.6 shows some of the new input types other than text, hidden and password used in the previous versions of HTML.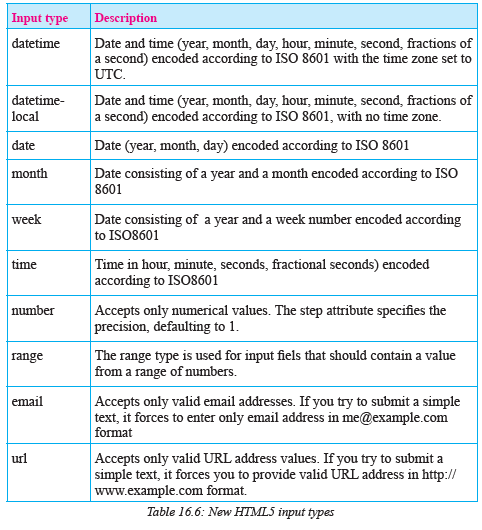 16.6.5 New Input Attributes
The HTML5 input element has several new attributes to specify the form behaviour and format. Some of the new attributes used for restricting input include: min, max, required, pattern and step. Other attributes used to enhance user input include. Such attributes include autocomplete, autofocus, placeholder, formvalidate, list, formaction,
form method, and formtarget.
To demonstrate how the new input types and attributes are used, below is sample HTML5 document used to get text, telephone, e-mail, date, time and numbers. The code also shows how to restrict input for the e-mail and range of number: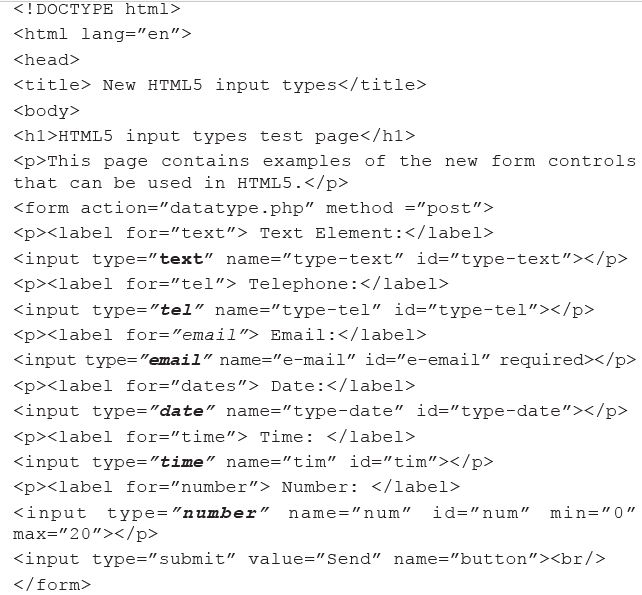
 Fig. 16.17 shows a sample output from HTML5 code above. Note the restrictions placed by HTML5 standard on user input such as email that must be provided and range of numbers shown by a drop down list.
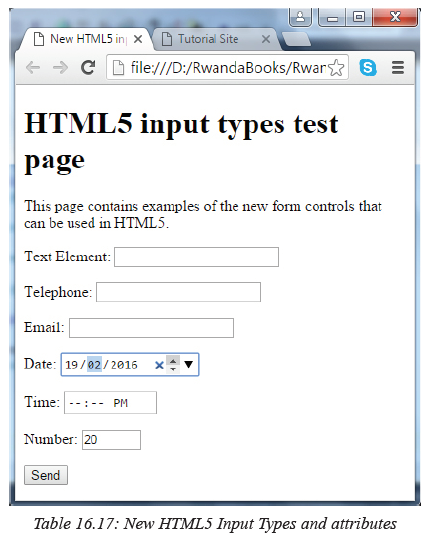 Activity 16.16: HTML 5 new input types
The new type called tel in HTML5 expects a telephone number. However, tel does not enforce any validation because many telephone numbers are alphanumeric or start with a + symbol e.g. +250 252 123 123.
• Research on internet the importance of tel input type.
• Explain how the new HTML5 pattern (regexp) attribute can be used to validate telephone number input.16.7 Migrating from HTML4 to HTML5
For smooth transition from HTML4 to HTML5, there are a number of design and factors to be considered. The two key factors that web developer need to consider are use of deprecated elements, and browser support.16.7.1 Deprecated elements and attribute
Deprecated elements are features that have been rendered obsolete but that browsers may continue supporting them. Examples of deprecated features are border attribute used with <img/> element and name attribute in the anchor <a> element. Other deprecated elements and attributes include: <applet>, <acronym>, <center>, <font>, <noframes>, <command> and <tt>.16.7.2 Browser support
Browser support is one of the key factors to consider when migrating from HTML4 to HTML5. Fortunately, since HTML5 became a W3C recommendation in October, 2014, major browsers like Safari, Chrome, Firefox, Opera and Internet Explorer 9.0 have started supporting to HTML5 features. Furthermore, most web browsers that come pre-installed on mobile phones that run on iOS and Android operating systems have support for HTML5 features.Activity 16.17: Migrating from HTML4 to HTML5
1. HTML5 may be a disruptive technology that will bring most of the sites on the web down due to the following issues:
• Removal of support for HTML frameset element in HTML5 standard.
• Removal of deprecated elements and attributes supported by earlier versions of HTML.
• Tables should not be used to create web page layout. Instead web developers are required to use CSS rules
• Attributes that let people create those perfectly laid-out tables, like align, bgcolor, border, cellpadding, cellspacing, height, nowrap, rules, valign, and width are gone.
2. In groups, research on internet the difference between HTML4 and HTML5.
3. Discuss previous versions of HTML that have been standardized by a consortium
known as W3C (W3C stands for World Wide Web Consortium).
4. Debate this argument by support it or giving justification why migrating from HTML4 to HTML5 is a brave decision that should not be held back due to few people who are resistant to change!Assessment Exercise 16.3
1. Define the following terms used in HTML 5:
(a) Deprecated attributes
(b) Pattern
(c) Form validation
2. Distinguish between HTML4 and HTML5 syntax in terms of elements, case sensitivity, and input restrictions.3. Identify at least three factors that are making it deficult for older browsers to support HTML 5.
4. Once you have created a website on your local machine, demonstrate how you would validate conformity to HTML5 specifications.Unit Test 16
1. Define the term web server.
2. Differentiate between internet and web.
3. A program, such as Mozilla Firefox that that lets a user display HTML-developed
web pages is referred to as _________.
4. The two standard languages used to create web pages are_____ and _____.
5. Write sample HTML statements to demonstrate how to insert the following:
(a) Scrolling images at the top part of a page
(b) An image of a house
(c) Table with 3 rows and 5 columns
6. Explain statement: <form action=“student.php” method=“get”>
7. Explain at least four types of controls that are used to create a form object.
8. Differentiate between the following terms:
(i) Hypertext and hyperlink
(ii) XHTML and HTML5 standards
9. Giving examples, explain restrictions that were imposed by XHTML that have been relaxed in HTML5.
10. Discuss three key factors that a web developer should consider before developing a website.
11. Build a static website for your school that consists of five hyperlinked pages
containing the following information:
(a) Home page – This is the index page containing general information about the school.
(b) About page – Contains mission, vision and background (History) of the school.
(c) Academic pages – Contains subjects, teachers and school programmes.
(d) Gallery – Contains important photos taken during school events.
(e) Contact page – Contains postal, email, web and mobile phone contacts of the school administration.Unit 17:CASCADING STYLE SHEET
Key Competency
By the end of this unit, you should be able to build standards compliance web pages using CSS.Unit Outline
• Definition of CSS
• HTML styling and disadvantages
• Comparison between HTML and CSS Styling
• CSS syntax
• Adding CSS to web pages
• CSS Styles
• Creating CSS pages from scratchIntroduction
Cascading Style Sheets (CSS) uses rules to describe to the browser how HTML elements are to be displayed on the screen. We use CSS properties to come up with rules that format one or many HTML pages all at once. These properties generally fall into one of two categories:Presentation
How to control things like the colour of text, the fonts you want to use and the size of those fonts, how to add background colours to pages (or parts of a page), and how to add background images.Layout
How to control where the different elements are positioned on the screen. You will also learn how to develop a CSS page from scratch.17.1 Definition of CSS
Activity 17.1: Research on CSS and HTML
Access the website suggested to you by the teacher and do some research on cascading style sheets. Find out the following:
1. Its difference when compared to HTML which you covered earlier.
2. The advantages it offers to website developers.CSS is a style language that defines the layouts of HTML documents in a more efficient manner. Unlike in HTML where we used tables to define strict layouts, with CSS there are no tables. Instead we define page layout styles using rules that are easy to apply across entire websites and that can easily be reused. CSS uses fonts, colors, lines, margins, height, width, background images, advanced positions etc. to define neat page layout styles.
Unlike some time back when few web browsers could understand CSS rules, most modern browsers support CSS. However, when developing CSS pages, test them in different browsers to ensure that they are displaying correctly across board.17.2 HTML Styling and disadvantages
HTML or Hypertext Markup Language is the standard and most basic language used to create web pages. It has a very simple code structure that makes it extremely user friendly, to learn and use. It has a few keywords (known as tags) that are dedicated to formatting text i.e. telling the browser how to display text. However, HTML suffers from the following shortcomings:
(a) In formatting, HTML is weak and cumbersome. Repeated blocks of the same code when formatting large documents increases memory usage and slows down web page loading time.
(b) The inclusion of formatting text together with page content in the same HTML file makes web pages to be inefficient and lack consistency throughout the website.
(c) HTML does not enforce strict coding standards. For example, you can type <br> without a terminating tag (i.e. without a terminating tag <br/> ). This may lead to language misunderstanding and problems when different browsers display the same web page differently.
(d) HTML is static in nature. It does not have control structures like other programming languages.
(e) HTML becomes complex when used to code large pages.17.2.1 Advantages of CSS
CSS addresses the need for functionally effective and efficient web designs. CSS has the following advantages:
(a) Improves Site Speed: The web pages and CSS stylesheet are small in size hence it makes the website to load faster and have efficient utilization of bandwidth.
(b) Centralised Format Styling: Changing a global stylesheet affects the entire site. Developers don’t have to individually change each page in the website separately.
(c) Flexibility: CSS can be combined with a Content Management System (CMS) to create content submission forms that can allow the user to easily select the layout of an article on-the-fly without the need for rigorous coding.
(d) Consistency: CSS has inheritance properties that can allow “cascading” of a global stylesheet that can be used to style an entire site. If a situation arises in which you need to change styles across the site, simply edit a few rules in the global stylesheet.17.3 Comparison between HTML and CSS styling
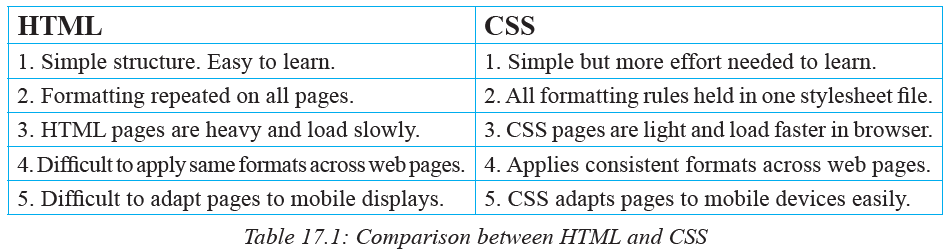
We can therefore conclude that while HTML is a markup language for building hypertext web pages, CSS is a rule based language that describes how various HTML page formats and layouts will be displayed on the screen.
17.4 CSS Syntax
We create CSS rule following a particular specific syntax. The format of a CSS rule set can be summarised as follows:
1. Start with a selector. The selector points to the HTML element you want to format.
2. Declaration block. It has a property and a value surrounded by curly brackets. It performs the actual formating of the selected element.
Figure 17. 1 below summarises this:
In this case, the rule specifies that all the level 1 headings will be pink in color and have a font size of 10.
17.4.1 CSS selectors
CSS selectors are used to point to or find HTML elements based on their defined names, IDs, attribute, class etc. Without a selector, the browser will not know which element to display in a particular format. There are several types of selectors:17.4.1.1 Element selector
It selects an element based on its known HTML name e.g. <p>, <h2> etc. For example, if we wish the rtext in a paragraph to have font size 12 and be blue in color, our CSSsyntax would be written as follows below:
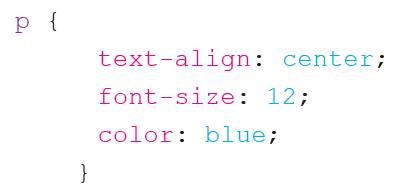
17.4.1.2 The ID selector
The id selector uses the id attribute in HTML to select a particular element. When creating id elements in HTML, make each one of them unique within a page to avoid reference conflicts!
An element with a specific id is selected by writing a hash (#) character, followed by the id of the element.
For example, if we have the HTML element with id=”globe”: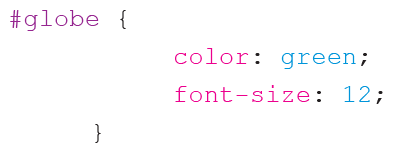
17.4.1.3 The Class selector
The class selector selects elements which are part of a particular class attribute. Write a period (.) followed by the name of the class. For example, if we have a class called wise in HTML e.g. class=”center” and we want all its elements to be orange and center-aligned we proceed as follows:
NB: A class name in HTML cannot start with a number.
17.4.2 CSS grouping selectors
The grouping feature enables the CSS code to be compact and reduces unnecessary repetition. For example, you could have CSS code which looks like the one below:
The above code can be grouped together as follows with all the selectors typed on the same line:
17.4.3 CSS comments
A comment is a string of non-executable text included in code as a means of explaining the code. It is helpful when you or someone else edits the source code at a later date.
In CSS, a comment starts with /* and ends with */. A comment can span more than one line. The example below demonstrates how comments are used:
17.4.4 CSS units
Measurement in CSS can be expressed using several different units. There are two types of units used to express length:
1. Relative length units: they specify a length as compared to another length e.g. if the font is 10 points then a length can be expressed as two times the current font size.
2. Absolute length units: these lengths are fixed. A length expressed in any of these will appear as exactly that size e.g. 10cm.17.4.4.1 Absolute length units
Unit Description
em Relative to size of current element e.g. 2em means 2 times the size
of the current font
vw Relative to 1% size of current viewport. The viewport is the
browser window size. e.g. if the browser has width 50cm e.g.
1vw = 0.5cm.17.4.4.2 Relative length units
Unit Description
px Pixel. 1px = 1/96th of 1 inch.
pt Points. 1pt = 1/72 of 1 inch.
mm Millimeter e.g. 1mm.NB: The margin, width, padding, border width, font-size, etc. all require unit specifications when designing your web page.
Activity 17.2: Creating simple HTML page
Open a text editor and create the following HTML page. Save your page as First. css as shown in Figure 17.2(a). If you are using Notepad in windows, select All files (*.*) in the Save as type box (Figure 17.2[a]) when saving to avoid saving it as First.css.txt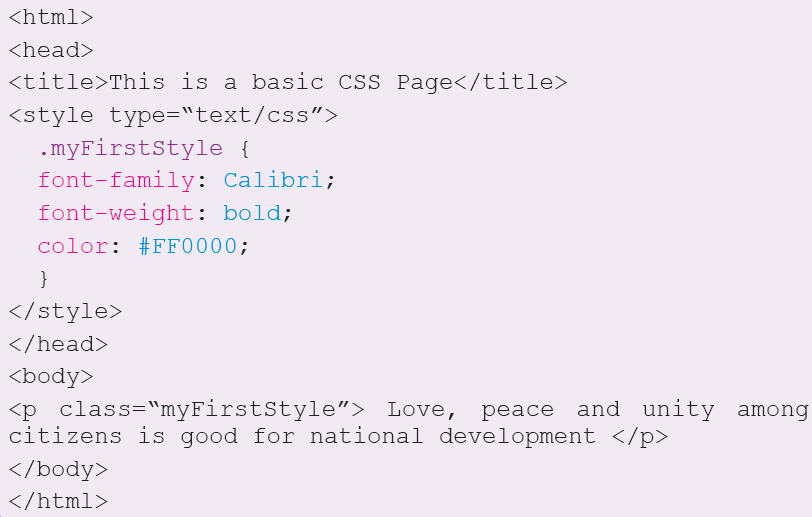
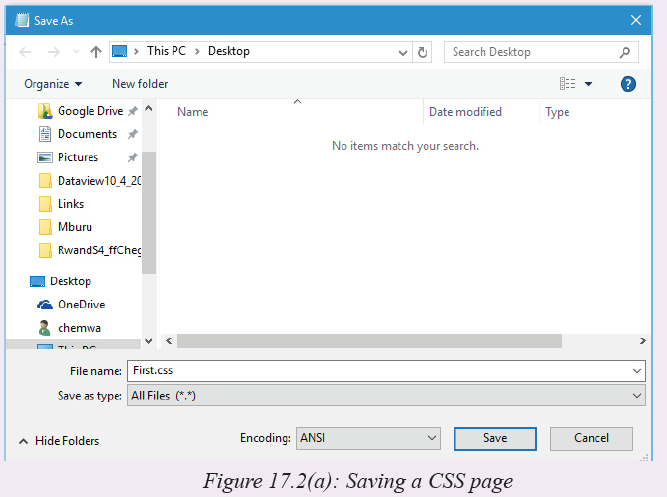

You can now open the page in a browser. What happens?
NB: In this example, .myFirstStyle is a Class. A class is a blue print on which we can define styles which can be accessed and applied to many different CSS sheets. You define a style by starting with a period (.) as shown above. It defines a class style which can be referenced as <p class=”myFirstStyle”>.
17.5 Colors
One of the most important formatting features in web design and development has to do with the right application of color. Color can be applied to text (font) or the background of a section or entire page.
In CSS, color can be specified in either of three ways:
1. Using a valid color name as a value in a declaration e.g. “red”, “blue”
2. Using a valid hexadecimal (HEX) value e.g. #ff1100, #BB00CC
3. Using the Red, Green, Blue (RGB) scheme e.g. “rgb(200,1,1)”
Table 17.2 below shows the values representing some of the most common colors.17.5.1 Using color names
The following pallete in Figure 17.3 shows the various colors and their names:
17.5.2 Using HEX values
Hexadecimal values are made of numbers that range from 0 - 9, A-F (where A = 10 and F=15). Some common HEX values are shown below in Figure 17.4: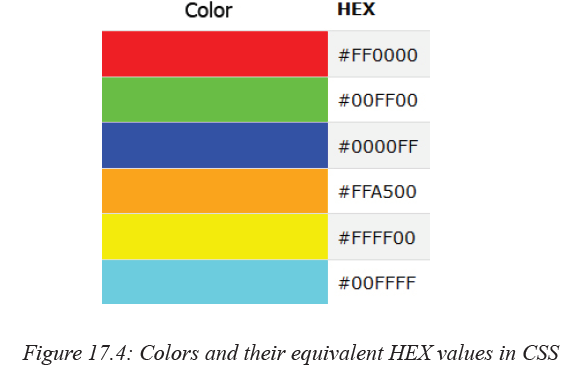
17.5.3 Using RGB values
RGB stands for the three primary colors of Red, Green and Blue. By combining these colors in varying percentages or ratios, it is possible to generate the other colors. Each color has an array that ranges from 0-255. The following are examples of RGB colors that can be generated using the stated ratios: Figure 17.5 below shows various RGB colors.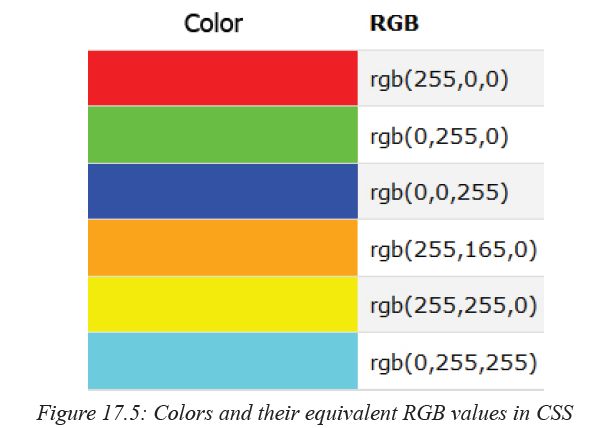
After briefly looking at the syntax, let us now delve into the specifics of how to include CSS in HTML pages.
17.6 Adding CSS to web pages
Activity 17.3: CSS coding strategiesOpen a web browser. Search for the following information:
1. External CSS
2. Internal CSS
3. Inline CSS
Write notes about each of these topics. Present to the class your findings.17.6.1 External CSS
An external style sheet is ideal when the style is applied to many pages. With an external style sheet, you can change the look of an entire web site by making changes to the CSS stylesheet file. Each page must link to the style sheet using the <link> tag. The <link> tag goes inside the head section as shown below:
An external style sheet can be written in any text editor. The file should not contain any html tags. Your stylesheet should be saved with a .css extension. An example of a style sheet file text is shown below:

Do not leave spaces between the property value and the units e.g. should be:
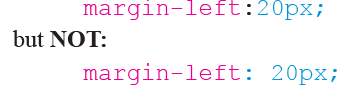
Activity 17.4: External CSS example
Create a folder on the Desktop and name it MyCSS. Type the stylesheet file text above in a blank Notepad document. Save the notepad file as external.css in the MyCSS folder. Now open a new Notepad document and type the following HTML code.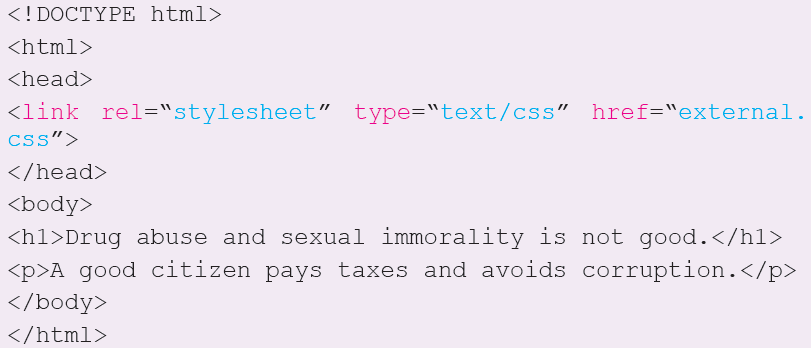
1. Save the above code as htmlcss.html in the MyCSS folder.
2. Download a *.jpg image and save it in the same folder as the CSS and
HTML files. Rename it as homepage.jpg.3. Load your htmlcss.html file in your localhost web server as guided by
the teacher. What happens?17.6.2 Internal CSS
An internal css applies styles to a single page or style sheet. An internal style sheet should be used when a single document has a unique style i.e a single page has styles that are not needed on other pages. You define internal styles in the head section of a HTML page, by using the <style> tag, as shown in Fig. 17.6: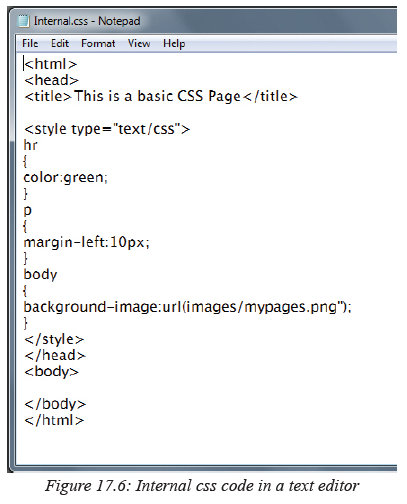
17.6.3 Inline CSS
An inline style loses many of the advantages of style sheets by mixing content with presentation. Do not use this method repeatedly.
To use inline styles, make sure to use the style attribute in the relevant tag. The style attribute contains CSS properties. The example below shows thow he paragraphs color and the left margin can be changed.
Each CSS property (the font-size property in this case) is followed by a colon and a
value. Attribute style specifies the style for an element.17.7 CSS styles
Activity 17.5: Fonts
Pair Work:
From you previous knowledge working with text in other applications, answer the following questions:
1. State four types of fonts that you know.
2. Is it possible to know the font used by looking at the text? If so how?17.7.1 Fonts
CSS has two types of font families:
1. Generic font families: a group of fonts that have a similar look and feel
e.g. Serif, Monospace, Arial etc.
2. A specific font family: e.g. Times New Roman, Courier New etc.
The font family in CSS is set by specifying the font-family property. Sometimes,
the browser may not be able to support the font specified. It is therefore wise to overload the font-family property with many font values separated by commas in order to create a fall back system i.e. its like telling the browser to display using the next font specified if the first cannot be found. If the name of the font-family has more than one words, it must appear between quote (“ ”) marks. The example below illustrates this strategy:
17.7.1.1 Font size
Use the font-size property to set the size of the font: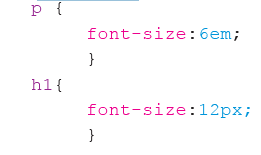
17.7.1.2 Font style
In CSS font-style property is used to display the font either in italics or not. The following example shows how this property can be used: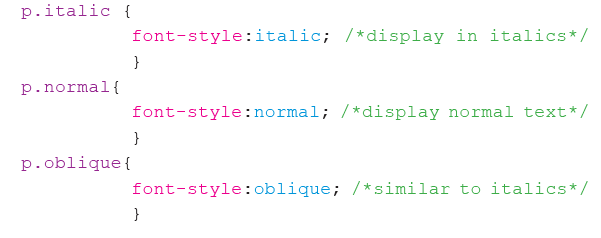
Activity 17.6: Fonts example
Open Notepad. Create the following and save it as myfonts.css in your folder.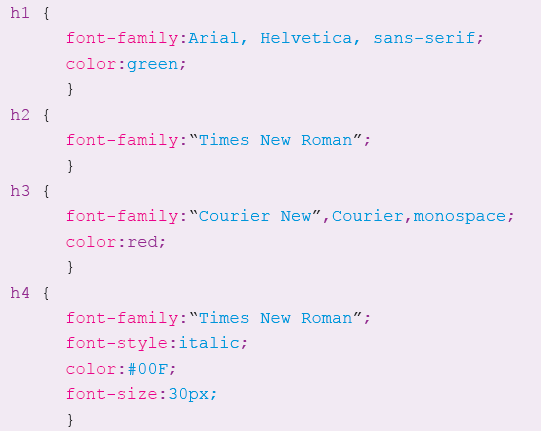
Now create a HTML file with the following code and save it as myfonts.html.
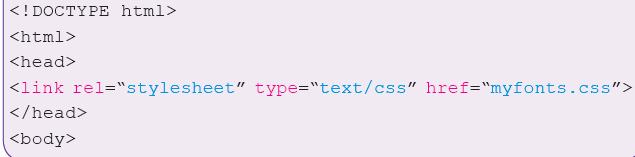
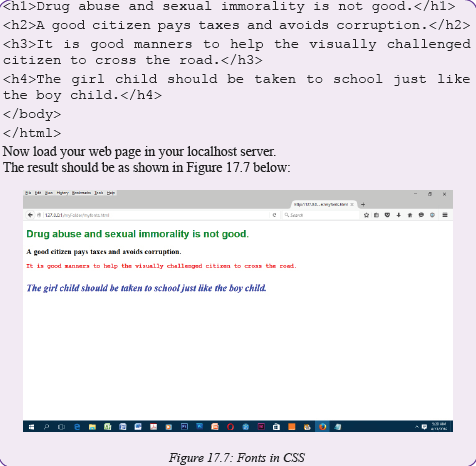
17.7.2 Margins
Activity 17.7: Margins
What is a margin? Why are margins important?
In CSS, margins are spaces that are generated around elements. The margin property is used to achieve this by specifying the size of the white space outside the border. We have the margin-top, margin left, margin right and marginbottom properties. The following example shows how you can apply this property to set the margind for a <p> element.
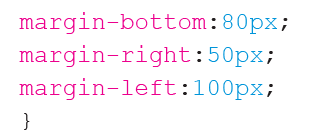
Activity 17.8: Margins example
Create the following HTML page and save it as myMargins.html. What type of CSS have we used? Load the HTML page in your server. What do you see?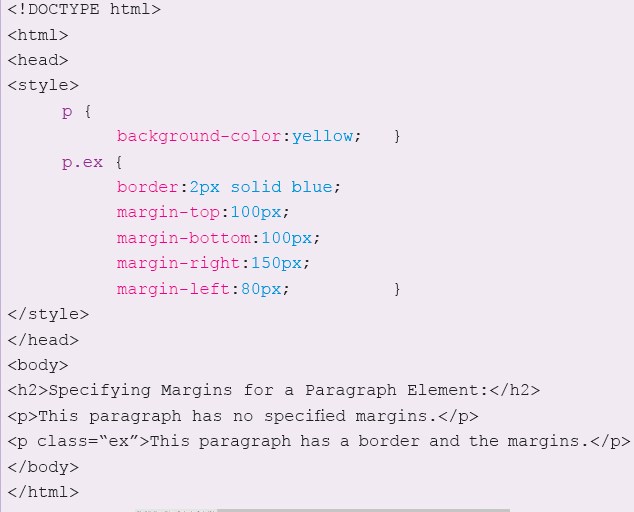
17.7.3 Display
Elements in HTML can be displayed either in block or inline value mode by default.
1. Block level element: an element that displays in block mode fills the entire
width of the screen by default and always starts on a new line e.g. the
<div>,<form>,<header>,<p>, <h1> etc.
2. Inline level element: An inline element does not start on a new line. It takes only the width that is required. Examples include <span>,<a> and <img>17.7.3.1 Hiding elements
Use the display:none; declaration to hide elements that you wish not to appear on the screen e.g.Activity 17.9: Hiding elements
Create the following HTML file and run it to see what happens: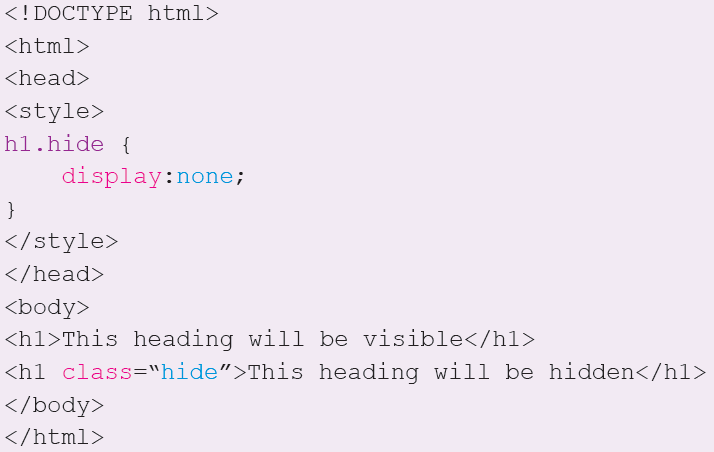
17.7.3.2 Overiding default display values
The <li> element creates a block list by default. However, it is possible to override it so that it can can be displayed as an inline element. One good example is when you create menus at the top of your page. Try out the following and load it in your browser:<!DOCTYPE html>
<html>
<head>
<style>
li {display: inline;
}
</style>
</head>
<body>
<p>Display a list of links as a horizontal menu:</p>
<ul>
<li><a href=“/myFolder/home.html”>Home</a></li>
<li><a href=“/myFolder/about.html”>About</a></li>
<li><a href=“/myFolder/Services.html”>Services</a></li>
</ul>
</body>
</html>If you do this correctly, you should get a web page like the one shown in Figure 17.9 below:

17.7.4 Background
The background of a web page, division or text is very important. It determines the general ambience of the web page to the visitor. There are many background properties. A few of them include:
1. background-color: used to set the background color of an element.
This means all <h1> elements (headings) will have a green background.
2. background-image: used to set an image as the background of an element. If the image is small, it repeats by default until it fills the space.

This will apply the image flower.gif to the body section of the web page. In case you do not want the image to repeat, then you can modify the CSS rule as follows:

3. background-attachment:this is used to fix an image in a particular position so that it does not scroll with the rest of the page.
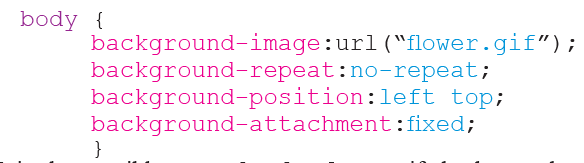
NB: It is also possible to use shorthand to specify background properties. This can be achieved as shown below:

Activity 17.10: Background example
Create the following HTML page and save it as background.html. Download an image of the flag of Rwanda and rename it as flag.jpg. Save both in myFolder.
NB: In the Notepad document background.html that you create, make sure the paragraphs starting with <p> are many i.e. 20 and above so as to fill and overflow the web page at runtime. If the web page is not full, scroll bars will not appear hence you will not be able to scroll. The result of this HTML code is as shown in Figure 17.10 below:
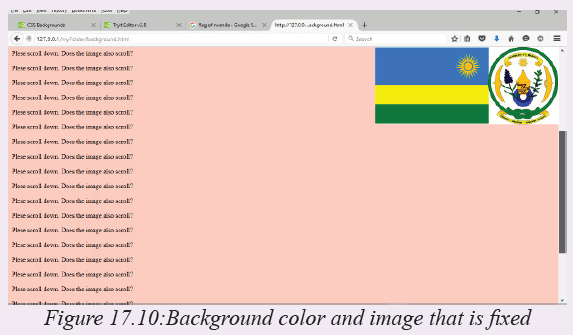
17.7.5 Positioning
The positioning properties allow you to position an element on the screen. It can help you to define which element will be behind another, or what should happen if the content of an element becomes too big.
You can position elements using the top, bottom, left, and right properties. You must set the position property before this values can work. They also work differently depending on the positioning method. There are four different positioning methods. This includes:17.7.5.1 Static Positioning
HTML elements have static positioning. A static positioned element follows the normal flow of a page. Static positioned elements are not affected by the top, bottom, left, and right properties of CSS.17.7.5.2 Fixed Positioning
An element with fixed position is positioned stationary relative to the browser window.It does not move even when the window is scrolled. A CSS code extract that fixes an element can take the following form:

NB: Some browsers like Internet Explorer support the fixed value only if a !DOCTYPE is specified.
17.7.5.3 Relative Positioning
A relative positioned element is positioned relative to its normal position.
Example
The content of relatively positioned elements can be moved and overlap other elements, but the reserved space for the element is still preserved in the normal flow.
Example
Relatively positioned elements are often used as container blocks for absolutely positioned elements.
Absolute Positioning
An absolute position element is positioned relative to the first parent element that has a position other than static. If no such element is found, the containing block is <html>:
Example
Absolutely positioned elements are removed from the normal flow. The document and other elements behave like the absolutely positioned element does not exist. Absolutely positioned elements can overlap other elements.
17.7.6 Floating
Activity 17.11: CSS float property
Fetch some water on a pail or basin. Float some bottletops on the water. try the
following:
1. Arrange them to float on a straight line relative to each other.
2. Push them to float to the left or right.
3. Is it easy to have the bottletops maintaining their order?
With CSS float, an element can be pushed to the left or right, allowing other elements
to wrap around it. Float is very often used for images, but it is also useful when
working with layouts.17.7.6.1 How Elements Float
Elements are floated horizontally; Either left or right on the page, not up or down. A floated element will move as far to the left or right as it can. Usually this means all the way to the left or right of the containing element. The elements after the floating element will flow around it. The elements before the floating element will not be affected. If an image is floated to the right, a following text flows around it, to the left:
Example
17.7.6.2 Floating Elements Next to Each Other
If you place several floating elements after each other, they will float next to each
other if there is room. Here we have made an image gallery using the float property:
Example
17.7.6.3 Turning off Float - Using Clear
Elements after the floating element will flow around it. To avoid this, use the clear property. The clear property specifies which sides of an element other floating elements are not allowed.
Add a text line into the image gallery, using the clear property:
Example
After learning all the above concepts, it is time for you to do the following Activity which will apply the concepts learned.
17.7.7 Padding
In CSS padding properties are used to create or generate space around content. This is seen as white space between the element content and the element border. When you set a padding value, it clears the area around the content within the inside of the margin. Figure 17.11 below represents this concept in a block diagram.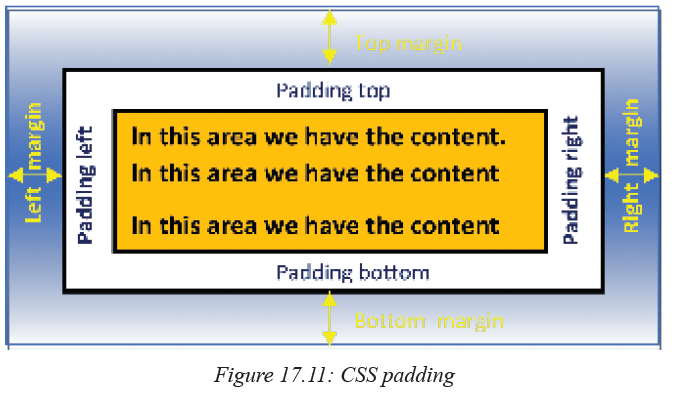
When specifying the padding, we use the following CSS properties:

When specifying the padding value associated to a particular property, you can use the following units:
a) length: you can specify this by using pixels (px), points (pt), Centimetres (cm) etc.
b) percentage(%): it specifies the padding space in terms of the width of the containing element.
c) inherit: specifies that the padding should be inherited from a parent element. For purposes of simplicity, we shall demonstrate how to use the pixels to specify the padding value.
Example: If you wish to specify the padding around the element p then do the following:
The above CSS code can be summarised as:
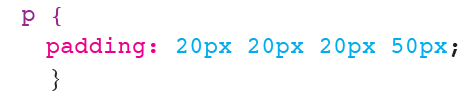
Activity 17.12: Setting the padding of an element
Open Notepad and type the following text exactly the way it is below: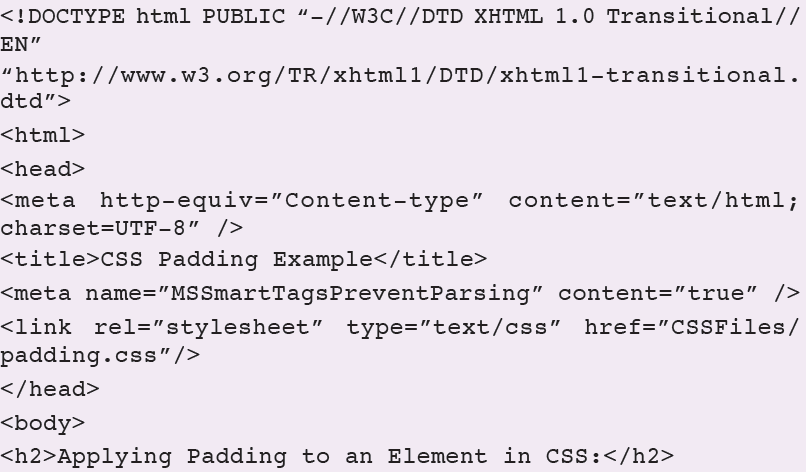

Save the text file as padding.html in a folder of your choice. In this case we have saved it in the htdocs folder of the WAMP server.
Now create the following CSS file too and save save it as padding.css in a folder of your choice. In this case, we saved ours in a folder called CSSFiles which is within htdocs folder.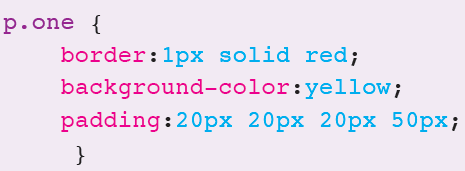
Now load your padding.html file in your web server. What do you see? You should get the following result as illustrated by Figure 17.12.

17.7.8 Borders
Using CSS, a border can be specified around an element like a paragraph. You specify
a border using the border-style property. The style of the border line can also be specified using various values as follows:
We can define different elements with different border styles as follows:
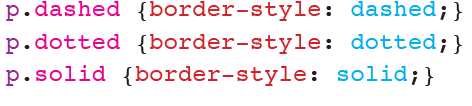
The results of such specifications in CSS would resemble the illustrations in Figure 17.13 below:
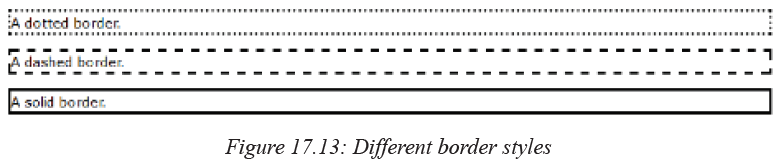
Activity 17.13: Setting the padding of an element
Open Notepad and type the following text exactly the way it is below then save the file as borders.html: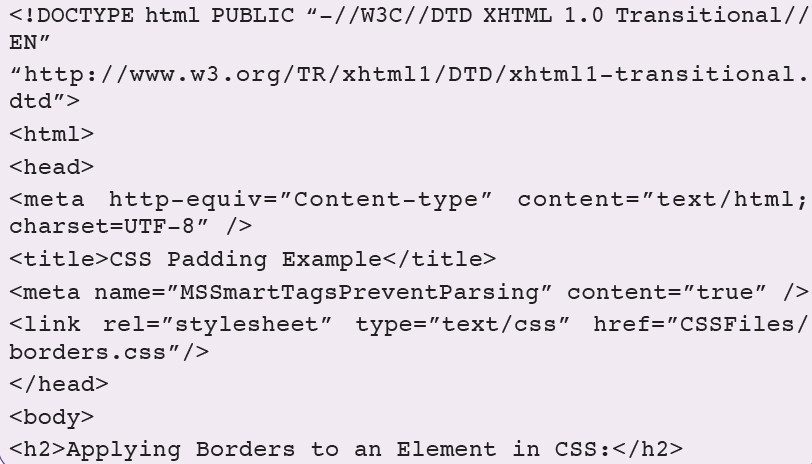
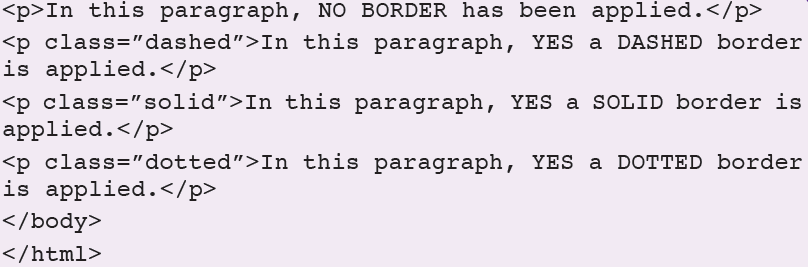
Now create the following in Notepad too and save it as borders.css.

After that load the HTML file (borders.html) in your browser. What do you see? Your results should be similar to what is shown in Fig. 17.14 below:

17.8 Creating a CSS page from Scratch
Activity 17.14: Creating CSS page example
Individual Work: Assuming you want to develop a CSS web page which contains information about resent discoveries in space science. You are told that the website should have a layout similar to Figure 17.15 below. Follow the steps provided to finally create your page.
1. Start by creating the following directory structure on the desktop or any other location in your computer. If you are using WAMP server, create it in the www folder because this is the default folder where Apache sever looks for websites.
Main Folder: myFolder
Subfolders within myFolder -- CSSFiles; Pictures.
2. Open a text editor and then create the following basic HTML page:<html>
<head>
<title> Respect for People with Special Needs </title>
</head>
<body>
</body>
</html>Save the page as index.html in the htdocs directory.
3. Looking at Figure 17.15, the width of the page is 760 pixels. We therefore, start by creating a container on the page which is this wide. Let the container be centered on the page. Nothing will float outside this width on the page. Between the <body> </body> tags insert container creating text as shown below:
A container called help-container has now been created by HTML on the page. Save and exit.
4. Create a new blank text file. Save it as rulestyles.css in the CSSFiles folder. Enter the following text in the file and save.
The # placed before the ID tells the browser that we are selecting a container ID that we have already defined. If we were selecting a class we would start with a (.) instead for example .help-stars{} if such a class did exist.
We use IDs to define elements that appear once on a page. We use classes for elements that appear many times on a page e.g. font formats.
5. To add background color to our container, we can do the following: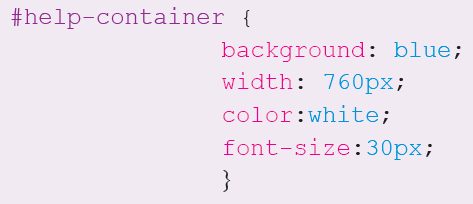
6. After saving (5) above, open index.html and modify it to look as below though do not include the line numbers.
<!DOCTYPE html PUBLIC “-//W3C//DTD XHTML 1.0 Transitional//EN”
“http://www.w3.org/TR/xhtml1/DTD/xhtml1-transitional.dtd”>
Explanations:
Line 3: it sets the parsing text format.
Line 5: it links the HTML file to the CSS file or style sheet.
Line 6: works the same as line 5. You can do without it if you have line 5.
Line 9: calls the CSS ID in the div container.
Line 10: applies the CSS ID formats on the text and div container.
7. Start your server. In the browser type: localhost/htdocs and then press the Enter key. You should be able to see the results as shown in Figure 17.16 below: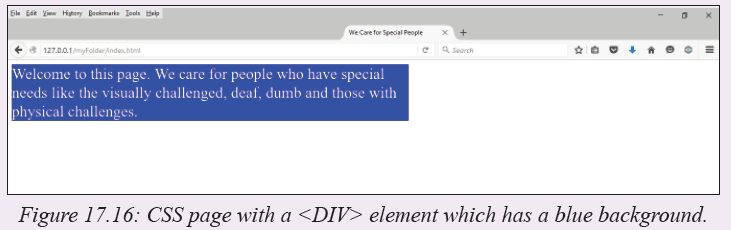
8. Notice the container seems to leave some white space on the left and top of the screen. We can be able to center it on the screen by using the margin =auto; property in the CSS file. Here we go:
Notice the comma between html and body: it stands for or

The first three lines forces the margin and padding to start from 0 since by default html usually leaves space on the left and top of the page as margins and padding. If you refresh your web page, you will notice that the container now starts from the very edge.
9. Good. We are now ready to add the various divisions of the page by dividing the “help-container” in the HTML file. We want to create the layout in Figure 17.1. So we add new divs each with its own unique id. Here we go: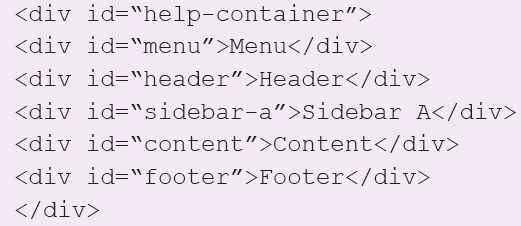
If you refresh you page, it should now look as the one in Figure 17.17. Notice that the divs are arranged one above another as is the normal document flow. Using CSS we are going to specify a different layout. We achieve this by going to our CSS style sheet, removing the background color from the main container and specifying new values for all our new divs separately.
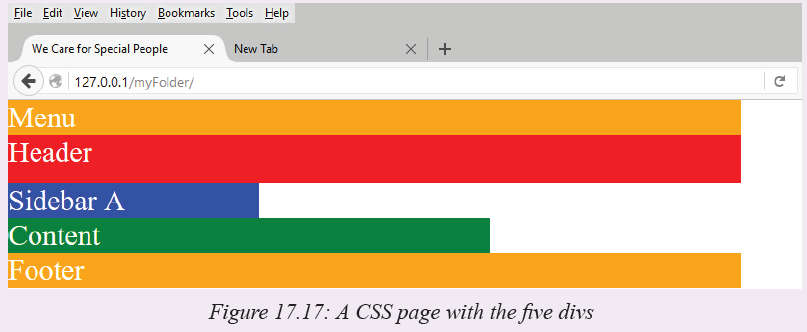
NB: We deleted the text in the help-container div. We also opened the galaxy.css and specified a color for each new div we created in order to get what you see in Figure 17.10.
10. Now, edit rulestyles.css to look as below. We wish to float some of the <DIV> elements to the right or left depending on our design:
Let us try to explain some of the code on the fly:
• Lines 6,21,26,31: they set the width of the div.
• Lines 11,16: sets the height of the div. Where no height is specified, the div will expand with text.
• Line 19: tells the sidebar-a div to float to the right.
• Line 24: tells the content div to float to the left.
Save the changes and refresh your page. Your page should now look like Figure 17.18 below: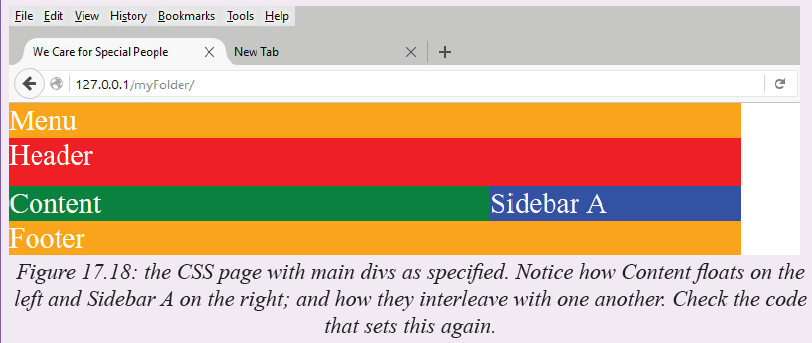
11. This layout looks okay for now as long as you have not added text. Upon adding some text, some misalignments will start to be seen. For example, let us add the following text in the content area:
<div id=“content”>How to Help Challenged Citizens
• Let all people respect the visually challenged, deaf and dumb without discrimination.
• For citizens that don’t have limbs, support them physically when required and financially to help them purchase prosthetics.
• The education system should provide special books written in Braille to support the visually challenged.
</div>
Notice what happens to the page layout now as captured in Figure 17.19.
Notice that the text in the content area does not push the footer down with it as we expect. This is because any floated element in CSS cannot push the elements below it. We need to introduce the “clear” property in the footer which will make sure that it is pushed down as the elements above it expand. This is how you will do it: open your css style sheet then make sure that the code under footer looks as follows:
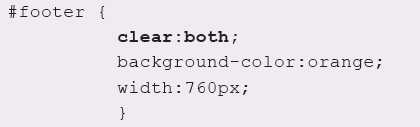
The clear property will have the effect on the footer as captured in Figure 17.20. refresh your page to see this:

12. In some browsers, the boundary between the Content and the Sidebar A may not be as clearly defined as is shown in Figure 17.7. Instead, the text of the content may flow into the white space under the blue Sidebar A. If this happens, then you may need a different means of specifying the extent of the right margin of the Content relative to the right margin of the container.
You will need to use the “margin-right” property i.e.#content {
margin-right:260px;
background-color:green;
}In so doing, you are telling the browser that the right margin of the content div is set at 260px from the right margin of the main container (galaxy-container). Hence, the container region cannot overlap with the sidebar that has been floated to the right.
You can now use the text formatting commands to format the text in each div. We need to do the following:(a) To add a menu to the menu div.
(b) To add a title in the Header div.
(c) To add copyright information in the footer.
13. Add the following in the header section:<div id=“header”>
<h2>Let Us Learn Sign Language </h2>
</div>Refresh your page to see the new header as shown in Figure 17.21.
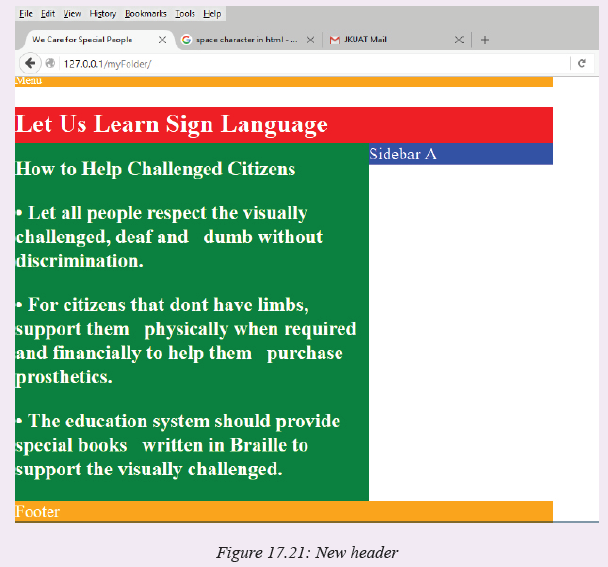
Notice the space between the menu and the header. This is caused by the default padding and margins. Open your style sheet file and strip these default values:
h2 {
margin:0;
padding:0;
}If you do it correctly the white space will disappear.
14. To add a menu we use the unnumbered list. Edit the text in the menu div section as follows:1. <div id=”menu”>
2. <ul>
3. <li><a href=“#”>Home</a></li>
4. <li><a href=“#”>About</a></li>
5. <li><a href=“#”>Our Services</a></li>
6. <li><a href=“#”>Contacts</a></li>
7. </ul>
</div>Line 2: the <ul> stands for unnumbered list. In this instance, it acts as a container for the menu items.
Line 3-6: the <li> stands for list values. Each li creates a unique identifier for the menu items. Each menu item should ideally be linked to a page (hence the href property).
If you refresh your page now, yo will see your menu having bullets one item after the next. We don’t want a bulleted list. We want a horizontal menu. We therefore move to step 15 below.
15. Open the CSS style sheet and edit #menu to become menu ul and menu li:
1. #menu ul {
2. list-style:none;
3. margin:0;
4. padding:0;
5. height:35px
6. }
7. #menu li {
8. float:left;
9. margin:0 1.00em;
10. }Explanations:
Line 1: points to the unnumbered list menu (ul).
Line 2: specifies that the list has no numbering style.
Line 7: points to the menu list items.
Line 8: floats the menu list items to the left and arranges them horizontally one after the next.
Line 9: specifies the spaces between menu items.
Save your work and refresh your page. It should now look like Figure 17.22 below:
16. Let us now format the text on our page. Let us start by creating a heading for our content. The heading is “How to Help Challenged Citizens”. We want to format it with the <h2> tag:
<div id=“content”>
<p><h2>How To Help Challenged Citizens</p></h2>
- Let all the people respect the visually challenged, deaf and dumb citizens.
- For citizens that don’t have limbs, support them physically when required and financially to help them purchase prosthetic limbs.
- The education system should provide special books written in Braille to support the visually challenged.
</div>
Do not forget to add the following in the style sheet file:
h3 {
margin:0;
padding:0;}
p {
margin:0;
padding:0;
}
17. Let us display the image of a sign languahe in the sidebar.
Download a .jpg image of one of sign language and save it in the Pictures folder as galaxy.jpg. To display this in the sidebar div add edit the code in the sidebar-a section of the style sheet:
#sidebar-a {
float:right;
background-image:url(../Pictures/signlanguage.jpeg);
width:260px;
height:237px;
}
Carefully specify the dimensions of the image to fit the sidebar space. When you refresh your page, you now have the following as shown in Figure 17.23. Notice we have deleted some of te text in the content area. Also, notice the image causes the sidebar to flow downwards so that it can fit according to the specifications that you gave in the CSS file.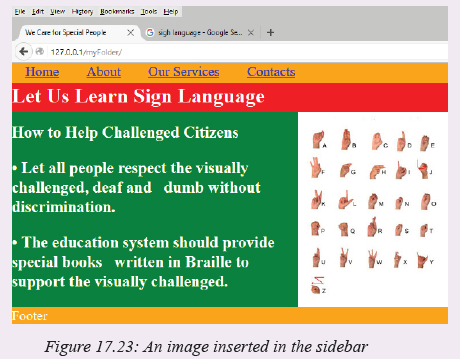
NB: Check for the code of this Activity in the code section below.


Activity 17.15: CSS assignment
Create a CSS web page for your school. Let it have a layout like the one in Activity
17.6 but you can choose to have a different layout if you so wish.Assessment Exercise 17.1
Fill in the blanks in the following statements:
(a) Using the ___________ element allows authors to use external style sheets in
their pages.
(b) To apply a CSS rule to more than one element at a time, separate the element
names with a_________.
(c) Pixels are a
(d) The __________pseudo class is activated when the user moves the mouse cursor
over the specified element.
(e) Setting the overflow property to_______ provides a mechanism for containing
inner content without compromising specified box dimensions.
(f) While ___________ is a generic in-line element that applies no inherent
formatting and ____________is a generic block-level element that applies no
inherent formatting.
(g) Setting property background-repeat to ____________tiles the specified
background image vertically.
(i) The property allows you to indent the first line of text in an element.
(j) Three _______ components of the box model are the________, ________ and_______.
Unit Test 17
1. Write a CSS rule that makes all text in a div to be of font color green.
2. Write a CSS rule that places a background image in a div.
3. Write a CSS rule that gives all h1 and h2 elements a padding of 0.5 ems, and a margin of 0.5 ems.
4. Create a CSS web page displaying the flag of Rwanda floating to the left. Write the National anthem of Rwanda and float it to the right of the flag.
5. Using HTML and CSS create a static website for your school that has the following features:
(a) The school logo at the top center of the page.
(b) The school motto just below the logo, also centered on the page.
(c) A menu bar with the following commands: Home, About, Subjects, Clubs, Games Teams.
(d) Create three sections one on top of the other below the menu. In the first section, display a picture of your school.
(e) In the second section, describe the location of your school and give directions on how a visitor can trace their way to the school.
(f) In the lowest section, give the contact information for the school e.g. Telephone, address etc.
(g) At the bottom of the page, include the copyright information.
NB: Specify the font styles, color and background color as you wish. However make sure that your colors give an attractive interface. A good method of selecting colors is to use the color scheme of your school if it exists.Glossary
Algorithm: A logical step-by-step procedure for solving a problem in terms of instructions to be executed, and the order in which the instructions are to be executed.
Arithmetic and Logic Unit (ALU): A part of the central processing unit that performs computations and makes comparisons as instructed.
Array: An array is a group of contiguous memory locations having identified by the same name for storing data the same type.
Artificial intelligence (AI): A field of computer technology in which researchers and electronic product developers concentrate on developing computers that mimic human intelligence.
Assignment: In programming context, assignment is an operation that causes operand
on the left side of the assignment operator to have its value changed to the value on the right.BIOS: This is an abbreviation for Basic Input Output System, a read-only firmware that contains the basic instruction set for booting the computer:
Bit: Bit is a short form of binary digits referring to a single digit 0 or 1 used to represent any data in digital computers.
Boolean data type: Data type used to represent two values: true (1) or false (0).
Boolean logic: A form of algebra in which all values are reduced to either true or false
Boot Order: Sequence in which a computer should check available storage devices
for the operating system’s boot files.Byte: A group of bits used to store a single character. A byte usually consists of seven or eight bits, which the computer handles as a unit. Cascading style sheet: Styles that define how HTML elements and markup should be displayed by the browser.
Computer hardware: The physical computer equipment one can see and touch. Such equipment includes; the system unit, input devices, storage devices and output devices.
Computer program: A set of instructions that directs the computer on the tasks to perform and how to perform them. These instructions are specially written using computer programming languages.
Computer system: A computer system refers not only to the physically attached
devices to the computer, but also to software and the user.Conditional logic: This is a Boolean statement formed by combining two statements or facts using conditional rules. Control structure: Refers to a statement or block of code that determines the flow or order in which other program statements are executed.
Control unit: The part of the CPU that interprets instructions and controls all the operations in a computer system. The control unit monitors on the input, storage, the arithmetic and logic operations, and the output operations to have the instructions carried out.
Declaration: In programming context, declaration refers to reserving memory location by specifying the type of data to be stored.
Device Driver: utility program that acts as an interface between a hardware device and the operating system.
Disk formatting: refers the process of preparing a new disk for use by imprinting sectors and tracks on the surface of the disk so that the operating system can recognise and make it accessible.
Drive: Devices used to read and/or write (store) data on a storage media. Electronic mail (e-mail): A type of mail system that uses computers and telecommunication facilities to transmit messages.
Electrostatic discharge (ESD): Refers to flow of static electricity when two triboelectric objects come into contact.
Ergonomics: Refers to applied science of equipment design intended to optimize productivity by minimizing discomfort and fatigue.
Ethics: Refers to a set of moral principles that govern behaviour of an individual
or group.Expression: Refers to a sequence of operators and operands that specifies relational
or mathematical computation.Flowchart: Program design tool represent an algorithm graphically using a set of
standard symbols.Function prototypes: This is a statement in C or C++ programming used to declare a function without implementing its body.
Goto: This is a form of jump statement used to transfer control to lines of code identified using labels.
Hard copy: Hard copy refers to the tangible output produced mostly on a piece of paper by devices such as printers and plotters.
Hard disk: Also referred to as a hard drive or a winchester disk, is a sealed unit in which are shiny, metallic disk platters and read/write heads that read and recorddata on the disks.
HMDI: This is an abbreviation for High Definition Multimedia Interface, an interface used for transferring compressed and uncompressed digital audio or video data:
Hypertext Markup Language (HTML): This a standard web development language used for describing the structure of a web document.
Infinite loop: This is an endless loop that may be caused by boolean condition that
is never returns false.
Input/output (I/O) devices: Devices used for entering data to be processed and for
reporting the results of processing.Input: A collection of raw data at the start of information processing cycle.
Integrated circuits: Thousands of small circuits etched on a silicon chip. As these circuits are made more and more compact, they are called Large Scale Integrated (LSI) and Very Large Scale Integrated (VLSI) circuits.
Interpreter: A language processor that translates the source program statementby- statement allowing the CPU to execute one line before translating the next.
Logic gate: These are the basic building blocks of electronic circuits having one or more inputs but returning only one output in digital systems.
Logic Programming: Rule-based nonprocedural programming paradigm that focuses on use of symbolic logic or predicate calculus.
Looping: In programming context, looping refers to repeated execution of a block of statements until a boolean condition returns false.
Microcomputer: The name computer with a microprocessor as its brain. A microcomputer can perform input, processing, storage and retrieval, and output operations rapidly, accurately, automatically, and economically despite its relatively small physical size.
Microprocessor: A complete central processing unit of a computer built silicon chip.
Minicomputer: A computer having a smaller capacity for both primary and secondary storage than medium size and large size mainframe computers.
Modular Programming: Programming approach in which complex program is broken down into smaller components known as modules, procedures or functions.
Networks: Communication systems that connect computers, terminals, and other
electronic office equipment for the purpose of efficient communication and sharing of resources.Nibble: This is a sequence of four bits Half a byte, which is usually a grouping of 4 bits is called a nibble.
Object-oriented Programming (OOP): Programming paradigm in which programming procedures (methods) are combined with data (state) to form objects that are organized into classes.Ones complement: Refers to bit-by-bit negation of a binary number. It is usually considered as a step to finding negative binary number of decimal numbers.
Operating system: This is a complex program that is responsible for controlling processing operations in a computer system, Examples of common Operating
Systems are: Microsoft Windows, UNIX, Linux and Mac OS. Output: Useful information available at the end of the information processing cycle.
Parameter passing: Refers to exchange of data between two functions. In other words
parameter passing serves as hence serving as the communication mechanism between two functions.Peripheral devices: Refers to devices that are connected to the system unit called through ports.
Programming Paradigm: Refers to pattern, theory or systems of ideas that used to guide development of computer programs.
Pseudocode: Refers to structured statements used to express an algorithm input, processing and output logic of a program.
Random-Access Memory (RAM): A type of main memory that holds data and information temporarily before and after processing.
Read-Only Memory (ROM): This is a type of main memory that stores data or instructions permanently or semi permanently.
Repetitive Strain Injuries (RSI): This is a health related problem characterized by eye strain, headache and dizziness caused by prolonged use of computers.
Reserved words: These are keywords that have a special meaning in a language and can only be used for the intended purpose.
Robotics: Study of robots controlled by computer to perform tasks ordinarily done
by human beings.Semiconductor: Materials that are neither bad conductors nor good conductors such as silicon on which integrated and support circuits are etched. It is used for developing microprocessors, solid state memory, RAM and other electronic components.
Source code: Refers to a set of instructions or statements written by a programmer
that are not yet translated into machine-readable form.Supercomputer: The largest, fastest, and most expensive type of computer. A supercomputer can perform hundreds of millions of complex scientific calculations in a second.
System unit: This is the main part of most desktop computers within which are components like the processor, hard disk drive and main memory
Utility program: A collection of instructions designed to make common processing operations run smoothly.
Variable: In programming context, a variable correspond to location in memory in which a value required by a program can be stored.
Web server: A program that runs on a computer and is responsible for replying to web browser requests for resources such as web pages.
World Wide Web: Refers to hypertext interactive, cross-platform, and graphical information repository known as website that runs over the Internet.