Main content blocks
Section outline
-
The picture below shows a family watching a cartoon programme in a
Television at their home.1. Study the chat among the family members carefully.

2. How would you help Nganji reach his dream as advised by her brother?
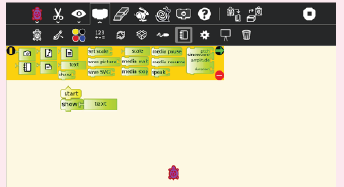
6.1 Turtle Art for displaying thingsActivity 6.1 Displaying text
1. Open turtle art.
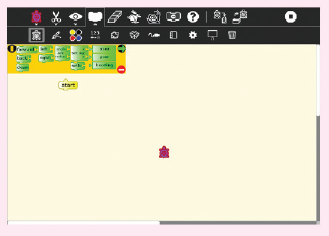
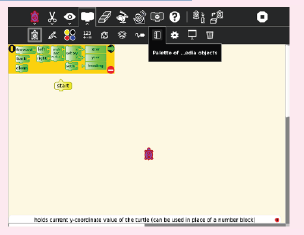
2. Click on pallete of media objects.
3. Click on show command.
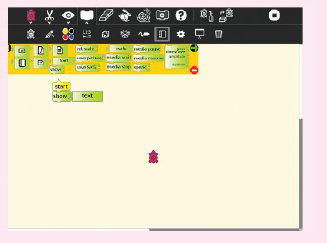
4. Replace the word text by typing “This is a green apple”.

5. Click on show to display this word.
To display text and numbers use the command block show then type the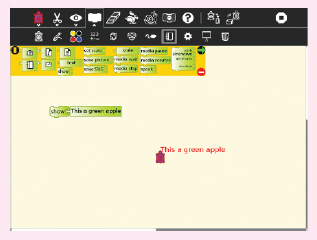
intended text. When you run the command, turtle prints values in thestatus block and displays it in the window.
Activity 6.2 Displaying numbers
1. Open turtle art.2. Go to palette of media objects drag & drop show command.
3. Replace the word “text” with a number, example here type “8”.
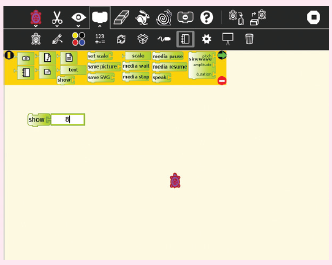
4. Click on show to display the number.
Activity 6.3 Displaying images
1. Click on palette of media objects.
2. Drag and drop the show command.
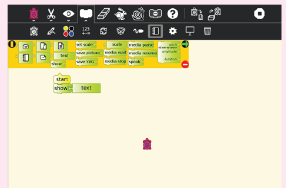
3. Drag and drop the journal icon over the word “text”.

4. Click on the image icon to choose the image in the journal.
5. Select the image by clicking on it.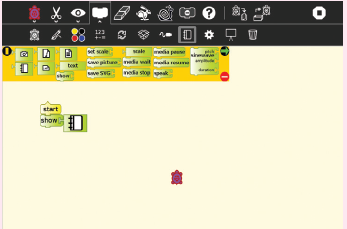
6. Click on show block to display the image
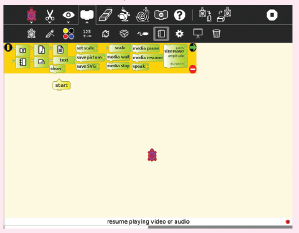
Activity 6.4 Displaying audio
1. Go to palette of media objects, click on media icon (sugar journal
audio object).
2. Drag and drop the command “show”
3. Drag and drop the audio icon over the word text.
4. Click on audio icon to choose the audio from journal, select and
click on the audio you want.5. Click on show to listen to the audio.
We can also use show block to play sound from our music or sound files.
Drawing regular polygons
1. Open turtle art2. Put the following blocks together (screenshot)
3. Test your programs by clicking on the commands
Activity 6.6 Drawing cuboid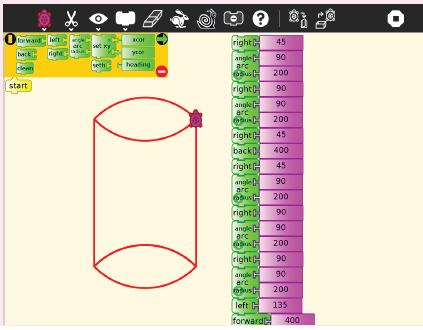
1. What is the name of this shape? What are its characteristics?
2. Discuss in pairs and draw it using turtle art. Which set of
instructions did you follow? Write them down in your notebook.3. What shape will this set of commands make? Try and see.
Activity 6.7 Drawing a cube
1. Open turtle art.2. Put the following blocks together.

3. Test your program by clicking on the commands.
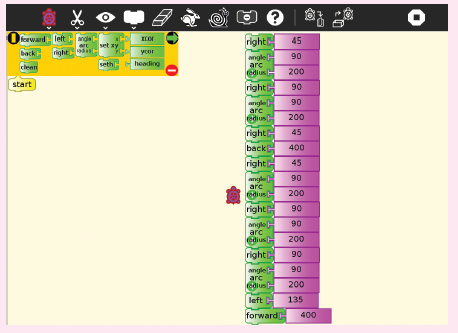
Activity 6.8: Drawing a circle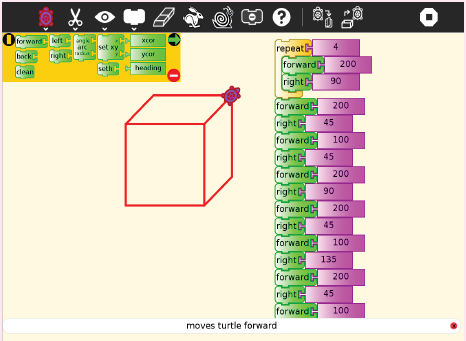
1. Open turtle art.2. Put the following blocks together (screenshot).

3. Test your programs by clicking on the commands.
Self –Test 6.1
1. We can use show blocks to display four things. Name them.
2. Distinguish between a regular and an irregular polygon.
3. Which of these shapes are regular polygons?
Cube, cuboid, circle, oval, triangle, rectangle, square,
parallelogram, rhombus
4. Draw vertical, horizontal and oblique lines using turtle art
commands.
5. Display some sound from your XO – laptop.
6. Construct and produce different geometric shapes (rectangle,triangle, cube, circle) using turtle instructions.
6.2 Programming animations and computing inscratch
Activity 6.9 Animation
Take time and familiarise yourself with the main features of the
scratch screen or the scratch Home Page. Recall what you learnt
in Primary 4 and 5 under Scratch. Do the following individually in your
XO-laptop:
1. Open scratch activity, click on the cat in the Sprite List.
2. Drag out “move 10 steps” block.
3. Double click on the block to see the cat move.
4. Add a control block, for example “When space key pressed”
In Scratch, Sprites can move around, can be activated or they can beobjects that stay still.
Scratch project
In this project, you will create a dancing Sprite. What stepswill you follow? To have an idea, try out the activity 6.10.
Activity 6.10 A dancing sprite
1. Open scratch program in your XO-laptop.
2. Select ‘New’ from the Menu to start a new project.
3. Delete the cat sprite.
4. Select the suitable background by clicking on the “stage icon” located
under the display window in the third column of the scratch screen.
5. Click on background in the second column and click on import.
6. Choose an appropriate background for the dancing sequence youare about to make by clicking on indoors and select spotlight stage.
Remember!
A Sprite cannot do anything by itself. You have to give instructionsfor it to follow.
Activity 6.11 Choosing a sprite
1. Click on “choose new sprite from file”.
2. Click on people folder then click ok.
3. Click on the 1st sprite of cassy-dancing then click ok.
4. Click on costume tab in the second column then click on
import.
5. Click on the second sprite of cassy dancing, then click ok.
6. Go back to costume tab click on import and choose the
third sprite called cassy dancing.
7. Repeat step 6 until you finish all sprites of cassy dancing asshown.
Activity 6.12 Animating
1. Go to script box and select ‘when clicked’ drag and drop it to thescript area.
2. Again from the control folder drag the command ‘forever’.
This command will let the dance program run continuously until
the user selects the red circle (Stop icon) located at the top rightside of the Stage screen.
3. Next, select the ‘Wait command’, which the user should reduce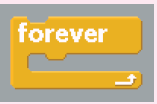
in duration from 1 second to 0.5 seconds - otherwise the Sprite
will be dancing slowly.
4. Go to Looks folder, select ‘Next Costume’ and place it withinthe Forever command block as shown below.
5. In order to add sound, go to Sound tab and click on “Sounds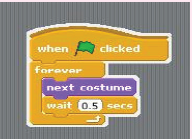
box” and click on import.
6. Click on music loops then click ok.
7. Select hip hop music then click ok.
8. Go to script box, click on sound and drag the command playsound hip hop until done to the script area and drop.

9. Run the program by clicking on the commands.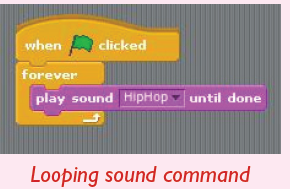
10. Finally, add the following command to introduce a disco lighteffect to the stage.
Your screen after inputting all the instructions should look like
this
Activity 6.13 Scratch projects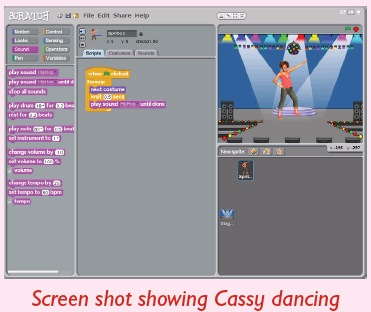
In this activity, you will follow the steps in activity. 6.12 to come up
with your own animation.
1. Start a new program with a different background, different music
and three dancing sprites.
2. Draw a few Rwandan traditional dancers in different poses using
paint editor, stagger their appearances on stage.
3. Locate some appropriate music and make your very own Riverdance scene using the above
Activity 6.14 Understanding X and Y co-ordinates
Familiarise yourself with xy co-ordinates as follows:
1. Switch on your XO laptop. Open scratch Activity.
2. Go to the stage, followed by background then select ‘Import’
icon.
3. Choose the xy-grid - the last of the screen options in the
background library.
4. Move the sprite around in order to come to an appreciation of
coordinates.
5. Put the cursor on the sprite, then check the horizontal bar at the
bottom right corner. Write down the ‘x’ and ‘y’ coordinates.
6. Repeat step 5 several times. Which ‘x’ and ‘y’ coordinates did youcome up with?
X and y coordinates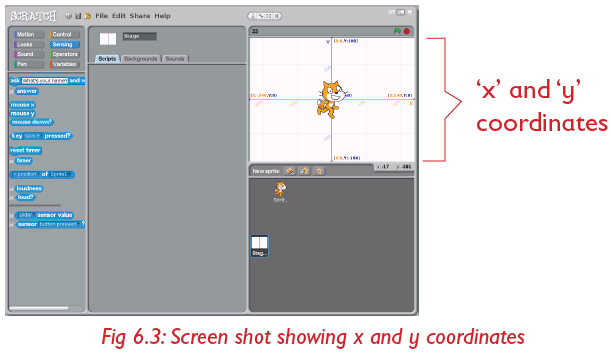
‘X’ and ‘Y’ coordinates are respectively the horizontal (x) and verticaladdresses of any pixel or addressable point on a computer display
screen.
With motion commands, inserting co-ordinate values can control the
magnitude and direction of the sprite’s movement. For example,
• A negative ‘x’ value will move the sprite horizontally left.
• A positive‘x’ value will move the sprite horizontally right.
• A negative ‘y’ value will move the sprite vertically down.• A positive‘y’ value will move the sprite vertically up.
Working with a stage
Activity 6.15 Selecting a background
1. Open scratch activity.2. Click on Stage.

3. Go to the “background” option and select “import” option
4. Go to the folder labelled ‘Indoors’ and select ‘bedroom1’. Does
your screen look like this?
You will notice that we have a problem - the cat looks as if it is walking on
air! Next is to come up with a solution of how to code the Script in order to
make the cat move across the floor of the room.
We therefore have to put in some extra command code that will ensure thatthe cat walks along the floor.
5. First step is to make the Sprite (cat) become the active element
instead of the Background, so ‘double Click’ on the sprite (cat) to
move back to the Script of the Sprite.
6. Move the Sprite to the bottom left-hand corner of the stage screenas shown below.
7. Return to the “bedroom 1” background by clicking on the stage
icon.
8. Move the cat to the top right hand corner of the stage.
The ‘x’ and ‘y’ coordinates for the cat will appear under the faded spriteicon located at the top right hand side of the script area.
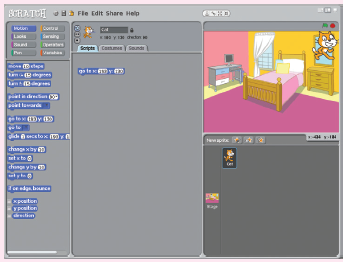
9. Go to the ‘Motion’ folder of the ‘Command’ panel.
Find the ‘Go to X: Y: block’
10. Move this block into the Script area block. Fill in the ‘x’ and ‘y’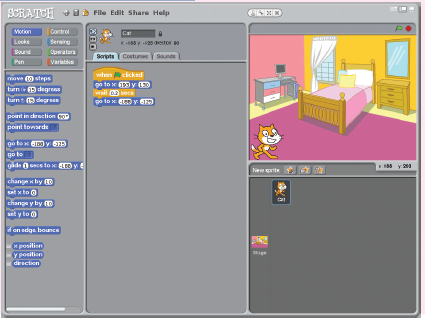
coordinates shown when you point the arrow head on the cat.
11. Go to command panel, click on control, pick the ‘when flag is clicked
block . Drag it into the script area and
place it on top of the block in step 10.
12. Return the sprite to the bottom left of the stage panel and double
click on it.
13. Click the Green Flag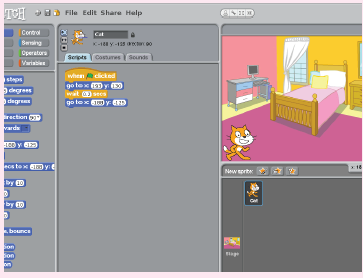
 icon to start the program. What happens?
How to make the cat jump up and down
Activity 6.16 Moving a sprite
1. Move the cat onto the bed. Place the cursor on the cat then notethe ‘x’ and ‘y’ co-ordinates of this position.
2. Now, move the cat to the highest position of jumping. Place the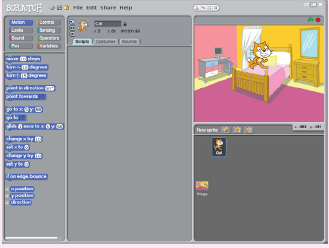
cursor onto the cat and record the ‘x’ and ‘y’ co-ordinates of thisposition.
3. Go to the Motion folder of the Command panel and find the ‘Glide
1 secs to X: Y block’.
4. Move this block into the Script area and input the ‘x’ and ‘y’co-ordinates of the position of the cat at the bed level.
5. Repeat steps 4 for the top position of the cat when it jumps.
6. Now, go to control panel and drag ‘when clicked’, ‘wait for 1 sec’
and ‘repeat 10 times’ blocks to the script area.
7. Go to sound panel choose ‘meow’ sound from import option and
bring the block to the script area.
8. Click the Green Flag icon to start the program. Does your
screen look like this?
9. Save your program file with the name ‘Cat Jumps’ by selecting
‘Save As’ in the File pull-down menu located at the top of the
Scratch screen, that is: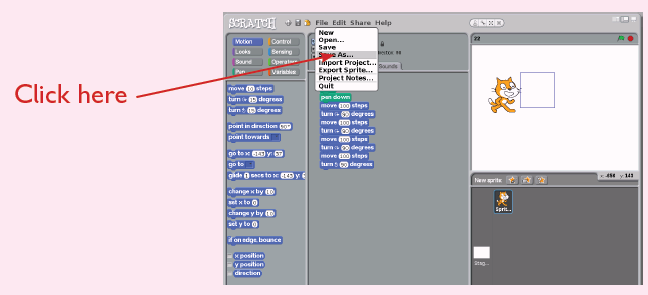
Your file will be saved in the scratch default folder located in yourXO-laptop.
Further Activity
1. Place some further blocks of code in the program that will allow
the cat to jump off the bed and walk a few steps.
2. Make the cat change colour for each step of the remainder of his
walk in question 1 above.
3. Replace the background with a new image from the BackgroundLibrary.
Activity 6.17 Creating an animation from a story
Step 1: Create a story line
The first step to create an animation is to have an idea. It could be
from a joke you’ve heard or a story you recently read. Or better yet, it
could be entirely your own. An example of a simple story line has been
created for you as shown below:
“Mr. Meow was hungry and needed to find the Donut Man, who is known
to carry numerous donuts. Fortunately, Mr. Meow found the Donut Man
immediately and got what he wanted. He ate and ate and ate! When Mr.Meow was full, he let out a happy sigh and returned home.”
Step 2: Create Sprites
In the story above, we can see that there are “three sprites” we need
to have. Can you name them? They are:
• Mr. Meow
• The Donut Man
• The Donut
The SPRITES are things or characters shown in the animation. It is very
easy and fun to create your own sprite. Let’s start by making them.First, let’s create the Donut Man.
Click the (“Create new sprite”) button to open the Paint Editor.
The paint editor allows you to create the default costume of the new Sprite.
Create the Donut Man who proudly wears three donuts round his waist
as a belt. Do this using lines, circles, rectangles, colours and other toolsfound in the paint editor.

In the same way, create a Donut Sprite. Click
 to open the Paint
Editor again. Use the circle drawing tool and make sure that you
select the hallow circle instead of solid circle to create the donut shape.Then use paint bucket to fill the inside of the donut.
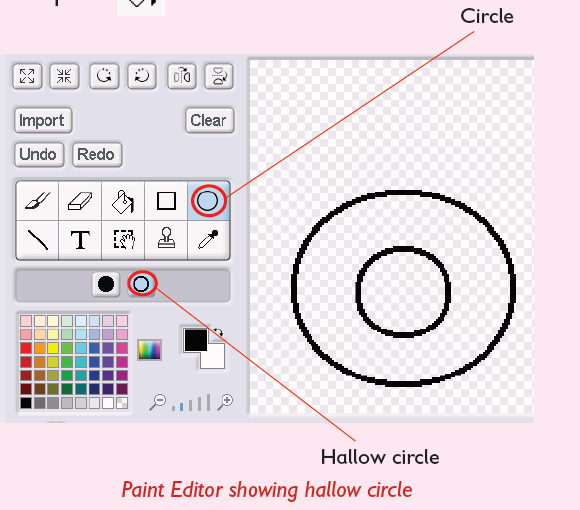
When you have created both new Sprites, that is, Donut Man and Donut,your Scratch Screen should look something like this:
When you have created both
new Sprites, that is, Donut Man
and a Donut, your Scratch
Screen should look something
like this:
You will then do the followingwith the sprites:
Scratch screen after creating Donut andDonut man
Table 6.1 The various sprites and their roles
Step 3: Creating Scripts from the Story Line Sprites
Now that we have all sprites we need, the next step is to get them to
work. To make them do anything meaningful, we need to give them their
scripts. To design scripts for each sprite, we need to review our simple
story line:
“Mr. Meow was hungry and needed to find the Donut Man, who is known to
carry many donuts. Fortunately, Mr. Meow found the Donut Man immediately
and got what he wanted. Mr. Meow ate, ate and ate. When Mr. Meow was full,he let out a happy sign and returned home.”
NOTE: Do not worry if the Scripts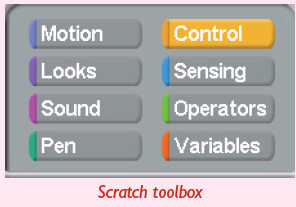
in Scratch Language do not make
sense to you; we will explain them
very shortly while we build Mr.
Meow’s scripts. Let’s do it!
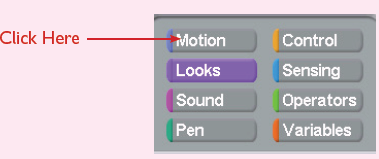
Now we need to use the Scratch
“Tool Box”. There are eight
categories of tools but we will only
look at five categories that is, Motion, Looks, Sound, Control, andSensing.
Remember!
Most of the tools are very self-explanatory and you can RIGHT CLICK
a tool and click on help to see a brief description about thattool as shown below
Step 4: Create a Simple Scene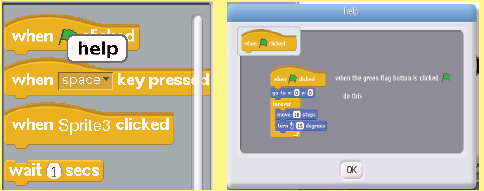
To create a scene, we change the costume of “Stage”. We will add two
houses and a plate to the “Stage”. To do so, double-click the Stage
icon to select. This will take you to “background 1”, hit “Edit” button.The paint editor window appears as shown below.
Change the costume by adding the two houses and a plate. When done,
hit “OK” button. Does your screen look like this?
Step 5: Adding Simple Movement Scripts to Sprites
We are going to show you how these tools work by first building Mr.
Meow’s scripts. “Double Click” Mr. Meow from the Sprites area, thenclick “Scripts” tab. Do you see a screen like this?
From the Tool Box, click the “Control” button. From the Control Script
Snippets, click and drag ‘when clicked’ to the “Scripts tab area”. Yourscreen should look like this.
Then, build a really simple script so that Mr. Meow follow go to his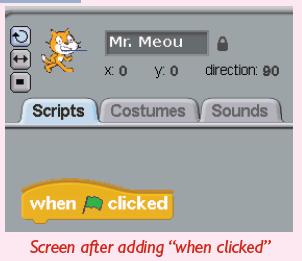
house when the green flag is clicked. Here are the steps to build this;
Activity 6.18 Moving the sprite around the stage
1. Move the three sprites as shown below. The x-axis and y-axis
values will be updated accordingly. Note them down for eachsprite.
2. Click “Motion” button in Tool Box Selection
3. From Motion Script Snippets, you would notice that the ‘x’-axis
and ‘y’-axis values are already filled in. See the figure below.
4. Click “Looks” button in Tool Box Selection, then ‘switch tocostume’ as shown below.
5. You are now ready to test this simple scripts. Drag Mr. Meow to
anywhere in the Stage and then click the Green Start Flag. You
would see Mr. Meow gliding back to his house.
6. In the same way, create the following scripts for the Donut Manand the Donut itself.
7. Click the green
 flag and see what happens.
Step 6: Saving the Project
To save your completed work: Click on ‘File’, and then ‘Save as’. Give the
project a title. In the “About this Project” section, fill in details about
the project such as what it does, what buttons activate the controls and
any other information you wish to include.
Step 7: Testing the project
Now you can test this very simple animation by first moving the sprites
around in the Stage and clicking the Green Start Flag button.
Describe what happens.
Further Activity
1. Make a Playground scene complete with see-saw and swing.
2. Draw in two children (boy and girl) and position them at the end
of the see-saw.3. Give the impression of the see-saw moving.
Scratch with Mathematics (Simple Computing using scratch)
As mentioned earlier, it is possible to use scratch to do some mathematical
computations. In this section, you will learn how to use scratch in:
• Determining angles and shapes
• Determining areas.
• Working out averages.
a) Shapes and angles
What shapes do you know? Draw some of these shapes in your notebook.
What angles do the corners make? For each shape you drew, write down
the value of the angles at its corners.
Activity 6.19 Drawing shapes using sprites
1. Try these out with a friend:
(a) Walk forward 2 steps, let your friend draw a line of your
path using a stick.
(b) Turn 90 degrees to the right. Walk forward 2 steps. Again,
let your friend draw a line of your path.
(c) Turn 90 degrees to the right. Walk forward 2 steps. Let
your friend draw a line of your path .
(d) Turn 90 degrees to the right, walk forward 2 steps. Let
your friend draw a line of your path.
• What shape did your friend come out with?
It is possible to draw shapes like this using sprites. It is as if your sprite
is holding a pencil. Whenever the sprite moves, it leaves a line behind it.
To draw a shape we must “walk” that shape.
2. Now, open a scratch activity and input the commands.In the
following picture.
3. Run the program by clicking on the green flag. What shape
did you come up with?
Did you notice that the code in step 3 above is repetitive? (Because the
movements and turns are all equal?)
In Scratch, we can use a repeat loop to create a shorter piece of
code. For example, the code above can be summarised as follows: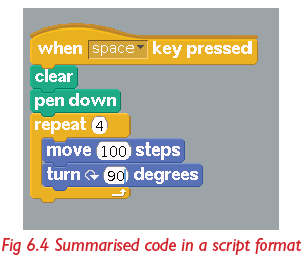
Try this out in your computer and run it. What shape did you end up
with? Compare it with the Fig. 6.4. Use the same basic commands to
draw a rectangle, triangle, pentagon and other shapes of your choice.
b) Using scratch in calculations
We can add, subtract, multiply or divide numbers in Scratch. Look at the
figure below and do different calculations by entering the numbers and
check for the answers.
You can also use scratch to calculate areas and perimeters. Further,
you can use scratch to determine perimeters of figures and to compute
averages.
Example: Using Scratch to calculate the area of a rectangle
To do this, create two (2) variables, one called Length (L), and the other
called Width (W). By clicking on “ Variable”then“ Make Variable” You
can enter the length and width values and the program will calculate thearea using the formula:
Activity 6.20 Calculating the area of a rectangle
1. Follow the steps shown in the screens below to calculate the areaof a rectangle in scratch.
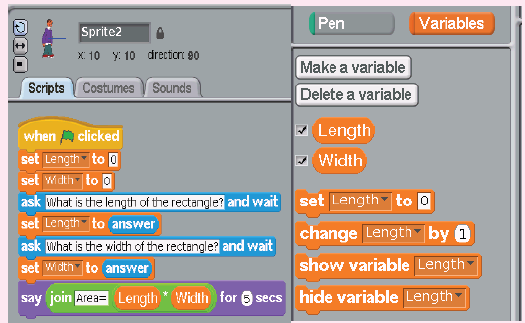
2. Set ‘Length’ and ‘Width’ in variables as shown below.
3. Calculate the area of a rectangle with length and width of your
choice in Scratch by running the program. What value did you get?
4. Use the dimensions above to draw the rectangle in your notebook.
Calculate its area using the formula: Area = Length x Width.
Compare your value in step 4 above to what you obtained using
scratch. Are they the same?
5. Try to calculate the perimeter of the rectangle:
• Ask the user for length (L)
• Ask the user for width (W)
• Compute (P) = (L + W) × 2
• Report P to the user.
Program to compute average in scratch
You may begin by an exercise first:
• Average 5 numbers for example { 12, 14, 15, 10, 10 }
Variable ‘sum’ will be used to add them. After you add all the
numbers, divide by 5.
• In the example sum = 12 + 14 + 15 + 10 + 10 = 61
• The average = 61/5= 12.2
Doing it using a Scratch program
In order to make a script in Scratch program, you need:
• To set variables, that is N-SUM and NEXT.
• A repeat loop (N-times).
• To ask the user for a number ‘NEXT’ inside the repeat loop
• To add NEXT to SUM each time in the loop.
• To say the answer eventually.
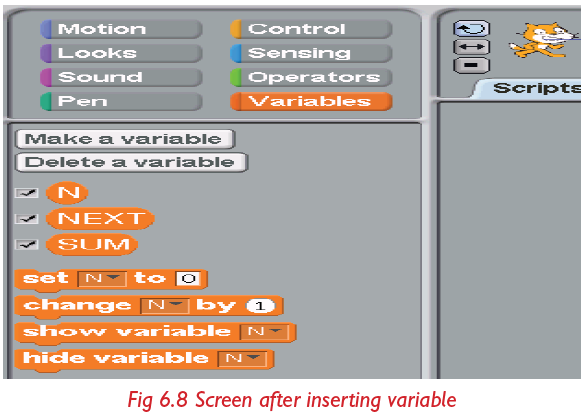
a) Creating the variables
The variables include:
N - which refers to how many numbers to average.
NEXT - the next number.
SUM - the sum of the numbers.
AVERAGE - the average of the numbers.
Remember!
A variable is a changeable value recorded in Scratch’s memory.Variables can only hold one value at a time.
To create the variables, click on variables tab on the commands panelfollowed by ‘make a variable’. A window like this appears.
Type in the variable name and create the next variable until you finish
the four. Your screen should eventually look like the one shown on figurebelow.
b) Creating the program
The program has three parts:
• Part 1: Allows you to insert the value of ‘N’.
• Part 2: Prompts you to insert the ‘N’ numbers to be averaged and
adds them up.• Part 3: Computes and says the average.
Can you identify these parts in the screen below?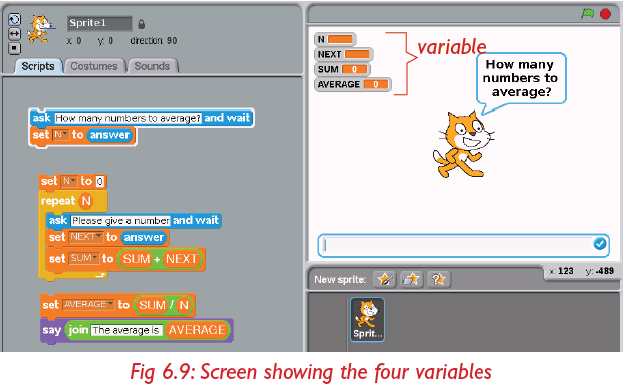
Open a scratch activity, input the above instructions to determine the
average of this set of data 14,15 and 16. Click on each part of the programand see it run! Did your screen finally look like this?
Save your average program in your scratch projects folder. You can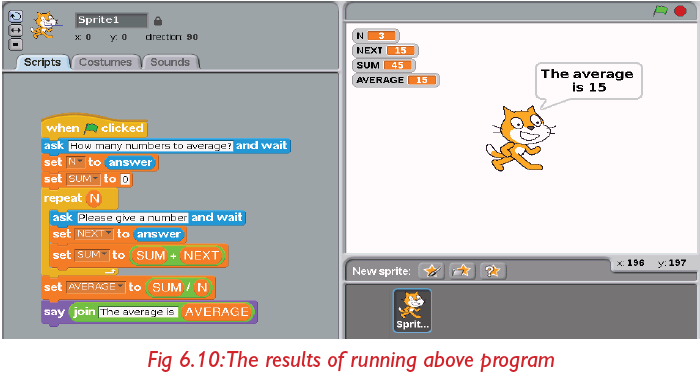
always use it again in the future.
Further Activity
Follow the steps above to determine the average of this range of data:23, 5, 8, 13, 17 and 11.
Self –Test 6.2
1. What is a sprite?
2. A sprite cannot do anything on its own. Why is this the case?
3. Practice changing the following:
a) Background.
b) Costumes of a sprite in your XO-laptop.
4. a) What is the importance of ‘x’ and ‘y’ co-ordinates in a
scratch project?
b) What does;
i. negative x-coordinate values mean in sprite movement?
ii. positive y – coordinate values mean in sprite movement?
5. When creating animation stories, which steps will you follow?6. We can use scratch in calculating _________, _________ and
6.3 Etoys
Identification of elements of Etoys environment
Activity 6.21 Identifying elements in Etoys environment
1. Look at the screen below. Is the screen familiar?Try to identify the things in the screen.
2. Draw and label the window in your notebook.
Etoys is a software environment that allows you to learn real
programming.
We use Etoys to make our own games, multimedia presentations,
computer art, animated storybooks, computer simulations and many
other things.
The screen in Activity 6.21 is an Etoys screen. It is called ‘the World’.
Everything you do from etoys will happen in this World!
To start Etoys, simply double-click on the Etoys icon which is
located on the desktop of sugar. The Etoys opening screen displays:
• Navigator bar
• Three coloured clouds
• An automobile that travels around the window, bouncing
off the clouds and the edges of the screen.
• The script - that controls the car’s movement.
Can you identify these in the screen above?
In the next section you will learn about some important features in
Etoy environment which you will use more oftenly. They include:
• Navigator bar
• Supplies• Etoys book
a) Navigator Bar
The Navigator Bar has many buttons:
All these buttons will allow you to navigate across different Etoys
projects. For now, note the ‘Publish It’, the ‘Find’
 and the
‘Quit’ buttons.
To save a project you will use the ‘Publish it’ button. To find a project that
you have saved, you will use the ‘Find’ button. To leave Etoys, you will use
‘Quit’ button.
b) Supplies
When you click on the ‘Supplies box’ a drop down screen like this
appears:
It contains various tools used to manipulate etoys program. The book in
the drop-down menu is very important.
c) Etoys book
The BOOK is one of the most useful objects in Etoys. You can use it to
do Slideshows, class diaries and albums; register observations and
even create your own animated book.
The most interesting part is that you can insert any kind of element
(OBJECT) inside a BOOK. For example, you can add text, drawings
and even animations in order to bring your book to live. So, let’s seesome tips before you create your first BOOK.
Activity 6.22 Creating a new book1. Once Etoys is open, you can find the BOOK in the SUPPLIES box.

2. When the SUPPLIES box opens, you will see the BOOK icon.
3. Now, just drag the BOOK icon over the WORLD to create a
new book. Did your screen look like this?
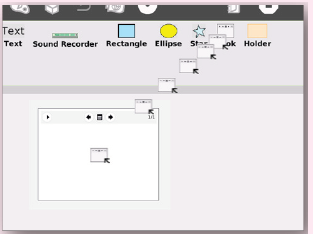
Etoys book screen
With this, a new book is now ready to be created!
Adding Text to the Book
To add text to the book, you need to open the SUPPLIES box again andlook for the TEXT object.
Just drag the TEXT over the book again and drop it. To start writing, just
select the text and start typing.
Now, you might have noticed that the size of the text is not right, or you
want to change the font or the size of your text. So, what you need to dois to call the halo, by clicking the TEXT with the circles buttons.
Activity 6.23 Adding text to an Etoy book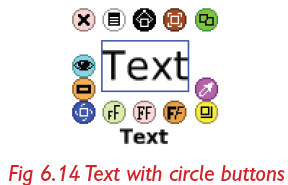
1. Follow the steps above to open an etoys book. Add text to the
book stating your name, your class and your school.
Adding drawings to the Book
There are two ways of adding a drawing to the BOOK. If you already
have a drawing outside the book, just drag it and drop over the book.
The drawing will be automatically added to the current page. The
second way is to create a new drawing, by clicking the PAINT icon
icon
located at the top menu. Clicking the paint palette in the toolbar brings
up the painting tool. It has two components: a translucent rectangle calleda SketchEditor where the user can paint an image and a PaintBox toolbar.
The SketchEditor is smaller than the screen. Therefore, everything drawn
on one page will be one object. To draw several objects, exit the painting
tool by clicking “keep” when one object is done and open it again to
get a new sheet to draw on. To draw the background of the world, click
the world’s grey pencil ‘halo’ icon.You can then use the toolbar to make a drawing of your choice.
Activity 6.24 Drawing in an Etoy book
1. Open a new Etoys book and draw a house in a valley. Do not
paint the diagram at this stage.
Painting a background
The BOOK is often used to create stories with animated characters. But,
in order to do animations in Etoys, it is necessary to draw the scenario
(BACKGROUND) separated from the characters (OBJECTS). Whatshould you do?
Activity 6.25 Painting a background
1. Right-click the circle button one time over the book. You will seethe halo, with the word “book” under it.
2. Now, click again over the book, You will see that the word ‘book’
changes to ‘page’. See Fig 6.40 above.
(If you look closer at the image, you might also notice some other
details. The PEN ICON , should have showed up. Well, it is exactly in this
icon that you should click in order to paint your scenario. Clicking on itgives you the paintbox toolbar below).
3. Use the various tools in the paintbox toolbar to paint your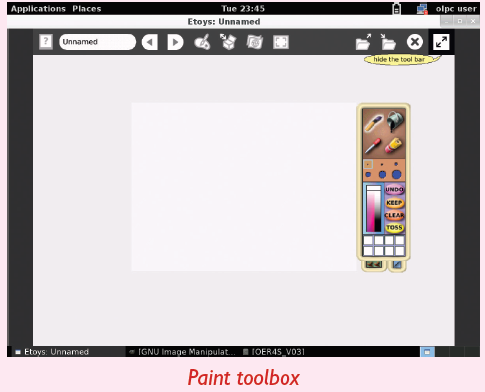
drawing in Activity 6.22 above. After painting, you will have adrawing such as this.
4. Finally, you can add the title of your storyline to come up with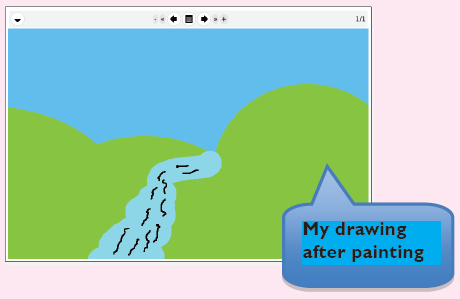
the cover of your book as shown below. The first page of yourstorybook should then look like this.
Etoys projects and Animations
In this section, you will learn how to create Etoys projects, how to save
new projects and how to open, rename and delete existing projects. You
will begin by making an Etoys animated car. To do this, go through thefollowing steps:
Step 1: Drawing and painting the car
Activity 6.26 Drawing and painting the car
1. Switch on your XO-laptop then click on the ‘Etoys’ icon in sugar
interface to open a new Etoys activity.
2. Click on ‘Make a Project’, or the ‘page icon’ to open up a new
project.
3. Choose the paintbrush to open up Etoys’ paint palette.
4. Draw a blob – which looks like the shape of a car as seen fromabove. See the diagram below.
NOTE: If you do not like what you drew, click on ‘Undo’ on the paint palette.
5. Choose different colours for the wheels, windows and so on.
6. When you are happy with what you have drawn, click on keep tosave your drawing. Did your screen look like this?
Congratulations! You have just finished the first step in your Etoys
project.
Right now, your car object is just a drawing. But every object in Etoys
has characteristics (properties) and behaviour, just like real world
things. You can manipulate the properties and behaviour of the objects
to make them do different things.
If you ‘right-click’ your mouse over the car object, you will see little
ovals surrounding the car. These are called ‘Handles’. Through these
handles, you can access the properties of your object and also modifyits behaviour.
Activity 6.27 Accessing the properties of a viewer handle
1. Click on the viewer handle to reveal the viewer. Did you seeimages like these?
The viewer contains property tiles (Fig.B) that shows what your car is
and what it can do.
2. You can “collapse” the viewer against the right edge by clicking
on the small tab with the picture of your car on it. To make the
viewer re-appear, simply click on the tab again.
Step 2: Changing the name property of the car
First, you will change the name of the object from ‘Sketch’ to ‘Car’.
Find the word ‘Sketch’ at the top of the viewer. Click on it to highlight it
and type in the word ‘Car’. Press enter to save the new name. Confirm
that your object is now known as ‘car’ and not ‘sketch’.
Step 3: Getting into more action!
Look at the tiles in the basic category pane. You will see two types of
tiles: some are preceded by a yellow exclamation point and others
are not. The tiles following the exclamation point are action
tiles. Clicking on them will fire the action once. Holding down on them
will run the action repeatedly. Try driving the car around the worldusing the exclamation points.
Step 4: Changing the behaviour of the car manually
Numeric values of the tiles can be changed by either clicking on the up
or down arrow on the left of the value or by selecting the value andtyping in a new number and hitting enter once.
After changing the value, click on the
 again. What happens?
Activity 6.28 Changing the value of the car
1. Practice changing the value as explained above.
2. Try different numbers, what do you think will happen if you typein negative numbers? Try this out as well!
Step 5: Changing the properties of the car
Tiles which are not followed by an exclamation point are value tiles.
(See Fig 6.17 below). Each of these is followed by a green and white
arrow that assigns or sets that value as the current value for a particularattribute or property of the car.
In the real world, objects have properties such as size, colour, location,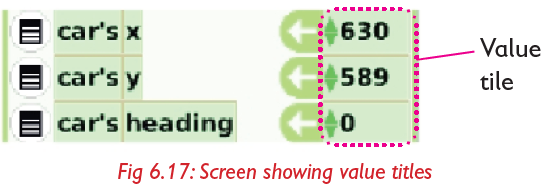
direction and so on. Every object that you draw or pull out of the
supplies bin in Etoys automatically has many standard properties that
tell us about the object, where it is and what it looks like and so on. Type
different numbers in the tiles then press enter, what happens?
Step 6: Changing the behaviour of the car – automatically
Manually pressing down on the yellow exclamation point as you did
in above activity to make the car move seems very inefficient and not
interesting! However, to make the car move on its own, until some
condition is reached (i.e. for one minute, until the car reaches an obstacle
and so on) we can use scripts just like in scratch.
a) Creating a script
Scripts are created for objects by assembling tiles in a scriptor. There are
two ways to get a scriptor:
i) Drag out the tile “car forward by 5” from the viewer and drop it
on the world. A scriptor will sprout around it. You can do this with
any action tile.
ii) If you would like to start with an empty scriptor, go to the scripts
pane of the viewer and drag out “car emptyscript”. (You can
scroll between panes by clicking on “basic” and “additional
panes” choices will appear).
Remember!
For now, use the first option only.
b) Naming the scriptYou now probably have something like this:
Click on “script1” to highlight it, and then change it by typing “drive”.
NOTE: When we program, we want our scripts and objects to be namedthings that tell us what their purpose is.
c) Running the scripts
Clicking on the yellow exclamation mark fires the action once.
This means that from the program above, the car will go forward 5
pixels. However, to make the car keep moving, click on the clock symbol (or ticker) on the scriptor. Notice that in the title of the script,
the word has changed to say “ticking”. If you click it again, the scriptwill stop and it will show “paused”.
Activity 6.29 Running the scripts
1. Open a new Etoys project. Experiment with different values and
different scripts.
2. How can you make your car go faster? Go Slower? Go backwards?
Go round in a circle? What tiles do you need to add for these?
d) Changing the “ticking” rate
Another way to change a script is to modify its “ticking rate”. Every
script is born with the default rate of 8 ticks per second. You can speed
things up, or slow them down by holding down the mouse button over
the clock icon until the following menu appears, after which, you can
make your selection.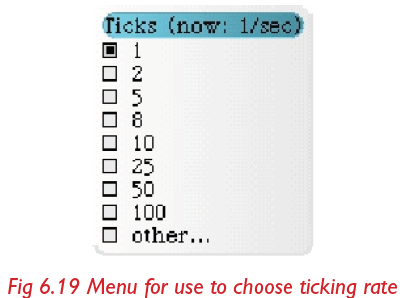
Step 7: Creating the steering wheel object Activity 6.32
Activity 6.30 Creating a steering wheel object
1. Open a paint activity, paint a steering wheel.
2. Bring up the handles of the steering wheel by pressing ‘alt-’.
3. Open the viewer for the steering wheel by clicking on the ‘eyeball’
handle. Did your screen look like this?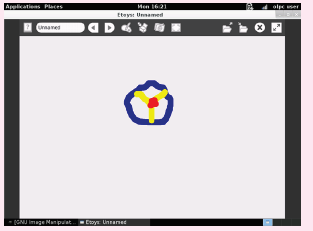
4. Change the name of the object to ‘Wheel’.
5. Bring up the handles of ‘Wheel’ again. Click on the blue ‘Rotate’handle. What happens?
By clicking and dragging the blue rotation handle, you can rotate the steering
wheel.
6. If you look at the wheel’s heading in the viewer, you will see how
the values change as you rotate the wheel. Try this out. Whichvalues did you see?
Step 8: Controlling the car through the steering wheel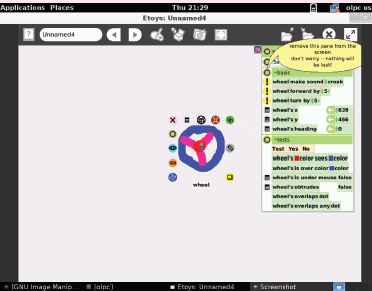
In the car’s scriptor, make sure you have the following tiles: To control
the car through the steering wheel, the car and the steering wheel have
to be connected. Specifically, the turn of the car has to be connected
to the heading of the steering wheel. Heading indicates at what angle
the object is rotating. As the car moves forward, if the heading of the
steering wheel is negative, it will turn left. If the heading is positive, it willturn right and if the heading is 0, then the car will move straight ahead.
Activity 6.31 Connecting the head of a steering
wheel to the car
To connect the heading of the steering wheel to the turn of the car,”
drag the heading tile of the steering wheel from the viewer and
position it over the “5” in the “turn by tile” of the car on its scriptor.You should end up with this:

Step 9: Driving the car using the steering wheel
You are now ready to drive the car using the steering wheel. In wheel’s
basic pane, set the value of heading to 0. Then start the car’s script by
clicking on the ticker in the car scriptor. Quickly bring up the handles of
the wheel. Scroll the mouse down on the blue rotation angle and start
driving the car! Is it fun?
Step 10: Using maths to scale the effect of the wheel on the car
You may have realised that the car in step 9 above is too sensitive to
the wheel. With every “tick”, the car turns by the wheel’s heading. So, if
the wheel is heading slightly to the right, say 5 degrees, then, assuming 8
ticks per second, the car is spinning 40 degrees every second. Dizzying!
Activity 6.32 Using maths to scale the effects of
the wheel on the car
1. Click on the small green arrow just next to the word “heading”,
and it will change to say “car turn by heading + 1”. You can
change the “+” to a variety of other math operations and you
can change the “1” to any number. Try these out and see what
happens.
2. Try the following and determine what they do, and which effect
you want in order to get the car to be less sensitive to the wheel”
a) “car turn by wheel’s heading –5”
b) “car turn by wheel’s heading * 5”c) “car turn by wheel’s heading * -5”
Step 11: Publish the car (save the car project)
We do not “save” Etoys projects, we “publish” them. In the Navigator
tab, click on the “Publish” icon A form like the one shown below will
appear.
Using the form, name the project. Follow the guidelines given by your
teacher. Include descriptive information in the name. Do not use any
special symbols in the name other than dashes. You need not to fill out
the other information. You can come back to that later.
After you click “ok” on the form, a new window like the one shown
below will appear.
Click once on “Etoys” (or wherever else your teacher tells you to publish
to) which is a special folder on your computer, and then click “Save” at
the bottom of the window. Wait for Etoys to finish publishing.
Congratulations!
You have just completed your very first Etoys project. Now go ahead
and play with the different options that we explored!! When you are
done, go back to the Navigator tab and click on “Quit”. At the end of thistutorial, you should have this:
Recovering your work (Open)
Open Etoys, and find your project by clicking on the “Find” button on
the Navigator Bar. Click on “Etoys” in the left pane, select your project
in the right pane and click “OK”. Follow this procedure to recover yoursaved work
Remember!
When you are drawing multiple sketches, it is very important to draw
them in layers. To do this, you must open the sketching tool every time
you want to draw a new sketch. For example, what we have done in the
project above is one sketch. If I want to draw a hat that moves, I have toopen the paint tool again and draw a separate hat sketch.
Self –Test 6.3
1. How do we call the window that appears when we open an
Etoys activity?_____________
2. Name the main features in an Etoys window.
3. What is a “halo” of an object?
4. How do you open a “viewer” for objects in Etoys?
5. Give five properties of any object in Etoys.
6. What is a “scriptor”?
7. What is the “heading” of an object? What does it mean if a
ticking program changes the heading so that it increases by 90?
If you were riding on the object, what would you say happened?
UNIT TEST 6
1. Using record activity, record a song of your choice and save
it in Journal. Open turtle art and use correctly the blocks of
commands to display your song.
2. Take different photos of yourself. Use turtle art to display them
by arranging appropriate blocks.
3. How can you make an object move backwards in Etoys?
4. a) Habineza wants to program a “hot air balloon” to go up
and down as she drags a picture of a sandbag up and
down. Can you describe how she can do this in Etoys? Be
real and specific, because she hasn’t seen Etoys before.
b) How would you make the balloon go up and down much
further than the sandbag?
5. a) Create scratch programs to do the following: (save each
project in your computer).
i) Calculate the area of a rectangle.
ii) Calculate the perimeter of a rectangle.
iii) Calculate the sum of three numbers.
iv) Calculate the average of three numbers.
b) Practice the following: Create three sprites. First sprite 1
starts at the upper left corner of the screen and glides to
the middle. Then sprite 2 starts in the upper right and
glides to the middle of the screen. They are followed by
sprite from bottom left and finally sprite 4 from bottom
right to the middle.
6. Practice and create a shark attack game in scratch. Change to a
suitable background and animate a shark to make it interactive.
7. Calculate the answer to the following problems; write the
answers in your exercise book. Enter the calculations into
scratch and confirm your answers.
a) 5 + 4 b) 5 × 4 c) 5 + 4 – 3
d) 34 + 3 × 6 e) (34 + 3) × 6 f)40/5+ 4
g) 4 +40/5