UNIT 1 :Carpentry Tools
Introduction
Carpentry is the art of making wooden products. Carpenters use carpentry tools to make wooden products. Carpentry is an important art that provides employment.
Look at the following pictures.

Describe them briefly.
Predict what you are going to learn.1.1: Identification of carpentry tools
Activity 1.1: Identifying carpentry tools
(i) Name the tools that the teacher has displayed in class.
(ii) Study the following tools (page 2 and 3).
(iii) Draw all the tools in your notebook.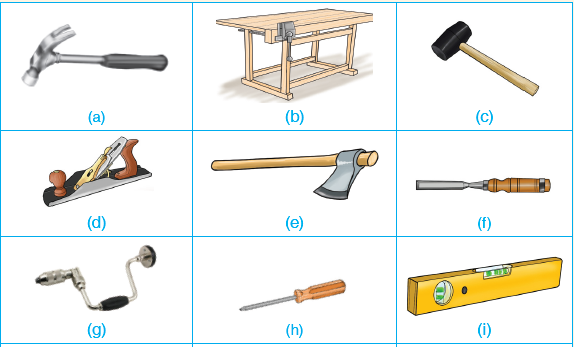
(iv) Using Internet and other carpentry books in the school library give the correct names of the tools.
A tool is a hand held device used to carry out a particular function.
1.2: U sage and maintenance of some carpentry tools
Activity 1.2: Using and maintaining carpentry tools
(i) Visit a timber workshop.
(ii) Observe the various tools and write down their names.
(iii) Ask the carpenter to demonstrate how various tools are used.
(iv) Practice how to use and maintain various carpentry tools.
Note: Be careful when using tools to avoid injuries or damaging the tools.
• When you get back to school, discuss:
(i) Use of carpentry tools.
(ii) Dangers of various tools found in the timber workshop.
(iii) Safety precautions when in the workshop.1. Work bench
Activity 1.3: Use and maintenance of a work bench
(i) Remove all the tools that are not in use from the work bench. Wipe the bench and check if that is firm and stable.
(ii) Place a piece of wood on the work bench and cut it into two using a saw.
(iii) Smoothen one part of the wood on the work bench.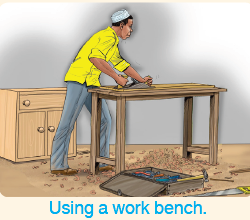
It is a surface on which a carpenter does her or his work.
Work that can be done on it include smoothing wood, cutting, measuring and making joints on wood.
Carpentry tools are important. They are used to make items like tables, chairs and desksCarpentry tools should be used appropriately. They should be maintained well.
2. Saw
Activity 1.4: Use and maintenance of a saw
(i) Check if the hand saw blade is sharp, if it is not sharpen it using a file. Check if the handle is in good condition.
(ii) Hold a piece of timber and cut it using a hand saw.
(iii) Cut another piece of wood using a bow saw.
(iv) Observe the carpenter using a table saw.
(v) After using the saws remove pieces of wood shaving stuck on the blade using a stick.
There are various types of saws. Examples are:
• Table saw, bow saw and wood saw
(a) Bow saw
• Is also known as a frame saw or buck saw.
• It is used to make straight and curved cuts on wood.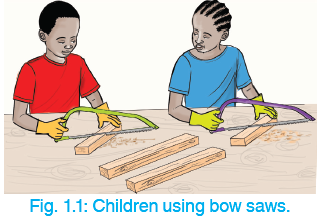
(b) Table saw
• It is made up of a circular blade that is moved by an electric motor. The blade is held in place by a table or bend.
• It is used to cut a block of wood into small pieces.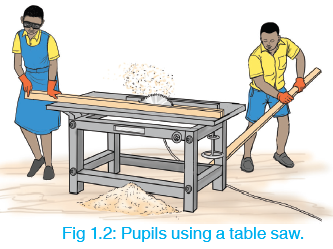
(c) Wood saw
• It is commonly called the handsaw.
• It is used to cut pieces of wood into different shapes and sizes.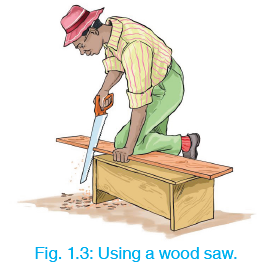
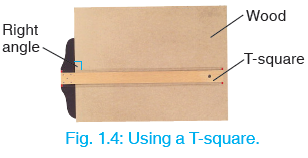
3. T-square
Activity 1.5: Use and maintenance of a T-square
(i) Place a T-square on a block of wood.
(ii) Draw a straight line on the wood along the length and width of the T-square.
(iii) Measure the angle formed and write down your answer.
(iv) Clean the parts to remove dust and saw dust. Store the T-square safely after use.
(v) Apply oil on the metallic parts of the T-square to prevent rusting.It is used for drawing and measuring right angled objects.
4. Claw hammer
Activity 1.6: Use and maintenance of a claw hammer
To driving the nail into wood
(i) Ensure that the handle is firmly attached to the head of the hammer.
Replace worn out or broken parts.
(ii) Hold a nail onto a piece of wood as shown in the picture.
(iii) Hold the hammer firmly and hit the nail several times until it enters.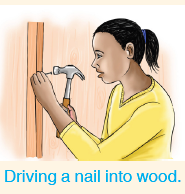
To remove the nail from the wood
(i) Slide the claw hammer under the nail head.
(ii) Pull the handle towards you to remove the nail.
(iii) Store the hammer in a dry and safe place after use.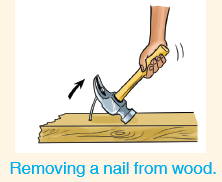
It is used for driving nails in wood and also for pulling them out.
5. Plane
Activity 1.7: Use and maitenance of a plane
(i) Look around the workshop and identify the different types of planes.
(ii) Choose the right place for the task.
(iii) Sharpen the blade and fix it on the plane.
(iv) Adjust the blade to the desired angle. Oil the plane.
(v) Place a piece of wood on the work bench and smoothen it using a plane.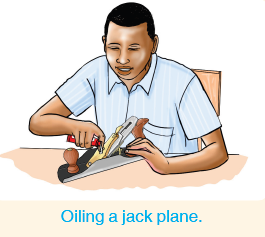
It is used for smoothing wood so as to give smooth and shinny surfaces.
Examples of planes are shown below.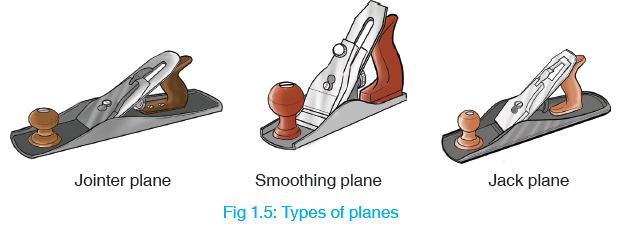
6. Axe
Activity 1.8: Use and maintenance of an axe
Identify an axe in the workshop.
(i) Look at the blade of the axe. Is it sharp?
• Sharpen blunt cutting edges of the axe.
• Replace the worn out blades with new ones.
• Ensure the axe is firmly fixed to the handle.
(ii) Hold the handle of the axe tightly and cut or split pieces of wood.
(iii) Clean the blade and store the axe in a clean dry place.• An axe is used for splitting and cutting wood.
• It is also used for cutting down trees and uprooting stumps.
7. Screw driver
Activity 1.9: Use and maintenance of a screwdriver
(i) Pick the screws to be fixed into the piece of wood.
(ii) Select a screw driver with a tip that matches the head of the screw.
(iii) Ensure the tip of the screw driver is not damaged. Replace broken or worn out handles.
(iv) Grasp the handle of the screw driver and use it to drive the screw in the piece of wood as shown in the picture.
It is used to drive screws in wood. It is also used to remove screws out of wood.
8. Brace
Activity 1.10: Use and maintenance of a brace
(i) Ensure that the handle and the head of the brace are well fixed.
(ii) Ensure that the cutting tip of the brace is sharp.
(iii) Lay a piece of wood on the work bench and mark the hole to be drilled on the wood using a
pencil.
(iv) Place the brace on the piece of wood. Make a hole in the wood by rotating the handle.
(v) Clean and store the brace in a clean and dry place.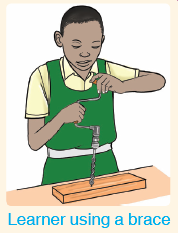
The brace is used for boring holes in wood. Force is applied on top and the handle rotated with one hand.
9. Clamp/Jointer
Activity 1.11: Use and maintenance of a clamp / Jointer
(i) Ensure you have the glue and the pieces of wood to be attached together ready.
(ii) Check and ensure the screw and other moving parts of the clamp are oiled and functioning well.
(iii) Apply glue on the pieces of wood and allow it to dry.
(iv) Attach the glued parts of wood and fix them to the clamp.
(v) Tighten the screw of the clamp and leave it for a while till the parts are firmly joined.
(vi) Blow out dirt from the joints of the clamp and wipe it with a moist piece of cloth.
A clamp is used to hold together pieces of wood to be glued.
It also holds together the glued parts until the glue is dry and the pieces of wood are firmly jointed.11. Spirit level
Activity 1.12: Use and maintenance of a Spirit Level
(i) Wipe the surface of the spirit level to remove dust and dirt from it.
(ii) Hold the spirit level firmly and place it on the wooden surface that you want to check.
(iii) View and note the position of the bubble in the spirit level.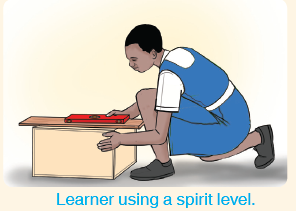
It is used to check if the wood surface is horizontal or vertical.
The spirit level is placed on a wooden surface, then the position of the bubble in the viewing point is noted.
Hold the spirit level firmly when using it. Do not let it drop on a hard surface because it can easily break.Practice Activity 1.1
1. Fill in the gaps to complete the statements below.
(a) A _______ is used to drive screws into wood.
(b) Straight and curved cuts are made on wood using a _________.
(c) A wood saw is also known as ________.
2. Name the tools below. Give their uses as well.
3. Write down 2 things you do to maintain an axe.
4. What is the main reason for applying oil on the metallic parts of a plane?
5. A _________ is used for drawing and measuring right angled objects.The general maintenance practices of carpentry tools are as follows:
(i) The tools need to be used for the right purpose. This is called proper use.
(ii) Sharpening cutting tools. Tools with cutting edges such as chisel, saw, axe and plane need to be regularly sharpened when they become blunt.
(iii) Cleaning tools after use.
(iv) Repair all broken parts. Repairing broken parts makes the tools efficient and safe to work with. Broken handles and blades need to be replaced.
(v) Oiling metallic parts helps to prevent rusting. Oiling moving parts reduces friction.
(vi) Proper storage. The tools need to be stored properly to avoid damage. They are also secured from thieves. Properly stored tools cannot cause injuries to people.1.3: D angers of carpentry tools and health and safety measures
Activity 1.13: Identifying dangers of carpentry tools
(i) Write down names of dangerous carpentry tools.
(ii) What are the dangers of the tools that you have named?
(iii) List down health and safety measures to take when using these tools.
(iv) What would you do if your friend hurt his finger or her finger while you were using a chisel?Many carpentry tools can be dangerous if not handled properly.
Most dangerous carpentry tools
1. Table saw
Dangers
• It rotates at high speed and has a sharp blade.
• If not well handled, the blade might slice off the users fingers or arm.• The table saw might throw back pieces of wood, which might hit the user. This is known as kickback.
Health and safety measures
• Do not bring your fingers or arm close to a rotating blade.
• Always wear a helmet and goggles. These will protect your head and eyes.
• When the saw is in use, stand at a safe distance from each side of the saw’s blade.
Fig 1.7: Using a table saw carefully.
How can kickbacks in a table saw be minimised?
2. Chisel
Dangers
• The chisel has a sharp cutting edge. This edge can injure you if carelessly handled.
• A chisel is driven into wood by a mallet. There is a danger of hitting your arm while hitting the chisel head.Health and safety measures
• Always keep the cutting edge of the chisel sharp. What will happen if you use a blunt chisel?
• Always clamp the work securely on the work bench.
• Wear gloves to protect hands.
Name two other health and safety measures that you need to take while using a chisel.
3. Clamp/jointer
Dangers
• During clamping, you can accidentally trap your fingers or hands.
• If the parts being clamped are loosely held, they may break and fall/drop on your hands or legs injuring them.Health and safety measures
• Hold the pieces of wood being glued together firmly. Close the jaws of the clamp until the clamp is tight before using it.
• Wear goggles or a face shield to protect your head.
4. Shaper
Dangers
A shaper has several blades that cut wood to give it different shapes. These blades can injure the user.Health and safety measures
• Shape only one piece at a time to avoid confusion and loss of concentration.
• Do not leave a shaper running without someone around.
• Do not place your hands near the part of wood that is being cut.
• Avoid clearing the working table when the shaper is rotating. Remove piled sawdust using a piece of wood or a long brush. Do not use bare hands.Revision Activity 1
1. ______ is the general name given to the cutting edge of a tool.
(Blade, Handle)
2. (i) Name any 3 carpentry tools used for cutting wood.
(ii) Draw the following carpentry tools:
(a) T - square (b) Spirit level
(c) Auger bit (d) Wood chisel
3. Match the tools named in A with their possible uses in B
4. Demonstrate how to use the following carpentry tools whilst avoiding their possible dangers.
(a) Hammer (b) Wood saw (c) Axe
5. The following pictures show use and maintenance of a hand saw.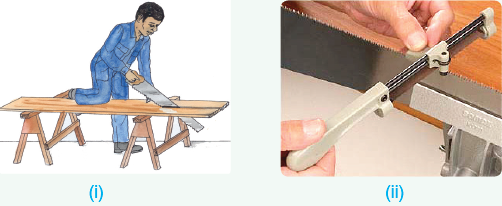
(a) Which picture shows maintenance of a hand saw.?
(b) Which picture shows use of a hand saw?
(c) Outline two other maintenance practices carried out on a hand saw.6. (a) What is the name of the following tool?
(b) In what ways is the tool useful in carpentry?
(c) Explain how it is maintained
7. A jack plane a is very important tool in carpentry.
(a) Outline the uses of this tool.
(b) In case you do not have a jack plane, what other tool can be used to do a similar job?
(c) How is the jack plane maintained?
8. (a) What is a work bench?
(b) Name two carpentry activities that are done on a work bench.
(c) How can you ensure your personal safety while working on a work bench?
9. A table saw is found in many workshops.
(a) Name any two parts of a table saw.
(b) List two dangers of a table saw.
(c) What health and safety measures can be taken to prevent injuries from a table saw?10. Outline the difference between the following saws in terms of appearance and uses.
(a) Table saw and hand sow
(b) Bow saw and wood saw
11. (a) Identify five carpentry tools that are not found in your school or home. Write down their uses.
(b) Explain the maintenance practices carried out on these tools.
(c) Write in your book 5 general health and safety measures to observe when using carpentry tools.Word list
1. Read the following words in pairs.
• Work bench • Carpentry • Mallet
• Brace • Clamp • Spokes shave
• Auger bit • Jack plane • Spirit level
2. Spell 3 words while your friend writes them in his or her notebook. Let your friend also spell 3 other words as you write them in your notebook.
3. Discuss with your friend the meaning of any 3 words in the word list. Refer to notes in your textbook.- SET P5 SB File Uploaded 21/12/20, 17:07
- SET P5 TG File Uploaded 21/12/20, 17:09

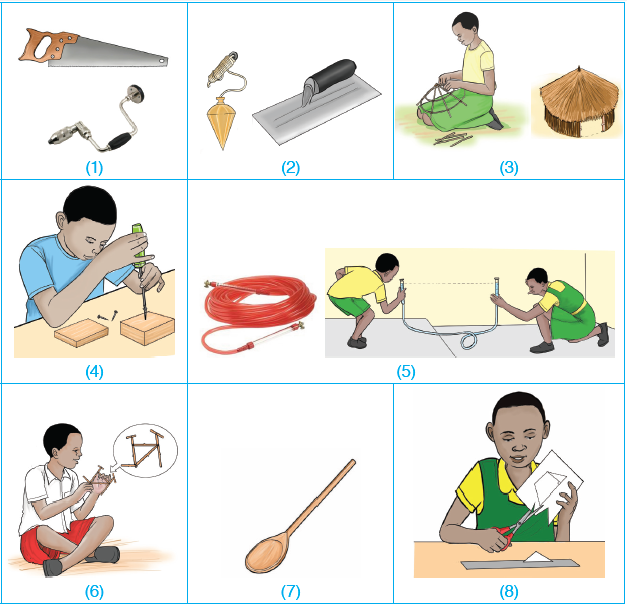
Look at the following pictures.

(a) What is common in pictures 1 to 8 above?
(b) From your response in (a) above, predict the topic area content for (1) to (8).
Look at the following pictures.

(a) How does picture (1) relate to screenshots 2, 3, 4, 5, 6, 7, and 8?
(b) Predict the topic area content for 1 to 8.
Look at the following pictures.


(a) How does picture (1) relate to screenshots 2, 3, 4, 5, 6, 7, and 8?
(b) Predict the topic area content for 1 to 8.
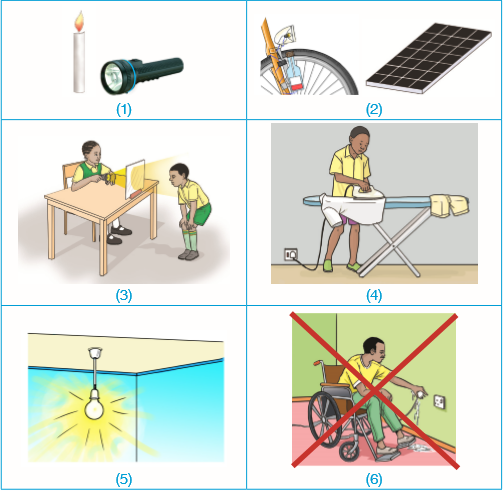
Look at the following pictures.


(a) What is common among pictures 1, 2, 3, 4, 5, and 6?
(b) From your response in (a) above, predict the topic area content for 1 to 6.
Look at the following pictures.


(a) What is common among pictures 1, 2, 3, 4, 5, and 6?
(b) From your response in (a) above, predict the topic area content for 1 to 6.
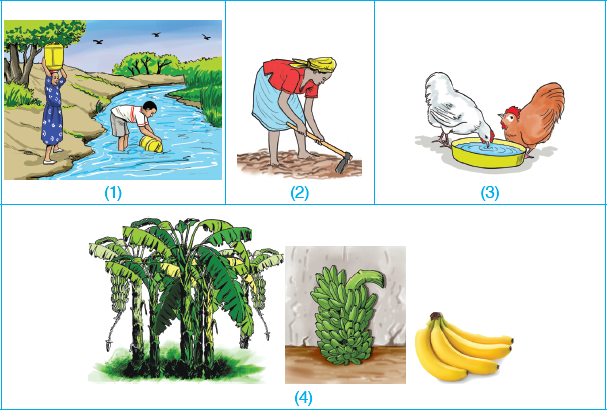
Look at the following pictures.

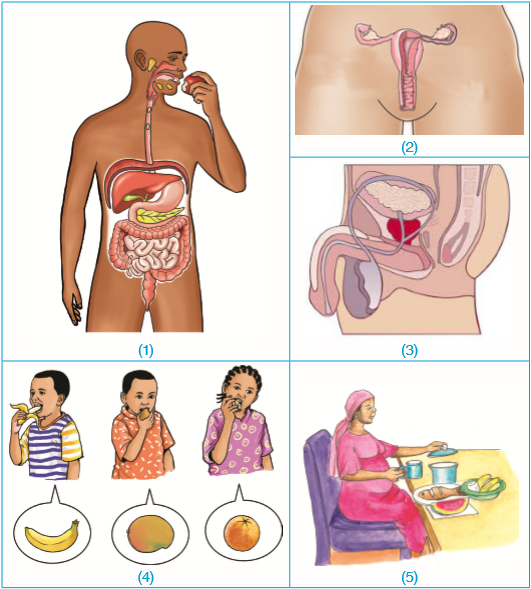
(a) Where are the system shown in 1, 2, and 3 found?
(b) What is the relationship between pictures 1, 4 and 5? (c) Predict the topic area content for 1, 2, 3, 4, and 5.

Look at the following pictures.

(a) Where are the system shown in 1, 2, and 3 found?
(b) What is the relationship between pictures 1, 4 and 5? (c) Predict the topic area content for 1, 2, 3, 4, and 5.

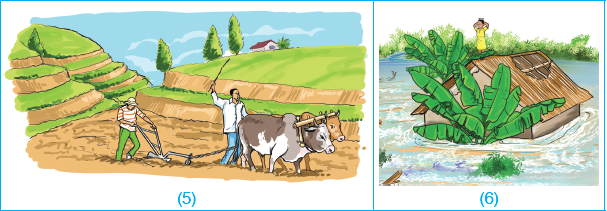
Look at the following pictures.

(a) What is common between pictures in 1, 3, 5 and those in 2, 4 and 6? (b) From your response in (a) above, predict the topic area content for 1, 2, 3, 4, 5 and 6.

Look at the following pictures.

(a) What is common between pictures in 1, 3, 5 and those in 2, 4 and 6? (b) From your response in (a) above, predict the topic area content for 1, 2, 3, 4, 5 and 6.

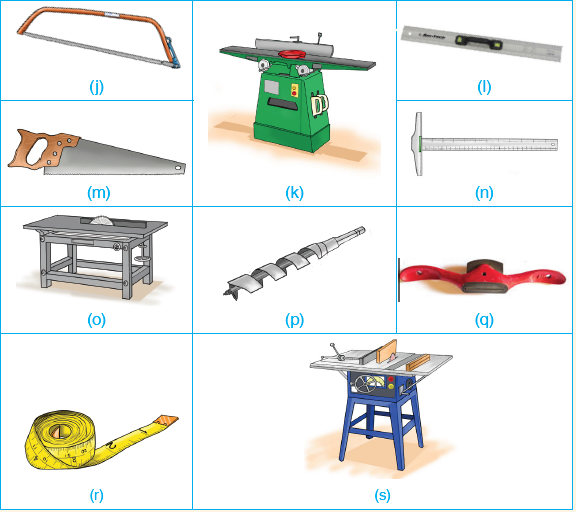
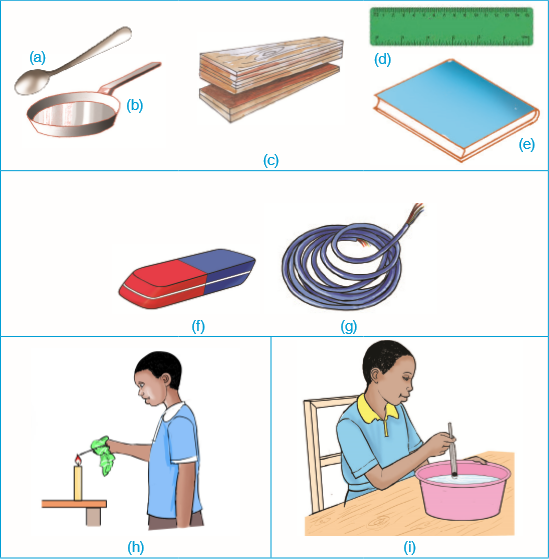
Look at the following pictures.

(a) What is the general name given to a, b, c, d, e, f and g?
(b) What are learners in h and (i) doing?
(c) Predict the topic area content for this unit.

Look at the following pictures.
(a) What is the general name given to a, b, c, d, e, f and g?
(b) What are learners in h and (i) doing?
(c) Predict the topic area content for this unit.
UNIT 10: ANIMALS

UNIT 15: ELECTRICITY

UNIT 10: ANIMALS
UNIT 15: ELECTRICITY

- OTHER QUESTIONS FOR SET P5 File Uploaded 26/04/20, 12:37
- SET P5 SB File Uploaded 21/12/20, 17:07
- SET P5 TG File Uploaded 21/12/20, 17:09

Look at the following pictures.
(a) What is common in pictures 1 to 8 above?
(b) From your response in (a) above, predict the topic area content for (1) to (8).
Look at the following pictures.


(a) How does picture (1) relate to screenshots 2, 3, 4, 5, 6, 7, and 8?
(b) Predict the topic area content for 1 to 8.
Look at the following pictures.


(a) How does picture (1) relate to screenshots 2, 3, 4, 5, 6, 7, and 8?
(b) Predict the topic area content for 1 to 8.
Look at the following pictures.


(a) What is common among pictures 1, 2, 3, 4, 5, and 6?
(b) From your response in (a) above, predict the topic area content for 1 to 6.
Look at the following pictures.
(a) What is common among pictures 1, 2, 3, 4, 5, and 6?
(b) From your response in (a) above, predict the topic area content for 1 to 6.
Look at the following pictures.

(a) Where are the system shown in 1, 2, and 3 found?
(b) What is the relationship between pictures 1, 4 and 5? (c) Predict the topic area content for 1, 2, 3, 4, and 5.

Look at the following pictures.
(a) Where are the system shown in 1, 2, and 3 found?
(b) What is the relationship between pictures 1, 4 and 5? (c) Predict the topic area content for 1, 2, 3, 4, and 5.

Look at the following pictures.

(a) What is common between pictures in 1, 3, 5 and those in 2, 4 and 6? (b) From your response in (a) above, predict the topic area content for 1, 2, 3, 4, 5 and 6.

Look at the following pictures.
(a) What is common between pictures in 1, 3, 5 and those in 2, 4 and 6? (b) From your response in (a) above, predict the topic area content for 1, 2, 3, 4, 5 and 6.

Look at the following pictures.

(a) What is the general name given to a, b, c, d, e, f and g?
(b) What are learners in h and (i) doing?
(c) Predict the topic area content for this unit.

Look at the following pictures.

(a) What is the general name given to a, b, c, d, e, f and g?
(b) What are learners in h and (i) doing?
(c) Predict the topic area content for this unit.
UNIT 10: ANIMALS

UNIT 15: ELECTRICITY

UNIT 10: ANIMALS

UNIT 15: ELECTRICITY

- OTHER QUESTIONS FOR SET P5 File Uploaded 26/04/20, 12:37
Table of contents
- Announcements
- SET P5 SB
- SET P5 TG
- click here for a lesson on uses of water
- click here for a lesson on Sources of water and properties of water
- click here for a leson on Rain Water
- click here for a lesson on water polluttans
- video on Lesson 4: Rules of Applying Fertilizers
- click here for a lesson on preparation of soil for cultivation
- click here fof a video on Fertilisation of soil for cultivation
- click here for a video lesson on Animals/Keeping chickens
- Click here for a video on Chicken reproduction
- Click here for a video lesson on Chicken diseases and parasites
- click here for a lesson on Process of chicken farming
- click here for a video lesson on: importance of chicken farming
- click here for a video lesson on Identification of importance of plants
- click here for a video lesson on cash crops
- click here for a video lesson on: the importance of plants
- click here for a video lesson on:COMMON IMPORTANCE OF TREES
- click here for a video lesson on: Cash crops
- click here for a video lesson on: DIGESTIVE SYSTEM
- click here for a video lesson on: Hygiene of digestion
- click here for a video lesson on: Components of balance diet
- CLICK HERE FOR A VIDEO LESSON ON: Stages of digestion
- OTHER QUESTIONS FOR SET P5
- click here for a video lesson on: revision exercises