Topic outline
PART I: GENERAL INTRODUCTION
1.1 The structure of the guide
This section presents the overall structure of this guide, the unit and lesson
structure to help teachers to understand different sections of this teacher’sguide.
Overall structure
The whole guide has three main parts as follows:
General Introduction:
This part provides general guidance on:
• How to develop the generic competences;
• How to integrate cross cutting issues;
• How to cater for students with special educational needs, active
methods and techniques of teaching Physical Education and Sports
and guidance on assessment.
Sample lesson plan:
This part provides a sample lesson plan developed and designed to help the
tutors to develop their own lesson plans.
Unit development:
This is the core part of the guide. Each unit is developed by following the
structure below.
Structure of a unit
Each unit is made of the following sections:
• Unit title: From the syllabus.
• Key unit competence: From the syllabus.
• Prerequisites (knowledge, skills, attitudes and values): This section
indicates knowledge, skills and attitudes required for the success of the
unit. The competence-based approach calls for connections between
units/topics within a subject and interconnections between different
subjects. The teacher will find an indication of those prerequisites and
guidance on how to establish connections.
• Cross-cutting issues to be addressed: This section suggests cross
cutting issues that can be integrated depending on the unit content.
It provides guidance on how to come up with the integration of the issue.
Note that the issue indicated is a suggestion; teachers are free to take another
crosscutting issue taking into consideration the learning environment.
• List of lessons/sub-heading: This section presents in a table suggestion on
the list of lessons, lesson objectives copied or adapted from the syllabus
and duration for each lesson. Each lesson /subheading is then developed.
• Summary of the unit: This section summarizes what students have been
learned in the whole unit.
• End of each unit: At the end of each unit, the teacher’s guide provides the
following sections:
Additional Information
This section gives further information that may help him/her to plan and
conduct Physical Education and Sports lesson.
End unit assessment
This part provides guidance on how to conduct the end unit assessment in a
practical way. It suggests activities/games as well as guidance on criteria to be
considered such as:
– Cognitive skills: (E.g.: Increase of the level of capacity of anticipation,
problem solving during sports activities, know rules of the game, know
techniques and tactics to use different sports activities, know the
importance of practice etc.).
– Technical competences: (E.g.: to receive the ball, to pass the ball to the
teammates, to throw a javelin, to score the goal, to dribble the ball etc.).
– Strong emotional points: Such as self-confidence and feeling, secure.
– Social competences: Such as cooperation and solidarity.
– Attitudes and values: E.g.: optimism, confidence, respect, fair play,
teamwork spirit, self-confidence, determination, courage, impartiality,
avoid doping in sport activities etc.
Additional activities
This section provides additional games/exercises for the teacher to have a wide
range of activities/games related to the unit.
– Consolidation activities: Additional activities to students with special
educational needs.
– Remedial Activities: Additional activities for students who need more
time and exercises to achieve a certain level of performance.-
Extended activities: Additional activities for talented students.
The guide ends with references.
Structure of each lesson
Each lesson/sub-heading is made of the following sections:
– Lesson title: It shows the title of the lesson.
– Introduction: This section gives a clear instruction to the teacher on how to
start the lesson.
– Teaching resources: This section suggests the teaching aids or other
resources needed in line with the activities to achieve the learning objectives.
Teachers are encouraged to replace the suggested teaching aids by the
available ones in their respective schools and based on learning environment.
– Steps of the lesson: This section provides activities/games/exercises and
guidance step by step: Opening discussions, warm up, lesson body, cool down
and closing discussions (R-C-A: Reflect, Connect and Apply).
1.2 Methodological guidance
1.2.1 Developing competences
Since 2015, Rwanda shifted from a knowledge based to a competence based
curriculum for pre-primary, primary and general secondary education. This called
for changing the way of learning by shifting from teacher-centered to the Learner
centered approach. Teachers are not only responsible for knowledge transfer but
also for fostering students’ learning achievement, and creating safe and supportive
learning environment. It implies also that a student has to demonstrate what he/
she is able to do using the knowledge, skills, values and attitude acquired in a new
or different or given situation.
The competence-based curriculum employs an approach of teaching and learning
based on discrete skills. It focuses on what students can do rather than what
students know. Students develop basic competences through specific subject
unit competences with specific learning objectives broken down into knowledge,
skills and attitudes. These competences are developed through learning activities
disseminated in learner-centered rather than the traditional didactic approach.
The students are evaluated against set standards to achieve before moving on.
In addition to specific subject competences, students also develop generic
competences that are transferable throughout a range of learning areas and
situations in life.
Below are examples of how generic competences can be developed in Physical
Education and Sports:
Generic competence
Examples of activities that develop generic competences
Communication
– Organize and present in writing and verbally a complete and clear report
of a training session, a match for a given sports or any organized sport
event;
– Select and use a set of verbal and nonverbal channels of communication
during a game situation or sport activities (a voice, facial expressions and
bodily movements);
– Observe and interpret different game situations, sport events and react
accordingly;
– Argue verbally or in writing about any given performance/results in sports
activities.
Cooperation, Personal and Interpersonal management and life skills
– Playing in Pairs;
– Playing in small groups/teams;
– Playing in large team and/or a club.
Critical thinking
– Demonstrate advantages of Sports activities to the schools where sports is
valued contrary to a school or institution where sport is neglected.
Innovation and creativity
– Create a set of physical activities of a training session for a given sport;
– Leading a given activity in sport training session with objectives,
methodology, observations, results and conclusions;
– Design a sketch map of some techniques and tactics used in different
games;
– Create a chart of the main steps in a performing a given tactic in different
sports/games;
– Create and organize sport event.
Intra and interpersonal skill (Intra skills refer to the skills of knowing and
living with oneself while Inter personal skills deals with knowing and living
with others)
– Ability in facilitating interaction and communication with others.
Lifelong learning
– Exploit all opportunities available to improve on knowledge and skills.
– Reading sports journals, listening to sports news and following different
games and sport events on TV or on playgrounds/ stadium.
Research and Problem solving
– Research using internet or books from the library and develop tactics or
strategies to be used in performing sports activities;
– Fabricate sports materials from local materials (e.g. making a soccer ball,
making a shot putting using sand and sacs, etc.).
1.2.2 Addressing cross-cutting issues
Among the changes in the competence, based curriculum is the integration
of cross cutting issues as an integral part of the teaching learning process as
they relate to and must be considered within all subjects to be appropriately
addressed.
The eight cross cutting issues identified in the national curriculum
framework are:
• Comprehensive Sexuality Education (CSE);
• Environment and sustainability;
• Financial Education;
• Gender;
• Genocide studies;
• Inclusive Education;
• Peace and Values Education;
• Standardization Culture.
Some cross cutting issues may seem specific to particular learning areas or
subjects but the teacher need to address all of them whenever an opportunity
arises. In addition, students should always be given an opportunity during the
learning process to address these cross cutting issues both within and out of
the classroom to progressively develop related attitudes and values.
Below are examples on how crosscutting issues can be addressed and how to
integrate them in Physical Education and Sports lessons.
Comprehensive sexuality education
A teacher provides physical activities. A teacher sets instructions that prevent
any sexual harassment, any kind of gender-based violence like sexual abuse
and physical contacts oriented to the sexuality intention physical and sports
activities.
Environment and sustainability
In teaching and learning process environment and sustainability are addressed
when:
The teacher explains to students the importance of a safe and clean environment
for safe physical and sport activities
.– Students avoid throwing away used materials before, during and after
exercises.
– There are rules set for cleaning the playgrounds before and after exercises.
– Students avoid spitting or blowing the nose in pitch, field, and court during
exercises.
Financial Education
in teaching and learning process, financial education may be addressed when:
– Students are able to find themselves local grown solutions as regards to
sports equipment and sport materials where there is shortage;
– Students are good managers of sports infrastructures and sports materials,
knowing that some of them are costly.
Gender
Teachers should ensure equal participation of both girls and boys during
physical activities and equal participation in open discussion and in refereeing.
Genocide studies
Inclusive education
While conducting Physical Education and Sports activities a teacher should take
a time to explain students how sports should be used to fight against Genocide
against Tutsi ideology and how to prevent it or organizing Genocide against
Tutsi memorial tournaments at school and giving the message related to the
Genocide against Tutsi.
Involve all students in all activities without bias. E.g., allow a student with
physical disability to be a referee, a coach, an assistant, a judge. Modify activities
so they suit the abilities and attention span of the students.
Peace and Values Education
In teaching and learning process, the teacher must encourage tolerance,
patience, cooperation, teamwork spirit, mutual help, and respect of opinions of
colleagues, obeisance (respect) of rules and culture of acceptance for creation
of a more peaceful game situation.
Standardization culture
– In teaching and learning process, the students must use standardized
materials in prevention of injuries and accidents.
– The teacher also must help students to know how to choose and use
safe sports clothing for their health (e.g. safe sports shoes), safe physical
exercises (avoid bad body postures and forbidden body exercises, adapted
physical activities).
1.2.3 Attention to special educational needs
Currently we are convinced that games and sports are very beneficial to people
with physical, mental, emotional and psychological disabilities.
What attitude to adopt to promote the integration of students with disabilities
during recreational and sports activities?
To promote the integration of students with disabilities during recreational and
sports activities, the following tips may help teachers/educators in the training
of these students:
• Adopt an approach of sports and game which is based on skills, you
focus on what students are capable of doing. In this respect, you can
introduce small changes in games and activities for students with
disabilities.
• Be relaxed and natural when you are with people with disabilities. Do
not treat them as if they need your pity or your charity. Do not think
they necessarily need help. Let them do and say things themselves.
• Avoid keeping students with disabilities out of the game: in a regular
class, let them participate in other’s games. However, avoid being too
demanding about the level of their performance.
What can we modify to promote the integration of students with disabilities
during recreational and sports activities?
Within the framework of integration of students in games, according to the
nature and the gravity of impairment, students can participate in games
designed for all students. In other cases, the teacher or educator should think
about changes he/she could make to meet the special needs of teachers he/she
has in the group. He/she should also think about adaptation of the game, the
playground, equipment and duration of the game.
Below are some examples of adaptation to initiate:
i. Adapt roles and rules
• Make the game easier or harder by changing some rules.
• Let students play different roles and in different positions.
• Allow students to play in different ways, for example, sitting instead of
standing.
• Simplify expectations of the game.
• Simplify instructions.
ii. Adapt the playground
• Change the size of the playground. Enlarge or reduce the playground.
• Change the distance: for example, put a target closer.
• Change the height of a target.
• Allow more or less space between students.
• Let students move from different spaces.
iii. Adapt the materials
• Reduce the size or weight of materials.
• Choose balls of various textures, bright colours or balls, which make
noise.
iv. Adapt the duration of the activity
• Reduce or extend the time allotted to the activity.
Aspects to consider when you want to modify an activity
Ask yourself the following questions:
• Does the modification affect negatively the activity? This should not be
the case.
• Does the modification correspond to the ability and duration of
students’ attention?
• Will the students with disability be able to play with others?
• Is the activity proportional to ages of participants?
• Does the activity respond to the needs of all participants?
Strategies to help students with physical disabilities or mobility difficulties
• Adapt activities so that students, who use wheelchairs, use other
mobility aids, have difficulty in moving can participate.
• Ask for adaptation of furniture. E.g., the height of a table may need to
be changed to make it easier for a student to reach it or fit their legs
or wheelchair. Encourage peer support between students. Get advice
from parents or a health professional about assistive devices.
Strategies to help students with hearing disabilities or communication difficulties
• Always get the student’s attention before you begin to speak.
• Encourage the students to look at your face.
• Use gestures, body language and facial expressions.
• Use pictures and objects as much as possible.
• Ask the parents/caregivers to show you the signs they use at home
for communication (use the same signs yourself and encourage other
students to also use them).
• Keep background noise to a minimum.
Strategies to help students with visual disabilities
• Help students to use their other senses (hearing, touch, smell and
taste) to play and carry out activities that will promote their learning
and development.
• Use simple, clear and consistent language.
• Use tactile objects to help in explaining a concept.
• For students with some sight, ask them what they can see. Get
information from parents/caregivers on how the students manage
their remaining sight at home.
• Make sure that the students have a group of friends who are helpful
and who allow the student to be as independent as possible.
• Plan activities so that students work in pairs or groups whenever possible.
1.2.4 Guidance on assessment
Assessment in PES must be a continuing process that arises out of interaction
during teaching and learning process. It includes lesson evaluation during
R-C-A after each session and end of unit assessment.
This formative assessment should play a big role in teaching and learning
process. The teacher should encourage individual, peer and group evaluation
of the activity done. In this step, the teacher sets exercise to assess abilities,
skills, knowledge and attitudes of individual students basing on unit or lesson
objectives. During assessment activity, students perform exercises individually
or work in teams. The teacher avoids intervening directly. In fact, results from
this assessment inform the teacher on next steps for the whole class and
individuals. In some cases, the teacher can end up with giving remedial and
extra activities.
1.2.5 Students’ learning styles and strategies to conduct teaching and learning process
There are different teaching styles and techniques that should be catered for. The
selection of teaching method should be done with the greatest care and some of the
factors to be considered that are:
• The uniqueness of Physical Education and Sports.
• The type of lessons to be learned.
• The particular learning objectives to be achieved.
• The allocated time to achieve the objective.
• Available instructional Sports materials, equipment and Sports
infrastructure.
• Individual students’ needs.
Abilities of students’ and learning styles
There are different learning styles to use while teaching Physical Education and
Sports depending on students’ abilities. The teacher should use a wide range of
techniques and tools to cater for different specificity of students’.
1.2.6 Teaching methods and techniques that promote the active
learning
A. Suitable Methods / techniques to teach PES
Physical Education and Sports is taught:
• In the classrooms (e.g. using a projector and videos to teach steps of
performing a technique, a system of game play and using a chalk board
to teach rules of the game).
• In the playgrounds/courts for teaching different games (e.g.: football
playground for teaching football game, volleyball court for teaching
volleyball game, handball playground for teaching handball game,
basketball court for teaching basketball game, netball court for teaching
netball game).
• On the athletic track, fields, roads and hills for teaching athletics
activities (racing, jumps and throws).
• In Gymnasiums for teaching gymnastics and indoor sports.
In the process of teaching and learning Physical Education and Sports, the
following methods should be used:
• Demonstration method: A teacher makes him/herself a demonstration
or asks an able student to do a demonstration. The teacher is advised not
to do a demonstration if he/she is not sure to do it better than every
individual student can do it.
• Verbal Explanation: A teacher describes/explains activities he/she
wants students to perform.
• Practice session: Students are given time to practice exercises intended
to develop the desired skills.
• Supervision: During a PES lesson, the teacher plays a role of supervising
where he/she must move around in field and make corrections for
individual students during exercises.
• Correction: While making corrections starting by group correction to
individual correction. Corrections for inaccuracy in performing given
techniques are done immediately.
• Evaluation: Let students do their own evaluation for each other, then
help them by giving some advice using encouraging words. Evaluation is
a continued activity throughout the physical exercises.
• Discussion: Discussions are used before and after teaching and learning
activities in open talks to motivate and develop attitude and values in
students.
• Application: Use of learned Physical Education and Sports skills in
different situations to solve a given problem.
Physical Education and Sports in small schools or schools with limited
facilities
Where schools have specific problems related to a lack of indoor and outdoor
space, consideration might be given to:
• The use of the classrooms, corridors and available school grounds for
orienteering exercises.
• The provision of markings on the playground for athletic activities and
small- sided games.
• The use of local facilities, e.g. Local grounds, community centres, parish
halls, youth clubs, colleges, higher learning institutions etc.
• Co-operation with other primary or secondary schools in sharing
facilities.
• Allocating more time to Physical Education and Sports in good weather.
• Visiting an outdoor education centre providing facilities for many
worthwhile activities.
• Use possible available space, which should be used to facilitate teaching
and learning of Physical Education and Sports.
• Use local materials by making for example: goal posts for Football,
Netball and Handball, posts for supporting net in Volleyball.
• Try to create their own playgrounds by using space available.
B. Steps of a PES lesson
While teaching a Physical Education and Sports lesson by using play based
approach, a teacher follows these steps:
Step 1: Opening discussions.
Step 2: Warm-up activities.
Step 3: Lesson body.
Step 4: Cool down.
Step 5: Closing discussions focusing on Reflect, Connect and Apply (R-C-A).
Step 1: Opening discussions
The Opening discussions prepare students for the learning experience.
Discussions encourage them to think about the learning objective of the play.
Opening discussions include quick questions to stimulate students’ curiosity
and engagement.
Strategies for good discussions:
• Set appropriate arrangement for good discussions: e.g. semi-circle,
circle, U-shape.
• Prepare students for discussions.
• Set ground rules, which create a safe atmosphere for students.
• Ensure interactive and inclusive discussions.
• Acknowledge each student’s contribution.
• Ensure classroom management and control.
Step 2: Warm-up activities
A warm-up is performed before a game/play/practice of technique. It helps
the body activation, prepares itself for a physical exercise, and reduces the risk
of injury. The warm-up should be a combination of rhythmic exercises, which
begin to raise the heart rate and raise muscle temperature, and static stretching
through a full range of motion. The use balls while warm up activities help
students to master previous skills, which should help them to perform new
skills.
Step 3: Lesson body
A game/play/exercise is selected according to the topic to be taught/age of
students/ability of students/available materials and skills you want to develop.
Step 4: Cool down
A cool down activity is an easy exercise that allows the body to gradually
transition to a resting or near-resting state. It is done after the main activity or
lesson body.
Step 5: R-C-A discussions
Assessment in PES lesson is done when students are performing exercises/
activities/games. At this level, through the R-C-A discussions the teacher allows
students to do their self-evaluation and provide the feedback from learned
lesson.
Reflect
-Connect
-Apply is a teaching and learning strategy that leads students
through a 3
-steps discussion about their experience:
Reflect
– Ask questions, which help student to reflect on the game/ play/skill
learned. The teacher asks questions about their experience and feelings
during the game/exercise/activity.
The teacher asks questions like:
– What was interesting?
– What was easy?
– What was challenging?
– What strategies have you used to win?
– How did you feel in case of success or failure?
Connect
Ask questions, which help students to connect what they have learned to life
experiences and lesson content.
The teacher asks questions like:
– How this game/exercise/activity is connected to what you already know,
believe or feel?
– Does it reinforce or expand your view?
– The teacher also asks questions, which connect the game/exercise/activity
to lesson content.
Apply
Ask questions, which help student to apply acquired experience to another
situation.
The teacher asks questions like:
– How could you use what you have learned from this experience?
– How could you use your new learning to benefit yourself, others, your
community?
RCA is based on the work of educationalists such as Freire, Brown, Piaget,
Brantford and others who support the concept of an educational process
that is active, relevant, reflective, collaborative and applied, and has its roots
in experiential learning theory (Kolb, 1984). Play-based learning technique
is closely linked to the Experiential Learning Cycle. It starts with a game or
play-based activity and ends with a closing Reflect, Connect and Apply (RCA)discussion linked to the subject matter.
Experiential Learning Cycle (David A. Kolb, 1984 – Experiential Learning Theory).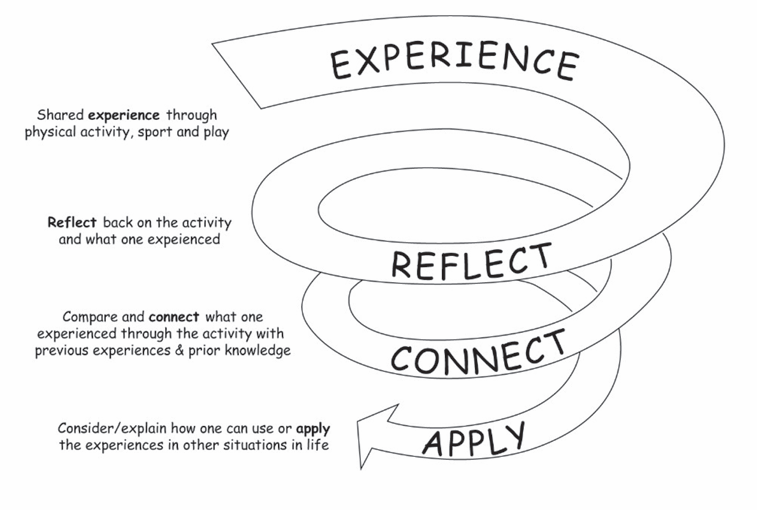
PART III: UNIT DEVELOPMENT :UNIT 1 :GYMNASTICS
Key unit competence: Apply rules and regulations of Gymnastic.
1.1 Prerequisite (Knowledge, skills, attitudes and values)
Students of senior six will learn better Gymnastic rules if they can perform
ground and apparatus gymnastics learnt in senior four.
1.2 Cross-cutting issues to be addressed
• Gender:
In teaching and learning of Gymnastics rules, the teacher must prepare and
provide activities that engage both girls and boys equally to exploit their full
potential and talents without any discrimination or prejudice.
• Inclusive education:
The teacher as a facilitator he/she must consider different special education
needs and select physical activities to adapt his teaching approaches to all
students. This creates a positive attitude and helps all learners to participate
actively and develop their competence levels.
• Financial education:
The teacher should integrate Financial Education into his teaching/learning
activities by providing the local and no cost teaching material where is possible.
He/she must encourage students to make their own materials that can help
them to develop competences not only in sport at school but also in their daily life.
• Standardization culture:
The teacher must choose and select the standardized materials to use in his/
her teaching/learning process. It is necessary to provide appropriate materials
required to the levels of students and help them to develop culture of checking
and using the quality of sport materials for the competitions before to use them
in order to prevent injuries and other accident.
• Environment and sustainability:
The teacher should provide materials and deliver the lesson with encouraging
students to protect the environment and well use of materials. The teacher
helps them to develop the spirit of keeping safe the environment they use in
sports activities.
• Peace and values education:
The teacher helps students to develop fair play and social values by planning
physical activities that Avoid violence and conflict in the game and by setting
clear and relevant instructions. He/she should provide the activities that help
students to develop their competence peacefully.
• Comprehensive sexuality education:
A teacher provides physical activities and sets instructions that prevent sexual
harassment, any kind of gender based violence like sexual abuse and physical
contacts oriented to the sexuality intention.
• Genocide studies:
While conducting gymnastics rules lesson a teacher should take a time to explain
students how sports should be used to fight against Genocide ideology and
how to prevent it. For example, to organize Genocide memorial tournaments at
school and give the message related to the Genocide.
1.3. Guidance on introductory activity
Before introducing the lesson one of this unit, teacher must introduce the whole
unit. The teacher as a guide, facilitator and expert, ask questions or give activity
related to Gymnastics exercises in order to help them to predict what to belearnt in the whole unit.
1.4. List of lessons/sub-heading
Lesson 1: Gymnastics exercises rules
a) Learning objective
List and explain elements of ground and apparatus gymnastics rules.
b) Teaching resources
Books, internet videos, pictures on manila paper, projector and laptop.
c) Prerequisites/Revision/Introduction
Student of senior six will learn better Gymnastics rules if they can perform ground
and apparatus gymnastics learnt in senior four.
d) Learning activities
Opening discussions
Teacher as a facilitator and a guider facilitates students in the following ways:
– Ask questions about types of ground and apparatus gymnastics exercises
learnt in senior four.
– Introduce the lesson of the day by asking question related to gymnastics
rules, like to brainstorm different rules and regulations to follow when
executing gymnastics exercises.e) Lesson body
Application activity 1.1
Divide students into 5 groups, and distribute to them questions in the table
based on group numbers and let them discuss given questions into their
respective groups. Distribute Gymnastics rules for each group based on
questions given and facilitate students to get resources (if possible, you may
use smart classroom and let them use soft copy of gymnastics rules, videosshowing officiating procedures etc.)
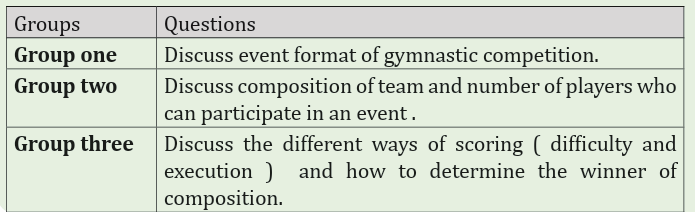
Pass though groups and help them where is necessary. Request students to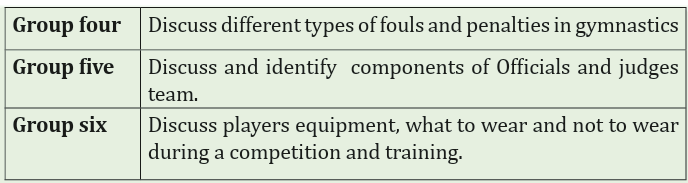
choose a secretary to record their findings and group representative who will
present their findings.– Request group representative to present their findings and group members
may support where is necessary.
– After presentation of all groups, use a projector to recap presentations,
show them different event format used in gymnastics competition.
Closing discussions (RCA)/ Conclusion
Summarize the lesson on different rules in gymnastics (event format, scoring,
teams and players, fouls and penalties) and ask students to write them in their
notebooks.
Lesson 2: Officiate a gymnastic competition
a) Learning objective
Interpret elements of apparatus and ground gymnastics during gymnastics
competition.
b) Teaching resources
Parallel bar, Horizontal bar, Playground.
c) Prerequisites/Revision/Introduction
Student of senior six will better officiate a Gymnastics competition if they can
list and explain element of gymnastics rules learnt in lesson one of this unit.
d) Learning activities
Opening discussions
– Ask questions related to gymnastics rules learned in lesson 1 in this unit.
– Let students answer asked questions and support their answers where is
necessary.
– Introduce the new lesson and invite students to start warm up.
Warm up exercises
– Let students perform general warm up exercises and specific warm up
based on the most body’s parts to be used while performing gymnastics
exercises and stretch their muscles properly.
– One student can lead warm up and stretching exercises.
e) Lesson body
Activity 1.2
Competition situation
– Organize a gymnastic competition between students of the same class.
– Form three groups A, B and C of students. Competition is organized in
this way:
Group A and B will be players and compete on floor ground gymnastics
exercises and apparatus exercises), C group will act as officials by providing:
judges other remaining players will record fouls and misconduct happened
and how officials have been reacted for those fouls and misconducts.
Points to be inspected by judges are:
– How difficulty exercise was.
– How exercises are being executed.
– Fouls made by players and penalties to be given.
Rotate groups until everyone have been a player and a judge.
Or Prepare a video of Olympic gymnastics competition or world championship,
and present if to students and ask them to judge the gymnasts performing in
that video. Each student must have a pen and note book, they must take note on
what they can do according to the performance of each athlete, and after they
must give score accordingly.
Points to check are:
How difficulty exercise was;
How exercises are being executed;Fouls made by players and penalties to be given.
Cool down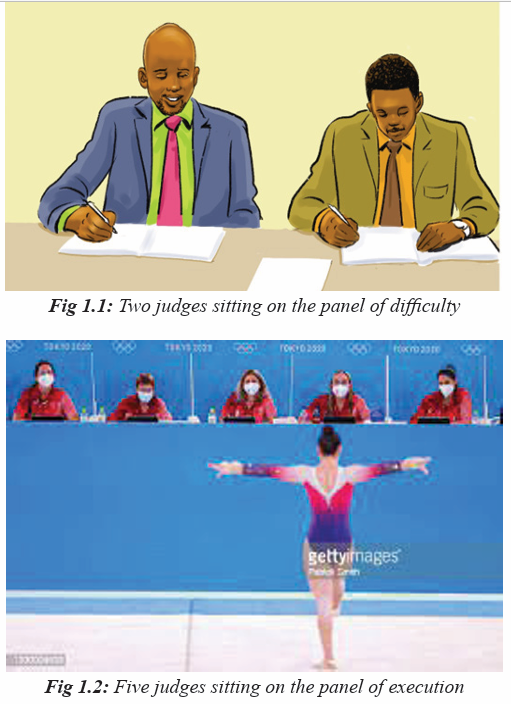
Choose one student to lead cool down and invite them to start after Competition
discussion.
1.5 additional information for tutors
Gymnastics, is a competitive sport in which individuals perform optional
and prescribed acrobatic exercises, mostly on special apparatus, in order to
demonstrate strength, balance, and body control.
It is a part of the ancient Olympic Games; gymnastics was virtually reinvented in
the modern era by the German Friedrich Jahn (1778–1852). The sport became
part of the revived Olympics in 1896; women’s gymnastics was instituted in
1936. Men’s events include the horizontal bar, parallel bars, pommel horse,
vaulting, rings, and floor exercises. Women’s events include the balance beam,
uneven parallel bars, vaulting, floor exercises, and rhythmic sportive gymnastics.
A lot of gyms will not allow you to participate in gymnastics if you don’t wear an
appropriate attire/clothes. Attire is not only a requirement to meet the standards
of a gym or competition but it is required for safety.
Loose clothing and gymnastics are a match that do not go well together, as a
baggy clothes can get in your way and lead you to injure yourself.
Girls: Wear either a leotard or biketard during a competition.
Boys: Wear t-shits that are tucked into pair of pants or shorts that are not baggy
will do the trick.
– No shoes are allowed on gym floor; bare feet or beam shoes are recommended
to avoid injuries or damaging the gymnastics floor.
– Jewelry are not allowed during competition or training.
– Gymnastics can either compete in a team or as an individual. There is a
team competition, an all- round competition and individual competition
for each event. The team event consists of four athletes, with three of them
competing in each event. There is a specific order in which athletes rotate
between apparatuses.– Women’s gymnastics consists of vault, bars, beam and floor.
– Men’s gymnastics consists of floor, pommel horse, rings, vault, parallel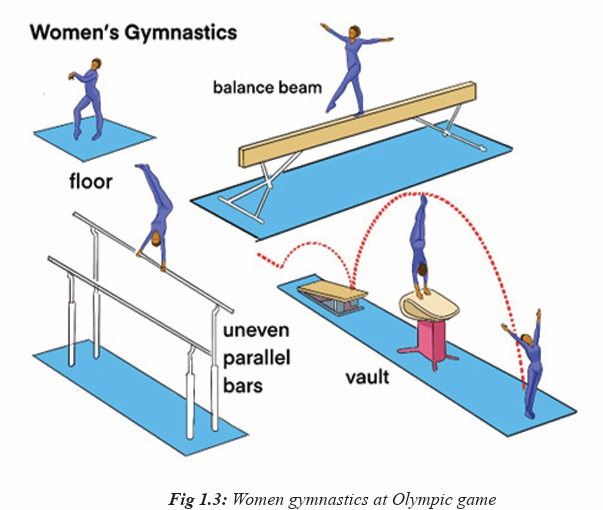
bars and high bar.
– Athletes are scored on both difficulty and execution. The score is determined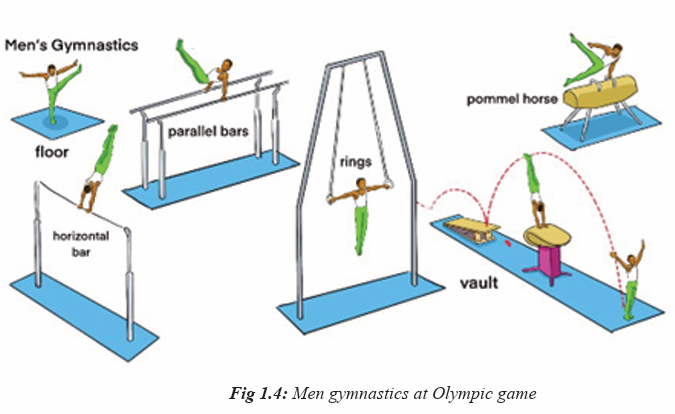
based on the execution and an artistry of routine with deductions for falls,
errors in technique and execution. Deductions range from 0.1 to1.0. errors
such as tie violations, stepping out of bounds, behavior faults, or falls are
penalized using neutral deductions.
– Gymnastics meet have no set time limit, but finish when every athletes has
performed on their specific event.
– Penalties are deciding by the judges, with the most common penalties
coming from a fall off an apparatus.
– The Jury is composed by the D-panel that judges the difficulty of an exercise,
and the E-panel that judges the execution of an exercises, and the R-panel
(or reference panel) that acts as a check on the athlete with the highestscore after everyone competes is named the winner.
1.6 End of unit assessment
Prepare a video demonstrating a gymnasts performing floor exercises
(ground gymnastics exercises) or apparatus gymnastics exercises, and
present it to the students in smart classroom. Students must watch the
video and decide the winner of the competition by providing the score and
penalties each athlete received and why he received it. This work is doneindividually.
1.7 Additional activities
Remedial activities
In groups, students watch a gymnastics video and identify and explain
elements of ground and apparatus rules and regulations.
Consolidation activities
Participate in competitions between small groups at school and choose
records.
Extended activities
their own officials to be parts of the jury to judge the performance and make
Organize a school competition of gymnastics (apparatus and ground
exercises) and asks students to become members of jury that is officiatingthe competition
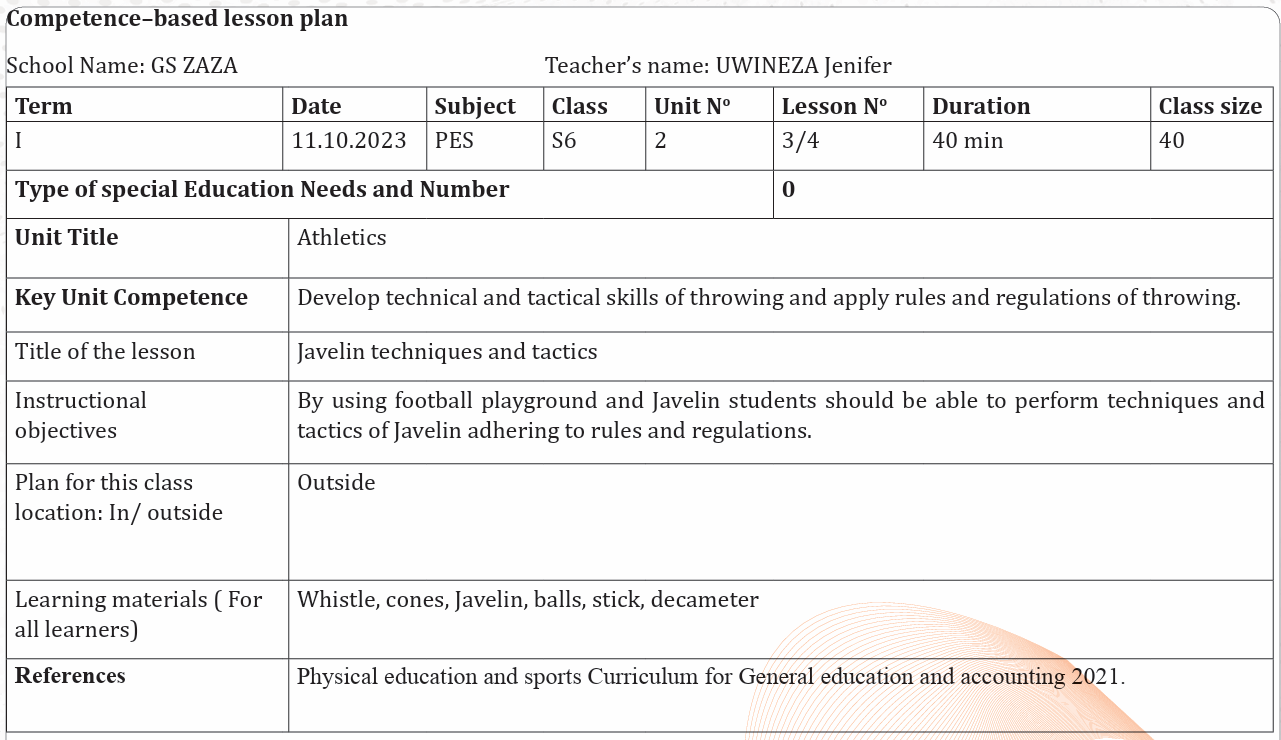
UNIT 2: ATHLETICS
Key unit competence: Develop technical and tactical skills of throwing and
apply rules and regulations of throwing.
2.1 Prerequisite (Knowledge, skills, attitudes and values)
Students of senior six will learn better athletics throws techniques and rules if
they can perform motor control, body control and balance learned in Secondary
School ordinary level.
2.2 Cross-cutting issues to be addressed
Gender: In teaching and learning of athletics throws, the teacher must prepare
and provide physical activities that engage both girls and boys equally to exploit
their full potential and talents without any discrimination or prejudice.
Inclusive education: The teacher as a facilitator he/she must consider
different special education needs and select physical activities to adapt his
teaching approaches to all students. This creates a positive attitude and helps
all learners to participate actively and develop their competence levels.
Financial education: The teacher should integrate Financial Education into
his teaching/learning activities by providing the local and no cost teaching
material where is possible. He/she must encourage students to make their
own materials that can help them to develop competences not only in sport at
school but also in their daily life.
Standardization culture: The teacher must choose and select the standardized
materials to use in his/her teaching/learning process. It is necessary to provide
appropriate materials required to the levels of students and help them to
develop culture of checking and using the quality of sport materials for the
competitions before to use them in order to prevent injuries and other accident.
Environment and sustainability: The teacher should provide materials and
deliver the lesson with encouraging students to protect the environment and
well use of materials. The teacher helps them to develop the spirit of keeping
safe the environment they use in sports activities.
Peace and values education: The teacher helps students to develop fair play
and social values by planning physical activities that Avoid violence and conflict
in the game and by setting clear and relevant instructions. He/she should
provide the activities that help students to develop their competence peacefully.
Comprehensive sexuality education: A teacher provides physical activities
and sets instructions that prevent sexual harassment, any kind of gender based
violence like sexual abuse and physical contacts oriented to the sexuality
intention.
Genocide studies: While conducting athletics throws activities a teacher
should take a time to explain students how sports should be used to fight against
Genocide ideology and how to prevent it. For example, to organize Genocide
memorial tournaments at school and give the message related to the Genocide.
2.3 Guidance on introductory activity
Before introducing the lesson one of this unit, teacher must introduce the whole unit.
The teacher as a guide, facilitator and expert, ask questions or give activity
related to athletics in order to help them to predict what to be learnt in the wholeunit.
2.4. List of lessons/sub-heading
Lesson 1: Shot put techniques and tactics exercises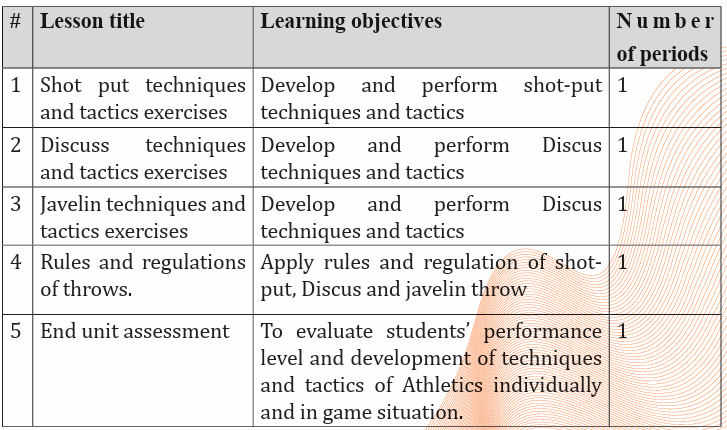
a) Learning objective
Develop and perform shot-put techniques and tactics.
b) Teaching resources
Cones, Whistle, Internet, Laptop, Projector, Field/playground/throwing area,
watch, decameter and shot put (for men and women).
c) Prerequisites/Revision/Introduction
Students of senior six will learn better techniques and tactics of shot putting in athletics
if they have developed basic techniques of shot putting in Ordinary Level and
have performed basic physical exercises.
d) Learning activities
Opening discussions
– Ask questions related to different types of athletics learned in senior four
and five.
– Introduce the lesson of the day by asking questions on techniques of shot
putting learned in ordinary level.
– Invite students to start warm up exercises.
Warm up exercises and stretching exercises
Let students perform general warm up exercises and specific warm up based
on the most body’s parts to be used while performing techniques of shot put
and stretch their muscles properly.
e) Lesson body
Activity 2.1
Explain and demonstrate to the students that during shot put, the following steps
are respected:
1st step: Holding a shot put
– Applying to grip the shot put.– Placing parallel fingers and slightly speed.
2nd step: Neck placement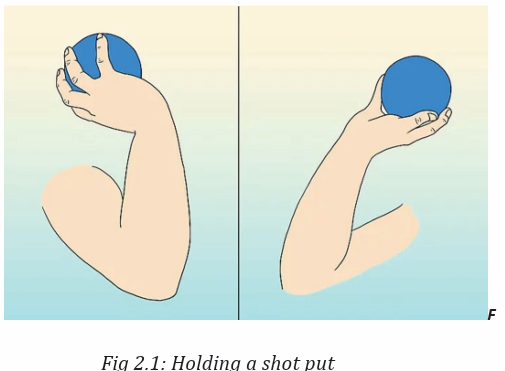
– Raise the shot above their head.
– Push the shot into their neck.
– Holding the shot on the front part of the neck.
– Lift elbow parallel to the floor.
– Check to see that their thumb is pointing down towards their clavicle.
– The palm keeps pointing towards the throwing direction.
3rd step: Preparation
– Carrying out start upright at the rear of the circle.
-Back to the stop board.
– Bend trunk forward parallel to the ground.
– Supporting the leg bent.
-Make free leg drawn towards the back of the circle.
4th step: Gliding
– Gliding off the right/left foot to its heel.
– Placing it in the center.
– Coordinate landing feet simultaneously.
– Land left/right foot on the ball.
– Maintain landing feet on the ground.
5th step: Rotation/deliver/recovery
– Execute preparation with non-support and maintain foot placement.
– Deliver shot put with increasing power position, accelerate and make final
– arm movement.
– Make recovery by changing legs quickly after the release by bending right
– leg, lowering upper body.
– Swing the left/right leg backwards and keep eyes look down.
Shot putting styles
There are two styles, which are currently used in shot put competition:
– The glide.
– The spin (rotational techniques).
Activity 2.2
Let students perform techniques of throwing shot put individually using
glide style by making many trials in order to be familiarized with shot put
throw, try to keep security while throwing by giving enough space to the
thrower in order to avoid accidents.
Activity 2.3
Let students perform techniques of throwing shot put individually using
rotational style by making many trials in order to be familiarized with shot
put throw, try to keep security while throwing by giving enough space to the
thrower in order to avoid accidents.
Application Activity 2.1
Let student teachers perform techniques of shot putting individually
using the style of their choice and record their performance to show and
evaluate their own progress. They can do this activity in a small competition.
Remember to give enough space to the thrower in order to avoid possible
accident, which may occur during throwing.
Cool down exercises
Ask students to make sure that their muscles are stretched after throwing a shot
put. To stretch shoulders, stand straight and lift your arm, holding it straight
Closing discussions (RCA)
and parallel to the floor, and gently stretch it backward, which will extend your
arm behind your shoulder. Hold the position for 30 seconds, then repeat the
exercise on the other side.
Reflect
– What are challenges/benefits did you face while performing exercises of
shot putting?
– How did you proceed in order to perform techniques of that throw?
Connect
– In which conditions do you need throws like shot putting?
Apply
– What is the usefulness of shot putting?
– How will you use skills of shot putting in your daily life?
Lesson 2: Discus techniques and tactics
a) Learning objective
Develop and perform discus techniques and tactics.
b) Teaching resources
Cones, Whistle, Internet, Laptop, Projector, Field/playground/throwing area,
watch, decameter and Discus (for men and women).
c) Prerequisites/Revision/Introduction
Students of senior six will learn better techniques and tactics of discus throw
in athletics if they have developed basic techniques of discus in Ordinary Level
and have performed basic physical exercises.
d) Learning activities
Opening discussions
– Ask questions related to different types of athletics learned in senior four
and five.
– Introduce the lesson of the day by asking questions on techniques of discus
learned in ordinary level.
– Invite students to start warm up exercises.
Warm up exercises and stretching exercises
Let students perform general warm up exercises and specific warm up based on
the most body’s parts to be used while performing techniques of discus throwand stretch their muscles properly.
e) Lesson body
Activity 2.4
Explain to the students that the discus throw is divided into four main phases;
Gripping the implement, Foot placement, the power position, and release and
recovery.
Phase 1: Gripping the implement
Request students to:
– Make preparation by holding the discus.
– Face back to the throwing direction.
– Bend knees slightly.
– Keep the weight on the balls of the feet.– Keep arms nearly to the shoulder height
Phase 2, 3 and 4: Foot placement, power position, release and recovery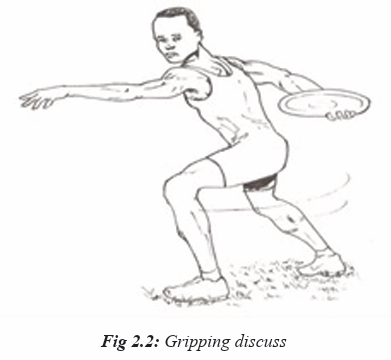
Request students to:
– Make preparations with non-support.
– Provide support and maintain momentum.
– Deliver by the maintenance of power position (the right toe should clear
past the left foot before the athlete starts the sprint to the middle.
– The left leg should stay low and fixed, ready to push off toward the front of
the circle the left arm will remain inside the knee and with the shoulders
level to help keep the body on balance) and acceleration.
– Recover with changing legs quickly after the release.
– Bend right leg and lower upper body.– Swing the left leg backwards and keep eyes look down.
Remind students that the influence on discus distance are the following: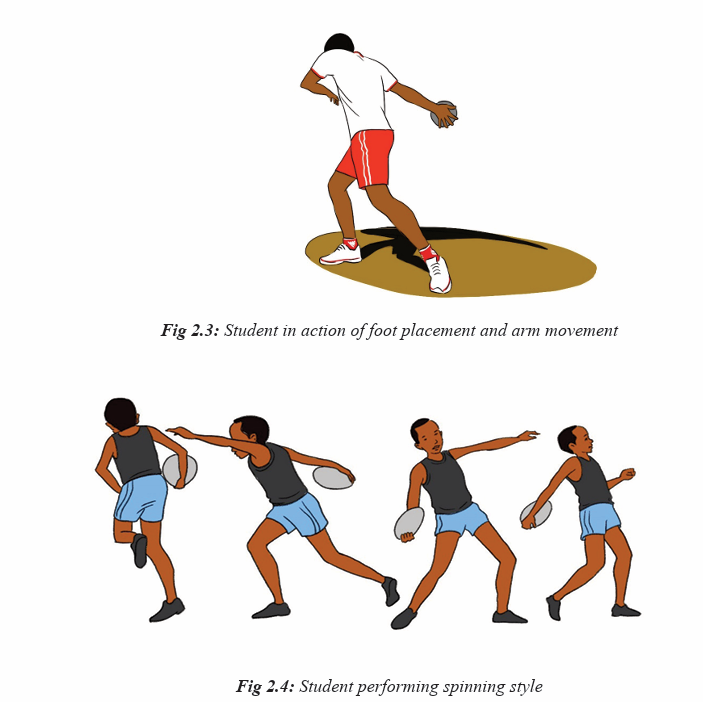
– Velocity of the discuss at release.
– Angle of release.
– Attitude angle or angle of tilt at the release.
– Wind direction and velocity.
Activity 2.5
Let students perform techniques of throwing discus individually by making many
trials in order to be familiarized with discus throw, try to keep security whilethrowing by giving enough space to the thrower in order to avoid accidents.
Application Activity 2.2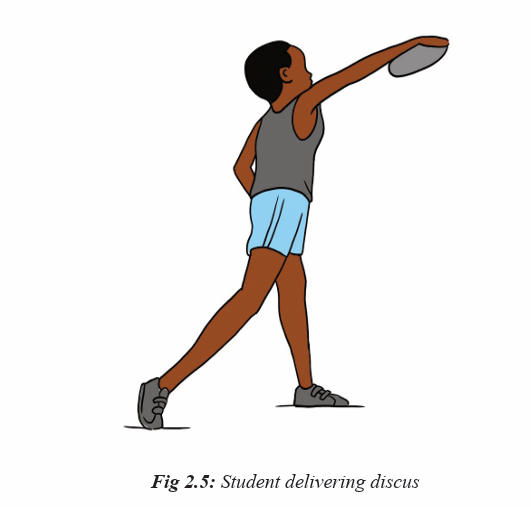
– Let students perform techniques of throwing discus individually and
record their performance with evaluating their own progress.
– They can do this as a small competition. Remember to give enough
space to the thrower in order to avoid possible accident, which mayoccur during throwing.
Cool down exercises
Let students do light exercises and stretch their group of muscles by insisting
on most used parts. Guide them while stretching their muscles systematically.
Help them/demonstrate/correct where is necessary.
Closing discussion
Reflect
– What are challenges/benefits did you face while performing discus throw
exercises?
– How did you proceed to perform those exercises?
Connect
– In which conditions do you need throw like discus?
Apply
– What is the usefulness of discus throw?
– How will you use skills of discus throw in your daily life?
Lesson 3: Techniques of throwing javelin
a) Learning objective
Develop and perform Discus techniques and tactics.
b) Teaching resources
Field/playground/throwing area, Watch, Whistle, Decameter, Javelin (for men
and women).
c) Prerequisites/Revision/Introduction
Students of senior six will learn better techniques and tactics of throwing
javelin in athletics if they have developed basic techniques of javelin throws in
Ordinary Level and have performed basic physical exercises.
d) Learning activities
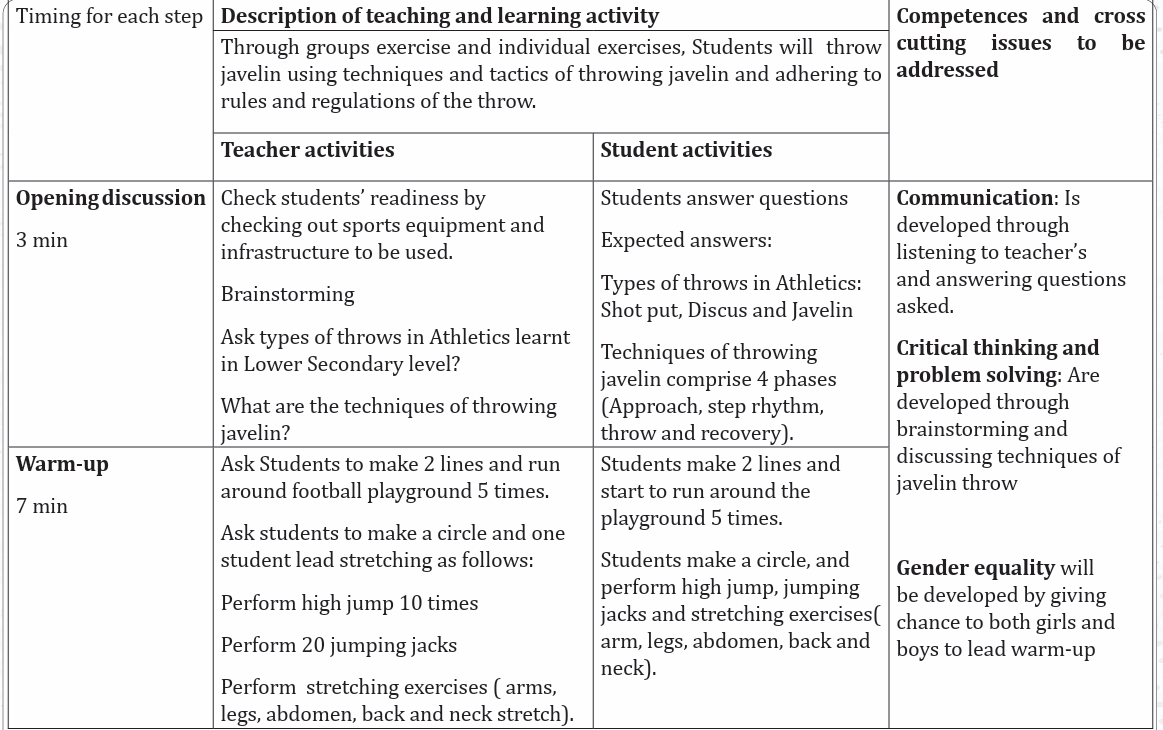
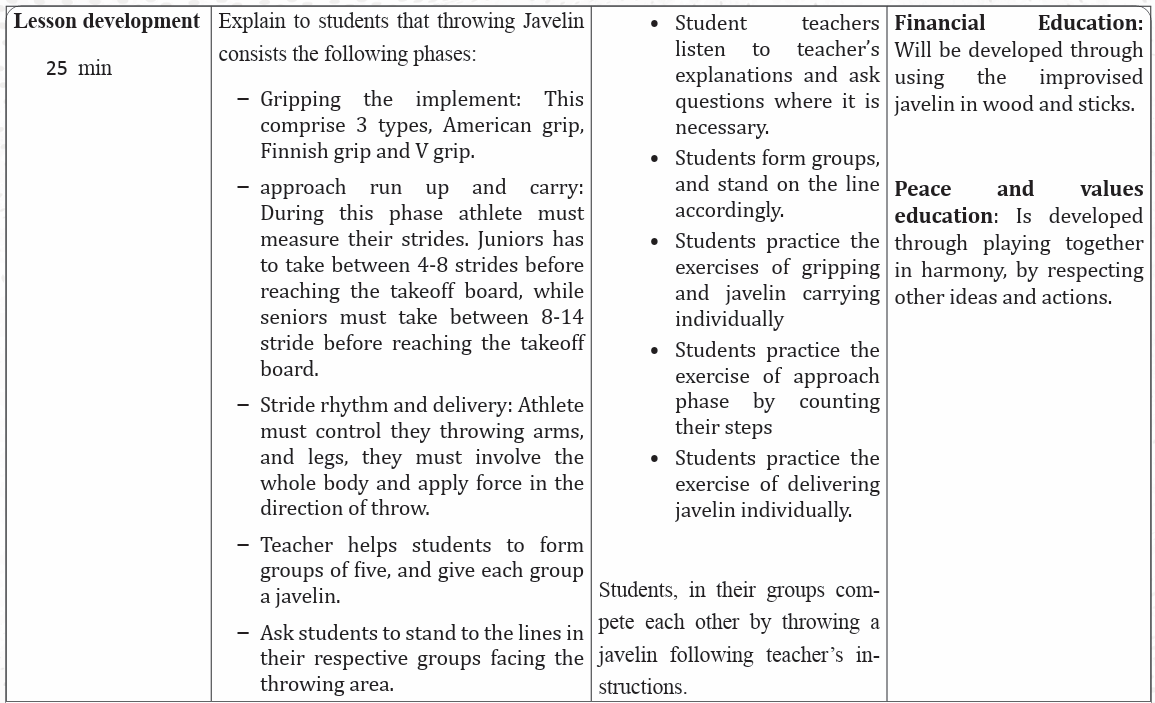
Opening discussions
– Ask questions related to techniques of throwing javelin learned in ordinary
level.
– Let students answer questions, support them where is necessary and
introduce the new lesson.
– Invite students to start warm up exercises.
Warm up exercises and cool down description
Let students perform general warm up exercises and specific warm up based
on the most used body’s parts to be used while performing techniques of javelin
throwing and stretch their muscles properly.
e) Lesson body
Activity 2.6
Teacher starts the lesson by explaining students that throwing javelin consist of
the 4 phases:
Phase 1: The grip phase
Explain students that there are three types of grips in throwing javelin such as:
i) The American grip:
The thumb and the first two joints of the index finger are behind the cord.
ii) The Finnish grip:
The thumb and the index finger are behind the cord, while the index finger
supports the shaft. The extended finger assists the rotation of the javelin during
delivery.
iii)The V grip:
The javelin is held between the index and middle fingers behind the cord.
The position of the fingers assists the throwing arm in staying at shoulderheight during the approach.\
Individually, let students perform how to grip javelin by using three grip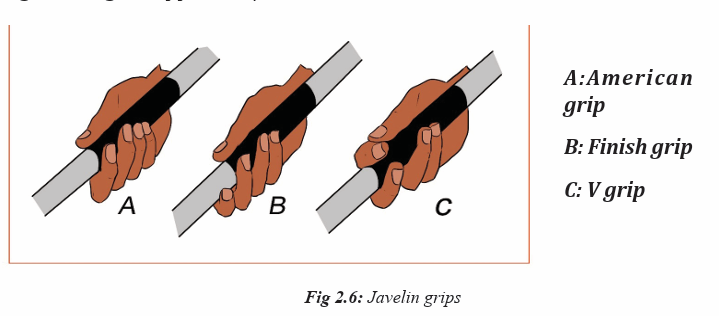
Methods.Phase 2: approach run up and carry
During the approach run up phase, remind students to measure their stridesas follow:
Remind students that:
– They must carry javelin at head height with their arms bent, their elbow
pointing forward.
– Their palm of hand must face upwards to facilitate the wrist and shoulder
to relax, and have an easy running movement.
– Must keep their shoulder parallel to the run up.
– Must keep their hip high with body weight carried on the ball of the foot.
– Must have the javelin lined up approximatively parallel to the ground.
– They have to increase constantly to the maximum controllable speed.
Activity 2.7
Let students perform approach run individually. During practice of run up ap
proach, remind them to:Put a clear marker where five steps rhythm start to indicate student ’s the area.
– Continuing to increase constantly to the maximum controllable speed
by avoiding lengthening the stride.
Tell students to do the following during approach run up and carry:
– Holding the javelin over the shoulder horizontally.
– Maintaining the top of javelin at head height.
– Holding the arm steadily with increasing running speed.– Accelerating until reaching the optimum speed.
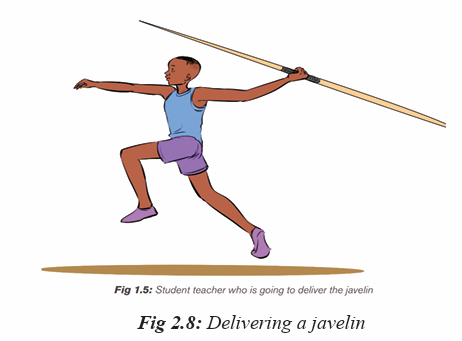
Phase 3 and 4: Stride rhythm and delivery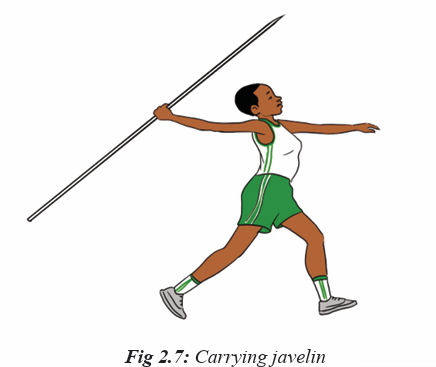
Activity 2.8
Tell students to do the following during stride rhythm and delivery:
– Execute the withdrawal action with impulse stride.
– Carry out delivery, transition, power position and final arm movement.
– Maintain the reserved legs.
– Bend the right legs and lowering the upper body.
– Swing the left leg backwards.– Move the foot of the brace leg to the foul line.
Activity 2.9
Remind students to remember basics throwing principles for javelin throw:
– Involve the whole body.
– Achieve a summation of forces.
– Apply force in the direction of the throw.
– Achieve a long range of motion.– Weight transfer.
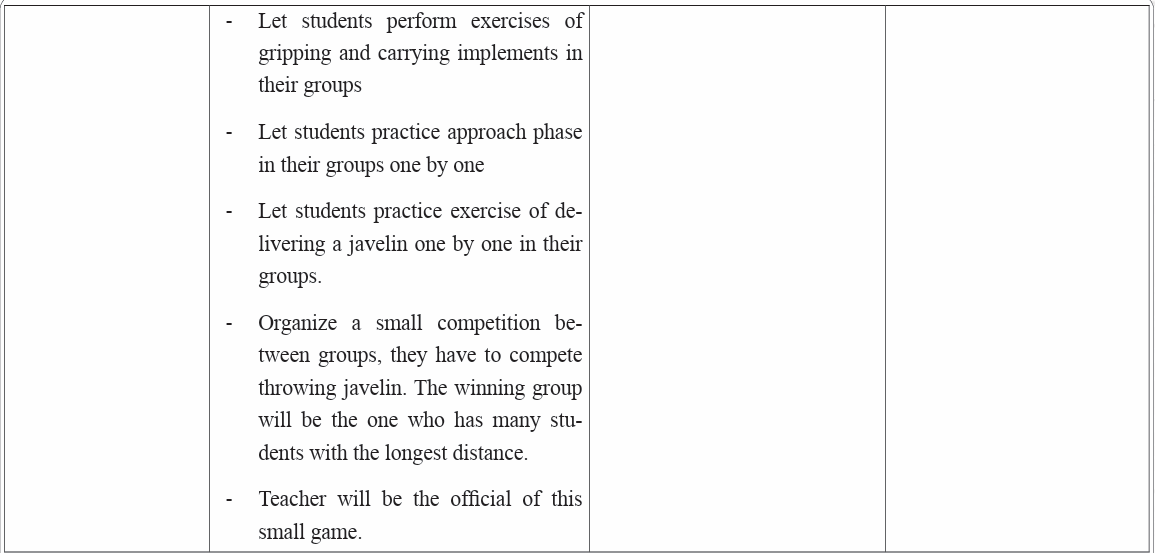
Let students perform techniques of throwing javelin individually by making many
trials in order to be familiarized with javelin throw, try to keep security while throwing
by giving enough space to the thrower in order to avoid accidents.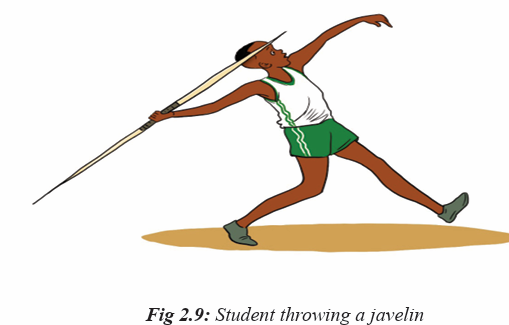
Application Activity 2.3
Let students perform techniques of throwing javelin individually by
respecting different phases and record their performance with evaluating
their own progress. They can do this as a small competition. Remember to
give enough space to the thrower in order to avoid possible accident, which
may occur during throwing.
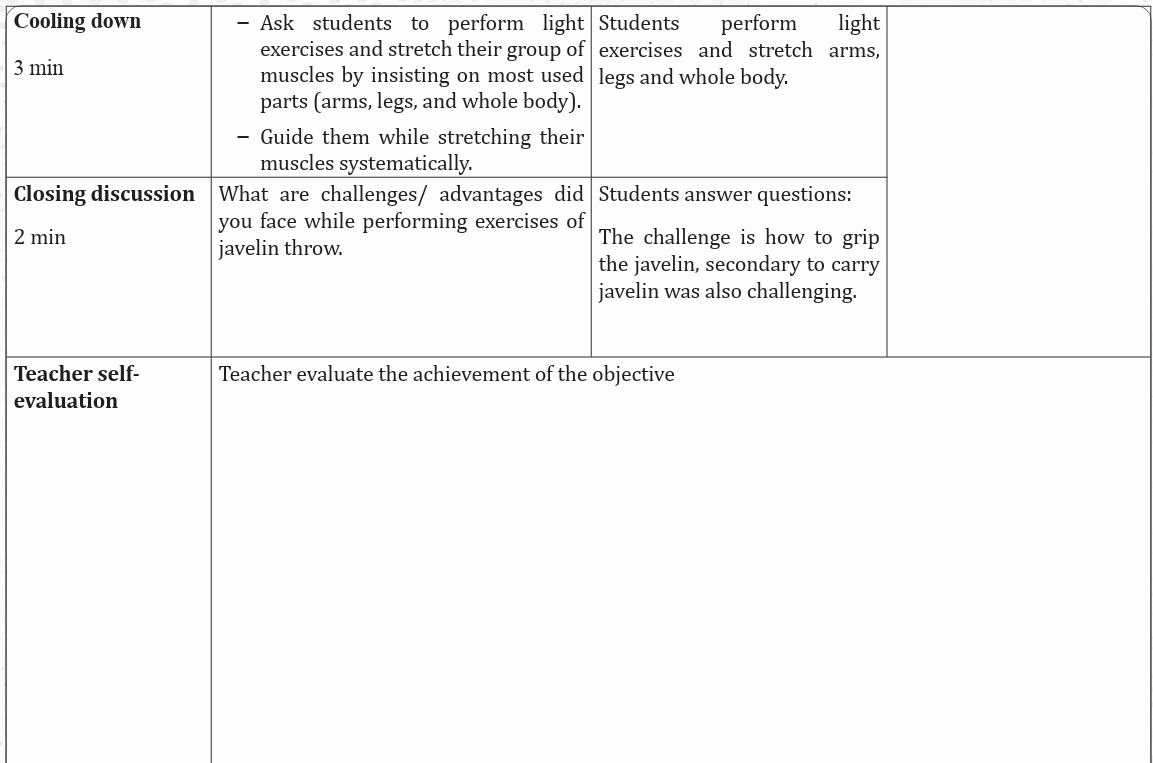
Cool down exercises
– Let students do light exercises and stretch their group of muscles by
insisting on most used parts. Guide them while stretching their muscles
systematically. Help them/demonstrate/correct where is necessary.
Closing discussion
Reflect
– What are challenges/ advantages did you face while performing exercises
of javelin throw?
– How did you proceed to perform those exercises?
Connect
– What are conditions do you need throws like javelin?
Apply
– What is the usefulness of javelin throw?
– How will you use skills of javelin throw in your daily life?
Lesson 4: Rules and regulations of throws
a) Learning objective
Apply rules and regulation of shot-put, Discus and javelin throw
b) Teaching resources
Books, Internet videos, Pictures on manila paper, Projector and Laptop
c) Prerequisites/Revision/Introduction
d) Learning activities
Opening discussions
Student of senior six will learn better athletic throws rules if they can perform
shot put, discus, and javelin throws learnt in lesson 1,2 and 3 of this unit.
– Teacher as a facilitator and a guider facilitates students in the following
ways:
– Ask questions about types of throws learnt in previous lesson.
– Introduce the lesson of the day by asking question related to athletic
throws rules, like to brainstorm different rules and regulations to followwhen executing shot-put, discus and javelin.
e) Lesson body
Activity 2.10
Divide students into 3 groups, and distribute to them questions in the table
based on group numbers and let them discuss given questions into their
respective groups. Distribute shot put, discus and javelin throwing rules for
each group based on questions given and facilitate students to get resources(if possible, you may use smart classroom, videos showing officiating procedures etc.)
– Pass though groups and help them where is necessary. Request students to
choose a secretary to record their findings and group representative who
will present their findings.
– Request group representative to present their findings and group members
may support where is necessary.
– After presentation of all groups, use a projector to recap presentations,
Application Activity 2.4
Prepare a video which show athletes in competition of shot-putting, discus
and javelin throw, and project it and asks students to watch and analyze the
actions of throwers and write their decision on paper basing on the rules
and regulations of each throw.
Closing discussions (RCA)/ Conclusion
Summarize the lesson on different rules of throwing in athletics (Implements,
throwing area, fouls and penalties) and ask students to write them in their
notebooks.
2.5. Summary of the unit
THE SHOT PUT
The shot has been an Olympic sport since 1896 and involves pushing or putting
a metal ball of 7.26kg for men and 4kg for women. The aim is to put it as far
as possible from a seven-foot diameter (2.135m) circle that has a curved10centimetre high toe-board at the front.
The following rules are adhered to for a legal throw: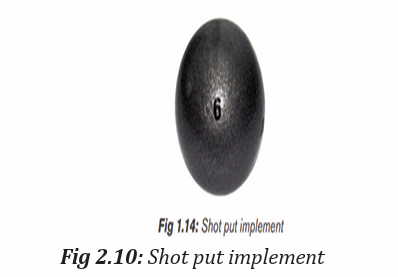
– Competitors take their throw from inside a marked circle 2.135m in
diameter, with a stop board approximately 10cm high at the front of the circle.
– The distance thrown is measured from the inside of the circumference of
the circle to the nearest mark made in the ground by the falling shot, with
distances rounded down to the nearest centimeter. Place the zero end of
the tape at the mark made by the shot closest to the throwing circle, pull
through to the center of the circle (should be a mark or hole, and read off the
measurement where the tape crosses the inside edge of the circumference
of the circle or toe board.
– Upon calling the athlete’s name, they have sixty seconds to commence the
throwing motion.
– The athlete must rest the shot close to the neck, and keep it tight to the
neck throughout the motion.
– The shot must be released above the height of the shoulder, using only
one hand. The ball is to be put (i.e. pushed), not thrown with an overhead
motion. At no time may the shot move behind the plane of the shoulders.
– The athlete may touch the inside surface of the circle or stop board, but
must not touch the top or outside of the circle or stop board, or the ground
beyond the circle. Limbs may however extend over the lines of the circle
in the air.
– The shot must land in the legal sector (34.92°) of the throwing area (Inside
of / not including the line.– The athlete must exit the throwing circle from the back half of the circle.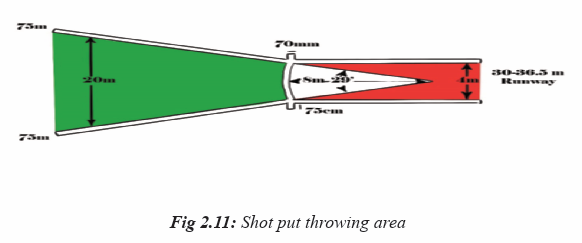
A foul throws occur when an athlete:
– Does not pause within the circle before beginning the throwing motion.
– Does not begin the throwing movement within sixty seconds of having his
or her name called
– Allows the shot to drop below his shoulder or outside the vertical plane of
his shoulder during the put.
– During the throwing motion, touches, with any part of the body (including
shoes): the top or ends of the stop board, the top of the iron ring, anywhere
outside the circle.
– Throws a shot, which either falls outside the throwing sector or touches a
sector line on the initial impact.
– Leaves the circle before the shot has landed.
– Does not exit from the rear half of the circle.
The top eight throwers, once established, will have three more attempts in
order of increasing distance. The final rankings will result from all 6 attempts.
The competitor’s best throw from the allocated number of throws, typically
three to six, is recorded, and the competitor who legally throws the shot the
farthest is declared the winner. Ties are broken by determining which thrower
has the longer second-best throw.
Discuss
The discus throw is an event in track and field athletics competition, in which
an athlete throws a heavy disc called a discus in an attempt to mark a farther
distance than his or her competitors. The men’s discus is a heavy lenticular
disc with a weight of 2 kilograms and diameter of 22 centimeters, the women’sdiscus has a weight of 1 kilogram and diameter of 18 centimeters.
– The discus can be made of any material such as wood but it must have a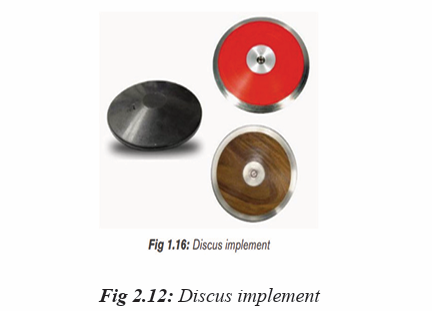
circular edge with a metallic rim.
– Inner construction can be both solid and hollow.
– The cross section of the edge should be made in circular manner and it
should have a radius of 6mm.
– All sides of the discus should be identical. They must be free from any type
of sharp edges or irregularities.
– Finishing of the discus should be smooth.
– An athlete can only throw the discus when he or she will stand inside a
circle, which has a diameter of 2.5m.
– During the course of throw, the athletes are prohibited from touching the
top of the rim. However, they can touch the inner part of the rim.
– An athlete cannot touch the ground beyond the circle.
– If the athlete leaves the circle before the landing of the disc on the ground,
then it will be considered as a foul throw.
– In the Olympic matches, each athlete is given eight chances to display their
talents.
– There is particular boundary of landing of the disc. If the disc lands outside
that zone, then that throw is considered invalid.
Javelin
Javelin throwing was once an integral part of ancient warfare and the farther
a warrior could hurl a javelin, the greater his standing in the army. The first
men’s Olympic javelin event was in 1908 and in 1932 for women. Originally
made of wood, modern javelins are made of metal. Men’s javelins weigh 800 g
and women’s javelins weigh 600 g. Javelins can be thrown huge distances and
have had to be redesigned as athletes were generating throws in excess of the
throwing event that allows a run up.
Implement
The weight and length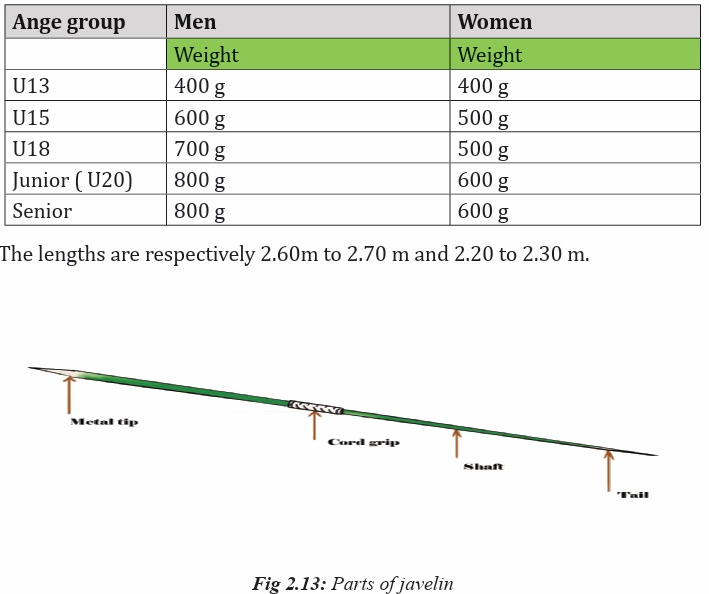
The javelin consists of three parts: a head, a shaft and a cord grip. The shaft
must be constructed of metal and has, fixed to it, a metal head terminating in a
sharp point.
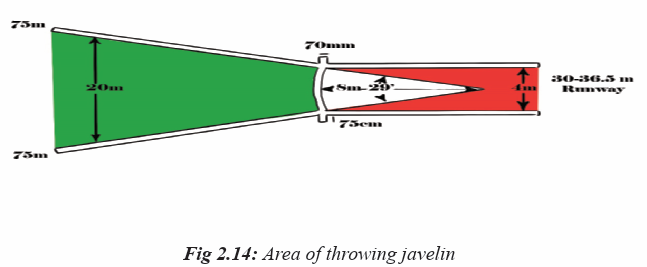
Throwing sector/area
This is bounded by the inner edges of two lines, which are drawn from the
centre of the arc through the points at which the arc joins the lines marking theedge of the runway.
General rules for throwing javelin
– The javelin must be held at the grip and the throw must be made over the
shoulder or upper part of the throwing arm.
– For a throw to be valid, the tip of the metal head must strike the ground
before any other part of the javelin and it must fall completely within the
inner edges of the landing sector.
– The competitor must make his approach and throw within the lines demarcating the runway.
– It is a foul throw if, after starting his throw, he touches the lines or the
ground outside with any part of his body.
– The athlete must not leave the runway until the javelin has landed and then
his first contact with the parallel lines or the ground outside the runway
must be completely behind the lines, at the ends of the arc at the right
angles to the parallel lines.
– Once the athlete has started the throw, the athlete must not turn completely
around so that the back is towards the throwing arc.
– The number of throws allowed is the same as for the shot and discus.
2.6. additional information for tutors
Throwing events are amongst the oldest in track and field athletics. Where
competitors once threw rocks and spears, they now use the shot and javelin.
Throwing events require great strength and throwers are usually the biggest
athletes in any athletic competition. There are four recognized throwing events
in modern track and field athletics: the shot put, the discus, the javelin and thehammer.
Duties of Competition Officials
SHOTPUT
In shot put they are 9 judges:
– The Chief Judge must supervise the whole of the event and check the
measurements.
– A Judge holding the measuring apparatus in such a way that it passes
through the centre of the circle.
– A Judge placing, immediately after the throw, a marker enabling the throw
to be measured.
– A Judge holding the measuring apparatus on the zero mark on the point
where the marker has been placed.
– A Judge in charge of placing the small flags indicating each athlete’s best
throw. The small flag is placed along a strip or line outside the sector in
order to avoid it being hit by an implement.
– A Recorder keeping the results sheet and calling the athletes.
– A Judge in charge of the results score-board.
– A Judge in charge of the clock indicating to the athletes that they have a
certain time to take their trial
– A Judge in charge of the athletes
DISCUSS
In Discuss there can be up to 14 judges
– Near the circle: - Two judges checking that the throw has been made
correctly and measuring the throw. In a large number of national
competitions, the Chief Judge, takes on this duty.
– A Judge placed opposite judge (2) checking from his side that the throw is
correct.
– A Judge (3) holding the tape measure so that it is held taut and passes
through the centre of the circle.
At the landing:
– A Judge (4) responsible for the landing zone and indicating with the help
of flags whether the throw is valid or not.
– Two Judges (5 and 6) who will watch the exact place of landing will have
a marker which he will place in the ground to enable the measuring of the
throw.
– A Judge (7) who will hold the tape measure on the zero mark at the spot
where the marker has been placed.
– A Judge (8) in charge of placing the small flags indicating each athlete’s
best throw along a strip or line outside the sector in order to avoid them
being hit by an implement. In important
– At the landing, one person or two responsible for sending back the discus
that has been thrown (13).
Near the circle:
– A Recorder (9) keeping the results sheet and calling the athletes.
– A Judge (10) in charge of the results scoreboard (trial-number-result).
– A Judge in charge of the clock indicating to the athletes that they have a
certain time to take their trial (11).
– A Judge in charge of the athletes and of the discus near the circle (12).
– Half-way between the circle and the landing zone:
– A Judge will make sure that the tape measure is taut in order to ensure acorrect measurement (14).
JAVELIN
During javelin throws, they are at least 14 officials, controlling that the
event is taking place adhering to rules and regulations.
1. The Chief Judge, must supervise the whole event and check the
measurements.
2. Near the runway:
3. One judge (1) checking that the throw has been made correctly and
measuring the throw. In a large number of national competitions, the
Chief Judge, takes on this duty.
4. A judge (2) holding the tape-measure so that it passes through the centre
of the arc of the circle.
At the landing:
1. A judge (3), responsible for the landing zone, and indicating with the
whether the throw is valid or not.
2. Two Judges (4) and (5) who watch the place where the tip of the metal
head touched the ground. One of these judges holds a marker which he
pushes in the ground.
3. A Judge (6) who will hold the tape-measure and who must place the zero
point on the spot where the marker has been placed.
4. A Judge (7) in charge of placing the small flags indicating each athlete’s
best throw. These flags must be placed along a strip or line outside the
sector in order to avoid them being hit by a javelin.
5. one person (or two) responsible for sending back the javelins that have
been thrown (12). Near the runway zone:
6. A Recorder (8) keeping the results sheet and calling the athletes.
7. A Judge (9) in charge of the results scoreboard (trial-number-result).
8. A Judge in charge of the clock indicating to the athletes that they have a
certain delay to take their trial (10);
9. A Judge in charge of the athletes and of the javelins placed near the
runway (11). Half-way between the runway and the landing zone:
10. A judge will make sure that the tape-measure is taut in order to ensure a
correct measurement (13).
2.7 End of unit assessment
Teacher set series of athletic exercises on javelin, discus and shot put. He/
she provides the appropriates materials to the student teachers and highlight
instructions to follow during performing different throws. Students must perform
individually three trials for
a) Javelin throw
b) Discus throw
c) Shot putting.
– Teacher observe how each student is performing by respecting rules.
– Teacher records the performance of each student to evaluate their
performance.
– Teacher lets students officiate the event and observe/assist them.
2.8 Additional activities
Remedial activities
Individually, the students revise the techniques of javelin, discus and shot
Put during free time and sports time.
Consolidation activities
The teacher organizes a kind of competition where students compete individually
in throwing javelin, discuss and shot putting. Record their performance and rank
them based on each discipline.
Extended activities
Encourages and facilitates students to participate in different athletics competitions
on javelin, discus and shot put organized by the school, Sector, district,
league and National school sports federation.UNIT 3 :FOOTBALL
Key unit competence: Apply Football Laws of the game
3.1 Prerequisite (Knowledge, skills, attitudes and values)
Students of senior six will learn better football laws of the game if they have
developed basic techniques and tactics of football learned in senior four and
senior five.
3.2 Cross-cutting issues to be addressed
Gender: In teaching and learning process, teacher must prepare and provide
football exercises that engage both girls and boys equally in exploiting their full
potential and football talents without any discrimination or prejudice.
Inclusive education: The teacher as a facilitator he/she must consider different
special education needs and select exercises to adapt his teaching approaches
to students. This creates a positive attitude and helps all students to participate
actively and develop their competence levels.
Financial education: The teacher should integrate Financial Education into his
football teaching/learning activities by providing the local and no cost teaching
material where is possible. He/she must encourage students to make their own
materials that can help them to develop competences not only in football game
but also in their life.
Standardization culture: The teacher must choose and select the standardized
materials to use in his/her teaching/learning process of football. It is necessary
to provide appropriate materials required to the levels of students and help
them to develop culture of checking and using the quality of football materials
for the competitions before using them in order to prevent injuries and other
cases of accident.
Environment and sustainability: Teacher should provide materials and
deliver the lesson by encouraging students to protect the environment and
well use of materials. Teacher helps them to develop the spirit of keeping safe
the environment in which is being used by cleaning it before leaving.
Peace and values education: Teacher helps students to develop fair play
and social values by avoiding violence and conflict in the football game and
by setting clear and relevant instructions. He/she should provide the activities
that help students to develop their competence peacefully.
Comprehensive sexuality education: Teacher provides football activities
and sets instructions that prevent sexual harassment, any kind of gender
based violence like sexual abuse and physical contacts oriented to the sexuality
intention.
Genocide studies: While conducting basic physical exercises a teacher should
take a time to explain students how sports should be used to fight against
Genocide ideology and how to prevent it. For example, to organize Genocide
memorial tournaments at school and give the message related to the Genocide.
3.3 Guidance on introductory activity
Before introducing the lesson one of this unit, you must introduce the whole
unit. Teacher as a guide, a facilitator and expert, asks questions and provides
activities related to football techniques and tactics in the game situation by
following official laws of the game in order to help them to predict what to belearned in the whole unit.
3.4 List of lessons/sub-heading
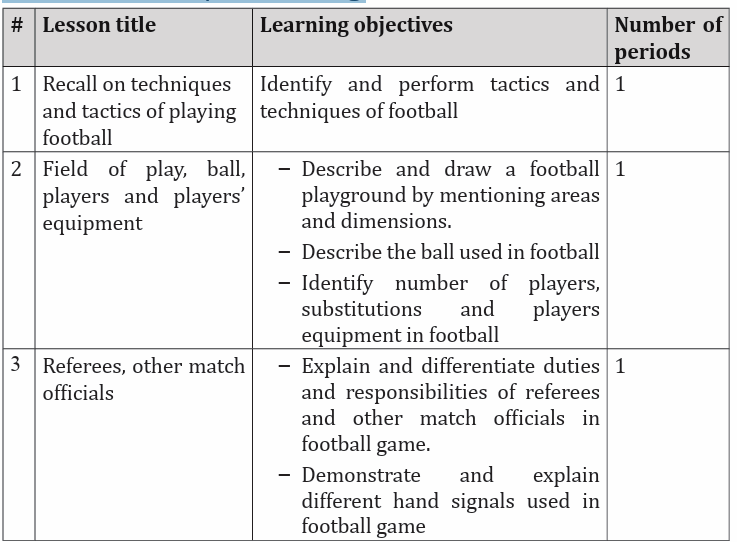
Lesson 1: Recall on techniques and tactics of playing football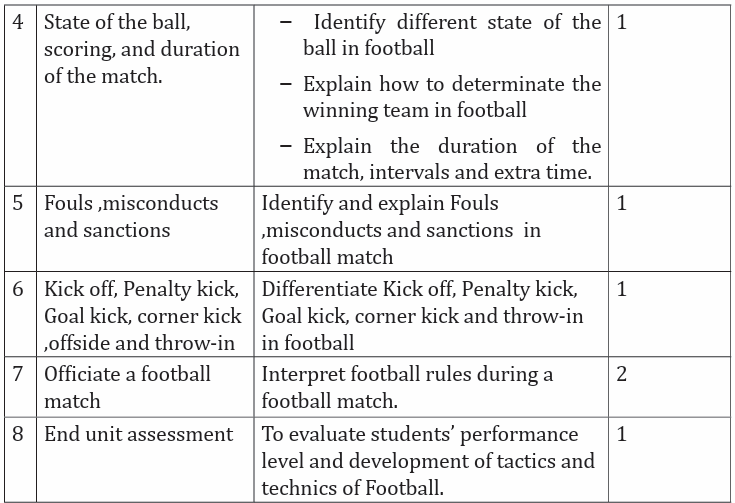
a) Learning objective
Identify and perform tactics and techniques of football.
b) Teaching resources
Balls, whistle, stopwatch/watch, cones, chasubles, markers, cards (yellow &
red), flags.
c) Prerequisites/Revision/Introduction
Students of senior six will recall better techniques and tactics of football through
game situation if they have developed basic techniques and tactics of playing
football learned in senior four and senior five.
d) Learning activities
Opening discussions
– Ask questions related to techniques and tactics of playing football game.
– Let students present their answers support them where is necessary.
– Introduce the new lesson and invite students to start warm up exercises.Warm up exercises and stretching exercises
Let students perform general warm up exercises and specific warm up based
on the most body’s parts to be used while performing Football techniques andtactics and stretch their muscles properly.
e) Lesson body
Activity 3.1
– Divide football playground into four equal parts.
– Form groups A, B, C and D including boys and girls.
– Avail four balls, one for each group on their part of the playing ground.
– On their playground part, ask each group to make a circle and choose
one students to go inside of the circle.
– Students inside of the circle must pass to others standing on the circle,
they must use all different types of passes (inside, outside of the foot,
instep, sole of the foot) when passing to each other. Do this activity untilevery student have made at least 5 passes
Activity 3.2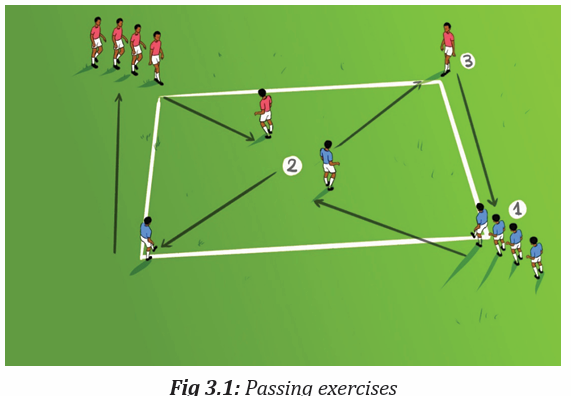
With the same groups (A, B, C and D), each group must make two vertical
lines facing each other, between two lines must be at least 10 meters. One
student standing in front must have a ball and start dribbling toward the
other line, when reach near pass the ball to the person in front, and the next
dribble the ball toward the other line. Do this until everyone had chance todribble and pass five times.
Application Activity 3.1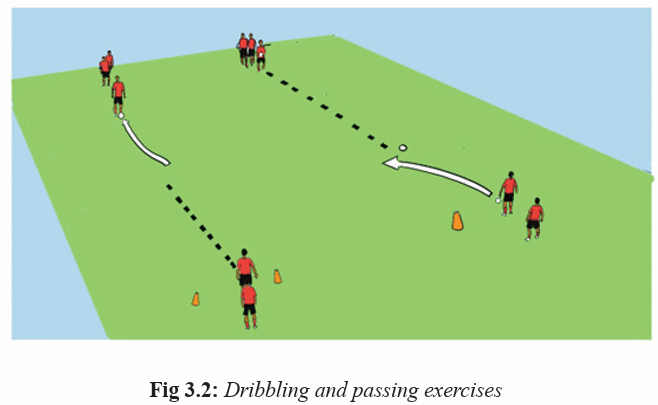
Make two groups A and B and organize a football match.
Let group play a normal football game by using the whole football playing
Ground. The winner is the groups, which will get more goals in a determinedperiod.
Cool down exercises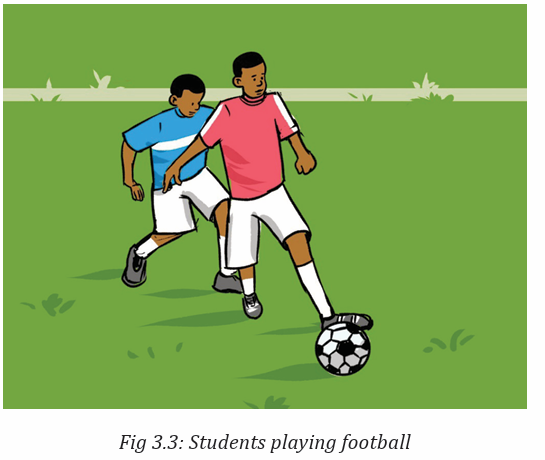
Let students do light exercises and stretch their group of muscles by insisting on
most used parts. Guides them while stretching their muscles systematically.
Closing discussions (RCA)
Reflect
– What are challenges/benefits did you face while playing football?
– How did you proceed in order to win? What are causes of losing?
Connect
– What is the importance of combining techniques and tactics in our works or plays?
Apply
– What is the usefulness of techniques and tactics in football game situation?
– How will you use those skills of playing football in your daily life?
Lesson 2: Field of play, ball, players and players’ equipment
a) Learning objective
– Describe and draw a football playground by mentioning areas and
dimensions.
– Describe the ball used in football.
– Identify number of players, substitutions and player’s equipment infootball.
b) Teaching resources
showing officiating images.
Senior five.
Balls, whistle, stopwatch/watch, markers, Book of Laws of the game for football,Projector, Computer, Charts/diagrams and images of playground, Videos
c) Prerequisites/Revision/Introduction
Students of senior six will learn better laws of the game of football if they haveperformed basic techniques and tactics of playing football in senior four and
d) Learning activities
Introduction/ opening discussion
Teacher as a facilitator and a guider facilitates students in the following ways:
e) Lesson body
– Ask questions about football techniques and tactics learnt in previous
years.– Introduce the lesson of the day by asking question related to football laws of
the game by helping students to brainstorm different rules and regulations
of football.
– Tell students that they are going to study the first four rules of football(Field of play, ball, players and players’ equipment).
Activity 3.3
Divide students into 5 groups and distribute to them questions based on
group numbers and let them discuss given questions into their respective
groups. Distribute the first four laws of the game and let each group discuss
based on questions given. To facilitate students to get resources (if possible,
you may use smart classroom and let them use soft copy of football laws of the game).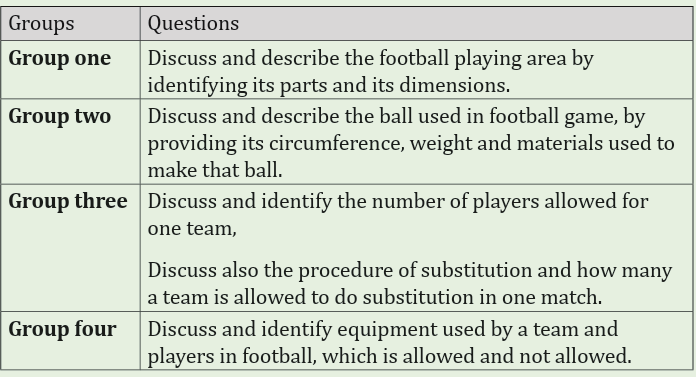
– Pass though groups and help them where is necessary. Request students
to choose a secretary to record findings and group representative who will
present their findings?
– Request group representative to present their findings and group members
may support where is necessary. After presentation of all groups, use a
projector to recap presentations, show them fouls, and misconduct withthe right hand signals to use while officiating in football.
Application Activity 3.2
Individually, let students draw a football playground used in official matchby putting all areas and their dimensions.

Conclusion/ closing discussion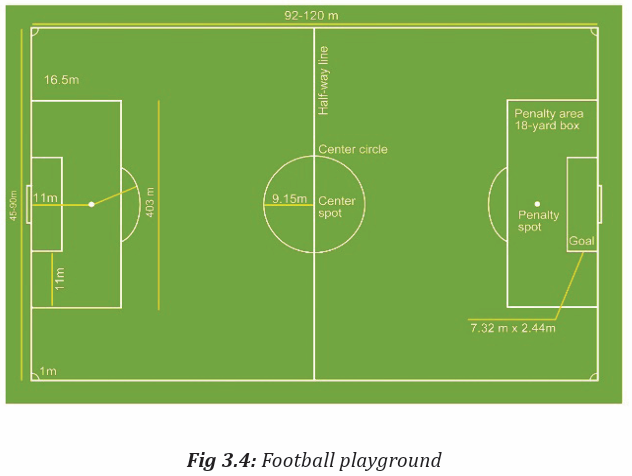
Teacher as a facilitator, together with students make summary of the lesson
and asks students to record them in their notebooks.
Lesson 3: Referees, other match officials
a) Learning objective
– Explain and differentiate duties and responsibilities of referees and other
match officials in football game.
– Demonstrate and explain different hand signals used in football game.
b) Teaching resources
Balls, whistle, stopwatch/watch, markers, Book of Laws of the game for football,
Projector, Computer, Charts/diagrams and images of playground and Videosshowing officiating images.
c) Prerequisites/Revision/Introduction
Students of senior six will learn better laws of the game of football if they have
performed basic techniques and tactics of playing football in senior four and
Senior five.
d) Learning activities
Introduction/ opening discussion
Teacher as a facilitator and a guider facilitates students in the following ways:
– Ask questions about football laws learnt in lesson one of this unit.
– Introduce the lesson of the day and tell students that they are going to
study two more rules of football (rule number 5&6) which are the Referee
as an important person on the playground and other officials which help
him to accomplish his/her responsibilities.
e) Lesson body
Activity 3.4
Divide students into 6 groups and distribute to them questions based on
group numbers and let them discuss given questions into their respective
groups. Distribute questions on referees and other match officials and let
each group discuss based on questions given. To facilitate students to get
resources (if possible, you may use smart classroom and let them use softcopy of football laws of the game).
Pass though groups and help them where is necessary. Request students to
choose a secretary to record findings and group representative who will present
their findings?
Request group representative to present their findings and group members
may support where is necessary.
After presentation of all groups, use a projector to recap presentations, show
them fouls, and misconduct with the right hand signals to use while officiatingin football.
Application Activity 3.3
In pairs, let students perform different hand signals used in football game
and interpret their meaning.
Conclusion/ closing discussion
Teacher as a facilitator, together with students make summary of the lesson
and asks students to record them in their notebooks.
Lesson 4: State of the ball, scoring, and duration of the match
a) Learning objective
– Identify different state of the ball in football.
– Explain how to determinate the winning team in football.
– Explain the duration of the match, intervals and extra time.
b) Teaching resources
showing officiating images.
Balls, whistle, stopwatch/watch, markers, Book of Laws of the game for football,
Projector, Computer, Charts/diagrams and images of playground and Videos
c) Prerequisites/Revision/Introduction
Students of senior six will learn better laws of the game of football (State of the
ball, scoring, and duration of the match) if they have performed basic techniquesand tactics of playing football in senior four and Senior five.
d) Learning activities
Introduction/ opening discussion
Teacher as a facilitator and a guider facilitates students in the following ways:
– Ask questions about football laws learnt in lesson one of this unit.
– Introduce the lesson of the day and tell students that they are going to
study two more rules of football (rule number 7&8) which are the State of
the ball, scoring, and duration of the match.
e) Lesson body
Activity 3.5
Divide students into 4 groups and distribute to them questions based on
group numbers and let them discuss given questions into their respective
groups. Distribute questions on State of the ball, scoring, and duration of
the match and let each group discuss based on questions given. To facilitate
students to get resources (if possible, you may use smart classroom and letthem use soft copy of football laws of the game).
Pass though groups and help them where is necessary. Request students to
choose a secretary to record findings and group representative who will present
their findings?
Request group representative to present their findings and group membersmay support where is necessary.
Conclusion/ closing discussion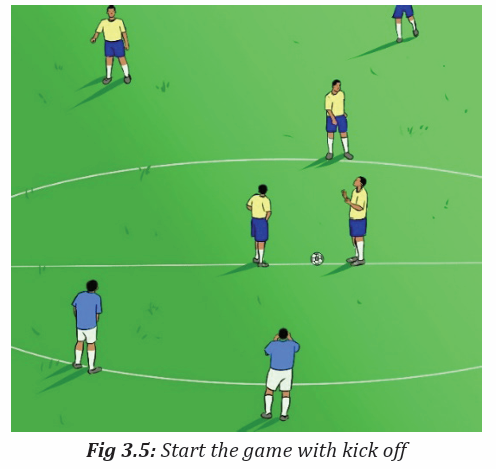
Teacher as a facilitator, together with students make summary of the lesson
and asks students to record them in their notebooks.
Lesson 5: Fouls, misconducts and sanctions
a) Learning objective
Identify and explain Fouls, misconducts and sanctions in football match
b) Teaching resources
showing officiating images.
Balls, whistle, stopwatch/watch, markers, Book of Laws of the game for football,
Projector, Computer, Charts/diagrams and images of playground and Videos
c) Prerequisites/Revision/Introduction
Students of senior six will learn better laws of the game of football (Fouls,
misconducts and sanctions) if they have performed basic techniques and tactics
of playing football in senior four and Senior five.
d) Learning activities
Introduction/ opening discussion
Teacher as a facilitator and a guider facilitates students in the following ways:
Ask questions about football laws learnt in lesson four of this unit.
– Introduce the lesson of the day and tell students that they are going to
study fouls, misconducts and their sanctions.
e) Lesson body
Activity 3.6
Divide students into 4 groups and distribute to them questions based on
group numbers and let them discuss given questions into their respective
groups. Distribute questions on fouls, misconducts and sanctions and let
each group discuss based on questions given. To facilitate students to get
resources (if possible, you may use smart classroom and let them use softcopy of football laws of the game).
Pass though groups and help them where is necessary. Request students to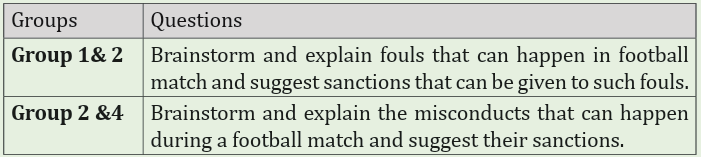
choose a secretary to record findings and group representative who will present
their findings?
Request group representative to present their findings and group members
may support where is necessary.After presentation of all groups, use a projector to recap presentations
Conclusion/ closing discussion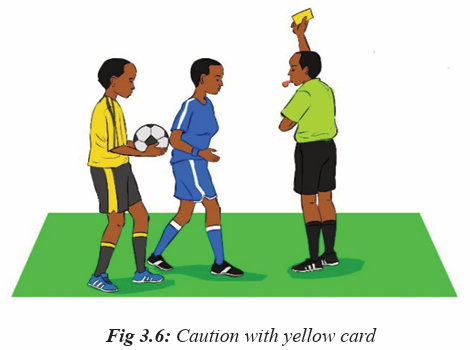
Teacher as a facilitator, together with students make summary of the lesson
and asks students to record them in their notebooks.
Lesson 6: Kick off, Penalty kick, Goal kick, corner kick, offside
and throw-in
a) Learning objective
Differentiate Kick off, Penalty kick, Goal kick, corner kick and throw-in in
football
b) Teaching resources
Balls, whistle, stopwatch/watch, markers, Book of Laws of the game for football,
Projector, Computer, Charts/diagrams and images of playground and Videos
showing officiating images.
c) Prerequisites/Revision/Introduction
Students of senior six will learn better laws of the game of football (Kick off,
Penalty kick, Goal kick, corner kick and throw-in in football) if they have
performed basic techniques and tactics of playing football in senior four and
Senior five.
d) Learning activities
Introduction/ opening discussion
Teacher as a facilitator and a guider facilitates students in the following ways:
– Ask questions about football laws learnt in lesson five of this unit.
– Introduce the lesson of the day and tell students that they are going to
study Kick off. Penalty kick, Goal kick, corner kick and throw-in in football.
e) Lesson body
Activity 3.7
Divide students into 4 groups and distribute to them questions based on
group numbers and let them discuss given questions into their respective
groups. Distribute questions on Kick off, Penalty kick, Goal kick, corner
kick and throw-in in football and let each group discuss based on questions
given. To facilitate students to get resources (if possible, you may use smartclassroom and let them use soft copy of football laws of the game).
– Pass though groups and help them where is necessary. Request students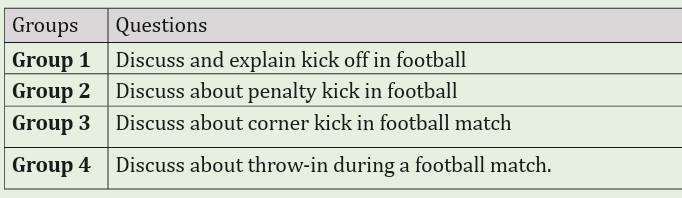
to choose a secretary to record findings and group representative who will
present their findings?
– Request group representative to present their findings and group members
may support where is necessary.– After presentation of all groups, use a projector to recap presentations.
Conclusion/ closing discussion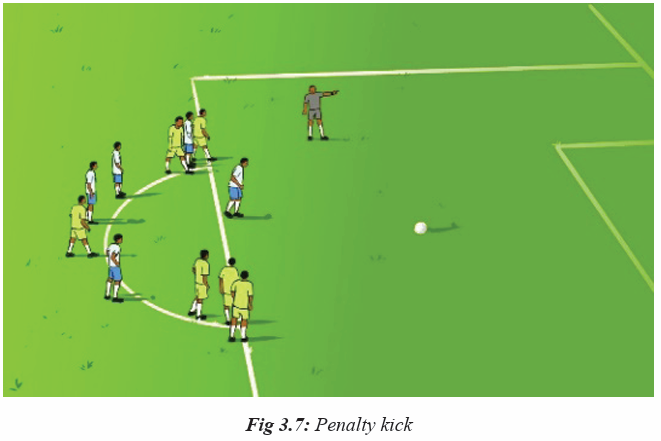
Teacher as a facilitator, together with students make summary of the lesson
and asks students to record them in their notebooks.
Lesson 7: Officiate a football match
a) Learning objective
Apply and interpret football rules during a football match.
b) Teaching resources
Balls, whistle, stopwatch/watch, markers, Book of Laws of the game for football,
Projector, Computer, Charts/diagrams and images of playground and Videos
showing officiating images.
c) Prerequisites/Revision/Introduction
Students of senior six will learn better laws of the game of football (Kick off,
Penalty kick, Goal kick, corner kick and throw-in in football) if they have
performed basic techniques and tactics of playing football in senior four and
Senior five.
d) Learning activities
Opening discussions
– Ask questions related to laws of the game learned in previous lessons of
this unit.
– Let students answer asked questions and support their answers where is
necessary.
– Introduce the new lesson and invite students to start warm up.
Warm up exercises
Let students perform general warm up exercises and specific warm up based
on the most body’s parts to be used while playing football and stretch their
muscles properly.
e) Lesson body
Match situation
Activity 3.8
Form three groups A, B and C. Competition is organized in this way:
1st match: A vs B, C will act as officials by providing: referee, two assistant
officials and the fourth referee and other remaining players will record fouls
and misconduct happened and how officials have been reacted for those
fouls and misconducts.
2nd match: B vs C, A will act as officials by providing: referee, two assistant
officials and the fourth referee and other remaining players will record fouls
and misconduct happened and how officials have been reacted for those
fouls and misconducts.
3rd match: A vs C, B will act as officials by providing: referee, two assistant
officials and the fourth referee and other remaining players will record fouls
and misconduct happened and how officials have been reacted for those
fouls and misconducts.
Points to consider during this game situation
Time for playing for each match: 10 minutes
Cool down
Let students do right exercises and stretch their group of muscles by insisting
on most used parts. Guide them while stretching their muscles systematically.
And invite them to the after match discussion.
Conclusion/ closing discussion
– Start by giving time each group A, B then C to share what they have recorded
based on laws of the games, decisions taken by officials, effectiveness
of hand signals used, and how officials are taking positions and their
movement during the match.
– Support them to clarify some rules of the game where is necessary.Signs used in officiating football game/match
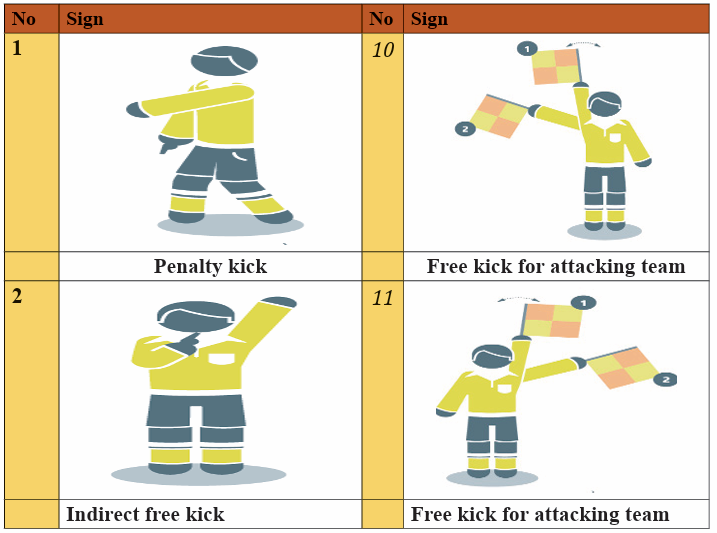
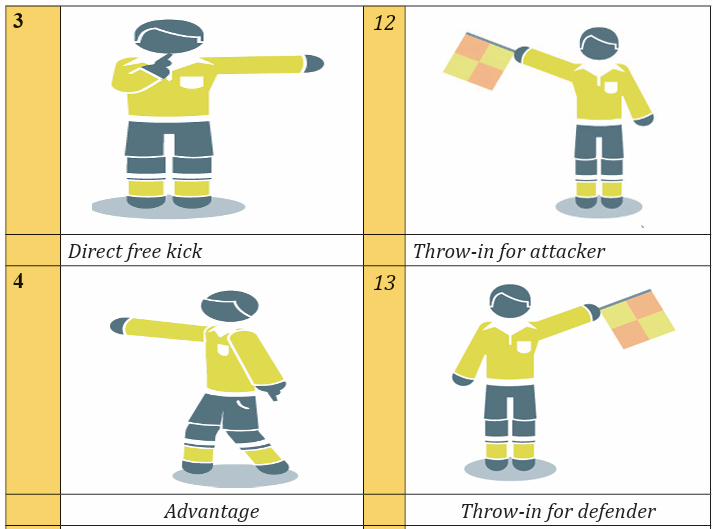
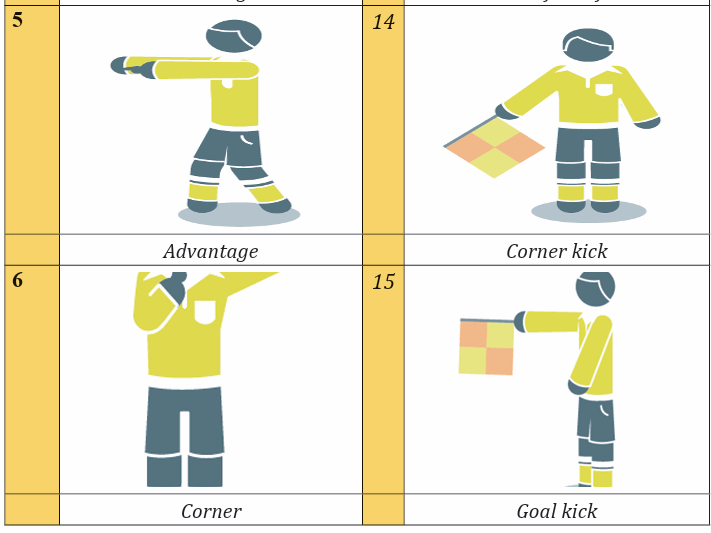
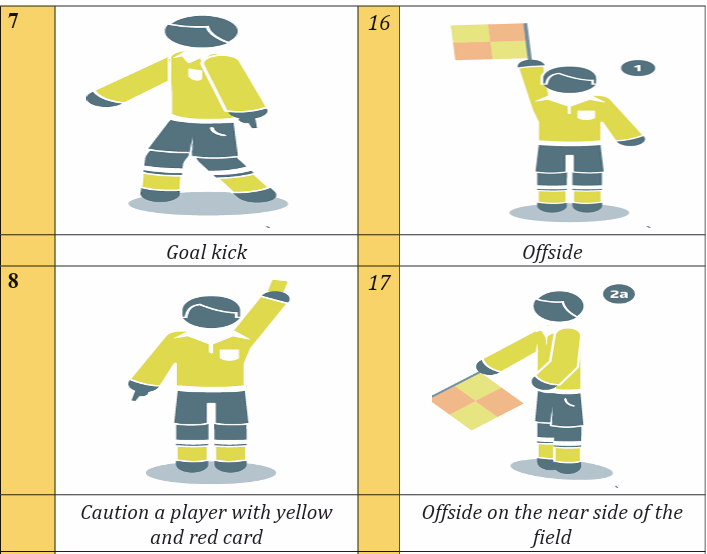
3.5 End of unit assessment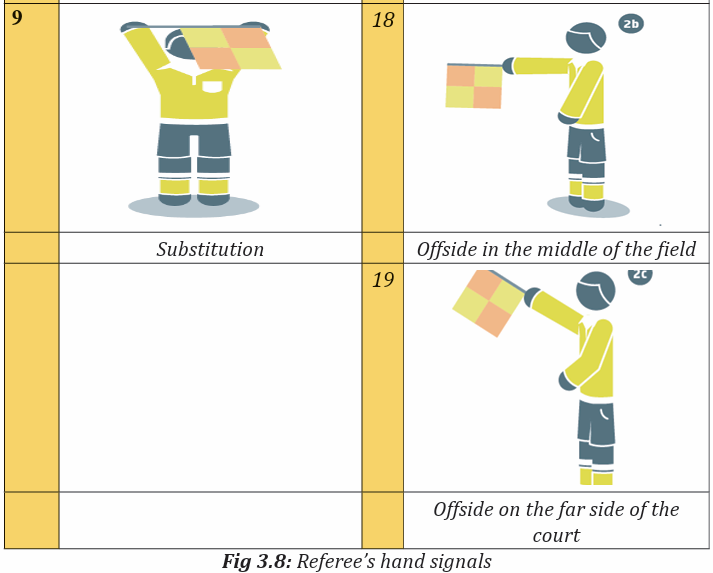
Divide students into groups of four including one referee, two assistant
referee and the fourth referee. After dividing students into their respecting
groups, set the order on which groups will lead the game, request the first
group to start the match. Ask other remaining students to form two teams of
11 players for each one including a goalkeeper. Let the match start, change
groups which is officiating after five minutes. Officials become players to
replace those who are becoming officials.
– During performing officiating for each group, observe how each student is
accomplishing given tasks and roles.
– Records their performance in order to give them feedback at the end of theexercise.
3.6 Additional activities
Remedial activities
Prepare a video of a football match, and project it using smart class projector.
Asks students to watch it and note on paper fouls and misconduct they have noticed
and which decision they can take as a referees.
Consolidation activities
Participate in competitions between small groups and choose their own officials
to lead the matches and make records.
Extended activities
Organize football competition between classes for forming school teams and par
ticipate in interclasses competitions and friendly matches. Let students officiate
the matches. Encourages students to exploit regularly official laws of the game offootball and be updated on changes about those laws of the game.
UNIT 4: VOLLEYBALL
Key unit competence: Apply volleyball rules of the game
4.1 Prerequisite (Knowledge, skills, attitudes and values)
Students of senior six will learn better rules of volleyball if they have developed
basic techniques and tactics of volleyball learned in senior four, senior five.
4.2 Cross-cutting issues to be addressed
Gender: In teaching and learning volleyball rules, the teacher must prepare
and provide physical activities that engage both girls and boys equally to exploit
their full potential and talents without any discrimination or prejudice.
Inclusive education: The teacher as a facilitator he/she must consider
different special education needs and select physical activities to adapt his
teaching approaches to all students. This creates a positive attitude and helps
all learners to participate actively and develop their competence levels.
Financial education: The teacher should integrate Financial Education into
his teaching/learning activities by providing the local and no cost teaching
material where is possible. He/she must encourage students to make their
own materials that can help them to develop competences not only in sport at
school but also in their daily life.
Standardization culture: The teacher must choose and select the standardized
materials to use in his/her teaching/learning process. It is necessary to provide
appropriate materials required to the levels of students and help them to
develop culture of checking and using the quality of sport materials for the
competitions before to use them in order to prevent injuries and other accident.
Environment and sustainability: The teacher should provide materials and
deliver the lesson with encouraging students to protect the environment and
well use of materials. The teacher helps them to develop the spirit of keeping
safe the environment they use in sports activities.
Peace and values education: The teacher helps students to develop fair play
and social values by planning physical activities that Avoid violence and conflict
in the game and by setting clear and relevant instructions. He/she should
provide the activities that help students to develop their competence peacefully.
Comprehensive sexuality education: A teacher provides physical activities
and sets instructions that prevent sexual harassment, any kind of gender based
violence like sexual abuse and physical contacts oriented to the sexuality
intention
Genocide studies: While conducting physical exercises and health a teacher
should take a time to explain students how sports should be used to fight against
Genocide ideology and how to prevent it. For example, to organize Genocide
memorial tournaments at school and give the message related to the Genocide.
4.3. Guidance on introductory activity
Before introducing the lesson one of this unit, teacher must introduce the whole
unit. The teacher as a guide, facilitator and expert, ask questions or give activity
related to volleyball rules in order to help them to predict what to be learnt in
the whole unit.
Introductory activity
By using a projector, demonstrate to students a video of volleyball match
between two teams (A, B), ask them to watch it to the end, after watching the
video asks them to highlight how the match was, how players behaved and foulsmade by players, coach and referees.
4.4. List of lessons/sub-heading

Lesson 1: Playing court, balls of Volleyball
a) Learning objective
– Describe and draw a volleyball court by mentioning areas and dimensions.
– Describe a ball used in volleyball match.
b) Teaching resources
Balls, playground, whistles, watch, cones, chasubles, score sheet, cards, flags.
c) Prerequisites/Revision/Introduction
Students of senior six will learn better rules of volleyball if they have performed
basic techniques and tactics of playing volleyball in Ordinary level, senior four
and five.
d) Learning activities
Opening discussions/ Introduction
– Start the lesson by asking students different types of techniques and tactics
of volleyball they have learnt in senior four and five.
– Introduce the lesson by asking number of rules found in volleyball game,facilitate them while answering the question.
e) Lesson body
Activity 4.1
Asks Students to form six groups and give them questions related to Playing
court, balls of Volleyball to discuss in each group as seen in the following table: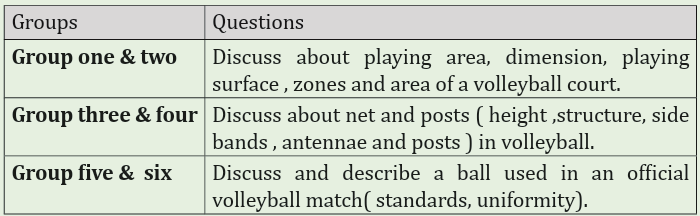
- Pass though groups and help them where is necessary. Request students to
choose a secretary to record findings and group representative who will present their findings.
Request group representative to present their findings and group members.
may support where is necessary. After presentation of all groups, use a projector to recap presentations,
Application Activity 4.1
Ask each students to draw a volleyball playing court, and put net, posts and allparts by demonstrating the measures of each line and part.
Closing discussion/ Conclusion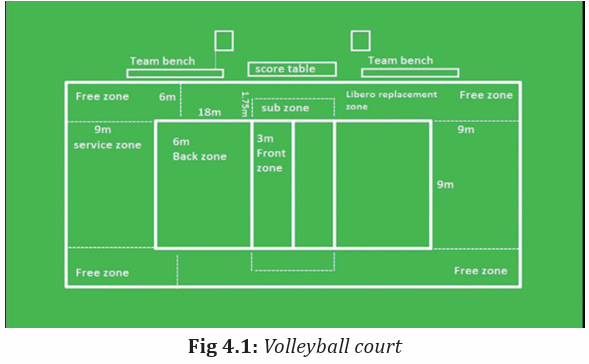
Together, teacher and students summarize the lesson of the day, and students
record the summary in their note books.
Lesson 2: Team composition, player’s positions and substitutions
a) Learning objective
– Identify team composition in Volleyball.
– Identify and explain player’s position and substitutions.
b) Teaching resources
Balls, playground, whistles, watch, cones, chasubles, score sheet, cards, flags.
c) Prerequisites/Revision/Introduction
Students of senior six will learn better rules of volleyball if they have performed
basic techniques and tactics of playing volleyball in Ordinary level, senior four
and five.
d) Learning activities
Opening discussions/ Introduction
Start the lesson by asking students the measurements of a volleyball court and
describe the ball used in volleyball match learnt in lesson one of this unit.
Introduce the new lesson by asking number of players in a Volleyball team inan official match.
e) Lesson body
Activity 4.2
Asks Students to form six groups and give them questions related Team
composition, player’s positions and substitutions to discuss in each group asseen in the following table.
– Pass though groups and help them where is necessary. Request students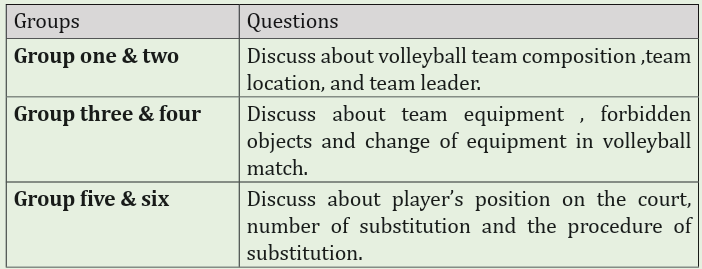
to choose a secretary to record findings and group representative who
will present their findings. Request group representative to present their
findings and group members.
– may support where is necessary. After presentation of all groups, use aprojector to recap presentations.
Application Activity 4.2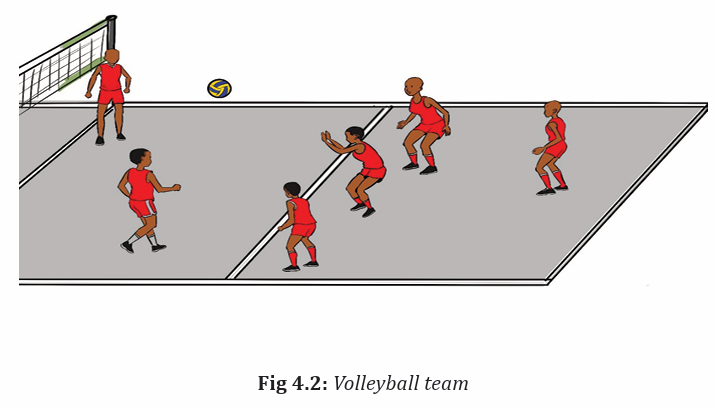
Ask students to choose a team in Rwanda Volleyball championship, and make a
list of players that can start on an any match and do a list also of their substitutes.
Demonstrate each player’s position on the list they are going to submit.
Closing discussion/ Conclusion
Together, teacher and students summarize the lesson of the day, and students
record the summary in their note books.
Lesson 3: Structure of play, scoring and winning a match in volleyball
a) Learning objective
Describe how to score a point, winning a set and winning a match in Volleyball
b) Teaching resources
Balls, playground, whistles, watch, cones, chasubles, score sheet, cards, flags.
c) Prerequisites/Revision/Introduction
Students of senior six will learn better rules of volleyball if they have performed
basic techniques and tactics of playing volleyball in Ordinary level, senior four
and five.
d) Learning activities
Opening discussions/ Introduction
– Start the lesson by asking students members of volleyball team learnt in
lesson one of this unit.
– Introduce the new lesson by asking ways of scoring a point in in a Volleyball
match.
e) Lesson body
Activity 4.3
– Helps students to form groups of five students, and give them questions
related, structure of play scoring a points, a set and how to win a match in
volleyball. Let students discuss about the toss, official warm-up, winning
a point, a set and a match, each student must participate in discussion by
giving his/her idea.
– Pass though groups and help them where is necessary. Request students
to choose a secretary to record findings and group representative who will
present their findings. Request group representative to present their findings
and group members
– may support where is necessary. After presentation of all groups, use aprojector to recap presentations
Closing discussion/ Conclusion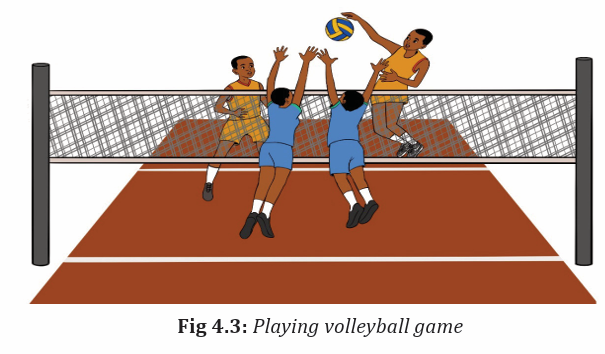
– Together, teacher and students summarize the lesson of the day, and
students record the summary in their note books.
lesson 4: State of play, interruptions, delays and intervals
a) Learning objective
Identify and explain game delays, interruptions, intervals and team timeout.
b) Teaching resources
Balls, playground, whistles, watch, cones, chasubles, score sheet, cards, flags.
c) Prerequisites/Revision/Introduction
Students of senior six will learn better rules of volleyball if they have performed
basic techniques and tactics of playing volleyball in Ordinary level, senior four
and five.
d) Learning activities
Opening discussions/ Introduction
– Start the lesson by asking students how to score and win a match as they
have learnt in lesson three of this unit.
– Introduce the new lesson by asking how long a Volleyball match last in an
official match.
e) Lesson body
Activity 4.4
Asks Students to form six groups and give them questions related to game
delays, interruptions, intervals and timeout to discuss in each group as seenin the following table.
– Pass though groups and help them where is necessary. Request students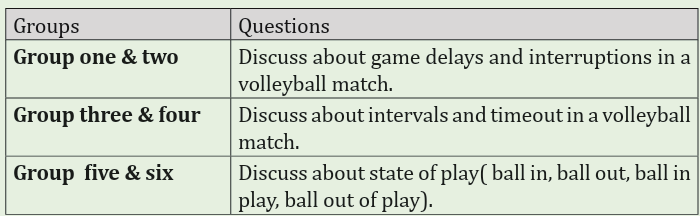
to choose a secretary to record findings and group representative who
will present their findings. Request group representative to present their
findings and group members.
– may support where is necessary. After presentation of all groups, use aprojector to recap presentations.
Closing discussion/ Conclusion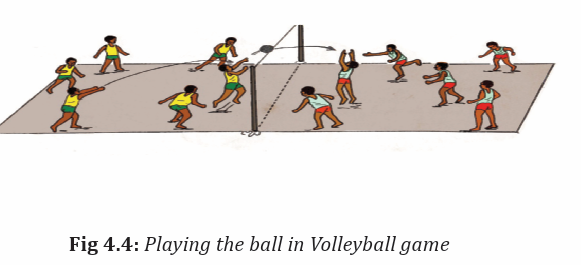
– Together, teacher and students summarize the lesson of the day, and
students record the summary in their note books.
Lesson 5: Conduct, misconduct, violation and penalties
a) Learning objective
– Describe the required conducts and misconduct and their sanctions in
volleyball.
– Identify different violation in volleyball and their penalties.
b) Teaching resources
Balls, playground, whistles, watch, cones, chasubles, score sheet, cards and
flags.
c) Prerequisites/Revision/Introduction
Students of senior six will learn better rules of volleyball if they have performed
basic techniques and tactics of playing volleyball in Ordinary level, senior four
and five.
d) Learning activities
Opening discussions/ Introduction
– Start the lesson by asking students questions on game delays, interruption
and timeout in volleyball match learnt in lesson four of this unit.
– Introduce the new lesson by asking questions on the conduct and violationin a Volleyball.
e) Lesson body
Activity 4.5
Asks Students to form four groups and give them questions related Conduct,
misconduct, violation and penalties to discuss in each group as seen in thefollowing table.
– Pass though groups and help them where is necessary. Request students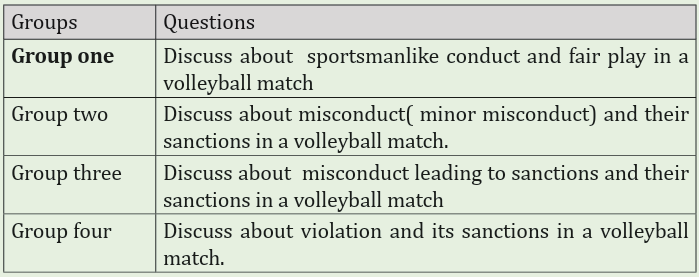
to choose a secretary to record findings and group representative who will
present their findings.
– Request group representative to present their findings and group members
may support where is necessary.
– After presentation of all groups, use a projector to recap presentations,
Closing discussion/ Conclusion
– Together, teacher and students summarize the lesson of the day, and
students record the summary in their note books.
Lesson 6: Officiating corps and procedures
a) Learning objective
– Identify and explain the duties and responsibilities of officials in volleyball.
– Describe the volleyball match procedures.
b) Teaching resources
Balls, playground, whistles, watch, cones, chasubles, score sheet, cards, flags.
c) Prerequisites/Revision/Introduction
Students of senior six will learn better rules of volleyball if they have performed
basic techniques and tactics of playing volleyball in Ordinary level, senior four
and five.
d) Learning activities
Opening discussions/ Introduction
– Start the lesson by asking students questions on conduct and misconduct
in volleyball learnt in lesson five of this unit.
– Introduce the new lesson by asking the composition of refereeing team in
a Volleyball.
– Facilitate the students to answer the question, refereeing team is composed
by first referee, second referee, the challenge referee, the reserve referee,
the scorer, line judges.
e) Lesson body
Activity 4.6
Divide students into 9 groups and give them questions related refereeing
team composition and procedures of refereeing to discuss in each group asseen in the following table.
– Pass though groups and help them where is necessary. Request students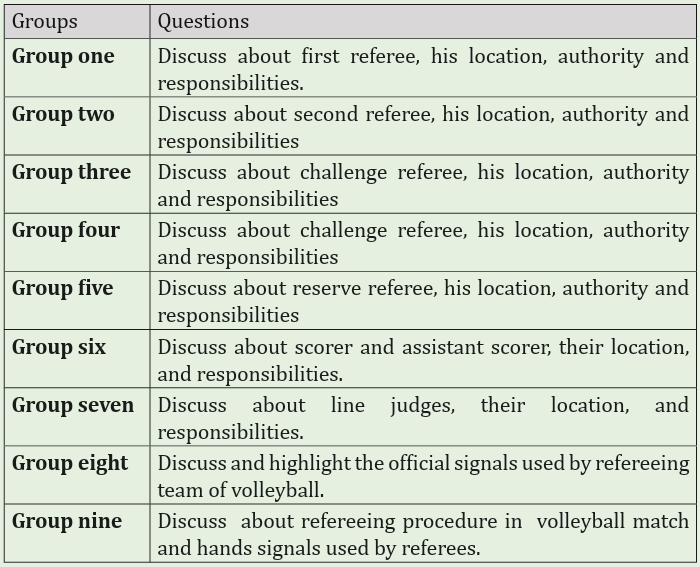
to choose a secretary to record findings and group representative who will
present their findings.
– Request group representative to present their findings and group members
may support where is necessary. After presentation of all groups, use a
projector to recap presentations,
Application Activity 4.3
Let students individually demonstrate different hand signals used in volleyballgame and interpret their meaning.
List of volleyball hand signals used in refereeing of volleyball game

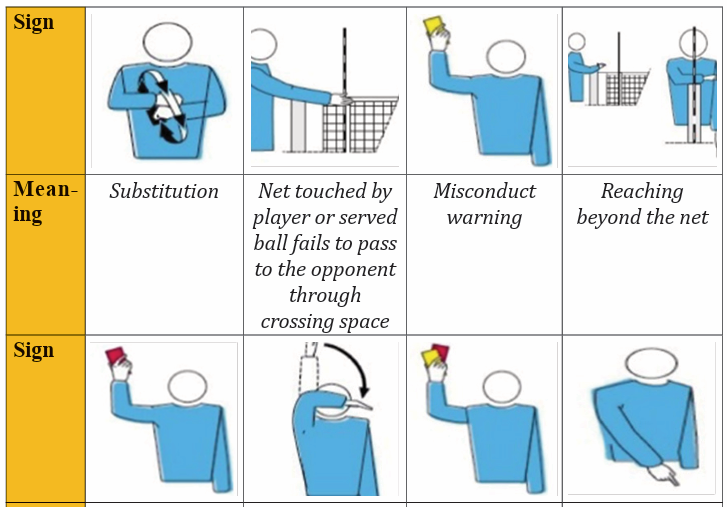
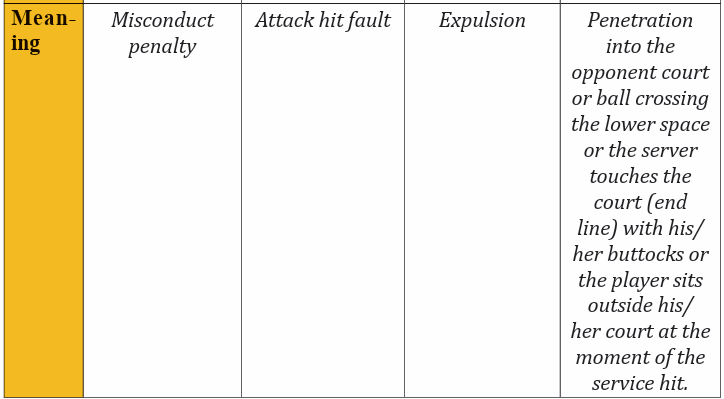
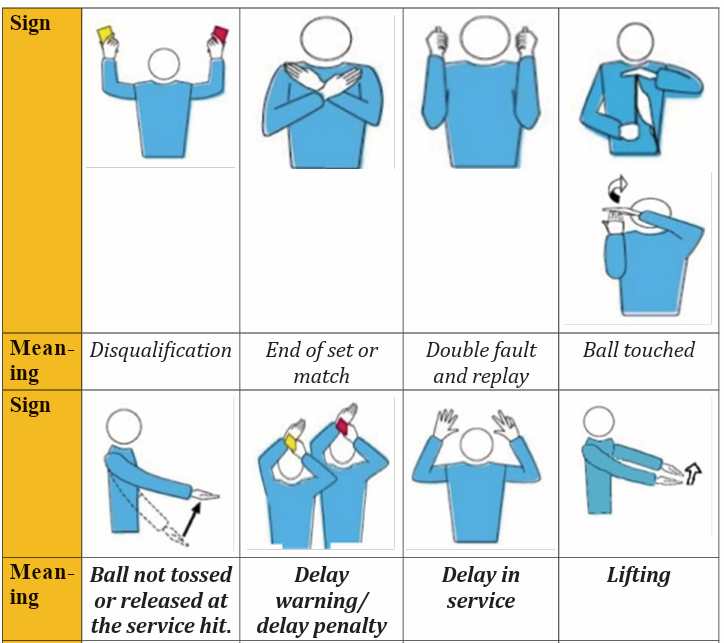
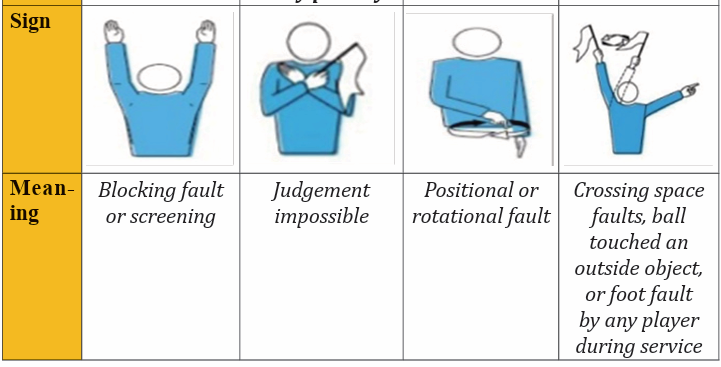
Closing discussion/ Conclusion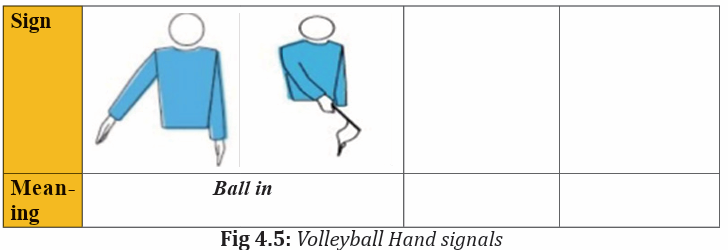
– Together, teacher and students summarize the lesson of the day, and
students record the summary in their note books.
Lesson 7: Refereeing volleyball game
a) Learning objective
Apply and interpret Volleyball rules during a match.
b) Teaching resources
Balls, playground, whistles, watch, cones, chasubles, score sheet, cards, and
flags.
c) Prerequisites/Revision/Introduction
Students of senior six will better apply volleyball rules if they have developed
basic techniques and tactics of playing volleyball learned in senior four and
senior five
d) Learning activities
Opening discussions
– Ask questions related to volleyball rules learnt in lesson 1,2,3,4,5, and 6 of
this unit.
– Introduce the lesson of the day by giving instruction to follow while they
are on volleyball court.
– Invite student teachers to start warm up exercises.
Warm up exercises
Let students perform general warm up exercises and specific warm up based on
the most body’s parts to be used while playing volleyball. Let students stretch
their muscles properly.
e) Lesson body
Activity 4.7
Game situation
Form three groups A, B and C. Competition is organized in this way:
1st match: A vs B C will act as officials by providing: referee, second referee,
scorer, assistant scorer and line judges other remaining players will record fouls
and misconduct happened and how officials have been reacted for those fouls and
2nd match B vs C, A will act as officials by providing: referee, second referee,
scorer, assistant scorer and line judges other remaining players will record fouls
and misconduct happened and how officials have been reacted for those fouls and
misconducts.
3rd match A vs C, B will act as officials by providing: referee, second referee,
scorer, assistant scorer and line judges other remaining players will record fouls
and misconduct happened and how officials have been reacted for those fouls and
misconducts.
Points to consider during this game situation
– Time for playing for each match: 10 minutes
– The winner is the team, which will gain many points in those three matches.
Cool down
– Choose one student to lead cool down and invite them to start game
situation discussion.
– Start by giving time group A, B then C to share what they have recorded
based on rules of the games, decisions taken by officials, effectiveness
of hand signals used, and how officials are taking positions and their
movement during the match. Support them to clarify some rules of the
game where is necessary.
– Close the lesson by asking some questions on what they have been
discussed.
4.5 Summary of the unit
In this unit, students perform exercises for recalling techniques and tactics of
volleyball. They have also learned rules of volleyball game and how to apply
them during the game.
4.6 End of unit assessment
– Teacher divide students into groups of five including first referee, second
referee, scorer and two line judges. After dividing students into their
respecting groups, set the order on which groups will lead the game,
request the first group to start the match.
– Ask other remaining students to form two teams of six players for each
one. Let the match start, change groups which is officiating after five
minutes. Officials become players to replace those who are becoming
officials.
– During performing officiating for each group, observe how each student
is accomplishing given tasks and roles.
– Records their performance in order to give them feedback at the end of
the exercise.
4.7Additional activities
Remedial activities
Distribute balls to students for regular familiarization with the ball focusing on
techniques of playing volleyball, encourage students to lead matches/games
while other are performing techniques and tactics in the game situation.
Consolidation activities
Participate in competitions between small groups and choose their own officials
to lead the matches. Scorers record performance of each group.
Extended activities
Organize volleyball competition between classes for forming school teams and
participate in interschool competitions and friendly matches. Let student teachers
officiate matches. Encourages student s to exploit regularly rules of the game ofvolleyball and request them to be update about changes of the rules.
UNIT 5: BASKETBALL
Key unit competence: Apply basketball rules of the game
5.1 Prerequisite (Knowledge, skills, attitudes and values)
Students of senior four will learn better Basketball rules if they can performtechniques and tactics of basketball learnt in senior four and five.
5.2 Cross-cutting issues to be addressed
Gender: In teaching and learning of Basketball rules, the teacher must prepare
and provide physical activities that engage both girls and boys equally to exploit
their full potential and talents without any discrimination or prejudice.
Inclusive education: The teacher as a facilitator he/she must consider
different special education needs and select physical activities to adapt his
teaching approaches to all students. This creates a positive attitude and helps
all learners to participate actively and develop their competence levels.
Financial education: The teacher should integrate Financial Education into
his teaching/learning activities by providing the local and no cost teaching
material where is possible. He/she must encourage students to make their
own materials that can help them to develop competences not only in sport at
school but also in their daily life.
Standardization culture: The teacher must choose and select the standardized
materials to use in his/her teaching/learning process. It is necessary to provide
appropriate materials required to the levels of students and help them to
develop culture of checking and using the quality of sport materials for the
competitions before to use them in order to prevent injuries and other accident.
Environment and sustainability: The teacher should provide materials and
deliver the lesson with encouraging students to protect the environment and
well use of materials. The teacher helps them to develop the spirit of keeping
safe the environment they use in sports activities.
Peace and values education: The teacher helps students to develop fair play
and social values by planning physical activities that Avoid violence and conflict
in the game and by setting clear and relevant instructions. He/she should
provide the activities that help students to develop their competence peacefully.
Comprehensive sexuality education: A teacher provides physical activities
and sets instructions that prevent sexual harassment, any kind of gender based
violence like sexual abuse and physical contacts oriented to the sexuality
intention
Genocide studies: While conducting physical exercises and health a teacher
should take a time to explain students how sports should be used to fight against
Genocide ideology and how to prevent it. For example, to organize Genocide
memorial tournaments at school and give the message related to the Genocide.
5.3 Guidance on introductory activity
Before introducing the lesson one of this unit, teacher must introduce the whole
unit. The teacher as a guide, facilitator and expert, ask questions or give activity
related to basketball rules in order to help them to predict what to be learnt in
the whole unit.
Activity/task
Divide students into groups of five, and give them the following scenario to
discuss:
Scenario: – It is the 3rd quarter of the game with 1:51 on the game clock. Player A1
is closely guarded when he drives the ball to the basket. There is light
contact with the defender on the torso. The basket is successful. In your
respective groups discuss the following points: The correct procedure to
handle this situation
– Rules of basketball that are found in this situation– In general, how many rules does Basketball has?
5.4 List of lessons/sub-heading

Lesson 1: Recall on basketball techniques and tactics in the
game situation.
a) Learning objective
Identify and perform techniques and tactics of Basketball.
b) Teaching resources
Balls, playground, Whistle, Watch, Cones, Chasubles
c) Prerequisites/Revision/Introduction
Student s of senior six will recall techniques and tactics used in playing
basketball game if they have developed basic techniques of playing basketball
senior four and five.
d) Learning activities
Opening discussions
– Asks students different types of techniques of basketball learnt in senior
four and different tactics of basketball learnt in senior five. Let students
brain storm them, and facilitate theme where it is necessary.
– Introduce the new lesson and ask students to start warm-up.
Warm up exercises and stretching exercises
Let students perform general warm up exercises and specific warm up based
on the most body’s parts to be used while performing basketball techniques
and tactics and stretch their muscles properly.
e) Lesson body
Activity 5.1
Divide students into 2 groups, and give each group a ball. Asks students in groups
to stand on the line facing the ring of a basketball court. Group one use one ring
on one part of the court, while another group are using the other ring to the other
side. Let students dribble the ball and shoot in the ring, take up the ball and make
dribble going back to the line, when rich near pass the ball to the next student on
the line and that person do the same exercise as the first, repeat this exercise until
everyone had chance to participate.
Teaching and learning points to consider
During this exercises, teacher as a facilitator should observe the following:
– How students are performing basic techniques (Dribbling, passing,
shooting)
– Help and correct those students who are struggling to perform very wellthe basic techniques
Activity 5.2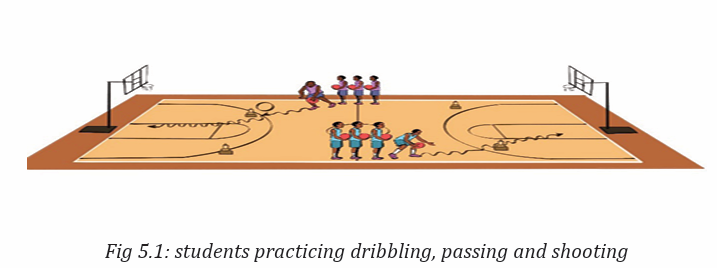
Divide students in four groups (A, B, C D), A and B become defenders while
C and D become offensive players. A will play against using half of basketball
court, while B will play against D using the other half of the court.
Set a line of offensive players(A) at one wing of the playground, and let
defenders (C) stands on the same side block. Do the same for the other part
of court for the group B and D.
Steps of doing this exercises:
– The first offensive player starts at the block. The defender moves in front
from the high side
– The offensive player cuts hard to the three-point line to receive the ball. The
defender closes out on the catch.
– They play one on one until a score or defensive rebound. Offensive player is
allowed a max of four dribbles.
– Repeat, with the same defender guarding each offensive player once– Rotate a new defender in and repeat
Application Activity 5.2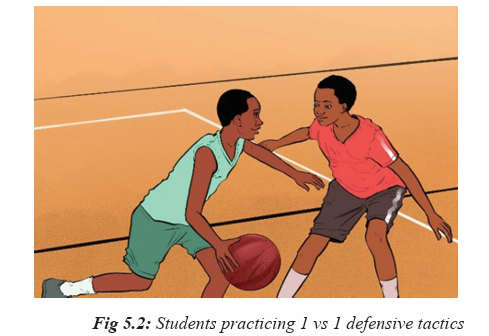
Form teams of five students for each one based on the number of students who
are in a class; two teams enter the court, request players to take their positions
based on tasks to accomplish during performing game situation, let them play a
normal basketball game in 5 minutes by using techniques and tactics of Basket
ball. After 5 minutes, let other team enter the court and ask them to play a Bas
ketball game as other team did.
Cool down exercises
– Let students do light exercises and stretch their group of muscles by
insisting on most used parts.
Closing discussions (RCA)
Reflect
– What are challenges/benefits did you face while playing basketball?
– How did you proceed in order to win the match? What are causes of losing
the game?
Connect
– What are the importance of combining techniques and tactics in playing
basketball game?
Apply
– What is the usefulness of techniques and tactics in basketball game
situation?
– How will you use those skills of playing basketball in your daily life?
Lesson 2: Playing court, equipment and ball
a) Learning objective
– Describe and draw Basketball playing court area and dimensions.
– Identify different equipment needed in Basketball
– Describe the ball used in basketball
b) Teaching resources
Balls of basketball, hard/soft copy of basketball rules of the game, computer,
projector
c) Prerequisites/Revision/Introduction
Students of senior six will better apply Basketball rules if they have developed
basic techniques and tactics of playing Basketball learned in senior four and
senior five
d) Learning activities
Opening discussions – Ask questions related to baseball techniques and tactics learn in lesson
one of this unit.– Introduce the lesson of the day by asking questions related to basketball
rules: How many rules do we have in Basketball? list them? Facilitate
students to answer those questions.
e) Lesson body
Activity 5.3
Asks Students to form four groups and give them questions related Basketball
playing court and equipment to discuss in each group as seen in the followingtable.
Pass though groups and help them where is necessary. Request students to
choose a secretary to record findings and group representative who will present
their findings.
– Request group representative to present their findings and group members
may support where is necessary.
– After presentation of all groups, use a projector to recap presentations,
Application Activity 5.3
Individually, let students draw a basketball playing court by putting all areas andtheir dimensions. Facilitate them and correct where it is necessary.
Closing discussion/ Conclusion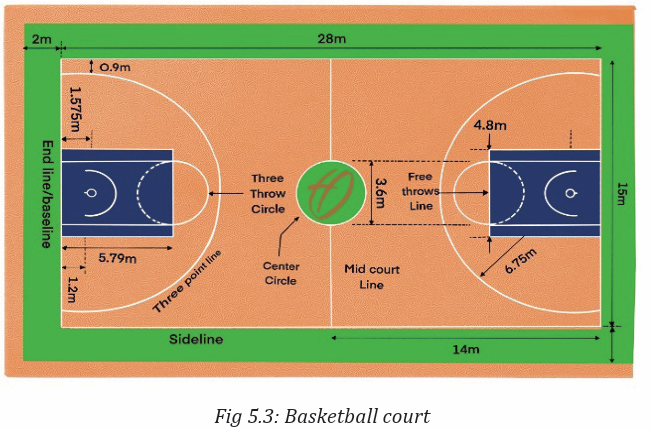

– Together, teacher and students summarize the lesson of the day, and
students record the summary in their note books.
Lesson 3: Players, substitutes, teams and teammates.
a) Learning objective
– Identify number of players and team component in Basketball.
– Identify player’s position and explain their responsibilities in a Basketball
match.
– Identify number of substitutions allowed and describe how substitution is
done in Basketball.
b) Teaching resources
senior five.
Balls of basketball, hard/soft copy of basketball rules of the game, computer,
projector.
c) Prerequisites/Revision/Introduction
Students of senior six will better apply Basketball rules if they have developed
basic techniques and tactics of playing Basketball learned in senior four and
d) Learning activities
Opening discussions – Ask questions related to playing court and equipment learn in lesson two
of this unit.– Introduce the lesson of the day by asking questions related to team’s
composition in basketball.
e) Lesson body
Activity 5.4
Asks Students to form four groups and give them questions related teams,
players and substitution to discuss in each group as seen in the followingtable.
Pass though groups and help them where is necessary. Request students
to choose a secretary to record findings and group representative who will
present their findings. Request group representative to present their findings
and group members may support where is necessary.
– After presentation of all groups, use a projector to recap presentations.
Closing discussion/ Conclusion
Together, teacher and students summarize the lesson of the day, and students
record the summary in their note books.
Lesson 4: Fouls, violations and Penalties.
a) Learning objective
– Identify fouls and violations
– Differentiate fouls and violations
– Identify fouls and violations penalties
b) Teaching resources
Balls of basketball, hard/soft copy of basketball rules of the game, computer,
projector
c) Prerequisites/Revision/Introduction
Students of senior six will better apply Basketball rules if they have developed
basic techniques and tactics of playing Basketball learned in senior four and
senior five.
d) Learning activities
Opening discussions
– Ask questions related to teams’ composition and the assistant given an
injured player in Basketball.
– Introduce the lesson of the day by asking questions related to fouls andviolation in basketball.
e) Lesson body
Activity 5.5
Asks students to form four groups and give them questions related to foulsand violation to discuss in each group as seen in the following table.
– Pass though groups and help them where is necessary. Request students
to choose a secretary to record findings and group representative who will
present their findings.
– Request group representative to present their findings and group members
may support where is necessary.
– After presentation of all groups, use a projector to recap presentations,
Application Activity 5.4
Divide students into groups of five students and give them the following
scenario to discuss in their respective groups:
Scenario 1:
Within the 2-point area in box 2, player A2 makes a jump shot and the ball
touches the front of the ring. There are then multiple touches from players
from both teams trying to gain control of the ball when the ball is batted to
the back court. Offensive player A1 catches the ball with two hands whilst in
the air as he jumps from his front court to his back court, and play continues.
Please list fouls and violations found in this scenario and prescribe their
penalties if any.
Scenario 2:
With 27 seconds on the game clock in the fourth quarter and the score for
Team A is 64 points with 4 team fouls, Team B has 60 points with 3 team
fouls. Team B score a field goal and Team A time-out request is granted.
Discuss with your team the procedure and discussion points during the time
out and how play will resume.
After, asks groups to present their ideas and help them to do correction
where is necessary.
Closing discussion/ Conclusion
– Together, teacher and students summarize the lesson of the day, and
students record the summary in their note books.
Lesson 5: Scoring, winning and time limits and how to deter
mine the winner in Basketball.
a) Learning objective
Identify and explain different tie limits situations in Basketball.
b) Teaching resources
Balls of basketball, hard/soft copy of basketball rules of the game, computer,
projector
c) Prerequisites/Revision/Introduction
Students of senior six will better apply Basketball rules if they have developed
basic techniques and tactics of playing Basketball learned in senior four and
senior five
d) Learning activities
Opening discussions – Ask questions related to fouls and violations learnt in lesson four of this
unit.– Introduce the lesson of the day by asking questions related to different
ways of scoring in basketball.e) Lesson body
Activity 5.6
Asks Students to form four groups and give them questions related to foulsand violation to discuss in each group as seen in the following table.
– Pass though groups and help them where is necessary. Request students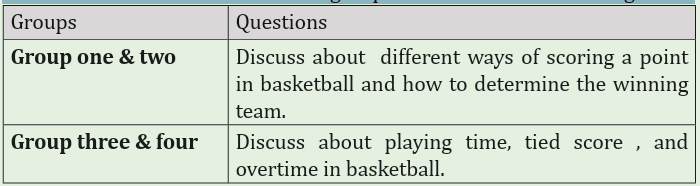
to choose a secretary to record findings and group representative who will
present their findings.
– Request group representative to present their findings and group members
may support where is necessary.
– After presentation of all groups, use a projector to recap presentations,
Closing discussion/ Conclusion
– Together, teacher and students summarize the lesson of the day, and
students record the summary in their note books.
Lesson 6:Officials, table officials, commissioners.
a) Learning objective
Identify basketball officials and explain their responsibilities
b) Teaching resources
Balls of basketball, hard/soft copy of basketball rules of the game, computer,
projector.
c) Prerequisites/Revision/Introduction
Students of senior six will better apply Basketball rules if they have developed
basic techniques and tactics of playing Basketball learned in senior four and
senior five.
d) Learning activities
Opening discussions – Ask questions related to what they have learnt in lesson 1,2,3,4,5 of this
unit.– Introduce the lesson of the day by asking questions related the names of
officials found in basketball.
e) Lesson body
Activity 5.7
Asks Students to form five groups and give them questions related to foulsand violation to discuss in each group as seen in the following table.
– Pass though groups and help them where is necessary. Request students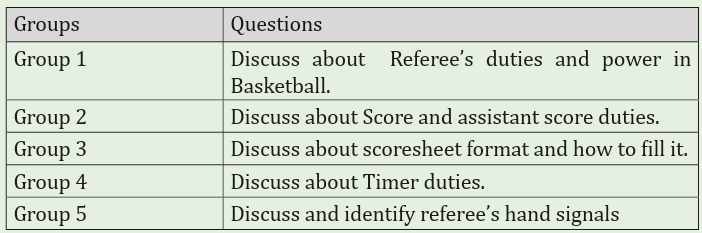
to choose a secretary to record findings and group representative who will
present their findings.
– Request group representative to present their findings and group members
may support where is necessary.– After presentation of all groups, use a projector to recap presentations.
Application Activity 5.5Individually students show different referees hand signals in Basketball.
List of refereeing hand signals in basketball

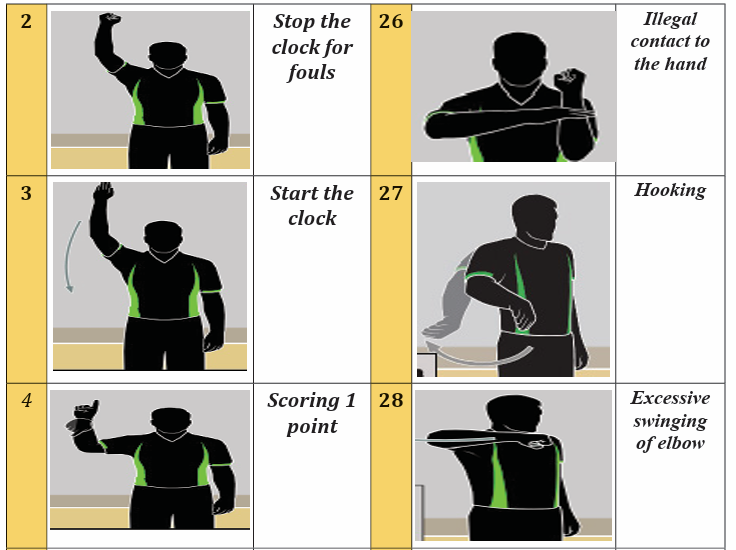
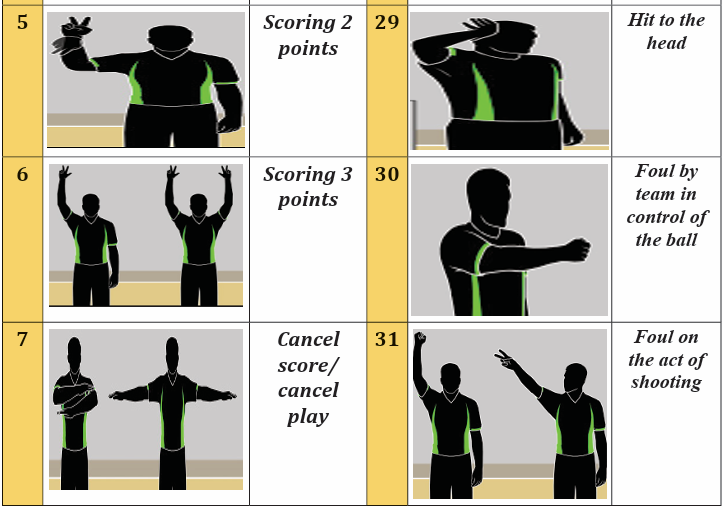
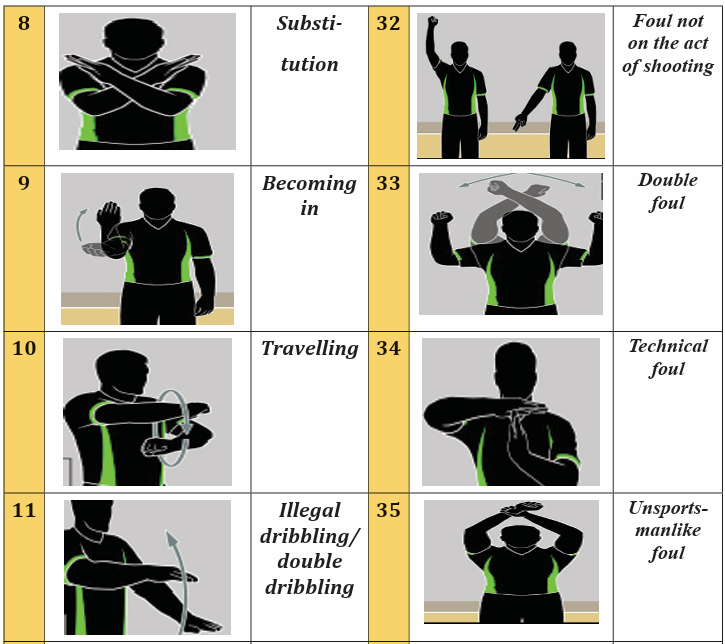
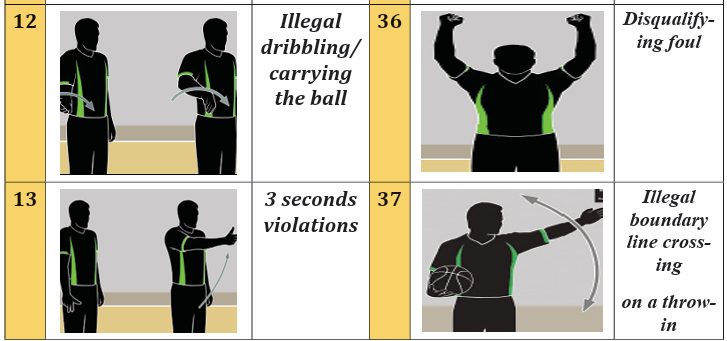
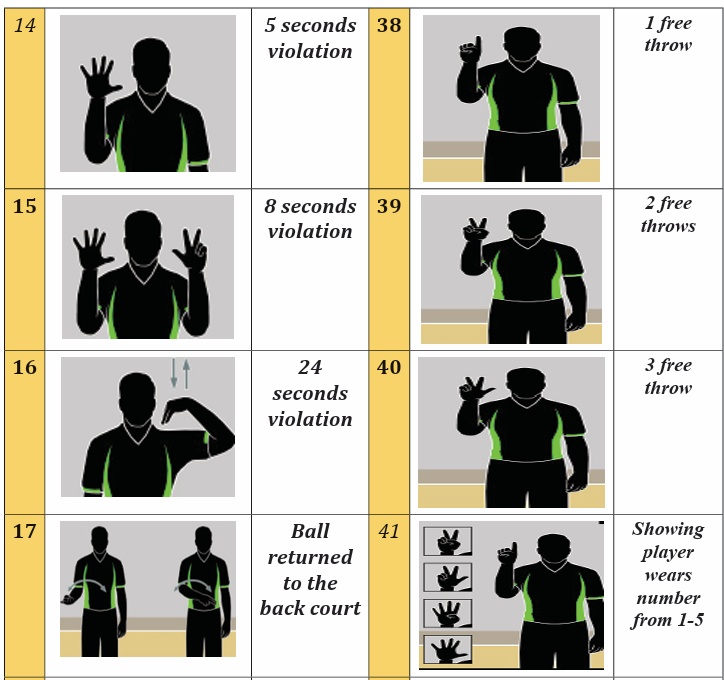
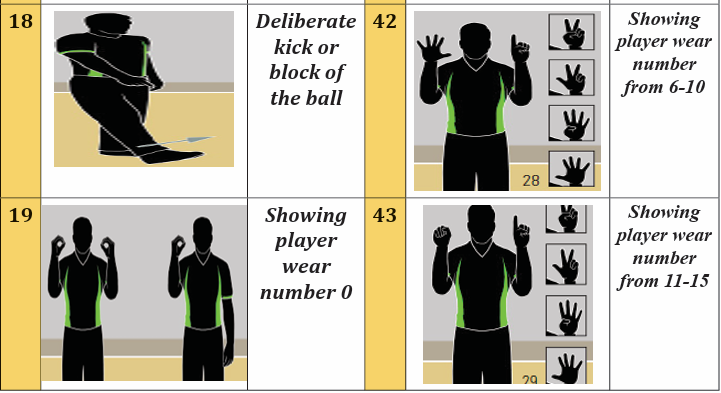
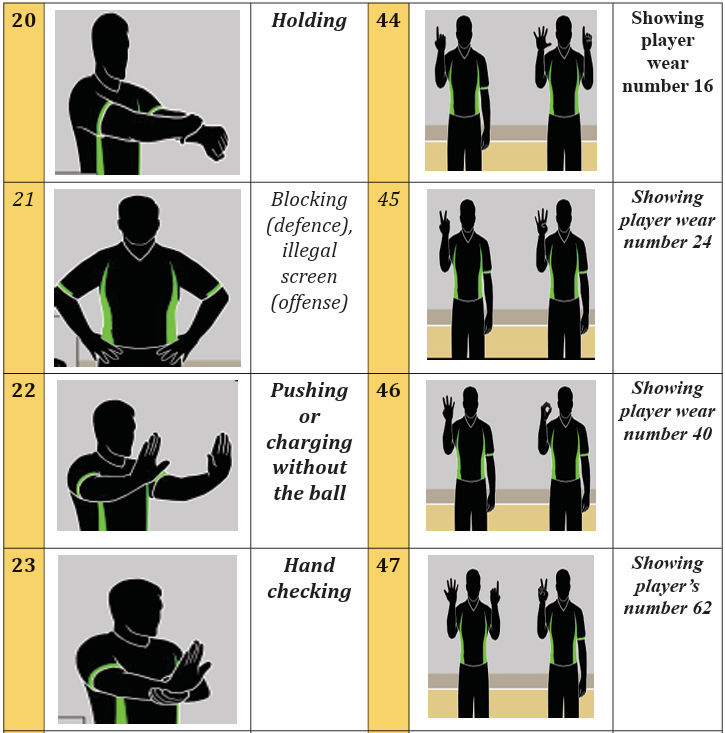
Application Activity 5.6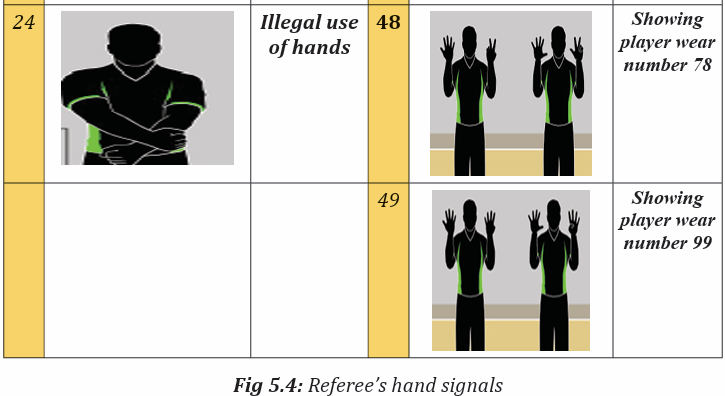
are watching in the presented video.
Prepare a five minutes’ video of a match between two teams, and give a score
sheet to each student and ask them to fill the scoresheet according to what they
Closing discussion/ Conclusion
– Together, teacher and students summarize the lesson of the day, andstudents record the summary in their note books
Lesson 7: Officiating a Basketball match.
a) Learning objective
Recognize and apply official rules of the game of basketball in the game situation
b) Teaching resources
Balls used in basketball game, court for basketball, whistle, watch, chasubles,
score sheet, protective equipment (if available), ring (rim) and posts.
c) Prerequisites/Revision/Introduction
Students of senior six will interpret and apply rules of basketball in game
situation if they have learned techniques and tactics of playing basketball game
in senior four, and senior five.
d) Learning activities
Opening discussions
Ask questions related to the application of basketball rules in game situations.
Let students present their findings and introduce the new lesson. Invite students
to start warm up exercises.
Warm up exercises and cool down description
Let students perform general warm up exercises and specific warm up based
on the most body’s parts to be used while playing basketball and stretch their
muscles properly.
e) Lesson body
Activity 5.8
Game situation
Form three groups A, B and C. competition is organized in this way:
1st match: A vs B C will act as officials by providing: umpires and table
officials and other remaining players will record fouls and misconduct
happened and how umpires and table officials have been reacted for those
fouls and violation.
2nd match: B vs C, A will act as officials by providing:
Umpires, table officials, and other remaining players will record fouls and
misconduct happened and how umpires and table officials have been reacted
for those fouls and violation
3rd match: A vs C, B will act as officials by providing:
umpires and table officials and other remaining players will record fouls
and misconduct happened and how umpires and table officials have been
reacted for those fouls and violation.
Points to consider during this game situation
– Time for playing for each match: 5 minutes
– The winner is the team, which will gain many points in those three matches.
– Choose one student to lead cool down and invite them to start after game
situation discussion.
– Start by giving time group A, B then C to share what they have recorded
based on rules of the games, decisions taken by officials, effectiveness of
hand signals used, and how officials are taking positions and their movement
during the match. Support them to clarify some rules of the game where is
necessary.
– Close the lesson by asking some questions on what the y have been discussed.
5.5 End of unit assessment
Teacher divide students into groups of six including two umpires, scorer, an
assistant scorer, a timer and a shot clock operator. After dividing student
teachers into their respecting groups, set the order on which groups will
lead the game, request the first group to start the match. Ask other remaining
students to form two teams of five players for each one.
Let the match start, change groups which is officiating after five minutes.
Officials become players to replace those who are becoming officials.
– During performing officiating for each group, observe how each student
is accomplishing given tasks and roles.
– Records their performance in order to give them feedback at the end of
the exercise.
5.6 Additional activities
Remedial activities
Prepare a video of two teams playing basketball match. Provide a list of team
A and B, provide also 5 score sheet. After divide students into groups, and asks
them to watch the given video and fill the score sheet accordingly. Facilitate
them where it is necessary, and after the given time let them present their
activities and help them to do correction where it is necessary.
Consolidation activities
Participate in competitions between small groups and choose their own officials
to lead the matches and make record of performance for different groups.
Extended activities
Organize basketball competition between classes for forming school teams
and participate in interclasses and friendly matches. Let student teachers
officiates matches. Encourages student teachers to exploit updated rules ofthe game of basketball regularly.
UNIT 6: HANDBALL
Key unit competence: Apply handball rules of the game
6.1. Prerequisite (Knowledge, skills, attitudes and values)
Students of senior six will learn better handball rules of the game if they have mastered
handball basic techniques learned in senior five.
6.2. Cross-cutting issues to be addressed
Gender: In teaching and learning process of handball, the teacher must prepare
and provide physical activities that engage both girls and boys equally to exploit
their full potential and talents without any discrimination or prejudice.
Inclusive education: The teacher as a facilitator he/she must consider different
special education needs and select handball activities to adapt his teaching
approaches to students. This creates a positive attitude and helps all students
to participate actively and develop their competence levels.
Financial education: The teacher should integrate Financial Education into
his/her teaching/learning activities by providing the local and no cost teaching
material where is possible. He/she must encourage students to make their
own materials that can help them to develop competences not only in sports at
school but also in their daily life.
Standardization culture: The teacher must choose and select the standardized
materials to use in his/her teaching/learning process of handball. It is necessary
to provide appropriate materials required to the levels of students and help
them to develop culture of checking and using the quality of sport materials
for the competitions before using them in order to prevent injuries and other
accidents
Environment and sustainability: The teacher should provide materials and
delivers the lesson by encouraging students to protect the environment and the
well use of materials. The teacher helps them to develop the spirit of keeping
safe environment they use in physical education and sports activities.
Peace and values education: The teacher helps students to develop fair play
and social values by avoiding violence and conflict in their handball games and
by setting clear and relevant instructions. He/she should provide the activities
that help students to develop their competence peacefully.
Comprehensive sexuality education: The teacher provides handball activities
and sets instructions that prevent sexual harassment, any kind of gender
based violence like sexual abuse and physical contacts oriented to the sexuality
intention.
Genocide studies: While conducting handball exercises, the teacher should
take a time to explain students how sports should be used to fight against
Genocide ideology and how to prevent it. For example, to organize Genocide
memorial tournaments at school and give the message related to the Genocide.
6.3. Guidance on introductory activity
Before introducing the lesson one of this unit, you must introduce the whole
unit. The teacher as a guide, facilitator and expert, ask questions or give activity
related to technical skills used in handball in order to help them to predict whatto be learned in the whole unit.
6.4 List of lessons/sub-heading
Lesson 1: Recall handball techniques and tactics in the game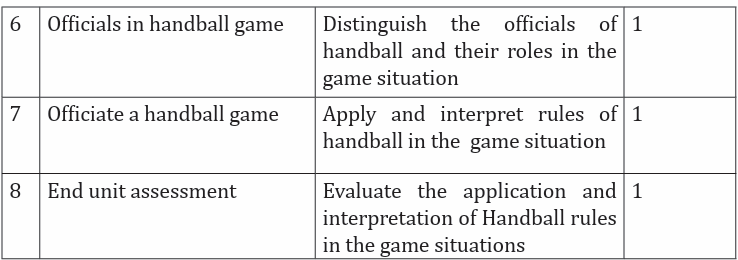
situation
a) Learning objective
Identify handball techniques and tactics in the game situation.
b) Teaching resources
Balls, Stopwatch/watch, Playground, Cones, Whistle and Chasubles.
c) Prerequisites/Revision/Introduction
Students of senior six will learn better recall on handball techniques and tactics
in the game situation if they have developed techniques and tactics exercises
learnt in year five.
d) Learning activities
Opening discussions
– Ask questions about handball techniques and tactics learnt in year five.
– Let students present their findings and introduce the prepared lesson.
– Invite students to start warm up exercises.
Warm up exercises and stretching exercises
– Let students perform general warm up exercises and specific warm up
based on the most body’s parts to be used while performing techniques
and tactics and stretch their muscles properly.
– One student leads warm up and stretching exercises.
– Guide them while performing warm up and stretching exercises.
– Help them/demonstrate/correct where is necessary.
e) Lesson body
Activity 6.1
Students play a handball game in 15 minutes. They make teams of six players
with on goal keeper and every one occupies responsibilities of his/her position on
the playground accordingly. They pass and receive the ball. They apply attackingtechniques of dribbling and shooting in the goals. They perform defending tactic.
Activity 6.2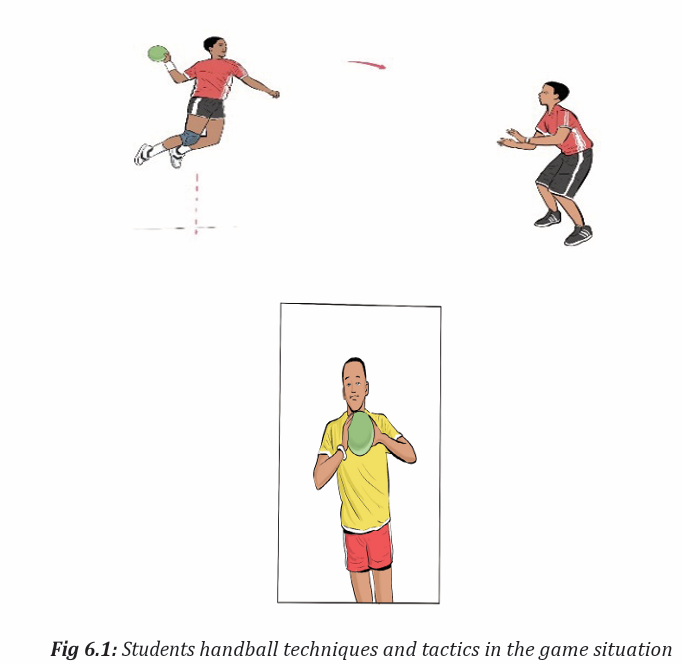
Make teams of 3 vs 3, 4 vs 4, 5vs 5, and 6 vs 6 students with a goal keeper. Let
students play handball adhering to rules of the game on the appropriate court in
limited period of ten minutes. The winner is the team which scores more goalsthan the other.
Activity 6.3
Let students play handball match, the outside teams lead the match as referees,
after a limited period of time teams change roles.
Application Activity 6.1
Distribute balls to students for regular familiarization by playing and request
them to choose their own officials for leading their game plays. After a giventime, the teams change the roles.
Cool down exercises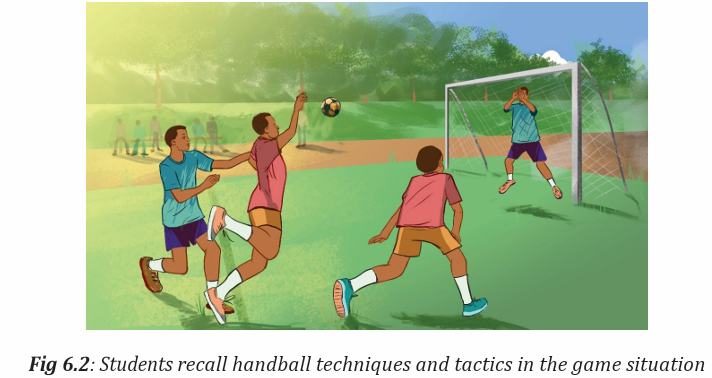
– Let students do right cool down exercises and stretch their group of
muscles by insisting on most used parts
– Randomly, one of students leads cool down exercises.
– Guide them while stretching their muscles systematically.
– Help them/demonstrate/correct where is necessary.
Closing discussions (RCA)
Reflect
– Which challenges/advantages did you face during the execution of passing,
receiving, dribbling, shooting and blocking exercises in handball game?Why?
Connect
– What are necessary conditions for a handball player to apply techniques
and tactics?
Apply
– What will you do to perform handball techniques and tactics after this
session to become a good player?
Lesson 2: Playing court, Playing time, final signal and time-out,
goalkeeper, the goal area in handball
a) Learning objective
Discuss playing court, playing time, final signal and time-out, goalkeeper, the
goal area in handball.
b) Teaching resources
Balls, Stopwatch/watch, Playground, Cones, Whistle, Chasubles and Handball
rule books.
c) Prerequisites/Revision/Introduction
Students of Senior six will learn better playing court, playing time, final signal
and time-out, goalkeeper, the goal area in handball if they have developed
handball rules learnt in senior five and in the previous lesson
a) Learning activities
Opening discussions
– Ask questions about handball rules learnt in senior five.
– Let students present their findings and introduce the prepared lesson.
– Invite students to start warm up exercises.
Warm up exercises and stretching exercises
– Let students perform general warm up exercises and specific warm up
based on the most body’s parts to be used while performing handball game
and stretch their muscles properly.
– One student leads warm up and stretching exercises.
– Guide them while performing warm up and stretching exercises.
– Help them/demonstrate/correct where is necessary.
d) Lesson body
Activity 6.4
– In groups of six, students discuss on the given elements of handball
rules. Each group has one rule to be discussed and findings are in the
distributed rules document as resource.
– Pass though groups and help them where is necessary. Request students
to choose a secretary to record findings and group representative who will
present their findings.
– Request group representative to present their findings and group members
may support where is necessary.– After presentation of all groups, use a projector to recap presentations.
Activity 6.5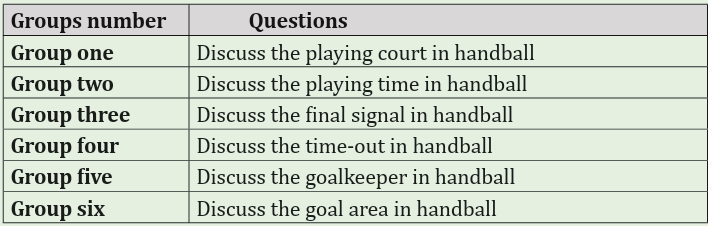
Make teams of 3 vs 3 or 4 vs 4 students with a goal keeper. Let students play
handball adhering to rules of the game on the appropriate court in limited
period of ten minutes. One of the outside teams leads the match as referees
following the handball rules. The winner is the team which scores moregoals or lead the match perfectly than others.
Activity 6.6
Make teams of 5vs 5, and 6 vs 6 students with a goal keeper. Let students play
handball adhering to rules of the game on the appropriate court in limited period
of ten minutes. One of the outside teams leads the match as referees following
the handball rules. The winner is the team which scores more goals or lead thematch perfectly than others.
Application Activity 6.2
Make teams of 6 vs 6 students with a goal keeper. Let students play handball adhering to
rules of the game on the appropriate court in limited period of ten minutes.
One of the outside teams leads the match as referees following the handball
rules. The winner is the team which scores more goals or lead the match perfectly
than others.
Cool down exercises
– Let students do right cool down exercises and stretch their group of
muscles by insisting on most used parts.
– Randomly, one of students leads cool down exercises.
– Guide them while stretching their muscles systematically.
– Help them/demonstrate/correct where is necessary.
Closing discussions (RCA)
Reflect
– Which challenges/advantages did you face during playing and leading the
handball match? Why?
Connect
– What are necessary conditions do you need to apply handball rules?
Apply
– What will you do to apply handball rules in the game perfectly?
Lesson 3: The ball, the team, substitutions, equipment, player
injuries in handball
a) Learning objective
Describe the ball, the team, substitutions, equipment, player injuries in handball.
b) Teaching resources
Balls, Stopwatch/watch, Playground, Cones, Whistle, Chasubles, Handball rule
books
c) Prerequisites/Revision/Introduction
Students of senior six will learn better the description of the ball, the team,
substitutions, equipment, player injuries in handball if they have developed
handball rules learnt in senior five and in the previous lessons.
d) Learning activities
Opening discussions
– Ask questions about handball rules learnt in year five.
– Let students present their findings and introduce the prepared lesson.
– Invite students to start warm up exercises.
Warm up exercises and stretching exercises
– Let students perform general warm up exercises and specific warm up
based on the most body’s parts to be used while performing handball game
and stretch their muscles properly.
– One student leads warm up and stretching exercises.
– Guide them while performing warm up and stretching exercises.
– Help them/demonstrate/correct where is necessary.
e) Lesson body
Activity 6.7
– In groups of five, students describe the given elements of handball rules.
Each group has one element of rules to be described. The resources are
distributed (handball rule books).
– Pass though groups and help them where is necessary. Request students
to choose a secretary to record findings and group representative who will
present their findings.
– Request group representative to present their findings and group members may support where is necessary.– After presentation of all groups, use a projector to recap presentations
Activity 6.8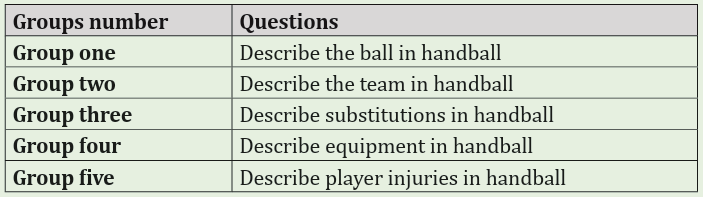
Make teams of 3 vs 3, 4 vs 4 and 5vs 5 students with a goal keeper. Let students
play handball adhering to rules of the game on the appropriate court in limited
period of ten minutes. One of the outside teams leads the match as referees
following the handball rules. The winner is the team which scores more goals or
lead the match perfectly than others.
Activity 6.9
Make teams of 5vs 5 or 6 vs 6 students with a goal keeper. Let students play
handball adhering to rules of the game on the appropriate court in limited period
of ten minutes. One of the outside teams leads the match as referees following
the handball rules. The winner is the team which scores more goals or lead the
match perfectly than others.
Application activity
Application Activity 6.2
Make teams of 6 vs 6 students with a goal keeper. Let students play handball
adhering to rules of the game on the appropriate court in limited period of ten
minutes. One of the outside teams leads the match as referees following the
handball rules. The winner is the team which scores more goals or lead the matchperfectly than others.
Cool down exercises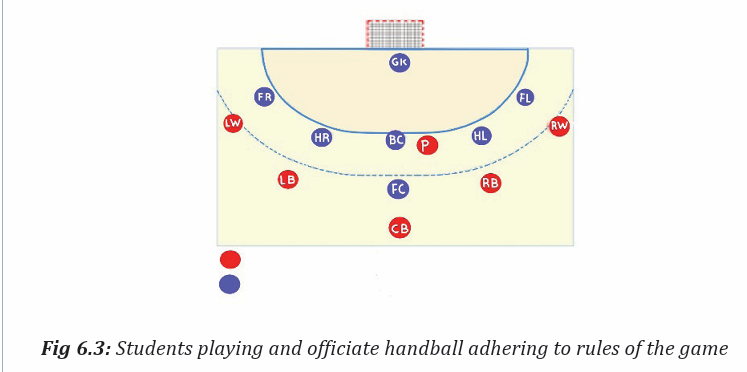
– Let students do right cool down exercises and stretch their group of
muscles by insisting on most used parts.
– Randomly, one of students leads cool down exercises.
– Guide them while stretching their muscles systematically.
– Help them/demonstrate/correct where is necessary.
Closing discussions (RCA)
Reflect
– Which challenges/advantages did you face during playing and leading the
handball match? Why?
Connect
– What are necessary conditions do you need to apply handball rules?
Apply
– What will you do to apply handball rules in the game perfectly?
Lesson 4: Playing the ball, passive play and scoring in handball
a) Learning objective
Discuss playing the ball, passive play and scoring in handball.
b) Teaching resources
Balls, Stopwatch/watch, Playground, Cones, Whistle, Chasubles and Handball
rule books
c) Prerequisites/Revision/Introduction
previous lessons.
d) Learning activities
Students of Senior six will learn better playing the ball, passive play and scoring
in handball if they have developed handball rules learnt in senior five and in the
Opening discussions
– Ask questions about handball rules learnt in senior five and in the last
lesson.
– Let students present their findings and introduce the prepared lesson.
– Invite students to start warm up exercises.
e) Lesson body
Warm up exercises and stretching exercises
– Let students perform general warm up exercises and specific warm up
based on the most body’s parts to be used while performing handball game
and stretch their muscles properly.
– One student leads warm up and stretching exercises.
– Guide them while performing warm up and stretching exercises.
– Help them/demonstrate/correct where is necessary.
Activity 6.10
In groups of three, students describe the given elements of handball rules.
Each group has one element of rules to be described. The resources are
distributed (handball rule books). Pass though groups and help them where
is necessary. Request students to choose a secretary to record findings and group
representative who will present their findings. Request group representative
to present their findings and group members may support where is necessary.After presentation of all groups, use a projector to recap presentations.
Activity 6.11
Make teams of 3 vs 3, 4 vs 4, 5vs 5, and 6 vs 6 students with a goal keeper. Let
students play handball adhering to rules of the game on the appropriate court
in limited period of ten minutes. One of the outside teams leads the match as
referees following the handball rules. The winner is the team which scores more
goals or lead the match perfectly than others.
Activity 6.12
Make teams of 3 vs 3, 4 vs 4, 5vs 5 students with a goal keeper. Let students play
handball adhering to rules of the game on the appropriate court in limited period
of ten minutes. One of the outside teams leads the match as referees following
the handball rules. The winner is the team which scores more goals or lead thematch perfectly than others.
Application Activity 6.3
Make teams of 6 vs 6 students with a goal keeper. Let students play handball
adhering to rules of the game on the appropriate court in limited period of
ten minutes. One of the outside teams leads the match as referees following
the handball rules. The winner is the team which scores more goals or leadthe match perfectly than others.
Cool down exercises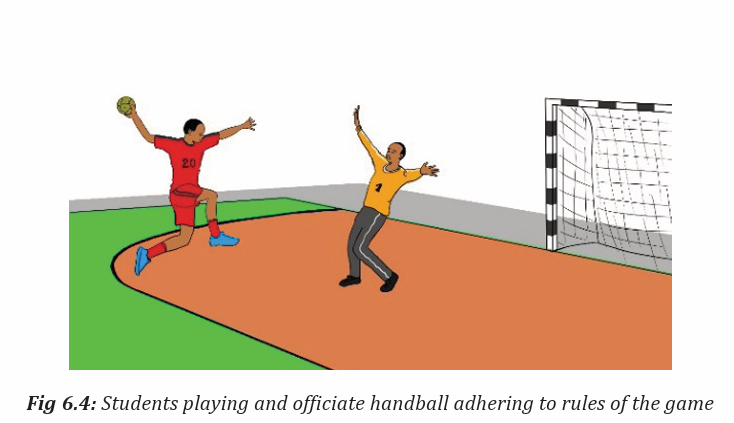
– Let students do right cool down exercises and stretch their group of
muscles by insisting on most used parts.
– Randomly, one of students leads cool down exercises.
– Guide them while stretching their muscles systematically.– Help them/demonstrate/correct where is neces
Closing discussions (RCA)
Reflect
– Which challenges/advantages did you face during playing and leading the
handball match? Why?
Connect
– What are necessary conditions do you need to apply handball rules?
Apply
– What will you do to apply handball rules in the game perfectly?
a) Learning objective
Lesson 5: Fouls and unsportsmanlike conduct, Throws and general
instructions on the execution of the throws in handball
Differentiate fouls and unsportsmanlike conduct, throws and general
instructions on the execution of the throws in handball.
b) Teaching resources
Balls, Stopwatch/watch, Playground, Cones, Whistle, Chasubles, Posts, Videos
related to handball rules of the game and Handball rule books.
c) Prerequisites/Revision/Introduction
Students of Senior six will learn better fouls and unsportsmanlike conduct,
throws and general instructions on the execution of the throws if they have
developed handball rules learnt in senior five and in the previous lessons.
d) Learning activities
Opening discussions
– Ask questions about handball rules learnt in senior five and in last lesson.
– Let students present their findings and introduce the prepared lesson.
– Invite students to start warm up exercises.
Warm up exercises and stretching exercises
– Let students perform general warm up exercises and specific warm up
based on the most body’s parts to be used while performing handball game
and stretch their muscles properly.
– One student leads warm up and stretching exercises.
– Guide them while performing warm up and stretching exercises.
– Help them/demonstrate/correct where is necessary.
e) Lesson body
Activity 6.13
– In groups of three, students describe the given elements of handball
rules. Each group has one element of rules to be described. The resources
are distributed (rulebooks.
– Pass though groups and help them where is necessary. Request students
to choose a secretary to record findings and group representative who will
present their findings.
– Request group representative to present their findings and group members
may support where is necessary. After presentation of all groups, use aprojector to recap presentations.
Activity 6.14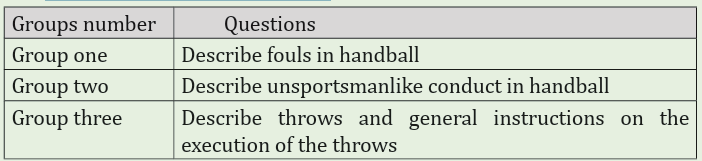
– Make teams of 3 vs 3, 4 vs 4, 5vs 5, and 6 vs 6 students with a goal keeper.
– The students play handball adhering to rules of the game on the appropriate
court in limited period of ten minutes. One of the outside teams leads the
match as referees following the handball rules.
– The winner is the team which scores more goals, made less fouls and
misconduct or lead the match perfectly than others.
Activity 6.15
– Make teams of 5vs 5 students with a goal keeper
– The students play handball adhering to rules of the game on the
appropriate court in limited period of ten minutes. One of the outside
teams leads the match as referees following the handball rules.
– The winner is the team which scores more goals, made less fouls andmisconduct or lead the match perfectly than others
Application Activity 6.3
– Make teams of 6 vs 6 students with a goal keeper. The students play
handball adhering to rules of the game on the appropriate court in
limited period of ten minutes. One of the outside teams leads the match
as referees following the handball rules.
– The winner is the team which scores more goals, made less fouls andmisconduct or lead the match perfectly than others.
Cool down exercises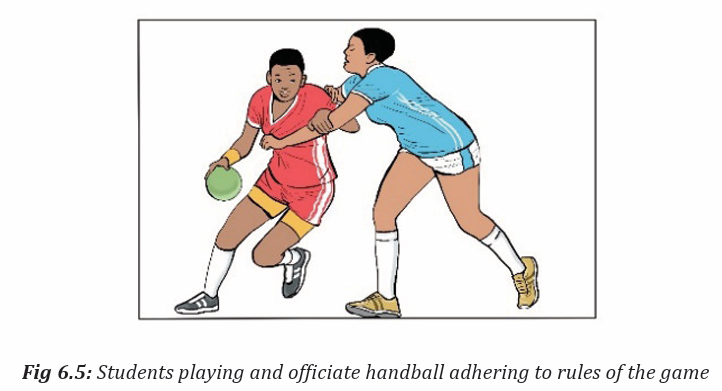
– Let students do right cool down exercises and stretch their group of
muscles by insisting on most used parts.
– Randomly, one of students leads cool down exercises.
– Guide them while stretching their muscles systematically.
– Help them/demonstrate/correct where is necessary.
Closing discussions (RCA)
Reflect
– Which challenges/advantages did you face during playing and leading the
handball match? Why?
Connect
– What are necessary conditions do you need to apply handball rules?
Apply
– What will you do to apply handball rules in the game perfectly?
Lesson 6: Officials in handball game
a) Learning objective
Distinguish the officials of handball and their roles in the game situation.
b) Teaching resources
Balls, Stopwatch/watch, Playground, Cones, Whistle, Chasubles, Posts, Videos
related to handball rules of the game and Handball rule books.
c) Prerequisites/Revision/Introduction
Students of Senior six will learn better officials in handball game if they have
developed handball rules learnt in senior five and in the previous lessons
d) Learning activities
Opening discussions
– Ask questions about handball rules learnt in senior five and in last lesson.
– Let students present their findings and introduce the prepared lesson.
– Invite students to start warm up exercises.
Warm up exercises and stretching exercises
– Let students perform general warm up exercises and specific warm up
based on the most body’s parts to be used while performing handball game
and stretch their muscles properly.
– One student leads warm up and stretching exercises.
– Guide them while performing warm up and stretching exercises.
– Help them/demonstrate/correct where is necessary.
e) Lesson body
Activity 6.16
– In groups students recall handball officials and their responsibilities.
They discuss also on assistants and their responsibilities before, during
and at the end of the match.
– Pass though groups and help them where is necessary. Request students
to choose a secretary to record findings and group representative who willpresent their findings.
Activity 6.17
– Make teams of 3 vs 3 students with a goal keeper.
– The students play handball adhering to rules of the game on the appropriate
court in a limited period of ten minutes. The outside teams play the roles of
officials and their assistants.
– The winner is the team which scores more goals, made less fouls and
misconduct or lead the match efficiently than others.
Activity 6.18- - -
Make teams of 5vs 5 students with a goal keeper.
The students play handball adhering to rules of the game on the appro
priate court in a limited period of ten minutes. The outside teams play the
roles of officials and their assistants.
The winner is the team which scores more goals, made less fouls and
misconduct or lead the match efficiently than others.
Application Activity 6.4
– Make teams of 6 vs 6 students with a goal keeper. Let students play
handball adhering to rules of the game on the appropriate court in
limited period of ten minutes. One of the outside teams leads the match
as referees following the handball rules.
– The winner is the team which scores more goals or lead the matchperfectly than others.
Cool down exercises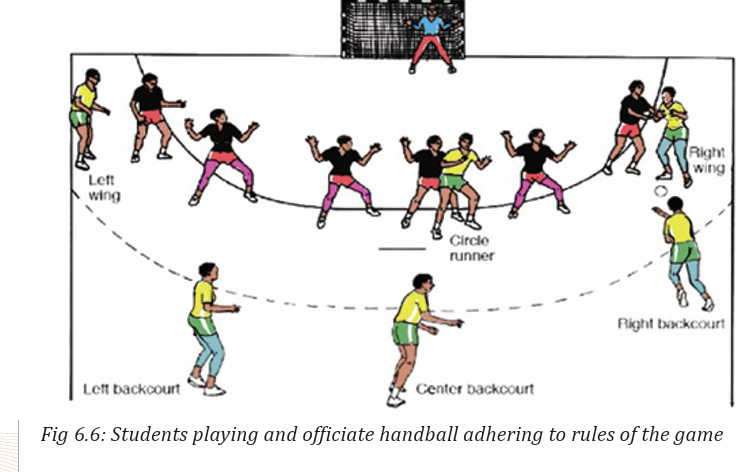
– Let students do right cool down exercises and stretch their group of
muscles by insisting on most used parts.
– Randomly, one of students leads cool down exercises.
– Guide them while stretching their muscles systematically.
– Help them/demonstrate/correct where is necessary.
Closing discussions (RCA)
Reflect
– Which challenges/advantages did you face during playing and leading the
handball match? Why?
Connect
– What are necessary conditions do you need officials in hand ball?
Apply
– What will you do to become handball officials?
Lesson 7: Officiate a handball game
a) Learning objective
Apply and interpret rules of handball in the game situation.
b) Teaching resources
Balls, Stopwatch/watch, Playground, Cones, Whistle, Chasubles, Posts, Videos
related to handball rules of the game, Handball rule books, Projector/computer,
Smart classroom, Hard/soft copy of handball rules and Cards.
c) Prerequisites/Revision/Introduction
Students of Senior six will learn better officiate a handball game if they have
developed handball rules learnt in senior five and in the previous lessons.
d) Learning activities
Opening discussions
– Ask questions about handball rules learnt in senior five and in last lesson.
– Let students present their findings and introduce the prepared lesson.
– Invite students to start warm up exercises.
Warm up exercises and stretching exercises
– Let students perform general warm up exercises and specific warm up
based on the most body’s parts to be used while performing handball game
and stretch their muscles properly.
– One student leads warm up and stretching exercises.
– Guide them while performing warm up and stretching exercises.
– Help them/demonstrate/correct where is necessary.
e) Lesson body
Activity 6.19
Game situation
Make teams of three players: A, B and C and organize a competition:
The first match: A vs B while C will act as officials by providing two officials,
the timekeeper and the scorekeeper. The remaining players will record fouls
and misconduct happened and how officials have been reacted.
The second match: B vs C while A will act as officials by providing two
officials, the timekeeper and the scorekeeper. The remaining players will
record fouls and misconduct happened and how officials have been reacted.
The third match: A vs C while B will act as officials by providing two officials,
the timekeeper and the scorekeeper. The remaining players will record fouls
and misconduct happened and how officials have been reacted. The playing
time is 5minutes.
The winner is the team which gains more points than others. After the
competition, each team shares with others what they have recorded: On
rules of the games, decisions taken by officials, effectiveness of hand signals
used, and how officials are taking positions and their movement during the
match. Support them to clarify some rules of the game where is necessary.
Game situation
Make teams of five players: A, B and C and organize a competition:
Activity 6.20
The first match: A vs B while C will act as officials by providing two officials,
the timekeeper and the scorekeeper. The remaining players will record fouls
and misconduct happened and how officials have been reacted.
The second match: B vs C while A will act as officials by providing two
officials, the timekeeper and the scorekeeper. The remaining players will
record fouls and misconduct happened and how officials have been reacted.
The third match: A vs C while B will act as officials by providing two officials,
the timekeeper and the scorekeeper. The remaining players will record fouls
and misconduct happened and how officials have been reacted. The playing
time is 7minutes.
The winner is the team which gains more points than others. After the
competition, each team shares with others what they have recorded: On
rules of the games, decisions taken by officials, effectiveness of hand signals
used, and how officials are taking positions and their movement during the
match. Support them to clarify some rules of the game where is necessary.
Activity 6.21
Game situation
Make teams six players: A, B and C and organize a competition:
The first match: A vs B while C will act as officials by providing two officials,
the timekeeper and the scorekeeper. The remaining players will record fouls
and misconduct happened and how officials have been reacted.
The second match: B vs C while A will act as officials by providing two
officials, the timekeeper and the scorekeeper. The remaining players will
record fouls and misconduct happened and how officials have been reacted.
The third match: A vs C while B will act as officials by providing two officials,
the timekeeper and the scorekeeper. The remaining players will record fouls
and misconduct happened and how officials have been reacted. The playing
time is 10minutes.
The winner is the team which gains more points than others. After the
competition, each team shares with others what they have recorded: On
rules of the games, decisions taken by officials, effectiveness of hand signals
used, and how officials are taking positions and their movement during the
match. Support them to clarify some rules of the game where is necessary.
Application Activity 6.4
– Make teams of 6 vs 6 students with a goal keeper play handball adhering
to rules of the game on the appropriate court in a limited period of
fifteen minutes. The outside teams play the roles of officials and their
assistants.
– The winner is the team which scores more goals, made less fouls andmisconduct or officiated the match efficiently than others.
Hand signals used in officiating handball game
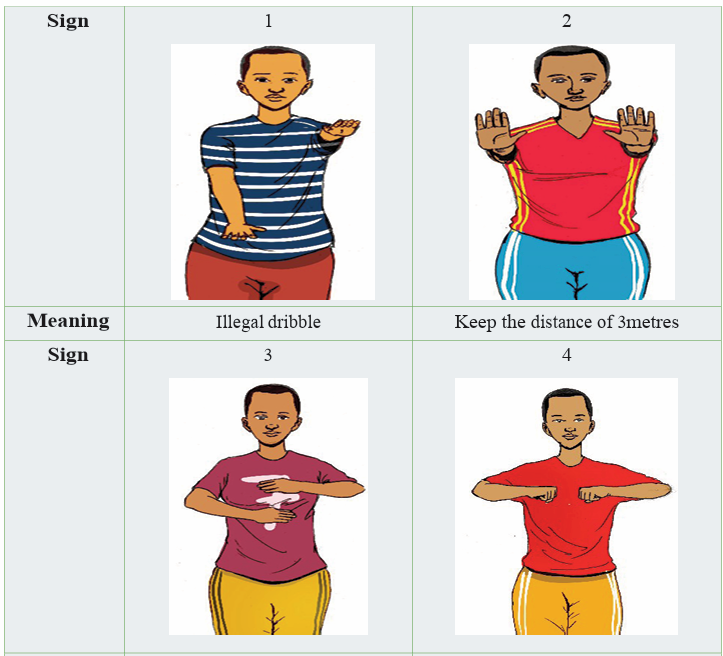
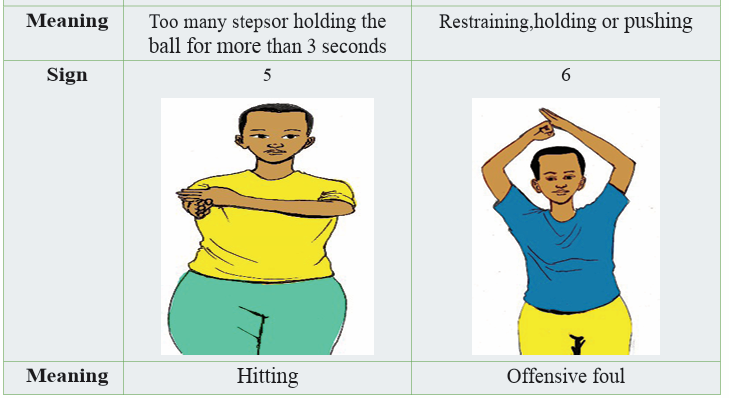
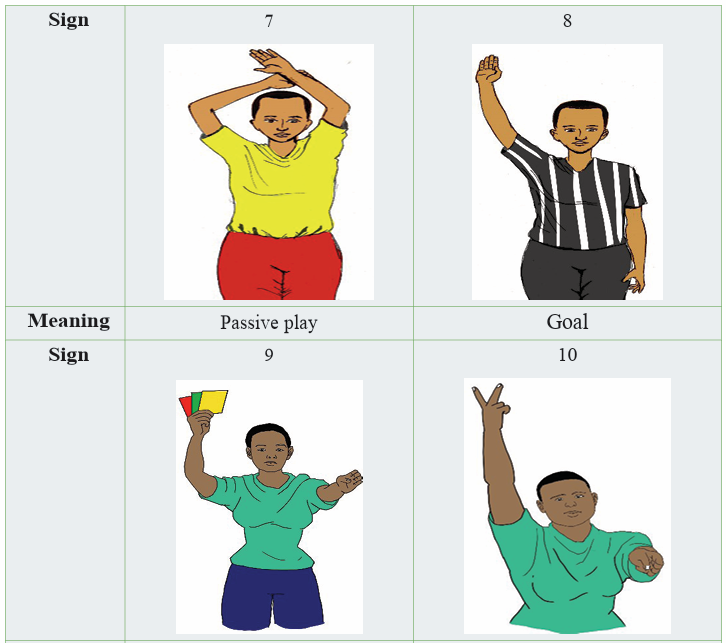
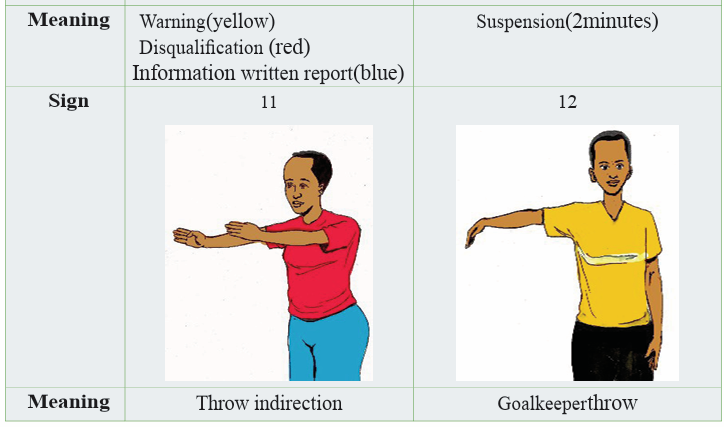
Provide one box which contains cards where written fouls and unsportsmanlike conduct.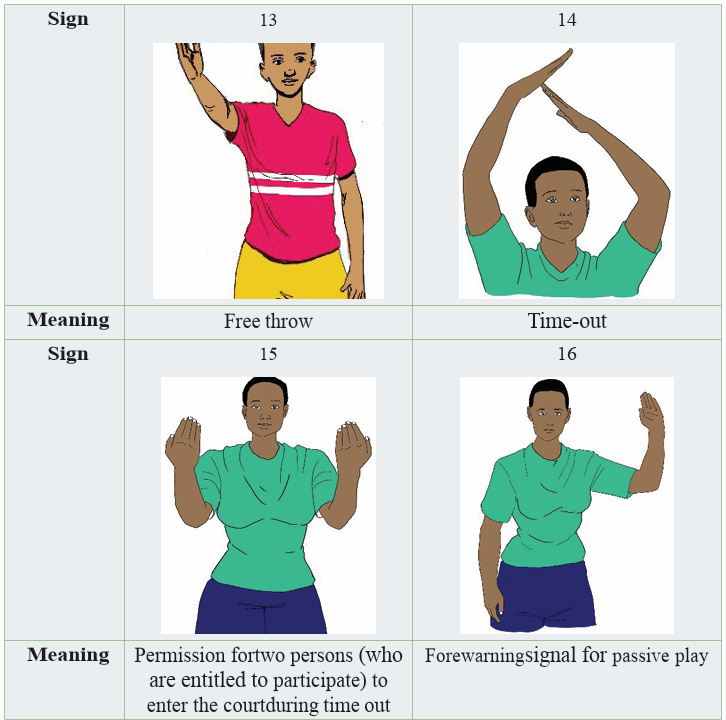
Another box contains cards where written sanctions/punishment. In groups, when
one member picks a card written a foul or an unsportsmanlike conduct, one from
another group raises the card of its relative sanction/ punishment. Continue the
activity until the prepared cards finished.
Cool down exercises
– Let students do right cool down exercises and stretch their group of
muscles by insisting on most used parts.
– Randomly, one of students leads cool down exercises.
– Guide them while stretching their muscles systematically.
– Help them/demonstrate/correct where is necessary.
Closing discussions (RCA)
Reflect
– Which challenges/advantages did you face during playing and officiating
the handball match? Why?
Connect
– What are necessary conditions do you need officials in hand ball?
Apply
– What will you do to become handball officials?
6.6 End of unit assessment
Organize handball competition between teams and assess learners’ abilities
to apply handball techniques and tactics such as pass, receive, shoot,
goalkeeping and observe how they apply handball rules through playing and
officiating the game
6.7 Additional activities
Remedial activities
– Providing school facilities for learner’s recreation where they perform
regular handball technical and tactical skills and officiating games.
Consolidation activities
– Encourage learners to participate actively in the handball school
competitions representing his/her class and officiate them.
Extended activities
– To participate actively in mass sport in their villages.
– Participate in the organized recreational handball activities and
competitions in their villages during weekends and holidays with their
neighboring learners and help in officiating and in the application ofhand ball rules.
UNIT 7 :NETBALL
Key unit competence: Perform netball techniques and tactics in the game
situation adhering to the rules.
7.1. Prerequisite (Knowledge, skills, attitudes and values)
Students of senior six will perform better netball techniques and tactics in
the game situation adhering to the rules if they have mastered netball basic
techniques learned in senior five.
7.2. Cross-cutting issues to be addressed
Gender: In teaching and learning process of netball, the teacher must prepare
and provide physical activities that engage both girls and boys equally to exploit
their full potential and talents without any discrimination or prejudice.
Inclusive education: The teacher as a facilitator he/she must consider different
special education needs and select netball activities to adapt his/her teaching
approaches to students. This creates a positive attitude and helps all students
to participate actively and develop their competence levels.
Financial education: The teacher should integrate Financial Education into
his/her teaching/learning activities by providing the local and no cost teaching
material where is possible. He/she must encourage students to make their
own materials that can help them to develop competences not only in sports at
school but also in their daily life.
Standardization culture: The teacher must choose and select the standardized
materials to use in his/her teaching/learning process of netball. It is necessary
to provide appropriate materials required to the levels of students and help
them to develop culture of checking and using the quality of sport materials
for the competitions before using them in order to prevent injuries and other
accidents.
Environment and sustainability: The teacher should provide materials and
delivers the lesson by encouraging students to protect the environment and the
well use of materials. The teacher helps them to develop the spirit of keeping
safe environment they use in physical education and sports activities.
Peace and values education: The teacher helps students to develop fair play
and social values by avoiding violence and conflict in their netball games and
by setting clear and relevant instructions. He/she should provide the activities
that help students to develop their competence peacefully.
Comprehensive sexuality education: The teacher provides netball activities
and sets instructions that prevent sexual harassment, any kind of gender
based violence like sexual abuse and physical contacts oriented to the sexuality
intention
Genocide studies: While conducting netball exercises, the teacher should take
a time to explain students how sports should be used to fight against Genocide
ideology and how to prevent it. For example, to organize Genocide memorial
tournaments at school and give the message related to the Genocide.
7.3. Guidance on introductory activity
Before introducing the lesson one of this unit, you must introduce the whole unit.
The teacher as a guide, facilitator and expert, ask questions or give activity related
to technical skills used netball in order to help them to predict what to be learned inthe whole unit.
7.4. List of lessons/sub-heading
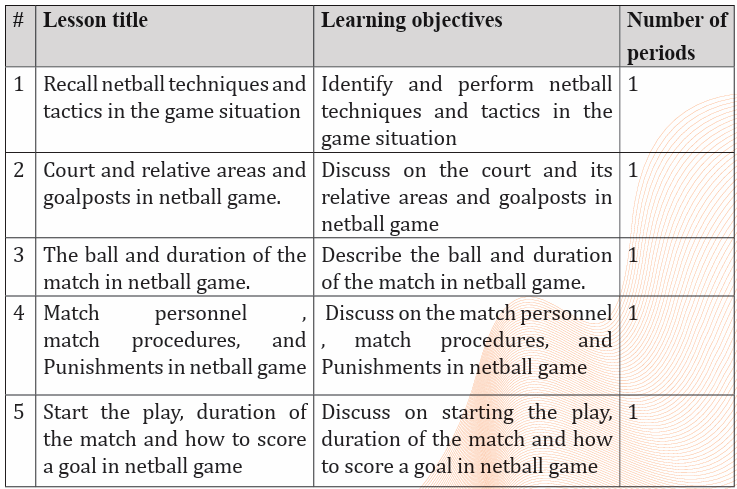
Lesson 1: Recall netball techniques and tactics in the game situation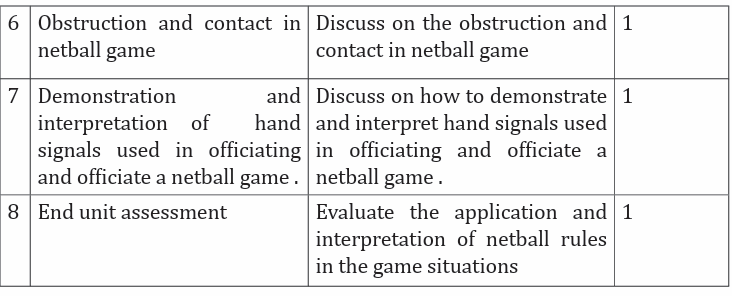
a) Learning objective
Identify and perform netball techniques and tactics in the game situation.
b) Teaching resources
Balls, playground, whistle, stopwatch, cones, videos related to netball rules of
the game, chasubles, posts, official rules’book.
c) Prerequisites/Revision/Introduction
Students of senior six will learn better recall on netball techniques and tactics
in the game situation if they have developed techniques and tactics exercises
learnt in senior five.
d) Learning activities
Opening discussions
– Ask questions about netball techniques and tactics learnt in senior five.
– Let students present their findings and introduce the prepared lesson.
– Invite students to start warm up exercises.
Warm up exercises and stretching exercises
– Let students perform general warm up exercises and specific warm up
based on the most body’s parts to be used while performing techniques
and tactics in the game and stretch their muscles properly.
– One student leads warm up and stretching exercises.
– Guide them while performing warm up and stretching exercises.
– Help them/demonstrate/correct where is necessary.
e) Lesson body
they are occupying.
Activity 7.1
In teams of 3 players after recalling netball techniques and tactics, students
play netball. In a limited time of ten minutes they play on the court and perform
techniques of passing, shooting and landing, tactics of attack and defense as tasks
and responsibilities to accomplish based on the relative playing positions that
Activity 7.2
In teams of 5 players, students play netball. In a limited time of ten minutes they players
on the court and perform techniques and tactics as tasks and responsibilities to
accomplish based on the relative playing positions that they are occupying.
The teams must be replaced after five minutes until all players/ teams participate
in the play as much as possible. The winner is the team which gained many
points than others.
Activity 7.3
In teams of 7players, students play netball. In a limited time of ten minutes they players
on the court and perform techniques and tactics as tasks and responsibilities to
accomplish based on the relative playing positions that they are occupying.
The teams must be replaced after five minutes until all players/ teams participate
in the play as much as possible. The winner is the team which gained many
points than others.
Application Activity 7.1
In two teams of 7 players, students play netball. In a limited time of ten
minutes they players on the court and perform techniques and tactics as tasks
and responsibilities to accomplish based on the relative playing positions
that they are occupying. The teams must be replaced after five minutes until
all players/ teams participate in the play as much as possible. The winner isthe team which gained many points than others.
Cool down exercises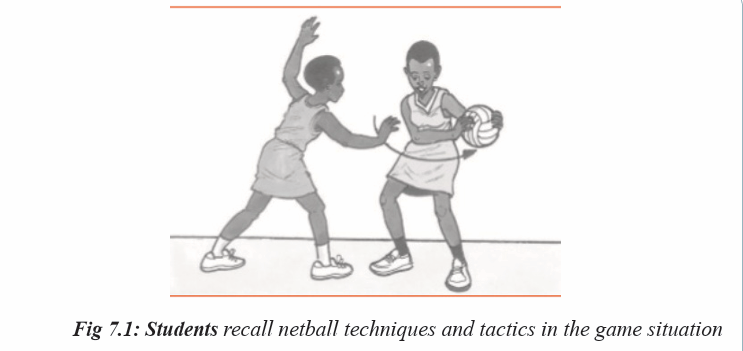
– Let students do right cool down exercises and stretch their group of muscles
by insisting on most used parts.
– Randomly, one of students leads cool down exercises.
– Guide them while stretching their muscles systematically.
– Help them/demonstrate/correct where is necessary.
Closing discussions (RCA)
Reflect
– Which challenges/advantages did you face during the game? Why?
Connect
– What are necessary conditions for a netball player to apply techniques and
tactics in the game?
Apply
– What will you do to perform netball techniques and tactics after this session
to become a good player.
Lesson 2: Court and relative areas and goalposts in netball game
a) Learning objective
Discuss on the court and its relative areas and goalposts in netball game
b) Teaching resources
Balls, playground, whistle, stopwatch, cones, videos related to netball rules of
the game, chasubles, posts, current official netball rules’ book.
c) Prerequisites/Revision/Introduction
five and in the previous lesson
d) Learning activities
Students of senior six will learn better the court and its relative areas and
goalposts in netball game if they have developed netball rules learnt in senior
Opening discussions
– Ask questions about netball rules learnt in senior five.
– Let students present their findings and introduce the prepared lesson.
– Invite students to start warm up exercises.
Warm up exercises and stretching exercises
– Let students perform general warm up exercises and specific warm up
based on the most body’s parts to be used while performing netball game
and stretch their muscles properly.
– One student leads warm up and stretching exercises.
– Guide them while performing warm up and stretching exercises.
– Help them/demonstrate/correct where is necessary.
e) Lesson body
Activity 7.4
– In groups students discuss the given elements of netball rules. Each
group has one rule to be discussed and findings are in the distributed
rules document as resource.
– Pass though groups and help them where is necessary.
– Request students to choose a secretary to record findings and group
representative who will present their findings.
- Request group representative to present their findings and group members
may support where is necessary.– After presentation of all groups, use a projector to recap presentations.
Activity 7.5
Make teams of 3, 4 or 5 players. Let students play netball adhering to rules of the
game on the appropriate court in limited period of ten minutes. One of the outside
teams leads the match as referees following rules. The winner is the team whichscores more goals or lead the match perfectly than others.
Activity 7.6
Make teams of 6 or 7 players. Let students play netball adhering to rules of the
game on the appropriate court in limited period of ten minutes. One of the outside
teams leads the match as referees following rules. The winner is the team whichscores more goals or lead the match perfectly than others.
Application Activity 7.1
Make two teams of 7 players. Let students play netball adhering to rules of
the game on the appropriate court in limited period of ten minutes. One of
the outside teams leads the match as referees following rules. The winner isthe team which scores more goals or lead the match perfectly than others.
Cool down exercises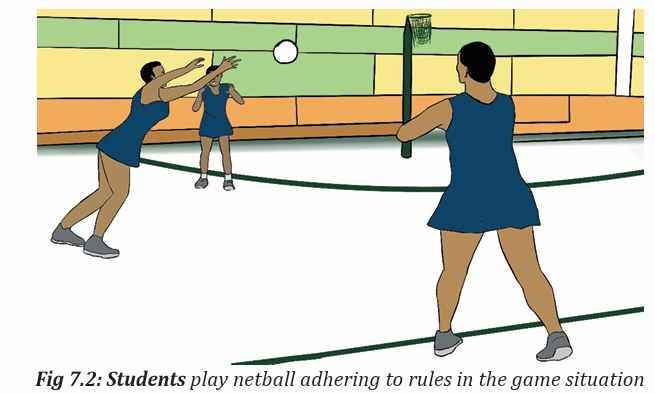
– Let students do right cool down exercises and stretch their group of
muscles by insisting on most used body parts.
– Randomly, one of students leads cool down exercises.
– Guide them while stretching their muscles systematically.
– Help them/demonstrate/correct where is necessary.
Closing discussions (RCA)
Reflect
– Which challenges/advantages did you face during playing and leading the
netball match? Why?
Connect
– What are necessary conditions do you need to apply netball rules?
Apply
– What will you do to apply netball rules perfectly in the game?
Lesson 3: The ball and duration of the match in netball game
a) Learning objective
Describe the ball and duration of the match in netball game.
b) Teaching resources
Balls, playground, whistle, stopwatch, cones, videos related to netball rules of
the game, chasubles, posts, current official rules’ book.
c) Prerequisites/Revision/Introduction
Students of Senior six will learn better the ball and duration of the match in
netball game if they have developed netball rules learnt in senior five and in the
previous lessons
d) Learning activities
Opening discussions
– Ask questions about netball rules learnt in senior five
– Let students present their findings and introduce the prepared lesson
– Invite students to start warm up exercises
Warm up exercises and stretching exercises
– Let students perform general warm up exercises and specific warm up
based on the most body’s parts to be used while performing netball game
and stretch their muscles properly.
– One student leads warm up and stretching exercises.
– Guide them while performing warm up and stretching exercises.
– Help them/demonstrate/correct where is necessary.
e) Lesson body
Activity 7.7
– In groups, students describe the given elements of netball rules. Each
group has one element of rules to be described. The resources are
distributed.
– Pass though groups and help them where is necessary. Request students
to choose a secretary to record findings and group representative who will
present their findings.
– Request group representative to present their findings and group members
may support where is necessary. After presentation of all groups, use aprojector to recap presentations.
Activity 7.8
Make teams of 3, 4, 5 and let them play netball adhering to rules of the game on
the appropriate court in limited period of 5 minutes. One of the outside teams
leads the match as referees following the netball rules while others make records.
The winner is the team which scores more goals or lead the match perfectly thanothers.
Activity 7.9
Make teams of 3, 4, 5or 6 and let them play netball adhering to rules of the
game on the appropriate court in limited period of 5 minutes. One of the
outside teams leads the match as referees following the netball rules while
others make records. The winner is the team which scores more goals orlead the match perfectly than others.
Application Activity 7.2
In two teams of 7 play netball adhering to rules of the game on the appropriate
court in limited period of 5 minutes. One of the outside teams leads the
match as referees following the netball rules while others make records. The
winner is the team which scores more goals or lead the match perfectly thanothers.
Cool down exercises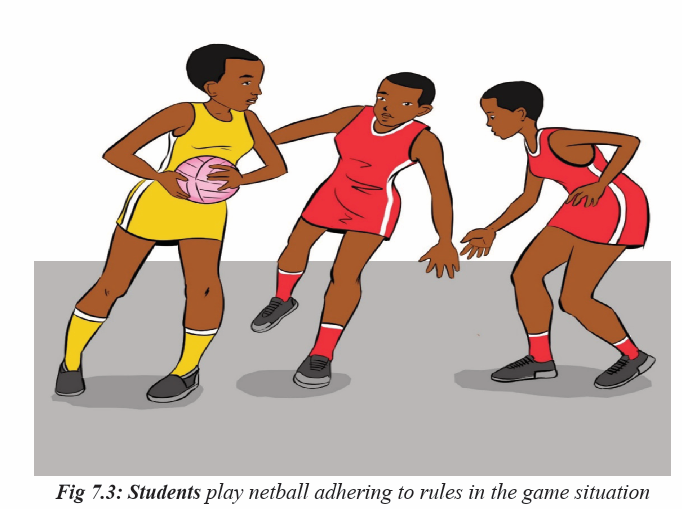
– Let students do right cool down exercises and stretch their group of
muscles by insisting on most used parts.
– Randomly, one of students leads cool down exercises.
– Guide them while stretching their muscles systematically.
– Help them/demonstrate/correct where is necessary.
Closing discussions (RCA)
Reflect
– Which challenges/advantages did you face during playing and leading the
netball match? Why?
Connect
– What are necessary conditions do you need to apply netball rules?
Apply
– What will you do to apply netball rules in the game perfectly?
Lesson 4: Match personnel, match procedures, and Punishmentsin netball game
a) Learning objective
Discuss on the match personnel, match procedures, and Punishments in netballgame.
b) Teaching resources
Balls, playground, whistle, stopwatch, cones, videos related to netball rules ofthe game, chasubles, posts, official rules’book.
c) Prerequisites/Revision/Introduction
Students of Senior six will learn better match personnel, match procedures,
and punishments in netball game if they have developed netball rules learntin senior five senior five and in the previous lessons.
d) Learning activities
Opening discussions
– Ask questions about netball rules learnt in senior five and in the last lesson.
– Let students present their findings and introduce the prepared lesson.
– Invite students to start warm up exercises.
Warm up exercises and stretching exercises
– Let students perform general warm up exercises and specific warm up
based on the most body’s parts to be used while performing netball game
and stretch their muscles properly.
– One student leads warm up and stretching exercises.
– Guide them while performing warm up and stretching exercises.– Help them/demonstrate/correct where is necessary.
e) Lesson bodypresent their findings.
Activity 7.10
– In groups, students describe the given elements of netball rules. Each
group has one element of rules to be discussed on. The resources are
distributed.
– Pass though groups and help them where is necessary. Request students
to choose a secretary to record findings and group representative who will
– Request group representative to present their findings and group members
may support where is necessary.– After presentation of all groups, use a projector to recap presentations.
Activity 7.11
Make teams of 3, 4, 5 or 6 students and let them play netball adhering to rules
of the game on the appropriate court in limited period of ten minutes. One of the
outside teams leads the match as umpires and others make records following the
netball rules. The playing teams are replaced after ten minutes. The winner is theteam which scores more goals or lead the match perfectly than others.
Activity 7.12
Make teams of 7 students and let them play netball adhering to rules of the game
on the appropriate court in limited period of ten minutes. One of the outside
teams leads the match as umpires and others make records following the netball
rules. The playing teams are replaced after ten minutes. The winner is the teamwhich scores more goals or lead the match perfectly than others.
Application Activity 7.3
In two teams of 7 students play netball adhering to rules of the game on the
appropriate court in limited period of ten minutes. One of the outside teams
leads the match as umpires and others make records following the netball
rules. The playing teams are replaced after ten minutes. The winner is theteam which scores more goals or lead the match perfectly than others.
Cool down exercises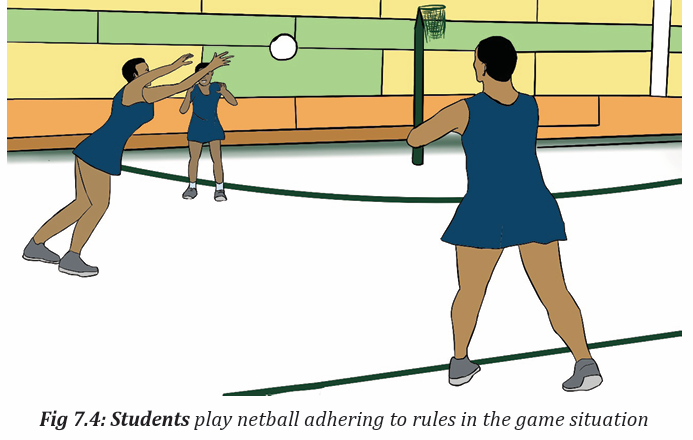
– Let students do right cool down exercises and stretch their group of
muscles by insisting on most used parts.
– Randomly, one of students leads cool down exercises.
– Guide them while stretching their muscles systematically.– Help them/demonstrate/correct where is necessary
Closing discussions (RCA)
Reflect
– Which challenges/advantages did you face during playing and leading the
netball match? Why?
Connect
– What are necessary conditions do you need to apply netball rules?
Apply– What will you do to apply netball rules in the game perfectly?
a) Learning objective
Lesson 5: Start the play, duration of the match and how to score
a goal in netball game
Discuss on starting the play, duration of the match and how to score a goal innetball game.
b) Teaching resources
Balls, playground, whistle, stopwatch, cones, videos related to netball rules ofthe game, chasubles, posts, current official rules’ book.
c) Prerequisites/Revision/Introduction
Students of senior six will learn better starting the play, duration of the match
and how to score a goal in netball game if they have developed netball ruleslearnt in senior five and in the previous lessons.
d) Learning activities
Opening discussions
– Ask questions about netball rules learnt in senior five and in last lesson.
– Let students present their findings and introduce the prepared lesson.
– Invite students to start warm up exercises.
Warm up exercises and stretching exercises
– Let students perform general warm up exercises and specific warm up
based on the most body’s parts to be used while performing netball game
and stretch their muscles properly.
– One student leads warm up and stretching exercises.
– Guide them while performing warm up and stretching exercises.– Help them/demonstrate/correct where is necessary.
e) Lesson body
Activity 7.13
– In groups students discuss on starting the play, duration of the match
and how to score a goal in netball game. Each group has one element of
rules to be described. The resources are distributed (rulebooks).
– Pass though groups and help them where is necessary. Request students
to choose a secretary to record findings and group representative who
will present their findings.Request group representative to present their
findings and group members may support where is necessary.-After presentation of all groups, use a projector to recap presentation.
Activity 7.14
Make teams of 3, 4, 5 students and let them play netball adhering to rules
of the game on the appropriate court in limited period of ten minutes. One
of the outside teams leads the match as umpires and others make records
following the netball rules. The playing teams are replaced after 8 minutes.
The winner is the team which scores more goals or lead the match perfectly
than others.
Activity 7.15
Make teams of 5 or 6 students and let them play netball adhering to rules of the
game on the appropriate court in limited period of ten minutes. One of the outside
teams leads the match as umpires and others make records following the netball
rules. The playing teams are replaced after 8 minutes. The winner is the team
which scores more goals or lead the match perfectly than others.
Application Activity 7.4
In two teams of 7 students play netball adhering to rules of the game on
the appropriate court in limited period of ten minutes. One of the outside
teams leads the match as umpires and others make records following the
netball rules. The playing teams are replaced after 8 minutes. The winner isthe team which scores more goals or lead the match perfectly than others.
Cool down exercises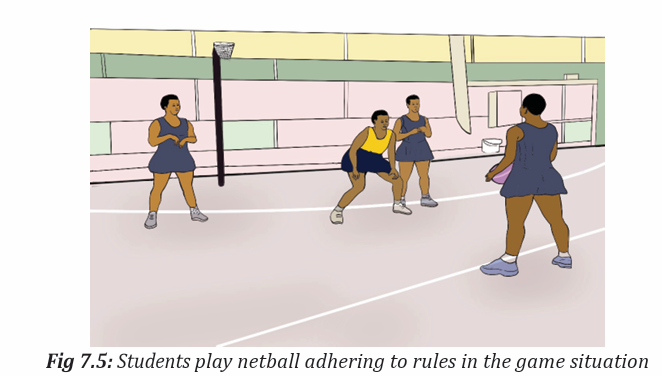
– Let students do right cool down exercises and stretch their group of
muscles by insisting on most used parts.
– Randomly, one of students leads cool down exercises.
– Guide them while stretching their muscles systematically.
– Help them/demonstrate/correct where is necessary.
Closing discussions (RCA)
Reflect
– Which challenges/advantages did you face during playing and leading the
netball match? Why?
Connect
- What are necessary conditions do you need to apply netball rules?
Apply
What will you do to apply netball rules in the game perfectly?
Lesson 6: Obstruction and contact in netball game
a) Learning objective
Discuss on the obstruction and contact in netball game.
b) Teaching resources
Balls, playground, whistle, stopwatch, cones, videos related to netball rules of
the game, chasubles, posts, official rules’book.
c) Prerequisites/Revision/Introduction
Students of senior six will learn better the obstruction and contact in netball
game if they have developed netball rules learnt in senior five and in the
previous lessons.
d) Learning activities
Opening discussions
– Ask questions about netball rules learnt in senior five and in last lesson.
– Let students present their findings and introduce the prepared lesson.
– Invite students to start warm up exercises.
Warm up exercises and stretching exercises
– Let students perform general warm up exercises and specific warm up
based on the most body’s parts to be used while performing netball game
and stretch their muscles properly.
– One student leads warm up and stretching exercises.
– Guide them while performing warm up and stretching exercises.
– Help them/demonstrate/correct where is necessary.
e) Lesson body
– In groups students discuss on the obstruction and contact in netball
game. They discuss also on the difference between them. Each group has
one element of rules to be discussed on. The resources are distributed
(rulebooks).
– Pass though groups and help them where is necessary. Request students to
choose a secretary to record findings and group representative
who will present their findings.
– Request group representative to present their findings and group members
May support where is necessary.– After presentation of all groups, use a projector to recap presentations.
Activity 7.17
Make teams of 3, 4, 5, 6 and 7 students and let them play netball adhering to rules
of the game on the appropriate court in limited period of ten minutes. One of the
outside teams leads the match as umpires and others make records following the
netball rules. The playing teams are replaced after 8 minutes. The winner is theteam which scores more goals or lead the match perfectly than others.
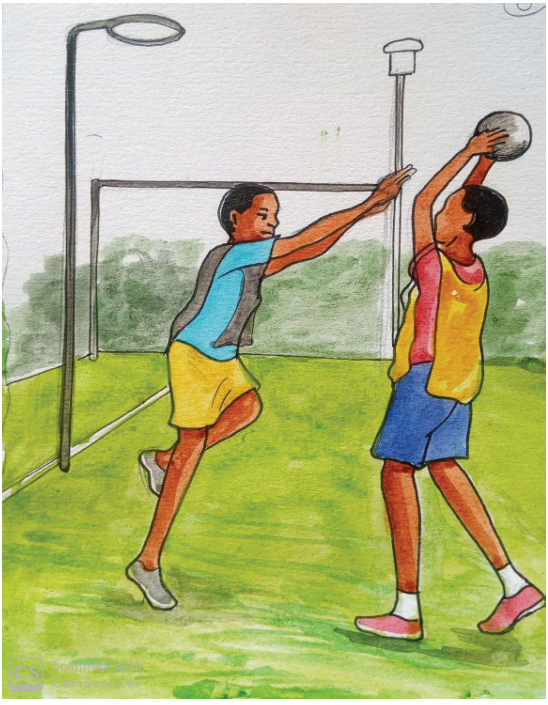
Fig 7.6: Students play netball adhering to rules in the game situation
Cool down exercises
– Let students do right cool down exercises and stretch their group of
muscles by insisting on most used parts.
– Randomly, one of students leads cool down exercises.
– Guide them while stretching their muscles systematically.– Help them/demonstrate/correct where is necessary.
Closing discussions (RCA)
Reflect
– Which challenges/advantages did you face during playing and leading the
netball match? Why?
Connect
– What are necessary conditions do you need officials in netball?
Apply -
What will you do to become netball officials?
Lesson 7: Demonstration and interpretation of hand signalsused in officiating and officiate a netball game
a) Learning objective
Discuss on how to demonstrate and interpret hand signals used in officiatingand officiate a netball game.
b) Teaching resources
Balls, playground, whistle, stopwatch, cones, videos related to netball rules ofthe game, chasubles, posts, official rules’book.
c) Prerequisites/Revision/Introduction
Students of senior six will learn better the demonstration and interpretation
of hand signals used in officiating and officiate a netball game if they havedeveloped netball rules learnt in senior five and in the previous lessons.
d) Learning activities
Opening discussions
– Ask questions about netball rules learnt in senior five and in last lesson.
– Let students present their findings and introduce the prepared lesson.
– Invite students to start warm up exercises.
Warm up exercises and stretching exercises
– Let students perform general warm up exercises and specific warm up
based on the most body’s parts to be used while performing netball game
and stretch their muscles properly.
– One student leads warm up and stretching exercises.
– Guide them while performing warm up and stretching exercises.
– Help them/demonstrate/correct where is necessary.
e) Lesson body
Game situation
Activity 7.18
Make complete teams A, B and C and organize a netball competition:
The first match: A vs B while C will act as officials by providing umpires,
reserve umpire, scorer and timekeeper and lead the match. The remaining
players will record fouls and misconduct happened and how officials have
been reacted.
The second match: B vs C while A will act as officials by providing umpires,
reserve umpire, scorer and timekeeper and lead the match. The remaining
players will record fouls and misconduct happened and how officials have
been reacted.
The third match: A vs C while B will act as officials by providing umpires,
reserve umpire, scorer and timekeeper and lead the match. The remaining
players will record fouls and misconduct happened and how officials have
been reacted. Every match duration is ten minutes.
The winner is the team which gains more points than others. After the
competition, each team shares with others what they have recorded: On
rules of the games, decisions taken by umpires, effectiveness of hand signals
used, and how umpires taking positions and their movements during thematch. Support them to clarify some rules of the game where is necessary.
Activity 7.19
Make teams of 3 vs 3, 4 vs 4, 5vs 5, and 6 vs 6 or 7vs 7 students.
The students play netball adhering to rules of the game on the appropriate court in
a limited period of fifteen minutes. The outside teams play the roles of umpires,
reserve umpire, scorer and timekeeper to lead the match.
The winner is the team which scores more points, made less fouls and misconductor officiated the match efficiently than others.
Activity 7.20
Make teams of 5vs 5, and 6 vs 6 or 7vs 7 students.
The students play netball adhering to rules of the game on the appropriate court in
a limited period of fifteen minutes. The outside teams play the roles of umpires,
reserve umpire, scorer and timekeeper to lead the match.
The winner is the team which scores more points, made less fouls and misconductor officiated the match efficiently than others.
Application Activity 7.4
Make teams of 7vs 7 students. The students play netball adhering to rules
of the game on the appropriate court in a limited period of fifteen minutes.
The outside teams play the roles of umpires, reserve umpire, scorer and
timekeeper to lead the match.
The winner is the team which scores more points, made less fouls andmisconduct or officiated the match efficiently than others.
Hand signals used in officiating netball game
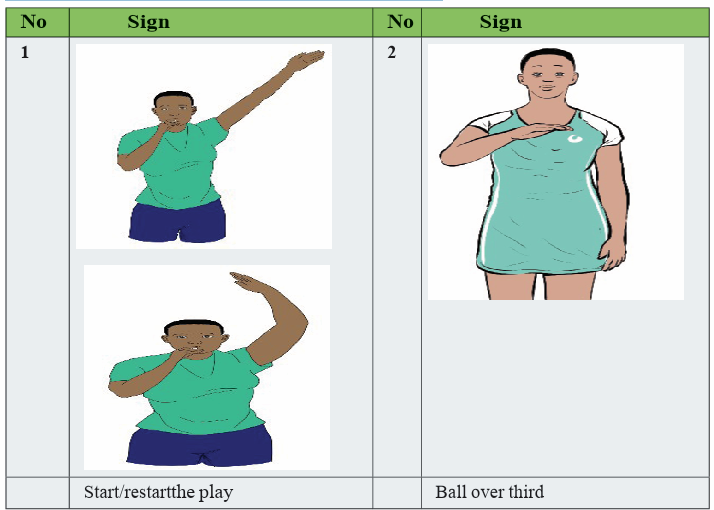
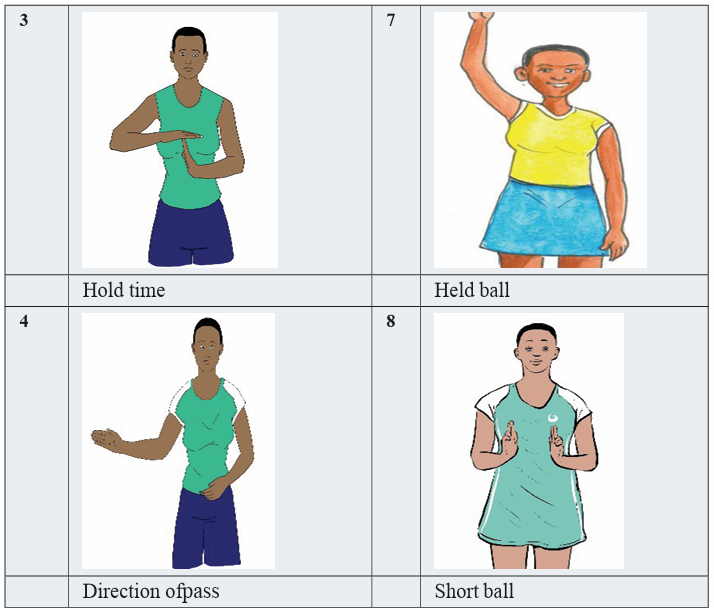
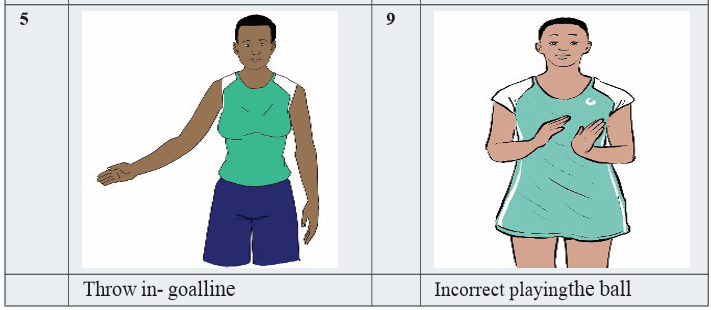
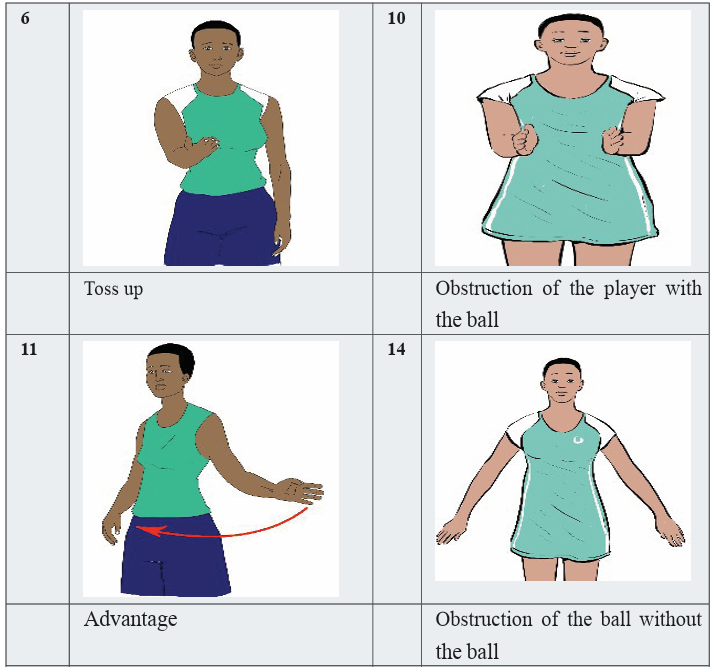
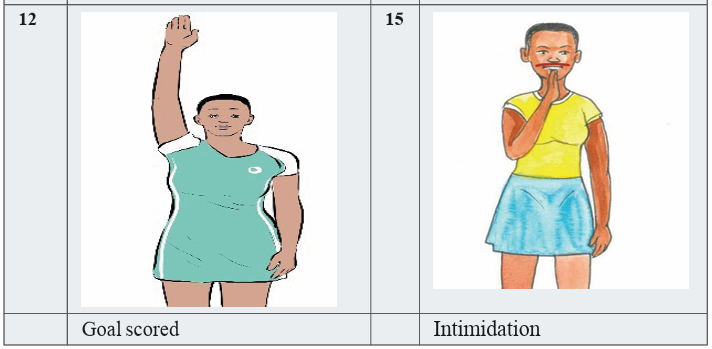
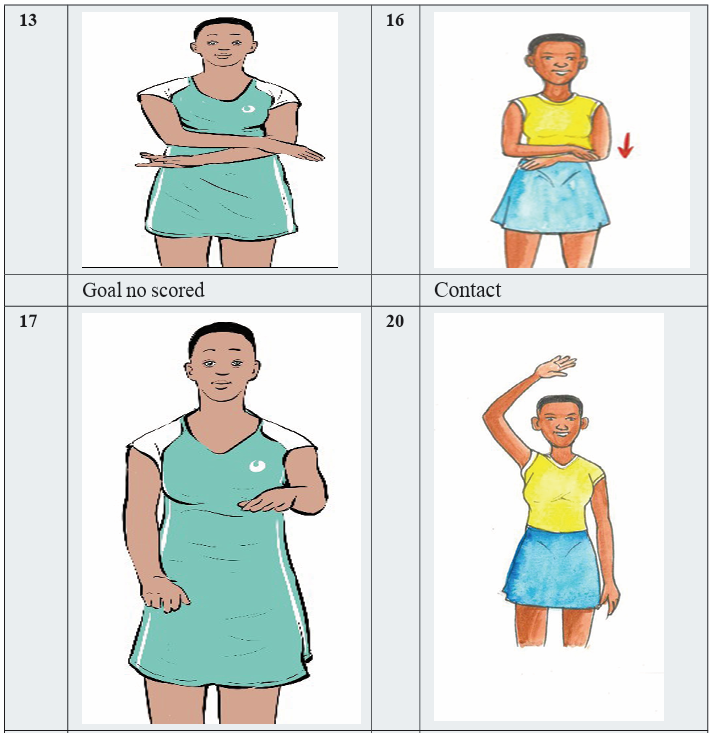
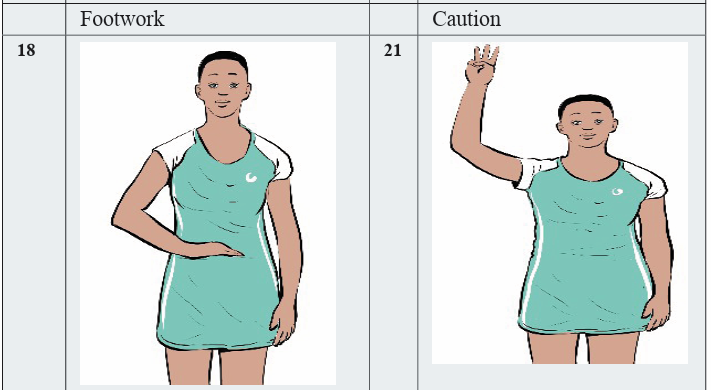
Cool down exercises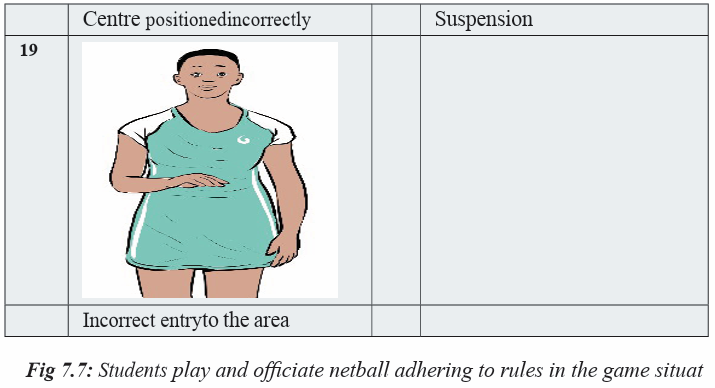
– Let students do right cool down exercises and stretch their group of
muscles by insisting on most used parts.
– Randomly, one of students leads cool down exercises.
– Guide them while stretching their muscles systematically.– Help them/demonstrate/correct where is necessary.
Closing discussions (RCA)
Reflect
– Which challenges/advantages did you face during playing and leading the
netball match? Why?
Connect
– What are necessary conditions do you need umpires in netball?
Apply– What will you do to become netball players or umpires?
7.6 End of unit assessment
Teacher divides students into groups of five including two umpires, reserve
umpire, scorer and timekeeper. After dividing students into their respecting
groups, set the order on which groups will lead the game, request the first group
to start the match. Ask other remaining student teachers to form two teams of
seven players for each one. Let the match start, change groups which is officiating
after five minutes. Officials become players to replace those who are becoming officials.
– During performing officiating for each group, observe how each student is
– Observe how techniques and tactics learned are being used.
– Records their performance in order to give them feedback at the end of theexercise.
7.7 Additional activities
Remedial activities
Distribute balls to students for regular familiarization with the ball focusing on techniques
and tactics of playing netball game by respecting official rules of the game.
Consolidation activities
Providing school facilities for learner’s recreation where they perform regular
netball technical and tactical skills and officiating games.
Extended activities Encourage learners:
- To participate actively in mass sport in their villages.
- Participate in the organized recreational netball activities and competitions in their
villages during weekends and holidays with their neighboring learners and help in
officiating and in the application of netball rules.Request students to read updated rules of the game of netball game.
UNIT 8: GOALBALL
Key unit competence: Perform goal ball techniques and tactics in the gamesituation adhering to the rules
8.1. Prerequisite (knowledge, skills, attitudes and values)
Students of Senior Six will perform better goal ball techniques and tactics in the
game situation adhering to the rules if they have developed techniques and tacticsin goal ball learnt in Senior five.
8.2. Cross-cutting issues to be addressed
Gender: In teaching and learning process of goalball, the teacher must prepare and
provide activities that engage both girls and boys equally in exploiting their full
potential and talents without any discrimination or prejudice.
Inclusive education: The teacher as a facilitator he/she must consider different
special education needs and select activities to adapt his teaching approaches
to students. This creates a positive attitude and helps all students to participate
actively and develop their competence levels.
Financial education: The teacher should integrate Financial Education into his
teaching/learning activities by providing the local and no cost teaching material where
is possible. He/she must encourage students to make their own materials that can
help them to develop competences not only in goal ball game but also in their life.
Standardization culture: The teacher must choose and select the standardized
materials to use in his/her teaching/learning process of goal ball. It is necessary to
provide appropriate materials required to the levels of students and help them to
develop culture of checking and using the quality of sport materials for the competitions
before using them in order to prevent injuries and other cases of accident.
Environment and sustainability: The teacher should provide materials and
deliver the lesson by encouraging students to protect the environment and well
use of materials. The teacher helps them to develop the spirit of keeping safe the
environment in which they use by cleaning playground and courts after the lesson.
Peace and values education: The teacher helps students to develop fair play and
social values by avoiding violence and conflict in the game and by setting clear and
relevant instructions. He/she should provide the activities that help students to
develop their competence peacefully.
Comprehensive sexuality education
The teacher provides goalball activities and sets instructions that prevent sexual
harassment or any kind of gender-based violence like sexual abuse and physical
contacts oriented to the sexuality intention.
Genocide studies: While conducting goal ball exercises a teacher should take a
time to explain students how sports should be used to fight against Genocide
ideology and how to prevent it. For example, to organize Genocide memorialtournaments at school and give the message related to the Genocide.
8.3. Guidance on introductory activity
Before introducing the lesson one of this unit, you must introduce the whole unit.
The teacher as a guide, facilitator and expert, asks questions related to rules of the
game of playing goal ball in order to help them to predict what to be learned in thewhole unit.
8.4. List of lessons/sub-heading
Lesson 1: Recall goal ball techniques and tactics in the game situation
a) Learning objectiveIdentify and perform goal ball techniques and tactics in the game situation.
b) Teaching resources
Balls, playground, whistle, stopwatch, cones, chasubles, videos related togoalball rules of the game, posts, current official Rules’ book.
c) Prerequisites/Revision/Introduction
Students of senior 6 will perform better recall on goal ball techniques and
tactics in the game situation if they have developed techniques and tacticsexercises learnt in senior five.
d) Learning activities
Opening discussions
– Ask questions about techniques and tactics of goal ball learned in senior five.
– Let students present their findings and introduce the topic of the day.
– Invite students to start warm up exercises.
Warm up and cool down exercises
– Let students perform general warm up exercises and specific warm up based on
the most body’s parts to be used while in game performance and stretch their
muscles properly.– Guide students while performing warm up and stretching exercises.
e) Lesson body
Activity 8.1
In teams of three, students recall techniques and tactics and play a goal ball
game in 15 minutes. They perform offensive and defensive play individually
and in team. Every one occupies responsibilities of his/her position on theplayground accordingly. They pass and receive the ball.
Activity 8.2
Make teams of 2 vs 2 or 3vs 3 and let students play goalball adhering to rules of
the game on the appropriate court in limited period of seven minutes. The outside
teams play the roles of referees. After ten minutes the playing teams are replacedby the outside ones. The winner is the team which scores more goals than others.
Activity 8.3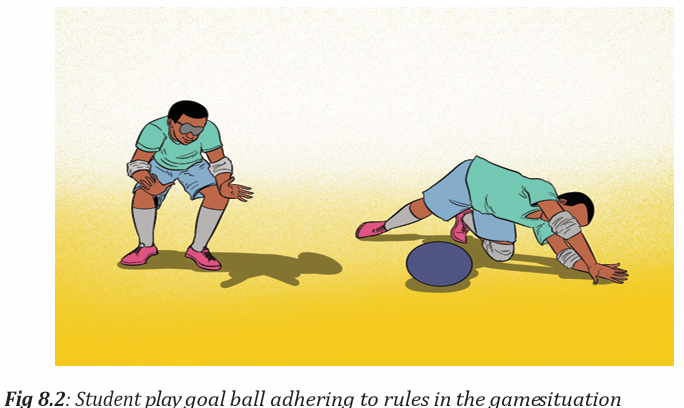
Make teams of 3vs 3 and let students play goalball adhering to rules of the game
on the appropriate court in limited period of ten minutes. The outside teams play
the roles of referees. After ten minutes the playing teams are replaced by the outside ones. The winner is the team which scores more goals than others.
Application Activity 8.1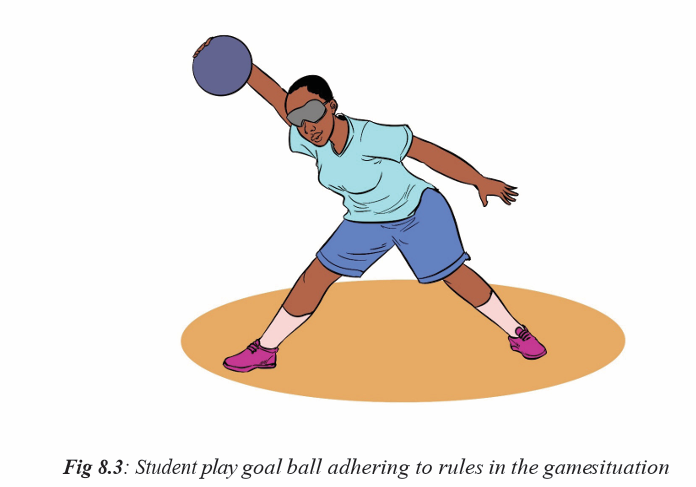
Make teams of 3vs 3 and let students play goalball adhering to rules of the game
on the appropriate court in limited period of fifteen minutes. The outside teams
play the roles of referees. After ten minutes the playing teams are replaced by theoutside ones. The winner is the team which scores more goals than others.
Fig 8.4: Student play goal ball adhering to rules in the game situation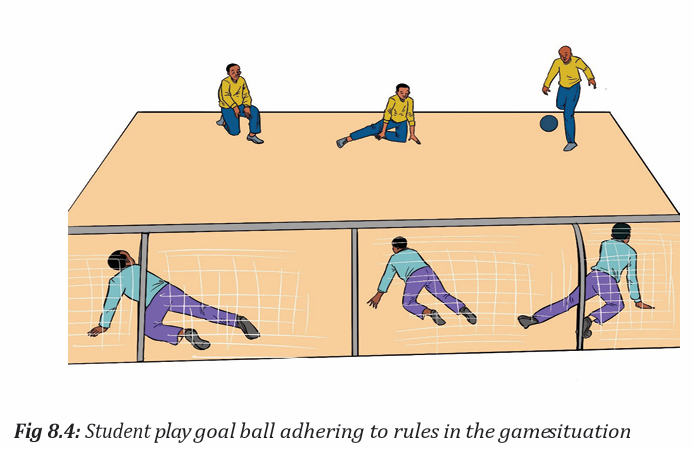
Closing discussion
Reflect
– Which challenges/advantages did you face during performing techniques
and tactics of goalball in game situation?
Connect
– What are conditions do you need to perform tactical exercises of handling and
throwing the ball in Goal ball?
Apply
What is the usefulness of applying tactics and techniques in the goal ball game
situation?
Lesson 2: The situation before the game and concerned items
during the game in goal ball game
a) Learning objective
Discuss the situation before the game and concerned items during the game in
goal ball game.
b) Teaching resources
Balls, playground, whistle, stopwatch, cones, chasubles, videos related to
goalball rules of the game, posts, current official rules’ book.
c) Prerequisites/Revision/Introduction
Students of senior 6 will learn better the situation before the game and
concerned items during the game in goal ball game if they have developed the
goalball official rules learnt in senior five.
d) Learning activities
Opening discussions
– Ask questions about the situation before the game and concerned items
during the game in goal ball game learned in senior six.
– Let students present their findings and introduce the topic of the day.
– Invite students to start warm up exercises.
Warm up and cool down exercises
– Let students perform general warm up exercises and specific warm up based on
the most body’s parts to be used in the game performance and stretch their
muscles properly.
– Guide students while performing warm up and stretching exercises.
e) Lesson body
Activity 8.4
– In groups students discuss on the given elements of goalball rules: The
situation before the game and concerned items during the game in goal
ball game. Each group has one rule to be discussed and findings are in
the distributed rules document as resource.
– Pass though groups and help them where is necessary. Request students
to choose a secretary to record findings and group representative who will
present their findings.
– Request group representative to present their findings and group members
may support where is necessary.– After presentation of all groups, use a projector to recap presentations.
Activity 8.5
Make teams of 2 or 3 players. Let students play goalball adhering to rules of
the game on the appropriate court in limited period of 7 minutes. One of the
outside teams leads the match as referees following rules and make records
to be shared after matches. The winner is the team which scores more goals
or lead the match perfectly than others. The teams change the roles everyten minutes to help all students to perform the game.
Activity 8.6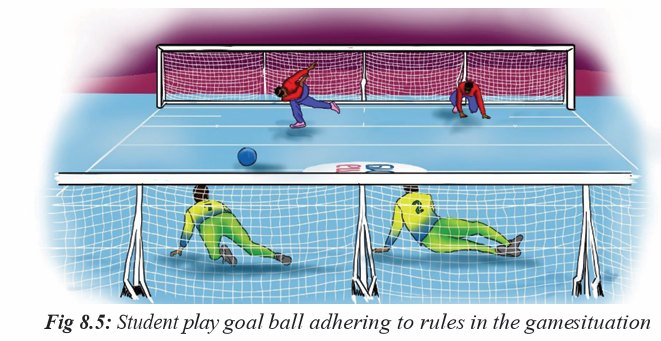
Make teams of 3 players. Let students play goalball adhering to rules of the
game on the appropriate court in limited period of ten minutes. One of the outside
teams leads the match as referees following rules and make records to be shared
after matches. The winner is the team which scores more goals or lead the match
perfectly than others. The teams change the roles every ten minutes to help allstudents to perform the game.
Application Activity 8.1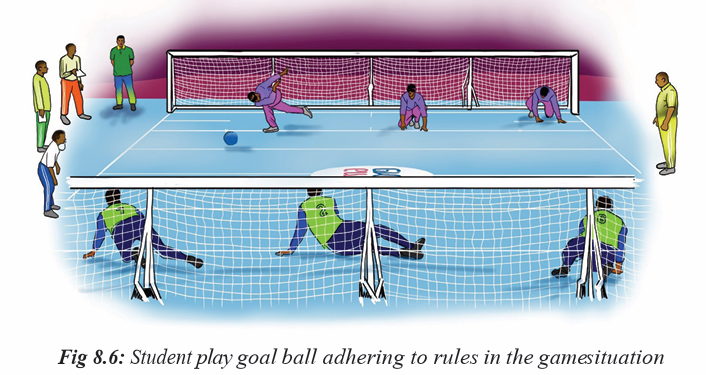
Make teams of 3 players. Let students play goalball adhering to rules of the game
on the appropriate court in limited period of fifteen minutes. One of the outside
teams leads the match as referees following rules and make records to be shared
after matches. The winner is the team which scores more goals or lead the match
perfectly than others. The teams change the roles every ten minutes to help allstudents to perform the game.
Closing discussion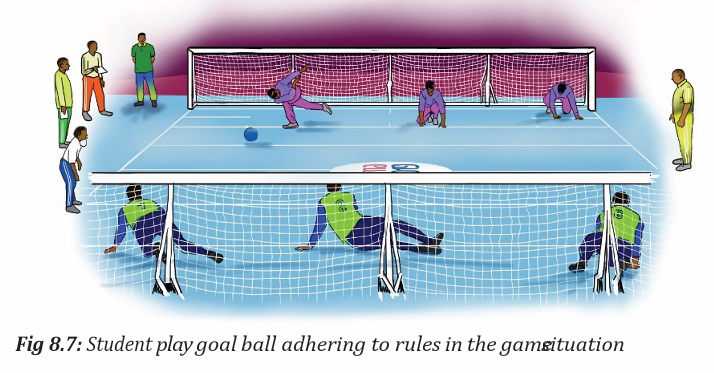
Reflect
– Which challenges/advantages did you face during performing techniques
Connect
and tactics of playing goalball in game situation adhering to rules?
– What are conditions do you need to perform goalball offensive and defensive
plays adhering to rules of the game?
Apply
– What is the usefulness of applying official rules in the goal ball gamesituation?
Lesson 3: Types of infractions in goal ball game
a) Learning objectiveIdentify types of infractions in goal ball game.
b) Teaching resources
Balls, playground, whistle, stopwatch, cones, chasubles, videos related togoalball rules of the game, posts, current official rules’ book.
c) Prerequisites/Revision/Introduction
Students of senior 6 will learn better types of infractions in goal ball game if
they have developed the goalball official rules learnt in Senior Six and in previouslessons.
d) Learning activities
Opening discussions
– Ask questions about types of infractions in goal ball game learned in Senior
Six.
– Let students present their findings and introduce the topic of the day.– Invite students to start warm up exercises.
Warm up and cool down exercises
– Let students perform general warm up exercises and specific warm up based on
the most body’s parts to be used in the game performance and stretch their
muscles properly.– Guide students while performing warm up and stretching exercises.
e) Lesson body
Activity 8.7-
In groups, students identify types of infractions in goal ball game. Each
group has the distributed rules document as resource. They share ideas
and carry out findings together.
- Pass though groups and help them where is necessary.
- Request students to choose a secretary to record findings and group representative who
will present their findings.
- Request group representative to present their findings and group members may
support where is necessary.- After the presentation of all groups, use a projector to recap presentations.
Activity 8.8
Make teams of 2 players. Let students play goalball adhering to rules of the
game on the appropriate court in limited period of ten minutes. One of the out
side teams leads the match as referees following rules and make records to share
after matches. The winner is the team which scores more goals or lead the match
perfectly than others. The teams change the roles every ten minutes to help allstudents to perform the game.
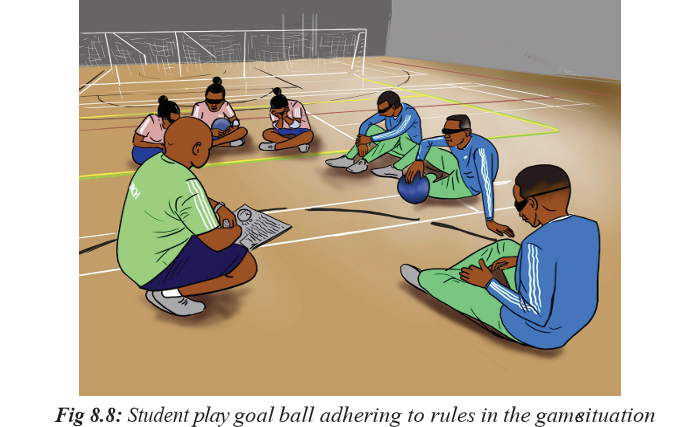
Activity 8.9
Make teams of 3 players. Let students play goalball adhering to rules of the game
on the appropriate court in limited period of fifteen minutes. One of the outside
teams leads the match as referees following rules and make records to share af
ter matches. The winner is the team which scores more goals or lead the match
perfectly than others. The teams change the roles every ten minutes to help allstudents to perform the game.
Application Activity 8.2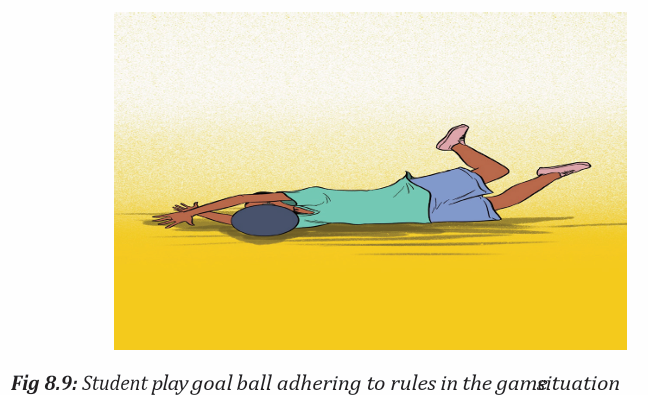
Make teams of 3 players. Let students play goalball adhering to rules of
the game on the appropriate court in limited period of fifteen minutes. One
of the outside teams leads the match as referees following rules and make
records to share after matches. The winner is the team which scores more
goals or lead the match perfectly than others. The teams change the rolesevery ten minutes to help all students to perform the game.
Closing discussion
Reflect
– Which challenges/advantages did you face during goalball in game
situation adhering to rules and records making?
Connect
– What are conditions do you need to perform goalball plays adhering to rules of
the game and making records?
Apply
– What is the usefulness of applying official rules and making records in thegoal ball game situation?
Lesson 4: Team penalties and Personal penalties in the goal ball game
a) Learning objectiveDifferentiate team penalties and personal penalties in the goal ball game.
b) Teaching resources
Balls, playground, whistle, stopwatch, cones, chasubles, videos related to goalball rules of the game, posts, current official rules’ book.
c) Prerequisites/Revision/Introduction
Students of senior six will learn better team penalties and personal penalties in the
goal ball game if they have developed the goalball official rules learnt in senior sixand in previous lessons.
d) Learning activities
Opening discussions
– Ask questions about the team penalties and personal penalties in the goal
ball game learned in senior six.
– Let students present their findings and introduce the topic of the day.
– Invite students to start warm up exercises.
Warm up and cool down exercises
– Let students perform general warm up exercises and specific warm up based on
the most body’s parts to be used in the game performance and stretch their
muscles properly.– Guide students while performing warm up and stretching exercises.
e) Lesson body
Activity 8.10
– In groups students discuss on the difference between team penalties and
personal penalties in the goal ball game. Each group has the distributed
rules document as resource. They share ideas and carry out findings
together
– Pass though groups and help them where is necessary. Request students
to choose a secretary to record findings and group representative who will
present their findings.
– Request group representative to present their findings and group members
may support where is necessary.– After presentation of all groups, use a projector to recap presentations.
Activity 8.11
Make teams of 2 players. Let students play goalball adhering to rules of the
game on the appropriate court in limited period of ten minutes. One of the outside
teams leads the match as referees following rules and make records to be shared
after matches. The winner is the team which scores more goals or lead the match
perfectly than others. The teams change the roles every ten minutes to help allstudents to perform the game.
Activity 8.12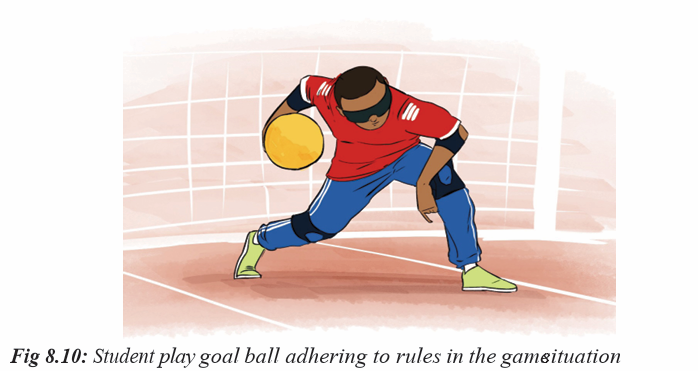
Make teams of 3 players. Let students play goalball adhering to rules of the
game on the appropriate court in limited period of fifteen minutes. One of the
outside teams leads the match as referees following rules and make records
to be shared after matches. The winner is the team which scores more goals
or lead the match perfectly than others. The teams change the roles everyten minutes to help all students to perform the game.
Activity 8.14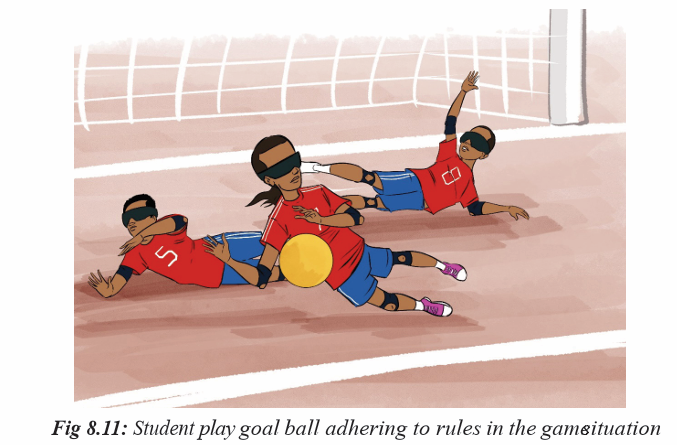
Make teams of 3 players. Let students play goalball adhering to rules of the
game on the appropriate court in limited period of ten minutes. One of the
outside teams leads the match as referees following rules and make records
to be shared after matches. The winner is the team which scores more goals
or lead the match perfectly than others. The teams change the roles everyten minutes to help all students to perform the game.
Closing discussion
Reflect
– Which challenges/advantages did you face during playing goalball in game
situation adhering to rules?
Connect
– What are conditions do you need to perform goalball plays adhering to rules of
the game?
Apply
– What is the usefulness of applying official rules in the goal ball game
situation?
Lesson 5: Officials’ authority and abuse of officials in the goal
ball game
a) Learning objective
Discuss the officials’ authority and abuse of officials in the goal ball game.
b) Teaching resources
Balls, playground, whistle, stopwatch, cones, chasubles, videos related togoalball rules of the game, posts, current official rules’ book.
c) Prerequisites/Revision/Introduction
Students of senior six will learn better officials’ authority and abuse of officials
in the goal ball game if they have developed the goalball official rules learnt insenior six and in previous lessons.
d) Learning activities
Opening discussions
– Ask questions about officials’ authority and abuse of officials in the goal ball
game learned in senior Six
– Let students present their findings and introduce the topic of the day.– Invite students to start warm up exercises.
Warm up and cool down exercises
– Let students perform general warm up exercises and specific warm up based on
the most body’s parts to be used in the game performance and stretch their
muscles properly.– Guide students while performing warm up and stretching exercises.
e) Lesson body
Activity 8.15
- In groups students discuss the officials’ authority and abuse of officials in
the goal ball game.
- Each group has the distributed rules document as resource. They share
ideas and carry out findings together.
- Pass though groups and help them where is necessary.
- Request students to choose a secretary to record findings and group representative
who will present their findings.
- Request group representative to present their findings and group members may support where
is necessary.
- After presentation of all groups, use a projector to recap presentations.
Activity 8.16
Make teams of 2 players. Let students play goalball adhering to rules of the
game on the appropriate court in limited period of ten minutes. One of the
outside teams leads the match as referees following rules and make records
to be shared after matches. The winner is the team which scores more goals
or lead the match perfectly than others. The teams change the roles everyten minutes to help all students to perform the game.
Activity 8.17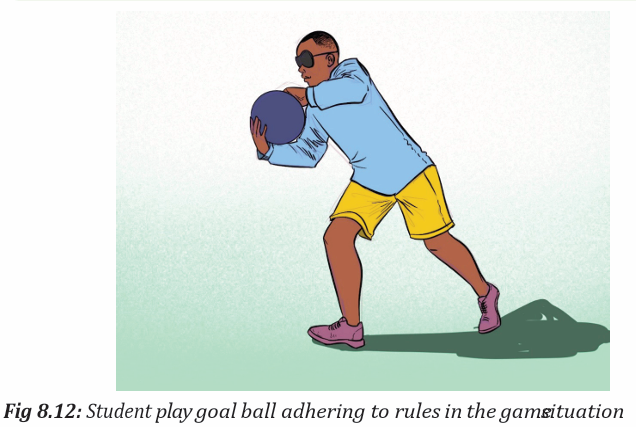
Make teams of 3 players. Let students play goalball adhering to rules of the
game on the appropriate court in limited period of ten minutes. One of the
outside teams leads the match as referees following rules and make records
to be shared after matches. The winner is the team which scores more goals
or lead the match perfectly than others. The teams change the roles everyten minutes to help all students to perform the game.
Activity 8.18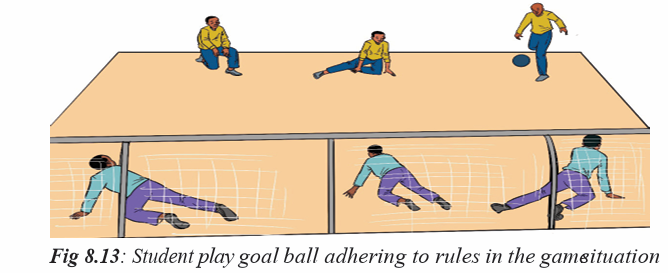
Make two teams of 3 players. Let students play goalball adhering to rules of the
game on the appropriate court in limited period of fifteen minutes. One of the
outside teams leads the match as referees following rules and make records to be
shared after matches. The winner is the team which scores more goals or lead the
match perfectly than others. The teams change the roles every ten minutes to helpall students to perform the game.
Closing discussion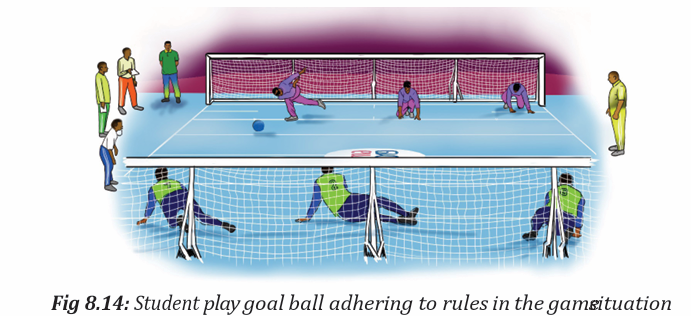
Reflect
– Which challenges/advantages did you face during playing goalball in game
situation adhering to rules?
Connect
– What are conditions do you need to perform goalball plays adhering to rules of
the game?
Apply
– What is the usefulness of applying official rules in the goal ball game
situation?
Lesson 6: End of the game in goal ball and officiate a goal ball
game
a) Learning objectiveDiscuss the end of the game in goal ball and officiate a goal ball game.
b) Teaching resources
Balls, playground, whistle, stopwatch, cones, chasubles, videos related togoalball rules of the game, posts, current official rules’ book.
c) Prerequisites/Revision/Introduction
Students of senior six will discuss the end of the game in goal ball and officiate
a goal ball game if they have developed the goalball official rules learnt in seniorsix and in previous lessons.
d) Learning activities
Opening discussions
– Ask questions about the end of the game in goal ball and officiate a goal ball
game learned in senior six.
– Let students present their findings and introduce the topic of the day.– Invite students to start warm up exercises.
Warm up and cool down exercises
– Let students perform general warm up exercises and specific warm up based on
the most body’s parts to be used in the game performance and stretch their
muscles properly.– Guide students while performing warm up and stretching exercises.
e) Lesson body
Activity 8.19
In groups students discuss the end of the game in goal ball and officiate
a goal ball game. Each group has the distributed rules document as resource.
They share ideas and carry out findings together.
- Pass though groups and help them where is necessary
- Request students to choose a secretary to record findings and group representative who will
present their findings.
Request group representative to present their findings and group members may
support where is necessary.- After presentation of all groups, use a projector to recap presentations.
Activity 8.20
Make teams of 2 or 3 players. Let students play goalball adhering to rules
of the game on the appropriate court in limited period of ten minutes. One
of the outside teams leads the match as referees following rules and make
records to be shared after matches. The winner is the team which scores
more goals or lead the match perfectly than others. The teams change theroles every ten minutes to help all students to perform the game.
Activity 8.21
Make teams of 3 players. Let students play goalball adhering to rules of the
game on the appropriate court in limited period of ten minutes. One of the
outside teams leads the match as referees following rules and make records
to be shared after matches. The winner is the team which scores more goals
or lead the match perfectly than others. The teams change the roles everyten minutes to help all students to perform the game.
Application Activity 8.6
The first match: A vs B while C will act as officials by providing 2 officials,
4 goal judges, 1 scorer, 1 timer, 2 ten second timers and 1 back-up timer.
The remaining players will record fouls and misconduct happened and how
officials have been reacted.
The second match: B vs C while A will act as officials by providing 2 officials,
4 goal judges, 1 scorer, 1 timer, 2 ten second timers and 1 back-up timer.
The remaining players will record fouls and misconduct happened and how
officials have been reacted
The third match: A vs C while B will act as officials by providing 2 officials,
4 goal judges, 1 scorer, 1 timer, 2 ten second timers and 1 back-up timer.
The remaining players will record fouls and misconduct happened and how
officials have been reacted. The playing time is 10minutes.
The winner is the team which gains more points than others. After the
competition, each team shares with others what they have recorded: On
rules of the games, decisions taken by officials, effectiveness of hand signals
used, and how officials are taking positions and their movement during thematch. Support them to clarify some rules of the game where is necessary.
Closing discussion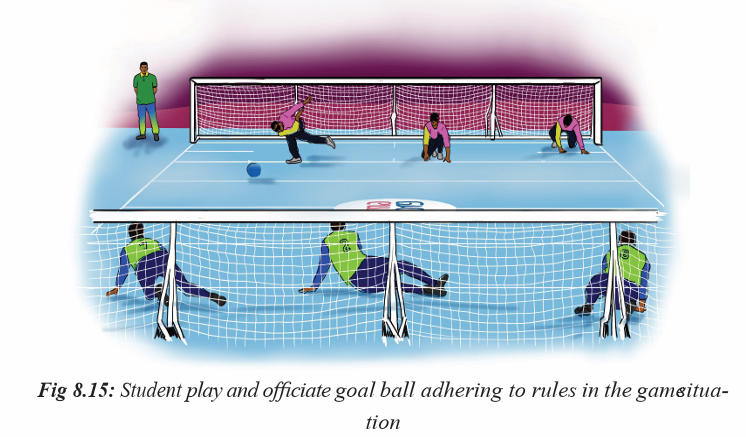
Reflect
– Which challenges/advantages did you face during playing and officiating
goalball in game situation adhering to 0fficial rules?
Connect
– What are conditions do you need to perform plays and officiating goalball adhering
to official rules of the game?
Apply
– What is the usefulness of officiating goalball and applying official rules in
the game situation?
8.5. Additional Information for teachers
The teacher should be updated on the current rules of the game of playinggoalball game.
8.6 End of unit assessment
Teacher divide students into groups of eleven including 2 officials, 4 goal judges,
1 scorer, 1 timer, 2 ten second timers and 1 back-up timer. After dividing students
into their respecting groups, set the order on which groups will lead the game,
request the first group to start the match. Ask other remaining student teachers
to form two teams of three players for each one. Let the match start, change groups
which is officiating after five minutes. Officials become players to replace those
who are becoming officials.
– During performing officiating for each group, observe how each student is
accomplishing given tasks and roles.
– Observe how techniques and tactics learned are being used.
– Records their performance in order to give them feedback at the end of theexercise.
8.7 Additional activities
Remedial activities
Distribute balls to students for regular familiarization with the ball focusing on techniques of
playing goal ball.
Consolidation activities
Participate in competitions between small groups and choose their own officials to
lead the matches.
Extended activities Encourage learners:
Organize goal ball competition between classes for forming school teams let students officiate
interclasses and friendly matches. Encourage students to exploit regularly updated rules of goal ball.UNIT 9 :SITTING VOLLEYBALL
Key unit competence: Perform sitting volleyball techniques and tactics in the
game situation adhering to rules.
9.1. Prerequisite (knowledge, skills, attitudes and values)
Students of senior six will learn better sitting volleyball if they have developed
techniques and tactics of playing sitting volleyball learned in senior five.
9.2. Cross-cutting issues to be addressed
Gender: In teaching and learning process, the teacher must prepare and provide
sitting volleyball activities that engage both girls and boys equally to exploit their full
potential and talents without any discrimination or prejudice.
Inclusive education: The teacher as a facilitator he/she must consider different
special education needs and select activities to adapt his teaching approaches
to students. This creates a positive attitude and helps all students to participate
actively and develop their competence levels.
Financial education: The teacher should integrate Financial Education into his
teaching/learning activities by providing the local and no cost teaching material where
is possible. He/she must encourage students to make their own materials that can
help them to develop competences not only in sitting volleyball but also in their life.
Standardization culture: The teacher must choose and select the standardized
materials to use in his/ her teaching/learning process of sitting volleyball. It is
necessary to provide appropriate materials required to the levels of students and help
them to develop culture of checking and using the quality of sport materials for the
competitions before using them in order to prevent injuries and accidents.
Environment and sustainability: The teacher should provide materials and
deliver the lesson by encouraging students to protect the environment and well
use of materials. The teacher helps them to develop the spirit of keeping safe the
environment they use during sports activities by cleaning playground and courts.
Peace and values education: The teacher helps students to develop fair play
and social values by avoiding violence and conflict in the sitting volleyball game and
by setting clear and relevant instructions. He/she should provide the activities that
help students to develop their competence peacefully.
Comprehensive sexuality education: The teacher provides sitting volleyball
exercise and sets instructions that prevent sexual harassment or any kind of gender
based violence like sexual abuse and physical contacts oriented to the sexuality
intention.
Genocide studies: While conducting sitting volleyball exercises a teacher should
take a time to explain students how sports should be used to fight against Genocide
ideology and how to prevent it. For example, to organize Genocide memorialtournaments at school and give the message related to the Genocide.
9.3. Guidance on introductory activity
Before introducing the lesson one of this unit, you must introduce the whole unit.
The teacher as a guide, facilitator and expert, ask questions or give activity related
to rules of sitting volleyball in order to help them to predict what to be learned inthe whole unit.
9.4. List of lessons/sub-heading
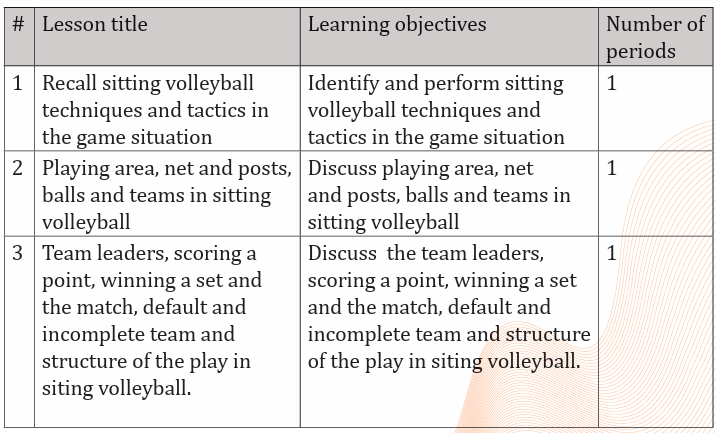
Lesson 1: Recall techniques and tactics of playing sitting volley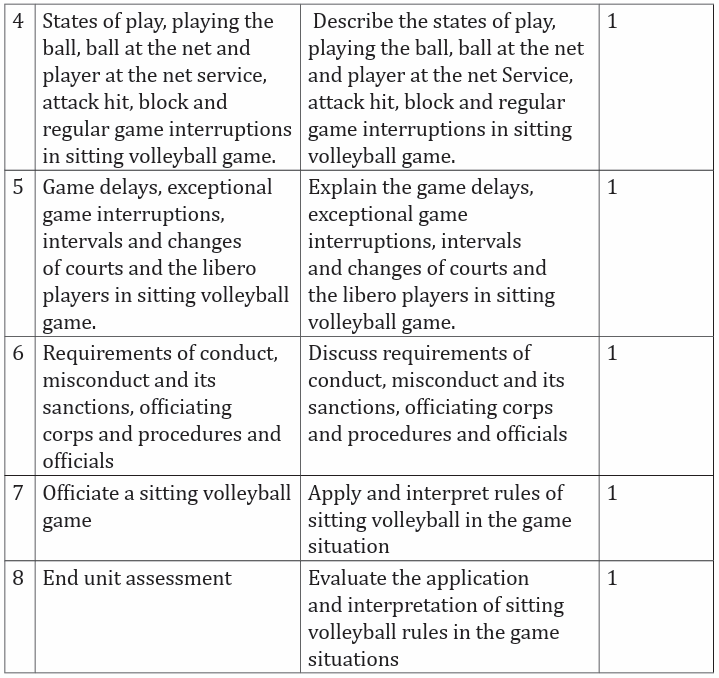
ball in the game situation
a) Learning objective
Identify and perform sitting volleyball techniques and tactics in the gamesituation.
b) Teaching resources
Balls, watch, whistle, cones, chasubles, trees, net and posts
c) Prerequisites/Revision/Introduction
Students of senior six will learn better the lesson of recalling techniques and tactics
used in sitting volleyball in the game situation if they have performed betterbasic techniques and tactics of playing sitting volleyball learned in senior five.
d) Learning activities
Opening discussions
Let students brainstorm different techniques and tactics learned in senior five
complement.
volleyball.
Let students present their findings and support them where is necessary for
Introduce the topic of the day ‘recall of techniques and tactics of playing sittingInvite students to start warm up session.
Warm up and stretching exercises
Students perform general and specific warm up.
Let students stretch the whole body and insist on the body’s part which will be usedmore in sitting volleyball game.
e) Lesson body
Activity 9.1
In teams of 3 students recall techniques and tactics and playing sitting volleyball
game in ten minutes. They perform offensive and defensive play individually
and in team. Everyone has responsibilities of his/her position on the playground
accordingly. The teams are replaced after ten minutes to help all students toperform.
Activity 9.2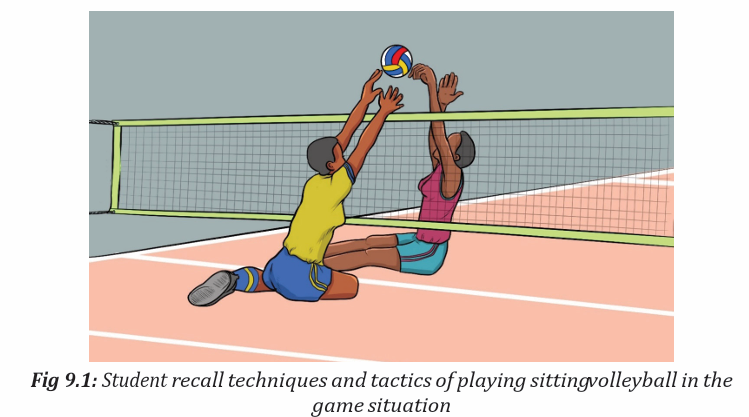
In two teams of six players sitting at the service line. Give balls to each group.
Tell students to perform different services while sitting down. After performing
five services for each one, request three students for each group to enter in the
court and be positioned in front area. Let one of the remaining students who
are on the service line perform a service and those who are in the court make
reception; play a normal game by using three hits then send the ball to the
opponent then opponents make three hits send back the ball over the net; the
exercise continue this way until the ball goes out or another foul occurs. After
five minutes let other three players for each team enter onto the court, now each
group has six players. One of the remaining players make a service, players who
are in the court play a normal game until the ball goes out or any foul occurs.
Change players’ roles, those who are in the court replace those who are makingservices verse versa.
Application Activity 9.1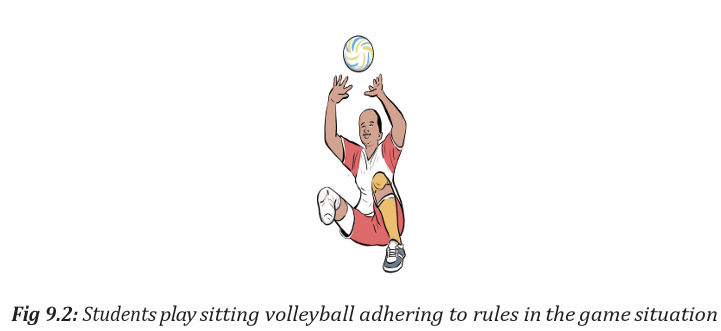
Form two groups of 6 to 12 players in order to teach proper techniques and tactics
used in playing sitting volleyball. Request students to choose positions in which they
will play in when they enter in the court. Tell them that all students they should
participate in game situation as player or substitute.
Description of the activity
First six students for each group enter into the court and start playing a normal game.
Students are requested to use all learned techniques and tactics in order to win. Let
two groups play 10 min, the winning team, is the team, which will gain many points
within 10 minutes. After 10 minutes, winning team will pay to the next group. Remindgroup to make substitution in order to let all group members to participate in the play.
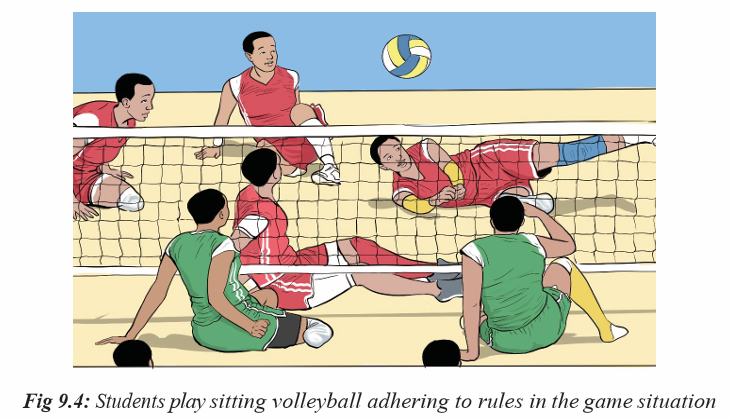
Cool down exercises
– Let students perform cool down exercises and light stretching by focusing the most
used muscles.
– Guide them how they can stretch their muscles accordingly.– Help them/demonstrate/correct where is necessary.
Closing discussion
Reflect
– What are challenges/advantages did you face while performing sitting
volleyball?
Connect
– In which conditions do you need techniques and tactics in order to play
sitting volleyball?
Apply
– How will you use learned techniques and tactics in sitting volleyball in your daily
life?
Lesson 2: Playing area, net and posts, balls and teams in sittingvolleyball
a) Learning objectiveDiscuss the playing area, net and posts, balls and teams in sitting volleyball.
b) Teaching resourcesBalls, watch, whistle, cones, chasubles, trees, net and posts.
c) Prerequisites/Revision/Introduction
Students of senior six will learn better playing area, net and posts, balls and teams
in sitting volleyball if they have performed basic techniques and tactics of playingsitting volleyball and mastered rules learned in senior five.
d) Learning activities
Opening discussions
– Let students brainstorm the playing area, net and posts, balls and teams in
sitting volleyball learned in senior five.
– Let students present their findings and support them where is necessary
for complement.
– Introduce the topic of the day.– Invite students to start warm up session.
Warm up and stretching exercises
– Students perform general and specific warm up.
– Let students stretch the whole body and insist on the body’s parts which willbe used more in sitting volleyball game.
e) Lesson body
Activity 9.3
– In groups students discuss the given elements of sitting volleyball
rules. Each group has one rule to be discussed and findings are in the
distributed rules document as resource.
present their findings.
– Pass though groups and help them where is necessary. Request students
to choose a secretary to record findings and group representative who will
– Request group representative to present their findings and group members
may support where is necessary.– After presentation of all groups, use a projector to recap presentations.
Activity 9.4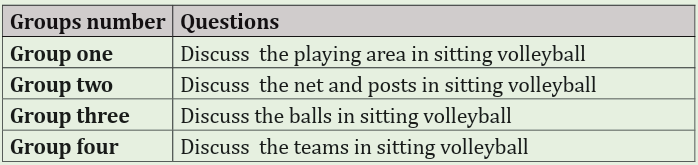
Make teams of 3 players. Let students play sitting volleyball adhering to rules
of the game on the appropriate court in limited period of ten minutes. One of the
outside teams leads the match as referees following rules. The winner is the teamwhich scores more points or lead the match perfectly than others.
Activity 9.5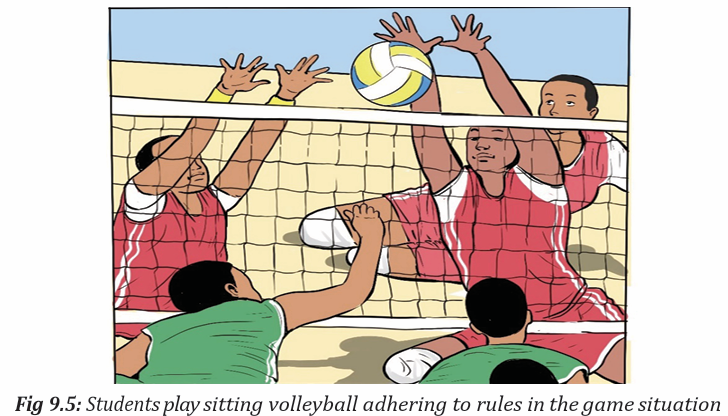
Make teams of 6 players. Let students play sitting volleyball adhering to rules
of the game on the appropriate court in limited period of ten minutes. One of the
outside teams leads the match as referees following rules. The winner is the teamwhich scores more points or lead the match perfectly than others.
Application Activity 9.2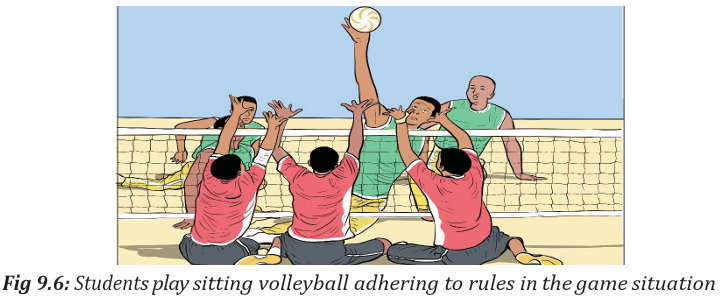
Make two teams of 6 players. Let students play sitting volleyball adhering to
rules of the game on the appropriate court in limited period of ten minutes.
The outside teams lead the match as referees following rules. The winner isthe team which scores more points or lead the match perfectly than others.
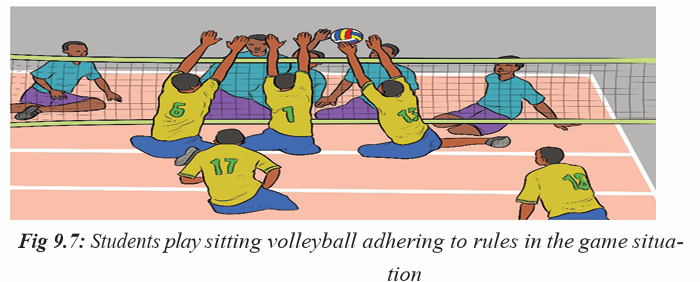
Cool down exercises
– Let students perform cool down exercises and stretch focusing on the most used
muscles.
– Guide them how they can stretch their muscles accordingly.– Help them/demonstrate/correct where is necessary.
Closing discussion
Reflect
– What are challenges/advantages did you face while performing sittingvolleyball game?
Connect– In which conditions do you need rules in playing sitting volleyball?
Apply
– How will you use learned rules in sitting volleyball in your daily life?
Lesson 3: Team leaders, scoring a point, winning a set and the
match, default and incomplete team and structure of the play insiting volleyball
a) Learning objective
Discuss team leaders, scoring a point, winning a set and the match, default andincomplete team and structure of the play in siting volleyball.
b) Teaching resourcesBalls, watch, whistle, cones, chasubles, trees, net and posts.
c) Prerequisites/Revision/Introduction
Students of senior six will learn better the team leaders, scoring a point, winning
a set and the match, default and incomplete team and structure of the play in
siting volleyball if they have performed basic techniques and tactics of playingsitting volleyball and mastered the official rules learned in senior five.
d) Learning activities
Opening discussions
– Let students brainstorm the team leaders, scoring a point, winning a set and
the match, default and incomplete team and structure of the play in siting
volleyball learned in senior five.
– Let students present their findings and support them where is necessary
for complement.-
Introduce the topic of the day.
-Invite students to start warm up session.
Warm up and stretching exercises
– Students perform general and specific warm up.
– Let students stretch the whole body and insist on the body’s parts which willbe used more in sitting volleyball game.
e) Lesson body
Activity 9.6
– In seven groups, students discuss the given elements of sitting volleyball
rules. Each group has one rule to be discussed and findings are in the
distributed rules document as resource.
– Pass though groups and help them where is necessary. Request students
to choose a secretary to record findings and group representative who will
present their findings.
– Request group representative to present their findings and group members
may support where is necessary. After presentation of all groups, use aprojector to recap presentations
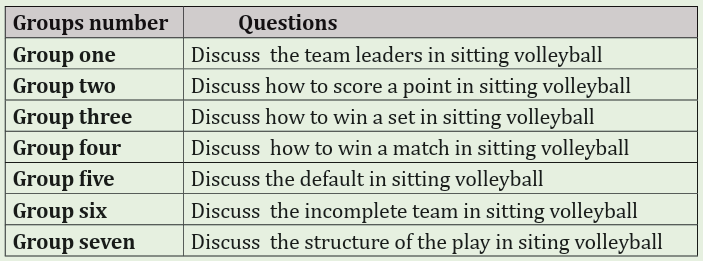
Activity 9.7
Make teams of 3 players. Let students play sitting volleyball adhering to rules
of the game on the appropriate court in limited period of ten minutes. One of the
outside teams leads the match as referees following rules. The winner is the teamwhich scores more points or lead the match perfectly than others.
Application Activity 9.3
Make two teams of 6 players. Let students play sitting volleyball adhering to
rules of the game on the appropriate court in limited period of ten minutes.
The outside teams lead the match as referees following rules. The winner is
the team which scores more points or lead the match perfectly than others.
The main points to consider are the team leaders, scoring a point, winning a
set and the match, default and incomplete team and structure of their play.
Cool down exercises
– Let students perform cool down exercises and stretch focusing on the most used
muscles.
– Guide them how they can stretch their muscles accordingly.
– Help them/demonstrate/correct where is necessary.
Closing discussion
Reflect
– What are challenges/advantages did you face while performing sitting
volleyball game?
Connect– In which conditions do you need rules in playing sitting volleyball?
Apply
– How will you use learned rules in sitting volleyball in your daily life?
Lesson 4: States of play, playing the ball, ball at the net and play
er at the net Service, attack hit, block and regular game interruptions in sitting
volleyball game
a) Learning objective
Describe the states of play, playing the ball, ball at the net and player at the net
Service, attack hit, block and regular game interruptions in sitting volleyball
game.
b) Teaching resources
Balls, watch, whistle, cones, chasubles, trees, net and posts.
c) Prerequisites/Revision/Introduction
Students of senior six will learn better the states of play, playing the ball, ball
at the net and player at the net Service, attack hit, block and regular game
interruptions in sitting volleyball game if they have performed basic techniques
and tactics of playing sitting volleyball and mastered the official rules learned in
senior five.
d) Learning activities
Opening discussions
– Let students brainstorm the states of play, playing the ball, ball at the net and
player at the net service, attack hit, block and regular game interruptions
in sitting volleyball learned in senior five.
– Let students present their findings and support them where is necessary
for complement.
– Introduce the topic of the day.
– Invite students to start warm up session.
Warm up and stretching exercises
– Students perform general and specific warm up.
– Let students stretch the whole body and insist on the body’s parts which will
be used more in sitting volleyball game.
e) Lesson body
– In seven groups, students discuss the given elements of sitting volleyball
rules. Each group has one rule to be discussed and findings are in the
distributed rules document as resource.
Activity 9.8
- In seven groups, students discuss the given elements of sitting volleyball
rules. Each group has one rule to be discussed and findings are in the
distributed rules document as resource.
– Pass though groups and help them where is necessary.
– Request students to choose a secretary to record findings and group
representative who will present their findings.
– Request group representative to present their findings and group members
may support where is necessary.– After presentation of all groups, use a projector to recap presentations.

Activity 9.9
Make teams of 3 players. Let students play sitting volleyball adhering to rules
of the game on the appropriate court in limited period of ten minutes. One of the
outside teams leads the match as referees following rules. The winner is the teamwhich scores more points or lead the match perfectly than others.
Activity 9.10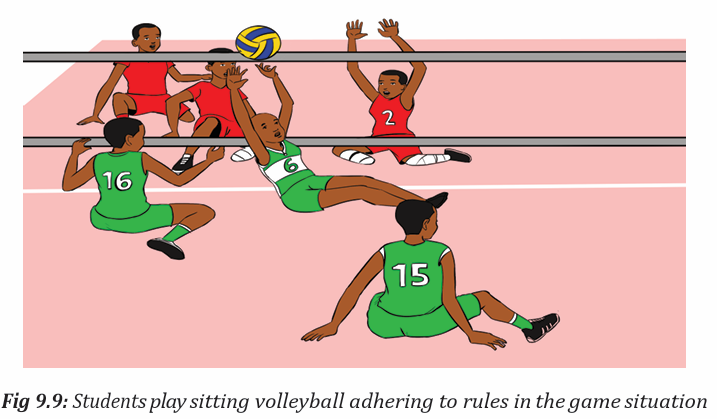
Make teams of 6 players. Let students play sitting volleyball adhering to rules
of the game on the appropriate court in limited period of ten minutes. One of the
outside teams leads the match as referees following rules. The winner is the teamwhich scores more points or lead the match perfectly than others.
Application Activity 9.4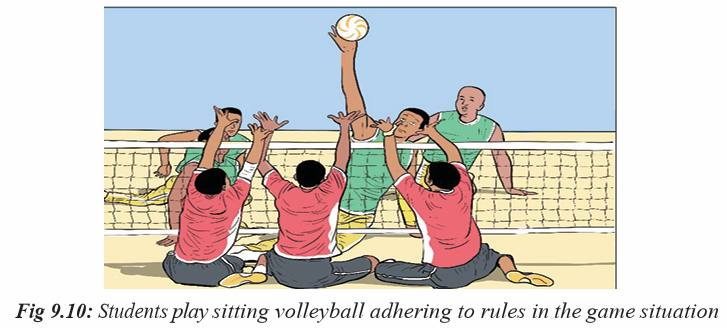
Make two teams of 6 players. Let students play sitting volleyball adhering to
rules of the game on the appropriate court in limited period of ten minutes. The
outside teams lead the match as referees following rules. The winner is the team
which scores more points or lead the match perfectly than others. The main points
to consider are the team leaders, scoring a point, winning a set and the match,default and incomplete team and structure of their play.
Cool down exercises-
Let students perform cool down exercises and stretch focusing on the most used
muscles.
- Guide them how they can stretch their muscles accordingly.-- Help them/demonstrate/correct where is necessary.
Closing discussion
Reflect
– What are challenging/advantages did you face while performing sittingvolleyball game?
Connect
– In which conditions do you need rules in playing sitting volleyball?
Apply
How will you use learned rules in sitting volleyball in your daily life?
Lesson 5: Game delays, exceptional game interruptions, intervals and changes
of courts and the libero players in sitting volleyball game
a) Learning objective
Explain the game delays, exceptional game interruptions, intervals and changes
of courts and the libero players in sitting volleyball game.
b) Teaching resources
Balls, watch, whistle, cones, chasubles, trees, net and posts.
c) Prerequisites/Revision/Introduction
Students of senior six will explain better the game delays, exceptional game
interruptions, intervals and changes of courts and the libero players in sitting
volleyball if they have performed basic techniques and tactics of playing sittingvolleyball and mastered the official rules learned in senior five
d) Learning activities
Opening discussions
– Let students brainstorm the game delays, exceptional game interruptions,
intervals and changes of courts and the libero players in sitting volleyball
learned in senior five.
– Let students present their findings and support them where is necessary
for complement.
– Introduce the topic of the day.
– Invite students to start warm up session.
Warm up and stretching exercises
– Students perform general and specific warm up.
– Let students stretch the whole body and insist on the body’s parts which willbe used more in sitting volleyball game.
e) Lesson body
Activity 9.11
– In five groups, students explain the given elements of sitting volleyball
rules. Each group has one rule to be explained and findings are in the
distributed rules document as resource.
– Pass though groups and help them where is necessary.
– Request students to choose a secretary to record findings and group
representative who will present their findings.
– Request group representative to present their findings and group members
may support where is necessary.– After presentation of all groups, use a projector to recap presentations.
Activity 9.12
Make teams of 6 players. Let students play sitting volleyball adhering to rules
of the game on the appropriate court in limited period of ten minutes. One of the
outside teams leads the match as referees following rules. The winner is the team
which scores more points or lead the match perfectly than others.Make teams of 6 players. Let students play sitting volleyball adhering to rules
of the game on the appropriate court in limited period of ten minutes. One of
the outside teams leads the match as referees following rules. The winner is theteam which scores more points or lead the match perfectly than others.
Activity 9.13
Make teams of 6 players. Let students play sitting volleyball adhering to rules of
the game on the appropriate court in limited period of fifteen minutes. One of the
outside teams leads the match as referees following rules. The winner is the teamwhich scores more points or lead the match perfectly than others.
Application Activity 9.5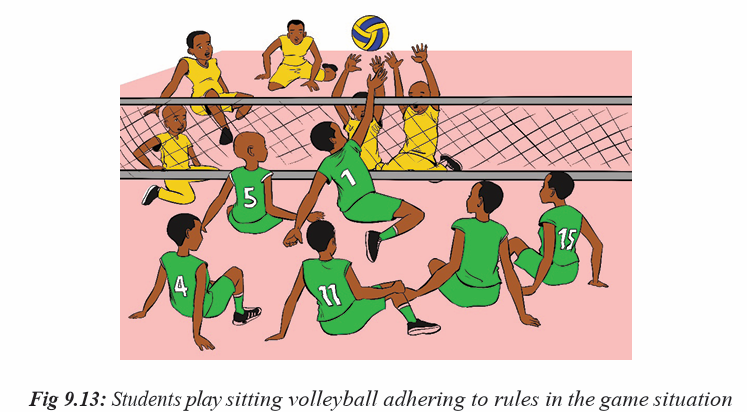
Make two teams of 6 players. Let students play sitting volleyball adhering to
rules of the game on the appropriate court in limited period of ten minutes.
The outside teams lead the match as referees following rules. The winner
is the team which scores more points or lead the match perfectly than
others. The main points to consider are the game delays, exceptional gameinterruptions, intervals and changes of courts and the libero players.
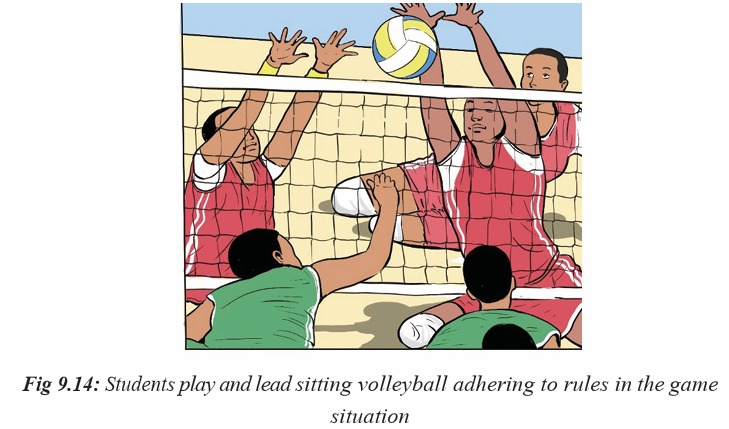
Cool down exercises
– Let students perform cool down and stretching exercises focusing on the most used
muscles.
– Guide them how they can stretch their muscles accordingly.– Help them/demonstrate/correct where is necessary.
Closing discussion
Reflect
– What are challenges/advantages did you face while performing sitting
volleyball game?
Connect
- In which conditions do you need to apply rules in playing sitting volleyball?
Apply
- How will you use learned rules in sitting volleyball to become good players?
Lesson 6: Requirements of conduct, misconduct and its sanctions, officiating
corps and procedures and officials
a) Learning objective
Discuss the requirements of conduct, misconduct and its sanctions, officiating
corps and procedures and officials.
b) Teaching resources
Balls, watch, whistle, cones, chasubles, trees, net and posts.
c) Prerequisites/Revision/Introduction
Students of senior six will discuss better the requirements of conduct, misconduct
and its sanctions, officiating corps and procedures and officials in sitting volleyball
if they have performed basic techniques and tactics of playing sitting volleyball and
mastered the official rules learned in senior five.
d) Learning activities
Opening discussions
– Let students brainstorm the requirements of conduct, misconduct and its
sanctions, officiating corps and procedures and officials in sitting volleyball
learned in senior five.
– Let students present their findings and support them where is necessary
for complement.
– Introduce the topic of the day.
– Invite students to start warm up session.
Warm up and stretching exercises
Students perform general and specific warm up.
Let students stretch the whole body and insist on the body’s parts which will beused more in sitting volleyball game.
e) Lesson body
Activity 9.14
– In four groups, students discuss the given elements of sitting volleyball
rules. Each group has one rule to be explained and findings are in the
distributed rules document as resource.
– Pass though groups and help them where is necessary.
– Request students to choose a secretary to record findings and group
representative who will present their findings.
– Request group representative to present their findings and group members
may support where is necessary.– After presentation of all groups, use a projector to recap presentations.
Activity 9.15
Make teams of 6 players. Let students play sitting volleyball adhering to
rules of the game on the appropriate court in limited period of ten minutes.
One of the outside teams leads the match as referees following rules. The
winner is the team which scores more points or lead the match perfectlythan others.
Activity 9.16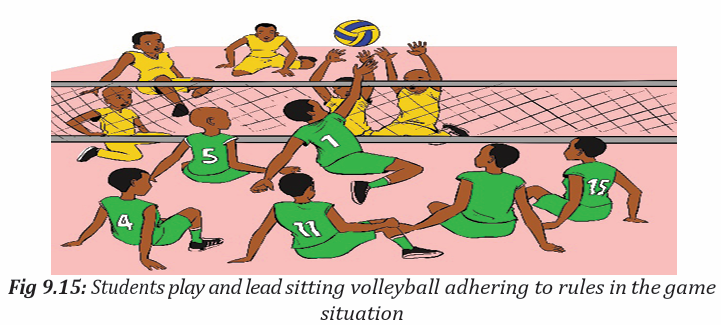
Make teams of 6 players. Let students play sitting volleyball adhering to rules
of the game on the appropriate court in limited period of ten minutes. One of the
outside teams leads the match as referees following rules. The winner is the teamwhich scores more points or lead the match perfectly than others.
Application Activity 9.6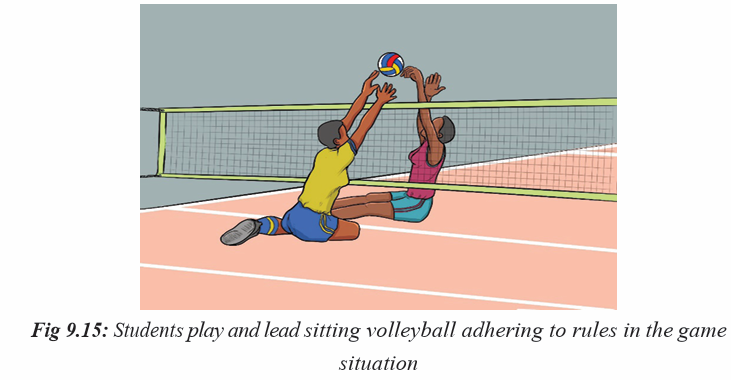
Make two teams of 6 players. Let students play sitting volleyball adhering to
rules of the game on the appropriate court in limited period of ten minutes.
The outside teams lead the match as referees following rules. The winner is
the team which scores more points or lead the match perfectly than others.
The main points to consider are the requirements of conduct, misconductand its sanctions, officiating corps and procedures and officials.
Cool down exercises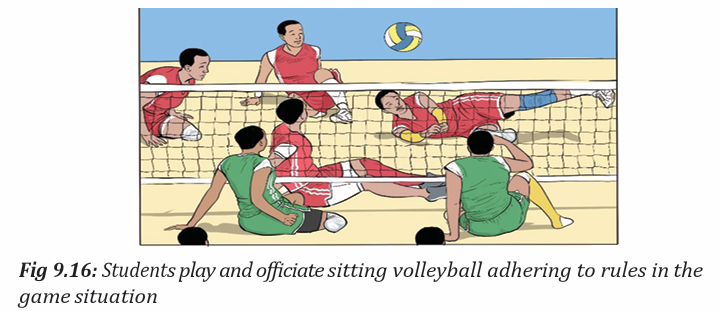
– Let students perform cool down and stretching exercises focusing on the most used
muscles.
– Guide them how they can stretch their muscles accordingly.– Help them/demonstrate/correct where is necessary.
Closing discussion
Reflect
– What are challenges/advantages did you face while performing sitting
volleyball game?
Connect
– In which conditions do you need to apply rules in playing sitting volleyball?
Apply
– How will you use learned rules in sitting volleyball to become good players?
Lesson 7: Officiate a sitting volleyball game
a) Learning objective
Apply and interpret rules of sitting volleyball in the game situation.
b) Teaching resources
Balls, watch, whistle, cones, chasubles, trees, net and posts.
c) Prerequisites/Revision/Introduction
Students of senior six will apply and interpret rules of sitting volleyball in the
game situation if they have performed basic techniques and tactics of playing
sitting volleyball and mastered the official rules learned in senior five.
d) Learning activities
Opening discussions
- Let students brainstorm the application and interpretation of rules of sitting
volleyball in the game situation learned in Senior Six and in previous lessons.
-Let students present their findings and support them where is necessary for
complement.
-Introduce the topic of the day.-Invite students to start warm up session.
Warm up and stretching exercises - -
Students perform general and specific warm up.used more in sitting volleyball game.
e) Lesson body
Game situationLet students stretch the whole body and insist on the body’s parts which will be
Activity 9.17
Make complete teams A, B and C and organize a sitting volleyball competition:
The first match: A vs B while C will act as officials by providing first referee,
second referee, scorer, assistant scorer and line judges to lead the match. The
remaining players will record fouls and misconduct happened and how
officials have been reacted.
The second match: B vs C while A will act as officials by providing first
referee, second referee, scorer, assistant scorer and line judges to lead the
match. The remaining players will record fouls and misconduct happened
and how officials have been reacted
The third match: A vs C while B will act as officials by providing first referee,
second referee, scorer, assistant scorer and line judges to lead the match. The
remaining players will record fouls and misconduct happened and how
officials have been reacted. Every match duration is ten minutes.
The winner is the team which gains more points and sets than others. After
the competition, each team shares with others what they have recorded: On
rules of the games, decisions of referees, effectiveness of hand signals used.Support them to clarify some rules of the game where is necessary.
Activity 9.18
Make teams of 2, 3, 4 or 6 players. Let students play sitting volleyball adhering
to rules of the game on the appropriate court in limited period of ten minutes. One
of the outside teams leads the match as referees following rules. The winner is theteam which scores more points or lead the match perfectly than others.
Warm up and stretching exercises
- Students perform general and specific warm up.
- Let students stretch the whole body and insist on the body’s parts which will be- used more in sitting volleyball game.
e) Lesson body
Activity 9.17
Game situation
Make complete teams A, B and C and organize a sitting volleyball competition:
The first match: A vs B while C will act as officials by providing first referee,
second referee, scorer, assistant scorer and line judges to lead the match. The
remaining players will record fouls and misconduct happened and how
officials have been reacted.
The second match: B vs C while A will act as officials by providing first
referee, second referee, scorer, assistant scorer and line judges to lead the
match. The remaining players will record fouls and misconduct happened
and how officials have been reacted
The third match: A vs C while B will act as officials by providing first referee,
second referee, scorer, assistant scorer and line judges to lead the match. The
remaining players will record fouls and misconduct happened and how
officials have been reacted. Every match duration is ten minutes.
The winner is the team which gains more points and sets than others. After
the competition, each team shares with others what they have recorded: On
rules of the games, decisions of referees, effectiveness of hand signals used.
Support them to clarify some rules of the game where is necessary.
Activity 9.18
Make teams of 2, 3, 4 or 6 players. Let students play sitting volleyball adhering
to rules of the game on the appropriate court in limited period of ten minutes. One
of the outside teams leads the match as referees following rules. The winner is theteam which scores more points or lead the match perfectly than others.
Activity 9.19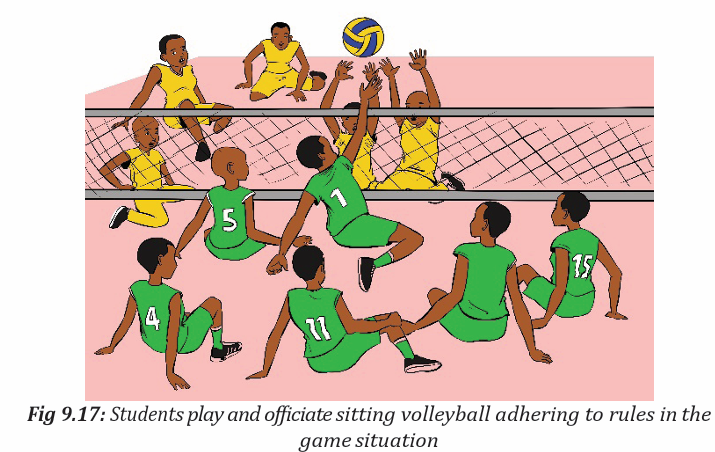
Make teams of 6 players. Let students play sitting volleyball adhering to rules
of the game on the appropriate court in limited period of ten minutes. One of the
outside teams leads the match as referees following rules. The winner is the teamwhich scores more points or lead the match perfectly than others.
Application Activity 9.7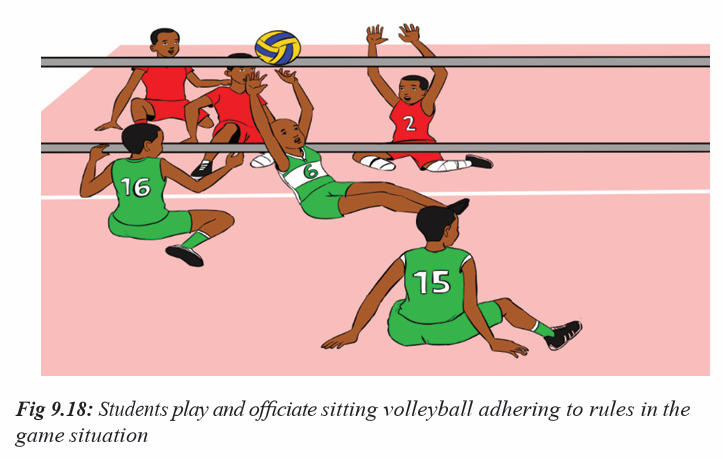
Make two teams of 6 players. Let students play sitting volleyball adhering to
rules of the game on the appropriate court in limited period of ten minutes.
The outside teams lead the match: First referee, second referee, scorer, assistant
scorer and line judges to lead the match The winner is the team which scores
more points or lead the match perfectly than others. The main points to
consider are the application and interpretation of rules of sitting volleyball inthe game situation.
Signs used in refereeing in volleyball and sitting volleyball
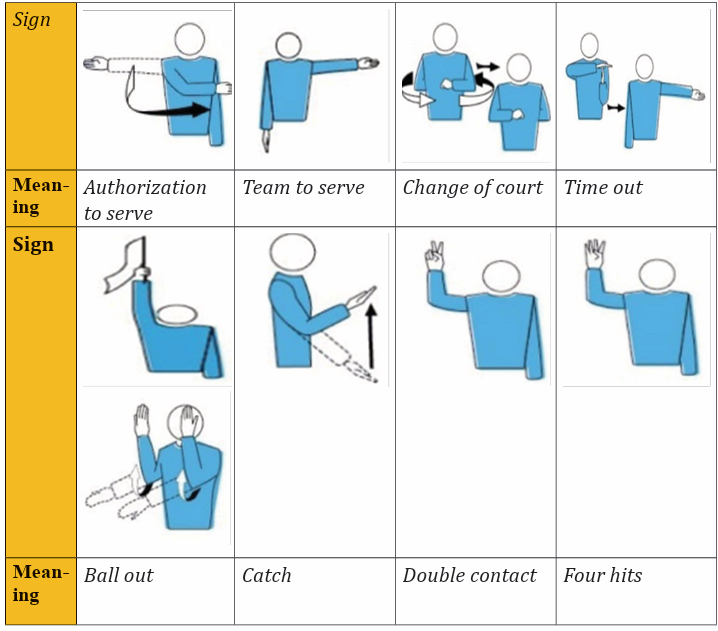
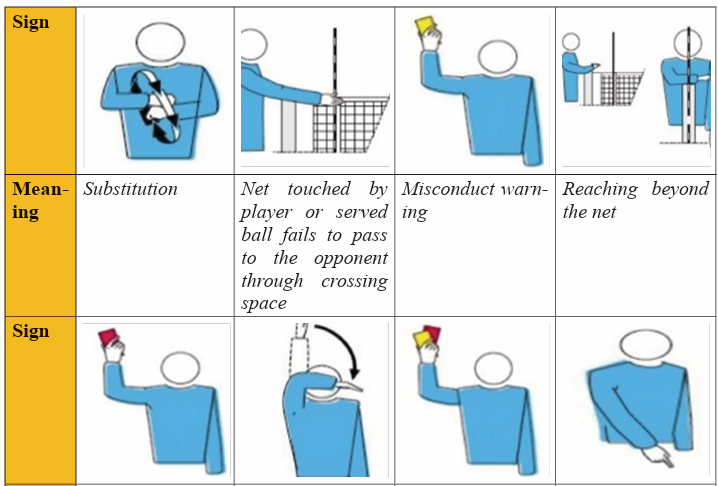
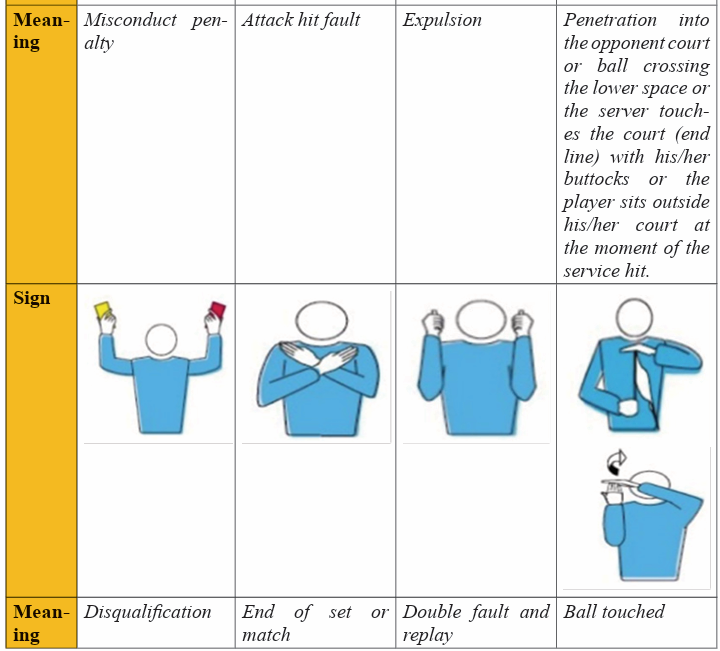
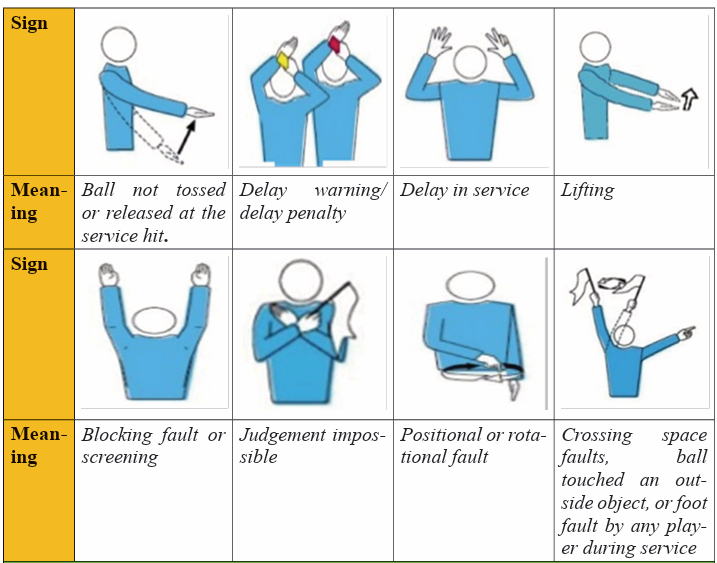
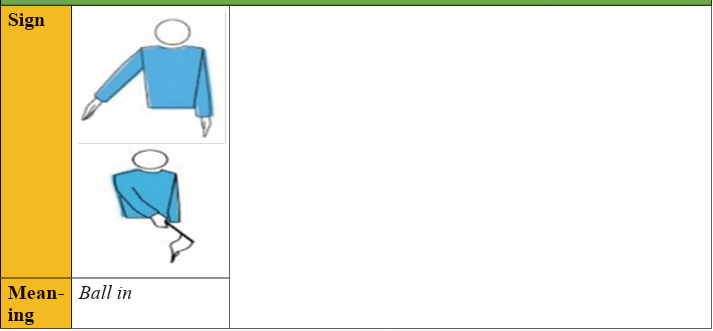
Cool down exercises
– Let students perform cool down and stretching exercises focusing on the most used
muscles.
– Guide them how they can stretch their muscles accordingly.– Help them/demonstrate/correct where is necessary
Closing discussion
Reflect
– What are challenges/advantages did you face while performing sitting
volleyball game and officiating the match?
Connect
– In which conditions do you need to apply rules in officiating the sitting
volleyball?
Apply
– How will you use learned rules in officiating sitting volleyball to become goodofficial?
9.6 End of unit assessment
In groups of five including first referee, second referee, scorer and two line judges. One
group leads the game while the second group start the match. The remaining students
make two teams of six players. Let the match start. The officiating team is changed
after five minutes. Officials become players to replace those who are becoming
officials. The main points to evaluate are: How students are accomplishing the
given tasks and roles, their performance in order to give them feedback at the end ofthe exercise.
9.7 Additional activities
Remedial activities
Students read hard/soft copy of rules of the game for sitting volleyball.
Consolidation activities
– In pair or in-group request students to discuss the facilities and equipment,
officials.
Interruptions, intervals and delays, the libero player, participants conduct and the
– In pairs, students demonstrate hand signals used while officiating sitting volleyball game.
Extended activities Encourage learners:
Encourages students to lead sitting volleyball matches/competitions organized by theschool such as interclass competitions or friendly matches.
UNIT 10 :BASIC FIRST AID
Key unit competence: Provide first aid to the victims
10.1. Prerequisite (knowledge, skills, attitudes and values)
Students of senior six will learn better basic first aid if they could be able to understandkey concepts related to first aid and apply it to the victims.
10.2. Cross-cutting issues to be addressed
Gender: In teaching and learning process of first aid, the teacher must
prepare and provide first aid activities that engage both girls and boys
equally to exploit their full potential and talents without any discriminationor prejudice.
Inclusive education: The teacher as a facilitator he/she must consider different
special education needs and select activities to adapt his teaching approaches
to students. This creates a positive attitude and helps all students to participate
actively and develop their competence levels.
Financial education: The teacher should integrate Financial Education into
his teaching/learning activities by providing the local and no cost teaching
material where is possible. He/she must encourage students to make their own
materials that can help them to develop competences not only in first aid at
school but also in their daily life.
Standardization culture: The teacher must choose and select the standardized
materials to use in his/her teaching/learning process. It is necessary to provide
appropriate materials required to the levels of students and help them to
develop culture of checking and using the quality of first aid materials for the
competitions before using them in order to provide first aid to injured people.
Environment and sustainability: The teacher should provide materials and
deliver the lesson by encouraging students to protect the environment and well
use of materials. The teacher helps them to develop the culture of cleaning anarea where first aid has been provided.
Peace and values education: The teacher helps students to develop fair play
and social values by avoiding violence and conflict in the game and by setting
clear and relevant instructions. He/she should provide the activities that help
students to develop their competence peacefully.
Comprehensive sexuality education: The teacher provides first aid activities
and sets instructions that prevent sexual harassment, any kind of gender
based violence like sexual abuse and physical contacts oriented to the sexuality
intention during providing of first aid.
Genocide studies: While conducting basics first aid a teacher should take
a time to explain to students how first aid should be used during Genocide
memorial events.
10.3. Guidance on introductory activity
Before introducing the lesson one of this unit, you must introduce the whole
unit.
The teacher as a guide, facilitator and expert, ask questions or give activity
related to first aid in order to help students to predict what to be learned in thewhole unit.
10.4. List of lessons/sub-heading
Lesson 1: Key terms used in first aid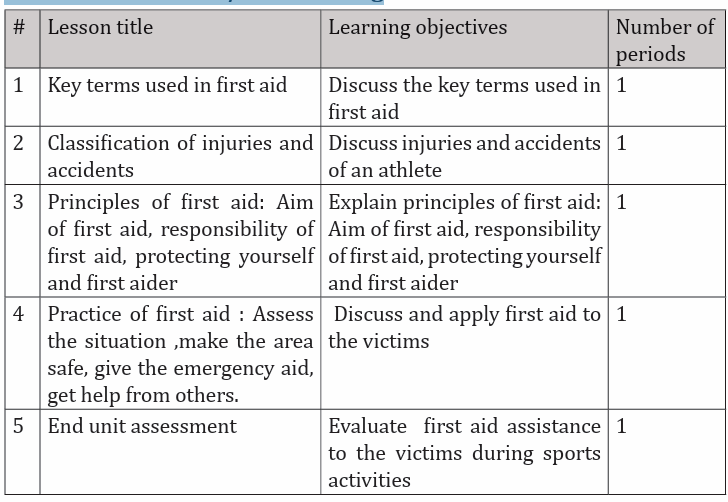
a) Learning objective
Discuss the key terms used in first aid
b) Teaching resources
chalk, notebook and pens.
Images/pictures that show injured people, first aid books, first aid kit, watch,
c) Prerequisites/Revision/Introduction
Students of senior six will learn better key terms used in first aid if they have
learned human skeletal, joint and movement, circulatory system in humans,
muscular system in previous levels.
d) Learning activities
Opening discussions
– Let students brainstorm the key terms used in first aid.
– Let students present their findings and support them where is necessary
for complement.
– Introduce the topic of the day.
e) Lesson body
Activity 10.1
– In four groups, students have their given first aid terms to discuss. The
resources are distributed in their relative groups.
– Pass though groups and help them where is necessary.
– Request students to choose a secretary to record findings and group
representative who will present their findings.
– Request group representative to present their findings and group members
may support where is necessary.– After presentation of all groups, use a projector to recap presentations.

In group of two students, find the answers of the questions bellow: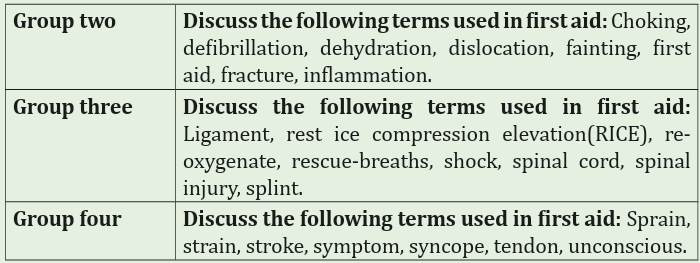
Question 1:
Explain the following terms used in first aid
a) Sprain
b) Open fracture
c) Dislocation
d) Bruisee) Symptom
Activity 10.3
In group of two students, find the answers of the question bellow:– Explain any four importance of first aid in the society.
Application Activity 10.1
Make two teams A and B. Every member of each team has a card where is
written the term used in first aid or the explanation of one of the terms used
in first aid. If one member of A raises a term used in first aid, the member of
B raises it relative explanation. The member of B raises the explanation of
another term use in first aid and one member of A raises the relative term
used in first aid. They continue the exercise until all students pass. The teachercontrol if they raise the cards and read the written term or its explanation.
Lesson 2: Classification of injuries and accidents
a) Learning objective
Discuss the injuries and accidents of an athlete
b) Teaching resources
chalk, notebook and pens.
Images/pictures that show injured people, first aid books, first aid kit, watch,
c) Prerequisites/Revision/Introduction
Students of senior six will learn better injuries and accidents of an athlete if
they have learned human skeletal, joint and movement, circulatory system in
humans, muscular system in previous levels.
d) Learning activities
– Let students brainstorm the key terms used in first aid.
– Let students present their findings and support them where is necessary
for complement.
– Introduce the topic of the day.
e) Lesson body
Activity 10.4
– In two groups, students have the injuries and accidents of an athlete
to discuss The resources are distributed in their relative groups to get
more information.
– Pass though groups and help them where is necessary.
– Request students to choose a secretary to record findings and group
representative who will present their findings.
– Request group representative to present their findings and group members
may support where is necessary.– After presentation of all groups, use a projector to recap presentations.
Activity 10.5
In group of two or three students, find the answers of the questions bellow:
– Recall types of accident/injury, which may result during performing
sports activities
– Explain the difference between accident and injury, which may resultduring performing sports activities.
Application Activity 10.2
Make two teams A and B. Every member of each team has a card where is
written the accident/injury, which may result during performing sports
activities or the explanation of one of them. If one member of A raises an
accident card, the member of B raises it relative explanation. The member
of B raises the explanation of another accident card and one member of A
raises the relative card. They continue the exercise until all students pass.
The teacher control if they raise the cards and read the written accident or itsexplanation.
Lesson 3: Principles of first aid: Aim of first aid, responsibility of
first aid, protecting yourself and first aider
a) Learning objective
Explain principles of first aid, aim of first aid, responsibility of first aid,
protecting yourself and first aider
b) Teaching resources
notebook and pens.
Images/pictures that show injured people, first aid books, first aid kit, watch, chalk,
c) Prerequisites/Revision/Introduction
Students of senior six will learn better principles of first aid, aim of first aid,
responsibility of first aid, protecting yourself and first aider if they have learned
human skeletal, joint and movement, circulatory system in humans, muscular
system in previous levels and n lesson one and two of senior six.
d) Learning activities
– Let students brainstorm principles of first aid: Aim of first aid, responsibility
of first aid, protecting yourself and first aider.
– Let students present their findings and support them where is necessary
for complement.– Introduce the topic of the day.
Activity 10.6
– In four groups, students have the principles of first aid, aim of first
aid, responsibility of first aid, protecting yourself and first aider to be
explained.
– The resources are distributed in their relative groups to get more
information
– Pass though groups and help them where is necessary.
– Request students to choose a secretary to record findings and group
representative who will present their findings.
– Request group representative to present their findings and group members
may support where is necessary.– After presentation of all groups, use a projector to recap presentations.
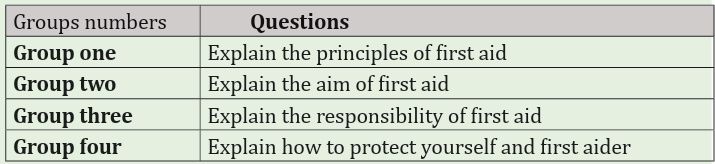
Activity 10.7
In group of two students, find the answers of the questions bellow:
– Explain the responsibility of first aid
– Explain the principles and the aim of first aid.– Explain the difference between aim and responsibility of first aid.
Application Activity 10.3
Make eight groups A, B, C, D, E, G, H and I. Every member of each team has a
card where is written principles of first aid, aim of first aid, responsibility of first
aid, protecting yourself and first aider or the explanation of each of them. If one
member of any group raises his card, the member of raises it relative explanation.
The next member raises the explanation of another card and the next member
raises relative card. They continue the exercise until all students pass. The teacher
control if they raise the cards and read the written explanation as quickly as possible.
Application Activity 10.4
In boxes: 1,2,3 and 4 containing small papers where written the following
questions:
– Explain the principles of first aid,
– Explain the aim of first aid,
– Explain the responsibility of first aid,– Explain the protecting yourself and first aider
By signal, every student goes and pic one question and give its answer. The points
are awarded to students based on their correct answers.
Lesson 4: Practice of first aid: Assess the situation make thearea safe, give the emergency aid, get help from others
a) Learning objectiveDiscuss and apply first aid to the victims
b) Teaching resources
chalk, notebook and pens.Images/pictures that show injured people, first aid books, first aid kit, watch,
c) Prerequisites/Revision/Introduction
Students of senior six will discuss and apply first aid to the victims if they have
learned human skeletal, joint and movement, circulatory system in humans,
muscular system in previous levels and lesson one and two and three of senior
six.
d) Learning activities
– Teacher as a guide and facilitator, starts the lesson by asking students
questions related to the previous lessons.
– Tell students that their roles as first aiders are: To recognize the emergency,
to protect themselves and others, to access help, to act according to their
skills and training.
– Remind them that they may call emergency if: There is a danger to
them or others and when an injured person is not easily accessible, is
not breathing normally, has persistent chest pain or pressure, has severe
bleeding, has a head, neck, or spinal injury and has an observable mentalhealth crisis.
e) Lesson body
Activity 10.8
In groups, students practice first aid: Assess the situation, make the area safe,
give the emergency aid, get help from others. The resources are distributed
in their relative groups to get more information. Pass though groups and
help them where is necessary. Request groups to present their works and group
members may support where is necessary. After presentation of all groups, usea projector to recap presentation.
Activity 10.9In pairs or group, let students perform different carries used in first aid.
Activity 10.10
In an assimilated situation, let students apply how to perform CPR onassimilated injured person
10.5. Additional Information for teachers
Some information about skeletal and articulation attacks
Types of fractures
Closed fracture: where the bone has broken but the skin over the fracture isnot broken
Open fracture: where the bone is broken and the skin over the fracture is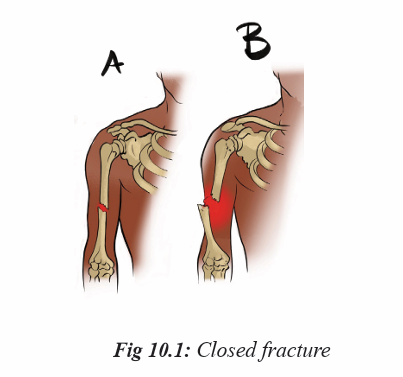
broken so that the bone is visible.
Causes, signs and symptoms of fracture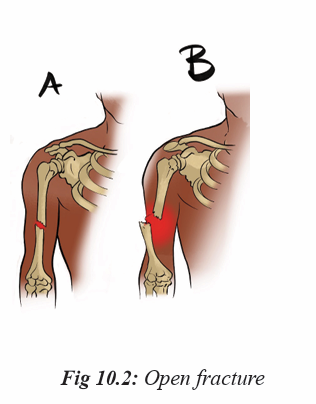
Causes
A direct force (e.g. a punch or kick) and an indirect force (e.g. a fall), or by a
twisting force.
– Certain bone diseases, such as osteoporosis, make bones very brittle and
they can break without much force.
– Old age and related conditions (osteoporosis) can weaken bones making
them brittle and at risk of breaking.
Signs and symptoms of fractures
Pain and tenderness:
Worse when the injury is touched or moved.
– Loss of function: The casualty cannot use the injured part.
– A wound: The bone ends may be sticking out.
– Deformity: Any unnatural shape or unnatural position of a bone or joint.
– Distortion/bending/ or shortening of the affected limb.
– Unnatural movement.
Crepitus:
A grating sensation or sound that can often be felt or heard when the broken
ends of bone rub together.
Swelling and bruising: Fluid accumulates in the tissues around the fracture.
Signs and symptoms of spinal cord injury
Swelling and/or bruising at the site of the injury.
– A loss of feeling in the arms and legs on one or both sides of the body.
– An injured person is not able to move arms and/or legs on one or both
sides of the body.
– Pain at the injury site.– Signs of shock.
Rib fracture and chest
Broken ribs or thoracic cage are painful and can hurt with every breath and if
they are broken severely they can seriously damage internal organs in thoracic
cavity.
Cause of ribs or chest breaking
– A traffic accident.
– Being punched in your rib cage during sports activities.
– Contact sports for example: football, handball, rugby, boxing, karate, etc.
– Repeated movements, like swinging a golf club, rowing or swimming.
– Coughing very hard repeatedly.
– A fall onto a hard surface.– Breaking of ribs while getting Cardiopulmonary Resuscitation.
Signs and symptoms for ribs or chest injury
- Pain at injury site when casualty moves, coughs or breathes deeply.
- Shallow breathing.
- Deformity and discoloration.
- The existence of the wound.
- May cough up frothy blood.
- May show signs of shock.
- Bruising over the affected fracture site.- Pain on breathing, particularly inspiration.
Dislocation: Is when the bones of a joint are not in proper contact
Causes and consequences of dislocation
A force stretches and tears the joint capsule, causing the dislocation.
Once this occurs, the bones can put pressure on blood vessels and nerves,
causing circulation and sensation impairments below the injury.
The most commonly dislocated joints are shoulder, elbow, thumb, fingers, jaw,and knee.
The signs and symptoms of a dislocation are similar to those of a fracture, and
may include:
– Deformity or abnormal appearance (a dislocated shoulder may make the
arm look longer).
– Pain and tenderness aggravated by movement.
– Loss of normal function (the joint may be “locked” in one position).
– Swelling of the joint– Lesions of articulations.
The signs and symptoms of sprains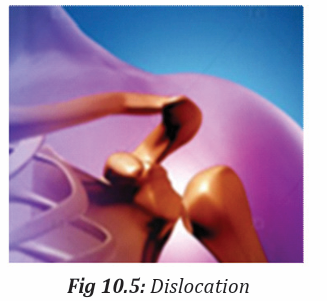
Sprain is when there is stretching or tearing of ligaments at a joint.
– Pain that may be severe and increase with movement of the joint.
– Loss of function.
– Swelling and discoloration.
The signs and symptoms of strains
Strain is when there is stretching or tearing of muscles or tendons.
The signs and symptoms of a strain often show up many hours after the injury.
– Sudden sharp pain in the strained muscle.
– Swelling of the muscles causing severe cramps.
– Bruising and muscle relaxedness.
– Casualty may not be able to use the affected body part (loss of function).
Muscles injuries
Muscle cramp
These are painful, spasmodic muscle contractions.
Causes:
– Long periods of exercise or physical labor, particularly in hot weather, can
lead to muscle cramps.
– Some medications and certain medical conditions also may cause muscle
cramps
Signs of muscle cramp:
Sharp pain.
Feel or see a hard lump of muscle tissue beneath your skin.
Emergency for muscle cramp:
– Gentle stretch.
– Massage and drinking fluid especially in hot weather.
See a doctor if your cramps:
– Cause severe discomfort.
– Are associated with leg swelling, redness or skin changes.
– Are associated with muscle weakness.
– Happen frequently.
– Do not improve with self-care.
– Are not associated with an obvious cause, such as strenuous exercise.
Prevention of muscle cramp
Avoid dehydration:
Fluids help your muscles contract, relax, and keep muscle cells hydrated and
less irritable. During activity, drink fluids at regular intervals, and continue
drinking water or other fluids after you are finished your activity
Stretch your muscles:
Warm and stretch muscles before and after you use any muscle especially for
an extended period.
Rupture
This is complete tearing of muscle, which may occur in the freshly part of the
tendon.
Partial tears: These tears damage the soft tissue but do not completely sever
the tendon.
Complete tears: A complete tear will detach the tendon completely from its
attachment point at the bone.
Causes: Injuries, some medicaments like Corticosteroid medications
Signs or symptoms: Pain, swelling, tenseness, bruising, inability/weakness to
move,
visible bruising in the elbow and forearm
Emergency and treatment:
Nonsurgical Treatment
It focuses on relieving pain and maintaining as much arm function as possible.
Treatment recommendations may include the use of RICE and physical therapy
(after the pain decreases, your doctor may recommend rehabilitation exercises
to strengthen surrounding muscles in order to restore as much movement as
possible).
Surgery
This is carried out to reattach the tendon to the bone is necessary to regain full
muscle functions. Surgery to repair the tendon should be performed during the
first 2 to 3 weeks after injury.
Treatment of common muscles injuries
Use RICE
Rest: Ensure rest, steady and support of injured area in the most comfortable
position.
Ice: If the injury has just happened, apply ice pack or cold compress to cool the
injured area to reduce swelling, bruising and pain.
Compress: Apply gentle, massage even pressure or compression, to the injured
area using cotton wool or plastic foam.
Elevation: Raise and support the injured limb.
General first aid for injuries to bones and joints
The aim of first aid given to a person with bone and joint injuries is to prevent
further tissue damage and to reduce pain.
The procedures to follow while applying first aid to bones and joints:
Check for potentially fatal conditions, the ABCs.
A = Airway (If the casualty is conscious, ask, “What happened?”
How well the casualty responds will help you determine if the airway is clear.
Use a head-tilt chin-lift to open the airway of an unresponsive casualty).
B = Breathing (If the casualty is conscious, check by asking how their breathing
is, If the casualty is unconscious, check for breathing for at least five seconds, and
no more than 10 seconds. If breathing is effective, move on to check circulation.
If breathing is absent or ineffective (gasping and irregular, agonal), begin CPR.
C = Circulation (Control obvious, severe bleeding, check for shock by checking
skin condition and temperature, check with a rapid body survey for hidden,
severe, external bleeding and signs of internal bleeding).
Rapid body survey:
The rapid body survey is a quick assessment of the casualty’s body, which is
performed during the primary survey.
When performing the rapid body survey:
Wear gloves when possible, and check gloves for blood every few seconds, be
careful not to cause any further injuries while performing the survey, look atthe casualty’s face to notice any responses to the rapid body survey.
The performance of a scene survey and a primary survey
CPR (Cardiopulmonary Resuscitation)
CPR is an artificial respiration and artificial circulation.
– Artificial respiration provides oxygen to the lungs.
– Artificial circulation causes blood to flow through the body.
It is used to circulate enough oxygenated blood to the brain and organs to delays
damage until either the heart starts beating again, or medical help takes over
from you.
There are two main steps in CPR:
Applying chest compressions and then providing breaths
Applying 30 chest compressions
The first aider should kneel next to the person who is injured.
They should be lying on their back.
– For adults, place the heel of one hand in the middle of the chest. Place your
other hand on top of the first hand and interlace the fingers.
– Push the chest down about 3.5cm to 5cm. If the person is a child aged
between 1 and 8 years, compress to a maximum of 3.5cm with one hand.
Let go, and wait for the chest to come back up completely before repeating.
Your elbows must remain straight throughout.
– Push the breastbone up and down to a depth of about 5 cm about 30 times,at a pulse rate of 100 beats per minute.
Provide two breaths:
– Make sure the airway is open, and pinch the nose so it closes.
– Gently raise the chin upwards with two fingers of your other hand.
– Take a deep breath, seal your mouth over that of the person with the injury,
and exhale into the airway.
– You should see the chest rise and fall.
– To get another breath, lift your head and breathe in deeply.
Make steps 1, 2, 3, and 4 again. Repeat the 30 chest compressions followed by
the two breaths about five times, and then check for normal breathing.
If they are not breathing normally, carry on performing CPR.
If breathing restarts as normal, stay with the injured person until help arrives.
It is important not to let your hands bounce when performing chest
compressions. Make sure the heel of your hand is touching the chest throughoutchest compressions
In the CPR process, do not stop except in one of these situations:
– There is a sign of life, for example breathing.– Another trained responder takeover
The secondary survey is applied when: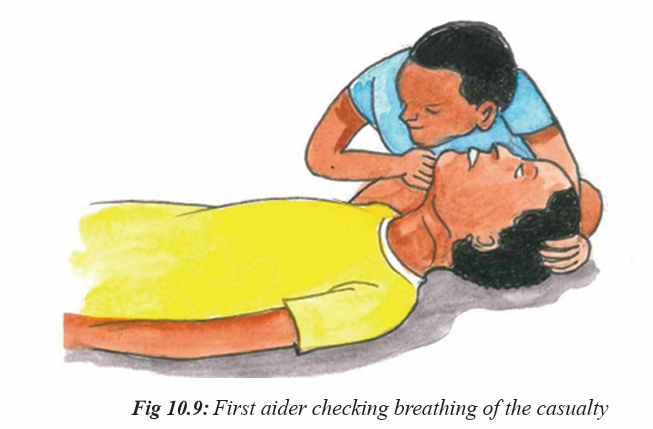
– The casualty has more than one injury.
– Medical help will be delayed more than 20 minutes:
Steady and support the injured part and maintain support until medical help
takes over, or the injury is immobilized, protect protruding bones.
Do not push the bone ends back in, do not attempt to apply traction to a limb
(pull on it) or manipulate it in any way,
– Medical help is not coming to the scene and you have to transport the
casualty: immobilize the injury, apply cold to the injury, as appropriate,
if medical help is on the way and will arrive soon, steady and support theinjury with your hands until they arrive.
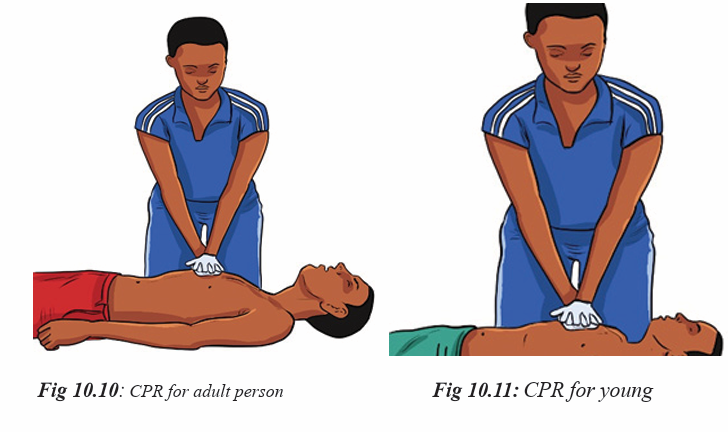
Emergency for bones and articulations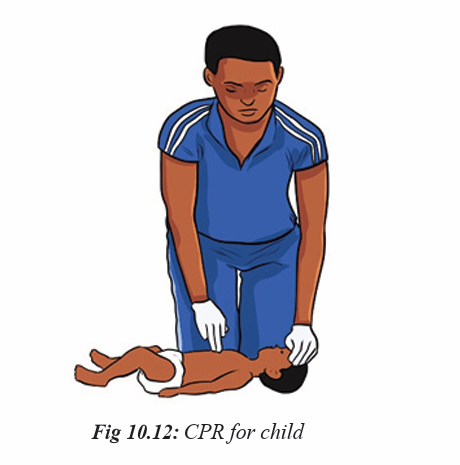
– Expose the injured area and look for a wound.
– If there is a wound, put a dressing on the wound and get medical help
quickly.
– If injuries permit, place the casualty in a semi-sitting position, leaning
slightly toward the injured side for easily breathing.
– Support the arm on the injured side to restrict movement.– Give ongoing casualty care, monitor breathing often and get medical help
Bleeding and wound emergency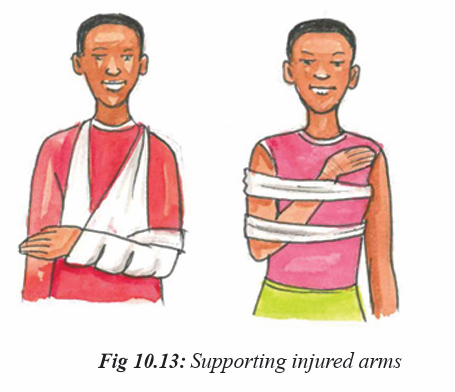
Nose bleeding
How to stop nose bleeding?
– Lean forward slightly with the head tilted forward (Leaning back or tilting
the head back allows the blood to run back into the sinuses and throat, and
can cause gagging or inhaling of blood).
– Do not spit out any blood that may collect in your mouth and throat (It
may cause nausea, vomiting, or diarrhea if swallowed).
– Pinch all the soft parts of the nose together between the thumb and index
finger.
– Press firmly toward the face (compressing the pinched parts of the nose
against the bones of the face, breathe through your mouth).
– Hold the nose for at least five minutes. Repeat as necessary until the nose
has stopped bleeding.
– Sit quietly, keeping the head higher than the level of the heart. Do not lay
flat or put your head between your legs.
– Apply ice (wrapped in a towel) to nose and cheeks afterwards. Stuffing
cotton or tissue into your nose is not recommended.
– Resting with your head higher than your heart.
– Talking to your doctor about skipping blood-thinning medications, such as
aspirin, warfarin (Coumadin) and clopidogrel (Plavix).
– Avoiding blowing your nose or putting anything in your nose.
– Limiting bending.
– Not lifting anything heavy.
– Quitting smoking.
– Avoiding hot liquids for a minimum of 24 hours.
– Sneezing with your mouth open, trying to push air out of your mouth andnot your nose.
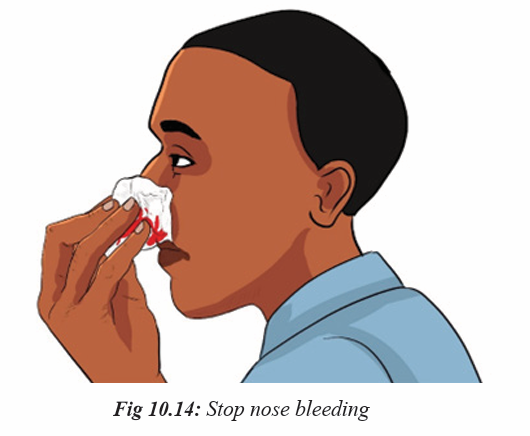
Wound
Open wound:
An open wound is an injury involving an external or internal break in bodytissue, usually involving the skin.
Abrasion:
An abrasion occurs when the skin rubs or scrapes against a rough or hard
surface. Road rash is an example of an abrasion. There is usually not a lot of
bleeding, but the wound needs to be scrubbed and cleaned to avoid infection.
Laceration:
A laceration is a deep cut or tearing of your skin.
Accidents with knives, tools, and machinery are frequent causes of lacerations.In the case of deep lacerations, bleeding can be rapid and extensive.
Puncture:
A puncture is a small hole caused by a long, such as a nail or needle.
Sometimes, a bullet can cause a puncture.
Avulsion:
An avulsion is a partial or complete tearing away of skin and the tissue beneath.
Avulsions usually occur during violent accidents, such as body crushing
accidents, explosions, and gunshots. They bleed heavily and rapidly.
Closed wound
Contusions:
A kind of wound causing pressure damage to the skin and/or underlying tissues
(includes bruises).
Blisters:
A kind of wound that has fluid filled pockets under the skin.
Seroma:
A wound that has a fluid filled area that develops under the skin or body tissue
(commonly occur after blunt trauma or surgery).
Hematoma:
A blood filled area that develops under the skin or body tissue (occur due to
internal blood vessel damage to an artery or vein).
Crush injuries:It’s can be caused by extreme forces, or lesser forces over a long period
Common emergency for injuries to bones, joint and muscles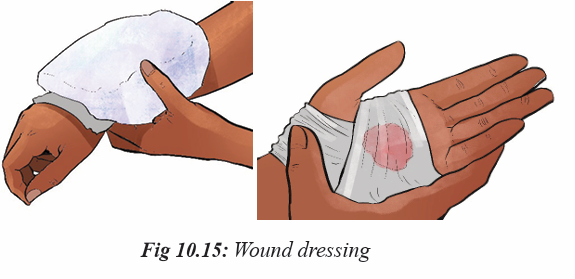
Use RICE for emergency
R stands for Rest:
Stop the activity that has caused the injury. Have the injured person restcomfortably.
I stand for Immobilize:
Suspecting a fracture whenever there is an injury to an arm or a leg and takingsteps to prevent movement of the injured limb.
C stands for Cold:
Applying cold to the injury as soon as you can once the injury has beenimmobilized.
E stands for Elevate:
Raising the injured part if possible. Only elevate if it will not cause more pain
or harm to the casualty. Elevation helps to reduce swelling and makes it easier
for fluids to drain away from the injury. This in turn, helps reduce swelling(do not elevate a “locked” joint).
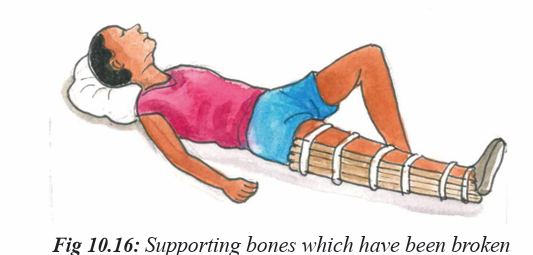
Proper ways used in transportation of injured person/casualty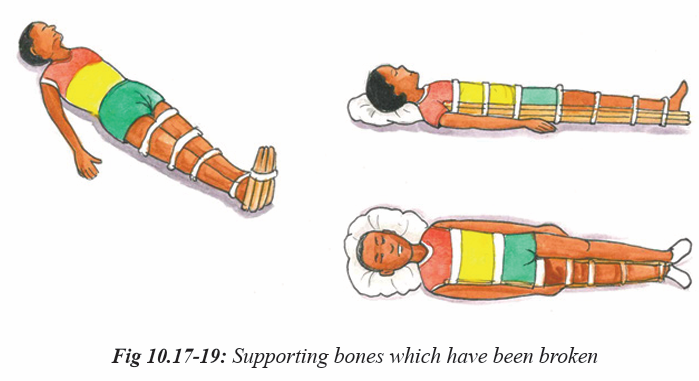
Pick-a-back
It is used for transporting a conscious casualty with lower limb injuries in case
a casualty can use his arms. The casualty must be able to help get into positionon your back or be already seated at chair or table height.
The cradle carry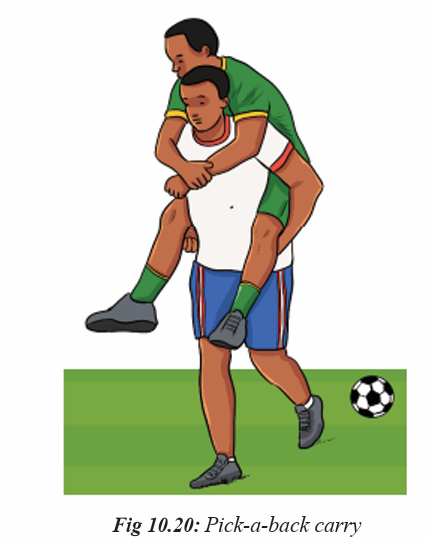
It is suitable for carrying children and light weighted adults.
Procedures
– Kneel on one knee at the casualty’s side.
– Place the casualty’s arm around your neck as you support the back and
shoulders.
– Pass your other arm under the knees to grasp the thighs.
– Ensure a solid footing and place the feet apart for good balance.
– Lift using your legs; keep your back straight, and your abdominal muscles tense.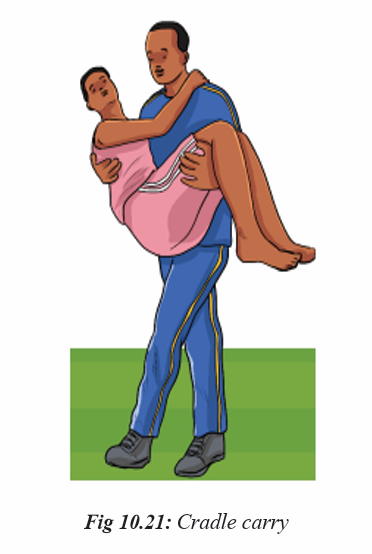
Fire fighter’s carry
This way should be used for casualties who are helpless and are not too heavy
for the rescuer.
Procedures
– With the casualty lying face up in front of you, stand with your toes against
the casualty’s toes.
– Grasp her wrists and pull her upward and forward.
– Maintain a grip on one wrist as you turn and bend to catch the casualty’s
upper body across your shoulder.
The lifting manoeuvre is a continuous, smooth motion to bring the casualty
through a sitting position to an upright position, finishing with the casualty
draped over your shoulder.
– Adjust the weight across your shoulders, with the casualty’s legs straddling
your shoulder.
– Pass your arm between the casualty’s legs and grasp her wrist. This willstabilize the casualty on your shoulders and leave your other hand free.
Two first aiders can carry a casualty who is unable to support his upper body.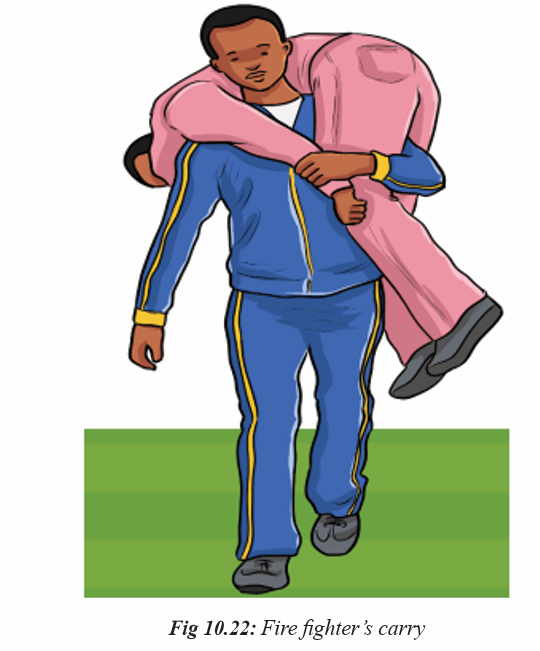
Procedures
– The first aiders crouch on either side of the casualty.
– Each first aider reaches across the casualty’s back to grasp his clothing at
the waist on the opposite side.
– Each first aider passes his other hand under the thighs, keeping his fingers
bent and holding padding to protect against the fingernails.
– Hook the bent fingers together to form a rigid seat. Alternatively, the
rescuers can hold each other’s wrists.
– The first aider lifts with their legs, keeping their backs straight. Once in the
standing position, the rescuers adjust their hands and arms for comfort.
When the casualty is securely positioned, the bearers step off together,each using the inside foot.
It is used by the single first aider to drag a casualty who is either lying on their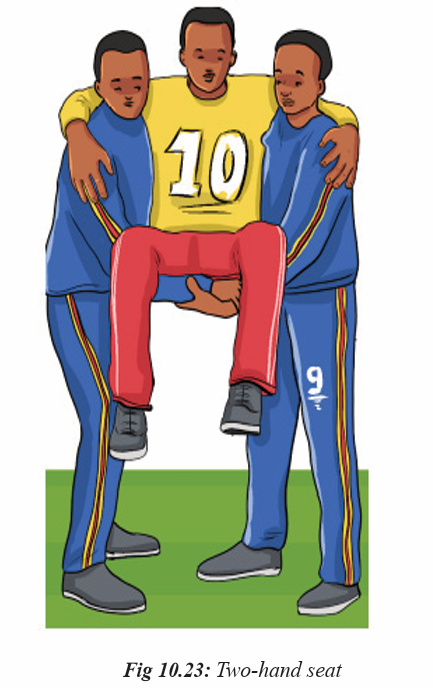
back or in a sitting position.
The drag carry provides maximum protection to the head and neck, and
therefore should be used when you are moving a casualty with this type of
injury.
The drag carry performance:
Procedures
– Stand at the casualty’s head facing their feet.
– Crouch down and ease your hands under the casualty’s shoulders. Grasp
the clothing on each side. Support the casualty’s head between your
forearms to stop movement.
– Drag the casualty backward only as far as necessary for their safety.
As an alternate method, the first aider can use a blanket to support and drag the
casualty. Because of the risk of aggravating any injuries, only use drag carries inthe extreme cases when there is an immediate threat to life.
This carry is used if a leg or foot is injured; help the casualty to walk on their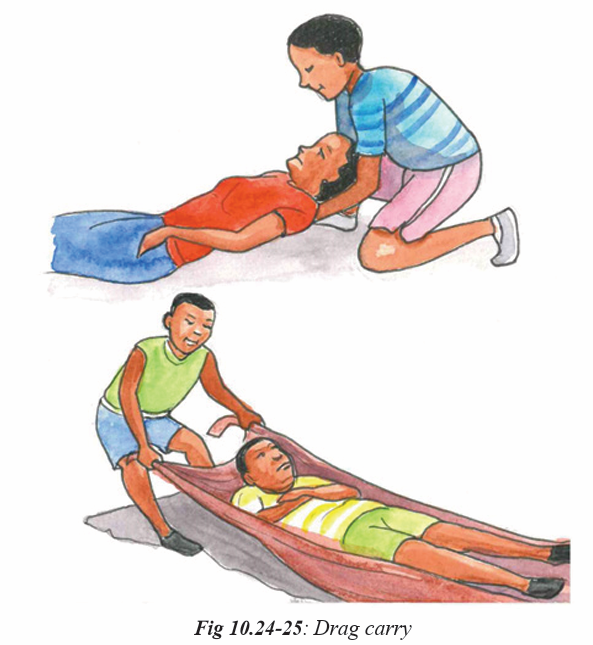
good leg while you give support to the injured side.
Procedures
– Take the weight of the casualty’s injured side on your shoulders by placing
the casualty’s arm (on the injured side) around your neck and grasping
the wrist firmly, reach around the casualty’s back with your free hand,
and grasp the clothing at the waist, tell the casualty to step off with you,
each using the inside foot. This let you, the first aider to take the casualty’sweight on the injured side.
The chair carry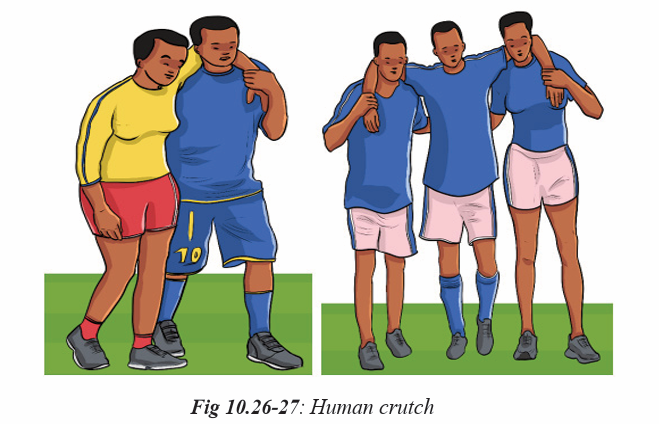
This carry enables two first aiders to carry a conscious or unconscious casualty
through narrow passages and up and down stairs.
Do not use this carry for casualties with suspected neck or back injuries.
Specially designed first aider chairs are available and should be used for this
type of carry.
If the casualty is unconscious or helpless:
– Place an unconscious casualty on a chair by sliding the back of the chair
under their legs and buttocks, and along the lower back.
– Strap their upper body and arms to the back of the chair.
– Two first aiders carry the chair, one at the front and one at the back.
– The first aider at the back crouches and grasps the back of the chair, while
the first aider at the front crouches between the casualties’ knees and
grasps the front chair legs near the floor.
– The first aiders walk out-of-step.
While going down stairs:
– The casualty faces forward.
– The front first aider faces the casualty.
– A third person/first, aider should act as a guide and support the front firstaider in case they lose their footing.
Extremity carry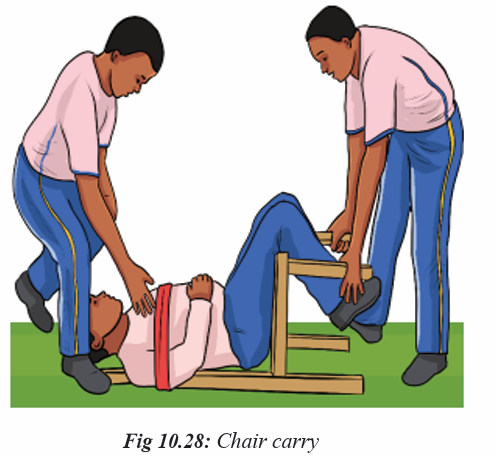
Use the extremity carry when you do not have a chair and do not suspect
fractures of the trunk, head, or spine.
Procedures
– One first aider passes their hands under the casualty’s armpits, and grasps
the casualty’s wrists, crossing them over their chest.
– The second first aider crouches with their back between the casualty’s
knees and grasps each leg just above the knee.– The first aider steps off on opposite feet
Stretchers (commercial stretchers, improvised stretchers)
If the casualty cannot walk, or if the injury or illness allows only the gentlestmovement, a stretcher should be used.
Principles of using stretchers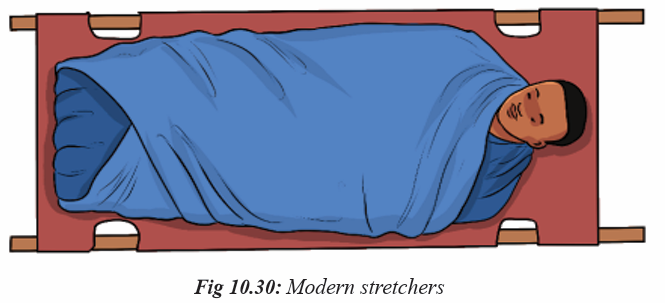
– Complete all essential first aid and immobilization before moving the
casualty onto a stretcher.
– Bring the blanketed and padded stretcher to the casualty, rather than
moving the casualty to the stretcher.
– As the first aider in charge, take the position that permits you to watch
and control the most sensitive area of the body, usually at the head and
shoulders, or the injured part.
– Tell the bearers what each is expected to do. If the move is difficult, and
time permits, it is a good idea to practice with a simulated casualty.
– This reduces risks and reassures the conscious casualty.
– Test an improvised stretcher with someone equal to or heavier than the
casualty to ensure that, it will hold.
– Check the clearance of an improvised stretcher to ensure that it will pass
through hallways, doors and stairways without harm to the casualty.– Use clear commands to ensure smooth, coordinated movements.
Improvised blanket stretcher
Procedures
– Place the blanket flat on the ground and place a pole one-third of the way
from one end. Fold the one-third length of blanket over the pole.
– Place the second pole parallel to the first so that it is on the doubled part
of the blanket, about 15 cm from the doubled edge.
– Fold the remaining blanket over the two poles.The casualty’s weight on the blanket holds the folds in place.
Improvised jacket stretcher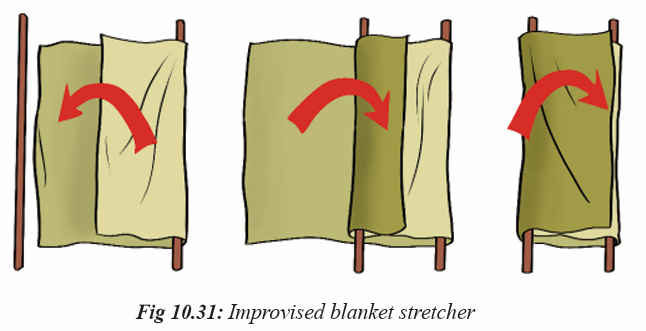
A non-rigid stretcher can also be improvised from two jackets and two or fourpoles/strong trees.
Procedures
– Button and zipper the jackets closed and pull the sleeves inside out so that
the sleeves are inside.
– Lay the jackets on the ground so that the top edge of one jacket meets the
bottom edge of the other.
– Pass the poles through the sleeves of the two jackets on either side to
complete the stretcher.
– If the casualty is tall, prepare another jacket as before and add it to thestretcher with the head of the jacket towards the middle.
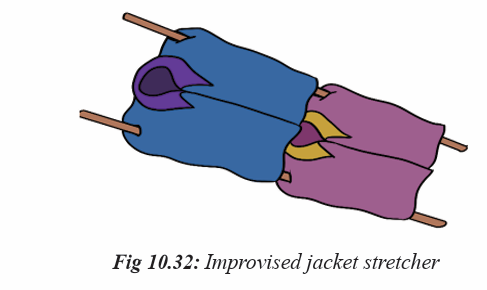
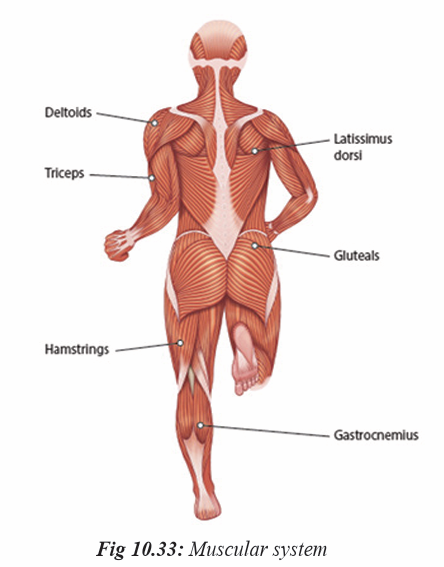
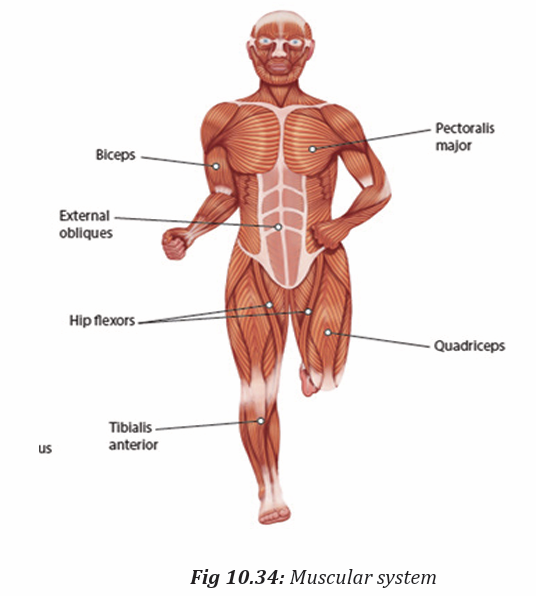
10.6 End of unit assessment
– Supposing that you are attending a basketball match in your local area. The
accidents happen where one of players breaks his tibia. How can you provide
basic first aid to this player?
– Explain different manners of carrying casualties to the nearest healthcare or
hospital when there are no other means of transport?– Describe the uses of CPR during providing basics first aid.
10.7 Additional activities
Remedial activities
In groups, students discuss the implication of first aid in collective sports situation
at schoolConsolidation activities
Students can perform first aid to support injured people according to the givenaccident situation which happen in games.
Extended activities Encourage learners:
Encouraging students to apply first aid during sports competitions organized bythe school or sector in their villages
UNIT 11:PERFORM PHYSICAL FITNESS EXERCISES
Key unit competence: Perform successfully physical fitness test and result
interpretation
11.1 Prerequisite (Knowledge, skills, attitudes and values)
Students of senior six will learn better physical fitness exercises if they can perform
basic physical exercises learnt in senior four and in previous levels
11.2 Cross-cutting issues to be addressed
Gender: In teaching and learning of physical fitness exercises, the teacher must
prepare and provide activities that engage both girls and boys equally to exploit
their full potential and talents without any discrimination or prejudice.
Inclusive education: The teacher as a facilitator he/she must consider
different special education needs and select physical activities to adapt his
teaching approaches to all students. This creates a positive attitude and helps
all students to participate actively and develop their competence levels.
Financial education: The teacher should integrate Financial Education into
his/her teaching/learning activities by providing the local and no cost teaching
material where is possible. He/she must encourage students to make their own
materials which can help them to develop competences not only in sports at
school but also in their daily life.
Standardization culture: The teacher must choose and select the standardized
materials to use in his/her teaching/learning process. It is necessary to provide
appropriate materials required to the levels of students and help them to
develop culture of checking and using the quality of sport materials for the
competitions before using them in order to prevent injuries and other accidents.
Environment and sustainability: The teacher should provide materials and
deliver the lesson with encouraging students to protect the environment and
well use of materials. The teacher helps them to develop the spirit of keeping
safe the environment they use in sports activities.
Peace and values education: The teacher helps students to develop fair play
and social values by planning physical activities that avoid violence and conflict
in the game and by setting clear and relevant instructions. He/she should
provide the activities that help students to develop their competence peacefully.
Comprehensive sexuality education: The teacher provides physical activities
and sets instructions that prevent sexual harassment, any kind of gender based
violence like sexual abuse and physical contacts oriented to the sexuality
intention.
Genocide studies: While conducting physical fitness lesson a teacher should
take a time to explain students how sports should be used to fight against
Genocide ideology and how to prevent it. For example, to organize Genocide
memorial tournaments at school and give the message related to the Genocide.
11.3 Guidance on introductory activity
Before introducing the lesson one of this unit, the teacher must introduce the
whole unit. The teacher as a guide, facilitator and expert, asks questions or give
activity related to physical fitness exercises in order to help them to predict
what to be learnt in the whole unit.
Introductory activity
Scenario:
Mugabo is a 19 years old. He is a secondary school student of senior six. He has
been attending his local gymnasium for the past 2 weeks going through cardio
exercises and he also practices running exercise for 30 minutes every morning
before going to school. Two years ago, he used to play football in his Ordinary
level in secondary school team but he stopped due to the lack of enough time at
his new school. Since then, he has not been involved in any team activity. Today
he has finished his last trimester at his school and he is looking for a training
program that will help him to build his body. Mugabo is 1.83 m tall and tips that
scale with 78 kg.
In groups discuss the following points:
a) Is Mugabo physically fit?
– if yes, what criteria are you referring too?
– If no, why?
b) Suggest exercises that he can perform in order to achieve his dreams.11.4 List of lessons/sub-heading
Lesson 1: Components of Physical fitness test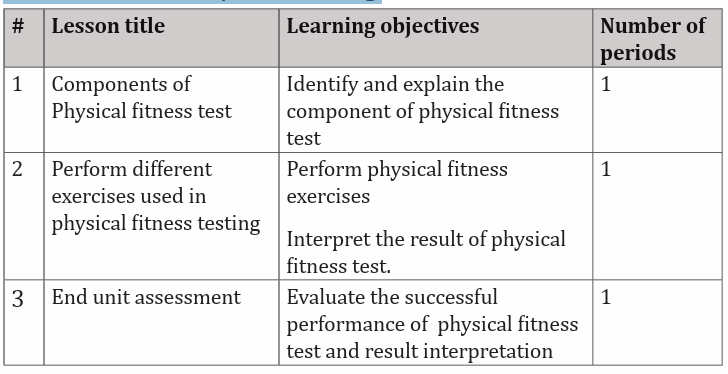
a) Learning objectiveIdentify and explain the component of physical fitness test
b) Teaching resourcesBooks, Laptop, Projector, Internet, Photos and video of exercises
c) Prerequisites/Revision/Introduction
Students of senior six will learn better components of Physical fitness test ifthey have developed physical exercises learnt in previous levels.
d) Learning activities
Opening discussions
– Ask students different types of basic physical exercises they have learnt in
previous levels
– Introduce the new lesson by asking students to brainstorm the components
of physical fitness test. Guide and facilitate them where it is necessary.
e) Lesson body
Activity 11.1
Divide students into 5 groups, ask them to discuss the following componentsof physical fitness test, how we measure and how to improve each component.
– Pass though groups and help them where is necessary. Request students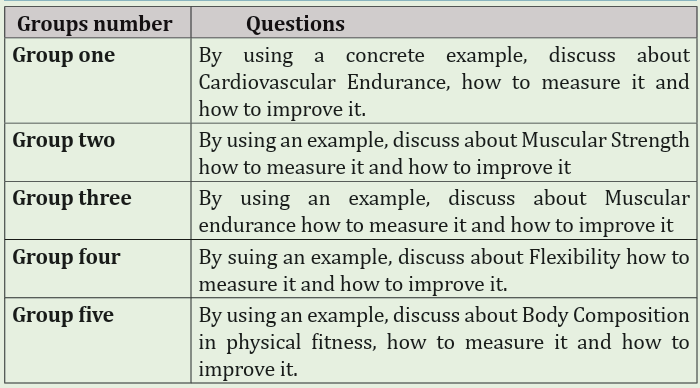
to choose a secretary to record findings and group representative who will
present their findings.
– Request group representative to present their findings and group members.
– Teacher may support where is necessary. After presentation of all groups,use a projector to recap presentations.
Application Activity 10.3
Assess Aerobic Fitness
Explain and ask students to perform the exercise of assessing aerobic fitness
test.
Explication:
Counting the number of beats of the resting heart rate (RHR). It is the useful
way of indicating the fitness progress. It should reduce according to theaerobic fitness improvements.
Your resting heart rate (RHR) represents the number of times your heart
beats each minute when you are at rest. Since a strong cardiovascular system
allows your heart to pump more blood with every beat, a lower RHR tends to
correspond with higher aerobic fitness. Some athletes have recorded a RHRof 40.
How to do this exercise
To measure your RHR, place two fingers either on your neck, just below your
jawline (carotid artery), or on your wrist (radial artery), and then count the
number of beats you feel in 60 seconds. You should count the first beat as‘zero’
Results of this exercise test:
– 60 or less = Good
– 61 to 80 = Average
– 81 to 100 = High, but still considered acceptable
– 101 or more = Abnormally high (not good!)
Your resting heart rate is a useful marker of your fitness progress, as it will drop
as you get fitter. It is often thought that the best time to take our RHR is first thingin the morning.
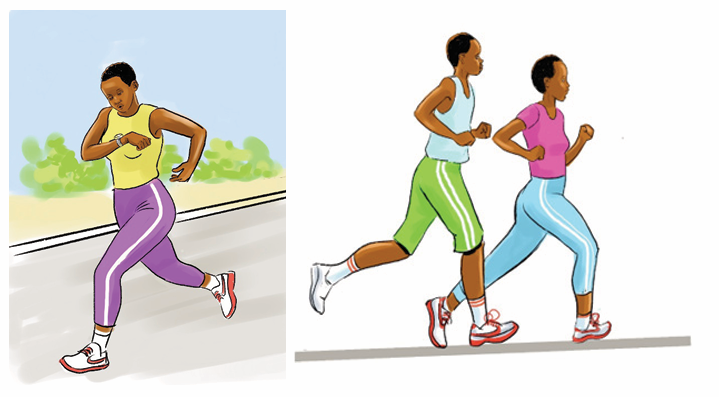
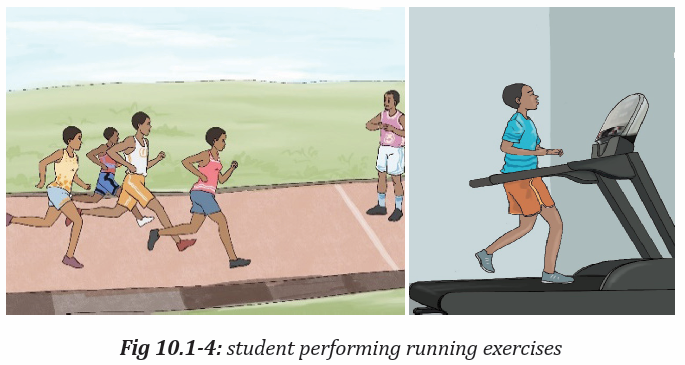

Closing discussions / Conclusion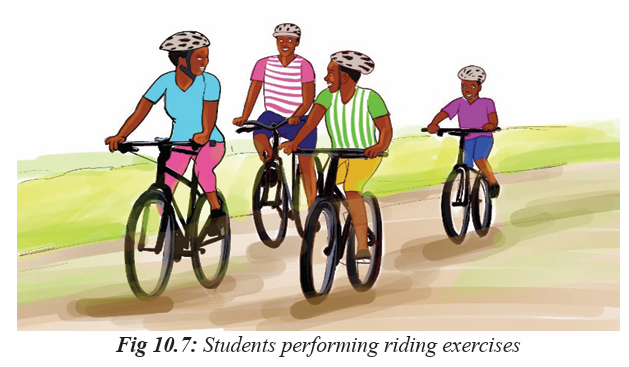
Together, teacher and students summarize the lesson of the day, and students
record the summary in their note books.
Lesson 2: Perform different exercises used in physical fitnesstest
a) Learning objective
– Perform physical fitness exercises– Interpret the result of physical fitness test.
b) Teaching resources
– Cones
– Whistle
– Laptop
– Field/playground
– watch/ Chronometer– decameter
c) Prerequisites/Revision/Introduction
Students of senior six will perform better different exercises used in physical
fitness test and interpret the result if they have developed basic physicalexercises.
d) Learning activities
Opening discussions
– Ask questions related to different component of physical fitness test learnt
in lesson one of this unit.
– Introduce the lesson of the day by asking questions on measuring physical
fitness.– Invite students to start warm up exercises.
Warm up exercises and stretching exercises
Let students perform general warm up exercises and specific warm up based on
the most body’s parts to be used while performing techniques of discus throw
and stretch their muscles properly.
e) Lesson body
Activity 11.2
In groups or individually, students perform different exercises used in physical
fitness test and they can interpret the result according the types of exercises they
perform. All of them perform cardiovascular endurance exercises in physical
fitness test. They interpret their physical fitness by appreciating their ability to
perform and the use of physical fitness exercises to develop and keep their bodyhealthy.
Activity 11.3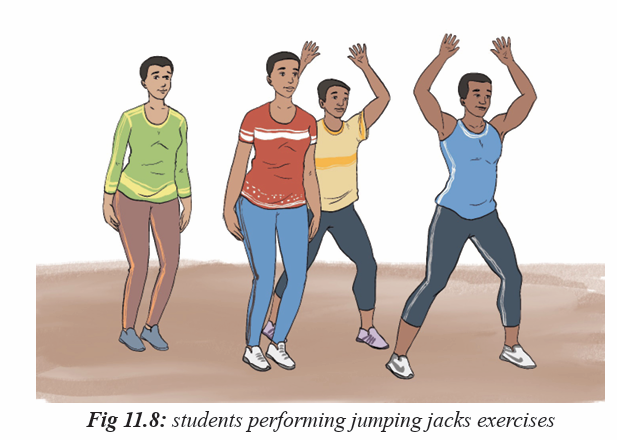
In groups or individually, students perform different exercises used in physical
fitness test and they can interpret the result according the types of exercises they
perform. All of them perform body composition exercises in physical fitness
test. They interpret their physical fitness by appreciating their ability to performand the use of physical fitness exercises to develop and keep their body healthy.
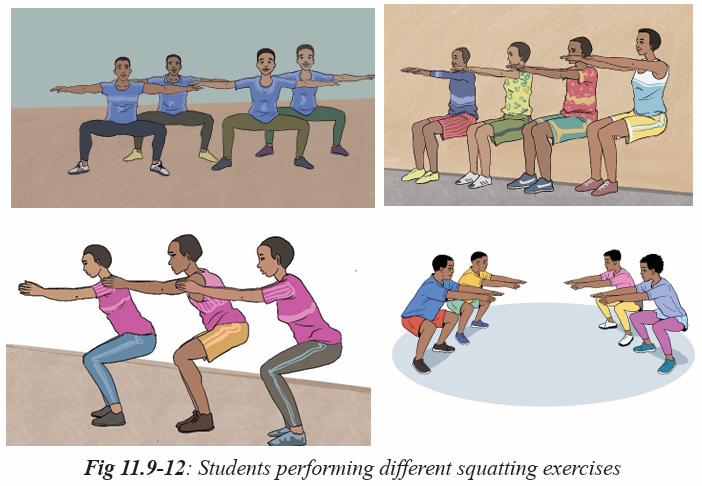

Activity 11.4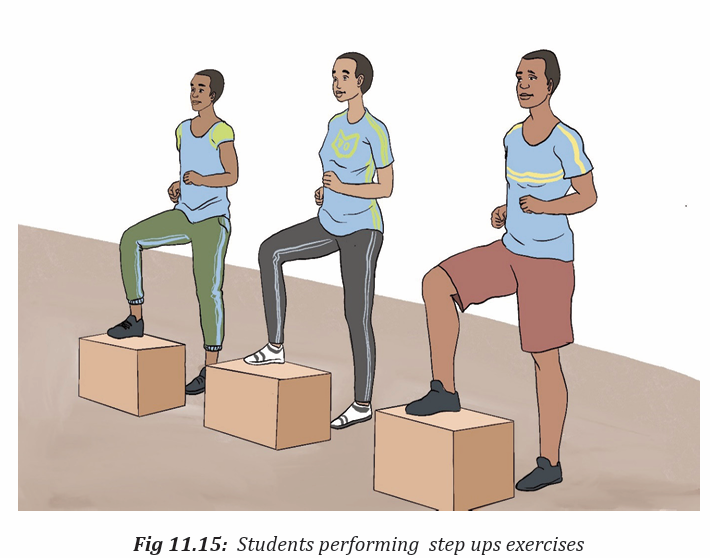
In groups or individually, students perform different exercises used in physical
fitness test and they can interpret the result according the types of exercises they
perform. All of them perform muscular strength exercises in physical fitness
test. They interpret their physical fitness by appreciating their ability to performand the use of physical fitness exercises to develop and keep their body healthy.
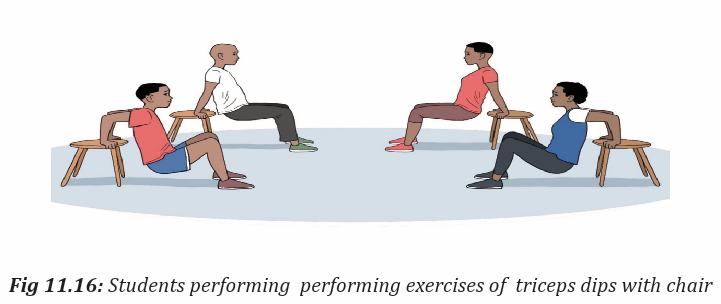
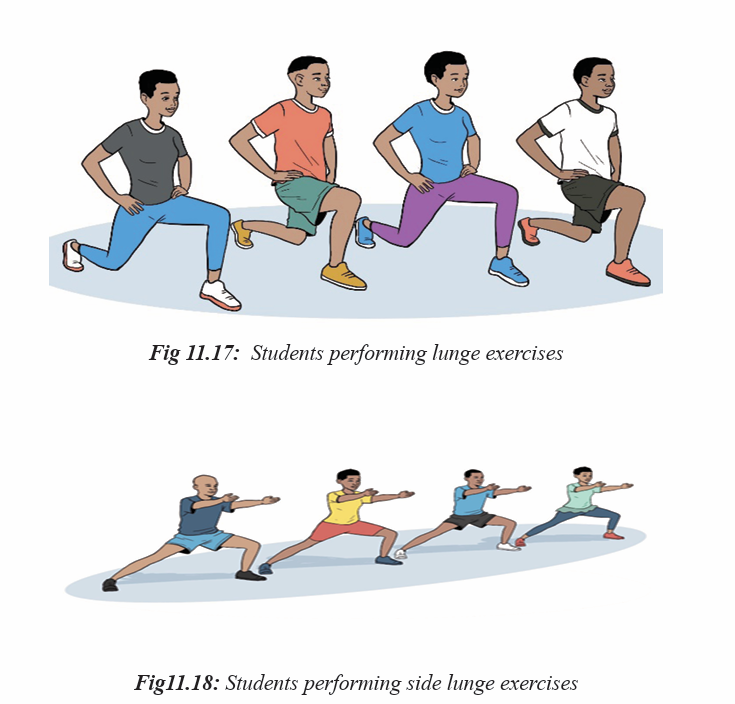
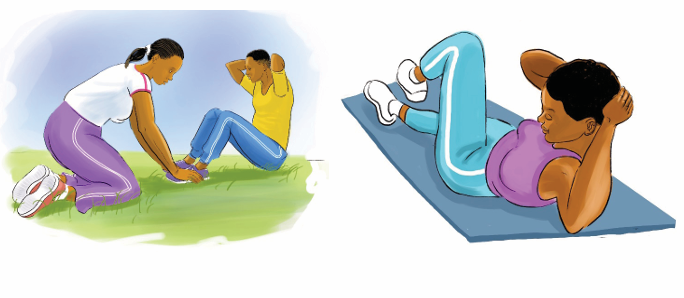
Activity 11.5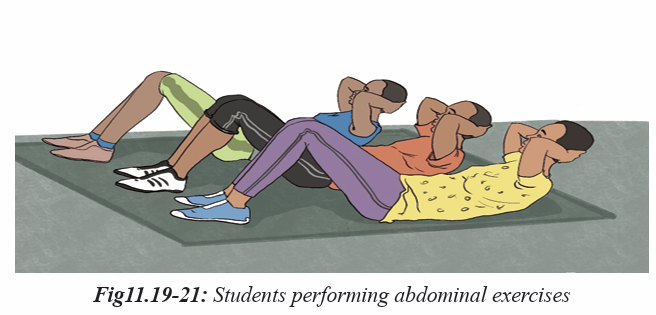
In groups or individually, students perform different exercises used in physical fit
ness test and they can interpret the result according the types of exercises they per
form. All of them perform muscular endurance exercises in physical fitness test.
They interpret their physical fitness by appreciating their ability to perform and theuse of physical fitness exercises to develop and keep their body healthy.

Activity 11.6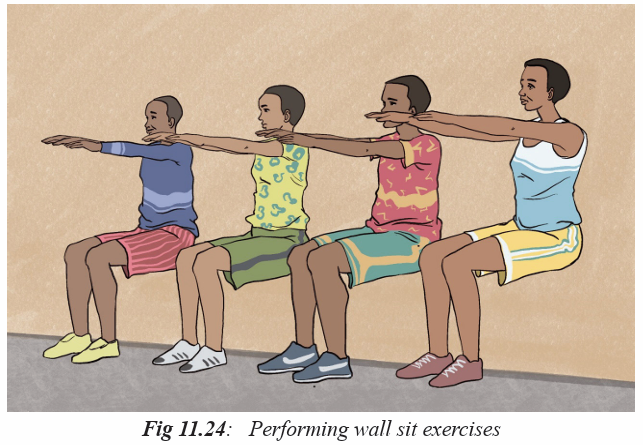
In groups or individually, students perform different exercises used in physical
fitness test and they can interpret the result according the types of exercises they
perform. All of them perform flexibility exercises in physical fitness test. They
interpret their physical fitness by appreciating their ability to perform and the useof physical fitness exercises to develop and keep their body healthy.

Application Activity 11.2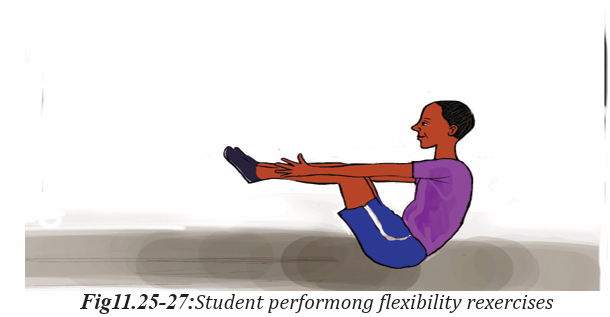
Let students perform shuttle run exercises by dividing them in 5 groups, each
group will have its own area of practicing.
Steps of practicing shuttle run exercises:
– Set up markers such as cones about 25 meter apart.
– Sprint from one marker to the other and back. That is 1 repetition.
– Do 3 repetitions as fast as you can (150 m total).
– Time your result for the entire 6 repetitions.
Let students perform standing jump exercises by respecting the following
steps:
– The student must stand behind a line marked on the ground with feet
slightly apart.
– A two-foot takeoff and landing is used, with swinging of the arms and
bending of the knees to provide forward drive.
– The subject attempts to jump as far as possible, landing on both feetwithout falling backwards.
Cool down exercises
Let students do light exercises and stretch their group of muscles by insisting
on most used parts. Guide them while stretching their muscles systematically.Help them/demonstrate/correct where is necessary.
Closing discussion
Reflect
– What are challenges/advantages did you face while performing different
exercises used in physical fitness test.
– How did you proceed to perform those exercises?
– How do you feel in your body fitness after performing those exercises?
Connect
– In which conditions do you need exercises used in physical fitness test
Apply
– How will you use different exercises used in physical fitness test in yourdaily life to maintain your physical fitness?
Summary of the unit
Physical Fitness is a measure of the body’s ability to function efficiently and
effectively in work and leisure activities, resist hypokinetic diseases (diseasesfrom sedentary lifestyles), and to meet emergency situations.
Components of Physical Fitness
The 5 components of physical fitness are often used in our school systems,
health clubs and fitness centers to gauge how good a shape we are truly in. The
5 components that make up total fitness are:
– Cardiovascular Endurance
– Muscular Strength
– Muscular endurance
– Flexibility
– Body Composition
These are the 5 components of fitness. But if you are an athlete, you have to step
up your game. Here are a few extra components of fitness that you should take
care of.
Other Components of Fitness for Athletes
a) Agility
b) Power
c) Balance
d) Coordinatione) Reaction time/ speed
11.5. Additional information for teacher
– Cardiovascular endurance is the ability of the heart and lungs to work together
to provide the needed oxygen and fuel to the body during sustained workloads.
Examples would be jogging, cycling and swimming. The Cooper Run is used
most often to test cardiovascular endurance.
– Muscular strength is the amount of force a muscle can produce. Examples
would be the bench press, leg press or bicep curl. The push up test is most often
used to test muscular strength.
– Muscular endurance is the ability of the muscles to perform continuous
without fatiguing. Examples would be cycling, step machines and elliptical
machines. The sit up test is most often used to test muscular endurance.
– Flexibility is the ability of each joint to move through the available range of
motion for a specific joint. Examples would be stretching individual muscles or
the ability to perform certain functional movements such as the lunge. The sit
and reach test is most often used to test flexibility.
– Body composition is the amount of fat mass compared to lean muscle mass,
bone and organs. This can be measured using underwater weighing, Skinfold
readings, and bioelectrical impedance. Underwater weighing is considered the
“gold standard” for body fat measurement, however because of the size and
expense of the equipment needed very few places are set up to do this kind of
measurement.
– Manual muscle testing is the most popular way to test strength. Your
physical therapist will push on your body in specific directions while you
resist the pressure. A score or grade is then assigned, depending on howmuch you were able to resist the pressure.
11.6 End of unit assessment
Let students perform regularly cardiorespiratory endurance exercises, body
composition exercises, muscular strength exercises, muscular endurance
performance.exercises, and flexibility exercises and analyze and interpret the results their
11.7 Additional activities
Remedial activities
Explain the following components of physical fitness:
a) Cardiorespiratory endurance
b) Body composition
c) Muscular strength
d) Muscular endurance
e) Flexibility
Consolidation activities
Let students perform regularly cardiorespiratory endurance exercises, body com
position exercises, muscular strength exercises, muscular endurance exercises,and flexibility exercises and analyze their performance.
Extended activities Encourage learners:
Let students participate regularly in competition of cardiorespiratory endurance
exercises, body composition exercises, muscular strength exercises, muscularendurance exercises, and flexibility exercises in their villages or sector.
REFERENCES
1. Dave Carnell, John Ireland, Claire Jones, Ken Mackreth, Sarah van Wely (2002),
Advanced PE for OCR, Oxford U.K
3. FIFA. (2018). Coaching manual
2. ELIAS, A. HILGERS, W. JETTER, M. RASHDORFF. J. WINTERMEIIER, D.
WOLFARTH Education Physique et Sportive pour les Ecoles Primaire et les
CERAI, F, Kigali.
4. Goldberger, M. and Howarth, K. (1990). The National Curriculum in Physical
Education and the Spectrum of Teaching Styles. British Journal of Physical
Education.
5. Ken Jones and Pat Welton (1979) Soccer Skills and Tactics, Crown Publishers.
6. Ministry of Education. (1998). Physical and Sports Training Programme in
Ordinary Level. National Curriculum Development Centre.
7. Peter J L Thomson (2009) The Official IAAF Guide to Teaching Athletics
8. REB (2019). The Teacher Training Colleges (TTCS) COMPETENCE BASED
CURRICULUM ORIENTATION MANUAL, Kigali.
9. REB. (2015). Ordinary level Physical Education syllabus
10.REB (2019). TTCs Physical Education and Sports syllabus
11.REB. (2016), Physical Education for Rwandan Schools. Teacher’s Guide,
Ordinary level 1, MK Publishers, Kigali, Rwanda.
12.REB. (2016), Physical Education for Rwandan Schools. Teacher’s Guide,
Ordinary level 2, MK Publishers. Kigali, Rwanda.
13.Right to Play, (2007). Football for development. Coaching manual
14.Williams, A. (1993). Aspects of Teaching and Learning in Gymnastics. British
Journal of Physical Education.
15.St John Ambulance (2019) saving lives REFERENCE GUIDE, Fourth Edition,
Canada.
16.Gina M. Piazza, DO, FACEP (2014) First Aid Manual, fifth Edition, New York.
17.AL JUFAILI Mahmood S. Dr (all) (2015) Football Emergency MedicineManual, 2nd Edition, Zurich.