- This topic
UNIT 4: VOLLEY BALL
Key unit competence: Develop volleyball tactical skills.
4.1 Prerequisite (Knowledge, skills, attitudes and values)
Students of senior five will develop better tactics of playing volleyball if
they can identify and perform basic techniques of volleyball as have been learned in senior four.
4.2 Cross-cutting issues to be addressed
– Gender: Engage both women and men in physical activity and sports
exercises and help them to exploit their full potentials. No activity is
reserved only for women or men.
– Inclusive education: Identify the students with special education
needs, ensure interactive and inclusive discussion during practice of
physical activity and sport exercises.
– Financial education: Facilitate/guide students to make non cost
materials like ropes and balls from banana leave fibers and they can
also improvise hurdles for jumping exercises.
– Standardization culture: Advise learners to use standardized
materials in prevention of injuries and accidents. Students have to
know how to choose and use safe sports clothes for their health (e.g.:
safe sports shoes), safe physical exercises (avoid bad body postures
and forbidden body exercises, adapted physical activities).
– Environment and sustainability: Train students on the culture of
protecting the environment surrounding the field/playground and any
other place they play on.
– Peace and values education: Encourage teamwork spirit, mutual
help, and respect of opinions of colleagues among learners.
– Comprehensive sexuality education: Provide physical activities and
set instructions that prevent sexual harassment, any kind of genderbased
violence like sexual abuse and physical contacts concerned with
sexuality intention in Physical Education and Sports activities.
– Genocide studies: Take time to explain to students how sports should
be used to fight against Genocide ideology and how to prevent it. E.g.:
Organizing Genocide memorial tournaments at school and giving the
message related to the Genocide.
4.3 Guidance on introductory activity
Before introducing the lesson one of this unit, teacher must introduce the whole unit.
The teacher as a guide, facilitator and expert, asks questions or gives activity
related to volleyball in order to help students to predict what to be learnt in
the whole unit. He/she may use a selected picture or scenario which helps
to quick thinking and reaction.4.4 List of lessons/sub-heading
Lesson 1: Players’ position and serving tactics exercises
a) Learning objective
Perform exercises of taking positions and serving tactics.
b) Teaching resources
Cones, balls, volleyball court, whistle, jumping rope and videos related to
volleyball tactical skills.
c) Prerequisites/Revision/Introduction
Students of senior five will develop better exercises of taking positions and serving tactics
if they can perform basic physical exercises and play volleyball by using technical skills learned
in senior four.
d) Learning activities
Opening discussions
– Ask questions about volleyball techniques as been learned in senior
four.
– Through brainstorming, introduce player’s position in volleyball game
and tactics of serving.
– Invite students to start warm up exercises.
Warm up exercises and stretching exercises
– Let students perform general warm up exercises and specific warm up
based on body’s parts to be used more while performing tactical skills
and stretch their muscles properly.
– Guide them while performing warm up and stretching exercises.
– Help them/demonstrate/correct where is necessary.
e) Lesson body
Activity 4.1
dentifying and taking player’s positions in volleyball
– Trough brainstorming, help students to identify player’s positions
in the field of volley ball.
– Guide students to individually pass by each position clock wisely
in the field.– Help the students to highlight all player’s positions.
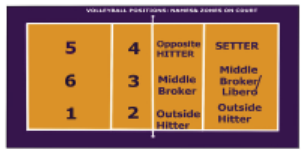
IFig.4.1: Volley ball players ’positions on the court
Activity 4.2
Serving tactics
Floater serve
Remind the students that in order to serve the volleyball so that it floats,
the ball must be moving in the air with minimal spin. To achieve this server
follows a set of specific techniques;
– Tossing the ball to the same height as maximum vertical arm
length, with the non-hitting hand, and without spin.
– Hitting the ball between the top and center of the palm, while
maintaining a firm wrist, and full extension of the hitting arm.
– Hitting the ball in the center of the volleyball, while pushing
straight through towards the intended serving zone.
– After contact is made with the ball, following through with the
hitting arm, towards the direction of the ball, past the hips.– Having a high elbow and wrist.
The teacher as a facilitator and a guide helps students serve the ball following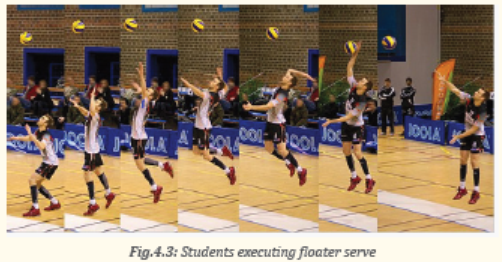
his/her instructions
• Divide class members into two groups;
• One group stand behind the attack line of the left of volleyball court and
another group stands behind the attack line of the left of volleyball court;
• Give balls to each group;
• Request a student who is standing at the beginning of the line to do
service using underhand service;
• Ask a student from the first group to serve the ball into the told position
and at the same time one of the member of the second group steps forward
and makes a reception;
• Ask the same to other group and vary the types of serving: overhand serve first,
floater serve secondly and jump serve thirdly;
• Remind the students that:
– If the ball has a low trajectory, it may be more difficult to read the flight
of the ball.
– If the ball stays low, then the ball will get there faster which will give
the passer less time to react.
– From the passers point of view, a low short serve may look the same as
a low deep serve. Getting a poor read on the ball makes it more difficult
to get in position to pass.
- The exercise continues until all members of the group finish to execute
all kinds of serve and on different player’s positions
Jump serve
– Ask student to take any distance behind the service line.
– Tell them to place the ball in left hand for right handed and right hand
for left handed. Request them to toss the ball higher in front of them.
Ask them to accomplish attack approaches: left- right -left for right
handed, right-left-right for light handed.
– Ask them to swing both arms behind them and then forward and up
while stepping forward with the left foot for right handed or right foot
for left handed and make a quick hop.
– Request them to jump up and forward behind the service line and
contact the ball at the top of their reach.
– Remind them to strike the ball with their palm and follow through with
their arm swing by aiming outward and downward to put topspin onthe ball.
Cool down exercises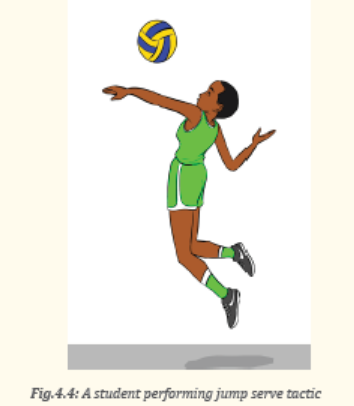
– Let students practice cool down exercises and light stretching by
focusing on used muscles.
– Guide them how they can stretch their muscles accordingly.
Closing discussions (RCA)
Reflect
– How did you proceed to succeed exercises of taking positions and
serving tactics volleyball?
– What are the challenges did you face while performing exercises of
taking positions and serving tactics volleyball?
Connect
– How important are exercises of taking positions and serving tactics
volleyball?
Apply
– How could exercises of taking positions and serving tactics in volleyball
help you to become best players in your society?
Lesson 2: System formations exercises
a) Learning objective
Apply system formations exercises
b) Teaching resources
Cones, balls, volleyball court, whistle, jumping rope and videos related to
volleyball tactical skills.
c) Prerequisites/Revision/Introduction
Students of senior five will develop better system formation exercise if they
can perform basic physical exercises and play volleyball. by using technical skills
learned in senior four.
d) Learning activities
Opening discussions
– Ask questions about volleyball techniques as been learned in senior
four.
– Through brainstorming, introduce system formations exercises.
– Invite students to start warm up exercises.
Warm up exercises and stretching exercises
– Let students perform general warm up exercises and specific warm
up based on body’s parts to be used more while performing system
formations exercises and stretch their muscles properly.
– Guide them while performing warm up and stretching exercises.
– Help them/demonstrate/correct where is necessary.
e) Lesson body
Offensive system formations
There are three standards formations in volleyball, namely the “4-2,”6-
2”and “5-1”
The numbers in the names of these formations refer to the numbers of
hitters and setters respectively
4-2 formation
This formation has four hitters and two setters. The setters position themselves
on the right; they are the two front attackers
6-2 formation
This is the formation where a player comes up from the back and acts as
setter. The front row is all positioned to attack. All players will be hitters
at some point or another (Is called 6-2 because there are 6 players who will
function as primarily hitters and there are two players who fill the setting role).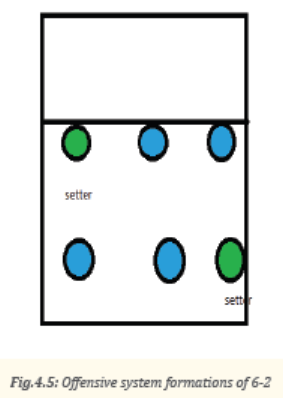
5-1 formation
Explain to the students that this formation has only one player as a setter,
regardless of where they are positioned in the rotation. Obviously then, there
are sometimes 2 and sometimes 3 attackers in the front row. Tell them that
the setter can then change up their strategy as they rotate and even just
dump the ball lightly over the net at times.
Activity 4.4
Defensive system formations
Defensive systems in volleyball are the ways in which a team must be
positioned in order to defend the attacks of the opposing team. Volleyball
defense systems can be categorized into four distinct types:
– Perimeter defense
– Middle up defense
– Rotation defense
– Combining defense systems
Application activity 4.1
Game situation in which system formations are applied
– Form groups of six students
– Let groups play the normal volleyball game
– Fix points to reach for winning a set
– Ask students to apply a system that will be communicated
– Help the students applying basic playing volley ball rules
– Comment and correct where necessary
– Determine the ending of the game
Cool down exercises
– Let students practice cool down exercises and light stretching by
focusing on used muscles.
– Guide them how they can stretch their muscles accordingly.
Closing discussions (RCA)
Reflect
– How did you proceed to succeed for defensive and offensive system
formation exercises in volleyball?
– What are the challenges did you face while performing defensive and
offensive system formation exercises in volleyball?
Connect
– How important are for performing defensive and offensive system
formation exercises in volleyball?
Apply
– How could apply defensive and offensive system formation exercises
help you to become best players in your society?
Lesson 3: Passing tactics exercises
a) Learning objective
Perform passing tactics exercises.
b) Teaching resources
Cones, balls, volleyball court, whistle, jumping rope and videos related to
volleyball tactical skills.
c) Prerequisites/Revision/Introduction
Students of senior five will develop passing tactic exercises if they can
perform basics physical exercises and play volley ball by using technical
skills learned in senior four.
d) Learning activities
Opening discussions
– Ask questions about volleyball techniques as been learned in senior
four.
– Through brainstorming, introduce passing tactics in volleyball game.
– Invite students to start warm up exercises.
Warm up exercises and stretching exercises
– Let students perform general warm up exercises and specific warm up
based on body’s parts to be used more while performing tactical skills
and stretch their muscles properly.
– Guide them while performing warm up and stretching exercises.
– Help them/demonstrate/correct where is necessary.
e) Lesson body
A pass is the most basic and essential skill in volleyball.it used to hit
a ball that is below the head or at your platform as most volleyball
players would call it, and is typically used as the first touch to receive
a serve or to receive a harddriven hit.
Practicing passing tactic individually
Organize students on volleyball court and help them to execute passing in
the following
• Request them to get into position;
• Ask them to:
– Stand with their legs about shoulder-width apart and should lean
forward a bit.
– Bend their knees a little bit, ready to spring their legs into action.
• Remind them that their hands should come together in the last moment
before the ball comes to them.
• Ask them to:
– Keep their hands about half a foot apart when they approach the
ball.
– Push the ball using their knees and arms.
– Hit the ball with both arms.
• Request them to Try to contact the ball on their forearms (above hands
but below the elbow joint).
• At the same time, ask them to move their arms forward and up slightly,
but do not swing their arms.• Request them to dip or twist their shoulders to aim the ball.
Activity 4.6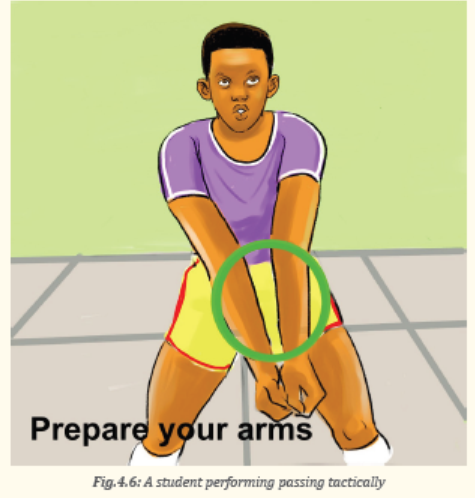
Practicing passing in group
– Form groups of students based on number of balls on the court;
– Give the ball to each group;
– Request one student for each group to go inside the circle and
serves as the net;
– Request the player in the middle to pass the ball to the students on
the circle;
– Ask students in a circle to pass the ball to each other so that the
ball does not drop or be intercepted by the player who is in the
middle;
– When the student in the middle gets the ball, the student who lost
the ball goes into the middle and the game continues.
Application activity 4.2
– Form groups of six students
– Let groups play the normal volleyball game
– Fix points to reach for winning a set (10- 15)
– The team wins the set must play with next team
– All teams must play the game
– The winner is the group wins many matches
Cool down exercises
– Let students practice cool down exercises and light stretching by
focusing on used muscles.
– Guide them how they can stretch their muscles accordingly.
Closing discussions (RCA)
Reflect
– How did you proceed to succeed passing tactics exercises in volleyball?
– What are the challenges did you face while performing passing tactics
exercises in volleyball?
Connect
– How important are passing tactics exercises in volleyball?
Apply
– How could apply passing tactics exercises in volleyball help you to
become best players in your society?
Lesson 4: Setting tactics exercises
a) Learning objective
Perform exercises of setting tactics.
b) Teaching resources
Cones, Balls, Volleyball court, Whistle, jumping rope and Videos related to
volleyball tactical skills.
c) Prerequisites/Revision/Introduction
Students of senior five will develop setting tactic exercises if they can perform
basics physical exercises and play volleyball by using technical skills learned in senior four.
d) Learning activities
Opening discussions
– Ask questions about volleyball tactics as been learned in senior four.
– Through brainstorming, introduce setting tactics exercises.
– Invite students to start warm up exercises.
Warm up exercises and stretching exercises
– Let students perform general warm up exercises and specific warm up
based on body’s parts to be used more while performing setting tactics
and stretch their muscles properly.
– Guide them while performing warm up and stretching exercises.
– Help them/demonstrate/correct where is necessary.
e) Lesson body
Explain to the students that set in volleyball is a maneuver in which
a player quickly makes contact with the ball in order to set up a spike
for another player.
Activity 4.7
Practicing setting the ball following steps:
Step1: Decide where to send the ball
Tell to the students that after getting to the ball quickly:
– Square their body with the target;
– Extend their arms up over their head;
– Position their hands and feet;
– Slightly bend their knees;– Choose the right attacker to send the ball to.
Step 2: Make contact with the ball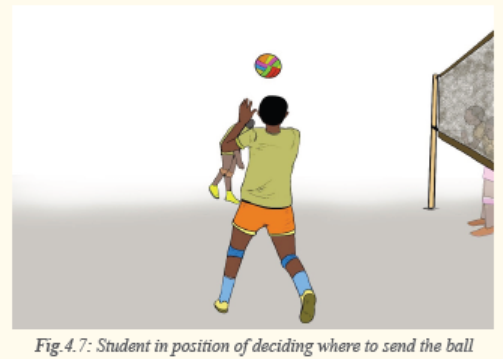
Tell students to do the following:
– Contact with the ball should occur just above the center of their
forehead, roughly at their hairline
– Try to make contact with all of their fingers touching the ball– Do not let the ball touch their palms
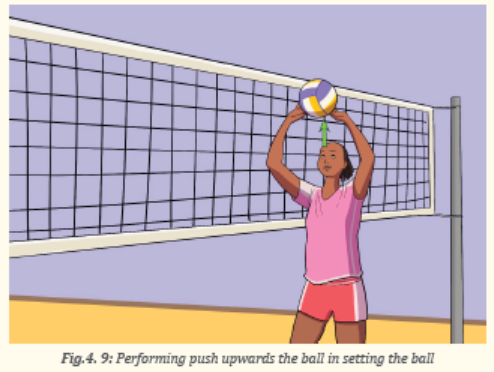
Step 3: Push upwards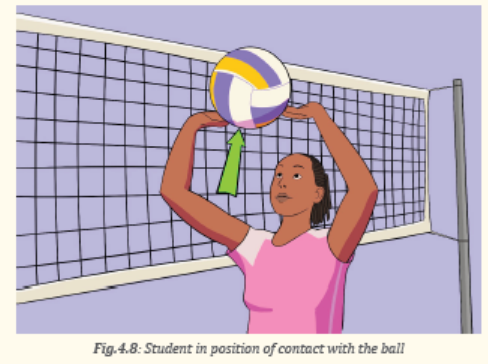
Tell students to do the following:
– As soon as the ball touches their fingers, straighten their arms and legs
as you push the ball upward in the direction of the spiker.
– Their whole body should be part of the push– Actual contact time with the ball should be minimal
Step 4: Follow through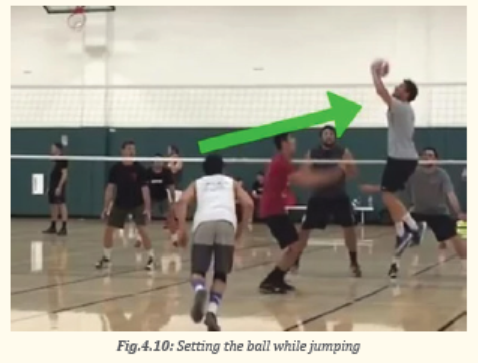
– At the end of their set, tell students that their arms should be fully
extended, and they should follow through with their hands by
straightening their wrists after releasing the ball.– This helps ensure that it stays on their intended trajectory.
Variation exercise
Help students to perform:
– Long distance sets;
– One and freeze;
– Side to side;
– Back sets.
Application activity 4.3
Small game in which setting is applied
- Form the teams of 6 students each
- Ask them to play trying to make good setting of the ball to attackers
- Rotate the students so that everyone sets at least four balls
Cool down exercises
– Let students practice cool down exercises and light stretching by
focusing on used muscles.
– Guide them how they can stretch their muscles accordingly.
Closing discussions (RCA)
Reflect
– How did you proceed to succeed setting the ball in volley ball game?
– What are the challenges did you face while performing setting the ball
in volley ball game?
Connect
How important are setting the ball exercises in volleyball
Apply
How could you apply setting the ball in volley ball game help you
to become best players in your society?
Lesson 5: Spiking tactics exercises
a) Learning objective
Perform spiking tactics exercises.
b) Teaching resources
Cones, Balls, Volleyball court, Whistle, jumping rope and Videos related to
volleyball tactical skills.
c) Prerequisites/Revision/Introduction
Students of senior five will develop spiking tactic exercises if
they can perform basics physical exercises and play volleyball by
using technical skills learned in senior four.
d) Learning activities
Opening discussions
– Ask questions about volleyball techniques as been learned in senior
four.
– Through brainstorming, introduce spiking tactics.
Warm up exercises and stretching exercises
– Let students perform general warm up exercises and specific warm up
based on body’s parts to be used more while performing tactical skills
and stretch their muscles properly.
– Guide them while performing warm up and stretching exercises.
– Help them/demonstrate/correct where is necessary.
e) Lesson body
Explain to the students that spiking volleyball entails forcefully
striking the ball toward the floor on your opponent’s side of the net.
Tell them that to spike the ball, they need to wait the setter to set
the ball near the net, then approach the ball, jump and go in for
the” kill”. If the ball hits the floor before the other team can retrieve it,
their team gets a point.
Activity 4.8
Practicing spiking the ball following steps
Organize students on the court and help them to individually perform the
exercise by respecting the steps:
– Get into position;
– Watch the setter;
– Assume the correct stance.
Explain to them hitting approach application:
– Left-right-left-jump-spike (right hander).
– Right-left-right-jump-spike (left hander).
Request students to:
– Take their first step toward the ball;
– Take a second powerful step;
– Take a final step to square their feet;
– Jump as the ball falls into position;
– Rear their hand back to strike;
– Hit the ball with the center of their hand;
– Bend their knees when your feet hit the ground;– Get back into position.
Activity 4.9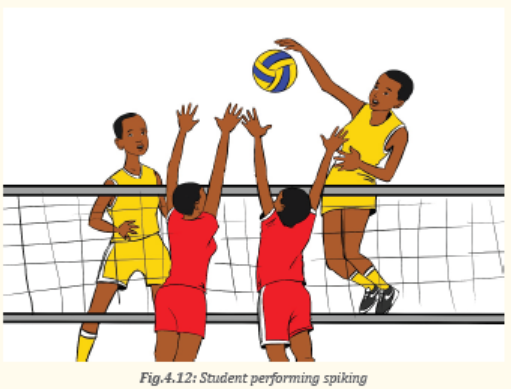
Practicing spiking tactic of high ball
– Organize students,
– Ask the students to practice footwork and jumping skills,
– Watch the setter,
– Attack the high ball set,
– Repeat the exercise to muster the spike.
Activity 4.10
Pass-set-hit exercise
– Organize students on the prepared court,
– Demonstrate how the exercise should be performed,
– Ask every student to exercise,
– Help students to perform the tactic correctly,
– Let all students perform the exercise,
– Make necessary corrections.
Application activity 4.4
Small game in which spiking is applied
Form the teams of 6 students each
– Ask them to play trying to make good spiking the ball
– Guide the students to respect rotation so that everyone spike at
least four balls in game
Cool down exercises
– Let students practice cool down exercises and light stretching by
focusing on used muscles.
– Guide them how they can stretch their muscles accordingly.
Closing discussions (RCA)
Reflect
– How did you proceed to succeed spiking tactics exercises in volleyball?
– What are the challenges did you face while performing spiking tactics
exercises in volleyball?
Connect
– How important are spiking tactics exercises in volleyball?
Apply
– How spiking tactics exercises in volleyball could help you to become
best players in your society?
Lesson 6: Blocking exercises
a) Learning objective
Perform blocking exercises.
b) Teaching resources
Cones, Balls, Volleyball court, Whistle, jumping rope and Videos related to
volleyball tactical skills.
c) Prerequisites/Revision/Introduction
Students of senior five will develop blocking tactic exercises if they can
perform basics physical exercises and play volley ball by using technical
skills learned in senior four.
d) Learning activities
Opening discussions
– Ask questions about volleyball techniques as been learned in senior
four.
– Through brainstorming, introduce blocking tactics.
– Invite students to start warm up exercises.
Warm up exercises and stretching exercises
– Let students perform general warm up exercises and specific warm up
based on body’s parts to be used more while performing tactical skills
and stretch their muscles properly.
– Guide them while performing warm up and stretching exercises.
– Help them/demonstrate/correct where is necessary
e) Lesson body
Explain to the students that blocking is the first line of defense against
attacks from the opposing team and creates less court for the
back defense to cover.
Activity 4.11
racticing blocking exercise individually
Demonstrate with the students how to block tactically
Step one: Getting into the ready position
Request students to do the following:
– Be ready at all times;
– Stand with their feet shoulder-length apart square to the net;
– Keep their knees bent ready to jump;
– Keep their arms high;
– Keep their palms facing the net;– Stay a half arm’s length away from the net.
Step two: Using proper techniques to block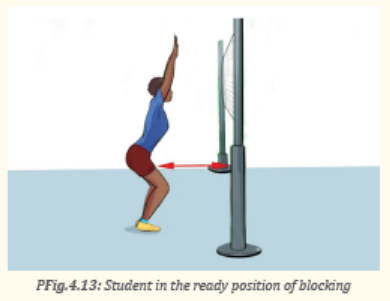
Request students to do the following:
– Jump straight up;
– Angle their hands inwards as if they are grabbing the ball
– Keep their fingers spread and relaxed but straight
– Keep their wrist rigid to work against a hard spike– Position their arms at an angle over the net
Activity 4.12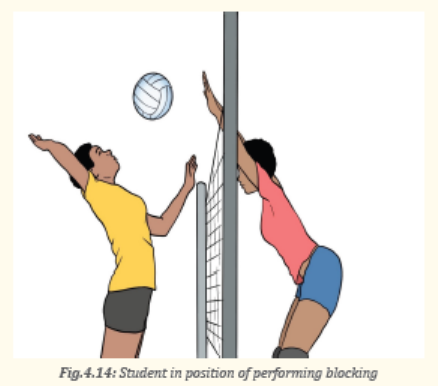
Practicing blocking exercise in groups
After organizing the students on the court, the teacher as a
facilitator and a guide explains and demonstrates how to perform the following:
– Mirror blocking drill;
– Blind blocking drill;
– Block and smash drill;– Side to side blocking drill.
Application activity 4.5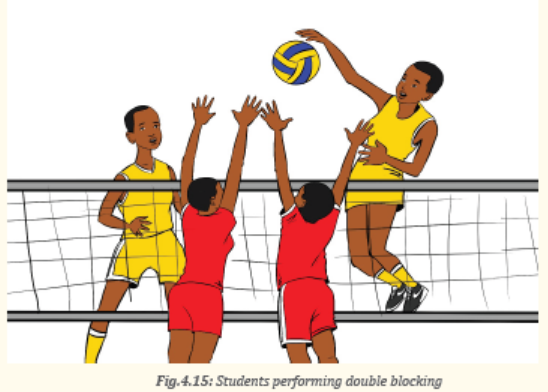
Small game in which blocking is applied
– Form the teams of 6 students each
– Ask them to play trying to make good blocks
– Guide the students to respect rotation so that everyone blocks at
least four balls
Cool down
– Let students practice cool down exercises and light stretching by
focusing on used muscles.
– Guide them how they can stretch their muscles accordingly.
Closing discussions (RCA)
Reflect
– How did you proceed to succeed blocking tactic exercises in volleyball?
– What are the challenges did you face while performing blocking tactic
exercises in volleyball?
Connect
– How important are blocking tactic exercises in volleyball?
Apply
– How could blocking tactic exercises in volleyball help you to become
best players in your society?
Lesson 7: Digging tactics exercises
a) Learning objective
Perform digging tactics exercises.
b) Teaching resources
Cones, Balls, Volleyball court, Whistle, jumping rope and Videos related to
volleyball tactical skills.
c) Prerequisites/Revision/Introduction
Students of senior five will develop digging tactic exercises if they
can perform basics physical exercises and play volleyball by using
technical skills learned in senior four.
d) Learning activities
Opening discussions
– Ask questions about volleyball techniques as been learned in senior
four.
– Through brainstorming, introduce digging tactics.
– Invite students to start warm up exercises.
Warm up exercises and stretching exercises
– Let students perform general warm up exercises and specific warm
up based on body’s parts to be used more while performing digging
tactical skills and stretch their muscles properly.
– Guide them while performing warm up and stretching exercises.
– Help them/demonstrate/correct where is necessary.
e) Lesson body
Remind the students that during defending the opponent’s attack,
digging is one of the defensive tactics to use when the block has
failed to stop strong spikes.
Activity 4.13
Practicing digging tactic individually
Step one: Get low and lean forward
Request students to do the following:
– Get into a low “ready “position even lower than they would to
receive a serve.
– Keep they knees bent,
– Bend at the waist s that their shoulders are out past your knees,
– Place their feet wider than your shoulders,
– Hold their arms out away from their body,
– Keep their weight balanced on their toes so that they can spring
forward or side to get the ball.
Step two: Place your arms in a receiving position
Request students to do the following:
– Stretch their arms, pressed together from hands to elbows
– Bend and lock their elbows
– Keep their wrists lower than their elbows to direct the ball forward
– Hold their hands together by placing their thumbs side by side and
overlap the fingers of their stronger hand over the curled fingers oftheir weaker hand.
Step three: Move to meet the ball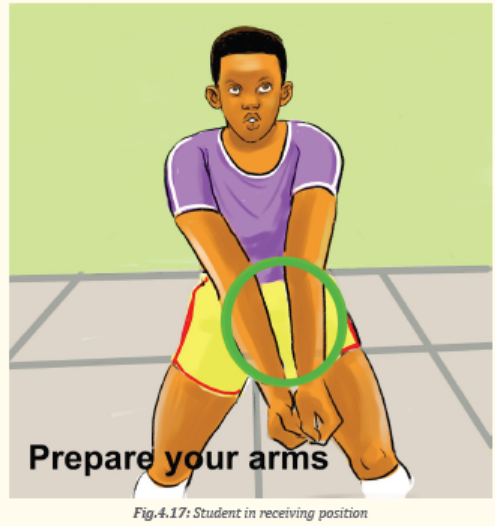
Request students to do the following:
– Remember their footwork and do not lunge unless they have to
– Take a quick step or a shuffle and remain in their ready position– Keep low as they relocate
Step four: Aim for the target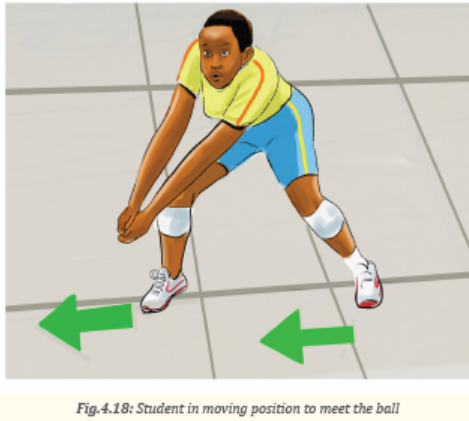
– Tell the students that a goal on a dig is not just to get the ball up in the
air, but to pass it to a teammate to set up the offensive series.
– Tell them that they will most likely be aiming for their setter up by the
net;
– Remind them to align their body as much as possible towards that
target while receiving the spike;
– Request them to aim a little short of their target to keep from digging
the ball back over the net;
– Remind them not to give their opponent an easy second chance.
Step five: Absorb and redirect the spike
Request students to do the following:
– Tell them that they do not need to swing at the ball; the spiker has
supplied the necessary power for their purposes;
– To keep their elbow locked and their angle of deflection the same;– To let their shoulders dip to absorb some of the power of he shot.
Remind students that there are several ways to get the ball through digging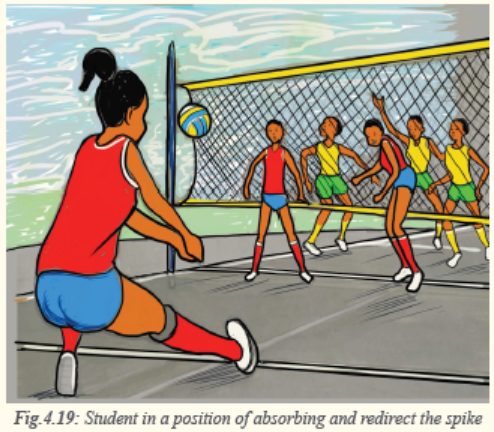
such as:
• Sprinting
• Rolling
• Jumping
• Falling
• Sprawling
• Diving
Activity 4.14
Performing double decker defense
– Organize students on the court one behind another
– Demonstrate how the exercise should be performed
– A student finishing double decker defense on one side go to the
other side
– Let all students perform the exercise
Performing knockout digging exercise
– Organize students on the prepared court
– Tell the students that the goal is to dig a ball into the target area
and catch it
– Demonstrate how the exercise should be performed
– Ask every student to exercise
– A student finishing double decker defense on one side go to the
other side
– Let all students perform the exercise
Application activity 4.6
Small game in which digging is applied
– Form the teams of 6 students each
– Ask students to play trying to make correct digging of the ball
spiked to them
– Guide the students to respect rotation so that everyone spikes at
least four balls– Encourage students to practice the tactic confidently
Cool down exercises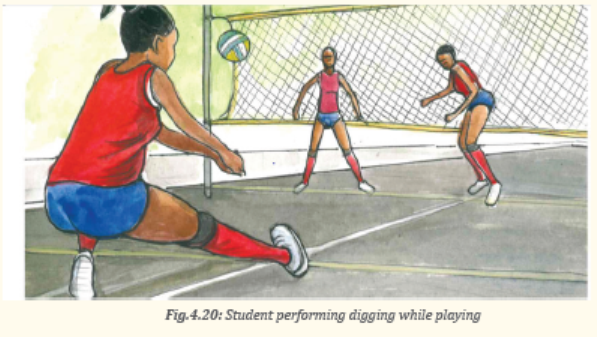
– Let students practice cool down exercises and light stretching by
focusing on used muscles.
– Guide them how they can stretch their muscles accordingly.
Closing discussions (RCA)
Reflect
– How did you proceed to succeed digging tactics exercises in volleyball?
– What are the challenges did you face while performing digging tactics
exercises in volleyball?
Connect
– How important are digging tactics exercises in volleyball?
Apply
– How could digging tactics exercises in volleyball help you to become
best players in your society?
4.5 Additional information to the teacher
Volleyball player positions
There are six positions on volleyball court and each position serves a
unique role in the success of the team.
– Setter: is the main contributor to the offense of the volleyball team.
He/she must have a delicate touch to set the ball perfectly for one of
hitters to attack.
– Outside hitter also known as the left side hitter: is the lead attacker
in the offensive strategy. He/she must be able to jump high, be quick
on his/her feet and ready to adapt to different situations
– Opposite hitter: Opposite hitters earned that title because they are
opposite to the strong (left) side hitter, meaning they hit behind the
setter. In a 6-1, just like an outside hitter, an opposite has the option
to play all the way around, passing, playing defense, and hitting out of
the back row. An opposite’s responsibilities include swinging from the
front and back row, playing right-back defense, and blocking the other
team’s outside hitter.
– Middle blocker: Middle blockers are the team’s best blockers, and
they hit mostly fast-tempo sets from the middle of the court and behind
the setter. Typically, the libero goes in for the middle when he or she
rotates to the back row. Middle sets are some of the most difficult to set
and require good passes, therefore middles often get the fewest sets
but have the best hitting percentages.
– Libero: Liberoes wear a jersey of a different color and play in the
back row five out the six rotations, usually subbing in for both middle
blockers. When the libero comes in for another player, it does not count
as a substitution. Liberoes are defensive and serve-receive specialists
who are typically fast and are able to change direction quickly. Liberoes
are not permitted to attack the ball from above the height of the net,
and they can only overhand set a front-row attacker from behind the
10-foot line
– Defensive Specialists (DS): Much like a libero, a defensive specialist
plays in the back row and is responsible for playing defense and
receiving serve. Unlike the libero, they do not wear different colored
jerseys and are required to abide by the normal substitution rules,
meaning they are only in for three out of the six rotations.
– Serving Specialist (SS): A serving specialist is a player who subs in just
to serve. These players typically have a very tough or very consistent
serve, and they come in for a player who is less strong behind the
service line, but otherwise very valuable to have on the court as an
offensive or defensive threat.
– Advantages and disadvantages of volleyball formations used in
volleyball
– In volleyball, teams must have their players in a specific formation.
– The players: There is a penalty for being out of rotation and the
opposing team receives a point. There are three formations that are
widely used in the court, each having advantages and disadvantages.
4-2 formation
This offense takes its name from the fact that it uses four attackers
and two setters. This is a basic formation generally used by less
experienced teams to avoid confusion on the court. At any given time,
one of the setters is in front row and the other is back row.
They are always opposite of each other on the court.
This allows for two attackers front row at any given time,
and the setter is able to dump the ball, as the setter will always be in the frontcourt.
This basic offensive formation allows for any of the basic sets to be run, as well as a 32,
shoot, or possibly a tandem. Teams that use a 4-2 will rarely set anything other than the basic sets.
- The positive aspects of the 4-2 include its simplicity, so a team can gain
experience and later move on to a more complicated formation.
- The negative aspect of using a 4-2 is its limits regarding your offense.
Some think that having two setters’ takes away from your team as
the setter is generally the team leader. Some coaches opt to start
their team out running a more complicated system and just having the players adopt it.
5-1 Formation
A 5-1 takes its name from using one setter and having five attackers on the court.
The secondary setter is replaced by an opposite hitter who is always opposite
the setter on the court. This formation allows the setter to be able to dump
the ball for half the rotations and have three front row attackers to set the
ball to on the other three rotations. This system allows the setter to set any
possible set he or she wants to depending on whether he or she is front row
or back row. Many coaches prefer this system, having one setter as the team leader.
- Positive aspect of this formation is to help having only one setter so that
the setting does not change. One setter may set the ball differently from
another giving a different feel for the attackers. It helps when the attackers
are used to one setter in particular.
- The negative aspect of this offense is that the setter needs to transition from
defense to set the ball. This creates situations where the setter has the first contact
and someone else has to set the ball.
6-2 Formation
A 6-2 is similar to a 4-2, but has six attackers and two setters.
This is possible by having the back row setter always set the ball,
making the setter only a hitter when he or she is front row.
This formation allows any possible set to be made not including a dump by
the setter because he or she is always back row when setting the ball.
- It is good for a team in which the setters are also very good attackers
where coach does not want to waste that talent. Unfortunately,
this formation has the problems of 5-1 and 4-2. Having two setters
and always having one of them be back row. The setter always has to
transition from defense and the leadership is lacking. Most teams at
the highest-level team use the 5-1 rather than this for leadership purposes.
Attack tempo (the speed of the attack). We distinguish three tempos in attack:
tempo 1 (the fastest tempo), tempo 2 and tempo 3. Thus, the effectiveness
of the attack will depend not only on the type of an attack but also on how
fast is the player on the action.
SPIKING is the offensive play where a player swings the ball with their palm
sharply downwards over the net and into the opposing court, making it difficult
for the opposing team to recover the ball
Spike is the strategy used to send the ball over the net to the
opponent in such manner that ball is not returnable
End unit assessment 4.6
Setting exercises and observe weather students are able to perform
better: Passing, setting, blocking, digging, spiking tactics and be able to
take position according to the chosen system formation
4.7 Additional activities
4.7.1 Remedial activities
Individually and in groups, the students will revise the correct tactics of serving,
setting, digging, spiking and blocking.
4.7.2 Consolidation activities
Individually or in groups, the students will perform the tactics of serving,
passing, setting, spiking, blocking and digging in volleyball.
4.7.3 Extended activities
Encourages and facilitates students to form teams and participate in
different competitions of volleyball organized by the school,
Sector or national sports schools federation.