Topic outline
PART I: GENERAL INTRODUCTION
1.1 The structure of the guide
This section presents the overall structure of this guide,
the unit and lesson structure to help teachers to understand
different sections of this teacher’s guide.
Overall structure
The whole guide has three main parts as follows:
General Introduction:
This part provides general guidance on:
– How to develop the generic competences;
– How to integrate cross cutting issues;
– How to cater for students with special educational needs, active
methods and techniques of teaching Physical Education and Sports
and guidance on assessment.
Sample lesson plan:
This part provides a sample lesson plan developed and designed to
help the tutors to develop their own lesson plans.
Unit development:
This is the core part of the guide. Each unit is developed by following the structure below.
Structure of a unit
Each unit is made of the following sections:
– Unit title: From the syllabus.
– Key unit competence: From the syllabus.
– Prerequisites (knowledge, skills, attitudes and values): This section
indicates knowledge, skills and attitudes required for the success of the unit.
The competence-based approach calls for connections between units/topics within
a subject and interconnections between different subjects.
The teacher will find an indication of those prerequisites and guidance on
how to establish connections.
– Cross-cutting issues to be addressed: This section suggests cross
cutting issues that can be integrated depending on the unit content.
It provides guidance on how to come up with the integration of theissue. Note that the issue indicated is a suggestion; teachers are free to
take another crosscutting issue taking into consideration the learning environment.
– List of lessons/sub-heading: This section presents in a table
suggestion on the list of lessons, lesson objectives copied or adapted from the syllabus
and duration for each lesson. Each lesson /subheading is then developed.
– Summary of the unit: This section summarizes what students have been learned in the whole unit.
– End of each unit: At the end of each unit, the teacher’s guide provides the following sections:
Additional Information
This section gives further information that may help him/her to plan
and conduct Physical Education and Sports lesson.
End unit assessment
This part provides guidance on how to conduct the end unit assessment in a practical way.
It suggests activities/games as well as guidance on criteria to be considered such as:
– Cognitive skills: (E.g.: Increase of the level of capacity of anticipation,
problem solving during sports activities, know rules of the game,
know techniques and tactics to use different sports activities,
know the importance of practice etc.).
– Technical competences: (E.g.: to receive the ball, to pass the ball to the teammates,
to throw a javelin, to score the goal, to dribble the ball etc.).
– Strong emotional points: Such as self-confidence and feeling, secure.
– Social competences: Such as cooperation and solidarity.
– Attitudes and values: E.g.: optimism, confidence, respect, fair play,
teamwork spirit, self-confidence, determination, courage, impartiality,
avoid doping in sport activities etc.
Additional activities
This section provides additional games/exercises for the teacher to have a
wide range of activities/games related to the unit.
– Consolidation activities: Additional activities to students with special educational needs.
– Remedial Activities: Additional activities for students who need more time
and exercises to achieve a certain level of performance.
– Extended activities: Additional activities for talented students.
The guide ends with references.
Structure of each lesson
Each lesson/sub-heading is made of the following sections:
– Lesson title: It shows the title of the lesson.
– Introduction: This section gives a clear instruction to the teacher on
how to start the lesson.
– Teaching resources: This section suggests the teaching aids or other
resources needed in line with the activities to achieve the learning objectives.
Teachers are encouraged to replace the suggested teaching aids by the available
ones in their respective schools and based on learning environment.
– Steps of the lesson: This section provides activities/games/exercises and
guidance step by step: Opening discussions, warm up, lesson body, cool down
and closing discussions (R-C-A): Reflect, Connect and Apply.
1.2 Methodological guidance
1.2.1 Developing competences
Since 2015, Rwanda shifted from a knowledge based to a competency based
curriculum for pre-primary, primary and general secondary education.
This called for changing the way of learning by shifting from teacher-centered to
the Learner-centered approach. Teachers are not only responsible for knowledge
transfer but also for fostering students’ learning achievement, and creating safe
and supportive learning environment. It implies also that a student has to
demonstrate what he/she is able to do using the knowledge, skills, values and
attitude acquired in a new or different or given situation.
The competence-based curriculum employs an approach of teaching and
learning based on discrete skills. It focuses on what students can do rather
than what students know. Students develop basic competences through
specific subject unit competences with specific learning objectives broken
down into knowledge, skills and attitudes. These competences are developed
through learning activities disseminated in learner-centered rather than the
traditional didactic approach. The students are evaluated against set standards
to achieve before moving on.
In addition to specific subject competences, students also develop generic
competences that are transferable throughout a range of learning areas and situations in life.
Below are examples of how generic competences can be developed in Physical
Education and Sports:
Generic competence
Examples of activities that develop generic competences
Communication
– Organize and present in writing and verbally a complete and clear
report of a training session, a match for a given sports or any organized sport event;
– Select and use a set of verbal and nonverbal channels of communication during a
game situation or sport activities (a voice, facial expressions and bodily movements);
– Observe and interpret different game situations, sport events and react accordingly;
– Argue verbally or in writing about any given performance/results in
sports activities.
Cooperation, Personal and Interpersonal management and life skills
– Playing in Pairs;
– Playing in small groups/teams;
– Playing in large team and/or a club.
Critical thinking
- Demonstrate advantages of Sports activities to the schools where sports is
valued contrary to a school or institution where sport is neglected.
Innovation and creativity
– Create a set of physical activities of a training session for a given sport;
– Leading a given activity in sport training session with objectives,
methodology, observations, results and conclusions;
– Design a sketch map of some techniques and tactics used in different games;
– Create a chart of the main steps in a performing a given tactic in
different sports/games;
– Create and organize sport event.
Intra and interpersonal skill
(Intra skills refer to the skills of knowing and living with oneself while Inter personal
skills deals with knowing and living with others)
- Ability in facilitating interaction and communication with others.
Lifelong learning
- Exploit all opportunities available to improve on knowledge and skills.
- Reading sports journals, listening to sports news and following different
games and sport events on TV or on playgrounds/ stadium.
Research and Problem solving
- Research using internet or books from the library and develop tactics or
strategies to be used in performing sports activities;
- Fabricate sports materials from local materials (e.g. making a soccer ball,
making a shot putting using sand and sacs, etc.).
1.2.2 Addressing cross-cutting issues
Among the changes in the competence, based curriculum is the integration of
cross cutting issues as an integral part of the teaching learning process as they
relate to and must be considered within all subjects to be appropriately addressed.
The eight cross cutting issues identified in the national curriculum framework are:
– Comprehensive Sexuality Education (CSE);
– Environment and sustainability;
– Financial Education;
– Gender;
– Genocide studies;
– Inclusive Education;
– Peace and Values Education;
– Standardization Culture.
Some cross cutting issues may seem specific to particular learning areas or
subjects but the teacher need to address all of them whenever an opportunity arises.
In addition, students should always be given an opportunity during the learning
process to address these cross cutting issues both within and out of the classroom to
progressively develop related attitudes and values.
Below are examples on how crosscutting issues can be addressed and how to
integrate them in Physical Education and Sports lessons.
Comprehensive sexuality education
A teacher provides physical activities. A teacher sets instructions that prevent
any sexual harassment, any kind of gender-based violence like sexual abuse and
physical contacts oriented to the sexuality intention physical and sports activities.
Environment and sustainability
In teaching and learning process environment and sustainability are addressed when:
The teacher explains to students the importance of a safe and clean environment for
safe physical and sport activities.
– Students avoid throwing away used materials before, during and after exercises.
– There are rules set for cleaning the playgrounds before and after
exercises.
– Students avoid spitting or blowing the nose in pitch, field, and court during exercises.
Financial Education
In teaching and learning process, financial education may be addressed when:
– Students are able to find themselves local grown solutions as regards to sports
equipment and sport materials where there is shortage;
– Students are good managers of sports infrastructures and sports
materials, knowing that some of them are costly.
Gender
Teachers should ensure equal participation of both girls and boys during physical
activities and equal participation in open discussion and in refereeing.
Genocide studies
While conducting Physical Education and Sports activities a teacher should take a time
to explain students how sports should be used to fight against Genocide against Tutsi ideology
and how to prevent it or organizing Genocide against Tutsi memorial tournaments at
school and giving the message related to the Genocide against Tutsi.
Inclusive education
Involve all students in all activities without bias. E.g., allow a student with physical
disability to be a referee, a coach, an assistant, a judge. Modify activities so they suit the
abilities and attention span of the students.
Peace and Values Education
In teaching and learning process, the teacher must encourage tolerance, patience,
cooperation, teamwork spirit, mutual help, and respect of opinions of colleagues,
obeisance (respect) of rules and creation of a more peaceful game situation.
Standardization culture
– In teaching and learning process, the students must use standardized materials in
prevention of injuries and accidents.
– The teacher also must help students to know how to choose and use safe sports
clothing for their health (e.g. safe sports shoes), safe physical exercises
(avoid bad body postures and forbidden body exercises, adapted physical activities).
1.2.3 Attention to special educational needs
Currently we are convinced that games and sports are very beneficial to people with
physical, mental, emotional and psychological disabilities.
What attitude to adopt to promote the integration of students with disabilities during
recreational and sports activities?
To promote the integration of students with disabilities during recreational and sports
activities, the following tips may help teachers/educators in the training of these students:
– Adopt an approach of sports and game which is based on skills, you focus on what
students are capable of doing. In this respect, you can introduce small changes in
games and activities for students with disabilities.
– Be relaxed and natural when you are with people with disabilities. Do not treat them
as if they need your pity or your charity. Do not think they necessarily need help.
Let them do and say things themselves.
– Avoid keeping students with disabilities out of the game: in a regular class,
let them participate in other’s games. However, avoid being too demanding about
the level of their performance.
What can we modify to promote the integration of students with disabilities during
recreational and sports activities?
Within the framework of integration of students in games, according to the nature
and the gravity of impairment, students can participate in games designed for all students.
In other cases, the teacher or educator should think about changes he/she could
make to meet the special needs of teachers he/she has in the group.
He/she should also think about adaptation of the game, the playground, equipment
and duration of the game.
Below are some examples of adaptation to initiate:
i) Adapt roles and rules
– Make the game easier or harder by changing some rules.
– Let students play different roles and in different positions.
– Allow students to play in different ways, for example, sitting instead of standing.
– Simplify expectations of the game.
– Simplify instructions.
ii) Adapt the playground
– Change the size of the playground. Enlarge or reduce the playground.
– Change the distance: for example, put a target closer.
– Change the height of a target.
– Allow more or less space between students.
– Let students move from different spaces.
iii) Adapt the materials
– Reduce the size or weight of materials.
– Choose balls of various textures, bright colours or balls, which make noise.
iv) Adapt the duration of the activity
– Reduce or extend the time allotted to the activity.
Aspects to consider when you want to modify an activity
Ask yourself the following questions:
– Does the modification affect negatively the activity? This should not be the case.
– Does the modification correspond to the ability and duration of
students’ attention?
– Will the students with disability be able to play with others?
– Is the activity proportional to ages of participants?
– Does the activity respond to the needs of all participants?
Strategies to help students with physical disabilities or mobility difficulties
– Adapt activities so that students, who use wheelchairs, use other
mobility aids, have difficulty in moving can participate.
– Ask for adaptation of furniture. E.g., the height of a table may need to be changed to
make it easier for a student to reach it or fit their legs or wheelchair.
Encourage peer support between students. Get advice from parents or a health
professional about assistive devices.
Strategies to help students with hearing disabilities or communication difficulties
– Always get the student’s attention before you begin to speak.
– Encourage the students to look at your face.
– Use gestures, body language and facial expressions.
– Use pictures and objects as much as possible.
– Ask the parents/caregivers to show you the signs they use at home
for communication (use the same signs yourself and encourage other students to also use them).
– Keep background noise to a minimum.
Strategies to help students with visual disabilities
– Help students to use their other senses (hearing, touch, smell and
taste) to play and carry out activities that will promote their learning
and development.
– Use simple, clear and consistent language.
– Use tactile objects to help in explaining a concept.
– For students with some sight, ask them what they can see. Get
information from parents/caregivers on how the students manage
their remaining sight at home.
– Make sure that the students have a group of friends who are helpful and who
allow the student to be as independent as possible.
– Plan activities so that students work in pairs or groups whenever
possible.
1.2.4 Guidance on assessment
Assessment in PES must be a continuing process that arises out of interaction
during teaching and learning process. It includes lesson evaluation during R-C-A
after each session and end of unit assessment.
This formative assessment should play a big role in teaching and learning process.
The teacher should encourage individual, peer and group evaluation of the activity done.
In this step, the teacher sets exercise to assess abilities, skills, knowledge and
attitudes of individual students basing on unit or lesson objectives.
During assessment activity, students perform exercises individually
or work in teams. The teacher avoids intervening directly. In fact, results from this
assessment inform the teacher on next steps for the whole class and individuals.
In some cases, the teacher can end up with giving remedial and extra activities.
1.2.5 Students’ learning styles and strategies to conduct teaching and learning process
There are different teaching styles and techniques that should be catered for.
The selection of teaching method should be done with the greatest care and some
of the factors to be considered that are:
– The uniqueness of Physical Education and Sports.
– The type of lessons to be learned.
– The particular learning objectives to be achieved.
– The allocated time to achieve the objective.
– Available instructional Sports materials, equipment and Sports
infrastructure.
– Individual students’ needs.
– Abilities of students’ and learning styles.
There are different learning styles to use while teaching Physical Education and
Sports depending on students’ abilities. The teacher should use a wide range of
techniques and tools to cater for different specificity of students’.
1.2.6 Teaching methods and techniques that promote the active
learning
A. Suitable Methods / techniques to teach PES
Physical Education and Sports is taught:
– In the classrooms (e.g. using a projector and videos to teach steps of performing
a technique, a system of game play and using a chalk board to teach rules of the game).
– In the playgrounds/courts for teaching different games (e.g.: football playground for
teaching football game, volleyball court for teaching volleyball game, handball
playground for teaching handball game, basketball court for teaching basketball game,
netball court for teaching netball game).
– On the athletic track, fields, roads and hills for teaching athletics
activities (racing, jumps and throws).
– In Gymnasiums for teaching gymnastics and indoor sports.
In the process of teaching and learning Physical Education and Sports,
the following methods should be used:
Demonstration method
A teacher makes him/herself a demonstration or asks an able student to do a demonstration.
The teacher is advised not to do a demonstration if he/she is not sure to do it better than
every individual student can do it.
Verbal Explanation
A teacher describes/explains activities he/she wants students to perform.
Practice session
Students are given time to practice exercises intended to develop the desired skills.
Supervision
During a PES lesson, the teacher plays a role of supervising where he/she must move
around in field and make corrections for individual students during exercises.
Correction
While making corrections starting by group correction to individual correction.
Corrections for inaccuracy in performing given techniques are done immediately.
Evaluation
Let students do their own evaluation for each other, then help them by giving some
advice using encouraging words. Evaluation is a continued activity
throughout the physical exercises.
Discussion
Discussions are used before and after teaching and learning activities in open
talks to motivate and develop attitude and values in students.
Application
Use of learned Physical Education and Sports skills in different situations to solve a given problem.
Physical Education and Sports in small schools or schools with limited facilities
Where schools have specific problems related to a lack of indoor and outdoor space,
consideration might be given to:
– The use of the classrooms, corridors and available school grounds for orienteering exercises.
– The provision of markings on the playground for athletic activities and small- sided games.
– The use of local facilities, e.g. Local grounds, community centres, parish halls, youth clubs,
colleges, higher learning institutions etc.
– Co-operation with other primary or secondary schools in sharing
facilities.
– Allocating more time to Physical Education and Sports in good weather.
– Visiting an outdoor education centre providing facilities for many
worthwhile activities.
– Use possible available space, which should be used to facilitate teaching and learning of
Physical Education and Sports.
– Use local materials by making for example: goal posts for Football,
Netball and Handball, posts for supporting net in Volleyball.
– Try to create their own playgrounds by using space available.
B. Steps of a PES lesson
While teaching a Physical Education and Sports lesson by using play based approach,
a teacher follows these steps:
Step 1: Opening discussions.
Step 2: Warm-up activities.
Step 3: Lesson body.
Step 4: Cool down.
Step 5: Closing discussions focusing on Reflect, Connect and Apply (R-C-A).
Step 1: Opening discussions
The Opening discussions prepare students for the learning experience.
Discussions encourage them to think about the learning objective of the play.
Opening discussions include quick questions to stimulate students’ curiosity and engagement.
Strategies for good discussions:
– Set appropriate arrangement for good discussions: e.g. semi-circle,
circle, U-shape.
– Set ground rules, which create a safe atmosphere for students.
– Prepare students for discussions.
– Ensure interactive and inclusive discussions.
– Acknowledge each student’s contribution.
– Ensure classroom management and control.
Step 2: Warm-up activities
A warm-up is performed before a game/play/practice of technique.
It helps the body activation, prepares itself for a physical exercise, and reduces the risk of injury.
The warm-up should be a combination of rhythmic exercises,
which begin to raise the heart rate and raise muscle temperature, and
static stretching through a full range of motion. The use balls while warm up activities help
students to master previous skills, which should help them to perform new skills.
Step 3: Lesson body
A game/play/exercise is selected according to the topic to be taught/age of
students/ability of students/available materials and skills you want to develop.
Step 4: Cool down
A cool down activity is an easy exercise that allows the body to gradually
transition to a resting or near-resting state. It is done after the main activity or lesson body.
Step 5: R-C-A discussions
Assessment in PES lesson is done when students are performing exercises/ activities/games.
At this level, through the R-C-A discussions the teacher allows students to
do their self-evaluation and provide the feedback from learned lesson.
Reflect-Connect-Apply is a teaching and learning strategy that leads students
through a 3-steps discussion about their experience:
Reflect
Ask questions, which help student to reflect on the game/ play/skill learned.
The teacher asks questions about their experience and feelings during the
game/exercise/activity.
The teacher asks questions like:
– What was interesting?
– What was easy?
– What was challenging?
– What strategies have you used to win?
– How did you feel in case of success or failure?
Connect
Ask questions, which help students to connect what they have learned to
life experiences and lesson content.
The teacher asks questions like:
– How this game/exercise/activity is connected to what you already
know, believe or feel?
– Does it reinforce or expand your view?
– The teacher also asks questions, which connect the game/exercise/
activity to lesson content.
Apply
Ask questions, which help student to apply acquired experience to another situation.
The teacher asks questions like:
– How could you use what you have learned from this experience?
– How could you use your new learning to benefit yourself, others, your community?
RCA is based on the work of educationalists such as Freire, Brown, Piaget,
Brantford and others who support the concept of an educational process that is
active, relevant, reflective, collaborative and applied, and has its roots in
experiential learning theory (Kolb, 1984). Play-based learning technique is
closely linked to the Experiential Learning Cycle. It starts with a game or play-based
activity and ends with a closing Reflect, Connect and Apply (RCA)
discussion linked to the subject matter.
Experiential Learning Cycle (David A. Kolb, 1984 – Experiential Learning Theory).
PART II: SAMPLE LESSON PLAN
School Name: ………………
Teacher’s name: ……………………………
UNIT 1: GYMNASTICS
Key unit competence: Develop tactical and technical skills of apparatus gymnastics
1.1.Prerequisite (Knowledge, skills, attitudes and values)
Students of senior five will learn better apparatus gymnastics if
they can perform ground gymnastics learned in senior four.
1.2.Cross-cutting issues to be addressed
– Gender: Engage both women and men in physical activity and sports
exercises and help them to exploit their full potentials. No activity is
reserved only for women or men.
– Inclusive education: Identify the students with special education
needs, ensure interactive and inclusive discussion during practice of
physical activity and sport exercises.
– Financial education: Facilitate/guide students to make non cost
materials like ropes and balls from banana leave fibers and they can
also improvise hurdles for jumping exercises
– Standardization culture: Advise learners to use standardized
materials in prevention of injuries and accidents. Students have to
know how to choose and use safe sports clothes for their health (e.g.: safe sports shoes),
safe physical exercises (avoid bad body postures and forbidden body exercises,
adapted physical activities)
– Environment and sustainability: Train students on the culture of
protecting the environment surrounding the field/playground and any other place they play on.
– Peace and values education: Encourage teamwork spirit, mutual
help, and respect of opinions of colleagues among learners.
– Comprehensive sexuality education: Provide physical activities and
set instructions that prevent sexual harassment, any kind of gender-based
violence like sexual abuse and physical contacts concerned with sexuality
intention in Physical Education and Sports activities.
– Genocide studies: Take time to explain to students how sports should be used
to fight against Genocide ideology and how to prevent it. E.g.: Organizing Genocide
memorial tournaments at school and giving the message related to the Genocide.
1.3 Guidance on introductory activity
Before introducing the lesson one of this unit, teacher must introduce the whole unit.
The teacher as a guide, facilitator and expert, asks questions or gives activity related
to gymnastics in order to help students to predict what to be learnt in the whole unit.
He/she may use a selected picture or scenario which helps to quick thinking and reaction.1.4 List of lessons/sub-heading
Lesson 1: Parallel bar techniques exercises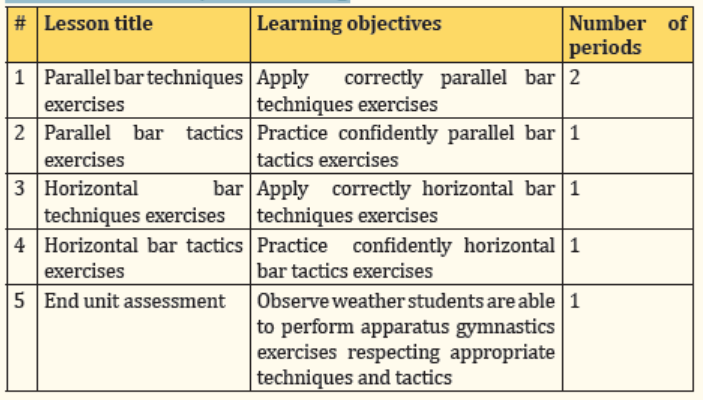
A. Learning objective
By the end of the lesson, senior five students will be able to apply correctly
parallel bar techniques exercises.
B. Teaching resources
Parallel bars, mat, whistle, videos related to gymnastics technical skills and stopwatch
C. Prerequisites/Revision/Introduction
Students of senior five will learn better parallel bar techniques if they can perform
advanced physical exercises on the ground learned previously in senior four.
Activity 1.1
D. Learning activities
Opening discussions
- Students on U shape formation; the teacher helps them to brainstorm the
importance of applying apparatus gymnastics exercises.
- He/she checks up sports uniform and requests to remove out forbidden objects.
- He/she asks them to brainstorm different exercises learnt in previous lesson
and introduces parallel bar techniques by asking them questions related to the
lesson to be taught to awaken their motivation and interest.
- He/she invites them doing warm up and stretching before the workout.
Warm up exercises and stretching exercises
- Let students perform general warm up exercises and stretch their muscles properly.
- One student can lead others
- Guide them while performing warm up and stretching exercises
- Help them/demonstrate/correct where is necessary.
D. Lesson body
Basic parallel technique moves:
– Static hold dips
– L-sits on parallel bar
– Low swings dips
– Swings with assistance
– Handstands
Static hold dips
The dip exercise trains the chest, shoulders, triceps, back and abdominals.
The teacher asks students to perform individually static holds following these steps:
• Stand between the dip bars and firmly grasp each side. The bars
should rest on their palm with their wrists stacked.
• Push down to lift their bodies upward, slowly removing their feet
from the floor until their elbows are locked out.
• Keep the whole body straight, eyes faced on the horizon (eyes faced on the sky).
• Hold this position for 15-30 seconds and then lower back to startposition
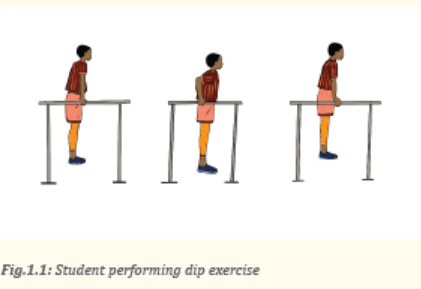
Activity 1.2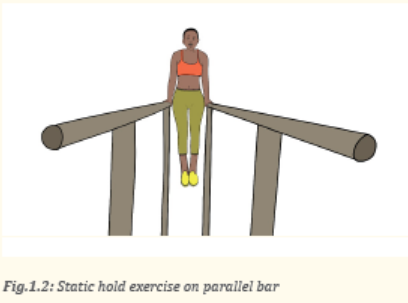
L-sits on parallel bar
The teacher asks students to perform individually L-sits following these steps:
• Stand between the dip bars and firmly grasp each side. The bars
should rest on their palm with their wrists stacked.
• Push down to lift their body upward, slowly removing their feet
from the floor until their arms is locked out.
• Raise their legs to form the letter L or 90 degrees’ angle
• Hold this position for 15-30 seconds and then lower themselves
back to the starting position.
• Repeat the exercise with adding length to their holds as you build
strength and stability.
• You need to be able to hold their own weight comfortably beforethey can add movement.
Activity 1.3
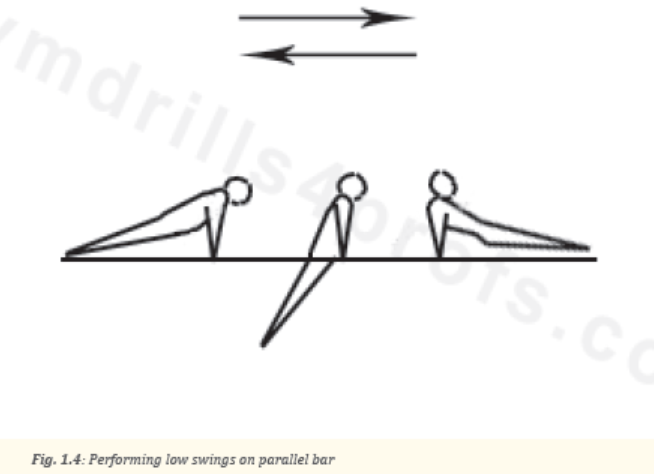
Low swings dips
• Stand between the dip bars and firmly grasp each side. The bars
should rest on your palm with their wrists stacked.
• Push down to lift their body upward, slowly removing their feet
from the floor until their arms is locked out.
• Swing the whole body front and back
• Begin with low swings under the bars and gradually increase the
height of the swing.
• The front-swing should be slightly arched until the bottom of the
swing, where you should begin to hollow.
• The backswing should be performed with a straight body until they
begin to return back to the bottom of the swing. At this point they
should begin kicking with their heels, letting their body becomeslightly arched.
Activity 1.4
Swings with assistance
The teacher assists students in swings on parallel bar (students can assist each
other after being given example)
– In the front-swing a teacher should hold the student with one hand
on their shoulder / neck area.
– With the other hand, he/she should spot the student by gently
pushing on his/her back in an upwards motion.
– This will encourage the students to push their hips up in the frontswing.
– In the backswing, the teacher should spot the student and helpensure a safe and correct backswing up to handstand.
Activity 1.5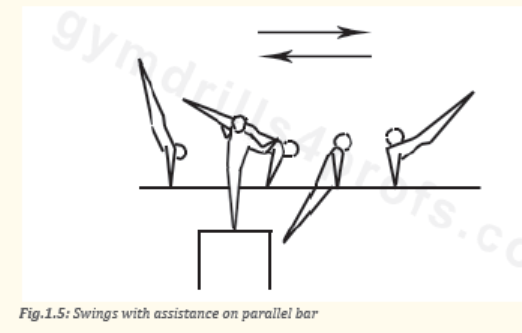
Handstand on parallel bar
Teacher as a facilitator and guide helps students to perform handstands on
parallel bar perfectly. He/she asks students to perform individually hand stand by
respecting the following steps:
• Support the body in a stable and inverted vertical position.
• Balance on the hands.
• The body is held straight with arms and legs fully extended.
• The hands are spaced approximately, the shoulder-width apart.Fig.1.6: Handstand position on parallel bar
Cool down exercises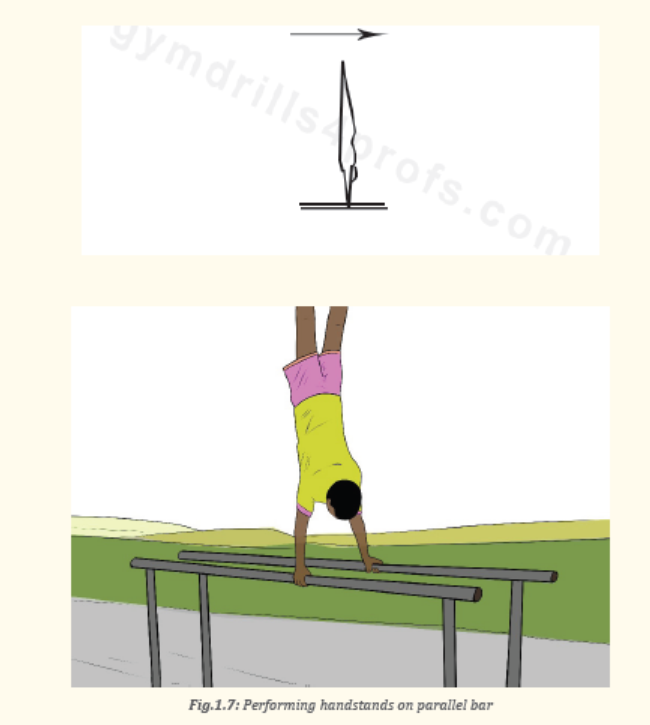
• Let students do light exercises and stretch their group of muscles by insisting on most used parts.
• Guide them while stretching their muscles systematically.
• Help them/demonstrate/correct where is necessary.
Closing discussions (RCA)
Reflect
– What are challenges/advantages did you face during handstand on
parallel bar technique exercises?
– How did you proceed to perform those exercises?
Connect
– What are conditions do you need to use handstand roll exercises?
Apply
– Where could you use handstand exercises in your daily life?
Lesson 2: Parallel bar tactics exercises
A. Learning objective
By the end of the lesson, senior five students will be able to practice confidently
parallel bar tactics exercises.
B. Teaching resources
Parallel bars, whistle, videos related to gymnastics tactical skills and stopwatch.
C. Prerequisites/Revision/Introduction
Students of senior five will learn better parallel bar tactics if they can perform well
parallel bar techniques learned in the previous lesson.
D. Learning activities
Opening discussions
- Students on semi-circle; the teacher helps them to brainstorm the importance
of applying parallel bar exercises.
- He/she checks up sports uniform and requests to remove out forbidden objects.
- He/she asks them to brainstorm different techniques learnt in previous lesson and
introduces parallel bar tactics by asking them questions related to the lesson to be
taught to awaken their motivation and interest.
- He/she invites them doing warm up and stretching before the workout.
Warm up exercises and stretching exercises
- Let students perform general warm up exercises and stretch their muscles properly.
- One student can lead others.
- Guide them while performing warm up and stretching exercises focusing on the
parts that are most being used.
- Help them/demonstrate/correct where is necessary.
E. Lesson body
Activity 1.6
Showing different tactics on parallel bar
The teacher shows videos of different tactics on parallel bar and through
brainstorming asks students to apply selected ones in the following:
Bicycle walks, traveling dips, push-ups, plyometric push-ups, push-ups with
knee drive, push-ups with spider man knee drive, shoulder tap push-ups,
single leg push-ups, L-sit pendulum, Bar to bar rotation, decline crunch,
vertical upside pull-ups, monkey bars, lateral monkey bars, L-sit typewriter
pull-ups, hanging L-sit pendulum, hanging windshield wipers.
Application activity 1.1
The teacher organizes students and instructs them how to perform the
traveling dip following steps
– Grab the bars;
– Get in the start position;
– Lower your body;
– Keep your forearms vertical and your body in slight forward lean;
– Move forward alternating arms;– Push yourself back up to the start position;
Variation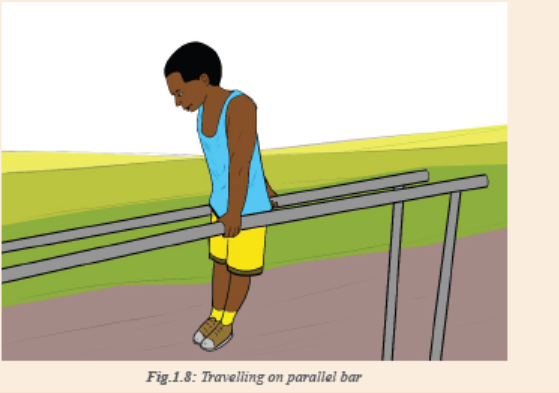
Teacher varies exercises by selecting other tactic and help students to perform it.
Cool down exercises
– Let students do light exercises and stretch their group of muscles by insisting on most used parts.
– Guide them while stretching their muscles systematically.
– Help them/demonstrate/correct where is necessary.
Closing discussions (RCA)
Reflect
– What are challenges/advantages did you face during traveling on
parallel bars tactics?
– How did you proceed to perform those exercises?
Connect
– Relate these parallel bar tactics to the techniques learnt in the previous lessons
Apply
– Where do you think to use these tactics in your daily life?
Lesson 3: Horizontal bar techniques exercises
A. Learning objective
Apply correctly horizontal bar techniques exercises.
B. Teaching resources
Horizontal bar, whistle, videos related to gymnastics tactical skills and stopwatch.
C. Prerequisites/Revision/Introduction
Students of senior five will learn better horizontal bar techniques if they can
perform parallel bar techniques and tactics learned in the previous lessons.
D. Learning activities
Opening discussions
Students on semi-circle; the teacher helps them to brainstorm the importance of
applying horizontal bar exercises.
– He/she checks up sports uniform and requests to remove out forbidden objects.
– He/she asks them to brainstorm different exercises learnt in previous lesson and
introduces horizontal bar techniques by asking them questions related to the
lesson to be taught to awaken their motivation and interest.
– He/she invites them doing warm up and stretching before the workout.
Warm up exercises and stretching exercises
– Let students perform general warm up exercises and stretch their
muscles properly.
– One student can lead others.
– Guide them while performing warm up and stretching exercises
focusing on the parts that are most being used.
– Help them/demonstrate/correct where is necessary.
E. Lesson body
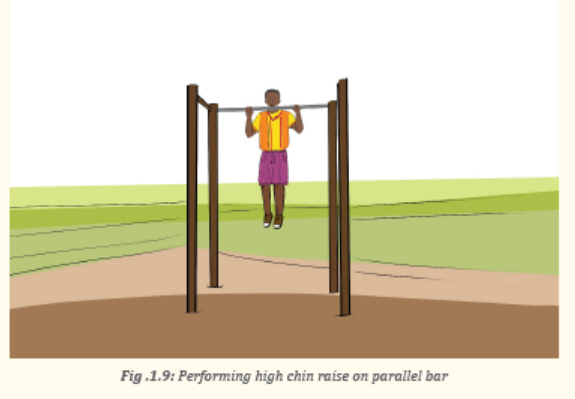
Activity 1.7
High bar chin raise
The teacher guides students to perform a high bar chin raise following the steps:
– Locate the chin raise bar;
– Find the perfect grip;
– Put their hands on the bar with their palms facing their body;
– Raise their body until their chin is above the bar;
– Lower themselves back down under control until their arms are
straight;
– Squeeze the bar tightly and flex their abs to keep control;– Do 5 repetition at least and few seconds between them.
Activity 1.8
High bar swings
The teacher organizes students and demonstrates how exercises should be performed
by following these steps:
– Hang with both hands on the bar and extend their shoulders, so
that their ears touch the shoulders.
– Their hands should be about one shoulder width apart and their
arms parallel.
– Elbows, knees and ankles should be fully extended.
– Look straight forward and keep their entire body in a perfect
straight line.
– Swing your fully extended legs forward up and contract their
abdominals a little, so that they can see their feet for a moment.
But don’t bend forward too much. Don’t lift themselves with your
arms.
– Then extend your entire body and lock your arms with their upper
body and their legs.
– Swing back without hollowing their back and keep their abdominals tight.
– Then swing forward again and repeat.– Go from horizontal level to horizontal level.
Cool down exercises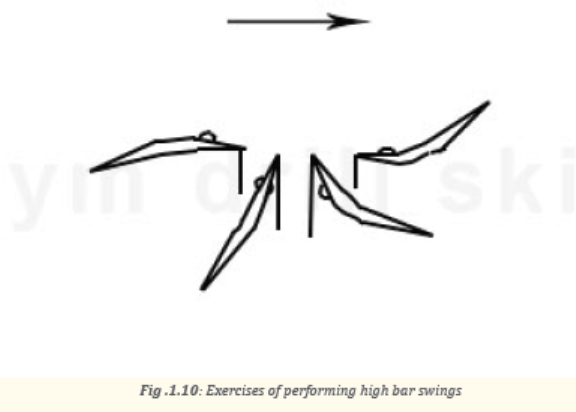
– Let students do light exercises and stretch their group of muscles by insisting on most used parts.
– Guide them while stretching their muscles systematically.
– Help them/demonstrate/correct where is necessary.
Closing discussions (RCA)
Reflect
– What are challenges/advantages did you face during the performance of
horizontal bar techniques?
– How did you proceed to perform horizontal bar techniques?
Connect
– How do you relate the techniques of high bar swings to the ones of the previous lessons?
Apply
– Where could you use horizontal bar techniques in your daily life?
Lesson 4: Horizontal bar tactics exercises
a) Learning objective
Practice confidently horizontal bar tactics exercises.
b) Teaching resources
Horizontal bar, stopwatch, whistle and videos related to gymnastics tactical skills.
c) Prerequisites/Revision/Introduction
Students of senior five will learn better horizontal bar tactics if they can perform
parallel bar techniques and tactics learned in the previous lessons.
d) Learning activities
Opening discussions
– Students on U shape formation; the teacher helps them to brainstorm the importance
of applying horizontal bar exercises.
– He/she checks up sports uniform and requests to remove out forbidden objects.
– He/she asks them to brainstorm different exercises learnt in previous lesson and
introduces horizontal bar tactics by asking them questions related to the lesson to be
taught to awaken their motivation and interest.
– He/she invites them doing warm up and stretching before the workout.
Warm up exercises and stretching exercises
– Let students perform general warm up exercises and stretch their
muscles properly.
– One student can lead others
– Guide them while performing warm up and stretching exercises
focusing on the parts that are most being used
– Help them/demonstrate/correct where is necessary.
e) Lesson body
Activity 1.9
Tactics on horizontal bar shows
The teacher shows videos of different tactics on horizontal bar and through
brainstorming asks students to apply selected one in the following
– High bar tuck swings tactics
– High bar hangs to pike tactics
Application activity 1.2
High bar hangs to pike tactics
The teacher organizes students and instructs them how to perform
individually hanging pike following steps
– Jump up to a pull-up bar with an overhand grip at a comfortable
distance.
– Bring their knees to hip height.
– As you extend their knees, bring them up to the bar as they attempt to touch
the bar with their ankles.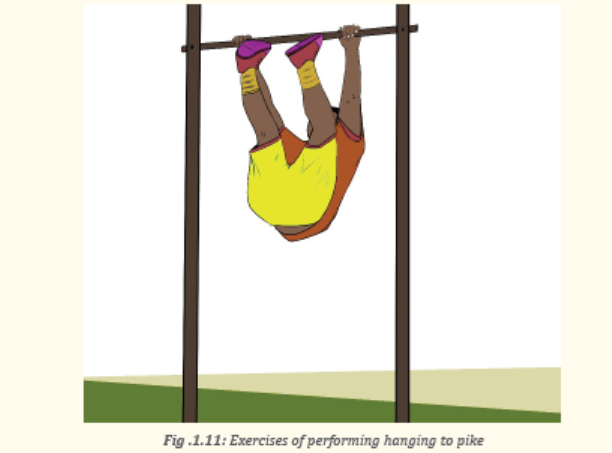
Cool down exercises
– Let students do light exercises and stretch their group of muscles by insisting on most used parts.
– Guide them while stretching their muscles systematically.
– Help them/demonstrate/correct where is necessary.
Closing discussions (RCA)
Reflect
– What are challenges/advantages did you face during horizontal bar
tactics?
– How did you proceed to perform those exercises?
Connect
– Relate these horizontal bar tactics to the techniques learnt in the
previous lessons
Apply
– Where do you think to use these tactics in your daily life?
1.5 Additional information to the teacher
Parallel bars are commonly used by gymnasts to build overall strength to help
improve performance in their respective events. Any person can use them to
increase their overall strength and build a moral impressive, capable physique.
Apart from bar moves like dips, L-sits and inverted Rows; there are many other
tactics to train to the students:
• Bicycle walks
• Traveling dips
• Push-Ups
• Plyometric Push-Ups
• Push-Ups with knee drive
• Push-Ups with Spiderman knee drive
• Shoulder tap push-ups
• Single leg push-ups
• L-sit pendulum
• Bar to bar rotation
• Decline crunch
• Vertical upside pull-ups
• Monkey bars
• Lateral monkey bars
• L-sit typewriter pull-ups
• Hanging L-sit pendulum
• Hanging windshield wipers
The horizontal bar, also known as the high bar, is a horizontally-aligned bar
used in gymnastics, upon which acts of swinging are performed.
Hanging Pike is a bodyweight exercise that works the abdominals, quadriceps,
hip flexors, lower abs and upper abdominals. When done correctly; it can effectively
target the core, hips, legs, lower body, thighs, upper legs and waist.
End unit assessment 1.6
Set exercises for students to observe how they develop tactical and technical skills
of apparatus gymnastics through parallel and horizontal bar practices.
1.7 Additional activities
1.7.1 Remedial activities
Regular performance of light parallel and horizontal bar gymnastics exercises
with agility, strength and flexibility to improve confidence of working on
gymnastics apparatuses.
1.7.2 Consolidation activities
Execute and harmonize parallel and horizontal bar gymnastics exercises with
agility, strength and flexibility.
1.7.3 Extended activities
Request students to participate in gymnastic competitions organized by the school
and evaluate their performance level.UNIT 2: ATHLETICS
Key unit competence: Develop tactical and technical skills of jumping
and apply rules and regulations of jumping.
1.1 Prerequisite (Knowledge, skills, attitudes and values)
Learners of senior five will learn better jumping exercises in athletics if
they have developed jumping techniques and abilities in senior four and
have performed other basic physical exercises learnt before.
1.2 Cross-cutting issues to be addressed
– Gender: Engage both women and men in physical activity and sports
exercises and help them to exploit their full potentials.
No activity is reserved only for women or men.
– Inclusive education: Identify the students with special education
needs, ensure interactive and inclusive discussion during practice of
physical activity and sport exercises.
– Financial education: Facilitate/guide students to make non cost
materials like ropes and balls from banana leave fibers and they can
also improvise hurdles for jumping exercises
– Standardization culture: Advise learners to use standardized
materials in prevention of injuries and accidents. Students have to
know how to choose and use safe sports clothes for their health (e.g.: safe sports shoes),
safe physical exercises (avoid bad body postures and forbidden body exercises,
adapted physical activities)
– Environment and sustainability: Train students on the culture of
protecting the environment surrounding the field/playground and
any other place they play on.
– Peace and values education: Encourage teamwork spirit, mutual
help, and respect of opinions of colleagues among learners.
– Comprehensive sexuality education: Provide physical activities and
set instructions that prevent sexual harassment, any kind of genderbased
violence like sexual abuse and physical contacts concerned with sexuality
intention in Physical Education and Sports activities.
– Genocide studies: Take time to explain to students how sports should be
used to fight against Genocide ideology and how to prevent it. E.g.: Organizing
Genocide memorial tournaments at school and giving the message related to the Genocide1.3 Guidance on introductory activity
With the help of this picture, teacher introduces the whole unit by asking questions or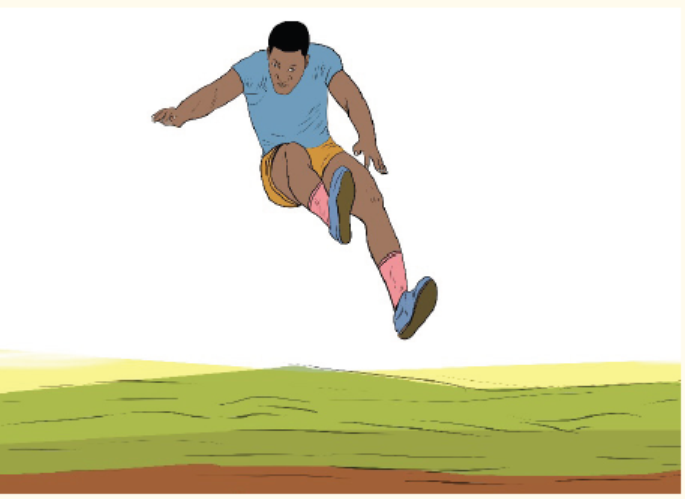
giving activity related to athletics in order to help students to predict what to be
learnt and stimulate quick thinking and reaction.
Examples of questions:
– What are your observations on the image presented to you?
– What kind of athletic sports is being done?
– Why is it important to do such kind of sports?
– Mention other related athletic sports to the current?
2.4 List of lessons/sub-heading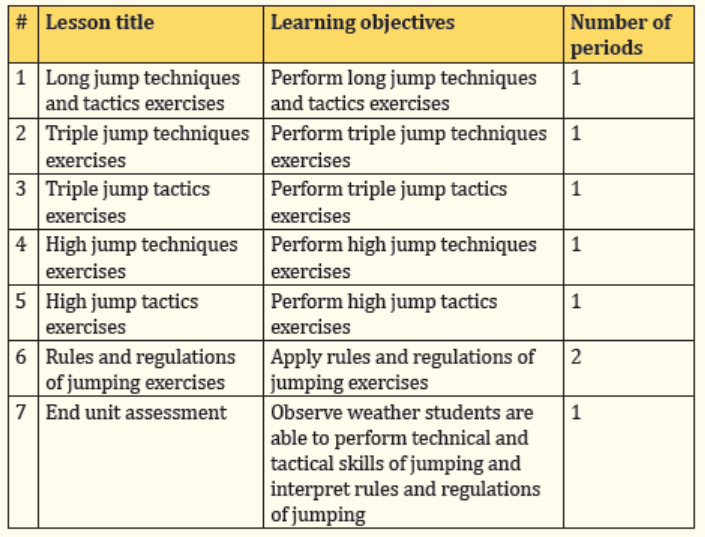
Lesson 1: Long jump techniques and tactics exercises
a) Learning objective
Perform long jump techniques and tactics exercises.
b) Teaching resources
Cones, markers, field for jumps, whistles, sand, decameter or measuring tape
and videos related to jumping tactical skills.
c) Prerequisites/Revision/Introduction
Students of senior five will learn better long jump techniques if they can perform
jumping techniques and tactics learned in senior four.
d) Learning activities
Opening discussions
– Ask questions about jumping techniques learned in senior four.
– Introduce long jump techniques.
– Invite students to start warm up exercises.
Warm up exercises and stretching exercises
– Let students perform general warm up exercises and specific warm up based
on body’s parts to be used more while performing long jump techniques and
stretch their muscles properly.
– Guide them while performing warm up and stretching exercises.
– Help them/demonstrate/correct where is necessary.
e) Lesson body
Techniques of long jump
The teacher guides students in practicing long jump techniques.
– Demonstrate how to perform the techniques accurately.
Activity 2.1
Marking Your Starting Point
• Explain to the students the following:
Ask them to decide which foot they will take off with.
– Help students to decide the takeoff foot which is the one that hits
the takeoff board;
– Generally, a right-handed long jumper takes off with the left footwhile a left-handed takes off with the right foot.
• Request students to figure out the number of strides they will take.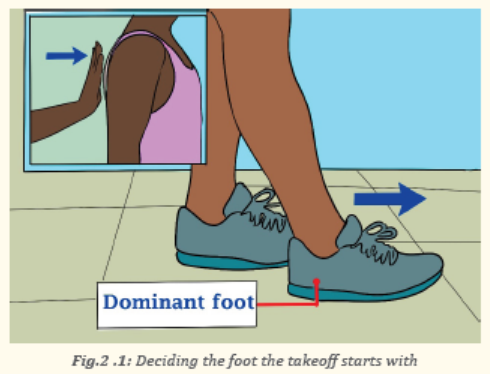
– Help students to figure the number of strides that fits to their age
– Let them practice their run-up several times to determine how many strides
they will take before performing the jump
• Help students to determine their starting point- Help students to mark the point of their first stride.
– Request students to place markers at their starting point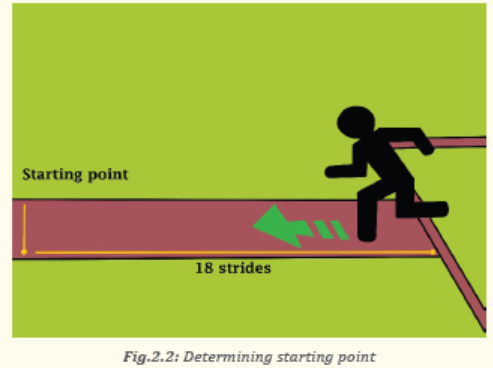
– Students can put cones, small flags, brightly colored rocks, or
colored tape at their starting point.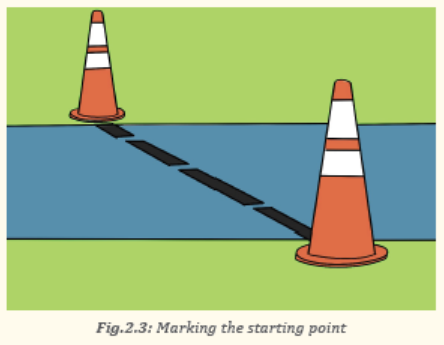
Activity 2.2
Setting up the Approach run
Request students to begin with their takeoff foot forward. Ask students to:
– Lean forward slightly and stand with their back to the pit.
– Make sure they are positioned in the middle of the track.
Help students to run down the track.
– Remind the students that acceleration is key, and after a few strides
they should be in an upright sprinting position.
– Ask students to keep their head and eyes up rather than looking
down.
– Request students to run full speed until they reach the takeoffboard.
Lower your center of gravity on the second two last steps.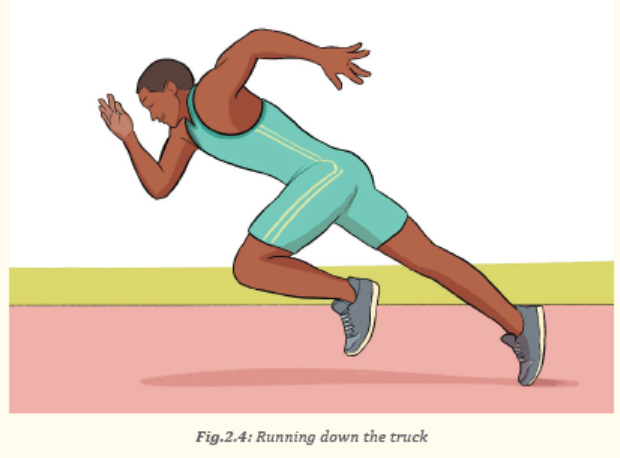
– On two last strides, request students to place their foot flat on the
ground, lower their hips, bend their knee, and flex their ankle to lower their center of gravity.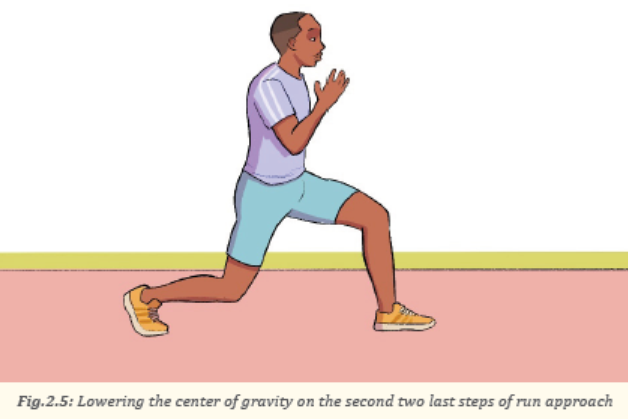
Remind students to make the last stride shorter.
Request students to:
– Shorten their last step to maintain speed.
– Place their foot flat on the ground out in front of their body.
– Flex the joints of their leg to raise their center of gravity.
Activity 2.3
Taking Off
Plant the takeoff foot flat on the ground.
– Remind the students that it is important that they plant their
takeoff foot flat on the ground, rather than using their heel or toe.
– Remind students that if they take off heel-first, their speed will be
reduced.
– Tell them that if they take off on their toes, their jump will beunstable and they are also at a higher risk for injury.
Swing the lead knee and opposite arm upward.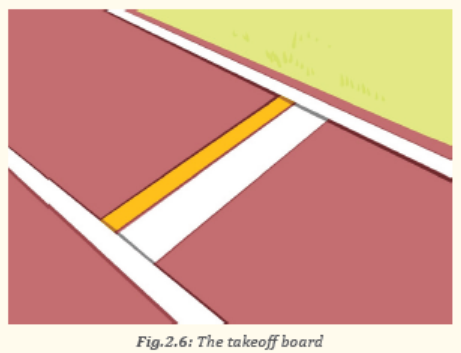
Request students to;
– Increase their force against the ground, swing their lead knee
(the one they takeoff with) and their opposite arm upward.– Keep the rest of their body in an upright position.
Jump for distance, not height.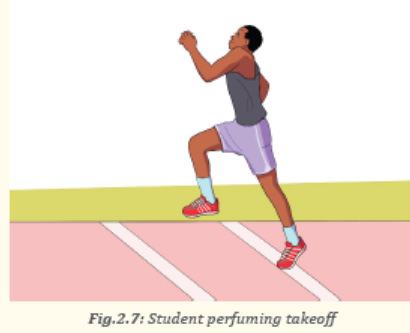
Request students to:
– Concentrate on making their jump as long as possible rather
than as high as possible.
– Look ahead of them, rather than down at the board or the sand
to keep their momentum moving forward.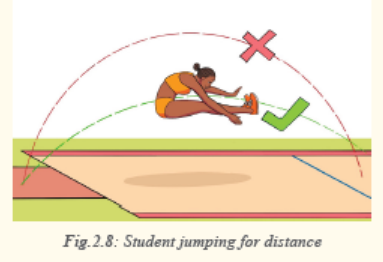
Activity 2.4
Landing the long jump
– Remind the students that the distance is measured by the part of
their body that lands the furthest back,
– Instruct them to try their best to avoid falling backwards ortouching their hands to the pit behind their body.
Cool down exercises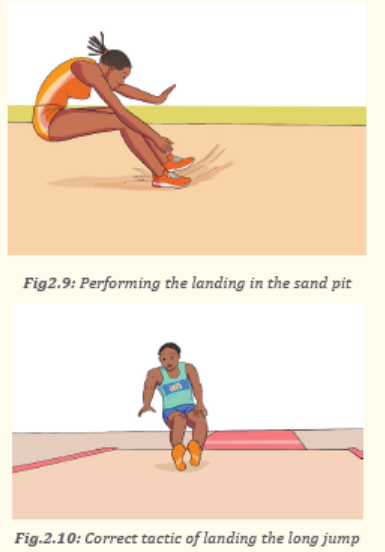
– Let students do light exercises and stretch their group of muscles
by insisting on most used parts.
– Guide them while stretching their muscles systematically.
– Help them/demonstrate/correct where is necessary.
Closing discussions (RCA)
Reflect
– What are challenges/advantages did you face during performing long
jump techniques and tactics exercises?
– How did you proceed to perform those exercises?
Connect
– Relate these long jump techniques and tactics to the techniques learnt
in the previous lessons
Apply
– Where do you think to use these techniques and tactics in your daily life?
Lesson 2: Triple jump techniques exercises
a) Learning objective
Perform triple jump techniques exercises.
b) Teaching resources
Cones, field for jumps, whistles, sandpit, decameter or measuring tape and
videos related to jumping tactical skills.
c) Prerequisites/Revision/Introduction
Students of senior five will learn better triple jump techniques if they can
perform long jumping techniques and tactics learned in the previous lesson.
d) Learning activities
Opening discussions
• Ask questions about jumping techniques learned previously.
• Introduce triple jump techniques.
• Invite students to start warm up exercises.
Warm up exercises and stretching exercises
– Let students perform general warm up exercises and specific warm up
based on body’s parts to be used more while performing triple jump techniques
and stretch their muscles properly.
– The specific warm up should focus on practicing single leg –hoping,
trying high knees, jumping drills
– Guide them while performing specific warm up and stretching
exercises.
– Help them/demonstrate/correct where is necessary
e) Lesson body
Activity 2.5
Triple jump techniques
The teacher as facilitator and guide organizes students and facilitates them
to perform triple jump techniques correctly following the steps:
– Hopping
– Stepping
– Jumping
Run up to the board and jump.
This will begin the first phase: “Hop”
Tell to the students to:
– Use their dominant foot.
– Get a running start (lasting about 17-18 strides) so they can
forcefully jump off the board.
– Pull their opposite foot up behind them.
– Make sure not to run beyond the board during their hop, as doing
so is considered a foul.– For the hop and skip, they will begin their jump with the same foot.
Request students to keep their arms extended in front of their body,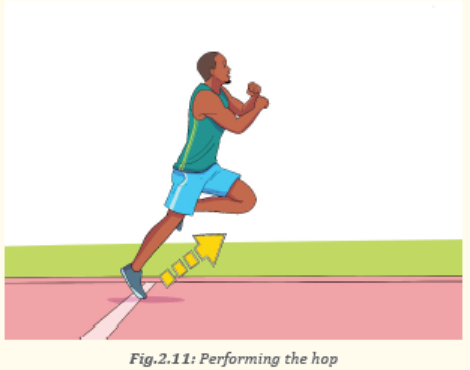
tell them the following instructions:
– While they are airborne during the hop, skip, and jump,
– Never let their hands drop lower than their chest or higher than their chin.
– Move both arms forward, as if they are grabbing something in front of them.
– If their arms are too high, they are more likely to fall out of position
when they hit the ground.
– Do not position they arms behind their back. Doing this will slow them
down during takeoff and landing.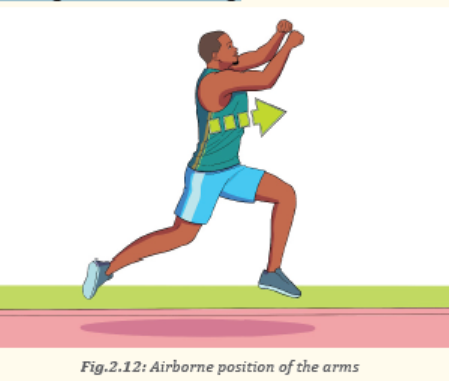
Guide students while hitting the ground with their foot flat by instructing the following:
– During the hop and step, explain to the students that they will land
with their dominant foot flat or roll from heel to toe.
– Request students not to put too much pressure on either their heel or toes.
– Tell them that once they have touched the ground, roll forward onto the balls
of their feet and prepare for the step.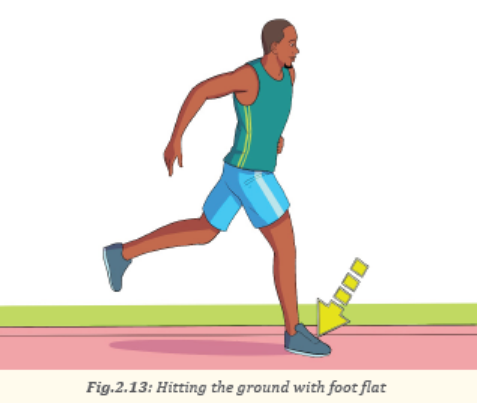
Guide students while starting their step with the same foot with the
following instructions:
– With their dominant foot, tell students to jump with their back leg
extended behind the body.
– Explain to them that they will keep your back leg’s heel up to prepare for the landing.
– Request them to land with their back leg forward to complete the step and
prepare for the final phase: jump.
– Ask them to keep their knee high and parallel to their hips for correct form.
– For the step, tell to the students that their goal is to get off the ground as soon as possible.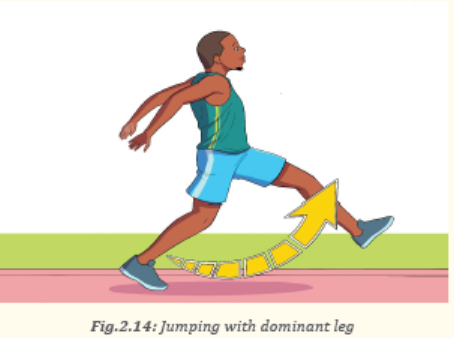
Guide students when starting their steep with the same foot in the
following ways:
– Ask students to begin the final phase (jumping) with their opposite
foot, instruct the them that during the jump, they will leap with their
opposite (formerly back foot).
– Tell them to be close to the sandpit.
– Ask them to bring both feet together with their knees parallel to their
chest as they jump into the pit.
– Unlike the first two steps, request them to land the jump with theirheels first.
Application activity 2.1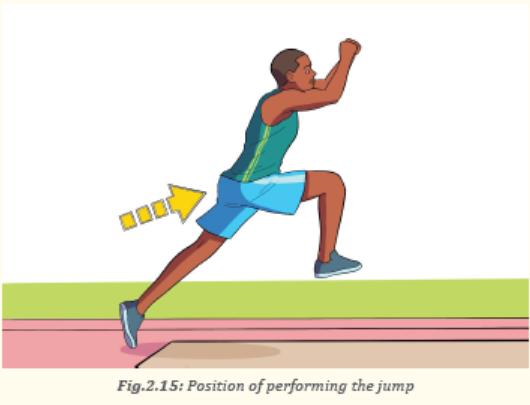
Students on extended line perform individually triple jump exercises
following all learnt steps
Cool down exercises
– Let students do light exercises and stretch their group of muscles by
insisting on most used parts.
– Guide them while stretching their muscles systematically.
– Help them/demonstrate/correct where is necessary.
Closing discussions (RCA)
Reflect
– What are challenges/advantages did you face during performing triple
jump techniques?
– How did you proceed to perform those exercises?
Connect
– Relate these triple jump techniques to the techniques learnt in the
previous lessons.
Apply
– Where do you think to use these techniques in your daily life?
Lesson 3: Triple jump tactics exercises
a) Learning objective
Perform triple jump tactics exercises.
b) Teaching resources
Cones, field for jumps, whistles, sandpit, decameter or measuring tape and
videos related to jumping tactical skills.
c) Prerequisites/Revision/Introduction
Students of senior five will learn better triple jump tactics if they can perform
triple jumping techniques learned in previous lesson.
d) Learning activities
Opening discussions
– Ask questions about jumping techniques learned previously.
– Introduce triple jump tactics.
– Invite students to start warm up exercises.
Warm up exercises and stretching exercises
– Let students perform general warm up exercises and specific warm up
based on body’s parts to be used more while performing triple jump
tactics and stretch their muscles properly.
– Guide them while performing warm up and stretching exercises.
– Help them/demonstrate/correct where is necessary.
e) Lesson body
Activity 2.6
Triple jump tactics
The teacher as facilitator and guide explains to the students that to better
perform triple jump exercises, a combination of tactics needs to be applied.
He /she then helps students on how to apply the following
– Accelerate run up to the take-off board;
– Simplify a hope-step-jump sequence;
– Maintain speed throughout the jump;
– Focus on even phases in length and rhythm;
– Hold back on the height of the hop;
– Hop with the heel close to butt;
– Bound not step during the step phase;
– Hold up the head and torso during the step and jump take-offs;
– Hop and step further with flat-foot landings;– Heels hit the sand not toes.
Cool down exercises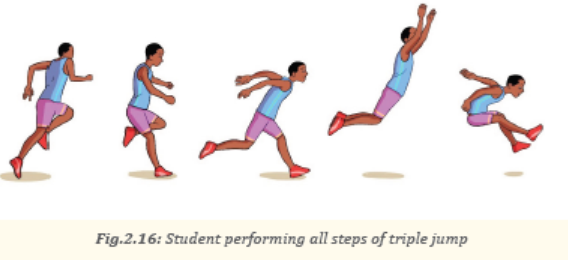
– Let students do light exercises and stretch their group of muscles by
insisting on most used parts.
– Guide them while stretching their muscles systematically.
– Help them/demonstrate/correct where is necessary.
Closing discussions (RCA)
Reflect
– What are challenges/advantages did you face during performing triple
jump tactic exercises?
– How did you proceed to perform those exercises?
Connect
– Relate these triple jump tactics to the techniques learnt in the previous
lessons
Apply
– Where do you think to use these tactics in your daily life?
Lesson 4: High jump techniques exercises
a) Learning objective
Perform high jump techniques exercises.
b) Teaching resources
Cones, Field for jumps, whistles, measuring tape, videos related to jumping
tactical skills, hurdles, improvised hurdles and mattress.
c) Prerequisites/Revision/Introduction
Students of senior five will learn better high jump techniques if they can
perform triple jumping techniques learned in previous lesson.
d) Learning activities
Opening discussions
– Ask questions about jumping techniques learned previously.
– Introduce high jump techniques.
– Invite students to start warm up exercises.
Warm up exercises and stretching exercises
– Let students perform general warm up exercises and specific warm up
based on body’s parts to be used more while performing high jump
techniques and stretch their muscles properly.
– Guide them while performing warm up and stretching exercises.
– Help them/demonstrate/correct where is necessary.
e) Lesson body
Explain to the students that the high jump is a track and field event in
which competitors must jump unaided over a horizontal bar placed at
measured heights without dislodging it.
High jump techniques
Activity 2.7
Scissor kicks technique
Help students to perform the technique by following the basic steps
for doing the scissor kick technique in the high jump by respecting the
following instructions:
– Set a run-up of between 7 to 11 steps.
– These steps should be in a straight line.
– The line should be around 25-30 degrees when compared with the bar.
– Request students to start their run from a consistent starting point.
– Ask students to keep their body tall and Centre of gravity high off
the ground.
– As they approach the bar, tell them that their legs should be
accelerating quicker.
– The last two steps should be the quickest.
– Remind them that their aim is to jump as high as possible.
– Ask them to drive their lead leg up with their knee (knee drive)
past the horizontal line of the bar.
– Tell them that once their lead leg is over, kick the other foot over the bar.– Remind them to land on their feet to complete the jump.
Activity 2.8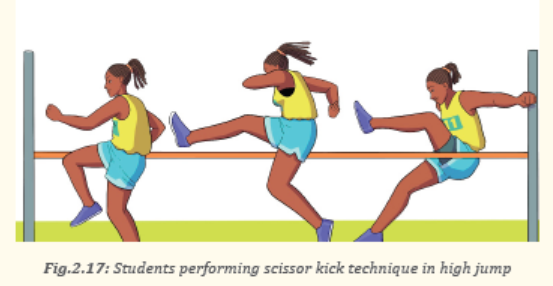
Belly roll high jump technique
As facilitator and a guide, organize students on the line and help them to
perform hurdle clearance.
– Tell the student to run toward the bar;
– Request students to place the lead leg at the last step;
– Request students to jump and slop with that leg
– Remind students to hop the supporting leg
– Remind students to roll their belly over the bar while facing down
– Request students to land with the hooped leg– Ask students to turn to receive on their back
Activity 2.9
Back roll high jump technique or Fosbury
The teacher organizes students accordingly and facilitates them to apply
the basics of Fosbury.
– Train to perfecting the run;
– Advise students to run in “Shape” according to their dominant legs;
– Students with right dominant leg should be to the right of mat;
– Students with left dominant leg should be to the left of mat;– Tell students to use the non-dominant foot to push off;
Request students to:
Drive the knee up;
– Pivot the body to face the sky;
– Tilt the head and upper back toward the mat;
– Arch your back up and lift your hips over the bar;
– Lift their feet up and over;
– Keep their arms close to their body;– Touch the mat with their back.
Cool down exercises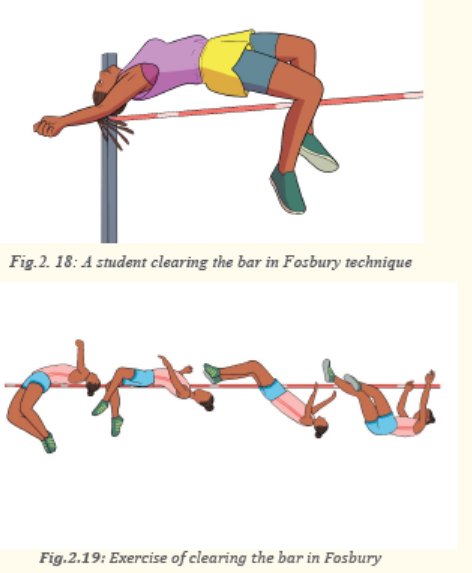
– Let students do light exercises and stretch their group of muscles by
insisting on most used parts.
– Guide them while stretching their muscles systematically.
– Help them/demonstrate/correct where is necessary.
Closing discussions (RCA)
Reflect
– What are challenges/advantages did you face during performing high
jump techniques?
– How did you proceed to perform those techniques exercises?
Connect
– Relate these high jump techniques to the techniques learnt in the
previous lessons.
Apply
– Where do you think to use these high jump techniques in your daily
life?
Lesson 5: High jump tactics exercises
a) Learning objective
Perform high jump tactics exercises.
b) Teaching resources
Cones, field for jumps, whistles, sand, measuring tape, videos related to
jumping tactical skills and Improvised hurdles.
c) Prerequisites/Revision/Introduction
Students of senior five will learn better high jump tactics if they can perform
high jump techniques learned in previous lesson.
d) Learning activities
Opening discussions
– Ask questions about jumping techniques learned previously.
– Introduce high jump tactics.
– Invite students to start warm up exercises.
Warm up exercises and stretching exercises
– Let students perform general warm up exercises and specific warm up
based on body’s parts to be used more while performing high jump
techniques and stretch their muscles properly.
– Guide them while performing warm up and stretching exercises.
– Help them/demonstrate/correct where is necessary.
e) Lesson body
Explain to the students that to overcome the high jump techniques,
you need to add tactical aspects that include the following aspects:
– How perfecting the Run;
– How clearing the bar using techniques acquired;
– How landing on the mat properly.
To better perfect the running technique before students attempt to jump
over anything, they need to practice by running towards a gymnastics mat
and behaving as if there was a bar in front of it.
Activity 2.10
How perfecting the Run
Prepare to run towards the mat.
Request students to do the following:
– To be sure to run in a “J” shape;
– To run straight toward the corner of the mat;
– To begin to curve so they will eventually be parallel with the bar
after about 3 strides;– Do not accelerate or decelerate.
Jump towards the mat.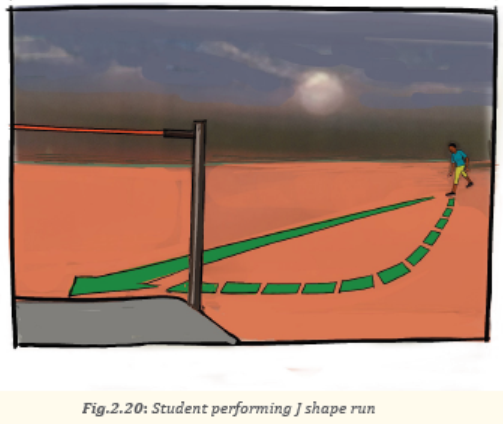
Explain to the students the following:
– Tell them that this can also be called a “push off.”
– Request them to push off into the air with their non-dominant foot.
– Tell them that the non-dominant leg will automatically be extended asthey jump and they will drive up their opposite knee.
Activity 2.11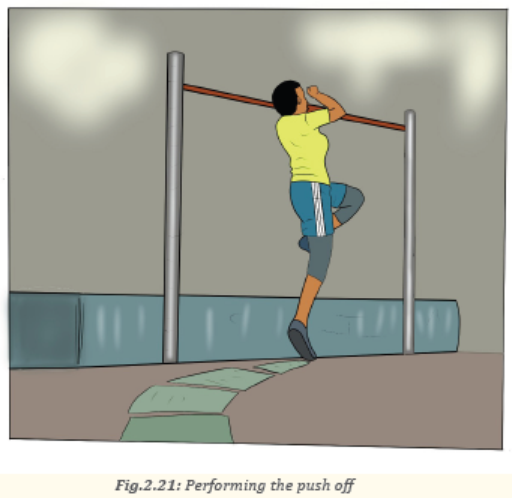
How clearing the bar using techniques acquired
Prepare to launch yourself over the bar
Explain to the students that:
– When they have finished the “J” run and are next to the mat, rotate
their back to the bar for the Fosbury Flop.
– As they drive their knee up and push off from their non-dominantleg, pivot their body to face the sky.
Clear the bar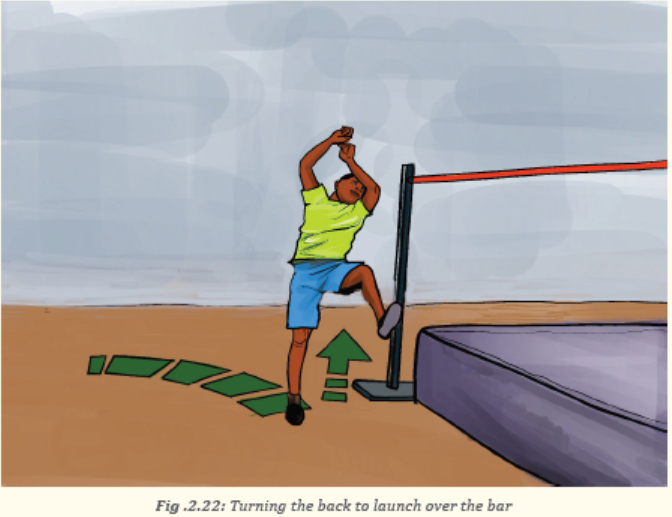
During practice request students to respect the following:
– Tilt their head and upper back toward the mat.
– Keep Angle of their head back and keep their chin un-tucked as they
clear the bar to avoid injury.
– Arch their back up.
– As they arch and lift their hips over the bar, their head will fall back.
– After their hips have cleared the bar they will naturally tuck their head
to their chest to help lift their feet over.
– To lift their feet up and over. Remind them that timing is critical here
as there may only be a small amount of clearance for getting their legs
over the bar.
– Tell them that as their hips cross the bar and come down, give their
legs a quick kick up and over to clear the bar.
– Try to keep their arms close to their body for a more solid center ofgravity.

Activity 2.12
How landing on the mat properly.
During practice, tell to the students the following;
– Touch the mat with their upper back first.
– After clearing the bar to land on their upper back and shoulders to
avoid injury.
– The rest of their body to follow and it may feel right to let the
movement turn into a backward tumble.
– To relax and try to roll into the tumble.
– push the roll to either the left or right side of their upper back
and put their body’s weight over the respective shoulder so the
pressure is distributed away from the neck.
– Keep their mouth closed. To avoid biting of their tongue.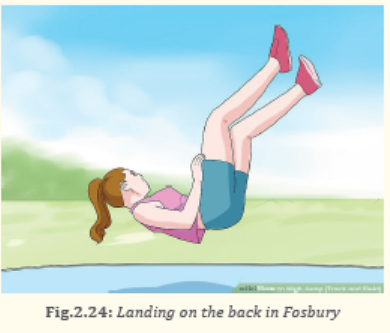
Cool down exercises
– Let students do light exercises and stretch their group of muscles by
insisting on most used parts.
– Guide them while stretching their muscles systematically.
– Help them/demonstrate/correct where is necessary.
Closing discussions (RCA)
Reflect
– What are challenges/advantages did you face during high jump tactics
exercises?
– How did you proceed to perform those exercises?
Connect
– Relate these high jump tactics exercises to the techniques learnt in the
previous lessons.
Apply
– Where do you think to use these tactics in your daily life?
Lesson 6: Rules and regulations of jumping exercises
a) Learning objective
Apply rules and regulations of jumping exercises.
b) Teaching resources
Cones, field for jumps, whistles, sand, decameter or measuring tape,
videos related to jumping tactical skills and flags (red, green and white).
c) Prerequisites/Revision/Introduction
Students of senior five will apply rules and regulations of jumping exercises
if they can perform jumping techniques and tactics learned in previous lesson.
d) Learning activities
Opening discussions
– Ask questions about athletic rules and regulations learned previously.
– Introduce triple jump techniques.
– Invite students to start warm up exercises
Warm up exercises and stretching exercises
– Let students perform general warm up exercises.
– Guide them while performing warm up and stretching exercises.
– Help them/demonstrate/correct where is necessary.
e) Lesson body
Activity 2.13
Rules and regulations of jumping
As a facilitator, help students in the following ways:
– Form groups of five students.
– Assign to groups formed the expressions to discuss.
– Name the groups by numbers 1, 2, 3, 4, 5, …
a) Odd numbers groups discuss Rules and regulations of long jump.
b) Even numbers groups discuss Rules and regulations of high jump.
Pass around groups by guiding and facilitating students.
– Ask groups to present their findings to the whole class by requesting
the group representative to write them on the chalkboard or flip
chart.
– Enable the class to ask questions related to the presented findings.
Initially, request the members of the groups which have presented to
respond to the questions asked; if they are not able to clarify, ask other
groups to contribute.
– After group’s presentation, teacher as a facilitator make a summary
of student’s findings and complete their information accordingly.
Application activity 2.2
Let’s students interpret the rules and regulations by becoming officials:
- Organize small competitions, some students become athletes (jumpers)
in different jumping competitions (long jumps and high jumps) and others
become officials where they will interpret rules.
- After some attempts, students respectively interchange roles.
Cool down exercises
– Let students do light exercises and stretch their body
– Guide them while stretching their muscles systematically.
– Help them/demonstrate/correct where is necessary.
Closing discussions (RCA)
Reflect
– What are challenges/advantages did you face during acting as judges?
– How did you proceed to perform that task?
Connect
– Relate these athletic rules and regulations to what learnt in the previous
lessons.
Apply
– Where do you think to use these athletic rules and regulations in your
daily life?
Summary of the unit
This unit covers technical and tactical skills of jumping. It provides horizontal
jump techniques and tactics of performing long jump and triple jump.
High jump tactics are also covered in this unit to help students performing
tactically scissor, belly roll and Fosbury. Applying rules and regulations of
jumping has also been dealt within the unit.
Techniques of long jump include:
– Marking the starting point,
– Setting up the approach run,
– Taking off,
– Landing the long jump.
Triple jump techniques include:
– The hoping
– The stepping
– The jumping
Triple jump tactics include:
– Accelerate run up to the take-off board;
– Simplify a hope-step-jump sequence;
– Maintain speed throughout the jump;
– Focus on even phases in length and rhythm;
– Hold back on the height of the hop;
– Hop with the heel close to butt;
– Bound not step during the step phase;
– Hold up the head and torso during the step and jump take-offs;
– Hop and step further with flat-foot landings;
– Heels hit the sand not toes.
High jump techniques include:
– Scissor
– Belly roll
– Fosbury
High jump tactics:
– How to perfect the run;
– How to clear the bar;
– How to land properly.
2.5 Additional information to the teacher
The long jump is a track and field event in which athletes combine speed,
strength and agility in an attempt to leap as far as possible from a takeoff point.
Along with the triple jump, the two events that measure jumping for distance
as a group are referred to as the “horizontal jumps”.
Techniques of long jump
There are five main components of the long jump: the approach run,
the last two strides, takeoff, action in the air, and landing.
The approach run: The approach run is aimed to gradually accelerate to a
maximum controlled speed at takeoff
Last two steps: The objective of the last two steps is to prepare the body
for takeoff while conserving as much speed as possible.
Takeoff: The objective of the takeoff is to create a vertical impulse through
the athlete’s center of gravity while maintaining balance and control.
There are four main styles of takeoff: the kick style, double-arm style,
sprint takeoff, and the power sprint or bounding takeoff.
Kick: The kick style takeoff is where the athlete actively cycles the leg before
a full impulse has been directed into the board then landing into the pit.
This requires great strength in the hamstrings. This causes the jumper
to jump to large distances.
Double-arm: The double-arm style of takeoff works by moving both arms
in a vertical direction as the competitor takes off. This produces a high
hip height and a large vertical impulse.
Sprint
The sprint takeoff is the style most widely instructed by coaching staff.
This is a classic single-arm action that resembles a jumper in full stride.
It is an efficient takeoff style for maintaining velocity through takeoff.
Power sprint or bounding
The power sprint takeoff, or bounding takeoff, is one of the more common elite styles.
Very similar to the sprint style, the body resembles a sprinter in full stride.
However, there is one major difference. The arm that pushes back on takeoff
(the arm on the side of the takeoff leg) fully extends backward,
rather than remaining at a bent position.
This additional extension increases the impulse at takeoff.
The “correct” style of takeoff will vary from athlete to athlete.
Action in the air and landing
There are three major flight techniques for the long jump: the hang, the sail,
and the hitch-kick.
The triple jump is a track-and-field competition in which athletes attempt
to cover the farthest distance using a running start and sequence of three jumps
The triple jump requires the competitor to complete a long jump in three
stages: the hop, the step and the jump. This is done from a running start,
much like the beginning of the long jump.
Triple jump techniques
There are four important sections of the triple jump that athletes must practice
in order to perform a successful jump.
Approach: This is arguably the most important part of a triple jump. The
athlete sprints down the runway to the take-off line, which is where the
jump is measured from. This part is important as they need to maintain
a good speed throughout the whole jump.
Hop: This part of the jump begins when the athlete leaves the take-off mark on one
foot, and propels themselves forwards with as much momentum as possible.
Step: When the athlete lands the hop stage, the step stage begins.
They have to use the momentum from the hop to jump forwards and upwards.
They should pull their leg up as high as possible to make the furthest jump they can.
Jump: When the athlete’s step has landed, they move onto the jump.
This part is very similar to the long jump, and they will land in a sandpit as they finish.
The jumper should try not to sit backwards or place their hands behind their feet
in the sandpit after they land to help with measuring the distance.
End unit assessment 2.6
Setting exercises and games aimed to observe whether students are able
to perform technical and tactical skills of jumping and interpret rules and
regulations of jumping
2.7 Additional activities
2.7.1 Remedial activities
Regular performance of horizontal and high jump gymnastics exercises with agility,
strength and flexibility to improve confidence of working on gymnastics apparatuses.
2.7.2 Consolidation activities
Execute and harmonize horizontal and high jump gymnastics exercises with agility,
strength and flexibility.
2.7.3 Extended activities
Request students to participate in gymnastic competitions organized by the school
and evaluate their performance level.UNIT 3: FOOTBALL
Key unit competence: Develop football tactical skills
3.1 Prerequisite (Knowledge, skills, attitudes and values)
Students of senior five will develop better football tactical skills if they can
perform basics physical exercises and play football by using technical skills learned in senior four.
3.2 Cross-cutting issues to be addressed
– Gender: Engage both women and men in physical activity and sports
exercises and help them to exploit their full potentials. No activity is
reserved only for women or men.
– Inclusive education: Identify the students with special education
needs, ensure interactive and inclusive discussion during practice of
physical activity and sport exercises.
– Financial education: Facilitate/guide students to make non cost
materials like ropes and balls from banana leave fibers and they can
also improvise hurdles for jumping exercises
– Standardization culture: Advise learners to use standardized
materials in prevention of injuries and accidents. Students have to
know how to choose and use safe sports clothes for their health (e.g.:
safe sports shoes), safe physical exercises (avoid bad body postures
and forbidden body exercises, adapted physical activities)
– Environment and sustainability: Train students on the culture of
protecting the environment surrounding the field/playground and any
other place they play on.
– Peace and values education: Encourage teamwork spirit, mutual
help, and respect of opinions of colleagues among learners.
– Comprehensive sexuality education: Provide physical activities and
set instructions that prevent sexual harassment, any kind of gender based
violence like sexual abuse and physical contacts concerned with
sexuality intention in Physical Education and Sports activities.
– Genocide studies: Take time to explain to students how sports should
be used to fight against Genocide ideology and how to prevent it. E.g.:
Organizing Genocide memorial tournaments at school and giving the
message related to the Genocide.
3.3 Guidance on introductory activity
Before introducing the lesson one of this unit, teacher must introduce the whole unit.
The teacher as a guide, facilitator and expert, asks questions or gives activity related
to football in order to help students to predict what to be learnt in the whole unit.
He/she may use a selected picture or scenario which helps to quick thinking and reaction.3.4 List of lessons/sub-heading
Lesson 1: Players’ position exercises
a) Learning objective
Take players’ position in the playing ground and identify responsibilities of each position.
b) Teaching resources
Balls, football playground, cones, whistle, watch and videos related to football tactical skills.
c) Prerequisites/Revision/Introduction
Students of senior five will develop better Players’ position exercises if they can perform
basic physical exercises and play football by using technical skills learned in senior four.
d) Learning activities
Opening discussions
– Ask questions about football techniques as been learned in senior four.
– Through brainstorming, introduce player’s position in football game.
– Invite students to start warm up exercises.
Warm up exercises and stretching exercises
– Let students perform general warm up exercises and specific warm up
based on body’s parts to be used more while performing tactical skills
and stretch their muscles properly.
– Guide them while performing warm up and stretching exercises.
– Help them/demonstrate/correct where is necessary.
e) Lesson body
Identifying and taking player’s positions in football.
– Trough brainstorming, help students to identify player’s positions in
the field of football.
– Guide students to individually pass by each position in the field.– Help the students to highlight all player’s positions.
Activity 3.1
Discussing the responsibilities of each player’s position
- Form 8 groups of mixed students;
- Each group should be composed by an odd number of students;
- Name the groups with letters A, B, C, D, E, F, G, H;
- Assign groups A and C to discuss on goalkeeper’s responsibilities;
- Assign groups B and D to discuss on defenders’ responsibilities;
- Assign groups E and G to discuss on midfielders’ responsibilities;
- Assign groups F and H to discuss on forwards responsibilities;
- Pass around groups by guiding and facilitating students;
- Ask groups to present their findings to the whole class by requesting the
group representative to write them on the chalkboard or flip chart;
- After group presentations, the teacher facilitates students to make a summary of
players’ position responsibilities.
Cool down exercises
– Let students do light relaxation exercises.
Closing discussions
Reflect
– What are advantages of players’ position exercises?
– How did you proceed to perform those exercises of positioning and
controlling the ball?
Connect
– Why is it important to have players’ position in football?
Apply
– How will you apply positioning exercises in your daily life?
Lesson 2: System formations exercises
a) Learning objective
Apply system formations.
b) Teaching resources
Balls, football playground, cones, whistle, watch and videos related to football tactical skills.
c) Prerequisites/Revision/Introduction
Students of senior five will develop better system formations if they can
perform taking different positions in football pitch and play football by using technical
skills learned in previous lessons.
d) Learning activities
Opening discussions
– On U shape formation, ask questions about football techniques as have
been learned in senior four.
– Through brainstorming, introduce system formations in football game.
– Invite students to start warm up exercises.
Warm up exercises and stretching exercises
– Let students perform general warm up exercises and specific warm up
based on body’s parts to be used more while performing tactical skills
and stretch their muscles properly.
– Guide them while performing warm up and stretching exercises.
– Help them/demonstrate/correct where is necessary.
e) Lesson body
Types of system formations most used in football
Help students in group formed to explain different system formations.
Formations 4-3-3/4-2-3-1/4-5-1 where by:
– Goalkeeper occupies post number 1;
– Right Back occupies post number 2;
– Left Back occupies post number 3;
– 2 Center Backs occupy posts number 4 and 5;
– Defensive Midfielder occupies post number 6;
– Right Winger/forward occupies post number 7;
– Center Midfielder occupies post number 8;
– Striker occupies post number 9;
– Attacking Midfielder occupies post number 10;– Left Winger/forward occupies post number 11.
Formation 4-4-2 where by:
– Goalkeeper occupies post number 1;
– Right Back occupies post number 2;
– Left Back occupies post number 3;
– 2 Center Backs occupy posts number 4 and 5;
– Central Midfielder (more defensive) occupies post number 6;
– Right Midfielder/Winger/forward occupies post number 7;
– Central Midfielder occupies post number 8;
– Striker occupies post number 9;
– Central Forward(withdrawn/link) occupies post number 10;– Left Midfielder/Winger occupies post number 11.
Formations 3-5-2/5-3-2 where by: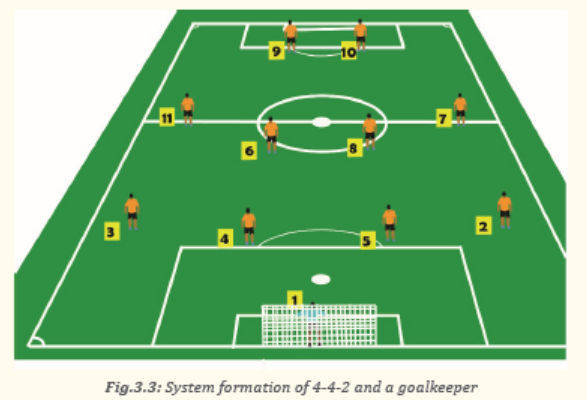
– Goalkeeper occupies post number 1;
– Right Center Back occupies post number 2;
– Left Wing Back occupies post number 3;
– Left Center Backs occupies post number 4;
– Center Back/Sweeper occupies post number 5;
– Defensive Midfielder occupies post number 6;
– Right Wing Back occupies post number 7;
– Central Midfielder occupies post number 8;
– Striker occupies post number 9;
– Attacking Midfielder occupies post number 10;– Central Forward occupies post number 11.
Application activity 3.1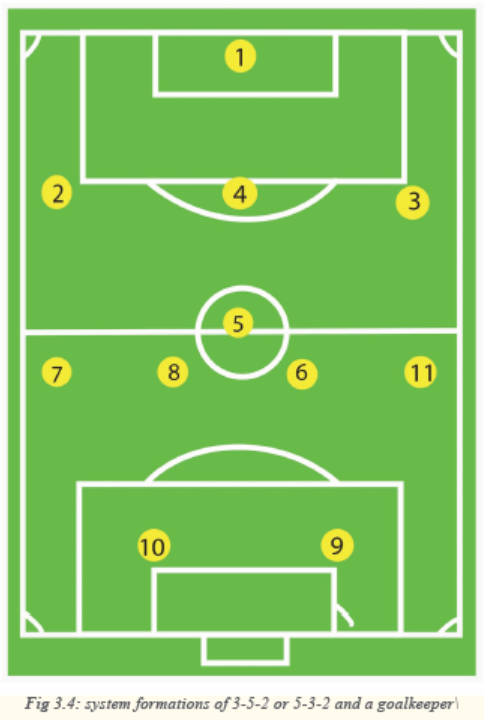
Small game in which students apply system formations
Tell the students to form two teams.
- Ask them to take positions according to the system told.
- Let them playing assuming every post responsibility.
- Make necessary substitutions.- Correct where it avails required.
Cool down exercises
– Let students practice cool down exercises and light stretching by
focusing on used muscles.
– Guide them how they can stretch their muscles accordingly.
Closing discussions (RCA)
Reflect
– How did you proceed to succeed exercises of player’s position and
system formation in Football?
– What are the challenges did you face while performing players’ position
and system formation exercises in Football?
– Describe different types of system formation used in football
Connect
– How players’ position and system formation exercises are useful in
football game?
Apply
– How could you apply tactics of players’ position and system formation
exercises in football help you to become best players in your society?
Lesson 3: Ball possession and movement exercises
a) Learning objective
Perform ball possession and movement exercises.
b) Teaching resources
Balls, football playground, cones, whistle, watch and videos related to football tactical skills.
c) Prerequisites/Revision/Introduction
Students of senior five will develop better ball possession and movement
exercises if they can perform basics physical exercises and play football by
using technical skills learned in senior four.
d) Learning activities
Opening discussions
– Ask questions about football technique as they learned in senior four.
– Through brainstorming, introduce ball possession and movement
exercises in football game.
– Invite students to start warm up exercises.
Warm up exercises and stretching exercises
– Let students perform general warm up exercises and specific warm up
based on body’s parts to be used more while performing tactical skills
and stretch their muscles properly.
– Guide them while performing warm up and stretching exercises.
– Help them/demonstrate/correct where is necessary.
e) Lesson body
Ball possession and movement
Help students to remember that:
– Ball possession is the amount of time the ball is in the feet of a team’s
field players or in the hands of the goalkeeper.
To better perform ball possession and movement in football, you need to think on the following factors:
– What to do before you receive the ball;
– Where your teammates are in the field;
– Where the spaces in the field are;
– Where your opponents are;
– Make quick and correct decisions once you get the ball,
Activity 3.3
Triangle passing
– Delimitate playing area with small cones,
– Distribute ball to groups formed,
– Demonstrate how to perform triangle passes,
– Let students perform the exercise,
– Apply all passing techniques and move quick,
– Pass to all groups to correct where necessary,
- Objective of the exercise is to train keeping the ball among players ofthe same team.
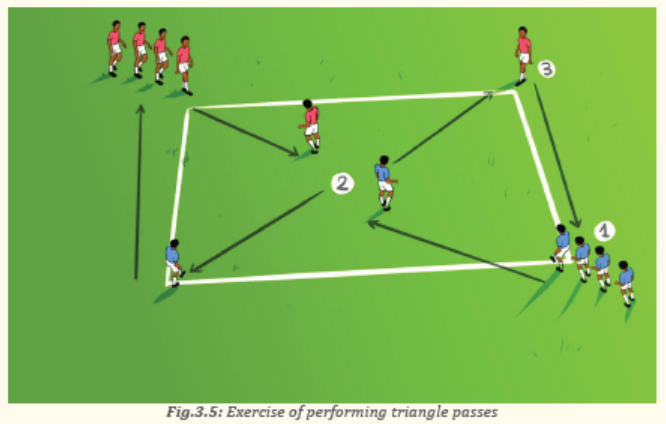
Activity 3.4
Circle passing and receiving exercise
– Set up the playing area
– One student in the middle and three others outside the circle
Explain to the students that the exercise is conducted in three phases:
• The player in the middle starts with the ball and passes to outside player.
Outside player takes a touch and passes to the player to his/her right
before overlapping to receive next pass into the middle of the grid. This
player then repeats the process.
• Similar to phase one but this time player after playing the ball to his/her
right checks in as a supporting player to connect an extra pass with the
overlapping player.
• The middle player receives the ball straight back from outside player
before connecting to outside player to the right. Overlapping player still
makes necessary run to receive pass into the middle of the grid:
– Demonstrate how to perform circle passing and receiving exercise.– Let students perform the exercise.
Application activity 3.2
- Form two teams;
- These two teams will play in an area without goals and the objective
is to keep the ball from the opponent’s teams as long as possible;
- Ask students to play in applying the following;
- Play the ball fast when the situation requires it;
- Play the ball slow or keep it when the situation requires it;
- Move to the empty spaces;
- Keep the ball as short as possible to make the opposing football team
run;
- Tell them to keep their head up as try to know what to do before the
ball comes to them;
- Make necessary substitutions.
Cool down exercises
– Let students practice cool down exercises and light stretching by
focusing on used muscles.
– Guide them how they can stretch their muscles accordingly.
Closing discussions (RCA)
Reflect
– How did you proceed to succeed exercises of keeping ball possession
and movement in football game?
– What are the challenges did you face while performing ball possession
and movement in football?
Connect
- How important is ball possession and movement in a football game?
Apply
– How could you apply ball possession and movement in a football game
help you to become best players in your society?
Lesson 4: Counter attack exercises
a) Learning objective
Apply counter attack tactics exercises
b) Teaching resources
Balls, football playground, cones, diamonds, whistle, watch and videos
related to football tactical skills.
c) Prerequisites/Revision/Introduction
Students of senior five will develop better Players’ position exercises if they
can perform basics physical exercises and play football by using technical skills learned in senior four.
d) Learning activities
Opening discussions
– Ask questions about football technique as they learned in senior four.
– Through brainstorming, introduce player’s position in football game.
– Invite students to start warm up exercises
Warm up exercises and stretching exercises
– Let students perform general warm up exercises and specific warm up
based on body’s parts to be used more while performing tactical skills
and stretch their muscles properly.
– Guide them while performing warm up and stretching exercises.
– Help them/demonstrate/correct where is necessary.
e) Lesson body
Activity 3.5
Counter attack exercises
– Divide the playing area into 3 zones with small cones or diamonds;
– Form the groups of 6 each;
– Name the groups of students formed team1, team 2 and team 3;
– Give the ball to the middle group that will start exercise;
– Demonstrate and explain how to perform counter attack;
– Team 1 will attack, team 2 will defend and team 3 will wait;
– Team 1 attacks the goal and if team 2 wins the ball, its players
attack team 3;
– Teams may regroup in the middle zone;
– If the attacking team scores, its players maintain possession and
attack the third team;
– Encourage players to play fast;
– Let students perform the exercise;– Correct where it avails necessary.
Cool down exercises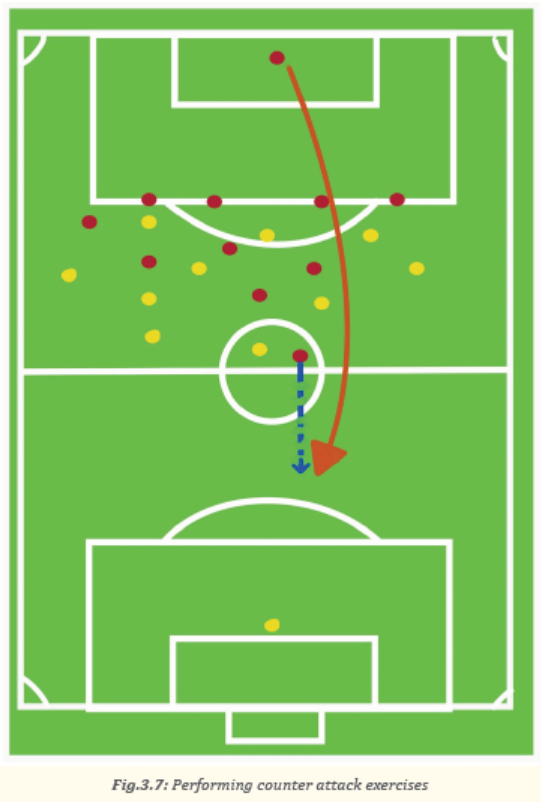
– Let students practice cool down exercises and light stretching by
focusing on used muscles.
– Guide them how they can stretch their muscles accordingly.
Closing discussions (RCA)
Reflect
– How did you proceed to succeed counter attack exercises in football
game?
– What are the challenges did you face while performing counter attack
exercises in football?
Connect
– How important is counter attack exercises in a football game?
Apply
– How could you apply counter attack exercises in a football game help
you to become best players in your society?
Lesson 5: Set pieces’ exercises
a) Learning objective
Perform set pieces’ exercises
b) Teaching resources
Balls, football playground, cones, whistle, watch and videos related to football tactical skills.
c) Prerequisites/Revision/Introduction
Students of senior five will develop better set pieces’ exercises if they can
perform basics physical exercises and play football by using technical skills learned in senior four.
d) Learning activities
Opening discussions
– Ask questions about football technique as they learned in senior four.
– Through brainstorming, introduce Set pieces exercises in football game.
– Invite students to start warm up exercises
Warm up exercises and stretching exercises
– Let students perform general warm up exercises and specific warm up
based on body’s parts to be used more while performing tactical skills
and stretch their muscles properly.
– Guide them while performing warm up and stretching exercises.
– Help them/demonstrate/correct where is necessary.
e) Lesson body
Activity 3.6
Kick off exercises
– Organize the students on football pitch;
– Remind the students that a kickoff is taken to start each half of the game and after a goal is scored;
– The ball must be stationary on the centre mark;
– The opponent players must be at 9.15 meters or 10 yards away from the ball;
– The referee gives a whistle signal;
– The ball goes in play when it is kicked and clearly moves;
– A goal may be scored directly against the opponents from the kick-off; if the
ball directly enters the kicker’s goal, a corner kick is awarded to the opponents;– Ask students to individually perform the kickoff.
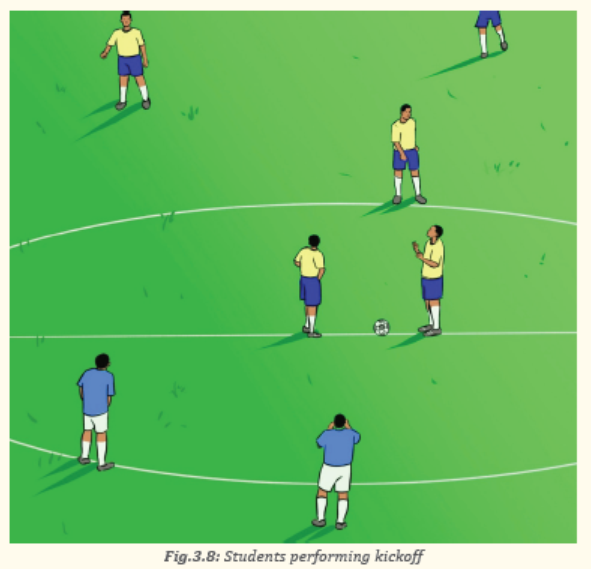
Activity 3.7
– Organize students on football pitch;
– Brainstorm when and where goal kick is taken
– Form the groups of students and align them behind each ball
placed at 5.5-meter line;
– Ask students to individually perform goal kick exercises;
– Let students perform goal kick alternating groups after theteacher’s command.
Activity 3.8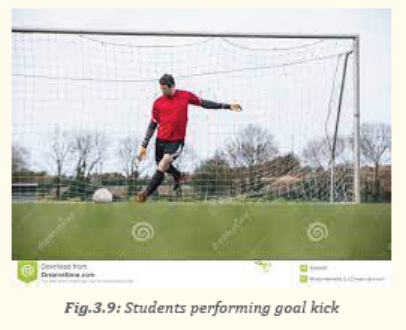
Penalty kick exercises
– Organize students on football pitch;
– Brainstorm when and where a penalty kick is taken and the correct
positions of players at that time;
– Form two groups of students and help them to position correctly;
– Use each half penalty area;
– Each student from his/her respective group should take and set
the ball by him/herself at 11meter marked point;
– Ask students to individually perform a penalty kick exercise;
– Randomly, one student acts as referee to give a whistle signal;– Pass to all groups to make necessary corrections where needed.
Activity 3.9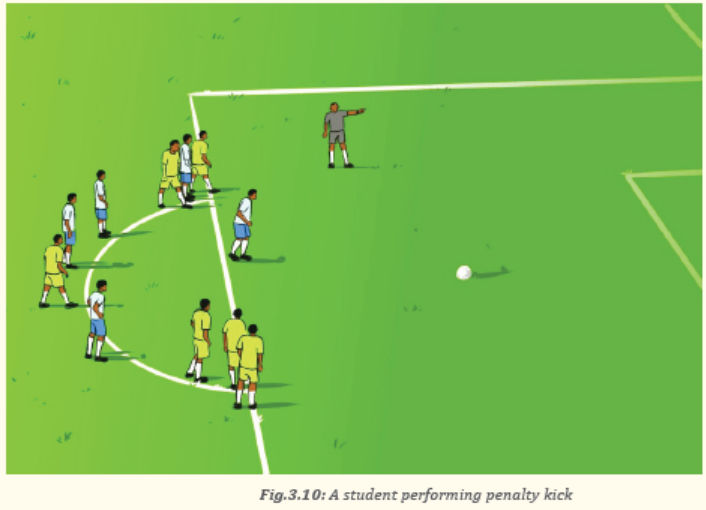
Corner kick exercises
– Organize students on football pitch.
– Brainstorm when and where a corner kick is taken.
– Form 4 groups of students and align each group members on side
line near each corner of the pitch.
– Each student from his/her respective group should take and set
the ball by him/herself correctly.
– Ask students to individually perform goal kick exercises.
– Let students perform corner kick alternating groups after the
teacher’s command.– Make necessary corrections where needed.
Activity 3.10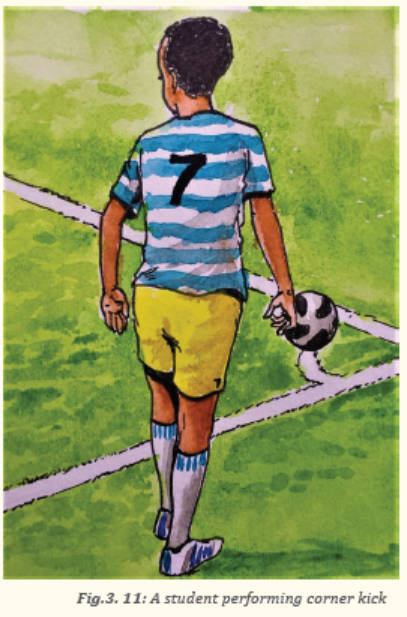
Free kick exercises
– Organize students on football pitch.
– Brainstorm when and where a corner kick is taken.
– Form groups of students and align each group members behind a
set ball.
– Each student from his/her respective group should take and set
the ball by him/herself correctly.
– Ask students to individually perform goal kick exercises.
– Let students perform corner kick alternating groups after the teacher’s command.– Make necessary corrections where needed.
Cool down exercises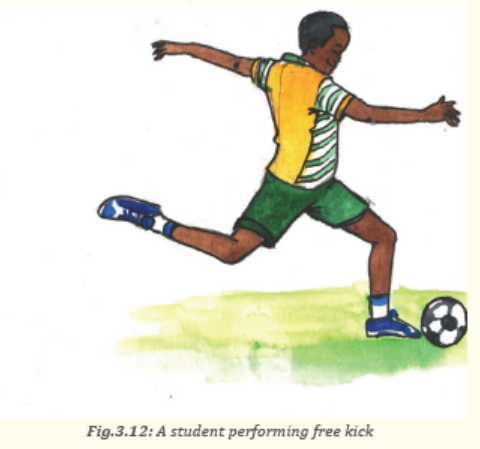
– Let students practice cool down exercises and light stretching by
focusing on used muscles.
– Guide them how they can stretch their muscles accordingly.
Closing discussions (RCA)
Reflect
– How did you proceed to succeed set pieces exercises in football?
– What are the challenges did you face while performing set pieces
exercises in football?
Connect
– How important are set pieces exercises in a football?
Apply
– How set pieces exercises in a football could help you to become best
players in your society?
Lesson 6: Defending set pieces
a) Learning objective
Perform defending set pieces.
b) Teaching resources
Balls, football playground, cones, whistle, watch and videos related to football tactical skills.
c) Prerequisites/Revision/Introduction
Students of senior five will develop better defending set pieces if they can
perform basics physical exercises and play football by using technical skills learned in senior four.
d) Learning activities
Opening discussions
– Ask questions about football technique as have been learned in senior
four.
– Through brainstorming, introduce defending set pieces balls in football
game.
– Invite students to start warm up exercises.
Warm up exercises and stretching exercises
– Let students perform general warm up exercises and specific warm up
based on body’s parts to be used more while performing tactical skills
and stretch their muscles properly.
– Guide them while performing warm up and stretching exercises.
– Help them/demonstrate/correct where is necessary.
e) Lesson body
Remind the students that defending a set piece is not difficult or complicated.
The most important thing is to ensure each attacking player is marked.
The defender must stay with their attacker and do so on the goal side,
so that the defender is always closer to the goal than the attacker.
Activity 3.11
Wall building for free kick
– Organize students on field.
– Brainstorm where to build a wall for defending a set ball.
– Facilitate students to build a wall.
– Let them perform wall building for free kick.– Correct where it avails necessary.
Activity 3.12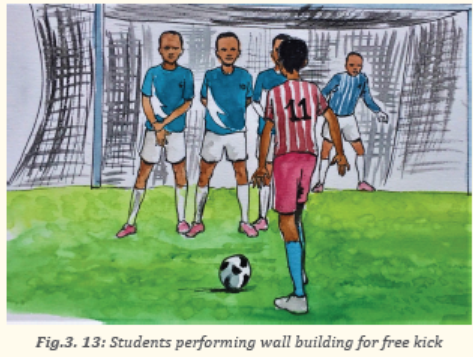
Man to man defense exercises
– Organize students on field.
– Brainstorm how to make man to man defense.
– Facilitate students to practice man to man defense.
– Let them perform the exercise.– Correct where it avails necessary.
Activity 3.13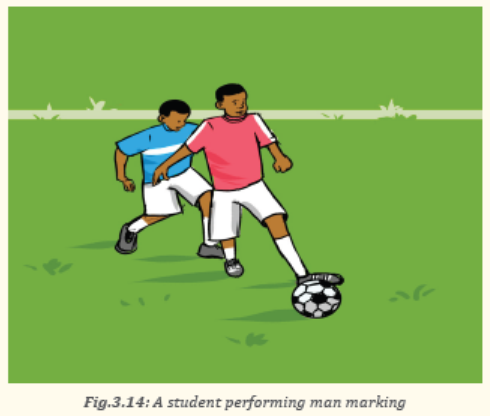
Zonal marking defense exercises
– Organize students on field.
– Brainstorm how to make zonal marking defense.
– Facilitate students to practice zonal marking defense.
– Let them perform the exercise.– Correct where it avails necessary.
Cool down exercises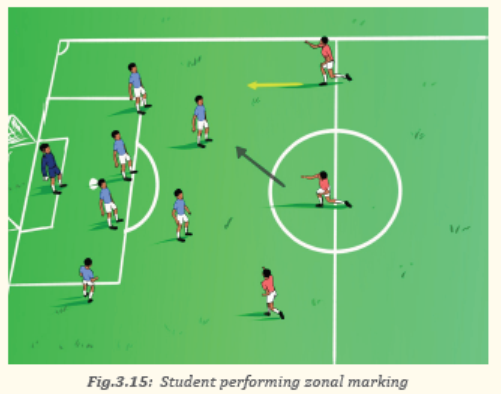
– Let students practice cool down exercises and light stretching by
focusing on used muscles.
– Guide them how they can stretch their muscles accordingly.
Closing discussions (RCA)
Reflect
- How did you proceed to succeed defending set pieces in football?
- What are the challenges did you face while performing defending set pieces in football?
Connect
– How important are defending set pieces in a football?
Apply
– How defending set pieces in a football could help you to become best
players in your society?
Lesson 7: General defending exercises
a) Learning objective
Apply general defending exercises.
b) Teaching resources
Balls, football playground, cones, whistle, watch and videos related to
football tactical skills.
c) Prerequisites/Revision/Introduction
Students of senior five will develop better general defending exercises
if they can perform basics physical exercises and play football by using
technical skills learned in senior four.
d) Learning activities
Opening discussions
– Ask questions about football tactics as have been learned in senior four.
– Through brainstorming, introduce general defending exercises in
football game.
– Invite students to start warm up exercises.
Warm up exercises and stretching exercises
– Let students perform general warm up exercises and specific warm up
based on body’s parts to be used more while performing tactical skills
and stretch their muscles properly.
– Guide them while performing warm up and stretching exercises.
– Help them/demonstrate/correct where is necessary.
e) Lesson body
Teacher as facilitator and guide helps students to perform:
– Man to man marking defense;
– Zonal marking defense;
– Tackling the ball while defending;
– Blocking the ball while defending;
– Clearing the ball while defending;– Protecting the ball while defending.
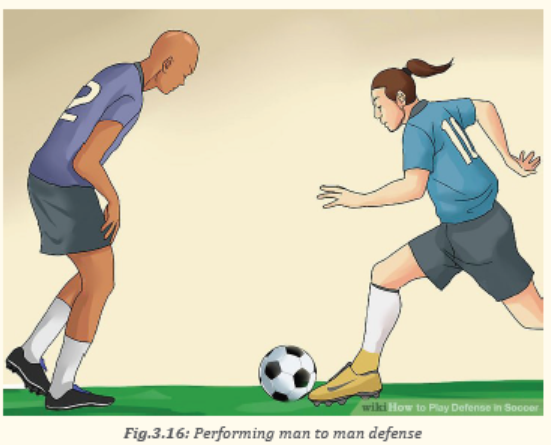
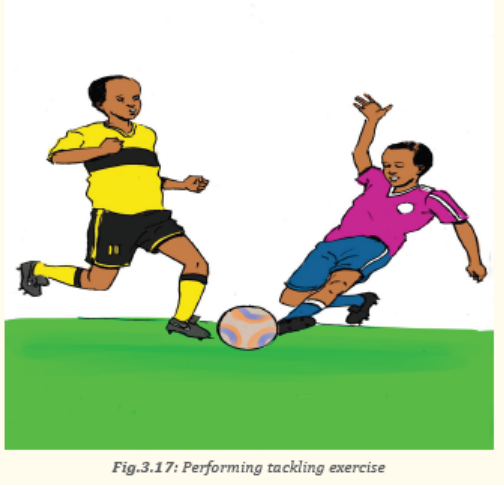
Activity 3.14
Blocking the ball
• Explain to the students that block is when a player obstructs a shot
initialized by an opposing player.
• Remind the students that it is not allowed to block the ball in the
following ways:
– With their hand or arm (up to the shoulder).
– With excessive force or excessive contact with the opposition
player.
– From a free-kick if they are standing within 10 yards or 9.15 meters
of the taker.
– From goal kicks inside the penalty box.– From penalty kicks, unless they are the goalkeeper.
Activity 3.15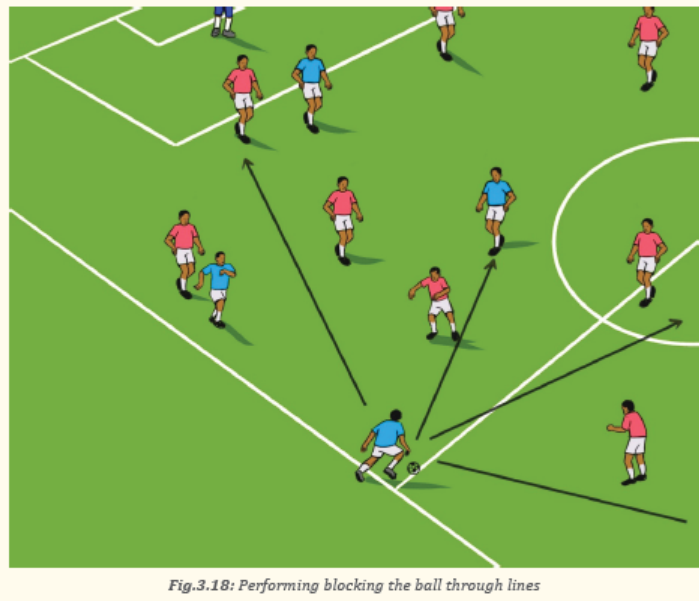
Clearing the ball
Remind the students that clearing is the process of getting the ball out of
the defensive third of the field into the neutral and offensive third. When
on defense, your players should be working to get the ball out as quickly as possible.
They do not want to waste time with footwork or back passing in a
pressure-level situation.
Activity 3.16
Protecting the ball
– Guided by the teacher, students pair up with one ball between
them in limited area.
– One student starts with ball with other behind him/her.
– The student player tries to keep ball away from other student
player by shielding it with their body.– Student tries to keep ball for 20 seconds, and then students switch.
Cool down exercises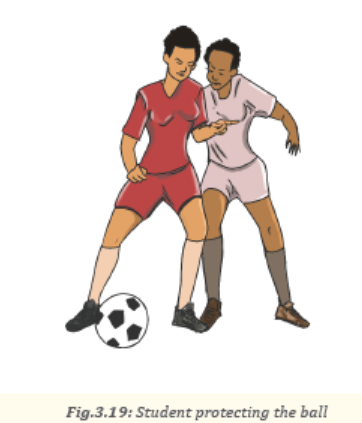
– Let students practice cool down exercises and light stretching by
focusing on used muscles.
– Guide them how they can stretch their muscles accordingly.
Closing discussions (RCA)
Reflect
– How did you proceed to succeed general defending exercises in
football?
– What are the challenges did you face while performing general
defending exercises in football?
Connect
– How important are general defending exercises in a football?
Apply
– How could general defending exercises in a football help you to
become best players in your society?
Lesson 8: Goalkeeping exercises
a) Learning objective
Apply goalkeeping exercises
b) Teaching resources
Balls, football playground, cones, whistle, watch and videos related to
football tactical skills.
c) Prerequisites/Revision/Introduction
Students of senior five will develop goalkeeping exercises if they can
perform basics physical exercises and play football by using technical
skills learned in senior four.
d) Learning activities
Opening discussions
– Ask questions about football technique as have been learned in senior
four.
– Through brainstorming, introduce goalkeeping exercises in football
game.
– Invite students to start warm up exercises.
Warm up exercises and stretching exercises
– Let students perform general warm up exercises and specific warm up
based on body’s parts to be used more while performing goalkeeping
exercises and stretch their muscles properly.
– Guide them while performing warm up and stretching exercises.
– Help them/demonstrate/correct where is necessary.
e) Lesson body
The teacher should remind the students that the goalkeeper needs the following qualities:
– Be physically and mentally fit;
– Pay close attention to the game;
– Communicate with his /her teammates;
– Be aggressive and anticipate players coming down the field;
– Attack every ball that comes at him/her;
– Save shots on goal using hands and feet.
Activity 3.17
Goalkeepers exercises
• The teacher organizes the students in the field prepared
• He/she helps students performing individually the following various
goalkeeping exercises:
– How to deal with high balls;
– How to defend 1 against 1 situation;
– How to save long shots;
– How to clear back passes along with the ground;
– How to deal with recovery saves;– How to get down to the ground.
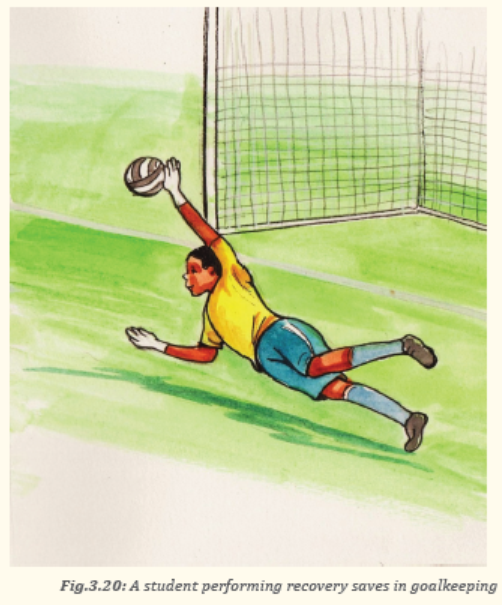
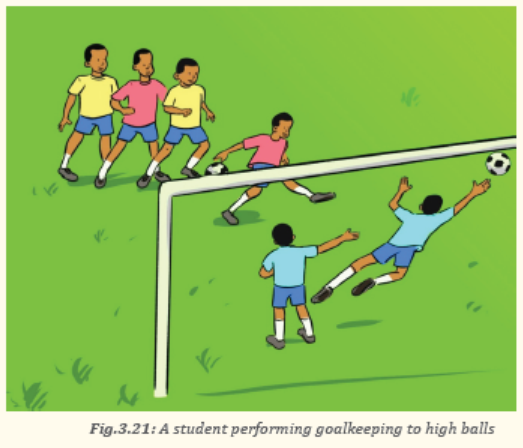
Cool down exercises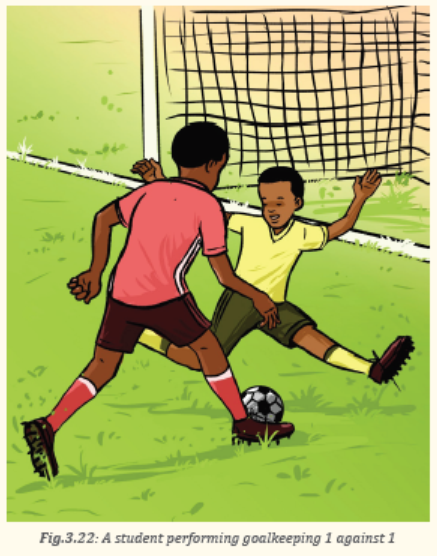
– Let students practice cool down exercises and light stretching by
focusing on used muscles.
– Guide them how they can stretch their muscles accordingly.
Closing discussions (RCA)
Reflect
– How did you proceed to succeed goalkeeping exercises in football?
– What are the challenges did you face while performing goalkeeping
exercises in football?
Connect
– How important are goalkeeping exercises in a football?
Apply
– How could goalkeeping exercises in a football help you to become best
goalkeeper in your society?
3.5 Additional information to the teacher
Football positions
As for the 11 players on the pitch, they can be broadly divided into four positions:
goalkeeper, defenders, midfielders and forwards.
The latter three: defenders, midfielders and forwards, can be further divided
into multiple positions.
While the one goalkeeper per team is a constant, the number of defenders,
midfielders and forwards and their starting positions on the football pitch
can vary according to the team’s formation or tactics.
Here’s a breakdown of all football positions and their roles.
Goalkeeper
A goalkeeper (GK) is essentially a team’s last line of defense. Generally seen
in a different colored jersey than the rest of the team, a goalkeeper usually
stays in his own team’s penalty area, usually under the goalpost, to protect the goal.
Goalkeepers are the only player on the football team who can use their hands to
catch or control the ball, but only if they are in their own penalty box.
Goalkeepers are allowed to leave their respective penalty box but once they do,
they will need to abide by the rules applicable to regular outfield players,
i.e. no using of hands.
Defenders
Defenders are usually the players in the playing XI, whose primary task is to defend
their goal from opposition attacks. In modern football, though,
even defenders tend to participate heavily in their team’s build-up play
to initiate offensive moves.
Teams mostly play three to five players as defenders in a match. However,
four at the back is the most commonly used tactic in modern football.
Defenders can be further divided into the following categories according to their roles.
Centre backs: Centre backs (CB) or central defenders are centrally placed
defenders just in front of the team’s goal. In a four-defender formation,
teams generally utilize two centre backs while in a three or five-player
backline involves three centre backs.
Centre backs are usually tall and physically imposing players with good aerial ability.
Full backs: The defenders who operate from either side of their centre backs
are termed as full backs or side backs. Depending on which flank they operate in,
they are further distinguished as a left back (LB) or a right back (RB).
Besides defense, full backs often contribute offensively by charging up the pitch
with overlapping runs to stretch the opposition defense.
If a team plays three centre backs and has two highly offensive full backs
operating in the formation, they are also referred to as wing backs. Full backs are
mostly quick with good positional sense.
Midfielders
As the name suggests, midfielders occupy the middle area of the football pitch
and their role is to act as the link between defense and attack. Midfielders also
have specialized roles and their position varies according to formations.
Central midfielders: Midfielders located centrally on the pitch are called
central midfielders (CM). The number of central midfielders mostly depends on
the team’s strategy.
If a central midfielder is tasked to primarily defend by staying in front of
their backline, they are called central defensive midfielders (CDM).
Players specializing as CDMs mostly have a high work rate and are good at
tackling and interceptions.
More attack-minded central midfielders who prioritize supporting the forwards
in attack rather than defense are called central attacking midfielders (CAM).
CAMs generally possess the ability to play killer final passes and can shoot well from distance.
Central midfielders can also be neutral and try to contribute both defensively and offensively.
Wingers: Midfielders who operate from the flanks just ahead of the full backs
are called wingers. They are called left wingers (LW) or right wingers (RW)
according to their position on the pitch. While they do help their full backs defensively,
a winger’s primary task is to attack and take on opposition defenders.
Traditionally wingers stay out wide and send in crosses into the opposition box
for their forwards to finish.
In modern-day football, however, the concept of inverted wingers also exists.
Inverted wingers are players who tend to cut in from wide and shoot at goal or
assist a team-mate from a more central position. A left-footed player playing on
the right wing or vice versa is considered ideal for inverted wingers.
Wingers are generally pacey, have good dribbling ability, can cross the ball well
and are good shooters of the ball.
Forwards
Forwards or strikers are the team’s most advanced players on the pitch, whose
job is exclusively to score goals. Hence, all forwards are great at finishing and
often possess very good positional sense to find space for themselves in the
opposition box. They can also be skillful, physically imposing or both,
according to their style of play.
A forward who plays more centrally just in front of the opposition goal is called
a centre forward (CF). More often than not, centre forwards are physically imposing
and can both head and shoot the ball well. They are also good a holding the ball up
by evading pressure from opposition defenders to allow their team-mates to
run up and support in attack.
Sometimes centre forwards are instructed to drop deep to receive the ball and
create goal-scoring chances for their team-mates instead of operating near the
opposition box. In such cases, the centre forwards are also referred to as False 9s.
Some teams often deploy forwards in the lane between the wingers and the centre forwards.
These strikers are referred to as right forwards (RF) or left forward (LF) according to
which side they are playing from. Generally fleetfooted, right forwards and left forwards
can drift out wide or cut back in to trouble the opposition backline.
End unit assessment 3.6
Setting exercises and games aimed to observe whether students are able to perform
football tactical skills: players positioning, system formation adaptation,
ball possession and movement, counter attacks, defending set pieces, defending
in general and goalkeeping
3.7 Additional activities
3.7.1 Remedial activities
Regular performance of: players positioning, system formation adaptation,
ball possession and movement, counter attacks, defending set pieces,
defending in general and goalkeeping
3.7.2 Consolidation activities
Increase performance of: players positioning, system formation adaptation,
ball possession and movement, counter attacks, defending set pieces,
defending in general and goalkeeping.
3.7.3 Extended activities
Participate in different football competitions organized by the school, at sector
or district level and national sports school competitions.UNIT 4: VOLLEY BALL
Key unit competence: Develop volleyball tactical skills.
4.1 Prerequisite (Knowledge, skills, attitudes and values)
Students of senior five will develop better tactics of playing volleyball if
they can identify and perform basic techniques of volleyball as have been learned in senior four.
4.2 Cross-cutting issues to be addressed
– Gender: Engage both women and men in physical activity and sports
exercises and help them to exploit their full potentials. No activity is
reserved only for women or men.
– Inclusive education: Identify the students with special education
needs, ensure interactive and inclusive discussion during practice of
physical activity and sport exercises.
– Financial education: Facilitate/guide students to make non cost
materials like ropes and balls from banana leave fibers and they can
also improvise hurdles for jumping exercises.
– Standardization culture: Advise learners to use standardized
materials in prevention of injuries and accidents. Students have to
know how to choose and use safe sports clothes for their health (e.g.:
safe sports shoes), safe physical exercises (avoid bad body postures
and forbidden body exercises, adapted physical activities).
– Environment and sustainability: Train students on the culture of
protecting the environment surrounding the field/playground and any
other place they play on.
– Peace and values education: Encourage teamwork spirit, mutual
help, and respect of opinions of colleagues among learners.
– Comprehensive sexuality education: Provide physical activities and
set instructions that prevent sexual harassment, any kind of genderbased
violence like sexual abuse and physical contacts concerned with
sexuality intention in Physical Education and Sports activities.
– Genocide studies: Take time to explain to students how sports should
be used to fight against Genocide ideology and how to prevent it. E.g.:
Organizing Genocide memorial tournaments at school and giving the
message related to the Genocide.
4.3 Guidance on introductory activity
Before introducing the lesson one of this unit, teacher must introduce the whole unit.
The teacher as a guide, facilitator and expert, asks questions or gives activity
related to volleyball in order to help students to predict what to be learnt in
the whole unit. He/she may use a selected picture or scenario which helps
to quick thinking and reaction.4.4 List of lessons/sub-heading
Lesson 1: Players’ position and serving tactics exercises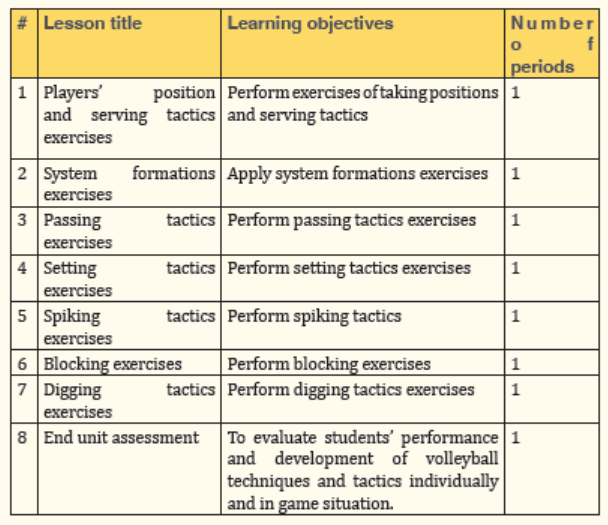
a) Learning objective
Perform exercises of taking positions and serving tactics.
b) Teaching resources
Cones, balls, volleyball court, whistle, jumping rope and videos related to
volleyball tactical skills.
c) Prerequisites/Revision/Introduction
Students of senior five will develop better exercises of taking positions and serving tactics
if they can perform basic physical exercises and play volleyball by using technical skills learned
in senior four.
d) Learning activities
Opening discussions
– Ask questions about volleyball techniques as been learned in senior
four.
– Through brainstorming, introduce player’s position in volleyball game
and tactics of serving.
– Invite students to start warm up exercises.
Warm up exercises and stretching exercises
– Let students perform general warm up exercises and specific warm up
based on body’s parts to be used more while performing tactical skills
and stretch their muscles properly.
– Guide them while performing warm up and stretching exercises.
– Help them/demonstrate/correct where is necessary.
e) Lesson body
Activity 4.1
dentifying and taking player’s positions in volleyball
– Trough brainstorming, help students to identify player’s positions
in the field of volley ball.
– Guide students to individually pass by each position clock wisely
in the field.– Help the students to highlight all player’s positions.
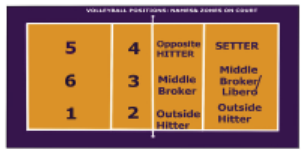
IFig.4.1: Volley ball players ’positions on the court
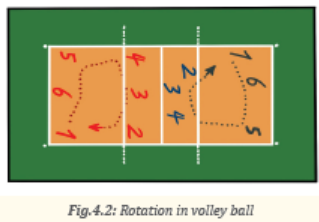
Activity 4.2
Serving tactics
Floater serve
Remind the students that in order to serve the volleyball so that it floats,
the ball must be moving in the air with minimal spin. To achieve this server
follows a set of specific techniques;
– Tossing the ball to the same height as maximum vertical arm
length, with the non-hitting hand, and without spin.
– Hitting the ball between the top and center of the palm, while
maintaining a firm wrist, and full extension of the hitting arm.
– Hitting the ball in the center of the volleyball, while pushing
straight through towards the intended serving zone.
– After contact is made with the ball, following through with the
hitting arm, towards the direction of the ball, past the hips.– Having a high elbow and wrist.
The teacher as a facilitator and a guide helps students serve the ball following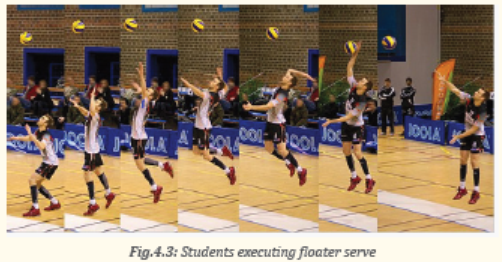
his/her instructions
• Divide class members into two groups;
• One group stand behind the attack line of the left of volleyball court and
another group stands behind the attack line of the left of volleyball court;
• Give balls to each group;
• Request a student who is standing at the beginning of the line to do
service using underhand service;
• Ask a student from the first group to serve the ball into the told position
and at the same time one of the member of the second group steps forward
and makes a reception;
• Ask the same to other group and vary the types of serving: overhand serve first,
floater serve secondly and jump serve thirdly;
• Remind the students that:
– If the ball has a low trajectory, it may be more difficult to read the flight
of the ball.
– If the ball stays low, then the ball will get there faster which will give
the passer less time to react.
– From the passers point of view, a low short serve may look the same as
a low deep serve. Getting a poor read on the ball makes it more difficult
to get in position to pass.
- The exercise continues until all members of the group finish to execute
all kinds of serve and on different player’s positions
Jump serve
– Ask student to take any distance behind the service line.
– Tell them to place the ball in left hand for right handed and right hand
for left handed. Request them to toss the ball higher in front of them.
Ask them to accomplish attack approaches: left- right -left for right
handed, right-left-right for light handed.
– Ask them to swing both arms behind them and then forward and up
while stepping forward with the left foot for right handed or right foot
for left handed and make a quick hop.
– Request them to jump up and forward behind the service line and
contact the ball at the top of their reach.
– Remind them to strike the ball with their palm and follow through with
their arm swing by aiming outward and downward to put topspin onthe ball.
Cool down exercises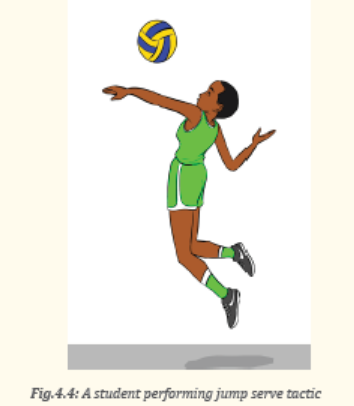
– Let students practice cool down exercises and light stretching by
focusing on used muscles.
– Guide them how they can stretch their muscles accordingly.
Closing discussions (RCA)
Reflect
– How did you proceed to succeed exercises of taking positions and
serving tactics volleyball?
– What are the challenges did you face while performing exercises of
taking positions and serving tactics volleyball?
Connect
– How important are exercises of taking positions and serving tactics
volleyball?
Apply
– How could exercises of taking positions and serving tactics in volleyball
help you to become best players in your society?
Lesson 2: System formations exercises
a) Learning objective
Apply system formations exercises
b) Teaching resources
Cones, balls, volleyball court, whistle, jumping rope and videos related to
volleyball tactical skills.
c) Prerequisites/Revision/Introduction
Students of senior five will develop better system formation exercise if they
can perform basic physical exercises and play volleyball. by using technical skills
learned in senior four.
d) Learning activities
Opening discussions
– Ask questions about volleyball techniques as been learned in senior
four.
– Through brainstorming, introduce system formations exercises.
– Invite students to start warm up exercises.
Warm up exercises and stretching exercises
– Let students perform general warm up exercises and specific warm
up based on body’s parts to be used more while performing system
formations exercises and stretch their muscles properly.
– Guide them while performing warm up and stretching exercises.
– Help them/demonstrate/correct where is necessary.
e) Lesson body
Offensive system formations
There are three standards formations in volleyball, namely the “4-2,”6-
2”and “5-1”
The numbers in the names of these formations refer to the numbers of
hitters and setters respectively
4-2 formation
This formation has four hitters and two setters. The setters position themselves
on the right; they are the two front attackers
6-2 formation
This is the formation where a player comes up from the back and acts as
setter. The front row is all positioned to attack. All players will be hitters
at some point or another (Is called 6-2 because there are 6 players who will
function as primarily hitters and there are two players who fill the setting role).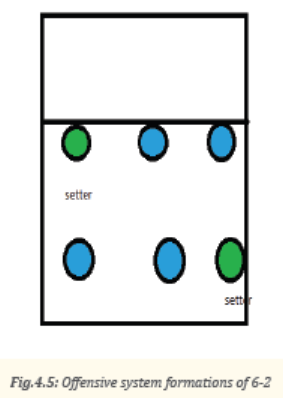
5-1 formation
Explain to the students that this formation has only one player as a setter,
regardless of where they are positioned in the rotation. Obviously then, there
are sometimes 2 and sometimes 3 attackers in the front row. Tell them that
the setter can then change up their strategy as they rotate and even just
dump the ball lightly over the net at times.
Activity 4.4
Defensive system formations
Defensive systems in volleyball are the ways in which a team must be
positioned in order to defend the attacks of the opposing team. Volleyball
defense systems can be categorized into four distinct types:
– Perimeter defense
– Middle up defense
– Rotation defense
– Combining defense systems
Application activity 4.1
Game situation in which system formations are applied
– Form groups of six students
– Let groups play the normal volleyball game
– Fix points to reach for winning a set
– Ask students to apply a system that will be communicated
– Help the students applying basic playing volley ball rules
– Comment and correct where necessary
– Determine the ending of the game
Cool down exercises
– Let students practice cool down exercises and light stretching by
focusing on used muscles.
– Guide them how they can stretch their muscles accordingly.
Closing discussions (RCA)
Reflect
– How did you proceed to succeed for defensive and offensive system
formation exercises in volleyball?
– What are the challenges did you face while performing defensive and
offensive system formation exercises in volleyball?
Connect
– How important are for performing defensive and offensive system
formation exercises in volleyball?
Apply
– How could apply defensive and offensive system formation exercises
help you to become best players in your society?
Lesson 3: Passing tactics exercises
a) Learning objective
Perform passing tactics exercises.
b) Teaching resources
Cones, balls, volleyball court, whistle, jumping rope and videos related to
volleyball tactical skills.
c) Prerequisites/Revision/Introduction
Students of senior five will develop passing tactic exercises if they can
perform basics physical exercises and play volley ball by using technical
skills learned in senior four.
d) Learning activities
Opening discussions
– Ask questions about volleyball techniques as been learned in senior
four.
– Through brainstorming, introduce passing tactics in volleyball game.
– Invite students to start warm up exercises.
Warm up exercises and stretching exercises
– Let students perform general warm up exercises and specific warm up
based on body’s parts to be used more while performing tactical skills
and stretch their muscles properly.
– Guide them while performing warm up and stretching exercises.
– Help them/demonstrate/correct where is necessary.
e) Lesson body
A pass is the most basic and essential skill in volleyball.it used to hit
a ball that is below the head or at your platform as most volleyball
players would call it, and is typically used as the first touch to receive
a serve or to receive a harddriven hit.
Practicing passing tactic individually
Organize students on volleyball court and help them to execute passing in
the following
• Request them to get into position;
• Ask them to:
– Stand with their legs about shoulder-width apart and should lean
forward a bit.
– Bend their knees a little bit, ready to spring their legs into action.
• Remind them that their hands should come together in the last moment
before the ball comes to them.
• Ask them to:
– Keep their hands about half a foot apart when they approach the
ball.
– Push the ball using their knees and arms.
– Hit the ball with both arms.
• Request them to Try to contact the ball on their forearms (above hands
but below the elbow joint).
• At the same time, ask them to move their arms forward and up slightly,
but do not swing their arms.• Request them to dip or twist their shoulders to aim the ball.
Activity 4.6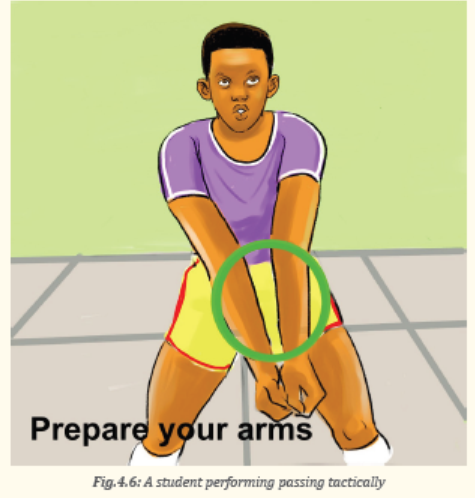
Practicing passing in group
– Form groups of students based on number of balls on the court;
– Give the ball to each group;
– Request one student for each group to go inside the circle and
serves as the net;
– Request the player in the middle to pass the ball to the students on
the circle;
– Ask students in a circle to pass the ball to each other so that the
ball does not drop or be intercepted by the player who is in the
middle;
– When the student in the middle gets the ball, the student who lost
the ball goes into the middle and the game continues.
Application activity 4.2
– Form groups of six students
– Let groups play the normal volleyball game
– Fix points to reach for winning a set (10- 15)
– The team wins the set must play with next team
– All teams must play the game
– The winner is the group wins many matches
Cool down exercises
– Let students practice cool down exercises and light stretching by
focusing on used muscles.
– Guide them how they can stretch their muscles accordingly.
Closing discussions (RCA)
Reflect
– How did you proceed to succeed passing tactics exercises in volleyball?
– What are the challenges did you face while performing passing tactics
exercises in volleyball?
Connect
– How important are passing tactics exercises in volleyball?
Apply
– How could apply passing tactics exercises in volleyball help you to
become best players in your society?
Lesson 4: Setting tactics exercises
a) Learning objective
Perform exercises of setting tactics.
b) Teaching resources
Cones, Balls, Volleyball court, Whistle, jumping rope and Videos related to
volleyball tactical skills.
c) Prerequisites/Revision/Introduction
Students of senior five will develop setting tactic exercises if they can perform
basics physical exercises and play volleyball by using technical skills learned in senior four.
d) Learning activities
Opening discussions
– Ask questions about volleyball tactics as been learned in senior four.
– Through brainstorming, introduce setting tactics exercises.
– Invite students to start warm up exercises.
Warm up exercises and stretching exercises
– Let students perform general warm up exercises and specific warm up
based on body’s parts to be used more while performing setting tactics
and stretch their muscles properly.
– Guide them while performing warm up and stretching exercises.
– Help them/demonstrate/correct where is necessary.
e) Lesson body
Explain to the students that set in volleyball is a maneuver in which
a player quickly makes contact with the ball in order to set up a spike
for another player.
Activity 4.7
Practicing setting the ball following steps:
Step1: Decide where to send the ball
Tell to the students that after getting to the ball quickly:
– Square their body with the target;
– Extend their arms up over their head;
– Position their hands and feet;
– Slightly bend their knees;– Choose the right attacker to send the ball to.
Step 2: Make contact with the ball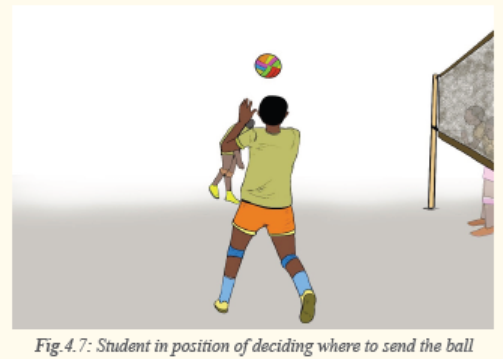
Tell students to do the following:
– Contact with the ball should occur just above the center of their
forehead, roughly at their hairline
– Try to make contact with all of their fingers touching the ball– Do not let the ball touch their palms
Step 3: Push upwards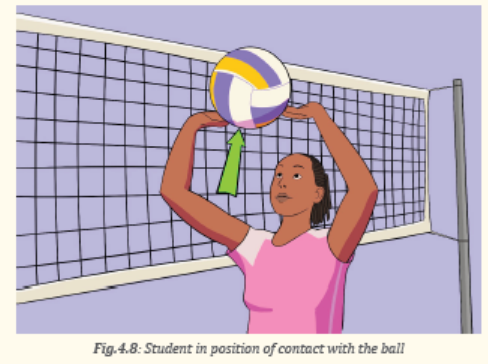
Tell students to do the following:
– As soon as the ball touches their fingers, straighten their arms and legs
as you push the ball upward in the direction of the spiker.
– Their whole body should be part of the push– Actual contact time with the ball should be minimal
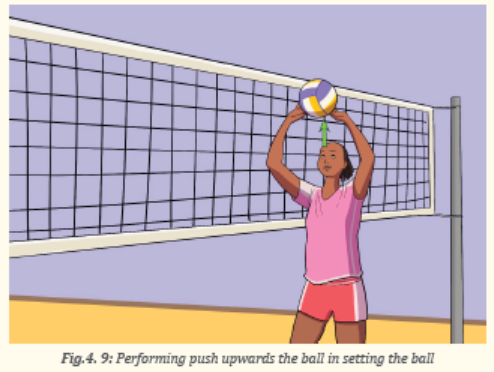
Step 4: Follow through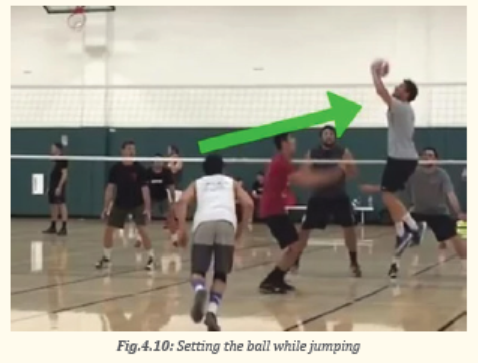
– At the end of their set, tell students that their arms should be fully
extended, and they should follow through with their hands by
straightening their wrists after releasing the ball.– This helps ensure that it stays on their intended trajectory.
Variation exercise
Help students to perform:
– Long distance sets;
– One and freeze;
– Side to side;
– Back sets.
Application activity 4.3
Small game in which setting is applied
- Form the teams of 6 students each
- Ask them to play trying to make good setting of the ball to attackers
- Rotate the students so that everyone sets at least four balls
Cool down exercises
– Let students practice cool down exercises and light stretching by
focusing on used muscles.
– Guide them how they can stretch their muscles accordingly.
Closing discussions (RCA)
Reflect
– How did you proceed to succeed setting the ball in volley ball game?
– What are the challenges did you face while performing setting the ball
in volley ball game?
Connect
How important are setting the ball exercises in volleyball
Apply
How could you apply setting the ball in volley ball game help you
to become best players in your society?
Lesson 5: Spiking tactics exercises
a) Learning objective
Perform spiking tactics exercises.
b) Teaching resources
Cones, Balls, Volleyball court, Whistle, jumping rope and Videos related to
volleyball tactical skills.
c) Prerequisites/Revision/Introduction
Students of senior five will develop spiking tactic exercises if
they can perform basics physical exercises and play volleyball by
using technical skills learned in senior four.
d) Learning activities
Opening discussions
– Ask questions about volleyball techniques as been learned in senior
four.
– Through brainstorming, introduce spiking tactics.
Warm up exercises and stretching exercises
– Let students perform general warm up exercises and specific warm up
based on body’s parts to be used more while performing tactical skills
and stretch their muscles properly.
– Guide them while performing warm up and stretching exercises.
– Help them/demonstrate/correct where is necessary.
e) Lesson body
Explain to the students that spiking volleyball entails forcefully
striking the ball toward the floor on your opponent’s side of the net.
Tell them that to spike the ball, they need to wait the setter to set
the ball near the net, then approach the ball, jump and go in for
the” kill”. If the ball hits the floor before the other team can retrieve it,
their team gets a point.
Activity 4.8
Practicing spiking the ball following steps
Organize students on the court and help them to individually perform the
exercise by respecting the steps:
– Get into position;
– Watch the setter;
– Assume the correct stance.
Explain to them hitting approach application:
– Left-right-left-jump-spike (right hander).
– Right-left-right-jump-spike (left hander).
Request students to:
– Take their first step toward the ball;
– Take a second powerful step;
– Take a final step to square their feet;
– Jump as the ball falls into position;
– Rear their hand back to strike;
– Hit the ball with the center of their hand;
– Bend their knees when your feet hit the ground;– Get back into position.
Activity 4.9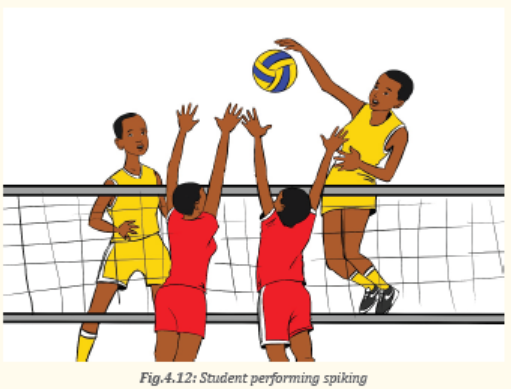
Practicing spiking tactic of high ball
– Organize students,
– Ask the students to practice footwork and jumping skills,
– Watch the setter,
– Attack the high ball set,
– Repeat the exercise to muster the spike.
Activity 4.10
Pass-set-hit exercise
– Organize students on the prepared court,
– Demonstrate how the exercise should be performed,
– Ask every student to exercise,
– Help students to perform the tactic correctly,
– Let all students perform the exercise,
– Make necessary corrections.
Application activity 4.4
Small game in which spiking is applied
Form the teams of 6 students each
– Ask them to play trying to make good spiking the ball
– Guide the students to respect rotation so that everyone spike at
least four balls in game
Cool down exercises
– Let students practice cool down exercises and light stretching by
focusing on used muscles.
– Guide them how they can stretch their muscles accordingly.
Closing discussions (RCA)
Reflect
– How did you proceed to succeed spiking tactics exercises in volleyball?
– What are the challenges did you face while performing spiking tactics
exercises in volleyball?
Connect
– How important are spiking tactics exercises in volleyball?
Apply
– How spiking tactics exercises in volleyball could help you to become
best players in your society?
Lesson 6: Blocking exercises
a) Learning objective
Perform blocking exercises.
b) Teaching resources
Cones, Balls, Volleyball court, Whistle, jumping rope and Videos related to
volleyball tactical skills.
c) Prerequisites/Revision/Introduction
Students of senior five will develop blocking tactic exercises if they can
perform basics physical exercises and play volley ball by using technical
skills learned in senior four.
d) Learning activities
Opening discussions
– Ask questions about volleyball techniques as been learned in senior
four.
– Through brainstorming, introduce blocking tactics.
– Invite students to start warm up exercises.
Warm up exercises and stretching exercises
– Let students perform general warm up exercises and specific warm up
based on body’s parts to be used more while performing tactical skills
and stretch their muscles properly.
– Guide them while performing warm up and stretching exercises.
– Help them/demonstrate/correct where is necessary
e) Lesson body
Explain to the students that blocking is the first line of defense against
attacks from the opposing team and creates less court for the
back defense to cover.
Activity 4.11
racticing blocking exercise individually
Demonstrate with the students how to block tactically
Step one: Getting into the ready position
Request students to do the following:
– Be ready at all times;
– Stand with their feet shoulder-length apart square to the net;
– Keep their knees bent ready to jump;
– Keep their arms high;
– Keep their palms facing the net;– Stay a half arm’s length away from the net.
Step two: Using proper techniques to block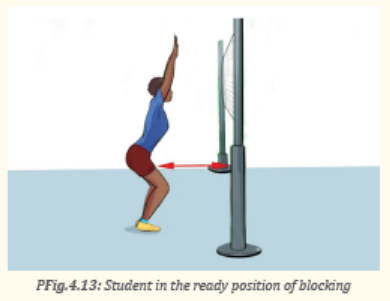
Request students to do the following:
– Jump straight up;
– Angle their hands inwards as if they are grabbing the ball
– Keep their fingers spread and relaxed but straight
– Keep their wrist rigid to work against a hard spike– Position their arms at an angle over the net
Activity 4.12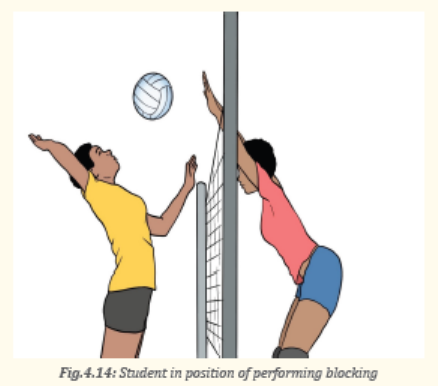
Practicing blocking exercise in groups
After organizing the students on the court, the teacher as a
facilitator and a guide explains and demonstrates how to perform the following:
– Mirror blocking drill;
– Blind blocking drill;
– Block and smash drill;– Side to side blocking drill.
Application activity 4.5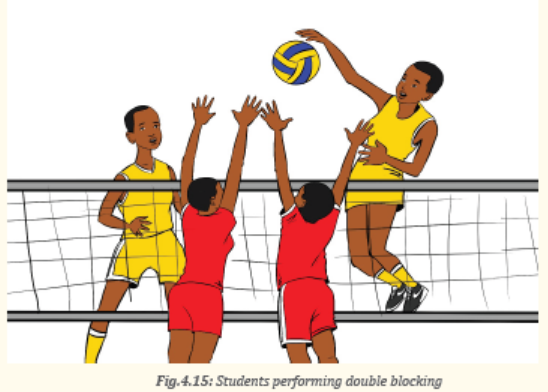
Small game in which blocking is applied
– Form the teams of 6 students each
– Ask them to play trying to make good blocks
– Guide the students to respect rotation so that everyone blocks at
least four balls
Cool down
– Let students practice cool down exercises and light stretching by
focusing on used muscles.
– Guide them how they can stretch their muscles accordingly.
Closing discussions (RCA)
Reflect
– How did you proceed to succeed blocking tactic exercises in volleyball?
– What are the challenges did you face while performing blocking tactic
exercises in volleyball?
Connect
– How important are blocking tactic exercises in volleyball?
Apply
– How could blocking tactic exercises in volleyball help you to become
best players in your society?
Lesson 7: Digging tactics exercises
a) Learning objective
Perform digging tactics exercises.
b) Teaching resources
Cones, Balls, Volleyball court, Whistle, jumping rope and Videos related to
volleyball tactical skills.
c) Prerequisites/Revision/Introduction
Students of senior five will develop digging tactic exercises if they
can perform basics physical exercises and play volleyball by using
technical skills learned in senior four.
d) Learning activities
Opening discussions
– Ask questions about volleyball techniques as been learned in senior
four.
– Through brainstorming, introduce digging tactics.
– Invite students to start warm up exercises.
Warm up exercises and stretching exercises
– Let students perform general warm up exercises and specific warm
up based on body’s parts to be used more while performing digging
tactical skills and stretch their muscles properly.
– Guide them while performing warm up and stretching exercises.
– Help them/demonstrate/correct where is necessary.
e) Lesson body
Remind the students that during defending the opponent’s attack,
digging is one of the defensive tactics to use when the block has
failed to stop strong spikes.
Activity 4.13
Practicing digging tactic individually
Step one: Get low and lean forward
Request students to do the following:
– Get into a low “ready “position even lower than they would to
receive a serve.
– Keep they knees bent,
– Bend at the waist s that their shoulders are out past your knees,
– Place their feet wider than your shoulders,
– Hold their arms out away from their body,
– Keep their weight balanced on their toes so that they can spring
forward or side to get the ball.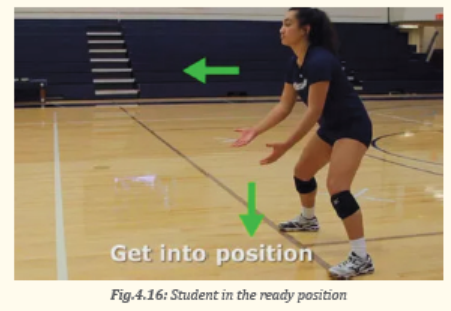
Step two: Place your arms in a receiving position
Request students to do the following:
– Stretch their arms, pressed together from hands to elbows
– Bend and lock their elbows
– Keep their wrists lower than their elbows to direct the ball forward
– Hold their hands together by placing their thumbs side by side and
overlap the fingers of their stronger hand over the curled fingers oftheir weaker hand.
Step three: Move to meet the ball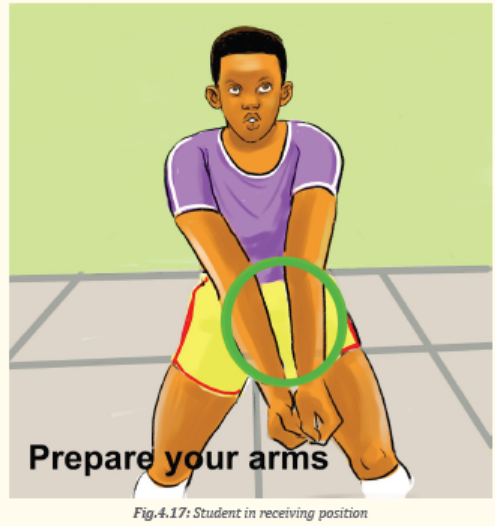
Request students to do the following:
– Remember their footwork and do not lunge unless they have to
– Take a quick step or a shuffle and remain in their ready position– Keep low as they relocate
Step four: Aim for the target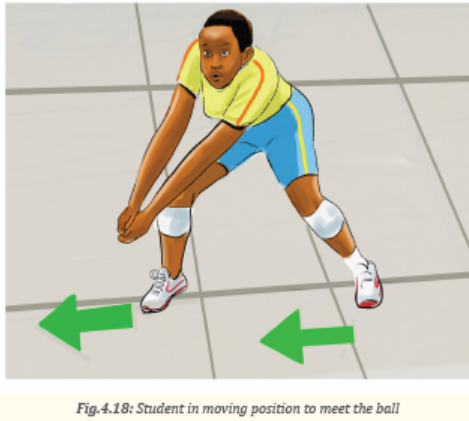
– Tell the students that a goal on a dig is not just to get the ball up in the
air, but to pass it to a teammate to set up the offensive series.
– Tell them that they will most likely be aiming for their setter up by the
net;
– Remind them to align their body as much as possible towards that
target while receiving the spike;
– Request them to aim a little short of their target to keep from digging
the ball back over the net;
– Remind them not to give their opponent an easy second chance.
Step five: Absorb and redirect the spike
Request students to do the following:
– Tell them that they do not need to swing at the ball; the spiker has
supplied the necessary power for their purposes;
– To keep their elbow locked and their angle of deflection the same;– To let their shoulders dip to absorb some of the power of he shot.
Remind students that there are several ways to get the ball through digging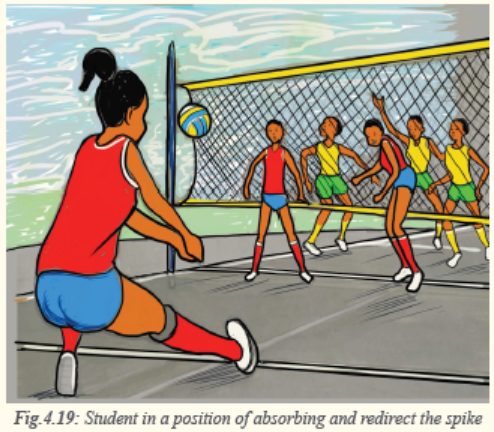
such as:
• Sprinting
• Rolling
• Jumping
• Falling
• Sprawling
• Diving
Activity 4.14
Performing double decker defense
– Organize students on the court one behind another
– Demonstrate how the exercise should be performed
– A student finishing double decker defense on one side go to the
other side
– Let all students perform the exercise
Performing knockout digging exercise
– Organize students on the prepared court
– Tell the students that the goal is to dig a ball into the target area
and catch it
– Demonstrate how the exercise should be performed
– Ask every student to exercise
– A student finishing double decker defense on one side go to the
other side
– Let all students perform the exercise
Application activity 4.6
Small game in which digging is applied
– Form the teams of 6 students each
– Ask students to play trying to make correct digging of the ball
spiked to them
– Guide the students to respect rotation so that everyone spikes at
least four balls– Encourage students to practice the tactic confidently
Cool down exercises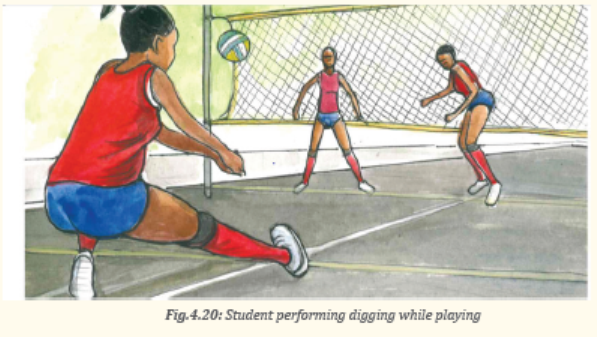
– Let students practice cool down exercises and light stretching by
focusing on used muscles.
– Guide them how they can stretch their muscles accordingly.
Closing discussions (RCA)
Reflect
– How did you proceed to succeed digging tactics exercises in volleyball?
– What are the challenges did you face while performing digging tactics
exercises in volleyball?
Connect
– How important are digging tactics exercises in volleyball?
Apply
– How could digging tactics exercises in volleyball help you to become
best players in your society?
4.5 Additional information to the teacher
Volleyball player positions
There are six positions on volleyball court and each position serves a
unique role in the success of the team.
– Setter: is the main contributor to the offense of the volleyball team.
He/she must have a delicate touch to set the ball perfectly for one of
hitters to attack.
– Outside hitter also known as the left side hitter: is the lead attacker
in the offensive strategy. He/she must be able to jump high, be quick
on his/her feet and ready to adapt to different situations
– Opposite hitter: Opposite hitters earned that title because they are
opposite to the strong (left) side hitter, meaning they hit behind the
setter. In a 6-1, just like an outside hitter, an opposite has the option
to play all the way around, passing, playing defense, and hitting out of
the back row. An opposite’s responsibilities include swinging from the
front and back row, playing right-back defense, and blocking the other
team’s outside hitter.
– Middle blocker: Middle blockers are the team’s best blockers, and
they hit mostly fast-tempo sets from the middle of the court and behind
the setter. Typically, the libero goes in for the middle when he or she
rotates to the back row. Middle sets are some of the most difficult to set
and require good passes, therefore middles often get the fewest sets
but have the best hitting percentages.
– Libero: Liberoes wear a jersey of a different color and play in the
back row five out the six rotations, usually subbing in for both middle
blockers. When the libero comes in for another player, it does not count
as a substitution. Liberoes are defensive and serve-receive specialists
who are typically fast and are able to change direction quickly. Liberoes
are not permitted to attack the ball from above the height of the net,
and they can only overhand set a front-row attacker from behind the
10-foot line
– Defensive Specialists (DS): Much like a libero, a defensive specialist
plays in the back row and is responsible for playing defense and
receiving serve. Unlike the libero, they do not wear different colored
jerseys and are required to abide by the normal substitution rules,
meaning they are only in for three out of the six rotations.
– Serving Specialist (SS): A serving specialist is a player who subs in just
to serve. These players typically have a very tough or very consistent
serve, and they come in for a player who is less strong behind the
service line, but otherwise very valuable to have on the court as an
offensive or defensive threat.
– Advantages and disadvantages of volleyball formations used in
volleyball
– In volleyball, teams must have their players in a specific formation.
– The players: There is a penalty for being out of rotation and the
opposing team receives a point. There are three formations that are
widely used in the court, each having advantages and disadvantages.
4-2 formation
This offense takes its name from the fact that it uses four attackers
and two setters. This is a basic formation generally used by less
experienced teams to avoid confusion on the court. At any given time,
one of the setters is in front row and the other is back row.
They are always opposite of each other on the court.
This allows for two attackers front row at any given time,
and the setter is able to dump the ball, as the setter will always be in the frontcourt.
This basic offensive formation allows for any of the basic sets to be run, as well as a 32,
shoot, or possibly a tandem. Teams that use a 4-2 will rarely set anything other than the basic sets.
- The positive aspects of the 4-2 include its simplicity, so a team can gain
experience and later move on to a more complicated formation.
- The negative aspect of using a 4-2 is its limits regarding your offense.
Some think that having two setters’ takes away from your team as
the setter is generally the team leader. Some coaches opt to start
their team out running a more complicated system and just having the players adopt it.
5-1 Formation
A 5-1 takes its name from using one setter and having five attackers on the court.
The secondary setter is replaced by an opposite hitter who is always opposite
the setter on the court. This formation allows the setter to be able to dump
the ball for half the rotations and have three front row attackers to set the
ball to on the other three rotations. This system allows the setter to set any
possible set he or she wants to depending on whether he or she is front row
or back row. Many coaches prefer this system, having one setter as the team leader.
- Positive aspect of this formation is to help having only one setter so that
the setting does not change. One setter may set the ball differently from
another giving a different feel for the attackers. It helps when the attackers
are used to one setter in particular.
- The negative aspect of this offense is that the setter needs to transition from
defense to set the ball. This creates situations where the setter has the first contact
and someone else has to set the ball.
6-2 Formation
A 6-2 is similar to a 4-2, but has six attackers and two setters.
This is possible by having the back row setter always set the ball,
making the setter only a hitter when he or she is front row.
This formation allows any possible set to be made not including a dump by
the setter because he or she is always back row when setting the ball.
- It is good for a team in which the setters are also very good attackers
where coach does not want to waste that talent. Unfortunately,
this formation has the problems of 5-1 and 4-2. Having two setters
and always having one of them be back row. The setter always has to
transition from defense and the leadership is lacking. Most teams at
the highest-level team use the 5-1 rather than this for leadership purposes.
Attack tempo (the speed of the attack). We distinguish three tempos in attack:
tempo 1 (the fastest tempo), tempo 2 and tempo 3. Thus, the effectiveness
of the attack will depend not only on the type of an attack but also on how
fast is the player on the action.
SPIKING is the offensive play where a player swings the ball with their palm
sharply downwards over the net and into the opposing court, making it difficult
for the opposing team to recover the ball
Spike is the strategy used to send the ball over the net to the
opponent in such manner that ball is not returnable
End unit assessment 4.6
Setting exercises and observe weather students are able to perform
better: Passing, setting, blocking, digging, spiking tactics and be able to
take position according to the chosen system formation
4.7 Additional activities
4.7.1 Remedial activities
Individually and in groups, the students will revise the correct tactics of serving,
setting, digging, spiking and blocking.
4.7.2 Consolidation activities
Individually or in groups, the students will perform the tactics of serving,
passing, setting, spiking, blocking and digging in volleyball.
4.7.3 Extended activities
Encourages and facilitates students to form teams and participate in
different competitions of volleyball organized by the school,
Sector or national sports schools federation.UNIT 5: BASKETBALL
Key unit competence: Develop basketball tactical skills.
5.1. Prerequisite (Knowledge, skills, attitudes and values)
Students of senior five will develop better basketball tactical skills
if they have well developed basketball technical skills learned in S4 and physical exercises.
5.2 Cross-cutting issues to be addressed
Gender:
In teaching and learning process of basketball, the teacher must prepare and
provide physical activities that engage both girls and boys equally to exploit their
full potential and talents without any discrimination or prejudice.
Inclusive education:
The teacher as a facilitator he/she must consider different special education
needs and select basketball activities to adapt his/her teaching approaches
to the students. This creates a positive attitude and helps all students to
participate actively and develop their competence levels.
Financial education:
The teacher should integrate Financial Education into his/her teaching/
learning activities by providing the local and no cost teaching material where is possible.
He/she must encourage students to make their own materials that can help them to
develop competences not only in sports at school but also in their daily life.
Standardization culture:
The teacher must choose and select the standardized materials to use in his/her
teaching/learning process of basketball. It is necessary to provide appropriate
materials required to the levels of students and help them to develop culture of
checking and using the quality of sport materials for the competitions before using
them in order to prevent injuries and other accident.
Environment and sustainability:
The teacher should provide materials and deliver the lesson by encouraging students
to protect the environment and well use of materials. The teacher helps them to
develop the spirit of keeping safe the environment they use in physical education and sports activities.
Peace and values education:
The teacher helps students to develop fair play and social values by avoiding violence and
conflict in their basketball games and by setting clear and relevant instructions.
He/she should provide the activities that help students to develop their competence peacefully.
Comprehensive sexuality education:
The teacher provides basketball activities and sets instructions that prevent sexual harassment,
any kind of gender-based violence like sexual abuse and physical contacts oriented to the sexuality intention.
Genocide studies:
While conducting basketball exercises a teacher should take a time to explain
students how sports should be used to fight against Genocide ideology and how to prevent it.
For example, to organize Genocide memorial tournaments at school and give
the message related to the Genocide.
5.3 Guidance on introductory activity
Before introducing the lesson one of this unit, you must introduce the whole unit.
The teacher as a guide, facilitator and expert, ask questions or give activity related
to tactical skills used in basketball in order to help them to predict what to be learned in the whole unit5.4 List of lessons/sub-heading
Lesson 1: Players’ position and system formation exercises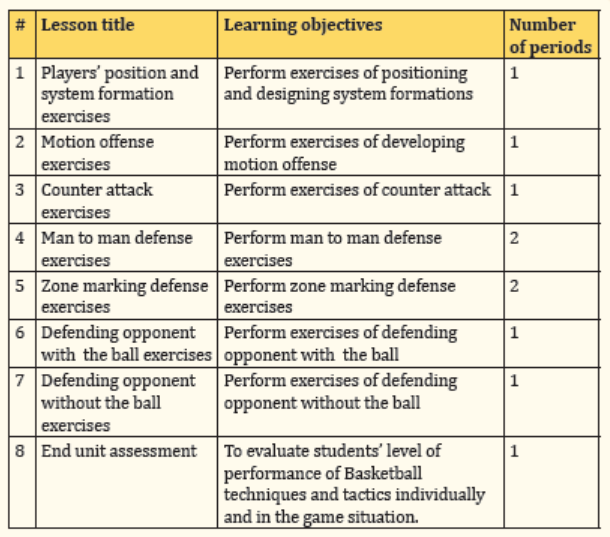
Perform exercises of positioning and designing system formations.
b) Teaching resources
Basketball court, Rim and post, Balls, Cones, Whistle, Watch/Stopwatch,
Chasubles, Laptop, Projector, Flash, Internet and Videos (related to basketball tactical skills).
c) Prerequisites/Revision/Introduction
Students of senior five will develop better basketball tactical skills of players’ position and
system formation exercises if they have well developed basketball technical skills learned in
S4 and physical exercises.
d) Learning activities
Opening discussions
– Ask the students to brainstorm different tactical skills of playing
basketball, which can help them in taking position and identifying
different system formations.
– Introduce the topic of the day.
– Invite students to start warm up exercises.
Warm up exercises and stretching exercises
- The whole class with the guidance of the teacher, let students perform general warm
up exercises and specific warm up based on the most body’s parts to be used in develop
tactical skills of players’ position and system formation exercises in basketball and
stretch their muscles properly.
- Guide them while performing warm up and stretching.
- Help them/demonstrate/correct where is necessary.
Activity5.1
Using the Basketball court, place 5-5 players on two parts of the playground then give
them the ball and ask them to play according to Basketball rules and regulation.
As teacher help players to know responsibilities of each position according to the designed system formation.
Using the Basketball court, place 5-5 players on two parts of the playground then
give them the ball and ask them to play according to Basketball rules and regulation.
As teacher help players to know responsibilities of each position according to thedesigned system formation.
Cool down exercises
– Let students do light exercises and stretch their group of muscles by
insisting on most used parts.
– Randomly, one of students leads cool down exercises.
– Guide them while stretching their muscles systematically.
Closing discussions (RCA)
Reflect
- How did you proceed to succeed exercises of player’s position and system
formation?
- What are the challenges did you face while performing players’ position and
system formation exercises?
- Describe different types of system formation used in basketball
Connect
- How players’ position and system formation exercises are useful in
basketball game?
Apply
– How could tactics of players’ position and system formation exercises
in basketball help you to become best players in your society?
Lesson 2: Motion offense exercises
a) Learning objective
Perform exercises of developing motion offense
b) Teaching resources
Basketball court, Rim and post, Balls, Cones, Whistle, Watch/Stopwatch,
Chasubles, Laptop, Projector, Flash, Internet and Videos (related to basketball
tactical skills).
c) Prerequisites/Revision/Introduction
Students of senior five will develop better basketball tactical skills of motion
offense exercises if they have well developed basketball technical skills learned
in S4 and physical exercises.
d) Learning activities
Opening discussions
– Ask the students to brainstorm different tactical skills of playing
basketball, which can help them in motion offense tactics.
– Introduce the topic of the day.
– Invite students to start warm up exercises.
Warm up exercises and stretching exercises
– The whole class with the guidance of the teacher, let students perform
general warm up exercises and specific warm up based on the most
body’s parts to be used in develop tactical skills of motion offense
exercises in basketball and stretch their muscles properly.
– Help them/demonstrate/correct where is necessary.
e) Lesson body
– Tell to the students that Motion offense is a category of offensive
scheme used in Basketball.
– Explain to them that Motion offense use player’s movement often as a
strategy to exploit the quickness of the offensive team or to neutralize
a size advantage of the defense. The easiest way to begin teaching
the 5-out offense is to start with the basic movements of passing and
cutting in 5-0 situation.
Activity 5.2
Set out 5 cones at 5 fill spots on the court. Let students know that when
they’re not cutting, they must change in one of these 5 positions
Application activity 5.1
Player A start with the ball enter inside the zone (A’) turns on his right
to give/pass the ball to player E who moves on his left toward the place
A then shoot by a jump shoot after receiving the ball from (A’). Player A
become B then B become C, C become D, D become E, E become A after
shooting.
5-0 situation (use one ball)
Kick-Ups (2Man Drills) 2 balls
Kick ups, which is also known as keepie-uppies, is the practice of juggling
a soccer ball with the feet, thighs, and head. It’s a great way to practice ball
Kick-Backs (2Man Drills) 2 balls
Kick-back pass means passing the ball back to perimeter after penetration
off the ball screen. See all free betting tips ·
Backdoor (2Man Drills) 2 balls
When the defense is overplaying the passing lanes, the wing player can
fake out his defender for an open layup by cutting behind him, otherwise
called “backdoor”. It’s key to create enough space on the wing and aroundthe basket so the help defense is too far away to recover.
Cool down exercises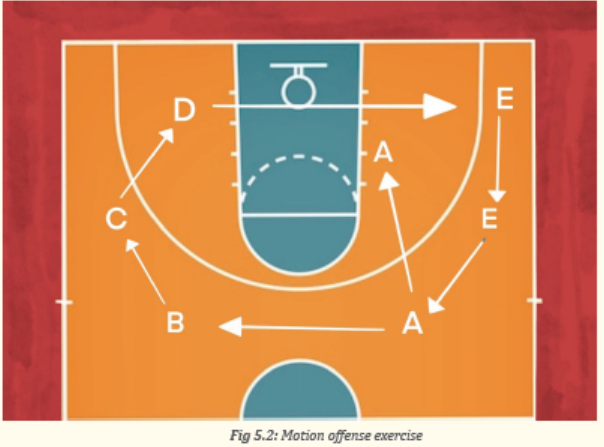
Let students do light exercises and stretch their group of muscles by insisting
on most used parts.
– Randomly, one of students leads cool down exercises.
– Guide them while stretching their muscles systematically.
Closing discussions (RCA)
Reflect
– How did you proceed to succeed exercises of motion offense exercises
in Basketball?
– What are the challenges did you face while performing motion offense
exercises in Basketball?
- Describe different types of motion offense used in basketball.
Connect
– How motion offense exercises are useful in basketball game in
Basketball?
Apply
– How tactics of motion offense exercises in basketball could help you to
become best players in your society?
Lesson 3: Counter attack exercises
a) Learning objective
Perform exercises of counter attack.
a) Teaching resources
Basketball court, Rim and post, Balls, Cones, Whistle, Watch/Stopwatch,
Chasubles, Laptop, Projector, Flash, Internet and Videos (related to basketball
tactical skills).
b) Prerequisites/Revision/Introduction
Students of senior five will develop better basketball tactical skills of counter
attack exercises if they have well developed basketball technical skills learned
in S4 and physical exercises.
c) Learning activities
Opening discussions
– Ask the students to brainstorm different tactical skills of playing
basketball, which can help them in counter attack.
– Introduce the topic of the day.
– Invite students to start warm up exercises.
Warm up exercises and stretching exercises
– The whole class with the guidance of the teacher, let students perform
general warm up exercises and specific warm up based on the most
body’s parts to be used in develop tactical skills of counter attack
exercises in basketball and stretch their muscles properly.
Help them/demonstrate/correct where is necessary.
d) Lesson body
Explain to the students that a counter move happens when a defender is able
to stop an offensive player’s ability to continue in their scoring opportunity.
This counter is a quick decision move that will help increase the probability of
a scoring play.
Tell them that a counterattack in basketball is when a team attacks immediately
after regaining the ball from defending the opponent`s attack.
Activity 5.3
Footwork and shooting
Individually, provide 2 balls to be used in front of basketball board on the 2
sides of penalty zone then a player picks up the balls side to side and shoot
(static and jump shoot)
Activity 5.4
Pivot and counters
Individually, provide 2 balls to be used in front of basketball board on the
2 sides of penalty zone then a player starts by pivot when he picks up the
ball dribble once then layup shoot and the second ball make a jump shoot.
Activity 5.5
Ball handling and weak hand development
A player two balls (left and right) try to dribble those balls consecutively or
alternatively from the front line to the center line and back to the penalty
line then leave one ball to finish with a layup and go back for the second
ball to finish by a jump shoot after picking up it on the penalty line. In
counterattack when number 1 hold the ball, number 2 and number3 cross
in transition to out and number 4 and 5 make transition to in.
Cool down exercises
– Let students do light exercises and stretch their group of muscles by
insisting on most used parts.
– Randomly, one of students leads cool down exercises.
– Guide them while stretching their muscles systematically.
Closing discussions (RCA)
Reflect
– How did you proceed to succeed exercises of counter attack in
Basketball?
– What are the challenges did you face while in counter attack exercises
in Basketball?
– Describe different types of counter attack exercises used in basketball.
Connect
– How counter attack exercises are useful in basketball game?
Apply
– How c tactics of counter attack exercises in basketball could help you
to become best players in your society?
Lesson 4: Man to man defense exercises
a) Learning objective
Perform man to man defense exercises.
b) Teaching resources
Basketball court, Rim and post, Balls, Cones, Whistle, Watch/Stopwatch,
Chasubles, Laptop, Projector, Flash, Internet and Videos (related to basketball
tactical skills).
c) Prerequisites/Revision/Introduction
Students of senior five will develop better basketball tactical skills of man to
man defense exercises if they have well developed basketball technical skills
learned in S4 and physical exercises.
d) Learning activities
Opening discussions
– Ask the students to brainstorm different tactical skills of playing
basketball, which can help them in man to man defense
– Introduce the topic of the day.
– Invite students to start warm up exercises.
Warm up exercises and stretching exercises
– The whole class with the guidance of the teacher, let students perform
general warm up exercises and specific warm up based on the most
body’s parts to be used in develop tactical skills of man to man defense
exercises in basketball and stretch their muscles properly.
– Help them/demonstrate/correct where is necessary.
e) Lesson body
Activity 5.6
Defensive footwork
In pairs, players face to face arranged on parallel lines of defending zone or
use a similar disposition then move on lateral chasing (without speed and
with speed).
Activity 5.7
In pairs, players face to face, player A handle or maintain the ball with two
hands and player B with squat position touch on the ball then the ball push
him backward chasing side to side from the front line to the center line.
Vice versa,
Activity 5.8
In pairs, players face to face, player A dribble the ball from the front line
towards the center line and player B with squat position defend him
backward chasing side to side from the front line to the center line. Vice
versa
Cool down exercises
– Let students do light exercises and stretch their group of muscles by
insisting on most used parts.
– Randomly, one of students leads cool down exercises.
– Guide them while stretching their muscles systematically.
Closing discussions (RCA)
Reflect
– How did you proceed to succeed exercises of man to man defense in
basketball game?
– What are the challenges did you face while in man to man defense
exercises in basketball game?
– Describe different types of man to man defense exercises used in
basketball game
Connect
– How man to man defense exercises is useful in basketball game?
Apply
How could you apply tactics of man to man defense exercises in basketball help
you to become best players in your society?
Lesson 5: Zone marking defense exercises
a) Learning objective
Perform zone marking defense exercises.
b) Teaching resources
Basketball court, Rim and post, Balls, Cones, Whistle, Watch/Stopwatch,
Chasubles, Laptop, Projector, Flash, Internet and Videos (related to basketball
tactical skills).
c) Prerequisites/Revision/Introduction
Students of senior five will develop better basketball tactical skills of zone
marking defense exercises if they have well developed basketball technical
skills learned in S4 and physical exercises.
d) Learning activities
Opening discussions
– Ask the students to brainstorm different tactical skills of playing
basketball, which can help them in zone marking defense.
– Introduce the topic of the day.
– Invite students to start warm up exercises.
Warm up exercises and stretching exercises
– The whole class with the guidance of the teacher, let students perform
general warm up exercises and specific warm up based on the most
body’s parts to be used in develop tactical skills of zone marking
defense exercises in basketball and stretch their muscles properly.
– Help them/demonstrate/correct where is necessary.
e) Lesson body
Activity 5.9
Here we have different types of Basketball zone defense which can change
the disposition according to the attacking system to defend but the structurestill the same.
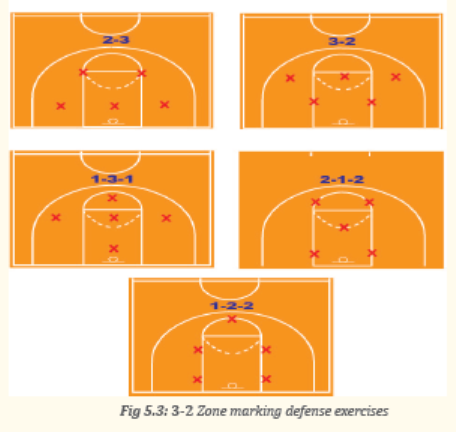
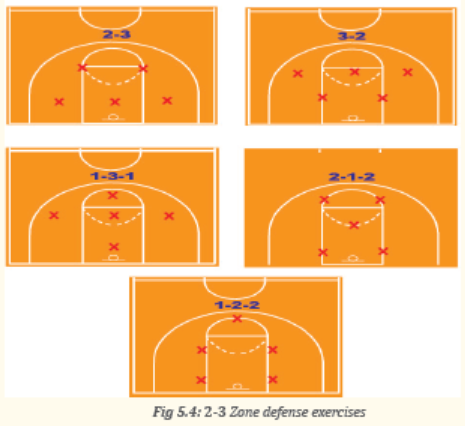
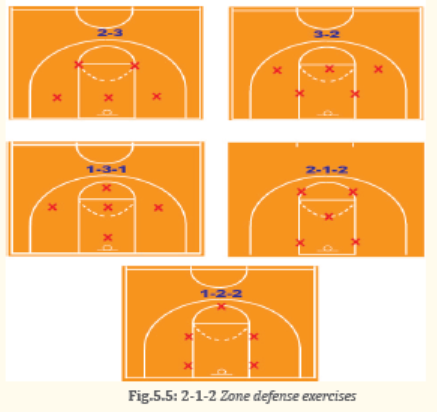
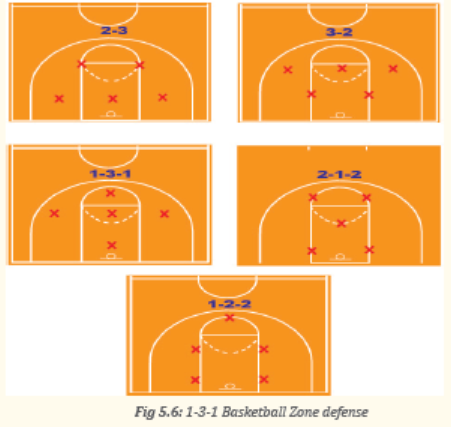
Cool down exercises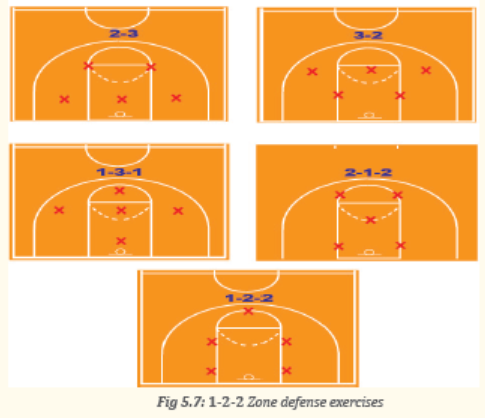
– Let students do light exercises and stretch their group of muscles by
insisting on most used parts.
– Randomly, one of students leads cool down exercises.
– Guide them while stretching their muscles systematically.
Closing discussions (RCA)
Reflect
– How did you proceed to succeed exercises of zone marking defense?
– What are the challenges did you face while in zone marking defense
exercises?
– Describe different types of zone defense exercises used in basketball
Connect
– How zone defense exercises are useful in basketball game?
Apply
– How could tactics of zone defense exercises in basketball help you to
become best players in your society?
Lesson 6: Defending opponent with the ball exercises
a) Learning objective
Perform exercises of defending opponent with the ball.
b) Teaching resources
Basketball court, Rim and post, Balls, Cones, Whistle, Watch/Stopwatch,
Chasubles, Laptop, Projector, Flash, Internet and Videos (related to basketball
tactical skills).
c) Prerequisites/Revision/Introduction
Students of senior five will develop better basketball tactical skills of defending
opponent with the ball exercises if they have well developed basketball technical
skills learned in S4 and physical exercises.
d) Learning activities
Opening discussions
– Ask the students to brainstorm different tactical skills of playing
basketball, which can help them in defending opponent with the ball.
– Introduce the topic of the day.
– Invite students to start warm up exercises.
Warm up exercises and stretching exercises
– The whole class with the guidance of the teacher, let students perform
general warm up exercises and specific warm up based on the most
body’s parts to be used in develop tactical skills of defending opponent
with the ball exercises in basketball and stretch their muscles properly.
– Help them/demonstrate/correct where is necessary.e) Lesson body:
Activity 5.11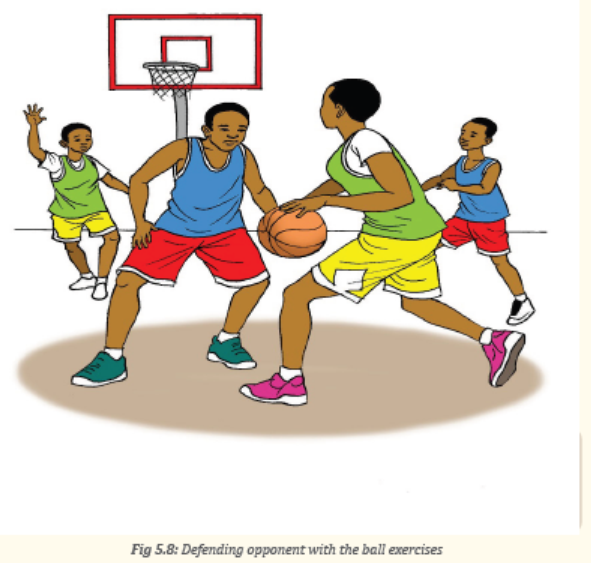
In groups of 3, start by a crisscross evolution from the front line to finish with
a shoot to the other side then player A become an opponent and B & C players
become defenders. When the opponent dribble and escape defender A, B willbe ready to stop or defend him/her too.
Cool down exercises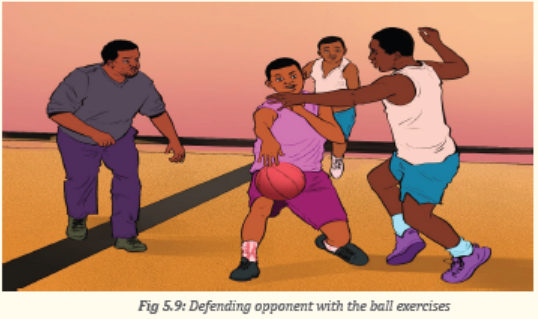
– Let students do light exercises and stretch their group of muscles by
insisting on most used parts.
– Randomly, one of students leads cool down exercises.
– Guide them while stretching their muscles systematically.
Closing discussions (RCA)
Reflect
– Which are the ways should you use to perform learned in defending
opponent with the ball exercises in basketball?
– How did you proceed to succeed exercises of defending opponent with
the ball in Basketball game?
– Describe different types of defending opponent with the ball exercises
used in basketball.
Connect
– How defending opponent with the ball exercises are useful in basketball
game?
Apply
– How tactics of defending opponent with the ball exercises in basketball
could help you to become best players in your society?
Lesson 7: Defending opponent without the ball exercises
a) Learning objective
Perform exercises of defending opponent without the ball.
b) Teaching resources
Basketball court, Rim and post, Balls, Cones, Whistle, Watch/Stopwatch,
Chasubles, Laptop, Projector, Flash, Internet and Videos (related to basketball
tactical skills).
c) Prerequisites/Revision/Introduction
Students of senior five will develop better basketball tactical skills of defending
opponent without the ball exercises if they have well developed basketball
technical skills learned in S4 and physical exercises.
d) Learning activities
Opening discussions
– Ask the students to brainstorm different tactical skills of playing
basketball, which can help them in defending opponent without the
ball.
– Introduce the topic of the day.
– Invite students to start warm up exercises.
Warm up exercises and stretching exercises
– The whole class with the guidance of the teacher, let students perform
general warm up exercises and specific warm up based on the most
body’s parts to be used in develop tactical skills of defending opponent
without the ball exercises in basketball and stretch their muscles
properly.
– Help them/demonstrate/correct where is necessary.
e) Lesson body
Activity 5.11
Box out drill
In groups of 3, the defender A and the opponent B face to face but player C stays
beside B. In defending position, a touch with his/her hand (on the chest level)
in order to feel the opponent to defend. After the hop given to start, player B
tries to escape the player A in order to find the ball behind the defender. By
defending action, player A turn around for making sure that the opponent todefend stay in his/her back for protecting to achieve his/her objective.
Cool down exercises
– Let students do light exercises and stretch their group of muscles by
insisting on most used parts.
– Randomly, one of students leads cool down exercises.
– Guide them while stretching their muscles systematically.
Closing discussions (RCA)
Reflect
- How did you proceed to succeed exercises of defending opponent without
the ball in Basketball game?
- What are the challenges did you face while in defending opponent without
the ball exercises in Basketball game?
- Describe different types of defending opponent without the ball exercises
used in basketball game.
Connect
- How defending opponent without the ball exercises are useful in basketball
game?
Apply
– How could tactics of defending opponent without the ball exercises in
basketball help you to become best players in your society?
5.6 Additional information for teacher
Basketball is played by two (2) teams of five (5) players each. The aim of each
team is to score in the opponents’ basket and to prevent the opponent team to
score in my own basket.
Positioning in Basketball
Players in a basketball game have assigned basketball positions: center, power
forward, small forward, point guard, and shooting guard. The center is the
tallest player on each team, playing near the basket. On offense, the center tries
to score on close shots and rebound.
Teaching each player various positions on the court is important. To help
encourage floor spacing and floor balance, the following diagram is provided.
– Positions 1 and 2 refer to guards.
– Position 3 is a small forward,
– Positions 4 and 5 are post players.
Point guard (1): The point guard is the team leader and play caller on the
basketball court. A point guard needs good ball handling skills, passing skills as
well as strong leadership and decision making skills.
Shooting guard (2): The shooting guard in basketball has the main
responsibility of making long outside shots including the three-point shot. The
shooting guard also should be a good passer and able to help the point guard
with the ball handling.
Small forward (3): Along with the shooting guard, the small forward is often
the most versatile player on the basketball team. They should be able to help
with ball handling, make an outside shot, and get rebounds. The small forward
is often a great defensive player as well.
The combination of height and quickness can allow them to defend a number
of positions and take on the best scorer on the opposing team. On many teams
today the small forward and the shooting guard are almost the same position
and are called “wing” players.
Power forward (4): The power forward on a basketball team is usually
responsible for rebounding and some scoring in the paint. A power forward
should be big and strong and able to clear out some space under the basket.
Power forwards are often good shot blockers as well.
Center (5): The center is usually the biggest or tallest member of the basketball
team. In NBA, many centers are 7 feet (2.1m) tall or taller. The center can be a
big scorer, but also needs to be a strong rebounder and shot blocker. On many
teams the center is the final line of defense.
The center also known as the pivot or the big man, usually plays near the
baseline or close to the basket (the “low post”).
Types of system formation
In basketball, a formation is the way that players are positioned on the
court. There are formations for both offense and defense. Each formation has
its own strengths and weaknesses. Zone defenses are good for limiting player
fouls but may be weak against good three point shooting teams. Teams often
use different formations to counter the strategy or formation their opponent
is using.
There are three main formations in Basketball that all others branch out from:
– Man to man defense.
– Zone defense.
– Press defense.
There are many types of formation in Basketball. All formations system from a
few basic principles:
– Player movement and spacing (offense);
– Getting open on the court with cuts and screen (offense);
– Giving the to your best players (offense);
– Playing fast or slow based on the tempo of the opponent and game
(offense);
– Forcing turnovers with steals, blocks and traps;
– Focusing on a specific area of the court, such as the half-court, fullcourt,
corner or three-point line (offense or defense).
When discussing the alignment of players on the court, numbers are often used
for quick recognition (2-3 zone defense, 1-4 high offense, 1-3-1 press). In this
format, the numbers tell how many players are in each location on the court:
the first number usually indicates how many players are at top of a formation
(farthest from the basket), and so on.
Example: In a 2-3 zone defense, two defenders will be positioned near the top
of the key, while the remaining three guard the areas between them and the
baseline.
The Basics of the Motion Offense.
The motion offense is a widely used offense in the game of basketball because
of its versatility and the ease of learning the basic concepts within it.
It differs from other offenses because it involves a set of philosophies and no
plays are called throughout the game, the offense just flows using ball screens,
cuts, passing, player movement, and good spacing.
So, a motion offense incorporates the basic elements of offensive basketball
and lets the players use them however they see fit. The type of motion offense
depends on the number of players on the perimeter usually four out and one in
or three out and two in.
Good ball movement and quick player movement will allow the motion defense
to beat almost any defense there is whether a zone or man to man.
A ball screen is an offensive basketball play in which a non-ball-handling
offensive player screens a defender by placing their body between the defender
and a teammate. This creates space for teammates to catch or distribute passes,
attack the hoop, or shoot a jump shot.
A basketball cut is an offensive skill that occurs when a player without
possession of the ball uses a specific action to move from one location on the
court to another with the primary purpose of creating space and getting open
from a defender.
Player movement
The more the ball can quickly move from player to player, the more the
defense will have to communicate, rotate, etc., and that means more potential
breakdowns. Quality ball movement not only makes things easier for the
offense, but it also makes things much more difficult for the defense.
There are four ways that players can move with the ball on the court in
basketball. Passing. Shooting. Dribbling. Pivoting.
Spacing in Basketball
Spacing and more specifically good spacing, is a foundational aspect within the
game of basketball and its general notion is that players on the court, especially
during offensive execution, should always strive to be at least 12 to 15 feet away
from each other.
End unit assessment 5.6
Setting players’ position and system formation, motion offense, counter
attack, man to man defense zone marking defense, defending opponent
with the ball, defending opponent without the ball exercises and observes
how students perform these Basketball tactical skills.
5.7 Additional activities
5.7.1 Remedial activities
Regular performance of players’ position and system formation, motion offense,
counter attack, man to man defense zone marking defense, defending opponent
with the ball and defending opponent without the ball exercises.
5.7.2 Consolidation activities
Increase the performance of players’ position and system formation, motion
offense, counter attack, man to man defense zone marking defense, defending
opponent with the ball, defending opponent without the ball exercises.
5..7.3 Extended activities
Request students to participate in different Basketball competitions organizedby a school.
UNIT 6: HANDBALL
KEY UNIT COMPETENCE: Develop handball tactical skills
6..1 Prerequisite (Knowledge, skills, attitudes and values)
Students of senior five will develop better handball tactical skills if they have well
developed handball techniques skills learned in S4 and physical exercises.
6.2 Cross-cutting issues to be addressed
Gender:
In teaching and learning process of handball, the teacher must prepare and
provide physical activities that engage both girls and boys equally to exploit
their full potential and talents without any discrimination or prejudice.
Inclusive education:
The teacher as a facilitator he/she must consider different special education
needs and select handball activities to adapt his/her teaching approaches to
students. This creates a positive attitude and helps all students to participate
actively and develop their competence levels.
Financial education:
The teacher should integrate Financial Education into his/her teaching/
learning activities by providing the local and no cost teaching material where
is possible. He/she must encourage students to make their own materials that
can help them to develop competences not only in sport at school but also in
their daily life.
Standardization culture:
The teacher must choose and select the standardized materials to use in his/her
teaching/learning process of handball. It is necessary to provide appropriate
materials required to the levels of students and help them to develop culture of
checking and using the quality of sport materials for the competitions before
using them in order to prevent injuries and other accident.
Environment and sustainability:
The teacher should provide materials and deliver the lesson by encouraging students
to protect the environment and well use of materials. The teacher helps them to
develop the spirit of keeping safe the environment they use in physical education
and sports activities.
Peace and values education:
The teacher helps students to develop fair play and social values by avoiding
violence and conflict in their handball games and by setting clear and relevant
instructions. He/she should provide the activities that help students to develop
their competence peacefully.
Comprehensive sexuality education:
The teacher provides handball activities and sets instructions that prevent
sexual harassment, any kind of gender-based violence like sexual abuse and
physical contacts oriented to the sexuality intention.
Genocide studies:
While conducting handball exercises, the teacher should take a time to explain
students how sports should be used to fight against Genocide ideology and
how to prevent it. For example, to organize Genocide memorial tournaments at
school and give the message related to the Genocide.
6.3 Guidance on introductory activity
Before introducing the lesson one of this unit, you must introduce the whole
unit. The teacher as a guide, facilitator and expert, ask questions or give activity
related to tactical skills used in handball in order to help them to predict what
to be learned in the whole unit.6.4 List of lessons/sub-heading
Lesson 1: Players’ positions and offensive systems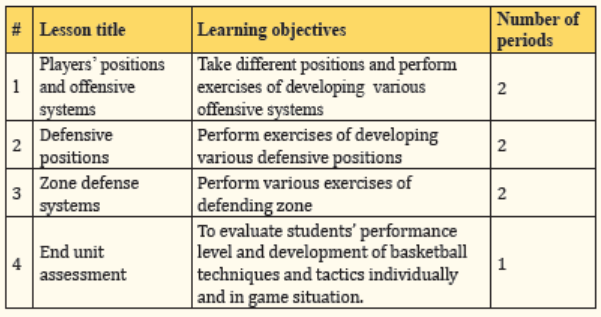
a) Learning objective
– Take different positions
– Perform exercises of developing various offensive systems
b) Teaching resources
Balls, playground, whistle, stopwatch, cones, videos related to handball tactical
skills, chasubles, posts.
c) Prerequisites/Revision/Introduction
Students of senior five will develop better Handball tactical skills of players’
positions and offensive systems if they have well developed Handball technical
skills learned in S4 and physical exercises.
d) Learning activities
Opening discussions
– Ask the students to brainstorm different tactical skills of playing
Handball, which can help them in players’ positions and offensive
systems.
– Introduce the topic of the day.
– Invite students to start warm up exercises.
Warm up exercises and stretching exercises
The whole class with the guidance of the teacher, let students perform general
warm up exercises and specific warm up based on the most body’s parts to
be used in develop tactical skills of players’ positions and offensive systems
exercises in basketball and stretch their muscles properly.
Help them/demonstrate/correct where is necessary.
e) Lesson body
Identification of different player’s positions of Handball playground.
Explain to the students that the seven player’s positions are accordingly named
from different roles (offense or defense).
Handball players follow their offensive roles:
– Goalkeeper (GK)
– Left back (LB)
– Center back (CB)
– Right back (RB)
– Left winger (LW)
– Center forward (pivot), (P)
– Right winger (RW)
Handball players follow their defensive roles:
- Goalkeeper (GK)
– Far right (FR)
– Half right (HR)
– Back center (BC)
– Half left (HL)
– Far left (FL)– Front center (FC)
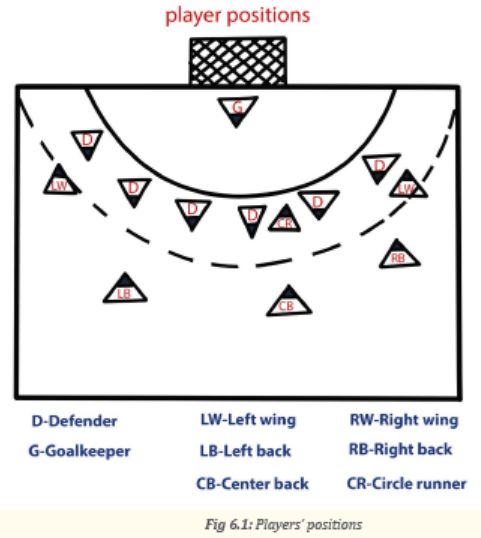
Offensive systems
Attack in zone 5: 1
It works to attack 6: 0, 4: 2, 3: 3 and 3: 2: 1 defense systems. Five players
are ahead, in the free-throw area, and a pivot is positioned close to the goal
area. There, he occupies the central range of the goal, where he manages to
have a greater pitch angle. The movement of the pivot is always in relation
to the ball. He must facilitate the receipt, and only if he walks or runs
towards the frame of the move.
The other five players are responsible for setting up the play. They can use
three players in this specific function, while two others, playing at the ends,try to penetrate the area or assist the pivot in finishing and shooting.
Activity 6.2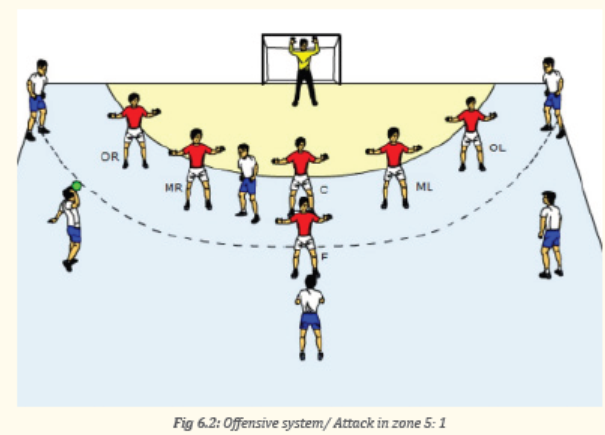
Attack in zone 6: 0
Effective for attacking 6: 0, 5: 1, 3: 3, and 3: 2: 1 defense systems. It is one
of the simplest offensive systems. Six players position themselves in front
of the free-throw area, trying to occupy this entire region. The movement
between them must always be in the sense of exchanging passes to be able
to penetrate or obtain conditions to execute long distance shots.
In this formation, there is no specific performance of the pivot, and the
guards must set up the plays from the sides. This causes the defense of the
opposing team to move to one side and the attack can penetrate the area
from the opposite side. In this case, the tip positioned on the opposite side
penetrates through the middle, occupying the position of the pivot. In case
the frame starts in the center of the court, players must exchange passesclose to the midfield, to avoid being cut by the defenders of the other team.
Cool down exercises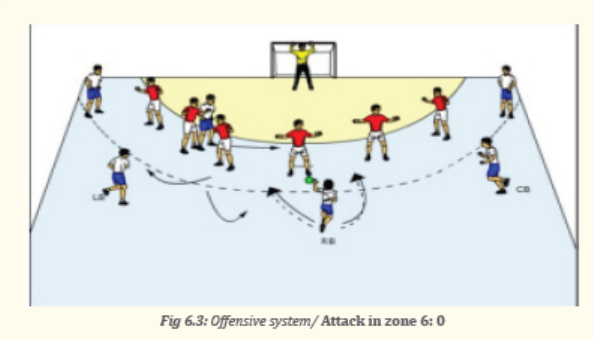
Let students do light exercises and stretch their group of muscles by insisting
on most used parts.
– Randomly, one of students leads cool down exercises.
– Guide them while stretching their muscles systematically.
Closing discussions (RCA)
Reflect
– How did you proceed to succeed exercises of players’ positions and
offensive systems in handball game?
– What are the challenges did you face while in players’ positions and
offensive systems exercises in handball game?
– Describe different types of players’ positions and offensive systems
exercises used in handball game
Connect
– How defensive positions exercises are useful in handball game?
Apply
– How could you apply tactics of players’ positions and offensive systems
exercise in handball help you to become best players in your society?
Lesson 2: Defensive positions
a) Learning objective
Perform exercises of developing various defensive positions.
b) Teaching resources
Balls, playground, whistle, stopwatch, cones, videos related to handball tactical
skills, chasubles, posts.
c) Prerequisites/Revision/Introduction
Students of senior five will develop better Handball tactical skills of defensive
positions exercises if they have well developed Handball technical skills learned
in S4 and physical exercises.
d) Learning activities
Opening discussions
– Ask the students to brainstorm different tactical skills of playing
Handball, which can help them in defensive positions exercises.
– Introduce the topic of the day.
– Invite students to start warm up exercises
Warm up exercises and stretching exercises
– The whole class with the guidance of the teacher, let students perform
general warm up exercises and specific warm up based on the most
body’s parts to be used in develop tactical skills of defensive position
exercises in Handball and stretch their muscles properly.
– Help them/demonstrate/correct where is necessary.
e) Lesson body
Defensive positions
Activity 6.3
Defense in zone 5:1
Tactical system formed by two lines of defense, one with five players close
to the six-meter mark, and the other with one player on the nine-meter line.
This player must be fast, agile and resistant to not allow long distance shots
and avoid making a pass to the pivot of the opposite team. In addition, it
has the function of disrupting the movement of attackers in long distance
shots and intercepting passes. You should also help defenders on the sidesand start the counterattack.
Activity 6.4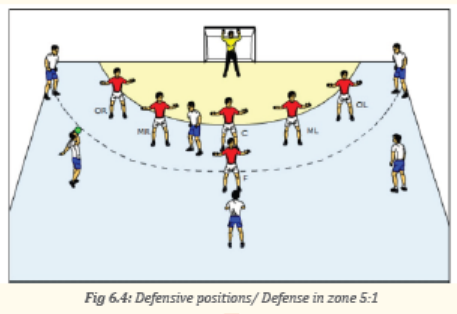
Defense in zone 3: 3
Three players position themselves in front of the free kick area, and three
infiltrators stay within the area, moving close to the goalkeeper’s area line.
It is one of the most aggressive tactical systems, but also considered one of
the most risk, as it makes coverage difficult and facilitates infiltrations by
the opposing team.
It can be easily adapted for 4: 2, 3: 2: 1 and 5: 1 system. It is effective in
neutralizing opposing teams in nine-meter shots. It also offers greatcounter-attack possibilities.
Cool down exercises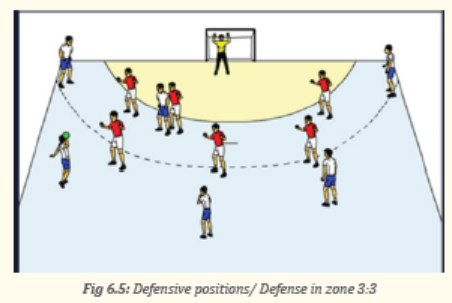
– Let students do light exercises and stretch their group of muscles by
insisting on most used parts.
– Randomly, one of students leads cool down exercises.
– Guide them while stretching their muscles systematically.
Closing discussions (RCA)
Reflect
– How did you proceed to succeed exercises of defensive positions
handball game?
– What are the challenges did you face while in defensive positions
exercises handball game?
– Describe different types of defensive positions exercises used in
handball game
Connect
– How defensive positions exercises are useful in handball game?
Apply
– How could you apply tactics of defensive positions exercises in handball
help you to become best players in your society?
Lesson 3: Zone defense systems
a) Learning objective
Perform various exercises of defending zone
b) Teaching resources
Balls, playground, whistle, stopwatch, cones, videos related to handball tactical
skills, chasubles, posts.
c) Prerequisites/Revision/Introduction
Students of senior five will develop better Handball tactical skills of zone
defense systems exercises if they have well developed Handball technical skills
learned in S4 and physical exercises.
d) Learning activities
Opening discussions
– Ask the students to brainstorm different tactical skills of playing
Handball, which can help them in zone defense systems exercises.
– Introduce the topic of the day.
– Invite students to start warm up exercises.
Warm up exercises and stretching exercises
The whole class with the guidance of the teacher, let students perform general
warm up exercises and specific warm up based on the most body’s parts to be
used in develop tactical skills of zone defense systems exercises in Handball
and stretch their muscles properly. Help them/demonstrate/correct where is
necessary.
e) Lesson body
Zone defense systems
Activity 6.5
Defense in zone 6:0
The usual formation of the defense 6:0, all defense players line up betweenthe 6-metre line to form a wall.
Activity 6.6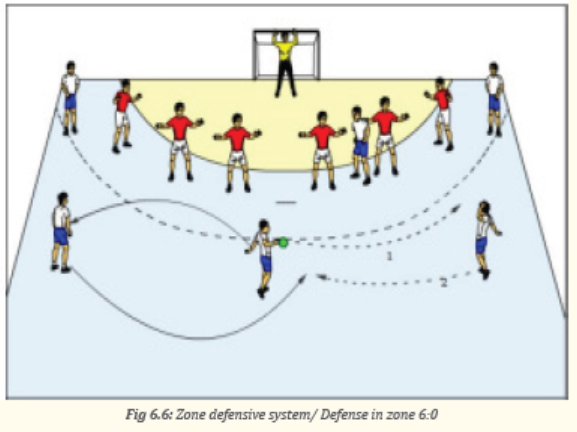
Defense in zone 5:1
Tactical system formed by two lines of defense, one with five players close
to the six-meter mark, and the other with one player on the nine-meter line.
This player must be fast, agile and resistant to not allow long distance shots
and avoid making a pass to the pivot of the opposite team. In addition, it
has the function of disrupting the movement of attackers in long distance
shots and intercepting passes. You should also help defenders on the sidesand start the counter attack.
Cool down exercises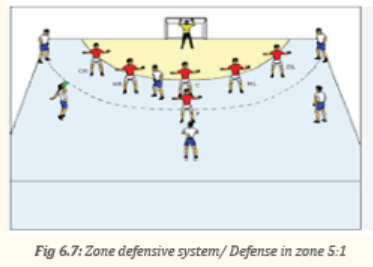
– Let students do light exercises and stretch their group of muscles by
insisting on most used parts.
– Randomly, one of students leads cool down exercises.
– Guide them while stretching their muscles systematically.
Closing discussions (RCA)
Reflect
– How did you proceed to succeed exercises of zone defense systems?
– What are the challenges did you face while in zone defense systems
exercises?
– Describe different types of zone defense systems exercises used in
Handball
Connect
– How zone defense systems exercises are useful in Handball game?
Apply
– How could tactics of zone defense systems exercise in Handball help
you to become best players in your society?
additional information for teacher
An offensive team formation basically has left and right wingman, who are
typically fast players and has excellent jumping ability required to get better
shooting angle. Left and Right back court These players should be tall enough
so that they are able to shoot over the defender.
Offensive systemsOffense position 2:4
Zone defensive systems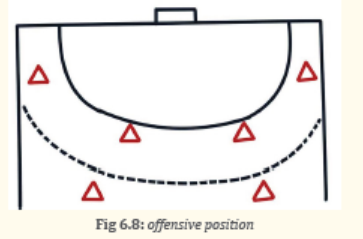
Defense in zone 4: 2
In this strategy, the team forms two lines of defense: the first has two athletes
close to the nine-meter mark, who move laterally, and the second has four
athletes close to the six-meter mark. The goal is to avoid long and medium
distance shots. Defenders of the second row, in addition to moving on the sides,
also move forward and backward, diagonally across the field.
It is an effective tactic when the opposing team has two good players in midfield
shots. Effective especially in the central zone, the defensive system has breadth
and depth. Works against attacks with two pivots. It is also effective at making
passing difficult, although it is weak against 3: 3 attacks.
Defense in zone 3: 2: 1
Three defenders stand on the six-meter mark and two others on a line between
six and nine meters. In addition, a defender stands at the mark on the nine
meters. It can be adapted quickly and become another defensive system.
Because it has more advanced player positions, it is also the system that best
offers chances for counterattacks. One of the disadvantages of this system is
that it is only efficient with a lot of displacement on the part of the players,
which can cause physical wear and tear.
Defense in zone 3: 3
Three players position themselves in front of the free kick area, and three
infiltrators stay within the area, moving close to the goalkeeper’s area line. It is
one of the most aggressive tactical systems, but also considered one of the most
risk, as it makes coverage difficult and facilitates infiltrations by the opposing
team.
It can be easily adapted for 4: 2, 3: 2: 1 and 5: 1 system. It is effective in
neutralizing opposing teams in nine-meter shots. It also offers great counterattack
possibilities.
End unit assessment 6.6
Setting players’ positions and offensive systems, defensive positions and
zone defense systems exercises while observe how students perform these
Handball tactical skills.
6.7 Additional activities
6.7.1 Remedial activities
Regular performance of players’ positions and offensive systems, defensive
positions and zone defense systems exercises
6.7.2 Consolidation activities
Increase the performance of players’ positions and offensive systems, defensive
positions and zone defense systems exercises
6.7.3 Extended activities
Request students to participate in different Handball competitions organizedby a school.
UNIT 7: NETBALL
KEY UNIT COMPETENCE: Develop Netball tactical skills
7..1 Prerequisite (Knowledge, skills, attitudes and values)
Students of senior five will learn better Netball tactical skills if they have well
developed Netball technical skills learned in S4 and physical exercises.
7.2 Cross-cutting issues to be addressed
Gender:
In teaching and learning process of Netball, the teacher must prepare and
provide physical activities that engage both girls and boys equally to exploit
their full potential and talents without any discrimination or prejudice.
Inclusive education:
The teacher as a facilitator he/she must consider different special education
needs and select Netball activities to adapt his/her teaching approaches to
students. This creates a positive attitude and helps all students to participate
actively and develop their competence levels.
Financial education:
The teacher should integrate Financial Education into his/her teaching/
learning activities by providing the local and no cost teaching material where
is possible. He/she must encourage students to make their own materials that
can help them to develop competences not only in sport at school but also in
their daily life.
Standardization culture:
The teacher must choose and select the standardized materials to use in his/
her teaching/learning process of Netball. It is necessary to provide appropriate
materials required to the levels of students and help them to develop culture of
checking and using the quality of sport materials for the competitions before
using them in order to prevent injuries and other accident.
Environment and sustainability:
The teacher should provide materials and deliver the lesson by encouraging
students to protect the environment and well use of materials. The teacher
helps them to develop the spirit of keeping safe the environment they use in
physical education and sports activities.
Peace and values education:
The teacher helps students to develop fair play and social values by avoiding
violence and conflict in their Netball games and by setting clear and relevant
instructions. He/she should provide the activities that help students to develop
their competence peacefully.
Comprehensive sexuality education:
The teacher provides Netball activities and sets instructions that prevent sexual
harassment, any kind of gender-based violence like sexual abuse and physical
contacts oriented to the sexuality intention
Genocide studies:
While conducting Netball exercises, the teacher should take a time to explain
students how sports should be used to fight against Genocide ideology and
how to prevent it. For example, to organize Genocide memorial tournaments at
school and give the message related to the Genocide.
7.3 Guidance on introductory activity
Before introducing the lesson one of this unit, you must introduce the whole
unit. The teacher as a guide, facilitator and expert, ask questions or give activity
related to tactical skills used in Netball in order to help them to predict what tobe learned in the whole unit.
7.4 List of lessons/sub-heading
Lesson 1: Offensive playing positions
a) Learning objective
Develop tactics of offensive playing positions
b) Teaching resources
Balls, playground, whistle, stopwatch, cones, videos related to netball tactical
skills, training bibs, rim.
c) Prerequisites/Revision/Introduction
Students of senior five will develop better Netball tactical skills of offensive
playing positions exercises if they have well developed Netball technical skills
learned in S4 and physical exercises.
d) Learning activities
Opening discussions
– In groups, students brainstorm about different tactics used while
playing netball as they learned in senior four;
– Let some groups present their findings;
– Assist them to clarify their findings;
– Introduce tactical skills of offensive playing positions in netball;
– Invite students to start warm up and stretching exercises.
Warm up exercises and stretching exercises
– Let students perform general warm up exercises and specific warm up
based on body’s parts to be used more while performing exercises of
offensive playing positions and stretch their muscles properly.
– Randomly one student leads warm up and stretching exercises.
– Guide them while performing warm up and stretching exercises.
e) Lesson body
Explain to the students that offensive playing positions are namely:
– Goal Shooter.
– Goal Attack.– Wing Attack.
Offensive tactics in netball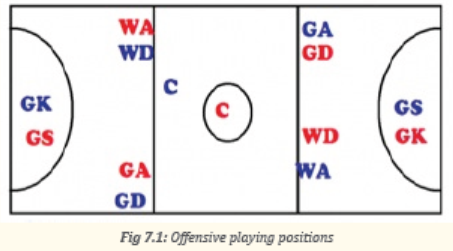
– Ensure passes are accurate and into the space, enabling the moving
player to attack the ball.
– Use arms to maximize speed on sprint to circle edge.
– Land in an upright and balanced position as close to the circle edge as
possible.
– Ball to shooter must be placed away from the defender.
Circle edge drive exercise
Players in 1 line have a ball each, player in opposite line sprints to receive a
pass on the circle edge. Feeder (after passing ball) also drives to circle edge
to support the first attacking player. Meanwhile the attacking player withthe ball passes to the shooter and makes a shot for goal.
Cool down exercises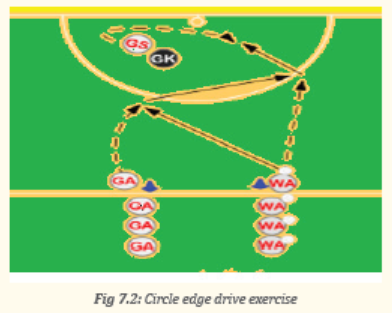
– Let students do light exercises and stretch their group of muscles by
insisting on most used parts.
– Randomly, one of students leads cool down exercises.
– Guide them while stretching their muscles systematically
Closing discussions (RCA)
Reflect
– How did you proceed to succeed exercises of offensive playing
positions?
– Which challenges did you face during the execution of the offensive
playing positions exercises?
Connect
– Can you identify types of offensive playing positions in the Netball
game situation?
Apply
– How tactical skills of offensive playing positions in Netball will help
you to be successful player/in the teams/ society?
Lesson 2: Defensive playing positions
a) Learning objective
Develop tactics of defensive playing positions
a) Teaching resources
Balls, playground, whistle, stopwatch, cones, videos related to netball tactical
skills, training bibs, rim.
b) Prerequisites/Revision/Introduction
Students of senior five will develop better Netball tactical skills of defensive
playing position exercises if they have well developed Netball technical skills
learned in S4 and physical exercises.
c) Learning activities
Opening discussions
– In groups, students brainstorm about different tactics used while
playing netball as they learned in senior four;
– Let some groups present their findings;
– Assist them to clarify their findings;
– Introduce tactical skills of defensive playing position in netball;
– Invite students to start warm up and stretching exercises.
Warm up exercises and stretching exercises
– Let students perform general warm up exercises and specific warm up
based on body’s parts to be used more while performing exercises of
defensive playing position and stretch their muscles properly.
– Randomly one student leads warm up and stretching exercises.
– Guide them while performing warm up and stretching exercises.
d) Lesson body
Explain to the students the following different defensive playing positions:
– Wing Defence.
– Goal Defence.– Goal Keeper.
Defensive tactics in netball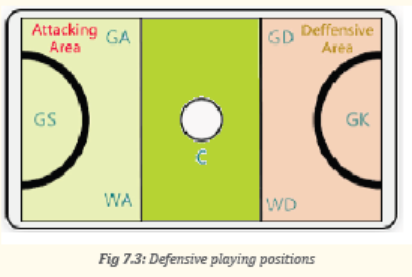
Request students to do the following:
– As a defender, tell them to keep their head up, arms down and keep
their feet moving.
– Body up on the opposing player with the ball.
– Contest the ball.
– Keep communicating with the Goal Defender and Centre for a defensiveset-up on a centre pass.
Activity 7.2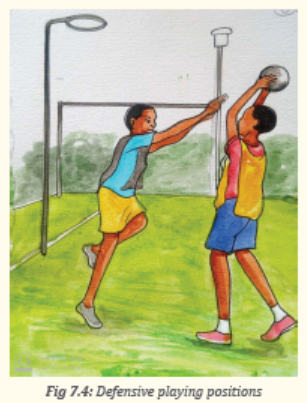
Place 3 players in a triangle 3-4m apart, one with the ball (thrower). 4th
player (defender) stands opposite thrower, between and a little in front of
the other two players (receivers). Thrower then makes chest pass to either
receiver, defender must try to intercept. After five clean interceptions,
players rotate.
A player attempting to intercept or defend the ball must be at least (0.9m)
away from the player with the ball. This distance is measured from the
landing foot of the player in possession of the ball.
Variation
Set up a limited area approximately 5m square. Two teams of four players, one
attacking the other defending. Attacking team pass the ball around the area
while defence try to restrict their space by staying on the inside and forcing
them out. Place a time limit or number of interceptions before swapping teams
over.
Cool down exercises
– Let students do light exercises and stretch their group of muscles by
insisting on most used parts.
– Randomly, one of students leads cool down exercises.
– Guide them while stretching their muscles systematically
Closing discussions (RCA)
Reflect
– How did you proceed to succeed exercises of offensive playing positions
in Netball?
– Which challenges did you face during the execution of the offensive
playing positions exercises in Netball?
Connect
– Can you identify types of offensive playing positions in the Netball
game situation?
Apply
– How tactical skills of offensive playing positions in Netball will help
you to be successful player/in the teams/ society?
Lesson 3: Dodging exercises
a) Learning objective
Perform exercises of dodging.
b) Teaching resources
Balls, playground, whistle, stopwatch, cones, videos related to netball tactical skills,
training bibs, rim.
c) Prerequisites/Revision/Introduction
Students of senior five will develop better Netball tactical skills of dodging exercises
if they have well developed Netball technical skills learned in S4 and physical
exercises.
d) Learning activities
Opening discussions
– In groups, students brainstorm about different tactics used while
playing netball as they learned in senior four;
– Let some groups present their findings;
– Assist them to clarify their findings;
– Introduce tactical skills of dodging in netball;
– Invite students to start warm up and stretching exercises.
Warm up exercises and stretching exercises
– Let students perform general warm up exercises and specific warm up
based on body’s parts to be used more while performing exercises of
dodging and stretch their muscles properly.
– Randomly one student leads warm up and stretching exercises.
– Guide them while performing warm up and stretching exercises.
e) Lesson body
Dodging exercise:
– Feet shoulder width apart (weight evenly distributed).
– Players on their toes, ready to move.
– Player takes two steps one way, drops the shoulder, push off the outside
foot to change direction and drive onto the ball the opposite way.
Activity 7.3
Set up a limited area approximately 3m square. Three players A, B and C,
the attacking player A is a flower in front faced two players, C defends B to
receive the ball from A. The player B on toes ready to take two steps one
way, drops the shoulder then push off the outside foot to change directionand drive onto the ball the opposite way.
Cool down exercises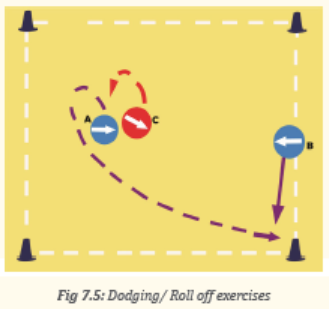
- Let students do light exercises and stretch their group of muscles by insisting
on most used parts.
- Randomly, one of students leads cool down exercises.
- Guide them while stretching their muscles systematically
Closing discussions (RCA)
Reflect
– How did you proceed to succeed exercises of dodging in Netball?
– Which challenges did you face during the execution of the dodging
exercises in Netball?
Connect
– Can you identify types of dodging in the Netball game situation?
Apply
– How tactical skills of dodging in Netball will help you to be successful
player/in the teams/ society?
Lesson 4: Change of direction and speed exercises
a) Learning objective
Perform exercises of changing direction and speed
b) Teaching resources
Balls, playground, whistle, stopwatch, cones, videos related to netball tactical
skills, training bibs, rim
c) Prerequisites/Revision/Introduction
Students of senior five will develop better Netball tactical skills of change of
direction and speed exercises if they have well developed Netball technical
skills learned in S4 and physical exercises
d) Learning activities
Opening discussions
– In groups, students brainstorm about different tactics used while
playing netball as they learned in senior four.
– Let some groups present their findings
– Assist them to clarify their findings
– Introduce tactical skills of change of direction and speed in netball.
– Invite students to start warm up and stretching exercises
Warm up exercises and stretching exercises
– Let students perform general warm up exercises and specific warm up
based on body’s parts to be used more while performing exercises of
change of direction and speed and stretch their muscles properly.
– Randomly one student leads warm up and stretching exercises.
– Guide them while performing warm up and stretching exercises.
e) Lesson body
During changing direction and speed exercises focus on the following points:
– Jump higher
– Run further before changing direction
– Faster push off
– Drive harder to the ball
Set up 6 cones in zig zag disposition, individually, students run through withspeed by changing direction reach each cone as a limit to change direction.
Activity 7.5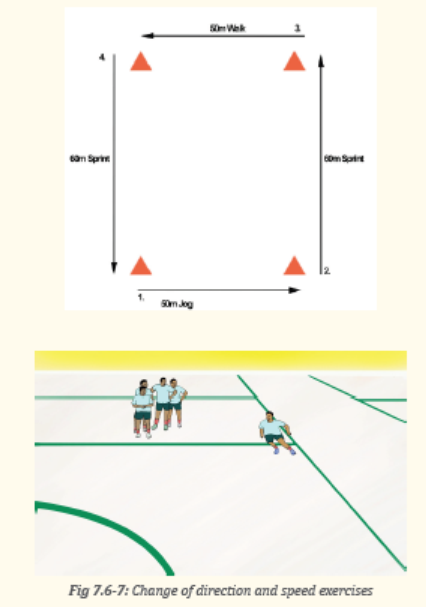
In pairs group straightly arranged, each group has a thrower or receiver
(in next group) student holding the ball stands with the defender find the
receiver of the next group who at the same time try to lose their defenderusing the dodge and continue until to the last group.
Cool down exercises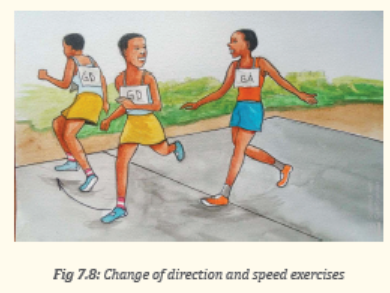
Let students do light exercises and stretch their group of muscles by insisting
on most used parts.
– Randomly, one of students leads cool down exercises.
– Guide them while stretching their muscles systematically
Closing discussions (RCA)
Reflect
– How did you proceed to succeed exercises of change of direction and
speed in Netball game?
– Which challenges did you face during the execution of the change of
direction and speed exercises in Netball game?
Connect
– Can you identify types of change of direction and speed in the Netball
game situation?
Apply
– How tactical skills of change of direction and speed in Netball will help
you to be successful player/in the teams/ society?
Lesson 5: Blocking and rebounding exercises
a) Learning objective
Perform exercises of blocking and rebounding.
b) Teaching resources
Balls, playground, whistle, stopwatch, cones, videos related to netball tactical
skills, training bibs, rim.
c) Prerequisites/Revision/Introduction
Students of senior five will develop better Netball tactical skills of blocking
and rebounding exercises if they have well developed Netball technical skills
learned in S4 and physical exercises.
d) Learning activities
Opening discussions
– In groups, students brainstorm about different tactics used while
playing netball as they learned in senior four.
– Let some groups present their findings.
– Assist them to clarify their findings.
– Introduce tactical skills of blocking and rebounding in netball.
– Invite students to start warm up and stretching exercises.
Warm up exercises and stretching exercises
– Let students perform general warm up exercises and specific warm up
based on body’s parts to be used more while performing exercises of
blocking and rebounding and stretch their muscles properly.
– Randomly one student leads warm up and stretching exercises.
– Guide them while performing warm up and stretching exercises.
e) Lesson body
Explain to the students that rebounding in netball is when a player attempts a
goal by shooting but the ball hits the goalpost and bounces back into play. The
rebounding drill below is especially important for your GS, GA, GK and GD as
they are the only players allowed in the shooting circle - and how they react to
a rebounded shot might mean the difference between scoring or conceding a
goal.
Activity 7.6
Set up two lines (A, B, C, D and 1, 2, 3, 4) on the shooting circle in V disposition
towards the goalpost, player A throws to player 1 and then follows in to
mark and catch the rebound from the 1 player’s shot. The player A returns
the ball to the next player in their line and joins the back of the 1 player’sline. The player 1 in turn joins the back of the A player’s line.
Activity 7.7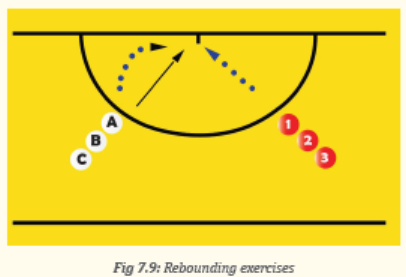
In this exercise the GS is blocking the GK in the circle from moving towards
the side the 2nd pass is thrown (right to left). By the GS turning towards
the player with the ball the GS will have created a space i which to receivethe ball.
Variation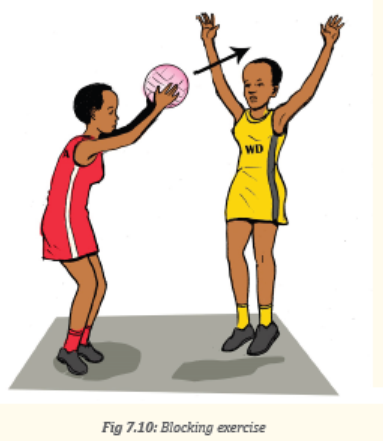
Ball tarts in the middle 1/3 passed to player in the attacking 1/3 and the GS has
to get free to receive the ball, marked by the GK. The GS can pass the ball out
of the circle again until she receives the ball in a shooting position close to thepost.
Cool down exercises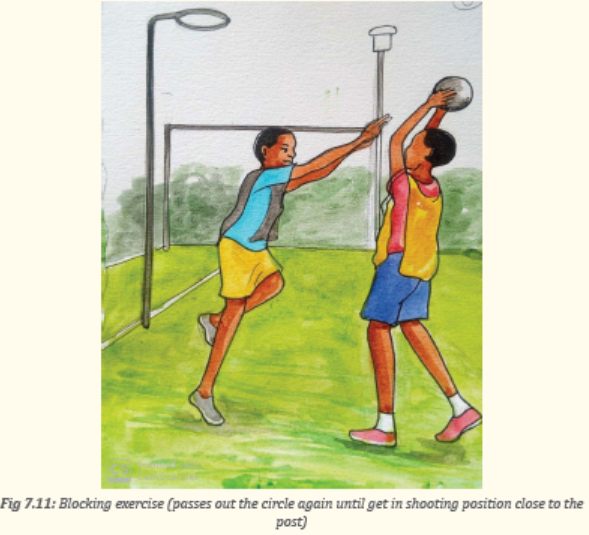
– Let students do light exercises and stretch their group of muscles by
insisting on most used parts.
– Randomly, one of students leads cool down exercises.
– Guide them while stretching their muscles systematically
Closing discussions (RCA)
Reflect
– How did you proceed to succeed exercises of blocking and rebounding
in Netball?
- Which challenges did you face during the execution of the blocking and
rebounding exercises in Netball?
Connect
– Can you identify types of blocking and rebounding in the Netball game
situation?
Apply
– How tactical skills of blocking and rebounding in Netball will help you
to be successful player/in the teams/ society?
Lesson 6: One on one shadowing (man to man)
a) Learning objective
The students of senior five will develop one on one shadowing exercises in
Netball. Apply tactics of one on one shadowing
b) Teaching resources
Balls, playground, whistle, stopwatch, cones, videos related to netball tactical
skills, training bibs, rim.
c) Prerequisites/Revision/Introduction
Students of senior five will develop better Netball tactical skills of one on one
shadowing exercises if they have well developed Netball technical skills learned
in S4 and physical exercises.
d) Learning activities
Opening discussions
– In groups, students brainstorm about different tactics used while
playing netball as they learned in senior four.
– Let some groups present their findings.
– Assist them to clarify their findings.
– Introduce tactical skills of one on one shadowing in netball.
– Invite students to start warm up and stretching exercises.
Warm up exercises and stretching exercises
– Let students perform general warm up exercises and specific warm up
based on body’s parts to be used more while performing exercises of
one on one shadowing and stretch their muscles properly.
– Randomly one student leads warm up and stretching exercises.
– Guide them while performing warm up and stretching exercises.
e) Lesson body
Activity 7.8
Set two cones approximately two meters apart. Attacking player sidesteps
between the two cones at an even pace while the worker shadows the
player and identifies the colored cones being shown.
Each player should work for 30secs-1min before switching roles. Ask
players to work as the defensive player twice each, and switch the pairs
around so everyone gets a look at a different opponent.
Activity 7.9
Players run in pairs along the length of the court. The defender runs
alongside the attacker, trying to keep the attacker on the outside edges of
the channel by turning their body as the attacker jogs/ changes direction.
Do this four times and then swap roles.
Focus on:
– Small foot base keeping on your toes (making small movements using
side steps and slip steps).
– Weight centrally balanced with knees flexed.
– Defender half covers the attacking player with their body slightly
angled in order to see the person with the cones.
– Keep head still and eyes up (you should be able to see the cones and
attacking player at the same time without turning the head).
– Use arms appropriately to increase speed.
Cool down exercises
– Let students do light exercises and stretch their group of muscles by
insisting on most used parts.
– Randomly, one of students leads cool down exercises.
– Guide them while stretching their muscles systematically
Closing discussions (RCA)
Reflect
– How did you proceed to succeed exercises of one on one shadowing in
Netball game?
– Which challenges did you face during the execution of the one on one
shadowing exercises in Netball game?
Connect
– Can you identify types of one on one shadowing in the Netball game
situation?
Apply
– How tactical skills of one on one shadowing in Netball will help you to
be successful player/in the teams/ society?
Lesson 7: Intercepting a pass and a throw
a) Learning objective
Apply tactics of intercepting a pass and a throw
b) Teaching resources
Balls, playground, whistle, stopwatch, cones, videos related to netball tactical
skills, training bibs, rim.
c) Prerequisites/Revision/Introduction
Students of senior five will develop better Netball tactical skills of intercepting
a pass and a throw exercises if they have well developed Netball technical skills
learned in S4 and physical exercises.
d) Learning activities
Opening discussions
– In groups, students brainstorm about different tactics used while
playing netball as they learned in senior four.
– Let some groups present their findings.
– Assist them to clarify their findings.
– Introduce tactical skills of intercepting a pass and a throw in netball.
– Invite students to start warm up and stretching exercises.
Warm up exercises and stretching exercises
– Let students perform general warm up exercises and specific warm up
based on body’s parts to be used more while performing exercises of
intercepting a pass and a throw and stretch their muscles properly.
– Randomly one student leads warm up and stretching exercises.
– Guide them while performing warm up and stretching exercises.
e) Lesson body
Activity 7.10
Intercepting timing
Using 3-5 lines of players (depending to the class size), in front of each line
in 1.5m stand a receiver P faced a correspondent flower T (with interval
of 2m). Every receiver P ready to receive an overhead pass given by a
correspondent thrower T but the pass intercepted by a player from the
line behind the receiver P according to the timing when the ball is released
from the flower T.
Activity 7.11
Interception in 3 seconds
In groups of three players (A, B, C), two of them A and B stand face to face
with 5m of interval, make a chest pass between them and the player C try
to intercept their passes by cutting between A and B side to side within 3seconds.
Activity 7.12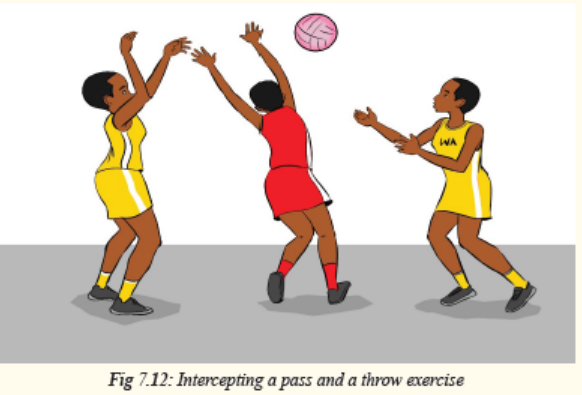
Intercepting left & right
In groups of four players (A, B, C and D), three of them A, B and C stand
on an equilateral triangle of 3m of interval, the receiver’s B and C facing
the thrower A then make a chest pass between them and the player D also
facing the thrower A stands inside the triangle try to intercept left and rightpasses from A to B and C with speed.
Cool down exercises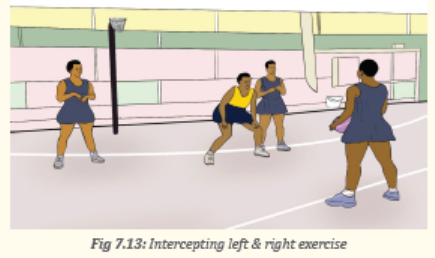
– Let students do light exercises and stretch their group of muscles by
insisting on most used parts.
– Randomly, one of students leads cool down exercises.
– Guide them while stretching their muscles systematically.
Closing discussions (RCA)
Reflect
– How did you proceed to succeed exercises of intercepting a pass and a
throwing Netball game situation?
– Which challenges did you face during the execution of the intercepting
a pass and a throw exercises in Netball game situation?
Connect
– Can you identify types of intercepting a pass and a throw in the Netball
game situation?
Apply
– How tactical skills of intercepting a pass and a throw in Netball will
help you to be successful player/in the teams/ society?
Lesson 8: Zone defending exercises
a) Learning objective
Perform exercises of zone defending
b) Teaching resources
Balls, playground, whistle, stopwatch, cones, videos related to netball tactical
skills, training bibs, rim.
c) Prerequisites/Revision/Introduction
Students of senior five will develop better zone defending exercises if they have
well developed Netball technical skills learned in S4 and physical exercises.
d) Learning activities
Opening discussions
– In groups students brainstorm about different tactics used while
playing netball as they learned in senior four.
– Let some groups present their findings.
– Assist them to clarify their findings.
– Introduce tactical skills of zone defending in netball.
– Invite students to start warm up and stretching exercises.
Warm up exercises and stretching exercises
– Let students perform general warm up exercises and specific warm up
based on body’s parts to be used more while performing exercises of
zone defending and stretch their muscles properly.
– Randomly one student leads warm up and stretching exercises.
– Guide them while performing warm up and stretching exercises.
e) Lesson body
Activity 7.13
Defender as a pair
The two defenders are covering the space inside the circle - and a bit like
piggy in the middle they are trying to win back the ball.
As one defender moves towards the player with the ball and tries to prevent
one pass, the other defender attempts to cover the space for the other pass.
Players need to constantly be communicating to ensure they know who is
doing what.
Cool down exercises
– Let students do light exercises and stretch their group of muscles by
insisting on most used parts.
– Randomly, one of students leads cool down exercises.
– Guide them while stretching their muscles systematically.
– Closing discussions (RCA)
Reflect
– How did you proceed to succeed exercises of zone defending in Netball
game situation?
– Which challenges did you face during the execution of the zone
defending exercises in Netball game situation?
Connect
– Can you identify types of zone defending in the Netball game situation?
Apply
– How tactical skills of zone defending in Netball will help you to be
successful player/in the teams/ society?
End unit assessment 7.6
Setting offensive playing positions, defensive playing positions, dodging,
change of direction and speed blocking and rebounding, one on one
shadowing, intercepting a pass and a throw and zone defending exercises
and observe how students perform Netball tactical skills.
7.7 Additional activities
7.7.1 Remedial activities
Regular performance of offensive playing positions, defensive playing positions,
dodging, change of direction and speed blocking and rebounding, one on one
shadowing, intercepting a pass and a throw and zone defending exercises
7.7.2 Consolidation activities
Increase the performance of offensive playing positions, defensive playing positions,
dodging, change of direction and speed blocking and rebounding, one on one
shadowing, intercepting a pass and a throw and zone defending exercises
7.7.3 Extended activities
Request students to participate in different Netball competitions organized bya school.
UNIT 8: GOALBALL
KEY UNIT COMPETENCE: Develop goalball tactical skills
Prerequisite (Knowledge, skills, attitudes and values)
Students of senior five will learn better Goalball tactical skills if they have well
developed Goalball technical skills learned in S4 and physical exercises.
Cross-cutting issues to be addressed
Gender:
Engage both women and men in physical activity and sports exercises and help
them to exploit their full potentials. No activity is reserved only for women or
men.
Inclusive education:
Identify the students with special education needs, ensure interactive and
inclusive discussion during practice of physical activity and sport exercises.
Financial education:
Facilitate/guide students to make non cost materials like ropes and balls from
banana leave fibers and they can also improvise hurdles for jumping exercises
Standardization culture:
Advise learners to use standardized materials in prevention of injuries and
accidents. Students have to know how to choose and use safe sports clothes
for their health (e.g.: safe sports shoes), safe physical exercises (avoid bad body
postures and forbidden body exercises, adapted physical activities).
Environment and sustainability:
Train students on the culture of protecting the environment surrounding the
field/playground and any other place they play on.
Peace and values education:
Encourage teamwork spirit, mutual help, and respect of opinions of colleagues
among learners.
Comprehensive sexuality education:
Provide physical activities and set instructions that prevent sexual harassment,
any kind of gender-based violence like sexual abuse and physical contacts
concerned with sexuality intention in Physical Education and Sports activities.
Genocide studies:
Take time to explain to students how sports should be used to fight against
Genocide ideology and how to prevent it. E.g.: Organizing Genocide memorial
tournaments at school and giving the message related to the Genocide.
8.3 Guidance on introductory activity
Before introducing the lesson one of this unit, teacher must introduce the
whole unit. The teacher as a guide, facilitator and expert, asks questions or
gives activity related to gymnastics in order to help students to predict what
to be learnt in the whole unit. He/she may use a selected picture or scenario
which helps to quick thinking and reaction.8.4 List of lessons/sub-heading
Lesson 1: Handling and throwing the ball exercises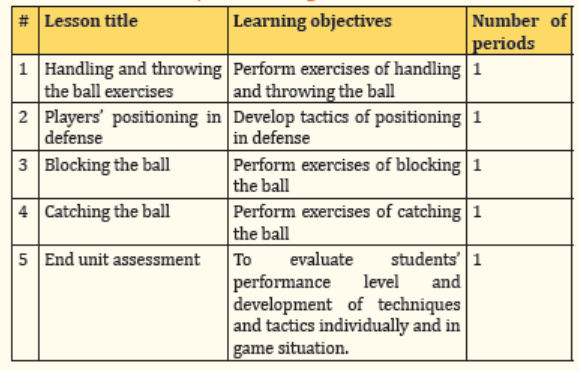
a) Learning objective
At the end of this lesson, senior five students will be able to perform exercises
of handling and throwing the ball.
b) Teaching resources
Balls, Training bibs, Goalball playground, Bell balls / Any other objects of varying
size which make sound, Stopwatch/Watch, First Aid kits, Knee and Elbow Pads,
Eyeshades/Blindfolds and whistle.
c) Prerequisites/Revision/Introduction
Students of senior five will learn better the defensive tactics in goalball if they
can execute basic physical exercises and perform basic goalball techniques.
d) Learning activities
Opening discussions
- Check the students’ readiness.
- In pairs students brainstorm about different goalball techniques learned in
senior four.
- Let some groups present their findings.
- Assist them to clarify their findings. Introduce the new lesson which is
handling and throwing the ball.
- Ask students to choose assistants and determine the limits of the game
playing area and to enforce basic rules
- Invite students to start warm up and stretching exercises
Warm up exercises and stretching exercises
- Let students perform general warm up exercises and specific warm up based
on body’s parts to be used more while performing tactical skills and stretch
their muscles properly.
- Guide them while performing warm up and stretching exercises.
- Help them/demonstrate/correct where is necessary
e) Lesson body
Tactical exercises of handling and throwing the ball in different positions
– Explain to the student teachers’ tactics of throwing the ball in goalball.
– Demonstrate how to handle and throw the ball tactically.
– Let student teachers apply it individually on the goalball court.
Activity 8.1
Handling the ball
During the process of setting up a throw to face the opponent team, a
thrower should do the following:
– To walk backwards onto the goal bar so that the bar is felt equally
across the back.
– To use the court orientation lines (forward direction).
– After those, grip the ball with one hand if not use two hands, place
part of the fingers in one of the eight holes and get ready to throwthe ball.
Activity 8.2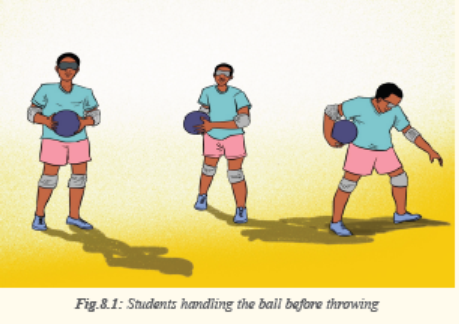
Throwing the ball
Explain to the students that throwing the ball in goalball is a skill that
generally considered as one-handed roll. While throwing the ball try
to focus on speed and accuracy by using frontal, spine or between legs
throws. In official goalball match, attacking take into account the attack
phases (preparation and throwing), player position (centers and wings)
and different styles to be used while throwing the ball in goalball such as
rolling forward
To better throw the ball, the teacher tells the students to respect steps
while throwing the ball by using one-handed delivery and a simple threestep
approach:
– First step (left) short and quick, while other two steps should have
a longer stride (First step is when student swings the ball back
(always supporting it with the other hand from underneath).
– On the second step, bring ball forward and lower body close to the
floor.
– On the third step, student slides on the left foot and body should
be low.Request students to throw the ball in less than 10 seconds.
Activity 8.3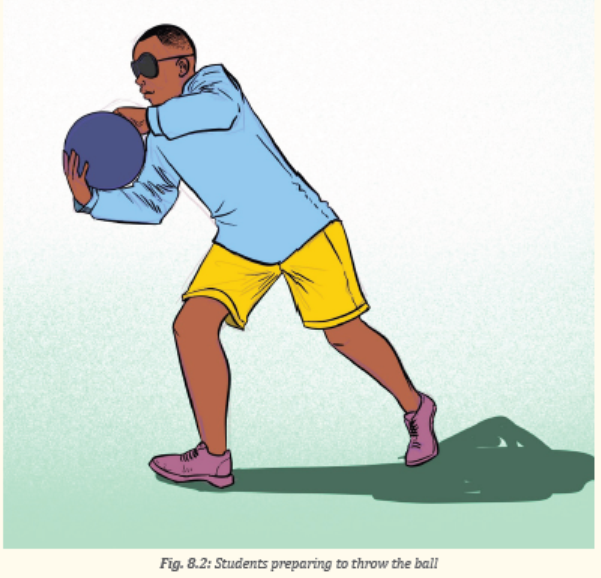
Executing the throw
– Organize students in pairs,
– Request one student to hold the ball in one hand with the fingers
spread and supporting the ball with the other hand.
– Ask him/her to draw the ball backward by releasing supporting
hand and extend the arm to a distance that maintains control of
the ball.
– Ask him/her to step forward with the opposite leg to his/her
throwing arm and keep both feet pointing in the direction of the
throw.
– Request him/her to the ball forwards very quickly and release the
ball close to the floor so that it makes very little sound.
– Ensure the other arm is extended outwards to help balance.
– Remind to follow though the throwing arm in the direction that
he/she wishes the ball to travel and keep the knees bent.– Let all students perform this exercise.
Application activity
Circle crossing throws
– Form the groups of 6 students each
– Ask the groups formed to sit making circles
– Each group must have a goalball or any other object of varied size
which make sound to begin the game that is being played blind
folded
– Start the game by one student who throws the ball to another
across the circle
– Before making the throw, the student who is going to receive he
ball makes the signal in order to locate where he/she is sitting.The teacher passes by all groups to observe and correct where necessary.
Variation exercises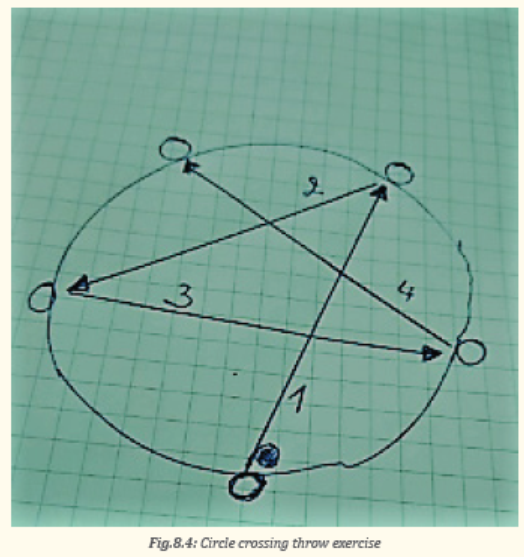
– The teacher guides students doing exercises of rolling the ball, curving
the ball and penalty shoots.
Cool down exercises
– Let students practice cool down exercises and light stretching by
focusing on the most used muscles.
– Guide them how they can stretch their muscles accordingly.
– Help them/demonstrate/correct where is necessary.
Closing discussion (RCA)
Reflect
– Which challenges/ advantages did you face during performing tactical
exercises of handling and throwing the ball in different positions in
Goalball?
Connect
– What are conditions do you need in order to perform tactical exercises
of handling and throwing the ball in Goalball?
– What kinds of other sports do you think people who are blind can play?
Apply
– What is the usefulness of applying tactics in Goalball?
– What are some of the criteria to become an elite Goalball player?
Lesson 2: Players’ positioning in defense
a) Learning objective
At the end of this lesson, senior five learners will be able to develop goalball
tactics of positioning in defense.
b) Teaching resources
Balls, Training bibs, Goalball playground, Bell balls / Any other objects of varying
size which make sound, Stopwatch/Watch, First Aid kits, Knee and Elbow Pads,
Eyeshades/Blindfolds and Whistle.
c) Prerequisites/Revision/Introduction
Students of senior five will learn better the defensive tactics in goalball if they
can execute basic physical exercises and perform basic goalball techniques.
d) Learning activities
Opening discussions
– Ask questions about goalball techniques and tactics as been learned in
senior four.
– Through brainstorming, introduce goalball tactics of positioning in
defense
Warm up exercises and stretching exercises
– Let students perform general warm up exercises and specific warm up
based on body’s parts to be used more while performing tactical skills
and stretch their muscles properly.
– Guide them while performing warm up and stretching exercises.
– Help them/demonstrate/correct where is necessary.
e) Lesson body
Players’ positions in goalball
The three main positions in goalball include center, right wing, and left wing. The
center, who plays in the middle of the zone, is the main defensive player of the team.
They usually position themselves near the front of the player zone and are responsiblefor defending most of the court.
Activity 8.4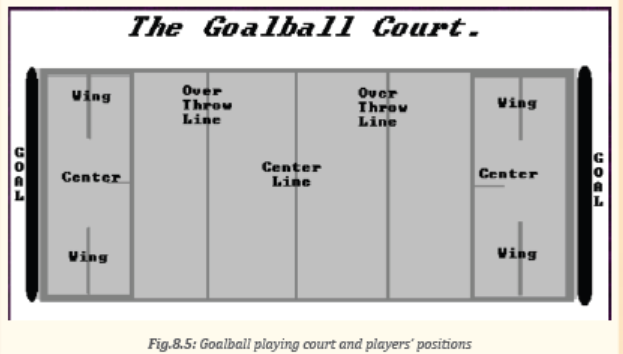
Kneeling position
– Organize students on prepared court;
– Explain how to exercise the tactic;
– Assign the center, the right wing and the left wing;
– Assign the throwers;
– Ask students to do exercise;
– Make necessary corrections;
– Let all students do the exercise.
Activity 8.5
Crouching position
– Organize students on prepared court;
– Explain how to exercise the tactic;
– Assign the center, the right wing and the left wing;
– Assign the throwers;
– Ask students to do exercise;
– Make necessary corrections;
– Let all students do the exercise.
Activity 8.6
Dive to stop the ball
– Organize students on prepared court;
– Explain how to exercise the tactic;
– Assign the center, the right wing and the left wing;
– Assign the throwers;
– Ask students to do exercise;
– Make necessary corrections;
– Let all students do the exercise.
Application activity 8..1
Two teams of three students each will play a normal game and try to apply
defending either by kneeling position, crouching position or diving.
Cool down exercises
– Let students practice cool down exercises and light stretching by
focusing on the most used muscles.
– Guide them how they can stretch their muscles accordingly.
– Help them/demonstrate/correct where is necessary.
Closing discussion (RCA)
Reflect
Which challenges/ advantages did you face during the performance of players
positioning in defense?
Connect
– What are conditions do you need in order to perform well positioning
defense in goalball?
Apply
– What is the usefulness of applying defensive tactics in goalball?
– What are some of the criteria to become an elite goalball player?
– How defensive positioning in goal ball help you to became a good
player?
Lesson 3: Blocking the ball
a) Learning objective
At the end of this lesson, senior five learners will be able to perform exercises
of blocking the ball.
b) Teaching resources
Goalball playground, Bell balls / any other objects of varying size which make
sound, Stopwatch/Watch, First Aid kits, Knee and Elbow Pads, Whistle and
Eyeshades/Blindfolds.
c) Prerequisites/Revision/Introduction
Students of senior five will learn better blocking the ball as defensive tactics in
goalball if they can execute basic physical exercises and perform basic goalball
techniques learnt previously.
d) Learning activities
Opening discussions
– Gather all students on semi-circle.
– Ask questions about goalball techniques and tactics as been learned in
senior four.
– Through brainstorming, introduce goalball tactics of positioning in
defense.
Warm up exercises and stretching exercises
– Let students perform general warm up exercises and specific warm up
based on body’s parts to be used more while performing tactical skills
and stretch their muscles properly.
– Guide them while performing warm up and stretching exercises.
– Help them/demonstrate/correct where is necessary.
e) Lesson body
- To block and catch the ball, the following actions should be done.
- Start with feet shoulder width apart, knees slightly bent, arms forward
with elbows slightly bent.
- Listen to the direction of the ball if the ball is going to the right, then
carefully the students should lower themselves to floor and then quicklylower knees and hips on right side of body.
– Arms should be brought in front of the face to protect their face from
being hit and head should tilt back slightly.
– Block the ball from a horizontal lying position with arms and legs fully
extended (The fully extended body should be tilted slightly forward
(top hip toward opposing side), so that the ball deflects down to the
floor when it makes contact with the player. If the top hip is tilted
away from the opposing side, the student’s body will act like a ramp,deflecting the ball up and into the net
Application activity 8.2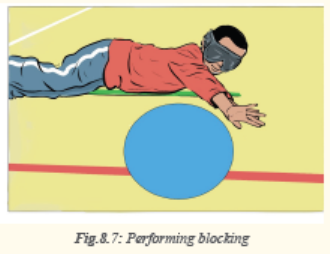
– In pairs let students perform blocking the ball on the goalball court.
– Remind students that diving should be also used while blocking the
ball.
Cool down exercises
– Let students practice cool down exercises and light stretching by
focusing on the most used muscles.
– Guide them how they can stretch their muscles accordingly.
– Help them/demonstrate/correct where is necessary.
Closing discussion (RCA)
Reflect
– Which challenges/ advantages did you face during performing tactical
exercises of blocking the ball in different positions in goalball?
Connect
– What are conditions do you need in order to perform tactical exercises
of blocking the ball in goalball?
Apply
– What is the usefulness of applying blocking the ball tactics in goalball?
– What are some of the criteria to become an elite goalball player?
Lesson 4: Catching the ball
a) Learning objective
At the end of this lesson, senior five learners will be able to Perform exercises of
catching the ball
b) Teaching resources
Balls, Training bibs, Goalball playground, Bell balls / Any other objects of varying
size which make sound, Stopwatch/Watch, First Aid kits, Knee and Elbow Pads,
Eyeshades/Blindfolds and Whistle.
c) Prerequisites/Revision/Introduction
Students of senior five will learn better catching the ball as defensive tactics in
goalball if they can execute basic physical exercises and perform basic goalball
techniques learnt previously
d) Learning activities
Opening discussions
- Ask questions about goalball techniques and tactics as been learned in senior
four.
- Through brainstorming, introduce catching goalball tactics in defense.
Warm up exercises and stretching exercises
- Let students perform general warm up exercises and specific warm up based
on body’s parts to be used more while performing tactical skills and stretch
their muscles properly.
- Guide them while performing warm up and stretching exercises.
- Help them/demonstrate/correct where is necessary.
a) Lesson body
Help the students to catch the ball firmly in order to launch your throwing towards
the opponent
Activity 8.7
Practicing the catching
- Two students opposite to each other, with varied distances.
- Ask them to pass and catch from crouching, kneeling and lying positions.
- Let the students practicing the ‘Goalball move’ by starting throwing the
ball from standing position.
- Wait for the ball in the kneeling position and catch it.
- Determine the duration of the exercise so that students change the roles.
- Guide and correct where it avails necessary.- Let students muster he catching.
Application activity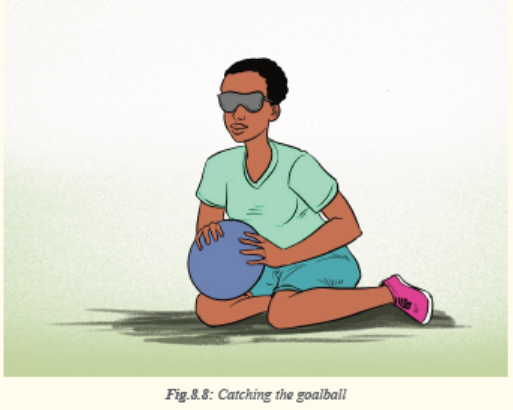
Goalball game: 3 x 3
Two teams of three students each will play a normal game and try to apply
catching goalball either in kneeling position, crouching position or diving
for it.
Cool down exercises
– Let students practice cool down exercises and light stretching by
focusing on the most used muscles.
– Guide them how they can stretch their muscles accordingly.
– Help them/demonstrate/correct where is necessary.
Closing discussion (RCA)
Reflect
– How did you feel while playing goalball?
– What did you find the most difficult?
– Do you think it is easy to become an elite goalball player?
– What did you do to overcome those difficulties?
Connect
– What are some of the criteria use to become an elite goalball player?
– Do you think it is easy to become an elite goalball player?
– What difficulties could they face in daily living? How might they
overcome those difficulties?
– What kinds of other sports do you think people who are blind can play?
Apply
– What is the usefulness of applying tactics in goalball?
– How would you describe a person who has blindness/visual
impairment?
– What difficulties could they face in daily living?
– How might they overcome those difficulties?
– How could you do to develop techniques and tactics skills in goalball
help you to became good players in daily life?
8.6 Additional information to the teacher
In goalball, two teams of three players each face each other across a court
that is nine meters wide and 18 meters long. The objective of the game is to
roll a basketball size ball with bells inside over the opponent’s goal line. Your
opponents listen for the oncoming ball and attempt to block it with their bodies.
Goalball players ’positions
The three main players in goalball include the center, right wing and the left
wing.
– Center: the center plays in the middle of the zone. He/she is the main
defensive player of the team
– The wing players: the wing players are the main offensive players of
the team and do most of the throwing. Although they are focused on
scoring, the wing players also play defense behind the center of each
side of the court. After the center stops a shot from the other team,
they usually pass the ball to one of the wing players to shoot and willget back into their defensive position
Strategies:
There are many strategies to the game of Goalball. You can throw the ball hard and
fast, or soft and slow. You can throw the ball cross court form corner to corner, or
even curve it by placing a spin on the ball before releasing it. These techniques all
have advantages and disadvantages which always leave new things to master the
game and make it both interesting and fun to play.
End unit assessment 8.7
Settings exercises and observe weather students are able to perform better:
handling the ball and throwing, blocking, positioning and catching the goalball
tactics`
8.8 Additional activities
8.8.1 Remedial activities
Individually and in groups, the students will revise the correct tactics of handling the
ball, throwing, blocking and catching in goalball.
8.8..2 Consolidation activities
Individually or in groups, the students will perform the tactics of handling the ball,
throwing, blocking and catching in goalball.
8.8.3 Extended activities
Encourages and facilitates students to form teams and participate in different competitions
of volleyball organized by the school, Sector or national sports school’sfederation.