Topic outline
UNIT 1:GENERAL INTRODUCTION
Skills lab based education practice in healthcare has been defined as any
educational activity that utilizes simulative aides to replicate clinical scenarios.
In skills lab setting students use variety equipment such as manikins, medical
equipment, consumables and checklists of procedures, but also, they can watch
videos on healthcare professional education. The acquisition of hands-on clinicalskills in a long education way is a key to protect patient safety.
1.1.Goal of skills laboratory
The goal for clinical skills laboratory is to create an artificial replication of the real
world situation in which students can gain knowledge and psychomotor skills and
be able to critically think through complex scenarios in a safe and non-threatening
environment. This approach to experiential learning is a ‘learner centric’ educational
method, which integrates the cognitive, psychomotor, and affective domains in a
non-threatening and safe environment thus ensuring accuracy and competency ofskills before the student enters the clinical environment.
1.2.Purpose of Skills lab
Maintain state-of-the-art laboratories that are equipped with human patient
simulators, digitalized video, and electronic supply and static mannequins. These
laboratories were designed to reproduce realistic practice settings, including the
basic hospital unit, critical care, surgical/operating suite, pediatrics neonatal nursery,
maternity, home care, health assessment and diagnostic laboratory. All laboratory
spaces are also outfitted with tables and chairs for reflective thinking exercises that
allow the students time to review their decisions and actions with the instructor andtheir classmates.
The Clinical Skill Laboratories exist primarily to serve the students, faculty and staff
of Nursing department
The clinical skill laboratories provide a clinical learning environment utilizing task
trainers and human patient simulation technology, as specified by the curriculum
and on recommendation by the faculty, and facilitate optimum and efficient utilizationof those resources.
1.3.Purpose of this teacher’s guide
To facilitate the teacher in teaching activities, the content of this teacher`s guide isself-explanatory so that you can easily use it.
1.3.1.Purpose
The purpose of the rules and regulations of skills lab is to guide teachers, students
and other health care professionals to use the available facilities for the development
of clinical competencies required in a skills lab environment before translating them
to the real clinical settings for the provision of safe and quality health care services toclients.
1.4. Structure of the guide
The guide has two main parts
1.4.1.Part I: General guidelines
This part provides general guidance on:
• Rules and regulation for skills lab
• Methodological principles to be used in skills lab• Guidance on assessment
1.4.2.Part II: Development of Checklist
This is the most important part of the guide. It includes Checklist of fundamental of
Nursing for senior 4, 5 and 6, and Checklist of Maternal and Child health for Senior4, 5 and 6.
Each checklist is developed in the following structure:- - -
Checklist title: this title is taken from course units; it contains the theory that need
to be translated into practices.
Procedure: each checklist is divided into different procedures; technique and all
steps composed each checklist.Aims of techniques(procedures).
1.5.Objectives of the Nursing Skills Laboratory
1. The objective of the Nursing Skills Laboratory is to provide realistic and quality
clinical learning experience to associate nursing students through various
clinical learning opportunities in the Nursing Skills Laboratory and serve as a
provision for the students to become associate nurses. It specifically aims to:
2. Build the students’ basic skills by providing definite connections between the
theoretical and clinical learning of the students through definite and adept
clinical learning experiences in the laboratory.
3. Develop the students’ associate nurse in providing nursing care in accordance
with the norms and values.
4. Foster the students’ ability to utilize the nursing process in performing nursingprocedures.
1.6. Duties and Student Nurse responsibilities in skills laboratory
Students are expected to come to skills laboratory prepared by having reviewed the
skill(s) to be practiced and/or demonstrated as well as having read the assigned
topics/chapters (if any) by his/her instructor prior to laboratory demonstration. Theyare advised to take advantage of every opportunity to enhance their nursing skills.
1. Log in on arrival to the attendance sheet provided by the laboratory instructor
and log out before leaving.
2. Inform the laboratory instructor of any particular learning needs.
3. Gather and return the equipment used for skill performance.
4. Approach situations and scenarios as if they are actual client interactions.
5. Follow safety measures at all time.
6. Maintain cleanliness of the laboratory area.
7. Dispose of sharps appropriately.
8. Demonstrate respect and consideration for self and others. All students
should display professional, courteous conduct.
9. Alert the laboratory instructor of allergies and injuries including latex allergy.
10. Any damage or malfunction of mannequins or equipment should be reported
to the laboratory instructor immediately.
11. Students should at all times observe the safety precautions and appropriate
techniques while learning and practicing skills in the lab. If not sure where to
locate equipment, supplies or resources, ask.
12. Students should be knowledgeable of the care, handling, and proper use of
equipment prior to using it in the laboratory.
13. The Identification card or ID should be always surrender when borrowingequipment
1.7.Skills lab Technician responsibilities
1. Conduct monthly inventory of the existing laboratory equipment and supplies and
submit semestral report to the program coordinator. It should include utilization,
losses, and breakages/damages on all laboratory rooms, laboratory equipment
and supplies.
2. Catalog and maintain security for audio visual and other media resources.
3. Check that the number of borrowed materials is complete and in good condition
when returned.
4. Prepare laboratory equipment and supplies for each skills laboratory class based
from the laboratory instructor or demonstrator’s requests.
5. Oversee maintenance of laboratory equipment and supplies, and computer
technology equipment for simulation; responsible in monitoring all equipment for
optimum performance and also for the certification.
6. Initiate processes on ensuring repairs of damaged laboratory equipment.
7. Coordinate with the laboratory coordinator in the procurement/requisition of
equipment and supplies.
8. Directly responsible on the documentation of usage of laboratory, laboratory
equipment and supplies.
9. Ensure that the laboratory rooms are clean, safe, and organized.
10. Accomplishes the Daily Nursing Skills Lab Follow-Up Sheet.
11. Promote safe laboratory practices.
12. Ensure the completeness of the first aid kit everyday. He/she will replace supplies
as needed.
13. Responsible for the Nursing skills laboratory lock/key.
1.8. Physical safety guidelines
1. Students should perform proper body mechanics during practice and return
demonstration especially in moving, lifting, and transferring skills.
2. Equipment used for body mechanics practice (bed, wheelchairs, stretcher,
etc.) should be used only if in good working condition. Any malfunction in
the equipment should be reported immediately to the laboratory technician
using the incident/injury form.
3. The wheels of all equipment (wheelchairs, stretchers, and beds) should be
locked during practice and return demonstration.
1.8. Managing hazardous waste:
1. Batteries which are not functioning should be disposed properly.
2. Contaminated supplies used during laboratory activities are collected,
singed as hazardous waste material and stored in designated area of the
skills laboratory.3. All biohazard wastes will be taken by a designated transporter.
2. RULES AND REGULATION FOR SKILLS LAB
2.1.Users of skills lab
Skills lab can be used by:
– Individual student,
– Individual instructor for his/her preparation before practice session,
– Group of students accompanied by a teacher,
– Group of students for peer tutoring,
– Group of instructors for continuous professional development,– People from outside the institution upon request
2.2.Main consideration during a skills lab
1. In accordance with humanistic education, all manikins and models are to be
treated with respect as though they are real clients. Models and manikins
are to be handled gently and carefully, draped appropriately when used, and
covered when not in use.
2. All skills lab users shall dress for skills lab as if attending the real clinical
setting among others name badges and uniform (or clinical coat), tied up
hair, close-toe shoes wear.
3. Tutors are responsible for supervising all students brought to the lab for
tutor-led sessions. He/she must prepare and rehearsal the practical sessions
before they start.
4. The tutor should not exceed a group of 8 students for session demonstration
and the student should not have more than 3 practical sessions for one day.
5. English as a medium language of instruction is recommended in all teaching
sessions including demonstration of procedures in skills lab.
6. Anybody who wants to practice in skills lab must make a booking for practical
rooms and equipment.
7. If the program permits students/tutors/other users to check out equipment
from the simulation lab, all procedures for signing out and returning equipment
are to be followed. Failure to responsibly adhere to the policy may mean loss
of check-out privileges.
8. Attendance and logbook for students should be signed after each simulation
teaching/learning session.
9. If the material(s)/equipment(s) are lost or damaged the person responsible,
signs the form of accepting the act and submit to the skills lab Technician
within 24 hours of the incidence in working days, then the procedure of
replacing it/them starts.
10. Clean-Up of the Area after Sessions: Upon completion of practice session,
it is the responsibility of the users to ensure that they tidy up the room
(furniture, trolleys,…) and leave the lab as they found it.
11. Coats, backpacks, and other personal belongings are not allowed in skills
lab rooms.
12. Food and drinks are prohibited in the skills lab rooms.
13. Universal precautions are to be followed at all times as are all safety
guidelines used in the clinical setting. Sharps and syringes are to be disposed
in appropriate containers.
14. Incident report: In case of any incidence during session, the responsible
person should report it in writing to the skills lab Technician within 24 hoursof the incidence in working days.
2.3.Attendance & evaluation skills lab
1. The signed attendance sheet is used in skill lab sessions as proof.
2. The module leader communicates the date of evaluation (OSCE) to be done
in skills lab to the students and any change is communicated at least two
weeks before.
3. OSCE should be prepared and rehearsed one day before by teachers.
4. Student must practice individually at least three times each procedure
taught, before the OSCE.
5. The student who hasn’t regularly attended the skills lab as indicated is not
allowed to sit for OSCE.
6. The average pass mark of OSCE is 60% and the results should be
communicated to the students within 48 hours of working days.
7. Debriefing is mandatory for all students within 2 working days after OSCE
and HoD should be informed of the process.
8. The evaluator should turn off his/her phone during OSCE, and follow each
step of the procedure done by student.
9. The student who missed the OSCE without sound justification is awarded a
zero mark. The justification has to be notified to the head of department at
the latest within 48 hours after the OSCE.
10. No teacher shall accept a justification which is not countersigned by thehead of the department.
2.4.Methodological principles to be used in skills lab
2.4.1.Techniques to be used in skills lab
Skills lab is an opportunity for a student to apply practically what he/she
learned theoretical. Even if there are different techniques to be used, one of the
recommendable techniques is Scaffolding.
Scaffolding is supporting new learning by building new concepts on previously
learnt concepts. There are various ways teachers can do this. One way is by
reminding the learners about concepts they have previously learned. Another is to
display previously learned concepts so that learners can focus on the new learning.
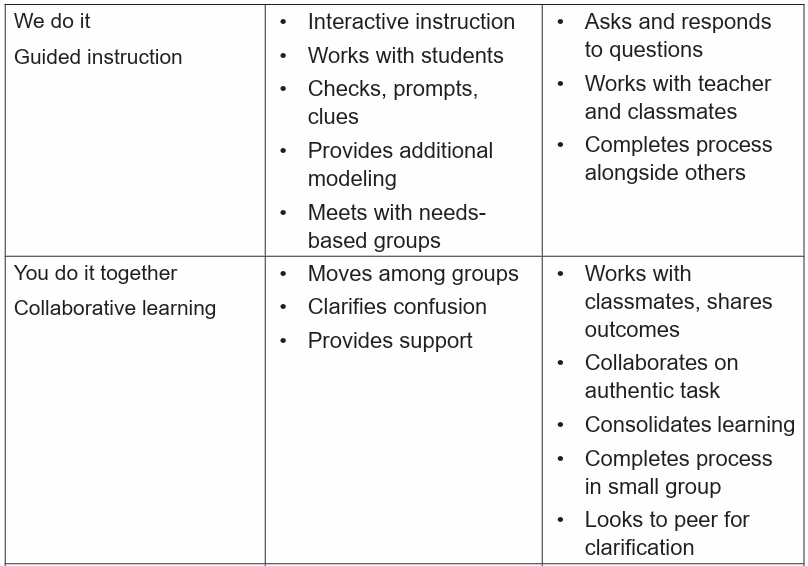
This gradual release of responsibility is sometimes called “I do, We do, You do”.
This model proposes a plan of instruction that includes demonstration, prompt, andpractice.
At the beginning of a procedure or when new material is being introduced, the
teacher has a prominent role in the delivery of the content. This is the “I do” phase.
But as the student acquires the new information and skills, the responsibility of
learning shifts from teacher-directed instruction to student processing activities. In
the “We do” phase of learning, the teacher continues to model, question, prompt
and cue students, but as student move into the “You do” phases, they rely more onthemselves and less on the teacher to complete the learning task.
2.4.1.1.The roles and responsibilities of teacher and student at every phase.
The table below shows the roles and responsibilities of teacher and student atevery phase.

2.4.2. Attention to special educational needs specific to skills lab practice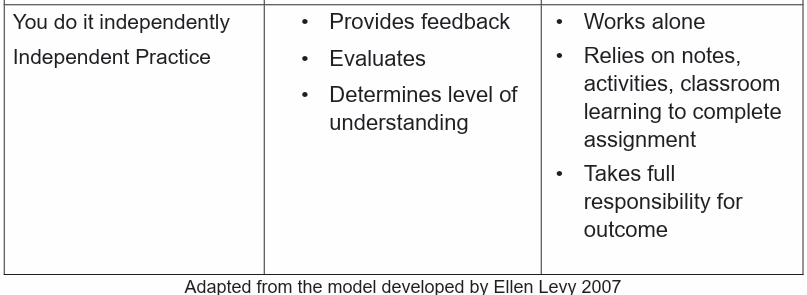
Teachers need to:
• Pair a student who has a disability with a friend. Let them do things together and
learn from each other. Make sure the friend is not over protective and does not do
everything for the student. Both students will benefit from this strategy.
Below are strategies related to each main category of disabilities and how to deal
with every situation that may arise. However, the list is not exhaustive becauseeach student is unique with different needs that should be handled differently.
2.4.3.Strategies to help student with physical disabilities:
• Do activities together with the student.
• Be patient! If you find that the student takes longer than others to learn or to
do an activity, allow more time.
• Gradually give the student less help.
• Let the student do the activity with other students and encourage them to help
each other.
• Divide the activity into small achievable steps.
• Remember to praise and say ‘Well done’ when the student learns somethingnew or makes a strong effort.
2.5.Guidance on assessment
The various assessment will be undertaken to assess students in skills laboratory :
OSCE:
The objective structured clinical examination (OSCE), is designed to assess the
student ability to competently apply the professional nursing or midwifery skills and
knowledge into real practice. It is set at the level expected of nurses and midwives
as they enter the profession. This means that you must show that you are capable
of applying knowledge to the care of patients.
The examination is testing the student ability to apply knowledge to the care of
patients rather than how well you can remember and recite facts. All of the scenarios
and any questions relate to current best practice and you should answer them in
relation to published evidence and not according to local arrangements.
Time for OSCE: The OSCE will be scheduled at the end of each unit theory,
organized to assethe students competencies using different stations according to
the course units.
Equipment : All equipment needed to complete the station successfully,accordingto the station requirements.
UNIT 2:Skills lab manual for Teachers and students of senior four
2.6.Procedure: Hands Hygiene And Gloving
2.6.1.Technique: Simple Hand Washing
Aims of SIMPLE HAND
• To reduce the risk of infection by maintaining a clean environment
• To prevent infections
• To remove germs from hands
• To cleanse the hands of pathogens (bacteria, viruses, or other
microorganisms that can cause disease).
Learning outcome
• Perform correctly hand washing technique using appropriate steps.
ASSOCIATE NURSE STUDENT/ PREPARATION
• Should appear professional (in full and clean uniform) with student ID Card
• Hair tied back and put bonnet
• Assemble equipment and arrange on bedside chair in the order the items will
be used
• Remove watch, jewels, and Rings• Wear closed shoes
EQUIPMENT
• Water
• Plain (non-antimicrobial) soap• Disposable towel

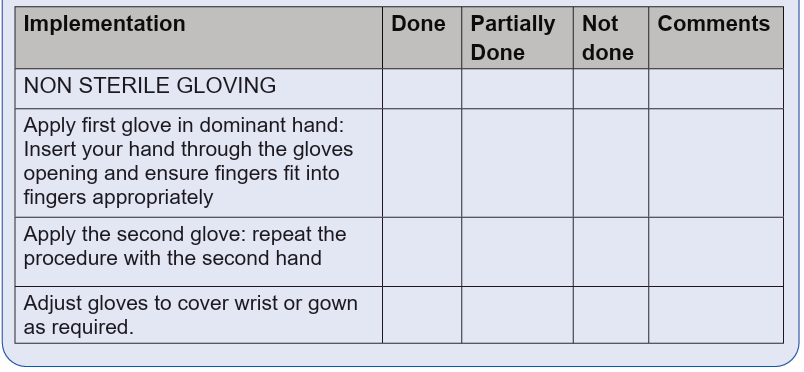
2.6.2.Techinque Non-Sterile And Sterile Gloving
AIMS
• To protect Associate nurses’ hands when handling substances
• To reduce likelihood of transmitting micro-organisms from nurses to the
patient and vice-versa;
• To reduce likelihood of transmitting micro-organisms from one patient to
the other.
ASSOCIATE NURSE PREPARATION
• Should appear professional (in full and clean uniform) with ID Card
• Hair tied back
• Remove watch, jewels, and Rings
• Wear closed shoes
• Ensure nails are cut short
• Hand washing
EQUIPMENT
• Clean gloves(for non sterile gloving)
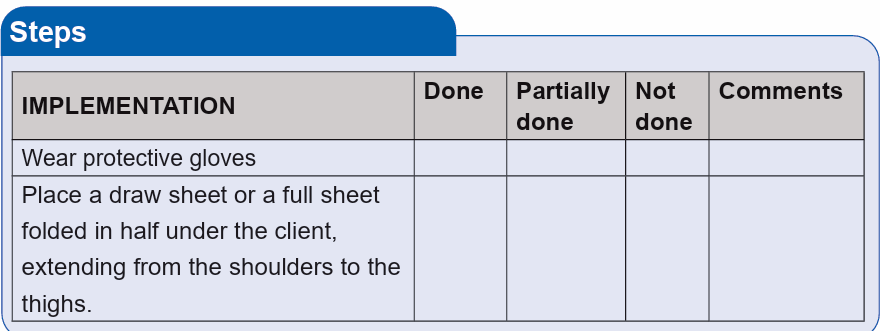
• Sterile Gloves(for sterile Gloving)2.6.3.Technique: Removing Non-Sterile And Sterile Gloves
Steps
AIMS
•To reduce likelihood of transmitting micro-organisms from associate nurse
student to the patient and vice-versa;
• To reduce likelihood of transmitting micro-organisms from one patient tothe other.
ASSOCIATE NURSE PREPARATION
• Should appear professional (in full and clean uniform) with ID Card
• Hair tied back
• Remove watch, jewels, and Rings
• Wear closed shoes
• Ensure nails are cut short
• Hand washing
EQUIPMENTS• Dustbin
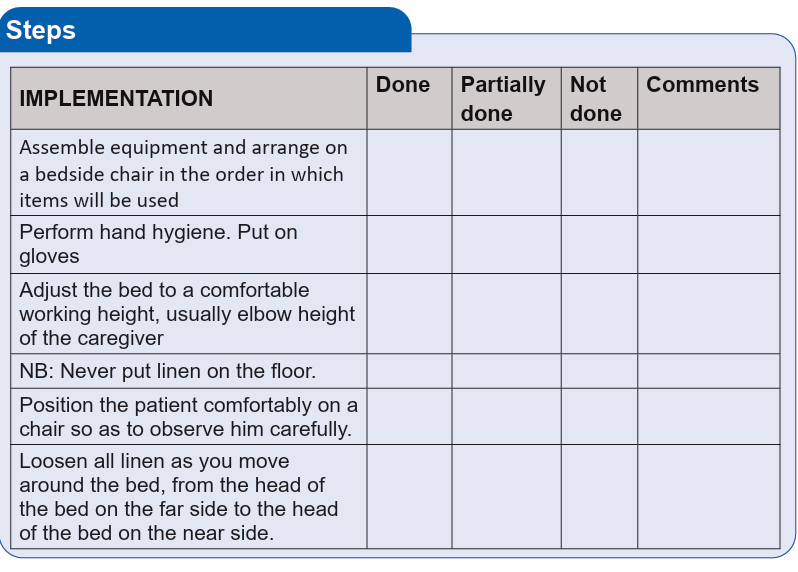
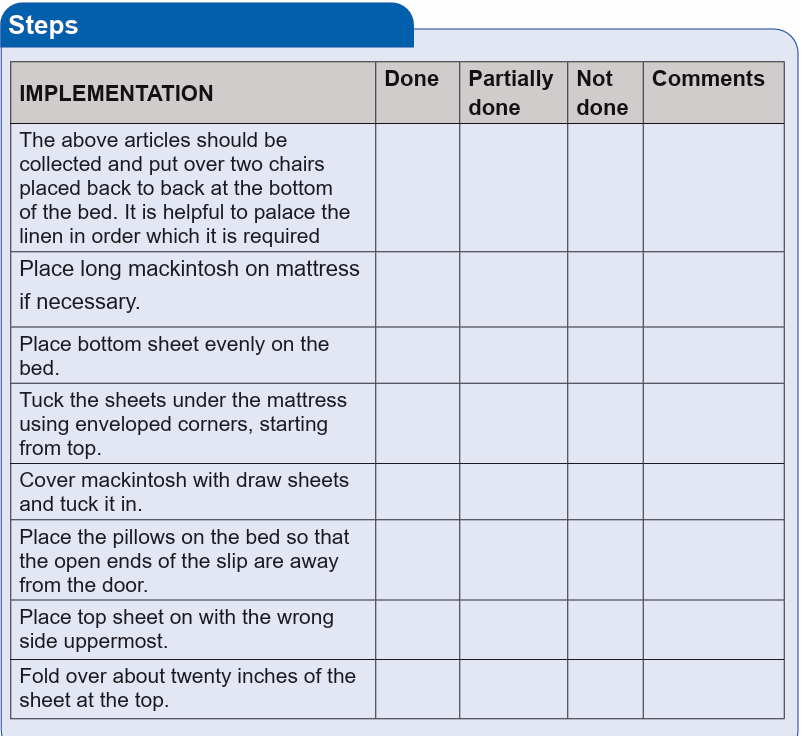
2.7. Procedure: Bedmaking
2.7.1.Technique: Unoccupied Bed, With Changing Bed-Sheets: One Nurse
AIMS
• To provide clean and comfortable position of the patient,
• To reduce risk of infection
• To Prevent bed sores
Learning outcomes:
ASSOCIATE NURSE PREPARATION
• Hair tied back
• Should appear professional (in full and clean uniform) with ID Card
• Remove watch, jewels, and Rings
• Wear closed shoes
• Ensure nails are cut short
• Hand washing
EQUIPMENTS
• Pillow case
• Protective gloves
• Blanket
• Waterproof protective pad• Linen hamper or bag
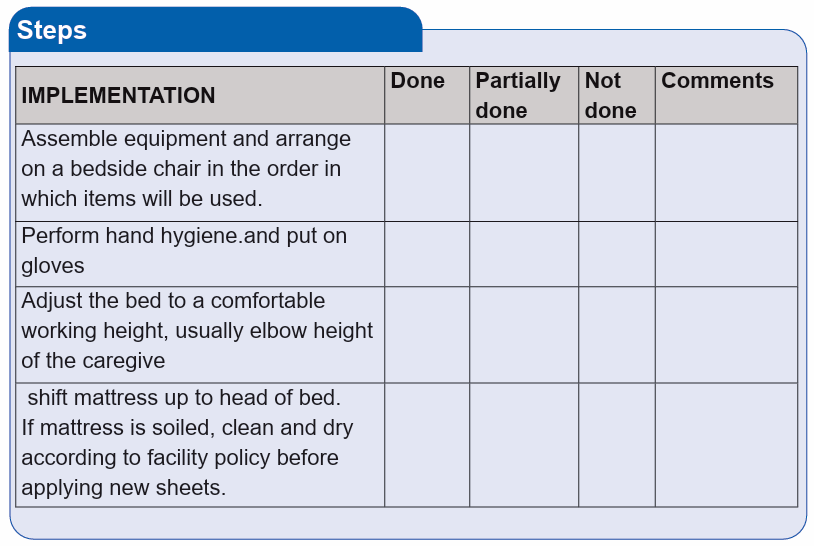
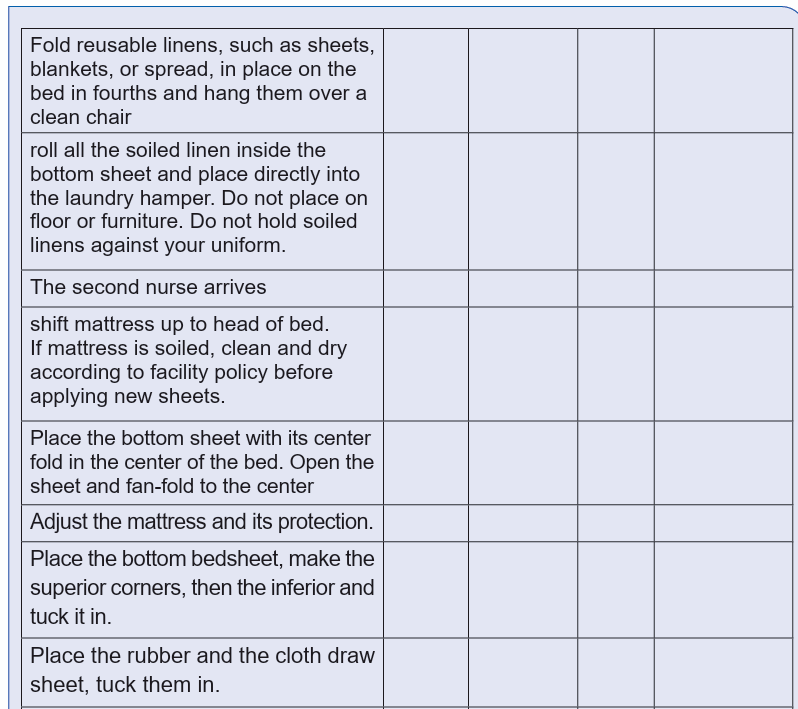
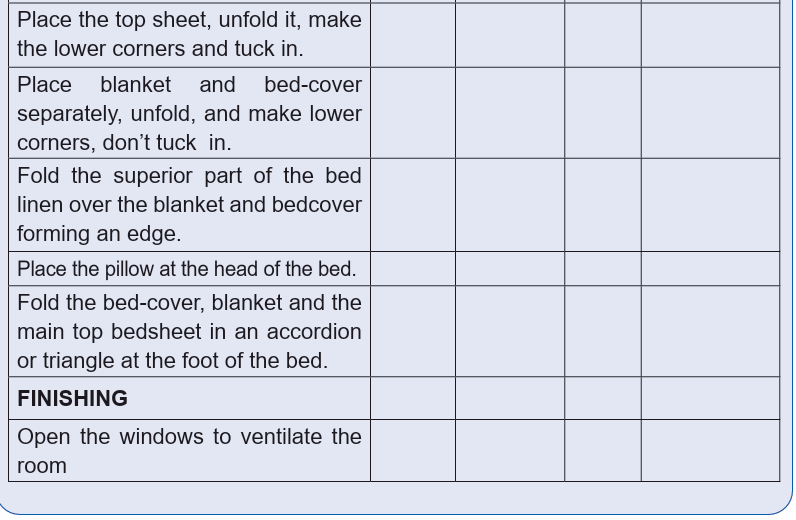
2.7.2.Techinque: Unoccupied Bed, With Changing Bed-Sheets :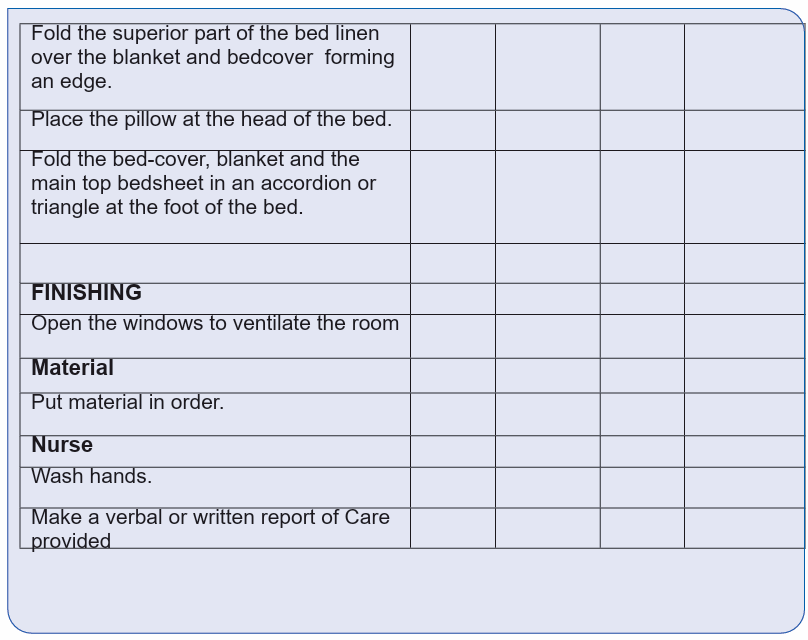
Two Associate Nurses.
AIMS
• To provide clean, safe and comfortable bed for the patient
• To promote rest and sleep
• To reduce the risk of infection by maintaining a clean environment
• To prevent bed sores
• To observe patient and to prevent complications
Learning outcomes:
• To provide physical and psychological comfort and security to the patient.
• Demonstrate the ability to make an unoccupied bed
ASSOCIATE NURSE STUDENT/ PREPARATION
• Hair tied back
• Should appear professional (in full and clean uniform) with ID Card
• Remove watch, jewels, and Rings
• Wear closed shoes
• Hand washing
EQUIPMENTS
• Pillow case
• Protective gloves
• Blanket
• cleaning materials
• Linen hamper or bag
• Draw sheet
• 2 Bed sheet (bottom sheet and top sheet)• Mackintosh (if contaminated or needed to change
2.7.3.Techinque: Unoccupied Bed Making Without Changing Bed Sheets
AIMS
• To be ready for the next occupant
• To prepare the bed for the client return
• To provide a clean environment
• To provide a good appearance
• To minimize sources of infections
earning outcomes:
• To provide physical and psychological comfort and security to the patient.
• Demonstrate the ability to make an unoccupied bed
ASSOCIATE NURSE / PREPARATION
• Should appear professional (in full and clean uniform) with ID Card
• Hair tied back
• Remove watch, jewels, and Rings
• Wear closed shoes
• Hand washing
EQUIPMENTS
• Two large cotton sheets
• One water proof draw mackintosh (if necessary)
• One draw sheet (if necessary)
• One or two pillows
• Pillow slips/covers
• One blanket optional• One bed cover or counterpane


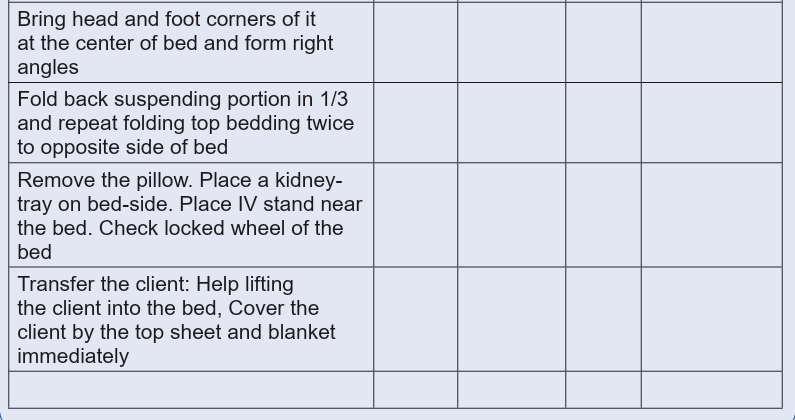
2.7.4.Techinque: Occupied Bed, With Changing Bed-Sheets: Two
Nurses Patient Can Turn
ASSOCIATE NURSE STUDENT / PREPARATION
• Should appear professional (in full and clean uniform) with ID Card
• Hair tied back
• Remove watch, jewels, and Rings
• Wear closed shoes
• Hand washing
PATIENT PREPARATION
• Identification of the patient
• Self-presentation to the patient
• Physical and psychological patient preparation
• Assess levels of comprehension and collaboration of the patient
• Adjust the environment of the patient as necessary.
• Check chart for limitations on patient’s physical activity.
• Cleanliness or condition of the bed and surrounding environment
EQUIPMENTS
• Pillow case
• Protective gloves
• Blanket
• cleaning materials ,
• Basin
• Linen hamper or bag
• 2 Bed sheet ( bottom sheet and top sheet)
• Draw sheet
• Mackintosh ( if contaminated or needed to change)• Chai


2.7.5.Techinque: Occupied Bed Making, Patient Can Sit
AIMS
• To promote the clients comfort
• To provide a clean environment for the client
• To minimize source of skin irritation
• Provide safety
• These are appliances used in bed making
• Provide comfort of the patient
• For the protection of bed linen
• Prevention of pressure sores• To facilitate putting the patient into bed without delay etc.
Learning outcomes:
• To provide physical and psychological comfort and security to the patient.
• Demonstrate the ability to make an occupied bed
ASSOCIATE NURSE STUDENT / PREPARATION
• Should appear professional (in full and clean uniform) with ID Card
• Hair tied back
• Remove watch, jewels, and Rings
• Wear closed shoes
• Hand washing
PATIENT PREPARATION
• Identification of the patient
• Self-presentation to the patient
• Physical and psychological patient preparation
• Assess levels of comprehension and collaboration of the patient
• Explain to the patient/ family the rational of BP check up
• Position the patient in a comfortable position
• Instruct the patient to have a rest for at least 10 minutes.
EQUIPMENTS
• Gloves
• Mattress Pad
• Bottom draw Sheet
• Cotton draw sheet
• A plastic draw sheet
• Pillowcase
• Top sheet
• Blanket
• Bed Spread
• Linen Hamper or bag• Bed side


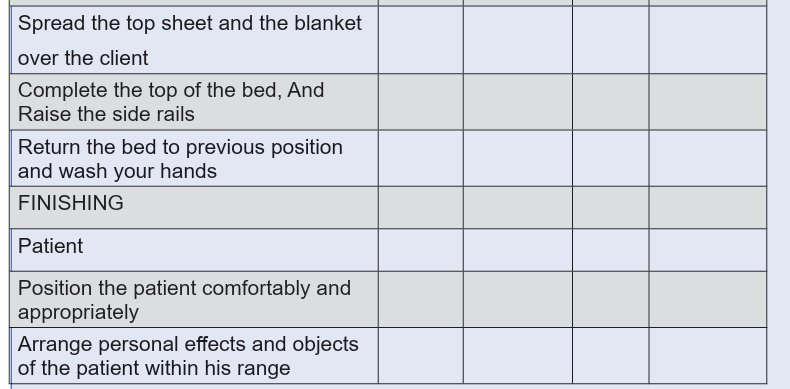
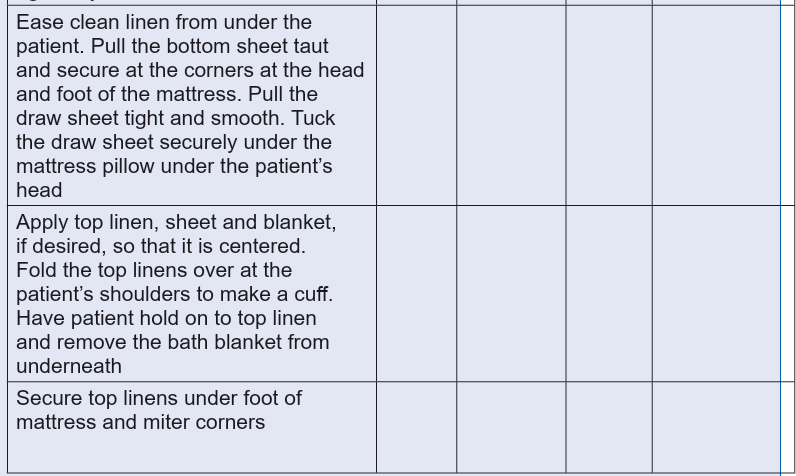
3..2.6. Techinque: Procedure: Occupied Bed Making, Patient
Cannot Sit Or Turn
AIMS
• To change the linen with the least possible disturbance to the patient
• To draw or fix the sheets under the patients very firmly so that it would not
wrinkle
• To remove crumbs from the bed.
• To make patient feel comfortable.
• Learning outcomes:
• To provide physical and psychological comfort and security to the patient.• Demonstrate the ability to make an occupied bed
ASSOCIATE NURSE / PREPARATION
• Should appear professional (in full and clean uniform) with ID Card
• Hair tied back
• Remove watch, jewels, and Rings
• Wear closed shoes
• Hand washing
PATIENT PREPARATION
• Identification of the patient
• Self-presentation to the patient
• Physical and psychological patient preparation
• Assess levels of comprehension and collaboration of the patient
• Position the patient in a comfortable position
• Make sure that the patient was at least 5-10 min before assessing
respiration
EQUIPMENTS
• Necessary linen.
• Tray for stripping and airing.
• Laundry bag or hamper
• Gloves
• Mattress Pad
• Bottom draw Sheet
• Cotton draw sheet
• A plastic draw sheet
• Pillow Case
• Top bed sheet
• Blanket
• Bed Spread
• Linen Hamper or bag• Bed side


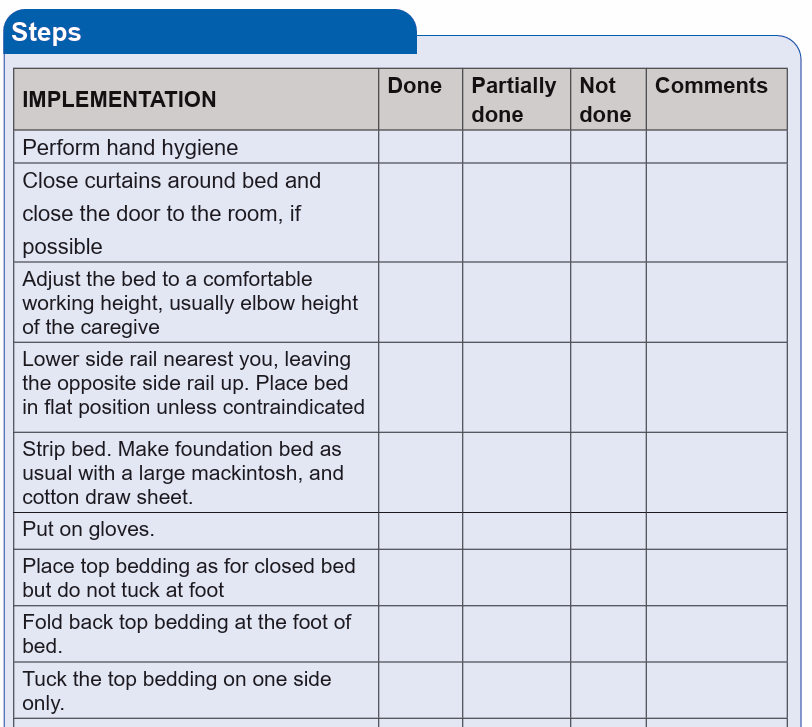
3.2.7. Techinque: Post-Operative Bed Making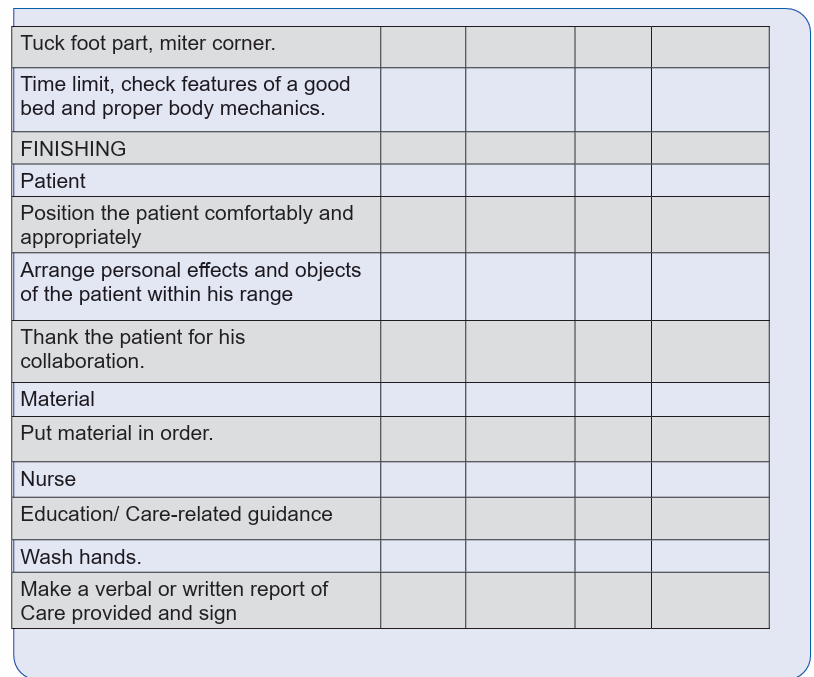
AIMS
• To provide clean, safe and comfortable bed for the patient
• To promote rest and sleep
• To reduce the risk of infection by maintaining a clean environment
• To prevent bed sores
• To economize time and energy
• To observe patient and to prevent complications
• Learning outcomes:
• To provide physical and psychological comfort and security to the patient.
• Demonstrate the ability to make a postoperative bed
ASSOCIATE NURSE / PREPARATION
• Hair tied back
• Wear closed shoes
• Should appear professional (in full and clean uniform) with ID Card
• Remove watch, jewels, and Rings
• Hand washing
EQUIPMENTS
• Pillowcase
• Protective gloves
• Bed sheets: Bottom sheet (1)
• Top sheet (1)
• Draw sheet (1-2)
• Mackintosh
• Draw sheet
• number required of mackintosh and draw
• sheet is different.
• Mackintosh ( if contaminated or needed to change)According to the
type of operation, the
• Blanket (1) Hot water bag with hot water if needed
• Materials for vital signs
• Iv stand• Chair
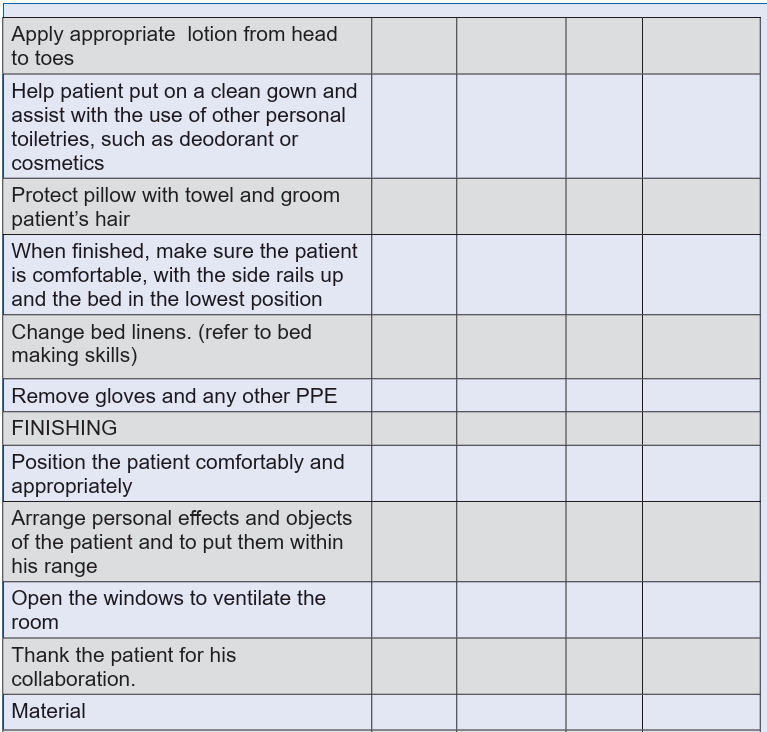
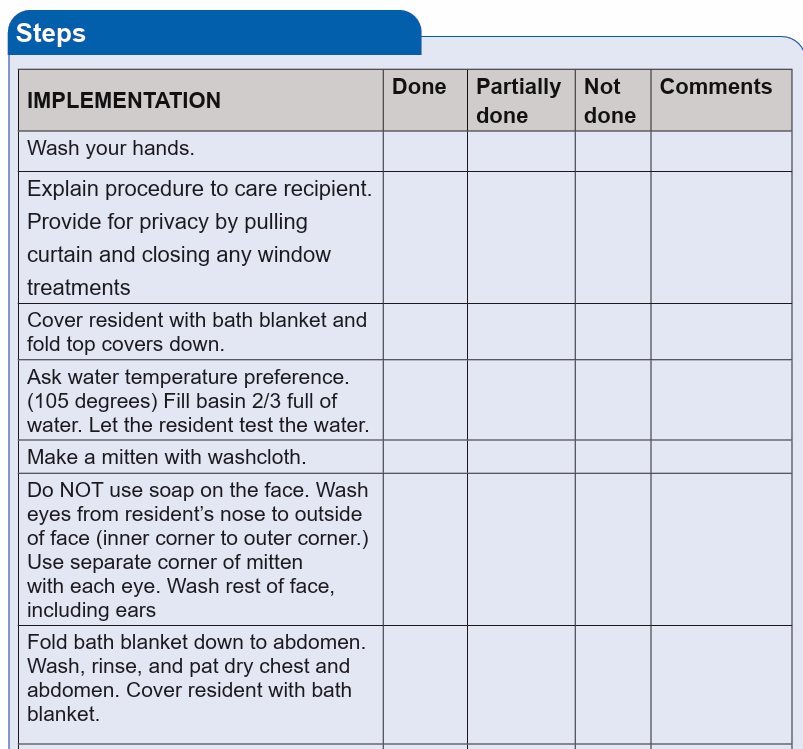
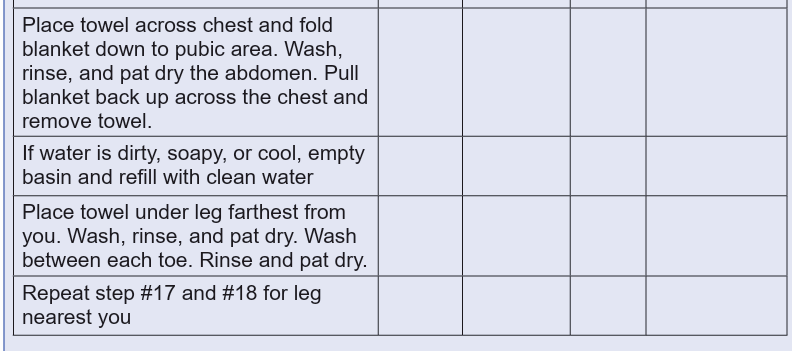
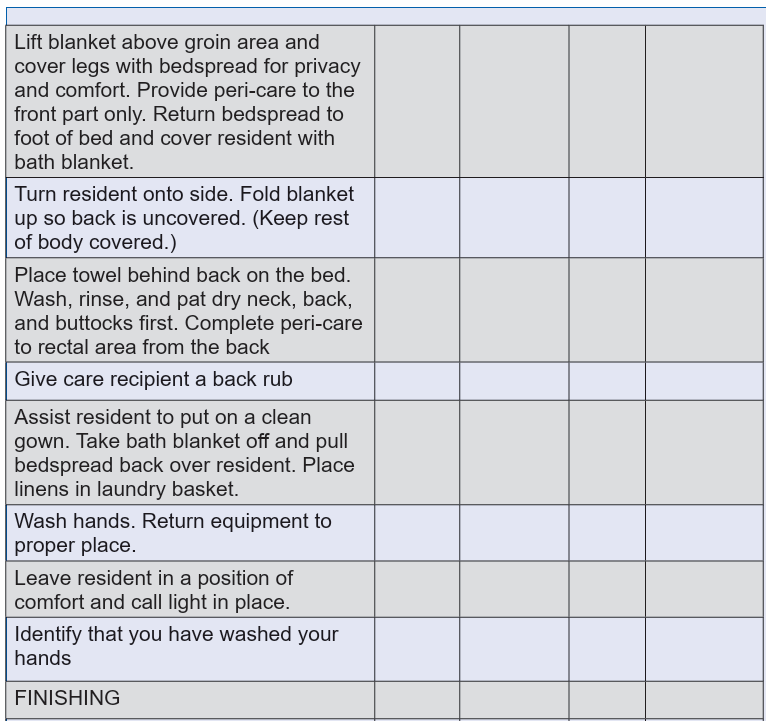
2.8. Procedure: Bedbath
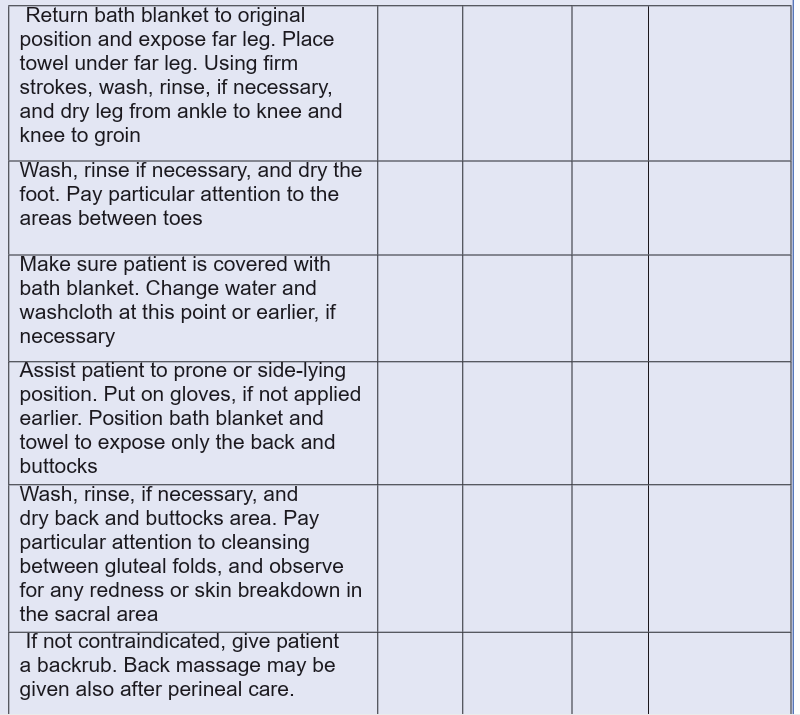
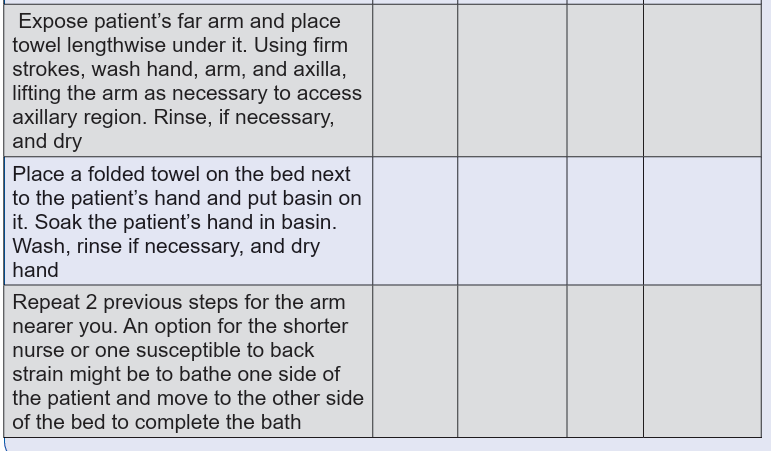
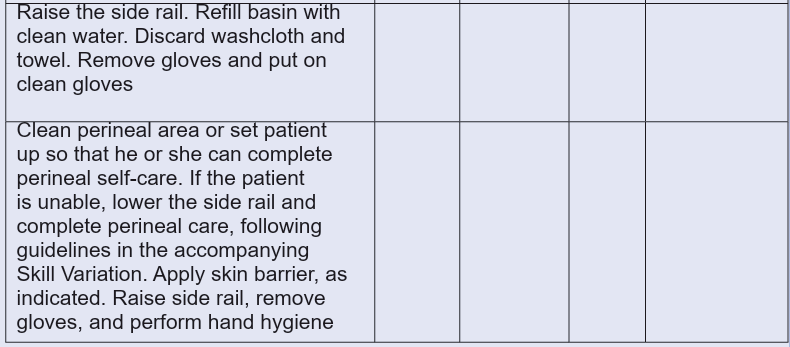
3.3.1. Techinque: Complete Bed Bath Patient Can Not Sit
AIMS
• To promote hygiene
• To prevent bacteria spreading on the skin
• To stimulate circulation
• To promote patient comfort and induce sleep
• To prevent bed sores
• To observe the client for any complications
Learning outcomes:
• To perform correctly the technic of bed bath
• Apply environmental safety
ASSOCIATE NURSE STUDENT / PREPARATION
• Should appear professional (in full and clean uniform) with ID Card
• Hair tied back
• Remove watch, jewels, and Rings
• Wear closed shoes
• Hand washing
PATIENT PREPARATION
• Identification of the patient
• Self-presentation to the patient
• Physical and psychological patient preparation
• Assess levels of comprehension and collaboration of the patient
• Adjust the environment of the patient as necessary.
• Check chart for limitations on patient’s physical activity.
EQUIPMENTS
• 2 Basins ( 1 with soap and 1 without soap)
• 2 Bucket: ( 1 for hot clean water, 1 for waste)
• 1 jug
• 1 Soap with soap dish
• 2 Sponge cloth ( 1 for wash another for rinse)
• Face towel
• 2 bath towels ( 1 for covering over mackintosh another for covering
client body)
• 1 Mackintosh
• 1 trolley
• Thermometer
• Paper bag
• Personal hygiene supplies ( deodorant, lotion, powder, combs, etc)
• Folded screens.
• Bag for dirty linen.• Clean Clothing or hospital gown.


3.3.2. Techinque: Complete Bed Bath, Patient Can Sit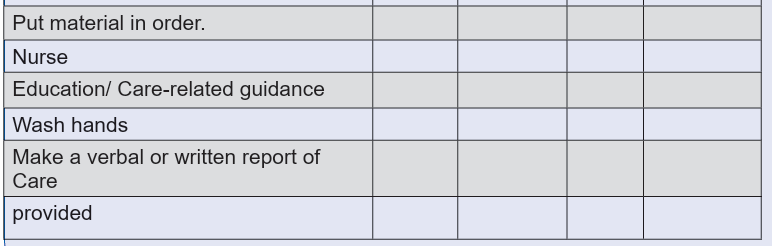
AIMS
• To Bath is an important part of professional hygiene
• To Bath cleanses the skin and makes the patient more comfortable
• To stimulate the circulation and relax the patient
• To provide the good opportunity to observe the client body and as well as
communicate with the patient
ASSOCIATE NURSE STUDENT / PREPARATION
• Should appear professional (in full and clean uniform) with ID Card
• Hair tied back
• Remove watch, jewels, and Rings
• Wear closed shoes
• Hand washing
PATIENT PREPARATION
• Identification of the patient
• Self-presentation to the patient
• Physical and psychological patient preparation
• Assess levels of comprehension and collaboration of the patient
• Explain to the patient/ family the rational of pulse check up
• Position the patient in a comfortable position
• Make sure that the patient has been at rest for at least 10 minutes.
EQUIPMENTS
• Two large cotton sheets
• One water proof draw mackintosh (if necessary)
• One draw sheet (if necessary)
• One or two pillows
• Pillow slips/covers
• One blanket (optional)• One bed cover or counterpane

3.3.3. Techinque: Complete Bed Bath, Patient Cannot Sit Or Turn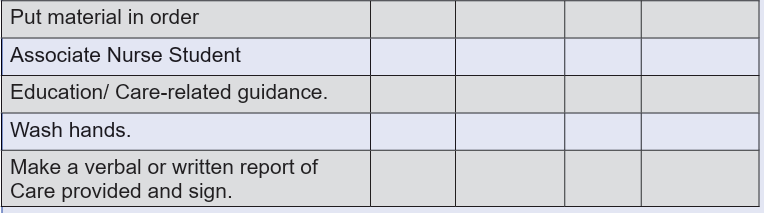
AIMS
• To keep the skin healthy
• To prevent infections
EQUIPMENTS
• Soap
• Wash cloths
• 1 Bath towel
• 2 Wash basins
• Clean gown
• Bath blanket
• Lotion for back rub
ASSOCIATE NURSE / PREPARATION
• Should appear professional (in full and clean uniform) with ID Card
• Hair tied back
• Remove watch, jewels, and Rings
• Wear closed shoes
• Hand washing
• PATIENT PREPARATION
• Identification of the patient
• Self-presentation to the patient
• Physical and psychological patient preparation
• Assess levels of comprehension and collaboration of the patient
• Explain to the patient/ family the rational of pulse check up
• Position the patient in a comfortable position
• Make sure that the patient was at least 5-10 min before assessingrespiration
3.3.4. Techinque: Partial Bed Bath, Perineal Care
AIMS
• To Clean the skin
• To stimulate blood circulation
• To improved self-image
• To reduce body odors• To promote range of motion exercises
ASSOCIATE NURSE STUDENT / PREPARATION
• Should appear professional (in full and clean uniform) with ID Card
• Hair tied back
• Remove watch, jewels, and Rings
• Wear closed shoes
• Hand washing
PATIENT PREPARATION
• Identification of the patient
• Self-presentation to the patient
• Physical and psychological patient preparation
• Assess levels of comprehension and collaboration of the patient
• Explain to the patient/ family the rational of pulse check up
• Position the patient in a comfortable position• Make sure that the patient has been at rest for at least 10 minutes.
EQUIPMENTS
• Clean gloves (1 pair)
• washcloth (1)
• Basin with warm water (1)
• Bath Towels (1)
• Mackintosh (1)
• Soap with soap dish (1)
• Toilet paper• Bed pan (1): as required

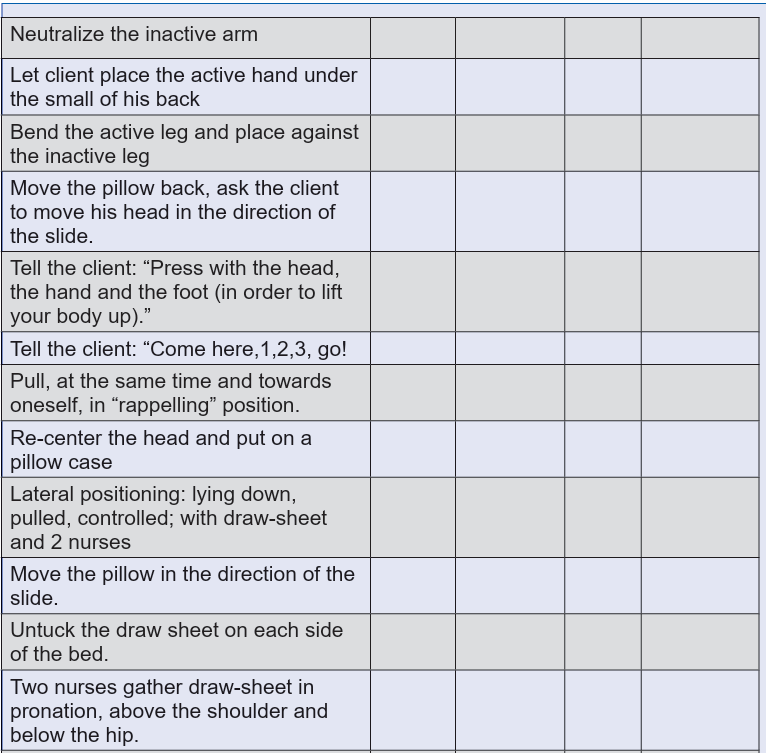
2.9.Procedure: Moving And Positioning Patients In Bed
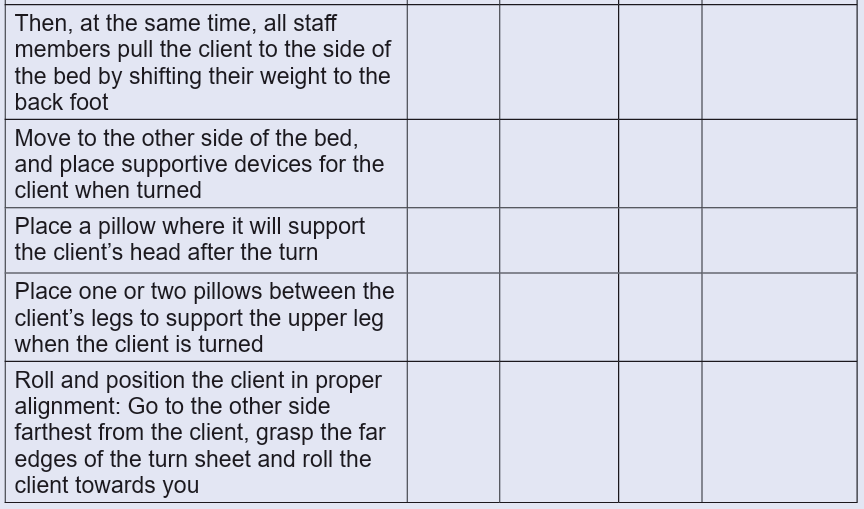
3.4.1. Techinque: Turning Client To The Lateral Or Prone
Position In Bed
Aims of the procedure
• To provide comfort
• • To prevent the occurrence of bed sores
• • To promote lung and cardiac function
Learning outcomes:
• The students will be able to
• Identify the predilection sites a patient in the: lateral and/or prone position
• Correctly communicate with the patient during positioning
• Put the patient into the basic position as precautionary positioning of the
body
ASSOCIATE NURSE STUDENT / PREPARATION
• Should appear professional (in full and clean uniform) with ID Card
• Hair tied back
• Remove watch, jewels, and Rings
• Wear closed shoes
• Hand washing
• PATIENT PREPARATION
• Identification of the patient
• Self-presentation to the patient
• Physical and psychological patient preparation
• Assess levels of comprehension and collaboration of the patient
• Explain to the patient/ family the rationale of the procedure
• Position the client appropriately before moving the client
EQUIPMENTS
• Folded screen
• Protective gloves
• Pillows for positioning• Possibly a draw-sheet.

3.4.2. Techinque: Logrolling A Client
Aims of the procedure
• To turn the client whose body must at all times be kept in a straight alignment
• To provide comfort
Learning outcomes:
• The students will be able to
• Identify the predilection sites a patient in Logrolling
• Correctly communicate with the patient during Logrolling
• Put the patient into the basic position as precautionary positioning of the
body
ASSOCIATE NURSE STUDENT / PREPARATION
• Hair tied back
• Should appear professional (in full and clean uniform) with ID Card
• Remove watch, jewels, and Rings
• Wear closed shoes
• Hand washing
PATIENT PREPARATION
• Identification of the patient
• Self-presentation to the patient
• Physical and psychological patient preparation
• Assess levels of comprehension and collaboration of the patient
• Explain to the patient/ family the rationale of the procedure
• Position the client appropriately before moving the client
EQUIPMENTS
• Folded screen
• Protective gloves
• Pillows for positioning• Possibly a draw-sheet.

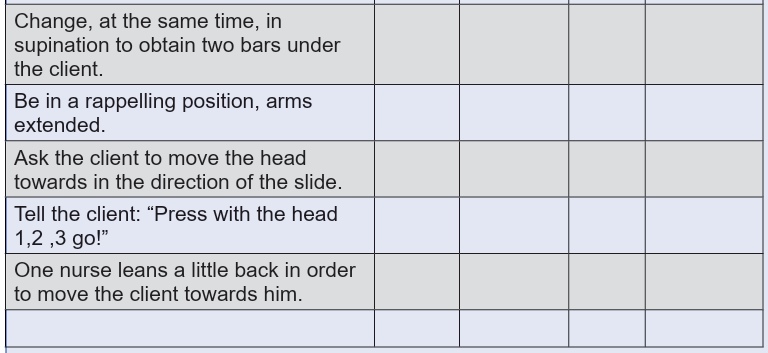
3.4.3. Technique: Moving Patient In Bed (Two Nurses Using Turn Sheet)
Aims of the procedure
• To assist clients who have slid down in bed from the Fowler’s position to
move up in bed
Learning outcomes:
• The students will be able to
• Correctly communicate with the patient during moving the patient
• Move the patient correctly
ASSOCIATE NURSE STUDENT / PREPARATION
• Should appear professional (in full and clean uniform) with ID Card
• Hair tied back
• Remove watch, jewels, and Rings
• Wear closed shoes
• Hand washing
PATIENT PREPARATION
• Identification of the patient
• Self-presentation to the patient
• Physical and psychological patient preparation
• Assess levels of comprehension and collaboration of the patient
• Explain to the patient/ family the rationale of the procedure
• Position the client appropriately before moving the client
EQUIPMENTS
• Folded screen
• Protective gloves
• Pillows for positioning• Draw-sheet or full sheet


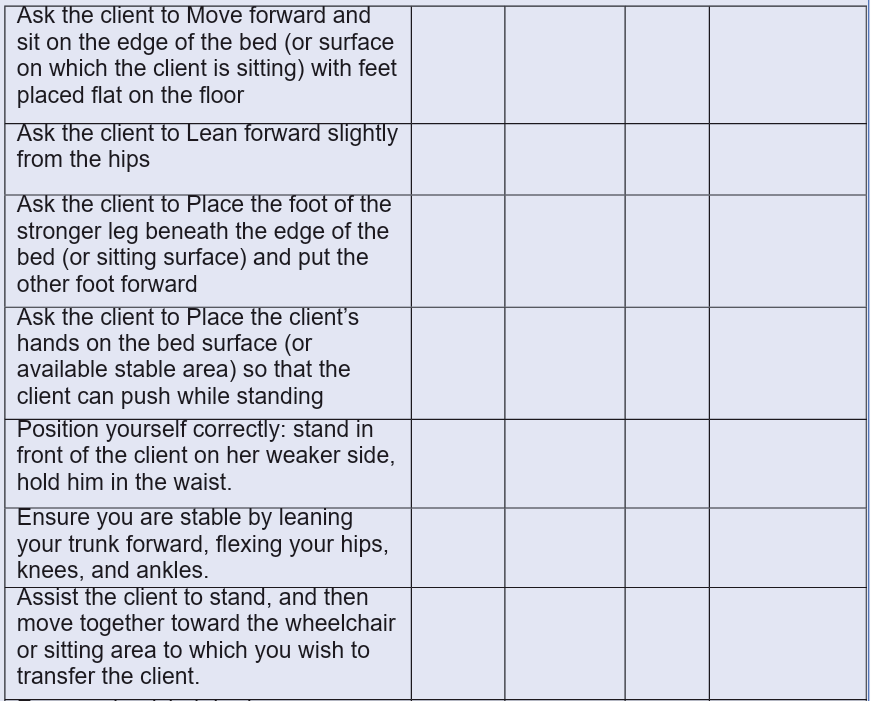
3.4.4. Technique: Moving The Patient From Bed To Chair Or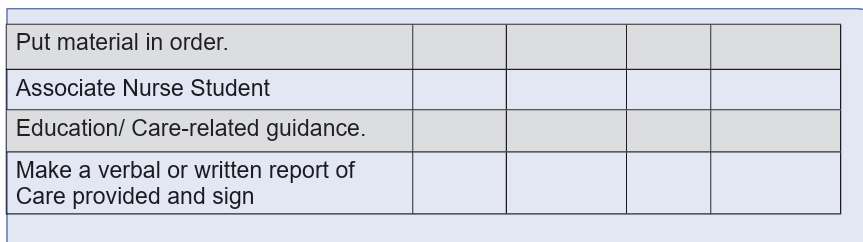
Wheel Chair (One Nurse And Two Nurses)
Aims of the procedure
• Changing position
• Ambulation
• Transfer to operating room
Learning outcomes:
The students will be able to
• Implement position changes correctly
• Use the appropriate means to facilitate the movement of the patient.
ASSOCIATE NURSE / PREPARATION
• Should appear professional (in full and clean uniform) with ID Card
• Hair tied back
• Remove watch, jewels, and Rings
• Wear closed shoes
• Hand washing
PATIENT PREPARATION
• Identification of the patient
• Self-presentation to the patient
• Physical and psychological patient preparation
• Assess Client body size, Activity tolerance, Muscle strength, joint mobility
• , presence of paralysis, degree of comfort, orthostatic hypotension and the
ability of the client
• Explain to the patient/ family the rationale of the procedure
• Position the client appropriately before moving the client
EQUIPMENTS
• Protective gloves
• Appropriate clothing
• Slippers or other appropriate open shoes• Chair or wheelchair (depending the purpose)


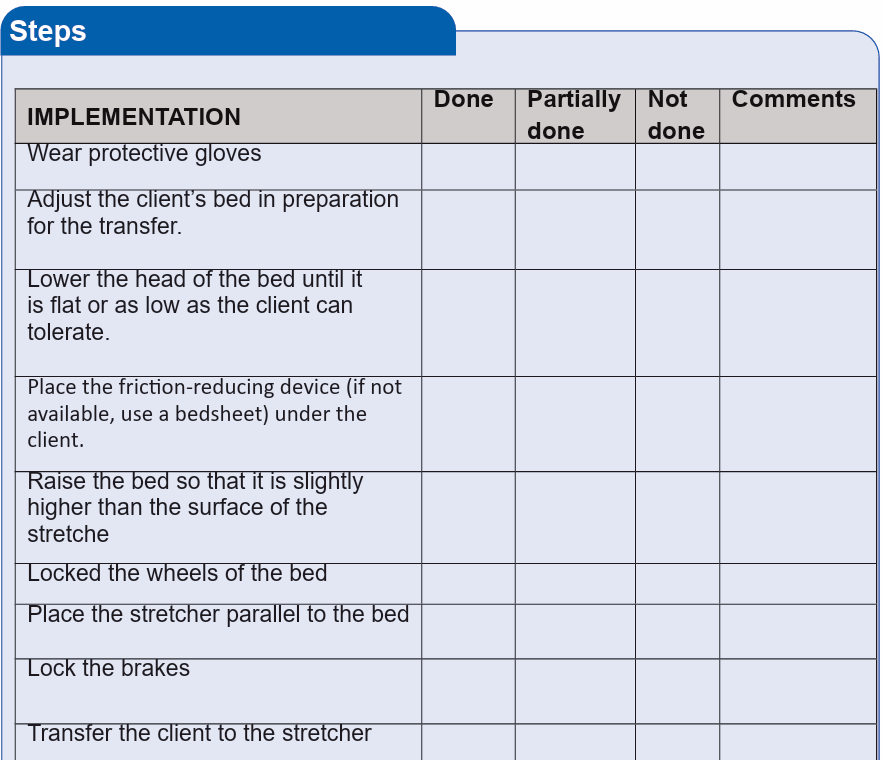
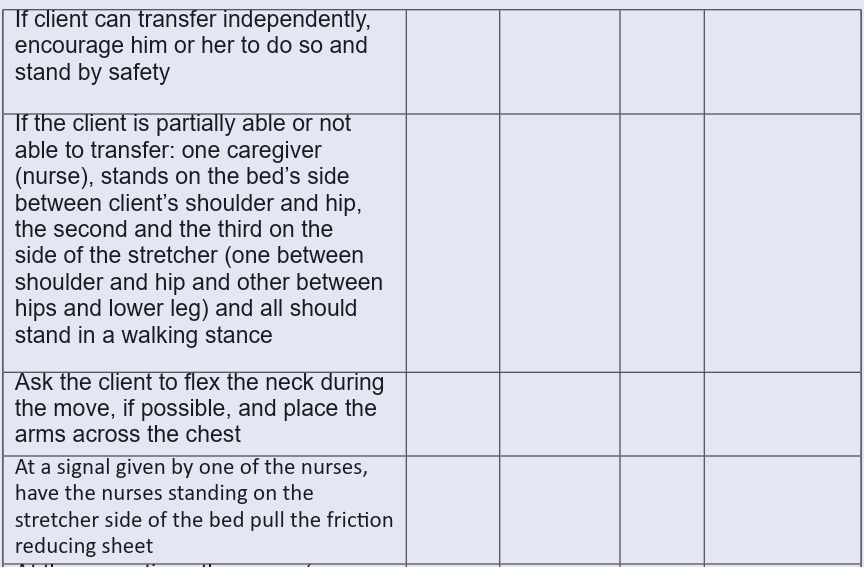
3.4.5. Techinque: Moving The Client From Bed To Stretcher Aims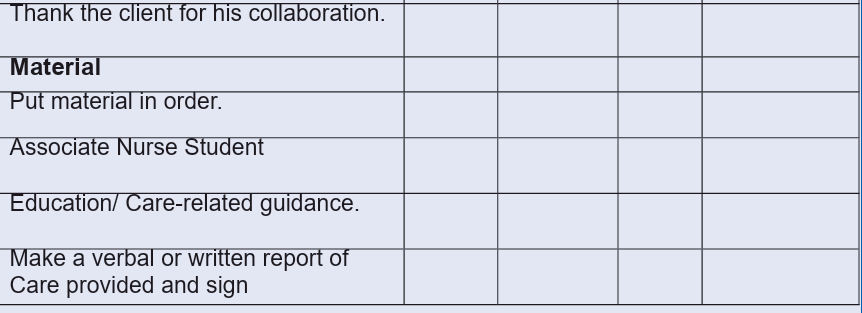
of the procedure
Aims of the procedure
• To transfer the client in supine position from one location to another
Learning outcomes:
The students will be able to
• mplement position changes correctly
• Use the appropriate means to facilitate the movement of the patient.
ASSOCIATE NURSE STUDENT / PREPARATION
• Should appear professional (in full and clean uniform) with ID Card
• Hair tied back
• Remove watch, jewels, and Rings
• Wear closed shoes
• Hand washing
PATIENT PREPARATION
• Identification of the patient
• Self-presentation to the patient
• Physical and psychological patient preparation
• Assess client body size, Activity tolerance, Muscle strength, joint mobility,
presence of paralysis, degree of comfort, orthostatic hypotension and the
ability of the client
• Explain to the patient/ family the rationale of the procedure
• Position the client appropriately before moving the client
EQUIPMENTS
• Protective gloves
• Appropriate clothing
• Stretcher• Assistive devices as required or bedsheet

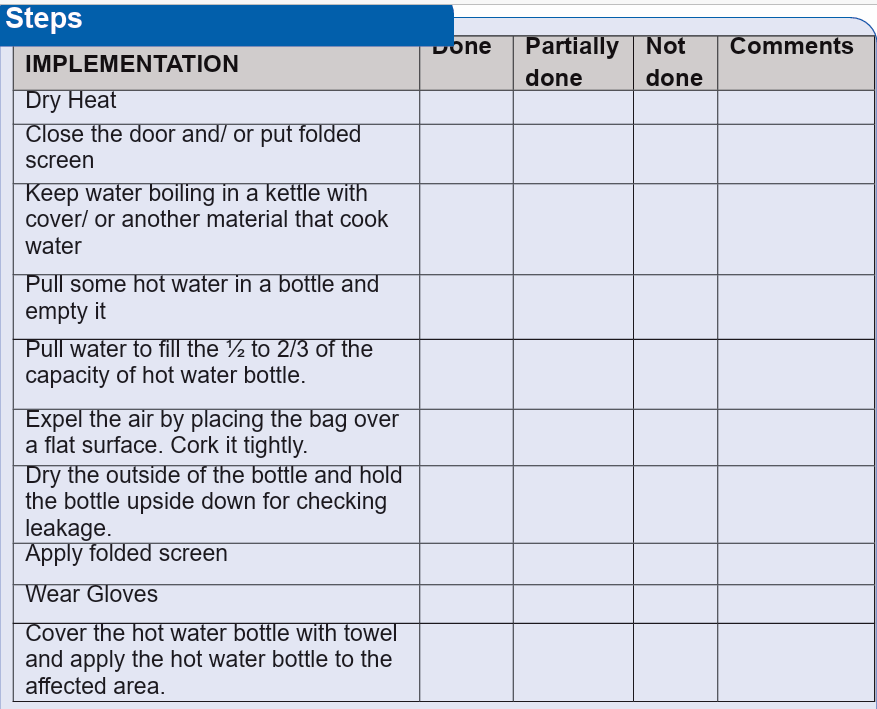
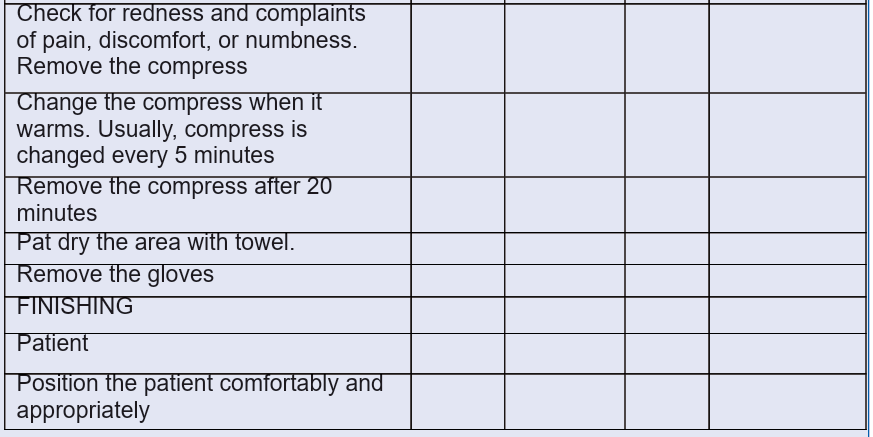
2.10.Procedure: Application Of Local Heat And Cold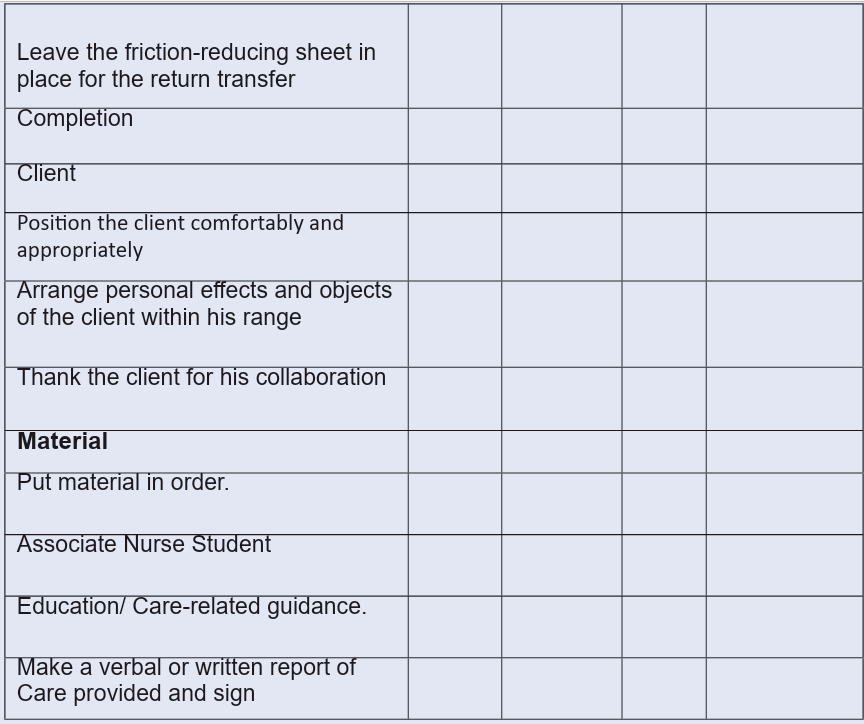
3.5.1. Technique: application dry and moist heat.
AIMS
• To treat sprains muscle pulls• To provide relief of pain
ASSOCIATE NURSE STUDENT / PREPARATION
• Should appear professional (in full and clean uniform) with ID Card
• Hair tied back
• Remove watch, jewels, and Rings
• Wear closed shoes
• Hand washing
PATIENT PREPARATION
• Identification of the patient
• Self-presentation to the patient
• Ask for the consent
• Physical and psychological patient preparation
• Assess levels of comprehension and collaboration of the patient
• Adjust the environment of the patient as necessary.
• Explain the procedure and purpose to the patient
• Check chart for limitations on patient’s physical activity.
• Cleanliness or condition of the bed and surrounding environment
EQUIPMENTS
• Tray,
• Folded screen
• Non sterile Gloves
Dry heat
• Hot water bag
• Kettle with cover/ or any other material that can kook the water.
EQUIPMENTS
• Water container.
Moist Heat
• Hot water bag cover / small towel to cover.
• Vaseline or oil for applying on the skin in case there is redness
• Basin or tub.
• Small towel.
• Bath towel
• Ties, tape, or rolled gauze.• Mackintosh

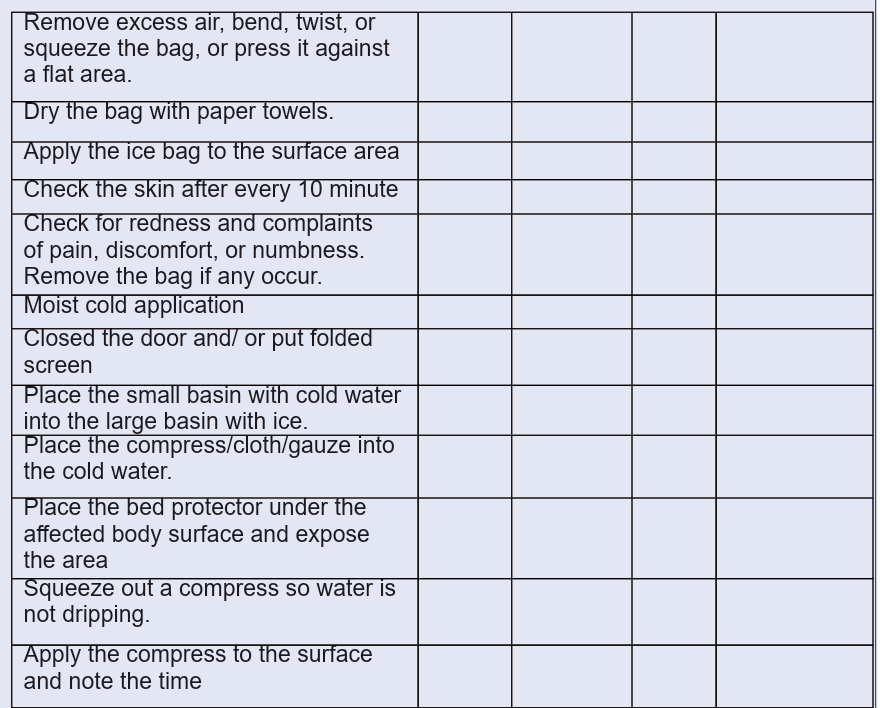
3.5.2. Technique: application dry and moist cold.
AIMS
• To treat sprains muscle pulls
• To provide relief of pain
ASSOCIATE NURSE STUDENT / PREPARATION
• Should appear professional (in full and clean uniform) with ID Card
• Hair tied back
• Remove watch, jewels, and Rings
• Wear closed shoes
• Clean and short nails
• Remove watch, jewels, and Rings
• Wear closed shoes
PATIENT PREPARATION
• Identification of the patient
• Self-presentation to the patient
• Ask for the consent
• Physical and psychological patient preparation
• Assess levels of comprehension and collaboration of the patient
• Adjust the environment of the patient as necessary.
• Explain the procedure and purpose to the patient
• Check chart for limitations on patient’s physical activity.
• Cleanliness or condition of the bed and surrounding environment
EQUIPMENTS
• Tray,
• Folded screen
• Non sterile Gloves
• Dry heat
• Hot water bag
• Kettle with cover/ or any other material that can kook the water.
• Water container.
• Hot water bag cover / small towel to cover.
• Moist cold
• Large basin Contains of ice.
• A towel
• Vaseline or oil for applying on the skin in case there is redness
• Small basin Contain with cold water.
• Gauze squares, wash cloth, or small towels.
• Waterproof pad/ Plastic sheet.• Mackintosh

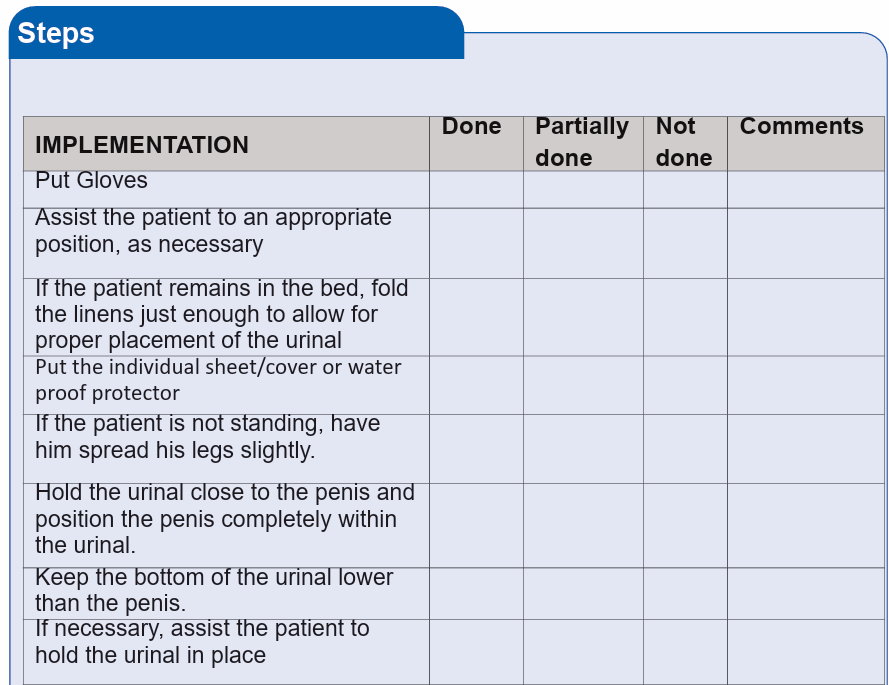
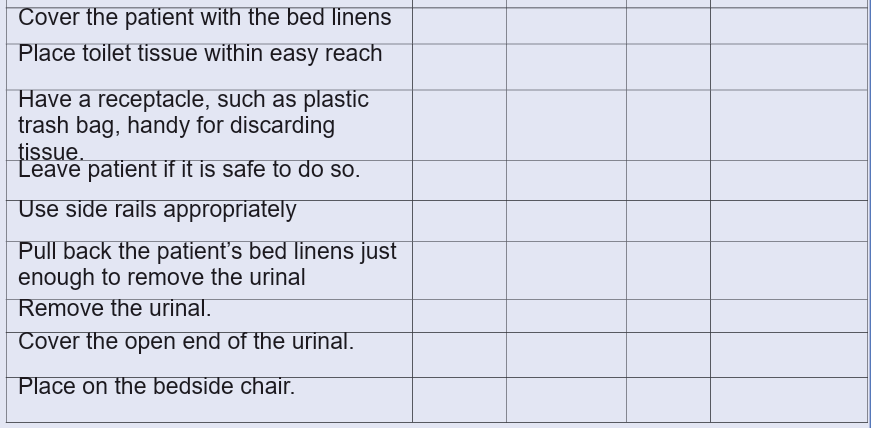
2.11.Procedure: Assisting The Patient To Eliminate
3.6.1. Technique: Use Of Urinal
Aims of the procedure
• To assist in urination when the client is unable to get out of bed
• To take urine sample
Learning outcomes:
The students will be able to
• Assist in urination when the client is unable to get out of bed• Take urine sample correctly
ASSOCIATE NURSE STUDENT / PREPARATION
• Hair tied back
• Should appear professional (in full and clean uniform) with ID Card
• Remove watch, jewels, and Rings
• Wear closed shoes
• Clean and short nails
• Remove watch, jewels, and Rings• Wear closed shoes
PATIENT PREPARATION
• Identification of the patient
• Self-presentation to the patient
• Physical and psychological patient preparation
• Assess levels of comprehension and collaboration of the patient• Position the patient in a comfortable position
EQUIPMENTS
• nal
• Protective Clean gloves
• Toilet paper
• Material for personal hygiene if necessary
• Receptacle for waste disposal
• Screen
• Linens such as privacy blankets• Water proof protector/Macintosh
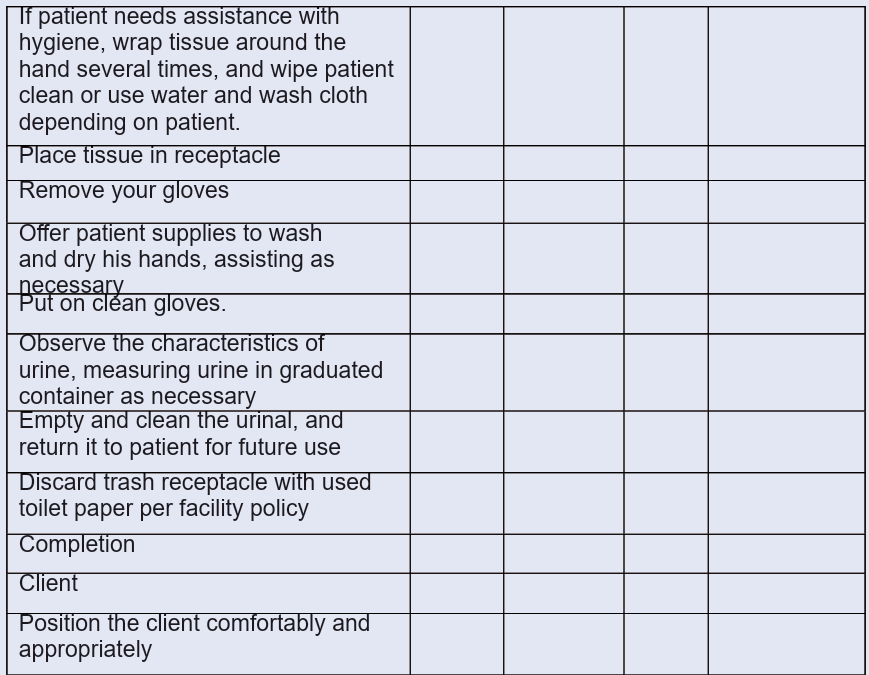
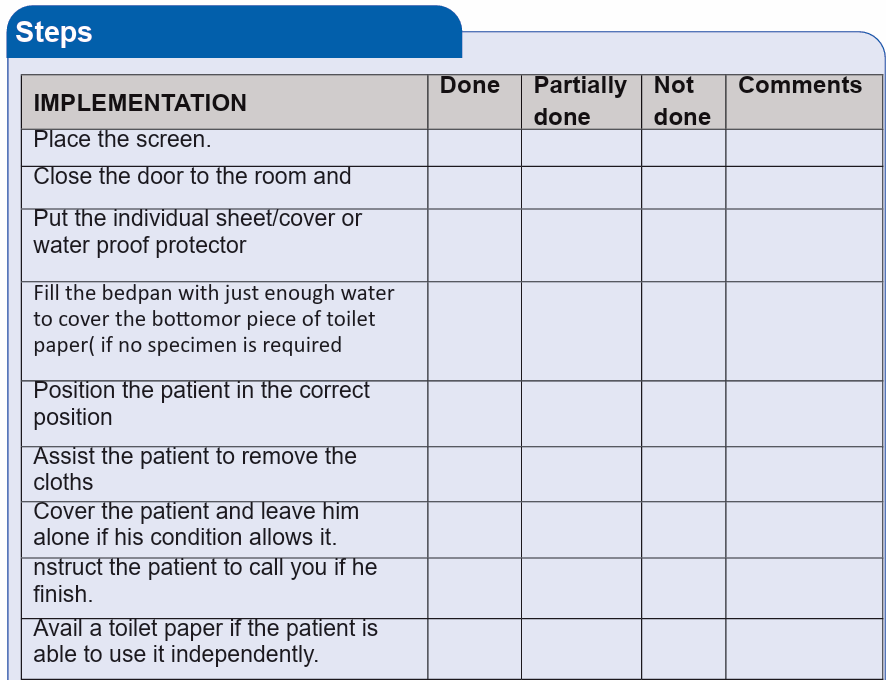
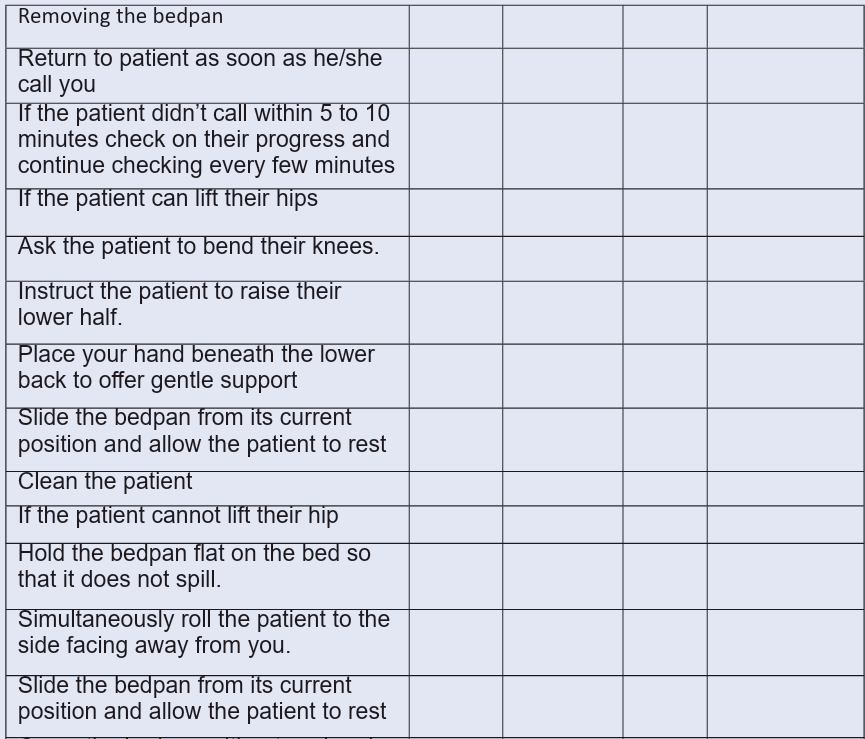
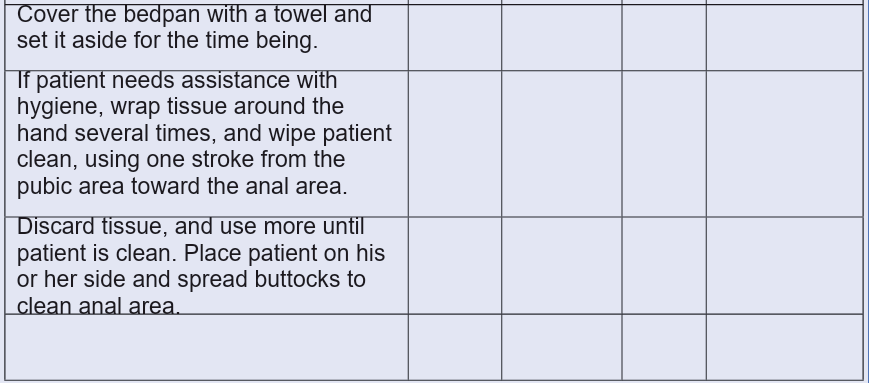
3.6.2. Technique: Use Of Bed Pan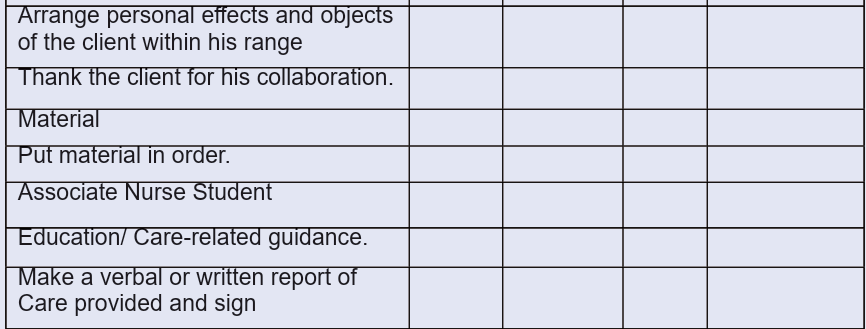
Aims of the procedure
• To assist in voiding when the client is unable to get out of bed
• To take stool sample
Learning outcomes:
The students will be able to
• Assist in voiding when the client is unable to get out of bed
• Take stool sample correctly
ASSOCIATE NURSE STUDENT / PREPARATION
• Should appear professional (in full and clean uniform) with student ID Card
• Hair tied back
• Remove watch, jewelries, and Rings
• Wear closed and short shoes
• Wash hand
PATIENT PREPARATION
• Identification of the patient
• Self-presentation to the patient
• Physical and psychological patient preparation
• Assess levels of comprehension and collaboration of the patient
• Position the patient in a comfortable position
EQUIPMENTS
• Bed pan
• Protective Clean gloves
• Toilet paper
• Material for personal hygiene if necessary
• Receptacle for waste disposal
• Screen
• Linens such as privacy blankets• Water proof protector/Macintosh
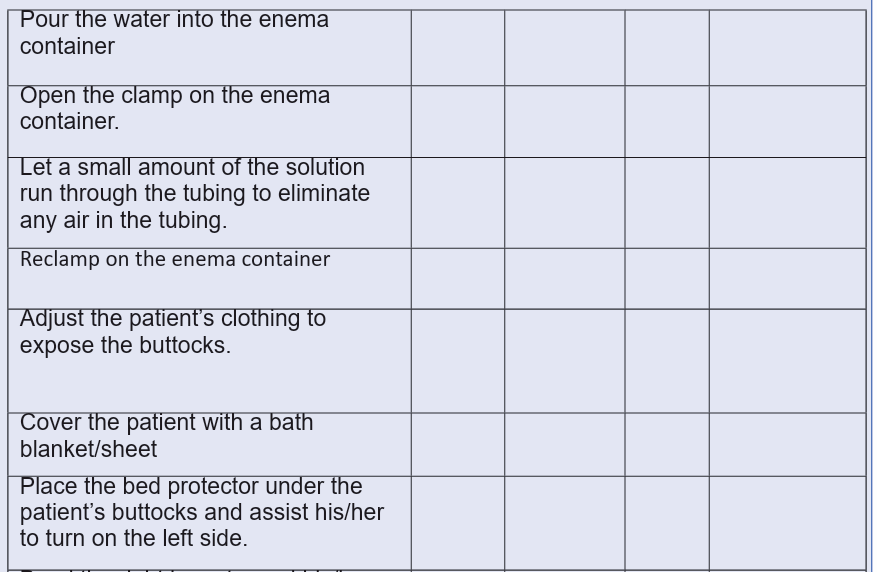
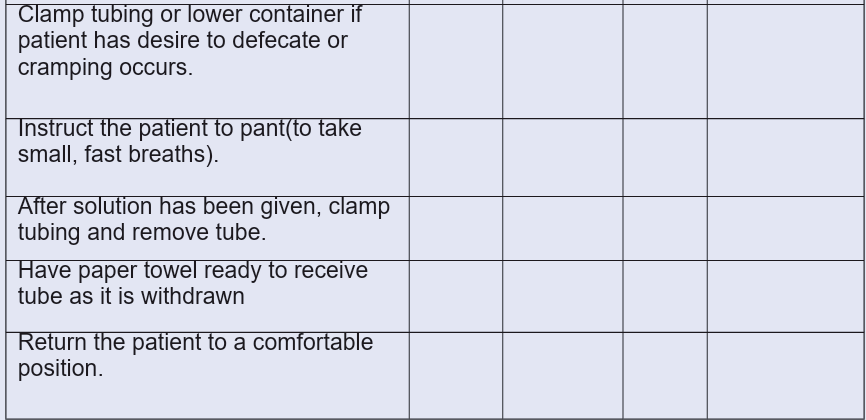
3.6.3. Technique: Administering Enema (Evacuating Enema/
Return Flow Enema)
Aims of the procedure
• To relieve constipation
• To clean bowel before endoscopic examination or procedure
• To clean bowel before surgical operation
• To reduce inflammation of intestine
Learning outcomes:
The students will be able to
• Perform enema
• Prepare the patient for enema administration
• Prepare the aids for enema administration
ASSOCIATE NURSE STUDENT / PREPARATION
Should appear professional (in full and clean uniform) with student ID Card
• Hair tied back
• Remove watch, jewelries, and Rings
• Wear closed and short shoes
• Wash hand
PATIENT PREPARATION
• Identification of the patient
• Self-presentation to the patient
• Ensure client privacy
• Physical and psychological patient preparation
• Assess levels of comprehension and collaboration of the patient
• Position the patient in a comfortable position
EQUIPMENTS
• Folding screens.
• Tray, Trolley.
• Bracket
• Impermeable protection and cotton cloth.
• Appropriate rectal tube.
• Kidney dish.
• Lubricant.
• Protective gloves.
• Clean compress and toilet paper.
• Enema cannula with connection tube.
• Grip for clamping or tap.
• Water or other solution at the temperature prescribed.
• Bed pan• Material for personal hygiene, if necessary


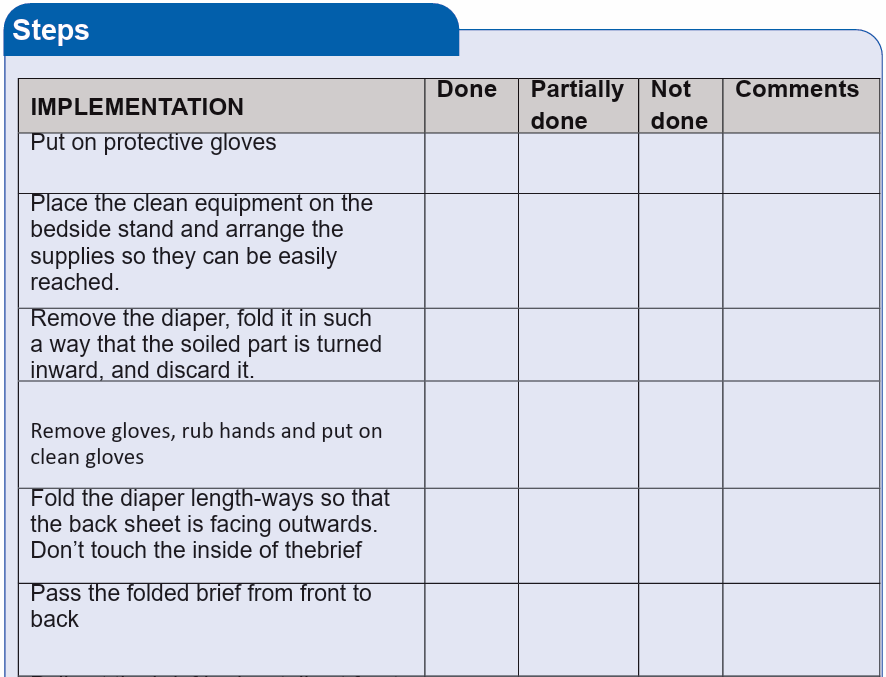
3.6.4. Technique: Assisting Patients In Using Diapers
Aims of the procedure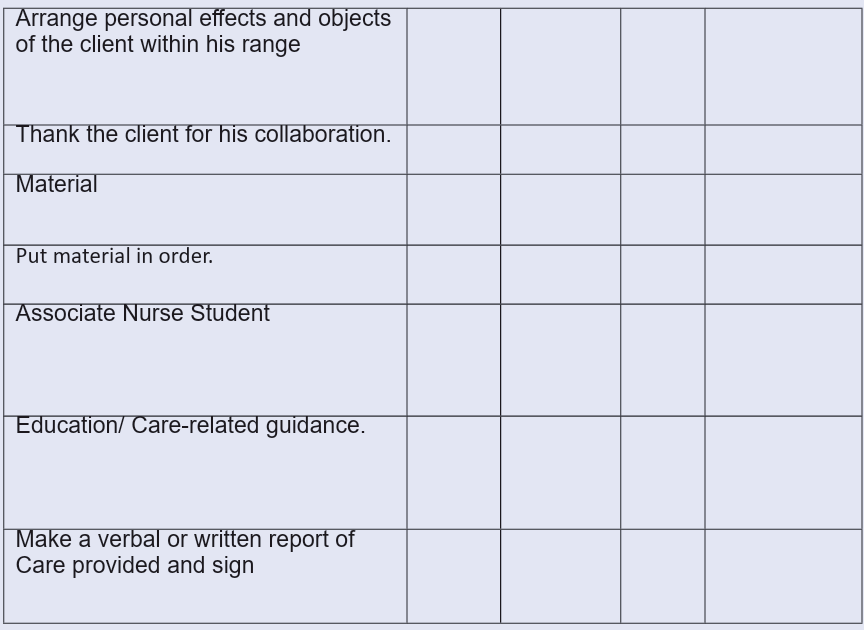
• To promote cleanliness to the client
• To prevent infection and bed sores
Learning outcomes:
The students will be able to
• Perform enema
• Prepare the patient for diapers change• Prepare the aids for diapers change
ASSOCIATE NURSE STUDENT / PREPARATION
Should appear professional (in full and clean uniform) with student ID Card
• Hair tied back
• Remove watch, jewelries, and Rings
• Wear closed and short shoes
• Wash hand
PATIENT PREPARATION
• Identification of the patient
• Self-presentation to the patient
• Ensure client privacy
• Physical and psychological patient preparation
• Assess levels of comprehension and collaboration of the patient• Position the patient in a comfortable position
EQUIPMENTS
• Tray or trolley
• Proper Gloves
• A clean diaper (consider the size of the patient)
• Dust bin or bucket to receive soiled diaper
• Bucket with a lid and filled with water for non-disposable diapers.
• Skin protection barrier cream• Bed linens, if necessary.

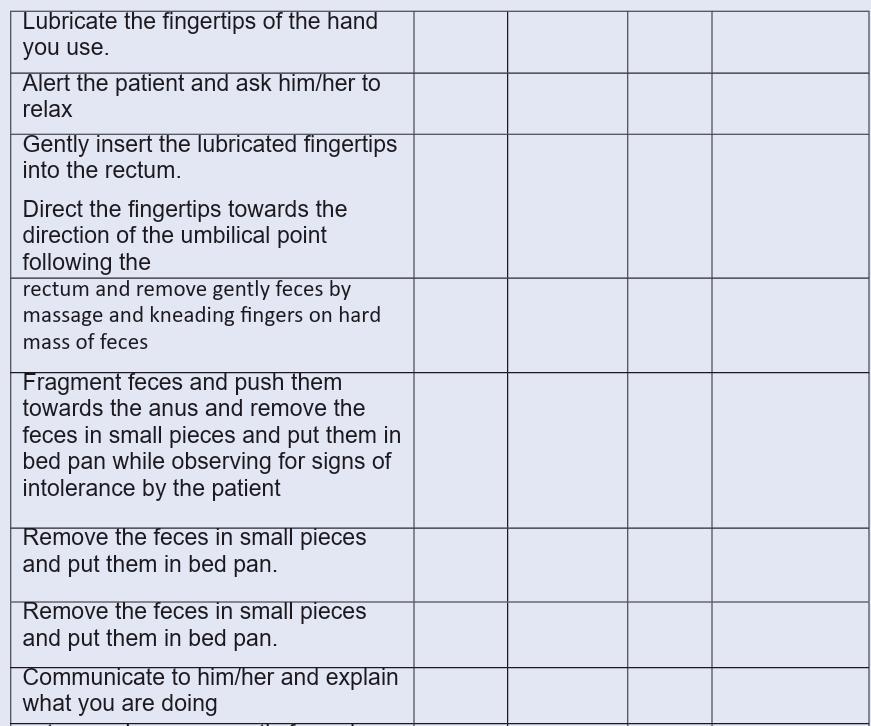
2.12.Technique: Manual Removal Of Fecaloma AIMS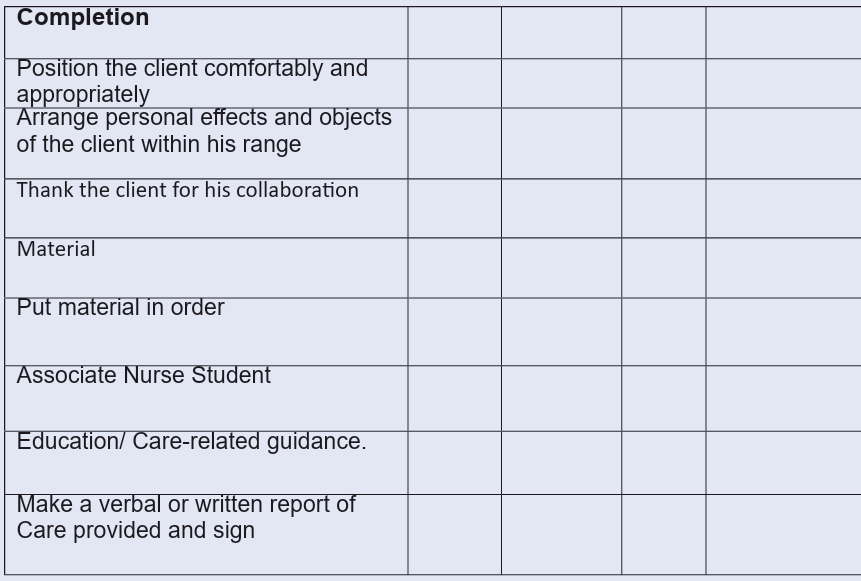
• To remove impacted feces
ASSOCIATE NURSE STUDENT / PREPARATION
• Hair tied back
• Should appear professional (in full and clean uniform) with ID Card
• Remove watch, jewels, and Rings
• Wear closed shoes
• Clean and short nails
• Remove watch, jewels, and Rings
• Wear closed shoes
• Hand washing
PATIENT PREPARATION
• Identification of the patient
• Self-presentation to the patient
• Ask for the consent
• Physical and psychological patient preparation
• Assess levels of comprehension and collaboration of the patient
• Adjust the environment of the patient as necessary.
• Explain the procedure and purpose to the patient
• Check chart for limitations on patient’s physical activity.
• Cleanliness or condition of the bed and surrounding environment
EQUIPMENTS
• The trolley.
• Serving forceps in its container.
• Disinfectant solution (for hands).
• Bed pan with cover.
• Impermeable protection and cotton protection.
• Lubricant.
• Toilet paper.
• Kidney dish for wastes.
• Individual blanket or towel.
• Protective gloves.• Plastic apron if available


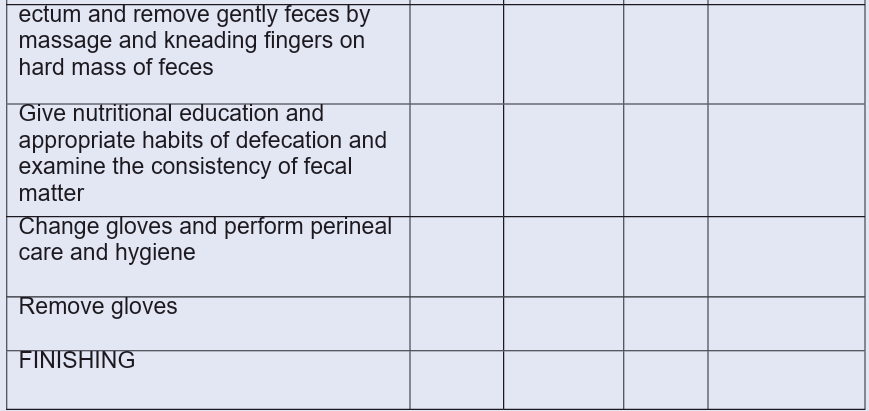
2.13.Hygiene Care of Ileostomy Or Colostomy AIMS
• To prevent infection• To prevent irritation of the skin
ASSOCIATE NURSE STUDENT / PREPARATION
• Hair tied back
• Should appear professional (in full and clean uniform) with ID Card
• Remove watch, jewels, and Rings
• Wear closed shoes
• Clean and short nails
• Remove watch, jewels, and Rings
• Wear closed shoes
• Hand washing
PATIENT PREPARATION
• Identification of the patient
• Self-presentation to the patient
• Ask for the consent
• Physical and psychological patient preparation
• Assess levels of comprehension and collaboration of the patient
• Adjust the environment of the patient as necessary.
• Explain the procedure and purpose to the patient
• Check chart for limitations on patient’s physical activity.
• Check Cleanliness or condition of the bed and surrounding environment
• Position the patient in a comfortable position
EQUIPMENTS
• Bed pan
• Protective Clean gloves
• Toilet paper
• Material for personal hygiene if necessary
• Receptacle for waste disposal
• Screen
• Linens such as privacy blankets
• Water proof protector/Macintosh
• Pieces of gauzes• Physiologic 0.9% solution The trolley.


2.14. Vital signs And Parameters
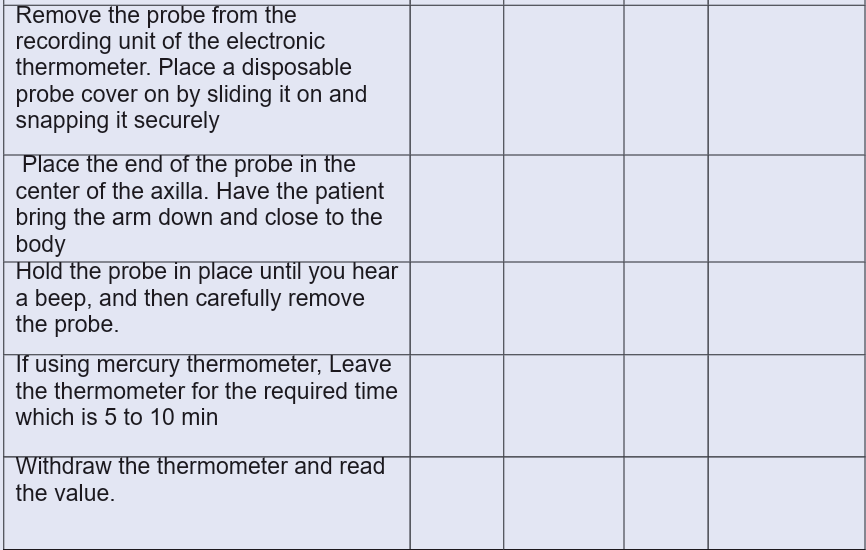
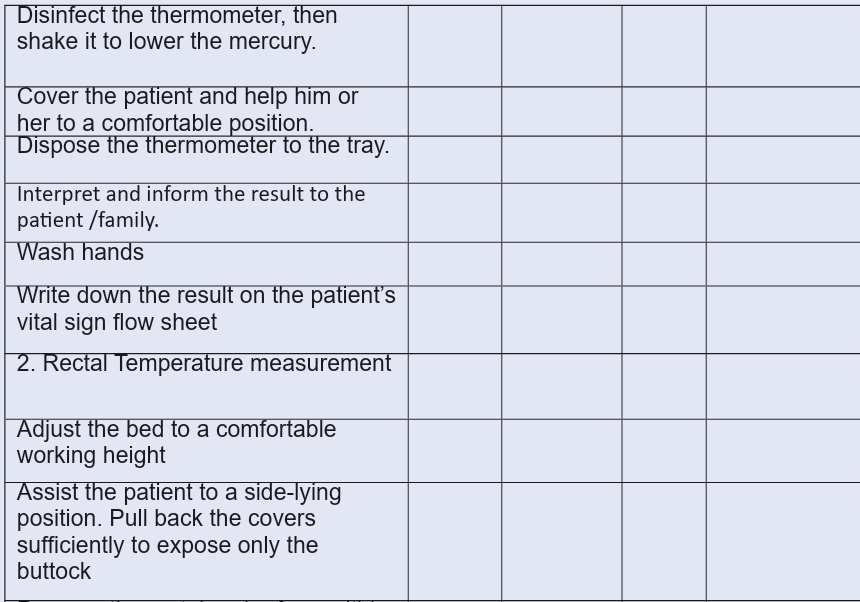
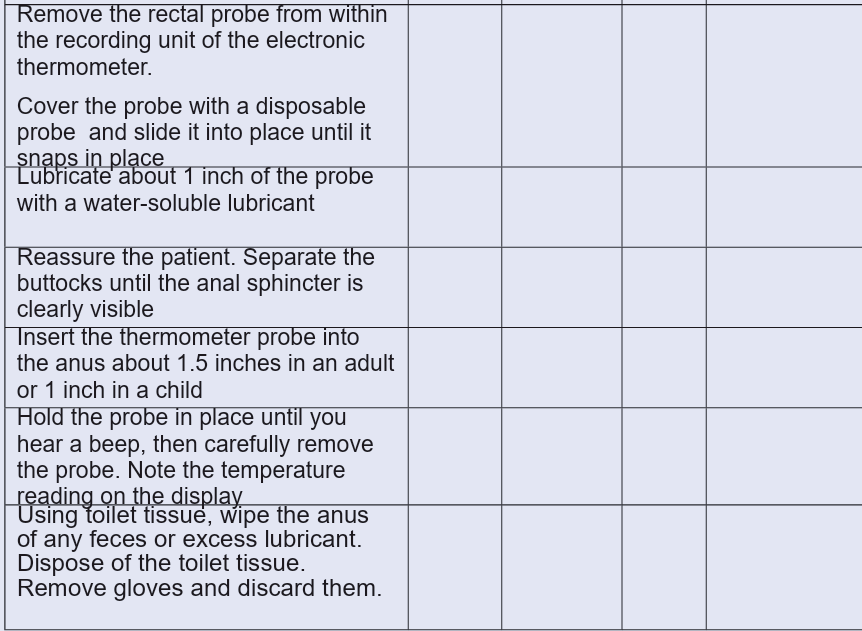
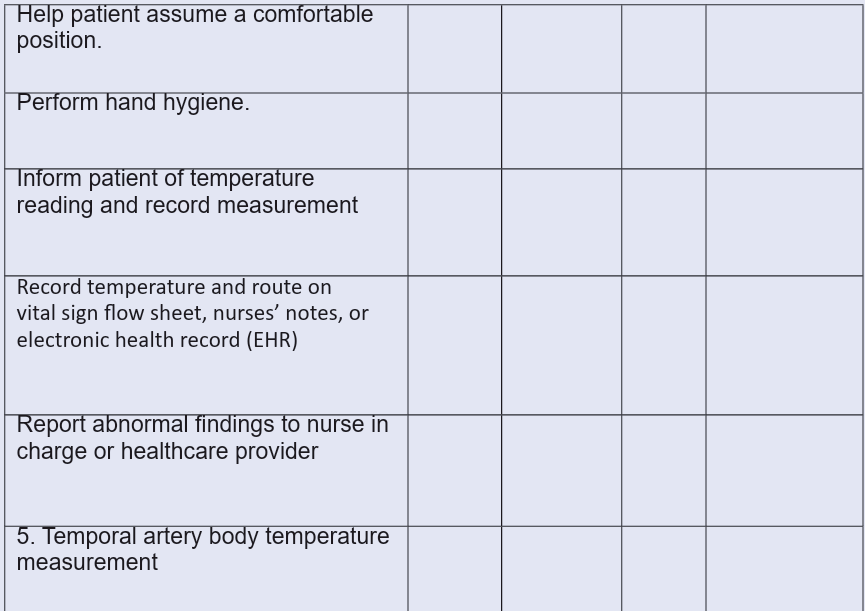
2.14.1.Technique: Body Temperature Measurement
Aims of the procedure
• To assist in diagnosis
• To evaluate patient recovery from illness,
• To determine if immediate measure is needed to any abnormal body
temperature
Learning outcomes:
• To measure the body temperature (axillary, oral, tympanic membrane and
temporal artery)• To write down the results , interpret them and communicate the results
ASSOCIATE NURSE STUDENT / PREPARATION
• Should appear professional (in full and clean uniform) with student ID
Card
• Hair tied back
• Remove watch, jewelries, and Rings
• Wear closed shoes
• Hand washing
PATIENT PREPARATION
• Identification of the patient
• Self-presentation to the patient
• Physical and psychological patient preparation
• Assess levels of comprehension and collaboration of the patient
• Explain to the patient/ family the rational of body temperature measurement• Position the patient in a comfortable position
EQUIPMENTS
EQUIPMENTS (axillary body temperature)
• Appropriate and functional thermometer.
• Cleaned and disinfected tray.
• Swabs and disinfectant.
• Pen and vital sign flow sheet or electronic health record
• Functional watch on the second hand
• Kidney dish and bowl
EQUIPMENTS(tympanic body temperature)z
• Infrared (tympanic) thermometer, appropriate for site to be used
• Disposable probe covers
• Non sterile gloves, if appropriate
• Cleaned and disinfected tray.
• Swabs and disinfectant
• Kidney dish and bowl
• Additional Personal Protective Equipment (PPE),as indicated
• Toilet tissue, if needed
• Pencil or pen, paper or flow sheet, computerized record
EQUIPMENTS(temporal body temperature)
• Infrared temporal artery thermometer, appropriate for site to be used
• Disposable probe covers
• Non sterile gloves, if appropriate
• Cleaned and disinfected tray.
• Swabs and disinfectant
• Kidney dish and bowl
• Additional Personal Protective Equipment (PPE),as indicated
• Toilet tissue, if needed• Pencil or pen, paper or flow sheet, computerized record


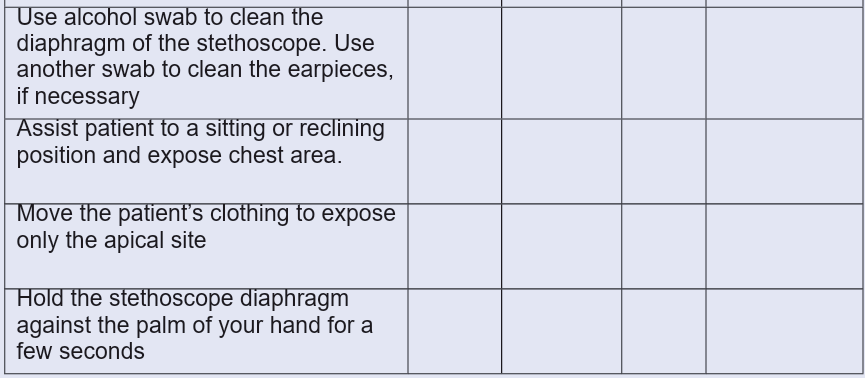
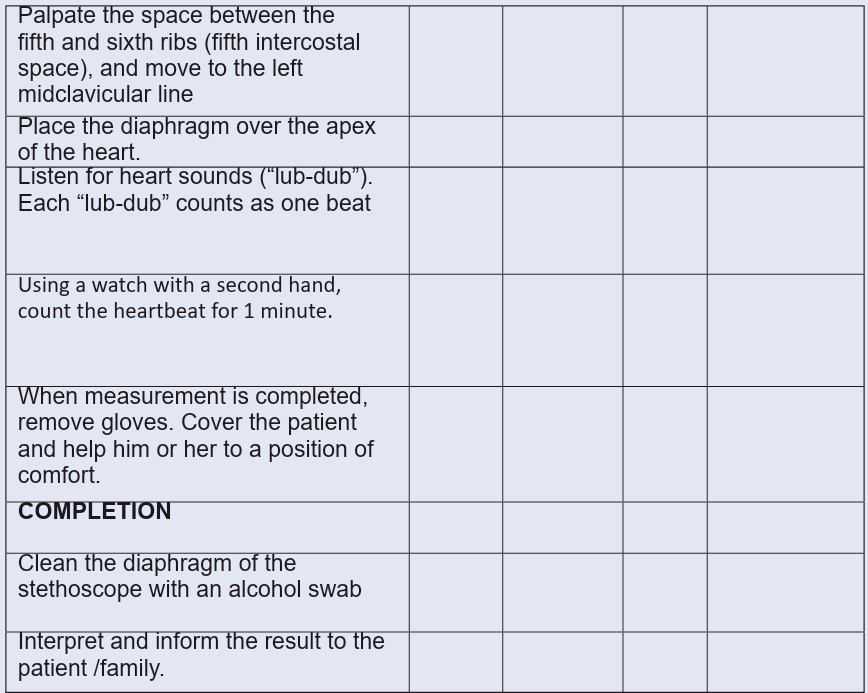
2.14.2.Technique: Pulse Measurement
AIMS
• To gather information about heart rhythm and pattern of beat
• To assess heart ability to deliver blood to distant areas
• To evaluate heart effect to cardiac medication, activity, blood volume and
gas exchange
Learning outcomes:
• Take correctly the pulse rate
• Record the results and interpret them.• Communicate results
ASSOCIATE NURSE STUDENT / PREPARATION
• Should appear professional (in full and clean uniform) with student ID Card
• Hair tied back
• Remove watch, jewelries, and Rings
• Wear closed shoes
• Hand washing
PATIENT PREPARATION
• Identification of the patient
• Self-presentation to the patient
• Physical and psychological patient preparation
• Assess levels of comprehension and collaboration of the patient
• Explain to the patient/ family the rational of pulse check up
• Position the patient in a comfortable position• Make sure that the patient has been at rest for at least 10 minutes.
EQUIPMENTS
• Watch with second hand.
• Stethoscope (for taking the apical pulse only).
• Non-sterile gloves
• Pen and vital sign flow sheet or electronic health record• Swabs with disinfectant in kidney dish in the event of the apical pulse.


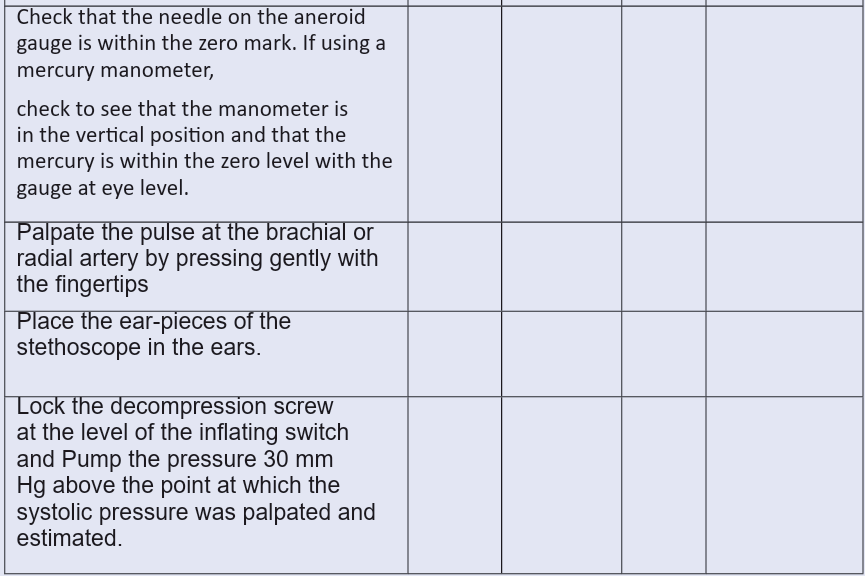
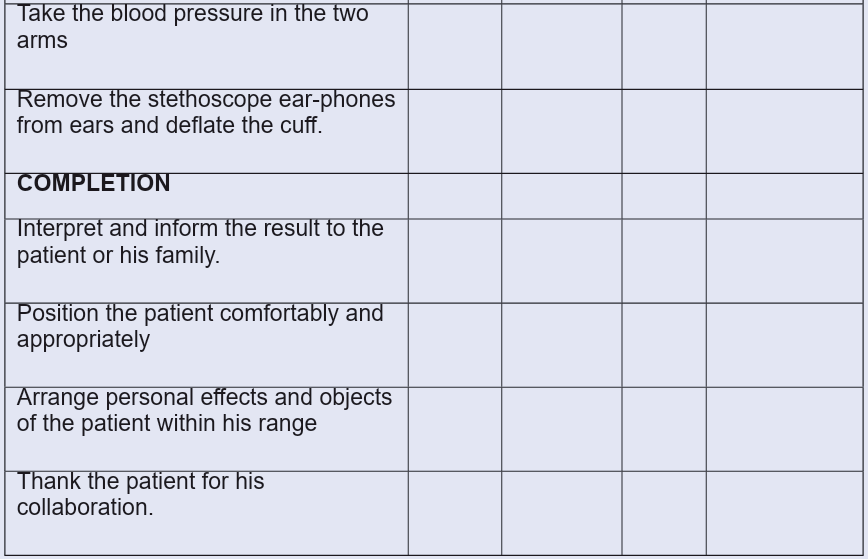
2.14.3. Technique: Blood Pressure Measurement
Aims of the procedure
• To obtain baseline data for diagnosis and treatment
• To compare and evaluate subsequent change occurred during care.
Learning outcomes:
• The students will be able to demonstrate how to use the equipment for
taking a blood pressure, organize their technique, and produce an accurate
reading according to what they hear or see.
• The student will be able to interpret the findings
ASSOCIATE NURSE STUDENT / PREPARATION
• Should appear professional (in full and clean uniform) with student ID Card
• Hair tied back
• Remove watch, jewelries, and Rings
• Wear closed shoes
• Hand washing
PATIENT PREPARATION
• Identification of the patient
• Self-presentation to the patient
• Physical and psychological patient preparation(Make sure that the skin is
dry and injury-free. Do not take BP on an arm with perfusion, paralyzed, or
on the side of a former mastectomy)
• Assess levels of comprehension and collaboration of the patient
• Explain to the patient/ family the rationale of BP check up
• Position the patient in a comfortable position
• Instruct the patient to have a rest for at least 10 minutes.
EQUIPMENTS
• Hand washing
• Disinfected Tray/Trolley
• Disposable pressure cuff of appropriate size for patient
• Functional sphygmomanometer
• Non sterile Gloves
• Alcohol swabs(concentrated at 70%)
• Functional stethoscope.
• Kidney dish• Pen and vital sign flow sheet or electronic health record


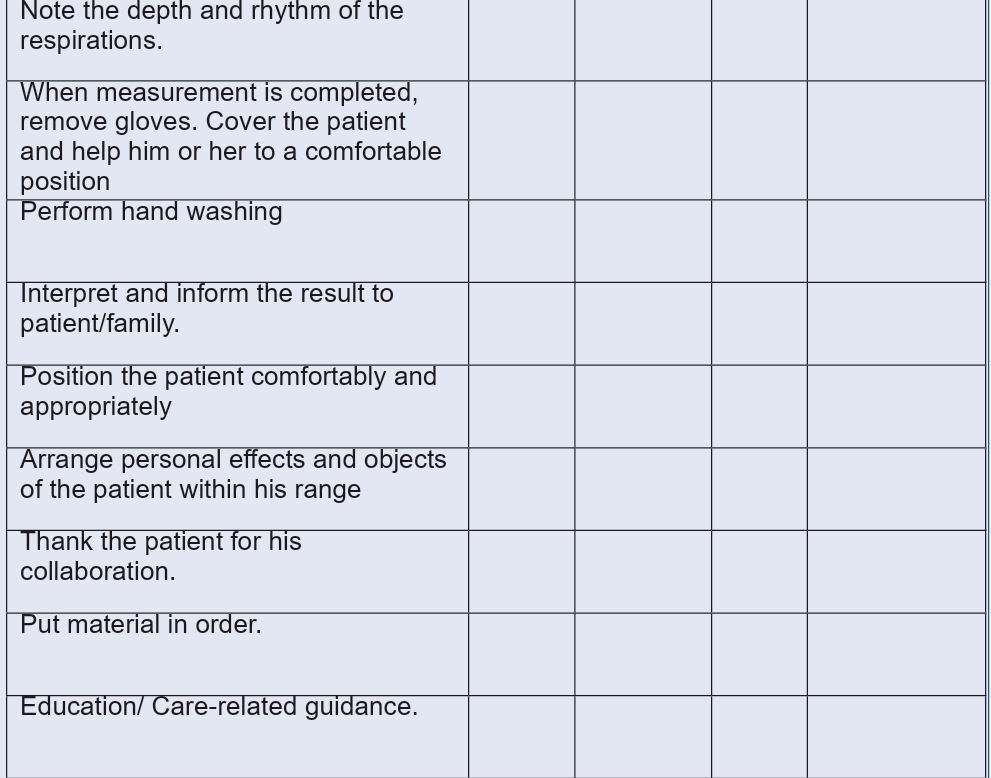
2.14.4.Technique: Respiratory Rate Measurement AIMS
• To gather information about rhythm and depth
• To determine number of respiration occurring per minutes
Learning outcomes:
• Take correctly the Respiration rate
• Record the results and interpret them.• Communicate results
ASSOCIATE NURSE STUDENT / PREPARATION
• Should appear professional (in full and clean uniform) with student ID Card • Hair tied back
• Remove watch, jewelries, and Rings
• Wear closed shoes
• Hand washing
PATIENT PREPARATION
• Identification of the patient
• Self-presentation to the patient
• Physical and psychological patient preparation(Make sure that the skin is
dry and injury-free. Do not take BP on an arm with perfusion, paralyzed, or
on the side of a former mastectomy)
• Assess levels of comprehension and collaboration of the patient
• Explain to the patient/ family the rationale of BP check up
• Position the patient in a comfortable position
• Instruct the patient to have a rest for at least 10 minutes.
EQUIPMENTS
• Functional watch
• Pen and vital sign flow sheet• Nonsterile glove

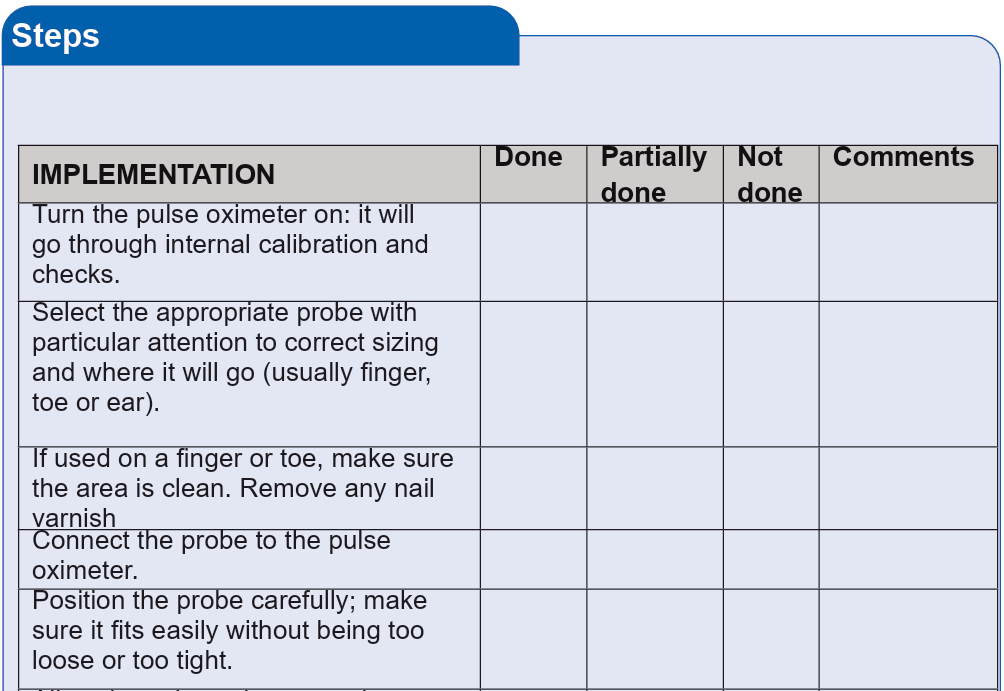
2.14.5. Technique: Pulse Oximetry Measurement (Oxygen Saturation)

AIMS
• To review basics of the hemodynamics of cardiovascular system
• To recognize various mechanisms for control of vascular disorders
• To incorporate hemodynamic concepts in treatment decision-making
process, including when selecting pharmacologic agents for management
of cardiovascular diseases.
• To assess the effectiveness of treatment
• To monitor the health of individuals with any type of condition that canaffect blood oxygen levels
Learning outcomes:
• Take correctly the pulse oximetry
• Record the results and interpret them.• Communicate results
ASSOCIATE NURSE STUDENT / PREPARATION
• Hair tied back
• Should appear professional (in full and clean uniform) with student ID Card
• Remove watch, jewelries, and Rings
• Wear closed shoes
• Hand washing
PATIENT PREPARATION
• dentification of the patient
• Self-presentation to the patient
• Physical and psychological patient preparation
• Assess levels of comprehension and collaboration of the patient
• Position the patient in a comfortable position
EQUIPMENTS
• Pulse oximeter
• Pen• Vital signs monitoring chart
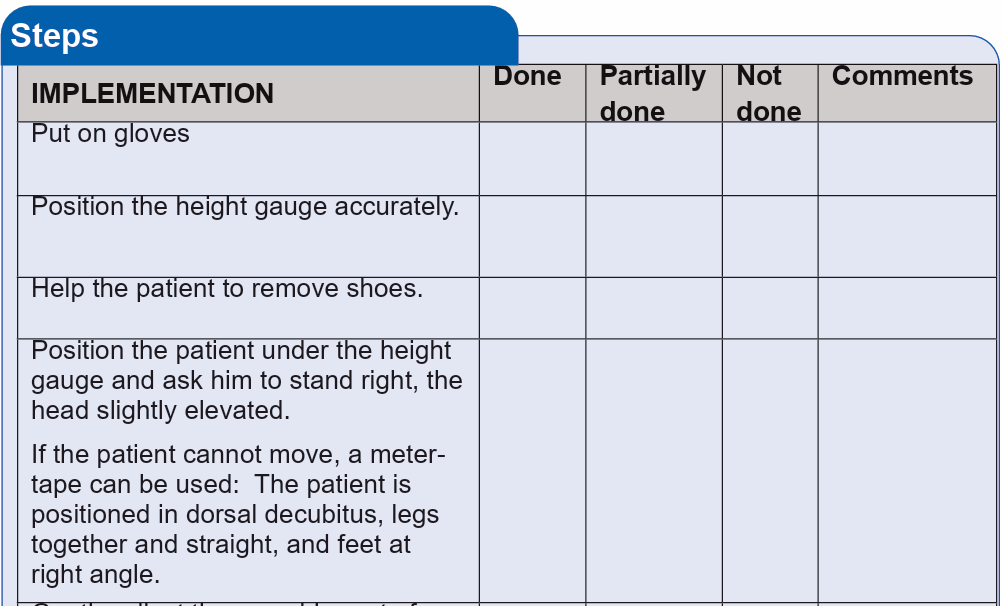
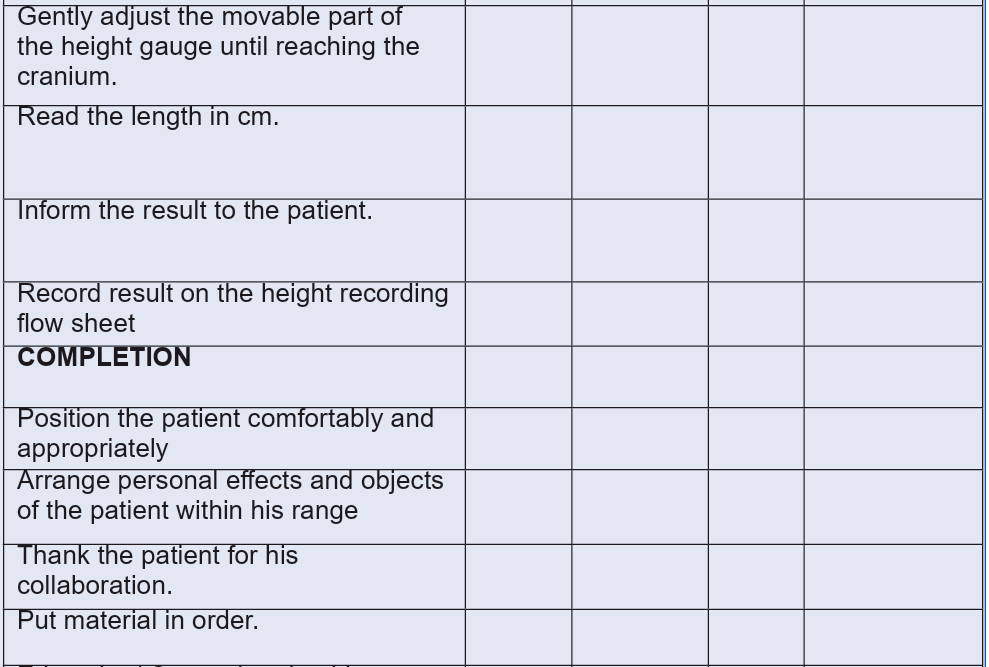
2.14.6. Technique: Height Measurement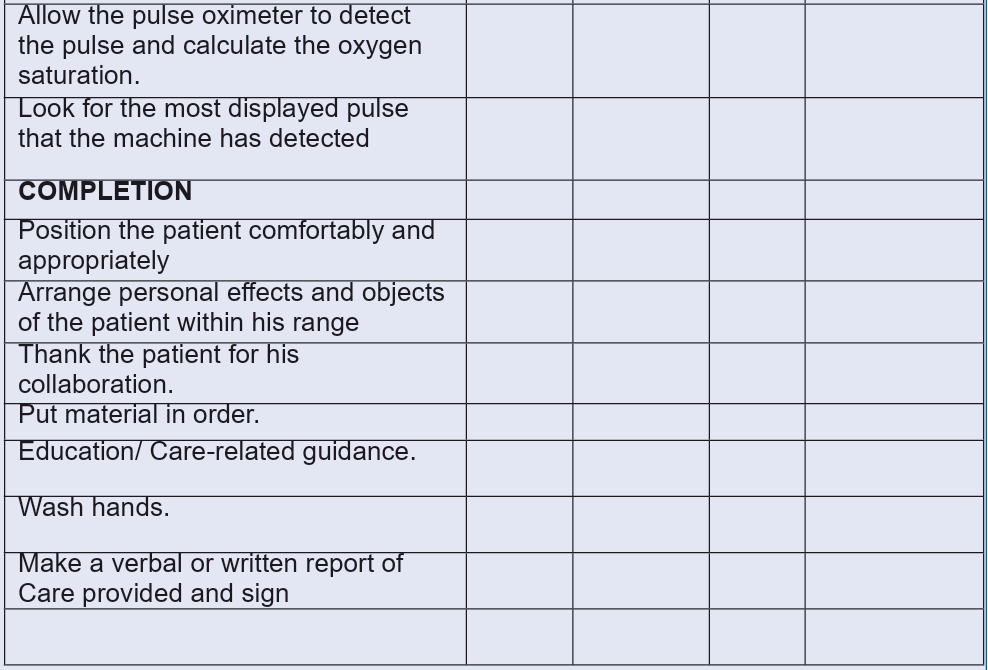
AIMS
• To assess overall health
Learning outcomes:
• Take correctly the height
• Record the results and interpret them.
• Communicate results
ASSOCIATE NURSE STUDENT / PREPARATION
• Should appear professional (in full and clean uniform) with student ID Card
• Hair tied back
• Remove watch, jewelries, and Rings
• Wear closed shoes
• Hand washing
PATIENT PREPARATION
• Identification of the patient
• Self-presentation to the patient
• Physical and psychological patient preparation
• Assess levels of comprehension and collaboration of the patient
• Position the patient in a comfortable position
EQUIPMENTS
• Height gauge, lath fixed on the wall or tape measure and gloves• Pen and height recording flow sheet
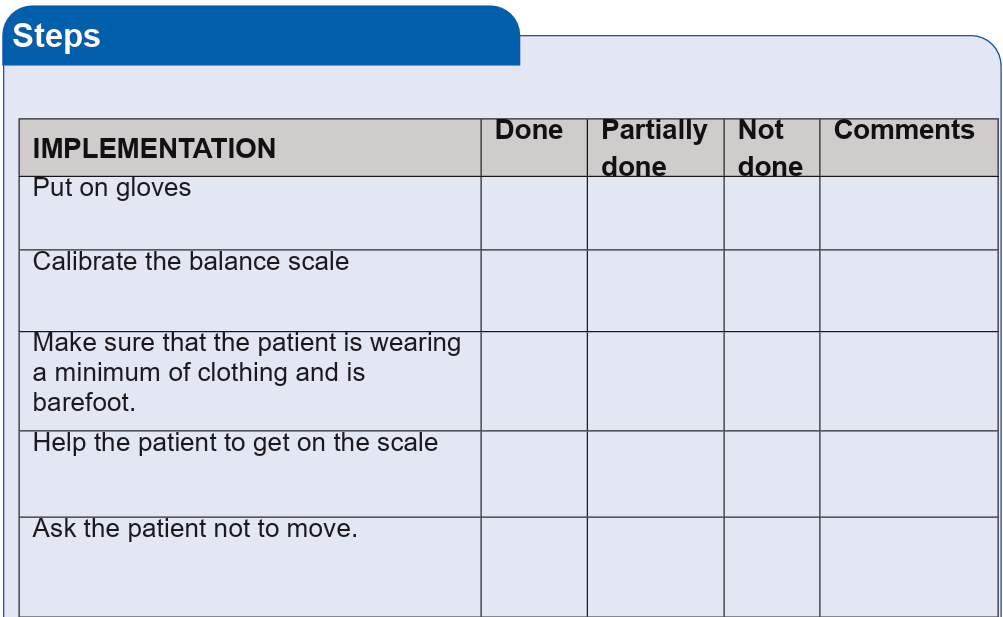
2.4.17.Technique: Weight Measurement
AIMS
• To assess overall of health
Learning outcomes:
• Take correctly the height
• Record the results and interpret them.
• Communicate results
ASSOCIATE NURSE STUDENT / PREPARATION
• Should appear professional (in full and clean uniform) with student ID Card
• Hair tied back
• Remove watch, jewelries, and Rings
• Wear closed shoes
• Hand washing
PATIENT PREPARATION
• Identification of the patient
• Self-presentation to the patient
• Physical and psychological patient preparation
• Assess levels of comprehension and collaboration of the patient
• Position the patient in a comfortable position
EQUIPMENTS
• Appropriate and functional Balance
• Pen, weight recording flow sheet• Gloves
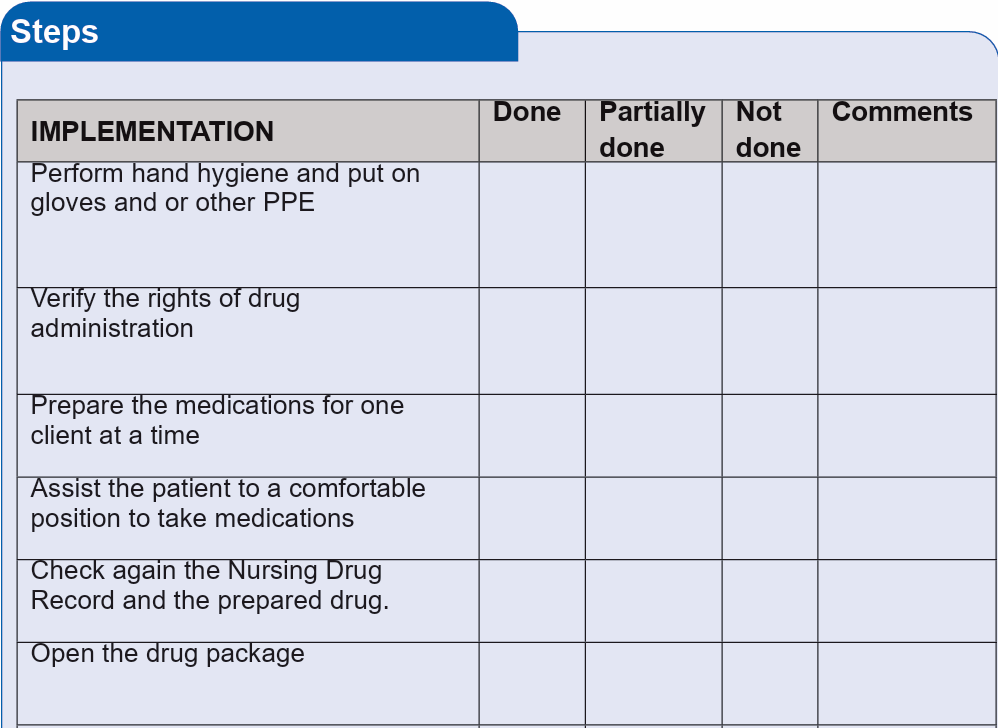
2.15.Procedure: Drug Administration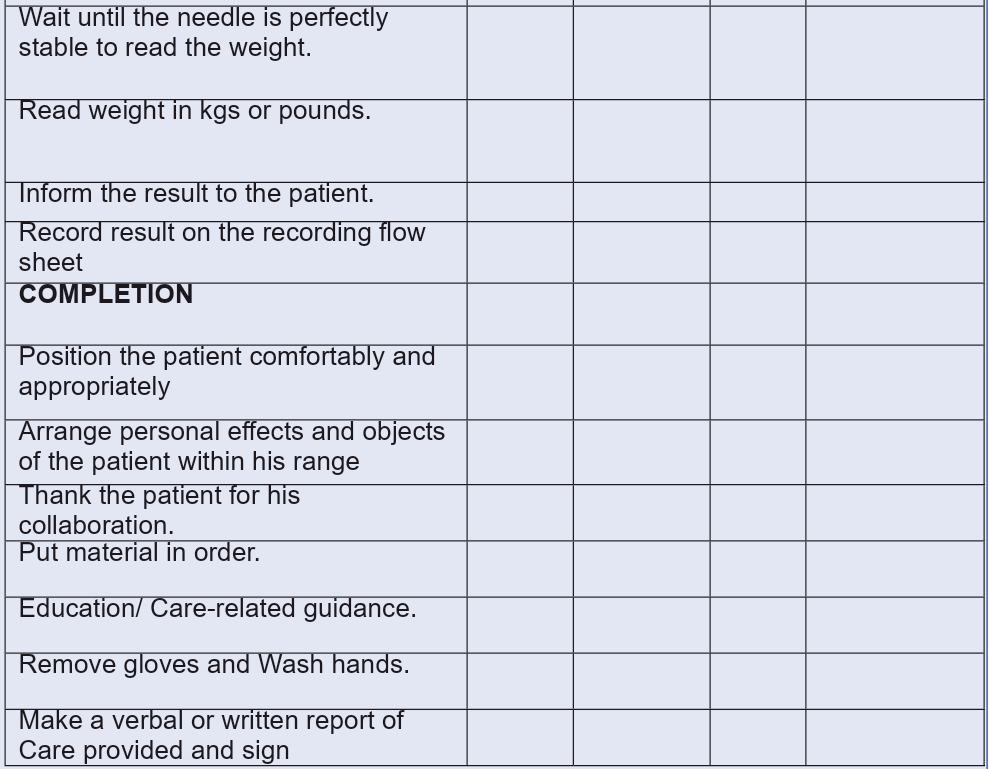
2.15.1.Enteral Routes Of Drug Administration
2.15.1.1.Technique: oral drug administration.
AIMS
• To take supplement in order to maintain health,
• To administer medication indicated for oral route
• To administer specific medication for local action
ASSOCIATE NURSE STUDENT / PREPARATION
• Should appear professional (in full and clean uniform) with ID Card
• Hair tied back
• Remove watch, jewels, and Rings
• Wear closed shoes
• Hand washing
PATIENT PREPARATION
• Identification of the patient
• Review patient’s note and prescription
• Self-presentation to the patient
• Physical and psychological patient preparation
• Assess levels of comprehension and collaboration of the patient
• Adjust the environment of the patient as necessary.
• Explain the procedure and purpose to the patient
• Check for any drug allergies
• Cleanliness or condition of the bed and surrounding environment
EQUIPMENTS
• Tray
• kidney tray for waste
• Clean gloves
• Drinking water in a jug
• Medication administration record
• Medication cup
• Drug prescription• Tablet cutter if needed

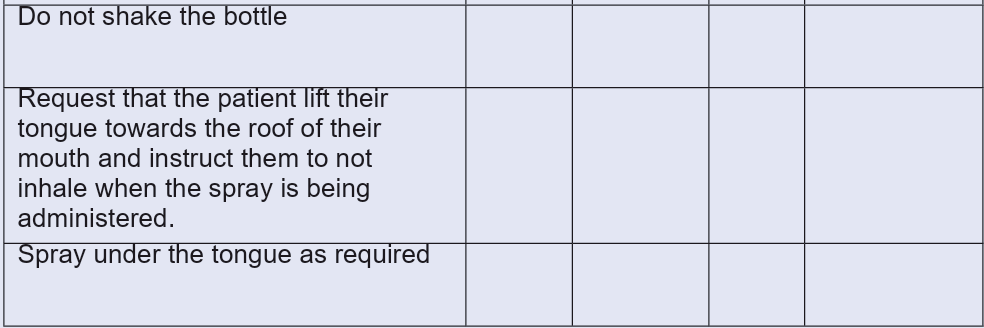
2.15.1.2.Technique: Sublingual Drug Adminisatration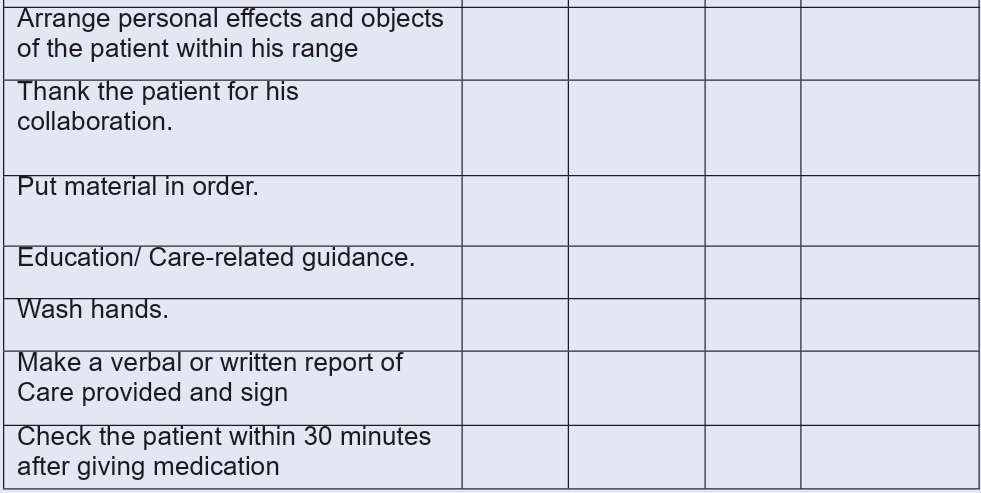
AIMS
• To ensure a consistent standardized practice for administering medications
sublingually
• To provide the substances that diffuse into the blood through tissues under
the tongue which is predominantly a mucous gland that produces a thick
mucinous fluid and lubricates the oral cavity.
ASSOCIATE NURSE STUDENT / PREPARATION
• Should appear professional (in full and clean uniform) with ID Card
• Hair tied back
• Remove watch, jewels, and Rings
• Wear closed shoes
• Hand washing
PATIENT PREPARATION
• Identification of the patient
• Review patient’s note and prescription
• Self-presentation to the patient
• Physical and psychological patient preparation
• Assess levels of comprehension and collaboration of the patient
• Adjust the environment of the patient as necessary.
• Explain the procedure and purpose to the patient
• Check for any drug allergies
• Cleanliness or condition of the bed and surrounding environment
EQUIPMENTS• Medication,
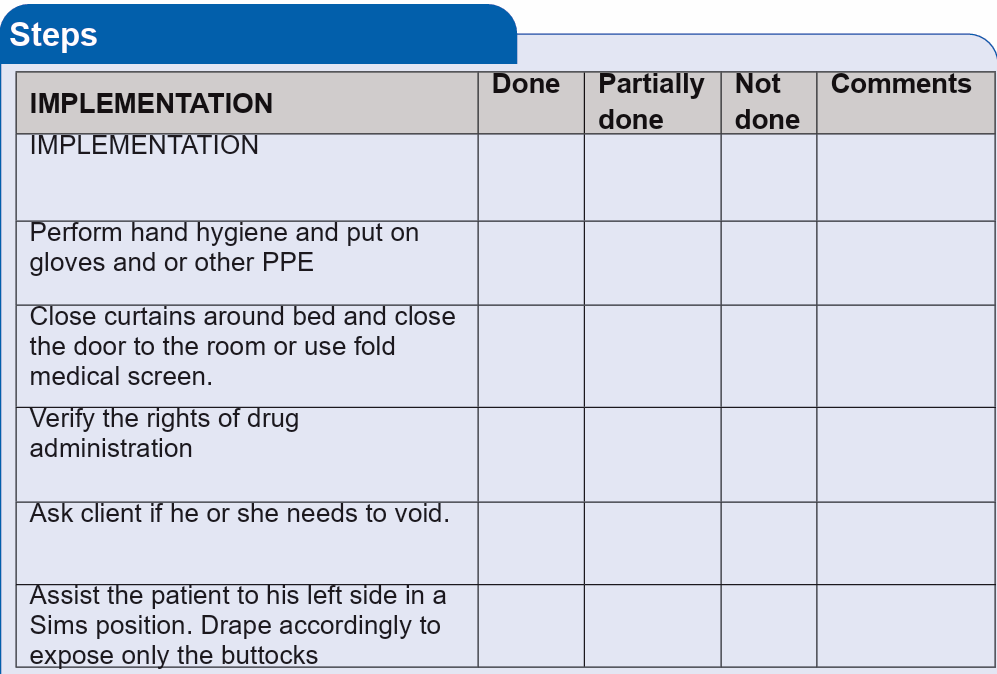
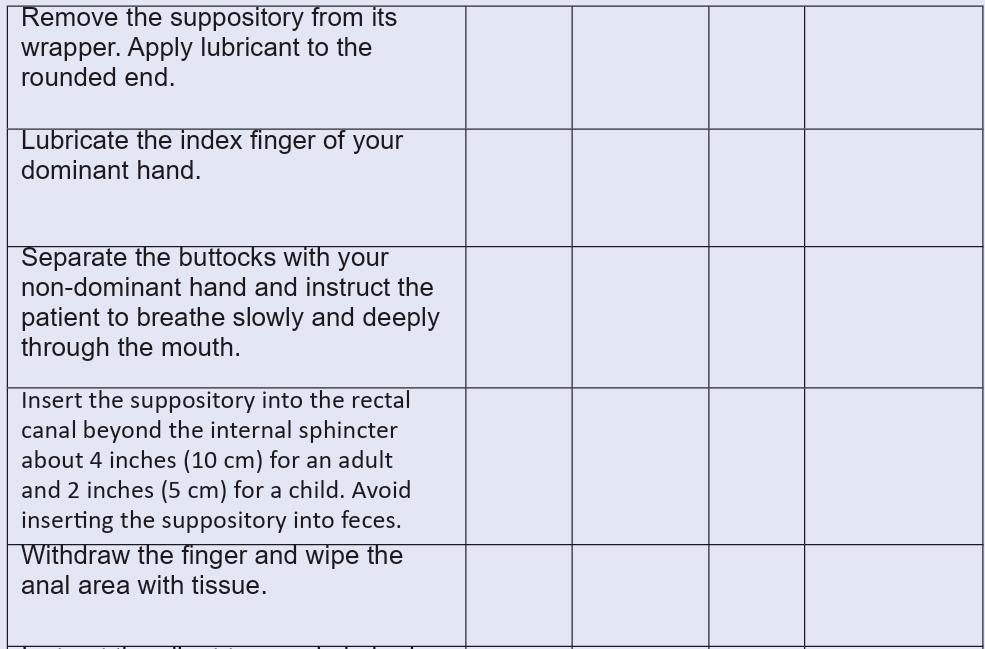
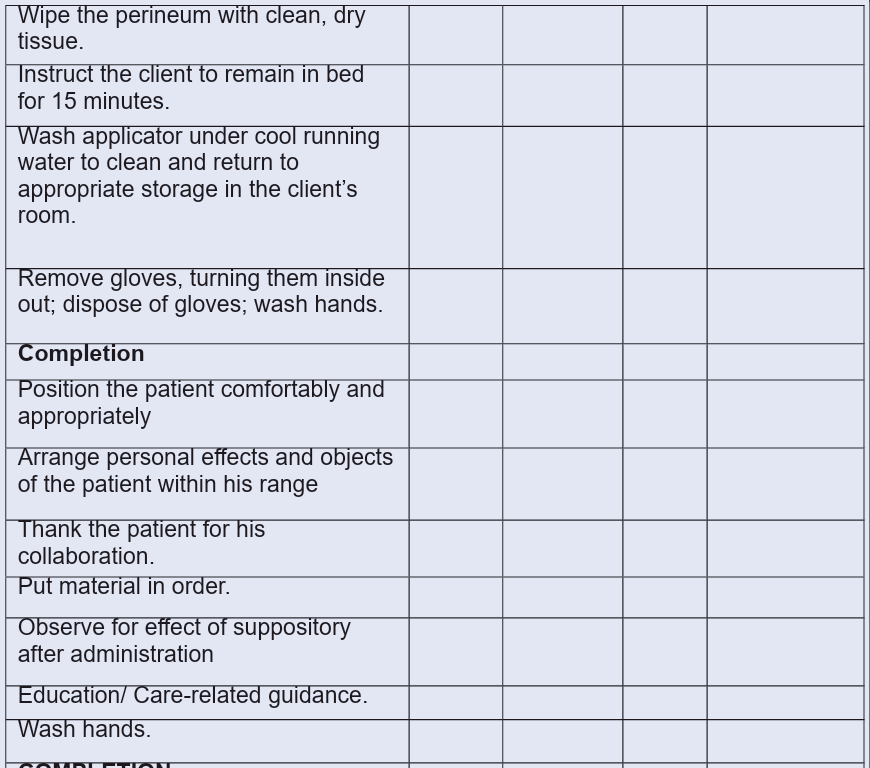
2.15.1.3.Technique: Rectal Suppository Drug Administration
AIMS
• To administer some inflammatory drugs,
• To administer some antipyretic,
• To soften stools in case of constipation
• To treat hemorrhoid
ASSOCIATE NURSE STUDENT / PREPARATION
• Should appear professional (in full and clean uniform) with ID Card
• Hair tied back
• Remove watch, jewels, and Rings
• Wear closed shoes
• Hand washing
PATIENT PREPARATION
• Identification of the patient
• Review patient’s note and prescription
• Self-presentation to the patient
• Physical and psychological patient preparation
• Assess levels of comprehension and collaboration of the patient
• Adjust the environment of the patient as necessary.
• Explain the procedure and purpose to the patient
• Check for any drug allergies
• Cleanliness or condition of the bed and surrounding environment
EQUIPMENTS
• Medication administration record,
• Nonsterile gloves
• swabs,
• Bed pan
• Prescribed rectal suppository,• Water-soluble lubricant
3.10.2. Parenteral Route Of Drugs Administration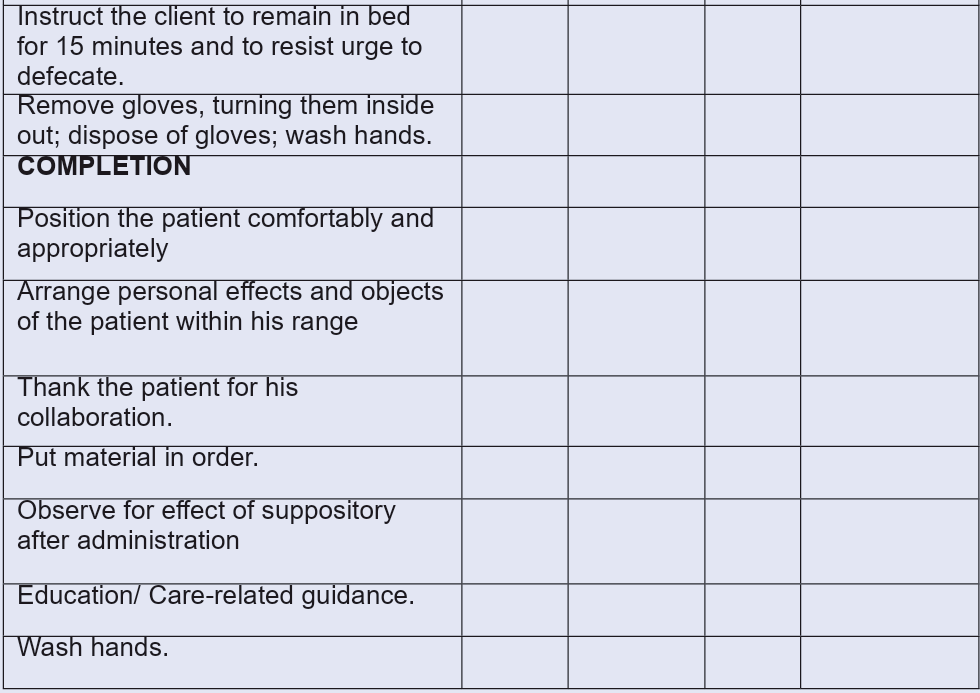
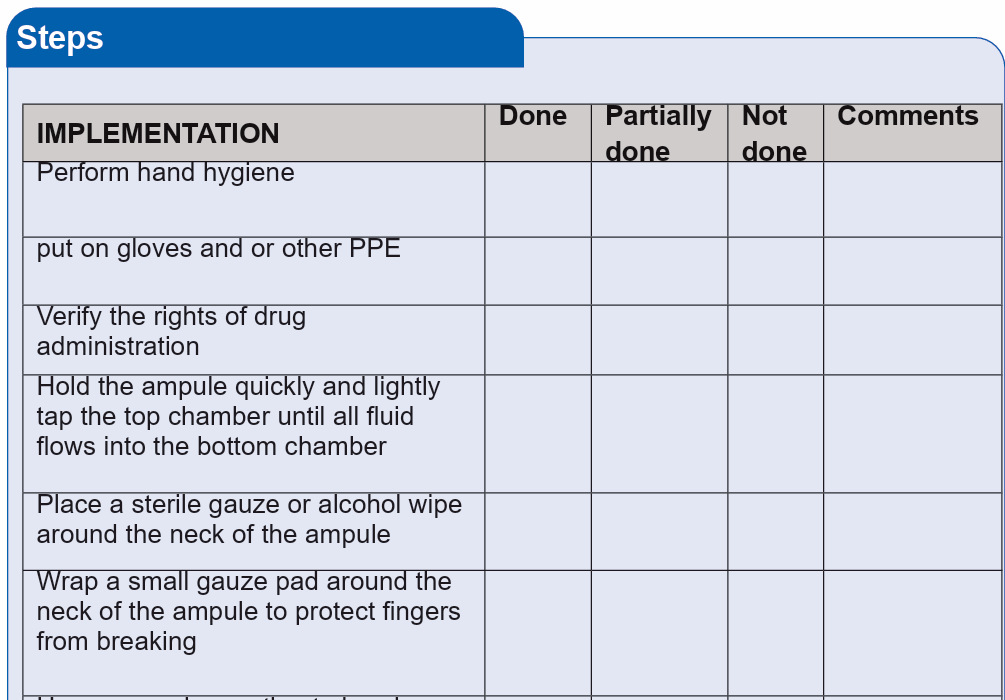
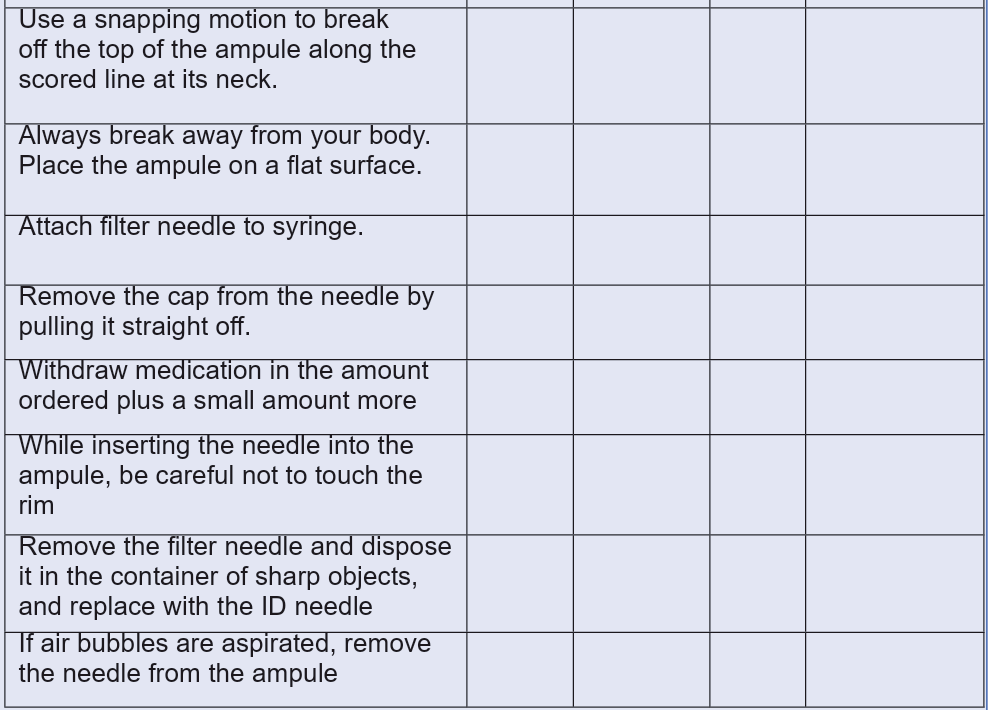
3.10.2.1. Technique: Withdrawing Medication From An Ampoule
AIMS
• To prepare medication before administration.
Leaning outcome
• The student will be able to withdrow the drug from ampoule
• The student will be able to hold and manipulate the serynge
ASSOCIATE NURSE STUDENT / PREPARATION
• Should appear professional (in full and clean uniform) with ID Card
• Hair tied back
• Remove watch, jewels, and Rings
• Wear closed shoes
• Hand washing
Materials
• Medication administration record,
• Sterile syringe and needle,• Second needle,
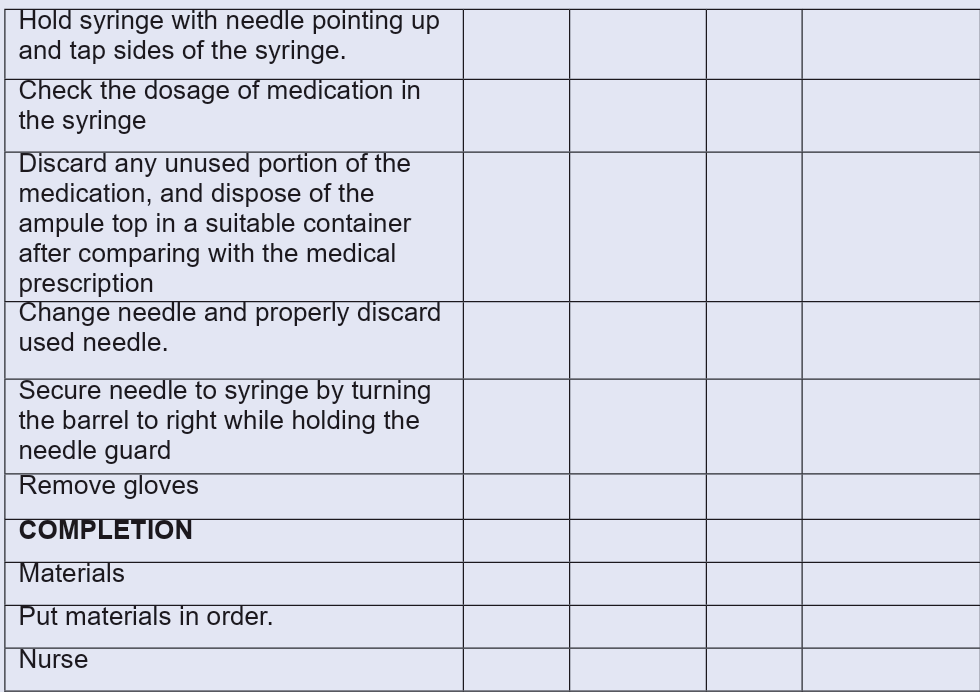
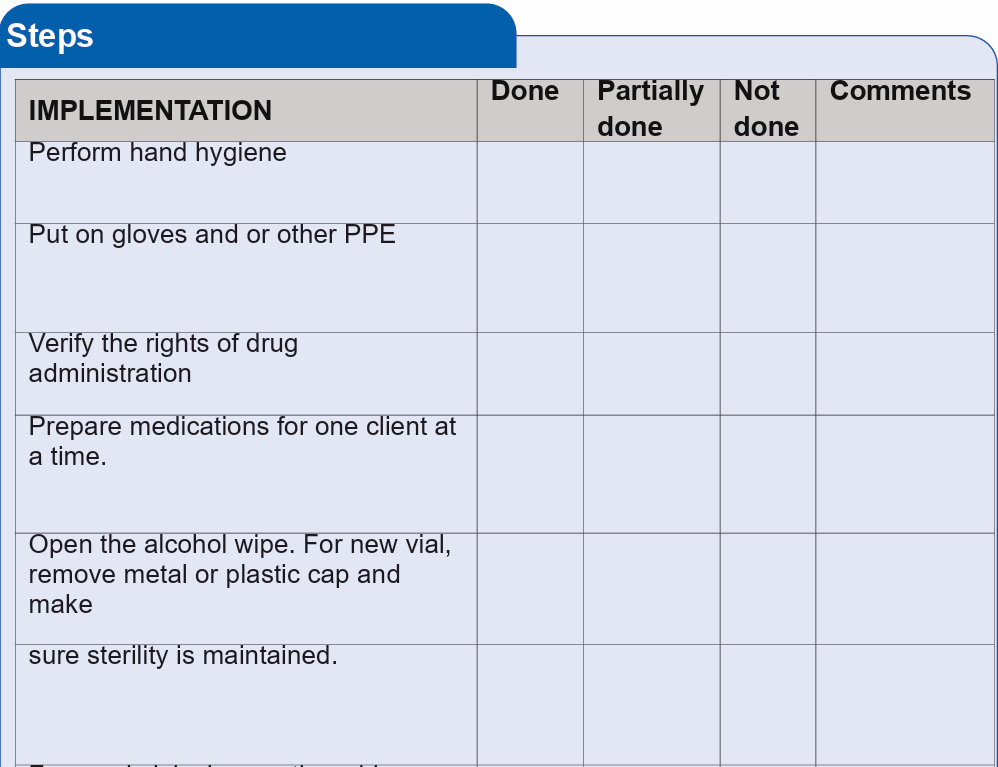
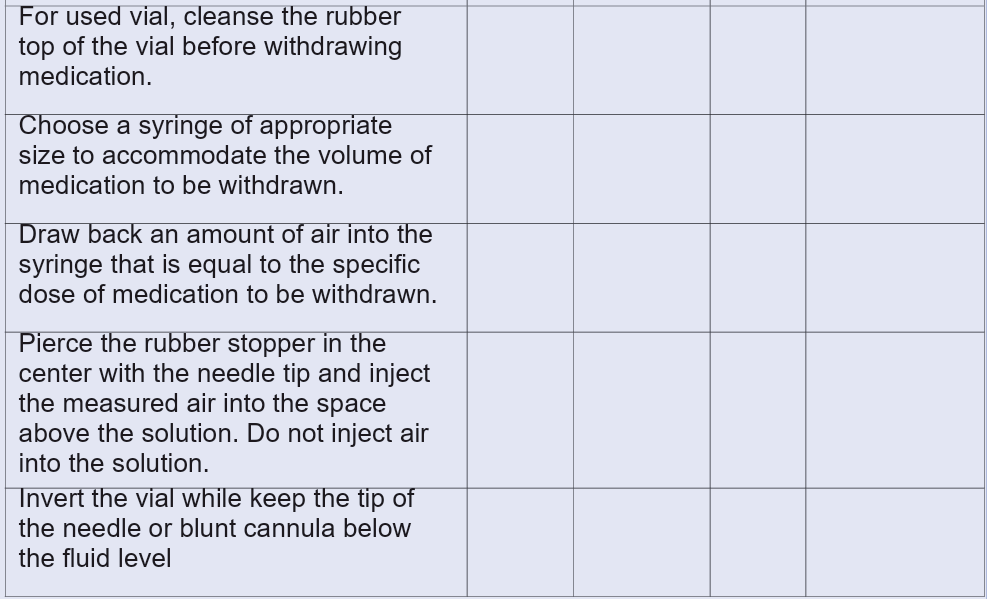
3.10.2.2. Technique : Withdrawing Medication From An Vial
AIMS
Leaning outcome
• To prepare medication before administration.
• The student will be able to withdraw the drug from ampoule
• The student will be able to hold and manipulate the syringe
STUDENT / NURSE PREPARATION
• Should appear professional (in full and clean uniform) with ID Card
• Hair tied back
• Remove watch, jewels, and Rings
• Wear closed shoes
• Hand washing
Materials
• Medication administration record,
• Sterile syringe and needle,
• Second needle,
• Alcohol swab,
• Sterile gauze,
• Ampoule of prescribed medication,
• Ampoule cutter if available,
• Kidney dish
• Container for discards,
• Nonsterile gloves,• Safety box for sharp instrument.

3.10.2.3. Technique: Intramuscular (Im) Injection
AIMS
• To Apply medication through the muscles
• To promote rapid drug absorption
• To provide an alternate route of parenteral drug administration
Leaning outcome
• To find suitable sites for administering intramuscular injections;
• To prepare materials for administering intramuscular injections in adults
and pediatrics patients;
• To apply the aseptic method during procedures;
• To explain the importance of intramuscular injections;• To assess the risks of potential complications of intramuscular injections.
ASSOCIATE NURSE STUDENT / PREPARATION
• Hair tied back
• Should appear professional (in full and clean uniform) with ID Card
• Remove watch, jewels, and Rings
• Wear closed shoes
• Hand washing
PATIENT PREPARATION
• Identification of the patient and ask consent
• Self-presentation to the patient
• Physical and psychological patient preparation
• Assess levels of comprehension and collaboration of the patient
• Adjust the environment of the patient as necessary.
• Cleanliness or condition of the bed and surrounding environment
EQUIPMENTS
• Sterile syringes and needles
• Alcohol-based antiseptic solution
• Drug,
• Protective Gloves
• Medication chart
• Dry cotton swab
• Safety box
• Disposable gloves
• Dustbin
• Trolley• Trolley or tray (Plate).


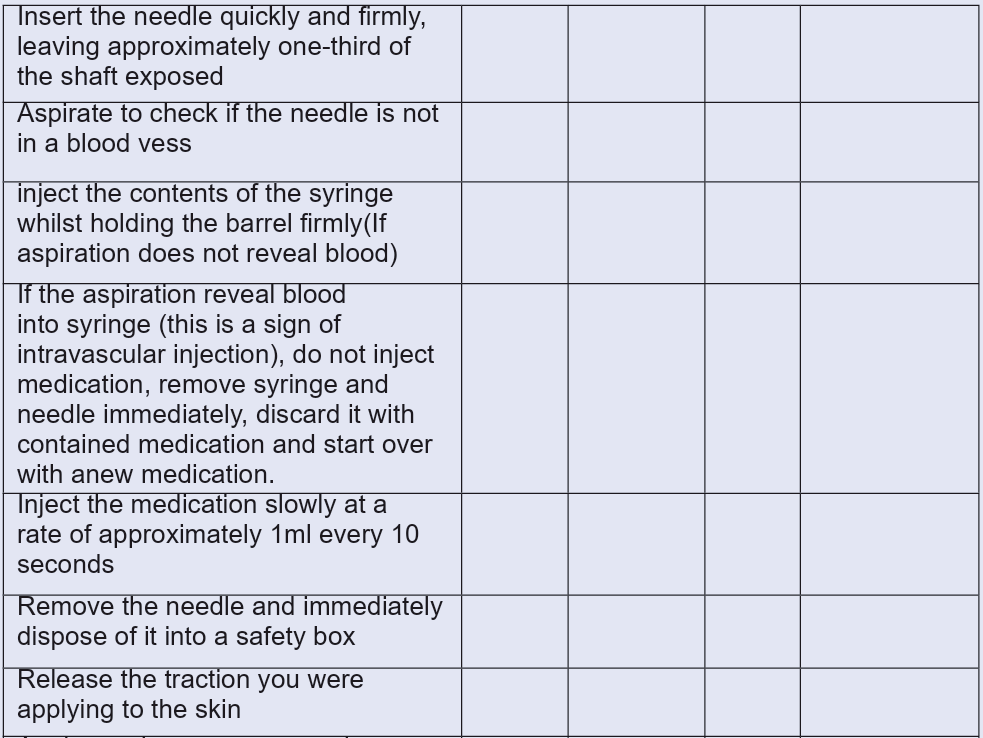
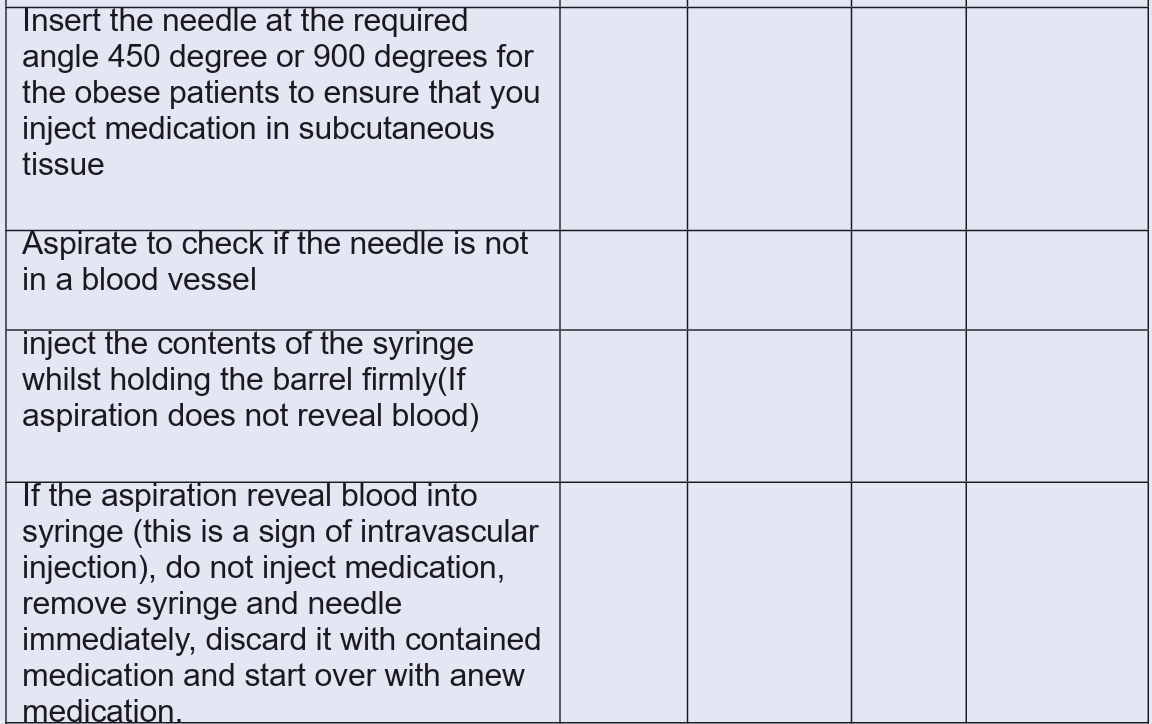
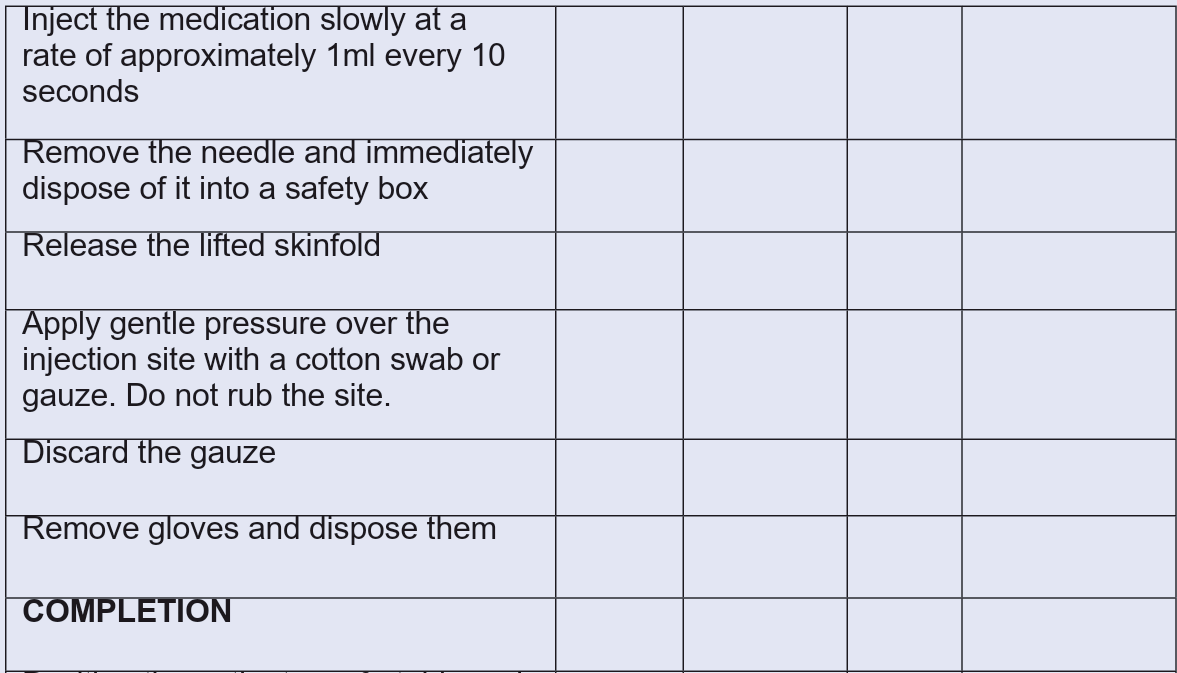
3.10.2.4. Technique: Subcutaneous Injection
AIMS
• To Apply medication under the skin
• To promote rapid drug absorption
• To provide an alternate route of parenteral drug administration
Leaning outcome
• To find suitable sites for administering subcutaneous injections;
• To prepare materials for administering subcutaneous injections
• To explain the importance of subcutaneous injections;• To assess the risks of potential complications of subcutaneous injections.
ASSOCIATE NURSE STUDENT / PREPARATION
• Should appear professional (in full and clean uniform) with student ID Card
• Hair tied back
• Remove watch, jewelries, and Rings
• Wear closed and short shoes
• Wash hand
PATIENT PREPARATION
• Identification of the patient and ask consent
• Self-presentation to the patient
• Physical and psychological patient preparation
• Assess levels of comprehension and collaboration of the patient
• Adjust the environment of the patient as necessary.
• Cleanliness or condition of the bed and surrounding environment
EQUIPMENTS
• Sterile syringes and needles
• Drug,
• Alcohol-based antiseptic solution
• Protective Gloves
• Medication chart
• Dry cotton swab
• Safety box
• Disposable gloves
• Dustbin
• Trolley• Trolley or tray (Plate).


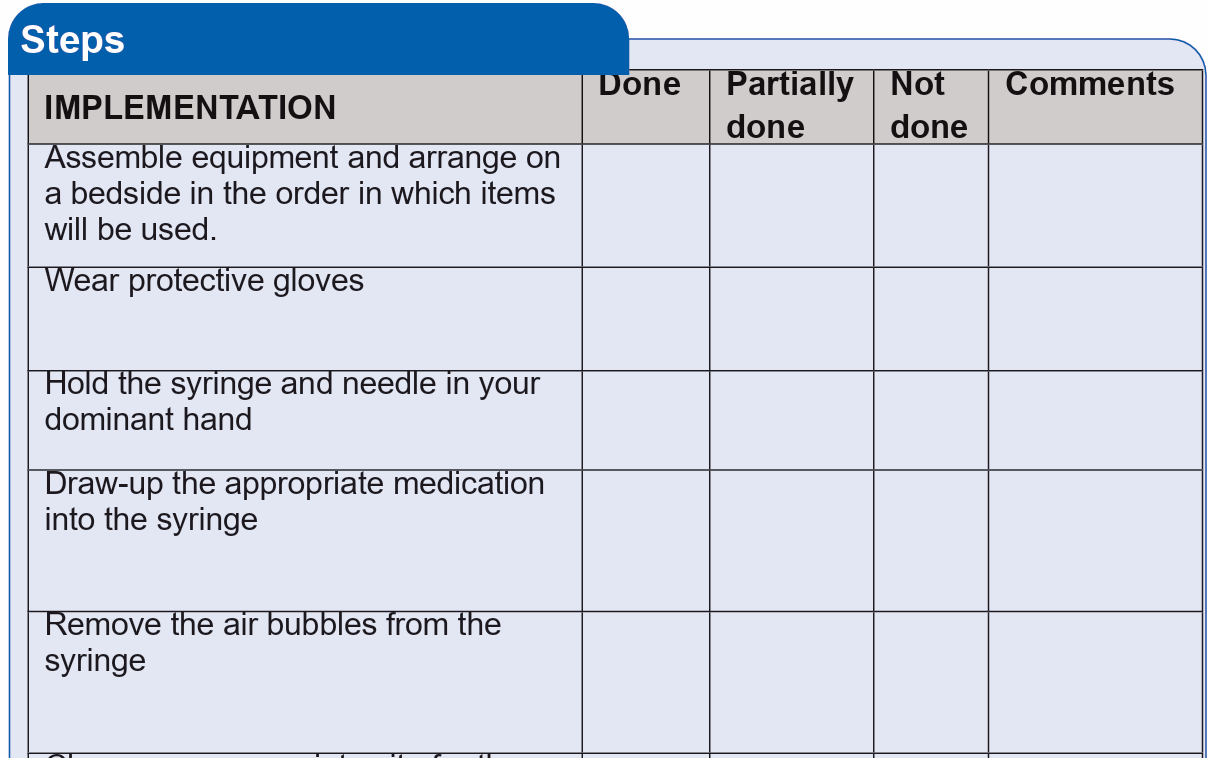
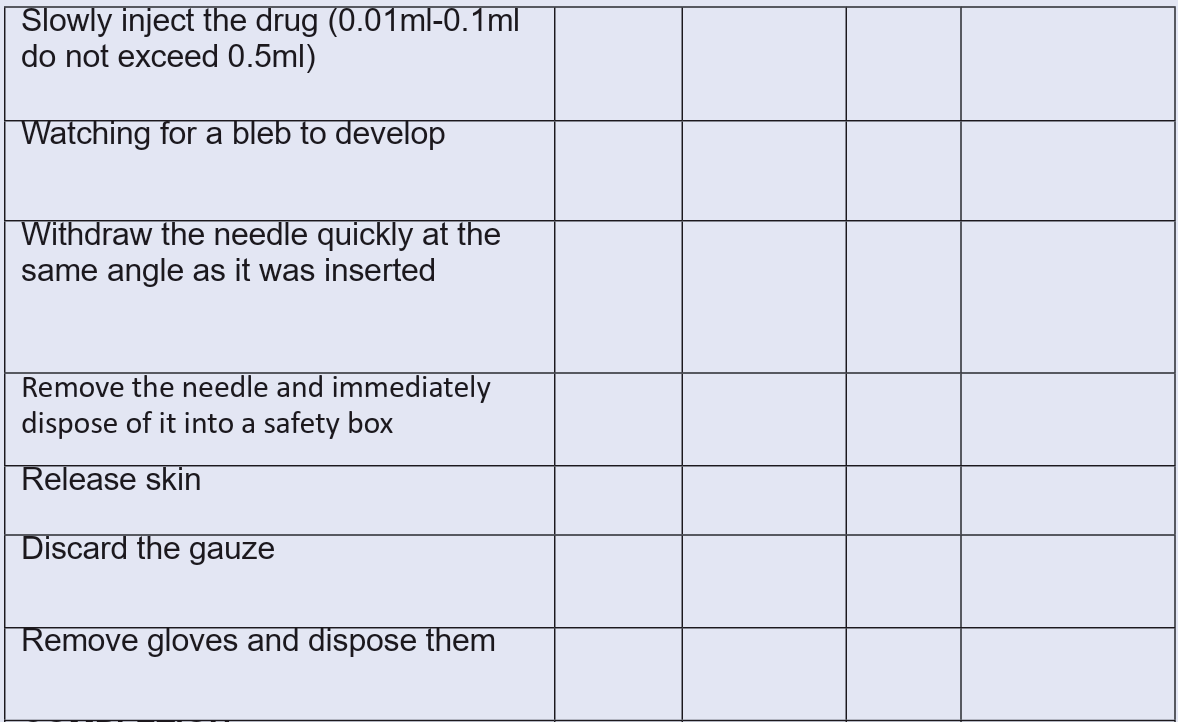
3.10.2.5. Technique: Intradermal (Id) Injection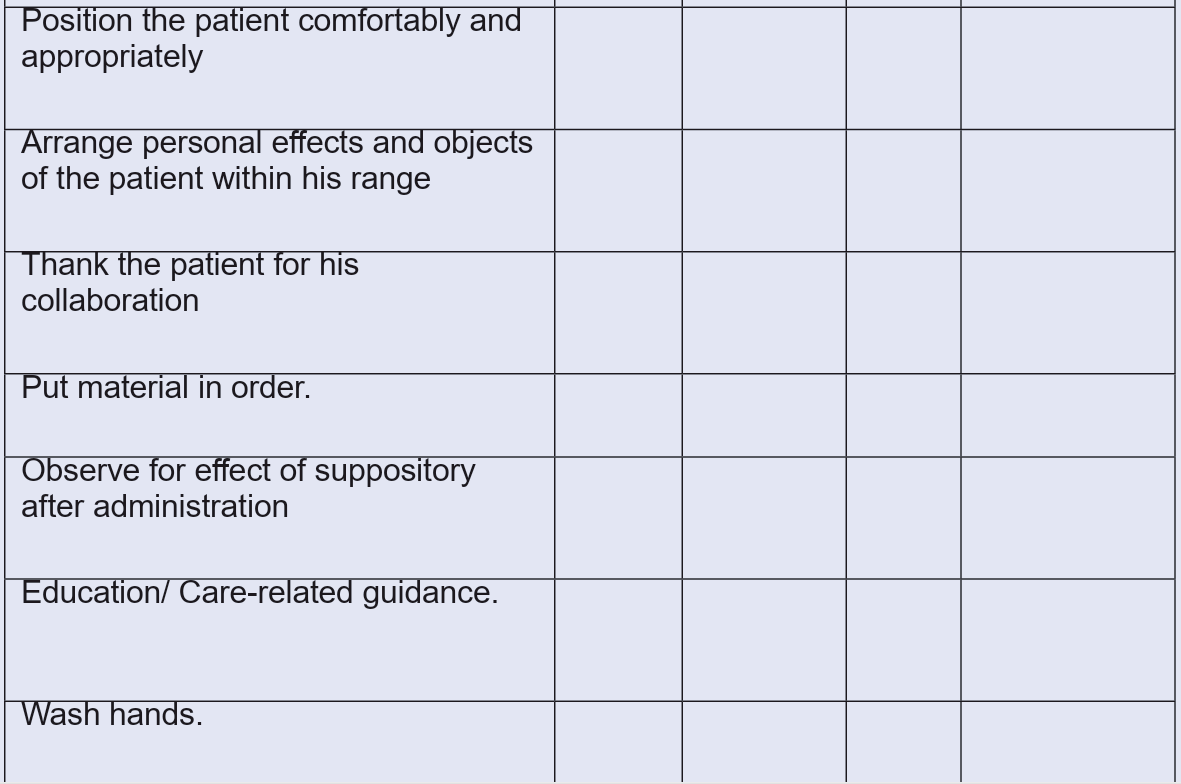
AIMS
• To Apply medication under the skin
• To promote rapid drug absorption
• To provide an alternate route of parenteral drug administration
Leaning outcome
• To find suitable sites for administering subcutaneous injections;
• To prepare materials for administering subcutaneous injections
• To explain the importance of subcutaneous injections;
• To assess the risks of potential complications of subcutaneous injections.
ASSOCIATE NURSE STUDENT / PREPARATION
• Should appear professional (in full and clean uniform) with student ID Card
• Hair tied back
• Remove watch, jewelries, and Rings
• Wear closed and short shoes
• Wash hand
PATIENT PREPARATION
• Identification of the patient and ask consent
• Self-presentation to the patient
• Physical and psychological patient preparation
• Assess levels of comprehension and collaboration of the patient
• Adjust the environment of the patient as necessary.
• Cleanliness or condition of the bed and surrounding environment
EQUIPMENTS
• Sterile syringes and needles
• Drug,
• Alcohol-based antiseptic solution
• Protective Gloves
• Medication chart
• Dry cotton swab
• Safety box
• Disposable gloves
• Dustbin
• Trolley• Trolley or tray (Plate).


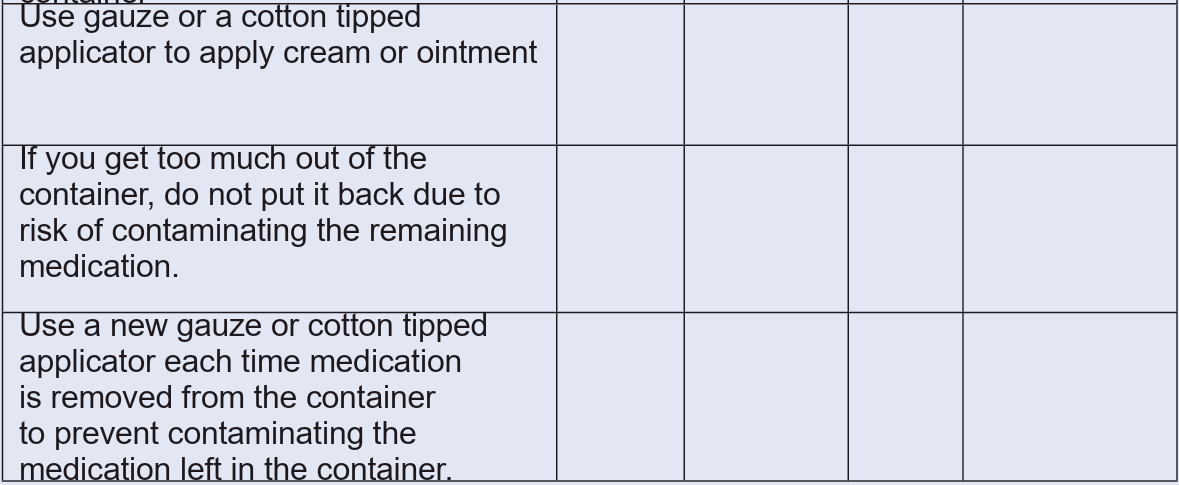
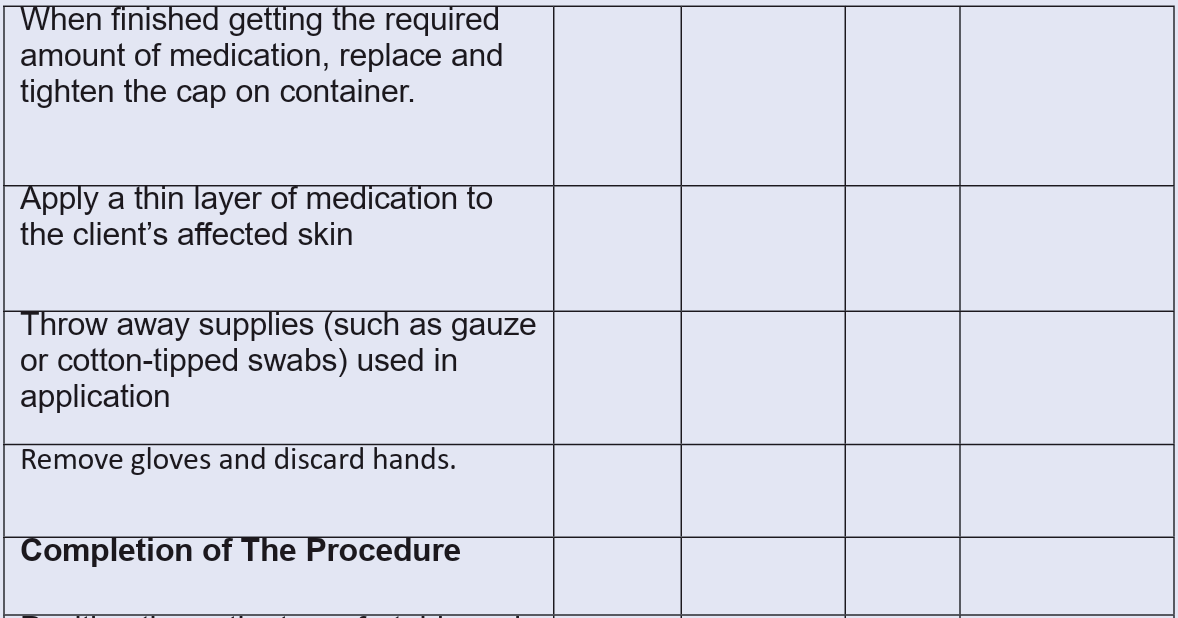
3.10.3. Procedure: Topical Application
3.10.3.1. Technique: Topical Skin Application
AIMS
• To Apply medication through the skin.
• To produce local effects, some topical preparations have systemic effects,
absorbed through the skin and mucous membrane
• To provide the continuous absorption of medication over several hours.
Leaning outcome
• Explain the principles of applying drugs to the skin ;
• •Apply the medication to the skin
ASSOCIATE NURSE STUDENT / PREPARATION
• Should appear professional (in full and clean uniform) with student ID Card
• Hair tied back
• Remove watch, jewelries, and Rings
• Wear closed and short shoes
• Wash hand
PATIENT PREPARATION
• Identification of the patient and ask consent
• Self-presentation to the patient
• Physical and psychological patient preparation
• Assess levels of comprehension and collaboration of the patient
• Adjust the environment of the patient as necessary.
• Cleanliness or condition of the bed and surrounding environment
EQUIPMENTS
• Tray
• Gauzes
• Clean gloves• Topical medication

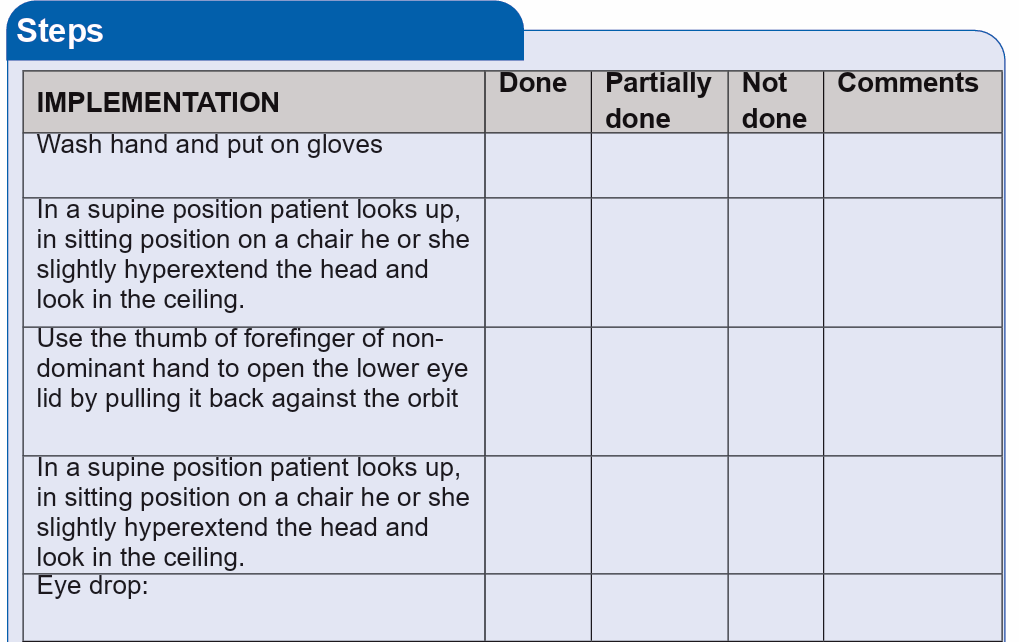
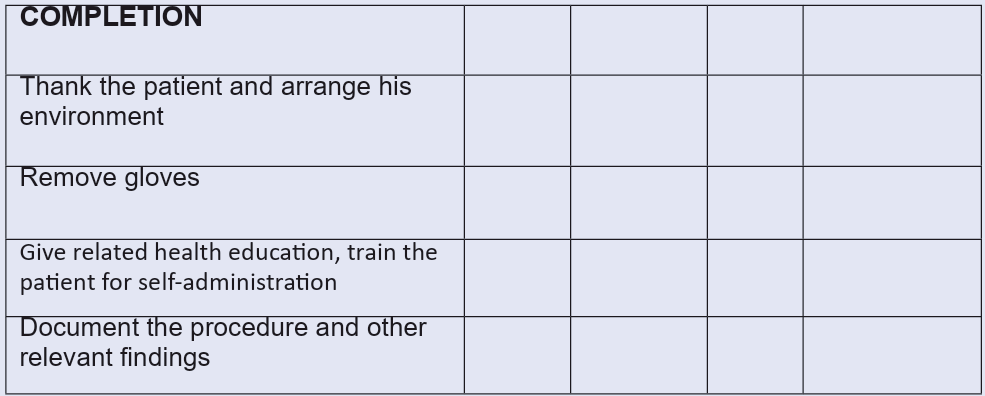
3.10.3.2. Technique: Eye Medication Administration
AIMS
• To administer medication indicated for eye route
• To test for medication allergy
ASSOCIATE NURSE STUDENT / PREPARATION
• The nurse introduces to the patient, explain the purpose of that medication
and ask for consent
• Wash hands
• The student nurse prepares and assemble all the materials after disinfecting
the tray/ trolley
• Assess the information related to the drug such as mode of action,
purpose, route, time of onset and peak of action, side effects and nursing
implications
• Apply privacy
• Assess the condition of external eye and note changes
• Assess for allergy, level of consciousness and ability to follow command
• Assess the ability for self-administration
PATIENT PREPARATION
• Identification of the patient and identify patient’s names
• Self-presentation to the patient and ask for consent
• Physical and psychological patient preparation
• Assess levels of comprehension and collaboration of the patient
• Adjust the environment of the patient as necessary.
• Check drug : name of the drug, name of the patient, dose, method and
hour of administration, expiry date
• Explain the procedure and purpose to the patient
• Check for any drug allergies and ensure that there is no skin tenderness.
• Understand the therapeutic indications of the drug, mode of action and its
side effects.
• Cleanliness or condition of the bed and surrounding environment
EQUIPMENTS
• Eye medicine,
• Medication chart,
• Clean gloves,
• Swabs,
• Disinfectant,• Tray or trolley.

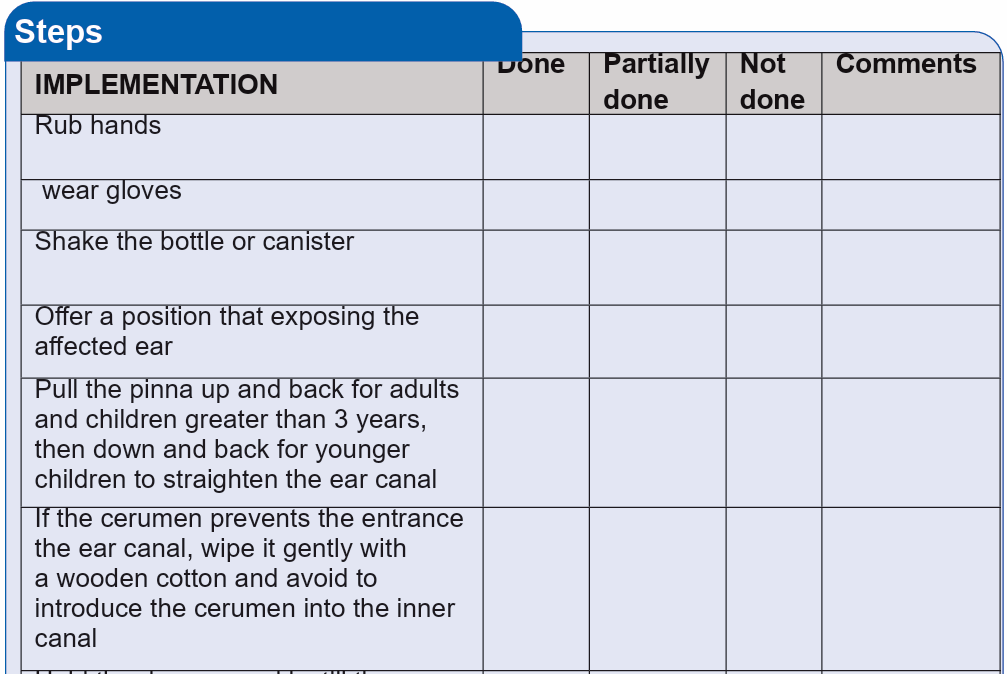
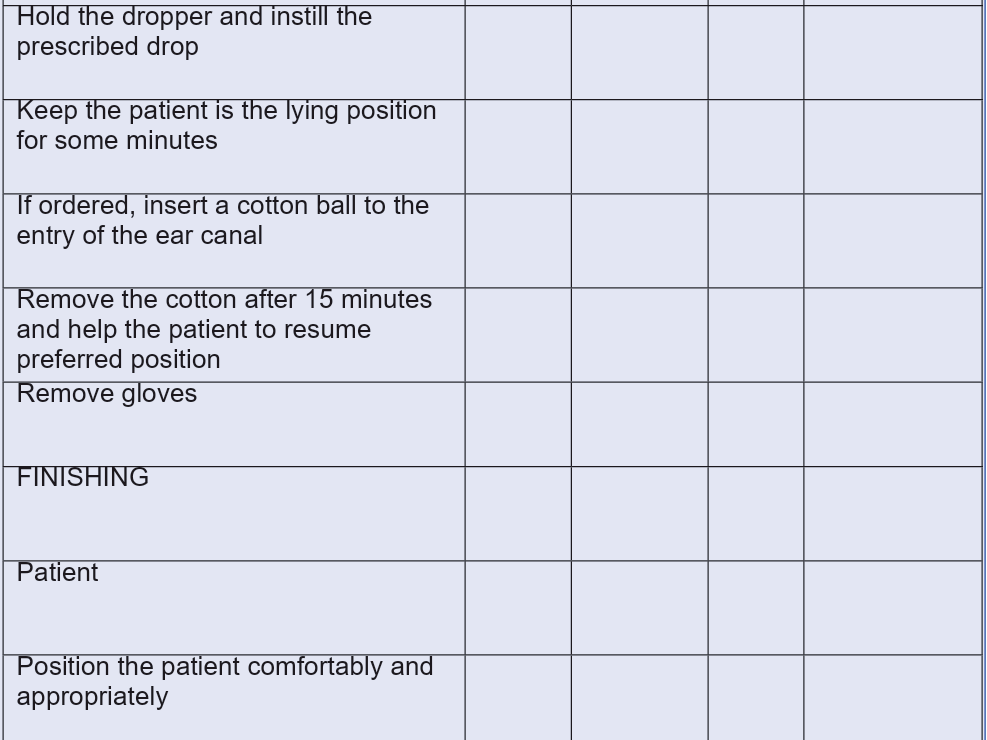
3.10.3.3. Technique: Ear Drug Administration
AIMS
• To take supplement in order to maintain health,
• To administer medication indicated for nasal route• To administer specific medication for local action
ASSOCIATE NURSE STUDENT / PREPARATION
• Should appear professional (in full and clean uniform) with Student’s ID
Card
• Hair tied back
• Remove watch, jewelries, and Rings
• Short cut nails
• Wear closed shoes
• Hand washing
PATIENT PREPARATION
• Identification of the patient
• Review patient’s note and prescription
• Self-presentation to the patient
• Physical and psychological patient preparation
• Assess levels of comprehension and collaboration of the patient
• Adjust the environment of the patient as necessary.
• Explain the patient the procedure regarding positioning and sensation to
expect such us burning or straining of mucosa or shocking sensation as
medication strikes into throat .
• Check for any drug allergies
• Cleanliness or condition of the bed and surrounding environment
EQUIPMENTS
• Right Medication
• Gloves
• Medication administration record
• Tray
• Drug prescription• Tissues

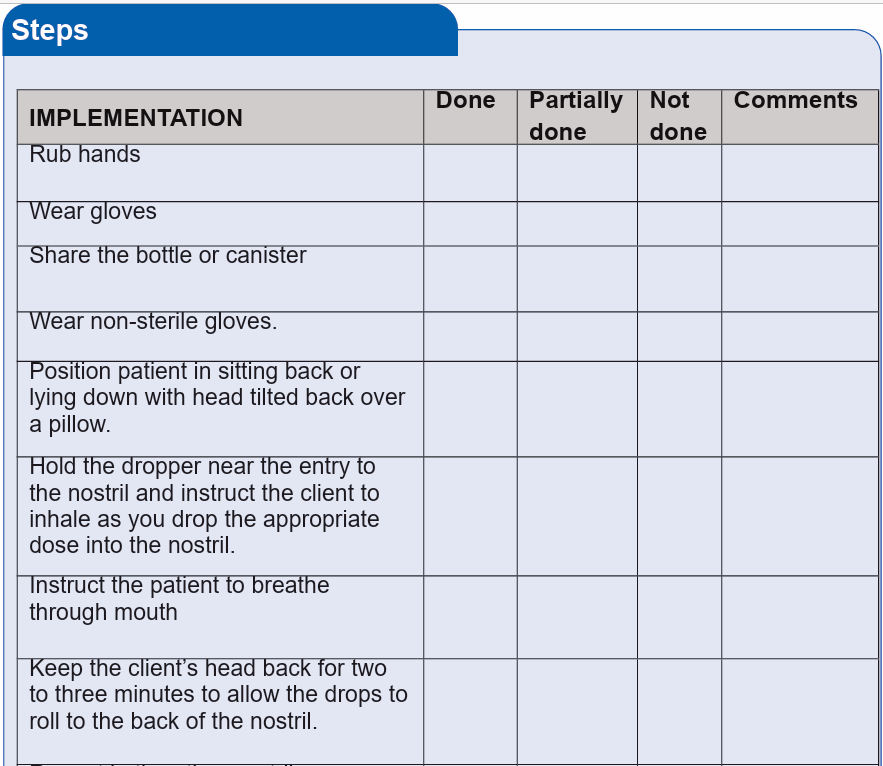
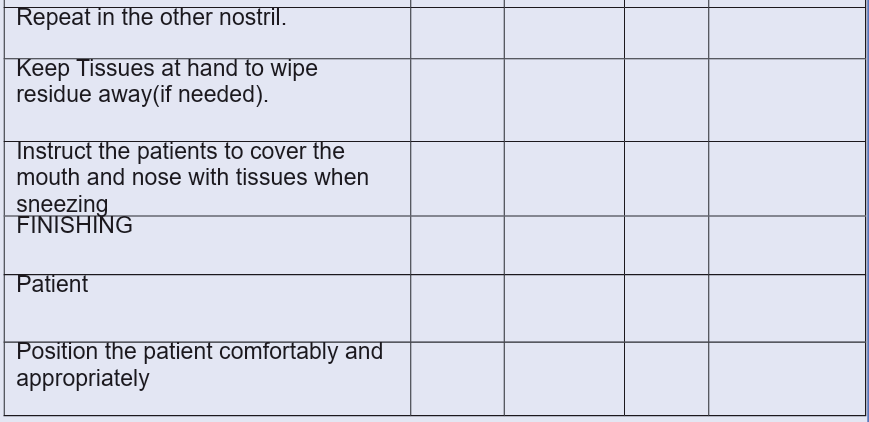
3.10.3.4. Technique: Nasal Drug Administration
AIMS
• To take supplement in order to maintain health,
• To administer medication indicated for nasal route
• To administer specific medication for local action
ASSOCIATE NURSE STUDENT / PREPARATION
• Should appear professional (in full and clean uniform) with Student’s ID
Card
• Hair tied back
• Remove watch, jewelries, and Rings
• Short cut nails
• Wear closed shoes
• Hand washing
PATIENT PREPARATION
• Identification of the patient
• Review patient’s note and prescription
• Self-presentation to the patient
• Physical and psychological patient preparation
• Assess levels of comprehension and collaboration of the patient
• Adjust the environment of the patient as necessary.
• Explain the patient the procedure regarding positioning and sensation to
expect such us burning or straining of mucosa or shocking sensation as
medication strikes into throat .
• Check for any drug allergies
• Cleanliness or condition of the bed and surrounding environment
EQUIPMENTS
• Right Medication
• Gloves
• Medication administration record
• Tray
• Drug prescription• Tissues
3.10.3.5. Technique: Vaginal Suppository Medical Administration
AIMS
• To treat certain conditions, such as yeast infections.
• To treat fungal infections and vaginal dryness.
• To administer some contraceptives method used as a form of birth control
• To provoke uterine muscle contraction
ASSOCIATE NURSE STUDENT / PREPARATION
• Hair tied back
• Should appear professional (in full and clean uniform) with Student’s ID
Card
• Remove watch, jewelries, and Rings
• Short cut nails
• Wear closed shoes
• Hand washing
PATIENT PREPARATION
• Identification of the patient
• Self-presentation to the patient and ask for consent
• Physical and psychological patient preparation
• Assess levels of comprehension and collaboration of the patient
• Adjust the environment of the patient as necessary.
• Explain the procedure and purpose to the patient
• Check for any drug allergies
• Cleanliness or condition of the bed and surrounding environment
EQUIPMENTS
• Medication administration record,
• Nonsterile gloves,
• Gauzes
• Prescribed vaginal suppository,
• Water-soluble lubricant,• Disposable applicator


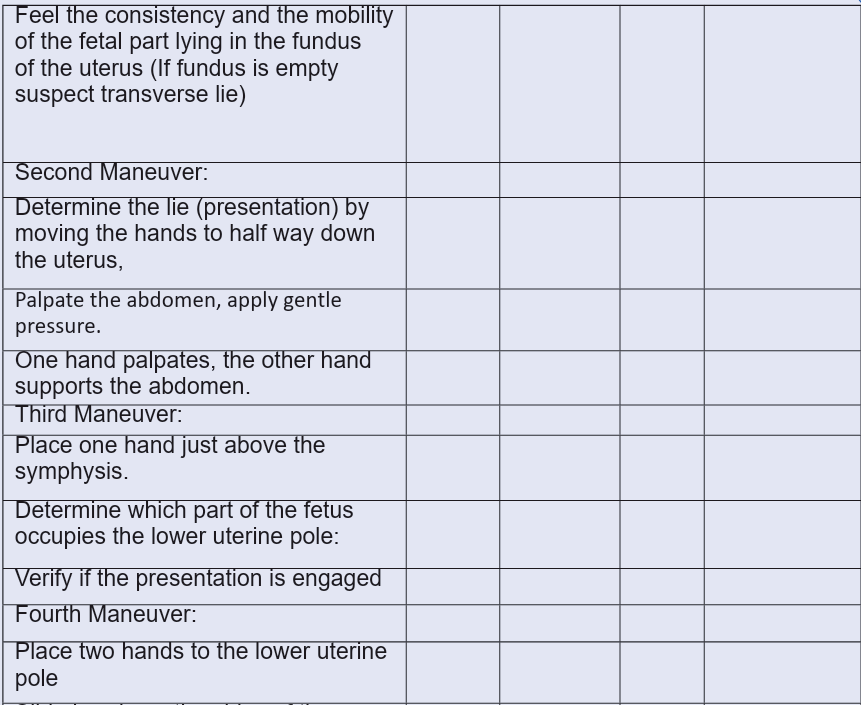
2.16.Technique: Leopord’s Manoeuver
AIMS
• To determine the fetal well being
• To confirm pregnancy
• To determine gestational age
• To determine presentation, lie, position and engagement of the presenting
part
ASSOCIATE NURSE STUDENT / PREPARATION
• Should appear professional (in full and clean uniform) with Student’s ID
Card
• Hair tied back
• Remove watch, jewelries, and Rings
• Wear closed shoes
• Clean and short nails
• Remove watch, jewelries, and Rings
• Wear closed shoes
• Wash Hands
PATIENT PREPARATION
• Identification of the patient
• Self-presentation to the patient
• Ask for the consent
• Physical and psychological patient preparation
• Assess levels of comprehension and collaboration of the patient
• Adjust the environment of the patient as necessary.
• Explain the procedure and purpose to the patient
• Ask the client to empty her bladder and explain why
• Check chart for limitations on patient’s physical activity.
• Check Cleanliness or condition of the bed and surrounding environment
• Position the patient in a comfortable position
EQUIPMENTS
• Tray
• Table of examination
• Tape measure
• ANC card and Client records
• Gloves (examination gloves)• Dust bin


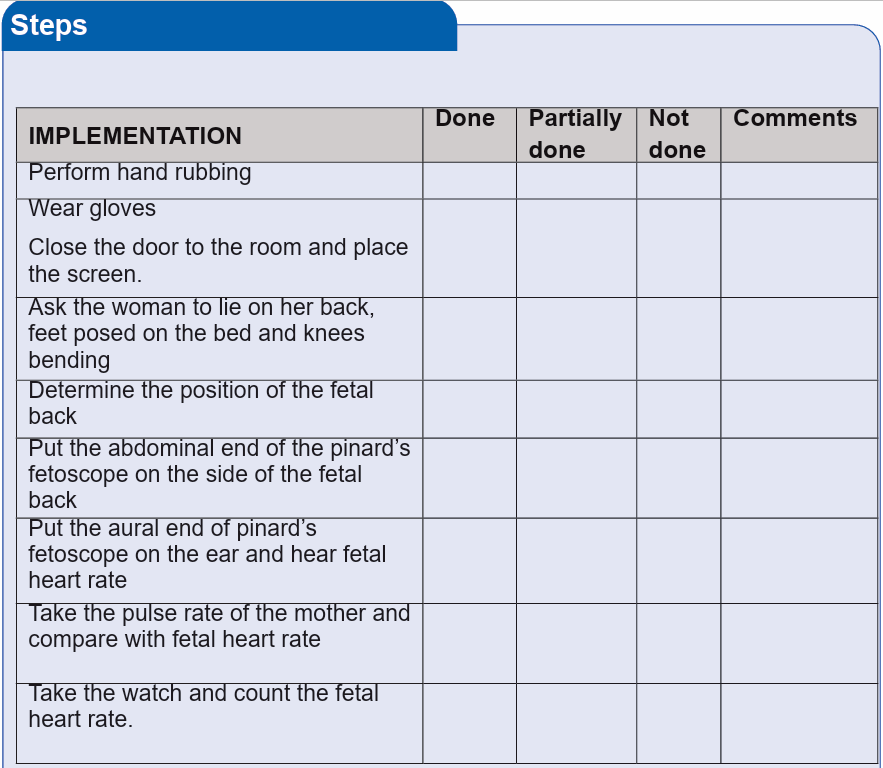
2.17.Technique: Auscultation Of Fetal Heart Rate
AIMS
• To listen and count fetal heart rate
• To differentiate Fetal heart rate rhythm from maternal pulse
ASSOCIATE NURSE STUDENT / PREPARATION
• Should appear professional (in full and clean uniform) with Student’s ID
Card
• Hair tied back
• Remove watch, jewelries, and Rings
• Wear closed shoes
• Clean and short nails
• Remove watch, jewelries, and Rings
• Wear closed shoes
• Wash Hands
PATIENT PREPARATION
• Identification of the patient
• Self-presentation to the patient
• Ask for the consent
• Physical and psychological patient preparation
• Assess levels of comprehension and collaboration of the patient
• Adjust the environment of the patient as necessary.
• Explain the procedure and purpose to the patient
• Ask the client to empty her bladder and explain why
• Check chart for limitations on patient’s physical activity.
• Check Cleanliness or condition of the bed and surrounding environment
• Position the patient in a comfortable position
EQUIPMENTS
• Tray
• Table of examination
• Pinard fetoscope
• ANC card and Client records
• Watch
• Gloves (examination gloves)• Dust bin
2.18.Technique: Vulval Disinfection
AIMS
• Reduces the risk of infection
ASSOCIATE NURSE STUDENT / PREPARATION
• Should appear professional (in full and clean uniform) with Student’s ID Card
• Hair tied back
• Remove watch, jewelries, and Rings
• Wear closed shoes
• Clean and short nails
• Remove watch, jewelries, and Rings
• Wear closed shoes
• Wash Hands
PATIENT PREPARATION
• dentification of the patient
• Self-presentation to the patient
• Ask for the consent
• Physical and psychological patient preparation
• Assess levels of comprehension and collaboration of the patient
• Adjust the environment of the patient as necessary.
• Explain the procedure and purpose to the patient
• Ask the client to empty her bladder and explain why
• Check chart for limitations on patient’s physical activity.
• Check Cleanliness or condition of the bed and surrounding environment
• Position the patient in a comfortable position
• Cleanliness or condition of the bed and surrounding environment
EQUIPMENTS
• Table of examination
• Client records
swabs and Kocher’s forceps)
• Non-irritant solution for disinfection
• Examination gloves
• Kocher’ s forceps
• Tray or trolley
• Set for disinfection (sterile packet containing a gall pot with minimum of 5
• Mackintosh and sterile drape
• Folding screen if no curtains available,
• Bucket with solution of decontamination• Dust bin
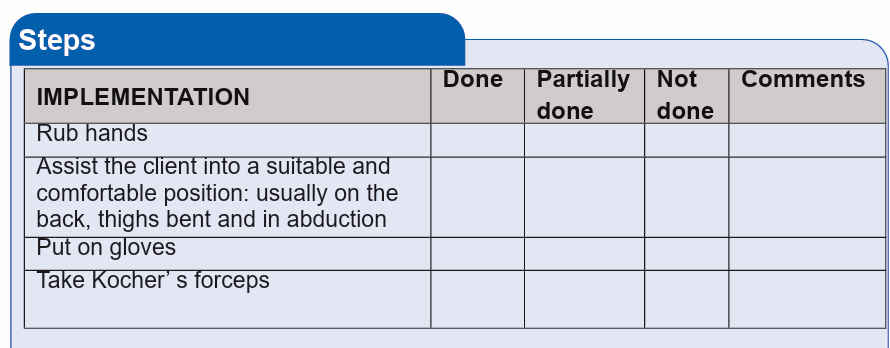
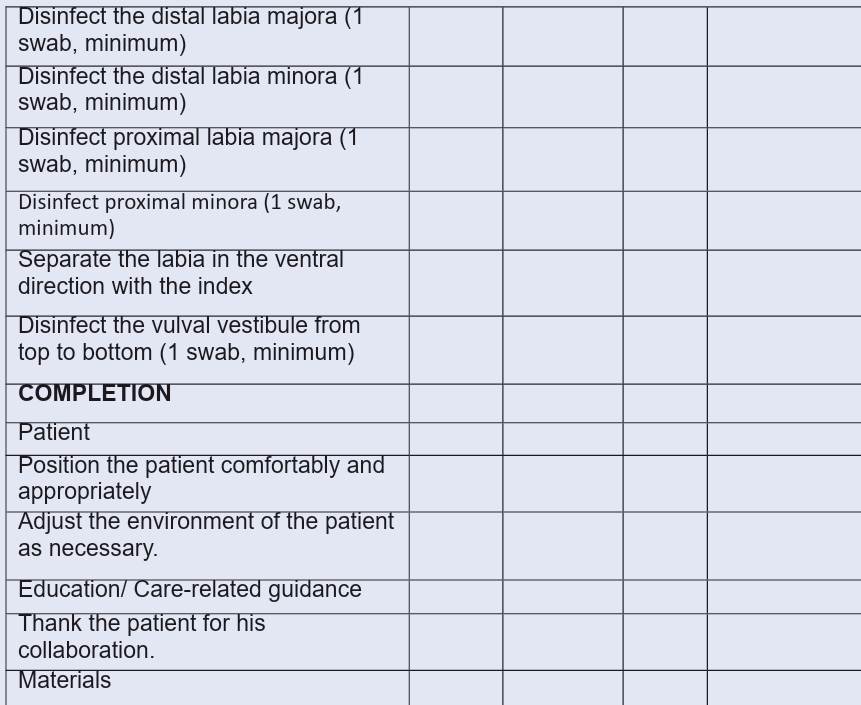
2.19.Technique: Digital Vaginal Examination
AIMS
• To assess the status of the cervix and membranes,
• To assess the position of head and degree of molding.
• To evaluate the bishop score(descent,effacement,dilation,consistence,
position).
• To detect the cephalopelvic disproportion.
• To identify complications as cordprolapse, Vasa previa
ASSOCIATE NURSE STUDENT / PREPARATION
• Should appear professional (in full and clean uniform) with Student’s ID
Card
• Hair tied back
• Remove watch, jewelries, and Rings
• Wear closed shoes
• Clean and short nails
• Remove watch, jewelries, and Rings
• Wear closed shoes
• Wash Hands
PATIENT PREPARATION
• Identification of the patient
• Self-presentation to the patient
• Ask for the consent
• Physical and psychological patient preparation
• Assess levels of comprehension and collaboration of the patient
• Adjust the environment of the patient as necessary.
• Explain the procedure and purpose to the patient
• Ask the client to empty her bladder and explain why
• Check chart for limitations on patient’s physical activity.
• Check Cleanliness or condition of the bed and surrounding environment
• Position the patient in a comfortable position
EQUIPMENTS
• Table of examination
• Client records
• Set for disinfection (sterile packet containing a gall pot with minimum of 5
swabs and Kocher’s forceps)
• Non-irritant solution for disinfection
• Examination gloves
• Kocher’ s forceps
• Tray or trolley
• Mackintosh and sterile drape
• Dust bin
• Folding screen if no curtains available,• Bucket with solution of decontamination
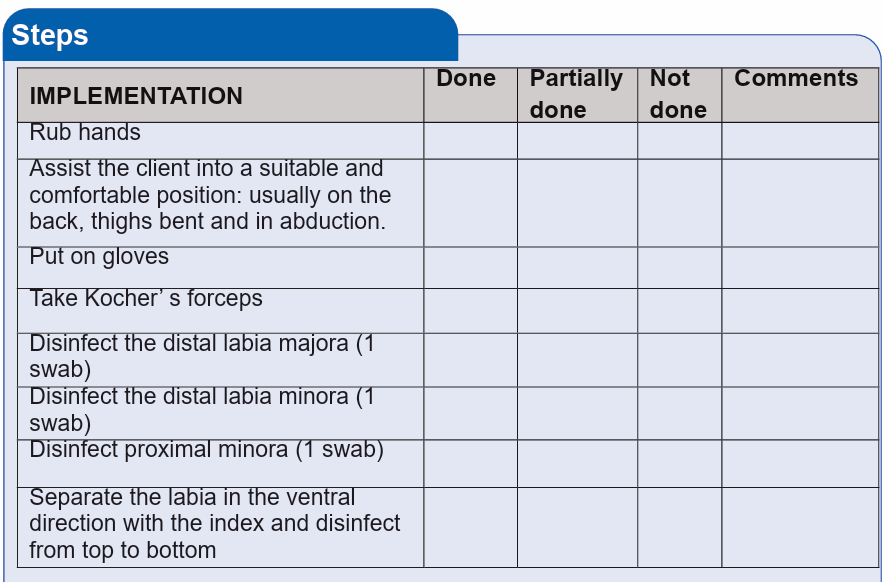
2.20.Technique: Spontaneous Vaginal Delivery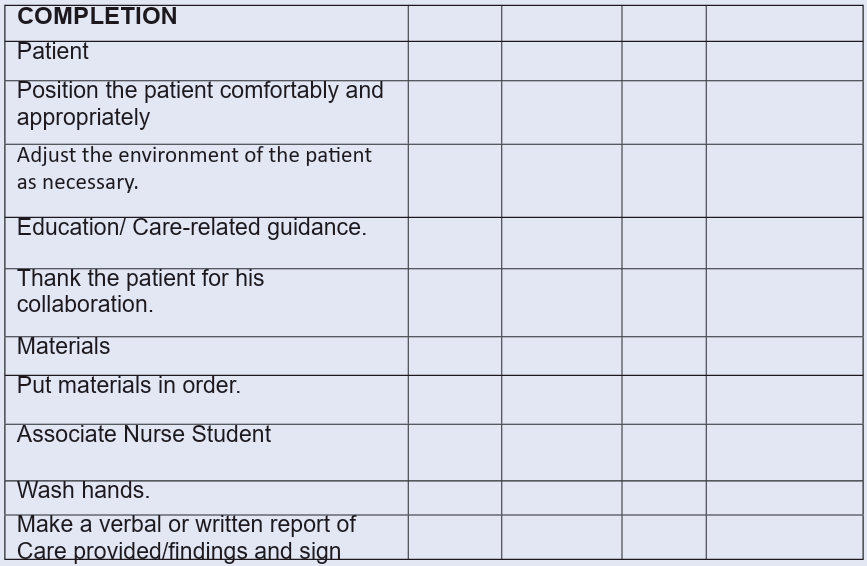
AIMS
• To assist the mother in childbearing safely without the use of drugs,
techniques or others special material.
ASSOCIATE NURSE STUDENT / PREPARATION
• Should appear professional (in full and clean uniform) with Student’s ID
Card
• Hair tied back
• Remove watch, jewelries, and Rings
• Wear closed shoes
• Clean and short nails
• Wear closed shoes
• Wash Hands
PATIENT PREPARATION
• Identification of the patient
• Self-presentation to the patient
• Ask for the consent
• Physical and psychological patient preparation
• Assess levels of comprehension and collaboration of the patient
• Adjust the environment of the patient as necessary.
• Explain the procedure and purpose to the patient
• Ask the client to empty her bladder and explain why
• Check chart for limitations on patient’s physical activity.
• Respect the client privacy.
• Check Cleanliness or condition of the bed and surrounding environment
• Position the patient in a comfortable position
EQUIPMENTS
• Table of examination
• Client records
• Set for disinfection (sterile packet containing a gall pot with minimum of 5
swabs and Kocher’s forceps)
• Non-irritant solution for disinfection
• Examination gloves
• Kocher’ s forceps (serving)
• Tray or trolley
• Mackintosh and sterile drape
• Folding screen if no curtains available,
• Bucket with solution of decontamination
• Dust bin
• Material of protection: plastic apron, boots, glasses, hat and mask.
• Folding screen if no curtains available
• Bucket with solution of decontamination
• Local anesthesia (lignocaine 2%)
• Syringe of 10ml and 2 needles
• Syringe of 2ml and 2 needles (1 for aspiration and 1 IM injection)
• 1 ampoule of 10 IU oxytocin.
• Gauzes
• Foetoscope, Doppler
• Check if the newborn resuscitation equipment is ready and in working
• Material for taking vital signs.• Container for placenta, Dustbin


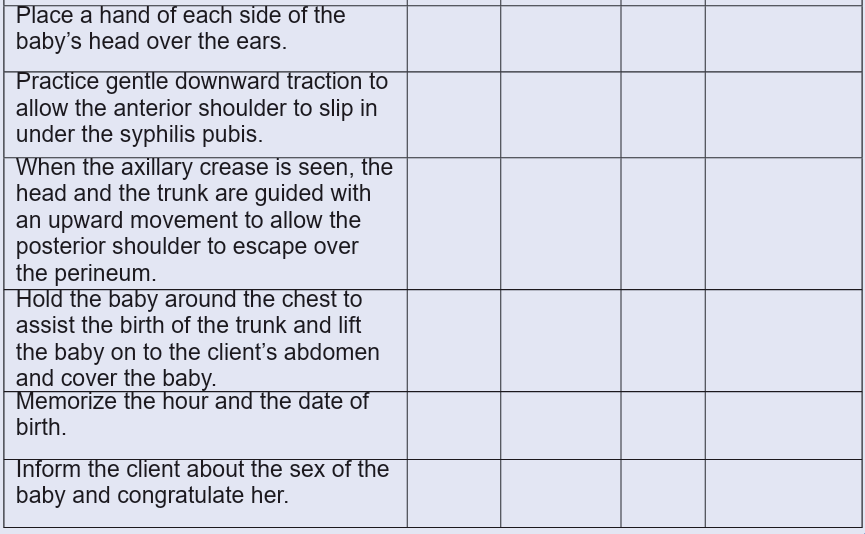

2.21.Technique: Immediate Care Of The New-Born Baby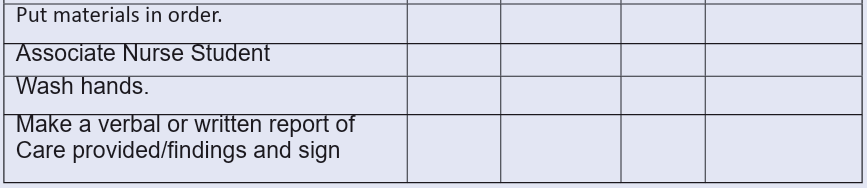
AIMS
• To detect the newborn abnormalities and reassure the parents
ASSOCIATE NURSE STUDENT / PREPARATION
• Should appear professional (in full and clean uniform) with Student’s ID
Card
• Hair tied back
• Remove watch, jewelries, and Rings
• Wear closed shoes
• Clean and short nails
• Wear closed shoes
• Wash Hands
PATIENT PREPARATION
• Introduce to the mother
• Explain the procedure to the mother and obtain her consent
• Ask about newborn’s information (Breastfeeding, elimination, sleeping,
state of umbilical cord and skin color)
EQUIPMENTS
• Tape measure,
• Baby weighing scale,
• Radiant warmer (if needed),
• Flannel to cover baby,
• Examination gloves,
• Neonatal stethoscope,
• Watch,
• Thermometer,
• Tongue depressor,
• Vitamin K
• Pamper &baby’s clothes if soiled,• Hand disinfectant.

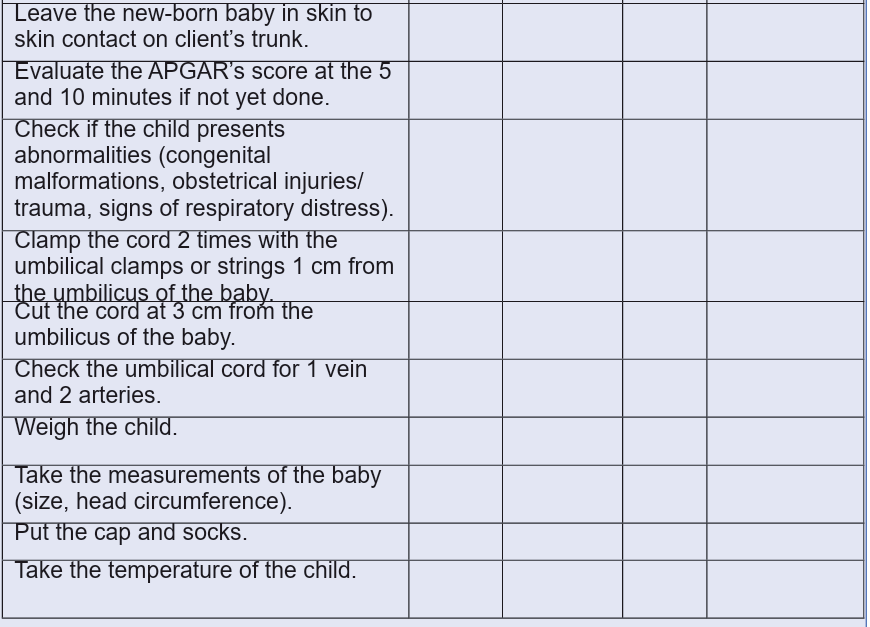
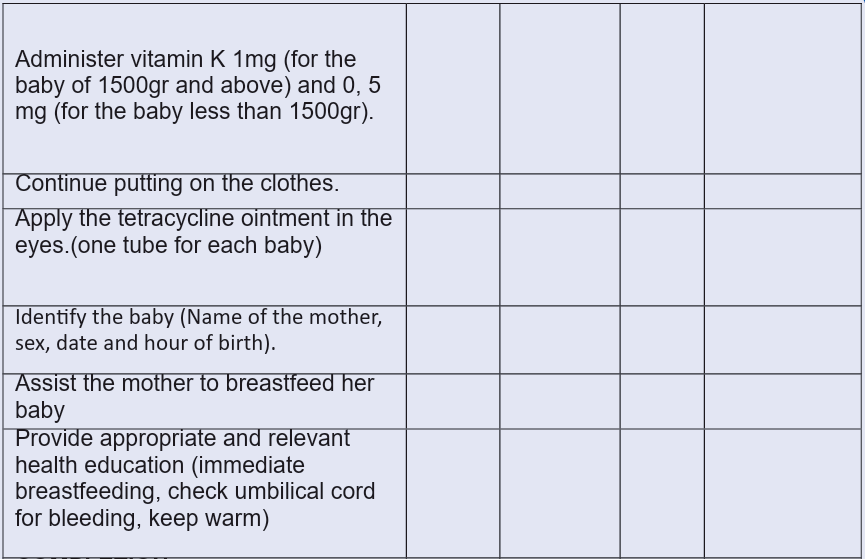
2.22.Technique: Assessment Of The New Born
AIMS
• To assess the adaptations of a newborn after birth
• To detect early possible abnormalities
• To establishes a baseline for subsequent examinations
• To reassure the parents
ASSOCIATE NURSE STUDENT / PREPARATION
• Identification of the patient
• Self-presentation to the patient
• Ask for the consent from the parents
• Explain the procedure to the mother and relatives
• Give them opportunity to ask questions.
• If possible, let them participate during the care.
PATIENT PREPARATION
• Introduce to the mother
• Explain the procedure to the mother and obtain her consent
• Ask about newborn’s information (Breastfeeding, elimination, sleeping,
state of umbilical cord and skin color)
EQUIPMENTS
• Tape measure,
• Baby weighing scale,
• Radiant warmer (if needed),
• Flannel to cover baby,
• Examination gloves,
• Neonatal stethoscope,
• Watch,
• Thermometer,
• Tongue depressor,
• Pamper &baby’s clothes if soiled,• Hand disinfectant.


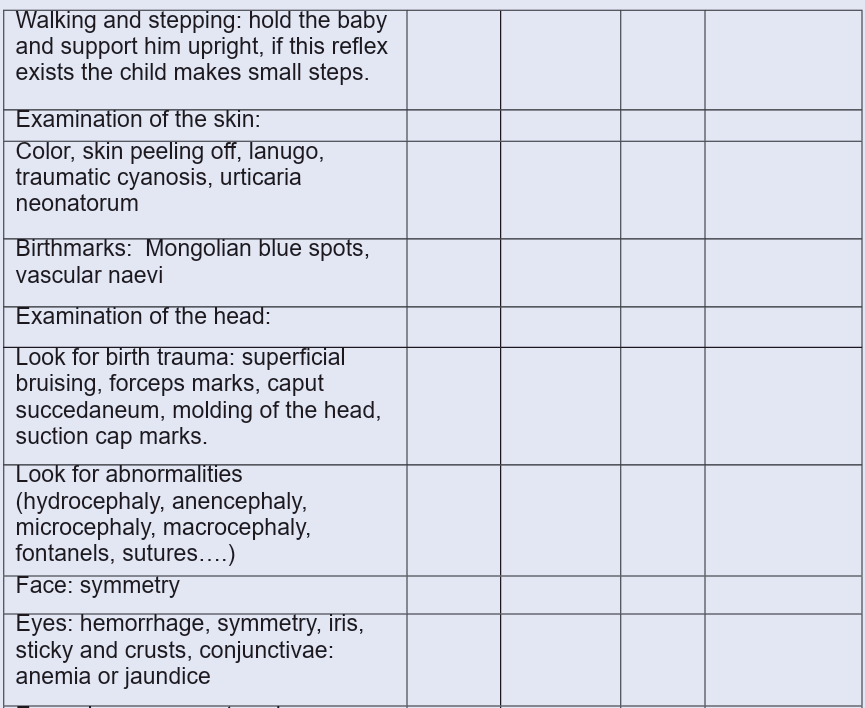

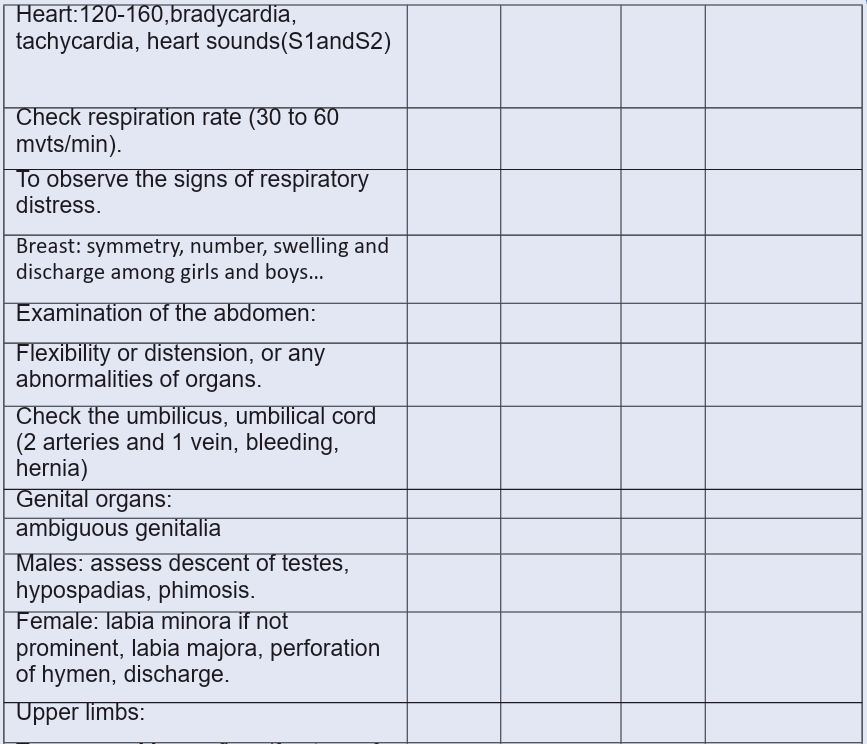
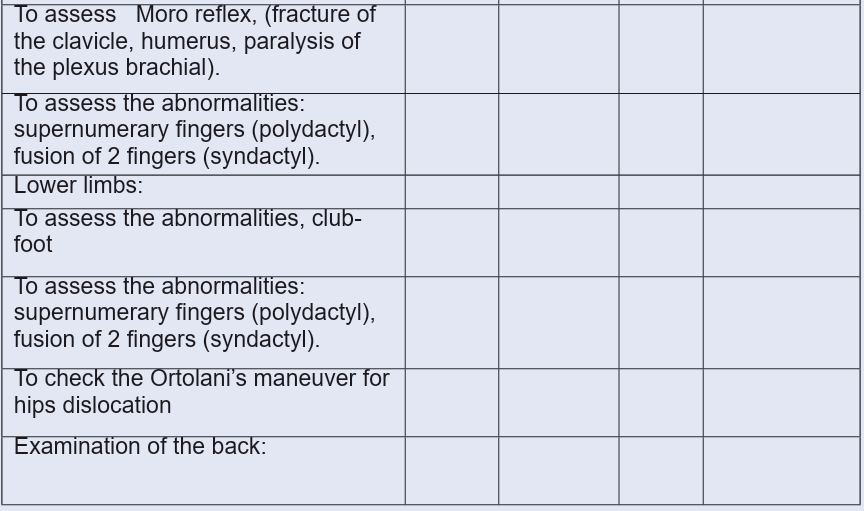
2.23.Technique: Helping Babies Breathe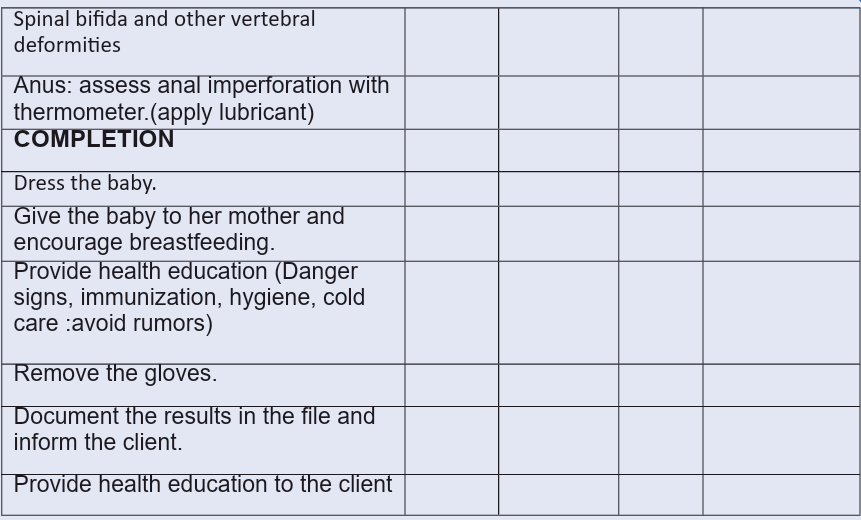
AIMS
• To ensure the newborn breath within the Golden minute.
ASSOCIATE NURSE STUDENT / PREPARATION
• Should appear professional (in full and clean uniform) with Student’s ID
Card
• Hair tied back
• Remove watch, jewelries, and Rings
• Wear closed shoes
• Clean and short nails
• Wear closed shoes
• Wash Hands and dry
• Close doors & windows to keep the environment warm
• Ensure good light
PATIENT PREPARATION
• Introduce to the mother
• Explain to the mother and the relatives about the procedure.
• Reassure her and give continuous emotional, physical support
EQUIPMENTS
• Examination gloves,
• Ambu bag,
• Clothes and head cap,
• Stethoscope,
• Penguin (suction)
• Ties,• Scissors
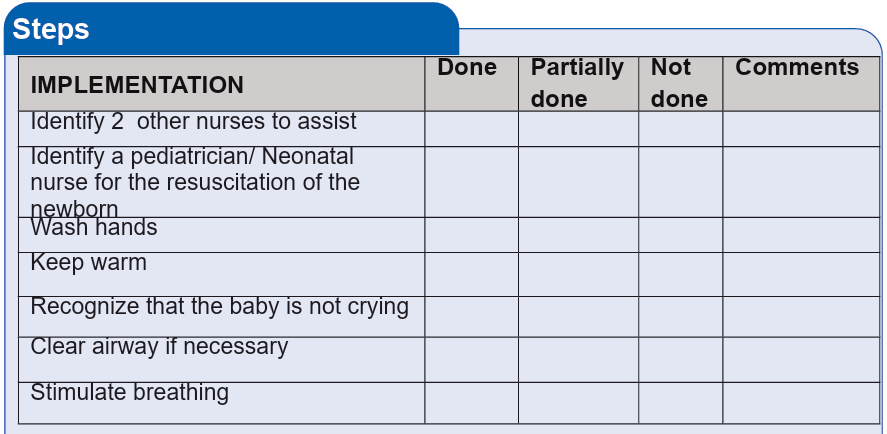
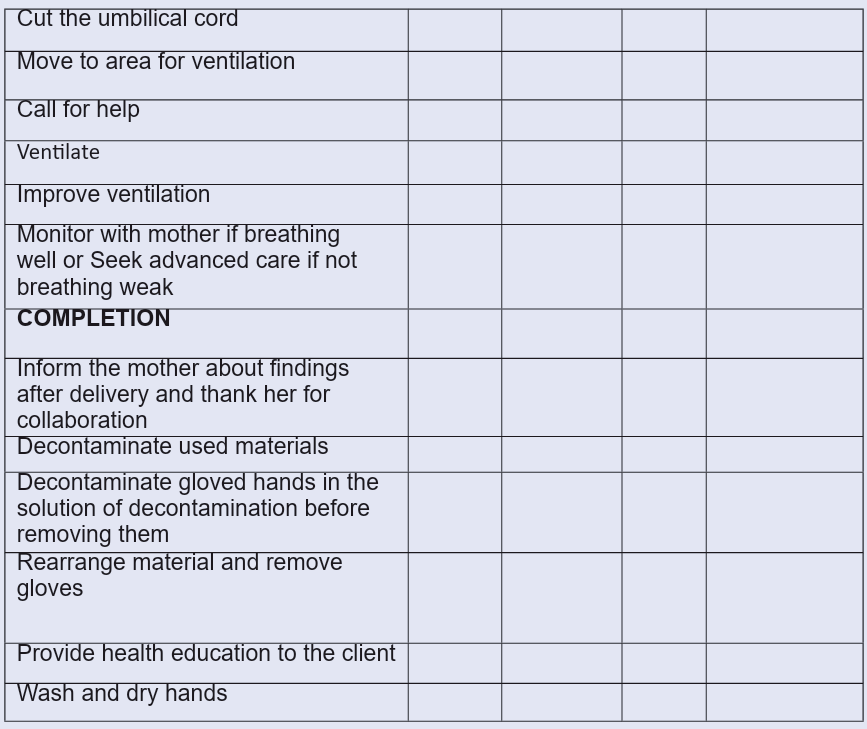
UNIT 3: FUNDAMENTALS OF NURSING CLINICAL SKILLS SENIOUR FIVE
3.1. Procedure: Wound Dressing
3.1.1. Technique: Aseptic Dry Wound Dressing
Aims of aseptic wound dressing
• To keep the wound clean
• To prevent the wound from injury and contamination
• To keep in position, the drugs applied locally
• To keep the edges of the wound together
• To apply pressure
Learning outcomes:
• Maintain a sterile field
• Hand hygiene
• Glove use and other PPE
• Maintain aseptic field (sterile field) and non-touch technique
• Environmental controls
• Logical sequencing of the procedure.
• Hair tied back
• Wear closed shoes
• Hand washing
ASSOCIATE NURSE STUDENT / PREPARATION
• Should appear professional (in full and clean uniform) with student ID Card
• Remove watch, jewels, and Rings
Identification of the client
• Self-presentation to the client
• Physical and psychological client preparation
• Assess levels of comprehension and collaboration of the client
• Location, area, state of the wound.
• Type of dressing to carry out.
• Type of product to use.
Materials
• Cleaned and disinfected trolley.
• On the upper shelf of the trolley.
• Sterile dressing set : for the sterile scissors and forceps(1 anatomic and 1
Kocher), Gauze dressings, Sterile drape, Sterile kidney dish
• Serving forceps
• Specific and Additional Material: in drums, boxes, individual packing.
• Sterile cleaning solution as ordered (commonly 0.9% normal saline
solution)
• Tape or bandage
• Sanitizer for hand rub
• On the lower shelf of the trolley.
• Kidney dish
• Protective gloves.
• Waterproof pad
• Kidney basin with a pair of scissors for cutting the adhesive plaster..
• Container or Recipient for used material.
• Additional personal protective Equipment (PPE), as indicated• Dust bin

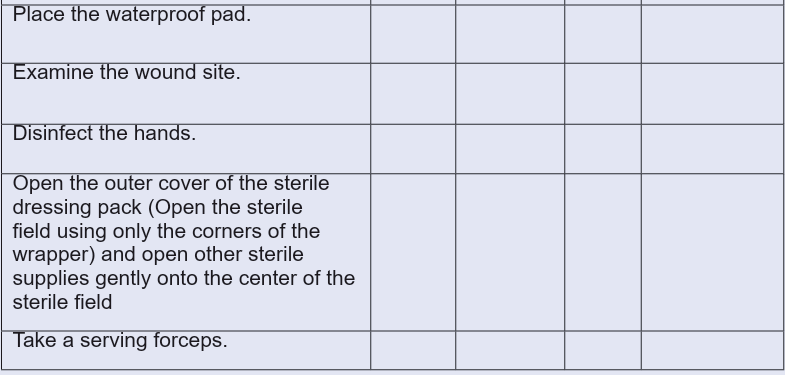
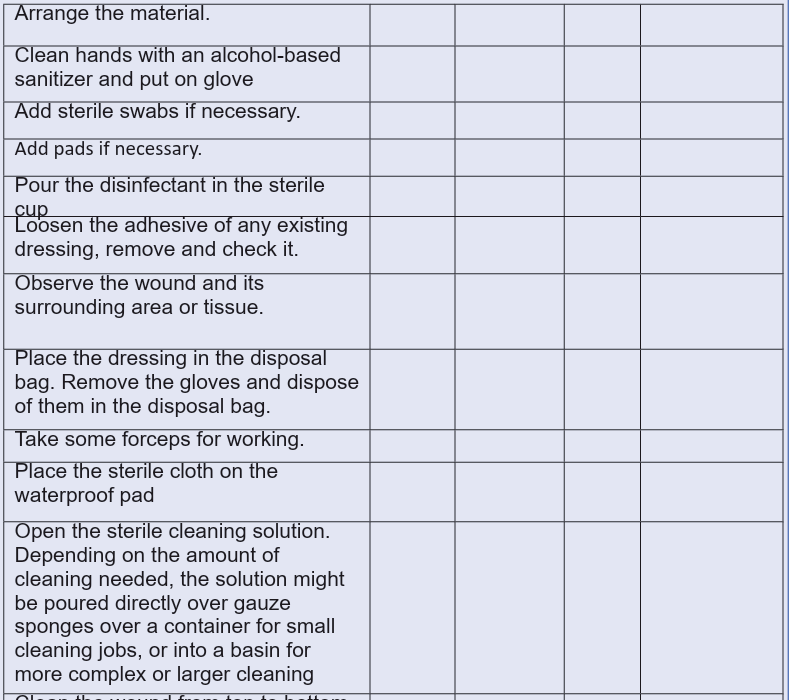

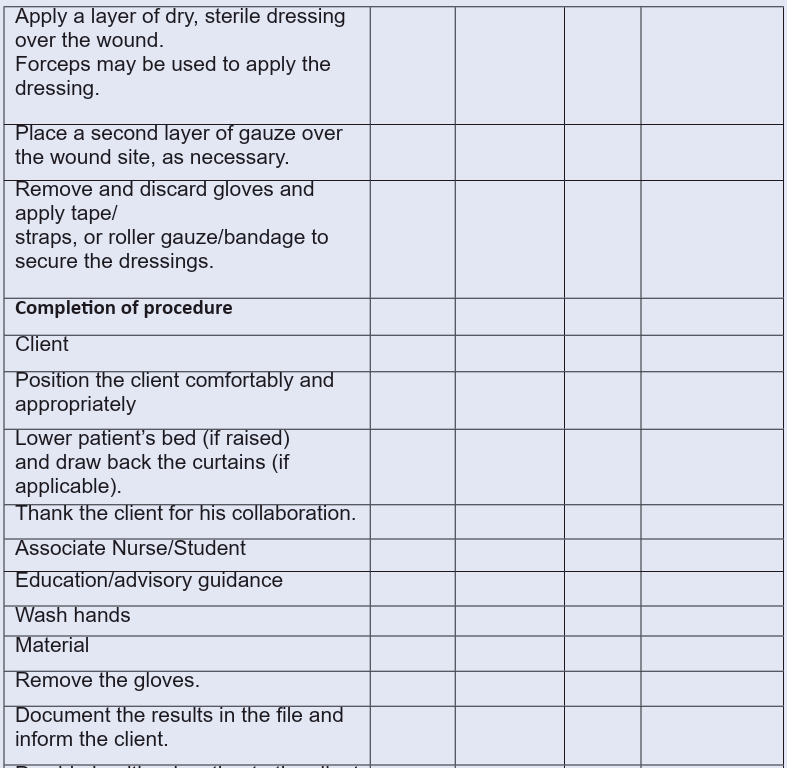
3.1.2. Technique: Wet Dressing Technique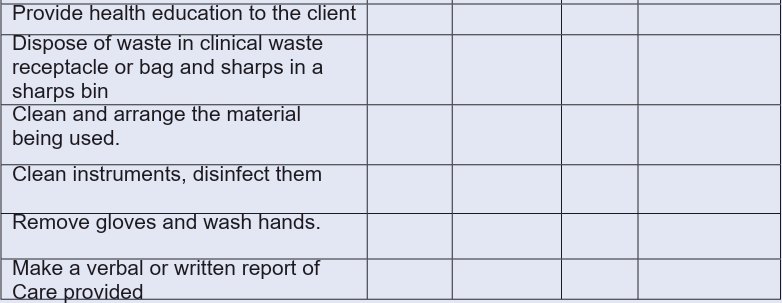
AIMS
• To optimize timely and cosmetically appropriate healing
• Maintain a moist environment
• Control or absorb excess exudate, and aid debridement of necrotic or
slough tissue
• To prevent or combat infection non adherent to the wound surface, not to
shed fibres or cause trauma to the wound or surrounding tissue on removal
• Maintain a sterile field
• Hand hygiene
• Glove use and other PPE
• Environmental controls
• Maintain aseptic field (sterile field) and non-touch technique
• Logical sequencing of the procedure.
• Should appear professional (in full and clean uniform) with student ID Card
• Hair tied back
• Remove watch, jewels, and Rings
• Wear closed shoes
• Hand washing
Client preparation
• Identification of the client
• Self-presentation to the client
• Physical and psychological client preparation
• Assess levels of comprehension and collaboration of the client
• Location, area, state of the wound.
• Type of dressing to carry out.
• Type of product to use.,
Materials
• Cleaned and disinfected trolley.
On the upper shelf of the trolley.
• Sterile dressing set : for the sterile scissors and forceps(1 anatomic and 1
Kocher), Gauze dressings, Sterile drape, Sterile kidney dish
• Serving forceps
• Specific and Additional Material: in drums, boxes, individual packing.
• Sterile cleaning solution as ordered (commonly 0.9% normal saline solution)
• Tape or bandage
• Sanitizer for hand rub
On the lower shelf of the trolley.
• Kidney dish
• Protective gloves.
• Waterproof pad
• Dust bin.
• Kidney basin with a pair of scissors for cutting the adhesive plaster…
• Container or Recipient for used material.• Additional personal protective Equipment (PPE), as indicated

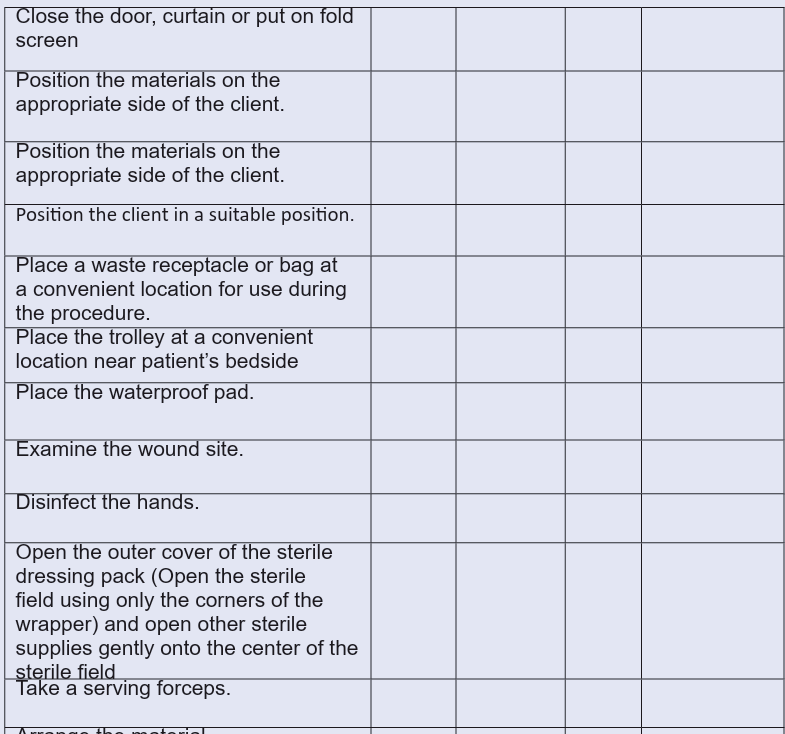
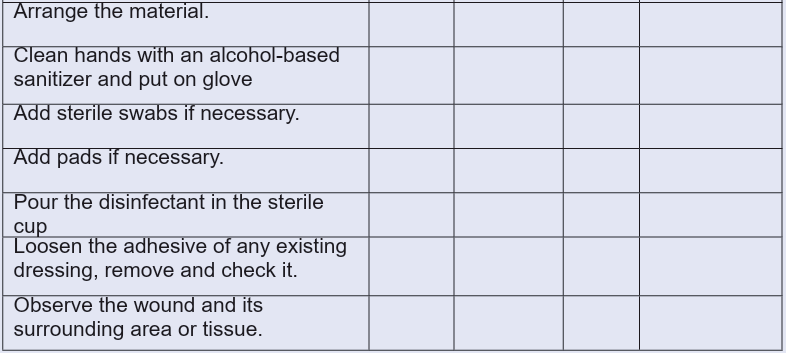


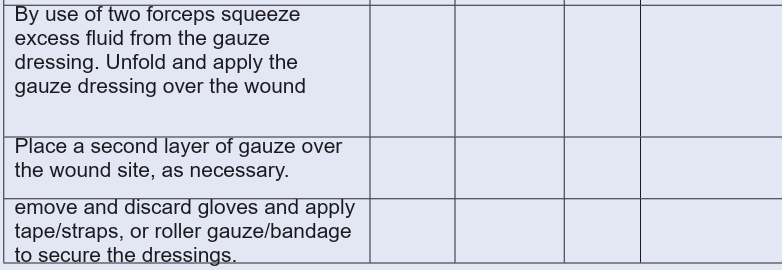
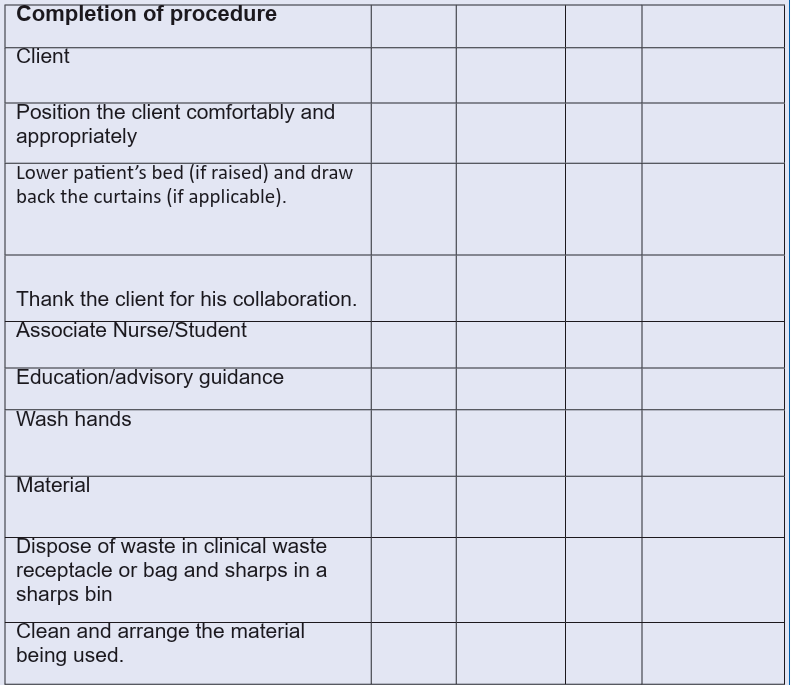
3.2. Procedure: Bandaging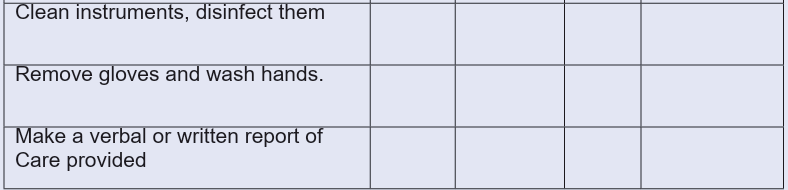
3.2.1. Technique: Spiral Bandage
Aims of spiral bandage procedure is to:
• To minimize swelling in the initial management of injury
• To stop bleeding
• To immobilize the injured part of the body
• To Provide additional support to an injured structure of the wound together
• To apply pressure
Learning outcomes:
• Know the role of a nurse during Spiral bandaging;
• Know the methodology of Spiral technique
• Apply Spiral bandaging
• Substantiate compliance with the general principles of Spiral bandaging;
• Know the necessary aids used in Spiral bandaging
• Know the aid care procedure after Spiral bandaging;
Associate Nurse/student preparation
• Should appear professional (in full and clean uniform) with student ID
Card
• Hair tied back
• Remove watch, jewelries, and Rings
• Wear short and closed shoes
• Wash hands
Client preparation
• Identification of the patient
• Ensure client privacy
• Self-presentation to the patient
• Physical and psychological client preparation
• Assess levels of comprehension and collaboration of the patient
• Explain to the patient/ family the rational of technique
• Position the client in a comfortable position
EQUIPMENTS
• A clean tray
• 2 or many bandages of appropriate size.
• Gloves
• Adhesive plaster or safety pin.• Scissors (if adhesive plaster is used).
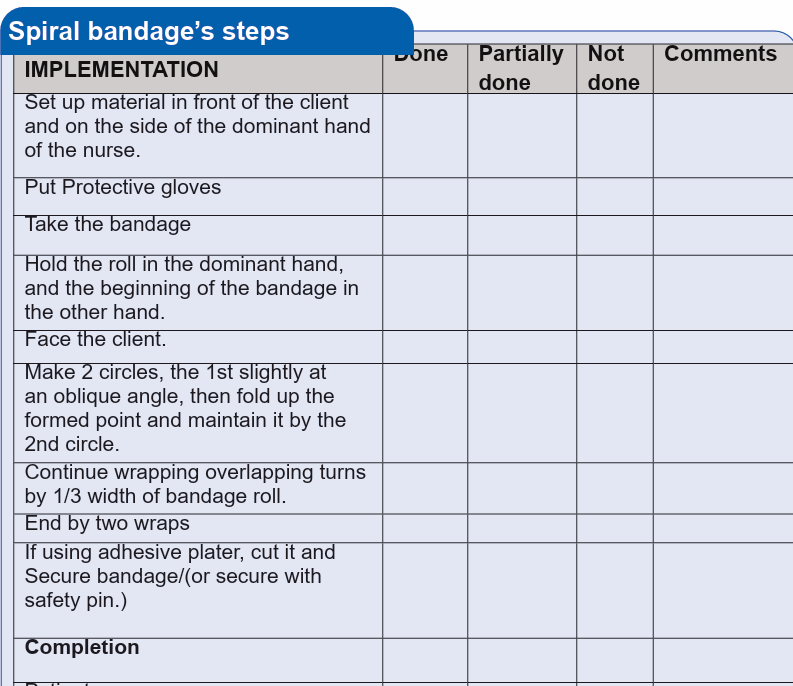

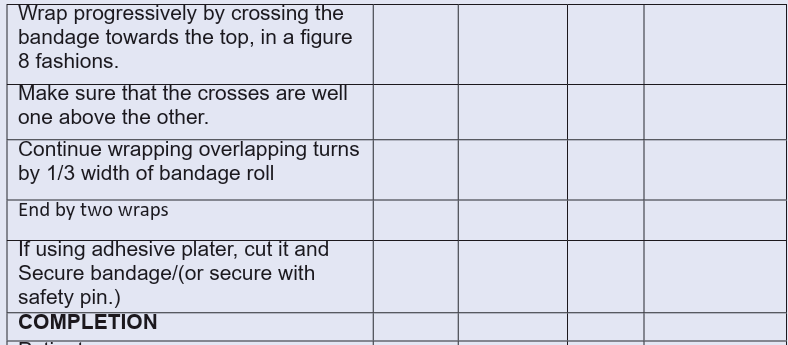
3.2.2. Technique : Spica Bandage
Aims of spica bandage procedure is to:
• To minimize swelling in the initial management of injury
• To stop bleeding
• To immobilize the injured part of the body
• To Provide additional support to an injured structure
Learning outcomes:
• Know the role of a nurse during Spica bandaging;
• Substantiate compliance with the general principles of Spica bandaging;
• Know the methodology of Spica technique
• Know the necessary aids used in Spica bandaging
• Apply Spica bandaging
• Know the aid care procedure after Spica bandaging;
ASSOCIATE NURSE STUDENT / PREPARATION
• Should appear professional (in full and clean uniform) with student ID card
• Hair tied back
• Remove watch, jewelries, and Rings
• Wear short and closed shoes
• Wash hands
Client preparation
• Identification of the patient
• Ensure client privacy
• Self-presentation to the patient
• Physical and psychological client preparation
• Assess levels of comprehension and collaboration of the patient
• Explain to the patient/ family the rational of technique
• Position the client in a comfortable position
EQUIPMENTS
• A clean tray
• 2 or many bandages of appropriate size.
• Gloves
• Adhesive plaster or safety pin.• Scissors (if adhesive plaster is used).
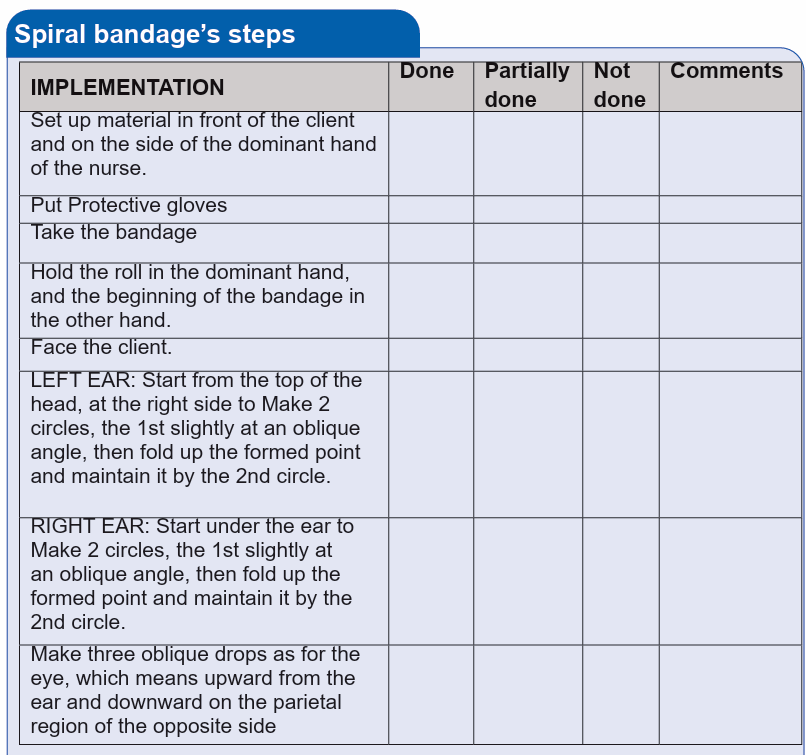
3.2.3. Technique: Earlobe Bandage
Aims of spica bandage procedure is to:
• To minimize swelling in the initial management of injury
• To stop bleeding
• To support a dressing to the ear
Learning outcomes:
• Know the role of a nurse during Earlobe bandaging;
• Substantiate compliance with the general principles of Earlobe bandaging;
• Know the methodology of Earlobe technique
• Know the necessary aids used in Earlobe bandaging
• Apply Earlobe bandaging
ASSOCIATE NURSE STUDENT / PREPARATION
• Should appear professional (in full and clean uniform) with student ID card
• Hair tied back
• Remove watch, jewelries, and Rings
• Wear short and closed shoes
• Wash hands
Client preparation
• Identification of the patient
• Ensure client privacy
• Self-presentation to the patient
• Physical and psychological client preparation
• Assess levels of comprehension and collaboration of the patient
• Explain to the patient/ family the rational of technique
• Position the client in a comfortable position
EQUIPMENTS
• A clean tray
• 2 or many bandages of appropriate size.
• Gloves
• Adhesive plaster or safety pin• Scissors (if adhesive plaster is used)
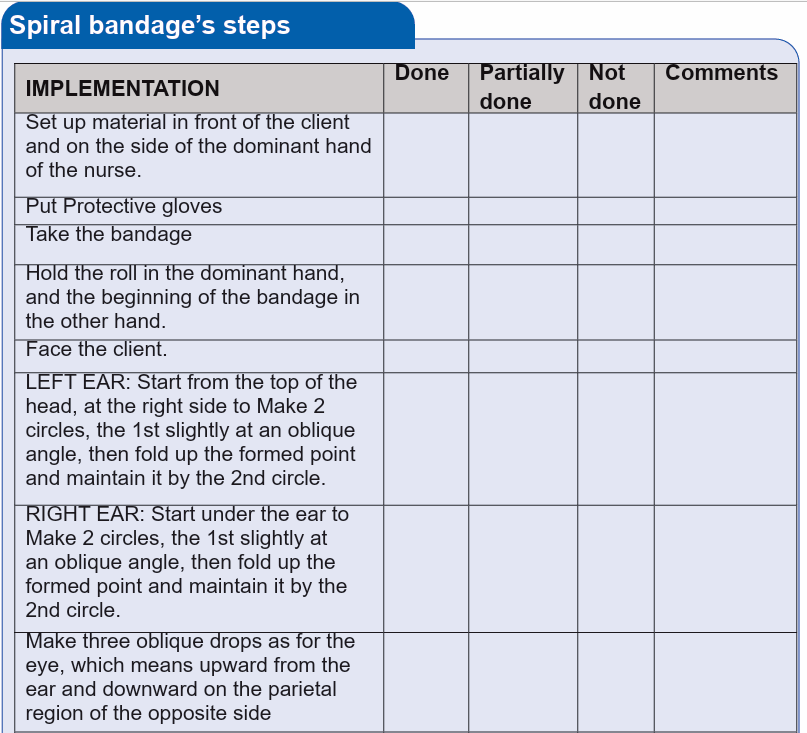
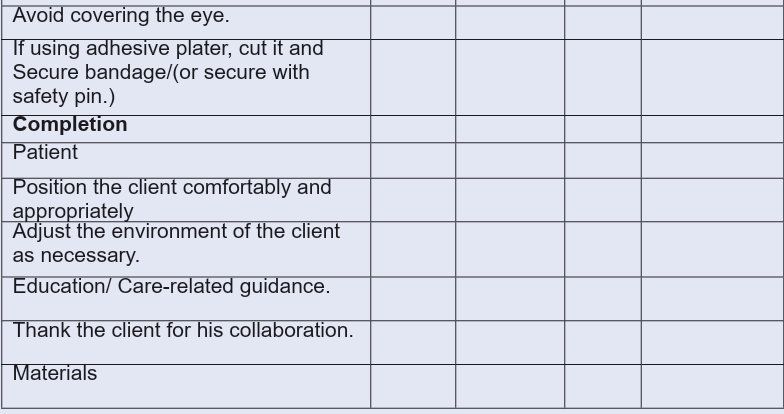
3.2.4. Technique: Cranial Bandage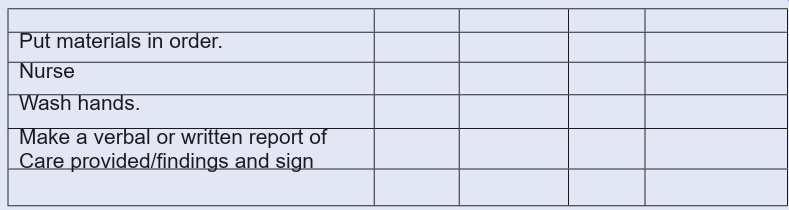
Aims of monocular bandage procedure is to:
• To minimize swelling in the initial management of injury
• To stop bleeding• To support a dressing to the ear
Learning outcomes:
Associate Nurse/student preparation
• Should appear professional (in full and clean uniform) with student ID
Card
• Hair tied back
• Remove watch, jewelries, and Rings
• Wear short and closed shoes• Wash hands
Client preparation
• Identification of the patient
• Ensure client privacy
• Self-presentation to the patient
• Physical and psychological client preparation
• Assess levels of comprehension and collaboration of the patient
• Explain to the patient/ family the rational of technique• Position the client in a comfortable position
EQUIPMENTS
• A clean tray
• 2 or many bandages of appropriate size (Usually 1.5 to 2width).
• Gloves
• Adhesive plaster or safety pin.• Scissors (if adhesive plaster is used

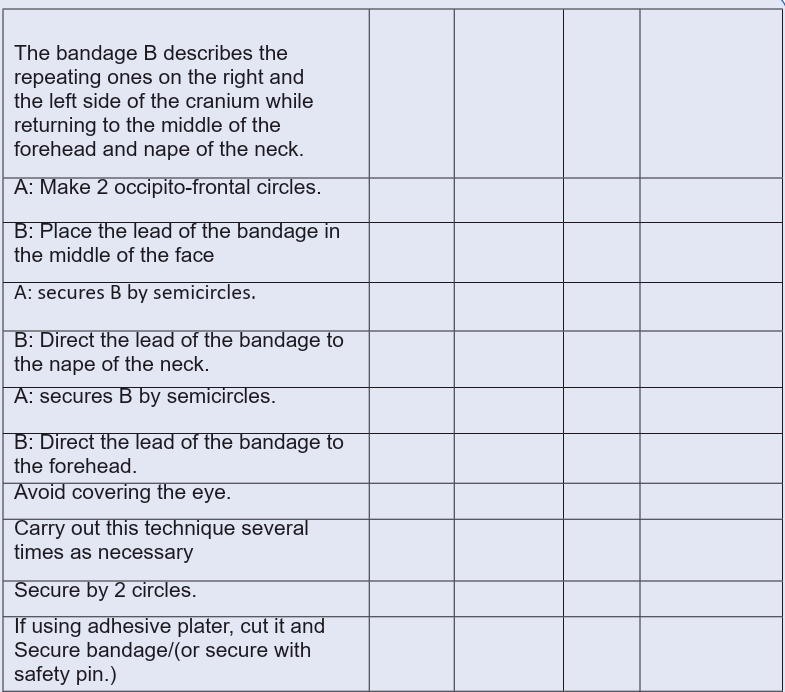
3.2.5. Technique: Monocular Bandage (Right Or Left)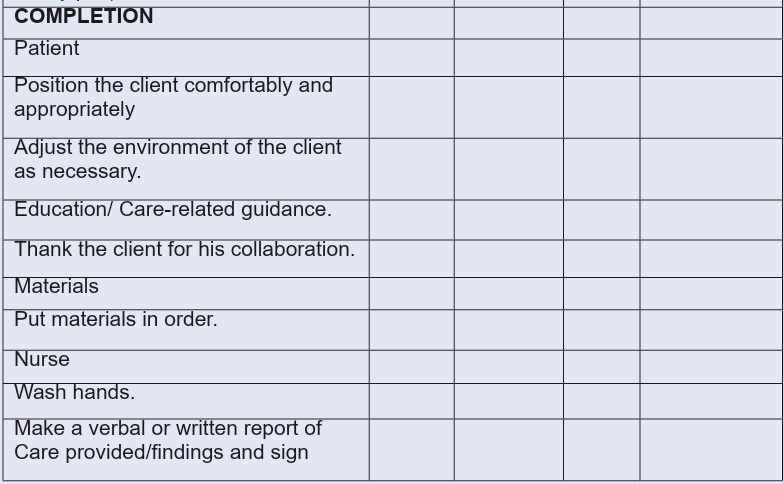
Aims of monocular bandage procedure is to:
• To stop bleeding
• To minimize swelling in the initial management of injury
• To support a dressing to the eye
Learning outcomes:
• Know the role of a nurse during monocular bandaging;
• Substantiate compliance with the general principles of monocular
bandaging;
• Know the methodology of monocular bandage technique
• Know the necessary aids used in monocular bandaging
• Apply monocular bandaging
Associate Nurse/student preparation
• Should appear professional (in full and clean uniform) with student ID card
• Hair tied back
• Remove watch, jewelries, and Rings
• Wear short and closed shoes
• Wash hands
Client preparation
• Identification of the patient
• Ensure client privacy
• Self-presentation to the patient
• Physical and psychological client preparation
• Assess levels of comprehension and collaboration of the patient
• Explain to the patient/ family the rational of technique
• Position the client in a comfortable position
EQUIPMENTS
• A clean tray
• 2 or many bandages of appropriate size (Usually 1.5 to 2width).
• Gloves
• Adhesive plaster or safety pin.• Scissors (if adhesive plaster is used
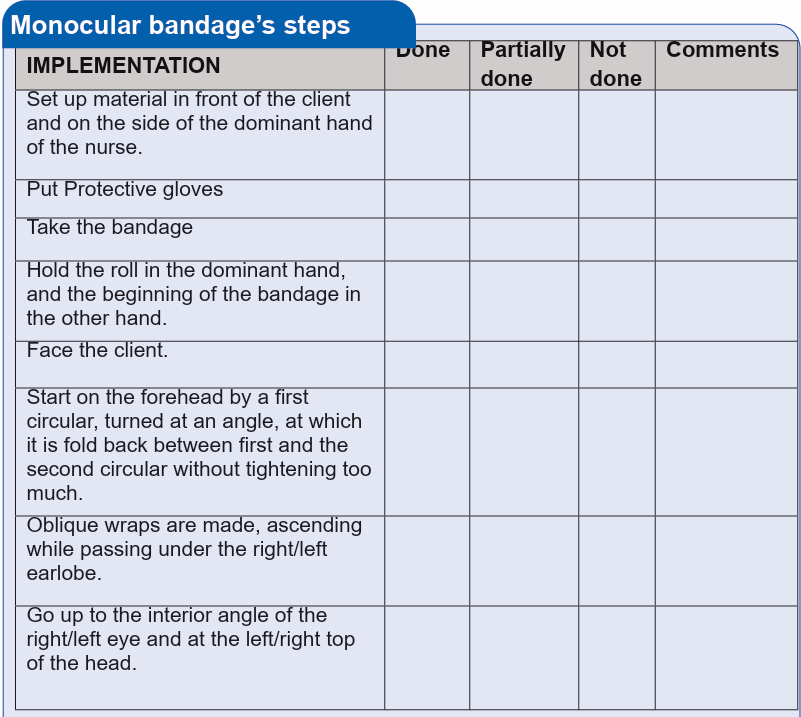
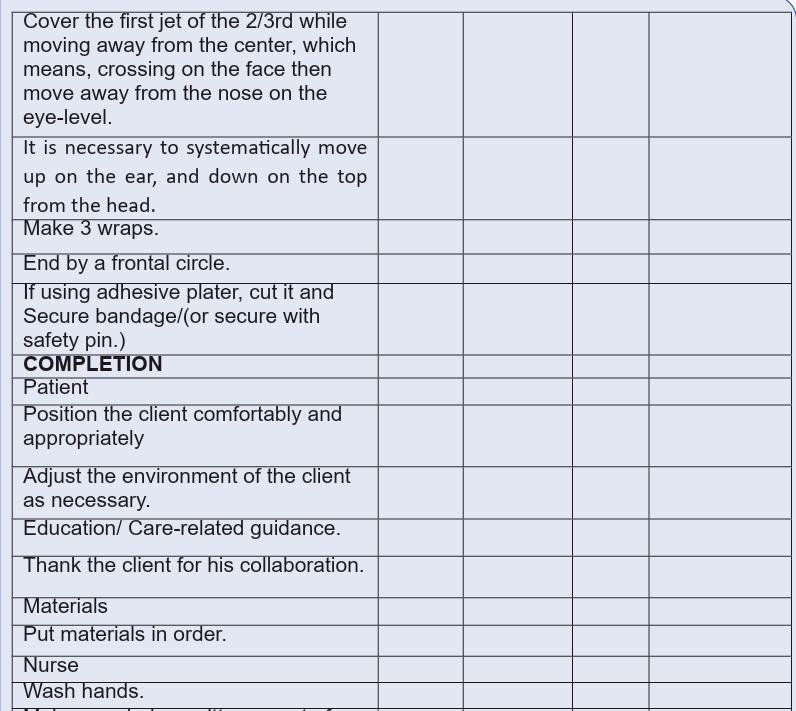
3.2.6. Technique: Binocular Bandage
Aims of binocular bandage procedure is to:
• To minimize swelling in the initial management of injury
• To stop bleeding• To support a dressing to the eyes
Learning outcomes:
• Know the role of a nurse during binocular bandaging;
• Substantiate compliance with the general principles of binocular bandaging;
• Know the methodology of binocular bandage technique
• Know the necessary aids used in binocular bandaging
• Apply binocular bandaging
Associate Nurse/student preparation
• Should appear professional (in full and clean uniform) with student ID card
• Hair tied back
• Remove watch, jewelries, and Rings
• Wear short and closed shoes
• Wash hands
Client preparation
• Identification of the patient
• Ensure client privacy
• Self-presentation to the patient
• Physical and psychological client preparation
• Assess levels of comprehension and collaboration of the patient
• Explain to the patient/ family the rational of technique
• Position the client in a comfortable position
EQUIPMENTS
• A clean tray
• 2 or many bandages of appropriate size (Usually 1.5 to 2width).
• Gloves
• Adhesive plaster or safety pin.• Scissors (if adhesive plaster is used).
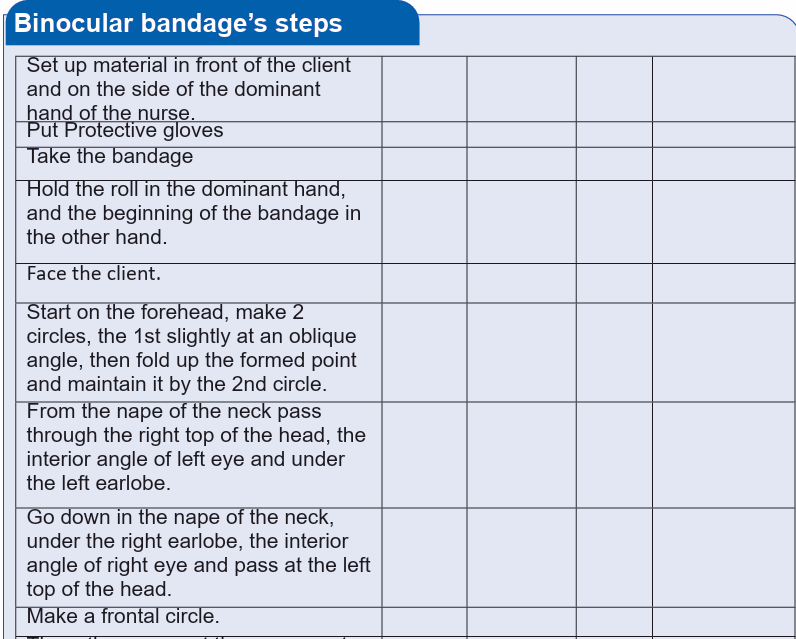
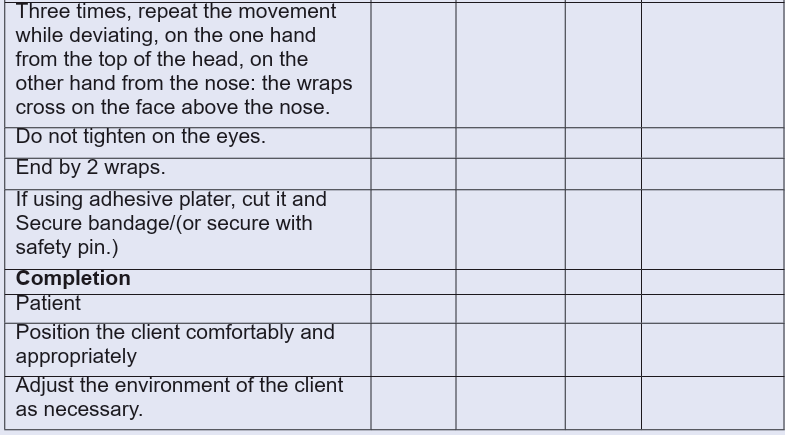
3.2.7. Technique: Hand Gloved Bandage
Aims of hand gloved bandage procedure is to:
• To minimize swelling in the initial management of injury
• To stop bleeding
• To support a dressing to the fingers
Learning outcomes:
• Know the role of a nurse during hand gloved bandaging;
• Substantiate compliance with the general principles of hand gloved
bandaging;
• Know the methodology of hand gloved bandage technique
• Know the necessary aids used in hand gloved bandaging
• Apply hand gloved bandaging
Associate Nurse/student preparation
• Should appear professional (in full and clean uniform) with student ID
Card
• Hair tied back
• Remove watch, jewelries, and Rings
• Wear short and closed shoes
• Wash hands
Client preparation
• Identification of the patient
• Ensure client privacy
• Self-presentation to the patient
• Physical and psychological client preparation
• Assess levels of comprehension and collaboration of the patient
• Explain to the patient/ family the rational of technique
• Position the client in a comfortable position
EQUIPMENTS
• A clean tray
• 2 or many bandages of appropriate size (Usually 1.5 to 2width).
• Gloves
• Adhesive plaster or safety pin.• Scissors (if adhesive plaster is used).


3.2.8. Technique: Triangular Bandage
Aims of triangular bandage procedure is to:
• To minimize swelling in the initial management of injury
• To support and immobilize fractured forearm
• To support and immobilize shoulder luxation
Learning outcomes:
• Know the role of a nurse during triangular bandaging;
• Substantiate compliance with the general principles of hand gloved
bandaging;
• Know the methodology of triangular bandage technique
• Know the necessary aids used in triangular bandaging
• Apply triangular bandaging
Associate Nurse/student preparation
• Should appear professional (in full and clean uniform) with student ID card
• Hair tied back
• Remove watch, jewelries, and Rings
• Wear short and closed shoes
• Wash hands
Client preparation
• Identification of the patient
• Ensure client privacy
• Self-presentation to the patient
• Physical and psychological client preparation
• Assess levels of comprehension and collaboration of the patient
• Explain to the patient/ family the rational of technique
• Position the client in a comfortable position
EQUIPMENTS
• A clean tray
• 2 or many bandages of appropriate size (Usually 1.5 to 2width).
• Gloves
• Safety pins.• Scissors (if adhesive plaster is used).
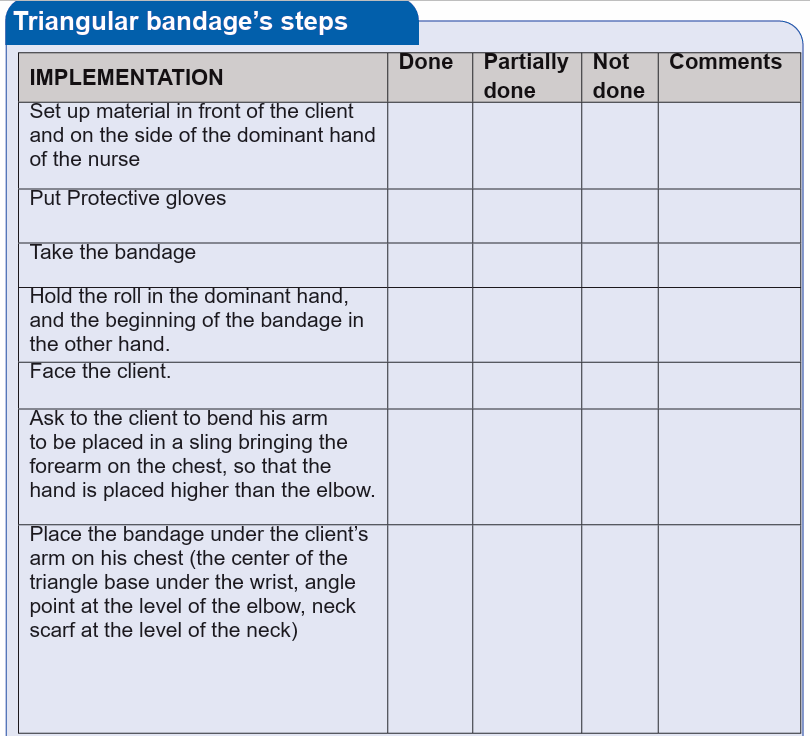
3.2.9. Technique: Stump Bandage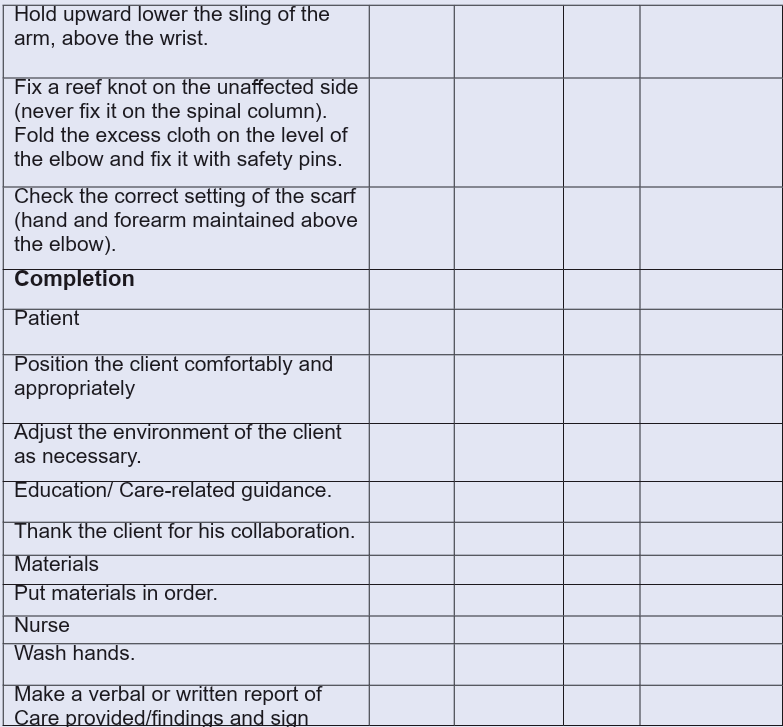
Aims of stump bandage procedure is to:
• To minimize swelling in the initial management of injury
• To stop bleeding
• To support a dressing
Learning outcomes:
• Know the role of a nurse during Stump bandaging;
• Substantiate compliance with the general principles of Stump bandaging;
• Know the methodology of Stump bandage technique
• Know the necessary aids used in Stump bandaging
• Apply Stump bandaging
Associate Nurse/student preparation
• Should appear professional (in full and clean uniform) with student ID card
• Hair tied back
• Remove watch, jewelries, and Rings
• Wear short and closed shoes
• Wash hands
Client preparation
• Identification of the patient
• Ensure client privacy
• Self-presentation to the patient
• Physical and psychological client preparation
• Assess levels of comprehension and collaboration of the patient
• Explain to the patient/ family the rational of technique
• Position the client in a comfortable position
EQUIPMENTS
• A clean tray
• 2 or many bandages of appropriate size (Usually 1.5 to 2width).
• Gloves
• Safety pins.• Scissors (if adhesive plaster is used).
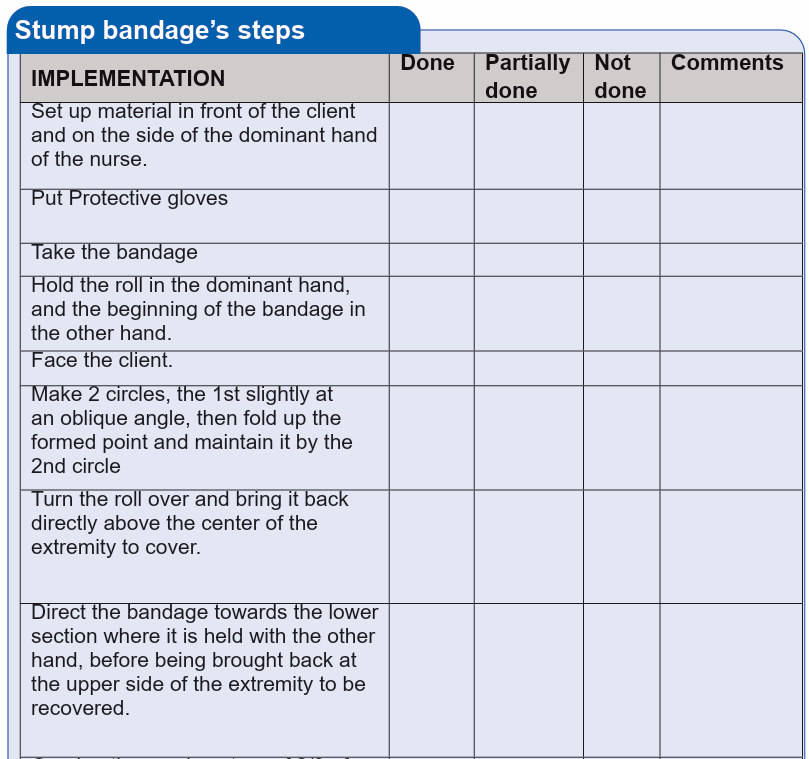

3.3. Procedure: Basic Laboratory Tests
3.3.1. Technique: Rapid Test for Malaria
AIMS
• Diagnosis of malaria by detecting evidence of malaria parasites (antigens)
in human blood.
Learning Outcomes
• Able to explain the steps of rapid test of malaria
• Perform the procedure with respect of procedure sequence
• Able to interpret results of rapid test of malaria
Associate Nurse/student preparation
• Hair tied back
• Remove watch, jewelries, and Rings
• Should appear professional (in full and clean uniform) with student ID Card
• Wear short and closed shoes
• Wash hands
Client preparation
• Identification of the patient
• Ensure client privacy
• Self-presentation to the patient
• Physical and psychological client preparation
• Assess levels of comprehension and collaboration of the patient
• Explain to the patient/ family the rationale of technique
• Position the client in a comfortable position
Materials preparation
• Gloves
• Rapid Diagnostic Test (RDT) kit
• Safety box
• Dustbin• Timer
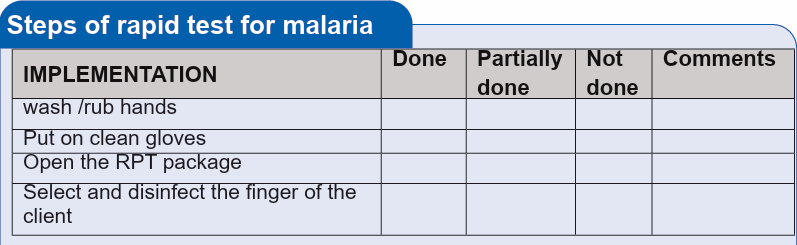
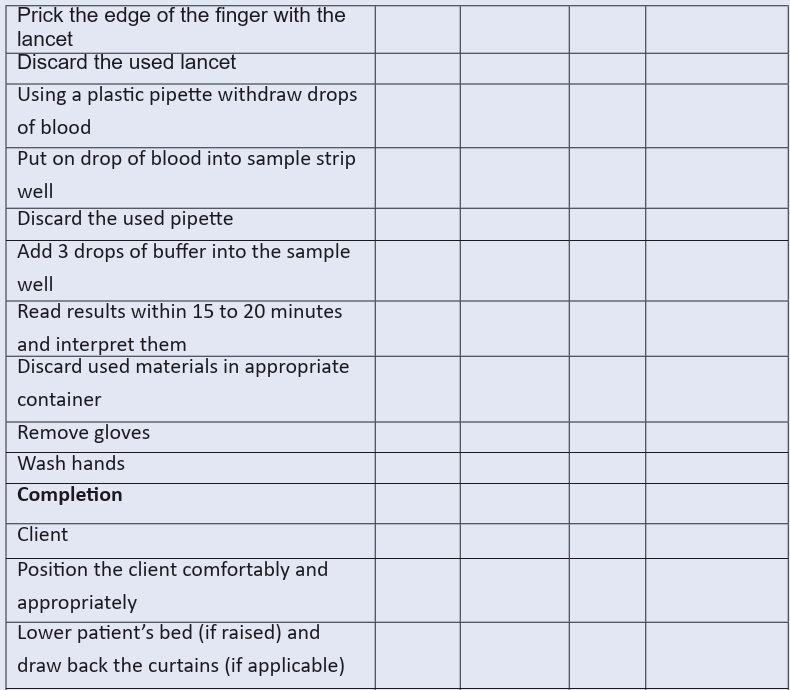
3.3.2. Technique: Performing urine test (albumin, glucose)
AIMS
• Introduce urinalysis testing procedures,
• Apply clinical correlation of the results with the diseases.
Learning Outcomes
• Able to collect urine specimen adequately and follow routine urinalysis
procedures
• Perform urinalysis respecting steps, report findings according to laboratory
protocol
• Recognize normal and abnormal urinalysis test results and correlate with
the diseases.
Associate Nurse/student preparation
• Should appear professional (in full and clean uniform) with student ID
Card
• Hair tied back
• Remove watch, jewelries, and Rings
• Wear short and closed shoes
• Wash hands
Client preparation
• dentification of the patient
• Ensure client privacy
• Self-presentation to the patient
• Physical and psychological client preparation
• Assess levels of comprehension and collaboration of the patient
• Explain to the patient/ family the rational of technique• Position the client in a comfortable position

3.3.3. Technique: Performing glycemia test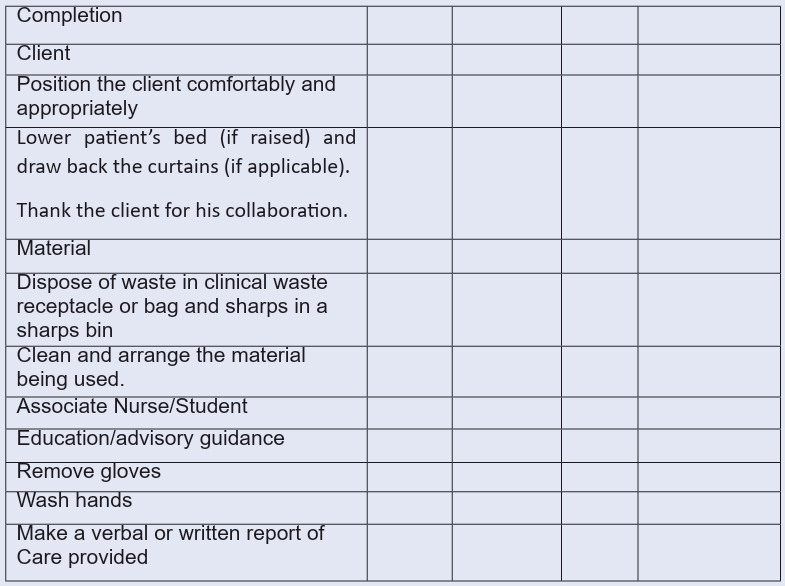
AIMS
• Monitor the effect of diabetes medications on blood sugar levels
• Identify blood sugar levels that are high or low
• Track progress in reaching overall treatment goals
• Learn how diet and exercise affect blood sugar levels
Learning Outcomes
• Perform glycemia test by respecting steps, report findings according to
laboratory protocol
• Recognize normal and abnormal glycemia test results and correlatewith the diseases.
Preparation
Associate Nurse/student preparation
• Should appear professional (in full and clean uniform) with student ID
Card
• Hair tied back
• Remove watch, jewelries, and Rings
• Wear short and closed shoes
• Wash hands
Client preparation
• Identification of the patient
• Ensure client privacy
• Self-presentation to the patient
• Physical and psychological client preparation
• Assess levels of comprehension and collaboration of the patient
• Explain to the patient/ family the rational of technique
• Position the client in a comfortable position
Materials preparation
• Blood glucose monitor (Glucometer)
• Test strips (check that they are in date and have not been exposed to the air)
• Alcohol swab
• Single-use safety lancets or lancing device,
• Gloves,
• Cotton wool/gauze,• Sharps box or safety box,
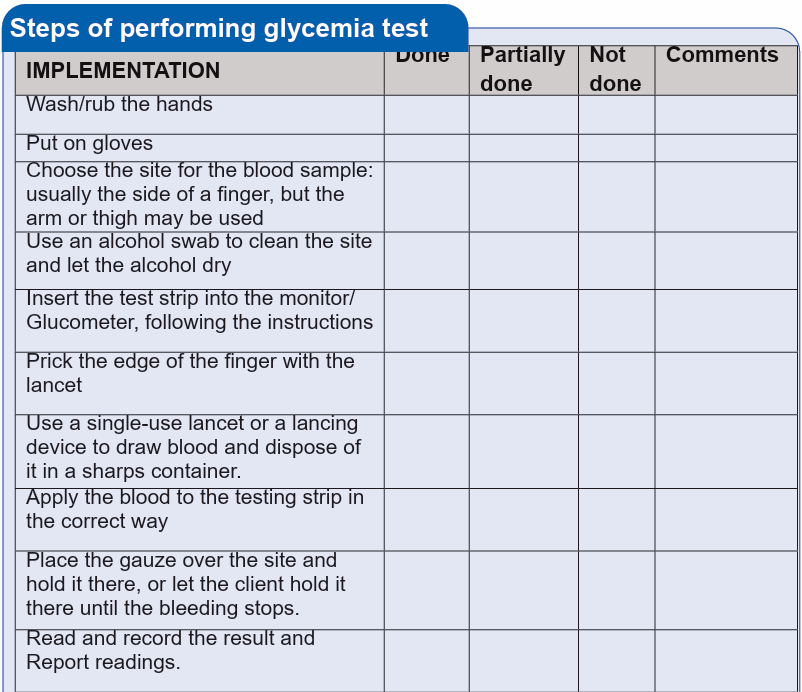
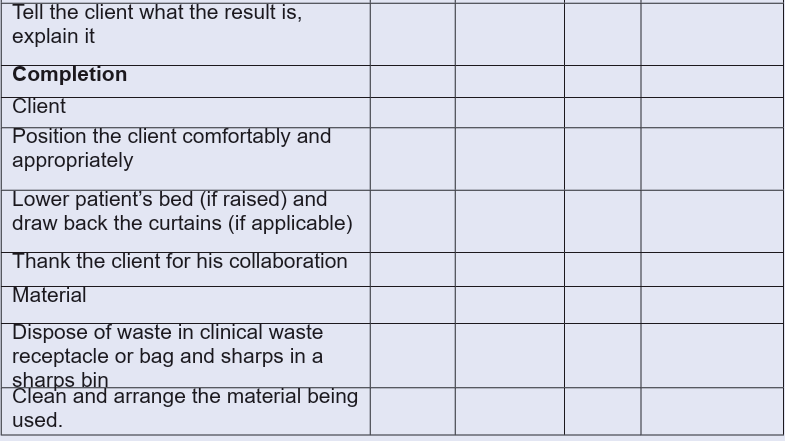
3.5.First Aid
3.4.1. Technique: Putting the victim into the recovery position
AIMS
• Prevent suffocation through obstruction of the airway
Learning Outcomes
• Able to understand and describe how the technique of putting the victim
into the recovery position is done
• Maintain comfort and safety during the procedure
• Perform the procedure by respecting the steps
Preparation
Associate Nurse/student preparation
• Should appear professional (in full and clean uniform) with
student ID Card
• Hair tied back
• Remove watch, jewelries, and Rings
• Wear short and closed shoes
• Wash hands if applicable
• Client preparation
Client preparation
• dentification of the patient
• Ensure client privacy if applicable
• Self-presentation to the patient if applicable
• Physical and psychological client preparation if applicable
• Assess levels of comprehension and collaboration of the patient if
applicable
• Explain to the patient/ family the rational of technique if applicable
• Position the client in a comfortable position if applicable
Materials preparation
• Materials
• A clean tray if applicable• Gloves if available
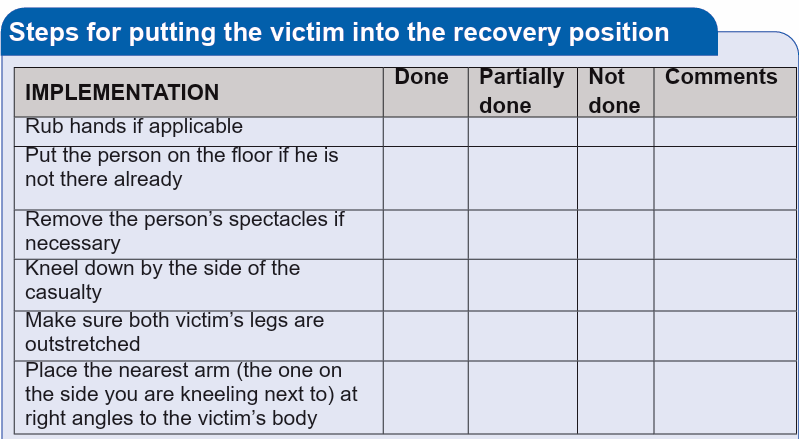

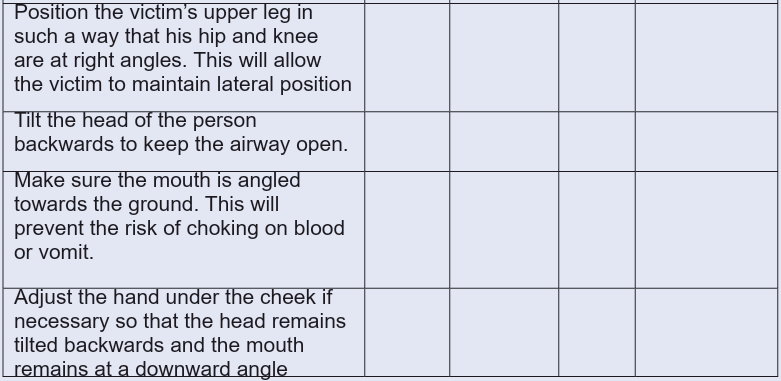
3.4.2. Technique: First aid interventions in case of burn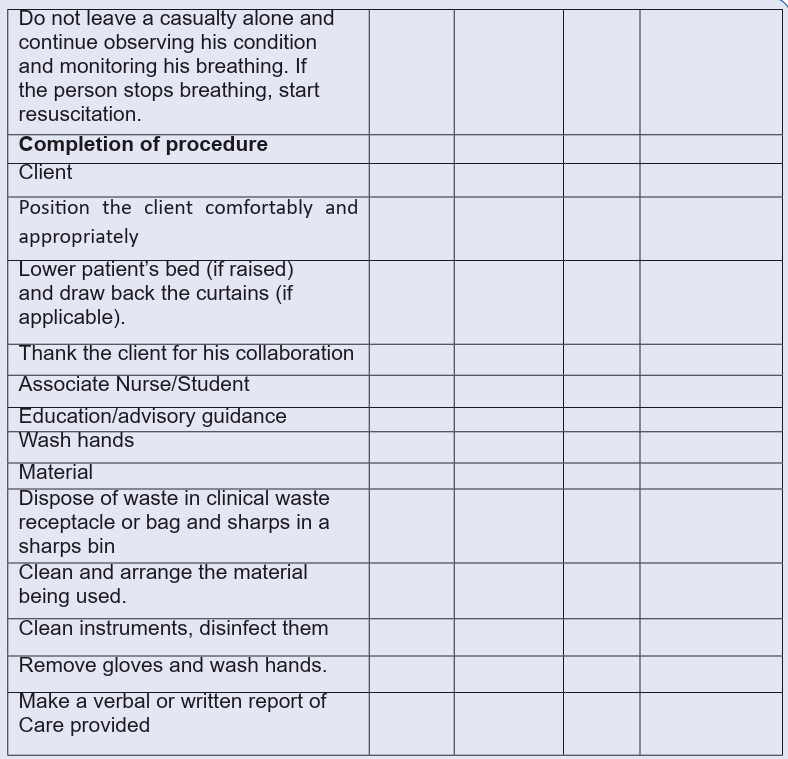
AIMS
• Protect the burned person from further harm
Learning Outcomes
• Able to understand and describe how the technique of first aid in case of burn
• Maintain comfort and safety during the procedure
• Perform the procedure by respecting the stepsPreparation
Associate Nurse/student preparation
• Should appear professional (in full and clean uniform) with
student ID Card
• Hair tied back
• Remove watch, jewelries, and Rings
• Wear short and closed shoes
• Wash hands
Client preparation
• Identification of the patient if applicable
• Ensure client privacy if applicable
• Self-presentation to the patient if applicable
• Physical and psychological client preparation if applicable
• Assess levels of comprehension and collaboration of the
patient if applicable
• Explain to the patient/ family the rational of technique if
applicable
• Position the client in a comfortable position if applicable
Materials
• A clean tray if applicable
• Gloves if applicable
• Tape water
• personal protective equipment if applicable
• Antibiotic / burn cream if available• Bandages if available
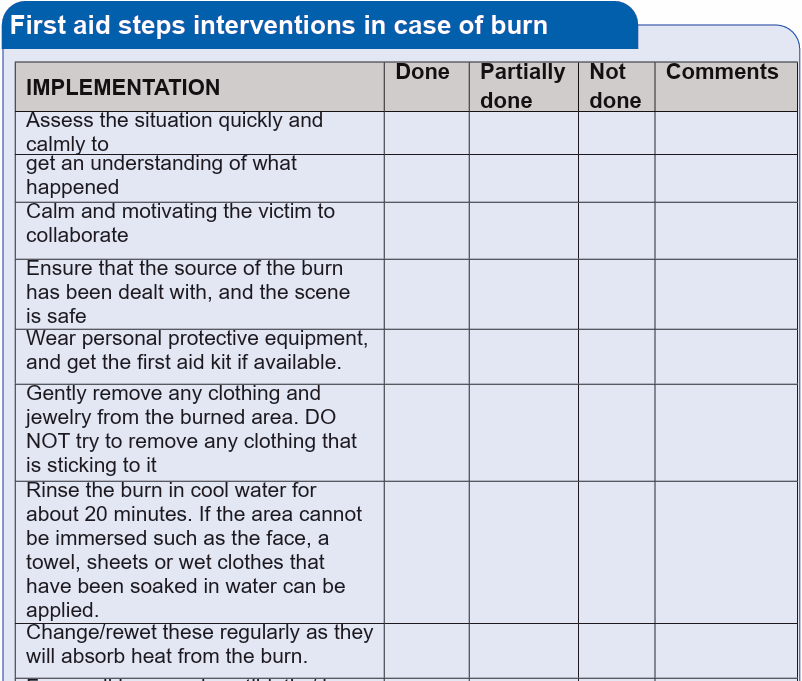
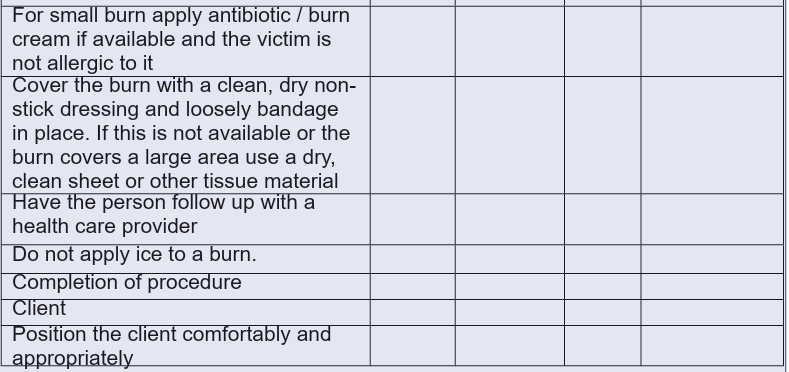
3.4.3. Technique: First aid in case of Drowning
AIMS
• Treat the victim for hypothermia
• To help the victim to regain the normal breathing
Learning Outcomes
• Able to understand and describe how the technique of helping drowned
person is done
• Maintain comfort and safety during the procedure• Perform the procedure by respecting the steps
Preparation
Associate Nurse/student preparation
• Hair tied back
• Should appear professional (in full and clean uniform) with student ID
Card
• Remove watch, jewelries, and Rings
• Wear short and closed shoes
• Wash hands
Client preparation
• Identification of the patient if applicable
• Ensure client privacy if applicable
• Self-presentation to the patient if applicable
• Physical and psychological client preparation if applicable
• Assess levels of comprehension and collaboration of the patient if applicable
• Explain to the patient/ family the rational of technique if applicable• Position the client in a comfortable position if applicable
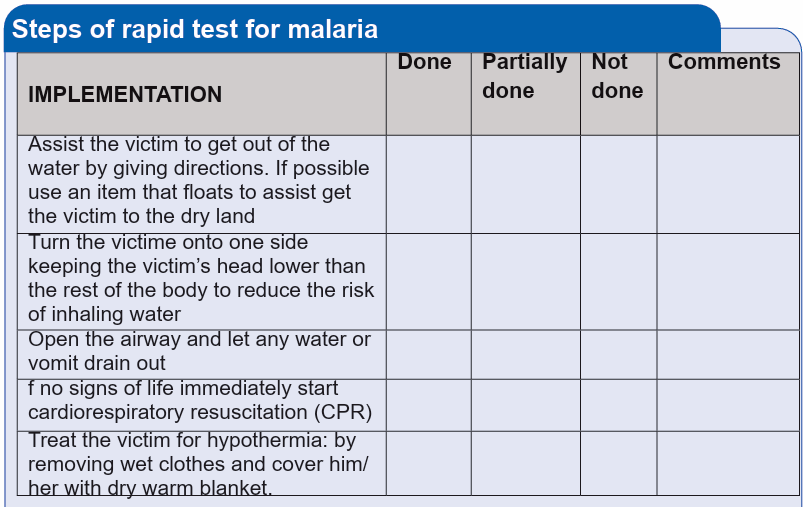
3.6.Technique: Choking relief in a responsive adult or child
AIMS
• To remove the foreign object lodged in the throat in order to clear
airways
• To provide first aid as quickly as possible.
Learning Outcomes
• Able to perform abdominal thrusts (Heimlich maneuver)
Associate Nurse/student preparation
• Hair tied back
• Should appear professional (in full and clean uniform) with student ID
Card
• Remove watch, jewelries, and Rings
• Wear short and closed shoes
• Wash hands
Preparation
Client preparation
• Identification of the patient if applicable
• Ensure client privacy if applicable
• Self-presentation to the patient if applicable
• Physical and psychological client preparation if applicable
• Assess levels of comprehension and collaboration of the patient if applicable
• Explain to the patient/ family the rational of technique if applicable
• Position the client in a comfortable position if applicable
Materials• Gloves if available

3.4.5. Technique: Choking relief in an unresponsive adult or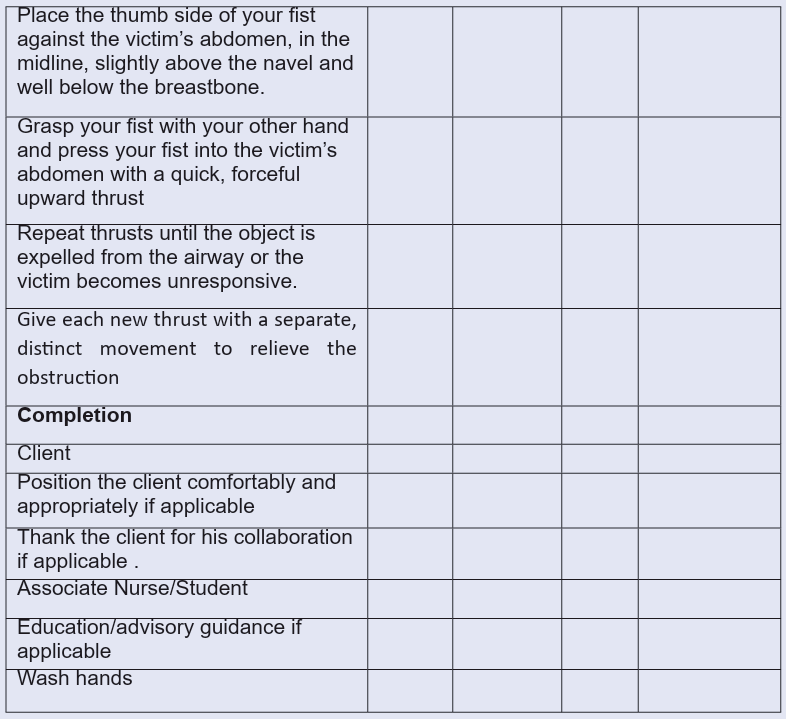
child
AIMS
• To remove the foreign object lodged in the throat in order to clear airways
• To provide first aid as quickly as possible.
Learning Outcomes
• Able to perform abdominal thrusts (Heimlich maneuver).
Preparation
Associate Nurse/student preparation
• Hair tied back
• Should appear professional (in full and clean uniform) with student ID
Card
• Remove watch, jewelries, and Rings
• Wear short and closed shoes
• Wash hands
Client preparation
• Identification of the patient if applicable
• Ensure client privacy if applicable
• Self-presentation to the patient if applicable
• Physical and psychological client preparation if applicable
• Assess levels of comprehension and collaboration of the patient if applicable
• Explain to the patient/ family the rational of technique if applicable
• Position the client in a comfortable position if applicable
Materials• Gloves if available
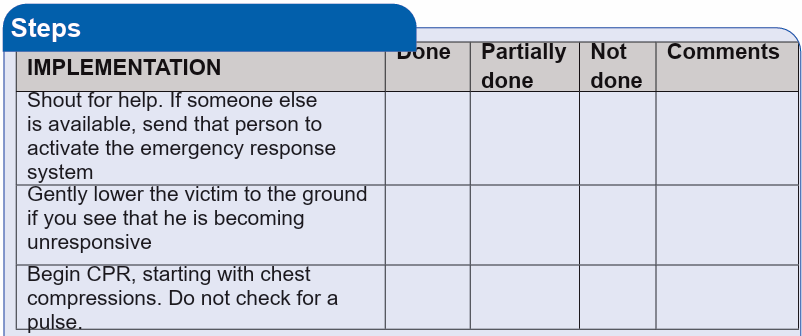

3.7.Choking relief in infants (Back slaps and chest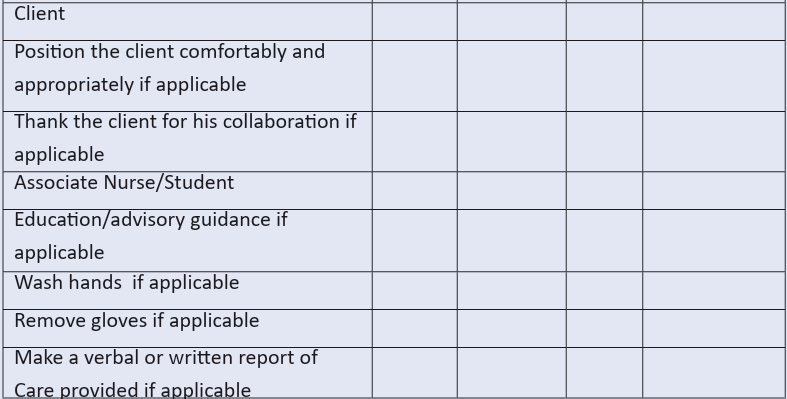
thrusts)
AIMS
• To remove the foreign object lodged in the throat in order to clear airways
• To provide first aid as quickly as possible.
Learning Outcomes
• Able to perform abdominal thrusts (Heimlich maneuver).
Preparation
Associate Nurse/student preparation
• Should appear professional (in full and clean uniform) with student ID
Card
• Hair tied back
• Remove watch, jewelries, and Rings
• Wear short and closed shoes
• Wash hands
Client preparation
• Identification of the patient if applicable.
• Ensure client privacy if applicable.
• Self-presentation to the patient or family if applicable.
• Physical client preparation if applicable.
• Explain to the patient/ family the rational of technique if applicable.
• Position the client in a required position
Materials• Gloves if available
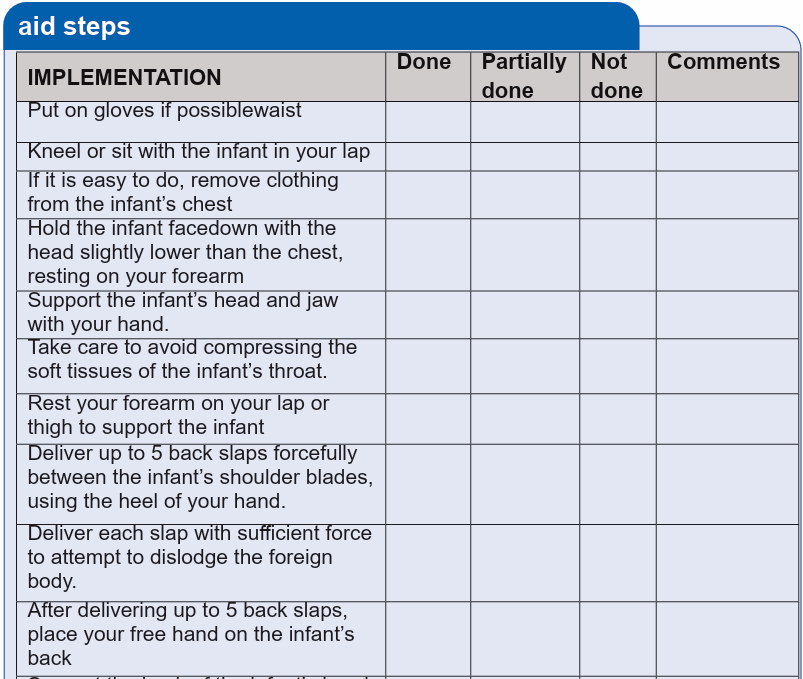
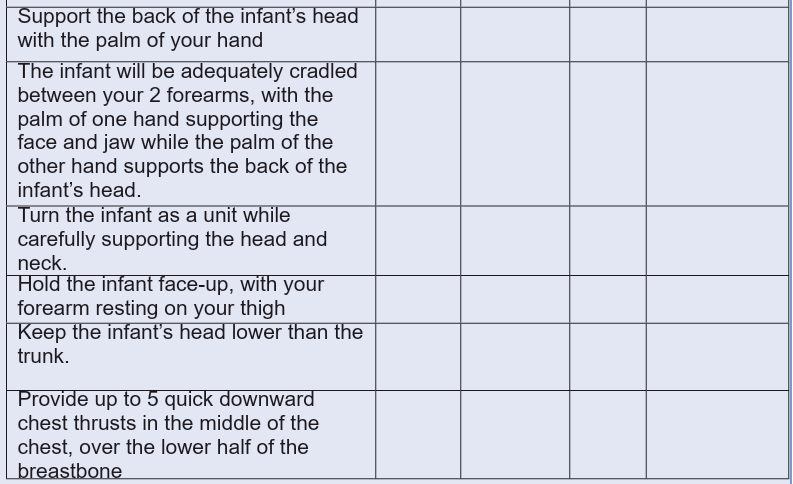
3.4.7. Choking Relief in an Unresponsive Infant AIMS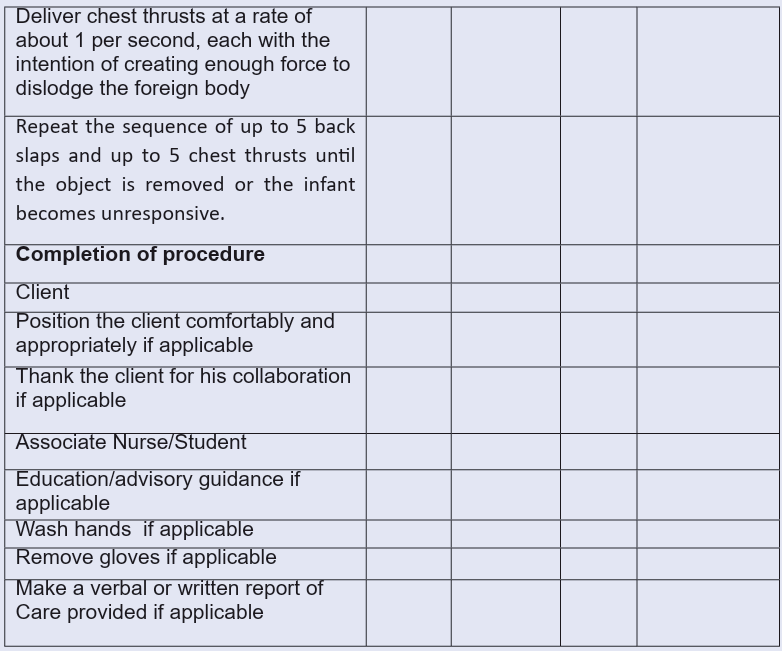
• o remove the foreign object lodged in the throat in order to clear airways
• To provide first aid as quickly as possible.
Learning Outcomes
• Able to perform abdominal thrusts (Heimlich maneuver).
Preparation
Associate Nurse/student preparation
• Should appear professional (in full and clean uniform) with student ID Card
• Hair tied back
• Remove watch, jewelries, and Rings
• Wear short and closed shoes
• Wash hands
Client preparation
• Identification of the patient if applicable.
• Ensure client privacy if applicable.
• Self-presentation to the patient or family if applicable.
• Physical client preparation if applicable.
• Explain to the patient/ family the rational of technique if applicable.• Position the client in a required position
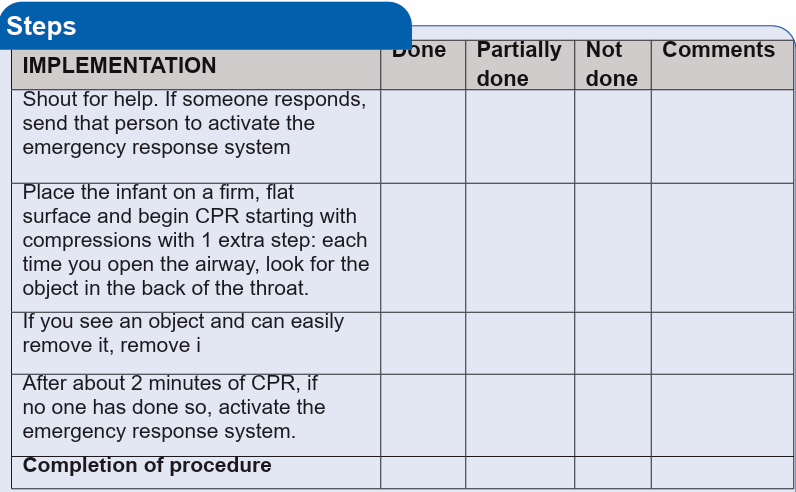
3.8.Technique: Cardiorespiratory Resuscitation: CPR
AIMS
• To restore partial flow of oxygenated blood to the brain and heart
• To delay tissue death including permanent brain damage.
Learning Outcomes
• The student will be able to provide CPR effectively.
Preparation
Associate Nurse/student preparation
• Should appear professional (in full and clean uniform) with
student ID Card
• Hair tied back
• Remove watch, jewelries, and Rings
• Wear short and closed shoes
• Wash hands
Client preparation
• Identification of the patient if applicable.
• Ensure client privacy if applicable.
• Self-presentation to the patient or family if applicable.
• Physical client preparation if applicable.
• Explain to the patient/ family the rational of technique if applicable.
• Position the client in a required position
Materials
• Gloves if available• AED if available
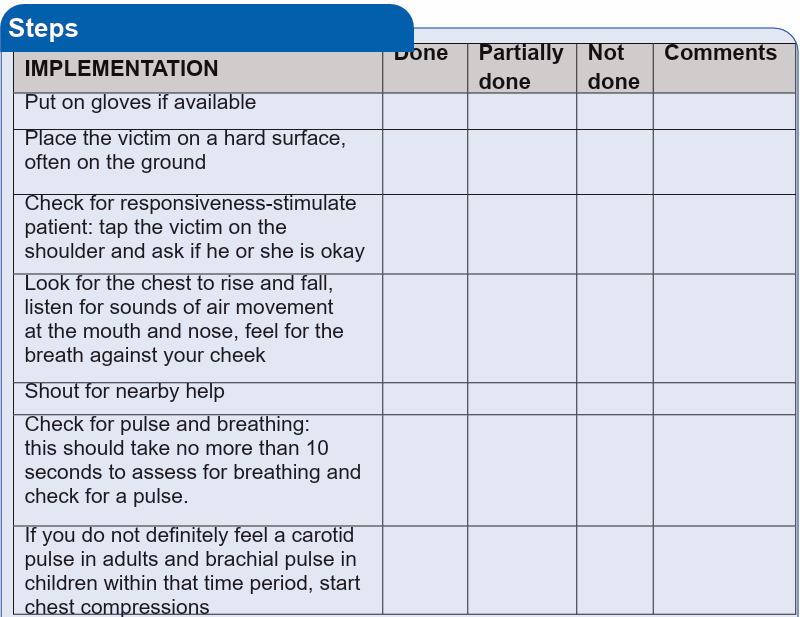


3.4.9. First aid care for broken bones
AIMS
• To rescue the patient’s life,
• To protect the affected limb
• To Stop any bleeding.
• To transport it safely and quickly in a simple and effective way in order to
get proper treatment
Learning Outcomes
• To Immobilize the injured area.
• To limit swelling and help relieve pain
Associate Nurse/student preparation
• Should appear professional (in full and clean uniform) with student ID
Card
• Hair tied back
• Remove watch, jewelries, and Rings
• Wear short and closed shoes
• Wash hands
Client preparation
• Identification of the patient
• Ensure client privacy
• Self-presentation to the patient
• Physical and psychological client preparation
• Assess levels of comprehension and collaboration of the patient
• Explain to the patient/ family the rational of technique
• Position the client in a comfortable position
Preparation
Materials
• Gloves
• Gauze
• Wood
• Splint material
• Tape• Triangular arm sling
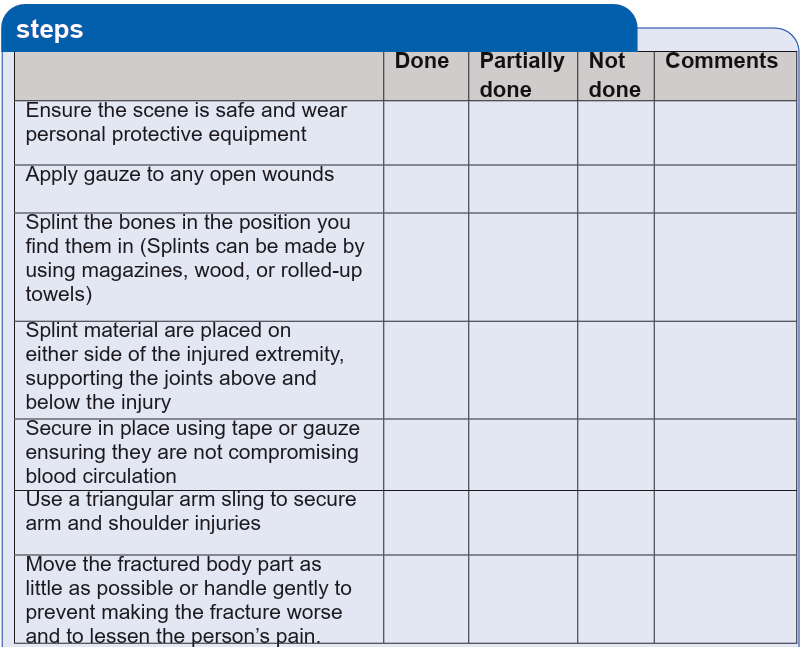
3.9.First aid in case of Epileptic seizure
AIMS
• keeping the person safe until the seizure stops
Learning Outcomes
• To Stay calm,
• To Loosen anything around the person’s neck,
• To Clear the area around
• To Stay with patient after the seizure stops
Associate Nurse/student preparation
• Should appear professional (in full and clean uniform) with student ID
Card
• Hair tied back
• Remove watch, jewelries, and Rings
• Wear short and closed shoes
• Wash hands
Client preparation
• Identification of the patient
• Ensure client privacy
• Self-presentation to the patient
• Physical and psychological client preparation
• Assess levels of comprehension and collaboration of the patient
• Explain to the patient/ family the rational of technique
• Position the client in a comfortable position
Materials• Gloves
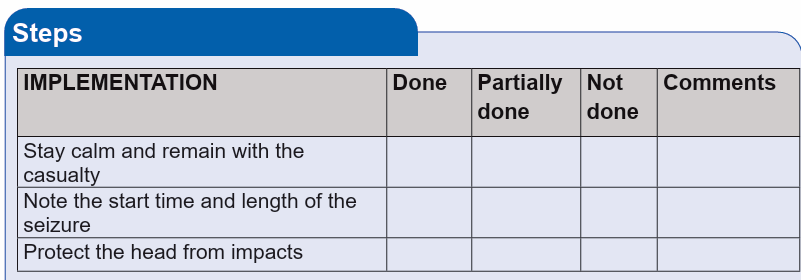
1.10.Technique: Immediate Post Natal Care Of The Mother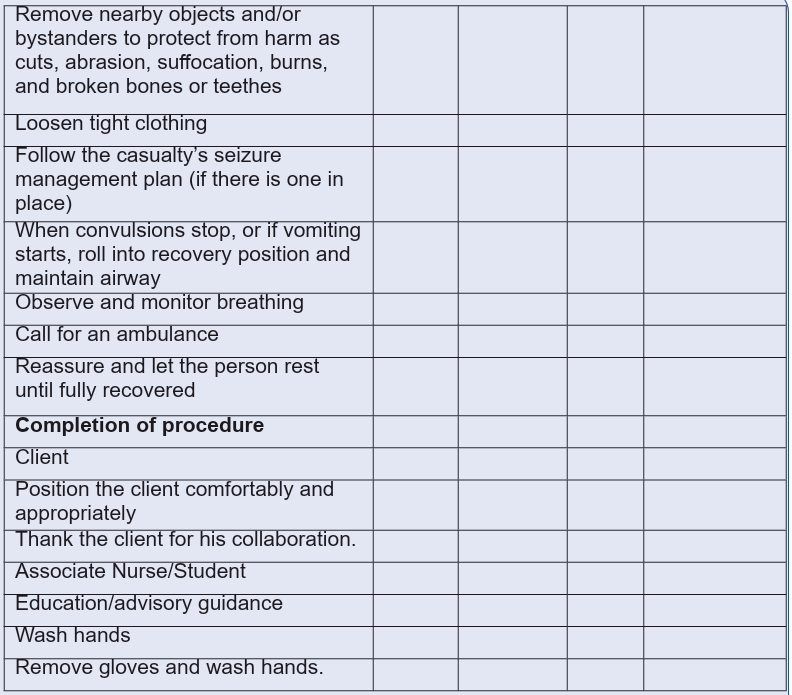
AIMS
• To have the general picture of the mother’s well being
• To find out the level of consciousness
• To find out if the woman’s condition gives rise to concern
• To find out the woman’s urgent need of care
Learning Outcomes
• Monitor a mother during postnatal period
Associate Nurse/student preparation
• Should appear professional (in full and clean uniform) with student ID Card
• Hair tied back and put bonnet
• Assemble equipment and arrange on bedside chair in the order the items
will be used
• Remove watch, jewels, and Rings
• Respect dignity and privacy of the client
• Wear closed and short shoes
• Hand washing
Client preparation
• Identification of the patient
• Self-presentation to the patient
• Physical and psychological patient preparation
• Assess levels of comprehension and collaboration of the patient
• Explain to the patient/ family the rationale
• Position the patient in a comfortable position
• Ensure privacy
Equipment
• Vital signs materials
• Examination gloves
• Gauze
• Kit for vulva disinfection
• Dustbin, and
• Examination table and folding/curtain screen if necessary• Sanitary pad


3.11.4.2. Technique: Pre HIV Testing Counselling For Pregnant Woman (PMTCT)
AIMS
• To ensure primary prevention of HIV among women of childbearing age
• To integrate PMTCT interventions into routine maternal and child’s health
services
Learning Outcomes
• To promote voluntary testing in the context of PMTCT when offering
antenatal care.
• To provide appropriate regimens to prevent mother-to-child transmission
• To Provide psychosocial support to HIV positive pregnant women.• Improving follow-up care for HIV positive women and their infants.
Associate Nurse/student preparation
• Hair tied back and put bonnet
• Should appear professional (in full and clean uniform) with student ID Card
• Assemble equipment and arrange on bedside chair in the order the items
will be used
• Remove watch, jewels, and Rings
• Respect dignity and privacy of the client
• Wear closed and short shoes
• Hand washing
Patient preparation
• Identification of the patient
• Self-presentation to the patient
• Physical and psychological patient preparation
• Assess levels of comprehension and collaboration of the patient
• Explain to the patient/ family the rationale
• Position the patient in a comfortable position• Ensure privacy


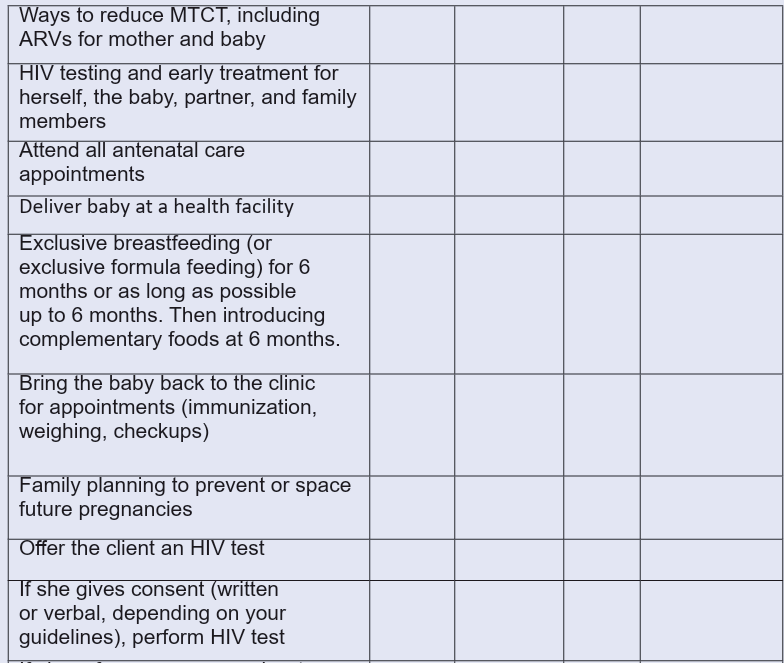


UNIT 4 : FUNDAMENTALS OF NURSING MODULE SENIOR SIX
3.12. Procedure: Nasogastric Tube (NGT) Feeding
Aims NGT feeding:
• NGT feeding is aimed to administer fluids, medications and liquid food
complete with nutrients directly into the stomach.
Learning outcome
• Demonstrate knowledge and skills of NGT feeding
• Describe the procedures for NGT feeding
• Demonstrate competence of NGT feeding
Student/nurse preparation
• Should appear professional (in full and clean uniform) with student ID Card
• Hair tied back and put bonnet
• Assemble equipment and arrange on bedside chair in the order the items
will be used
• Remove watch, jewels, and Rings
• Respect dignity and privacy of the client.
• Wear closed and short shoes
• Hand washing
Patient preparation
• Identification of the patient
• Self-presentation to the patient
• Physical and psychological patient preparation
• Explain the procedure to be performed and purpose
• Position the patient in a comfortable position
• Ensure privacy
Equipment
• Trolley or Tray cleaned and disinfected
• Verify the provider’s order.
• Gather supplies: stethoscope, gloves, towel, irrigating solution (usuallywater), and irrigation set with irrigating syringe, pH tape, Formula indicated,