UNIT 6 VICTIM’S EVACUATION TECHNIQUES
Key unit competence
Apply correctly the technique of victim’s evacuation during emergencies
Introductory activity 6Observe the image below and respond to the asked questions
1. What does the illustrates A, B, C and D above show?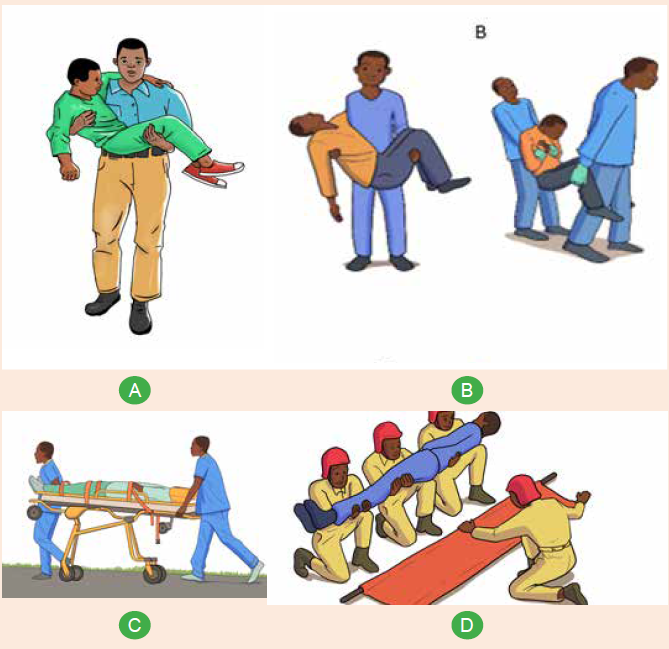
2. What are the materials do you see in use in the mentioned illustrate?
3. Differentiate different technique for victim evacuation observed on the
illustrate above.
6.1.Basic concepts of emergency response and management(ERM)
1) Observe the image above and mention what they all have in common.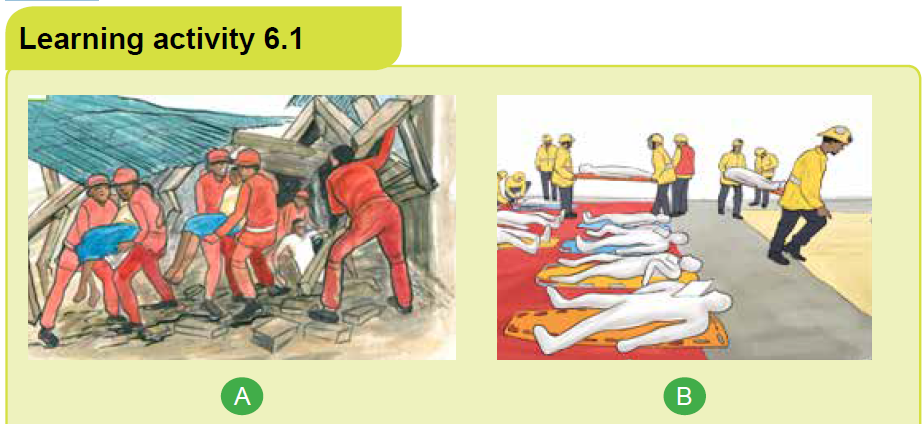
2) Referring to the above image explain the term emergency and emergency
response
a) Emergency /Disaster
An emergency is a situation that poses an immediate risk to health, life, property,
or environment. Most emergencies require urgent intervention to prevent a
worsening of the situation. While some emergencies are self-evident (such as
a natural disaster that threatens many lives), many smaller incidents require that
an observer (or affected party) decide whether it qualifies as an emergency.
b) Emergency Response
Response is a reaction to an emergency situation or event. Response can range
from individual to national level. The response phase of an emergency may
commence with search and rescue but in all cases the focus will quickly turn to
fulfilling the basic lifesaving and humanitarian needs of the affected population.
For the disaster, emergency response is the phase of the disaster-management
cycle that often attracts the most attention and resources. It should therefore be
seen as a critical part of the disaster management cycle. Emergency response is
a cyclical process, involving repeated assessment, planning, action and review, to
respond appropriately to needs and capacities as they evolve. It starts with an initial
assessment and may be triggered spontaneously by the disaster event, or officials
may authorize the mobilization of people and resources. Rapid and effective
mobilization is facilitated by proper disaster preparednes
-Aim of the Emergency Response Management
To reduce mortality rate and damage to property thereby reducing the impacts of
disaster and to ensure successful recovery of maximum number of people
-Importance of a Timely and Coordinated Response
Depending on injuries sustained by the victim, outside temperature, and victim’s
access to air and water, the vast majority of those affected by a disaster will die
within 72 hours after impact
-Activities included in emergency response management
• Search & Rescue
• Fire Fighting
• Emergency Medical Assistance including first aid, mass casualty
management and physiological first aid etc.
• Transportation of victims
• Need Assessment Survey
• Hospital Preparedness
• Evacuation
• Provision of food and non-food items
• Temporary shelter
• Emergency repair of critical facilities
• Security measures/tracing/family reunification
c) Emergency management
Emergency management is the organization and management of the resources
and responsibilities for dealing with all humanitarian aspects of emergencies. The
aim is to reduce the harmful effects of all hazards, including disasters.
The emergency management has 4 phases. preparedness, response, mitigation,
and recovery
Emergency Preparedness is a research-based set of actions that are taken as
precautionary measures in the face of potential disasters. These actions can include
both physical preparations (such as emergency supplies depots, or adapting
buildings to survive earthquakes) and trainings for emergency action. Preparedness
is an important quality in achieving goals and in avoiding and mitigating negative
outcomes.
Disaster Mitigation is the ongoing effort to lessen the impact disasters have on
people and property. Mitigation involves keeping homes away from floodplains,
engineering bridges to withstand earthquakes, creating and enforcing effectives.
building to protect property from sliding etc. Mitigation describes the ongoing effort
at the federal, state, local and individual levels to lessen the impact of disasters
upon families, homes, communities and economy.
Recovery is those activities that continue beyond the emergency period to restore
lifelines. Examples include providing temporary shelter, restoring power, critical
stress debriefing for emergency responders and victims, job assistance, smallbusiness loans, and debris clearance
Self-assessment 6.1.
1) Mitigation in the disaster management cycle involves what activity?
a) Prevention of disasters if possible
b) Caring for the birds injured
c) Responding to the disaster
d) Preparing for litigation after the event
2) Disasters can happen at any time. What is the first part of the disaster
management cycle to consider?
a) Response
b) Litigation
c) Recovery
d) Preparation
3) Most emergencies require urgent intervention to prevent a worsening of
the situation
a) Yes
b) Not
4) installing electricity destroyed after an earthquake strike is considered an
activity of:
a) Emergency Recovery
b) Emergency preparedness
c) Emergency mitigation
d) Emergency litigation6.2. Local level search and rescue technique
Analyze carefully the following images above and respond to the question aside.
1) Explain the common features observed among people on this picture?
2) What are different tasks are they doing?
3) How do you find the place where they are performing their duties?
4) What might be the cause of the situation observed on these pictures?
Search and rescue is a technical activity rendered by a group of specially trained
personnel, who rescue and attend to the casualties under adverse conditions,
where life is at threat. Search and rescue is organized in close cooperation with
the community and in a team approach. The search and rescue activities are
undertaken in two ways such as community local rescuers and outside community
rescuers.
6.2.1 Community Local Rescuers
With adequate safety measures, rescue immediately after any natural calamities
such as cyclone, flood, earthquake and fire in a community.
6.2.2 Outside Community Resources
Circumstances where the situation is grave and the local rescuers do not have
required efficiency and equipment, then specialist assistance from outside the
community is required. The role of public health providers is to promote, protect,
and improve the health of individuals and communities. The community rescuers
shall have to be in readiness to respond quickly, when a cyclone, flood, earthquake
and fire occur. The rescuers efficiency level has to be maintained thorough practice
nd demonstrations /mock-drills during the non-disaster period. The rescue team
should undergo standard training from time to time.
6.2.3 Rescue workers
An event requiring rescue operations will usually create three categories of rescue
workers survivors, untrained personnel and trained personnel.
a) Survivors
The immediate reaction of survivors in a major incident, once discovered that they
are not injured, is to help their neighbors and families. They often do not know
what to do, but obviously it is a serious situation and thus they feel they must do
something.
b) untrained personnel
The second ‘wave’ of rescue workers is drawn from people either witnessing the
event from the immediate vicinity, or are drawn to the site by curiosity and a desire
to assist the victims. Although not quite as emotionally involved as the survivors,
the danger inherent in utilizing untrained personnel is still a factor which must be
considered. On the positive side, they often bring necessary resources with them
and can be effective if brought under control and properly supervised.
c) Trained personnel
The last group to arrive at the scene is the trained rescuers: Police, Fire, Civil
Defense, etc. It takes some time for various emergency services to mobilize and
arrive at the scene. The quicker they can arrive, the less time there will have
been for the first two groups to aggravate the situation and create more dangers
to surviving victims and themselves. The well-trained team will know what to do,
and how to utilize the available resources and untrained personnel in efficiently
carrying out the necessary tasks in a manner that will not further endanger
anyone.
6.2.4 Team composition
Team composition will be determined by the various organizations within each
area on the basis of safe accomplishment of set tasks. Regardless of the team
composition, a team leader must be appointed. A team of 6 – 8 members is
required for effective general rescue teamwork. It is essential that each safe
shelter form a rescue group, comprising of 8 members; Team leader: 1, Skilled
persons: 2 Members: 5
-Activation
Each team should have a call out system established, and have determined the
time necessary to ensure a full team response. This system should include such
details as:
• Who calls out the team
• Who will be responsible for them
• Where to report
• What functions the team will perform
• What equipment to take
• Likely duration of task or event.
-Deployment
On call-out, teams should state clearly to the organization requesting their support,
details of accommodation and any feeding assistance that may be required.
If practicable, each team should be self-sufficient in the provision of food for the
first 24 hours.
-Coordinated incident management system (CIMS)
The Coordinated Incident Management System) provides the model for command,
control, and coordination of an emergency response. It provides a means of
coordinating the efforts of agencies as they work towards the common goal ofstabilizing an incident and protecting life, property, and the environment.
Self-assessment 6.2
1) Mention the two ways/levels search and rescue activities are undertaken.
2) Explain role of the three types of rescue workers.
3) How is the rescue team composed?
4) How does a rescue team coordinated.
6.3. Introduction to basic rescue victim’s techniques
Learning activity 6.3
Analyze careful the following image below and respond to the questions thatfollow
1) What is the purpose of the different activities depicted on the image above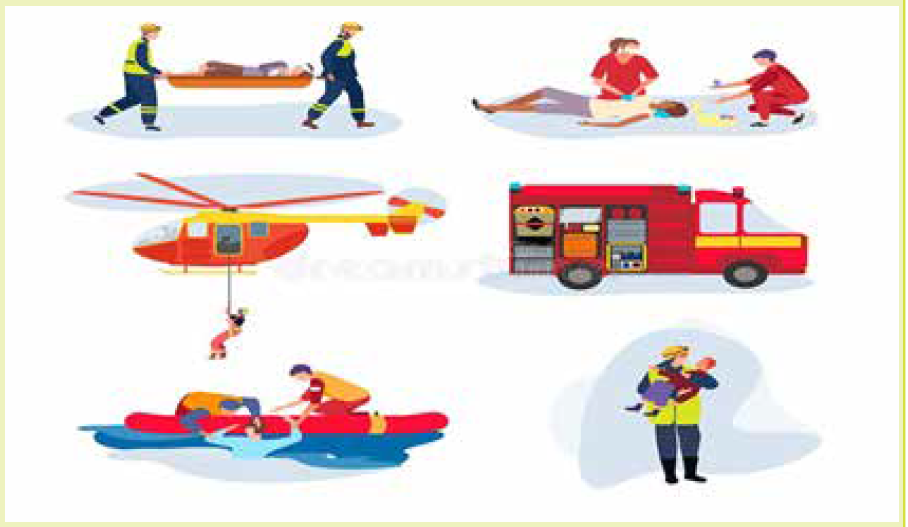
2) Distinguish different technique observed on the image above.
6.3.1. The aim of rescue
The aim of rescue is to save the greatest number of lives in the shortest possible
time and to minimize further injury to people and damage to property.
-Basic rescue evacuation techniques: Evacuation and safe rescuing of victim by
applying simple manual techniques can save the life of the victim. Regular hands
on practice and drills will help the rescuer to safe lives in quicker and safer manners
Rescue drag and victim evacuation techniques,
• Required to evacuate an injured person from an emergency scene to a
location of safety.
• Manual carries are tiring for the rescuer and involve the risk of increasing the
severity of the casualty’s injury.
• Choose the evacuation techniques that will be least harmful, both to rescuer
and the victim.
• Causalities carried carefully and correctly handled, otherwise their injuries
may become more serious or possibly fatal.
• Situation permitting, evacuation of a causality should be organized and unhurried.
• Each movement should be performed as deliberately and gently as possible.
All rescuers must be aware that the safety of the casualty is paramount even
when immediate evacuation from a hazardous environment is necessary. A careful
assessment must be made of the casualties’ injuries, condition, and possible
entrapment, and a final check must be made to ensure that the casualty is actually
ready to move and is not caught or entangled in some unseen object. Selection or
sorting of casualties before evacuation of casualties where multiple casualties need
attention, the rescuer will be required to select casualties for treatment and rescue
by order of priority. This selection or sorting of casualties is known as triage.
Rescuers may be called upon to perform the triage role at a rescue site as a specific
task, or this may be a part of the overall reconnaissance element of a rescue. While
moving fairly quickly from casualty to casualty, the rescuer performing triage must:
• Quickly assess the condition of casualties and label them.
• Place any unconscious person in a lateral recovery position – care for airway,
breathing, and circulation.
• Temporarily control any serious bleeding by the use of bystanders or other
rescuers as necessary.
• Choose the casualties with the greatest chance of survival.
It must be noted that it will sometimes be necessary to treat and rescue casualties
of relatively low priority in order to access and clear the way for treatment of high
priority casualties. Additionally, the principle of ‘remove the casualty from the risk or
remove the risk from the casualty’ should be adopted where a site hazard presents
a risk to casualties being treated prior to rescue.
-casualty sorting
Before transporting the causalities, it is important to start by sorting them, in other
of priority.
Red: Priorities are displayed using a color code system.
• Those victims who need immediate advanced medical treatment (within 1
hour) to survive.
• These victims would have first priority for transport to a medical facility, if
available.
Yellow: These victims have serious injuries, but are not life threatening. They will
survive without advanced medical treatment and their situation can be maintained
through proper basic emergency care.
Green: Minor injuries that can be dealt with by first aid, or can wait for some time
without treatment
Black: Deceased, or who are unlikely to survive given the situation.
NOTE: These colour codes may constantly change, as the assessment of the
casualties and their injuries is an ongoing process. The victim’s colour code may
change as the situation changes (e.g., the availability of transport, medical supplies,
etc). In a major incident, be prepared to wait some time without either advanced
care on-site, or transport to an appropriate facility. After removal, many casualties
will have to be carried over piles of debris and uneven ground before being handed
over to the ambulance service or first aid station. Whilst speed of removal is
important, it must be consistent with safety and proper handling to prevent further
injury.
The technique used will depend on the immediate situation, the condition of
casualties, types of injuries, and available equipment. Rescue leaders should
conduct frequent exercises in the removal of casualties, using live people as
casualties to give team members understanding and confidence in the various
methods, enabling them to make decisions promptly in times of emergency. As
important as learning methods; rescuers should experience the physical effort
required in transporting casualties, either by stretchers or by some improvised
method. The transportation of casualties over long distances is a very tiring task
and requires fit personnel.
There are many types of victim evacuation techniques but in our context, we shall
focus on:
• Ankle pull
• Shoulder pull
• One-person lift
• Pack-strap car
• Two-person arm carry
• Two person carry by arms and legs
• Chair carry
• Improvised stretcher
• Fireman’s carry and• Blanket drag
Rescue tools

Self-assessment 6.3
1) Explain the methods used to sort or selecting the victim evacuation in
other of priority
2) Outline the Rescue drag and victim evacuation techniques3) Mention and differentiate at least 2 different victim evacuation techniques
6.4. Ankle pull

a) Description
Ankle pull evacuation technique is also known as ankle drag evacuation technique
and is used to move a victim who is too large to carry or move in any or other way.
Generally, the movement of a victim by lifting part of their body as the other part
drags is often used when a carry isn’t possible or practical. Regardless of whether
you carry or drag a victim to safety, you must remember to keep your own safety
a high priority. It doesn’t sound heroic to say, but it does no good for anyone if you
injure yourself and become part of the problem rather than the solution.
Things to consider before deciding to use ankle pull technique.
• How many victims are in need of rescue?
• How many rescuers are available?
• What are the capabilities and conditions of the rescuers?
• What is the size and condition of the victim(s)?
• What is the safety and stability of the environment?
The feet drag is a last resort. Moving a victim in this manner will most certainly be
uncomfortable for the victim and will likely cause greater injury. It’s a “life over limb”
technique. This can really be accomplished only if the victim is unconscious because
of the pain of dragging their torso and head along the ground. To perform ankle pull
evacuation technique, the rescuer has to grasp firmly the ankles of victim and move
backward, victim’s arms should be crossed aver his/her chest, the rescuer pulls the
victim to safety in a straight line. The technique should not be used if the victim issuspected to have a spinal cord injury, head or neck injuries.
Self-assessment 6.4
In simulation lab or in classroom make pairs and perform the ankle pull victim’s
evacuation technique.6.5. Shoulder pull
a) Description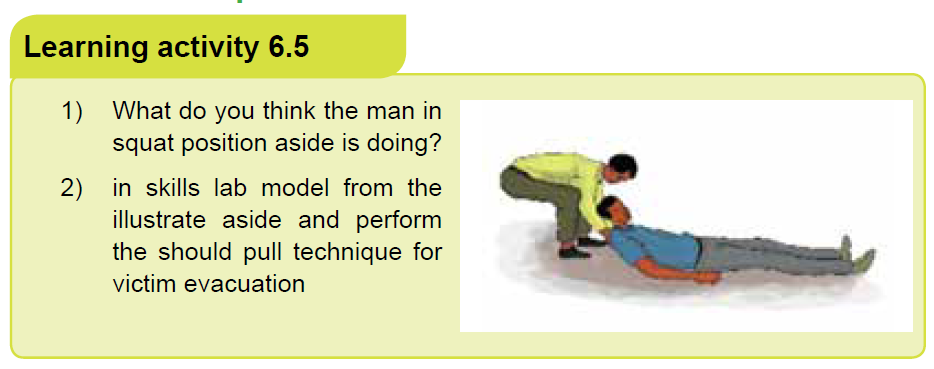
The shoulder pull technique is a one-man rescue technique used to evacuate the
causality from the danger area to the safe area or from the incident area to the
hospital. Because in this procedure the rescuers use his own hand, therefore it
does not require equipments. However, for trauma patients, it is always advised to
evacuate them using equipment that allows stabilization of the whole body and safe
handling of the injured in vertical and horizontal planes because maximum care
must be taken to avoid to worsen an unstable trauma. The head-neck-chest axis
must be kept straight to protect the spine, and the first responders must keep the
patient’s body stable (no movement of the feet) before the pull.
The shoulder pull is preferred to the ankle pull. It supports the head of the victim.
The negative is that it requires the rescuer to bend over at the waist while pulling.
b) Procedure
• Grasp the victim by the clothing under the shoulders.
• Keep your arms on both sides of the head.
• Support the head.
• Try to keep the pull as straight and in-line as possible
• Pull the victim
Self-assessment 6.5
In group of 2 go in the skills lab and perform the technique of shoulder pull oneach other
6.6. One-person lifting
One-person transport methods
• Fireman’s Carry- the easiest way to transport a light and smaller victim.
• Piggy Back- when the victim is conscious.
• Pack Strap Carry- when the victim is smaller than the first aider.
• Shoulder Drag- used when the floor is smooth, short distance transport.
• Fireman’s Drag or Tied-hands Crawl- used when the first aider and the victim
must crawl underneath a low structure.
• Blanket Drag- used when the victim is seriously injured and should not be
lifted.
Factors to Consider before lifting the causality by one-person lift:
• Weight and height of the victim
• Status of the victim (conscious or unconscious)
• Environment (safe, floor is smooth, narrow or wide)
• Special need considerations (injuries of the victims)
A single person who cannot walk but who does not need to be on a litter (one with,
for example, a broken ankle, mild exhaustion, or acute mountain sickness) may
be carried on the back of a strong rescuer using a rope seat. This is fashioned by
passing a long 1 inch (2.5 cm) rope or strap across the victim’s back and under his
arms, then crossing the rope in front of his chest.
The victim is loaded piggyback onto the rescuer’s back, and the rope ends are
passed forward over the shoulders of the rescuer, under his arms, and around to
the rescuer’s back, then between and through the victim’s legs from the front, and
around the outside of the victim’s legs just under the buttocks, to be tied snugly
in front of the rescuer’s waist. Such a rope seat is far preferable to a standard
fireman’s carry, which is very fatiguing. A blanket drag is only good for very short
distances, such as to pull a person quickly away from an immediate hazard.One rescuer handling technique

Application activity 6.6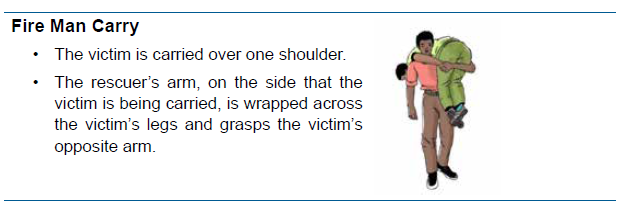
1) What are the factors to Consider before lifting the causality by one-person
lift?
2) In Fire Fighters Carry, the victim is carried over one _________.
a) knee
b) arm
c) shoulder
d) leg
3) Go in the simulation lab, pair yourself and perform the one-person liftarms carry technique for victim evacuation.
6.7. Pack- strap car victim evacuation technique
Learning activity 6.7Analyze carefully the following images and respond to the questions below:
1) The victim evacuation technique illustrated above is appropriate to a)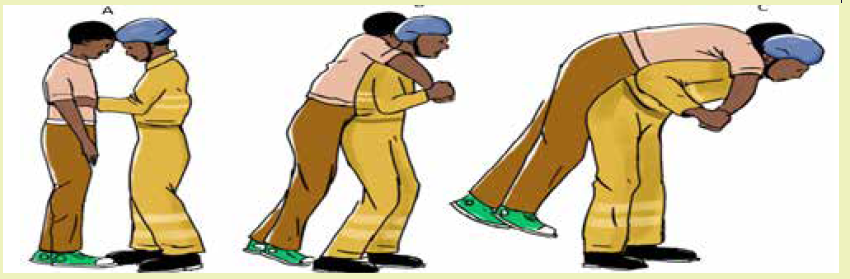
unconscious patient, b) conscious patient, c) adult causality.
2) describe in a stepwise approach the technique of pack-strap as observedon the illustrate A, B and C above.
a) Description
The pack-strap car is a rescue technique using no equipment for appropriate
victim evacuation; the pack-strap car technique involves only one rescuer handling
maneuvers to evacuate the causality from one area to another for appropriate care.
This technique is used on the conscious casualty with no fractures of the extremities.
b) Procedure
• The rescuer turns his/her back to the standing casualty.
• The rescuer after turning the back to the causality brings the causality’s arms
over his/her shoulders to cross his/her chest.
• The arms of causality must be kept straight as possible, the armpits over the
shoulders of rescuer.
• The rescuer holds casualty’s wrists, bends, and pulls the person onto his/herback.
Self-assessment 6.7
In your class make groups of two students one student will play the role of
casualty while the second one will play the role of rescuer then perform the
“pack- strap car” victim’ evacuation technique modeling on the illustrate above.
After performing the first round exchange the role and reperform the “pack-strapcar” victim’s evacuation technique
6.8. Two person arms carry
Two-person arms carry is a technique for victim evacuation which involve two
rescuers to drag the victim in a safe place using their hands. Both conscious and
unconscious victims can be carried with this technique. Two person carry involve
human crutch/two person drag technique, two handed seat technique and fourhanded
seat technique.
6.8.1. Human crutch/two-person drag
a) Description
For the conscious victim, this carry allows the victim to swing their leg using the
rescuers as a pair of crutches. For the unconscious victim, it is a quick and easy
way to move a victim out of immediate dangerb) Procedure
Self-assessment 6.8.1
In your groups model from the illustrate above and perform the technique of
human crutch /two-person drag
6.8.2. Two Handed- seat technique
a) Description
This technique is for carrying a victim for longer distances. This technique can
support an unconscious victim.b) Procedure

Self-assessment 6.8.2
Pair yourself in groups of two and perform the technique of two handed- seat for
victim evacuation modeling from the illustrate above
6.8.3 Four handed- seat
a) Description
This technique is for carrying conscious and alert victims in a moderate distance.
The victim must be able to stand unsupported and hold themselves upright during
transport.b) Procedure
Self-assessment 6.8.3
Pair yourself in groups of 3 then model from the image above and perform the
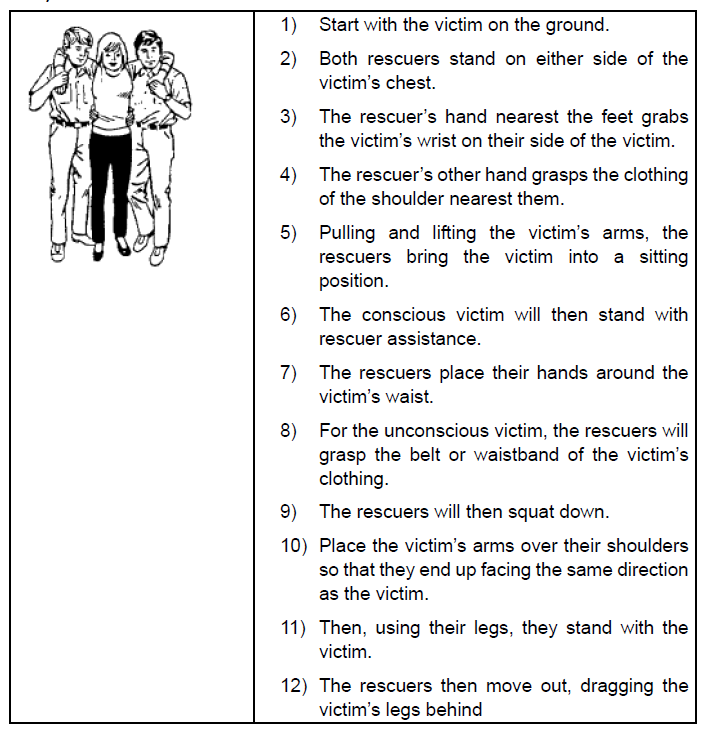
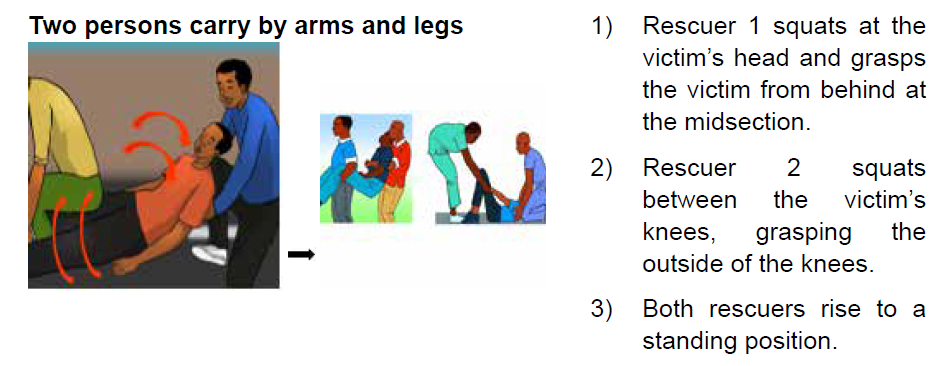
technique of four handed seat for victim evacuation.6.9. Two person carry by arms and legs
Two persons carry by arms and legs technique is a method of victim evacuation
where one rescue holds the victim legs and the other one hold the arms to drag the
victims out of danger.
a) Things to consider before attempting the two arms and legs carry
technique
• Explain the Procedure to the casualty. If the casualty is conscious, tell him
what you are going to do. The explanation will help to calm his fears and will
help you to get his cooperation.
• Perform necessary measures before transporting. Make sure the casualty
is breathing properly, open wounds have been dressed and bandaged, and
fractures have been splinted before transporting the casualty.
• Have one person in charge. One person must give the instructions to the
remainder of the team so actions will be performed in union.
b) Precautions:
• Do not transport a casualty with a suspected fracture of the neck or back
unless a life-threatening hazard is in the immediate area. Wait until medical
personnel arrive.
• Go slowly to avoid further injury. If the injured person is able to talk, check in
frequently to make sure they are comfortable throughout the process.
• In the event the injured person is unconscious, you may want to tie their
hands loosely together at the wrists. This can make the carrying process
easier.
• Do not use anything thin or sharp to tie the person’s hands this could cut their
wrists.c) Procedure

Self-assessment 6.9
1) What do you need to consider before evacuating a victim with arms and
legs.
2) Describe what the Fore and Aft method involves in two person carry by
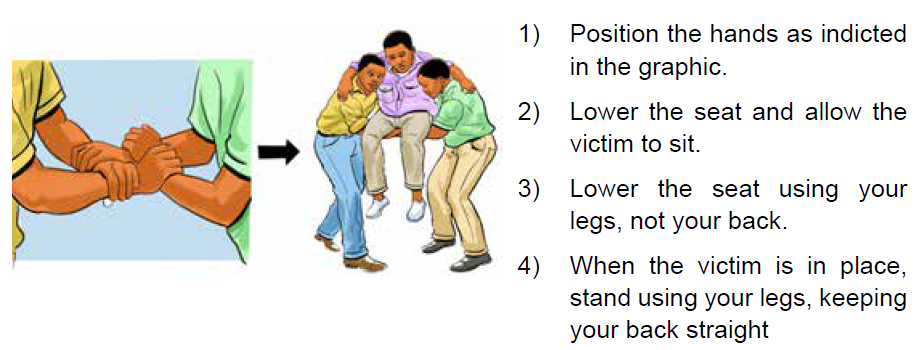
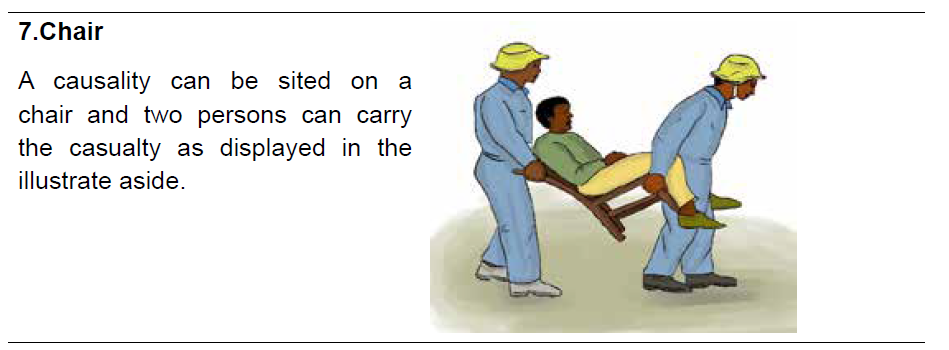
arms and legs evacuation technique.6.10. Chair carry technique
a) Description
A chair carry technique is a method often used to move a sick or injured person
away from a position of danger. The casualty is seated on a chair and a chair is
carried by two rescuers. The two-person seat carry requires a second responder.
This carry can be used by any person who is conscious and not seriously injured.
This method is prohibited if the casualty is suspected to have head, neck or spinal
injuries.
A chair carry method is a victim’s evacuation methods which doesn’t require
equipments; only an appropriate chair is used.
This is a good method for carrying victims up and down stairs or through narrow oruneven areas.
b) Procedure

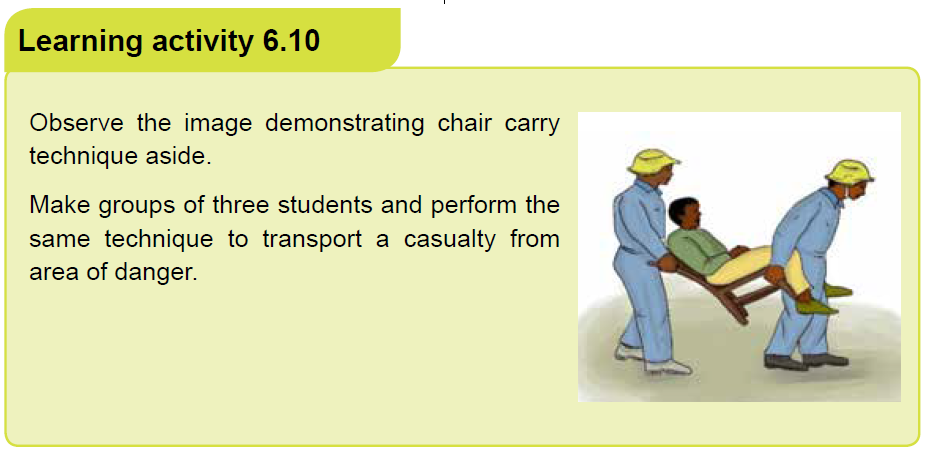
Self-assessment 6.10
In your class make groups of three students. One student will play the role of
causality while the two others will play the role of rescuers then perform the “chair
carry” victim’ evacuation technique. After performing the first round exchange
the role and reperform the “chair carry” victim’s evacuation technique. Everystudent should play the role of rescuer.
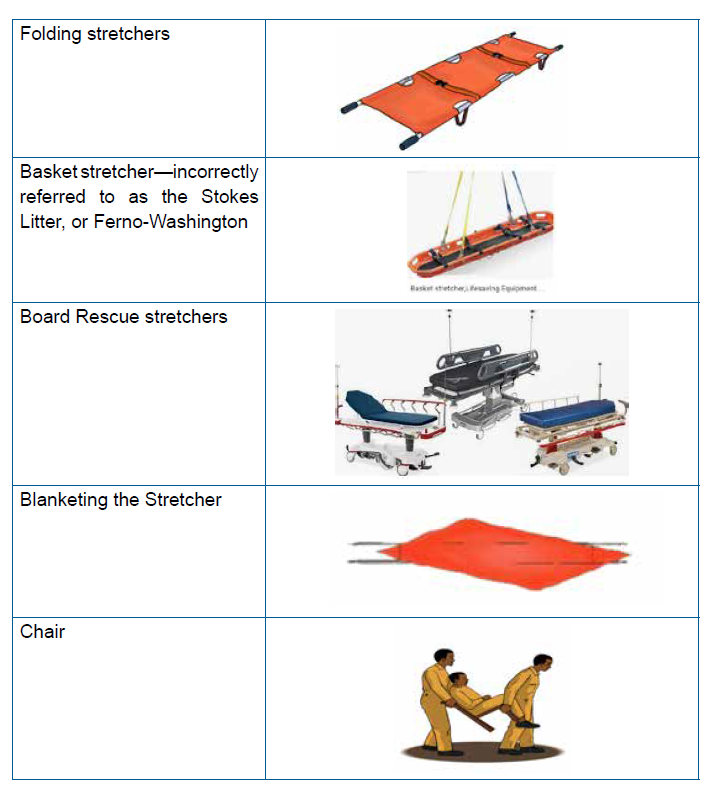
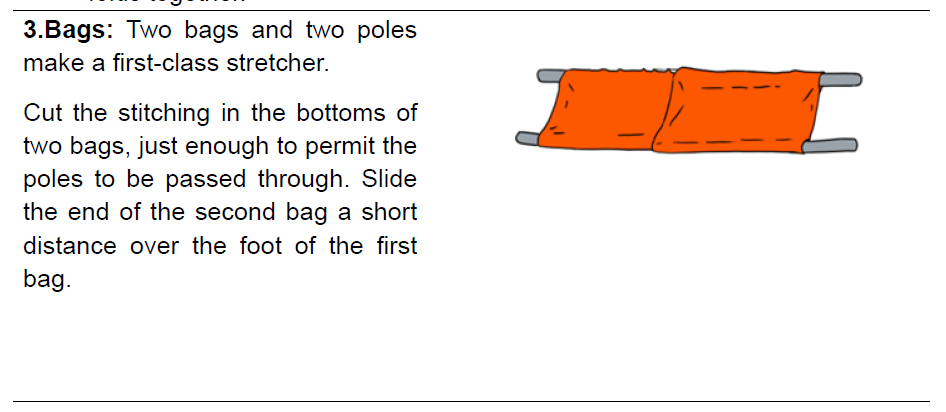
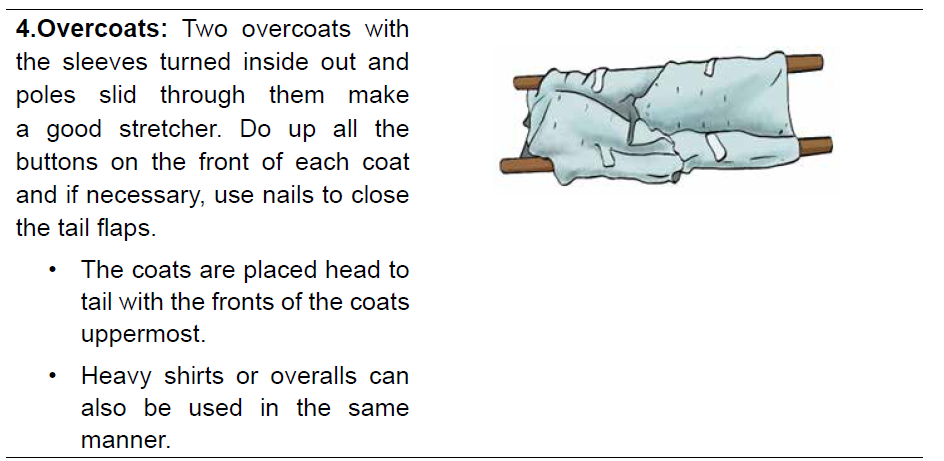
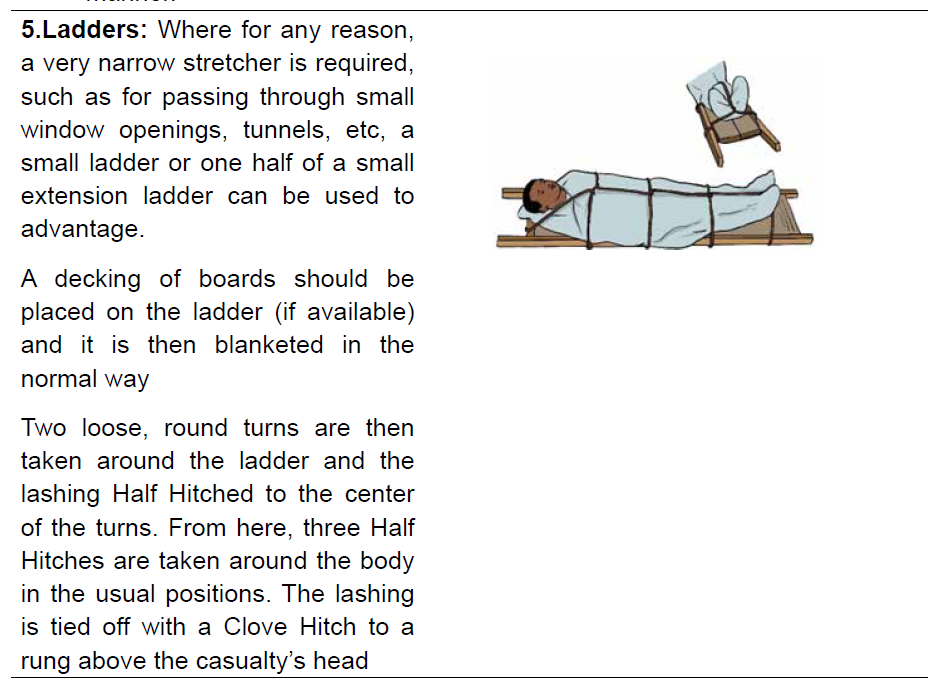
6.11. Improvised stretchers
A stretcher is a light frame made from two long poles with a cover of soft materials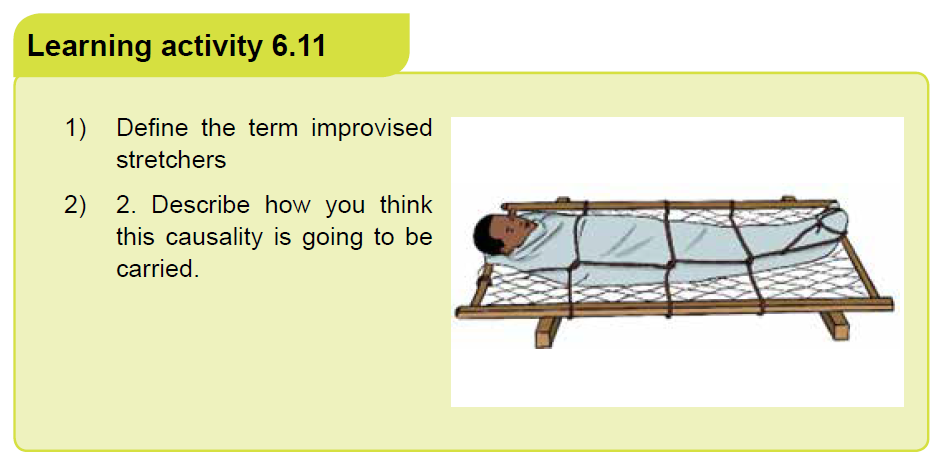
stretched between them, used for carrying people who are ill, injured, or dead.
Causality evacuation from the danger area to the safe area or from the incident
area to the hospital is crucial to save life. However, in some situation there may be
insufficient stretchers for the number of casualties involved. Therefore, improvised
stretchers have to be used to carry victims.There are many methods of improvisation


Self-assessment 6.11
1) What are the materials needed to make a blanket stretcher2) Describe the process of making a stretcher with a door.
6.12. Fire man’s carry technique
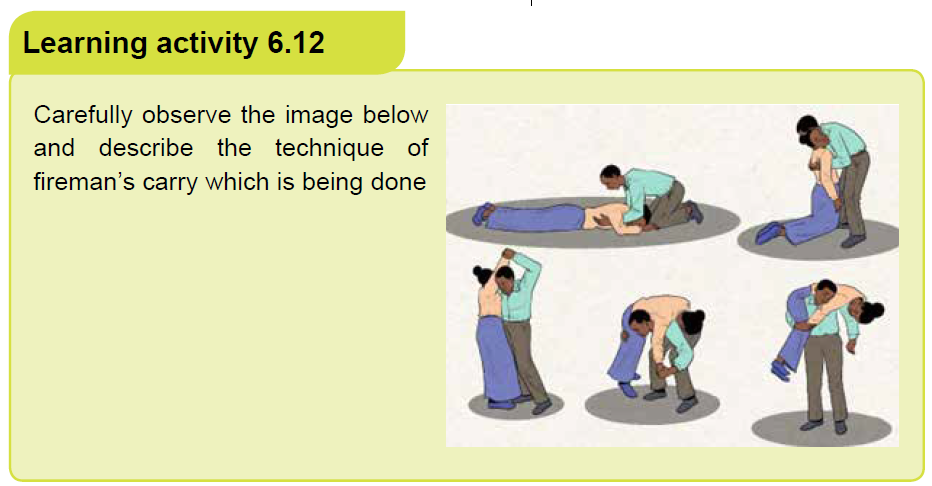
a) Description
A fireman’s carry or fireman’s lift is a technique allowing one person to carry
another person without assistance. It requires placing the carried person across the
shoulders of the carrier. This technique is for carrying a victim in longer distances.
It is very difficult to get the person up to this position from the ground. Getting the
victim into position requires a very strong rescuer or an assistant.
Fireman’s carry technique was commonly used by firefighters to carry injured
or unconscious people away from danger, but has been replaced in firefighting due
to the drawback that smoke and heat are greater higher up, and may be fatal to the
person being carried. The «fireman›s carry» technique is still taught for use outside
firefighting. Soldiers use this technique to carry the wounded. Lifeguards are
sometimes trained to use the fireman›s carry.
b) Advantage
Carrying someone in this manner has several advantages over other methods
of moving another person. The subject’s torso is fairly level, which helps prevent
further injuries. When the subject’s weight is evenly distributed over both shoulders,
it is easier to carry them for a longer distance mainly 15 meters or more.
The fireman’s carry is preferred over a single-shoulder carry if someone is seriously
hurt or if the person must be carried for a considerable amount of time. A person
being carried over one shoulder would experience more shaking as his or her body
is hanging more freely over the carrier’s shoulder. Also, blood would be unevenly
distributed if someone was hanging upside-down over the carrier›s shoulder for an
extended period of time. This could also be a very uncomfortable position for the
carried person if he or she is still conscious.
The fireman’s carry allows a soldier to carry an injured comrade securely using only
one hand, leaving their other hand free to carry and fire their weapon if required
c) Disadvantages
In firefighting, smoke and heat are greater higher up, and may be fatal to the person
being carried. The person carried is largely outside the rescuer’s field of vision,
and almost all vital areas are out of the rescuer’s view. Thus, dangerous changes
in their condition can be missed, and an inexperienced rescuer can inadvertently
create or further compound injuries via collision with obstacles. Furthermore, the
rescuer’s obstructed peripheral vision puts both persons at risk if the incident that
caused the injury is still ongoing (fire, combat, public disturbances, etc.). It is also
harder to get a patient onto a rescuers shoulders than it is to drag a patient by their
shoulders.
The fireman’s carry presents severe hazards if the person being carried has or mayhave a spinal injury, and should be avoided.

Self assessment 6.12
Go to the playground, pair yourself in groups of two of the same weight theperform the technique of fireman’s carry.
6.13 Blanket drag technique
1) Explain the material observed on the first above image.
2) Outline the advantages of victim evacuation technique observed on the
above image?
a) Description
The blanket drag technique also known as “blanket lift or blanket carry” technique
is an effective method for loading or moving a casualty in a confined space. This
technique can be used to transport suspected spinal injured casualties with correct
immobilization of the spine and with particular attention paid to the head and neck.
This ‘blanket carry’ can also be used as an improvised stretcher for carries over
moderate distances. This technique involves four or six rescuers.
b) Procedure
• Make a stretcher ready using one blanket.
• Roll a blanket lengthways for half of its width and lay the rolled section along
the side of the casualty (casualty flat on back).
• The leader then directs two (or three) rescuers to kneel down on each side
of the casualty.
• The rescuers on one side ease the casualty over on one side and the rolled
section of the blanket is pushed well underneath the casualty.
• With the rolled up section of the blanket now under the center of the casualty,
the casualty is eased over in the opposite direction and the blanket is unrolled.
The casualty should now be lying flat on their back.
• The sides of the blanket are rolled up close to the casualty’s body to provide
handgrips for the bearers.
• On the order from the leader, the casualty is lifted waist high, and carried to
the stretcher.
• On the order from the leader, the casualty is lowered onto the stretcher.
• The blanketing is then completed with one blanket, leaving the lifting blanketin position.
Self assessment 6.13
In your class, make groups of seven students. One student will play the role of
casualty while other students will be rescuers; then perform the “Blanket drag”evacuation technique
End unit assessment 6
From question 1-9; Select the bests answer, only one option is accepted:
1) It is critical to know background information about the patient you are
transporting because:
a) It helps you remain proactive in the prevention of injury
b) It can help you do your job better
c) Such information can help to diagnose the patient
d) You might have to relay the information to someone else
2) A technique/method where rescuer 1 grasps the victim from behind at the
midsection while the other rescuer grasping the outside of the knees is.
a) Two-Person Carry by arms and legs
b) Ankle Pull
c) Blanket Drag
d) Two Handed Seat
3) The following are the methods in carrying and transporting a victim
EXCEPT?
a) fighters carry
b) shoulder pull
c) ankle pull
d) chair carry
4) In Fire Fighters Carry, the victim is carried over one _________
a) knee
b) arm
c) shoulderd) leg
5) What technique/method is shown in the image below?
a) Four handed seat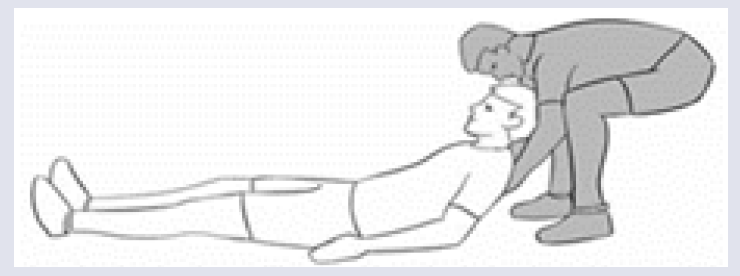
b) One-person carry
c) Ankle pull
d) Shoulder pull
6) Which of the following technique is the best in moving downstairs a
causality who has head or spinal injuries.
a) Blanket drag
b) Chair carry
c) Rope carry
d) Crutch carry
7) A technique/method of carrying where in rescuers get on both sides of the
victim is.
a) Hammock Carry
b) Chair Carry
c) Three Person Carry
d) Two Handed Seat
8) This carry allows the victim to swing their leg using the rescuers as a pair
of crutches.
a) Blanket Drag
b) Human Crutch
c) Hammock Carry
d) Crawling Technique
9) What type of carry is desirable for picking up persons and carrying abreast
in a straight for passing through a narrow place?
a) Four-man carry
b) Three-man hammock carry
c) six-man carry
d) Three man carry from one side
Open questions
1) What are the precautions to consider before carrying the causalities with
two arms?
2) Explain the method of two-handed seat:
3) Describe the steps to follow when performing the technique of human
crutch Carry?
Clarify things to consider before attempting carrying the victim with two arms
and legs. 5) List and explain the methods used to sort or selecting the
victim evacuation in other of priority
6) Explain with description the technique of fireman’s carry.7) Describe the method of blanket drag technique for victim evacuation