UNIT 4 FIRST AID CARE IN EMERGENCY SITUATIONS
Key unit competence
Provide first aid in case of emergencies
Introductory activity 4
1) What are similarities in these pictures?
2) Each picture represents an emergency situation. Attempt to describe the
situation and what is being done
3) What should be expected from a first aider?
4.1. First aid
4.1.1 Concepts of first aid, triage in emergency care
Learning activity 4.1.1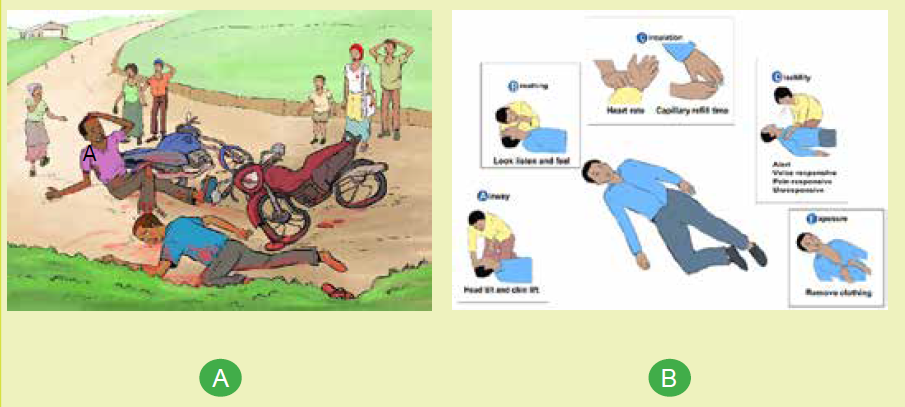
1) What do you observe on picture A and B
2) Assume that you are the first bystander at car accident, how can you
behave
a) Concepts of first aid
First aid referred as “Emergency aid” or immediate care is the first skilled
[acceptable] assistance given to a victim (sick or injured) on the occurrence of
accident or sudden illness in order to preserve life, prevent further injury and relive
suffering until qualified medical care is available. For minor conditions, first aid care
may be enough while for serious or complex problems, first aid care should be
continued until more advanced care becomes available. The person who provide
this emergency aid is called a first aider and has a responsibility to keep everyone
involved safe while taking care of the victim.
An emergency is a situation that poses an immediate risk to health, life, property
or environment and requires immediate action.
A Casualty or a Victim is a person who is injured or killed in an accident or in a war.
Bystander is a person/witness who is present at an event or incident but does not
take part.
Triage is a sorting process used to identify the sickest patients or those at greatest
risk of demise so immediate medical needs can be rapidly addressed. It is important
to obtain a verbal consent before attempting first aid as most first aid activities
involve touching to avoid causing offence or distress. A consent is an approval
of what is done or proposed by another or an agreement as to action or opinion.
However, if you encounter a confused casualty who is critically injured or ill, you can
assume that they would want you to help them.
b) Triage in emergency care
Triage is an effective system that classifies patients into groups according to acuity
of illness or injury and aims to ensure that the patients with life threatening illness
or injury, receive immediate intervention and resource allocation. It can be a difficult
decision to make as to who to treat first, however, you should work under the
principle of acting in a way that gives the greatest number of people the greatest
chance of survival.
To meet its goals, the process of triaging considers the following questions and use
START triage system to categorize casualties:
• How sick or injured is the victim?
• What is this victim’s potential for demise?
• How quickly do interventions, care and treatment need to be delivered?
• What is the evacuation plan after initial intervention?
The START triage system
“START” stand for Simple Triage And Rapid Treatment and is a simple way that
allows rapid assessment of victims within 15 seconds per casualty/victim. It is based
on respiratory, perfusion and mental status assessment.
Self-assessment 4.1.1
1) Why do we learn first aid?
2) Briefly explain the START triage flow char.
4.1.2 Principles of first aid care
Learning activity 4.1.2
1) Imagine you are a casualty in a road traffic accident. What would you
expect from the attending firs aider?
2) What qualities do you think should the first aider possess to be effective
in helping casualties?
Learning activity 4.1.2
It is important that when engaging in the application of first aid that you adhere to
the established first aid principles. Four basic principles and concepts underlying
the practice of first aid are:
a) Preserve life:
The first aim of first aid is to preserve life, which involves the key emergency
practices to ensure that the casualty isn’t in any mortal danger. Remember though,
this includes preserving your own life as you shouldn’t put yourself in danger in
order to apply first aid.
b) Prevent deterioration:
Once the first principle is met, as first aider your next priority is to prevent further
illness or injury and or worsening of illness or injury. This can be achieved through
keeping the victim still to avoid aggravating their injury, or from complicating any
unseen issues.
c) Promote recovery
This encompasses steps the first aider follow to lessen the time taken for a casualty
recover from an accident and aid in minimizing lasting damage and or scarring. For
example, applying cold water to a burn as soon as possible to lower the chance of
long-term scarring and helps speed up the healing process.
d) Protect the unconscious casualty
This involves placing an unconscious casualty into the recovery position to keep
their airway clear
4.1.3 Quality of First aid worker
Providing an effective require more than just technical skills. Therefore, a quality
first aider worker should possess several personal qualities and skills to be able to
work under pressure and use common sense.
a) Good communication skills
Communicating with sick and injured people can be challenging. Therefore, a first
aider should have excellent communication skills and a natural ability to talk to
people. Communication is key to good casualty care and is very important when
passing the casualty onto the next level of care. First-aiders should also take care
to listen to any remarks or requests a casualty makes.
b) Ability to work in a team
First aiders are often required to work alongside members of the emergency
services, especially the ambulance service; thus required to be good team player.
c) Ability to work under pressure
First aid situations can range from the mundane e.g. a small cut wound to incredibly
stressful and demanding situation such as cardiac arrest. A first aider must always
remain calm and assess the situation first before rushing to help the victim. This will
help reduce the overall stress levels of the injured person as well as bystanders who
may be concerned. Furthermore, it will help him/her manage tasks whilst having an
awareness of the overall situation. Panic is likely to make the situation much worse
and cause further distress and physical harm to the casualty as a result of wrong
decisions.
d) Good leadership skills
First-aiders must ensure the removal of any danger from the casualty, or remove
the casualty from dangers, and prevent the crowding of casualties by bystanders.
A first aider may therefore have to take command of a potentially volatile situation.
He or she may be looked upon by his/her colleges to provide leadership during an
emergency. A first aider may also have to organize bystanders to assist in various
tasks, such as moving the casualties.
e) Knowledge of their own limitations
A key skill of first aid is being able to recognize someone who needs quick
emergency help. However, a first aider should know the limits of their skills and
knowledge and be able to call for further appropriate help when required rather
than try to do it alone. Calling for help should be done as soon as possible by the
first aider him/her-self or by asking a bystander to do so if preoccupied by handing
the victim. This will ensure that a medical professional arrives quickly to handle the
situation in a more comprehensive manner and provide more specialist treatment.
First-aiders should also understand that first aid has its limitations and does not
take the place of professional medical treatment and that their responsibility ends
when the casualty is handed over to the care of a competent health provider.
Self-assessment 4.1.2
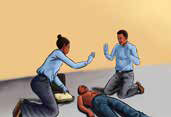
A first aider was attending a multiple causality at the scene below. Comments on
her intervention reflecting on what you have learnt regarding principles of first aid
and qualities of a good first aider.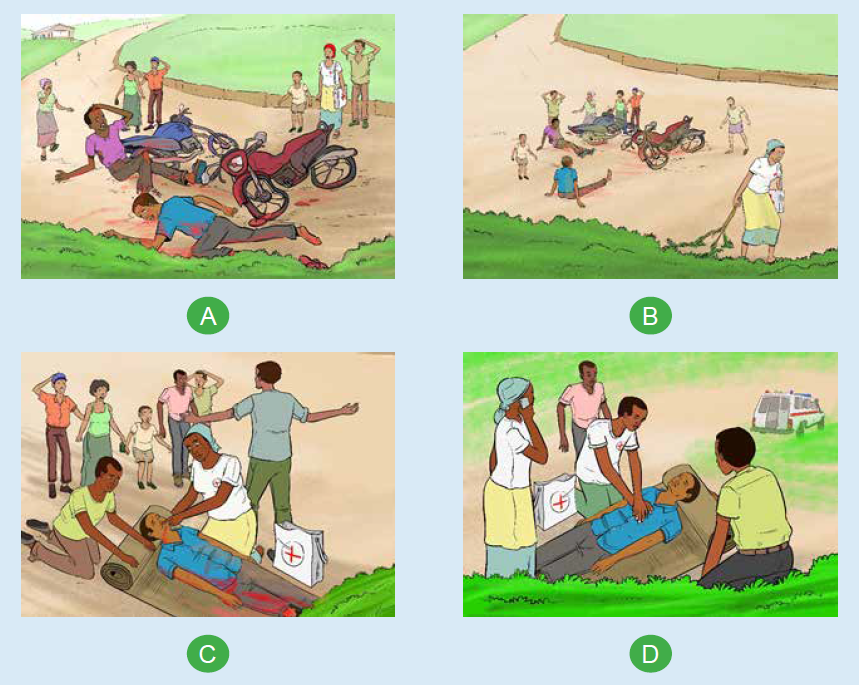
4.1.4 Emergency gestures
Learning activity 4.1.3
With reference to “picture B” illustrated in learning activity 4.1.1) figure out
what ABCDE approach involves for, for effective emergency care provision and
attempt to practice what you see on model mannequin in skills lab.
It is vital for a first aider to provide first aid in an organized and structured manner
for all casualties that is following DRSABCDE sequence. DRSABCDE involve
checking and addressing issues related to Dangers (for you as a first aider, the
victim and others involved people), Response (a quick assessment to find out
whether a casualty is conscious or unconscious), Shout or Send for help, Airway
maintenance with cervical spine protection, Breathing and ventilation, Circulation
with hemorrhage control, Disability and Exposure.
a) Airway maintenance with cervical spine protection
Check that a casualty’s airway is open and clear. If a casualty is alert and talking to
you, it follows that the airway is open and clear. If, however, a casualty is unconscious,
the airway may be obstructed. Obstructed airway dictates some lifesaving gestures
to open and clear the airway namely jaw thrust or chin lift/head tilt as appropriate.
Never move to next step until it is open and clear. for any known traumatic injuries,
the cervical spine immobilization is required.
b) Breathing and ventilation
Check whether the casualty is breathing. If he/she is alert and or talking to you, he
or she will be breathing, however you have to determine if the casualty is breathing
normally through noting the rate, depth, and ease with which he or she is breathing
which requires to look, listen, and feel for breaths. If an unconscious casualty is
not breathing, the heart will stop. Chest compressions and rescue breaths must
be started immediately. Note that a victim who is speaking full sentences is likely
breathing is sufficiently. If the casualty is unconscious and breathing normally, put
him/her in recovery position.
c) Circulation with hemorrhage control
Quickly estimate the patient’s heart rate and determine the quality of the pulse and
evaluate the patient’s skin temperature, color, capillary refill and moisture to assess
perfusion. Check for bleeding (absent or present, if present is it controlled or not).
Injuries that result in severe bleeding can cause blood loss from the circulatory
system, so they must be treated immediately to minimize the risk of a life-threatening
condition known as shock. If a pulse is present and capillary refill is < 2 seconds,
the patient’s circulation is likely sufficient.
d) Disability
Briefly evaluate the neurologic status and note any neurologic deficit. Any change
in mentation from baseline should be concerning.
e) Exposure
Expose the casualty both anterior and posterior body surfaces and look for injuries,
rash, etc., ask about recent exposure to infectious diseases note and address
environmental concerns (hypothermia/hyperthermia).
f) Recovery position
Putting a victim in a recovery position is a frequent emergency aid gesture used for
unresponsive victims who have open airway and are breathing. This position helps
keep the victim airway open and allows any vomit to drain onto the floor preventing
the victim from choking on it as well as from asphyxiation due to body position.
Following are the steps for putting the victim into the recovery position:
1) Put the person on the floor if he is not there already
2) Remove the person’s spectacles if necessary
3) Kneel down by the side of the casualty
4) Make sure both victim’s legs are outstretched
5) Place the nearest arm (the one on the side you are
kneeling next to) at right angles to the victim’s body
6) Bend the forearm upwards
with palm facing up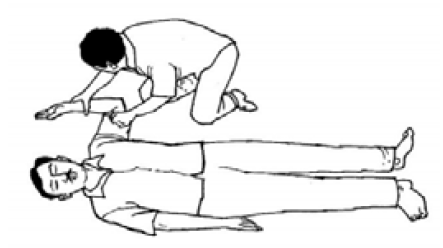
7) Lay the person’s other arm
across his chest.
8) Hold the back of this hand
against his cheek on the side
at which you are kneeling.
9) Keeping that hand in that
position, with your other free
hand, grasp the leg on the
other side of the victim’s body
under the knee.
10) Raise that leg, but leave the
person’s foot on the ground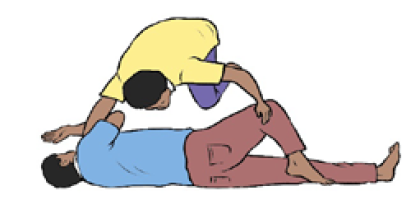
11) Pull the raised leg towards you.
12) In the meantime, keep the
back of the victim’s hand
held against his cheek. Roll
the person towards you so he
turns on his side.
13) Position the victim’s upper
leg in such a way that his hip
and knee are at right angles.
This will allow the victim to
maintain lateral position.
14) Tilt the head of the person
backwards to keep the airway open.
15) Make sure the mouth is
angled towards the ground.
This will prevent the risk of
choking on blood or vomit.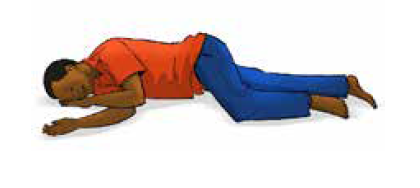
16) Adjust the hand under the cheek if necessary so that the head remains
tilted backwards and the mouth remains at a downward angle.
17) Do not leave a casualty alone and continue observing his condition and
monitoring his breathing. If the person stops breathing, start resuscitation.
Note:
An unconscious, breathing casualty who is heavily pregnant, should be placed on
their LEFT side so the weight of the baby does not put pressure on a major vein on
the right side of the abdomen.
Self-assessment 4.1.3
In your groups go in the simulation lab and perform the ABCDE used emergency
situation on model mannequin and attempt to put the mannequin in the recovery
position.
4.2.First aid in the selected common emergency situations
Introductory activity 4.2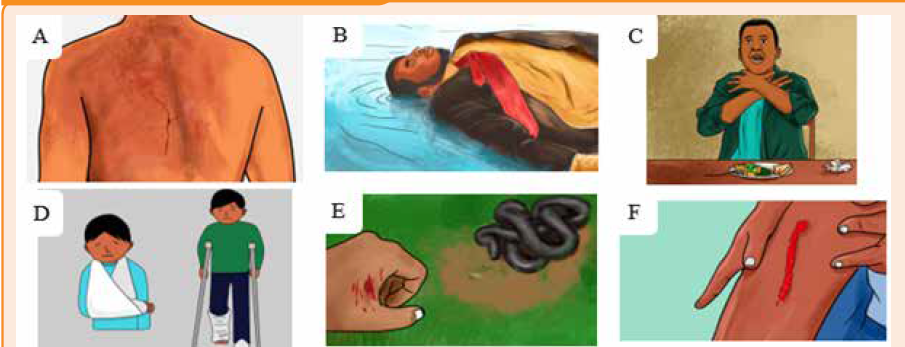
1) Observe and describe each of the above pictures?
2) Summarize the emergent interventions to a snake bite used in your
community
3) Which of the following are considered personal protective equipment?
a) Gloves
b) Mask
c) Eye shield
d) All of the above
4.2.1 Burns
Learning activity 4.2.1
Outline the causes of burn you known.
object, electrical current, radiations sources, certain chemicals and exposure to
extreme cold. The burn is characterized by its appearance, its location, its extend,
its degree and the presence of pain. Burns can vary from minor superficial burns to
very deep burns that damage muscles, tendons, nerves, and even bones.
First aid interventions in case of burn include:
• Assess the situation quickly and calmly to get an understanding of what
happened
• Calm and motivating the victim to collaborate.
• Ensure that the source of the burn has been dealt with, and the scene is safe.
• Wear personal protective equipment, and get the first aid kit if available.
• Gently remove any clothing and jewelry from the burned area. DO NOT try to
remove any clothing that is sticking to it
• Rinse the burn in cool or cold water for about 20 minutes. If the area cannot
be immersed such as the face, towel, sheets or wet clothes that have been
soaked in water can be applied. Change/rewet these regularly as they will
absorb heat from the burn.
• For small burn apply antibiotic / burn cream if available and the victim is not
allergic to it
• Cover the burn with a clean, dry non-stick dressing and loosely bandage in
place. If this is not available or the burn covers a large area use a dry, clean
sheet or other tissue material
• Have the person follow up with a health care provider.
• Do not apply ice to a burn. This technique will result in a cold injury on top of
a burn and cause further tissue damage
Note: Do not apply ice to a burn. This technique will result in a cold injury on top of
a burn and cause further tissue damage
Self-assessment 4.2.1
Your classmate, was using an iron that is in its maximum warming up accidently,
it /falls on his/her left foot cause a superficial burn. You are warned by a loud
scream of pain. You jump to see what happen. What will you do to help him/her?
4.2.2.Drowning
Learning activity 4.2.2
1) Observe and describe the picture
aside.
2) What can you do to help the drowned
victim?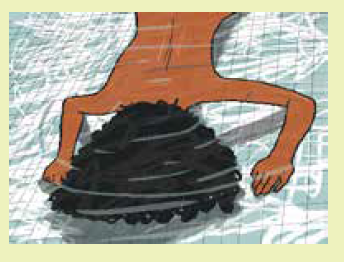
Drowning is a type of suffocation induced by the submersion or immersion of the
mouth and nose in a liquid. Drowning can result in death from hypothermia due
to immersion in cold water, sudden cardiac arrest due to cold water, spasm of
the throat blocking the airway and/or inhalation of water and consequent airway
obstruction. You should not endanger your own life in trying to rescue the casualty
from water; if possible use an item that floats to rescue the victim from water. Once
the victim is out of water, turn him or her onto one side, open the airway and let any
water or vomit drain out and if no signs of life immediately start cardiorespiratory
resuscitation. It important to recognize early drowning victim’s distress signs.
The assistance to the drowning victim should be initiated as soon as possible. Note
that the chance for survival decreases as the time goes on. A drowned person
rescued within the first minute has a 95% survival chance, only 25% survival chance
if after 6 minutes, and these drop to only 3% survival chance if after 8 minutes.
The first thing to be done is to Assist the victim to get out of the water by giving
directions. However, as a first aider, you should not endanger your own life in trying
to rescue the casualty from water; if possible, use an item that floats to assist get
the victim to the dry land.
Once the victim is out of water:
• Turn him or her onto one side keeping the victim’s head lower than the rest of
the body to reduce the risk of inhaling water.
• Open the airway and let any water or vomit drain out and if no signs of life
immediately start cardiorespiratory resuscitation (CPR).
• Treat the victim for hypothermia that is remove wet clothes and cover him/her
with dry warm blanket. If the person regains full consciousness, give him/her
a warm drink.
When giving the emergency aid to a drowning casualty you should aim to restore
adequate breathing and keep the casualty warm while seek medical assistance and
or hospital care. Note that any casualty rescued from a drowning incident should
always receive medical attention even if he or she seems to have recovered as any
water entering the lungs causes them to become irritated, and the air passages
may begin to swell several hours later.
Self-assessment 4.2.2
Demonstrate how to position a drowning victim once out of water.
4.2.3 Choking
Learning activity 4.2.3
A group of teen in your village are celebrating their achieving with a steak dinner.
During the meal, one of them suddenly clutched his throat, with severe difficulty
breathing and he was unable to speak.
1) What do you think happened?
2) As a first Aider, attempt to rescue him
Choking is the result of either a totally or
partially obstructed airway caused by swollen
tissues or a foreign body. Food or other material
entering the windpipe instead of the esophagus.
Early recognition and intervention are the key
to successful outcome. Choking should be
distinguished from other conditions that may
cause sudden respiratory distress but require
different treatment such fainting, stroke, heart
attack, seizure, drug overdose, among others.
Signs of chocking range from mild to severe
airway obstruction and these along the age
of the casualty dictate steps emergency aid
interventions.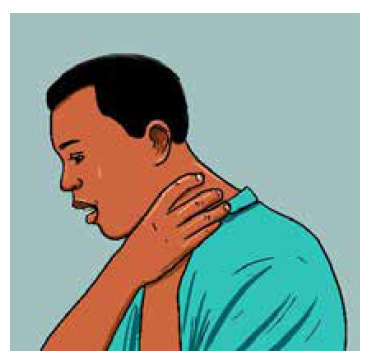
Universal choking sign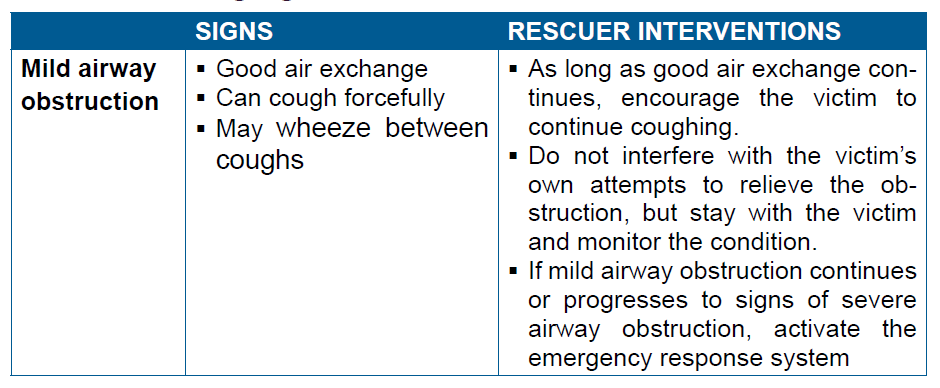

a) Choking relief in a responsive adult or child
Abdominal Thrusts also known as “Heimlich maneuver” is used to relieve choking
in a responsive adult or child. Individual thrust is given with the intention of relieving
the obstruction and it may be necessary to repeat the thrust several times to clear the
airway. This maneuver should not be used to relieve choking in an infant. Moreover,
this maneuver is avoided in pregnant or obese victims where chest thrusts are
performed instead of abdominal thrusts.
b) Choking relief in an unresponsive adult or child
In severe airway obstruction, the victim will be unable to speak, cough, or breathe,
and will eventually lose consciousness. If the rescuer is certain that that the victim’s
condition is caused by a foreign-body airway obstruction the following steps are
undertaken to help the victim.
1) Shout for help. If someone else is available, send that person to activate the
emergency response system.
2) Gently lower the victim to the ground if you see that he is becoming
unresponsive.
3) Begin CPR, starting with chest compressions. Do not check for a pulse.
4) Each time you open the airway to give breaths, open the victim’s mouth
wide. Look for the object.
• If you see an object that can be easily removed, remove it with your
fingers.
• If you do not see an object, continue CPR.
5) After about 5 cycles or 2 minutes of CPR, activate the emergency response
system if someone has not already done so.
Note:
• Sometimes the choking victim may already be unresponsive when you
first encounter him. In this situation you probably will not know that a
foreign-body airway obstruction exists. Activate the emergency response
system and start high-quality CPR.
• If the victim is pregnant or obese, perform chest thrusts instead of
abdominal thrusts
• You can tell if you have successfully removed
an airway obstruction in an unresponsive
victim if you feel air movement and see the chest rise when you give
breaths or see and remove a foreign body from the victim’s mouth
c) Choking relief in infants
Back slaps and chest thrusts are used to relieve choking in responsive infant rather
than abdominal thrusts through the following steps:
1) Kneel or sit with the infant in your lap.
2) If it is easy to do, remove clothing from the infant’s chest.
3) Hold the infant facedown with the head slightly lower than the chest,
resting on your forearm. Support the infant’s head and jaw with your
hand. Take care to avoid compressing the soft tissues of the infant’sthroat. Rest your forearm on your lap or thigh to support the infant.
4) Deliver up to 5 back slaps forcefully
between the infant’s shoulder blades,
using the heel of your hand. Deliver
each slap with sufficient force toattempt to dislodge the foreign body.
5) After delivering up to 5 back slaps, place your free hand on the infant’s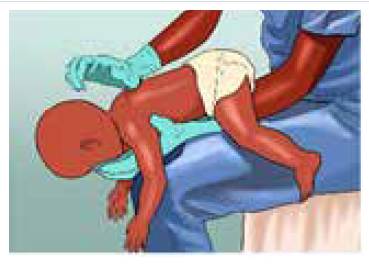
back, supporting the back of the infant’s head with the palm of your
hand. The infant will be adequately cradled between your 2 forearms,
with the palm of one hand supporting the face and jaw while the palm ofthe other hand supports the back of the infant’s head.
6) Turn the infant as a unit while carefully supporting the head and neck.
Hold the infant face-up, with your forearm resting on your thigh. Keep
the infant’s head lower than the trunk.
7) Provide up to 5 quick downward chest
thrusts in the middle of the chest,
over the lower half of the breastbone
(the same location as for chest
compressions during CPR). Deliver
chest thrusts at a rate of about 1 per
second, each with the intention of
creating enough force to dislodge theforeign body.
8) Repeat the sequence of up to 5 back slaps and up to 5 chest thrusts until
the object is removed or the infant becomes unresponsive.
d) Choking Relief in an Unresponsive Infant
If the infant victim becomes unresponsive, stop giving back slaps and begin CPR,
starting with chest compressions. To relieve choking in an unresponsive infant,
implement the following steps:
9) Shout for help. If someone responds, send that person to activate the
emergency response system.
10) Place the infant on a firm, flat surface and begin CPR starting with
compressions with 1 extra step: each time you open the airway, look for the
object in the back of the throat. If you see an object and can easily remove
it, remove it. You should never perform a blind finger sweep in attempt to
remove the foreign body as it may push the foreign body back into the
airway, causing further obstruction and or injury. Note that you do not check
for a pulse before beginning CPR.
11) After about 2 minutes of CPR, if no one has done so, activate the emergencyresponse system.
Self-assessment 4.2.3
1) A nine months old boy was playing with small block toys with his older
sister, and suddenly became unresponsive and his lips turned blue.
a) What do you think happened to the boy?
b) As a first aider on premises, what will you do step by step to help this
kid?
c) What type of choking is the kid suffering from?
2) What are specific considerations for relieving a choking 32 weekspregnant women?
4.2.4 Cardio respiratory distress
Learning activity 4.2.4
1) Observe and describe the pictures ABCD below2) If the victim is not breathing, how can you help him/her?
A distress is an urgent situation in which a person is suffering or is in danger
and therefore in urgent need of help. It requires urgent intervention to prevent
worsening of the situation.
The cardio respiratory distress is relating to the heart, the lungs and the airway
passages and breathing muscles. Severe cardio respiratory distress results in
cardiac arrest which can be witnessed or unwitnessed. Lack of quick interventions
to restart the heart can result in serious complications such as brain damage which
can be irreversible and the death follows in fact timing of intervention is crucial as
the brain may die within 4 to 6 minutes without oxygen.
Cardio Pulmonary Resuscitation (CPR) is the name given to the technique combining
chest compressions, airway management, and rescue breathing aiming to restart
the heart and is indicated when a casualty has no pulse, stops breathing or only
gasping for air and becomes unconscious. To deliver high-quality CPR, you must
begin high-quality chest compressions quickly, as these are considered the most
important factor in giving the person a chance to recover. Compressing the chest
circulates blood to the brain and the heart. High-quality chest compressions are
delivered at a rate between 100 to 120 beats per minute and at a depth between 2
to 2.4 inches (5 to 6 cm) in adult casualty.
Fundamental aspects of an effective CPR include:
• Immediate recognition of respiratory distress and cardiac arrest
• Activation of the emergency response system, getting help and equipment
• Early cardiopulmonary resuscitation (CPR)
• Rapid defibrillation with an automated external defibrillator (AED)a) Steps in CPR
• Place the victim on a hard surface,
often on the ground
• Check for responsivenessstimulate
patient: tap the victim
on the shoulder and ask if he or
she is okay
• Look for the chest to rise and fall,
listen for sounds of air movement
at the mouth and nose, feel for
the breath against your cheek• Shout for nearby help
• Check for pulse and breathing:
this should take no more than 10
seconds to assess for breathing
and check for a pulse. If rescuer
does not definitely feel a carotid
pulse in adults and brachial
pulse in children within that time
period, rescuer should start chestcompressions.
• Open the airway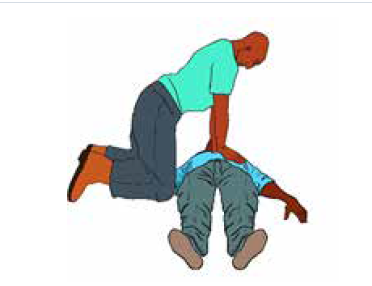
• If no breathing or only gasping
and no pulse, begin cycles of 30
compressions and 2 breaths until
AED is available
• Chest compressions:
• Kneel by the victim’s side
• Place the heel of one hand in the
centre of the victim’s chest.
• Place the heel of your other hand
on top of the first hand and ensure
that pressure is not applied overthe victim’s ribs.
• Do not apply any pressure over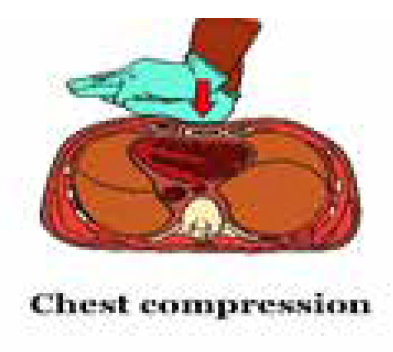
the upper abdomen or the bottom
end of the sternum
• With your arms straight, press
down on the sternum at least 5-6
cm at a rate of at least 100 per
minute (nearly 2 compressions
each second) but no more than120 per minute.
• After each compression, release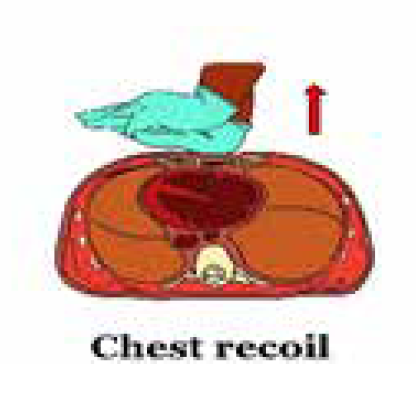
all the pressure on the chest
without losing contact between
your hands and the sternum
to allow chest recoil (chest
compression and chest recoil/
relaxation times should beapproximately equal)
• Minimize frequency and duration of interruptions in compressions.
• Once chest compressions have been started, a trained rescuer should deliver
breaths by bag-mask to provide oxygenation and ventilation at a ratio of 30
compressions: 2 breaths in adults and a rate of 15 compressions: 2 breaths if
2 or more rescuers involved (if 1 rescuer involved a rate of 30 compressions:
2 breaths)
• Managing the Airway:
• Use a head tilt–chin lift maneuver to open airway of a victim with NO
evidence of head or neck trauma.
• Use cervical spine injury is suspect, open airway using a jaw thrust without
neck extension.
• Give breaths using a mask;
however, mouth-to-mouth can also
be performed (Should not be done in
a hospital setting unless you have a
barrier but can be used at home with
family or people you know)
• Use ambubag-valve-mask attached
to oxygen once available:
• Choose the right mask size to
cover the mouth and nose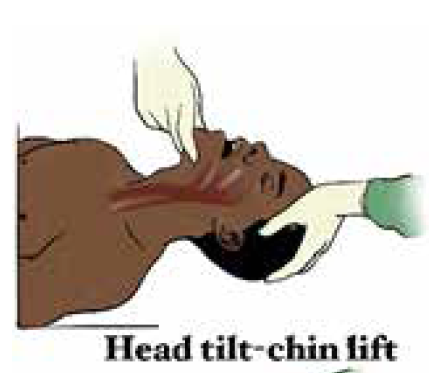
• Give breaths slowly (over one
second)
• Watch for chest rise. Don’t overinflate,
especially infants
• Reposition if no chest rise
• 5 cycles of compressions: breaths
should be done in about 2 minutes
• Check for pulse every 2 minutes
Note:
• Rescuer fatigue may lead to inadequate compression rates or depth. Therefore,
if 2 or more rescuers are available switch chest compressors approximately
every 2 minutes to prevent decreases in quality of compressions. Every effort
should be made to accomplish this switch in 5 seconds
• CPR should continue and can be stopped when rescuers are physically
exhausted or decision to stop is made by a doctor.
• If you can feel the pulse and the victim airways are open and can breathe,
put him/her in recovery position and continue monitoring the victim carefully,
checking regularly the pulse and watching for signs of reduced air passage such
as weak, ineffective cough, a high-pitched wheeze during inhalation, increased
strain during breathing, clutching at the throat slight cyanosis.b) The automated external defibrillator (AED)
An automated external defibrillator (AED) is a small,
lightweight, portable and easy to operate device used
to give an electric shock to restore when the casualty
is having a sudden cardiac arrest. This device once
attached to the victim analyzes the casualty’s heart
rhythm and advise you what action to take at each
stage. Starting CPR immediately and quickly using
an AED improves the chances of survival.
Following are universal steps for operating an AED:
1) Perform CPR until an AED arrives
2) Once AED obtained, turn the power on
3) Expose the victim chest and attach the
adhesive AED pads to the victim’s bare
chest
4) Clear the victim to make sure no one is
touching any part of the victim, let the AED
analyze the rhythm and wait until the AEDtells you what to do

Pads attached
5) Follow the AED advice such as shock
advised, no shock advised, continue CPR,
check connection, etc.
6) If a shock is indicated and other people are
present, warn them to keep clear and ensure
your body is not touching the person:
7) Say, “I’m going to shock on
three. One, I’m clear. Two,you’re clear. Three, everybody’s clear.”
Clear the victim
8) Check to make sure no one is touching the
person or the AED then press the “Shock”
button to give a chock
9) Resume CPR with compressions for 2 min
10) After 2 min of CPR, the AED will prompt you
with further verbal and visual cues
Pads attached
Clear the victim
Note:
• The pads should be placed in a position that maximize current flow through heart(Sternum/apex or Anterior/posterior)
• When no pediatric pads available adult can be used for children > 8 years old or
weighing > 25 Kg
• Ensure that victim is not lying in water and wet areas on victim are dried beforeusing AED
Self-assessment 4.2.4
1) What should be done immediately when you find a person with apnea
before performing a CPR?2) Perform a CPR on model mannequin
4.2.5 Fractures
Learning activity 4.2.5
Observe carefully the figure above and attempt to answer the following questions:
1) What do you understand by fracture?2) Contrast and compare image A and image B
Observe carefully the figure above and attempt to answer the following questions:
1) What do you understand by fracture?
2) Contrast and compare image A and image B
Musculoskeletal injuries are common occurrences and these results into bone
fractures (break or crack in the continuity of the bone), joint dislocation (the bones
are partially or completely pulled out of their normal position), strains and sprains
(injuries to soft structures surrounding bones). All of these injuries results in almost
similar complaints. Use of x-ray is paramount to rule out fractures. Fractures arebroadly classified as either open or closed fractures.
Open fractures – also called “compound fractures”,
are fracture in which there is an open wound or break in
the skin near the site of the broken bone. Involved bone
is exposed at the surface where it breaks the skin but
both sides of the fracture do not need to be visible.
Closed fractures – are fractures in which the skin is
unbroken although the bone ends may damage nearbytissues and blood vessels.
Fractures can become life-threatening if there is severe internal or external bleeding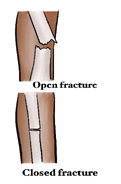
and due to the risk of shock. If organs or major nerves or other structures/systems
are also injured.
Common signs and symptoms of fracture include:
• Deformity, swelling, and bruising at the fracture site
• Pain and or difficulty in moving the area
• Shortening, bending, or twisting of a limb
• Coarse grating (crepitus) of the bone ends that can be heard or felt (by
casualty). Do not try to seek this.
• Signs of shock, especially if femur or pelvis are fractured
• Difficulty in moving a limb normally or at all (for example, inability to walk)
• A wound, possibly with bone ends protruding
First aid interventions in case of fracture should aim at preventing movement at
the injury site (immobilization) and at arranging transportation to the hospital, with
comfortable support during transit.
First aid care for broken bones includes the following:
1) Ensure the scene is safe and wear personal protective equipment.
2) Apply gauze to any open wounds.
3) Do not attempt to push the bone back in (if open fracture) and/or straighten
the extremity
4) Splint the bones in the position you find them in, never attempt to manipulate
or correct an abnormally positioned bone or joint. Splints can be made by
using magazines, wood, or rolled-up towels. Splint material are placed on
either side of the injured extremity, supporting the joints above and below
the injury and secure in place using tape or gauze ensuring they are not
compromising blood circulation. The fingertips or toes in a splinted extremityshould remain warm and pink.
5) Use a triangular arm sling to secure arm and shoulder injuries
6) Move the fractured body part as little as possible or handle gently to prevent
making the fracture worse (e.g. a closed fracture may become an open
fracture) and to lessen the person’s pain.
7) Encourage further evaluation by a health care provider and avoid use of theinjured part
Self-assessment 4.2.5
Referring to Images of learning activity 4.2.5, attempts the following questions:
1.What do you think is the right course of action by the first aider? (Multiple
answers are possible):
a) Try to straighten the limb in image B
b) Avoiding moving the victim
c) Immobilizing the limb in the position he/she found it in by use of tree
branches and clothes holding
d) Pushing back the protruding bone in picture A and apply pressure
dressing to control bleeding
2.Using the knowledge and skills leant previously on bandaging, attempt to
immobilize these fractures
4.2.6 HemorrhagesLearning activity 4.2.6
The body must have enough circulating blood volume to keep the body functioning
and keep the organs supplied with oxygen. Blood is moved around the body under
pressure by the heart and blood vessels. Without adequate blood volume and
pressure, the human body soon collapses. When blood vessels rupture due to a
severe injury, bleeding or hemorrhage, poses a threat. Note that hemorrhage is
a feature of many presentations particularly, but not exclusively, those involving
trauma. It is a loss of blood from damaged blood vessels and it may be internal or
external. The aim of the first aider is to reduce loss of blood from the casualty.
a) External bleeding
External bleeding is usually associated with wounds (cuts, abrasions, amputations,
incisions, lacerations and punctures). Serious wounds involve damage to blood
vessels. External Bleeds can be categorized into three main types with regard totheir origin:
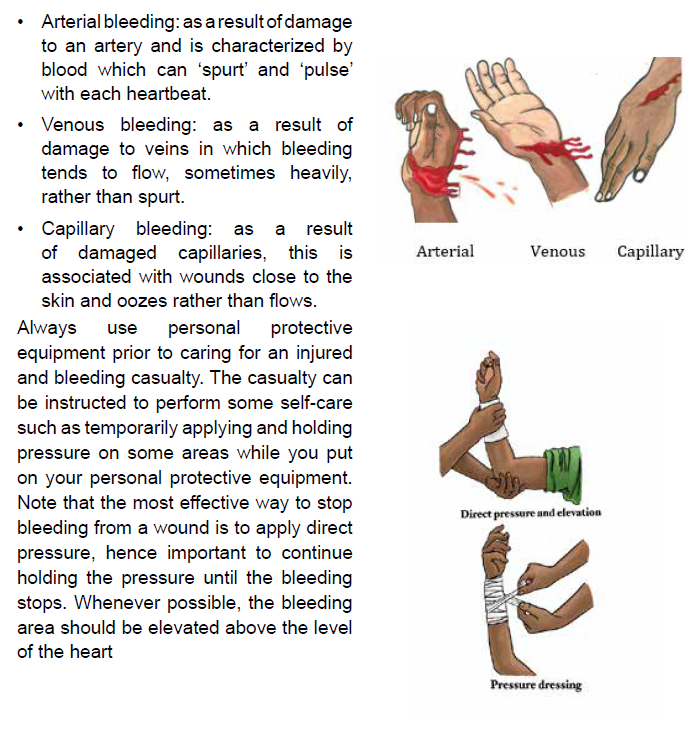
Record the time the tourniquet was applied and stay with the casualty and do not
release tourniquet. Only a medical professional should remove a tourniquet. Help
casualty into a comfortable position, if possible have him/her lying down. If the
casualty becomes unresponsive and not breathing normally follow ABCDE.
Note that blood loss often gets the most attention and many times the amount
of bleeding is overestimated and draws attention to wounds when more serious
injuries should be dealt with first. Therefore, whenever confronted with bleeding,
perform a quick overview of the person to make sure something more serious is notbeing overlooked, the rescuer should be calm and reassuring.
b) Internal bleeding
Always consider internal bleeding after injury, understanding it cannot be controlled
by the first aider. Internal bleeding is classified as either visible (where the bleeding
can be seen) or concealed, (where no direct evidence of bleeding is obvious).
Obtaining an adequate history of the incident or illness will, in most instances,
give the first aid provider the necessary clue as to whether internal bleeding may
be present. You should remember that current signs and symptoms or the lack
of them, do not necessarily indicate the casualty’s condition. Due to the stealth
of bleed, certain critical signs and symptoms may not appear until well after the
incident, becoming apparent despite there being no visible cause, only when the
casualty worsens.
Visible internal bleeding is referred to in this way because the bleeding can be seen
from:
• Ears: Blood or blood mixed with clear fluid.
• Lungs: Frothy, bright red blood coughed up by the casualty.
• Stomach, bowel or intestines: Bright, dark or tarry blood coughed up by the
casualty.
• Under the skin (bruising): The tissues appear dark due to blood under the
skin.
In concealed internal bleeding, detecting internal bleeding relies on good observation
and an appreciation of the physical forces that have affected the casualty. In these
cases, the first aid provider considers the history, signs and symptoms. If you
are unsure, assume the worst and treat for internal bleeding. Consider important
observations that may indicate internal bleeding, which include:
• Rapid, shallow, or irregular breathing
• ‘Guarding’ of the abdomen, with foetal position if lying down
• Pain or discomfort and/or swelling of the abdomen
• Nausea and/or vomiting
• Altered consciousness
• Pale, clammy skin
To help a casualty with an internal bleeding:
• Call emergent help/ambulance
• Wear personnel protective equipment
• If conscious, lie the casualty down on their back with both legs bent at the
knees and if unconscious, in recovery position with both legs bent at the
knees
c) Nosebleeds
Nosebleeds are not usually serious though sometimes they can be quite dramatic
and are often messy. They commonly occur because of dry air or high altitude, an
injury to the nose, or a medication (especially a blood thinner such as warfarin).
Blowing or picking the nose can also cause a nosebleed. People with nosebleeds
often swallow a fair amount of blood, which may result in vomiting. Therefore, be
sure to wear personal protective equipment and eye protection when attending tonosebleeds.
Note: If a severe bleeding is not managed promptly and correctly, it results into a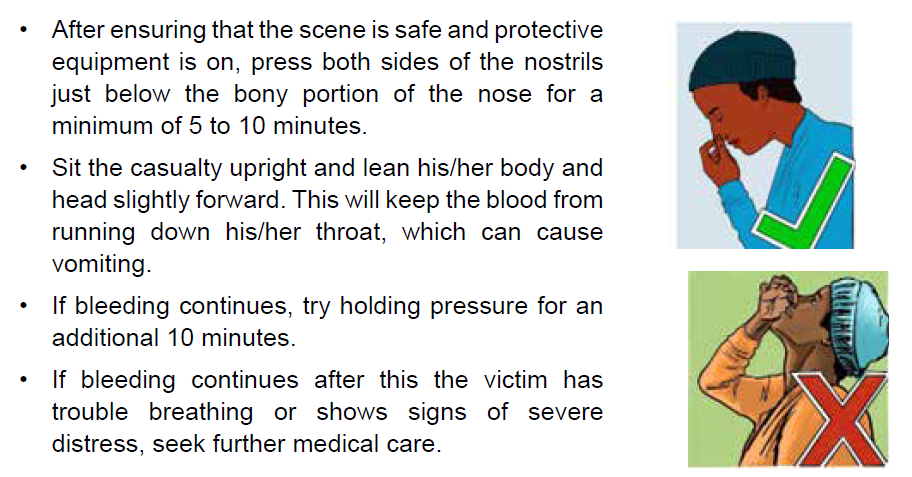
life-threatening condition called “Chock”. Hemorrhagic chock can result either from
severe external bleeding, internal bleeding or both
4.2.7 Loss of consciousnessLearning activity 4.2.7
Loss of consciousness we are referring to is synonymous to “fainting” which is a
common reaction to a variety of conditions. It is the body’s reaction to the decreased
blood flow to the brain that causes the person to pass out. Individuals may faint at
the sight of blood, reaction to pain, exhaustion, hunger or during periods of intense
emotional stress. Fainting also may result from long periods of physical inactivity,
such as standing or sitting still, especially in a warm atmosphere. More serious
conditions, such as an abnormal or erratic heart rhythm, can also cause fainting.
Moreover, severely dehydrated persons may faint when standing up suddenly.
Fainting is characterized by a brief loss of consciousness that causes the casualty
to fall to the ground, a slow pulse and the victim become pale, cold skin and he or
she is sweating.
The rescue a fainted victim aims at improving blood flow to the brain and at
reassuring the casualty and making him or her comfortable. When a casualty feels
faint, advise him/her to lie down. Approach the victim and kneel down, raise his/her
legs, supporting his ankles on your shoulders to improve blood flow to the brain.
Ensure that the casualty has plenty of fresh air; ask someone to open a window
if you are indoors. In addition, ask any bystanders to stand clear. As the casualty
recovers, reassure him/her and help him/her sit up gradually. If he/she starts to feel
faint again, advise him to lie down once again, and raise and support his legs until
he recovers fully.
Self-assessment 4.2.7
1) Enumerate signs and symptoms of fainting
2) Arrange the follow activities done to support a fainting uninjured causality
in a sequential manner using the table below
a) Continue CPR until help arrives or the person begins to breathe
b) To reduce the chance of fainting again, don’t get the person up too quickly.
c) Call our local emergency on 912.
d) Position the person on his or her back.
e) begin CPR,
f) If the person isn’t breathing,
g) Raise the person’s legs above heart level,
h) Check for breathing.
i) If the person doesn’t regain consciousness within one minute,j) Loosen belts, collars or other constrictive clothing.
4.2.8 Snake bites
Learning activity 4.2.8
You were camping with your friends and suddenly one of them screamed “I
am pricked by something on my left leg”. Looking around, you saw multicolor
snake leaving your tent. Your friend leg present two puncture marks with parallel
scratches on skin area he felt pricks.
1) What do you think of this situation?
2) What first aid care do think is need to help him?
Many animals can bite or sting. Whereas most such bites and stings are painful,
only a few types can cause sickness, allergic reactions, or death. Poisonous snakes
inject a toxic venom when they strike their victim. It’s difficult to accurately identify
a snake once it has bitten someone, as snakes are similar in shape and have
many different colours, even within the same species. The effects of snake venom
can take up to 2 hours to become apparent, so symptoms are not always obvious
straight away. All snake bites are emergency and must be treated as venomous
until proven otherwise and the bite may be painless and without visible marks.
Do not attempt to kill or capture the snake that bit the casualty. But, if possible, make
a note of the snake’s appearance to help doctors identify the correct antivenom.Take precautions to prevent other people from being bitten.
b) Care and treatment
The first aid principles for treating any kind of snake bite are the same. The main
treatment for snake bite is the application of “Pressure Immobilization Technique”
(PIT).
• Follow DRABCDE and be prepared to perform cardio pulmonary resuscitation
• Ensure the casualty remain as still as possible to slow venom travelling through
the body
• Keep casualty under constant observation and at rest and provide reassurance.
• Apply the pressure immobilization technique (PIT):
1) Have the victim lie down Stay quiet; do not move the bitten part. The more
it is moved, the faster the poison will spread through the body. If the bite is
on the foot, the person should not walk at all.
2) Remove any rings, watches, or bracelets because swelling can spreadrapidly.
Note:
• Keep the limb immobilized until medical assistance arrives
• If only one bandage is available, start just below the bite site and wind as far up
the limb as possible, ensuring to cover the bite site.
• If no bandages, or splints available, improvise with clothing or whatever youcan from the surrounding environment.
• Do not wash the bitten area, as a venom sample may be obtained.
• Do not elevate the limb.
• Do not use an arterial tourniquet.
• Do not remove the bandage once it has been applied, even if casualty is feeling
well as long as there is no compromised blood circulation.
• Do not try to capture or kill the snake.• Do not cut the bite and suck the venom out.
Self-assessment 4.2.8
A 12 years’ kid was passing through a forest to fetch water and sustained snake
bite on the right leg about 2 cm above lateral malleolus
1) Critic and comment on the following bystander emergency aid to this
victim:
a) Used a vascular tourniquet to stop the venom to spread
b) Advised the victim to run fast and leave the forest
c) Took a short clip of the snake that was leaving the scene of incident
d) Reassured the victim
e) Once out the forest, he widened that wound to wash out the venom
2) What would do have done differently?
4.2.9 Epilepsy
Learning activity 4.2.9
You live in place where a family has a kid who experiences seizures several time.
1) The parents of that kid cognizant that you are an associate nurse ask you
this question “what do you think to be the cause of that condition?
2) What would you do when you find this kid in crisis?
Epilepsy is a common cause of seizures. Seizures are a disruption of brain function
that interrupts normal electrical activity of the brain. They consist of involuntary
contractions of many of the muscles in the body. It is only when there’s a tendency
for recurrent and major disturbances of brain activity seizures that epilepsy is
diagnosed.
No matter what the cause of the seizure, care must always include maintaining an
open, clear airway and a monitoring of the casualty’s level of response, breathing,
and pulse. You will also need to protect the casualty from further harm during a
seizure and arrange appropriate aftercare once he or she has recovered.
First aid management DOs in epilepsy include:
• Stay calm and remain with the casualty
• Note the start time and length of the seizure
• Protect the head from impacts
• Remove nearby objects and/or bystanders to protect from harm as cuts,
abrasion, suffocation, burns, and broken bones or teethes…
• Loosen tight clothing
• Follow the casualty’s seizure management plan (if there is one in place)
• When convulsions stop, or if vomiting starts, roll into recovery position and
maintain airway
• Observe and monitor breathing
• Call for an ambulance
• Reassure and let the person rest until fully recovered
First aid management DO NOTs include:
• Do not put anything in the casualty’s mouth
• Do not restrain the casualty
• Do not move the casualty unless they are in danger
Self-assessment 4.2.9
Witnessing a seizure in the street is impressive. How do you react as a first
aider?
End unit assessment 4
1) What does ABCDE stand for?
2) How should you open the airway of an unconscious casualty?
a) Head tilt and chin lift.
b) Jaw thrust.
c) Head tilt and jaw thrust.
d) Lift the chin.
3. What should your first action be when treating an electrical burn?
a) Ensure that the casualty is still breathing.
b) Wash the burn with cold water.
c) Check for danger and ensure that contact with the electrical source is
broken.
d) Check for level of response.
4. What is an open fracture?
a) A fracture in which the bone ends can move around.
b) A fracture in which the bone is exposed as the skin is broken.
c) A fracture which causes complications such as a punctured lung.
d) A fracture in which the bone has bent and split.
5. Which of the first aid duties below has the highest priority for you as a first
aider?
a) Re-assure the victim
b) Arrange medical attention
c) Be aware of the danger
d) Begin CPR
6. You are attending a party in your family and suddenly your 3 years old
nice become unresponsive after brief episode of coughing and crunching
of her throat.
a) What might be the cause of this unresponsiveness status?
b) As a first aider at the premises what steps would you undertake to help
her?
7. On your way while jogging, you find 2 victims involved in road traffic
accident. One of the victim is bleeding a lot on his left leg and his right
arm is broken and you can see forearm bones piercing through the skin.
The second victim, is unresponsive and has contusion on his forehead.
a) What would you do first to rescue these victims?
b) Who among the two victims should be attended to first and why?
c) Stepwise execute steps appropriate for bleeding control
d) Immobilize these fractures
8. What is the first question you must ask before you respond to any first aid
situation?
a) What is the age of the victim?
b) Is the scene safe?
c) What happened?
d) What time did you get hurt?
9. After observing picture B, what do u think is the first action when examining
the condition of a patient?
a) check for breathing
b) Check for airway and c-spine immobilization (if appropriate)
c) Check for insurance
d) Speak to Victim and shake his shoulders
e) Check for external injuries
10. How do you check for breathing referring to picture B?
a) Listen
b) Look for rising chest
c) Feel with the cheekd) Look, Listen and feel