UNIT 2 BANDAGING TECHNIQUES
Key unit competence
Apply correctly the techniques of bandaging
Introductory activity 2Observe the picture provided and respond to the questions below
1. What does the above image A show to you?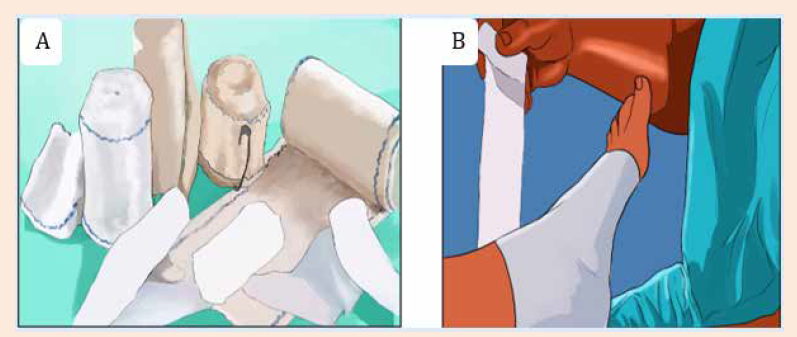
2. Which technique is being performed on image B?
3. What do you think the technique performed will help the casualty
2.1.INTRODUCTION TO BANDAGING TECHNIQUES
A bandage applied properly can aid in the recovery of a patient while a carelessly or
improperly applied bandage can cause discomfort to the patient, expose the wound
to danger of infection and even imperil the life of the patient.
Bandaging is a process of covering a wound or an injured body parts.
A bandage is a strip of cloth used to wrap some part of the body. Applying the right
type of bandage for a particular injury is necessary. Moreover, a bandage protects
the injury from any kind of germs that might slow down the healing process.
Learning activity 2.1Observe the illustrated images and answer the following questions
1) What do the images give you an idea about?
2) What was the purpose of the procedure done?
3) Describe the differences in the images illustrated above
4) Suggest the types of bandages used5) Comment on the way different body parts bandaged are tightened
2.1.1. Purpose of Bandaging
Bandaging can be done purposefully to immobilize an injured part and relieve pain,
to protect a wound and secure dressing, to control bleeding from wounds, and to
reduce or prevent swelling.
2.1.2. Rules of applying bandages
The rules of applying bandaging are but not limited to; selecting a bandage of
appropriate size and suitable material, putting the patient in a comfortable position,
support the injured area while bandaging, if a joint is involved; flex it slightly, face
the patient while applying the bandage, except when applying it on the head, hold
the roll of the bandage in the dominant hand when applying the bandage and check
the circulation in the area distal to the bandage, If necessary, unroll the bandageuntil the blood supply returns, and reapply it more loosely.
2.1.3.Types of bandages
The types of bandages include the following:
A. Triangular bandage
Triangular bandage consists of a wide
triangular piece of cloth usually made
from meter square tissue that is cut in half
diagonally. The bandage can be used in
various ways as sling to support an injured
limb, to secure splint or for immobilization
of broken bones and soft tissue injuries.
It is valuable in emergency bandaging
since it is quickly, easily applied and stays
on well They are used also for applyingpressure to a wound to control bleeding.
When opened up, they make slings to support, elevate or immobilize upper limbs.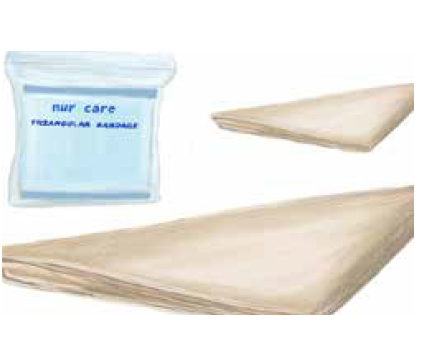
For example, this may be necessary with a broken bone or strain or to protect a
limb after an operation.
Folded narrowly, a triangular bandage becomes a cold compress that can help
reduce swelling.
B. Roller bandage
A roller bandage is a long strip of gauze or
cotton material prepared on a roll. Roller
bandages can be used to immobilize
injured body parts, provide pressure
to control internal or external bleeding,
absorb drainage, and secure dressings.
Basically, there are two types of roller
bandages; an elastic roller bandage
which is used to apply support a strain
or sprain and is wrapped around the joint
or limb many times, another type of roller
bandage is linen roller bandages which
are used to cover gauze dressings.
They come in many different widths and are held in place with tape or pins; they
can also be used for wound compression as they are typically sterile.Bandages should be applied firmly but not tightly enough to reduce circulation.
C. Tubular bandage
Tubular bandages are used for supporting
purpose in case of contusions, light sprains
and post-plaster casting, hold dressings on
fingers or toes because those areas are
difficult to bandage, prevents slipping down
in joints and allows full freedom of movement
and saves Healthcare provider’s time.
They’re made of seamless fabric tube. You
can get elasticized ones to place over joints
such as the ankle.Size of bandages by body part to be bandaged


Self-assessment 2.1
A 9 years male child X is brought to the health center by her mother saying that
he fallen down while he was climbing avocado tree and the child is complaining
for left arm pain; through observation you realize that there is a deformity of the
left forearm and while you try to palpate the arm this act increases the pain to the
child. After consultation you suspect closed fracture and you decide to transfer
the child to the nearest District Hospital for full diagnosis and management.
Questions:
1) Choose the best type of bandage you can use for supporting the injured
upper limb of child X.
a) Roller bandage
b) Triangular bandage
c) Tubular bandage
2) Explain the reason why you choose that type of bandage?
2.2. TECHNIQUES OF BANDAGING2.2.1. Spiral bandage
Learning activity 2.2.1
A male patient Y. has a wound on his left lower arm and his wound is to be
dressed and supported by a spiral bandage. Referring to the aside image of
spiral bandage, use the model in simulation lab and make a spiral bandage ofthe lower arm of the patient.
a) Description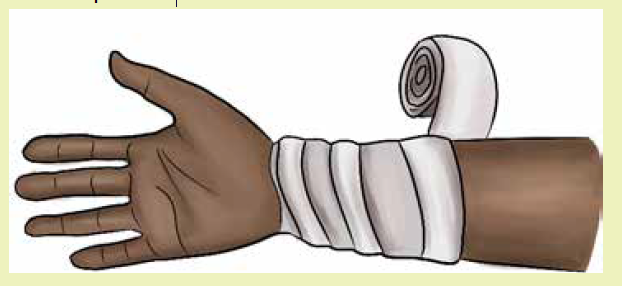
A bandage rounds a part of the body, overlapping the previous section at each
turn.Spiral turns are used to bandage parts of the body that are fairly uniform in
circumference.
Example: Upper arm, upper leg.
b) Implementation
• Make two spiral turns to anchor the bandage,
• Continue spiral turns at an oblique angle about a 30 degree,
• Each turn overlapping the preceding one by two third the width of the bandage,• Terminate the bandage with two circular turns and secure the end.
Self-assessment 2.2.1
Respecting principles and steps of bandaging techniques,
Perform the spiral bandage of upper arm using the mannequin in simulation laband respecting principles and steps of bandaging techniques
2.2.2. Spica bandage
Learning activity 2.2.2
A female patient D has fallen down and got a wound on her right upper arm.
The wound is to be dressed and supported by a spica bandage to stop bleeding.
Referring to the aside image of spica bandage, use the model for bandaging inthe simulation lab and make a spica bandage of the upper arm of patient D.
a) Description
A bandage in which a figure of eight turns are applied, each a little higher or lower,
overlapping a portion of each preceding turn so as to give an imbricated appearance.
b) Implementation
• Hold the roll in the dominant hand, and the beginning of the bandage in the
other hand and face the patient.
• Make 2 circles, the 1st slightly at an oblique angle, then fold up the formed
point and maintain it by the 2nd circle.
• Wrap progressively by crossing the bandage towards the top, in a figure 8
fashions.
• Make sure that the crosses are well one above the other.• End by 2 wraps. Secure bandages with adhesive plaster or a safety pin.
Self-assessment 2.2.2
Perform the spica bandage of the lower arm of mannequin in simulation lab by
following the steps of spica bandaging correctly and respecting the rules andprinciples of applying bandages.
2.2.3. Earlobe bandage
Learning activity 2.2.3
A 20 years female K. had a left earlobe wound infection after piercing her
ears. The wound care was done and you are asked to help by covering the
dressing using earlobe bandage. Following the image illustrated of earlobebandage aside, use the mannequin and make an earlobe bandage for K.
a) Description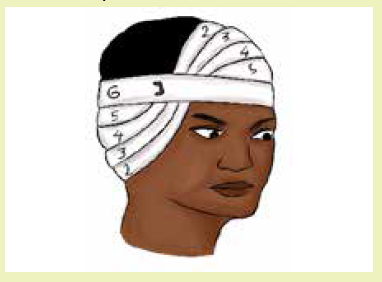
Earlobe bandage consists of use of a strip of material such as gauze or cloth used
to protect, compress, or support a wound dressing of the ear.
b) Implementation
• Make 2 circles facing the patient, the 1st slightly at an oblique angle, then
• Fold up the formed point and maintain it by the 2nd circle.
• Make three oblique drops as for the eye, which means upward from the ear
and downward on the parietal region of the opposite side, in order to have a
crossing at the location of the brow just above the eye.
• When bandaging the left ear, start from the top of the head at the right side;
When bandaging the right ear, start under the ear and avoid covering the eye.
• Secure bandages with adhesive plaster or a safety pin.
Self-assessment 2.2.3
Form groups of two learners and make the earlobe bandage for each other by
following steps of earlobe bandage, respecting rules and principles of applicationof bandages.
2.2.4. Cranial bandage
Learning activity 2.2.4
A 30 years old cyclist had road traffic accident and got head injuries; the multiple
wounds cover his head and it is necessary to support the wound dressings using
bandage. Referring to the image of cranial bandage also known as capeline of
head illustrated, Work in pairs and perform a cranial bandage of your colleagueshowing the way you can bandage the patient after wound care.
a) Description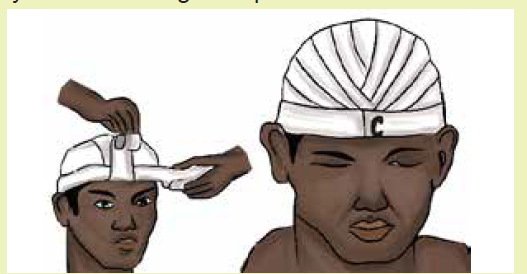
Cranial bandage is sometimes used when the whole scalp is to be covered. A
double headed roller bandage is used. The patient should be seated and the nurse
should stand behind the patient.
b) Implementation
• Place a center of the outer surface of the bandage in the center of the
forehead, the lower border of the bandage lying just above the eyebrows.
• The head of the bandage as brought over the temples and above the ears to
the nape of the neck where the ends are crossed.
• The upper bandage being carried, round the head and another brought over
the center of the top of the scalp to the root of the nose.
• The bandage which encircles head is now brought over the forehead, covering
and fixing the bandage which could cross the scalp.
• This bandage is then brought back over the scalp.
• Slightly to one side of the center, thus covering one margin of the original turn.
• At the back, it is again crossed and fixed by the encircling bandage and is turn
back over the scalp to the opposite side of center line,
• Now covering the other margin of its original turn.
• These backward and forward turns are repeated to alternate side of the
center, each one being, in turn, fixed by encircling bandage until the whole
scalp is covered.
• The bandage is completed by a circular turn around the head and pinned in
the center of the forehead.Self-assessment 2.2.4
In groups of two learners perform capeline of head bandage to each other
following all steps of the procedure and respecting the rules and principles ofbandages application.
2.2.5. Monocular bandage
Learning activity 2.2.5
Mr. G had an injury of the left eye and he needs a monocular bandage to prevent
swelling of his injuries.
Referring to the illustrated image, perform a monocular bandage of the left eyefor Mr. M.
a) Description
Monocular bandage also known as “Crossed bandage of one eye” is the way of
bandaging used to hold dressing of the eye.
b) Implementation
A bandage of 1.5-2width is required for monocle bandage.
• Start on the forehead by a first circular, turned at an angle, at which it is fold
back between first and the second circular without tightening too much.
• Oblique wraps are made, ascending while passing under the earlobe.
• Go up to the interior angle of the affected eye and at the opposite top of the
head.
• Cover the first jet of the 2/3rd while moving away from the center, which
means, crossing on the face then move away from the nose on the eye-level.
• Make 3 wraps.
• End by a frontal circle.
• Secure bandages with adhesive plaster or a safety pin.
• It is necessary to systematically move up on the ear, and down on the top
from the head.
Some people prefer to take the bandage around the forehead between each turn
covering the dressing, but this makes a heavy bulk around the head which is notreally necessary.
Self-assessment 2.2.5
A 10 years old male child had left eye problem, after being operated, a wound
dressing is to be done and supported by a left eye bandage. Use group of twolearners and perform eye bandage
2.2.6. Binocular bandage
Learning activity 2.2.6
Mrs. N. a 56 years old woman underwent a surgery of both eyes and there was
need for binocular bandage to support the dressing and prevent swelling.Perform the binocular bandage as illustrated in the aside image.
a) Description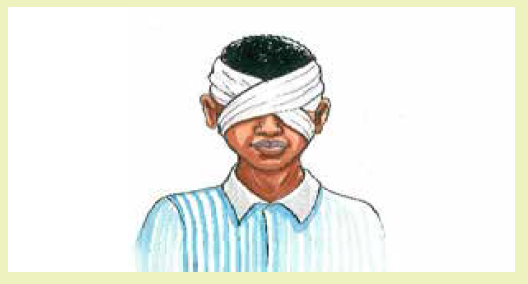
Binocular bandage also known as “Crossed bandage of both eyes” is the way of
bandaging used to hold dressings of both eyes.
b) Implementation
• A figure of eight technique is used.
• Start on the forehead and make two circles; the first slight at an oblique angle,
then fold up the formed point and maintain it by the second cycle.
• From the nape of neck pass through the right top of the head, the interior
angle of the left eye and under the left earlobe.
• Go down in the nape of the neck, under the right earlobe, the interior angle
of right eye and pass at the left top of the head.
• Make a frontal circle. Three times, repeat the movement while deviating, on
the one hand from the top of the head, on the other hand from the nose: the
wraps cross on the face above the nose.
• Do not tighten on the eyes.• End by two wraps and secure bandages with adhesive plaster or safety pin.
Self-assessment 2.2.6
In classroom and in pair, perform binocular bandage to each other following
all steps of binocular bandage and respecting rules and principles of bandageapplication.
2.2.7. Hand gloved bandage
Learning activity 2.2.7
K. a 10 years old child has a dressing on the back of his hand and there is
need to do a hand-gloved bandage in order to protect the wound and supportthe dressing. Perform a hand gloved bandage of the left arm as illustrated aside.
a) Description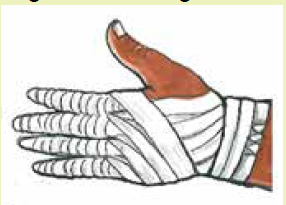
Hand gloved bandage also called complete bandage of hand is used to retain
dressings on the back of the hand.
b) Implementation
• Hold the roll in the dominant hand, and the beginning of the bandage in the
other hand and face the patient.
• Make 2 circles, the 1st slightly at an oblique angle, then fold up the formed
point and maintain it by the 2nd circle.
• If hand is pronated: start with the small finger of the right hand or start with
the thumb of the left hand.
• If hand is supinated: start with the thumb of the right hand or start with the
small finger of the left hand.
• Form a spiral at each finger, starting with the distal part of each finger.
• Each time, make the bandage pass over the back of the hand before returning
to the wrist.
• Make a circle at the wrist before to start wrapping next finger.
• End by 2 circles at the wrist. Secure bandages with adhesive plaster or a
safety pin.
Self-assessment 2.2.7
In simulation lab, using the mannequin perform hand gloved bandage using
appropriate bandage type, following steps of hand gloved bandage and
respecting rules and principles of bandage application.
2.2.8. Triangular Bandage
Learning activity 2.2.8
A 32years old male was injured on his elbow in a motorcycle accident and you
are among the people gathering around the accident site.
Work in pairs and perform a triangular bandage of the right arm as illustratedaside.
a) Description
Triangular bandage, also known as handkerchief bandage is used for temporary
or permanent dressing of wounds, fractures, dislocations and slings.
It is very valuable in first-aid work since it is quickly and easily applied and can be
improvised from any kind of cloth such as a piece of cloth such as a shirt, a sheet,
a large handkerchief etc.
b) Implementation
• Ask the patient to bend his arm to be placed in a sling bringing the forearm on
the chest, so that the hand is placed higher than the elbow.
• Place the bandage under the Patient’s arm on his chest (the center of the
triangle base under the wrist, angle point at the level of the elbow, neck scarf
at the level of the neck).
• Hold upward lower the sling of the arm, above the wrist.
• Fix a reef knot on the unaffected side (never fix it on the spinal column).
• Fold the excess cloth on the level of the elbow and fix it with safety pins.
• Check the correct setting of the scarf (hand and forearm maintained abovethe elbow).
Self-assessment 2.2.8
Mr. F. has injured in road traffic accident and he has injured his right elbow, make
pairs in class and perform triangular bandage simulating to support Mr. F’s arm
before evacuation from the accident point.
2.2.9. Stump bandage
Learning activity 2.2.9
Mr. M.’s left leg has been amputated below the knee due to a malignant disease
condition. After the surgical operation the stump was sutured, dressed and
bandaged. On the 3rd day post-operative, there is need to change the dressing
and do a stump bandaging. After the wound dressing, you have to apply a stump
bandage.
Perform a stump bandage of Mr. M’s left leg on the model in the simulation labas illustrated in the image.
a) Description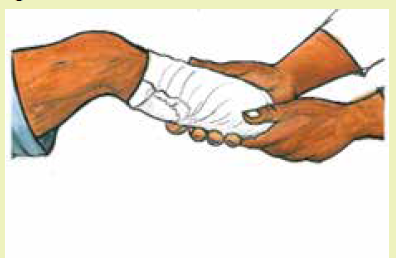
Stump bandage also known as recurrent bandage of the stump is used to control
postoperative edema and to shape the stump, hold the dressing around the stump
of arm, leg or around finger. The elastic bandage is applied in a recurrent or figure
of eight fashion with more pressure applied to the distal, rather than the proximal
portion of the limb.
b) Implementation
• Use a four-inch bandage and make two circular turns round the limb and
place the end of the bandage in the center of the upper side of the limb.
• Carry the bandage over the center of the stump to the same level behind
holding the turns back and front with the thumb and finger of the other hand.
• Repeat the recurrent turns over the end of the stump first on the left and then
on the right side of the original turn, until the whole of the dressing is covered.
• Fix the loop with a straight turn round the stump and continue the bandage with
figure of eight turns round the limb until the dressing is completely covered.• Secure with a safety pin.
Self-assessment 2.2.9
In simulation lab, using a mannequin of stump, perform stump bandage andterminate with spica following steps of stump bandage application.
End unit assessment 2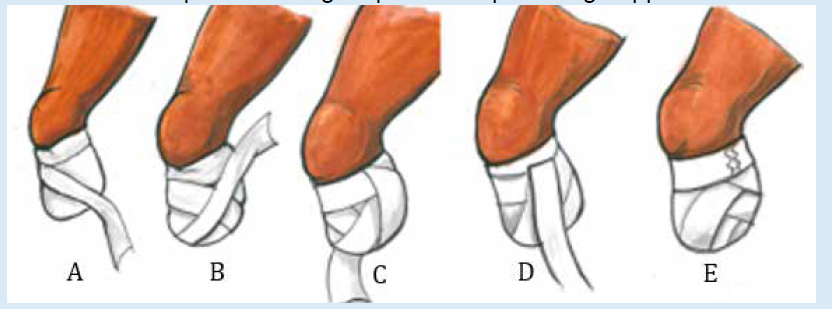
Match the item in column A with the appropriate statement in column B
(2) Outline at least five rules of bandage application.
(3) Give two specific examples of roller bandaging techniques.
(4) Point out 3 purposes of bandaging.
(5) Appraise why a bandage have to be anchored as a rule of bandaging.
(6) Describe the consequences of tightening the bandage.(7) Indicate the type of bandage performed on the images below.
(8) Reorder the shuffled order of steps followed to make a triangular bandage.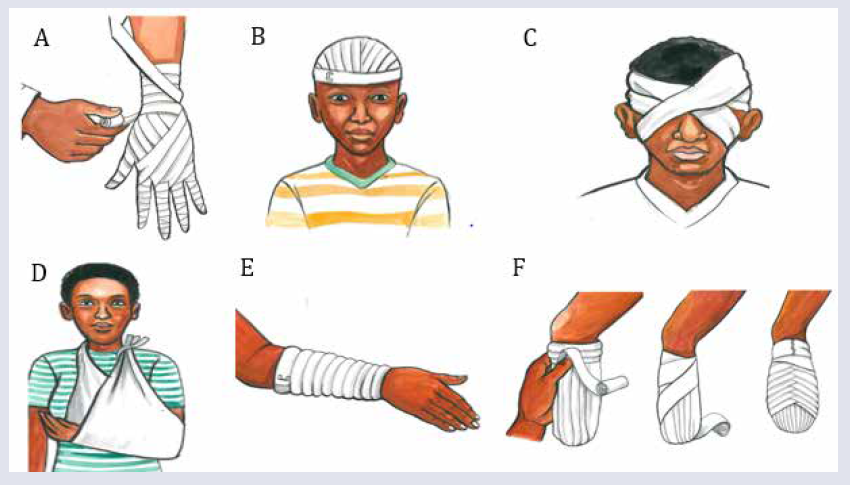
Shuffled order of triangle bandaging technique
f) Hold upward lower the sling of the arm, above the wrist.
g) Ask to the patient to bend his arm to be placed in a sling bringing the
forearm on the chest, so that the hand is placed higher than the elbow.
h) Fix a reef knot on the unaffected side (never fix it on the spinal column).
Fold the excess cloth on the level of the elbow and fix it with safety pins.
i) Face the patient and ensure good communication with the patient
j) Check the correct setting of the scarf (hand and forearm maintained above
the elbow).
Place the bandage under the patient’s arm on his chest (the center of the triangle
base under the wrist, angle point at the level of the elbow, neck scarf at the levelof the neck).
(9) Reorder the shuffled order of steps followed to make a stump bandage
Shuffled order - stump
a) Repeat the recurrent turns over the end of the stump first on the left and
then on the right side of the original turn, until the whole of the dressing iscovered.
b) Make two circular turns round the limb and place the end of the bandage
in the center of the upper side of the limb.
c) Carry the bandage over the center of the stump to the same level behind
holding the turns back and front with the thumb and finger of the other
hand.
d) Secure with a safety pin.
e) Fix the loop with a straight turn round the stump
f) Continue the bandage with figure of eight turns round the limb until thedressing is completely covered.
