UNIT 8: SITTING VOLLEYBALL
8.1. Key unit competence:
Perform Sitting volleyball tactics in game situations8.2. Prerequisite (knowledge, skills and attitude)
Students of senior five will learn better basic tactics of playing sitting volleyball
if they can apply basic motor control and coordination exercises and performed
sitting volleyball basic techniques learned in senior four.
8.3. Cross-cutting issues to be addressedGender
In teaching and learning process of sitting volleyball, the teacher must prepare and
provide physical activities that engage both girls and boys equally to exploit their full
potential and talents without any discrimination or prejudice.Inclusive education
The teacher as a facilitator must consider different special education needs and
select activities to adapt his teaching approaches to students. This creates a positive
attitude and helps all students to participate actively and develop their competence
levels.Financial education
The teacher should integrate Financial Education into his/her teaching/learning of
sitting volleyball activities by providing the local and no cost teaching and learning
material where is possible. He/she must encourage students to make their own
materials that can help them to develop competences not only in sport at school
but also in their life.Standardization culture
The teacher must choose and select the standardized materials to use in his/ her
teaching/learning process of sitting volleyball. It is necessary to provide appropriate
materials required to the levels of students and help them to develop culture of
checking and using the quality of sport materials for the competitions before using
them in order to prevent injuries and other accident.
Environment and sustainability
The teacher should provide materials and deliver the lesson with encouraging
students to protect the environment and well use of materials. The teacher helps
them to develop the spirit of keeping safe the environment they use in sports
activities.Peace and values education
The teacher helps students to develop fair play and social values by avoiding
violence and conflict in the sitting volleyball game by setting clear and relevant
instructions. He/she should provide the activities that help students to develop their
competence peacefully.Comprehensive sexuality education
A teacher provides sitting volleyball activities and sets instructions that prevent
sexual harassment or any kind of gender-based violence like sexual abuse and
physical contacts oriented to the sexuality intention.Genocide studies
While conducting sitting volleyball exercises a teacher should take a time to explain
student show sports should be used to fight against Genocide ideology and how to
prevent it. For example, to organize Genocide memorial tournaments at school and
give the message related to the Genocide.8.4. Guidance on introductory activity
Before introducing the lesson one of this unit, you must introduce the whole unit.
The teacher as a guide, facilitator and expert, ask questions or give activity related
to different tactics needed to play sitting volleyball in order to help them to predict
what to be learned in the whole unit.
8.5. List of lessons/ sub-heading
Lesson 1: Tactics of serving and receiving the ball
a. Learning Objective
Perform different tactical exercises of serving and receiving the ball.b. Teaching resources
– Balls
– Playground (volleyball court)
– Trees
– Net
– Cones
– Chasubles
– Whistle
– Stopwatch/Watchc. Prerequisites/Revision/Introduction
Students of senior five will learn better the tactics of serving and receiving the
ball in sitting volleyball if they can execute basic physical exercises and perform
different basic sitting techniques learned in senior four.d. Learning activities
Opening discussions (in a semi-circle formation)
– Check the students’ readiness.
– In pairs students brainstorm about different sitting volleyball techniques
learned in senior four.
– Let some groups present their findings.
– Assist them to clarify their findings.
– Recall defensive and offensive sitting volleyball techniques learnt in year one.
– Invite them to start warm up exercises and stretching.Warm up exercises
Let the students perform warming up activities to prepare their muscles, cardio-
vascular and respiratory system and to be ready for more activities that are vigorous
and to prevent injuries. Those activities should include the following:
– Easy-paced activities.
– Light moving activities.
– Passing the ball.
– StretchingWhile conducting warm up, request students the following:
– Be seated and move in any direction based on exercise.
– Stay balanced at all times.
– Use a variety of fakes when tagging or avoiding tags.
– Guide them while performing stretching exercises.e. Lesson body
Tactics of serving in sitting volleyball
Serving can be very effective in sitting volleyball to put pressure on opponents.
Because of the lower net height and the challenges in moving on serve receive;
points can be generated from the serving line. This is why front row players are
allowed to block the serve on the opposition side. Both float serves and spin serves
are used in sitting volleyball, however, the spin serve can be slightly less effective
because of the angle of the ball going over the net. Because there is no jumping,
there is no ‘downward’ angle put on the ball that is largely why it is effective in
traditional volleyball.Tell students that a good serve is an effective way for a team to score points.
Here below are the fundamentals to perform a good serving:
– Tell the students that they should pull back their hitting arm as if they were
going to draw back a bow and arrow.
– In their non-serving hand, students should raise the ball to shoulder height
with their arm in front of their body and toss the ball gently 0.3-0.5m above
their head.
– Students must then swing through the ball to their intended target.
– To allow the wrist to be loose so that it snaps on contact with the ball to create
a top spin serve or keep the wrist rigid and consistent for a float serve.
– The ball served should not touch the antennae and should land in the court
of the opposing team.
ACTIVITY
Student line up at the attacking line and targeting designated areas in the opposite
side of the net. As students achieve their goal of hitting the target, they move to
imaginative line one-meter back and targeting again. If successful, the students
move back until they reach the serving line where the exercise ends. Targets vary
in size while students develop their ability of serving.Teaching points to consider
– Students should practice serving to the designated areas on the court (on
different positions).
– Practice focuses on short, deep line and cross targeting.Correction for tossing the ball while jumping:
– Check that the shelf hand is tossing the ball in front of the hitting shoulder.
Have students practice tossing without hitting the ball.
– Concentrate on tossing the correct height.
– Look at the server’s body and feet position.
– They should make the impact with the ball at the 1 o’clock position.Tell students that there are two major adaptations of the rules concerning sitting
volleyball:
– Remind the students that they are allowed to have the legs inside the court
while serving but must sit behind the service line.
– In sitting volleyball, it is allowed to block the service.Reception of the ball
During receiving the ball, tell students to keep reception ready position in the
following ways:
– Sit tall with chest and head up.
– Place legs in front of body or slightly to the side. If possible, have one-foot flat
on the ground to push off.
– Arms down beside hips with hands on the floor ready to push in any direction.
– Stay alert and use both hands and feet to move behind ball once in play.
After reception, pass should be made with the purpose of preparing the attack.
Students may use different types of passes as learned in Year One.Tell students to use
• Forearm pass:
When receiving the ball from the service or to play a ball that is too low to volley.
Remind them main fundamentals of forearm as follow:
– Start in a balanced ready position with relaxed arms and extended away from
the body at about 45 degrees.
– Join hands to form a flat forearm platform.
– At contact, the arms follow through and direct the ball to the target.• The volley (overhead pass)
– When the ball is above the head, which is the most common way of playing the
ball.
– When the students need to pass the ball, set up a smash, or to play the ball
over the net.
APPLICATION ACTIVITY
Students form multitriangle formation. Player 1 tosses the ball to player 2, who
forearm passes to player 3. Player 3 catches the ball and tosses to player 1, who
forearm passes to player 2, etc. Players attract other players’ attention by saying
ready, mine, pass, etc.Teaching points to consider
Pay attention to the players’ hands position and ready to play positionError detection and correction: For forearm, passing Players at early stage of
playing often have problems with judging the speed and distance of a moving ball.
Error: A player misjudges balls and makes contact with the upper arms instead of
the forearms.
Correction: Watch how the students contacts the ball emphasize moving the body
to get into a balanced position before contacting the ball, the ball should contact
the forearms between the elbow and the wrist on the flat platform a player can
overcome misjudging the ball by titling the forearm platform to deflect the ball toward
the target players need to establish a low position and extend the arms away from
the body when contacting the ball Players in sitting volleyball usually establish their
own way to get into a ready position to play the forearm pass.Cool down
– Let the students practise cool down and stretching exercises by focusing on
the most used muscles.
– Guide them how they can stretch their muscles accordingly.
– Help them/demonstrate/correct where is necessary.Closing discussion
• Reflect
– What were the most challenging/advantageous when serving and smashing
the ball in sitting volleyball game?• Connect
– How do you serve/passing the ball in a sitting volleyball?
– How do you contact the ball when serving and passing the ball in sitting
volleyball?
– When and how making service, rotation and pass in sitting volleyball?
• Apply
– What is the usefulness of applying serving and passing tactics in sitting
volleyball?
– What are some of the criteria to become a good server/receiver in sitting
volleyball?Lesson 2: Tactics of setting and smashing
a. Learning Objective
Perform different tactical exercises of setting and attacking.b. Teaching resources
– Balls
– Playground (volleyball court)
– Trees
– Net
– Cones
– Chasubles
– Whistle
– Stopwatch/Watchc. Prerequisites/Revision/Introduction
Students of senior five will learn better the tactics of setting and smashing the ball in
sitting volleyball if they can execute basic physical exercises and perform different
basic setting and smashing techniques learned in senior four.d. Learning activities
Opening discussions (in a semicircle formation)
– Check the student ‘readiness.
– In pairs, students brainstorm about different sitting volleyball techniques and
tactics learned in the lesson one.
– Let some groups present their findings.
– Assist them to clarify their findings.
– Recall basic sitting volleyball techniques and tactics learnt in the lesson one.
– Invite them to start warm up exercises.Warm up exercises
– Let the students perform warming up exercises to prepare their muscles,
cardio-vascular and respiratory system, to be ready for more activities that
are vigorous and to prevent the injuries.
– Chose randomly a student to lead warm up.
– Guide them while performing warm up and stretching exercises.
e. Lesson bodyShort description of setting
Explain to the students that setting in sitting volleyball, is an action where a player
transfers the ball for another player to make a smash (or spike). Setting is done
close to the net. The ball must be set up at a height above the net for the smasher
to make a powerful smash or put the ball over the block.
• Setting fundamentals
Remind the students that setting the ball needs to follow the following steps:
– Sit in a ready position, put hand above the forehead and locating the ball.
– Contact the ball is in the middle of the forehead;
– The pads of the fingers should contact the ball;
– As contact is made, the setter extends the arms;Tell students that getting prepared to set a ball from the correct ready position is the
first part of a successful set.
ACTIVITY 1
Description of the activity
The server begins by tossing the ball over the net to the passer, who passes to the
setter. Setter sets the ball parallel to the net, passer who moves close to the net to
catch the set and then rolls the ball back to server.Teaching point to consider
Encourage cooperation and dynamic actions with no playing of hard balls.
Error: Players use improper hand position when setting; they make a hard contact.
Correction: Start teaching beginners with lighter balls. Review hand position
fundamentals. Setting is the second part of three touch sitting volleyball. The setter
is directing the attack.• Smashing (Hitting)
Short description of smashing
Smashing (or spike, hit) is the most dynamic of all volleyball skills. The approach
to the net should be made at sufficient speed. A player (either a front row or a back
row) is not allowed to lift his or her buttocks from the floor when carrying out any
type of attack hit. A back row player may complete an attack hit at any height from
behind the front zone. The player’s buttocks must neither have touched nor crossed
over the attack line. A back row player may also complete an attack hit from the
front zone, if at the moment of the contact the ball is not absolutely higher than the
top of the net.
– Let the students perform the following activity to help them mastering
smashing skills.APPLICATION ACTIVITY 1
Description of the activity
Players with the balls toss to themselves and extend up to spike the ball down
to the floor, then bounce up and off wall. When the ball bounces back, the player
moves to catch the ball, and returns to re-toss and hit againTeaching points to consider
Players concentrate on contacting the ball over the head, at the 1 o’clock
position. Emphasize on arm movement.Errors that may occur: move too soon or too late and players keep smashing the
ball out of bounds players lack the control of their bodies.Corrections of occurred errors: Players must contact the ball at the peak of ball
position in sitting volleyball. Check the approach and timing of the players’ action.
Players need to watch the set that they can judge their approach to the ball and
make smash. Control the arm swing of the players. Control the contact between ball
and the palm when players smash the ball.APPLICATION ACTIVITY 2
Form two groups of 4 to 6 players in order to teach proper technique for back row
hitting and setting.Description of the activity
Three back row players and one front row player for a group of four fill in front row
players as desired. Only back row hitting is allowed. Play is initiated by serve or free
ball from on the court.
Variation
– After performing the above activity, facilitate students to perform different
tactical actions of setting and smashing in game situations.
– Put the students in two equal teams and organize a short sitting volleyball
game to apply different ways of setting the ball from different position in field
of play.
– Ask every team to choose a setter (Designated ‘Setter’) to be used for the first
15 min, and then use the frontcourt setters.During performing this activity:
– Remind students that every team has three ball contacts (not including a
block touch) to generate an attack. Before the start of any rally, it is important
that all players on the team know which player is aiming to take the second
contact. However, if the ball does not go to this player then others must take
the ball
– Ask them to communicate clearly from all concerned, i.e. the designated
setter to shout that they cannot get to the ball and another player to shout
that they will take the 2nd contact and set.
– For the second way of setting the ball, request them to use the frontcourt
setters from different positions such as position 2, 3 and 4.Cool down
– Let students practice cool down exercises and light stretching by focusing the
most used muscles.
– Guide them how they can stretch their muscles accordingly.
– Help them/demonstrate/correct where is necessary.
Closing discussion
Reflect
– Which were the most challenging/advantageous when setting or smashing the
ball in sitting volleyball game?Connect
– How do you set/smash the ball in a sitting volleyball?
– How do you contact the ball in a sitting volleyball?
– What is the setter/smasher job in sitting volleyball?Apply
– What is the usefulness of applying setting and smashing tactics in sitting
volleyball?
– What are some of the criteria to become a good setter/smasher in sitting
volleyball?Lesson 3: Tactics of blocking and digging
a. Learning Objective
Perform different tactical exercises of blocking and digging.b. Teaching resources
– Balls
– Playground (volleyball court)
– Trees
– Net
– Cones
– Chasubles
– Whistle
– Stopwatch/Watchc. Prerequisites/Revision/Introduction
Students of senior five will learn better the tactics of blocking and digging the ball in
sitting volleyball if they can execute basic motor control and movement exercises
and perform different basic sitting volleyball techniques of blocking and digging the
ball learned in senior four.d. Learning activities
Opening discussions (in a semi-circle formation)
– Check the students’ readiness.
– In pairs students brainstorm about blocking and digging technique of sitting
volleyball learned in senior four.
– Let some groups present their findings.
– Assist them to clarify their findings.
– Recall the sitting volleyball techniques of blocking and digging learnt in
Senior four.
– Invite them to start warm up exercises and stretching.Warm up exercises
– Let the students perform warming up activities to prepare their muscles,
cardio-vascular and respiratory system and to be ready for more activities
that are vigorous and to prevent injuries. Those activities should include:
• Easy paced activities
• Light moving activities
• Passing the ball
• Stretching
– Guide them while performing stretching exercises.e. Lesson body Blocking
Briefly give short description of blocking in sitting volleyball
Blocking is used to encounter the smash. Any or all of the front line players carry out
Block. Players try to block a smash with their hands. The four factors are important
when making the block: Positioning, Timing, Speed reaction and Aggression.The block should be made with open hands and fingers spread to cov-
er as wide an area as possible and try to force the ball down into the
opponents’ court. Good blocking involves the ability to read the of-
fensive smasher’s intentions. In sitting volleyball, it is allowed by the
rules to block the serve, which has consequences in defense strategies
Blocking fundamentals
Explain students that:
– The ready position gets players aligned to set a good block.
– The blocker should face the net; hands are open and relaxed, held in front of
the shoulders at head level.
– The blocker watches the smasher and reacts to his attempt.
– Emphasize that blocker should stay out of the net.
– Player in block should be ready to move in any direction after blocking.Let students apply them on the sitting volleyball court.

System of defending by using 6-up or 6-High defence
The position 6 up or 6-High defense is most commonly used in sitting volleyball due
to the vulnerability of the middle of the court behind the block and the fact that it
is quicker for the athletes to move backwards rather than forwards. For an outside
cross-court attack, position 5 or 1 will move to the deep corner and possibly even
outside the court to defend the ball off the top of the block. The off-blocker will move
deep off the net towards position 5 or 1. For an outside line attack, position 5 or 1
will move inside the court away from the line as that is a difficult shot to score off
in sitting volleyball and the greater percentage of shots will come over or off the
block. For a middle attack, the outside blockers will try to close and help if they
can. If unable, they will drop back to pick up tips or deflections. Position 6 reads
to direction of the hitter and shifts one direction or the other, filling any potential
seams in block. Positions 1 and 5 stay relatively home but also read hitter and shift
in direction of attack.

Digging
– Explain to the students that digging is a defensive move in which both arms
are placed together in an attempt to bounce a hard-hit ball up into the air.
– Tell the students the tactical of actions of digging in sitting volleyball as they
outlined below:
• Anticipate and move to the ball.
• Get your forearms under the ball.
• Lean into the ball as you make contact.
• Dig the ball at the midline of your body if you can.
• If you have to reach outside your body, extend and angle your arms in the
direction of the target.
Remind students:
– To remember changing their body position to face the hitter. Hard driven balls
are dug often just by getting in good body position.
– If they are continually able to get into good position for digging (angling their
arms to the target every time), they will often dig balls that will stay in play just
by them rebounding off you in the right direction.Let students apply them on the sitting volleyball court.
APPLICATION ACTIVITY 1
Description of the activity
Players in sitting volleyball situation get their hands above the net; the teacher
smashes the ball at the outstretched blocker’s hands. Player gets a point for
blocking the ball.Teaching points to consider
As player develops the skill, increase the speed of attacksError detection and correction for blocking blocker’s hand should be
keeping firm and angled properly.
Errors: Hands are not firm. Hard driven smashes are defecting off the blocker and
out of bounds. Off speed, smashes are defected off the blocker and out of bounds.
Correction: The blocker must keep the body parallel to the net. Extend the hands
over the net if possible. The blocker should turn the outside hand in towards the
court, so the ball can rebound back into the opponent’s court. The blocker should
keep the hands firm and strong. Take care of the angle of the hands for rebounding
the ball.APPLICATION ACTIVITY 2
Put students into groups of 8-10.Description of the activity
Three athletes line up behind each other in position 5 and three athletes line up
behind each other in position 1. One athlete at net in position 4 and one athlete in
position 2. Athlete in position 2 tossing free ball to position 5 initiates Ball. Position
5 athlete passes ball to position one athlete (middle of the court) who sets it to
position four and follows ball to position 4. Position 4 attacks ball back to position 1
where next player in line has filled in (attacking athlete in position 4 then follows ball
to position 1). Position 1 passes to position 5, who sets position 2 and follows ballCycle repeats continuously with attackers always. Following ball and defenders
only following ball to attack positions once, they set.
Success Criteria
Student scan continuously keep the ball in play and within the structure of the drill.
A time goal can be set, which the athletes will need to keep the ball in play for that
amount of time.Teaching points to consider
– Emphasize the height that needs to be put on the first ball contact.
– Offside defender needs to release into the middle of the court to set a second
contact ball to the outside.
– First contacts need to be high, inside the attack line and in the middle of the
court; second contacts need to be high, off the net and slightly inside the
antennae.
– After performing the all above drills, facilitate the students to perform different
defensive tactics in game situations.
– Put the students in two equal teams and organize a short sitting volleyball
game to apply different ways of defending the ball in field of play.Cool down
– Ask the students to stop playing.
– Have them practice different relaxation exercises to help them to restore the
muscle back to resting length, reduce soreness, and enhance recovery for
the next sitting volleyball workout.
– Let them perform different flexibility exercises under your guidance.Closing discussion
Reflect
– Which challenging/advantageous when blocking and digging the ball in sitting
volleyball game?Connect
– How do you block/dig the ball in a sitting volleyball?
– How do you contact the ball in a sitting volleyball?
– What is the blocker job in sitting volleyball?Apply
– What is the usefulness of applying of blocking and digging tactics in sitting
volleyball?
– What are some of the criteria to become a good defender (digging and
blocking) in sitting volleyball?
Lesson 4: Applying offensive and defensive tactics in sit-ting volleyball
game situation
a. Learning Objective:
Apply sitting volleyball offensive and defensive techniques and tactics in game
situation.b. Teaching resources
– Balls
– Playground (volleyball court)
– Trees
– Net
– Cones
– Chasubles
– Whistle
– Stopwatch/Watchc. Prerequisites/Revision/Introduction
Students of senior five will apply better the sitting volleyball techniques and tactics
in game situation if they can execute basic sitting techniques learned in senior four
and perform different basic sitting volleyball tactics learned in the previous lessons.d. Learning activities
Opening discussions (in a semicircle formation)
– Check the students’ readiness.
– In pairs students brainstorm about different sitting volleyball tactics learned
in the three previous lesson.
– Let some groups present their findings.
– Assist them to clarify their findings.
– Introduce defensive and offensive sitting volleyball tactics learnt in the three
previous lesson.
– Invite them to start warm up exercises and stretching.Warm up exercises
– Let the students perform warming up activities to prepare their muscles,
cardio-vascular and respiratory system and to be ready for activities that are
more vigorous and to prevent injuries.
– Guide them while performing stretching exercises.
e. Lesson body
Description of switching (Frontcourt and backcourt switching)
The rules of the game allow players to switch between positions in the same part
of the court (e.g.: front or back), after the ball has been served. This is to enable
teams to move their players into other positions, either to maximize their own
strengths or counteract against the strengths of the opposition. The most common
use of switching is to enable teams to move their setter into positions that are more
desirable.
– Demonstrate them how a player from position 4 can switch to either position
3, or if the setter is a quick mover then position two.
– Remind the students that it is important to look at where their starting position
is, how they sit to enable them to move quickly after the service, and how they
move and play the ball to one of their attackers.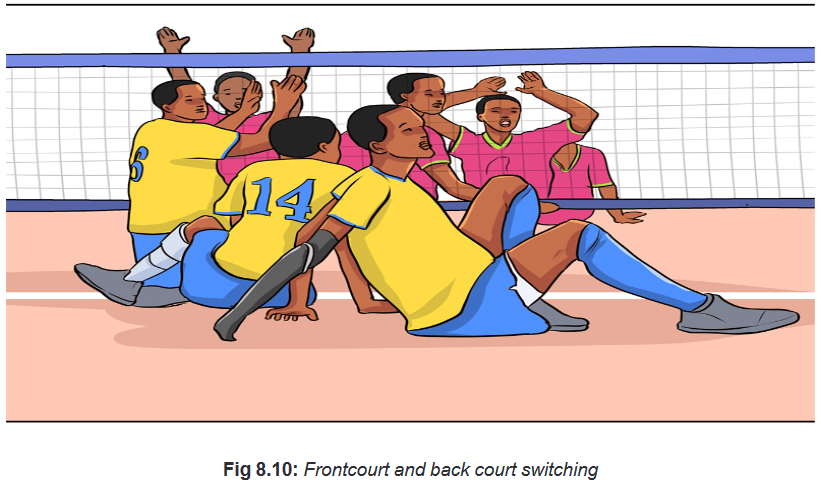
Let students apply them on the sitting volleyball court.
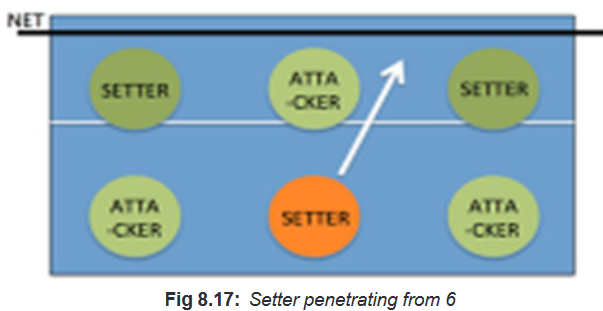
• Setter penetrating
Explain the students that penetration is usually done with a player from position 1
or position 6. To do this you must have a setter who is comfortable and quick at
moving around the court.Let students perform the penetration and switching within a short sitting volleyball
game.Remind them that:
– By having a backcourt setter moving into the space between positions 2 and
3, you open up the reverse/backwards set to an attacker at position 2. The
benefit in doing this is that it means that you have three teammates who can
attack in the front zone of the court.
– By having three attackers in the front zone of the court, it means that you
can spread the attack right across the entire length of the net making it much
harder for the blockers. The system is somehow complicated, tell them to
communicate and make sure they do not have two.
Let students apply them on the sitting volleyball court.TEAM SYSTEMS
Team systems in sitting volleyball are in three levels: level one, level two and level
three.Level 1
• 6-6 System description
In this system, the team agrees in advance that the player who is at a certain
position is designed setter for the rally. There is no switching or penetration required
so movement is restricted enabling players to focus on the skills that are required. It
requires all players to be confident and competent in setting the ball. Players setting
from position 2, and from positon 3 requires setting backwards.
– Explain them that this team system there is no switching and penetrating
required, so movement is restricted to enable players to focus on the skills
that are required.
– After a brief explanation, let them play a short sitting match to apply the
system the system.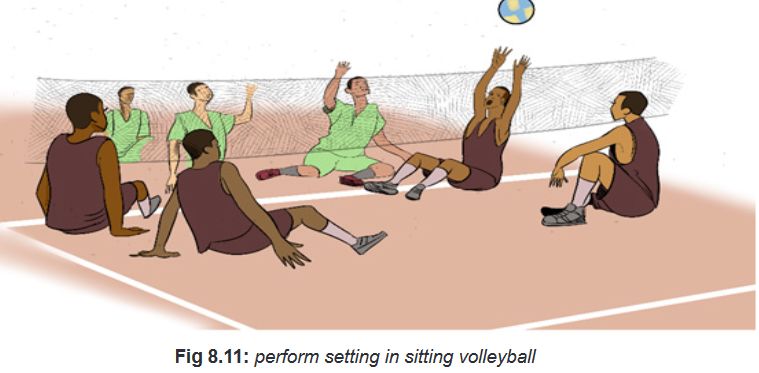
• 1-4 or 2-4 (a)no switching system description
This system is used when there is one or two players who are unsuitable for setting
either because of their impairment, or because they do not have required skills. You
can use it when you have a player or two players excel at attacking and you do not
want them to be the setter so that you can have them attacking.
– Let students apply the system in a short sitting volleyball match.
– Demonstrate/help them where is necessary.
(The players in green are the no setters, while those in purple would be the dominate
setters and set whenever they are in positions two or three. However, when they
are at position four the orange setters will set from position two.)• 1-5 or 2-4 (b) with front court switching system description
This system progresses from the non-switching equivalent outlined before. Here
the players switch from court to get the dominant setters over to position two. This
is a very common system in sitting volleyball but it requires most of players to be
able to do all of the required skills. However, it is recommended to take care of the
individual situation of impairment of all players.
– Let students apply the system in a short sitting volleyball match.
– Demonstrate/help them where is necessary.Level 2
• 3-3(a) without switching description
The system consists of three dominant setters and three dominant attackers so
that there is always a setter in either position 3 or 2. This system can be referred to
as two trigonal sit on top of each other. Means that those, which set, alternate with
those who do not set.
Disadvantage: it relies on each of the setters being very competent attackers, as
they will need to do this from all backcourt positions and most significantly position
four.
– Let students apply the system in a short sitting volleyball match.
– Demonstrate/help them where is necessary.
• 4-2 (a) without switching description
Two dominant specialists are placed opposite each other and they set from
whichever position they are in front court so as one of those setters goes backcourt,
the other comes front court. Therefore, as one of these setters goes back court, the
other comes frontcourt. There are also the challenges associated with setting from
position 4. It is the most system, which is being used by many teams.
– Let students apply the system in a short sitting volleyball match.
– Demonstrate/help them where is necessary.
• 3-3 (b) with switching system description
It a progression from system 3-3(a) but when the setter is at position three they
switch the player who is at position two to move into the preferred setting positions.
If you have specialist middle, or if the setter is not competent at blocking in the
middle it will be benefit.
– Let students apply the system in a short sitting volleyball match.
– Demonstrate/help them where is necessary.
Level 3
• 3-3 (b) system description
This system is similar to 3-3 a but the three identified setters set from position one
and six, penetrating both times from back court into frontcourt. During this system
you can start with 3-3(a) or (b), and then progress to this when an easy ball is
played over the opponent.
– Let students apply the system in a short sitting volleyball match.
– Demonstrate/help them where is necessary.
• 4-2 (b)(with switching / penetration) system description
The system has two setters who set rotationally between them and four attackers.
As with 4-2(a), these two players need to be placed opposite each other in the
lineup. With this framework, the setters can then switch/penetrate from either
positions to enable them to set from the team-preferred position. Ball should be sat
from position three, two and then penetrate from position one.
– Let students apply the system in a short sitting volleyball match.
– Demonstrate/help them where is necessary.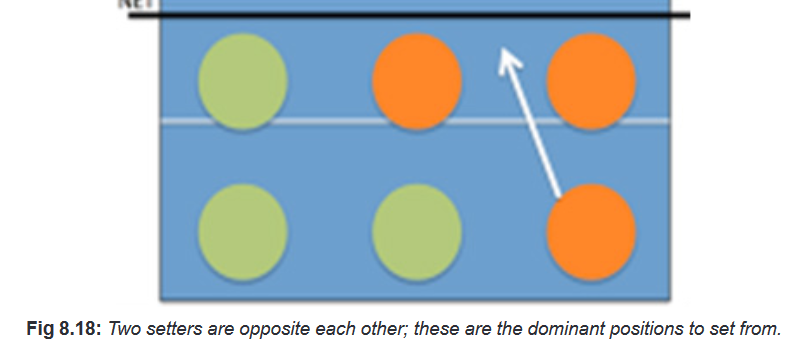
• 5-1 system description
In standing volleyball, it is the most system that is regular used but in sitting volleyball
it is complex due to moving when sitting on the floor. It could be done while setting
from the position that the setter is in, or by adding switching/ penetration so that the
setter sets from any position. The most difficult rotations are usually from position
four and position five, it is recommended to have a backup option when the setter
is in these two positions.
– Let students apply the system in a short sitting volleyball match.
– Demonstrate/help them where is necessary.APPLICATION ACTIVITY
Form groups of six students and let them play a normal game by using learned
techniques and tactics.Cool down
– Ask the students to stop playing.
– Have them practice different relaxation exercises to help them to restore the
muscle back to resting length, reduce soreness, and enhance recovery for
the next sitting volleyball workout.
– Let them perform different flexibility exercises under your guidance.Closing discussion
Reflect
– Identify the different team systems and tactics in sitting volleyball game
situation.
– What are the most challenging/advantageous team systems in sitting
volleyball game?Connect
– What are the similarities and contrasts between basic tactics applied in sitting
volleyball and standing volleyball?Apply
– How will you use learned tactics in your daily life?8.6. Summary of the unit
This unit is detailing different basic sitting volleyball tactics including tactics of
serving, receiving, passing, setting, hitting, blocking and digging the ball.Different tactical exercises have been suggested to help students to improve their
performances needed in sitting volleyball.Finally, there are proposed playing and team systems to facilitate students to play
sitting volleyball match technically and tactically.
8.7. Additional information for teachers
• Height of the net in sitting volleyball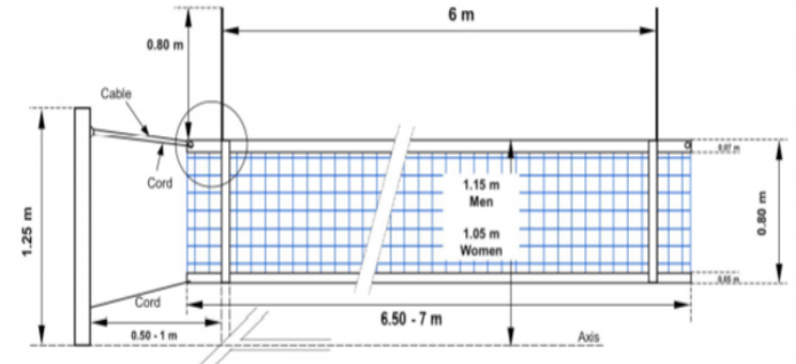
• Principles for teaching beginners sitting volleyball
In order to teach sitting volleyball, we need to respect the following aspects:
– Use trained teachers/instructors/coaches to assist volleyball for the disabled
players.
– While playing encourage progress, but not the use of pressure.
– Teach/Train in a logical order, ensuring that all pre-requisite steps have been
mastered.
– Remember to emphasize on ability, not disability.
– Create enjoyment mood, with many activities in a game.
– Let students work in groups so players encourage each other.
– Everyone can contribute to the volleyball for the disabled movement.• Setting the ball from different positions in the field of play
Setting from position 2
This is the most common and popular place to have the Setter set the ball from.This is largely because most people are right handed and it is easier to spike when
the ball comes onto your hitting arm, rather than comes across your body before
hitting it. The other positive with this position is that the setter can see all of their
attackers.
Setting from the position 3
This is usually the position used with complete beginners, when they first start to
designate a setter. This is because as they are in the middle of the court they are
more likely to get to the ball.However, as this person is in the middle they are constantly rotating around and
often this can lead to a lack of awareness over where they are.Setting from the position 4
As players start to specialize, those who excel at setting are positioned away
from each other in the team rotational order. Consequently, as a team rotates, the
specialist setters end up at position 4 and to enable them to remain as the setter,
teams will set from position 4 to avoid any further complication.Obviously if you have a team of left-handed players then you can set from four!
Sitting volleyball plays and systems
In sitting volleyball, players are playing based on their location on the court. On
each side of the net, there are two zones, the frontcourt zone and the backcourt
zone. Only players positioned in the front zone can attack above the height of the
net. In addition to this, the court is divided into 6 positions, numbers from 1 to 6 and
starting at the person who is serving. These indicate the service order. At the point
of service, all players must be in front/behind, to the left/ right of those next to them.Back Row Attacks
Our back row attack plays are very simple. The setter will rub his chest showing the
hitter where the set is going to be. The back-row player may perform any type of
attack-hit from any height, if at the time of the hit the bottom does not touch or cross
over to the attack line.During the middle of a rally, a back row hitter will call “pipe” to let them know that
they are ready for the ball.• General guidelines of being in ready positions while receiving and
defending in sitting volleyballReceiving the ball
– Sit tall with chest and head up;
– Place legs in front of body or slightly to the side. If you are able, have one-foot
flat on the ground to push off.
– Arms down beside hips with hands on the floor ready to push in any direction.
– Stay alert and use both hands and feet to move behind ball once in play.
Defending
– Keeping back straight and head up, lean forward at the waist.
– Legs are bent and angled to the side, widening the amount of court covered
and allowing body to get closer to the floor.
– Once in position to receive the ball, lift arms in front of body with elbows
extended and palms up.• Varieties of moving on the floor
To sit and play on the floor is basic to sitting volleyball. The height of the net follows
the idea of sitting requirement.
Moving on the floor could be practiced through various activities like:
– Maneuvering in different directions on the court.
– Playing small games in sitting position, and orienting similar exercises.
Sitting position is the key issue for any further development and progress in play.
Players in sitting volleyball game use hands for moving around and if the nature of
disability allows their feet. Playing on the floor should follow the appropriate time
for relaxation, which allows exposing parts of the body, especially palms of the
hands and buttocks to rest. During practice moving on the floor, the type and level
of disability of each player should be taken into account.Players could practise moving on the floor by:
– Moving forward
– Moving in sideways
– Moving diagonally
– Moving individually
– Moving in small groups
– Moving backward
– Moving straight
– Moving zig – zag
– Moving in pair• Care of the person with disabilities while performing sitting volleyball
General safety considerations at the training site:
– Teacher should be informed about medical status and specific requirements
of all students involved in teaching and learning process.
– Teacher should have basic educational background to work with disabled.Essential facilities at training site:
– First-aid kit and knowledge of use.
– Rules and insurance.
8.8. End unit assessment
– Set various activities to assess students’ ability of applying basic sitting
volleyball techniques and tactics.
– Set different activities to assess students ability of applying different defensive
and offensive systems in sitting volleyball game.8.9. Additional activities
8.9.1. Remedial activities
Facilitate the students to perform the activity below to help them improve their level
of performance mastering the individual movements, ball control and attacking.Description of the activity
Students in groups of five students perform the following:
– Students position themselves one on each corner of court and one athlete in
the middle.
– Students in the middle sets athlete on one corner that will attack directly
cross-court.
– All Students attacking converge cross-court and prepare to defend attack.
– After digging attacked ball to athlete in the middle, corner Students must reset
to respective corner and athlete in the middle sets another corner.Progressions: Athlete in the middle (setter) can set to themselves before setting
corner to slow the drill down in the beginning.Success criteria: Athletes can continuously keep the ball in play and within the
structure of the drill. Athletes should be constantly transitioning from offence to
defense and back to offense.Teaching points to consider
– Emphasize the height that needs to be put on the first ball contact.
– The second ball can be accelerated to simulate game speed for the defenders
to get into position.
– Encourage attacking players to switch from defensive position to attacking
position every contact.
8.9.2. Consolidation activities
ACTIVITY 1
Put the students into two teams of six players to play a short sitting volleyball match.
Ask them to use different techniques and tactics learned in the unit. No player
is allowed to play kneeling or standing position. After 10 minutes’ teams may be
changed. Check out the individual application of basic tactics of sitting volleyball.
Check out how they are applying switching and penetrations to facilitate the setter
into desirable positionsACTIVITY 2
– In pairs, one player passes the ball to the receiver who dig it back;
– Try a simple contest, for example dig back to your partner 10 times or a
1-minute period.
– Then swap with your partner and repeat the drill.
– The winner is the first player to finish after 10 digs or the player with the most
digs within the one-minute’s period.8.9.3. Extended activities
Encourages students to participate in different competitions organizedby the School,
sector, and district or at the national level.
REFERENCES
1. Dave Carnell, John Ireland, Claire Jones, Ken Mackreth, Sarah van Wely
(2002), Advanced PE for OCR, Oxford U.K
2. ELIAS, A. HILGERS, W. JETTER, M. RASHDORFF. J. WINTERMEIIER, D.
WOLFARTH Education Physique et Sportive pour les Ecoles Primaire et les
CERAI, F, Kigali.
3. FIFA. (2018). Coaching manual
4. Goldberger, M. and Howarth, K. (1990). The National Curriculum in Physical
Education and the Spectrum of Teaching Styles. British Journal of Physical
Education.
5. Ken Jones and Pat Welton (1979) Soccer Skills and Tactics, CrownPublishers
6. Ministry of Education. (1998). Physical education and Sports Training
Programme in Ordinary Level. National Curriculum Development Centre
7. Peter J L Thomson (2009) The Official IAAF Guide to Teaching Athletics
8. REB (2019). The Teacher Training Colleges (TTCS) COMPETENCE BASED
CURRICULUM ORIENTATION MANUAL, Kigali.
9. REB. (2015). Ordinary level Physical Education syllabus
10. REB (2019). TTCs Physical Education and Sports syllabus
11. REB. (2016), Physical Education for Rwandan Schools. Teacher’s Guide,
Ordinary level 1, MK Publishers, Kigali, Rwanda.
12. REB. (2016), Physical Education for Rwandan Schools. Teacher’s Guide,
Ordinary level 2, MK Publishers. Kigali, Rwanda
13. Right to Play, (2007). Football for development. Coaching manual
14. Williams, A. (1993). Aspects of Teaching and Learning in Gymnastics.
British Journal of Physical Education.
Websites
1. www.netbalnation.com.
2. http://www.blazesports.org.
3. http://www.dhamilton.net/goalball/HOW_TO_PLAY_GOALBALL/How_ to_
Play_GOALBALL.htm.
4. https://www.disabled-world.com/sports/goalball.php.
5. https://www.quora.com/What-are-the-best-techniques-for-efficiently-
running-long-distance.
6. http://www.olympichandball.org/wpcontent/Basic%20Handball%20
Methods
PES, Teacher’s Guide, Senior 5236
7. https://www.nchpad.org/1073/5480/Sitting~Volleyball~~A~Skill
Enhancing~and~Physically~Demanding~Activity
8. http://www.education.auburn.edu/wpcontent/uploads/2015/09/ Handball-
handbook
9. http://www.olympichandball.org/wpcontent/Basic%20Handball%2 Methods.
10. http://vcdm.org/global/images/misc/SIT_Systems_Offensive.pdf
11. http://vcdm.org/global/images/misc/SIT_Drills_All.pdf