Topic outline
PART I: GENERAL INTRODUCTION
1.1 The structure of the guide
This section presents the overall structure of this guide, the unit and lessonstructure
to help teachers to understand different sections of this teacher’s Guide.Overall structure
The whole guide has three main parts as follows:General Introduction:
This part provides general guidance on:
• How to develop the generic competences,
• How to integrate cross cutting issues,
• How to cater for students with special educational needs, active methods
and techniques of teaching Physical Education and Sports and guidance on
assessment.Sample lesson plan:
This part provides a sample lesson plan developed and designed to help the teachers
to develop their own lesson plans.Unit development:
This is the core part of the guide. Each unit is developed by following the structure
below.Structure of a unit
Each unit is made of the following sections:
• Unit title: From the syllabus.
• Key unit competence: From the syllabus.
• Prerequisites (knowledge, skills, attitudes and values): This section
indicates knowledge, skills and attitudes required for the success of the unit.
The competence-based approach calls for connections between units/topics
within a subject and interconnections between different subjects. The teacher
will find an indication of those prerequisites and guidance on how to establish
connections.
• Cross-cutting issues to be addressed: This section suggests cross cutting
issues that can be integrated depending on the unit content. It provides
guidance on how to come up with the integration of the issue. Note that the issue
indicated is a suggestion; teachers are free to take another crosscutting issue taking
into consideration the learning environment.• List of lessons/sub-heading: This section presents in a table suggestion
on the list of lessons, lesson objectives copied or adapted from the syllabus and
duration for each lesson. Each lesson /subheading is then developed.
• Summary of the unit: This section summarises what students have been
learned in the whole unit.
• End of each unit: At the end of each unit, the teacher’s guide provides the
following sections:Additional Information
This section gives further information that may help him/her to plan and conduct
Physical Education and Sports lesson.End unit assessment
This part provides guidance on how to conduct the end unit assessment in a practical
way. It suggests activities/games as well as guidance on criteria to be considered such
as:
– Cognitive skills: (E.g.: level of concentration, memory, capacity of anticipation,
problem solving, know rules of the game, know techniques and tactics to use
different sports activities etc.).
– Technical competences: (E.g.: to throw the ball, to catch it, to dribble it, to pass
it to others etc.).
– Strong emotional points: Such as self-confidence and feeling, secure.
– Social competences: Such as cooperation and solidarity.
– Attitudes and values: E.g.: optimism, confidence, respect and impartiality.Additional activities
This section provides additional games/exercises for the teacher to have a widerange
of activities/games related to the unit.
– Consolidation activities: Additional activities to students withspecial educational
needs.
– Remedial Activities: Additional activities for students who need more time
and exercises to achieve a certain level of performance.
– Extended activities: Additional activities for talented students.The guide ends with references.
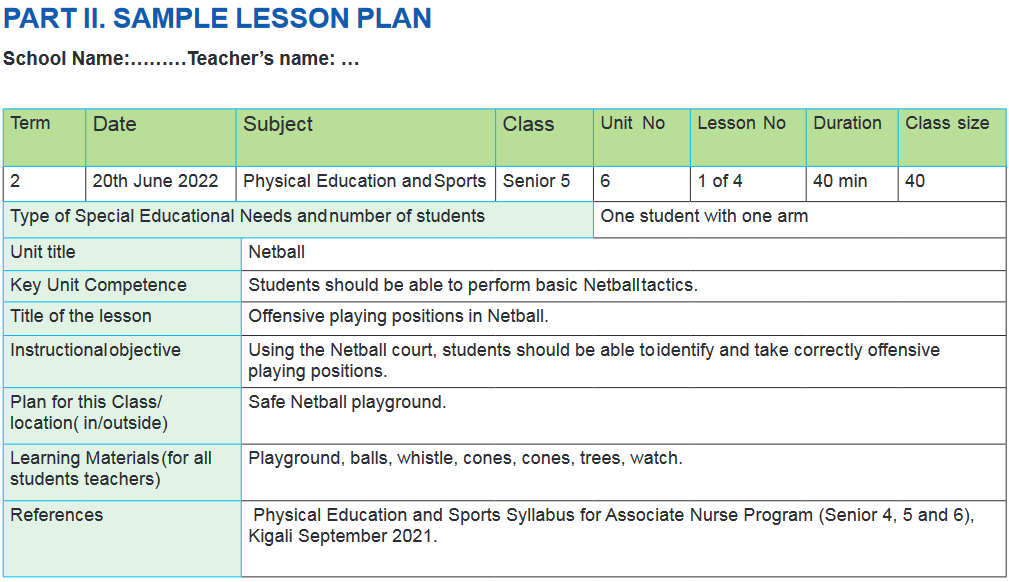
Structure of each lesson
Each lesson/sub-heading is made of the following sections:
– Lesson title: It shows the title of the lesson.– Introduction: This section gives a clear instruction to the teacher on how to start
the lesson.
– Teaching resources: This section suggests the teaching aids or other
resources needed in line with the activities to achieve the learning objectives.
Teachers are encouraged to replace the suggested teaching aids by the available
ones in their respective schools and based on learning environment.
– Steps of the lesson: This section provides activities/games/exercises and
guidance step by step: Opening discussions, warm up, lesson body, cool down
and closing discussions (R-C-A: Reflect Connect and Apply).1.2 Methodological guidance
1.2.1 Developing competences
Since 2015, Rwanda shifted from a knowledge based to a competency based curriculum
for pre-primary, primary and general secondary education. This called for changing the
way of learning by shifting from teacher-centers to the student- centered approach.
Teachers are not only responsible for knowledge transfer but also for fostering students’
learning achievement, and creating safe and supportive learning environment. It implies
also that a student has to demonstrate what he/she is able to do using the knowledge,
skills, values and attitude acquired in a new or different or given situation.The competence-based curriculum employs an approach of teaching and learning based
on discrete skills. It focuses on what students can do rather than what students know.
Students develop basic competences through specific subject unit competences with
specific learning objectives broken down into knowledge, skills and attitudes. These
competences are developed through learning activities disseminated in student-centred
rather than the traditional didactic approach. The students are evaluated against set
standards to achieve before moving on.In addition to specific subject competences, students also develop generic competences
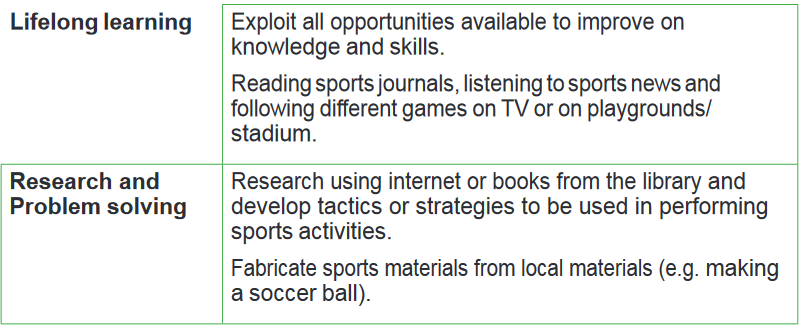
that are transferable throughout a range of learning areas and situations in life.Below are examples of how generic competences can be developed in Physical
Education and Sports: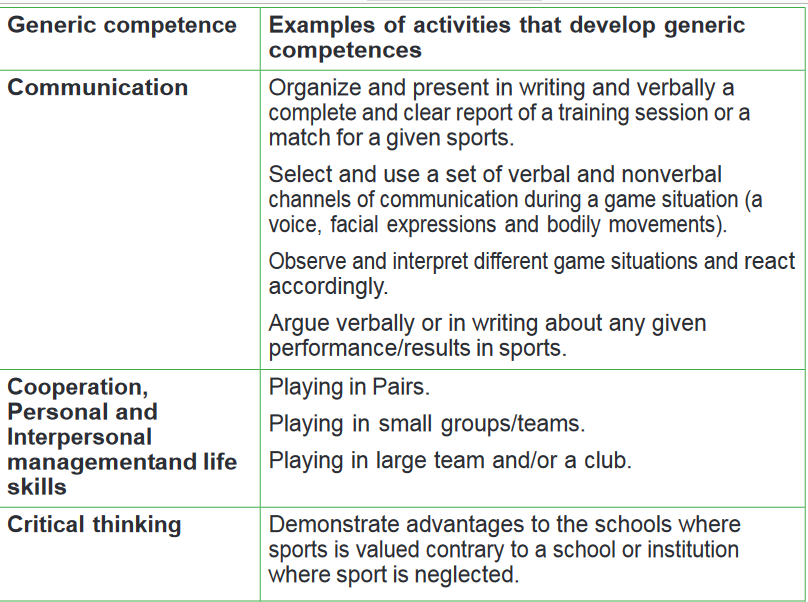

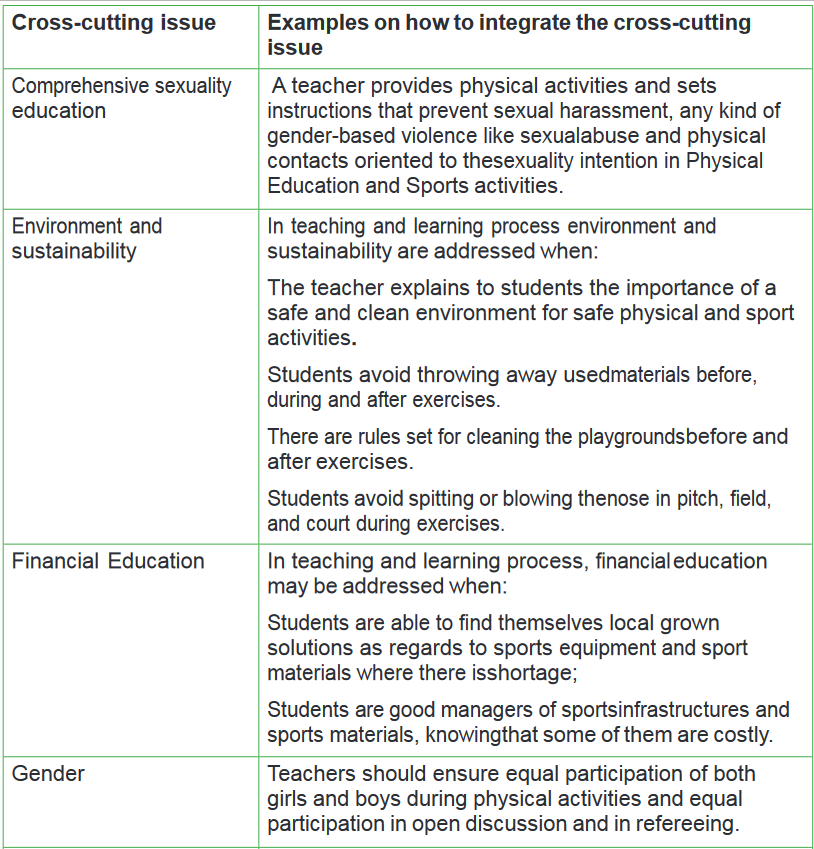
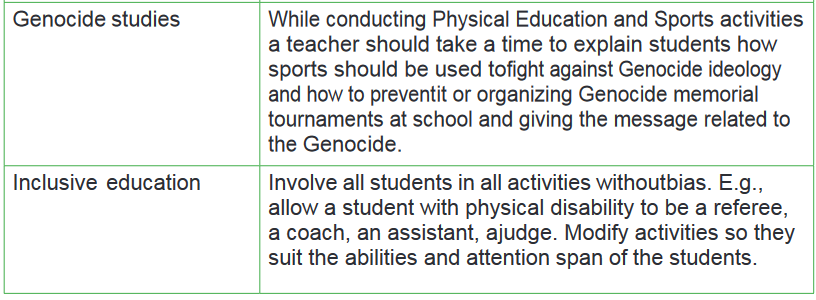
1.2.2 Addressing cross-cutting issues
Among the changes in the competence, based curriculum is the integration of cross
cutting issues as an integral part of the teaching learning process as they relate to and
must be considered within all subjects to be appropriately addressed. The eight cross cutting
issues identified in the national curriculum framework are:
• Comprehensive Sexuality Education (CSE),
• Environment and sustainability,
• Financial Education,
• Gender,
• Genocide studies,
• Inclusive Education.
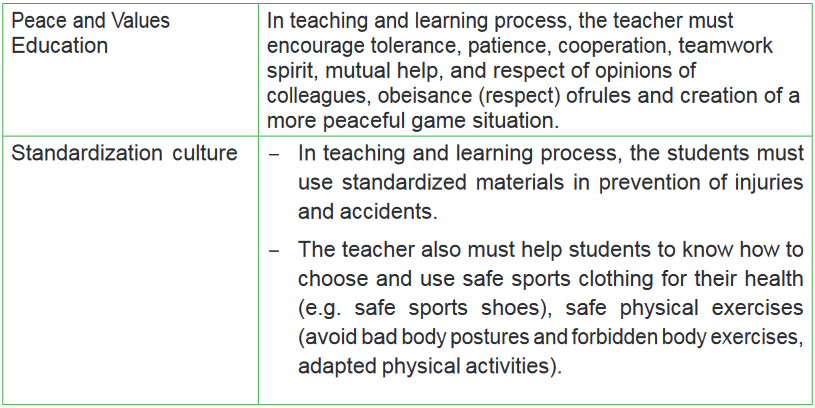
• Peace and Values Education,
• Standardization CultureSome cross cutting issues may seem specific to particular learning areas or subjects
but the teacher need to address all of them whenever an opportunity arises. In addition,
students should always be given an opportunity during the learning process to address
these cross cutting issues both within and out of the classroom to progressively develop
related attitudes and values.Below are examples on how crosscutting issues can be addressed in PES.
1.2.3 Attention to special educational needs
Currently we are convinced that games and sports are very beneficial to peoplewith
physical, mental, emotional and psychological disabilities.What attitude to adopt to promote the integration of students with disabilities
during recreational and sports activities?To promote the integration of students with disabilities during recreational and sports
activities, the following tips may help teachers/educators in the training of these
students:
• Adopt an approach of sports and game which is based on skills, you focus on what
students are capable of doing. In this respect, you can introduce small changes in
games and activities for students with disabilities.
• Be relaxed and natural when you are with people with disabilities. Do not treat
them as if they need your pity or your charity. Do not think theynecessarily need
help. Let them do and say things themselves.
• Avoid keeping students with disabilities out of the game: in a regular class, let
them participate in other’s games. However, avoid being too demanding about
the level of their performance.What can we modify to promote the integration of students with disabilities
during recreational and sports activities?Within the framework of integration of students in games, according to the nature and the
gravity of impairment, students can participate in games designed for all students. In
other cases, the teacher or educator should think about changes he/she could make to
meet the special needs of teachers he/she has in the group. He/she should also think
about adaptation ofthe game, the playground, equipment and duration of the game.Below are some examples of adaptation to initiate:
i) Adapt roles and rules
• Make the game easier or harder by changing some rules.
• Let students play different roles and in different positions.
• Allow students to play in different ways, for example, sitting instead ofstanding.
• Simplify expectations of the game.
• Simplify instructions.
ii) Adapt the playground
• Change the size of the playground. Enlarge or reduce the playground.
• Change the distance: for example, put a target closer.
• Change the height of a target.
• Allow more or less space between students.
• Let students move from different spaces.
iii) Adapt the materials
• Reduce the size or weight of materials.
• Choose balls of various textures, bright colours or balls, which make noise.
iv) Adapt the duration of the activity
• Reduce or extend the time allotted to the activity.Aspects to consider when you want to modify an activity
Ask yourself the following questions:
• Does the modification affect negatively the activity? This should not be the case.
• Does the modification correspond to the ability and duration of students’
attention?
• Will the students with disability be able to play with others?
• Is the activity proportional to ages of participants?
• Does the activity respond to the needs of all participants?Strategies to help students with physical disabilities ormobility difficulties
• Adapt activities so that students, who use wheelchairs, use other mobility aids,
have difficulty in moving can participate.
• Ask for adaptation of furniture. E.g., the height of a table may need to be
changed to make it easier for a student to reach it or fit their legs orwheelchair.
Encourage peer support between students. Get advice from parents or a health
professional about assistive devices.Strategies to help students with hearing disabilities orcommunication
difficulties
• Always get the student’s attention before you begin to speak.
• Encourage the students to look at your face.
• Use gestures, body language and facial expressions.
• Use pictures and objects as much as possible.
• Ask the parents/caregivers to show you the signs they use at home for
communication (use the same signs yourself and encourage other students to
also use them).
• Keep background noise to a minimum.Strategies to help students with visual disabilities
• Help students to use their other senses (hearing, touch, smell and taste) to play
and carry out activities that will promote their learning and development.
• Use simple, clear and consistent language.
• Use tactile objects to help in explaining a concept.
• For students with some sight, ask them what they can see. Get information from
parents/caregivers on how the students manage their remaining sight at home.
• Make sure that the students have a group of friends who are helpful and who allow
the student to be as independent as possible.
• Plan activities so that students work in pairs or groups whenever possible.1.2.4 Guidance on assessment
Assessment in PES must be a continuing process that arises out of interaction during
teaching and learning process. It includes lesson evaluation during R-C-A after each
session and end of unit assessment.This formative assessment should play a big role in teaching and learning process. The
teacher should encourage individual, peer and group evaluation of the activity done.
In this step, the teacher sets exercise to assess abilities, skills, knowledge and attitudes of
individual students basing on unit or lesson objectives. During assessment activity, students
perform exercises individually or work in teams. The teacher avoids intervening directly.
In fact, results from this assessment inform the teacher on next steps for the whole class
and individuals. In some cases, the teacher can end up with giving remedial and extra
activities.1.2.5 Students’ learning styles and strategies to conduct
teaching and learning process
There are different teaching styles and techniques that should be catered for. The selection
of teaching method should be done with the greatest care and some of the factors to be
considered that are:
• The uniqueness of Physical Education and Sports.
• The type of lessons to be learned.
• The particular learning objectives to be achieved.
• The allocated time to achieve the objective.
• Available instructional Sports materials, equipment and Sports infrastructure.
• Individual students’ needs.
• Abilities of students’ and learning styles.There are different learning styles to use while teaching Physical Education and Sports
depending on students’ abilities. The teacher should use a wide range of techniques and
tools to cater for different specificity of students’.1.2.6 Teaching methods and techniques that promote the
active learningA. Suitable Methods / techniques to teach PES
Physical Education and Sports is taught:
• In the classrooms (e.g. using a projector and videos to teach steps of
performing a technique, a system of game play and using a chalk board to teach
rules of the game).
• In the playgrounds/courts for teaching different games (e.g.: football playground
for teaching football game, volleyball court for teaching volleyball game, handball
playground for teaching handball game, basketball court for teaching basketball
game, netball court for teaching netball game).
• On the athletic track, fields, roads and hills for teaching athletics activities(racing,
jumps and throws).
• In Gymnasiums for teaching gymnastics and indoor sports.
In the process of teaching and learning Physical Education and Sports, the following
methods should be used:• Demonstration method
A teacher makes him/herself a demonstration or asks an able student to do a
demonstration. The teacher is advised not to do a demonstration if he/she is not sure
to do it better than every individual student can do it.• Verbal Explanation
A teacher describes/explains activities he/she wants students to perform.• Practice session
Students are given time to practice exercises intended to develop the desired skills.• Supervision
During a PES lesson, the teacher plays a role of supervising where he/she must move
around in field and make corrections for individual students during exercises.• Correction
While making corrections starting by group correction to individual correction.Corrections
for inaccuracy in performing given techniques are done immediately.• Evaluation
Let students do their own evaluation for each other, then help them by giving some advice
using encouraging words. Evaluation is a continued activity throughout the physical
exercises.• Discussion
Discussions are used before and after teaching and learning activities in open talks
to motivate and develop attitude and values in students.• Application
Use of learned Physical Education and Sports skills in different situations to solve a
given problem.Physical Education and Sports in small schools or schools with limited
facilitiesWhere schools have specific problems related to a lack of indoor and outdoor space,
consideration might be given to:• The use of the classrooms, corridors and available school grounds for
orienteering exercises.
• The provision of markings on the playground for athletic activities and small- sided
games.
• The use of local facilities, e.g. Local grounds, community centres, parish
halls, youth clubs, colleges, higher learning institutions etc.
• Co-operation with other primary or secondary schools in sharing facilities.
• Allocating more time to Physical Education and Sports in good weather.
• Visiting an outdoor education centre providing facilities for many worthwhileactivities.
• Use possible available space, which should be used to facilitate teaching and
learning of Physical Education and Sports.• Use local materials by making for example: goal posts for Football, Netball and
Handball, posts for supporting net in Volleyball.
• Try to create their own playgrounds by using space available.B. Steps of a PES lesson
While teaching a Physical Education and Sports lesson by using play basedapproach,
a teacher follows these steps:
Step 1: Opening discussions.
Step 2: Warm-up activities.
Step 3: Lesson body.
Step 4: Cool down.
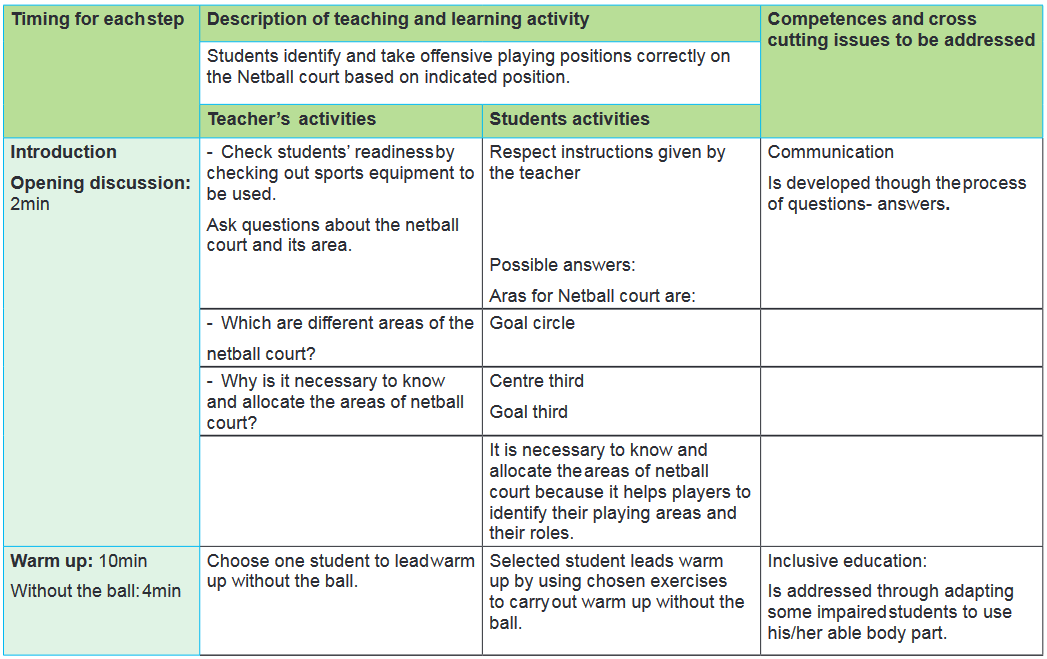
Step 5: Closing discussions focusing on Reflect, Connect and Apply (R-C-A).Step 1: Opening discussions
The Opening discussions prepare students for the learning experience. Discussions
encourage them to think about the learning objective of the play. Opening discussions
include quick questions to stimulate students’ curiosity and engagement.Strategies for good discussions:
• Set appropriate arrangement for good discussions: e.g. semi-circle, circle,
U-shape.
• Set ground rules, which create a safe atmosphere for students.
• Prepare students for discussions.
• Ensure interactive and inclusive discussions.
• Acknowledge each student’s contribution.
• Ensure classroom management and control.Step 2: Warm-up activities
A warm-up is performed before a game/play/practice of technique. It helps the body
activation, prepares itself for a physical exercise, and reduces the risk of injury. The
warm-up should be a combination of rhythmic exercises, which begin to raise the heart
rate and raise muscle temperature, and static stretching through a full range of motion. The
use balls while warm up activities help students to master previous skills, which should
help them to perform new skills.Step 3: Lesson body
A game/play/exercise is selected according to the topic to be taught/age of students/
ability of students/available materials and skills you want to develop.Step 4: Cool down
A cool down activity is an easy exercise that allows the body to gradually transition to a
resting or near-resting state. It is done after the main activity or lesson body.Step 5: R-C-A discussions
Assessment in PES lesson is done when students are performing exercises/
activities/games. At this level, through the R-C-A discussions the teacher allows students
to do their self-evaluation and provide the feedback from learned lesson.Reflect-Connect-Apply is a teaching and learning strategy that leads students through
a 3-steps discussion about their experience:
• Reflect: Ask questions, which help student to reflect on the game/ play/skill
learned. The teacher asks questions about their experience and feelings during the
game/exercise/activity.The teacher asks questions like:
– What was interesting?
– What was easy?
– What was challenging?
– What strategies have you used to win?
– How did you feel in case of success or failure?
• Connect: Ask questions, which help students to connect what they have
learned to life experiences and lesson content.The teacher asks questions like:
– How this game/exercise/activity is connected to what you already know, believe
or feel?
– Does it reinforce or expand your view?
– The teacher also asks questions, which connect the game/exercise/activity to
lesson content.
• Apply: Ask questions, which help student to apply acquired experience to another
situation.The teacher asks questions like:
– How could you use what you have learned from this experience?
– How could you use your new learning to benefit yourself, others, your
community?RCA is based on the work of educationalists such as Freire, Brown, Piaget, Brantford
and others who support the concept of an educational process that is active,relevant, reflective, collaborative and applied, and has its roots in experiential learning
theory (Kolb, 1984). Play-based learning techniqueis closely linked to the Experiential
Learning Cycle. It starts with a game or play-based activity and ends with a closing
Reflect, Connect and Apply (RCA)discussion linked to the subject matter.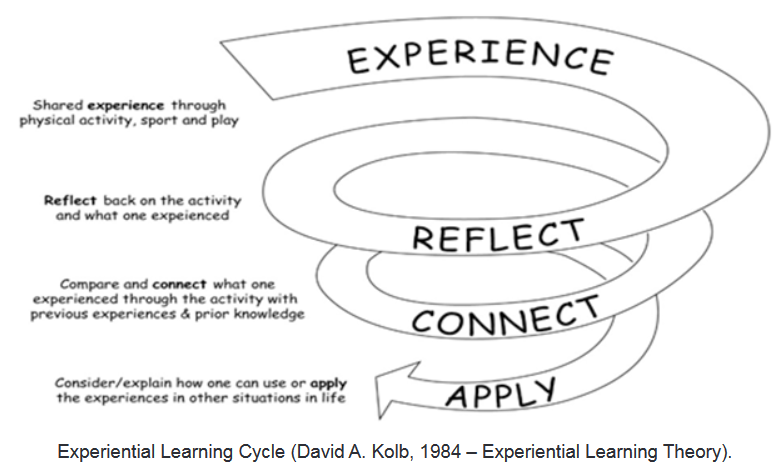


UNIT 1: ATHLETICS
1.1 Key unit competence:
Perform jumping exercises in athletics.1.2 Prerequisite (knowledge, skills, attitudes and values)
Students of senior five will have better performance in jumping exercises in athletics
if they have developed basic techniques in jumping learned in Ordinary Level and
have performed basic physical exercises.1.3 Cross-cutting issues to be addressed
Gender
In teaching and learning process, the teacher must prepare and provide athletic
activities that engage both girls and boys equally to exploit their full potential and
talents without any discrimination or prejudice.Inclusive education
The teacher as a facilitator he/she must consider different special education needs
and select activities to adapt his teaching approaches to students. This creates a
positive attitude and helps all students to participate actively and develop their
competence levels.Financial education
The teacher should integrate Financial Education into his teaching/learning
activities by providing the local and no cost teaching material where is possible. He/
she must encourage students to make their own materials that can help them to
develop competences not only in athletics but also in their life.Standardization culture
The teacher must choose and select the standardized materials to use in his/
her teaching/learning process of athletics. It is necessary to provide appropriate
materials required to the levels of students and help them to develop culture of
checking and using the quality of sport materials for the competitions before using
them in order to prevent injuries and other accident.Environment and sustainability
The teacher should provide materials and deliver the lesson by encouraging students
to protect the environment and well use of materials. The teacher helps them to
develop the spirit of keeping safe environment they use during sport activities by
avoiding throwing wastes on the ground.Peace and values education
The teacher helps students to develop fair play and social values by avoiding
violence and conflict in the athletics competition and by setting clear and relevant
instructions. He/she should provide the activities that help students to develop their
competence peacefully.Comprehensive sexuality education
The teacher provides athletics activities and sets instructions that prevent sexual
harassment, any kind of gender-based violence like sexual abuse and physical
contacts oriented to the sexuality intention.Genocide studies
While conducting athletics exercises a teacher should take a time to explain student
show sports should be used to fight against Genocide ideology and how to prevent
it. For example, to organize Genocide memorial tournaments at school and give
the message related to the Genocide.1.4 Guidance on introductory activity
Before introducing the lesson one of this unit, you must introduce the whole unit.
The teacher as a guide, facilitator and expert, ask questions or give activity related
to athletics in order to help them to predict what to be learned in the whole unit.1.5 List of lessons/sub-heading

Lesson 1: Recall on sprints
a) Learning objectives
To develop endurance and resistance and acquire techniques of sprinting in the
phases of running before the take-off in jumping sequences.b) Teaching resources
– Baton
– Stopwatch/Watch
– Decameter
– Whistle
– Starting block,
– Cones
– Ropes
– Hurdles.
– Athletic track/
Playgroundc) Prerequisites/Revision/Introduction:
Students of senior five will perform better recall on sprint races if they can execute
basics sprint exercises learnt in year one and in ordinary level and have developed
basic motor control and movement.d) Learning activities
Opening discussions
– Ask questions to the students about sprint races and their techniques learned
in senior four.
– Let students present their findings and introduce the new lesson.
– Invite students to start warm up exercises.
Warm up exercises
– Let students perform general warm up exercises and specific warm up based
on the most body’s parts to be used while performing techniques and stretch
their muscles properly.
– Guide students while performing warm up and stretching exercises.e) Lesson bodyExercises on sprint races (100m, 200m, 400m)Task/activityStudents run a certain distance in a given time, e.g. 30m in 4 secs, 60m in 8sec,
100m in 15sec.Variation
Progressively students increase distance until 400m.
During the workout of sprinting, observe the following elements:
– Starting the sprint with short and quick strides.
– Lift the front knee high and straighten the back leg completely to deliver full
power.
– Lengthen the strides as the speed and momentum are gained.
– Students must hold his/her torso straight and vertical while accelerating.
– Pump the arms so as the hands travel from hip to lip, and keep arms close to
the sides.
– Keep the head still, but the face and neck are relaxed.
– To bend elbow at 90 degrees.
– In each hand do as if, they are lightly gripping a small object.
– Shoulders must be steady but relaxed. Cool down exercises
– Let students do light exercises and stretch their muscles by insisting on most
used parts.
– Guide students while stretching their muscles systematically.Closing discussionsReflect
– Which challenges/benefits did you face while performing sprintingexercises?
– What went well during the workout?
– Connect
– What are conditions do you need in order to practice sprinting exercises?Apply
– What is the usefulness of sprinting race exercises?
– How will you use sprinting exercises in your daily life?Lesson 2: Long jump
a) Learning objectives
To execute long jumps using correct techniques with self-confidence and
coordination.b) Teaching resources
– Athletic track/ sand pit
– Stopwatch/Watch
– Ropes.
– Whistles
– Decameters
– Conesc) Prerequisites/Revision/Introduction
Students of senior five will perform better long jump exercise if they are able to
remember the basic skills they have acquired in jumps in ordinary level.d) Learning activities
Opening discussions
– Start by asking students questions related to techniques of approach
phase, take off phase, flight phase and landing phase while performing
long jump as they learned in Ordinary Level.
– Let students present their findings and introduce the topic of the day.
– Invite a student to start and lead the warm-up.
Warm up exercises
– Let students perform general warm up exercises and specific warm up based
on body’s parts to be used more while performing techniques and let students
stretch their muscles properly.
– Guide students while performing warm up and stretching exercises.e) Lesson body Techniques of long jump
In details, explain learner’s student show to respect the four main steps of long
jump (the approach, the take-off, the flight and the landing).• The approach phase
Request to do the following:
– They have to choose the maximum and controllable speed (it is better if it is
between 14 and 20 strides) according to the age ( -11, -13, 15, -17, over 17).
– To use number of strides to do (Even or odd number) according to the takeoff
foot.
– To stay focused and block out all distractions.
– At the beginning of the approach, drive forward like in sprints (slight body lean,
head down, high knee and arm drive, quick, powerful feet pushing back.
– As you are about reaching the take-off step, stay tall with eyes up (not looking
on the board), prepare for a vertical movement.– Let students perform approach phase individually.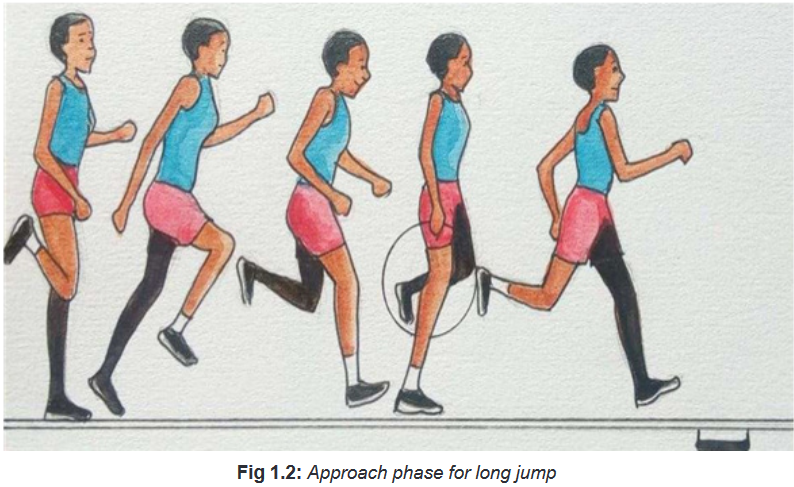 Take off phase
During take-off in long jump, remind l students to do the following:
– Maximum extension through hip, knee, ankle, and toe.
– Free thigh at least parallel to the ground.
– Co-ordinate with the opposite arm.
– Chest and back straight, eyes looking ahead.
– Head not thrown back.
– Maintain speed throughout take-off.
– Foot must point forward on touchdown.
– Once these postural positions are achieved, look at the action of the take- off
leg.
– Do not allow the athlete to “stab” the ground with the take-off leg. Let students
perform take-off phase individually. • The flight phase
Remind students to take care of the following:
– Arms should gradually drop and circulate back, upward, and over.
– Maintain a big chest and slightly upward head-tilt.
– Drive knee should also drop downward to elongate the body, further
combating forward rotation.
Let students perform flight phase individually.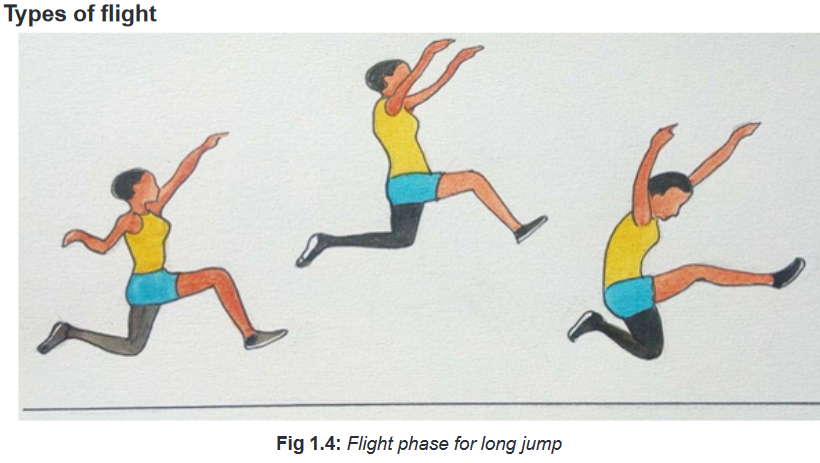 Tell the students that there are two types of flight used in long jumps.• The hang flight
Description of hang flight
After the takeoff, the jumper allows the free leg to drop until it is directly under the
hips (see the image below). This long, narrow silhouette of the body causes the
least possible rotation, as both the arm and leg (hand and foot) are a maximum
distance away from the hips (the theoretical center of mass). Long levers rotate
more slowly than short levers. The free leg, which has dropped.Remind students that during the hang flight:
– No separate leg action.
– The thigh of the free leg is quickly raised to the horizontal position and
– then lowered during flight.
– The take-off leg trail behind during most of the flight.
– The arms are lifted at the same time upwards.
– The whole body is extended and slightly arched.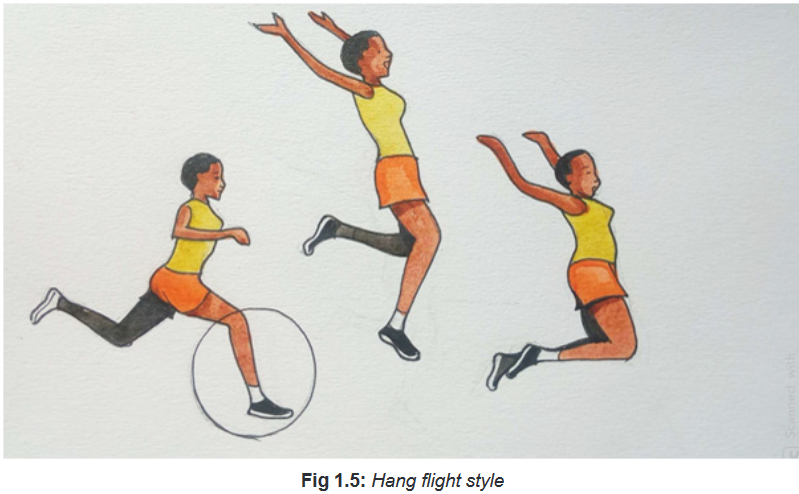 The hitch kick flight
Description of the hitch kick flight
Remind students that during the hitch kick flight:
– Separate leg action.
– The free leg is straightened and drawn down and to the rear after take-off.– At the same time, the take-off leg is drawn forward and upwards.
– The athlete appears to be running in midair.
Demonstrate how to use those types of flight (or a skilled may demonstrate) and let
them perform them individually on the jumping area.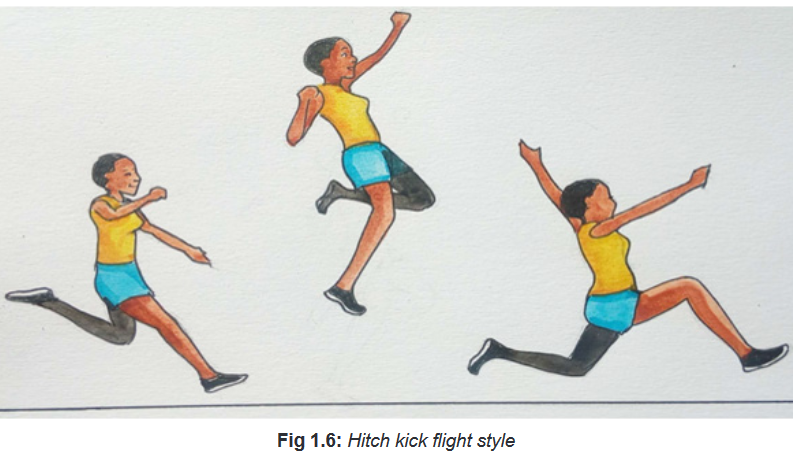 Landing
Remind students to respect the following while landing:
– During preparation for the landing, the jumper is trying to get the heels as far
away from scratch line as possible.
– To reach a position where he would normally fall back into the sand in a
normal landing.
– The body remains upright, with the head looking forward.
– The arms are forced down and backward to assist the legs in the upward
motion.For weaker students and female students remind them to:
– Bring the upper body upright again before landing by pushing the arms
horizontally forward, not upwards, to avoid the legs from dropping again, and
to reduce forward rotation because sometimes the upper body will tend to
lean forward during this phase.
– Remain in this forward position until the landing is completed to avoid
backward rotation.Let students perform 3 to 5 trials by using techniques learned. APPLICATION ACTIVITY
Individually, students perform five trials of long jump on the jumping area and
record their performance.Cool down exercises
– Let students do light exercises and stretch their muscles by insisting on most
used parts.
– Guide students while stretching their muscles systematically.Closing discussions
Reflect
– Which challenges did you face during the execution of long jump exercises? Why?
– What went well during the performance of long jump? Why?
Connect
– What conditions are necessary for a long jumper to have the bestperformance?Apply
– What is the usefulness of long jump in our daily life?
– How will you do to make better your performance in long jump after this
session?
Lesson 3: Triple jump
a) Learning objectives
To execute triple jumps using correct techniqueswith self-confidence and
coordination.b) Teaching resources
– Athletic track/ sand pit
– Stopwatch/watch
– Ropes.
– Whistles
– Cones
– Decametresc) Prerequisites/Revision/Introduction
Students of senior five will learn better triple jump exercise if they are able to
remember the basic skills they have acquired in jumps in ordinary level.d) Learning activities Opening discussions
– Start by asking students questions related to techniques of
– approach phase, take off phase, flight phase and landing phase while
– performing triple jump as they learned in Ordinary Level.
– Let students present their findings and introduce the new lesson.
– Invite student to start the warm-up.Warm up exercises
– Students in two lines jog approximately 800 meters with mild movement
exercises such as skipping, backward jogging or skipping, and lateral shuffles
mixed in periodically.
– Students perform specific warm up based on body’s parts to be used more
while performing techniques and stretch their muscles properly (dynamic
flexibility exercises, range-of-motion exercises, such as leg swings, trunk
twists, and arm circles).
– Guide them while performing warm up and stretching exercises.e) Lesson body
Start by explaining how triple jump can be performed. Demonstrate different steps of
triple jump and let students apply it individually on jumping area.Step 1: The run-up
During this step, remind students to:
– Take the speed.
– Accelerate.
– Maintain the speed to the impulse.Request them to insist on:
– Keeping the right attitude.
– Maintaining the rhythm of strides (between 10 and 20 strides).
– Taking marks of the running.
– Determining the jumper.Step 2: Impulse
During this step, remind students:
– That the impulse leg must carry out an active impulse on the take-offboard
and be ready to rebound.
– To throw the thigh of the free leg to the horizontal.
– To push forwards and upwards by the impulse leg.Step 3: The hop
During this step, remind students:
– That the hop must be long and razed to the ground.
– To throw the take-off leg forward and upward and the free leg to downward.
– To maintain straight the chest.
– To take quickly the impulse and all junctions of the ankle, knee and hip are
in extension.Step4: The step/leaping stride
During this step, remind students:
– To throw the thigh of the free leg to the horizontal.
– To push completely on the take-off leg, the shoulders and arms are high.
– To put in extension, the free leg forward and downward.Step 5: Take-off phase/ the jump
During this step, remind students:
– To take quickly the third impulse.
– To throw the thigh of the free leg to the horizontal.– That during the take-off, to jump and use one of the two techniques as like as in
long jump (the hang and the hitch kick).
– To bow forwards and downwards the torso for landing.
– To bring forwards the arms.
– To land on the landing area with the feet at the same level APPLICATION ACTIVITY 1
Individually students perform the following exercises:
– Performing standing long jumps.
– Performing three consecutive double-leg hops.
– Performing standing triple jumps (a right-left or left-right bounding sequence).
– Performing double-double (a right-right-left-left or left-left- right-right bounding
sequence).APPLICATION ACTIVITY 2
Individually students perform the following exercises:
– Performing three rights (a right-right-right bounding sequence).
– Performing three lefts (a left-left-left bounding sequence).
– Performing double-double (a right-right-left-left bounding sequence).
– Performing double-double (a left-left-right-right bounding sequence).
– Alternates (a left-right-left-right bounding sequence).
– Alternates (a right-left-right-left bounding sequence).APPLICATION ACTIVITY 3
Individually, students perform five trials of triple jump on the jumping area and
record their performance.Cool down exercises
– Let students do light exercises and stretch their group of muscles by insisting
on most used parts.
– Guide students while stretching their muscles systematically.Closing discussions
• Reflect
– Which challenges did you face during the execution of the triple jump
exercises? Why?
– What went well during the performance of the triple jump? Why?
• Connect
– What conditions are necessary for a triple jumper to have the best
performance?
• Apply
– How are you going to use triple jump in your daily life??
– How will you do to make better your performance in long jump after this
session?Lesson 4: High jump
a) Learning objectives
To execute different high jumps using correct techniques with self-confidence and
coordination.
b) Teaching resources/materials
– Athletic track/ high jump pit.
– High jump posts/standards.
– Elastic/rope/or standards crossbar.
– Athletic tape.
– Mat to be used for landing on while jumping.– Watchc) Prerequisites/Revision/Introduction
Students of senior five will learn better high jumps if they are able to remember
the basic skills they have acquired in ordinary level.d) Learning activities
Opening discussions
– Ask students questions about the types of techniques to cross the bar they
have learned in ordinary level.
– Ask the students the question about landing technique they have learned
in ordinary level.
– Let students present their findings and introduce the new lesson.
– Invite students to start the warm-up.Warm up exercises
– A warm-up jog of approximately 200 meters with mild movement exercises
such as skipping, backward jogging or skipping, and lateral shuffles mixed in
periodically.
– Side shuffle on 100 m, backward run on 50m, walking arm circles and shoulders
rotation on 50m, striding arm rotations (forward and backward) on 100m, head
circles, trunk rotations, hip circles, lower leg circles, ankle rotations on 100 m,
heel walks (inward, outward, inversion, eversion), leg swings front and side on
100m.
– Guide them while performing warm up and stretching exercises students.e) Lesson body
Explain to the students that in comparison with the previous jumps (long and triple
jumps) high jump is characterized by:
– The run-up speed will be smaller and uniformly accelerated.
– The length of the run-up will be shorter so as not to tire the jumper and
remove his/her concentration.
– The impulse/take-off is directed upwards and forwards. It will be complete
and in line with run-up race.
– The crossing bar is in three types namely: Simple scissor, Belly roll, Back roll
or/FOSBURY FLOP.The scissor technique
Tell students that s c i s s o r technique has an advantage of being simple, very
easy and natural.Explain to students that:
– For an impulse done by the left foot, the run-up comes from the right side.
– For an impulse done by the right foot, the run-up comes from the left side.
– The angle made by the runway and the bar is almost closed (50 to 100).Remind students to:
– Throw upwards the free leg stretched and the trunk above the bar.
– Make the impulse in growing by the rise of the shoulders and hips.
– Lower the free leg for crossing the bar by the impulse leg.
– Land on the pelvis and back.
Let students perform scissors jump individually on the jumping area.

 Belly roll technique
On a line drawn on the ground, students will make three strides in walking and
then in gradual acceleration, jump in making a half turn in landing:
– On his/her free leg and steady leg.
– On his/her free leg and opening the knee of the impulse leg.
– To do the same exercise in crossing a rope placed at 40 to 50 cm from the
ground.Remind students:
– That the angle made by the runway and the bar is more or less open (200
to 500 ).
– To throw the attack leg and attack over the crossbar.
– To roll around the crossbar with the same leg and the trunk, to return the hip
and attack leg.
– To gradually raise the knee high of the attack leg pointed up.
– To completely push on the impulse leg for a total extension.
– To place the free hip as high as possible above the impulse leg and at the
height of the elastic rope/or the crossbar.
– To place the shoulder above the support of the same leg.
– To topple over the basin by lowering the free leg to the landing area and
raising the impulse leg.
– To rotate around the crossbar and dive on the landing area.
– To land on the back.Tell students that the Belly rolling has some advantages such as:
– The jumper can see the crossbar.
– The impulse is done towards the center of the crossbar.
– The landing is done on the center of the landing area.Let students perform belly roll jump individually on the jumping area.FOSBURY flop technique or back roll techniqueTell to the students that unlike other techniques for the crossing the bar, the run-up
of the back roll technique comprises a race in a straight line and a race in curved
line.
– The part, we must run with straightened bust and increase the speed of the
run-up with the long and powerful strides.
– On the curved line of the run-up, the jumper must bow the body axis
– inside of the curve. It takes between four and five steps.
– The race of the run-up must increase its speed by making powerful strides.
– The last stride is less short than others.Points to check out while applying back roll jump
• The impulse
Remind students that the concept of take-off depends to:
– The pushing by the impulse leg.
– The action of the free leg.
– The lifting of the shoulders and the arms action.The impulse foot must be actively and quickly put on the ground. It should not
be parallel to the edge of the landing area, but the tiptoe is oriented to the opposite
side to landing area. The ankle, knee and hip are in extension.• The action of the free leg
To raise quickly the high of the free leg to the horizontal and at the opposite side of
the landing area of for allowing a gradual rotation of the pelvis and bust.• The arms action
To raise the shoulders and arms at the height of the jumper head and maintain them
in this position. The inside arm will be thrown faster and higher to fix the pelvis and
bust (the attack arm firstly pass above the crossbar).• Crossing the bar
– To topple over the pelvis upward and forward, trunk-thigh angle open.
– The legs are dangling and relaxed.– The legs are extended over the basin.
– The lumbar spine is arched.
– The spine is in extension with motion of the head backward.
– The dodging of the legs by the legs flexion on the trunk and leg extension
– on the thighs.• The landing
– Enter the head to the chest and extend the legs.
– To land on the back keeping the knees opened and avoiding any rotation
back.Let students perform back roll jump individually on the jumping area. APPLICATION ACTIVITY
With different height, individually students perform scissors , belly roll and back
roll techniques.Cool down exercises
– Let students do light exercises and stretch their group of muscles by insisting
on most used parts.
– Guide students while stretching their muscles systematically.Closing discussions
• Reflect
– Which challenges did you face during the execution of the high jump
exercises? Why?
– What style of the three high jumping technique is the best to use in
competition? Why?
– What went well during the performance of the high jump? Why?• Connect
– What conditions are necessary for a high jumper to have the best
performance?• Apply
– How are you going to use jumps in your daily life?
– How will you do to make better your performance in high jump after this
session?1.6. Summary of the unit
• Long Jump
Long jumpers sprint along a narrow track toward a line, which the athlete cannot
step over. Good long jumpers can time their runs with precision and step as close
to the back edge of the line without going over as they jump and propel themselves
forward into a sandbox.• Triple Jump
Much like the long jump, the triple jump begins along a narrow track. The athlete
must sprint toward three designated zones that are marked by lines before jumping
for distance. The jumper must touch down with one foot in eachzone before launching
for distance into the sandbox. The jumping sequence is referred to as the hop, step
and jump phase.• High Jump
The high jump requires athletes to run and jump over a raised bar. High jumping
techniques can vary but typically involve the belly roll, the Fosbury Flop or back roll
and the simple scissor.1.7. Additional information for teachers
General methodological steps for teaching and learning long jumps Step 1
– Students must be familiar with the approach run especial with the last two
strides and the maximum number of strides everyone needs to take before
the take-off.
– Everyone will have to mark his/her starting point, which must not be the same
for every student.
– Deciding which foot they will take-off (dominant foot) requires many repetitions
in order to get familiar with it. In this regards as a teacher you need to offer
many trials to each student, to help them to recognize and get familiar with their
dominant foot (take-off foot) which is very crucial in long jumping technique.Step 2
The students must have many trails in order to get familiar with the take-off especially
mastering the last two-step and the hitting of the take-off board. Here as a teacher
put an emphasis on the mastering of the take-off leg and the free leg.Step 3
Getting familiar with keeping the balance during the flight phase. At this step, they
need to master keeping the centre of gravity in the correct position above the legs
during the flight.Step 4
Students need to be familiar with the landing technique. Emphasis must be put in
teaching how not to fall back and touch behind the original mark made by the feet.
Here students need to do many repetitions.Except for the exceptions regarding the nature of the jump, and the take-off the
wind speed, the long jump regulations apply also to the triple jump. Rules and regulations for jumps
Long jump regulations• Runway
The minimum length of the runway shall be 40m measured from the relevant take-
off line/take-off board to the end of the runway. It shall have a width of 1.22 m.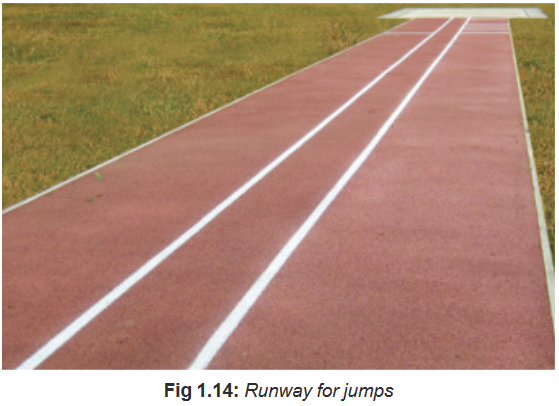 • The take-off boardThe take-off board shall measure 1.22 m long, 20 cm wide and 10 cm deep. It shall
be placed between 1m and 3m (for long jump) and 11m and 13m (for triple jump)
from the nearer end of the landing area. • The landing area
The landing area shall have a minimum width of 2.75m and maximum width of 3m.
The length shall have a minimum of 7m and a maximum of 9 m.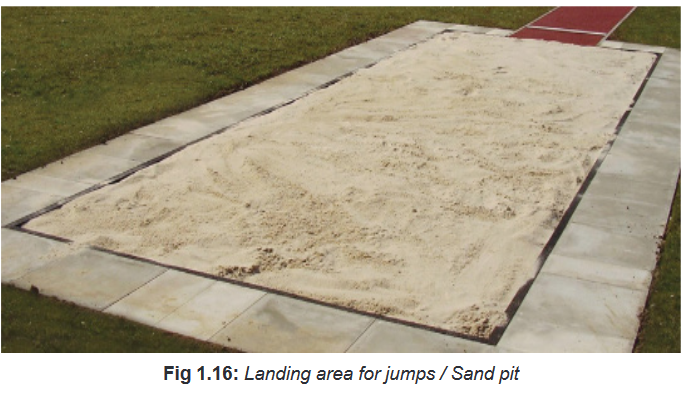 • Trials
In field events, except high jump and the pole vault, when there are more than eight
athletes, each athlete shall be allowed three trials and the eight athletes with the
best valid performances shall be allowed three additional trials.• Delay
If the time allowed elapses once, an athlete has started his/her trial, that trial should
not be disallowed. The following time should not normally exceed 1 minute for all
events.• Ties
To resolve the tie, the second best performance of the athlete shall be considered. If
necessary, the third best. If the remains and concerns first place, the athletes having
achieved the same results will compete again in the same order in a new trial until
the tie is resolved.• Cases of trials annulation
A trial is failed if the athlete:
– Touches the ground beyond the take-off line with any part of his/her body,
whether running up without jumping or in the act of jumping.
– Takes off from outside either end of the board, whether beyond or before the
extension of the take-off line.
– Touches the ground between the take-off line and the landing area.
– Employ any form of somersaulting while running up or in the act of jumping.
– In the course of landing, he/she touches the ground outside the pit closer to
the take-off line than the nearest break made in sand.– In leaving the landing area, his/her first contact with the ground outside the
landing area is closer to the take-off line than the nearest break mad in the
sand on landing.
– Does not respect the order of the triple jump that consists of a hop, a step and
a jump.• Measures
All jumps shall be measured from the nearest break in the landing area made by any
part of the body to the take-off or the take-off extended. The measurement shall be
taken perpendicular to the take-off line of its extension. Distance is measured by
the part of the body that contacts the pit closest to the take-off line; not the first part
of the body that hits the sand. In other words, if the feet hit first, in front of the body,
then the hand touches the pit behind the body, the distance will be marked at the
point the hand hits. No matter which flight style is used, one must be sure to land
feet first, with the feet stretched as far in front of the body as possible without any
other part of the body touching the pit behind the original mark.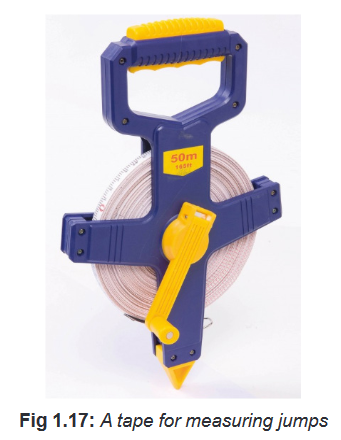 High jump regulations• Competing order
The athletes shall compete in order drawn by a lot. If there is a qualifying order
round, there shall be a fresh drawing of lot for the final.• Trials
Each athlete shall be allowed three trials at each height.• Delay
The time should not exceed normally 1 minute for starting jumping process.• Cases of trial annulation
A trial is failed if:
– The athlete does not take off from one foot.
– After the jump, the bar does not remain on the supports because of the
action of an athlete while jumping.
– The athlete touches the ground including the landing area beyond theplane
of the nearer edge of the uprights (between or outside them).• Measurement
All measurements shall be made perpendicularly from the ground to the lowest part
of the upper side of the bar and shall be measured in whole centimeters.• Ties
In case athletes tied, the following regulations should be applied:
– The athlete with the lowest number of jumps at the height at which the tie
occurs shall be awarded the higher place.
– If the tie remains, the athlete with the lowest total of failures throughout the
completion up to and including the height last cleared shall be awarded the
higher place.
– If the tie still remains and concerns the first place, the athletes tying have one
more jump at the lowest height at which any of those involved in the tie have
lost their right to continue jumping, and if no decision is reached, the bar shall
be raised or lowered of 2 cm and so on.
– If it concerns any other place, the athletes shall be awarded the same place
in the competition.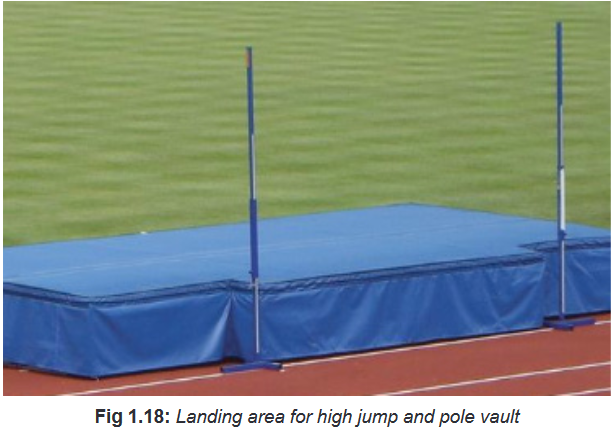 1.8. End unit assessment
– Set long jumps exercises for students and observe the compliance to the
correct techniques. Take measurement for three trials for each students.
– Set triple jumps exercises for students and observe the respect of correct
technique of triple jump. Take measurement for three trials for each student.
– Set high jumps exercise for the students and observe that they respect the
correct technique of executing high jumps. Take measurement for three trials
for each student.
– Give feedback for each student based on his/her performance.1.9. Additional activities
1.9.1. Remedial activities
Students perform long jump individually by respecting different steps of long jump.1.9.2. Extended activities
– With the support of the school, organize a kind of competition of jumping (long,
high and triple jump) and let students participate in that competition.
– Request students to participate in different athletics competitions (different
jumps) at the school level, sector level, district level and national level.UNIT 2: FOOTBALL
2.1. Key unit competence:
Perform various individual skills and team tactics needed to play effective football.2.2. Prerequisite (knowledge, skills, attitudes and values)
Students of senior five will learn better football if they have developed basic
techniques of playing football in Ordinary Level and in senior four.2.3. Cross-cutting issues to be addressed
Gender
In teaching and learning process of football, the teacher must prepare and provide
physical activities that engage both girls and boys equally to exploit their full
potential and talents without any discrimination or prejudice.Inclusive education
The teacher as a facilitator he/she must consider different special education needs
and select Football activities to adapt his teaching approaches to students. This
creates a positive attitude and helps all students to participate actively and develop
their competence levels.Financial education
The teacher should integrate Financial Education into his teaching/learning
activities by providing the local and no cost teaching material where is possible. He/
she must encourage students to make their own materials that can help them to
develop competences not only in sport at school but also in their life. The teacher
must explain the financial implication of some sports.Standardization culture
The teacher must choose and select the standardized materials to use in his/her
teaching/learning process of football.
It is necessary to provide appropriate materials required to the levels of learners and
help them to develop culture of checking and using the qualityof sport materials for
the competitions before using them in order to prevent injuries and other accident.Environment and sustainability
The teacher should provide materials and deliver the lesson by encouraging
learners to protect the environment and well use of materials. The teacher helps
them to develop the spirit of keeping safe the environment in which they use in
sports activities by avoiding waste on the playground.Peace and values education
The teacher helps students to develop fair play and social values by avoiding violence
and conflict in the football game and by setting clear and relevant instructions. He/
she should provide the activities that help students to develop their competence
peacefully.Comprehensive sexuality education
The teacher provides football exercises and sets instructions that prevent sexual
harassment or any kind of gender-based violence like sexual abuse and physical
contacts oriented to the sexuality intention.Genocide studies
While conducting football exercises a teacher should take a time to explain to
student show sports should be used to fight against Genocide ideology and how to
prevent it. For example, to organize Genocide memorial tournaments at school and
give the message related to the Genocide.2.4. Guidance on introductory activity
Before introducing the lesson one of this unit, you must introduce the whole unit.
The teacher as a guide, facilitator and expert, ask questions or give activity related
to tactics used in playing football in order to help them to predict what to be learned
in the whole unit.2.5. List of lessons/sub-heading


Lesson 1: Playing positions and general offensive and defensive tactics
a) Learning objectives
The students of senior five will master football playing positions and develop general
tactics in attack in football.b) Teaching resources
– Playground of football
– Stopwatch / Watch
– Whistle
– Chasubles
– Football balls
– Cones
– Movable goalposts (additional
goalposts)
– Ballsc) Prerequisites/Revision/Introduction:
Students of senior five will perform better in playing positions and offensive tactics if
they can execute basics techniques of playing football learned in in ordinary level and
senior four and have developed basic physical conditions for an athlete.d) Learning activities
Opening discussions
– Ask questions about playing positions in football learned in senior four and in
ordinary level.
– Let students present their findings.
– Invite students to start warm up exercises.Warm up exercises
– Let students perform general warm up exercises and specific warm up based
on the most body’s parts to use in football and stretch their muscles properly.
Emphasize exercises like jogging around the playground progressively,
sideways facing to a marked point, sideways back to back to the marked
point, forwards and backwards to the marked point, high knees, heel flicks,
inside and outside leg lunges, jog and sprints and header at the marked point.
– Guide them while performing warm up and stretching exercises Lesson body
– Ask the students to recall the playing positions in football. Guide them while
practicing the exercises.
– Tell students that in football, basic positions are based on each position
assigned a number and involve the following positions/roles that correspond
to the number assigned to them as follow:
Remind students that:
– Every position has a specific task to accomplish which corresponding to its
name and its position number even though formations should vary based on
the strategy of the coach/teacher /trainer.
– Let students take different positions on the football court individually.ACTIVITY 1
– Select 11 students to be ready to take any position on the court.
– Tell other s t u d e n t s to be attentive in order to checkout his/her teammate
has taken the right position (goalkeeper, defenders, midfielders, attackers).
– Request one student to take any position of your choice, ask other students to
confirm whether the position taken is right or wrong.
– Continue in such ways until all positions finish.General offensive and defensive tactics
Tell students that even though there are playing posts seem to offensiveor defensive,
in modern football every player can be offensive or defensive at any time during the
game situation based on playing actions.Explain five attacking principles used in playing football which are:
– Penetration,
– Support,
– Mobility,
– Widening the playground,
– Creativity or improvisation.Tell student that general principles of attacking during playing football
game are:– All players must help their teammates.
– Everyone participates in attack.
– Everyone participates in defense.
– Remember that defense starts as soon as the ball is lost.Tell student that main individual tactics for attacking during playing
football game are:– Always try to be in an unmarked position (free).
– Pass and get into position that enable to help a teammate.Avoid unnecessary confrontations.Remind students that when faced by an
opponent while attacking, they should:– Take the ball to the opposite side from your opponent.
– Shake off your opponent by quick bursts, feints and sudden changes of
direction.
– Take the ball to the left and then pass to the right and vice versa.
– Do not carry the ball too far; short and long passes should make progress.
– Use cross-pitch balls to a teammate in a good position.
– Avoid playing down the center in their own half; if the ball is lost, it could be
dangerous.
– Do not pass the ball into crowded areas, play it to a teammate who is in free
space.
– Always support a teammate who has the ball.
– Run to meet the ball; do not wait for it to come to you.
– Do not let the ball go past without controlling it.
– Do not waste time with fancy footwork.
– Play in a sensible, simple, useful manner.Remind students that counter attacks may be used while offensive tactics.
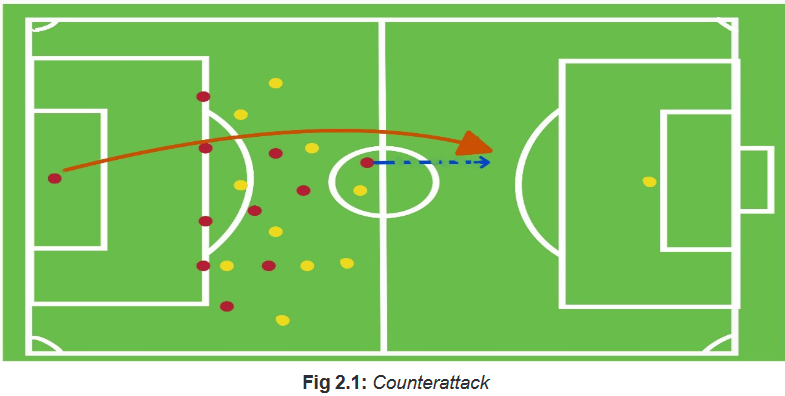
ACTIVITY 2
4 vs 2 to 2 vs 2
Activity organization
Play in a total area of 18m x 27m or two areas of 18m x 14m.Description of the activity
Play starts with a 4 vs 2 possession game. When the two inside players win the ball,
they play 2 vs 2 in the other half to try and score. Should the two defenders (black)
win the ball, they quickly play the ball back to the original grid, and the two original
defenders return to the grid defend.Variations
– Limit touches to attacking team.
– If waiting defenders (black) allows a goal, they become defenders in the first
zone.Teaching points to consider
– Possession team (red) maintain possession of the ball by offeringgood support.
– Defending (black) defend as unit. Limit penetrating passes. Once the ball is
won, transition quickly try to score.
ACTIVITY 3
(8 vs 5 to counter goals)
Organization of the activity
7 + Goalkeeper Vs 5 on a field 23 x 45 m.Description of the activity
White team attacks the goal. Red team plays to the small goals at midfield. Red
Team must transition to goal within four touches, and Red team must play two
touches to small goals.Variations
Adjust touch limits to suit age/skills level of the students.Teaching points to consider
Constant transition and awareness. Defenders become attackers and attackers
becoming defenders.
ACTIVITY 4
Organization of the activity
Three even numbered teams, two goals with keepers, with the field set up into three
zones.Description of the activity
Team 1 will attack, Team 2 will defend, and Team 3 will wait. Team 1 attacks the
goal and if Team 2 wins the ball, they attack team 3. Teams may regroup in the
middle zone. If attacking team scores, theymaintain possession and attack the third
team.Variations
Attacking team in the middle zone is allowed no time to gain their shape.Teaching Points to consider
– Possession when the attack is not on.
– When possession is lost, transition into defense.
Attacking formations in football
• 4-3-3 formation
The most popular attacking formation in football is 4-3-3 and it is used by most of
the teams during football matches. Four defenders, three midfielders and three
attackers compose it. The 4-3-3 formation is the most used formation during the
matches. This is because it is a good attacking formation, which also has a solid
back-four defense. The job of the four defenders is to keep it tight, secure at the
back, and get the ball forward to the midfielders as quickly as possible.During a soccer game, the three midfielders (who will play through the center) will
look to get the ball to the three front players.The three attacking players can be used in different ways. For example, you could
have three strikers playing close together.
• 3-4-3 formation
The key to this formation is to ensure your team has three attributes.They are:
A. 3 strong central defenders.
B. 3 competent attacking players.
C. 2 good wingbacks who can run and intervene in attacking and defending.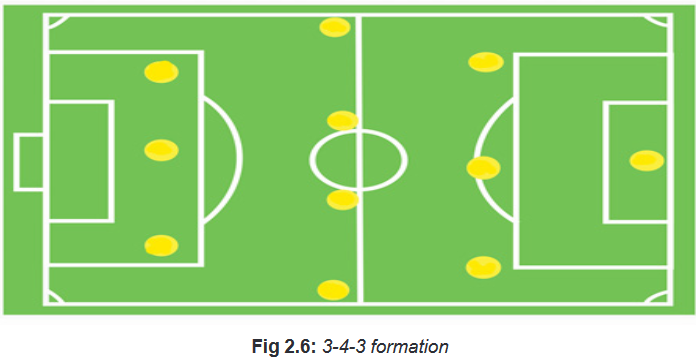
• 4-4-2 formation
In this attacking system
– 4 stands for 4 defenders.
– 4 stands for 4 midfielders.
– 2 stands for 2 forwards (strikers).
Let students apply formation systems learned in a normal football game.
APPLICATION ACTIVITY
Counter attack
One team for 4 students another for 2 students. Instructions
– Put your students in teams as indicated.
– Allow everyone to have an experience on the exercises.
– Help them to manage well their time.
– If you have many balls you can work in more teams and use the whole pitch
divided into parts according to the measures given in instructions.
– Play in a total area of 13m X 18m- two areas of 13mx 15m.Description of the activity
Play starts with a 4 Vs 2 possession game. When the two inside players win the
ball, they play 2 Vs 2 in the other half, to try and score. Should the two defenders
win the ball, they quickly play the ball back to the original grid, and the two original
defenders return to the grid to defend.Variations
– Limit touches to attacking team.
– If waiting defenders allows a goal, they become defenders in the first zone.Teaching points to consider
– Possession team maintains possession of the ball by offering good support.
– Defending team defends as unit. Limit penetrating passes. Once the ball is
won, transition quickly try to score.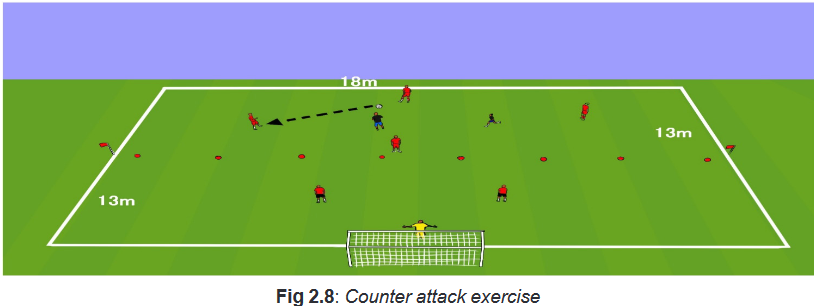
Cool down exercises
Let students do light exercises and stretch their group of muscles by insisting on
most used parts.
– Randomly, one of students leads cool down exercises.
– Guide them while stretching their muscles systematically.
– Help them/demonstrate/correct where is necessary.Some exercises after this intense workout may include:
– Easy jogging or walking around the playground
– Deep breathing during the exercise to help oxygenate the system
– Static stretching of all the body partsClosing discussions
• Reflect
– Which challenges did you face while initiating counter attack in football
exercises?
– What went well during the workout?• Connect
– What are the skills do you need in order to play an offensive game
tactically?• Apply
– What is the usefulness of offensive play mind-set in football?
– How will you use the learned offensive tactics in football in next days?Lesson 2: Set pieces used in offensive tactics
a. Learning objectives
To develop offensive tactics during set pieces in football.b. Teaching resources
– Playground of football
– Whistle
– Football balls
– Watch/Stopwatch
– Cones
– Balls
– Chasubles
– Additional goalpostsc. Prerequisites/Revision/Introduction:
Students of senior five will learn better offensive tactics in set pieces if they can
execute basics techniques of playing football learned in ordinary level and in senior
four and have developed basic physical conditions for an athlete. These basic
techniques include heading, kicking the ball, blocking, dribbling, and stopping the
ball.d. Learning activities
Opening discussions
– Ask the students the questions about set pieces in football game learned in
senior four and in ordinary level.
– Invite students to start warm up exercises.Warm up exercises
– Let students perform general warm up exercises and specific warm up
based on the body’s parts to be used in playing football and stretch their
muscles properly. Emphasize exercises like jogging around the playground
by increasing the speed after each series, sideways facing to a marked point,
sideways back to back to the marked point, forwards and backwards to the
marked point, high knees, heel flicks, inside and outside lunges, jog and
sprints and header at the marked point.
– Guide them while performing warm up and stretching exercises.e. Lesson body
Explain to the students set pieces and their importance in playing football game.• Description of set pieces
Set pieces in football
A set piece is the action of putting the ball back into play when the ball is out of play
(the ball is dead). Set pieces involve:
• Importance of set pieces in football game
Set pieces can give to a team an opportunity to score. Some teams are said to
be good at set pieces when it comes to be offensive. The other ones are bad in
defending against balls from set pieces. A good coach knows how to use these
opportunities to create chances to score from set pieces by using different tactical
systems. One of the ways of scoring from set pieces is to play very quickly without
giving the opponent the time to position well in defense.ACTIVITY 1
During the practical lesson, help the l students to do many repetitions on executing
ball from set pieces, the teacher will guide, demonstrate and correct where
necessary. You can use videos from youtube.com to illustrate some complicated
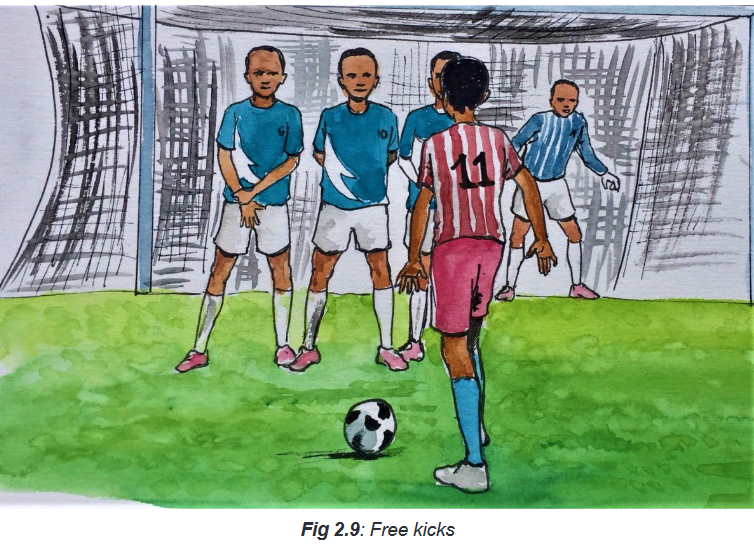
tactics if you are not able to do demonstrations or to understand.Free kicks
Explain students that while executing free kicks, they can use two types of free
kicks: direct and indirect kick.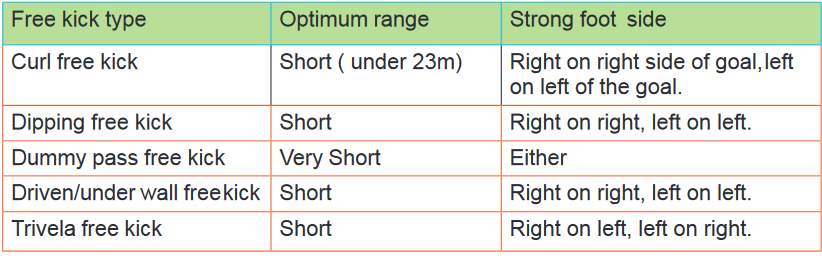
Penalty kick
While teaching tactics of taking a penalty, emphasize that the research has showed
that:
– Targeting to the upper third of the goal will maximize the chances to score.
– The kicks to the middle third of the goal will decrease the chances to score
– The kicks to the lower third will decrease the chances to score.Remind students that:
They must train themselves to kick targeting the upper third of the goal. It is better to
remember that from there is also a risk that the ball may be kick out of the goalpost.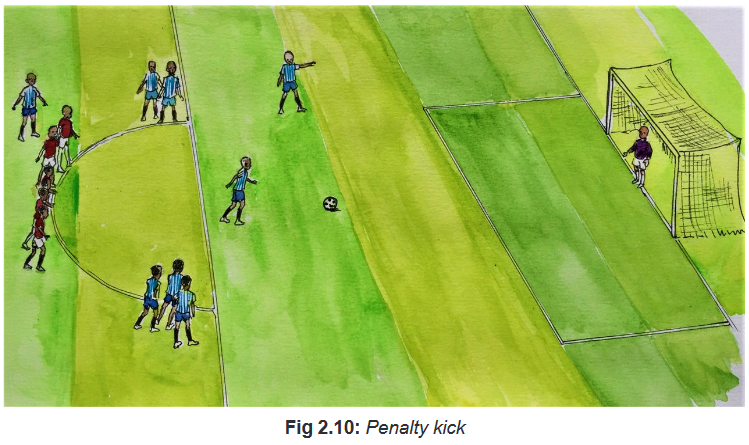
Corner kick
Explain students that there are four types of corner kick according to the area they
are kicked to. In teaching, you will ask the students to try each type and to score
from these different balls.
– The back post corner kick.
– The front post corner kick.
– The penalty spot corner kick.
– The short lay-off.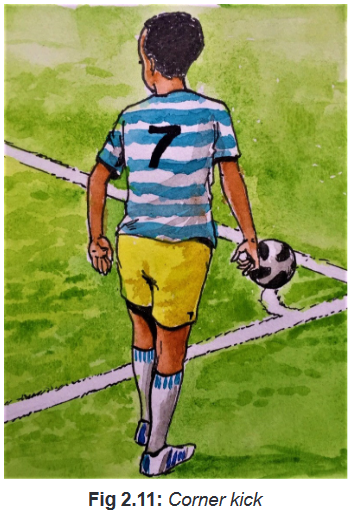
The kick off
A team can initiate a powerful attack from the kick off. From the kick off you can
initiate a counter attack from a long ball, you can retain ball position and attack. A
more direct strategy when kicking off is to progress up the pitch straight away in order
to threaten the opposition goal or to shift into the opposition half withthe whole team.Application activity
The students form teams according to the personal ability (strengths and weaknesses
of the students) and the resources available
Students are asked to:
– Play balls from set pieces.
– Execute the balls in set pieces.
– Create tactical moves in set pieces’ balls.
– Create different offensive tactical exercises in set pieces.
– Create scoring opportunities from set pieces’ balls.Cool down exercises
– Let students do light exercises and stretch their group of muscles by insisting
on most used parts. Some exercises after this intense workout may include
easy jogging or walking around the playground, deep breathing during the
exercise to help oxygenate the system, Static stretching of all the body parts.
– Guide students while stretching their muscles systematically.
Closing discussions• Reflect
– Which challenges did you face while executing set pieces (free kicks,
– corner kick, and penalty kick) in football?
– What went well during the workout?• Connect
– What are the skills do you need in order to score from set pieces during the
game tactically?• Apply
– What is the usefulness of set pieces in football?
– How will you use these learned tactics in football in next days?Lesson 3: General defensive tactics and defending at set pieces
a. Learning objectives
The students of s e n i o r f i v e will develop defensive tactics during set pieces in
football.b. Teaching resources
– Playground of football
– Cones
– Whistle
– Chasubles
– Football balls
– Additional goal posts
– Watch/ Stopwatch
– Ballsc. Prerequisites/Revision/Introduction
Students of senior five will learn better defensive tactics in set pieces if they
can execute basics techniques (heading, kicking the ball, blocking, dribbling, and
stopping the ball) of playing football learned in senior four and in ordinary level and
have developed basic physical conditions for an athlete.d. Learning activities
Opening discussions
– Ask the students the questions about set pieces in football game learned in
senior four and in the previous lesson.
– Introduce the lesson of the day.
– Invite students to start warm up exercises.Warm up exercises
– Let students perform general warm up exercises and specific warm up based
on the most used body’s parts in football and stretch their muscles properly.
Emphasize exercises like jogging around the playground by increasing the
speed after each series, sideways facing to a marked point, sideways back to
back to the marked point, forwards and backwards to the marked point, high
knees, heel flicks, inside and outside leg lunges, jog and sprint and header at
the marked point.
– Guide them while performing warm up and stretching exercises .e. Lesson body
Explain students that set pieces can give to a team an opportunity to score, but also
it can help a defending team to initiate a counter attack if well organized in defense
and with good defending tactics.• Defending a ball from a corner kick
Tell students that tactics of defending a ball from the corner kick to teach to the
students are:• Man marking defence
In man marking defence, a player must make sure to be at the right side of him/her
and the goal. When you are on the wrong side, it makes it harder to defend and it will
be easy for the opponent to score the goal.Remind students to be sure to communicate with their teammates, to make sure that
the right player is marking the right player and no confusion happens.• Zonal marking
In zonal marking defence tactics, during defending the corner kick, all players have
their own defensive zone in which they are supposed to defend the ball when it
comes to their zone. It is better to position at the edge of the 5.5 m box because
that is the most frequent and most dangerous position for an offensive player to head
a ball into the goal. Tell students never clear a ball to the middle. There will always
be an opponent at the edge of the area and you do not want him to get an easy shot
on goal. When clearing the ball, play it to the side of the field. It also makes it a lot
easier to counter-attack since there will most likely be no opposing players there.
Remind students that most teams use a mix, with more players defending zone
than defending the man. Teams do this to try to benefit from both types of marking
and concede as fewer goals from corner kicks as possible.• Defending a ball from a free kick
Tell students that the most used and real defending tactic against the balls from free
kick is to build the wall.• How to build the wall?
The first player in the wall should position him/herself about eight paces from
the ball in a direct line between it and the near post, facing the goal. The remaining
players build a wall towards the opposite post. The players follow the first player’s
lead as the goalkeeper repositions him. The goalkeeper might position this player
up correctly based on where the ball is and the side or position he/she wishes to be
covered by the wall. If the player standing over the ball is supposed to be in the wall,
they should call for a replacement. Remind students that the referee should have
informed everyone that the taker must wait for the whistle, allowing the player to take
up his or her position in the wall. If a player that forms part of the wall is substituted,
they must tell their replacement what number they are to take in the wall.

The aspects to be taught by the teacher during the practical lesson
– When a free kick is conceded the player who committed the fault must stay
nearest the ball to prevent the opponent to play very quickly and allow his/her
teammates to position well in defending positions.
– The goalkeeper must be sure that the free kick cannot be taken quickly
– Once the goalkeeper is sure that the free kick cannot be taken quickly, he/ she
calls players to build the wall (in general not exceeding four players).
– Once he/she has positioned the wall, the goalkeeper should position him/
herself in the unprotected part of the goal. Make sure he/she knows which part
of the goal he/she is defending and where he/she should stand when the kick
is taken.Remind students that defending tactics in other set pieces rather than the corner
kick and the free kicks, requires only the ability to read the game and to react quickly
according to the opponent actions.B. General defending tactics in football
Explain students that generally the purpose of defending in footballis to regain the
possession of the ball once you have lost it and to prevent the opponent to score.
Those defending tactics are as the follows:
– Man to man making.
– Zone marking.
– Stealing the ball by a block.
– Tackling
– Clearing the ball by a kick or by a header.
– Protecting the ball.
– Committing a tactical foul.Tell students general defending tactics for a good defender
– Giving no time to react.
– Correct Positioning.
– Patience waiting for mistakes.
– Anticipating their next move.
– Using your body correctly.
– The eyes on the ball and the player.
– Always play to the outside.
– No risking of leaving the ball behind.
– Impose yourself with security.– Always on your toes.
– Covering the ball.
– Perfect slide tackles.
– Intimidating attackers and prevent them from using their strengths.
– Using your strengths.
– Moving attackers into congested areas.
– Tactical fouls are needed where is necessary.In details, explain defensive tactics and demonstrate how to apply them on thecourt.
• Protecting the ballRules to follow while protecting the ball in football:
– The first rule of protecting the ball is to avoid turning your back on the
– incoming defender if possible.
– The second rule of protecting the ball is to take control of the situation
yourself.
– The third rule of protecting the ball is to be aggressive in holding onto the ball.Remind students that the basic protecting posture in football:
– Knees bent and bottom down to lower centre of gravity.
– Turn sideways with weight balanced on both feet.
– Arm/elbow of side, which will make contact tucked well in to protect ribs.
– Keep other arm spread out for balance.
– Time the step across so that shoulder aggressively makes contact with
opponent, transferring weight to front foot so that back foot is free to pass/
control the ball.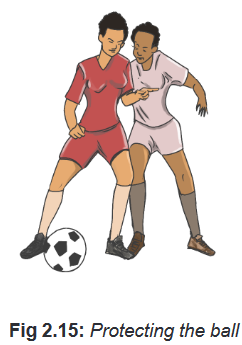
TASK / ACTIVITY
In pairs, students perform the following exercise.
– One student has a ball another has the task of stealing the ball.
– If a player with the ball is approaching the stealer, he/she must be in ball
protection position.Teaching point to consider
– Keep head up and be aware of coming stealers.
– Keep the ball from sharks by accelerating into space.Variation
– Switch roles of students.
– The stealers have four seconds to try to get the ball.Tackling in football
Tackling is an important skill in football regardless of your playing position. Tackles
are used to regain possession of the ball for your team and are sometimes seen as
critical particularly in defensive positions when the opponent are in an offensively
advantageous position.Tell students that there are two types of tackles:
– A standing/block tackle as its name implies is one where you remain on your
feet.
– The other tackle is when you are off your feet, also known as the sliding
tackle.Explain
students that tackling should be made by:
Front block tackle
• Position of the ball
Tell students to ask themselves how far the ball away is. This allows you to assess
the timing to stick their foot out and dispossess their opponent by taking the ball
away from them with minimal physical contact.• Position of their own feet
Ask them to lead them with their non-primary foot. Their weaker foot will be in front
while their primary foot will be behind. This allows them to dispossess the opponent
or quickly begin running after them.• Position of their body
Ask them to keep their body low, and always slightly bending their knees, as it will
lower their Centre of gravity. This will give them additional balance and allow them
to turn the other ways more easily.• Lead with the inside of their foot
This will allow more control and can pull back their foot remind them to pull back the
ball to draw a foul from them. This ensures they are not fully committed to a tackle like
a toe-poke, and be able to still give chase if they manage to get past them.Side block tackle
The side block tackle is used when the opponent is in full flight or has managed to
move pass them, resulting in themselves no longer facing them directly. They now
have to attempt to chase them down and make the tackle from the side.• Position of the ball
Similar to the front block tackle, gauge the distance between the ball, their feet and
the speed at which their opponent is travelling to time their tackle.• Position of your own feet
Once they are beside their opponent, they will have to drop their nearest shoulder
to them and lean into them to exert pressure.• Position of your body
Keep their body low once again to lower their center of gravity, allowing more
stability and strength.Remind students that during tackling:
It is extremely important to remain on your feet because if you fall down and the ball
breaks free, your opponent will regain control of the ball and there is an immediate
gap in your team’s shape which the opposition team can exploit. The fact that you
remain on your feet is the main reason why standing and block tackles are preferred
over slide tackles. As with all other techniques in football, always lock your ankle
before performing any action. Football injuries can be avoided and keeping ankles
locked is one of the best ways to avoid picking up unnecessary injuries.Let students apply tackling tactics during game play situation.
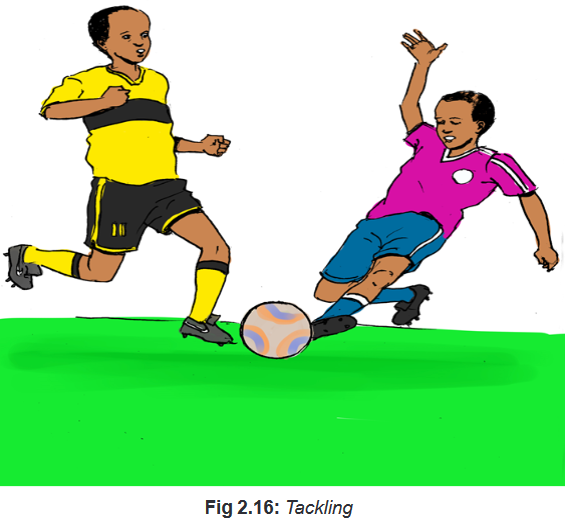
C. Man to man defence
Man to man, marking simply means that all your teammates are responsible for keeping an ey
on a particular opponent.D. Zonal marking defence
Every midfielder and defender is given a particular zone on the field to cover. It is crucial th
each one of your teammates fulfil their duties with 100 % concentration.
Remind students that while defending, they should:
– Always keep between the opponent and your goal.
– Always watch the opponent and the ball.
– Try to counter the opponents’ attacking build-up as soon as possible by marking.
– Do not give their opponent space.
– Slow the opponent down when they run with the ball (shutting down).
– Try to get to the ball before the opponent, or otherwise hinder them when they receive th
ball.– Mark the opponent on the side of the ball, in other words the side where he/
she will make the pass.
– When a high ball comes in, jump a moment earlier than the opponent
(timing of the ball).
– Do not dribble in their penalty area.
– Avoid cross-pitch passes from the outside to the inside.
– Play on the outside along the touchline.
– If he/she loses the ball, strive to recover it.
– Avoid ineffective tackles; do not throw yourself at an opponent who has the
ball.
– Never turn your back on an attacker
– Push the opponent towards the touchline.
– Carefully follow play, even if the ball is far away.
– A good defender never gives up.
APPLICATION ACTIVITY
– Composing teams among the students according to their number and the
resources available.
– Setting exercises of different types of defending tactics in football.
– Create different defensive tactical exercises in set pieces.
– Students are asked to execute the balls in set pieces.
– Students are asked to defend balls from set pieces.
– Be familiar with the defensive tactics in set pieces.
– Evaluate individual students. Progress/performance.
Cool down exercises
– Let students do light exercises and stretch their group of muscles by insisting
on most used parts. Some exercises after this intense workout may include
easy jogging or walking around the playground, deep breathing during the
exercise to help oxygenate the system, static stretching of all the body parts.
– Guide students while stretching their muscles systematically.Closing discussions
• Reflect
– Which challenges did you face while defending a ball from a corner kick/ free
kick?
– What are the qualities of a good defender?• Connect
– What are the skills do you need in order to avoid to concede a goal from set
pieces during the game tactically?
• Apply
– What is the usefulness of the learned tactics of defending set pieces in
football?Lesson 4: Safe play in short football match to apply themastered tactics
a. Learning objectives
The students will apply the learned tactics in game situation with confidence.b. Teaching resources
– Playground of football
– Cones
– Whistle
– Chasubles
– Football balls
– Goalposts
– Watch/ Stopwatchc. Prerequisites/Revision/Introduction:
Students of senior five will perform better safe play in a short football match to apply
the mastered tactics if they are able to remember and use learned defending and
offensive tactics learned whether in set pieces or during the game situation.d. Learning activities Opening discussions
– Ask the students to brainstorm different offensive and defending tactics learned
in the previous lesson.
– Introduce the topic of the day.
– Invite students to start warm up exercises.Warm up exercises
– Let students perform general warm up exercises and specific warm up based
on the most used body’s parts in football and stretch their muscles properly.
Emphasize exercises like jogging around the playground by increasing the
speed after each series, sideways facing to a marked point, sideways back to
back to the marked point, forwards and backwards to the marked point, high
knees, heel flicks, inside and outside leg lunges, jog and sprint and header at
the marked point.
– Randomly one student to lead the stretching and guide him/her where
necessary.e. Lesson body
GAME SITUATION
Teacher avails materials to be used during this safe play including balls (at least
2) chasubles (11 for each team), whistle, watch, chronometer, flags and cards
(optional). Request students to form two balanced teams (balance between
defenders, attackers and midfielders). Let all students participate in a play as either
a court player or substitute. Manage well the time in order to give every student
the chance to play. Correct students mistakes where is necessary. Within this game
situation students are requested to play by avoiding any unwanted risks or dangers
with caution and prudence.Description of the activity
– Students will play a football game where they will be asked to play a normal
game by using offensive tactics (counter attack, penetration, and set pieces)
and defensive tactics (tackling, covering/protecting the ball, man to man
and zonal marking) learned and they are requested to create more often set
pieces’ situations so as the teacher can evaluate how they have mastered the
tactics of defending and offending in set pieces. Here the teacher will observe
how the defending team defends a ball from a corner, a free kick, and how
attacking team tries to score from this ball.
– The teacher will observe that the students take good positions during the
game and keep good attitudes (emphasis on positioning during set pieces for
both defenders and attackers).
– Once attackers loose the ball they become defenders and defenders become
attackers (change of game situation).
– The teacher has to take notes of what is going well and what is not going
well to help him/her during the final discussion.
– The teacher may give correction immediately during the play when it is
necessary.
– The teacher will evaluate individual student progress/performance during the
safe play and provide feedback after the game situation.Cool down exercises
– Let learners students do light exercises and stretch their group of muscles
by insisting on most used parts. Some exercises after this intense workout
may include easy jogging or walking around the playground, deep breathing
during the exercise to help oxygenate the system, static stretching of all the
body parts.
– Guide them while stretching their muscles systematically.
– Help them/demonstrate/correct where is necessary.Closing discussions
• Reflect
– Which challenges did you face in applying the mastered tactics in game
situation?
– What went well during the safe play applying the mastered offensive and
defending tactics?• Connect
– What are the skills do you need in order to play safely with confidence and
applying correct defending and offensive tactics?• Apply
– What is the usefulness of the learned tactics in football?
2.6. Summary of the unit
Playing positions and general offensive tactics
In football, there are different formations that are used during the matches, but
there is no ideal formation. Adopting a given formation depends on the qualities of
your players and that of your opponent. A given system also may depend on the
game philosophy of the players and of the coach. In modern football, every player
can score a goal and every player can defend. Overall, we can say that the roles of
players are summarized as in the playing positions below.• Goalkeeper: The main aim of a goalkeeper is to stop the opposing team from
scoring a goal.
• Defenders: The defenders are positioned in front of the goalkeeper and their
aim is to stop the opposing team from entering into their goal area.
• Outside fullback/winger back: They play on the left and right flanks and
• see that the ball does not pass over them.
• Central Defenders (Central back and the sweeper): They are positioned in
the center of the field and are supposed to cover the leading goal scorer of the
opposition’s team.
• Midfielders (Central midfielders, defensives midfielders, attacking
midfielders, wide midfielders): They are the link between the defenders and
attackers. They need to be fit and physically very strong than other players on
the field as they are the players who run maximum time of the game all around
the field. Their responsibility is to enter the opposing team’s area and see that
they defend them when the opposing team retains the ball.
• Forwards/attackers (Center forwards, second strikers, winger attackers):
Their main aim is to score goals or to create an easy situation for their
teammates to score a goal.• Center Forward: The most tactful, dangerous and strong player of the game.
He/she is also called a striker. Strikers are the leading goal scorers in the
game.Offensive tactics in set pieces
Set pieces refer to a situation when the ball is returned to open play after the ball
was dead.These are corner kick, free kicks; kick off, goal kick, penalty and throw-ins. All these
set pieces when they are well used they may result into a powerful goal scoring
opportunities.General defensive tactics and defending at set pieces
In set pieces there, some positions to take in defense in order to avoid con- ceding
a goal from set pieces’ ball. Some of tactics involve man mark and zone marking,
tackling, building a wall, blocking etc.Safe play in short football match to apply the mastered tactics
After studying different tactics of defending and attacking, the students can now
apply in game situations the learned tactics whether in defense or in attack by using
individual and team tactics in order to win the game.2.7. Additional information for teachers
Terminologies used in offensive tactics in football• Tactics
Those are plans, which are set up for a specific purpose during a match. Essentially,
the tactics in football involves dropping deep, allowing the opposition to have the
ball and come forward with it, committing players forward and leaving gaps in behind
as they go. The aim is to take the ball off the opposition, exploiting the space left to
attack and score.Applying different tactics in football needs some important skills to master which
include ball control, passing, dribbling, shooting and defending.Tactical awareness is the ability to know your role and have positional awareness
on the field, and possessing the ability to make good decisions.• Counter attacking
Series of actions involves a team withdrawing players into their own half but
ensuring that one or two players are committed to the attack. The idea is to try to get
strikers isolated from the defenders by remaining hidden on the halfway line, and to
create space for a quick break.• Game intelligence
A player’s ability to make smart decisions on the pitch and make them quickly.
Game intelligence requires three skills: spatial awareness (ability to see space
clearly across the entire pitch and utilize it to his/her advantage), tactical knowledge
(knowledge of the nature and structure of the game) and the risk assessment (having
in mind that certain aggressive decisions could lead to loss of ball possession).• Creating free spaces
When an attacker beats one defender or more defenders, it gives him/her and
teammates a free space to play and create chances to score.• Individual tactics
Those are simple principles that a player learns in order to make the best decisions
during a particular passage of play.• Plan of a football training sessions
As teacher of physical education and sports subject, the first thing to teach your
students is to know how to plan a football training session.
Have in mind that failing to plan is planning to fail. One and important thing in
teaching physical education and sport subject is to plan practice in writing.• Factors to consider in planning football training sessions:
– Capabilities of the players
– Number of players
– Length of the training session
– Field space available
– Weather conditions
– Objective of each activity
– Approximate time per activity
– Weekly cycle
– Include on the Plan
– Topic
– Age group
– Training equipment
– Activity description
– Activity diagram
– Key coaching points
– Guided discovery• Guidelines for the length of a training session based on age:
– U6 = 45 minutes
– U8 = 45 to 60 minutes
– U10 = 60 to 75 minutes
– U12 = 75 minutes
– U14 = 75 to 90 minutes
– U16 = 90 minutes
– U19 = 90 to 120 minutes• Key activities to plan for in advance some of them must be shown in the
steps of your lesson plan:
– Define learning objectives
– Organize materials to use
– Plan demonstrations
– Focus on timing
– Cooling down exercises
– Warm up drills
– Stretching drills
– Techniques and tactics to teach
– Include evaluation2.8. End unit assessment
– Set different exercises that help you to evaluate how the students apply
playing positions and general offensive tactics.
– Set different exercises that help you to evaluate how the students apply
offensive tactics in set pieces.
– Set exercises on general defensive tactics and defending at set pieces and
evaluate individual student performance.
– Organize a competition and evaluate how the students are playing respecting
the learned tactics during the game situation.2.9. Additional activities
2.9.1. Remedial activities
The students form teams according to their abilities and based on the resources
available. Students are asked to:
– Play balls from set pieces.
– Execute the balls in set pieces.
– Create scoring opportunities from set pieces’ balls.2.9.2. Consolidation activities
Form two teams of 11 players including goalkeepers and let play a normal game by
taking learned position. In case students are above 22, create more than two teams
to let all students to participate in the game. This exercise should be done not
more than 10 minutes. Select a student who is able to lead the game and be there
to support him/her and giving instructions, reminders or orientations to the students
while performing an activity.2.9.3. Extended activities
Organization of the activity
4 + 4 vs 4 + 4 with two goalkeepers in 30 x 22m areaDescription of the activity
Fast paced 4 Vs 4 game utilizing four neutrals on the outside of the playing fieldVariations
– Inside Players, two touch limit.
– Outside Players one touch limit.
– After winning the ball, must playing an outside player before scoring.Teaching Points to consider
– Shooting technique.
– Following up shots.
– Constant transition and awareness. Defenders become attackers and
attackers becoming defenders.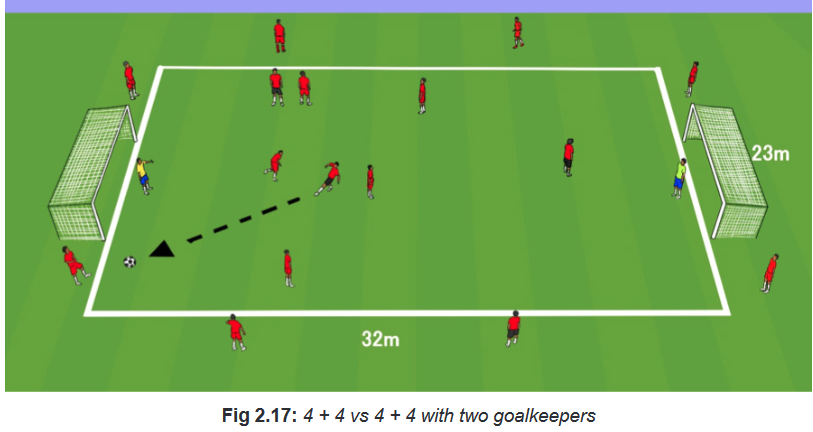
UNIT 3: VOLLEYBALL
3.1. Key unit competence:
Perform basic volleyball tactics.3.2. Prerequisite (knowledge, skills, attitudes and values)
Learners Students of senior five will perform better basic volleyball tactics if theyhave
mastered fundamental volleyball techniques learned in previous years.3.3. Cross-cutting issues to be addressed
Gender
In teaching and learning process of volleyball, the teacher must prepare and
provide physical activities that engage both girls and boys equally to exploit their
full potential and talents without any discrimination or prejudice.Inclusive education
The teacher as a facilitator he/she must consider different special education needs
and select activities to adapt his teaching approaches to students. This creates
a positive attitude and helps all students to participate actively and develop theircompetence levels.
Financial education
The teacher should integrate Financial Education into his teaching/learning
activities by providing the local and no cost teaching material where is possible. He/
she must encourage students to make their own materials that can help them to
develop competences not only in volleyball game but also in their life.Standardization culture
The teacher must choose and select the standardized materials to use in his/
her teaching/learning process of volleyball. It is necessary to provide appropriate
materials required to the levels of students and help them to develop culture of
checking and using the quality of sport materials for the competitions before using
them in order to prevent injuries and other accident.
Environment and sustainability
The teacher should provide materials and deliver the lesson by encouraging students
to protect the environment and well use of materials. The teacher helps them to
develop the spirit of keeping safe the environment they use in sports activities.Peace and values education
The teacher helps students to develop fair play and social values by avoiding
violence and conflict in the volleyball game and by setting clear and relevant
instructions. He/she should provide the activities that help students to develop their
competence peacefully.Comprehensive sexuality education
The teacher provides volleyball activities and sets instructions that prevent sexual
harassment or any kind of gender-based violence like sexual abuse and physical
contacts oriented to the sexuality intention.Genocide studies
While conducting volleyball exercises a teacher should take a time to explain
student show sports should be used to fight against Genocide ideology and how to
prevent it. For example, to organize Genocide memorial tournaments at school and
give the message related to the Genocide.3.4. Guidance on introductory activity
Before introducing the lesson one of this unit, you must introduce the whole unit.
The teacher as a guide, facilitator and expert, ask questions or give activity related
to volleyball tactics in order to help them to predict what to be learned in the whole
unit.

Lesson 1: Serving and reception tactics
a. Learning objectives
To master serving and reception tactics in volleyball.b. Teaching resources
– Volleyball court
– Net
– Stopwatch/watch
– Antenna
– Whistle
– Ballsc. Prerequisites/Revision/Introduction:
Students of senior five will perform better serving and reception tactics in they have
mastered the techniques of reception and serving learned in Ordinary Level and
Senior four.d. Learning activities
Opening discussions
– Ask the students to brainstorm the correct techniques of making good service
and a good reception.
– Let students present their finding and introduce the new lesson.
– Invite students to start warm up exercises.Warm up exercises
• Let students perform general warm up exercises and specific warm up and
stretch their muscles properly. Let students use the following exercises:
– High knees exercises.
– High knees laterally exercises.
– Toes in, toes out exercises.
– Volleyball shuffles exercises.
– High skips exercises.
e. Lesson body Service tactics
Explain students that to choose the type of service depend on the difficult of that
pass in order to be received or passed by the opponent. State types of services used
in volleyball, demonstrate how to perform them and let students apply individually.• Tactics of floater service
Tell students that to perform a good floater service tactically they do the following:
– To make contact in front of their body with their hand by hitting behind the
middle of the ball.
– The arm follows through but only partway.
– By hitting directly behind the ball, ensure that there is no spin.
Request them to respect the following steps for floater serve:• Starting position
– Hold the ball in your left palm if you are right handed or right palm if you are
left handed.
– Find the air hole in your ball and place the air hole down on your palm (due
to air hole is the heaviest part of the ball keeping it at the bottom enables the
ability of the ball to float).
• Ball contact phase Remind students to:
– Lock the wrist upon contact.
– Stay tall with limited back bend until the ball is contacted with the open palm.
– You need to hit the ball with a pop (Just a quick and firm contact on the middle
of the ball will send it over with no spin and if it catches some air the entire
better to float with).
– Have the hitting arm straight and stay high upon to finish.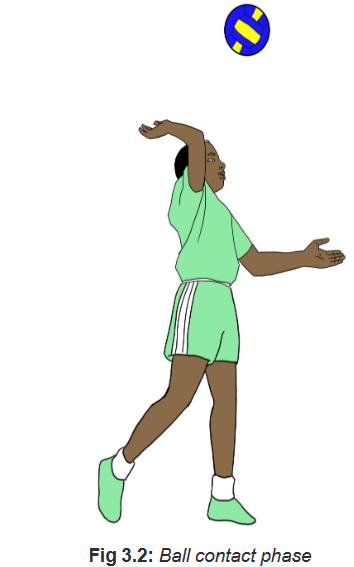
• Topspin
Tell students that to perform a good topspin serve tactically they do the following:
– Take a position for serving.
– To toss the ball a little higher comparing to the tossing while serving the
– floater serve.
– To step under the toss and strike the ball underneath toward the top of the
back in a down and outward motion.
– To keep their arms following all the way through with a wrist snap. The arm
follows all the way through with a wrist snap.• Jump serve
– Ask students to take any distance behind the service line.
– Tell them to place the ball in left hand for right handed and right hand for left
handed.
– Request them to toss the ball higher in front of them.
– Ask them to accomplish attack approaches: left right left for right handed,
right-left-right for light handed.
– Ask them to swing both arms behind them and then forward and up while
stepping forward with the left foot for right handed or right foot for left handed
and make a quick hop.
– Request them to jump up and forward behind the service line and contact the
ball at the top of your reach.
– Remind them to strike the ball with their palm and follow through with their
arm swing by aiming outward and downward to put topspin on the ball.How to choose tactical direction in the opposing court to orient the serve?
Tell students that other tactics in serving are:
– To orient the serve in strategic directions hence all serves that because the
setter to move are the best.
– To serve in the front zone of the opponent court. The front zones (2, 3, 4)if you
see that the setters are closer to the 3m line than the end line, it is better to
serve a fast, flat and deep ball at the shoulders of setters to forcethem to move
backward while passing their teammates.Remind student that a good service is which one that can cause the setters to be
unstable and force them to move or to pass the ball in a not desired side.
• Reception tactics in volleyball
– The teacher explains to the students the role of receiving the ball in volleyball.
– Tell the students that in volleyball all players need to be habilitated with the
skills or receiving the ball.
– Explain to the students the role of the specialist in defence(reception) used inNote that:
The libero is a player specialized in defensive skills: The libero must wear a
contrasting jersey colour from their teammates and cannot block or attack the ball
when it is entirely above net height. When the ball is not in play, the libero can
replace any back-row player, without prior notice to the officials. One of the tactics of
having good receptions is to use the libero player.
• For reception
Teacher reminds student that:
– The positions in reception will depend on the setters’ positions near the net,
the width of service area, and the ability and speciality of the server.• Sideways position of reception
Teacher reminds students that:
– In sideways service reception, direction is decided by the positions of setters
near the net. The ball could be sent in correct direction if the ball returns
automatically to the setter’s direction without twisting body or arms ball is sent
in the wrong direction if the ball is not sent to setter.
Let two students move sideways crossing each other according to the setter’s
position as shown in the picture above.• Conditions concerning the width of the service reception area
In reception tactics, the students are taught to keep their positions within the
imaginary lines extending from the server to the back corners of the court. This
exercise will help students to know how to protect the whole court and avoiding
surprises of the ball falling down in their court.• Height of service reception area by the player
In teaching reception tactics, the teacher tells the front line player that they should not
receive a ball served above the shoulder height in standing position; the back line
player should receive such a ball. During the teaching exercises, the teacher must
see that the students are conscientious with this principle.
• Service receiver position considering ability and speciality of the server
In teaching the tactics of reception in volleyball, the teacher must explain that
anticipation in volleyball is a fundamental skill. Thus, tell the students that special
characteristics of different balls will dictate the proper position to take for easier
reception. The students must know the proper position to take for easier reception
from deep, fast or slow balls.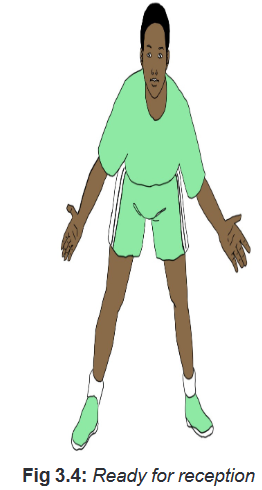
• Deep service
Tell students that for a deep serve correct positions in reception help to receive
the ball easily. This will help to avoid the ball that can surprise you to drop and fall
down in your court and making a point for the opponent. For demonstration and
application, see the image below.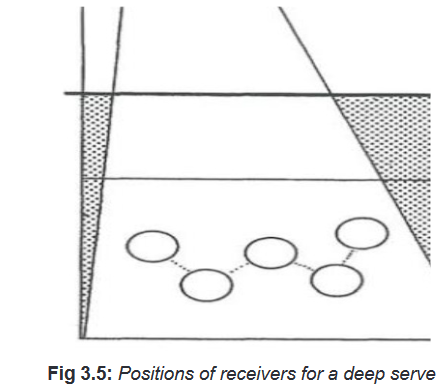
• Short or long low slow service
In receiving a short or long low slow service in volleyball; tell the students that
the correct positions to take in defence is to keep the distance between front and
back lines and stand far from each other. For demonstration and application, see the
image below.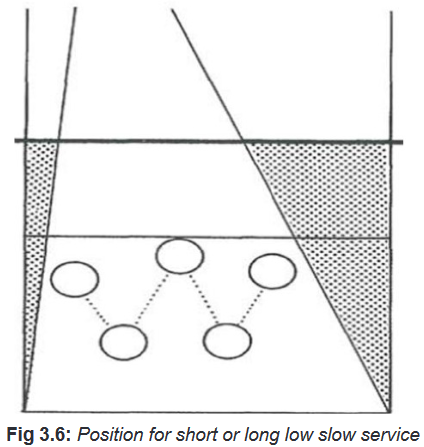
Typical examples of in service-reception formations
• System of W formation
Explain students that in W formations the players take the W formation in the court
using five players in reception. One setter in front line stays near the net for set-ups.
The W serve-receive system helps to introduce three attacker systems always
after service and attack reception. It is the general formation for reception and for
preparation of quick attacks just after the service reception. For demonstration and
application, see the image below.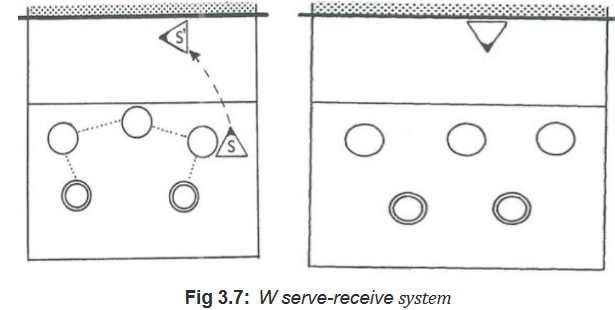
• System of M formation
Explain students that in M serve-receive system of reception, one receiver stays
near the net for in case service reception mistakes. This system is used to receive
for short and soft serves (M roof formation) as well as for hard and strong serves
(M dish formation). The receiver’s direction of movement should be decided by
the position of the team’s setter. For demonstration and application, see the image
below.
• M roof formation for short and soft serves
The final variation of M formation is the dish formation used to receive the balls from
hard and strong servers. For demonstration and application, see the image below.
– Put the students in two groups (A&B) of servers and receivers.
– The group of receivers chooses a setter.
– The group of the students on service will stand in a line behind the serving
zone and will execute their serves one after another.
– The students composing the group of the receivers must stand in a formation
of reception of the ball and be read to receive and make an attack after serve-
reception.
– The teacher tells the time to change the types of serves to the group of servers
so they may use various types of serves (jump serve, floater, topspin, severing
side-lines, serving in the middle of the court, deep serve, short serves)
– The student in reception must make a good pass to the setter and the setter
sets to the hitter in proper position to hit the ball over the net.
– If the ball goes down into the court, the team of receiver is awarded a point.
– If the ball goes out or if the reception is inaccurate, the point is awarded
to the group of servers. The total number of points to be scored to win the
competition is 10 points and then the groups switch the roles.Variations:
– Ask the students composing the serving group to change the type of the serve.
– Ask the students of the group receiving the ball to adjust their formation
(system of reception according to the types of serve. Help them to be in good
positions.Progression
– Both the groups play like in a game situation where they will be asked to
serve-receive and attack.
– See how the students receive the ball from a strong attack. Help them to be
in good positions if they fail.
– Always emphasize the correct positions and the correct tactics in receptionCool down exercises
– Let students do light exercises and stretch their muscles by insisting on most
used parts.
– Guide students while stretching their muscles systematically.Closing discussions
• Reflect
– Which is the best formation in receiving a jump serve/front line serve and why?
– What do we need to take care of in receiving the ball from the opponent
serve?
• Connect
– What are the techniques do you need in order to be a good receiver/good
server?
– What are the learned techniques in previous years do you need to perform
effective reception in volleyball?• Apply
– What importance of learning tactics of reception in volleyball?
– What importance of learning tactics of serving and attacking in volleyball?Lesson 2: Setting and spiking tactics used in volleyball
a. Learning objectives
The students of senior five will master setting and spiking tactics in volleyball.b. Teaching resources
– Volleyball court
– Net
– Stopwatch/watch
– Antenna
– Whistle
– Ballsc. Prerequisites/Revision/Introduction:
Students of senior five will perform better setting and spiking tactics in volleyball if
they have mastered the techniques of setting and spiking.d. Learning activities
Opening discussions
– Ask the students to brainstorm the correct techniques of setting and spiking
in volleyball.
– Ask the students if they know the tactics of winning a volleyball match.
If yes, ask them to list some.
– Introduce the new lesson.
– Invite students to start warm up exercises.Warm up exercises
– Let students perform general warm up exercises and specific warm up based
on the most body’s parts to be used while performing setting and spiking
tactics and stretch their muscles properly.
– Help them to do some of the following exercises: high knees exercises,
volleyball shuffles, jumping exercises, and arms swing exercises.
e. Lesson body
A. Setting tactics in volleyball
– Explain students that the set is an overhead pass used to change the direction
of the dig and put the ball in a good position for the spike.
– Tell students that type and the quality of the set will depend on the quality or
receptions and the quality of the receptions will depend also on the types of
attacks from the opponents. The setter must have different tactics to set every
ball from the reception.Types of setting in volleyball game
Explain students that there are different types of setting in volleyball including
the following:
– Four: a set that goes high to the outside hitter.
– Two: a set in the middle of the court at net, usually to the middle hitter.
– One: a quick set to the middle player.
– Three: quick set half way between the outside and middle player.
– Five set: back set to the right side hitter.
– Ten (setting the pipe): a set that is set to a back row attacker. The ball is set
to be attacked near the 3-metre attack line.Let students apply it individually/pairs/groups on the volleyball court
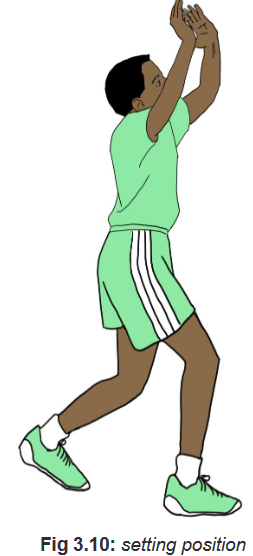
B. Spiking tactics in volleyball
– Explain the students that spiking is when the ball is hit or smashed over the net.
– Tell them that there are different tactical spikes used in volleyball game such
as:
– Hard driven: is a hard hit ball that travels forcefully down towards the
opponent’s court.
– Off speed: is a controlled spike ball placed in an open area of the court.
– Standing spike (down ball): is attacking a ball from a standing position.
– Open hand tip: action of directing the ball with the fingers when attacking
– in the volleyball game.
– Wipe-off attack: is the action of hitting the ball aiming the outside arm of
the blocker in order to have the ball deflected outside the court. Short height
attackers against tall blockers mainly use this tactic.Let students apply it individually/pairs/groups on the volleyball court.
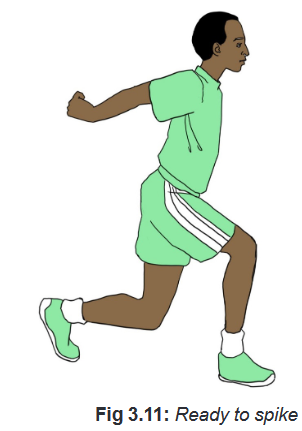
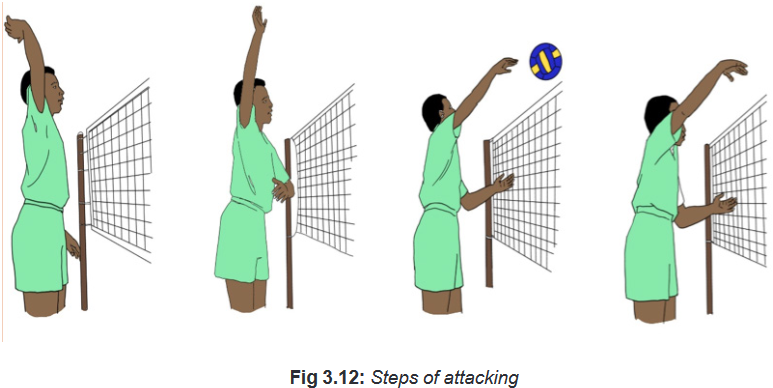
Offensive tactical plays for a setter and for a hitter
Tell students that offensive tactical plays for a setter and for a hitter are as follow:
– Outside shoot: a quick set to the outside hitter.
– 32: is set half way between the outside and middle. The height of the set is
about the same as a two ball.
– Flare: when an attacker uses an inside-out path to attack an outside set.
– Isolation play: a play designed to use an attacker as a distraction to draw
in opposing blockers. This can give a teammate a chance to attack against a
single blocker.Let students apply it individually/pairs/groups on the volleyball court.
Combination plays
Explain students that different combination plays should be used in volleyball game.
Some of them are:
– Tandem: when one player follows behind the other when attacking. Especially
done when the outside hitter approach behind or right next tothe middle hitter.
– Double quick: when two hitters approach to hit quick sets. A middle hitter
approach to hit a front one and a right side hitter approach to hit a back a back
one.
– X play (cross): when hitters approach to hit crossing one another’s paths. A
middle approaching to hit a front one and the right side player coming around
to hit a front two.Let students apply it individually/pairs/groups on the volleyball court.
APPLICATION ACTIVITY 1
Put the students in two groups (A & B) of equal number, each group of students
stands in line on its own court. The first group on the left side while the other one
stands on the right side of the other part of the court. The students stand behind the
serving zone and do the service one after another. The students in the front lines
for both the sides hold the ball. After the serve, the student goes to recuperate the
ball and stand last in the opposite group.Variation of activity
– The teacher tells the time to change the type of the serve.
– The teacher adds a group of the student in reception.APPLICATION ACTIVITY 2
Put the students in two groups (A & B) of equal number, each group of students
stands in line on its own court. The first group on the left side while the other one
stands on the right side of the other part of the court. Each group chose a setter and
the setter stands near the net. The students in the front of the line hold the balls.
The student in front throws the ball to the setter, who in return makes a set to be
hit by the thrower of the ball. After the attack, the student goes to recuperate the ball
and stands behind in line on the opposite court. The students will do the exercises
in this way one after another for the two groups.Variation of the activity
The setter will use in progressive way different sets as follows: one, two, three, four
and ten. The teacher tells the time to change the type of sets.
After every student has practice, switch the sides and the setters.APPLICATION ACTIVITY 3
In the same group and the same sequences of events as in activity 1, the students
will practice different spiking tactics. The teacher tells the time to change the type of
spiking according to the students’ progress. In activity number, two choose a group
of blockers at each side to help to apply tactics like a tandem, a double quick, a
line attack etc.Variation of the activity
Add a group of blocker to disturb attackers. Starts the ball with the setter, the setter
tosses the ball from his/her hands to the student in front line who passes the ball
back to the setter (with a good reception) The setter then sets the ball while the
passer moves to hitting position.
Variation for activities 2 and 3
Chose three students for each group: the setter, the passer and
the other one to recuperate the balls. The student in charge of
recuperation of the ball recuperates it and the students rotate,
the passer, hitter, taking the setter’s position, the setter going
in recuperation of the ball, and the student in recuperation
of the ball rotating to the pass-hit position. The rotation con-
tinues for five minutes before switching sides, to work on the
right side of the court (Group A switch the side with group B).Cool down exercises
- Let students do light exercises and stretch their muscles
by insisting on most used parts.
- Randomly, one of students leads cool down exercises.
- Guide students while stretching their muscles systematically.Closing discussions
• Reflect
- Which challenges did you face during the execution of different
setting/
spiking tactics?
- What went well during the workout?
- What to correct in next sessions?• Connect
- What are the techniques do you need to make good sets?
- What are the techniques do you need to perform effective spikes?• Apply
- What is the importance of learning tactics of setting and spiking
in volleyball?
Lesson 3: Tactics of attacking the ball in volleyball
a. Learning objectives
The students of senior five will master the tactics of attacking the ball in volleyball.b. Teaching resources
– Volleyball court
– Stopwatch/watch
– Whistle
– Net
– Antenna
– Ballsc. Prerequisites/Revision/Introduction:
Students of senior five will perform better tactics of attacking the ball in volleyball if
they have mastered the techniques of attacking the ball learned in Ordinary Level
and Senior Four.Learning activities Opening discussions
– Ask the students to brainstorm the correct techniques of attacking the ball in
volleyball.
– Introduce the new lesson.
– Invite students to start warm up exercises.Warm up exercises
Let students perform general warm up exercises and specific warm up based on the
most body’s parts to be used while performing tactics of reception ing volleyball and
stretch their muscles properly.Help students to use some of the following exercises: high knees exercises, volleyball
shuffles, jumping exercises, arms swing exercises, bending knees exercises,
crossover, forward and backward movement exercises.d. Lesson body
Tell students that tactics in attack vary from the attacking angle, the hitting force and
the direction of the shot. Briefly describe types of attack and demonstrate or used a
skilled students and let students apply it individually.The following ways should be used while attacking in volleyball:
– Back row attack hit: when the row player attacks the ball by jumping from
beyond the attack line.
– Cross-court shot: An individual attack directed across the net at an angle
from one side to the other side. E.g.: from the left side to the right side and vice
versa.– Line shot: when the ball is attacked down on an opponent’s side-line. The ball
is usually hit down the line just outside the outside blocker or over the top of
the outside blocker.
– Off-speed hit/ tip ball attack (soft spike): The ball is spiked with less force.
It helps to place the ball where you want and/or keep the ball in play.
– A cut shot: a spike that is hit from the hitter’s strong side and travels at a
sharp angle across the net. A cut shot is like a cross-court hit except that the
ball is hit at a much sharper angle. Cut shots are also a much softer hit ball.Remind students the steps of attack in volleyball as follow:
• Step one the approach:
To position their body in the air ready to hit.
• Step two the take-off phase:
To use energy that is more elastic they can utilize for exploding high especially for
the last two steps of approach.
• Step three the mid-air contact:
To get positioned with their arm stretched upward then contact the ball at your highest
point in the jump.
• Step four the landing:
Cushion their landing by landing on the balls of their feet with their knees bent.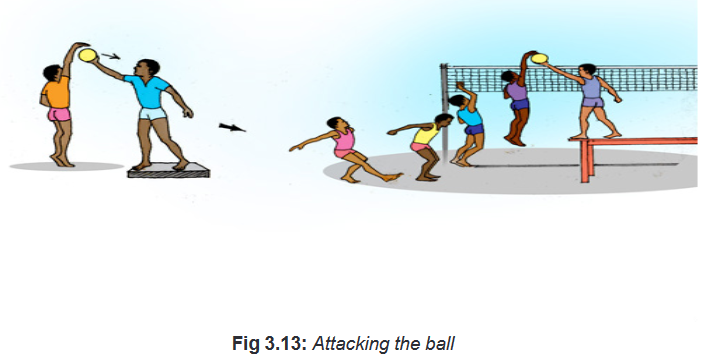
APPLICATION ACTIVITY
Form groups of six students. Let two groups play the normal volleyball
game. Request them to use attack tactics learned. Change groups after 5
minutes of playing. The winner is the team, which finish 5 min with high scoreCool down exercises
– Let students do light exercises and stretch their muscles by insisting on most
used parts.
– Guide students while stretching their muscles systematically.Closing discussions
• Reflect
– Which challenges did you face during the execution of the attack?
– Explain different steps used while performing an attack in volleyball.• Connect
– What are the learned techniques in previous years do you need to be good at
attacking in volleyball?• Apply
– What importance of learning tactics of attacking in volleyball?Lesson 4: Tactics of digging and blocking
a. Learning objectives
After this lesson, the students of senior five will master tactics of digging and blocking
in volleyball.b. Teaching resources
– Volleyball court
– Net
– Stopwatch/Watch
– Antenna
– Whistle
– Ballsc. Prerequisites/Revision/Introduction
Students of senior five will learn better tactics of digging and blocking in volleyball if
they have mastered the techniques of digging and blocking the ball in volleyball.d. Learning activities
Opening discussions
– Ask the students to recall techniques of blocking in volleyball as they have
learned in year one.
– Introduce the lesson of the day.
– Invite students to start warm up exercises.Warm up exercises
– Let students perform general warm up exercises and specific warm up based
on the most body’s parts to be used while performing techniques and stretch
their muscles properly.e. Lesson body
• Digging in volleyball
Explain students that during defending the opponent’s attack, digging is one of the
defensive tactics to use when the block has failed to stop strong spikes. Demonstrate
how to apply it and let students perform digging during game situation.Tell students that executing digging tactic follows the following steps:
Step 1: Set up around the block.
Step 2: Read the hitter.
Step 3: Dig to the target.Remind students that while executing digging:
– Teammates usually decide ahead of time how they are going to defend a
hitter.
– The blockers need to communicate with the defense about who is blockingwhat
( line or angle) and where on the court the defense is going to be positioned.
Tell students that there are several ways to get the ball through digging such as:
– Sprinting
– Sprawling
– Jumping
– Taking quick steps
– Falling
– Rolling
– Diving
– Falling• Pancake tactic
A pancake tactic is especially used when a defensive player wishes to play the
ball, which is falling to the floor but is far away.Remind students to respect the following while performing pancake:
– Take a few steps and dive as far as you can through the air.
– Slide your hand firmly on the ground.Requirement for pancake
Tell students that to perform a good pancake they should do the following:
– Anticipate and move to the ball.– Get their forearms under the ball.
– Lean into the ball as they make contact.
– Dig the ball at the midline of their body if you can.
– Extend their arms in the direction of the target if they have to reach outside
their body.• Blocking tactics in volleyball
– Teach the students different tactics used in effective blocking in volleyball.
– Demonstrate and let students apply about footwork of better preparation
while blockingRemind them that anticipation is always a great skill to develop in volleyball, more
over in blocking.
– Explain different types of sets and different tactics of block to apply
against such sets.
– Identify different sets and then after d e m o n s t r a t e s t u d e n t s effective
blocking tactics to apply against them.
– For each set, a blocker needs to understand that the hitter is likely going to hitwhere the set takes them and then anticipate where to put a block.
Each set presents different challenges and opportunities to both the attacker and
the blocker. As a blocker, if you are able to recognize the set, combined with your
knowledge about the attacker you will be better prepared to block.
– For example, when the set is more inside, the hitter is more likely to hit
cross court angle. If the set is pushed way outside, the hitter tends to hit more
down the line. If the hitter is in trouble, watch out for the tip.A ball set off the net will be attacked differently than a ball set tight. For example, a
hard hit ball coming from off the net will go deeper.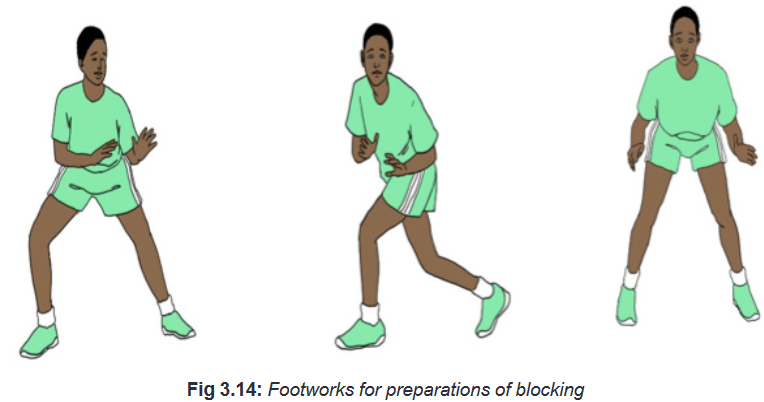
While teaching blocking in volleyball emphasize the following points:
– The better a blocker is at reading the play; the more efficient the team can
respond and attack.
– Remember the positioning of the block informs the positioning of the
defence/cover players.Explain to the students that preparation of the block in volleyball require the following
steps:Step 1: Preparing to Block
– Teach anticipation as it is the key for a successful block. This is done by
teaching them to scan the court and find the front row attackers.Tell the students that to prepare effective block they need to:
• Call out the hitters: For example, 6 outside, 3 middle, and 5 opposite and
guess who the hitters are before the serve.
• Call out the setter: Is the setter front row or back row? It is important to know
if the setter is front row because if she is, you may have to help with blocking
her.
Step 2: Penetrating the Net (blocking is counter attacking)
The students must be taught that to be successful in blocking in volleyball, they had
better learn to penetrate above the net into the opponent’s space. Penetrating the
net is considered the most important part to blocking.Step 3: Blocking tactics
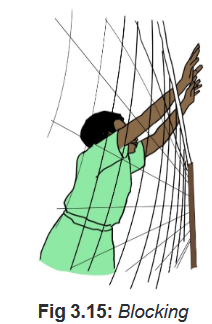
After teaching anticipation and penetration, the teacher needs to teach proper
tactics of blocking against different hitters. Some guidelines are given below (you
may enrich them by doing your own research).
• Blocking tactic 1: Front the hitter
Most people will hit the ball in the direction it takes them. Front the Hitter means get
in front of the hitter in the direction the hitter is facing. The blocker could focus on
lining up with the outside hand on the ball.• Blocking tactic 2: Give and take-away shots
Blockers need to be skilled at giving and taking away shots. If a player is known to
have a great line hit, the blockers can take-away line. Every team needs to have a
block and defence strategy.• Blocking tactic 3: Knowing blocking strategy and hide it
If the strategy is to block line, do not show it early. Wait and block line late.Remind your students that:
– They do not want to give away their team strategy.
– If they wait and show the block late, their opponent will often make a mistake
and play right into their hands.
– Having a strategy for blocking in volleyball does not guarantee that they will
win, but it can help their team by having a plan of what to do.• Blocking tactic 4: Read and anticipate the opponent
Most setters have a setting technique that is consistent. For example, many setters
take the ball more out in front of their body when they set outside versus setting
back. Watching for cues like these will help you to get a read on where the ball will
be set. This is important because the better you are at reading the setter, the easier
it will be to get in good position to block.• Blocking tactic 5: Tips for blocking middle
Your first responsibility as a middle blocker is to find the middle hitter and know
what they are doing. Once you have identified what play the middle is likely running,
look at the setter and try to figure out what they are doing.For clues, watch the setter’s hands. Look at hand position and where the ball is
going to contact the hands.
– If the setter is positioned more behind the ball, look for an outside set.
– If the position is more neutral, watch for middle or back.
– If the setter drops an arm, watch for the dump.This all happens fast. You do not want tunnel vision. You want be able to see both
the hitter and setter. Watch, anticipate and react. Once the ball has left the setters
hands, you do not need to watch the ball anymore.
• Blocking tactic 6: The hitter goes where the ball goes.
Teach the students to recognize where the ball is set and to watch the hitter by:
– Watching the pass.
– Watching where the ball goes.
– Finding the setter.
– Finding the middle and figure out what pattern they are running.
– Finding the setter again.
– Finding the hitter after the ball is released from the setter.
– Choose the group of hitters and setters and the group of the students to dig
the balls from the hitters.
– Make sure the hitters have accurate hit in the way you want.
– Use the two sides of the court and for each side must have a ball feeder to
avoid wastage of the time.
– Put the students in-group of digging and after a while switch the roles.Progress
– Place the hitters on a stand to increase the accuracy of the balls.
Teaching points to observe
– Learning to dig the ball in front of their body.
– Learning to dig the ball on the side of their body.
– Learning to dig the ball above their head (overhead dig).
– Learning to dig extremely hard driven ball.
– Learning to defend a tip/roll shot.
– Learning to roll/learning to dive.
– Organize the students in two groups (A & B)
– The hitters and the setter compose group 1 and the other group will be
composed of blockers.
– Two students, the hitter and the setter compose the group of hitters.
– Other students queue in line so as to that they may have the place to play
one after another.
– The students tosses the ball to the setter who set the ball in a position
indicated by the teacher.
– The blockers have to block according to the instructions given by the teacher
– After 5 minutes, the groups switch the roles.
Progression
– Start with a single block until to a block of three blockers.
– Start with small spikes to strong spikes.
– Changes the types of spikes and the hitting angles.
– You may choose to use the hitter placed on a stand in order to be able to hit
the ball easier and in the way, you want it to be.Teaching points to focus on
– The timing and the decision making ability.
– The footwork and the agility.
– Use a game situation and let the students apply correc tactics of digging and
correct tactics of blocking.Cool down exercises
– Let students do light exercises and stretch their group of muscles by insisting
on most used parts.
– Guide students while stretching their muscles systematically.Closing discussions
• Reflect
– What are the different ways of doing a dig in volleyball?
– What is needed for effective block in volleyball?
– There are different blocking tactics in volleyball according to where the ball
is set; what are they?• Connect
– What are the techniques do you need to be good at digging?
– What are the learned techniques in previous years do you need to be good at
blocking in volleyball?• Apply
– What importance of learning tactics of digging and blocking in volleyball?3.6. Summary of the unit
Serving and attacking tactics in volleyball• Types of services
Serving is one of many ways you can make points if it is done tactically. In general,
a good serve one that is complicated to pass or to receive. In addition, a tactical
serve is that one which causes the setter to move and put him/her in uncomfortable
position to set.
• Jump serve
The jump serve is more advanced and utilizes an even higher toss that should be
several high in front of the server. It uses more of an attack approach, jumping and
striking the ball with the heel of the hand while in the air. With this serve, the wrist
remains firm, then you hold (stop) your palm in position facing the target.
The extra motion of jumping allows putting even more power on the ball, making
this cause a serve to be difficult to handle. The drawback is that all that extra motion
can lead to a higher incidence of serving errors. Most jumps serve have topspin on
them, but it is possible to jump and serve a floater.• Floater serve
It does not spin at all. It is referred to as a floater because it moves in extremely
unpredictable ways. This makes this service to be difficult in reception and passing.
A floater serve catches the air and can move unexpectedly to the right or left, or
dropping suddenly.• Topspin
It has a much more predictable movement than the other types of serves. It is
very difficult to handle due to it quick speed generated by topspin serve.Effective attacking in volleyball requires some tactical actions like to be quick inattack
(tempo), to orient the ball in a strategic area on the opponent court and to use
different types of attack according to the set and the opponent defence.• Setting and spiking tactics in volleyball
Setting and spiking are two techniques, which are interdependent as a good set
makes a good spike. There are different types of sets to use as tactics of winning the
match according to the opponent’s defence and the teammates’ skills to hit the ball.
A good set also depends on the quality of the reception and sometimes reception
can influence the decision of the direction of the set.• Tactics of reception of the ball
For effective receptions, the students should be able to apply tactical formations in
defence according to the type of serve. Another important tactic in reception is to
use the libero player who is a specialist in defence.• Tactics of digging and blocking in volleyball
Digging and blocking are both tactics of defence, which require the ability to
read and interpret accurately the opponent’s actions especially the setter position
and the probable setting direction.3.7. Additional information to the teachers
Advantages and disadvantages of volleyball formations used in volleyball
In volleyball, teams must have their players in a specific formation. The players
then rotate around the court clockwise whenever the team performs a side-out.
There is a penalty for being out of rotation and the opposing team receives a point.
There are three formations that are widely used in the court, each having advantages
and disadvantages.4-2 formation
This offense takes its name from the fact that it uses four attackers and two setters.
This is a basic formation generally used by less experienced teams to avoid
confusion on the court. At any given time, one of the setters is in front row and the
other is back row.They are always opposite of each other on the court. This allows for two attackers
5-1 Formation
front row at any given time, and the setter is able to dump the ball, as the setter will
always be in the front court. This basic offensive formation allowsfor any of the basic
sets to be run, as well as a 32, shoot, or possibly a tandem. Teams that use a 4-2
will rarely set anything other than the basic sets.
– The positive aspects of the 4-2 include its simplicity, so a team can gain
experience and later move on to a more complicated formation.
– The negative aspect of using a 4-2 is its limits regarding your offense. Some
think that having two setters’ takes away from your team as the setter is
generally the team leader. Some coaches opt to start their team out running a
more complicated system and just having the players adopt it.
A 5-1 takes its name from using one setter and having five attackers on the court.
The secondary setter is replaced by an opposite hitter who is always opposite the
setter on the court. This formation allows the setter to be able to dump the ball for
half the rotations and have three front row attackers to set the ball to on the other
three rotations. This system allows the setter to set any possible set he or she
wants to depending on whether he or she is front row or back row. Many coaches
prefer this system, having one setter as the team leader.– Positive aspect of this formation is to help having only one setter sothat the setting does not change. One setter may set the ball differently from
another giving a different feel for the attackers. It helps when the attackers
are used to one setter in particular.
– The negative aspect of this offense are that the setter needs to transition from
defence to set the ball. This creates situations where the setter has the first
contact and someone else has to set the ball.6-2 FormationA 6-2 is similar to a 4-2, but has six attackers and two setters. This is possible by
having the back row setter always set the ball, making the setter only a hitter when he
or she is front row. This formation allows any possible set to be made not including
a dump by the setter because he or she is always back row when setting the ball.
– It is good for a team in which the setters are also very good attackers where
coach does not want to waste that talent.
– Unfortunately, this formation has the problems of 5-1 and 4-2. Having two
setters and always having one of them be back row. The setter always has
to transition from defence and the leadership is lacking. Most teams at
the highest-level team use the 5-1 rather than this for leadership purposes.Attack tempo (the speed of the attack).We distinguish three tempos in attack: tempo 1 (the fastest tempo), tempo 2 and
tempo 3. Thus, the effectiveness of the attack will depend not only on the type of an
attack but also on how fast is the player on the action. The strong attack must beassisted by being very quick in action.3.8. End unit assessmentGAME SITUATION
Organize a competition among the students and ask them to apply all the learned
tactics in a game situation. While the students are playing the game, the teacher
assesses if students are able to perform tactics of serving, passing, setting, spiking,
blocking and digging in volleyball.3. 9. Additional activities
3.9.1. Remedial activitiesIndividually and in groups, the students will revise the correct techniques of serving,
setting, digging, spiking and blocking.3.9.2. Consolidation activities
Individually or in groups, the students will perform the tactics of serving, passing,
setting, spiking, blocking and digging in volleyball.3.9.3. Extended activities
Encourages and facilitates students to form teams and participate in different
competitions of volleyball organized by the school, Sector, district, and National
federation in charge of sports in schools.UNIT 4: BASKETBALL
4.1. Key unit competence:
Perform basic basketball tactics.4.2. Prerequisite (knowledge, skills, attitudes and values)
Students of senior five will learn better basic tactics in basketball if theyhave mastered
fundamental volleyball techniques learned in previous years.4.3. Cross-cutting issues to be addressed
Gender
In teaching and learning process of basketball, the teacher must prepare and
provide physical activities that engage both girls and boys equally to exploit their
full potential and talents without any discrimination or prejudice.Inclusive education
The teacher as a facilitator he/she must consider different special education needs
and select basketball activities to adapt his teaching approaches to students. This
creates a positive attitude and helps all students to participate actively and develop
their competence levels.Financial education
The teacher should integrate Financial Education into his teaching/learning
activities by providing the local and no cost teaching material where is possible. He/
she must encourage students to make their own materials that can help them to
develop competences not only in sport at school but also in their life.Standardization culture
The teacher must choose and select the standardized materials to use in his/
her teaching/learning process of basketball. It is necessary to provide appropriate
materials required to the levels of students and help them to develop culture of
checking and using the quality of sport materials for the competitions before using
them in order to prevent injuries and other accident.
Environment and sustainability
The teacher should provide materials and deliver the lesson by encouraging
students to protect the environment and well use of materials. The teacher helps
them to develop the spirit of keeping safe the environment they use insports activities.Peace and values education
The teacher helps students to develop fair play and social values by avoiding
violence and conflict in the basketball game and by setting clear and relevant
instructions. He/she should provide the activities that help students to develop their
competence peacefully.Comprehensive sexuality education
The teacher provides basketball activities and sets instructions that prevent sexual
harassment or any kind of gender-based violence like sexual abuse and physical
contacts oriented to the sexuality intention.Genocide studies
While conducting basketball exercises a teacher should take a time to explain
student show sports should be used to fight against Genocide ideology and how to
prevent it. For example, to organize Genocide memorial tournaments at school and
give the message related to the Genocide.4.4. Guidance on introductory activity
Before introducing the lesson one of this unit, you must introduce the whole unit.
The teacher as a guide, facilitator and expert, ask questions or give activity related
to tactics used in Basketball in order to help them to predict what to be learned in
the whole unit

Lesson 1: Offensive tactics in basketball
a. Learning objectives
The students of senior five will master offensive tactics in basketball and be able to
apply them in game situations.b. Teaching resources
– Basketball court
– Balls
– Whistle
– Chasubles
– Ring and post
– Cones
– Watch/Stopwatchc. Prerequisites/Revision/Introduction:
Students of senior five will perform better exercises of offensive tactics in basketball
if they have mastered the basic techniques in basketball learned in senior four.d. Learning activities
Opening discussions
– Ask the students to brainstorm different techniques of playing basketball,
which can help in building offensive tactics in basketball.
– Introduce the topic of the day.
– Invite students to start warm up exercises.Warm up exercises
Let students perform general warm up exercises and specific warm up based
on the most body’s parts to be used in applying offensive tactics in basketball and
stretch their muscles properly. See below some useful exercises to use.
– Jogging and sprinting in the court.
– Lateral high knees.
– Skips
e. Lesson body
A. Offensive players’ positions and their tactics
Explain to the students that an offensive system will be built according to the
opponent system of defense and/or the level of play of the opponent. Aside from
this, positions and roles of players in offensive ways help a team tactically to win the
match. Those positions are as the follow:• Centre player
Centre performs the following actions while attacking:
– Run down the floor quickly to get in position for a quick lay-up if he/she
– are open.
– Stay near the basket while his/her team has the ball.
– Move in and out of the restricted area quickly to get open for the basketball and
a shot.
– Look for the open man to pass the ball to if he/she is well defended and do not
have a good open shot at the basket.
– Take the shot with one of the basic basketball shots he/she has practiced.
– Box out by placing his/her body between the basket and the defenderwhen
a teammate takes a shot at the basket.
– Move fast and grab balls bouncing off the rim or backboard when a
teammate misses a shot.• Offensive tactical play for the power forward
Power forward performs the following actions while attacking:
Rebounding Posting up Jump shot
• Offensive playing tactics for the small forward
Small forward performs the following actions while attacking
• Offensive tactics for the shooting guard
Shooting guard performs the following actions while attacking:
– Know where you are best.
– Simplify your shot.
– Get good at the opposite.
– Learn to score without dribbling.
– Master the mid-range.
– Learn how to read space.• Offensive tactics for the point guard
Point guard performs the following actions while attacking:
– He/she needs to have good court vision to create open shots for the receivers
as well as drive the ball down the court and initiate offensive plays.
– Need to have an excellent long-distance shooting, though it is not quite as
crucial as for shooting guards, some point guards take as many shots as
shooting guards.B. Counter attack or early offense (fast break)
Explain to the students that the main reason for early offense (counter attack) is to
advance the ball into the front court area and attack before the defense be able to
become organized into a disruptive force. In advancing the ball into the offensive
operating area quickly, it creates quick medium jump shots, or penetration lay-ups,
or kick out passes along with severe mismatches.TASK / ACTIVITY
There are many drills for counterattack tactics; the teacher will do his/ her own
research to add more on what has been given here. Let us have a great transition
drill that works on a game-like situation where there is a transition from 5 on 4 to 4
on 4.Description of the activity
Start with four students in defence and five students in offense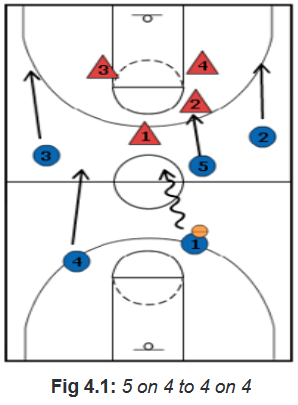
After a change of possession where the defines gets a stop or the offense scores,
the last offensive player steps off the floor to make it 4 on 4. In this situation, we will
say students 4 missed a shot.
– If the new offense scores or the new defense gets a stop, the offensive
students comes back on the floor to make it 5 on 4 again.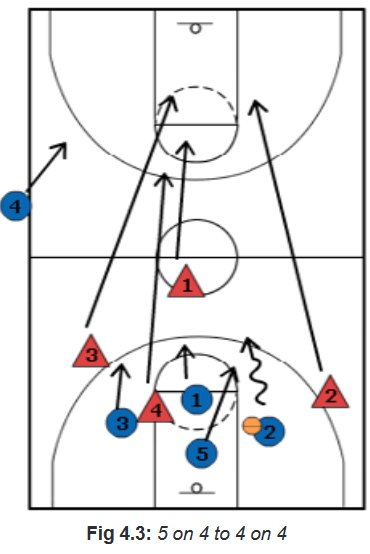
C. Screening to block a defensive player
Tell students that the key elements to set up a great basketball screen are as the
follow:
– Defender need to be in a difficult position by creating separation between
himself/herself and them before setting the screen. Doing so makes it difficult
for them to provide good help on the dribbler or the cutter.
– The angle is the most important part of an effective screen. Focus on setting
a screen on the best angle possible:
– When setting an on-ball screen, set the screen on the back hip of the on- ball
defender.
– When setting an off-ball screen, set the screen with your back facing the
direction you want your teammate to go.
– Players must make sure that they are making physical contact with the
opponent when setting a screen on them.
– If there is no contact, it is too easy for the defender to step around the screen
and quickly get back into good defensive position.
– The screen will never be effective if it is easy to knock the screener off
balance. Set the screen with their feet shoulder width apart, knees slightlybent,
and arms tucked in close to the body.
– The aim of the player setting the screen should be to hold their position until
the defender has managed to evade the screen.TASK / ACTIVITY
Description of the activity (Play 3 vs 2)
Players in offensive position must complete three passes before attempting a
screen. With the ball handler out on top with the ball, one teammate sets a screen
for the other teammate, who cuts around the screen and locks for a pass from the
ball handler. The ball handler can call out, the abbreviation PR means setting a pick
on the right side or PL means peak on the left or teammates moves on their own
without the call. Give the offense five possessions and give two points for each
successful screen and one point for each basket scored directly off screen. Reset
the play after a shot is taken, whether the ball goes in or not.Variation 1 (Easy)
– Play 3vs1
– Use defenders who are passive and moving at about half speed
Variation 2 (Difficult)
– Play 3vs3
– Use defenders who are active and play all out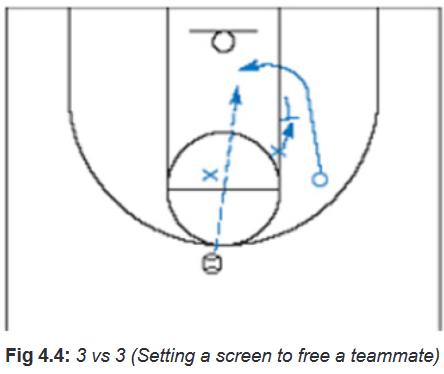
D. Motion offense
Explain students that motion offense is based on five key elements:
– Cutting: All players stay in constant motion. No standing.
– Passing: The ball has to move.
– Screening: Seek opportunities to free up teammates.
– Ball reversals: Force defences to make adjustments, which will create
driving, passing and shooting lanes.
– Shot selection: Players taking shots they can make rather than shots they
have to create.• Set offense in basketball or set play in basketball#
Tell students that set offense plays are most commonly run out of the following
special situations:
– After time outs.
– At the beginning of games (right after the tip off).
– At end of games.
– When you really need a basket.
– When your offense is stagnant.
– After your secondary break.
• Spread offense in basketball
The spread Offense is 3-2 no post, motion offense. Since all five players are
involved in the continuity, all players should be skilled passing and handling the
basketball. Although, only a couple of basic cuts take place, the key to its success
is the players being able to read and counter the defensive over plays.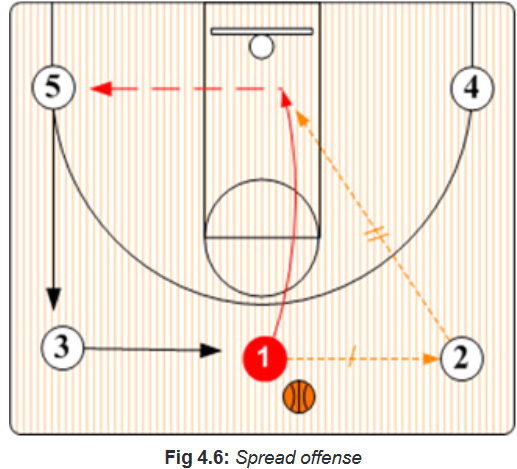
Different system for zone offense in basketball
Zone defenses create special problems for the offense. Plays and sets designed to
be successful against man-to-man coverage often run into problems against zones.
To beat zone defense successful, the tam must have a zone offensive.Two types of zone offense should be used:
Zone offense 1: This zone is used to beat a zone with a two-guard defensive front.
Zone offense 2: This zone is used to beat a zone with a one-guard defensive
front.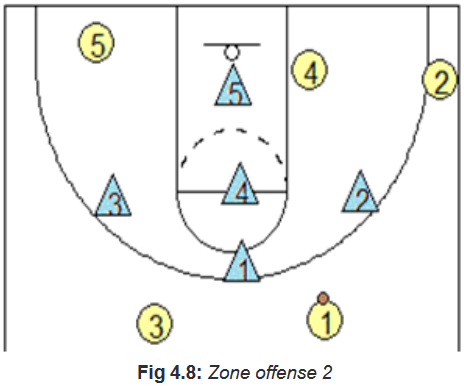
Some principles to consider while attacking zone defense by using zone
offence
– Analyses the zone: if you are playing with the team using zone defense, you
have to ask yourself the kind of zone set you are facing in order to set your
zone offence.
– Maintain good spacing: stretch the zone with a pass to a wing or corner, and
then skip to the opposite side.
– Attack the gaps, but avoid unnecessary dribbling: unnecessary dribbling
allows the defense time to adjust or reset. However, guards and wings should
look to dribble-penetrate the gaps in the zone and look to dish off inside.
– Screen the zone: Set screens against the zone, both inside and outside.
Players should make cuts into the open areas, and look to the weak-side.
– Full-court press on defense: This favours a “transition type”, wide-open,
up-tempo game. A slow-down, half-court game allows the zone defense to be
more effective.Note: there are many offensive formations, teacher as a researcher, you may
search other formations to use while performing practice on the court.Description of the activity
Put three students under the basket. The teacher shoots the ball up. All three
students work for position and go for the rebound.The student who gets the rebound
powers the ball back to the hoop while the other two are on defense and try to
stop him/her. No dribbling is permitted except for a one-bounce dribble adjust. The
offensive student should be thinking three-point play, the basket and a foul. This
drill not only stresses rebounding fundamentals and aggressiveness, but also power
offensive moves, as well as in the paint defense and shot blocking.Guidelines on the activity
Give the ball to the wing student. Have the first student in defensive line move over to
defend the wing student. Have the wing take a good shot (defense should let him/
her shoot the shot),Then as soon as the shot is released, the defender turns and
boxes the shooter out and gets the rebound (even if the shot is made). The shooter
tries to get the rebound (but no second shots are allowed, as this is mainly a box-
out drill).Variation of the activity 1
Make two lines of students; the shooting line on the wing and the defense, box-out
line at the free-throw line.Variation of the activity 2
In groups of five students for each one, let them play a normal basketball game in
5minutes by using offensive tactics learned. Changes groups after minutes.
Cool down exercises
– Let students do light exercises and stretch their group of muscles by insisting
on most used parts.
– Guide students while stretching their muscles systematically.
Closing discussions
• Reflect
– Which challenges did you face during the execution of different offensive
tactics?
– In your point of view what is the best offensive tactics to apply for a strong
defence?
– What went well during the workout?• Connect
– What are the techniques do you need in order to apply different offensive
tactics in basketball?• Apply
How are you going to use these tactics in your daily life?Lesson 2: Defensive tactics in basketball
a. Learning objectives
The students of senior five will master defensive tactics in basketball and be able to
apply them in game situations.b. Teaching resources
– Basketball court
– Balls
– Whistle
– Chasubles
– Ring and posts
– Cones
– Watch/chronometerc. Prerequisites/Revision/Introduction:
The students of senior five will learn defensive tactics in basketball if they have
mastered the basic techniques of basketball learned in senior four.d. Learning activities Opening discussions
– Ask the students to brainstorm different basic techniques of playing
basketball, which can help in building defensive tactics in basketball.
– Let them present their findings and add some clarifications where is
necessary.
– Introduce the topic of the day.
– Invite students to start warm up exercises.Warm up exercises
– Let students perform general warm up exercises and specific warm up based
on the most body’s parts to be used in applying defensive tactics used in
basketball. See below some useful exercises to use.
– Jogging and sprinting in the court.
– Lateral high knees.
– Skips.
– Jumping Jacks.
– Side shuffle: half court and back.
– Backward cycle: half court and back.e. Lesson body
Different tactics of defending in basketball• Man to man defence
The Man to man defense involves all five defensive players on the court being
allocated one opposition player who they are accountable for defending whenever
they are on defense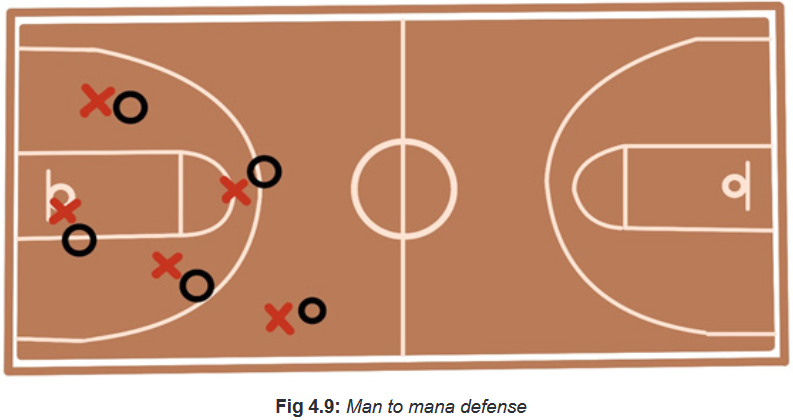
• Defending the opponent without the ball or off-ball defence
A strong defense should do more than guard the ball handler on the basketball court
should. You can limit an offense by guarding players without the ball. Being able to
put pressure on a ball handler can be crucial in shutting down anopponent’s offense
or coming up with a turnover.Techniques for defending an opponent that does not have the ball:
– Denial stance: the defender keep his/her back towards the ball and his/ her
chest is facing the person they are guarding. One arm is stretched out, with
thumb pointing toward the ground and the palm facing the ball, so that they
can deflect a pass. The defender should keep sight of both the person with
the ball and the person they are guarding.
– Open stance: the defender generally has their back to the basket and is
standing side on to both the player they are guarding and the player with the
ball.
– Hedge: is simply a fake by a defender. The defender fakes that they are
coming over to guard another player. This is typically done when an opponent
is dribbling, although it can also be used to pressure a post defender.• Zone defense
Zone defense is different from man to man defense because instead of guarding a
particular player, each zone defender is responsible for guarding an area of the floor
or “zone” and any offensive player that comes into that area. Zone defenders move
their position on the floor in relationship to where the ball moves. Zone defense is
often effective in stopping dribble penetration and one on one moves.• 2-3 zone defense formation


APPLICATION ACTIVITY
5 vs 5 with 2-3 (2-1-2) formation system.
Description of the game
Step 1: Divide learners students into groups of five. Put the learners students in
2-3 set defense zone and other team ready to attack the team in offensive position.
The two top two learners students will pinch towards the middle to stop dribble
penetration as seen in the image below: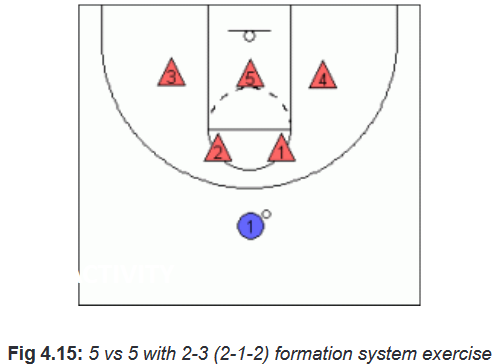
Step 2: The student 4 comes up to stop the outside shot and dribble penetration.
The student 1 hustles over the wing to guard the ball. The student 2 in front of the
high post. The student 5 slides over a couple steps at first to cover the student on
the low block.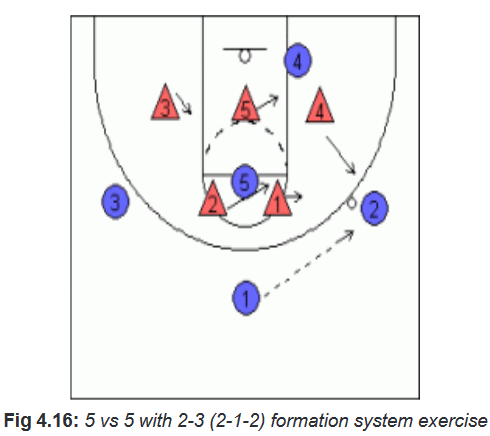
– If the student in the high post is hurting you, he/she will probably want to sink
down and deny the entry into the high post. He/she want to stay on the top
half of the student, so he/she can still rotate to cover the ball at the top of the
key.
– If the opponent is hurting from the 3-line point arc or the opposing student in the
high post is not a threat, you can have students 2 cheat towards the top of
the key. Generally, this will also enable him/herto create a few more turnovers
during the game.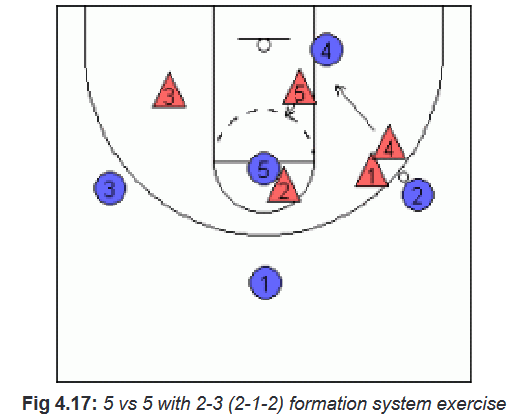
Variations to the exercises
– The pass is towards the corner.
– Entry into high post from the top of the key.
– Entry into the High Post from the Wing.
– Entry Pass into the Short Corner.
– Skip Pass - Top of the Key to the Corner.
– Skip Pass - Wing to Wing.Cool down exercises
– Let student students do light exercises and stretch their muscles by insisting
on most used parts.
– Guide students while stretching their muscles systematically.
Closing discussions
• Reflect
– Which challenges did you face during the execution of different offensive
tactics?
– In your point of view what is the best offensive tactics to apply for a strong
defense?• Connect
– What are the techniques do you need to apply different offensive tactics in
basketball?• Apply
– How are you going to use these tactics in your daily life?Lesson 3: Half court and full court pressing tactics in basketball
a. Learning objectives
To apply pressing tactics in half court and full court in game situations.b. Teaching resources
– Basketball court
– Balls
– Whistle
– Chasubles
– Ring and post
– Cones
– Watch/Stopwatchc. Prerequisites/Revision/Introduction
Students of senior five will perform better exercises of half court and full court in
basketball game situations if they have mastered the basic techniques and tactics
of playing basketball learned in senior four and in previous lessons.d. Learning activities
Opening discussions
– Ask the students to brainstorm different techniques and tactics of offensive and
defensive in basketball.
– Let students present their findings and assist them where clarifications
are needed.
– Introduce the topic of the day.
– Invite students to start warm up exercises.Warm up exercises
Let students perform general warm up exercises and specific warm up based on the
most body’s parts to be used in applying tactics in half court and full court in game
situations and stretch their muscles properly.
e. Lesson body Half court press
• X half-curt zone press
The X half court press is very versatile and valuable defensive tactics. It is a major
weapon to disrupt fast break attacks. It is very valuable in protecting hard-earned
leads late in a game. The X half court press can be used to get the ball out of a good
ball handler hands. Also, develop it as a change of pace or game tempo during the
game.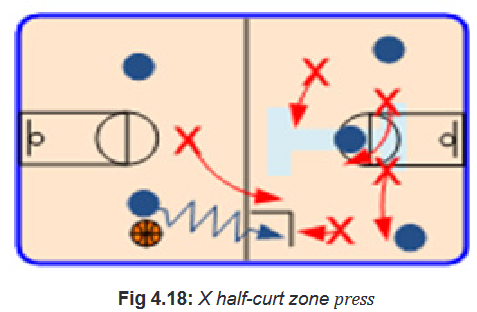
• SOS red half-court match-up press
They are disruptive that are used in short intervals to change tempo, create
easy baskets and disrupt half court; execution of an opponent has set offense.
Additionally, these mid court scenarios may be used to take the ball out of the
hands of a good penetrating point guard.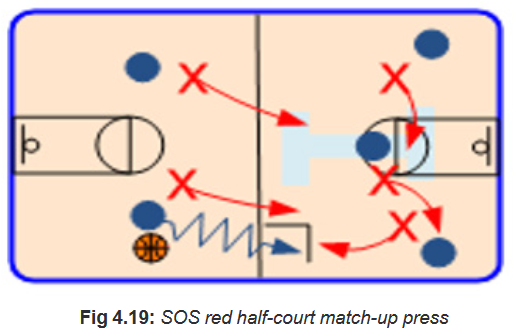
• Amoeba half-court press
This is a gambling zone in which that if run well help you to get some interceptions and
fast breaks. I had previously stated that, it probably would not be wise to structure
your team’s entire half-court defense based on the Amoeba. Rather, use it assomething disruptive, that you can throw in at various times in a game to confuse
the opponent, and force some turnovers.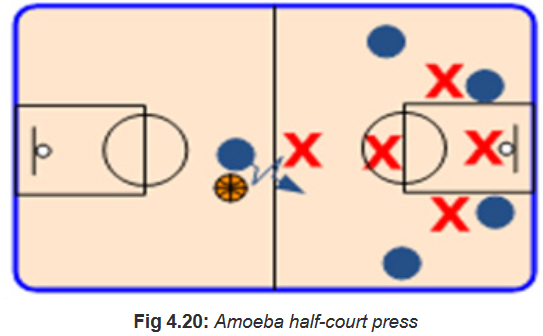
• Quarter court trap
When the opponent spreads the court and tries to hold the ball, the quarter court trap
becomes a variable defensive weapon. The Quarter Court trap is deployed out of
a 1-3-1 alignment that readily allows for trapping or double-teaming the ball in the
corners. It is an easy defense to teach and learn. However, when deployed at the
right time, it can create havoc and panic against any opponent who is not prepared
to attack.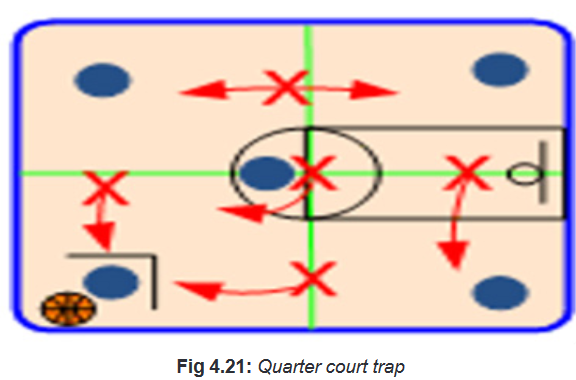
Full court press
The full-court press in basketball means putting pressure on the opponent for the
entire length of the court. This is instead of sprinting back to the halfway line and
setting up a half-court defense.• Types of full-court press
There are many different full-court presses. Depending on the team’s personnel
(strengths and weaknesses), some suit better than others.• Man-to-man press
A man-to-man press involves every defensive player guarding a direct opponent for
the entire length of the court.• Full-court man-to-man pressure
Involves every defensive player defending his or her direct opponent for the entire
length of the court.• Full-court run and jump defense
Involves every player starting with a direct opponent in regular man-on-man, except
there are several run and jump rules, which encourage trapping and switching,
which can disrupt the opponent.• Full-court zone press
There are many variations of a full-court zone press that teams can run depending
on the team’s personnel (strengths and weaknesses) and how team wants to play.
Each of them has their own strengths and weaknesses, but the right team can run
all of them effectively.Let us see the six of the most common variations of the full-court zone:
• 2-2-1 press
Involves two players across the free-throw line, two players near half-court, and
one player down back as safety.• 1-2-1-1 press
Involves one player at the front defending the inbounds pass, two players across the
free-throw line, one player just above the three-point line, and another player down
back as safety.• 1-3-1 press
Involves the front defender on the three-point line, three defenders across the
halfway line, and a safety at the back.• 3-1-1 press
Involves three players across the free-throw line, one player just in front of the
halfway line, and a safety at the back.• 1-2-2 press
Involves one player on the free-throw line, two players just before the halfway line,
and two players down back.
APPLICATION ACTIVITY
– Ask the students to form teams according to the resources available and the
specialties of each student.
– Students take defensive positions in the court (Man to man and/or zone
defenses tactics).
– Explain to each student the tactics you want him/her to apply according to his/
her position on the court.
– Change the defensive formation and tactics of defense when you realize the
student have made progress. Then adopt another formation and other tactics
of defense.
– Set offensive tactics and instructions for the other students who are in
offensive team in order to create desired challenges for the defending team.
– After every student has tried, switch the roles where it is possible.
– Guide (the teacher teacher), correct and teach the correct tactics and the
correct techniques.Cool down exercises
– Let students do light exercises and stretch their muscles by insisting on most
used parts
– Randomly, one of students leads cool down exercises.
– Guide students while stretching their muscles systematically.Closing discussions
• Reflect
– Which challenges did you face during the execution of different defensive
tactics in basketball?
– In your point of view what is the best defensive tactics to apply for a strong
offensive teams? Why?• Connect
– What are the techniques learned in previous years do you need to apply
different offensive tactics in basketball? Why?• Apply
– What is the importance of learning defensive tactics in basketball for
learners of senior five?
– How are you going to use these tactics in your daily life?
4.6. Unit summary
Offensive tactics
For a basketball team to be effective in offensive tactics the coach/trainer needs
to have skills to position well his/her players according to the personnel (strengths,
weaknesses) he/she has. Each position has the qualities the player must fulfill.
Hence, players in offensive tactics according to the specialties of each one can be
given different positions as follows: center player, power forward, small forward,
shooting guard, and point guard. In offensive tactics, the team can choose to apply
different offensive tactics according to its personnel, the target you have and the
defensive tactics of the opponent and or the level of the game. Different tactics used
involves counter attacks, motion offense, spread, offense and set offense.Defensive tactics
Basketball game is highly a very offensive sport; this shows how much we need to
have strong defensive tactics if we need to win the game.
Depending to the opponent tactics of offense, the personnel (strengths and
weaknesses), the target you have and the level of the game there are different
options in defense. A team has options to choose man-to-man defense and zone
defense according to the game situations.4.7. Additional information to teachers
Important basketball footwork in basketball
Skilled physical sports educator knows the importance of focusing on foot works in
teaching basketball at all levels. Foot works are the most important prerequisites to
become a greater basketball player. Effective footwork will prevent students(players)
from silly violations, allow them to create space and get past defenders, set them up
to shoot on balance, let them dominate the post, and more.Important drills to teach defensive movements in basketball
– Lateral slides east and west: the teacher points the direction he/she wants
the students to slide.
– Drop step slides: point diagonally behind them. The students must drop step
and then slide that direction.
– Closeouts: point hands in the air. The learners sprint 2-3 steps forward and
then closeout with high hands while keeping a low base.
– Charge: Cross arms at chest. The students fall backwards simulating taking
a charge and then get straight back up into pitter-patter.
– Rebound: jump up with two hands. On the rebound call, student must jump
up and down three times as high as they can simulate getting a defensive
rebound.
– Back-pedal: pointing behind the student. student behind must communicate
with the player in front of them.
– Sprint: Motion forward with hands. Student must sprint forward to their starting
position.Teaching points while teaching defensive movements in basketball
– Students must remain in a low and wide defensive stance during the entire
drill.
– Pay attention on correct footwork and good balance. Students should not
be leaning forward when in defensive stance.
– Arms must be out to the sides throughout the entire drill. Get used to doing
it for games.
– Encourage the students to be loud on closeouts, charge calls, when back-
pedaling, etc.
– Can be a great drill to use when you have a large group of student.
– Theteachermust be enthusiastic while leading the student through the drill.
They are not going to be enthusiastic if you are not.Some terminologies used in basketball game
Backcourt: the area from the mid-court line to the end line furthest from the
offense’s basket.
Blocked shot: the successful deflection of a shot by touching part of the ball on its
way to the basket, there by preventing a field goal.
Boxing out: a player’s attempt to position his body between his opponents and the
basket to get rebounds and prevent the opponents from doing so.
Defensive rebound: a rebound of an opponent’s missed shot.
Double dribble: a violation that occurs when a player dribbles the ball with
Double team: when two teammates join efforts in guarding a single opponent.
Dunk: When a player close to the basket jumps and strongly throws the ball down
into it, an athletic, creative shot used to intimidate opponents.
Elbow: also called the “junction;” a term often used to indicate the area of the court
where the free-throw line and side of the key meet.
Fast break: also called the run-and-shoot offense, it begins with a defensive
rebound by a player who immediately sends an outlet pass toward mid-court to his
waiting teammates; these teammates can sprint to their basket and quickly shoot
before enough opponents catch up to stop them.
Field goal: when the ball enters the basket from above during play; worth 2 points,
or 3 points if the shooter was standing behind the 3-point line.
Free-throw line extended an imaginary line drawn from the free-throw line to the
sideline to determine the location throw-ins.
Frontcourt: the area between the mid-court line and the end line closest to the
offense’s basket.
Full-court press: when defenders start guarding the offense in the backcourt.
Layup: a shot taken close to the basket that is usually banked off the backboard
towards the basket.
Low post: an imaginary area outside either side of the foul lane close to the basket.
Man-to-man defense: the defensive style where each defensive player is
responsible for guarding one opponent.
Offensive rebound: a rebound of a team’s own missed shot.
Perimeter: the area beyond the foul circle away from the basket, including 3-point
line, from which players take long-range shots.
Pivot: a center; also the foot that must remain touching the floor until a ball
handler who has stopped dribbling is ready to pass or shoot.
Playmaker: the point guard who generally sets up plays for his teammates.
Possession: to be holding or in control of the ball.
Screen or screener: the offensive player who stands between a teammate and a
defender to gives his teammate the chance to take an open shot.
3-point play: a 2-point field goal followed by a successful free throw.
3-point shot: a field goal worth 3 points because the shooter had both feet on the
floor behind the 3-point line when he released the ball; also counts if one foot is
behind the line while the other is in the air.
Transition: the shift from offense to defense.
Turnover: when the offense loses possession through its own fault by passing the
ball out of bounds or committing a floor violation.
Weak side: the side of the court away from the ball.
Zone defense: a defense where each defender is responsible for an area of the4.8. End unit assessment
– Set various offensive tactics exercises to evaluate the performance of different
tactical play of the students according to the positions on the court (centre
player, power forward, small forward, shooting guard, point guard).
– Organise a game situation exercises and evaluate the students ability to apply
a counter attack, motion offense, spread, offense and playing in set offense.
– Set various exercises on defensive tactics (man-to-man defense, zone
defense) on half-court as well as on full court and evaluate the students
abilities to apply correct tactics in defense.
– In a game situation, the teacher evaluates students abilities to defending the
opponent with the ball and defending the opponent without the ball.
– In a game situation, the teacher evaluates the students abilities to apply half
court and full court pressing as tactics of defense.
– Organize a competition among the students, ask them to apply all the learned
tactics in a game situation and let them play freely.
While the students are playing the teacher assess if the students are able to perform
offensive and defensive tactics of basketball.4.9. Additional activities
4.9.1. Remedial activities
Individually and in groups, the students will revise the correct tactics of offense and
defense in basketball. The students will focus on mastering the playing positions
and the tactics to apply for each position.4.9.2. Consolidation activities
Individually and in groups, the students will revise the tactics of counterattack, motion
offense, spread, offense and set offense, defensive tactics (man- to-man defence,
defending the opponent with the ball, defending the opponent without the ball and
the zone defence.
4.9.3. Extended activities
– Ask the students to participate in the competitions organized by the school.
– Ask the students to participate in interschool’s competitions.
– Ask the students to participate in the competitions of their age organized
by Rwandan Federation of school sports and the Rwandan Federation of
Basketball.UNIT 5: HANDBALL
5.1. Key unit competence:
Perform different tactics needed to play handball.5.2. Prerequisite (knowledge, skills, attitudes and values)
Students of senior five will learn better basic tactics of playing handball if they can
perform basic techniques of handball as they learned in senior four andhave developed
basic motor control and movement exercises.5.3. Cross-cutting issues to be addressed
Gender
In teaching and learning process of handball, the teacher must prepare and provide
physical activities that engage both girls and boys equally to exploit their full potential
and talents without any discrimination or prejudice.Inclusive education
The teacher as a facilitator he/she must consider different special education needs
and select handball activities to adapt his teaching approaches to those students.
This creates a positive attitude and helps all students to participate actively and
develop their competence levels.Financial education
The teacher should integrate financial education into his/her teaching/learning
activities by providing the local and no cost teaching and learning material where
is possible. He/she must encourage students to make their own materials that can
help them to develop competences not only in handball game but also in their life.Standardization culture
The teacher must choose and select the standardized materials to use in his/
her teaching/learning process of handball. It is necessary to provide appropriate
materials required to the levels of students and help them to develop culture of
checking and using the quality of sport materials for the competitions before using
them in order to prevent injuries and other accident.Environment and sustainability
The teacher should provide materials and deliver the lesson with encouraging
students to protect the environment and well use of materials. The teacher helps
them to develop the spirit of keeping safe the environment they usein sports activities.Peace and values education
The teacher helps students to develop fair play and social values by avoiding
violence and conflict in the handball game and by setting clear and relevant
instructions. He/she should provide the activities that help students to develop their
competence peacefully.Comprehensive sexuality education
A teacher provides handball activities and sets instructions that prevent sexual
harassment or any kind of gender-based violence like sexual abuse and physical
contacts oriented to the sexuality intention.Genocide studies
While conducting handball exercises a teacher should take a time to explain student
show sports should be used to fight against Genocide ideology and how to prevent
it. For example, to organize Genocide memorial tournaments at school and give the
message related to the Genocide.5.4. Guidance on introductory activity
Before introducing the lesson one of this unit, you must introduce the whole unit.
The teacher as a guide, facilitator and expert, ask questions or give activity related
to different tactics needed to play handball in order to help them to predict what to
be learned in the whole unit.5.5. List of lessons/sub-heading


Lesson 1: Offensive positions and offensive tactics
a. Learning objective
By the end of the lesson, students will be able to:
– Take different defensive positions used in handball game on the field of play.
– Apply different offensive tactics.b. Teaching resources
– Handball playground
– Balls
– Stopwatch/Watch
– First aid kits
– Whistles
– Cones
– Chasubles
– Goal postsc. Prerequisites/Revision/Introduction
Students of senior five will learn better offensive positions and offensive tactics if
they can execute basic motor control and movement exercises and perform basic
handball techniques learned in senior four.d. Learning activities
Opening discussions
– In group activities students discuss about different basic handball
– techniques learned in senior four.
– Let some groups present their findings.
– Help them to clarify their findings.
– Introduce different offensive positions and offensive tactics in handball.
– Then invite the students to start warm up and stretching exercises.
Warm up exercises
– Let students perform general warm up exercises and specific warm up
exercises based on body’s parts to be used more while performing offensive
positions and offensive pay and let students stretch their muscles properly.
– Guide students while performing warm up and stretching.e. Lesson body
Tell students that regarding the position of players’ in-group tactical attack we call
them centre players, wing players and pivot players. Each player in his particular
position should learn various ways of moving, which are essential for his/her
particular position.Offensive positions
– Explain to the students that in handball players are typically referred to by the
positions they are playing.
– Tell students that positions are always denoted from the viewof the respective
goalkeeper, so that a defender on the right opposes an attacker on the left.
However, not all of the following positions may be occupied depending on the
formation or potential suspensions.Describe positions used in handball with the role of each one as follow:
• Left and right wing players (LW and RW)
These fast players excel at ball control and wide jumps from the outside of the goal
perimeter in order to get into a better shooting angle at the goal. Teams usually try
to occupy the left position with a right-handed player and vice versa.• Left and right backcourt players (LB and RB)
Goal attempts by these players are typically made by jumping high and shooting over
the defenders. Thus, it is usually advantageous to have tall players with a powerful
shot for these positions.• Centre backcourt (CB)
A player with experience is preferred on a position who acts as playmaker and the
handball equivalent of a basketball point guard.• Circle runner or pivot (CR)
This player tends to intermingle with the defence, setting picks and attempting to
disrupt the defence’s formation. This position requires the least jumping skills; but
ball control and physical strength are an advantage.
Show students different offensive positions on the handball court and let them be
placed on those offensive positions.
ACTIVITY 1
By using two halve court of handball game, students in groups of 3 and 4 for each
half, perform the following exercise:
– Students in-group of four must have a goalkeeper and be defenders.
– Those who are in group of three be attackers.
Each student who is in attacking group plays a certain attacking role. Students in
group, which is defending, their role is to prevent attackers to score a goal. Let them
play it in 3 minutes. In case there are many teams change them after 3minutesOffensive tactics
Explain to the students the different waves (offensive tactics) as they are applied in
handball game situation:• First wave
Tell the students that the target of the first wave attack is to get to a shooting
position before the opponent manages to return. The first wave includes the players
who rush forth from the defensive position now of the shot or when their team
intercepts the ball. The fast attack is initiated most frequently by the goalkeeper
or occasionally by one of the field players. He/ she passes to the attacker who is
not guarded and is closest to the opponent’s goal. The first wave attackers free
themselves as quickly as possible, carefully watching the ball and if the opponent
gains the ball, they immediately return to a defensive position to initiate the second
wave.Remind students to apply the following principles for movement and passing while
performing the first wave:
– Move into free space as fast as possible and fake the shortest route. If a
defender guards them, try to get rid of him.
– Keep enough distance between themselves and a fellow player, so that they
can safely pass to each other but that a defender cannot guard both of them.
– Use crossing only in the situations 2 against 2 or 3 against 3. It is not suitable
in the situations 2 against 1, 3 against 2 or 3 against 1.
– Free themselves if they are not guarded and you are the nearest player to the
opponent’s goal or if you cannot pass.
– Pass if your fellow-player is in a better position than you are.
– Catch the ball before the free throw line and shoot after 2 or 3 steps,
preferably by jumping, if you get into the shooting area.
• Second wave
Tell students that if the first wave is not successful, then second wave comes into
play. As more defenders get back into position, offense initiates quick passes to
outnumber the local defenders and score. In case the goal is not scored, third wave
is initiated.Remind the students about the tasks of the second wave:
– After losing the ball, secure the area in front of your own goal.
– Be ready to catch the pass from the goalkeeper if he/she is not able to pass
a further distance or to the first wave players.
– Finish the fast attack with a shot if the first wave does not succeed.• Third wave
Tell students that in the third wave, the attackers use patterns involving crossing and
passing between backcourt players, getting the ball to their pivot,taking a jump shot,
or attracting the defense away from a wingman.ACTIVITY 2
Students form two teams; each team consist of seven players. Assign position to
each student and let them play a normal handball game.Description of the activity
The ball should start from the goalkeeper to the back centre and continue to be
played toward the opponent court. If the ball has been recuperated by the opponent
team, the lost team will come back to defend. If there are many teams, change
teams after five minutes.Points to consider
The students to play on their respective posts and accomplish the roles assigned to
while playing as a team.
The winner is the team that scores many goals.Variation
The ball starts with throw-off and respect the rules of starting with throw-off after
the goal has been scored.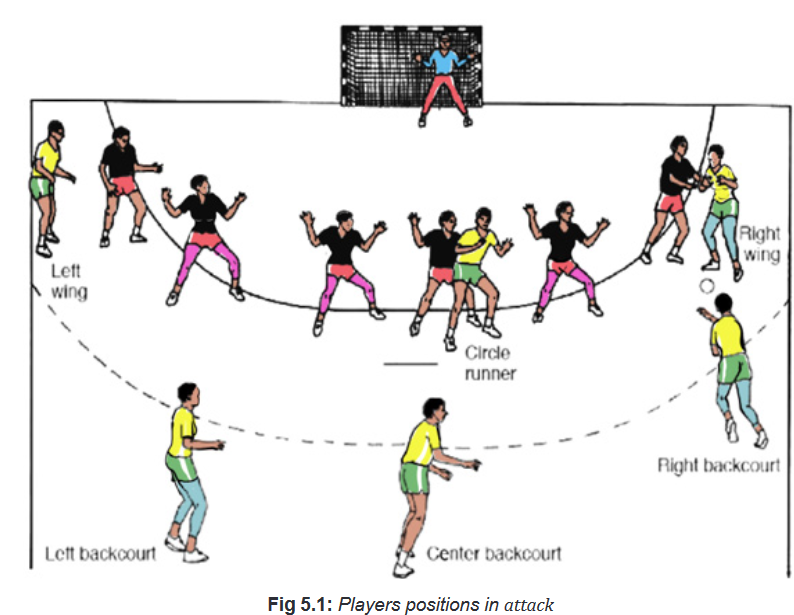
APPLICATION ACTIVITY 1
Description of the activity
– Let the students perform simple fast break drill with two lines of students (one
on each side) and Teacher standing in the middle.
– The player at the front of the line passes the ball to the teacher in the middle
and then sprints towards the goal.
– The teacher returns the ball, passing the ball in front of the runner, for them to
run onto and shoot with a quick centre shot.
– The attackers should go all the way to the goal line.
– Request students to use low shots.Teaching point to consider while performing this activity
Always keep the students on running “false foot should be in front when throwing the
ball.Variation
– A defender may follow the attacker from behind or from the side to make the
shot a bit more difficult.
– Divide students into two groups and let them play a normal game in 5minutes.
APPLICATION ACTIVITY 2
Put students into groups of four. Put Team A, B, C in group 1 and D, E, F in
group 2. By using two halve court of handball game, students in groups A with a
goalkeeper play against team B (in one half) team D with a goalkeeper play against
team E (in another half court).Description of the activity
B and E in group start their attacks from the center line against A and D. After
attempting to shoot into the goal (with or without the goal), A and D leave the
court and C and F get in the court to attack B and E. continue in this way during 6
minutes.Variation
By respecting their halves, organize a kind of competition in group (Avs B, B vs C,
C vs A) and 2 (D vs E, D vs F, F vs E) and see the winner.
Each match consists of 2 minutes.Cool down exercises
– Let students do light exercises and stretch their group of muscles by insisting
on most used parts.
– Guide students while stretching their muscles systematically.Closing discussion
• Reflect
– Describe different positions occupied in handball playground.
– Which challenges/advantages did you face when occupying different
offensive positions in handball playground?
– Which are strengths and weaknesses for each system.• Connect
– Give one example of attacking position similar in handball and basketball.• Apply
– How will apply different attacking waves in handball game situation?Lesson 2: Defending positions and defensive tactics
a. Learning objective
By the end of the lesson, students will be able to take different defensive positions
used in handball game on the field of play and perform defensive tactics perfectly.b. Teaching resources
– Handball playground
– Balls
– Stopwatch/Watch
– First aid kits
– Whistles
– Cones
– Chasuble
– Goal postsc. Prerequisites/Revision/Introduction
Students of senior five will learn better defensive positions and defensive play if they
can perform basic handball techniques and able to take different offensive positions
in handball learned in lesson one.d. Learning activities
Opening discussions
– In group activities students discuss about different offensive positions learned
in lesson one.
– Let some groups present their findings.
– Help them to clarify their findings.
– Introduce the new lesson “defensive positions and defensive tactics”.
– Then invite l students to start warm up and stretching exercises.Warm up exercises
– Let students perform general warm up exercises and specific warm up
exercises based on body’s parts to be used more while performing offensive
positions and offensive pay and let students stretch their muscles properly.
– Request students to use warm up with the ball.
– Guide students while performing warm up and stretching.
e. Lesson body Defending positions
Explain to students that those players in handball are typically referred to by the
positions they are playing.
Describe defending positions in handball are as the follow:
• Far left (FL) and far right (FR): The opponents of the wingmen.
• Half-left (HL) and half right (HR): The opponents of the left and right
backcourts.
• Back centre (left and right): Opponent of the pivot.
• Front centre: Opponent of the centre backcourt may also be set against
another specific backcourt player.
A. Defensive sytems
Man to man defence
As a teacher, give a clear explanation to the learners students that Man-to-man
defence can be played throughout the field, in the own defensive half of the field or
only in front of the own goal area.
Remind students that:
Man-to-man defence throughout the field demands that each player guards the
closest opponent immediately after the loss of the ball. Disturbing an opponent’s
attack from the very beginning is an advantage.• Advantages of man to man defence
Man-to-man defence is advantageous in the match against a weaker opponent or
in that part of the match, when we want to surprise the opponent or to reverse an
unfavorable development of the match.• Disadvantages of man to man defence
The disadvantage is the possibility that weaker defenders must cover stronger
attackers and vice versa. If this occurs, it is necessary to make a “redistribution of
attackers” during the next break in the game. If each attacker is to be guarded by the
same defender all the time, then all defenders must return towards their goal. In a
chosen area, for example at the middle line or at the free throw line they expect the
opponents and guard them. These systems do not demand so much cooperation
as the systems of zone defence.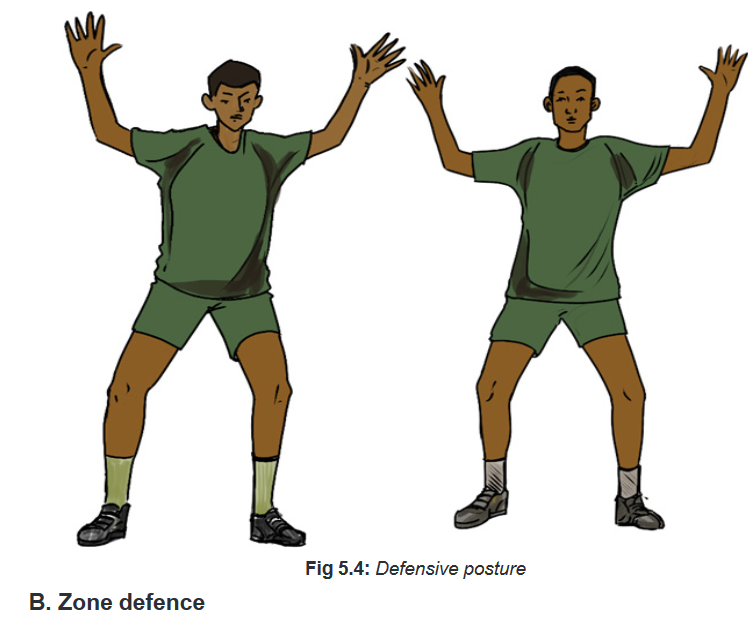
B. Zone defence
Explain to the students that the defensive systems are named according to the basic
positions of defenders.
• 6-0 zone defence (Flat defence)
– Tell students that within this zone defence all 6 players line up between the
6-metre and 9-metre lines to form a wall.
– Explain students advantages and disadvantages of 6-0 zone defence.• Advantages of 6-0
The advantage of the system 6:0 is that it is relatively easy to practice (the positions
of all players in one line facilitates cooperation) and protects the space in front of
the goal area. The system is useful against a team with weaker shooters from the
backcourt players’ area or when the wings and pivot are strong players.Disadvantages of 6-0
The disadvantage is the lack of possibilities to disturb preparatory combinations and
the lack of possibilities to closely guard the attackers shooting from a long distance. Tell students that by shifting some defender’s forwards from their initial position,
other zone defensive systems (5-1, 4-2 and 3-3) may be created.• 5-1 zone defence
One of the players’ cruises outside the 9-metre perimeter, usually targeting the
centre forwards while the other five line up on the 6-metre line.
Remind students that the forward defender can fulfil the following tasks:
– Guards the central backcourt players’ space and controls the activities in the
left and right backcourt players’ space.
– Is responsible for the entire space of backcourt players, he movespreferably
in the area where the ball is.
– Guards the space of the backcourt player who is nearest to the ball toprevent him from taking the pass.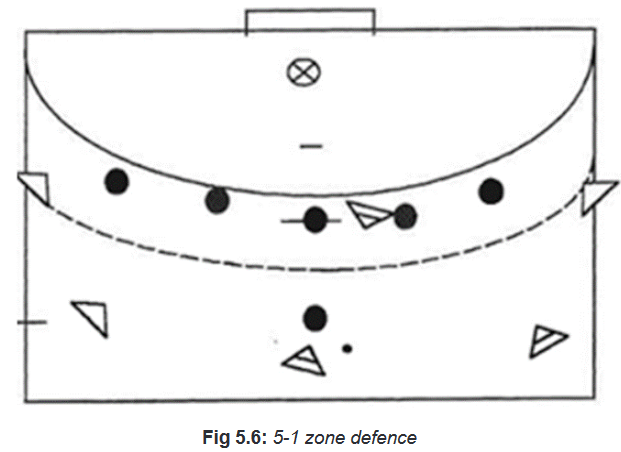 • 4-2 zone defence
Two defenders are out front and others are lined up on the 6-metre line. • 3-3 zone defence
Very fast teams may use a 3–3 formation, which is close to a switching man-to- man
style.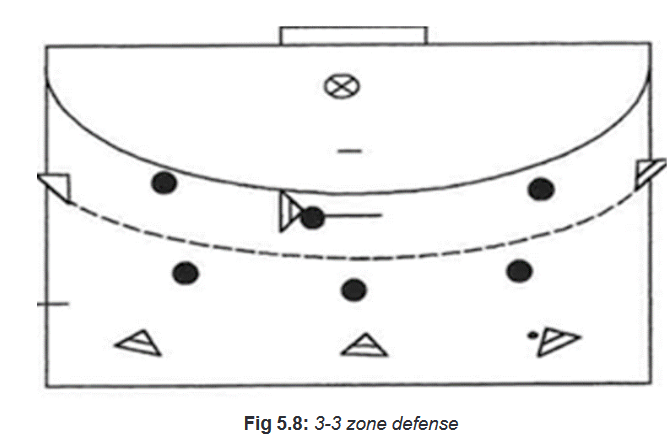 • Advantages of the systems with forward defenders (5-1, 4-2 and 3-3)
The disturbance of preparatory combinations and the close guarding of shooters
from longer distances. The greater the number of forward defenders and the greater
the space they defend, the better these tasks can be fulfilled.• Disadvantages of the systems with forward defenders (5-1, 4-2 and 3-3)
More difficult communication among the defenders from various lines and the small
number of defenders near the goal area.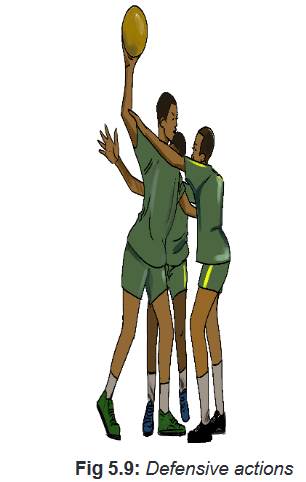 ACTIVITY
Three attacking players start play by passing among them towards the goal area
by attempting to shoot into the goal by scoring a goal. The defending players try to
prevent this by blocking the shot by using different blocking tactics.Variations:
– Request defenders to block a center Shot.
– Request defenders to block a Jump Shot.Points are distributed as the follow:
– points for every successful block.
– Goal scored obtain one.
The team with most points is the winner.Teaching points to consider
– Blockers are trying to use both arms, high and close together.
– Attackers are searching how to score a goal by observing the way defenders
are positioning.Divide students into two teams of six players (A and B). Let A be defenders and B
attackers. Ask students from team A to mark one player from team B, request him
to mark the same player throughout this exercise. Teacher throws the ball in the air
to start the game. The team B in possession must try to pass passes towards the
opponent team A. The opposition TEAM A must stop TEAM B by using man-to-man
defense by trying to intercept the ball. In case defending team intercepts the ball,
attacking team will go back to their own half to defend by using zone defense (6-
0). If the attacking team (B) score the goal, defending team (A) will start the game
through throw-off and defending team defends by using man-to-man defense.Variations
Let them introduce 4-2 defense zone for defending team after 5 min.
Every time a team intercepts the ball from the opposition, they score a point. In
addition, if the team score a goal get a point. Count points and the winner is the
team, which has the most points in 5 minutes.Teaching points to consider
– Defenders should stay with an identified attacker (man-to-man defense).
– Defender should try to stay between the attacker and the ball.
– Use wide arms to cut off avenues of passing.
– Introduce split vision technique (look for player and look for the ball).
Cool down exercises
– Let students do light exercises and stretch their group of muscles by insisting
on most used parts.
– Guide students while stretching their muscles systematically.Closing discussion
• Reflect
– Mention six defensive positions of handball playground.
– Give and explain two activities you have performed during the lesson.
– Which challenges/ advantages did you face when applying different
defensive systems in handball game situation?
– Outline the strengths and weaknesses for each of system mention above.• Connect
– Compare and contrast offensive systems and defending systems applied in
handball game situation.
– Why is it important for mastering the handball defensive and offensive
systems?• Apply
– Which of the handball systems do you prefer as more advantageous, easy to
win a handball match?Lesson 3: Safe play in short handball match to apply the mastered tactics
a. Learning objective
Play a short handball game to apply the mastered tactics.b. Teaching resources
– Playground of handball
– Balls
– Stopwatch/Watch
– First Aid kits
– Whistles
– Cones
– Goal postsc. Prerequisites/Revision/Introduction
Students of senior five will apply better the mastered tactics through a short
handball game if they are able to apply different handball offensive, defensive set
ups and strategies learned in the previous lessons.d. Learning activities
Opening discussions
– In group activities students discuss about different handball offensive,
defensive set ups and strategies learned in two previous lessons.
– Help them to clarify their findings.
– Introduce different handball set-ups and strategies used in playing handball
game.
– Then invite students to start warm up and stretching exercises.Warm up exercises
– Let students perform general warm up exercises and specific warm up
exercises based on body’s parts to be used more while performing offensive
positions and offensive play and let students stretch their muscles properly.
– Request students to perform a warm up with the ball.e. Lesson body
GAME SITUATION
In this game, the teacher feeds the ball to the first attacker/ students (2 and 3 in
green), number two works with number 3 to try and get past the two defenders (2
and 3 in blue).• Description of the game
– The attackers should always try to get stuck into the two defenders,
– Students should play the ball fast and always move back quickly to get into a
new position to receive the pass back immediately and change the direction
of the attacking ‘wave’.• Variations
– The teacher can also gradually build up the numbers in this half court attacking
game 4v4, 5v5 until you finally have 6v6 on court players (and a goalkeeper
for the defending side).
– Let students play a handball game on the full court by using 7 vs 7.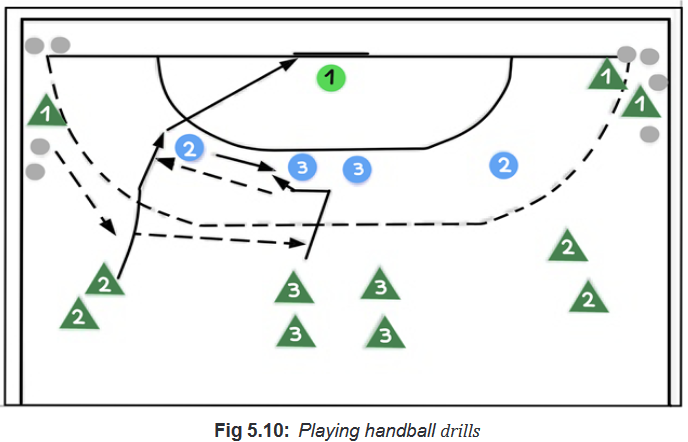 Cool down exercises
– Let the students stop playing and perform relaxation exercises including
slow running and walking around the playground.
– Put students on semi-circle for stretching exercises.
– Help them/demonstrate/ correct them if needed.Closing discussion
• Reflect
– What are the offensive and defensive strategies used in team handball?
– How much offensive play did you apply in short handball games?
– What are challenges/ advantages did you face when playing different short
handball games?• Connect
– What are the conditions do you need to apply different handball tactics in
game situation?
– Recognize the similarities/dissimilarities between the handball offensive play
and other offensive play in basketball.• Apply
– What is the usefulness of mastering handball techniques and tactics in
game situation?5.6. Summary of the unit
Handball playing positions in the field of play should be classified under
two ways:
– Defending positions: Far left and far right, half left and right, Back centre right
and back centre left, Front centre, Goalkeeper)
– Offensive positions: (Left and right-winger men, Left and right backcourt,
Pivot, Centre backcourt, Goalkeeper). For all those positions of playing,
players may use different tactics or strategies in order to attack the opponent
team or defending their goal. It is better to choose the appropriate offensive
or defensive tactics based on the nature of the game situation.5.7. Additional Information for teachers
Offensive strategies in handball
– Try not to lob the ball or make long passes as it gives the opposing team a
chance to take possession.
– Good ball handling is a very important key in team handball. This is mainly
talking about pass movement.
– Try constantly cutting towards the goal with or without the ball; this forces the
defense to continuously adjust and opens up more scoring opportunities for
your team.
– Move the ball quickly and keep the dribbling to a minimum. Scoring
opportunities develop when sharp, quick passes are made and the defense
does not have time to adjust to what you are doing.
– Do not force a shot but if you drive for a shot and are blocked by defense,pass
to a teammate instead. Use ‘feint’ movements; fake out the defense.
– Proper court spacing is a good key to keep each player as an offensive threat.
– Making cuts toward the goal, with or without the ball, will force defense todefend
all players on the court and provide more scoring opportunities. Players
should avoid too much dribbling.Defensive strategies used in handball
– Be ready to switch from offense to defense fast.
– If there is a turnover, your whole team needs to be ready to switch to
defense otherwise; you leave yourself open to many scoring opportunities.
– Handball is a fast-paced game and these turnovers happen quickly. Decide as
a team if you will defend man-to-man or zone.
Attacking Systems against Man-to-man Defense
– In these systems, there are no differences between the work of backcourt
player, pivot and wing. Attack can be realized in various ways, for example:
– The attackers separate further from each other and try to individually move
into free space towards the opponent’s goal to catch the ball.
– The attackers move as closely as possible to the opponent’s goal area and
use the naturally arisen screens for moving into free space.
– This is very demanding on orientation and accuracy of movement in a rather
small and crowded space.
– The attackers move to the side lines, for example 3 to the left side and 3 to
the right side and the goalkeeper, running into the free space in the middle of
the field, creates numerical superiority.Attacking Systems against Zone and Combined Defense
When using this system, the attackers play the roles of backcourt players, pivots and
wings. In the systems against combined defense there is also the role for a man-to
man defended attacker.The task of first wave defenders
To guard the attackers of the first wave and to get into position in front of their own
goal earlier than the opponent. In the first wave, the backcourt players and the
wings are most often engaged unless they took part in the finishing of a shooting
combination. The situations with numerical equality are advantageous, but the
situations with numerical superiority are even more advantageous.The defenders should apply the following principles:
– Anticipating the finishing your own attack and be ready to return to
defense.
– After losing the ball immediately get into a defensive position, return more
quickly than the attacker, and do not allow him to control the first long pass.
– If you are close to the attacker with the ball, guard him closely and press
him into a less advantageous space, disturb or make his further activities
impossible.
– If you are not guarding any attacker, then guard the most endangered area
(most often between the ball and your own goal).
– If the attacker moves into a free space near to your fellow player and becomes
more dangerous than the attacker whom you guard, then help your fellow
player.
– If your attacker moves into a free space and your fellow player helps, then you
take over his role.
The most important tasks of the second wave defenders are:
– Make it difficult or impossible for the attack to be mobilized from the
opponent’s goal area.
– Return to your goal as quick as possible and disturb the attack of the
second wave.
– Finish the organization of the defense in the space in front of your goalarea.5.8. End unit assessment
GAME SITUATION
Divide students into two teams. Let them play normal handball game by using all
learned techniques (passing, dribbling reception, shooting and goalkeeping) with
the respect of playing positions, the offensive and defensive tactics of handball in
the field of play.Points to consider:
– How players are positioning in the field of play.
– Each team must announce the attacking and defending systems, which they
are applying in the field of play.
– All students must participate in the game as players or substitutes.As a teacher facilitate both teams by refereeing the match to help them adhering
to the basic handball rules. Moreover, count the goals scored by each team to
determine the winning team.5.9. Additional activities
5.9.1. Remedial activities
GAME SITUATION
Two teams play on the half court. Five attackers and six defenders with a goalkeeper.
Defenders are near 6m line and attackers are aligned on the centre line. Attackers
start by passing each other towards the goal to score the goal. Defenders try to
stop the attackers. Attackers must attempt five consecutive attacks. If defenders
intercept the ball, they should throw it to the attackers and start the attack from
the centre line. Count the goals scored by attackers and change role after five
consecutive attacks. The winner is the team with the highest number of goals in five
consecutive attacks.
5.9.2. Consolidation activities
Use the same exercise in the remedial activity but with the following variations:
– Both teams have goalkeepers.
– Use the full court.
– During five consecutive attacks in case defenders intercept the ball, they
become attackers immediately and play towards the opponent team. If the
ball is re-intercepted by attackers, the game starts on the centre line and
continue to count left attacks. If defending team score a goal it will become
attacking team and count 5 consecutive attack until the ball is intercepted.5.9.3 Extended activities
– Encourage students to actively participate in handball training sessions during
co-curricular activities.
– Encourage students to participate actively in handball interclass competitions
organized by the school.
– Encourage students to create local handball competitions in their villages.
– With the support of the school, students form teams and participate in handball
competition organized by National School Sports Federation.UNIT 6 : NETBALL
6.1. Key unit competence:
To perform basic netball tactics6.2. Prerequisite (knowledge, skills, attitudes and values)
Students of senior five will learn better basic netball tactics if they havelearned better
techniques of playing netball in senior four and have developed basic motor control
and movement exercises.6.3. Cross-cutting issues to be addressed
Gender
In teaching and learning process of netball, the teacher must prepare and provide
netball tactical exercises that engage both girls and boys equally to exploit their full
potential and talents without any discrimination or prejudice.Inclusive education
The teacher as a facilitator he/she must consider different special education needs
and select netball exercises to adapt his teaching approaches to students. This
creates a positive attitude and helps all students to participate actively and develop
their competence levels.Financial education
The teacher should integrate financial education into his teaching/learning activities
by providing the local and no cost teaching material where is possible. He/she must
encourage students to make their own sport materials that can help them to develop
competences not only in netball game but also in their life.Standardization culture
The teacher must choose and select the standardized materials to use in his/her
teaching/learning process of netball. It is necessary to provide appropriate materials
required to the levels of students and help them to develop culture of checking and
using the quality of sport materials for the competitions before to use them in order
to prevent injuries and other accident.
Environment and sustainability
The teacher should provide materials and deliver the lesson with encouraging
students to protect the environment and well use of materials. The teacher helps
them to develop the spirit of keeping safe the environment.Peace and values education
The teacher helps students to develop fair play and social values by avoiding violence
and conflict in the netball game and by setting clear and relevant instructions. He/
she should provide the activities that help students to develop their competence
peacefully.Comprehensive sexuality education
A teacher provides netball activities and sets instructions that prevent sexual
harassment or any kind of gender-based violence like sexual abuse and physical
contacts oriented to the sexuality intention.Genocide studies
While conducting netball exercises a teacher should take a time to explain student
show sports should be used to fight against Genocide ideology and how to prevent
it. For example, to organize Genocide memorial tournaments at school and give the
message related to the Genocide.6.4. Guidance on introductory activity
Before introducing the lesson one of this unit, you must introduce the whole unit.
The teacher as a guide, facilitator and expert, ask questions or give activity related
to basic netball tactics in order to help them to predict what to be learned in the
whole unit.6.5. List of lessons/sub-heading

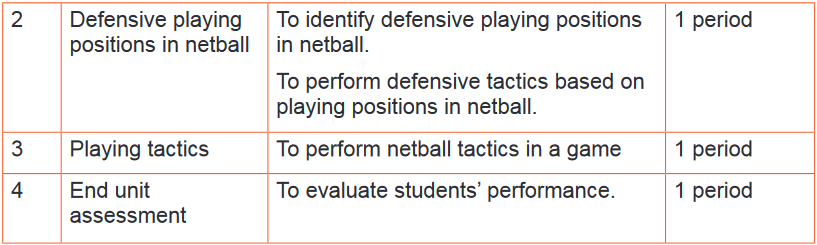
Lesson 1: Offensive playing position in netball
a. Learning objective
Students will be able to:
– To identify offensive playing positions in netball.
– To perform offensive tactics based on playing positions in netball.b. Teaching resources
– Playground of netball
– Balls
– Stopwatch/Watch
– First Aid kits.
– Goal post
– Cones
– Whistlesc. Prerequisites/Revision/Introduction
Students of senior five will learn better this lesson if they have learned basic netball
techniques in Ordinary Level and senior four.d. Learning activities
Opening discussions
The teacher must check the readiness of students by checking out sports equipment
and should check out sports infrastructure to be used during the lesson deliverance.
After he/she should start the lesson by brainstorming students about the netball
court and its area. Ask the questions, which direct them to predict/state/introduce
the offensive tactics (new lesson), then invite students to start warm up session.Warm up session
During warm up session, facilitate students in the following ways:
Warm up without the ball
- Guide students during the warm up session.
- Support/help/ demonstrate where is necessary.
- While doing warm up remember to use appropriate exercises for
- general warm up and specific warm up.Warm up with the ball
ACTIVITY
Put six or more players in four corners making a square (at least two at each corner)
passing the ball in a clockwise direction and then running behind the cone they just
passed to as seen in the image below
Perform this exercise within 4-5 minutes. Let students perform stretching exercises
systematically; randomly one may lead stretching.e. Lesson body
Explain to the students the different offensive positions used in netball game, the roles
and tactics for each player in his/her respective post.i. Shooters/goal scores
• Goal Shooter (GS)
Tell students that GS plays in goal third and goal circles and goal third of the
opposing team.
Her main role is:
– To shoot accurately from all areas of the circle.
– To receive the ball facing the goal.
– To take care of variety and timing because are vital.
– To jump high both to catch a pass and to retrieve a missed shot.
– To work efficiently with GA.
– To defend when necessary.Show students the position of GS on the netball court and it playing area.
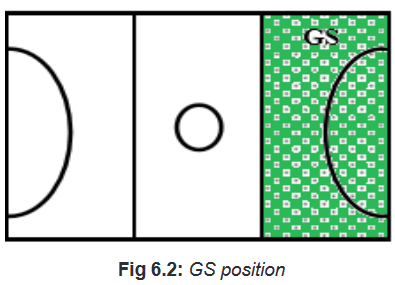
• Goal Attack (GA)
Tell students that GA plays in the centre of their opponent’s goal third and goal
circle.
Her main role is:
– To act as goal shooter.
– To feed the shooter accurately or sympathetically.
– To work harmoniously with the centre court players(C).
Show students the position of GA on the netball court and it playing area
ii. Centre court players
• Wing Attack (WA)
Tell students that WA plays in their opponent’s team third and the centre third but
not in the goal circle.Her main role is:
– To feed the circle accurately.
– To land facing the goal.
– To make your last move as near the circle as possible to increase accuracy of
pass.
– To allow GD and WD freedom in their attacking area.Show students the position of WA on the netball court and it playing area.
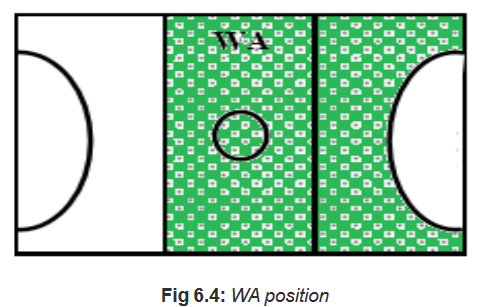
• Centre (C)
Tell students that C plays a vital role in a netball game. They are allowedto move over
the whole court except the goal circle.
Her main role is:
– To link attack and defence.
– To distribute accurate centre passes.
– To direct but do not dominate the game .
– To work with WA to cover the attacking circle.
Show students the position of C on the netball court and it playing area.
APPLICATION ACTIVITY 1
Individually students take offensive playing positions on the netball court by showing
the playing areas of the position of that position.
In group of five students let them perform the following exercises on the court by
sing the following positions: WD, C, WA, GA and GS.Description of the activity
WD, C and WA are place on the court as seen below
WD passes the ball to C, and then C passes the ball to WA. Immediately C goes to
goal third. WA passes the ball to C, then C pass to GA who is in the goal circle. GA
passes the ball to GS who is also in the goal circle near the goal post and shoot the
ball into the basket.Cool down
– Let students practise cool down exercises and light stretching by focusing on
used muscles.
– Guide students how they can stretch their muscles accordingly.Closing discussion
• Reflect
– Which challenges/advantages did you face during taking offensive
positions in netball?
– How did you proceed in order to perform those exercises of taking
offensive positions in netball?• Connect
– What are conditions do you need in order to perform taking offensive
positions in netball?• Apply
– What is the usefulness of taking offensive positions in netball?Lesson 2: defensive playing position in netball
a. Learning objective
Students will be able to:
– To identify defensive playing positions in netball.
– To perform defensive tactics based on playing positions in netballb. Teaching resources
– Playground of netball
– Balls
– Stopwatch/Watch
– First Aid kits.
– Whistles
– Balls
– Cones
– Goal postc. Prerequisites/Revision/Introduction
Students of senior five will learn better this lesson if they have learned about basic
netball techniques and have learned basic rules of netball.d. Learning activities
Opening discussions
The teacher must check the readiness of students by checking out sportsequipment
and should check out sports infrastructure to be used during the lesson deliverance.
After he/she should start the lesson by brainstorming students about the netball
court and its area. Ask the questions, which direct them to predict/state/introduce
the defensive tactics (new lesson), then invite students to start warm up session.Warm up session
During warm up session, facilitate students in the following ways:• Warm up without the ball
– Randomly choose one student to lead the warm up session.
– Support/help/ demonstrate where is necessary.
– While doing warm up remind the leader to use appropriate exercises for
general warm up and specific warm up.• Warm up with the ball
In group of six students with one ball, let them perform exercises of passing among
them by using different passes.e. Lesson body
Explain to the students the different offensive positions used in netball game and the
roles and tactics for each player.Wing Defence (WD)
Tell the students that WD plays in the centre third and goal third of their team.
Her role is:
– To defend and initiate moves from interception.
– To make opponent’s task more difficult by denying them prime attacking
space.
– To interchange with both GD, C and WA.
– To work with C to cover the defending circle.
Show students the position of WD and it playing area on the court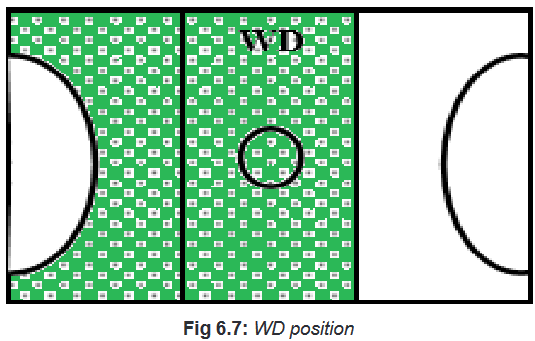
Goal Defense (GD)
Tell the students that GD plays in the centre third, goal third and goal circle of their
team.Her role is:
– To vary method of defence
– To keep ball and opponent in full vision
– To position intelligently in circle
– To initiate attack, play quickly and efficiently
– To interchange with GK on attack and defence
– To intercept from static and moving positions
– To cover shots and reboundsShow students the position of GD and it playing area on the court.
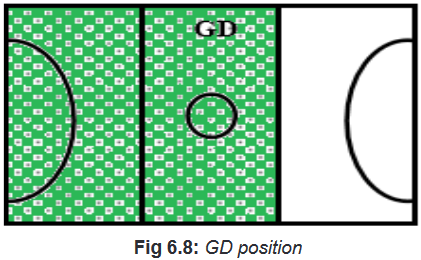
Goal keeper (GK)
Tell students that GK plays in the goal third and goal circles of their team.
Her role is:
– To act as goal defense.
– To have close marking and movement in a small area.
– To utilise good upward spring.
Show students the position of GK and it playing area on the court.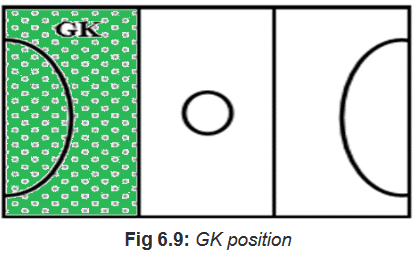
APPLICATION ACTIVITY
Individually students take offensive playing positions on the netball court by showing
the playing areas of the position taken. Learners Student splay a normal game.Cool down
– Let students practice cool down exercises and light stretching by focusing on
used muscles.
– Guide students how they can stretch their muscles accordingly.Final discussions
• Reflect
– What are challenges/advantages did you face during taking defensive
positions in netball?
– How did you proceed to perform those exercises of taking defensive
positions in netball?• Connect
– What are conditions do you need to perform taking defensive positions in
netball?• Apply
– What is the usefulness of taking defensive positions in netball?Lesson 3: Playing tactics in Netball
a. Learning objective
– To identify defensive playing positions in netball.
– To perform defensive tactics based on playing positions in netballb. Teaching resources
– Playground of netball
– Balls
– Stopwatch/Watch
– First Aid kits.
– Whistles
– Balls
– Cones
– Goal postc. Prerequisites/Revision/Introduction
Students of senior five will learn better this lesson if they have learned about basic
netball techniques and have also learned basic rules of netball.
d. Learning activities
Opening discussions
The teacher must check the readiness of students by checking out sportsequipment
and should check out sports infrastructure to be used during the lesson deliverance.
After he/she should start the lesson by brainstorming students about the netball
court and its area. Ask the questions, which direct them to predict/state/introduce
the defensive tactics (new lesson), then invite students to start warm up session.Warm up session
During warm up session, facilitate students in the following ways:
– Randomly choose one to lead the warm up session.
– Support/help/ demonstrate where is necessary.
– While doing warm up remind the leader to use appropriate exercises for
general warm up and specific warm up.Let them stretch their muscles properly.
e. Lesson body
Teacher tells students that they are going to learn attacking and defending strategies
(tactics) in netball game.Attacking strategies
Explain to the students different attacking strategies to use while playing netball
game.• Dodge (feints and deceptions)
Tell students that dodging is a quick and sharp movement; usually form a stationary
position, aimed at wrong footing the opponent. Demonstrate howto perform dodging
and let students perform it in pairs.Remind them to:
– Keep their feet no more than their shoulder width apart.
– Keep their knees bent in preparation for the quick movement and make sure
the head is kept up.
– Use the weight of their body over the feinting foot to fool the opponent.
– Make one or two steps away from the intended catching position.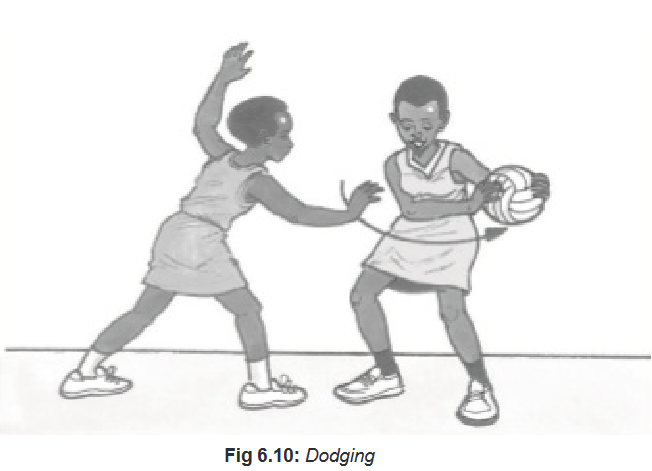
• Change of direction (changes of speed and/or direction)
Tell to the students that changing direction assist the player to create space and
often wrong foot their opponent. Demonstrate them how to change direction and let
them apply it in pairs.Remind them to:
– Push off using their outside leg.
– Dodge, pivot and change of speed.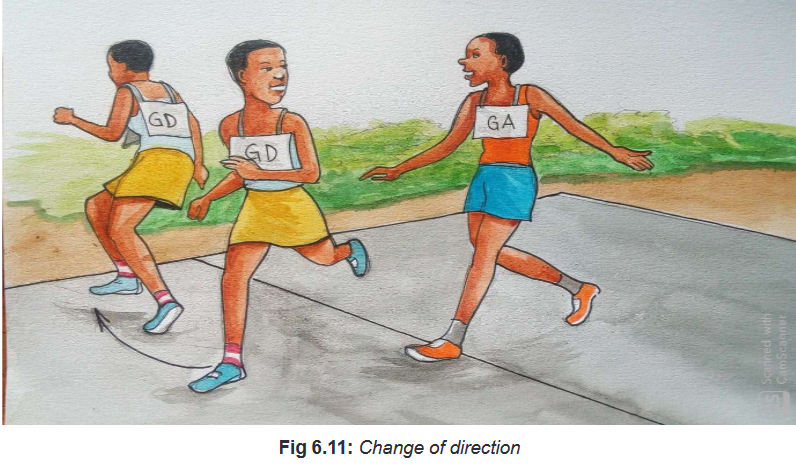
ACTIVITY 1
Work in groups of four. Players drive through the cones focusing on astrong change
of direction. Push off on the outside foot at each cone to drive hard the other way.
• Change of pace (speed of running stops and restarts)
Tell to the students that change of pace will be used to get free. Demonstrate them
how to perform it and let them do it individually.Remind students to:
– Adopt a very abrupt change of speed leaving the opponent to continue
running.
– Sprint, slow down and then suddenly sprint of again in a new direction
outsprinting the opponent who not expecting a second increase in speed, has
also slowed down.
ACTIVITY 2
Players complete a straight drive out to the cone, and then change direction and
drive for a second time to receive a pass. Use two different variations for this drill.
Defensive strategies
Explain to the students defensive strategies to use while playing netball game.• Hand over the ball (attempting to block a pass or shot)
Explain student show to hand over the ball and let them apply in in pairs.Remind students to:
– Step quickly or jump back 0.9m distance, as soon as their opponent takes
possession of the ball.
– Keep their head up with eyes on ball and opponent.
– Stand with feet shoulder-width apart, knees, hips and ankles slightly bent.
– Stretch both arms out and in position over the ball.
– Follow’ the ball with their arms, blocking the path of the ball as much as
possible.• Rebounding (attempt to gain possession from an unsuccessful shot)
Explain and demonstrate student show to gain possession from unsuccessful
shot and let them apply three, one shooter and students under the goal post one
defender and one attacker.Remind students to:
– Reposition in preparation to leap and attempt to gain possession of the
rebound.
– Deflect the ball to a teammate.
– To prevent a pass being made if marking the non-shooting attacker.
– Be ready to jump to gain possession of an unsuccessful shot.
• One on one shadowing
Explain and demonstrate student show to perform one on one shadowing and let
them apply in pairs.Remind students to:
– Stand in front of opponent with back to the attacker and body halfway
across opponent’s body.
– Keep their arms close to sides of body.
– Keep their feet shoulder-width apart, knees bent, weight slightly forward over
toes and back upright.
– Maintain their vision to see attacker and the ball.
– Shadow their opponent’s moves using fast small steps.
– Aim to move feet, keep head up, maintain vision of the attacker, and not
swing head.• Intercepting a pass and a throw
Explain and demonstrate student show to intercept the ball. Let them apply it in
group of three students.• Intercepting a pass
Remind them to:
– Use small quick steps to prepare for an extended leap to intercept the ball, from
the covering position.
– Use the footwork techniques to control the subsequent landing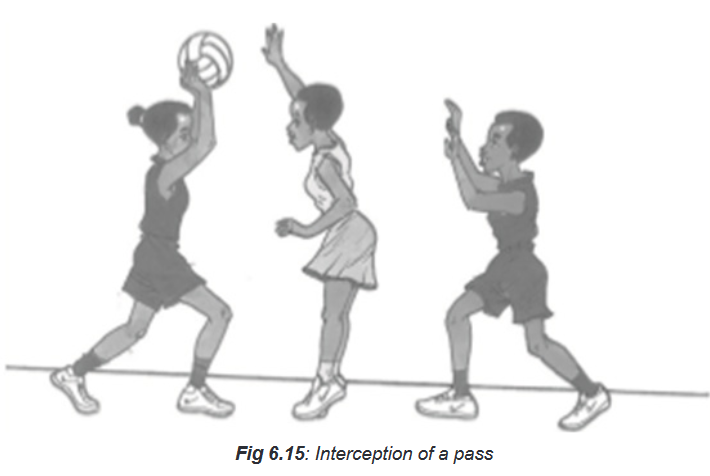
• Intercepting a throw
Remind them to:
– Stand facing the thrower 0.9m away from the first landed foot with the feet
slightly apart and the knees slightly bent.
– Hold the arms ready to anticipate the direction of the throw or shot.
• Marking an opponent
Explain and demonstrate to the student show to mark the opponent and let them
do it in pairs or groups with or without the ball.Remind them to:
– Mark their opponents; they are standing so close to them that they are not
in a safe for receiving a pass. This is a primary objective in defense that is
preventing their opponent from taking part in the game.
– Take their body position, which should at all times allow them to see the flow
of the game (the movement of ball and opponent).
– Position themselves side on to their opponent, either slightly in front or slightly
behind, depending on which direction they would like to prevent movement.
• Zone Defending
Explain and demonstrate student show to defend the specific zone based on the
movement of the ball in the court. Let them apply it in a game situation.
APPLICATION ACTIVITY
Organise four players, two defenders and two attackers. The defenders take
starting positions for one-on-one defence. When the attackers move the defenders
stay close for three (3) seconds. The defenders work hard to shadow every move.
The defenders keep a changing position, as do the attackers, to the side, back and
the front. If the attackers succeed in passing the ball, try to deflect or intercept the
pass. Count the number of ball intercepted and number of goals scored. In a given
period, if the defending team has intercepted many balls will be the winner, if the
attacking team has scored, many goals will be the winner.Variation
Let students play a normal netball game. Request them to use mastered tactics.
The winner is the team that has scored more goals.Cool down
– Let students practise cool down exercises and light stretching by focusing on
used muscles.
– Guide them how they can stretch their muscles accordingly.
– Help them/demonstrate/correct where is necessary.Closing discussion
• Reflect
– What are challenges/advantages did you face during performing playing
tactics in netball?• Connect
– What are conditions do you need in order to perform playing tactics in
netball?• Apply
– What is the usefulness of playing tactics in netball?6.6. Summary of the unit
Netball is the game, which is played based on different playing positions of players
on the court and the court areas. Playing positions determine the roles and actions
of the player who is on that position. There are seven positions in netball namely:Goalkeeper (GK), Goal defence (GD), Wing defence (WD), Centre (C), Wing
Attack (WA), Goal attack (GA), Goal score (GS). During playing netball all players
participate based on their roles. Some are playing the role of defending such as
GK, GD, and WD. Others play the role of offending such as: WA, GA and GS. One
PES, Teacher’s Guide, Senior 5178
player (C) coordinates the action of launching the attacking and become to defend
while her team loses the ball.Skills (strategies) are needed in netball game in order to win the match or improve
performance. Those strategies are related to offensive and defensive.Offensive strategies are as follow:
– Hand over the ball (attempting to block a pass or shot).
– Rebounding (attempt to gain possession from an unsuccessful shot).
– One On One Shadowing.
– Intercepting a pass and a throw.
– Zone Defending.Defensive play as of the follow:
– Dodge (feints and deceptions).
– Change of direction (changes of speed and/or direction).
– Change of pace (speed of running stops and restarts).6.7. Additional Information for teachers
To have a very good tactics in Netball requires high levels of physical and mental
ability, excellent techniques and skills, and a good physical fitness.
Because of the rule structure of the game, netball is a game of precise tactics, but
it should never be forgotten that skills are the vocabulary on which these tactics
are based. Tactics should be practised and understood by all players (court players
and substitutes) but tactics must allow for flexibility, giving players the opportunity
to use them creatively and with flair. Players who have acquired skills that are more
advanced may use greater flexibility of tactical play. In netball game, we need
transition, where a team changes tactical role. This may occur:
– At the start or re-start of play.
– After a set piece.
– After a break in an attacking or defensive.Netball is a game of speed and anticipation. The rules that cover time and space,
plus the territorial limitations, mean that turnovers can occur suddenly at any point
on the court. The team that can respond the quickest, getting all members focused
and reacting as a unit has the greatest potential for success.
Set pieces in netball play a great role in playing the game. Those set pieces are the
following:
– Toss up.
– Throw in.
– Penalty pass.
– Penalty shot.
– Centre pass.
Successful set pieces depend on:
– Speed of reaction.
– Speed of response.
– Understanding of the rules.
– Well drilled team plans.6.8. End unit assessment
GAME SITUATION
Form teams consist of seven students, let them take their respective positions on
the court and start play normal netball game. If there are many teams changing of
team will be after five minutes. Give team A role of attacking and to team B with the
role of defending. Within a given period, count the number of goals scored.
If B has scored more goals than A, B team will get 3 points A team gets 1 point. If
they tie B team gets 1 point and A team gets 0 point. If B win, it will get 2 A team
gets 0 point.6.9. Additional activities
6.9.1. Remedial activities
GAME SITUATION
Two players with one ball stand 2 m apart.
– Player 1 passes a short quick chest pass directly to player 2 who catches and
returns the ball.
– Player 1 then passes a lob over the head of player 2 and into the space
behind her.
– Player 2 must keep her eye on the ball, turn body on an angle and run to
get body under the ball in order to catch it. Player 2 passes a shoulder pass
back to player 1 and quickly returns to her starting position. Player 2 alternates
between receiving short-pass passes and high overhead passes.
– Swap after 30 seconds.Variation
– Only one player moves at a time while doing this drill, the other is the
passer.
– The catcher must move quickly backwards and again forwards to her starting
position, always keeping her eyes on the ball.6.9.2. Consolidation activities
GAME SITUATION
In group of eight up to ten players in a circle with one ball:
– Players stand in a circle and hold hands.
– Each take four steps backwards to create a wide-open circle.
– One player has the ball and can throw to any of the players in the circle.
– On passing the ball, she must follow her pass and defend the next pass
made.Variation
– Vary the pass made.
– Stick on three-second rule.
– Stay 0.9m passer and defend the ball.
– A second ball can be added to the circle.
– Enlarge the circle.6.9.3. Extended activities
GAME SITUATION
Eight or more players and two balls. Players form a square (in the Centre third,
using the center as the cross over point) with two players standing at each corner
– Players 1 and 3 each have a ball.
– Players 2 and 4 run towards the center circle and get the ball from their left.
– On getting the ball, they pass it forward to the players waiting on the opposite
corner (players 6 and 8).
– Players 1 and 3 then begin to run towards the center circle get the ball on the
left from players 6 and 8 and pass forward to players 5 and 7.
Points to consider
– This drill requires high levels of concentration.
– Players must be able to get a ball on the move from one direction on and pass
it in another direction on without making any footwork or handling errors.
– As players progress, this drill should be done with more speed.
– Players can progress to get the ball on the right, i.e. change the direction of
the drill.UNIT 7: GOALBALL
7.1. Key unit competence:
Perform different Goalball tactics7.2. Prerequisite (knowledge, skills, attitudes and values)
Students of senior five will learn better basic tactics of playing goal ball if they
can perform basic techniques of goal ball as they learned in senior four and have
developed basic motor control and movement exercises.7.3. Cross-cutting issues to be addressed
Gender
In teaching and learning process of goal ball, the teacher must prepare and provide
physical activities that engage both girls and boys equally to exploit their full potential
and talents without any discrimination or prejudice.Inclusive education
The teacher as a facilitator must consider different special education needs and
select goal ball activities to adapt his teaching approaches to students. This creates
a positive attitude and helps all students to participate actively and develop their
competence levels.Financial education
The teacher should integrate financial education into his/her teaching/learning of
goal ball by providing the local and no cost teaching and learning material where
is possible. He/she must encourage students to make their own materials that can
help them to develop competences not only in sport at school but also in their life.Standardization culture
The teacher must choose and select the standardized materials to use in his/
her teaching/learning process of goal ball. It is necessary to provide appropriate
materials required to the levels of students and help them to develop culture of
checking and using the quality of sport materials for the competitions before using
them in order to prevent injuries and other accident.
Environment and sustainability
The teacher should provide materials and deliver the lesson with encouraging
students to protect the environment and well use of materials. The teacher helps
them to develop the spirit of keeping safe the environment they use in sports
activities.Peace and values education
The teacher helps students to develop fair play and social values by avoiding
violence and conflict in the goal ball game and by setting clear and relevant
instructions. He/she should provide the activities that help students to develop theircompetence peacefully.
Comprehensive sexuality education
A teacher provides goal ball activities and sets instructions that prevent sexual
harassment, any kind of gender-based violence like sexual abuse and physical
contacts oriented to the sexuality intention.Genocide studies
While conducting goal ball exercises a teacher should take a time to explain student
show sports should be used to fight against Genocide ideology and how to prevent
it. For example, to organize Genocide memorial tournaments at school and give the
message related to the Genocide.7.4. Guidance on introductory activity
Before introducing the lesson one of this unit, you must introduce the whole unit.
The teacher as a guide, facilitator and expert, ask questions or give activity related
to different tactics needed to play Goalball in order to help them to predict what to
be learned in the whole unit.7.5. List of lessons/sub-heading

Lesson 1: Offensive tactics in Goalball
a. Learning objective
Perform tactical exercises of handling and throwing the ball in different positions.b. Teaching resources
– Goalball playground.
– Bell balls / Any other objects of varying size which make sound.
– Stopwatch/Watch.
– First Aid kits.
– Knee and Elbow Pads.
– Whistle.
– Eyeshades/Blindfolds.c. Prerequisites/Revision/Introduction
Students of senior five will learn better the offensive tactics in goalball If they can
execute basic physical exercises and perform basic goalball techniques learned in
year one.d. Learning activities
Opening discussions (in a semi-circle formation)
Check the students’ readiness. In pairs students brainstorm about different goalball
techniques learned in senior four. Let some groups present their findings. Assist them
to clarify their findings. Introduce defensive and offensive goalball techniques learnt
in senior four. Ask students to choose assistants and determine the limits of the
game playing area and to enforce respect of the rules. Invite them to start warm up
exercises and stretchingWarm up exercises
– Let the students perform warming up exercises. They should jog around,
stretch and strengthen their muscles systematically.
– One students can lead warm up and stretching exercises.
– Guide students while performing warm up and stretching exercises (let them
perform warm up without using eyeshade).e. Lesson body
Tactical exercises of handling and throwing the ball in different positions
– Explain to the students tactics of throwing the ball in goalball.
– Demonstrate how to handle and throw the ball tactically.
– Let students apply it individually on the goalball court.• For handling the ball
During the process of setting up a throw to face the opponent team, a thrower
should do the following:
– To walk backwards onto the goal bar so that the bar is felt equally across the
back.
– To use the court orientation lines (forward direction).
– After those, grip the ball with one hand if not use two hands, place part of the
fingers in one of eight holes, and get ready to throw the ball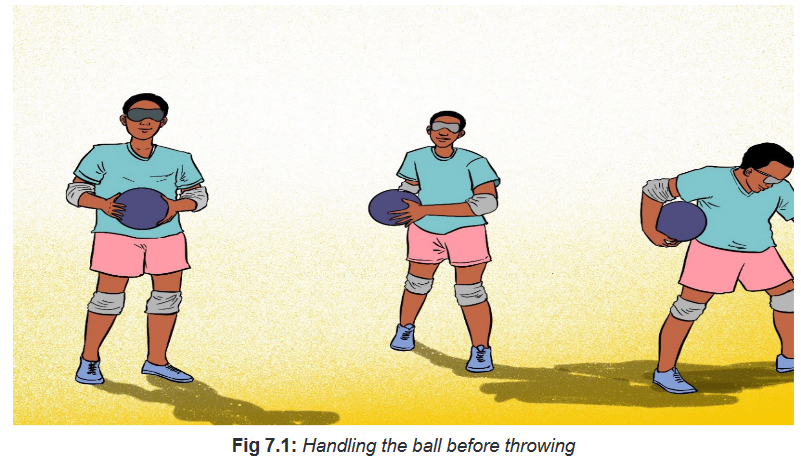
• While throwing the ball
Remind students that:
– Throwing the ball in goalball is a skill that generally considered as one-
handed roll.
– While throwing the ball try to focus on speed and accuracy by using frontal,
spin or between legs throw.
– In official goalball match, attacking take into account the attack phases
(preparation and throwing), player position (centres and wings) and different
styles to be used while throwing the ball in goalball such as rolling forward,
between legs throwing, ten-pin bowling, side throw, discuss throw and silent
throw.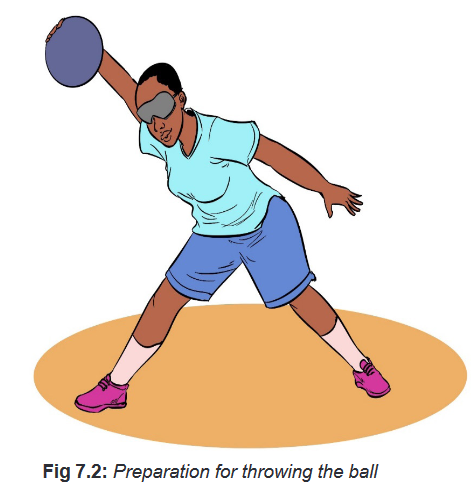
Tell the students to respect steps while throwing the ball by using one- handed
delivery and a simple three-step approach:
– First step (left) short and quick, while other two steps should have a longer
stride (First step is when students swing the ball back (always supporting it
with the other hand from underneath).
– On the second step, bring ball forward and lower body close to the floor.
– On the third step, student slides on the left foot and body should be low.
Request students to throw the ball in less than 10 seconds.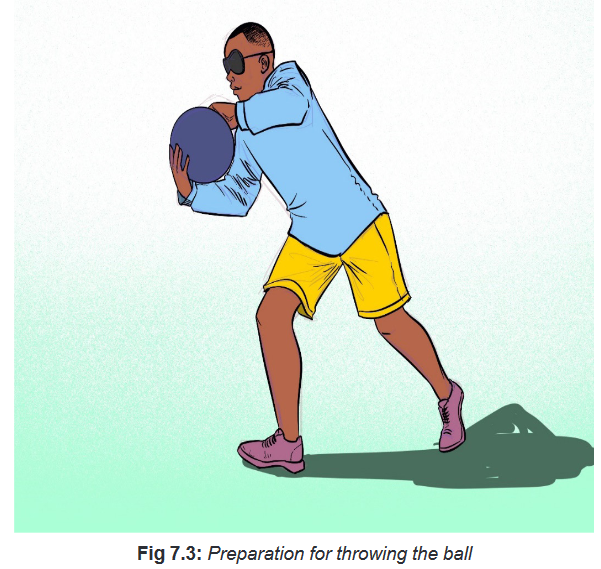
TASK / ACTIVITY
Step 1
In pairs, request one student to hold the ball in one hand with the fingers spread and
supporting the ball with the other hand. Ask him/her to draw the ball backward by
releasing supporting hand and extend the arm to a distance that maintains control
of the ball. Ask him/her to step forward with the opposite leg to his/her throwing arm
and keep both feet pointing in the direction of the throw.Step 2
Student swings the ball forwards very quickly and release the ball close to the floor
so that it makes very little sound. Let all students perform this exercise.Points to consider
– Ensure the other arm is extended outwards to help balance.
– To follow though the following arm in the direction that he/she wishes the ball
to travel.
– Keep the knees bent.
Students sit in a five-point star shaped formation without wearing eyeshades. One
student is given the Goalball or any other objects of varying size, which make sound
to begin the game.
One student throws the ball to another student across the star. Before the throw is
made the student, who is going to receive the ball must use verbal sign to indicate
where he/she is located.Modifications/Variations:
– All students use eyeshades.
– Instead of verbal sign, students knock on the floor to signal the thrower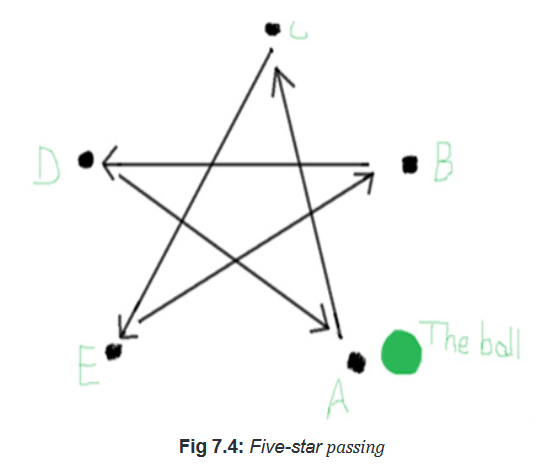
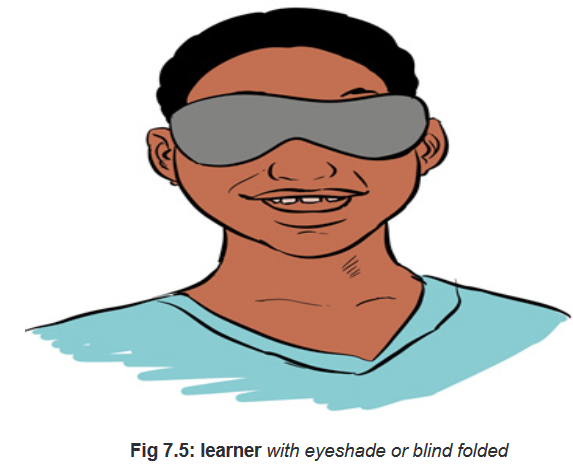
Cool down
– Let students practise cool down exercises and light stretching by focusing the
most used muscles.
– Guide them how they can stretch their muscles accordingly.
– Help them/demonstrate/correct where is necessary.Closing discussion
• Reflect
– Which challenges/ advantages did you face during performing tactical
exercises of handling and throwing the ball in different positions in Goalball?• Connect
– What are conditions do you need in order to perform tactical exercises of
handling and throwing the ball in Goalball?
– What kinds of sports do you think people who are blind play?• Apply
– What is the usefulness of applying tactics in Goalball?
– What are some of the criteria to become an elite Goalball player?Lesson 2: Defensive tactics in Goalball
a. Learning objective:
Perform tactical exercises of blocking and catching the ball in lying, knees, crouching
and diving position.b. Teaching resources
– Goalball playground.
– Bell balls / Any other objects of varying size which make sound.
– Stopwatch/Watch.
– First Aid kits.
– Knee and Elbow Pads.
– Whistle.
– Eyeshades/Blindfolds.c. Prerequisites/Revision/Introduction
Students of senior five will learn better the defensive tactics in Goalball If they can
execute basic motor control and movement exercises and perform basic Goalball
techniques learned in senior four.
d. Learning activities
Opening discussions (in a semicircle formation)
– Check the students’ readiness.
– In pairs students brainstorm about different goalball techniques learned in
senior four.
– Let some groups present their findings.
– Assist them to clarify their findings.
– Recall defensive and offensive goalball techniques learnt in senior four.
– Invite them to start warm up exercises and stretching.Warm up exercises
– Let the students perform warming up exercises. They should jog around,
stretch and strengthen their muscles systematically.
– One student can lead warm up and stretching exercises.
– Guide them while performing warm up and stretching exercises.e. Lesson body
A. Players positioning
• STANDARD V
Explain students that standard V is a good position for beginners, particularly as the
head and feet of each player should not contact with another player.Description of standard V position on the goalball court
– The wingers mark off with the side orientation markers, and the center player
marks off the forward center marker.
– The ball should be connected with the center player (position B) it may be
thrown towards the wingers (A or C) and if not grabbed by a winger, should
go off court rather than into the goals (good defense).In group of three students let them practices standard V position as shown on the
image below.
• REVERSE V
Description of reserved V position on the court
– - The center player marks off the center rear line marker, with the wingers
playing forward of the center player.
– - An incoming ball may then be channeled towards the center player.
– - The playing position is susceptible to cross-court balls and does not leave
much room for error because it is quite close to the goals.In group of three students let them practices reverse V position as shown on the
image below.
• STRAIGHT ACROSS
Description of straight across position on the court
– Players can play across the front line, across the back line, or in a line across
the court anywhere in between.
– A team must practice this move, as poor positioning will result in feet and
heads coming together.In groups of three students let them practices straight across position as shown on
the image below.
• OVERLAP
Description of overlap position on the court
– In this move, one winger goes forward of the center player while the other
winger goes back.
– This move requires coordination between all members to be effective.In groups of three students let them practices overlap position as shown on the
image below.
Body position while defending
With nine meters of goal and three members on a team, each member needs to
lay down and stretch out to cover three meters each to make an impregnable line.Defensive movements
Explain students that all defensive techniques rely on a players’ abilityto orientate on
the court. Good knowledge of player orientation lines and gooduse of communication
is necessary and helpful.Request students to:
– Place their fingers upon a player orientation marker, and squats down.
– Keep shoulders square to the front, with the knee of one leg on the floor and
the other leg stretched outright towards the side of the court to allow quick
movement to either lie down or move further around the court.
– Keep the fingers on the orientation marker to help a player quickly return
– to the squatting position after lying down.
– Stand up to deliver the ball before quickly returning to the squat and the
orientation marker.B. Blocking and catching the ball.
To block and catch the ball, the following actions should be done.
– Start with feet shoulder width apart, knees slightly bent, arms forward with
elbows slightly bent.
– Listen to the direction of the ball if the ball is going to the right, then carefully
the students should lower themselves to floor and then quickly lower knees
and hips on right side of body; make themselves as long as they can by
stretching out arms and legs.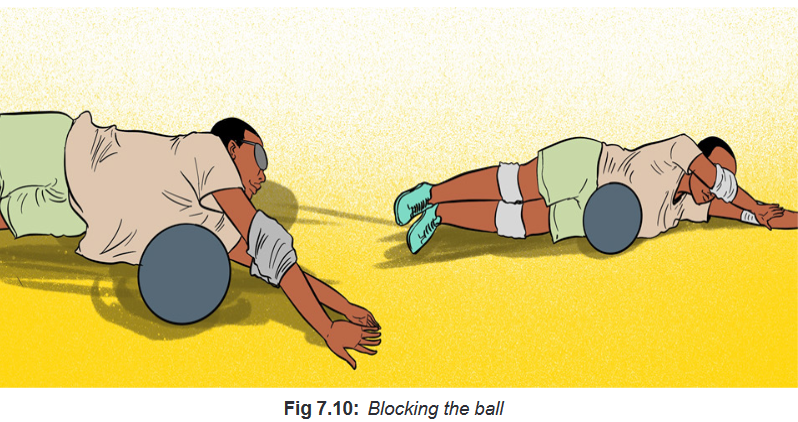
– Arms should be brought in front of the face to protect their face from being hit
and head should tilt back slightly.
– Block the ball from a horizontal lying position with arms and legs fully extended
(The fully extended body should be tilted slightly forward (top hip toward
opposing side), so that the ball deflects down to the floor when it makes
contact with the player. If the top hip is tilted away from the opposing side,
the students’ body will act like a ramp, deflecting the ball up and into the net).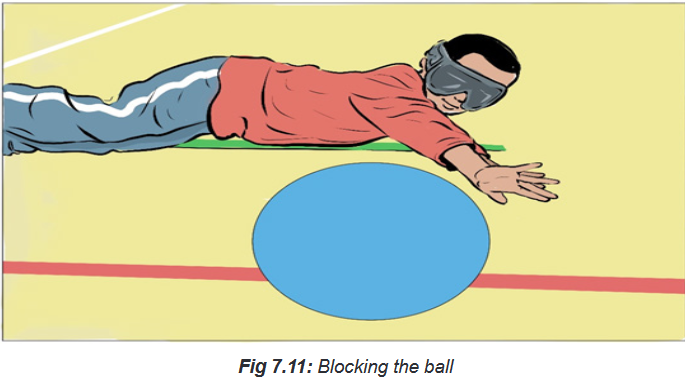
– Catch the firmly in order to launch your throwing towards the opponent team.

In pairs let students perform blocking the ball on the goalball court.
Remind students that diving should be also used while blocking the ball.
APPLICATION ACTIVITY
In pairs, one student try to score by hitting the wall behind the opposite defending
students.Variation
– Let students practice the same exercises in team of 2 vs 2, 3vs 3.
– Let students play a normal game by using teams of three persons.Cool down
– Let students practise cool down exercises and light stretching by focusing to
the most used muscles.
– Guide students how they can stretch their muscles accordingly.Closing discussion
• Reflect
– Which challenges/advantages did you face during performing tactical
exercises of blocking and catching the ball in different positions in Goalball?• Connect
– What are conditions do you need in order to perform tactical exercises of
blocking and catching the ball in Goalball?• Apply
– What is the usefulness of applying tactics in Goalball?
– What are some of the criteria to become an elite Goalball player?
Lesson 3: Applying learning tactics in Goalball game situationa. Learning objective
Play a short Goalball game to apply the learnt techniques and tactics.b. Teaching resources
– Goalball playground.
– Bell balls / Any other objects of varying size which make sound.
– Stopwatch/Watch.
– First Aid kits.
– Knee and Elbow Pads.
– Whistle.
– Eyeshades/Blindfolds.c. Prerequisites/Revision/Introduction
Students of senior five will apply better the learned goalball techniques and tactics
in game situation if they are able to apply different Goalball offensive and defensive
techniques and strategies learned in senior four and in the previous lessons of senior
five.d. Learning activities
Opening discussions (in a semicircle formation)
– Check the students’ readiness.
– In pairs, students brainstorm about different goalball offensive and defensive
tactics learned in the previous lessons.
– Let some groups present their findings.
– Assist them to clarify their findings.
– Describe the game situation you are going to use.
– Invite them to start warm up exercises and stretching.Warm up exercises
– Let students perform warming up exercises. They should jog around,
stretch and strengthen their muscles systematically.
– One students can lead warm up and stretching exercises.
– Guide them while performing warm up and stretching exercises.
e. Lesson bodyGAME SITUATION
Prepare the court and materials to be used while playing Goalball. Divide students
into groups of three. Choose three officials to lead the game including a referee,
timekeeper and a scorekeeper and set duration of the game. Each half has five
minutes.
– Determine which team starts with the ball by using coin tossing.
– Request teams to line up beside their goal where the referee will check their
eyeshades.
– Referee request players to move onto court with their eyeshades on and
– find their player orientation marks.Opening the game
– Let students play the first two minutes without eyeshades, but there after, in
three minutes’ eyeshades should be worn.
– Request students not throw the ball so hard towards their teammate.Procedures
– The referee, after consulting the table officials who do the scoring and timing,
will call ‘Centre’ followed by throwing the ball towards the person in the center
of the team taking possession of the ball for the first throw.
– As soon as the player touches the ball, the whistle is blown three times,
followed by the call ‘Play’.
– The team now has ten seconds in which to throw the ball towards the other
goal, and the game is started.
– If the ball goes over the edge, it will be called ‘out’, dropped back to the
nearest player, called ‘play’ and off it goes again. A whistle will indicate if the
ball goes out more than 1.5 meters from the side, and a goal judge will retrieve
the ball. Usually following the standard phrase of ‘Quiet Please’, there will be
a whistle, and called ‘play’ and the game continues.During the play time-outs, team time-out, substitutions will be made. Remind
students not to remove their eyeshades unless permitted by a referee. Where an
official time-out is called, the ball will be taken from a player, and then dropped back
in from the sideline.Half time
– The referee will whistle the end of the half, followed by ‘Half time’. Once a
player walks off the edge of court, eyeshades may be removed.
– Within the half time period, the team will swap ends and team bench areas,
get some water, substitute some players, and be ready to go back on court.
– The referee will recheck the eyeshades; players enter the court and get ready
for the second half. The referee will call ‘Centre’, whistle three times, and call
‘Play’ and the game is back on!Finishing the game
– After the second, half of ten minutes has expired, the referee will whistle and
call ‘Game’ (If the score is tied, there will be a three-minute break and then
overtime of two three-minute halves).
– At the conclusion of the game, players may remove their eyeshades and then
walk to the center of the court or towards the score table.
– The teams then shake the hands of the opposing team in a show of good
sportsmanship and fellowship.The winner is the team with the highest score.
Cool down
– Let students practise cool down exercises and light stretching by focusing the
most used muscles.
– Guide them how they can stretch their muscles accordingly.
– Help them/demonstrate/correct where is necessary.Closing discussion
• Reflect
– How do you feel playing Goalball?
– Which challenges/advantages did you face during performing different
– games and developmental activities to apply tactics in Goalball?• Connect
– Do you think Goalball is real sport? Should it be played during theParalympic
Games?
– What are conditions do you need to perform different games and
– developmental activities to apply tactics in Goalball?• Apply
– Do you think it is easy to become an elite Goalball player?
– What is the usefulness of applying tactics in Goalball?
– What are some of the criteria to become an elite Goalball player?
7.6. Summary of the unit
Strategies are needed in goalball game in order to improve performance and win
the match. Those strategies are related to offensive and defensive.Offence strategies:
To score, a player must roll or bounce the ball down the length of the court, pass the
opposing defenders, and into the opponents’ goal. Typically, the player with the ball
will stand; orient themselves using the tactile lines, sounds from teammates, and/or
the crossbar of their own goal. The player will then stride forward, lean low, and roll
or side arm the ball down the court.The ball must hit in the player’s own landing zone, and anywhere in the neutral
zone. So long as it hits each zone, the style of throw is entirely up to the player in
question.Many players will take several strides and release the ball as close to their own
high ball line as possible; leaning low to ensure a legal throw. Some players will
throw after spinning; transferring the momentum of the spin into additional velocity.
Others are able to throw the ball so that it will bounce just once in each of the required
zones.Defensive strategies:
The defending players stay within the team area, generally in somewhat staggered
positions to avoid collisions. When they hear the other team throw the ball, they ‘lay
out’, that is slide on their hips and stretch their arms above their heads and extend
their legs in order to cover as much distance as possible. The objective is simply
to keep the ball from getting past with whatever part of the body the player can get
in front of it.To help students for mastering the above offensive and defensive strategies, they
are proposed games and developmental activities and methodological process of
teaching suggested to guide and facilitate the students improve their performance
and win the match.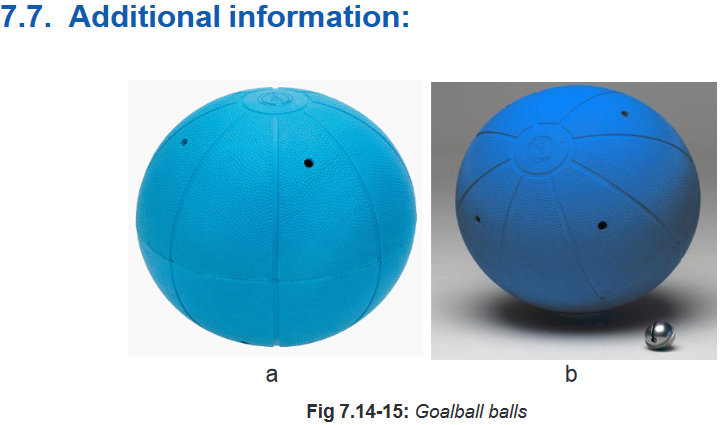
Goalball strategies for beginners
– After blocking a shot, back up to the net so you can line yourself up with the
direction you want to throw the ball.
– Tactile markings made with a line of string and tape on the floor of help to
orient players on the court. Feel around on the floor to avoid getting lost.
– Getting into a low lunge position when you release the ball will help prevent
throwing a high ball.
– When blocking a shot, make sure tuck your face under your upper arm to
prevent the ball from hitting your face.
– Tapping your hand on the floor or snapping your fingers will let your teammates
know where you are and can avoid a collision.
– When passing the ball, communication with your teammate is key! Call their
name and wait for their sound indication before firmly bouncing the ball on the
floor so they can hear where it is coming from.
– You only have 10 seconds from the time the ball hits a player on your team
until the moment the ball crosses half-court. Take your time to get oriented,
but do not be too slow on your return.
– Making sounds can be effective for communication amongst teammates or
used as a distraction for the other team, but when the ball is released from
the hand of your team, the noises must be finished. Otherwise, your team will
receive a noise penalty.
– When gripping the ball, extend your fingers as wide as they will go and
grasp the ball in the crease of your wrist.– In the blocking position, tilting your extended body slightly forward will deflect
the ball down to the floor after making contact with the player. If the top hip is
tilted backwards towards the net, your body will act like a ramp, deflecting the
ball up and into the net.Personal equipment
As with any sport, some equipment is required to play the game. For goalball, this
includes:
– Clothing: A t-shirt or jersey will be enough for the upper body, with track
pants and joggers for the lower body. The track pants assist when scrumming
on the floor.
– Eyeshades (obligatory): Regardless of a player’s degree of sight, all players
are blindfolded. Ski goggles or motocross motorcycle goggles should be
used, but inside should be black and should not show any pinholes of light.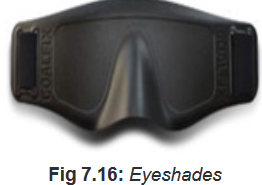
• Padding (optional): There are several types of padding:
– Elbows: to protect elbow. Volleyball elbow pads should be used effectively
when diving or defending across the team area.
– Knees: As per elbow pads;
– Hips: Squares of foam (larger than an A4 page) can be tucked down the
inside of the track pants. With a little protruding above the track pants tie-lace,
the padding will be held in place.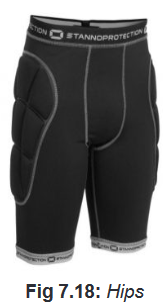
– Body: As a matter of personal comfort, players may wish to place some
padding along the front of the legs or across the chest. Some players use
shin guards;– Gloves (optional): Some players may use fingerless gloves to aid gripof the
ball, to keep the fingers warm on a cold morning and as a little reinforcement
to the fingers should a quick ball hit them.– Mouth guard (optional): The dental requirements of a sport should not be
overlooked.
– Groin protector (optional): For male players, the cricket box provides a little
protection to the pelvic organ area, thereby reducing immense pain.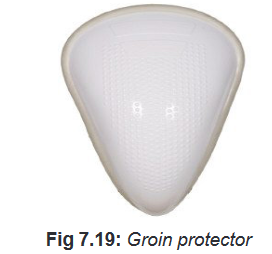
– Chest protectors (optional): For female players, the hard upper body-
shaped plastic breast protectors may be a little uncomfortable to begin with,
but reduces possible pain from a chest hit by a ball.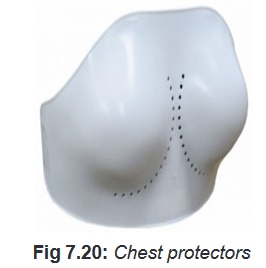
Remember that equipment is designed for playing the game, and protecting the
player from injury. The comfort of the player is also important. Remind to request
students to search and use protective materials during playing goalball.How to lay down (correct body position) in a way to protect the body and
prevent injury in goalball game?– Ensure protective equipment is being worn.
– Lie down onto one side, into a straight line.
– The knees may need to be bowed a little to stop rolling forward or backwards,
stretch the feet out, pointing the toes.
– Place the ankle of the upper leg slightly forward of the lower ankle, the ball
should hit the legs, it should stop rather than using the feet as a ramp into the
goals.
– Stretch the arms out, maintaining the straight line from the toes past the body
to the fingertips.
– The fingers should be straight out with fingers together to prevent the fingers
being bent back if struck by the ball.
– The fingers of one hand should be placed behind the fingers of the other
hand.
– Thumbs should be out to the side of the hand and locked across towards the
other hand. Keep the hands stretched out and not bowed out at the elbows.
– Keep the head tilted back behind the upper arms.Styles used to throw the ball in goalball game
– Rolling forward: Face the opponent team, attacking players stand with feel
shoulder width apart. Player’s place the ball forward of the feet, then bend
down and push it forward to roll towards the opponent team. It may be done
when sitting on the court.
– Between the legs: Instead of facing forward, turn around to face the goals
and throw the ball between the legs towards the opponent team. Push the ball
along the ground instead of throwing it up the area that may result in a highball
penalty. This allow the ball to be quickly and accurately got rid of possibly to
prevent a ten-second penalty.
– Ten-pin bowling: the ball is initially held in both hands (one on top, one
below). While turning slightly to one side, the top hand is released and the ball
is swept through with the other hand. One of the feet is usually swept up as a
counter-balance. Do not collide with another player, as the loss of balance will
usually cause the player to fail over.
– Underarm throwing: The ball is thrown downwards and forward and may or
may not involve a slight turn of the body. There is no leg sweep.
– Side throw: this can be done while standing on the sideline or with one foot
on a player orientation line. The body is turned at right angles to the opponent
team. Feet are placed shoulder width apart. With the ball held either side,
the arms are swung back and forth. On the forward swing, the forward hand is
released and the rear hand pushes the ball onwards.
– Discus throw: this throw is done as the discus thrower on a sports field. The
ball is held firmly, the body is bunched and then spun on the feet and flinging
the ball forward. Players are requested a lot of practice; the ball may not
bounce before the highball line or will go past the end of the court.Passing the ball
A ball may be passed to another player to prevent committing a third throw penalty,
because the player is not in a position to quickly throw the ball, or to set up an
offensive play strategy.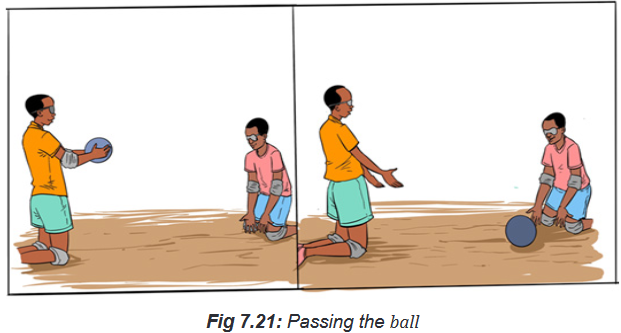
7.8. End unit assessment
GAME SITUATION
Organize a completion where students are divided into groups of six players
(randomly). Two groups play a normal game using offensive and defensive
techniques and tactics. Let all groups meet play and count number of goals scored
by each team.Points to consider
– Duration period for confrontation of two teams is 3min.
– Team members must wear eyeshades.
– Teams that are not in a play provide officials to lead the game.
– Only one substitute is accepted for each team during one match.
– The winner is the team finishes with high goals.
7.9. Additional activities7.9.1. Remedial activities
In pairs students (the thrower with no eyeshades the blocker with eyeshades)
perform exercises of throwing and blocking the ball. One throws the ball another
tries to block the ball. After ten throws for each one count number of ball blocked.
The student who blocked the highest number of ball will be the winner.7.9.2. Consolidation activities
Two partners start on the ground, sitting feet-to feet and practice rolling the ball
to each other (keep the distance short at the beginning and then the distance can
be increased, as the student are more comfortable with the activity). The goal is
to make accurate passes. The student can call their partner’s name to help with
direction of the passes. This can also be done from a sitting position.Variations
– Introduce partner number three and let them play normal game.
– Request them to use offensive and defensive tactics learned.
– Use 10 minutes of playing.7.9.2. Extended activities
Encourage students to make a team, do trainings and participate in different goalball
competitions at School level, Sector level, District level or National level.UNIT 8: SITTING VOLLEYBALL
8.1. Key unit competence:
Perform Sitting volleyball tactics in game situations8.2. Prerequisite (knowledge, skills and attitude)
Students of senior five will learn better basic tactics of playing sitting volleyball
if they can apply basic motor control and coordination exercises and performed
sitting volleyball basic techniques learned in senior four.
8.3. Cross-cutting issues to be addressedGender
In teaching and learning process of sitting volleyball, the teacher must prepare and
provide physical activities that engage both girls and boys equally to exploit their full
potential and talents without any discrimination or prejudice.Inclusive education
The teacher as a facilitator must consider different special education needs and
select activities to adapt his teaching approaches to students. This creates a positive
attitude and helps all students to participate actively and develop their competence
levels.Financial education
The teacher should integrate Financial Education into his/her teaching/learning of
sitting volleyball activities by providing the local and no cost teaching and learning
material where is possible. He/she must encourage students to make their own
materials that can help them to develop competences not only in sport at school
but also in their life.Standardization culture
The teacher must choose and select the standardized materials to use in his/ her
teaching/learning process of sitting volleyball. It is necessary to provide appropriate
materials required to the levels of students and help them to develop culture of
checking and using the quality of sport materials for the competitions before using
them in order to prevent injuries and other accident.
Environment and sustainability
The teacher should provide materials and deliver the lesson with encouraging
students to protect the environment and well use of materials. The teacher helps
them to develop the spirit of keeping safe the environment they use in sports
activities.Peace and values education
The teacher helps students to develop fair play and social values by avoiding
violence and conflict in the sitting volleyball game by setting clear and relevant
instructions. He/she should provide the activities that help students to develop their
competence peacefully.Comprehensive sexuality education
A teacher provides sitting volleyball activities and sets instructions that prevent
sexual harassment or any kind of gender-based violence like sexual abuse and
physical contacts oriented to the sexuality intention.Genocide studies
While conducting sitting volleyball exercises a teacher should take a time to explain
student show sports should be used to fight against Genocide ideology and how to
prevent it. For example, to organize Genocide memorial tournaments at school and
give the message related to the Genocide.8.4. Guidance on introductory activity
Before introducing the lesson one of this unit, you must introduce the whole unit.
The teacher as a guide, facilitator and expert, ask questions or give activity related
to different tactics needed to play sitting volleyball in order to help them to predict
what to be learned in the whole unit.
8.5. List of lessons/ sub-heading
Lesson 1: Tactics of serving and receiving the ball
a. Learning Objective
Perform different tactical exercises of serving and receiving the ball.b. Teaching resources
– Balls
– Playground (volleyball court)
– Trees
– Net
– Cones
– Chasubles
– Whistle
– Stopwatch/Watchc. Prerequisites/Revision/Introduction
Students of senior five will learn better the tactics of serving and receiving the
ball in sitting volleyball if they can execute basic physical exercises and perform
different basic sitting techniques learned in senior four.d. Learning activities
Opening discussions (in a semi-circle formation)
– Check the students’ readiness.
– In pairs students brainstorm about different sitting volleyball techniques
learned in senior four.
– Let some groups present their findings.
– Assist them to clarify their findings.
– Recall defensive and offensive sitting volleyball techniques learnt in year one.
– Invite them to start warm up exercises and stretching.Warm up exercises
Let the students perform warming up activities to prepare their muscles, cardio-
vascular and respiratory system and to be ready for more activities that are vigorous
and to prevent injuries. Those activities should include the following:
– Easy-paced activities.
– Light moving activities.
– Passing the ball.
– StretchingWhile conducting warm up, request students the following:
– Be seated and move in any direction based on exercise.
– Stay balanced at all times.
– Use a variety of fakes when tagging or avoiding tags.
– Guide them while performing stretching exercises.e. Lesson body
Tactics of serving in sitting volleyball
Serving can be very effective in sitting volleyball to put pressure on opponents.
Because of the lower net height and the challenges in moving on serve receive;
points can be generated from the serving line. This is why front row players are
allowed to block the serve on the opposition side. Both float serves and spin serves
are used in sitting volleyball, however, the spin serve can be slightly less effective
because of the angle of the ball going over the net. Because there is no jumping,
there is no ‘downward’ angle put on the ball that is largely why it is effective in
traditional volleyball.Tell students that a good serve is an effective way for a team to score points.
Here below are the fundamentals to perform a good serving:
– Tell the students that they should pull back their hitting arm as if they were
going to draw back a bow and arrow.
– In their non-serving hand, students should raise the ball to shoulder height
with their arm in front of their body and toss the ball gently 0.3-0.5m above
their head.
– Students must then swing through the ball to their intended target.
– To allow the wrist to be loose so that it snaps on contact with the ball to create
a top spin serve or keep the wrist rigid and consistent for a float serve.
– The ball served should not touch the antennae and should land in the court
of the opposing team.
ACTIVITY
Student line up at the attacking line and targeting designated areas in the opposite
side of the net. As students achieve their goal of hitting the target, they move to
imaginative line one-meter back and targeting again. If successful, the students
move back until they reach the serving line where the exercise ends. Targets vary
in size while students develop their ability of serving.Teaching points to consider
– Students should practice serving to the designated areas on the court (on
different positions).
– Practice focuses on short, deep line and cross targeting.Correction for tossing the ball while jumping:
– Check that the shelf hand is tossing the ball in front of the hitting shoulder.
Have students practice tossing without hitting the ball.
– Concentrate on tossing the correct height.
– Look at the server’s body and feet position.
– They should make the impact with the ball at the 1 o’clock position.Tell students that there are two major adaptations of the rules concerning sitting
volleyball:
– Remind the students that they are allowed to have the legs inside the court
while serving but must sit behind the service line.
– In sitting volleyball, it is allowed to block the service.Reception of the ball
During receiving the ball, tell students to keep reception ready position in the
following ways:
– Sit tall with chest and head up.
– Place legs in front of body or slightly to the side. If possible, have one-foot flat
on the ground to push off.
– Arms down beside hips with hands on the floor ready to push in any direction.
– Stay alert and use both hands and feet to move behind ball once in play.
After reception, pass should be made with the purpose of preparing the attack.
Students may use different types of passes as learned in Year One.Tell students to use
• Forearm pass:
When receiving the ball from the service or to play a ball that is too low to volley.
Remind them main fundamentals of forearm as follow:
– Start in a balanced ready position with relaxed arms and extended away from
the body at about 45 degrees.
– Join hands to form a flat forearm platform.
– At contact, the arms follow through and direct the ball to the target.• The volley (overhead pass)
– When the ball is above the head, which is the most common way of playing the
ball.
– When the students need to pass the ball, set up a smash, or to play the ball
over the net.
APPLICATION ACTIVITY
Students form multitriangle formation. Player 1 tosses the ball to player 2, who
forearm passes to player 3. Player 3 catches the ball and tosses to player 1, who
forearm passes to player 2, etc. Players attract other players’ attention by saying
ready, mine, pass, etc.Teaching points to consider
Pay attention to the players’ hands position and ready to play positionError detection and correction: For forearm, passing Players at early stage of
playing often have problems with judging the speed and distance of a moving ball.
Error: A player misjudges balls and makes contact with the upper arms instead of
the forearms.
Correction: Watch how the students contacts the ball emphasize moving the body
to get into a balanced position before contacting the ball, the ball should contact
the forearms between the elbow and the wrist on the flat platform a player can
overcome misjudging the ball by titling the forearm platform to deflect the ball toward
the target players need to establish a low position and extend the arms away from
the body when contacting the ball Players in sitting volleyball usually establish their
own way to get into a ready position to play the forearm pass.Cool down
– Let the students practise cool down and stretching exercises by focusing on
the most used muscles.
– Guide them how they can stretch their muscles accordingly.
– Help them/demonstrate/correct where is necessary.Closing discussion
• Reflect
– What were the most challenging/advantageous when serving and smashing
the ball in sitting volleyball game?• Connect
– How do you serve/passing the ball in a sitting volleyball?
– How do you contact the ball when serving and passing the ball in sitting
volleyball?
– When and how making service, rotation and pass in sitting volleyball?
• Apply
– What is the usefulness of applying serving and passing tactics in sitting
volleyball?
– What are some of the criteria to become a good server/receiver in sitting
volleyball?Lesson 2: Tactics of setting and smashing
a. Learning Objective
Perform different tactical exercises of setting and attacking.b. Teaching resources
– Balls
– Playground (volleyball court)
– Trees
– Net
– Cones
– Chasubles
– Whistle
– Stopwatch/Watchc. Prerequisites/Revision/Introduction
Students of senior five will learn better the tactics of setting and smashing the ball in
sitting volleyball if they can execute basic physical exercises and perform different
basic setting and smashing techniques learned in senior four.d. Learning activities
Opening discussions (in a semicircle formation)
– Check the student ‘readiness.
– In pairs, students brainstorm about different sitting volleyball techniques and
tactics learned in the lesson one.
– Let some groups present their findings.
– Assist them to clarify their findings.
– Recall basic sitting volleyball techniques and tactics learnt in the lesson one.
– Invite them to start warm up exercises.Warm up exercises
– Let the students perform warming up exercises to prepare their muscles,
cardio-vascular and respiratory system, to be ready for more activities that
are vigorous and to prevent the injuries.
– Chose randomly a student to lead warm up.
– Guide them while performing warm up and stretching exercises.
e. Lesson bodyShort description of setting
Explain to the students that setting in sitting volleyball, is an action where a player
transfers the ball for another player to make a smash (or spike). Setting is done
close to the net. The ball must be set up at a height above the net for the smasher
to make a powerful smash or put the ball over the block.
• Setting fundamentals
Remind the students that setting the ball needs to follow the following steps:
– Sit in a ready position, put hand above the forehead and locating the ball.
– Contact the ball is in the middle of the forehead;
– The pads of the fingers should contact the ball;
– As contact is made, the setter extends the arms;Tell students that getting prepared to set a ball from the correct ready position is the
first part of a successful set.
ACTIVITY 1
Description of the activity
The server begins by tossing the ball over the net to the passer, who passes to the
setter. Setter sets the ball parallel to the net, passer who moves close to the net to
catch the set and then rolls the ball back to server.Teaching point to consider
Encourage cooperation and dynamic actions with no playing of hard balls.
Error: Players use improper hand position when setting; they make a hard contact.
Correction: Start teaching beginners with lighter balls. Review hand position
fundamentals. Setting is the second part of three touch sitting volleyball. The setter
is directing the attack.• Smashing (Hitting)
Short description of smashing
Smashing (or spike, hit) is the most dynamic of all volleyball skills. The approach
to the net should be made at sufficient speed. A player (either a front row or a back
row) is not allowed to lift his or her buttocks from the floor when carrying out any
type of attack hit. A back row player may complete an attack hit at any height from
behind the front zone. The player’s buttocks must neither have touched nor crossed
over the attack line. A back row player may also complete an attack hit from the
front zone, if at the moment of the contact the ball is not absolutely higher than the
top of the net.
– Let the students perform the following activity to help them mastering
smashing skills.APPLICATION ACTIVITY 1
Description of the activity
Players with the balls toss to themselves and extend up to spike the ball down
to the floor, then bounce up and off wall. When the ball bounces back, the player
moves to catch the ball, and returns to re-toss and hit againTeaching points to consider
Players concentrate on contacting the ball over the head, at the 1 o’clock
position. Emphasize on arm movement.Errors that may occur: move too soon or too late and players keep smashing the
ball out of bounds players lack the control of their bodies.Corrections of occurred errors: Players must contact the ball at the peak of ball
position in sitting volleyball. Check the approach and timing of the players’ action.
Players need to watch the set that they can judge their approach to the ball and
make smash. Control the arm swing of the players. Control the contact between ball
and the palm when players smash the ball.APPLICATION ACTIVITY 2
Form two groups of 4 to 6 players in order to teach proper technique for back row
hitting and setting.Description of the activity
Three back row players and one front row player for a group of four fill in front row
players as desired. Only back row hitting is allowed. Play is initiated by serve or free
ball from on the court.
Variation
– After performing the above activity, facilitate students to perform different
tactical actions of setting and smashing in game situations.
– Put the students in two equal teams and organize a short sitting volleyball
game to apply different ways of setting the ball from different position in field
of play.
– Ask every team to choose a setter (Designated ‘Setter’) to be used for the first
15 min, and then use the frontcourt setters.During performing this activity:
– Remind students that every team has three ball contacts (not including a
block touch) to generate an attack. Before the start of any rally, it is important
that all players on the team know which player is aiming to take the second
contact. However, if the ball does not go to this player then others must take
the ball
– Ask them to communicate clearly from all concerned, i.e. the designated
setter to shout that they cannot get to the ball and another player to shout
that they will take the 2nd contact and set.
– For the second way of setting the ball, request them to use the frontcourt
setters from different positions such as position 2, 3 and 4.Cool down
– Let students practice cool down exercises and light stretching by focusing the
most used muscles.
– Guide them how they can stretch their muscles accordingly.
– Help them/demonstrate/correct where is necessary.
Closing discussion
Reflect
– Which were the most challenging/advantageous when setting or smashing the
ball in sitting volleyball game?Connect
– How do you set/smash the ball in a sitting volleyball?
– How do you contact the ball in a sitting volleyball?
– What is the setter/smasher job in sitting volleyball?Apply
– What is the usefulness of applying setting and smashing tactics in sitting
volleyball?
– What are some of the criteria to become a good setter/smasher in sitting
volleyball?Lesson 3: Tactics of blocking and digging
a. Learning Objective
Perform different tactical exercises of blocking and digging.b. Teaching resources
– Balls
– Playground (volleyball court)
– Trees
– Net
– Cones
– Chasubles
– Whistle
– Stopwatch/Watchc. Prerequisites/Revision/Introduction
Students of senior five will learn better the tactics of blocking and digging the ball in
sitting volleyball if they can execute basic motor control and movement exercises
and perform different basic sitting volleyball techniques of blocking and digging the
ball learned in senior four.d. Learning activities
Opening discussions (in a semi-circle formation)
– Check the students’ readiness.
– In pairs students brainstorm about blocking and digging technique of sitting
volleyball learned in senior four.
– Let some groups present their findings.
– Assist them to clarify their findings.
– Recall the sitting volleyball techniques of blocking and digging learnt in
Senior four.
– Invite them to start warm up exercises and stretching.Warm up exercises
– Let the students perform warming up activities to prepare their muscles,
cardio-vascular and respiratory system and to be ready for more activities
that are vigorous and to prevent injuries. Those activities should include:
• Easy paced activities
• Light moving activities
• Passing the ball
• Stretching
– Guide them while performing stretching exercises.e. Lesson body Blocking
Briefly give short description of blocking in sitting volleyball
Blocking is used to encounter the smash. Any or all of the front line players carry out
Block. Players try to block a smash with their hands. The four factors are important
when making the block: Positioning, Timing, Speed reaction and Aggression.The block should be made with open hands and fingers spread to cov-
er as wide an area as possible and try to force the ball down into the
opponents’ court. Good blocking involves the ability to read the of-
fensive smasher’s intentions. In sitting volleyball, it is allowed by the
rules to block the serve, which has consequences in defense strategies
Blocking fundamentals
Explain students that:
– The ready position gets players aligned to set a good block.
– The blocker should face the net; hands are open and relaxed, held in front of
the shoulders at head level.
– The blocker watches the smasher and reacts to his attempt.
– Emphasize that blocker should stay out of the net.
– Player in block should be ready to move in any direction after blocking.Let students apply them on the sitting volleyball court.

System of defending by using 6-up or 6-High defence
The position 6 up or 6-High defense is most commonly used in sitting volleyball due
to the vulnerability of the middle of the court behind the block and the fact that it
is quicker for the athletes to move backwards rather than forwards. For an outside
cross-court attack, position 5 or 1 will move to the deep corner and possibly even
outside the court to defend the ball off the top of the block. The off-blocker will move
deep off the net towards position 5 or 1. For an outside line attack, position 5 or 1
will move inside the court away from the line as that is a difficult shot to score off
in sitting volleyball and the greater percentage of shots will come over or off the
block. For a middle attack, the outside blockers will try to close and help if they
can. If unable, they will drop back to pick up tips or deflections. Position 6 reads
to direction of the hitter and shifts one direction or the other, filling any potential
seams in block. Positions 1 and 5 stay relatively home but also read hitter and shift
in direction of attack.

Digging
– Explain to the students that digging is a defensive move in which both arms
are placed together in an attempt to bounce a hard-hit ball up into the air.
– Tell the students the tactical of actions of digging in sitting volleyball as they
outlined below:
• Anticipate and move to the ball.
• Get your forearms under the ball.
• Lean into the ball as you make contact.
• Dig the ball at the midline of your body if you can.
• If you have to reach outside your body, extend and angle your arms in the
direction of the target.
Remind students:
– To remember changing their body position to face the hitter. Hard driven balls
are dug often just by getting in good body position.
– If they are continually able to get into good position for digging (angling their
arms to the target every time), they will often dig balls that will stay in play just
by them rebounding off you in the right direction.Let students apply them on the sitting volleyball court.
APPLICATION ACTIVITY 1
Description of the activity
Players in sitting volleyball situation get their hands above the net; the teacher
smashes the ball at the outstretched blocker’s hands. Player gets a point for
blocking the ball.Teaching points to consider
As player develops the skill, increase the speed of attacksError detection and correction for blocking blocker’s hand should be
keeping firm and angled properly.
Errors: Hands are not firm. Hard driven smashes are defecting off the blocker and
out of bounds. Off speed, smashes are defected off the blocker and out of bounds.
Correction: The blocker must keep the body parallel to the net. Extend the hands
over the net if possible. The blocker should turn the outside hand in towards the
court, so the ball can rebound back into the opponent’s court. The blocker should
keep the hands firm and strong. Take care of the angle of the hands for rebounding
the ball.APPLICATION ACTIVITY 2
Put students into groups of 8-10.Description of the activity
Three athletes line up behind each other in position 5 and three athletes line up
behind each other in position 1. One athlete at net in position 4 and one athlete in
position 2. Athlete in position 2 tossing free ball to position 5 initiates Ball. Position
5 athlete passes ball to position one athlete (middle of the court) who sets it to
position four and follows ball to position 4. Position 4 attacks ball back to position 1
where next player in line has filled in (attacking athlete in position 4 then follows ball
to position 1). Position 1 passes to position 5, who sets position 2 and follows ballCycle repeats continuously with attackers always. Following ball and defenders
only following ball to attack positions once, they set.
Success Criteria
Student scan continuously keep the ball in play and within the structure of the drill.
A time goal can be set, which the athletes will need to keep the ball in play for that
amount of time.Teaching points to consider
– Emphasize the height that needs to be put on the first ball contact.
– Offside defender needs to release into the middle of the court to set a second
contact ball to the outside.
– First contacts need to be high, inside the attack line and in the middle of the
court; second contacts need to be high, off the net and slightly inside the
antennae.
– After performing the all above drills, facilitate the students to perform different
defensive tactics in game situations.
– Put the students in two equal teams and organize a short sitting volleyball
game to apply different ways of defending the ball in field of play.Cool down
– Ask the students to stop playing.
– Have them practice different relaxation exercises to help them to restore the
muscle back to resting length, reduce soreness, and enhance recovery for
the next sitting volleyball workout.
– Let them perform different flexibility exercises under your guidance.Closing discussion
Reflect
– Which challenging/advantageous when blocking and digging the ball in sitting
volleyball game?Connect
– How do you block/dig the ball in a sitting volleyball?
– How do you contact the ball in a sitting volleyball?
– What is the blocker job in sitting volleyball?Apply
– What is the usefulness of applying of blocking and digging tactics in sitting
volleyball?
– What are some of the criteria to become a good defender (digging and
blocking) in sitting volleyball?
Lesson 4: Applying offensive and defensive tactics in sit-ting volleyball
game situation
a. Learning Objective:
Apply sitting volleyball offensive and defensive techniques and tactics in game
situation.b. Teaching resources
– Balls
– Playground (volleyball court)
– Trees
– Net
– Cones
– Chasubles
– Whistle
– Stopwatch/Watchc. Prerequisites/Revision/Introduction
Students of senior five will apply better the sitting volleyball techniques and tactics
in game situation if they can execute basic sitting techniques learned in senior four
and perform different basic sitting volleyball tactics learned in the previous lessons.d. Learning activities
Opening discussions (in a semicircle formation)
– Check the students’ readiness.
– In pairs students brainstorm about different sitting volleyball tactics learned
in the three previous lesson.
– Let some groups present their findings.
– Assist them to clarify their findings.
– Introduce defensive and offensive sitting volleyball tactics learnt in the three
previous lesson.
– Invite them to start warm up exercises and stretching.Warm up exercises
– Let the students perform warming up activities to prepare their muscles,
cardio-vascular and respiratory system and to be ready for activities that are
more vigorous and to prevent injuries.
– Guide them while performing stretching exercises.
e. Lesson body
Description of switching (Frontcourt and backcourt switching)
The rules of the game allow players to switch between positions in the same part
of the court (e.g.: front or back), after the ball has been served. This is to enable
teams to move their players into other positions, either to maximize their own
strengths or counteract against the strengths of the opposition. The most common
use of switching is to enable teams to move their setter into positions that are more
desirable.
– Demonstrate them how a player from position 4 can switch to either position
3, or if the setter is a quick mover then position two.
– Remind the students that it is important to look at where their starting position
is, how they sit to enable them to move quickly after the service, and how they
move and play the ball to one of their attackers.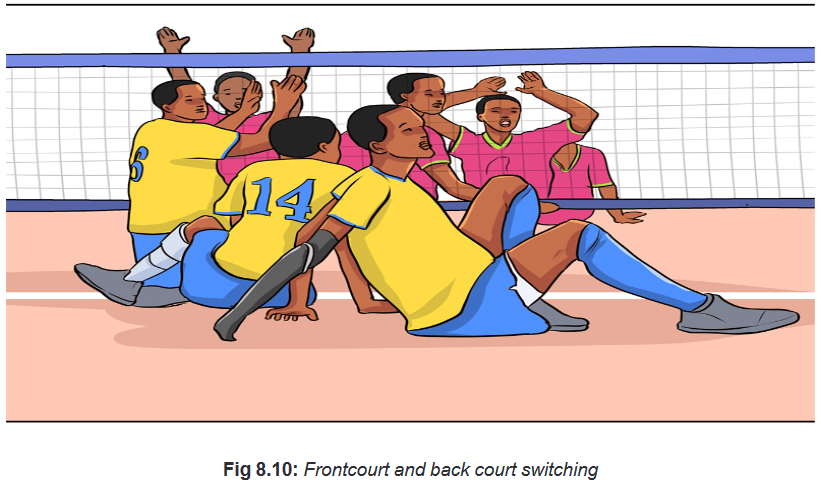
Let students apply them on the sitting volleyball court.
• Setter penetrating
Explain the students that penetration is usually done with a player from position 1
or position 6. To do this you must have a setter who is comfortable and quick at
moving around the court.Let students perform the penetration and switching within a short sitting volleyball
game.Remind them that:
– By having a backcourt setter moving into the space between positions 2 and
3, you open up the reverse/backwards set to an attacker at position 2. The
benefit in doing this is that it means that you have three teammates who can
attack in the front zone of the court.
– By having three attackers in the front zone of the court, it means that you
can spread the attack right across the entire length of the net making it much
harder for the blockers. The system is somehow complicated, tell them to
communicate and make sure they do not have two.
Let students apply them on the sitting volleyball court.TEAM SYSTEMS
Team systems in sitting volleyball are in three levels: level one, level two and level
three.Level 1
• 6-6 System description
In this system, the team agrees in advance that the player who is at a certain
position is designed setter for the rally. There is no switching or penetration required
so movement is restricted enabling players to focus on the skills that are required. It
requires all players to be confident and competent in setting the ball. Players setting
from position 2, and from positon 3 requires setting backwards.
– Explain them that this team system there is no switching and penetrating
required, so movement is restricted to enable players to focus on the skills
that are required.
– After a brief explanation, let them play a short sitting match to apply the
system the system.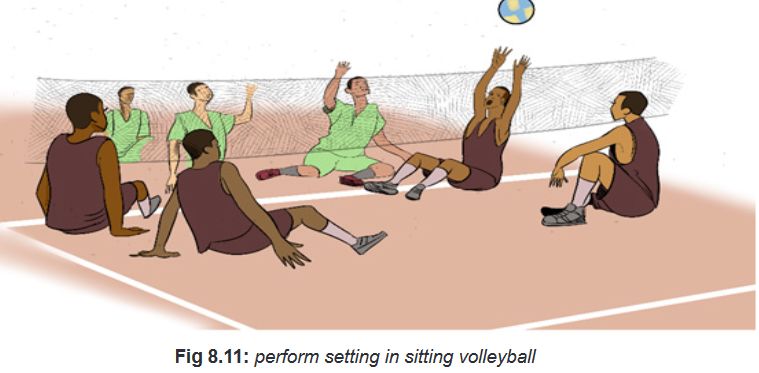
• 1-4 or 2-4 (a)no switching system description
This system is used when there is one or two players who are unsuitable for setting
either because of their impairment, or because they do not have required skills. You
can use it when you have a player or two players excel at attacking and you do not
want them to be the setter so that you can have them attacking.
– Let students apply the system in a short sitting volleyball match.
– Demonstrate/help them where is necessary.
(The players in green are the no setters, while those in purple would be the dominate
setters and set whenever they are in positions two or three. However, when they
are at position four the orange setters will set from position two.)• 1-5 or 2-4 (b) with front court switching system description
This system progresses from the non-switching equivalent outlined before. Here
the players switch from court to get the dominant setters over to position two. This
is a very common system in sitting volleyball but it requires most of players to be
able to do all of the required skills. However, it is recommended to take care of the
individual situation of impairment of all players.
– Let students apply the system in a short sitting volleyball match.
– Demonstrate/help them where is necessary.Level 2
• 3-3(a) without switching description
The system consists of three dominant setters and three dominant attackers so
that there is always a setter in either position 3 or 2. This system can be referred to
as two trigonal sit on top of each other. Means that those, which set, alternate with
those who do not set.
Disadvantage: it relies on each of the setters being very competent attackers, as
they will need to do this from all backcourt positions and most significantly position
four.
– Let students apply the system in a short sitting volleyball match.
– Demonstrate/help them where is necessary.
• 4-2 (a) without switching description
Two dominant specialists are placed opposite each other and they set from
whichever position they are in front court so as one of those setters goes backcourt,
the other comes front court. Therefore, as one of these setters goes back court, the
other comes frontcourt. There are also the challenges associated with setting from
position 4. It is the most system, which is being used by many teams.
– Let students apply the system in a short sitting volleyball match.
– Demonstrate/help them where is necessary.
• 3-3 (b) with switching system description
It a progression from system 3-3(a) but when the setter is at position three they
switch the player who is at position two to move into the preferred setting positions.
If you have specialist middle, or if the setter is not competent at blocking in the
middle it will be benefit.
– Let students apply the system in a short sitting volleyball match.
– Demonstrate/help them where is necessary.
Level 3
• 3-3 (b) system description
This system is similar to 3-3 a but the three identified setters set from position one
and six, penetrating both times from back court into frontcourt. During this system
you can start with 3-3(a) or (b), and then progress to this when an easy ball is
played over the opponent.
– Let students apply the system in a short sitting volleyball match.
– Demonstrate/help them where is necessary.
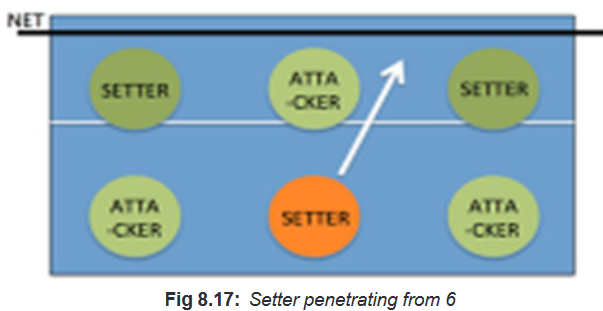
• 4-2 (b)(with switching / penetration) system description
The system has two setters who set rotationally between them and four attackers.
As with 4-2(a), these two players need to be placed opposite each other in the
lineup. With this framework, the setters can then switch/penetrate from either
positions to enable them to set from the team-preferred position. Ball should be sat
from position three, two and then penetrate from position one.
– Let students apply the system in a short sitting volleyball match.
– Demonstrate/help them where is necessary.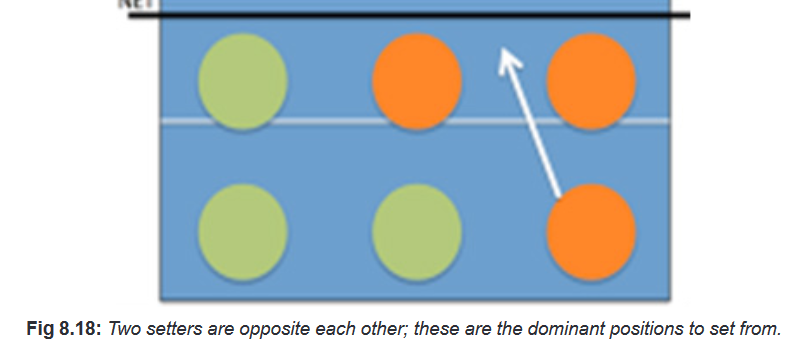
• 5-1 system description
In standing volleyball, it is the most system that is regular used but in sitting volleyball
it is complex due to moving when sitting on the floor. It could be done while setting
from the position that the setter is in, or by adding switching/ penetration so that the
setter sets from any position. The most difficult rotations are usually from position
four and position five, it is recommended to have a backup option when the setter
is in these two positions.
– Let students apply the system in a short sitting volleyball match.
– Demonstrate/help them where is necessary.APPLICATION ACTIVITY
Form groups of six students and let them play a normal game by using learned
techniques and tactics.Cool down
– Ask the students to stop playing.
– Have them practice different relaxation exercises to help them to restore the
muscle back to resting length, reduce soreness, and enhance recovery for
the next sitting volleyball workout.
– Let them perform different flexibility exercises under your guidance.Closing discussion
Reflect
– Identify the different team systems and tactics in sitting volleyball game
situation.
– What are the most challenging/advantageous team systems in sitting
volleyball game?Connect
– What are the similarities and contrasts between basic tactics applied in sitting
volleyball and standing volleyball?Apply
– How will you use learned tactics in your daily life?8.6. Summary of the unit
This unit is detailing different basic sitting volleyball tactics including tactics of
serving, receiving, passing, setting, hitting, blocking and digging the ball.Different tactical exercises have been suggested to help students to improve their
performances needed in sitting volleyball.Finally, there are proposed playing and team systems to facilitate students to play
sitting volleyball match technically and tactically.
8.7. Additional information for teachers
• Height of the net in sitting volleyball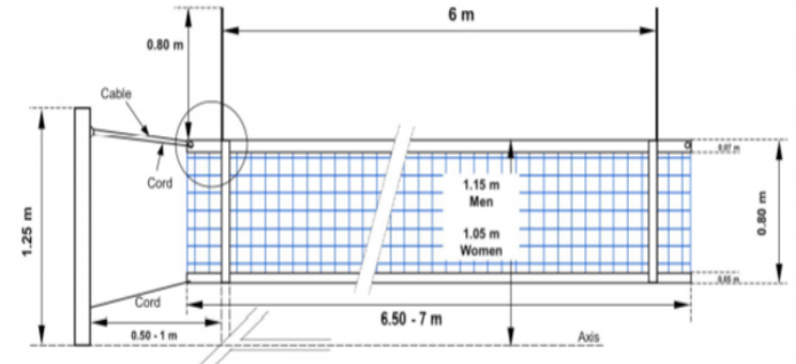
• Principles for teaching beginners sitting volleyball
In order to teach sitting volleyball, we need to respect the following aspects:
– Use trained teachers/instructors/coaches to assist volleyball for the disabled
players.
– While playing encourage progress, but not the use of pressure.
– Teach/Train in a logical order, ensuring that all pre-requisite steps have been
mastered.
– Remember to emphasize on ability, not disability.
– Create enjoyment mood, with many activities in a game.
– Let students work in groups so players encourage each other.
– Everyone can contribute to the volleyball for the disabled movement.• Setting the ball from different positions in the field of play
Setting from position 2
This is the most common and popular place to have the Setter set the ball from.This is largely because most people are right handed and it is easier to spike when
the ball comes onto your hitting arm, rather than comes across your body before
hitting it. The other positive with this position is that the setter can see all of their
attackers.
Setting from the position 3
This is usually the position used with complete beginners, when they first start to
designate a setter. This is because as they are in the middle of the court they are
more likely to get to the ball.However, as this person is in the middle they are constantly rotating around and
often this can lead to a lack of awareness over where they are.Setting from the position 4
As players start to specialize, those who excel at setting are positioned away
from each other in the team rotational order. Consequently, as a team rotates, the
specialist setters end up at position 4 and to enable them to remain as the setter,
teams will set from position 4 to avoid any further complication.Obviously if you have a team of left-handed players then you can set from four!
Sitting volleyball plays and systems
In sitting volleyball, players are playing based on their location on the court. On
each side of the net, there are two zones, the frontcourt zone and the backcourt
zone. Only players positioned in the front zone can attack above the height of the
net. In addition to this, the court is divided into 6 positions, numbers from 1 to 6 and
starting at the person who is serving. These indicate the service order. At the point
of service, all players must be in front/behind, to the left/ right of those next to them.Back Row Attacks
Our back row attack plays are very simple. The setter will rub his chest showing the
hitter where the set is going to be. The back-row player may perform any type of
attack-hit from any height, if at the time of the hit the bottom does not touch or cross
over to the attack line.During the middle of a rally, a back row hitter will call “pipe” to let them know that
they are ready for the ball.• General guidelines of being in ready positions while receiving and
defending in sitting volleyballReceiving the ball
– Sit tall with chest and head up;
– Place legs in front of body or slightly to the side. If you are able, have one-foot
flat on the ground to push off.
– Arms down beside hips with hands on the floor ready to push in any direction.
– Stay alert and use both hands and feet to move behind ball once in play.
Defending
– Keeping back straight and head up, lean forward at the waist.
– Legs are bent and angled to the side, widening the amount of court covered
and allowing body to get closer to the floor.
– Once in position to receive the ball, lift arms in front of body with elbows
extended and palms up.• Varieties of moving on the floor
To sit and play on the floor is basic to sitting volleyball. The height of the net follows
the idea of sitting requirement.
Moving on the floor could be practiced through various activities like:
– Maneuvering in different directions on the court.
– Playing small games in sitting position, and orienting similar exercises.
Sitting position is the key issue for any further development and progress in play.
Players in sitting volleyball game use hands for moving around and if the nature of
disability allows their feet. Playing on the floor should follow the appropriate time
for relaxation, which allows exposing parts of the body, especially palms of the
hands and buttocks to rest. During practice moving on the floor, the type and level
of disability of each player should be taken into account.Players could practise moving on the floor by:
– Moving forward
– Moving in sideways
– Moving diagonally
– Moving individually
– Moving in small groups
– Moving backward
– Moving straight
– Moving zig – zag
– Moving in pair• Care of the person with disabilities while performing sitting volleyball
General safety considerations at the training site:
– Teacher should be informed about medical status and specific requirements
of all students involved in teaching and learning process.
– Teacher should have basic educational background to work with disabled.Essential facilities at training site:
– First-aid kit and knowledge of use.
– Rules and insurance.
8.8. End unit assessment
– Set various activities to assess students’ ability of applying basic sitting
volleyball techniques and tactics.
– Set different activities to assess students ability of applying different defensive
and offensive systems in sitting volleyball game.8.9. Additional activities
8.9.1. Remedial activities
Facilitate the students to perform the activity below to help them improve their level
of performance mastering the individual movements, ball control and attacking.Description of the activity
Students in groups of five students perform the following:
– Students position themselves one on each corner of court and one athlete in
the middle.
– Students in the middle sets athlete on one corner that will attack directly
cross-court.
– All Students attacking converge cross-court and prepare to defend attack.
– After digging attacked ball to athlete in the middle, corner Students must reset
to respective corner and athlete in the middle sets another corner.Progressions: Athlete in the middle (setter) can set to themselves before setting
corner to slow the drill down in the beginning.Success criteria: Athletes can continuously keep the ball in play and within the
structure of the drill. Athletes should be constantly transitioning from offence to
defense and back to offense.Teaching points to consider
– Emphasize the height that needs to be put on the first ball contact.
– The second ball can be accelerated to simulate game speed for the defenders
to get into position.
– Encourage attacking players to switch from defensive position to attacking
position every contact.
8.9.2. Consolidation activities
ACTIVITY 1
Put the students into two teams of six players to play a short sitting volleyball match.
Ask them to use different techniques and tactics learned in the unit. No player
is allowed to play kneeling or standing position. After 10 minutes’ teams may be
changed. Check out the individual application of basic tactics of sitting volleyball.
Check out how they are applying switching and penetrations to facilitate the setter
into desirable positionsACTIVITY 2
– In pairs, one player passes the ball to the receiver who dig it back;
– Try a simple contest, for example dig back to your partner 10 times or a
1-minute period.
– Then swap with your partner and repeat the drill.
– The winner is the first player to finish after 10 digs or the player with the most
digs within the one-minute’s period.8.9.3. Extended activities
Encourages students to participate in different competitions organizedby the School,
sector, and district or at the national level.
REFERENCES
1. Dave Carnell, John Ireland, Claire Jones, Ken Mackreth, Sarah van Wely
(2002), Advanced PE for OCR, Oxford U.K
2. ELIAS, A. HILGERS, W. JETTER, M. RASHDORFF. J. WINTERMEIIER, D.
WOLFARTH Education Physique et Sportive pour les Ecoles Primaire et les
CERAI, F, Kigali.
3. FIFA. (2018). Coaching manual
4. Goldberger, M. and Howarth, K. (1990). The National Curriculum in Physical
Education and the Spectrum of Teaching Styles. British Journal of Physical
Education.
5. Ken Jones and Pat Welton (1979) Soccer Skills and Tactics, CrownPublishers
6. Ministry of Education. (1998). Physical education and Sports Training
Programme in Ordinary Level. National Curriculum Development Centre
7. Peter J L Thomson (2009) The Official IAAF Guide to Teaching Athletics
8. REB (2019). The Teacher Training Colleges (TTCS) COMPETENCE BASED
CURRICULUM ORIENTATION MANUAL, Kigali.
9. REB. (2015). Ordinary level Physical Education syllabus
10. REB (2019). TTCs Physical Education and Sports syllabus
11. REB. (2016), Physical Education for Rwandan Schools. Teacher’s Guide,
Ordinary level 1, MK Publishers, Kigali, Rwanda.
12. REB. (2016), Physical Education for Rwandan Schools. Teacher’s Guide,
Ordinary level 2, MK Publishers. Kigali, Rwanda
13. Right to Play, (2007). Football for development. Coaching manual
14. Williams, A. (1993). Aspects of Teaching and Learning in Gymnastics.
British Journal of Physical Education.
Websites
1. www.netbalnation.com.
2. http://www.blazesports.org.
3. http://www.dhamilton.net/goalball/HOW_TO_PLAY_GOALBALL/How_ to_
Play_GOALBALL.htm.
4. https://www.disabled-world.com/sports/goalball.php.
5. https://www.quora.com/What-are-the-best-techniques-for-efficiently-
running-long-distance.
6. http://www.olympichandball.org/wpcontent/Basic%20Handball%20
Methods
PES, Teacher’s Guide, Senior 5236
7. https://www.nchpad.org/1073/5480/Sitting~Volleyball~~A~Skill
Enhancing~and~Physically~Demanding~Activity
8. http://www.education.auburn.edu/wpcontent/uploads/2015/09/ Handball-
handbook
9. http://www.olympichandball.org/wpcontent/Basic%20Handball%2 Methods.
10. http://vcdm.org/global/images/misc/SIT_Systems_Offensive.pdf
11. http://vcdm.org/global/images/misc/SIT_Drills_All.pdf