Topic outline
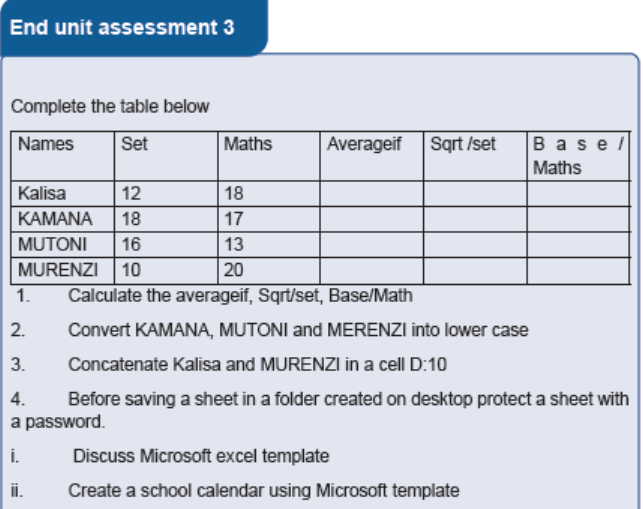
UNIT 1: ADVANCED SPREADSHEET II
Key Unit competenceUse the full potential of the spreadsheet to manipulate data.
a. Which sector that has more expectant mothers to receive mosquito nets?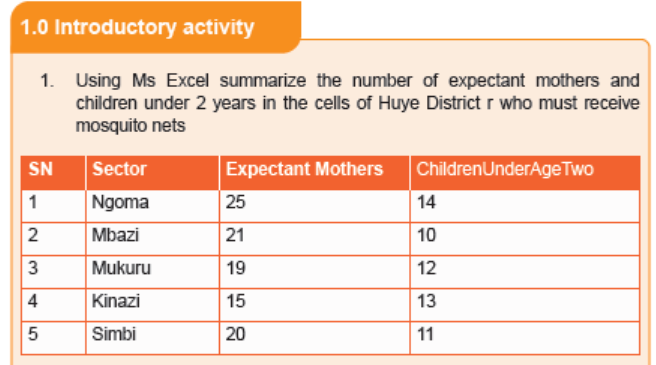
b. Which sector that has more children under age Two?
c. Calculate the average number of children to receive mosquito nets in
Ngomad. Which cell has less children under age Two?
1.1. Advanced Spreadsheet functions
1.1.1. Logical functions
Learning activity 1.1
Ministry of Health is rewarding best performing students with marks between 80
and 100 in Fundamental of Nursing and Chemistry. The reward is a laptop for
those who succeeded in both subjects and a dictionary for those who succeededin one subject. Using MS Excel answer below questions:
a. Write an Excel function to find students who are to be rewarded with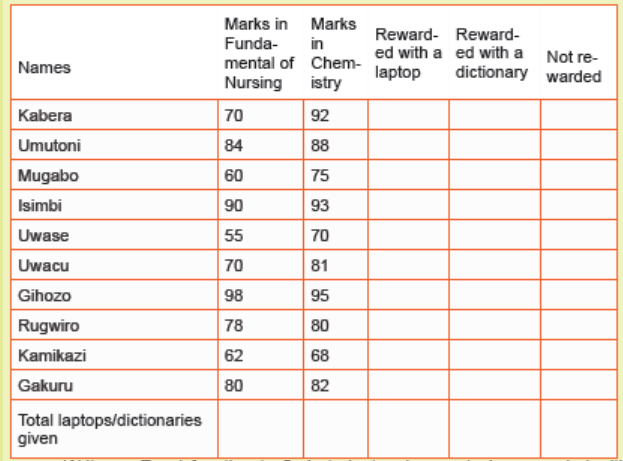
laptops, dictionaries and those not rewarded
b. Determine the number of students that have not been rewarded?
c. How many laptops and dictionaries will be given?
d. In which subject does Kabera have more marks?
e. In which subject does Umutoni have minimum marks
f. Use Excel logical functions to fill the table above
A condition is an expression that either evaluates to true or false. The expression
could be a function that determines if the value entered in a cell is of numeric or textdata type, if a value is greater than, equal to or less than a specified value, etc
Logical Function is a feature in Excel that allows excel users to introduce
automated decision-making when executing formulas and functions.
The role of functions in this is to check if a condition is true or false. It combines
multiple conditions together and comes up with a result depending on the result of
the evaluation of the condition.
a. IF Function
The If function checks whether data in a cell meets a certain condition and returns
one value which can be True or False
• Syntax: = IF(Logical_test, Value_If_True, Value_If_False )
The If function takes as arguments the logical test, checks if it evaluates to true and
if so returns as a result the content of the second argument and if false the content
of third argument is returned• Example 1:
In the above example the If function with its arguments is entered in the cell where
the result is to appear.
To apply that function in other cells proceed like this:
1. Place the cursor in the bottom corner of the cell
2. Hold down the left key, scroll down to other cells and release the left
button
The If function in the above examples checks if the two names are alike and if
yes, the function writes MATCH in the cell, if not the function writes DON’T MATCH
• Example 2:
Considering the marks obtained by Irasubiza, Karenzi, Byukusenge and Shyaka in
ICT, Maths and English. The If function checks if the marks are greater than 87 andgives to the candidate the Very Good note else the Good note is given.
b . AND Function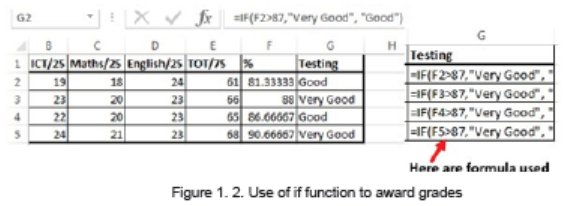
The Excel AND function is a logical function used to test if two or many conditions
are true. The result is TRUE if all the conditions are true else the result is FALSE
• Syntax: =AND (Logical1, Logical2, logical3,…)
• Example:
In the table below the And function checks if people in the table studiedEducation and that their age is greater than 18
Note: the And function may have more than two arguments and for the results to
be True all the arguments must evaluate to TRUE and if one of the arguments is
false all the result is FALSE
Interpretation of the results:
The second, fourth, fifth and seventh rows evaluate to True as the education for all
those rows is Education and the age is greater than 18 while the remaining rows
evaluate to FALSE as they don’t meet the two criteria.
c. FALSE Function
The FALSE function takes no arguments and generates the Boolean value FALSE. It
is used to compare the results of a condition or function that either returns true or
false
ICT- Student Book-Senior 5 5
• Syntax: =False
The false function takes no argument but just returns the logical value False
• Example
The False function used in the example below returns FALSE if the age entered inC2 is less than 20 (C2<10)
Interpretation: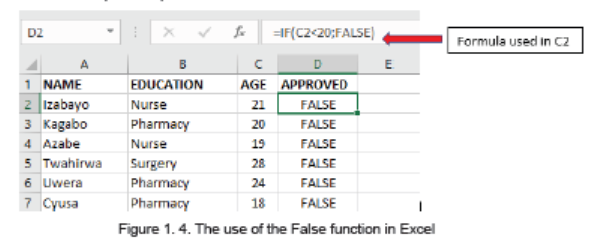
The used function “=IF(C2<10,FALSE)” will check if the C2 cell data is less than
10, if so it will return False as a result else it will return True. The same function will
be applied to other cells by changing the cell position
d. NOT Function
The Excel NOT function returns the opposite of a given logical or Boolean value.
When given TRUE, NOT returns FALSE. When given FALSE, NOT returns TRUE.
Use the NOT function to reverse a logical value.
• Syntax: =NOT(Logical)
The not function takes one logical expression as an argument. It returns an error if
more than one argument is used.
• Example
The table below will have all its content returned to True by the use of the NOT
function. If the results to reverse were got by using a formula the Not function can
be put in front of the function/formula to make the latter an argument of the Notfunction.
Note: If the results in column D2 were got by using the function “=IF(C2<10,FALSE(
))” the result in column E2 can be got by using the function “=NOT(IF(C2<10,FALSE(
)))”. As always the formula/function in one cell can be applied to other cells by pasting
it in those cells
e) The OR function
The OR function is a logical function to test multiple conditions at the same time.
OR returns either TRUE or FALSE.
• Syntax: = OR(logical1, Logical2, …)
• Example:
The OR function in the screenshot below checks for students who got more than70% as the Pass mark in anyone of the three tests.
APPLICATION ACTIVITY 1.1
1. Give the difference between IF and AND functions?2. Which of these three functions in column B will give you TRUE as an answer?
1.1.2. Advanced Math Spreadsheet functions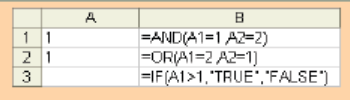
Learning activity 1.2You are given the following data in Microsoft Excel data sheet.
Answer below questions:
1. Convert ICT marks into Roman style?
2. Discuss on how to calculate the modulus of the students’ marks?
3. Calculate the square root of student average marks?
4. Discuss the conversion from roman style to Arabic style number?
Mathematical functions are used to calculate values basing on what is in cells,
perform operations on a cell content, fetch values after an operation based on the
search criteria and much more. Some of the functions to be seen here are Abs
Arabic
a. ABS
The Excel ABS function returns the absolute value of any provided number.
The syntax of the function is: ABS (number)
Where the numerical argument is the positive or negative numeric value for which
the absolute value is to be calculated.Examples:
b. ARABIC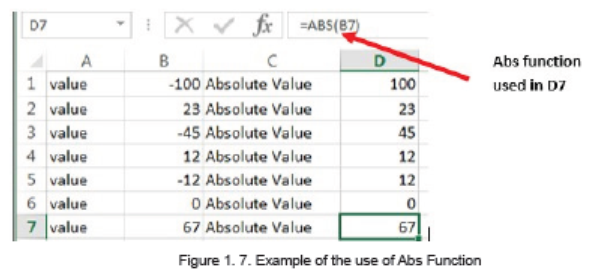
The Excel Arabic function converts a Roman numeral into an Arabic numeral. The
syntax of the function is: ARABIC (text)
Where the text argument is a text representation of a Roman numeral not
exceeding 255 characters.
Note that:
• If supplied directly to the function, the text argument must be encased in
quotation marks;
• If an empty text string is supplied, the Arabic function returns the value 0;
• The Arabic function was only introduced in Excel 2013 and so is notavailable in earlier versions of Excel.
Below are five examples of converting ARABIC to NUMBERS
c. ROMAN
The Excel ROMAN function converts an Arabic number to a Roman number. This
means that if a function is supplied with an integer, the function returns a text string
showing the Roman numeral form of the number.
The syntax of the function is: ROMAN (Number, [form])
• Where Number is any Arabic number and the form specifies the presentation
format of the Roman number to be calculated. The formats to choose from
are displayed after writing the number to convert and writing the comma butthe default (classic) is used.
• Roman Function use examples
• In the following spreadsheet, the Excel Roman function is used to convert thenumber 1999 to different forms of Roman numerals.
d) BASE
The Excel Base function converts a number into a supplied base and returns a text
representation of the calculated value. The Base function was introduced in Ms
Excel 2013 and therefore, it is not available in earlier versions of Excel.The spreadsheet below shows three examples of the Excel Base Function.
e. MOD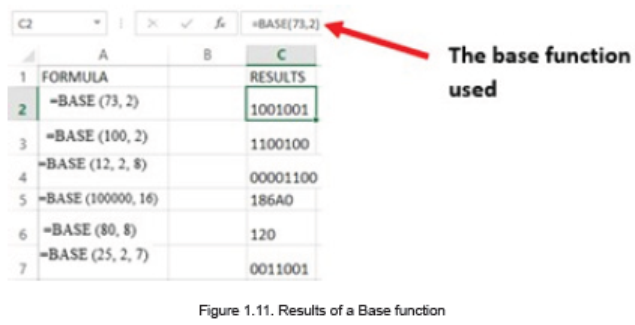
The Excel MOD function returns the remainder of a division between two
supplied numbers.
The syntax of the function is: =MOD (number, divisor)The spreadsheet below shows four simple examples of the Excel Mod function.
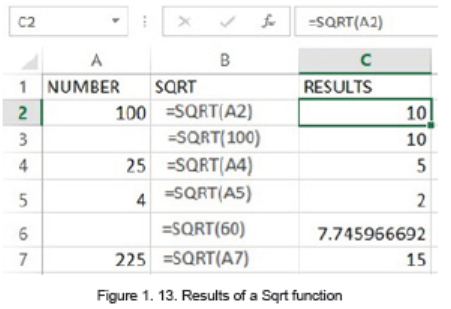
f. SQRT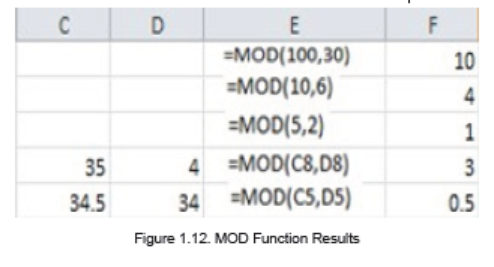
The Excel SQRT Function calculates the positive square root of a supplied number.
The syntax of the function is: SQRT (number)
• Where the number argument is the numeric value for which the square root
is to be found.
If the supplied number is negative, the Sqrt function returns the #NUM! Error.
• Excel Sqrt Function Examples
The following spreadsheet shows three simple examples of the Excel Sqrtfunction.
f. SQRT
The Excel SQRT Function calculates the positive square root of a supplied number.
The syntax of the function is: SQRT (number)
• Where the number argument is the numeric value for which the square root
is to be found.
If the supplied number is negative, the Sqrt function returns the #NUM! Error.
• Excel Sqrt Function Examples
The following spreadsheet shows three simple examples of the Excel Sqrt
function.
APPLICATION ACTIVITY 1.2
1) Using Excel change the following Roman into Arabic style
a) MCCIII
b) XLIX
c) CMVd) XXIII
1.1.3. Advanced Statistical Spreadsheet functions
a . AVERAGE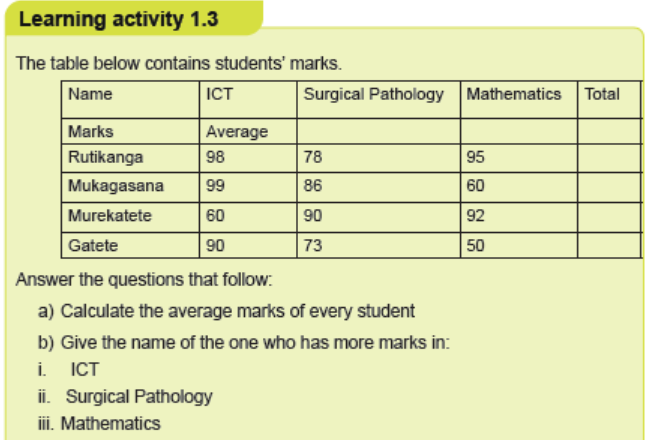
The AVERAGE function in Excel returns the arithmetic mean of a list of supplied
numbers, where the number arguments are a set of one or more numeric values, or
arrays of numeric values, for which the average is to be calculated.
• Syntax of AVERAGE Function in Excel
= Average (Number1, Number2, …)An example of how Average function is used is displayed in the screenshot below:
b . AVERAGEIF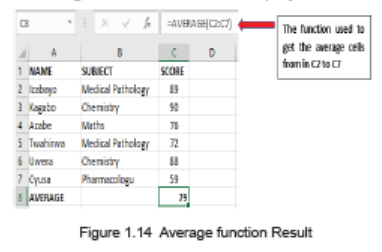
AVERAGEIF Function in Excel finds and returns the average of array that meets the
specific condition. The AVERAGEIF function in Excel supports logical operators (>,
<, <>, =)
• Syntax of AVERAGEIF Function in Excel:
=AVERAGEIF (range, criteria, [average_range])
Where:
• Range: An Array of range to be tested against the supplied criteria.
• Criteria: The criteria or condition on which average has to be calculated.
• [average_range]: An optional array of numeric values for which the
average is to be calculated.
Example of AVERAGEIF Function in Excel
In the Excel screenshot below the averages of cells meeting certain conditions have
been calculated. Those conditions are: cells with scores greater than 70, averagefor Irasubiza and average for science courses.
c. LARGE
The LARGE Function in Excel returns the largest value from an array of numeric
values.
• The syntax of LARGE Function is
=LARGE (array, k)
Where:
• Array – An array of numeric values from which to find the Kth largest
value.
• K- The index. Value of K that is passed to find the Kth largest value.Example of LARGE Function in Excel:
Interpretation:
• First Example finds the 2nd Largest Value as 89
• Second Example finds the 5th Largest Value as 72
• Third Example finds the 7th Largest Value as 55
d. MAXIFS
MAXIFS function in Excel returns the Maximum value from the set of supplied
numbers that meets some specific conditions. In other terms it returns the maximum
if a condition is met. The MAXIFS function in Excel supports logical operators (>, <,
<>, =) and wildcards characters (*,) for pattern matching.
Syntax of MAXIFS Function in Excel:
• MAXIFS(max_range,criteria_range1,criteria1,[criteria_range2,criteria2],… )
Where:
• max_range: is the range of numeric values from which to find the
• maximum value if the conditions are satisfied.
• criteria_range1: is an array of values to be tested against the criteria
• “criteria1”.
• criteria1: is the condition to be tested against the values in criteria_
range1
Example of MAXIFS Function in Excel
• First two examples states the use of logical operation in MAXIFS function with
conditions.
• Last two examples states the use of wildcards in MAXIFS function with two
conditions.
e. MEDIAN
MEDIAN function in Excel returns the statistical median or middle value of a list of
supplied numbers.
Syntax of MEDIAN Function in Excel is: = MEDIAN (number1, [number2], …)
Where the number arguments are a set of one or more numeric values for which to
calculate the median.
An example of how the Median function is used in Excel is shown in the
table below:
• When the total number of supplied values is odd, the median is calculated as
the middle number in the group.
• When the total number of supplied values is even, the median is calculated
as the average of the two numbers in the middle.
• Cells containing Text values, logical values, or no value are ignored.
f. MINIF Function
The Excel MINIFS function returns the smallest numeric value that meets one or
more criteria in a range of values. MINIFS can be used with criteria based on dates,
numbers, text and other conditions.Syntax:
g. MODE Function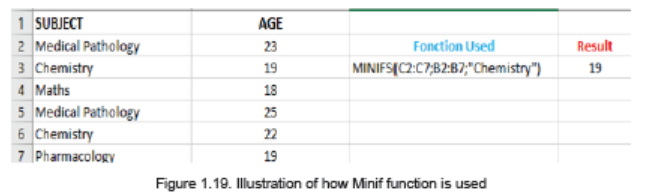
MODE function in Excel returns the mode which is the most frequently occurring
number in a group of supplied arguments.
The Syntax of MODE Function in Excel is =MODE (number1, [number2],…)
Where the number of arguments are a set of one or more numeric values forwhich you want to calculate the mode.
Cells containing Text values, logical values, or no value are ignored.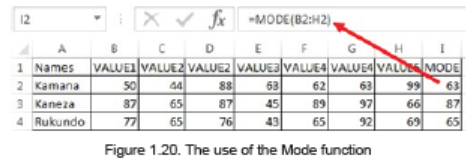
• Mode (most frequently occurring value) is calculated row wise in aboveexample.

1.1.4. Text spreadsheet functions
a. Discuss what Mukamana will do to arrange data in Table 1 and make it
look like the data in Table 2
b. Estimate the time required to do this if Table 1 has 1000 rows
c. Using functions make the data in Table 1 look like those in Table 2 d. For
the 1000 rows to be reorganized discuss the amount of timed. needed compared to the manual method used in question 1
Excel has functions which facilitate an automatic manipulation of text which would
take too much time if it was done manually.
For example in the case presented in the activity above if one has to combine data
from two rows into one for a total of 1000 rows by copying data from one row and
pasting it next to data in the other row and if one can do one row in
2 seconds, the whole exercise would take up to 33 minutes. Considering that some
names which are in upper case must be in lower case and some in lower must be
in upper which would require rewriting the names the whole exercise can take up
to an hour.
That is where Excel ingeniosity comes in by providing functions which can allow
one to do this in less than one minute. The section below explore the functions that
can be used to do such a task
a) CHAR
The CHAR function returns the character based on the ASCII value. The CHAR
function is a built-in function in Excel that is categorized as a String/Text Function.
The syntax for the CHAR function is:
• CHAR( ascii_value )
The ASCII value is used to retrieve the character.
Example: Explore how to use the CHAR function as a worksheet function inMicrosoft Excel:
Based on the Excel spreadsheet above, the following use of the CHAR function
would return:
=CHAR(A1) : Gives Result: “v”
=CHAR(A2) : Gives Result: “@”
=CHAR(72) : Gives Result: “H”
=CHAR(109) : Gives Result: “m”b.
b. CONCATENATE
The CONCATENATE function in Excel is designed to join different pieces of text
together or combine values from several cells into one cell.
The syntax of Excel CONCATENATE is as follows:
CONCATENATE (text1, [text2], …)
Where text is a text string, cell reference or formula-driven value.
Below is an example of using the CONCATENATE function in Excel in which data
from two cells has been combined.
The simplest CONCATENATE formula to combine the values of cells A1 and B1 is
as follows:=CONCATENATE(A1, B1)
c. UPPER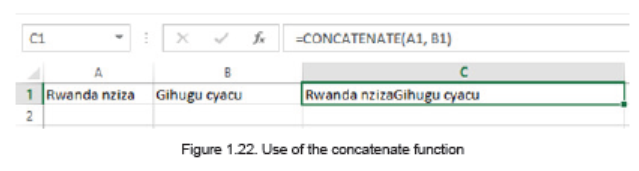
The UPPER function is a built-in function in Excel that is categorized as a String/
Text Function. It converts a text (String) into uppercase
Example:
A1==” better technology for the best future”
=UPPER(A1)
Result: “BETTER TECHNOLOGY FOR THE BEST FUTURE”
d. LOWER
The LOWER function is used to convert text (String) into small cap text
Example:
B1=”EXCEL SCIENCES THROUGH TECHNOLOGY”
=LOWER (B1)Result: excel sciences through technology
1.2. Using formula & functions from different sheets
Learning activity 1.5
Suppose that you have a class of 15 students in Year 2 . You have also the
marks for those students in three separate sheets where each sheet contains
marks for each term
1) Discuss how you can combine the data from the three sheets to make theyearly total
When the workbook has many sheets there is a possibility to get data from one
sheet into another by using formula or functions.
Example 1:
Consider the example below which are data from two different sheets named Sheet1
and Sheet2. These sheets contain marks for ICT and for Biology. The teacher wants
to make totals for each student for the two subjects and keep those totals in aseparate sheet “Sheet3”
To achieve this go to the table in Sheet3 where totals of data from the two sheets
has to be done then in the TOT column cell C3 write the formula to use which is
=Sheet1!C3+Sheet2!C3
Meaning that data from cell C3 of Sheet1 is added to data from cell C3 of sheet2 You
can do this by writing formula from scratch or by:
• Going to the cell containing the first data to be added and selecting it
• Writing the + sign
• Selecting second data to be added by going to the sheet containing that data
and selecting the right cell and lastly hitting enter
The formulas used to calculate the totals for the example above are in the imagebelow:
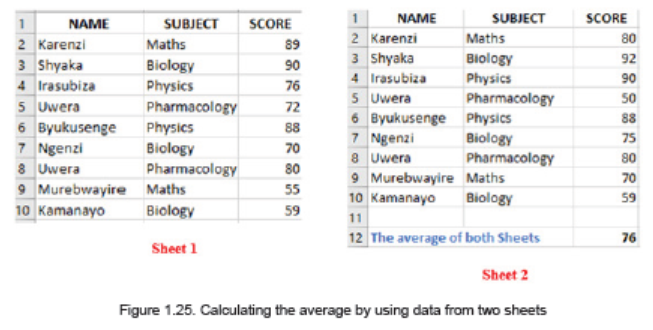
Consider another example in which two sheets Sheet1 and Sheet2 contains data
(score) on different subjects. The average of marks contained in the two sheets
is going to be calculated and kept in Sheet1. The formula used is =AVERAGE(Sheet1:Sheet2! C2:C10)

1.3. Protecting worksheet style, contents and elements
Learning activity 1.6
At the end of the school year, GS Kamucyo teachers receive student reports so
that they may fill in marks for the third term , do totals and average for the whole
year. However the head teacher fears that teachers may mistakenly change
even marks for Term I and Term II
a) Which advice would you give to the head teacher on what to do in order
to avoid this?
b) If this advice is adopted, teachers won’t be able to edit term I and II. Whatcan be done to allow them to do it if it is found necessary?
1.3.1. Protecting & unprotecting worksheet;
Worksheet protection is to prevent other users from accidentally or deliberately
changing, moving, or deleting data in a worksheet, you can lock the cells on your
Excel worksheet and then protect the sheet with a password.
With worksheet protection, you can make only certain parts of the sheet editable
and users will not be able to modify data in any other region in the sheet.
Rules to follow for protecting worksheets with strong protection
a) Protect your sheets with strong passwords that include different types of
alpha numeric characters and special symbols. At that, try to make passwords
as random as possible
b) Protect the workbook structure to prevent other people from adding, moving,
renaming or deleting the sheets.
c) For workbook-level security, encrypt the workbook with different passwords
from opening and modifying.
d) If possible, store your Excel files with sensitive information in a secure
location, e.g. on an encrypted hard drive.
To protect a sheet in Excel 2019, 2016, 2013 and 2010, perform the following
steps.
a) Under the Review tab click on Protect Sheet.
b) Type the password and click on Ok
c) Reenter password and click on Ok
When a sheet is protected, anyone will be able to read data but will not be able
to modify it and once data in that sheet is modified this message below will bedisplayed
1.3.2. Lock &unlock cells, style, contents and other elements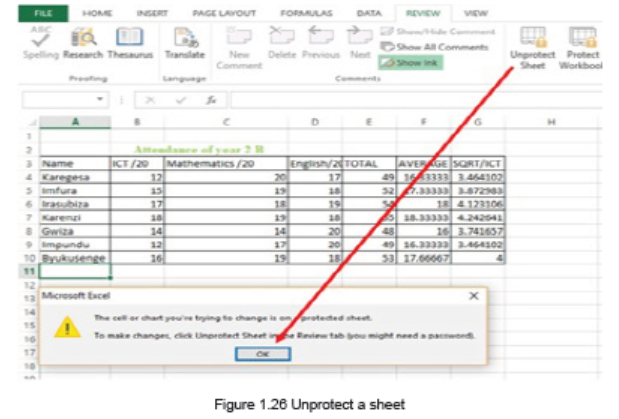
a) How to Lock Cells for Editing and Protect Formulas
When a sheet is shared while some sheet cells must not be modified some rules
have to be set so that data can be modified by anyone who wants it but not
modified by someone who does not have the right to do so. In the table below a list
of products will be sent to the customers. Customers will be able to modify someproduct records.
The great news is that you can lock cell, or a whole range of cells, to keep your work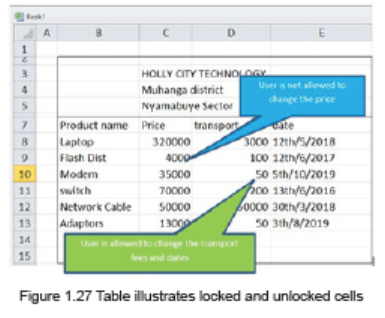
protected. Here’s how to prevent users from changing some cells.
Type a password in the corresponding field.
Be sure to remember the password or store it in a safe location because you will
need it later to unprotect the sheet.
Select locked cells .
If only these two options are selected, the users of your sheet, including yourself,will be able only to select cells (both locked and unlocked).
If the worksheet protection is nothing more than a precaution against accidental
modification of the sheet contents by yourself or by the members of your local
team, you may not want to bother about memorizing the password and leave the
password field empty
Select the actions you allow the users to perform.
b. How to unprotect Excel sheet with password
To lock only specific cells and ranges in a protected worksheet
Follow these steps:
1) Select the cells you want to lock.
2) On the Home tab, in the Alignment group, click the small arrow to open the
Format Cells popup window.
ICT- Student Book-Senior 5 27
3) On the Protection tab, select the Locked check box, and then click OK to
close the popup.
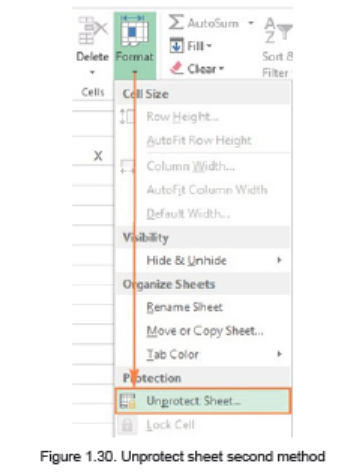
4) Right-click the sheet tab, and select Unprotect Sheet from the contextmenu.
On the Review tab, in the Changes group, click Unprotect Sheet.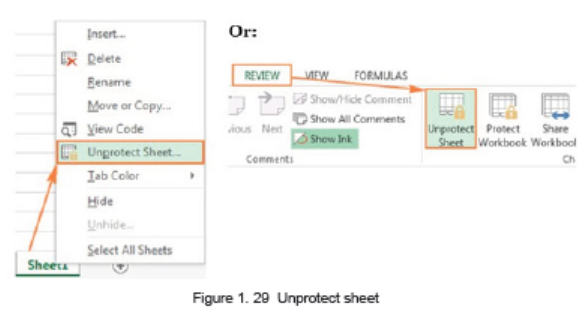
• On the Home tab, in the Cells group, click Format, and select UnprotectSheet from the drop-down menu.
By considering the table above
1) Explain how the table can be protected?
2) Using MS Excel, protect marks and names columns?3) What is the role of protecting a document?
1.4. Data validation
Learning activity 1.1
Trinity High school committee needs to record the parents’ ID of their students
and every ID has 16 digits.
Discuss about how committee will fix the numbers of digits
a. Discuss the message that will be appeared in case the entered records is
not valid
Excel Data Validation is a feature that restricts (validates) user input to a worksheet.
Technically, you create a validation rule that controls what kind of data can be
entered into a certain cell.
Here are just a few examples of what Excel’s data validation can do:
• Allow only numeric or text values in a cell.
• Allow only numbers within a specified range.
• Allow data entries of a specific length.
• Restrict dates and times outside a given time frame.
• Restrict entries to a selection from a drop-down list.
• Validate an entry based on another cell.
• Show an input message when the user selects a cell.
• Show a warning message when incorrect data has been entered.
• Find incorrect entries in validated cells.
For instance, you can set up a rule that limits data entry to 4-digit numbers between
1000 and 9999. If the user types something different, Excel will show an error
alert explaining what they have done wrong. The window below shows a warningmessage that appears when data outside of the range (1000-9999) is entered.
How to do data validation in Excel
1) Select the cell(s) you want to create a rule for.2) Select Data >Data Validation.

3) On the Settings tab, under Allow, select an option.
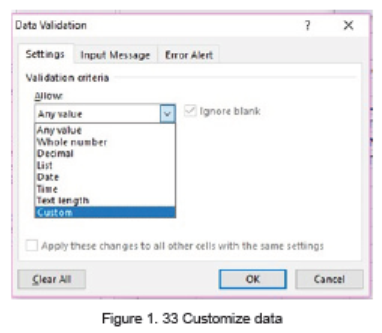
4) Under Data, select a condition:
5) On the Settings tab, under Allow, select an option: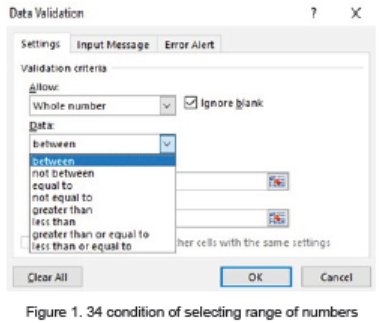
6) Set the other required values, based on what you chose for Allow and
Data. For example, if you select between, then select the Minimum: and
maximum: values for the cell(s).
7) Select the Ignore blank checkbox if you want to ignore blank spaces.
8) If you want to add a Title and message for your rule, select the Input
Message tab, and then type a title and input message.
9) Select the Show input message when cell is selected checkbox to display
the message when the user selects or hovers over the selected cell(s).
10) Select OK.
As an example, let’s make a rule that restricts users to entering a whole numberbetween 1000 and 9999:
With the validation rule configured, either click OK to close the Data Validation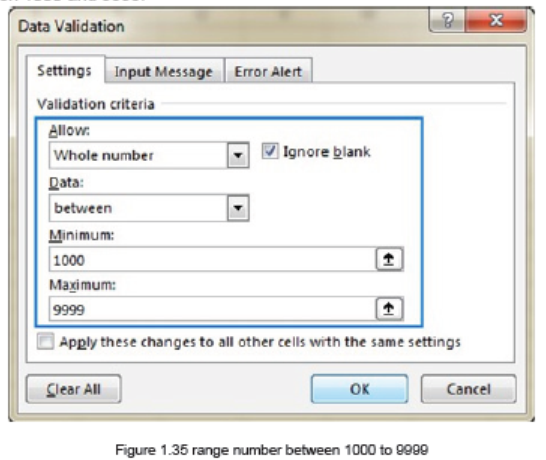
window or switch to another tab to add an input message or/and error alert.
3) Add an input message (optional)
If you want to display a message that explains to the user what data is allowed in a
given cell, open the Input Message tab and do the following:
• Make sure the Show input message when cell is selected box is checked.
• Enter the title and text of your message into the corresponding fields.• Click OK to close the dialog window.
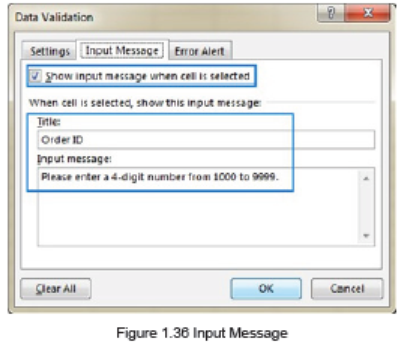
As soon as the user selects the validated cell, the following message will show up:
4) Display an error alert (optional)
To configure a custom error message, go to the Error Alert tab and define the
following parameters:
• Check the Show error alert after invalid data is entered box (usually selected
by default).
• In the Style box, select the desired alert type.
• Enter the title and text of the error message into the corresponding boxes.• Click OK.

1.5. Using other Excel templates
Learning activity 1.8
In the scenario below discuss the excel template to be used:
1) ICT Club members are trying to make a school calendar
2) Mbabazi, a Math teacher at Lycee de Nyanza wants to request for a loan
of five million (5,000,000) from Umwalimu Sacco. The loan will be paid at
the 11% interest rate in five years (5). The starting period of payment is
25/05/2019. Do the followings :
a) By using loan amortization template, find out the last date of payment,
number of months and years of payment.
b) What is the total interest to pay for this loan?
Microsoft Excel templates are a powerful part of Excel experience and a great way
to save time. Excel templates can also help you create consistent and attractive
documents that will impress your colleagues or supervisors.
Templates are especially valuable for frequently used document types such as
Excel calendars, budget planners, invoices, inventories and dashboards.
a. Creating a workbook from an existing Excel template
Instead of starting with a blank sheet, you can quickly create a new workbook
based on an Excel template. The right template can really simplify your life since
it makes the most of tricky formulas, sophisticated styles and other features of
Microsoft Excel that you might not be even familiar with.
To make a new workbook based on an existing Excel template, perform the following
steps.
• Switch to the File tab
• Click NewTemplates provided by Microsoft displayed.
1) To preview a certain template, simply click on it. A preview of the selected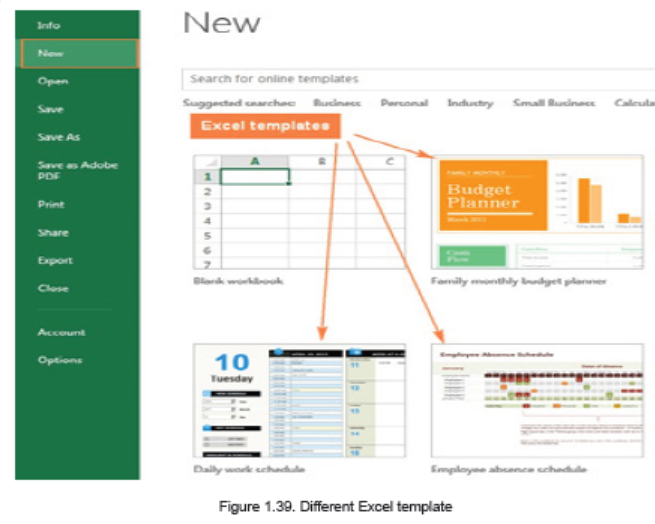
template will show up along with the publisher’s name and additional details
on how to use the template.
2) If you like the template’s preview, click the Create button to download it. Forexample, I’ve chosen a nice mini calendar template for Excel:
That’s it - the selected template is downloaded and a new workbook is created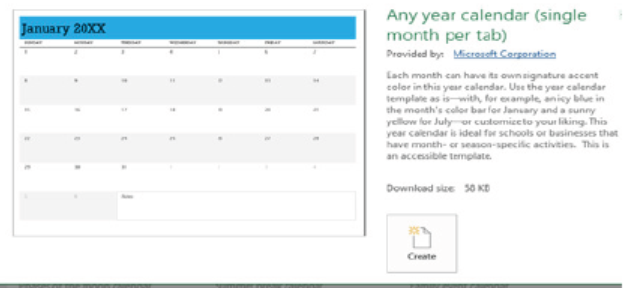
based on this template right away.
b. Finding more templates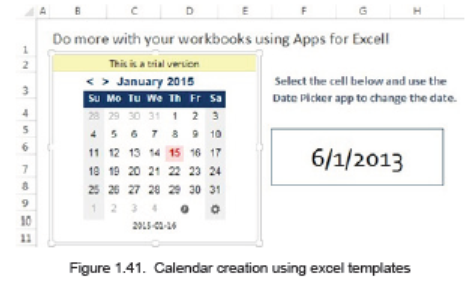
To get a bigger selection of templates for your Excel, type a corresponding keywordin the search bar:
If you are looking for something specific, you can browse available Microsoft Excel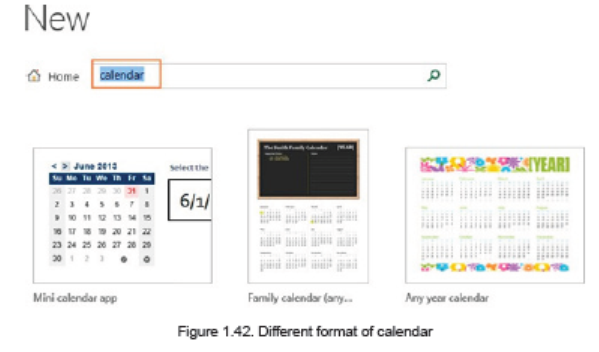
templates by category. For example, see how many different calendar templatesyou can choose from:
Note. When you are searching for a certain template, Microsoft Excel displays all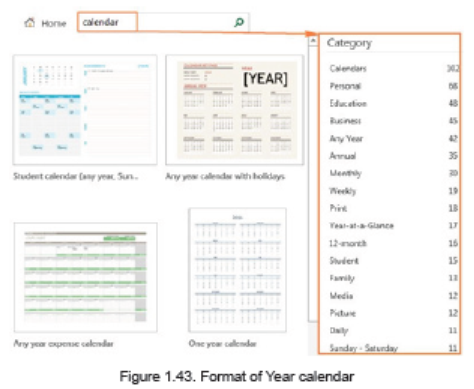
relevant templates that are available on the Office Store.
c. Making a custom Excel template
Making your own templates in Excel is easy. You start by creating a workbook in
the usual way, and the most challenging part is to make it look exactly the way you
want. It is definitely worth investing some time and effort both in the design and
contents, because all formatting, styles, text and graphics you use in the workbook
will appear on all new workbooks based on this template.
In an Excel template, you can use save the following settings:
• The number and type of sheets
• Cell styles and formats
• Page layout and print areas for each sheet
• Hidden areas to make certain sheets, rows, columns or cells invisible
• Protected areas to prevent changes in certain cells
• Text that you want to appear in all workbooks created based on a given
template, such as column labels or page headers
• Formulas, hyperlinks, charts, images and other graphics
• Excel Data validation options such as drop-down lists, validation messages
or alerts, etc.
• Calculation options and window view options.
• Macros and ActiveX controls on custom forms
Note: Once you’ve created the workbook, you just need to save it as a .xlt or .xltx
file (depending on which Excel version you use) instead of usual .xls or .xlsx.
If you need the detailed steps, here you go:
• In Excel 2019,2016,2013, click File
• In the Save As dialogue, in the File name box, type a template name.
• Under Save as type, select Excel Template (*.xltx) if you are using Excel
2019,2016,2013, 2010 or 2007. In earlier Excel versions, select Excel 97-
2003 Template (*.xlt).
If your workbook contains a macro, then choose Excel Macro-Enabled
Template (*.xltm).
When you select one of the above template types, the file extension in the File.Name field changes to the corresponding extension.
1. Click the Save button to save your newly created Excel template. Where to
download Excel templates
As you probably know, the best place to look for Excel templates from Microsoft
Office website (www.Office. com). Here you can find a great lot of free Excel
templates grouped by different categories such as calendar templates, budget
templates, invoices, timelines, inventory templates, project management templatesand much more.
To download a particular Excel template, simply click on it. This will display a brief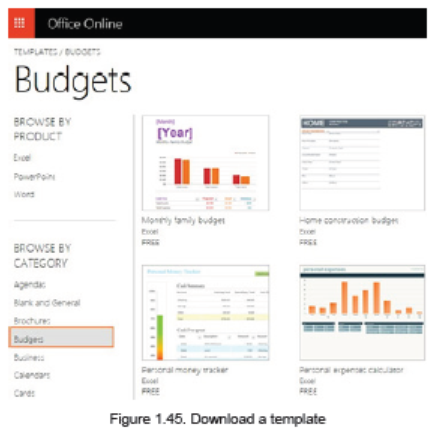
description of the template as well as the Open in Excel Online button.
Application activity 1.8
1. Define the following Terms:
a. Microsoft Excel template
b. Business
c. Calendars
2. Design your personal Card using Microsoft Excel template (be specific)
3. You want to request a loan in BK,
a. Using Loan Amortization template calculate the monthly payment
b. In which year will you finish paying?
c. Calculate the total interest to pay
d. If you get more means and you want to pay one year before the end of yourcontractual payment how much money will you save on unpaid interest
UNIT 2: ADVANCED POWER POINT
Key Unit CompetenceCreate a power point presentation to address a bigger audience
Answer the two question below and do what is requested in question 3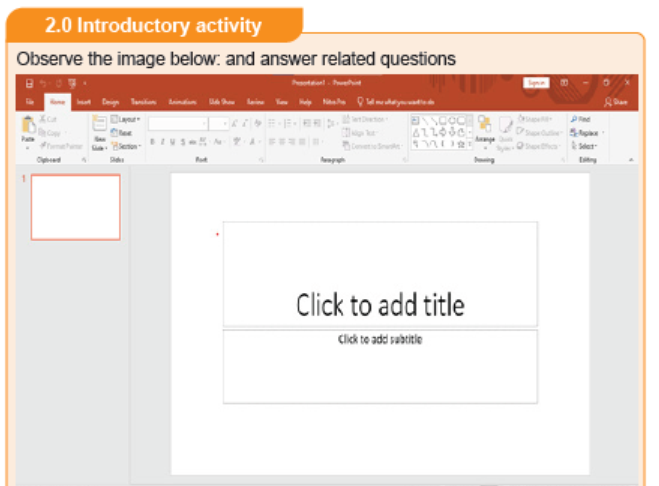
1. What is the application program that is opened in the projection
2. What is the use of the opened program mentioned above3. Connect a projector to your computer and present your work
2.1. Create and manage presentations
2.1.1. Creating, copying and inserting slides
Learning activity 2.1
1. Discuss elements that make a Good Presentation?
2. Create a PowerPoint presentation on “Good Money Habits” having
two slides. Save the presentation on the desktop of your computer as
“Good Money Habits”
A presentation is an organized report or message prepared as a talk before an
audience, with the help of a computer program.
A presentation software is a program used to create slide shows for presentation on
screen to an audience. Example of programs/software which can be used to create
presentations are the following:
– Harvard Graphics,
– Corel Presentations,
– Lotus Freelance Graphics
– Microsoft PowerPoint
The role of Presentation applications is to help the presenter convey the message
easily.
Microsoft PowerPoint is presentation software commonly used when planning to
give a talk as a presentation. The purpose of the talk may be to inform, create
awareness, present strategies or to sell a product or service.
A PowerPoint presentation is made by slides and it can be done on computer
screen if the audience is very small and if the audience is large the computer can
be connected to a projector that projects the image onto a large screen or a wall.
2.1.1.a. Starting PowerPoint Presentation
To start Microsoft PowerPoint 2013, 2016 & 2019 go through these steps:
• Click to the start icon
• Select and click on PowerPoint 2013 located on the startup menu
• Click on one of the PowerPoint templates. Here click on Blank
Presentation. The PowerPoint screen appears as in the image below: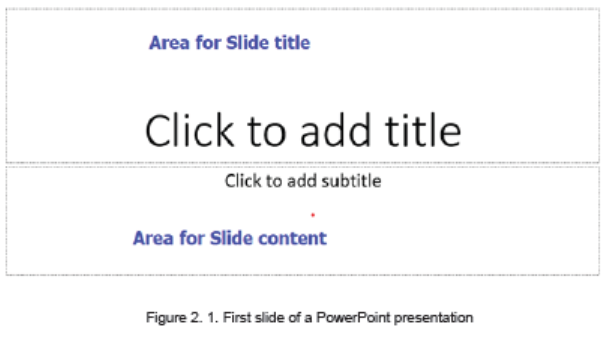
In the new slide write the slide title and write the content in the appropriate zone.
Resize the writing zones accordingly to make the title area small and the content
area bigger.
2.1.1.b Creating and inserting a slide in a presentation
The opened PowerPoint presentation has now one slide and each slide has to have
its title set and have the content. Once this is finished a need to have more slides
may arise. To create a slide in an existing presentation click on the Insert tab thenclick on New Slide then choose the slide theme to apply.
A new slide can also be inserted by selecting the slide behind which a new one is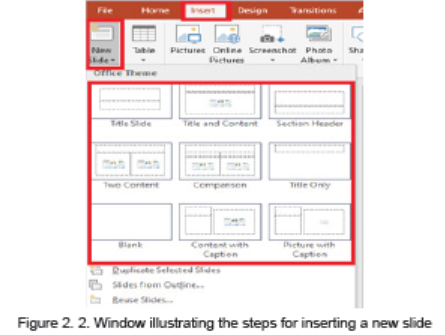
to be inserted and hitting the Enter key.
The created presentation will be saved by clicking on the Save icon then choose
the location where to save and specifying the name of the presentation.
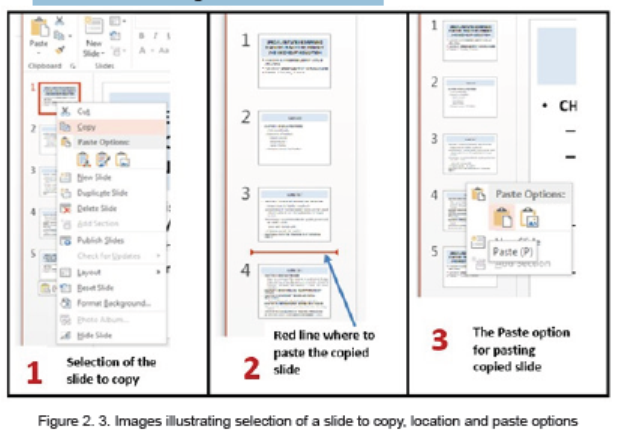
2.1.1.c. Copying a slide
A slide can be copied in the same presentation or copied to a new presentation
in order to avoid rewriting that presentation from scratch. To copy a slide do the
following:
• Open the presentation containing the slide to copy
• In the left pane outlining the slides select the slide to copy
• Do a Right click and click on copy
• In the left pan click in the location where to put the copied slide so as to havea red line and do a right click and click Paste
APPLICATION ACTIVITY 2.1
1. Create a PowerPoint presentation on any topic of your choice in
Fundamental of Nursing
2. Using a computer connected to the projector present the created
presentation to the class
3. Discuss the difference between presentation using ICT tools to normalpresentation using paper notes
2.1.2. Managing slides
Learning activity 2.2
Create a PowerPoint presentation of not less than 10 slides. The title of the
presentation is” The importance of ICT in Health sector”
Instruction:
Hide two last slides of the above presentation
Once the slides are created, one needs to know how to manipulate them by hiding
some slides, moving in slides, rearrange slides, delete some slides, dividing slides
into sections, etc.
a. Hiding a slide
When a slide is not currently needed it can be hidden by selecting it then doing a
Right click and clicking on Hide Slide. The hidden slide will continue to appear in
the slide pane and can be opened by double clicking it but it won’t appear if the
presentation is opened in the Slide Show mode. To unhide the hidden slide gothrough the same process.
b. Moving in slides
A slide that will be displayed on the computer screen or on the projector is the one
which is selected.
In the Normal view to move from one slide to another use the Arrow keys found
on the keyboard. The Up key will move to the previous slide while the Down key
will move to the next slide. One can go to any slide without needing to serially go
through all slides by just clicking the slide to go to.
In the Slide Show view also use the same keys but not that the Escape Key can
be used to end the presentation in the Slide Show View mode and switch to the
Normal view. Once the last slide is reached hitting the Down key will switch to the
Normal View.
c. Rearranging slides
Slides are not stationary, they can be moved and rearranged making for example
the first slide be the third. To rearrange slides select the slide, hold down the left
button and move the slide by moving the mouse up or down.
d. Deleting slides
A slide that is no longer needed can be completely deleted by selecting it and hitting
the Delete key or selecting that slide, doing a Right click and clicking on Delete
Slide.
e. Dividing slides into sections
Sections are subdivisions in a PowerPoint presentation slides used preferably for
bigger presentations that can be logically grouped. Slides in the same group
should be logically related so as to facilitate their understanding during presentation
or while reading them.
Putting slides into sections can also be done when slides are to be presented by
different people thus each person presents his/her section.
• Creating a section
To create a section in a PowerPoint presentation do the following:
1. Select in between the slides where to insert the section or the slide behind
which to insert the section
2. Do a right click and click on Add Section in the provided options
3. Rename the section by selecting it and clicking on Rename. The default
name of a section is Untitled Section.4. Write the new name and click Rename
A created section can be removed by selecting it, doing a right click and choosing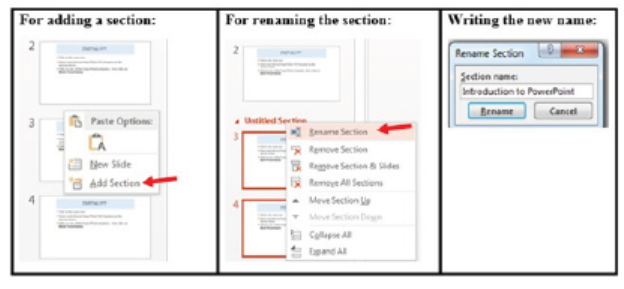
Remove Section. It can be moved by choosing the Move Section Up or MoveSection Down option.
APPLICATION ACTIVITY 2.2
1. Create a PowerPoint presentation on ICT in health with 3 distinct sections
in the presentation where each section is about the following:
a. Benefits of ICT in Health
b. Importance of technology into Hospital management
c. Role of ICT in bringing about changes in Health care
2.1.3. Apply Design themes and format background
Learning activity 2.3
Discuss tips you can use to make effective and more attractive for a
PowerPoint presentations
a. Design theme
PowerPoint provides a variety of design themes which are predefined colors, fonts
and visuals that can be applied to slides to make them have a beautiful look without
doing a lot of formatting work.
The Themes gallery can be reached by clicking the DESIGN tab and themes willimmediately be viewed.
To apply a given theme to a presentation just open that presentation and select the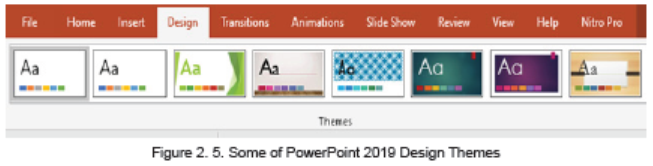
desired Theme. In the image below the Theme “Facet” has been applied.
b. Format background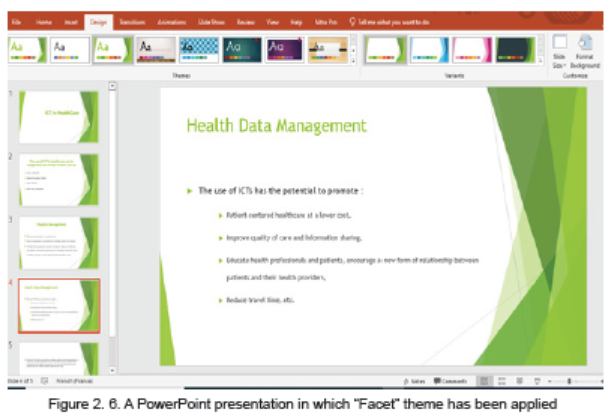
A background is an object which can be just a color, an image behind whatever text,
charts, images in a PowerPoint presentation.
To set a presentation’s background follow these steps:
• Open the presentation for which the background is to be set
• Under the DESIGN tab Click on Format Background
• Choose one of the provided options and customize those optionsaccordingly
APPLICATION ACTIVITY 2.3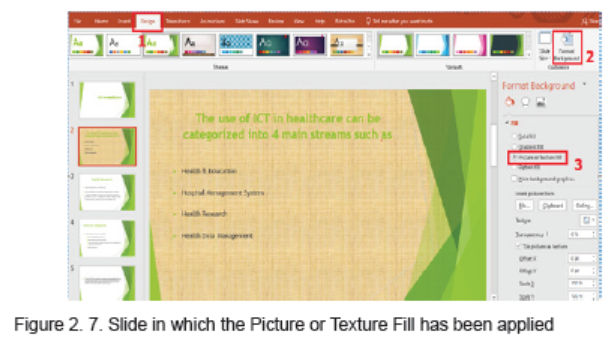
Create a PowerPoint presentation “Understanding Gender Equality” containing
at least 10 slides and do the following:
1. Change the theme of the presentation to “Organic”.
2. Give this presentation a picture background
3. Change the background of the presentation to “Pattern Fill”
4. Create a new section “Gender equality in the development of Rwanda”
with 5 slides Give the section should have “Main event” as the theme of
a presentation.
5. Apply new theme with colour and font to the working presentation
2.1.4. Adding notes and comments, Inserting header and footer
Learning activity 2.3
Using Ms Power Point create a presentation containing 15 slides which has the
title “Inborn reflexes”
Apply the followings to the presentation:
• Add notes and comments to created slides that will help you while
presenting
• Add header as “Inborn reflexes” on every slide
a. Adding comment
In PowerPoint presentation, a comment is an explanation that is attached to a text
or an object on a slide, or to an entire slide.
To add a comment in a slide go through the following steps:Step 1. On the Review tab, click New comment
Step 2. Write the comments in the provided space as visible in the zone No 3 of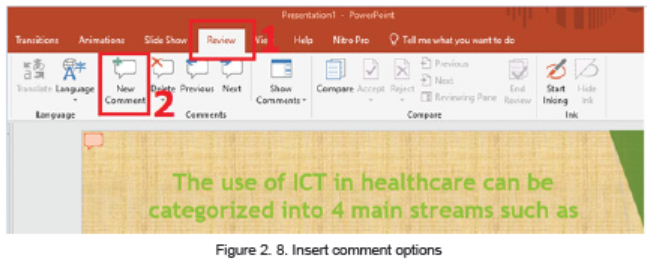
the above image
Note: Comments can be added to a PowerPoint presentation by using a simpler
method of clicking at the Comment option located at the bottom middle of an opened
PowerPoint window.
b. Adding notes
In a PowerPoint presentation Notes are words/text added to a presentation as
reference and only visible to the one presenting the slides. They serve as additional
information for the presenter that can be read for guidance as the presentation
goes on.
To add notes to a presentation do the following:
1. On the View menu, Click Normal
2. Select the thumbnail of the slide to add notes to
3. The notes pane will appear under the slide. Click where it says Click to addnotes and type whatever notes depending on your choice
Note: A simple way to add notes is to use the Notes option located at the bottom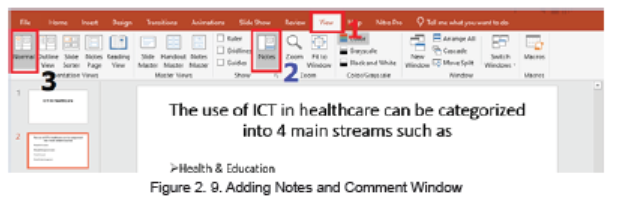
middle of an opened PowerPoint window
d. Insert header and footer
Header and footer in a presentation is the top and bottom parts of the slides. These
include the slide number, text footer and date.
To add a header or footer follow these steps:
1. Click Insert then go to Header & Footer
2. In the box below Footer, type the text to use as footer such as the
presentation title
3. Check Date and time to add that to the slides
4. Check Slide number to add to the created slides
5. Click on Apply or Apply to all if all slides are to have the same header orfooter
APPLICATION ACTIVITY 2.4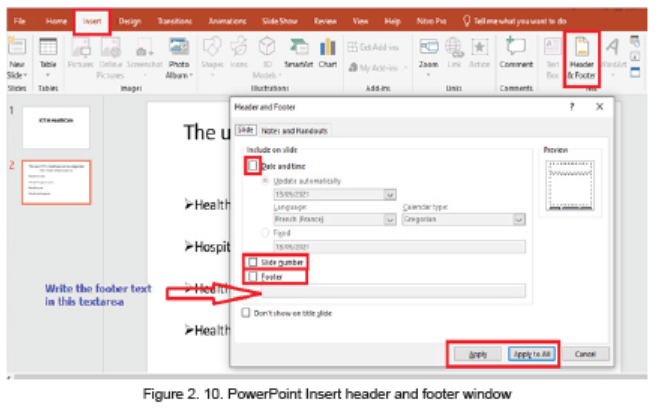
1. What is the difference between header and footer?
2. Discuss the importance of notes and comments in a PowerPoint
presentation
3. Create a PowerPoint presentation on “Quality and Accessibility of Health
services in Rwanda “that you will present to the class. Add notes and
comments to slides that will help you while presenting
2.2. Add sound and animation to slides
Learning activity 2.5
1. Give the benefits of adding multimedia into a presentation
2. Improve the PowerPoint presentation created on “Quality and Accessibility
of Health services in Rwanda “by adding in images
2.2.1. Animate text and picture in slides
In PowerPoint, it is possible to animate text and objects such as clip art, shapes
and pictures on the slide. Animation or movement on the slide can be used to draw
the audience’s attention to specific content or to make the slide easier to read.
a. Inserting pictures
To insert pictures in a slide select the Insert tab, and then click the Pictures command.Browse where the image are located and select one image and click Insert.
b. Animating a text or a picture.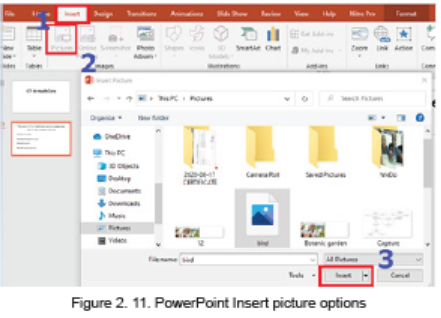
When a text is written in a slide or an image inserted they can be animated using
the options available in PowerPoint. There are many types of animations available
and each is used for different reasons like making the message come to the screen
in a certain way (entrance animation) or bringing an emphasis to that message
(emphasis animations). The image below shows some of the animations availablein PowerPoint 2013.
For animating a text or an image do this: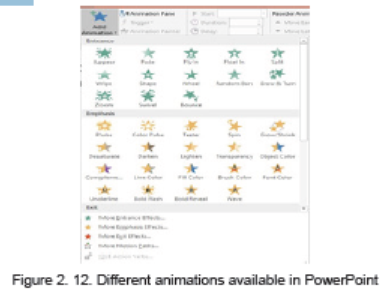
a. Select the text or picture to animate
b. In the Animation tab choose one of the available options like Float In, Split,
etc. The selected animation is immediately applied
In the next images below the title has been animated with “Fly In” animation, the
text is animated with “Split” and the image is animated with “Zoom”. When the
whole slide is opened in Slide Show mode each element has its own animationwhich helps attract more the attention of the audience.
Now that the title’s animation is Fly In, the text’s animation is going to be set to
“Split” by selecting the text and choosing Split which is under the Animations tab
Now is the time to animate the image by also selecting it and choosing the desired
animation
Opening the above animated slide in Slide show mode will look like in the sequenced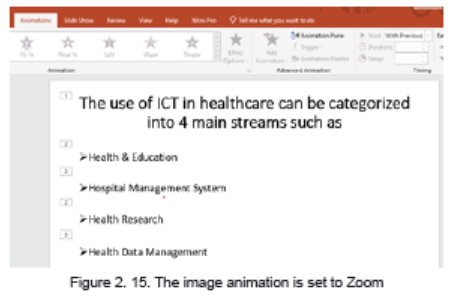
images below:
Interpretation: the above animated slide when opened in Slide view mode will
show in this way:
a. A blank black screen will open and rapidly the black color will cede place to
the white background of a normal document
b. The text in the slide will come from left and right to meet in the middle c. The
image will appear as a small image that will grow from the center
c. The title of the slide will appear from the bottom of the slide, sliding upward
B.1. Setting the delay of an animation
The default duration of a text or image animation can be changed to make the
animation slower or quicker. The delay cannot be greater than 59 seconds. To set
a delay click on Animations tab and in the Timing group specify the duration andthe delay.
c. Customize animation effects
It is possible to apply multiple animation effects to a text, an image or a picture.
When working with multiple animation effects, it helps to work in the AnimationPane, where a list of all the animation effects for the current slide is displayed.
APPLICATION ACTIVITY 2.5
Create a PowerPoint presentation having at least 10 slides on “Nursing
principles”.
1. Insert a picture in each slide.
2. Animate the presentation as follow :
a. The title to “Fade”,
b. The text to “Appear”c. The image to “Pulse”
2.2.2. Add audio and video content to slides
Learning activity 2.5
Create a presentation with a slide “Video in PowerPoint”. Insert a video as the
only content on the slide. Play the presentation in the slideshow
PowerPoint allows to use images, audio and video to have a greater visual impact.
These visual and audio cues may also help a presenter be more improvisational
and interactive with the audience.
Animation applied to text or objects in a presentation gives them sound or visual
effects, including movement. It is possible to use animation to focus on important
points, to control the flow of information, and to increase viewer interest in a
presentation.
a. Inserting an audio or a video
To insert an audio or a video do the following:
1. On the Insert tab click on Media
2. Choose the media to use which can be a video, an audio or a recordingwhich is taken using a computer
3. Browse the location where the audio or video to insert is located.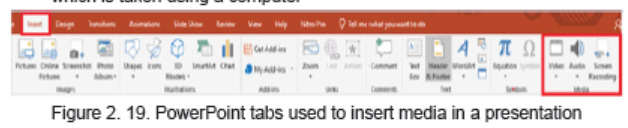
4. Select the media to use and click on Insert
The slide where audio has been inserted will have a graphic as shown in below.
Play using the media buttons displayed.
A media inserted in a PowerPoint presentation can have the role of providing more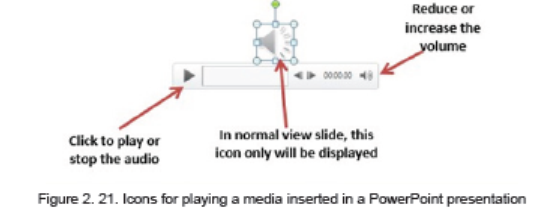
clarification for efficient understanding, it can be the only content in the slide, it can
be a recording of the screen activity when for example one wants to show the steps
to do a certain think using a computer. It can also be a readout of the slide’s text.
b. Inserting a recording
A recording is taken using the computer microphone and is inserted much the same
way as other audio except that instead of browsing the audio to insert, the audio
has to be recorded. To insert a recording go through the following steps:
1. Under the Insert tab click on Media2. Click on Audio then on Record Audio
The recorded audio can be set to play as the slide is opened or to play when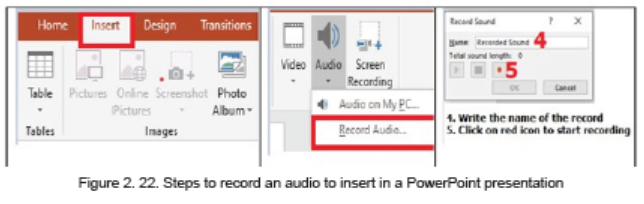
clicked on. It can also be trimmed to fit in the desired time frame.
To trim the recording:
1. Click on the micro icon then under the Audio tools go to Playback2. Click on Trim audio then on OK
c. Inserting a screen capture
Capturing a screen can be very important for many reasons but the main is when
you want to make an instructional video that shows the steps that are being done
on the screen. This can be combined with capturing an audio describing what is
being done.
Note: Thus, for future student teachers this functionality can prove very useful.
Steps to capture the screen:1. Click on Insert then under the Media group go to Screen Recording
2. Choose among the available options in the dialog box that will appear, click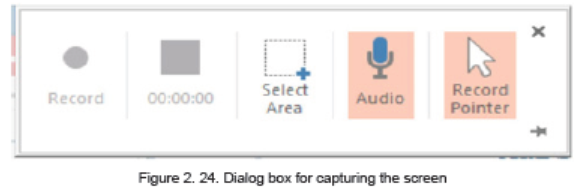
on Select Area to choose which portion of the screen to be recorded and
click on Record
3. To end the recording use the combination keys Window key with shift keyand Q
APPLICATION ACTIVITY 2.6
Create a PowerPoint presentation explaining how to insert audio and video into
a presentation. Your presentation should contain a text stating the steps to follow
and the audio of these steps should be heard on the display of the presentation.A screenshot of the steps to follow must be visible.
2.2.3. Slide transitions
Learning activity 2.7
Create a PowerPoint presentation “Tubungabunge Umuco wacu” of 5 slides.
1. Apply different slide transitions: Slide 1=” Blind”, Slide 2=” Clock”,
Slide 3=” Ripple” Slide 4=” Honeycomb”, Slide 5=” Reveal”,
2. Add sound to the slide3
3. Add time transitions to make them last for 2 seconds
A slide transition is the visual effect that occurs when moving from one Slide to
the next during a presentation. Hereby one can control the speed, add sound, and
customize the look of transition effects.
a. Types of transitions:
In PowerPoint 2019 there are two main slide transitions namely subtle, exciting and
dynamic content
In Subtle transition simple transitions are used to move from one slide to another,
for Exciting additional visual effects are used to catch the eye of the audience whilefor Dynamic content will move only the placeholders, not the slides themselves.
b. Using a transition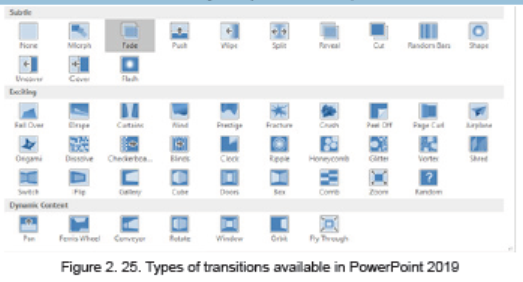
To use the different transitions do the following:
• To select the text or image on which to apply the transition
• Click on the Transition tab then choose one of the transitions. In the imagebelow the chose n transition is “Dissolve”
Once the transition has been set it can be modified by selecting the text having a
particular transition and choosing the new transition to apply. It can also be removed
by choosing the None transition.
APPLICATION ACTIVITY 2.7
Create a presentation on” Education for all” which contain 10 slides and do the
followings:
1. Make the Font type =” Candara” ; Font Size =”24” and Paragraph groups
available in PowerPoint
2. Make the slide titles and each bullet in every slide have the Fly in animation.
3. If the title of the slide changes, change the sound accompanying the
projection of the title (not the whole slide)
4. End the presentation with a visible and audible clap of the hands
5. Change the transition Duration to 2.00.
6. Use the Apply to All command to apply your changes to every slide.7. Save your work
2.3. Presenting Using PowerPoint
Learning activity 2.5
You are tasked to present to an audience of 300 people in the school hall on how
to improve your schools discipline.
1. Discuss the plan of your presentation by focusing on the organization
of the presentation that of the session, plan to gather feedback and plan
to make the group more participative and attentive.
2. Discuss the effectiveness of this presentation if you use papers and not a
projector in your presentation
Microsoft PowerPoint can add a visual dynamic to a business meetings and
presentations. The best way to share a PowerPoint presentation with a large group
is to project slides on screen using a digital projector connected to the computer’s
video output.
a. Presenting using a projector
A projector is an output device that can take images generated by a computer and
produce them by projection onto a screen, wall or another surface.
A projector is connected to the computer through the VGA port but newprojectors and computers can be connected using the HDMI ports
Steps for connecting a laptop to a projector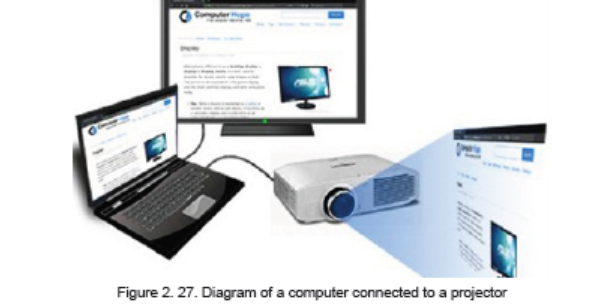
1. Make sure the laptop is turned off
2. Connect the video cable(VGA) from the laptop’s external video port to theprojector
3. Plug the projector into an electrical outlet and press the “power” button to
turn it ON.
4. Turn on the laptop
There are different presentation modes while using a computer connected to a
projector. One can use the Projector only, duplicate (both the projector andcomputer), Extend and Disconnect the projector.
b. Printing and distributing handouts
A handout is a piece of printed information provided to the audience so as to give a
summarized information on a given topic.
Handouts are distributed to an audience so as to help them follow the presentation
and take some notes on what is being presented.
It is a good practice to give the presentations to the audience at the end of the
session so as to review what was presented to them.
c. Conducting the presentation
When everything is in order; the projector is properly connected and working, the
handouts have been distributed and everyone is properly seated it is then time to
start the presentation.
For a presentation to be effective, the PowerPoint document have to have these
qualities:
• Make the PowerPoint presentation short. Slides will contain short and concise
sentences which are bulleted,
• Highlight important points by using animations and transitions wisely not
randomly as these are used with a purpose like attracting attention on certain
section, notifying of the change in the topic, etc
• For long slides provide short partial synthesis to make the audience keep
track of what is so far presented
• Rehearse the presentation and use scripts and notes to help you not forget
the important points to mention
• Be polite and use appropriate language.
APPLICATION ACTIVITY 2.8
1. List the qualities a presentation should have?
2. List available options to use when a projector is connected to a computer?
End Unit assessment 2
1. Create a presentation of 12 slides on the topic “Nature-Protect”. Do the
following:
a. In first slide describe the environmental protection in the World
b. In the second two slides describe the environmental protection in Rwanda
c. To give a good appearance and make slides more understandable insert
images related to environment where applicable. Change theme, font and
color to your presentation appropriately
d. In third three slides, describe the advantages of forest in environment and
use a related audio/song that will play in the background.
e. In the fourth two slides discuss special cases where nature destruction by
human exploitation had severe consequences
f. In the last two slides state what should be done for a better human future
provided by livable environment. End with one conclusion slide and aThank you slide.
UNIT 3: E COMMERCE, SOCIAL MEDIA AND ONLINE SERVICES
Key Unit competenceTo be able to request for online services and access social media
3.0 Introductory activity
Holly City Technology Ltd manager needs to buy computer spare parts products
from outside of Rwanda. The manager doesn’t have time to go out of the country
and he decided to search on the Internet the websites which sell computer spare
parts.
a. Discuss ways the manager can use to communicate with the supplier to
obtain the price of the goods
b. Discuss the type of business conducted via the Internet
c. Give social media platforms used for daily communicationd. Discuss the way that can be used for payment
3.1. E commerce
Learning activity 3.1
1. 1. Kamikazi wants to buy a Psychology book. She visited many
libraries in the country but she could not find the title she wanted. She
decided to search for the book using google.com. Finally, she realized
that the book is available online on amazon. com and the price is at
15,000 RWF.
a. Discuss the process Kamikazi will go through in order to buy that book and
have it delivered to her
b. Brainstorm the other local and global online platforms that can be used to
buy goods and services2. What do you understand
3.1.1. Understanding e commerce
a. History
E-Commerce or Electronic Commerce also known as e-Business, Is the buying
and selling of goods, products, or services over the internet using electronic means
of payment like credit cards. This commerce provides to buying parties physical
goods but also electronic materials (goods) where possible.
The history of ecommerce dates back to the invention of the very old notion of “sell
and buy”, electricity, cables, computers, modems, and the Internet. Ecommerce
became possible in 1991 when the Internet was opened for commercial use
At first, the term ecommerce meant the process of execution of commercial
transactions electronically with the help of the leading technologies such
as Electronic Data Interchange (EDI) and Electronic Funds Transfer (EFT) which
gave an opportunity for users to exchange business information and do electronic
transactions. The ability to use these technologies appeared in the late 1970s and
allowed business companies and organizations to send commercial documentation
electronically.
b. Some Ecommerce platforms
With ecommerce the buying and selling parties don’t need to meet at the same
location, the buyer does not go to the store but there is an electronic platform that
is used as a market where the buyer and the seller meet. An example of such aplatform is amazon.com.
To buy goods on amazon.com or any other online chopping platform (ecommerce
website), the buyer must have an Amazon account, must log in using that account,
choose among the list of provided goods, choose location where the goods are to
be delivered and pay using acceptable payment means like Credit cards.
As of September 2021, the online shopping platforms available in Rwanda are
among others vubavuba.rw and kikuu.com. Through this platforms one can buyfood (Vuba Vuba) or clothes (kikuu.com).
c. Buying on an e-commerce platform case of kikuu.com
As stated earlier kikuu.com is one of the platforms available in Rwanda with which
one can buy available goods and have them delivered to his/her preferred location
in Kigali. To buy with Kikuu, as it is a principle for other e-commerce the buyer has
to have an account. To create that account go through these steps:
1. In the address bar write kikuu.com and once the platform loads click on
Register to create a login account. Fill in the provided form the requested
details. Or2. If the user account is already created login
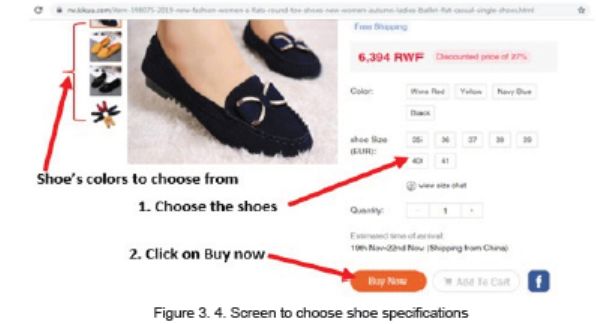
3. Once the login is successful choose goods to buy.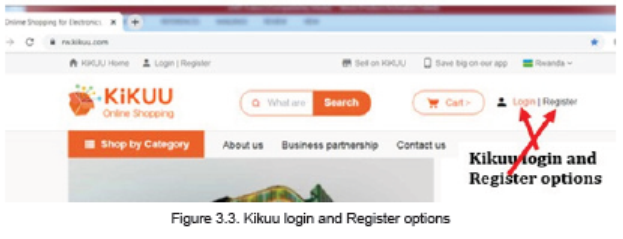
For most platforms goods have pictures and accompanying image and for selecting
the goods just click on its image. Select the goods specifications carefully so as
68 ICT- Student Book-Senior 5
to get what is wanted. In the case of the shoes chosen like in the image below thecustomer has to choose the shoe’s color and the size.
4. Pay the amount due by using the preferred payment method
in the next two screens choose the payment method and click on PAY<Amount>.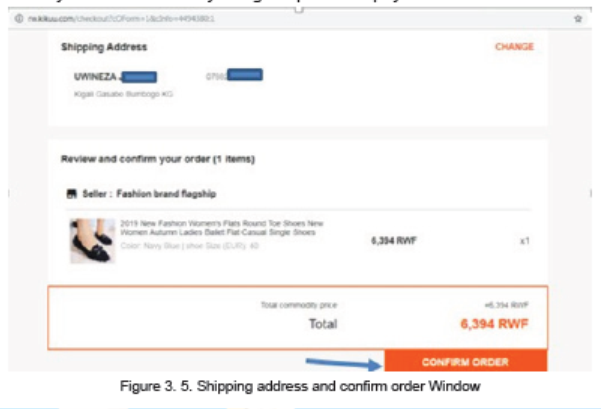
In the other screen as MTN Money has been chosen as payment method fill theaccount and click PAY <Amount>
d. Advantages and disadvantages of e commerce
There is no good thing without a bad side. Ecommerce presents to its users many
advantages but has also disadvantages.
a. Advantages of E-commerce
• Does not require physical displacement of the buyer hence saving money
and time
• Products and services are easy to find on the platform rather than moving. in
so many stores, warehouses or supermarkets
• Transactions can be done all the time of the day and the week (24/7).
• No geographical limitations translates as a bigger customer reach.
• Higher quality of services and lower operational costs.
b. Disadvantages of E-commerce
• No guarantee of product quality as the product is not physically viewed
• Customer loyalty becomes a bigger issue as there is a minimal direct
customer-seller interaction.
• Anyone can start an online business, which sometimes leads to scam and
phishing sites.
• Hackers target web shops which may lead to disruption of service.
3.1.2. E-commerce models
Electronic commerce can be classified into four main categories. The basis for this
simple classification is the parties that are involved in the transactions. The four
basic electronic commerce models are:
a. Business to Business
In a business to business model companies are doing business with each other.
The final consumer is not involved. So the Online transactions only involve the
manufacturers, wholesalers and retailers, etc.
b. Business to Consumer
Here the company will sell their goods and/or services directly to the consumer. The
consumer can browse their websites and look at products, pictures, read reviews.
Then, they place their order and the company ships the goods directly to them.
c. Consumer to Consumer
Consumers are in direct contact with each other. No company is involved. It helps
people sell their personal goods and assets directly to an interested person.
d. Consumer to Business
The consumer provides goods or services to the company.
For example an IT freelancer who demos and sells his software to a company.
APPLICATION ACTIVITY 3.1
1. Discuss the major benefits of E-commerce
2. What are two advantages of electronic commerce over traditional
commerce?3.1.3. Online Payment methods
Is the way that a buyer chooses to compensate the seller of a good or service that is
also acceptable to the seller. Typical payment methods used in a modern business
context include cash, checks, credit or debit cards, money orders, bank transfers
and online payment services such as PayPal.
1. Cash Payment
Buying online requires using electronic means which are acceptable by the selling
companies for example as seen in previous sections buying with Kikuu requires
using MTN Money. Other online platforms may require special cards known as
debit or credit cards.
In Rwanda, banks provide means to pay using those cards. For example, Bank of
Kigali provides options to buy on POS (Point of Sale) or on ecommerce platforms
using Visa or MasterCard debit cards.
a. Debit & credit cards
A debit/credit card is a plastic card normally issued by a financial institution to allow
its user to pay at Points of Sale in order to complete a purchase. They also allow
the same purchase on online shopping platforms.
Debit and credit cards look alike and it is not easy to identify them simply by liking
at them except when it is written on them. The main difference is where money is
got from: for the debit cards money is immediately got from the owner bank account
while for the credit card money is charged to the customer’s credit line.The image below shows the front and back side of a credit/debit card
The parts found on the front side of the credit card are: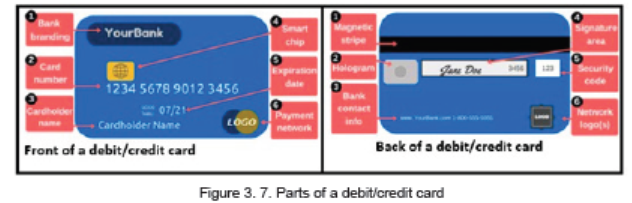
1. Bank branding which identifies the bank name that issued the card
2. Card number which is unique and identifies the client with the bank. The
card number are the ones provided while purchasing online.
Note: Keep the card number a secret as that number can be used by illintentioned
people
3. Card holder name is the name of person authorized to use that card
4. Smart ship is the electronic circuit (processor) which stores some
information. The smart ship feature makes cards more secure than the
magnetic-stripe-card only
5. Expiration date is the date after which the card is no longer usable. The
reason for this is mainly for the purpose of providing new cards which
are more technologically advanced. The expiry date is necessary while
purchasing online as most platforms require this information and when it is
wrong the transaction can’t be done
6. Payment network logo is the type of card and this can be MasterCard, Visa
and Discover. Services specify which types they accept for payments and
knowing the card’s type is very essential.
The parts found on the back side of the credit card are:
1. Magnetic stripe: the black strip contains information about the card and
its owner, and specialized devices known as card readers gather that
information when the card is inserted
2. Hologram: is a mirror-like area showing a three-dimensional image that
seems to move as the viewing angle changes. Holograms are security
features which help merchants identify valid cards
3. Bank contact information
4. Signature panel is the place where the user’s signature is put
5. Security codes is an additional code to help ensure that anybody using the
card number has a legitimate, original card
6. Network logosAn example of a typical debit card is found below:
b. 1. Using a debit/credit card to purchase
The following are the steps of using a Debit/Credit card in online shopping:
1. Enter the address of the website where to purchase from in the address box
of the browser’s window.
2. Select items to purchase and click the appropriate button used for
purchasing the item.
3. Enter the shipping, billing and debit/credit card details.
4. Click the appropriate button to complete the transaction.
5. Print the confirmation screen or proof of purchase received upon
completing the transaction, and keep it until the item arrives.
For using debit cards at POS or ATMs insert the card and follow the prompts
c. Mobile Phone based Money
Also called Mobile money is a technology that allows people to receive, keep and
spend money using a mobile phone. It’s sometimes referred to as a ‘Mobile Wallet’
or by the name of a specific service
There are more different mobile money services around the world. Although they
are most popular in Africa, Asia and Latin America. Mobile money is a popular
alternative to both cash and banks because it’s easy to use, secure and can be
used anywhere there is a mobile phone signal.
Mobile money keeps funds in a secure electronic account linked to a mobile phone
number. In some cases, the mobile money number will be the same as the phone
number. Mobile money is often provided by the same companies that run the mobile
phone services and it is available to both pre-pay and contract customers.
APPLICATION ACTIVITY 3.2
1. List 5 public services that are paid using Mobile money here in Rwanda
2. Discuss the payment method at your school used to pay school fees?
3. What are the advantages of Mobile money payment method over paying
cash at the bank counter ?
3.2. Social media
Social media is the collective of online communications channels dedicated to
community-based input, interaction, content-sharing and collaboration which
enable users to create or share content or participate in social networking.
Examples of social media are: Facebook, twitter, Instagram and WhatsApp
3.2.1. Facebook
Activity 3.2Observe the image below and answer the questions below:
Discuss the nature of the window above
1. What do you understand by the term “Social media”?
2. Discuss the positive and negative impacts the social media has to theRwanda Society
Facebook is one of the most popular free social networking websites. It allows
registered users to create profiles, upload photos and videos, send messages and
stay in touch with friends, family and colleagues.
a. Creating a facebook account
For most social media before using them an account must be created. An account
identifies the user as different from other users in the system.
The following steps are followed to create a facebook account:
1. Open Facebook Home page by entering in the browser’s address bar the
link www.facebook.com
2. The first page provides the option to login or sign up. Fill in the form the
required information and click on sign up
3. Enter personal information(First name, Last name, email or phone
number, Birthday and gender)4. Enter the code provided through SMS or the provided email
Figure 3. 9. Filling forms for creating facebook account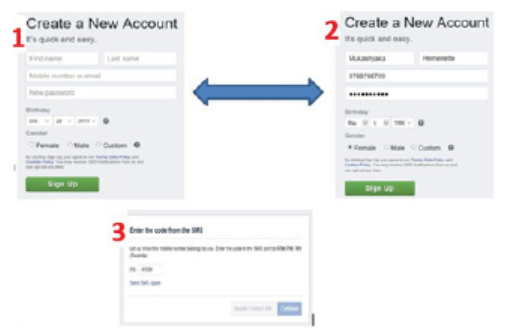
1. Open the verification email that is sent to the email provided while creating
the account
2. Edit the profile information by logging into the new account and clicking onEdit profile
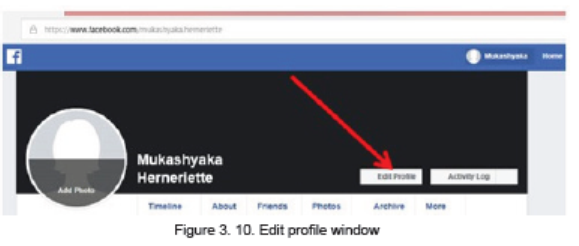
The following table will be appeared.
Note: The account has been created you are able to login into your facebook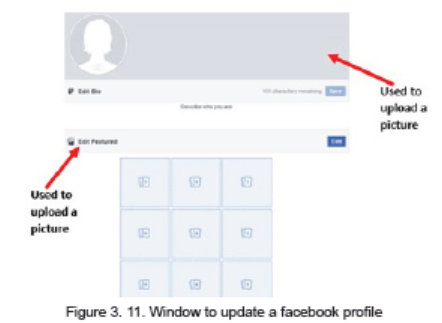
account:
Go to facebook.com and in the top right form fill in the email and the password thenclick on:
b. Connecting with friends
Facebook has millions of users, all users are in the public and appear like anonymous
to you. As a facebook user you are allowed to search for other users, viewing their
profiles, friends, and photos. You can immediately message them inbox but once
the account owner sets some restrictions on his/her account a non-friend user may
view nothing among these.
In order to be able to fully communicate with another facebook user, you just need
to be a facebook friend.
To have a friend on facebook go through this process:• In the facebook search box enter the account of the friend to be
• Once the account is entered in the search box choose the correct facebook
account among the many options and click Add Friend. In the image above
the account chosen is Shyaka Emmanuel
c. Sharing pictures
A facebook account holder can upload pictures on his/her facebook account, share
them or share pictures uploaded by others.
Steps to upload a picture in your account are:• In the menu click on Photo then on Add Photos/Video
• In the new window that will appear browse for the picture to upload and open
it so that it gets uploaded.
• Comment the picture, set who has rights to view it and click on Post like
illustrated in the image above
The uploaded image can then be viewed by anyone (if right to view the image has
been set to Public) and they can like, share and comment this image.
d. Chatting
Facebook provides the option to converse with friends by using the chat option
whose window is available in the far down right zone of a facebook page.
The content of the chat is text but can be also attachments in form of text files,
images, GIF files, videos or a laptop camera taken picture/video
APPLICATION ACTIVITY 3.2
1. List and explain the steps to create a facebook account
2. Create a facebook account and give it your names. Upload your picture
on the account’s profile
3. Search and request for friends by focusing on your classmates
4. Chat with your friend and send them some documents related to yourdifferent subjects lessons
3.2.2. Twitter
Twitter is a free microblogging service that allows registered members to broadcast
short posts called tweets. Twitter members can broadcast tweets and follow other
users’ tweets by using multiple platforms and devices.
a. Creating an account
• For creating a twitter account first go enter in the browser’s address bar
twitter.com
• In the first page that will appear click on Sign up. This same page is used forsign in when the user has already a twitter account
• In the next screen that will appear also click on Next. Confirm the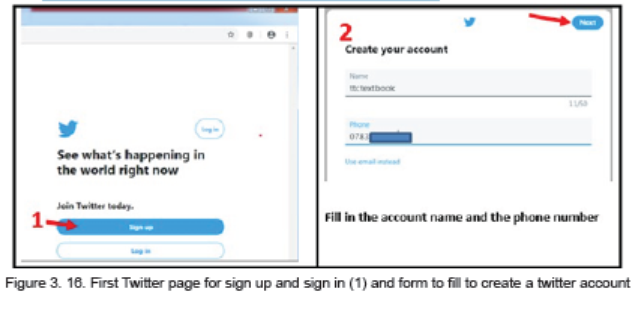
telephone number so and use the sent code to continue to the next stage
• In the next screen enter the password for your twitter account and click on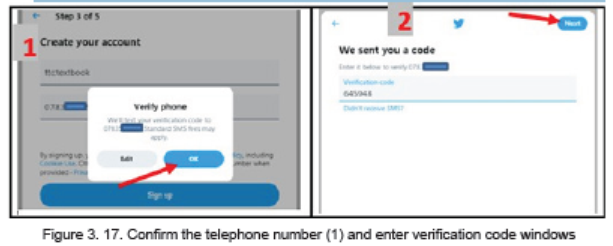
Next.
The screen that will thereafter appear will allow you to edit the twitter account profile
picture by clicking on the human head-and-body silhouette but this can be skippedto be done later.
In the next screens that will appear follow the prompts. Those screens will allow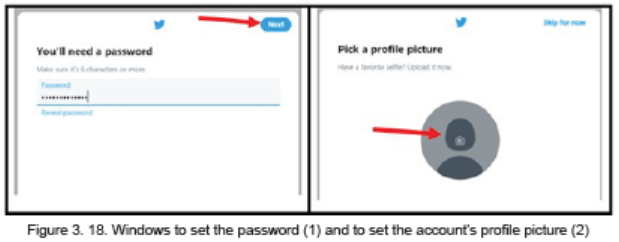
describing yourself, setting your interests, suggestions of accounts to follow, turningon notifications
In the steps given above the account creator may decide to go into additional
steps depending on which features to activate. Here most of the options have been
skipped or the default provided option was chosen. After going through all the steps
the account is created and is ready to be used. However the steps are subject
to change and screens may not look like the ones provided here depending onchanges brought in by Twitter.
b. Following a twitter account
All social media provide better experience when one is acquainted with other
user in the same social media network. For a twitter user to have better experience
he/she has to follow other accounts.
Following an account permits one to receive immediately prompts when the
followed account posts a tweet in form of text, image or video; updates the profiles
immediately after they are posted.
Following a twitter account is done in these steps:
1. Search for the account to follow using the twitter search box
2. Next to the searched account click on Follow. The Follow immediatelychange into Following tab will
c. Tweeting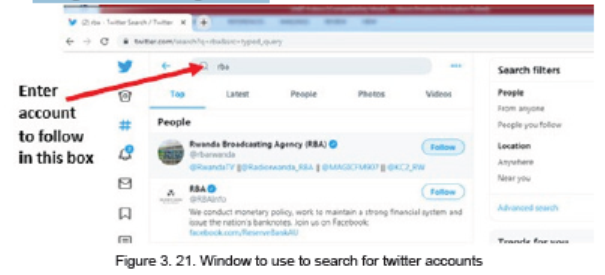
Also known as tweeting is posting making a post on the social media Twitter. The
post can be just text, images and videos.
To post a tweet go through this process:
1. In the Twitter Home page click on the twitter icon
2. In the text area that will appear write the tweet text. If images and videos are
to be used in the tweet click on the corresponding icons below the text area
3. Once the tweet is ready click on Tweet. The tweet is now posted and can beviewed by the account followers and anyone who searches for it
Note: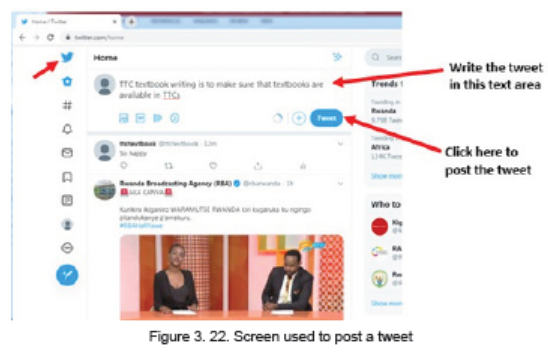
• Twitter provides the option to delete the created tweet by clicking on the drop
down icon next to the tweet and clicking on Delete
• As one tweet is only of 280 character while tweeting choose properly the
words to use. For this reason tweets contain more shortened words
• Twitter users can create hashtags which are keywords preceded by the hash
sign and are easily searchable on twitter
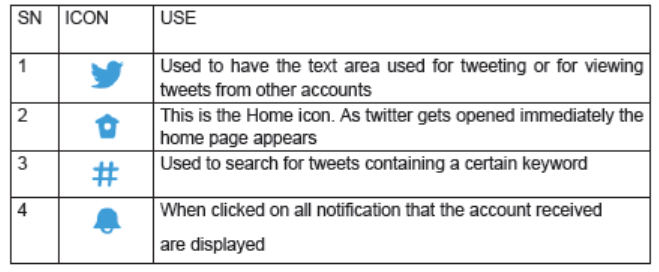
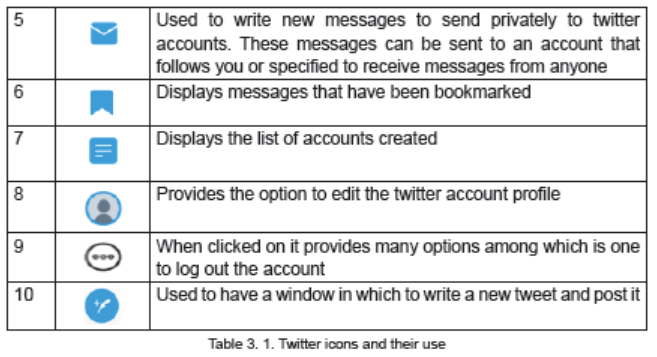
d. Twitter menu icons
In the previous sections some of the available twitter options have been elaborated.
Those options can however be easily accessed by using the icons located at the
left side of a twitter account page. The table below represents those icons and theirroles
APPLICATION ACTIVITY 3.4
1. What is Twitter and why should you use it?
2. Create your twitter account and do the following:
a. Make it have your picture as a profile picture
b. Search for accounts to follow mainly your classmatesc. Post some tweets about your school and lessons
3.2.3. Instagram
Activity 3.5
Instagram is one of the Social media platform used by many people:
a. Discuss the use of Instagram
b. Do a research and differentiate Instagram from other social media
namely facebook and Twitter
c. Analyze the Instagram icon and discuss how it relates Instagram use
Instagram is a free social networking service built around sharing photos
and videos. It launched in October 2010 on iOS (iPhone Operating Systems) first,
and became available on Android in April 2012 and can be accessed via computer
internet browsers.
Similar to Facebook or Twitter, everyone who creates an Instagram account has a
profile and a news feed. When a photo or video is posted on Instagram it will be
displayed on the account’s profile and accounts that follow you will see it in their
own feed. Likewise posts from other accounts can be viewed if you chose to follow
them.
Just like other social networks, an account can interact with others on Instagram by
following them, being followed by them, commenting, liking, tagging.
a. Creating an Account on Instagram
Like other social media one cannot use Instagram without having an account
created and for that go through these steps:
1. Enter in the browser’s address bar the URL of the application (instagram.
com)
2. In the form that appear to the right of the new page fill in the required detailsand click on Sign up
3. in the next screen click on Turn on (to turn on notification) or Not so as to be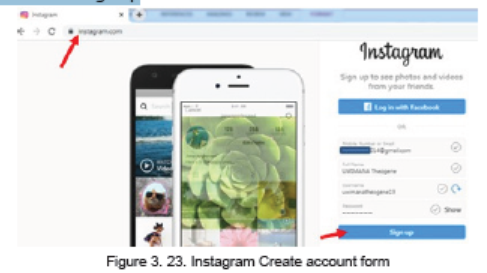
directed to the Instagram first page
d. Instagram main icons
Instagram has got icons which help carry out the basic functions. Those icons areshown in the image below:

The role of each icon is explained in the table below:
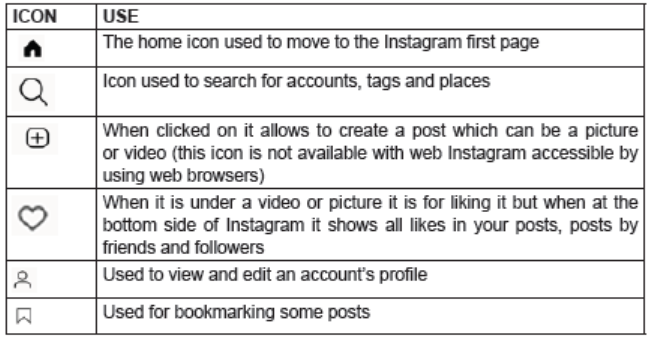
APPLICATION ACTIVITY 3.5
1. Create an Instagram account under your name
2. Follow some of your class mates
3. Create posts and comment posts from other accounts
3.2.4. WhatsApp
Activity 3.6
Umurerwa, a grade 2 student, has heard of a phone application that she can use
to chat, send a photo and video call. She decided to use her father’s phone to
find this app.Observe the screen of Umurerwa‘s father
Answer the below questions:
1. Among these applications, which application Umurerwa should use?2. Explain why you have chosen that application
WhatsApp is a popular messaging app with end-to-end encrypted instant messaging
that can be used on various platforms, including Android, iPhone and Windows
smartphones, and Mac or Windows PCs.
For WhatsApp to be installed on PCs an auxiliary application is needed in order
to create a virtual environment resembling a Mobile Operating System in which
WhatsApp will be installed. Such auxiliary applications are NoxPlayer and Blue
Stack.
A. Installing WhatsApp
Installing WhatsApp first requires downloading it through the phone application
for downloading applications. For android that application is Play Store. DownloadWhatsApp by searching for it in Play Store and install it by going through the prompts
In the next screen that will appear touch on Accept and let the application download.
When there is not enough space for downloading the application, it will be necessary
to delete some files to liberate some space.
Downloading and installing WhatsApp will go through these steps shown in thescreenshots below:
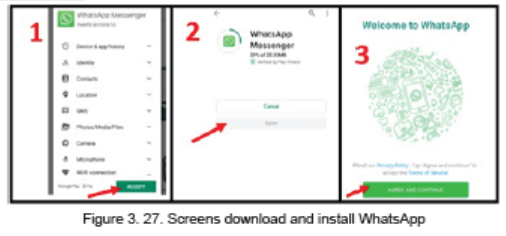
Interpretation of the screens: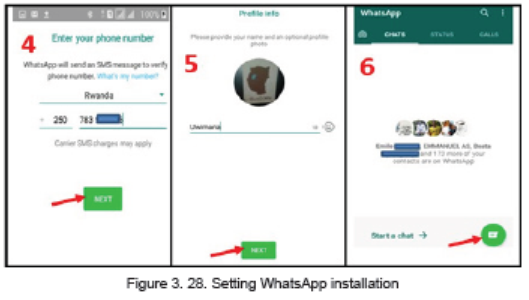
a. Screen One: The choosing of the application to download and install has
already been done now the person has to agree that WhatsApp will have
rights to have access to some of the resources in the telephone.
b. Screen Two: WhatsApp is now being downloaded and is at 26%. Once
downloading is over the application will install itself and when finished the
user will touch on Open to do further configurations.
c. Screen Three: Once the Open option is touched in the next screen touch on
Agree and Continue to agree to the terms of service.
d. Screen Four: In this screen fill in the phone number to use on WhatsApp and
touch on Next. A WhatsApp code message will be sent to your telephone.
Enter it in the next screen and continue
e. Screen Five: Configure WhatsApp by uploading an image that will be used
as a profile picture to your account and set the account name.
f. Screen Six: WhatsApp is now installed. Start chatting by touching on the icon
shown by an arrow.
B. Adding a Status in WhatsApp for Android
Similar to apps like Snapchat and Instagram, WhatsApp Status is a place for
snapping pictures of whatever you’re doing and then uploading them to your profile
where they’re available for your contacts to see for 24 hours. To get started with
Status:
• Tap the Status bar on the home screen.
• Tap the camera icon at the bottom-right.
• Take a picture or video.
• Add any filters, stickers, text, or whatever else you’d like.
• Tap the green circle at the bottom-right to add the post to your Status.
APPLICATION ACTIVITY 3.6
1. Discuss the improvement WhatsApp has brought in the
communication area in Rwanda
2. Compare options provided by WhatsApp and Instagram
3.3. Online Services
An online service refers to any information and services provided over the Internet.
These services not only allow subscribers to communicate with each other, but
they also provide unlimited access to information. Online services may include E
Banking, E payment, etc
3.3.1. E-Banking and E-Payment
Activity 3.7
Read the scenario below:
During the weekend, Kamana was sent home for school fees issues but on
Monday, 7:30 AM he must attend the exam after the payment of the school fees.
Umwalimu Sacco Cooperative where Kamana’s parents keep their money did
not open as it was on Sunday.
Answer the questions below:
1. What Kamana should do to not miss the exam?
2. Give examples of services that can be paid electronically in Rwanda
E-Banking and E-Payment
It is an electronic transfer of money from bank account, usually checking account
without the use of the paper check. E-cash is a form of an Electronic payment
system where a certain amount of money is stored on client’s device and made
accessible for online transaction.
a. E Banking
Electronic banking is a form of banking in which funds are transferred through an
exchange of electronic signals rather than through an exchange of cash, checks, or
other types of paper documents
It is also a method of banking in which the customer conducts transactions
electronically via the Internet.
Transfer of funds occur between financial institutions such as banks and
credit unions. They also occur between financial institutions and commercial
institutions such as stores. Whenever someone withdraws cash from an
Automated Teller Machine (ATM) or pays for services using a debit card, the funds
are transferred via electronic banking.
E-banking is a safe, fast, easy and efficient electronic service that enables an
access to a bank account and to carry out online banking services, 24 hours a day,
and 7 days a week.
With this service you save your time by carrying out banking transactions at
any place and at any time, from home or office provided there is internet access.
E-banking enables the following:
• Accurate statement of all means available in your bank account
• Statement of current account, credits, overdrafts and your deposits
• Execution of national and international transfers in various currencies
• Execution of all types of utility bill payments (electricity, water supply, telephone
bills, and many others)
• Carrying out customs payments
• Electronic confirmation for all transactions executed by E-banking
• Management of your credit cards
Disadvantages
The disadvantages presented by E-banking are linked to the fact that it is a new
technology which is not usable by anyone especially in countries where ICT literacy
is still a problem.
Other disadvantages are also linked to weaknesses in the system that may be
exploited by hackers who may steel money using weaknesses found in the system
b. E payment
An e-payment system is a way of making transactions or paying for goods and
services through an electronic medium, without the use of checks or cash. It’s
also called an electronic payment system or online payment system. E-payment
includes the use of Debit/credit card, Mobile Money
Services done by mobile money
Services provided by Mobile Money include money transactions whereby money
can be sent from one telephone user to another who can then withdraw the money
as cash or keep it and use to pay for different goods and services.
Example
In Rwanda mobile money services are provided by TIGO Cash, MTN Mobile Money
and Airtel Money. They include money transfer and withdrawal from a mobile money
account and from even a bank account, payment of different bills like water and
electricity.
APPLICATION ACTIVITY 3.6
1. Give 3 differences between credit card payment and mobile money
payment
2. By conducting a research on the Internet, analyze the Rwandan context in
terms of electronic payment. Give the benefits to Rwandans if the country
adopts electronic payment in all transactions.
3. by WhatsApp and Instagram
3.3.2. Irembo local online services
Activity 3.8
By searching the Internet, list the services available for Irembo.rw and analyze
them if they meet the expectations of the local population.
Irembo is an initiative by the Government of Rwanda aiming at improving its
service delivery to the citizens and businesses. Irembo is the one-stop portal
for e-Government services. Irembo as a platform has the role of the provision ofGovernment services online with ease, efficiency and reliability.
How to create account from irembo• Type www.irembo.gov.rw in the address bar of your browser
Fill in dialogue box black space
a. Password place
b. Confirm Password
c. Emaild. Captcha Text
These services are subject to changes as some services can be added but the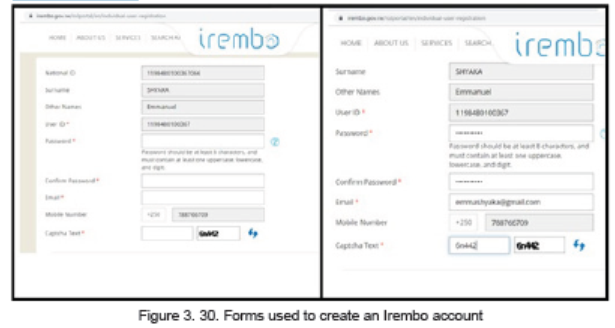
ultimate goals is to have all services offered through this platform.
a. Requesting for Irembo service
Requesting for services on Irembo requires first to have a username which is theidentity card number without the last three digits and a password
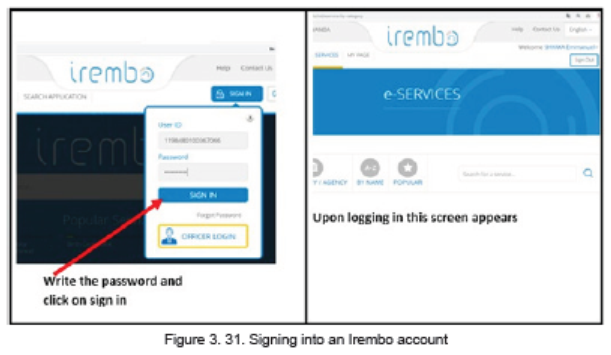
b. Current Irembo services
Currently, Irembo services are into these categories:
1. Immigration and emigration
2. Land
3. Local government
4. National ID
5. Notarization and Gazette services
6. Police
7. Rwandans living abroad
8. Media
9. Education
10. Health
11. Ubudehe and mutuelle
12. Institutions of national meseum of Rwanda
13. Transportation14. Tourism
Requesting for a criminal records clearance
1. Open irembo website
2. Enter your ID and Password
3. Payment using VISA, MasterCard , MTN Mobile money(*182#), airtel
4. (*182#), Tigo(*310#) Mobicash or BK
5. After paying you send sms/email confirming that you have requested a
service and service paid
6. Feedback of certificate must be sent to you after 3 days
Advantages of using irembo
1. Helps citizens to save a time
2. Save transport
3. People can request a service when he or she is at home
4. Reducing corruption malpractices
5. It creates jobs
6. It simplifies access to the Government services
7. Avoiding friendship
APPLICATION ACTIVITY 3.8
1. List and explain 5 advantages of using IREMBO Service
2. Explain at least 3 problems that Irembo services have come to solve
End Unit assessment 3
1. Give the difference between WhatsApp , Instagram and Twitter ?
2. Using a clear example, explain 3 common features of social media
3. Give examples of services that can be paid electronically in Rwanda
4. Give 3 differences between credit card payment and mobile money.
BIBLIOGRAPHY
1. National Curriculum Development Centre (NCDC). (2011). ICT Syllabus for
Upper Secondary. Kigali.
2. MYICT. (2011). National ICT strategy and plan NICI III-2015.Kigali.
3. National Curriculum Development Centre (NCDC). (2006). ICT syllabus for
Lower Secondary Education. Kigali.
4. Pearson Education. (2010). Computer Concepts.
5. Rwanda Education Board (REB), (2019), ICT Syllabus for TTC, (2019),
Kigali
6. Rwanda Education Board (REB) (2019), Computer Science S5 student’s
book
7. Rwanda Education Board (REB) (2019), Computer Science S6 student’s
book
8. Rwanda Education Board (REB) (2019), Information and Communication
Technology for Rwandan Schools Secondary 1 Students’ Book
9. Rwanda Education Board (REB) (2019), Information and Communication
Technology for Rwandan Schools Secondary 1 Students’ Book
10. Rwanda Education Board (REB) (2019), Information and Communication
Technology for Rwandan Schools Secondary 2 Students’ Book
11. Longhorn Publishers (2016) Computer Science For Rwandan Schools
Senior Four Student’s Book
12. Fountain Publishers (2016) Information and Communication Technology(ICT) for Rwanda Schools Learner’s Book Senior Three