General
- ICT S3 SB File Uploaded 25/01/22, 13:15
- S3: ICT TG File Uploaded 10/08/22, 18:12
Unit 8: Introduction to Multimedia
Key unit competence
explain the different uses of multimedia and interactive multimedia applications. Use multimedia software to create a video.
8.1 Introduction
Multimedia has become familiar in our life, it can be found in different areas of life such as in education, business, wedding ceremony and others. In these days, with the evolution of the use of computer, the demand of multimedia contents has also increased, multimedia content can be: movies, power-point presentation and audio sounds.
8.2 Definition
Multimedia is the collection of medias that use multiple forms of information content and information processing to inform or entertain the user.
Examples of multimedia contents are; text, audio, graphics, animation, and video.
Multimedia also refers to the use of electronic media to store and experience multimedia content.
Multimedia information can be represented in form of audio file, graphical file, image file, video file and animation file.
8.3 Categories of multimedia
Multimedia may be broadly divided into linear and non-linear categories.
- Linear multimedia; active content progresses without any navigation control for the viewer/user. Examples: Movies, video clips and songs.
- non- linear multimedia content offers the ability to control the content interactivity with the user/viewer.Examples: Computer games, assimilation software used in self computer based trainings.Multimedia presentations can be live or can be recorded.
- A recorded presentation is a presentation which has been recorded and edited, after all processing stages.Example: TV program.
- A live multimedia presentation occurs when things are happening at that moment.Examples: news on television and Football game.
8.4 Features of multimedia
- Presentations may be viewed in person on stage, projected, transmitted, and played locally with a media player. examples: Power point presentation and cinema presentation.
- Games and simulations may be used in a physical environment with special effects, played /used by multiple users on the computer network and locally with an offline computer, game system, simulator.Examples: online games and game on mobile telephone.
8.5 Types of multimedia
- Text: It is used as the basic element for all multimedia applications. It is directly used to inform users about the information that it wishes to communicate.
- Graphics: It uses pictures as visuals in digital form used in multimedia presentations. there are two types of graphics:
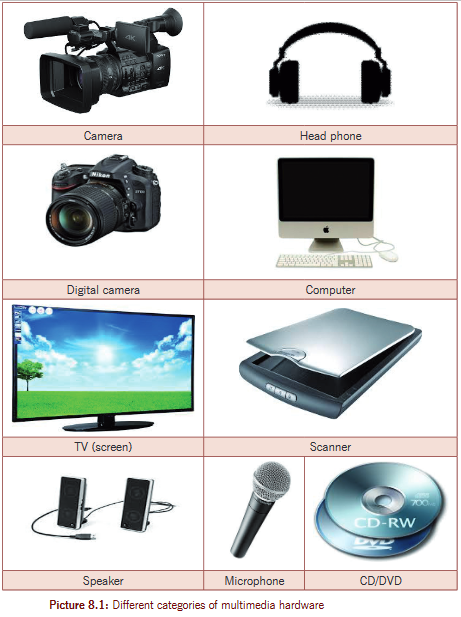
(i) Bitmap Graphics (Image Raster): Formed by pixels arranged in specific ways in a matrix form.(ii) Vector Graphics: Formed by lines that follow mathematical equations called vector.Animation: It is the process of adding movements to static images or picture through using various computing methods.Audio: It is the sound in digital form used in multimedia presentations.Video: Moving pictures in digital form in multimedia presentations.Activity 8.1Use internet or school library textbooks to make research and answer the following questions.1. explain the term multimedia.2. Describe different types of multimedia.3. explain features of multimedia.4. Using examples, describe categories of multimedia.You can share your opinions to the rest of the class.8.6 Applications of multimediathe application of multimedia is found in various areas including: advertisements, art, education, entertainment, engineering, medicine, mathematics, business, scientific research and spatial. A few of application areas of multimedia are discussed below:1. CommercialMost of the electronic media used in commercial advertisement fall in multimedia. In most Rwandan cities, there is exciting presentations that are used to take and keep attention of people with the interest of advertising.2. EntertainmentMultimedia is heavily used in the entertainment industry. It is especially used to develop special effects in movies and video games.3. EducationIn education, multimedia is used to produce computer-based training courses and reference books.4. IndustryIn the Industrial sector, multimedia is used as a way to help present information to shareholders, superiors and coworkers. Multimedia is also helpful for providing employee training, advertising and selling products all over the world via virtually unlimited web-based technologies.5. MedicineIn Medicine, doctors can be trained to do human surgery and they can simulate how the human body is affected by disease viruses and how bacteria spread, using multimedia tools and then develop techniques to prevent it.6. Multimedia in public placesIn hotels, airports, shopping malls, museums, and grocery stores multimedia tools are available to help people/tourists to give information, they need.Example: In airport, there is no need to ask plane information to the personnel of the airport; notice board is there to inform passengers.Activity 8.2Using your school internet facilities1. search for multimedia application and compare your results.2. Discuss the applications of multimedia in your local community.3. Compare what is happening in other communities and what you have found in your community.8.7 Hardware and software in the multimedia requirement8.7.1 Multimedia hardwareBelow are some of the hardware that can be used in multimedia :- Computer.
- Digital camera.
- Microphone.
- scanner.
- Microphone.
- speaker /headphone.
- Digital camera
 8.7.2 Multimedia software
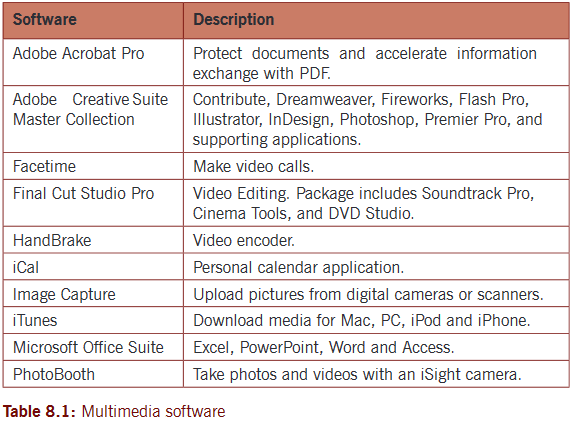 these hardware and software are used together to make up the multimedia system which can capture, digitize, compress, decompress, retrieve multimedia components (multimedia data) and show it on the output device like computer monitor and multimedia projectors.Activity 8.31. Discuss other multimedia hardware and software which are not discussed in here. Use the facilities available within your school.2. Identify multimedia hardware which are used in your school.3. List multimedia software that are installed in school computer lab.8.8 Interactive multimedia8.8.1 Create hyperlinks to link to a slide in the current presentationYou already know how to use Ms PowerPoint presentation. now open the program and perform the following actions. You should use an existing file.Step 1: In normal view, select the text, shape, or picture that you want to use as a hyperlink.Step 2: on the Insert tab, in the Links group, click Hyperlink.
 Step 3:In the Insert Hyperlink dialog box, under Link to, click Place in this Document.
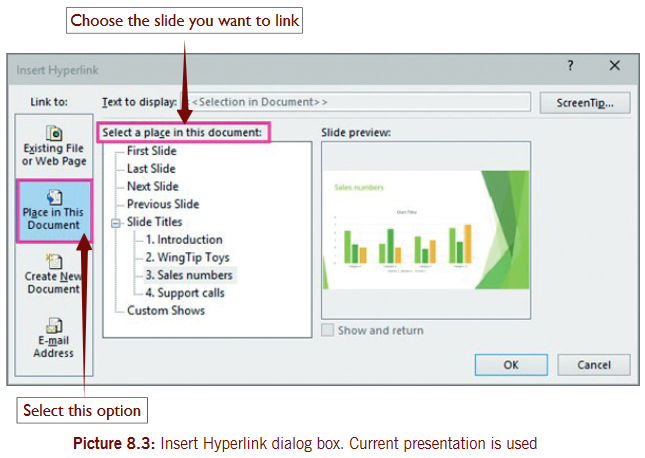 Activity 8.4Create a PowerPoint presentation “Rwanda nziza”. this presentation has the following slides:·slide 1: Province.·slide 2: northern Province.·slide 3: eastern Province.·slide 4: southern Province.·slide 5: Western Province.·slide 6: City of Kigali.Link slide 1 to other remaining slides in any way that you can jump from slide1 to any other of these slides.Step 4: select “First slide, next slide, Previous slide or Last slide”. You can use slide titles.Step 5:Click OK.8.8.2 Create hyperlinks to link to a slide in a different presentationUse the following steps to link a slide in a different file.Step 1:In normal view, select the text, shape, or picture that you want to use as a hyperlink.Step 2: on the Insert tab, in the Links group, click Hyperlink.
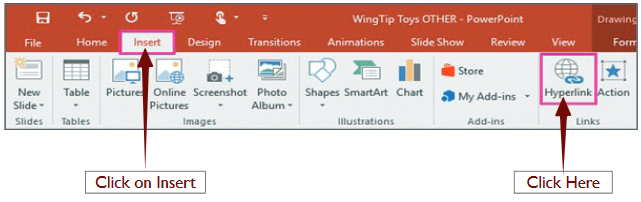 Step 3:Under Link to, click Existing File or Web Page.Step 4:Locate and select the presentation file that contains the slide that you want to link to.Step 5:Click Bookmark and then click the title of the slide that you want to link to. Click OK and then OK.
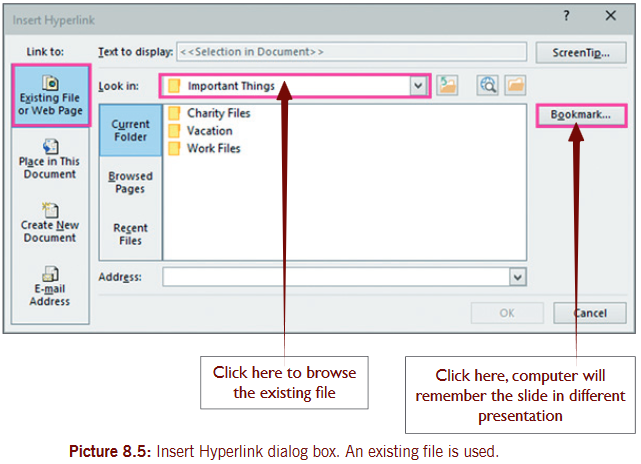 Activity 8.5Create a PowerPoint presentation “My school” and connect it to the previous presentation “Rwanda nziza”. “My school” presentation should contain the slides about your school as follows:Slide 1: name of your school and school motto.Slide 2:Location of your school, addresses or contacts. Headmaster’s name.Slide 3:5 male and 5 female teachers in your school.Slide 4: sports activities in your school.Slide 5:Co-curricular activities in your school.Slide 6: subjects taught in your school.8.8.3 Create hyper links to link to an e-mail addressStep 1: In normal view, select the text, shape, or picture that you want to use as a hyperlink.Step 2: on the Insert tab, in the Links group, click Hyperlink.
 Step 3: Under Link to, click E-mail Address.Step 4: In the E-mail address box, type the e-mail address that you want to link to, or in the Recently used e-mail addresses box, click an e-mail address.Step 5: In the Subject box, type the subject of the e-mail message.
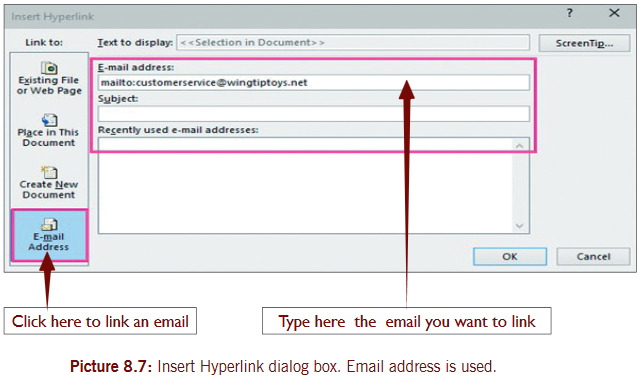 Activity 8.6open a PowerPoint presentation “My school” and connect it to the class email “classsenior3@gmail.com”8.8.4 Create hyperlinks to link to a new fileFollow the steps below to create a link between my school and classroom3@gmail.com.Step 1: In normal view, select the text, shape, or picture that you want to use as a hyperlink.Step 2: on the Insert tab, in the Links group, click Hyperlink.
 Step 3: Under Link to, click Create New Document.Step 4: In the Name of new document box, type the name of the file that you want to create and link to.Note: If you want to create a document in a different location, under Full path, click Change, browse to the location where you want to create the file, and then click OK.Step 5: Under When to edit, click whether you want to Edit the new document later or Edit the new document now.
 Activity 8.7open presentation “My school” and connect it to the new presentation you are going to create “My Class”.“My class” presentation should contain the following information:Slide 1:name of your class e.g. s.3.A.Slide 2:List of 10 girls in your class.Slide 3:List of 10 boys in your class.Slide 4:Reasons why learners like ICT.Slide 5:Disadvantages of ICT to learners.8.9 Create action buttons8.9.1 Add commands to your presentation with action buttonsFollow the steps given below to use Action buttons.Step 1: o n the Insert tab, in the Illustrations group, click Shapes, and then under Action Buttons, click the button shape that you want to add.
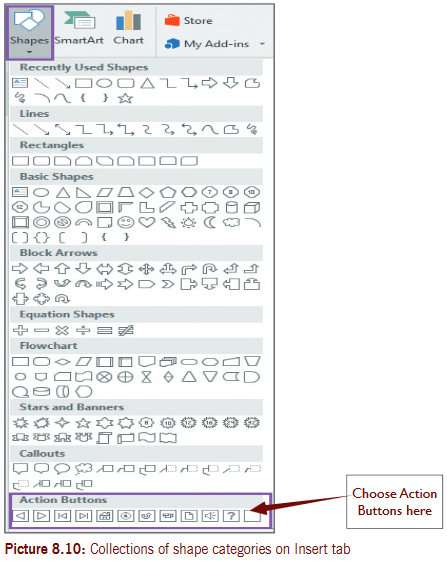 TIP: Action buttons provide great visual cues to the action it launches, but you can also assign actions to other objects, such as clip art, pictures, general shapes, or to the text in a Smart Art graphic. Use the procedure below to add an action to those objects as well.Step 2: Click a location on the slide, and then drag to draw the shape for the button.Step 3: In the Action Settings dialog box, do one of the following:• to choose the behavior of the action button when you click it in slide show view, click the Mouse Click tab.• to choose the behavior of the action button when you move the pointer over it in slide show view, click the Mouse Over tab.
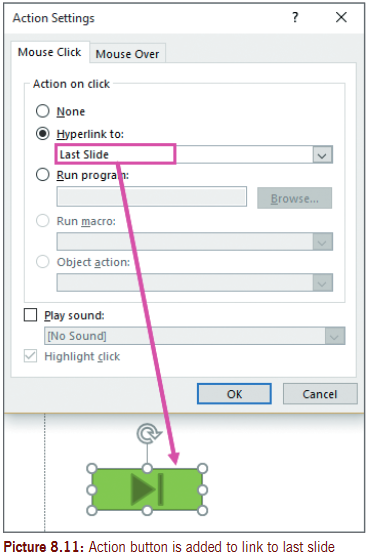 Add a button shape, and then assign an action (in this case, a hyperlink).Step 4: to choose the action that will take place when you click or move the pointer over the action button, do one of the following:TIP:To play a sound, select the Play sound check box, and then select the sound that you want to play.Step 5: When you’ve finished choosing your action, pick OK.Activity 8.8Insert in each slide play buttons and stop buttons on the last slide in “my class presentation”.8.9.2 Insert an MP3 audio file into a presentationActivity 8.9You are provided with an audio file which has mp3 file extension. Insert the audio file into “my class presentation” in the 3rd slide.Step 1:From the Insert tab, click the Audio drop-down arrow, and then select Audio on My PC.
 Step 2:Locate and select the desired audio file, then click Insert.
 Step 3: the audio file will be added to the slide.8.9.3 Insert a video file into a presentationActivity 8.10You are provided with a video file. Insert the video file into “my class presentation” in the 4th slide.Step 1:From the Insert tab, click the video drop-down arrow, and then select Video on My PC.
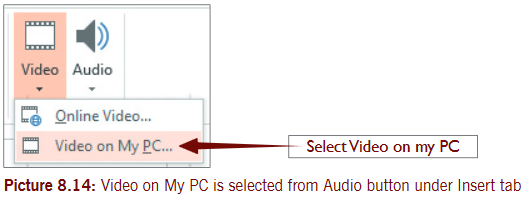 Step 2:Locate and select the desired audio file, then click Insert.
 8 .9.4 Insert a CD audio track in the presentationActivity 8.11You are provided a CD audio track. Insert the CD audio track into “my class presentation” in the 5th slide.If you want to add the Play CD Audio Track command back to the Insert tab, you must create a custom group and then add the command to the new group. to do this, follow these steps:Step 1:Click the File tab, and then click Options in the navigation pane.Step 2:In the navigation pane of the PowerPoint Options window, click Customize Ribbon.
 Step 3:In the Customize ribbon column, in the Main Tabs list, expand Insert, and then select Media.
 Step 4:Under the Main Tabs list, click New Group. the new group named New Group (Custom) is inserted under the Media group.Step 5:Click Rename, type CD audio, and then click OK.
 Step 6:In the Choose commands from drop-down list, select All commands.Step 7:Locate and then select the Play CD Audio Track command, and then click the Add button. the command appears under the new CD Audio group.Step 8:Click OK.
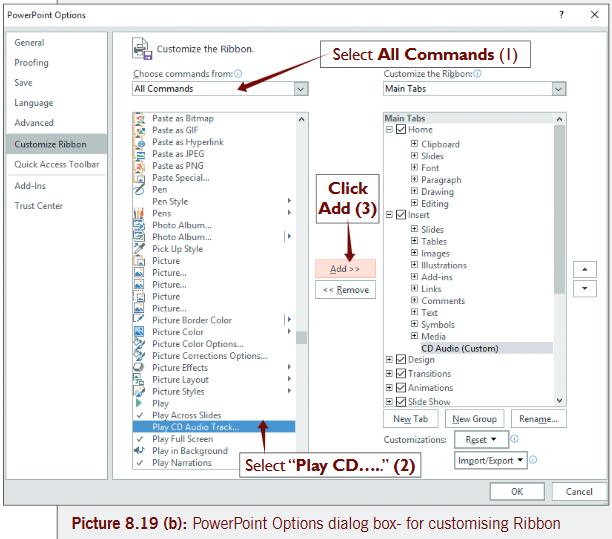 Step 9:Return to Insert tab and click play CD Audio Track from CD Audio group (new group created). this will work as long as you have the CD inserted in computer.8.10 Create digital image, audio and video fileActivity 8.12You are provided with a digital camera or smart phone elaborate on:1. How to capture a video using a digital camera / smartphone.2. How to take a picture using a digital camera / smartphone.After the teacher has demonstrated on how to do the activity, take a video of 4 minutes and 6 pictures to be presented in class.Step 1: open and switch on digital camera.Step 2:Click the Video Capture button.
 8.10.1 Manipulate an imageActivity 8.13In reference to Activity 8.12, open GIMP and use the 6 pictures you have taken and do the followings:1. Crop the pictures.2. Rotate to 128 degrees.3. save the pictures on the desktop.We are going to use GIMP (GNU Image Manipulation Program). It is free software and it is a powerful application that can alter, manipulate, enhance, and create digital image files. this software should be downloaded and installed on your computer.Saving an image to save an image file;Step 1:Right-click on the image, follow the steps below;Step 2:Choose File.Step 3: select either Save or Save As.Step 4: the Save Image window opens.Create a new imageStep 1:Choose File => New.
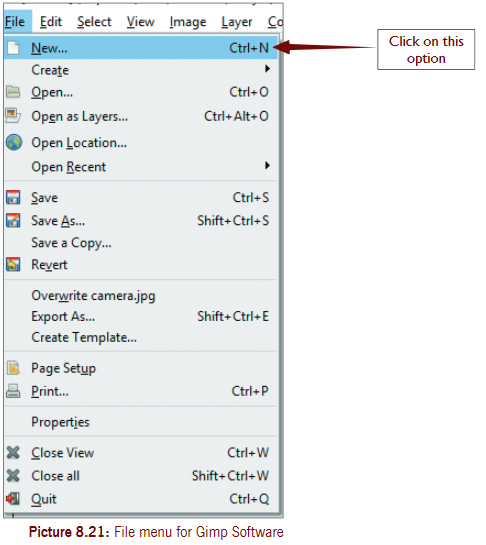 Step 2: enter the image size, image type, and fill type of the file.
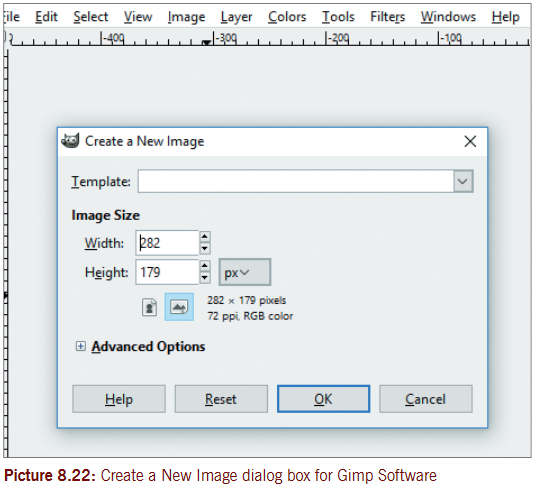 Step 4:Click the OK button.Step 5: edit and manipulate the image with the GIMP’s various tools.Step 6: save your file.Editing an imageSteps to crop an imageStep 1: open the image.
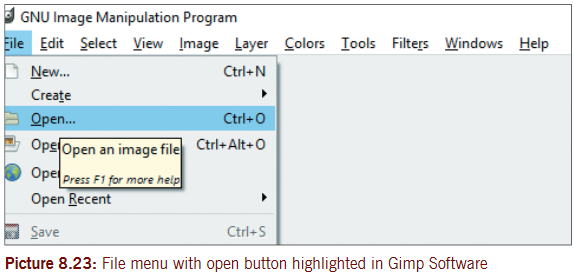 Step 2:Browse your picture from the computer.Step 3:Right click on the image and select Tools=> Transform Tools => Crop.
 Step 4:Left-click and drag the mouse pointer to create a frame that fits the part of the image to keep.Step 5:Click the Crop button in the window that opens as you drag the frame across the image.Step 6:If you are unhappy with the cropped image, press [Ctrl]-[Z].To Rotate an imageStep 1: open the image.Step 2:Right-click on the image and select Image => Transform, then select any of the Flip or Rotate options.
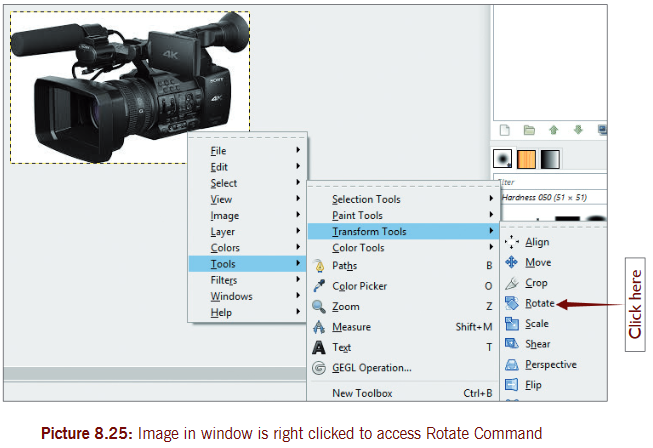 Step 3:If you are unhappy with the changes, press [Ctrl]-[Z].Activity 8.14Record audio file (on your computer)Follow these steps to create or record an audio file on your computer1. Connect a microphone on your computer. A microphone can connect through USB port (USB microphone) or input jack- (audio port) for microphone. some computers come with built-in microphone. If you don’t have microphone, use headphones.2. open Windows Voice Recorder. Follow procedure given below:·Click Start·Click All Apps·select Voice RecorderAlternatively, you click in the Search box near the start button and type Voice and then click Voice RecorderNote: Voice Recorder is a small application in Windows OS having the capability to make sounds louder, quieter, faster or slower.3. In the Voice Recorder window, click Record button to record your message. When you click Record button, wait for 3 seconds and then start to speak or sing. When you have finished speaking or singing, wait for 3 seconds and then click on Stop recording button. this will prevent the recording to start or stop abruptly. see the picture below.
 4. Click Play to hear your message or song. (see picture below)
 Note: When you are not pleased with your recording, you can delete it and then record again or record new files for comparison.When audio file (s) is named and played, may appear as shown.
 Create/record videothere are two main ways you can use to create video on your computer i.e. using Microsoft PowerPoint and using Windows Movie Maker.Method 1: To create/record a video file (with PowerPoint) follow steps below:1. Create a PowerPoint presentation and save it. You can also open an existing presentation. In this activity, let us open Nature-protect presentation we created in unit 6.2. Add transitions and animations to your PowerPoint presentation in case they are missing (follow steps for adding animation and transitions in Unit 6)3. Add audio to your presentation: on Insert tab, in the Media group, click Audio. on the Audio menu, select Audio on My PC... see picture below.
 4. Record narration and add timings to the slide showRecord a narration during a presentation·In Normal view, select the slide that you want to start the recording on.·on the Slide Show tab, in the Set Up group, click Record Slide Show.
 ·In the Record Slide Show box that displays, click Start Recording5. export (save) your PowerPoint presentation as a video by;Click File tab, select Export and then click Create Video. on the recording tab of the ribbon, click on Export to Video.
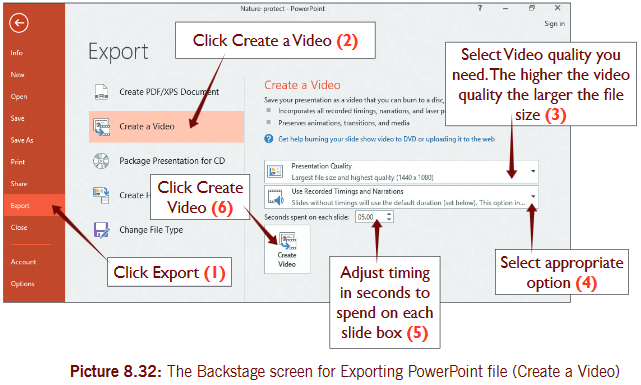 6. Click Create a Video
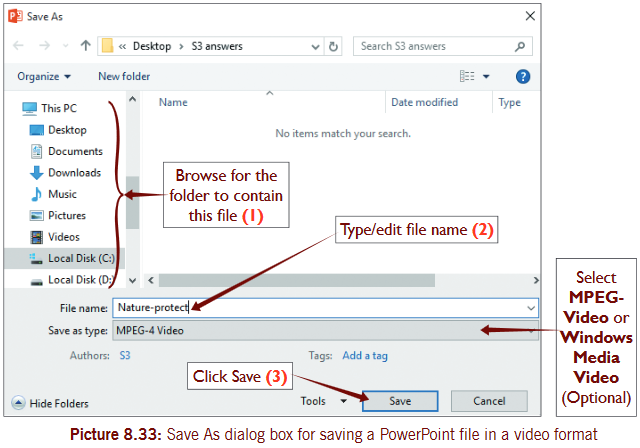 Track the progress of the video creation by looking at the status bar at the bottom of your screen. see picture 8.34 for status bar.
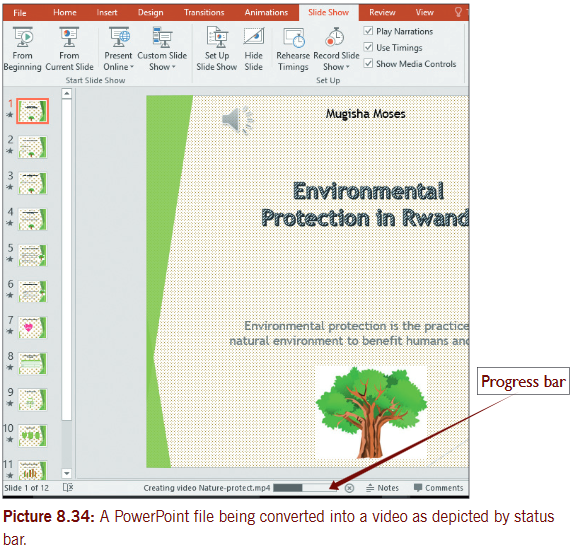 Note: The video creation process can take many hours depending on the length of the video and the complexity of the presentation. If the video is long, you can set it up to be created overnight. By morning time, it will be ready.To play your newly-created video, go to the folder location, and then double-click the file.Activity 8.15Create or open any presentation file you have on a computer and use it to make a video file.Method 2: To create video (movie) file - using Windows Movie Makerstart Windows Movie makerNote: Users of Windows 10 must have to download Movie Maker and install it on their computers. When Windows Movie Maker is ready, then:First add videos and photos to Movie Maker following the procedure below:(i) In Movie Maker, on the Home tab, in the Add group, select Add Videos and Photos.(ii) In the Add Videos and Photos dialog box, open the folder that contains the photos or videos that you want to add, select the video files and photos, and then select open.
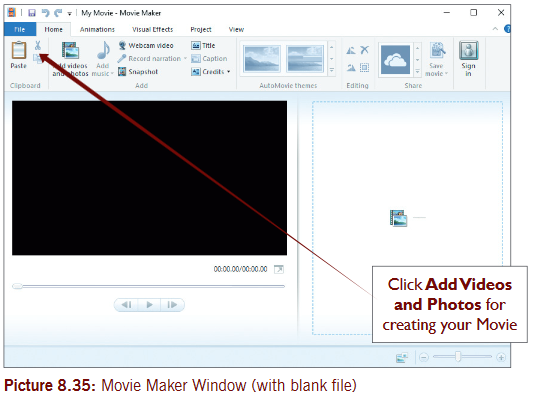
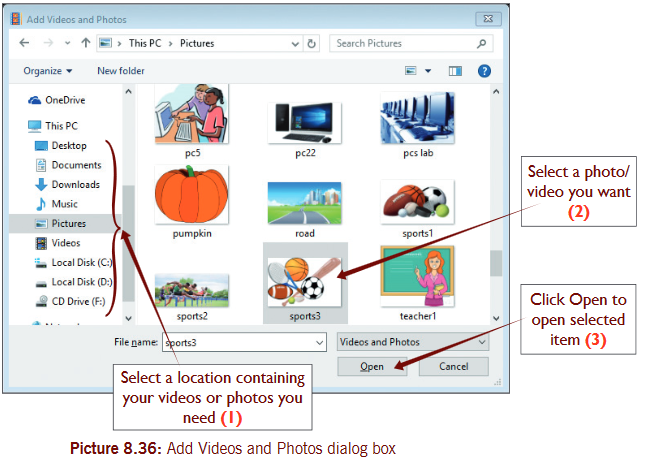 To select multiple photos or videos, press and hold the Ctrl key, and then select each photo and video you want.Note: You can import photos and videos from many different kinds of cameras and devices to your PC using Movie Maker. For example, a webcam built into your PC, a data CD/DVD, digital camera, flash disk, or Secure Digital card (SD card) in a card reader. With your webcam you can record a live video and add to Movie Maker.
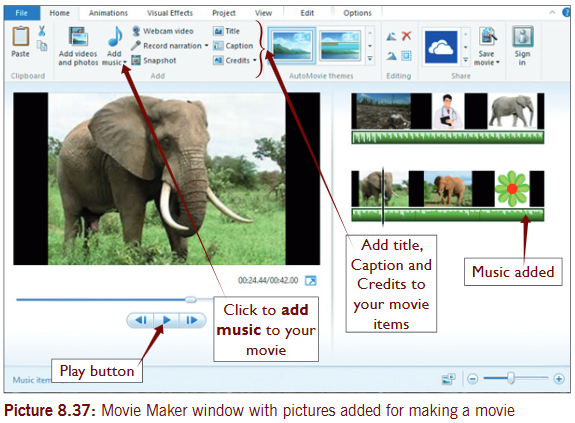 Add and edit audio - in Movie MakerYour movie requires you to add a soundtrack to feel professional. Later you can use editing tools to adjust the volume, fade music in or out.To add music1. on the Home tab, in the Add group, select Add music.
 2. select the music file you want to use, and then select Open.
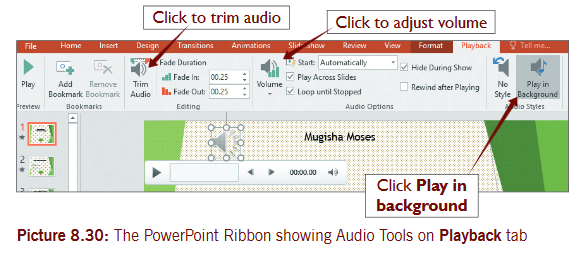
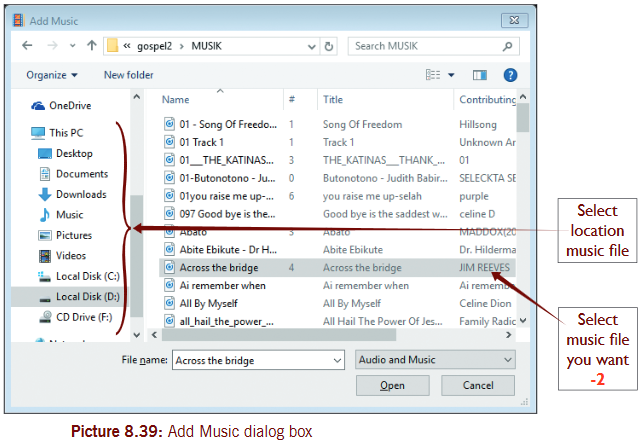 To fade music in or out1. select the music you want to fade in and or out.2. Under Music Tools, in the Options tab, in the Audio group, do either and or:·select the Fade in list, and then select the speed for the music to fade in.·select the Fade out list, and then select the speed for the music to fade out. see picture below.
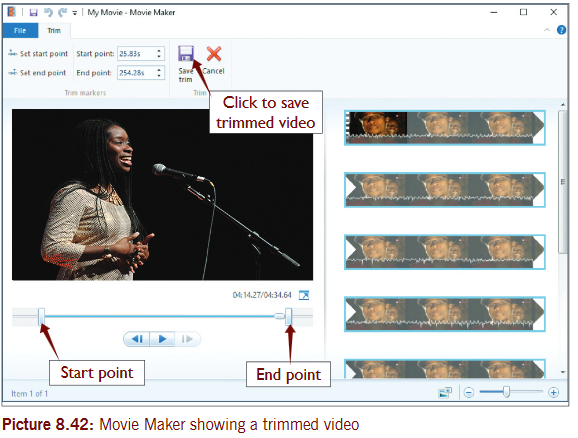
 To change the start or end point of the musicUse picture above and follow steps given below:1. select the music.2. Drag the playback indicator on the storyboard to the point in the music where you want it to start or stop playing in your movie. then do one of the following:·to set a new start point for the music to start playing at the current point, under Music Tools, on the Options tab, in the Editing group, select Set start point.·to set a new end point so the music stops playing at the current point, under Music Tools, on the Options tab, in the Editing group, select Set end point.To change the audio volume of a music item1. select the music.2. Under Music Tools, on the Options tab, in the Audio group, select Music volume, and then move the slider left to lower the volume or right to increase it.Edit video (Movie Maker)there are several applications used today to edit videos/movies and movie maker is one them. You can use it to make your video/movie look the way you want it to be. one way of editing video is to trim it as described below. see edit video tools in picture8.41.Trim your video (see picture 8.41 and 8.42)You can trim the beginning and the end of a video such that the video shows only the part you want. For example, if you have a video with black frames at the beginning, you could trim the beginning of the video so the black frames don’t appear in your final saved movie, however this does not affect the original video file.To trim a video in Movie Maker1. on the Home tab, in the Add group, select Add videos and photos.
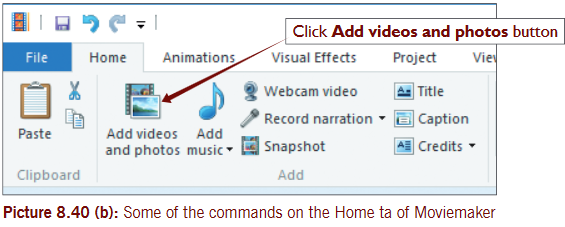 2. In the Add Videos and Photos dialog box, open the folder that contains the photos or videos you want to add, select the video file or photo, and then select Open. see picture 8.40 (c).3. select the video that you want to trim.
 4. Under Video Tools, on the Edit tab, in the Editing group, click on Trim tool, either and or·Move the slider underneath the preview monitor to the point that you want the video to start, and then select Set start point. see picture 8.41 and 8.42.·Move the slider underneath the preview monitor to the point that you want the video to stop playing, and then select Set end point. see pictures 8.41 and 8.42.
 Note: To remove the start and end points and allow the whole video to play, repeat 1 – 3 above. Move the start trim handle to the beginning of the video and end trim handle to the end of the video (in their original locations). Afterwards click Save trim to save the changes.Split a videoYou can split a video into two smaller items and then continue editing.To split a video into two items1. select your video, and drag the playback indicator to the point where you want to split the video.2. Under Video Tools, on the Edit tab, in the Editing group, select Split (see picture 8.41).Speed up or slow down a videoChange the speed of your video in Movie Maker to make it play faster or slower by:
- selecting the video, and under Video Tools, on the Edit tab, in the Adjust group, select the Speed list, and then select a speed (depending on how much you want to speed the video up or slow it down). see picture 8.41.
Activity 8.16Use a digital camera to capture video (s) about different activities different learners do during either break or lunch time. Use this video in windows Movie Maker and trim as you may like. split the video into two parts and burn each part on a separate compact disk.End of Unit 8 Assessment1. List at least 5 multimedia tools used in your community (Village, town, Home, and school).2. In which area are these multimedia tools being used?3. open Ms PowerPoint and create the following presentation:a) Geography of Rwanda , it must have 8 slidesb) Cities of Rwanda , it must have 6 slidesc) Gender in Rwanda, it must have 5 slides therefore create the following hyperlinks:(i) In geography of Rwanda presentation , link the second slide and the last slide.(ii) Link together cities of Rwanda and geography of Rwanda presentation in the third slide of cities of Rwanda presentation.(iii) Link gender in Rwanda to your class email. save the presentation as “Beauty of Rwanda”.4. Use a digital camera and do the following:a) take 20 pictures which show learners doing different activities.b) Record a video in your school where learners are in extra-curriculum activity (learners in sport, different club and other activities).5. explain 5 ways in which you can use pictures captured by digital camera on different school activities.6. open voice recorder on your computer and record yourself singing the:a) national anthemb) school anthemc) east African anthem7. Introduce one audio track in Power point and edit it by trimming parts you do not want at the beginning or at the end of the track.8. take a video about learners playing football or netball using digital cameras. Introduce the video into Windows Movie maker and edit the video by splitting it into two parts.