General
- S1: ICT SB File Uploaded 22/07/21, 16:10
- S1: ICT TG File Uploaded 23/10/23, 16:15
UNIT 3 Computer Navigation
Key Unit Competencies
By the end of this chapter, you should be able to:(i) Navigate the Windows environment.
(ii) Work with Windows Explorer to introduce the techniques of folder and file management.
Learning Objectives
Knowledge and understanding
By the end of this chapter, you should be able to:
(i) Recognise the desktop and taskbar elements.
(ii) Explain the role of saving files in a folder.
(iii) Identify the process of managing files and folders.
(iv) State the purpose of the recycle bin and explain why deleted files are kept in recycle bin.
Skills
By the end of this chapter, you should be able to:
(i) Explore and customise the desktop, taskbar and start menu.
(ii) Restore deleted files and folders.
(iii) Use the control panel to customise the working environment.
(iv) Navigate window and manage files and folders hierarchically correctly.
(v) Use computer storage devices to move data between computers.
(vi) Use search techniques to find files and folders.
(vii) Analyse storage devices so that decisions can be made on what storage device should be used based on its characteristics.
Attitudes and values
By the end of this chapter, you should be able to:
(i) Adjust the computer working environment properly.
(ii) Delete files and folders.
(iii) Appreciate the importance of correctly managing files and folders so that files can be located.
70
Keywords in the chapter
• Customise • Screen • Programs • Suites • Toolbar • CPU • Graphics tablet • Clipboard • Accessories • Applications • BITMAP • Desktop
Desktop
Desktop is the first screen that is displayed when a computer boots up. It consists of icons, the task bar, and other features.
Desktop Icons: Icons are images that represent application programs, folders, and files. Icons are usually manipulated using pointing devices. Icons on the desktop include Computer, Documents and the Recycle Bin among others.
File: A file is a collection of data that are stored together. Files can be stored on the hard drive, in a flash memory, or a Compact Disk (CD) among others. Everything that a computer does is based on data stored in files.
Folder: A folder is a specific storage location in a storage media. Folders are used to organize and store related files. A folder may also contain other folders within it which are called subfolders.

71
Task bar It is a bar usually at the bottom of a computer screen showing running programs. These programs can be clicked to start software applications or switch between open applications or active windows.
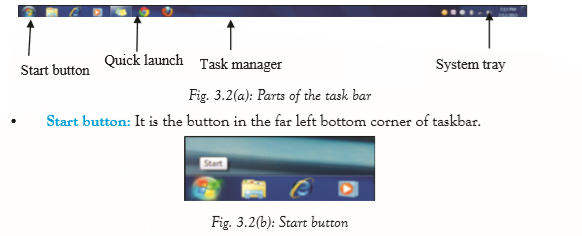
• Task manager: It is used to provide information about the processes and programs running on a computer, as well as the general status of the computer. Some implementations can also be used to terminate processes and programs, as well as change the processes priority.
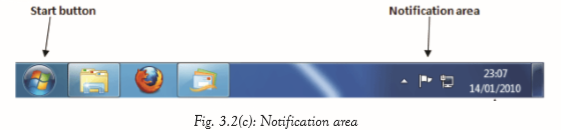
• System tray/Notification area: This is a part of the taskbar in the desktop interface that displays small icons on the opposite side of the Start Menu such as the clock, date and time, antivirus, and the icons of certain programs so that a user is reminded that they are running in the background
• Quick launch: It is a part of the taskbar near the Start menu where shortcuts to programs are added. This toolbar stays visible for shortcuts to be easily accessed, even when a window is open.
72
Customising the desktop
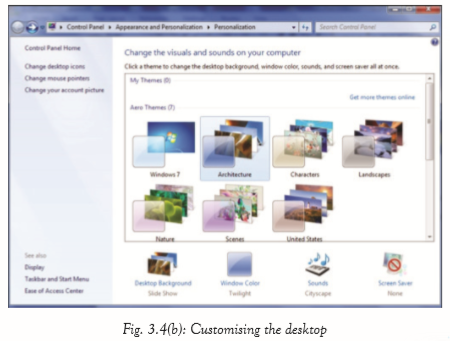
Customising refers to personalising the desktop to suit the user’s needs and tastes. The changes that the user can make to customise include new themes, mouse pointers, backgrounds, user images, and gadgets among others.
(i) To customize, right-click on the desktop. The following dialog box appears:

(ii) Click Personalize.
(iii) Select the desired theme from the dialog box displayed.
73
Customising the taskbar To customise the task bar:
(ii) Click on the properties option as shown in the figure below:
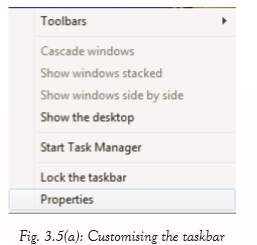
(iii) The dialog box below appears and can be used to customise the taskbar as desired.
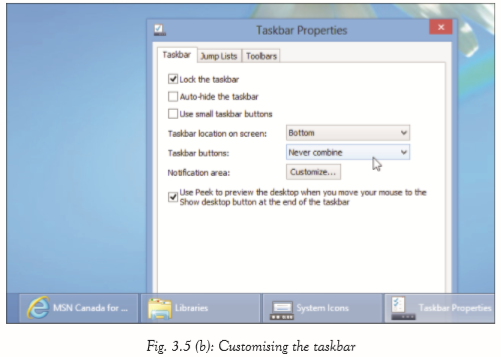
The following are some of the taskbar customisation options:• Lock the taskbar: Check marking this option ensures that the taskbar cannot be moved or changed in size. Any changes can only be made by un-checking.
74
• Auto-hide the taskbar: Check marking this option hides the taskbar until the mouse pointer moves over the area where it is hidden and it pops up. It hides again when the mouse pointer is moved away from it.
• Use small icons: This changes the size of the icons on the taskbar and the width of the taskbar.
• Taskbar location on screen: It helps position the taskbar at the left, top or right of the screen instead of the default location at the bottom.
• Taskbar buttons: Helps select how application icons behave, that is, always combine, hide labels, combine when taskbar is full, and never combine.
• NExplore and customise the start menu
(i) Right click the Start Menu then click on Properties. The shown in figure 3.6 dialog box appears:

(ii) Clicking the customise button helps modify items such as the control panel and pictures among others. (iii) Make the desired changes and click Apply.
(iv) Click OK to finish.
To customise the power button:
(i) Click Power button action.
(ii) Select the option to appear when turning off the computer.
(iii) Click Apply then OK to finish.
75

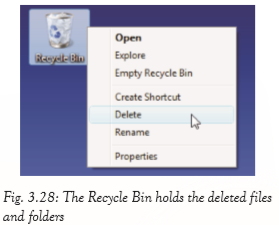
Recycle bin
It is a container that temporarily stores deleted files and folders before they are permanently deleted. It allows restoring of files and folders that have been deleted accidentally.
Deleting and Restoring files from the Recycle Bin
Deleting is the act of erasing files or folder. Restoring is the act of retrieving the deleted files and folders from the Recycle Bin. The deleted files remain in the Recycle Bin until it is emptied. If files have been deleted by mistake, they can be recovered by clicking the Restore button in the Recycle Bin. However, pressing Shift + Delete permanently erases the file without sending it to the Recycle Bin. To delete a file or a folder, do one of the following:
(i) Click on the file or folder to be deleted. Press Delete.
(ii) Click on the file or folder to be deleted. Right click and then select Delete option from the pop-up menu.
.The operating system will prompt the confirmation of the deletion by displaying a dialogue box as shown below.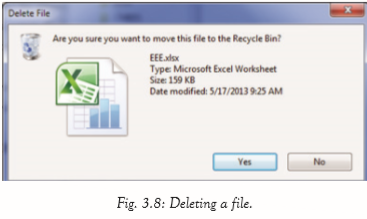
76
(iii) Click Yes to confirm deletion and No to cancel. To restore a file or folder from the Recycle Bin, do the following:
(i) Right click and select Open from the pop-up menu or double-click the Recycle Bin icon on the Desktop. (ii) Select the file(s) or folder(s) to be restored. (iii) Right-click then select Restore from the pop-up menu, or click the Restore this item option in the recycle bin window.
This action will put the file or folder back to its original location.
To empty the recycle bin, do the following:
(i) Right-click and select Open from the pop-up menu or double-click the Recycle Bin icon on the Desktop. (ii) Select the file(s) or folder(s) to be permanently deleted.
(iii) Select Delete. (iv) You will be prompted to confirm the deletion.
(v) If you are sure of the action, click Yes to conform the deletion.

Alternatively, click on Empty the Recycle Bin in the recycle bin window to permanently delete all items in the Recycle Bin.

Warning: Once items have been deleted from the Recycle Bin, they cannot be restored. Always keep a backup of the work. Do not attempt to delete program files. If you are unsure about an action, seek guidance from your teacher.The Control panel
It a graphical user interface found on the Start Menu which allows users to view and manipulate basic system settings and controls.
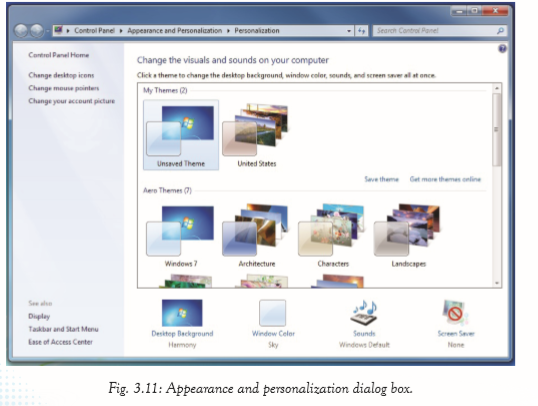
Desktop Background and theme, Window color and Screen saver.
A background also known as wallpaper is an image used to decorate the graphical user interface on the screen. A theme is a preset package used to customise the look and feel of graphical appearance details. It replaces a computer’s ordinary icons, sounds, pointers, background, or screen saver with a designed pattern to reflect the interests of the user.
To customise the desktop background and theme, do as follows:
(i) Click the Start menu. Click on the Control Panel. Click on Appearance and Personalization.
(ii) Click on Change the theme or Personalization. Make the desired changes.
(iii) Click Save changes or OK where applicable.
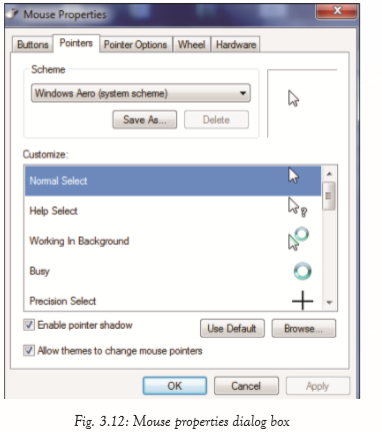
Mouse pointer
To customise the mouse pointer, do the following:
(i) Click on the Start menu. Click on the Control Panel. Click on Hardware and Sound. (ii) Click the Mouse tab. Click Pointers. (iii) Select the desired pointer option under Customize. Click Apply then OK.
Desktop icons and gadgetsIcons
The following procedure is used to customise desktop icons:
(i) Click the Start menu. Click on the Control Panel.
(ii) Click on Personalization.
(iii) Click on Change desktop icons on the left pane.
(iv) Select the icons to appear on the desktop, for example, Computer and Network.
(v) To change the way an icon appears, click on Change Icon button.
(vi) Clicking on Restore Default reverts the setting to Windows settings.
79

Gadgets
A gadget is a small application that is designed to sit on a user’s desktop screen and is capable of performing different tasks. Examples include the clock, CPU meter, and calendar among others. To customise desktop gadgets, do as follows:
(i) Right click on the desktop. Click on Gadgets.
(ii) Double-click on the gadget to insert on the desktop.

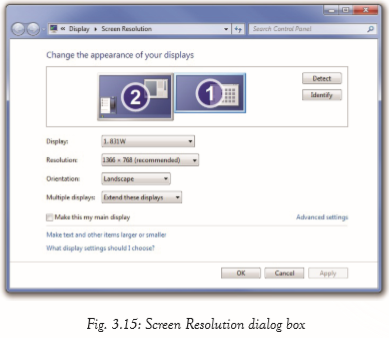
80Screen Resolution
This refers to the clarity of the text and images displayed on the screen. To change the screen resolution:
(i) Click the Start menu. Click on the Control Panel. Click on Personalization.
(ii) Click on Display. Click on Adjust resolution on the left pane.
(iii) Select the preferred resolution using the slide bar.
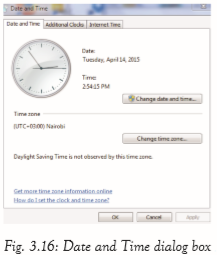
Changing Date and Time
To change date and time, do either of the following:(i) Click the Start menu. Click on the Control Panel.
(ii) Click on Clock, Language and Region.
(iii) Click on Date and Time.
(iv) Click Change date and time to set time and date;
or click Change time zone to adjust time zone settings.
(v) Click Apply and then OK to save the changes.
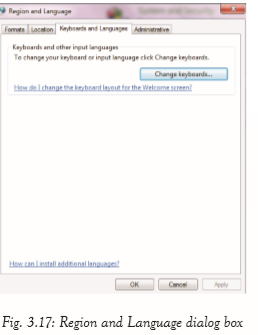
81Keyboard Layout
This refers to the arrangement of keys. To change keyboard layout:(i) Click the Start menu.
(ii) Click on the Control Panel.
(iii) Under Clock, Language and Region, click on Change keyboards or other input methods.
(iv) Click Change keyboards and make the preferred changes.
(v) Click Apply and then OK to save the changes.
Windows
A window is an open application on a computer’s display screen. A window shows the program currently running
Types of windows
There are two types of windows, namely application and document windows.
(i) Application window: It is the larger window that is displayed when an application is opened, for example, MS Word and MS Excel among others. It helps the user to communicate with the application program.
(ii) Document window:
It is the smaller window inside the application window. It is used for typing, editing, draWindow control buttons wing and formatting the text and graphics.
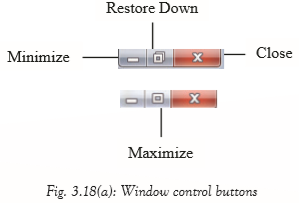
Window control buttons
There are four window control buttons, namely Minimize, Restore Down, Maximize and Close.
• Minimize: It removes a window from a view to an icon on the taskbar.
• Restore Down: It reduces the size of a window.
• Maximize: It enlarges the window to occupy the entire screen.
• Close: It exits the active program.
82
Common Windows Accessories
The following are some of the common windows accessories:
(i) Windows Explorer:
It is also known as File Explorer. It refers to the graphical file management utility that displays the drives and contents of folders and files in the computer.

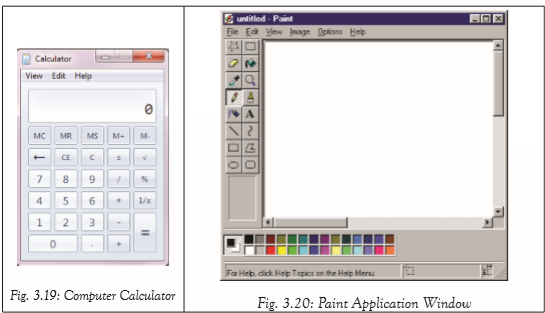
(ii) Calculator: It is a program similar to a hand-held calculator for performing mathematical operations. It is found in the accessories folder at the Start Menu.
(iii) Games: It is a program that enables the user to interact with objects displayed on the screen for the purpose of entertainment and learning skills.
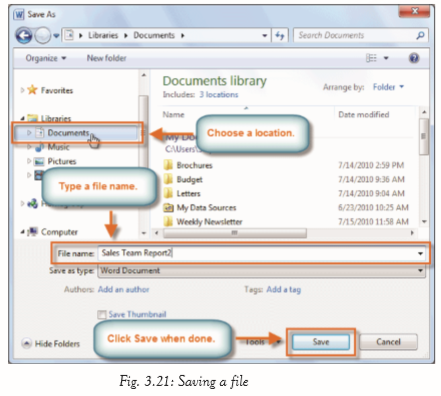
(iv) Paint: It is an application program designed to draw pictures or images on the display screen using a mouse or graphics tablet. The images are generated as bitmaps. It is incorporated in all Microsoft Office suites and is found in the accessories folder at the Start Menu.
83
Creating a folder
It is important to understand the organisational plan of the folders in the computer system when creating folders. This helps in knowing where the work has been saved. To create a new folder for example in the Local Disk C: in Windows 7:
(i) Click on the New Folder tab.
(ii) A new folder appears with the name New Folder highlighted.
(iii) Type the desired name to replace the name New Folder then press Enter. A new folder can also be created on an empty space in a storage location.
To do this,
(i) Right click on an empty space.
(ii) Select New from the drop down menu that appears then click on Folder.
(iii) Type the desired name to replace the name New Folder then press Enter.
Creating a file
(i) To create a new file, click the File menu in the active program and then click New. A dialog box appears. (ii) On the right pane, click Create button and select Blank Document under the available templates.
Saving
Saving is the process of storing a document in a storage medium or device for future reference or later use. There are two ways of saving a document:
(i) Save: It updates an active or existing document in a given location. If it is a new document, clicking on Save displays the Save As dialog box.
84
(ii)Save As: It allows one to enter a new file name and specify the location where to store the document. If there is an existing file with the same name, the file is overwritten. The file can also be renamed by typing a different file name or specifying a different location.
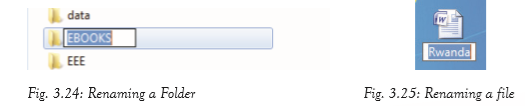
When saving a file for the first time, do the following:
(i) Click on File tab and select Save As command. A dialogue box appears.
(ii) Select the location to save the file from the left pane, for example, in a folder in Local Disk (C
.
(iii) Type the file name in the File name box.
(iv) Click the Save button. The document is saved in the selected location.
Opening a fileTo open a file, do either of the following:
(i) Double-click on the file.
Right-click and then click Open from the pop-up menu.
85

Renaming a folder
Renaming refers to changing the name of a file. To rename a folder, do the following:
(i) Click on the file or folder to be renamed.
(ii) From the Organize tab, select the Rename option from the drop down menu.
(iii) The original name will be highlighted and surrounded with a box.
(iv) Type the new name and press Enter. Alternatively, do the following:
(v) Right click on the file or folder to be renamed.
(vi) Select and click Rename option from the pop-up menu.
(vii) Type the new name over the old name and press Enter.
86
Cutting and pasting files and folders
Cutting is also known as moving. It is the transfer of the selected file or folder to a new location without leaving a copy at the source location. It is implemented using the Cut command. Once the file(s) or folder(s) to be moved are selected, they can be cut and pasted at any location by use of menu, keyboard shortcuts or by dragging and dropping.
The operating system automatically stores the cut data in a clipboard from where it will be pasted to the new location. Pasting refers to placing cut file or folder to a new location.
(a) Using the Menu

(b) Using Keyboard
To move selected file(s) or folder(s) using the keyboard commands, do the following;
(i) Press Ctrl + X to cut.
(ii) Press Ctrl + V to paste.
Copying and Pasting files and folders
Copying is duplication of text which means that a copy remains at the source location.
87
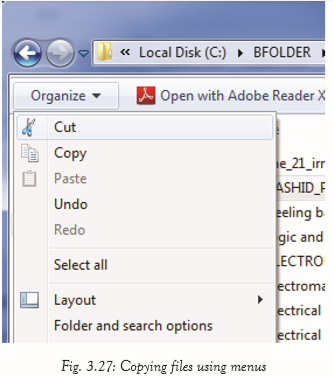
(c) Using Menu
To copy selected file (s) or folder (s) to another location using menus, do the following:
(i) Click on the Organize tab and select Copy.
(ii) Go to the new location where file(s) or folder(s) are to be copied.
(iii) Click on the Organise tab and select the Paste command.
(d) Using the Keyboard
To copy selected file (s) or folder (s) using the keyboard commands, do the following:
(i) Press Ctrl + C to copy.
(ii) Press Ctrl + V to paste.
(e) Using Dragging and Dropping
To move selected file(s) or folders(s) by dragging and dropping method, do the following:
(i) Click the file or the folder.
(ii) Hold down the left mouse button. Drag the selected file or folder to the preferred destination. Release the mouse button.
Note: Dragging and dropping file or folder in the same drive moves the file or folder to the new location. Dragging and dropping the file or the folder on different drives creates a duplicate
88Deleting files or folders
Most Windows Operating Systems usually protect files and folders deleted from the hard disk by placing them in a Recycle Bin.
Files or folders deleted accidentally or prematurely can be retrieved from the recycle bin. The deleted files and folders remain in the Recycle Bin until it is emptied.
Once the Recycle Bin has been emptied, its contents are permanently deleted from the computer and cannot be recovered.To delete a file, do either of the following:
(i) Click on the file or folder to be deleted. Press Delete
(ii) Click on the file or folder to be deleted. Right-click and then select Delete option from the pop-up menu. You will be prompted to confirm the deletion.
(iii) Click Yes to confirm deletion and No to cancel.

89Assignment 3.1
1. Define the term task manager.
2. Define these terms: desktop icons and control panel.
3. State and explain three parts of a task bar.
4. Outline the procedure followed to rename a folder.
5. State any two Window control buttons
6.List three accessories found in Microsoft Window.
Learning Activity 3A
1. Using the taskbar shortcut set the date and time of the computer.
2. In pairs, change the background of the computer.
3. Create a file called Senior1 on the Desktop, delete the file and restore it.
Revision Exercise 3
1. Describe each of the following: Save and Save As.
2. Differentiate between a file and a folder as used in computing.
3. Explain how to customise the taskbar.
4. Explain the role of the Recycle Bin.
5. Explain how gadgets are inserted on the computer desktop.
90