Distinguish between the types of microscopes and their principal uses.
Learning objectives
By the end of this unit, I should be able to:
–– Describe the main features and functions of the components of a
compound light microscope.
–– Manipulate a
compound light microscope to observe prepared slides.
–– Show perseverance when using light microscopes.
–– Pay attention when using a
compound light microscope to avoid damage of the lenses, mirrors and slides.
–– State that magnification is the increase in the apparent size of the object.
–– State that resolution is the ability of the microscope to show two objects as separate.
–– Appreciate the importance of magnifying instruments in Biology.
–– Use of a microscope to determine the relationship between actual size of the specimen and the image.
–– Calculate the approximate size of different biological structures using an appropriate unit of measurement
–– State the advantages and disadvantages of using an electron microscope.
–– State the principles and limitations of TEM (Transmission Electron Microscopy).
–– State the advantages and disadvantages of using SEM (Scanning Electron Microscopy).
–– Compare light and electron microscopes
–– Acknowledge the use of electron microscopes in modern science with reference to electron micrographs.
–– Observe and draw biological specimens under a light microscope.
–– Prepare temporary slides for observation under light microscopes using different objective lenses
–– Appreciate the importance of magnifying instruments in Biology
Introductory activity
Point out scientific activities that require the use of microscope in our daily lives.
A microscope is used to produce a magnified image of an object or specimen.
Anton Van Leeuwenhoek (1632-1723) was the first to invent a microscope powerful enough to explore the world of microbes. His discoveries stimulated an explosion of interest in scientific use of microscopes. Since the 18th century, many new types have been invented of which the most commonly used today are the
compound light microscope and the electron microscope.1 (Kent, 2000, p. 58)).
3.1 Compound Light Microscope
Activity 3.1Some of the living things including protoctista and fungi have small size to be observed by naked eyes. Discuss the ways used by biologists to observe and identify different parts of these living organisms.
The optical microscope, often referred to as light microscope is a type of microscope which uses visible light and a system of lenses to magnify images of small samples.

The different parts of light microscope are described below:
–– Base: supports and stabilizes the microscope on the table or any other working place
–– Light source: It is made by lamp or mirror which provides light for viewing the slide.
–– Stage: is a platform used to hold the specimen in position during observation.
–– Stage clips: are pliers used to fix and hold tightly the slide on stage.
–– Arm: supports the body tube of microscope
–– Body tube: maintains the proper distance between the objective and ocular lenses
–– Arm: used for holding when carrying the microscope and it holds the body tube which bears the lenses.
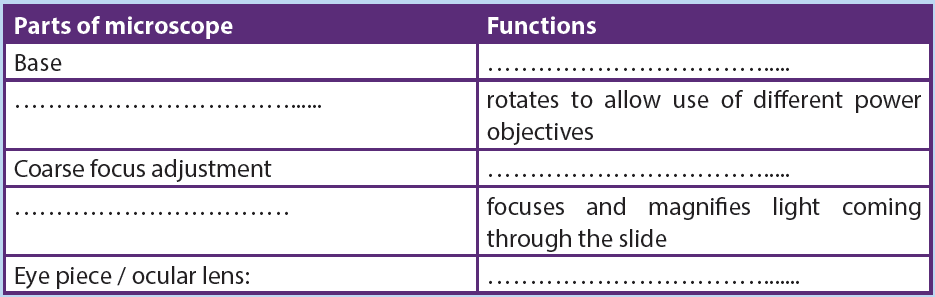
–– Coarse focus adjustment: moves stage up and down a large amount for coarse focus
–– Fine focus adjustment: moves stage up and down a tiny amount for fine focus
–– Objective lenses: focuses and magnifies light coming through the slide
–– Revolving nosepiece: rotates to allow use of different power objectives
–– Slide: is a transparent pane on which a specimen is placed.
–– Eye piece/ocular lens: magnifies image produced by objective lens
–– Condenser: It will gather the light from the illuminator and focus it on the specimen lying on the stage. The function of the condenser is to focus the light rays from the light source onto the specimen.
–– Iris diaphragm lever: This allows the amount of light passing through the condenser to be regulated to see the object.
Activity 3.2
Using the light microscope
a. To observe under low power and low magnification, proceed as follows:
–– Objects (specimens) to be observed under the microscope are first placed on a glass slide and covered with a cover slip.
–– Place the specimen on the stage of your microscope; in other words, arrange it so that the specimen is exactly at the center of the hole at the stage.
–– Fix the slide in place with two clips.
–– Rotate the nosepiece so that small objective lens is immediately above the specimen.
–– Set the angle of the reflector mirror so that light is directed up through the microscope.
–– Look down the microscope through the eye piece. Adjust the iris diaphragm so that the field of vision is bright and not dazzling.
–– Turn the course adjustment knob until the tip of the objective lens is close to the slide.
–– Now look down the microscope again. Slowly turn the course adjustment knob in the other direction, so the tube gradually moves upwards. The specimen on the slide should eventually come into view.
–– Use the course and fine adjustment knobs to focus the object as sharply as possible.
–– If necessary readjust, the iris diaphragm so the specimen is correctly illuminated. You will get a much better image if you don’t have too much light coming through the microscope.
b. To observe under high power at a greater magnification, proceed as
follows:
–– Rotate the nosepiece so that the large objective lens (with higher magnifying power) is immediately above the specimen. The nosepiece should click into position, as before.
–– If the specimen is not in focus, focus it with fine adjustment knob. Be careful that the tip of the objective lens does not touch the slide.
–– Readjust the illumination if necessary.
Microscope uses transmitted light for observation. However, microscope uses specific light characteristics for specific samples, such as transparent specimens and samples that do not pass light. All parts of a microscope work together, the light from the illuminator passes through the aperture, through the slide, and through the objective lens, where the image of the specimen is magnified. Then the magnified
image continues up through the body tube of the microscope to the eyepiece, which further magnifies the image the viewer can see.
Light from the source is focused on the specimen by the condenser lens. It then enters the objective lens, where it is magnified to produce a real image. The real image is magnified again by the ocular lens to produce a virtual image that is seen by the eye.
Care of the compound microscope
The microscope is an expensive instrument that must be given proper care. Always
general instructions have to be respected when using a microscope. These include:
–– Carry the microscope with both hands, one hand under the base, and the other on the arm.
–– When getting ready to put the microscope away, always return it to the low power or scanning power setting.
–– When setting the microscope on a table, always keep it away from the edge.
–– It is generally better to clear your lab table of items that are not being used.
–– Never clean lenses with anything other than lens paper, don’t use towels and
other paper tissues because they scratch the lens.
–– Inform the instructor or the biology lab technician if there is any microscope
damage or irregularity in its operation as soon as possible. Do not return a
faulty microscope without first informing the instructor or lab technician.
–– You are responsible for the microscope while using it treat it with care!
Self-assessment 3.1
1. Complete the table below:
2. What is the importance of a light microscope?
3. Suggest a reason why it is not advisable to clean the objective and eye piece
lens with a wet cloth or towel?
3.2 Magnification and resolution of a compound light microscope.
Activity 3.2Work out the following equivalent measurements:
1. 1 millimetre (mm) =........... metre (m)
2. 1micrometre (μm) =............mmetre (m)
3. 1 nanometre (nm) =..............metre (m)
4. 1 metre (m) = .............mm =.......... μm =........nm,
5. 1 kilometre (km) = .............m
a. Magnification
Magnification refers to increase in the apparent size of the object, while resolution of a microscope is the ability to show two close objects as separate. The maximum magnification of an ordinary light microscope is about x1500. Magnification must be written on the right side and below the biological drawing and it does not have units. The size of the image is measured in mm but converted into micrometres or nanometres to work out the actual size. It is calculated as follows:
Example
Calculate the magnification if the actual size is 5μm and the measured image of the specimen has the size of 40mm.
Answer:
–– Make the size of the image and the actual size in the same units by converting mm in μm. This is done by multiplying 40mm by 1000 so that 40mm = 40000 μm
Note that the magnification of the specimen under a light microscope is calculated by multiplying the magnification of the objective used to that of the eyepiece.
For example: 10x (objective) 10x (eyepiece) = x100.
b. Microscopic observation
Activity 3.3
Using prepared slides of microorganisms such as a bacterium, amoeba, and paramecium. Observe, draw and label the visible parts under a light microscope. Avail these materials before you start: Petri-dishes, plate covers, pencil, transparent tape, microscope, agar powder, and permanent slide of bacteria, amoeba, and paramecium, Bunsen burner or any other source of heat.
Procedure
–– Prepare agar medium by boiling a mixture of 10g of agar powder with 50ml of water
–– Label a control and exposed petri dishes in which you pour prepared agar medium.
–– Cool both plates for 20 minutes until the medium hardens.
–– Tape closed the cover of the control plate and removes the cover of the exposed plate.
–– Leave both plates for 5 minutes, and do not touch or breathe on the agar. After five minutes, tape closed the lid of the exposed plate and store both plates upside down in a warm place and draw your observations
–– Repeat the observation by using mounted slides of amoeba and paramecium and make a comparison between bacteria, amoeba and paramecium: what is your conclusion?
For this experiment, light microscope allows to observe organisms of small size including bacteria, amoeba and paramecium. Some other parts of macroscopic organisms such as cells and tissues of plants and animals or some parts of these living organisms such as stems and roots can also be observed under light microscope.
Some specimens can be observed directly after collection and preparation. However, some of the details might not be clearly observed because specimens are not colored. Also, some material distorts when you try to cut the specimen into thin sections. To overcome this challenge, slides can be prepared in advance by the use of the following steps:
–– Staining: colored stains are chemicals that bind to chemicals on or in the specimens. This allow the specimen to be seen. Some stains bind to specific cell structures. For example, acetic orcein stains DNA dark red, while gentian violet stains bacterial cell walls.
–– Sectioning: specimens are embedded in wax, where thin sections are then cut without distorting the structure of the specimen. This is particularly useful for making sections of soft tissue, such as brain. Safety measures might be taken. Make sure that hands are washed with soap and warm water after the
experiment. Use a disinfectant to wipe down all surfaces where bacteria may
have been deposited for example. Be sure that some substances and animals
might be harmful to the life.
Activity 3.4
Preparing of temporary slides and observation under light microscope
Make temporary preparation of slides of epidermis of onions young stems by fixing, staining and mounting. Observe under low and high power of a light microscope.
Preparation and procedures
–– Add a drop of water at the center of the microscopic slide to flatten the membrane
–– Pull of a thin membrane from the onion layer and lay it at the center of the microscopic slide
–– Add a drop of iodine solution or methylene blue on the onion membrane
–– Gently lay a microscopic cover slip on the membrane and press it down gently using a needle to remove air bubbles.
–– Touch a blotting paper on one side of the slide to drain excess iodine/water solution,
–– Place the slide on the microscope stage under low power to observe.
–– Adjust focus for clarity to observe.
–– Make another slide without adding the stain to see the difference between a stained slide and a non- stained slide.
–– Draw and label the observed parts of each of the two slides and compare a drawing of a stained slide and that of a non-stained slid.
c. Measuring cells
Cells and organelles can be measured with a microscope by means of an eyepiece called graticule. This is a transparent scale, usually having 100 divisions (Figure 3.4, A). The eyepiece graticule is placed in the microscope eyepiece so that it can be seen at the same time as the object to be measured (Figure 3.4, B). At this figure (Figure 3.4, B), the cell lies between 40 and 60 on the scale, so that it measures 20 eyepiece units in diameter (60 – 40 = 20).
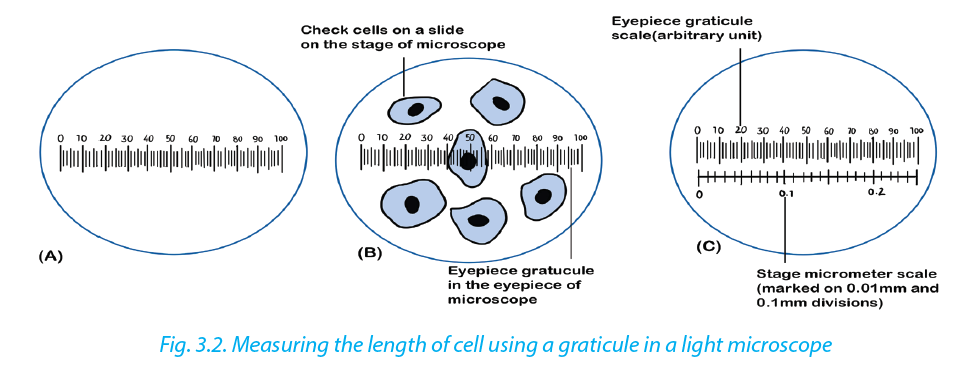
To calibrate the eyepiece graticule scale, a miniature transparent ruler called a stage micrometer scale is placed on the microscope stage and is brought into focus. This scale may be fixed onto a glass slide or printed on a transparent film. It commonly has subdivisions of 0.1 and 0.01 mm. The images of the two scales can then be superimposed (Figure 3.4, C). If in the eyepiece graticule, 100 units measure 0.25
mm, the value of each eyepiece unit equals

By converting mm to μm, the value of eyepiece equals

The diameter of the cell shown superimposed (Figure 3.4, B) measures 20 eyepiece units. Its actual diameter equals 20 × 2.5 μm = 50 μm. This diameter is greater than that of many human cells because the cell is a flattened epithelial cell.
Use the following instructions to measure the length of one cell
–– Measure the distance in millimetre from the start of one cell to the end of 10 cells
–– Divide by 10 to find the length of one cell in the specimen.
–– Convert this length in millimetre to micrometer by multiplying by 1000.
–– Find the actual length of a cell by dividing this length by the magnification of thespecimen got from the product of eye piece and objective lens used.
Self-assessment 3.2.
1. Calculate the magnification of an image with 50mm, and the objectmeasuring 5μm. in length.
2. If a nucleus measures 100mm on a micrograph, with a magnification of X10 000, what is the actual size of the nucleus?
3.3 Electron microscopes
Activity 3.3
Suggest the form and source of energy used by electron microscope. How does this differ from that used by a compound microscope?
An electron microscopes use a beam of accelerated electrons as a source of illumination.
Electron beams have a much smaller wave length than light rays and therefore have greater resolving powers and can produce higher effective magnifications than light microscopes. There are two types of electron microscopes;
–– Transmission electron microscope (TEM)
–– Scanning electron microscope (SEM)
Electron microscopes are used to study the details of internal structures (the ultrastructures)
of cells. Most modern TEMs can distinguish objects as small as 0.2nm.
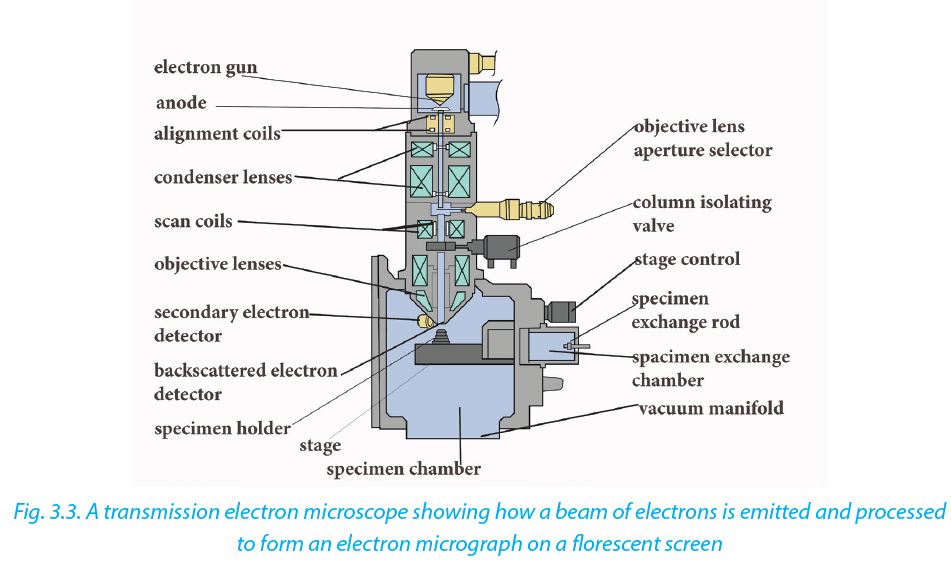
This means that they can produce clear images magnified up to 250,000 times. Formation of an image by the TEM:
–– Extremely thin samples of the specimen are needed and are cut by using diamond or glass knives as they are supported in resin block to prevent them from collapsing
–– The section is then impregnated with a heavy-metal stain
–– As the beam passes through the specimen, electrons are absorbed by the heavily stained parts but passes readily through the lightly stained parts.
–– Electro magnets bend the electron beam to focus an image onto the florescent screen or photographic film to form an electron micro graph
Scanning electron microscope (SEM)
The SEM is used to produce 3D images of surfaces of the specimens. Electrons are reflected from the surface of the specimen stained with a heavy metal. This enables the SEM to produce images of all specimens, cells, tissues, or even organisms
a. Advantages of the electron microscope over light microscope
Electron microscope has a higher resolution and istherefore able of a higher effective magnification estimated at up to 250,000 million times compared to the light microscope which can show a useful magnification only up to 1000-2000 times. This is because a light microscope uses a beam of light with a longer wave length while Electron microscopes use a beam of electrons that have a short wave length.
b. Disadvantages of electron microscope
Despite the advantages, electron microscope presents a number of setbacks and limitations.
–– They are extremely expensive and the maintenance costs are high.
–– Sample preparation is often much more technical requiring special training.
–– Samples must be dead, exposed to high radiation and are placed in a vacuum so that it is impossible to observe living specimens
–– It is not possible to observe colors because electrons do not possess a color. The image is only black-white, even if sometimes the image is colored artificially to give a better visual impression.
–– They require more training and experience in identifying artifacts that may have been introduced during the sample preparation process.
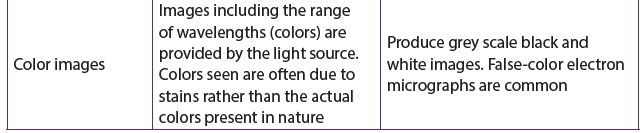
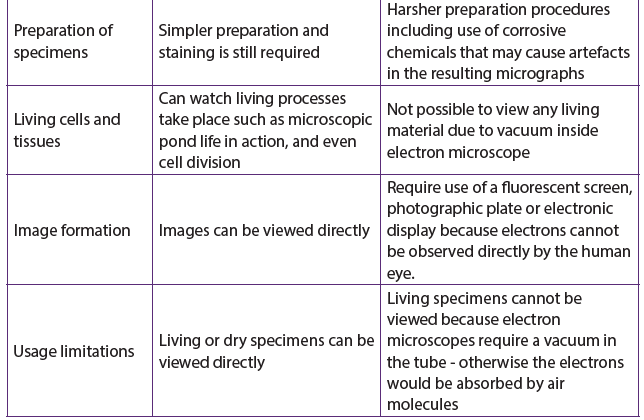
c. Comparison between light and electron microscopes
Light and electron microscope presents the following similarities and differences. The following are some of the similarities:
–– Both light and electron microscopes form larger (magnified) and more detailed (highly resolved) images of small objects or small areas of larger objects
–– Both light and electron microscopes are used in biology study, research and medical sciences particularly histology, material sciences such as metallurgy and other aspects of science.
–– Specimens must be carefully prepared using techniques appropriate for both the equipment and the sample including slicing, staining, and mounting.
Despite the similarities, light and electron microscope presents differences such as these summarized in the following table:
Table 3.1. Differences between light and electron microscopic
Self-assessment 3.3
1. How is magnification varied in;
a. A light microscope
b. An electron microscope?
2. Why is the resolving power of an electron microscope such better than that of a light microscope?
3. Make a comparison between light and electron microscope, highlighting the advantages and disadvantages for each type of microscope. Summarise the similarities and differences between light and electron microscopes
End of unit assessment 3
Section A. Multiple choice questions
1. Which ranges can be viewed using a light microscope?
a. 4 only
b. 1 and 2 only
c. 2 and 3 only
d. 3 and 4 only
2. The figure below shows a mitochondrion drawn from an electron micrograph. Study it carefully and answer the following questions.
If the length of the mitochondrion line X Y is 3000 nm. What is the magnification of the drawing of the mitochondrion?
a. ×100
b. ×1000
c. ×10 000
d. ×100 000
3. A light microscope is used to observe two membranes that are 200 nm apart. How far apart are the membranes when the objective lens is changed from low power (×40) to high power (×400)?
a. 2 μm
b. 20 μm
c. 200 nm
d. 2000 nm
4. The electronmicrograph below is that of a chloroplast.
The length of the chloroplast along the line shown is 80 mm. The actual length of the chloroplast is 10 μm. What is the magnification of the chloroplast?
a. ×8 × 10²
b. ×8 × 10³
c. ×8 × 10⁴
d. ×8 × 10⁶
5. The following diagram below is drawn from an electron micrograph of an animal cell.
Which represents the same cell, seen under a light microscope at ×400 magnification?
Section B:
6.
The micrograph above shows a transverse section of part of an animal cell.
a. Identify organelles labelled X and Y
b. The maximum actual diameter of Y is 2um. Calculate the magnification of this organelle in the electron micrograph.
c. Determine with two reasons whether the cell is prokaryotic or eukaryotic.
d. From evidence in the electron micrograph, deduce two substances that were being synthesised by large quantities by this cell.
e. The dark granules in the cell are glycogen. Explain the conclusion that you draw from this information
 2. What is the importance of a light microscope?
 Example
 Note that the magnification of the specimen under a light microscope is calculated by multiplying the magnification of the objective used to that of the eyepiece.For example: 10x (objective) 10x (eyepiece) = x100.b. Microscopic observation
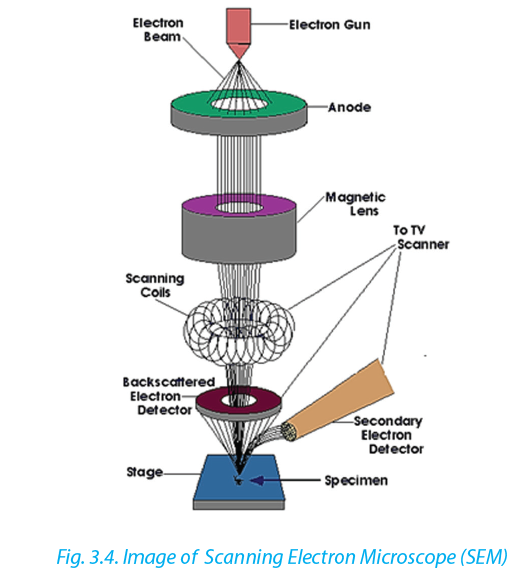 a. Advantages of the electron microscope over light microscope
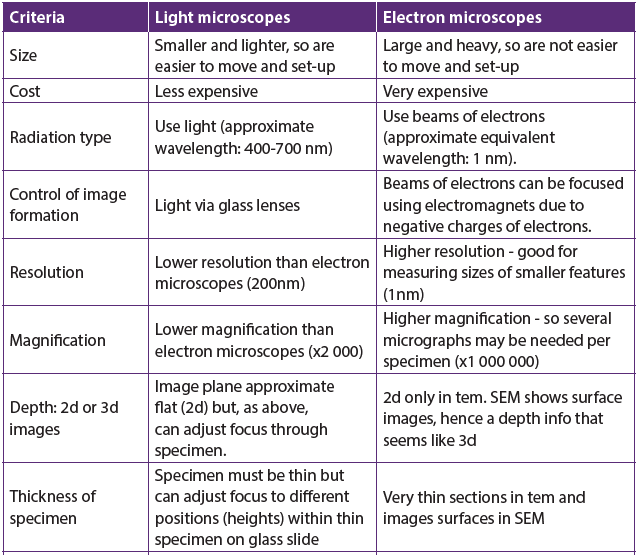
 Self-assessment 3.3
 a. 4 only
 If the length of the mitochondrion line X Y is 3000 nm. What is the magnification of the drawing of the mitochondrion?
 The length of the chloroplast along the line shown is 80 mm. The actual length of the chloroplast is 10 μm. What is the magnification of the chloroplast?
 Which represents the same cell, seen under a light microscope at ×400 magnification?
 Section B:6.