UNIT 3: VOLLEYBALL
3.1. Key unit competence:
Perform basic volleyball tactics.3.2. Prerequisite (knowledge, skills, attitudes and values)
Learners Students of senior five will perform better basic volleyball tactics if theyhave
mastered fundamental volleyball techniques learned in previous years.3.3. Cross-cutting issues to be addressed
Gender
In teaching and learning process of volleyball, the teacher must prepare and
provide physical activities that engage both girls and boys equally to exploit their
full potential and talents without any discrimination or prejudice.Inclusive education
The teacher as a facilitator he/she must consider different special education needs
and select activities to adapt his teaching approaches to students. This creates
a positive attitude and helps all students to participate actively and develop theircompetence levels.
Financial education
The teacher should integrate Financial Education into his teaching/learning
activities by providing the local and no cost teaching material where is possible. He/
she must encourage students to make their own materials that can help them to
develop competences not only in volleyball game but also in their life.Standardization culture
The teacher must choose and select the standardized materials to use in his/
her teaching/learning process of volleyball. It is necessary to provide appropriate
materials required to the levels of students and help them to develop culture of
checking and using the quality of sport materials for the competitions before using
them in order to prevent injuries and other accident.
Environment and sustainability
The teacher should provide materials and deliver the lesson by encouraging students
to protect the environment and well use of materials. The teacher helps them to
develop the spirit of keeping safe the environment they use in sports activities.Peace and values education
The teacher helps students to develop fair play and social values by avoiding
violence and conflict in the volleyball game and by setting clear and relevant
instructions. He/she should provide the activities that help students to develop their
competence peacefully.Comprehensive sexuality education
The teacher provides volleyball activities and sets instructions that prevent sexual
harassment or any kind of gender-based violence like sexual abuse and physical
contacts oriented to the sexuality intention.Genocide studies
While conducting volleyball exercises a teacher should take a time to explain
student show sports should be used to fight against Genocide ideology and how to
prevent it. For example, to organize Genocide memorial tournaments at school and
give the message related to the Genocide.3.4. Guidance on introductory activity
Before introducing the lesson one of this unit, you must introduce the whole unit.
The teacher as a guide, facilitator and expert, ask questions or give activity related
to volleyball tactics in order to help them to predict what to be learned in the whole
unit.

Lesson 1: Serving and reception tactics
a. Learning objectives
To master serving and reception tactics in volleyball.b. Teaching resources
– Volleyball court
– Net
– Stopwatch/watch
– Antenna
– Whistle
– Ballsc. Prerequisites/Revision/Introduction:
Students of senior five will perform better serving and reception tactics in they have
mastered the techniques of reception and serving learned in Ordinary Level and
Senior four.d. Learning activities
Opening discussions
– Ask the students to brainstorm the correct techniques of making good service
and a good reception.
– Let students present their finding and introduce the new lesson.
– Invite students to start warm up exercises.Warm up exercises
• Let students perform general warm up exercises and specific warm up and
stretch their muscles properly. Let students use the following exercises:
– High knees exercises.
– High knees laterally exercises.
– Toes in, toes out exercises.
– Volleyball shuffles exercises.
– High skips exercises.
e. Lesson body Service tactics
Explain students that to choose the type of service depend on the difficult of that
pass in order to be received or passed by the opponent. State types of services used
in volleyball, demonstrate how to perform them and let students apply individually.• Tactics of floater service
Tell students that to perform a good floater service tactically they do the following:
– To make contact in front of their body with their hand by hitting behind the
middle of the ball.
– The arm follows through but only partway.
– By hitting directly behind the ball, ensure that there is no spin.
Request them to respect the following steps for floater serve:• Starting position
– Hold the ball in your left palm if you are right handed or right palm if you are
left handed.
– Find the air hole in your ball and place the air hole down on your palm (due
to air hole is the heaviest part of the ball keeping it at the bottom enables the
ability of the ball to float).
• Ball contact phase Remind students to:
– Lock the wrist upon contact.
– Stay tall with limited back bend until the ball is contacted with the open palm.
– You need to hit the ball with a pop (Just a quick and firm contact on the middle
of the ball will send it over with no spin and if it catches some air the entire
better to float with).
– Have the hitting arm straight and stay high upon to finish.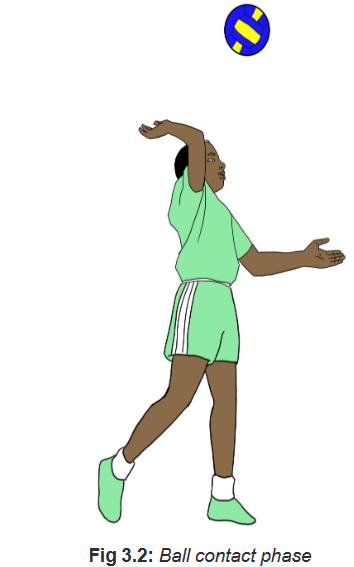
• Topspin
Tell students that to perform a good topspin serve tactically they do the following:
– Take a position for serving.
– To toss the ball a little higher comparing to the tossing while serving the
– floater serve.
– To step under the toss and strike the ball underneath toward the top of the
back in a down and outward motion.
– To keep their arms following all the way through with a wrist snap. The arm
follows all the way through with a wrist snap.• Jump serve
– Ask students to take any distance behind the service line.
– Tell them to place the ball in left hand for right handed and right hand for left
handed.
– Request them to toss the ball higher in front of them.
– Ask them to accomplish attack approaches: left right left for right handed,
right-left-right for light handed.
– Ask them to swing both arms behind them and then forward and up while
stepping forward with the left foot for right handed or right foot for left handed
and make a quick hop.
– Request them to jump up and forward behind the service line and contact the
ball at the top of your reach.
– Remind them to strike the ball with their palm and follow through with their
arm swing by aiming outward and downward to put topspin on the ball.How to choose tactical direction in the opposing court to orient the serve?
Tell students that other tactics in serving are:
– To orient the serve in strategic directions hence all serves that because the
setter to move are the best.
– To serve in the front zone of the opponent court. The front zones (2, 3, 4)if you
see that the setters are closer to the 3m line than the end line, it is better to
serve a fast, flat and deep ball at the shoulders of setters to forcethem to move
backward while passing their teammates.Remind student that a good service is which one that can cause the setters to be
unstable and force them to move or to pass the ball in a not desired side.
• Reception tactics in volleyball
– The teacher explains to the students the role of receiving the ball in volleyball.
– Tell the students that in volleyball all players need to be habilitated with the
skills or receiving the ball.
– Explain to the students the role of the specialist in defence(reception) used inNote that:
The libero is a player specialized in defensive skills: The libero must wear a
contrasting jersey colour from their teammates and cannot block or attack the ball
when it is entirely above net height. When the ball is not in play, the libero can
replace any back-row player, without prior notice to the officials. One of the tactics of
having good receptions is to use the libero player.
• For reception
Teacher reminds student that:
– The positions in reception will depend on the setters’ positions near the net,
the width of service area, and the ability and speciality of the server.• Sideways position of reception
Teacher reminds students that:
– In sideways service reception, direction is decided by the positions of setters
near the net. The ball could be sent in correct direction if the ball returns
automatically to the setter’s direction without twisting body or arms ball is sent
in the wrong direction if the ball is not sent to setter.
Let two students move sideways crossing each other according to the setter’s
position as shown in the picture above.• Conditions concerning the width of the service reception area
In reception tactics, the students are taught to keep their positions within the
imaginary lines extending from the server to the back corners of the court. This
exercise will help students to know how to protect the whole court and avoiding
surprises of the ball falling down in their court.• Height of service reception area by the player
In teaching reception tactics, the teacher tells the front line player that they should not
receive a ball served above the shoulder height in standing position; the back line
player should receive such a ball. During the teaching exercises, the teacher must
see that the students are conscientious with this principle.
• Service receiver position considering ability and speciality of the server
In teaching the tactics of reception in volleyball, the teacher must explain that
anticipation in volleyball is a fundamental skill. Thus, tell the students that special
characteristics of different balls will dictate the proper position to take for easier
reception. The students must know the proper position to take for easier reception
from deep, fast or slow balls.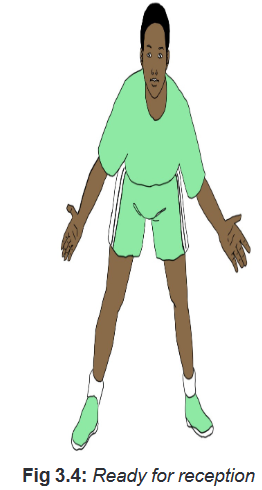
• Deep service
Tell students that for a deep serve correct positions in reception help to receive
the ball easily. This will help to avoid the ball that can surprise you to drop and fall
down in your court and making a point for the opponent. For demonstration and
application, see the image below.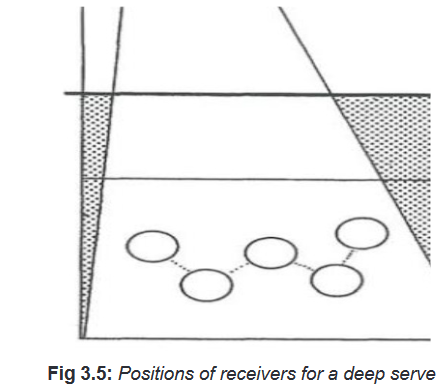
• Short or long low slow service
In receiving a short or long low slow service in volleyball; tell the students that
the correct positions to take in defence is to keep the distance between front and
back lines and stand far from each other. For demonstration and application, see the
image below.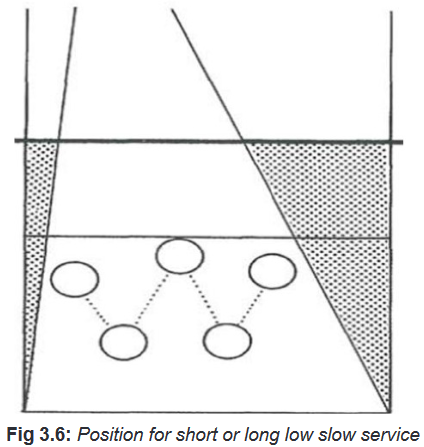
Typical examples of in service-reception formations
• System of W formation
Explain students that in W formations the players take the W formation in the court
using five players in reception. One setter in front line stays near the net for set-ups.
The W serve-receive system helps to introduce three attacker systems always
after service and attack reception. It is the general formation for reception and for
preparation of quick attacks just after the service reception. For demonstration and
application, see the image below.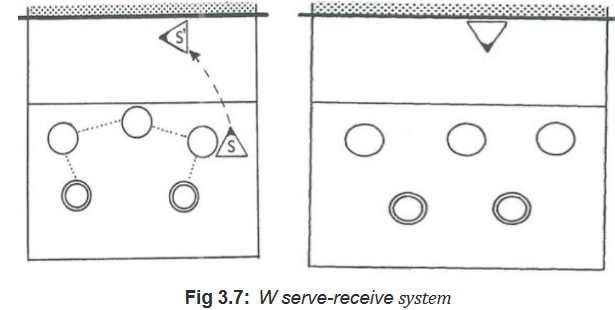
• System of M formation
Explain students that in M serve-receive system of reception, one receiver stays
near the net for in case service reception mistakes. This system is used to receive
for short and soft serves (M roof formation) as well as for hard and strong serves
(M dish formation). The receiver’s direction of movement should be decided by
the position of the team’s setter. For demonstration and application, see the image
below.
• M roof formation for short and soft serves
The final variation of M formation is the dish formation used to receive the balls from
hard and strong servers. For demonstration and application, see the image below.
– Put the students in two groups (A&B) of servers and receivers.
– The group of receivers chooses a setter.
– The group of the students on service will stand in a line behind the serving
zone and will execute their serves one after another.
– The students composing the group of the receivers must stand in a formation
of reception of the ball and be read to receive and make an attack after serve-
reception.
– The teacher tells the time to change the types of serves to the group of servers
so they may use various types of serves (jump serve, floater, topspin, severing
side-lines, serving in the middle of the court, deep serve, short serves)
– The student in reception must make a good pass to the setter and the setter
sets to the hitter in proper position to hit the ball over the net.
– If the ball goes down into the court, the team of receiver is awarded a point.
– If the ball goes out or if the reception is inaccurate, the point is awarded
to the group of servers. The total number of points to be scored to win the
competition is 10 points and then the groups switch the roles.Variations:
– Ask the students composing the serving group to change the type of the serve.
– Ask the students of the group receiving the ball to adjust their formation
(system of reception according to the types of serve. Help them to be in good
positions.Progression
– Both the groups play like in a game situation where they will be asked to
serve-receive and attack.
– See how the students receive the ball from a strong attack. Help them to be
in good positions if they fail.
– Always emphasize the correct positions and the correct tactics in receptionCool down exercises
– Let students do light exercises and stretch their muscles by insisting on most
used parts.
– Guide students while stretching their muscles systematically.Closing discussions
• Reflect
– Which is the best formation in receiving a jump serve/front line serve and why?
– What do we need to take care of in receiving the ball from the opponent
serve?
• Connect
– What are the techniques do you need in order to be a good receiver/good
server?
– What are the learned techniques in previous years do you need to perform
effective reception in volleyball?• Apply
– What importance of learning tactics of reception in volleyball?
– What importance of learning tactics of serving and attacking in volleyball?Lesson 2: Setting and spiking tactics used in volleyball
a. Learning objectives
The students of senior five will master setting and spiking tactics in volleyball.b. Teaching resources
– Volleyball court
– Net
– Stopwatch/watch
– Antenna
– Whistle
– Ballsc. Prerequisites/Revision/Introduction:
Students of senior five will perform better setting and spiking tactics in volleyball if
they have mastered the techniques of setting and spiking.d. Learning activities
Opening discussions
– Ask the students to brainstorm the correct techniques of setting and spiking
in volleyball.
– Ask the students if they know the tactics of winning a volleyball match.
If yes, ask them to list some.
– Introduce the new lesson.
– Invite students to start warm up exercises.Warm up exercises
– Let students perform general warm up exercises and specific warm up based
on the most body’s parts to be used while performing setting and spiking
tactics and stretch their muscles properly.
– Help them to do some of the following exercises: high knees exercises,
volleyball shuffles, jumping exercises, and arms swing exercises.
e. Lesson body
A. Setting tactics in volleyball
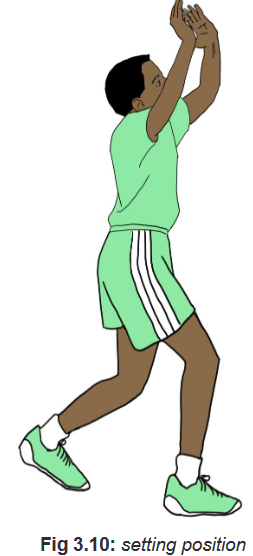
– Explain students that the set is an overhead pass used to change the direction
of the dig and put the ball in a good position for the spike.
– Tell students that type and the quality of the set will depend on the quality or
receptions and the quality of the receptions will depend also on the types of
attacks from the opponents. The setter must have different tactics to set every
ball from the reception.Types of setting in volleyball game
Explain students that there are different types of setting in volleyball including
the following:
– Four: a set that goes high to the outside hitter.
– Two: a set in the middle of the court at net, usually to the middle hitter.
– One: a quick set to the middle player.
– Three: quick set half way between the outside and middle player.
– Five set: back set to the right side hitter.
– Ten (setting the pipe): a set that is set to a back row attacker. The ball is set
to be attacked near the 3-metre attack line.Let students apply it individually/pairs/groups on the volleyball court
B. Spiking tactics in volleyball
– Explain the students that spiking is when the ball is hit or smashed over the net.
– Tell them that there are different tactical spikes used in volleyball game such
as:
– Hard driven: is a hard hit ball that travels forcefully down towards the
opponent’s court.
– Off speed: is a controlled spike ball placed in an open area of the court.
– Standing spike (down ball): is attacking a ball from a standing position.
– Open hand tip: action of directing the ball with the fingers when attacking
– in the volleyball game.
– Wipe-off attack: is the action of hitting the ball aiming the outside arm of
the blocker in order to have the ball deflected outside the court. Short height
attackers against tall blockers mainly use this tactic.Let students apply it individually/pairs/groups on the volleyball court.
Offensive tactical plays for a setter and for a hitter
Tell students that offensive tactical plays for a setter and for a hitter are as follow:
– Outside shoot: a quick set to the outside hitter.
– 32: is set half way between the outside and middle. The height of the set is
about the same as a two ball.
– Flare: when an attacker uses an inside-out path to attack an outside set.
– Isolation play: a play designed to use an attacker as a distraction to draw
in opposing blockers. This can give a teammate a chance to attack against a
single blocker.Let students apply it individually/pairs/groups on the volleyball court.
Combination plays
Explain students that different combination plays should be used in volleyball game.
Some of them are:
– Tandem: when one player follows behind the other when attacking. Especially
done when the outside hitter approach behind or right next tothe middle hitter.
– Double quick: when two hitters approach to hit quick sets. A middle hitter
approach to hit a front one and a right side hitter approach to hit a back a back
one.
– X play (cross): when hitters approach to hit crossing one another’s paths. A
middle approaching to hit a front one and the right side player coming around
to hit a front two.Let students apply it individually/pairs/groups on the volleyball court.
APPLICATION ACTIVITY 1
Put the students in two groups (A & B) of equal number, each group of students
stands in line on its own court. The first group on the left side while the other one
stands on the right side of the other part of the court. The students stand behind the
serving zone and do the service one after another. The students in the front lines
for both the sides hold the ball. After the serve, the student goes to recuperate the
ball and stand last in the opposite group.Variation of activity
– The teacher tells the time to change the type of the serve.
– The teacher adds a group of the student in reception.APPLICATION ACTIVITY 2
Put the students in two groups (A & B) of equal number, each group of students
stands in line on its own court. The first group on the left side while the other one
stands on the right side of the other part of the court. Each group chose a setter and
the setter stands near the net. The students in the front of the line hold the balls.
The student in front throws the ball to the setter, who in return makes a set to be
hit by the thrower of the ball. After the attack, the student goes to recuperate the ball
and stands behind in line on the opposite court. The students will do the exercises
in this way one after another for the two groups.Variation of the activity
The setter will use in progressive way different sets as follows: one, two, three, four
and ten. The teacher tells the time to change the type of sets.
After every student has practice, switch the sides and the setters.APPLICATION ACTIVITY 3
In the same group and the same sequences of events as in activity 1, the students
will practice different spiking tactics. The teacher tells the time to change the type of
spiking according to the students’ progress. In activity number, two choose a group
of blockers at each side to help to apply tactics like a tandem, a double quick, a
line attack etc.Variation of the activity
Add a group of blocker to disturb attackers. Starts the ball with the setter, the setter
tosses the ball from his/her hands to the student in front line who passes the ball
back to the setter (with a good reception) The setter then sets the ball while the
passer moves to hitting position.
Variation for activities 2 and 3
Chose three students for each group: the setter, the passer and
the other one to recuperate the balls. The student in charge of
recuperation of the ball recuperates it and the students rotate,
the passer, hitter, taking the setter’s position, the setter going
in recuperation of the ball, and the student in recuperation
of the ball rotating to the pass-hit position. The rotation con-
tinues for five minutes before switching sides, to work on the
right side of the court (Group A switch the side with group B).Cool down exercises
- Let students do light exercises and stretch their muscles
by insisting on most used parts.
- Randomly, one of students leads cool down exercises.
- Guide students while stretching their muscles systematically.Closing discussions
• Reflect
- Which challenges did you face during the execution of different
setting/
spiking tactics?
- What went well during the workout?
- What to correct in next sessions?• Connect
- What are the techniques do you need to make good sets?
- What are the techniques do you need to perform effective spikes?• Apply
- What is the importance of learning tactics of setting and spiking
in volleyball?
Lesson 3: Tactics of attacking the ball in volleyball
a. Learning objectives
The students of senior five will master the tactics of attacking the ball in volleyball.b. Teaching resources
– Volleyball court
– Stopwatch/watch
– Whistle
– Net
– Antenna
– Ballsc. Prerequisites/Revision/Introduction:
Students of senior five will perform better tactics of attacking the ball in volleyball if
they have mastered the techniques of attacking the ball learned in Ordinary Level
and Senior Four.Learning activities Opening discussions
– Ask the students to brainstorm the correct techniques of attacking the ball in
volleyball.
– Introduce the new lesson.
– Invite students to start warm up exercises.Warm up exercises
Let students perform general warm up exercises and specific warm up based on the
most body’s parts to be used while performing tactics of reception ing volleyball and
stretch their muscles properly.Help students to use some of the following exercises: high knees exercises, volleyball
shuffles, jumping exercises, arms swing exercises, bending knees exercises,
crossover, forward and backward movement exercises.d. Lesson body
Tell students that tactics in attack vary from the attacking angle, the hitting force and
the direction of the shot. Briefly describe types of attack and demonstrate or used a
skilled students and let students apply it individually.The following ways should be used while attacking in volleyball:
– Back row attack hit: when the row player attacks the ball by jumping from
beyond the attack line.
– Cross-court shot: An individual attack directed across the net at an angle
from one side to the other side. E.g.: from the left side to the right side and vice
versa.– Line shot: when the ball is attacked down on an opponent’s side-line. The ball
is usually hit down the line just outside the outside blocker or over the top of
the outside blocker.
– Off-speed hit/ tip ball attack (soft spike): The ball is spiked with less force.
It helps to place the ball where you want and/or keep the ball in play.
– A cut shot: a spike that is hit from the hitter’s strong side and travels at a
sharp angle across the net. A cut shot is like a cross-court hit except that the
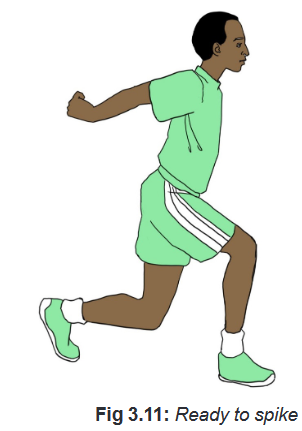
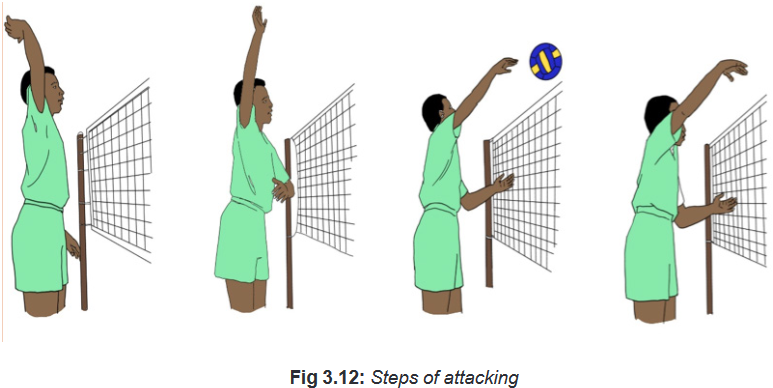
ball is hit at a much sharper angle. Cut shots are also a much softer hit ball.Remind students the steps of attack in volleyball as follow:
• Step one the approach:
To position their body in the air ready to hit.
• Step two the take-off phase:
To use energy that is more elastic they can utilize for exploding high especially for
the last two steps of approach.
• Step three the mid-air contact:
To get positioned with their arm stretched upward then contact the ball at your highest
point in the jump.
• Step four the landing:
Cushion their landing by landing on the balls of their feet with their knees bent.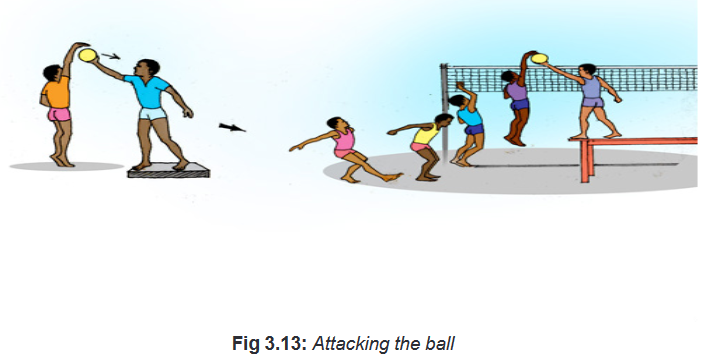
APPLICATION ACTIVITY
Form groups of six students. Let two groups play the normal volleyball
game. Request them to use attack tactics learned. Change groups after 5
minutes of playing. The winner is the team, which finish 5 min with high scoreCool down exercises
– Let students do light exercises and stretch their muscles by insisting on most
used parts.
– Guide students while stretching their muscles systematically.Closing discussions
• Reflect
– Which challenges did you face during the execution of the attack?
– Explain different steps used while performing an attack in volleyball.• Connect
– What are the learned techniques in previous years do you need to be good at
attacking in volleyball?• Apply
– What importance of learning tactics of attacking in volleyball?Lesson 4: Tactics of digging and blocking
a. Learning objectives
After this lesson, the students of senior five will master tactics of digging and blocking
in volleyball.b. Teaching resources
– Volleyball court
– Net
– Stopwatch/Watch
– Antenna
– Whistle
– Ballsc. Prerequisites/Revision/Introduction
Students of senior five will learn better tactics of digging and blocking in volleyball if
they have mastered the techniques of digging and blocking the ball in volleyball.d. Learning activities
Opening discussions
– Ask the students to recall techniques of blocking in volleyball as they have
learned in year one.
– Introduce the lesson of the day.
– Invite students to start warm up exercises.Warm up exercises
– Let students perform general warm up exercises and specific warm up based
on the most body’s parts to be used while performing techniques and stretch
their muscles properly.e. Lesson body
• Digging in volleyball
Explain students that during defending the opponent’s attack, digging is one of the
defensive tactics to use when the block has failed to stop strong spikes. Demonstrate
how to apply it and let students perform digging during game situation.Tell students that executing digging tactic follows the following steps:
Step 1: Set up around the block.
Step 2: Read the hitter.
Step 3: Dig to the target.Remind students that while executing digging:
– Teammates usually decide ahead of time how they are going to defend a
hitter.
– The blockers need to communicate with the defense about who is blockingwhat
( line or angle) and where on the court the defense is going to be positioned.
Tell students that there are several ways to get the ball through digging such as:
– Sprinting
– Sprawling
– Jumping
– Taking quick steps
– Falling
– Rolling
– Diving
– Falling• Pancake tactic
A pancake tactic is especially used when a defensive player wishes to play the
ball, which is falling to the floor but is far away.Remind students to respect the following while performing pancake:
– Take a few steps and dive as far as you can through the air.
– Slide your hand firmly on the ground.Requirement for pancake
Tell students that to perform a good pancake they should do the following:
– Anticipate and move to the ball.– Get their forearms under the ball.
– Lean into the ball as they make contact.
– Dig the ball at the midline of their body if you can.
– Extend their arms in the direction of the target if they have to reach outside
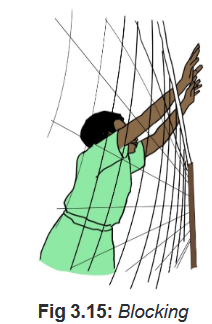
their body.• Blocking tactics in volleyball
– Teach the students different tactics used in effective blocking in volleyball.
– Demonstrate and let students apply about footwork of better preparation
while blockingRemind them that anticipation is always a great skill to develop in volleyball, more
over in blocking.
– Explain different types of sets and different tactics of block to apply
against such sets.
– Identify different sets and then after d e m o n s t r a t e s t u d e n t s effective
blocking tactics to apply against them.
– For each set, a blocker needs to understand that the hitter is likely going to hitwhere the set takes them and then anticipate where to put a block.
Each set presents different challenges and opportunities to both the attacker and
the blocker. As a blocker, if you are able to recognize the set, combined with your
knowledge about the attacker you will be better prepared to block.
– For example, when the set is more inside, the hitter is more likely to hit
cross court angle. If the set is pushed way outside, the hitter tends to hit more
down the line. If the hitter is in trouble, watch out for the tip.A ball set off the net will be attacked differently than a ball set tight. For example, a
hard hit ball coming from off the net will go deeper.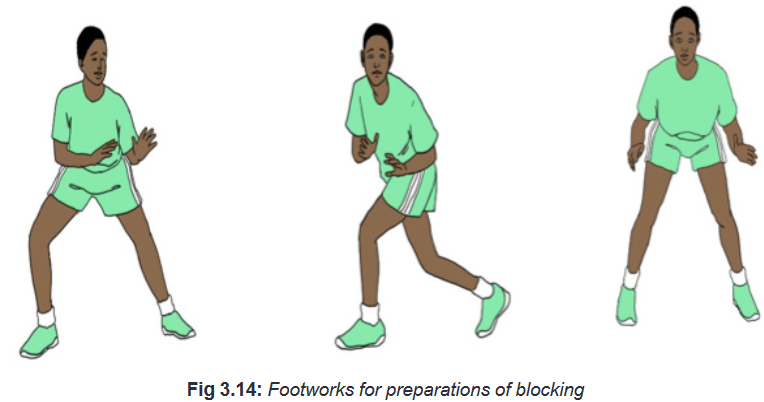
While teaching blocking in volleyball emphasize the following points:
– The better a blocker is at reading the play; the more efficient the team can
respond and attack.
– Remember the positioning of the block informs the positioning of the
defence/cover players.Explain to the students that preparation of the block in volleyball require the following
steps:Step 1: Preparing to Block
– Teach anticipation as it is the key for a successful block. This is done by
teaching them to scan the court and find the front row attackers.Tell the students that to prepare effective block they need to:
• Call out the hitters: For example, 6 outside, 3 middle, and 5 opposite and
guess who the hitters are before the serve.
• Call out the setter: Is the setter front row or back row? It is important to know
if the setter is front row because if she is, you may have to help with blocking
her.
Step 2: Penetrating the Net (blocking is counter attacking)
The students must be taught that to be successful in blocking in volleyball, they had
better learn to penetrate above the net into the opponent’s space. Penetrating the
net is considered the most important part to blocking.Step 3: Blocking tactics
After teaching anticipation and penetration, the teacher needs to teach proper
tactics of blocking against different hitters. Some guidelines are given below (you
may enrich them by doing your own research).
• Blocking tactic 1: Front the hitter
Most people will hit the ball in the direction it takes them. Front the Hitter means get
in front of the hitter in the direction the hitter is facing. The blocker could focus on
lining up with the outside hand on the ball.• Blocking tactic 2: Give and take-away shots
Blockers need to be skilled at giving and taking away shots. If a player is known to
have a great line hit, the blockers can take-away line. Every team needs to have a
block and defence strategy.• Blocking tactic 3: Knowing blocking strategy and hide it
If the strategy is to block line, do not show it early. Wait and block line late.Remind your students that:
– They do not want to give away their team strategy.
– If they wait and show the block late, their opponent will often make a mistake
and play right into their hands.
– Having a strategy for blocking in volleyball does not guarantee that they will
win, but it can help their team by having a plan of what to do.• Blocking tactic 4: Read and anticipate the opponent
Most setters have a setting technique that is consistent. For example, many setters
take the ball more out in front of their body when they set outside versus setting
back. Watching for cues like these will help you to get a read on where the ball will
be set. This is important because the better you are at reading the setter, the easier
it will be to get in good position to block.• Blocking tactic 5: Tips for blocking middle
Your first responsibility as a middle blocker is to find the middle hitter and know
what they are doing. Once you have identified what play the middle is likely running,
look at the setter and try to figure out what they are doing.For clues, watch the setter’s hands. Look at hand position and where the ball is
going to contact the hands.
– If the setter is positioned more behind the ball, look for an outside set.
– If the position is more neutral, watch for middle or back.
– If the setter drops an arm, watch for the dump.This all happens fast. You do not want tunnel vision. You want be able to see both
the hitter and setter. Watch, anticipate and react. Once the ball has left the setters
hands, you do not need to watch the ball anymore.
• Blocking tactic 6: The hitter goes where the ball goes.
Teach the students to recognize where the ball is set and to watch the hitter by:
– Watching the pass.
– Watching where the ball goes.
– Finding the setter.
– Finding the middle and figure out what pattern they are running.
– Finding the setter again.
– Finding the hitter after the ball is released from the setter.
– Choose the group of hitters and setters and the group of the students to dig
the balls from the hitters.
– Make sure the hitters have accurate hit in the way you want.
– Use the two sides of the court and for each side must have a ball feeder to
avoid wastage of the time.
– Put the students in-group of digging and after a while switch the roles.Progress
– Place the hitters on a stand to increase the accuracy of the balls.
Teaching points to observe
– Learning to dig the ball in front of their body.
– Learning to dig the ball on the side of their body.
– Learning to dig the ball above their head (overhead dig).
– Learning to dig extremely hard driven ball.
– Learning to defend a tip/roll shot.
– Learning to roll/learning to dive.
– Organize the students in two groups (A & B)
– The hitters and the setter compose group 1 and the other group will be
composed of blockers.
– Two students, the hitter and the setter compose the group of hitters.
– Other students queue in line so as to that they may have the place to play
one after another.
– The students tosses the ball to the setter who set the ball in a position
indicated by the teacher.
– The blockers have to block according to the instructions given by the teacher
– After 5 minutes, the groups switch the roles.
Progression
– Start with a single block until to a block of three blockers.
– Start with small spikes to strong spikes.
– Changes the types of spikes and the hitting angles.
– You may choose to use the hitter placed on a stand in order to be able to hit
the ball easier and in the way, you want it to be.Teaching points to focus on
– The timing and the decision making ability.
– The footwork and the agility.
– Use a game situation and let the students apply correc tactics of digging and
correct tactics of blocking.Cool down exercises
– Let students do light exercises and stretch their group of muscles by insisting
on most used parts.
– Guide students while stretching their muscles systematically.Closing discussions
• Reflect
– What are the different ways of doing a dig in volleyball?
– What is needed for effective block in volleyball?
– There are different blocking tactics in volleyball according to where the ball
is set; what are they?• Connect
– What are the techniques do you need to be good at digging?
– What are the learned techniques in previous years do you need to be good at
blocking in volleyball?• Apply
– What importance of learning tactics of digging and blocking in volleyball?3.6. Summary of the unit
Serving and attacking tactics in volleyball• Types of services
Serving is one of many ways you can make points if it is done tactically. In general,
a good serve one that is complicated to pass or to receive. In addition, a tactical
serve is that one which causes the setter to move and put him/her in uncomfortable
position to set.
• Jump serve
The jump serve is more advanced and utilizes an even higher toss that should be
several high in front of the server. It uses more of an attack approach, jumping and
striking the ball with the heel of the hand while in the air. With this serve, the wrist
remains firm, then you hold (stop) your palm in position facing the target.
The extra motion of jumping allows putting even more power on the ball, making
this cause a serve to be difficult to handle. The drawback is that all that extra motion
can lead to a higher incidence of serving errors. Most jumps serve have topspin on
them, but it is possible to jump and serve a floater.• Floater serve
It does not spin at all. It is referred to as a floater because it moves in extremely
unpredictable ways. This makes this service to be difficult in reception and passing.
A floater serve catches the air and can move unexpectedly to the right or left, or
dropping suddenly.• Topspin
It has a much more predictable movement than the other types of serves. It is
very difficult to handle due to it quick speed generated by topspin serve.Effective attacking in volleyball requires some tactical actions like to be quick inattack
(tempo), to orient the ball in a strategic area on the opponent court and to use
different types of attack according to the set and the opponent defence.• Setting and spiking tactics in volleyball
Setting and spiking are two techniques, which are interdependent as a good set
makes a good spike. There are different types of sets to use as tactics of winning the
match according to the opponent’s defence and the teammates’ skills to hit the ball.
A good set also depends on the quality of the reception and sometimes reception
can influence the decision of the direction of the set.• Tactics of reception of the ball
For effective receptions, the students should be able to apply tactical formations in
defence according to the type of serve. Another important tactic in reception is to
use the libero player who is a specialist in defence.• Tactics of digging and blocking in volleyball
Digging and blocking are both tactics of defence, which require the ability to
read and interpret accurately the opponent’s actions especially the setter position
and the probable setting direction.3.7. Additional information to the teachers
Advantages and disadvantages of volleyball formations used in volleyball
In volleyball, teams must have their players in a specific formation. The players
then rotate around the court clockwise whenever the team performs a side-out.
There is a penalty for being out of rotation and the opposing team receives a point.
There are three formations that are widely used in the court, each having advantages
and disadvantages.4-2 formation
This offense takes its name from the fact that it uses four attackers and two setters.
This is a basic formation generally used by less experienced teams to avoid
confusion on the court. At any given time, one of the setters is in front row and the
other is back row.They are always opposite of each other on the court. This allows for two attackers
5-1 Formation
front row at any given time, and the setter is able to dump the ball, as the setter will
always be in the front court. This basic offensive formation allowsfor any of the basic
sets to be run, as well as a 32, shoot, or possibly a tandem. Teams that use a 4-2
will rarely set anything other than the basic sets.
– The positive aspects of the 4-2 include its simplicity, so a team can gain
experience and later move on to a more complicated formation.
– The negative aspect of using a 4-2 is its limits regarding your offense. Some
think that having two setters’ takes away from your team as the setter is
generally the team leader. Some coaches opt to start their team out running a
more complicated system and just having the players adopt it.
A 5-1 takes its name from using one setter and having five attackers on the court.
The secondary setter is replaced by an opposite hitter who is always opposite the
setter on the court. This formation allows the setter to be able to dump the ball for
half the rotations and have three front row attackers to set the ball to on the other
three rotations. This system allows the setter to set any possible set he or she
wants to depending on whether he or she is front row or back row. Many coaches
prefer this system, having one setter as the team leader.– Positive aspect of this formation is to help having only one setter sothat the setting does not change. One setter may set the ball differently from
another giving a different feel for the attackers. It helps when the attackers
are used to one setter in particular.
– The negative aspect of this offense are that the setter needs to transition from
defence to set the ball. This creates situations where the setter has the first
contact and someone else has to set the ball.6-2 FormationA 6-2 is similar to a 4-2, but has six attackers and two setters. This is possible by
having the back row setter always set the ball, making the setter only a hitter when he
or she is front row. This formation allows any possible set to be made not including
a dump by the setter because he or she is always back row when setting the ball.
– It is good for a team in which the setters are also very good attackers where
coach does not want to waste that talent.
– Unfortunately, this formation has the problems of 5-1 and 4-2. Having two
setters and always having one of them be back row. The setter always has
to transition from defence and the leadership is lacking. Most teams at
the highest-level team use the 5-1 rather than this for leadership purposes.Attack tempo (the speed of the attack).We distinguish three tempos in attack: tempo 1 (the fastest tempo), tempo 2 and
tempo 3. Thus, the effectiveness of the attack will depend not only on the type of an
attack but also on how fast is the player on the action. The strong attack must beassisted by being very quick in action.3.8. End unit assessmentGAME SITUATION
Organize a competition among the students and ask them to apply all the learned
tactics in a game situation. While the students are playing the game, the teacher
assesses if students are able to perform tactics of serving, passing, setting, spiking,
blocking and digging in volleyball.3. 9. Additional activities
3.9.1. Remedial activitiesIndividually and in groups, the students will revise the correct techniques of serving,
setting, digging, spiking and blocking.3.9.2. Consolidation activities
Individually or in groups, the students will perform the tactics of serving, passing,
setting, spiking, blocking and digging in volleyball.3.9.3. Extended activities
Encourages and facilitates students to form teams and participate in different
competitions of volleyball organized by the school, Sector, district, and National
federation in charge of sports in schools.