General
- P6: Physical Education and Sports File Uploaded 31/07/22, 11:52
- P6: Physical Education and Sports TG File Uploaded 1/08/22, 09:37
UNIT 5: BASKETBALL
5.1. Key unit competence
Learners will be able to demonstrate defensive and offensive techniques and tactics in game situations.
5.2. Prerequisites knowledge and skills
Learners will learn better this unit if they are able to apply technical skills in game situations with increasing adherence to the rules.
5.3. Cross-cutting issues to be addressed
1. Inclusive education: In teaching-learning process of basketball the teacher together with the learners must set instructions that include all learners. Learners with physical impairment will be referees. Modifying the height of where the basketball rim is to meet individual learners.
2. Standardization culture: In volleyball lesson, the height of net and the balls must be adapted to learners’ age according to the accepted standards.5.4. List of lessons

Lesson 1: Types of passing in basketball
a. Prerequisites
Learners will learn better this lesson if they are able to perform exercises of consecutive passing, ten consecutive passes without the other team touching the ball
b. Teaching resources
Playground, whistles, basketball balls, pinnies, stopwatchc. Introduction
• Opening discussions (in a semicircle formation)
• After checking learner’s readiness, give instructions and rules of the game
• Forms groups basing on the quantity of resources available as well as on the class size.
• Discuss with learners how to maximize the use of all the available resources.d. Lesson development
There are different types of passes to teach in Basketball. Let your learners perform, do demonstration where necessary and make corrections for bad techniques or bad body postures.
Some techniques are described or illustrated by images where necessary. Some teaching exercises are given, but it is advised to do further research to enrich your teaching activities.Warm-up and stretching activities
Have your learners start off at the baseline, run to the near free-throw line, turn around and return to the baseline. Instruct them to run to midcourt and back, and then run to the far free-throw line and back. Finally, have them run from the near baseline to the far baseline and back. Allow them a one-minute break and repeat. This drill should get your learners’ legs and cardiovascular system ready for basketball.For stretching activities see unit 1, lesson 1.
Different types of passing in Basketball
There are essentially two types of passes:
Air Pass: The pass travels between players without hitting the floor.
Bounce Passes: The pass is thrown to the floor so that it bounces to the intended receiver
Each type of pass comes with its own variationsBasic Variations:
• Chest pass
• Bounce pass
• Overhead pass
• Wrap around passAdvanced Variations:
- Baseball pass
- Dribble pass
- Behind-the-back pass
- Pick and roll pass
a. Chest pass
The chest pass is named so because the pass originates from the chest. It is thrown by gripping the ball on the sides with the thumbs directly behind the ball. When the pass is thrown, the fingers are rotated behind the ball and the thumbs are turned down. The resulting follow through has the back of the hands facing one another with the thumbs straight down. The ball should have a nice backspin.
b. Bounce pass
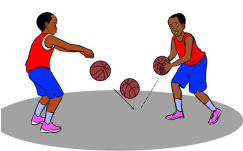
The bounce pass is thrown with the same motion (as chest pass) however it is aimed at the floor. It should be thrown far enough out that the ball bounces waist high to the receiver. Some say try to throw it 3/4 of the way to the receiver, and that may be a good reference point to start, but each learner has to experiment how far to throw it so it bounces to the receiver properly. Putting a proper and consistent backspin on the pass will make the distance easier to judge.
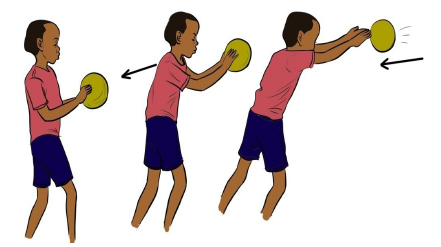
c. Overhead pass
The overhead pass is often used as an outlet pass. Bring the ball directly above your forehead with both hands on the side of the ball and follow through. Aim for the teammate’s chin. Sometimes it is advised not bring the ball behind your head, because it can get stolen and it takes a split-second longer to throw the pass.
d. Wrap around pass
Step around the defense with your non-pivot foot. Pass the ball with one hand (outside hand). It can be used as an air or a bounce pass. You will often see the wrap-around, air pass on the perimeter and the wrap-around, bounce pass to make an entry into the post.
e. Baseball ball passA baseball pass is a one-handed pass that uses the same motion as a baseball throw. It is often used to make long passes.
Be careful with young kids. You don’t want them throw their arms out.f. Behind-the-back pass
A behind-the-back pass is when you wrap the ball around your back to throw the ball. It is used to avoid the defender when making a pass across the front of you would be risky. It can also be used to throw the ball to a player trailing on the fast break.
Teaching points
When teaching passing, points of emphasis should be:
• A good pass is a pass a teammate can catch
• When passing, step toward your receiver.
• When catching, step toward the pass
• Like shooting, the ball should have a backspin to it. This is accomplished by following through on every pass.Exercises to develop passing techniques in Basketball
1. Pair passing
Learners are paired up and face one another about 2.5m apart. They then pass back and forth, making sure that they step toward their partner to pass and step to the ball to receive. Teach calls the type of pass to be thrown. Gradually, partners move further apart as they are comfortable and accurate.
Variations:
Chest pass, pass and overhead pass
Points to teach
Step to pass.-Follow through so the backs of your hands are together with the thumbs pointing down.
Step to catch.
Catch with your hands extended and guide the ball into your body to secure it into triple threat position.
2. Middle learner passingInstructions:
• Position three learners as shown in the diagram.
• Ask learners to use chest passes and less overhead pass.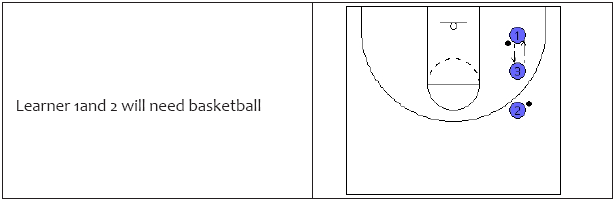


Points of emphasis
Continually tell your learners to:
• Make accurate passes.
• Move as quickly as possible without sacrificing form and accuracy.
• When passing, step toward your receiver.
• When catching, extend your hands step toward the pass.
• Like shooting the ball should have a backspin to it (This is accomplished by following through on every pass).3. Pass and switch
Instructions
Points of emphasis
Continually tell your learners to:
• Make accurate passes.
• Move as quickly as possible without sacrificing form and accuracy.
• When passing, step toward your receiver.
• When catching, extend your hands step toward the pass.
• Like shooting the ball should have a backspin to it (This is accomplished by following through on every pass).e. Assessment (RCA discussions).
Reflection
What are the different types of passes in basketball?
What are the important points to emphasise to make accurate passes?Connection
Recognise similarities between basketball passes and other passes of different sports.
Application
Apply passing technique in a small game situation.
Lesson 2: Different types of dribbling and shooting in basketballa. Prerequisites
Learners will learn better this lesson if they are able to perform basic dribbling and shooting exercises in basketball.
b. Teaching resources
Playground, whistles, basketball balls, pinnies, stopwatch
c. Introduction
Opening discussions (in a semicircle formation)
• After checking learner’s readiness, give instructions and rule of the game
• Forms groups basing on the quantity of resources available as well as on the class size.
• Discuss with learners how to maximize the use of all the available resources.d. Lesson development
In teaching-learning process, let your learners perform on their own basing on your instructions. Do demonstration where necessary and make corrections for bad techniques or bad body postures.
Some techniques are described or illustrated by images where necessary. Some teaching exercises are given, but it is advised to do further research to enrich your teaching activities.Warm-up activities
For warm-up exercises, use the activities in the previous lesson.
Stretching activities
For stretching activities see unit one, lesson one.
Dribbling technique in basketball
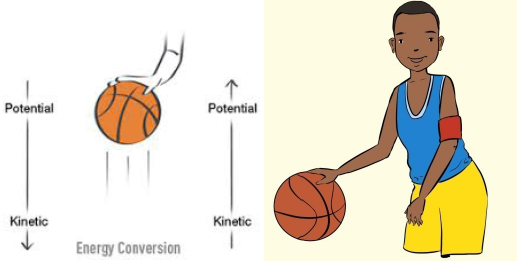
In basketball, dribbling is the legal method of advancing the ball by oneself, as opposed to passing it to another player or shooting for the basket. It consists of bouncing the ball on the floor continuously with one hand while walking or running down the court.
Dribbling teaching exercisesa. Cones dribbling
Cones dribbling instructions:
• Put learners in lines, each learner holding a ball if there are plenty of them.
• Learners will dribble one after another going thru the cones
• You can progressively reduce the distance between cones to make the drill more complex.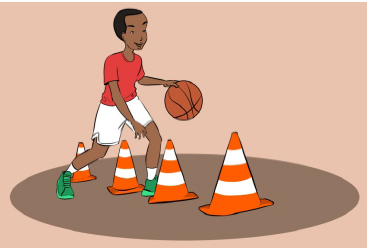
b. Two ball dribbling
Instructions:
• Give each learner two balls if you have plenty of them
• Each leaner has to dribble two balls simultaneously using both hands, each hand having its own ball
This exercise will help learners to:
• Use their weak hand
• Challenge their coordination
If a learner can dribble two basketballs at the same time, well then she/he or she will definitely be able to dribble one very well with either hand.
c. Dribling with a defenceEach learner has to dribble the ball with a passive defense of a partner.

Points to check always while learners are performing dribbles in Basketball
While learners are dribbling check that they are:
• Dribbling the ball hard,
• Keeping up their eyes all the time when dribbling,
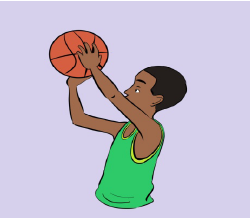
• Use fingers tips to control the ball, not the palmShooting in basketball
Stationary basketball shooting form and technique
There are 8 steps of making an accurate shoot in basketball. Check if learners are doing it correctly based on your instructions.
1. Eyes on target
• To improve accuracy, locate the target (rim) as early as possible.
• Keep your eyes on the target and do not follow the flight of the ball.
• Feet are shoulder width apart for good balance.
2. Stance and balance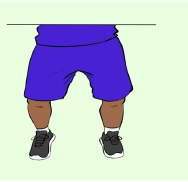
• Feet should be in a slightly staggered stance that is consistent and comfortable for you. Your shooting foot is slightly ahead of the non-shooting foot in a comfortable position.
• Point your feet in the general direction of the basket, but not necessarily directly at it. We prefer an open stance, but you can also use the closed (squared) stance if that’s more comfortable for you. With an open stance, your feet point towards one side of the basket. For example, a right handed shooter will point his or her feet just to the left of the rim for a more natural position and shooting motion.
• Once you develop a comfortable stance, line up your feet the exact same way on every shot. Whatever stance you use, consistency is critical.
• Flex/bend your knees on every shot.• Keeping your target focus is very important
3. Shot pocket
• As you catch the ball, move it quickly into the shot pocket.
• Line everything up so the ball and your shooting eye form a straight line to the basket. This is very important.
• Position the ball several inches above your waist.
• Grip the ball properly and be ready to shoot.4. Grip
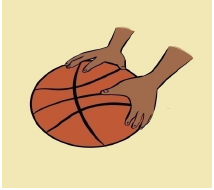
• Place the air hole between the middle and index fingers.
• Line up your fingertip pads parallel to the long seams of the ball, so you can monitor the back spin.
• Leave space between the ball and the middle of your palm. You should be able to insert a pencil between the ball and your palm area.
• Position the ball in your shot pocket the same way every time you catch it.
• Spread your fingers far enough apart to comfortably balance the ball in one hand.
• The ball should sit on your finger pads.5. Balance hand

• Your non-shooting hand should be on the side of the ball.
• Your balance hand should not add force or spin to the shot.
• Your non-shooting hand should not move on delivery and should always come off the ball first.6. Delivery
• The ball should start motion directly upwards from the shot pocket.
• Your elbow should be positioned comfortably under the ball.
• The ball stays in front of you and should not go behind your head.
• Uncoil your body with your legs, core, and arm power all coordinated.
• Your elbow and wrist should extend in a straight line to the basket.
• Your shooting hand should extend in a straight line to the rim.
• Hand position on delivery is very important. The ball should come off the hand with perfect symmetrical backspin.
• As shown in the picture to the right, your guide hand stays to the side and does not influence the flight of the ball.7. Up force and landing
• Release the ball on the way up, just before the top of your jump.
• Use your legs to generate up force.
• You should land in the same spot that you jumped, which shows that you have good balance on your shot.
8. Follow-through
• Your wrists should be floppy (relaxed).
• Fingers should be pointed at the target (rim).
• Finish high. You should see your fingers at the top square of the back board.
• Hold your follow through position until the ball hits the rim.Sample exercises to develop shooting skills
Learners will be taught to shoot from the following different situations:
• Shooting from a stationary position
• Shooting off the dribble
• Catch and shoot
• Triple threat shooting
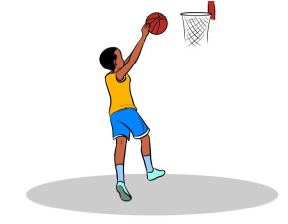
• On the move shootingPerforming a Lay-up
a. The opposite foot to the hand laying up the ball is jumped off.
b. The leg on the same side as the hand laying up the ball is driven up to help provide lift.
c. The jump has to be both up and towards the basket.
d. When the ball is picked up from the dribble the ball must come to make contact on the top of the chest and chin.
e. Once the ball is picked up, a player’s eyes should be focused on the basket.f. Once the ball is raised past the forehead of the player the two hands separate and the inside arm extends to protect the body and ball from defenders to the front and side.
g. The shooting hand should extend fully pushing through the ball and finishing with a flick of the wrist.
h. The ball should make a light touch off the backboard and into the basketball hoop.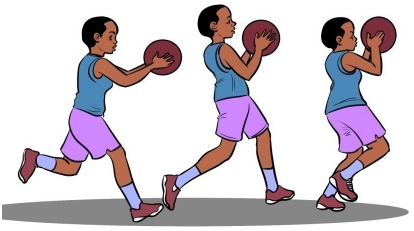

Teaching exercises for lay-up
1.Two lines layup exercises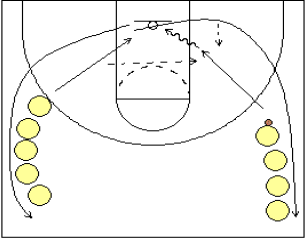
• Put learners in two lines as shown on the diagram
• Determine the shooting and the rebounding line (for left layup the rebounding line is the right line)
Process: The first learner (shooter) dribbling in and shooting the lay-up, while the first rebounder rebounds and passes to the next shooter cutting toward the basket. The shooter goes to the rebounding line and the rebounder goes to the shooting line.
After a few minutes, switch sides so that now the left line is the shooting line (for shooting left-handed lay-ups). As an option, run the drill with two balls. In addition to standard right and left-handed lay-ups, also get some reps on both sides doing reverse lay-ups.Teaching points
• Dribble with the left hand for left-handed lay-ups, and the right hand for right-handed lay-ups.
• Passes should be bounce passes.
• Make sure players are using correct footwork and technique (see lay-up correct technique)
• Make sure the two lines start well outside of the arc... if the lines are too close to the basket, there is little running and the drill tends to drag. Learners should run this drill at game speed.
• You can make a team competition out of it by requiring the team to make a certain number of lay-ups within two-minutes. If they fail, everyone does 5 or 10 push-ups. Making it competitive will force learners to run the drill up-tempo, but make sure they don’t cheat by allowing the lines to come in too close.2. Three-line lay-up exercise
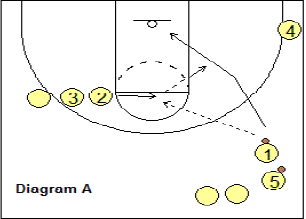
Process: Learner 1 passes to learner 2 and cuts down the right side-line, then makes sharp cut to the basket. Learner 2 passes the ball back to 1 who shoots a lay-up (see diagram A). After shooting, 1 goes to the top-of-the-key line.
Cutting technique in basketball
Cutting in basketball is a term which describes the action of a player moving across the court. It is used to describe a player making a concerted effort to move quickly across the court in an attempt to get open to receive a pass or draw the defense away from a teammate.
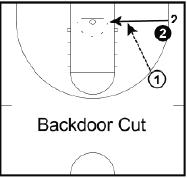
Find below ten most common cuts in basketball.1. Back cut
A back-cut is when a player cuts behind his defender towards the basket
2. V-cut
They are executed by walking the defender a couple of feet inside the 3-point line, planting your foot, and then exploding out to receive the ball.

3. L-cut
L-cuts are a great way to get open on the perimeter when starting on the block.
This cut doesn’t require the offensive player to be quick; rather this cut will be most effective if good footwork is used and good use of the body.
Take the defender up to the elbow, get your top foot over theirs, give a small nudge to create space, and lead directly out to the wing while calling for the ball.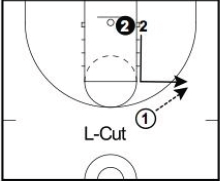
4. Curl cut
The curl cut is executing a curl around a screen.
This cut relies on the offensive player reading his defender. If the defense follows around the screen, then a curl cut is the best option to receive an open lay-up. But if the defense cheats on the screen and goes over it, then the best cut would be the next one on the list, the flare cut.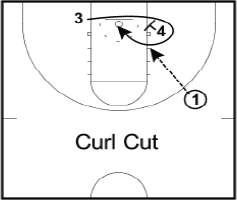
5. Flare cut
The curl cut and flare cut go hand-in-hand.
When the defender cheats on a curl and tries to cut it off, players should flare out to the corner.
6. Deep cut
A deep cut involves the player on one side of the floor to cut baseline behind everyone and to the other side.
This cut is used a lot against zone defenses because often the defense doesn’t see the player cutting if they’re pre-occupied with the ball and other players.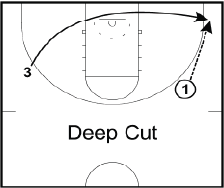
7. UCLA cut
The UCLA cut got its name because it was popularized by UCLA legendary coach John Wooden.
It involves a player at the top of the key making a pass to a perimeter player and then cutting directly to the block off a high post screen. If performed properly, this cut often leads to an open lay-up for the cutter.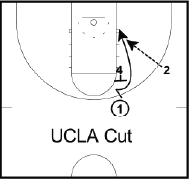
8. Front cut
The front cut involves getting on the ball-side of your opponent.
Usually this is executed by performing a jab step or a small cut behind the defense to get them to move back. Once they do, you cut in front of them closest to the ball.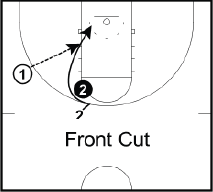
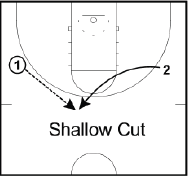
9. Shallow cut
A shallow cut is used when you’re exchanging positions with the person dribbling the ball. This means going underneath them and keeping your defender occupied while they fill the spot that you were in.
10. Flash cut
A flash cut is a quick, explosive cut made by a post player to the high post.

Exercises to teach cuts in Basketball
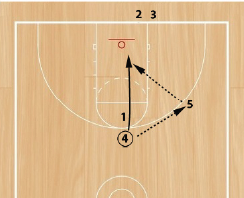
Instructions: Set up with one learner at top of key, one learner at wing, and rest of learners line up on the baseline. First learner in line has a ball and passes to 4.
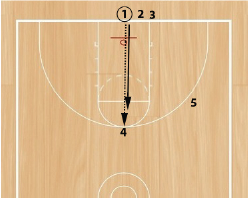
1 closes out on defence. 4 passes to 5. 1 stays and 4 reads the defence by making a face cut. 5 passes back to 4. 4 shoots the lay- up and goes to the end of the line.
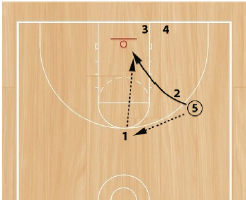
The next learner in line (2) rebounds the ball, passes to the wing (to player 5) and closes out.
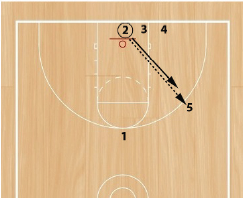
5 passes to 1. 5 reads the defence and makes a face cut toward the basket. 1 passes back to 5 and 5 makes a layup.
Progressions you can use:
Face cuts on right wing,
Backdoor cuts on right wing,
Face cuts on left wing,
Backdoor cuts on left wingPoints of emphasis
• Cut hard all the way to the basket.
• Passes should be on time so cutter can catch in stride and finish.
• Keep good spacing.
Sometimes learners will drift closer together. Make sure to go back to the correct starting points for good spacing. To help with this you can use chalks to mark starting positions.
Lesson 3: Man to man defense and playing in team adhering to rulesa. Prerequisites
Learners will learn better this lesson if they are able to use individual techniques and tactics in defence: even numbers, man to man defence but no contact, ten consecutive passes, ten consecutive passes without the other team touching the ball, dribbling and shooting applying the rules.
b. Teaching resources
Playground, whistles, basketball balls, pinnies, stopwatchc. Introduction
• Opening discussions (in a semicircle formation)
• After checking learner’s readiness, give instructions and rules of the game
• Forms groups basing on the quantity of resources available as well as on the class size.
• Discuss with learners how to maximize the use of all the available resources.
• Brief learners about basic basketball rules followed while playing
• Ask them to brainstorm some basketball rules they know
d. Lesson development
In teaching-learning process you need to:
• Form teams of equal number of learners and gender balanced.
• Start by teaching defensives drills, and then let learners play a short game adhering to basic rules of basketball.
• Guide and instruct always where necessary.
Warm-up activities
For warm-up exercises, use the activities in lesson 1 of this unit.Man to man defense
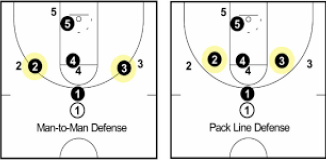
Man-to-man defense is a type of defensive tactic used in team sports, in which each player is assigned to defend and follow the movements of a single player on offense.
A screen in basketball
A screen: is a blocking move by an offensive player, by standing beside or behind a defender, to free a teammate to shoot, receive a pass, or drive in to score.
Teaching exercises for man-to-man defense
1. Slide footwork exercise
Guidelines for the exercise
• Arrange learners as shown above in the diagram. Give each learner plenty of room (space).
• The teacher, or an assistant learner, serves as the leader (dribbler). Dribble right, left, forward and backward.
• The individual learners react as if they were guarding the dribbler by moving from place to place using the slide step.The objective is to:
• Teach movement without crossing the feet.
• Encourage learners to watch the belly button of the offensive player.
• Conditions back and leg muscles to strenuous defensive play.
• To teach proper stance: one hand up to discourage shots and one hand down to deflect passes.
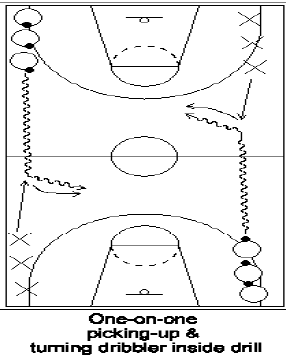
2. One defender versus the dribbler
Instructions and guidelines
• Divide the learners into an offensive group and defensive group at opposite ends of court (see the diagram above).
• The first offensive learner (dribbler) speed dribbles to the other end of the court, the other learner (defender) guards him/her until he stops, or the dribbler scores.
• Learners alternate lines.Objective
• Develop one-on-one defensive skills
• Force the dribbler to stop before he reaches his position by faking and retreating3. Forcing the dribble to break inside
Instructions and guidelines for this exercise
• Divide the learners into two groups, one on each side of the floor.
• Break each group into defensive and offensive units.
• The first dribbler starts his move
• The first defender moves out to guard the approaching offensive player.
• After each performance, learners change lines.Objective
• Forces dribbler to turn to the inside.
• Develop good footwork, stance, and a competitive defensive attitude.
Playing in team adhering to rules
Instructions/ guidelines
• Divide your learners into teams by respecting the legal number of players (5 players for each team).
• Chose referees among learners.
• Ask learner to brainstorm basketball rules and help them where necessary.
• Let them play a normal basketball game adhering to rules.
• Let other teams wait outside for 5 minutes as they cheer up those on the court
• Correct errors and encourage the learners on the court.
• Supervise focusing on how rules are respected• Enforce the application of all learnt basketball techniques (pass, dribbling, shooting and man to man defense).
• Continue to switch teams’ roles until time is over.Basketball rules for beginners
Game purpose and basics1. To shoot the basketball through the hoop as often as possible.
• Each time this happens 2 points will be added to your team’s score.
• 3 Points will be awarded if the basketball is shot from outside the three-point line.
• 1 point will be awarded if the basket is shot from the free-throw line.2. Each team has a maximum of 5 players on the court at any time. Substitutes are made by the Coach to replace players on the court. They are substituted or subbed-off. This can only be done at certain times in the game and the referee will let you know when it is OK. This can take place as often as the coach likes.
3. The team who has control of the basketball is on offence. The team without the ball is on defense. Both parts of the game are equally important. Teams on defense are trying to stop the offence from shooting a hoop. The defense should always try to stay between the basket and the players they are guarding.
4. There are two ways for the ball to be moved up the court on offence - by dribbling the ball, which is by bouncing the ball with one hand only on it, or by passing it to another of your team members. Passing is a lot faster and ensures all team members enjoy the fun of the game.
5. While stationary (not passing or dribbling) the player holding the ball must always keep one of their feet on the floor, this is called the pivot foot. Players can only lift their foot if they wish to dribble, pass or shoot the ball. The pivot foot can twist but must remain in contact with the floor and in the same place. If players move their foot / feet without dribbling, passing or shooting they are penalized and the ball given to the other team, this is called travel.
6.The ball must stay within the court of play (inside sidelines and baselines); otherwise it goes to the other team.
7. No player may contact an opposition team member; this is called a foul. If a foul takes place while a player is shooting for a basket, the shooter is given free shots from the free-throw line.
• If the basket (while being fouled) is scored, 2 points are awarded and 1 free-throw is taken.
• If the basket misses. 2 free-throws are given.
• If a player receives 5 fouls during a game they must leave the court and can take no more part in the game8. Duration: generally, in junior competition a game is made up of two halves (usually 18 or 20 minutes each half). For seniors the game is made up of two halves of 20 minutes for each half.
9. Timeouts: A time-out is an interruption of the game requested by the coach or assistant coach to talk to their players; When a timeout is called players must hurry to the sideline to talk with their coach. Each time-out shall last 1 minute.
Each team may be granted:
• 2 time-outs during the first half,
• 3 time-outs during the second half with a maximum of 2 of these time-outs in the last 2 minutes of the second half,
• 1 time-out during each extra period.
Note: Unused time-outs may not be carried over to the next half or extra period.10. Rebounding: Players should assume that every basket shot will miss. Getting possession of the ball after a missed shot is called a rebound. When 2 players get possession of the ball at the same time this is called a jump ball. A jump ball starts the beginning of a game and after half time.
Fouls and violations
Fouls
1. Personal fouls: Personal fouls include any type of illegal physical contact.
• Hitting
• Pushing
• Slapping
• Holding
• Illegal pick/screen: when an offensive player is moving. When an offensive player sticks out a limb and makes physical contact with a defender in an attempt to block the path of the defender.2. Personal foul penalties: If a player is shooting while a being fouled, then he gets two free throws if his shot doesn’t go in, but only one free throw if his shot does go in.
Three free throws are awarded if the player is fouled while shooting for a three-point goal and they miss their shot. If a player is fouled while shooting a three-point shot and makes it anyway, he is awarded one free throw. Thus, he could score four points on the play.3.Inbounds: If fouled while not shooting, the ball is given to the team the foul was committed upon. They get the ball at the nearest side or baseline, out of bounds, and have 5 seconds to pass the ball onto the court.
4. One and one: If the team committing the foul has seven or more fouls in the game, then the player who was fouled is awarded one free throw. If he makes his first shot, then he is awarded another free throw.
5.Ten or more fouls: If the team committing the foul has ten or more fouls, then the fouled player receives two free throws.
6.Charging: An offensive foul that is committed when a player pushes or runs over a defensive player. The ball is given to the team that the foul was committed upon.7.Blocking: Blocking is illegal personal contact resulting from a defender not establishing position in time to prevent an opponent’s drive to the basket.
8.Flagrant foul: Violent contact with an opponent. This includes hitting, kicking, and punching. This type of foul results in free throws plus the offense retaining possession of the ball after the free throws.
9.Intentional foul: When a player makes physical contact with another player with no reasonable effort to steal the ball. It is a judgment call for the officials.
10.Technical foul: A player or a coach can commit this type of foul. It does not involve player contact or the ball but is instead about the manners of the game. Foul language, obscenity, obscene gestures, and even arguing can be considered a technical foul, as can technical details regarding filling in the scorebook improperly or dunking during warm-ups.
Violations
1. Walking/Traveling: Taking more than a step and a half without dribbling the ball is traveling. Moving your pivot foot once you’ve stopped dribbling is traveling.2. Carrying/palming: When a player dribbles the ball with his hand too far to the side of or, sometimes, even under the ball.
3. Double Dribble: Dribbling the ball with both hands on the ball at the same time or picking up the dribble and then dribbling again is a double dribble.
4. Held ball: Occasionally, two or more opposing players will gain possession of the ball at the same time. In order to avoid a prolonged and/or violent tussle, the referee stops the action and awards the ball to one team or the other on a rotating basis.
5. Goaltending: If a defensive player interferes with a shot while it is on the way down toward the basket, while it is on the way up toward the basket after having touched the backboard, or while it’s in the cylinder above the rim, it is goaltending and the shot counts. If committed by an offensive player, it is a violation and the ball is awarded to the opposing team for a throw-in.
6. Backcourt violation: Once the offense has brought the ball across the mid-court line, they cannot go back across the line during possession. If they do, the ball is awarded to the other team to pass inbounds.
Time restrictions: A player passing the ball inbounds has five seconds to pass the ball. If he does not, then the ball is awarded to the other team. Other time restrictions include the rule that a player cannot have the ball for more than five seconds when being closely guarded and, in some states and levels, shot-clock restrictions requiring a team to attempt a shot within a given time frame.
Basic basketball players positions and their roles
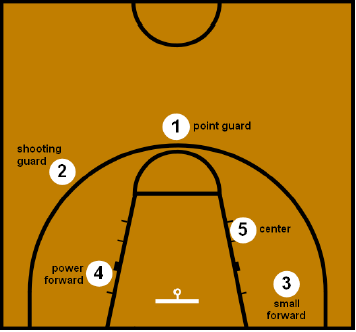
1.Centre
The centre is generally the tallest player who is positioned near the basket as he/she must be able to get up as high as possible for rebounds. He is also required to be more physically domineering with more physical strength and overall athleticism.Offensive: The centre’s goal is to get open for a pass and to shoot. They are required to block defenders, and to open other players up for driving to the basket for a goal. Centres are expected to get some offensive rebounds and put-backs.
The centre should be good at making quick jump shots, hook shots, and using the backboard on his shots.
Defensive: On defense, the centre’s main responsibility is to keep opponents from shooting by blocking shots and passes in the key area. They also are expected to get more rebounds because they’re taller.2.Power forward
The power forwards are usually the next tallest players in the team, who are closest to the centre in physical attributes and playing style, but with more speed. A forward may play under the hoop or are expected to operate in the wings and corner areas.They must be strong and comfortable with a lot of physical play and must be an effective rebounder and effective inside shooter like the centre. The power forward is also expected to shoot from further distances than the centre.
3. Small forward
The small forward is usually the shorter of the two forwards on the team. However, the small forward must have enough height and ability to play inside, and on top of that, play like the centres and power forwards, but also be able to guard.
Small forwards are also the second or third best shooters from distance of the five positions as they also play defensive roles.4.Shooting guard
The shooting guard is potentially the shortest player in the team. However, he has to be good at dribbling fast, passing and having court vision by seeing the court. He is responsible for bringing the ball down the court and setting up offensive plays.
The shooting guard is also the player who takes the most shots. He needs to be an accurate shooter from three-point range.
In terms of height, shooting guards are taller than point guards.
5. Point guard
The point guard needs to be the best ball handler, dribbler and passer as he handles the ball the most out of all the players on the team. He needs to bring the ball down the court and initiate offensive plays.
Point guards can also be the shortest player on the team as they use their intelligence and court vision to coordinate all his teammates on offense.
Point guards need to have a good long distance shooting, though it’s not quite as crucial as for shooting guards. However, some point guards take as many shots as shooting guards.e.Assessment (R-C-A discussions).
Reflection
• What is the importance of playing basketball adhering to rules?
• How long can you hold the ball without dribbling?
• What are the types of fouls in basketball?
• Can you take two steps without dribbling in basketball?
• How many seconds do you have to get the ball past half court?
• How many steps can you take for a layup in basketball?
• What is considered travelling in basketball?Connection
Recognise similarities between basketball rules and other games’ rules
Application
Apply rules of basketball in your daily sports activities.
5.5. End unit assessment
Set exercises passing, dribbling and shooting (including lay-up).
Set exercises of defending using man to man defensive tactics.
Organize a basketball match and observe these techniques in a game situation and the ability to adhere to basketball basic rules during game situation.
Observe:
• Learners’ ability to referee the match applying basic rules.
• The use of correct basketball techniques: pass, dribbling, shooting, lay-up
• Movement of learners in man to man defensive situation.
5.6. Additional information
Basketball play court and equipment
a. The play court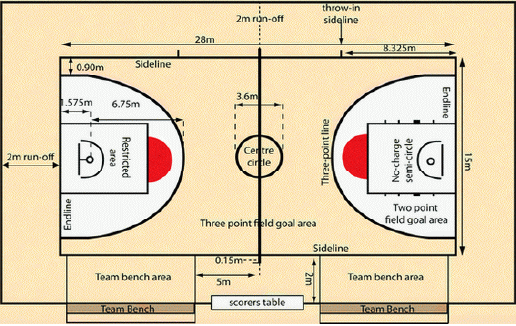
b. Equipment
The following equipment will be required:
• Backstop units, consisting of: 1) Backboards 2) Baskets comprising rings and nets 3) Backboard support structures including padding.
• Basketballs balls,
• Game clock,
• Scoreboard,
• Shot clock,
• Stopwatch or suitable (visible) device (not the game clock) for timing time-outs,
• Two separate, distinctly different and loud signals, one of each for the 1) shot clock operator, 2) scorer/timer.
• Score sheet,
• Player foul markers,
• Team foul markers,
• Alternating possession arrow,
• Playing floor,
• Playing court,
• Adequate lighting.5.7. Additional activities
As additional activities to give to your learners you need to:
• Encourage learners to actively participate in basketball training sessions organized by different coaches and private individuals in training centers.
• Encourage also learners to participate in basketball community competitions if there are any (e.g.: Kagame cup competitions, right to play, Imbuto foundation….)
• Encourage learners to participate actively in school organized competitions as well as in Sector, District and national competitions (e.g.: Inter-school’s competition organized by FRSS)
• Encourage learners to participate in all youth competitions available (e.g.: Competitions organized by FERWABA).
• Encourage learners to create local basketball competitions in their villages.