UNIT 6: MODELLING
Key unit competence: To be able to prepare clay and modelsimple object and figures.
Introductory Activity
1. Observe ceramic objects and explain the characteristics of clay.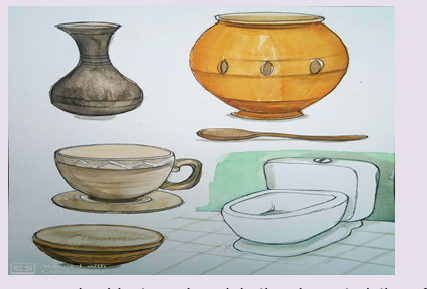
2. Following all the steps, prepare clay to be used.3. Make some ceramic object by using clay prepared.
6.1. Characteristics of clay
Activity 6.11. After observing the drawings located in introductory activity of unita. Ceramic
6, define the following concepts:
b. Clay
c. Modelingd. Sculpture
6.1.1.Definition
Ceramic
Ceramic is the art or technology of making work of art or objects of clay and
similar materials treated by firing.
Clay
Clay is an earthy material that is plastic when moist but hard when fired,
that is composed mainly of fine particles of hydrous aluminum silicates
and other minerals, and that is used for making work of art, brick, tile, and
pottery.
Modeling
This is the art of shaping an image from different soft materials such as clay.
Sculpture
Is the art of creating figures and forms in three dimensions. It also means an
art of producing statues/forms from clay, wood, stones or any other material
found usable.
6.2.1.Characteristics of clay/ Physical properties
There are three main important properties of clay:
Plasticity: This is the quality that makes clay a material that can be easily
shaped to make many forms.
Porosity: is the ability of clay to hold water and air, all clay has a lot of water
lodged in it. To reduce the water content, a chamotte/ grog is added.
Vitrification: This is the quality that makes clay products yield to high
temperature as they go through the process of firing. This makes them hard
brittle and strong.
Application activity 6.1• Discuss the three physical properties of clay.
6.2.Clay preparationActivity 6.2
Using the drawing above as a reference, discuss the steps of clay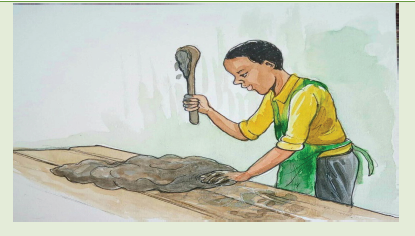
preparation
6.2.1.Steps of clay preparation
When clay is dag out from the source, and corrected with the container.
Water is added in it to make slip (porridge like structure). The slip is then
left to settle for some days, this allows the light impurities to go up and
heavy impurities go to the bottom. The big impurities such as sticks, stones,
leaves and stalks can be removing easily. It is then passage through a wire
mesh sieve to remove the remaining impurities into a basin or a bucket. It
left to stand for a few days. During this time, water corrects on top of the
clay. It poured out and then slip clay, which by now has started to solidify, is
poured out from the bucket into plastic sheeting or any appropriate slab for
maturating.
6.2.2.Preparation for use
Clay must be worked to an even consistency. This means that it should have
the right amount of moisture. This enables to be freely shaped. All the air
pockets should be removed otherwise the vessel would break during firing.
It should be homogeneous in texture.
6.2.3.Wedging
This is the process of removing air bubbles from the clay. The lump of clay is
slammed vigorously on a firm bench base. Every slam is followed by cutting
through the lump of clay using a thin wire. This allows the lodged air to
escape. Join the uncut side of the lump and slam again. This process canbe repeated as many times as possible.
After wedging process, the clay is either rolled or kneaded. This is beating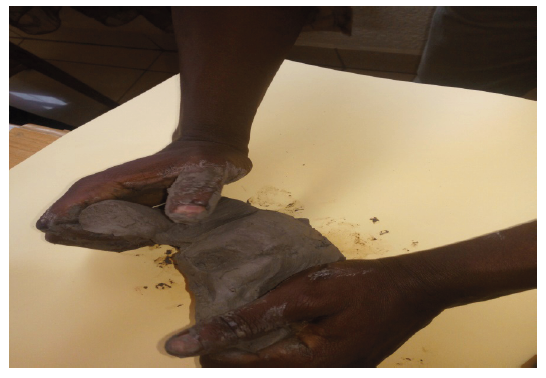
and mixing the dough of clay with both hands in the same way wheat flouris prepared for baking.
6.2.4.Storage
The storage of clay is very crucial to any work of pottery. The container in
which clay is stored should be painted, from both the outside and the inside,
if it is made of iron to prevent it from rusting. The container should then be
lined with a moistened sack before putting the clay. Clay should never be left
to dry and harden. A dampened sack should be used to cover on the clay.
The dampened sack for covering should then drip to the water to keep it wet.
This will protect the clay from drying up quickly. In case the clay dries, beat
it to make a compact block using sack. Dip it in water for a short time and
repeat the wedging process again.
Application activity 6.2
• Describe the process of wedging.• Give reasons why storage of clay is an important factor in ceramic.
6.3.Clay modeling
Activity 6.3
1. Define the following terms,
• Relief modeling
• Round modeling2. Discuss the techniques/ methods of modeling.
6.3.1.Definition
Relief modeling is done on a base. It is not free standing; it gains support
from the background. There are two main types of relief modeling:
• Low relief modeling• High relief modeling
Round modeling: it can be referred to as freestanding modeling in that, one
can turn around to view it from all directions or work around it.
Tools and materials used in modeling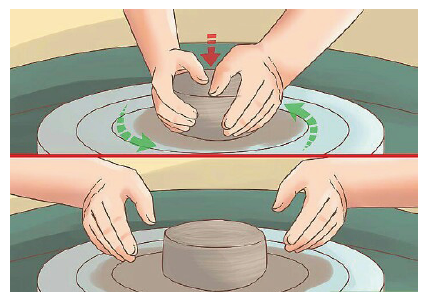
Chamois
Chamois skin is great for compressing the edges of your pottery. The skin
can also be used to smooth any pottery ware that has a rough surface.
Towels
A towel is a necessity in pottery. When you are throwing, it is ideal to wipe
your hands occasionally as well as placing the towel on your lap to avoid
ruining your clothes.
Potter’s Needles
Potter’s needles are long heavy needles set into wooden, metal or plastic
handles are one of the most versatile tools in pottery. They are used to trim
the top of your pottery ware while it is on the wheel. The needles are also
used for scoring slabs of clay.
Cut-Off Wires
Cut-off wires have a wooden handle on each end; and are used to cut large
clumps of clay. The wire also helps to remove any excess clay that remainson the wheel.
Scrappers and Ribs
These two tools are excellent for smoothing pottery ware and shaping them
while they are on the wheel.
Fettling Knives
This particular type of a knife is used to cut slabs of clay or to remove the
fettle of your pottery ware. The fettle is the small ridge of material that is left
where the pieces of the mold join together.
Ribbon Tools
Ribbon tools are great for trimming any green-ware. It also helps in hand
building your ceramic ware. Although these tools work great for trimming,
they are too fragile to be used during the throwing process.
Wooden Modeling Tools
These particular tools are also ideal for any hand-building projects. They
also work in trimming process.
Calipers
Calipers are used to measure the inner and outer dimensions of pottery
ware. This comes in handy for projects such as jars and saucers.
Box
Having a box to carry all of your pottery tools is ideal for anyone that is taking
pottery classes or teaching classes is different areas. It is worth including
some accessories such as transfers for ceramics or ceramic decals, which
will improve the decorative value of your projects.
6.3.2.Modeling methods
Pinching method: A lump of clay is molded into a ball in the hands. A
groove/ hole is created in the middle of the ball using the thumb. Pinching is
then done to form the walls by rotating a lump of clay. (The article is shaped
as the ball is pressed in a pinching motion). The technique is also called
thumb method.
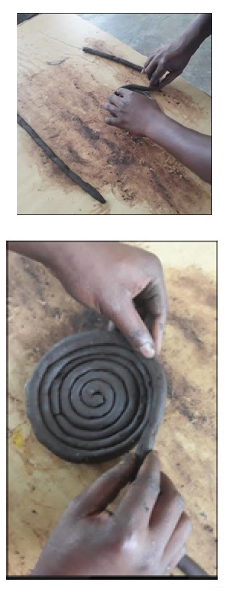
Coiling: There are many ways to build ceramic objects using the coiling
technique. To do this, the potter takes clay, rolls it until it forms a long roll.Then, by placing one coil on top of another to form different shapes.
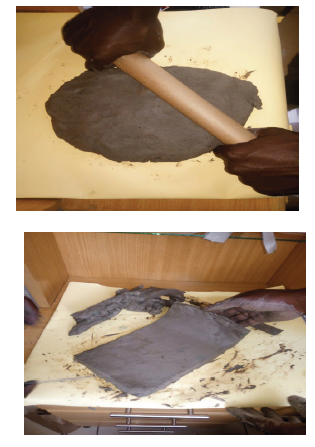
Slab method: Slabs of clay are prepared and then pressed together to make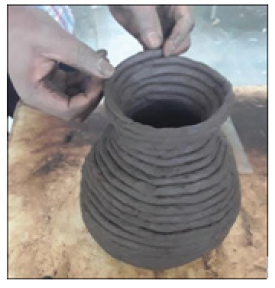
articles such as a jug, pot… a slab is a flat piece of clay rolled out using
rolling pin or bottles or simply even by pressing between hands. Slabs are
cut to required shapes. To join then, scratches are made and slip is applied.The slabs are then pressed to fix.
Ball: Ceramic balls are manufactured by pressing a ceramic powder binder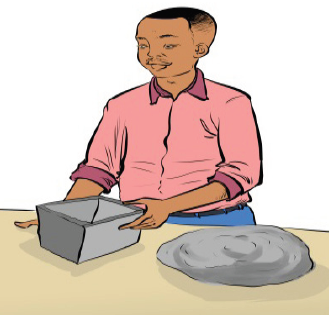
mixture in a perform shape. After the ball is sintered, the part lines areremoved via finish-grinding.
6.3.3.Modeling process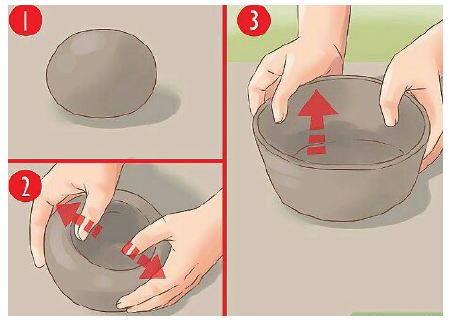
• Make research on some object you wish to model.
• Make sketches for an object researched on
• Look for suitable row materials
• Prepare tools, materials and surface.
• Choose method you wish to use for example, pinching method
• Prepare the work place/ surface
• Take a ball of well wedged clay and place it on the bench
• Make a well-rounded ball of clay using your hands
• Holding the lump between your fingers, press in the thumb from top of
the ball of clay
• Turn it round slightly sliding the ball on the surface as the thumbs work
from the inside
• Dampen the hands with water continue to work until the right thickness
of vase walls is achieved
• Flatten any threading crack
• When the work is finished, use a flattening tool to cut away any
unnecessary edges on the vase• Put the vase under the shade and wait for it to dry.
Application activity 6.3
• What is the process of making a simple clay object?• Using clay, model domestic objects.
End unit assessment 6
1. Describe the methods that can be used in modeling.
2. Using prepared clay, make flowerpot / vase, decorate it with motifs,and pattern designs.