UNIT 1 : SOIL
Key Unit Competence:
Learners should be able to identify types, causes, factors, effects of soil erosion and carry out soil conservation practices.
1.1 Learning Objectives
(i) Knowledge and understanding
• Define soil erosion.
• State types of soil erosion.
• Differentiate causes of soil erosion.
• Name factors affecting soil erosion.
• Determine effects of soil erosion
• Name factors affecting soil exhaustion.
• Describe environment conservation measures.
• Carry out environment conservation measures.
(ii) Skills
• Recognise the meaning of soil erosion.
• Compare types of soil erosion.
• Examine causes of soil erosion.
• Recognise factors affecting soil erosion point.
• Point out soils affected by erosion.
• Recognise factors affecting soil exhaustion.
• Perceive various measures of environment, protection and conservation.
• Practise various measures of environment protection and conservation.
(iii) Attitudes and values
• Show concern of eroded soil.
• Agree on types of soil with group members.
• Participate actively in group discussion.
• Listen carefully to his/her colleagues notice on effects of soil erosion.
• Appreciate the importance of environment conservation.
• Show awareness and interest about protected environment.
Introduction
This unit addresses the problems brought about by soil erosion and how it can be controlled when carrying out farming practices. A farmer of GAKENKE District has grown maize crop on 1 ha soil as shown on the following photo.
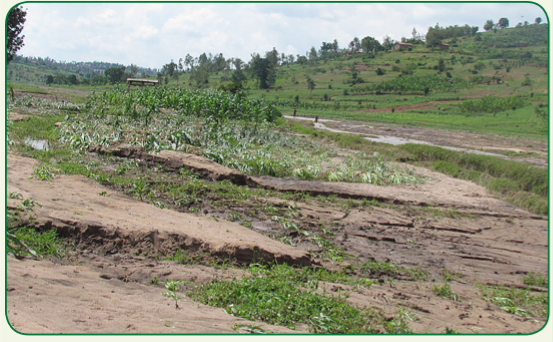
When the rainfall fell, all the crops were washed away to the hillside and consequently the production went down. The farmer calls up on you for help. Analyse the photo and identify the problem that may have occurred on the field. Propose possible solutions to the problem.
1.2. Soil erosion definition
Activity 1 1.1: Research activity to find out the meaning of soil erosion
Using the references provided, carry out the following activities:
(i) Find out the meaning of soil erosion from the internet, library books, textbooks and video shows.
(ii) Discuss and record your findings.
(iii) Present your findings to the class.
(iv) Take teacher’s summary notes.
Soil erosion is defined as the gradual removal of the soil particles and their movement from one place to another. It occurs naturally but can be accelerated by human activities. The soil particles are first detached from the ground and then carried away by different agents. Bare land is easily eroded than vegetated land.
1.3 Types of soil erosion
Activity 1 1.2: Field visit in the school compound or hill side environment to observe and find out signs of erosion in the area
Make a visit to the school compound or hill side environment and carry out the following activities:
(i) Find out the signs of erosion in the area.
(ii) Identify the types of erosion and types of soils eroded in the area.
(iii) Discuss and record your findings.
(iv) Present your findings to the class.
(v) Take teacher’s summary notes.
The following are types of soil erosion:
• Splash erosion • Gully erosion
• Sheet erosion • Soil exhaustion
• Rill erosion
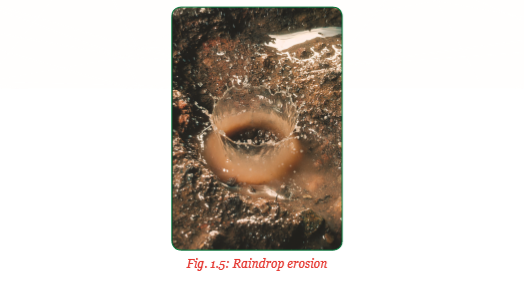
(a) Splash erosion – It is also known as raindrop erosion. It is as a result of soil splashing from the impact of water drops directly on the soil particles. The drops strike bare soil with high impact and splash the soil particles laterally. In addition, the falling raindrops also keep fine materials and plant nutrients in suspension to be easily removed by run-off.

(b) Sheet erosion – This is a type of erosion whereby a thin layer of top soil is removed uniformly by agents of soil erosion. It occurs after heavy downpours are experienced on a piece of land which is bare or recently cultivated. The loose layer of the soil is carried away into the lower areas, valleys or rivers.

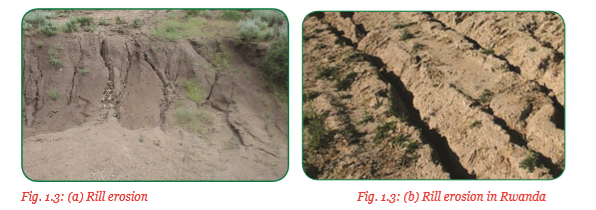
(c) Rill erosion – This is a type of erosion which occurs where continuous sheet erosion has taken place, forcing water to make small shallow channels as it flows down. The rills direct the water down the slope, carrying soil particles with it. Rill erosion takes place on a newly cultivated piece of land in case rain falls immediately after cultivation.
(d) Gully erosion – Gullies are long deep ditches with steep sides which are formed as a result of heavy soil erosion taking place for a long time. They form where continuous flow of water in rills has taken place, carrying away large quantities of soil. When rills become enlarged, they form gullies. Gully formation takes place systematically as follows:
(i) Water moves down bare land.
(ii) Rills are formed.
(iii) Widening and deepening of the rills through continuous erosion to form channels.
(iv) The channels are further widened and deepened at the base to form gullies.
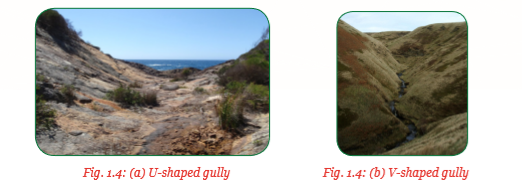
Newly formed gullies are usually V- shaped, with a wide surface and a narrow bottom. However, where gully erosion has taken place for a long time and the soil is removed “top- bottom” in a uniform way, a U-shaped gully results. V-shaped gullies form where the soil is loose alternating with hard un-weathered rocks. U-shaped gullies are found where there is uniform type of soil.
(e) Soil exhaustion – This is a condition whereby the nutrients in the soil have been removed for plant use at a higher rate than they are replaced. This makes the soil to have below optimum levels of nutrients to support plant growth. Soil that is exhausted of nutrients is loose and pliable. The soil structure cannot hold particles together hence soil particles are easily moved by erosive agents.
1.4 Causes or agents of soil erosion
Activity 1 1.3: A field visit to the school compound or the environment to observe and identify causes of soil erosion
Make a field visit to either the school compound or the area around the school and carry out the following activities:
(i) Observe and identify different types of soil erosion in the area.
(ii) Find out the agents that may have caused the type of soil erosion identified.
(iii) Discuss and record your findings.
(iv) Present your findings to the class.
(v) Take teacher’s summary notes.
Soil erosion is the most devastating process that cause land degradation worldwide. It is caused by moving water, animals and poor human activities. It leads to desertification, loss of life, water and farming land. Soil erosion should be controlled when carrying out all types of farming.
There are many factors that operate together to cause soil erosion. These factors are referred to as the agents of soil erosion.
They include:
• Moving water
• Wind
• Animals
• Human activities
(a) Moving water
Moving water is the main agent of soil erosion in Rwanda. This is so especially in arable hilly areas with high rainfall. Erosion caused by water means the removal of the surface soil due to the action of moving water over the surface. As the rain falls, what appears first is the action of the raindrops and then the run-off. Kinetic energy is used in these types of erosion.
(i) Raindrop/splash erosion:
When the raindrop moves soil directly, it causes splash erosion. Soil erosion occurs when the falling drops hit the soil and splash. The soil surface is destroyed, breaking up the soil crumbs and causing capping on the soil surface. The effects of the raindrop action which are important in this erosion are:
• Flattening effect on the soil.
• Movement of soil downhill.
• Breakdown of the soil particles which may reduce the nutrient holding capacity of the soil.
• Reduction in infiltration rate of the rain water. Fast falling raindrops tend to bounce off the soil surface rather than penetrate into it. Capping also reduces water penetration.
(ii) Surface run-off: This is also known as overland flow. It is the flow of water that occurs when excess storm water flows over the land surface. It may occur due to any of the following:
• Soil may be fully saturated.
• Rainfall may fall so fast that the soil has no time to absorb it.
• The hard rock is too close to the surface such that the shallow soil cannot absorb the water.
A land area producing run-off which drains to a common outflow point is called a watershed. Moving water also picks up and carries rocks and other physical materials which may also accelerate the rate of soil erosion.

(b) Wind erosion
This erosion is a problem in flat, bare dry areas with sandy soils or where soil is loose, dry and finely granulated. Wind erosion involves the detachment, transportation and deposition of the soil particles by wind. Loose sandy soils with a poor soil structure are most likely to be eroded by wind. Low rainfall causes lack of vegetative cover.
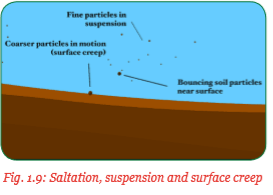
Vegetation that barely grow has poor rooting system which cannot hold the soil particles together. Wind velocity causes the soil to move depending on the size of the particle. Some particles move by saltation, others by suspension while others just creep on the surface.
(i) Saltation: This type of erosion moves a big fraction of the soil. Fine soil particles are lifted into the air and drift horizontally across the surface. They cause surface damage and where vegetation exists, it is also damaged by uprooting. Soil particles moved through saltation, keep on bouncing back on the ground knocking off other particles.
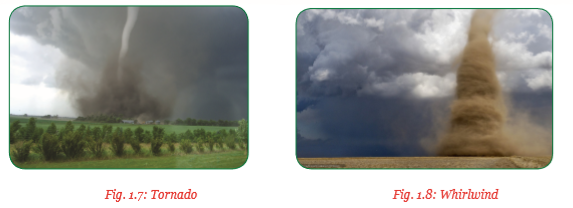
(ii) Suspension: Occurs when fine dust are lifted above the ground by wind. They collide into each other in the air and break further. This makes it easy for them to be carried to extremely long distances. It is the most spectacular form of wind erosion such as whirlwind and tornadoes as shown in figures 1.7 and 1.8.
(iii) Creep: Large soil particles which are too heavy to be lifted by the wind are moved through surface creep. This is the process whereby soil particles roll across the surface after hitting particles in saltation.
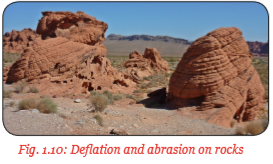
Wind generally causes erosion by deflation and abrasion:
• Wind abrasion – This is the process of erosion produced by the suspended particles that impact on soil objects. Wind-blown particles that move at high speed wears away rocks by abrasion.
• Wind deflation – Wind causes the lifting and transporting of lighter particles from a dry soil, leaving behind a surface of coarse grained sand and rocks. These are then deposited in another place.
(c) Animals
Animals of all sizes contribute to the process of soil erosion as follows:
(i) Animals that live on the ground, break up the soil, dig tunnels and move the soil around. This makes the soil more susceptible to water and wind erosion.
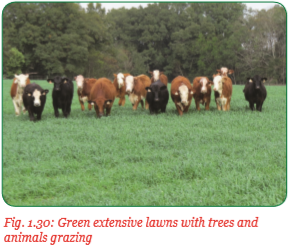
(ii) Grazing stock animals such as cattle, sheep and goats, pull out entire plants and roots causing barrenness of land.
(iii) Large animals with heavy hooves and feet such as camels, cattle and horses. Their impact cause soil compaction which prevents water absorption and run-off.
(iv) Pigs and hogs dig out roots and tubers, exposing the soil to rain and water.
(d) Human activities
The largest problem of soil erosion is created by human beings through activities such as:
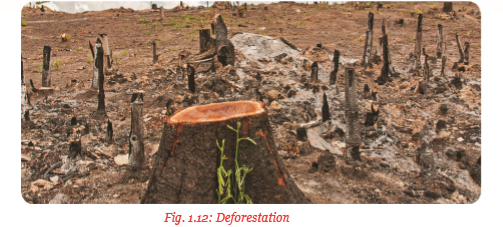
• Deforestation.
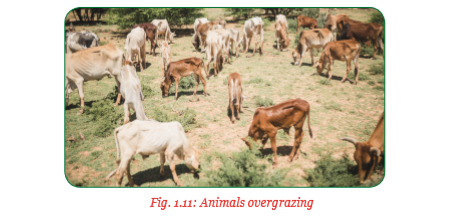
• Overgrazing.
• Poor methods of farming.
• Diversion of natural drainage courses.
• Wrong orientation of structures such as roads, railways, embankment and bridges.
(i) Deforestation – This is brought about by indiscriminate cutting down of trees for fuel or to create farming land. Roots of trees bind the soil particles and regulate the flow of water. Thus when they are removed, soil erosion takes place.
(ii) Overgrazing – Forests and grasslands provide fodder needed for animals. There is plenty of forage during the rainy seasons. However, during drought, there is great shortage, making animals to graze to the ground and uproot the plants. This leads to destruction of the structure of the soil. Moreover, the grazing animals pulverise the soil with their hoofs making it easy to be eroded.
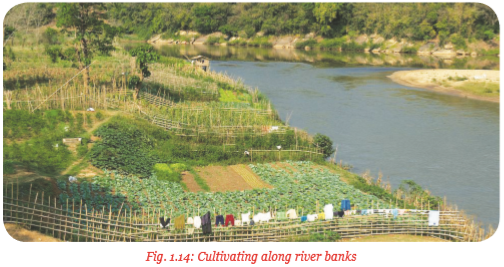
(iii) Poor methods of farming – These include wrong ploughing such as along the slope, poor cropping systems and indiscriminate cultivation near the river banks.
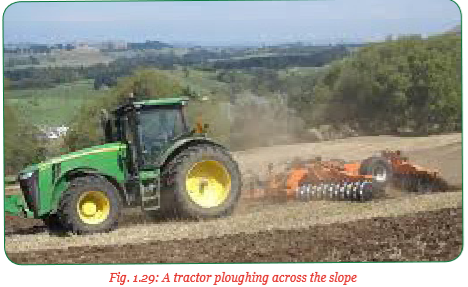
• Ploughing along the slopes: This means ploughing up and down a slope. It makes it easy for the run-off to flow down the slope at a high speed, carrying soil along with it. The furrows created by the plough directs water downslope with high velocity. Under good farming practices, ploughing should be done across the slope. This produces ridges and furrows that hold water longer thus increasing water infiltration into the ploughed land. Consequently, this will check soil erosion.
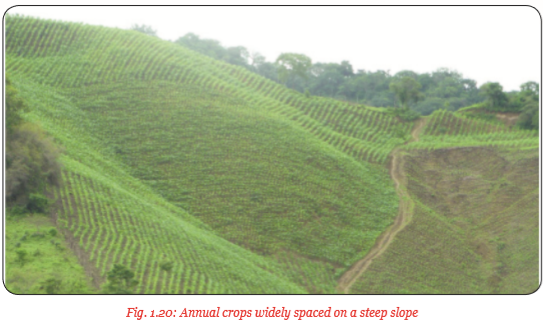
• Poor cropping systems: Poor cropping systems such as planting annual crops on slope areas, lack of crop rotation, late planting, use of wide spacing or wrong spacing, excessive cultivation and over-irrigation. All these are poor practices and reduce the ground cover exposing the soil to agents of soil erosion.
• Cultivating along river banks: This causes river bank erosion, a type of erosion which occurs along the sides of the river. It widens and deepens the river thus reducing the potential size of land for cultivation.
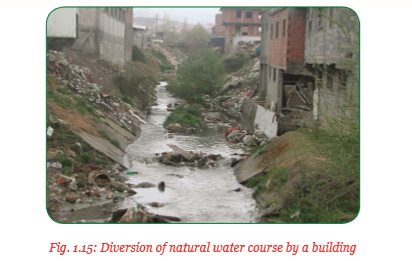
(iv) Diversion of natural drainage courses – Man-made constructions such as ditches, drains or streams obstruct the natural water courses. This can be either through intentional or negligent diversion of the natural water courses, excess surface water run-off from paved or covered land areas, damage or collapse of existing drainage systems and over-development of land without proper drainage. This causes soil erosion, deposition and flooding.
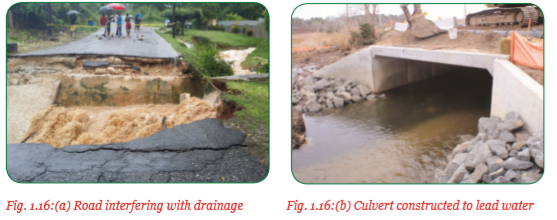
(v) Wrong orientation of infrastructure – These structures include roads, railways, bridges and embankment. They cause soil erosion when the drainage of these infrastructure conflict with the drainage systems of the adjacent farmlands. Well designed systems of side drains and culverts should be installed to lead water from these structures.
1.5 Factors affecting soil erosion
Activity 1 1.4: Research activity to find out the factors affecting soil erosion
Using the references provided, carry out the following activities:
(i) Find out the factors affecting soil erosion.
(ii) Discuss and record your findings.
(iii) Present your findings to the class.
(iv) Take teacher’s summary notes.
The following are the factors that affect soil erosion:
• Rainfall
• Topography/relief
• Vegetation cover
• Nature and type of vegetation
• Nature and type of soil
• Farming practices
• Wind velocity
(a) Rainfall – Rainfall is one of the most important factors affecting soil erosion. The most important rainfall aspect that affect soil erosion is intensity. Rainfall intensity is the amount of rainfall that falls in an area per unit time. It affects the energy of the raindrop and the speed of water runoff. This in turn accelerates erosion. This effect is especially experienced in areas without vegetation.

(b) Topography – This is also known as relief or the slope of land. It affects the speed at which water run-off takes place. Soil erosion in steep areas is more pronounced than in gentle areas. As the speed of water increases, it becomes more forceful and erosive.
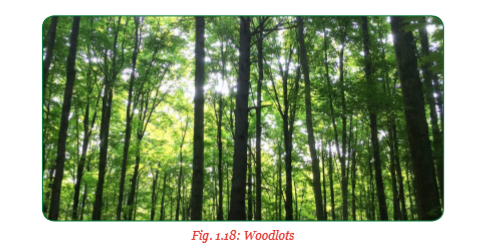
(c) Nature and type of vegetation cover – Wherever there is enough rainfall for vegetation to grow, the soil is naturally covered with a protective layer. This cover may include grassland, woodland or shrubs which absorb the force of heavy rain storms and strong winds and allows the rain water to soak down into the soil. It then percolates slowly into the sub-soil. Forests on steep slopes are particularly important for protection of the catchment or watersheds which provide water supply. Organic matter supply from decomposted leaves, roots and crop residues help to maintain good soil structure and porosity which prevents water run-off.
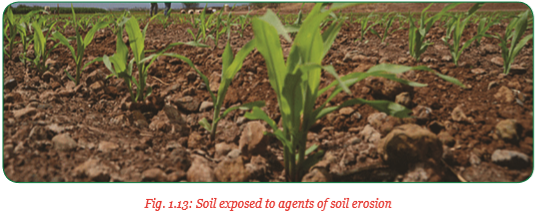
(d) Nature and type of soil – Some soils are more easily erodable than others. Soil resistance to erosion is based on its physical characteristics. Soils with high level of organic matter and good structure are resistant to erosion. Fine sandy and silty soils are easily eroded as shown in figure 1.19.

(e) Farming practices – Farming practices such as planting of annual crops on steep slopes, clean weeding, burning of land, excessive cultivation either expose the soil to agents of soil erosion or destroy the soil structure. Destroyed soil structure cannot be able to absorb water and resist run-off.
(f) Wind velocity – Wind is air in motion. Velocity refers to the speed of wind blowing over a particular area per hour. Wind velocity of 21 kilometres per hour at 30 cm above the ground is capable of moving small amounts of soil. However, if wind velocity increases, then it can move large branches of trees as well as clouds of dust.
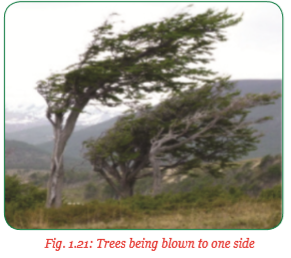
Wind of high velocity can be disastrous when it blows over bare land with loose dry soil particles. The soil moved is then deposited into water masses thus creating water pollution, sedimentation and reduced volume of stored water.
1.6 Effects of soil erosion
Activity 1 1.5: Video show and research activity to find out the effects of soil erosion
Watch a video show on eroded areas in Rwanda and then carry out the following activities:
(i) Find out the areas which are mostly affected by soil erosion in Rwanda.
(ii) From the video show, identify the various effects of soil erosion.
(iii) Discuss and record your findings.
(iv) Present your findings to the class.
(v) Take teacher’s summary notes.
Soil erosion has the following effects:
• Desertification
• Loss of soil fertility
(a) Desertification – It is a process of land degradation by which land becomes progressively drier and eventually drifts into a desert. This describes the human and climatic processes which reduce biological activities to a point where desert-like conditions prevail. Land that was productive biologically is transformed into a wasteland. Desertification is as a result of deforestation, drought or inappropriate farming activities. Soil erosion by wind and water, carry away top fertile soil leaving a mixture of dust and sand which is highly infertile.
The result of desertification is mass migration. When rural land is unable to support the local population, people are forced to move elsewhere, usually in urban areas.
(b) Loss of soil fertility – Soils lose fertility when the qualities that support plant growth are no longer there. This is through:
(i) Loss of essential nutrients for growth: This loss can either be through plant removal or through soil erosion and leaching.
(ii) Loss of organic matter: Organic matter provides many benefits to the soil which include increasing water holding capacity, maintaining soil structure, ability to hold nutrients until plants require them and increases water permeability.
(iii) Loss of soil structure: The granular crumb-like structure of the top soil is desirable for good plant growth. Good soil structure allows air and water to penetrate easily and allows roots penetration.
1.7 Factors causing soil exhaustion
Activity 1 1.6: Research activity to find out factors that cause soil exhaustion
Using the references provided, carry out the following activities:
(i) Find out the factors that cause soil exhaustion.
(ii) Discuss and record your findings.
(iii) Present your findings to the class.
(iv) Take teacher’s summary notes.
Soil exhaustion is caused by the following factors:
• Overcropping
• Leaching
• Overgrazing
• Burning of plants
(a) Overcropping – This is the practice of growing a crop on a piece of land continuously without resting the land. Every time the crops are harvested, they remove large quantities of soil nutrients. These nutrients are not replaced before the next cropping as a result of which the soil becomes exhausted.
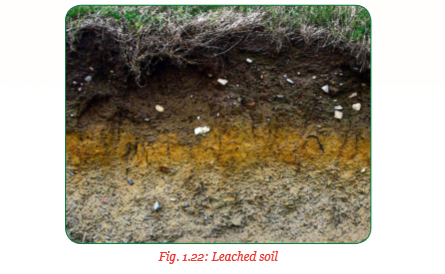
(b) Leaching – This is the movement of soluble plant nutrients vertically from the top soil to the lower horizons of the soil where plant roots cannot get them. It takes place when water dissolves the mineral salts and move down through soils which is excessively drained. The soil is left infertile as shown in figure 1.22.
(c) Overgrazing – This is where animals are kept in larger numbers than a piece of land can support resulting to overgrazing. Animals eat all vegetation and uproot the maintenance foliage. Maintenance foliage is the lowest level of grass or legume species that should be left holding onto the ground after the animals remove the rest through grazing. It helps the pasture or foliage to recover after the rains. When the maintenance foliage is removed, land is left bare and run-off increases after a heavy downpour. This leads to soil erosion. The top fertile soil is removed and the land which was productive becomes barren

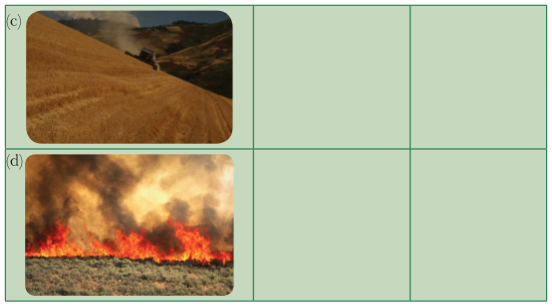
(d) Burning of plants – When the vegetation that serves as a soil protective cover is burned, the soil is exposed to agents of erosion. Organic matter is destroyed leading to destruction of soil structure. The ash accumulation formed after burning causes nutrients imbalance in the soil. This prevents absorption of other nutrients. Microbial activities such as nitrogen fixation and decomposition are interfered with due to death of organisms. Such soils become infertile as illustrated in figure 1.24 below.

Exercise 1.1
The photographs in table 1.1 show different practices that lead to loss of soil fertility. Study them carefully and then name each of the practice illustrated and state the damage it produces on the soil.

Soil exhaustion can be prevented through use of good farming practices such as:
(i) Crop rotation – This is the growing of different types of crops or crops of different families on the same piece of land in an orderly sequence. This sequencing is made possible by dividing a piece of land into plots. In each plot, different crops are grown in particular seasons.
Exercise 1.2
Table 1.2 shows a list of crops grown in season one on a piece of land divided into four plots A, B, C and D. Study the table and then draw another table that indicate the types of crops to be grown on each plot in the subsequent season. Table 1.2 shows types of crops grown in four plots in season one.

Crop rotation helps in maximisation of soil nutrients. It also improves soil fertility and controls soil erosion by improving the soil structure.
(ii) Adding fertilisers – Fertilisers are materials that contain plant nutrients in form of elements. They can be chemical substances known as inorganic fertilisers or decomposed organic matter referred to as manures. They are added to the soil to replace the exhausted soil nutrients thus restoring fertility.

(iii) Mixed cropping – This is the growing of two or more crops in the same piece of land but on separate plots or sections at the same time. It facilitates crop rotation and helps restore soil fertility.

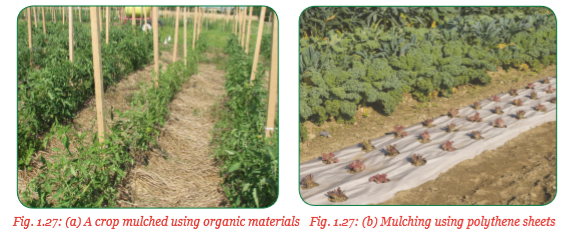
(iv) Mulching – This is provision of protective materials on the surface of the soil. These materials can be organic such as crop residues or inorganic such as black polythene sheets. The mulches protect the soil from the impact of the raindrop and run-off. They also control weeds thus preventing soil exhaustion as shown in figure 1.27 (a) and (b).
(v) Weeding – This is the removal of weeds from a piece of land where crops are growing. Weeds are plants which grow where they are not needed. They impose competition for nutrients with the growing crops hence exhaust the soil. They are removed by slashing, uprooting, mulching or use of herbicides depending on the type.
(vi) Avoiding overgrazing – Overgrazing reduces ground cover and makes the soil to be vulnerable to the soil erosion agents. It also overstretches the use of soil nutrients by pastures and other foliage taken up by animals. These nutrients should be replaced.
1.8 Prevention methods of soil erosion
Activity 1 1.7: A field visit to the hillside to observe prevention methods of soil erosion
Visit a hillside to observe prevention methods of soil and carry out the following activities:
(i) Observe the prevention methods of soil erosion carried out on the hillside
(ii) Identify prevention methods of soil erosion observed.
(iii) Discuss and record your findings.
(iv) Present your findings to the class.
(v) Take teacher's summary notes.
Prevention methods of soil erosion include the following:
• Mulching
• Reforestation
• Terracing
• Contour ploughing
• Strip cropping
• Cover cropping
• Reduction of grazing
(a) Mulching – This involves the provision of protective materials over the soil surface to prevent soil erosion. These materials can be obtained from plants such as grass, leaves and twigs. They can also be obtained from artificially provided materials such as black polythene sheets. Mulches prevent agents of erosion from detaching soil particles and transporting them away.
(b) Reforestation – This is the practice of planting trees on farm land where they have been cut down. Trees help to intercept the raindrops, reducing their erosive force, their roots hold the soil particles together making them able to resist removal by water or wind. They also provide wind breaks reducing the spread of wind and its erosivity. Leaves shed off by trees decompose to humus which improves the soil structure thus increasing water infiltration.
(c) Terracing – This is a mechanical method of preventing soil erosion where the slope of land is modified into a series of successively flat surfaces to minimise the slope and therefore the speed of water flow or interupting the course of water flow preventing erosion.
(d) Contour ploughing – This is ploughing across the slope of the land. The furrows made while ploughing reduces the speed of runoff thus reducing its erosive power. The soil in the runoff is deposited into the furrows.
(e) Strip cropping – It is a method of farming which involves planting of different crops into alternate strips. The crop types are alternated in terms of their nature of foliage, root type and depth and the size of the plants. This makes the plants utilise different nutrients from the soil and covering of the soil surface thus preventing soil erosion.
(f) Cover cropping – This involves the establishment of a crop that spread out on the surface of the soil to provide it with a cover. The crop helps to control soil erosion by preventing the movement of soil and the impact of the rain drops. Crops used as cover crops include sweet potatoes, spreading varieties of beans, lucerne desmodium and grasses.
(g) Reduction of grazing – Grazing is reduced by keeping the correct number of animals in a given piece of pasture land. Animals get enough pasture from this area and leave enough foliage to protect the soil against erosive agents thus preventing erosion.
1.9 Various measures for soil conservation
Activity 1 1.8: A field visit to observe hill sides protected against erosion and to identify cultural measures of soil conservation
Visit hill sides protected against soil erosion and carry out the following activities:
(i) Observe the hill sides protected against soil erosion.
(ii) Identify the protective measures used against soil erosion.
(iii) Discuss and record your findings.
(iv) Present your findings to the class.
(v) Take teacher’s summary notes.
Soil conservation measures are divided into two categories:
• Cultural measures
• Mechanical measures
(a) Cultural measures – These are farming practices which help to minimise soil erosion. They aim at maintaining soil fertility and soil structure. Cultural measures of soil conservation are methods of farming that are sustainable to the environment. Sustainable farming means production of food, plants and animal products using farming techniques that are beneficial to the environment. They preserve the soil and are economically beneficial. They include:
(i) Strip cropping – This practice is also called contour strip cropping. It is the growing of crops in alternate strips of the land. It is applicable where grass is grown in rotation with annual food crops. For example, maize can be grown with grass in rotational strips. When water from the maize strip reaches the grass strip, it is distributed through the grass and infiltrates into the soil, leaving the eroded soil behind.

(ii) Contour farming – This means that all the farming operations such as ploughing, planting, ridging and weeding are carried out along the contours. Ploughing up and down the slope creates lines which guides flowing water to move faster downslope initiating rill erosion. In contour ploughing and planting, the lines or ridges created hold the water, thus preventing rill erosion.
(iii) Permanent pasture – A pasture is a piece of land on which grass or legume species of plants are maintained for the purpose of grazing animals. The grasses or legume can be mixed or pure stands. Grasses have numerous fibrous roots that help to hold the soil particles together. They spread very quickly providing a good ground cover against splash erosion.
Legumes on the other hand have deep taproot and numerous fibrous roots which hold soil together. Their nitrogen fixing ability help to enrich the soil with nutrients which ensure continuous growth of vegetative cover to prevent soil erosion.
(iv) Windbreaks – A windbreak is a row of trees planted perpendicularly to the prevailing direction of strong winds. The trees should be spaced at 1.5 m – 3 m from each other. Windbreaks protect both the windward side (the side where the wind is blowing from) and the leeward side (the side where the wind is blowing to).

Windbreak trees such as Eucalyptus, Hakea saligna and Grevillea spp. should be planted in long and continuous rows without gaps. However, windbreak trees should not form a dense wall to prevent the shadding effects on crops on the leeward side.
Also, when the wind is blocked, it creates turbulence on the crops to be protected. Blocking the wind creates strong air currents that damage crops and cause soil erosion as shown in figure 1.32 (a) and (b).
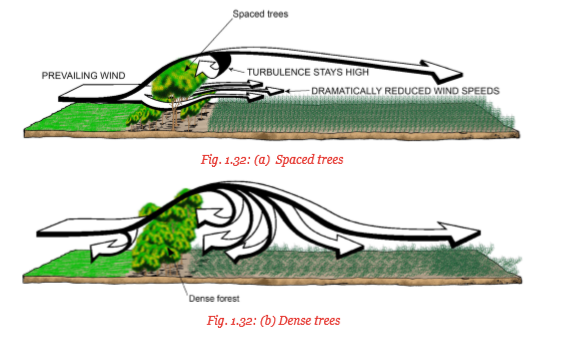
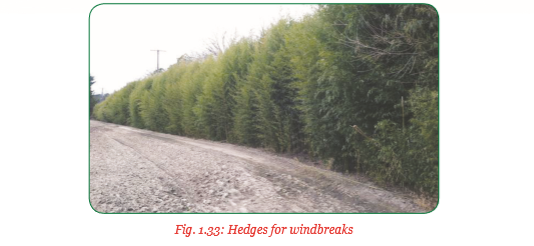
The distance from one windbreak to another should be 15 – 20 times the height of the trees. Smaller trees or shrubs planted to form a hedge on both windward and leeward sides are also effective.
Windbreaks reduce the speed of wind thus causing deposition of soil eroded elsewhere. They act as shelter belts decreasing the rate of evapotranspiration of the crops protected.
(v) Afforestation and reafforestation – Afforestation is the practice of planting trees in an area where they have never been planted. Reafforestation on the other hand is the practice of planting trees where they have been cut down. Afforestation also entails establishing forests in the slopy areas of the country. Rwanda is a mountainous country and, therefore, a forest cover of more than 10% as dictated by the international agreement need not be overemphasised.

Trees are important in soil conservation and in the rehabilitation of eroded areas. They help in the following ways:
• Maintain a favourable climate.
• Prevent or reduce wind erosion.
• Provide favourable conditions for the recycling of nutrients in the soil.
• Add humus and nitrogen to the soil, thus improving soil structure and fertility.
• Produce buds, leaves and fruits used by human and livestock as food.
• Provide ideal environment for wildlife.
• Carry flowers that are the main source of honey.
• Provide timber and timber products.
• Increase the value of a particular piece of land.
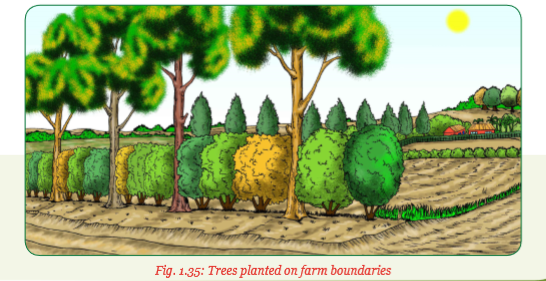
Trees may also be established and integrated with other cultivated crops. This practice is referred to as agroforestry. In this case, trees are planted in the following areas:
• Parts of the farm not suitable for crops, for example, the steep or sloppy areas.
• Eroded areas which include the gullies to rehabilitate them.
• On river banks to reduce river bank erosion.
• Along cut-off drains and terraces.
• As windbreakers, and as the farm boundaries as shown in figure 1.35.
(vi) Cover cropping – This involves the establishment of a crop that spreads out over the surface of the soil to provide it with protection. Cover crops help to control soil erosion by preventing the movement of soil and the impact of the raindrop. They also prevent the soil from being baked hard by the sun thus preserving soil moisture and volatile soil nutrients. Crops used as cover crops include sweet potatoes, spreading varieties of beans, lucerne, desmodium, grasses, among others.

Other cultural methods of soil conservation include:
• Crop rotation
• Mixed cropping
• Mulching
• Reduction of grazing
(b) Mechanical methods of soil conservation
Activity 1 1.9: A field visit to observe and identify mechanical methods of soil conservation
(i) Observe how the following mechanical constructions have been done; bench terraces, ridges, graded bunds, diversion channels (ditches), antierosive ditches and stone lines.(ii) Discuss and record your findings.
(iii) Present your findings to the class.
(iv) Take teacher’s summary notes.
Mechanical or physical methods of soil erosion control involve earth-moving and soil shaping to produce the desired structures such as terraces, ridges, graded bunds, diversion channels, anti erosive ditches and stone lines.
They concentrate water in an artificial channel, that is, in one area if not well constructed, therefore, they may fail to work. They should be designed correctly, constructed properly and maintained always.
Construction works
Most of the structures for controlling soil erosion are constructed along the contours. Therefore, their construction starts with establishing the contour lines.
Contour lines run horizontally across a slope jointing points of the same elevation. These lines are important for certain soil conservation measures such as contour planting, terracing or making contour ridges.
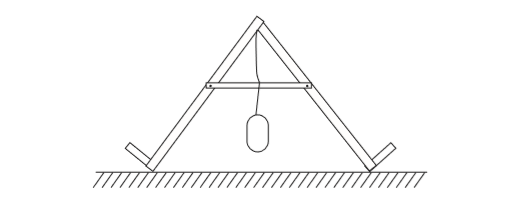
Before planting on the contour line or making a contour ridge, it is important to ascertain and mark the contour lines. This can be done simply by using:
(i) An A-frame
(ii) Transparent water hose level
Activity 1 1.10: A practical activity of making and using an A-frame and a transparent water hose level to mark the contour lines on a sloppy piece of land
Using the materials provided, carry out the following activities:
(i) Make an A-frame and a transparent water hose level.
(ii) Use an A-frame and the transparent water hose level to mark on the contour lines using wooden pegs.
(iii) Discuss and record your findings.
(iv) Present your findings to class.
(v) Take teacher’s summary notes.
Procedure for making an A-frame
1. Drill a hole on end piece of 2 m wood at the top end at exactly the same point.
2. Place the 2 pieces of wood together to form an inverted V- shape and screw them tightly together. The screws should go through the holes drilled.
3. Measure the mid-point of one piece of wood and then drill a hole through it.
4. Take the 1 m long piece of wood and drill a hole on one end. This piece is called a cross bar.
5. Screw the cross bar at the mid-point of the 2 m long piece of wood where the hole was drilled. The two pieces of wood will now form the shape of a letter A.
6. Make an A-frame to stand upright on a level ground and adjust the cross bar to the mid-point of the second piece of wood using a spirit level.
7. When the spirit level is centred, mark the position of the cross bar on the mid-point of the second piece of wood and drill a hole.
8. Screw the cross bar (1m long wood) onto the second 2 m long wood firmly.
9. Fold the 2.5 m string into two equal parts and tie one end at the midpoint of the apex of an A-frame.
10. Place a weight or a stone at the lower end of the string and tie it tightly.
11. The weight should make the string swing in between the two legs of an A- frame.
12. The string and the weight will be used to ensure the two legs of an A- frame are on level ground when the string is in the mid-point of the cross bar.
13. An A-frame is now ready for use.

If an A- frame is to be used to mark accurately different slopes, then use blocks of wood of different thickness as follows:
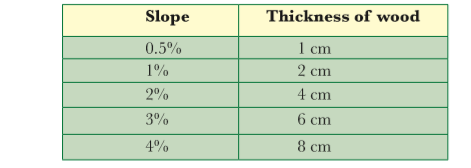
The wood should be exactly 2 m long for the above measures to give accurate gradients.
Establishing a level contour line using an A-frame
1. After placing the two legs of an A-frame on the same level ground, mark the spot where one of the legs is standing with a peg or stone.
2. Then lift that leg, while the other leg remains in place and rotate an A-frame (in a semi circle) until the lifted leg is on the opposite side. Now place it on the ground and adjust it until the weighted string touches the mid-point mark of the cross bar.
3. Place a peg where the second leg of an A-frame has been standing.
4. Lift the second leg and rotate it until it is on the opposite side of the frame.
5. Repeat this process marking the ground where each leg stands before moving it to the opposite side.
6. When these points are marked across the slope, the line that joins the pegs together on the ground is the contour line.
7. Ridges, terraces or crops can be planted along the contour line.

After establishing the countour lines, mechanical construction can be made along these contour lines.
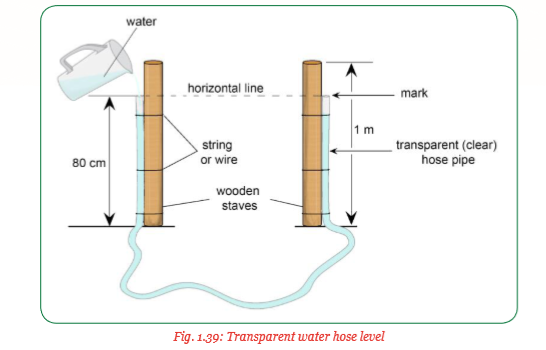
Procedure for making a transparent water hose level
(i) Make a mark on each of the staves about 80 m from the bottom.
(ii) Place the ends of the hose pipe level with the top of the staves so that the pipes runs the full length of the staves.
(iii) Attach the hose pipe to the stave using the strings or wire.
(iv) Place the staves side by side making sure the marks are exactly opposite each other.
(v) Fill the hose pipe with water from one end until the level of the water reaches the marks on the staves. This is shown in figure 1.39.
(vi) Check to make sure that there are no bubbles in the hose pipe.
(vii) The level is now ready for use.
Using the transparent water hose level to trace the contour lines:
(a) Place the wooden poles besides each other and the level of water in the hose pipe at the same level.
(b) Mark the position of the first pole with a peg and name it A.
(c) Move the second pole B to different locations along the ground until the two marks are at the same level with the water level.
(d) Mark this position with another peg.
(e) Move post A to where post B is and move post B to different locations along the ground as in (c).
(f) Repeat these operations until the end of the land.
(g) The line made by wooden pegs is the contour line.
Activity 1 1.11: A practical activity of constructing terraces, ridges, bunds and diversion channels
Make a field visit to an area where terraces, ridges, bunds and diversion channels are being constructed and carry out the following activities:
(i) Determine the contour line using an A-frame or the transparent water hose level, wooden pegs and the garden line.
(ii) Use the materials provided to construct the terrace, ridge, bund and a diversion channel.
(iii) Discuss and record your findings.
(iv) Present your findings to the class.
(v) Take teacher’s summary notes.
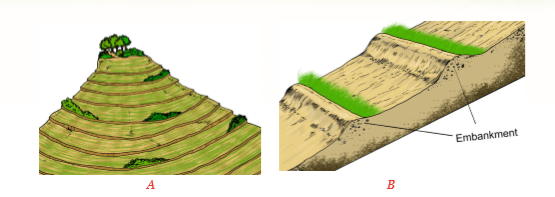
Terracing
A terrace is an earth-embankment constructed across the slope to control runoff and minimise soil erosion. It acts as an intercept to the landslope and divides the sloping land into strips thus reducing the slope length available for run-off. Soil loss downslope has been found to be proportional to the square root of the length of the slope. Thus, by shortening the length of the slope, soil erosion is reduced. Terraces block the movement of the run-off and reduce their velocity.
Terraces are classified into two major types; broad-based and bench terraces. The broad-based terraces are used where the main purpose is either to remove or retain water on sloping land for cultivation whereas bench terraces are mainly to reduce the land slope.
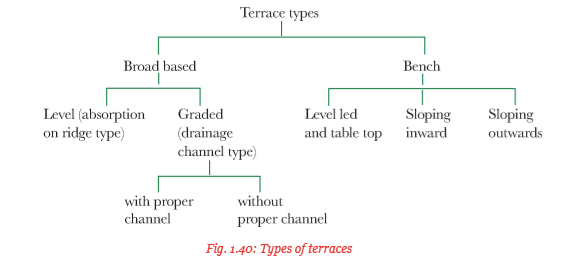
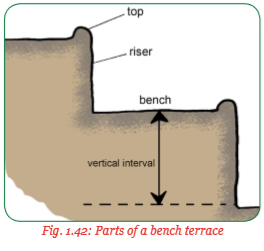
(a) Bench terraces – Bench terraces consists of a series of platforms constructed along the contours which cut into the hill slope in a step-like formation. These platforms are separated at regular intervals by a vertical drop or a steep sided wall which is protected by vegetation packed with stones. The hill slope are converted to cultivatable platforms. They can also be converted into irrigated fields or orchards.

Construction
In designing the bench terrace, it is important to consider:
• The average rainfall of the area.
• The soil type.
• The soil depth.
• The slope of the land.
It is also important to determine the following:
(i) The type of bench terrace, i.e., where the riser (sides) will be inclining at a slope of (1/2: 1, V:H) or the vertical type at a slope of (1:1, V:H)
(ii) The terrace width.
(ii) The terrace cross section.
(iv) The terrace spacing or the depth of cut.
The terrace spacing is the vertical interval between two terraces.
Excavated bench terraces
The terrace width is the distance between two risers. The soil that is cut from the upper part of the slope is used to fill lower part which forms the riser. The construction can start from the highest point or lowest point and proceeds downwards. The soil excavated is thrown downwards to form the riser. The excess top soil is spread to flatten the bench.
Where the construction starts from the lower most part and proceeds upwards, the soil excavated is thrown upwards to form the riser. The top soil from the second terrace is spread on the first terrace and the process continues for the subsequent terraces.
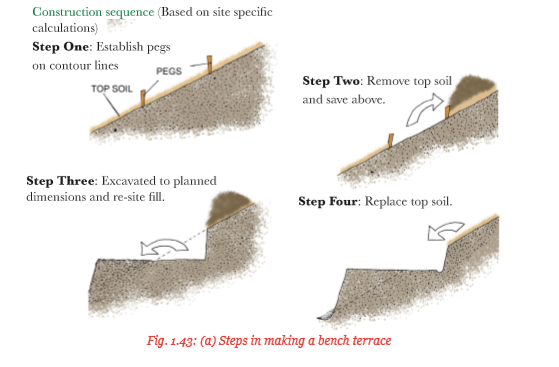
The procedure of constructing a bench terrace is as follows:
Step I – The contour lines are established, measured and then marked with wooden pegs.
Step II – The top soil is removed from the space between two pegs and thrown upwards.
Step III – The remaining sub soil is excavated up to the required depth and thrown downward to the bench.
Step IV – The top soil which had been thrown upwards is returned and spread to the bench to level it.
These four steps will construct one bench terrace along one contour line. The process is repeated for the other terraces. Figure 1.43 (a) shows the bench terrace construction steps.
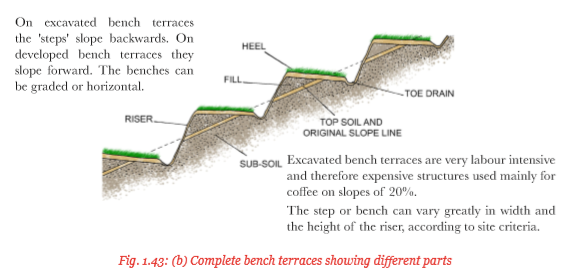
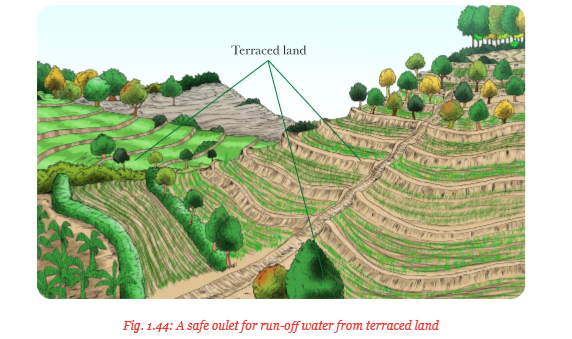
Grass is then planted on the heel of the embankment or riser to stabilise it. A toe-drain is dug at the foot of every raiser (embankment) to carry away the runoff. Suitable outlets should then be provided to dispose of the run-off safely. In most cases, one of the sides of the hill slope where vegetation is well established can be used as an outlet. A channel can also be created as a waterway to dispose of the run-off safely, as shown in figure 1.44.
Benches
Water should not be allowed to accumulate in any part of the terrace. All runoff should collect at the toe drains for safe disposal or infiltration. Ploughing should be done with care to avoid destroying the toes.
Risers
These are also called embankments. Grasses should be grown on the risers. Any small break of the riser or embankments should be repaired as a maintenance practice after heavy rains.
(b) Progressive terraces – This is the most common form of erosion control measure. It is applicable on moderately steep slopes and is easily combined with agroforestry measures. The combination of bunds and ditches slow down the movement of water and soil. In the course of time, soil accumulate behind the bunds and “progressively” a terrace is formed. Bunds are usually strengthened with perennial fodder grasses, legumes or trees.
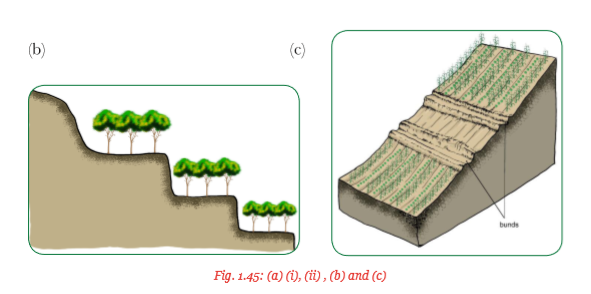
Exercise 1.3
Study the diagrams below carefully and identify the type of construction.

Ridges
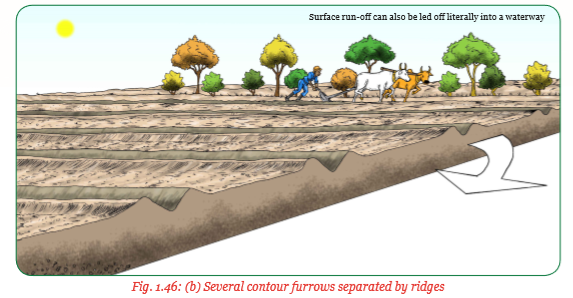
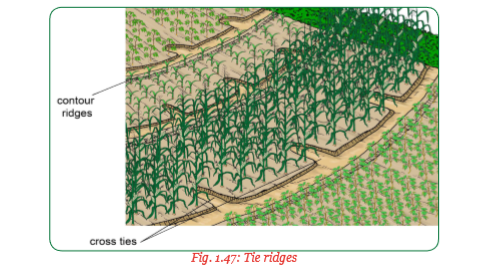
A ridge is a strip of ground or earth thrown up by a plough or left in between furrows. The small earthen ridges are 15 cm – 20 cm high with an up slope furrow which accommodates run-off from a catchment strip in between the ridges. The catchment strips are usually uncultivated but if used for water harvesting and to increase infiltration, crops can be planted. These ridges reduce soil erosion and allow water to seep into the ground. They also trap eroded soil. Furrows can be blocked at regular intervals with similar ridges of soil. This prevents water from moving through the furrow. The water is held in the furrows for long. The ridges may be between 1.5 m and 10 m apart. There are two types of ridges;
contour ridges and tie ridges.
(a) Contour ridges – Making contour ridges involves building a series of earthen or stone barriers (bunds) along the contour line. They retain water in the furrows and allow it to seep into the ground.

(b) Tie ridges – These are ridges where the furrows in between the ridges are blocked with similar ridges of soil. The small ridges that block these furrows are known as cross ties. Cross ties are made at right angles to the contour to make the ridges more effective in trapping water. The cross ties prevent water from flowing along behind the contour ridge and collect water to the lowest point. They prevent the water from breaking through the ridge. This prevents gully formation. Cross ties can be spaced at 10 m interval in gently sloping areas with low rainfall. However, in steeper slopes and in areas of high rainfall, they should be spaced closer at 4 m – 5 m interval.
Bunds
A bund is an embankment-like structure constructed across the landslope. They are used to modify the surface of the slope of the land increasing retention of water and safe disposal of run-off water.
They serve the following purposes:
(i) Increase the time of stay of run-off water in order to increase infiltration time.
(ii) Decrease the effect of landslope and speed of run-off by intercepting the slope at several points thus decreasing the erosivity of run-off water.
(iii) They protect the soil from erosion caused by the run-off.
Bunds should be 1m – 2 m wide and about 60 cm high. They are best used for small cultivated areas on moderate slope and should be about 30 m apart. However, they should be close together on steeper slopes.

There are two types of bunds made for controlling soil erosion. These include: Contour bunds and graded bunds.
The type of bunds to be used depend on the following factors:
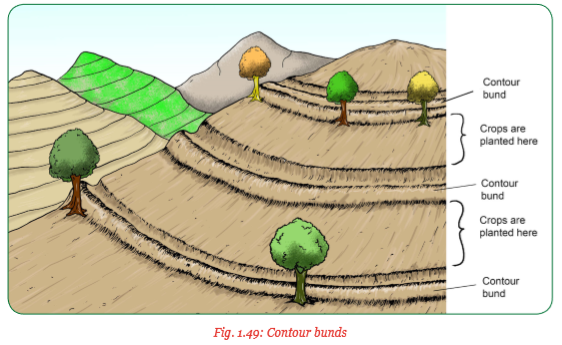
(a) Contour bunds – These type of bunds are constructed along the contours. Contour bunds sometimes are constructed with small offshoots called tie-bunds emanating from them to facilitate better erosion control. The ties are placed every 5 cm –10 cm of the bund to enable any run-off water to seep into the soil and prevent it from running along the channel above the bund.• Slope of land.
• Amount of rainfall.
• Soil type.
• Purpose or the use of bunds.
Countor bunds are recommended for areas with low rainfall less than 600 mm/annum with permeable soils and landslope less than 6%. They prevent soil erosion as well as conserve water for the crop.
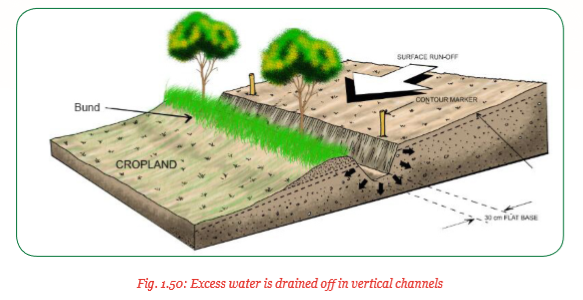
(b) Graded bunds – These type of bunds are used for safe disposal of excess run-off in areas of high rainfall and impervious soil. They require establishment of grassed waterway as an outlet for safe disposal of excess water accumulated over bunded area. The grassed waterways should not be overgrazed or left without vegetation.
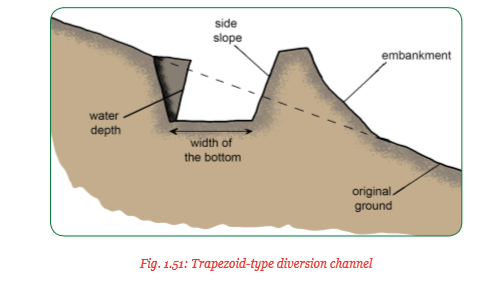
Diversion channels
These are earth structures constructed across a field to intercept and divert surface run-off from the slope above and drain it to a safe outlet.
The structures can be in form of a trench, a narrow base channel or a ditch.
• Narrow based channels are constructed for gentle sloping areas of about 15% slope.
• Ditches are constructed on steep slopes with small quantities of run-off to be diverted.
• Trench types are used where large quantities of run-off are to be diverted at foothills.
Use of diversion channels
Diversion channels are used to:
(i) Protect cultivated lands, roads or farm buildings at the foot of the hill by diverting run-off.
(ii) Protect other conservation structures such as terraces and bunds which have been made on land at the slopes and foot of the hills.
(iii) Collect water run-off and channel it to ponds or other storage structures.
(iv) Prevent gullies from developing.
Diversion channels are used in the following areas:
• Where run-off endangers low lying lands below and within the hill slope, roads and other conservation areas.
• Where a gully is developing.
• Where a piece of land or a farm above the slope concentrates run-off which is damaging the land below.
Construction of diversion channels
1. The land where the channel is to be constructed is cleared and all vegetation and stumps removed.
2. Deep digging is carried out to make the channel as deep as required and the soil thrown downwards to create the embankment.
3. The embankment (the fill) on the lower side is compacted layer by layer to make it firm.
4. Extra soil from the lower side can be used to increase the height and width of the embankment (fill) if necessary.
The upslope areas of the diversion channels should be protected with vegetation in order to make it effective. Grass should be grown on the sides and the embankment to stop soil from coming down or breaking into the channels. Diversion channels or ditches should safely discharge storm or run-off water to non-eradible areas such as:
• Natural waterways, for example, rivers.
• Stony or rocky grounds.
• Grassland or forest with well established cover vegetation.
• Artificial waterways.
Maintenance of diversion channels
Deposits of silt in the channel should always be removed and thrown to the underlying land. This is to make sure that water flows freely all the time. Any large plants, trees or bushes should be cleared from the embankment trench or channel. The roots of trees may cause cracking and breaking of the embankment.
Exercise 1.4
The following photographs show structures constructed along the contour lines to control soil erosion by preventing run-off. Study the structures and then carry out the following activities:
(i) Identify the structures.
(ii) Compare structures
(a) and
(b) and then give four differences between them.
Activity 1 1.12: Field activity and a practical activity for constructing anti-erosive ditches and stone lines
Make a field visit to an area where anti-erosive ditches and stone lines are being constructed and carry out the following activities:
(i) Observe the construction of anti-erosive ditches and stone lines.
(ii) Use the materials provided to construct anti-erosive ditches and stone lines.
(iii) Discuss and record your findings.
(iv) Present your findings to the class.
(v) Take teacher’s summary notes.
Anti-erosive ditches
These are structures which are designed to protect agricultural land from erosion caused by rainfall.
There are many types of anti-erosion ditches and ridges. The most suitable type for the land in question depend on:
• Rainfall intensity.
• The nature of the soil, for example, permeability.
• The slope of the land.
• The use to which the land is put, that is, the type of crop to be grown.
Steep sloping land (slope greater than 25%)
This type of land is basically grazing land or on forest. The purpose of antierosion structures on such land is to protect the cultivated land which lies below it. The appropriate structures are ditches or terraces with silt catchment pits or trees.
(a) Silt catchment pits
This type of ditch is used to stop the flow of overland run-off water and allow it to be absorbed by the soil as well as collect the sediments carried by the water in the pit.
The structures are located uphill from cultivated land. They have rectangular sections which are 40 cm wide 20 cm deep and between 3 m and 25 m in length. They are dug along the contour line with 2 m of levelling between each ditch.
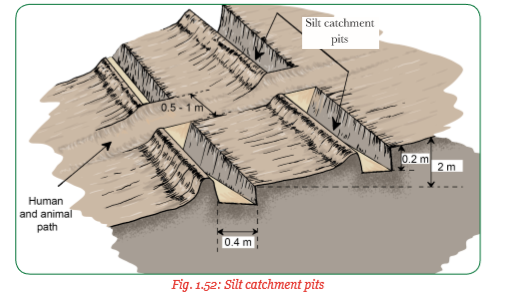
The ditches are blocked off in a zigzag pattern by a mound of earth about 50 cm – 100 cm wide after every 3 cm – 25 m to provide a path for human and animals.
(b) Forest tiering
This kind of tiering is used on a steep ground to allow plantation to be established.
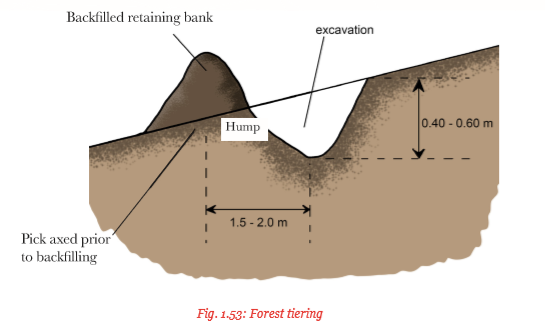
The ditch is dug uphill from the retaining ridge to allow the water to be reabsorbed by the soil.
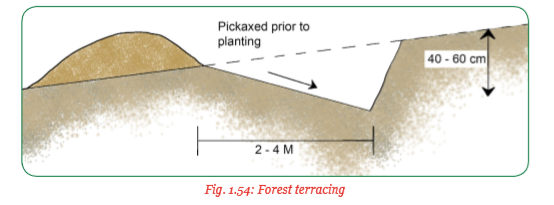
(c) Forest terracing
This system is used on slopes of between 15% and 20%. Fruit trees may be used for the plantation at the base of the ridge as shown in figure 1.54 below.
(d) Cropping terracing
These are built on slopes less than 15%. They form gentle cross section where farm machinery has easy access to the land. There are two main types; the channel and crest type. These are shown in figures 1.56 and 1.57.
(i) Channel type terrace – This has a deeper ditch and a higher hump. It is used to divert the water from farmland.

(ii) Crest type terrace – Where the hump is raised and the ditch is shallow so that the water is retained and absorbed.

Construction procedure for the anti-erosive ditches
1. The site where these ditches are constructed should be determined by the community as a project.
2. Work should begin with the highest lying fields.
3. The contour lines should be determined and marked first before construction starts. This can be done using an A-frame or the transparent water hose level.
4. Excavation work of the trench should be done by digging the soil with pick axes and removing it with a shovel.
5. The earth which is excavated from the ditches should be backfilled down hill to make the banks or embankments. This backfilling materials should be compacted by stamping with foot animals or hand rammers.
6. Compaction should be done after every 10 cm layer is added.
7. The slopes between the ditches and retaining banks should be protected with vegetation.
Maintenance of anti-erosive ditches
(i) Ensuring the embankments remain horizontal.
(ii) Reinforce and repair any part of the structure which has become weak by compacting.
(iii) Filling in the gullies or gaps with earth and compacting well.
(iv) Vegetation or the grass cover should be protected to remain adequate.
(v) If trees prevent the growth of grass under cover, they should be cut.
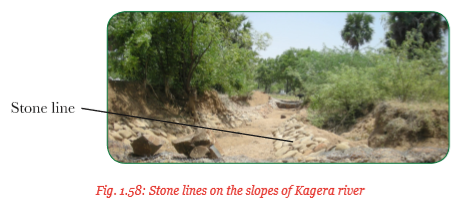
Stone lines
These are long rows of stones piled together to form barriers across the field. Stone lines are commonly used in the dry and humid areas of Africa to control soil erosion.
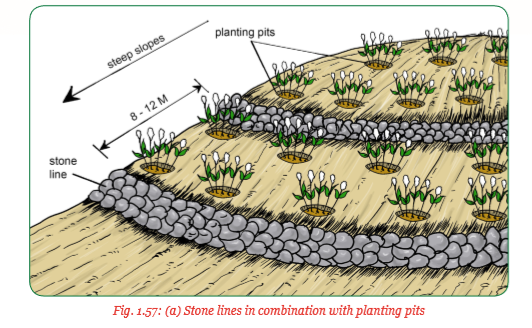
They are used in places where there are loose stones in the fields. Stone lines are made by heaping stones about 0.4 m –0.6 m wide and 0.5 m along the slope to trap soil carried by run-off water. They slow down the run-off and soil gradually builds up behind these lines of stones. They are used on both flat and sloppy lands.
The distance between the lines depends on the slope and the amount of stones available. It should be about 20 m – 25 m apart on a gently sloping areas and 8 m – 12 m in steep areas. If the stones collected from the farm are not enough, they can be ferried using donkey carts or lorries from other places such as quarries. Stone lines follow the contour lines which should be determined using an A-frame or the transparent water pipe level. Grass or trees are planted on either sides of the stone lines in order to give an effective conservation farming. Planting pits are often used with stone lines as shown in figure 1.57 (a) and (b).

Construction procedure for the stone lines
1. Collect many different sized stones.
2. Pile the stones on the contour lines marked with an A-frame.
3. Pile a line of 0.4 m – 0.6 m wide and 0.5 m high; put them close together to prevent any gaps in between.
4. Plant some shrubs on either side of the stone line in pits. Stone line have very little maintenance practices except to return the fallen off stones in the line.
Activity 1 1.13: Field visit with practical activity to establish a grass filter strip, trash line and constructing a gabion
Visit a farm or an area where filter strips, trash lines are being established and a gabion is under construction and carry out the following activities:
(i) Observe the establishment of the filter strips, trash lines and the construction of the gabion.
(ii) Use the materials provided to establish a filter strip and trash line and take part in gabion construction.
(iii) Discuss and record your findings.
(iv) Present your findings to the class.
(v) Take teacher’s summary notes.
Filter strips
Filter strips are uncultivated strips measuring at least 1m – 2 m wide along the contour between the cultivated strips which are wider than 30 m. The strips are normally of grass and they are suited to low lying fields. They can easily be integrated into the existing landscape and if well designed, they provide beauty.
They capture sediments and other materials by slowing run-off water flowing from a field. As water is slowed, large soil particles rapidly settle out. Small clay particles need a longer flow distance to settle out in the filter. A longer strip width is needed to remove finer soils. They work best in uniform depth across the filter and on relatively flat slopes.

Their effectiveness depends on:
(i) Soil characteristics.
(ii) Slope, shape and area of the field draining to the filter.
(iii) Type and quality of vegetation.
(iv) Width of the strip.
(v) Proper installation and maintenance.
How to establish a grass filter strip
1. Determine where the filter strips are required, their width and the number required. This depends on the area to be covered.
2. Prepare the strips into weed free seedbeds.
3. Plant suitable grass such as sugar cane, Cetaria sphacelotheca, Paspalum notatum but avoid creeping grasses such as star grass. Deep-rooted legumes can also be used.
4. Planting should be done during the rains when the other crops are being planted to avoid drying of the grass strips.
Maintenance of filter strips
(i) Frequent inspection especially after heavy rains to remove accumulated sediments.
(ii) Minimise the development of erosion channels by repairing them or planting more grass.
(iii) Plant more grass or reseed bare patches.
(iv) Mow or remove vegetation regularly to leave a height of 15 cm.
(v) Test the soil periodically to ensure healthy growth of grass or vegetation.
(vi) Control or remove unwanted trees, bush or noxious weeds.
(vii) Fence off livestock from the strips to maximise the filtering potential.
(viii) Discourage use of machinery such as mowers through the strips.
(ix) Filter strips should be used with good agricultural practices such as pasture management, proper nutrients and pest management to enhance effectiveness.

In general, vegetative filter strips are effective in:
(i) Reducing sediments and nutrients in run-off from crop lands.
(ii) Controlling run-off in the form of shallow uniform flow compared to concentrated heavy flows.
(iii) Trapping clay-sized particles compared to silt and sand-sized particles when filter width is longer.
Trash line
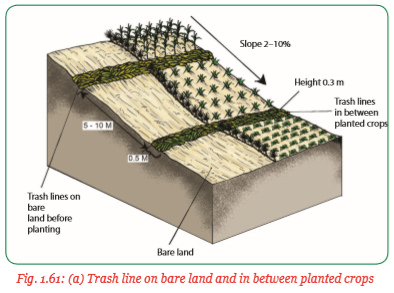
A trash line is a pile of vegetative materials made of crop residues, weeds and prunings laid along the contour lines to slow down the flow of run-off. They are placed in definite lines leaving the rest of the land bare as shown in figure 1.61 (a).
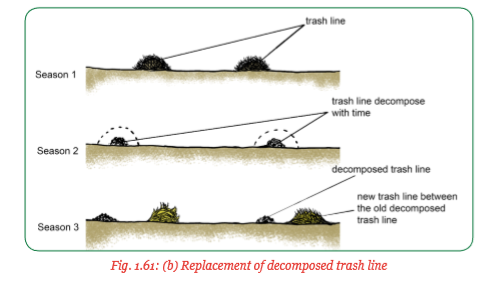
The trash decompose within the first season and add organic matter to the soil.
During the second season, another trash line is built in the middle of the old trash line as shown in figure 1.61 (b).
These are then replaced in the coming seasons with fresh materials each time on different contour lines within the farm. Trash lines are recommended as the first stage to develop bench terraces. In this case, wooden pegs are placed along the lower side of the trash line to stabilise them. It is important that crop residues used in the trash line are free from any diseases and pests.
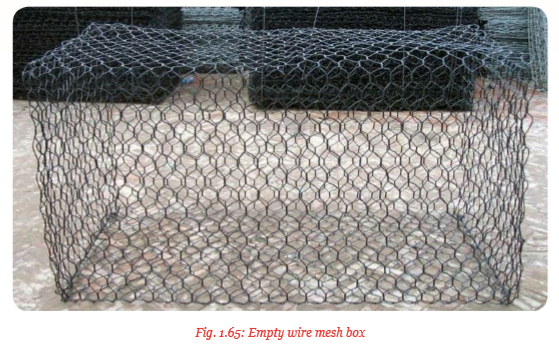
Gabions
These structures are also referred as porous dams. Gabions are boxes made of woven wire mesh which are filled with stones at the site to form flexible permeable and permanent structures. The structures act as retaining walls, channels and weirs for erosion control. All the mesh wire boxes are reinforced with iron rods of greater diameter at the edges to strengthen them. The gabions are divided into several cross ties. The gabion boxes can be of various sizes, for example, 2 m long by 1m width and 1m high. The boxes may be arranged beside each other.
The internal stability of the gabion is dictated by:
• The way each store interlock with each other in the mesh.
• Their weight which helps them to resist the hydraulic force created by moving water.
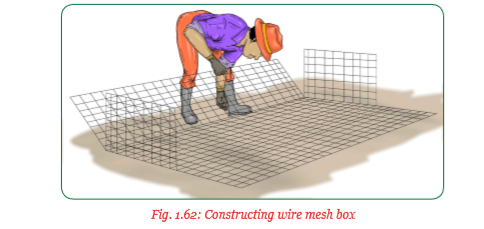
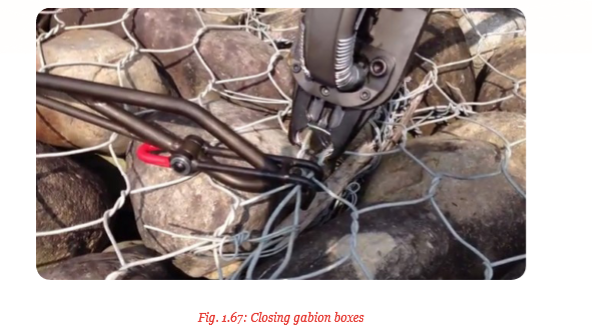
Construction and installation of gabions
Step I – Shows panels of wire mesh sheets fitted together which will be folded to form the boxes, as shown in figure 1.62.
Step II – Wire mesh sheet panels are folded together to form rectangular boxes, as shown in figure 1.63.

Step III – Excavating the site where the gabion is to be placed and levelling the ground together with embankment. Loose materials and vegetation removed, as shown in figure 1.64.

Step IV – Placing the gabion units to the site.
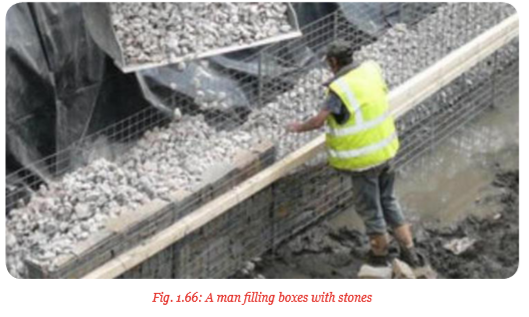
Step V – Filling in the boxes with stones.
Step VI – Close the lid and finish the box by attaching vertical braces to the lid.
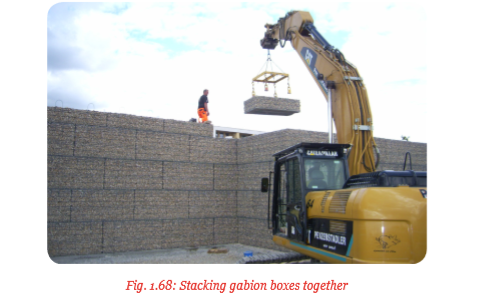
Step VII – Placing more boxes on top of the finished one. Attach the boxes to each other with the wire, then fill with stones. The boxes should fit the area to be covered exactly.
A single box gabion can be constructed at the end of a gully as shown in fig. 1.69.
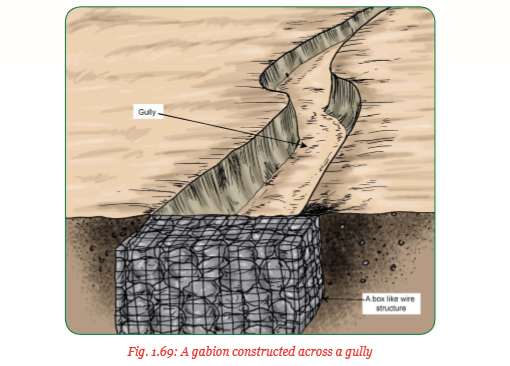
Stones used to fill in the gabion boxes should be obtained from a nearby source to reduce cost of transportation. The best stone size should be 100 mm – 250 mm in diameter to produce a well packed gabion.
The exposed side of the box should be lined with stones of equal sizes, neatly packed with the flat side against the mesh. Smaller stones should be packed in between the larger ones to reduce space. Gabion boxes should not be filled with mechanical equipment to prevent spaces left in between.
Uses of gabions
Gabions are used:
1. To slow the speed of concentrated run-off.
2. In conditions where water velocity is so high that it causes gully formation.
3. On steeper slopes to stabilise the area especially where the slope drops to a road or any other structure.
4. To protect earth embankments in steep areas from sliping over.
5. To protect farms, buildings, roads, railways and other structures constructed on the edges of a slope.
6. To help in recovering eroded areas by filling in already formed gullies.
7. To prevent gullies from forming in areas where they may be prevalent.
Advantages of using gabions
• They are easy to handle and construct.
• Once constructed, they are permanent.
• They are permeable to water thus allow water to pass through them.
• They filter the soil in run-off and with time, this soil fills in the gully.
Maintenance of gabions
(i) Should be inspected regularly after each heavy storm.
(ii) Should be repaired in case the storms cause any damage.
Unit Summary
Soil erosion is the gradual removal of the top soil through the action of water, wind, animals and human beings.
The eroded soil is finally deposited into water bodies and reservoirs causing siltation and reduction in water storage capacity. Soil erosion is accelerated by the following factors: Rainfall of high intensity, steep slopes, lack of vegetation cover or bare ground, loose shallow soils, poor farming practices and wind of high velocity.
Soil erosion leads to desertification and loss of soil fertility hence land becomes barren in terms of agricultural production. In addition, soil exhaustion may occur as a result of overcropping, leaching, overgrazing and burning of organic matter.
However, soil erosion can be prevented using cultural and mechanical measures. Cultural measures used to prevent soil erosion include use of good practices such as crop rotation, mixed cropping, mulching, weeding, contour farming, strip cropping and controlled grazing.
Mechanical methods also referred to as physical or structural measures of controlling soil erosion include terracing, ridging, construction of graded bunds, diversion channels, anti-erosive ditches, stone lines, filter strips and gabions of porous dams.
When soil conservation measures are carried out, soil erosion is controlled. Less soil erosion means better soil quality with soil retaining nutrients which naturally lead to better and more improved crop yield. Erosion control also reduces expenses incurred in drainage and water filtration. It prevents longterm damage to the environment.
Group activity
1. (a) Walk around the school compound or farm after a heavy downpour and check out for signs of splash, sheet, rill or gully erosion.
(b) Find out where the run-off that caused the type of erosion visible originated from.
2. (a) Mark out four plots on a slightly sloppy area of the school compound or farm. The plots should border each other. Label the plots A, B, C and D.
(b) Dig a trench at the foot of the plots stretching from one end of the plots to the other end.
(c) Spread a sheet of polythene paper on the trench.
(d) Carry out the following on each plot: Plot A – Leave it bare. Plot B – Cover with dry grass. Plot C – Plant beans and allow them to grow up to the first weeding. Plot D – Plant a fast spreading grass.
(e) Compare the amount of soil collected on the polythene sheet from each plot at the end of the seasons.
(f) Find out the following from the results:
(i) Which plot was most vulnerable to soil erosion?
(ii) Which plot had the least soil erosion and why?
Key terms
1. Agroforestry – Growing woody perennials under the same land unit with agricultural crops and pastures for livestock.
2. Barren land – A piece of land that is unable to support the growth of crops.
3. Barrier – An obstacle that prevents movement or access.
4. Bund – A ridge of earth placed in a line along the contour run-off and soil erosion.
5. Contour – A line joining all places of the same height above sea level.
6. Controlled grazing – Livestock grazing limited to specific area.
7. Cropping systems – The order in which the crops are cultivated on a piece of land over a fixed period of time.
8. Desertification – Transformation of land which was once suitable for agriculture into arid and barren.
9. Ditch – A long narrow trench or channel.
10. Diversion dyke – A temporary ridge of soil constructed at the top of a cut of hill slope to divert over land flow from a small area away from unstable slope.
11. Infiltration – The seepage of water into the soil.
12. Infrastructure – The basic physical systems that provide services such as transport, communication, water and sewage.
13. Kinetic energy – Energy possed by moving objects.
14. Leeward side – The side which is sheltered from the prevailing wind.
15. Microbial activities – Activities of the micro-organisms such as bacteria, fungi, protozoa and viruses in the soil.
16. Overland flow – The flow of water on the surface of the land that occurs after a storm.
17. Perennial – A plant that grows for more than one year.
18. Pollution – Introduction of contaminants or toxic substances that cause adverse change into the natural environment.
19. Ridge – A long raised strip of earth.
20. Run-off – Rainfall or other type of water that does not infiltrate into the soil but flows across the surface.
21. Sedimentation – Depositing of small solids such as soil particles.
22. Shrub – A woody plant that remains less than 10 metres tall and produces shoots or stems from its base.
23. Siltation – The process by which water becomes dirty as a result of fine mineral particles in water.
24. Slope – The inclination or angle of the land surface which can be measured as a percentage or in degrees.
25. Soil capping – This is the formation of a hard crust on the soil surface that limit permeability of water.
26. Watershed – A unit of the landscape that consists of all the drainage area and channels contributing to a single stream or river.
27. Waterway – A natural or artificial watercourse or channel for the flow of water
28. Windward side – Towards the direction from which wind blows. The side which faces the prevailing wind.
29. Wood stave – A vertical wooden post or plank in a building or other structures. It is also known as staff.
End of Unit 1 Assessment
1. Differentiate between sheet and rill erosion.
2. Explain how overgrazing increases soil erosion.
3. Draw a well labelled diagram showing contour farming.
4. Suggest the type of land where each of the following soil erosion control measures would mostly apply:
(a) Use of trash line.
(b) Use of diversion channels.
(c) Use of gabions or porous dams.
5. The diagrams below show a soil erosion control structure. Study them carefully then answer the questions that follow.
(a) Identify the structure in the diagram.
(b) Name the parts labelled A and B.
(c) Give two functions of the part labelled B in soil erosion control.
6. The following diagram illustrates a method used in laying down terraces. Study it carefully and then answer the questions that follow.
(i) Identify the method illustrated.
(ii) Briefly explain how the method is used in laying down terraces.
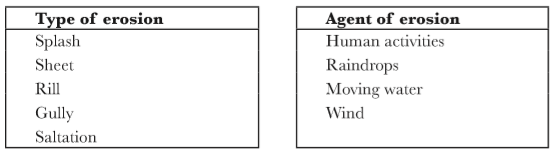
7. Match the following types of erosion with most common agent using an arrow:
8. Why is it recommended to carry out farming activities along the contour?
- S3:Agriculture SB File Uploaded 27/10/21, 16:38
- S3: Agriculture TG File Uploaded 27/10/21, 16:49