General
- Home Science S2 SB File Uploaded 24/01/22, 15:21
Unit 8: Bread making techniques
Key Unit Competency
To be able to bake a variety of breads.
Learning objectives
After studying this topic, I should be able to:
• Distinguish between various types of bread.
• Describe the steps in bread making.
• Apply techniques used in making breads appropriately.
Introduction
At what time of the day do you eat bread? Have you ever visited a bakery? Do you know how bread is baked in a bakery?
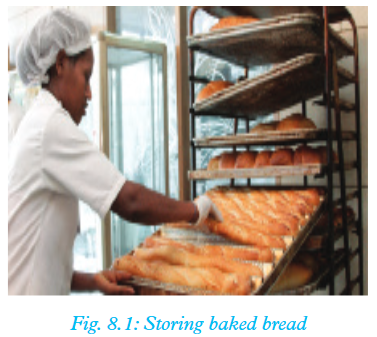
Look at the picture above. What do you think is happening in the picture?
8.1 Types of bread
Bread is a popular food in many countries in Africa. It is mostly taken during breakfast. Apart from the bread that we normally buy at the shop, there are many other types of breads. These breads are made at bakeries. However, we can also learn how to make bread in our own households.
Discussion corner
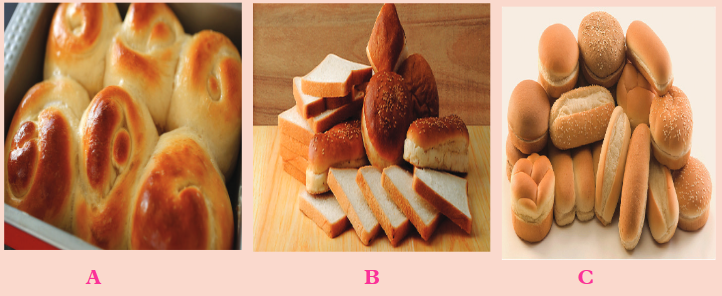 Have you ever seen these breads? What type of bread is your favourite? How are they made? Can you make such a bread at home?
The facts
Bread is a staple food prepared from a dough of fl our and water, usually by baking. Throughout recorded history, it has been popular around the world and is one of the oldest artificial foods having been of importance since the dawn of agriculture.There are many combinations and proportions of types of fl our and other ingredients, and also of different traditional recipes and modes of preparation of bread. As a result, there are wide varieties of types, shapes, sizes and textures of breads in various regions. Also, bread may be leavened by many different processes ranging from the use of naturally occurring microbes (for example, yeast) to high-pressure artificial aeration methods during preparation or baking. However, some products are left unleavened, either for preference, or for traditional or religious reasons. Many non-cereal ingredients may be included as well, ranging from fruits and nuts to various fats. Commercial bread in particular commonly contains additives, some of them non-nutritional, to improve flavour, texture, colour, shelf life, or ease of manufacturing. Further, bread can be simple or complex.• Simple bread - is made using basic bread making ingredients and techniques. The basic ingredients include flour and yeast.• Complex bread - this in addition to basic ingredients, has other ingredients like additives, flavours and non-cereal ingredients such as nuts, etc.Either way, the process of making bread is quite rigorous. Apart from just the ingredients and methods of cooking, there are various other factors that need to be considered when making bread.8.2 Steps of bread making
Activity 8.1: Research Activity
Go to the library. Find out from textbooks the factors to consider when making bread. What ingredients do you need and what should you do? You can also do internet search. Write down main points then share with your group members.The facts
Ingredients for making simple bread and their functions
The basic ingredients in bread making include fl our, water, yeast and salt. Others are optional such as milk, eggs, fat, sugar and ascorbic acid.(a) Flour
Bread flour or wheat fl our is recommended because it has high quality and quantity of glutein. The high quality and quantity of glutein is necessary in order to produce the best volume and characteristics of bread texture. The starch in the fl our is a source of food for the yeast.The starch gelatinises when subjected to moist heat and makes the bread rigid and crumby. Whole meal flour produces bread that is coarse in texture, darker in colour and smaller in volume. (b) WaterWater is a medium in which the ingredients are allowed to mix. Salt and sugar dissolve in the mixture through the water. Water creates the moisture required by the yeast in order to be able to grow. Water hydrates the fl our mixture as well. Water hydrates the starch during cooking and creates a medium for gelatinisation. When the water is heated, the steam acts as a raising agent.(c) YeastYeast grows and produces carbon dioxide when subjected to favourable conditions. The carbon dioxide is used as a rising agent.(d) SaltSalt adds flavour to the dough. It also has an inhibiting effect on the development of glutein in the fl our. Dough made without salt is sticky.
 (e) FatIt tenderises the bread crumb. Fat also reduces the volume of the bread and causes it to become stale faster.
 (f) SugarIt is usually an activator for the yeast. It provides food for the yeast. Too much sugar retards the action of yeast and development of glutein. Sugar improves the flavour and colour of the bread as well.(g) EggsThey give the baked product a rich flavour and a darker colour.
Milk
It gives the bread crust a richer brown colour. Milk also brings a rich fl avour to the bread.(i) Ascorbic acidIt is used to improve the development of glutein.Importance of balancing the bread recipe ingredients
Liquid to flourThe liquid should not be too little because it makes the fl our to be stiff. Stiff fl our does not become suffi ciently elastic. Hence, rising and expansion of the dough during cooking is limited. The resulting bread will be small and tough. Too much liquid makes the dough to be sticky and have a course open texture.YeastToo little yeast will delay the fermentation process while too much of it will produce a sour product.SaltIt should not be more that 2% of the weight of the fl our. If too much salt is used, it inhibits the action of yeast and the development of glutein. This results in a bread that is small in volume, course and with a closed texture and with a salty taste. If too little yeast is used, the bread tastes fl at and is poorly risen on the top.SugarIt should not be more than 10% of the weight of the fl our. Too much sugar draws water from the yeast cell and slows or even kills them (osmotic effect). This causes the bread to have a close texture.FatExcess fat inhibits the yeast from coming into contact with water and hence slows their action. Fat slows down hydration of the fl our causing slow development of the glutein and this causes the bread to be tough.The 12 steps of bread making
Activity 8.2: Making a simple bread
Ingredients• 500 g plain or ½ plain and ½ whole meal fl our.• 1 level teaspoon salt.• 20 g fresh yeast• 300 ml water or milk or a mixture of both.• 1 level teaspoon sugar.• 50 g margarine(optional)• OilMethod1. Mix the fl our, salt and yeast in a large bowl.2. Make a well at the center, add the oil and water. Mix well. If the dough seems a little stiff, add 1-2 table spoonfuls of water.3. Tip the dough onto a lightly floured work surface and knead it until the dough becomes satin-smooth.4. Place it in a lightly oiled bowl to proof. Leave to proof for 1 hour until doubled in size or place in the fridge overnight.5. Knock back the dough, then gently mold it into a ball. Place it on a baking tray lined with grease-proof paper to proof for a further one hour until doubled in size.6. Dust the loaf with fl our and cut across, about 6 cm wide, into the top of the loaf.Note:Baking temperatures should be maintained at 230°C (450°F). Reduce the temperature to 200°C after 5 minutes.7. Place the bread in greased loaf tin.8.Bake until golden brown and the loaf sounds hollow when tapped underneath.9.Test for readiness, remove from oven and turn on the cooling tray.10.Leave to cool and use as desired.The twelve steps followed when making bread are given below:Step 1: Scaling or measuring ingredientsThis is putting everything in place. Choose and accurately weigh ingredients and assemble equipment and other supplies.Step 2: MixingThis involves combining all ingredients into a smooth, uniform dough. It also involves kneading to ensure even distribution of the yeast throughout the dough in order to allow development of the gluten. Step 3: Primary fermentationThis is the process during which yeast acts on the sugars and starches in the dough. Cover the dough, leave it aside, either at room temperature for a quicker rise or in a cool place to slow the process down and thus give it more time to develop flavor and character. Up to about 75% of the flavour of the bread is developed at this time.
 Step 4: Punching/ foldingThis refers to deflating the dough by expelling the carbon dioxide gas produced during fermentation process. It helps to redistribute the yeast and relaxes the glutein. It also helps to equalize the temperature in the dough.
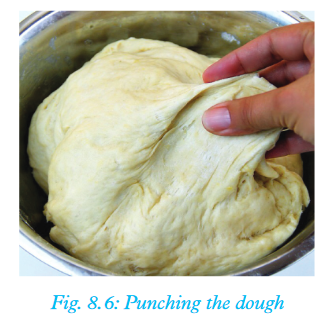 Step 5: Pre-shaping of the doughThis is dividing the dough into pieces of the same weight based on the product to be made. It helps to prepare the dough for shaping.
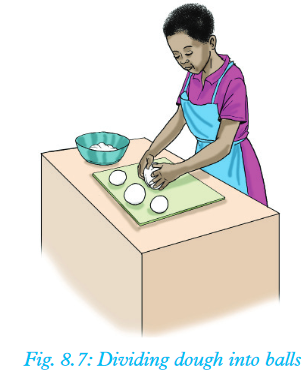 Step 6: Moulding of the doughAt this stage, dough is moulded into desired shapes, which range from smooth round balls to the shape of the bread as we know it.
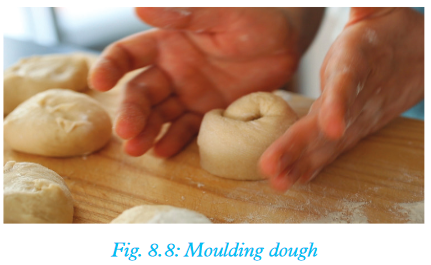 Step 7: Benching(Secondary fermentation)This is resting the dough on the table (bench) to allow the gluten to rest or the dough to continue to ferment.Step 8: ScoringThis refers to giving the bread final artistic look. You can include decorations of your liking or any other form of artistic work including inscribing names, words, etc.Step 9: ProofingThis stage ends the period of secondary fermentation. Heat and humidity are supplied to help the dough to rise and maintain a supple appearance.Step 10: BakingDuring baking, the bread is subjected to enough heat for the bread to form. At this stage, the bread is said to produce ‘oven spring’ which refers to when the gases are exposed to heat. Coagulation of proteins occurs and formation and browning of the crust occurs as well.
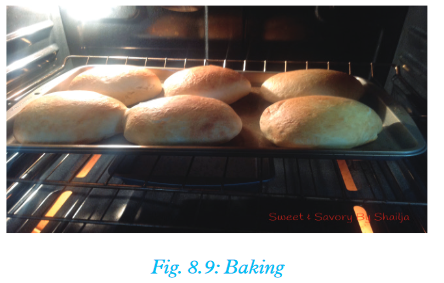 Step 11: CoolingAfter the bread has formed, it is removed from the pan or oven and allowed to cool. This should take like 30 minutes. Cooling prevents the bread from becoming soggy.
 Step 12: Storing or eatingThis involves placing the bread in an appropriate area or wrapping the bread to prevent staling or freezing. Also, the bread is ready to be eaten at this point.
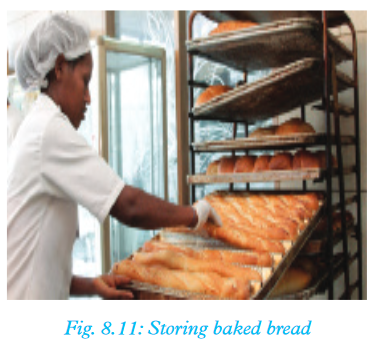
Precautions to take when making bread
The following are important factors which need to be adhered to in order to get the best results when making bread.(i) Temperature of the liquidYeast cells are sensitive to heat. They require warmth to grow. The liquid should therefore be heated to between 25-27oC. Cool temperatures retard the action of yeast. Too high temperatures kill the yeast cells. Also, salt and sugar dissolve much faster in warm liquids. (ii) Distribution of yeast cellsIf possible, yeast should be mixed with either water or milk for easy distribution into the fl our mixture. Yeast can also be distributed by compressing it by kneading the dough thoroughly. Fine yeast can be sieved together with the dry ingredients to ensure complete distribution of the cells.(iii) MixingThis is very crucial as it distributes the yeast cells. Mixing yeast with a liquid and fl our ensures proper hydration. This helps in providing a perfect medium for the yeast to grow. Hydration also ensures a good medium for the development of the glutein.(iv) KneadingThis helps in the development of high quality glutein. During kneading, air is incorporated which makes the dough to become elastic, which can hold enough gases in itself. Under-kneaded or over-kneaded dough leaks gas and makes the product to have a heavy texture.
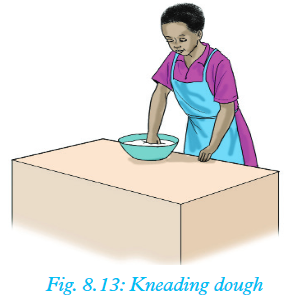 (v) FermentationThis is done by putting the dough in a bowl and leaving it to stay for sometime. The bowl should be kept in a warm place. If the temperatures are too high, this can kill the yeast cell, the dough will rise rapidly and fall back, the bread will have a sour taste. During fermentation, yeast cells grow and produce carbon dioxide and lactic and acetic acids. The carbon dioxide produced makes the dough to have foam. As the gas tries to escape, it pulls the glutein strands upwards, a condition which causes the dough to double in size. The process of fermentation should be allowed to continue until the dough doubles in size and becomes very elastic. Fermentation process gives bread its desirable taste. The process should not be overdone to avoid the dough from losing its elasticity. Inadequate fermentation causes the bread to be heavy in texture, have a fl at taste, and small in volume. The dough is also very sticky and unmanageable.
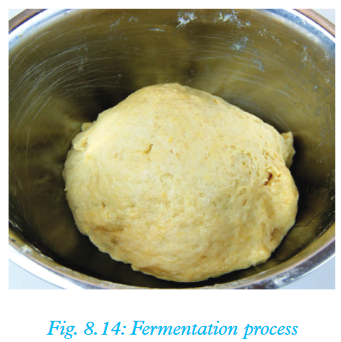
Qualities of a well baked bread
1. It should have a symmetrical shape which has the top smoothly rounded.2. The crust should have a rich brown colour.3. It should be well risen on all sides.4. It should have a light texture.5. It should be moist and not dry.6. It should have a good flavour which is not sour.Uses of bread
• Eating directly when we feel hungry.• Bread mixture is also used as a pizza base.• For making sauces – bread sauce.• Used for coating for example, bread crumbs for coating foods like fish, chicken.• Bread can be used for garnishing, for example, toasted bread can be used as a garnish.8.3 Cooking the bread
In this section, you are going to practice making various types of bread. Bread should be baked in temperatures of about 200°C. It should be cooked in high temperatures of about 230°C in the first five minutes to kill the yeast. If oven proofing is allowed to continue, the bread usually ends up with a sour taste. The flavour and aroma of the bread develop during cooking. The starch gelatinises and becomes soft and the glutein becomes hard during cooking. The bread then becomes rigid and has a definite shape. A crust forms on the surface of the bread due to loss of water. Under-cooked bread has a heavy texture and the crust does not change colour. However, if the bread is over-cooked, the crust becomes dark-brown and the bread is dry. You are now going to use the recipes given below to make the various types of bread.Basic recipe for making bread
Activity 8.3: Making a cold and closed meat and vegetable sandwich bread
Ingredients• 200g minced meat• 4 tomatoes• 1 onion• 1 tablespoon cooking oil• 2 leaves lettuce• 1 cucumber• Margarine• 200g loaf of sliced bread (or bread made in Activity 8.2 Above)• SaltMethod1. Put the meat in a saucepan and boil in little water until cooked.2. Add the oil, diced onion and salt. The meat should be dry from any soup.3. Clean the vegetables and shred the lettuce, slice the cucumber and tomatoes separately into thin slices.4. Butter the bread slices and place them on a plate.5. Spread two tablespoons of the minced meat on the bread, place a piece of the lettuce and slices of cucumber and tomatoes on top and cover with another slice.6. Serve with tea or juice.Note: The above ingredients can be used for making a hot sandwich by placing it in a sandwich maker for one minute.Complex bread
Activity 8.4: Making butter bread
Ingredients• 1 Package dry yeast + 1 teaspoonful sugar• 4½ Tablespoons sugar• 1½ Teaspoon salt• 1 Teaspoon baking powder• 4½ Cups all-purpose fl our• 1 Egg, lightly mixed• ¼ Cup butter, melted• ½ Cup fl our for dusting• 1¾ Cup warm milk (not hot)• ½ Cup warm water• 1 Teaspoon butter for brushing doughMethods1. Combine salt, baking powder and sugar, flour and mix. In small cup/bowl, combine dry yeast sugar and little warm milk, mix and let yeast activate. 2. Add lightly mixed egg, activated yeast, mix then add melted butter. (You can add dry fruit before adding wet ingredients)
 3. Pour warm milk and mix. Slowly add water and mix with wooden spoon. Then knead the dough dusting with fl our.
 4. Knead dough until you form a ball, for about 10 minutes or so. Cover and let it rise for about 45 minutes to 1 hour in warmer area. (For example, turn off oven or microwave).
 5. Dough should double in size. Knead again and grease/butter baking dish. Pre-heat oven at 400o F6. Place dough in the baking pan and let it rise to the edges of the pan. Butter the top with melted butter.
 7. Bake for about 40-45 minutes at 400o F. Bread should be golden. Let it cool down on a rack or covered with kitchen towel before slicing it.
The facts
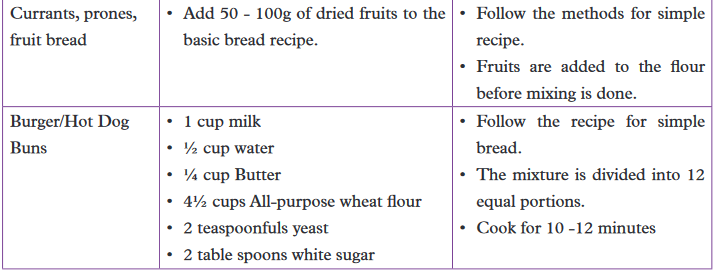
Certain ingredients can be added to the basic recipe of simple bread to provide varieties in the product i.e (produce a complex bread). Ingredients such as sugar, fruits and nuts can be used to produce a sweet bread, nut-bread, chocolate bread and fruit-bread. The shapes of bread can also create varieties such as bread rolls, scones, various types of buns and croissants. The table below gives a summary of these types of breads.Table 8.1: Various types of complex breads and how to make them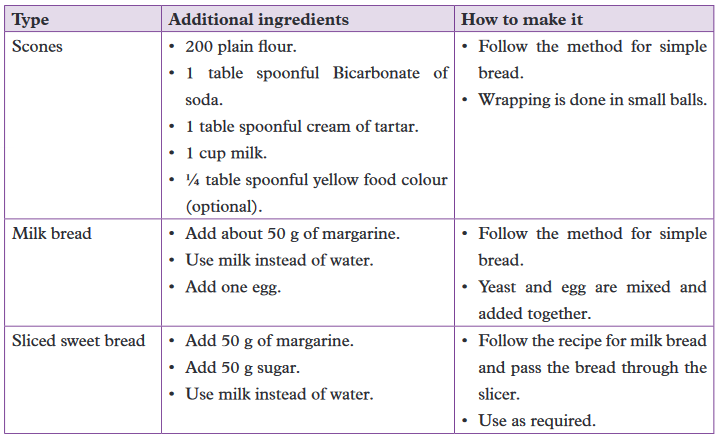
 Other types of complex bread include:• Chocolate bread• Butter breadFollow the procedures below to make a chocolate bread.
Activity 8.5: Making chocolate bread
Ingredients• 1½ cups all-purpose fl our• ½ cup baking cocoa• ½ teaspoon salt• ½ teaspoon baking powder• ½ teaspoon baking soda• ½ cup (1 stick) butter, softened• 1 cup granulated sugar• 2 large eggs• 1 cup buttermilk or sour milk ( optional)• ¼ cup semi-sweet chocolateMethods1. Pre-heatoven to 350° F. Grease 9 x 5-inch loaf pan.2. Mix fl our, cocoa, salt, baking powder and baking soda in medium bowl. Beat butter and sugar in large mixer bowl until creamy. Add eggs, one at a time, beating well after each addition. Gradually beat in fl our mixture alternately with buttermilk. Pour into prepared pan.3. Bake for 20 minutes. Top with chocolate and continue baking for 30 to 35 minutes or until wooden pick inserted in center comes out clean. Cool in pan or wire rack for 10 minutes; remove the wire rack to cool completely. Serve with Chocolate Honey Butter.Common faults in making bread and their causes
Activity 8.6
Visit a bakery around your school and find out the problems workers face when making bread. Do they always get the product they expected? Why?Prepare a report and present to the rest of your class members.The facts
The common faults in bread-making that should be avoided include:1. Heavy texture - This is as a result of:• Insufficient raising agent.• Very cool oven during cooking.• Keeping the mixture for too long after mixing in a cool place and before cooking.2. Bread burnt on the underside and uncooked on top - This results from:• Cooking too low in the oven.• Baking sheet used being too light and without lining.3. Uneven rising - This is caused by:• Uneven rolling.• Inadequate mixing of ingredients.• Over-proofing dough.4. Well raised bread but with wrinkled surface - This is caused by:• Over-proofing dough causing the glutein strands to overstretch and collapse.• The oven may have not been hot enough at the beginning.5. Badly risen loaf with a close texture - Caused by:• Too little liquid in the dough.• Under-proofing6. Bread that has sour unpleasant flavour - Caused by:• Stale yeast.• Too much yeast.• Too slow a proofing process, that leads to development of acids.Activity 8.7
1. Use recommended recipes to make different bread products from fl our mixture.2 Identify different faults in the products made; if any.3 Suggest possible remedies for the faults found. 1. Discuss the factors which determine the quality of bread2. Explain how variety can be achieved in bread making3. Discuss the qualities of a well-made bread.4. Give some abnormalities that indicate bread making process gone wrong.Remember the facts• Wheat flour is commonly used for bread making because it contains high glutein content.• Sugar, fat, salt and liquid are the major determinants of the quality of glutein obtained in wheat flour.• Bread is best made using temperatures of between 200 – 230 °F.• Flour can either be strong, whole meal, germ fl our or white fl our.• The main ingredients of bread making are: wheat fl our, sugar yeast, salt, liquid and ascorbic acid. Eggs and fat are optional to use.• The process of bread making involves: ensuring a good proportion of ingredients, mixing, fermentation, punching, scaling, benching, shaping, baking, cooling and storing.• Bread variety can be provided by fruits, sugar and nuts. It can also be given in different shapes such as rolls, buns, scones among others.
Test your competence 8
1. Discuss the differences between bread and cake.2. Name the two types of breads. What is the difference between them?3. Explain why bread is cooked in a lot of heat for the first five minutes of baking.4. Explain the significance of using ascorbic acid in bread making.5. Match the description with the process using a line. 6. The following are steps of bread making. Which one is not?A. FermentationB. KneadingC. ProofingD. Creaming7. Make a yeast bread for a family of three people. Come up with a list of ingredients, get the ingredients and complete the task in 2 hours. Which steps did you follow? List them down?8. Use True or False to answer the following questions.a) The bread and cake fl our mixtures are reffered to as doughs. ______b) Bread is a type of pastry. _______c) Bread can be cooked without yeast. ______d) Too hot water makes yeast to grow faster. ______e) Too much yeast makes bread mixture raise more. ______f) Too much sugar has no effect on yeast. ______g) Acids have no effect on the bread mixture. _____9. Your friend tells you that he cannot bake bread because he is a man and that bread making is a career for women. What would you advise such a friend?10. Assume you want to venture into a project of making scones in your local community. Plan and execute your plan to get the project started. What resources will you use? What challenges do you think you will come across? How will you overcome them?
Glossary
Aerate: This is the act of introducing air into a light fl our mixture.Ascorbic acid: This is another name for vitamin C.Batter: Batter is obtained by mixing fl our, eggs and liquids such as water or milk.Bakery: This is a place where products such as bread, cake, biscuits and other pastries are made.Baking: This is a method of dry-heat cooking whereby food is cooked and browned by radiant heat from an oven..Butter: Butter fat is obtained from milk.Complex bread: This is bread that involves additional ingredients and additives to improve flavour, nutritive value and appearance.Fermentation: This term refers to any of the chemical reactions induced by micro-organisms such as yeast or enzymes that split complex organic compounds into molecules.Garnishing: This is a term used to decorate food or to embellish food in order to improve its appearance.Glutein: This is protein found in wheat fl our.Kneading:This refers to the act of preparing the dough into a uniform mixture by pressing, folding and stretching during bread making.Proofing:This is a term used to refer to letting the yeast to eat up the sugars in the dough thereby creating attractive flavour and making the bread to rise.Punching: This term refers to defl ating the dough by expelling carbon dioxide gas produced during fermentation.Recipe: This is a set of instructions detailing how to prepare or make a certain type of food.Relax: To allow dough in batter to rest before use.Rub-in: To rub-in means mixing fat into fl our until it resembles fine bread crumbs.Scaling: This is a term that refers to the act of measuring ingredients before baking bread.Simple bread: This is bread made using simple techniques and basic ingredients.Yeast: These are minute forms of fungi, which multiply when subjected to moisture, food and warmth. It releases carbon dioxide, which causes raising during bread-making.References
Bull, W. (1989): Introduction to Needlework, New Metric Edition. Longman: KenyaCartwright, D. (1978): How to Sew Things for your Home. Longman: KenyaJeffrey. H. (2004): Bread: A Bread Book Techniques and Recipes. John Wily & sons.JILL, D. (2000): Cooking Explained. Pearson Education Limited. Edinburgh Gate, Harlow. London.Hart, D. (1977): Senior Needlecraft. Evans Brothers ltd. Campfield press: EnglandMichael, C (1973): Human Nutrition in Tropical Africa; UNICEF.M.O.E (1990): Secondary Home Science Student’s Book for Form 4. Nairobi: KenyaOigo eta al (2006): Longhorn Secondary Home Science Form 1 Student’s book. Nairobi:KenyaOigo eta al (2006): Longhorn Secondary Home Science Form 2 Student’s book. Nairobi: KenyaOigo eta al (2006): Longhorn Secondary Home Science Form 3 Student’s book. Nairobi: KenyaReinhart. P (2001): Mastering the Art of extraordinary Bread. Ten Speed Press.Valarie Cliffe, (1961): Design and Embroidery: A course for Schools. Edward Arnold Ltd. Londonwww.maggiescritchet.com/products/garden-tea-coziez.(Accessed on 16/11/16)WYK, C E et...al (1986): Moderm Home Economics. Maskew Miller Longman Ltd. Horward Drive, Pinelands, Cape Town.