General
- P6: Physical Education and Sports File Uploaded 31/07/22, 11:52
- P6: Physical Education and Sports TG File Uploaded 1/08/22, 09:37
UNIT 4: VOLLEYBALL
4.1 Key unit competence
Learners will be able to improve techniques of passing, blocking, setting, and serving and use these techniques in game situations.
4.2 Prerequisites knowledge and skills
Learners will perform better in this unit if they are able to apply basic techniques and tactics in volleyball. Learners should be able to perform individual techniques and tactics in attack: under head serve, overhead serve, jump serve, hitting or smash, blocking exercises and using basic rules during the short games.
4.3 Cross-cutting issues to be addressed
1. Inclusive education: In teaching-learning process of volleyball the teacher together with the learners must set instructions that include all learners. Learners with physical impairment will be referees. Modifying the height of the net to meet individual learners.
2. Standardization culture: In volleyball lesson, the height of net and the balls must be adapted to learners’ age according to the accepted standards.4.4 List of lessons
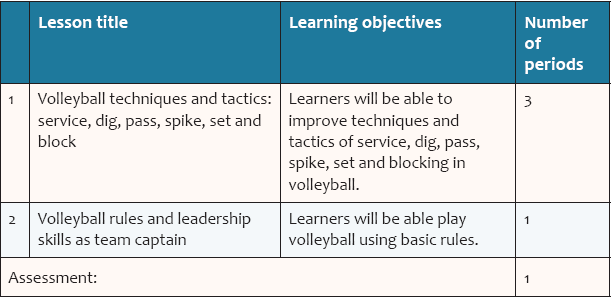
Lesson 1 : Volleyball techniques and tactics: service, dig, pass, spike, set and block
a. Prerequisites
Learners will learn better this lesson if they are able to perform basic exercises of service, dig, pass, spike, set and block.
b. Teaching resources
Playground, whistles, balls, chairs, cones, bibs, sport uniforms
c. Introduction
Opening discussions (in a semicircle formation)
• After checking learner’s readiness, give instructions and rules of the game.
• Forms groups basing on the quantity of resources available as well as on the class size.
• Discuss with learners how to maximize the use of all the available resources.d. Lesson development
In this lesson there are different techniques seen in previous grades. As a primary 6 PE teacher you have to help learners improving their skills. Let learner practice and make correction where necessary. Examples of drills (teaching exercises) are given but it is advised to do further research to enrich your session.
Volleyball techniques and tactics include: service, dig, pass, spike, set and block.
For each technique: show learners how to execute with explanations and if possible demonstrate (NB: Always remember that you must not give a demonstration if you are not sure to perform better than every individual learner).
After setting clear instructions and rules, let learners practice based on instructions and provide necessary support.Warm-up activities
1. Various courses on the court (forward and backward drills)
2. High knees by balancing arms: Prepares the lower body for eventual explosive activity.
3. High knees laterally: Same as high knees, except it focuses on pushing muscles in the legs to prepare the body for explosive lateral activity.
4. Front straight leg run: Wakes up the ankles, muscles around the lower leg and posterior chain.
5. Lateral lunge: Works on active stretching through the entire range of motion of a lunge transition move.
6. High skips: This plyometric exercise should be used when the body is warm. It prepares the body for full explosive movements (i.e. approach jumps).
Exercises of stretching in (In columns formation not exceeding 6 columns)Refer to unit 1, lesson one. For this lesson emphasize the stretching of leg muscles and thigh muscles. Arms and wrist also should be well stretched.
1. Service
The serve is an attack action; it should be safe and aggressive at the same time. This requires great concentration as it is the key to engagement.
• It is always the player in post 1 who serves the ball. The server must stand behind the end line of his court (without touching the line with the foot), where he wants in-depth, but remain within the field width.
• He must hit the ball with one hand. Prior to the shot, the ball must be thrown or dropped (it cannot be held).
• If the ball touches the net, but passes into the opponent court, the service is valid.
• When serving, players must respect their position to the current rotation in order to avoid a false position. There is no error in the server’s position relative to other players during the service.• With the exception of the server, all players must be entirely within the
• field during the service: they must not touch the ground outside the lines.
• Once the ball is hit, players can leave the court and change positions (players in positions 1-6-5 and players in positions 2-3-4 of them). Players’ positions are shown below.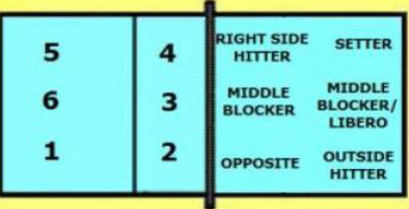
Description of the technique
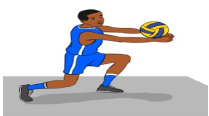
Underhand Serve techniques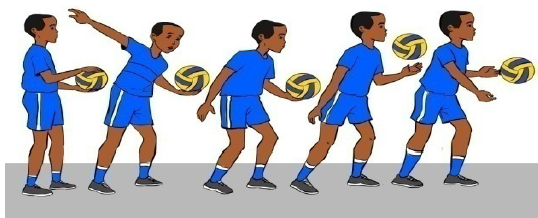
In underhand serve the ball is given a slight under-hand toss from about waist high and then struck with a closed fist by the opposite hand.
The underhand serve is usually the first type of serve taught to a beginning player in youth volleyball.This is the easiest serve to execute, it´s usually used by beginners. The server takes the ball with his left hand (for right-hand), stretch that arm forward at this level of the pelvis, slightly launch the ball high and hit it from bottom with your right hand to make it “flying”. (See figure above)Overhand Serve
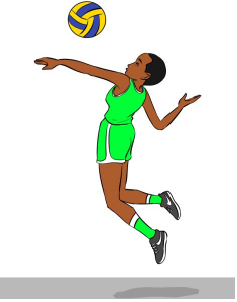
The overhand serve is done by tossing the ball up into the air then striking it with the opposite hand above the shoulder.
This is the most popular serve in competitive volleyball. There are many variations that you can master with practice. As in any serve, make sure you don’t touch or cross the end line at any time during your serve.
This type of serve offers speed and type does not require the use of legs.
• The player throws the ball high and hits it by using the same gesture of the attack, but without fold his hand completely.
• The ball will follow a floating trajectory that makes it uncertain exactly where the ball is supposed to touch the ground. This uncertainty therefore put the receiver in trouble.The Jump Serve
The smashed service is the most frequently used by professionals. This service requires the use of the lower limbs.
To do this, throw the ball very high and do a small run-up (same race as that of the attack) to hit his ball during the suspension, however, it is simple enough to be received because the ball rotating very fast and bounces off the receiver’s arms, which does not need to make efforts to bring it back into the air.
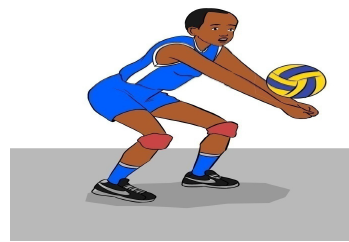
2. Dig
Starting Position: Always be stable and balanced.
Knees and hands position: You have to bend the knees to be close to the ground and have your hands in front of you.
Hands on dig: Always perform a dig with both hands, if possible. Two hands provide a much better tool for controlling the volleyball from going out of bounds.
Two or one: If it not possible to get two hands to the ball, they should use a fist in order to get it back in the air.
Toes and shoulders: Stand on your toes, with your weight balanced, so that you can easily move forward or side to side. Keep the shoulders over the knees to stabilize the body and gain momentum.
Know your ground: Know your portion of the court, as well as know to move to dig the ball when another player is unable to reach it.
Ready for anything: You have to be ready at all times for anything. It may not always be a hard hit from a spike. It could be a dump off by a setter or a tip by a hitter. There are a number of unexpected things that could happen, so it is important to always be focused.Read the position: Learn to watch for things such as which way a hitter shoulders are facing, if there is a hole in your team blocking, or if the line is covered. These things enable you to cover the ground where a setter or hitter will place the volleyball.
Overhand dig: If the volleyball comes at your head or face, you may need to use an overhand dig to get the volleyball back in to the air. This is where you need to use the bottom or heel of your hand to hit.
Diving: Sometimes the volleyball will be hit in a position where you are unable to get there in time on your feet, forcing you to dive. This is difficult because you have to reach out with your body off the ground, make contact with the volleyball, and get it to go in a certain direction so your setter is able to make the next move.Teaching exercises for digging in volleyball
For this technique, you need a setter, spikers and a defender (who has to dig). The hitter hits the ball from the setter over the net towards the learner in defense who has to dig it.
Variety of the spikes so as to help learners:• Learning to dig the ball in front of their body.
• Learning to dig the ball on the side of their body,
• Learning to dig the ball above their head (overhead dig),
• Learning to dig extremely hard driven ball
• Learning to defend a tip/roll shot
• Learning to roll/learning to dive3. Pass
Passing is the most important skill in volleyball. If you don’t get your pass right, you have a low chance of delivering an effective attack because it makes the set and hit suffer.
A. Forearm pass

It is the motion used when the ball is low and / or rapid for the purpose of making a pass, making a reception for a serve, or make a defend a hit (attack).
Technical points to check for the teacher:
• Touch the ball with the forearm;
• Extend the arms straight and parallel;
• Play the ball by extending the legs
• Avoid an active movement of armsPractice drills:
a. Pipeline passing: This exercise will help learners to improve lateral movements while forearm passing.
This volleyball exercise needs two learners. Place two dotted lines of the court about 3m apart. All passing occurs between these lines. After one learner passes the ball to his/her partner, she/he must shuffle sideways to his/her right and touch the sideline. Next he/she must shuffle back before the pass arrives back from his/her partner. After 10 passes each, shuffle to the left sideline for 10 more.
Variations of pipeline passing: Increase the distance learners have to travel to make the drill more difficult. Also, learners passing the ball lower can make the volleyball drill more challenging.b. Partner passing series:
1. First progression: the first learner tosses the ball to the second learner who then passes the ball straight up to him/herself. The learner then adjusts her feet and passing platform so the ball is in line with the center of her body. The learner then passes the ball to her partner. This drill can be done in a continuous manner.
2. Second progression: This time, the learner turns so his/her right side is facing his/her partner and then adjusts his/her feet position and passes the ball angling his/her passing platform behind the ball. Learners can alternate passing from their right and left sides.3. Third progression: In this drill learners will alternate between short quick passes and high passes. From this drill, learners will learn to adjust their positioning depending on where they want to pass the ball. This drill will also help learners to use their legs when passing.
c. Individual bounce pass drill
Learners form a line at the end line facing the volleyball net. The teacher stands near middle front position on the court. The first learner in the line starts the drill by lying on his/her stomach on the ground looking at the teacher.
The teach slaps the ball and the learner gets up off the floor by pushing up with his/her arms. As the learner is getting up, the teacher bounce-passes the ball in the direction of the learner. The learner performs a run through technique to successfully get to the ball and pass it to the target.Variation:
You can also have the learners perform the drill near their base defensive positions. This will make this drill more game-like.
Volleyball passing drills
The objective of this exercise is to improve forearm passing accuracy.
This volleyball passing drill needs one server and three passers. Line up 3 passers in serve- receive. The server serves the ball as controlled and accurate as they can. They want to serve the ball in the way that is easiest for the passers to pass. The aim is to the develop the mind set of passers that they are going to pass accurate ball every single time.
Count the balls that hit the basket as good passes, not just the ones that go in.To make this volleyball drill harder:
• Have the server serve as though as they would like to do.
• Make the volleyball passing drills are often a lot more fun if they are turned into a competition or a game.B. Overhead pass
Technique description
• Hand position: fingers spread and firm, hands in front of face.
• Where to make contact: contact with ball should be made in front of face
• Foot position: feet and body must be behind the ball, feet (base) should be comfortable and solid.
• Making contact: hands and fingers should remain firm and strong on contact, not soft like when you set a hitter.
• Follow through as contact is made: push the ball to your target by extending your arms out from your face.
• Be aggressive: this is an aggressive skill, you have to go to the ball with strong hands and push the ball away from you. You will not be successful with this if you just allow the ball to come to you and you play it passively.Teaching drills for overhead pass
a. Pass and move
Form groups of 4 to 6 learners. After making his/her pass, the learner moves following the pass and change the side.
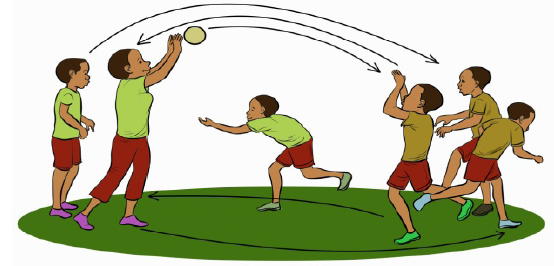
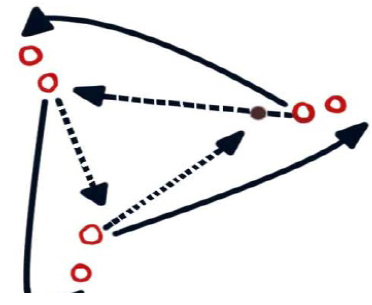
b. Pass and follow in triangle
Organize learners in a triangle; the same as the above drill. After making his/her pass moving following the ball.
c. Pass in box
Form groups of 4 to 6 learners; A passes the ball to P and move; P repasses in the running direction of A, A passes the ball over the rope so that it falls in the box (or in a circle traced on the ground). The winning group is the one which manages to enter in the box many balls than others in 2 minutes.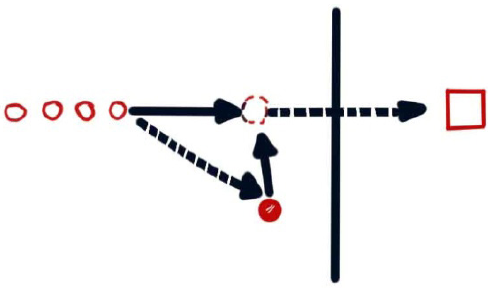
d. Three Passes in movement
Form groups of 6 learners, 3 at each side of the semi-court of the ground; at each side of the rope, there is a setter (S); A1 (B1) passes the ball to Setter, move towards the rope and passes the ball for the second time, this time he/she passes over the rope, afterwards she/he recuperates the ball and places him/herself at the end of the opposite line; B1 does the same.
e. Passes in chain in two triangles
2 teams of 3 learners in the playground of a mini-volleyball; A1 passes towards A2, A2 to A3; A3 passes over the rope and towards B1, B1 Passes to B2, B2 to B3; B3 passes over the rope towards A1 .
Competition: Which group is able to perform 15(30) successive passes without the ball touching the ground?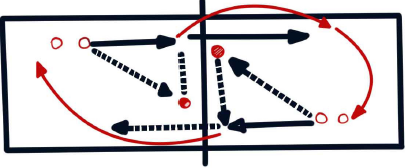
f. Vertical passes in the circle
The whole group of 6 learners trots in the circle formation; the ball is permanently played over in the air, learners trot under the ball.
g. Passes in diagonal
A1 makes a diagonal pass and goes to stand in the last position at the opposite line (B); C runs under the ball and passes to B1; B1 makes a diagonal pass and goes to stand in the last position at the opposite line (A); C runs under the ball and passes towards A2. After 10 (20) passes, the learner C is replaced.4. Spike
steps of spiking in volleyeball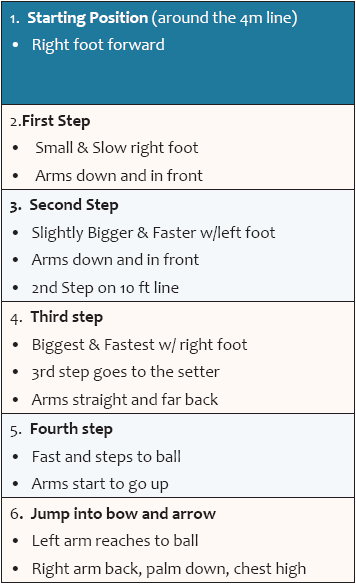

Teaching drills of spiking in Volleyball
a.Spike in a fixed position
A partner leaner holds the ball higher in hand with outstretched arm; the spiking learner raises the arm and hit the ball with the hand towards the ground.
b. Running and spike
Learners are taught to perform the run-up phase and to take the impulse with the right take-off leg. They will perform this exercise in mimic activity in first.
NB: To trace the mark of a run-up way on the ground is a good methodology which will enable learners to take their impulse on the right.
c. Spiking a dead ball
Hold the ball higher than the edge of the net and also approximately 30 cm in front of the net.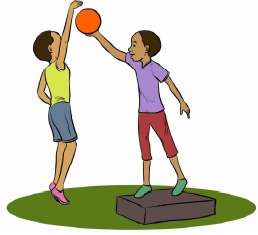
d. Spike after a pass
A setter passes an overhead pass (very high) parallel to the net; the first learner in the line hit the ball after the running-up phase and correct impulse(take-off) on the right leg. (See figure in e).
e. Spike/smash after double pass
The first hitter in the line (A1) stands behind the attacking line and passes the ball using an overhead pass towards a partner in front of the net (P); the learner P passes the ball parallel to the net so that the ball descends in front of the net; the smasher hit the ball after the running-up phase and correct and powerful impulse (take-off) on the right leg; after the hit, he/she run at the opposite line and stands at the end(B).5. Setting in volleyaball
Description of the techniques
Hand Position
Step 1: Bring your hands together above your head.
Step 2: Face your palms toward the ceiling with fingertips touching.
Step 3: Form a triangle with your thumbs and index fingers, opening up the rest of your hands.
Step 4: Separate your hands so that volleyball would fit nicely in the pocket.
Setter Posture
Step 1: Place your feet shoulder-width apart for increased balance.
Step 2: Bend your knees slightly.
Step 3: Place one foot slightly behind the other.
Step 4: Position your elbows out to the side with your hands over your forehead.
Ball ContactStep 1: Relax your hands as the ball drops into them.
Step 2: Extend your arms and wrists, pushing the ball up immediately after the ball contacts your fingertips.
Step 3: Follow through with a complete arm extension as the ball is released.
Tips
Watch the ball after you have set it. If it spins, you are not contacting it cleanly. Slow down your setting motion, which allows you to get more fingers on the ball for better control and less spin.
WarningsAvoid being called for a “lift.” This is illegal and happens when the ball briefly stops on your fingertips before you set it.
6. Block
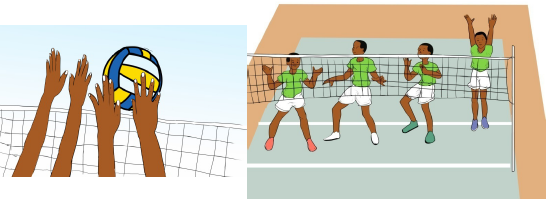
a. Description of the technique
1. Be ready at all times: Timing is one of the most important aspects in blocking; a fraction of a second could be the difference between stuffing an opponent’s attack and missing the ball completely. Being in the ready position will allow you to move more efficiently when attempting a block
2. Stand with your feet shoulder-length apart square to the net. Keeping your feet the proper distance apart will help with your footwork, another essential aspect of blocking. With your shoulders and hips square to the net you will be able to jump straight up more quickly.
3. Keep your knees bent. Keeping your knees bent is an essential part of the ready position. By keeping your knees bent you are ready to jump immediately rather than having to lower yourself and then jump up for the block. Be careful not to get lazy and stand straight up while waiting to block.
4. Keep your arms high. Keep your arms high with your elbows around shoulder height. This also reduces the time it takes to get your arms up for the block. If they begin by your sides, then they have much farther to travel to get high in the air.
5. Keep your palms facing the net. This puts them at the correct angle for blocking and again reduces the time needed to get your hands in position, making you a faster blocker.6. Stay a half arm’s length away from the net. If you touch the net while attempting to block you will get a violation. Allow sufficient space between your body and the net to ensure you do not accidentally touch it.
body in front of the hitter’s hitting shoulder to make the block. There are two footwork patterns that can be used to quickly get to the correct position: the sidestep and the crossover step.b. Footwork
The sidesteps are used when the hitter is within 1m–1.5 m of you. Take one step with the foot closest to the hitter and then follow with the other foot so they are shoulder-width apart once again. Keep your hips and shoulders square to the net as you sidestep. If it takes you more than two steps to reach the hitter then you should rather use the crossover step.
The crossover steps are used when you need to cover more ground, for example if the hitter is more than 1.5 m away from you. Step first with the leg closest to the hitter and then cross the other leg in front of your body. Although your hips may angle towards the hitter during the cross step, your shoulders should remain square to the net. Step again with the foot closest to the hitter to bring your feet back to shoulder-width apart and make your hips square to the net once more.Teaching exercises for the block
a. Blocking a dead ball
Four learners stand on chairs holding balls with two hands over the net. other learners form a line at the other side of the rope; they slide along the extent of the rope and jump high to touch the balls with two hands. They must push on the ball.
• Learner standing on chairs holding the ball
• The learner who is doing the block
b. Simultaneously blocking
Two partner learners standing (each one in front of the net, vis –a-vis), one of them holding the ball. They jump together and hold the ball over the net with two hands.
Variations:One of the learners with the ball jumps and tries to throw the ball over the net down on the ground, the other learner simultaneously jumps to block actively and try to push the ball in the opposite camp.
c. Combine smashing with the block
A1 passes towards P, runs and takes the impulse and smashes. After smashing he/she does the block for the smash of A2; after he/she goes at the line B. B1 does the same at the opposite side.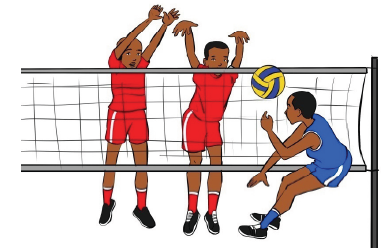
Mixed exercises of blocking and other techniques and tactics
a. Hitting, blocking, defence, warm up
This volleyball drill will practice defensive movements and transition into hitting from defensive movements.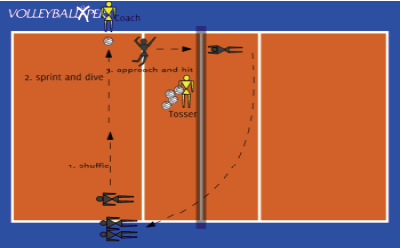
Description
Setup
• One learner on right sideline (will pass and then hit)
• One tosser
• One blocker on opposite side of net
• Line waiting to enter on sidelineInstructions
• Learner starts on right sideline and shuffles twice toward the center of the court.
• Learner turns and sprints toward opposite sideline (left sideline).
• Learner dives and touches ball.
• Learner gets up and gets into hitting position.
• Tosser tosses ball.
• Learner approaches and attacks.
• Blocker attempts to block.
• Blocker recuperates the ball and goes to end of line.
• The learner who was attacking replaces blocker.
• The teacher replaces ball.Variations
Go in the opposite direction to work both sides (from left sideline to right)
Teaching points
• Encourage learners to roll after dive if able to
• Check for learners to turn shoulders to passing target
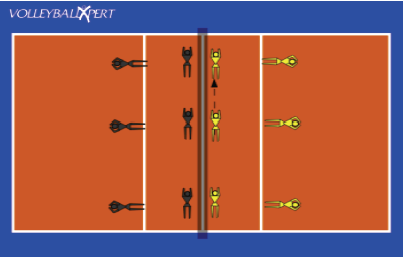
b. Middle hitter, passing, hitting, serving, setting
Description
This drill focuses on hitting middle out of serve receive.
Setup1. A server on one side of the net with one middle blocker
2. Three passers on the opposite side with a setter and a middle hitter
Instructions
1. Server serves the ball over the net and in.
2. Middle hitter transitions into position to hit.
3. Serve receive passers pass ball to setter.
4. Middle hitter calls for set and approaches.
5. Setter sets the middle hitter.
6. Middle hitter attacks.
7. Blocker attempts to block.
8. Repeat until middle hitter gets a desired number of good hits, over the net, hard and in.
9. Middle hitter and middle blocker switch.Variations
• Alternate middles with each swing (for teams with more than 2 middles). Middles hitters will hit, then block, then wait, then repeat
Teaching points to focus on
• Making sure that middle hitters are calling the set they want in plenty of time for the setter to react
• Encouraging passers to focus on a perfect pass to the setter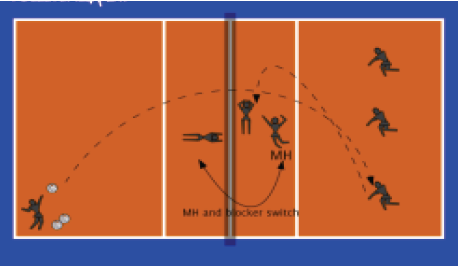
Volleyball serving, receiving, passing, setting, hitting, blocking, defence
Description
This drill is to practice serve-receive, and understand the importance of a good pass
Setup
1. One server
2. A team of 6 learners on the receiving side opposite the server
3. Three blockers on the same side as the server
Instructions
1. Learners on receiving side set up in serve receive for their first rotation.
2. Server serves to serve receive team.
3. Learners pass set and hit.
4. Blockers attempt to block.
5. Receiving side must get three hard swings in a row in order to rotate.
6. Change server when receiving team rotates.
7. Repeat until receiving side rotates all the way around.Variations
1. Change the goal to suit the team, either increase or decrease the number of swings necessary to rotate.
2. Instead of hard swings the goal could be the setter must be able to run the middle or right side attacker three times in a row.
Teaching points to focus on
Making sure that learners are concentrating on a good pass before worrying about anything else. A good pass will equal a good play.
c. volleyball blocking, passing, hitting
This drill teaches blockers when to block, hit an overpass, or back off the net and pass.
Description
This drill teaches blockers when to block, hit an overpass, or back off the net and pass.
Setup
1. Three tossers on one side of the net
2. Three blockers on opposite side of the net
Instructions
1. Tossers toss the ball over the net to the blockers
2. Blocker must decide whether to block the ball, step back and pass, or hit the ball
3. Reset blocker and repeat4. Tossers must change tosses: close on the net, on top of the net, over the net, etc. This allows blockers to make different decisions on what to do.
Variations
1. Add a second blocker for a double block
2. Make the middle blocker shuffle to outside hitters to form a double block
Teaching points to focus on
Blockers hands positions should be ready at all times
d. Pass, set, hit, dig, and warm-up.
Description
This drill is good for warm up while practicing communication and ball control.
Setup
1. Same number of players on each side behind the 3 m line
Instructions
1. The teach gives alternating sides free balls
2. Learners playing: dig, set, and back row attack while calling the ball
3. Each time a player touches the ball; they must run and touch the net before being able to touch the ball again
4. Play rally scoring games to a set number of pointsVariations
1. Add a blocker to each side
Teaching points to focus on
The fewer number of players on each side makes for more movement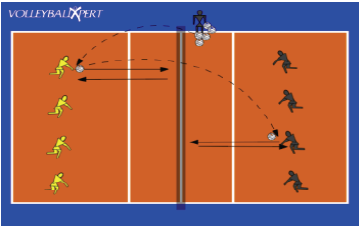
e.Volleyball offense, passing, setting, hitting, blocking
Description
This volleyball drill will practice hitting against the block and transitioning off the net.
Setup
1. Three blockers on one side of net
2. Three hitters, a setter, and two passers on one side
Instructions
1. The teacher tosses ball to passer
2. Passer passes to setter who sets any hitter running any team plays or sets
3. Blocking side attempts to block, focusing on attempting to double block every attack
4. Hitting side gets 1 point for every hard driven attack they can get past the block
5. Blocking side gets 1 point for every significant touch at the net
6. Have the setter and passers switch sides of the net to give the other players a chance to pass the free balls and attack
7. Play to a set number of points!Variations
1. Use a setter for both sides of the net and only have two front row hitters
Teaching points to focus on
Watching for significant touches at the net, not just barely touching the volleyball
f. Volleyball hitting, passing, blocking
Description
This high energy drill focuses on blocking, attacking and endurance
Setup
Instructions
1. Two tossers(the teacher may be one of the tossers) at the net
2. Follow letter diagrams for starting positions
3. Two tossers (the teacher may be one of the tossers) begin by tossing to their respective outside hitters
4. Hitters try to hit around the block to the middle back player
5. Middle back is trying for a good pass to the target area
6. Players rotate quickly and are ready for the next toss to the hitters
7. Continue drill by rotating: Hitter under the net to blocker, blocker to middle back, middle back to hitter, hitter under the net to blocker, blocker to middle back
8. Continue drill until all players have attempted a certain number of hits
9. Rotations go in alphabetical order on diagramVariations
Add two setters and keep ball in play
Teaching points to focus on
1. Watching to see if hitters “see the block” and aim to hit around them or adjust
2. Watching for blockers to adjust to toss where hitter will be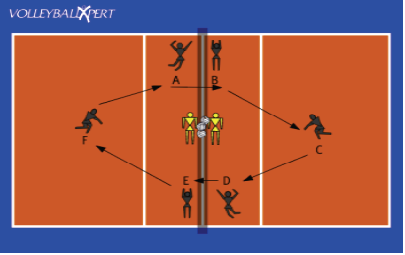
g. Volleyball blocking, passing, setting, hitting, defence, offense
Description
This blocking drill teaches how to face a double block.
Setup
1. 6 players on one side (attacking side)
2. 4 blockers, one server and two defenders on opposite side (defending side)
Instructions
1. Start with the defending side serving
2. Defending side starts with 4 blockers on the net
3. If attacking side gets the ball past the block, then the defending side plays the ball out
4. The fourth blocker (right side) steps off the court to get out of the way of the offense and returns to court when ball goes to attacking side
5. Give the attacking side a goal to meet: 3 out of 5, 7 out of 10 etc.Variations
Change sides for the 4th blocker
Teaching points to consider
Watching correct blocker positioning with footwork and hands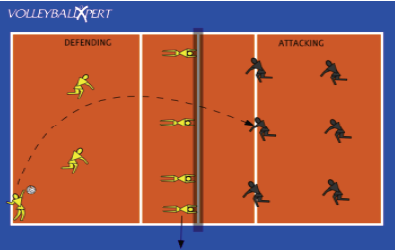
h. Volleyball warm up, blocking, middle hitter.
Description
This drill will focus on all the necessary footwork to be a middle hitter and blocker.
Setup
Two lines, one on each side of the court in the left front position
Instructions
1. The teacher will need to demonstrate and call out directions until all learners understand the footwork routine.
2. Starting at position
3. Shuffle into hitting position
4. Approach the net for a hit
5. Block jump
6. Crossover step outside and block again
7. Transition off the net
8. Approach the net for a hit
9. Go to the end of the lineVariations
Only use one side of the net and put one or two blockers on the other side of the net to practice fronting the hitter.
Teaching points to consider
Make sure the players are using the correct foot on the crossover step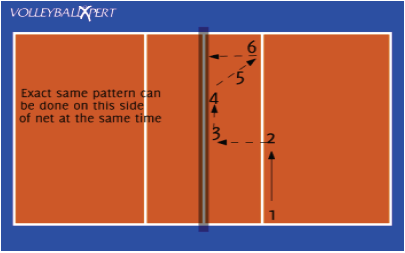
I. Volleyball coverage drill, hitting, blocking, defence
Description
This volleyball coverage drill will teach how to cover their hitters.
Setup
1. six learners in normal set on one side of the court (receiving the ball)
2. two blockers in each of the three blocking zones on the opposite side
Instructions
1. Teach tosses a ball to receiving side who plays the ball.
2. With so many blockers (6) chances are the returns will be blocked.
3. Receiving side covers the hitters and passes up the blocked ball.
Variations
Can encourage team to get three in a row before rotating positions.
Teaching points to consider
Look to see where holes are on coverage or in block.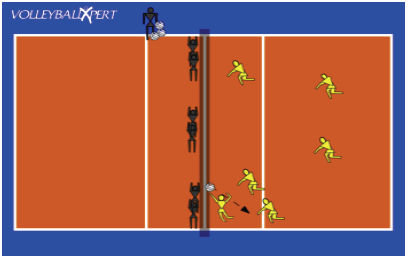
j. Blocking
Description
This drill works on blocking, footwork, and making sure the middle blocker closes the block with the right or left front player.
Setup
Set up a middle blocker, right side blocker, and left side blocker on both sides of the net. Have another player behind each blocker on the 3m line doing an abdominal strengthening exercise while they wait for their turn to block. (This should be 6 blockers total, and six other players waiting at the 3m line)
Instructions
1. When learners are in position, teacher calls out middle, right, or left. Middle blocker must either practice a block alone in the middle or use their footwork to block with the right or left blocker.
2. Middle blocker must re-set before next blocker is called.
3. Switch positions with players waiting on ten foot line when signaled by coach.
Variations
Teach can add a volleyball toss after calling out specific block for the players to practice with.
Teaching points to considerMiddle blockers are working on communicating with outside players to close block and jump together.
Description
This volleyball 3 versus 3 drill is great to teach your offense how to read and react to the defense. Players are forced to read whether the defense has blockers and must react to each scenario.
Setup
1. Learners form 2 teams of 3 (3 versus 3).
2. One team has 2 blocking players and a passer.
3. The other team has a passer, setter, and hitting player.
4. The coach should have a rack of balls off the court.
Instructions
1. The coach begins the drill by playing a free ball over the net to the team with the passer, setter, and hitter.
2. As the ball is played over the net the coach calls out whether the blockers should attempt the block or not.
3. The passer, setter, and hitter must react to the defense and quickly get into position to return the ball.
4. Players should play out the point 3 versus 3.Variations
Allow the defense to choose when to block or not.
Alter the drill to focus on blocking and focus on blocking communication and positioning.Teaching points to consider
Listen for good communication among the learners while playing.
Make sure the learners are reading the block and altering their position based on the blocking players.
3 Vs 3 reading the block
k. Volleyball pass and move, passing, ball controL
Description
This passing drill focuses on good passing technique as well as movement after the pass.
Setup
1. Set two target players with a ball each near the attack line.
2. Set two poly spot markers near the end line on each side of the court.
3. The passers start at the marker near the right side of the court.
Instructions
1. The target player in front of the passers tosses a ball to the first passer in line.
2. The passer returns the ball with a pass back to the target player and sprints to the attack line near the target, touches the line with their hand, and continues to the marker on the left end line of the court.
3. The next target player tosses a ball to the passer who again returns the ball to the same target player.
4. The passer then sprints to the net, shuffles across the court at the net while jumping up 3 times to simulate blocking.
5. The player returns to the end of the line.
6. The drill should be fluid and the next passer should start as the first target player receives their return pass
Teaching points to consider.Focus on good passing technique, moving after the pass, getting height at the net.

e. Assessment (R-C-A discussions)
Closing discussion
Reflection
• What is the definition of a pass in volleyball?
• What is considered an attack in volleyball?
• What does attack mean in volleyball?
• What is hitting in volleyball?
• What is attack block in volleyball?
• How is the spike ball hit?
• What is passing in volleyball?
Connection
Discuss importance of passing in volleyball compared with other games.
Application
What are the benefits of applying correct volleyball techniques?Lesson 2: Volleyball rules and leadership skills as team captain
a. Prerequisites
Learners will learn better this lesson they are able to demonstrate and use basic volleyball rules during the short games.
b. Teaching resources
Playground, whistles, Volleyball balls, chasubles, cards
c. Introduction
Opening discussions (in a semicircle formation)
• Discuss with the learners their readiness and proper wearing
• Ask learners to make teams of equal number and gender balanced
• Set clear instructions to follow in teaching basic rules during a game situation.
• Discuss on the importance of adhering to rules in volleyball match
Warm-up and stretching activities
For warm-up and stretching activities see unit 1d. Lesson development
1. Volleyball court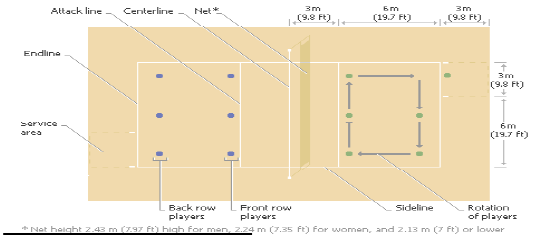
The field must be rectangular and symmetrical. The court length is 18m and 9m wide and be surrounded by a free area of at least 3 m wide on all sides. Lines are 5cm wide and must be light in color different from the court.
In each camp there is a line of attack, the outer edge is drawn in 3 meters from the axis of the center line and which marks the front area (players cannot take back pulse in the that front area to attack once they are in back area .
The height of the net is 2.43m high for men, 2.24m high for women and 2.13 m or lower for children aged 12 years or younger for high young players.2. The ball
It is spherical, flexible, light-colored synthetic leather cover. Smaller and lighter than a basketball, the volleyball is 63.5 to 68.6 cm in circumference and weighs 255 to 283, internal pressure: 0.30 to 0.325 kg/cm3.
3. Team and how to play
• A six-person volleyball team includes three front-row players, who stand near the net (4-3-2) from left to right position and three back-row players (5-6-1) from left to right position.
• When a team gains possession of the serve, its players rotate their positions, moving clockwise. For example, the player who was in the right-front position moves into the right-back, or serving, position.
• The server starting the game stands anywhere behind the end line. Only one attempt is allowed on the serve.
• By hitting the ball back and forth over the net, with the hands, forearms, head, or any part of the body, play is continued until one team fails to keep the ball in play (in the air) or until a rule violation is committed.
• The ball must be returned by a team over the net after no more than three hits, and no player may hit the ball twice in succession.
• The return over the net must be done without catching, holding, or carrying the ball, without a player touching the net, and without entering the opponents’ area.
• A player keeps serving as long as his or her team continues to win points. The serve must rotate to a new player each time a team wins back the service.4. Scoring system
Officially, a volleyball match is won by the team that wins the best of five sets or (3 wined sets). All sets are rally scored. In the rally score system, a point is awarded on each service or side out. This means that a receiving team’s error or penalty results in a point. Likewise, a serving team’s error or penalty results in a point and the ball for the receiving team to serve. It isn’t necessary for the winning team to be serving when the winning point is scored.
A set is won by the team which first scores 25 points with a minimum lead of two points. In the case of a 24-24 tie, play is continued until a two-point lead is achieved.
The deciding set of any match (3rd or 5th game) is played to 15 points. The winner is the first team to achieve 15 points with a minimum lead of two points. Play is continued until a two-point lead is achieved.
A default game results if a team cannot field six players or fails to begin play after the referee request. Default games are scored either 25-0 or 15-0 depending on the set being played. In a set to 25 points, if a default is due to injury, the losing team keeps its points and the winning team is credited with at least 25 points or up to 27 if necessary to provide a two-point victory.5. Officials
In competitive volleyball include a referee, scorer, umpire, and line judges.1st Referee
The first Referee is in full control of the match including settling all questions of rules and those things not covered by rules. The first Referee has the right to overrule all other officials. The first Referee also has the power to impose sanctions on players. The first Referee is positioned at one end of the net; with her/his head above the net. After blowing a whistle to stop play, the first Referee uses hand signals to indicate who won the point, the fault committed, or replay.2nd Referee
The second Referee is concerned with such matters as service order of each team, keeping time, assisting in making calls, supervision of substitutions, signaling the end of play, and replacing the first Referee, if necessary. The second Referee is positioned on the floor at the opposite end of the net from the first refereeScorekeeper:
The scorekeeper sits on the side of the court opposite the 1st Referee and records all scores, makes sure the serving order and rotation are correct, keeps track of substitutions and time outs, and keeps track of protests. The scorekeeper also indicates when a team has scored an 8th point in a deciding game so that sides can be switched.6.Rights and Responsibilities of the Participants
Only the playing captain or coach may ask for a time-out or substitution and only when the ball is not in play. Only the playing captain may speak to the referees. And the team captain is responsible for the conduct and discipline of his team. It is the only one allowed to speak to the referees when the ball is offside for an explanation.7. Players Equipment
Uniforms must be similar; each player wears a jersey, shorts and sneakers, clean and of the same color. The Libero, if used, will wear a uniform of contrasting color8. Misconduct
Individual sanctions may be assessed against a player or coach for a variety of unsportsman like actions during or between games including: shouting at an opponent; addressing officials about their decisions; trying to distract an opponent; or coaching in a disruptive manner.Yellow or Warning Card:
This is given for minor unsporting offenses. A second yellow card to an individual will result in an automatic red card. It goes together with 1 point for other team.Red or Penalty Card:
This is given for serious offenses. If a team is serving and receives a red card, they will lose the serve. When rally scoring their opponent also is awarded a point. If the team receiving serve get a red card, their opponent will receive a point.Expulsion:
This is given for extremely offensive behavior. The player is out for the rest of the game. No additional penalty is given.Disqualification:
This is called when a player receives a second expulsion during a match or when physical aggression is shown toward an official, another player, or a spectator. The player is ordered from the playing area for the balance of the match. No other penalty is given.
Positions of players in volleyball court.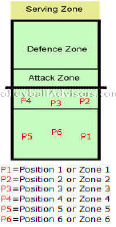

P1 = Right Back
P2 = Right Front
P3 = Middle Front
P4 = Left Front
P5 = Left Back
P6=Middle Back.
Basics of volleyball positions on the court
There are three players on each of the zone.
• Front row players are players who are allowed to block the opponent and attack the ball in the attack zone.
• Back row players are players who play defence by digging opponent’s attacks and attack the ball behind attack line (3 meter line).
• Players are rotating clockwise on the court after winning the rally after the opponent’s serve.
• Players have rotational positions (position 5, position 2 etc.) on the court from which they are allowed to move to their playing positions (opposite, middle hitter etc.) after the serve when appropriate.
Volleyball positions on the court can also be called zones. Position 4 being called zone 4 etc.Playing Positions in Volleyball
Volleyball positions in a team are :
• Outside hitter (also called wing spiker, left side)
• Right side hitter (wing spiker, right side)
• Opposite hitter (attacker)
• Setter
• Middle blocker (center, middle hitter)
• Liberoa. Outside Hitter (also called wing spiker, left side)
Outside Hitter is the player who carries the serve receive responsibility along with the libero.
Outside hitter most often attacks the balls which setter sets to the antenna to the left side of the court.Therefore, after the serve outside hitters place themselves to the left front position. Sometimes setters run offensive plays in which outside hitters run to hit balls inside around the middle blockers.
Outside hitters play both the front row and the back row. In modern high level volleyball outside hitters are responsible for hitting the 3 meter line attacks, usually from the middle back position when playing in the back row.
Playing on the outside hitter’s position requires great all around skills because they play through the front row and the back row.
Wing spikers have to have the skills to pass, attack, block, serve and play defence.
Wing spikers along with the opposites are often players who score the most points in the game.Outside hitter’s passing responsibility makes them extremely important player for the team
b. Right side hitter (also called wing spiker)
Right side hitter has the similar role than outside hitter, they play front row and back row and are carrying pass, attack, block, serve and defence responsibilities.
Right side hitters aim to place themselves to the right front playing position.
When playing top level international volleyball on the back court right side hitters often have 3 meter attacks responsibility from the middle back position.
Right side hitter can be also called a wing spiker.c. Opposite Hitter
The opposite hitter is the player who most often scores the most points in the team. Opposite hitters don’t have the passing responsibilities. They stand behind the passers on the rotation while libero and outside hitters pass the ball and place themselves to the left front, right front or right back playing position. The opposite usually gets the most sets in the game.
Often counter attack sets after the defensive play go to the opposite hitters; they carry the responsibility of hitting the ball against a solid block when the pass is off the net.
Opposites need to have great blocking skills since they play against the opposite hitter of the opponent or opponent’s outside hitter when in the front row.
Opposites also need to have defensive skills because they also play the back row where they are responsible of hitting 3 meter balls from the right back position.
In professional volleyball opposites along with setters have traditionally been the highest paid individuals; those are volleyball positions in most demand.d. Setter
The setter is the playmaker, point guard or the quarterback of the volleyball team. A setter’s responsibility is to run the team’s offense and build up offensive scoring opportunities for the team.
The setter plays both front row and back row, therefore s/he needs to be able to block, serve and play defence.
The setter needs to have good blocking skills because in front row position s/he plays against the opponent’s outside hitter who often carries big load of the attacking responsibility for the team.
The setter plays the right front or the right back positione. Middle blocker (Center, Middle, Middle Hitter)
Middle blockers main responsibility is to stop the opponent’s offense.
The middle blocker builds a block which stops the ball, or allows the team to dig the ball up.
Middle blockers’ job is to stop the opponent’s middle hitters or wing hitters in co-operation with teammates.
Middle blockers need to have great blocking, attacking and serving skills.
Note on the middle blockers in the back row:In competitive volleyball middle blockers usually play defence only on one rotation - after an own serve. After losing the rally after an own serving turn, a libero usually comes in and replaces the middle blocker.
The middle blocker usually doesn’t master in defence because they hardly play any of it. However, at junior level practicing defence and even passing is much recommended for the middles. Allow players to practice all the skills equally to ensure their overall skill development. This improves their athleticism and prepares players to play other positions - i.e. they may not be tall enough to play middle in the future.f. Libero
The libero is fairly new position in volleyball. The libero is a back row specialist who is allowed to play back court only.
The libero wears a different colour shirt in the team and is allowed to enter and exit the game without substitution request.
The libero can replace any player on the court and most often replaces middle blockers.
The libero is not allowed to serve the ball.
Since playing in the back court only, the libero needs to have the best passing and defensive skills in the team. The libero need to have exceptional serve receive skills because often they pass a larger area than other serve receivers in the team. Libero most often plays the left back position.Official hand signals for volleyball officials

e. Assessment (R-C-A discussions).
Reflection
• What are the six positions in volleyball?
• Can you hit volleyball with your head?
• Can you kick the ball in volleyball?
• What is the most important position on a volleyball team?
• Where yellow card is used to impose sanction? Red?
Connection
Give some examples of volleyball rules from other games similar to volleyball rules.
Application
What is the importance of applying volleyball rules in game situation?
4.5. End unit assessment
• Set exercises of passing, receiving and spiking the ball
• Set exercises of blocking in volleyball
• Organize a competition between teams and if possible reward for the winners.
4. 6. Additional activities for learnersAs additional activities to give to your learners you need to:
• Encourage learners to actively participate in volleyball training sessions organized by different coaches and private individuals in training centers.
• Encourage also learners to participate in volleyball community competitions if there are any (e.g.: Kagame cup competitions, right to play….)
• Encourage learners to participate actively in school organized competitions as well as in Sector, District and national competitions (e.g.: Inter-school’s competition organized by FRSS)
• Encourage learners to participate in all youth competitions available (e.g.: Competitions organized by FRVB and other stakeholders).
• Encourage learners to create local football competitions in their villages.