General
- P6: Physical Education and Sports File Uploaded 31/07/22, 11:52
- P6: Physical Education and Sports TG File Uploaded 1/08/22, 09:37
UNIT 2: ATHLETICS
2.1. Key unit competence
After completion of this unit learner will demonstrate techniques of jumping, running, and throwing objects from different positions.
2.2. Prerequisites knowledge and skills
Learners will learn better this unit if they are able to perform different types of basic techniques of athletics and understand their importance. Learners must know to explain the rules and their importance and to demonstrate techniques to improve his/her performance in athletics and use rules of athletics in the game situation.
2.3. Cross-cutting issues to be addressed
1. Financial Education: Learners must be able to manage well athletics equipment. Some of them are costly and can easily be damaged like javelins, batons etc.
2. Standardisation Culture: In Athletics, the selection of teaching materials and equipment must meet the accepted standards according to learners’ age and sex. These materials are shot, discus and javelin, hurdles in races ... As a teacher you need to watch out for the size, weight and height of these tools according to learners’ age and sex as well as their abilities.2.4. List of lessons


Lesson 1: Different types of jumping, running, and throwing
a. Prerequisites
Learners will learn better this lesson if they are able to perform:
• Forward squat jump, jumping over short obstacles, and long jump.
• Exercises of running: sprint, hurdles, shuttle relay, ladder running, and resistance races.
• Exercises of throwing: throw heavy objects at small distances by using one hand.b. Teaching resources
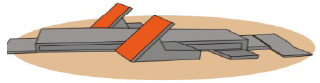
Playground/track, whistles, mat, hurdles, javelin, discus, batons, shot, cones, stopwatch, pole, etc.
c. Introduction
Opening discussions
In this part of the lesson you need to check learners’ readiness to work out and set clear rules and instructions concerning safety measures as throwing can cause accidents if a learner hits his classmate with the thrown objects.
Warm-up activities
To warm-up ask one learner to lead the activity. They will do jogging with increasing acceleration and speed in a progressive way until they are warmed-up.
Exercises of stretching in (In semicircle formation)
Tell one of the learners to lead the stretching activity (use stretching exercises in the first unit, lesson 1).
Tell learners to focus on hamstring to prevent from hamstring tearing which is a common injury in sprints.d. Lesson development
• Different types of jumping include: Long jump, triple jump and high jump
•Different types of running include: Sprint, middle and long distance running and race walking.
• Different types of throwing include: javelin throw, discus throw and shot put throw.
In this lesson, you need to teach preparatory exercises of jumping, throwing and running. Techniques will be seen in next lessons.
Let learners practice based on instructions and provide necessary support.
Exercises to practice are listed below but you can enrich them by your own research.1. Jumps in athletics
Physical activities to develop skills of jumps: long, triple and high jump.
• Exercises of running with speed in the run-up phase for both long and triple jump on track
• Exercises of taking-off and landing without techniques after run-up phase with maximum speed.
• Exercises of jumping high without applying specific techniques
• Exercises of leap-frog with sufficient repetitions
• Exercises that emphasize coordination in all movement.
• Those exercises include: running up on the runway track with leaping strides.
• Exercises to help learners recognise their taking-off leg and the number of strides every learner needs to make during the run-up phase.2. Runs in athletics
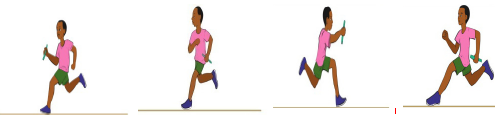
Different types of running in athletics include the disciplines explained below. In teaching put emphasize on the sprints and middle distance running because considering the age of learners they are adapted to their capability.
1. Sprints: In this activity includes:
• 100 m, 200 m, 400 m
• 4x100m and 4x400m relay
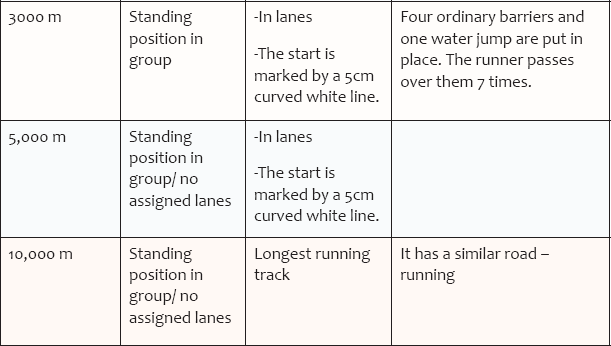
• 100m, 110m hurdles.2. Middle distance running: 800m,1500m,3000m and 5000m.
3. Long distance running: 10000m
Physical activities to develop skills of running
Exercises of running sprints:• Reduce the distance and ask learners to run at their maximum speed.
• Increase the distance and ask learner to run at their maximum speed.
• Doing leaping strides (coordination and agility is important for this exercise).
• Big arms movement (arms swings): emphasize elbow back and the hand up near the face when running on their top speed.
• Running from different departure position: lying down, standing, bent, kneeled down etc. this helps to improve their reaction time which is extremely important in sprinting.
• Ladder running to develop frequency of strides and coordination. Variations to be done by mixing forward ladder run with lateral ladder run.
• Running exercises with obstacles: start by short obstacles and increase progressively, start by short distances and increase progressively.
• Exercises to help learner to recognise the starting leg in sprint, positioning himself/herself in starting blocks and being able to start on time after the starting signal (Whistle, starting gun, any other tool which can make sound).
• Learners must be able to recognise the following starting signals: 1. On your marks, 2. Set and 3. The final starting sound which is produced by a starting gun, a whistle or any other object which can make a sound.
• Exercises of resistance and endurance running: Ex: teacher will choose between 4,6,8,10,15 minutes running without stopping according to learner’s abilities and the progression they are making.
• Alternate speed running with slow running, alternate speed running and walking
• Exercises to help learners stretch their stride at the maximum stride (e.g. running up stairs by skipping some stairs).• The teacher also must help learners to be able to start on time after the starting signal (Whistle, starting gun, any other tool which can make sound) and to start with the correct foot.
3. Throws in athletics
In teaching learning process let learners practice and guide them.
1. Javelin
• The teacher helps learners to perform exercises of gripping the javelin properly
• Learners perform exercise of running-up by holding the javelin high over the head (elbow level with neckline)
• Tell learners to do many repetitions of gripping the tool and running-up holding the javelin correctly.
• Learners may use batons if there is shortage of appropriate tools.2. Shot:
Using shot or similar objects learners may be given exercises of throwing at the longest
distance they are able to throw. Smooth techniques will be developed in next lessons.
3. Discus:
Using discus or similar objects learners may be given exercises of throwing at the longest distance they are able to throw. Smooth techniques will be developed in next lessons or next years.
e. Assessment (RCA discussions)
• Reflection
1. What difference have you noticed between sprint and endurance races?
2. What are the types of high jump?
3. What are the disciplines or track races running?
4. What are the disciplines of throws?
• Connection
Give some examples previously done physical activity in connection with this lesson.• Application
Where do you think the activities of today will be beneficial in further lessons?
Lesson 2: Jumping exercises with techniques
a. Prerequisites
Learners will learn better this lesson if they are able to perform different exercises of jumping. Learners must also be able to perform wide range exercises of jumping: forward squat jump, jumping over short obstacles and long jump.
b. Teaching resources
Track and field with jumping equipment, tape measure, whistle, mat, land pit
c. Introduction
• Opening discussions (in a semicircle formation)
After checking learners’ readiness, discuss with them safety measures of jumping to prevent from possible accidents.• Warm-up activities (same as for the previous lesson)
• Exercises of stretching (refer to unit 1, lesson 1)Stretching exercises are the same as for the previous lesson but learners must emphasize legs’ muscles to prevent from possible injuries in throwing.
Let one learner lead the stretching and intervene for necessary support
d. Lesson development
• Jumps include: Long jump, triple jump and high jump.
• Different techniques of high jump: Scissors, Eastern cut-off, Western roll, Straddle and Fosbury flop (which most used).
• For each discipline you have different steps described with details. Set clear instructions and guide learners to perform each step based on your guidance. Pole vault will not be taught; learner will be given basic skills to jump long jump using pole.
• In high jumps techniques emphasize fosbury technique as it is the most used in modern competitions.
Let learners alone practice based on instructions and provide necessary support
1. Jumps
1. Long jump
Techniques of long jump

Step 1: Run up. In the run up phase, be consistent and speedy.
The teacher needs to have an idea of what is an appropriate length run-up for learners according to the age of his/her learners. This can be done by matching their age with a recommended number of strides in their run-up. As guide:
10 years = 10-11 strides
11 years = 10-12 strides
12 years = 11-13 strides13 years = 12-14 strides
14 years = 13-15 strides
15 years = 14-16 strides
16 years = 15-17 strides
17 years = 15-21 stridesStep 2: Take-off: The take-off leg is the one that stays on the ground to support your weight when you kick a ball.
Find out which foot the learner jumps off. Is it their left or right foot that hits the board? This is their “take-off” foot.
Ask the learners to show you how they like to stand at the start of their run-up. Is their take-off foot forward or back? If it is forward, the learners will need to take an even number of steps in their run-up to ensure that foot hits the board. If it is back, they will need to take an odd number of steps in their run-up.
You will find that there are learners who will tell you that they don’t know which foot they like forward at the start of a long jump run-up. If this occurs, ask them to show you a standing On Your Marks racing position. The position that they take is generally how they will begin their long jump run-up.Step 3: Flight
Step 4: Landing. After the peak of the jump, the arms sweep forward and down to the hips. The feet are extended out until the jumper hits the sand. The knees and hips absorb the impact of the landing as the body continues to move forward.
2. Triple jump
Techniques of triple jump
Jumpers take off in the “hop” phase and land on the take-off leg. They take one step onto the other foot (step phase), then jump. Otherwise, triple jump rules are identical to those of the long jump. Jumps are measured from the nearest impression made in the landing pit by any part of the jumper’s body.
There are three phases of the triple jump: the “hop” phase, the “bound” or “step” phase, and the “jump” phase. These three phases are executed in one continuous sequence.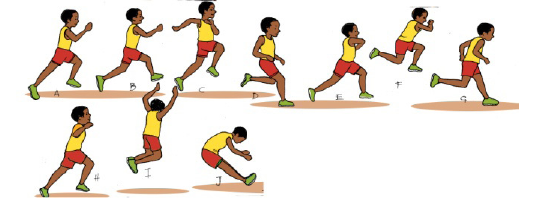
Step1. Run up to the board and jump. This will begin the first phase: hop. Generally, learners will want to use their dominant foot. They need to get a running start (lasting about 17-18 strides) so they can forcefully jump off the board.
Tell learners to pull their opposite foot up behind themselves.
Tell learners to make sure not to run beyond the board during the hop, as doing so is considered a foul.Step 2. Tell learners to keep their arms extended in front of their body.
While they are airborne during the hop, they must skip, and jump, never let their hands drop lower than their chest or higher than their chin.
Tell learners to move both arms forward, as if they are grabbing something in front of them. If their arms are too high, they are more likely to fall out of position when they hit the ground.
They must not position their arms behind their back. Doing so will slow them down during take-off and landing.
Step 3. Hit the ground with the foot flat. During the hop and step, tell learners to land with their dominant foot flat. They must not put pressure on either their heel or toes. Once they have touched the ground, they must roll forward onto the balls of their feet and prepare for the step.
Step 4. Start the step with the same foot. Again with their dominant foot, they will jump with their back leg extended behind the body. They will keep their back leg’s heel up to prepare for the landing. They must land with their back leg forward to complete the step and prepare for the final phase: which is the jump.Learners must keep their knee high and parallel to their hips for correct form.
For the step, the goal is to get off the ground as soon as possible
NB: Begin the final phase (jumping) with your opposite foot.During the jump, leap with the opposite foot or formerly back foot. By this point, they will be close to the sandpit.
Learner has to bring both feet together with knees parallel to chest as he/she jumps into the pit.
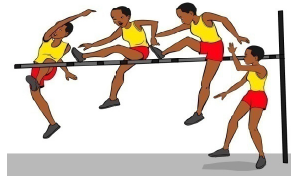
Unlike the first two steps, they must land the jump with the heels first.3. High jump
There are 5 styles of high jump. The most used in modern athletics events is Fosbury flop
1. Scissors
2. Eastern cut-off

3. Straddle

4. Western roll
5. Fosbury flop
Steps Of Fosbury Jump
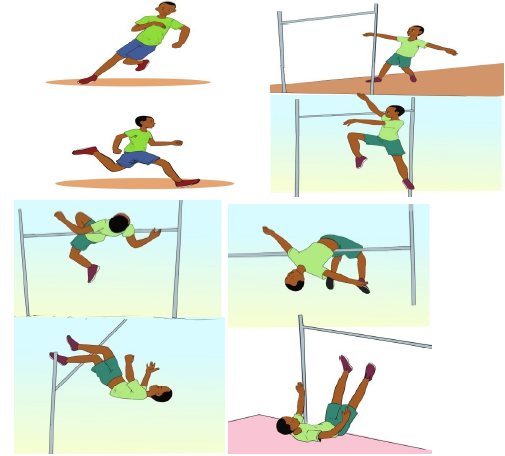
High jump phases:
• Run-up phase/ Approach
• 2 or 4 stride lead into a checkpoint
• Non take-off foot hits this checkpoint
• Followed by a curved 5 stride approach to the take-off point
• In the last 3 to 4 strides the athlete is inclined away from the bar
• Final strides to be fast and hips kept highTake-off phase
• Take-off point is approx 0.5 metres to 0.75 metres from the near upright along the bar and out from the bar
• Take off foot is slightly ahead of the athlete’s body
• Take-off foot plant is heel first to provide the maximum lever
• Take-off foot is pointing towards a position halfway between the middle of the bar and the far upright (10o to 20o)
• Take-off foot is in alignment with the take-off leg
• Hips are forward• Inside shoulder is high
• The trunk is upright and leaning slightly back - not leaning towards the bar
• Hips are at 45° to the bar and the shoulders at 90°
• There is quick and vigorous movement of free limbs
• The inside shoulder does not drop in towards the bar
• Rotation comes from the non-jumping side i.e. the free leg and shoulder pulling across the body
• The leg nearest the bar is driven up bent and high at the opposite upright, thigh and foot parallel with the ground and lower leg vertical both arms are swung forwards and upwards with the free legFlight phase (bar clearance)
Inside knee stays up at bar level
• Heels are pulled back towards the head (arching the back), Knees bent and wide apart
• Arms in a crucifix position or held by the side
• Head back and looking towards the far back corner of the mat (forces the hips to stay high)
• Once the hips are over the bar the legs are snapped straight from the knees
• landing on the shoulders.Landing
Land on your upper back or shoulders on the mat; your feet will land over your head.
e. Assessment (RCA discussions)
Reflection
What are the techniques of long jump?
How can I improve my long jump?
What are the styles of high jump?
How do they measure the triple jump?
What are the rules of the high jump?
What are the various techniques used in high jump?
What are the rules of the high jump?Connection
Relate this lesson to what you have learned in previous years.
Application
Give examples of where you can use the learned physical activities in your daily life?
Lesson 3 : Running exercises with uniform acceleration and endurance
a. Prerequisites
Learners will learn better this lesson if they are able to perform:
• Exercises of running: sprints, hurdles, shuttle relays, ladder running, and 8 minutes’ endurance races.
• Exercises of using basic athletic equipment.b. Teaching resources
Playground or track, whistles, stop watches, hurdles, starting block, cones, batons.
c. Introduction
Opening discussions (in a semicircle formation)
1. Checks the readiness of learners, check the sport clothing, give instructions and rules of the game.
2. Asks learners to give examples previously learned exercises of running with uniform acceleration and endurance.Warm-up activities
Learners do jogging by increasing the acceleration and speed in a progressive way around the racing track until they are warmed-up.
Exercises of stretch
In stretching, use the same exercises as for unit 1, lesson 1.
d. Lesson development
• Different types of running include: Sprints, middle and long distance running, steeplechase and race walking.
• For each running activity techniques are described with details below. You need to let learners practice based on your instructions and provide necessary support.
Sprints:
• 100m, 200m, 400m
• 4x100m and 4x400 relays
• 100m&110m hurdles.Basic elements of correct sprinting technique
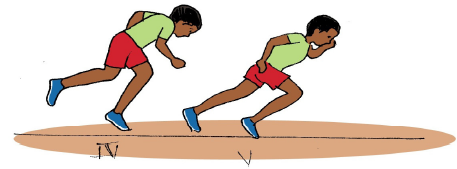
There three starting signals in running activities; two are vocal and the third is made by a sound maker tool (often a fire gun).
On your marks: focus on track, feet placed in the starting block, fingers on the ground behind the starting line, hands slightly wider than should width, muscles relaxedSet: Get hips slightly above shoulder level, feet pushed hard into the blocks, hold breath and ready to race
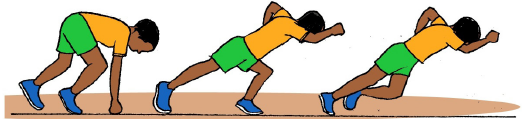
After bang/sound
• Exhale and run out the blocks not jumping. Then acceleration up to the maximum speed
• Hold your torso straight and vertical.
• Hold your head still, but relax your face and neck.
• Bend your elbows at 90 degrees.
• Pretend you are lightly gripping a small bird in each hand.
Techniques teacher must observe in learners and help them performing well.Start phase
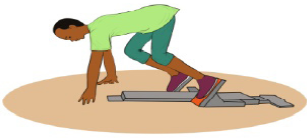
a. Weight distributed over four contact points in the start position (i.e. hands and knees). Front knee angle is about 90o, rear knee angle about 100-130o.
b. Explosive push off with both legs. Front leg extends remaining in contact with the ground while back leg swings forward. Extended front leg and trunk form a straight line.
c. Arms swing opposite to legs, elbows flex to approximately 90o and fists swing towards forehead.Acceleration
d. After first two strides, foot touches down in front of center of gravity.
e. Forward body lean begins to decrease until normal sprinting position is reached after about 20 meters. Head is relaxed, eyes focused straight ahead.
Maximum speed phase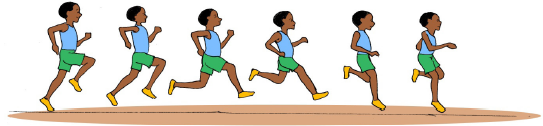
f. Push-off angle from ground is about 50-55o. Trunk is almost erect with about 5o forward lean.
g. (Midflight) Push-off leg folds tightly towards buttocks in a relaxed heeling motion. Front leg thrusts forward and upward at maximum speed (~44mph in elite sprinters). When front thigh reaches maximum possible knee lift, lower leg swings forward in a relaxed movement.
h. Foot meets ground with ankle slightly extended (plantar flexion) directly under center of gravity. Bodyweight is balanced so that only the ball of the foot touches the ground.
i. Shoulders remain steady, elbows flexed at ~90o, kept close to body throughout all phases. Hands swing forward and up above shoulder height, down and past hips. Arms and hands should have an aggressive hammering action. Head aligns naturally with trunk and shoulders and facial/neck muscles are relaxed by keeping the mouth slightly open.Races over 100m, 110m, 200m and 400m hurdles distances
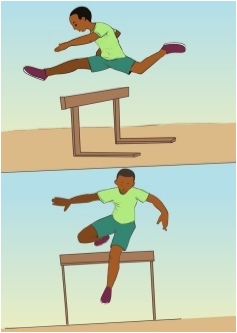
• Racing techniques are the same as for sprint. Learners need to learn how to jump over the obstacles/ hurdles.
• Hurdles height: 83.8cm,
• 100m hurdles (mainly run by women): The first hurdle is placed after a run-up of 13 metres from the starting line. The next 9 hurdles are set at a distance of 8.5 metres from each other, and the home stretch from the last hurdle to the finish line is 10.5 metres long.
• 110m hurdles (men counterpart of 100 m huddles): the first hurdle is placed after a run-up of 13.72 metres from the starting line. The next nine hurdles are set at a distance of 9.14 metres from each other, and the home stretch from the last hurdle to the finish line is 14.02 metres long.
• 200m hurdles: rare events.
• 400m hurdles: The official height of the hurdles is to 91.4 cm for men and 76.20 cm for women. The hurdles are placed on the course like this: the first hurdle after 45 metres from the starting line, a distance between the hurdles of 35 metres each, and a home stretch from the last hurdle to the finish line of 40 metres.
Relay
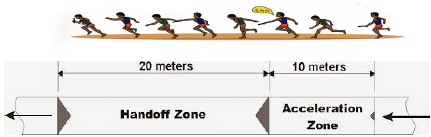
• 4x100m: The 4 × 100 metres relay or sprint relay is an athletics track event run in lanes over one lap of the track with four runners completing 100 metres each. The first runners must begin in the same stagger as for the individual 400 m race.
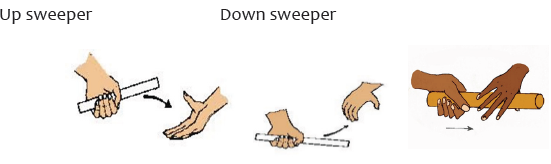
• 4x400m: The 4 × 400 metres relay or long relay is an athletics track event in which teams consist of four runners who each complete 400 metres or one lap. It is traditionally the final event of a track meet. At top class events, the first 500 metres is run in lanes.There are two types of baton exchange in the relay races:
1. Visual
2. Non-visual
NB: visual exchange does not require specific techniques.
Non visual exchange techniques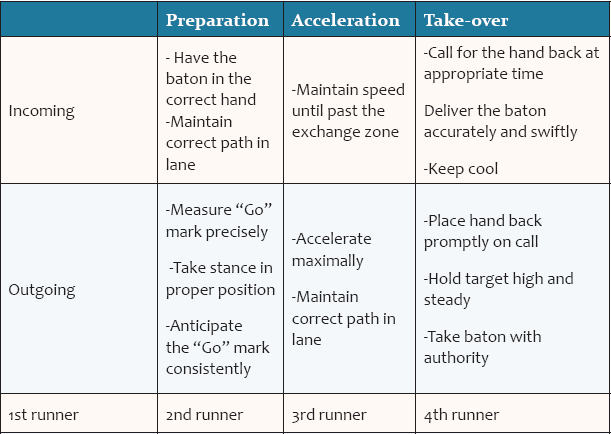

Techniques of transmitting the baton: 1) Up-sweep, 2) Down- sweep, and push pass
Non vision transmission

Vision transmission

Lesson 4: Exercises of throwing technically heavy objects
a. Prerequisites
Learners will perform better in the lesson of throwing if they are able to perform exercises of throwing heavy objects at small distance by using one hand.
b.Teaching resources
Playground/ Track and field, javelin, tape measure, shot, discus, stick, baton
c. Introduction
• Opening discussions (in a semicircle formation)
After checking the readiness of learners, you need to discuss with learners the measures for safety use of throwing tools and set clear rules governing the session.
• Warm-up activities
1. Jogging by increasing the acceleration in a progressive way
2. Goings and backs running while balancing the arms
• Exercises of stretching
For stretching use exercises in unit 1 but focus on shoulders, triceps and biceps.d. Lesson development
Different types of throwing include: Javelin throw, Discus throw, shot put and Hammer throw (to see in next grades)
• For each throwing techniques are described with details below. You need to let learners practice based on your instructions and provide necessary support.
• Pay attention to possible injuries and accidents. Here you need to align learners in a way that they have a free space where they can throw their tools.Throwing techniques
Javelin throw
The javelin’s minimum length is 260cm in men’s competition and 220cm for women. It has a minimum weight of 800g for men and about 600g for women. The javelin’s grip measures about 15cm (6 in) long.
Technique of throwing javelin has two phases: Approach phase and delivery phase.Approach phase
Step1. Grip the javelin correctly
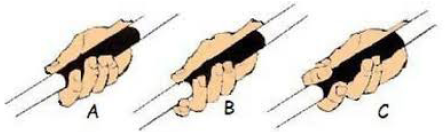
To hold the javelin properly, you have to place it in the crease of your hand. Here are the three types (learners choose to use what he/she sees is simple for him/her):
A. American grip: The American grip is done by holding the javelin with the cord in between the thumb and index finger.
B. Finnish Grip: The Finnish grip is done by extending the index finger under the shaft for control and then gripping the cord in between the thumb and middle finger.
C. “V” grip: The “V” grip is done by gripping the shaft in between extended index and middle fingers.
Step 2. Hold the javelin up near your head: Before you begin running, lift the javelin up above your shoulder so that it is about even with your head.
Step 3.Take the Approach phase: After you have the javelin in position, you can start the approach.
Step 4.Perform the “Withdrawal” The withdrawal phase is when you get your body into the proper throwing position.
Step 5. Make the “Transition” This is also known as the “cross-over”. This is where you get into the javelin tosser’s “lean-back” position by putting your right foot ahead of your center of gravity.
The delivery phaseStep 1. Do the “pre-delivery stride:” This is the step you take just before you throw the javelin. Move your left leg forward and direct your shoulders and hips towards your target.
Step 2. Perform the “delivery:” Throw the javelin when your arm is up as high as possible. Once the left foot hits the ground, your left side must be ready to hold the weight of your right leg, which drives up and forward and brings the hips into a right angle with the throw.
Step3. Move into “recovery:” You have to make sure to follow through after you throw the javelin, allowing your throwing arm to travel diagonally across your body. If you’re throwing with your right hand, the hand should end up in front of your left side. The left foot is on the ground. The right leg passes it and then stops you. How quickly you stop depends on how much momentum you built during the run-up.Discus throw
1. Body position
• Stand facing the throwing direction.
• Take a step with your right foot.
• Place 80% of your body weight on the right foot.
• Put your body in an athletic position in relation to your right leg.
• The alignment of your body should be chest- right knee- right to
2. Holding the discus
• Place discus in your throwing hand
• Spread fingers out with index finger in line with wrist
• Place fingers first knuckles over the discus3. Phases of releasing the discus
• When releasing the discus have your palm down
• Squeeze the discus out (bar of soap)
• The discus will come off the index finger
• The discus will spin in a clockwise direction for a right handed thrower
For men, the discus measures from 21,9cm to 22cm in diameter and 44mm to 46mm in thickness; it weighs 2kg. For women at all levels, the dimensions are 18cm to 18,2cm across, 37mm to 39mm (1.5 t in thickness, and 1 kg in weight). At the high school level, boys use a discus that is 20,9cm in diameter and weighs 1.62kg.Shot put
1. Grip the shot
• The shot is held at the base of the fingers not the palm
• The fingers are slightly spread apart with the thumb for support.
• The hand will be bent back in the cocked position when holding the shot.
2. Neck placement
• Raise the shot above your head
• Lower the shot straight down until it is under your jaw
• Push the shot into your neck
• Lift your elbow parallel to the floor. Don’t squeeze your elbow towards your back
• Check to see that your thumb is pointing down towards your clavicleA. Throwing from the power position
• Over exaggerate the use of the legs in the throw especially the hips
• Sequence of the throw will be legs - hips - back – arm
• Push the weight from right leg to the left leg in an upwards direction
• When driving up with your legs your right heel (hips) needs to be turned out
• There will be a stretch reflex reaction between your upper body and lower body
• The upper body will start coming around
• As your upper body comes around sweep the left arm around and then bring it tight to your body
• Stop the left side of your body to aid in accelerating the shot
• Deliver the shot as mentioned aboveB. Glide techniques
1. Body position in glide techniques
• Stand at the back of the ring facing away from the throwing direction
• Place shot against your neck
• Put your body in an athletic position facing away from the sector
• Extend your left arm out – relaxed
• Extend the left leg back towards the toe board
• Most of the body weight should be on the right leg
2. Gliding into the power position
• Tap your left leg for balance
• Draw up the left knee even with the right knee, remember to keep the left leg straight
• Do not allow your left leg to curl behind the right leg
• Allow your hips to start to fall
• Violently extend your left leg towards the toe board, do not lift up with your back
• Push and then pull your right leg underneath you, it will look like the last part of your body leaving the circle is your right heele. Assessment (RCA discussion)
• Reflexion
1. What type of javelin grip do you prefer more and why?
2. What is the releasing angle of javelin and why?
3. What are the challenges did meet during sessions?
4. What is similar in shot put and discus throwing?
5. What is better between throwing from a power position and glide position?• Connection
What connection between this lesson and the previous learned physical activities?
• Application
Participation in athletics competitions
Lesson 5 : Use of basic athletics equipment
a. Prerequisites
Learners will learn better this lesson if they are able to enjoy athletics activities using athletics equipment.
b. Teaching resources
Playground/ track and field, whistles, stopwatch, mat, tape measure, javelin, shot, discus,
c. Introduction
• Opening discussions (in a semicircle formation)
1. Check the readiness of learners and the sport uniform,
2. The teacher asks learners examples of learnt different types of basic athletics equipment.
• Warm-up activities
Warm-up activities: consider activities in previous lesson
• Exercises of stretching: Consider exercises in previous lessond. Lesson development
• Basic equipment in athletics include: racing tracks, jumping field, throwing field.
• Equipment used in races are baton in relay races, hurdles and water jump in steeplechase
• Equipment in throwing are: javelin, shot, discus and hammer
• Basic equipment in high jumping are: mat and the 2 elevated posts with a crossbar.
• Basic equipment in long jump are: running way and the sand pit.
• For each equipment for each track: show learners how to use it with explanations and if possible demonstrate.
• Let learners practice based on instructions and provide necessary support
• Let learners evaluate one’s own and others’ performance and provide guidance where necessary.
• Track and field with the appropriate equipment as well as the way of evaluating performance results are shown below with roles of judges in athletics. In teaching process, some learners are performers, others are officials. They will switch the roles.
• In absence of track and field, by the help of learners on your guidance you can mark the limits using local sand or other available materials.
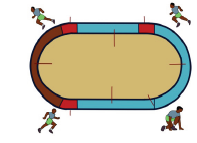
1. Athletics track
NB. One lap of athletics track: 400 m• 800m : 2 laps,
• 1500m : 3 laps plus 300m,
• 3000m : 7 laps plus 200m,
• 5000m : 12 laps plus 200m,
• 10000m : 25 laps.


False start: If a sprinter begins his/her starting motion from the set position before the starting gun is fired. If he/she does it twice, he/she disqualified.
Standard athletics track lane: six to nine lanes of 1.22m width.
2. Running events officials and responsibilites1. Head judge
2. Lanes judges: report on infractions or irregularities during the race (e.g.: a lane judge must be put at each exchange zone in relay races)
3. Starter: Fire the starting gun/ give the starting sign
4. Timekeepers: responsible for turning on and turning off the timing devices (stopwatches...) and capturing each runner results.
5. Finishing line judges: Stay at the finishing line and assist the timekeepers to keep the children in order when they finish their track events. The athletes are then taken to the recording table to have their time recorded.
3. Throwing field
Javelin field with all details (angle, distance etc.)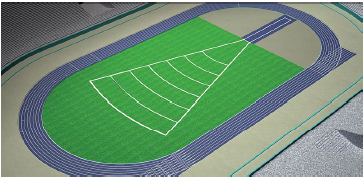
Shot put field

The diameter of the circle is 2.135 metres. A stop board of 10 cm is put at the front of the circle.
A high school discus ring has a diameter of 2.5 metres.
4. Throwing events officials and responsibilites
Javelin: Tasks of judges in javelin throw are: range athletes in their throwing order; watching for foul throws, finding and marking the point where the javelin legally (vertically) hits the ground, pulling the measuring tape through the center of the runway, recording measurements and (with the assistance of the competitor) returning the javelin to the run up area.
Shot: Tasks of judges in shot put throw include: range athletes in their throwing order; watching for foul puts; marking the point where the shot put hits the ground; pulling the measuring tape through the center of circle; recording measurements and returning (with the assistance of the competitor) the shot put to the ring.
Discus: Tasks of judges in discus are mainly the following: watching for foul throws, recording measurements, pulling the tape through the center of circle, finding and marking the point of impact and (with the assistance of the competitor) returning the Discus to the ring.
Evaluation of individual level of performance
In throwing and jumping events, each competitor is allowed three trials. The three trials are recoded all of them and the best one among them is the one who is considered in classifying competitors.5. Long jump and triple jump officials and responsibilites
Head judge: rules on all trials, reads measurements and records results
Official 1: marks attempts and supervises the action around the landing pitOfficial 2: pull tape measure (double-decametre).
Official 3: (the flight coordinator): calls the jumping order and enforces the time limit
Assistants 1 and 2: Level the pit (e.g.: remove any marker left from previous attempts)
Jumps: Long jump field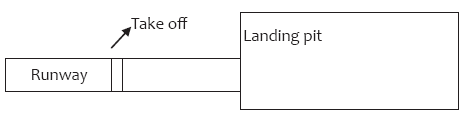
High jump and pole vault jump track
6. Jumping events officials and responsibilites
1. Two officials: responsible for setting the bar when it is dislodged.
2. The bar official: responsible of the landing pit and declaring legal jump.
3. The flight coordinator: responsible of calling the names of the competitors in the proper order.
4. Primary recorder: is responsible for recording all missed and successful attempts for each competitor.
7. Official dimensios of throwing equipments
Javelin: The javelin measures between 2.6 and 2.7 m in length and 800 g in weight for men, and women throw a javelin between 2.2 and 2.3 m in length and 600 g in weight.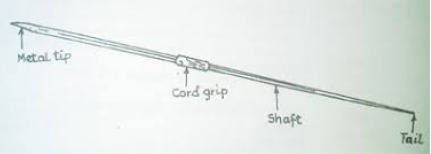
Shot
In international and collegiate track, men put a 7 kg shot. High school boys put a 5 kg shot. Women put a shot that weighs shot in high school, collegiate, and international events.
2.5 Additional information
• In teaching-learning process the teacher must by the help of learners find local grown solution considering athletics equipment to use.
• In running events: marking lanes using ropes, using chalks, carpentry residuum, making hurdles using ropes and pieces of trees, …
• In throwing events: Using javelin shaped sticks in place of the real javelin, using shaped stones in place of the shot put• In jumping events: drawing on the ground a sand pit, making a high jump track using ropes and pieces of trees to enable a wide range of learner’s participation.
• Some athletics events like pole vault were not popular in our country.2.6 End unit assessment
• Set exercises of long and high jump to help learners to demonstrate their ability to jump with improved techniques
• Set running exercises of various courses (sprints, resistance and endurance races) which will help to evaluate individual learner‘s ability and use of improved techniques. Verify the starting techniques and running techniques
• Set exercises of throwing javelin and evaluate individual learner ‘ability and use of improved techniques: griping the tools and the throwing techniques
• Record individual learner’s performance.
• Organize a school competition and if possible give prizes.2.7 Additional activities
As additional activities to give to your learners you need to:
• Encourage learners to actively participate in athletics training sessions organized by different coaches and private individuals in training centers.
• Encourage learners to participate actively in school organized competitions as well as in Sector, District and national competitions (e.g.: Inter-school’s competition organized by FRSS)
• Encourage learners to participate all youth competitions available. (e.g.: District, Imbuto foundation, Right to play, FRA/RAF, can organize such competitions).
• Encourage learners to create local athletics competitions in their villages